

Page 1

I
PAQ H3000 P
OCKET
PC
EFERENCE
R
G
UIDE
Page 2

N
OTICE
The information in this document is subject to change without notice.
COMPAQ COMPUTER CORPORA T ION SHALL NOT BE LIABLE FOR TECHNICAL OR
EDITORIAL ERRORS OR OMISSIONS CONTAINED HEREIN; NOR FOR INCIDENTAL
OR CONSEQUENTIAL DAMAGES RESULTING FROM THE FURNISHING, PERFORMANCE, OR USE OF THIS MATERIAL.
This document contains information protected by copyright. No part of this document may be
photocopied or reproduced in any form without prior written consent from Compaq Computer
Corporation.
© 2000 Compaq Computer Corporation.
Compaq and the Compaq logo are registered in the U.S. Patent and Trademark Office. iPAQ is a
trademark of Compaq Information Technologies Group, L.P. Microsoft, ActiveSync, Outlook,
Pocket Outlook, Expedia, AutoRoute Express, MapPoint, Windows, Windows NT, and the Windows logo are either registered trademarks or trademarks of Microsoft Corporation in the United
States and/or other countries. Microsoft products are licensed to OEMs by Microsoft Licensing,
Inc., a wholly owned subsidiary of Microsoft Corporation.
Product names mentioned herein are may be trademarks and/or registered trademarks of their
respective companies.
iPAQ H3000 Pocket PC Reference Guide
iPAQ H3000 Pocket PCs
6/2000.
177711-003
Page 3

T
ABLE OF
C
ONTENTS
Table of Contents
Chapter 1: Getting Started
Welcome
Where to Find Information _______________________________________ 1-2
Symbols and Conventions________________________________________ 1-3
Customer Registration __________________________________________ 1-3
How to Transfer Palm-size PC Data_________________________________ 1-4
Chapter 2: Basic Skills
Front Panel Components_________________________________________ 2-1
Bottom Edge Components _______________________________________ 2-3
Cradle and AC Adapter __________________________________________ 2-4
Compaq iPAQ Expansion Pack System_______________________________ 2-6
____________________________________________________ 1-1
_________________________________________ I-1
__________________________________ 1-1
_____________________________________ 2-1
The Stylus ___________________________________________________ 2-9
Today Screen_________________________________________________ 2-10
Programs____________________________________________________ 2-11
Navigation Bar and Command Bar__________________________________ 2-13
Pop-up Menus ________________________________________________ 2-14
Notifications _________________________________________________ 2-14
Enter Information on Your iPAQ ____________________________________ 2-15
Find Information_______________________________________________ 2-22
Customize Your iPAQ H3000 ______________________________________ 2-22
QStart ______________________________________________________ 2-28
QUtilities and QMenu ___________________________________________ 2-29
Backup and Restore Data ________________________________________ 2-33
Table of Contents
I-1
Page 4
Chapter 3: Microsoft ActiveSync
______________________________ 3-1
Chapter 4: Microsoft Pocket Outlook
Calendar: Scheduling Appointments and Meetings ______________________ 4-2
Contacts: Tracking Friends and Colleagues ___________________________ 4-6
Tasks: Keeping a To Do List ______________________________________ 4-9
Notes: Capturing Thoughts and Ideas _______________________________ 4-12
Inbox: Sending and Receiving E-mail Messages________________________ 4-14
Chapter 5: Companion Programs
Pocket Word
Pocket Excel _________________________________________________ 5-6
Microsoft Money ______________________________________________ 5-7
Windows Media Player for Pocket PC _______________________________ 5-12
Microsoft Reader ______________________________________________ 5-14
_________________________________________________ 5-1
___________________________ 4-1
_____________________________ 5-1
Pocket Streets ________________________________________________ 5-17
Chapter 6: Pocket Internet Explorer
The Mobile Favorites Folder ______________________________________ 6-1
Favorite Links ________________________________________________ 6-1
Mobile Favorites_______________________________________________ 6-2
Channels ____________________________________________________ 6-3
Use Pocket Internet Explorer ______________________________________ 6-4
____________________________ 6-1
I-2
Table of Contents
Page 5
Chapter 7: Getting Connected
Transfer Items Using Infrared _____________________________________ 7-2
Connect to an ISP______________________________________________ 7-3
Connect to Your Network ________________________________________ 7-4
End a Connection______________________________________________ 7-7
Connect Directly to an E-mail Server ________________________________ 7-7
Get Help on Connecting _________________________________________ 7-8
________________________________ 7-1
Appendix A: Tips and Troubleshooting
Reset the iPAQ H3000 and Clear Memory ____________________________ A-1
Battery Loses Power____________________________________________ A-3
If You Forget Your Password ______________________________________ A-4
If You Run Out of iPAQ H3000 Memory ______________________________ A-4
Screen Freezes or Responds Slowly ________________________________ A-6
Screen is Blank _______________________________________________ A-6
Screen is Dark ________________________________________________ A-6
Screen is Hard to Read__________________________________________ A-7
Inaccurate Response to Stylus Taps ________________________________ A-7
Slow or No Response ___________________________________________ A-7
Infrared (IR) Connection Problems __________________________________ A-7
Modem Connection Problems _____________________________________ A-8
__________________________ A-1
Network Connection Problems ____________________________________ A-10
Cable Connection Problems ______________________________________ A-10
Routine Maintenance ___________________________________________ A-11
Battery Guidelines _____________________________________________ A-11
Travel Guidelines ______________________________________________ A-12
Appendix B: Character Recognizer
____________________________ B-1
Table of Contents
I-3
Page 6

Appendix C: Regulatory Notices
Regulatory Agency Identification Numbers____________________________ C-1
Federal Communications Commission Notice__________________________ C-2
Canadian Notice_______________________________________________ C-3
Avis Canadien ________________________________________________ C-3
European Union Notice __________________________________________ C-3
Battery Warning _______________________________________________ C-3
Airline Travel Notice ____________________________________________ C-3
Power Cords _________________________________________________ C-4
______________________________ C-1
Appendix D: Hardware Specifications
System Specifications __________________________________________ D-1
Physical Specifications __________________________________________ D-2
Operating Environment __________________________________________ D-2
__________________________ D-1
I-4
Table of Contents
Page 7

chapter 1
G
ETTING
Welcome
Congratulations on purchasing a Compaq iPAQ H3000 W indows Powered Pocket PC.
Due to the size and capabilities of your iPAQ H3000 Pocket PC, you can keep your most
important business and personal information up-to-date and close at hand. Microsoft
ActiveSync increases the power of your iP AQ H3000 Pocket PC by allowing you to synchronize the information on your desktop or laptop computer with your Pocket P C. Picture
yourself in the following situations:
• While walking with a colleague, your cell phone rings and your manager asks if the
two of you are free this afternoon for an emergency meeting. While your colleague
fumbles through his paper organizer, you press a button on your iPAQ H3000 and
instantly see a list of the day’s appointments and meetings. You are quickly able to tell
your manager your available times. For more information on scheduling appointments
and meetings, see Chapter 4 (Microsoft Pocket Outlook).
• You’re meeting your friends tonight for dinner and a movie. You download the latest
movie information from the Internet onto your computer then synchronize it with your
iPAQ H3000. At dinner, you pull out your iPAQ H3000 and review your movie
options with your friends. For more information on downloading We b pages to your
iPAQ H3000, see Chapter 6 (Pocket Internet Explorer).
• A calendar reminder alerts you that it’s time to catch the bus to work. You grab your
iP AQ H3000 and catch the bus just in time. Because ActiveSync keeps the information
on your iPAQ H3000 up-to-date, you leisurely review your task list, make notes about
the new books and CDs you want to buy, and read and respond to e-mail messages.
When you get back to the office, ActiveSync transfers any task changes you made,
your notes, and your e-mail message responses to your computer. For more information on ActiveSync, see Chapter 3 (Microsoft ActiveSync).
S
TARTED
Getting Started
1-1
Page 8
Where to Find Information
This reference guide describes your iPAQ H3000 Pocket PC hardware, provides an overview of the programs on your iPAQ H3000, and explains how to connect your iPAQ
H3000 to a computer, a network, or the Internet. For instructions on setting up your iPAQ
H3000, see the Getting Started card. For instructions on installing ActiveSync, see the
booklet accompanying the ActiveSync CD. The following table is a guide to additional
information to help you use your iPAQ H3000:
For information on: See this source:
Programs on your iPAQ
H3000
Additional programs that
can be installed on your
iPAQ H3000
Connecting to and
synchronizing with a
computer
Last-minute updates and
detailed technical
information
Up-to-date information
on Windows-powered
devices including tips
The latest information
and offers for your iPAQ
This reference guide and iP AQ H3000 Help. To
view Help, tap then Help.
The Extras folder, located on the ActiveSync
CD. -orThe Virtual Tour, located on the Compaq
Softwar e and Refere nce Guide CD.
The ActiveSync booklet or online ActiveSync
Help on your computer. To view online Help,
open Microsoft ActiveSync on your computer,
then select Help, Microsoft ActiveSync He lp.
The Read Me files, located in the Microsoft
ActiveSync folder on the computer and on the
ActiveSync CD.
Microsoft Windows Powered Home Page
www . microsoft.com /pocketpc/
Compaq Handheld Home Page
www . c ompaq.com/products/handhelds
1-2
Information on iPAQ
accessories and ordering
Tips and troubleshooting
information
Technical support and
your warranty
Getting Started
Accessories Information
Online ActiveSync Help on your computer. T o
view the online Help, open Microsoft ActiveSync on your computer, then select Help,
Microsoft ActiveSync Help. -or-
Appendix A (Tips and T roubleshooting), in this
reference guide. -orCompaq iPAQ Support Home Page
www . c ompaq.com/support/handhelds
The How Do I Get Service and Support for My
Compaq iPAQ Pocket PC? card.
Page 9
Symbols and Conventions
Some or all of the f ollowing format conventions may be used in this guide to distinguish elements of text:
• Names of menus, commands and icons are shown in bold type as they appear on the
display, for example, Settings, Power.
Tex t set off in this man ner indicates that failure to follow directions could result in
!
bodily harm or loss of life.
Tex t set off in this man ner indicates that failure to follow directions could result in
damage to equipmen t o r loss of information.
NOTE:
Text set off in this manner presents commentary, sidelights, or interesting points of infor-
mation.
Customer Registration
You can receive the latest information on your iPAQ H3000 Pocket PC, as well as special
offers on iPAQ H3000 accessories and software, by registering with Compaq by completing and mailing the Register Now* card included in the shipping box or the online registration.
* Not available in all regions.
Getting Started
1-3
Page 10
How to Transfer Palm-size PC Data
If you are currently using a Windows CE-based Palm-size PC and want to transfer your
data to your iPAQ H3000 Pocket PC, follow this upgrade procedure:
1. Install Microsoft ActiveSync 3.1 on your computer. For information on installing
ActiveSync, see the booklet accompanying the ActiveSync CD.
2. Synchronize your Palm-size PC with your computer so that the information on your
computer is current.
NOTE:
3. Synchronize your iPAQ H3000 with your computer. This will update your device
using the current data on your computer (step 2).
4. Reinstall programs. Check whether new versions are available.
NOTE:
NOTE:
5. Enter your settings and connection information on the iPAQ H3000.
If you have offline folders in Inbox on your Palm-size PC that contain e-mail messages
you want to transfer to your iPAQ H3000, follow this procedure:
1. Connect your Palm-size PC to your computer then click Windows CE Inbox Trans-
fer on the Microsoft Outlook T ools menu.
2. Select Copy or move selected messages to your computer, then click Browse.
3. Select the offline folder that contains the messages you want to transfer to your computer , then click OK.
If you have files on your Palm-size PC that you want to transfer, such as Note Taker
notes and recordings, turn file conversion off in ActiveSync options so that the files
stay in device format, and use the ActiveSync Explorer to copy the files to your com-
puter. For specific instructions, see ActiveSync Help on the computer.
Some older Palm-size PC programs may not work on your iPAQ H3000 Pocket PC.
Copy the files you transferred to your computer to your i PAQ H3000 using the Activ e-
Sync Explorer. Turn file conversion on again in ActiveSync.
1-4
4. Click the Transfer button and select the f older you want to transfer the messages to or
click New Folder to create a new folde r. Click OK to transfer the messages. Now you
must transfer the messages from your computer to your iPAQ H3000.
5. Tap Tools then New Folder and create a folder for the messages you are going to
transfer in Inbox on your iPAQ H3000.
6. Select the messages you want to transfer in Outlook on your computer.
7. Connect your iPAQ H3000 to your computer, then click Windows CE Inbox Trans-
fer on the Outlook Tools menu.
8. Select Copy selected messages to your mobile device, then click Browse.
9. Select the offline folder on your iPAQ H3000 that you want to transfer the messages
to, then click OK.
10. Click the Transfer button. The selected messages are moved to your iPAQ H3000.
Getting Started
Page 11
chapter 2
B
ASIC
Learning to use your iPAQ H3000 Pocket PC is easy. This chapter describes the basic concepts of using and customizing your iPAQ H3000 Pocket PC.
S
KILLS
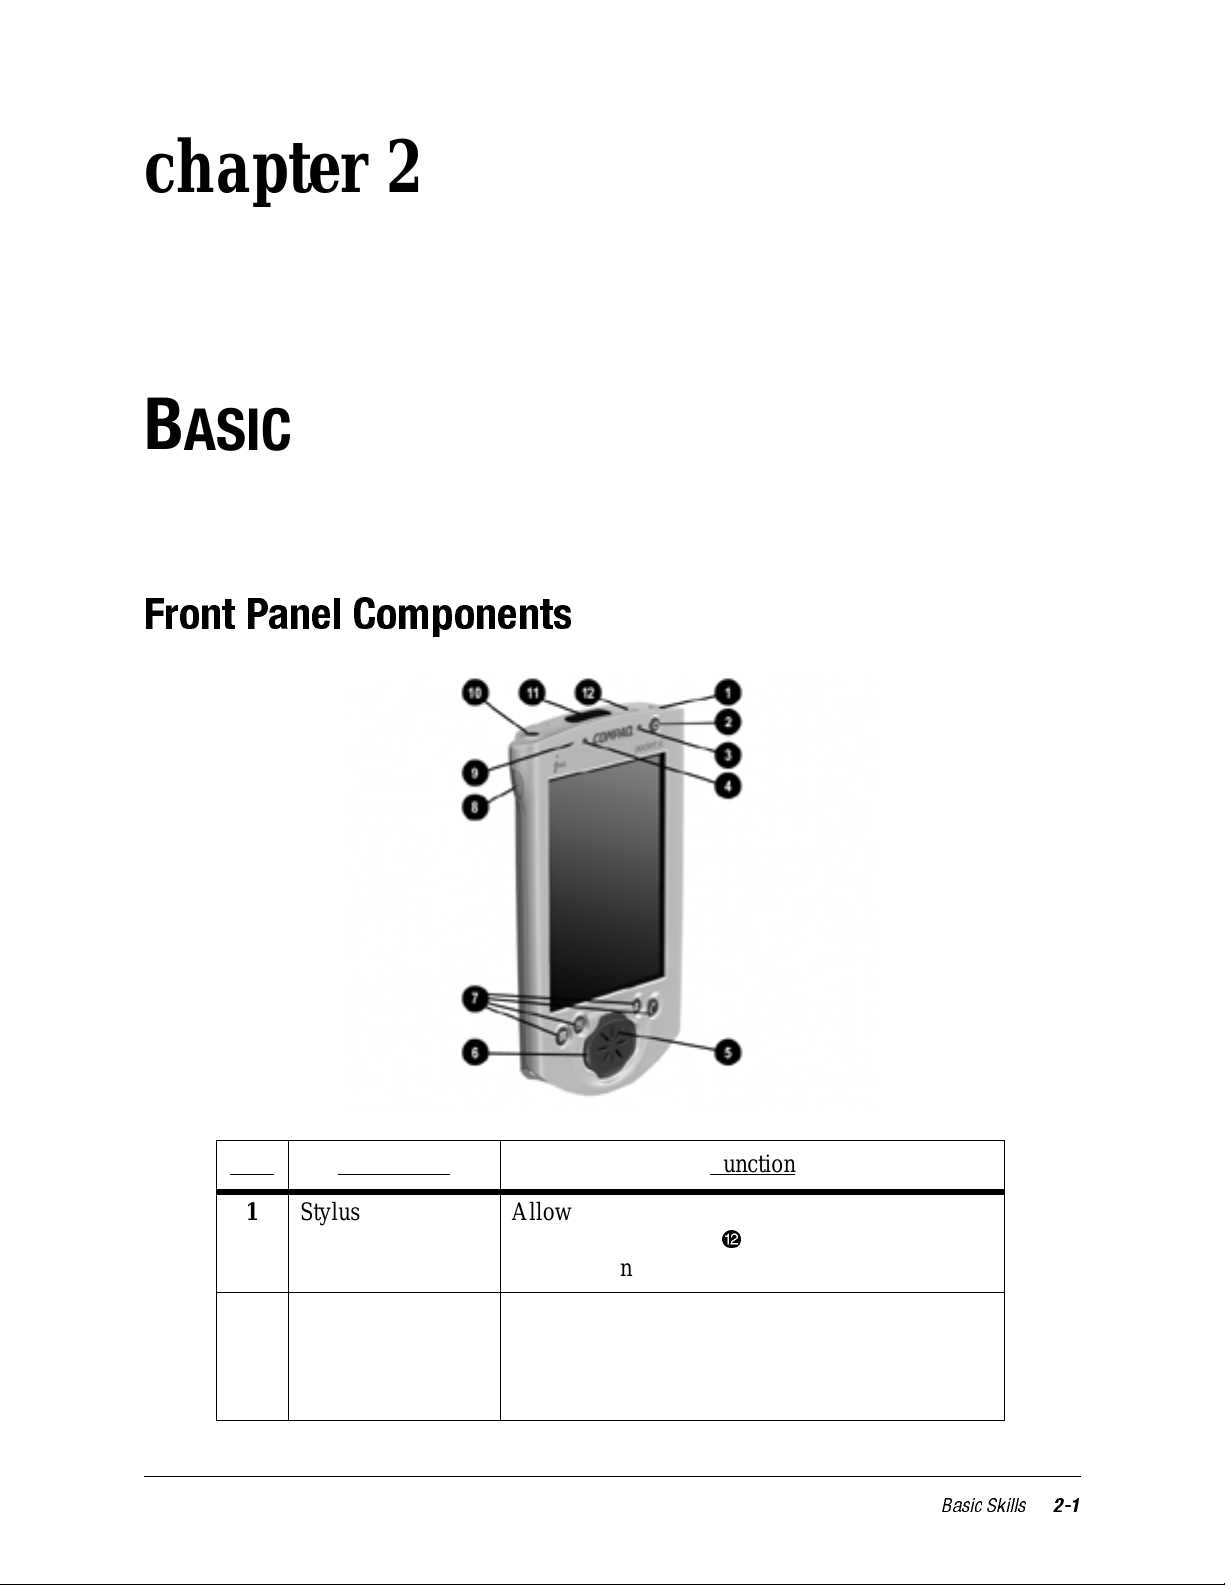
Front Panel Components
Item Component Function
1 Stylus Allows you to tap or write on the screen. Push the
stylus release button (w) to release it from the
compartment.
2 Power Button Powers the iPAQ H3000. Press and release the
button to turn on or off your iPAQ H3000. Press
and hold the button for one s econd to toggle on or
off the backlight.
Basic Skills
2-1
Page 12

Item Component Function
3 Alarm/Charge
Light
4 Light Sensor Detects the ambient light level so that the back-
5 Speaker Sounds alarms and plays back sound recordings.
6 iPAQ Navigator/
Action Button
7 Application
Buttons
Serves as both a battery charge indicator and a
visual alarm indicator .
• Flashing green: Notification alarm signal.
• Flashing amber: Battery is charging.
• Solid amber: Battery is fully charged
light level adjusts to suit the environment (only
available on iPAQ H3600 Series Pocket PCs).
Allows you to scroll through a list (similar to
pressing the arrow keys on a keyboard). In the list
view of a program, you can use your iPAQ Navigator to scroll to the item you want to view. Can
also be used as game buttons within a game application. The center of the button can be used as an
Action button to open a selected item.
Allow quick access to four applications. By
default, the applications are Calendar, Contacts,
QMenu, and QStart. Y ou can change the functions
of the application buttons to open different applications. For more information, see “Adjusting
Settings” later in this chapter.
8 Record Button Activates the record function in Notes. For more
information, see “Notes” in Chapter 4. Y ou can
change the function of the Record button so that it
opens a different application. For more information, see “Adjusting Settings” later in this chapter .
9 Microphone Allows you to record voice messages.
10 Headphone Jack Lets you connect standard headphones.
To reduce the risk of personal injury, turn
!
down the volume control before putting on
headphones.
11 Infrared Port Enables you to exchange data with other Win-
dows-powered devices. The infrared port can
transmit at speeds up to 115.2Kb per second. For
information, see Chapter 7 (Getting Conected).
12 Stylus Release
Button
Lets you eject the stylus from its compartment.
2-2
Basic Skills
Page 13
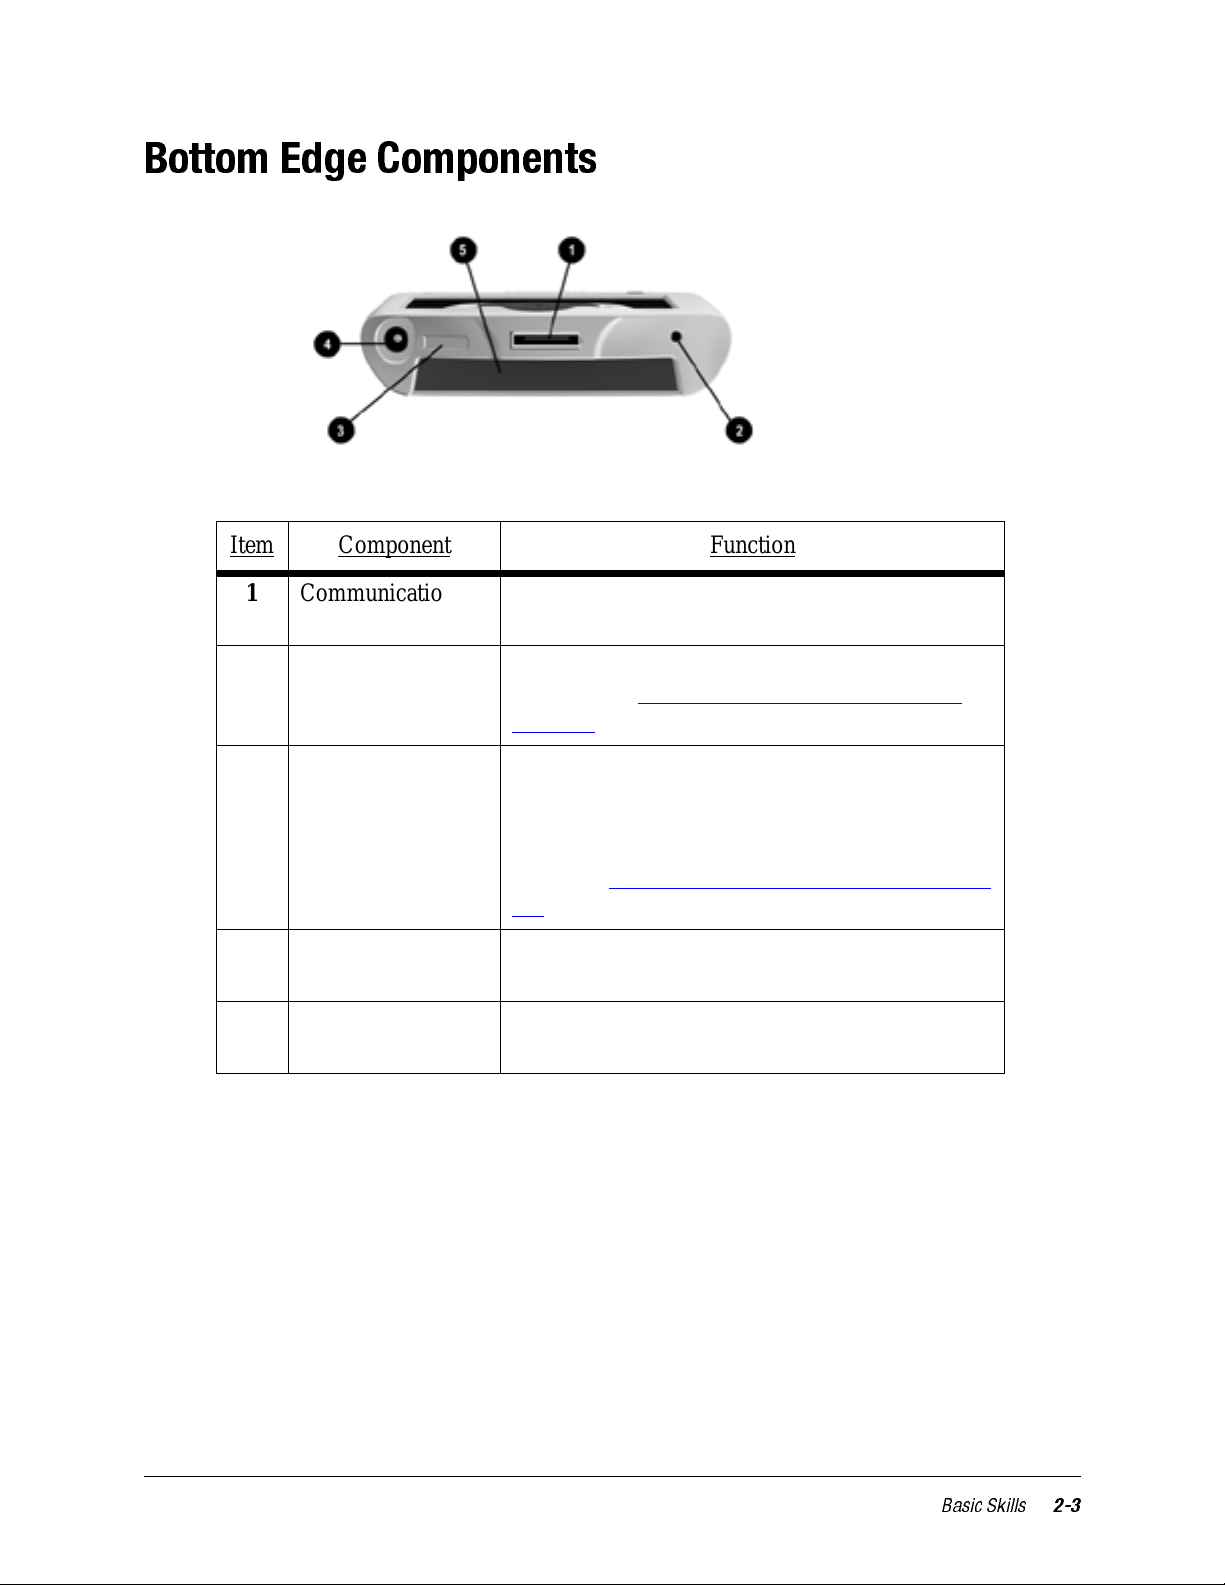
Bottom Edge Components
Item Component Function
1 Communications
Port
2 Reset Button Lets you reset your iPAQ H3000. For more infor-
3 On/Off Switch Allows you to clear all data, and reset your system
4 DC Jack Allows you to connect to external power with the
5 iPAQ Expansion
Pack Connector
Connects your iPAQ H3000 to the cradle or autosync cable.
mation, see “Reset the iPAQ H3000 and Clear
Memory” in Appendix A.
if you have forgotten your password. Clearing
memory deletes all data and restores your iPAQ
H3000 to its default settings. For more information, see “Reset the iPAQ H3000 and Clear Mem-
ory” in Appendix A.
supplied AC adapter.
Connects to the connector of an (optional) iPAQ
Expansion Pack.
Basic Skills
2-3
Page 14
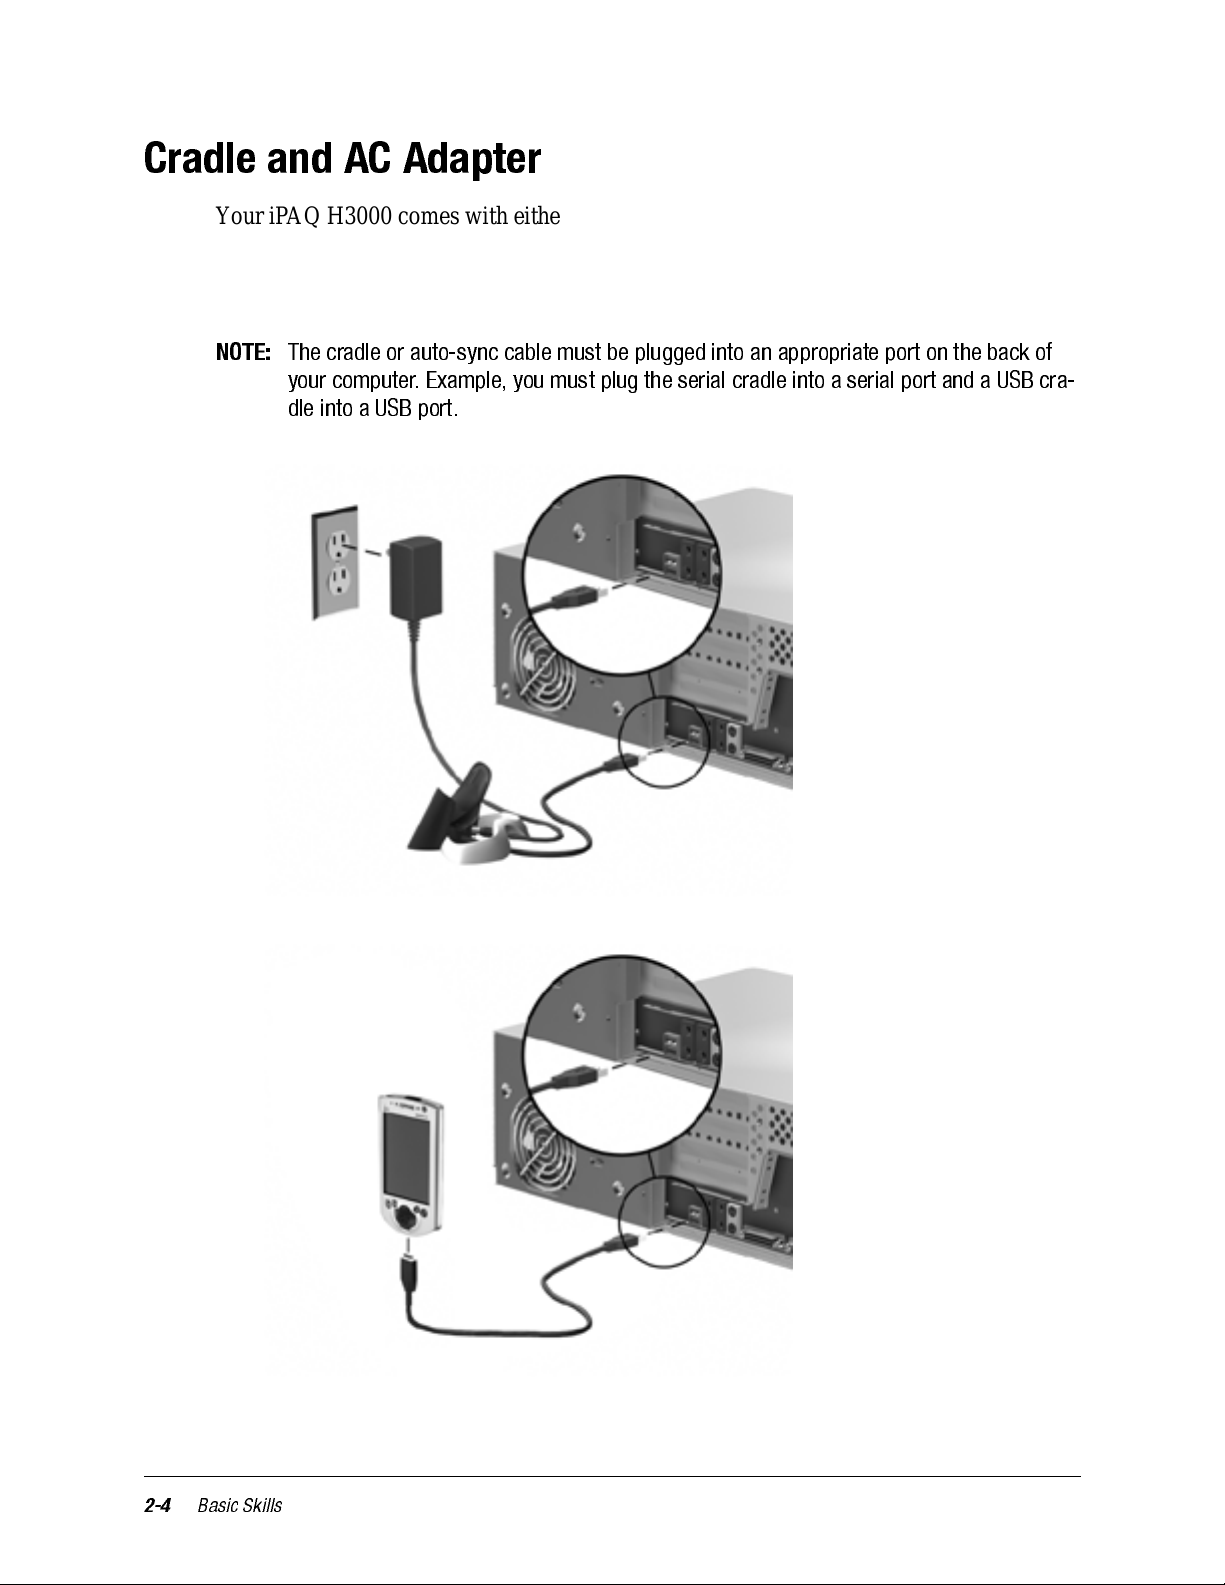
Cradle and AC Adapter
Your iP AQ H3000 comes with either a cradle or auto-sync cable, and an AC adapter. This
allows you to recharge your iPAQ H3000, as well as synchronize the informa tion between
your iPAQ H3000 and a computer using ActiveSync. For more information on synchronization, see ActiveSync Help on your computer.
NOTE:
The cradle or auto-sync cable must be plugged into an appropriate port on the back of
your computer. Example, you mus t plug the serial c radle into a serial port and a USB cra-
dle into a USB port.
2-4
Basic Skills
Page 15

Recharging the Battery
Your iPAQ H3000 contains a rechargeable Lithium Polymer battery that i s recharged each
time you place your iPAQ H3000 in the cradle and connect the cradle to an external power
source with the AC adapter. You never need to replace the battery. Just place your iPAQ
H3000 in the cradle for three to four hours for an initial charge bef ore you use it the first
time. Next, place it in the cradle for a short time each day to recharge t he battery to it s full
capacity.
NOTE:
If the battery gets very low, your iPAQ H3000 displays a warning message. If this occurs,
save any unsaved data you are working on, perform a synchronization with your computer, then turn off your iP AQ H3000. Don’t try to restart your iP AQ H3000 until you have
connected to external power. The battery acts like a rechargeable backup battery by protecting your data if your iP AQ H3000 shuts down. If your iPAQ H3000 does shut down,
you still have about 24 hours to recharge the battery before you lose the data on your
Pocket PC.
You can also use the AC adapter to connect your iPAQ H3000 directly to the external
power source.
Basic Skills
2-5
Page 16
Compaq iPAQ Expansion Pack System
Your iPAQ features the iPAQ Expansion Pack System, which allows you to personalize
the appearance of your iPAQ H3000 or add extra functionality . iPAQ Style Packs offer a
range of styles to customize your iPAQ, while Expansion Packs, such as the CompactFlash Card, or PC Card Expansion Pack, let you add extra features.
Compaq iPAQ Expansion and Style Packs are designed to easily slide on and off your
Pocket PC without having to power off your Pocket PC.
NOTE:
For information on ordering Compaq iPAQ Expansion Packs, see the
tion
card included in the shipping box, or visit the Compaq iPAQ H3000 home page at
www.compaq.com/products/handhelds/
Accessories Informa-
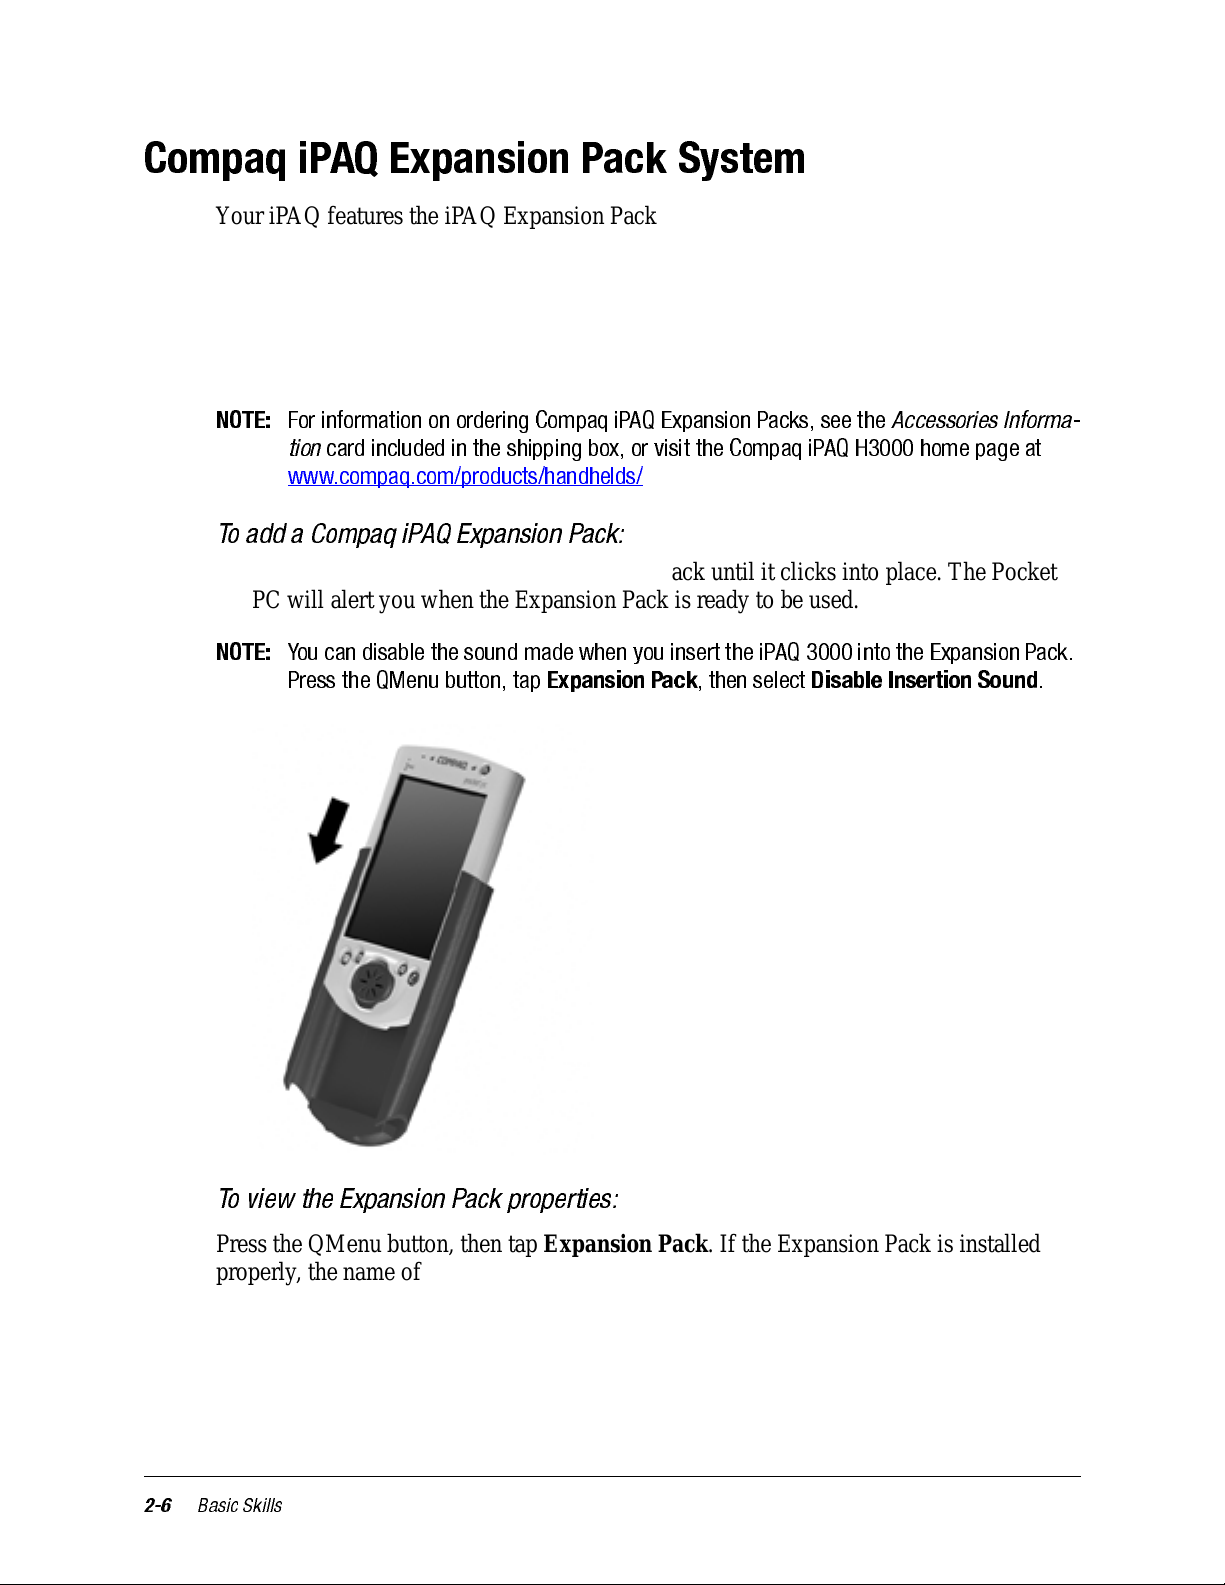
To add a Compaq iPAQ Expansion Pack:
1. Slide the iPAQ H3000 into the Expansion Pack until it clicks into place. The Pocket
PC will alert you when the Expansion Pack is ready to be used.
NOTE:
You c an disable the soun d made when you insert the iPAQ 3000 i nto the Expansion Pack.
Press the QMenu button, tap
Expansion Pack
, then select
Disable Insertion Sound
.
2-6
To view the Expansion Pack properties:
Press the QMenu button, then tap Expansio n Pa ck. If the Expansion Pack is ins t alled
properly, the name of the Expansion Pack will appear in the Expansion Pack Properties
screen.
Basic Skills
Page 17
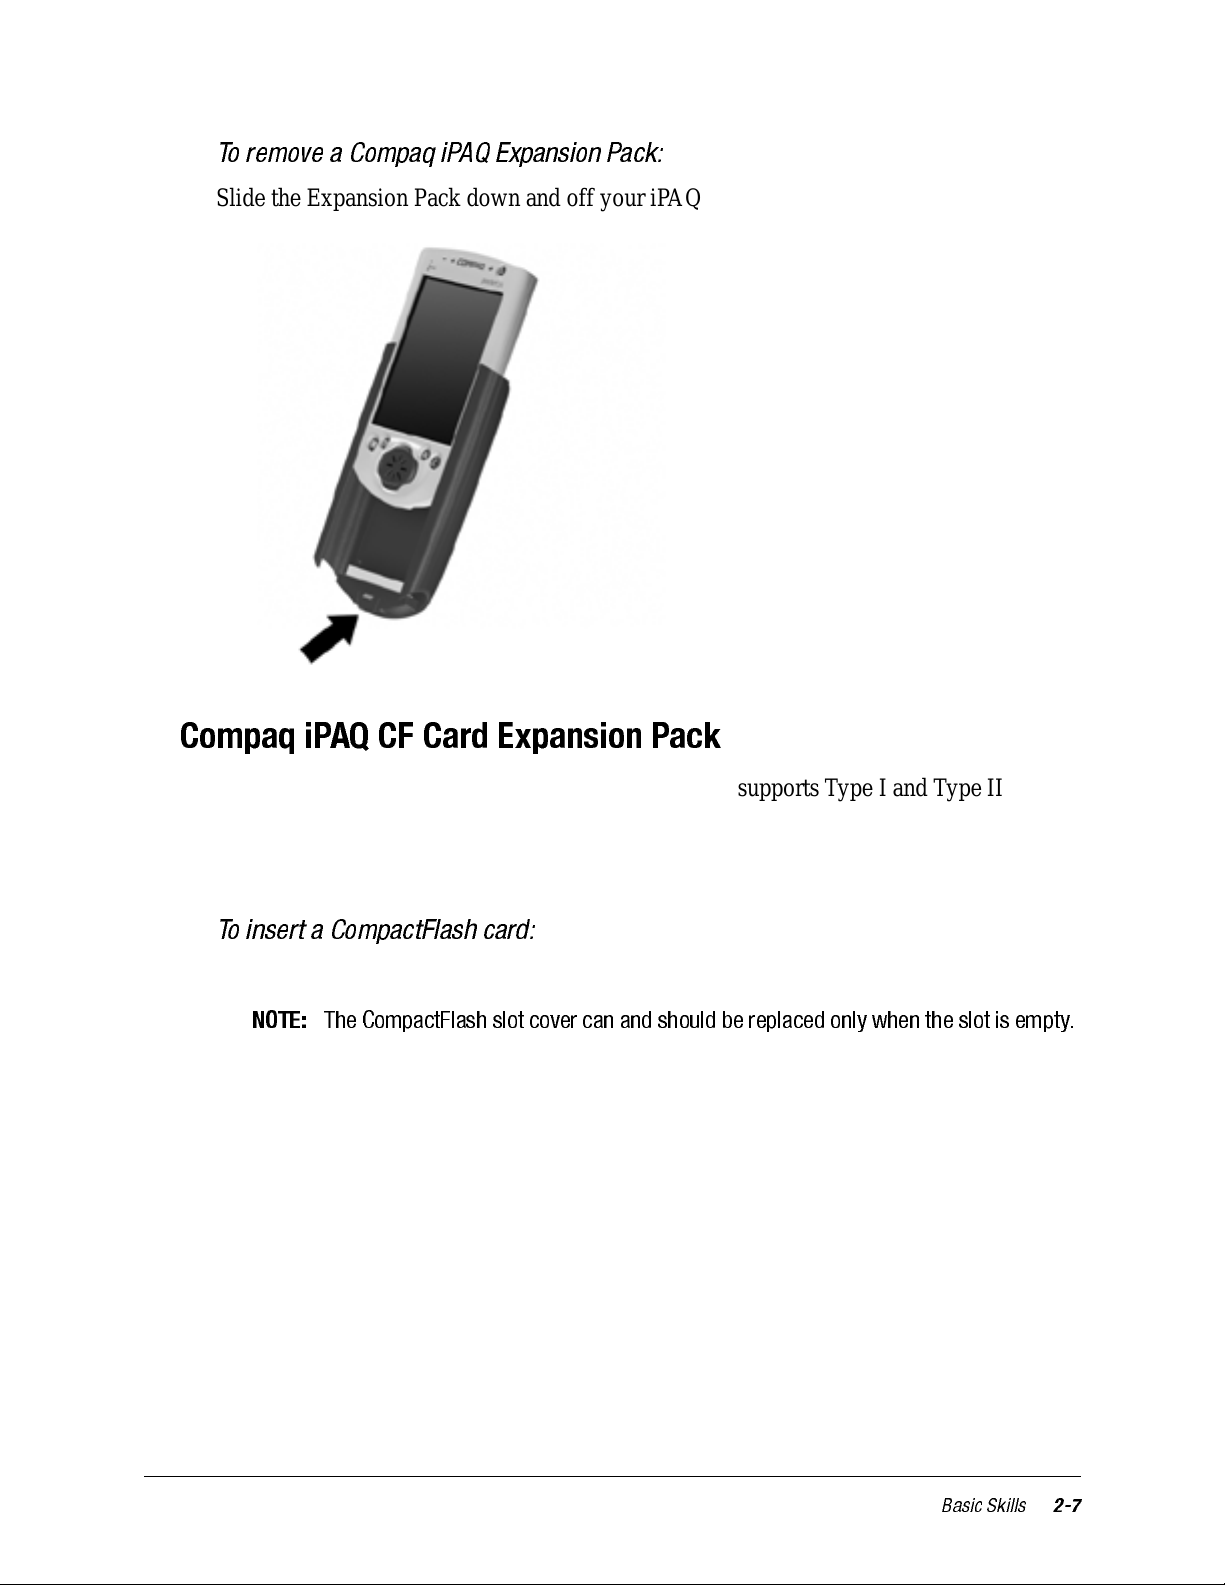
To remove a Compaq iPAQ Expansion Pack:
Slide the Expansion Pack down and off your iPAQ H3000.
Compaq iPAQ CF Card Expansion Pack
The optional Compaq iPAQ CF Card Expansion Pack supports Type I and Type II CompactFlash cards. The CompactFlash slot allows you to install storage cards for backup and
storage of data and applications. It also allows you to install communication de vices such
as a LAN adapter or a fax/modem.
To insert a CompactFlash card:
1. Remove the CompactFlash slot cover.
NOTE:
The Compa ctFlash slot cover can and should be replaced only whe n the slot is empty.
Basic Skills
2-7
Page 18
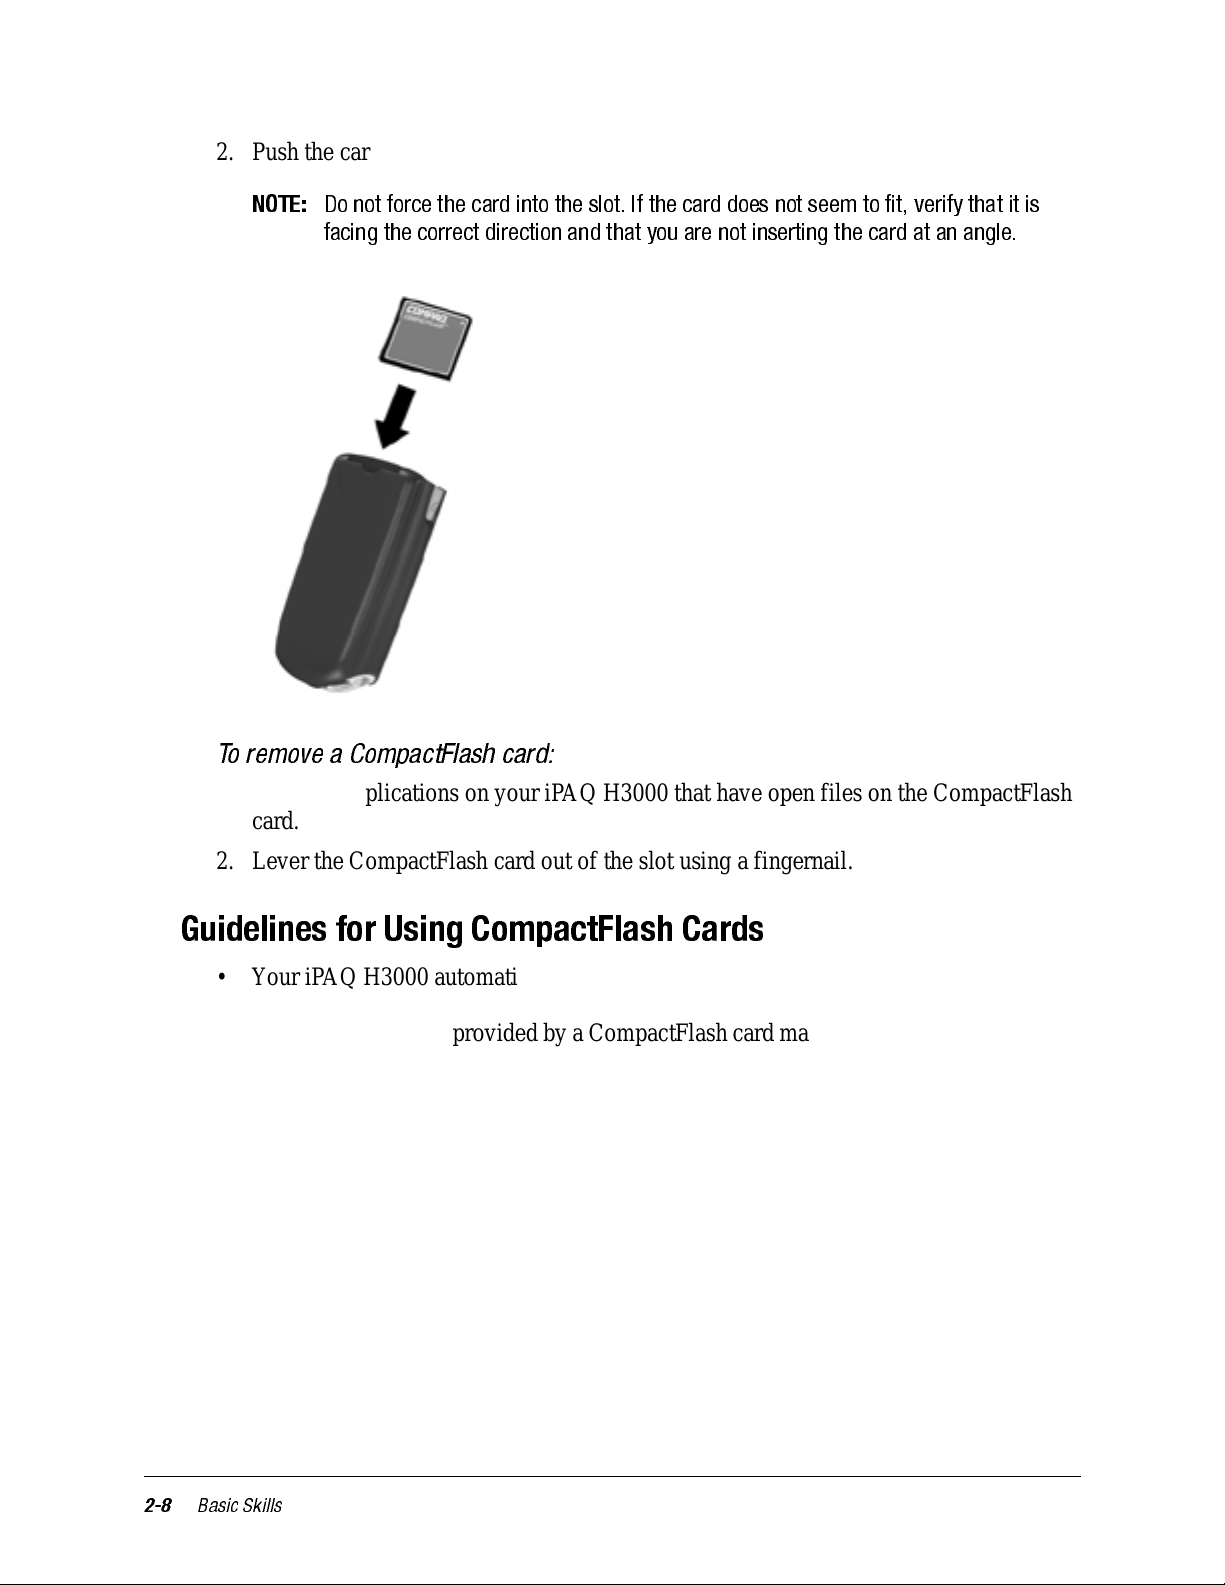
2. Push the card, connector-side first into the slot until it stops.
NOTE:
Do not force the card into the slot. If the card does not seem to fit, verify that it is
facing the correct direction and that you are not inserting the card at an angle.
To remove a CompactFlash card:
1. Close all applications on your iPAQ H3000 that have open files on the CompactFlash
card.
2. Lever the CompactFlash card out of the slot using a fingernail.
Guidelines for Using CompactFlash Cards
• Your iPAQ H3000 automatically recognizes a wide range of CompactFlash cards
approved for use with ActiveSync. If you are ever instructed to install card-specific
iPAQ H3000 drivers provided by a CompactFlash card manufacturer, be sure to install
only device drivers specifically designed for the operating system on your iPAQ
H3000. If you are unclear about installation instructions, call your CompactFlash card
manufacturer for more information.
• Some CompactFlash cards consume large amounts of power. To avoid battery drainage when using a CompactFlash card, connect your iPAQ H3000 to AC power wherever possible.
• If the battery is very low , you should not attempt to save data to a CompactFlash card.
This may result in the loss of data. First connect to AC power.
• Do not turn off your iPAQ H3000 or remove the CompactFlash card when you are in
the middle of performing an operation, such as saving data to your CompactFlash
card.
2-8
• Keep your CompactFlash card in a protective case when not in use to protect it from
dirt and moisture.
Basic Skills
Page 19
The Stylus
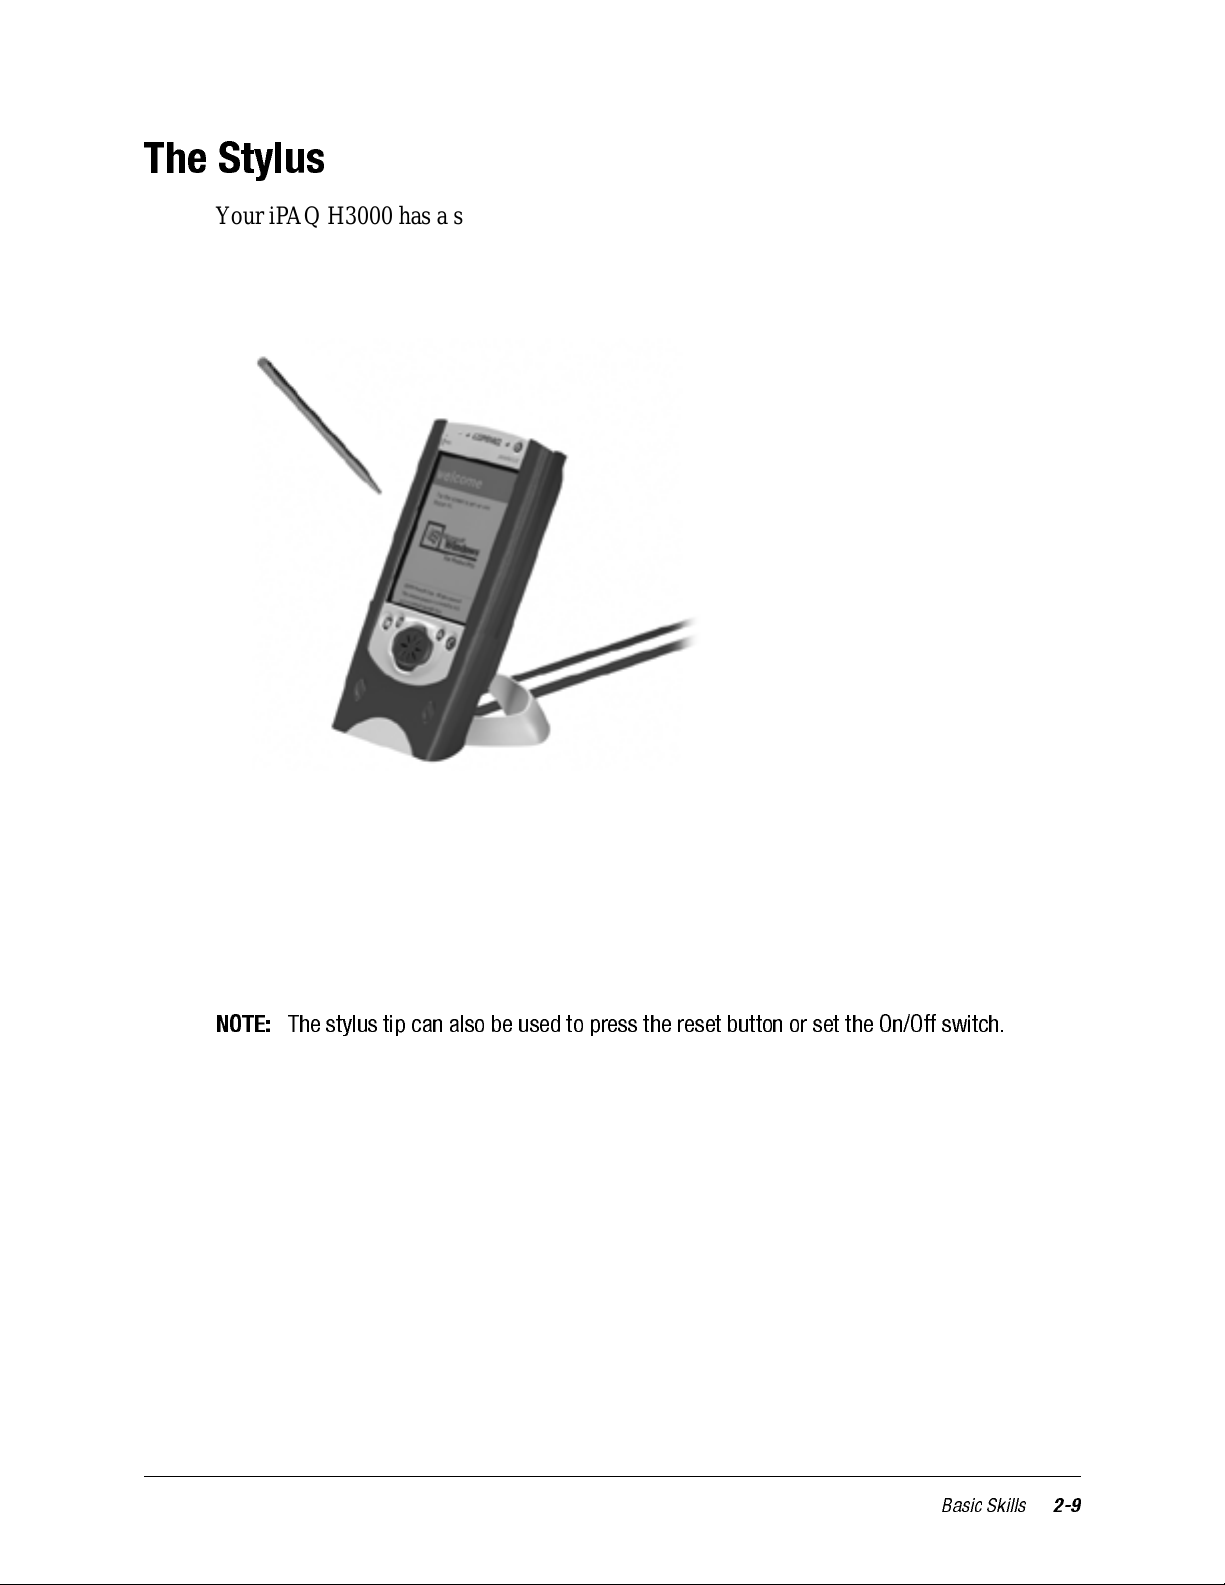
Your iPAQ H3000 has a stylus for selecting items and entering information. To use the
stylus, press and hold the stylus release button while pulling the stylus upward out of its
compartment. To replace the stylus, just insert it back into the compartment, then push it
until it clicks into place.
The following actions are available with the stylus:
• Tap. Touch the screen once with the stylus to open items and select options.
• Drag. Hold the stylus on the screen and drag it across the screen to select text and
images. Drag within a list to select multiple items.
• Tap-and-hold. Tap and hold the stylus on an item to see a list of actions available for
that item. T ap the action you want to perform on the pop-up menu that appears.
NOTE:
The stylus tip can also be used to press the reset button or set the On/Off switch.
Basic Skills
2-9
Page 20
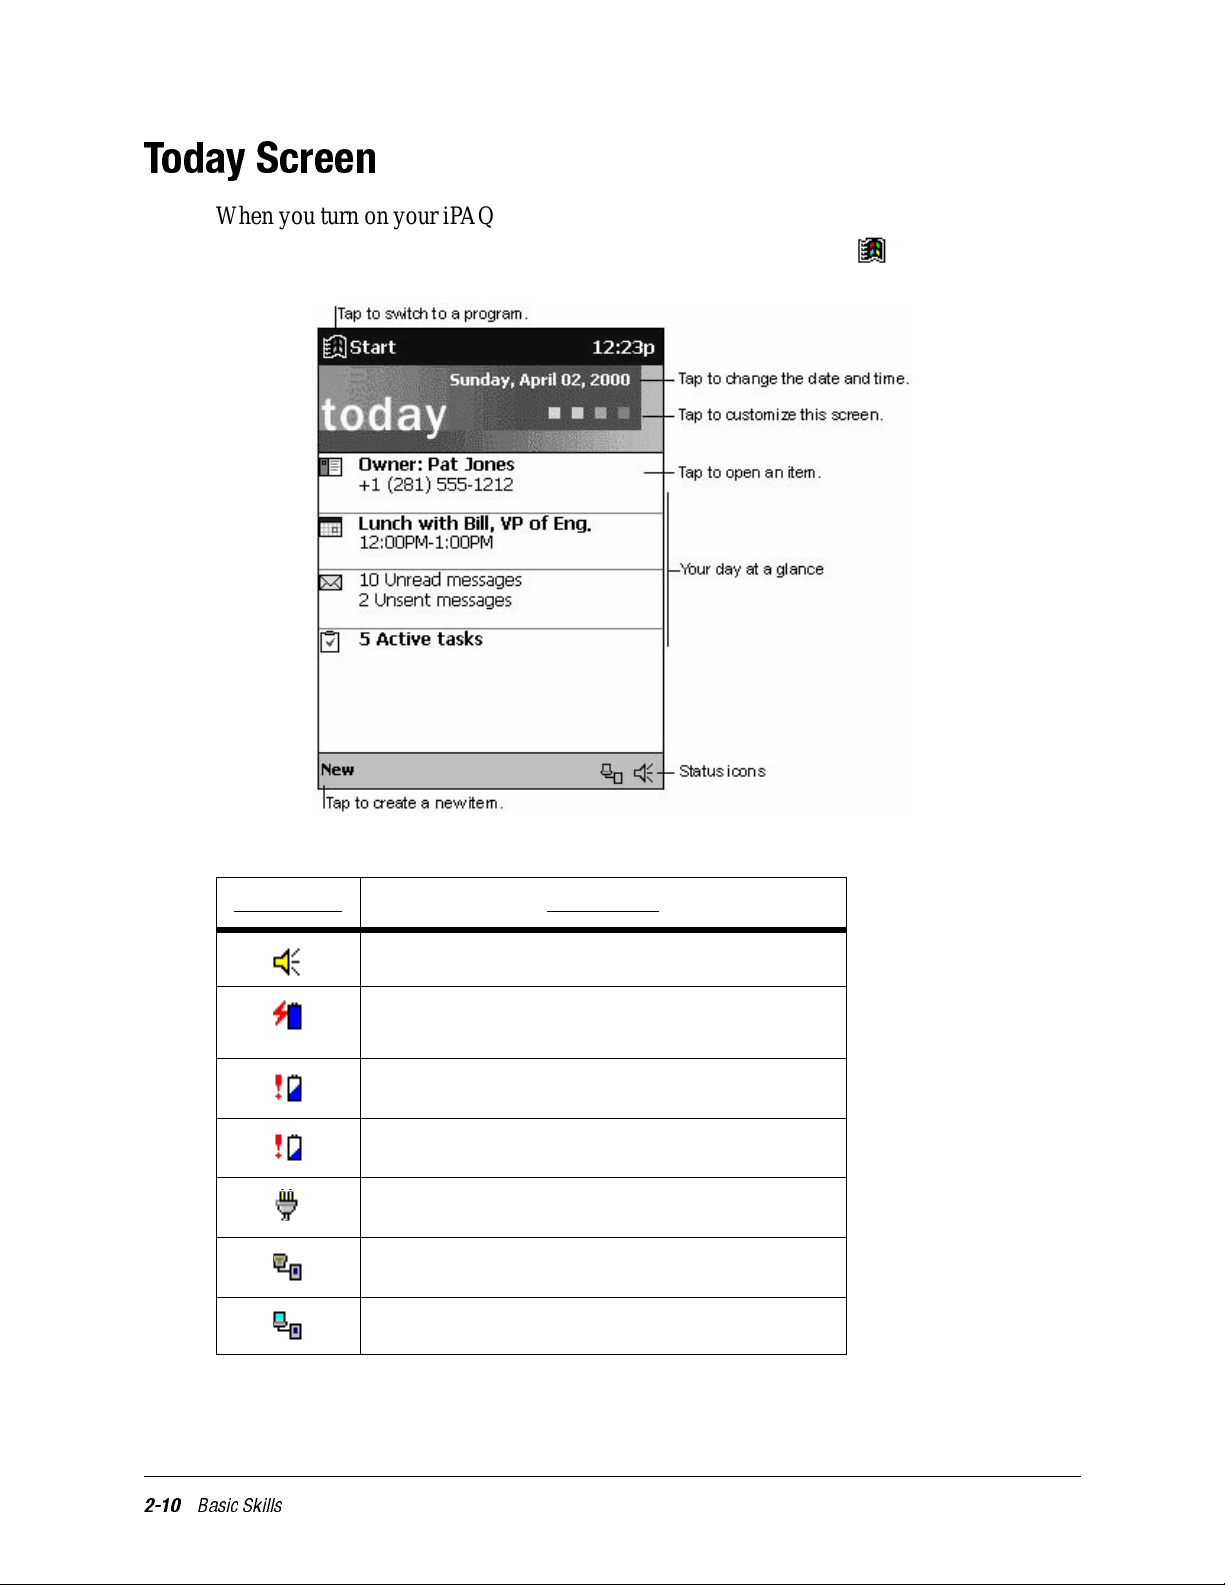
Today Screen
When you turn on your iP AQ H3000 for the first time each day (or after 4 hours of inactivity), you’ll see the T oday s creen. You can also display it by tapping then Today. O n th e
Today screen, you can see at a glance important information for the day.
You may see the following status icons on the command bar in the Today screen.
Status Icon Description
Turns all sounds on and off
Main battery is charging
Main battery is low
Main battery is very low
External (AC) power source is connected
Dial-up connection is active
Direct connection is active
2-10
Basic Skills
Page 21

Programs
You can switch from one program to another by selecting it from the menu. (You can
customize which programs you see on this menu. For information, see “Adjusting Set-
tings”, later in this chapter.) You can also use QStart to switch between programs. See
“QStart” later in this chapter.
NOTE:
NOTE:
Some programs have abbreviated labels for check boxes and drop-down menus. To see
the full spelling of an abbreviated label, tap and hold the stylus on the label. Drag the sty-
lus off the label so that the command is not carried out.
You can also switc h to some programs by pressing an application button . Your iPAQ
H3000 has four application buttons located on the front of your iPAQ H3000, and the
Record button located on the side. The following icons on the buttons on the front of the
iPAQ identify the programs they switch to:
Item Icon Program
1 Calendar
2 Contacts
3 QMenu
4 QStart
Basic Skills
2-11
Page 22
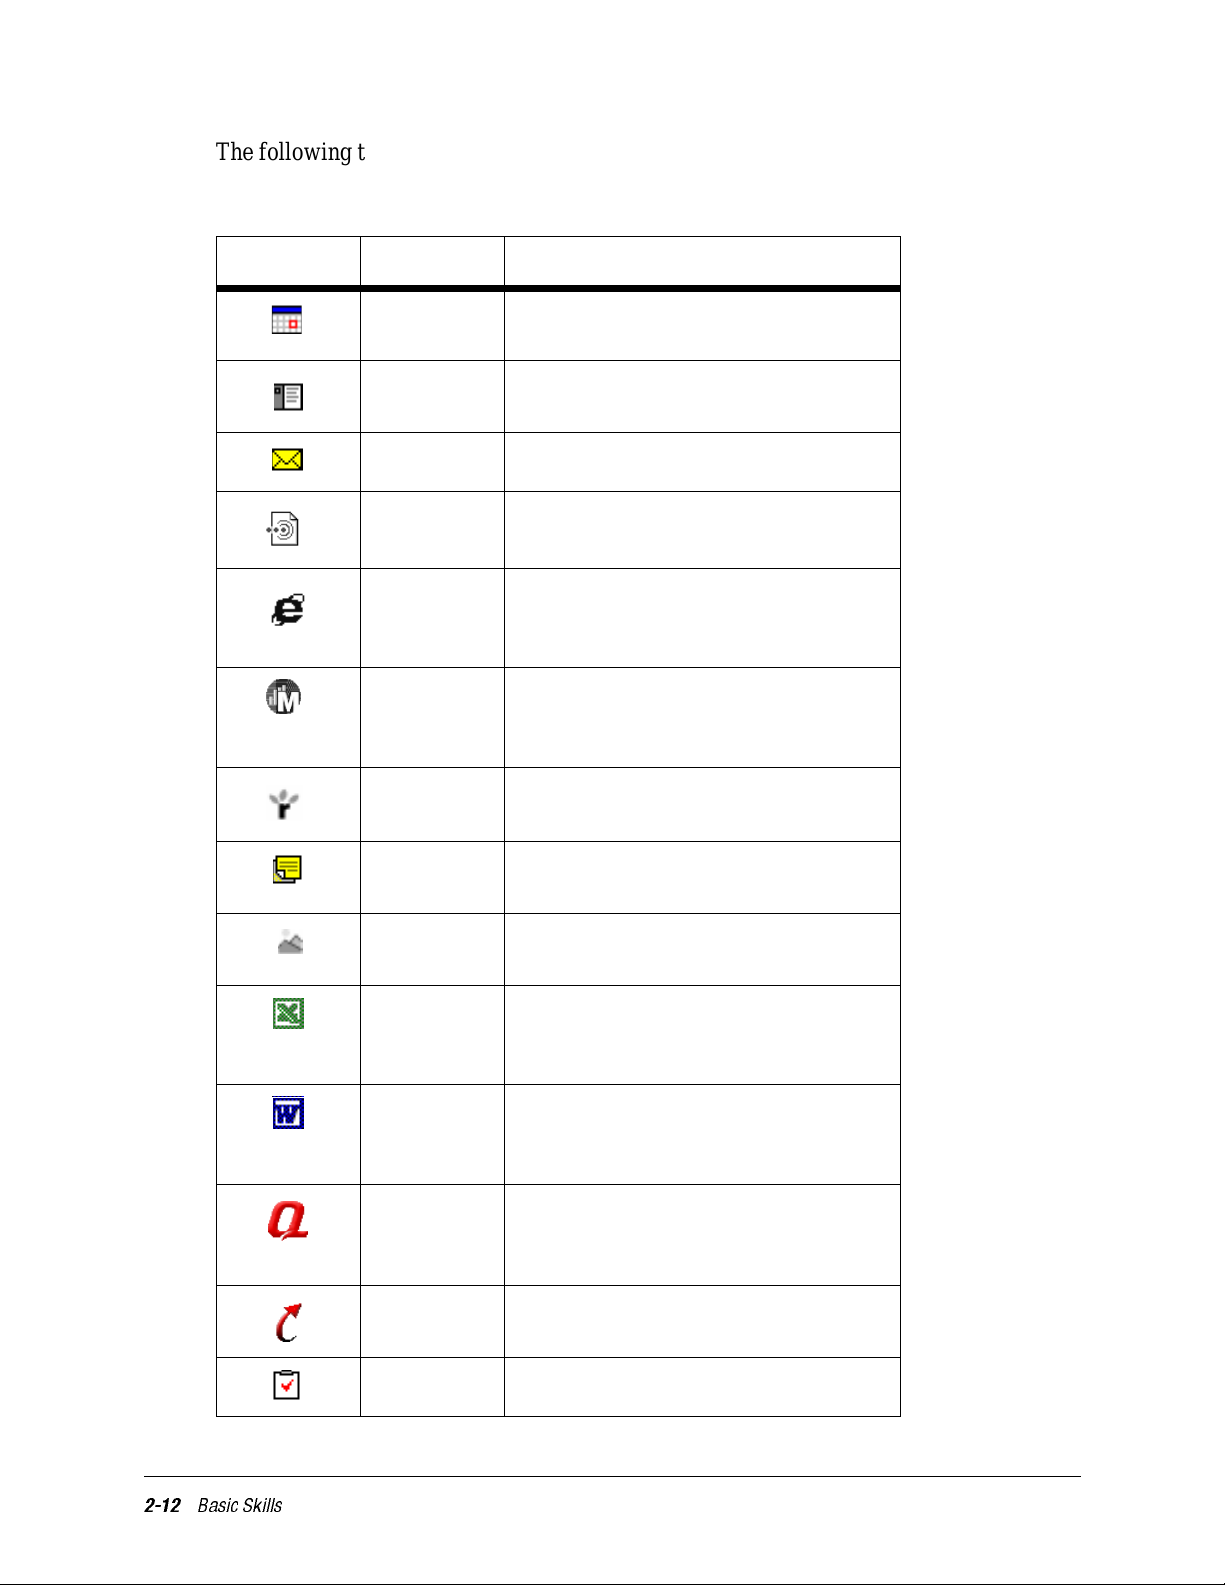
The following table contains a partial list of programs that are on your iPAQ H3000. Look
in the Compaq CD and the Extras folder on the ActiveSync CD for additional programs
that you can install onto your iPAQ H3000.
Icon Program Description
Calendar Keep track of your appointments and
create meeting requests.
Contacts Keep track of your friends and
colleagues.
Inbox Send and receive e-mail messages.
Infrared
Receive
Internet
Explorer
Receive information from another
Windows-powered device.
View Web pages downloaded from
your computer or connect to an ISP
and browse the Web.
Microsoft
Money
Enter and view transactions and check
on your account balances. (Available
for English operating systems only.)
Microsoft
Reader
Read or listen to (using Audible)
electronic books on your iPAQ.
Notes Create handwritten or typed notes,
drawings, and recordings.
Picture
Viewer
Pocket
Excel
View bitmap or JPEG images on your
iPAQ.
Create new workbooks or view and
edit Excel workbooks created on your
computer.
2-12
Basic Skills
Pocket
Word
Create new documents or view and
edit Word documents created on your
computer.
QMenu Activates the QMenu which provides
easy-open programs and quick access
to activities and the QUtilities.
QStart Allows you to quickly access
programs.
Tasks Keep track of your tasks.
Page 23
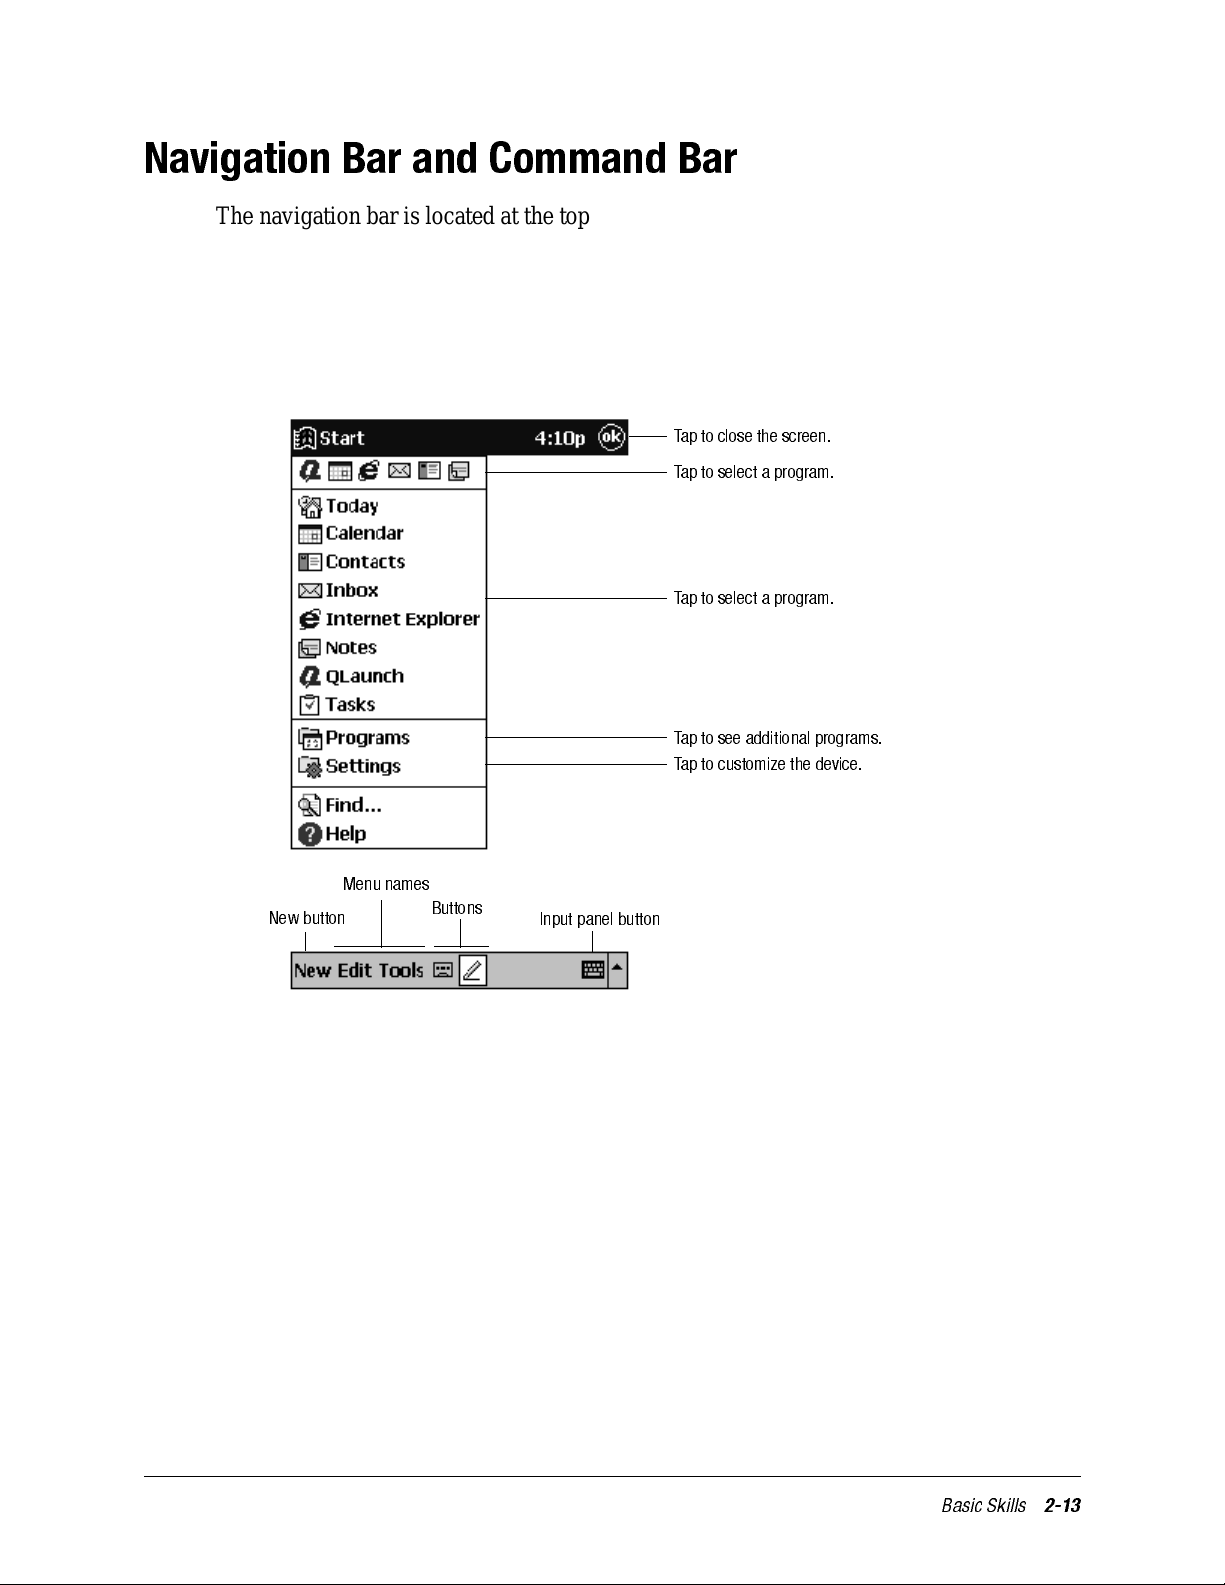
Navigation Bar and Command Bar
The navigation bar is located at the top of the screen and displays the title of the active
program and current time. It also allows you to switch to programs and close screens.
Use the command bar at the bottom of the screen to perform tasks in programs. The command bar includes menu names, buttons, and the input panel button. T o create a new item
in the current program, tap New. To see the name of a button on screen, tap and hold the
stylus on the button. Drag the stylus off the button so that the command is not carried out.
Tap to close the screen.
Tap to select a program.
Tap to select a program.
Tap to see additional programs.
Tap to customize the device.
New button
Menu na mes
Buttons
Input panel button
Basic Skills
2-13
Page 24
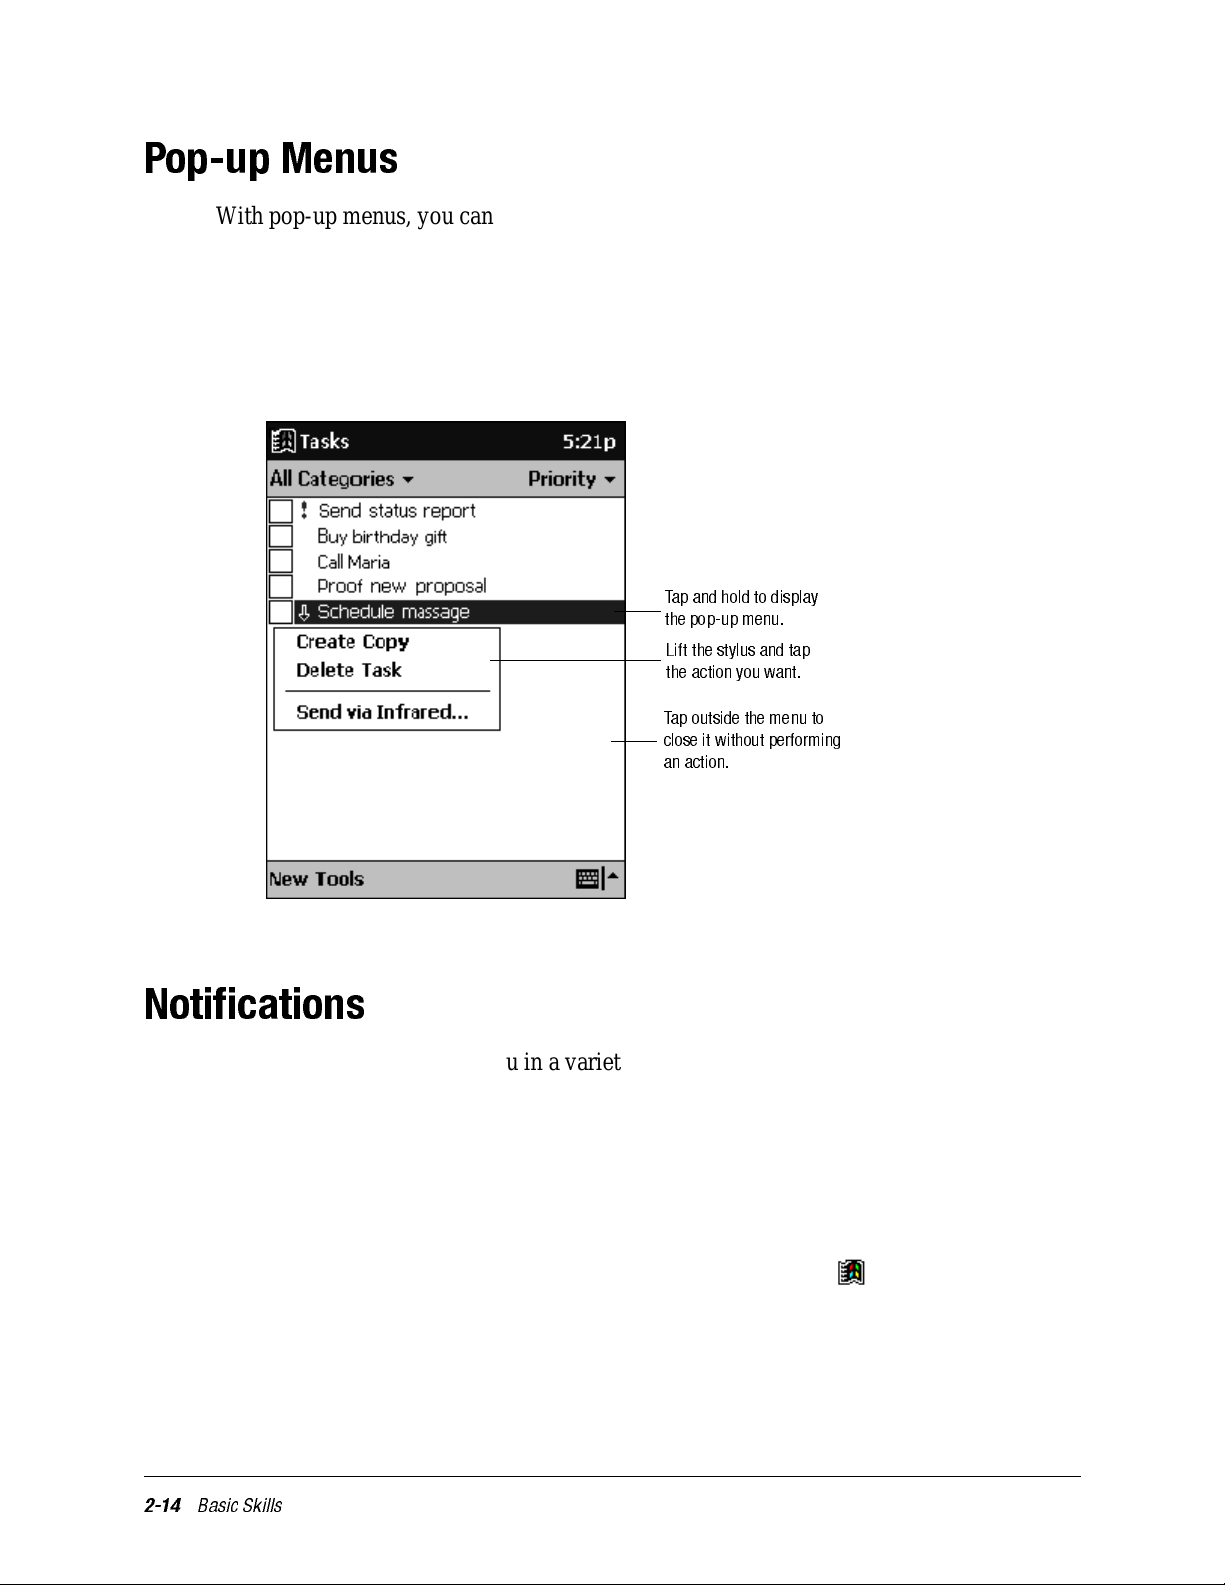
Pop-up Menus
With pop-up menus, you can quickly choose an action for an item. For example, you can
use the pop-up menu in the contact list to quickly delete a contact, make a copy of a contact, or send an e-mail message to a contact. The actions in the pop-up menus vary from
program to program. To access a pop-up menu, tap and hold the stylus on the item name
that you want to perform the action on. When the menu appears, lift the stylus, and tap the
action you want to perform. Or tap anywhere outside the menu to close the menu without
performing an action.
Tap and hold to display
the pop-u p menu.
Lift the stylus and tap
the action you want.
Tap outside the menu to
close it without performing
an action.
Notifications
Your iPAQ H3000 reminds you in a variety of ways when you have something to do. For
example, if you’ve set up an appointment in Calendar, a task with a due date in T a sks, or
an alarm in Clock, you’ll be notified in any of the following ways:
• A message box appears on the screen.
• A sound, which you can specify, plays.
• The green alarm light flashes on your iPAQ H3000.
To choose reminder types and sounds for your iPAQ H3000, tap then Settings. In the
Personal tab, tap Sounds & Reminders. The options you choose here apply throughout
your iPAQ H3000.
2-14
Basic Skills
Page 25
Enter Information on Your iPAQ
You have several options for entering new information:
• Enter typed text in the input panel by using the soft keyboard or Character Recognizer .
• Write or draw pictures directly on the screen.
• Speak into your iP AQ H3000 microphone to record a message.
• Synchronize or copy information from your computer to your iPAQ H3000 using
ActiveSync. For more information on ActiveSync, see the booklet accompanying the
ActiveSync CD or ActiveSync Help on your computer.
Typing Using the Input P anel
Use the input panel to enter information in any program on your iPAQ H3000. You can
either type using the soft keyboard or write using Character Recognizer. In either case, the
characters appear as typed text on the screen.
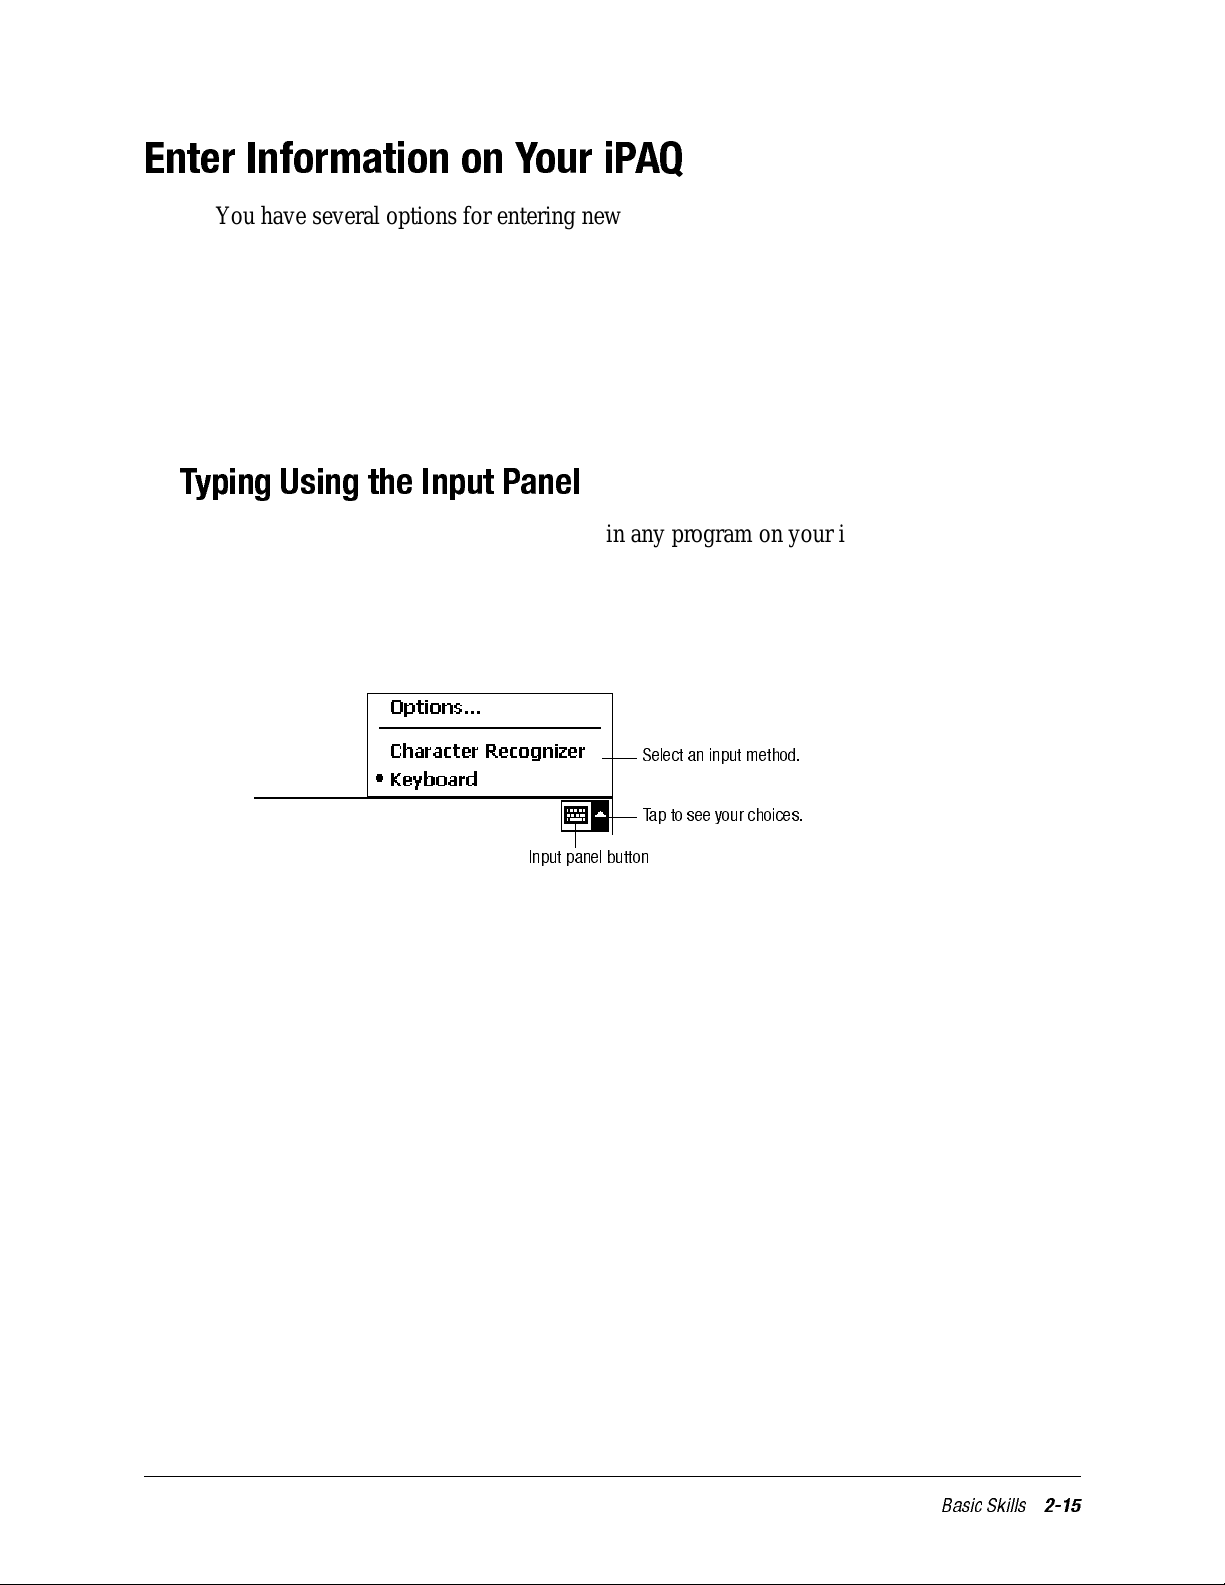
Tap the Input Panel button to show or hide the input panel, then tap the arrow next to the
Input Panel button to see your choices.
Input pane l button
Select an input method.
Tap to se e your cho ices.
Basic Skills
2-15
Page 26
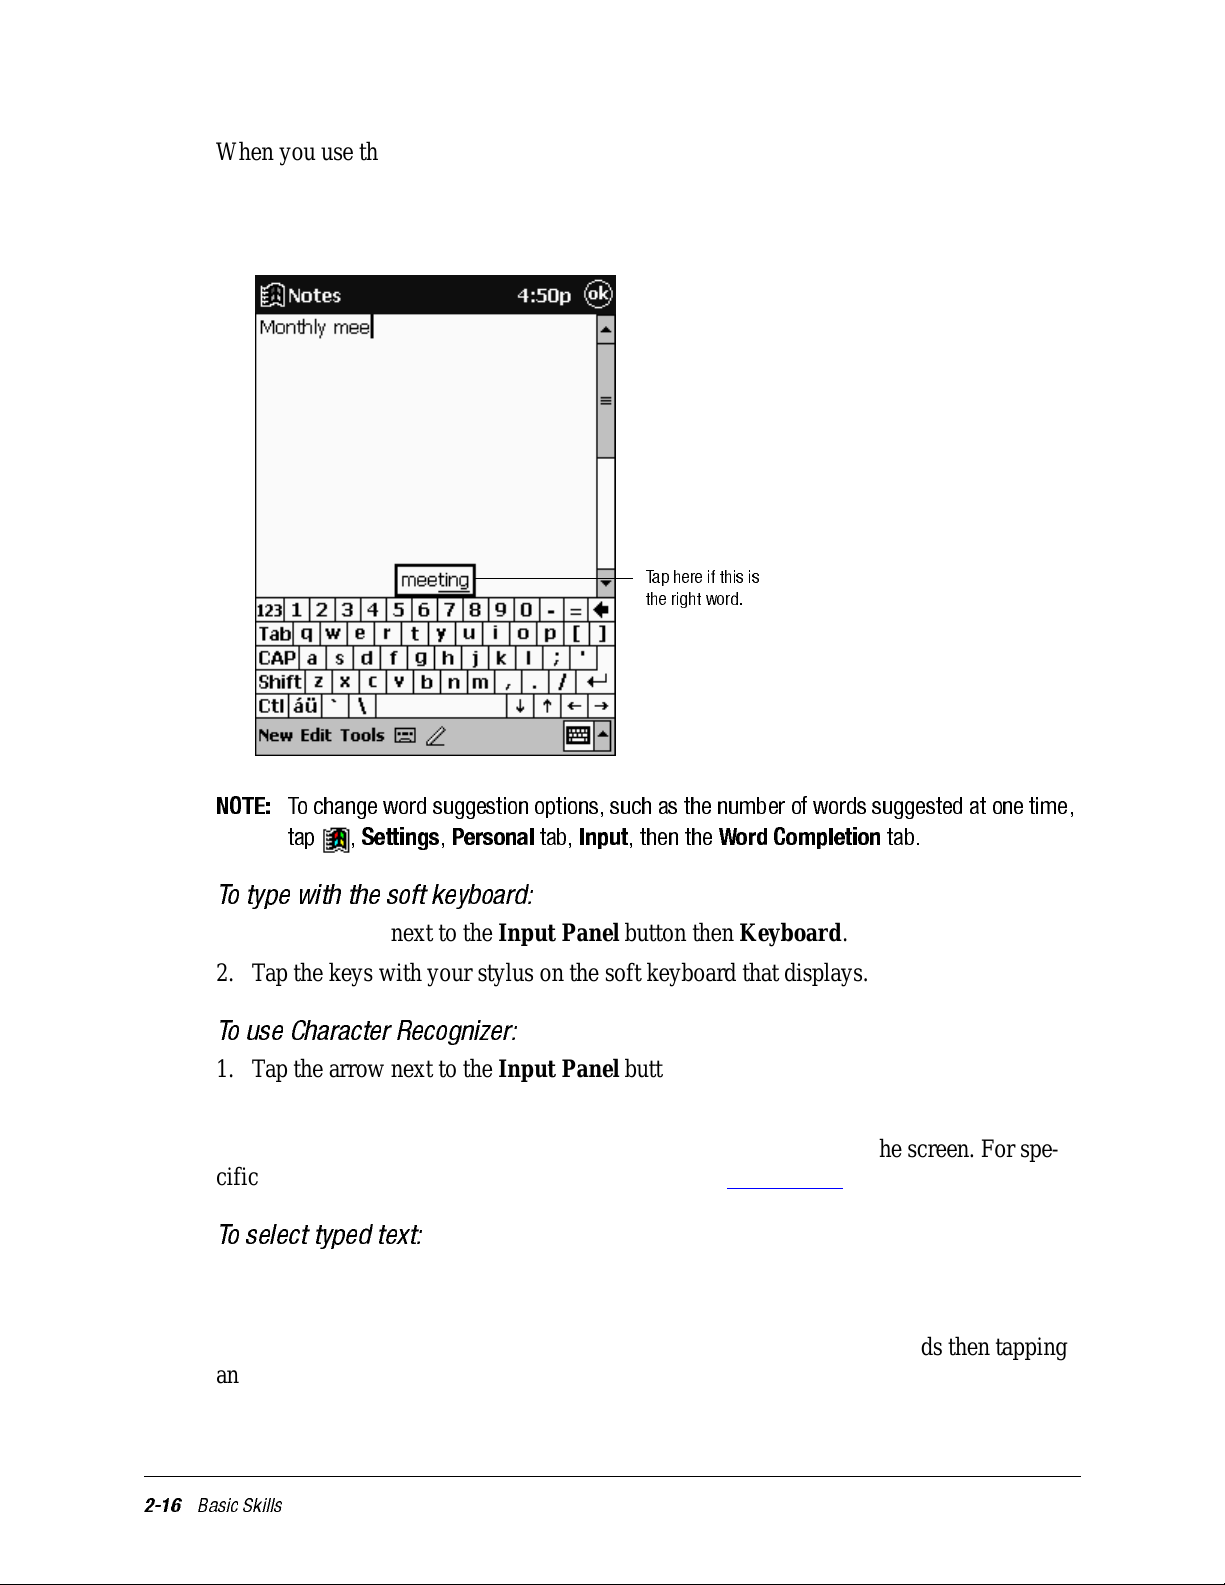
When you use the input panel, your iPAQ H3000 anticipates the word you are typing or
writing and displays it above the input panel. When you tap the displayed word, it is
inserted into your text at the insertion point. The more you use your iPAQ H3000, the
more words it learns to anticipate.
Taphereifthisis
the right word.
NOTE:
To change word suggestion options, such as the number of words suggested at one time,
tap ,
Settings,Personal
tab,
Input
, then the
Word Completion
tab.
To type with the soft keyboard:
1. Tap the arrow next to the Input Panel button then Keyboard.
2. Tap the keys with your stylus on the soft keyboard that displays.
To use Character Recognizer:
1. Tap the arrow next to the Input Panel button then Character Recognizer.
2. Write a letter in the box.
When you write a letter, it is converted to typed text that appears on the screen. For specific instructions on using Character Recognizer, see Appendix B.
To select typed text:
If you want to edit or format typed text, you must select it first by dragging the stylus
across the text you want to select.
You can cut, copy, and paste text by tapping and holding the selected words then tapping
an editing command on the pop-up menu, or by tapping the command on the Edit menu.
2-16
Basic Skills
Page 27
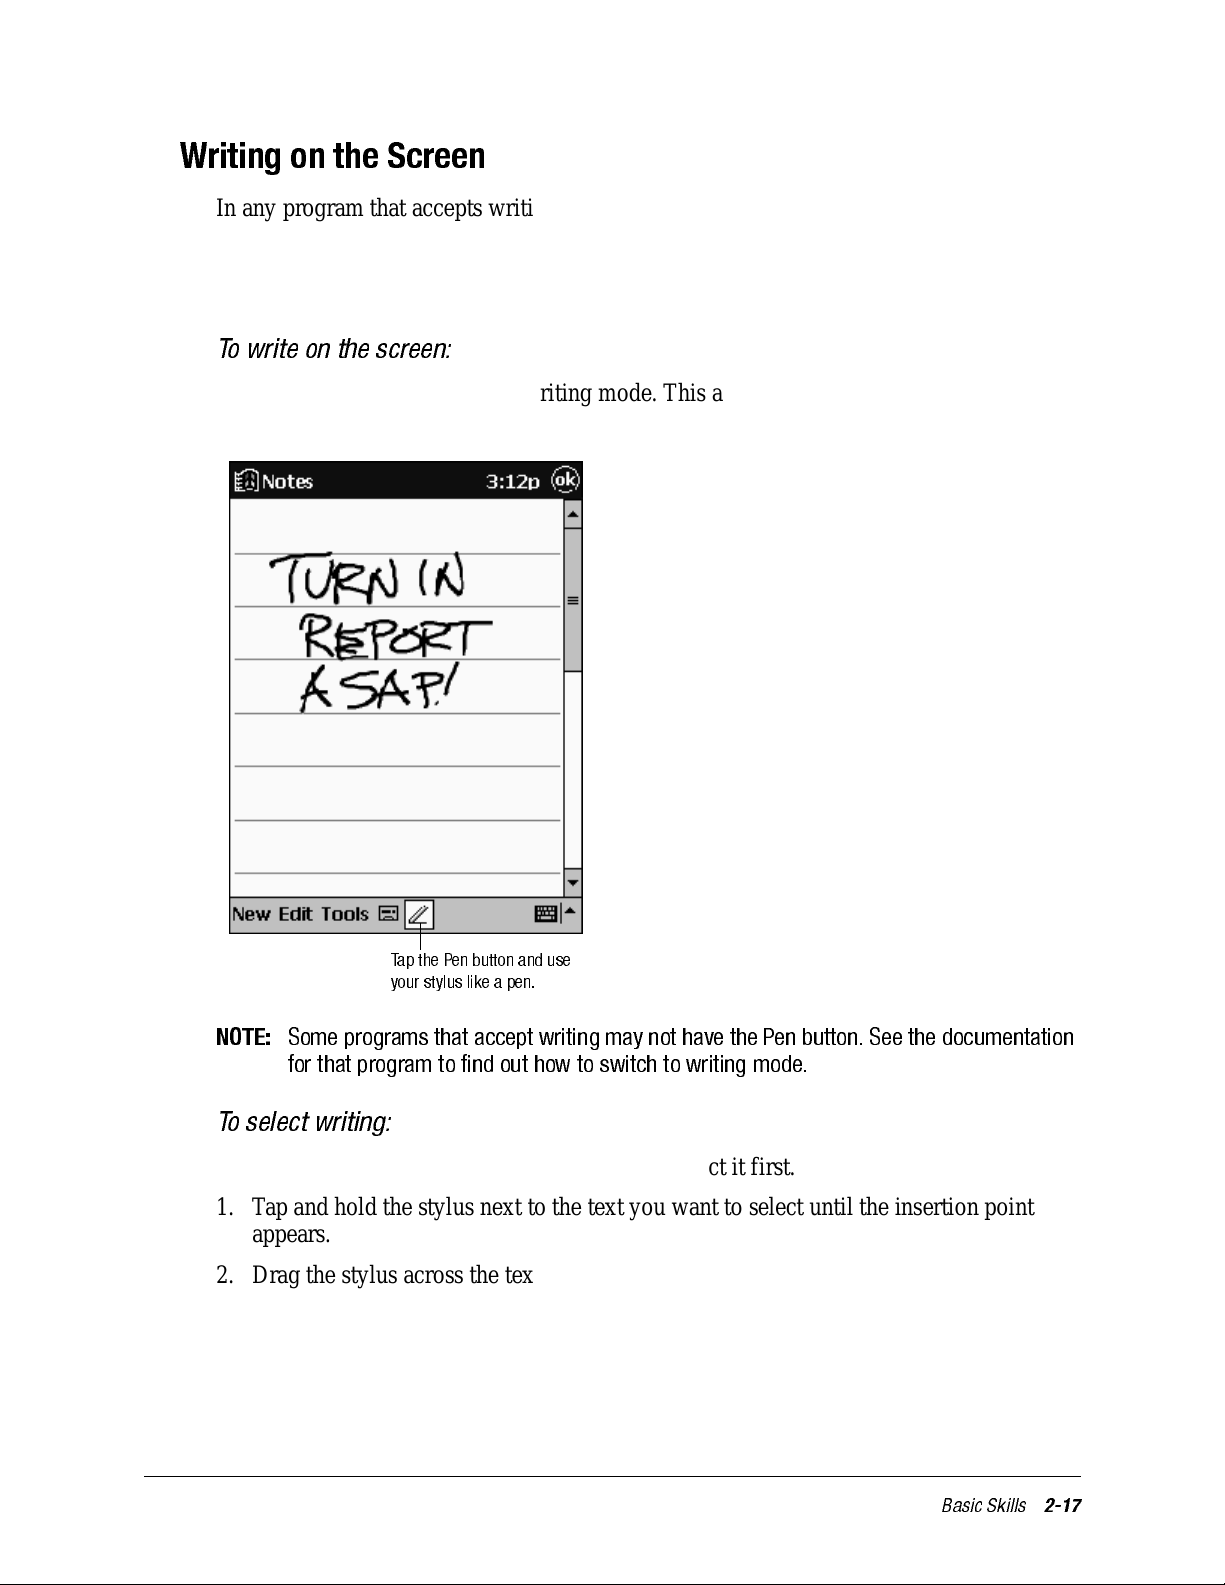
Writing on the Screen
In any program that accepts writing, such as the Notes program and the Notes tab in Calendar, Contacts, and Ta sks, you can use your stylus to write directly on the screen. Write
the way you do on paper. You can edit and f orma t what you’ve written and convert the
information to text at a later time.
To write on the screen:
Tap the Pen button to switch to writing mode. This action displays lines on the screen to
help you write.
Tap the Pen button and use
your stylus like a pen.
NOTE:
Some programs that accept writing may not have the P en button. See the documentation
for that program to find out how to switch to writing mode.
To select writing:
If you want to edit or format writing, you must select it first.
1. Tap and hold the stylus next to the text you want to select until the insertion point
appears.
2. Drag the stylus across the text you want to select without lifting the stylus.
If you accidentally write on the screen, tap Tools then Undo and try again. You can also
select text by tapping the Pen button to deselect it then dragging the stylus across the
screen.
Basic Skills
2-17
Page 28

You can cut, copy, and paste written text in the same way you work with typed text: tap
and hold the selected words then tap an editing command on the pop-up menu, or tap the
command on the Edit menu.
To convert writing to text:
•Tap Tools then Recognize.
If you want to convert only certain words, select them before tapping Recognize on the
Tools menu (or tap and hold the selected words then tap Recognize on the pop-up menu).
If a word is not recognized, it is left as writing.
2-18
Basic Skills
Select the text you want to
convert and tap Recognize
on the pop-up menu.
The writing is turned into text.
Page 29
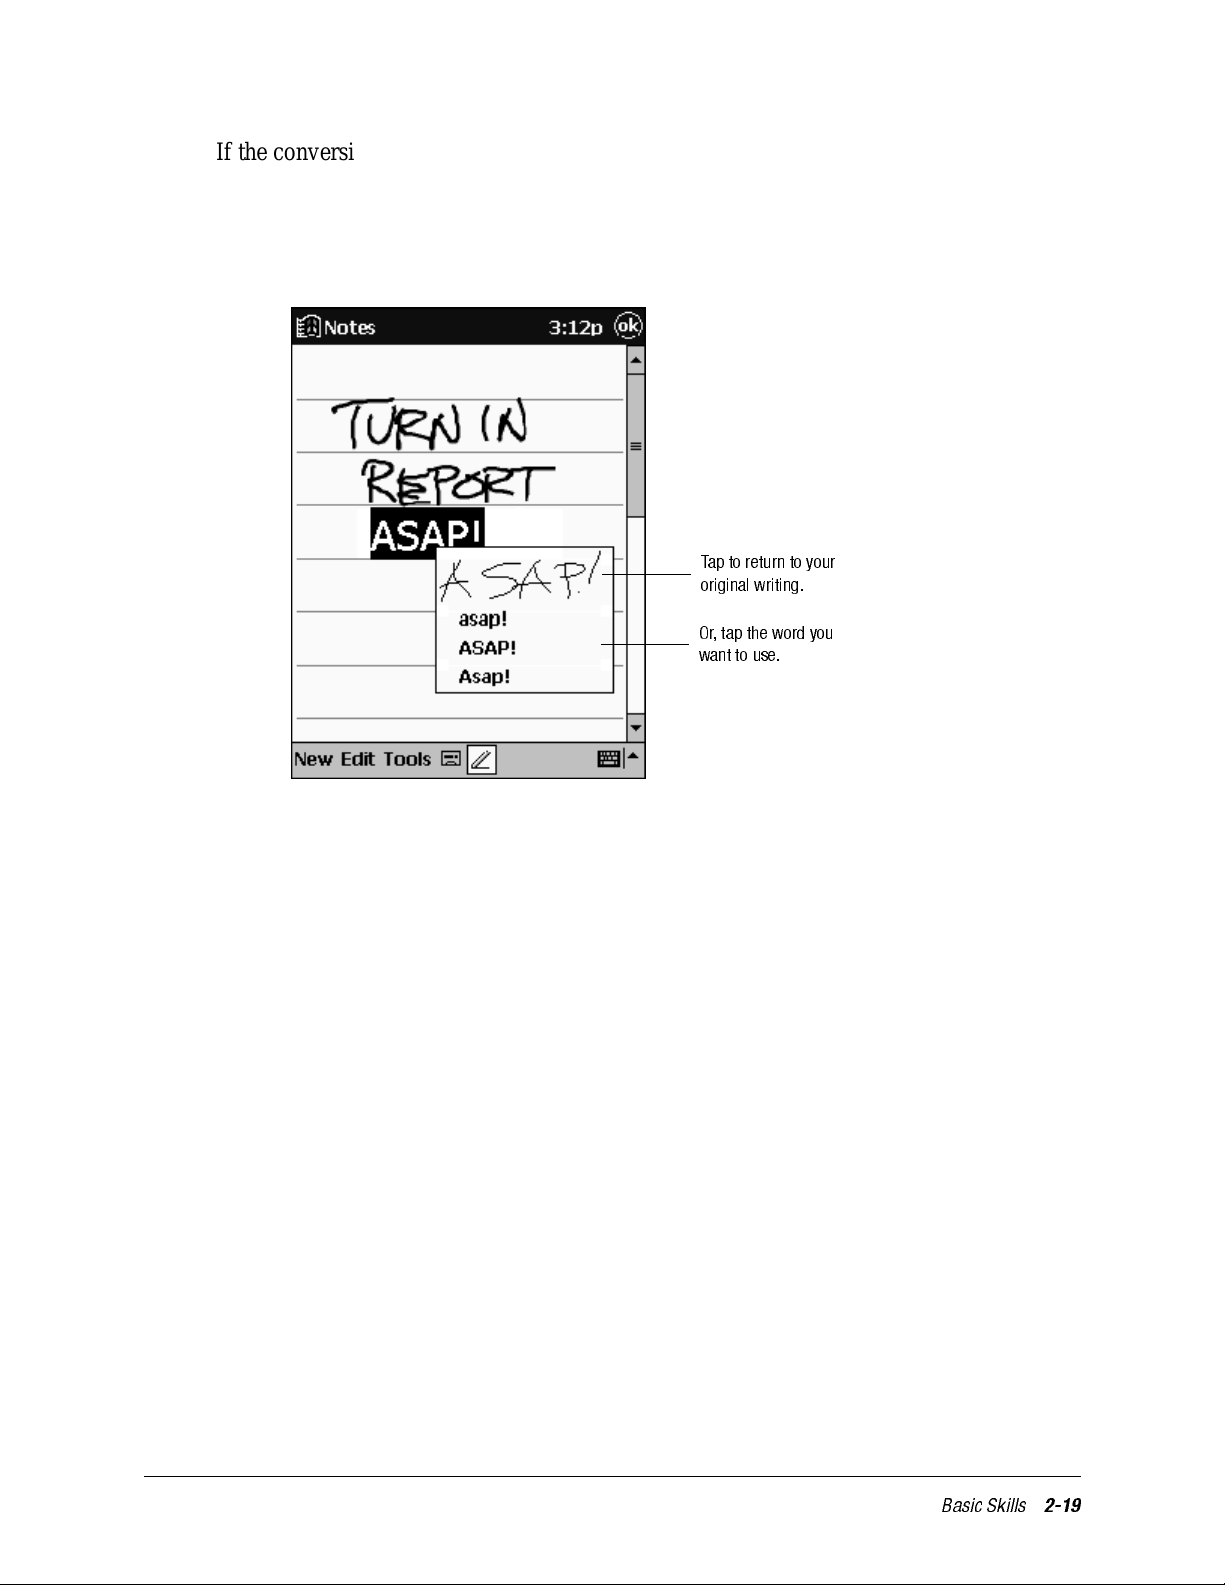
If the conversion is incorrect, you can select different words from a list of alternates or
return to the original writing. To do so, tap and hold the incorrect word (tap one word at a
time). On the pop-up menu, tap Alternates. A menu with a list of alternate words appears.
Tap the word you want to use, or tap the writing at the top of the menu to return to the
original writing.
Taptoreturntoyour
original writing.
Or , tap the word you
want to use.
Tips for getting good recognition:
• Write neatly.
• Write on the lines and draw descenders below the line. Wr i te the cross of the “t” and
apostrophes below the top line so that they ar e not confused with the word above.
Write periods and commas above the line.
• For better recognition, try increasing the zoom level to 300% using the Tools menu.
• Write the letters of a word clos ely and leave big gaps between words so that your iPAQ
H3000 can easily tell where words begin and end.
• Hyphenated words, foreign words that use special characters such as accents, and
some punctuation cannot be converted.
• If you add writing to a word to change it (such as changing a “3” to an “8”) after you
attempt to recognize the word, the writing you add will not be included if you attempt
to recognize the writing again.
Basic Skills
2-19
Page 30

Drawing on the Screen
You can draw on the screen in the same way that you write on the screen. The difference
between writing and drawing on the screen is how you select items and how they can be
edited. For example, selected drawings can be resized, while writing cannot.
To create a drawing:
• Cross three ruled lines on your first stroke. A drawing box appears. Subsequent
strokes in or touching the drawing box become part of the drawing. Drawings that do
not cross three ruled lines will be treated as writing.
The dra wing box indicates the
bounda ries of the drawing.
Pen button
NOTE:
You may want to change the zoom level so that you can more easily work on or view your
drawing. Tap
T ools
then a zoom level.
To select a drawing:
If you want to edit or format a drawing, you must select it first. Tap and hold the stylus on
the drawing until the selection handle appears. To select multiple drawings, deselect the
Pen button then drag to select the drawings you want.
You can cut, copy, and paste selected drawings by tapping and holding the selected drawing then tapping an editing command on the pop-up menu, or by tapping the command on
the Edit menu. To resize a drawing, make sure the Pen button is not selected and drag a
selection handle.
2-20
Basic Skills
Page 31

Recording a Message
In any program where you can write or draw on the screen, you can also quickly capture
thoughts, reminders, and phone numbers by recording a message. In Calendar, T asks, and
Contacts, you can include a recording in the Notes tab. In the Notes program, you can
either create a stand-alone recording or include a recording in a written note. If you want
to include the recording in a note, open the note first.
To create a recording:
1. Hold your iPAQ H3000 so that the microphone is near your mouth or other source of
sound.
2. Press and hold the Record button on the side of your iPAQ H3000.
3. Make your recording while holding down the Record button.
4. Release the Record button to stop recording. Two beeps will sound. The new recording
appears in the note list or as an embedded icon.
NOTE:
You can also make a recording by tapping the
Record
button on the Recording toolbar.
To play a recording, tap it in the list or tap its icon in the note.
Indicates an
embedde d
recording.
Taptobegin
recording.
Tap to sh ow or hide the Recording toolbar.
Basic Skills
2-21
Page 32

Find Information
The Find feature on your iPAQ H3000 helps you quickly locate information. On the
menu, tap Find. Enter the text you want to find, select a data type, then tap Go to start the
search.
NOTE:
To quickly find information that is taking up storage space on your iPAQ H3000, select
Larger than 64 KBinT ype
.
Customize Your iPAQ H3000
You can customize your iPAQ H3000 by adjusting iPAQ H3000 settings and installing
additional software.
Adjusting Settings
You can adjust iPAQ H3000 settings to suit the way you work. To see available options,
tap , Settings, then the Personal, System, or Connections tab located at the bottom of
the screen. You can also view settings by pressing the QMenu button, then tapping Set-
tings.
You might want to adjust the following:
Item Description
Align Screen Adjust the touch screen if it is not responding accurately .
Asset Viewer Access detailed information about your iP AQ H3000 as well as
your owner information.
Backlight Set the time before the backlight turns off when the iPAQ is
idle.
Auto Run Allow specialized programs stored on a CompactFlash card to
begin running automatically as soon as the card is inserted.
Buttons As socia te program buttons with specific programs and adjust
the up/down control of your iPAQ Navigator.
Clock Change the time or set alarms.
Input Customize the input method and set word completion settings.
Memory Adjust the allocation of storage and program memory .
Menus
Customize what appears on the menu and enable a pop-up
menu from the New button.
2-22
Basic Skills
Page 33

Item Description
Microphone
AGC
Owner
Information
Password Limit access to your iP AQ H3000.
Power Maximize battery life.
Regional
Settings
Remove
Programs
Sounds and
Reminders
Today Customize the information displayed on the Today screen.
Enable or disable Automatic Gain Control function (automatically adjusts the recording volume).
Enter your contact information.
Customize the appearance of numbers, currency , times and
dates.
Uninstall a program.
Customize or turn off sounds.
Setting a Password
Password security is provided to help protect against unauthorized use of your iPAQ
H3000. For immediate protection, Compaq recommends setting up the password security
through the Password utility in the Settings of your iPAQ H3000 as soon as possible. If
set, your login password must be entered each time you turn on your iPAQ H3000.
NOTE:
To set your login password, follow these steps:
1. Tap , Settings, then Password.
2. Enter a new 4-digit PIN. This number is now your password.
3. Enable the login password by checking the Require password when device is turned
4. Save your new settings by tapping OK.
Your login password is now set. The login password screen appears each time you turn on
your iPAQ H3000.
Choose a pass word tha t's easy to remember. If you forget it, you must perform a full reset
to use your iPAQ H3000 again. A full rese t restarts your iPAQ H3000 an d removes all infor-
mation that was stored in memory, such as your data files and your system settings.
on box.
Basic Skills
2-23
Page 34

Adding or Removing Programs
Programs added to your iPAQ H3000 at the factory are stored in ROM (read-only memory). You cannot remove or modify this software, and you’ll never accidentally lose ROM
contents. Programs and data files added to your iPAQ H3000 after factory installation are
stored in RAM (random access memory). You can install any program created for your
iPAQ H3000, as long as your iPAQ H3000 has enough memory. You can also install a program to a CompactFlash card inserted into your iPAQ H3000. The most popular place to
find software for your iP AQ H3000 is on the World Wide W eb.
To add programs
You’ll need to install the appropriate software for your iPAQ H3000 on your computer
before installing it on your iPAQ H3000.
1. Download the program to your computer (or insert the CD or disk that contains the
program into your computer). You may see a single *.exe file, a *.zip file, a Setup.exe
file, or several versions of files for different iPAQ H3000 types and processors. Be
sure to select the program designed for the Pocket PC and your iPAQ H3000 processor
type (StrongARM SA-1110).
2. Read any installation instructions, Read Me files, or documentation that comes with
the program. Many programs provide special installation instructions.
3. Connect your iPAQ H3000 and computer.
4. Double-click the *.exe file.
5. If the file is an installer, the installation wizard will begin. Follow the directions on the
screen. Once the software has been installed on your computer, the installer will automatically transfer the software to your iPAQ.
If the file is not an installer, you will see an error message stating that the program is
valid but it is designed for a different type of computer. Y ou will need to move this file
to your iPAQ. If you cannot find any installation instructions for the program in the
Read Me file or documentation, use ActiveSync Explore to copy the program file to
the Program Files folder on your iPAQ. For more information on copying files using
ActiveSync, see ActiveSync Help.
Once installation is complete, tap , Programs, then the program icon to switch to it.
To add a program to the Start menu:
Tap , Settings, Menus, the Start Menu tab, then the check box for the program. If you
do not see the program listed, you can either use File Explorer on your iP AQ to move the
program to the Start Menu folder or use ActiveSync on the computer to create a shortcut
to the program and place the shortcut in the Start Menu folder.
2-24
Basic Skills
Page 35

Using File Explorer on your iP AQ:
1. Tap , Programs, File Explorer, and locate the program (tap the folder list, labeled
My Documents by default, then My De vice to see a list of all folders on your iPAQ) .
2. Tap and hold the program and tap Cut on the pop-up menu.
3. Open the Start Menu folder located in the Windows folder, tap and hold a blank area of
the window , and tap Paste on the pop-up menu. The program will now appear on the
menu. For more information on using File Explorer , see “Find Information”, ear-
lier in this chapter.
Using ActiveSync on the computer:
1. Use the Explorer in ActiveSync to explore your iPAQ files and locate the program.
2. Right-click the program, then click Create Shortcut.
3. Move the shortcut to the Start Menu folder in the Windows folder. The shortcut now
appears on the menu. For more information, see ActiveSync Help.
To remove programs:
1. Tap then Settings.
2. Tap Remove Programs on the System tab.
3. Use File Explorer on your iPAQ to locate the program if the program does not appear
as an installed program.
4. Tap and hold the program.
5. Tap Delete on the pop-up menu.
Basic Skills
2-25
Page 36

Power
When you are working with your iPAQ H3000 and using battery power, you can monitor
the charge held in the battery by using the Power window. To conserve battery power, your
iPAQ H3000 automatically powers off whenever it is idle for a continuous period of time.
If you are running on battery power, you can conserve charge if you shorten the idle time
before your iPAQ H3000 automatically powers off.
To display the Power control panel:
Tap , Settings, System, then Po w e r.
NOTE:
NOTE:
If the battery is low on charge, the battery icon appears on the command bar on the T oday
screen. T ap the battery icon to display the Power control panel.
If the battery gets very low, your iPAQ H3000 displays a warning message. If this occurs,
save any unsaved data you are working on, perform a synchronization with your com-
puter, then turn off your iPAQ H3000. Dont try to restart your iPAQ H3000 until you have
connected to external power . If your iPAQ H3000 shuts down, you still have about 24
hours to recharge the battery before you lose the data on your iPAQ H3000.
2-26
The Power control panel only shows the battery charge level if you are using the battery. If
you have connected the AC adapter, the window shows the recharging status.
To set the power off timer:
1. Tap , Settings, System, then Power.
2. Use the drop down menus to set the idle intervals before your iPAQ automatically
powers off.
Basic Skills
Page 37
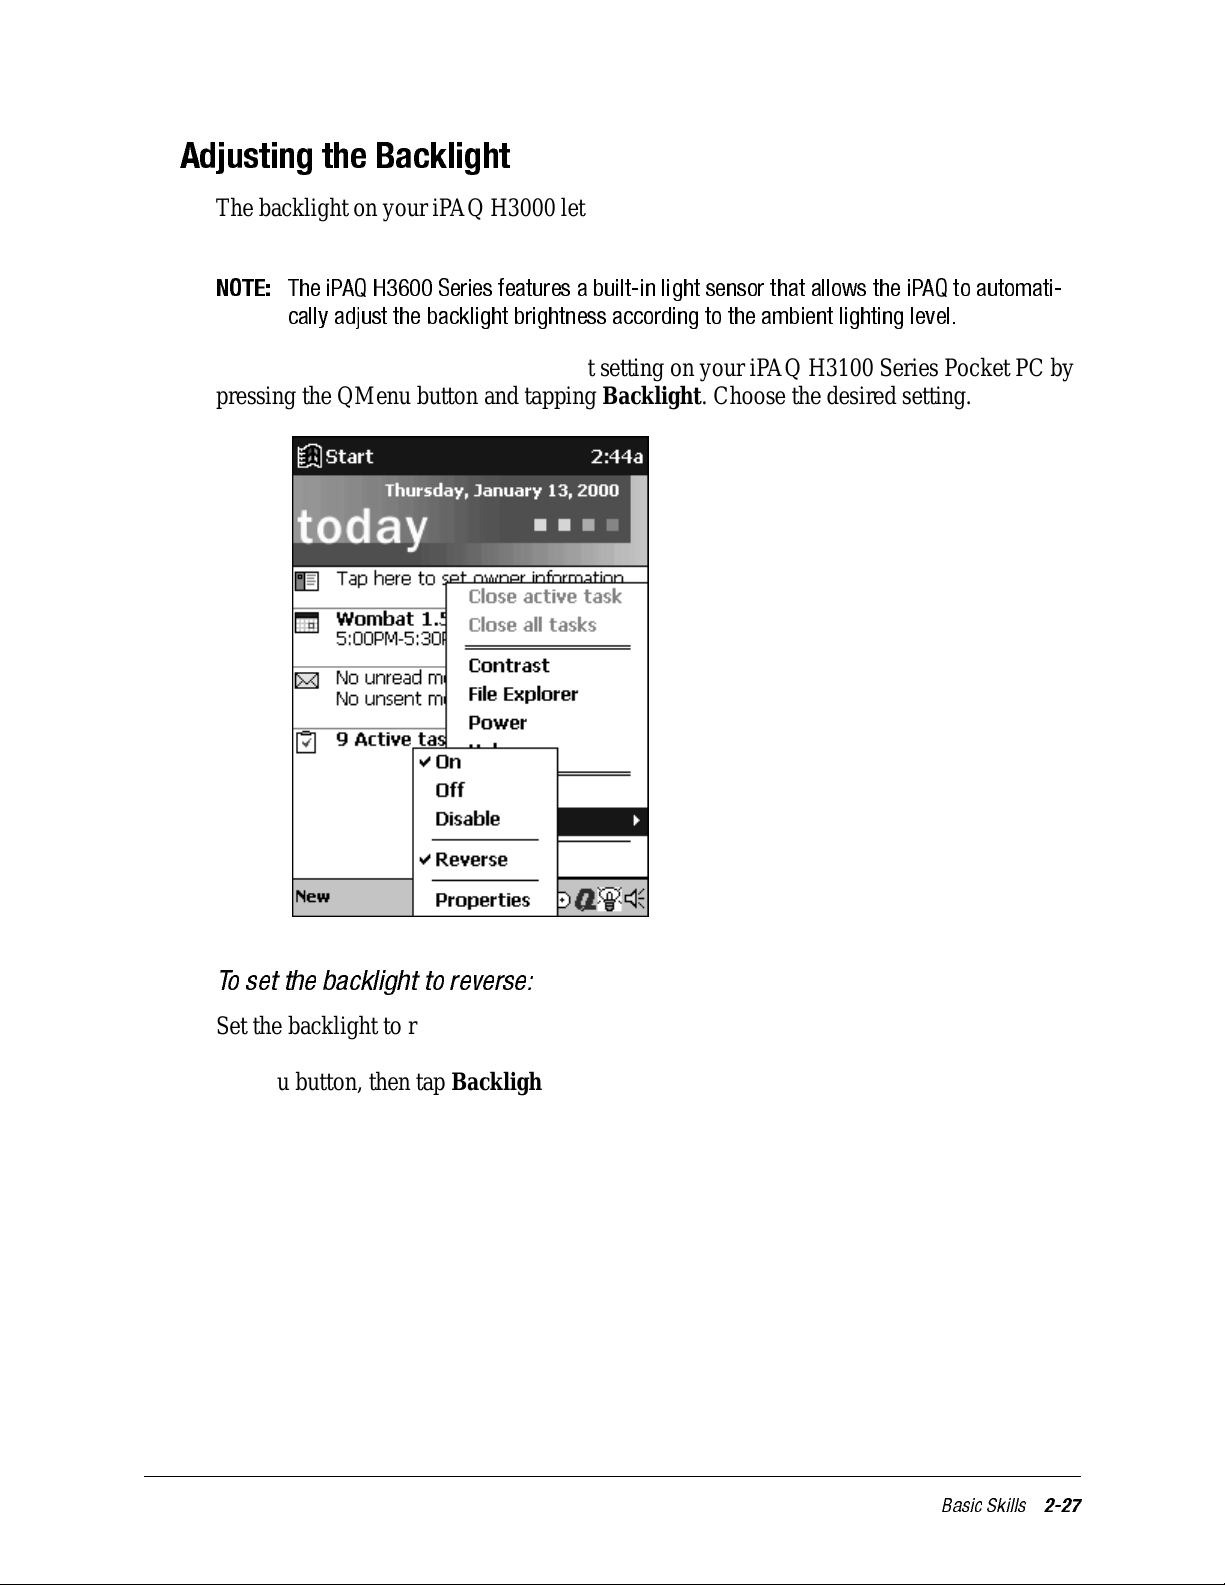
Adjusting the Backlight
The backlight on your iPAQ H3000 lets you view text and graphics clearly whether you're
indoors or outdoors, in a dim study or at a brightly lit worksite.
NOTE:
You can manually change the backlight setting on your iPAQ H3100 Series Pocket PC by
pressing the QMenu button and tapping Backlight. Choose the desired setting.
The iPAQ H3600 Series features a built-in light sensor that allows the iPAQ to automati-
cally adjust the backlight brightness according to the ambient lighting level.
To set the backlight to reverse:
Set the backlight to reverse mode to display dark text on a white background in dimly-lit
environments and white text on a dark background in brightly-lit areas. Simply press the
QMenu button, then tap Backlight, Reverse.
Basic Skills
2-27
Page 38

To adjust the backlight time-out:
1. Press the QMenu button, then tap Backlight, Properties.
2. Use the drop-down menus to set the amount of idle time before the backlight turns off
when your iPAQ is using battery power and external power.
QStart
QStart allows you to quickly acces s programs on your iPAQ Pocket PC. There are two
ways to access the QStart:
•Press the QStart button.
•Tap , Programs then QSta rt .
To open a program, select a category from the pop-up menu at the bottom of the screen,
then tap the program icon. To customize the appearance of the QStart categories, tap
Tools. You can create a new category or add or remove applications from an existing category.
2-28
Basic Skills
Page 39

QUtilities and QMenu
Customizing your iP AQ Pocket PC is both convenient and easy when you use the QMenu
and the QUtilities. The QMenu and QUtilitie s let you quickly access several important
setting controls. The QMenu also lets you switch between, or close, open applications.
The QUtilities are located on the QMenu. There are four ways to access the QMenu:
•Press the QMenu button.
•Tap the Q icon on the command bar in QStart.
•Tap the Q icon on the command bar on the Today screen.
•Tap , Programs then QMenu.
If you want to remove the Q icon from your command bar, tap Exit on the QMenu. To
restore the Q icon, tap , then QMenu.
To change which items appear on the QMenu, press the QMenu button, then tap QUtili-
ties, QMenu. Any items that you select will appear on the QMen u .
Task Management
The QMenu allows you to close or switch among tasks on your iPAQ H3000. You can
close the program that is currently active by tapping Close active task. Close all the open
programs on your iP AQ H3000 by tapping Close all tasks.
NOTE:
Below these two options is a list of running tasks. To switch among running tasks, tap the
name of the task you want to go to.
When you close a task, all unsaved data in that task is lost.
Basic Skills
2-29
Page 40

File Explorer
You can use the File Explorer to find files on your iPAQ and to organize these files into
folders. Press the QMenu button, then tap File Explorer.
Select the sort
order for the list.
Tap the folder
name to open it.
Tap and hold
to create a
new folder.
NOTE:
You can move files in File Explorer by tapping and holding the item you want to move then
tapping
CutorCopy
and
Paste
on the pop-up menu.
Self Test
The Self Test utility within QUtilities activates a debugging and system diagnostic tool.
Use this tool to verify any problems that you may have experienced on your iPAQ.
1. Press the QMenu button, then tap Close all tasks to close all active programs.
2. If you have enabled password protection at power-on, disable this by tapping , Set-
tings, then Password. Enter your 4-digit PIN, then deselect the Require password
check box.
If you have enabled display owner identification at power-on, disable this by tapping
, Settings, then Owner Information. Deselect th e Show information when
device is turned on check box.
2-30
Basic Skills
Page 41

3. Press the QMenu button, then tap QUtilities, then Self Test.
4. Tap the check boxes to select the items you want to test, then tap Next.
NOTE:
The "IR transfer" test item is an internal infrared functionality test. You do not need to
set up another IR iPAQ to test this item.
5. Tap Start. Your iPAQ will reset (unless you have disabled this option), and the test
will start automatically. Follow the instructions to complete the test. When Self Test
finishes running, it displays the result of each test item.
6. Tap Finish. You can also choose to save the results as a log file. This is stored in My
Documents on your iP AQ.
7. Tap OK to exit.
8. Reset your password and owner information settings.
To read the Self Test log file on your computer:
1. Connect your iPAQ to your computer, then use ActiveSync to copy the file from My
Documents on your iP AQ, to your computer.
2. Open the SelfTest.log file in WordPad on your computer.
Basic Skills
2-31
Page 42

Controlling Volume
The Volume utility provides an easy way to adjust the volume of your iPAQ H3000.
1. Press the QMenu button, then tap Volume.
- orTap , Settings, System, then Sounds & Reminders.
2. Adjust the volume level on the s lider.
3. Tap OK to save the new setting.
Contrast
2-32
Basic Skills
The Contrast utility allows you to adjust the display contrast of your iPAQ for easy viewing in any lighting environment. To adjust the display contrast:
1. Press the QMenu button, then tap Contrast, then Set Contr ast.
2. Adjust the slider until the contrast is suitable, then tap OK.
Page 43

Backup and Restore Data
T o avoid losing your dat a in the event that your i PAQ Pocket PC is lost, stolen, or becomes
defective, Compaq recommends periodic backups to the computer or a CompactFlash
card. Depending on your usage, you may want to perform a backup as often as once a day .
You can back up and restore your iPAQ's data using the following utilities:
• ActiveSync Back up/Restore. Use this ActiveSync utilit y to periodically back up your
iPAQ's data onto your computer’s hard drive. You can manually back up data or set
this utility to back up automatically each time you connect to your Pocket PC. For
more information, see ActiveSync Help on your computer.
• Backup. This utility lets you back up and restore your entire Pocket PC memory contents as well as save your Contacts list to a CompactFlash storage card (purchased separately). You can then carry a CompactFlash card–based copy of your data with you at
all times for quick retrieval.
Saving Contacts
You can backup or save the contents of your contact list to a CompactFlash card by pressing the QMenu button and tapping QUtilities. Tap the Backup tab and tap Save Contacts.
NOTE:
Tapping
from the Contacts application.
Erase All
deletes the contacts backup saved to flash memory. Data is not deleted
Backing up Data to a CF Card
Each time you use the Backup utility, your data files, databases, preferences, ActiveSync
system data, and applications are copied to the CompactFlash storage card. The subdirectories on your iPAQ H3000 are also duplicated on the storage card.
NOTE:
To perform a backup:
1. Connect to external power or, tap , Settings, System, then Power to verify that the
2. Install the optional Compaq iPAQ CF Card Expansion Pack and CompactFlash storage
Backup is designe d for use with Compac tFlash storage cards that are approved by
Microsoft as Windo ws CE compatible. You should use a ca rd at least as big as y our iPAQ
H3000's RAM (Random Access Memory) size, e.g., 16 or 24 MB. For i nformati on on
ordering a CompactFlash s torage card, se e the
shipping box. For a list of other Compaq-tested CompactFlash cards, visit the Compaq
iPAQ H3000 home pa ge at www.compaq.com/prod ucts/ha ndhelds.
battery has a charge rating of 20% or greater.
card on your iP AQ, as described earlier this chapter.
Accessories Info rmation
included in the
3. Press the QMenu button, then tap Close all tasks, to close all active programs.
Basic Skills
2-33
Page 44

4. Press the QMenu button, then tap QUtilities, Backup, then Backup. The screen displays a list of all the items that will be backed up, so it is easy to identify the data and
size that is saved to the CompactFlash storage card.
5. Tap the Start button to begin the backup process. A status bar reports the data activity
until the function is complete.
Do not remove the CF card or turn off the unit during backup. Data loss can result.
6. When backup is complete, remove the CompactFlash storage card and keep i t close for
easy retrieval.
To restore a backup onto your iPAQ Pocket PC:
1. Install the optional Compaq iPAQ CF Card Expansion Pack and CompactFlash storage
card on your iPAQ.
2. Turn on your iPAQ.
3. Press the QMenu button, then tap Close all tasks to close all active programs.
4. Press the QMenu button, then tap QUtilities, CF Backup tab.
5. Tap Restore.
6. Tap the Start button to begin the restore process. A status bar reports the data activity
until the function is complete.
Do not remove the CF card, or turn off the unit during restore. Data loss can result.
2-34
7. Press the reset button to restart your iPAQ when the restore process is complete.
Basic Skills
Page 45

chapter 3
M
ICROSOFT
Using Microsoft ActiveSync, you can synchroniz e the information on y our computer with
the information on your iPAQ H3000 Pocket PC. Synchronization compares the data on
your iPAQ H3000 Pocket PC with your computer and updates both computers with the
most recent information. For example:
• Keep Pocket Outlook data up-to-date by synchronizing your iPAQ H3000 with your
choice of Microsoft Outlook, Microsoft Schedule+, or Microsoft Exchange on your
computer.
• Synchronize Microsoft Word and Microsoft Excel documents between your iPAQ
H3000 and computer. Your files are automatically converted to the correct format.
NOTE:
With ActiveSync, you can also:
• Back up and restore your iPAQ H3000 data.
• Copy (rather than synchronize) files between your iPAQ H3000 and computer.
• Control when synchronization occurs by selecting a synchronization mode. For exam-
By default, ActiveSync does not automatically synchronize all types of information, for
example, e-mail messages. Use ActiveSync options to turn synchronization on and off for
specific information types.
ple, you can synchronize continually while the iPAQ H3000 is in the cradle or only
when you choose the synchronize command.
A
CTIVESYNC
• Select which information types are synchronized and control how much data is synchronized. For example, you can choose how many weeks of past appointments you
want synchronized.
For information on installing ActiveSync, see the booklet accompanying the ActiveSync
CD. For information on using ActiveSync, see ActiveSync Help on the computer.
Microsoft ActiveSync
3-1
Page 46

3-2
Microsoft ActiveSync
Page 47

chapter 4
M
ICROSOFT
Microsoft Pocket Outlook includes Calendar, Contacts, T asks, Inbox, and Notes. Y ou can use these programs individually or together. For example, e-mail addresses stored in Contacts can be used to address e-mail messages in Inbox.
Using ActiveSync, you can synchronize information in Microsoft Outlook, Microsoft
Schedule+, or Microsoft Exchange on your computer with your iPAQ H3000. Each time
you synchronize, ActiveSync compares the changes you made on your iPAQ H3000 and
computer and updates both with the latest information. For information on using ActiveSync, see ActiveSync Help on the computer .
You can switch to any of these programs by tapping them on the menu.
P
OCKET
O
UT
LOOK
Microsoft Pocket Outlook
4-1
Page 48

Calendar: Scheduling Appointments and Meetings
Use Calendar to schedule appointments, including meetings and other events. You can
check your appointments in one of several views (Agenda, Day, Week, Month, and Year)
and easily switch views by using the View menu.
Taptogototoday.
Tap todisplayor editthe
appointment details.
NOTE:
Tap to create a new appointment.
You can customize the Calendar display, such as changing the first day of the week, by
tapping
Options
on the
T ools
menu.
4-2
Microsoft Pocket Outlook
Page 49

To create an appointment:
1. Tap the desired date and time for the appointment if you are in Day or Week view.
2. Tap New.
Tap to return to the calendar (the
appointment is saved automatically).
Tap to choose from
predefined text.
Tap to choose from previously
entered locations.
Tap to select a time.
Tap to select a date.
Notes is a good place for
maps and directions.
3. Enter a description and a location using the input panel. Tap first to select the field.
4. Tap the date and time to change them, if needed.
5. Enter other desired information. You will need to hide the input panel to see all available fields.
6. Tap the Notes tab to add notes. You can enter text, draw, or create a recording. For
more information on creating notes, see “Notes: Capturing Thoughts and Ideas”, later
in this chapter.
7. Tap OK to return to the calendar when finished.
NOTE:
If you select
Remind me
to the options set in ,
in an appoin tment, your iPAQ H3000 will remind yo u acc ording
Settings,Personal
tab,
Sounds & Reminders
.
Microsoft Pocket Outlook
4-3
Page 50

Using the Summary Screen
When you tap an appointment in Calendar, a summary screen is displayed. Tap the top
portion of the summary screen to change the appointment.
Taptoeditthe
appo intment details.
Tap to enteror
edit notes.
4-4
Microsoft Pocket Outlook
Page 51

Creating Meeting Requests
You can use Calendar to set up meetings with users of Outlook, Pocket Outlook, or Schedule+. The meeting notice will be created automatically and sent either when you synchronize Inbox or when you connect to your e-mail server. Indicate how you want meeting
requests sent by tapping T ools then Options. If you send and receive e-mail messages
through ActiveSync, select ActiveSync.
To schedule a meeting:
1. Create an appointment.
2. Tap the Input Panel button to hide the input panel, then tap Attendees in the appoint-
ment details.
3. Select the meeting attendees from the list of e-mail addresses you’ve entered in Contacts.
The meeting notice is created automatically and placed in the Outbox folder. For more
information on sending and receiving m eeting requests, see Calendar Help and Inbox Help
on the iPAQ H3000.
Microsoft Pocket Outlook
4-5
Page 52

Contacts: Tracking Friends and Colleagues
Contacts maintains a list of your friends and colleagues so that you can easily find the
information you’re looking for, whether you’re at home or on the road. Using the iP AQ
H3000 infrared port, you can quickly share Contacts information with other Windowspowered device users.
Select the category of contacts you want displayed in the list.
Tap and enter part of a name
to quickly find it in the list.
Tap to see additional phone num-
bers and e-mail addresses.
Tap to displayor edit
the contact details.
Tap and hold to display a
pop-up menu of actions.
Tap to create a new contact.
NOTE:
To change the way information is displayed in the list, tap
T ools
then
Options
.
4-6
Microsoft Pocket Outlook
Page 53

To create a contact:
1. Tap New.
T ap to return to the contact
list (the contact is saved
automatically).
Scroll to see more fields.
Notes is a good place for
maps and directions.
2. Enter a name and other contact information using the input panel. You will need to
scroll down to see all available fields.
3. Scroll to and tap Categories and select a category from the list to assign the contact to
a category . In the contact list, you can display contacts by category.
4. Tap the Notes tab to add notes. You can enter text, draw, or create a recording. For
more information on creating notes, see “Notes: Capturing Thoughts and Ideas”, later
in this chapter.
5. Tap OK to return to the contact list when finished.
Microsoft Pocket Outlook
4-7
Page 54

Using the Summary Screen
When you tap a contact in the contact list, a summary screen is displayed.
Tap to edit the
contact details.
Tapto enteror
edit notes.
4-8
Microsoft Pocket Outlook
Page 55

Tasks: Keeping a To Do List
Use Tasks to keep track of what you have to do. In the task list, overdue tasks are displayed in bold (and in red on the color iPAQ H3000 and 3000).
Select the category of tasks you want displayed in the list.
Select the sort
order of the list.
Indicates high priority.
Tap to displayor edit
the task details.
Tap and hold to display a
pop-up menu of actions.
Tap to create a new task.
NOTE:
To change the way information is displayed in the list, tap
T ools
then
Options
.
Microsoft Pocket Outlook
4-9
Page 56

To create a task:
1. Tap New.
Tap to re turn to the task list (the task is saved automatically).
Tap to ch oose from
predefine d subjects.
Notes is a good place
for maps and drawing s.
2. Enter a description using the input panel.
3. Enter a start date and due date or enter other information by first tapping the field. If
the input panel is open, you will need to hide it to see all available fields.
4. Tap Categories and select a category from the list to assign the task to a category. In
the task list, you can display tasks by category.
5. Tap the Notes tab to add notes. You can enter text, draw, or create a recording. For
more information on creating notes, see “Notes: Capturing Thoughts and Ideas”, later
in this chapter.
6. Tap OK to return to the task list when finished.
NOTE:
To quickly create a task with only a subject, tap
Tap here to add a new task
and enter your task information.
Entry Bar
on the
Tools
menu. Then, tap
4-10
Microsoft Pocket Outlook
Page 57

Using the Summary Screen
When you tap a task in the task list, a summary screen is displayed.
Taptoeditthe
task details.
T ap to show and hide
additional summary
information.
Tap to enteror
edit notes.
Microsoft Pocket Outlook
4-11
Page 58

Notes: Capturing Thoughts and Ideas
Quickly capture thoughts, reminders, ideas, drawings, and phone numbers with Notes.
You can create a written note or a recording. You can also include a recording in a note. If
a note is open when you create the recording, it will be included in the note as an icon. If
the note list is displayed, it will be created as a stand-alone recording.
Tap to change the
sort order of the list.
Taptoopenanoteor
play a recording.
T ap and hold to display a
pop-up menu of actions.
T ap to record.
T ap to show or hide the
Recording toolbar.
4-12
Microsoft Pocket Outlook
Page 59

To create a note:
1. Tap New.
2. Create your note by writing, drawing, typing, and recording. For more infor mation
about using the input panel, writing and drawing on the screen, and creating recordings, see Chapter 2 (Basic Skills).
Tap to return to the
note list (the note is
saved automatically).
Tap to add a recording
to the note.
Tap to show or hide
the input panel.
Tap to write on
the screen.
Microsoft Pocket Outlook
4-13
Page 60

Inbox: Sending and Receiving E-mail Messages
Use Inbox to send and receive e-mail messages in either of these ways:
1. Synchronize e-mail messages with Microsoft Exchange or Outlook on your computer.
2. Send and receive e-mail messages by connecting directly to an e-mail server through
an Internet service provider (ISP) or a network.
Synchronizin g E-mail Messages
E-mail messages can be synchronized as part of the general synchronization process. First,
enable Inbox synchronization in ActiveSync options. For information on enabling Inbox
synchronization, see ActiveSync Help on the computer. During synchronization:
• E-mail messages are copied from the Inbox folder of Exchange or Outlook on your
computer to the Inbox folder on your iPAQ H3000. The e-mail messages on the two
computers are linked, so when you delete an e-mail message on your iPAQ H3000, it’s
also deleted from your computer the next time you synchronize.
• E-mail messages in the Outbox folder on your iPAQ H3000 are transferred to
Exchange or Outlook, then sent from those programs.
NOTE:
You can also synchronize e-mail messages with your computer from a remote location.
For more information, see Chapter 7 (Getting Connected).
Connecting Directly to an E-mail Server
In addition to synchronizing e-mail messages with your computer, you can send and
receive e-mail messages by connecting to an e-mail server using an optional modem or
network card connected to your iP AQ H3000. You’ll need to set up a remote connection to
a network or an ISP, and a connection to your e-mail server. For more information, see
Chapter 7 (Getting Connected).
When you connect to the e-mail server, new messages are downloaded to the iP AQ H3000
Inbox folder, messages in the iPAQ H3000 Outbox folder are sent, and messages that have
been deleted on the e-mail server are removed from the iPAQ H3000 Inbox.
Messages that you receive directly from an e-mail server are linked to your e-mail server
rather than your computer. When you delete a message on your iPAQ H3000, it’s also
deleted from the e-mail server the next time you connect.
You can work online or offline. When working online, you read and respond to messages
while connected to the e-mail server . Messages are sent as soon as you tap Send, which
saves space on your iPAQ H3000.
When working offline, once you’ve downloaded new message headers or partial messages, you can disconnect from the e-mail server then decide which messages to download
completely. The next time you connect, Inbox downloads the complete messages you’ve
marked for retrieval and sends the messages you’ve composed.
4-14
Microsoft Pocket Outlook
Page 61
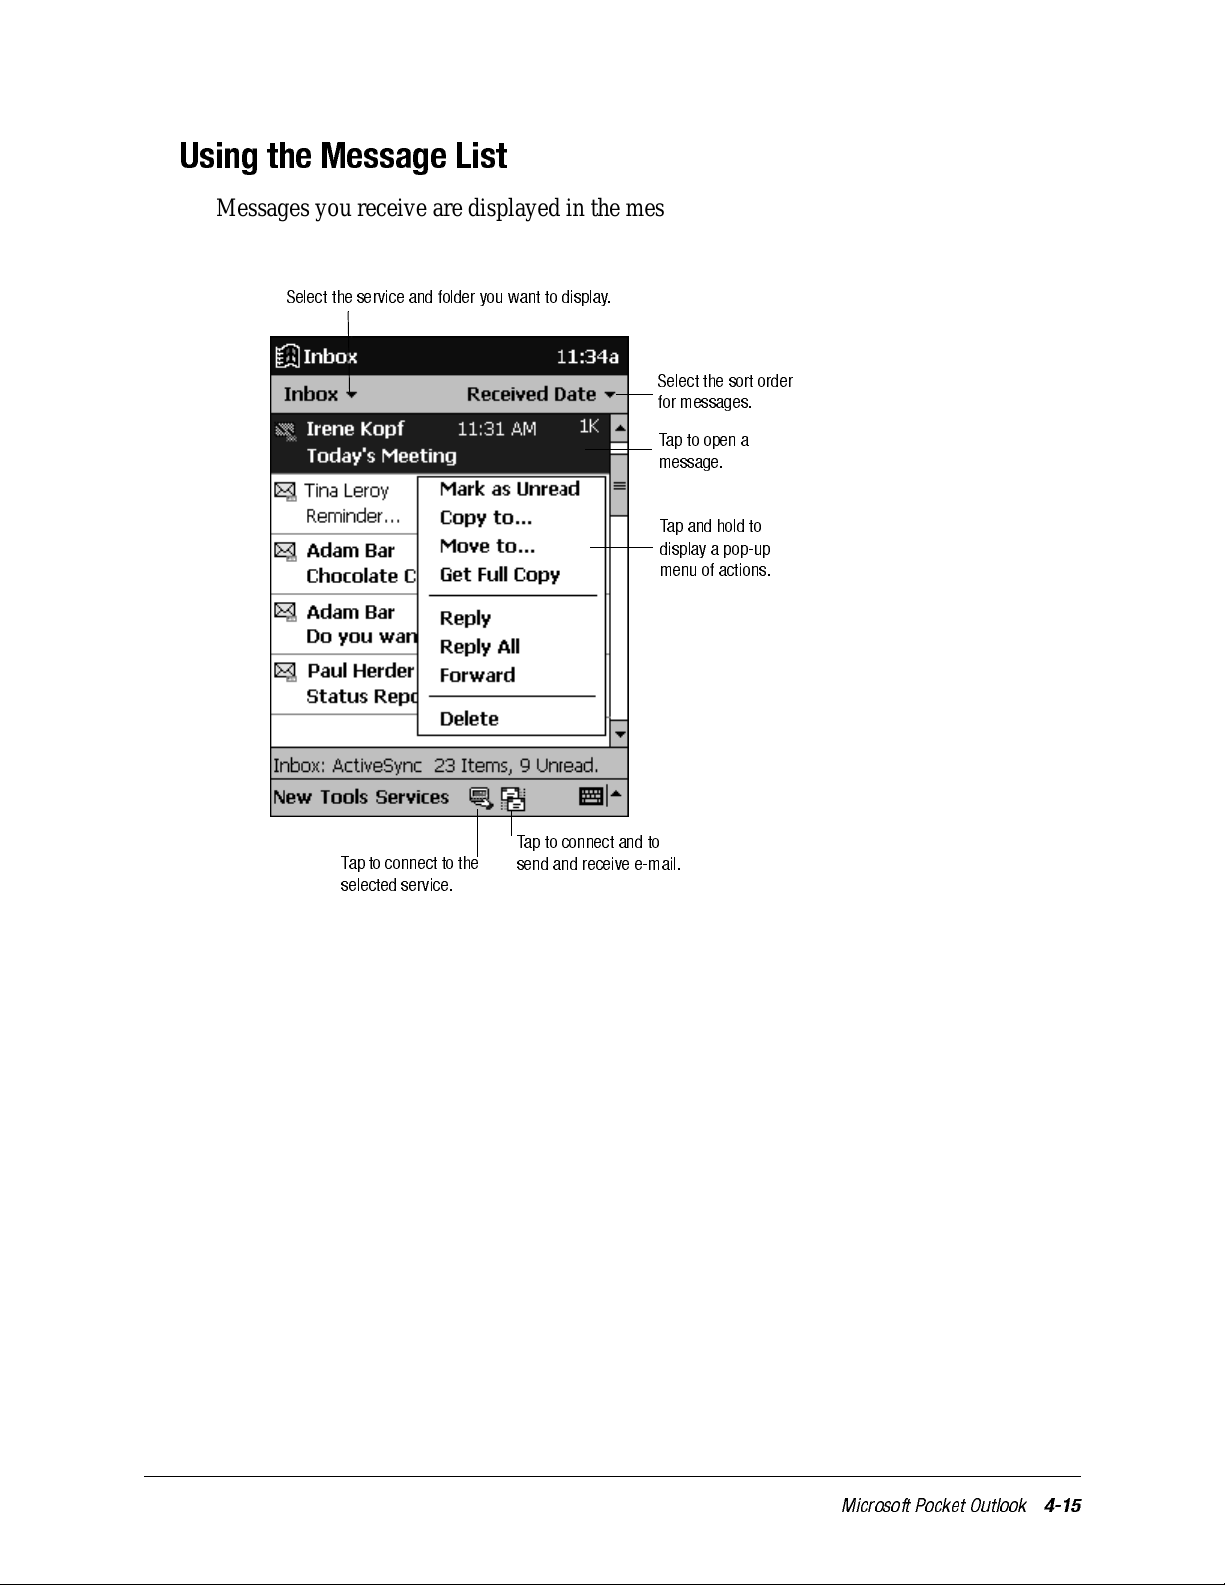
Using the Message List
Messages you receive are displayed in the message list. By default, the most recently
received messages are displayed first in the list.
Select the serv ice and folder yo u want to display.
Select the sort order
formessages.
Taptoopena
message .
Tap a nd hold to
display a po p-up
menu of action s.
Tap to conne ct to the
selected se rvice.
Taptoconnectandto
send an d receive e-mail.
Microsoft Pocket Outlook
4-15
Page 62

When you receive a message, tap it in the list to open it. Unread messages are displayed in
bold.
Taptoreturnto
the messa ge list.
Taptoshoworhide
the complete he ader.
Tap to d elete
this message .
Tap to re ply to or for-
ward this messa ge.
Tap to vie w the previous
or next mess age.
When you connect to your e-mail server or synchronize with your computer, Inbox downloads only the first 100 lines of each new message by default. No e-mail attachments are
downloaded. The original messages remain on the e-mail server or your computer.
You can mark the messages that you want to retrieve in their entirety the next time you
synchronize or connect to your e-mail server. In the message list, tap and hold the message
you want to retrieve. On the pop-up menu, tap Get Full Copy. The icons in the Inbox mes-
sage list give you visual indications of message status.
You’ll need to download a full message before you can view its attachments. Attachments
appear as icons in a window pane at the bottom of the message. Tapping an attachment
icon opens the attachment if it has been fully downloaded or marks it for download the
next time you synchronize or connect to your e-mail server.
You specify your downloading preferences when you set up the service or select your synchronization options. You can change them at any time:
• Change options for Inbox synchronization using ActiveSync options. For more information, see ActiveSync Help.
• Change options for direct e-mail server connections in Inbox on your iPAQ H3000.
Tap Tools then tap Options. On the Service tab, tap the service you want to change.
4-16
Microsoft Pocket Outlook
Page 63

Composing E-mail Messages
To compose an e-mail message:
1. Tap New.
2. Enter an e-mail address in To, or select a name from the contact list by tapping the
Address Book button.
All e-mail addresses entered in the e-mail fields in Contacts appear in the Address
Book.
Tap to send the message.
T ap to show or hide the
complete header.
Taptoattachafile.
T ap to check names in the To, Cc, and Bcc boxes with
names in Contacts and/or an online address book.
T ap to display the address book.
3. Compose your message.
4. Tap Send when you’ve finished the message.
The message is placed in the Outbox folder on your iPAQ H3000 and will be delivered in
one of two ways:
• They are transferred to the Outbox folder in Exchange or Outlook on your computer
and sent the next time you s ynchr onize.
• They are transferred to your e-mail server the next time you connect. In Inbox, make
sure the appropriate service is selected on the Services menu. Then tap the Connect
button (or Connect on the Services menu).
Microsoft Pocket Outlook
4-17
Page 64

Managing E-mail Messages and Folders
By default, messages are displayed in one of four folders for each service you’ve created:
Inbox, Deleted (local), Outbox, and Sent. The Deleted folder contains messages that have
been deleted on the iPAQ H3000. If you are using IMAP4, you may see a Deleted Items
folder. This folder is for messages deleted on the e-mail server. The behavior of the
Deleted and Sent folders depends on the options you have chosen. In the message list, tap
Tools then Options. On the Message tab, select your options.
If you want to organize messages into additional folders, tap Tools, then New Fold er to
create new folders. To move or copy a message to another folder, in the message list, tap
and hold the message then tap Move to or Cop y to on the pop-up menu.
Folder behavior with ActiveSync
If you move e-mail messages into a folder you create, the link is broken between these email messages and their copies on the computer. When you synchronize next, the e-mail
messages in the folder you created will not be synchronized. In addition, e-mail messages
that are missing from the iPAQ H3000 Inbox folder will be deleted from the Inbox folder
on the computer so that both Inbox folders match. This prevents you from getting duplicate copies of an e-mail message, but it also means that you will no longer have access to
the e-mail messages you move out of Inbox except from the iPAQ H3000.
Folder behavior with a direct connec tion to an e-mail server
The behavior of the folders you create depends on whether you are using POP3 or IMAP4:
• If you are using POP3, folders will behave like they do when using ActiveSync.
• If you are using IMAP4, the folders you create and the messages you move are mirrored on the e-mail server. For example, if you move two messages from the Inbox
folder to a folder called Family, the e-mail server will create a copy of the Family
folder and move the messages into that folder. Therefore, messages are available to
you anytime you connect to your e-mail server, whether it is from your iPAQ H3000,
laptop computer, or computer. This synchronization of folders occurs when you create
a new folder, move e-mail messages into a folder , or tap Synchronize Folders on the
Services menu. If you want to view the messages in a folder while disconnected from
your e-mail server, select the folder then tap Folder Available Offline on the Services
menu. This downloads the e-mail message in the folder to your iPAQ H3000.
4-18
Microsoft Pocket Outlook
Page 65

chapter 5
C
OMPANION
The companion programs consist of Microsoft Pocket Word, Microsoft Pocket Excel,
Microsoft Money*, Windows Media Player for Pocket PC, Microsoft Reader, and
Microsoft Pocket Stree ts*.
* Available for English operating systems only.
To switch to a companion program on your iPAQ H3000 Pocket PC, tap Programs on the
menu, then tap the program name, or press the QStart button, select a category from
the pop-up menu at the bottom of the screen, then tap the program icon.
Pocket Word
Pocket Word works with Microsoft Word on your computer to give you easy access to
copies of your documents. You can create new documents on your iPAQ H3000, or you
can copy documents from your computer to your iPAQ H3000. Synchronize documents
between your computer and your iPAQ H3000 so that you have the most up-to-date content in both locations.
Use Pocket Word to create documents, such as letters, meeting minutes, and trip reports.
To create a new file, tap , Programs, Pocket Word, then New. A blank doc ument
appears. Or, if you’ve selected a template for new documents in the Options dialog box,
that template appears with appropriate text and formatting already provided. You can open
only one document at a time; when you open a second document, you’ll be asked to save
the first. You can save a document you create or edit in a variety of formats, including
Pocket Word (.psw), Rich Text Format (.rtf), and Plain Text (.txt).
P
ROGRAMS
Companion Programs
5-1
Page 66

Pocket Word contains a list of the files stored on your iPAQ H3000. Tap a file in the list to
open it. To delete, make copies of, and send files, tap and hold a file in the list. Then,
select the appropriate action on the pop-up menu.
Select the type of folder you want displayed in the list.
Tap to cha nge the
sort order o f the list.
Tap to op en a docu ment.
Tap and hold an item
to see a pop-up
menu of actions.
Tap to crea te a new
document.
You can enter information in Pocket W ord in one of four modes (writing, drawing, typing,
and recording), which are displayed on the View menu. Each mode has its own toolbar,
which you can show and hide by tapping the Show/Hide Toolbar button on the command
bar.
NOTE:
You can change the zoom magnification by tapping
View
then
Zoom
. Th en select the per-
centage you want. Select a higher percentage to enter text and a l ower one to see more o f
your document.
NOTE:
If youre opening a Word document created on a computer, select
the
View
menu so that you can see the entire document.
Wrap to Window
on
5-2
Companion Programs
Page 67

Typing Mode
Using the input panel, enter typed text into the document. For more information on entering typed text, see Chapter 2 (Basic Skills).
T o format existing text and to edit text, first select the text. You can select text as you do in
a Word document, using your stylus instead of the mouse to drag through the text you
want to select. You can search a document to find the text you want by tapping Edit then
Find/Replace.
Tap to return to the document list (changes are saved automatically).
Tap and hold to
see a pop-up
menu of actions.
Tap to change for-
matting options.
Tap to format text.
Taptoshoworhidethetoolbar.
Companion Programs
5-3
Page 68

Writing Mode
In writing mode, use your stylus to write directly on the screen. Ruled lines are displayed
as a guide, and the zoom magnification is greater than in typing mode to allow you to
write more easily. For more information on writing and selecting writing, see Chapter 2
(Basic Skills).
With Space button selected,
drag to insert space. An arrow
appears showing the space
direction and size.
Tap to highlight
selected text.
NOTE:
Pen button
Space button
Tap to select formatting options, such as pen weight and line color.
If you cross three ruled lines in a single stylus stroke, the writing becomes a drawing, and
can be edited and manipulated as described in the following section.
Written words are converted to graphics (metafiles) when a Pocket Word document is
converted to a Word document on your computer.
5-4
Companion Programs
Page 69

Drawing Mode
In drawing mode, use your stylus to dr aw on the screen. Gridlines appear as a guide. When
you lift your stylus off the screen after the first stroke, you’ll see a drawing box indicating
the boundaries of the drawing. Every subsequent stroke within or touching the drawing
box becomes part of the drawing. For more information on drawing and selecting drawings, see Chapter 2 (Basic Skills).
Select Shape on the pop-up menu to
convert objects to proper shapes.
Resize an object by
dragging the
selection handles.
Tap to select formatting
options such as line weight,
fill color, and line color.
Tap an arrow to see your choices.
Pen button
Recording Mode
In recording mode, embed a recording into your document. Recordings are saved as .wav
files. For more information on recording, see “E nter Information on Your iPAQ” in Chap-
ter 2. For more information on using Pocket Word, tap then Help.
Companion Programs
5-5
Page 70

Pocket Excel
Pocket Excel works with Microsoft Excel on your computer to give you easy access to
copies of your workbooks. Y ou can create new workbooks on your iP AQ H3000, or you
can copy workbooks from your computer to your iPAQ H3000. Synchronize workbooks
between your computer and your iPAQ H3000 so that you have the most up-to-date content in both locations.
Use Pocket Excel to create workbooks, such as expense reports and mileage logs. To create a new file, tap , Programs, Pocket Excel, then New. A blank workbook appears.
Or, to select a template for a new workbook, tap Tools, Options, then tap New. The tem-
plate you selected appears with appropriate text and formatting already provided. You can
open only one workbook at a time; when you open a second workbook, you’ll be asked to
save the first. You can save a workbook you create or edit in a variety of formats, including Pocket Excel (.pxl) and Excel (.xls).
Pocket Excel contains a list of the files stored on your iP AQ H3000. Tap a file in the list to
open it. T o delete, make copies of, and send files, tap and hold a file in the list. Then select
the appropriate action from the pop-up menu.
Pocket Excel provides fundamental spreadsheet tools, such as formulas, functions, sorting, and filtering. To display the toolbar, tap View then Toolbar.
NOTE:
Cell contents
appearhere as
you enter them.
Format button
AutoSum button
Zoom button
If your workbook contains sensitive information, you can protect it with a password. To do
so, open the workbook, tap
Edit
, then
Password
. Every time you open the workbook, you
will need to enter the password, so choose one that is easy for you to remember but hard
for others to guess.
5-6
Companion Programs
Page 71

Tips for Working in Pocket Excel
Note the following when working in large worksheets in Pocket Excel:
• V iew in full-screen mode to see as much of your worksheet as possible. Tap View then
Full Screen. To exit full-sc re en mode, tap Restore.
• Show and hide window elements. T ap View then tap the elements you want to show or
hide.
• Freeze panes on a worksheet. First select the cell where you want to freeze panes. Tap
View then Freeze Panes. You might want to freeze the top and leftmost panes in a
worksheet to keep row and column labels visible as you scroll through a sheet.
• Split panes to view different areas of a large worksheet. Tap View then Split. Then
drag the split bar to where you want it. To remove the split, tap View then Remove
Split.
• Show and hide rows and columns. T o hide a hidden row or column, select a cell in the
row or column you want to hide. Then tap Format, then Row or Column, then Hide.
To show a hidden row or column, tap Tools, then Go To, then type a reference that is
in the hidden row or column. Then tap Format, then Row or Column, then Unhide.
For more information on using Pocket Excel, tap then Help.
Microsoft Money*
* Available for English operating systems only.
Use Microsoft Money to easily enter and view your financial transactions, check your
account balances, and track your investments. If you are using Microsoft Money on your
computer, you should synchronize first so that you won’t have to enter your accounts and
other required information on your iPAQ H3000 by hand. Before you can synchronize,
you will need to run the Setup program found in the MSMoney folder under Extras on the
ActiveSync CD. The first time you synchronize, all Microsoft Money information on the
iPAQ H3000 will be replaced with information from your computer. If you do not use
Microsoft Money on your computer, Microsoft Money on the iPAQ H3000 can still be
used to help organize your finances, but you will not be able to synchronize the financial
information with your computer.
Companion Programs
5-7
Page 72

Getting Started
To create a new account:
1. Tap , Programs, Microsoft Money, th e n New. A screen for entering account
details with a Required and an Optional tab appears.
2. Enter the name and type of the account on the Required tab and the other information
you want to record on the Optional tab then tap OK.
The name of the account appears in the Account Manager with its opening balance.
The total of all balances for your accounts appears at the bottom of the screen.
The upper-left corner of the screen shows which view you are in, for example, Account
Manager.
To navigate within Microsoft Money:
1. Tap the name Account Manager. A list of the fi ve screens within Microsoft Money
appears.
2. Tap the screen you want to see.
Select the screen you want displayed.
Tap to create a new account.
Tap to view the Account Register.
Tap and hold to see a pop-up
menu of actions.
Ending balance for
each account.
Balance for all accounts.
5-8
Companion Programs
Page 73

Using the Account Register
To view the Account Register for an account, tap it in the Account Manager. The Account
Register displays all transactions for that account that are stored on your iPAQ H3000. For
each transaction, you will see the date, the payee, the amount, and the running balance of
your account as a result of the transaction. The ending account balance is displayed at the
bottom of the screen.
Select the account
you want displayed.
Transaction amount
Transaction payee
Tap to view details.
Tap and hold to see a
pop-up menu of actions.
NOTE:
Running balance for account
Ending balance for account
Tap to create a new transaction.
Tap the name of the current account in the upper-right corner and select another account
from the list to switch between accounts.
Companion Programs
5-9
Page 74

Entering Transactions
Once you have the Account Register open, tap New to create a new transaction.
On the Required tab, Microsoft Money automatically creates a withdrawal and enters
today’s date. If you are not entering a withdrawal, tap the Type box and select Deposit or
Transfer. You can also change the account in which the transaction is being created. Then,
tap the Payee box. Using the input panel, enter the payee for your transaction. As you
type, Microsoft Money tries to guess the payee that you are entering from your list of
existing payees. If Microsoft Money guesses correctly, tap another field or tap Tab to
accept the payee.
When you accept a payee, Microsoft Money enters the same amount, category, and subcategory that you used for the last transaction with that same payee. This information gets
entered on the Required tab and the Optional tab. This AutoComplete+ feature helps you
quickly enter similar transactions, such as ATM withdrawals. If AutoComplete+ has
entered the wrong information, use the input panel to correct it.
Tap to return to the Account
Register (the transaction is
saved automatically).
T ap to select the transaction type.
NOTE:
T ap to select another account.
T ap to enter the payee.
T ap to enter the date.
T ap to enter the amount.
T ap to create a split transaction.
If you do not want Microsoft Money to automatically enter information, tap
Options
and turn off AutoComplete+.
T ools
then
5-10
Companion Programs
Page 75

Entering and Tracking Investments
In the Investments screen, you can track the value of the investments in your portfolio.
The Investments screen displays each investment with the current number of shares, their
price, and market value. The total market value for all of your investments is displayed at
the bottom of the screen.
Tap New to create a new investment. On the new investment screen, enter the name, symbol, current price, and number of shares. Tap OK to save the new investment.
Microsoft Money can update investment prices from the MoneyCentral website. To do
this, open a connection to the Internet and tap Update Investments on the Tools menu.
When the update is complete, Microsoft Money will record the date and time and display
it after Last Quote Updat e at the bottom of the scr een. If you do not have an Int ernet connection from your iPAQ H3000, you can manually update the investment prices by tapping the investment and entering a new price with the input panel.
Market symbol for investment
Number of shares
Tap to view details.
NOTE:
Tap and hold to see a
pop-up menu of actions.
Latest market price
Market value of investment
Total market value of all investments
Time at which quotes were
last updated, if available
Tap to update investment prices from MoneyCentral website.
Tap to create a new investment.
Microsoft Money can get a quote update over any direct (IP) Internet connection, including
a wireless connection or network connection. If you cannot get a quote update, check
with your Internet service provider (ISP) or network administrator to see if you require a
proxy server to connect to the Internet. If so, tap
Tools
then
Options
and set up the proxy
server.
For more information on using Microsoft Money, tap then Help.
Companion Programs
5-11
Page 76

Windows Media Player for Pocket PC
Use Windows Media Player for Pocket PC to listen to digital audio files. To swit ch to
Windows Media Player, tap , Windows Media Player.
Active playlist
Track informa tion
Indicates the p rogress
of the current track
Skip back
Shuffle playlist
Stop
Skip forward
Play/Pause
Repea t playlist
Volume
Using Windows Media Manager for Pocket PC
Use Windows Media Manager for Pocket PC on the computer to create digital audio files
in Windows Media format and to transfer audio content to your iPAQ H3000 or storage
card. With Windows Media format, you can create high-quality audio for your iPAQ
H3000 without using large amounts of iPAQ H3000 memory.
You can transfer the following media formats to your iP AQ H3000 for use with the Windows Media Player: WMA (Windows Media Audio), MP3 (MPEG Audio Layer 3), and
WAV (waveform).
5-12
Companion Programs
Page 77

Windows Media Manager is included in the Extras folder on the ActiveSync CD. You
must install Windows Media Manager on your computer to copy and convert digital audio
files.
What is Packaged Content?
Packaged content is digital music that has been encrypted for distribution to prevent unauthorized access to copyrighted content. W indows M edia Player f or Pocket PC cannot play
packaged content without a valid license. First use Windows Media Player on the computer to obtain packaged content that has a license that allows transferring the content to
your iPAQ H3000. Then use Windows Media Manager for Pocket PC to transfer the packaged content and its license to your iPAQ H3000 or storage card. To successfully transfer
packaged content, your iP AQ H3000 or storage card may require a hardware serial number.
You can play packaged content until the license expires. During license download, you
will be informed of the terms of the license. License terms can be for an unlimited tim e, a
set amount of time, or a set number of playbacks. A license can support content being copied to a iPAQ H3000 or storage card an unlimited number of times or one time only. T erms
are entirely dependent on the content provider.
Companion Programs
5-13
Page 78

Using the Playlist Manager
Use the playlist manager to se t the track playback order. All My Music is the default playlist. It contains all digital audio files available for playback on your iPAQ H3000 and storage card. To see a list of recently selected playlists, tap Select Playlist. To create or edit
playlists, tap All Playlists.
Default playlist of all tracks
Previously selected playlists
Playlist management
Tap and hold a track or playlist to perform actions such as copying, moving, and deleting.
For more information on using Windows Media Player, ta p then Help.
Microsoft Reader
Use Microsoft Reader to read or listen (with Audible) to electronic books on your iPAQ
H3000.
Download books to your computer from your favorite eBook website. Then, use ActiveSync to copy the book files to your iPAQ H3000. The books appear in the Reader Library,
where you can tap them in the li s t to open them.
Each book consists of a cover page, an optional table of contents, and the pages of the
book. Page through the book by using the Direction key on your iPAQ H3000 or by tapping the page number on each page. You can annotate the book with highlighting, bookmarks, notes, and drawings. You can also search for text and look up definitions for words.
The Reader Guidebook contains all the information you'll need to use the software. To
open the Guidebook, tap Guidebook on t he R eader command bar. Or, on a book page, tap
the book title then tap Guidebook on the pop-up menu.
To switch to Microsoft Reader, tap , Programs, then Microsoft Reader.
5-14
Companion Programs
Page 79

Getting Books on Your iPAQ H3000
You can download book files from the Web. Just visit your favorite eBook retailer and follow the instructions to download the book files. Sample books and a dictionary are also
included in the MSReader folder in the Extras folder on the ActiveSync CD. Use ActiveSync to download the files from your computer to your iPAQ H3000 as described in the
Read Me file in the MSReader folder.
Using the Library
The Library is your home page. It displays a list of all books stored on your iPAQ H3000
or storage card. You can go to the Library by tapping Library on the Reader command
bar. Or on a book page, tap the book title then tap Library on the pop-up menu.
Tap the title in the Library list to open a book.
Tap to select a sort order.
Tap to scroll through
the Library list.
Tap to specify the
books you want to
display in the list.
Tap to open a book.
Tapanicontonavi-
gate to other parts
of the Reader.
Reading a Book
Each book consists of a cover page, an optional table of contents, and the pages of the
book. Navigation options are listed in the bottom portion of the cover page. The first time
you open a book, you’ll probably want to go to the first page or to the table of contents, if
there is one. Subsequently, whenever you open the book, you’ll be automatically taken to
the last page read.
Companion Programs
5-15
Page 80

In addition to the text, each book page includes a page number and book title.
Tap to select a navigation button.
Tap to turn the page.
Drag to select text and
then tap an option.
You can also page through a book by using the Navigation button on your iPAQ H3000.
Using Reader Feature s
Reading a book electronically gives you several options not available with paper books.
These options are available from any book page.
Select text by dragging across the text on the page. Then, tap an option on the pop-up
menu, as described here:
• Search for Text. Find text in a book by tapping Find on the pop-up menu. Change the
text that appears in the Find box, if necessary, and tap the desired Find option. The
Reader finds the text and highlights it on the page. Tap outside the Find box to close it.
To return to your original page, tap the title then tap Return on the pop-up menu.
• Copy Text. You can copy text from a book into any program that accepts text. On a
book page, select the text you want to copy . Then, tap Copy Text on the pop-up menu.
The text you’ve copied can be pasted into the pr ogram of your choice.
• Bookmarks. When you add a bookmark to a book, a color-coded bookmark icon
appears in the right margin. You can add multiple bookmarks to a book. Then, from
anywhere in the book, you can tap the bookmark icon to go to the bookmar ked page.
• Highlights. When you highlight text, it appears with a colored background, just as if
you used a marker pen.
• Notes. When you attach a note to text, you enter the text in a note pad that appears on
top of the book page. A note icon appears in the left margin. You can show or hide the
note by tapping the icon.
5-16
Companion Programs
Page 81

• Drawings. When you add a drawing, a drawing icon appears in the bottom-left corner
of the page, and drawing tools appear across the bottom of the page. Draw by dragging
your stylus.
NOTE:
To s ee a list of a bo oks annotations, including bookmarks, h ighlights, text notes, and
drawings, tap
list to go to the annotated page.
Removing a Book
When you’ve finished reading a book, you may want to delete it to conserve space on your
iPAQ H3000. If a copy of the book is stored on your computer, you can download it again
at any time. T o remove a book from your iPAQ H3000, tap and hold the title in the Library
list then tap Delete on the pop-up menu.
Pocket Streets*
* Available for English operating systems only.
The Pocket Streets feature, included in Microsoft Expedia Streets and Trips 2000,
AutoRoute Express Great Britain 2000, and Microsoft MapPoint 2000, delivers thou-
sands of miles of street map information to your iP AQ H3000. You can create custom
maps of unfamiliar cities, towns, and villages.
Annotations Index
on the books cover page. You can tap an entry in the
Installing Pocket Streets
Pocket Streets is included in the Extras folder on the ActiveSync CD. To install Pocket
Streets on your device, go to the PStreets folder in the Extras folder on the ActiveSync CD
and follow the instructions in the Read Me file.
Getting Maps on Your iPAQ H3000
Sample maps are included in the PStreets folder in the Extras folder on the ActiveSync
CD. Use ActiveSync Explore to copy the files from your computer to your iPAQ H3000.
For more information on copying f iles using ActiveSync, see ActiveSync Help.
Companion Programs
5-17
Page 82

Creating Map and Pushpin Files for Your iPAQ H3000
1. Draw a box around the area you want to save as a map in Microsoft Expedia Streets
and Trips 2000, AutoRoute Express Great Britain 2000, or Microsoft MapPoint 2000.
2. Click Create Map For Pocket Streets on the Tools menu.
3. Click Create.
4. Navigate to the folder where you want to save the map, then type a file name for the
map.
5. Click Save. When you create a map, all visible Pushpins in the portion of the map that
you selected are also exported. A map file and a corresponding Pushpin file are created
for your iPAQ H3000.
6. Copy the maps (.mps) and/or Pushpin files (.psp) that you've created for use with
Pocket Streets to the My Documents folder on your iPAQ H3000. For more information on using ActiveSync to copy files, see ActiveSync Help on the computer.
View ing Map s
To open a map, tap Tools, Maps, then the name of the map you want to see. If you don't
see the name, tap T ools , Maps, t h e n Op en Map, select the folder where you stored the
map, then tap the name in the list.
For more information on using Pocket Streets, tap then Help.
5-18
Companion Programs
Tap to mark the map
with a Pushpin.
Tap to move the map view.
Taptozoominandout.
Page 83

chapter 6
P
OCKET INTERNET
Use Pocket Internet Explorer to view Web pages in either of these ways:
• During synchronization with your computer, download your favorite links, mobile
favorites, and mobile channels that are stored in the Mobile Favorites subfolder in
Internet Explorer on the computer.
• Connect to an Internet service provider (ISP) or network and browse the Web. To do
this, you’ll need to create the connection first, as described in Chapter 7 (Getting
Connected).
To switch to Pocket Internet Explorer, tap then In te rn et Explorer.
E
The Mobile Favorites Folder
Only items stored in the Mobile Favorites subfolder in the Favorites folder in Internet
Explorer on your computer will be synchronized with your iPAQ H3000. This folder was
created automatically when you installed ActiveSync.
Favorite Links
XPLORER
During synchronization, the list of favorite links in the Mobile Favorites folder on your
computer is synchronized with Pocket Internet Explorer on your iPAQ H3000. Both computers are updated with changes made to either list each time you synchronize. Unless you
mark the favorite link as a mobile favorite, only the link will be downloaded to your iPAQ
H3000, and you will need to connect to your ISP or network to view the content. For more
information on synchronization, see ActiveSync Help on the computer.
Pocket Internet Explorer
6-1
Page 84

Mobile Favorites
If you are using Microsoft Internet Explorer 5 on your computer, you can download
mobile favorites. (You can install Microsoft Internet Explorer 5 from the Extras folder on
the ActiveSync CD.) Synchronizing mobile favorites downloads Web content to your
iPAQ H3000 so that you can view Web pages while you are disconnected from your ISP
and computer .
Use the Internet Explorer 5 plug-in installed with ActiveSync to create mobile favorites
quickly.
To create a mobil e favorite:
1. Click Tools then Create Mobile Favorite in Internet Explorer 5 on your computer.
2. Enter a new name in the Name box to change the link name.
3. Select a desired update schedule in Update.
4. Click OK. Internet Explorer downloads the latest version of the Web page to your
computer.
NOTE:
5. Synchronize your iPAQ H3000 and computer. Mobile favorites that are stored in the
Mobile Favorites folder in Internet Explorer 5 are downloaded to your iPAQ H3000.
NOTE:
If you want to download the pages that are linked to the mobile favorite you just cre-
ated, in Internet Explorer on the computer, right-click the mobile favorite then click
Properties
download. To conse rve iPAQ H3000 memory, only go one level dee p.
If you did not specify an update schedule in step 3, you will need to manually down-
load content to keep the information updated on your computer and iPAQ H3000.
Before synchronizing w ith your iPAQ H3000, in Internet Explorer on your computer,
click
to the computer, and you can manually downlo ad content, if neede d.
You c an add a button to the Internet Explorer toolba r fo r creating mobile favorites. In
Internet Explorer 5 on your computer, click
Tools
.Onthe
then
Synchronize
Download
tab, specify the number of links deep you want to
. Yo u will see the most recent conten t was downloaded
View,Toolbars
, then
Customize
.
To save iPAQ H3000 memory
Mobile favorites take up storage memory on your iPAQ H3000. To minimize the amount
of memory used:
• In the settings for the Favorites information type in ActiveSync options , turn off pic-
• Limit the number of downloaded linked pages. In Internet Explorer on the computer,
6-2
Pocket Internet Explorer
tures and sounds or stop some mobile favorites from being downloaded to the iPAQ
H3000. For more information, see ActiveSync Help.
right-click the mobile favorite you want to change then Properties. O n t h e Downl oad
tab, specify 0 or 1 for the number of linked pages you want to download.
Page 85

Channels
Channels are websites designed specifically for offline viewing on your i PAQ H3000. You
can subscribe to two types of channels at no fee: A vantGo Channels (A vailable for English
operating systems only.) and mobile channels.
Using AvantGo Channels*
* Available for English operating systems only.
AvantGo is a free interactive service that gives you access to personalized content and
thousands of popular websites. Unlike mobile channels, you can subscribe to AvantGo
channels directly from your iPAQ H3000. Then, you synchronize your iPAQ H3000 and
computer or connect to the Internet to download the content. For more information, visit
http://avantgo.com/help.
To sign up for AvantGo:
1. Add the Mobile Application Link information type to ActiveSync by installing it from
the AvantGo folder in the Extras folder on the ActiveSync CD.
2. Tap the Favorites button to display your list of favorites in Pocket Internet Explorer
on your iPAQ H3000.
3. Tap the AvantGo Channels link.
4. Tap the Activate button.
5. Follow the directions on the screen. You will need to synchronize your iPAQ H3000
with your computer then tap the My Channels button to complete the AvantGo setup.
When synchronization is complete, tap the AvantGo Channels link in your list of favorites
to see a few of the most popular channels. To add or remove channels, tap the Add or
Remove link.
Pocket Internet Explorer
6-3
Page 86

Using Mobile Channels
Mobile channels are sites you subscribe to on your computer. They are stored in the Channels subfolder in the Mobile Favorites folder in Internet Explorer 4.0 or later and are
downloaded to your iPAQ H3000 during synchronization.
To see a list of mobile channels you can subscribe to at no fee, visit the Pocket PC Mobile
Channel List Web page (www.microsoft.com/pocketpc). Click on the name of the channel
you want to subscribe to, then click the Add Mobile Channel button and select Make
available offline to download the channel to your computer. The mobile channel will be
transferred to your iPAQ H3000 the next time you synchronize. For more information on
synchronization, see ActiveSync Help on the computer.
Use Pocket In ter n et Explor er
You can use Pocket Internet Explorer to browse mobile favorites and channels that have
been downloaded to your iPAQ H3000 without connecting to the Internet. You can also
connect to the Internet through an ISP or a network connection and browse the Web.
6-4
Pocket Internet Explorer
Favorites b utton
Home button
Refresh b utton
Page 87

To view mobile favorites and channels:
1. Tap the Favorites button to display your list of favorites.
Tap the favorite you
wantto view.
Tapto add or delete
a favorite link .
2. Tap the mobile favorite or channel you want to view .
You’ll see the page that was downloaded the last time you synchronized with your computer. If the page is not on your iPAQ H3000, the favorite will be dimmed. You will need
to synchronize with your computer again to download the page to your iPAQ H3000 or
connect to the Internet to view the page.
Pocket Internet Explorer
6-5
Page 88

To browse the Web:
1. Connect to the Internet or your network in either of the following ways:
2. Connect using Connections, as described in Chapter 7 (Getting Connected). Then
switch to Pocket Internet Explorer by tapping it on the menu.
3. Connect in Pocket Internet Explorer. T o select a service or type of connection, tap
Tools then Options. Tap the Connections tab and select the connection type. Then,
whenever you want to connect to the selected service, tap Tools then Connect.
NOTE:
You can have Pocket Internet Explorer automatically connect to the Internet when you
attempt to access a page that i s not stored on yo ur iPAQ H3000 by speci fying a con-
nection in the
automatically
Connection
.
tab in
Options
and selecting
Access remote content
4. Go to a specific Web page in either of these ways once connected:
•Tap the Favorites button then tap the favorite you want to view .
•Tap View then Address Bar. In the address bar that appears at the top of the
screen, enter the Web address you want to visit then tap Go. T ap the arrow to
choose from previously entered addresses.
5. Tap Tools then Disconnect to end the connection.
NOTE:
To a dd a favorite li nk while using the iPAQ H3000, go to the Web page yo u want to add,
tap the
Favorites
button, tap the
Add/Delete
tab, tap the
Add
button, and enter a name
for the favorite link.
6-6
Pocket Internet Explorer
Page 89

chapter 7
G
ETTING
You can use your iPAQ H3000 to exchange information with other Windows-powered
devices as well as your computer, a network, or the Internet. Use the Infrared (IR) port on
your iPAQ H3000 to send and receive files between two devices. In addition to using a
cradle, cable, or IR port to connect your iPAQ H3000 to your computer, you can connect
to your computer while away from the office by using a remote connection. You can also
connect your iPAQ H3000 to a network or the Internet by using a remote connection. You
have the following connection options:
• Connect to your Internet service provider (ISP). Once connected, you can send and
• Connect to the network at your company or organization. Once connected, you can
C
ONNECTED
receive e-mail messages by using Inbox and view Web pages by using Pocket Internet
Explorer. If this is the method you want to use, see “Connect to an ISP”. The commu-
nication software for creating an ISP connection is already installed on your iPAQ
H3000. Your service provider will provide software needed to install other services,
such as paging and fax services.
NOTE:
send and receive e-mail messages by using Inbox, view Web pages by using Pocket
Internet Explorer, and synchronize with your computer. If this is the method you want
to use, see “Connect to Your Network”.
Your ISP may not support receiving e-mail on a Pocket PC. Contact your ISP fo r
details.
• Connect to your computer to synchronize remotely . Once connected, you can synchronize information such as your Pocket Outlook data. If this is the method you want to
use, see ActiveSync Help on your computer or Connections Help on the iPAQ H3000.
Getting Connected
7-1
Page 90

Transfer Items Using Infrared
Using the IR port on your iPAQ H3000, you can send and receive information, such as
contacts and appointments, with another Windows-powered device at speeds of up to
115.2Kbps.
To send information:
1. Switch to the program where you created the item you want to send and locate the item
in the list. If you want to send more than one item, drag the stylus across the items you
want to send.
2. Align the IR ports so that they are unobstructed and within a range of one foot (30 cm).
3. Tap and hold the item, then tap Send via Infrared on the pop-up menu.
NOTE:
You can also send items, but not folders, from File Explorer. Tap and hold the item you
want to send, then tap
Send via Infrared
on the pop-up menu.
To receive information:
1. Align the IR ports so that they are unobstructed and within a r ange of 12 inches (30
cm).
2. Tap , Programs, then Infrared Receive.
NOTE:
You c an also receive items from Tasks, Contacts, Calendar, and Notes by tapp ing
then
Receive via Infrared
in list view.
Tools
,
7-2
Getting Connected
Page 91

Connect to an ISP
You can connect to your ISP by creating a modem connection. Once connected, you can
send and receive e-mail messages and view W e b pages.
To create a modem connection to an ISP:
1. Get the following information from your ISP: ISP dial-up access telephone number,
user name, password, and TCP/IP settings. Some ISPs require information in front of
the user name, such as MSN/username.
2. Install a CompactFlash modem card using the optional iP AQ CF Card Expansion Pack
or a PCMCIA modem card using the optional iPAQ PC Card Expansion Pack.
NOTE:
3. Tap then Settings. On the Connections tab, tap Modem.
4. Tap New connection.
For informa tion on ordering Compaq iPAQ Expansion Packs , see the
tion
card included in the shipping box, or visit the Compaq iPAQ H3000 home pag e at
www.compaq.com/products/handhel ds/.
Accessories Informa-
Getting Connected
7-3
Page 92

5. Enter a name for the connection, such as “ISP Connection”.
6. Select your modem type in the Select a modem list. If your modem type does not
appear, try re-inserting the modem card.
NOTE:
7. Enter the access phone number, and tap Next.
8. Select other desired options, and tap Finish.
9. Specify your current location and phone type (most phone lines are tone) on the Dial-
Once you have created the connection, it appears in , Programs, Connections. To start
the connection, remove your iPAQ H3000 from the cradle, tap the connection icon, enter
your user name and password, and tap Connect. Once connected, you can:
• Send and receive e-mail messages by using Inbox. Before you can use Inbox, you need
• V is it Web pages by using Pocket Internet Explorer. For information, see Chapter 6
NOTE:
You s hould not need to change an y settings in
assigned address . If the ISP you are con necting to does not use a ser ver-assigned
address, ta p
then
Next
ing tab. These settings will apply to all connections you create.
to provide the information it nee ds to communic ate with the e-mail server. For specific
instructions, see “Connect Directly to an E-mail Server”, later in this chapter.
(Pocket Internet Explorer).
You can quickly return to
Modem
tap the
Advanced
.
link at the bottom of the
Connections
then the
Modem Settings
link.
TCP/IP
Connections
Advanced
tab and enter the address. When finished, tap
to change connection settings by tapping the
folder. Toreturn to the
. Most ISPs now use a server-
Connections
folder,
OK
Connect to Your Network
If you have access to a network, you can send e-mail messages, view intranet pages, synchronize your iPAQ H3000, and possibly access the Internet. You can connect to your network in one of two ways:
• Create a modem connec ti o n by using a RAS account. Before you can create this
modem connection, your network administrator will need to set up a RAS account for
you. If this is the method you want t o use, s ee “To create a modem connection to a net-
work”.
• Use an Ethernet card and a net tap to connect to the network. If this is the method
you want to use, see “To create an Ethernet connection to a network”.
7-4
Getting Connected
Page 93

To create a modem connection to a network:
1. Get the following information from your network administrator: dial-up access telephone number, user name, password, domain name, and TCP/IP settings.
2. Install a CompactFlash modem card using the optional iP AQ CF Card Expansion Pack
or a PCMCIA modem card using the optional iPAQ PC Card Expansion Pack.
NOTE:
For informa tion on ordering Compaq iPAQ Expansion Packs , see the
tion
card included in the shipping box, or visit the Compaq iPAQ H3000 home pag e at
Accessories Informa-
www.compaq.com/products/handhel ds/.
3. Tap then Settings. On the Connections tab, tap Modem.
4. Tap New connection.
5. Enter a name for the connection, such as “Company Connection.”
6. Select your modem type in the Select a modem list. If your modem type does not
appear, try reinserting the modem card.
NOTE:
You should not need to change any settings in
Advanced
. Most servers now use a server-
assigned address . If the serve r you are connecting to does not use a ser ver-assigned
address, ta p
then
Next
Advanced
.
then the
TCP/IP
tab and enter the address. When finished, tap
OK
7. Enter the access phone number, and tap Next.
8. Select other desired options, and tap Finish.
9. Specify your current location and phone type (most phone lines are tone) on the Dial-
ing tab. These settings will apply to all connections you create.
Once you have created the connection, it appears in , Programs, Connections. To start
the connection, remove your iPAQ H3000 from the cradle, tap the connection icon, enter
your user name, domain, and password, and tap Connect. Once connected, you can:
• Send and receive e-mail messages by using Inbox. Before you can use Inbox, you
need to provide the information it ne eds to communicate with the e-mail server. For
specific instructions, see “Connect Directly to an E-mail Server”, later in this chapter.
• Visit Internet or intranet Web pages by using Pocket Internet Explorer. You may
need to set up a proxy server to visit Internet Web pages. For more information on setting up a proxy server, see Pocket Internet Explorer Help on the iP AQ H3000.
• Synchronize. For more information, see ActiveSync Help on the computer.
Getting Connected
7-5
Page 94

To create an Ethernet connection to a network:
You do not need to create a new connection on your iPAQ H3000. Instead, you must purchase and configure an Ethernet card that is compatible with your iPAQ H3000.
1. Get the following information from your network administrator: user name, password,
and domain name.
2. Install the optional CompactFlash or PCMCIA Ethernet card into your optional CF
Card or PC Card Expansion Pack. For instructions on inserting and using the Ethernet
card, see the owner’s manual for the card.
NOTE:
For informa tion on ordering Compaq iPAQ Expansion Packs , see the
tion
card included in the shipping box, or visit the Compaq iPAQ H3000 home pag e at
Accessories Informa-
www.compaq.com/products/handhel ds/.
Network Settings will appear automatically the first time you insert the card, so that
you can configure the Ethernet card. Most networks use DHCP, so you should not
have to change these settings unless your network administrator ins tructs you to do so.
3. Tap OK. (If it does not appear or to change settings later, tap , then Settings. On th e
Connections tab, tap Network then the adapter you want to change.)
4. Connect the Ethernet card to the network by using a network cable. For information,
see your owner's manual.
If you want to synchronize your iPAQ H3000, tap , then Programs. Tap the Connec-
tions folder, then ActiveSync. Se lect Network Connection as the connection method
then tap Connect. Remote synchronization with a computer will work only if you have set
up a partnership with that computer through ActiveSync and have set ActiveSync to allow
remote connections. Other restrictions apply. For more information on synchronizing
remotely , see ActiveSync Help on the computer.
If you want to access your e-mail server or the intranet, tap , then Settings. On the
Connections tab, tap Network then the Identification tab. Enter your user information. If
you need assistance, see your network administrator.
7-6
Getting Connected
Once connected, you can do the same activities as listed in the preceding section.
Page 95

End a Connection
If you started the connection from a pr ogr am, such as Inbox or Pocket Internet Explorer,
disconnect from that program first. Then, tap then Today. Tap or at the bottom
of the screen then Disconnect. To end a network connection, remove the card from your
iPAQ H3000.
Connect Directly to an E-mail Ser ve r
You can set up a connection to an e-mail server so that you can send and receive e-mail
messages by using a modem or network connection and Inbox on your iPAQ H3000.
NOTE:
You can use multiple e-mail services to receive your messages. For each e-mail service
you intend to use, first set up and name the e-mail service. If you use the same service to
connect to different mailboxes, set up and name each mailbox connection.
The ISP or network must use a POP3 or IMAP4 e-mail server and an SMTP gateway.
Inbox does not currently support connecting with proprietary e-mail protocols such as
Juno, or Virgin Net. However, you can still access the Internet through these services.
There may be third-party programs available that would enable you to send and receive
e-mail messages t hrough proprietary protocols.
To set up a e-mail service:
1. Tap Services, then New Service in Inbox on your iP AQ H3000.
2. Select POP3 or IMAP4 as the service type, name the service, and tap Next. For infor mation on which service type to select, ask your ISP or network administrator.
Getting Connected
7-7
Page 96

3. Select a connection from the Connection list. If you have not created a connection,
select Create new connection and follow the steps in the wizard. When you return to
this screen at the end of the wizard, select the connection you created from the Con-
nection list.
A wizard will walk you through the remaining steps. For an explanation of a screen, tap
Start then Help. When finished, tap Services then Connect to connect to your e-mail
server . For more information on using the Inbox program, see “Inbox: Sending and
Receiving E-mail Messages” in Chapter 4.
Get He lp on Connec tin g
More information on the procedures described here, as well as information on additional
procedures, can be found in the following locations:
•“Inbox: Sending and Receiving E-mail Messages” in Chapter 4.
• Online Help on the iPAQ H3000. Tap then Help. Tap View, All Installed Help,
then Inbox or Connections.
• ActiveSync Help on the computer. In ActiveSync, click Microsoft ActiveSync Help
on the Help menu.
• Appendix A, “Tips and Troubleshooting”.
7-8
Getting Connected
Page 97

appendix a
T
IPS AND
This chapter contains troubleshooting information that can help you to s olve any problems
you might encounter with your iPAQ H3000. It also has a tips section that may help you to
get better service from your iPAQ H3000.
If you can't solve a particular problem, see “Where to Find Information” in Chapter 1. The
various documents and websites listed here may have the information you need to solve
the problem.
To help diagnose a malfunction, use the Diagnostic utility, which activates a debugging
and system diagnostic tool. Press the QMenu button, then tap QUtilities, Self Test. For
more information, see "Self Test" in Chapter 2.
If you encounter a problem that you cannot solve, contact Compaq technical support or
your service provider for assistance.
T
ROUBLESHOOTING
Reset the iPAQ H3000 an d Clear Memory
Resetting the iPAQ
If your iPAQ H3000 responds slowly , stops responding as expected, or “freezes,” try resetting it. A reset causes the iPAQ H3000 to restart and re-adjust memory allocation.
Unsaved data in open windows may be lost. Use the stylus to pr ess and hol d the R eset button for about two seconds.
Tips and Troubleshooting
a-1
Page 98

NOTE:
Do not turn off your iPAQ as it must remain on in order to reset.
Clearing memory
If you want to clear all data from your iPAQ H3000 and return it to the factory settings,
you should clear the memory.
Clearing memory deletes all data and restores the iPAQ H3000 to its default set-
tings. Programs installed at the factory remain, while data you have created and
programs you have installed are erased.
1. Using the stylus, slide open the On/Off door on the base of the iPAQ H3000.
2. Slide the On /Off switch to the Off position using the stylus. Wait about one minute,
then slide the switch to the On position.
a-2
Tips and Troubleshooting
Page 99

3. Close the Battery On/Off door using the stylus.
NOTE:
Use CF Backup/Restore or ActiveSync to keep a backup of your iPAQ data so that if you
need to clear memory, you can restore the data on your iPAQ. For more information, see
Backup and Restore Data in Chapter 2, and ActiveSync Help on the computer.
Battery Loses Power
When the battery is low, you will see a battery icon in the status bar of the Today scr een.
Recharge a low battery as soon as possible. If your iPAQ H3000 shuts down, you still have
about 24 hours to recharge the battery before you lose the data on your Pocket PC.
Letting the battery fully discharge has the same effect as clearing memor y: all data
is lost and your iPAQ H3000 returns to its factory settings. If your iPAQ H3000 shuts
down, you shou ld recharge the ba ttery within 24 hours.
You want your iPAQ H3000 battery charge to last as long as possible, especially when
you’re on the road. Under normal conditions, you can get many hours of use from a full
charge. The following tips to help you get the most from them:
Use external power whenever possible
Use the AC adapter to plug your iPAQ H3000 into external power whenever possible,
especially when:
• Establishing a remote connection (some modems use a lot of power).
• Using the backlight feature of your iPAQ H3000 display.
• Connecting to a computer.
• Playing audio files for extended periods.
Shorten auto-suspend time
While on battery power, your iPAQ H3000 automatically suspends operation if you
haven’t touched the hardware buttons or used the stylus for three minutes. Maximize battery life by shortening the time. Press the QMenu button, then pres s Power, and adjust the
On battery power setting.
Tips and Troubleshooting
a-3
Page 100

Turn off sounds you dont need
The iPAQ H3000 produces sounds in response to a number of events, such as warnings,
appointments, and screen taps or hardware-button presses. To optimize battery life, turn
off any sounds you don’t need. Tap then Settings. On the Personal tab, tap Sounds &
Reminders and clear check boxes on the Vo lume and Reminders tabs.
Turn off notification light
Tap then Settings. On the Personal tab, tap Sounds & Reminders. On the Rem inders tab, clear the Flash light for check box.
If You Forget Your Password
If you forget your password, you’ll need to clear memory on the iPAQ H3000. See “Reset
the iPAQ H3000 and Clear Memory”, earlier in this appendix.
If you’ve used ActiveSync or CF Backup/Res tore to create a backup file, all of your pro-
gram data can be restored. Your Pocket PC password is removed and you can set a new
password.
If You Run Out of iPAQ H3000 Me mory
Memory on your iPAQ H3000 is shared between storage memory and program memory.
Storage memory is used to store the information you create and programs you install. Program memory is used to run programs on your iPAQ H3000. The iPAQ H3000 automatically manages the allocation between storage and program memory. However, in some
situations, such as when memory is low, the iP AQ H3000 may not be able to automatically
adjust the allocation. If you receive a message stating that storage or program memory is
unavailable, try the following solutions:
a-4
Tips and Troubleshooting
 Loading...