

Page 1

DXV04T
4 GALLON (15 L) PORTABLE WET/DRY VACUUM
ASPIRADORA PARA LIQUIDOS Y SOLIDOS DE 15 L
INSTRUCTION MANUAL
MANUAL DE INSTRUCCIONES
INSTRUCTIVO DE OPERACIÓN, CENTROS DE SERVICIO Y PÓLIZA DE
GARANTÍA. ADVERTENCIA: LÉASE ESTE INSTRUCTIVO ANTES DE
USAR EL PRODUCTO.
If you have questions or comments, contact us.
Si tiene dudas o comentarios, contáctenos.
1-888-899-0146 • www.Altonindustries.com
Page 2

2
English
Specifications................................................................................2
Package Contents........................................................................3
Safety Information.........................................................................4
Operating Instructions...................................................................6
Care and Maintenance...............................................................10
Troubleshooting..........................................................................11
Exploded View and Parts List.....................................................12
Warranty......................................................................................13
TABLE OF CONTENTS PRODUCT SPECIFICATIONS
WARNING:
Power 120 V / 60 Hz / 9 A
Single Stage
4 Gallon
1-7/8 in. x 7 ft.
Gauge A.W.G.
14
12
SJTW18AWG / 20 ft. Length
Motor
Tank Capacity
Hose
Power cord
Extension Cord Length
0 - 50 ft.
50 - 100 ft.
Use only extension cords that are rated for outdoor use. Extension
cords in poor condition or that are too small in wire size can pose
fire and shock hazards. To reduce the risk of these hazards when
using an extension cord, be sure it is in good condition and that the
connection does not come into contact with liquid. To keep power
loss to a minimum, use the follow
ing table to choose the minimum
wire size extension cord.
Model DXV04T
Page 3
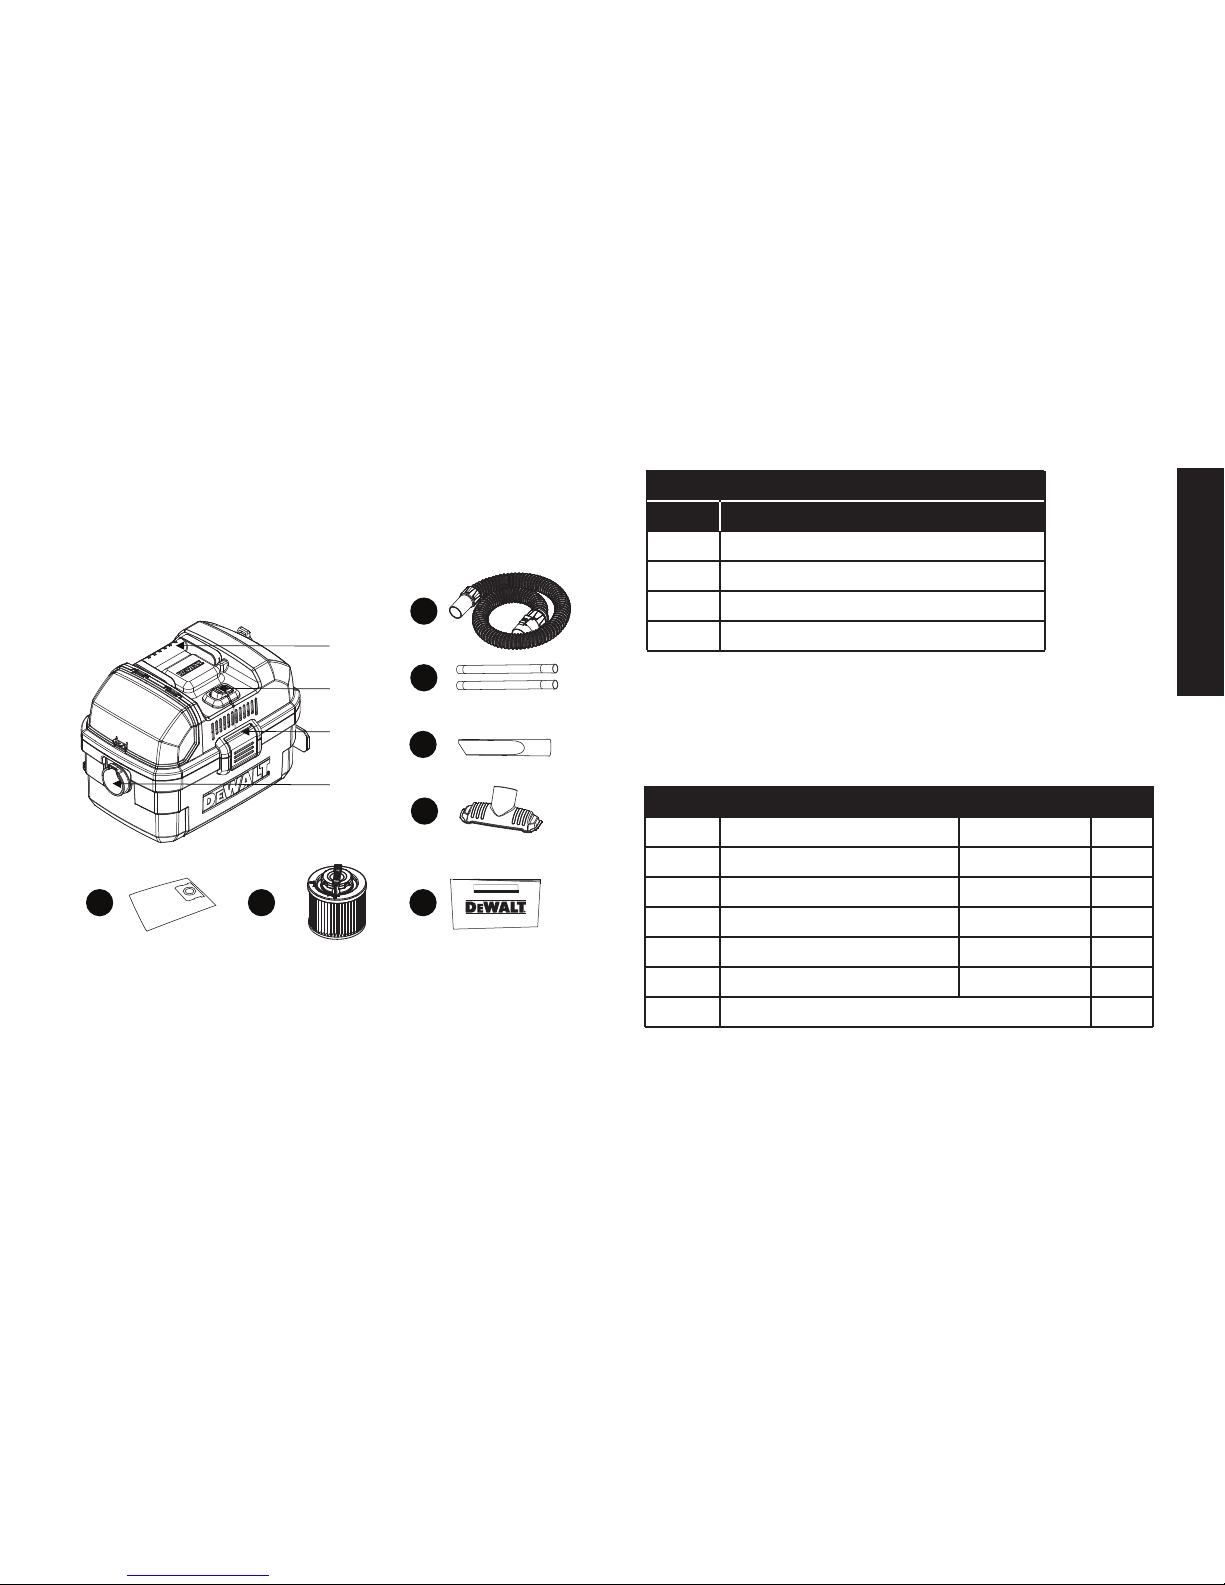
PACKAGE CONTENTS
English
3
Cleaner Description
Description
Handle
Power Switch
Two Lid Latches
Vacuum Port
Item
1
2
3
4
1
2
1
1
1
1
1
1-7/8” Flexible Hose DXVA19-2600
DXVA19-1202
DXVA19-1400
DXVA25-4040
DXVA19-1300
DXVC4001
Extension Wand
Crevice
Nozzle
Nozzle
Disposable Dust Bag
Utility
Clean Connect
TM
Filter
Instruction Manual
A
B
C
D
E
F
G
Part Description Part No. Qty
D
A
B
F
C
G
E
1
2
3
4
DXV06P
4 GALLON (15 L) PORTABLE WET/DRY VACUUM
ASPIRADORA PARA LIQUIDOS Y SOLIDOS
INSTRUCTIONMANUAL
MANUALDEINSTRUCCIONES
INSTRUCTIVODEOPERACIÓN,CENTROSDESERVICIOYPÓLIZADE
GARANTÍA.ADVERTENCIA:LÉASEESTE INSTRUCTIVO ANTES DE
USARELPRODUCTO.
Ifyouhavequestionsorcomments,contactus.
Sitienedudasocomentarios,contáctenos.
1-888-899-0146 • www.Altonindustries.com
Page 4

English
4
IMPORTANT SAFETY
INSTRUCTIONS
WARNING:When using electric appliances, always
follow basic safety precautions to reduce the risk of fire, electric
shock and personal injury, including the following:
BEFORE USING THIS APPLIANCE, READ AND FOLLOW ALL
INSTRUCTIONS.
WARNING: To reduce the risk of electric shock. Do not expose
to rain. Store indoors.
• Do not leave the appliance when it is connected to a power
source. Unplug it from outlet when not in use and before
servicing.
• Do not allow the appliance to be used as a toy. Pay close
attention when the appliance is used by or near children.
• Use this appliance ONLY as described in the manual. Use only
D
E
WALT recommended attachments.
• Do not use this appliance with a damaged cord or plug. If the
appliance is not working correctly, or if it has been dropped,
damaged, left outdoors, or dropped in water, return it to a service
center.
• Do not pull or carry this appliance by the cord, use the cord as a
handle, close a door on the cord, or pull the cord around sharp
edges or corners. Do not run the appliance over the cord. Keep
cord away from heated surfaces.
• Do not unplug this appliance by pulling on the cord.
To unplug,
grasp the plug, not the cord.
• Do not handle the plug or appliance with wet hands.
• Do not put any objects into the openings of the appliance. Do not
use the appliance with any opening blocked; keep free of dust,
lint, hair and anything else that may reduce air flow.
• Keep hair, loose clothing, fingers, and all body parts away from
the ope
nings and moving parts.
• Turn off all controls before unplugging appliance.
• Use extra care when cleaning on
stairs.
• Do not use the appliance to pick up flammable or combustible
liquids, such as gasoline, or use in areas where flammable or
combustible liquids are present.
• Static shocks are possible in dry areas or when the relative
humidity of the air is low. This is only temporary and does
not affect the use of the vacuum. To reduce the frequency of
static shocks, add moisture to the air with a console, installed
humidifier or use anti-static hose (standard on s
ome models).
• To avoid spontaneous combustion, empty canister after each
use.
Defi nitions: Safety Guidelines
The de nitions below describe the level of severity for each
signal word. Please read the manual and pay attention to
these symbols.
DANGER: Indicates an imminently hazardous situation
which, if not avoided, will result in death or serious injury.
WARNING: Indicates a potentially hazardous situation
which, if not avoided, could result in death or serious injury.
CAUTION: Indicates a potentially hazardous situation which,
if not avoided, may result in minor or moderate injury.
NOTICE: Indicates a practice not related to personal injury
which, if not avoided, may result in property damage.
Page 5

English
5
SAVE THESE
INSTRUCTIONS
ADDITIONAL SAFETY RULES
• Do not pick up anything that is burning or smoking, such as
cigarettes, matches, or hot ashes.
• Do not use to vacuum combustible explosive materials, such as
coal, grain, or other finely divided combustible material.
• Do not use to vacuum hazardous, toxic or carcinogenic materials,
such as asbestos or pesticide.
• Never pick up explosive liquids (e.g. gasoline, diesel fuel, heating
oil, paint thinner, etc.), acids or solvents.
• Do not use vacuum without filters in place, except as described
under Wet Pickup Applications.
• Some wood contains preservatives which can be toxic. Take
extra care to prevent inhalation and skin conta
ct when working
with these materials. Request and follow any safety information
available from your material supplier.
• Do not use vacuum as a step ladder.
• Do not place heavy objects on vacuum.
• An extension cord must have adequate wire size (AWG
or American Wire Gauge) for safety. The smaller the gauge
number of the wire, the greater the capacity of the cable, that
is 16 gauge has more capacity than 18 gauge. An undersized
cord will cause a drop in line voltage resulting in loss of power
and overheating. When using more than one extension to make
up the total length, be sure each individual extension contain
s
at least the minimum wire size. The following table shows the
correct size to use. If in doubt, use the next heavier gauge. The
smaller the gauge number, the heavier the cord.
• If an extension cord is to be used outdoors it must be marked
with the suffix W-A or W following the cord type designation. For
example – SJTW-A to indicate it is acceptable for outdoor use.
Minimum Gauge for Cord Sets
Ampere Rating
Volts Total Length of Cord in Feet (meters)
120V 25 (7.6) 50 (15.2) 100 (30.5) 150 (45.7)
240V 50 (15.2) 100 (30.5) 200 (61.0) 300 (91.4)
More
Than
Not More
Than
AWG
0 6 18 16 16 14
6 10 18 16 14 12
10 12 16 16 14 12
12 16 14 12 Not Recommended
WARNING: Always wear proper personal hearing protection
that conforms to ANSI S12.6 (S3.19) during use. Under some
conditions and duration of use, noise from this product may
contribute to hearing loss.
WARNING: ALWAYS use safety goggles. Everyday eyeglasses
are NOT safety goggles. Also use face or dust mask if area operation
is dusty. ALWAYS WEAR CERTIFIED SAFETY EQUIPMENT:
• ANSI Z87.1 eye protection (CAN/CSA Z94.3),
• ANSI S12.6 (S3.19) hearing protection,
• NIOSH/OSHA/MSHA respiratory protection.
WARNING: Some dust contains chemicals known to the State of
California to cause cancer, birth defects or other reproductive harm.
Some examples of these chemicals are:
• compounds in fertilizers,
• compounds in insecticides, herbicides and pesticides,
• arsenic and chromium from chemically-treated lumber.
Page 6

OPERATING INSTRUCTIONS
UNPACKING & SET-UP SUMMARY
1.Pull lid latches in an outward motion, remove power head and
some accessories that may have been shipped in the tank.
2.Attach heavy-duty rubberized casters following the instructions
in this manual.
3.Before replacing power head, refer to this manual to ensure
you have the proper filters installed for your cleaning operation.
4.Replace power head, and apply pressure with thumb to each
latch until it snaps tightly in place. Make sure all lid latches are
clamped secu
rely.
5.Insert the air hose end into inlet of tank.
6.Attach the extension wands to the accessory end of the hose.
Apply slight pressure until fitting is tight.
7.Attach one of the cleaning accessories (depending on your
cleaning requirements) on the extension wands. Twist slightly
to tighten the connection.
8.Plug the cord into the wall outlet. Your cleaniner is ready for use.
English
6
To reduce your exposure to these chemicals, wear approved safety
equipment such as dust masks that are specially designed to filter
out microscopic particles.
For your convenience and safety, the following warning labels are
on your vacuum.
ON MOTOR HOUSING :
WARNING:
SAVE THESE INSTRUCTIONS
• TO REDUCE THE RISK OF INJURY, USER MUST READ
INSTRUCTION MANUAL. DO NOT RUN UNATTENDED. DO
PU KCIP TON FLAMMABLE, COMBUSTIBLE OR HOT
MATERIALS. DO NOT USE AROUND EXPLOSI ,TSUD EV
LIQUIDS OR VA ECUDORP SECIVED LACIRTCELE .SROP
ARCS OR SPARKS WHICH CAN CAUSE FIRE
OR
EXPLOSION. DO NOT USE AT FILLING STATIONS OR
ANYWHERE GASOLINE IS STORED OR DISPENSED. DO
NOT VACUUM TOXIC OR CARCINOGENIC MATERIALS
OR OTHER HEALTH ENDANGERING MATERIAL SUCH
AS ASBESTOS OR PESTICIDES. ALWAYS USE PROPER
EYE AND RESPIRATORY PROTECTION. TO REDUCE THE
RISK OF ELECTRICAL SHOCK, DO NOT EXPOSE TO
RAIN. STORE INDOORS. WHEN SERVICING, USE ONLY
IDENTICAL REPLACEMENT PARTS. NOT TO BE USED
AS A STEP STOOL.
Page 7

English
WARNING!
DRY PICK-UP
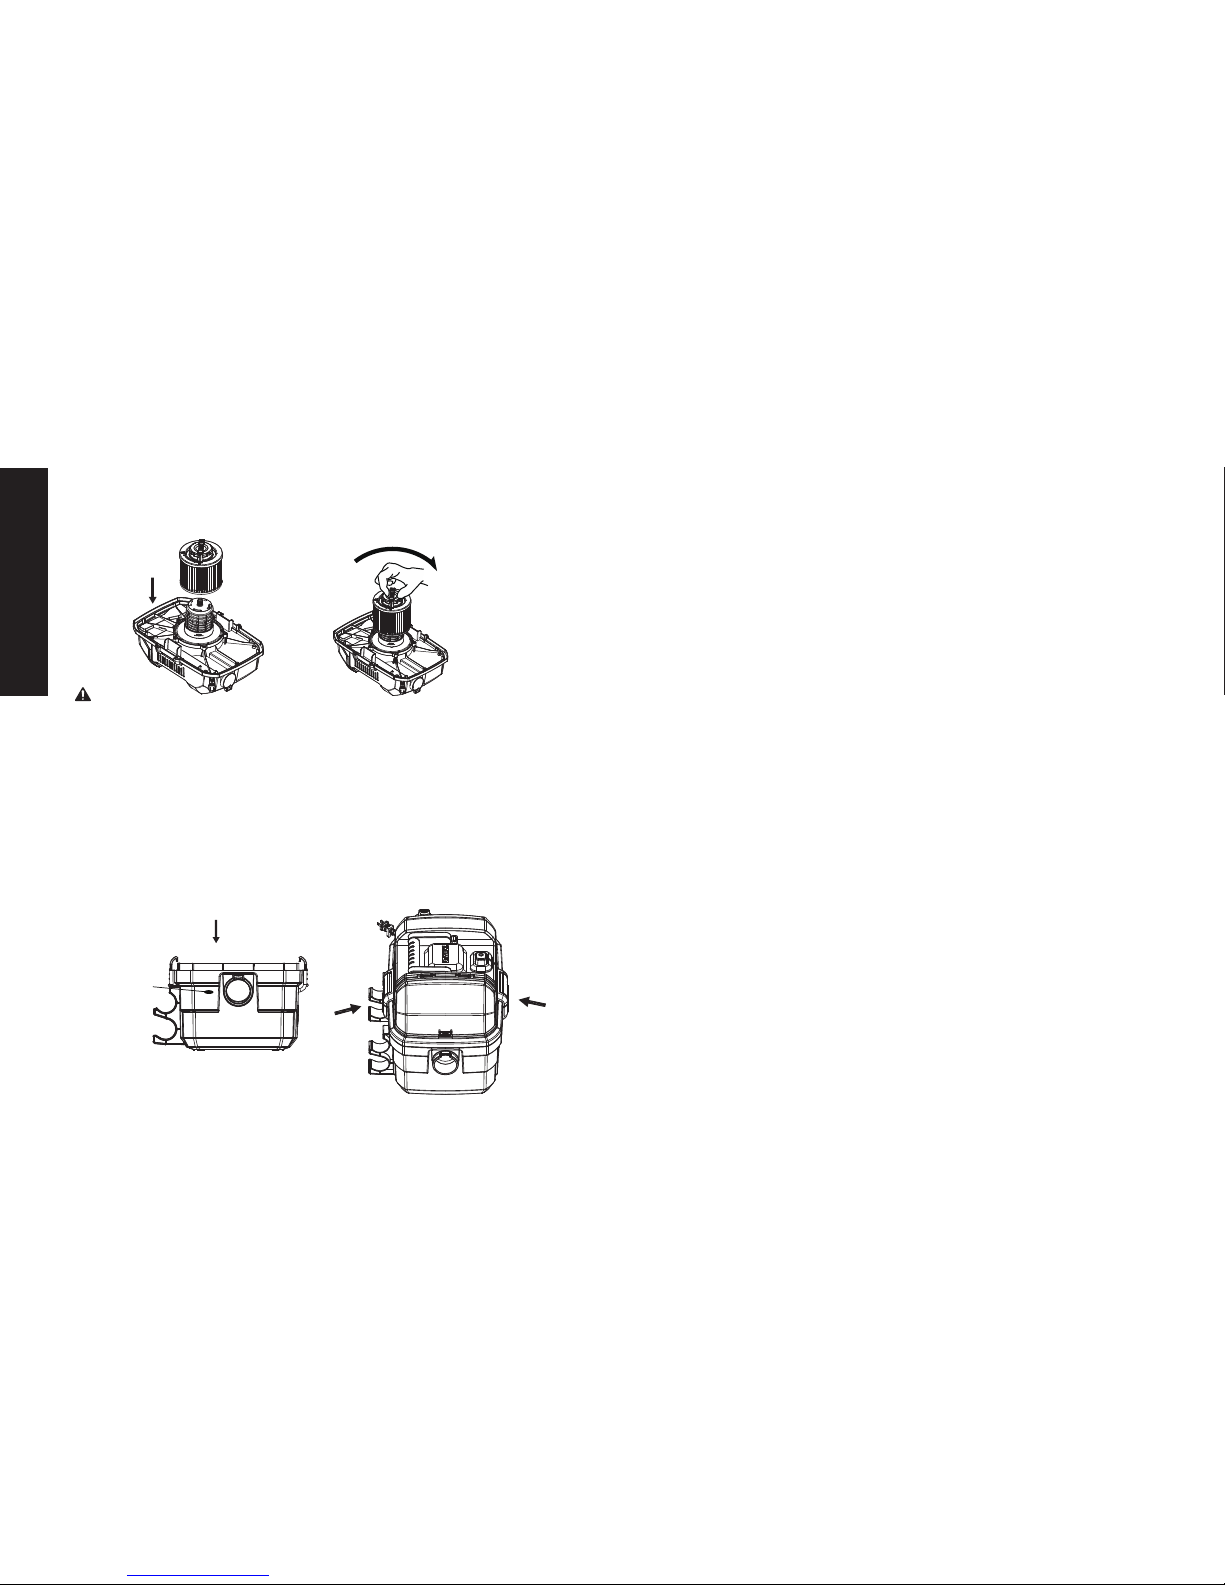
INSTALLING THE CARTRIDGE FILTER
To reduce the risk of fire or explosion, do not operate this vac in
areas with flammable gases, vapors or explosive dust in the air.
Flammable gases or vapors include but are not limited to: lighter
fluid, solvent-type cleaners, oil-based paints, gasoline, alcohol or
aerosol sprays. Explosive dusts include but are not limited to:
coal, magnesium, aluminum, and grain or gun powder. Do not
vacuum explosive dust, flammable or combustible liquids or hot
ashes. Do not use this vac as a sprayer fo
r any flammable or
combustible liquid. To reduce the risk of health hazards from
vapors or dusts, do not vacuum toxic materials.
WARNING!
The operation of any utility vac can result in foreign objects being
blown into the eyes, which can result in severe eye injury.
Always wear safety goggles complying with ANSI Z87.1 (or in
Canada, CSA Z94.3) before starting operation.
NOTE
A dry filter is necessary to pick up dry material. If you use your
vac to pick up dust when the filter is wet, the filter will clog quickly
and be very difficult to clean. If the filter gets wet, replace it before
continuing to do dry pickups.
The cartridge filter can be used for wet or dry pick, installation is
the same for both.
1. With the power head in an upside down position, slide the
cartridge filter down over the lid cage, push the filter seals
against the power head.
2. Turn the knob on filter retainer clockwise to tighten,
the filter into place.
3. To remove the filter for cleaning, turn the filter knob counter
clockwise till feel the tactile and auditory cue, and make sure
the knob arrow align with the "Unlock" icon on the filter cap,
then slide the cartridge filter off the lid cage. then grasp the
step of knob tightly with fingers to pull the cartridge filter out
off the cage.
CAUTION:
To reduce risk of hearing loss, wear ear protectors when using
the vac for extended hours or when using it inanoisy area.
The unit is ready for dry vacuuming or blowing. After you plug the
power cord into the wall receptacle, turn the unit “ON” by pushing
the switch h 1 embossing straps is the “ON” position.
1. The filter must always be in correct position to reduce the risk
of leaks and possible damage to vac. Make sure that the filter
is completely covering the filter cage. Make sure there are no
gaps bet
ween the filter and the lid. It is very important to
assemble the filter to the cage without allowing any possible
leaks or tears. Any leaks will allow the picked up debris to be
blown out of the blowing port and back into the surrounding
environment.
2. When using your vac to pick up very fine dust, it will be
necessary to empty the dust tank and clean or replace the filte
r
at more frequent intervals to maintain peak vac performance.
7
ON ONOFF OFF
locking
position wit
Page 8
English
NOTE
If the filter has been used for wet pick-up, it must be cleaned and
dried before using for dry pick-up.
INSTALLING THE DISPOSABLE FILTER BAG
1. Slide the cardboard collar opening firmly onto the vacuum port
deflector until it stops against the deflector wall.
2. Position the bag so that it is distributed around the inside of the
tank.
3. Replace and secure the power head onto the tank.
WET PICK-UP
Remove all dirt and debris found in the tank. The vacuum requires
only a minimum of conversion when going from dry to wet pick up.
Remove all dry use filter from the vacuum. A clean cartridge filter
may used for vacuuming small amounts of liquids. For best results
when vacuuming large quantities of liquid, remove the cartridge
filter. When vacuuming liquids containing debris, it is recommended
purchasing a foam filter and install over filter cage. Foam filter may
be purchased by visiting our website at www.dewalt.com, contacting
our customer service department, or purchasing at your local
DEWALT distributor. When picking up large amounts of liquid we
recommend that the filter be removed. If the filter is not removed,
it will become saturated and misting may appear in the exhaust.
At this time, you should dry
or replace the cartridge filter to
eliminate the misting and possible dripping of liquid around the lid.
After completing a wet pick-up job, raise the hose to drain any
excess liquid into the tank before shutting off. The interior of tank
should be periodically cleaned.
1. Always disconnect the plug from the wall outlet before removing
the power head. Place power head in an upside down position.
Remove cartridge filte
r by sliding it up and off the filter cage.
2. Shake excess dust off cartridge filter with a rapid up and down
movement.
NOTE:
WET PICK-UP ACCESSORIES SHOULD BE WASHED
PERIODICALLY, ESPECIALLY AFTER PICKING UP WET,
STICKY KITCHEN ACCIDENTS. THIS CAN BE
ACCOMPLISHED WITH A WARM SOLUTION OF SOAP AND
WATER.
4. To clean the cartridge filter, shake or brush off excess dirt or
rinse (from the inside of the filter) with
water, dry completely
(approximately 24 hours) and re-install.
8
Disposable
dust bag
Lock
Page 9

English
9
BLOWING OPERATION
WARNING!
Always wear safety goggles complying with ANSI Z87.1 (or in
Canada CSA Z94.3) when using as a blower.
WARNING!
To avoid injury to bystanders, keep them clear of blowing debris.
CAUTION
Wear a dust mask if blowing creates dust which might be inhaled.
CAUTION
To reduce the risk of hearing loss, wear ear protectors when
using the vac/blower for extended hours or when using it in a
noisy area.
Your vac contains a blowing feature. It has the capability to blow
sawdust and other debris. It can be used to blow dust and debris
out of garages or off patios and driveways. Follow the steps
below to use your vac as a blower.
2. Dump the tank contents into the proper waste disposal
container.
pulling outward on the lid clips located on each side of the vac.
Lift off the power head assembly.
EMPTY THE TANK
WARNING!
To reduce the risk of injury from accidental starting, unplug
power cord before emptying the dust tank.
1. Remove the power head assembly of the wet/dry vac by
NOTE:
IF ACCIDENTALLY TIPPED OVER, THE VACUUM
COULD CLOSED SUCTION. IF THIS OCCURS, PLACE VAC
IN UPRIGHT POSITION AND TURN SWITCH OFF. THIS WILL
ALLOW THE FLOAT TO RETURN TO ITS NORMAL POSITION,
AND YOU WILL BE ABLE TO CONTINUE OPERATION.
Float in raised position
3. This wet/dry vac is equipped with a float mechanism which will
rise automatically to cut off the airflow when the liquid in the
tank reaches a predetermined level. When this happens, turn
off vac, unplug the power cord, and empty the dust tank. You
will know that the float has shut the airflow off because the
suction ceases and the motor noise becomes higher in pitch
due to increased motor speed. The liquid capacity may
vary
with the rate of pickup.
IMPORTANT:
To reduce the risk of damage to the vac, do not
run motor with float in raised position.
Page 10

English
CLEANING
To keep your wet/dry vac looking its best, clean the outside with a
cloth dampened with warm water and mild soap.
To clean the tank:
STORAGE
Before storing your vac, the dust tank should be emptied and
cleaned. The cord should be wrapped and hung on the unit and the
accessories should be kept in mesh bag so they can be readily
available. The vac should be stored indoors.
1. Dump out debris.
2. Wash tank thoroughly with warm
water and mild soap.
3. Wipe out with dry cloth.
CARE AND MAINTENANCE
FILTER REPLACEMENT
WARNING!
To reduce the risk of injury from accidental starting, unplug power
cord before changing or cleaning filter.
Your filter should be cleaned often to maintain peak vac
performance.
IMPORTANT
To avoid damage to the blower wheel and motor, always reinstall
the Clean Connect
TM
filter before using the vac for dry pickups
and wet pickups.
IMPORTANT
After cleaning, check the filter for tears or small holes. Do not use
a filter with holes or tears in it. Even a small hole can cause a lot
of dust to come out of your vac. Replace it immediately.
NOTE
Before installing the filter on the vac, clean the area of the lid so
that the filter will seal against the lid and stop small particles from
bypassing the filter bag. If the filter is clean and not damaged,
replace it on the filter cage. If it cannot be reused,place a new filter
over the filter cage.
NOTE
Clean the filter in an open area. Cleaning should be done outdoors
and not in living quarters.
WARNING!
Do not remove filter cage and float. The float prevents water from
entering the impeller and damaging the motor. The cage prevents
fingers from touching the moving impeller.
10
1. Locate blowing port on your vac.
2. Insert one end of the 1-7/8 in. x 7 ft. hose
into the blowing port.
3. Turn vac “ON”.
Page 11

English
11
TROUBLESHOOTING
TO REDUCE THE RISK OF INJURY FROM MOVING PARTS
AND/OR ELECTRICAL SHOCK, TURN POWER SWITCH OFF
AND DISCONNECT GROUNDED PLUG FROM ELECTRICAL
OUTLET BEFORE PERFORMING TROUBLESHOOTING
CHECKS.
WARNING!
Minor problems often can be fixed without calling customer service.
PROBLEM SOLUTION
Motor does not run
Check power cord, plugs and outlet.
Ensure the on/off switch is in the ON
position (
)
Suction capacity
decreases
Remove blockages in the suction nozzle,
suction tube, suction hose or filters.
Replace the paper or fleece bag.
Check for proper installation of the filters.
Clean or replace the filters.
Empty canister, refer to Emptythe tank
under Operating instructions.
PROBLEM SOLUTION
Vacuum stops running
Thermal overload has been tripped:
1. Turn the vacuum off and disconnect
vacuum cleaner from power source.
2. Empty the canister, if needed.
3. Allow the unit to cool.
4. Plug the power cord into an appropriate
outlet and turn on/off switch to the ON
position (
) to test. If vacuum will not
restart call 1-888-899-0146
Dust comes out while
vacuuming
Check for proper installation of the filters.
Ensure filters are not damaged; replace if
necessary.
Ensure filter seals are in place and are
secure.
Page 12

English
12
EXPLODED VIEW / PARTS LIST
1 1
1
1
1
1
1
Handle
On/off Switch
Top Cover
Accessory Cover
Lid
Thermal Baffle
Vacuum Port
Motor
Accessory Front Bracket
Accessory Rear Bracket
Winding Wire Bar
2
3
4
5
6
PART DESCRIPTION QTY
Power Cord
7 1
1
1
1
2
1
1
1
1
1
Sponge
Filter Cage
8
9
10
11
12
Lid Latch
13
Dust Tank
14
15
16
Page 13

English
WARRANTY
Alton Industry Ltd. Group
3 year Limited Warranty
This warranty covers any defects in materials or workmanship of the enclosed
product. Alton Industry Ltd. Group willrepair or replace any defective materials due to
craftsmanship of the product. This warranty does not cover any problem caused by
misuse, abuse, accidents or acts of God,such as floods or hurricanes. Consequential
and incidental damages are not covered under this warranty. Coverage terminates if
you sell or otherwise transfer the ownership. If you feelyou have a defective product,
please submit a copy of your receipt to the address below and call 1-888-899-0146
for instructions prior returning this item to the store or sending back to:
Alton Industry Ltd.Group
1031 North Raddant Rd
Batavia, Illinois 60510
We will inspect the product and contact you within 72 hours to give you the results of
our inspection. We reserve the right to repair or replace theproduct at our discretion.
However, we mayreplace the product withone of similar but notexact features.
Parts and Service Information available callAlton Industry at 1-888-899-0146.
This warranty gives you specific legal rights. You may have other rights
which vary from state to state.
13
Copyright © 2018 DEWALT.
D
E
WALT® and the DEWALT Logo are trademarks of the DEWALT Industrial Tool Co., or an affiliate thereof and are used
under license.
The yellow/black color scheme is a trademark for D
E
WALT power tools & accessories.
Copyright © 2018 D
E
WALT.
D
E
WALT® y el logotipo de DeWALT son marcas comerciales de DEWALT Industrial Tool Co., o una filial del mismo y se
usan bajo licencia.
El gráfico de color negro y amarillo es una marca registrada para las herramientas eléctricas y los accesorios de
D
E
WALT.
Copyright © 2018 DEWALT.
D
E
WALT® et le logo DEWALT sont des marques de commerce de DEWALT Industrial Tool Co. ou d'une société affiliée à
cette dernière et sont utilisés sous licence.
L’agencement de couleurs jaune et noir est une marque de commerce des outlils électriques et accessorires
D
EWALT.
Page 14

Especificaciones........................................................................14
Contenido del paquete...............................................................15
Información de seguridad..........................................................16
Instrucciones de funcionamiento...............................................19
Cuidado y mantenimiento..........................................................23
Solución de problemas.............................................................. 24
Vista detallada y lista de piezas.................................................24
Garantía.....................................................................................26
TABLA DE CONTENIDO ESPECIFICACIONES DEL PRODUCTO
ADVERTENCIA:
P
Modelo
otencia 120 V / 60 Hz / 9 A
DXV04T
de una sola fase
15 litros
4,76 cm x 2,1 m
Calibre A.W.G.
14
12
SJTW18AWG / 6 m largo
Motor
Capacidad del tanque
Manguera
Cable de alimentación
Largo de la extensión eléctrica
0 a 15,24 m
15,24 a 30,48 m
Use solo extensiones eléctricas calificadas para uso en exteriores.
Las extensiones eléctricas en malas condiciones o de tamaño muy
pequeño pueden constituir peligro de incendios y descargas
eléctricas. Para reducir el riesgo de estos peligros al usar una
extensión eléctrica, asegúrese de que esta esté en buenas
condiciones y de que la conexión no entre en contacto con líquidos.
Para mantener la pérdida de energía al mínimo, use la siguiente
tabla para escoger el tamaño de cable mínimo de la extensión
eléctrica.
Español
14
Page 15

Español
CONTENU DE L’EMBALLAGE
1
2
1
1
1
1
1
1-7/8” Manguera flexible
Tubo extensón
Pico esquinero
Bolsa de polvo desechable
Boquilla de utilidad
Filtre de Clean-Lock
TM
A
B
C
D
E
F
G
Pièce Descripción
Referencia
Cantidad
15
Manuel de instrucciones
Descripción más limpia
Descripción
Manejar
Interruptor
Dos tap
De vacío de puerto
Pièce
1
2
3
4
D
A
B
F
C
G
E
1
2
3
4
DXV06P
4 GALLON (15 L) PORTABLE WET/DRY VACUUM
ASPIRADORA PARA LIQUIDOS Y SOLIDOS
INSTRUCTIONMANUAL
MANUALDEINSTRUCCIONES
INSTRUCTIVODEOPERACIÓN,CENTROSDESERVICIOYPÓLIZADE
GARANTÍA.ADVERTENCIA:LÉASEESTE INSTRUCTIVOANTESDE
USARELPRODUCTO.
Ifyouhavequestionsorcomments,contactus.
Sitienedudasocomentarios,contáctenos.
1-888-899-0146 • www.Altonindustries.com
DXVA19-2600
DXVA19-1202
DXVA19-1400
DXVA25 4040
DXVA19--1300
DXVC4001
Page 16

Español
Definiciones: Normas de seguridad
Las siguientes de niciones describen el nivel de gravedad de
cada advertencia. Lea el manual y preste atención a estos
símbolos.
PELIGRO:
indica una situación de peligroinminente que,si no
se evita,
provocará
la
muerte o lesiones graves.
ADVERTENCIA:
Indica una situación de peligro potencial
que, si no se evita,
podría
provocar la
muerte o lesiones
graves
ATENCIÓN:
Indica una situación de peligro potencial que, si
no se evita,
puede
provocar
lesiones leves o moderadas.
AVISO: Se re e a una práctica no relacionada a lesiones
corporales que de no evitarse puede resultar en daños a la
propiedad.
INSTRUCCIONES DE
SEGURIDAD IMPORTANTES
ADVERTENCIA: Cuando utilice aparatos
eléctricos, siempre siga instrucciones básicas de seguridad
para reducir el riesgo de incendio, descarga eléctrica y lesiones
corporales, incluyendo las siguientes:
ANTES DE UTILIZAR ESTE APARATO, LEA Y SIGA TODAS
LAS INSTRUCCIONES.
ADVERTENCIA: Para reducir el riesgo de descarga eléctrica, no
exponer a la lluvia. Almacenar bajo techo.
• No exponga el aparato a la lluvia. Almacénelo en el interior. Esto
reducirá el riesgo de descargas eléctricas.
• No permita que se juegue con él. Preste especial atención si el
aparato es utilizado por o cerca de niños.
• SÓLO use este aparato como lo describe el manual. Use sólo los
accesorios D
EWALT recomendados.
• No use este aparato si su cable o enchufe están dañados. Si
el aparato no funciona debidamente, o si se ha caído, dañado,
dejado a la intemperie, o si se ha caído en agua, devuélvalo a un
centro de servicio.
• No tire del cable, levante el aparato por el cable, use el cable
como un mango, cierre la puerta si el cable está en el umbral, o
tire del cable entorno a bordes o esquinas a
lados. No atropelle
el cable con el aparato. Mantenga el cable alejado de super cies
calientes.
• No tiredelcablepara desenchufarel aparato.Para desenchufarlos,
tome el enchufe con meza, no el cable.
• No toque el enchufe o el aparato si tiene las manos mojadas.
• No inserte ningún objeto por las aperturas del aparato. No utilice
este aparato si tiene alguna apertura bloqueada; manténgalo sin
polvo, pelusa, pelo o cualquier otra cosa que podría
reducir el
de aire.
• Mantenga su cabello, vestimenta suelta, dedos y toda parte de
su cuerpo alejados de las aperturas y piezas móviles del aparato.
• Apague todos los controles antes de desenchufar el aparato.
• Tenga especial cuidado cuando lo use para limpiar en escaleras.
• No use el aparato para recoger líquidos
o
combustibles, como gasolina, ni lo use en lugares donde exista
la presencia de líquidos in
amables o combustibles.
• Es posible que se produzcan descargas estáticas en áreas secas
o cuando la humedad relativa del aire sea baja. Esto es solo
pasajero y no afecta la utilización de la aspiradora. Para reducir la
frecuencia de las descargas estáticas, agregue humedad al aire
16
Page 17

Español
17
con un ador instalado de consola o use la manguera
antiestática (estándar en algunos modelos).
• Para evitar una combustión espontánea, vacíe el recipiente
después de cada uso.
GUARDE ESTAS
INSTRUCCIONES
REGLAS DE SEGURIDAD ADICIONALES
• No recoja nada que se esté quemando o que esté humeando,
como cigarrillos, fósforos o cenizas calientes.
• No use para aspirar materiales combustibles explosivos, como
carbón, grano u otro material combustible amente dividido.
• No utilice para aspirar materiales peligrosos, tóxicos o
cancerígenos, tales como asbesto o pesticida.
• Nunca recoja líquidos explosivos (como gasolina, combustible
diesel, gasóleo, diluyente de pintura, etc.), ácidos o solventes.
• No utilice la aspiradora sin los ltros bien puestos, excepto según
se describe en Aplicaciones de recogida en mojado.
• Alguna madera contiene pres
ervantes que pueden ser tóxicos.
Tenga especial cuidado para prevenir la inhalación y el contacto
con la piel cuando trabaje con estos materiales. Solicite y
siga cualquier información de seguridad que su proveedor de
materiales ponga a su disposición.
• No use la aspiradora como escalera de mano.
• No coloque objetos pesados sobre la aspiradora.
• Los hilos del alargador deben ser de un calibre apropiado
(AWG o American Wire Gauge) para su seguridad. Mientras
menor sea el calibre del hilo, mayor la capacidad del cable.
Es decir, un hilo calibre 16 tiene mayor capacidad que uno de
18. Un cable de un calibre insu
ciente causará una caída en la
tensión de la línea dando por resultado una pérdida de energía
y sobrecalentamiento. Cuando se utilice más de un alargador
para completar el largo total, asegúrese que los hilos de cada
alargador tengan el calibre mínimo. La tabla siguiente muestra el
tamaño correcto a utilizar. Si tiene dudas sobre cuál calibre usar,
use un calibre mayor. Cuanto más pequeño sea el número del
calibre, más resistente será el cable.
• Si utilizará un alargador en el ex
terior, deberá tener marcado el
jo W-A ó W luego de la designación del tipo de cable. Por
ejemplo – SJTW-A para indicar que es aceptable para usar
afuera.
Calibre mínimo para cables de alimentación
Amperaje
Voltios
Largo total del cordón
en metros (pies)
120 V 7,6 (25) 15,2 (50) 30,5 (100) 45,7 (150)
240 V 15,2 (50) 30,5 (100) 61,0 (200) 91,4 (300)
MásdeNo más
de
AWG
0 6 18 16 16 14
6 10 18 16 14 12
10 12 16 16 14 12
12 16 14 12 No recomendado
ADVERTENCIA: Siempre use protección auditiva personal
en conformidad con ANSI S12.6 (S3.19) durante el uso de
este aparato. Bajo algunas condiciones y duraciones de uso, el
Page 18

Español
ruido producido por este producto puede contribuir a la pérdida
auditiva.
ADVERTENCIA: SIEMPRE utilice gafas de seguridad. Los
anteojos de diario NO SON gafas de seguridad. Utilice también
careta o mascarilla si se produce polvo al operar en el área.
PORTE SIEMPRE EQUIPO DE SEGURIDAD CERTIFICADO:
• Protección ocular ANSI Z87.1 (CAN/CSA Z94.3),
• Protección auditiva ANSI S12.6 (S3.19),
• Protección respiratoria NIOSH/OSHA/MSHA.
ADVERTENCIA: Algunos tipos de polvo contienen químicos
que el estado de California sabe producen cáncer, defectos de
nacimiento y otros tipos de daño reproductivo. Algunos ejemplos
de estos químicos son:
• Compuestos de fertilizantes,
• Compuestos de insecticidas, herbicidas y pesticidas ,
• Arsénico y cromo proveniente de madera tratada
químicamente.
Para reducir su exposición a estos químicos, use equipo de
seguridad aprobado tal como máscaras antipolvo diseñadas
especialm
ente para ltrar partículas microscópicas.
Para su conveniencia y seguridad, su aspiradora tiene las
siguientes etiquetas.
EN LA CAJA DEL MOTOR
:
ADVERTENCIA:
•
PARA REDUCIR EL RIESGO DE LESIONES, EL USUARIO
DEBE LEER EL MANUAL DE INSTRUCCIONES. NO HAGA
FUNCIONAMIENTO SIN CONSTRUIR. NO RECOGER
MATERIALES INFLAMABLES, COMBUSTIBLES O CALIENTES.
NO USE ALREDEDOR DE POLVO, LÍQUIDOS O
VAPORES EXPLOSIVOS. LOS DISPOSITIVOS
ELÉCTRICOS PRODUCEN ARCOS O CHISPAS
QUE PUEDEN O EXPLOSION. NO UTILICE EN
ESTACIONES DE LLENADO O BIEN QUE EL
GASOLINA SE GUARDE O SE DISPENSA. NO
VACÚE MATERIALES TÓXICOS O CARCINÓGENOS
U OTROS MATERIALES DE ENFERMEDADES DE
SALUD COMO ASBESTO O PESTICIDAS. UTILICE
SIEMPRE LA PROTECCIÓN RESPIRATORIA Y LOS
OJOS ADECUADOS. PARA REDUCIR EL RIESGO DE
DESCARGA ELÉCTRICA, NO EXPONGA A LA LLUVIA.
ALMACENE EN EL INTERIOR. CUANDO REPASE,
UTILICE SÓLO PIEZAS DE REPUESTO IDÉNTICAS.
NO SE DEBE USAR COMO UN TABURETE DE PASO.
GUARDE ESTAS
INSTRUCCIONES
18
Page 19

19
INSTRUCCIONES DE FUNCIONAMIENTO
DESEMBALAJE Y CONFIGURACIÓN
1.Libere la traba de la tapa con un movimiento hacia el exterior,
retire la tapa y algunos accesorios que podrían expedirse en el
tanque.
2.Ensamble las ruedas siguiendo las instrucciones en este manual.
3.Antes de colocar la tapa con el motor, consulte este manual
para asegurarse de que tiene los filtros apropiados instalados
para la limpieza.
4.Coloque la tapa con el motor y presione con el pulgar en cada
traba hasta que cierre firmemente en su lugar. Asegúrese de qu
e
todas las trabas sujetan firmemente la tapa.
5.Inserte el extremo de la manguera de aire en la entrada del
tanque.
6.Conecte las extensiones al extremo de la manguera. Aplicar
presion ligera hasta que la conneccíon este fija.
7.Conecte uno de los accesorios para limpieza(según sus
necesidades de limpieza) en el extremo libre de la extensión.
8.Conecte el cable eléctrico en el tomacorriente de pared. Su
aspiradora esta lista para usarr.
Español
ADVERTENCIA:
Inflamables o polvo explosivo en el aire. Los gases o vapores
inflamables incluyen, entre otros: Líquidos de encendedores,
limpiadores tipo solvente, pinturas a base de aceite, gasolina,
alcoholyrociadores en aerosol. Los polvos explosivos incluyen,
entre otros: Carbón, magnesio, aluminio y pólvora o pólvora
cilíndrica. No aspire polvos explosivos, líquidos inflamables o
combustibles ni cenizas calientes. No use esta aspiradora como
rociador de líquidos inflamablesocombustibles. Para reducir el
riesgo de pe
ligros para la salud debido a vaporesopolvo, no
aspire materiales tóxicos.
ADVERTENCIA:
El funcionamiento de cualquier vac de la utilidad puede resultar
en objetos extraños siendo soplado en los ojos, lo que puede
resultar en lesiones oculares graves. Siempre use gafas de
seguridad que cumplan con ANSI Z87.1 (o en Canadá,
CSA Z94.3) antes de comenzar la operación.
).
Page 20

Español
ASPIRADO EN SECO
INSTALACIÓN DEL FILTRO DE CARTUCHO
NOTA
Se necesita un filtro seco para recoger el material seco. Si usa la
aspiradora para aspirar polvo cuando el filtro está mojado, este se
obstruirá rápidamente y la limpieza será muy difícil. Si el filtro se
moja, reemplácelo antes de continuar aspirando.
El filtro de cartucho puede utilizase para la aspiración de materiales
líquidos o sólidos; las instalación es la misma para ambos.
1. Con la cubierta del depóposito en posición invertida, deslice el
filtro de cartucho hacia abajo sobre el alojamien
to de la tapa,
empujando hasta que el filtro se selle contra la cubierta.
2. Gire la perilla del retenedor del filtro en sentido horario para
apretar, bloqueando el filtro en su lugar.
3. Para quitar el filtro para la limpieza, gire la perilla del filtro en
sentido contrario a las agujas del reloj hasta sentir la señal táctil
y auditiva y asegúrese de que la flecha del botón se alinee con
el icono "Desbloquear" de la tapa del filtro y deslice el cartucho
de la jaula . then grasp the step of knob tightly with fingers to pull
the cartridge filter out off the cage.
4. Para limpiar el filtro de cartucho, retire la suciedad sacudiendo,
cepillando o enjuagandolo(desde el interior hacia fuera del filtro)
con agua, deje que se seque por completo(approximadamente
24 horas) antes de volver a insta arlo.
1. El filtro debe estar siempre en la posición correcta para reducir
el riesgo de fugas y posibles daños a la aspiradora. Asegúrese
de que el filtro esté cubriendo completament
e la caja del filtro y
que el aro de la abrazadera esté lo más cerca posible de la tapa.
Asegúrese de que no haya espacios entre el filtro y la tapa.
Es muy importante ensamblar el filtro a la caja sin dejar ninguna
fuga o gotera. Cualquier fuga permitirá que la suciedad aspirada
sea soplada hacia fuera del puerto de soplado y de vuelta en el
aire.
2. Cuando use su aspiradora para aspirar polvo fino, será
necesario vaciar el tanque para polvo y limpiar o reemplazar el
filtro en intervalos más frecuentes para mantener el máximo
ren
dimiento de la aspiradora.
20
PRECAUCIÓN:
Para reducir el riesgo de pérdida auditiva, use protectores
auriculares cuando Usar el vac por horas extendidas o al usarlo
en un área ruidosa. La unidad está lista para aspirar o soplar en
seco. Después de conectar el El cable de alimentación en el
receptáculo de la pared, encienda la unidad. La posición del
interruptor con 1 cintas de gofrado es la posición "ON".
APAGADOAPAGADO ENCENDIDOENCENDIDO
Bloquear
Page 21

Español
3. Esta aspiradora para seco/mojado está quipada con un
mecanismo de flotador que se eleva automáticamente para cortar
el flujo de aire cuando el líquido en el tanque alcanza un nivel
predeterminado. Cuando ocurra esto, apague la aspiradora,
FUNCIONAMIENTO DE ASPIRACIÓN DE LÍQUIDOS
Elimine toda la suciedad y la suciedad que se encuentre en el
tanque. El vacío requiere solo un mínimo de conversión cuando
se pasa de una aspiración seca a húmeda. Retire todo el filtro
de uso seco de la aspiradora. Se puede usar un filtro de
cartucho limpio para aspirar pequeñas cantidades de líquidos.
Para obtener los mejores resultados al aspirar grandes
cantidades de líquido, retire el filtro del cartucho. Al aspirar
líquidos que contengan desechos, se recomienda comprar un
filtro de espuma e instalarlo sobre la caja del filtro. El filtro de
espuma se puede comprar visitando nuestro sitio web en
www.dewalt.com, comunicándose con nuestro departamento de
servicio al cliente o comprando en su distribuidor local DEWALT.
21
INSTALACIÓN DE LA BOLSA DE FILTRO DESECHABLE
1. Deslice la abertura del collar de cartón firmemente sobre el
deflector del puerto de aspiración, hasta que se detenga contra
la pared del deflector.
2. Coloqu
e la bolsa de modo que se distribuya en todo el interior
del tanque.
3. Vuelva a colocar y asegurar el cabezal en el tanque.
Bolsa de polvo
desechable
NOTA:
Si el filtro ha sido utilizado para aspiración de líquidos, se deberá
limpiarydejar secar antes de utilizarlo para la aspiración de sólidos.
Coloque la cubierta del tanque al revés.Quite el manguito
deslizándolo hacia arriba y fuera del ajustador interno de la
bolsa.
2. Sacuda el polvo sobrante del manguito con un rápido
movimiento de arriba a abajo.
NOTA:
LOS ACCESORIOS PARA LA ASPIRACIÓN DE SÓLIDOS
DEBEN LAVARSE PERIÓDICAMENTE, ESPECIALMENTE
DESPUÉS DE ASPIRAR LÍQUIDOS, DERRAMES PEGAJOSOS
EN LA COCINA. ESTO PUEDE IR ACOMPAÑADO DE UNA
SOLUCIÓN TIBIA DE AGUA Y JABÓN. DESPUÉS DE
COMPLETAR LA ASPIRACIÓN DE LÍQUIDOS, LEVANTE LA
MANGUERA SOBRE LA ASPIRADORA PARA PERMITIR QUE
CUALQUIER LÍQUIDO EN LA MANGUERA DRENE HACIA EL
TANQUE ANTES DE APAGARLA. EL INTERIOR DEL TANQUE
DEBE LIM PIARSE PERIÓDICAMENTE.
1. Siempre desconecte el enchufe del receptáculo de pared antes
de quitar la cubierta del tanque. Coloque la cubierta del tanque.
Cuando recoja grandes cantidades de líquido, recomendamos
retirar el filtro. Si el filtro no se retira, se saturará y podría aparecer
niebla en el escape. Para entonces,usted deberáó secar el
manguitode cartucho o manguito de líquido alrededor
de la cubierta. Después de terminarde aspirar líquidos,levante la
ma
nguera para drenar
cualquier exceso de líquido en el tanque
antes de apagarla. Manguito debe limpiarse periódicamente como
se describe en los siguientes pasos:
cambiarlo el
Page 22

22
Español
ADVERTENCIA:
Para reducir el riesgo de lesiones debido a arranques
accidentales, desenchufe el cable de alimentación antes vaciar
l tanque para polvo.
1. Retire el ensamble del cabezal de alimentación de la
aspiradora para seco/mojado jalando hacia fuera los
sujetadores de la tapa ubicados a cada lado de la aspiradora.
Retire el ensamble del cabezal de alimentación.
2. Vacíe el contenido del tanque en el contenedor de residuos
adecuado.
NOTA: SI SE ACCIDENTALMENTE SE TIRA, EL VACÍO
PODRÍA CERRAR LA SUCCIÓN. Si esto ocurre, coloque VAC
EN POSICIÓN ACTUAL Y DESLIG
UE EL INTERRUPTOR.
ESTA VOLUNTAD PERMITIR AL FLOTADOR VOLVER A SU
POSICION NORMAL, Y USTED PODRÁ CONTINUAR LA
OPERACIÓN.
Su aspiradora cuenta con una característica de soplado. Tiene la
capacidad de soplar aserrín y otros residuos. Puede usarse para
soplar polvo y suciedad de garajes o de patios y entradas de
garaje. Siga los siguientes pasos para usar su aspiradora como
soplador.
1. Ubique el puerto de soplado en su aspiradora.
2. Insert
e un extremo de la manguera de 1-7/8 in. x 7 ft.
(4,76 cm x 2,1 m) en el puerto de soplado.
3. Encienda la aspiradora.
Use una mascarilla antipolvo si el soplado provoca polvo que
pueda ser inhalado.
Para reducir el riesgo de pérdida auditiva,use protectores para
los o
ídos cuando use la aspiradora/soplador por varias horas o en
un entorno bullicioso.
FUNCIONAMIENTO DE SOPLADO
ADVERTENCIA:
Siempre use gafas de seguridad que cumplan con ANSI Z87.1
(o en Canadá CSA Z94.3) cuando utilice como soplador.
ADVERTENCIA:
Para evitar lesiones a los transeúntes, manténgalos alejados de
la suciedad soplada.
desenchufe el cable de alimentación y vacíe el tanque para polvo.
Sabrá que el flotador ha cerrado el flujo de aireyque la
succión se detieneyel ruido del motor se vuelve más agudo
debido a la disminución de la velocidad del motor. La
capacidad de líquido puede variar según la cantidad que se aspire.
IMPORTANTE:
Para reducir el riesgo de daños a la aspiradora, no haga
funcionar el motor con el flotador en la posición elevada.
Flotador en la
posición elevada
VACIADO DEL TANQUE
Page 23

Español
NOTA:
Limpie el filtro en un área abierta. La limpieza se debe efectuar en
exteriores y no en áreas habitadas.
CUIDADO Y MANTENIMIENTO
REEMPLAZO DEL FILTRO
Para reducir el riesgo de lesiones debido a arranques accidentales,
desenchufe el cable de alimentación antes de cambiar o limpiar el
filtro. Debe limpiar el filtro a menudo para mantener el máximo
rendimiento de la aspiradora.
IMPORTANTE:
Para evitar daños en la rueda del ventilador y en el motor, vuelva a
instalar siempre el filtro de Clean Connect
TM
antes de usar la
aspiradora para pastillas secas y pastillas mojadas.
IMPORTANTE:
Después de limpiar, revise si el filtro tiene desgarraduras u orificios
pequeños. No use la aspiradora si un filtro tiene orificios o
desgarraduras. Incluso un pequeño orificio puede causar que salga
mucho polvo de su aspiradora. Reemplácelo inmediatamente.
NOTA:
Antes de instalar el filtro en la aspiradora, limpie el área de la tapa
para que el filtro se cierre contra la tapa y evite que las partículas
pequeñas salgan de la bolsa del filtro. Si el filtro está limpio y no está
dañado, reemplácelo en la jaula del filtro. Si no puede reutilizarse,
coloque un nuevo filtro sobre la jaula del filtro.
ADVERTENCIA:
ADVERTENCIA:
No retire la caja del filtro ni el flotador. El flotador evita que el
agua ingrese al propulsor y que dañe el motor. La caja evita que
LIMPIEZA
Para mantener su aspiradora para seco/mojado con una
apariencia perfecta, limpie la superficie exterior con un paño
humedecido con agua tibia y jabón suave.
Para limpiar el tanque:
ALMACENAJE
Antes de almacenar su aspiradora, el tanque para polvo debe
vaciarse y limpiarse. El cable debe enrollarse y colgarse en la
unidad y los accesorios deben gua
rdarse en bolsa de malla
para que estén a la mano. La aspiradora se debe almacenar en
interiores.
1. Retire los desechos.
2. Lave el tanque completamente con agua tibia y jabón suave.
3. Limpie con un paño seco.
los dedos toquen el propulsor en movimiento.
23
Page 24

24
ADVERTENCIA!
SOLUCIÓN DE PROBLEMAS
PARA REDUCIR EL RIESGO DE LESIONES CAUSADAS POR
LAS PIEZAS EN MOVIMIENTO Y/O DESCARGAS ELÉCTRICAS,
COLOQUE EL INTERRUPTOR DE ENCENDIDO EN LA
POSICIÓN DE APAGADO Y DESCONECTE EL ENCHUFE CON
PUESTA A TIERRA DEL TOMACORRIENTE ANTES DE
PROCEDER CON LA SOLUCIÓN DE PROBLEMAS.
Los problemas menores se pueden arreglar generalmente sin
llamar al Servicio al Cliente.
VISTA DETALLADA/LISTA DE PIEZAS
Español
El motor no funciona
Compruebe el cable de alimentación, los enchufes
y la toma de corriente.
Asegúrese de que el interruptor de encendido / apagado esté
en la posición ON posición
)
)
La capacidad de
succión disminuye
Quitar los bloqueos en la boquilla de succión,
Tubo de aspiración, manguera de succión o filtros.
Reemplace la bolsa de papel o de lana.
Compruebe la correcta instalación de los filtros.
Limpie o reemplace los filtros.
El vacío deja de
funcionar
Se ha disparado la sobrecarga térmica:
1. Apague la aspiradora y desconéctela
Aspirador de la fuente de energía.
2. Vacíe el recipiente, si es necesario.
3. Deje que la unidad se enfríe.
4. Enchufe el cable de alimentación en un
Salida y encienda el interruptor de
encendido / apagado posición(
)
Reiniciar llamada 1-888-899-0146
Probar. Si el vacío no
El polvo sale mientras
se aspira
Compruebe la correcta instalación de los filtros.
Asegúrese de que los filtros no estén
dañados; Reemplazar si es necesario.
Asegúrese de que los sellos del filtro estén en
su lugar y estén seguros.
PROBLEMA SOLUCIÓN
Vacíe el recipiente, consulte Vaciar el tanque
en las instrucciones de uso
Page 25

Español
25
1
1
1
1
1
1
Manejar
Botón Interruptor
Tapa superior
Cubierta accesoria
La vivienda del viento
Puerto de vacío
Descripción
Cable de alimentación
1
1
1
1
2
1
1
1
1
1
Cierre de la tapa
Motor
Depósito de polvo
Al amparo
Accesorio Soporte delantero
Accesorio Soporte trasero
Barra de alambre sinuoso
Esponja
1
2
3
4
5
6
7
8
9
10
11
12
13
14
15
16
Artículo Cantidad
GARANTÍA
Alton Industry Ltd. Group
Garantía Limita de 3 año
Esta garantía cubre cualquier defecto en materiales o habilidad del producto incluido.
Alton el Grupo de Industrias reparará o sustituirá cualquier material defectuoso debido a
la artesanía del producto. Esta garantía no cubre ningún problema causado por el mal
uso, el abuso, accidentes o actos del dios, como inundaciones o huracanes. También
daños y perjuicios consiguientes y secundarios no son cubiertos conforme a esta
garantía. La cobertura se termina si usted vende o de otra manera transfiere la propiedad.
Si usted siente que usted tiene un producto defectuoso por favor envíe el producto atrás,
el franqueo pagado con una copia de su recibo para dirigirse debajo. Por favor llámese
1-888-899-0146 para instrucciones antes del devolver este artículo a la tienda o el enviar
atrás: Alton Industry Ltd. Group
1031 North Raddant Rd
Batavia, Illinois 60510
Inspeccionaremos el producto y nos pondremos en contacto con usted dentro de 72 horas
para darle los resultados de nuestra inspección. Reservamos el derecho de reparar o
sustituir el producto en nuestra discreción. Sin embargo, podemos sustituir el producto
por uno de similar, pero no rasgos exactos.
Partes y Información de Servicio disponible llamada Alton Industries at 1-888-899-0146.
Esta garantía le da derechos específicos legales, y usted puede tener también otros
derechos que varían de estado al estado.
Filtro de jaula
Page 26

Español
26
Copyright © 2018 DEWALT.
D
EWALT
®
and the DEWALT Logo are trademarks of the DEWALT Industrial Tool Co., or an affiliate thereof and are used
under license.
The yellow/black color scheme is a trademark for D
E
WALT power tools & accessories.
Copyright © 2018 DE
WALT.
D
EWALT
®
y el logotipo de DeWALT son marcas comerciales de DEWALT Industrial Tool Co., o una filial del mismo y se
usan bajo licencia.
El gráfico de color negro y amarillo es una marca registrada para las herramientas eléctricas y los accesorios de
D
EWALT.
Copyright © 2018 D
E
WALT.
D
E
WALT® et le logo DEWALT sont des marques de commerce de DEWALT Industrial Tool Co. ou d'une société affiliée à
cette dernière et sont utilisés sous licence.
L’agencement de couleurs jaune et noir est une marque de commerce des outlils électriques et accessorires
D
EWALT.
 Loading...