

Page 1
DEWALT Industrial Tool Co., 701 East Joppa Road, Baltimore, MD 21286 Printed in U.S.A. (FEB00-CD-1) Form No. 384286-01
Copyright © 1997,2000
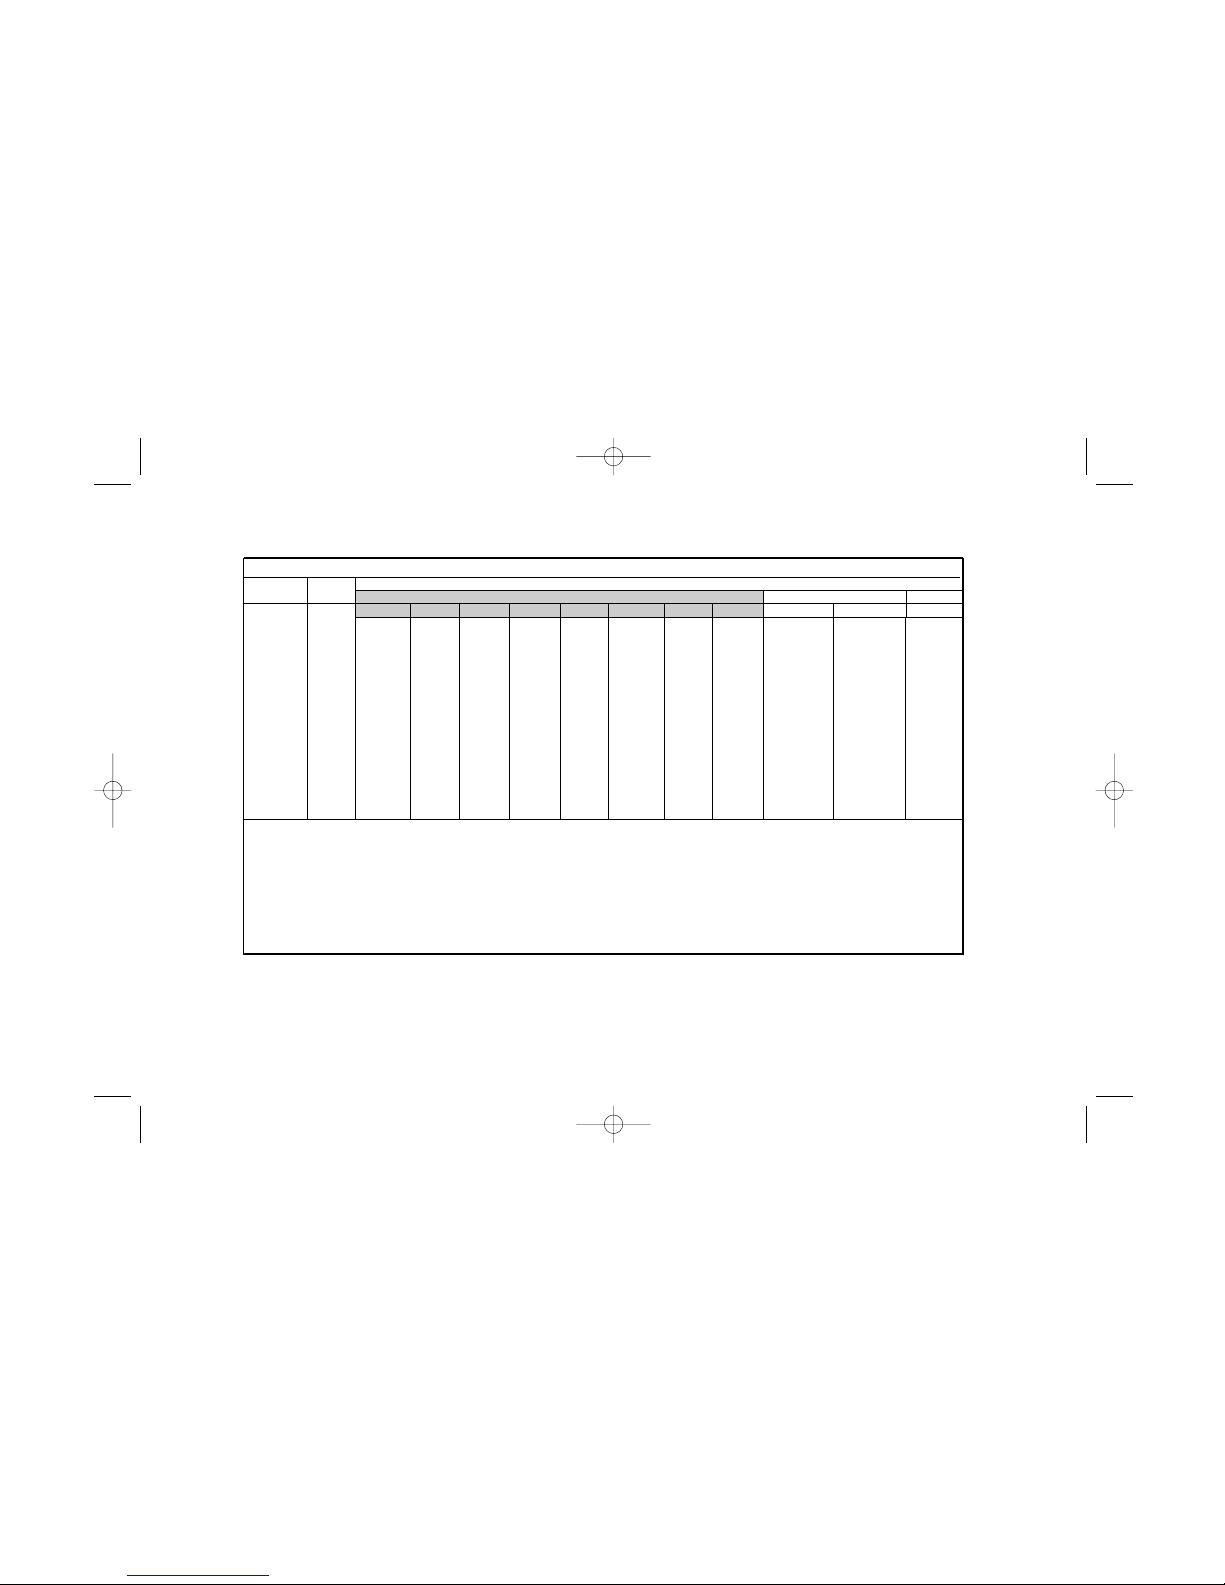
DEWALT Battery and Charger Systems
Batt. Output Chargers/Charge Time - Chargeurs/Durée de charge (Minutes) - Cargadores de pilas/Tiempo de carga (Minutos)
Model# Volts 120 Volts 230 Volts 12 Volts
DW9106 DW9118 DW9107 DW9108 DW9116 DW9117 DW911 DW0245 DW9108220 DW9116220 DW9109
DW0240 24 X X X X X X X 60 X X X
DW9096 18 X X X 60 60 22 60 X X X X
DW9095 18 X X X 45 45 15 45 X 45 45 45
DW9098 18 X X X 30 30 12 30 X 30 30 30
DW9091 14.4 60 90 45 45 45 15 45 X 45 45 45
DW9094 14.4 42 60 30 30 30 12 30 X 30 30 30
DW9051 13.2 43 X X X X X X X X X X
DW9071 12 60 90 45 45 45 15 45 X 45 45 45
DW9072 12 42 60 30 30 30 12 30 X 30 30 30
DW9050 12 43 X X X X X X X X X X
DW9061 9.6 60 90 45 45 45 15 45 X 45 45 45
DW9062 9.6 42 60 30 30 30 12 30 X 30 30 30
DW9048 9.6 40 X X X X X X X X X X
DW9057 7.2 42 60 30 30 30 12 30 X 30 30 30
DW9046 7.2 40 X X X X X X X X X X
X Indicates that the battery pack is not compatible with that specific charger.
X indique que le bloc-piles n’est pas compatible avec ce chargeur.
Una “X” indica que el paquete de pilas no es compatible con ese cargador.
All charge times are approximate. Actual charge time may vary. Read the instruction manual for more specific information.
Les durÈes de charge sont approximatives; la durÈe de charge rÈelle peut varier. Lire le manuel d’utilisation pour obtenir des renseigne-
ments plus prÈcis.
Los tiempos de carga son aproximados. La duraciÛn de carga real puede variar. Para obtener una informaciÛn m·s precisa, lea el manual
de utilizaciÛn.
DW936/384286-01 3/15/00 8:25 AM Page 2
Page 2

INSTRUCTION MANUAL
GUIDE D’UTILISATION
MANUAL DE INSTRUCCIONES
DW930/DW935/DW936
Cordless Trim Saws
Ébouteuses sans fil
Sierras circulares inalámbricas
INSTRUCTIVO DE OPERACIÓN, CENTROS DE SERVICIO Y PÓLIZA
DE GARANTÍA. ADVERTENCIA: LÉASE ESTE INSTRUCTIVO ANTES
DE USAR EL PRODUCTO.
DW936/384286-01 3/15/00 8:25 AM Page 3
Page 3
IF YOU HA VE ANY QUESTIONS OR COMMENTS ABOUT THIS
OR ANY D
EWALT TOOL, CALL US TOLL FREE AT:
1-800-4-DEWALT (1-800-433-9258)
General Safety Rules – For All Battery
Operated Tools
WARNING! Read and understand all instructions. Failure to
follow all instructions listed below may result in electric shock, fire
and/or serious personal injury.
SAVE THESE INSTRUCTIONS
WORK AREA
• Keep your work area clean and well lit. Cluttered benches and
dark areas invite accidents.
• Do not operate power tools in explosive atmospheres, such as
in the presence of flammable liquids, gases, or dust. Power
tools create sparks which may ignite the dust or fumes.
• Keep bystanders, children, and visitors away while operating
a power tool. Distractions can cause you to lose control.
ELECTRICAL SAFETY
• Do not abuse the cord. Never use the cord to carry the tool. Keep
cord away from heat, oil, sharp edges or moving parts. Replace
damaged cords immediately. Damaged cords may create a fire.
• A battery operated tool with integral batteries or a separate
battery pack must be recharged only with the specified
charger for the battery. A charger that may be suitable for one
type of battery may create a risk of fire when used with another
battery.
• Use battery operated tool only with the specifically
designated battery pack. Use of any other batteries may create
a risk of fire.
English
IF YOU HAVE ANY QUESTIONS OR COMMENTS ABOUT THIS
OR ANY D
EWALT TOOL, CALL US TOLL FREE AT:
1-800-4-DEWALT (1-800-433-9258)
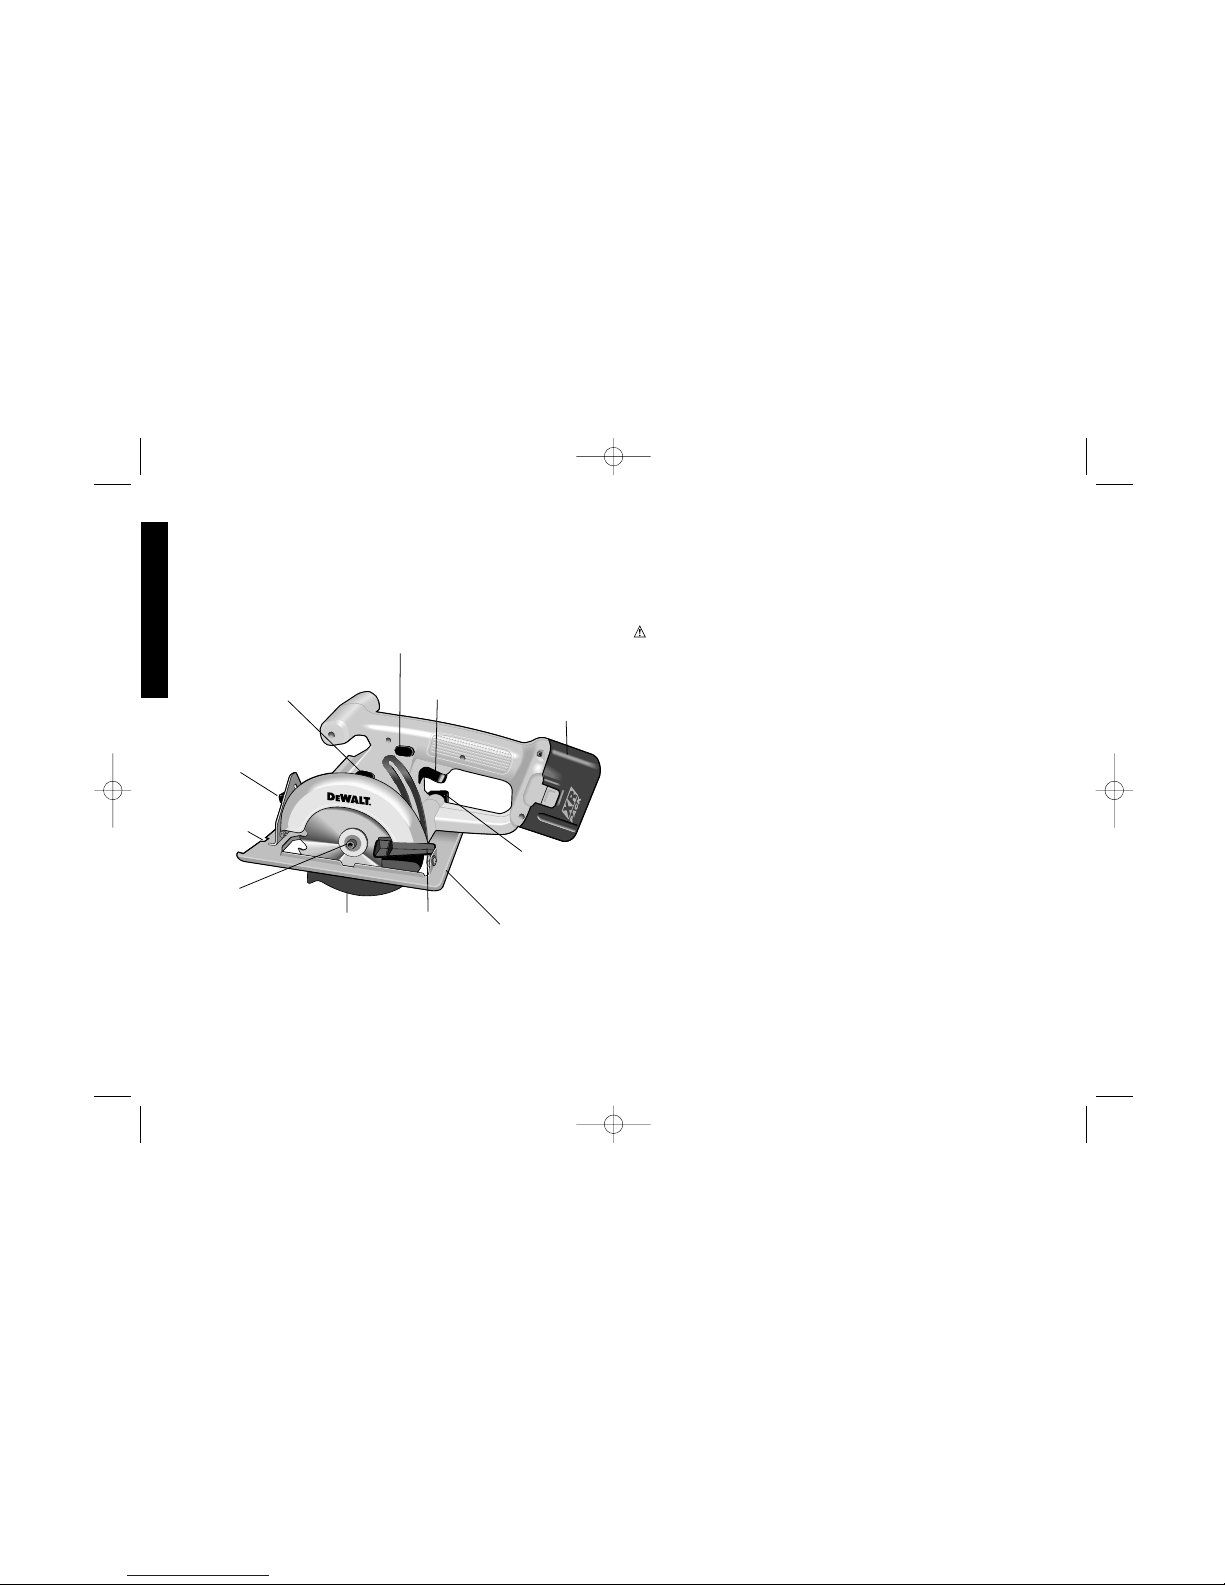
R
SWITCH LOCK OFF
BUTTON
BATTERY
PACK
SHOE
TRIGGER
SWITCH
DEPTH
ADJUSTMENT
KNOB
LOWER
GUARD
RETRACTING
LEVER
LOWER
GUARD
BLADE LOCK
BUTTON
BEVEL
ADJUSTMENT
KNOB
KERF
INDICATOR
BLADE CLAMPING
SCREW
DW930 12.0 Volt Cordless Trim Saw 2500 RPM
DW935 14.4 Volt Cordless Trim Saw 3000 RPM
DW936 18.0 Volt Cordless Trim Saw 3200 RPM
DW935 shown
DW936/384286-01 3/15/00 8:25 AM Page 4
Page 4

1
English
PERSONAL SAFETY
• Stay alert, watch what you are doing and use common sense
when operating a power tool. Do not use tool while tired or under
the influence of drugs, alcohol, or medication. A moment of
inattention while operating power tools may result in serious
personal injury,
• Dress properly. Do not wear loose clothing or jewelry .Contain
long hair. Keep your hair, clothing, and gloves away from moving
parts. Loose clothing, jewelry, or long hair can be caught in moving
parts.
• Avoid accidental starting. Be sure switch is in the locked or
off position before inserting battery pack. Carrying tools with
your finger on the switch or inserting the battery pack into a tool
with the switch on invites accidents.
• Remove adjusting keys or wrenches before turning the tool
on. A wrench or a key that is left attached to a rotating part of the
tool may result in personal injury.
• Do not overreach. Keep proper footing and balance at all times.
Proper footing and balance enables better control of the tool in
unexpected situations.
• Use safety equipment. Always wear eye protection. Dust
mask, non-skid safety shoes, hard hat, or hearing protection must
be used for appropriate conditions.
TOOL USE AND CARE
• Use clamps or other practical way to secure and support the
workpiece to a stable platform. Holding the work by hand or
against your body is unstable and may lead to a loss of control.
• Do not force tool. Use the correct tool for your application. The
correct tool will do the job better and safer at the rate for which it is
designed.
• Do not use tool if switch does not turn it on or off. A tool that
cannot be controlled with the switch is dangerous and must be
repaired.
• Disconnect battery pack from tool or place the switch in the
locked or off position before making any adjustments,
changing accessories, or storing the tool. Such preventative
safety measures reduce the risk of starting the tool accidentally.
• Store idle tools out of reach of children and other untrained
persons. Tools are dangerous in the hands of untrained users.
• When battery pack is not in use, keep it away from other
metal objects like: paper clips, coins, keys, nails, screws, or
other small metal objects that can make a connection from
one terminal to another. Shorting the battery terminals together
may cause sparks, burns, or a fire.
• Maintain tools with care. Keep cutting tools sharp and clean.
Properly maintained tools, with sharp cutting edges are less likely
to bind and are easier to control.
• Check for misalignment or binding of moving parts, breakage
of parts, and any other condition that may affect the tools
operation. If damaged, have the tool serviced before using. Many
accidents are caused by poorly maintained tools.
• Use only accessories that are recommended by the
manufacturer for your model. Accessories that may be suitable
for one tool, may create a risk of injury when used on another tool.
SERVICE
• Tool service must be performed only by qualified repair
personnel. Service or maintenance performed by unqualified
personnel may result in a risk of injury.
• When servicing a tool, use only identical replacement parts.
Follow instructions in the Maintenance section of this manual. Use
of unauthorized parts or failure to follow Maintenance Instructions
may create a risk of shock or injury.
Additional Safety Rules
• Hold tool by insulated gripping surfaces when performing an
operation where the tool may contact hidden wiring. Contact
with a “live” wire will also make exposed metal parts of the tool
“live” and shock the operator.
DW936/384286-01 3/15/00 8:25 AM Page 1
Page 5
2
• When working on a ladder or on scaffolding be sure to lay the
tool down on its side when not in use. Some tools with large
battery packs will stand upright but may be easily knocked over.
• The label on your tool may include the following symbols.
V....................volts
A....................amperes
Hz..................hertz
W ..................watts
min ................minutes
................alternating current
..............direct current
n
o..................no load speed
..................
Class II Construction
…/min............revolutions or reciprocation per minute
..................earthing terminal
..................safety alert symbol
WARNING: Use of this tool can generate dust containing
chemicals known to cause cancer, birth defects or other
reproductive harm. Use appropriate respiratory protection.
Important Safety Instructions for Battery
Packs
The battery pack is not fully charged out of the carton! First
read the safety instructions below. Then follow charging notes
and procedures.
READ ALL INSTRUCTIONS.
• Do not incinerate the battery pack even if it is severely damaged or is
completely worn out.The battery pack can explode in a fire.
• A small leakage of liquid from the battery pack cells may occur under
extreme usage or temperature conditions. This does not indicate a
failure. However, if the outer seal is broken and this leakage gets on
your skin:
a. Wash quickly with soap and water.
b. Neutralize with a mild acid such as lemon juice or vinegar.
c. If battery liquid gets into your eyes, flush them with clean water for
a minimum of 10 minutes and seek immediate medical attention.
(Medical note: The liquid is 25-35% solution of potassium hydroxide.)
• Do not carry extra battery packs in aprons, pockets, or tool boxes along
with other metal objects. Battery pack could be short circuited causing
damage to the battery pack and possibly causing severe burns or fire.
• Charge the battery packs only in D
E
WALTchargers.
• NOTE: The batteries in your battery pack are the nickel–cadmium
type. Cadmium is considered to be a toxic material by the
Environmental Protection Agency. Before disposing of damaged or
worn out Nickel–Cadmium battery packs, check with your state
Environmental Protection Agency to find out about special restrictions
on the disposal of these battery packs or return them to a D
EWALT
certified service center for recycling.
• DO NOT store or use the tool and battery pack in locations where the
temperature may reach or exceed 105°F (such as outside sheds or
metal buildings in summer).
DANGER: Never attempt to open the battery pack for any reason.
If battery pack case is cracked or damaged, do not insert into
charger. Danger of electric shock or electrocution. Damaged battery
packs should be returned to service center for recycling.
The RBRC™ Seal
The RBRC™ (Rechargeable Battery Recycling Corp
oration) Seal on the nickel-cadmium battery (or battery
pack) indicates that the costs to recycle the battery (or
battery pack) at the end of its useful life have already
been paid by D
EWALT. In some areas, it is illegal to
place spent nickel-cadmium batteries in the trash or
municipal solid waste stream and the RBRC program provides an
environmentally conscious alternative.
RBRC in cooperation with D
EWALT and other battery users, has
English
DW936/384286-01 3/15/00 8:25 AM Page 2
Page 6
established programs in the United States to facilitate the collection
of spent nickel-cadmium batteries. Help protect our environment
and conserve natural resources by returning the spent nickelcadmium battery to an authorized D
EWALTservice center or to your
local retailer for recycling. You may also contact your local recycling
center for information on where to drop off the spent battery.
Important Safety Instructions for Battery
Chargers
SAVE THESE INSTRUCTIONS - This manual contains important
safety instructions for D
EWAL T battery chargers.
• Before using battery charger, read all instructions and cautionary
markings on battery charger, battery and product using battery.
CAUTION:To reduce the risk of injury, charge only D
EWAL T nickel
cadmium rechargeable batteries. Other types of batteries may
burst causing personal injury and damage.
CAUTION: Under certain conditions, with the charger plugged in to
the power supply, the exposed charging contacts inside the charger
can be shorted by foreign material. Foreign materials of a
conductive nature such as, but not limited to, steel wool, aluminum
foil, or any buildup of metallic particles should be kept away from
charger cavities. Always unplug the charger from the power supply
when there is no battery pack in the cavity. Unplug charger before
attempting to clean.
DANGER: 120 volts present at charging terminals. Do not probe
with conductive objects. Danger of electric shock or electrocution.
WARNING: Don’t allow any liquid to get inside charger. Electric
shock may result.
• The charger and battery pack are specifically designed to work
together. DO NOTattempt to charge the battery pack with any chargers
other than the ones in this manual.
• These chargers are not intended for any uses other than charging
D
EWALT rechargeable batteries. Any other uses may result in risk of
fire, electric shock or electrocution.
• To reduce risk of damage to electric plug and cord, pull by plug rather
than cord when disconnecting charger.
• Make sure cord is located so that it will not be stepped on, tripped over,
or otherwise subjected to damage or stress.
• An extension cord should not be used unless absolutely necessary.
Use of improper extension cord could result in risk of fire, electric shock,
or electrocution.
• An extension cord must have adequate wire size (AWG or American
Wire Gauge) for safety. The smaller the gauge number of the wire, the
greater the capacity of the cable, that is 16 gauge has more capacity
than 18 gauge. When using more than one extension to make up the
total length, be sure each individual extension contains at least the
minimum wire size.
Recommended Minimum AWG Size for Extension Cords
Total Extension Cord Length (feet)
25 50 75 100 125 150 175
Wire Gauge
18 18 16 16 14 14 12
• The charger is ventilated through slots in the top and the bottom of the
housing. Do not place any object on top of charger or place the charger
on a soft surface that might block the ventilation slots and result in
excessive internal heat. Place the charger in a position away from any
heat source.
• Do not operate charger with damaged cord or plug — have them
3
English
• CHARGING
• CHARGED
• DELAY
DW9115
DANGER:
WARNING:
15 MINUTE CHARGER
FLASHING
ON
FAST FLASH•DEFECTIVE PACK
ON
9.0v
E
X
T
E
N
D
E
D
R
U
N
T
I
M
E
12.0v
E
X
T
E
N
D
E
D
R
U
N
T
I
M
E
DW9115
DANGER:
WARNING:
R
R
R
R
15 MINUTE CHARGER
1 HOUR CHARGERS
DW936/384286-01 3/15/00 8:25 AM Page 3
Page 7

continuously. The pack is fully charged and may be used at this time
or left in the charger.
4. If you select Tune-up™ and then change your mind, remove the
battery from the charger. After 5 seconds, insert the battery into the
charger. The normal charge cycle will commence.
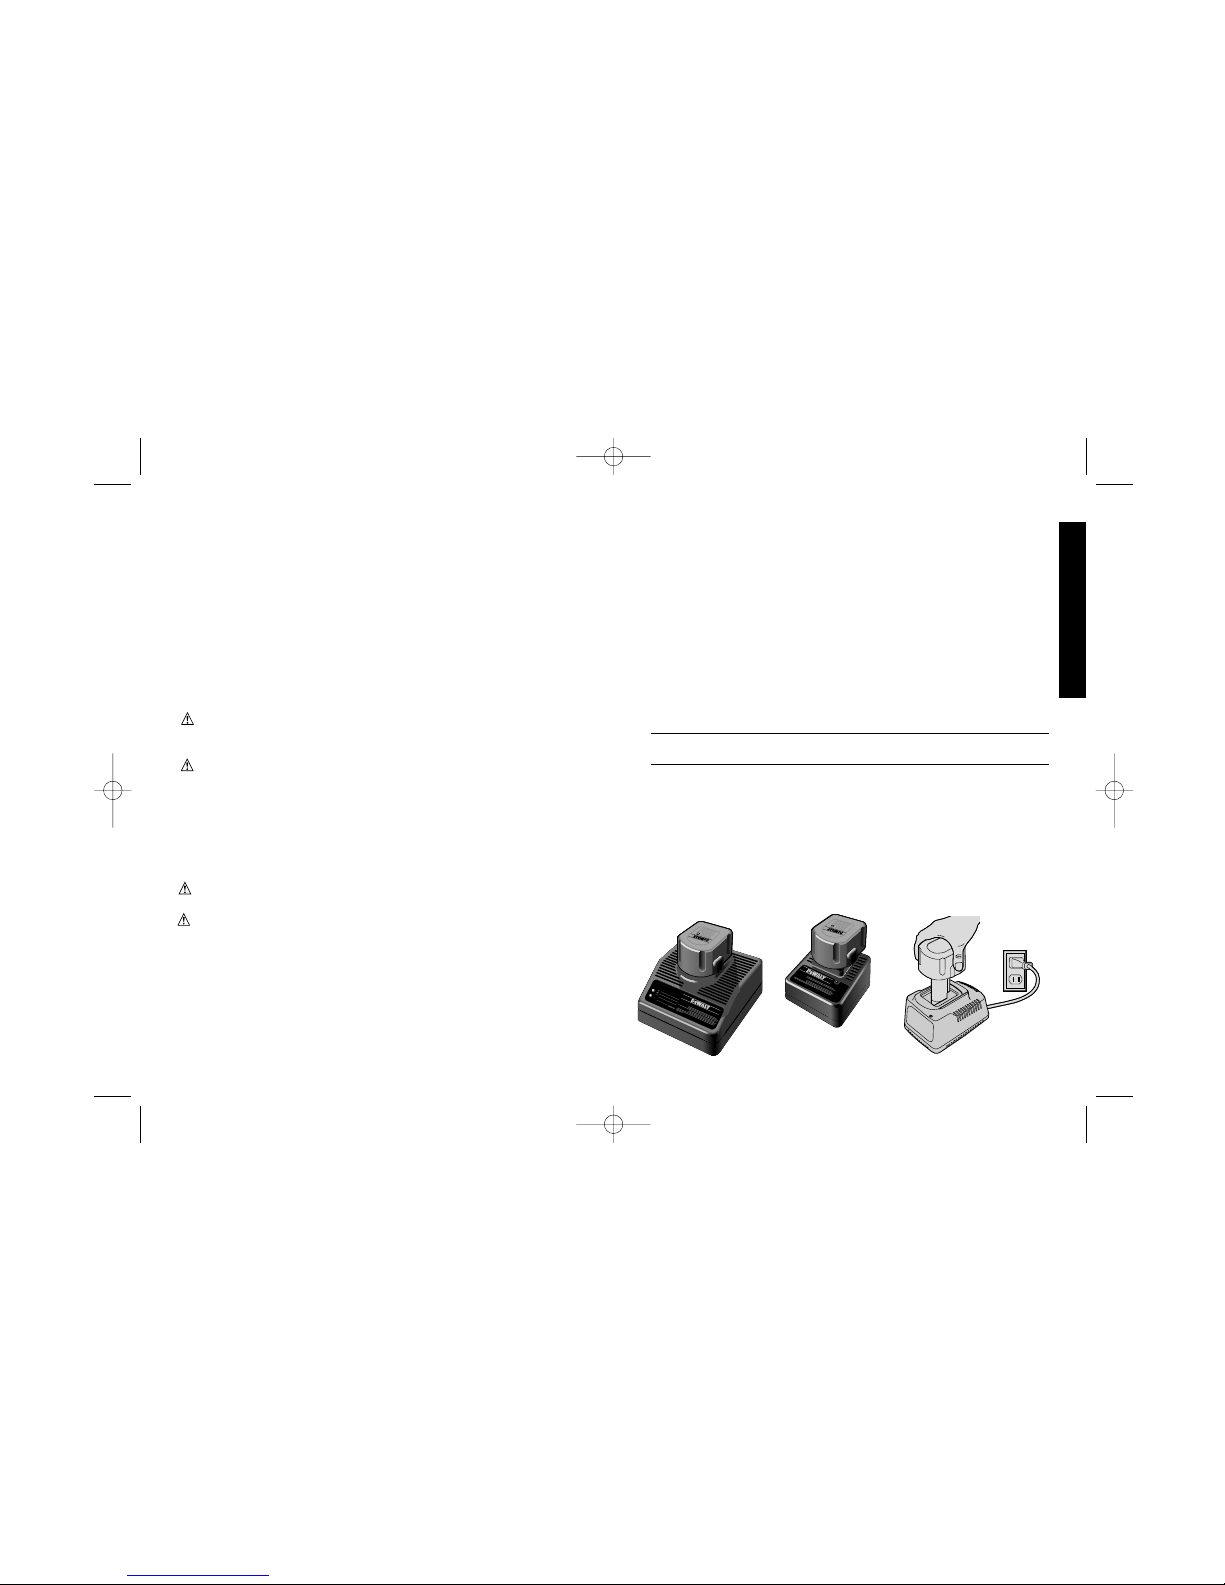
Charging Procedure
1 HOUR CHARGERS
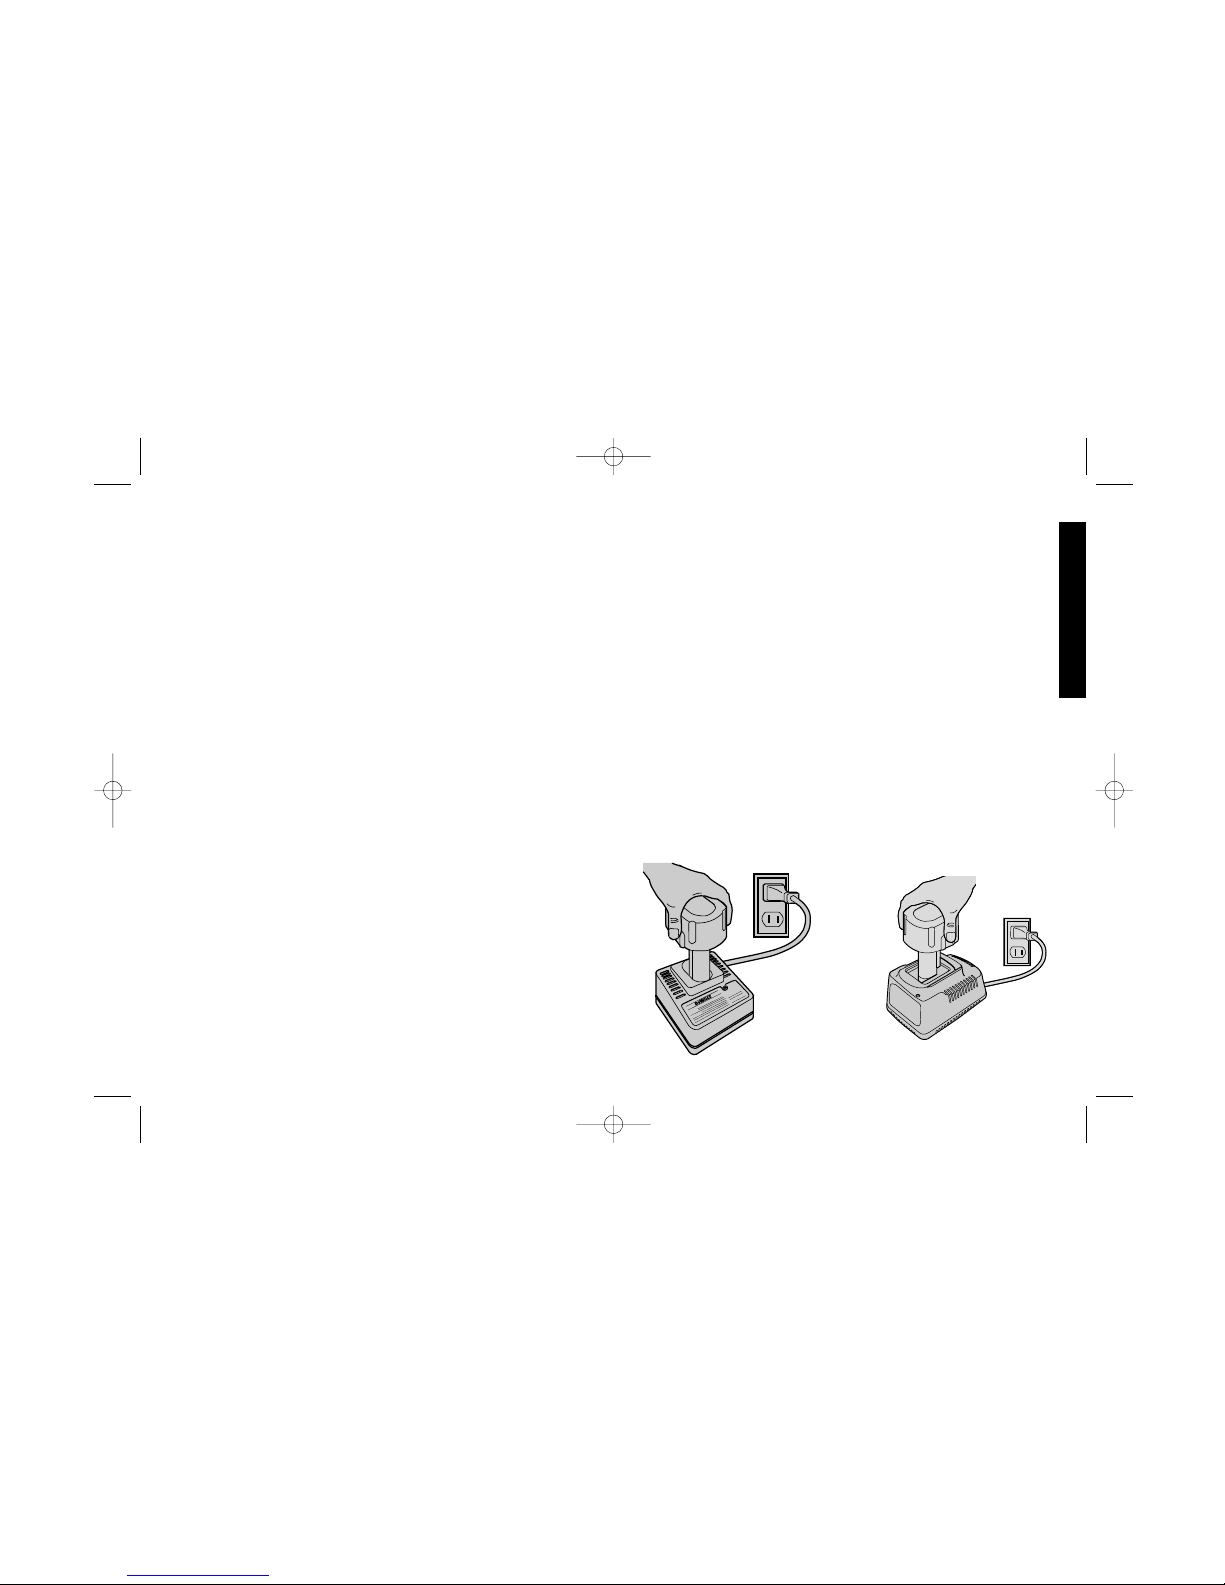
1. Plug the charger into an appropriate power outlet.
2. Insert the battery pack into the charger, as shown in FIG.1,
making sure the pack is fully seated in the charger. The red
(charging) light will blink continuously indicating that the charging
process has started.
3. The battery pack will be fully charged in about 1 hour. The
completion of charge will be indicated by the red light remaining
ON continuously. The pack is fully charged and may be used at
this time or left in the charger.
TROUBLE INDICATORS: These chargers are designed to detect
certain problems that can arise with battery packs which would be
indicated by the red light flashing at a fast rate (and continuous
beeping for 15 Minute Chargers). If this occurs, re-insert battery
pack. If problem persists, try a different battery pack to determine if
the charger is OK. If the new pack charges correctly, then the original
pack is defective and should be returned to a service center for
recycling. If the new battery pack elicits the same trouble indication
as the original, have charger tested at an authorized service center.
PROBLEM POWER LINE
If your charger has a Problem Power Line indicator: When the charger
‘is used with some portable power sources such as generators or
sources that convert DC to AC, the charger may temporarily suspend
operation, flashing the red light with two fast blinks followed by a
pause. This indicates the power source is out of limits.
HOT PACK DELAY
If your charger has a Hot Pack Delay feature: When the charger
4
English
replaced immediately.
• Do not operate charger if it has received a sharp blow, been dropped, or
otherwise damaged in any way; take it to an authorized service center.
• Do not disassemble charger; take it to an authorized service center
when service or repair is required. Incorrect reassembly may result in a
risk of electric shock, electrocution or fire.
• To reduce risk of electric shock, unplug charger from outlet before
attempting any cleaning. Removing the battery pack will not reduce this
risk.
• NEVER attempt to connect 2 chargers together.
• The charger is designed to operate on standard household electrical
power (120 Volts AC). Do not attempt to use it on any other voltage!
This does not apply to vehiculat charger.
Chargers
Your battery can be charged in DEWALT 1 Hour Chargers, 15 Minute
Chargers or Vehicular 12 volt charger. Be sure to read all safety
instructions before using your charger.
Consult chart on back cover for compatibility of chargers and battery
packs.
Using Tune-Up™ Mode
The Tune-up™ mode will equalize or balance the individual cells in
the battery pack at its peak capacity. This cycle takes up to 8 hours to
complete. Battery packs should be tuned up weekly or after 10 to 20
charge/discharge cycles or whenever the pack no longer delivers the
same amount of work.
1. To tune up your battery pack, place the battery in the charger as
usual. The red light will blink continuously indicating that the charge
cycle has started.
2. The Tune-up™Button may be pressed at any time after the charge
has started. The red light will stop blinking momentarily, blink quickly
3 times, and then resume blinking continuously. The charger is
now giving your batteries a tune-up.
3. When the charge cycle has completed, the light will stay on
DW936/384286-01 3/15/00 8:25 AM Page 4
Page 8
detects a battery that is hot, it automatically starts a Hot Pack Delay,
suspending charging until the battery has cooled. After the battery has
cooled, the charger automatically switches to the Pack Charging
mode. This feature ensures maximum battery life. The red light
flashes long, then short while in the Hot Pack Delay mode.
15 MINUTE CHARGERS
1. Plug the charger into an appropriate power outlet. The charger will
beep twice, the red light will blink and go off.
2. Insert the battery pack into the charger, as shown in FIG. 1,
making sure the pack is fully seated in the charger. The red light
will blink and the charger will beep once indicating the charging
process has started.
3. The battery pack will be fully charged in less than 15 minutes
under most conditions. This will be indicated by the red light
remaining ON and 3 beeps. The pack is fully charged and may
be used at this time or left in the charger.
WEAK BATTERY PACKS: The charger can also detect a weak
battery. Such batteries are still usable but should not be expected to
perform as much work. In such cases, about 10 seconds after battery
insertion, the charger will beep rapidly 8 times to indicate a weak
battery condition. The charger will then go on to charge the battery to
the highest capacity possible.
ALL CHARGERS
Leaving the battery pack in the charger: When the red light
remains ON, the charger has switched to its "equalize charge" mode
which lasts approximately 4 hours, after which the charger will switch
to "maintenance charge" mode. The battery pack can be removed at
any time during these charge cycles, but will only be fully charged if
the red light is continuously ON. The charger and battery pack can be
left connected with the red light glowing indefinitely. The charger will
keep the battery pack fresh and fully charged. A battery pack will
slowly lose its charge when kept out of the charger. If the battery pack
has not been kept on maintenance charge, it may need to be
recharged before use. A battery pack may also slowly lose its charge
5
English
if left in a charger that is not plugged into an appropriate AC source.
Important Charging Notes
1. Longest life and best performance can be obtained if the battery
pack is charged when the air temperature is between 65°F and 75°F
(18°- 24°C). DO NOT charge the battery pack in an air temperature
below +40°F(+4.5°C), or above +105°F (+40.5°C). This is important
and will prevent serious damage to the battery pack.
2. The charger and battery pack may become warm to touch while
charging. This is a normal condition, and does not indicate a
problem.
3. If the battery pack does not charge properly — (1) Check current at
receptacle by plugging in a lamp or other appliance, (2) Check to see
if receptacle is connected to a light switch which turns power off
when you turn out the lights. (3) Move charger and battery pack to a
location where the surrounding air temperature is approximately
65°F - 75°F (18°- 24°C). (4) If charging problems persist, take or
send the tool, battery pack and charger to your local service center.
4. The battery pack should be recharged when it fails to produce
sufficient power on jobs which were easily done previously. DO NOT
CONTINUE to use under these conditions. Follow the charging
procedure. You may also charge a partially used pack whenever you
• CHARGING
• CHARGED
• DELAY
15 MINUTE CHARGER
FLASHING
ON
FAST FLASH•DEFECTIVE PACK
ON
DW9115
DANGER:
WARNING:
R
FIG. 1
DW936/384286-01 3/15/00 8:25 AM Page 5
Page 9

• GUARD AGAINST KICKBACK. Kickback occurs when the saw
begins to stall rapidly and is driven back towards the operator. Release
the switch immediately if blade binds or saw stalls. Keep blades sharp.
Don’t force tool. Stay alert. Exercise control. Don’t remove saw from
work during a cut while the blade is moving. A more detailed
explanation of kickback follows in the operation section of this manual.
• LOWER GUARD when necessary for accurate starts, or when pocket
cutting, raise lower guard with the retracting lever.
• ADJUSTMENTS. Before cutting be sure depth and bevel adjustments
are tight.
• USE ONLY CORRECT BLADES. Use only blades with 10mm
diameter arbor. Do not use blades with incorrect size holes. Never
use defective or incorrect blade washers or bolts.
• AVOID CUTTING NAILS. Inspect for and remove all nails from lumber
before cutting.
• CAUTION: When sawing into walls, floors, or wherever “live”
electrical wires may be encountered, DO NOT TOUCH ANY METAL
PARTS OF THE TOOL! Hold the saw only by its plastic handles to
prevent electric shock if you accidentally saw into a live wire.
CAUTION: Some wood contains preservatives such as copper
chromium arsenate (CCA) which can be toxic. When cutting these
materials, extra care should be taken to avoid inhalation and minimize
skin contact.
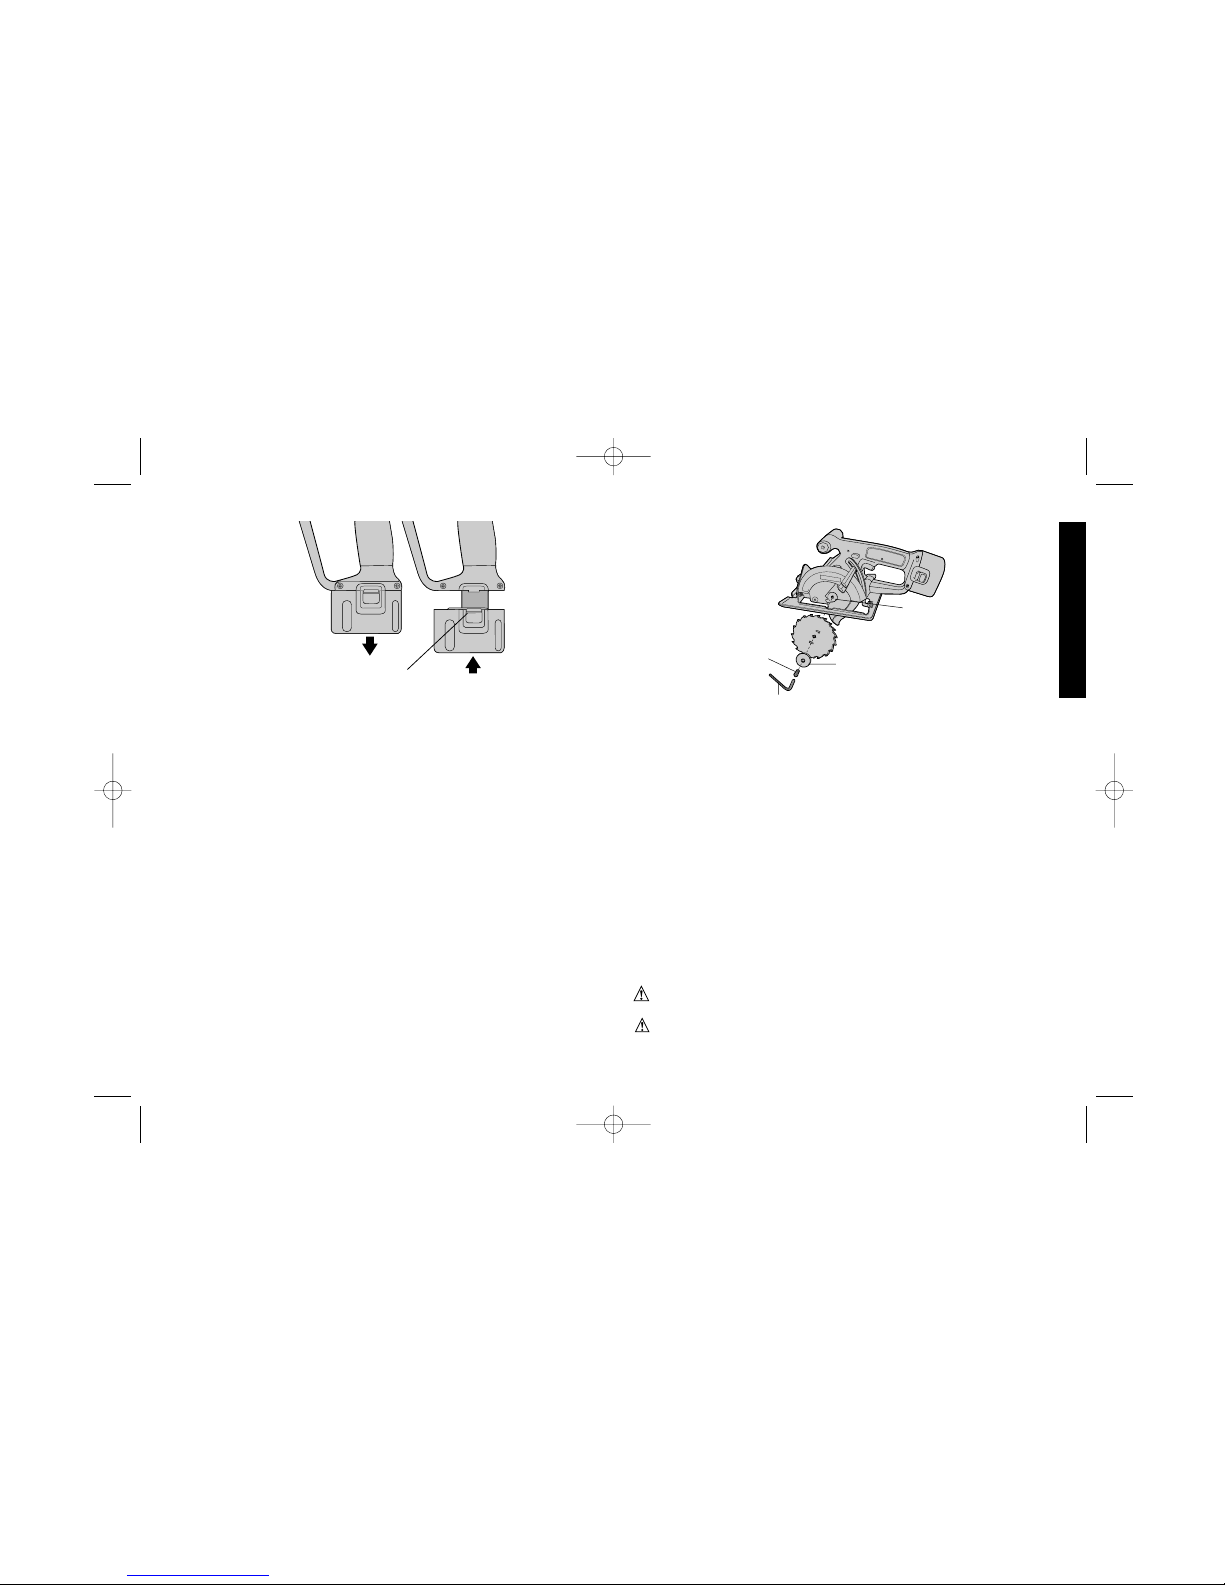
Installing and Removing the Battery Pack
NOTE: Make sure your battery pack is fully charged. To install the
battery pack into the tool handle, align the base of the tool with the
notch inside the tool’s handle and slide the battery pack firmly into the
handle until you hear the lock snap into place as shown in FIG. 2.
To remove the battery pack from the tool, press the release buttons
and firmly pull the battery pack out of the tool handle. Insert it into
the charger as described in the charger section of this manual.
6
English
desire with no adverse affect on the battery pack.
6. Do not immerse charger in water or any other liquid.
WARNING: Don't allow any liquid to get inside charger. Electric
shock may result. To facilitate the cooling of the battery pack after
use, avoid placing the charger or battery pack in a warm
environment such as in a metal shed, or an uninsulated trailer.
CAUTION: Never attempt to open the battery pack for any reason.
If the plastic housing of the battery pack breaks or cracks, return to
a service center for recycling.
Operation
Additional Safety Instructions
(For Circular Saws)
• Remove battery pack before changing blades, making cutting
depth or bevel adjustments, inspecting, and cleaning.
• KEEP GUARDS IN PLACE AND IN WORKING ORDER. Never
wedge or tie lower guard open. Check operation of lower guard before
each use. Do not use if lower guard does not close briskly and
completely over saw blade.
CAUTION: If saw is dropped, lower guard may be bent, restricting
full return. Do not use saw until the lower guard is returned to the
proper working order.
• KEEP BLADES CLEAN AND SHARP. Sharp blades minimize stalling,
overload, kickback, and give a cleaner cut.
• DANGER: Keep hands away from cutting area. Keep hands away
from blades. Do not reach underneath work while blade is rotating. Do
not attempt to remove cut material when blade is moving.
CAUTION: Blades continue to coast after trigger is released. Never
place your hand on the work surface in front of or behind the saw.
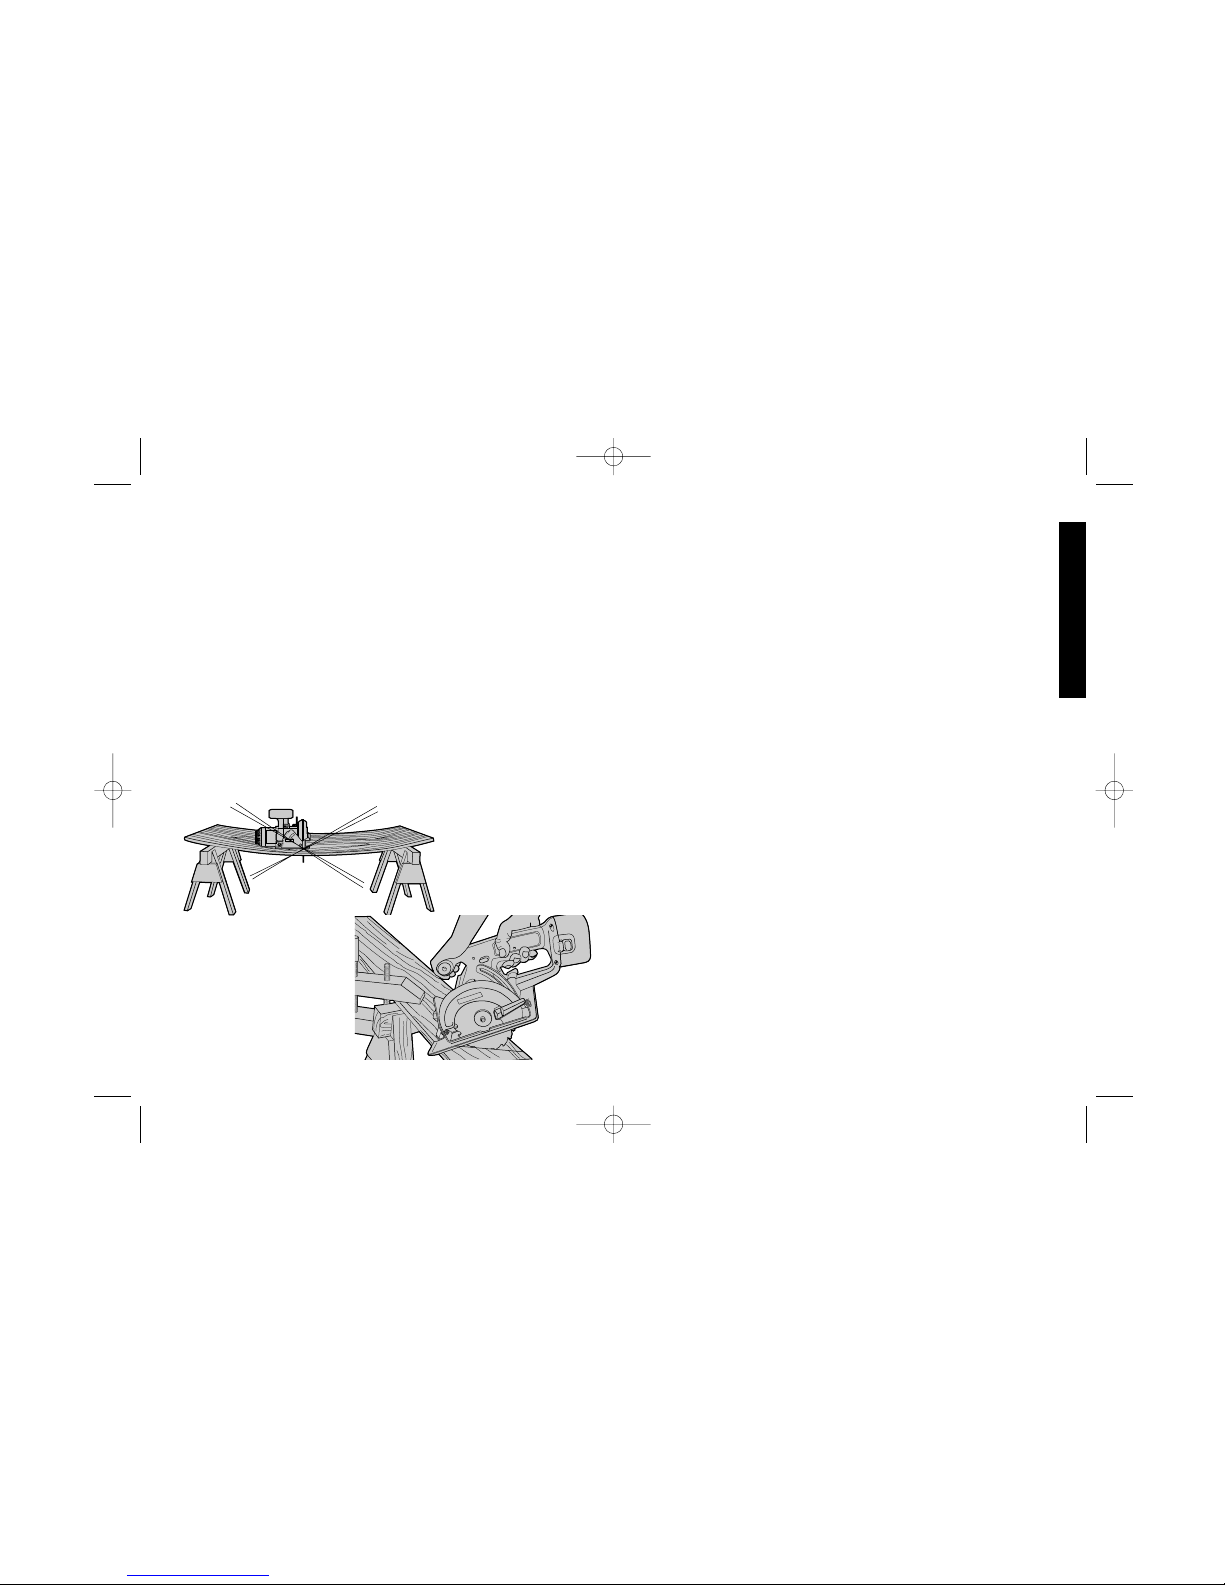
• SUPPORT LARGE PANELS. Large panels must be supported as
shown in FIG. 8 to minimize the risk of overload and kickback from
blade pinching. Resting the saw on the work piece should be done on
the larger portion of the work and the smaller piece should be cut off.
DW936/384286-01 3/15/00 8:25 AM Page 6
Page 10
Important!
This product is not user servicable. There are no user servicable
parts inside the charger. Servicing at an authorized service center is
required to avoid damage to static sensitive internal components.
READ ALL OF THE INSTRUCTIONS IN THE BATTER Y CHARGER
SECTION OF THIS MANUAL BEFORE ATTEMPTING TO
CHARGE THE BATTERY PACK FOR YOUR TOOL.
Always use correct battery pack (pack supplied with tool or
replacement pack exactly like it.) Never install any other battery pack.
It will ruin your tool and may create a hazardous condition.
Changing Blades
1. TURN OFF TOOL AND REMOVE BATTERY PACK.
2. To attach blade, retract lower blade guard and place blade over
spindle and against the inner clamp washer. Place outer clamp
washer against the blade. (Blade must go on with the printed side
out- teeth at bottom of blade pointing forward—FIG. 3).
3. Thread on blade clamping screw firmly by hand to hold washer in
position. (Screw has left hand threads and must be turned
counterclockwise to tighten).
4. Lightly depress the blade lock (FIG. 4) while turning the spindle
7
English
INNER CLAMP
WASHER
OUTER
CLAMP
WASHER
BLADE
CLAMPING
SCREW
WRENCH
FIG. 3
RELEASE BUTTON
FIG. 2
until the blade stops rotating.
5. Tighten blade clamping screw (counterclockwise) firmly with the
blade wrench.
6. To remove blade, TURN OFF TOOL AND REMOVE BATTERY
PACK. Engage the blade lock and unscrew the blade clamping
screw by turning it clockwise with the blade wrench.
NOTE: Never engage blade lock while saw is running, or engage in
an effort to stop the tool. Never turn switch on when blade lock is
engaged. Serious damage to your saw will result.
Blades
A dull blade will cause slow, inefficient cutting overload on the saw
motor, excessive splintering, and could increase the possibility of
kickback. Recommended blades for use with your tool are available at
extra cost from your local dealer or authorized service center. If you
need assistance regarding blades, please call 1-800-4-D
EWALT
(1-800-433-9258).
CAUTION: Do not use abrasive discs or blades for cutting ferrous
(steel) materials, glass or tile.
WARNING: To minimize the risk of eye injury, always use eye
protection. Carbide is a hard but brittle material. Foreign objects in
DW936/384286-01 3/15/00 8:25 AM Page 7
Page 11
the work piece such as wire or nails can cause tips to crack or break.
Only operate saw machine when proper saw blade guard is in place.
Mount blade securely in proper rotation before using, and always use
a clean, sharp blade.
Cutting Depth Adjustment
1. TURN OFF TOOL AND REMOVE BATTERY PACK.
2. Hold the saw firmly and loosen (counterclockwise) the depth
adjustment knob and move shoe to obtain the desired depth of
cut.
3. Make sure the depth adjustment knob has been retightened
(clockwise) before operating saw.
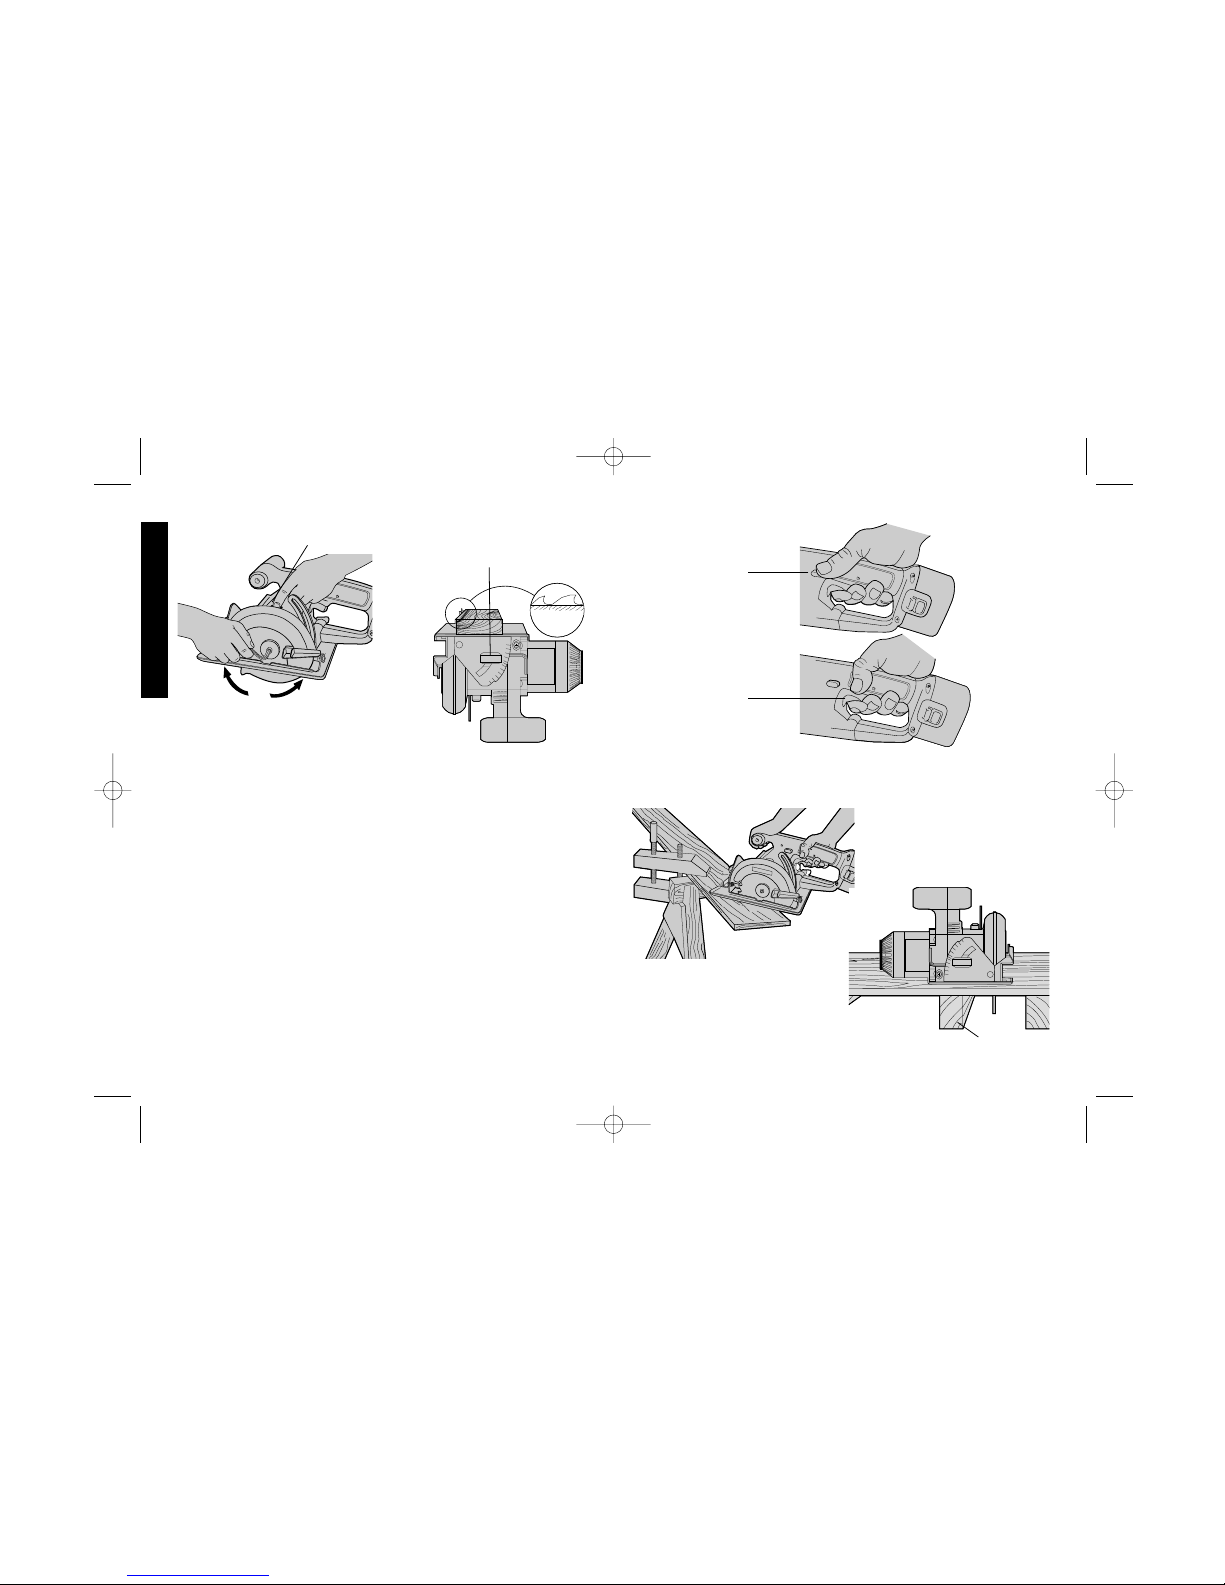
For the most efficient cutting action, set the depth adjustment so that
one tooth of the blade will project below the material to be cut. This
distance is from the tip of the tooth to the bottom of the gullet in front
of it. This keeps blade friction at a minimum, removes sawdust from
8
English
0
1
5
20
30
40
5
0
SWITCH LOCK
OFF RELEASE
BUTTON
TRIGGER
SWITCH
SUPPORT
DO support board or
panel NEAR the cut.
FIG. 6
FIG. 7
FIG. 8
0
1
5
2
0
3
0
40
50
LOOSEN
clockwise
TIGHTEN
counterclockwise
BEVEL
ADJUSTMENT
KNOB
FIG. 4
FIG. 5
BLADE LOCK
BUTTON
DW936/384286-01 3/15/00 8:25 AM Page 8
Page 12
the cut, results in cooler, faster sawing and reduces the chance of
kickback. A method for checking for correct cutting depth is shown
in FIG. 5. Lay a piece of the material you plan to cut along the side
of the blade, as shown, and observe how much tooth projects beyond
the material.
NOTE: When using carbide-tipped blades, make an exception to the
above rule and allow only one-half of a tooth to project below the
material to be cut.
Bevel Angle Adjustment
The full range of the bevel adjustment is from 0˚ to 50˚. The quadrant
is graduated in increments of 5˚. On the front of the saw is a bevel
angle adjustment mechanism (FIG. 5) consisting of a calibrated
quadrant and a knob. To set the saw for a bevel cut:
1. TURN OFF TOOL AND REMOVE BATTERY PACK.
9
English
0
1
5
2
0
3
0
40
50
DON’T support board or
panel AWAY from the cut.
FIG. 9
FIG. 10
2. Loosen (counterclockwise) the quadrant knob and tilt shoe to the
desired angle by aligning the pointer with the desired angle mark.
Retighten knob firmly (clockwise).
NOTE: The quadrant pointer, located between the quadrant knob
and the quadrant, can be adjusted after loosening its screw.
Retighten firmly after adjustment.
Shoe Adjustment for 90˚ Cuts
If additional adjustment is needed:
1. TURN OFF TOOL AND REMOVE BATTERY PACK.
2. Adjust the saw to 0˚ bevel.
3. Retract blade guard. Place the saw on blade side.
4. Loosen bevel adjustment knob. Place a square against the blade
and shoe to adjust the 90˚ setting.
5. Move the adjustment screw so that the shoe will stop at the proper
angle.
6. Confirm the accuracy of the setting by checking the squareness of
an actual cut on a scrap piece of material.
Kerf Indicator
The front of the saw shoe has a kerf indicator for vertical and bevel
cutting. This indicator enables you to guide the saw along cutting
lines penciled on the material being cut. The indicator lines up with
the left (outer) side of the saw blade, which makes the slot or “kerf”
cut by the moving blade fall to the right of the indicator. Guide along
the penciled cutting line so that the kerf falls into the waste or surplus
material.
Switch
Release lock off by pressing button as shown in FIG. 6. Pull the
trigger switch to turn the motor ON. Releasing the trigger turns the
motor OFF . Releasing the trigger also automatically actuates lock of f
button.
DW936/384286-01 3/15/00 8:25 AM Page 9
Page 13

10
English
NOTE: This tool has no provision to lock the switch in the ON
position, and should never be locked ON by any other means.
Work Piece Support
FIG. 7 shows proper sawing position. Note that hands are kept away
from cutting area. To avoid kickback, DO support board or panel
NEAR the cut, (FIG. 8). DON’T support board or panel away from the
cut, (FIG. 9).
WARNING: It is important to support the work properly and to
hold the saw firmly to prevent loss of control which could cause
personal injury. FIG. 7 illustrates typical hand support of the saw.
ALWAYS TURN OFF TOOL AND REMOVE BATTERY BEFORE
MAKING ANY ADJUSTMENTS!
Place the work with its “good” side–the one on which appearance is
most important–down. The saw cuts upward, so any splintering will
be on the work face that is up when you cut it.
Cutting
Place the wider portion of the saw shoe on that part of the work piece
which is solidly supported, not on the section that will fall off when the
cut is made. As examples, FIG. 7 illustrates the RIGHT way to cut
off the end of a board. Always clamp work. Don’t try to hold short
pieces by hand! Remember to support cantilevered and overhanging
material. Use caution when sawing material from below.
Be sure saw is up to full speed before blade contacts material to be
cut. Starting saw with blade against material to be cut or pushed
forward into kerf can result in kickback. Push the saw forward at a
speed which allows the blade to cut without laboring. Hardness and
toughness can vary even in the same piece of material, and knotty or
damp sections can put a heavy load on the saw. When this happens,
push the saw more slowly, but hard enough to keep it working without
much decrease in speed. Forcing the saw can cause rough cuts,
inaccuracy, kickback, and over-heating of the motor. Should your cut
begin to go off the line, don’t try to force it back on. Release the switch
and allow blade to come to a complete stop. Then you can withdraw
the saw, sight anew , and start a new cut slightly inside the wrong one.
In any event, withdraw the saw if you must shift the cut. Forcing a
correction inside the cut can stall the saw and lead to kickback.
IF SAW STALLS, RELEASE THE TRIGGER AND BACK THE SAW
UNTIL IT IS LOOSE. BE SURE BLADE IS STRAIGHT IN THE CUT
AND CLEAR OF THE CUTTING EDGE BEFORE RESTARTING.
As you finish a cut, release the trigger and allow the blade to stop
before lifting the saw from the work. As you lift the saw, the springtensioned telescoping guard will automatically close under the blade.
Remember the blade is exposed until this occurs. Never reach under
the work for any reason. When you have to retract the telescoping
guard manually (as is necessary for starting pocket cuts) always use
the retracting lever.
NOTE: When cutting thin strips, be careful to ensure that small cutoff
pieces don’t hang up on inside of lower guard.
RIPPING
Ripping is the process of cutting wider boards into narrower stripscutting grain lengthwise. Hand guiding is more difficult for this type
of sawing and some type of guide should be used.
POCKET CUTTING (FIG. 10)
TURN OFF TOOL AND REMOVE BATTERY PACK BEFORE
ADJUSTING.
A pocket cut is one that is made in a floor, wall, or other flat surface.
Adjust saw shoe so blade cuts at desired depth. Tilt saw forward
and rest front of the shoe on material to be cut. Using the retracting
lever, retract blade guard to an upward position. Lower rear of shoe
until blade teeth almost touch cutting line. Now release the blade
guard (its contact with the work will keep it in position to open freely
as you start the cut). Start the motor and gradually lower the saw until
its shoe rests flat on the material to be cut. Advance saw along the
DW936/384286-01 3/15/00 8:25 AM Page 10
Page 14

11
English
cutting line until cut is completed. Release trigger and allow blade to
stop completely before withdrawing the blade from the material.
When starting each new cut, repeat as above. Never tie the blade
guard in a raised position. Never move the saw backwards when
pocket cutting. This may cause the unit to raise up off of the work
surface which could cause injury.
Kickback
When the saw blade becomes pinched or twisted in the cut, kickback
can occur. The saw is thrust rapidly back toward the operator. When
the blade is pinched or bound tightly by the kerf closing down, the
blade stalls and the motor reaction drives the unit backward. When
the blade becomes twisted or misaligned in the cut, the teeth at the
back edge of the blade can dig into the top surface of the wood
causing the blade to climb out of the kerf and jump back toward the
operator. Kickback is more likely to occur when any of the following
conditions exist.
Improper work piece support
• Sagging or improper lifting of the cutoff piece causing pinching of
the blade.
• Cutting through material supported at the outer ends only (FIG. 9).
As the material weakens it sags, closing down the kerf and
pinching the blade.
• Cutting off a cantilevered or overhanging piece of material from the
bottom up in a vertical direction. The falling cut off piece can pinch
the blade.
• Cutting off long narrow strips (as in ripping). The cutoff strip can
sag or twist closing the kerf and pinching the blade.
• Snagging the lower guard on a surface below the material being
cut, momentarily reducing operator control. The saw can lift
partially out of the cut, increasing the chance of blade twist.
Improper depth of cut setting on saw
Using the saw with an excessive depth of cut setting increases
loading on the unit and susceptibility to twisting of the blade in the kerf.
It also increases the surface area of the blade available for pinching
under conditions of kerf close down.
Blade twisting (Misalignment in Cut)
• Pushing harder to cut through a knot, or hard grain area can cause
blade to twist.
• Trying to turn the saw in the cut (trying to get back on the marked
line) can cause blade twist.
• Extended reach or operating saw with poor body control (out of
balance) can result in twisting the blade.
• Changing grip or body position while cutting can result in blade
twist.
• Backing unit up to clear blade can lead to twist if not done carefully.
Insufficient allowance for particularly tough materials
Materials that require extra attention: wet lumber, green lumber
(material freshly cut or not kiln dried), pressure treated lumber
(material treated with preservatives or anti-rot chemicals)
Use of dull or dirty blades
Dull blades cause increased loading of the saw. To compensate, an
operator will usually push harder which further loads the unit and
promotes twisting of the blade in the kerf. Worn blades may also have
insufficient body clearance which increases the chance of binding and
increased loading.
Lifting the saw when making bevel cuts
Bevel cuts require special operator attention to proper cutting
techniques - especially guidance of the saw. Both blade angle to the
shoe and greater blade surface in the material increase the chance for
binding and misalignment (twist) to occur.
Restarting a cut with the blade teeth jammed against the
material
The saw should be brought up to full operating speed before starting
a cut or restarting a cut after the unit has been stopped with the blade
in the kerf. Failure to do so can cause stalling and kickback.
Any other conditions which could result in pinching, binding, twisting,
or misalignment of the blade could cause kickback. Refer to sections
DW936/384286-01 3/15/00 8:25 AM Page 11
Page 15

Full One Y ear W arranty
DEWALT heavy duty industrial tools are warranted for one year from
date of purchase. We will repair, without charge, any defects due to
faulty materials or workmanship. For warranty repair information, call
1-800-4 D
EWALT. This warranty does not apply to accessories or
damage caused where repairs have been made or attempted by
others. This warranty gives you specific legal rights and you may have
other rights which vary from state to state.
In addition to the warranty, D
EWALTtools are covered by our:
30 DAY NO RISK SATISFACTION GUARANTEE
If you are not completely satisfied with the performance of your
D
EWALTheavy duty industrial tool, simply return it to the participating
seller within 30 days for a full refund. Please return the complete unit,
transportation prepaid. Proof of purchase may be required.
12
on “Adjustments and Set-Up” and “Operation” for procedures and
techniques that will minimize the occurrence of kickback.
Cleaning
Use only mild soap and a damp cloth to clean the tool. Many
household cleaners contain chemicals which could seriously damage
plastic. Also, do not use gasoline, turpentine, lacquer or paint thinner,
dry cleaning fluids or similar products. Never let any liquid get inside
the tool; never immerse any part of the tool into a liquid.
Lubrication
Self lubricating ball and roller bearings are used in the tool and
relubrication is not required. However, it is recommended that, once a
year, you take or send the tool to a certified service center for a
thorough cleaning, inspection, and lubrication of the gear case.
Important
To assure product SAFETY and RELIABILITY, repairs, maintenance
and adjustment (including brush inspection and replacement) should
be performed by certified service centers or other qualified service
organizations, always using identical replacement parts.
Accessories
Recommended accessories for use with your tool are available at
extra cost from your local dealer or authorized service center. If you
need assistance in locating any accessory for your tool, contact:
DEWALT Industrial Tool Co., 70 East Joppa Road, Baltimore, MD
21286. 1-800-4-DEWALT
CAUTION: The use of any other accessory not recommended
for use with this tool could be hazardous.
English
DW936/384286-01 3/15/00 8:26 AM Page 12
Page 16

13
Français
SI VOUS AVEZ DES QUESTIONS OU VOULEZ NOUS FAIRE
PART DE VOS COMMENTAIRES CONCERNANT CET OUTIL OU
TOUT AUTRE OUTIL D
E
WALT, COMPOSEZ SANS FRAIS LE : 1
800 433-9258.
Règles générales de sécurité - Outils à
piles
AVERTISSEMENT! Lire et comprendre toutes les directives, car le
non-respect des directives suivantes peut entraîner un choc électrique,
un incendie ou des blessures graves.
CONSERVER CES DIRECTIVES
ZONE DE TRAVAIL
· Garder la zone de travail propre et bien éclairée; les établis
encombrés et les endroits sombres sont propices aux accidents.
· Ne pas utiliser les outils électriques dans une atmosphère
explosive, comme à proximité de liquides, de gaz ou de
poussières inflammables; le moteur peut créer des étincelles et
enflammer les vapeurs ou les poussières environnantes.
· Tenir les enfants, les visiteurs ou toute autre personne à l’écart
lorsqu’on utilise un outil électrique; les distractions peuvent faire
perdre la maîtrise de ce dernier.
MESURES DE SÉCURITÉ : ÉLECTRICITÉ
· Ne pas utiliser le cordon de manière abusive; on ne doit pas
transporter l’outil en le tenant par le cordon. On doit tenir le cordon à
l’écart des sources de chaleur, de l’huile, des bords tranchants ou des
pièces mobiles. Remplacer immédiatement les cordons endommagés,
car ces derniers augmentent les risques d’incendie.
· Un outil à piles intégrées ou à bloc-piles externe doit être
rechargé seulement au moyen du chargeur approprié, car un
chargeur destiné à une pile particulière peut entraîner un risque
POUR TOUT RENSEIGNEMENT SUPPLÉMENTAIRE SUR CET
OUTIL OU TOUT AUTRE OUTIL D
E
WALT, COMPOSER SANS
FRAIS LE NUMÉRO :
1 800 4-DEWALT (1-800-433-9258)
R
BOUTON DE
VERROUILLAGE DE
L’INTERRUPTEUR
ENSEMBLE
DE PILES
PATIN
INTERRUPTEUR
À DÉTENTE
BOUTON DE
RÉGLAGE DE LA
PROFONDEUR DE
COUPE
RESSORT DE
RAPPEL DU
PROTÈGE-
LAME
INFÉRIEUR
PROTÈGE-
LAME
INFÉRIEUR
BOUTON DE
VERROUILLAGE
DE LA LAME
BOUTON DE
RÉGLAGE
DES COUPES
EN BISEAU
INDICATEUR
DE VOIE
VIS DE FIXATION
DE LA LAME
DW930 Ébouteuse sans fil de 12,0 volts 2 500 trs/min
DW935 Ébouteuse sans fil de 14,4 volts 3 000 trs/min
DW936 Ébouteuse sans fil de 18,0 volts 3 200 trs/min
DW936/384286-01 3/15/00 8:26 AM Page 13
Page 17

14
Français
pour lesquels il a été conçu. Pour obtenir de meilleurs résultats et
prévenir les risques de blessure, laisser l’outil couper à la vitesse pour
laquelle il a été conçu.
· Ne pas utiliser l’outil lorsque l’interrupteur de marche-arrêt ne
fonctionne pas; tout outil qui ne peut être commandé au moyen de
l’interrupteur est dangereux et doit être réparé.
· Débrancher le bloc-piles de l’outil ou mettre l’interrupteur en
position de verrouillage ou d’arrêt avant d’effectuer un réglage,
de changer les accessoires ou de ranger l’outil; ces mesures de
sécurité préventives réduisent les risques de démarrage accidentel.
· Lorsqu’on n’utilise pas l’outil, le ranger hors de la portée des
enfants ou des personnes non qualifiées; les outils sont dangereux
entre les mains de personnes inexpérimentées.
· Lorsqu’on n’utilise pas le bloc-piles, le ranger à l’écart des objets
métalliques tels que les trombones, les pièces de monnaie, les
clés, les clous, les vis ou autres petits objets susceptibles de
conduire l’électricité entre les bornes et d’occasionner ainsi des
étincelles, des brûlures ou un incendie.
· Bien entretenir l’outil; s’assurer qu’il soit toujours bien propre et
aiguisé. Les outils bien entretenus et dont les bords sont bien
tranchants sont moins susceptibles de rester coincés et sont plus
faciles à maîtriser.
· Vérifier les pièces mobiles afin de s’assurer qu’elles soient bien
alignées et qu’elles ne restent pas coincées; vérifier également les
pièces afin de s’assurer qu’il n’y ait aucun bris ni aucune autre
condition susceptible de nuire au bon fonctionnement de l’outil. Faire
réparer l’outil si ce dernier est endommagé avant de s’en servir à
nouveau, car les accidents sont souvent causés par des outils mal
entretenus.
· N’utiliser que les accessoires recommandés par le fabricant pour
le modèle concerné; un accessoire destiné à un outil particulier peut
devenir dangereux lorsqu’il est utilisé avec un autre.
ENTRETIEN
· L’outil doit être entretenu ou réparé par le personnel qualifié
d’incendie lorsqu’il est utilisé avec une autre.
· N’utiliser l’outil à piles qu’avec le bloc-piles désigné, car l’utilisation
d’un autre type de piles peut entraîner un risque d’incendie.
SÉCURITÉ PERSONNELLE
· Rester vigilant en tout temps et faire preuve de jugement
lorsqu’on utilise un outil électrique; ne pas utiliser l’outil lorsqu’on
est fatigué ou sous l’influence de drogues, d’alcool ou de
médicaments, car un moment d’inattention peut entraîner des
blessures graves.
· Porter des vêtements appropriés; ne pas porter de vêtements
amples ni de bijoux. Couvrir ou attacher les cheveux longs. Garder
les cheveux, les vêtements, les bijoux et les gants éloignés des pièces
mobiles, car ceux-ci peuvent s’y coincer.
· Éviter les démarrages accidentels; s’assurer que l’interrupteur soit
placé en position de verrouillage ou d’arrêt avant d’insérer le bloc-piles.
Ne pas transporter l’outil en laissant le doigt sur l’interrupteur ni insérer
le bloc-piles lorsque l’outil est en position de marche, car cela pourrait
causer un accident.
· Retirer les clés de réglage avant de démarrer l’outil; une clé
laissée sur une pièce rotative peut entraîner des blessures.
· Ne pas trop étendre les bras; les pieds doivent rester ancrés
fermement sur le sol afin de maintenir son équilibre en tout temps et de
mieux maîtriser l’outil dans des situations imprévues.
· Utiliser le matériel de sécurité approprié; toujours porter des lunettes
de protection. Porter un masque anti-poussières, des chaussures
antidérapantes, un casque de sécurité ou des protecteurs auditifs
lorsque la situation le requiert.
UTILISATION ET ENTRETIEN DE L’OUTIL
· Fixer et soutenir l’ouvrage sur une plate-forme stable au moyen
d’un étau ou de tout autre dispositif semblable; l’ouvrage est
instable lorsqu’on le retient manuellement ou qu’on l’appuie contre le
corps, ce qui peut faire perdre la maîtrise de l’outil.
· Ne pas forcer l’outil ni l’utiliser pour des travaux autres que ceux
DW936/384286-01 3/15/00 8:26 AM Page 14
Page 18

15
Français
seulement; toute maintenance effectuée par une personne non
qualifiée peut entraîner des risques de blessure.
· Lors de l’entretien, n’utiliser que des pièces de rechange identiques et
suivre les directives de la section «Entretien» du présent manuel afin
de prévenir les risques de choc électrique ou de blessure.
Règles de sécurité additionnelles
· Tenir l’outil par les surfaces isolées prévues à cette fin lorsque
l’outil risque d’entrer en contact avec des fils cachés, car de tels
contacts peuvent mettre les pièces métalliques de l’outil sous tension,
engendrant des risques de choc électrique.
· Lorsqu’on est installé sur une échelle ou un échafaudage pour
travailler, on doit déposer l’outil sur le côté lorsqu’on ne s’en sert
plus. Bien que certains outils munis d’un gros bloc-piles puissent être
placés à la verticale, dans cette position, ils peuvent facilement être
renversés.
• L’étiquette de l’outil peut comporter les symboles suivants.
V..............volts A ............ampères
Hz............hertz W ..........watts
min ..........minutes . . courant
alternatif
........courant continu
n
o ..........sous vide
............
Construction de classe II
............borne de mise
à la minute
............symbole d´avertissement .../min ....tours ou
courses à la minute
AVERTISSEMENT : puisque cet outil peut soulever de la poussière
contenant des produits chimiques susceptibles d’entraîner le
cancer, des malformations congénitales ou pouvant être nocifs sur le
plan reproductif, on recommande le port d’un appareil de protection
respiratoire approprié.
• CHARGING
• CHARGED
• DELAY
DW9115
DANGER:
WARNING:
15 MINUTE CHARGER
FLASHING
ON
FAST FLASH•DEFECTIVE PACK
ON
9
.0
v
E
X
T
E
N
D
E
D
R
U
N
T
I
M
E
1
2
.0
v
E
X
T
E
N
D
E
D
R
U
N
T
I
M
E
DW9115
DANGER:
WARNING:
R
R
R
R
CHARGEUR EN 15 MINUTES
• CHARGING
• CHARGED
• DELAY
15 MINUTE CHARGER
FLASHING
ON
FAST FLASH•DEFECTIVE PACK
ON
DW9115
DANGER:
WARNING:
R
FIG. 1
CHARGEURS EN UNE HEURE
CHARGEURS EN UNE HEURE
DW936/384286-01 3/15/00 8:26 AM Page 15
Page 19

16
Français
Importantes consignes de sécurité
concernant les bloc-piles
Les piles ne sont pas complètement chargées au moment de leur
livraison! Avant de les charger, lire attentivement toutes les
consignes de sécurité énumérées ci-dessous, ainsi que les
remarques, les notes et les méthodes de chargement.
LIRE TOUTES LES DIRECTIVES
· Ne pas incinérer les bloc-piles, même s’ils ont subi des dommages
importants ou ils sont usés complètement, car ils peuvent exploser en
présence de flammes.
· Les cellules des bloc-piles peuvent subir une fuite légère par suite d’un
usage extrême ou d’une exposition à certaines températures; ceci
n’indique pas un problème. Cependant, si le scellant externe est percé
et le liquide entre en contact avec la peau, on doit :
a) se laver rapidement la partie du corps touchée avec de l’eau
savonneuse;
b) neutraliser l’effet au moyen d’un acide doux tel que du jus de citron ou
du vinaigre;
c) si les yeux sont touchés, les rincer à fond avec de l’eau propre pendant
au moins 10 minutes et consulter immédiatement un médecin.
(Remarque aux fins médicales : ce liquide contient une solution
composée de 25 à 35 % d’hydroxyde de potassium.)
· Ne pas transporter des bloc-piles supplémentaires dans un tablier, une
poche ou une boîte à outils contenant des objets métalliques, car le
bloc-pile pourrait causer un court-circuit et s’endommager, ou risquer
de provoquer de graves brûlures ou un incendie.
· Ne charger les bloc-piles qu’au moyen des chargeurs D
EWALT .
· REMARQUE : le bloc-piles contient des piles au nickel-cadmium. Le
cadmium est considéré comme une substance toxique par les
agences de protection de l’environnement, dont le ministère de
l’Environnement; on recommande donc de vérifier auprès de l’agence
concernée avant de mettre au rebut des bloc-piles au nickel-cadmium
usés ou endommagés afin de se renseigner sur les dispositions
particulières qui s’appliquent dans votre région à ce sujet, ou de
retourner les bloc-piles usés ou endommagés à un centre de service
qualifié D
E
WALT afin qu’ils puissent être recyclés.
· NE PAS ranger ni utiliser l’outil ou le bloc-piles dans des endroits où la
température peut atteindre ou dépasser 40,5 ºC (105 ºF), comme les
cabanons ou les bâtiments en revêtement métallique durant l’été.
· DANGER : Ne jamais tenter d’ouvrir le bloc-piles pour quelle que
raison que ce soit. Si le compartiment se rupture ou subit des
dommages, ne pas l’insérer dans le chargeur afin d’éviter les risques
de choc électrique ou d’électrocution. On doit retourner les bloc-piles
endommagés à un centre de service afin qu’ils puissent être recyclés.
Bloc-piles
L'outil fonctionne sur un bloc-piles DEWALT de 18 volts. Lorsqu’on
commande des bloc-piles de rechange, on doit indiquer le numéro de
catalogue et la tension requise. Les bloc-piles à durée prolongée
durent 25 % plus longtemps que les bloc-piles standard.
REMARQUE : bien que l’outil puisse fonctionner au moyen de l’un ou
l’autre des deux types de bloc-piles, on doit s’assurer d’en choisir un
de tension appropriée.
FIG. 2
BOUTONS DE
DÉGAGEMENT
DW936/384286-01 3/15/00 8:26 AM Page 16
Page 20

17
Français
Sceau RBRC
MC
Le sceau RBRCMC de la Rechargeable Battery Recycling Corporation
apposé sur la pile au nickel-cadmium (ou le bloc-piles)
indique que les coûts de recyclage de ce dernier à la fin
de sa vie utile ont déjà été payés par D
EWALT. En
certains endroits, la mise au rebut ou aux ordures
municipales des piles au nickel-cadmium est illégale; le
programme de «RBRC» constitue donc une solution des plus
pratiques et écologiques.
La «RBRC», en collaboration avec D
EWALT et d’autres utilisateurs de
piles, a mis sur pied des programmes aux États-Unis dans le but de
faciliter la collecte des piles déchargées. D
EWALT encourage ses
utilisateurs à participer à son programme de protection de
l'environnement et de conservation des ressources naturelles en
retournant les piles usagées à un centre de service D
E
WALT ou chez
un dépositaire local afin qu’elles puissent être recyclées. On peut en
outre se renseigner auprès d’un centre de recyclage local pour
connaître d'autres sites les acceptant.
Importantes consignes de sécurité
concernant les chargeurs
CONSERVER CES DIRECTIVES – Le présent manuel contient
d’importantes consignes de sécurité concernant les chargeurs
D
EWALT .
· Avant d’utiliser le chargeur, lire toutes les directives et étiquettes de
mise en garde apposées sur le chargeur, la pile et le produit utilisant
la pile.
· Ne pas utiliser les outils électriques dans une atmosphère explosive,
comme à proximité de liquides, de gaz ou de poussières inflammables;
le moteur peut créer des étincelles et enflammer les vapeurs ou les
poussières environnantes.
· MISE EN GARDE : afin de réduire les risques de blessure, ne
charger que des piles au nickel-cadmium rechargeables D
EWALT, car
les autres peuvent éclater et entraîner des blessures ou des
dommages matériels.
· MISE EN GARDE : dans certaines conditions, lorsque le chargeur
est enfiché, les raccords de charge à nu situés à l’intérieur du chargeur
peuvent subir un court-circuit lorsqu’ils entrent en contact avec une
matière étrangère. Les matières conductives comme la laine d’acier, la
feuille d’aluminium ou les particules métalliques, mais sans toutefois
s’y limiter, doivent être tenus à l’écart des cavités du chargeur.
Toujours débrancher celui-ci lorsque le bloc-piles n’y est pas inséré
ou avant de le nettoyer.
· DANGER : les bornes du chargeur conduisent une haute tension;
on ne doit pas les toucher au moyen d’objets conducteurs afin d’éviter
les risques de choc électrique ou d’électrocution.
· AVERTISSEMENT : ne jamais laisser de liquide s’infiltrer à
l’intérieur du chargeur ni l’exposer à la pluie ou à la neige afin d’éviter
les risques de choc électrique.
· Le chargeur et le bloc-piles sont conçus spécialement pour être utilisés
ensemble; NE PAS charger le bloc-piles au moyen d’un chargeur autre
que ceux décrits dans le présent manuel.
· N’utiliser ces derniers que pour charger les piles rechargeables
D
EWALT; tout autre usage peut entraîner des risques d’incendie, de
choc électrique ou d’électrocution.
· Afin de réduire les risques de dommage à la fiche ou au cordon
électrique, débrancher le chargeur en saisissant la fiche, non le
cordon.
· S’assurer que le cordon soit placé de manière à éviter qu’il ne subisse
des dommages ou des contraintes ou que les personnes s’y prennent
les pieds et trébuchent.
· Ne pas utiliser de rallonge à moins que cela ne soit absolument
nécessaire, car l’usage d’une rallonge ayant une puissance
inadéquate pourrait causer des risques d’incendie, de choc électrique
ou d’électrocution.
· Afin d’assurer la sécurité de l’utilisateur, la rallonge doit être de calibre
AWG approprié. Plus le calibre est petit, plus la capacité est grande;
autrement dit, une rallonge de calibre 16 est plus puissante qu’une
DW936/384286-01 3/15/00 8:26 AM Page 17
Page 21

rallonge de calibre 18. Lorsqu’on utilise plusieurs rallonges pour
obtenir la longueur voulue, s’assurer que chacune d’elles présente les
valeurs minimales requises.
Calibre minimal recommandé des rallonges
Longueur totale de la rallonge (en pieds)
25 50 75 100 125 150
175
7.6 m 15.2 m 22.9 m 30.5 m 38.1 m
45.7 m 53.3 m
Calibre AWG
18 18 16 16 14 14 12
· Le chargeur s’aère par l’entremise de fentes situées sur le dessus et le
dessous du logement; ne jamais mettre un objet sur le dessus du
chargeur ni placer celui-ci sur une surface molle risquant d’obstruer les
fentes de ventilation, ce qui pourrait causer une chaleur interne
excessive. Tenir le chargeur éloigné de toute source de chaleur.
· Ne pas faire fonctionner le chargeur lorsque le cordon ou la fiche est
endommagé. Si tel est le cas, les remplacer immédiatement.
· Ne pas faire fonctionner le chargeur s’il a subi un coup important, une
chute ou des dommages quelconques. Si cela se produit, l’emporter à
un centre de service autorisé.
· Ne pas démonter le chargeur, car un mauvais assemblage pourrait
occasionner des risques de choc électrique, d’électrocution ou
d’incendie. Le chargeur doit être retourné à un centre de service
autorisé aux fins d’une réparation ou d’un entretien, le cas échéant.
· Afin de réduire les risques de choc électrique, débrancher le chargeur
de la prise murale avant de procéder au nettoyage; le seul fait
d’enlever le bloc-piles ne réduit pas ce risque.
· Ne JAMAIS brancher deux chargeurs ensemble.
· Ne pas alimenter le chargeur au moyen d’une source autre que celles
indiquées sur la plaque signalétique.
Chargeurs
Les piles DeWALT peuvent être chargées au moyen d’un chargeur
18
Français
DEWALT d ’une heure ou de 15 minutes, ou d’un chargeur pour
véhicules de 12 volts. S’assurer de lire toutes les consignes de
sécurité avant d’utiliser le chargeur.
Consulter le diagramme apparaissant sur le couvercle arrière afin
de vérifier la compatibilité du chargeur avec le bloc-piles.
Mode rechargement (Tune-UpMC)
Le mode rechargement (Tune-UpMC) sert à égaliser ou à équilibrer
chaque cellule du bloc-piles lors de son cycle de capacité limite; le
cycle total dure 8 heures. Le bloc-piles doit être rechargé chaque
semaine, après 10 ou 20 cycles de charge / de décharge ou lorsque
la capacité du bloc-piles commence à diminuer.
1. Pour recharger le bloc-piles, placer les piles dans le chargeur de
la manière habituelle. Le voyant rouge clignotera continuellement,
indiquant que le cycle de charge est amorçé.
2. On peut enfoncer le bouton Tune-UpMC à n’importe quel moment
une fois la charge amorçée. Le voyant rouge s’éteindra
momentanément, clignotera trois fois brièvement puis restera
allumé, indiquant que le chargeur est en mode rechargement.
3. Une fois le cycle de rechargement terminé, le voyant restera
allumé, indiquant que le bloc-piles est complètement rechargé; on
peut alors le réutiliser ou le laisser dans le chargeur.
4. Si on sélectionne le mode de rechargement mais qu’on change
d’idée par la suite, retirer les piles du chargeur. Attendre 5
secondes, puis réinsérer la pile afin d’amorcer le cycle de charge
normal.
Méthode de chargement
CHARGEURS D’UNE HEURE
1. Enficher le chargeur dans une prise appropriée.
2. Insérer le bloc-piles dans le chargeur, tel qu’illustré à la FIG. 1,
en s’assurant de bien l’enfoncer. Le voyant (de charge) rouge
clignotera continuellement, indiquant que le cycle de charge est
amorcé.
DW936/384286-01 3/15/00 8:26 AM Page 18
Page 22

19
Français
3. Le bloc-piles est complètement chargé après environ une heure.
Le voyant rouge restera allumé, indiquant que le bloc-piles est
complètement rechargé; on peut alors le réutiliser ou le laisser
dans le chargeur.
4. PROBLÈMES RELIÉS À LA SOURCE DE COURANT : les
chargeurs munis d’un voyant d’indication de problème au niveau
de la source de courant peuvent suspendre temporairement le
chargement s’il est branché dans une source d’alimentation
portative, comme une génératrice ou un convertisseur de courant
continu en courant alternatif. En présence d’un tel problème, le
voyant rouge émet deux clignotements rapides, suivis d’une
pause, indiquant que le problème se situe au niveau de la source
de courant.
5. DISPOSITIF DE DÉTECTION DE PILES CHAUDES : si le
chargeur est muni d’un dispositif visant à détecter les piles
chaudes, le chargement sera retardé jusqu’à ce que la pile se
soit refroidie et le chargeur se placera automatiquement en
FIG. 3
FIG. 4
RONDELLE
DE
FIXATION
INTERNE
VIS DE FIXATION
DE LA LAME
CLÉ
RONDELLE
DE FIXATION
EXTERNE
DESSERRER
SENS
HORAIRE
SERRER
SENS
ANTIHORAIRE
BOUTON DE
VERROUILLAGE
DE LA LAME
position de chargement; ce dispositif sert à maximiser la durée
de vie des piles. Le voyant rouge s’allume longuement, et ensuite
brièvement lorsque ce dispositif est en marche.
CHARGEURS DE 15 MINUTES
1. Enficher le chargeur dans une prise appropriée; une fois alimenté,
il émet deux signaux sonores et le voyant rouge clignote puis
s’éteint.
2. Insérer le bloc-piles dans le chargeur, tel qu’illustré à la FIG. 1, en
s’assurant de bien l’enfoncer. Le voyant rouge clignotera
continuellement et le chargeur émettra un seul signal sonore pour
indiquer que le cycle de charge est amorcé.
3. Dans la plupart des cas, le bloc-piles requiert moins de 15 minutes
pour se charger complètement. Le voyant rouge reste allumé et le
chargeur émet trois signaux sonores pour indiquer que le bloc-piles
est complètement rechargé; on peut alors le réutiliser ou le laisser
dans le chargeur.
4. BLOC-PILES FAIBLE : on peut aussi utiliser le chargeur de 15
minutes pour déterminer si une pile est faible. Bien qu’on puisse
continuer à utiliser une pile faible, elle ne procurera pas un plein
rendement. Si tel est le cas, 10 secondes après l’insertion de la pile,
le chargeur émettra rapidement huit signaux sonores pour indiquer
qu’il s’agit d’une pile faible, puis chargera la pile jusqu’à sa pleine
capacité.
CHARGEURS DE TOUT TYPE
Bloc-piles laissé dans le chargeur. Lorsque le voyant rouge reste
allumé, cela signifie que le chargeur s’est placé en mode d’égalisation
de charge, lequel peut rester ainsi pendant environ 4 heures. Après
ce délai, le chargeur se placera en mode de tenue de charge. Bien que
le bloc-piles puisse être retiré pendant n’importe quel de ces cycles, il
n’est complètement chargé que lorsque le voyant rouge reste allumé
continuellement. On peut laisser le chargeur (avec un bloc-piles
inséré) raccordé à une prise tant que le voyant rouge reste allumé; le
DW936/384286-01 3/15/00 8:26 AM Page 19
Page 23

chargeur maintient alors la charge du bloc-piles afin que ce dernier soit
prêt à être utilisé. Un bloc-piles perd graduellement sa charge s’il n’est
pas gardé dans le chargeur. Un bloc-piles n’étant pas maintenu en
mode de tenue de charge devra être rechargé avant son utilisation. Un
bloc-piles peut graduellement perdre sa charge s’il est laissé dans un
chargeur qui n’est pas enfiché dans une source d’alimentation à
courant alternatif appropriée.
INDICATEURS D’ANOMALIE : les chargeurs sont conçus pour
détecter certains problèmes pouvant être reliés aux bloc-piles. Ces
problèmes sont indiqués par le clignotement rapide du voyant rouge et,
dans le cas des chargeurs de 15 minutes, par un signal sonore
continu. Si un tel problème survient, réinsérer le bloc-piles dans le
chargeur. Si le problème persiste, remplacer le bloc-piles afin de
déterminer si le chargeur fonctionne bien. Si le bloc-piles de rechange
se charge correctement, cela signifie que le bloc initial est défectueux
et qu’on doit le retourner à un centre de service afin qu’il puisse être
recyclé. Si le bloc neuf affiche le même problème que le bloc initial, on
doit faire vérifier le chargeur à un centre de service autorisé.
Notes importantes concernant le
chargement
1. Afin de maximiser la durée de vie du bloc-piles et d’assurer son
rendement optimal, le charger à la température ambiante, soit
entre 18 et 24 °C (65 et 75 °F). Afin d’éviter d’endommager le
bloc-piles, il est important de NE PAS le charger à des
températures inférieures à +4,5 °C (+40 °F) ou supérieures à
+40,5 °C (105 °F).
2. Le chargeur et le bloc-piles peuvent devenir chauds au toucher lors
du chargement. Ceci est normal et n’indique pas la présence d’un
problème.
3. Si le bloc-piles ne se charge pas normalement, il faut : (1) vérifier
l’alimentation de la prise en y enfichant une lampe ou un appareil,
(2) s’assurer que la prise ne soit pas raccordée à un interrupteur qui
coupe le courant lorsqu’on éteint les lumières, (3) placer le chargeur
et le bloc-piles dans un endroit où la température ambiante est
environ 18 à 24 °C (65 et 75 °F) ou, si le problème persiste, (4)
retourner l’outil, le bloc-piles et le chargeur au centre de service de
sa région.
4. Le bloc-piles doit être rechargé lorsqu’il ne produit pas suffisamment
de courant pour permettre à l’utilisateur de travailler normalement.
On doit CESSER de l’utiliser dans de telles conditions et suivre la
méthode de chargement. On peut aussi charger en tout temps un
bloc-piles partiellement déchargé sans nuire à son fonctionnement.
5. Dans certaines conditions, lorsque le chargeur est enfiché, les
raccords de charge à nu situés à l’intérieur du chargeur peuvent
subir un court-circuit lorsqu’ils entrent en contact avec une matière
étrangère. Les matières conductives comme la laine d’acier, la
feuille d’aluminium ou les particules métalliques, mais sans
toutefois s’y limiter, doivent être tenus à l’écart des cavités du
chargeur. Toujours débrancher celui-ci lorsque le bloc-piles n’y est
pas inséré ou avant de le nettoyer.
AVERTISSEMENT : ne jamais laisser de liquide s’infiltrer à
l’intérieur du chargeur afin d’éviter les risques de choc électrique.
Pour faciliter le refroidissement du bloc-piles après son utilisation,
éviter de placer ce dernier ou le chargeur dans un environnement
chaud comme un cabanon en métal ou une remorque non isolée.
MISE EN GARDE : ne jamais ouvrir le bloc-piles pour quelle que
raison que ce soit. Si le compartiment en plastique se rupture
ou se fissure, le retourner au centre de service afin qu’il puisse être
recyclé.
Important
L’utilisateur ne peut pas réparer le chargeur ni les pièces qu’il
renferme. Il faut donc en confier la réparation à un centre de service
autorisé afin d’éviter d’endommager les composants internes du
chargeur qui sont sensibles à la statique.
BIEN LIRE TOUTES LES DIRECTIVES RELATIVES AU
20
Français
DW936/384286-01 3/15/00 8:26 AM Page 20
Page 24

21
Français
0
1
5
20
3
0
4
0
50
FIG. 5
BOUTON DE
RÉGLAGE DES
COUPES EN BISEAU
FIG. 6
BOUTON DE DÉGAGEMENT DU
DISPOSITIF DE VERROUILLAGE DE
L’INTERRUPTEUR
INTERRUPTEUR À
DÉTENTE
CHARGEUR DU PRÉSENT GUIDE AVANT DE CHARGER
L’ENSEMBLE DE PILES.
Toujours utiliser l’ensemble de piles approprié (comme celui fourni
avec l’outil ou un ensemble de rechange identique). Ne jamais utiliser
un autre ensemble de piles; cela peut endommager l’outil et présente
des risques.
Lames
Une lame émoussée procure une coupe lente et inefficace, elle
entraîne la surchauffe du moteur et la production excessive d’éclats,
et elle peut augmenter les risques de rebond. On peut se procurer en
sus des lames recommandées pour l’outil chez les détaillants et au
centre de service de la région. Pour obtenir de plus amples
renseignements sur les lames, composer le 1 (800) 433-9258.
ATTENTION: Ne pas utiliser de lames ni de disques abrasifs pour
couper des matériaux ferreux (comme de l’acier), du verre ou de la
céramique.
AVERTISSEMENT : Pour réduire les risques de blessures,
toujours porter des lunettes de sécurité. Le carbure est un matériau
dur mais friable. Les bouts de lames peuvent craquer ou casser s’ils
entrent en contact avec des corps étrangers se trouvant dans la pièce
à découper (comme des fils ou des clous). Utiliser la scie seulement
avec le protecteur approprié en place. Bien installer la lame dans le
bon sens avant d’utiliser la scie et toujours se servir d’une lame
propre et bien affûtée.
Remplacement de la lame
1. METTRE L’OUTIL HORS TENSION ET ENLEVER L’ENSEMBLE
DE PILES.
2. Pour installer la lame, escamoter le protège-lame inférieur et
placer la lame sur l’arbre contre la rondelle de fixation interne.
Placer la rondelle de fixation externe contre la lame (la face
imprimée de la lame doit s’orienter vers l’extérieur; les dents du
bas de la lame pointant vers l’avant) (figure 3).
3. Serrer fermement à la main la vis de fixation de la lame de
manière à retenir la rondelle en place (la vis a des filets à gauche
et il faut la faire tourner dans le sens antihoraire pour la serrer).
4. Enfoncer légèrement le dispositif de verrouillage de la lame
(figure 4) en faisant tourner l’arbre jusqu’à ce que la lame
s’immobilise.
5. Serrer fermement (dans le sens antihoraire) la vis de fixation de la
lame avec la clé de la lame.
6. Pour retirer la lame, METTRE L’OUTIL HORS TENSION ET
ENLEVER L’ENSEMBLE DE PILES. Mettre le dispositif de
verrouillage de la lame en place et desserrer la vis de fixation de
la lame en la faisant tourner dans le sens horaire à l’aide de la
clé de la lame.
DW936/384286-01 3/15/00 8:26 AM Page 21
Page 25

22
NOTE : Ne jamais engager le dispositif de verrouillage de la lame
lorsque la scie fonctionne ni pour immobiliser l’outil. Ne jamais mettre
la scie en marche lorsque le dispositif de verrouillage de la lame est
en place; cela risque d’endommager la scie irrémédiablement.
Réglage de la profondeur de coupe
1. METTRE L’OUTIL HORS TENSION ET ENLEVER L’ENSEMBLE
DE PILES.
2. Saisir fermement la scie et desserrer (dans le sens antihoraire) le
bouton de réglage de la profondeur de coupe. Déplacer le patin
afin d’obtenir la profondeur de coupe voulue.
3. S’assurer que le bouton de réglage de la profondeur de coupe
est bien resserré (dans le sens horaire) avant d’utiliser l’outil.
Afin d’optimiser les résultats de coupe, régler la profondeur de coupe
de sorte qu’une dent de la lame sorte du dessous du matériau à
découper. La distance correspond à celle à partir du bout de la dent
jusqu’au fond du creux en forme d’hameçon situé devant la dent.
Cette mesure minimise la friction de la lame, permet l’évacuation de
la sciure, assure une coupe rapide et en douceur tout en réduisant
les risques de rebond. La figure 5 illustre la marche à suivre pour
vérifier le réglage de la profondeur. Déposer une pièce à découper
le long du côté de la lame de la façon illustrée et voir comment la
dent de la lame dépasse du dessous du matériau.
NOTE : Lorsqu’on utilise une lame à dents au carbure, ne faire sortir
la dent qu’à moitié du matériau à découper.
Réglage pour coupes en biseau
La gamme complète de réglage pour les coupes en biseau va de 0˚
à 50˚. Le secteur est calibré en multiples de 5˚. Le mécanisme de
réglage se trouve à l’avant de l’outil (figure 5). Il consiste en un
secteur calibré et un bouton. Faire ce qui suit pour régler la scie
pour effectuer une coupe en biseau.
1. METTRE L’OUTIL HORS TENSION ET ENLEVER L’ENSEMBLE
Français
0
1
5
20
30
4
0
5
0
0
1
5
2
0
3
0
40
5
0
SOUTENIR LA PIÈCE
PRÈS DE LA LIGNE DE
COUPE
FIG. 7
FIG. 8
SUPPORT
FIG. 9
NE PAS SOUTENIR LA PIÈCE
LOIN DE LA LIGNE DE COUPE
DW936/384286-01 3/15/00 8:26 AM Page 22
Page 26

23
Français
DE PILES.
2. Desserrer (dans le sens antihoraire) le bouton du secteur et faire
basculer le patin jusqu’à l’obtention de l’angle voulu en alignant
l’indicateur sur la mention d’angle voulue. Bien resserrer le bouton
(dans le sens horaire).
NOTE : On peut régler l’indicateur du secteur (qui se trouve entre le
bouton du secteur et le secteur) après en avoir desserré la vis. Il
faut bien resserrer la vis après le réglage.
Réglage du patin pour effectuer des coupes
à 90˚
(Faire ce qui suit lorsqu’il faut modifier le réglage.)
1. METTRE L’OUTIL HORS TENSION ET ENLEVER L’ENSEMBLE
DE PILES.
2. Régler l’outil pour effectuer une coupe en biseau à 0˚.
3. Escamoter le protège-lame. Déposer la scie du côté de la lame.
4. Desserrer le bouton de réglage du secteur. Placer une équerre
contre la lame et le patin pour régler l’angle de 90˚.
5. Desserrer l’écrou hexagonal à l’aide d’une clé ou de pinces à bec
effilé. Déplacer la vis de réglage de sorte que le patin s’arrête à
l’angle approprié. Serrer la vis en place en resserrant l’écrou
hexagonal.
6. Il peut être nécessaire de régler l’indicateur d’angle du secteur afin
de l’aligner sur la mention «0» après avoir réglé le patin.
7. Vérifier la précision du réglage sur un échantillon en s’assurant
que la coupe est d’équerre.
Indicateur de voie
Il y a un indicateur de voie à l’avant du patin de la scie servant aux
coupes verticales et en biseau. L’indicateur permet de guider la scie
le long de lignes de coupes tracées sur le matériau à découper.
L’indicateur s’aligne sur le côté gauche (externe) de la lame; la voie se
trouve alors à la droite de l’indicateur. Guider l’outil le long des lignes
tracées de sorte que la voie se trouve dans le surplus de matériau.
Interrupteur
Dégager le dispositif de verrouillage en appuyant le bouton, comme le
montre la figure 6. Enfoncer l’interrupteur à détente pour mettre l’outil
en marche. Relâcher la détente pour arrêter l’outil. De plus, le bouton
de verrouillage est automatiquement actionné lorsqu’on relâche la
détente de l’interrupteur.
NOTE : On ne peut bloquer l’interrupteur en position de marche
continue et il ne faut jamais le bloquer de quelque manière que ce soit.
Soutien du matériau à découper
La figure 7 illustre la meilleure position de coupe. Remarquer que les
mains sont loin de la zone de coupe.
Pour éviter les risques de rebond, INSTALLER UN SUPPOR T PRÈS
de la ligne de coupe (figure 8). NE PAS installer le support loin de la
ligne de coupe (figure 9).
AVERTISSEMENT : Il est essentiel de bien soutenir la pièce à
découper et de bien saisir la scie afin de prévenir les risques de
blessures. La figure 7 montre la bonne façon de tenir l’outil.
TOUJOURS METTRE L’OUTIL HORS TENSION ET ENLEVER
L’ENSEMBLE DE PILESAVANT DE RÉGLER L’OUTIL.
Placer le «bon» côté du matériau (celui dont l’apparence importe le
plus) vers le bas. En effet, la scie coupe vers le haut de sorte que les
éclats se trouvent sur la face supérieure de la pièce.
Coupe
Placer la partie large du patin sur la partie soutenue du matériau qui
tombera après la coupe. La figure 7, par exemple, illustre la BONNE
façon de découper l’extrémité du matériau. Toujours placer le
matériau dans un étau. Ne pas essayer de retenir les petites pièces à
la main. Soutenir également les pièces en porte-à-faux ou en saillie.
Prendre garde lorsqu’on scie des pièces par le bas.
S’assurer que la scie tourne à plein régime avant d’insérer la lame
DW936/384286-01 3/15/00 8:26 AM Page 23
Page 27

24
Français
COUPES EN REFENTE
La refente consiste à découper de larges planches en bandes
minces avec le grain dans le sens de la longueur. Il est plus difficile
de guider la scie à la main pour ce genre d’application; il est donc
conseillé d’utiliser un guide quelconque.
COUPES EN RETRAIT
METTRE L’OUTIL HORS TENSION ET ENLEVER L’ENSEMBLE
DE PILES AVANT DE RÉGLER L’OUTIL.
Une coupe en retrait se fait dans un plancher, un mur ou toute autre
surface plate. Régler le patin de sorte que la lame coupe à la
profondeur voulue. Faire basculer la scie vers l’avant et appuyer le
devant du patin contre le matériau à découper. À l’aide du ressort de
rappel, escamoter le protège-lame vers le haut. Abaisser l’arrière du
patin jusqu’à ce que les dents de la lame touchent presque à la ligne
de coupe. À ce moment, relâcher le protège-lame (son contact avec
la pièce le met dans une position lui permettant de s’ouvrir facilement
au moment de la coupe) (figure 10). Mettre le moteur en marche et
abaisser graduellement la scie jusqu’à ce que le patin repose contre
le matériau à découper. Faire avancer la scie le long de la ligne de
coupe jusqu’au bout. Relâcher la détente et attendre l’immobilisation
complète de la lame avant de la retirer du matériau. Répéter les
étapes précédentes à chaque nouvelle coupe. Ne jamais bloquer le
protège-lame en position ouverte. Ne jamais déplacer la scie vers
l’arrière lors des coupes en retrait. En effet, la scie pourrait se
soulever hors du matériau et causer des blessures.
Rebond
Lorsque la lame se coince ou se tord dans la ligne de coupe, il y a
risque de rebond. La scie sort alors rapidement de la pièce à
découper vers l’utilisateur. Lorsque la lame est coincée en raison de
la fermeture de la voie, la lame se bloque et la réaction du moteur fait
sortir la scie de la pièce à découper vers l’arrière. Lorsque la lame est
coincée ou n’est pas bien alignée sur la ligne de coupe, les dents à
dans la pièce à découper. Il existe des risques de rebond lorsqu’on
démarre la scie et que la lame est contre la pièce à découper ou que
la lame se trouve dans la voie.
Faire avancer la scie à une vitesse qui ne force pas la lame. La
difficulté de la coupe peut varier dans une même pièce en raison de
la teneur en humidité et en nœuds du bois. Lorsque l’humidité et les
nœuds exercent une surcharge sur la scie, la faire avancer lentement
mais assez fermement pour que la scie maintienne son régime.
Lorsqu’on force la scie, on obtient des coupes imprécises et rudes, et
il y a risque de rebonds ou de surchauffe du moteur.
Lorsque la scie s’éloigne de la ligne de coupe, ne pas la forcer dans
le sens voulu. Relâcher la détente de l’interrupteur et attendre
l’immobilisation complète de la lame. Retirer alors la lame de la pièce
et reprendre la coupe dans la trajectoire voulue. Dans tous les cas, il
faut retirer la lame de la pièce pour modifier le sens de la coupe.
Autrement, on peut faire caler la scie et cela présente des risques de
rebond.
LORSQUE LA SCIE CALE, RELÂCHER LA DÉTENTE DE
L’INTERRUPTEUR ET RETIRER LA SCIE DE LA PIÈCE.
S’ASSURER QUE LA LAME EST DROITE DANS LA LIGNE DE
COUPE ET DÉGAGER LE REBORD TRANCHANT AVANT DE
REPRENDRE LES TRAVAUX.
Lorsque la coupe est terminée, relâcher l’interrupteur et attendre
l’immobilisation de la lame avant de sortir la scie de la pièce.
Lorsqu’on soulève la scie, le protège-lame télescopique à ressort se
referme automatiquement sous la lame. Se rappeler que la lame est
à découvert jusqu’à ce qu’on la retire de la pièce. C’est pourquoi il ne
faut jamais mettre les mains sous la pièce. Lorsqu’il faut escamoter
le protège-lame télescopique à la main (comme il faut le faire avant
une coupe en retrait, par exemple), toujours utiliser le ressort de
rappel.
NOTE : Lorsqu’on découpe de minces sections de matériau,
s’assurer que les petites pièces détachées ne s’accrochent pas à
l’intérieur du protège-lame inférieur.
DW936/384286-01 3/15/00 8:26 AM Page 24
Page 28

l’arrière de la lame peuvent creuser la surface supérieure de la pièce,
faisant sortir la lame de la voie vers l’utilisateur. Les situations
suivantes présentent des risques de rebond.
MAUVAIS SOUTIEN DE LA PIECE À DÉCOUPER
• L’affaissement ou le mauvais soutien de la pièce découpée peut
causer le blocage de la lame.
• Le découpage d’un matériau seulement soutenu à l’extrémité
externe (figure 9) fait affaisser le matériau à mesure qu’il s’affaiblit,
refermant ainsi la voie et bloquant la lame.
• Le découpage d’une pièce en porte-à-faux ou en saillie à partir
du bas vers le haut, à la verticale, provoque le blocage de la lame
lorsque la pièce découpée tombe.
• Le découpage de longues bandes étroites (coupe en refente) peut
causer l’affaissement ou la torsion de la bande bloquant ainsi la
voie et coinçant la lame.
• L’accrochage du protège-lame inférieur sur la surface sous le
matériau peut réduire momentanément la maîtrise de l’utilisateur
sur l’outil. La scie peut alors sortir en partie de la pièce
augmentant le risque de torsion de la lame.
RÉGLAGE INCORRECT DE LA PROFONDEUR DE COUPE
Lorsque le réglage de la profondeur de coupe dépasse la profondeur
requise, la charge de l’outil ainsi que les risques de torsion de la lame
dans la voie augmentent. Le réglage incorrect augmente également
la surface de coinçage de la lame dans le cas où la voie se referme.
TORSION DE LA LAME (COUPE MAL ALIGNÉE)
• Le fait de pousser fort pour découper un nœud, un clou ou une
section à grain dur peut provoquer la torsion de la lame.
• Lorsqu’on essaie de faire dévier la scie pendant la coupe (pour
revenir dans la ligne de coupe), on peut également provoquer la
torsion de la lame.
• Le fait de s’étirer hors de sa portée ou de ne pas garder son
équilibre peut causer la torsion de la lame.
• Le changement de position des mains ou du corps pendant la
coupe peut provoquer la torsion de la lame.
• Le retrait de la scie pour dégager les copeaux de la lame peut
faire tordre la lame si le retrait ne se fait par soigneusement.
DISPOSITIONS INSUFFISANTES POUR MATÉRIAUX
CORIACES
Matériaux présentant des risques : le bois humide, le bois vert (qui
est frais coupé ou qui n’a pas encore passé au séchoir), le bois traité
sous pression (traité avec des agents de conservation ou des
produits chimiques contre la moisissure).
UTILISATION DE LAMES ÉMOUSSÉES OU SALES
Les lames émoussées augmentent la charge de la scie. Pour
compenser, l’utilisateur pousse habituellement fort, ce qui charge un
peu plus la scie et occasionne la torsion de la lame dans la voie. Les
lames usées n’ont pas suffisamment de jeu, ce qui augmente les
risques de pliage et de torsion.
RETRAIT DE LA SCIE PENDANT LES COUPES EN BISEAU
Les coupes en biseau doivent être faites en respectant un certain
nombre de techniques, particulièrement le guidage de la scie. En
effet, l’angle de la lame au patin et la grande surface de la lame sur
le matériau augmentent les risques de pliage et de torsion.
REDÉMARRAGE D’UNE COUPE AVEC LES DENTS DE LA
LAME COINCÉES DANS LE MATÉRIAU
Il faut atteindre le plein régime de l’outil avant de commencer à
découper ou avant de mettre la scie en marche. Autrement, la scie
25
Français
FIG. 10
DW936/384286-01 3/15/00 8:26 AM Page 25
Page 29

26
risque de caler ou de rebondir.
Toute autre condition qui peut occasionner le pliage, la torsion ou
l’alignement incorrect de la lame peut également résulter en un
rebond. Consulter les rubriques relatives aux réglages et à
l’installation ainsi qu’au fonctionnement de la scie afin de minimiser
les risques de rebond.
Nettoyage
Nettoyer l’outil seulement à l’aide d’un savon doux et d’un chiffon
humide. De nombreux produits nettoyants domestiques renferment
des produits chimiques qui peuvent causer d’importants dommages
au plastique. Ne pas utiliser de l’essence, de la térébenthine, de la
laque, des solvants, des liquides pour le nettoyage à sec ni tout autre
produit semblable. Ne laisser aucun liquide s’infiltrer dans l’outil et ne
jamais immerger l’outil.
Lubrification
L’outil est monté sur des roulements autolubrifiés à billes et à
rouleaux qui ne requièrent pas de lubrification périodique. Il est
toutefois conseillé de confier une fois l’an la scie à un centre de
service autorisé pour une inspection, une lubrification et un
nettoyage complets du boîtier d’engrenages.
Accessoires
On peut se procurer en sus les accessoires recommandés pour l’outil
chez les détaillants ou aux centres de service autorisés. Pour trouver
un accessoire pour l’outil, communiquer à l’adresse suivante.
DEWALT Industrial Tool Co., 701 East Joppa Road, Baltimore, MD
21286. 1 (800) 433-9258.
MISE EN GARDE: L’utilisation de tout autre accessoire non
recommandé pour l’outil peut être dangereuse.
Important
Pour assurer la SÉCURITÉ D’EMPLOI et la FIABILITÉ de l’outil, n’en
confier la réparation, l’entretien et les rajustements (y compris
l’inspection et le remplacement des balais) qu’au personnel d’un
centre de service D
EWALT ou d’un atelier d’entretien autorisé
n’utilisant que des pièces de rechange identiques.
Garantie complète
Les outils industriels de service intensif DEWALT sont garantis
pendant un an à partir de la date d’achat. Toute pièce d’un outil
D
EWALT qui s’avérait défectueuse en raison d’un vice de matière ou
de fabrication sera réparée ou remplacée sans frais. Pour obtenir de
plus amples renseignements sur les réparations couvertes par la
garantie, composer le 1 (800) 4-D
EWALT (! (800) 433-9258). La ga
rantie ne couvre pas les accessories ni les réparations tentées ou
effectuées par des tiers. Les modalités de la présente garantie
donnent des droits légaux spécifiques. L’utilisateur peut également
se prévaloir d’autres droits selon l’état ou la province qu’il habite.
En outre, la garantie suivante couvre les outils D
EWALT.
GARANTIE DE SATISFACTION DE 30 JOURS OU ARGENT REMIS
Si, pour quelque raison que ce soit, l’outil industriel de service intensif
D
EWALT ne donne pas entière satisfaction, il suffit de le retourner
chez le marchand participant dans les 30 jours suivant la date
d’achat afin d’obtenir un remboursement complet. Il faut retourner,
port payé, l’outil complet. On peut exiger une preuve d’achat.
Français
DW936/384286-01 3/15/00 8:26 AM Page 26
Page 30

27
Español
R
BOTÓN DE SEGURO
DEL INTERRUPTOR
BATERÍA
ZAPATA
GATILLO
INTERRUPTOR
PERILLA DE
AJUSTE DE
PROFUNDIDAD
PALANCA
RETRACTIL
DE LA
GUARDA
INFERIOR
GUARDA
INFERIOR
SEGURO DE
FLECHA
PERILLA DE
AJUSTE DE
ANGULO
INDICADOR
DE CORTE
TORNILLO DE
SUJECIÓN DEL
DISCO
DW930 Sierra circular inalámbrica de 12.0 volts 2500 RPM
DW935 Sierra circular inalámbrica de 14.4 volts 3000 RPM
DW936 Sierra circular inalámbrica de 18.0 volts 3200 RPM
SI TIENE ALGUNA PREGUNTA O COMENTARIO ACERCA DE
ESTA O CUALQUIER OTRA HERRAMIENTA DEWALL, LLÁMENOS
GRATIS AL SIGUIENTE NÚMERO:
(1-800-433-9258)
Reglas generales de seguridad – Para
todas las herramientas que funcionan
con pilas
¡ADVERTENCIA! Lea y asegúrese de comprender todas las
instrucciones. El no hacerlo puede originar riesgos de choque
eléctrico, incendio y lesiones personales de gravedad.
CONSERVE ESTAS
INSTRUCCIONES
ÁREA DE TRABAJO
• Conserve su área de trabajo limpia y bien iluminada. Las bancas
amontonadas y las zonas oscuras propician los accidentes.
• No utilice herramientas eléctricas en atmósferas explosivas,
como en presencia de líquidos, gases o polvos inflamables. Las
herramientas eléctricas producen chispas que pueden originar la
ignición de los polvos o los vapores.
• No permita a ningún observador, niño o visitante acercarse
mientras pone en funcionamiento una herramienta eléctrica. Las
distracciones pueden hacerle perder a usted el control.
SEGURIDAD ELÉCTRICA
• No maltrate el cable. Nunca tome la herramienta por el cable para
transportarla ni para desconectarla de la toma de corriente. Conserve
el cable alejado de calor, del aceite, de bordes afilados o de piezas
móviles. Cambie inmediatamente los cables dañados, dado que éstos
aumentan el riego de incendio.
• Una herramienta que funciona con pilas integradas o por
DW936/384286-01 3/15/00 8:26 AM Page 27
Page 31

28
Español
pieza de trabajo a una plataforma estable. Sujetar las piezas con
la mano o contra su cuerpo es inestable y puede originar la pérdida
de control.
• No fuerce la herramienta. Utilice la herramienta adecuada según la
situación. Esto le permitirá ejecutar mejor el trabajo, de manera más
segura y al ritmo para el cual ha sido diseñada.
• No utilice la herramienta si el interruptor no enciende y apaga.
Cualquier herramienta que no pueda controlarse por medio del
interruptor es peligrosa y debe ser reparada.
• Desconecte la batería de la herramienta o coloque el interruptor
en la posición de seguro o apagado antes de realizar cualquier
ajuste, cambiar accesorios o guardar la herramienta. Esta medida
preventiva reduce el riesgo de encendido accidental de la herramienta.
• Guarde las herramientas que no utiliza fuera del alcance de los
niños y de cualquier otra persona no entrenada. Las herramientas
son peligrosas en manos de personas sin entrenamiento.
• Cuando no utilice la batería, consérvela alejada de otros objetos
metálicos tales como clips, monedas, clavos, tornillos y otros
pequeños objetos metálicos que puedan hacer conexión entre
una terminal y la otra. Hacer corto entre las terminales de la batería
puede originar chispas, quemaduras o incendios.
• Mantenga adecuadamente sus herramientas. Conserve las
herramientas de corte afiladas y limpias. Aquellas herramientas con
piezas de corte afiladas que reciben un mantenimiento adecuado,
difícilmente se atascan y son más fáciles de controlar.
• Verifique la correcta alineación de las piezas móviles, la presencia
de roturas en las piezas y cualquier otra anomalía que pueda
afectar el funcionamiento adecuado de las herramientas. Si su
herramienta se encuentra dañada, llévela al servicio de mantenimiento
antes de utilizarla. La falta de un mantenimiento adecuado puede ser
la causa de muchos accidentes.
• Utilice solamente aquellos accesorios recomendados por el
fabricante para el modelo de la herramienta que usted posee. Los
accesorios diseñados para una herramienta pueden resultar
separado debe recargarse solamente con el cargador
especificado para esa batería. Un cargador adecuado para un tipo
de pila puede originar riesgos de incendio cuando se utiliza con otro
tipo de pila.
• Utilice su herramienta a baterías solamente con las baterías
específicamente diseñadas para ella. El uso de otro tipo de baterías
puede originar riesgos de incendio.
SEGURIDAD PERSONAL
• Esté siempre alerta, concéntrese en lo que está haciendo y
recurra al sentido común cuando utilice una herramienta
eléctrica. No utilice ninguna herramienta si se encuentra fatigado o
bajo la influencia de drogas, alcohol o medicamentos. Un descuido
de su parte mientras utiliza una herramienta eléctrica puede
ocasionarle lesiones graves.
• Vístase adecuadamente. No utilice ropa floja ni joyas. Cubra su
cabello si lo tiene largo. Conserve su cabello, ropas y guantes alejados
de las piezas móviles. Las piezas de vestir flojas, las joyas y el cabello
largo pueden resultar atrapados por las piezas móviles.
• Evite el encendido accidental. Asegúrese de que el interruptor esté
apagado antes de conectar el aparato. Sostener una herramienta con
su dedo colocado en el interruptor o conectarla sin fijarse si el
interruptor está encendido, puede provocar accidentes.
• Retire las llaves de ajuste o presión antes de encender la
herramienta. El dejar una llave en una pieza giratoria puede
ocasionar lesiones personales.
• No se incline demasiado. Conserve siempre los pies bien apoyados,
al igual que su equilibrio. La posición correcta de los pies y el equilibrio
permiten controlar mejor la herramienta en situaciones inesperadas.
• Utilice equipo de seguridad. Proteja siempre sus ojos. Las
mascarillas contra el polvo, los zapatos de seguridad antideslizantes,
el casco o los protectores auditivos deben ser utilizados con el fin de
trabajar en condiciones apropiadas.
USO Y CUIDADOS DE LA HERRAMIENTA
• Utilice prensas u otros medios prácticos para asegurar y apoyar la
DW936/384286-01 3/15/00 8:26 AM Page 28
Page 32

29
Español
peligrosos el emplearse en otra para la cual no han sido diseñados.
SERVICIO DE MANTENIMIENTO Y REPARACIÓN
• El servicio de mantenimiento y reparación de las herramientas
debe ser efectuado únicamente por personal calificado para su
reparación. El mantenimiento realizado por personal no calificado
puede provocar riesgos de lesiones.
• Cuando se efectúe el mantenimiento de una herramienta, utilice
únicamente accesorios originales. Siga las instrucciones
presentadas en la sección Mantenimiento, de este manual. El empleo
de piezas no autorizadas o el no seguir las instrucciones de
mantenimiento, puede originar riegos de choque eléctrico o lesiones.
Reglas adicionales de seguridad
• Cuando realice un trabajo en el cual la herramienta pueda tener
contacto con cables ocultos, tome la herramienta por las
superficies aislantes de sujeción. El contacto con un cable “vivo”
hará que las partes metálicas de la herramienta puedan transmitir
una descarga eléctrica al operario.
• Cuando trabaje en una escalera o en un andamio, asegúrese de
colocar la herramienta de costado mientras ésta no se encuentre
en uso. Algunas herramientas con amplios cargadores para batería
pueden sostenerse en posición vertical pero pueden caer muy
fácilmente.
• La etiqueta de su herramienta puede incluir los siguientes
símbolos.
V ................volts A ................amperes
Hz ..............hertz W ..............watts
min..............minutos ..............corriente
alterna
............corriente directa
n
o ..............
velocidad sin carga
................construcción clase II
................
terminales de conexión a ..................
tierre
..............símbolo de alerta seguridad .../min ........
revoluciones o minuto
ADVERTENCIA: La utilización de esta herramienta puede
generar polvo con contenidos químicos que pueden producir
cáncer, defectos de nacimiento u otros defectos en el sistema
reproductor. Utilice la protección respiratoria adecuada.
Instrucciones importantes de seguridad
para los cargadores de baterías
¡La batería no viene completamente cargada de fábrica! Lea primero
las instrucciones de seguridad que siguen a continuación. Luego,
siga las instrucciones y procedimientos de carga.
LEA TODAS LAS INSTRUCCIONES
• No incinere la batería aún si ésta se encuentra muy averiada o si está
completamente descargada. La batería puede explotar en el fuego.
• En condiciones de temperatura o de uso extremos, puede presentarse
un ligero goteo de líquido de la batería. Esto no indica que haya una
falla. Sin embargo, si el sello externo está roto y si su piel llegase a
tener contacto con este líquido, siga las siguientes instrucciones:
DW936/384286-01 3/15/00 8:26 AM Page 29
Page 33

30
Español
• CHARGING
• CHARGED
• DELAY
DW9115
DANGER:
WARNING:
15 MINUTE CHARGER
FLASHING
ON
FAST FLASH•DEFECTIVE PACK
ON
9
.0
v
E
X
T
E
N
D
E
D
R
U
N
T
I
M
E
1
2
.0
v
E
X
T
E
N
D
E
D
R
U
N
T
I
M
E
DW9115
DANGER:
WARNING:
R
R
R
R
• CHARGING
• CHARGED
• DELAY
15 MINUTE CHARGER
FLASHING
ON
FAST FLASH•DEFECTIVE PACK
ON
DW9115
DANGER:
WARNING:
R
FIG. 1
CARGADOR DE 15 MINUTOS
CARGADORES DE 1 HORA
CARGADORES DE 1 HORA
a. Lave rápidamente la zona afectada con agua y jabón.
b. Neutralice con un ácido débil como jugo de limón o vinagre.
c. Si el líquido de la batería toca sus ojos, enjuáguelos con agua limpia
por un tiempo mínimo de 10 minutos y busque atención médica
inmediata. (Nota médica: el líquido es una solución de potasa cáustica
en una concentración de 25 a 35%).
• No cargue baterías extra en delantales, bolsillos o cajas de
herramienta, junto a objetos de metal. La batería podría hacer corto
circuito y dañarse, y provocar quemaduras severas o un incendio.
• Cargue las baterías únicamente en cargadores DeWalt.
• NOTA: Repase y observe todas las “Notas y procedimientos de carga”
en la sección de Instrucciones para el cargador, de este manual.
• NOTA: Su batería es de tipo níquelcadmio. La EPA (Agencia de
Protección Ambiental) considera que el cadmio es un material tóxico.
Antes de desechar las baterías de cadmio desgastadas o dañadas,
verifique ante las autoridades ambientales locales, las restricciones
especiales con relación al desecho de éstas, o regréselas a un Centro
de servicio autorizado D
EWALTpara que su reciclaje.
• NO guarde ni utilice la herramienta o la batería en lugares en los que
la temperatura pueda alcanzar o exceder 40ºC (105°F) (tales como
cobertizos o construcciones de metal en el verano).
PELIGRO: Nunca intente abrir la batería por ningún motivo. Si el
recubrimiento de plástico de la batería se rompe o estrella, no
introduzca la batería en el cargador. Esto puede presentar un peligro
de descarga eléctrica o electrocución. Lleve la batería dañada a un
Centro de servicio para su reciclaje.
Baterías
Su herramienta utiliza una batería DEWALT de 18,0 voltios. Cuando
solicite baterías de repuesto, asegúrese de incluir el número de
catálogo y el voltaje. Las baterías XR PACK™, de larga duración, le
ofrecen un tiempo de funcionamiento hasta en un 25% superior a de
las baterías estándar. NOTA: Su herramienta funciona tanto con
baterías estándar como con baterías de larga duración. Sin embargo,
asegúrese de seleccionar el voltaje adecuado.
El sello RBRC™
El sello RBRC™ (Rechargable Battery Recycling Corporation) en las
baterías de níquelcadmio, indica que el costo del
reciclaje de la batería o del cargador de
baterías, al final de su vida útil, ya ha sido
pagado por D
EWALT. En algunas áreas es
ilegal colocar las baterías de níquelcadmio
desgastadas en la basura doméstica o en los basureros municipales;
DW936/384286-01 3/15/00 8:26 AM Page 30
Page 34

31
Español
el programa RBRC™ proporciona una alternativa ambiental
conveniente.
La RBCR, en cooperación con D
EWALT y otros usuarios de baterías,
han establecido programas en los Estados Unidos para facilitar la
recolección de baterías desgastadas de níquelcadmio. Al llevar sus
baterías desgastadas de níquelcadmio a un Centro de servicio
autorizado de D
EWALT, o a su minorista local para el reciclaje de su
batería, usted ayuda a proteger el medio ambiente y a conservar
nuestros recursos naturales. También puede comunicarse con el
centro de reciclaje de su localidad para que le informen acerca de los
lugares donde usted puede regresar las baterías desgastadas
Importantes instrucciones de seguridad
para cargadores de baterías
CONSERVE ESTAS INSTRUCCIONES: Este manual contiene
importantes informaciones de seguridad para los cargadores de
baterías DE WALT.
• Antes de utilizar el cargador, lea todas las instrucciones y las
advertencias que acompañan el cargador de baterías, la batería y los
productos que utilicen las baterías.
• No utilice herramientas eléctricas en atmósferas explosivas, como en
presencia de líquidos, gases o polvos inflamables. Las herramientas
eléctricas producen chispas que pueden originar la ignición de los
polvos o los vapores.
ADVERTENCIA: Para reducir el riesgo de lesiones, recargue tan sólo
baterías recargables de níquelcadmio DEWALT. Otros tipos de baterías
pueden estallar causando así lesiones y daños personales.
ADVERTENCIA: Bajo ciertas condiciones, cuando el cargador está
conectado a la toma de corriente, los contactos de carga expuestos
dentro del cargador pueden hacer contacto entre sí debido a algún
material externo. Los materiales externos de naturaleza conductora tales
como, pero sin limitarse a ellos, el alambre de acero, el papel aluminio o
cualquier tipo de partícula metálica, deben conservarse alejados de las
FIG. 2
BOTONES DE LIBERACIÓN
cavidades del cargador. Desconecte siempre el cargador de la toma de
corriente antes de limpiarlo.
PELIGRO: Alto voltaje en las terminales de carga. No haga pruebas
con objetos conductores. Hay peligro de choque eléctrico o electrocución.
ADVERTENCIA: No permita que ningún líquido se introduzca en el
cargador, ni exponga éste a la lluvia o la nieve, puede originarse una
descarga eléctrica.
• El cargador y la batería están especialmente diseñados para trabajar
juntos. No intente cargar la batería con otros cargadores que no sean
los descritos en este manual.
• Estos cargadores no están diseñados para usos diferentes a la carga
de las baterías recargables D
EWALT. Cualquier otro uso puede
originar riesgos de incendio, choque eléctrico o electrocución.
• Para reducir los riesgos de daño del enchufe y del cable eléctrico,
cuando desconecte el cargador tire del enchufe, no del cable.
• Asegúrese de que el cable eléctrico esté colocado de manera que no
lo pisen, enreden o quede expuesto a una tensión que pueda
averiarlo.
• Trate de no utilizar cables de extensión a menos que sea
absolutamente necesario. El uso de una extensión inadecuada puede
DW936/384286-01 3/15/00 8:26 AM Page 31
Page 35

32
Español
ocasionar incendios, descargas eléctricas o electrocución.
• Por seguridad, el cable de una extensión debe tener una dimensión
adecuada (AWG o American Wire Gauge). En la medida que el calibre
de un cable es menor, mayor es su capacidad; el cable calibre 16 tiene
una mayor capacidad que el calibre 18. Cuando esté utilizando más de
una extensión para lograr la longitud deseada, asegúrese que cada
extensión cumpla con las normas mínimas en cuanto al calibre del
cable.
Calibre mínimo requerido (AWG) para cables de extensión
Longitud total del cable de extensión
25 50 75 100 125 150 175
7.6 m 15.2 m 22.9 m 30.5 m 38.1 m 45.7 m
53.3 m
Calibre promedio del alambre
18 18 16 16 14 14 12
• El cargador se ventila a través de las ranuras que se encuentran en las
partes superior e inferior de la cubierta. No coloque ningún objeto
sobre el cargador ni coloque éste en una superficie suave que pueda
bloquear las ranuras de ventilación ocasionando un calor interno
excesivo. Coloque el cargador en un lugar alejado de cualquier fuente
de calor.
• No utilice el cargador si el cable o el enchufe se encuentran dañados;
hágalos reparar de inmediato.
• No utilice el cargador si ha recibido algún golpe, si se ha caído o si
presenta cualquier otro daño; llévelo a un Centro de servicio
autorizado.
• No desarme el cargador, llévelo a un Centro de servicio autorizado
cuando requiera ser reparado. Ensamblarlo de modo incorrecto puede
ocasionar descargas eléctricas, electrocución o incendios.
• Desconecte el cargador antes de intentar limpiarlo para reducir el
riesgo de descargas eléctricas. El retiro de la batería no reducirá este
riesgo.
• NUNCA intente conectar 2 cargadores juntos.
• No utilice el cargador con cualquier otra fuente de energía diferente a
0
1
5
20
3
0
4
0
50
FIG. 3
FIG. 4
FIG. 5
ROLDANA DE
SEGURIDAD INTERIOR
TORNILLO
DE
FIJACIÓN
DEL DISCO
LLAVE
ROLDANA DE
SEGURIDAD EXTERIOR
AFLOJE
(EN EL SENTIDO
DE LAS
MANECILLAS DEL
RELOJ
APRIETE
(EN SENTIDO
CONTRARIO A
LAS
MANECILLAS
DEL RELOJ)
PERILLA DE
AJUSTE DE
ÁNGULO DE
CORTE
DW936/384286-01 3/15/00 8:26 AM Page 32
Page 36

33
Español
la indicada en la placa de descripción de características de la batería.
Cargadores
Su batería DeWalt puede ser cargada en un cargador DeWalt de 1
hora, de 15 minutos o en cargadores vehiculares de 12 voltios.
Asegúrese de leer todas las instrucciones antes de utilizar su
cargador.
Consulte el cuadro que se encuentra al respaldo para conocer la
compatibilidad de los cargadores y las baterías
Utilización del modo Tune-up
TM
El modo Tune-upTM nivelará o mantendrá en equilibrio las células
individuales que se encuentran al interior de la batería a su máxima
capacidad. Este ciclo puede tomar hasta 8 horas. Las baterías deben
ser niveladas semanalmente o después de 10 a 20 ciclos de
carga/descarga, o cuando ya no funcione adecuadamente.
1. Para nivelar su batería, introdúzcala en el cargador como de
costumbre. La luz roja parpadeará continuamente indicando que
el proceso de carga ha comenzado.
2. Usted podrá presionar el botón Tune-upTM en cualquier momento,
después de que la carga haya empezado a funcionar. La luz roja
dejará de parpadear momentáneamente, enseguida lo hará 3
veces rápidamente y luego continuará parpadeando de manera
continua. Esto indica que el cargador se encuentra nivelando sus
baterías.
3. Una vez terminado el ciclo de carga, la luz seguirá encendida de
manera continua. El paquete se encuentra completamente cargado
y podrá ser utilizado en ese momento o usted podrá dejarlo en el
cargador.
4. Si usted selecciona el modo Tune-upTM y cambia de parecer, retire
la batería del cargador. Después de 5 segundos, inserte
nuevamente la batería en el cargador. El ciclo de carga normal
comenzará en ese momento.
Procediemente de Carga
CARGADORES DE 1 HORA
1. Conecte el cargador a una toma de corriente alterna adecuada.
2. Introduzca la batería en el cargador, como se ilustra en la figura 1,
asegurándose de que la batería haya asentado bien en el cargador.
La luz roja (de carga) parpadeará indicando que el proceso de
carga ha comenzado.
3. La batería quedará completamente cargada en aproximadamente 1
hora. La luz roja quedará ENCENDIDA de forma continua,
indicando que el proceso de carga ha terminado. La batería ha
quedado completamente cargada y podrá ser utilizada en ese
momento o podrá dejarse en el cargador.
4. LINEA DE ALIMENTACION PROBLEMÁTICA: Si su cargador
cuenta con un Indicador de fallas en la línea de energía eléctrica:
Cuando estos cargadores se utilizan con fuentes de poder
portátiles tales como generadores, o plantas que convierten
corriente continua en corriente alterna, el cargador puede
suspender su funcionamiento temporalmente, encendiendo la luz
roja dos veces de manera intermitente, seguidas de una pausa.
Esto indica que la alimentación de corriente está más allá de sus
límites.
5. RETARDADOR PARA BATERIAS CALIENTES: Si su cargador
cuenta con el Retardador para baterías calientes, éste detecta
cuándo una batería está caliente y se coloca en Modo de retardo
de carga, suspendiendo así la carga hasta que la batería se haya
enfriado. Una vez enfriada la batería, el cargador pasará
automáticamente al Modo de carga de batería. Este dispositivo
asegura la máxima duración a su batería. La luz roja parpadea a
intervalos largos y lo hace a intervalos cortos cuando está en el
Modo de retardo de carga.
CARGADORES DE 15 MINUTOS
1. Conecte el cargador a una toma de corriente alterna adecuada. El
DW936/384286-01 3/15/00 8:26 AM Page 33
Page 37

34
Español
cargador emitirá un sonido dos veces, enseguida la luz roja
parpadeará y luego se apagará.
2. Introduzca la batería en el cargador, tal como se ilustra en la figura
1, asegurándose de que la batería se encuentre bien asentada en
el cargador. La luz roja parpadeará y el cargador emitirá un sonido
indicando que el proceso de carga ha comenzado.
3. Normalmente, la batería quedará completamente cargada en
menos de 15 minutos. Una vez que la batería se encuentre
cargada, la luz roja quedará ENCENDIDA en forma continua y se
escucharán tres sonidos. La batería ha quedado completamente
cargada y podrá ser utilizada en ese momento o podrá dejarse en
el cargador.
4. BATERÍAS DÉBILES: El cargador de 15 minutos también puede
detectar cuándo una batería se encuentra débil. Tales baterías se
pueden emplear pero no debe esperarse de ellas un alto
rendimiento. En tales casos, aproximadamente 10 segundos
después de haber insertado la batería en el cargador, éste emitirá
FIG. 6
BOTÓN DE
LIBERACIÓN DEL
MECANISMO DE
SEGURO
GATILLO
INTERRUPTOR
FIG. 7
8 sonidos intermitentes rápidamente, para indicar el estado débil de
la batería. Después, el cargador continuará con la recarga de la
batería hasta la máxima capacidad posible.
PARA TODOS LOS CARGADORES
Dejar la batería en el cargador: Cuando la luz roja permanece
encendida significa que el cargador ha pasado al modo de “nivelado
de carga”, el cual dura aproximadamente 4 horas, al final de las cuales
cambiará al modo de “mantenimiento de carga”. La batería puede ser
retirada del cargador en cualquier momento durante estos ciclos de
carga; su carga será total tan sólo si la luz roja se encuentra
ENCENDIDA permanentemente. El cargador y la batería pueden
dejarse conectados indefinidamente mientras la luz roja esté
encendida. El cargador mantendrá la batería completamente cargada.
La batería perderá su carga lentamente después de ser retirada del
cargador. Si la batería no se ha dejado en carga de mantenimiento,
puede necesitar ser recargada antes de utilizarse nuevamente. La
batería también puede perder lentamente la carga si se deja en un
cargador que no esté conectado a una toma de corriente alterna
apropiada.
DW936/384286-01 3/15/00 8:26 AM Page 34
Page 38

35
Español
0
1
5
20
3
0
40
50
0
1
5
2
0
3
0
4
0
5
0
FIG. 8 FIG. 9
APOYE la table o el tablero
CERCA de la zona de corte
NO apoye la taba o el tablero lejos de
la zona de corte
APOYO
INDICADORES DE PROBLEMAS: Estos cargadores han sido
diseñados para detectar ciertos problemas que pueden surgir con las
baterías, los cuales serán indicados por una luz roja que se enciende
de manera intermitente a gran velocidad (y, en el caso de Cargadores
de 15 minutos, por un sonido continuo). Si esto ocurre, coloque
nuevamente la batería en el cargador. Si el problema persiste, pruebe
con otra batería para determinar si el cargador está en buen estado. Si
la segunda batería carga correctamente, esto significa que la primera
se encuentra defectuosa y que debe llevarla a un Centro de servicio
para su reciclaje. Si la segunda batería hace que el cargador indique
el mismo problema que la primera, lleve el cargador a un Centro de
servicio autorizado para su verificación.
Notas importantes acerca de la carga
1. Para obtener un mayor rendimiento y una mayor vida útil de su
batería, cárguela cuando la temperatura oscile entre 18° y 24°C
(65°y 75°F). NO cargue la batería cuando la temperatura es inferior
a 4.5°C (40°F), o superior a 40.5°C (105°F). Esto es muy
importante y le evitará serios daños a la batería.
2. El cargador y la batería pueden sentirse calientes al tacto durante
la carga. Esto es una condición normal y no indica ningún
problema.
3. Si la batería no carga apropiadamente - (1) Verifique la corriente en
la toma conectando una lámpara u otro aparato eléctrico. (2)
Verifique si la toma está conectada a un interruptor que corte la
corriente cuando apaga las luces. (3) Lleve el cargador con la
batería a un lugar en donde la temperatura del aire esté entre 18°
y 24°C (65° y 75°F). (4) Si los problemas de carga persisten, lleve
o envíe la herramienta, la batería y el cargador a su Centro de
servicio local.
4. La batería debe recargarse cuando deja de producir suficiente
potencia en trabajos que se hicieron fácilmente con anterioridad.
NO CONTINÚE utilizándola en estas condiciones. Siga los
procedimientos de carga. Usted puede cargar una batería
parcialmente usada cuando lo desee sin que ésta sufra efectos
adversos.
5. Bajo ciertas condiciones, con el cargador conectado a la toma de
corriente, los contactos de carga expuestos dentro del cargador
pueden hacer contacto entre sí debido a algún material externo.
Los materiales externos de naturaleza conductora tales como, pero
sin limitarse a ellos, el alambre de acero, el papel aluminio o
cualquier tipo de partícula metálica, deben conservarse alejados de
las cavidades del cargador. Desconecte el cargador siempre que
no se encuentre una batería en su receptáculo. Desconecte
siempre el cargador de la toma de corriente antes de limpiarlo.
ADVERTENCIA: No permita que ningún líquido se introduzca en el
cargador. Esto puede originar una descarga eléctrica. Para facilitar el
enfriamiento de la batería después de su utilización, evite colocar el
cargador o la batería en un lugar caliente, tales como un galpón
metálico o un remolque sin aislamiento térmico.
ADVERTENCIA: Nunca intente abrir la batería por ninguna razón.
Si el recubrimiento plástico de la batería se rompe o se quiebra, llévela
a un Centro de servicio para su reciclaje.
DW936/384286-01 3/15/00 8:26 AM Page 35
Page 39

36
Español
Instrucciones de seguridad adicionales
(Para sierras circulares)
• QUITE LA BATERÍA antes de cambiar discos, hacer ajustes en
el ángulo o la profundidad de corte, inspeccionar y limpiar.
• CONSERVE LAS GUARDAS EN SU LUGAR Y APTAS PARA EL
TRABAJO. Nunca ate u obligue a permanecer abierta a la guarda
inferior. Verifique el funcionamiento de la guarda inferior antes de
cada uso, y no emplee la unidad si la guarda inferior no cierra
completamente sobre el disco.
• PRECAUCIÓN: Si la sierra se golpea, la guarda inferior puede
resultar dañada, restringiendo su funcionamiento correcto. No
utilice la sierra hasta que la guarda sea reparada y funcione
apropiadamente.
• CONSERVE LOS DISCOS LIMPIOS Y AFILADOS. Los discos
afilados minimizan atascos, sobrecarga, contragolpes y producen
cortes más limpios.
• PELIGRO. Conserve las manos alejadas de la zona de corte;
consérvelas alejadas de los discos; no las coloque por debajo de
la pieza de trabajo mientras la herramienta está en operación. No
intente retirar el material cortado cuando el disco está en
movimiento.
• PRECAUCIÓN: Los discos continúan girando después que se
libera el gatillo. Nunca coloque sus manos en la superficie de
trabajo por enfrente o por detrás del disco.
• APOYE LOS PÁNELES LARGOS. Los páneles grandes se deben
apoyar como se ilustra en la FIGURA 8 para minimizar el riesgo de
sobrecarga o contragolpes al atorarse el disco. Cuando la
operación de corte requiera que la sierra descanse sobre la
superficie de trabajo, ésta debe descansar sobre la parte mayor, y
la parte menor debe ser la que se retire.
• PROTÉJASE DE LOS CONTRAGOLPES. Los contragolpes
ocurren cuando la sierra comienza a atascarse rápidamente y
salta hacia el operador. Libere el interruptor inmediatamente si el
disco se traba o la sierra se atasca. Conserve los discos afilados.
FIG. 10
No fuerce la herramienta. Manténgase alerta y en control de la
situación. No levante la sierra de un corte mientras el disco esté en
movimiento. En la sección “Operación” hay una explicación más
detallada acerca de los contragolpes.
• GUARDA INFERIOR. Cuando necesite un arranque preciso, o
para efectuar cortes de bolsillo, levante la guarda inferior con la
palanca del mecanismo retráctil.
• AJUSTES. Asegúrese que los ajustes de profundidad y angular
estén apretados antes de cortar.
• EMPLEE LOS DISCOS apropiados. Solamente emplee discos
con eje de 10 mm. No utilice discos con perforaciones de tamaño
incorrecto. Nunca emplee pernos o tuercas defectuosos o
inadecuados.
• EVITE CORTAR CLAVOS. Busque todos los clavos en la madera
y retírelos antes de cortar.
• PRECAUCIÓN: cuando emplee esta herramienta para cortar
sobre paredes, pisos u otras zonas en las que puedan encontrarse
cables eléctricos “vivos” ¡NO TOQUE NINGUNA PARTE
METÁLICA DE LA MISMA! Sostenga la sierra sólo por las
empuñaduras de plástico para evitar el choque eléctrico si entrara
en contacto con un cable “vivo”.
DW936/384286-01 3/15/00 8:26 AM Page 36
Page 40

37
Español
• PRECAUCIÓN:algunos tipos de madera contienen conservadores
como el arsenato cúprico de cromo (CCA) que pueden ser tóxicos.
Cuando corte estos materiales, necesita tener precaución para evitar la
inhalación y para minimizar el contacto de estas sustancias con la piel.
Cambio de discos
1. APAGUE LA HERRAMIENTA Y RETIRE LA BATERÍA.
2. Para colocar un disco, recorra la guarda inferior y coloque la
roldana de seguridad interior y el disco en la flecha. Coloque la
roldana de seguridad exterior contra el disco. (El disco debe ir con
el lado impreso hacia afuera los dientes en la parte baja del disco
apuntando hacia adelante.) (Figura 3.)
3. Enrosque el tornillo de sujeción firmemente con la mano para
sostener a la roldana en posición. (El tornillo tiene cuerda
izquierda y debe apretarse girándolo en sentido contrario a las
manecillas del reloj.)
4. Oprima ligeramente el seguro de la flecha (figura 4) al mismo
tiempo que hace girar la flecha hasta que el disco deje de girar.
5. Apriete el tornillo de fijación del disco (en sentido contrario a las
manecillas del reloj) con firmeza con la llave para discos.
6. Para quitar el disco, APAGUE LA HERRAMIENTA Y QUITE LA
BATERÍA. Trabe el seguro de la flecha y destornille el tornillo de
fijación del disco girándolo en el sentido de las manecillas del reloj
con la llave para discos.
NOTA: nunca trabe el seguro de la flecha mientras la sierra esté
trabajando o a fin de detener la herramienta. Nunca encienda el
interruptor cuando el seguro se encuentre trabado, su herramienta se
dañará con severidad.
Discos
Un disco mellado puede ocasionar cortes lentos e ineficientes,
provocando sobrecarga en el motor de la sierra y astillado excesivo,
e incrementa la posibilidad de que ocurran contragolpes. Los discos
recomendados para emplearse con su herrmienta están a su
disposición con costs extra con su distribuidor o centro de service
local. Si necesita ayuda para localizar algún accesorio, por favor
lame: 1-800-4-DEWALT.
PRECAUCIÓN: No utilice discos abrasivos para cortar materiales
ferrosos (acero), cristal o mosico.
ADVERTENCIA: Para minimizar el riesgo de lesiones en los ojos,
siempre utilice protección en estos. El carburo es un material duro
pero frágil, y objetos extraños en la superficie de trabajo, como
alambres y clavos pueden ocasionar que los dientes se rompan.
Emplee la sierra únicamente cuando la guarda está acomodada en
su posición. Coloque el disco bien asegurado y con la dirección de
giro apropiada antes de emplear la sierra, y procure siempre utilizar
un disco limpio y afilado.
Ajuste de la profundidad de corte
1. APAGUE LA HERRAMIENTA Y RETIRE LA BATERÍA.
2. Sujete la sierra firmemente y afloje (hacia la izquierda) la perilla de
ajuste de profundidad de corte y mueva la zapata para obtener la
profundidad deseada.
3. Asegúrese de haber reapretado (en dirección de las manecillas del
reloj) la perilla de ajuste de profundidad antes de operar la sierra.
Para una acción de corte más efectiva, ajuste la profundidad de
manera que se proyecte un diente completo por debajo del material
que va a cortar. Esta distancia se mide de la punta del diente al fondo
de la garganta que tenga adelante. Este procedimiento conserva la
fricción al mínimo, remueve el aserrín del corte y produce un aserrado
más fresco y rápido y reduce las posibilidades de contragolpes. En la
figura 5 se ilustra un método para verificar si la profundidad de corte
es la correcta. Note la parte del diente que se proyecta sobre la pieza
que se va a cortar.
NOTA: Cuando emplee discos con puntas de carburo, haga una
DW936/384286-01 3/15/00 8:26 AM Page 37
Page 41

38
Español
excepción a la regla anterior, y deje que se proyecte únicamente la
mitad de un diente del material que vaya a cortar.
Ajuste del ángulo de bisel
La capacidad total de ajuste de corte a bisel va de 0 a 50 grados. El
cuadrante está graduado en incrementos de 5 grados. En la parte
frontal de la sierra hay un mecanismo de ajuste del ángulo de bisel
(figura 5) que consiste en un cuadrante calibrado y una perilla. A fin
de ajustar la sierra para cortes a bisel:
1. APAGUE LA HERRAMIENTA Y RETIRE LA BATERÍA.
2. Afloje (sentido contrario a las manecillas del reloj) la perilla del
cuadrante y gire la zapata hasta el ángulo deseado haciendo que
la línea grabada coincida con la marca del ángulo que se desea.
Reapriete firmemente la perilla (sentido de las manecillas del
reloj).
NOTA: El indicador del cuadrante, localizado entre la perilla del
cuadrante y éste último, puede ajustarse después de aflojar su
tornillo. Reapriételo firmemente después de hacer cualquier ajuste.
Ajuste de la zapata para cortes a 90˚
Si se requieren ajustes adicionales:
1. APAGUE LA HERRAMIENTA Y RETIRE LA BATERÍA.
2. Ajuste la sierra en ángulo de 0˚.
3. Corra la guarda inferior. Coloque la sierra sobre el lado del disco.
4. Afloje la perilla del cuadrante. Coloque una escuadra contra el
disco y la zapata para ajustar a 90˚.
5. Afloje la tuerca hexagonal con una llave o unas pinzas de punta y
mueva y mueva el tornillo de ajuste hasta que la zapata quede en
el ángulo correcto. Asegure el tornillo en su posición reapretando
la tuerca hexagonal.
6. Puede ser necesario ajustar el indicador de ángulos del cuadrante
para alinearlo con la marca de “0” después que se ha ajustado la
zapata.
7. Confirme la precisión del ajuste verificando la escuadra de un
corte hecho en material de desperdicio.
Indicador de corte
El frente de la zapata está provisto con un indicador para cortes
rectos y a bisel. Este indicador le permite guiar la sierra a lo largo de
líneas trazadas a lápiz en la pieza por cortar. El indicador está
alineado con el lado izquierdo (exterior) del disco, lo que hace que la
ranura del corte quede a la derecha del indicador. Guíe la unidad a lo
largo de la línea trazada con lápiz, de manera que el corte se haga
sobre la pieza sobrante o de desperdicio.
Interruptor
Libere el seguro oprimiendo el botón como se ilustra en la figura 6.
Oprima el gatillo interruptor para ENCENDER el motor. Soltar el
gatillo APAGARÁ el motor. Al soltar el gatillo automáticamente se
acciona el seguro.
NOTA:Esta herramienta no cuenta con mecanismo para asegurar el
interruptor de la herramienta en posición de ENCENDIDO, y no debe
asegurarse por ningún otro medio.
Soporte para las piezas de trabajo
La figura 7 ilustra la posición de aserrado correcta. Note que las
manos se encuentran alejadas del área de corte. Para evitar
contragolpes, ofrezca buen soporte a la tabla o tablero CERCA del
corte (figura 8). No apoye la tabla o el tablero lejos de la zona de corte
(figura 9).
ADVERTENCIA: Es importante apoyar la pieza de trabajo
apropiadamente y sostener firmemente la sierra con ambas manos
para prevenir la pérdida de control que pudiera ocasionar lesiones
personales; la figura 7 ilustra la manera en que debe sujetarse la
sierra.
¡SIEMPRE APAGUE LA SIERRA Y RETIRE LA BA TERÍA ANTES DE
HACER CUALQUIER AJUSTE!
DW936/384286-01 3/15/00 8:26 AM Page 38
Page 42

39
Español
Coloque la pieza con el lado “bueno” (aquel cuyo aspecto es más
importante) boca abajo. La sierra corta hacia arriba, así que cualquier
astilladura quedará en la cara del tablón que esté boca arriba.
Corte
Coloque la parte ancha de la zapata sobre el lado de la pieza que
está sólidamente soportado, no en la sección que caerá al
desprenderse. Como ejemplos, la figura 7 ilustra la manera
CORRECTA de cortar el extremo de una tabla. Siempre sujete las
piezas de trabajo. ¡No intente sujetar las piezas pequeñas con la
mano! Recuerde apoyar las partes de las piezas que queden al aire.
Sea precavido cuando aserre por debajo del material.
Asegúrese que la sierra ha alcanzado su máxima velocidad antes
que el disco entre en contacto con el material que va a cortar.
Arrancar la sierra con el disco en contacto con el material puede
ocasionar contragolpes.
Empuje la sierra hacia adelante a una velocidad que le permita cortar
sin hacer esfuerzo. La dureza del material puede variar aún en la
misma pieza, y las secciones resinosas y los nudos pueden añadir
una pesada carga a la sierra. Cuando suceda así, empuje lentamente
la sierra, pero con la fuerza necesaria para conservarla trabajando sin
disminución considerable de su velocidad. Forzar la sierra
ocasionará cortes burdos, imprecisión, contragolpes y sobrecalentamiento del motor.
Si al iniciar el corte se desvió de la línea trazada, no fuerce la sierra
hacia atrás. Suelte el interruptor y permita que el disco se detenga por
completo. Retire entonces la sierra, colóquela otra vez e inicie un
nuevo corte ligeramente hacia la izquierda del corte incorrecto. Pase
lo que pase retire la sierra si necesita desviar el corte. Forzar la
corrección en el corte puede atascar la sierra y provocar
contragolpes.
SI LA SIERRA SE ATASCA, SUELTE EL GATILLO Y RETÍRELA
HASTA QUE QUEDE LIBRE. ASEGÚRESE QUE EL DISCO ESTE
ALINEADO EN EL CANAL DEL CORTE Y SEPARADO DE LOS
BORDES ANTES DE REINICIAR LA OPERACIÓN.
Cuando termine un corte, suelte el gatillo y permita que el disco se
detenga por completo antes de levantar la unidad. Cuando levante la
sierra, la guarda telescópica se cerrará automáticamente sobre el
disco. Recuerde que el disco quedará expuesto hasta que la guarda
se accione; por ningún motivo coloque las manos por debajo del
trabajo. Cuando por alguna razón tenga que tirar manualmente de la
guarda inferior (por ejemplo, para iniciar cortes de bolsillo) utilice
siempre la palanca del mecanismo retráctil.
NOTA: Cuando corte tiras angostas, asegúrese que las piezas
sobrantes no se atoren con la parte interior de la guarda inferior.
Cortes al hilo
Cortar al hilo, como su nombre lo indica, es cortar en paralelo al hilo
de la madera y se utiliza para disminuir el ancho de un tablón.
Cuando haga cortes al hilo, utilice una guía para este efecto, ya que
guiarse con la mano es difícil.
Cortes de bolsillo
APAGUE LA HERRAMIENTA Y RETIRE LA BATERÍA ANTES DE
HACER AJUSTES. El corte de bolsillo es aquel que se hace en un
piso, una pared u otra superficie plana sin empezar el corte desde el
borde. Ajuste la zapata para que el disco corte a la profundidad
deseada.Incline la sierra hacia adelante y coloque el frente de la
zapata sobre el material que va a cortar. Tire de la guarda empleando
la palanca del mecanismo retráctil. Baje la parte trasera de la zapata
hasta que los dientes del disco casi toquen el trazo de corte. Suelte la
guarda del disco (el contacto de ésta con la superficie de trabajo la
mantendrá en su posición cuando usted inicie el corte) figura 10.
Encienda el motor y baje gradualmente la sierra hasta que la zapata
descanse por completo en el material que va a cortar. Avance la
sierra a lo largo de la línea de corte hasta que éste quede terminado.
Suelte el gatillo y permita al disco detenerse completamente antes de
DW936/384286-01 3/15/00 8:26 AM Page 39
Page 43

levantar la sierra. Cada vez que inicie un corte nuevo, repita la
operación señalada. Nunca ate la guarda para que permanezca
levantada.
Nunca deslice la sierra hacia atrás cuando haga un corte de bolsillo,
ya que puede ocasionar que la sierra se levante y le provoque alguna
lesión.
Contragolpes
Cuando el disco queda aprisionado o se desvía del canal de corte,
pueden ocurrir contragolpes. La sierra salta violentamente hacia el
operador. Cuando el disco queda atrapado en el canal de corte que se
va cerrando, el disco se traba y la inercia del motor arroja a la unidad
hacia atrás. Cuando el disco se desvía del corte, los dientes que se
encuentran en la parte de atrás del disco pueden perforar la superficie
superior de la madera y hacer que salga del canal de corte y salte
hacia atrás, en dirección del operador.
Soporte inadecuado de la pieza de trabajo
• Caída o levantamiento inadecuado de la pieza que se desprende,
lo que hace que el disco quede atrapado.
• Cortes en material que se apoya sólo por los extremos (figura 9) Al
tiempo que el material se debilita, también se pandea y cierra el
canal de corte, lo que ocasiona que el disco quede atrapado.
• Corte de piezas voladas en dirección vertical desde la parte inferior.
La pieza que caerá podría trabar el disco.
• Corte de tiras largas y angostas (como en cortes al hilo). La pieza
que se separa puede cerrar el canal de corte o girar y esto trabará
el disco.
• Sujetar la guarda inferior con una superficie que se encuentre por
debajo del material que se corta, lo que reduce el control del
operador. La sierra se puede levantar parcialmente de la zona de
corte, lo que incrementará la posibilidad de un atorón del disco.
Ajuste incorrecto de la profundidad de corte en la sierra
Emplear la sierra con una profundidad de corte excesiva incrementa
la carga sobre la unidad y la posibilidad de que el disco se trabe en el
canal de corte. También aumenta el área del disco expuesta a los
40
Español
atascos bajo condiciones en las que el canal de corte se cierra.
Dobleces en el disco (desviaciones en el corte)
• Empujar demasiado para cortar a través de un nudo o un área de
fibras duras puede ocasionar que el disco se doble.
• Tratar de girar la sierra durante un corte (tratar de regresar a la
línea marcada) puede causar doblez.
• Se corren los mismos peligros al tratar de alcanzar zonas alejadas
u operar la sierra con poco control por parte del operador (fuera de
balance).
• Cambiar la posición del cuerpo o cambiar de mano mientras se
corta puede ocasionar que el disco se doble.
• Correr la unidad hacia atrás para limpiar el disco puede ocasionar
que se doble si no se hace con cuidado.
Espacio insuficiente para materiales particularmente duros.
Materiales que requieren de mayor atención: madera húmeda,
madera verde (material cortado recientemente o no estufado),
madera tratada a presión (material tratado con conservadores o
anticorrosivos).
Empleo de discos sucios o mellados
Los discos mellados ocasionan carga excesiva a la sierra. Para
compensar la carga, el operador empujará normalmente con más
fuerza, lo que incrementará aún más la carga y propiciará que el
disco se trabe en el canal de corte. Los discos desgastados pueden
tener un espacio libre menor, lo que aumentará la oportunidad de que
el disco se doble e incrementará la carga.
Levantar la sierra mientras se hacen cortes en ángulo
Los cortes a bisel requieren que el operador preste atención especial
a las técnicas de corte adecuadas, sobre todo a la conducción de la
sierra. El ángulo del disco en relación con la zapata y la gran
superficie expuesta al material incrementan las posibilidades de que
ocurran desviaciones.
Reiniciación de un corte con los dientes del disco bloqueados
por el material
DW936/384286-01 3/15/00 8:26 AM Page 40
Page 44

41
Español
Debe permitirse que la sierra alcance su velocidad máxima antes de
iniciar o reiniciar un corte después de que se ha detenido con el disco
dentro del canal. No hacerlo así causará que la sierra se atasque y
ocurran contragolpes.
Cualesquiera otras condiciones que pudieran originar atorones,
dobleces, desvíos o presiones en el disco pueden provocar
contragolpes. Revise las secciones “Ajustes Iniciales” y “Operación”
para conocer las técnicas que minimizarán la incidencia de
contragolpes.
Limpieza
Únicamente utilice detergente suave y un trapo húmedo para limpiar
la herramienta. Muchos limpiadores caseros contienen substancias
químicas que pueden provocar serios daños a los plásticos. T ampoco
utilice gasolina, aguarrás, adelgazador de pinturas y lacas, fluidos
para lavado en seco ni productos similares. Nunca permita que un
líquido se introduzca en el interior de la herramienta; nunca sumerja
ninguna parte de la herramienta en ningún líquido.
Lubricación
Se han empleado baleros autolubricantes en la construcción de su
herramienta, por lo tanto no se requiere de relubricación posterior. Sin
embargo, se recomienda que, una vez al año, lleve la herramienta a
un centro de servicio autorizado para que le efectúen una limpieza
profunda, la inspeccionen y lubriquen la caja de engranes.
Accesorios
Dispone usted de los accesorios recomendados para su herramienta
con cargo adicional con su distribuidor local autorizado.
PRECAUCION: El empleo de cualquier accesorio no
recomendado puede ser peligroso.
Las muelas de centro rebajado deben de caber dentro de las
dimensiones del protector y deben de estar clasificadas para
velocidades superiores a la velocidad recomendada en la etiqueta.
Importante
Para garantizar la SEGURIDAD y la CONFIABILIDAD, deberán
hacerse reparaciones, mantenimiento y ajustes de esta herramienta
en los centros de servicio para herramientas industriales de D
EWALT.
u otras organizaciones calificadas. Estas organizaciones prestan
servicio a las herramientas D
EWALTy emplean siempre refacciones
legítimas D
EWALT.
PARA REPARACION Y SERVICIO DE SUS HERRAMIENTAS
ELECTRICAS FAVOR DE DIRIGIRSE AL CENTRO DE SERVICIO MAS
CERCANO
CULIACAN
Av. Nicolas Bravo #1063 Sur (91 671) 242 10
GAUDALAJARA
Av. La Paz #1779 (91 3) 826 69 78.
MEXICO
Eje Lázaro Cárdenas No. 18 Local D, Col. Obrera 588-9377
MERIDA
Calle 63 #459-A (91 99) 23 54 90
MONTERREY
Av. Francisco I. Madero Pte. 1820-A (91 83) 72 11 25
PUEBLA
17 Norte #205 (91 22) 46 37 14
QUERETARO
Av. Madero 139 Pte. (91 42) 14 16 60
SAN LOUIS POTOSI
Pedro Moreno #100 Centro (91 48) 14 25 67
TORREON
Blvd. Independencia, 96 pte. (91 17) 16 52 65
VERACRUZ
Prolongación Diaz Miron #4280 (91 29) 21 70 16
VILLAHERMOSA
Constitucion 516-A (91 93) 12 53 17
PARA OTRAS LOCALIDADES LLAME AL: 326 7100
DW936/384286-01 3/15/00 8:26 AM Page 41
Page 45

42
Garantía Completa
Las herramientas industriales DEWAL T están garantizadas durante un año a
partir de la fecha de compra. Repararemos, sin cargos, cualquier falla debida
a material o mano de obra defectuosos. Por favor regrese la unidad completa,
con el transporte pagado, a cualquier Centro de Servicio para Herramientas
Industriales de DEWAL T o a las estaciones de servicio autorizado enlistadas
bajo "Herramientas Eléctricas" en la Sección Amarilla. Esta garantía no se
aplica a los accesorios ni a daños causados por reparaciones efectuadas
por terceras personas. Esta garantía le otorga derechos legales específicos,
y usted puede tener otros derechos que pueden variar de estado a estado.
En adición a la garantía, las herramientas DEWALT están amparadas por
nuestra:
GARANTÍA DE SATISFACCIÓN SIN RIESGO POR 30 DÍAS
Si usted no se encuentra completamente satisfecho con el desempeño de
su herramienta industrial DEWALT, sencillamente devuélvala a los
vendedores participantes durante los primeros 30 días después de la fecha
de compra para que le efectúen un reembolso completo. Por favor regrese
la unidad completa, con el transporte pagado. Se puede requerir prueba de
compra.
Español
IMPORTADO: DEWALT S.A. DE C.V.
BOSQUES DE CIDROS ACCESO RADIATAS NO. 42
COL. BOSQUES DE LAS LOMAS.
05120 MÉXICO, D.F
TEL. 326-7100
SECCI N
AMARILLA
Si funciona…
y funciona muy bien.
Para servicio y ventas consulte
“HERRAMIENTAS ELECTRICAS”
en la sección amarilla.
DW936/384286-01 3/15/00 8:26 AM Page 42
 Loading...