

Page 1

¿Dudas? Visítenos en Internet: www.dewalt.com
Questions? See us on the World Wide Web at www.dewalt.com
MANUAL DE INSTRUCCIONES
INSTRUCTION MANUAL
INSTRUCTIVO DE OPERACIÓN, CENTROS DE SERVICIO Y PÓLIZA DE
GARANTÍA. ADVERTENCIA: LÉASE ESTE INSTRUCTIVO ANTES DE USAR EL
PRODUCTO.
DW505
Taladro Percutor 13mm (1/2")
1/2" (13mm) Dual Speed Range Hammerdrill
Page 2

Page 3

Defi niciones: Normas
de seguridad
Las siguientes definiciones describen el nivel de gravedad de cada
advertencia. Lea el manual y preste atención a estos símbolos.
PELIGRO:
provocará
evita,
ADVERTENCIA:
no se evita,
ATENCIÓN:
que, si no se evita,
moderadas.
AVISO: Se refi ere a una práctica no relacionada a lesiones
corporales que de no evitarse puede resultar en daños a la
propiedad.
ADVERTENCIA: para reducir el riesgo de lesiones, lea el
manual de instrucciones.
indica una situación de peligro inminente que, si no se
la
muerte o lesiones graves.
Indica una situación de peligro potencial que, si
podría
provocar la
indica una situación de peligro potencial
muerte o lesiones graves.
puede
provocar
lesiones leves o
Advertencias generales de seguridad
para las herramientas eléctricas
ADVERTENCIA: Lea todas las advertencias de seguridad e
instrucciones. El incumplimiento de las advertencias o instrucciones
puede provocar descargas eléctricas, incendios o lesiones graves.
GUARDE LAS ADVERTENCIAS E
INSTRUCCIONES PARA PODER
CONSULTARLAS EN EL FUTURO
El término “herramienta eléctrica” incluido en todas las advertencias se
refiere a su herramienta eléctrica conectada a la red (cable eléctrico)
o a su herramienta eléctrica accionada con baterías (inalámbrica).
1) SEGURIDAD DEL ÁREA DE TRABAJO
a) Mantenga el área de trabajo limpia y bien iluminada. Las
áreas abarrotadas u oscuras propician accidentes.
b) No haga funcionar las herramientas eléctricas en
atmósferas explosivas, como ambientes donde haya
polvo, gases o líquidos inflamables. Las herramientas
eléctricas originan chispas que pueden encender el polvo o
producir humo.
c) Mantenga alejados a los niños y a los espectadores
de la herramienta eléctrica en funcionamiento. Las
distracciones pueden provocar la pérdida de control.
2) SEGURIDAD ELÉCTRICA
a) Los enchufes de la herramienta eléctrica deben
adaptarse a la toma de corriente. Nunca modifique el
enchufe de ninguna manera. No utilice ningún enchufe
adaptador con herramientas eléctricas con conexión a
tierra. Los enchufes no modificados y que se adaptan a las
tomas de corrientes reducirán el riesgo de descarga eléctrica.
b) Evite el contacto corporal con superficies con toma de
tierra como, por ejemplo, tuberías, radiadores, cocinas
y refrigeradores. Existe mayor riesgo de descarga eléctrica
si su cuerpo está puesto a tierra.
c) No exponga las herramientas eléctricas a la lluvia ni a
condiciones de humedad. Si entra agua en una herramienta
eléctrica, aumentará el riesgo de descarga eléctrica.
d) No use el cable indebidamente. Nunca utilice el cable
para transportar, tirar o desenchufar la herramienta
eléctrica. Mantenga el cable alejado del calor, el aceite,
los bordes afilados o las piezas móviles. Los cables
dañados o enredados aumentan el riesgo de descarga
eléctrica.
e) Al operar una herramienta eléctrica en el exterior, utilice
un cable prolongador adecuado para tal uso. Utilice un
cable adecuado para uso en exteriores a fin de reducir el
riesgo de descarga eléctrica.
3
3
Español
Page 4

f) Si no se puede evitar el uso de una herramienta eléctrica
en una zona húmeda, utilice un dispositivo de corriente
residual (residual current device, RCD) de seguridad.
El uso de un RCD reduce el riesgo de sufrir una descarga
eléctrica.
3) SEGURIDAD PERSONAL
a) Permanezca alerta, controle lo que está haciendo y
Español
utilice el sentido común cuando emplee una herramienta
eléctrica. No utilice una herramienta eléctrica si
está cansado o bajo el efecto de drogas, alcohol o
medicamentos. Un momento de descuido mientras se opera
una herramienta eléctrica puede provocar lesiones personales
graves.
b) Utilice equipo de seguridad personal. Utilice siempre
protección ocular. El uso de equipo de seguridad, como
mascarillas para polvo, calzado de seguridad antideslizante,
cascos o protección auditiva en las condiciones adecuadas
reducirá las lesiones personales.
c) Evite poner en marcha la herramienta involuntariamente.
Asegúrese de que el interruptor está apagado antes de
conectar la fuente de alimentación y/o la batería, coger
o transportar la herramienta. Transportar herramientas
eléctricas con su dedo apoyado sobre el interruptor o enchufar
herramientas eléctricas con el interruptor en la posición de
encendido puede propiciar accidentes.
d) Retire la clavija de ajuste o la llave de tuercas antes de
encender la herramienta eléctrica. Una llave de tuercas
o una clavija de ajuste que quede conectada a una pieza
giratoria de la herramienta eléctrica puede provocar lesiones
personales.
e) No se estire demasiado. Conserve el equilibrio y
posiciónese adecuadamente en todo momento. Esto
permite un mejor control de la herramienta eléctrica en
situaciones inesperadas.
f) Use la vestimenta adecuada. No use ropas holgadas ni
joyas. Mantenga el cabello, la ropa y los guantes alejados
de las piezas en movimiento. Las ropas holgadas, las joyas
o el cabello largo pueden quedar atrapados en las piezas
en movimiento.
g) Si se suministran dispositivos para la conexión de
accesorios con fines de recolección y extracción de
polvo, asegúrese de que estén conectados y que se
utilicen correctamente. El uso del extractor de polvo puede
reducir los riesgos relacionados con el polvo.
4) USO Y MANTENIMIENTO DE LA HERRAMIENTA
ELÉCTRICA
a) No fuerce la herramienta eléctrica. Utilice la herramienta
eléctrica correcta para el trabajo que realizará. La
herramienta eléctrica correcta hará el trabajo mejor, y de un
modo más seguro, a la velocidad para la que fue diseñada.
b) No utilice la herramienta eléctrica si no puede encenderla
o apagarla con el interruptor. Las herramientas que no
puedan ser controladas con el interruptor constituyen un
peligro y deben repararse.
c) Desconecte el enchufe de la fuente de alimentación o
la batería de la herramienta eléctrica antes de realizar
cualquier ajuste, cambio de accesorios o almacenar
las herramientas eléctricas. Estas medidas de seguridad
preventivas reducen el riesgo de encender la herramienta
eléctrica de forma accidental.
d) Guarde la herramienta eléctrica que no esté en uso fuera
del alcance de los niños y no permita que otras personas
no familiarizadas con ella o con estas instrucciones
operen la herramienta. Las herramientas eléctricas son
peligrosas si son operadas por usuarios que no tienen
formación.
4
4
Page 5

e) Mantenimiento de las herramientas eléctricas. Revise
que no haya piezas en movimiento mal alineadas o
trabadas, piezas rotas o cualquier otra situación que
pueda afectar el funcionamiento de las herramientas
eléctricas. Si encuentra daños, haga reparar la
herramienta eléctrica antes de utilizarla. Se producen
muchos accidentes a causa de las herramientas eléctricas que
carecen de un mantenimiento adecuado.
f) Mantenga las herramientas de corte afiladas y limpias.
Las herramientas de corte con mantenimiento adecuado y con
los bordes de corte afilados son menos propensas a trabarse
y son más fáciles de controlar.
g) Utilice las herramientas eléctricas, sus accesorios y
piezas, etc. de acuerdo con las presentes instrucciones,
teniendo siempre en cuenta las condiciones de trabajo y
el trabajo que deba llevar a cabo. El uso de la herramienta
eléctrica para operaciones diferentes de aquellas para las que
fue diseñada podría originar una situación peligrosa.
5) MANTENIMIENTO
a) Solicite a una persona cualificada en reparaciones que
realice el mantenimiento de su herramienta eléctrica
y que solo utilice piezas de repuesto idénticas. Esto
garantizará la seguridad de la herramienta eléctrica.
NORMAS ESPECÍFICAS DE SEGURIDAD
Instrucciones de seguridad adicionales
para los taladro percutores
• Utilice protectores auditivos. La exposición a ruidos fuertes
puede causar pérdida auditiva.
• Utilice los mangos auxiliares que vienen con la herramienta.
Perder el control de la herramienta podría causar lesiones
corporales.
• Sostenga la herramienta eléctrica sólo por sus superficies
de empuñadura aisladas cuando realice una operación
en la cual la herramienta para cortar pudiera entrar en
contacto con instalaciones eléctricas ocultas o con su
propio cable. Si la herramienta para cortar entra en contacto con
un hilo eléctrico activo, se activarán asimismo las partes metálicas
de la herramienta expuestas a la corriente, las que podrán
descargarse en el operador.
• Use abrazaderas u otra manera práctica de fijar y sujetar
la pieza de trabajo a una plataforma estable. Sujetar la pieza
con la mano o contra el cuerpo es inestable y resultará en que
pierda el control.
• Lleve lentes de seguridad u otra protección ocular. Durante
la perforación pueden salir disparados pedazos de material. Las
partículas despedidas pueden provocar lesiones irreversibles en
los ojos.
• Las brocas y las herramientas se calientan durante la
operación. Utilice guantes para tocarlas.
• Mantenga las empuñaduras secas, limpias y libres de
aceite y grasa. Se recomienda utilizar guantes de goma.
Esto permitirá un mejor control de la herramienta.
• El cable de extensión deben ser de un calibre apropiado
para su seguridad. Un cable de un calibre insuficiente causará
una caída en la tensión de la línea dando por resultado una pérdida
de energía y sobrecalentamiento. Cuando se utilice más de un
alargador para completar el largo total, asegúrese que los hilos
de cada alargador tengan el calibre mínimo. La tabla siguiente
muestra el tamaño correcto a utilizar, dependiendo de la longitud
del cable y del amperaje nominal de la placa de identificación. Si
tiene dudas sobre cuál calibre usar, use un calibre mayor..
Español
5
5
Page 6

Tensión (Voltios) Longitud del cable en metros (m)
120–127 V 0–7 7–15 15–30 30–50
220–240 V 0–15 15–30 30–60 60–100
Corriente
nominal
(Amperios)
0–6 A 1,0 1,5 1,5 2,5
Español
dañados lo debe reemplazar el fabricante o su representante o por
una persona igualmente calificada para evitar peligro.
anteojos de diario NO SON lentes de seguridad. Utilice además
una cubrebocas o mascarilla antipolvo si la operación de corte
genera demasiado polvo. SIEMPRE LLEVE EQUIPO DE SEGURIDAD
CERTIFICADO:
y taladrar, así como al realizar otras actividades del sector de la
construcción, contienen productos químicos que pueden producir
cáncer, defectos congénitos u otras afecciones reproductivas.
Algunos ejemplos de estos químicos son:
6–10 A 1,0 1,5 2,5 4,0
10–12 A 1,5 1,5 2,5 4,0
12–16 A 2,5 4,0 No recomendado
ADVERTENCIA: Si el enchufe o el cable de alimentación están
ADVERTENCIA: Use SIEMPRE lentes de seguridad. Los
• Protección ocular ANSI Z87.1 (CAN/CSA Z94.3),
• Protección auditiva ANSI S12.6 (S3.19),
• Protección respiratoria NIOSH/OSHA/MSHA.
ADVERTENCIA: Parte del polvo generado al lijar, serrar, esmerilar
• plomo de algunas pinturas en base a plomo,
• polvo de sílice proveniente de ladrillos y cemento y otros
productos de albañilería, y
• arsénico y cromo provenientes de madera tratada
químicamente.
Sección nominal mínima del cable en
milímetros cuadrados (mm2)
Su riesgo de exposición a estos químicos varía, dependiendo de la
frecuencia con la cual realiza usted este tipo de trabajo. Para reducir
su exposición a estas sustancias químicas: trabaje en una zona
bien ventilada y llevando equipos de seguridad aprobados, como
mascarillas antipolvo especialmente diseñadas para filtrar partículas
microscópicas.
• Evite el contacto prolongado con polvo generado por el
lijado, aserrado, pulido, taladrado y otras actividades de
construcción. Vista ropas protectoras y lave las áreas de
la piel expuestas con agua y jabón. Si permite que el polvo
se introduzca en la boca u ojos o quede sobre la piel, puede
favorecer la absorción de productos químicos peligrosos.
ADVERTENCIA: La utilización de esta herramienta puede
generar polvo o dispersarlo, lo que podría causar daños graves
y permanentes al sistema respiratorio, así como otras lesiones.
Siempre use protección respiratoria aprobada por NIOSH (Instituto
Nacional de Seguridad y Salud en el Trabajo) u OSHA (Administración
de Seguridad y Salud en el Trabajo) apropiada para la exposición al
polvo. Dirija las partículas en dirección contraria a la cara y el cuerpo.
ADVERTENCIA: Siempre lleve la debida protección auditiva
personal en conformidad con ANSI S12.6 (S3.19) durante el
uso de esta herramienta. Bajo algunas condiciones y duraciones
de uso, el ruido producido por este producto puede contribuir a la
pérdida auditiva.
ADVERTENCIA: Utilice siempre protección para los ojos.
Todos los usuarios y espectadores deben utilizar protección para los
ojos conforme con las normas ANSI Z87.1.
• La etiqueta de su herramienta puede incluir los siguientes
símbolos. Los símbolos y sus definiciones son los siguientes:
V ..........voltios A ........... amperios
Hz ........hertz W .......... vatios
min ......minutos
....corriente directa
........ corriente alterna
n
o .........velocidad sin carga
6
6
Page 7
........Construcción Clase I .......... terminal a tierra
(con conexión a tierra)
.........Construcción Clase II seguridad
(con aislamiento doble) …/min ... revoluciones o
BPM ....golpes por minuto reciprocidad por
sfpm ....pies superficies por minuto
......... símbolo de alerta de
............. minuto
GUARDE ESTAS INSTRUCCIONES PARA
VOLVER A CONSULTAR EN EL FUTURO
MONTAJE Y AJUSTES
ADVERTENCIA: Para minimizar el riesgo de graves lesiones
personales, apague la herramienta y desconecte la batería
antes de realizar ajustes o quitar/instalar los acoples o
accesorios. Un encendido accidental puede causar lesiones.
Un arranque accidental podría causar lesiones.
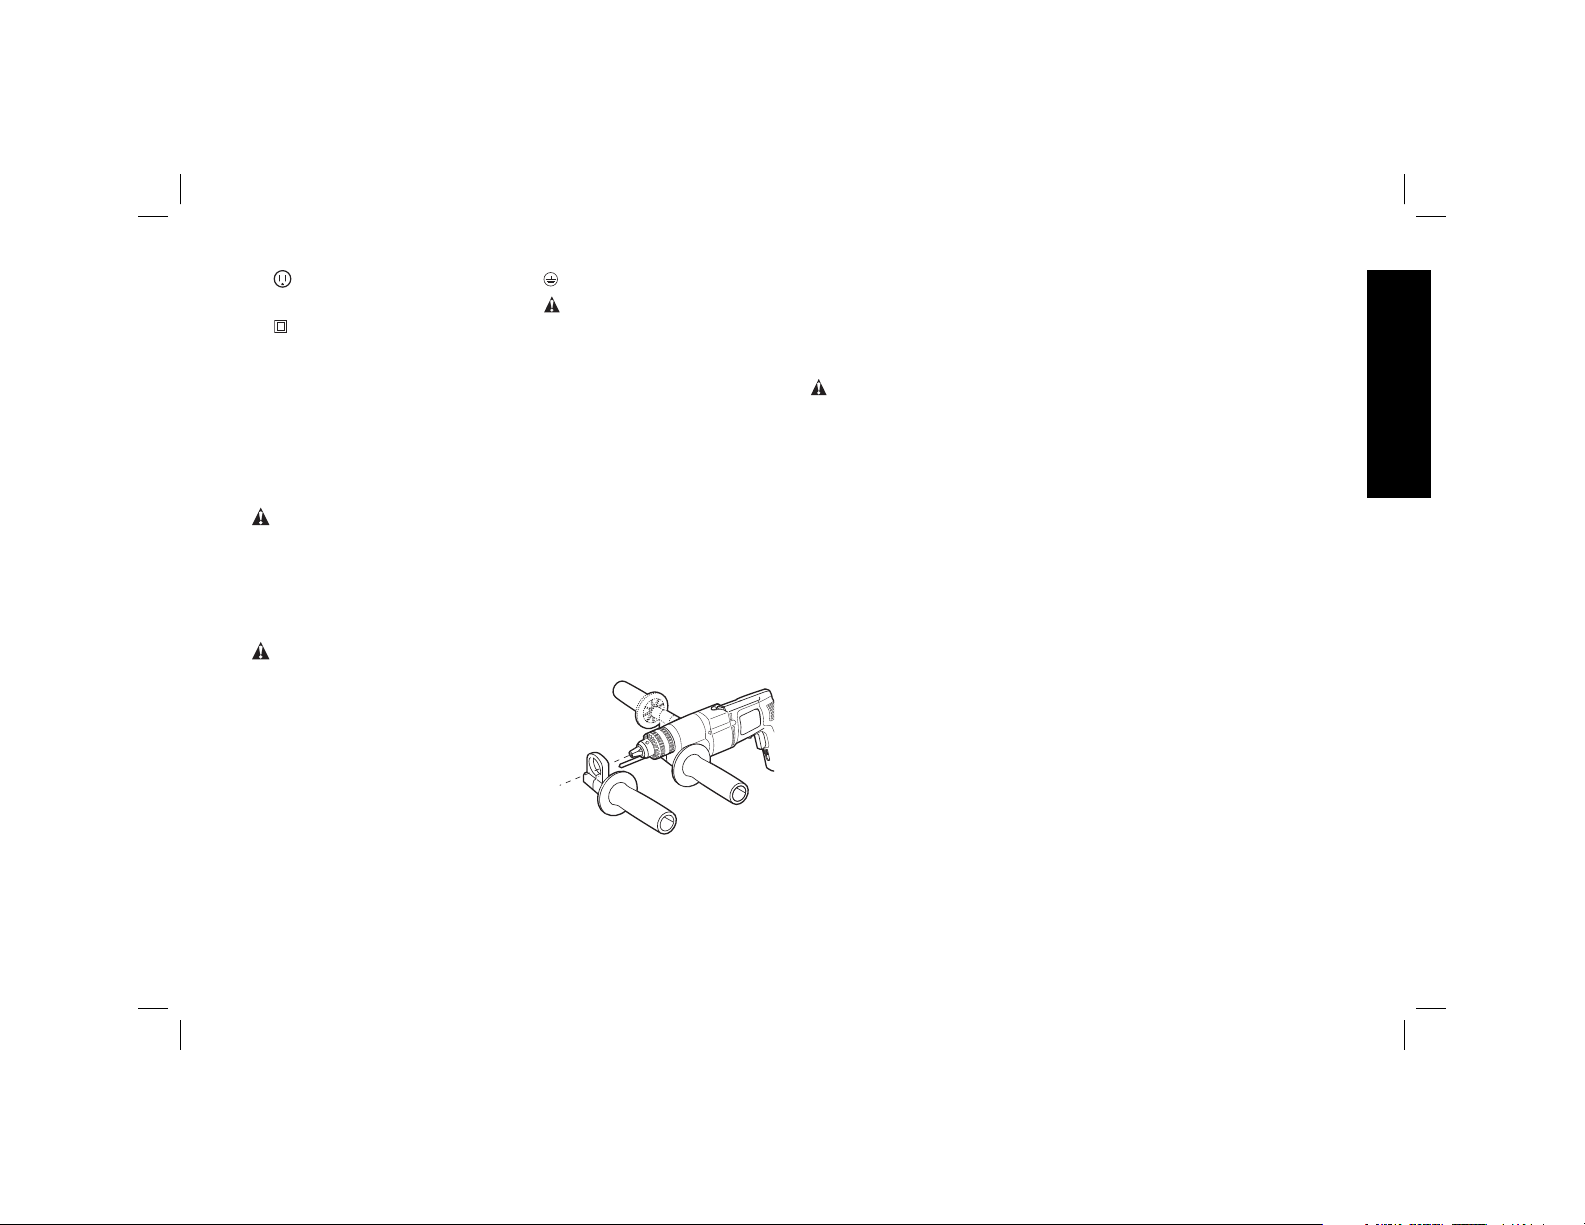
Agarradera lateral (Fig. 1)
ADVERTENCIA: Para reducir el
riesgo de lesiones corporales,
SIEMPRE opere la herramienta
con el mango lateral debidamente
instalado y ajustado. El
incumplimiento con lo anterior
podría resultar en que el mango
lateral se suelte durante la operación
de la herramienta y que el operador
pierda el control como
consecuencia. Sostenga la herramienta con ambas manos para
maximizar control
FIG. 1
Se suministra una agarradera lateral con este taladro percutor. Se
sujeta en la parte frontal de la caja de engranajes, como se muestra
en la Figura 1, y se puede girar 360˚ para permitir el uso con la mano
izquierda o derecha.
Interruptor (Fig. 2)
ADVERTENCIA: Suelte el mecanismo de trabado antes de
desconectar la clavija de la toma de corriente. Si no lo hace el
taladro se encenderá cuando vuelva a conectarlo, con el posible
riesgo de daños o lesiones.
Para encender el taladro percutor, presione el interruptor de gatillo.
Para detener el taladro percutor, suelte el interruptor.
Para dejar fijo el interruptor de gatillo en la posición de encendido
(ON), en caso de operación continua, presione el interruptor de
gatillo y pulse el botón del seguro. La herramienta continuará en
funcionamiento. Para apagar la herramienta (OFF), desde la posición
de encendido, pulse y suelte el gatillo una vez. Asegúrese de que el
mecanismo de liberación del seguro se mueva con normalidad cada
vez que desee usar la herramienta.
NO fije el interruptor de gatillo en la posición de encendido cuando
taladre a mano, para así poder soltarlo en caso de que la broca se
atasque en el orificio. SOLAMENTE se debe usar el botón del seguro
si el taladro se encuentra montado en una base de soporte vertical o
de algún otro tipo.
Español
7
7
Page 8

FIG. 2
PALANCA DE
REVERSA
INTERRUPTOR
Español
DE GATILLO
BOTÓN DEL
SEGURO
VELOCIDAD VARIABLE
El interruptor de gatillo de velocidad variable permite controlar la
velocidad. Cuanto más fuerte se pulse el interruptor de gatillo, mayor
será la velocidad del taladro percutor.
NOTA: Utilice velocidades bajas para perforar sin haber marcado
un punto de centrado, para taladrar en metal, plástico o cerámica
y para atornillar. Las altas velocidades son mejores para taladrar en
madera y aglomerados, y para usar accesorios abrasivos y de pulido.
PALANCA DE CAMBIO DE MARCHA
La palanca de reversa se usa para invertir la marcha del taladro
percutor con el fin de sacar tornillos o desatascar brocas. Se
encuentra situada encima del interruptor de gatillo, como se muestra
en la Figura 2.
Para activar el taladro percutor en reversa, apáguelo y mueva la
palanca hacia la izquierda (mirándola desde el portabrocas).
Para operar la unidad hacia delante, apague el taladro percutor y
empuje la palanca hacia la derecha.
Operación a velocidad alta o baja (Fig. 3)
El engranaje de dos velocidades del taladro percutor de doble acción
permite un funcionamiento eficaz en gran variedad de aplicaciones,
con el mayor número de accesorios posible.
Para la operación en BAJA VELOCIDAD, debe girar la perilla de
cambios situada en la parte inferior del taladro percutor, de forma
que el gráfico de “baja velocidad” quede orientado hacia el frente de
la herramienta.
Para operar en ALTA VELOCIDAD, debe girarse la perilla de forma
que el gráfico de “alta velocidad” quede orientado hacia el frente de
la herramienta.
Se ha diseñado el tren de engranajes para efectuar los cambios sólo
cuando esté apagada la unidad. Sin embargo, quizá sea necesario
girar ligeramente el portabrocas a mano, para alinear los engranajes
mientras se gira la perilla de cambios.
AVIS: NO INTENTE CAMBIAR VELOCIDADES girando la perilla de
cambios si la herramienta se encuentra en funcionamiento. Hacer lo
contrario dañará el tren de engranajes.
FIG. 3
PARTE FRONTAL DE LA HERRAMIENTA
PERILLA DE
CAMBIOS
POSICIÓN DE
VELOCIDAD
BAJA
POSICIÓN DE
VELOCIDAD
ALTA
8
8
Page 9

Selector del modo de martillo o de
taladro (Fig. 4)
Para cambiar la herramienta del modo de taladro al de martillo (o
viceversa) gire el selector hasta la posición que desee, como se
muestra en la Figura 4.
Para taladrado simple, alinee el símbolo de la broca con el
portabrocas.
Para las operaciones de martilleo, alinee el símbolo del martillo
con el portabrocas, como se muestra en la figura.
NOTA: El selector debe estar siempre en una de las dos posiciones:
taladro o martillo. No hay posiciones de operación entre ambas.
FIG. 4
POSICIÓN DE
MARTILLO
POSICIÓN DE
TALADRO
Portabrocas
Para insertar la broca, abra las mordazas del broquero haciendo
girar el collar con los dedos e inserte el vástago de la broca a una
profundidad aproximada de 19mm (3/4") en el interior del broquero.
Apriete el collar con la mano. Coloque la llave en cada uno de los
tres orificios y apriete en el sentido de las manecillas del reloj. Es
importante que apriete las mordazas sobre la broca en los tres
orificios.
Para quitar la broca, gire el broquero en sentido contrario a las
manecillas del reloj valiéndose solamente de un orificio y afloje a
continuación el broquero con la mano.
FUNCIONAMIENTO
ADVERTENCIA: Para minimizar el riesgo de graves lesiones
personales, apague la herramienta y desconecte la batería
antes de realizar ajustes o quitar/instalar los acoples o
accesorios. Un encendido accidental puede causar lesiones.
Un arranque accidental podría causar lesiones.
Taladrado
ADVERTENCIA: Para reducir el riesgo de lesiones corporales,
SIEMPRE asegúrese de que la pieza de trabajo esté debidamente
sujeta. Si va a perforar un material delgado, utilice un bloque de
madera como “respaldo” para evitar dañarlo.
1. Utilice exclusivamente brocas afiladas. Para MADERA, utilice
brocas helicoidales, brocas de horquilla, brocas de berbiquí o
brocas de sierra. Para METAL, use brocas de acero helicoidales
o de campana. Para MAMPOSTERÍA, como ladrillos, cemento,
bloques de hormigón, etc., utilice brocas con punta de carburo
de tungsteno para taladrado con percusión.
2. Siempre aplique presión al taladro en línea recta con la broca.
Haga suficiente presión para que la broca siga perforando, pero
no tanta como para que el motor se atasque o la broca se desvíe.
3. Sujete el taladro firmemente con ambas manos para controlar la
fuerza de torsión de la broca.
4. SI EL TALADRO SE ATASCA, esto probablemente se
deberá a una sobrecarga o a un uso incorrecto. SUELTE
EL GATILLO DE INMEDIATO, retire la broca de la pieza de
trabajo y determine la causa del atascamiento. NO APRIETE Y
SUELTE REPETIDAMENTE EL GATILLO PARA INTENTAR
DESATASCAR LA BROCA, YA QUE SE PODRÍA DAÑAR EL
TALADRO.
5. Para evitar que se atasque el taladro o que atraviese el material,
reduzca la presión y deje ir suavemente la broca hacia el final del
orificio.
Español
9
9
Page 10

6. Haga funcionar el motor al retirar la broca del interior del orificio.
Esto evitará que se atasque.
7. Con los taladros de velocidad variable no hay necesidad de hacer
una marca de centrado con un punzón. Utilice una velocidad
menor para comenzar el orificio y acelere, presionando más el
gatillo, cuando el orificio tenga la profundidad suficiente para
evitar que la broca se salga.
TALADRADO EN METAL
Español
SOLAMENTE UTILICE el taladro en “velocidad baja”. Inicie la
perforación a baja velocidad y vaya aumentándola hasta la máxima
potencia mientras aplica presión firme en la herramienta. El flujo
uniforme y suave de virutas indica que se taladra a la velocidad
adecuada. Emplee un lubricante para corte cuando taladre en
metales. Las excepciones son el hierro colado y el latón, que se
deben taladrar en seco. Los lubricantes que mejor funcionan son el
aceite sulfúrico y la manteca.
NOTA: los orificios grandes en acero [de 8 mm (5/16") a 13 mm
(1/2")] se pueden hacer con mayor facilidad si se taladra primero un
orificio piloto [de 4mm (5/32") a 5mm (3/16")].
TALADRADO EN MADERA
SOLAMENTE UTILICE el taladro en “velocidad baja”. Inicie la
perforación a baja velocidad y vaya aumentándola hasta la máxima
potencia mientras aplica presión firme en la herramienta. Se puede
taladrar la madera con las mismas brocas helicoidales que se
utilizan para el metal. Estas brocas pueden sobrecalentarse a
menos que se saquen con frecuencia para limpiarlas de virutas.
Los trabajos susceptibles de astillarse deben respaldarse con un
bloque de madera.
TALADRADO EN MAMPOSTERÍA
Cuando taladre en mampostería, utilice brocas afiladas con punta
de carburo de tungsteno, clasificadas para percusión. Para orificios
de hasta 10 mm (3/8") de diámetro utilice la “velocidad alta”.
Para orificios mayores de 10mm (3/8"), utilice la “velocidad baja”.
Seleccione el modo de martillo. Aplique una fuerza constante y
firme en la herramienta para taladrar con mayor efectividad. El flujo
uniforme y suave de virutas indica que se taladra a la velocidad
adecuada.
Varilla de profundidad
Para ajustar la varilla de profundidad, afloje la agarradera y mueva
la varilla de forma que la distancia entre el final de ésta y el final de
la broca sea igual a la profundidad de taladrado deseada. Cuando
utilice la varilla de profundidad, deténgase cuando el extremo de ésta
alcance la superficie del material.
MANTENIMIENTO
ADVERTENCIA: Para minimizar el riesgo de graves lesiones
personales, apague la herramienta y desconecte la batería
antes de realizar ajustes o quitar/instalar los acoples o
accesorios. Un encendido accidental puede causar lesiones.
Un arranque accidental podría causar lesiones.
Su herramienta D
largo período con un mínimo de mantenimiento. Un funcionamiento
continuo satisfactorio depende del cuidado adecuado de la
herramienta y de una limpieza periódica.
EWALT ha sido diseñada para funcionar durante un
Lubricación
La herramienta eléctrica no requiere lubricación adicional.
Limpieza
ADVERTENCIA: Sople la suciedad y el polvo de todos los
conductos de ventilación con aire seco al menos una vez por
semana. Utilice la protección adecuada para los ojos ANSI Z87.1
(CAN/CSA Z94.3) y la protección respiratoria adecuada NIOSH/
OSHA/MSHA cuando realice esta operación.
10
10
Page 11

ADVERTENCIA: Nunca utilice disolventes u otros productos
químicos abrasivos para limpiar las piezas no metálicas de la
herramienta. Estos productos químicos pueden debilitar los materiales
plásticos utilizados en estas piezas. Utilice un paño humedecido sólo
con agua y jabón neutro. Nunca permita que penetre líquido dentro
de la herramienta y nunca sumerja las piezas de la herramienta en un
líquido.
Reparaciones
Para garantizar la SEGURIDAD y la CONFIABILIDAD, deberán
hacerse reparaciones, mantenimiento y ajustes de esta herramienta
en los centros autorizados de servicio D
autorizadas. Estas organizaciones prestan servicio a las herramientas
D
EWALT y emplean siempre refacciones legitimas DEWALT.
Protección del Medio Ambiente
Compra de accesorios
ADVERTENCIA: Dado que algunos accesorios, diferentes de los
ofrecidos por D
empleo de tales accesorios podría constituir un riesgo. Para reducir
el riesgo de lesiones, sólo deben usarse con el producto los
accesorios recomendados D
Si desea más información sobre los accesorios adecuados, consulte
a su distribuidor.
DW505
CAPACIDAD DEL PORTABROCAS 13 mm (1/2")
RPM 0–1 100
0–2 700
BROCAS PARA METAL 10mm (3/8") – baja velocidad
BROCAS PARA MADERA 38 mm (1-1/2") – baja velocidad
BROCAS PARA
MAMPOSTERÍA 19 mm ( 3/4") materiales blandos
BROCAS SIERRA 53,9 mm (2-1/8") – baja velocidad
EWALT, no se han probado con este producto, el
EWALT.
CAPACIDADES MÁXIMAS RECOMENDADAS
Si llegase el día en que su producto D
no es de utilidad para usted, no lo deseche junto con otros residuos.
Le sugerimos llevar el producto a un centro de servicio autorizado
D
EWALT o a un centro de reciclaje, donde expertos podrán reciclar y
reutilizar los materiales.
Revise las normativas locales para reciclaje de productos eléctricos
tales como herramientas y electrodomésticos, allí podrá encontrar
centros de reciclaje municipales.
Tensión Alimentación: 220V~ 220V~ 120V~
Potencia Nominal: 700W 700W 700W
Frecuencia de operación: 50 Hz 50-60 Hz 50-60 Hz
Velocidad: 0–1 000 /
Golpes/minuto: 0–19 000 /
EWALT u otras organizaciones
No deseche este producto con la basura normal del hogar o
sitio de trabajo.
EWALT necesita reemplazo, o si
Este producto puede ser reciclado para prevenir la
contaminación del medio ambiente y reducir la demanda de
materias primas.
ESPECIFICACIONES
DW505-AR DW505-B2 DW505-B3
0–2 700/min
0–46 000
0–1 000 /
0–2 700/min
0–19 000 /
0–46 000
0–1 000 /
0–2 700/min
0–19 000 /
0–46 000
Español
11
Page 12

Defi nitions: Safety Guidelines
The definitions below describe the level of severity for each
signal word. Please read the manual and pay attention to these
symbols.
DANGER: Indicates an imminently hazardous situation which,
if not avoided, will result in death or serious injury.
WARNING: Indicates a potentially hazardous situation which,
if not avoided, could result in death or serious injury.
CAUTION: Indicates a potentially hazardous situation which, if
not avoided, may result in minor or moderate injury.
NOTICE: indicates a practice not related to personal injury
which, if not avoided, may result in property damage.
WARNING: To reduce the risk of injury, read the instruction
manual.
General Power Tool Safety Warnings
WARNING! Read all safety warnings and all instructions
Failure to follow the warnings and instructions may result in
electric shock, fire and/or serious injury.
SAVE ALL WARNINGS AND INSTRUCTIONS
FOR FUTURE REFERENCE
The term “power tool”in the warnings refers to your mains-operated
(corded) power tool or battery-operated (cordless) power tool.
1) WORK AREA SAFETY
a) Keep work area clean and well lit. Cluttered or dark areas
English
invite accidents.
b) Do not operate power tools in explosive atmospheres,
such as in the presence of flammable liquids, gases or
dust. Power tools create sparks which may ignite the dust or
fumes.
c) Keep children and bystanders away while operating a
power tool. Distractions can cause you to lose control.
2) ELECTRICAL SAFETY
a) Power tool plugs must match the outlet. Never modify
the plug in any way. Do not use any adapter plugs with
earthed (grounded) power tools. Unmodified plugs and
matching outlets will reduce risk of electric shock.
b) Avoid body contact with earthed or grounded surfaces
such as pipes, radiators, ranges and refrigerators. There
is an increased risk of electric shock if your body is earthed or
grounded.
c) Do not expose power tools to rain or wet conditions.
Water entering a power tool will increase the risk of electric
shock.
d) Do not abuse the cord. Never use the cord for carrying,
pulling or unplugging the power tool. Keep cord away
from heat, oil, sharp edges or moving parts. Damaged or
entangled cords increase the risk of electric shock.
e) When operating a power tool outdoors, use an extension
cord suitable for outdoor use. Use of a cord suitable for
outdoor use reduces the risk of electric shock.
f) If operating a power tool in a damp location is unavoidable,
use a residual current device (RCD) protected supply.
Use of an RCD reduces the risk of electric shock.
3) PERSONAL SAFETY
a) Stay alert, watch what you are doing and use common
sense when operating a power tool. Do not use a power
tool while you are tired or under the influence of drugs,
alcohol or medication. A moment of inattention while
operating power tools may result in serious personal injury.
b) Use personal protective equipment. Always wear eye
protection. Protective equipment such as dust mask, nonskid safety shoes, hard hat, or hearing protection used for
appropriate conditions will reduce personal injuries.
12
Page 13

c) Prevent unintentional starting. Ensure the switch is in
the off position before connecting to power source and/
or battery pack, picking up or carrying the tool. Carrying
power tools with your finger on the switch or energising power
tools that have the switch on invites accidents.
d) Remove any adjusting key or wrench before turning the
power tool on. A wrench or a key left attached to a rotating
part of the power tool may result in personal injury.
e) Do not overreach. Keep proper footing and balance at
all times. This enables better control of the power tool in
unexpected situations.
f) Dress properly. Do not wear loose clothing or jewellery.
Keep your hair, clothing and gloves away from moving
parts. Loose clothes, jewellery or long hair can be caught in
moving parts.
g) If devices are provided for the connection of dust
extraction and collection facilities, ensure these are
connected and properly used. Use of dust collection can
reduce dust-related hazards.
4) POWER TOOL USE AND CARE
a) Do not force the power tool. Use the correct power tool
for your application. The correct power tool will do the job
better and safer at the rate for which it was designed.
b) Do not use the power tool if the switch does not turn it
on and off. Any power tool that cannot be controlled with the
switch is dangerous and must be repaired.
c) Disconnect the plug from the power source and/or the
battery pack from the power tool before making any
adjustments, changing accessories, or storing power
tools. Such preventive safety measures reduce the risk of
starting the power tool accidentally.
d) Store idle power tools out of the reach of children and
do not allow persons unfamiliar with the power tool or
these instructions to operate the power tool. Power tools
are dangerous in the hands of untrained users.
e) Maintain power tools. Check for misalignment or binding
of moving parts, breakage of parts and any other
condition that may affect the power tool’s operation. If
damaged, have the power tool repaired before use. Many
accidents are caused by poorly maintained power tools.
f) Keep cutting tools sharp and clean. Properly maintained
cutting tools with sharp cutting edges are less likely to bind and
are easier to control.
g) Use the power tool, accessories and tool bits etc., in
accordance with these instructions taking into account
the working conditions and the work to be performed.
Use of the power tool for operations different from those
intended could result in a hazardous situation.
5) SERVICE
a) Have your power tool serviced by a qualified repair
person using only identical replacement parts. This will
ensure that the safety of the power tool is maintained.
ADDITIONAL SPECIFIC SAFETY RULES
Additional Safety Rules for Hammerdrills
• Wear ear protectors. Exposure to noise can cause hearing loss.
• Use auxiliary handles supplied with the tool. Loss of control
can cause personal injury.
• Hold power tool by insulated gripping surfaces only, when
performing an operation where the cutting accessory may
contact hidden wiring or its own cord. Cutting accessory
contacting a “live” wire may make exposed metal parts of the
power tool “live” and shock the operator.
English
13
Page 14

• Use clamps or other practical way to secure and support
the workpiece to a stable platform. Holding the work by hand
or against your body is unstable and may lead to loss of control.
• Wear safety goggles or other eye protection. Drilling operations
cause chips to fly. Flying particles can cause permanent eye
damage.
• Bits and tools get hot during operation. Wear gloves when
touching them.
• Keep handles dry, clean, free from oil and grease. it is
recommended to use rubber gloves. This will enable better
control of the tool.
• An extension cord must have adequate wire size for safety.
An undersized cord will cause a drop in line voltage resulting in loss
of power and overheating. When using more than one extension
to make up the total length, be sure each individual extension
contains at least the minimum wire size. The following table shows
the correct size to use depending on cord length and nameplate
ampere rating. If in doubt, use the next heavier gauge. The smaller
the gauge number, the heavier the cord.
English
Voltage (Volts)
120–127V 0–7 7–15 15–30 30–50
220–240V 0–15 15–30 30–60 60–100
Rated Ampere
range
0–6A 1.0 1.5 1.5 2.5
6–10A 1.0 1.5 2.5 4.0
10–12A 1.5 1.5 2.5 4.0
12–16A 2.5 4.0 Not Recommended
Total length of cord in meters (m)
Minimal cross-sectional area of the
cord in meters (mm2 )
WARNING: ALWAYS USE SAFETY GLASSES. Everyday
eyeglasses are NOT safety glasses. Also use face or dust mask if
cutting operation is dusty. All users and bystanders MUST ALWAYS
wear certified safety equipment:
• ANSI Z87.1 eye protection (CAN/CSA Z94.3),
• ANSI S12.6 (S3.19) hearing protection,
• NIOSH/OSHA/MSHA respiratory protection.
WARNING: Some dust created by power sanding, sawing,
grinding, drilling, and other construction activities contains chemicals
known to cause cancer, birth defects or other reproductive harm.
Some examples of these chemicals are:
• lead from lead-based paints,
• crystalline silica from bricks and cement and other masonry
products, and
• arsenic and chromium from chemically-treated lumber.
Your risk from these exposures varies, depending on how often you
do this type of work. To reduce your exposure to these chemicals:
work in a well ventilated area, and work with approved safety
equipment, such as those dust masks that are specially designed to
filter out microscopic particles.
• Avoid prolonged contact with dust from power sanding,
sawing, grinding, drilling, and other construction activities.
Wear protective clothing and wash exposed areas with
soap and water. Allowing dust to get into your mouth, eyes, or
lay on the skin may promote absorption of harmful chemicals.
WARNING: Use of this tool can generate and/or disburse dust,
which may cause serious and permanent respiratory or other injury.
Always use NIOSH/OSHA approved respiratory protection appropriate
for the dust exposure. Direct particles away from face and body.
WARNING: Always wear proper personal hearing protection
that conforms to ANSI S12.6 (S3.19) during use. Under some
conditions and duration of use, noise from this product may
contribute to hearing loss.
14
Page 15

............
WARNING: Always use eye protection. All users and
bystanders must wear eye protection that conforms to ANSI Z87.1.
• The label on your tool may include the following symbols. The
symbols and their definitions are as follows:
V .......... volts A .......... amperes
Hz ........ hertz W......... watts
min ......minutes ....... alternating current
...direct current ....... alternating or direct current
........Class I Construction no ........ no load speed
............ (grounded) ........ earthing terminal
........ Class II Construction ......... safety alert symbol
............ (double insulated) BPM .... beats per minute
…/min .per minute RPM .... revolutions per minute
IPM ......impacts per minute sfpm .... surface feet per minute
SAVE THESE INSTRUCTIONS
FOR FUTURE USE
ASSEMBLY AND ADJUSTMENTS
WARNING: To reduce the risk of injury, turn unit off and
disconnect tool from power source before installing and
removing accessories, before making any adjustments or
removing/installing attachments or accessories. An accidental
start-up can cause injury.
Side Handle (Fig. 1)
WARNING: To reduce the risk of
personal injury, ALWAYS operate
the tool with the side handle properly
installed. Failure to do so may result
in the side handle slipping during tool
operation and subsequent loss of
control. Hold tool with both hands to
maximize control.
A side handle is supplied with this
hammerdrill. It clamps to the front of
the gear case as shown in Figure 1
and can be rotated 360˚ for right- or left- hand use.
FIG. 1
Switch (Fig. 2)
WARNING: Be sure to release the locking mechanism before
disconnecting the plug from the power supply. Failure to do so will
cause the hammerdrill to start immediately the next time it is plugged
in. Damage or personal injury could result.
To start hammerdrill, depress the trigger switch. To stop hammerdrill,
release the trigger switch.
To lock the trigger switch in the ON position for continuous operation,
depress the trigger switch and push up the locking button. The tool
will continue to run. To turn the tool OFF, from a locked-on condition,
squeeze and release the trigger once. Before using the tool (each
time), be sure that the locking button release mechanism is working
freely.
DO NOT lock the switch on when drilling by hand so that you can
instantly release the trigger switch if the bit binds in the hole. The
locking button is for use ONLY when the hammerdrill is mounted in a
drill press stand or other wise held stationary.
English
15
Page 16

FIG. 2
REVERSING
LEVER
TRIGGER
SWITCH
LOCK ON
BUTTON
VARIABLE SPEED
The variable speed trigger switch permits speed control. The
farther the trigger switch is depressed, the higher the speed of the
hammerdrill.
NOTE: Use lower speeds for starting holes without a centerpunch,
drilling in metal, plastics or ceramics, or driving screws. Higher speeds
are better for drilling in wood and composition board and for using
abrasive and polishing accessories.
REVERSING LEVER
The reversing lever is used to reverse the hammerdrill for backing
out screws or jammed bits. It is located above the trigger, shown in
Figure2. To reverse the hammerdrill, turn it off and push the reversing
lever to the left (when viewed from the chuck end).
To position the lever for forward operation, turn the hammerdrill off
English
and push the lever to the right (when viewed from the chuck end).
High/Low Speed Operation (Fig. 3)
The two speed gear drive in the dual range hammerdrill permits
effective operation over an extended range of applications with
greater selection of accessories.
For LOW SPEED operation, the shift knob located on the underside
of the hammerdrill should be rotated so the low speed setting is
toward the front of the tool.
For HIGH SPEED operation, the shift knob should be rotated so the
high speed setting is toward the front of the tool.
The gear train has been designed for shifting only when the unit is off.
It may be necessary however, to rotate the chuck slightly by hand to
align the gears while turning the shift knob.
NOTICE: DO NOT ATTEMPT TO CHANGE SPEEDS by turning the
shift knob when the tool is running. Doing so will damage the gear
train.
FIG. 3
SHIFT KNOB
FRONT OF TOOL
LOW SPEED
SETTING
HIGH SPEED
SETTING
Hammer/Drill Selector (Fig. 4)
To switch the tool from the drilling mode to the hammering mode
(or vice-versa) rotate the selector to the applicable symbol as shown
in Figure 4.
16
Page 17

For straight drilling, align selector with drill bit symbol.
For hammering, align selector with the hammer symbol, as shown
in the figure.
NOTE: The selector must be in either drill or hammer/drill mode at
all times. There are no operable positions between the two.
FIG. 4
HAMMER
SETTING
DRILL
SETTING
Chuck
To insert the bit, open chuck jaws by turning collar with fingers
counterclockwise (when viewed from the chuck end) and insert
shank of bit about 3/4" (19 mm) into chuck. Tighten chuck
collar by hand. Place chuck key in each of the three holes and tighten
in clockwise direction. It’s important to tighten chuck with all three
holes.
To release the bit, turn collar key counterclockwise in just one hole,
then loosen the chuck by hand turning collar counterclockwise (when
viewed from the chuck end).
OPERATION
WARNING: To reduce the risk of injury, turn unit off and
disconnect tool from power source before installing and
removing accessories, before making any adjustments or
removing/installing attachments or accessories. An accidental
start-up can cause injury.
Drilling
WARNING: To reduce the risk of personal injury, ALWAYS
ensure workpiece is anchored or clamped firmly. If drilling thin
material, use a wood “back-up” block to prevent damage to the
material.
1. Use sharp drill bits only. For WOOD, use twist drill bits, spade bits,
power auger bits, or hole saws. For METAL, use steel twist drill
bits or hole saws. For MASONRY, such as brick, cement, cinder
block, etc., use carbide-tipped bits rated for percussion drilling.
2. Always apply pressure in a straight line with the bit. Use enough
pressure to keep drill biting, but do not push hard enough to stall
the motor or deflect the bit.
3. Hold tool firmly with both hands to control the twisting action of
the drill.
4. IF DRILL STALLS, it is usually because it is being overloaded or
improperly used. RELEASE TRIGGER IMMEDIATELY, remove
drill bit from work, and determine cause of stalling. DO NOT
CLICK TRIGGER ON AND OFF IN AN ATTEMPT TO START
A STALLED DRILL — THIS CAN DAMAGE THE DRILL.
5. To minimize stalling or breaking through the material, reduce
pressure on drill and ease the bit through the last fractional part
of the hole.
6. Keep the motor running when pulling the bit back out of a drilled
hole. This will help prevent jamming.
7. With variable speed drills there is no need to center punch
the point to be drilled. Use a slow speed to start the hole and
accelerate by squeezing the trigger harder when the hole is deep
enough to drill without the bit skipping out.
English
17
Page 18

DRILLING IN METAL
USE ONLY in the low-speed gear range. Start drilling with slow speed
and increase to full power while applying firm pressure on the tool. A
smooth even flow of metal chips indicates the proper drilling rate. Use
a cutting lubricant when drilling metals. The exceptions are cast iron
and brass which should be drilled dry.
NOTE: Large [5/16" (8 mm) to 1/2" (13 mm)] holes in steel can be
made easier if a pilot hole [5/32" (4 mm) to 3/16" (5 mm)] is drilled first.
DRILLING IN WOOD
USE ONLY in the low-speed gear range. Start drilling with slow speed
and increase to full power while applying firm pressure on the tool.
Holes in wood can be made with the same twist drills used for metal.
These bits may overheat unless pulled out frequently to clear chips
from the flutes. Work that is apt to splinter should be backed up with
a block of wood.
DRILLING IN MASONRY
When drilling in masonry, use carbide tipped bits rated for percussion
drilling and be certain that the bit is sharp. For holes up to 3/8" (10
mm) diameter use the high-speed gear range. For holes larger than
3/8" (10 mm), use the the low-speed gear range. Ensure that the
hammer mode is selected. Use a constant and firm force on the tool
to drill most effectively. A smooth, even flow of dust indicates the
proper drilling rate.
Depth Rod
To adjust the depth rod, loosen the handle and move rod so that the
distance between the end of the rod and the end of the bit equals the
desired drilling depth. When drilling with depth rod, stop when end of
rod reaches surface of material.
English
MAINTENANCE
WARNING: To reduce the risk of injury, turn unit off and
disconnect tool from power source before installing and
removing accessories, before making any adjustments or
removing/installing attachments or accessories. An accidental
start-up can cause injury.
Your D
EWALT power tool has been designed to operate over a
long period of time with a minimum of maintenance. Continuous
satisfactory operation depends upon proper tool care and regular
cleaning.
Lubrication
Your power tool requires no additional lubrication.
Cleaning
WARNING: Blow dirt and dust out of the main housing with dry air
as often as dirt is seen collecting in and around the air vents. Wear
approved eye protection and approved dust mask when performing
this procedure.
WARNING: Never use solvents or other harsh chemicals for
cleaning the non-metallic parts of the tool. These chemicals may
weaken the materials used in these parts. Use a cloth dampened only
with water and mild soap. Never let any liquid get inside the tool;
never immerse any part of the tool into a liquid.
Purchasing Accessories
WARNING: Since accessories, other than those offered by
D
EWALT, have not been tested with this product, use of such
accessories with this tool could be hazardous. To reduce the risk of
injury, only D
this product.
Recommended accessories for use with your tool are available at extra
cost from your local dealer or authorized service center.
EWALT, recommended accessories should be used with
18
Page 19

MAXIMUM RECOMMENDED CAPACITIES
DW505
CHUCK CAPACITY 1/2" (13 mm)
R.P.M. 0–1,100 – 0–2,700
BITS, METAL DRILLING 3/8" (10 mm) low speed
WOOD, FLAT BORING 1-1/2" (38 mm) low speed
BITS, MASONRY DRILLING 3/4" (19 mm) soft materials
HOLE SAWS 2-1/8" (53.9 mm) – Low speed
Repairs
To assure product SAFETY and RELIABILITY, repairs, maintenance
and adjustment (including brush inspection and replacement) should
be performed by authorized service centers or other qualified service
personnel, always using identical replacement parts.
Protecting the Environment
Separate collection. This product must not be disposed of
with normal household waste.
Should you find one day that your D
replacement, or if it is of no further use to you, do not dispose of it
with household waste.
Separate collection of used products and packaging allows
materials to be recycled and used again. Re-use of recycled
materials helps prevent environmental pollution and reduces
the demand for raw materials.
Local regulations may provide for separate collection of electrical
products from the household, at municipal waste sites or by the
retailer when you purchase a new product.
EWALT product needs
D
EWALT provides a facility for the collection and recycling of DEWALT
products once they have reached the end of their working life. To take
advantage of this service please return your product to any authorized
service center that will collect them on our behalf.
You can check the location of your nearest authorized service center
by contacting your local D
EWALT office. Alternatively, a service center
listing is included in the packaging of this product.
SPECIFICATIONS
DW505-AR DW505-B2
Voltage: 220V~ 220V~
Power-Watts: 700W 700W
Frequency: 50 Hz 50-60 Hz
Power: 0–1000 / 0–2700/min 0–1000 / 0–2700/min
Strokes per minute: 0–19000 / 0–46000 0–19000 / 0–46000
DW505-B3
Voltage: 120V~
Power-Watts: 700W
Frequency: 50-60 Hz
Power: 0–1000 / 0–2700/min
Strokes per minute: 0–19000 / 0–46000
English
19
Page 20

Page 21

Page 22

SOLAMENTE PARA PROPÓSITO DE ARGENTINA:
IMPORTADO POR: BLACK & DECKER ARGENTINA S.A.
IMPORTADO POR: BLACK & DECKER S.A. DE C.V.
BOSQUES DE CIDROS, ACCESO RADIATAS NO.42
MAQUINAS Y HERRAMIENTAS BLACK & DECKER CHILE S.A.
PACHECO TRADE CENTER
COLECTORA ESTE DE RUTA PANAMERICANA
KM. 32.0 EL TALAR DE PACHECO
PARTIDO DE TIGRE
BUENOS AIRES (B1618FBQ)
REPÚBLICA DE ARGENTINA
NO. DE IMPORTADOR: 1146/66
SOLAMENTE PARA PROPÓSITO DE MÉXICO:
3A. SECCIÓN DE BOSQUES DE LAS LOMAS
DELEGACIÓN CUAJIMALPA,
05120, MÉXICO, D.F.
TEL. (52) 555-326-7100
R.F.C.: BDE810626-1W7
AVDA. EDUARDO FREI M. #6001 EDIFICIO 67
CONCHALI-SANTIAGO
CHILE
HECHO EN MÉXICO
MADE IN MEXICO
(NOV11) Part No. N142137 DW505 Copyright © 2003, 2006, 2011 D
The following are trademarks for one or more D
EWALT power tools: the yellow and black color scheme; the “D” shaped air intake grill; the array
EWALT
of pyramids on the handgrip; the kit box configuration; and the array of lozenge-shaped humps on the surface of the tool.
DEWALT Industrial Tool Co., 701 East Joppa Road, Baltimore, MD 21286
 Loading...