

Page 1

Page 2
IF YOU
HAVE ANY
QUESTIONS OR COMMENTS ABOUT THIS,
OR
ANY
DeWALT
TOOL, CALL
US
TOLL FREE
AT I{üF+DE\IVALT
(1۾43}925S).
Serial Numberfrom Nameplate
Date of Purchase
Save this information forfdure
reference.
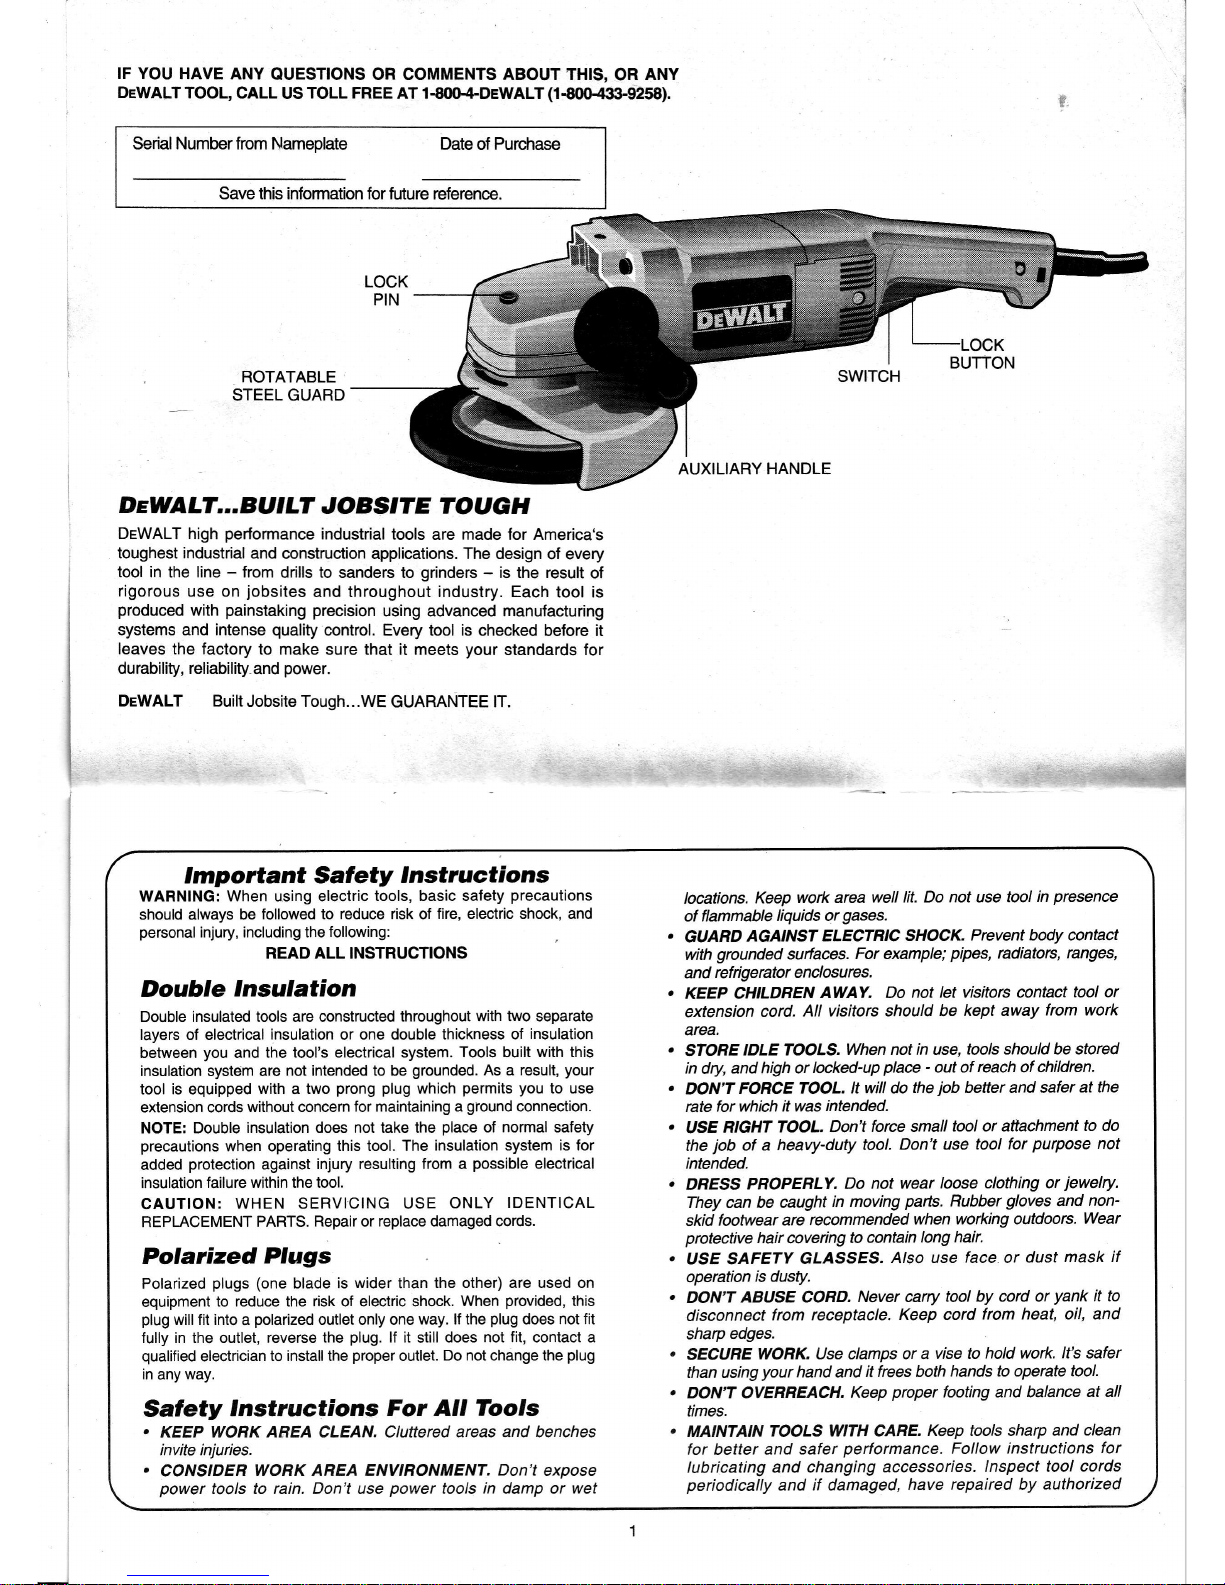
ROTATABLE'
STEEL GUARD
DgWALT...BU,
LT
J O
BSIT
E TO
U Grl
DeWALT high
performance
industrial
tools are made lor America's
toughest industrial and
construction applications. The design
of every
tool in the line
-
from
drills to sanders to
grinders
-
is the resuli
of
rigorous use on
jobsites
and throughout industry. Each
tool is
produced
with
painstaking precision
using advanced manufacturing
systems and intense
qualiÿ
control. Every tool is
checked before it
leaves
the
factory
to make
sure
that it
meets
your
standards for
durabiliÿ, reliabiliÿ
and
power.
DeWALT
Built Jobsite Tough...WE
GUARANTEE lT.
.-':r.:,.
:-r1,,-+;-Ë.4§*æ++
lmportant Salety
lnstructions
WARNING: When using electric
tools, basic safety
precautions
should always be
followed to reduce risk of
fire, electric shock, and
personal
inlury, including the
following:
READ ALL INSTRUCTIONS
Double
lnsulation
Double insulated tools are constructed
throughout with
two
separate
layers of electrical
insulation
or one double
thickness of
insulation
between
you
and the tool's electrical
system.
Tools
built
with this
insulation system are
not intended to be
grounded.
As
a
result,
your
tool is equipped
with a two
prong plug
which
permits you
to use
extension cords
without concem for maintaining
a
ground
connection.
NOTE: Double
insulation does not take the
place
of normal safeÿ
precautions
when operating
this tool. The
insulation system is for
added
protection
against
injury resulting from a
possible
electrical
insulation
failure within the tool.
CAUTION:
WHEN SERVICING USE
ONLY
IDENTICAL
REPLACEMENT
PARTS.
Repair
or
replace damaged cords.
Polarized
Plugs
Polarized
plugs (one
blade is
wider
than
the other) are used on
equipment
to reduce the risk of electric shock.
When
provided,
this
plug
will fit into
a
polarized
outlet only one
way. lf the
plug
does not fit
fully in the outlet, reverse the
plug.
lf it
still
does not fit, contact a
qualified
electrician
to install the
proper
outlet.
Do not change the
plug
in
any
way.
Salety
Instruclions
For All Tools
.
KEEP
WORK AREA CLEAN. Cluttered areas and benches
invite injuries.
.
CONSIDER
WORK AREA ENVIRONMENT.
Don't
expose
power
tools to rain. Don't use
power
tools
in
damp or
wet
locations.
Keep
work area
well lit. Do not use tool
in
presence
of flammable
liquids or
gases.
GUARD
AGAINST
ELECTRIC
SHOCK
Prevent boÜ contact
with
grounded
surtaces.
For example;
pipes,
radiators,
ranges,
and
ref rige rator enclosu
re s.
KEEP CHILDREN
AWAY. Do
not let visitors contact
tool or
extension
cord.
All visitors should be
kept away
from work
area.
STORE
IDLE TOOLS.
When not in use,
tools
should
be stored
in
dry,
and high or
locked-up
plaæ
-
out of
reach
of children.
DON'T
FORCE TOOL.
lt will do
the
iob
better and safer
at the
rate for which
it was
intended.
llSE RIGHT
TOOL. Don't
torce small
tool or attachment
to do
the
iob
of
a
heavy-duty tool.
Don't use tool
for
purpose
not
intended.
DRESS
PROPERLY.
Do
not wear loose clothing
or
iewelry.
They can be caught
in moving
parts.
Rubber
gloves
and
non-
skid tootwear
are
recommended
when working outdoors.
Wear
protective
hair
covering
to contain
long
hair.
USE SAFETy
GLASSES.
Also use
face
or
dust
mask if
operation
is dusÿ.
DON'T
ABUSE CORD.
Never carry
tool by cord or
yank
it to
disconnect
from receptacle.
Keep cord
from heat, oil, and
sharp
edges.
SECURE
WORK.
Use clamps or a
vise to hold
work. lt's safer
than using
your
hand and
it frees both
hands to operate tool.
DON'T OVERREACH.
Keep
proper
footing and balance
at all
times.
MAINTAIN
TOOLS WITH CARE.
Keep tools sharp and
clean
for better and
safer
pertormance.
Follow
instructions
for
lubricating and changing
accessories.
lnspect tool cords
periodically
and
if damaged,
have repaired by
authorized
1
I
_.1
Page 3
seruice
facilÿ. lnspæt
ertension
ærds
peiodically
and
replace if
damaged.
Keep handles
dry, clean, and lree from
oil and
grease.
DISCONNECT
OR LOCK
OFF TOOLS when
not in use,
before
seruicing,
and
when
changing
accessories,
such as blades, bits,
cutters.
REMOVE
ADJUSTING KEYS
AND WRENCHES.
Form habit
of
checking
to see that keys
and adjusting wrenches
are removed from
tool
before tuming it
on.
AVOID
UN,NTENTIONAL
STARTING. Don't
carry tool with finger
on switch. Be
sure switch is
off
when
plugging
in.
EXTENSION
CORDS. Make
sure
your
ertension cord is in
good
condition. When
using
an ertension cord,
be sure to uæ one heavy
enough to
cany the cunent
your product
will draw. An
undersized
cord will
cause a drop in line
voltage resulting in lo*s
of
power
and
overheating.
The following table
shows the correct
size to use
depending on
cord
length
and nameplate
ampere rating. lt in doubt,
use
the next heavier
gage.
The
smaller the
gage
number,
the
heavier the
cord.
OUTDOOR USE EXTENSION
CORDS. When
tool is used
outdoors,
use onÿ
ertension cords intended lor
use outdoors and
so marked.
STAY ALERT. Watch
what
you
are
doing. Use common
sense.
Do
not
operate tool when
you
are tired.
.
CHECK DAMAGED
PARTS.
Before
tufircr
use
of thë tool,
a
guard
or
other
part
that is
damaged
should
be carefully
cheçked
to
determine
that
it will
operate
properly
and
pertorm
its intended
function.
Check for
alignment
of moving
pails,
binding
of moving
parts,
breakage
of
pafts,.
mounting,
and
any other
conditions
that
may
atfect its
operation.
A
guard
or other
part
that is
damaged
should
be
properly
repaired
or replaced
by
an authorized
seruice
center
unless
otherwise indicated
elsewhere
in
this instruction
manual.
Have
defective
switches replaced
by authorized
service
center.
Do not
use tool if switch
does not
tum it
on and off.
.
ALWAYS
WEAR EYE PNOTECNON.
.
KEEP
GIIARDS lN
PLACE.
.
Use only
grinding
wheels
having a maximum
operating speed
at
least
high as
"No
Load RPM" marked
on the
tool's nameplate.
.
Before
using, inspect reæmmended
accessory
for cracks
or flaws. lf
such
a crack
or
flaw is
evident,
discard
the accessory. The
accessory
should
also be inspected
whenever
you
think the
tool
may have
been
dropped.
When
btaiing
the tool
(with
a new
or
replacement
wheel installed)
hold
the tool in
a well
protected
area
and let it run for
one minute. lf
the wheel
has
an undetected
crack or ftaw,
it shoutd
burst in tess
than
one minute.
Never stan the
tæl with
a
person
in line
with the
wheel.
This includes
the
operator.
ln
operation,
avoid bouncing the
wheel or
giving
rt rough
treatment.
lf this
occurs,
stop the tool
and inspect
the wheet.
ALWAYS
USE GUARDS with
depressed
center
wheels
or
flaring
cup
ginding
wheels.
Clean
your
tool out
periodically.
CAUTION:
Some wood
contains
preservatives
such as
copper
chromium
arsenate
(CCA)
which
can be toxic.
When
sanding these
materials
extra care
should be taken
to avoid inhalation
and
minimize
skin
contact.
SAVE THESE INSTRUCTIONS
FOR
FUTURE USE
Volts
r20v
I hon
Minimum
Goge
for
Cond Sets
Totul tengrh
of Cond in Feet
o-25 26-50
5t
-l
00 I 0t
-150
Not more
Thon
Americon
Wire Goge
0
6
l0
12
6 t8
10
t8
12
16
t6
l6
l6
l6
14
1À
14
12
12
16 14 12 Not Recommenderl
COUNTER CLOCKWISE
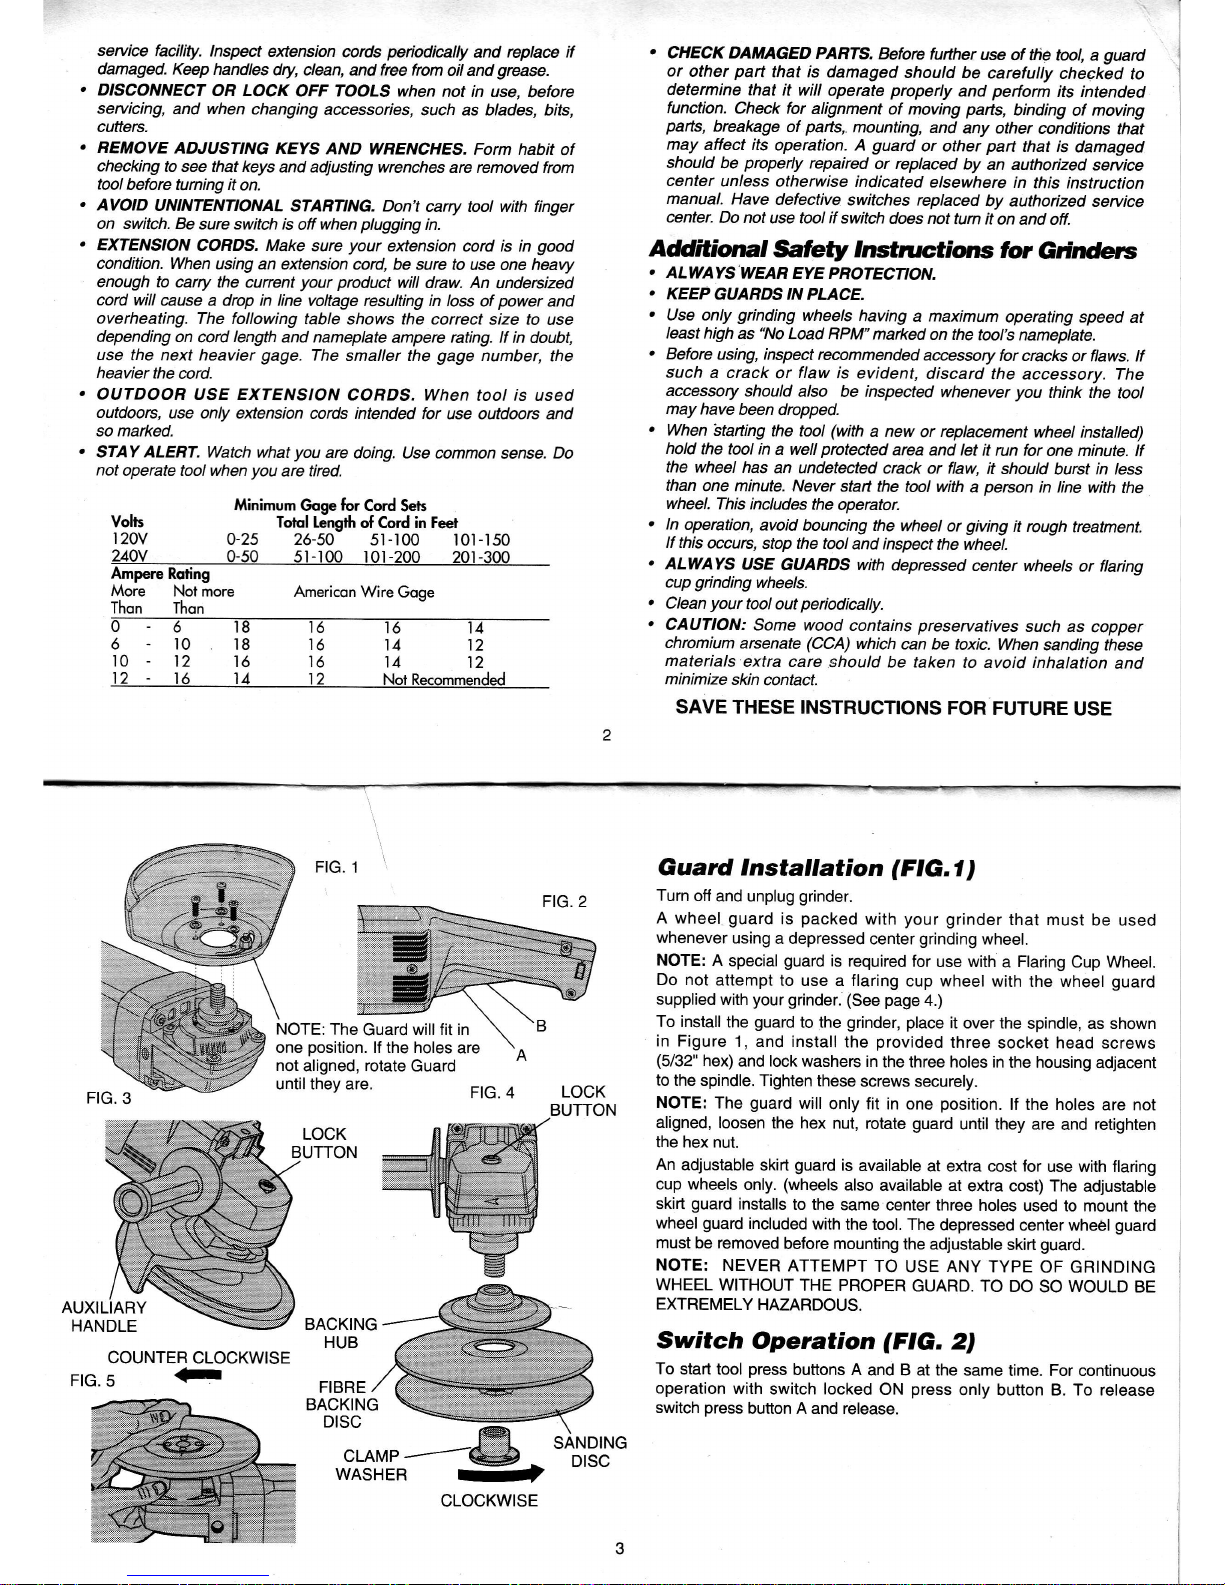
Ftc.s
-
FIG.1
NOTE:
The
Guard
will fit in
one
position.
lf the holes
are
not
aligned,
rotate
Guard
until they are.
FlG. 4
LOCK
BUTTON
BACKING
HUB
FIBRE
Guard lnstallation
(FlG.l
)
Turn
off
and unplug
grinder.
A wheel
guard
is
packed
with
your grinder
that must
be used
whenever
using
a depressed
center
grinding
wheel.
NOTE: A
special
guard
is
required for
use with a Flaring
Cup
Wheel.
Do not
attempt
to use a flaring
cup wheel
with the wheel
guard
supplied with
your grinder.
(See page
4.)
To install
the
guard
to the
grinder,
place
it over the
spindle, as shown
in Figure
1, and install
the
provided
three
socket head screws
(5/32"
hex)
and
lock
washers in
the three holes in
the housing
adjacent
to the spindle.
Tighten these
screws
securely.
NOTE:
The
guard
will
only fit in one
position.
lf the holes
are not
aligned,
loosen
the
hex
nut, rotate
guard
until they
are and
retighten
the hex nut.
An
adjustable
skirt
guard
is
available
at extra cosl lor
use with flaring
cup wheels
only.
(wheels
also
available at
extra cost) The
adjustable
skirt
guard
installs
to the
same center three
holes
used to mount
the
wheel
guard
included
with
the tool. The
depressed
center wheèl
guard
must
be
removed
before mounting
the adjustable
skirt
guard.
NOTE:
NEVER
ATTEMPT
TO
USE ANY TYPE
OF GRINDING
WHEEL
WITHOUT
THE PROPER
GUARD. TO
DO
SO
WOULD
BE
EXTREMELY
HMARDOUS.
Swr'tch
Operation
(FIG.
2,
To
start tool
press
buttons A
and B at the
same time. For continuous
operation
with
switch locked
ON
press
only button B. To release
switch
press
button A and release.
LOGK
BUTTON
SANDING
DISC
BACKING
CLOCKWISE
Page 4

Auxiliary llandle
(FIG.
3l
An auxiliary handle
is fumished
with
your grinder
and can
be installed
on either
side of the
front housing, as shown
in Figure 3.
This handle
SHOULD BE USED
AT ALL
TIMES to maintain
complete control
of
the tool.
Spindle
Lock Button
(FtG.
3)
Turn off and unplug
grinder.
ln order to
prevent
the spindle
of the tool
lorm rotating
while installing
or
removing accessories,
a spindle
lock button
has been
provided
in
the
gear
head
of
the machine,
as shown
in Figure
4. To lock
the
spindle, depress
and
hold the lock button.
NEVER
DEPRESS
THE
LOCK BUTTON
WITH
THE TOOL
RUNNING OR COASTING.
Sanding
Discs
(FIG,
4)
NOTE:
The
guard
need
not be used
with sanding
discs.
TO INSTALL SANDING
DISCS:
Be sure that the
tool is unplugged.
Push the hub of the
clamp
washer
through the center oI
the sanding disc,
as far as
it will
go,
and also
through
ûre backing
disc.
Pr.i the
backing
hub
on
the tool spindle.
lnstall
the clamp
washer
on
the tool spindle
and thread the assembly
clockwise,
completeÿ
down on
the
spindle.
Engaç
the lock button.
When using a sanding
disc,
hold the tool so that an
angle of
10'to 15"
exists beùreen
the disc and
the work.
lf
onÿ
the outer edge
of the disc
is
used a rough crÎ surlace
will
result. lf the disc is
pressed
flat against
the
work the surface
will be inegular
and bumpy, and
the tool
will be difficult
to
control.
See
page
7 for a æmplete
descripüon
of usage and
mounüng altematives.
Removing
Disc
(FIG.
5l
Using
a cloth or
glove
to
protect your
hand, turn
the disc assembly
counterclockwise
to remove
it from the tool spindle.
Engage
lock button.
Depressed Center
Wheels
(FtG.
6t
Depressed center
wheels may be used lor
moderate metal removal on
flat or contoured surfaces.
CAUTION:
Never use depressed center
wheels without the
proper
guard.
TO INSTALL DEPRESSED CENTER
WHEELS:
1. Be sure tool is disconnected
from
power
supply and switch
is in
OFF
position.
2. Be sure the
guard
assembly
is securely attached to
the spindle
housing.
BACKING HUB
i;rry
SCREWS
FLARING
CUP
WHEEL
CLAMP
FIG.7
3.
Put
the backing
hub onto
the tool spindle.
4. Check
rated speed on depressed
center
wheel. Never use
wheel
with
rated speed lower
than the speed
in the'WARNING'
statement
on
the
nameplate of
the tool
5.
Place
the
depressed
center
wheel on
the tool spindle.
6.
Thread the clamp
washer on tool
spindle,
hold the tool spindle
by
engaging
the lock button,
and tighten
clamp
washer with
ppanner
wrench.
See
page
T lor a complete
description
ol usage
and
mounting alternatives.
When using a depressed
center
wheel,
hold the tool so
that an angle
of
approximately
30o exists
between
the wheel and
the work.
Wire Brushing
1. Disconnect tool
from
power
source.
Rest
grinder
on its back
with
spindle
facing up.
2. Thread wire cup brush onto
spindle and
tighten.
3. Common
applications
for wire cup brushes
include cleaning
welds,
angles, corners and
removal of
paint.
4. Always wear eye
protection
and appropriate
protective
clothing.
Flaring Cup
Wheels
(FIG.
fl
Use
flaring cup
wheels for smoothing
welds, casting
ridges, or
large
metal
areas, cutting
off studs, bolts,
rivets, etc.
A
5/8'
-
11
thread bushing
in the
wheel threads
directly on
the tool spindle.
Flaring Cup
Wheels should
only
be used
in
conjunction
with the correct size
adjustable skirt
guard.
Disconnect the tool
from the
power
supply.
Attach
guard
with the open
paft
of
the
guard
facing
away
from the operator.
Tighten mounting
screws
to sêcure
guard
in
place.
Hold down
the
spindle
lock button and
thread the flaring cup
wheel
onto
the spindle.
Be
sure
that the
wheel is
firmly
and completely
threaded onto
the spindle.
Loosen screws
holding the adjustable skirt
part
of the
guard
and slide
the skirt down
until about
1/4"
of
the llaring cup
wheel is exposed.
Tighten screws.
When using tool, tilt tool slightly-do
not
hold wheel
perfectly
flat
against the
work. Avoid bouncing
the wheel or
giving
it rough
treatment, since cracks
might develop
which would cause the
wheel
to fly apart. Always check
the wheel
for
cracks
before using
it,
and
always
use a wheel
guard.
Maintenance ol
Tool
Cleaning
Blowing dust and
grit
out oI the
motor housing using compressed
air is
a
necessary regular maintenance
procedure.
Dust and
grit
containing
metal
particles
often accumulate on
interior surfaces and
could create
an electrical shock hazard
if not frequently
cleaned
out.
CAUTION:
Never use solvenls or other
harsh
chemicals
for
cleaning
the
non-metallic
parts
of
the tool.
Use
clean, dry rag only.
Lubrication
DeWALT tools are
properly
lubricated at the
factory
and
are
ready for
use.
Tools should be
relubricated regularly every sixÿ days
to six
months,
depending on
usage.
(Tools
used constantly
on
production
or
heavy-duÿ
iobs
and
tools exposed to
heat may require more
frequent
lubrication.) This lubrication should only be attempted
by trained
power
tool repairpersons.
Page 5

lmportant
To
assure
product
SAFEIY
and RELIABILITY,
repairs, maintenanc€,
and adjustment should be
performed
by DeWALT certilied service
centers or other
qualified
service organizations.
These service
organizations service
DEWALT tools
always using
DeWALT
replacement
parts.
Black
&
Decker
(U.S.)
lnc., industrial tool service centers
are certified
for
serving DeWALT
industrial tools.
Aceessorr'es
AccessoryType Notes Usage
DEPRESSED
CENTER
WHEEL
Use Guard
Supplied
with
Tool
Use
for moderate
metal & mÉsonry
removal on
flat or
contoured surfaces
FLARING
CUP
GRINDING
WHEELS
Use
Flaring
Cup
Wheel
Guard
of size
to
match wheel
Use for smoothing
welds, and
sharp
edges,
and automotive
body
parts
W|RE
CUP
BRUSHES
Always wear
eye
protection
and
appropriate clothing
Use
lor rust removal
and surface
preparation
before
painting
*
Depressed
center
grinding
wheels
must fit within
the cpnfines
of the
guard
and must be rated higher than the recommended speed
as
marked on the nameplate.
**
When
using
flaring
cup
wheels,
always use
skirt
guard (4"
only).
Guards are available at
Black & Decker
(U.S.)
lnc., industrial service
centers.
WARNING-To reduce the risk ol injury, always use
proper guards
when
grinding
and
wear
eye
protection.
"'
CAUTIOI{: S:trands of
wire
anp brushes rnay break
and
fly oft whlle
in
use.
Users and oüprs
in ths
area should wear
adegueb
qn,
lace
and
body
protection.
Use onÿ wire
cup brush€s
thet
aro
ratêd
at or
gr€ater
than the RPM
shovn on the tool's nameplate.
lf
you
need
any assistrarrce
in locating
any acoessory,
pleass
oontact
DEWALT lndustrial Tool Cornpany,
626
Hanorrer Pike, P.O. Box 158,
Hampstead, MD
21 074 or call
1
-8ü)-4-DEWALT
(1
-80G.til3-9258).
Full Wananÿ
DEWALT heavy duÿ industrial tools
are
warranted for
one
year
from
date of
purchase.
We will repair, without charge, any defects due to
faulÿ
materials or wgrkmanship. Arrangements have
been
made with
the industrial tool
division of
Black
& Decker
(U.S.)
lnc. to
provide
warranty
repairs for DeWALT tools.
Please retum
the complete unit,
transportation
prepaid,
to any Black
&
Decker
(U.S.)
lnc. industrial
service center or authorized service station
listed
under
"Tools,
Electric" in the
yellow
pages.
This warranty
does
not apply to
accessories or damaç caused where repairs have been made or
attempted
by others.
This warranÿ
gives you
specific
legal rights
and
you
may have
other
rights which vary from
state to state.
ln addition to the warranty, DeWALT tools
are covered
by our:
30 DAY NO RISK SATISFACTTON
GUARANTEE
lf
you
are not
completely satisfied with the
performance
of
your
DeWALT heavy duty industrial tool,
simply
return it to
the
participatlng
seller within 30 days for a full refund. Please return
the
complete unit, transportation
prepaid.
Proof of
purchase
may
be
required.
See
'Tools-Electric'
-Yellow
Pages-
for Service & Sales
For Sandlng Applicatlons For Sanding
Applicâtlons
For use with all 7' Itlodels For usê
with
all
7" Models
For Grinding
Appllcations
For Grinding
Applications
For use
with
all
7"
Models
For
llllire Brush
Applications
For use with all
T" Models
For use with all 7' Models
l----
I
@@
I
ffi."**GDs#vq,"rd
ffi
t, * wlt,
+''narf rg wtê€b
I
s"FbirgG+Salblyqltd
.
brewihs'iâringwm
'
g'tu
irrsG.psâftryclârd
|
furæwitro'flaiEufræb
I
@
HffiFHHH",
gtÊ'oldCrchang3
RûÈbrPâd
I
(l/bcseRPMô000)
ùu.roop"o"-tu*'*r,pr*rc
^d6&»
ebrlmilmfsÔiny.
*3§@8ry
I
or
I
HtrÆiitffi*p***Æffi
@
§
4il.-ptm;;"pis
SWWz6/r'q1ickchilgpFtsb
WW
(i/hxsdeRPMdno)
I
sidFæFù&rBecldngPad
I
Uswitlrubbs@andôV1'
I
0üarsæRPM86æ)
I
Phsdicdsctormimmrigidity.
or
lrdtdæ@nut
I
a./a"
Oui*ClmgE
RrËber Pâd
(lra(
sde
RPM60æ)
6r/a"
Plsrclic Dis
(lüaxsæRPM6(m)
Usewih 3ÿr'QrickChange
Rubbs Pad
lor
mimum
flexibility
orllvr' Quick Change
Rubber Pad
forlsflext
lity.
6P/.'PiHElic
Di$
(Àrax
sæ RPM 6000)
Psfomæfundim æ
regulil
piHolic
d$ wih mE
flenbility
andffi@ler.
T"SandingDitcs
(tÉ"
Arbor)
WhedAdæ
(toræwihmh'-ù)
7' Depr€s6ed CenÈr
wheels
(t{oHü)
TlDeZl n
eialGrindirE
7 xllaxTlè I Tlfi
xtlqxtle I 85m
I
*
€sffiffit
.Wry
I
z's"ncnsDio
|
('r!"
atôoÔ
G eit MarRPil
w
24 8560
padNur
-æ-------@-
T\pe27 ÀrasnryGrindng
7 xllaxTlo
I
Tlæ
Orùr(Clügp7'DeprËsed
C$brfryhe*(Wrth
Hû)
Tlpez/ iretal Grin&rg
xr/6x
x1ÂxVell
Masry BslMl
(S;iliil
Carti&)
,À iT* EPiT
5.
6" 6m
GllrFedwhEq+B.rdE
(%ï1'IhEd)
KnoGd
Whs
qp
BnEtEs
FÂLllffæad)
qlt
illilRPM
24 8560
s6 8560
I
I
-!,!@*
ffiffi
W
,k
c@
PadNln
50
8560
_æ---_________!550_
80
8550
1æ 8550
I
I
I
I
I
I
I
I
I
I
I
I
I
l
I
I
I
I
**
ÉwÀ
ffi
I
or
;
*
ffi
W
Oiâ"Odd(CllarlsEFloôb
*-%-
ffi ffirs*rycilâd
iro,rU*p"Or,t
V
a
\8FÙ@GssedHte{wtEds'
I
@
I
or
I
@
I
I
I
@
I
I
Æw*ffi
-qiË#Éffiffi;,,
I
or
I
**.@*
4IF@
W
I
I
I 17
xllnxTle
I
Tlæ
-Fr
lcro I
Y
c*nnpNut
,dÆffiM.
ffiiffiT.s*yq,d
v
| §
or@r&eoererurces
60
8550
80 8560
Page 6

?
1
:--l
Other DIWÂLT
Heatry
Duly
lndustrial
Tools Available
From Your
Local Dealer
DW944K
9.6V Heavy Duty Versa-Clutch
Cordless
3/8"
Driver/Drill
Kit with
Keyless Chuck:
High
performance
industrial Versa-Clutch
cordless
Driver/Drill has
two variable speed ranges
and
reversing to
perform
well in
a wide variety of metals and wood. The
extremely versatile
cordless DriveriDrill has 11
clutch
settings, a keyless
chuck and delivers more
power
and
torque than
any cordless drill in its class. Also available:
DW945K
12.0V Heavy Duty Versa-Clutch
Cordless 3/8"
Driver/Drill
Kit with Keyless
Chuck
DW942R 7.2V
Heavy Duty Cordless 3/8" VSR Drill
DW360 Heavy
Duly 7-114" Circular
Saw
with Electric Brake:
High
pedormance
industrial saw has
a
13
amp
rating and a 2
second
electric brake.
lt has
a 50 degree bevel capacity and
steel helical
gears
to assure
long
term reliability" lt delivers
more watts
out and more torque
than other saws
in its
class.
Other DaWALT Heavy
Duty lndustrial
Tools
Available From
Your Local Dealer
DWl00l;leavy
Duty 3/8" VSR Drill:
High
performance
industrial
quality
variable
speed
reversing
drill
is
designed for long
life in heavy-duty
professional
use.
High
speed
(0-2500
RPM)
and
4.0
amps
enable the drill to
perform
well
in
a wide variety
of
metals,
wood, masonry
and composite materials. lt
also has a built-
in 2-way bubble level for
drilling accuracy.
DW411
Heavy Duty 1/4
Sheet Palm
Grip Sander:
High
performance
industrial
palm
grip
sander has
efficient
through-the-pad
dust
collection. Low vibration
design
delivers
less
than half
the vibration
of other
palm
sanders
for
greater
comfort
and durability. The
sander
gives
fast
and efficient material
removal.
DW3O4K Heavy
Duty VS
Reciprocating
Saw Kit:
High
performance
industrial
reciprocating
saw has low
vibration
design to reduce
user fatigue.
High
power
(6.0
amps and 1-118"
stroke Iength)
allows increased
productivity.
Lightweight
and comfortable.
DWI20K
Heavy
Duty 1/2" Right
Angle Drill Kit:
High
performance
industrial
right
angle drill is reversing
and
has
three speeds
(400/600/900
RPM) for
plumbing
and
electrical
applications. Powerful
7.0 amp motor
easily
handles
popular
2-9116"
self-feed
bits.
DW411
Page 7

 Loading...