

Page 1

INSTRUCTION MANUAL
GUIDE D'UTILISATION
MANUAL DE INSTRUCCIONES
DW441, DW442, DW443, DW444
Right Angle Random Orbit Sanders
Ponceuses orbitales excentriques à angle droit
Lijadoras orbitales de movimiento múltiple de ángulo recto
INSTRUCTIVO DE OPERACIÓN, CENTROS DE SERVICIO Y PÓLIZA
DE GARANTÍA. ADVERTENCIA: LÉASE ESTE INSTRUCTIVO ANTES
DE USAR EL PRODUCTO.
If you have questions or comments, contact us.
Pour toute question ou tout commentaire, nous contacter.
Si tiene dudas o comentarios, contáctenos.
1-800-4-DEWALT • www.dewalt.com
Page 2
English
Important Safety Instructions
(For all tools)
WARNING: When using electric tools, basic safety precautions should always be followed to reduce risk of fire, electric
shock, and personal injury, including the following:
READ ALL INSTRUCTIONS
• KEEP WORK AREA CLEAN. Cluttered areas and benches invite
injuries.
• CONSIDER WORK AREA ENVIRONMENT. Don’t expose power
tools to rain. Don’t use power tools in damp or wet locations. Keep
work area well lit.
• GUARD AGAINST ELECTRIC SHOCK. Prevent body contact
with grounded surfaces; for example, pipes, radiators, ranges, and
refrigerator enclosures.
• KEEP CHILDREN AWAY. All visitors should be kept away from
work area. Do not let visitors contact tool or extension cord.
• STORE IDLE TOOLS. When not in use, tools should be stored in
dry, and high or locked-up place — out of reach of children.
• DON’T FORCE A TOOL. It will do the job better and safer at the
rate for which it was intended.
• USE RIGHT TOOL. Don’t force small tool or attachment to do the
job of a heavy duty tool. Don’t use tool for purpose not intended; for
example, don’t use circular saw for cutting tree limbs or logs.
• DRESS PROPERLY. Do not wear loose clothing or jewelry. They
can be caught in moving parts. Rubber gloves and non-skid
footwear are recommended when working outdoors. Wear protective hair covering to contain long hair.
Air vents often cover moving
parts and should also be avoided.
• USE SAFETY GLASSES. Also use face or dustmask if operation
is dusty.
• DON’T ABUSE CORD. Never carry tool by cord or yank it to dis-
connect from receptacle. Keep cord from heat, oil, and sharp
edges.
1
R
IF YOU HAVE ANY QUESTIONS OR COMMENTS ABOUT THIS OR
ANY D
EWALT TOOL, CALL US TOLL FREE AT:
1-800-4-DEWALT (1-800-433-9258)
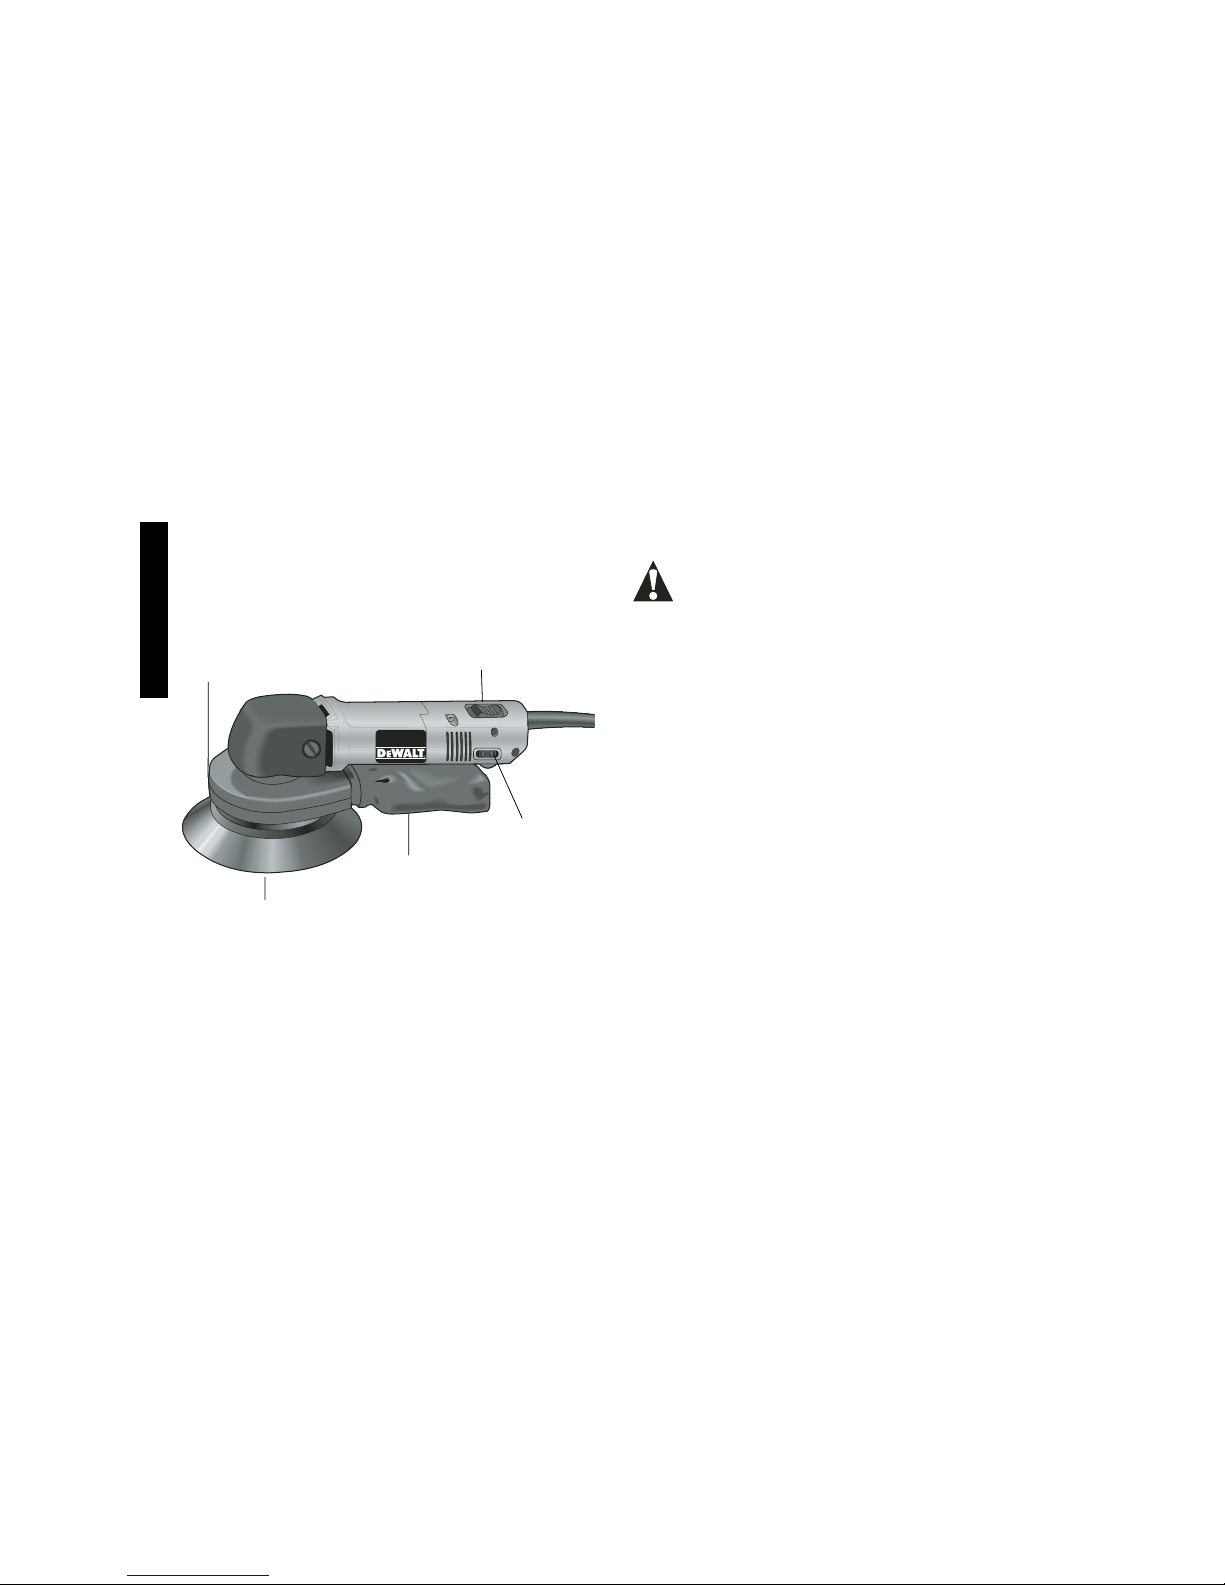
SANDING PAD
(HOOK AND LOOP - DW442 AND DW443)
(PSA- PRESSURE SENSITIVE ADHESIVE - DW441 AND DW444)
DUST BAG
SPEED CONTROL DIAL
(DW443 AND DW444)
ON/OFF SWITCH
SHROUD
Page 3

• SECURE WORK. Use clamps or a vise to hold work. It’s safer than
using your hand and it frees both hands to operate tool.
• DON’T OVERREACH. Keep proper footing and balance at all
times.
• MAINTAIN TOOLS WITH CARE. Keep tools sharp and clean for
better and safe performance. Follow instructions for lubricating and
changing accessories. Inspect tool cords periodically and if damaged have repaired by authorized service facility. Inspect extension
cords periodically and replace if damaged. Keep handles dry,
clean, and free from oil and grease.
• DISCONNECT OR LOCK OFF TOOLS when not in use, before
servicing, and when changing accessories, such as blades, bits,
cutters.
• REMOVE ADJUSTING KEYS AND WRENCHES. Form habit of
checking to see that keys and adjusting wrenches are removed
from tool before turning it on.
• AVOID UNINTENTIONAL STARTING. Don’t carry plugged-in tool
with finger on the switch. Be sure the switch is off when plugging
in.
• OUTDOOR USE EXTENSION CORDS. When tool is used out-
doors, use only extension cords intended for use outdoors and so
marked.
• STAY ALERT. Watch what you are doing. Use common sense. Do
not operate tool when you are tired.
• CHECK DAMAGED PARTS. Before further use of the tool, a guard
or other part that is damaged should be carefully checked to determine that it will operate properly and perform its intended function.
Check for alignment of moving parts, binding of moving parts,
breakage of parts, mounting, and any other conditions that may
affect its operation. A guard or other part that is defective should be
properly repaired or replaced by an authorized service center
unless otherwise indicated elsewhere in this instruction manual.
Have defective switches replaced by authorized service center. Do
not use tool if switch does not turn it on and off.
1
English
• DO NOT OPERATE portable electric tools near flammable liquids
or in gaseous or explosive atmospheres. Motors in these tools normally spark, and the sparks might ignite fumes.
Special Safety Instructions For Sanders
• Always wear eye protection and a respirator when sanding.
• Sanding of lead based paint is not recommended. See page 5 for
additional precautions when sanding paint.
• Do not operate the unit without the dust shroud.
• Do not operate this tool for long periods of time. Vibration
caused by the operating action of this tool may cause permanent
injury to fingers, hands, and arms. Use gloves to provide extra
cushion, take frequent rest periods, and limit daily time of use.
WARNING: Some dust created by power sanding, sawing, grinding,
drilling, and other construction activities contains chemicals known to
cause cancer, birth defects or other reproductive harm. Some examples of these chemicals are:
• lead from lead-based paints,
• crystalline silica from bricks and cement and other masonry
products, and
• arsenic and chromium from chemically-treated lumber (CCA).
Your risk from these exposures varies, depending on how often you
do this type of work. To reduce your exposure to these chemicals:
work in a well ventilated area, and work with approved safety equipment, such as those dust masks that are specially designed to filter
out microscopic particles.
• Avoid prolonged contact with dust from power sanding, saw-
ing, grinding, drilling, and other construction activities. Wear
protective clothing and wash exposed areas with soap and
water. Allowing dust to get into your mouth, eyes, or lay on the skin
may promote absorption of harmful chemicals.
WARNING: Use of this tool can generate and/or disburse dust,
which may cause serious and permanent respiratory or other injury.
Page 4

English
2
Always use NIOSH/OSHA approved respiratory protection appropriate for the dust exposure. Direct particles away from face and body.
CAUTION: Wear appropriate hearing protection during use.
Under some conditions and duration of use, noise from this product
may contribute to hearing loss.
Double Insulation
Double insulated tools are constructed throughout with two separate
layers of electrical insulation or one double thickness of insulation
between you and the tool’s electrical system. Tools built with this insulation system are not intended to be grounded. As a result, your tool
is equipped with a two prong plug which permits you to use extension
cords without concern for maintaining a ground connection.
NOTE: Double insulation does not take the place of normal safety precautions when operating this tool. The insulation system is for added
protection against injury resulting from a possible electrical insulation
failure within the tool.
CAUTION: When servicing all tools, USE IDENTICAL REPLACE-
MENT PARTS. Repair or replace damaged cords.
Polarized Plug
This product is supplied with a polarized plug (one blade is wider than
the other). This plug will fit into a polarized outlet (receptacle) only one
way. If the plug does not fit fully into your outlet, reverse the plug. If it
still does not fit, contact a qualified electrician to install a proper polarized outlet. Do not modify or change this plug in any way.
Extension Cords
Make sure your extension cord is in good condition. When using an
extension cord, be sure to use one heavy enough to carry the current
your product will draw. An undersized cord will cause a drop in line
voltage resulting in loss of power and overheating. The table shows
the correct size to use depending on cord length and nameplate
ampere rating. If in doubt, use the next heavier gage. The smaller the
gage number, the heavier the cord.
Minimum Gage for Cord Sets
Volts Total Length of Cord in Feet
120V 0-25 26-50 51-100 101-150
240V 0-50 51-100 101-200 201-300
Ampere Rating
More Not more AWG
Than Than
0-6 18 16 16 14
6 - 10 18 16 14 12
SAVE THESE INSTRUCTIONS
FOR FUTURE USE
Motor
Be sure your power supply agrees with nameplate marking.120 AC
means your tool may be operated only with alternating current and
never with direct current. Voltage decrease of more than 10% will
cause loss of power and overheating. All tools are factory tested; if this
tool does not operate, check the power supply.
Attaching Sanding Discs
Your sander is designed to use 6" sanding discs with the 6 hole dust
extraction pattern.
Hook and Loop
(DW442 and DW443)
PSA - Pressure Sensitive Adhesive
(DW441 and DW444)
To attach paper to the sanding pad:
1. Turn off and unplug tool.
2. Turn the sander over so that the sanding pad is facing upward.
3. (DW441 and DW444 only) Clean dust from vinyl pad face.
4. Hold the pad with one hand to keep it from rotating.
5. With the other hand, align the holes and place the disc directly on
top of the pad (see FIG. 1).
Page 5
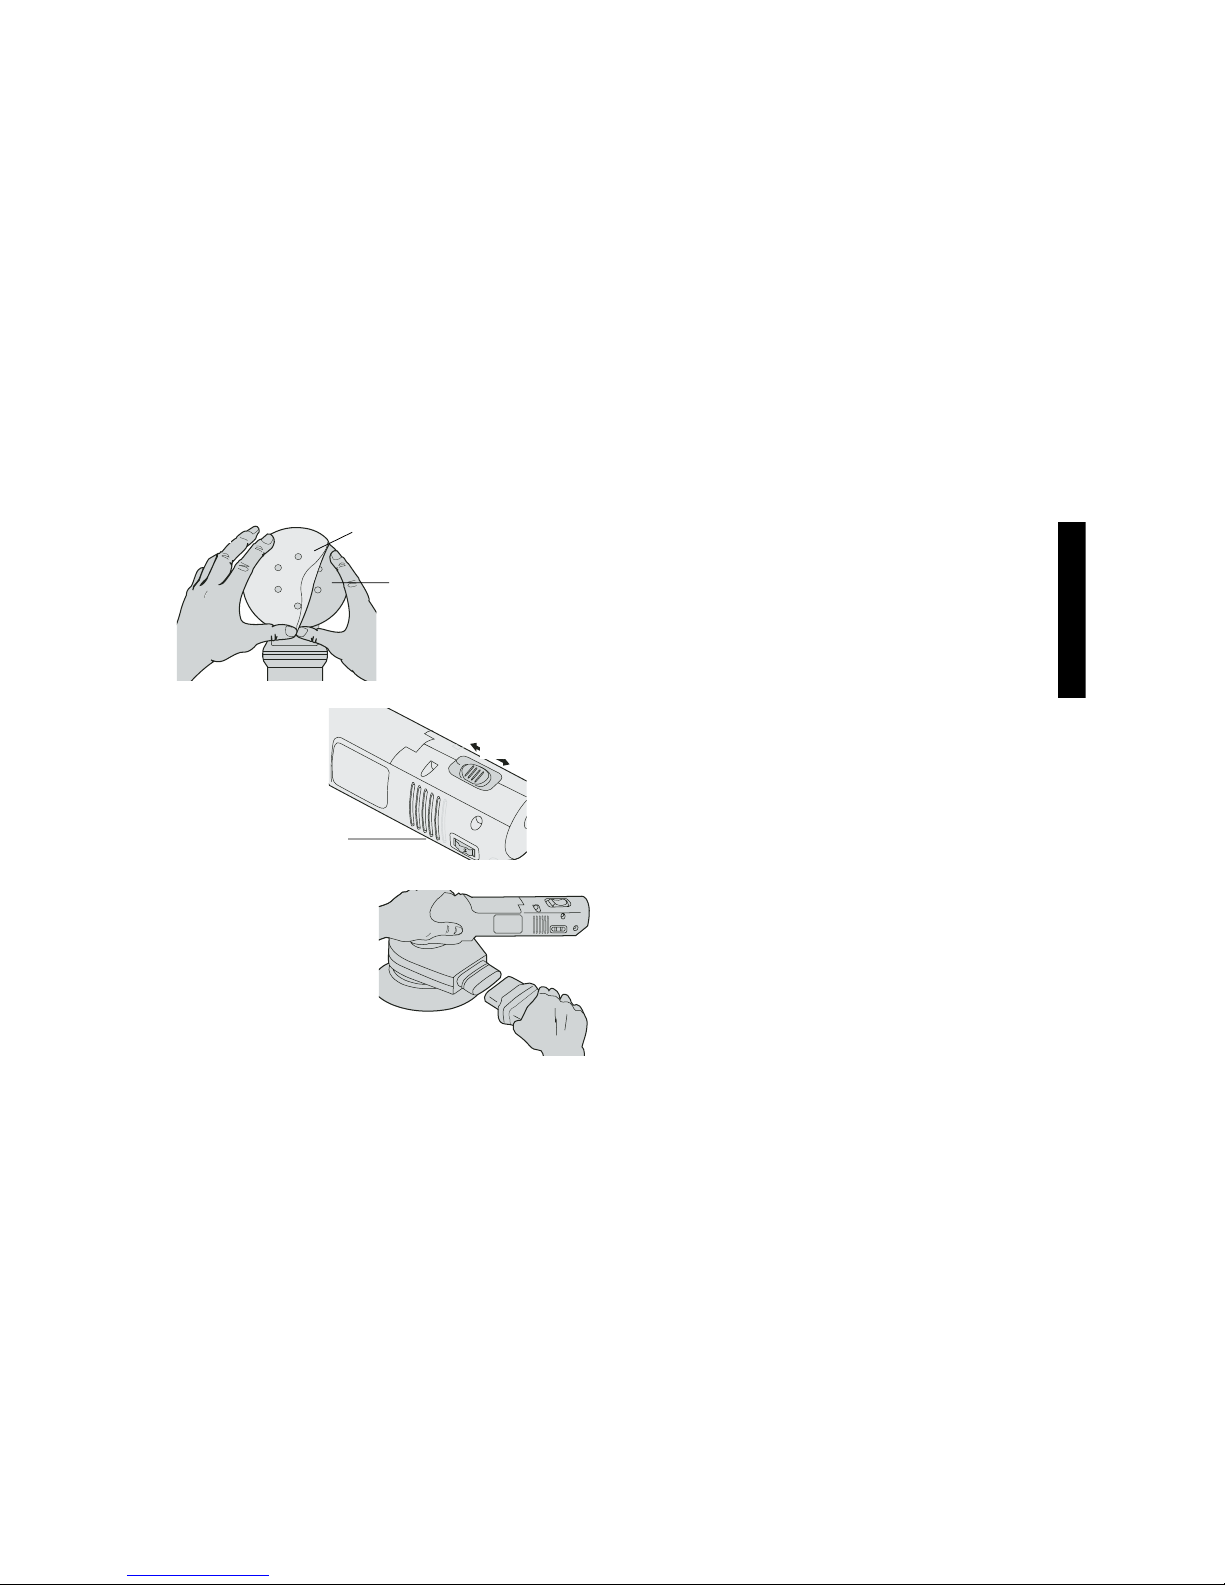
Switch
(See FIG. 2)To turn the unit on, slide the switch forward (the symbol
“I” will be visible.) To turn the unit off, slide the switch back (the symbol “O” will be visible). Before plugging in the unit, make sure the
switch is in the off position.
Speed Control Dial
(DW443 & DW444 Only)
The speed control dial (5 incremental settings) allows you to increase
or decrease speed from 4000 - 6800 Orbits Per Minute. The optimal
speed setting for each application is very much dependent on personal preference. You may want to experiment on a piece of scrap to
determine what gives you the best combination of finish quality and
material removal rate for your application. Generally, you will want to
use a higher setting on harder materials and a lower setting on softer
materials. Material removal rate increases as speed increases.
Dust Collection
Your sander comes equipped with a cloth filter bag to collect the dust
generated during sanding. To empty the dust bag, first turn off and
unplug tool. Firmly pull the bag off while holding the rubber boot
(FIG. 3). Empty the bag (you may want to turn it inside out.)
NOTE: Never operate this tool unless the dust collection bag is in
place.
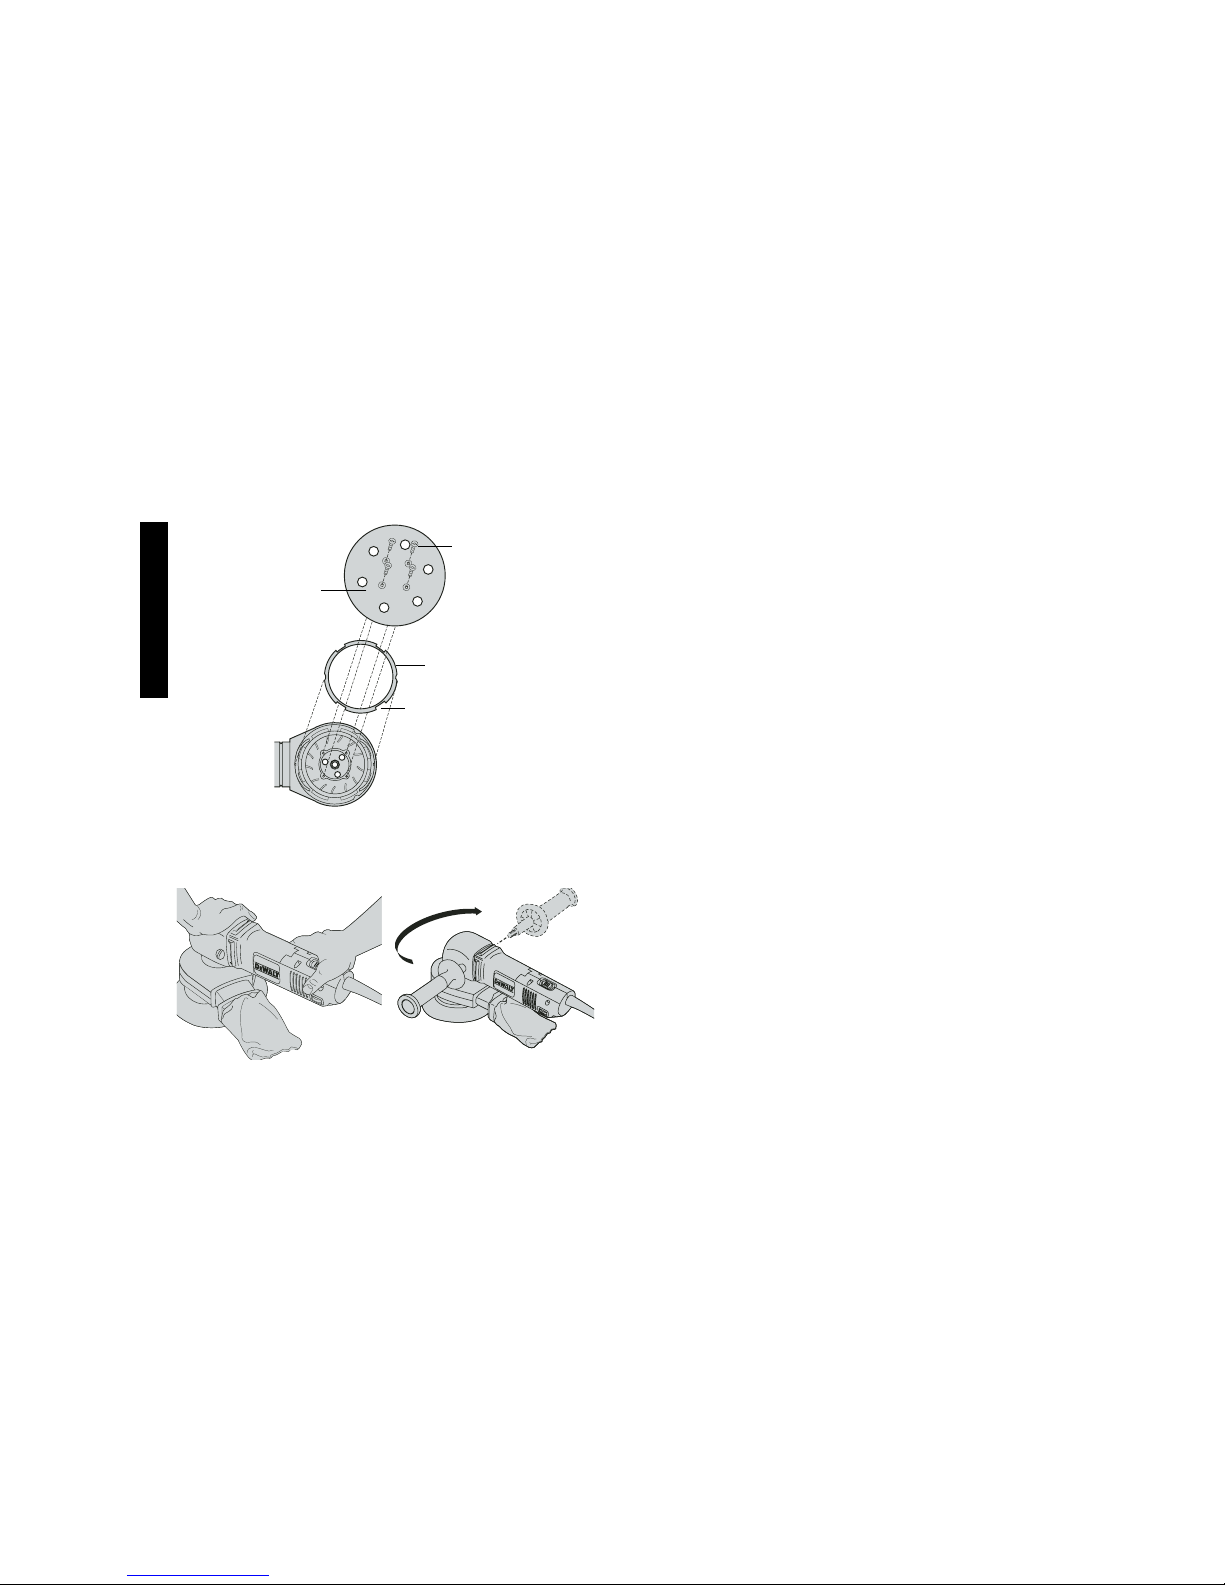
Replacing Sanding Pad
When the pad becomes worn out, use the following procedure to
replace pad. (See FIG. 4)
1. Turn off and unplug tool.
2. Remove 4 torx head screws from the bottom of the tool and
remove the pad.
3. Replace the pad and screws, making sure the CFS disc is aligned
properly.
3
English
1
FIG. 1
SANDING DISC
PAD
FIG. 2
ON
OFF
SPEED CONTROL DIAL
(SETTINGS 1 - 5)
FIG. 3
Page 6
4
Operation
To operate your sander, grasp it as shown in FIG. 5 and turn it on.
Move the unit in long, sweeping strokes along the surface being sanded, letting the sander do the work.
NOTE: Excessive downward pressure on the tool while sanding actually slows the removal rate and produces an inferior quality surface.
A side handle has been provided with your unit and can be used if
desired. The side handle can be screwed into either side of tool by first
removing the plastic screw, as shown in FIG. 6.
NOTE: Be sure to check your work often, this sander is capable of
removing material rapidly, especially with coarse paper.
The random orbital action of your sander allows you to sand with the
grain or at any angle across it for most sanding jobs. To produce the
best finish possible, start with coarse grit sandpaper and change gradually to finer and finer paper. Vacuum and wipe surface with a tack
cloth between grit steps.
The rate at which the dust bag fills up will vary with the type of material being sanded and the coarseness of the sandpaper. For best
results, empty the bag frequently.
When sanding painted surfaces, (see page 5 for additional precautions when sanding paint) you may find that the sandpaper loads up
and clogs with paint. A heat gun will work much better to remove paint
before sanding. FOLLOW ALL SAFETY INSTRUCTIONS IN HEAT
GUN INSTRUCTION MANUAL.
NOTE: (DW441 and DW444 only): When using PSA sanding discs, it
is necessary to remove the disc soon after operation. PSA papers, if
left on during tool storage, sometimes become difficult to remove. To
aid in the removal of old PSA paper, sand for a few minutes to soften
adhesive backing prior to changing disc.
Precautions To Take When Sanding Paint
1. Sanding of lead based paint is NOT RECOMMENDED due to the
difficulty of controlling the contaminated dust. The greatest danger
of lead poisoning is to children and pregnant women.
English
FIG. 5
FIG. 6
FIG. 4
TORX HEAD
SCREWS
CFS DISC
PAD
ALIGN NOTCHES
TO THOSE IN
SHROUD
Page 7

2. Since it is difficult to identify whether or not a paint contains lead
without a chemical analysis, we recommend the following precautions when sanding any paint:
PERSONAL SAFETY
a. No children or pregnant women should enter the work area where
the paint sanding is being done until all clean up is completed.
b. A dust mask or respirator should be worn by all persons entering
the work area. The filter should be replaced daily or whenever the
wearer has difficulty breathing.
NOTE: Only those dust masks suitable for working with lead paint
dust and fumes should be used. Ordinary painting masks do not
offer this protection. See your local hardware dealer for the proper N.I.O.S.H. approved mask.
c. NO EATING, DRINKING or SMOKING should be done in the work
area to prevent ingesting contaminated paint particles. Workers
should wash and clean up BEFORE eating, drinking or smoking.
Articles of food, drink, or smoking should not be left in the work
area where dust would settle on them.
ENVIRONMENTAL SAFETY
a. Paint should be removed in such a manner as to minimize the
amount of dust generated.
b. Areas where paint removal is occurring should be sealed with
plastic sheeting of 4 mils thickness.
c. Sanding should be done in a manner to reduce tracking of paint
dust outside the work area.
CLEANING AND DISPOSAL
a. All surfaces in the work area should be vacuumed and thorough-
ly cleaned daily for the duration of the sanding project. Vacuum filter bags should be changed frequently.
b. Plastic drop cloths should be gathered up and disposed of along
with any dust particles or other removal debris. They should be
placed in sealed refuse receptacles and disposed of through regular trash pick-up procedures.
During clean up, children and pregnant women should be kept
away from the immediate work area.
c. All toys, washable furniture and utensils used by children should
be washed thoroughly before being used again.
Lubrication
Self lubricating bearings are used in the tool and periodic relubrication
is not required. However, it is recommended that, once a year, you
take or send the tool to a service center for a thorough cleaning and
inspection.
Cleaning
Keep your machine as clean as possible by wiping with a clean cloth
and blowing through it with air after every 5 hours of use. Don’t use
harsh chemicals or solvents to clean the tool. These chemicals could
seriously damage the engineering polymers used to construct your
sander. If you typically wrap the cord around the tool when you store
it, leave a generous loop of cord such that the strain relief does not
bend. This helps prevent premature cord failure.
Repairs
To assure product SAFETY and RELIABILITY, repairs, maintenance
and adjustment (including brush inspection and replacement) should
be performed by a D
EWALT factory service center, a DEWALT autho-
rized service center or other qualified service personnel. Always use
identical replacement parts.
Application Notes
SANDPAPER - GRIT TYPES
Natural Abrasives
Flint is the softest (Mohs’ Scale 7)* of the common natural abrasives.
It has a tan color and is very inexpensive.
Garnet paper is harder than flint (Mohs’ Scale 7.5) and is easily identified by its bright orange color. Even though it is not the hardest, the
way the abrasive fractures gives you a good cutting edge for woodworking.
5
English
Page 8

6
Emery, even though harder than garnet (Mohs’ Scale 9), has blunt
edges making it a poor sanding abrasive. Its primary use is for polishing metal.
* Mohs’ Scale is the mineral hardness scale. It rates diamond at 15,
the hardest, and talc at 1.
Manufactured Abrasives
White Aluminum Oxide (AlO) is extremely hard (Mohs’ Scale 12) and
durable which makes it a great abrasive for use with the Random Orbit
Sander. “White” describes the particular way the abrasive is manufactured, not its color. This abrasive is widely available and comes in a
variety of colors due to the increasing use of dyes. Stearate lubricants
on the paper also enhance performance by reducing heat and the rate
at which the paper clogs.
Silicon Carbide (SiC) is the hardest abrasive (Mohs’ Scale 13) commonly available next to industrial diamond but is not as tough as
Aluminum Oxide abrasives. This abrasive easily fractures and provides sharp faces to the work throughout the life of the sanding paper.
This “self-sharpening” feature makes SiC an outstanding abrasive for
material removal but limits its life.
OPEN COAT VERSUS CLOSED COAT
Abrasives are applied to the paper with glue. When the grit is large
(say 60 or 80 grit) the percent of coverage is usually reduced to 60%
to 70% of the backing paper surface.This increases the life of the
paper by reducing the rate at which the paper clogs. This is called an
open coat and almost the only way you can buy sandpaper in heavier
grits. With finer grits the grit is applied at rates of 90% or more and
are labeled closed coat. Since the dust particle is much smaller the
tendency of the paper to load up and clog is greatly reduced.
GRIT SIZES
There are several grading systems used. The system most popular
today is sieve size. The number on the back of your sandpaper disc
refers to the screen size the particle can pass through. 120 grit paper
for example will sift through a screen with 120 holes per linear inch.
Every square inch of screen has 14,400 holes (120 x 120). The higher the number the finer the particle size. Common sizes are from 36
to 600 with the recent introduction of grit sizes up to 1200.
PAPER AND FILM: THE BACKING
Paper: The material most commonly used to carry the abrasive is
paper. Paper is graded by weight. “A” weight paper which is the most
prevalent is the lightest paper used and gives good durability and flexibility in most sanding applications. Other paper weights that are available are C, D, E, and F weight. The disadvantage of paper is its low
mechanical stiffness. Since the paper fiber gives during sanding, the
abrasive doesn’t stand up and some of the cutting edges do not
engage the work. The advantage is cost.
Film: Film backed sanding discs address the disadvantage of paper.
The film is mechanically stiffer than paper. Film is also more expensive but when all other things are held constant improves the cutting
performance of the abrasive.
Cloth and Vulcanized Fiber: These backings are typically hard to
find and are used in specialty applications. Most sandpaper you will
use will have the paper or film backing.
HOOK AND LOOP AND PSA: WHAT HOLDS THE SANDING
DISK TO THE PAD.
Hook & Loop
: The sanding disk as backed with a fabric nap (loops)
that interlocks with a grid of posts (hooks) on the sander’s pad. The
advantages are paper reusability and cooler interface between paper
and work.
PSA:
Pressure Sensitive Adhesive is applied to the back of the sanding disc and adheres to the sanding pad (Not the same pad that carries Hook & Loop paper). The advantage is cost. The major disadvantage is the tendency of PSA backed papers to adhere permanently to the pad if left on after sanding. Why does this happen? The main
culprit is heat. During sanding the pad and paper heat up. This causes the adhesive to flow into all the ridges on the vinyl pad and form a
English
Page 9

tight bond. If you remove the paper soon after you are finished sanding you don’t allow the adhesive to set. If you leave it on for a couple
of days the adhesive sets and has more strength than the paper carrier, causing the paper to tear and leaving you with a difficult clean up
job. One more disadvantage: If you do small sanding jobs and don’t
wear out the paper you cannot reuse it and tend to waste more paper.
SANDING
THE BASIC RULES: Which ones to break and which ones not to.
Always start with the coarsest grit first. Don’t break this rule. The
scratches get smaller as the grit number gets larger and the quality of
the finish generally improves. When you change grits be particular
about cleaning the surface that you are finishing. An 80 grit particle
floating on your work under your 220 grit paper will leave 80 grit
scratches. The best way to avoid this is to vacuum the work and then
carefully wipe down the work with a tack rag.
The random orbit sander action is equally applied across the grain and
with the grain. Since the scratch mark is small and random in all directions, the ability of the eye to see a scratch is greatly reduced.
Always wear a mask to avoid breathing the dust. NEVER BREAK
THIS RULE. We have engineered the tool to collect a majority of the
dust created in the sanding process but the tool does not capture it all.
To improve the capture rate use a vacuum but ALWAYS wear a dust
mask.
SOME OTHER HINTS FOR A BETTER FINISH
A random orbit sander is much more aggressive than other similarly
sized orbital tools so you may want to consider the next finer grit when
you start to sand your project.
Since the random orbit action makes a short scratch, you may find that
a project doesn’t require as many grit steps. A lot of professional cabinet makers only use 80, 120, and 150 grit on their work with satisfactory results. If in doubt about how the finish will take to your sanded
surface, wipe the surface with some paint thinner. Defects will show
up darker than the surrounding wood.
Careful inspection of the work prior to the finishing operation may
reveal dents. Try to correct these problems by raising the dent (a
hot iron and wet rag will do this) or carefully sand a large area
around the dent. If you vigorously sand the dent, you may create a
cupped surface.
When you are satisfied with the sanding job and you have finished
sanding with your finest grit, raise the grain by dampening the wood
with a wet rag. When the wood has dried and you are ready to apply
the finish, resand lightly to take off the wood fibers raised by the water.
Vac and tack the surfaces and immediately apply the first coat of finish before the wood gets dirty.
WOOD: Some important characteristics of wood
Hard grain and soft grain
Wood has hard grain and soft grain. Hard grain is typically the product of summer growth and soft grain the product of spring. All sanders
will remove more soft grain than hard grain and since the random
orbit sander is more aggressive, it will remove it that much more
quickly. Extended sanding on a piece of fir for example, will produce
a noticeably uneven finish. This is a good reason to correct flaws
before sanding.
Accessories
Recommended accessories for use with your tool are available at
extra cost from your local dealer or authorized service center. If you
need assistance in locating any accessory for your tool, please contact D
EWALT Industrial Tool Co., 701 East Joppa Road, Baltimore, MD
21286, call 1-800-4-D
EWALT (1-800-433-9258) or visit our website
www.dewalt.com.
CAUTION: The use of any other accessory not recommended for
use with this tool could be hazardous.
Three Year Limited Warranty
DEWALT will repair, without charge, any defects due to faulty materials or workmanship for three years from the date of purchase. This
warranty does not cover part failure due to normal wear or tool abuse.
7
English
Page 10

8
For further detail of warranty coverage and warranty repair information, visit www.dewalt.com or call 1-800-4-D
EWALT (1-800-433-9258).
This warranty does not apply to accessories or damage caused where
repairs have been made or attempted by others. This warranty gives
you specific legal rights and you may have other rights which vary in
certain states or provinces.
In addition to the warranty, D
EWALT tools are covered by our:
1 YEAR FREE SERVICE
D
EWALT will maintain the tool and replace worn parts caused by nor-
mal use, for free, any time during the first year after purchase.
90 DAY MONEY BACK GUARANTEE
If you are not completely satisfied with the performance of your
D
EWALT Power Tool, Laser, or Nailer for any reason, you can return it
within 90 days from the date of purchase with a receipt for a full refund
– no questions asked.
LATIN AMERICA: This warranty does not apply to products sold in
Latin America. For products sold in Latin America, see country specific warranty information contained either in the packaging, call the local
company or see website for warranty information.
FREE WARNING LABEL REPLACEMENT: If your warning labels
become illegible or are missing, call 1-800-4-D
EWALT for a free
replacement.
English
Page 11

9
1
R
Français
POUR TOUT RENSEIGNEMENT SUPPLÉMENTAIRE SUR CET
OUTIL OU TOUT AUTRE OUTIL D
EWALT, COMPOSER SANS
FRAIS LE NUMÉRO :
1 800 4-DEWALT (1 800 433-9258)
Importantes mesures de sécurité
(pour tous les outils)
AVERTISSEMENT : Afin de réduire les risques d’incendie, de
secousses électriques ou de blessures lorsqu’on utilise des
outils électriques, il faut toujours respecter les mesures de sécurité
suivantes.
LIRE TOUTES LES DIRECTIVES
• BIEN DÉGAGER LA SURFACE DE TRAVAIL. Des surfaces et
des établis encombrés peuvent être la cause de blessures.
• TENIR COMPTE DU MILIEU DE TRAVAIL. Protéger les outils
électriques de la pluie. Ne pas s’en servir dans des endroits
humides ou mouillés. Bien éclairer la surface de travail.
• SE PROTÉGER CONTRE LES SECOUSSES ÉLECTRIQUES.
Éviter tout contact avec des objets mis à la terre, comme des
tuyaux, radiateurs, cuisinières, réfrigérateurs et autres objets du
genre.
• ÉLOIGNER LES ENFANTS. Tous les visiteurs doivent être tenus
à l’écart de l’aire de travail et il faut les empêcher de toucher à l’outil
ou au cordon de rallonge.
• RANGER LES OUTILS INUTILISÉS. Il faut ranger les outils dans
un endroit sec, situé en hauteur ou fermé à clé, hors de la portée
des enfants.
• NE JAMAIS FORCER L’OUTIL. Afin d’obtenir un rendement sûr et
efficace, utiliser l’outil à son rendement nominal.
• UTILISER L’OUTIL APPROPRIÉ. Ne jamais exiger d’un petit outil
ou d’un accessoire le rendement d’un outil de fabrication plus
robuste. Se servir de l’outil selon l’usage prévu (par exemple, ne
pas se servir d’une scie circulaire pour couper des branches
d’arbres ou des bûches).
• PORTER DES VÊTEMENTS APPROPRIÉS. Éviter de porter des
vêtements amples et des bijoux qui peuvent être happés par les
pièces en mouvement. Porter des gants de caoutchouc et des
chaussures à semelle antidérapante pour travailler à l’extérieur.
Protéger la chevelure si elle est longue. Se tenir éloigné des évents
puisque ces derniers pourraient camoufler des pièces mobiles.
DISQUE DE PONÇAGE
(DE TYPE BOUCLES ET CROCHETS - MODÈLES DW442 ET DW443)
(AUTOCOLLANT - MODÈLES DW441 ET DW444)
SAC À POUSSIÈRE
RÉGULATEUR DE
VITESSE
(MODÈLES DW443
ET DW444)
INTERRUPTEUR
ÉCRAN ANTIPOUSSIÈRE
Page 12

10
Français
• PORTER DES LUNETTES DE SÉCURITÉ. Porter également un
masque respiratoire si le travail de coupe produit de la poussière.
• NE PAS MANIPULER LE CORDON DE FAÇON ABUSIVE. Ne
pas transporter l’outil par le cordon ni tirer sur ce dernier pour le
débrancher de la prise. Éloigner le cordon des sources de chaleur,
des flaques d’huile et des arêtes tranchantes.
• ASSUJETTIR LA PIÈCE. Immobiliser la pièce à l’aide de brides ou
d’un étau. On peut alors se servir des deux mains pour faire fonctionner l’outil, ce qui est plus sûr.
• NE PAS DÉPASSER SA PORTÉE. Toujours demeurer dans une
position stable et garder son équilibre.
• PRENDRE SOIN DES OUTILS. Conserver les outils propres pour
qu’ils donnent un rendement supérieur et sûr. Suivre les directives
concernant la lubrification et le remplacement des accessoires.
Inspecter régulièrement le cordon de l’outil et le faire réparer au
besoin à un atelier d’entretien autorisé. Inspecter régulièrement
les cordons de rallonge et les remplacer lorsqu’ils sont endommagés. S’assurer que les poignées sont toujours propres, sèches
et libres de toute tache d’huile ou de graisse.
• DÉBRANCHER LES OUTILS NON UTILISÉS. Respecter cette
mesure lorsqu’on ne se sert pas de l’outil, ou qu’on doit le réparer
ou en changer un accessoire (comme une lame, un foret ou un
couteau).
• ENLEVER LES CLÉS DE RÉGLAGE. Prendre l’habitude de véri-
fier si les clés de réglage ont été retirées avant de faire démarrer
l’outil.
• ÉVITER LES DÉMARRAGES ACCIDENTELS. Ne pas laisser le
doigt sur l’interrupteur lorsqu’on transporte l’outil. S’assurer que
l’interrupteur est à la position hors circuit lorsqu’on branche l’outil.
• CORDONS DE RALLONGE PRÉVUS POUR L’EXTÉRIEUR.
Lorsque l’outil est utilisé à l’extérieur, ne se servir que d’un cordon
de rallonge conçu pour l’extérieur et portant la mention appropriée.
• DEMEURER VIGILANT. Travailler avec vigilance et faire preuve
de bon sens. Ne pas se servir de l’outil lorsqu’on est fatigué.
• VÉRIFIER LES PIÈCES ENDOMMAGÉES. Vérifier l’alignement
et les attaches des pièces mobiles, le degré d’usure des pièces et
leur montage, ainsi que tout autre facteur susceptible de nuire au
bon fonctionnement de l’outil. Faire réparer ou remplacer tout protecteur ou toute autre pièce endommagée dans un centre de service autorisé, sauf si le présent guide fait mention d’un avis contraire. Confier le remplacement de tout interrupteur défectueux à
un centre de service autorisé. Ne jamais se servir d’un outil dont
l’interrupteur est défectueux.
• NE PAS UTILISER les outils portatifs électriques dans des endroits
où l’atmosphère contient des vapeurs combustibles ou explosives.
Les étincelles que produit le moteur en marche pourraient enflammer ces produits.
Mesures de sécurité propres aux
ponceuses
• Toujours porter des lunettes de sécurité ainsi qu’un respirateur
lorsqu’on effectue des travaux de ponçage.
• Il n’est pas conseillé de poncer des surfaces recouvertes de pein-
ture à base de plomb. Consulter la page 15 pour connaître les
directives particulières portant sur le ponçage des surfaces recouvertes de peinture.
• Ne pas utiliser l’outil sans l’écran antipoussière.
• Ne pas utiliser cet outil pendant des périodes prolongées. Les
vibrations causées par l’action de fonctionnement de l’outil peuvent
blesser en permanence les doigts, les mains et les bras. Porter des
gants pour amortir les vibrations, faire des pauses fréquentes et
limiter le temps d’utilisation quotidien de l’outil.
AVERTISSEMENT : Certains outils, tels que les sableuses élec-
triques, les scies, les meules, les perceuses ou certains autres outils
de construction, peuvent soulever de la poussière contenant des produits chimiques susceptibles d’entraîner le cancer, des malformations
congénitales ou pouvant être nocifs pour le système reproductif.
Parmi ces produits chimiques, on retrouve :
• le plomb dans les peintures à base de plomb;
Page 13

11
Français
• la silice cristalline dans les briques et le ciment et autres produits de maçonnerie;
• l’arsenic et le chrome dans le bois de sciage ayant subi un
traitement chimique (CCA).
Le risque associé à de telles expositions peut varier selon la
fréquence avec laquelle on effectue ces travaux. Pour réduire l’exposition à de tels produits, il faut travailler dans un endroit bien ventilé et
utiliser l’équipement de sécurité approprié tel un masque anti-poussières spécialement conçu pour filtrer les particules microscopiques.
• Éviter tout contact prolongé avec la poussière soulevée par
cet outil ou autres outils électriques. Porter des vêtements de
protection et nettoyer les parties exposées du corps avec de
l’eau savonneuse. S’assurer de bien se protéger afin d’éviter
d’absorber par la bouche, les yeux ou la peau des produits chimiques nocifs.
AVERTISSEMENT : Cet outil peut produire et répandre de la pous-
sière susceptible de causer des dommages sérieux et permanents au
système respiratoire. Toujours utiliser un appareil respiratoire antipoussières approuvé par le NIOSH ou l’OSHA. Diriger les particules
dans le sens opposé du visage et du corps.
MISE EN GARDE : Porter un dispositif de protection person-
nel anti-bruit approprié durant l’utilisation. Sous certaines condi-
tions et pendant toute la durée de l’utilisation, le bruit émanant de ce
produit pourrait contribuer à la perte d’audition.
Double isolation
Les outils à double isolation comportent deux couches distinctes
d’isolant électrique ou une double épaisseur d’isolant qui protègent
l’utilisateur contre les risques de blessures provenant du système
électrique de l’outil. Ce système de double isolation élimine le besoin
de mettre les outils à la terre. En effet, l’outil est muni d’une fiche à
deux broches, ce qui permet d’utiliser une rallonge ordinaire sans
avoir à se soucier d’assurer la mise à la terre.
NOTE : La double isolation ne dispense pas des mesures de sécurité
normales lors de l’utilisation de l’outil. Elle vise à procurer une pro-
tection supplémentaire contre les blessures que peut entraîner une
défectuosité de l’isolant électrique à l’intérieur de l’outil.
MISE EN GARDE : Pour réparer tout outil, N’UTILISER QUE DES
PIÈCES DE RECHANGE IDENTIQUES. Réparer ou remplacer les
cordons endommagés.
Fiche polarisée
Le produit est muni d’une fiche polarisée (une lame plus large que
l’autre) afin de minimiser les risques de secousses électriques. Ce
genre de fiche n’entre que d’une façon dans une prise polarisée.
Lorsqu’on ne peut insérer la fiche à fond dans la prise, il faut tenter de
le faire après avoir inversé les lames. Si la fiche n’entre toujours pas
dans la prise, il faut communiquer avec un électricien certifié qui
installera une prise polarisée appropriée. Il ne faut pas modifier ni
remplacer cette fiche.
Cordons de rallonge
S’assurer que le cordon de rallonge est en bon état. Lorsqu’on se sert
d’un cordon de rallonge, s’assurer qu’il est de calibre approprié pour
la tension nécessaire au fonctionnement de l’outil. L’utilisation d’un
cordon de calibre inférieur occasionne une baisse de tension entraînant une perte de puissance et la surchauffe. Le tableau indique le
calibre approprié selon la longueur du cordon et les mentions de la
plaque signalétique de l’outil. En cas de doute, utiliser un cordon de
calibre supérieur. Le chiffre indiquant le calibre est inversement proportionnel au calibre du cordon.
Calibre minimal des cordons de rallonge
Tension Longueur totale du cordon en pieds
120 V De 0 à 25 De 26 à 50 De 51 à 100 De 101 à
150
240 V De 0 à 50 De 51 à 100 De 101 à 200 De 201 à 300
Intensité
Au Au Calibre de fil (AWG)
moins plus
0-6 18 16 16 14
6 - 10 18 16 14 12
Page 14

12
CONSERVER CES MESURES
À TITRE DE RÉFÉRENCE
Moteur
Veiller à ce que la tension d’alimentation soit conforme aux exigences
de la plaque signalétique de l’outil. La mention 120 volts c.a. signifie
que l’outil fonctionne seulement sur une alimentation en courant alternatif, jamais en courant continu.
Une baisse de tension de plus de 10 p. 100 entraîne une perte de
puissance et la surchauffe. Tous les outils sont essayés avant de quitter l’usine. Lorsque celui-ci refuse de fonctionner, vérifier la source de
courant électrique.
Installation des disques de ponçage
La ponceuse est conçue pour utiliser des disques de ponçage de 6 po
percés de 6 trous pour le dépoussiérage.
Type boucles et crochets (Modèles DW442 et DW443)
Autocollants (Modèles DW441 et DW444)
Faire ce qui suit pour installer le papier sur le tampon de ponçage:
1. Mettre la ponceuse hors tension et la débrancher.
2. Retourner la ponceuse de sorte que le tampon de ponçage se
trouve sur le dessus.
3. (Modèles DW441 et DW444 seulement) Enlever la poussière des
surfaces en vinyle du tampon.
4. Retenir le tampon d’une main pour l’empêcher de tourner.
5. De l’autre main, aligner le disque sur le tampon et le placer
directement sur ce dernier (fig. 1).
Interrupteur
(Voir la fig. 2.) Pour mettre l’outil en marche, il suffit de faire glisser
l’interrupteur vers l’avant (pour découvrir le symbole «|»). Pour mettre l’outil hors tension, il suffit de faire glisser l’interrupteur vers l’arrière
(pour découvrir le symbole «O»). Avant de brancher l’outil, s’assurer
que l’interrupteur est en position d’arrêt.
Français
1
FIG. 1
DISQUE DE PONÇAGE
FIG. 2
MARCHE
ARRÊT
RÉGULATEUR DE VITESSE
( RÉGLAGES DE 1 À 5)
FIG. 3
TAMPON DE PONÇAGE
Page 15

Régulateur de vitesse
(Modèles DW443 et
DW444 seulement)
Le régulateur de vitesse (constitué de cinq réglages consécutifs) permet à l’utilisateur d’augmenter ou de diminuer la vitesse de l’outil sur
une gamme de 4 000 à 6 800 orbites à la minute. La vitesse optimale
à utiliser pour chaque application dépend des goûts personnels de
l’utilisateur. Il est conseillé d’essayer cette fonction sur des échantillons afin de déterminer la meilleure combinaison en vue de l’obtention
du fini et du taux de ponçage voulus. Habituellement, on utilise un
régime élevé pour poncer des matériaux durs et un faible régime, pour
les matériaux mous. Le taux de ponçage augmente avec le régime.
Système de dé poussiérage
La ponceuse est munie d’un sac à poussière qui ramasse la poussière
généreé par les travaux de ponçage. Pour vider le sac, il faut d’abord
mettre l’outil hors tension et le débrancher. Tirer fermement sur le sac
tout en retenant la gaíne en caoutchouc (fig. 3). Vider le sac (il peut
être nécessaire de le retourner à l’envers).
NOTE: Ne jamais utiliser l’outil si le sac à poussière n’est pas en
place.
Remplacement du tampon de ponçage
Lorsque le tampon est usé, le remplacer comme suit (fig. 4).
1. Mettre l’outil hors tension et le débrancher.
2. Enlever les 4 vis à tête Torx qui se trouvent sous l’outil (utiliser un
tournevis Torx T20 ou un tournevis à lame plate).
3. Retirer le tampon.
4. Remettre en place le tampon et les vis en s’assurant que le disque
à système de finition contrôlé est bien aligné.
Fonctionnement
Pour utiliser la ponceuse, la saisir de la façon illustrée à la figure 5,
puis la mettre en marche. Déplacer l’outil en lui imprimant de longs
mouvements de va-et-vient le long de la surface à poncer et sans le
forcer.
13
Français
FIG. 4
4 VIS À TÊTE
TORX
DISQUE À SYSTÈME
DE FINITION CON-
TRÔLÉ
ALIGNER LES
ENCOCHES SUR
CELLES DE L’ÉCRAN
ANTIPOUSSIÈRE
TAMPON DE PONÇAGE
FIG. 5
Page 16

14
NOTE : Lorsqu’on appuie sur la ponceuse pendant la tâche, on minimise le taux de ponçage et on obtient une surface de qualité moindre.
L’emballage comprend une poignée latérale qui peut être utilisée avec
la ponceuse. Il suffit de la visser d’un côté ou de l’autre de l’outil en
enlevant au préalable la vis de plastique (fig. 6).
NOTE : Vérifier souvent la surface de travail, car la ponceuse enlève
rapidement les matériaux (surtout avec du papier abrasif à gros
grains).
Le mouvement orbital excentrique de la ponceuse permet de poncer
dans le sens du grain ou dans tout autre angle dans la plupart des
cas. Pour optimiser le rendement, commencer à poncer avec du papier abrasif à gros grains et le remplacer graduellement par du papier
de plus en plus fin. Passer l’aspirateur et essuyer la surface avec un
chiffon entre chaque remplacement de papier.
Le taux de remplissage de la sac à poussière varie selon le type de
matériau poncé et la rugosité du papier abrasif. Pour optimiser les
résultats, vider souvent la sac.
Lorsqu’on ponce une surface peinte (voir les mesures supplémentaires à prendre lors du ponçage de peinture à la page 15), il se peut
que le papier abrasif se charge de peinture et bloque. Il est préférable
Français
FIG. 6
d’utiliser un pistolet chauffant pour enlever la peinture avant de sabler.
SE CONFORMER AUX MESURES DE SÉCURITÉ DU GUIDE
D’UTILISATION DU PISTOLET CHAUFFANT.
NOTE : (Modèles DW441 et DW444 seulement): Lorsqu’on utilise des
disques de ponçage autocollants, il faut enlever le disque peu après
les travaux. En effet, le disque autocollant est difficile à enlever si on
le laisse sur l’outil lorsqu’on range ce dernier. Le cas échéant, poncer
pendant quelques minutes afin de ramollir l’adhésif avant de remplacer le disque.
Mesures à prendre lors du ponçage de
peinture
1. IL N’EST PAS RECOMMANDÉ de poncer de la peinture à base de
plomb puisqu’il est difficile d’en maîtriser la poussière contaminée. Ce
genre de ponçage présente de sérieux risques d’empoisonnement au
plomb pour les femmes enceintes et les enfants.
2. Puisqu’il est difficile de déterminer si la peinture renferme du plomb
sans en faire une analyse chimique, il est conseillé de se conformer
aux mesures suivantes lors du ponçage de tout type de peinture.
SÉCURITÉ PERSONNELLE
a. Ne laisser aucun enfant ni aucune femme enceinte entrer dans la
pièce où il y a ponçage de peinture jusqu’à ce que la pièce soit nettoyée.
b. Toute personne entrant dans la pièce de travail devrait porter un
masque ou un respirateur. L’utilisateur devrait en remplacer le filtre
chaque jour ou dès qu’il éprouve de la difficulté à respirer.
NOTE : Il faut seulement utiliser des masques conçus pour le travail
en présence de poussières ou de vapeurs de plomb. Les masques
ordinaires ne sont pas conçus à cet effet. Consulter le quincaillier pour
choisir le masque approprié.
c. IL EST DÉCONSEILLÉ DE MANGER, DE BOIRE ET DE FUMER
dans la pièce de travail afin de ne pas ingérer de particules contaminées. L’utilisateur doit se laver et se nettoyer AVANT de manger, de
boire ou de fumer. Il ne faut pas laisser dans la pièce de travail de la
Page 17

15
Français
nourriture, des boissons ou des cigarettes car de la poussière pourrait
se déposer sur ces articles.
PROTECTION DE L’ENVIRONNEMENT
a. Il faut enlever la peinture de manière à produire un minimum de pous-
sière.
b. Il faut sceller la zone de travail à l’aide de feuilles de plastique d’une
épaisseur minimale de 4 mils.
c. Il faut poncer de façon à réduire la propagation de la poussière hors
de la pièce de travail.
NETTOYAGE ET DÉCHETS
a. Il faut bien aspirer toutes les surfaces de la pièce de travail et les net-
toyer à fond chaque jour pendant la durée des travaux. Il faut remplacer fréquemment le filtre de l’aspirateur.
b. Ramasser les feuilles de plastique et les jeter avec la poussière et les
autres débris dans des contenants étanches à placer avec les ordures
ménagères pour l’enlèvement.Tenir les enfants et les femmes
enceintes à l’écart de la zone de travail pendant les travaux de nettoyage.
c. Il faut nettoyer à fond les jouets, les meubles et les ustensiles des
enfants avant de les utiliser de nouveau.
Lubrification
L’outil comporte des roulements autolubrifiants qui ne nécessitent
aucune lubrification périodique. Il est toutefois conseillé de porter
l’outil, une fois l’an, à un centre de service pour une inspection et un
nettoyage complets.
Nettoyage
S’assurer que l’outil est toujours propre en l’essuyant avec un chiffon
propre et en y soufflant de l’air après chaque 5 heures d’utilisation. Ne
pas utiliser de produits chimiques puissants ni de solvants pour nettoyer l’outil. Ce genre de produits peut grandement endommager les
polymères utilisés dans la fabrication de l’outil. Lorsqu’on enroule sys-
tématiquement le cordon autour de l’outil au moment du rangement,
faire des boucles lâches de façon à ne pas faire plier la bague antitraction. On prévient de la sorte la défaillance prématurée du cordon.
Réparations
Pour assurer la SÉCURITÉ et la FIABILITÉ du produit, les réparations,
l'entretien et les réglages (y compris l'inspection et le remplacement de
la brosse) doivent être réalisés par un centre de réparation en usine
D
EWALT, un centre de réparation autorisé DEWALT ou par un person-
nel de réparation professionnel. Toujours utiliser des pièces de
rechange identiques.
Utilisation
PAPIER ABRASIF - TYPES DE GRAINS
Abrasifs naturels
Le silex est le plus malléable (7 à l’échelle de Mohs*) des abrasifs
naturels communs. Il est de teinte ocre et très bon marché.
Le grenat est plus dur que le silex (7,5 à l’échelle de Mohs) et on le
reconnaît facilement à sa couleur orangée claire. Même s’il ne s’agit
pas de l’abrasif le plus dur, son type de fracture procure un très bon
tranchant pour le travail du bois.
L’émeri, même s’il est plus dur que le grenat (9 à l’échelle de Mohs),
a des rebords émoussés qui en font un abrasif de moindre qualité
pour le ponçage. On s’en sert essentiellement pour le polissage des
métaux.
Abrasifs fabriqués
L’oxyde d’aluminium blanc est extrêmement dur (12 à l’échelle de
Mohs) et durable ce qui en fait un bon abrasif à utiliser avec la ponceuse orbitale excentrique. Le terme «blanc» ne décrit pas la couleur
de l’abrasif mais la façon dont il est fabriqué. On en retrouve partout
et il est offert dans une vaste gamme de couleurs en raison de l’utilisation répandue des teintures. Les lubrifiants au stéarate du papier
améliorent également le rendement en minimisant le dégagement de
chaleur et le taux de blocage du papier. Le carbure de silicium con-
Page 18

stitue l’abrasif le plus dur (13 à l’échelle de Mohs) qu’on retrouve sur
le marché, après le diamant industriel, mais il n’est pas aussi résistant
que l’oxyde d’aluminium. Il casse facilement et offre des arêtes tranchantes pour toute la durée du papier abrasif. Cette caractéristique
d’«autoaffûtage» fait du carbure de silicium un abrasif remarquable
pour le ponçage mais en limite la durée.
* L’échelle de Mohs sert à mesurer la dureté des minéraux. On y
classe le diamant à 15 (le plus dur) et le talc à 1.
COUCHE OUVERTE OU FERMÉE
Les abrasifs sont fixés au papier à l’aide de colle. Lorsque les grains
sont gros (60 ou 80), le pourcentage de l’enduit est habituellement
réduit entre 60 et 70 p. 100 de la surface du papier. On augmente ainsi
la durée du papier en en réduisant le blocage. Il s’agit alors d’une
couche ouverte; forme sous laquelle on retrouve la plupart des
papiers abrasifs à gros grains sur le marché. Dans le cas des grains
fins, on fixe au moins 90 p. 100 d’abrasifs sur le papier. C’est ce qu’on
appelle une couche fermée. Puisque les particules sont plus fines, le
papier a moins tendance à se charger et à bloquer.
GROSSEUR DES GRAINS
Il existe plusieurs systèmes de classement. Le système le plus utilisé
consiste en celui qui mesure la dimension des éléments (déterminée
par tamisage). Le nombre qui apparaît à l’arrière du disque de
ponçage correspond à la dimension du tamis. Par exemple, un papier à grain 120 est constitué des grains qui passent dans un tamis
ayant 120 trous par pouce linéaire. Il y a 14 400 trous (120 sur 120)
par pouce carré. Plus le nombre accompagnant le terme «grain» est
élevé, plus la particule est fine. On trouve des papiers de grain 35
à 600, et depuis peu, il s’en fait jusqu’à 1 200.
PAPIER ET PELLICULE
Papier - Le matériau le plus élevé pour soutenir les abrasifs est le
papier. Celui-ci est classé en fonction de son poids. Du papier de
classe A, le plus commun, est le plus léger utilisé et il offre une bonne
durabilité et une bonne souplesse dans la plupart des utilisations. Il y
16
Français
a également du papier de classes C, D, E et F. Le désavantage du
papier consiste en sa faible rigidité mécanique. Puisque les fibres du
papier cèdent au cours du ponçage, l’abrasif ne tient pas en place et
certains tranchants ne s’engagent pas dans la pièce à ouvrer. L’avantage tient dans le prix.
Pellicule
- Les disques de ponçage sur pellicule parent aux désavantages du papier. La pellicule est plus rigide que le papier. Mais elle est
également plus chère, tout en offrant un rendement supérieur des
abrasifs.
Tissu et fibre vulcanisée
- Ces matériaux sont assez difficiles à trouver et servent dans des applications particulières. On trouve surtout
des abrasifs sur papier ou sur pellicule.
Disques à boucles et crochets et disques autocollants
- Systèmes
de fixation du disque
Boucles et crochets
- L’arrière du disque consiste en un tissu à
boucles qui se fixe sur le tissu à crochets du tampon. Ce système est
avantageux puisqu’on peut réutiliser le papier. De plus, l’interface
entre le papier et la pièce à poncer est plus fraîche.
Disque autocollant
- L’arrière du disque de ponçage est enduit d’un
adhésif sensible à la pression pour adhérer à la surface du tampon
(pas celui qui accepte un disque à boucles). L’avantage réside dans
le coût. Le principal désavantage est la tendance des disques autocollants à adhérer en permanence au tampon si on oublie de les
enlever après le ponçage. Quelle en est la raison? Il s’agit de la
chaleur. Pendant le ponçage, le tampon et le papier se réchauffent.
L’adhésif du disque coule alors dans les fissures du tampon en vinyle
et forme un lien solide. Si on enlève le papier peu après les travaux,
l’adhésif n’a pas le temps de prendre. Par contre, si on oublie
d’enlever le papier, l’adhésif a le temps de prendre. Le papier risque
alors de déchirer et le nettoyage de la ponceuse sera difficile. Un
autre désavantage : lorsqu’on effectue de petits travaux de ponçage
et qu’on n’utilise pas tout le papier, on ne peut pas le réutiliser. On
gaspille alors plus de papier.
Page 19

17
Français
PONÇAGE
MESURES FONDAMENTALES
Toujours commencer avec l’abrasif à gros grains. Ne pas déroger à
cette règle. Plus le numéro de grain est élevé, plus les égratignures
sont fines; ce qui améliore généralement la qualité du fini. Lorsqu’on
change de grosseur de grains, il ne faut pas oublier de nettoyer la surface de travail. En effet, s’il reste de l’abrasif à grain 80 sur la surface
lorsqu’on ponce cette dernière avec du papier 220, on risque
d’égratigner la surface avec les grains 80.
C’est pourquoi il est conseillé de passer l’aspirateur sur la surface puis
de bien l’essuyer avec un chiffon.
La ponceuse à mouvement orbital excentrique agit uniformément sur
le grain. Puisque les égratignures sont tellement fines et excentriques,
il est difficile de les voir à l’œil nu.
Toujours porter un masque afin de ne pas respirer la poussière. NE
JAMAIS DÉROGER À CETTE RÈGLE. La ponceuse est conçue
pour ramasser la plupart de la poussière générée par les travaux mais
elle ne capture pas toute la poussière. Pour améliorer le dépoussiérage, utiliser un aspirateur. Il faut également TOUJOURS porter un
masque.
AUTRES CONSEILS PRATIQUES POUR OPTIMISER LES
RÉSULTATS
La ponceuse orbitale excentrique agit plus rapidement qu’une ponceuse orbitale ordinaire, il vaut mieux choisir un abrasif plus fin qu’à
l’habitude pour commencer les travaux.
Puisque le mouvement orbital excentrique fait de courtes
égratignures, il se peut que la tâche nécessite moins de changement
de grosseur de grain. Un bon nombre d’ébénistes professionnels
n’utilise que du papier 80, 120 et 150 pour obtenir des résultats satisfaisants. En cas de doute sur la qualité du fini, essuyer la surface avec
du solvant. Les défauts apparaissent alors plus foncés que le reste de
la surface.
Avant la finition, on peut déceler des entailles grâce à une bonne
inspection. Essayer de corriger les défauts (à l’aide d’un fer chaud et
d’un chiffon humide) ou poncer avec soin une grande surface autour
de l’entaille. Si on ponce l’entaille avec vigueur, la surface risque de
se creuser.
À la fin des travaux de ponçage, soulever le grain en humectant le
bois avec un chiffon humide. Lorsque le bois est sec et qu’on est prêt
à l’enduire de fini, poncer légèrement pour enlever les fibres
soulevées par l’eau. Passer l’aspirateur, essuyer les surfaces et
enduire sans tarder la première couche de fini avant que le bois se
salisse.
BOIS : Caractéristiques importantes
Grain dur et tendre
Le bois comporte des grains durs et tendres. Le grain dur résulte de
la croissance estivale et le grain tendre est le produit de la croissance
printanière. Toutes les ponceuses retirent plus de grains tendres que
de grains durs. Puisque la ponceuse orbitale excentrique agit plus
rapidement, elle en enlève beaucoup plus. C’est pourquoi un ponçage
prolongé sur une pièce de résineux donne un fini inégal. Il s’agit d’une
bonne raison de corriger les défauts avant les travaux de ponçage.
Accessoires
Les accessoires recommandés pour être utilisés avec votre outil sont
disponibles chez votre concessionnaire ou le centre de réparation
autorisé de votre région. Si vous avez besoin d'assistance pour
trouver tout accessoire, veuillez communiquer avec D
EWALT
Industrial Tool Co., 701 East Joppa Road, Baltimore, MD 21286,
États-Unis, composer le 1(800) 4-D
EWALT (1-800-433-9258) ou
visiter notre site Web à www.dewalt.com.
MISE EN GARDE : L’utilisation de tout autre accessoire non
recommandé pour l’outil peut être dangereuse.
MISE EN GARDE : NE PAS UTILISER DE COIFFE À POLIR À
FICELLE AVEC LA PONCEUSE. LA FICELLE EN MOUVEMENT
PRÉSENTE DES RISQUES DE BLESSURES GRAVES AUX
DOIGTS.
Page 20

18
Français
Garantie limitée de trois ans
DEWALT réparera, sans frais, tout produit défectueux causé par un
défaut de matériel ou de fabrication pour une période de trois ans à
compter de la date d’achat. La présente garantie ne couvre pas les
pièces dont la défectuosité a été causée par une usure normale ou
l’usage abusif de l’outil. Pour obtenir de plus amples renseignements
sur les pièces ou les réparations couvertes par la présente garantie,
visiter le site www.dewalt.com ou composer le 1 800 433-9258 (1 800
4-D
EWALT). Cette garantie ne s’applique pas aux accessoires et ne
vise pas les dommages causés par des réparations effectuées par un
tiers. Cette garantie confère des droits légaux particuliers à l’acheteur,
mais celui-ci pourrait aussi bénéficier d’autres droits variant d’un état
ou d’une province à l’autre.
En plus de la présente garantie, les outils D
EWALT sont couverts par
notre :
CONTRAT D’ENTRETIEN GRATUIT D’UN AN
D
EWALT entretiendra l’outil et remplacera les pièces usées au cours
d’une utilisation normale et ce, gratuitement, pendant une période
d’un an à compter de la date d’achat, et la
GARANTIE DE REMBOURSEMENT DE 90 JOURS
Si l’acheteur n’est pas entièrement satisfait, pour quelque raison que
ce soit, du rendement de l’outil électrique, du laser ou de la cloueuse
D
EWALT, celui-ci peut le retourner, accompagné d’un reçu, dans les
90 jours à compter de la date d’achat, pour obtenir un remboursement intégral, sans aucun problème.
AMÉRIQUE LATINE : Cette garantie ne s'applique aux produits vendus en Amérique latine. Pour ceux-ci, veuillez consulter les informations relatives à la garantie spécifique présente dans l'emballage,
appeler l'entreprise locale ou consulter le site Web pour les informations relatives à cette garantie.
REMPLACEMENT GRATUIT DE L'ÉTIQUETTE : Si vos étiquettes
d'avertissement deviennent illisibles ou sont manquantes, composez le
1-800-4-D
EWALT pour obtenir une étiquette de remplacement gratuite.
Page 21

19
Español
1
R
BASE DE LIJADO
(GANCHO Y ABRAZADERA - DW442 Y DW443)
(PSA: ADHESIVO SENSIBLE A LA PRESIÓN - DW441 Y DW444)
BOLSA
RECOLECTORA
DE POLVO
CONTROL DE VELOCIDAD
(DW443 Y DW444)
INTERRUPTOR DE ENCEN-
DIDO Y APAGADO
CUBIERTA
ESPECIFICACIONES
Tension de alimentación: 120 V/CA~
Potencia nominal: 192 W
Frecuencia de operación: 60 Hz
Consumo de corriente: 2,0A
Instrucciones importantes de seguridad
(Para todas las herramientas)
ADVERTENCIA: Es indispensable sujetarse a las precau-
ciones básicas de seguridad, con la finalidad de reducir el peligro de incendio, choque eléctrico y lesiones personales, en todas
las ocasiones en que se utilicen herramientas eléctricas. Entre estas
precauciones se incluyen la siguientes:
LEA TODAS LAS INSTRUCCIONES
• CONSERVE LIMPIA LA ZONA DE TRABAJO. Las superficies y
los bancos con objetos acumulados en desorden propician los
accidentes.
• OTORGUE PRIORIDAD A LA ZONA DE TRABAJO. No deje las
herramientas eléctricas expuestas a la lluvia. No las utilice en
lugares inundados o mojados. Conserve bien iluminada la zona de
trabajo.
• PROTÉJASE CONTRA EL CHOQUE ELÉCTRICO. Evite el con-
tacto corporal con superficies aterrizadas, por ejemplo, tuberías,
radiadores, antenas y gabinetes de refrigeración.
• CONSERVE APARTADOS A LOS NIÑOS. Los visitantes deben
estar alejados de la zona de trabajo. No permita que los visitantes
toquen las herramientas o los cables de extensión.
• GUARDE LAS HERRAMIENTAS QUE NO EMPLEE. Las her-
ramientas que no se están utilizando deben guardarse en un lugar
seco y elevado o bajo llave fuera del alcance de los niños.
• NO FUERCE LA HERRAMIENTA. Esta cumplirá su función mejor
y con más seguridad a la velocidad y la presión para las que se
diseñó.
• EMPLEE LA HERRAMIENTA ADECUADA. No fuerce a una her-
ramienta pequeña o a sus dispositivos de montaje en un trabajo de
tipo pesado. No emplee la herramienta en una tarea para la que
no se diseñó; por ejemplo, no recurra a una sierra circular para cortar ramas o troncos de árbol.
• VÍSTASE DE LA MANERA ADECUADA. No use ropas o artícu-
Page 22

con el dedo en el interruptor. Asegúrese que el interruptor está en
posición de “apagado” antes de conectar la unidad.
• CORDONES DE EXTENSIÓN PARA INTEMPERIE. Cuando
opere su herramienta a la intemperie, utilice únicamente cordones
de extensión diseñados y marcados para este fin. Encontrará información más detallada en el interior del manual.
• NO SE DISTRAIGA. Concéntrese en lo que está haciendo.
Recurra al sentido común. No opere ninguna herramienta si está
fatigado.
• VERIFIQUE LAS PARTES DAÑADAS. Antes de seguir emplean-
do cualquier herramienta, es indispensable verificar con mucho
cuidado que las guardas u otras partes dañadas puedan operar de
la manera adecuada para cumplir con su función. Verifique la alineación de las partes móviles, la firmeza con que deben encontrarse sujetas a sus montaduras, las partes rotas, las propias montaduras y cualesquiera otros detalles que pudieran afectar la
operación de la herramienta. Las guardas y otras partes que se
encuentren dañadas deberán cambiarse o repararse en un centro
de servicio autorizado, a menos que se diga otra cosa en el manual del usuario. Haga que se cambien los interruptores dañados en
un centro de servicio autorizado. No emplee ninguna herramienta
que tenga estropeado o inutilizado el interruptor.
• NO OPERE ninguna herramienta eléctrica portátil cerca de líqui-
dos inflamables ni atmósferas cargadas con gases explosivos. Los
motores de estas herramientas descargan chispazos en condiciones normales, y éstos pueden desencadenar la ignición de
gases y vapores combustibles.
Instrucciones especiales de seguridad
para lijadoras
• Siempre que lije utilice protección para los ojos y respirador.
• No se recomienda lijar pinturas con base de plomo. Vea en la pág
24 las precauciones adicionales que se deben tomar cuando lije
pintura.
• No opere la unidad sin la cubierta para polvo.
20
Español
los de joyería flojos, pues podrían quedar atrapados por las partes
móviles de las herramientas. Se recomienda el empleo de guantes
de caucho y calzado antiderrapante cuando se trabaje al aire libre.
Cúbrase bien la cabeza para sujetarse el cabello si lo tiene largo.
Las rejillas de ventilación cubren partes móviles y también deben
evitarse.
• COLÓQUESE ANTEOJOS DE SEGURIDAD. Póngase también
una mascarilla contra el polvo si lo produce la operación que va
a efectuar.
• TENGA CUIDADO CON EL CORDÓN ELÉCTRICO. Nunca lev-
ante la herramienta tomándola por el cordón, ni tire de éste para
desconectarlo del enchufe. Apártelo del calor y los objetos
calientes, las substancias grasosas y los bordes cortantes.
• SUJETE LOS OBJETOS SOBRE LOS QUE TRABAJE. Utilice
prensas o tornillos de banco para sujetar los objetos sobre los que
va a trabajar. Esto ofrece mayor seguridad que sujetar los objetos
con la mano, y además deja libres ambas manos para operar la
herramienta.
• MANTENGA EL EQUILIBRIO. Conserve en todo momento bien
apoyados los pies, lo mismo que el equilibrio.
• CUIDE SUS HERRAMIENTAS. Conserve sus herramientas afi-
ladas y limpias para que funcionen mejor y con mayor seguridad.
Siga las instrucciones para lubricación y cambio de accesorios de
su unidad. Revise periódicamente el cordón eléctrico y hágalo
reparar o reemplazar por un centro de servicio si está dañado.
Cambie los cordones de extensión si están dañados. Conserve las
empuñaduras secas, limpias y libres de aceite y grasa.
• DESCONECTE Y APAGUE LAS HERRAMIENTAS cuando no las
use, antes de darles servicio y cuando cambie accesorios, tales
como discos, brocas y otros dispositivos de corte.
• RETIRE LAS LLAVES DE AJUSTE Y DE TUERCAS. Adquiera el
hábito de asegurarse que se han retirado las llaves de ajuste de
las herramientas antes de accionarlas.
• EVITE QUE LA HERRAMIENTA SE ACCIONE ACCIDENTAL-
MENTE. Nunca sostenga una herramienta que está conectada
Page 23

• No opere esta herramienta durante períodos largos de tiempo.
La vibración causada por la acción de operación de la herramienta
puede causar lesiones permanentes a sus dedos, manos y brazos.
Use guantes para un mejor amortiguamiento, descanse con
frecuencia y limite el tiempo diario de uso.
ADVERTENCIA: Parte del polvo creado al lijar, aserruchar, moler
o perforar con máquina, así como al realizar otras actividades de la
construcción, contiene substancias químicas que se sabe producen
cáncer, defectos congénitos u otras afecciones reproductivas.
Algunos ejemplos de esas substancias químicas son:
• plomo de pinturas a base de plomo,
• sílice cristalizado de ladrillos y cemento y otros productos de
albañilería, y
• arsénico y cromo de la madera químicamente tratada (CCA).
El riesgo al contacto con estas substancias varía, según la frecuencia
en que se haga este tipo de trabajo. Para reducir la exposición a esas
substancias químicas: trabaje en un área bien ventilada, y trabaje con
equipos de seguridad aprobados, tales como máscaras contra el polvo
especialmente diseñadas para filtrar las partículas microscópicas.
• Evite el contacto prolongado con polvos originados por lijar,
aserrar, esmerilar, taladrar y otras actividades constructivas.
Vista ropas protectoras y lave las áreas expuestas con agua y
jabón. Permitir que el polvo se introduzca en su boca, ojos, o
dejarlo sobre la piel promueve la absorción de químicos dañinos.
ADVERTENCIA: La utilización de esta herramienta puede originar
polvo o dispersarlo, lo que podría causar daños graves y permanentes
al sistema respiratorio, así como otras lesiones. Siempre use protección respiratoria aprobada por NIOSH/OSHA, apropiada para su uso
en condiciones de exposición al polvo. Procure que las partículas no
se proyecten directamente sobre su rostro o su cuerpo.
PRECAUCION: Utilice la protección auditiva apropiada
durante el uso. Bajo ciertas condiciones de duración de uso, el ruido
producido por este producto puede contribuir a la pérdida auditiva.
21
Español
Doble Aislamiento
Las herramientas DOBLEMENTE aisladas se han elaborado de manera integral con dos capas separadas de aislamiento eléctrico o una
capa doble de aislamiento entre usted y el sistema eléctrico que contienen. Las herramientas construidas con este sistema de aislamiento
no requieren conectarse a tierra. Como resultado su herramienta está
equipada con una clavija de dos patas que le permite emplear cordones de extensión sin preocuparse por tener una conexión a tierra.
NOTA: El doble aislamiento no substituye a las precauciones normales
de seguridad cuando se opera esta herramienta. La finalidad de este
sistema de aislamiento es ofrecer a usted protección añadida contra
lesiones resultantes de fallas en el aislamiento eléctrico interno de la
herramienta.
PRECAUCIÓN: UTILICE SOLAMENTE REFACCIONES ORIGI-
NALES cuando haga servicio a cualquier herramienta. Repare o
reemplace los cordones eléctricos dañados.
Clavija polarizada
Este producto se suministra con una clavija polarizada (una de las
patas es más ancha que la otra). Esta clavija se ajusta a tomas de
corriente polarizadas (contactos) sólo de una manera. Si la clavija no
se ajusta completamente a su toma de corriente, cambie las patas de
lado. Si aún así no se ajusta, llame a un electricista calificado para
que le instale una toma de corriente polarizada. No modifique o cambie esta clavija de ninguna manera.
Cordones de extensión
Asegúrese que su cordón de extensión esté en buenas condiciones.
Cuando utilice un cordón de extensión, asegúrese de usar uno con el
calibre necesario para soportar la corriente que su producto necesita.
Un cordón de extensión de menor calibre al necesario ocasionará una
caída en el voltaje de la línea, produciendo pérdida de potencia y
sobrecalentamiento. La tabla muestra el calibre correcto para utilizarse de acuerdo de la longitud del cordón y el amperaje nominal
que se encuentra en la placa de identificación del producto. Si tiene
dudas, utilice el calibre inmediato superior. Mientras más pequeño es
el número del calibre, mayor capacidad tiene el cordón.
Page 24

22
Español
figura 1
DISCO DE LIJA
figura 2
ENCENDIDO
APAGADO
CONTROL DE VELOCIDAD
(5 POSICIONES PROGRESIVAS)
figura 4
4 TORNILLOS
HEXAGONALES
ANILLO
CFS
HAGA COINCIDIR LAS
MUESCAS CON LAS DE LA
CUBIERTA
BASE DE LIJADO
BASE
1
figura 3
figura 5
figura 6
Page 25

23
Español
Calibre mínimo para cordones de extensión
Volts Longitud total del cordón en metros
120V 0-7.6 7.7-15.2 15.3-30.4 30.5-45.7
240V 0-15.2 15.3-30.4 30.5-60.9 70-91.4
Amperaje
Más No más AWG
de de
0 - 6 18 16 16 14
6- 10 18 16 14 12
GUARDE ESTAS INSTRUCCIONES
PARA FUTURAS REFERENCIAS
Motor
Asegúrese que su toma de corriente concuerde con las especificaciones
de la placa de identificación.120 CA significa que su herramienta solamente se puede operar con corriente alterna y nunca con corriente directa. Disminuciones en el voltaje mayores al 10% causarán pérdida de
potencia y sobrecalentamiento. Todas las herramientas se prueban en la
fábrica; si esta herramienta no funciona, verifique la toma de corriente.
Colocación de los discos de lija
Su lijadora está diseñada para usar discos de lija de 15 cm (6") con
seis perforaciones para extracción de polvo.
Gancho y abrazadera (DW442 y DW443)
ASP - Adhesivo Sensible a la Presión (DW441 y DW444)
Para colocar la lija en la base de lijado:
1. Apague y desconecte la herramienta.
2. De la vuelta a la lijadora de manera que la base de lijado quede
boca arriba.
3. (Sólo DW441 y DW444) Elimine el polvo de la superficie de vinil
de la base.
4. Sujete la base con una mano para evitar que gire.
5. Con la otra mano, haga coincidir las perforaciones y coloque el
disco directamente sobre la base (figura 1).
Interruptor
(Ver figura 2) Para encender la unidad, deslice el interruptor hacia
adelante (el símbolo “I” quedará visible). Para apagar la unidad,
deslice el interruptor hacia atrás (el símbolo “O” quedará descubierto).
Antes de conectar la herramienta, asegúrese que el interruptor está
en la posición de apagado.
Control de velocidad
(sólo DW443 y DW444)
El control de velocidad (5 posiciones progresivas) le permite incrementar o disminuir la velocidad desde 4000 hasta 6800 órbitas por
minuto. La posición óptima para cada aplicación depende en gran
parte de las preferencias personales. Quizá usted desee experimentar en una pieza de desperdicio para determinar la velocidad que le
proporcione la mejor combinación de calidad de acabados y velocidad de remoción de material para su aplicación. Generalmente, usted
utilizará una posición más alta en materiales con mayor dureza y una
posición más baja en materiales suaves. La cantidad de material
removido aumenta proporcionalmente a la velocidad.
Recolección de Polvo
Su lijadora está equipada con una bolsa-filtro de tela para recolectar
el polvo generado durante el lijado. Para vaciar la bolsa recolectora,
primero apague y desconecte la herramienta. Tire firmemente de la
bolsa mientras sostiene la unidad por el protector de goma (figura 3).
Vacíe la bolsa (puede voltear el interior hacia afuera si gusta.)
NOTA: Nunca opere esta herramienta a menos que la bolsa recolectora de polvo esté en su posición.
Reemplazo de la base de lijado
Cuando la base se haya desgastado, siga este procedimiento para
reemplazarla. (Vea la figura 4)
1. Apague y desconecte la herramienta.
2. Quite los 4 tornillos hexagonales que se encuentran en la parte
inferior de la herramienta. (utilice un dado T20 o un destornillador
de punta plana.)
Page 26

NOTE: Cuando utilice discos de lija con ASP (adhesivo sensible a la
presión) es necesario remover el disco lo más pronto posible despues
de la operación. Es más difícil remover los papeles ASP si se dejan
en la herramienta cuando se guarda. Para facilitar la remoción de lijas
ASP, lije durante algunos minutos para suavizar el adhesivo del
respaldo antes de cambiar este último.
Precauciones a tomar en cuenta cuando
lije pintura
1. NO SE RECOMIENDA el lijado de pinturas con base de plomo
debido a la dificultad para controlar el polvo contaminado. El
mayor peligro de envenenamiento por plomo es para niños y
mujeres embarazadas.
2. Ya que es difícil identificar si una pintura contiene plomo o no sin
efectuar un análisis químico, recomendamos que tenga en cuenta las siguientes precauciones cuando lije cualquier tipo de pintura:
SEGURIDAD PERSONAL
a. No permita que entren al área de trabajo niños ni mujeres
embarazadas cuando lije pintura hasta que haya terminado de
asear el lugar.
b. Se recomienda el uso de máscaras o respiradores para todas las
personas que entren al área de trabajo. El filtro se debe reemplazar diariamente o cuando el usuario tenga dificultad para respirar.
NOTA: Sólo deben utilizarse mascaras adecuadas para trabajo
con polvo y vapores de pintura. Las mascaras ordinarias para pintura no ofrecen esta protección. Vea a su distribuidor de herramienta local para conseguir la máscara adecuada.
c. NO COMA, BEBA O FUME en la zona de trabajo para evitar
ingerir partículas de pintura contaminadas. Los usuarios deberán
lavarse y limpiarse ANTES de comer, beber o fumar. No deben
dejarse artículos para comer beber o fumar en el área de trabajo
donde el polvo se asentaría en ellos.
24
Español
3. Quite la base.
4. Reemplace la base y coloque los tornillos, asegurándose que el
disco quede bien alineado.
Operación
Para operar su lijadora, tómela como se muestra en la figura 5 y
enciéndala. Haga movimientos largos y consistentes sobre la superficie que esté lijando, permitiendo que la lijadora haga el trabajo.
NOTA: Aplicar presión excesiva a la herramienta únicamente disminuye la cantidad de material removido y da como resultado una superficie de calidad inferior.
Se suministra una empuñadura lateral con su unidad para que la
emplee si lo desea. La empuñadura lateral puede atornillarse en
cualquiera de los lados de la herramienta quitando primero el tornillo
de plástico (figura 6).
NOTA: Asegúrese de revisar su trabajo constantemente, ya que su
lijadora es capaz de remover el material rápidamente, especialmente
con papel de grano grueso.
La acción orbital de su lijadora le permite lijar en cualquier ángulo en
relación con el hilo de la madera en la mayor parte de los trabajos.
Para producir el mejor acabado posible, comience con lija de grano
grueso (burdo) y cámbielo gradualmente por lijas con grano más fino.
Aspire y limpie la superficie con una franela entre los cambios de tipo
de lija.
El tiempo que tarda en llenarse el recolector de polvo varía según el
tipo de material que se lije y el tipo de grano de la lija. Para obtener
mejores resultados, vacíe el recolector frecuentemente.
Cuando lije superficies pintadas, (vea en la página 24 las precauciones a tomar en cuenta cuando lije pintura) puede encontrarse con
que la lija se tapa con la pintura que levanta. Una pistola de calor funcionará mucho mejor para remover la pintura antes de lijar. SIGA
TODAS LAS INSTRUCCIONES DE SEGURIDAD DE EL MANUAL
DE INSTRUCCIONES DE LA PISTOLA DE CALOR.
Page 27

SEGURIDAD AMBIENTAL
a. La pintura debe removerse de tal manera que se minimice la can-
tidad generada de polvo.
b. Se deben sellar las áreas en que se remueve pintura con láminas
de plástico de 4 mils. de espesor.
c. El lijado debe hacerse en tal forma que se reduzca el desalojo de
pintura fuera de la zona de trabajo.
LIMPIEZA Y DESECHO
a. Todas las superficies en el área de trabajo deben ser aspiradas y
limpiadas a conciencia diariamente el tiempo que dure el proyecto de lijado. Las bolsas filtro de las aspiradoras deben cambiarse
frecuentemente.
b. Las láminas de plástico deben recogerse y desecharse con
cualquier resto de pintura. Deben depositarse en receptáculos
sellados y deben desecharse a través de los procedimientos de
recolección de basura normales. Durante la limpieza, niños y
mujeres embarazadas deben permanecer alejados de la zona de
trabajo inmediata.
c. Todo tipo de juguetes, mobiliario lavable y utensilios usados por
niños deben lavarse a conciencia antes de volver a utilizarse.
Limpieza
Conserve su unidad tan limpia como sea posible frotándola con un
trapo limpio y aplicándole aire a presión después de cada 5 horas de
uso.No emplee productos químicos agresivos o solventes para limpiar
la herramienta. Estos químicos pueden dañar seriamente los
polímeros utilizados en la fabricación de su unidad. Si acostumbra
enrollar el cordón eléctrico alrededor de su herramienta cuando la
guarda, déjelo suficientemente flojo para que la protección del cordón
no se dañe. Esto ayudará a evitar fallas prematuras en el cordón eléctrico.
Lubricación
Se han empleado baleros autolubricantes en la fabricación de su
herramienta, por lo tanto no se requerirá relubricación periódica. Sin
25
Español
embargo, se recomienda que, una vez al año, lleve o envíe la herramienta a un centro de servicio para una limpieza profunda e
inspección.
Reparaciones
Para garantizar la SEGURIDAD y la CONFIABILIDAD, deberán hacerse reparaciones, mantenimiento y ajustes de esta herramienta en
los centros autorizados de servicio D
EWALT u otras organizaciones
autorizadas. Estas organizaciones prestan servicio a las herramientas
D
EWALT y emplean siempre refacciones legitimas DEWALT.
Notas sobre aplicaciones
PAPEL DE LIJA - TIPOS DE GRANO
Abrasivos naturales
El pedernal es el más suave (7 en la escala de Mohs)* de los abrasivos naturales comunes. Tiene color pardusco y es muy barata.
La lija de granate es más dura que la de pedernal (7.5 en la escala de
Mohs) y se le identifica fácilmente por su color naranja brillante. Aún
cuando no es la más dura, la forma de fracturarse del abrasivo le proporciona buenos filos de corte para trabajar con madera.
El esmeril, aunque es más duro que el granate (9 en la escala de
Mohs), tiene filos romos, lo que lo hace un abrasivo para lijado muy
pobre. Su principal uso es en el pulido de metales.
Abrasivos Manufacturados
El óxido de aluminio blanco (AlO) es extremadamente duro (12 en la
escala de Mohs) y durable, lo que lo hace una gran alternativa para
usarse con su Pulidora de Órbita Aleatoria. “Blanco” describe la forma
de fabricación del abrasivo, no su color. Este abrasivo es fácil de
encontrar y viene en diferentes colores, debido al cada vez más
común uso de pigmentos. Los lubricantes de estearato en la lija mejoran su desempeño al bajar la temperatura y reducir la velocidad con
que se tapa.
El carburo de silicio (SiC) es el abrasivo más duro (13 en la escala de
Mohs) que comúnmente se pueda encontrar, después del diamante
industrial, pero no es tan resistente como los abrasivos de óxido de
aluminio. Este abrasivo se fractura fácilmente y forma caras afiladas
Page 28

quedan expuestas durante el lijado, el abrasivo no se sostiene y algunas partes no ofrecen filos cortantes. La ventaja es el costo.
Película:
los discos de lija con respaldo de película resuelven las
desventajas del papel. La película ofrece mayor rigidez mecánica que
este último. Es más cara, pero aumenta el rendimiento de corte del
abrasivo.
Tela y fibra vulcanizada
: Este tipo de respaldos son típicamente difíciles de encontrar y se usan en aplicaciones especializadas. La mayoría de las lijas que usted utilizará tendrán respaldo de papel o de
película.
Gancho y abrazadera y ASP:
Lo que sujeta el disco de lija a la base.
Gancho y abrazadera
: El disco de lija con lazos de paño en la parte
posterior (abrazadera) que se sujetan a unos postes (ganchos) en la
base de la lijadora. Las ventajas consisten en que el papel puede
volver a usarse y existe una zona más fría entre la lija y la pieza de
trabajo.
ASP:
El adhesivo sensible a la presión se aplica a la parte posterior
del disco de lija y se adhiere a la base de la lijadora (no a la misma
base que soporta la lija de gancho y abrazadera). La ventaja es el
costo. La mayor desventaja es la tendencia de las lijas con ASP a
adherirse permanentemente a la base si se les deja allí después de
lijar. ¿Por qué ocurre esto? Principalmente debido al calor. Durante el
proceso la lija y la base se calientan, esto ocasiona que el adhesivo
fluya por todos los surco del vinil y haga una fuerte unión. Si usted
quita la lija de la base inmediatamente después de que termine de
lijar, no permitirá que el adhesivo haga esta unión. Si deja el disco por
un par de días el adhesivo se asentará y adquirirá mayor fuerza que
el vehículo de papel, ocasionando que éste se rompa y dejándole una
pesada tarea de limpieza. Una desventaja más: Si usted realiza
pequeñas tareas de lijado y la lija no se desgasta , no podrá volver a
utilizarla y tendrá mayor desperdicio.
LIJADO
REGLAS BÁSICAS: ¿Cuáles romper y cuáles no?
Comience siempre con el grano más grueso. No rompa esta regla.
Los rasguños se hacen más pequeños conforme el número del grano
26
para trabajar todo el tiempo que dure el papel de lija. Esta característica “auto afilante” hace del SiC un abrasivo sobresaliente para la
remoción de material, pero limita su vida útil.
* La Escala de Mohs es la escala de dureza mineral. Califica el dia-
mante como 15, lo más duro, y el talco como 1
RECUBRIMIENTO ABIERTO CONTRA RECUBRIMIENTO
CERRADO
Los abrasivos se aplican al papel con pegamento. Cuando el grano
es grande (digamos grano 60 u 80) el porcentaje de cobertura usualmente se ve reducido a 60% ó 70% sobre la superficie del papel. Esto
aumenta la vida del papel al reducir la frecuencia con que se tapa.
Esto se llama recubrimiento abierto y casi es la única forma en que
puede conseguir lija de grano grueso. Con grano más fino, éste se
aplica en coberturas de 90% o más y se conocen como recubrimiento cerrado. Ya que las partículas de polvo son mucho más pequeñas,
la tendencia del papel a recoger material y taparse se ve ampliamente reducida.
TAMAÑOS DE GRANO
Existen varios sistemas para graduar. El más popular actualmente se
basa en el tamaño de tamiz. El número que se encuentra en la parte
posterior de su disco de lija se refiere al tamaño de la malla por la que
una partícula puede pasar. En la lija de grano 120, por ejemplo, el
grano pasará a través de una malla con 120 agujeros por pulgada lineal. Cada pulgada cuadrada de la malla tiene 14,400 agujeros (120 x
120). Mientras mayor sea el número, más finas serán las partículas.
Los tamaños comunes van de 36 a 600 con la reciente introducción
de tamaños de grano hasta 1200.
PAPEL Y PELÍCULA: EL RESPALDO:
Papel: el material más frecuentemente usado para llevar el abrasivo es
papel. El papel se gradúa de acuerdo al peso. El papel con peso “A”
es el más utilizado y es el más ligero de los que se emplean y brinda
buena durabilidad y flexibilidad para la mayoría de las aplicaciones de
lijado. Otros pesos de papel disponibles son C, D, E, y F. La desventaja del papel es su baja rigidez mecánica. Ya que las fibras del papel
Español
Page 29

aumenta y la calidad del acabado generalmente mejora. Cuando
cambie de grano, tenga cuidado de limpiar la superficie que esté trabajando. Una partícula de grano 80 en la superficie de trabajo cuando usted esté lijando con grano 220 dejará rasguños de grano 80. La
mejor forma de evitar esto es aspirarla superficie de trabajo y limpiarla después con una franela.
La acción orbital aleatoria de su lijadora se aplica igual a través del
grano que a lo largo de éste. Ya que las marcas de la lija son pequeñas
y en todos sentidos, la habilidad del ojo para verlas será reducida.
Siempre utilice una máscara para evitar respirar el polvo. NUNCA
ROMPA ESTA REGLA. Hemos diseñado la herramienta para recolectar la mayor parte del polvo creado durante el proceso de lijado, pero
la unidad no lo capturará todo. Para mejorar la captura, utilice una
aspiradora, pero SIEMPRE utilice una máscara para polvo.
ALGUNAS OTRAS RECOMENDACIONES PARA UN MEJOR
ACABADO
Una lijadora de órbita aleatoria es mucho más agresiva que otras herramientas orbitales de tamaño similar, así que usted quizá quiera considerar utilizar el siguiente número de grano cuando vaya a iniciar su
proyecto.
Ya que la acción orbital aleatoria hace rasguños pequeños, usted
puede encontrarse con que no necesita tantos cambios de grano.
Muchos fabricantes de muebles utilizan solamente grano 80, 120 y
150 en sus trabajos con resultados satisfactorios. Si tiene dudas acerca del acabado, frote la superficie con algún adelgazador de pintura,
los defectos se verán más oscuros que la madera que los rodea.
La inspección cuidadosa de la superficie antes de la operación de
acabado puede revelarle salientes. Trate de corregir estos problemas
con una plancha caliente y un trapo húmedo, o lije con cuidado una
superficie amplia alrededor de la saliente. Si lija vigorosamente únicamente sobre el defecto, puede originar una superficie cóncava.
Cuando haya quedado satisfecho con el trabajo de lijado y haya terminado con la lija de grano más fino, levante los granos depositados
en la superficie mojándola con un trapo húmedo. Cuando la madera
27
Español
se haya secado y usted esté listo para aplicar el acabado, vuelva alijar ligeramente para eliminar las fibras de madera que se hayan levantado con el agua. Aspire y limpie las superficies y aplique inmediatamente la primera capa del recubrimiento antes de que se ensucie
la madera.
MADERA: Algunas características importantes de la madera
Fibra dura y fibra suave
Existen maderas de fibras duras y de fibras suaves. Las fibras duras
son el producto típico de crecimiento de verano y las fibras suaves de
primavera. Todas las lijadoras remueven mayor cantidad de fibras
suaves que duras, y en vista de que la lijadora de órbita aleatoria es
más agresiva, removerá el material mucho más rápido. El lijado prolongado en una pieza de pino, por ejemplo, producirá un acabado
notablemente disparejo. Esta es una buena razón para corregir las
imperfecciones antes de lijar.
Accesorios
Los accesorios que se recomiendan para la herramienta están
disponibles a un costo adicional en su distribuidor local o en un centro de mantenimiento autorizado. Si necesita ayuda para localizar
algún accesorio para su herramienta, comuníquese con D
EWALT
Industrial Tool Co., 701 East Joppa Road, Baltimore, MD 21286 o visite nuestro sitio Web www.dewalt.com.
PRECAUCIÓN: El empleo de cualquier accesorio no recomendado
para esta herramienta puede ser peligroso.
PRECAUCIÓN: NO UTILICE BONETES PARA PULIR CON
LAZOS PARA ATAR. PUEDEN RESULTAR LESIONES PERSONALES EXTREMAS SI LOS DEDOS SE ATORAN CON UNO DE
LOS NUDOS DE LAZO AL GIRAR ÉSTOS.
Póliza de Garantía
IDENTIFICACIÓN DEL PRODUCTO:
Sello o firma del Distribuidor.
Nombre del producto: __________ Mod./Cat.: _____________
Marca: _____________________ Núm. de serie:__________
Page 30

28
(Datos para ser llenados por el distribuidor)
Fecha de compra y/o entrega del producto: __________________
Nombre y domicilio del distribuidor donde se adquirió el producto:
_____________________________________________________
Este producto está garantizado por un año a partir de la fecha de
entrega, contra cualquier defecto en su funcionamiento, así como en
materiales y mano de obra empleados para su fabricación. Nuestra
garantía incluye la reparación o reposición del producto y/o componentes sin cargo alguno para el cliente, incluyendo mano de obra, así
como los gastos de transportación razonablemente erogados derivados del cumplimiento de este certificado.
Para hacer efectiva esta garantía deberá presentar su herramienta
y esta póliza sellada por el establecimiento comercial donde se
adquirió el producto, de no contar con ésta, bastará la factura de compra.
EXCEPCIONES.
Esta garantía no será válida en los siguientes casos:
• Cuando el producto se hubiese utilizado en condiciones distintas a las normales;
• Cuando el producto no hubiese sido operado de acuerdo con el
instructivo de uso que se acompaña;
• Cuando el producto hubiese sido alterado o reparado por personas distintas a las enlistadas al final de este certificado.
Anexo encontrará una relación de sucursales de servicio de fábrica,
centros de servicio autorizados y franquiciados en la República
Mexicana, donde podrá hacer efectiva su garantía y adquirir partes,
refacciones y accesorios originales.
Garantía limitada por tres años
DEWALT reparará, sin cargo, cualquier falla que surja de defectos en
el material o la fabricación del producto, por hasta tres años a contar
de la fecha de compra. Esta garantía no cubre fallas de las piezas
causadas por su desgaste normal o abuso a la herramienta. Para
mayores detalles sobre la cobertura de la garantía e información acerca de reparaciones realizadas bajo garantía, visítenos en
www.dewalt.com o llámenos al 1 800 433-9258 (1-800-4-D
EWALT).
Esta garantía no aplica a accesorios o a daños causados por reparaciones realizadas o intentadas por terceros. Esta garantía le otorga
derechos legales específicos, además de los cuales puede tener
otros dependiendo del estado o provincia en que se encuentre.
Además de la garantía, las herramientas D
EWALT están cubiertas
por:
1 AÑO DE SERVICIO GRATUITO
DEWALT mantendrá la herramienta y reemplazará las piezas gastadas por su uso normal, sin cobro, en cualquier momento durante un
año a contar de la fecha de compra.
GARANTÍA DE REEMBOLSO DE SU DINERO POR 90 DÍAS
Si no está completamente satisfecho con el desempeño de su
máquina herramienta, láser o clavadora DEWALT, cualquiera sea el
motivo, podrá devolverlo hasta 90 días de la fecha de compra con su
recibo y obtener el reembolso completo de su dinero – sin necesidad
de responder a ninguna pregunta.
AMÉRICA LATINA: Esta garantía no se aplica a los productos que se
venden en América Latina. Para los productos que se venden en
América Latina, debe consultar la información de la garantía específica del país que viene en el empaque, llamar a la compañía local o visitar el sitio Web a fin de obtener esa información.
REEMPLAZO DE LAS ETIQUETAS DE ADVERTENCIA GRATUITO: Si sus etiquetas de advertencia se tornan ilegibles o se pierden,
llame al 1-800-4-D
EWALT para que se las reemplacen sin cost.
Español
Page 31

PARA REPARACION Y SERVICIO DE SUS HERRAMIENTAS
ELÉCTRICAS, FAVOR DE DIRIGIRSE AL CENTRO DE SERVICIO
MAS CERCANO
CULIACAN, SIN
Av. Nicolás Bravo #1063 Sur - Col. Industrial Bravo (667) 7 12 42 11
GUADALAJARA, JAL
Av. La Paz #1779 - Col. Americana Sector Juárez (33) 3825 6978
MEXICO, D.F.
Eje Central Lázaro Cárdenas No. 18
Local D, Col. Obrera (55) 5588 9377
MERIDA, YUC
Calle 63 #459-A - Col. Centro (999) 928 5038
MONTERREY, N.L.
Av. Francisco I. Madero No.831 - Col. Centro (81) 8375 2313
PUEBLA, PUE
17 Norte #205 - Col. Centro (222) 246 3714
QUERETARO, QRO
Av. Madero 139 Pte. - Col. Centro (442) 214 1660
SAN LUIS POTOSI, SLP
Av. Universidad 1525 - Col. San Luis (444) 814 2383
TORREON, COAH
Blvd. Independencia, 96 Pte. - Col. Centro (871) 716 5265
VERACRUZ, VER
Prolongación Díaz Mirón #4280 - Col. Remes (229) 921 7016
VILLAHERMOSA, TAB
Constitución 516-A - Col. Centro (993) 312 5111
PARA OTRAS LOCALIDADES LLAME AL: (55) 5326 7100
29
Español
IMPORTADOR: DEWALT S.A. DE C.V.
BOSQUES DE CIDROS ACCESO RADIATAS NO. 42
COL. BOSQUES DE LAS LOMAS, 3A. SECCIÓN, CP 05120
DELEGACIÓN CUAJIMALPA, MÉXICO, D.F
TEL. 5 326 7100
R.F.C.: BDE810626-1W7
Para servicio y ventas consulte
“HERRAMIENTAS ELECTRICAS”
en la sección amarilla.
Page 32

DEWALT Industrial Tool Co., 701 East Joppa Road, Baltimore, MD 21286 (DEC05) Form No. 384233-00
DW441, DW442, DW443, DW444 COPYRIGHT © 2000, 2004, 2005 D
EWALT
The following are trademarks for one or more D
EWALT power tools: the yellow and black color scheme; the “D” shaped air intake grill; the array
of pyramids on the handgrip; the kit box configuration; and the array of lozenge-shaped humps on the surface of the tool.
 Loading...