

DeWalt DCD740 Instruction Manual
LULU
dz]n
"0 Z
O_<{
>-o
o_>
wz
c_3--
co
cow
O,M
Z-J
£
_<o
c'c
- <_ CI_
O'F- _
_z W
cr <Ccr
co <_ co
zcsD
1
@
0
0
0
1
O o')
"0 ,(_
0')0
_ e'-'_
E'E
°8 F.
DEWALT Industrial Tool Co., 701 Joppa Road, Baltimore, MD 21286
(JUN11) Part No. N064781 DCD740 Copyright © 2011 DEWALT
The following aretrademarks for one or more DEWALT power tools: the yellow and black color scheme, the
"D" shaped air intake grill, the array of pyramids on the handgrip, the kit box configuration, and the array of
lozenge-shaped humps on the surface of the tool.
S Definitions: Safety Guidelines \
The definitions below describe the level of severity for each signal word. Please read the
manual and pay attention to these symbols.
_DANGER: Indicates an imminently hazardous situation which, if not avoided, will result
in death or serious injury.
_, WARNING: Indicates a potentially hazardous situation which, if not avoided, could result
in death or serious injury.
i_ CAUTION: Indicates a potentially hazardous situation which, if not avoided, may result in
minor or moderate injury.
NOTICE: Indicates a practice not related to personal injury which, if not avoided, may
result inproperty damage.
IF YOU HAVE ANY QUESTIONS OR COMMENTS ABOUT THIS OR ANY DEWALT TOOL, CALL
US TOLL FREEAT: 1-800-4-DEWALT (1-800-433-9258}.
WARNING: To reduce the risk of injury, read the instruction manual.
General Power Tool Safety Warnings
_ ARNING! Read all safety warnings and all instructions. Failure to follow the warnings
and instructions may result in electric shock, fire and/or serious injury.
SAVE ALL WARNINGS AND INSTRUCTIONS
FOR FUTURE REFERENCE
The term "power tool" in the warnings refers to your mains-operated (corded) power tool or battery-
operated (cordless) power tool.
1) WORK AREA SAFETY
a) Keep work area clean and well lit. Cluttered or dark areas invite accidents.
b) Do not operate power tools in explosive atmospheres, such as in the presence of
flammable liquids, gases or dust. Power tools create sparks which may ignite the dust
or fumes.
c) Keep children and bystanders away while operating a power tool. Distractions can
cause you to lose control.
2) ELECTRICAL SAFETY
@ Power tool plugs must match the outleL Never modify the plug in any way. Do not
use any adapter plugs with earthed (grounded) power tools. Unmodified plugs and
matching outlets will reduce risk of electric shock.
b) Avoid body contact with earthed or grounded surfaces such as pipes, radiators,
ranges and refrigerators. There is an increased risk of electric shock if your body is
earthed or grounded.
c) Do not expose power tools to rain or wet conditions. Water entering a power tool will
increase the risk of electric shock.
d) Do not abuse the cord. Never use the cord for carrying, pulling or unplugging the
power tool Keep cord away from heat, oil, sharp edges or moving parts. Damaged
or entangled cords increase the risk of electric shock.
e) When operating a power tool outdoors, use an extension cord suitable for outdoor
use. Use of a cord suitable for outdoor use reduces the risk of electric shock.
0 If operating a power tool in a damp location is unavoidable, use a ground fault
circuit interrupter (GFCI) protected supply. Use of a GFCI reduces the risk of electric
shock.
3) PERSONAL SAFETY
@ Stay alert, watch what you are doing and use common sense when operating a
power tool. Do not use a power tool while you are tired or under the influence of
drugs, alcohol or medication. A moment of inattention while operating power tools may
result in serious personal injury.
b) Use personal protective equipment. Always wear eye protection. Protective
equipment such as dust mask, non-skid safety shoes, hard hat, or hearing protection used
for appropriate conditions will reduce personal injuries.
c) Prevent unintentional starting. Ensure the switch is in the off position before
connecting to power source and/or battery pack, picking up or carrying the tool.
Carrying power tools with your finger on the switch or energizing power tools that have the
switch on invites accidents.
d) Remove any adjusting key or wrench before turning the power tool on. A wrench or
a key left attached to a rotating part of the power tool may result in personal injury.
e) Do not overreach. Keep proper footing and balance at all times. This enables better
control of the power tool in unexpected situations.
Dress properly. Do not wear loose clothing or jewelry. Keep your hair, clothing and
gloves away from moving parts. Loose clothes, jewelry or long hair can be caught in
moving parts.
g) If devices are provided for the connection of dust extraction and collection facilities,
ensure these are connected and properly used. Use of dust collection can reduce dust-
related hazards.
4) POWER TOOL USE AND CARE
@ Do not force the power tool Use the correct power tool for your application. The
correct power tool will do the job better and safer at the rate for which it was designed.
b) Do not use the power tool if the switch does not turn it on and off. Any power tool
that cannot be controlled with the switch is dangerous and must be repaired.
c) Disconnect the plug from the power source andlor the battery pack from the power
tool before making any adjustments, changing accessories, or storing power tools.
Such preventive safety measures reduce the risk of starting the power tool accidentally.
d) Store idle power tools out of the reach of children and do not allow persons
unfamiliar with the power tool or these instructions to operate the power tool.
Power tools are dangerous in the hands of untrained users.
e) Maintain power tools. Check for misalignment or binding of moving parts, breakage
of parts and any other condition that may affect the power tool's operation. If
damaged, have the power tool repaired before use. Many accidents are caused by
poorly maintained power tools.
t) Keep cutting tools sharp and clean. Properly maintained cutting tools with sharp cutting
edges are less likely to bind and are easier to control
g) Use the power tool, accessories and tool bits, etc. in accordance with these
instructions, taking into account the working conditions and the work to be
performed. Use of the power tool for operations different from those intended could result
in a hazardous situation.
5) BA'rFERY TOOL USE AND CARE
@ Recharge only with the charger specified by the manufacturer. A charger that is
suitable for one type of battery pack may create a risk of fire when used with another battery
pack.
b) Use power tools only with specifically designated battery packs. Use of any other
battery packs may create a risk of injury and fire.
c) When battery pack is not in use, keep it away from other metal objects like paper
clips, coins, keys, nails, screws, or other small metal objects that can make a
connection from one terminal to another. Shorting the battery terminals together may
cause bums or a fire.
d) Under abusive conditions, liquid may be ejected from the battery; avoid contact. If
contact accidentally occurs, flush with water. If liquid contacts eyes, additionally
seek medical help. Liquid ejected from the battery may cause irritation or bums.
6) SERVICE
@ Have your power tool serviced by a qualified repair person using only identical
replacement parts. This will ensure that the safety of the power tool is maintained.
Drill Safety Warnings
• Use auxiliary handle(s), if supplied with the tool. Loss of control can cause personal injury.
• Hold power tool by insulated gripping surfaces, when performing an operation where
the cutting accessory may contact hidden wiring. Cutting accessory contacting a "live"
wire may make exposed metal parts of the power tool "live" and could give the operator an
electric shock.
• Use clamps or another practical way to secure and support the workpiece to a stable
platform. Holding the work by hand or against your body leaves it unstable and may lead to
loss of control
• Wear safety goggles or other eye protection. Drilling operations cause chips to fly. Flying
particles can cause permanent eye damage.
• Keep a firm grip on the tool at all times. Do not attempt to operate this tool without
holding it with both hands. Operating this tool with one hand will result in loss of control.
Breaking through or encountering hard materials such as re-bar may be hazardous as well.
• Accessories and tool may get hot during operation. Wear gloves when handling them if
performing heat producing applications such as drilling metals.
• Air vents often cover moving parts and should be avoided. Loose clothes, jewelry or long
hair can be caught in moving parts.
_,WARNING: ALWA YS usesafety glasses. Everyday eyeglasses are NO Tsafety glasses. Also use
face or dust mask if cutting operation is dusty. ALWAYS WEAR CERTIFIED SAFETY EQUIPMENT."
• ANSI Z87.1 eye protection (CAN/CSA Z94.3),
• ANSI $12.6 ($3. 19)hearing protection,
• NIOSH/OSHA/MSHA respiratory protection.
_WARNING: Some dust created by power sanding, sawing, grinding, drilling, and other
construction activities contains chemicals known to the State of California to cause cancer, birth
defects or other reproductive harm. Some examples of these chemicals are:
• lead from lead-based paints,
• crystalline silica from bricks and cement and other masonry products, and
• arsenic and chromMm from chemically-treated lumber.
Your risk from these exposures varies, depending on how often you do this type of work. To reduce
your exposure to these chemicals: work in a well ventilated area, and work with approved safety
equipment, such as those dust masks that are specially designed to filter out microscopic particles.
• Avoid prolonged contact with dust from power sanding, sawing, grinding, drilling, and
other construction activities. Wear protective clothing and wash exposed areas with
soap and water. Allowing dust to get into your mouth, eyes, or lay on the skin may promote
absorption of harmful chemicals.
_WARNING: Use of this tool can generate and/or disperse dust, which may cause serious and
permanent respiratory or other injury. Always use NIOSH/OSHA approved respiratory protection
appropriate for the dust exposure. Direct particles away from face and body.
_CAUTION: When not in use, place tool on its side on a stable surface where it will not
cause a tripping or falling hazard. Some tools with large battery packs will stand upright on the
battery pack but may be easily knocked over.
• The label onyour tool may include the following symbols. Thesymbols and their definitions are
as follows:
V.................. volts A ................... amperes
Hz................ hertz W .................. watts
min .............. minutes
.... ........... direct current
(_)................ Class I Construction
(grounded)
[] ................ Class II Construction
(double insulated)
.../min ......... per minute
IPM .............. impacts per minute
"_ ................ alternating current
................ alternating or direct current
no ................. no load speed
@.................. earthing terminal
.................. safety alert symbol
BPM.............. beats per minute
RPM.............. revolutions per minute
Important Safety Instructions for All Battery Packs
When ordering replacement battery packs, be sure to include the catalog number and voltage.
Consult the chart at the end of this manual for compatibility ofchargers and battery packs.
The battery pack is not fullycharged out of the carton. Before using the battery pack and charger,
read the safety instructions below and then follow charging procedures outlined.
READ ALL INSTRUCTIONS
• Do not charge or use the battery pack in explosive atmospheres, such as in the
presence of flammable liquids, gases or dusL insertingor removing the battery pack from
the charger may ignite the dust or fumes.
• NEVER force the battery pack into the charger. DO NOT modify the battery pack inany
way to fit into a non-compatible charger as battery pack may rupture causing serious
personal injury. Consult the chart at the end of this manual for compatibility of batteries and
chargers.
• Charge the battery packs only in designated DEWALT chargers.
• DO NOT splash or immerse in water or other liquids.
• Do not store or use the tool and battery pack in locations where the temperature may
reach or exceed 105°F (40°C) (such as outside sheds or metal buildings in summer).
For best lifestore battery packs in a cool, dry location.
NOTE: Do not store the battery packs in a tool with the trigger switch locked on. Never
tape the trigger switch in the ON position.
i_WARNING: Fire hazard. Never attempt to open the battery pack for any reason. If the battery
pack case is cracked or damaged, do not insert into the charger. Do not crush, drop or damage
the battery pack. Do not use a battery pack or charger that has received a sharp blow, been
dropped, run over or damaged in any way (e.g., pierced with a nail, hit with a hammer, stepped
on). Damaged battery packs should be returned to the service center for recycling.
WARNING: Fire hazard. Do not store or carry the battery pack so that metal objects
can contact exposed battery terminals. For example, do not place the battery pack in
aprons, pockets, tool boxes, product kit boxes, drawers, etc., with loose nails, screws, keys, etc.
Transporting batteries can possibly cause fires if the battery terminals inadvertently
come in contact with conductive materials such as keys, coins, hand tools and the like.
The US Department of Transportation Hazardous Material Regulations (HMR) actually prohibit
transporting batteries in commerce or on airplanes (e.g.,packed in suitcases and carry-on luggage)
UNLESS they are properly protected from short circuits. So when transporting individual battery
packs, make sure that the battery terminals are protected and well insulated from materials that
could contact them and cause a short circuit.
SPECIFIC SAFETY INSTRUCTIONS FOR LITHIUM ION (Li-lon)
• Do not incinerate the battery pack even if it is severely damaged or is completely
worn out. The battery pack can explode in a fire. Toxic fumes and materials are created when
lithium ion battery packs are burned.
• If battery contents come into contact with the skin, immediately wash area with mild
soap and water. If battery liquid gets into the eye, rinse water over the open eye for 15 minutes
or until irritation ceases. If medical attention is needed, the battery electrolyte is composed of a
mixture of liquid organic carbonates and lithium salts.
• Contents of opened battery cells may cause respiratory irritation. Provide fresh air. If
symptoms persist, seek medical attention.
J_WARNING: Bum hazard. Battery liquid may be flammable if exposed tospark or flame.
The RBRC TM Seal
The RBRCTM (Rechargeable Battery Recycling Corporation) Seal on the nickel
cadmium, nickel metal hydride or lithium ion batteries (or battery packs) indicate that
the costs to recycle these batteries (or battery packs) at the end of their useful life
have already been paid by DEWALT. In some areas, it is illegal to place spent nickel
cadmium, nickel metal hydride or lithium ion batteries in the trash or municipal solid
waste stream and the RBRC program provides an environmentally conscious
alternative.
RBRCTM, in cooperation with DEWALT and other battery users, has established programs in the
United States and Canada to facilitate the collection of spent nickel cadmium, nickel metal hydride
or lithium ion batteries. Help protect our environment and conserve natural resources by returning
the spent nickel cadmium, nickel metal hydride or lithium ion batteries to an authorized DEWALT
service center or to your local retailer for recycling. You may also contact your local recycling center
for information on where to drop off the spent battery.
RBRCTM isaregistered trademark of the Rechargeable Battery Recycling Corporation.
Important Safety Instructions for All Battery Chargers
SAVE THESE INSTRUCTIONS: This manual contains important safety and operating instructions
for battery chargers.
• Before using the charger, read all instructions and cautionary markings on the charger, battery
pack and product using the battery pack.
/¢ WARNING: Shock hazard. Do not allow any liquid to get inside the charger. Electric shock may
result.
_,CAUTION: Bum hazard. Toreduce the risk of injury, charge only DEWALT rechargeable battery
packs. Other types of batteries may overheat and burst resulting in personal injury and property
damage.
NOTICE: Under certain conditions, with the charger plugged into the power supply, the charger can
be shorted by foreign material Foreign materials of a conductive nature, such as, but not limited
to, grinding dust, metal chips, steel wool, aluminum foil or any buildup of metallic particles should be
kept away from the charger cavities. Always unplug the charger from the power supply when there
is no battery pack in the cavity. Unplug the charger before attempting to clean.
• DO NOT attempt to charge the battery pack with any chargers other than the ones in
this manual. The charger and battery pack are specifically designed to work together.
• These chargers are not intended for any uses other than charging DEWALT
rechargeable batteries. Any other uses may result in risk of fire, electric shock or electrocution.
• Do not expose the charger to rain or snow.
• Pull by the plug rather than the cord when disconnecting the charger. This will reduce
the risk of damage to the electric plug and cord.
• Make sure that the cord is located so that it will not be stepped on, tripped over or
otherwise subjected to damage or stress.
• Do not use an extension cord unless it is absolutely necessary. Use of improper extension
cord could result in risk of fire, electric shock or electrocution.
• When operating a charger outdoors, always provide a dry location and use an
extension cord suitable for outdoor use. Use of a cord suitable for outdoor use reduces the
risk of electric shock.
• An extension cord must have adequate wire size (AWG or American Wire Gauge) for
safety. The smaller the gauge number of the wire, the greater the capacity of the cable, that is,
16 gauge has more capacity than 18 gauge. An undersized cord will cause a drop in line voltage
resulting in loss of power and overheating. When using more than one extension to make up
the total length, be sure each individual extension contains at least the minimum wire size. The
following table shows the correct size to use depending on cord length and nameplate ampere
rating. If in doubt, use thenext heavier gauge. Thelower the gauge number, the heavier the cord.
Ampere Rating
More
Than
0
6
10
12
Not More
Than
6
10
12
16
Minimum Gauge for Cord Sets
Volts Total Length of Cord in Feet (meters)
120V 25 (7.6) 50(15.2) 100 (30.5) 150 (45.7)
240V 50 (15.2) 100 (30.5) 200 (61.0) 300 (91.4)
AWG
18
18
16
14
16
16
16
12
16 14
14 12
14 12
Not Recommended
• Do not place any object on top of the charger or place the charger on a soft surface
that might block the ventilation slots and result in excessive internal heat. Place the
charger in a position away from any heat source. The charger is ventilated through slots in the
top and the bottom of the housing.
• Do not operate the charger with a damaged cord or plug.
• Do not operate the charger if it has received a sharp blow, been dropped or otherwise
damaged in any way. Take it to an authorized service center.
• Do not disassemble the charger; take it to an authorized service center when service or
repair is required. Incorrect reassembly may result in arisk of electric shock, electrocution or fire.
• Disconnect the charger from the outlet before attempting any cleaning. This will
reduce the risk of electric shock. Removing the battery pack will not reduce this risk.
• NEVER attempt to connect 2 chargers together.
• The charger is designed to operate on standard 120V household electrical power. Do
not attempt to use It on any other voltage. This does not apply to the vehicular charger.
Chargers
Your tool uses a DEWALT charger. Be sure to read all safety instructionsbefore using your charger.
Consult the chart at the end of this manual for compatibility of chargers and battery packs.
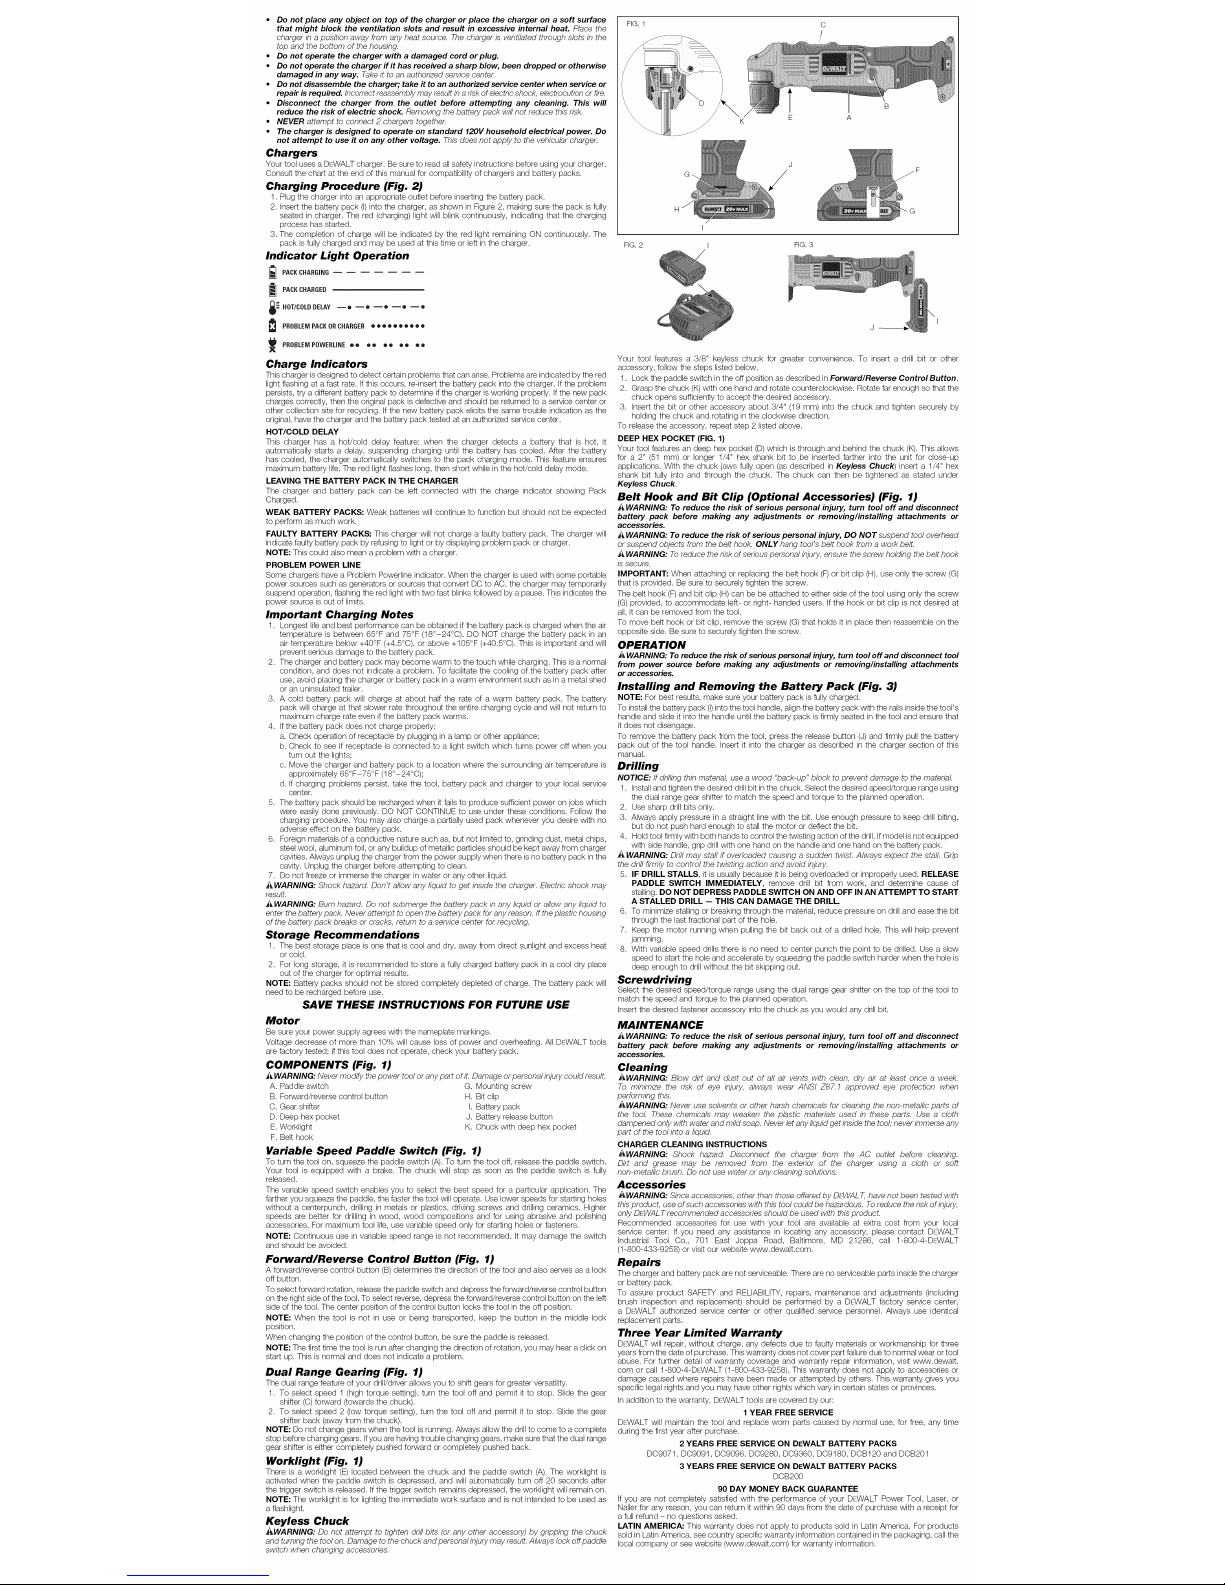
Charging Procedure (Fig. 2)
1. Plug the charger into an appropriate outlet before inserting the battery pack.
2. Insert the battery pack (I) into the charger, as shown in Figure 2, making sure the pack isfully
seated in charger. The red (charging) light will blink continuously, indicating that the charging
process has started.
3. The completion of charge will be indicated by the red light remaining ON continuously. The
pack is fully charged and may be used at this time or left inthe charger.
Indicator Light Operation
PACKCHARGING
PACKCHARGED
HOT/COLDDELAY--o --e _e _e _e
PROBLEMPACKORCHARGER• • • • • • =,ee•
ee ee ee eo oe
PROBLEMPOWERLINE
Charge Indicators
This charger is designed to detect certain problems that can arise. Problems are indicatedby the red
lightflashing at a fast rate. Ifthis occurs, re-insert the battery pack into the charger. If the problem
persists, try a different battery pack to determine ifthe charger is working properly. Ifthe new pack
charges correctly, then the original pack isdefective and should be returned to a service center or
other collection site for recycling. If the new battery pack elicits the same trouble indication as the
original, have the charger and the battery pack tested at an authorized service center.
HOT/COLD DELAY
This charger has a hot/cold delay feature: when the charger detects a battery that is hot, it
automatically starts a delay, suspending charging until the battery has cooled. After the battery
has cooled, the charger automatically switches to the pack charging mode. This feature ensures
maximum battery life. The red light flashes long, then short while in the hot/cold delay mode.
LEAVING THE BATTERY PACK IN THE CHARGER
The charger and battery pack can be left connected with the charge indicator showing Pack
Charged.
WEAK BATTERY PACKS: Weak batteries will continue to function but should not be expected
to perform as much work.
FAULTY BA'rrERY PACKS: This charger will not charge a faulty battery pack. The charger will
indicate faulty battery pack by refusing to light or by displaying problem pack or charger.
NOTE: This could also mean a problem with a charger.
PROBLEM POWER LINE
Some chargers have a Problem Powerline indicator. When the charger is used with some portable
power sources such as generators or sources that convert DC to AC, the charger may temporarily
suspend operation, flashing the red light with two fast blinks followed by a pause. This indicates the
power source is out of limits.
Important Charging Notes
1. Longest life and best performance can be obtained ifthe battery pack is charged when the air
temperature is between 65°F and 75°F (18°-24°C). DO NOT charge the battery pack in an
air temperature below +40°F (+4.5°C), or above +105°F (+40.5°C). This is important and will
prevent serious damage to the battery pack.
2. The charger and battery pack may become warm to the touch while charging. This is a normal
condition, and does not indicate a problem. To facilitate the cooling of the battery pack after
use, avoid placing the charger or battery pack in a warm environment such as ina metal shed
or an uninsulated trailer.
3. A cold battery pack will charge at about half the rate of a warm battery pack. The battery
pack will charge at that slower rate throughout the entire charging cycle and will not return to
maximum charge rate even if the battery pack warms.
4. Ifthe battery pack does not charge properly:
a. Check operation of receptacle by plugging in a lamp or other appliance;
b. Check to see if receptacle is connected to a light switch which turns power off when you
turn out the lights;
c. Move the charger and battery pack to a location where the surrounding air temperature is
approximately 65°F-75°F (18°-24°C);
d. If charging problems persist, take the tool, battery pack and charger to your local service
center.
5. The battery pack should be recharged when it fails to produce sufficient power on jobs which
were easily done previously. DO NOT CONTINUE to use under these conditions. Follow the
charging procedure. You may also charge a partially used pack whenever you desire with no
adverse effect on the battery pack.
6. Foreign materials of a conductive nature such as, but not limited to, grinding dust, metal chips,
steel wool, aluminum foil, or any buildup of metallic particles should be kept away from charger
cavities. Always unplug the charger from the power supply when there is no battery pack in the
cavity. Unplug the charger before attempting to clean.
7. Do not freeze or immerse the charger inwater or any other liquid.
i_ WARNING: Shock hazard. Don't allow any liquid to get inside the charger. Electric shock may
result.
_WARNING: Burn hazard. Do not submerge the battery pack in any liquid or allow any liquid to
enter the battery pack. Never attempt to open the battery pack for any reason. If the plastic housing
of the battery pack breaks or cracks, return to a service center for recycling.
Storage Recommendations
1. The best storage place is one that is cool and dry, away from direct sunlight and excess heat
or cold.
2. For long storage, it is recommended to store a fully charged battery pack in a cool dry place
out of the charger for optimal results.
NOTE: Battery packs should not be stored completely depleted of charge. The battery pack will
need to be recharged before use.
SAVE THESE INSTRUCTIONS FOR FUTURE USE
Motor
Be sure your power supply agrees with the nameplate markings.
Voltage decrease of more than 10% will cause loss of power and overheating. All DEWALT tools
are factory tested; if this tool does not operate, check your battery pack.
COMPONENTS (Fig. 1)
i_ WARNING: Never modify the power tool or any part of it. Damage or personal injury could result.
A. Paddle switch
B. Forward/reverse control button
C. Gear shifter
D. Deep hex pocket
E. Worklight
F. Belt hook
G. Mounting screw
H. Bit clip
I. Battery pack
J. Battery release button
K. Chuck with deep hex pocket
Variable Speed Paddle Switch (Fig. 1)
To turn the tool on, squeeze the paddle switch (A). To turn the tool off, release the paddle switch.
Your tool is equipped with a brake. The chuck will stop as soon as the paddle switch is fully
released.
The variable speed switch enables you to select the best speed for a particular application. The
farther you squeeze the paddle, the faster the tool willoperate. Use lower speeds forstarting holes
without a centerpunch, drilling in metals or plastics, driving screws and drilling ceramics. Higher
speeds are better for drilling in wood, wood compositions and for using abrasive and polishing
accessories. For maximum tool life, use variable speed onlyfor starting holes or fasteners.
NOTE: Continuous use invariable speed range is not recommended. It may damage the switch
and should be avoided.
Forward/Reverse Control Button (Fig. 1)
A brward/reverse control button (B)determines the direction of the tool and also serves as a lock
off button.
To select forward rotation, release the paddle switch and depress the forward/reverse control button
on the right side of the tool. To select reverse, depress the forward/reverse control button on the left
side of the tool. The center position of the control button locks the tool in the off position.
NOTE: When the tool is not in use or being transported, keep the button in the middle lock
position.
When changing the position of the control button, be sure the paddle is released.
NOTE: The first time the tool is run after changing the direction of rotation, you may hear a click on
start up. This is normal and does not indicate a problem.
Dual Range Gearing (Fig. 1)
The dual range feature of your drill/driver allows you to shift gears for greater versatility.
1. To select speed 1 (high torque setting), turn the tool off and permit it to stop. Slide the gear
shifter (C)forward (towards the chuck).
2. To select speed 2 (low torque setting), turn the tool off and permit it to stop. Slide the gear
shifter back (away from the chuck).
NOTE: Do not change gears when the tool is running. Always allow the drill to come to a complete
stop before changing gears. If youare having trouble changing gears, make sure that the dual range
gear shifter is either completely pushed forward or completely pushed back.
Worklight (Fig. 1)
There is a worklight (E) located between the chuck and the paddle switch (A). The worklight is
activated when the paddle switch is depressed, and will automatically turn off 20 seconds after
the trigger switch is released. If the trigger switch remains depressed, the worklight will remain on.
NOTE: The worklight is for lighting the immediate work surface and is not intended to be used as
a flashlight.
Keyless Chuck
_WARNING: Do not attempt to tighten drill bits (or any other accessory) by gripping the chuck
and turning the tool on. Damage to the chuck and personal injurymay result. Always lock off paddle
switch when changing accessories.
FIG. 1
c
/
K
A
H
FIG. 2 I FIG. 3
G
I
J
Your tool features a 3/8" keyless chuck for greater convenience. To insert a drill bit or other
accessory, follow the steps listed below.
1. Lock the paddle switch in the off position as described in Forward/Reverse ControlButton.
2. Grasp the chuck (K) with one hand and rotate counterclockwise. Rotate far enough so that the
chuck opens sufficiently to accept the desired accessory.
3. Insert the bit or other accessory about 3/4" (19 mm) into the chuck and tighten securely by
holding the chuck and rotating in the clockwise direction.
To release the accessory, repeat step 2 listed above.
DEEP HEX POCKET (FIG. 1)
Your tool features an deep hex pocket (D)which is through and behind the chuck (K). This allows
for a 2" (51 mm) or longer 1/4" hex shank bit to be inserted farther into the unit for close-up
applications. With the chuck jaws fully open (as described in Keyless Chuck) insert a 1/4" hex
shank bit fully into and through the chuck. The chuck can then be tightened as stated under
Keyless Chuck.
Belt Hook and Bit Clip (Optional Accessories) (Fig. 1)
_ WARNING: To reduce the risk of serious personal injury, turn tool off and disconnect
battery pack before making any adjustments or removing/installing attachments or
accessories.
i_ WARNING: To reduce the risk of serious personal injury, DO NOT suspend tool overhead
or suspend objects from the belt hook. ONLY hang tool's belt hook from a work belt.
ii WARNING: To reduce the risk of serious personal injury, ensure the screw holding the belt hook
is secure.
IMPORTANT: When attaching or replacing the belt hook (F) or bit clip (H), use only the screw (G)
that is provided. Be sure to securely tighten the screw.
The belt hook (F)and bit clip (H) can be be attached to either side of the tool using only the screw
(G) provided, to accommodate left- or right- handed users. If the hook or bit clip is not desired at
all, it can be removed from the tool.
To move belt hook or bit clip, remove the screw (G) that holds it in place then reassemble on the
opposite side. Be sure to securely tighten the screw.
OPERA TION
A WARNING: To reduce the risk of serious personal injury, turn tool off and disconnect tool
from power source before making any adjustments or removing/installing attachments
or accessories.
Installing and Removing the Battery Pack (Fig. 3)
NOTE: For best results, make sure your battery pack isfully charged.
To install the battery pack (I) into the tool handle, align the battery pack with the rails inside the tool's
handle and slide it into the handle until the battery pack is firmly seated in the tool and ensure that
it does not disengage.
To remove the battery pack from the tool, press the release button (J) and firmly pull the battery
pack out of the tool handle. Insert it into the charger as described in the charger section of this
manual.
Drilling
NOTICE:/f drilling thin material, use a wood "back-up" block to prevent damage to the material.
1. Install and tighten the desired drillbit inthe chuck. Select the desired speed/torque range using
the dual range gear shifter to match the speed and torque to the planned operation.
2. Use sharp drillbits only.
3. Always apply pressure in a straight line with the bit. Use enough pressure to keep drill biting,
but do not push hard enough to stall the motor or deflect the bit.
4. Hold tool firmly with both hands to control the twisting action of the drill. Ifmodel is not equipped
with side handle, grip drill with one hand on the handle and one hand on the battery pack.
i_ WARNING: Drill may staff if overloaded causing asudden twist. Always expect the stall. Grip
the drill firmly to control the twisting action and avoid injury.
5. IF DRILL STALLS, it is usually because it is being overloaded or improperly used. RELEASE
PADDLE SWITCH IMMEDIATELY, remove drill bit from work, and determine cause of
stalling. DO NOT DEPRESS PADDLE SWITCH ON AND OFF IN AN A'rFEMPT TO START
A STALLED DRILL -- THIS CAN DAMAGE THE DRILL.
6. To minimize stalling or breaking through the material, reduce pressure on drill and ease the bit
through the last fractional part of the hole.
7. Keep the motor running when pulling the bit back out of a drilled hole. This will help prevent
jamming.
8. With variable speed drills there is no need to center punch the point to be drilled. Use a slow
speed to start the hole and accelerate by squeezing the paddle switch harder when the hole is
deep enough to drill without the bit skipping out.
Screwdriving
Select the desired speed/torque range using the dual range gear shifter on the top of the tool to
match the speed and torque to the planned operation.
Insert the desired fastener accessory into the chuck as you would any drill bit.
MAINTENANCE
_WARNING: To reduce the risk of serious personal injury, turn tool off and disconnect
battery pack before making any adjustments or removing/installing attachments or
accessories.
Cleaning
AWARNING: Blow dirt and dust out of all air vents with clean, dry air at least once a week.
To minimize the risk of eye injury, always wear ANSI Z87.1 approved eye protection when
performing this.
AWARNING: Never use solvents or other harsh chemicals for cleaning the non-metallic parts of
the tool. These chemicals may weaken the plastic materials used in these parts. Use a cloth
dampened only with water and mild soap. Never let any liquid get inside the tool,"never immerse any
part of the tool into a liquid.
CHARGER CLEANING INSTRUCTIONS
AWARNING: Shock hazard. Disconnect the charger from the AC outlet before cleaning.
Dirt and grease may be removed from the exterior of the charger using a cloth or soft
non-metallic brush. Do not use water or any cleaning solutions.
Accessories
_WARNING: Since accessories, other than those offered by DEWALT, have not been tested with
this product, use of such accessories with this tool could be hazardous. Toreduce the risk of injury,
only DEWALT recommended accessories should be used with this product.
Recommended accessories for use with your tool are available at extra cost from your local
service center. If you need any assistance in locating any accessory, please contact DEWALT
Industrial Tool Co., 701 East Joppa Road, Baltimore, MD 21286, call 1-800-4-DfiiiWALT
(1-800-433-9258) or visit our website www.dewalt.com.
Repairs
The charger and battery pack are not serviceable. There are no serviceable parts inside the charger
or battery pack.
To assure product SAFETY and RELIABILITY, repairs, maintenance and adjustments (including
brush inspection and replacement) should be performed by a DFT:WALTfactory service center,
a DEWALT authorized service center or other qualified service personnel. Always use identical
replacement parts.
Three Year Limited Warranty
DEWALT will repair, without charge, any defects due to faulty materials or workmanship for three
years from the date of purchase. This warranty does not cover part failure due to normal wear or tool
abuse. For further detail of warranty coverage and warranty repair information, visit www.dewalt.
com or call 1-800-4-DEWALT (1-800-433-9258). This warranty does not apply to accessories or
damage caused where repairs have been made or attempted by others. This warranty gives you
specific legal rights and you may have other rights which vary in certain states or provinces.
In addition to the warranty, DEWALT tools are covered by our:
1 YEAR FREE SERVICE
DEWALT will maintain the tool and replace worn parts caused by normal use, for free, any time
during the first year after purchase.
2 YEARS FREE SERVICE ON DEWALT BATTERY PACKS
DC9071, DC9091, DC9096, DC9280, DC9360, DC9180, DCB120 and DCB201
3 YEARS FREE SERVICE ON DEWALT BATTERY PACKS
DCB200
90 DAY MONEY BACK GUARANTEE
If you are not completely satisfied with the performance of your DEWALT Power Tool, Laser, or
Nailer for any reason, you can return it within 90 days from the date of purchase with a receipt for
a full refund - no questions asked.
LATIN AMERICA: This warranty does not apply to products sold in Latin America. For products
sold in Latin America, see country specific warranty information contained in the packaging, call the
local company or see website (www.dewalt.com) for warranty information.
FREE WARNING LABEL REPLACEMENT: If your warning labels become illegible or are missing,
call 1-800-4-DEWALT (1-800-433-9258) for a free replacement.
ntt n_AN 3/8" (10ram) VSRCORDLESS
U _._U J_U EIGHTANGLE OH|LIJDRiVER
SER.
TO REDUCE THE RiSK OF
iNJURY, USER MUST READ
INSTHOCn0N MANUAL. USE ONLY WiTH 0EWALT
BATTEEIES, ALWAYS USE PROPER EYE AND
RESPIRATORY PROTECTION.
R_WALT INRRBTMALTOOL CO. BALTIMORE,MR 212_6BSA
FOBSERVICE INFORMATION, BALLI_-DEWALT
_. www.D_WALT.com j
Ddfinitions : lignes directrices en
mati_re de sdcuritd
Les definitions ci-dessous decrivent le niveau de danger pour chaque mot-
indicateuremploye. Lire le mode d'emploi et porter une attention particuliere a,ces
symboles.
i_,DANGER : indique une situation dangereuse imminente qui, si elle n'est pas
evitee, entraTnera la mort ou des blessures graves.
i_4 VERTISSEMENT : indique une situation potentie//ement dangereuse qui, si e//e
n'est pas evitee, pourrait entra_ner/amort ou des blessures graves.
i_LATTENTION : indique une situation potentiel/ement dangereuse qui, si ellen'est
pas evitee, pourrait entra_nerdes blessures I_g_res ou mod_r_es.
AVIS : indique une pratique ne posant aucun risque de dommages corporels
mais qui par centre, si rien n'est fair pour/'eviter, pourrait poser des risques de
dommages materiels.
J
POUR TOUTE QUESTION OU REMARQUE AU SUJET DE CET OUTIL OU DE TOUT AUTRE
OUTIL DEWALT, COMPOSEZ LE NUMERO SANS FRAIS ' 1 800 433-9258 (1 800 4-DEWALT}.
_ AVERTISSEMENT : afin de reduire le risque de blessures, life le mode d' emploi de I'outil.
Avertissements de sdcuritd gdndraux pour les outils
dlectriques
_ A VERTISSEMENT! Lire toutes les directives et toutes les consignes de s_curit_. Le
non-respect des avertissements etdes directives pourrait se solder par un choc electrique,
un incendie et/ou une blessure grave.
CONSERVER TOUS LES AVERTISSEMENTS ET TOUTES LES
DIRECTIVES POUR UN USAGE UL TERIEUR
Le terme _ outil dectrique _ cite dans les avertissements se rapporte a votre outil dectrique
alimentation sur secteur (avec ill) ou par piles (sans fil).
1) SI_CURITI_ DU LIEU DE TRAVAIL
a) Tenir I'aire de travail propre et bien _clair_e. Les lieux encombres ou sombres sent
propices aux accidents.
b) Ne pas faire fonctionner d'outils _lectriques clans un milieu d_flagrant, tel qu'en
presence de liquides, de gaz ou de poussi_res inflammables. Les outi/s e/ectriques
produisent des etincelles qui pourraient enflammer la poussiere ou les vapeurs.
c) Eloigner les enfants et les personnes a proximit_ pendant I'utilisation d'un outil
_lectrique. Une distraction pourrait en faire perdre la ma_trisea I'utilisateur.
2) SI_CURITI_ EN MATIERE D'I_LECTRICITI_
a) Les fiches des outils _lectriques doivent correspondre a la prise. Ne jamais modifier
la fiche d'aucune fa_on. Ne jamais utiliser de fiche d'adaptation avec un outil
_lectrique mis a la terre. Le risque de choc dectrique sera reduit par I'utilisation de fiches
non modifiees correspondant a la prise.
b) Eviter tout contact physique avec des surfaces mises a la terre comme des tuyaux,
des radiateurs, des cuisini_res et des r_frig_rateurs. Le risque de choc dectrique est
plus deve si votre corps est mis a la terre.
c) Ne pas exposer les outils _lectriques a la pluie ou a I'humidit_. La penetration de I'eau
dans un outil dectrique augmente le risque de choc dectrique.
d) Ne pas utiliser le cordon de fa_on abusive. Ne jamais utiliser le cordon pour
transporter, tirer ou d_brancher un outil _lectrique. Tenir le cordon _loign_ de
la chaleur, de I'huile, des bords tranchants et des pi_ces mobiles. Les cordons
endommages ou enchev_tres augmentent les risques de choc dectrique.
e) Pour I'utilisation d'un outil _lectrique a I'ext_rieur, se servir d'une rallonge
convenant a cette application. L'uti/isation d'une ra//onge conque pour/'exterieur reduira
les risques de choc dectrique.
S'il est impossible d'_viter I'utilisation d'un outil _lectrique clans un endroit
humide, brancher I'outil clans une prise ou sur un circuit d'alimentation dot_s d'un
disjoncteur de fuite a la terre (GFCI). L'utilisation de ce type de disjoncteur reduit les
risques de choc dectriqu.
3) SI_CURITI_ PERSONNELLE
a) Etre vigilant, surveiller le travail effectu_ et faire preuve de jugement Iorsqu'un outil
_lectrique est utilis_. Ne pas utiliser d'outil _lectrique en cas de fatigue ou sous
I'influence de drogues, d'alcool ou de m_dicaments. Un simple moment d'inattention
en utilisant un outil dectrique peut entra_ner des blessures corporelles graves.
b) Utiliser des _quipements de protection individuelle. Toujours porter une protection
oculaire. L'utilisation d'equipements de protection comme un masque antipoussiere, des
chaussures antiderapantes, un casque de securite ou des protecteurs auditifs Iorsque la
situation le requiert reduira les risques de blessures corporelles.
c) Emp_cher les d_marrages intempestifs. S'assurer que I'interrupteur se trouve a la
position d'arr_t avant de relier I'outil a une source d'alimentation et/ou d'ins_rer un
bloc-piles, de ramasser ou de transporter I'outil. Transporter un outi/ e/ectrique a/ors
que le doigt repose sur I'interrupteur ou brancher un outil dectrique dent I'interrupteur est
la position de marche risque de provoquer un accident.
d) Retirer toute cl_ de r_glage ou cl_ avant de d_marrer I'outil. Une cle ou une cle de
reglage attachee a une pattie pivotante de I'outil dectrique peut provoquer des blessures
corporelles.
e) Ne pas trop tendre les bras. Conserver son _quilibre en tout temps. Cela permet de
mieux ma_triser I'outil dectrique dans les situations imprevues.
S'habiller de mani_re appropri_e. Ne pas porter de v_tements amples ni de bijoux.
Garder les cheveux, les v_tements et les gants a I'_cart des pi_ces mobiles. Les
v_tements amples, les bijoux ou les cheveux longs risquent de rester coinces dans les pieces
mobiles.
g) Sides composants sent fournis pour le raccordement de dispositifs de d_poussi_rage
et de ramassage, s'assurer que ceux-ci sent bien raccord_s et utilis_s. L'uti/isation
d'un dispositif de depoussierage peut reduire les dangers engendres par les poussieres.
4} UTILISATION ET ENTRETIEN D'UN OUTIL #LECTRIQUE
a) Ne pas forcer un outil _lectrique. Utiliser I'outil _lectrique appropri_ a I'application.
L'outil dectrique approprie effectuera un meilleur travail, de faqonplus sore eta la vitesse pour
laquelle il a ete conqu.
b) Ne pas utiliser un outil _lectrique dent I'interrupteur est d_fectueux. Tout outil
dectrique dent/'interrupteur est defectueux est dangereux et doit _tre repare.
c) D_brancher la fiche de la source d'alimentation et/ou du bloc-piles de I'outil
_lectrique avant de faire tout r_glage ou changement d'accessoire ou avant de
ranger I'outil. Ces mesures preventives reduisent les risques de demarrage accidentel de
I'outil dectrique.
d) Ranger les outils _lectriques hers de la pottle des enfants et ne permettre
aucune personne n'_tant pas famili_re avec un outil _lectrique ou son mode
d'emploi d'utiliser cet outil. Les outi/s dectriques deviennent dangereux entre/es mains
d'utilisateurs inexperimentes.
e) Entretien des outils _lectriques. V_rifier si les pi_ces mobiles sent mal align_es ou
coinc_es, si des pi_ces sent bris_es ou pr_sentent toute autre condition susceptible
de nuire au ben fonctionnement de I'outil _lectrique. En cas de dommage, faire
r_parer I'outil _lectrique avant toute nouvelle utilisation. Beaucoup d'accidents sent
causes par des outils dectriques mal entretenus.
S'assurer que les outils de coupe sent aiguis_s et propres. Les outils de coupe bien
entretenus et affOtessent moins susceptibles de se coincer et sent plus faci/es a ma_triser.
g) Utiliser I'outil _lectrique, les accessoires, les forets, etc. conform_ment aux
pr_sentes directives en tenant compte des conditions de travail et du travail
effectuer. L'utilisation d'un outil dectrique pour toute operation autre que cel/e pour laquel/e
ila ete conquest dangereuse.
5} UTILISATION ET ENTRETIEN DU BLOC-PILES
a) Ne recharger I'outil qu'au moyen du chargeur pr_cis_ par le fabricant. L'utilisation
d'un chargeur qui convient a un type de bloc-piles risque de provoquer un incendie s'il est
utilise avec un autre type de b Ioc-piles.
b) Utiliser les outils _lectriques uniquement avec les blocs-piles census a cet effet.
L'utilisation de tout autre bloc-piles risque de causer des blessures ou un incendie.
c) Lorsque le bloc-piles n'est pas utilis_, le tenir _loign_ des objets m_talliques,
notamment des trombones, de la monnaie, des cl_s, des clous, des vis ou autres
petits objets m_talliques qui peuvent _tablir une connexion entre les deux bornes.
Le court-circuit des bomes du bloc-piles risque de provoquer des brOlures ou un incendie.
d) En cas d'utilisation abusive, le liquide peut gicler hers du bloc-piles; _viter tout
contact avec ce liquide. Si un contact accidentel se produit, laver a grande eau. Si
le liquide entre en contact avec les yeux, obtenir _galement des soins m_dicaux. Le
Iiquide qui gicle hers du bloc-piles peut provoquer des irritations ou des brOlures.
6) RI_PARATION
a) Faire r_parer I'outil _lectrique par un r_parateur professionnel en n'utilisant que
des pi_ces de rechange identiques. Cela permettra de maintenir une utilisation securitaire
de I'outil dectrique.
Consignes de s_curit_ propres au per(;age
• Utiliser la/les poign_e(s) auxiliaire(s) si fournie(s) avec I'outil. Une perte de contr_le de
I'outil pourrait occasionner des dommages corporels.
• Tenir I'outil _lectrique par les surfaces isol_es pr_vues a cet effet pendant toute
utilisation ob I'organe de coupe pourrait entrer en contact avec des ills _lectriques
caches. Tout contact de I'organe de coupe avec un fil sous tension mettra les parties
metalliques exposees de I'outil sous tension et dectrocutera I'utilisateur.
• Utiliser des brides de fixation ou tout autre dispositif de fixation permettant de
soutenir et de retenir la piece sur une plate-forme stable. Tenir /a piece avec /a main ou
centre son corps est instable et risque de provoquer une perte de ma_trisede I'outil.
• Porter des lunettes de protection ou toute autre protection oculaire. Le pergage
pourrait faire voltiger des eclats. Des particules volantes pourraient occasionner des dommages
oculaires permanents.
• Tenir fermement I'outil en tout temps. Ne pas utiliser I'outil sans le tenir des deux
mains. Faire fonctionner cet outil d'une seule main risque de provoquer laperte de ma_trise de
I'outil. II peut aussi _tre dangereux de percer ou de tomber sur des materiaux durs comme une
barre d' armature.
• Les accessoires et I'outil peuvent devenir br_lants au toucher pendant I'utilisation.
Porter des gants pendant leur utilisation pour effectuer des travaux produisant beaucoup de
chaleur comme leperqage des metaux.
• Prendre des precautions a proximit_ des _vents, car ils cachent des pi_ces mobiles.
Les v_tements amples, bijoux ou cheveux longs pourraient s'y faire prendre.
_VERTISSEMENT : TOUJOURS porter des lunettes de securite. Les lunettes de vue ne
constituent PAS des lunettes de securite. Utiliser egalement un masque facial ou anti-poussiere si
I'operation de decoupe genere de la poussiere. TOUJOURS UTILISER DE L'EQUIPEMENT DE
PROTECTION HOMOL OGUE :
• protection oculaire conforme a la norme ANSI Z87.1 (CAN/CSA Z94.3),
• protection auditive conforme a la norme ANSI $12.6 ($3.19) et
• protection des voies respiratoires conformes aux normes NIOSH/OSHA.
,_VERTISSEMENT : les scies, meules, ponceuses, perceuses ou autres outils de construction
peuvent produire des poussieres contenant des produits chimiques reconnus par I'Etat califomien
pour causer cancers, malformations congenitales ou _tre nocifs au systeme reproducteur. Parmi
ces produits chimiques, on retrouve :
• Le plomb dans les peintures a base de plomb;
• La silice cristallisee dans les briques et le ciment, ou autres produits de maqonnerie; et
• L'arsenic et le chrome dans le bois ayant subi un traitement chimique.
Le risque associe aces expositions varie selon la frequence de ces types de travaux. Pour reduire
I'exposition aux produits chimiques : travailler dans un local bien ventile et utiliser du materiel
de securite approuve, comme les masques antipoussieres specialement conqus pour filtrer les
particules microscopiques.
• Eviter le contact prolong_ avec la poussi_re provenant du pon_age, du sciage, du
meulage et du forage m_canique ainsi que d'autres activit_s de construction. Porter
des v_tements de protection et laver les parties expos_es au savon et a I'eau. La
poussiere qui pourrait penetrer dans la bouche et les yeux ou se deposer sur la peau peut
favoriser I'absorption de produits chimiques nocifs.
_VERTISSEMENT : cet outil peut produire et repandre de la poussiere susceptible de causer
des dommages serieux et permanents au systeme respiratoire. Toujours utiliser un apparei/
respiratoire anti-poussieres approuve par le NIOSH ou I'OSHA. Diriger les particules dans le sens
oppose du visage et du corps.
J_4TTENTION : apr_s utilisation, ranger I'outil sur son c_t_ sur une surface stable I_ o_
il ne pourra faire ni tr_bucher ni tomber personne. Certains outi/s equipes d'un large bloc-pile
peuvent tenir a la verticale sur ce demier mais ils sent alors faci/ement destabilises.
• L'etiquette apposee sur votre outil peut comprendre les symboles suivants. Les symboles et
leurs definitions sent indiques ci-apres :
V.................. volts
Hz................ hertz
min .............. minutes
.... ........... courant continu
(_)................ Classe I fabrication
(mis a la terre)
[] ................ fabrication Classe II
(double isolation)
.../min ......... par minute
IPM .............. impacts par minute
A ................... amperes
W.................. watts
_, ................ courant altematif
................ courant altematif ou continu
no ................. vitesse a vide
.................. borne de terre
_, .................. symbole d'avertissement
BPM.............. battements par minute
r/min ............. tours par minute
Consignes de sdcuritd importantes propres _ tous les
blocs-piles
Pour commander un bloc-piles de rechange, s'assurer d'inclure son numero de catalogue et sa
tension. Consulter letableau en derniere page de ce manuel pour connaTtre les compatibilites entre
chargeurs et blocs-piles.
Le bloc-piles n'est pas totalement charge d'usine. Avant d'utiliser le bloc-piles et le chargeur, lire
les consignes de securite ci-dessous. Puis suivre la procedure de charge indiquee.
LIRE TOUTES LES CONSIGNES
• Ne pas recharger ou utiliser un bloc-piles en milieu d_flagrant, en presence, par
exemple, de poussi_res, gaz ou liquides inflammables. Le fa/t d'/nserer ou ret/rer un bloc-
piles de son chargeur pourrait causer I'inflammation de poussieres ou d'emanations.
• NE JAMAIS forcer I'insertion d'un bloc-piles clans un chargeur. NE modifier un bloc-
piles d'AUCUNE faqon pour le faire rentrer clans un chargeur incompatible, car il
pourrait se briser et causer des dommages corporels graves. Consulter le tableau en
derniere page de ce manuel pour conna_tre les compatibilites entre chargeurs et blocs-piles.
• Recharger les blocs-piles exclusivement clans des chargeurs DEWALT.
• NE PAS eclabousser le bloc-piles ou I'immerger dans I'eau ou dans tout autre liquide.
• Ne pas entreposer ou utiliser I'appareil et le bloc-piles en presence de temperatures
ambiantes pouvant exc_der 40 °C (105 °F) (comme clans des hangars ou des b&timents
m_talliques I'_t_). Pour preserver/eur duree de vie,entreposer /es blocs-piles dans un endroit
frais et sec.
REMARQUE :ne pas mettre un bloc-piles clans un outil dent la g_chette est verrouill_e
en position de marche. Ne jamais bloquer I'interrupteur en position de MARCHE.
_J_AVERTISSEMENT : risques d'incendie. Ne jamais tenter d'ouvrir le bloc-piles pour quelque
raison que ce soit. Si le bo_tier du bloc-piles est fissure ou endommage, ne pas I'inserer dans un
chargeur. Ne pas ecraser, laisser tomber, ou endommager les blocs-piles. Ne pas utiliser un
bloc-piles ou un chargeur qui a requ un choc violent, ou si I'apparei/ est tombe, a ete ecrase ou
endommage de quelque faqon que ce soit (p. ex. perce par un clou, frappe d'un coup demarteau,
pietine). Les blocs-piles endommages doivent _tre renvoyes aun centre de reparation pour y _tre
recycles.
_AVERTISSEMENT : risques d'incendie. Au moment de ranger ou transporter le bloc-
piles, s'assurer qu'aucun objet m_tallique n'entre en contact avec /es bornes a d_couvert
du bloc-piles. Par exemple, eviter de placer un bloc-piles dans un tablier, une poche, une bo_te
outils ou un tiroir, etc. contenant des objets tels que des clous, des vis, des cles, etc. Le fait
de transporter des bloc-piles comporte des risques d'incendie, car les bornes des piles
pourraient entrer, par inadvertance, en contact avec des objets conducteurs, tels que :
cl_s, pi_ces de monnaie, outils ou autres. La reglementation sur les produits dangereux
(Hazardous Material Regulations) du departement americain des transports interdit, en fait, le
transport des piles pour le commerce ou dans les avions (ex :dans les bagages enregistres ou
main) A MOINS qu'elles ne soient correctement protegees centre tout court-circuit. Aussi lots du
transport individuel de blocs-piles, s'assurer que leurs bomes sent bien protegees etisolees de tout
materiau pouvant entrer en contact avec elles et provoquer un court-circuit.
CONSIGNES DE S#CURIT# PROPRES AUX PILES AU LITHIUM-ION (Li-lon)
• Nepas incin_rerle bloc-piles m_me s'ilests_v_rementendommag_ ou compl_tement
usage, car ilpourrait exp/oser et causer un incendie. Pendant I'incineration des blocs-piles au
lithium-ion, des vapeurs et matieres toxiques sent degagees.
• En cas de contact du liquide de la pile avec la peau, rincer imm_diatement au savon
doux eta I'eau. En cas de contact oculaire, rincer I'ceil ouvert a I'eau claire une quinzaine de
minutes ou jusqu'a ce que I'irritation cesse. Si des soins medicaux s'averaient necessaires,
noter que I'dectrolyte de la pile est compose d'un mdange de carbonates organiques liquides
et de sels de lithium.
• Le contenu des cellules d'une pile ouverte peut causer une irritation respiratoire.
En cas d'inhalation, exposer I'individu a I'air Iibre. Si les sympt_mes persistent, consulter un
medecin.
_A VERTISSEMENT : risques de brOlure. Le liquide de la pile peut s'enflammer s'il est expose
des etincelles ou a une flamme.
Le sceau SRPRC Mc
Le sceau SRPRCMc (Societe de recyclage des piles rechargeables au Canada)
appose sur une pile au nickel-cadmium, a.hydrure metallique de nickel ou au lithium-
ion (ou un bloc-piles) indique que les coots de recyclage de ces derniers en fin
d'utilisation ont dejb.ete regles par DEWALT. Dans certaines regions, la mise au rebut
ou aux ordures municipales des piles au nickel-cadmium, a. I'hydrure metallique de
nickel ou au lithium-ion, est illegale ; le programme de SRPRC constitue donc une
solution pratique et ecologique.
La SRPRC Me,en collaboration avec DEWALT et d'autres utilisateurs de piles, a mis sur pied des
programmes aux E_tats-Uniset au Canada pour faciliter la collecte des piles au nickel-cadmium,
a.I'hydrure metallique de nickel ou au lithium-ion usagees. Aidez-nous a.proteger I'enwonnement
et a.conserver nos ressources naturelles en renvoyant les piles au nickel-cadmium, a.I'hydrure
metallique de nickel ou au lithium-ion usagees a. un centre de reparation autorise DEWALT ou chez
votre detaillant afin qu'elles y soient recyclees. On peut en outre se renseigner aupres d'un centre
de recyclage local pour connaTtre d'autres sites les acceptant.
SRPRCMcest une marque deposee de laSociete de recyclage des piles rechargeables au Canada.
Directives de s_curit_ importantes propres _ tous les
chargeurs de piles
CONSERVER CES INSTRUCTIONS: ce manuel contient des directives de securite et d'utilisation
importantes propres aux chargeurs de piles.
• Avant d'utiliser le chargeur, life toute consigne et tout avertissement apposes sur le chargeur, le
bloc-piles etle produit utilisant le bloc-piles.
_J,AVERTISsEMENT : risques de chocs dectriques. Ne laisser aucun liquide penetrer dans le
chargeur, des chocs dectriques pourraient enresulter.
,_A TTENTION : risques debrOlure.Pour reduire tout risque de dommages corporels, nerecharger
que des blocs-piles rechargeables DEWALT. Tout autre type de piles pourrait exploser et causer
des dommages corporels et materiels.
AVIS : sous certaines conditions, Iorsque le chargeur est connecte au bloc d'alimentation, des
materiaux etrangers pourraient court-circuiter le chargeur. Les corps etrangers conducteurs
tels que (mais pas limite a) poussieres de rectification, debris metalliques, laine d'acier, feuilles
d'aluminium, ou toute accumulation de particules metalliques doivent _tre maintenus a distance des
orifices du chargeur. Debrancher systematiquement le chargeur Iorsque le bloc-piles n'y est pas
insere. Debrancher systematiquement le chargeur avant tout entretien.
• NE PAS tenter de charger de bloc-piles avec des chargeurs autres que ceux d_crits
clans ce manuel Le chargeur et son bloc-piles ont ete conqus tout specialement pour
fonctionner ensemble.
• Ces chargeurs n'ont pas _t_ census pour une utilisation autre que recharger les blocs-
piles rechargeables DEWAL T. Toute autre uti/isation comporte des risques d'incendie, de
chocs dectriques ou d'dectrocution.
• Prot_ger le chargeur de la pluie ou de la neige.
• Tirer sur la fiche plut_t que sur le cordon pour d_brancher le chargeur. Cela permet de
reduire les risques d'endommager la fiche ou le cordon d'alimentation.
• S'assurer que le cordon est prot_g_ de mani_re a ce que personne ne marche ni ne
tr_buche dessus, ou a ce qu'il ne soit ni endommag_ ni soumis a aucune tension.
• N'utiliser une rallonge qu'en cas de n_cessit_ absolue. L'utilisation d'une rallonge
inadequate comporte des risques d'incendie, de chocs dectriques ou d'dectrocution.
• Pour utiliser un chargeur a I'ext_rieur, le placer clans un endroit sec et utiliser une
rallonge con_ue pour I'ext_rieur. L'utilisat/on d'une rallonge congue pour I'exter/eur redu/t
les risques de chocs dectriques.
• Pour la s_curit_ de I'utilisateur, utiliser une rallonge de calibre ad_quat (AWG,
American Wire Gauge [calibrage am_ricain normalis_ des ills _lectriques]). Plus le
calibre est petit, et plus sa capacite est grande. Un calibre 16, par exemple, a une capacite
superieure a un calibre 18. L'usage d'une ral/onge de calibre insuffisant causera une chute de
tension qui entra_nera perte de puissance et surchauffe. Siplus d'une rallonge est utilisee pour
obtenir une certaine Iongueur, s'assurer que chaque ral/onge presente au moins le calibre de
fil minimum. Le tableau ci-dessous iliustre les calibres a utiliser selon la Iongueur de rallonge
et I'intensite nominale indiquee sur la plaque signaletique. En cas de doute, utiliser le calibre
suivant. Plus le calibre est petit, plus la rallonge peut supporter de courant.
 Loading...