

Page 1

BatteryOutput
DEWALT Battery and Charger Systems
Chargers/Charge Time - Chargeurs/Duree de charge (Minutes) - Cargadores de baterias/Tiempo de carga (Minutos)
Cat Number Voltage DW0249 DW0246 DW9109
DW0242 24 X X X X X X X X X 60 60 X
DC9096 18 X X X 60 60 60 20 60 60 X X 60
DW9096 18 X X X 60 60 60 20 60 60 X X 60
DW9098 18 X X X 30 30 30 12 30 30 X X 30
DW9099 18 X X X 45 45 45 15 45 45 X X 45
DC9091 14.4 90 115 60 60 60 60 20 60 60 X X 60
DW9091 14.4 45 90 45 45 45 45 15 45 45 X X 45
DW9094 14.4 60 60 30 30 30 30 12 30 30 X X 30
D09071 12 90 115 60 60 60 60 20 60 60 X X 60
DW9071 12 60 90 45 45 45 45 15 45 45 X X 45
DW9072 12 45 60 30 30 30 30 12 30 30 X X 30
DW9050 12 40 X X X X X X X X X X X
DW9061 9.6 60 90 45 45 45 45 15 45 45 X X 45
DW9062 9.6 45 60 30 30 30 30 12 30 30 X X 30
DW9048 9.6 40 X X X X X X X X X X X
DWO057 7.2 45 60 90 90 90 90 12 90 90 X X 90
X Indicates that the battery pack is not compatible with that specific charger.
X indique que le bloc-piles n'est pas compatible avec ce chargeur.
Una "X" indica que el paquete de baterfas no es compatible con ese determinado cargador.
All charge times are approximate. Actual charge time may vary.
Read the instruction manual for more specific information.
Les durees de charge sont approximatives; la duree de charge relle peut varie_
Lire le manuel d'utilisation pour obtenir des renseignements plus precis.
El tiempo de duracion de carga es aproximado; la duracion de carga real puede varia_
Lea el manual de instrucciones para obtener informacion mas precisa.
DEWALT Industrial Tool Co., 701 East Joppa Road, Baltimore, MD 21286 (APR04-CD-1) Form No. 624909-00 DC727, DC728, DC759
Copyright © 2004
The following are trademarks for one or more DEWALT power toois: the yellow and black color scheme; the "D" shaped air intake grill; the array of
pyramids on the handgrip; the kit box configuration; and the array of lozenge-shaped humps on the surface of the tool.
Page 2

Questions? See us on the WoHd Wide Web at wwwodewaltocom
INSTRUCTION MANUAL
GUIDE D'UTILISATION
MANUAL DE INSTRUCCIONES
INSTRUCTIVO DE OPERACrON, CENTROS DE SERVrCIO Y POLIZA
DE GARANTiA. ADVERTENC_A: LEASE ESTE INSTRUCTIVO ANTES
DE USAR EL PRODUCTO.
®
D0727, D0728, D0759
Cordless Adjustable Clutch OrivedDrilt
Perceuse=toumevis sans fil a embrayage r6glable
Taladro/destornillador inalambrico con embrague a]ustable
Page 3
iF YOU HAVE ANY QUESTIONS OR COMMENTS ABOUT THiS OR
ANY DEWALT TOOL, CALL US TOLL FREE AT:
1-800-4-DEWALT (1-800-433-9258}
General Safety Rules - For All Battery
Operated Tools
A WARNtNG t.Read and understand all instructions. Failure
to foflow aft instructions listed below may result in electric
shock, tire and/or serious persona! injudz
SAVE THESE #NSTRUCT#OHS
WORK AREA
* Keep your work area clean and well lit. Cluttered benches and
dark areas invite accident&
* Do not operate power tools in explosive atmospheres, such
as in the presence of flammable liquids, gases, or dust. Power
tools create sparks which may ignite t,_edust or fumes.
* Keep bystanders, ch#dren, and visitors away while operating
a power tool Distractions can cause you to lose control.
ELECTRICAL SAFETY
* Do not abuse the cord. Never use the cord to carry the tool.
Keep cord away from heat, oil, sharp edges or moving parts.
Replace damaged cords immediately. Damaged cords may cre-
ate a tire.
* A battery operated tool with integral batteries or a separate
battery pack must be recharged only with the specified charg-
er for the battery. A cha_ger that may be suitable for one type of
battery may create a risk of tire when used with anot,_er battery:
* Use battery operated tool only with the specifically designated
battery pack. Use of any ot,_er batteries may create a risk of tire.
PERSONAL SAFETY
* Stay alert, watch what you are doing and use common sense
when operating a power tooL Do not use tool while tired or
under the influence of drugs, alcohol, or medication. A
moment of ,,hattention while operating power tools may result in
serious personal injury:
* Dress properly. Do not wearloose clothing or jewelry. Contain
long hair. Keep your hair, clothing, and gloves away from
moving parts. Loose clot,%_g,jewe/_ or tong hair can be caught
in moving parts. Air vents often cover moving parts and should also
be avoided.
* Avoidaccidentaistarting. Besureswitchisinthelockedoroff
position before inserting battery pack. Carrying tools wit,_your
finger on t,#eswitch or inserting the battery pack into a too! with the
sw,_'chor7invites accidents.
* Remove adjusting keys or wrenches before turning the tool
on. A wrench or a key t,_at is left attached to a rotating part of the
tool may result in personal injury:
* Do not overreach. Keep proper footing and balance at all
times. Proper footing and balance enables better control of the tool
in unexpected situations.
* Use safety equipment. Always wear eye protection. Dust mask,
non-skid safety shoes, hard ha_; or hearing protection must be
used for appropriate conditions.
TOOL USE AND CARE
* Use clamps or other practical way to secure and support the
workpiece to a stable platform. Holding t,_e work by hand or
against your body is unstable and may lead to a loss of control
* Do not force tool. Use the correct tool for your application. The
correct tool wfl/ do the job better and safer at the rate for which it is
designed.
* Do not use tool if switch does not turn it on or off. A tool that
cannot be controlled with t,_e swqtch is dangerous and must be
repaired.
* Disconnect battery pack from tool or place the switch in the
locked or off position before making any adjustments, chang-
ing accessories, or storing the tooL Such preventative safety
measures reduce the risk of starting the tool accidentally
Page 4
* Storeidle tools out of reach of chiMren and other untrained
persons. Tools are dangerous in the hands of untrained users,
* Whenbatterypaekisnotinuse, keepitawayfromothermetal
objects like: paper clips, coins, keys, nails, screws, or other
small metal objects that can make a connection from one ter-
minal to another Shorting t,_e battery terminals together may
cause sparks, bums, or a fire,
* Maintain tools with care. Keep cutting tools sharp and clean.
Properly maintained tools, with sharp cutting edges are less tikely
to bind and are easier to control
* Check for misalignment or binding of moving parts, breakage
of parts, and any other condition that may affect the tool's
operation. If damaged, have the tool serviced before using.
Many accidents are caused by poorly maintained tools.
* Use only accessories that are recommended by the manufac-
turer for your model Accessories that may be suitable for one
tool may create a risk of injury when used on anot,_er tool
SERWCE
* Tool service must be performed only by qualified repair per-
sonnel. Service or maim'enance performed by unquafified person-
ne/ may result in a risk of Zojurj4
* When servicing a tool, use only identical replacement parts.
Follow instructions in the Maintenance section of this manu-
aL Use of unauthorized pails or failure to follow Maintenance
Instructions may create a risk of shock or inju_
Additional Specific Safety Rules
* Hold tool by insulated gripping surfaces when performing an
operation where the tool may contact hidden wiring. Contact
with a "live" wire will also make exposed metal parts of t,_e tool
"live" and shock the operator.
A WARNING: Some dust created by power sanding, sawing, grind-
ing, drN/ing, and other construction activities contains chemicals
known to cause cancer, birth defects or other reproductive harm.
Some examples of t,_ese chemicals are:
* lead from lead-based paints,
* crystalline silica from bricks and cement and other masonry
products, and
* arsenic and chromium from chemically-treated lumbe_
Your risk from these exposures varies, depending on how often you
do t,_b type of work, To reduce your exposure to these chemicals:
work in a weft ventilated area, and work with approved safety equip-
ment, such as those dust masks that are specially designed to filter
out microscopic particles,
* A void prolonged contact with dust from power sanding, saw-
ing, grinding, drilling, and other construction activities. Wear
protective clothing and wash exposed areas with soap and
water Allowing dust to get into your mouth, eyes, or lay on t,_eskin
may promote absorption of harmful chemicals,
_WARNING: L,tse of this toot can generate and/or disburse dust,
which may cause serious and permanent respiratory or other inju_
Always use N/OSH/OSHA approved respiratory protection appropri-
ate for the duat expoaure, Direct particlea away from face and body,
A CAUTION: When not in use, place tool on its side on a stable
surface where it will not cause a tripping or falling hazard. Some
tools with large battery packs wih'stand uprigM on the battery pack but
may be easily knocked over,
* The label on your tool may include t,_efollowing symbols, The sym-
bols and t,_eirdefinitions are as follows:
V .......... volts
Hz ........hertz
min ........minutes
.... ,,,,,,direct current
[] ..........Class II Construction
_'_,..........safety alert symbol
sfpm ......surface t_et per minute
A............ amperes
W .......... watts
'_ ........alternating current
no .......... no load speed
.......... eart,Sing tenninaf
,,,/min,,,, revolutions per minute
Page 5
#mportant Safety #.s*ruc*ions
for Batterv Packs
Your toot uses either a 12, 14.4 or 18 Volt DE'WALT battery pack_
When ordering replacement battery packs, be sure to include catalog
number and voltage: Extended Run-Time battery packs deliver 25%
more run-time than standard battery packs.
NOTE: Your tool will accept either standard or Extended Run Time
battery packs. However, be sure to select proper voitage. Batteries
slowly lose their charge when they are not on the charger, the best
place to keep your battery is on the charger at all times.
The battery pack is not fully charged out of the carton. Before using
the battery pack and charger, read the safety instructions below. Then
follow charging procedures outlined.
READ ALL INSTRUCTIONS
* Do not incinerate the battery pack even if it is severely dam-
aged or is completely worn out. The battery pack can explode in
a fire.
* A small leakage of fiquid from the battery pack cells may
occur under extreme usage or temperature conditions. ThLs
does not indicate a failure. However, if the outer seal is broken and
this leakage gets on your skin:
a. Wash quickly with soap and water.
b. Neutralize wh,#a mild acid such as lemon juice or vinega_
c. If battery liquid gets into your eyes, flush t,_em wh,_clean water
for a mit_imum of 10 minutes and seek immediate medical
attention. (Medical note: The liqdd /s 25-35% solution of potas-
sium ,_ydroxide.)
* Do not carry extra battery packs in aprons, pockets, or tool
boxes along with other metal objects. Battery pack could be
short cimuited causing damage to the battery pack and possibly
causing severe burns or fire.
* Charge the battery packs only in DEWALT chargers.
DO NOT splash or immerse in water or other liquids.
Do not store or use the tool and battery pack in locations
where the temperature may reach or exceed 105°F (40 °C)
(such as outside sheds or metal buildings in summer).
A DANGER: Never attempt to open t,_e battery pack for any reason.
If battery pack case is cracked or damaged, do not insert into charg-
er. Electric shock or electrocution may result. Damaged battery packs
should be returned to service center for recycling.
NOTE: Battery storage and carrying caps are provided
for use whenever the battery is out of the tool or charger. '_J#&_
Remove cap before placing battery in charger or tool.
A WARNtNG: Do not store or carry battery so that
metal objects can contact exposed battery terminals.
For example, do not place battery in aprons, pockets,
tool boxes, product kit boxes, drawers, etc. with loose nails,
screws, keys, etc. without battery cap. Wit,_out cap in place, battery
could short circuit causing fire or bums or damage to battery
CAUTION: Battery pack must be securely attached to tool If bat-
tory pack is detached, personal injury may result.
The _BF_C TM Seal
The RBRCTM (RechargeabIe Battery BecycI[ng Corpor-
ationt SeaI on the nickel-cadmium battery (or battery packt /_
indicates that the costs to recycle the battery (or battery __,_ ), )
pack) at the end of its useful life have already been paid by '_'
DEWALT. In some areas, it is illegai to place spent nicke!-
cadmium batteries in the trash or municipal solid waste stream and the
RBRC program provides an environmentally conscious alternative.
RBRC in cooperation with DEWALT and other battery users, has
established programs inthe United States to facilitate the collection of
spent nickel-cadmium batteries. Help protect our environment and
conserve natural resources by returning the spent nickel-cadmium
battery to an authorized DEWALT service center or to your !ocaI retail-
er for recycling. You may also contact your Ioca! recycling center for
information on where to drop off the spent battery.
Page 6
Important Safety lrestr.ctiores for Battery
C#argers
SAVE THESE INSTRUCTIONS: Th,;s manual contains important
safety ,_nstructiens for battery charger&
* Before using charger, read all instructionsand cautionary markings
on charger, battery pack, and product using battery pack.
A DANGER: 120 vo/_:sare present at charging termina,ts. Do not probe
with conductive objects. Flectric shock or electrocution may resdL
WARNING: Do not allow any liquid to get inside charge_ Electric
shock may result.
AOAUTION: To reduce the risk of #_jury,charge only DEWALTnickel
cadmium rechargeabte batteries. Ot,_er types of batteries may burst
causing persona/iX, jury and damage.
_ CAUTtON: Under certain conditions, wh.#the charger plugged in to
t,_epower suppt_ the exposed charging contacts inside t,_echarger
can be shorted by foreign material. Foreign materia,ts of a conductive
nature such as, but not limited to, steel wool, aluminum foil, or any
buildup of metah;icparticles should be kept away from chat:ger cavities.
Always unplug the charger from t,#epewer suppty when there,is no bah
tery pack ,_t_the cav/tj4 Unplug c,_arger before attempting to clean.
* DO NOT attempt to charge the battery pack with any chargers
other than the ones in this manual The charger and battery
pack are specifically designed to work toget,_er.
* These chargers are not intended for any uses other than
charging DEWALT rechargeable batteries. Any other uses may
result in risk of fire, electric shock or electrocution.
* Do not expose charger to rain or snow.
* Pull by plug rather than cord when disconnecting charger.
This wilt reduce risk of damage to electric plug and cord.
* Make sure that cord is located so that it will not be stepped on,
tripped over, or otherwise subjected to damage or stress.
* Do not use an extension cord unless it is absolutely neces-
sary. Use of improper extension cord could result in risk of fire,
electric shock, or electrocution.
* An extension cord must have adequate wire size (AWG or
American Wire Gauge) for safety. T,Sesmah'er the gauge number
of the wire, t,#e greater t,_ecapacity of t,#e cable, that is 16 gauge
has more capacity than 18 gauge. W,_en using more than one
extension to make _o the total length, be sure each individual
extension contains at least t,#e minimum wire size.
Recommended Minimum Wire Size for Extension Cords
TotamLength of Cord
25ft. 50ft. 75ft. 100ft. 125ft. 150ft. 175ft.
7.6m 15.2m 22.9m 30.5m 38.1 m 45.7m 53.3m
Wire Size AWG
18 18 16 16 14 14 12
. Do not place any object on top of charger or place the charg-
er on a soft surface that might block the ventilation slots and
result in excessive internal heat. Place the charger in a position
away from any heat soume. The charger is ventilated through slots
in the top and the bottom of the housing.
* Do not operate charger w#h damaged cord or plug- have
them replaced immediatetJ4
* Do not operate charger if it has received a sharp blow, been
dropped, or otherwise damaged in any way. Take it to an autho-
rized service center.
* Do not disassemble charger; take it to an authorized service
center when service or repair is required. Incorrect reassembly
may result in a risk of electric shock, electrocution or fire.
* Disconnect the charger from the outlet before attempting any
cleaning. This will reduce the risk of electric shock. Removing
t,_ebattery pack will not reduce t,_isrisk.
* NEVER attempt to connect 2 chargers together.
* The charger is designed to operate on standard household
electrical power (t20 Volts). Do not attempt to use it on any
other voltage. This does net apply to the vehicular charge_
Page 7
Using Automatic TUEJe_Up TM MOde
The Automatic Tune-UpTM Mode equalizes or balances the individual
cells in the battery pack allowing it to function at peak capacity. Battery
packs shouid be tuned up weekly or after 10 charge/discharge cycles
or whenever the pack no longer delivers the same amount of work. To
use the Automatic Tune-Up TM, ptace the battery pack in the charger
and Ieave it for at Ieast 8 hours. The charger w[II cycle through the fol-
lowing modes.
1. The red I[ght will blink continuously indicating that the 1-hour
charge cycle has started.
2. When the 1-hour charge cycle is complete, the light w[lI stay on
continuously and will no longer bI[nk. This indicates that the pack
is fully charged and can be used at this time.
3. Whenever the pack is left in the charger after the initial 1-hour
charge, the charger will begin the Automatic Tune-Up TM Mode.
This mode continues up to 8 hours or until the individual cells in
the battery pack are equalized. The battery pack is ready for use
and can be removed at any time during the Tune-Up TM Mode.
4. Once the Automatic Tune-Up TM Mode is complete the charger w[l!
transition to a maintenance charge; the indicator light shuts off
when the Automatic Tune-Up TM Mode is complete.
SAVE THESE IHSTRUCTIOHS
FOR FUTURE USE
Chargers
Your tool uses a 12.0, 14.4, or 18.0 Volt DEWALT Charger. Your battery
can be charged in DEWALT 1 Hour Chargers, 15 Minute Chargers or
Vehicular 12 volt charger. Be sure to read all safety instructions before
using your charger. Consult the chart on the back cover of this manual
for compatibility of chargers and battery packs.
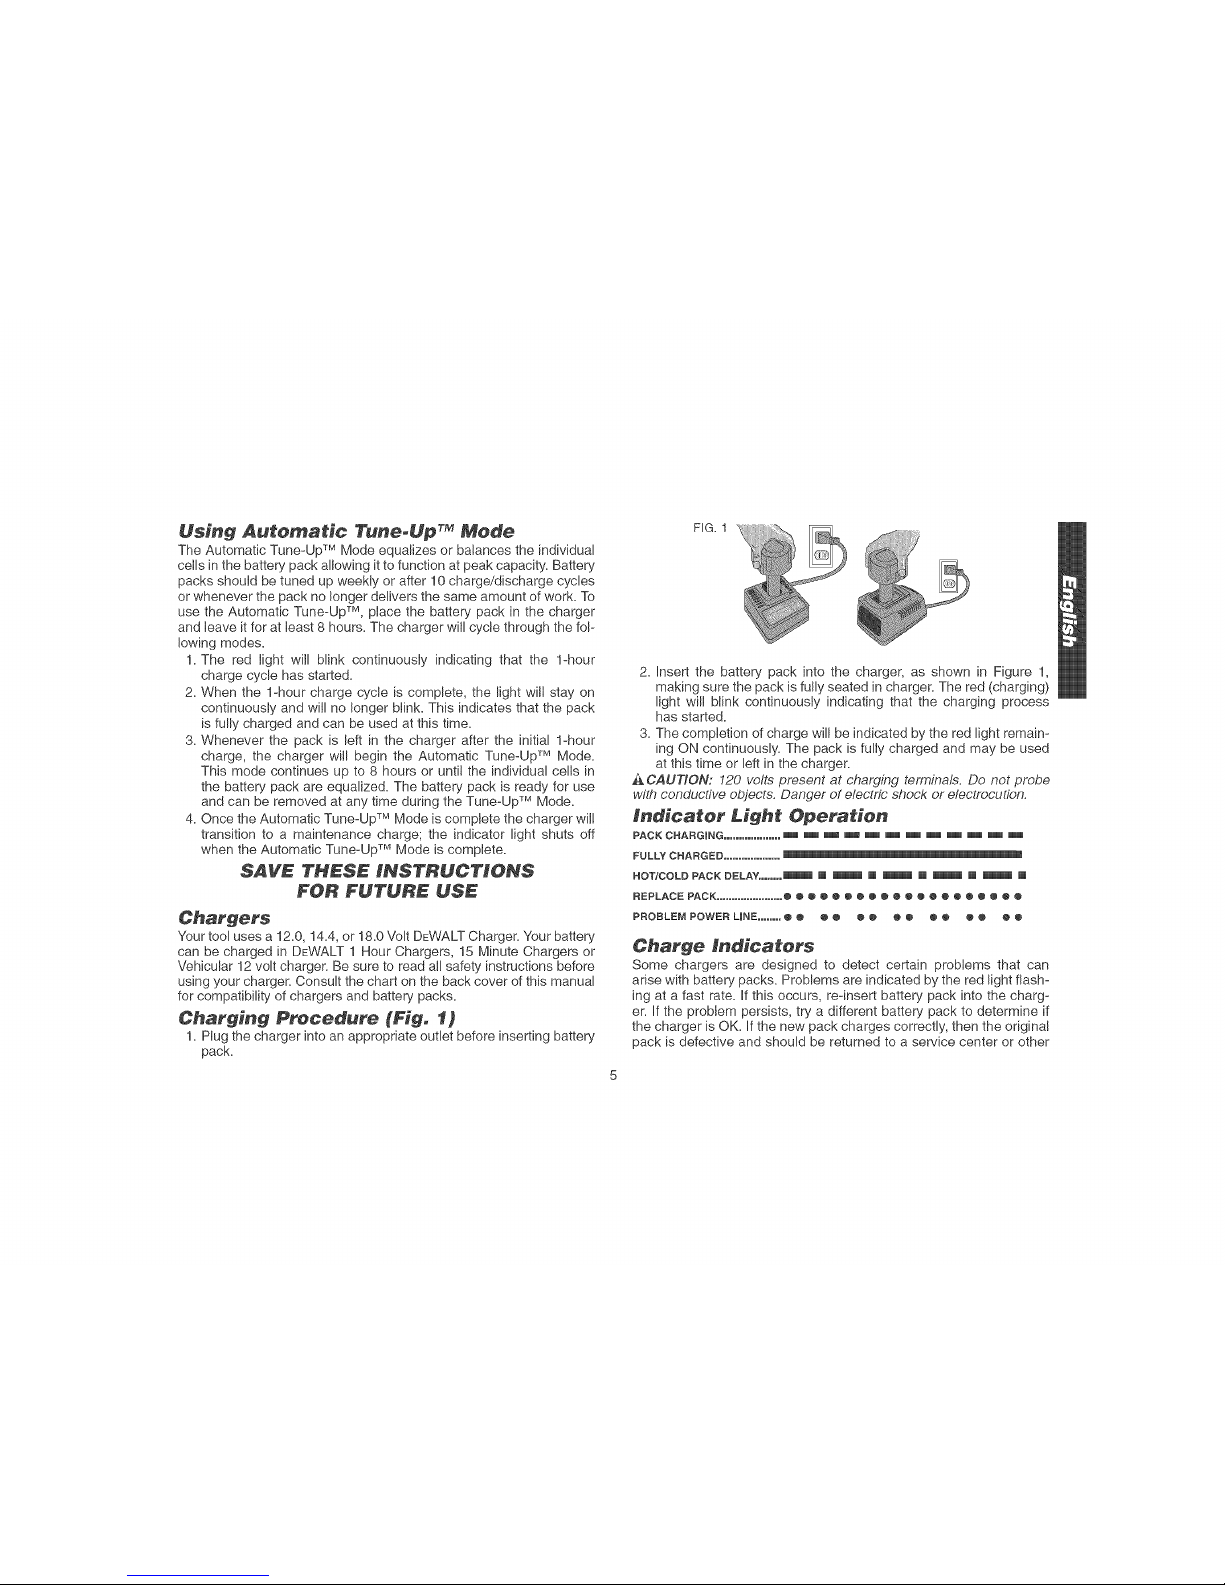
Charging Preced_re [Figo t)
1. Plug the charger into an appropriate outlet before inserting battery
pack.
FIG. 1
2. Insert the battery pack into the charger, as shown in Figure 1,
making sure the pack is fully seated in charger. The red (charging)
light will bt[nk continuously indicating that the charging process
has started.
3. The completion of charge will be indicated by the red light remain-
[ng ON continuously. The pack is fully charged and may be used
at this time or left in the charger.
A CAUTION: 120 volts present at chat:ging terminals. Do not probe
wit/7conductive objects. Danger of etectr/c shock or electrocution.
Indicator Light Operatien
PACK CHARGING ...................
FULLY CHANGED ...................
HOT/COLD PACK DELAY ........ _ [] _ [] _ [] _ [] _ []
nEPLACE PACK ...................... @@@@@@@@@@@@@@@@@@@@
PROBLEP,_ POWER LINE ........@ @ @ @ @ @ []@ @ [] @ @ @ @
Charge indicators
Some chargers are designed to detect certain problems that can
arise with battery packs. Problems are indicated by the red light flash-
ing at a fast rate. If this occurs, reqnsert battery pack into the charg-
er. If the problem persists, try a different battery pack to determine if
the charger is OK. If the new pack charges correctly, then the or[g[na!
pack is defective and should be returned to a service center or other
Page 8
collectionsiteforrecycling.Ifthenewbatterypackelicitsthesame
troubleindicationastheoriginal,havethechargertestedatanautho-
rizedservicecenter.
HOT/COLDPACKDELAY
SomechargershaveaHot/ColdPackDelayfeature:whenthecharg-
erdetectsabatterythatishot,itautomaticallystartsaRotPackDelay,
suspendingcharginguntilthebatteryhascooled.Afterthebatteryhas
cooled,thechargerautomaticallyswitchesto thePackCharging
mode.Thisfeatureensuresmaximumbatterylife.Theredlightflash-
eslong,thenshortwhileintheRotPackDelaymode.
PROBLEMPOWERUNE
SomechargershaveaProblemPowerLineindicator.Whenthecharg-
erisusedwithsomeportablepowersourcessuchasgeneratorsor
sourcesthatconvertDCtoAC,thechargermaytemporarilysuspend
operation,flasMngtheredmightwithtwofastMinksfollowedbya
pause.Thisindicatesthepowersourceisoutoflimits.
LEAVING THE BATTERY PACK _NTHE CHARGER
The charger and battery pack can be left connected with the red light
glowing indefinitely. The charger wilI keep the battery pack fresh and
fully charged.
NOTE: A battery pack will stowly lose its charge when kept out of the
charger. Ifthe battery pack has not been kept on maintenance charge,
it may need to be recharged before use. A battery pack may also slow-
ly Iose its charge if left in a charger that is not plugged into an appro-
priate AC source.
WEAK BATTERY PACKS: Chargers can also detect a weak battery.
Such batteries are still usable but should not be expected to perform
as much work. In such cases, about 10 seconds after battery inser-
tion, the charger wilI beep rapidly 8 times to indicate a weak battery
condition. The charger wiII then go on to charge the battery to the
highest capacity possible.
i_portant Charging Notes
1. Longest life and best performance can be obtained if the battery
pack is charged when the air temperature is between 65°F and
75°F (18 °- 24°C). DO NOT charge the battery pack in an air tem-
perature below +40°F(+4.5°C), or above +105°F (+40.5°C). This
is important and will prevent serious damage to the battery pack.
2. The charger and battery pack may become warm to touch while
charging. This is a normaI condition, and does not indicate a
problem.
3. If the battery pack does not charge properly:
a. Check current at receptacle by pIugging in a lamp or other
appliance
b. Check to see if receptacle is connected to a light switch which
turns power off when you turn out the Iights.
c. Move charger and battery pack to a location where the
surrounding air temperature is approximately 65°F - 75°F (18°-
24°0).
d. If charging problems per_isL, Lake Lhe Loci, baLLery puck and
charger to your local service center.
4. The battery pack should be recharged when itfails to produce suf-
ficient power on jobs which were easily done previously. DO NOT
CONTINUE to use under these conditions. Follow the charging
procedure. You may aIso charge a partially used pack whenever
you desire with no adverse affect on the battery pack.
5. Under certain conditions, with the charger plugged into the power
supply, the exposed charging contacts inside the charger can be
shorted by foreign material. Foreign materials of a conductive
nature such as, but not limited to, steel woot, aluminum foil, or any
buildup of metallic particles should be kept away from charger
cavities. Always unplug the charger from the power supply when
there is no battery pack in the cavity. Unplug charger before
attempting to clean.
6. Do not freeze or immerse charger in water or any other liquid.
A WARNING: Don't a!low any i/quid to get inside charger. Electric
shock may resu/L Tofacilitate t,_ecooiing of the battery pack after use,
Page 9
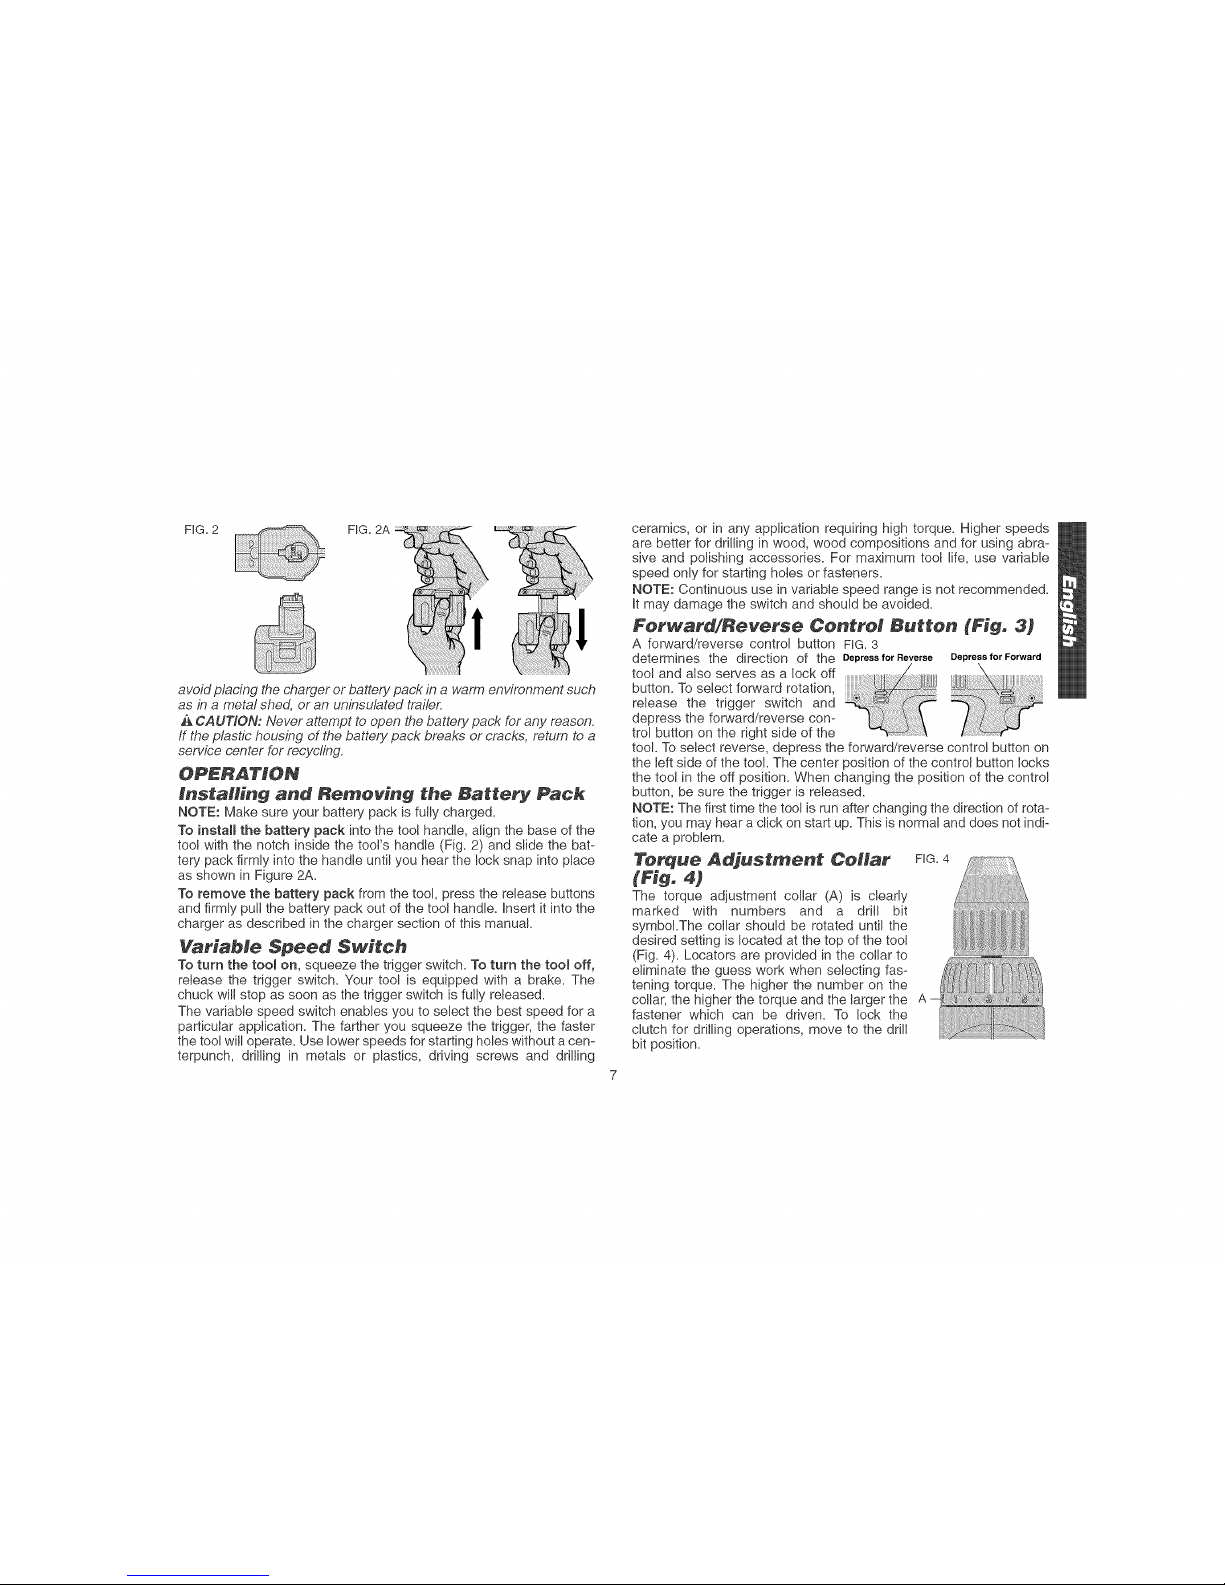
HG.2 HG.2A
avoid p/acit_g _,#echarger or battery pack in a warm environment such
as in a metal shed, or an uninsulated trailer.
A CAUTION: Never attempt to open _,_ebattery pack for any reason.
If the plastic housing of the battery pack breaks or cracks, return to a
service center for recycling.
installing and Removing the Battery Pack
NOTE: Make sure your battery pack is fully charged.
To install the battery pack into the toot handle, align the base of the
tool with the notch inside the tool's handle (Fig. 2) and slide the bat-
tery pack firmly into the handle until you hear the lock snap into place
as shown in Figure 2A.
To remove the battery pack from the tool, press the release buttons
and firmly pull the battery pack oat of the toot handle. Insert it into the
charger as described in the charger section of this manual.
Variable Speed Switch
To turn the tool on, squeeze the trigger switch. To turn the tool off,
release the trigger switch. Your tool is equipped with a brake. The
chuck will stop as soon as the trigger switch is fu!ly released.
The variable speed switch enables you to select the best speed for a
particular application. The farther you squeeze the trigger, the faster
the too! will operate. Use lower speeds for starting holes without a cen-
terpunch, drilling in metals or plastics, driving screws and drilling
ceramics, or in any application requiring high torque. Higher speeds
are better for dri!ling in wood, wood compositions and for using abra-
sive and polishing accessories. For maximum tool life, use variable
speed only for starting holes or fasteners.
NOTE: Continuous use in variable speed range is not recommended.
It may damage the switch and should be avoided.
Forward/Reverse Control Button (FJgo 3)
A forward/reverse control button FIG. 3
determines the direction of the Depressfor Reverse DepressforForward
tool and also serves as a lock off
button. To select forward rotation,
release the trigger switch and
depress the forward/reverse con-
trol button on the right side of the
tool. To select reverse, depress the forward/reverse control button on
the ieft side of the tool. The center position of the control button locks
the toot in the off position. When changing the position of the control
button, be sure the trigger is released.
NOTE: The first time the tool is run after changing the direction of rota-
tion, you may hear a click on start up. This is normal and does not indi-
cate a problem.
Terque Adjustment Cellar FIG.4
(Fig, 4)
The torque adjustment collar (A) is clearly
marked with numbers and a driI! bit
symbol.The collar should be rotated until the
desired setting is located at the top of the tool
(Fig. 4). Locators are provided in the collar to
eliminate the guess work when selecting fas-
tening torque. The higher the number on the
collar, the higher the torque and the larger the A
fastener which can be driven. To lock the
clutch for drilling operations, move to the drill
bit position.
Page 10
NOTE:WhenusingtheDrii!/Driverfordriftingholes,besurethatthe
TorqueAdjustingCollarissetsothefigureofthedrillisalignedwith
thecenterlineonthetopofthetoolFailuretodothiswillallowthe
clutchtoslipwhileattemptingtodrill
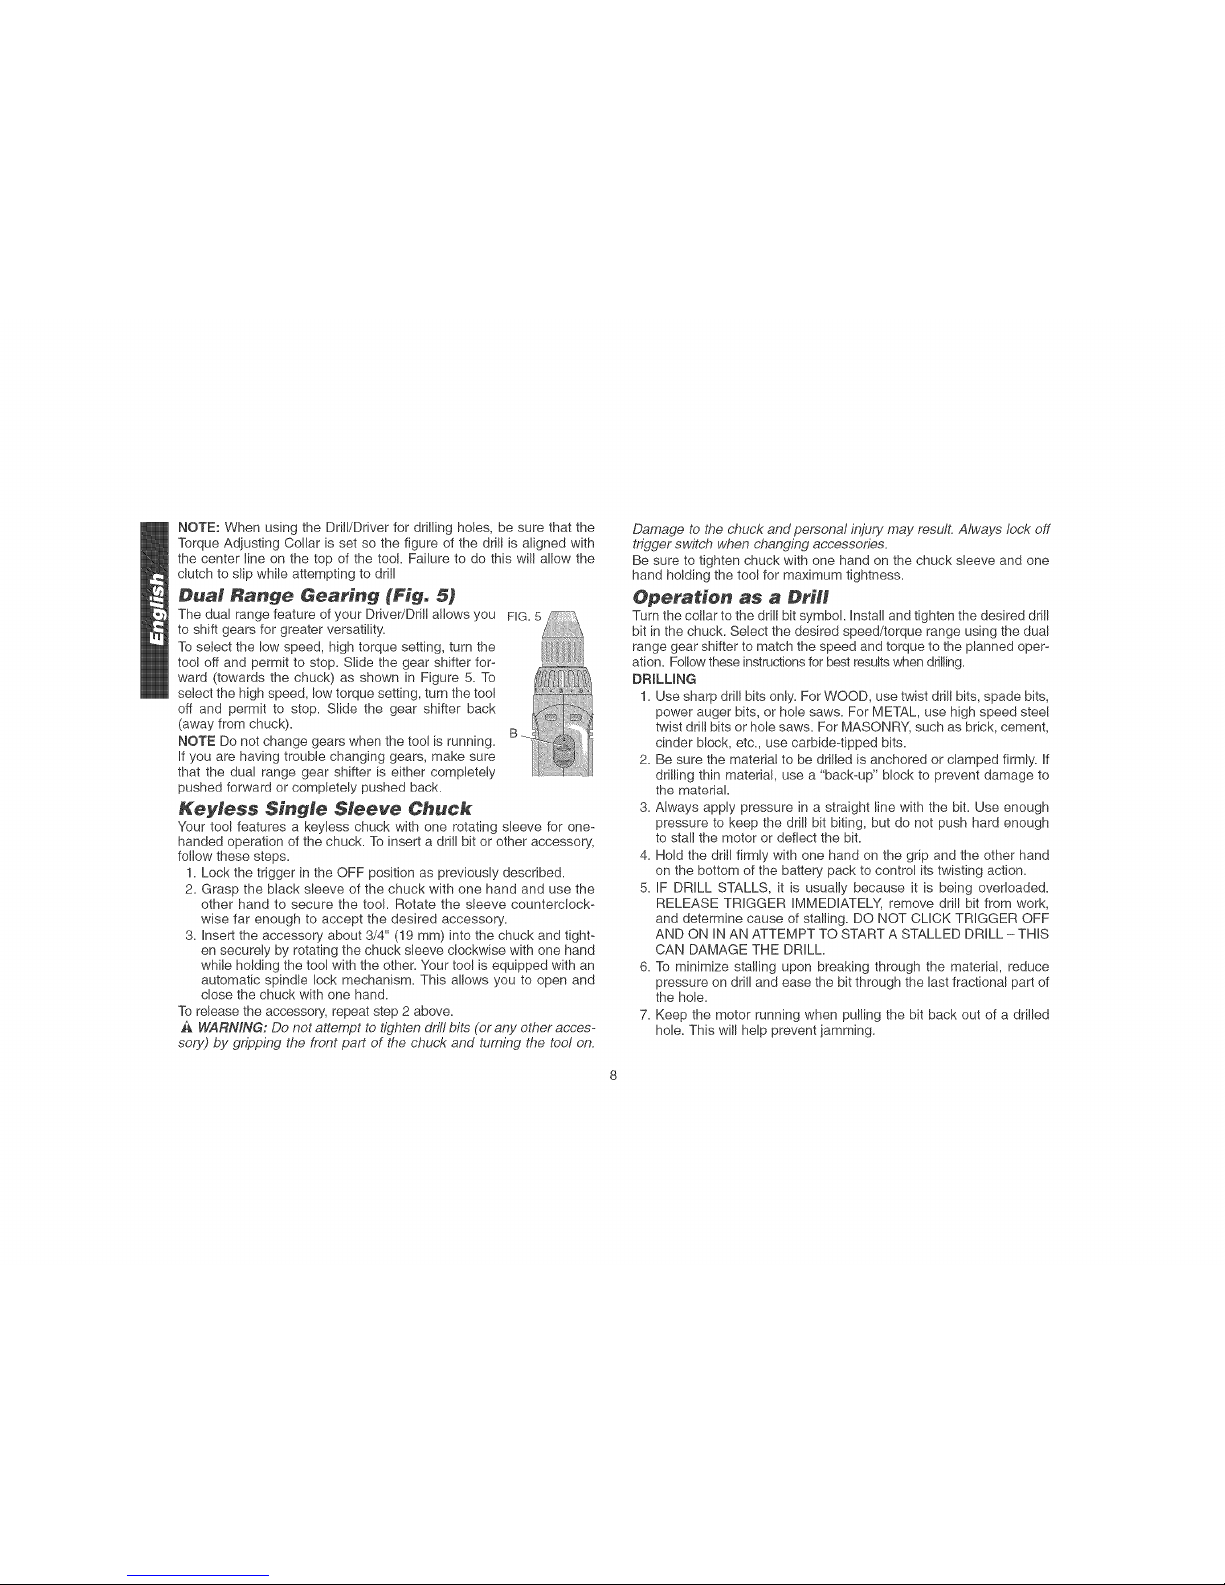
Dual Range Gearing (Fig. 5)
The dual range feature of your Driver/Drift allows you
to shift gears for greater versatility.
To select the low speed, high torque setting, turn the
too! off and permit to stop. Slide the gear shifter for-
ward (towards the chuck) as shown in Figure 5. To
select the high speed, low torque setting, turn the tool
off and permit to stop. Slide the gear shifter back
(away from chuck).
NOTE Do not change gears when the tool is running.
If you are having trouble changing gears, make sure
that the dual range gear shifter is either completeJy
pushed forward or completely pushed back.
Keyless Single Sleeve Chuck
FIG.B_
z
Your tool features a keyless chuck with one rotating sleeve for one-
handed operation of the chuck. To insert a drill bit or other accessory,
follow these steps.
1. Lock the trigger in the OFF position as previously described.
2. Grasp the black sleeve of the chuck with one hand and use the
other hand to secure the tool. Rotate the sleeve counterclock-
wise far enough to accept the desired accessory.
3. Insert the accessory about 3/4" (19 ram) into the chuck and tight-
en secureiy by rotating the chuck sleeve clockwise with one hand
while holding the tool with the other. Your tool is equipped with an
automatic spindle lock mechanism. This allows you to open and
close the chuck with one hand.
To release the accessory, repeat step 2 above.
L¢ WARNING: Do not attempt to tighten drill bits (orany other acces-
sory) by gripping the front part of the chuck and turning the tool on.
Damage to the chuck and personal Lr,,jurymay resdL Always lock off
Lngger switch when changing accessories.
Be sure to tighten chuck with one hand on the chuck sleeve and one
hand holding the tool for maximum tightness.
Operatien as a DHtl
Turn the collar to the drill bit symbol. Install and tighten the desired drill
bit in the chuck. Select the desired speed/torque range using the dual
range gear shifter to match the speed and torque to the planned oper-
ation. Followthese instructions for best results when drilling.
DRiLLiNG
1. Use sharp drill bits only. For WOOD, use twist drill bits, spade bits,
power auger bits, or hole saws. For METAL, use high speed steel
twist drill bits or hole saws. For MASONRY, such as brick, cement,
cinder b!ock, etc., use carbide-tipped bits.
2. Be sure the materia! to be drilled is anchored or clamped firmly. If
drilling thin material, use a "back-up" block to prevent damage to
the material
3. Always apply pressure in a straight line with the bit. Use enough
pressure to keep the drill bit biting, but do not push hard enough
to stall the motor or deflect the bit.
4. Hold the drill firmly with one hand on the grip and the other hand
on the bottom of the battery pack to control its twisting action.
5. IF DRILL STALLS, it is usually because it is being overloaded.
RELEASE TRIGGER IMMEDIATELY, remove drill bit from work,
and determine cause of stalling. DO NOT CLICK TRIGGER OFF
AND ON IN AN ATTEMPT TO START A STALLED DRILL - THIS
CAN DAMAGE THE DRILL.
6. To minimize stalling upon breaking through the material, reduce
pressure on drill and ease the bit through the last fractional part of
the hole.
7. Keep the motor running when pulling the bit back out of a drilled
hole. This will help prevent jamming.
Page 11
8.Withvariablespeeddrillsthereisnoneedtocenterpunchthepoint
tobedrilled.Useaslowspeedtostarttheholeandaccelerateby
squeezingthetriggerharderwhentheholeisdeepenoughtodrill
withoutthebitskippingout.Operateatfull-onafterstartingthebit.
Drilling in Weod
Holes in wood can be made with the same twist drills used for metal
These bits may overheat unless pulled out frequently to clear chips
from the flutes. For larger holes, use low speed wood bits. Work that
is likely to splinter should be backed up with a block of wood.
Drilling in Metals
Use a cutting lubricant when drilling metals_ The exceptions are cast
iron and brass which should be drilled dry. The cutting lubricants that
work best are sulphurized cutting oil or lard oil; bacon grease will also
serve the purpose.
Dritling Masonry
Use carbide tipped masonry bits at low speeds. Keep even force on
the dril! but not so much that you crack the brittle materials. A smooth,
even flow of dust indicates the proper drilling rate.
Operatien as a Screwdriver
Select the desired speed/torque range using the dual range gear
shifter on the top of tool to match the speed and torque to the planned
operation.
insert the desired fastener accessory into the chuck as you would any
drill bit. Make a few practice runs in scrap or unseen areas to deter-
mine the proper position of the clutch collar.
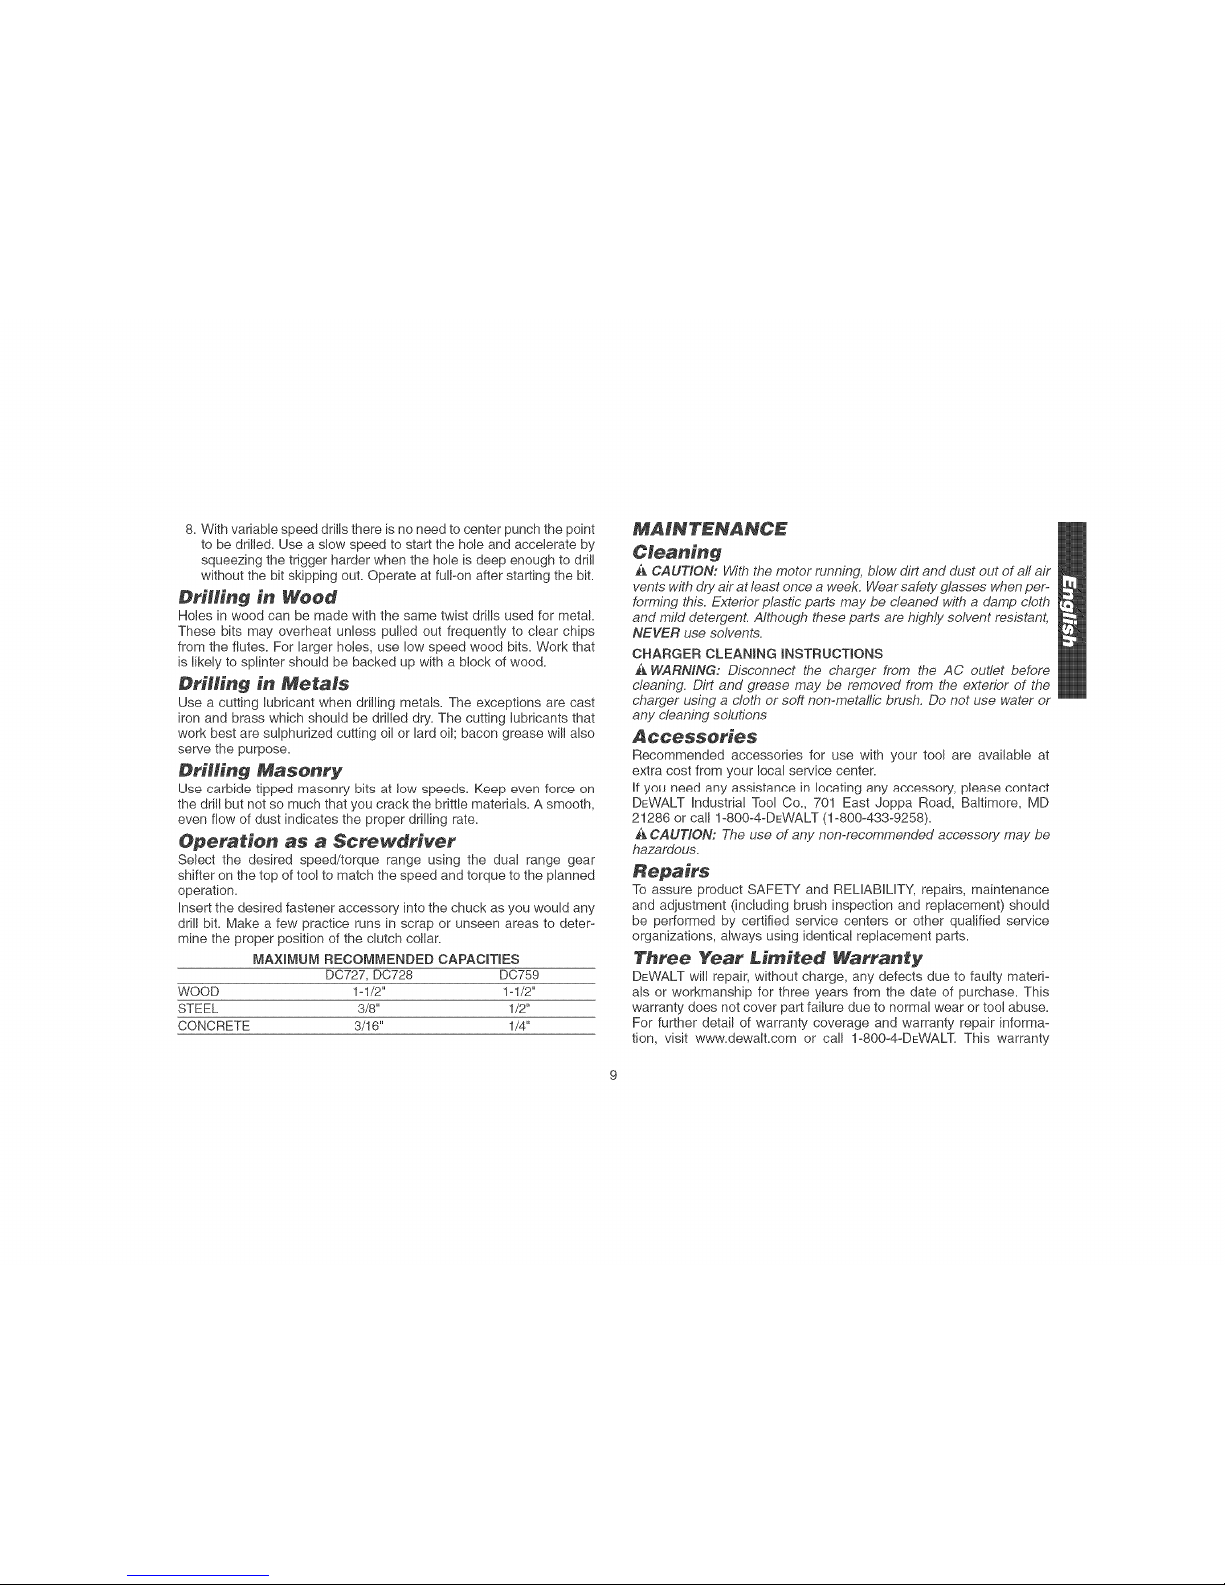
MA×IMUM RECOMMENDED CAPACiTiES
DC727, DC728 DC789
WOOD 1_1/2" 1_1/2"
STEEL 3/8" 1/2"
CONCRETE 3/16" 4/4"
Cleaning
A CAUTION: Wi_;hthe motor running, blow dirt and dust out of all air
vents wit,5 dry air at least once a week. Wear safety glasses when per-
forming t,_is.Exterior plastic parts may be cleaned t44it,5a damp cloth
and mild detergenL Ah,#ough these parts are highly solvent resistant,
NEVER use solvents.
CHARGER CLEANING INSTRUCTIONS
A WARNING: Disconnect the charger from t,_e AC outlet before
cleaning. Dirt and grease may be removed from the exterior of the
charger using a cloth or solI_non-meta_;qcbrush. Do not use water or
any cleaning solutions
Accessories
Recommended accessories for use with your tool are available at
extra cost from your local service center.
If yol; need any assistance in locating any accessory, please contact
DEWALT Industrial Tool Co., 701 East Joppa Road, Baltimore, MD
24286 or call 1-800-4-DEWALT (1-800-433-9258).
i& CAUTION: The use of any non-recommended accessory may be
hazardous.
Repairs
To assure product SAFETY and RELIABILITY, repairs, maintenance
and adiustment (including brush inspection and replacement) should
be performed by certified service centers or other qualified service
organizations, always using identical replacement parts.
Three Year Limited Warranty
DEWALT wilI repair, without charge, any defects due to faulty materi-
als or workmanship for three years from the date of purchase. This
warranty does not cover part failure due to normal wear or tool abuse.
For further detail of warranty coverage and warranty repair informa-
tion, visit www.dewalt.com or call 1-800-4-DEWALT. This warranty
Page 12

doesnotapplytoaccessoriesordamagecausedwhererepairshave
beenmadeorattemptedbyothers.Thiswarrantygivesyouspecific
legalrightsandyoumayhaveotherrightswNchvaryincertainstates
orprovinces.
Inadditiontothewarranty,DEWALTtoolsarecoveredbyour:
1YEARFREESERVICE
DEWALTwillmaintainthetoolandreplacewornpartscausedbynor-
maluse,forfree,anytimeduringthefirstyearafterpurchase.
90DAYMONEYBACKGUARANTEE
Ifyouarenotcompletelysatisfiedwiththeperformanceofyour
DEWALTPowerTool,Laser,orNailerforanyreason,youcanreturnit
within 90 days from the date of purchase with a receipt for a fulI refund
- no questions asked.
FREE WARNING LABEL REPLACEMENT: if your warning labels
become Hlegible or are missing, call 1-800-4-DEWALT for a free
replacement.
/ 3/_" {18mm}V$O
D {_7_7 CORDLESS DR@Lt/BR@VER
_s_Eo_c_
TYPEI SE&
,$voo=
uto O=@o/min/o4 _/miu_(RpM ) -- ,.
AVERTISSENENT
TO REBU_E _HE RH,_KOF HNJURY, USeR MU$$ I_EAD A_D
UIIID_RTTA_ D HN_TRUC%lON MABUAL USE OI_LY W]Yff OEWALT
BATTEF$1ES ,e,NB CBA_GE_, ALWAYS USE PROPE_ EYE A,_)
R_SPHP,AT_R¥ P_ OTEC'_ll0N=A THT_E P_EVEN_E LURELE GUHDE,
$0_0LE85 B_@LLrZO_VE_{
TYPE1 $E& List__
no Lt_4_VminN=14OO/min{RPN}
AVERTiSSENENT
TO _E_UCE THE R_$_{ _F _N,_8}f% _SE_ _U_I REA_ ANB
U_DE_TA_D _NSTRU_T_O_ MANUAL _$E O[_L¥ W_H DEWALT
_AT_E_E$ AND _,¢BGER. A[WAV_ U_£ P_OPEB EVE AND
_E_P_RATO_Y PROSE£1_0N= A T]T_E PR_VENT_F, L_E L_ G_DE=
$ORDLE$S DRILL/DR_VE$
TYPEI SE& _tE__A
_o O=450/min/O=1_hni_H RP_ }
_;_][E_ AVERTiSSENENT
_O REDUCE THE R_$K OF _NJURY, U_;E_ _UST _EA° AND
UNdERSTaNDP_ST_UST_ON_Ar_UAL US_O_LYW_H OeWALT
BAT_R_$ AND _HAR_E_. ALWAYS USE _ ROmPE_ EyE AI_D
EESP_RATORY PRO_CT_O[_. A 7_T]{E p_EVE_F, L_BE LE _U_D_,
lO
Page 13

SIVOUSAVEZDESQUESTIONSOUVOULEZNOUSFAIREPART
DEVOSCOMMENTAIRESCONCERNANTCETQUTILOUTOUT
AUTREOUTILDEWALT,COMPOSEZSANSFRAISLE:
1800433-9258.
R#gles g_n#rales de s#c#Ht#
concernant #es ou*ils i, pi#es
AVERTISSEMENT _.Lire et comprendre toutes lee directives,
car le non-respect des directives suivantes pou_rait entra,;ner un
choc #iectrique, un incendie ou des btessures graves.
CONSERVER CES DIRECTIVES
ZONE DE TRAVAIL
* Garder ]a zone de trava# propre et bien #clair#e; les 6tab/is
encombr#s et los endroits sombres sent propicee aux accidents,
* Ne pae utiliser lee outils #lectriquee dane une atmosphere
explosive, comme # proximit# de liquides, de gaz ou de pous-
sieres inflammables; le moteur peut crier des #tinceiies et
enflammer les vapeurs ou les poussieres environnantes.
* Tenir ]es enfants, lee vie#ours ou route autre personne #
F#eart ]orsqu'on ut#ise un outil #lectrique; /es distractions peu-
vent faire perdre /a maftrise de ce demie_
MESURES DE SECUR_TE : ELECTRIO_TE
* Ne pae ut#iser le cordon de maniere abusive; on ne doit pas
transporter l'outil en ie tenant par ie cordon. On doit tenir le cordon
I'#cart des sources de chaleur, del'huile, des bords tranchants ou
des pibces mobiles. Remp/acer imm#diatement les cordons
endommag#s, car ces demiers augmentent tes risques d'incendie.
* Un outi] a piles int#gr#es ou a bloc-piles externe dolt _tre
recharge eeu]ement au moyen du chargeur approprie, car un
chargeur destin# a une pile particuilere pourrait entrMner un risque
d'incendie Iorsqu'il est utitis# avec une autre.
* N'utiliser Foutil # piles qu'avec le bloc-piles d#signe, car/'utiti-
sation d'un autre type de piles pourrait entrafner un risque
d'incendie.
11
SECUR_T¢: PERSONNELLE
* Rester vigilant en tout temps et fMre preuve de jugement
Iorsqu'on ut#ise un outil electrique; ne pas utiliser Fouti]
Iorsqu'on est fatigue ou sous Finfiuence de drogues, d'a]coo]
ou de m#dicaments, car un moment d'inattention pourrait entrafn-
er des btessures graves.
* Porter des v@tements appropH#s; ne pas porter de v#tements
amples ni de bijoux. Couvrir ou attacher lee cheveux longs.
Garder lee cheveux, ]es v#tements, lee bijoux et los gants
61oign6s des pieces mobiles, car ceuxoci peuvent s'y coincer.
Se tenir _toign_ des _vents puisque ces demiers pou_raient cam-
outer des pieces mobiles.
* Eviter lee d_marrages accidentele; e'assurer que Finterrup-
tour soit plac# en position de verrouil]age ou d'arr#t avant
d'ins#rer le bloc-piles. Ne pas transporter l'outii en /aissant le
doigt sur l'interm'pteur ni ins#rer te b/oc-piles /orsque t'outii est en
position de marche, car ceia pou_rait causer un accidenL
* Rotifer lee cles de tog]age avant de demarrer Foutil; une ci#
laiss6e sur une piece mtative pourrait entrafner des btessures.
* Ne pas trop etendre lee brae;/es pieds doivent rester ancr#s fer-
mement sur le so/af,,n de maLetenir son #quitibre en tout temps et
de mieux maftriser !'outi/ dans des situations impr6vues.
* Utiliser le materiel de s#curite approprie; toujours porter des
lunettes de protection. Porter un masque anti-poussieres, des
chaussures antid_rapantes, un casque de s_curit_ ou des pro-
tecteurs aud,#'ifsIorsque /a situation le requiert.
UT_LISAT_ON ET ENTRETIEN DE L'OUT_L
* Fixer et soutenir Fouvrage sur une plate-forme stable au moyen
d'une butte fixe ou de tout autre diepositif eemb]ab]e; t'ouvrage
est instabie lorsqubn le retient manuellement ou qu'on t'appuie cen-
tre le corps, ce qd pou_rait faire perdre la mai_'risede Ibuti/.
* Ne pas forcer I'outi] ni Futiliser pour des travaux autres que
ceux pour lesquels il a et# con_u. Pour obtenir de meiileurs
r_sultats et pr_venir les risques de biessure, laisser !'out,;!couper
la vitesse pour laquefle it a #t# con_u.
Page 14

* Nepasutiliser Foutil Iorsque Finterrupteur de marche-arr_t ne
fonctionne pas; tout out/t qui ne peut _tre command_ au moyen
de I'interrupteur est dangereux et duit _tre r_par_.
* Debrancher le bloc-piles de Fouti] ou mettre Finterrupteur en
position de verroui]]age ou d'arr6t avant d'effectuer un
reglage, de changer ]es aeeessoiree ou de ranger Foutil; cee
mesures de s_curit_ preventives _duisent les risques de d_mar-
rage accidenteL
* Lorsqu'on n'ut#ise pas Foutii, le ranger here de ]a portee des
enfants ou des personnes non qualifiees; les out/ls sent dan-
gereux entre/es mains de personnes inexperiment_es.
* Lorsqu'on n'utilise pas le bloc-piles, le ranger _tF6cart des
objets meta]]iques tels que ]es trombones, tes pibces de mon-
naie, les c/_s, /es claus, les v/s ou autres pet/ts objets susceptibles
de conduire l'_tectflcit_ entre les barnes et d'occasionner aLesides
courts-circuits suscept/bles de provoquer des _tinceh'es, des
brOlures ou un incendie.
* BienentretenirFoutil;s'assurerqu'ilsoittoujoursbienpropre
et aiguise. Les outils bien entretenus et dent les bards sent bien
tranc,#ants sent mains suscept/btes de rester coinc_s et sent plus
fac/les a maftr/ser.
* Verifier ]es pieces mobiles afin de s'assurer qu'eltes soient
bien alignees et qu'ellee ne reetent pas coincees; verifier
egalement lee pieces afin de s'assurer qu'il n'y ait aueun bris
ni aucune autre condition susceptible de nuire au ben fonc-
tionnement de FoutiL Paire r_parer I'out/l si ce demier est endom-
mag_ avant de s'en servir a nouveau, car les accidents sent sou-
vent causes par des out/ls mal entretenus.
* N'uti]iser que lee accessoires recommand#s par le fabdcant
pour le mod#le coneerne; un accessuire destin# a un outil part/-
culier pourrait devenir dangereux Iorsqu'fl est u_.qis_avec un autre.
ENTRET_EN
* L'outil doit _tre entretenu ou r6par6 par ]e personnel qua]ifie
seulement; toute maintenance effectu_e par une personne non
quat/fl_e peut entraiber des risques de blessure.
12
* Lore de Fentretien, n'utiiiser que des pieces de reehange iden-
tiques et suivre lee directives de ]a section .Entretien. du
present manuel afin de pr_ven/r les risques de choc _lectrique ou
de blessure.
R_gles de s_curit_ specJfiq_e
* ToBit Fouti] par lee surfaces isoleee prevues acette fin
Iorsque Foutil risque d'entrer en contact avec des ills caches,
car de tets contacts peuvent mettre les pieces m_taHiques de I'out//
sous tension, engendrant des risques de choc _tectrique.
iiAVERTtSSEMENT : Certains outils _lectr/ques, tels que les
sab/euses, les scies, tes meuies, /es perceuses ou certains autres out-
i/s de construction, peuvent souiever de la poussibre contenant des
produits chim/ques suscept/bfes d'entrafner /e cancer, des malforma-
tions cong_nitales ou pouvant _tre nodfs pour le systeme repmduct/tt
Parmi ces produits chimiques, on retrouve :
* le plomb clans les peintures a base de plomb,
* ta silice crLsta///ne dans les briques et le ciment et autres pm-
duits de magonnerie,
* /'arsenic et /e chrome darts le bois de sciage ayant subi un
traitement chimique.
Le _isque assoc/_ 9 de relies expositions peut varier selon la
fr_quence avec laque//e on effect_e ces travaux. Pour r_duire /'expo-
sit/on 9 de tels produits, fl faut travaifler clans un endroit bien ventil_ et
ut/t/ser I'equipement de s_curit_ appropri_ tel un masque anti-pous-
sieres sp_cialement congu pour flitter tes particuies m/cmscopiques.
* E:viter tout contact prolonge avecla poussiere soulevee par
cot oudl ou autres outils eleetriques. Porter des v#tements de
protection et nettoyer ]es parties exposees du corps avec de
Feau savonneuee. S'assurer de bien se prot_ger afin d'_viter
d'absorber par la boucbe, los yeux ou la peau des produits chim-
iques noch%
iiAVERTISSEMENT : Cet outil peut produire et r_pandre de la pous-
sibre susceptible de causer des dommages s_rieux et permanents au
systeme respiratoire. Toujours uti!iser un apparefl respiratoire ami-
poussieres appmuv_ par le N/OSH ou t'OSHA. Diriger les particuies
darts le sens oppos_ du visage et du corps.
Page 15

_kM/SE EN GARDE : Lorsqu'il n'est pas utilise, coucher /'outil
sur une surface stable ou il ne risque pas de causer une chute.
Certains outi,tsdot_s d'un bloc-piles volumineux peuvent demeurer en
position vertica/e sur teur bloc-piles, mais peuvent _galement @'reren-
vers_s facilemenL
* L'_tiquette appos_e sur/'outil peut affic,her lee symboles sdvants.
Voici les symbofes et leurs d6finitions :
V............ volts
Hz ..........hertz
min ........minutes
.... ___ courant continu
[] .......... construction
de classe l/
..........borne de terre
sppm ......surface de sciage
par minute
A ............ amperes
W ............ watts
_ ..........courant altematif
no ............ aucune option 9 vide
.../min ......tours OUmouvements
altemailts par minute
Z¢ .......... symbole d'avertissement
#mportantes cenMgnes de s6cudt_
cencernant lee Mec-pi#es
L'oufii fonctionne sur un bloc-piles DEWALT de 12, de 14,4 ou de 18
volts. Lorsqu'on commande des bloc-piles de rechange, on dolt indi-
quer le num6ro de catalogue et la tension requise. Les bloc-plies b,
dur6e prolong6e durent 25 % plus Iongtemps que les bloc-piles
standard.
REMARQUE : bien que !'outil puisse fonctionner au moyen de I'un ou
I'autre des deux types de bloc-piles, on dolt s'assurer d'en choisir un
de tension appropri6e. Comme Ies piles perdent leur charge lente-
ment Iorsqu'elles ne sont pas placSes dans le chargeur, il est
pr6f6rable de les laisser a cet endroit en tout temps.
Le b!oc-piles n'est pas compl_tement charg6 Iorsqu'on le sort de la
baste. Avant d'utiliser Ie bloc-piles et Ie chargeur, Iire Ies consignes de
s_curit6 ci-dessous. Puis suivre la m6thode de chargement indiqu6e.
LIRE TOUTES LES CONSIGNES
* Ne pas Mcinerer le bloc_piles m_me s'H eet tree endommage eu
comp/etement use. h'risque d'expleser si on tejette au feu.
* H peut y avoir une legere fuite de fiquide en provenance des
616merits du b/ecopiles dane des conditions d'utiflsation ou
des temperatures extremes. Ceci n'est pas un signe de
d_faitlance. Cependant, si te sceau d'_tanch_it_ ext_ieur est bris_
et si le tiquide entre en cem_ct avec ta peau :
a. la laver rapidement au savon eta/'eau ;
b. neutrahser avec un acide doux, comme du jus de dtron ou du
vinaigre ;
c. si /e liquide des piles entre en contact avec les yeux, lee rincer
9 /'eau claire pendant au mains 10 minutes et consdter
immediatement un medecin. (Remarque d'ordre medical : Le
/iqu/de est une solution compos_e 9 25-35% d'hydroxyde de
potassium.)
* Ne pas transporter de b/ocsopHes de rechange dane eon tab/ier
ou see poches, ni dane des beZtes a outils contenant d'autree
objets en metal Le bloc-piles peurrait #tre endommag_ par un
court-circuit qui risquerait d'entrafner de graves br_lures ou un
incendie.
Ne charger lee blocs-piles que dans lee chargeurs D_WALT_
* NE PAS _clabousserni irnmerger clans/'eau ou d'autres liquides.
Ne pas ranger ou utiffser _'outi_ et _e b_oc-pfles dane des
endroits o# la temperature peut atteindre ou d#passer 40 -°C
(105°F), par exemple, dans lee cabanens ou lee bgtiments
metaHiques, en etc.
_€DANGER : On ne dolt en aucun cas tenter d'ouvrir/e bloc-piles. Si
son barrier est fissur# ou endommag#, ne pas insurer le bloc clans te
chargeur au risque de subir un choc #/ectrique ou une #tectrocution.
Les blocs-piles endommag#s doivent #tre retoum#s a un centre de
service oL_ils semnt recycles.
13
Page 16

REMARQUE:uncapuchonestfoumiaveclapiieenvue
d'etreutiJis6chaqueloisqu'onretirecettedernJerede!'outiI
ouduchargeurenvuedelarangeroudelatransporter;
enleverIe capuchonavantde remettreIa piledansle
chargeuroudansI'outil.
_AVERTtSSEMENT: s'assurer, au moment de ranger ou de
transporter la pile, qu'aucun objet metallique n 'entre en contact
avec les homes a decouvert de la pile. Par exempte, it faut _viter
de placer une pile sans capuchon clans un tabfier, une poche, une
boi_'ea outits ou un firoir (etc.) contenant des objets tels que des ctous,
des v/s ou des c/_s, car ta pile pou_rait causer un court-circuit et
s'endommager, ou risquer de provoquer des brOlures ou un incendie.
_MISE EN GARDE : Le bloc-pries dolt _tre so!idement fix4 a/'outri;
tout bloc-piles qui n'est pas bien fixe a /'ourit risque de causer des
blessures.
Sceau RBRC Mc
Le sceau RBRC Mcde Ia Rechargeable Battery Recycling
Corporation appos6 sur la pile au nickei-cadmium (ou le
bloc-piles) indique que Ies coots de recyclage de ce
dernier a Ja fin de sa vie utile ont dej& 6t6 pay6s par
DEWALT. En certains endroits, Ia mise au rebut ou aux ordures munic-
ipales des piles au nickel-cadmium est iII6gale; le programme de
<<RBRC >> constitue donc une solution des plus pratiques et
6cologiques.
La <<RBRC >>,en collaboration avec DEWALT et d'autres utilisateurs
de plies, a mis sur pied des programmes aux E_tats-Unis dans Ie but
de faciliter la collecte des piles d6charg6es. DEWALT encourage sos
utiIisateurs a participer a son programme de protection de I'environ-
nement et de conservation des ressources naturelJes en retoumant
Jespiles usag6es a un centre de service DEWALT autoris6 ou chez un
d6positaire Iocal afin qu'eIles puissent 6tre recycl6es. On pout en
outre se renseigner aupr6s d'un centre de recydage Jocai pour con-
naitre d'autres sites Jesacceptant.
14
impertantes consignes de s_cuHt_
CO_CeR'Et_nt _eS C_1i3E_e_##'S
CONSERVER CES CONStGNES : Ce manuel confient des consignes
de s_curit4 importantes pour los chailgeurs.
* Avant d'udliser le chargeur, Iire toutes les consignes et tousles
marquages de s#cufit_ sur le chargeur, /e bloc-plies et /e produit
utilisant le bloc-pries.
ZcDANGER : Les bomes de charge re_oivent une tension de 120
volts. Ne pas los touctler avec des objets conducteurs, au risque de
subir un choc _lectrique ou une 41ectmcufion.
_AVERTISSEMENT : Ne laisser aucun fiquide s'infiltrer dans le
chargeu£ Cela risque d'entrainer un c,hoc _lectrique.
/&MISE EN GARDE : Pour r_duire les risques de blessures, ne
charger que les piles au nickel-cadmium rechargeables DEWALT Les
autres types de pries risquent d'_clater, et d'entra_ner ainsi des
b/essures et des dommages.
_MtSE EN GARDE : Dans certains cas, lorsque le chargeur est
branche clans la source d'alimentation, il est possible que des corps
4trangers court-circuitent les contacts de charge a nu a/'/nt_r/eur du
chargeu_ Les corps 4trangers conducteurs, notamment ta tafi_ed'acier,
le papier d'aluminium ou toute accumulation de particu/es m#talliques,
doivent _tre tenus a distance des cavit4s du chargeur. On dolt toujours
d#brancher le chargeur de la source d'alimentation lorsqu'i/ n'y a pas
de bloc-pries clans la cavitY. D_brancher le chargeur avant de tenter de
/e nettoyer.
* NE PAS tenter de charger le bloc-piles avec un chargeur autre
que ceux du pr#sent manuel Le c,hargeur et le bloc-piles sont
sp#cifiquement con_us pour #tre ufi/is#s conjointement.
* Cos chargeurs ne sont census que pour charger des piles
rechargeables D_WALT. Tout autre usage peut entrah_er un
incendie, un choc 4lectrique ou une #lectrccurion.
. Ne pas exposer le chargeur a la pMie ni a la neige.
* Tirer sur la fiche et non sur le cordon pour debrancher le
chargeur. AinsL on risque moins d'endommager la fiche et le
cordon d'alimentafion #lectrique.
Page 17

* S'aeeurer que le cordon eet poeitionne de fa_on a emp_cher
qu'on ne le pietine ou qu'on ne tr6buche deseue, ou bien qu'i]
soit expose a des contraintes ou des dommages quelconques.
* On utilieera une rallonge eeulement si c'est absolument
neceesaire. Une raftonge inadequate peut entra,;ner un incendie,
un choc _lectrique ou une _lectmcution.
* Pour des raisons de securit6, ]a rallonge dolt comporter un
diametre de fil (AWG ou American Wire Gauge) approprie. Plus
le num#ro de jauge du fil est petit, plus la capacit# du cgble est
grande ; par exemple, un num6ro de jauge 9gal a 16 correspond 9
une capac/t_ plus grande qu'un num_ro de jauge _gal 9 18.
Lorsqubn ufltise plusieurs rallonges pour obtenir la longueur totale,
on dolt s'assurer que les ills de chacune d'elles sent au moins du
calibre minimum n6cessaire.
Calibre de fil minimum recommande pour lee rallongee
Longueur totale de la rallonge
25 pi 50 pi 75 pi 100 pi 125 pi 150 pi 175 pi
7,6m 15,2m 22,9m ;-_0,5m f:_A,1m 45,7m 53,;_m
CaBibre AWG
18 18 16 16 14 14 12
* Ne poser aueun objet cur le chargeur et ne pae poser ]e
chargeur sur une surface non rigide risquant d'obstruer les
prises d'air et d'entra[ner ainei une surchauffe interne de
I'appareiL Placer te chargeur a l'_cart de route source de chaleur.
flest a_r6 par des fentes dans le haut et le bas du bo,;tier.
* Ne pae ut#ieer ]e chargeur ei le cordon d'a]imentation ou ]a
fiche eont endommages. -- Les l_ire remplacer imm_diatement.
* Ne pas utiliser le chargeur s'i] a re_u un coup violent, si on Fa
#chapp6 ou s'g a et6 endommage d'une fa_on quelconque. On
dolt alors !'apporter a un centre de service autoris_.
* Ne pae demonter le chargeur ; il taut plut_t I'apporter a un
centre de service autorise s'# requiert de ]'entretien ou dee
reparations. Un r_assemblage inad6quat risque d'entra,;ner un
choc _lectrique, une _lectrocution ou un incendie.
* Debrancher le chargeur avant detenter tout nettoyage. On reduit
ainsi lee fisques de chocs electriques. Le seul falt d'enlever le bloc-
piles ne _du'it pas ces fisques.
* NE JAMAIS tenter de raccorder dec:_chargeurs l'un 9 l'autre.
* Le chargeur est con_u pour _tre aliment# par un courant
electfique domeetique normal (120 volts). Ne tentez pas de
I'alimenter au moyen de route autre tension. Cela ne s'apptique
pas au chailgeur pour poste mobile.
UtJlisa_r_ d_ _ede T_ne.U_¢ _c
Automatiq_e
Le mode Tune-up _c automatique _qailibre Ies diff_rents _t_ments du
bloc-piles afin de lai permettre de fonctionner & pleine capacite. Les
blocs-piles do!vent _tre mis au point chaque semaine ou apres 10
cycles de charge/dScharge, ou quand ils n'offrent plus Ie m_me
rendement. Pour utiliser le mode Tune-Up _c Automatique, p{acer le
bloc-piles dans le chargeur pendant une p_riode d'au moins huit
heares. Le chargeur execute les cycles suivants.
1. Le voyant ioug÷ clignotela en continu, ce qui il_dique que le cycle
de charge d'une dur_e d'une heure est amorc_.
2. Lorsque le cycle de charge d'une dur_e d'une heure est terrainS,
le voyant reste allum_ continuellement et ne clignote plus. Cela
indique que Ie bloc est enti_rement charg_ et peat _tre utilis_.
3. Lorsque le bloc demeure dans le chargeur apres la p_riode de
charge initiale de une heure, Ie chargeur passe en mode Tune-
Up_cAutomatique. Ce mode se maintient pendant huit heares ou
jusqu'a ce que les diff_rents _I_ments de Ia pile soient _quilibr_s.
Le bloc-piles est pr_t a _tre utiIis& et peat _tre retir_ en tout temps
au coats du mode Tune-Up Me.
4. Une lois que Ie mode Tune-Up _c automatique est termin_, le
chargeur passe en charge de maintien ; le voyant s'_teint quand le
mode Tune-Up _c automatique est terminS.
CO_SEBVEB CES CO_S_G_ES
POUB UT_L#SAT#O_ ULTEB#EUBE
15
Page 18

FIG. 1
Fenctiennement du voyant
CHARGEMENT OU
BLOC=PILES ................................ Him
CHARGE A BLOC .......................
RETABDEMENT BLOC=PILES
BEIVIPLACEB LE BLOC=PILES,,= @ ® O O • • ® • O ® O O • • ® O @O O O
SOURCE D'ALIMENTATION
INADEQUATE ............................... • @ Q Q • @ @ • Q • @ • Q Q
Chargeurs
L'outil utilise un chargeur DEWALT de 12.0, 14.4, ou 18 volts. Les piles
peuvent _tre charg6es au moyen d'un chargeur DEWALT d'une heure
ou de 15 minutes, ou d'un chargeur pour v6hicules de 12 volts.
S'assurer de lire toutes les consignes de s_curit_ avant d'utiliser Ie
chargeur. Consulter le diagramme apparaissant sur la couverture
arri_re du present guide afin de v_rifier la compatibilit_ du chargeur
avec le bloc-pile.
M_thede de charge
1. Brancher le chargeur a une prise de courant appropri_e avant
d'insSrer Ie bloc-piles.
2. Ins&rer Ie bloc-piles dans Ie chargeur, tel qu'ilIustr8 a la Figure 1,
en s'assurant de bien I'enfoncer. Le voyant rouge (recharge)
clignotera continuelIement, ce qui indique que le cycle de charge
est amorc_,
3, Le bloc-pibs est completement charg6 Iorsque le voyant rouge
reste allum6 continuellement, Le bloc-piles est alors compl6tement
charg6 et on peut I'utiliser ou Ie Iaisser darts le chargeur,
AMtSE EN GARDE : La tension pr_sente aux bomes de charge est
de 120 volts. Ne pas les toucher avec des objets conducteurs. Danger
de choc _lectrique ou d'_/ectrocut/on.
Indicate.rs de charge
Certains chargeurs sont con?us pour d_tecter certains problemes
pouvant aIt6rer le fonctionnement des blocs-pibs. Les problemes sont
signal6s par Ie dignotement rapide du voyant rouge. Si cela se produit,
r6introduire Ie bIoc-pibs darts le chargeur. Si le probleme persiste,
essayer un autre bloc-piIes pour d6terminer si le chargeur est en bon
6tat. Si Ia charge du nouveau bloc-pibs se fait sans probleme, le bloc
originaI est d6fectueux et iIfaut le retourner & un centre de service ou
un site de coibcte pour qu'il soit recyct6. Si I'indication de panne
persiste avec Ie nouveau bloc-piles, faire tester le chargeur a un centre
de service autoris6.
RETARDEMENT- BLOC=PILES CHAUD/FROID
Certains chargeurs sont munis d'une fonction de retardement en raison
d'un bloc-plies chaud/froid : Iorsque le chargeur d_tecte une pile
chaude, il d6clenche automatiquement un retardement -- bloc-piles
chaud, interrompant lacharge jusqu'& ce que la pile ait refroidL Lorsque
les piles sont refroidies, Ie chargeur passe automatiquement en mode
de chargement du bloc. Cette fonction permet de maximiser la vie utile
des piles. Lorsque le chargeur est en mode de retardement en raison
du bloc-piles chaud, le voyant rouge clignote en _mettant
alternativement des signaux de Iumiere longs et brefs.
SOURCE D'ALIMENTATION tNADE_QUATE
Certains chargeurs comportent un indicateur de source d'alimentation
d6fectueuse. Lorsque le chargeur est utilis6 avec certaines sources
16
Page 19

d'alimentationportatives,commedes g6n6ratricesou des
convertisseursc.c.-c.a,11peutcesserdefonctionnertemporairement;
letemoinrougeemettantabetsunclignotementsconstituede
deuxsignauxrapidessuivisd'unepause.Celaindiquequelasource
d'alimentatJonesthorslimites.
BLOC-PILESLAJSSE_BANSLECNARGEUB
OnpeutlaJsserlechargeuretlebloc-pilesbranch6saveclevoyant
rougeallure6Jnd6finiment.Lechargeurmaintiendralebloc-piles
comptetementcharge.
NOTA: Unbloc-pilessed_chargelentementhorsduchargeur.S'i!
n'6taitpasa!iment6parlachargedemaintien,11faudraitpeut-&trele
chargerdenouveauavantdeI'utiliser.Unbloc-pilespeut_galementse
dSchargerlentementsionIelaissedansunchargeurquin'estpas
branch6aunesourcedecourantc.a.appropri6e.
BLOOSoP_LESFAIBLES:Leschargeurspeuventegalement d_tecter
si des piles sont faibles. Celles-c[ sont utilisables mais on ne dolt pas
s'attendre _ ce qu'e!les offrent le m&me rendement. Pour signaler qu'un
bloc-piles est faible, le chargeur emet huit bips rapides environ 10
secondes apres qu'on y a ins6r8 Ie bloc. Le chargeur commence
ensuite _ charger Ies piles jusqu'a Ieur capacit8 maximale dans les
circonstances.
Remarques i_pertantes sur la charge
1, Pour une dur@ede vie maxirnale et un rendement optimal, Ie bloc-
piles doit @trecharg6 _ une temp6rature ambiante de 65 a 75 °F
(18 a 24 °C). NE PAS charger le bloc-piles _ une temp6rature
[nf6rieure b.+40 °F(+4,5 °C) ou superieure _ +105 °F (+40,5 °C).
II s'agit d'une mesure de pr6caution importante pour @viter des
dommages s6rieux au bloc-piles.
2. Le chargeur st le bloc-piles peuvent devenir chauds au toucher
pendant le chargement. II s'agit d'une condition normale, qu[
n'indique pas Ia pr@sence d'un probleme.
3. S[ le bloc-piles ne se recharge pas correctement :
a. V@rifierle courant a Ia prise en branchant une lampe ou un autre
appare[I @lectrique.
b. V@rifier si Ia prise est raccord6e & un interrupteur qu[ coupe le
courant Iorsque I'on 6teint I'6clairage.
c. Placer Ie chargeur et Ie bloc-piles a un endroit o_ Ia temp@rature
de !'air ambiant est d'environ 65 _ 75 °F (18 a 24 °C)
d. S'[I y a touiours des problemes de charge, emmener I'outil, le
bloc-piles etIe chargeur a un centre de service local.
4. Le bloc-piles doit 6tre recharg& Iorsqu'[I ne produit plus
suffisamment de puissance pour des travaux qui @taient
auparavant effectu6s sans difficult@.CESSER I'utilisation dans ces
conditions. Suivre Ia m@thode de charge. On peut @galement
charger un bloc-piles partiellement decharg& sans que cela n'ait
d'incidence n@gativesur Ie bloc-piles.
5. Dans certains cas, Iorsque le chargeur est branch@ a Ia source
d'aiimentation, 11est possible que des corps etrangers court-
circuitent les contacts de charge _ nu a !'int@rieurdu chargeur. Les
corps @trangersconducteurs, notamment Ia laine d'acier, le papier
d'aluminium ou toute accumulation de particules m_talliques,
doivent etre tenus a distance des cavites du chargeur. On doit
toujours d_brancher le chargeur de la source d'alimentation
Iorsqu'[I n'y a pas de bloc-piles dans la cavitY. D_brancher le
chargeur avant de tenter de Ie nettoyer.
6. Ne pas congeler ni [mmerger le chargeur dans I'eau ou un Iiquide
quelconque.
ZCAVERTIBBEMENT : Ne /aisser aucun fiquide s'infiltrer clans /e
chargeu_ Ce/a risque d'entra_ner un choc 41ectrique. Pour facititer le
refroidissement des piles apr_s /'usage, _viter de placer le chargeur
ou le bloc-piles 9 la chaleur, comme dana un cabanon m_ta_;qqueou
darts une remorque non isol_e.
AMiBE EN GARDE : On ne dolt en aucun cas tenter d'ouvfir le bloc-
piles. Si le bo/tier de p/astique du bloc-plies se bfise ou se fissure,/e
rapporter 9 un centre de service pour le recycle_
17
Page 20

FIG. 2
FONCTIONNEMENT
Montage e* d_montage du blocopJles
REMARQUE : S'assurer que Iebloc-piles soit completement charg6.
Pour Hnstaller darts Bapoignee de I'outiB,aligner la base de I'outil
avec I'encoche situ6e & I'int_rieur de Ja poign6e (Fig. 2) et glisser le
bloc-piles fermement dans la poign_e jusqu'a ce qu'on entende un
d6clic indiquant qu'il est bien enclench6, tei qu'illustr6 & la Figure 2A.
Pour retirer le bloc-piles hors de m'outil, appuyer sur Ies boutons de
d_gagement et tirer fermement Ie bloc-piles hers de la poign_e, puis
I'insSrer dans le chargeur selon les directives darts la section
<<Chargeur >>du pr6sent manuel.
interrupfteur de vitesse variable
Pour mettre Voutil en marche, appuyer sur I'[nterrupteur. Pour
I'arr_ter, ret&cher I'interrupteur. Cet out[I est dot6 d'un re&can[sine de
freinage. Le mandrin cesse de toumer aussit6t que I'interrupteur est
completement rel&ch_. L'interrupteur a vitesse variable permet de
s_lect[onner la v[tesse qu[ convient le m[eux & une appI[cafion
parficul[ere. Plus on appu[e sur I'[nterrupteur, plus I'outiI tourne
rapidement. Utiliser I'outil &des vitesses plus basses pour amorcer le
per£age de trous sans coup de pointeau, pour le per£age des m_taux,
du plastique ou de la c_ramique, pour v[sser ou pour toute application
exigeant un couple &lev_. Les v[tesses plus _lev_es conviennent mieux
FIG. 3 , Enfoncer pour la Enfoncer pour la (
rotation arriere rotation avant
au per_age du bois et des compositions de bois ou pour I'utilisation
d'accessoires de pongage et de polissage. Pour assurer a I'outil une
dur_e de vie maximale, n'utiliser la vitesse variable que pour amorcer
le per cage de trous ou pour Ia boulonnerie.
NOTA : L'utilisation prolong6e & des vitesses variables n'est pas
recommand_e. Cette pratique doit 8tre 8vitae car elle risque
d'endommager I'interrupteur.
Bouten de co_mande avant.arri_re
Le bouton de commande avant-arriere d6termine lesens de rotation de
I'outi! et sert 6galement de bouton de verrouillage. Pour s_lectionner la
rotation avant, rel&cher I'interrupteur et enfoncer le bouton de
commande avant-arriere qu[ se trouve du c6t_ droit de I'outiL Pour
s_lectionner Ia rotation arri_re, enfoncer Ie bouton de commande
avant-arri_re qui se trouve du c6t8 gauche de I'outiL Lorsqu'il est pIac_
au centre, le bouton de commande verrouille I'outil en position d'arr_t.
Avant de changer la position du bouton de commande, veilIer
rel&cher d'abord I'interrupteur.
NOTA : Lorsque I'on utilise !'outil pour la premiere lois apres avoir
chang_ Ie sens de rotation, iI est possible qu'un d_clic se fasse
entendre au d_marrage. Ce bruit est normal et n'indique pas la
presence d'un probl_me.
18
Page 21

Collier de r_glage de couple (fig° 4)
Le collier de r6glage de couple est marqu6 a FIG. 4
I'aide de chiffres et d'un symbole repr6sentant
un foret. Faire tourner Ie collier jusqu'a ce que
le r6gIage d_sir8 se trouve sur le dessus de
I'outil (fig. 4). Ces marques sont fournies afin
de permettre de s6Iectionner avec pr6cision le
couple deserrage. Plus le hombre indiqu6 sur
le collier est 61ev6, plus Ie couple est 61ev6 et
plus la dimension de la piece de boulonnerie
visser peut @treimportante. Pour verrouiller
I'embrayage afin d'ex@cuter des op@rations de
pergage, faire tourner le collier iusqu'au
symbole repr6sentant un foret.
NOTA : Lorsque Ia perceuse tournevis est utilis6e pour percer des
trous, s'assurer que le cotlier de r6glage de couple est tourn6 de fagon
que le symbole repr@sentant un foret soit align@avec la Iigne au centre
sur le dessus de I'outil, a defaut de quoi I'embrayage glissera Iorsque
I'on tentera de percer.
Engrenage _ double ga_e (figo 5)
La caract_ristique d'engrenage &double gamme de la FIG.5_
pergeuse-tournevis permet de changer de rapport afin
d'obtenir une plus grande polyvalence. Pour
s6tectionner le rSglage de basse vitesse et de couple
&leve, mettre I'outil hors tension et attendre qu'il
s'arrSte. Faire glisser Ie bouton de changement de
rapport vers I'avant (vers Ie mandrin), comme le
montre Ia fig. 5. Pour sSIectionner le r_glage de haute
vitesse et de faibte couple, mettre I'outil hors tension B
et attendre qu'iI s'arrSte. Faire glisser Ie bouton de
changement de rapport vers I'arriere (dans le sens
oppos_ au mandrin).
NOTA : Ne pas changer de rapport Iorsque I'outil fonctionne. Si le
changement de rapport ne se produit pas, s'assurer que le bouton de
19
changement de rapport est compl_tement pouss_ vers I'avant ou vers
I'arriere.
Mandrin _ mancbon unique sans ci_
L'outil est dot6 d'un mandrin sans fil & rnanchon rotatif afin de permet-
tre a I'utilisateur de manipuier Ie mandrin d'une seule main. Pour ins6r-
er une meche ou tout autre accessoire, suivre les _tapes d_crites ci-
dessous :
1. Verrouiiler Finterrupteur & g&chette en position d'arr_t, tel que
decrit.
2. Saisir la pattie arri_re du mandrin d'une main et utiiiser I'autre
pour retenir fermement I'outil. Faire tourner Ie manchon vers la
gauche, iusqu'& ce que I'ouverture soit assez grande pour
recevoir I'accessoire.
3. Ins6rer I'accessoire sur environ 19 mm (3/4 po) dans Ie mandrin
et te serrer fermement en tournant le manchon vers Ia droite d'une
main et en utilisant I'autre pour tenir I'outil. L'outil est muni d'un
m_canisme de verrouiliage automatique de la broche permettant
d'ouvrir et de fermer le mandrin d'une seule main.
Utiiisation co_e perceuse
Tourner Ie collier iusqu'au symbole repr6sen!ant un foret, hstaller et
serrer Ie foret d6sir6 darts le mandrin. A I'aide du bouton de
changement de rapport, s61ectionner Ia gamme de vitesse et de couple
d@sir6equi convient &I'op6ration planifi@e. Pour le percage, suivre les
directives suivantes afin d'obtenir Ies meilleurs r@sultatspossibles.
PER(_AGE
1=N'employer que des forets bien aff0t_s. Pour Ie BOIS, utiliser des
forets h@Iicoidaux, des forets a trois poin!es, des forets de tari@re
moteur ou des scies &trous. Pour les METAUX, utiliser des forets
h@licoYdaux en acier rapide ou des scies & trous. Pour Ia
MA(_ONNERE (brique, ciment, blocs de b@ton, etc.), utiliser des
forets a pointe au carbure.
2. S'assurer que le mat@riau qui doit @tre perc@est ancr@ ou fix@
solidement. Si le mat@riauest mince, I'appuyer sur un "bloc de bois"
pour @viterde I'endommager.
Page 22

3.Toujoursexercerunepressionenlignedroiteparrapportauforet.
ExercersuffisammentdepressionpourfairemordreIeforetmais
nepasappuyer&I'excSspour8viterdebloquerlemoteuroude
faired6vierleforet.
4.TenirfermementlaperceuseensaisissantIapoign_ed'unemain
etenpla£antI'autremainsurlapartieinf_rieuredubloc-pileafin
demaTtriserlatorsiondeI'outiL
5.SlLAPERCEUSESEBLOQUE,le^probl_meestgen6ralement
attribuable&unesurcharge.RELACHERIMMEDIATEMENT
UNTERRUPTEUR,retirerteforetdutrouperc8etd&terminerla
causedublocage.NEPASAPPUYERDEFACONRE_PE_TE_E
SURL'INTERRUPTEURPOURTENTERDESUPPRIMERLE
BLOCAGECARCETTEPRATIQUEPEUTENDOMMAGERLA
PERCEUSE.
6.Pour&viterunblocageIorsqueI'outiltentedetraverserlemat6riau,
r_duireIapressionexerc&esurlaperceuseafinqueleforetperce
lentementladerni_repattiedutrou.
7.Fairetournertaperceusepourretirerleforetdutrouperc&.Cette
pratiqueempScheleforetdesecoincer.
8.DansIecasdesperceuses&vitessevariable,iln'estpasn&cessaire
demarqueraupointeaulecentredutrou&percer.DSbuterabasse
vitessepouramorcerIetrou,puisacc_I6rerenenfoncantdavantage
I'interrupteurIorsqueIetrouestsuffisammentprofondpour
emp6cherIeforetdesortir.Unefoisletrouamorc&,fairefonctionner
laperceuse&lavitessemaximale.
Per_age du bois
Le bois peut 8tre perc& a I'aide des m_mes forets h&licoTdaux utilis_s
pour les m_taux. Ce type de foret peut surchauffer s'il n'est pas retir6
fr6quemment du trou afin de d&gager lescopeaux des goujures. Pour les
trous de grande dimension, utiliser un foret a bois a basse vitesse. Si le
bois est susceptible de faire des &ctats, placer un bloc de bois a I'arri_re.
Per_age des _taux
Pour percer des m6taux, utiliser un lubrifiant de coupe. Cette consigne
ne s'applique pas b.la fonte ni au laiton, qui doivent _tre perc&s &sec.
Les meilleurs Iubrifiants sont I'huile de coupe sulfur6e et I'huile de
saindoux; la graisse de bacon peut &galement faire I'affaire=
Per_age de la ma_onneHe
Utiliser un foret a maconnerie a pointe au carbure a basse vitesse.
Exercer une force uniforme sur la perceuse mais ne pas appuyer
I'exces pour &viter de faire craquer les mat6riaux friables. Une &mission
de poussi_re rSguli_re indique que lavitesse est appropri_e.
Utilisatien comme teurnevis
_, I'aide du bouton de changement de rapport qui se trouve sur le
dessus de I'outiI, sSlectionner Ia gamme de vitesse et de couple
d&sir&e qui convient &I'op&ration ptanifiSe.
Ins&rer I'accessoire de fixation d&sir8 darts le mandrin, comme pour un
foret quelconque. Faire quelques essais sur une piece inutilisable ou
un endroit qui n'est pas apparent afin de d_terminer la position
appropri&e du collier d'embrayage.
CAPAC_TES MAXIMALES RECOMMANDEES
DC727, DC728 DC759
BOIS 1 1/2 po 1 1/2po
ACIER 3/8 po 1/2 po
BENTON 3/16 po 1/4 po
2O
_ettoya_e
_M/SE EN GARDE : Au moins ut_e lois par semaine, mettre /e
moteur en marche et souffler la poussiere et la salet# hors des #vents
au moyen d'un pulv#r]sateur 9 air sec; on doit porter des iut_ettes de
s#curit# pour effectuer cette tgche. On peut nettoyer les pi_ces
extemes en ptastique au moyen d'un /inge humide et de d#tergent
dos,x. Bien que ces pieces soient tres r#sistantes aux solvants, NE
JAMAIS ut#'iser ces demiers.
_ETHODE DE NETTOYAGE DU CHARGEUR
_AVERT/SSEMENT : D_braneher le c,_argeur de /a prise e.a.
(eourant a/tematif) avant d'en effectuer /e nettoyage. E/it*f_iner/a sa/et_
Page 23

et/agraissede/asurfaceext_rieureduchargeuraumoyend'untinge
ou d'une brosse deuce non m4tallique. Ne pas utLUserd'eau ou de
solutions de nettoyage.
AccessoJres
Des accessoires recommand6s pour I'utilisation avec I'outiI sent
disponibles moyennant un suppl6ment aupres du centre de sewice
autoris6 local
Pour obtenir de I'aide afin de Iocatiser un accessoire particulier,
communiquer avec DEWALT IndustriaE Tool Co., 701 East Joppa Road,
Baltimore, MD 21286 ou composer le 1 800 4-DEWALT. (1 800 433-
9258).
AMISE EN GARDE : fl peut _tre dangereux dbhH'iser des acces-
soires autres due ceux recommand#s.
R_paratiens
Pour assurer Ia SE_CUR,TE_et la F,AB,L,TE_ du produit, les centres de
service certifi6s ou autres services de r6paration comp6tents doivent
effectuer les r6parations, !'entretien et le r6glage (y compris I'inspection
et Ie remplacement des balais) en utilisant touiours des pieces de
rechange identiques.
Garantie ii_it_ de trois arts
DEWALT r_parera, sans frais, tout produit d6fectueux cause par un
d6faut de mat6riel ou de fabrication pour une p6riode de trois arts &
compter de la date d'achat. La pr6sente garantie ne couvre pas les
pieces dent la d6fectuosit6 a 6t6 caus6e par une usure normale ou
Fusage abusif de Foutil. Pour obtenir de ptus amples renseignements
sur les pieces ou Ies r6parations couvertes par la pr6sente garantie,
visiter le site www.dewalt.com ou composer le 1 800 433-9258 (1 800
4-DEVv'ALT). Cette garantie ne s'applique pas aux accessoires et ne
vise pas les dommages caus6s par des r6parations effectu6es par un
tiers. Cette garantie conf6re des droits 16gaux particuliers _ I'acheteur,
mais celui-ci pourrait aussi b6n6ficier d'autres droits variant d'un 6tat
ou d'une province a Fautre.
En plus de la pr6sente garantie, les outils DEWALT sent couverts par
notre :
CONTFtAT D'ENTRETJEN GRATUJT D'UN AN
DEWALT entretiendra l'outiJ et remptacera les pi6ces us6es au cours
d'une utiiisation normale et ce, gratuitement, pendant une p6riode
d'un an a compter de la date d'achat, et la
GARANTIE DE REMBOURSEI_ENT DE 90 JOURS
Si Facheteur n'est pas entierement satJsfait, pour quelque raison que
ce soit, du rendement de I'outil 61ectrique, du laser ou de la cloueuse
DEWALT, celui-ci peut le retourner, accompagn6 d'un recu, darts les
90 jours a compter de Ia date d'achat, pour obtenir un rembourse-
ment int@gra!,sans aucun probleme.
REMPLACEMENT SANS FRAIS DES ETIQUETTES
D'AVERT_SSEMENT : Si les _tiquettes d'avertissement deviennent
illisibJes ou sont perdues, composer le 1 800 4-DEWALT pour les
remplacer sans frais.
/_ 3/8" (l(_m} VSR %
_7_ CODDLES0 DO_LUO_VE_
AVE_TISSENENT
TO I_DOCE TFIER_K 0F _JUP_Y, US_F_ MUST RF_D A_D
IfHE}EBSTA_D _TRUCT_ON _A_AL, USE O_/Y W_T_ DEWALT
BAT_EIO E,_A_D CHA_GE_. P,LWAYS _S[ PROPE_ EYE AN_
BESP_P,_TO_tY p_QTECTJ_N=A T_TBE P_EVENT_E LO_E LE GU_E=
1/Z"ti 3r_m) OSO
DC728 CO,OLES_ D_LL.D_=VEB
TYPE1 SE_=
_e _/min/e=1400/mi.(_P_} -- ..
AVENTISSENENT
T0 _EOU_E THE R_$_( _F _l_J_ _$E_ MUST REAl} ANg
O_I3E_ST_O _ST_UCT_O__A_UAL _;E O_LYW_TH_EWALT
_AT_E'_JE$A_D CItA_EF_.A[WAYSUS[ P_0PER EYEAND
_ESP_RATORY PROTECT_O _= AT_T_E PBEV_T_E L_E t_ °_D E=
lJ2"(13mm)VSR
_C7_ CORDLESS °_IL_IVER
no 0=450h_i_/0=15_/min(i_PN}
AVE_TISSENENT
TO REDUCE THE IO_1{ OF _JURY, US[J_ MUST _EAD _lY_
UBDF_TA_O IBSTR_JCT_0_ h_A_UAL USE O_LY W_TH D_WALT
BAT_ER_!; A_D _HARGE_. A_.WA¥_ USE _BO_E_ EYE A_D
_ESP_AT0_y pROT_I_0N, A "_T_E p}]EVENT_E L_E LE GUIDE.
21
Page 24

Reglas Generales de seguridad - Para
todas las herramientas que f.ncionan
con baterias°
_ iADVERTENCtA! Lea y aseg_rese de comprender todas
las instrucciones. FI no haceflo puede originar riesgos de
e/ectrochoque, incendio, y lesiones persona/es de gravedad.
GUARDE ESTAS INSTRUCCIONES
._REA DE TRABAJO
* Conserve su area de trabajo limpio y bien iJuminado. Los ban-
cos amontonados y/as zonas oscuras propician /os accidentes.
* No utilice herramientas el#ctricas en atm6sferas expiosivas,
tales como en presencia de liquidos, gases o polvos inflam-
ables. Las herramientas e/_ctricas producen chispas que pueden
oflginar la ignid6n de los polvos o los vapores.
* No permita a ningon observador, ni_o o visitante aeercarse
mientras opera una herramienta electrica. Las distracciones
pueden hacefle perder el control
SEGUR_DAD ELEOTRJCA
* No maltrate el cable. Nunca tome la herramienta por el cable
para transportarla. Mantenga el cable alejado de calor, del
aceite, de bordes afilados o de piezas mdviles. Cambie inmedi-
atamente los cables da_ados. Estos pueden originar un ,,_ecendio.
* Una herramienta que funcJona con baterias integradas o por
separado debe recargarse solamente con el cargador especifi-
carlo para esa bateria. Un cargador adecuado para un tipo de
baterfa puede originar r/esgos de incendio cuando se u_ifiza con
otto tipo de baterfa.
* Utilice su herramienta de bater/as sdlo con las baterias desigo
nadas especificamente para la misma. FI use de otto ripe de
baterfas puede originar riesgos de incendio.
SEGURIDAD PERSONAL
* Este siempre alerta, conc#ntrese en Io que est# haciendo y
recurra al sentido comQn cuando utilice una herramienta el#c-
22
trica. No utilice ninguna herramienta si se encuentra fatigado
o bajo la infMencia de drogas, alcohol o medicamentos. Un
descuido de su parte mientras uflliza una herramienta et_ctrica
puede ocasionafle graves tesiones.
, Vistase adecuadamente. No utilice ropa fioja nJ joyas. Sujete
el cabello si Io tiene largo. Mantenga el cabeJlo, ropas y
guantes alejados de las piezas mdv#es. Las piezas de vestir flo-
jas, /as joyas y el cabelio largo pueden quedar atrapadas por /as
piezas mdviles. Las rejiflas de venti/aciSn cubren partes mSviies
y tambi_n deben evitarse.
* Evite el encendido accidental Asegurese de que el interruptor
este apagado o asegurado antes de conectar el aparato,
Sostener una herramienta con su dedo cotocado en el inte_ruptor
o conectafla sin 11_;arsesi el interrupter estb encendido, puede
provocar accidentes.
* Retire las IJaves de ajuste o presidn antes de encender la her°
ramienta. El dejar una Ilave en una pieza giratoria puede ocasion-
ar /esiones persona/es.
* No se incline demasiado. Conserve siempre los pies bien
apoyados, al igual que su equiJibrio. La posiciSn correcta de los
pies y e/ equilibrio permiten controlar mejor la herramienta en situa-
ciones inesperadas.
, Utilice equipo de seguridad. Proteja siempre sus ojos, Las
mascarfllas contra el polvo, los zapatos de seguridad amide-
s_%antes, el casco o los pmtectores auditivos deben ser utitizados
con e! fin de trabajar en condiciones apropiadas.
USO Y CU_DADOS DE LA RERRAMIENTA
* Utilice prensas u otros medios prbctieos para asegurar y apo-
yar la pieza de trabajo a una plataforma estable. Sujetar /as
piezas con la mane o contra su cuerpo es inestable y puede origi-
nat ia p_rdida de control
* No fuerce la herramienta. Utilice la herramienta adecuada
segQn la situation. Esto le permitir_ ejecutar meier et trabajo, de
manera mbs segura y a! r/tmo para e! cual ha side disehada.
Page 25

* Nouti//ce/aherramientasi el interruptor no enciende y apaga.
Cualquier he_ramienta que no pueda controtarse par media de!
inte_ru'ptor es pe/igmsa y debe ser reparada.
* Deeconecte/a bater_a de/a herram/enta o co/oque el interrup-
tar en /a posici6n de seguro o apagado antes de rea/izar
cua/quier ajuste, cambiar accesorioe o guardar /a herramien-
ta, Esta medida preventiva reduce et riesgo de encendido acci-
dental de la he_ramienta.
* Guarde/as herram/entas que no uti/iza fuera de/a/cance de
los hi, as y de cua/quier otra persona no entrenada. Las
herramientas son peligrosas en manos de personas sin entre-
namiento.
* Cuando no uti/ice/a bateHa, conserve/a a/e]ada de arras able-
toe metbficos tales coma clips, monedas, /laves, c/avos,
torni//os y otros peque#os objetos metb/icoe que puedan
hater conexi6n entre una terminal y/a otra. Hacer corto entre
las termLnales de la baterfa puede originar chispas, quemaduras
o incendios.
, Mantenga adecuadamente sue herram/entas. Conserve /as
herramientas de carte afi/adas y/impiae. Aqueltas herramientas
con piezas de carte afiladas que reciben un mantenimiento ade-
cuado, diffcilmente se atascan y son robs fbciles de contmlar.
. Verif/que/a correeta a/ineac/6n de/as p/ezae mov//es, preseno
cia de roturae en /as p/ezas y cua/quier otra anomaffa que
pueda afeetar el funcionamiento adecuado de/as herramien-
tae. Si su herramienta ee encuentra daflada, fleve/a a/ servicio
de mantenimiento antes de udfizaHa. La fa/ta de un manten-
,;miento adecuado puede set la causa de muchos accidentes.
* Uti/ice so/amente aqueffos accesorios recomendados per el
fabricante para el mode/o de/a herramienta que ueted posee.
Los accesorios adecuados para una he_ramienta pueden resultar
petidrosos cuando se usan en otra.
SERWC_O
* E/eervicio a/a herram/enta debe ser hecho per personal de
reparac/on ca/ificado Qn/camente. Et servicio o manten/mien-
to real,;zado par personal no calificado puede provocar riesgos
de lesiones.
* Cuando se efectEte el mantenimiento de una herramienta, utffo
ice un/camente accesorios origina/ee. Siga /as instrucciones
presentadas en /a secci6n Mantenimiento, de este manual Et
empleo de p/ezas no autorizadas o el no segu/r las /nstrucciones de
mantenimiento, puede orig,_narriegos de electrochoque o lesiones.
Reglas especifJcas de seguHdad
* Cuando reaHce una operacion en/a cua//a herramienta pueda
hacer contacto con cables escondidoe, eostenga/a de /as
partes con ais/amiento antides/izante. El contacto con un cable
con corriente har_ que /as partes metblicas de la he_ramienta
puedan transmitir una descarga el_ctrica al operario.
_ADVERTENC/A: El polvo creado al I,!iar,serruchar, putir, tatadrar o
real/zar arras actividades de ta construcci6n, contiene substancias
qU_*TfiCaSque se sabe producen cbncer, defectos de nacimiento u
otros defectos del sistema repmducto_ Algunos ejemplos de esos
productos qufmicos son:
* Fl ptomo de/as pinturas a base de ptomo,
* La sfl/ce cristafit_a de los ladriflos, de/cemento y de arras pm-
ductos de albaditerfa, y
* El ars_nico y el cmmo de ta madera tratada qufmicamente
(CCA).
El riesgo que se co_re a causa de/contacto con esos pmductos varfa
segDn la frecuencia con que usted realice este t_oo de trabajos. Con
el [Lode reducir su exposici6n a esas substancias quLmicas, trabaje
en un brea bien venfilada y utflice un equipo de seguridad redlamen-
ratio, ta/ coma una mascara contra el po/vo especialmente disehada
para filtrar partfculas micmsc6picas.
* Evite el contacto pro/ongado con po/voe or/g/nados par fijar,
aserrar, eemer//ar, ta/adrar y arras activ/dades constructivae.
Vista ropas protectoras y/ave/as areas expuestas con agua y
jab6n. Permit/r que e/ polvo se Lntroduzca en su boca, ojos, o
dejarto sabre la pie/promueve la absorci6n de qufmicos dad}has.
23
Page 26

AADVERTENCIA:Toda persona que entre aJ_rea de trabajo debera
usar una mbscara antipolvo o protecciSn respiratofla. Et filtro deberfa
ser reemp/azado a diario o cuando el usuario tenga dificultad para
respirar, Puede encontrar la mascara antipolvo apropiada aprobada
per NIOSH/OSHA en su ferreteffa local
A PRECAUCt6N: Cuando no se use, guards la herramienta en
posici6n horizontal sobre una superficie estable, deride no
interrumpa el paso o provoque una caida. A/gunas herramientas
con baterfas grandes se sost/enen sobre la baterfa, pete pueden
caer fa'cilmente.
* Laetiquetadesuherramientapuede,_ncluir/ossiguientessfrnbolos.
A continuaciSn se indican los sfmbo/os y sue definiciones.
V ................ volts
Hz .............. hertz
_./min .......... minutes
.... ............corriente d/recta
[] .............. construcciSn
Ctase II
.............. tennina/es de
conexiSn a tierre
sfpm ............ pies de su;oe_cie
per minute
A .............. amperes
W ............ watts
"_ ............ corriente a/tema
no ............ ve/ocidad sin cat:ga
/min .......... revoluciones per
minute
A ..........s_rnbolo de alerta
de seguridad
instruccJones irnportantes de seguridad
para los grupos de baterias
Su herramienta usa un grupo de baterfas DEWALT ya sea de 12, 14.4
o 18 Volts. AI ordenar un grupo de batedas de repuesto, asegOrese
de incluir el nOmero de catAIogo y vottaje: los grupos de bater[as con
tiempo de ejecuci6n extendido proveen 25% mAs tiempo de
operaci6n que los grupos de bater[a estAndar=
NOTA: Su herramienta aceptarA grupos de bater[as ya sean estAndar
o de tiempo de operaci6n extendido= No obstante, asegOrese de
haber seleccionado el voltaje adecuado= Puesto que Ias bater[as pier-
den la carga lentamente cuando no estAn en el cargador, el lugar
meier para guardar la bater[a serA siempre el cargador=
La bateria noviene completamente cargada de f6.brica. Antes de usar
la bateda y eI cargador, Iea estas instrucciones de seguridad. A
continuaci6n, siga Ios procedimientos de carga indicados.
LEA TODAS LAS INSTRUCCtONES
* No mcinere la bateHa, aun en el case de que este muy da#ada
o completamente descargada. La baterfa puede explotar en el
fuego,
* En eondiciones de temperatura o de use extremes, puede
presentarse un Iigero goteo del liquido de la bateHa. Esto no
indica ta existencia de un defecto= Sin embargo, sise tempe el sello
extemo y su pie/llegase a entrar en contacto con este lfquido, siga
estas indicaciones:
a. Lave r_pidamente la zona afectada con agua y jabSn.
b. Neutrafice con un bride d6bi!, come jugo de limSn o vinagre.
c. Si el/fquido de/a baten;a toca sus ojos, enju_guelos con agua
fimpia per un fiempo m_'_imo de 10 m,_nutosy busque atenciSn
m#dica ,;nmed,;ata.(Nora m6dica: El tfquido es una sotuc,;Snde
potasa c_ustica en una concentraciSn de125 at 35%.)
* No IJeve bateHas extra en delantales, bolsillos o cajas de
herramientas, junto a objetos de metal La baterfa podrfa hacer
cortocircuito y daharse, asf come provocar quemaduras severas o
un incendio.
* Cargue las baterfas #nicamente en cargadores DEWALT.
* NO la moje ni sume#;a en agua u otros lfqddos.
No guarde nJ use la herramJenta ni la bateria en lugares en los
que la temperatura puede alcanzar los 40 -_C(105 _F), come
cobertizos o construcciones de metal en verano.
_PELIGRO: Nunca intente abfir la baterfa per n,_ngE_nmotive. Si e/
recubrimiento de pl_stico de la baterfa se mmpe o daha, no intmduzca
la baterfa en el cargador. Podrfa pmducirse un cheque e/#ctrico o una
electrocuci6n. Lleve la baterfa dahada a un centre de servicio para su
recicl_je.
24
Page 27

NOTA:loscapuchonesparatransportey almacenaje
deIasbater[asseproporcionanparausarsesiempreque
labatedaest_fueradelaherramientaodetcargador.
Retireelcapuch6nantesdecolocarlabaterfaenlaher-
ramientaoenetcargador.
ADVERTENCIA: No guarde e transporte la bateHa de manera
que objetos metblicos puedan hacer contacto con las terminales
expuestas de la bateria. Per ejemple, no ponga la bateria en
delantalee, boleillos, cajas de herramientas, eetuchee de produce
tee, cajones, etc. junto con clavos, tornillos, Ilaves, etc. sin el
capuchon. La baterfa puede hacer corto cuando no tenga puesto e!
capuch6n, ocasionando incendios o quemaduras, o dahos a sf rnisma.
_. PRECAUCtON: La unidad de alimentacidn debe estar firmemente
conectada a la herramienta. Si ta unidad de a/imentaci6n se
desconecta, podrfa resultar en lesiones personales.
E! sello RBR_ c
E! setIo RBRC Mc(Rechargable Battery RecycIing Corpor
ation) en las bater[as de niquelcadmio, indica que el
costo del recictaje de Ia bater[a (o grupo de bater[as), al
finaI de su vida Otit,ya ha side pagado per DEWALT. En
aIgunas _reas es ilegal colocar Ias bater[as de n[queI-
cadmio desgastadas en la basura domestica o en Ios
basureros municipales y el programa RBRC Mcproporciona una alter-
nativa ambienta! conveniente.
La RBRC, en cooperaci6n con DEWALT y otros usuarios de baterias,
hart establecido programas en los Estados Unidos para facilitar la
recolecci6n de bater[as de n[quelcadmio desgastadas. AI lIevar sus
baterias desgastadas de n[queIcadmio a un centre de servicio autor-
izado DEWALT o a su minorista local para el recictaje de su bater[a,
usted ayuda a proteger nuestro medio ambiente y a conservar nue-
stros recursos naturaIes. Usted puede comunicarse con et centre de
recictaje de su Iocalidad para que le informen acerca de los lugares
donde usted puede regresar las batedas desgastadas.
25
importantes i.strucciones de seguridad
para cargadores de baterias
CONSERVE ESTASINSTRUCCIONES: Este manual contiene
importantes instrucciones de seguridad para los cargadores de bateffas,
* Antes de usar el cardador, lea todas /as instrucciones y
advertencias que acompahan al cargador, a la baterfa y a los
pmductos que usan la baterfa.
_PELIGRO: Hay 120 vo/tios en /as terminales de carga. No haga
pruebas con objetos conductores. Podrfa producirse un cheque
electrico o una electrocud6n.
/&ADVERTENClA: No permita que ningbn h;qu_dose introduzca en el
cargador. Podrfa originarse un cheque e/6ctrico.
i&PRECAUCION: Para reducir el riesgo de lesiones, cargue tan solo
baterfas recargables de nfquel-cadmio DEWALT. Otros tipos de
baterfas pueden estallar y causar asf daises y lesiones personales.
APRECAUCt6N: Bajo ciertas condiciones, cuando el cargador estb
encbufado a/a toma de corriente, los contactos de carga expuestos
dentro de/cardadorpueden hacer cortoc/rcuito debido a a,_gSnmaterial
extemo. Los materiates extemos de naturaleza conductora, come et
alambre de acem, el papel de aluminio o cuatquier t,!oo de partfcula
metblica deben conservarse alejados de las caw_dadesdel cargador.
Desconecte siempre el cargador de la toma de corriente cuando no
haya baterfa en la cavidad. Desconecte siempre el cargador dela toma
de co_riente antes de/impian'o.
* No intente cargar la bateria con otros cargadores que no sean
los descdtes en este manual El cardador y la baterfa est_n
especfficamente disedados para trabajar juntos.
* Eetos cargadores no estan dieef_ados para uses diferentes a
la carga de las baterias recargables DEWALT. Cualquier otro use
puede ocasionar Lncendios, cheque el_ctrico o e/ectrocuciSn.
* No exponga d cargador a la Huvia ni a la nieve.
* Tire de la clavija, y no del cable, cuando desconecte el
cargador. De esta forma se reduce e! riesgo de daY_oen la clavija
y el cable.
Page 28

* Coloqueelcableel#ctricodemaneraquenoIo piee nadie, nJ
ee enrede o quede expueeto a una tenei6n que pueda daflarlo.
* No use un cable de extenei6n a menoe que sea absolutamente
necesario. El use de un cable de extensidn inadecuado podrfa
ocasionar,,hcendios, cheque e/#ctrico o e/ectrocuciSn.
* Per eeguHdad, el cable de extension debe tenet el tama#o
adecuado (AWG: American Wire Gauge). Cuanto menor sea ei
ca/ibre de ut_ alambre, mayor es su capacidad: e! calibre 16 fiene
mayor capacidad que e/ cafibre l& Cuando use mas de una
extensidn para Iograr la longitud deseada, asegElrese que cada
extensiSn cump/a con ins nonnas mLnimas en cuanto a/ cafibre.
TamaFIominima recomendado del conductor
para ruescabmesde extensi6n
Longitud total demcable
25pies 50pies 75pies 100pies 125pies 150pies 175pies
7.6m 152m 22.9m 30.5m 38.1m 45.7m 53.3m
TamaF_oAWG demconductor
18 18 16 16 14 t4 t2
* No coloque ningdn objeto eebre el cargador ni coleque eete
sebre una superficie blanda que pueda btoquear Ins ranuras de
ventiJaci6n, ecasionando un calor interne exceeivo. Co/oque e/
cargador en un /ugar a/ejado de cua/quier fuente de ca/ok El
cargador se venfila a tray,s de Ins ranuras que se encuentran en la
parte superior e infenor de la cubierta.
* No use el cargador sJ eJ cable o la clavi]a ee encuentran
da#ados -- h_gatos reparar de inmediato.
* No use el cargador ei ha recibido algun golpe, si se ha caide o
ei preeenta cuMquier otto da#o. Ll#velo a un centre de servicio
autorizado.
* No deearme el cargador; llevelo a un centre de servicio
autorizado cuando deba set reparado. Volver a ensamb/aflo de
farina incorrecta puede ocasionar cheque et_ctrico, etectrocuciSn o
incendios.
* Desconecte el cargader de la toma de corriente antes de
fimpiaHo. Eeto redueirb el rJesge de cheque el#ctrice. Refirar la
baterfa no reduce este riesgo.
* NUNCA intente conectar 2 cargadores juntos.
* El cargador se ha dise#ado para que opere con una fuente de
energia domesdca eetandar (120 re#s). No intente uearJe con
ningQn otto veRaje. Esto no es aplicabfe a/cargador de/vehfcu/o.
Ut#iEaci#n #et mode T_ne Up Mc
automatico
El mode Tune-up "c autom_tico ecuaIiza o equilibra las c61ulas
individuales de la bater[a, permitiendo que 6sta funcione a su
maxima capacidad. Se deber[a ajustar la bateda semanalmente o
despu6s de 10 cities de carga y descarga o siempre que Ia bater[a
no finda per igual. Para usar el Tune-Up Mcautom&fico, ponga la
bater[a en eI cargador y d6jeia alI[ per Io menos durante 8 horns. El
cargador pasar& per los modes siguientes.
1. La luz roja parpadearb, continuamente para indicar que se ha
inicJadoel ciclo de carga de 1 hera.
2. Cuando el cido de carga de 1 hera ha finaiizado, la Iuz
permanecerA encendida de manera continua y dejar& de
parpadear. Esto indica que la bater[a estb, totalmente cargada y
lista para su use,
3. Si ia baterfa se deia en ei cargador transcurrida la carga inicial
de 1 hera, el cargador pondr._, en marcha el mode Tune-Up Mc
autom&tico Este mode funcionara durante 8 horns o hasta que
Ins c61ulas individuales est6n ecuaiizadas. La baterfa est& !ista
para utilizarse y puede retirarse cuando se desee durante el
mode Tune-Up Me,
4. Cuando el mode Tune-Up Mcautomatico haya finalizado, eI cargador
pasar& a una carga de mantenimiento; el indicador de encendido se
apaga cuando finaliza eI mode Tune-UpMcautomb,tico.
GUARDE ESTAS INSTRUCCIONES
PARA SU FUTURA UT#L#EAC#ON
26
Page 29

Cargadores
Su herramienta usa un cargador DEWALT de 12.0, 14.4, o 18 volts.
Su bateda puede ser cargada en cargadores DEWALT de 1 hora, car-
gadores de 15 minutos o con un cargador vehicular de 12 vo[tios.
AsegOrese de leer todas las instrucciones de seguridad antes de usar
su cargador. Consulte el cuadro en la parte posterior de este manual
para ver la compatibilidad de cargadores y unidades de alimentaci6n
PrecedimJente de carga
1. Conecte e! cargador a un enchufe apropiado antes de insertar la
unidad de al[mentaci6n.
2. Inserte Ia bateffa en el cargador, como se ilustra en la figura 1,
asegur_ndose de que la bateffa haya asentado bienen el
cargador. La Iuz ro]a (carga) parpadeara continuamente para
indicar que se ha iniciado el cic[o de carga.
3. Se indicara el t_rmino de la carga cuando Ia luz roja permanezca
ENCENDIDA de manera continua. La bateffa queda cargada y se
puede utilizar en ese momento o dejarse en el cargador.
,_PRECAUCtON: Hay 120 vohtsen /as terminales de card& No haga
pruebas con objetos conductores. Peligro de cheque e!_ctrico o
e/ectrocudSn.
FIG. 1
27
OperacJ6n de la luz indJcadora
CARGANDO BATERiA ................
CARGA COMPLETA ....................
RETARDO POR BATER[A
CAL[ENTE/FRIA ........................... _ [] _ [] _ [] _ [] _ []
REEMPLAZAR BATERiA ............ @ @ @ @ @ @ @ @ @ @ @ @ ® @ ® @ ® @ @ @
LiNEA DE A L[MENTAC|ON
PROBLEMATiCA ......................... @ @ @ @ @ @ @ @ @ @ @ @ @ @
lndicaderes de carga
Se han diseffado estos cargadores para que detecten ciertos
problemas que pueden surgir con Ias baterias. Estos problemas se
indican mediante una Iuz roja que se enciende de manera intermitente
a gran velocidad. Si esto ocurre, vuelva a colocar la bateria en el
cargador. Si el probtema persiste, pruebe con otra bater[a para
determinar si el cargador est_ en buen estado. Si la segunda bateffa
carga correctamente, significa que Ia primera es defectuosa y que debe
Ilevarla a un centro de servicio para su reciclaje. Si la segunda bateffa
hace que el cargador indique el mismo problema que la primera, Ileve
el cargador a un centro de sewicio autorizado para su verificaci6n.
RETARDO POR BATERiA CALIENTE/FRIA
Atgunos cargadores tienen una funci6n de Retardo por bater[a
caliente/fr[a: si detectan que una bater[a est& catiente,
autom_ticamente inician un Retardo por bateffa caliente,
suspendiendo as[ Ia carga hasta que la bateffa se haya enfriado. Una
vez enfriada la bateffa, et cargador pasar& autom&ticamente al mode
de Carga de bateffa. Esta funci6n asegura la m_xima duraci6n a su
bateria. La luz roja parpadea a intervalos largos y Io hace a intervalos
cortos cuando est_ en el modo de Retardo per bateffa caliente.
LINEA DE ALIMENTACION PROBLEMATIOA
AIgunos cargadores tienen un indicador de fallas en Ia linea de energ[a
eI6ctrica. Si se usa el cargador con fuentes de energ[a port,tiles,
come generadores o plantas que convierten corriente directa en
corriente alterna, el cargador puede suspender su funcionamiento
Page 30

temporalmente,encendiendoBaBuzrojadosvecesderoanera
interroitente,seguidasde unapausa.Estoindicaquela
alimentaci6ndecorrienteestA mAs alia de sus I[mites.
PERMANENCJA DE LA BATERIA EN EL CARGADOR
El cargador y la bater[a pueden dejarse conectados indefinidamente
mientras la Iuz roja este encendida. EI cargador mantendrA Ia baterfa
completamente cargada.
NORA: La bater[a perderA la carga lentamente sise retira det cargador.
Si no se ha dejado la baterfa en mantenimiento de carga, puede ser
necesario recargada antes de usarla nuevamente. La bateda tambi6n
puede perder Ientamente Ia carga si se deia en un cargador que no este
conectado a una toma de corriente alterna adecuada.
BATERIAS BAJAS: El cargador tambi_n puede detectar una bateria
baja. Estas baterfas aOn son utilizables, pero no se puede esperar de
elias el mismo rendimiento. En tales casos, aproximadamente 10
segundos despu6s de introducir Ia baterfa, ei cargador emitirA 8 pitidos
intermitentes para indicar el estado de la baterfa. A continuaci6n el
cargador procederA a cargar la bateria hasta su maxima capacidad.
Netas importantes sobre la carga
1. Se conseguirA un rendimiento roeior y mAs duradero si se carga la
bater[a con una temperatura ambiental de entre 18 y 24 °C (65 y
75 °F). NO cargue Ia bater[a si Ia temperatura ambiental es inferior
a +4.5 _C (+40 °F) o superior a +40.5 °C (+105 °F). Esto es muy
importante y se evitarAn graves dafios en la bater[a.
2. EI cargador y la bateda pueden transmitir calor durante la carga.
Esto es normaI y no representa ningOn probiema.
3. Si la bater[a no carga adecuadamente:
a. Verifique la corriente en la toma conectando un aparato
el_ctrico.
b. Verifique si la toma estA conectada a un interruptor que corte la
corriente al apagar la luz.
c. Lleve ei cargador y la bateria a un lugar con una temperatura
ambientaI de 18 a 24 °C (65 a 75 °F).
d. Si los problemas de carga persisten, Ileve Ia herramienta, la
bater[a y el cargador al centre de servicio local.
4. Se debe recargar Ia bater[a cuando deie de producir suficiente
energ[a en tareas que se ejecutaron con facilidad anteriormente.
NO CONTINOE usAndola en estas circunstancias. Siga Ios
procedimientos de carga. TambiSn puede cargar una bater[a
usada parciaimente cuando Io desee, sin da_arla.
5. Bajo ciertas condiciones, cuando el cargador estA enchufado a la
toma de corriente, los contactos de carga expuestos dentro del
cargador pueden hacer cortocircuito debido a algOn material
externo. Los materiales exteroos de naturaleza conductora, come
el alambre de acero, el papel de aluminio o cualquier tipo de
particula metAIica deben conservarse aleiados de las cavidades
dei cargador. Desconecte siempre eI cargador de la toma de
corriente cuando no haya baterfa en la cavidad. Desconecte
siempre el cargador de la toma de corriente antes de timpiarlo.
6. No sumerja el cargador en agua ni en ningOn otto Ifquido.
AADVERTENC/A: No perroita que ning#n ffquido se introduzca en ei
cargador. Podrfa originarse un choque el#ctrico. Para facilitar el
enfriamiento de la baterfa despu#s de/uso, evite cotocar et cargador o
la baterfa en un /ugar cb/ido, como un gatpdn metb/ico o un remolque
sin aisiaroiento t#rroico.
APREOA UCt6N: Nunca ,Letenteabrir la baten;a por ning#n mofivo. Si
la cubierta de p/_stico de la baterfa se rompe o cuartea, ilevela a un
centro de servicio para su recic_je.
28
lnstalacJ6n y ren_oci6n de la bateria
NOTA: AsegL_rese de que su bateda estA compIetamente cargada=
Rata instaBar Babateria en eBroango de Baherraroienta, haga coin-
cidir Ia base de la herramienta con Ia muesca que se encuentra al inte-
rior del mango (Fig. 1) y deslice Ia bateria con firmeza hasta escuchar
el sonido que produce a! asegurarse en su posici6n.(Fig. 1A)
Para reroover mabateria de la herraroienta, optima los botones de
liberaci6n y tire firmemente de _sta para extraerla del mango de la
Page 31

FiG.2 FiG.2A ..........
'
herramienta. Insertela en et cargador taI come se describe en la sec-
ci6n correspondiente de este manual.
Interrupter de velecidad variable
Para encender Baherramienta, apriete e! interrupter de gatillo. Para
apagar Baherramienta, suelte el interrupter de gatillo. La herramienta
est_ equipada con un freno. EIdispositivo dejarb, de funcionar cuando
se suelte totalmente el interruptor de gatillo.
Et interrupter de velocidad variable permite seleccionar la meier
velocidad para una aplicaci6n concreta. Cuanto m_s apriete el gatilIo,
mAs r_pido ir_ la herramienta. Utilice ve!ocidades bajas para iniciar la
perforaci6n sin haber marcado un punto de centrado, para taladrar en
metales o pl_sticos, para atornillar y desatornillar y para taladrar en
cer_mica, o para cualquier otra operaci6n que necesite un gran par.
Las altas velocidades son mejores para taladrar en madera y
aglomerados, y para usar accesorios abrasives y de pulido. Para
alargar Ia vida OtiI de Ia herramienta, utilice Ia velocidad variable
sotamente para iniciar agujeros o para fijaciones.
NOTA: No se recomienda Ia utilizaci6n continuada de Ia velocidad
variable. Puede daf_ar el interruptor y se debe evitar.
Beft6n de centrel hacia delanfte/hacia
arras (Fig, 3)
El bot6n de control hacia delante/hacia atr_s determina la direcci6n de
la herramienta y tambi@n sirve como bot6n de desbloqueo. Para
29
FIG. 3 Adelante Atr_s
seleccionar la rotaci6n hacia detante, suelte el interrupter de gatiI!o y
apriete el bot6n de control hacia delante/hacia atr_s, situado en el lade
derecho de Ia herramienta. Para seleccionar hacia atr_.s, pulse e!bot6n
de control hacia detante/hacia atr_s situado en el lade izquierdo de la
herramienta. La posici6n central de los botones de control bloquea la
herramienta en la posici6n de apagado. AI cambiar la posici6n del
bot6n de control, el gatillo debe estar suelto.
NOTA: Es posible que oiga un clic aI iniciar el funcionamiento la
primera vez que utilice la herramienta despu@sde cambiar la direcci6n
de rotaci6n. Esto es normal y no representa ningOn problema.
Collar de ajus*e del par (FJgo 4)
El collar de ajuste del par est_ claramente FIG. 4
indicado con nOmeros y con et simboto de
una broca. Se debe girar e! collar hasta que
el aiuste deseado se sitOe en Ia parte
superior de Ia herramienta (Fig. 4). El collar
dispone de marcas, para no tenet que
hacer pruebas al seleccionar el par. Cuanto
mas alto sea el nOmero del collar, mayor
ser_ el par y el fijador que se puede utilizar.
Para bloquear el embrague en Ias A
operaciones de taladrado, sitOese en Ia
posici6n de broca.
NOTA: Cuando utilice el taladro/destornillador para hacer agujeros,
debe aiustar correctamente el collar de aiuste del par, de forma que la
Page 32

imagendettaladrosealineeconlaIfneaenelcentroqueseencuentra
enlapartesuperiordeherramienta.Nohacerloasfharaqueel
embraguesedeslicealtaladrar.
Engranaje de dos velocJdades {Fig. 5)
La funci6n de dos velocidades del taladro/ FIG=5_
destomillador permite cambiar los engranajes para
conseguir una mayor versatJlidad.
Para seleccionar Ia vetocidad baja, con un gran par,
apague la herramienta y permita que se detenga. "
Deslice e! selector de engranaje hacia delante (hacia
e! broquero) come se muestra en Ia Fig. 5. Para
seleccionar tavelocidad alta, con un par bajo, apague
la herramienta y permita que se detenga. Deslice el B
selector de engranaje hacia atras (en sentido
contrario al broquero).
NOTA: No cambie los engranajes cuando ta herramienta est6
funcionando. Si tiene problemas al cambiar los engranajes, compruebe
que eI selector est_ en una de Ias dos posiciones: completamente
hacia delante o completamente hacia arras.
Pertabrocas de manguJte para operaci6n
se.cilla sin Ilave
La herramienta dispone de un portabrocas sin Ilave con un manguito
rotatorio para operar e! portabrocas con una sola mano. Para inset-
tar una broca u otto accesorio, siga estos pasos:
1. Cierre el interruptor de disparo inmovilizandolo en la posici6n
APAGADO como se describe.
2. Asir el manguito negro del portabroca con una mano y usar Ia otra
para sujetar la herramienta como se demuestra. Girar el mangui-
to en sentido antihorario Io suficiente para aceptar el accesorio
deseado.
3. Insertar el accesorio aproximadamente 19 mm (3/4") dentro de!
portabrocas y apretar bien el manguito det portabrocas gir_ndolo
con una mano mientras suieta la herramienta con la otra. La
3O
herramienta viene equipada con un mecanismo que inmoviJiza el
husillo autom_ticamente. Esto le permite abrir y cerrar eI portabro-
cas con una mane.
Para Iiberar eI accesorio, repita ei paso 2 arriba.
i_ADVERTENCIA: No trate de apretar /as brocas (u otto accesorio)
agarrando ia parte fronta/ de/ portabrocas y encendiendo la her-
ramienta. Esto podffa dahar el portabrocas u ocasionar lesiones per-
sonafes. Et interruptor de disparo debe estar siempre inmovflizado
durante ei cambio de accesorios.
AsegOrese de apretar eI portabrocas con una mano sobre el
manguito de! mismo y otra sujetando la herramienta para obtener el
mAximo de apriete.
FuncJonamiente ce_o tatadre
Gire eJ collar hasta el simbo!o de Ia broca. Inserte y aiuste en el
broquero la broca deseada. SeteccJone la veJocidad/par mediante el
selector de velocidades para acoplar Ia velocJdad y el par a Ia funci6n
planeada. Siga estasinstrucciones paraconseguir unos mejores resuitados
al taladrar.
TALADRADO
1_Utilice exdusivamente brocas afiladas_ Para MADERA, utilice
brocas heJicoidaJes, brocas de horquilIa, brocas de berbiqui o
brocas de sierra. Para METAL, utilice brocas heticoidales de acero
para alta veIocidad o brocas de sierra. Para MAMPOSTERiA,
como Iadrillos, cemento, bIoques de hormig6n, etc, utilice brocas
con punta de carburo de tungsteno.
2. AncJe firmemente el material que se debe taladrar. Si va a perforar
un material deJgado, utilice un bloque como "respaldo" para evitar
daFlarlo.
3. Aplique presi6n al taladro en I[nea recta con la broca. Haga
suficiente presi6n para que labroca siga per_orando, pero no tanta
come para que el motor se atasque o la broca se desvie.
4. Sostenga el taladro firmemente con una mano en Ia empu_iadura
y Ia otra en Ia parte inferior de la unidad de alimentaci6n para con-
trolar la acci6n de torsi6n.
Page 33

5.SIELTALADROSEATASCA,probablementesedebaa una
sobrecarga.SUELTEELGATILLODEINMEDIATO,retirelabroca
delapiezadetrabajoydeterminelacausadelatascamiento.NO
APRETEELGATILLOPARAUNTENTARDESATASCARLA
BROCA,YAQUESEPODRiADAI/ARELTALADRO.
6.Paraevitarqueseatasqueeltaladrotrasatravesarelmateria!,
reduzcalapresi6nydejeirsuavementeIabrocahaciaelfinaldel
orificio.
7.HagafuncionarelmotoralretirarIabrocadeIinteriordeIorificio;de
estaformaevitarAqueseatasque.
8.ConlostaIadrosdevelocidadvariablenohaynecesidaddehacer
unamarcadecentrado.Utiliceunavelocidadbajaparacomenzar
elorificioyacelere,presionandomAse!gatillo,cuandoelorificio
tengalaprofundidadsuficienteparaevitarqueIabrocasesalga.
Trabajealamaximapotenciadespu_sdeiniciarlaperforaci6n.
Taladrade en madera
Se puede taladrar la madera con la£ mi£ma£ brocas helicoidab£ qua
se utilizan para el metal. Estas brocas pueden sobrecalentarse a menos
que se saquen con frecuencia para Iimpiarlas de virutas. Para agujeros
mayores, utilice brocas de madera de baja vetocidad. Los trabajos
susceptibtes de astillarse deben respaldarse con un bloque de madera.
Taladrade en metal
Emplee un lubricante para corte cuando taladre en metales. Las
excepciones son eI hierro colado y e! lat6n, que se deben taladrar en
seco. Los lubricantes que mejor funcionan son el aceite suIfOrico y la
manteca.
Taladrade en marnposteria
Utilice brocas con punta de carburo de tungsteno con velocidades
bajas. Haga fuerza en el taladro, pero no tanta como para romper los
materiales frAgiles. El fiujo uniforme y suave de virutas indica que se
taladra a la velocidad adecuada.
FuncionamJento cerno desterniHador
Seleccione Ia veIocidad/par mediante el selector de velocidades que
se encuentra en la parte superior de la herramienta para acoplar la
vetocidad y el par a Ia funci6n planeada.
Inserte el accesorio fijador deseado en el broquero, al igual que har[a
con cuaIquier broca. Practique un poco en un fragmento sobrante o en
una zona que no quede visible para determinar la posici6n adecuada
del collar del embrague.
CAPACIDADES [v],,_XIMAS RECOMENDADAS
DC727, DC728 DC759
MADERA 1+1/2" 1+1/2"
ACERO 3/8" 1/2"
HORMIGON 3/16" 1/4"
MANTENIMIENTO
LJrnpieza
APRECAUC/ON: Con et motor andando, sople el polvo fuera de
todas /as ventosas de a/re con aire seco pot !o menos una vez a/a
semana. Use gal_s de seguridad cuando ejecuta esto+ Las partes
p/bsticas extemas se pueden fimpiar con un trapo hSmedo y deter-
gente suave. Aunque estas partes son attamente res,@tentes a so/+
ventes, NUNCA use so/ventes+
tNSTRUOOIONES PARA LA UMPIEZA DEL CARGADOR
AADVERTENClA: Desconectar el cargador de/ tomacorriente de
corriente a/tema antes de/,_rnpiar. Se puede quitar e/ sucio y la grasa
de la superficie exterior de! cargador con un trapo o un cepiflo suave
no metbfico+ No usar agua o soluciones de/impieza+
Accesorios
Los accesorios recornendados para su herramienta estAn disponibles
con un cargo adicional en su centro de servicio local.
31
Page 34

Sinecesitaayudaparaencontraratgtinaccesorio,p6ngaseen contacto
con DEWALT Industrial Tool Co., 701 East Joppa Road, Baltimore, MD
21286 o Ilame al tel_fono 1-800-4-DEWALT (1-800-433-9258).
/_ RREOAUOI6N: La utifizaciSn de cualquier accesorio no recomen-
dado puede resu/tar petigmsa.
Reparacienes
Para garantizar Ia SEGURIDAD y CONFIABILIDAD del producto, las
reparaciones, e! mantenimiento y el ajuste (induidas Ia inspecci6n y
sustituci6n de las escobillas) deben realizarlos Ios centros de servicio
certificados u otras organizaciones de servicio calificadas, usando
siempre refacciones id_ntbas.
P61Jza de Garantia
IDENTIFICACION DEL PRODUCTO:
SeHo o firma deJ Distribuidor.
Nombre del producto: Mod./Cat.:
Marca: N0m. de serie:
(Datos para sor IIonados por ol distribuidor)
Fecha de compra y/o entrega deI producto:
Nombre y domicilio deI distribuidor donde se adquiri6 el producto:
Este producto estA garantizado por un a_o a partir de Ia fecha de
entrega, contra cualquier defecto en su funcionamiento, asf como en
materiabs y mano de obra empbados para su fabricaci6n. Nuestra
garanfia incluye la reparaci6n o reposici6n de! producto y/o compo-
nentes sin cargo alguno para el cliente, induyendo mano de obra, asf
como !os gastos de transportaci6n razonabbmente erogados deriva-
dos del cumptimiento de este certificado.
Para hacer efectiva esta garantia deberA presentar su herramienta y
esta p61izasellada pot el estabbcimiento comercial donde se adquiri6
el producto, de no contar con 6sta, bastarA la factura de compra.
EXCEPCtONES
Esta garantia no serA vAlida en los siguientes casos:
_, Cuando el producto se hubiese utilizado en condiciones distin-
tas alas normabs;
32
_, Cuando el producto no hubiese sido operado de acuerdo con el
instructivo de uso que se acompa_a;
,, Cuando e! producto hubiese sido alterado o reparado por per-
sonas distintas alas enlistadas al final de este certificado.
Anexo encontrarA una relaci6n de sucursales de servicio de fAbrica,
centros de servicio autorizados y franquiciados en Ia RepOblica
Mexicana, donde podrA hacer efectiva su garantia y adquirir partes,
refacciones y accesorios originabs.
Garantia limJtada per tres a_os
DEWALT repararA, sin cargo, cualquier falla que surja de defectos en
el material o la fabricaci6n deI producto, por hasta tres aFios a contar
de Ia fecha de compra. Esta garantia no cubre fallas de Ias piezas
causadas pot su desgaste normal o abuso a Ia herramienta. Para
mayores detalles sobre Iacobertura de la garantia e informaci6n acer-
ca de reparaciones realizadas bajo garant[a, visRenos en
www.dewalt.com o IIAmenos aI 1 800 433-9258 (1-800-4-DEWALT).
Esta garantfa no apiica a accesorios o a daF_oscausados pot repara-
ciones realizadas o intentadas por terceros. Esta garantia le otorga
derechos bgales especfficos, ademAs de los cuabs puede tenet
otros dependiendo del estado o provincia en que se encuentre.
AdemAs de la garantfa, tasherramientas DEWALT estAn cubiertas pot:
1 ANO DE SERWCIO GRATU_TO
DEWALT mantendrA Ia herramienta y reemplazara las piezas gas-
tadas por su uso normal, sin cobro, en cualquier momento durante un
aSo a contar de la fecha de compra.
GARANTiA DE REEMBOLSO DE SU D_NERO POR 90 DiAS
Si no estA completamente satisfecho con eI desempeho de su
mAquina herramienta, laser o davadora DEWALT, cualquiera sea el
motivo, podrA devolverlo hasta 90 dfas de la fecha de compra con su
recibo y obtener el reembolso compbto de su dinero - sin necesidad
de responder a ninguna pregunta.
SUST_TUC_ON GRATUJTA DE LAS ETIQUETAS DE
ADVERTENCJA: Si las etiquetas de advertencia se vuelven iIegibbs
Page 35

osepierden,flameaI1-800-4-DEWALTparaconseguirgratuitamente
otrasderepuesto=
3t_" (10ram} VSR
_7_7 CO_DLESS DRBLL_D_BVER
TYPE1 $E_L
, v00=
_o 8=40O/mhd0=l_/mia(RPM)
AVERTISSENENT
TO REDUCETHERHSKOF H_JURY,U_EB_4U_TBEAUA_]_
UNDERSTAND HNSTRUCTnON MANUAL, USE ONlY WHT_/°EWALT
BATTE_HES AND CHARGER, ALWAYS USE PROPE_ EYE ANI)
RESPHRAT[}'_Y pI_DTE_TION=A THTREFI_EVENT_E LOrE LE _UHDE=
°0°°LESS DB_LUDBJVEB
TYPE1 SER= usT__A
ne _/min/O=14OO/mi_{RP_) -- ..
AVEBTISSEMENT
TO _E_UCE THE R_SK _F _NJ_{Y, _$EB MUST REAO AM°
°_DE_$TAFJD _NSTBUCT_ I_IAN UAL USE O_LY W_TH D_WALT
BATTEriES A_D CItA_G_I_,A_WAYS US_ P_AOPEREYE A_D
BESP_RAT_}BY PROTEOT_ON= A T_T_E pI_EVENT_ L0_EL_ _U_DE,
O_WALT _NT_I_AL T[_OLCO_ _ALIB_IBBE,h_p_2_ L_ t_AD_ IN _XIC(I
_{)C759 "
1/2"{13mm) V_
CORDLESS °_JU_[_RJVER
TYPEI SE_. ult_D_A
no D=450/min/_=15_/min(B PIVl}
__J AVE_TISSENENT
TO REDUCE THE R_SK DF B_JUBV, USE_ MUST _EA_ AND
UNDEBSTA_B _NSTR_CT_ON _Ar_UAL U_ _LY W_TB D_WALT
BATT_ AND _BAI_G E_=ALWAY_ U_ PROPER EYE AND
BE_P_RATDRY PRDTE_r_DM, ATIITRE P_EVEM_E L_RE LE GUIDE=
Eepecifigions:
_ode_o Volts RP_
DC727 12,0 0-400, 0-1400
DC728 14,4 0-400, 0-1400
DC759 18,0 0-450, 0-1500
IMPORTADOR: D_WALT S.A. DE C.V.
BOSQUES DE CIDROS ACCESO RADI,_3-AS NO, 42
COL, BOSQUES DE LAS LOMAS, 3A. SECCION, CP 05120
DELEGACION CUAJIMALPA, MEXICO, D,F
TEL. 5 326 7100
R.RC.: BDE810626-1W7
•PARA REPARACI6N Y SERVIC_O DE SUS HERRAMIENTAS
ELECTRICAS DIR_JASE AL CENTRO DE SERVIC_O _,S CERCANO
CUUAOAN, SIN
Av=Nicol&s Bravo #1063 Sur - Col= industrial Bravo (667) 7 12 42 11
GUADALAJARA, JAL
Av=La Paz #1779 - Co!=Americana Sector Juarez (33) 3825 6978
_EXICO, D.F.
Eje Central L&zaro Cardenas No= 18 (55) 5588 9377
Local D, CoL Obrera
MERe°A, YUC
Calle 63 #459-A - Col= Centro (999) 928 8038
_ONTERREY, N,L.
Av=Francisco L Madero No=831 - Col= Centro (81) 8378 2313
PUERLA, PUE
17 Norte #205 - Col= Centro (222) 246 3714
QUERETARO, QRO
Av=Madero 139 Pte= - Col= Centro (442) 214 1660
_AN LUI_ POTO_L SLP
Av=Universidad 1525 - CoL San Luis (444) 814 2383
TORREON, COAH
BIvd= Independencia, 96 Pte=- Col= Centro (871) 716 8285
VERACRUZ, VER
Prolongaci6n Diaz Mir6n #4280 - Col=Remes (229) 921 7016
VILLARER_OSA, TAB
Constituci6n 516-A (993) 312 8111
Col= Centro
PARA OTRAS LOOALIDADES LLA_E AL: (55) 5326 7100
Para servicioy ve_tas consu{te
"HERRAM_ENTASELECTRICAS" 1_
33
 Loading...