

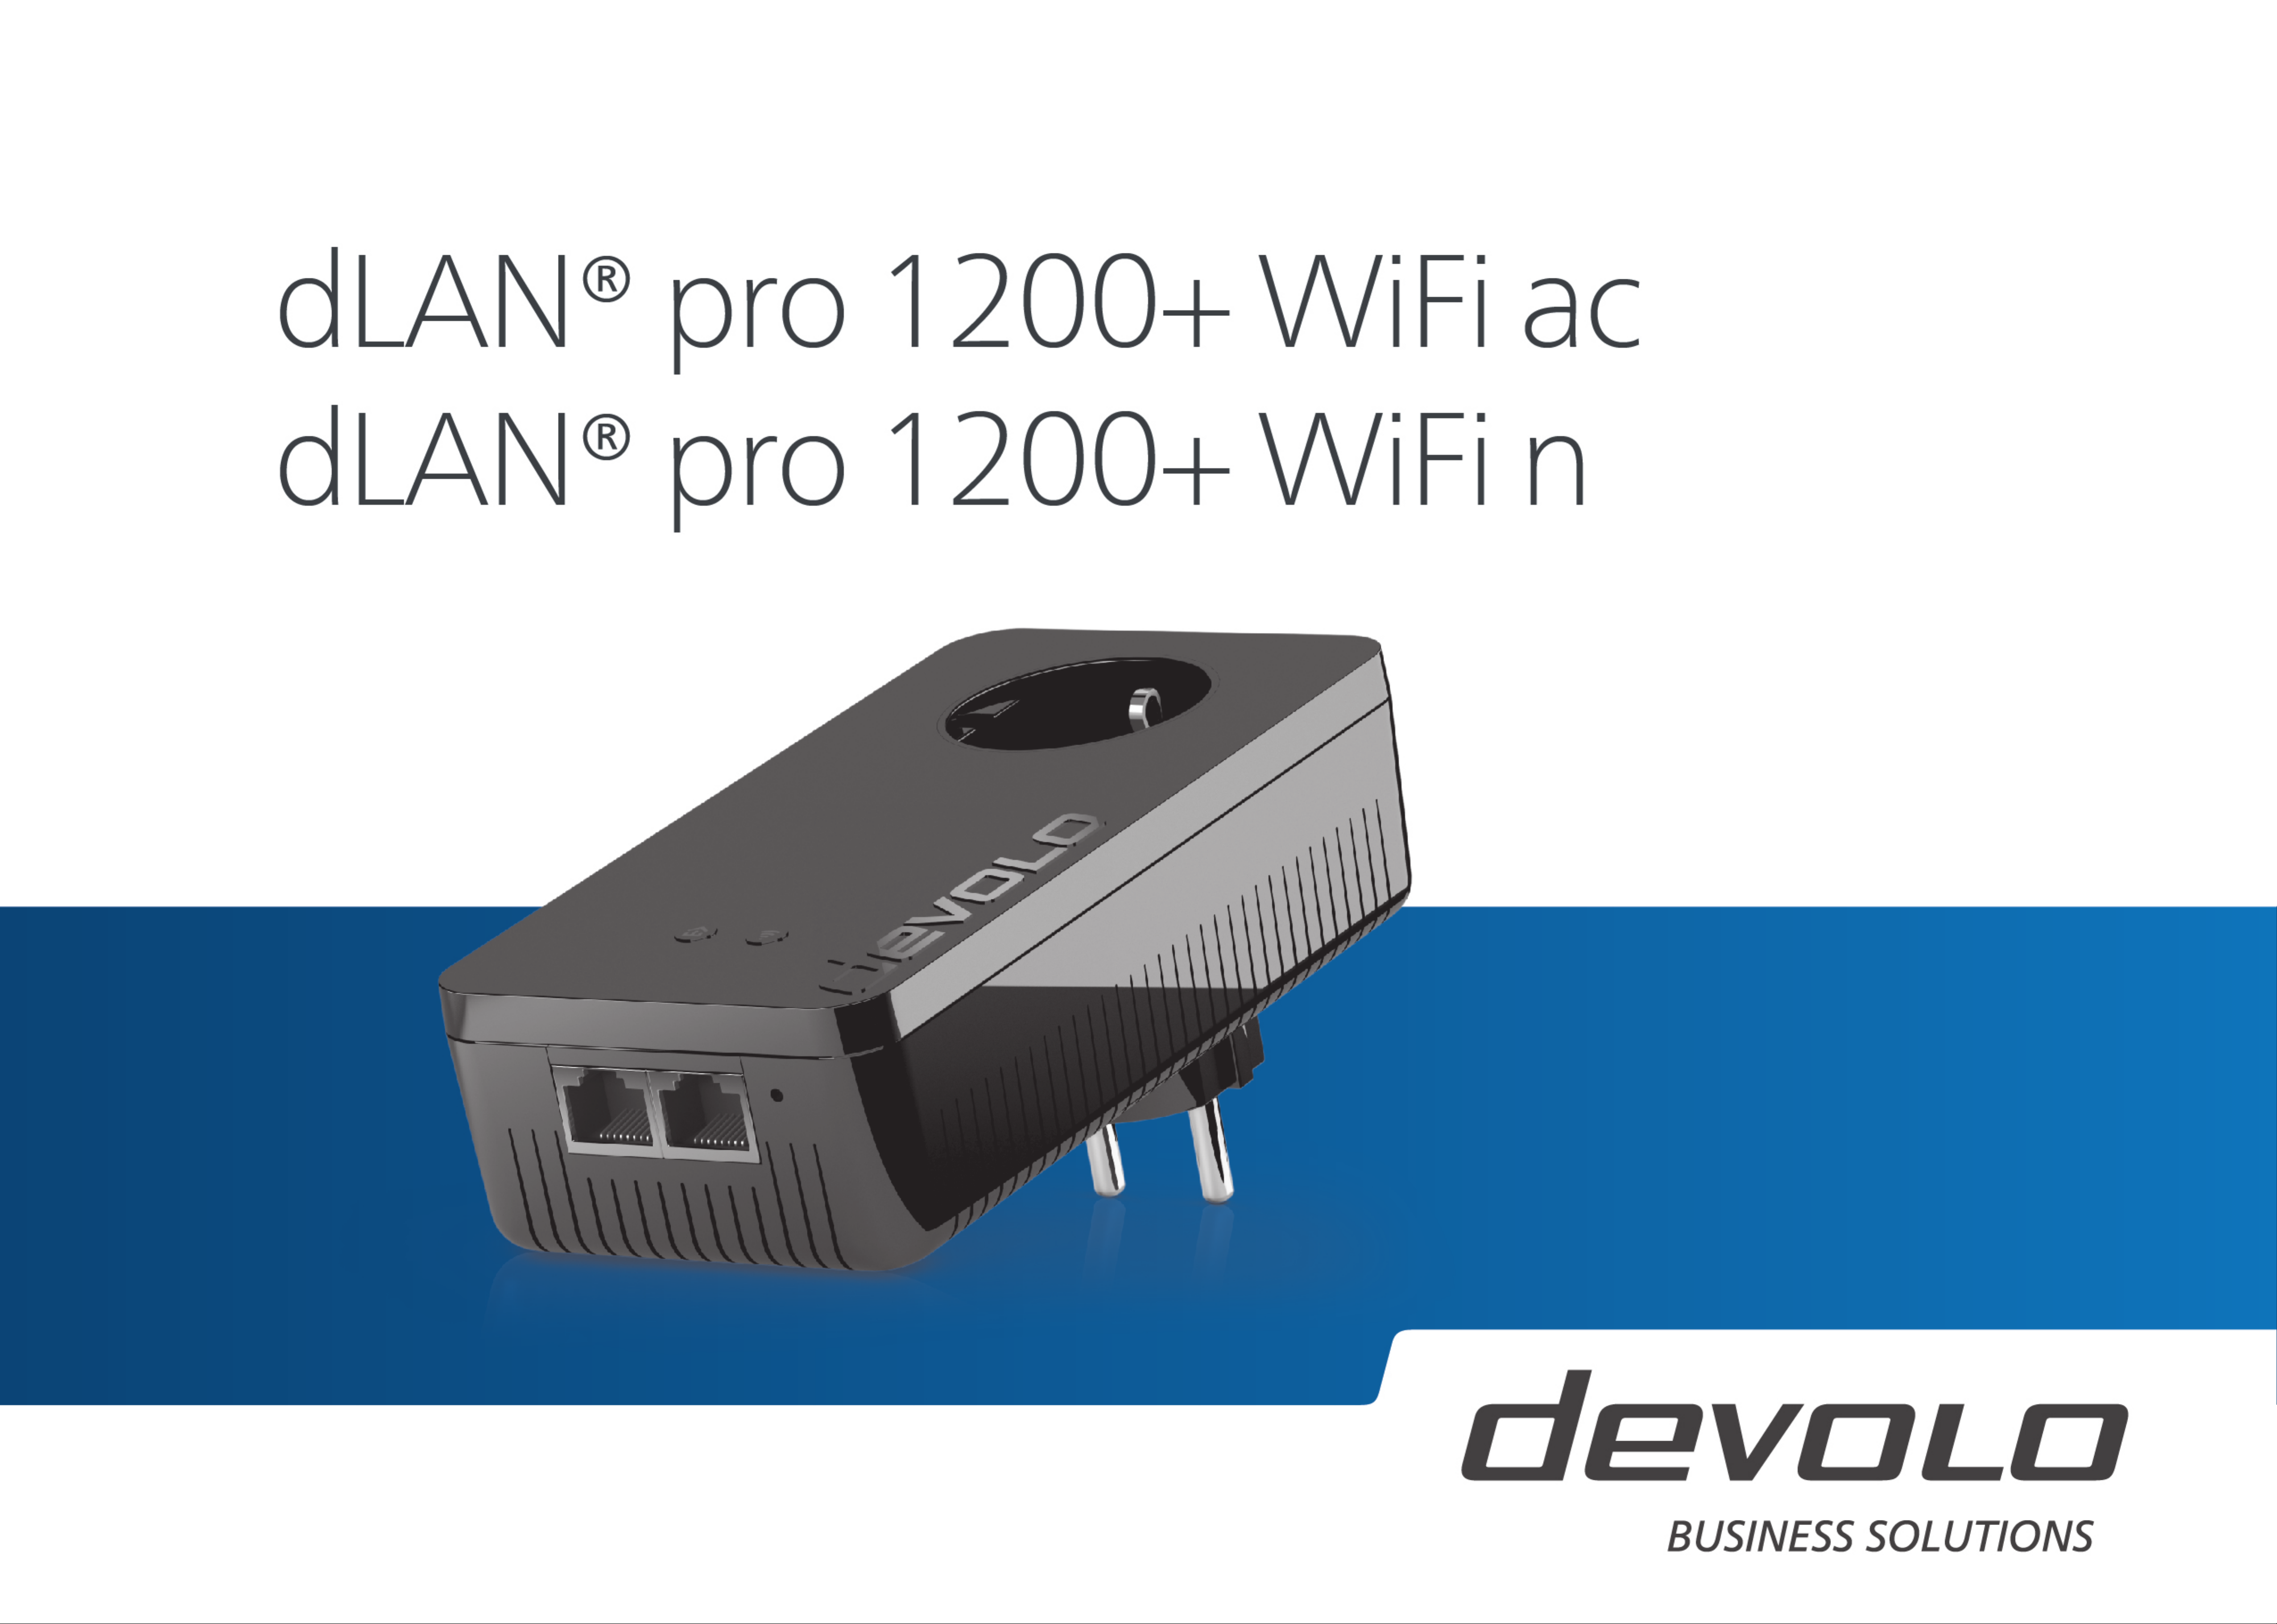
Page 1
Page 2

devolo dLAN® pro 1200+ WiFi ac
®
devolo dLAN
pro 1200+ WiFi n
Page 3

© 2017 devolo AG Aachen (Germany)
While the information in this manual has been compiled with great care, it may not be deemed an assurance of product characteristics. devolo shall be liable only
to the degree specified in the terms of sale and delivery.
The reproduction and distribution of the documentation and software supplied with this product and the use of its contents is subject to written authorization from
devolo. We reserve the right to make any alterations that arise as the result of technical development.
Trademarks
®
is a registered trademark of Linus Torvalds.
Linux
®
is a registered trademark of Canonical Ltd.
Ubuntu
®
Windows
Wi-Fi
devolo, dLAN
and Microsoft® are registered trademarks of Microsoft, Corp.
®
, Wi-Fi Protected AccessTM, WPATM, WPA2TM and Wi-Fi Protected SetupTM are registered trademarks of the Wi-Fi Alliance®.
®
, Vianect® and the devolo logo are registered trademarks of devolo AG.
The firmware package from devolo contains files which are covered by different licenses, in particular under devolo proprietary license and under open source
license (GNU General Public License, GNU Lesser General Public License or FreeBSD License). The source code which is available for Open Source distribution
can be requested in writing from gpl@devolo.de.
All other names mentioned may be trademarks or registered trademarks of their respective owners. Subject to change without notice. No liability for technical errors
or omissions.
devolo AG
Charlottenburger Allee 60
52068 Aachen
Germany
www.devolo.com
Aachen, January 2017
Version 1.2 (1/17)
Page 4

Content
Content
1 Preface . . . . . . . . . . . . . . . . . . . . . . . . . . . . . . . . . . . . . . . . . . . . . . . . . . . . . . . . . . . . . . . . . . . . 7
1.1 About this manual . . . . . . . . . . . . . . . . . . . . . . . . . . . . . . . . . . . . . . . . . . . . . . . . . . . . . . .7
1.1.1 Intended use . . . . . . . . . . . . . . . . . . . . . . . . . . . . . . . . . . . . . . . . . . . . . . . . . . . .8
1.1.2 CE conformity . . . . . . . . . . . . . . . . . . . . . . . . . . . . . . . . . . . . . . . . . . . . . . . . . . .8
1.1.3 Safety notes . . . . . . . . . . . . . . . . . . . . . . . . . . . . . . . . . . . . . . . . . . . . . . . . . . . 10
1.2 devolo on the Internet . . . . . . . . . . . . . . . . . . . . . . . . . . . . . . . . . . . . . . . . . . . . . . . . . . .11
2 devolo dLAN pro . . . . . . . . . . . . . . . . . . . . . . . . . . . . . . . . . . . . . . . . . . . . . . . . . . . . . . . . . . . . . 12
2.1 dLAN pro 1200+ WiFi ac/n at a glance . . . . . . . . . . . . . . . . . . . . . . . . . . . . . . . . . . . . . .12
2.2 All about the network . . . . . . . . . . . . . . . . . . . . . . . . . . . . . . . . . . . . . . . . . . . . . . . . . . .13
2.2.1 dLAN pro 1200+ WiFi ac/n as a WiFi access point . . . . . . . . . . . . . . . . . . . . . . . 13
2.2.2 dLAN pro 1200+ WiFi ac/n as WDS bridge . . . . . . . . . . . . . . . . . . . . . . . . . . . .15
2.2.3 Static VLAN . . . . . . . . . . . . . . . . . . . . . . . . . . . . . . . . . . . . . . . . . . . . . . . . . . . .15
2.2.4 Dynamic VLAN . . . . . . . . . . . . . . . . . . . . . . . . . . . . . . . . . . . . . . . . . . . . . . . . . 19
3 Initial use . . . . . . . . . . . . . . . . . . . . . . . . . . . . . . . . . . . . . . . . . . . . . . . . . . . . . . . . . . . . . . . . . .20
3.1 Package contents . . . . . . . . . . . . . . . . . . . . . . . . . . . . . . . . . . . . . . . . . . . . . . . . . . . . . . .20
3.2 System requirements . . . . . . . . . . . . . . . . . . . . . . . . . . . . . . . . . . . . . . . . . . . . . . . . . . . . 20
3.3 The dLAN pro 1200+ WiFi ac/n . . . . . . . . . . . . . . . . . . . . . . . . . . . . . . . . . . . . . . . . . . . .21
3.3.1 Encryption button . . . . . . . . . . . . . . . . . . . . . . . . . . . . . . . . . . . . . . . . . . . . . . .21
3.3.2 WiFi button . . . . . . . . . . . . . . . . . . . . . . . . . . . . . . . . . . . . . . . . . . . . . . . . . . . .22
3.3.3 Ethernet ports . . . . . . . . . . . . . . . . . . . . . . . . . . . . . . . . . . . . . . . . . . . . . . . . . .23
3.3.4 Reset . . . . . . . . . . . . . . . . . . . . . . . . . . . . . . . . . . . . . . . . . . . . . . . . . . . . . . . . . 23
3.3.5 WiFi antennas . . . . . . . . . . . . . . . . . . . . . . . . . . . . . . . . . . . . . . . . . . . . . . . . . . 23
3.3.6 Integrated electrical socket . . . . . . . . . . . . . . . . . . . . . . . . . . . . . . . . . . . . . . . . 23
3.4 Connecting the dLAN pro 1200+ WiFi ac/n . . . . . . . . . . . . . . . . . . . . . . . . . . . . . . . . . . . 23
3.4.1 Single Kit – Expanding an existing dLAN pro network . . . . . . . . . . . . . . . . . . . . 24
3.4.2 Starter Kit and Single Kit – Setting up a new dLAN pro network . . . . . . . . . . . .26
3.5 dLAN AVpro manager . . . . . . . . . . . . . . . . . . . . . . . . . . . . . . . . . . . . . . . . . . . . . . . . . . .27
3.5.1 Software for Windows and Linux . . . . . . . . . . . . . . . . . . . . . . . . . . . . . . . . . . . .28
devol o dLAN pro 1200+ WiFi ac/n
Page 5

Content
3.6 Remove dLAN pro 1200+ WiFi ac from the dLAN pro network . . . . . . . . . . . . . . . . . . . . .28
4 Network configuration . . . . . . . . . . . . . . . . . . . . . . . . . . . . . . . . . . . . . . . . . . . . . . . . . . . . . . . .29
4.1 General information about the menu . . . . . . . . . . . . . . . . . . . . . . . . . . . . . . . . . . . . . . . . 30
4.2 Status . . . . . . . . . . . . . . . . . . . . . . . . . . . . . . . . . . . . . . . . . . . . . . . . . . . . . . . . . . . . . . .32
4.2.1 Status/Overview . . . . . . . . . . . . . . . . . . . . . . . . . . . . . . . . . . . . . . . . . . . . . . . .33
4.2.2 Status/Events . . . . . . . . . . . . . . . . . . . . . . . . . . . . . . . . . . . . . . . . . . . . . . . . . . 35
4.2.3 Status/Licence . . . . . . . . . . . . . . . . . . . . . . . . . . . . . . . . . . . . . . . . . . . . . . . . . . 35
4.3 System . . . . . . . . . . . . . . . . . . . . . . . . . . . . . . . . . . . . . . . . . . . . . . . . . . . . . . . . . . . . . . .36
4.3.1 System/Status . . . . . . . . . . . . . . . . . . . . . . . . . . . . . . . . . . . . . . . . . . . . . . . . . .36
4.3.2 System/Management . . . . . . . . . . . . . . . . . . . . . . . . . . . . . . . . . . . . . . . . . . . . .37
4.3.3 System/Time . . . . . . . . . . . . . . . . . . . . . . . . . . . . . . . . . . . . . . . . . . . . . . . . . . .40
4.3.4 System/Button/LEDs . . . . . . . . . . . . . . . . . . . . . . . . . . . . . . . . . . . . . . . . . . . . .41
4.3.5 System/Services . . . . . . . . . . . . . . . . . . . . . . . . . . . . . . . . . . . . . . . . . . . . . . . . .43
4.3.6 System/Configuration . . . . . . . . . . . . . . . . . . . . . . . . . . . . . . . . . . . . . . . . . . . .44
4.3.7 System/Firmware . . . . . . . . . . . . . . . . . . . . . . . . . . . . . . . . . . . . . . . . . . . . . . . . 45
4.3.8 System/Reboot . . . . . . . . . . . . . . . . . . . . . . . . . . . . . . . . . . . . . . . . . . . . . . . . . 45
4.3.9 System/Change password . . . . . . . . . . . . . . . . . . . . . . . . . . . . . . . . . . . . . . . . . 46
4.4 LAN . . . . . . . . . . . . . . . . . . . . . . . . . . . . . . . . . . . . . . . . . . . . . . . . . . . . . . . . . . . . . . . . .47
4.4.1 LAN/Status . . . . . . . . . . . . . . . . . . . . . . . . . . . . . . . . . . . . . . . . . . . . . . . . . . . .47
4.4.2 LAN/IP configuration . . . . . . . . . . . . . . . . . . . . . . . . . . . . . . . . . . . . . . . . . . . . .48
4.4.3 LAN/VLANs . . . . . . . . . . . . . . . . . . . . . . . . . . . . . . . . . . . . . . . . . . . . . . . . . . . .48
4.5 dLAN . . . . . . . . . . . . . . . . . . . . . . . . . . . . . . . . . . . . . . . . . . . . . . . . . . . . . . . . . . . . . . . .51
4.5.1 Status . . . . . . . . . . . . . . . . . . . . . . . . . . . . . . . . . . . . . . . . . . . . . . . . . . . . . . . .51
4.5.2 dLAN pro network . . . . . . . . . . . . . . . . . . . . . . . . . . . . . . . . . . . . . . . . . . . . . . .52
4.6 WiFi . . . . . . . . . . . . . . . . . . . . . . . . . . . . . . . . . . . . . . . . . . . . . . . . . . . . . . . . . . . . . . . . .55
4.6.1 WiFi/Status . . . . . . . . . . . . . . . . . . . . . . . . . . . . . . . . . . . . . . . . . . . . . . . . . . . .55
4.6.2 WiFi/2.4 GHz radio . . . . . . . . . . . . . . . . . . . . . . . . . . . . . . . . . . . . . . . . . . . . . . 56
4.6.3 WiFi/5 GHz radio . . . . . . . . . . . . . . . . . . . . . . . . . . . . . . . . . . . . . . . . . . . . . . . . 59
4.6.4 WiFi/SSIDs . . . . . . . . . . . . . . . . . . . . . . . . . . . . . . . . . . . . . . . . . . . . . . . . . . . . .61
4.6.5 WiFi/Bridge . . . . . . . . . . . . . . . . . . . . . . . . . . . . . . . . . . . . . . . . . . . . . . . . . . . . 64
4.6.6 WiFi/RADIUS . . . . . . . . . . . . . . . . . . . . . . . . . . . . . . . . . . . . . . . . . . . . . . . . . . . 65
devolo dLAN pro 1200+ WiFi ac/n
Page 6

Content
5 Appendix . . . . . . . . . . . . . . . . . . . . . . . . . . . . . . . . . . . . . . . . . . . . . . . . . . . . . . . . . . . . . . . . . . 66
5.1 Basic information . . . . . . . . . . . . . . . . . . . . . . . . . . . . . . . . . . . . . . . . . . . . . . . . . . . . . . .66
5.1.1 MAC adresse . . . . . . . . . . . . . . . . . . . . . . . . . . . . . . . . . . . . . . . . . . . . . . . . . . .66
5.1.2 What exactly is dLAN? . . . . . . . . . . . . . . . . . . . . . . . . . . . . . . . . . . . . . . . . . . . .66
5.1.3 What is VLAN? . . . . . . . . . . . . . . . . . . . . . . . . . . . . . . . . . . . . . . . . . . . . . . . . .66
5.1.4 What is WLAN (WiFi)? . . . . . . . . . . . . . . . . . . . . . . . . . . . . . . . . . . . . . . . . . . . .67
5.2 Bandwidth optimization . . . . . . . . . . . . . . . . . . . . . . . . . . . . . . . . . . . . . . . . . . . . . . . . . .68
5.3 Disposal of old devices . . . . . . . . . . . . . . . . . . . . . . . . . . . . . . . . . . . . . . . . . . . . . . . . . . .69
5.4 Warranty conditions . . . . . . . . . . . . . . . . . . . . . . . . . . . . . . . . . . . . . . . . . . . . . . . . . . . . .69
devol o dLAN pro 1200+ WiFi ac/n
Page 7
7 Preface
1Preface
Thank you for choosing a device from the devolo
dLAN pro 1200+ WiFi ac/n series!
1.1 About this manual
Carefully read all instructions before setting up the device and store the manual and/or installation guide for
later reference.
The only difference between the two WiFi
access points is in frequency band they use:
쎲The dLAN pro 1200+ WiFi ac supports
the 2.4 GHz and the 5 GHz frequency band,
even during parallel operation.
쎲The dLAN pro 1200+ WiFi n only
supports the 2.4 GHz frequency band.
Functional descriptions that apply to 5 GHz
operation are marked below with a note that
reads "Only the dLAN pro 1200+ WiFi ac
supports operation in the 5 GHz frequency
band".
After a presentation of the dLAN pro 1200+ WiFi ac/n
with sample applications in Chapter 2, Chapter 3
will cover successfully setting up your
dLAN pro 1200+ WiFi ac/n and configuring the dLAN
pro network. Chapter 4 describes in detail the setting
options of the built-in configuration interface and
thereby also access to the WiFi. Basic information to
"MAC-address" "WiFi (WLAN)" and "VLAN", tips for
bandwidth optimization, information of environmental
compatibility of the device and our warranty conditions
can be found in Chapter 5 and conclude the manual.
The technical data for these products can be found online at www.devolo.com/en/business-solutions
respective product area.
in the
devolo dLAN pro 1200+ WiFi ac/n
Page 8
Preface 8
Description of the symbols
Here we briefly describe the meaning of the symbols
used in this manual.
Very important note. Failure to observe this note may result in damage.
Important note that should be observed.
Additional information, background material and configuration tips for your device.
1.1.1 Intended use
Use the devices as described in these instructions to
prevent damage and injuries.
The devices are designed for indoor
use only.
1.1.2 CE conformity
This products comply with the technical requirements of the directive 2014/53/EU,
2014/35/EU, 2014/30/EU and the other relevant provisions of the FTEG. The products
are class B equipments.
"2014/53/EU" is a radio directive. It applies to
radio equipment. Observance of this directive is
verified by the use of harmonized European
norms.
The CE declarations of these products can be found
online at www.devolo.com/en/business-solutions
the respective product area.
in
These products are designed for use
in the EU, Switzerland and Norway.
d evol o dL AN pr o 1200+ WiFi ac/n
Page 9
9 Preface
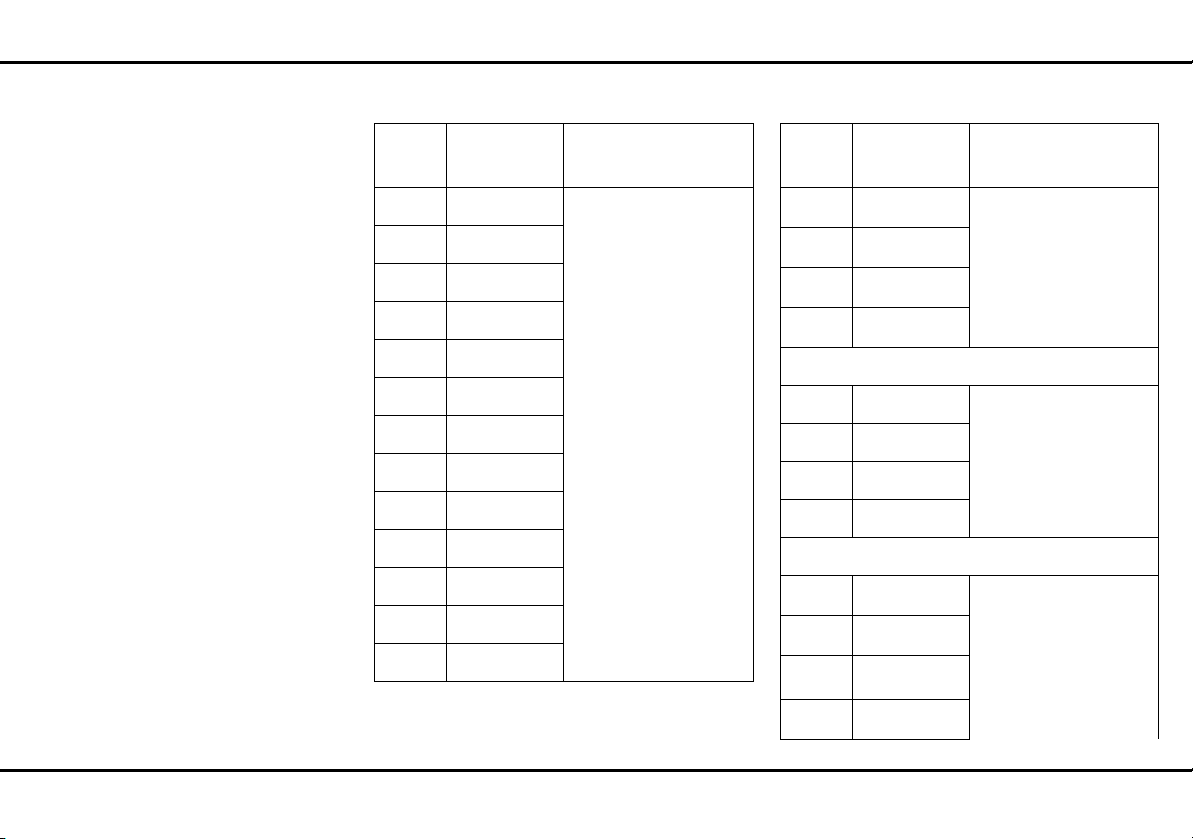
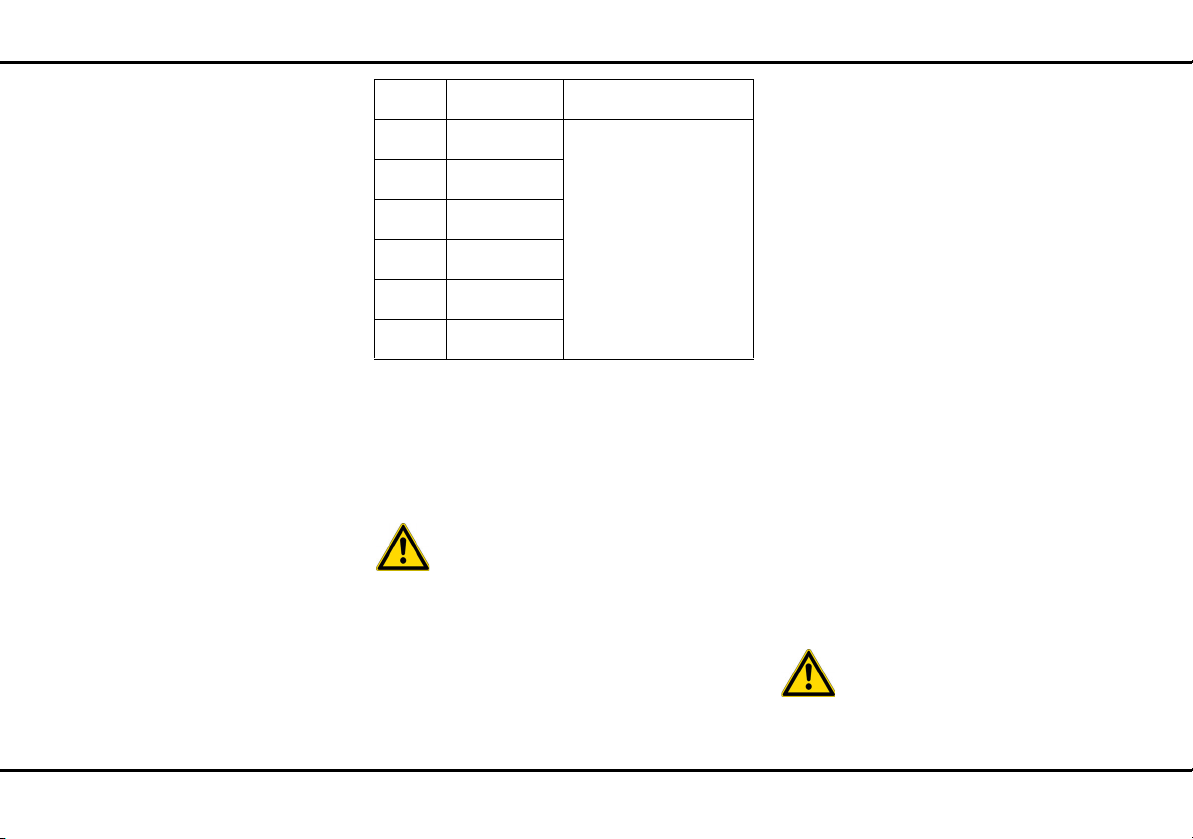
Wireless propertiesfor the 2.4 GHz range Wireless propertiesfor the 5 GHz range
Channel
1 2,412 GHz
2 2,417 GHz
3 2,422 GHz
4 2,427 GHz
5 2,432 GHz
6 2,437 GHz
7 2,442 GHz
8 2,447 GHz
9 2,452 GHz
10 2,457 GHz
11 2,462 GHz
12 2,467 GHz
13 2,472 GHz
Frequency Max. transmitting
power
100 mW/20 dBm
Chan-
Frequency Max. transmitting
nel
36 5,180 GHz
40 5,200 GHz
44 5,220 GHz
48 5,240 GHz
52 5,260 GHz
56 5,280 GHz
60 5,300 GHz
64 5,320 GHz
100 5,500 GHz
104 5,520 GHz
108 5,540 GHz
112 5,560 GHz
power
200mW/23dBm
200mW/23dBm
560mW/27,5dBm
devolo dLAN pro 1200+ WiFi ac/n
Page 10
Preface 10
116 5,580 GHz
120 5,600 GHz
124 5,620 GHz
128 5,640 GHz
132 5,660 GHz
136 5,680 GHz
140 5,700 GHz
1.1.3 Safety notes
It is essential to have read and understood all safety
and operating instructions before the devolo device is
used for the first time; keep them safe for future reference.
DANGER due to electricity
Users should never open devolo devices. Opening
the device poses a risk of electric shock!
Users do not need to carry out any maintenance on devolo devices. In the event of damage, disconnect the
devolo device from the mains supply by pulling it or its
plug out of the power outlet. Then contact qualified
specialist personnel (after-sales service) exclusively.
Damage is deemed to have occurred, for example,
쎲 if the power plug is damaged
쎲 if the devolo device has been showered with
liquid (e.g. rain or water).
쎲 if the devolo device is inoperable.
쎲 if the housing of the devolo device is damaged.
devolo devices may only be operated using a mains
power supply, as described on the nameplate.
To disconnect devolo devices from the mains supply,
pull the device itself or its mains plug from the power
outlet. The power outlet and all connected net-
work devices should be easily accessible so that
you can pull the mains plug quickly if needed.
devolo devices are designed for indoor use only.
Only use devolo devices at a dry location.
Disconnect devolo devices from the mains supply to clean! Avoid solvent cleaning agents since they
can cause damage to the housing. Only use a dry towel
for cleaning.
DANGER due to overheating
Multiple devolo devices must not be interlocked.
d evol o dL AN pr o 1200+ WiFi ac/n
Page 11

11 Preface
devolo devices should only be installed at locations
that guarantee adequate ventilation. Slots and
openings on the housing are used for ventilation:
쎲 Do not cover devolo devices when operating.
쎲 Do not place any objects on devolo devices.
쎲 Do not insert any objects into the openings of
devolo devices.
쎲 devolo devices must not be placed directly next
to an open flame (such as fire or candles).
devolo devices must not be exposed to direct heat
radiation (e.g. radiator, direct sunlight).
1.2 devolo on the Internet
For detailed information on our products, visit
www.devolo.com/en/business-solutions
The devolo business area not only contains product
descriptions and documentation, but also updates of
devolo software and your device's firmware. We
especially recommend the descriptions of the "dLAN
pro network," which are arranged according to
Application, Sectors and Integration, where you
can find lots of interesting background information.
If you have any further ideas or suggestions related to
our products, please don't hesitate to contact us at
support@devolo.com
!
.
devolo dLAN pro 1200+ WiFi ac/n
Page 12
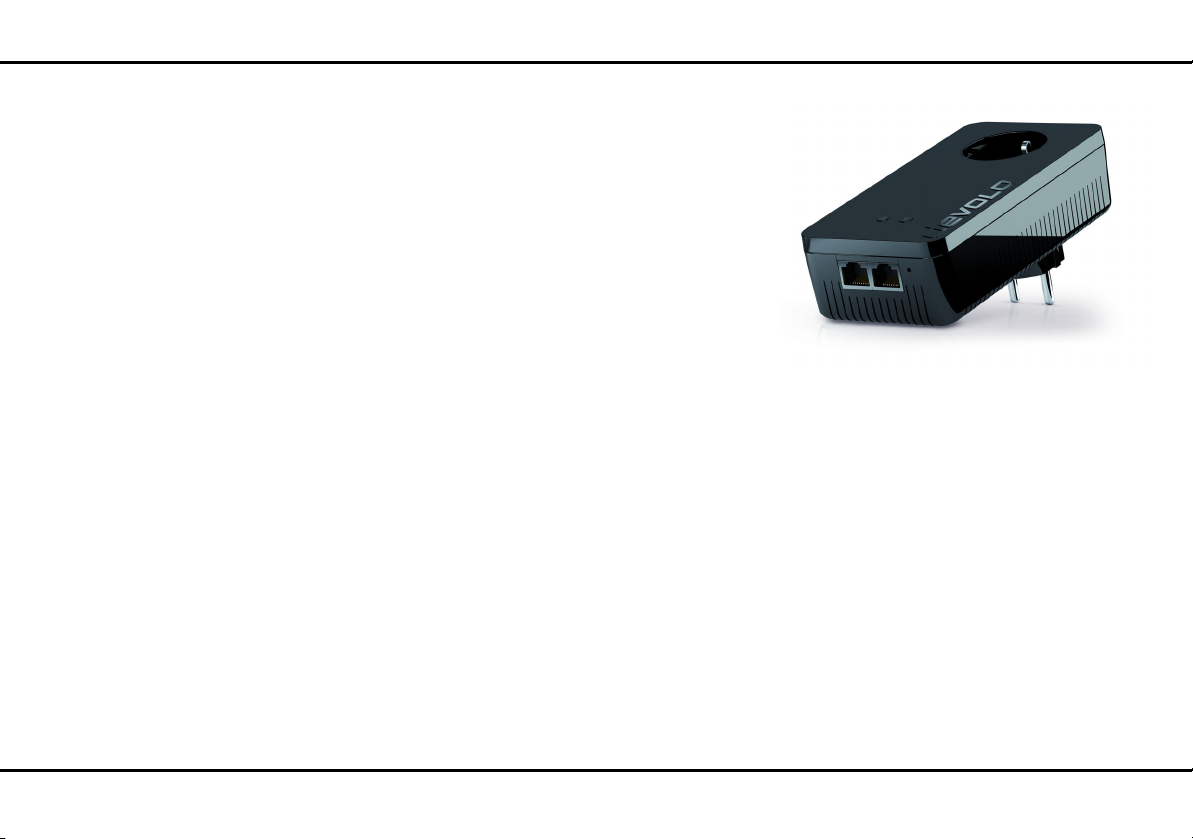
devolo dLAN pro 12
Fig. 1 is country-specific
2 devolo dLAN pro
devolo dLAN business solutions are a favourably priced
option to establish a broadband IP network in a building—using the power grid or according to the dLAN
pro product also coax lines or two-wire lines.
Positioning anywhere in a building is possible due to
the flexibility of dLAN pro networking over an existing
power line: even areas without a network connection
are perfectly integrated this way. dLAN can be used as
an easily scalable, primary network as well as to supplement an existing infrastructure.
d evol o dL AN pr o 1200+ WiFi ac/n
The advantage this brings is obvious: no new cables
have to be laid—expenditure and costs remain low.
2.1 dLAN pro 1200+ WiFi ac/n at a glance
Developed for use in businesses devolo Business Units
offers with the dLAN pro 1200+ WiFi ac/n an innovative access point for network-compatible terminal devices. The professional delos firmware provides
administrators with numerous installation, set-up and
monitoring options.
The dLAN pro 1200+ WiFi ac provides the IEEE
802.11ac wireless standard and offers reliable support
for 2.4 and 5 GHz devices, even during parallel operation.
The dLAN pro 1200+ WiFi n provides the IEEE
802.11n wireless standard and offers reliable support
for 2.4 GHz devices.
The configuration of VLAN and dynamic VLAN is just as
simple as configuring the legacy rate sets and viewing
Syslog entries.
The device can be optimally adapted to various usage
scenarios thanks to interfaces that can be disabled and
deactivation of the function buttons.
Page 13

13 devolo dLAN pro
It features 2 gigabit Ethernet ports.
The dLAN powerline technology uses the internal power line and thus enables flexible positioning of the
dLAN pro 1200+ WiFi ac/n everywhere in the building.
쎲 1200 Mbps (gross) connection for fast data trans-
mission via dLAN
쎲 MIMO technology for the best transmission and
reception performance.
쎲 Optimal dLAN security with a 128-bit AES encryp-
tion.
The dLAN pro 1200+ WiFi ac has four internal WiFi
antennas and supports the high-speed "IEEE 802.11a/
b/g/n/ac" WiFi standards with a data transmission rate
of up to 1200 Mbps (IEEE 802.11ac at speeds up to
866 Mbps and IEEE 802.11n at speeds of up to 300
Mbps).
The dLAN pro 1200+ WiFi n has two internal WiFi
antennas and supports the high-speed "IEEE 802.11a/
b/g/n" WiFi standards with a data transmission rate of
up to 300 Mbps (IEEE 802.11n).
Lowering the transmitting power—e. g. if you do not
require a large range. For example, if the client is in the
same room as the dLAN pro 1200+ WiFi ac/n.
Separation of user groups and granular access control
through access points (Multi SSID) and VLAN.
Remote management via the
devolo dLAN AVpro manager software.
2.2 All about the network
This chapter describes application scenarios in order to
provide an overview of the various WiFi pro networks
possible with the dLAN pro 1200+ WiFi ac/n.
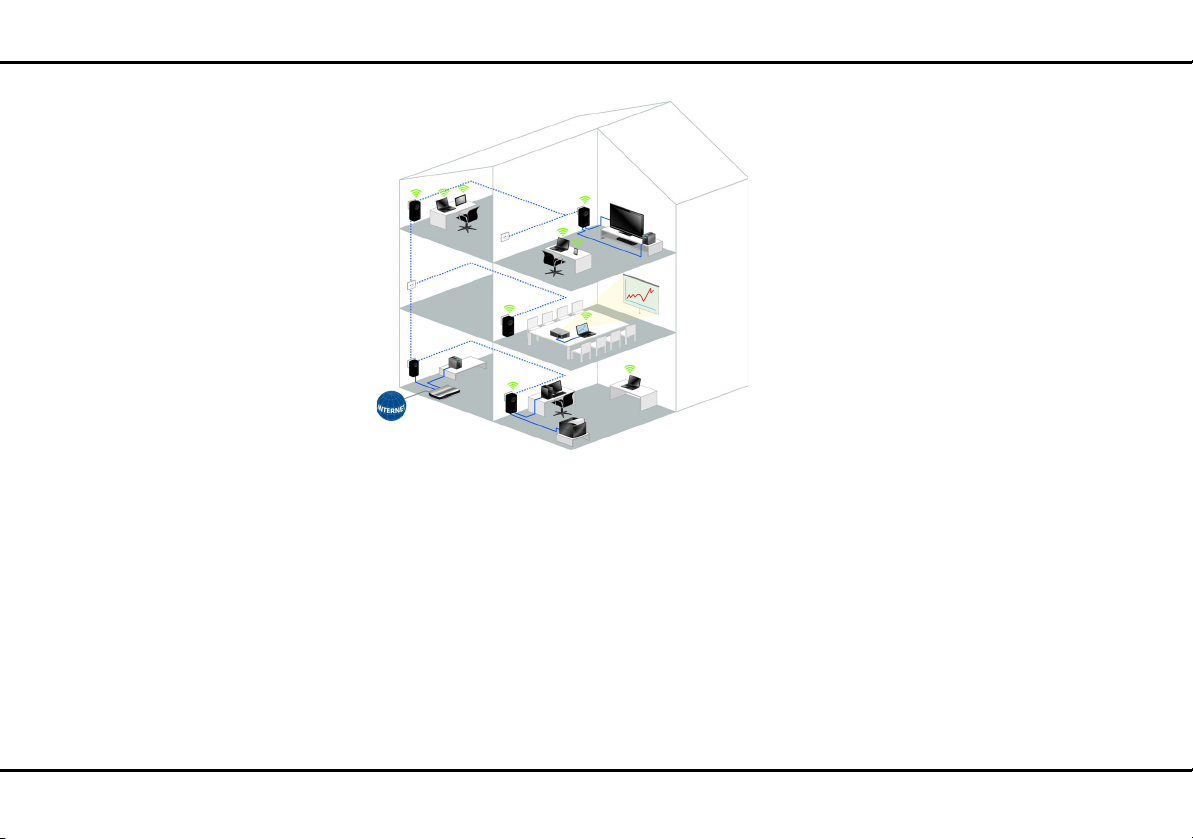
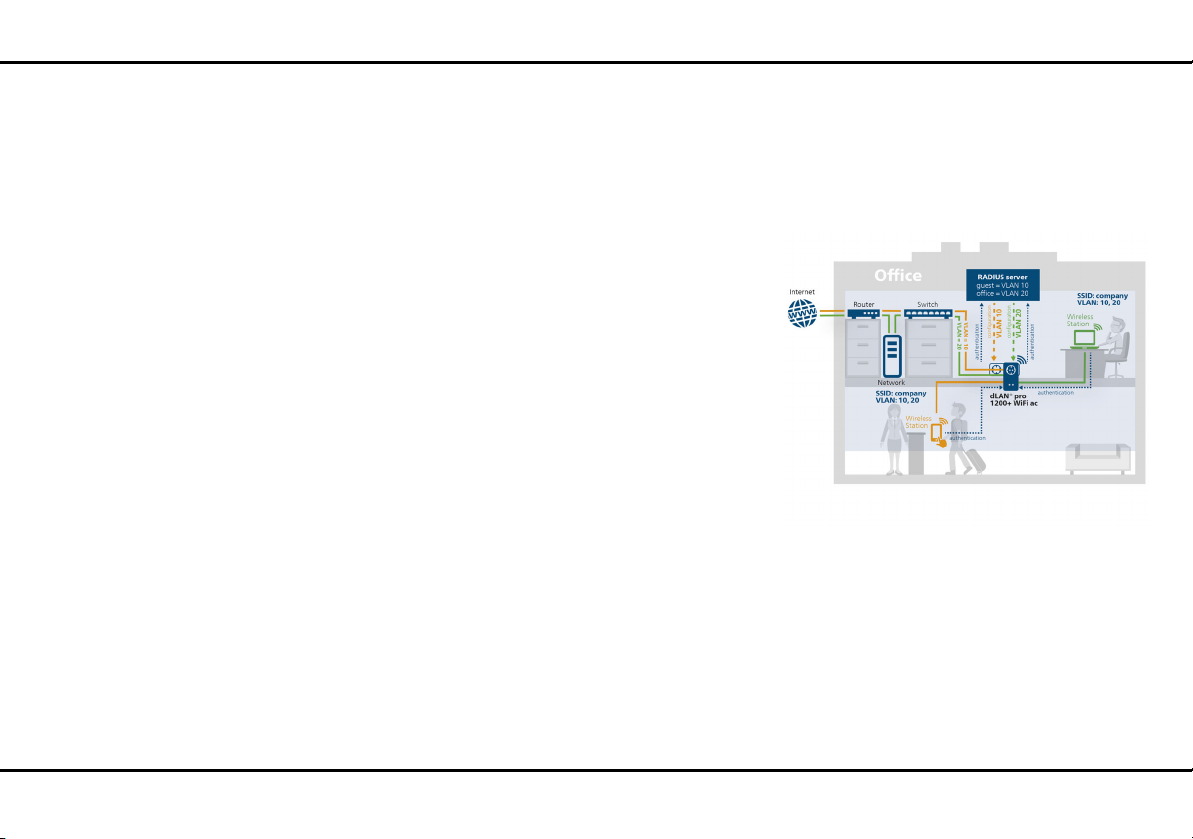
2.2.1 dLAN pro 1200+ WiFi ac/n as a WiFi access point
As WiFi access point, the dLAN pro 1200+ WiFi ac/n
provides the other WiFi stations (e. g. laptops, IP radios
or IP telephones) with a dLAN pro network connection
and Internet via the mains outlet available wirelessly or
by Ethernet.
This is particularly practical if not all client stations are
within range of a WiFi access point, for example because concrete walls disrupt the signal. With dLAN pro
various rooms can be easily connected via the mains
supply. And using the dLAN pro 1200+ WiFi ac/n,
every mains outlet can be turned quickly and easily into
a WiFi connection with excellent reception quality.
The following illustration shows how the Internet connection is set up using the dLAN pro 1200+ WiFi ac/n
and a router, and how the connection within the network is set up using additional dLAN pro devices.
devolo dLAN pro 1200+ WiFi ac/n
Page 14
devolo dLAN pro 14
Fig. 2: WiFi access point
d evol o dL AN pr o 1200+ WiFi ac/n
Page 15

15 devolo dLAN pro
Fig. 3: Building connection via WiFi
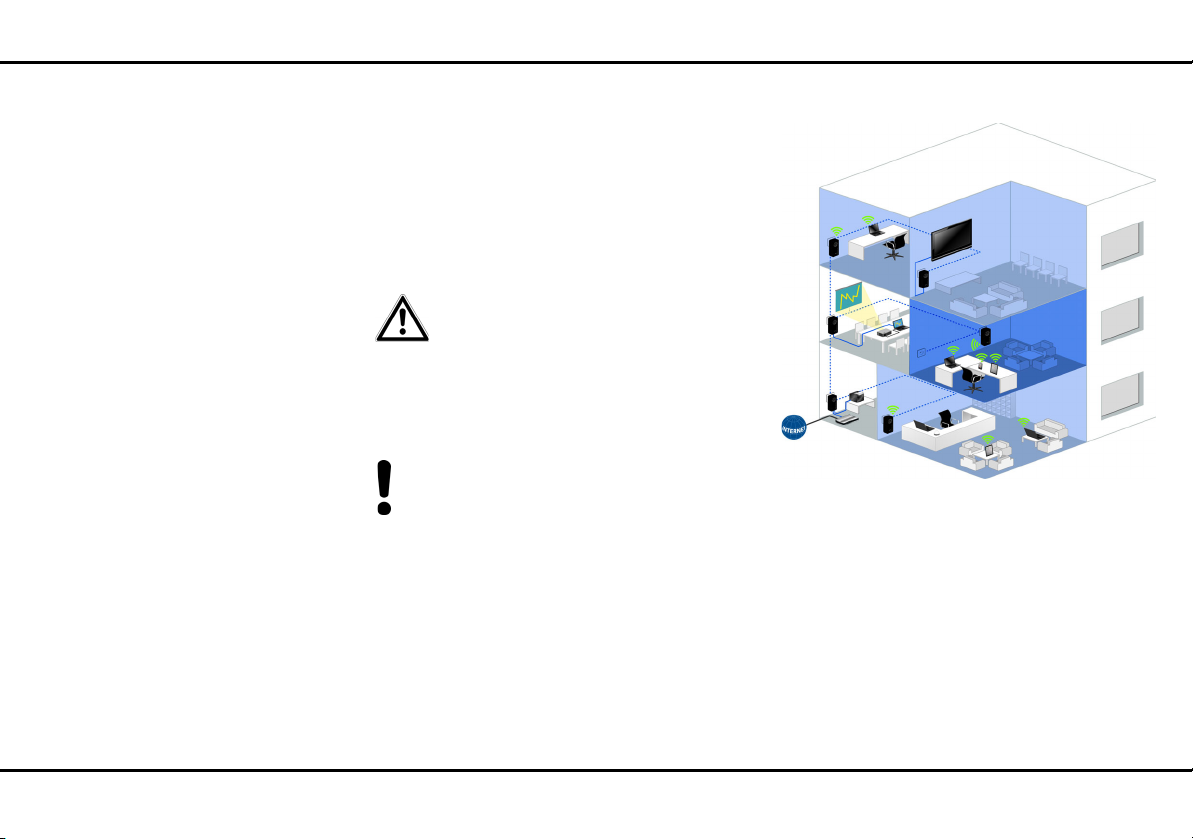
2.2.2 dLAN pro 1200+ WiFi ac/n as WDS bridge
Wireless bridging is the wireless connection of WiFi
networks and is used to expand network coverage.
2.2.3 Static VLAN
VLANs provide the option of assigning the payload
from WiFi users from various user groups (e.g. employees from various departments or guests) to any VLAN
and, therefore, separating the data streams in your
network from each other.
WDS (Wireless Distribution System) is a process for
data addressing in accordance with the IEEE 802.11
standard.
Figure 3 shows a WiFi network, which is connected to
the Internet router via WDS using two
dLAN pro 1200+ WiFi ac/n.
The payload is transmitted to or received by the LAN
port using a prefixed VLAN tag.
Proper use of the VLANs requires a managed Ethernet
switch to which the dLAN pro 1200+ WiFi ac/n is connected.
The first VLAN that you create is configured automatically as the Management VLAN (untagged). The Man-
devolo dLAN pro 1200+ WiFi ac/n
Page 16
devolo dLAN pro 16
Fig. 3: Rented offices
VLAN
CO. Schmitz
VLAN
CO. Schmitz
VLAN
CO. Bergmann
agement VLAN is used for configuration and operation
of the WiFi access point. This includes communication
with DHCP, DNS, RADIUS and a time server.
Once you have created additional VLANs, there is an
option to change the Management VLAN or convert it
to tagged. In this case, make sure that the port of the
connected Ethernet switch is appropriately configured
for this purpose.
If you can no longer access the
dLAN pro 1200+ WiFi ac/n due to a
configuration error, you can reset it
to its factory defaults by holding the
reset button for 10 seconds using a
pointed object (e.g. paperclip).
More information can be found in Chapter 3.3.4
Reset.
The following illustration shows a building with a single physical network architecture that in turn has
to be used by two different companies separately
and isolated.
All network-compatible devices are connected on a
single dLAN pro network and share a broadband connection and a VLAN-capable router. All data traffic
from each company in this building is contained in a
separate VLAN. Here, each data packet sent over the
dLAN pro network is given a VLAN tag specific to each
dLAN pro 1200+ WiFi ac/n.
Each VLAN tag contains a unique VLAN ID: The VLAN
of the Bergmann company, for example, uses a
d evol o dL AN pr o 1200+ WiFi ac/n
Page 17
17 devolo dLAN pro
Fig. 5: Configuration of CO. Bergmann
VLAN ID of "100" while the VLAN of the Schmitz
company uses a VLAN ID of "200".
devolo dLAN pro 1200+ WiFi ac/n
Only the dLAN pro 1200+ WiFi ac
supports operation in the 5 GHz frequency band.
The dLAN pro 1200+ WiFi ac of the Bergmann company only receives data packets with the VLAN ID
of "100", and respectively, the
dLAN pro 1200+ WiFi ac of the Schmitz company
Page 18
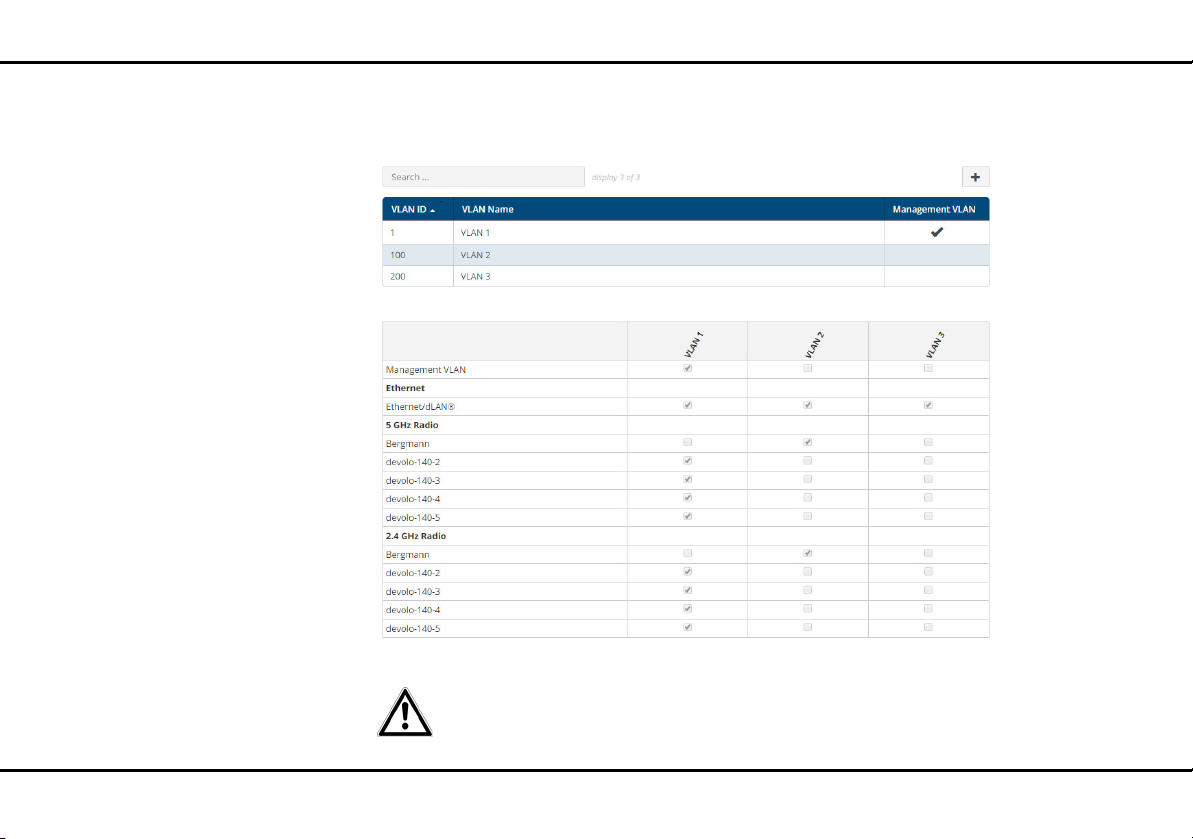
devolo dLAN pro 18
Fig. 6: Configuration of CO. Schmitz
only receives data packets with the VLAN ID of
"200".
d evol o dL AN pr o 1200+ WiFi ac/n
Only the dLAN pro 1200+ WiFi ac
supports operation in the 5 GHz frequency band.
Page 19
19 devolo dLAN pro
Fig. 7: Dynamic VLAN
This configuration ensures that each company has access only to its own assigned data traffic even
though all data runs through the same, commonly
used physical network.
2.2.4 Dynamic VLAN
The use of dynamic VLANs (virtual LANs) in Enterprise
WiFi provides a series of advantages for the administrator and WiFi users.
The following applies to WiFi users:
쎲 The WiFi network (SSID) can be located more eas-
ily, because only one SSID is visible for various
VLANs.
쎲 This provides more bandwidth for payloads within
a WiFi network, because each additional broadcast SSID worsens the efficiency of the radio interface.
The following applies to administrators:
쎲 Central assignment of WiFi users to VLANs in the
RADIUS server or an associated directory service.
쎲 Dynamic change to the assignment without inter-
action by the WiFi user.
Here, a standard VLAN can be defined for an SSID. If
the RADIUS server does not provide a VLAN assignment for a user, the user is assigned automatically to
the default VLAN.
If no default VLAN is configured, these users are rejected from using the WiFi access point. Adding a VLAN is
not required for this configuration. Management data
are transmitted untagged and the payloads from users are given the VLAN tag assigned by the RADIUS.
devolo dLAN pro 1200+ WiFi ac/n
Page 20
Initial use 20
3Initial use
This chapter covers everything you need to know to set
up your dLAN pro 1200+ WiFi ac/n. We provide a
description of how the device is connected, its
functions and briefly introduce the devolo dLAN AVpro
manager management software.
3.1 Package contents
Please ensure that the delivery is complete before beginning with the installation of your
dLAN pro 1200+ WiFi ac/n:
Single Kit:
쎲 dLAN pro 1200+ WiFi ac or WiFi n
쎲 Hard copy of installation guide and CE declaration
of conformity
쎲 Documentation at
쑗 www.devolo.com/en/Business-Solutions/Wi-
Fi-Pro/dLAN-pro-1200+-WiFi-ac
쑗 www.devolo.com/en/Business-Solutions/Wi-
Fi-Pro/dLAN-pro-1200+-WiFi-n
or
Starter Kit:
쎲 dLAN pro 1200+ WiFi ac or WiFi n
쎲 dLAN pro 1200+
쎲 1 network cable
쎲 Hard copy of installation guide and CE declaration
of conformity
쎲 Documentation at
쑗 www.devolo.com/en/Business-Solutions/Wi-
Fi-Pro/dLAN-pro-1200+-WiFi-ac
쑗 www.devolo.com/en/Business-Solutions/Wi-
Fi-Pro/dLAN-pro-1200+-WiFi-n
devolo AG reserves the right to change the package
contents without prior notice.
3.2 System requirements
쎲 All operating systems with network support
쎲 dLAN AVpro manager: Windows 7 Professional
SP1 (x86/x64), Windows 8.1 Pro (x86/x64),
Windows 10 (x86/x64), Ubuntu 12.04 LTS "Precise Pangolin" (x86/x64), Ubuntu 13.04 "Raring
Ringtail" (x86/x64), Ubuntu 14.04, OpenSuse
12.3 (x86/x64)
쎲 Network connection
To set up a dLAN pro network, you
need at least two dLAN pro devices
(200 Mbps, 500 Mbps, or
1200 Mbps).
d evol o dL AN pr o 1200+ WiFi ac/n
Page 21

21 Initial use
3.3 The dLAN pro 1200+ WiFi ac/n
The dLAN pro 1200+ WiFi ac/n is equipped with
쎲 An encryption button (home icon) with LED status
display,
쎲 A WiFi button with LED status display,
The LED status display and button
functionality can be deactivated on
the device's configuration interface
(see 4.3.4 System/Button/LEDs).
쎲 Two Ethernet ports,
쎲 One reset button
쎲 Four or two internal WiFi antennas and
쎲 One integrated electrical socket
3.3.1 Encryption button
This button controls the following functions:
Encrypting the dLAN pro network
쎲 To encrypt your dLAN pro network individually,
press each encryption button on the connected
devices for approximately 1 second—within 2
minutes.
쎲 To remove a dLAN pro device from your network,
press the encryption button on the corresponding device for at least 10 seconds.
In the factory default settings, the
devices have unique passwords and
therefore do not connect to other
dLAN pro networks automatically.
For more information about this, refer to
Chapters 3.4 Connecting the
dLAN pro 1200+ WiFi ac/n or 3.6 Remove
dLAN pro 1200+ WiFi ac from the dLAN
pro network.
Indicator lights
The integrated indicator lights (LEDs) show the dLAN
status for the dLAN pro 1200+ WiFi ac/n by illuminating and/or flashing:
쎲 The LED flashes red quickly at regular intervals
if the dLAN pro 1200+ WiFi ac/n is connected to
the mains supply but there is no dLAN con-
nection.
Check whether the device is connected to the
mains supply correctly and whether the encryption process has been carried out successfully.
For more information about this, refer to 3.4
Connecting the dLAN pro 1200+ WiFi ac/n.
devolo dLAN pro 1200+ WiFi ac/n
Page 22

Initial use 22
Fig. 8: Label
쎲 The LED lights up white if the
dLAN pro 1200+ WiFi ac/n is ready to operate
and a dLAN connection exists.
쎲 The LED flashes white quickly at regular inter-
vals if the encryption process (pairing) is being
performed in the dLAN pro network.
쎲 The LED flashes white at irregular intervals if
the dLAN pro 1200+ WiFi ac/n is in PowerSave
mode.
쎲 The LED flashes red at regular intervals if the
transmission rate of the dLAN pro 1200+ WiFi ac/
n is not in the optimum range. For information on
improving the transmission rate, refer to Chapter
5.2 Bandwidth optimization.
You can find more information on this topic in
chapter 4.3.4 System/Button/LEDs.
3.3.2 WiFi button
The WiFi button controls the following WiFi
functions:
WiFi On/Off:
쎲 In the factory default settings, the WiFi set-
ting is already enabled and the WiFi encryption is
set to WPA2. The default WiFi key for the initial
installation of the dLAN pro 1200+ WiFi ac/n is
the device's WiFi key. You will find the unique key
on the label on the back of the housing.
Note the WiFi key of the
dLAN pro 1200+ WiFi ac/n before the networking procedure. You will find the device's
unique key (WiFi key) on the label on the back
of the housing.
In order to connect the
dLAN pro 1200+ WiFi ac/n with your laptop,
tablet or smartphone later via WiFi, enter the
noted WiFi key as the network security key.
쎲 In order to switch WiFi off, press and hold the
WiFi button longer than 3 seconds.
d evol o dL AN pr o 1200+ WiFi ac/n
Page 23

23 Initial use
쎲 In order to switch WiFi back on, tap the WiFi
button.
Indicator light
The integrated indicator light (LED) shows the WiFi
status for the dLAN pro 1200+ WiFi ac/n by illuminating and/or flashing:
쎲 When the WiFi connection is switched off, the
LED is also off.
쎲 When the WiFi connection is switched on, the
LED lights up white.
쎲 The LED lights up white if there is a connection to
the WiFi network.
You can find more information on this topic in
chapter 4.3.4 System/Button/LEDs.
3.3.3 Ethernet ports
The two network jacks can be used to connect computers or other network devices to the
dLAN pro 1200+ WiFi ac/n via commercially available
network cables.
3.3.4 Reset
The Reset button (on the side of the housing) has two
different functions:
쎲 The device restarts if you press the Reset button
for less than 10 seconds.
쎲 To change the configuration of the
dLAN pro 1200+ WiFi ac/n back to the factory
defaults, press the Reset button for more than
10 seconds. Keep in mind that all settings that
have already been configured will be lost!
You can use a pointed object (such as a paper
clip) to press the reset button.
3.3.5 WiFi antennas
The internal WiFi antennas are for connecting to other
network devices wirelessly.
3.3.6 Integrated electrical socket
If you connect additional devices using a power strip,
plug this power strip into the electrical socket of the
dLAN pro 1200+ WiFi ac/n. The integrated mains filter
eliminates any noise of connected devices and significantly improves data transmission in the network.
3.4 Connecting the dLAN pro 1200+ WiFi ac/n
The device may be used only indoors.
devolo dLAN pro 1200+ WiFi ac/n
Page 24

Initial use 24
Note the WiFi key of the
dLAN pro 1200+ WiFi ac/n before the networking procedure. You will find the device's
unique key (WiFi key) on the label on the back
of the housing.
In order to connect the
dLAN pro 1200+ WiFi ac/n with your laptop,
tablet or smartphone later via WiFi, enter the
noted WiFi key as the network security key.
In the following sections we describe how to connect
the dLAN pro 1200+ WiFi ac/n and integrate it into
the network. We clarify the exact procedures based on
potential network scenarios:
3.4.1 Single Kit – Expanding an existing dLAN pro network
햲 Plug the dLAN pro 1200+ WiFi ac/n into a wall
socket. The device is ready to operate once the
indicator light of the encryption button with the
home icon turns white (after approximately 45
seconds).
To disconnect the
dLAN pro 1200+ WiFi ac/n from the
mains supply, unplug the device from
the electrical socket. The power
socket and all connected network devices should be easily accessible so
that you can pull the mains plug
quickly if needed.
Integrating the dLAN pro 1200+ WiFi ac/n into an
existing dLAN pro network
Before you can use the dLAN pro 1200+ WiFi ac/n in
your dLAN pro network, first you have to connect it to
your existing dLAN pro devices as a network. This is accomplished by using the shared dLAN password. This
forms a delimited dLAN pro network. Shared use of the
dLAN password serves as access control to the dLAN
pro network as well as the encryption, and thereby the
interception protection, of the transmitted data.
The dLAN password can be set in different ways:
dLAN pro network encryption at the touch of a
button (home icon)
햳 First press the encryption button (for about 1
second) on a device in your existing network and
then, within 2 minutes, press the encryption
button with the home icon (for about 1 second)
on the new dLAN pro 1200+ WiFi ac/n.
d evol o dL AN pr o 1200+ WiFi ac/n
Page 25

25 Initial use
Fig. 9: dLAN encryption at the press of a button
The new dLAN pro 1200+ WiFi ac/n is now integrated
into your existing dLAN pro network.
or
dLAN pro network encryption using
dLAN AVpro manager computer software. More
information can be found in Chapter 3.5 dLAN
AVpro manager.
or
dLAN pro network encryption by entering the
dLAN password in the configuration interface.
Be aware that dLAN pro encryption
with the help of dLAN AVpro manager and the configuration interface are
separate processes and are not automatically synchronised. More information can be found in Chapter 4.5
dLAN.
Integrating the dLAN pro 1200+ WiFi ac/n into an
existing WiFi network
햴 Establish the WiFi connection with your laptop,
tablet or smartphone and enter the noted
WiFi key as the network security key.
By default, the SSID (e.g. devolo-123) consists
of "devolo" and the last three digits of the serial number. For more information on the
SSID, refer to Chapter 4.6 WiFi and 4.6.4
WiFi/SSIDs.
devolo dLAN pro 1200+ WiFi ac/n
Page 26

Initial use 26
3.4.2 Starter Kit and Single Kit – Setting up a new dLAN pro network
햲 Connect the dLAN pro 1200+ to your Internet
access device's network jack.
햳 Plug the dLAN pro 1200+ WiFi ac/n into a wall
socket. The device is ready to operate once the
indicator light of the encryption button with the
home icon turns white (after approximately 45
seconds).
To disconnect the device from the
mains supply, unplug the device. The
power socket and all connected network devices should be easily accessible so that you can pull the mains
plug quickly if needed.
Connecting the dLAN pro 1200+ and a
dLAN pro 1200+ WiFi ac/n as a dLAN pro network
Before you can use the device in a dLAN pro network,
first you have to connect it as a network. This is accomplished by using a shared dLAN password. This forms
a delimited dLAN pro network. Shared use of the dLAN
password serves as access control to the dLAN pro network as well as the encryption, and thereby the interception protection, of the transmitted data.
dLAN pro network encryption at the touch of a
button
햴 First press the encryption button (for about 1
second) of dLAN pro 1200+ and then, within
2 minutes, press the encryption button with the
home icon (for about 1 second) of
dLAN pro 1200+ WiFi ac/n.
햵 Your dLAN pro network is now set up and pro-
tected against unauthorised access.
or
dLAN pro network encryption using
dLAN AVpro manager computer software. More
information can be found in Chapter 3.5 dLAN
AVpro manager.
or
dLAN pro network encryption by entering the
dLAN password in the configuration interface.
More information can be found in Chapter 4 Network
configuration.
The dLAN password can be set in different ways:
d evol o dL AN pr o 1200+ WiFi ac/n
Page 27

27 Initial use
Fig. 10: dLAN pro 1200+ WiFi ac/n integration
devolo dLAN pro 1200+ WiFi ac/n
Integrating additional dLAN pro 1200+ WiFi ac/n
devices into a WiFi network
햶 Establish the WiFi connection with your laptop,
tablet or smartphone by entering the previously
noted WiFi key as the network security key.
To individually secure your WiFi network, configure the appropriate settings on the configuration interface of the
dLAN pro 1200+ WiFi ac. To do so, read
Chapters 3.5 dLAN AVpro manager and 4
Network configuration.
For detailed information about connecting
other devolo dLAN pro devices, visit
www.devolo.com/en/business-solutions
.
3.5 dLAN AVpro manager
The dLAN AVpro manager provides advanced dLAN
functions, such as:
쎲 Management software to support the user during
configuration and monitoring
쎲 Central administration interface
쎲 Real time monitoring of all the dLAN pro devices
in the network
Page 28

Initial use 28
쎲 Global or individual assignment of security set-
tings for databases and devices
쎲 MDU mode for master/slave networks and peer-
to-peer networks
쎲 VLAN configuration for subnet management
For detailed descriptions and information on
configuration of your dLAN pro network, please
consult the devolo dLAN AVpro manager manual at
www.devolo.com/en/business-solutions.
3.5.1 Software for Windows and Linux
The dLAN AVpro manager software is available at
www.devolo.com/en/business-solutions
have downloaded the installation file to your PC, start
it by double-clicking on it.
Then you will find the link to the configuration interface as well as the installed dLAN AVpro manager in
the program group Start All Programs devolo.
. After you
3.6 Remove dLAN pro 1200+ WiFi ac from the dLAN pro network
To remove a dLAN pro 1200+ WiFi ac device from an
existing network, press this device's encryption button
with the home icon for at least 10 seconds. The device will be assigned a new randomly generated password and will thus no longer be able to access the
network. To integrate the device into a different network, follow the steps described above, depending on
whether you are setting up a new network or adding
the device to an existing one.
d evol o dL AN pr o 1200+ WiFi ac/n
Page 29

29 Network configuration
4 Network configuration
The dLAN pro 1200+ WiFi ac/n can be accessed via
the device's IP address (encrypted access via https).
You can also access the dLAN pro 1200+ WiFi ac/n de-
vice interface using the network overview in Windows.
The host name of the dLAN pro 1200+ WiFi ac/n is
comprised of devolo-XXX;
XXX are the last three digits of the serial number.
The option Use this to accept network
settings from a DHCP server is enabled
for the dLAN pro 1200+ WiFi ac/n in
the factory defaults.
The IP address of the
dLAN pro 1200+ WiFi ac/n can be
found on your DHCP server.
You can find more information on
this topic online in the product download area at
쎲www.devolo.com/en/Business-Solutions/
Wi-Fi-Pro/dLAN-pro-1200+-WiFi-ac
or
쎲www.devolo.com/en/Business-Solutions/
Wi-Fi-Pro/dLAN-pro-1200+-WiFi-n
You can either manage the dLAN pro 1200+ WiFi ac/n
using the network management provided by the devolo connectivity center or adjust all of the settings using
the dLAN pro 1200+ WiFi ac/n device interface.
Choose your desired management variant the first time
you access the device. If you prefer to configure the device settings using the dLAN pro 1200+ WiFi ac/n interface, say no to forwarding at this point with Disable
devolo connectivity center network management.
devolo dLAN pro 1200+ WiFi ac/n
Page 30

Network configuration 30
Restoring the device configuration
To send an existing configuration file to be restored to
the dLAN pro 1200+ WiFi ac/n, select an appropriate
4.1 General information about the menu
All menu functions are described in the corresponding
interface as well as in the associated chapter in the
manual. The sequence of the description in the manual
follows the structure of the menu. The figures for the
device interface serve as examples.
file using the Browse… button and start the process
by clicking the Restore button.
So that the dLAN pro 1200+ WiFi ac/
n device interface described in this
chapter is displayed, the network
management in the connectivity
center must be disabled.
Logging in
Choose your desired management variant the first time
you access the device. If you prefer to configure the device settings using the dLAN pro 1200+ WiFi ac/n interface, say no to forwarding at this point with Disable
d evol o dL AN pr o 1200+ WiFi ac/n
Page 31

31 Network configuration
devolo connectivity center network management.
The web interface is not password protected. Assigning a login password is mandatory when logging in for
the first time to prevent unauthorised access by third
parties.
Enter your existing password each time you login again
and confirm by pressing Log in.
Logging out
Log out of the web interface by clicking Log
out.
Language selection
Select the desired language in the language
selection list.
The central areas of the web interface and their subcategories are listed on the left edge. Click the entry for
an area to move directly into it.
Making changes
As soon as a change is made, an asterisk (*) is displayed in the header of the corresponding menu page.
Required fields
Fields with a red border are required fields. This means
entries must be made in these fields to continue with
the configuration.
devolo dLAN pro 1200+ WiFi ac/n
Page 32

Network configuration 32
Help text blank fields
Fields that have not been filled in yet contain greyed
out help text, which indicates the required content for
the field. This help text disappears immediately once
content has been entered.
Default settings
Some fields contain default settings which ensure the
greatest amount of compatibility and ease of use. Default settings are identified with an * in drop-down
menus.
Default settings can of course be replaced with customised information.
Recommended settings
Some fields contain recommended settings for networks with a large number of users.
Settings intended to support a large number
of users limit the performance and the compatibility of the network.
Recommended settings can of course be replaced with
customised information.
Tables
You can make changes within a table by clicking the
corresponding table row. In edit mode, the corresponding table rows have a blue background.
Tables have a filter function to make them easier to
work with. The search function can be limited even further using special characters like ! or " ".
Invalid entries
Entry errors are either highlighted by a red border or error messages are shown.
Buttons
Click Save to save the settings for the respective web
interface area.
Click Back or use the Menu path above the buttons
to exit the respective web interface area.
Click the Recycle bin icon to delete an entry.
Click the Arrow icon to refresh a list.
4.2 Status
The Status area shows the status of the
dLAN pro 1200+ WiFi ac/n and the connected LAN,
dLAN and WiFi devices.
d evol o dL AN pr o 1200+ WiFi ac/n
Page 33

33 Network configuration
4.2.1 Status/Overview
System
You can see status information for your device here.
LAN
You can see status information for a cable-based network such as protocol information or the connection
speed of both Ethernet ports, etc. here.
dLAN
You can see status information for the dLAN network
here, including the type of encryption as well as connected devices.
devolo dLAN pro 1200+ WiFi ac/n
Page 34

Network configuration 34
WiFi
You can see status information for a wireless network
such as frequency channels in use, SSIDs in use and
connected WiFi devices here.
Only the dLAN pro 1200+ WiFi ac
supports operation in the 5 GHz frequency band.
d evol o dL AN pr o 1200+ WiFi ac/n
Page 35

35 Network configuration
4.2.2 Status/Events
You can see syslog entries of your
dLAN pro 1200+ WiFi ac/n here.
devolo dLAN pro 1200+ WiFi ac/n
You can search for specific entries using the Search
field.
Reorganise the list by category by clicking the column
header.
Refresh the list by clicking the Arrow icons. The list is
refreshed automatically in 10 second intervals.
4.2.3 Status/Licence
Licence information for this product can be found in
this area on the web surface.
Page 36

Network configuration 36
4.3 System
Make changes to the device settings in the System ar-
ea.
4.3.1 System/Status
You can see all status information for your device here.
d evol o dL AN pr o 1200+ WiFi ac/n
Page 37

37 Network configuration
4.3.2 System/Management
To ensure that the dLAN pro 1200+ WiFi ac/n can be
found quickly in your network, assign the device a
.
unique name and list the device location. You can also
specify a contact person available to be notified
devolo dLAN pro 1200+ WiFi ac/n
Page 38

Network configuration 38
Remote Syslog server
Switch the remote Syslog server on if you want to record the syslog entries (see 4.2.2 Status/Events) on
another server. To do so, enter the name or the IP address and the port number of the corresponding server.
In the public source field, enter, for example, as follows:
쎲 default: any terminal device can have access
For security reasons, only allow access from certain sources.
SNMP
Switch on the SNMP option if you'd like to allow
SNMP access. Enter the SNMP version, port number
as well as the desired entries for public community
and public source.
or
쎲 test128: only this terminal device can have
access
or
쎲 172.25.0.0/16: network address and bits
d evol o dL AN pr o 1200+ WiFi ac/n
Page 39

39 Network configuration
or
쎲 172.25.0.0/255.255.0.0: network address and
subnet mask
or
쎲 172.25.200.253/32: IP address and bits
Be aware that entering the IP address and subnet mask
(172.25.200.253/255.255.255.255)
do not work.
You can find the devolo connectivity center at
www.devolo-cc.com/en
You can enable and disable the connectivity center
functionality depending on how you'd like to manage
your device or upload an existing device configuration.
The connectivity center functionality is enabled by default.
.
connectivity center
The connectivity center is an administrative tool and
online portal for professional and centralised network
administration.
You can use this to handle the entire WiFi configuration for yourdLAN pro 1200+ WiFi ac/n as well as
manage the uniform configuration of multiple
dLAN pro 1200 WiFi and WiFi pro series devices from
a centralised location.
Be aware that the existing device
configuration can be lost through
enabling and disabling management
with the connectivity center and the
device will be subsequently reset to
factory settings.
The following apply after pairing with the connectivity
center:
devolo dLAN pro 1200+ WiFi ac/n
Page 40

Network configuration 40
쎲 The device's configuration interface can be
reached only using the device password assigned
in the connectivity center.
쎲 The configuration interface only shows status
information for IP and WiFi settings.
Select the desired time zone in the Time zone dropdown menu.
Select the desired time server or add a desired time
server using the plus icon and confirm the entry by
pressing the Save button in the Time server dropdown menu.
The dLAN pro network can be managed as
usual using the dLAN AVpro manager; see
chapter 4.5.2 dLAN pro network.
4.3.3 System/Time
A time server is a server on the Internet or in your network tasked with providing the exact time.
d evol o dL AN pr o 1200+ WiFi ac/n
Page 41

41 Network configuration
4.3.4 System/Button/LEDs
Here you can assign the settings for the device's LEDs
and buttons.
LED settings
You can choose between the standard, reduced and
off settings for each LED. Depending on the setting,
all possible or only certain flash and light statuses will
be shown.
The LED schema on the following page (see
Fig. 11) explains these statuses in detail.
Button settings
You can enable and disable the function of the buttons
by activating or deactivating the corresponding checkboxes.
devolo dLAN pro 1200+ WiFi ac/n
Page 42

Network configuration 42
Fig. 11: LED schema
d evol o dL AN pr o 1200+ WiFi ac/n
Page 43

43 Network configuration
4.3.5 System/Services
Here you can specify which protocols are used to access the dLAN pro 1200+ WiFi ac/n.
devolo dLAN pro 1200+ WiFi ac/n
mDNS
multicast DNS is used by Linux and MacOS in order to
access network-compatible devices.
Remote syslog
If you have enabled the remote syslog (see 4.3.2 System/Management), you can enter the remote syslog
server's IP port so that the dLAN pro 1200+ WiFi ac/n
can write log data to the server configured here.
SNMP
The simple network management protocol provides
central monitoring and control of network nodes (such
as routers, servers, switches, printers, computers).
SSDP
The simple service discovery protocol is a network protocol used for searching for UPnP devices in the network. Windows uses this protocol in order to display
the dLAN pro 1200+ WiFi ac/n in the network environment.
SSH
The SSH protocol allows console-based access to the
device (standard TCP port: 22).
Page 44

Network configuration 44
4.3.6 System/Configuration
You can save the current configuration as a file on your
computer here, restore it or reset to the factory defaults.
Saving the device configuration as a file
For backup purposes, all active configuration settings
can be transmitted to your computer, stored there as a
file and reloaded into the dLAN pro 1200+ WiFi ac/n.
This function can be useful for creating a variety of configurations that will let you quickly and easily set up the
device for use in different network environments.
To save the active configuration as a file on your computer, select the Save file option. Then enter a storage
location and name for the settings file.
Restoring the device configuration
To send an existing configuration file to be restored to
the dLAN pro 1200+ WiFi ac/n, select an appropriate
d evol o dL AN pr o 1200+ WiFi ac/n
file using the Select file… button and start the process by clicking the Restore button.
Page 45

45 Network configuration
Resetting the device configuration
With the reset button, the dLAN pro 1200+ WiFi ac/n
can be returned to the original factory defaults. Your
personal settings will be discarded during the reset.
4.3.7 System/Firmware
The firmware of the dLAN pro 1200+ WiFi ac/n
includes the software for operating the device. If
necessary, devolo offers new versions on the Internet
as a file download, for example to modify existing
functions.
햲 To update the firmware to the latest version, first
go to the devolo website, www.devolo.com/en/
business-solutions, and download the
appropriate file for the dLAN pro 1200+ WiFi ac/n
to your computer.
햳 Click Select file… and select the downloaded
file.
햴 Then start the update procedure with the Update
Firmware button. After a successful update, the
dLAN pro 1200+ WiFi ac/n restarts automatically.
Ensure that the update procedure is
not interrupted. This is best done by
connecting your computer to the
dLAN pro 1200+ WiFi ac/n over a
LAN and not over WiFi.
4.3.8 System/Reboot
Here, the device can be restarted and/or reset to the
factory defaults.
devolo dLAN pro 1200+ WiFi ac/n
The device is restarted by clicking the Restart button.
Page 46

Network configuration 46
Enable the Reset device to factory defaults option
and confirm by pressing Restart if you want to set the
device back to the factory defaults. Keep in mind that
all settings that have already been configured will be
lost!
4.3.9 System/Change password
You can change the login password for accessing the
web interface.
To do so, enter the current password and then enter
the desired new password twice.
d evol o dL AN pr o 1200+ WiFi ac/n
Page 47

47 Network configuration
4.4 LAN
Change the settings for the wired network in the LAN
area.
4.4.1 LAN/Status
You can see the status of your LAN here.
devolo dLAN pro 1200+ WiFi ac/n
Page 48

Network configuration 48
4.4.2 LAN/IP configuration
As a component of your network, the
dLAN pro 1200+ WiFi ac/n also communicates via the
TCP/IP protocol. The IP address required for this can either be entered manually as a static address or obtained automatically from a DHCP server.
The option Get IP configuration from a DHCP
server is enabled in the factory defaults. The currently
assigned network data are hidden.
If a DHCP server is already present in the network for
giving out IP addresses, have the option Get IP con-
figuration from a DHCP server enabled so that the
dLAN pro 1200+ WiFi ac/n automatically receives an
address from it.
You can also assign a static IP address by specifying entries under Address, Subnet mask, Standard gate-
way and Name server. If the
dLAN pro 1200+ WiFi ac/n is to act as the DHCP server, activate the option Act as DHCP server.
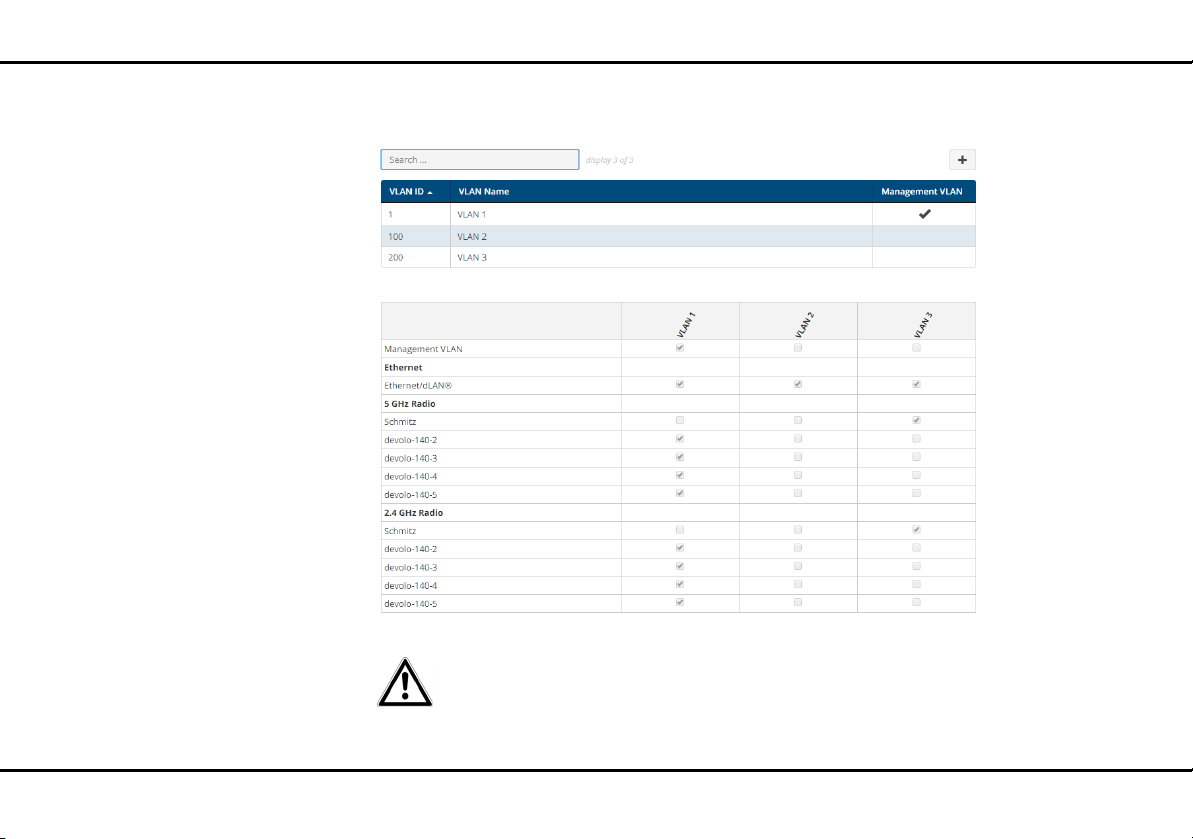
4.4.3 LAN/VLANs
The VLAN configuration of the LAN
ports is intended for future use.
You can configure VLANs on the device. To add a
VLAN, click on the plus symbol. Then, select whether
it is a Management VLAN or if the VLAN is to be con-
figured untagged.
d evol o dL AN pr o 1200+ WiFi ac/n
Page 49

49 Network configuration
devolo dLAN pro 1200+ WiFi ac/n
Creating a VLAN
The factory defaults do not have VLAN configured. You
can create VLANs by clicking the Plus icon. In doing
so, a VLAN (VLAN 1 to VLAN 16) has to be selected and
a VLAN ID (1 to 4094) assigned. When creating VLANs,
already assigned VLAN IDs cannot be assigned a second time.
When configuring the VLANs and the
VLAN port settings, the web interface of the dLAN pro 1200+ WiFi ac/
n should remain accessible, i.e. configurable. If you can no longer access
the dLAN pro 1200+ WiFi ac/n despite this, reset the device back to
factory defaults (see chapter 3.3.4
Reset).
Page 50

Network configuration 50
You can display details about the VLANs to be created
using the Search field.
Deleting a VLAN
To delete a VLAN, first select it by clicking the corresponding table row and confirm by pressing Delete
(recycle bin icon).
For detailed information about this, refer to
the online FAQs on our website www.devo-
lo.com/business-solutions.
The behaviour of the ports is configured using the untagged option. If the untagged option is not selected, outgoing frames from this port are sent as
tagged.
If the untagged option is selected, outgoing
frames from this port are sent as untagged.
The untagged option can be selected for one VLAN
port at maximum.
Incoming untagged frames are marked with VLAN
port that is set to untagged.
If no VLAN port is set to untagged and at least one
VLAN is created, incoming untagged frames are
discarded.
d evol o dL AN pr o 1200+ WiFi ac/n
Page 51

51 Network configuration
4.5 dLAN
Make all changes to your dLAN network in the dLAN
pro area.
4.5.1 Status
You can see the current status of your dLAN pro network configuration here. The connected dLAN devices
.
are displayed with detailed basic information such as
the MAC address, local or network connectivity, functionality as a centralised coordinator and the transmission rates. You can search for specific devices using the
search function.
devolo dLAN pro 1200+ WiFi ac/n
Page 52

Network configuration 52
4.5.2 dLAN pro network
In a dLAN pro network, all connected components
must use the same password. The dLAN password can
be defined with help from dLAN AVpro manager,
via the dLAN encryption button (see chapter 3.4
Connecting the dLAN pro 1200+ WiFi ac/n) or at
this point.
If the dLAN password is set with help from
dLAN AVpro manager or via the dLAN encryption
button, you can disregard the dLAN setting here.
d evol o dL AN pr o 1200+ WiFi ac/n
Page 53

53 Network configuration
We recommend that you always
choose the same dLAN password assignment procedure within a single
dLAN pro network.
For example, if you encrypted your
dLAN pro network with help from
dLAN AVpro manager before, then
add this device to the network in the
same way.
Add device
If you would like to manually add a new dLAN pro device, provide its security ID and confirm with Save/En-
crypt.
If a new device is added with the help of
dLAN AVpro manager (see 3.5 dLAN AVpro manager), you can disregard the dLAN pro setting here.
For detailed descriptions and information on
configuration of your dLAN pro network please
consult the devolo dLAN AVpro manager manual at
www.devolo.com/en/business-solutions.
dLAN network mode
There are two logical operating modes for dLANs.
dLANs are set up in peer-to-peer operating mode by
default. Alternatively, there is also the MDU operating
mode, which you can configure with dLAN AVpro manager.
쎲 In the dLAN peer-to-peer [P2P] operating
mode, every dLAN device on the dLAN can communicate with every other dLAN device on the
same dLAN directly. Within a P2P network, all
dLAN devices are equal to each another in the
hierarchy. In order to coordinate the communication between the individual end points of the network, the dLAN devices in the P2P network
automatically determine the dLAN device which is
easiest for all devices in this same dLAN network
to reach. This device takes on the role of the Cen-
tral Coordinator [CCo], which ensures efficient
communication between the individual end points
[peers] in the P2P network.
devolo dLAN pro 1200+ WiFi ac/n
Page 54

Network configuration 54
The standard auto mode in
dLAN AVpro manager should only be
changed by experts.
쎲 In the dLAN operating mode known as "Multiple
Dwelling Unit" [MDU], one or more dLAN devices
are assigned as 'slaves' to a single dLAN device as
'master', and together they form a shared, logical
network segment. Each of these MDU dLAN segments always contains exactly one master and 1
to 63 slaves which are assigned to the master. In
MDU operating mode, direct data communication
is only between the slave and its master ["peer
isolation"], and never from slave to slave.
d evol o dL AN pr o 1200+ WiFi ac/n
Page 55

55 Network configuration
4.6 WiFi
Make all changes to your wireless network in the WiFi
area.
4.6.1 WiFi/Status
You can see the current status of your WiFi network
configuration here. In addition to the connected WiFi
stations with detailed basic information, such as the
MAC address, the selected frequency band, the SSID,
the transfer rates and the connection duration, information about whether you have configured a bridge or
a RADIUS server is displayed. Additionally, you can see
the newly added SSIDs with possible VLAN configurations. You can display details about the respective frequency band using the search function.
devolo dLAN pro 1200+ WiFi ac/n
Page 56

Network configuration 56
4.6.2 WiFi/2.4 GHz radio
Here, carry out all necessary settings for the frequency
band of 2.4 GHz.
Switching the WiFi on or off
If you would like, you can switch off this WiFi part of
your dLAN pro 1200+ WiFi ac/n completely. To do so,
disable the Enable option and confirm your entry by
pressing Save.
Keep in mind that after saving this
setting, you will be disconnected
from any existing wireless connection to the dLAN pro 1200+ WiFi ac/
n. In this case, configure the device
over Ethernet.
d evol o dL AN pr o 1200+ WiFi ac/n
Page 57

57 Network configuration
Mode
In the Mode field, select the desired WiFi communication standard.
Channel
There are 13 channels available in the 2.4 GHz frequency band. The channels recommended for Europe
are channels 1, 6 and 11. This ensures the frequency
bands of the channels do not overlap and any connection problems are avoided.
The channel selection default setting is Automatic.
The dLAN pro 1200+ WiFi ac/n regularly and automatically executes the channel selection in this setting. In
other words, if the last connected station logs out, a
search for a suitable channel is carried out immediately. If no stations are connected, the device automatically selects a channel every 15 minutes.
Channel width
Optimal use of the available frequency band requires
selecting the appropriate channel width.
Max. transmitting power
In this section, you can adjust the WiFi transmission
level to your needs. I.e. if you require a large range, se-
lect High....
Data rates
Only change the preconfigured data rates if
you understand the concept behind them.
Setting the radio data rates entails selecting the data
rates used by the WiFi access point for transmission.
The WiFi access point sends all packets with the largest
possible basic rate. If the distance between the WiFi
access point and the WiFi stations is too large for this
data rate or faults and interference occur, packets are
sent with the next smallest basic rate. At least one basic rate must be selected. Unicast packets can also be
sent with the supported data rates which are not basic
rates.
You can optimise the WiFi access point either for maximum range or for the best performance by varying the
data rates. The maximum range is achieved when the
basic rate is set only to 1 Mbps, all data rates, however, are supported.
If a WiFi station only supports 802.11b, no basic rates
outside of 1; 2; 5.5 or 11 Mbps (default) can be used.
For optimisation to ensure the best performance, it
makes more sense to exclude all 802.11b clients (CCK
modulation) by having the 1, 2, 5.5 or 11 Mbps rates
both as not supported as well as not selected as basic
rates.
devolo dLAN pro 1200+ WiFi ac/n
Page 58

Network configuration 58
You should select multiple data rates as basic rates,
e.g. 6, 12 or 24 Mbps (recommended) so that multicast
packets are sent at 24 Mbps, if possible.
Furthermore, the smallest selected basic rate is used
for emitting the SSID (beacon). The larger this rate is,
the more efficient the WiFi is being used. Note that this
can reduce the maximum range.
d evol o dL AN pr o 1200+ WiFi ac/n
Page 59

59 Network configuration
4.6.3 WiFi/5 GHz radio
Here, make all necessary settings for the frequency
band of 5 GHz.
Only the dLAN pro 1200+ WiFi ac
supports operation in the 5 GHz frequency band.
devolo dLAN pro 1200+ WiFi ac/n
Switching the WiFi on or off
If you would like, you can switch off this WiFi part of
your dLAN pro 1200+ WiFi ac/n completely. To do so,
disable the Enable option and confirm your entry by
pressing Save.
Page 60

Network configuration 60
Keep in mind that after saving this
setting, you will be disconnected
from any existing wireless connection to the dLAN pro 1200+ WiFi ac/
n. In this case, configure the device
over Ethernet.
It is worth noting that connected devices also have to
support the increased frequency band of 5 GHz. From
channel 52 onward you go into the radar range. When
accessing the device for the first time, a radar detection
phase (DFS) starts automatically, during which time the
dLAN pro 1200+ WiFi ac/n cannot be accessed via
WiFi.
Mode
In the Mode field, select the desired WiFi communication standard.
Channel
There are 11 channels available in the 5 GHz frequency
band. The recommended channel selection default setting is Automatic. The dLAN pro 1200+ WiFi ac/n
regularly and automatically executes the channel selection in this setting. In other words, if the last connected station logs out, a search for a suitable channel
is carried out immediately. If no stations are connected, the device automatically selects a channel every 15
minutes.
Channel width
Optimal use of the available frequency band requires
selecting the appropriate channel width.
Max. transmitting power
In this section, you can adjust the WiFi transmission
level to your needs. I.e. if you require a large range, se-
lect High....
Data rates
Only change the preconfigured data rates if
you understand the concept behind them.
Setting the radio data rates entails selecting the data
rates used by the WiFi access point for transmission.
The WiFi access point sends all packets with the largest
possible basic rate. If the distance between the WiFi
access point and the WiFi stations is too large for this
data rate or faults and interference occur, packets are
sent with the next smallest basic rate. At least one basic rate must be selected. Unicast packets can also be
sent with the supported data rates which are not basic
rates.
You can optimise the WiFi access point either for maximum range or for the best performance by varying the
data rates. The maximum range is achieved when the
basic rate is set only to 1 Mbps, all data rates, however, are supported.
d evol o dL AN pr o 1200+ WiFi ac/n
Page 61

61 Network configuration
You should select multiple data rates as basic rates,
e.g. 6, 12 or 24 Mbps (recommended) so that multicast
packets are sent at 24 Mbps, if possible.
Furthermore, the smallest selected basic rate is used
for emitting the SSID (beacon). The larger this rate is,
the more efficient the WiFi is being used. Note that this
can reduce the maximum range.
Click the table row of the respective WiFi access point
to reach its settings.
Enable
Here you can switch the SSID on/off.
SSID
The SSID specifies the name of your wireless network.
You can see this name when logging onto the WiFi, allowing you to identify the correct subnet. By default,
4.6.4 WiFi/SSIDs
The dLAN pro 1200+ WiFi ac supports up to 8 WiFi
access points (multi-SSID), each with two frequency
bands of 2.4 GHz and 5 GHz, i.e. you can use the
dLAN pro 1200+ WiFi ac to operate up to 16 WiFi
networks.
The dLAN pro 1200+ WiFi n supports up to 8 WiFi
access points with the frequency band of 2.4 GHz.
the SSID (e.g. devolo-123) consists of devolo and the
last three digits of the serial number.
devolo dLAN pro 1200+ WiFi ac/n
Page 62

Network configuration 62
Fig. 12: Label
Radio
Here you can assign one frequency band or both frequency bands to the SSID.
Only the dLAN pro 1200+ WiFi ac
supports operation in the 5 GHz frequency band.
Security
The WPA2 Personal (WiFi Protected Access) security standard is available for securing data transmission
in your wireless network. This method allows for individualised keys consisting of letters and numbers
and the depicted special characters with a
If you enable the Show SSID option, your wireless network name becomes visible. If this option is disabled,
potential network users must know the exact SSID and
enter it manually to be able to set up a connection.
A change to the SSID can interfere
with all existing connections for a
short time.
length of up to 63 characters. You can simply enter
them into the Key field via the keyboard.
In addition, the dLAN pro 1200+ WiFi ac/n also supports the WPA/WPA2 Enterprise Mode encryption
key. As a central authentication and accounting server,
a RADIUS server handles the registration and management of user information for multiple WiFi access
points.
Some WiFi stations have difficulty connecting
to these types of hidden wireless networks. If
the connection to a hidden SSID poses problems, first try to set up the connection with a
Default VLAN
If you have configured one or more VLANs, you can assign the SSID to a VLAN.
visible SSID and only then try to hide it.
d evol o dL AN pr o 1200+ WiFi ac/n
Page 63

63 Network configuration
Fig. 13: Peer-to-peer isolation
You can find more information on the topic
VLAN in chapters, 2.2.3 Static VLAN 2.2.4
Dynamic VLAN and 4.4.3 LAN/VLANs.
Communication between WiFi stations prohibited
Depending upon the application scenario, security
considerations may mean that it is to be forbidden for
all devices to exchange data freely with each other. For
this purpose, this option can be enabled, which implements true peer-to-peer isolation. All WiFi devices configured as a station are not able to exchange any data
with each other, only with the
dLAN pro 1200+ WiFi ac/n.
This option is disabled in the factory
defaults, i.e. all WiFi stations present
in the network can freely exchange
data with each other (peer-to-peer
mode).
devolo dLAN pro 1200+ WiFi ac/n
Page 64

Network configuration 64
4.6.5 WiFi/Bridge
The WiFi bridge function enables wireless connection
to a remote WiFi access point.
Enable
Here you can switch the bridge mode on or off.
Radio
Here you can assign a frequency band to the bridge.
Only the dLAN pro 1200+ WiFi ac
supports operation in the 5 GHz frequency band.
WDS (Wireless Distribution System) is a process for
data addressing in accordance with the IEEE 802.11
standard.
SSID
You can enter the SSID of the other WiFi access point
here.
Security
Here you can select the encryption methods used (the
target SSID) and then enter the corresponding security
key.
d evol o dL AN pr o 1200+ WiFi ac/n
Page 65

65 Network configuration
4.6.6 WiFi/RADIUS
As a central authentication and accounting server, a
RADIUS server handles the registration and
management of user information for multiple WiFi
access points.
Designate the respective server using its IPv4 address
and enter the port number and server-side NAS key.
devolo dLAN pro 1200+ WiFi ac/n
Page 66

Appendix 66
Fig. 14: Label
5 Appendix
5.1 Basic information
5.1.1 MAC adresse
The MAC address designates the hardware interface of
each individual network device uniquely (e.g. the WiFiWiFi card of a computer or the Ethernet port of a printer). It consists of six double-digit hexadecimal
numbers, each separated by a colon (e.g.
00:0B:3B:37:9D:C4). In general, the MAC address is
on the housing of the device.
mand prompt under Start All Programs
Accessories Command Prompt. Enter the command IPCONFIG /ALL here. The MAC address is displayed under the designation Physical address.
5.1.2 What exactly is dLAN?
dLAN (direct Local Area Network) uses the household
power grid to transfer data between computers
equipped with suitable adapters and other network
components. As a result, any power outlet can be used
as a network access point. The data is modulated prior
to transfer and sent as a signal via household power
lines. State-of-the-art technology ensures that the
power and data networks do not interfere with one another. Networking via dLAN is fast and secure. The
data is encrypted using a key (128-bit-AES encryption)
to prevent interception by third parties.
5.1.3 What is VLAN?
A VLAN (Virtual Local Area Network, IEEE 802.1Q) is
a logical, self-enclosed, local network – unlike a physical (switched) network. VLANs divide physical networks into multiple logical, independent networks.
They optimise data distribution and make it easier to
set up network architecture that is more secure and ar-
You can easily determine the MAC address of a Windows computer by opening the window with the com-
d evol o dL AN pr o 1200+ WiFi ac/n
ranged more clearly.
Page 67

67 Appendix
Using VLANs prevents the need for complicated physical wiring. This gives you greater spatial flexibility and
saves you having to purchase multiple costly individual
devices (e.g. routers, switches).
Different criteria can be used for mapping to VLANs,
such as port assignments or addresses. The
dLAN pro 1200+ WiFi ac/n allows VLANs to be
mapped by port and/or access point. Other mapping
methods by third-party devices using "VLAN tags" are
also supported. In addition, it is possible to prioritise
data traffic in the VLAN configuration.
5.1.4 What is WLAN (WiFi)?
WLAN (Wireless Local Area Network) refers to the use
of radio technology to network computers and other
devices. While it is possible to wirelessly connect computers in pairs (peer-to-peer, p2p), a central access
point is required to set up a network of multiple devices. Such access points are frequently combined in a
single device with modems for Internet access and
routers to manage network traffic.
The wireless network established by an access point
using a specific channel and name (SSID) has a limited
range. The range of the access point, which is also
known as a "radio cell", is impeded by building walls.
In some cases, stable connections are often only possible between WLAN devices within a single room.
As it is not possible to rely on hardware such as network cables (in a LAN) or household wiring (in a dLAN)
to control access to a WLAN, wireless networking naturally presents special security challenges. WLANs
therefore use a number of security measures, such as a
concealed network name (SSID), data encryption and
access control via the MAC addresses of the network
stations.
devolo dLAN pro 1200+ WiFi ac/n
Page 68

Appendix 68
Fig. 15
5.2 Bandwidth optimization
To significantly improve the transmission capacity of
the network, we recommend that you comply with the
following "connection rules":
쎲 Plug the device directly into a wall socket. Avoid
multiple sockets.
쎲 You should connect all additional devices that are
connected to a multiple socket to the mains
power supply via the electrical socket integrated
into the dLAN pro 1200+ WiFi ac/n.
d evol o dL AN pr o 1200+ WiFi ac/n
Page 69

69 Appendix
5.3 Disposal of old devices
To be used in the countries of the European Union and
other European countries with a separate collecting system:
The icon with crossed-out wastebasket on
the device means that this product is an
electrical or electronic device that falls
within the scope of application of the
European Community WEEE Directive.
These types of devices may no longer be
disposed of with household waste. Rather
they can be given to a municipal collection
point free of charge. Contact your
municipal government to find out the
address and hours of the nearest collection
point.
5.4 Warranty conditions
The devolo AG warranty is given to purchasers of devolo products in
addition to the warranty conditions provided by law and in accordance with the following conditions:
1 Warranty coverage
a) The warranty covers the equipment delivered and all its parts.
Parts will, at devolo's sole discretion, be replaced or repaired
free of charge if, despite proven proper handling and adherence to the operating instructions, these parts became defective due to fabrication and/or material defects. Alternatively,
devolo reserves the right to replace the defective product with
a comparable product with the same specifications and features. Operating manuals and possibly supplied software are
excluded from the warranty.
b) Material and service charges shall be covered by devolo, but
not shipping and handling costs involved in transport from the
buyer to the service station and/or to devolo.
c) Replaced parts become property of devolo.
d) devolo is authorized to carry out technical changes (e.g. firm-
ware updates) beyond repair and replacement of defective
parts in order to bring the equipment up to the current technical state. This does not result in any additional charge for the
customer. A legal claim to this service does not exist.
2Warranty period
The warranty period for this devolo product is three years. This
period begins at the day of delivery from the devolo dealer. Warranty services carried out by devolo do not result in an extension of
the warranty period nor do they initiate a new warranty period. The
warranty period for installed replacement parts ends with the warranty period of the device as a whole.
devolo dLAN pro 1200+ WiFi ac/n
Page 70

Appendix 70
3Warranty procedure
a) If defects appear during the warranty period, the warranty
claims must be made immediately, at the latest within a period
of 7 days.
b) In the case of any externally visible damage arising from trans-
port (e.g. damage to the housing), the person carrying out the
transportation and the sender should be informed immediately. On discovery of damage which is not externally visible,
the transport company and the sender are to be immediately
informed in writing, at the latest within 3 days of delivery.
c) Transport to and from the location where the warranty claim is
accepted and/or the repaired device is exchanged, is at the
purchaser's own risk and cost.
d) Warranty claims are only valid if a copy of the original
purchase receipt is returned with the device. devolo reserves
the right to require the submission of the original purchase
receipt.
4 Suspension of the warranty
All warranty claims will be deemed invalid
a) if the label with the serial number has been removed from the
device,
b) if the device is damaged or destroyed as a result of acts of
nature or by environmental influences (moisture, electric
shock, dust, etc.),
c) if the device was stored or operated under conditions not in
compliance with the technical specifications,
d) if the damage occurred due to incorrect handling, especially to
non-observance of the system description and the operating
instructions,
e) if the device was opened, repaired or modified by persons not
contracted by devolo,
f) if the device shows any kind of mechanical damage, or
g) if the warranty claim has not been reported in accordance with
3a) or 3b).
5Operating mistakes
If it becomes apparent that the reported malfunction of the device
has been caused by unsuitable hardware, software, installation or
operation, devolo reserves the right to charge the purchaser for the
resulting testing costs.
6 Additional regulations
The above conditions define the complete scope of devolo's legal
liability.
a) The warranty gives no entitlement to additional claims, such as
any refund in full or in part. Compensation claims, regardless
of the legal basis, are excluded. This does not apply if e.g.
injury to persons or damage to private property are specifically
covered by the product liability law, or in cases of intentional
act or culpable negligence.
b) Claims for compensation of lost profits, indirect or consequen-
tial detriments, are excluded.
c) devolo is not liable for lost data or retrieval of lost data in
cases of slight and ordinary negligence.
d) In the case that the intentional or culpable negligence of
devolo employees has caused a loss of data, devolo will be
liable for those costs typical to the recovery of data where periodic security data back-ups have been made.
e) The warranty is valid only for the first purchaser and is not
transferable.
f) The court of jurisdiction is located in Aachen, Germany in the
case that the purchaser is a merchant. If the purchaser does
not have a court of jurisdiction in the Federal Republic of Germany or if he moves his domicile out of Germany after conclusion of the contract, devolo's court of jurisdiction applies. This
is also applicable if the purchaser's domicile is not known at
the time of institution of proceedings.
g) The law of the Federal Republic of Germany is applicable. The
UN commercial law does not apply to dealings between devolo
and the purchaser.
d evol o dL AN pr o 1200+ WiFi ac/n
Page 71

Index
A
Authentication and accounting server 62, 65
B
Buttons 41
C
CE declaration 8
connectivity center 39
D
Default VLAN 19, 62
Default WiFi key 22
Device interface 29
DHCP server 48
Disposal of old devices 69
dLAN encryption 52
dLAN password 52
Dynamic VLAN 19
E
Ethernet ports 23
F
Frequency band of 2.4 GHz 56
Frequency band of 5 GHz 59
I
Indicator light (LED) 41
Integrated electrical socket 23
IPv4 address 48, 65
L
LED 21
Login password 31, 46
M
MAC address 66
Management VLAN 15
N
Network jacks 23
Network management 29
P
Package contents 20
Peer-to-peer isolation 63
R
RADIUS server 16, 19, 65
Remote Syslog server 38
Reset 23
Restart 45
S
Safety notes 10
SNMP 38
devolo dLAN pro 1200+ WiFi ac/n
Page 72

SSID 19, 61
Static VLAN 15
System requirements 20
T
Time server 16, 40
U
Updating firmware 45
V
VLAN 48
VLAN ID 49
W
Warranty 69
WDS bridge 15, 64
WiFi access point 13
WiFi antenna 23
WiFi key 22
Wireless bridging 15
WPA/WPA2 Enterprise Mode 62
devol o dLAN pro 1200+ WiFi ac/n
 Loading...