

Page 1
dLAN
®
pro 1200+
Page 2

devolo dLAN® pro 1200+
Page 3

© 2015 devolo AG Aachen (Germany)
While the information in this manual has been compiled with great care, it may not be deemed an assurance of product characteristics. devolo shall be liable only
to the degree specified in the terms of sale and delivery.
The reproduction and distribution of the documentation and software supplied with this product and the use of its contents is subject to written authorization from
devolo. We reserve the right to make any alterations that arise as the result of technical development.
Trademarks
®
HomePlug
Linux
Windows
devolo, dLAN
is a registered trademark of HomePlug Powerline Alliance.
®
is a registered trademark of Linus Torvalds.
®
and Microsoft® are registered trademarks of Microsoft, Corp.
®
, Vianect® and the devolo logo are registered trademarks of devolo AG.
All other names mentioned may be trademarks or registered trademarks of their respective owners. Subject to change without notice. No liability for technical errors
or omissions.
devolo AG
Charlottenburger Allee 60
52068 Aachen
Germany
www.devolo.com
Aachen, March 2015
Page 4

Contents
Contents
1 Preface . . . . . . . . . . . . . . . . . . . . . . . . . . . . . . . . . . . . . . . . . . . . . . . . . . . . . . . . . . . . . . . . . . . . 5
1.1 About this manual . . . . . . . . . . . . . . . . . . . . . . . . . . . . . . . . . . . . . . . . . . . . . . . . . . . . . . .5
1.1.1 Intended use . . . . . . . . . . . . . . . . . . . . . . . . . . . . . . . . . . . . . . . . . . . . . . . . . . . .6
1.1.2 CE conformity . . . . . . . . . . . . . . . . . . . . . . . . . . . . . . . . . . . . . . . . . . . . . . . . . . . 6
1.1.3 Safety notes . . . . . . . . . . . . . . . . . . . . . . . . . . . . . . . . . . . . . . . . . . . . . . . . . . . . 6
1.2 devolo on the Internet . . . . . . . . . . . . . . . . . . . . . . . . . . . . . . . . . . . . . . . . . . . . . . . . . . . .7
2 Introduction . . . . . . . . . . . . . . . . . . . . . . . . . . . . . . . . . . . . . . . . . . . . . . . . . . . . . . . . . . . . . . . . . 9
2.1 What exactly is dLAN? . . . . . . . . . . . . . . . . . . . . . . . . . . . . . . . . . . . . . . . . . . . . . . . . . . . 10
2.2 devolo—Up to speed on green IT . . . . . . . . . . . . . . . . . . . . . . . . . . . . . . . . . . . . . . . . . .10
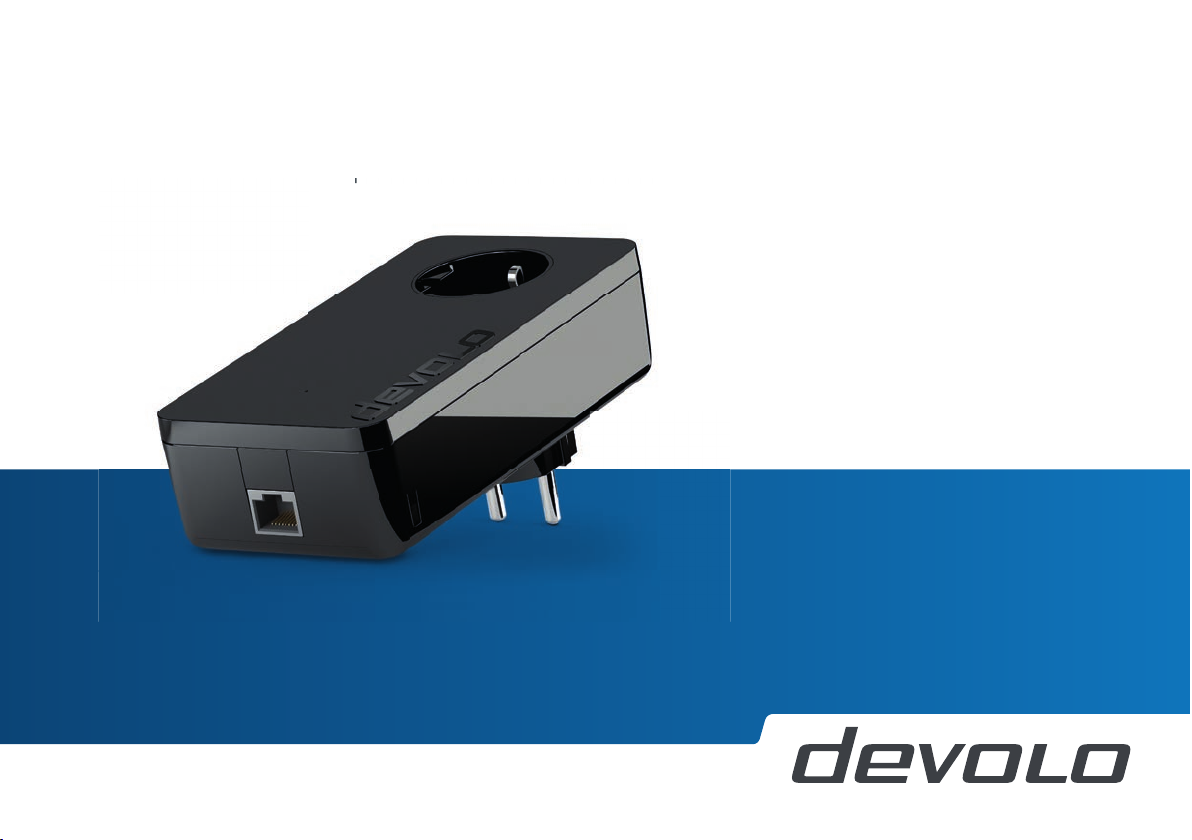
2.3 The dLAN pro 1200+ . . . . . . . . . . . . . . . . . . . . . . . . . . . . . . . . . . . . . . . . . . . . . . . . . . . . 11
2.4 All about the network . . . . . . . . . . . . . . . . . . . . . . . . . . . . . . . . . . . . . . . . . . . . . . . . . . . 12
2.4.1 Internet standalone solution . . . . . . . . . . . . . . . . . . . . . . . . . . . . . . . . . . . . . . . 12
2.4.2 dLAN Peer-to-Peer . . . . . . . . . . . . . . . . . . . . . . . . . . . . . . . . . . . . . . . . . . . . . . 13
2.4.3 dLAN MDU . . . . . . . . . . . . . . . . . . . . . . . . . . . . . . . . . . . . . . . . . . . . . . . . . . . . 14
3 Installation . . . . . . . . . . . . . . . . . . . . . . . . . . . . . . . . . . . . . . . . . . . . . . . . . . . . . . . . . . . . . . . . .15
3.1 Package contents . . . . . . . . . . . . . . . . . . . . . . . . . . . . . . . . . . . . . . . . . . . . . . . . . . . . . . .15
3.2 System requirements . . . . . . . . . . . . . . . . . . . . . . . . . . . . . . . . . . . . . . . . . . . . . . . . . . . . 15
3.3 Functions . . . . . . . . . . . . . . . . . . . . . . . . . . . . . . . . . . . . . . . . . . . . . . . . . . . . . . . . . . . . . 16
3.3.1 Monitoring light . . . . . . . . . . . . . . . . . . . . . . . . . . . . . . . . . . . . . . . . . . . . . . . .16
3.3.2 Network connection . . . . . . . . . . . . . . . . . . . . . . . . . . . . . . . . . . . . . . . . . . . . . 16
3.3.3 Encryption button . . . . . . . . . . . . . . . . . . . . . . . . . . . . . . . . . . . . . . . . . . . . . . . 16
3.3.4 Integrated electrical socket . . . . . . . . . . . . . . . . . . . . . . . . . . . . . . . . . . . . . . . . 17
3.3.5 Standby mode . . . . . . . . . . . . . . . . . . . . . . . . . . . . . . . . . . . . . . . . . . . . . . . . . .17
3.4 Connecting the dLAN pro 1200+ . . . . . . . . . . . . . . . . . . . . . . . . . . . . . . . . . . . . . . . . . . . 17
3.5 Software installation . . . . . . . . . . . . . . . . . . . . . . . . . . . . . . . . . . . . . . . . . . . . . . . . . . . .18
3.5.1 Software for Windows . . . . . . . . . . . . . . . . . . . . . . . . . . . . . . . . . . . . . . . . . . . . 18
devolo dLAN pro 1200+
Page 5

Contents
4 dLAN pro network . . . . . . . . . . . . . . . . . . . . . . . . . . . . . . . . . . . . . . . . . . . . . . . . . . . . . . . . . . .19
4.1 Security in the dLAN . . . . . . . . . . . . . . . . . . . . . . . . . . . . . . . . . . . . . . . . . . . . . . . . . . . .19
4.2 dLAN pro network encryption at the touch of a button . . . . . . . . . . . . . . . . . . . . . . . . . .19
4.3 dLAN AVpro manager for Windows . . . . . . . . . . . . . . . . . . . . . . . . . . . . . . . . . . . . . . . . . 23
5 Appendix . . . . . . . . . . . . . . . . . . . . . . . . . . . . . . . . . . . . . . . . . . . . . . . . . . . . . . . . . . . . . . . . . . 25
5.1 Bandwidth optimization . . . . . . . . . . . . . . . . . . . . . . . . . . . . . . . . . . . . . . . . . . . . . . . . . . 25
5.2 Disposal of old devices . . . . . . . . . . . . . . . . . . . . . . . . . . . . . . . . . . . . . . . . . . . . . . . . . . .25
5.3 Warranty conditions . . . . . . . . . . . . . . . . . . . . . . . . . . . . . . . . . . . . . . . . . . . . . . . . . . . . .26
devolo dLAN pro 1200+
Page 6
Preface 5
1Preface
Thank you for placing your trust in this product.
devolo dLAN business solutions are a favourably
priced option for using the power grid infrastructure
in a building to establish a broadband IP network.
The advantage this brings is obvious: no new cables
have to be laid – expenditure and costs remain low.
dLAN can be used as an easily scalable, primary network as well as to supplement an existing infrastructure.
The dLAN pro 1200+ allows you to set up your own
home network with almost no effort. Because the
clever dLAN technology transmits the data over the
electrical wiring, you do not have to lay any new cables.
1.1 About this manual
Carefully read all instructions before setting up the device and store the manual and/or installation guide for
later reference.
After a brief introduction to "dLAN" and "Green IT"
basics and a presentation of the dLAN pro 1200+ in
Chapter 2, Chapter 3 will cover successfully setting
up your dLAN pro 1200+. Chapter 4 explains how to
configure your dLAN pro network. Tips for bandwidth
optimization, information of environmental compatibility of the device and our warranty conditions can be
found in Chapter 5 and conclude the manual.
You can find the technical data for the
dLAN pro 1200+ in the product information sheet on
the enclosed product CD.
Description of the symbols
Here we briefly describe the meaning of the symbols
used in this manual.
Very important note. Failure to observe this note may result in damage.
Important note that should be observed.
Additional information, background material and configuration tips for your device.
devolo dLAN pro 1200+
Page 7
6 Preface
1.1.1 Intended use
Use the adapter as described in these instructions to
prevent damage and injuries.
1.1.2 CE conformity
This product complies with the technical requirements
of the EMC directive 2004/108/EC and the other relevant provisions of the FTEG.
This product is designed for use in
the EU, Switzerland and Norway.
The product is class B equipment.
You can find the CE declaration of this product on the
enclosed product CD and/or under www.devolo.com
1.1.3 Safety notes
It is essential to have read and understood all safety
and operating instructions before the devolo device is
used for the first time; keep them safe for future reference.
DANGER due to electricity
Users should never open devolo devices. Opening
the device poses a risk of electric shock!
Users do not need to carry out any maintenance on devolo devices. In the event of damage, disconnect the
devolo device from the mains supply by pulling it or its
plug out of the power outlet. Then contact qualified
specialist personnel (after-sales service) exclusively.
Damage is deemed to have occurred, for example,
쎲 if the power cable or plug is damaged
쎲 if the devolo device has been showered with
liquid (e.g. rain or water).
쎲 if the devolo device is inoperable.
쎲 if the housing of the devolo device is damaged.
devolo devices may only be operated using a mains
power supply, as described on the nameplate.
.
To disconnect devolo devices from the mains supply,
pull the device itself or its mains plug from the power
outlet. The power outlet and all connected net-
work devices should be easily accessible so that
you can pull the mains plug quickly if needed.
devolo devices are designed for indoor use only.
Only use devolo devices at a dry location.
Disconnect devolo devices from the mains supply to clean! Avoid solvent cleaning agents since they
can cause damage to the housing. Only use a dry towel
for cleaning.
devolo dLAN pro 1200+
Page 8
Preface 7
DANGER due to overheating
Batteries should never be exposed to large amounts
of heat, such as direct sunlight, fire or other heat sources.
Multiple devolo devices must not be interlocked.
devolo devices should only be installed at locations
that guarantee adequate ventilation. Slots and openings on the housing are used for ventilation:
쎲 Do not cover devolo devices when operating.
쎲 Do not place any objects on devolo devices.
쎲 Do not insert any objects into the openings of
devolo devices.
쎲 devolo devices must not be placed directly next
to an open flame (such as fire or candles).
쎲 devolo devices must not be exposed to direct
heat radiation (e.g. radiator, direct sunlight).
1.2 devolo on the Internet
For detailed information on our products or "dLAN", visit www.devolo.com
tains downloadable product descriptions and
documentation, as well as updates to devolo software
and device firmware.
If you have any further ideas or suggestions related to
our products, we would be delighted to hear from you
at support@devolo.com
. The Service Centre area con-
!
devolo dLAN pro 1200+
Page 9

8 Preface
devolo dLAN pro 1200+
Page 10

Introduction 9
Fig. 1
2Introduction
dLAN is an intelligent, secure technology that lets you
set up a home network easily, quickly and economically via your household electrical wiring, without the
need for complex and expensive dedicated cabling.
The available performance and effort required for the
installation also compares favourably to traditional
methods.
devolo dLAN pro 1200+
Page 11

10 Introduction
2.1 What exactly is dLAN?
dLAN (direct Local Area Network) uses the power grid
to transfer data between computers equipped with
suitable devices and other network components. As a
result, any power outlet can be used as a network access point. The data is modulated prior to transfer and
sent as a signal via power lines. State-of-the-art technology ensures that the power and data networks do
not interfere with one another. Networking via dLAN is
fast and secure. The data is encrypted using a key to
prevent easy interception by third parties.
2.2 devolo—Up to speed on green IT
The topic everyone is talking about is green IT. devolo
has an easy solution: the energy saving mode, which
comes standard with the network devices, sets the
company apart from many competitors in the IT industry.
Developers at devolo, have for a long time kept a close
eye on how much power dLAN devices may consume.
After all, a devolo network via electrical sockets should
not only be convenient, but also require as little energy
as possible—particularly during times when it is not
being used.
That devolo can satisfy the demand for energy efficiency is evidenced by the patented energy saving mode
in the devices. It automatically reduces the energy
consumption when the computers in the dLAN pro
network or connected equipment are switched off.
The power saving mode in the devices is not only a tribute to environmental protection but also a real service to the customer. Most people tend to forget to
regularly press the standby button on the hardware.
The patented technology in devolo devices allows you to save energy without having to do
anything. And if less energy is consumed, your elec-
tric meter will turn more slowly. In other words, every
minute the device is in power saving mode, you will
save money.
A dLAN device connected to a computer can only go into energy saving
mode if the network card of the
switched-off computer is also inactive. If you are using a network card
that remains active even when the
computer is switched off, we recommend connecting the computer to an
on/off switch using a multiple socket
so that both the computer and the integrated network card are de-energised.
devolo dLAN pro 1200+
Page 12

Introduction 11
If you would like to ensure that a dLAN device does
not switch to energy saving mode, this function
can be deactivated in the dLAN AVpro manager
software.
2.3 The dLAN pro 1200+
쎲 Developed for professional use in small networks
with high demands on reliability and performance
쎲 dLAN technology from the world's market leader,
developed for professional use
쎲 Professional remote management using the
devolo AVpro manager software with comprehensive configuration options
쎲 Reliable security in public areas: PowerSave func-
tions, LED status display and encryption button
can be switched off by remote management
쎲 The fast transfer rate and dLAN speeds up to
1200 Mbps allow you to experience entertain-
ment at the highest level. The range+ technology provides an even more stable Internet
connection with significantly longer range.
쎲 Gigabit Ethernet port
쎲 Optimal dLAN security with a 128-bit AES key
쎲 Supports Quality of Service (QoS) for automatic
data prioritisation
쎲 Long range of up to 400 meters with a connection
over the power line
쎲 Patented energy-saving technology for cost-effi-
cient operation
쎲 The dLAN pro 1200+ is provided with the dLAN
AVpro manager configuration tool, which enables
reliable, fast and convenient integration of the
dLAN pro 1200+ into dLAN pro networks with
different architecture ('Peer-to-Peer' or 'MDU').
devolo dLAN pro 1200+
Page 13

12 Introduction
Fig. 2
Fig. 3
2.4 All about the network
2.4.1 Internet standalone solution
devolo dLAN pro 1200+
Page 14

Introduction 13
Fig. 4
Fig. 5
2.4.2 dLAN Peer-to-Peer
If the network is configured as a 'Peer-to-Peer' network
('P2P'), all dLAN pro devices within it are equal to each
other. The connected network nodes can communicate
with one another freely and directly. The dLAN pro device which is most easily accessible from all dLAN pro
devices in the network is automatically designated by
these as the Central Coordinator ('CCo') and from then
on coordinates the communication between the
nodes. By default, dLAN pro devices are configured as
a Peer-to-Peer network.
devolo dLAN pro 1200+
Page 15

14 Introduction
2.4.3 dLAN MDU
If the network is configured as an 'MDU' network
(MDU: 'Multiple Dwelling Unit'), the connected network nodes are linked as 'slaves' to a 'master' and
form a logical dLAN pro network segment along with
their 'master'. Each slave sends data only to its master.
At the technical level, communication between the
Fig. 6 Room 1 Room 2 Room 3 Room 4
slaves of the MDU dLANs is not possible. The masters
of the MDU dLANs are interconnected via Ethernet
switches. Thus MDU dLANs are ideally suited for floorby-floor networking (such as in hotels). MDU dLANs
can be configured only in the expert mode of the dLAN
AVpro manager.
devolo dLAN pro 1200+
Page 16

Installation 15
Fig. 7 is country-specific
3 Installation
This chapter covers everything you need to know to set
up your dLAN pro 1200+. It will explain connecting
the dLAN pro 1200+ and its functions. We will also
briefly introduce the devolo software.
3.1 Package contents
Please ensure that the delivery is complete before beginning with the installation of your dLAN pro 1200+:
쎲 Single Kit:
쑗 dLAN pro 1200+
쑗 Network cable
쑗 Hard copy of installation guide
or
쎲 Starter Kit:
쑗 Two dLAN pro 1200+
쑗 Two network cables
쑗 Hard copy of installation guide
devolo AG reserves the right to change the package
contents without prior notice.
3.2 System requirements
쎲 Operating systems: Windows 7 Home Premium
(32 bit/64 bit), Windows 8 (32 bit/64 bit), Windows 8 Pro (32 bit/64 bit), Linux (Ubuntu 12.04),
Mac (OS X 10.6) and any other operating system
with network support
쎲 Network connection
devolo dLAN pro 1200+
Page 17

16 Installation
Please note that your computer or other device must feature a network device with a
network port.
To set up a dLAN pro network, you
need two dLAN pro devices
200Mbps, 500Mbps and
1200 Mbps).
3.3 Functions
The dLAN pro 1200+ has a monitoring light (LED), one
network jack and an encryption button.
3.3.1 Monitoring light
The monitoring light (LED) shows all of the statuses for
the dLAN pro 1200+ by illuminating and/or flashing in
different ways:
쎲 The LED flashes quickly in red at uniform inter-
vals if the dLAN pro 1200+ is connected to the
mains supply but there is no dLAN connection.
쎲 The LED lights up in white if the
dLAN pro 1200+ is ready to operate and there
is a dLAN connection.
쎲 The LED flashes quickly in white at uniform
intervals if the encryption process (pairing) is
being performed in the dLAN pro network.
쎲 The LED flashes in white at irregular intervals if
the dLAN pro 1200+ is in PowerSave mode.
쎲 The LED flashes in red at uniform intervals if the
data transmission rate of the dLAN pro 1200+ is
not optimal. For information to improve the data
transmission rate, please see the chapter 5.1
Bandwidth optimization.
The function of the LED status display
can be deactivated in the
dLAN AVpro manager software.
3.3.2 Network connection
This is the connection point on the dLAN pro 1200+
for connecting it to a computer or another network device with the network cable (included).
3.3.3 Encryption button
Data encryption at the touch of a button; For more information on the functions of the encryption button,
please see the chapter 4.2 dLAN pro network en-
cryption at the touch of a button.
For safety reasons, you can deactivate the encryption button in the
dLAN AVpro manager software.
devolo dLAN pro 1200+
Page 18

Installation 17
3.3.4 Integrated electrical socket
If you connect additional network devices using a multiple socket, plug this multiple socket into the electrical
socket of the dLAN pro 1200+. The integrated mains
filter eliminates any noise of connected devices and significantly improves data transmission in the home
network.
3.3.5 Standby mode
A dLAN pro device switches to Standby mode after a
short while if no active network device such as a computer is connected to the network port. In Standby
mode, the dLAN pro device cannot be accessed
via the power supply grid. As soon as the network
device (e.g. computer) connected to the network interface is switched on again, your dLAN pro device can
also be reached again via the electrical wiring.
If you would like to ensure that a dLAN pro device
does not switch to energy saving mode, this function can be deactivated in the dLAN AVpro manager
software. More information concerning "energy saving
mode" can be found in the chapter 2.2 devolo—Up
to speed on green IT.
3.4 Connecting the dLAN pro 1200+
This section describes how to connect your
dLAN pro 1200+ to a computer or another network
device.
For the permitted voltage range for
operating the device and the power
consumption, refer to the label on
the rear side of the device.
Additional technical information is
available in the download area at
www.devolo.com
햲 Use the included network cable to connect the
dLAN pro 1200+ to the network port of your running computer or another network device.
Prevent tripping hazards when cabling.
햳 Plug the dLAN pro 1200+ into a free electrical
outlet.
.
devolo dLAN pro 1200+
Page 19

18 Installation
The power outlet and all connected
network devices should be easily accessible so that you can pull the
mains plug quickly if needed.
To disconnect the device from the
mains supply, pull the device itself or
its mains plug from the power outlet.
Additional network devices that are connected via a multiple socket are connected
to the mains power supply by plugging the
multiple socket into the integrated electrical socket of the dLAN pro 1200+.
햴 Once you have connected at least two dLAN pro
devices as described above, your dLAN
pro network has been set up. To secure your dLAN
pro network, continue with the configuration as
described in chapter 4 dLAN network.
For detailed information about connecting
other devolo dLAN adapters, visit our website: www.devolo.com
3.5 Software installation
3.5.1 Software for Windows
The installation wizard installs the
devolo dLAN AVpro manager and the associated
manual on the Windows operating system.
In addition to the individual encryption of your dLAN
pro network, devolo dLAN AVpro manager offers
other expanded dLAN functions.
To install the software, insert the included CD-ROM in
the CD drive of your computer.
Then you will find the installed devolo dLAN AVpro
manager and the corresponding manual in the program group Start 쒁 All Programs 쒁 devolo.
devolo dLAN pro 1200+
Page 20

dLAN pro network 19
4 dLAN pro network
4.1 Security in the dLAN
Before you can use the dLAN pro 1200+ in your dLAN
pro network, first you have to connect it to other dLAN
pro devices as a network. Two specific pieces of information are especially important for this:
쎲 Shared use of a dLAN password results in a delim-
ited dLAN network.
쎲 Shared use of the dLAN password serves as access
control to the dLAN pro network as well as the
encryption, and thereby the interception protection, of the transmitted data.
The dLAN password can be specified automatically via
the encryption button or manually using the
dLAN AVpro manager program. Please note the following basic principle when choosing your encryption
method:
쎲 In dLAN pro networks, data encryption is as
simple as touching a button, since all corresponding dLAN pro devices are equipped
with an encryption button.
쎲 For dLAN pro networks that include devices with
and without encryption buttons, data encryp-
tion must be set up using the dLAN AVpro
manager.
4.2 dLAN pro network encryption at the touch of a button
To encrypt a dLAN pro network, in which all associated
devices are equipped with an encryption button, simply
press the encryption button that is located on the device. Pressing this button will encrypt your dLAN pro
network with a randomly generated password.
For security reasons, you can deactivate encryption button in the dLAN
AVpro manager software.
devolo dLAN pro 1200+
Page 21

20 dLAN pro network
Fig. 8
The following section contains exact instructions of encryption on the basis of possible network scenarios:
dLAN devices cannot be configured
while in Standby mode.
Encrypting a new dLAN pro network with a
dLAN pro 1200+ and an additional dLAN pro
device
Once both dLAN pro devices have been successfully
connected, press each encryption button for >one sec-
ond within two minutes of one another.
That's it! Your dLAN pro network is now protected
against unauthorised access.
devolo dLAN pro 1200+
Page 22

dLAN pro network 21
Fig. 9
Expanding an existing dLAN pro network by
adding another dLAN pro device
If you have already secured your existing dLAN pro
network using the encryption button, use the same
method to integrate further devices. Once you have
successfully connected the new dLAN pro device, first
press the encryption button (> one second) of one of
your network’s existing devices, then press the
encryption button (> one second) of your new dLAN
pro device within two minutes.
That's it! The new dLAN pro device is now integrated
in your network. To integrate additional dLAN pro devices in your network, repeat the above steps.
devolo dLAN pro 1200+
Page 23

22 dLAN pro network
Fig. 10
Removing a dLAN pro device from a network
To remove a dLAN pro 1200+ or another dLAN pro device from an existing network, press its encryption button for at least ten seconds. The device will be
assigned a new randomly generated password and will
thus no longer be able to access the network. To inte-
grate the device into a different dLAN pro network, follow the steps described above, depending on whether
you are setting up a new network or adding the device
to an existing one.
devolo dLAN pro 1200+
Page 24

dLAN pro network 23
4.3 dLAN AVpro manager for Windows
The installation wizard installs the dLAN
AVpro manager configuration software as well as the
associated manual on the Windows operating system
(see 3.5.1 Software for Windows).
In addition to the individual encryption of your dLAN
pro network and the security from unauthorised access, dLAN AVpro manager offers other expanded
dLAN pro functions.
For detailed descriptions and information
on configuration of your dLAN pro network
please consult this devolo dLAN
AVpro manager manual.
devolo dLAN pro 1200+
Page 25

24 dLAN pro network
devolo dLAN pro 1200+
Page 26

Appendix 25
Fig. 11
5 Appendix
5.1 Bandwidth optimization
To significantly improve the transmission capacity of
the network, we recommend that you comply with the
following "connection rules":
쎲 Plug the device directly into a wall socket. Avoid
multiple sockets.
쎲 You should connect all additional network devices
that are connected to a multiple socket to the
mains power supply via the electrical socket integrated into the dLAN pro 1200+.
쎲 To take full advantage of the filter function of the
dLAN pro 1200+ and to improve data transmission in the network, always plug the multiple sokket into the electrical socket of the
dLAN pro 1200+.
5.2 Disposal of old devices
To be used in the countries of the European Union and
other European countries with a separate collecting system:
The icon with crossed-out wastebasket on
the device means that this adapter is an
electrical or electronic device that falls
within the scope of application of the European Community WEEE Directive. These types of devices may no longer be disposed
of with household waste. Rather they can
be given to a municipal collection point
free of charge. Contact your municipal government to find out the address and hours
of the nearest collection point.
devolo dLAN pro 1200+
Page 27

26 Appendix
5.3 Warranty conditions
The devolo AG warranty is given to purchasers of devolo products in
addition to the warranty conditions provided by law and in accordance with the following conditions:
1 Warranty coverage
a) The warranty covers the equipment delivered and all its parts.
Parts will, at devolo's sole discretion, be replaced or repaired
free of charge if, despite proven proper handling and
adherence to the operating instructions, these parts became
defective due to fabrication and/or material defects. Alternatively, devolo reserves the right to replace the defective product with a comparable product with the same specifications
and features. Operating manuals and possibly supplied software are excluded from the warranty.
b) Material and service charges shall be covered by devolo, but
not shipping and handling costs involved in transport from the
buyer to the service station and/or to devolo.
c) Replaced parts become property of devolo.
d) devolo is authorized to carry out technical changes (e.g. firm-
ware updates) beyond repair and replacement of defective
parts in order to bring the equipment up to the current technical state. This does not result in any additional charge for the
customer. A legal claim to this service does not exist.
2 Warranty period
The warranty period for this devolo product is three years. This
period begins at the day of delivery from the devolo dealer. Warranty services carried out by devolo do not result in an extension of
the warranty period nor do they initiate a new warranty period. The
warranty period for installed replacement parts ends with the warranty period of the device as a whole.
3Warranty procedure
a) If defects appear during the warranty period, the warranty
claims must be made immediately, at the latest within a period
of 7 days.
b) In the case of any externally visible damage arising from trans-
port (e.g. damage to the housing), the person carrying out the
transportation and the sender should be informed immediately. On discovery of damage which is not externally visible,
the transport company and the sender are to be immediately
informed in writing, at the latest within 3 days of delivery.
c) Transport to and from the location where the warranty claim is
accepted and/or the repaired device is exchanged, is at the
purchaser's own risk and cost.
d) Warranty claims are only valid if a copy of the original
purchase receipt is returned with the device. devolo reserves
the right to require the submission of the original purchase
receipt.
4 Suspension of the warranty
All warranty claims will be deemed invalid
a) if the label with the serial number has been removed from the
device,
b) if the device is damaged or destroyed as a result of acts of
nature or by environmental influences (moisture, electric
shock, dust, etc.),
c) if the device was stored or operated under conditions not in
compliance with the technical specifications,
d) if the damage occurred due to incorrect handling, especially to
non-observance of the system description and the operating
instructions,
e) if the device was opened, repaired or modified by persons not
contracted by devolo,
f) if the device shows any kind of mechanical damage, or
g) if the warranty claim has not been reported in accordance with
3a) or 3b).
devolo dLAN pro 1200+
Page 28

Appendix 27
5Operating mistakes
If it becomes apparent that the reported malfunction of the device
has been caused by unsuitable hardware, software, installation or
operation, devolo reserves the right to charge the purchaser for the
resulting testing costs.
6 Additional regulations
The above conditions define the complete scope of devolo's legal
liability.
a) The warranty gives no entitlement to additional claims, such as
any refund in full or in part. Compensation claims, regardless
of the legal basis, are excluded. This does not apply if e.g.
injury to persons or damage to private property are specifically
covered by the product liability law, or in cases of intentional
act or culpable negligence.
b) Claims for compensation of lost profits, indirect or consequen-
tial detriments, are excluded.
c) devolo is not liable for lost data or retrieval of lost data in
cases of slight and ordinary negligence.
d) In the case that the intentional or culpable negligence of
devolo employees has caused a loss of data, devolo will be
liable for those costs typical to the recovery of data where periodic security data back-ups have been made.
e) The warranty is valid only for the first purchaser and is not
transferable.
f) The court of jurisdiction is located in Aachen, Germany in the
case that the purchaser is a merchant. If the purchaser does
not have a court of jurisdiction in the Federal Republic of Germany or if he moves his domicile out of Germany after conclusion of the contract, devolo's court of jurisdiction applies. This
is also applicable if the purchaser's domicile is not known at
the time of institution of proceedings.
g) The law of the Federal Republic of Germany is applicable. The
UN commercial law does not apply to dealings between devolo
and the purchaser.
devolo dLAN pro 1200+
Page 29

28 Appendix
devolo dLAN pro 1200+
Page 30

Index
C
CCo 13
CE declaration 6
Central Coordinator 13
D
devolo dLAN AVpro manager 18, 23
Disposal of old devices 25
dLAN pro device 13
dLAN pro network 19
E
Encryption button 16, 19
energy saving mode 10
Expert mode 14
G
Green IT 10
I
Integrated electrical socket 17
M
Master 14
MDU 14
Monitoring light (LED) 16
Multiple Dwelling Unit 14
N
Network connections 16
Network segment 14
P
P2P 13
Package contents 16
Peer-to-peer 13
S
Safety notes 6
Slave 14
W
Warranty 26
devolo dLAN pro 1200+
Page 31

devolo dLAN pro 1200+
 Loading...