

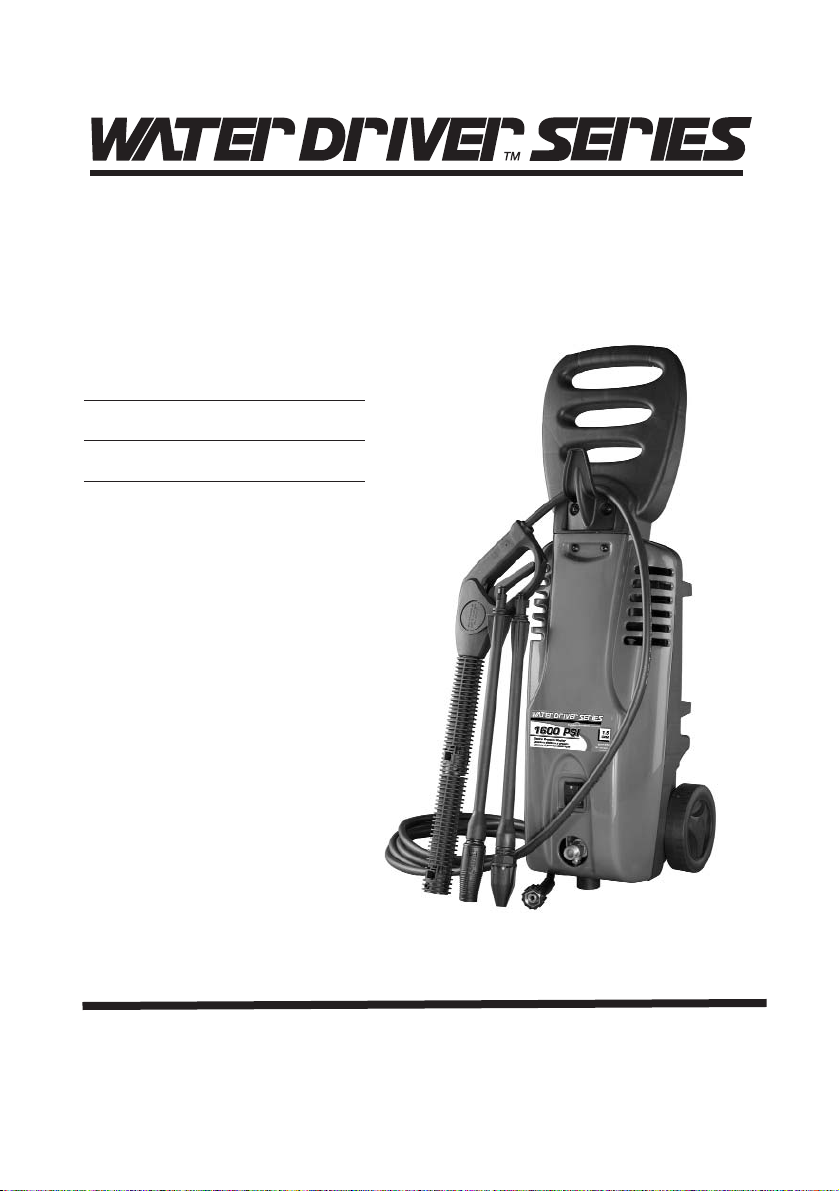
Pressure Washer
Operation Manual
for model WD1600E
Part No. D28921 Rev. 0 3/17/03
IMPORTANT
Please make certain that the person who is to use this equipment
carefully reads and understands these instructions before operating.
Record All Information
for future reference:
Purchase Date:
Model #:
Serial #:
Questions? 1-800-888-2468
Learn more about your pressure
washer and register on line at
www
.devap.
com

2- ENG
D28921
1.0 SAFETY AND OPERATION RULES
INDEX
1.0 SAFETY AND OPERATION RULES . page 2
2.0 SAFETY FEATURES . . . . . . . . . . . . page 8
3.0 INSTALLATION . . . . . . . . . . . . . . . . page 9
3.1 HIGH PRESSURE HOSE . . . . . page 9
3.2 WATER CONNECTION . . . . . . . page 9
3.3 POWER SUPPLY
CONNECTION . . . . . . . . . . . . . page 9
4.0 OPERATING INSTRUCTIONS . . . . page 10
4.1 START-UP PROCEDURE . . . . page 10
4.2 HIGH PRESSURE/
LOW PRESSURE . . . . . . . . . . page 11
4.3 ADJUSTABLE SPRAY
NOZZLE . . . . . . . . . . . . . . . . page 12
4.4 HIGH PRESSURE/
TURBO SPRAY . . . . . . . . . . . page 12
4.5 USE OF CHEMICAL . . . . . . . . page 13
4.6 CLEANING TECHNIQUES . . . page 13
4.7 END OF OPERATION . . . . . . . page 14
5.0 USER MAINTENANCE . . . . . . . . . page 14
5.1 CONNECTIONS . . . . . . . . . . . page 14
5.2 NOZZLE . . . . . . . . . . . . . . . . . page 14
5.3 LUBRICATION . . . . . . . . . . . . page 15
5.4 WATER SCREEN . . . . . . . . . . page 15
5.5 COOLING SYSTEM . . . . . . . . page 15
6.0 MOVING AND STORAGE
INSTRUCTIONS . . . . . . . . . . . . . . page 15
6.1 AFTER EXTENDED STORAGE page 15
7.0 TROUBLESHOOTING . . . . . . . . . page 16
8.0 REPLACEMENT PARTS AND
ACCESSORIES . . . . . . . . . . . . . . page 18
9.0 TECHNICAL DATA . . . . . . . . . . . . page 18
Indicates an imminently
hazardous situation which,
if not avoided, will
result in death or
serious injury.
Indicates a potentially
hazardous situation which,
if not avoided, could result in death or
serious injury.
Indicates a potentially
hazardous situation which, if
not avoided, may
result in minor or
moderate injury.
Used without the safety alert
symbol indicates a
potentially hazardous situation which, if not
avoided, may result in pr
operty damage.
This manual contains information that is important for you to know and understand. This
information relates to protecting YOUR SAFETY and PREVENTING EQUIPMENT
PROBLEMS. To help you recognize this information, we use the symbols below. Please
read the manual and pay attention to these symbols.
Read Operation Manual. Do not operate equipment until you have
read Operation Manual for Safety, Assembly, Operation, and Mainte-
nance Instructions.
3- ENG
D28921
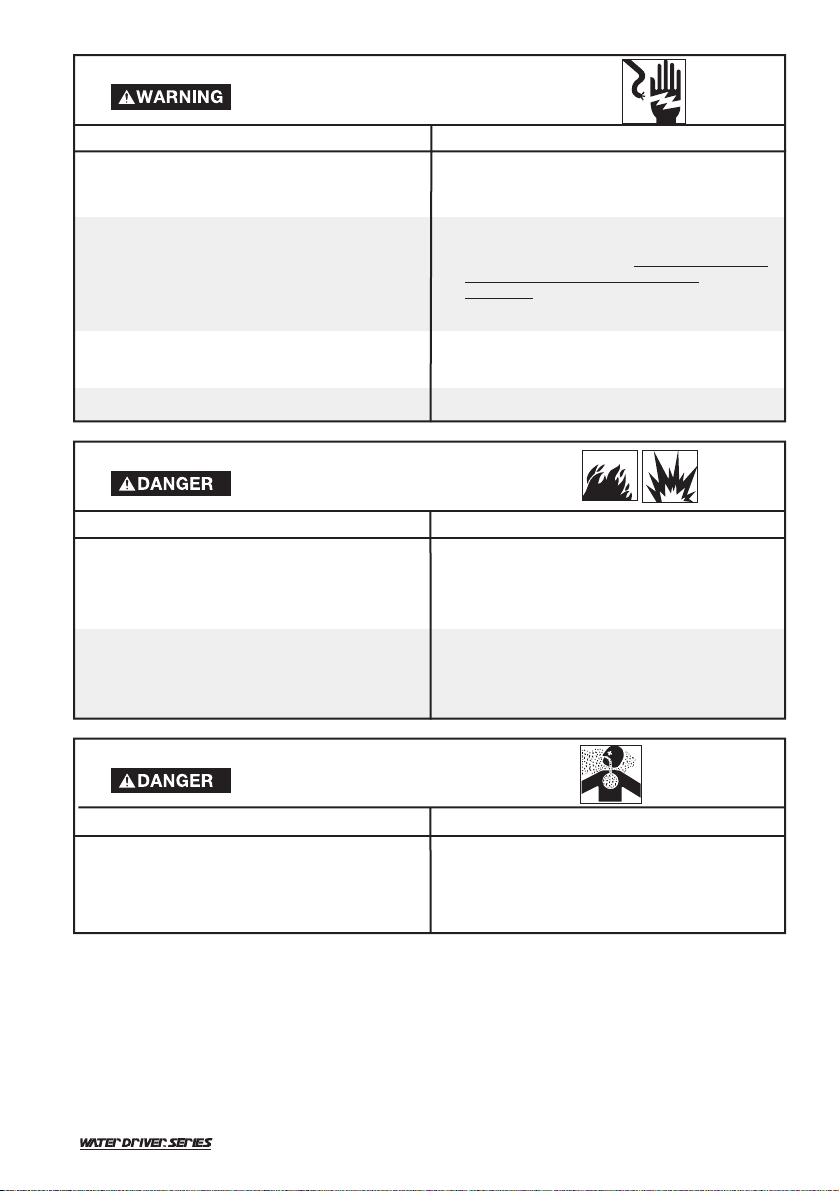
• Water spray directed at electrical outlets or
switches, or objects connected to an electrical
circuit, could result in a fatal electrical shock.
• Unplug any electrically operated product before
attempting to clean it. Direct spray away from
electric outlets and switches.
• This product is powered by electricity. It contains
and sprays water and other conductive liquids.
Improper operation could result in electrocution.
• The Ground Fault Circuit Interrupter (GFCI) will
not function properly unless connected to a
fully grounded electrical circuit!
• Extension cords can lead to electrical shock.
• Always connect cordset to a properly
grounded and polarized electrical circuit. Your
cordset is equipped with a Gr
ound Fault Circuit
Interrupter (GFCI) for your personal
protection.
• Do not touch plug or outlet with wet hands
• If damaged, the entire cordset assembly must be
replaced by an authorized service center. Refer
to Grounding Instructions.
• Do not use with extension cords.
RISK OF
ELECTRICAL SHOCK
DANGER
WHAT CAN HAPPEN
HOW TO PREVENT IT
• Some cleaning fluids contain substances which
could cause injury to skin, eyes, or lungs.
• Use only cleaning fluids specifically recom-
mended for high pressure washers. Follow
manufacturers recommendations. Do not use
chlorine bleach or any other corrosive
compound.
RISK OF EXPLOSION OR FIRE
DANGER
WHAT CAN HAPPEN
HOW TO PREVENT IT
Do not use acids, gasoline, kerosene, or any other
flammable materials in this product. Use only
household detergents, cleaners, and degreasers
recommended for use in Pressure Washers. Work
in a well ventilated area.
Use of acids, unapproved chemicals, or flammable
solvents with this product could cause injury or
death.
Restricting any of the pressure washer
ventilation openings will cause serious
overheating and could cause fire.
Never place objects against or on top of
pressure washer. Operate pressure washer in
an open area at least 12 inches away from any
wall or obstruction that would restrict the flow of
fresh air to the ventilation openings.
RISK TO BREATHING
DANGER
WHAT CAN HAPPEN
HOW TO PREVENT IT
4- ENG
D28921
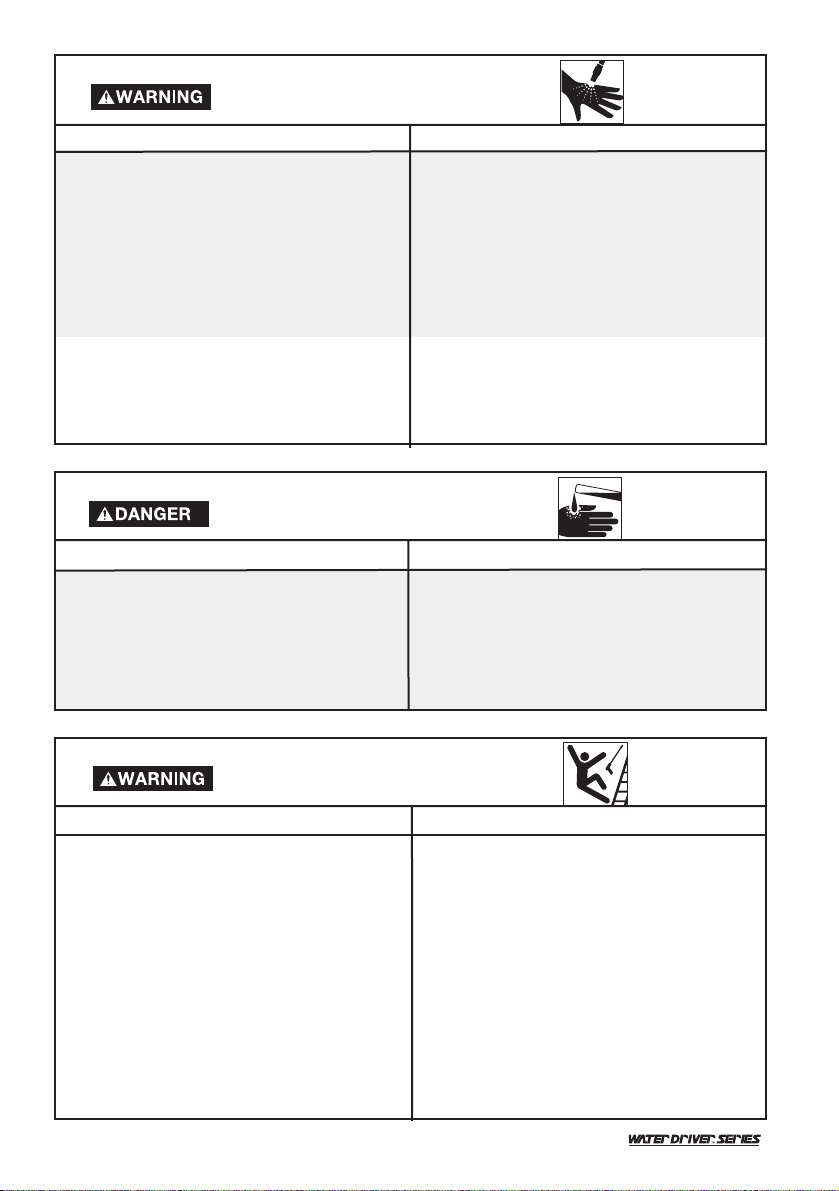
• Your washer operates at fluid pressures and
velocities high enough to penetrate human and
animal flesh, which could result in amputation or
other serious injury. Leaks caused by loose fittings
or worn or damaged hoses can result in injection
injuries. DO NOT TREAT FLUID INJECTION AS A
SIMPLE CUT! See a physician immediately!
RISK TO FLUID INJECTION
DANGER
WHAT CAN HAPPEN
HOW TO PREVENT IT
• Injuries can result if system pressure is not
reduced before attempting maintenance or
disassembly.
• To relieve system pressure, place on/off switch in
off position, turn off water supply, and pull gun
trigger until water stops flowing.
• Use only hose and high pressure accessories
rated for pressure higher than your pressure
washer's p.s.i.
• Never place hands in front of nozzle.
• Do not direct discharge stream at persons or
animals.
• Make sure hose and fittings are tightened and in
good condition. Never hold onto the hose or
fittings during operation.
• Do not operate pressure washer with worn or a
braided hose.
• Never attach or remove wand or hose fittings
while system is pressurized.
RISK OF
CHEMICAL
BURN
DANGER
WHAT CAN HAPPEN
HOW TO PREVENT IT
• Do not use acids, gasoline, kerosene, or any
other flammable materials in this product. Use
only household detergents, cleaners and
degreasers recommended for use in pressure
washers.
• Wear protective clothing to protect eyes and
skin from contact with sprayed materials.
• Use of acids, toxic or corrosive chemicals,
poisons, insecticides, or any kind of flammable solvent with this product could result in
serious injury or death.
• Unsafe operation of your pressure washer
could lead to serious injury or death to you or
others.
• Do not use chlorine bleach or any other
corrosive compound.
• Become familiar with the operation and controls of the pressure washer.
• Keep operating area clear of all persons,
pets, and obstacles.
• Do not operate the product when fatigued or
under the influence of alcohol or drugs. Stay
alert at all times.
• Never defeat the safety features of this product.
• Never leave wand unattended while unit is
running.
• Know how to stop product and bleed
pressure quickly.
RISK OF UNSAFE OPERATION
WHAT CAN HAPPEN
HOW TO PREVENT IT
DANGER
5- ENG
D28921
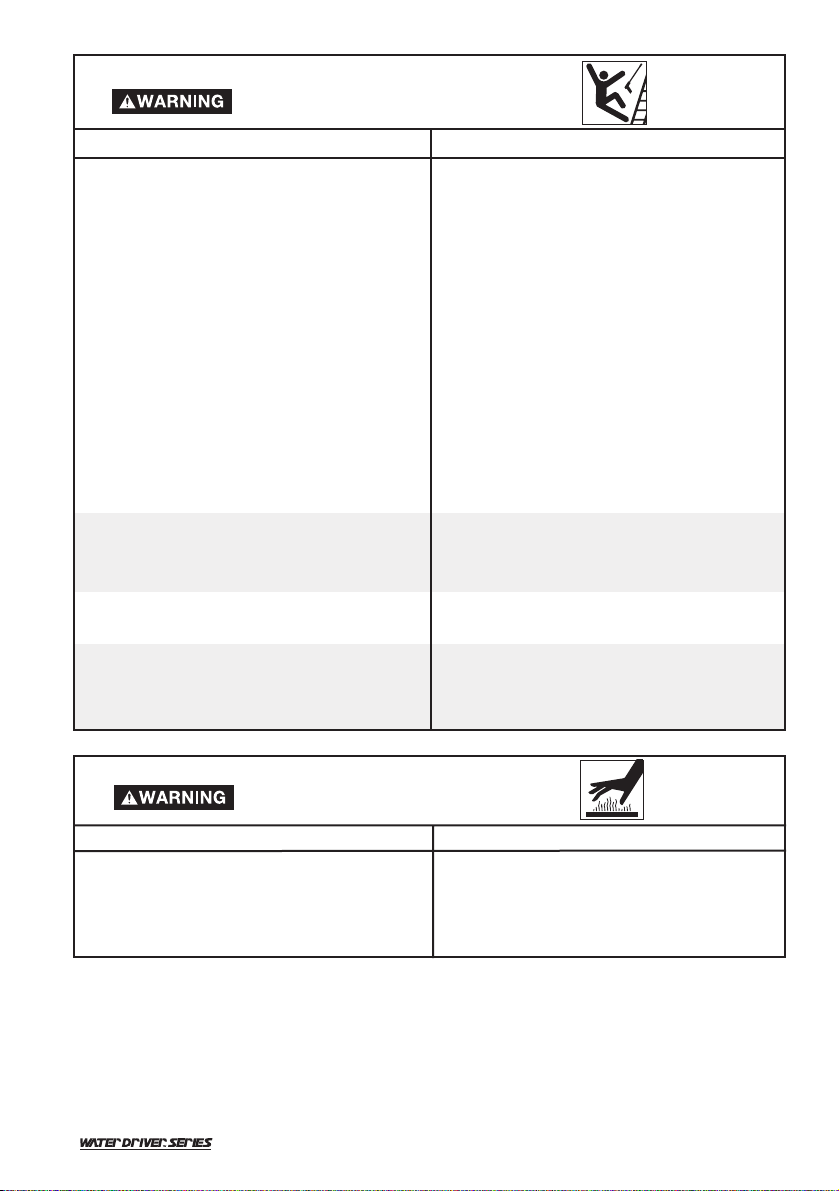
• Reactive force of spray will cause gun/wand to
move, and could cause the operator to slip or
fall, or misdirect the spray. Improper control of
gun/wand can result in injuries to self and
others.
• Do not overreach or stand on an unstable
support. Grip gun/wand firmly with both
hands. Expect the gun to kick when triggered.
• The spray gun/wand is a powerful cleaning
tool that could look like a toy to a child.
• Keep children away from the pressure
washer at all times.
• Unsafe operation of your pressure washer
could lead to serious injury or death to you or
others.
• Avoid accidental starts. Move switch on unit to
"OFF" position before connecting or
disconnecting cord to electrical outlets.
• Never carry your pressure washer by the cord.
Do not pull on the cord to disconnect from the
outlet.
• To prevent damage, the cord should not be
crushed, placed next to sharp objects or near a
heat source.
• Disconnect power plug from the outlet when not
in use and prior to the detaching of the high
pressure hose.
• Never tie knots or kink the high pressure hose as
damage could result.
• Prior to starting the pressure washer in cold
weather, be sure ice has not formed in any part
of the equipment.
• To minimize the amount of water getting into the
pressure washer, the unit should be placed as far
as possible from the cleaning site during
operation.
• Pressure washer pump contains moving parts.
Contact with moving parts can cause serious
injury.
• Never operate machine with pump guard
removed.
• Do not operate machine with missing,
broken, or unauthorized parts.
• Contact with hot surfaces could result in serious burn.
• During operation, touch only the control
surfaces of the pressure washer. Keep children
away from the pressure washer at all times.
They may not be able to recognize the hazards
of this product.
RISK OF UNSAFE OPERATION
WHAT CAN HAPPEN
HOW TO PREVENT IT
RISK OF HOT
SURFACES
DANGER
WHAT CAN HAPPEN
HOW TO PREVENT IT
DANGER
6- ENG
D28921
GROUNDING INSTRUCTIONS
This product must be grounded. If it should malfunction or breakdown, grounding provides a path of
least resistance for electric current to reduce the risk of electric shock. This product is equipped with
a cord having an equipment-grounding conductor and a grounding plug. The plug must be plugged
into an appropriate outlet that is properly installed and grounded in accordance with all local codes
and ordinances.
Improper connection of the equipment-grounding conductor can result in a
risk of electrocution. Check with a qualified electrician or service person if
you are in doubt as to whether the outlet is properly grounded. Do not modify the plug
provided with the product - if it will not fit the outlet installed by a qualified electrician. Do
not use any type of adapter with this product.
DANGER
The powerful spray from your pressure washer is capable of causing damage
to surfaces such as wood, glass, automobile paint, auto striping and trim, and
delicate objects such as flowers and shrubs. Before spraying, check the item to be cleaned to
assure yourself that it is strong enough to resist damage from the force of the spray. Avoid the
use of the concentrated spray stream except for very strong surfaces like concrete and steel.
SAVE THESE INSTRUCTIONS
• High velocity fluid spray can cause objects to
break, propelling particles at high speed.
• Light or unsecured objects can become
hazardous projectiles.
RISK OF INJURY FROM SPRAY
WHAT CAN HAPPEN
HOW TO PREVENT IT
• Always wear ANSI approved Z87 safety
glasses.Wear protective clothing to protect
against accidental spraying.
• Never point wand at, or spray people or
animals.
• Always secure trigger lock when wand is not in
service to prevent accidental operation.
• Never permanently secure trigger in pull back
(open) position.
7- ENG
D28921
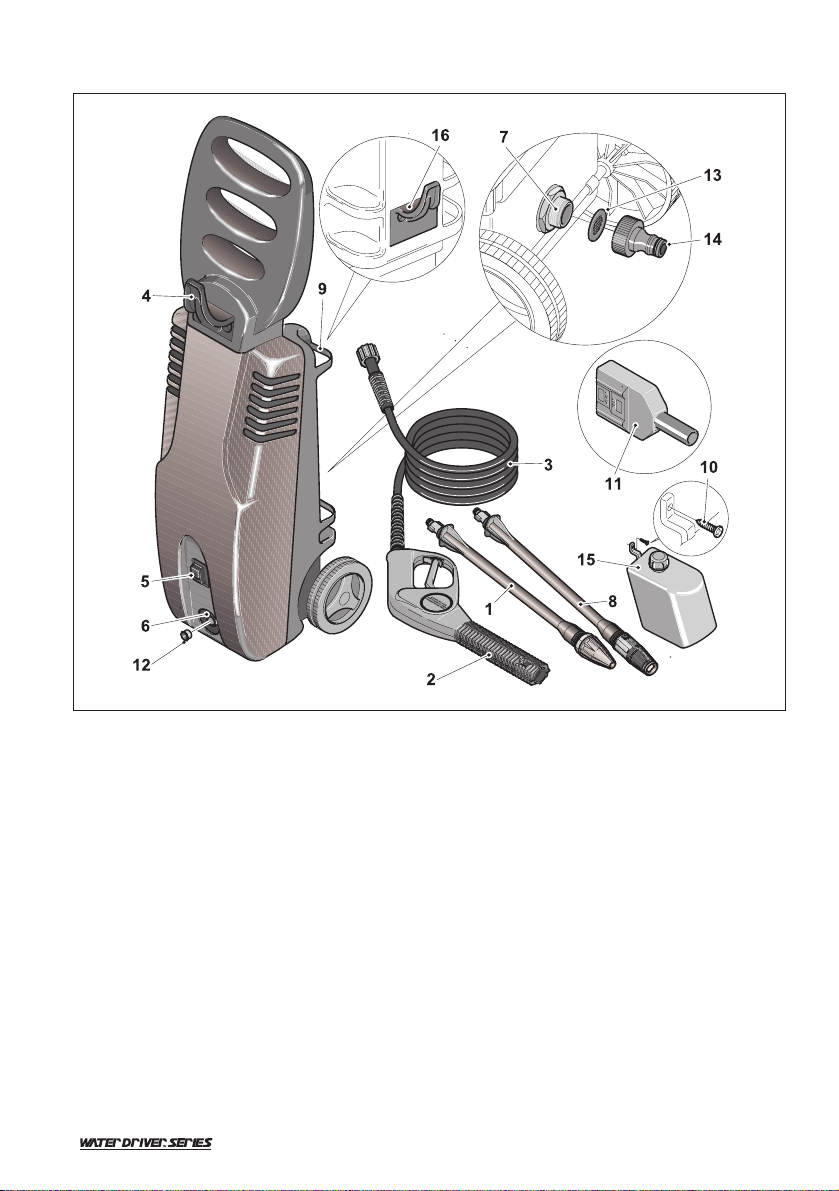
PARTS DRAWING
PARTS LIST
1 Wand with Rotary Nozzle Head
2 Spray Gun
3 High-Pressure Hose
4 Holder For High-Pressure Hose
5 ON/OFF Switch
6 High-Pressure Hose Connector
7 Threaded Water Inlet
8 Wand with Variable Nozzle Head
9 Holder for Accessories
10 Screw (Chemical Solution Reservoir)
11 Electrical GFCI Plug
12 Water Plug
13 Screen Filter
14 Garden Hose Inlet Nipple with Quick Connector
15 Chemical Solution Reservoir
16 Holder for Power Cable
8- ENG
D28921
2.0 SAFETY FEATURES
The pressure washer is equipped with a stop device which will sense when the trigger on the gun
is released. It will open the power circuit to the motor and cause the pressure washer to stop.
The pressure washer is also equipped with a main power ON/OFF switch
located on the unit. It should always be moved to the off position when the
pressure washer is not being used to prevent possible injury or damage.
MOTOR OVERLOAD
The electric motor in this pressure washer is equipped with an overload protection device which
will automatically shut off the motor in the event the motor draws excessive current or overheats.
The device will automatically reset itself and resume normal operation after a short period of time.
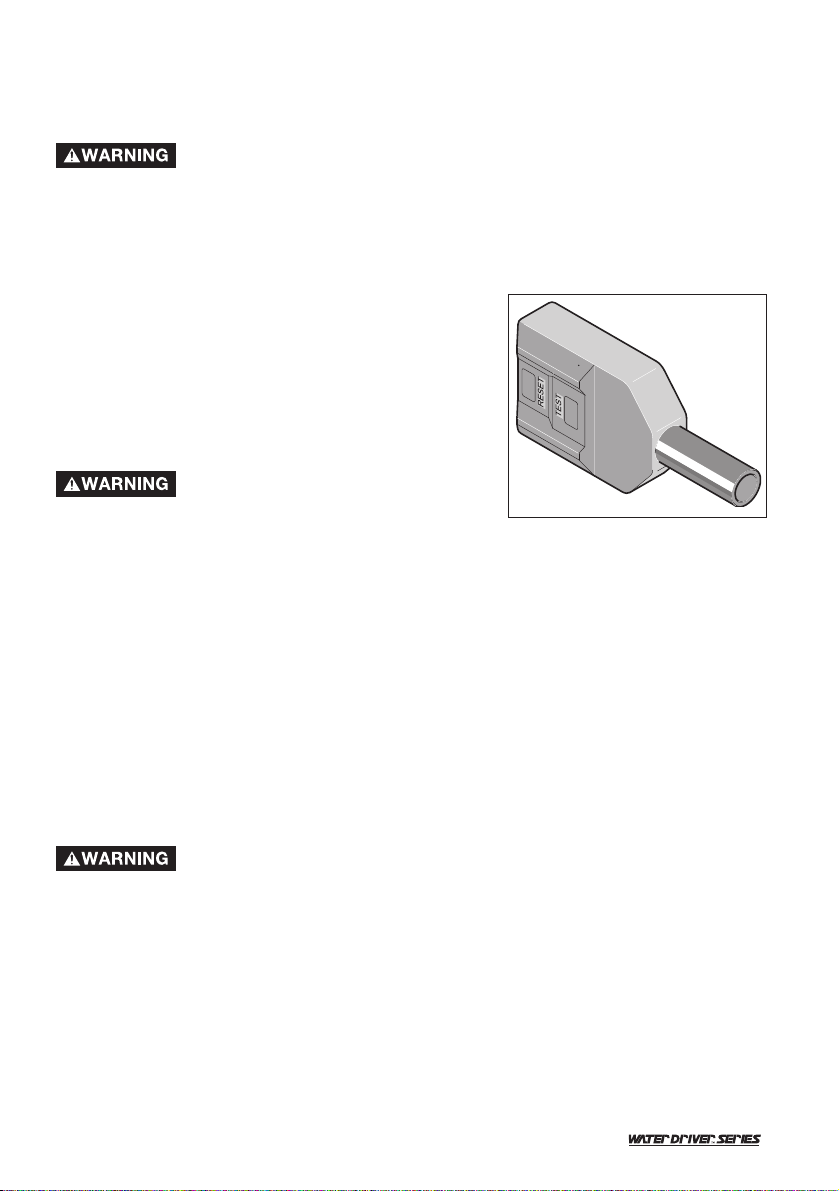
GROUND-FAULT CIRCUIT-INTERRUPTER PROTECTION
This pressure washer is provided with a ground-fault circuitinterrupter (GFCI) built into the plug of the power supply cord.
This device provides additional protection from the risk of
electric shock. Should replacement of the plug or cord
become necessary, use only identical replacement parts that
include GFCI protection.
EXTENSION CORDS
extension cords are not recommended
unless they are plugged into a groundfault circuit-interrupter found in circuit boxes or protected
receptacles.
Use only 3-wire extension cords that have 3-prong grounding-type plugs and 3-pole cord
connectors that accept the plug from the product.
Use only extension cords that are intended for outdoor use. These extension cords are identified
by a marking “Acceptable for use with outdoor appliances; store indoors while not in use”.
Use only extension cords having an electrical rating higher than the rating of the product.
Do not use damaged extension cords. Examine extension cord before using and replace if
damaged.
Do not abuse extension cord and do not yank on any cord to disconnect. Keep cord away from
heat and sharp edges. Always disconnect the extension cord from the receptacle before
disconnecting the product from the extension cord.
When using an extension cord, observe the specification below:
Cable Length Wire Gauge
Up to 50 ft. 14 AWG
50 to 100 ft. 12 AWG
To reduce the risk of electrocution, keep all connections dry and off the
ground. Do not touch plug with wet hands.
9- ENG
D28921
3.3 POWER SUPPLY CONNECTION
The pressure washer is factory-equipped with an electrical cord and a Ground Fault Circuit
Interrupter (GFCI) power plug.
This cord should only be connected to an electrical outlet installed in accordance with local safety
regulations.
NOTE: The power supply must be 120v, 60hz and a minimum 15 amp circuit.
Test GFCI before each use. DO NOT use pressure washer if test below fails.
GFCI Test Procedures:
1. Plug GFCI into power receptacle
2. Press reset button
3. Press test button.
4. Press reset button again for use.
NOTE: The GFCI must be reset each time the pressure washer is connected to an electrical outlet.
Reset by simply pushing the reset button on the GFCI power plug.
WATER CONNECTION
Proper water connection.
3.0 INSTALLATION
3.1 HIGH PRESSURE HOSE
Remove and discard the water plug (12 parts list) before attaching the high pressure hose by
carefully inserting the fitting with the o-ring into the high pressure outlet and tighten the threaded
nut by hand.
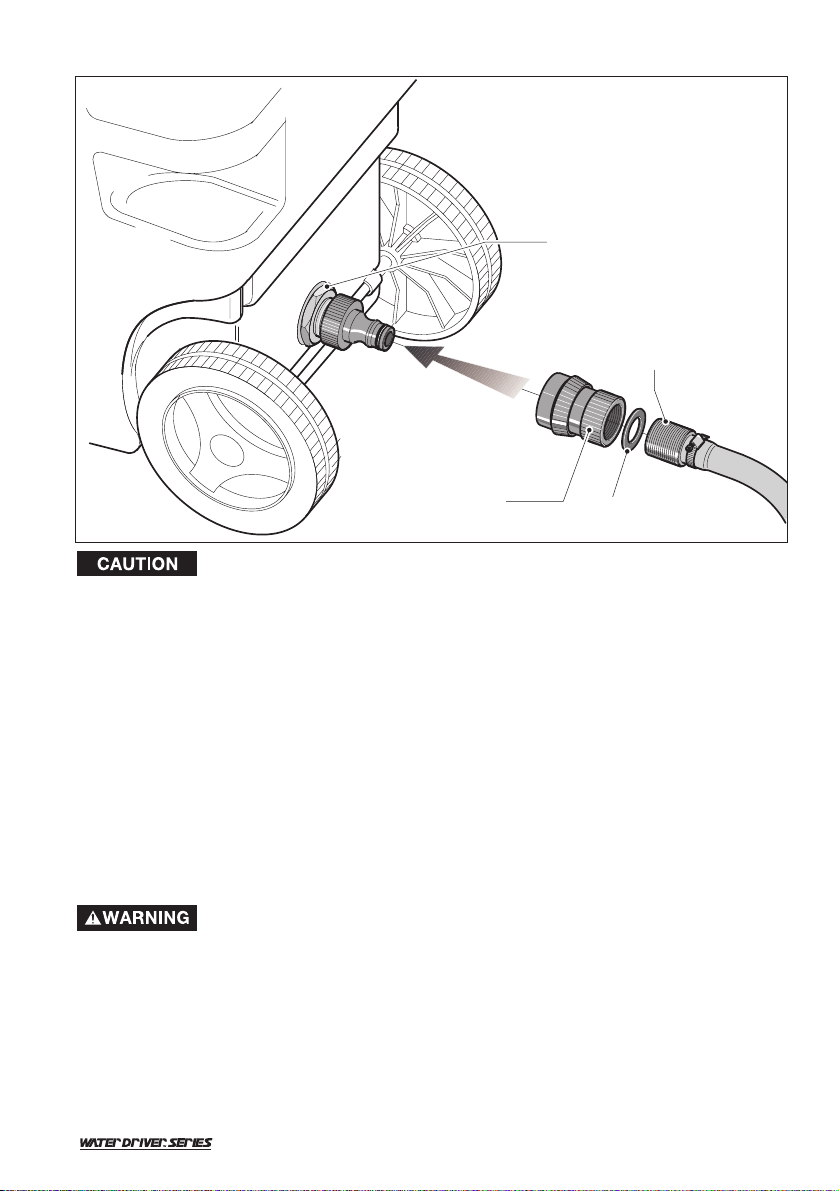
3.2 WATER CONNECTION
Before connecting, run water through the garden hose (not supplied) to flush out any foreign
matter. Attach garden hose to the pressure washer water inlet connection.
Fig. 1
Machine Inlet
Quick Connector
Garden Hose
Gasket
10- ENG
D28921
A. Connect only to properly grounded outlet. Do not remove grounding pin.
B. Inspect cord before using. Do not use if cord is damaged.
C. Keep all connections dry and off the ground.
D. Do not touch plug with wet hands.
E. The pressure washer is provided with a ground-fault circuit interrupter built into the power
plug. If replacement of the plug or cord is needed, use only identical replacement parts.
Contact Customer Service for proper replacement parts.
Extension cords are not recommended unless they are plugged into a receptacle protected by a
ground fault circuit interrupter. Any extension cord used should be 14 AWG and no longer than 50
feet to prevent excessive voltage loss. Use only extension cords intended for outdoor use. These
extension cords are identified by a marking “Acceptable for use with outdoor appliances; store
indoors when not in use”.
4.1 START-UP PROCEDURE
1. Make sure water supply is connected and turned on.
2. Make sure the unit is plugged in and the GFCI HAS BEEN RESET.
3. Release gun safety if locked.
4.0 OPERATING INSTRUCTIONS
Risk of injection or injury. Do not direct discharge stream at persons.
A. Safety lock “locked”
B. Safety lock “unlocked”
4. To allow air to escape from the hose, squeeze trigger on the gun until there is a steady stream
of water.
5. Remove any dirt or foreign matter from the gun outlet and the male connector of the wand.
6. Insert the requested wand into the gun’s quick connect coupling by pushing firmly and twisting
wand ¼ of a turn to lock into place.
NOTE: Make sure wand is locked.
11- ENG
D28921
7 Squeeze trigger on the spray gun
8 Press the on/off button to start pressure washer
if the wand is not securely locked into place, it could be ejected under
high pressure when operating the gun, possibly causing injury or damage.
When low-pressure is required, grasp collar and slide collar and nozzle away from the gun.
4.2 HIGH PRESSURE/LOW PRESSURE
Do not move the nozzle to adjust pressure while the trigger is squeezed.
The high pressure nozzle position is intended for cleaning. When high pressure is required, grasp
collar and slide the collar and nozzle toward the gun.
NOTE: Make sure the collar is pulled to the extreme rear position to lock the nozzle in the high
pressure position.
12- ENG
D28921
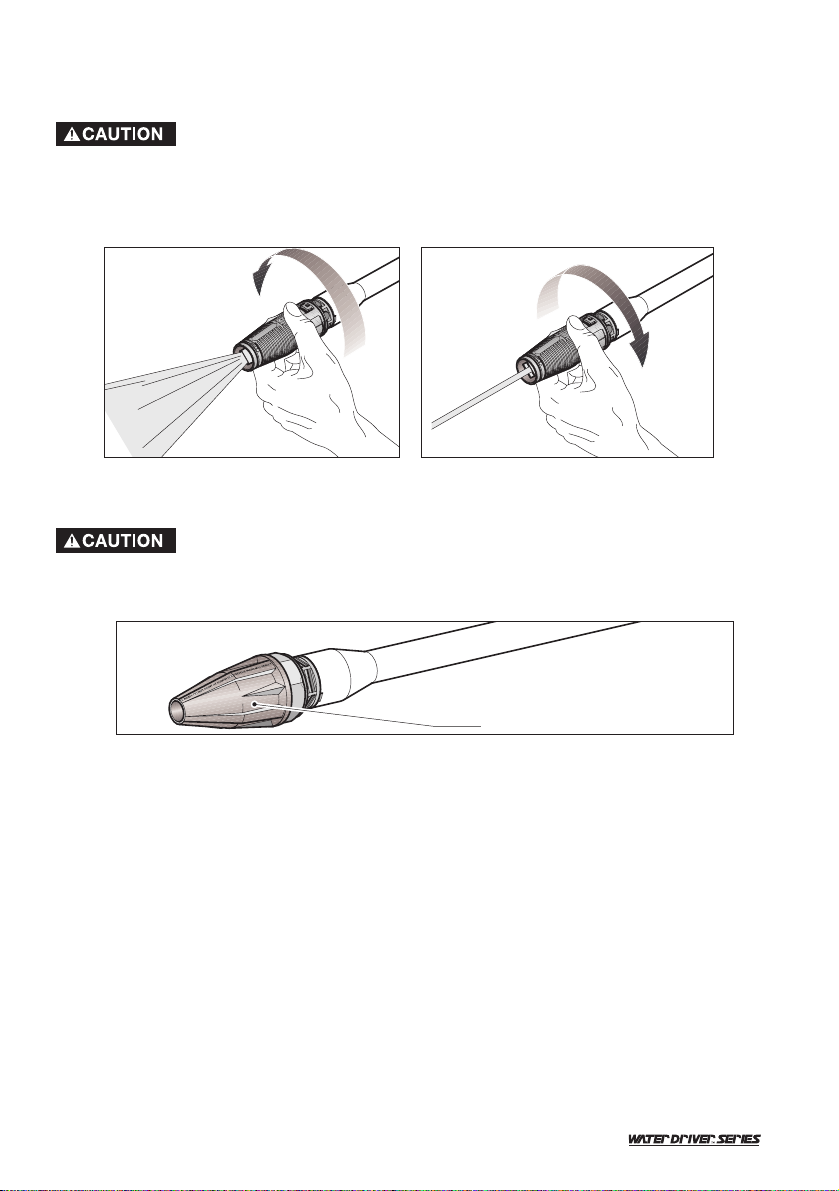
4.3 ADJUSTABLE SPRAY NOZZLE
The adjustable spray nozzle can adjust spray from fan to pencil point in both the high and low
pressure positions. The spray is adjusted by turning the nozzle.
The pencil point spray adjustment is very aggressive. We recommend that
for most cleaning applications, a twenty degree (20°) spray angle be used
to avoid damage to the surface being sprayed.
NOTE: The pressure of the spray on the surface you are cleaning increases as you move the wand
closer to the surface.
To increase angle to a fan spray, turn counterclockwise
To decrease angle to pencil point spray, turn clockwise
4.4 HIGH PRESSURE/TURBO SPRAY
Do not move the nozzle to adjust pressure.
The high pressure rotary nozzle position is intended for maximum cleaning effect. Keep the spray
lance min. 6” to 8” away from the cleaning surface at all times.
Rotary Spray
13- ENG
D28921
4.6 CLEANING TECHNIQUES
When cleaning with the pressure washer, some cleaning tasks can be solved with water alone, but
for most tasks it is advantageous to use a detergent. A detergent ensures a quick soaking of the
dirt allowing the high pressure water to penetrate and remove the dirt more effectively.
The low pressure position provides a gentle application of chemicals. This position is also
recommended to rinse a surface after wax application or for other applications which require the
low pressure of a garden hose. Low pressure is the equivalent of a garden hose set at the lowest
output to properly apply chemical. FOR CHEMICAL APPLICATION, SLIDE COLLAR ACCORDING
TO SECTION 4.2.
4.5 USE OF CLEANING CHEMICALS
only use cleaning chemicals recommended for pressure washers.
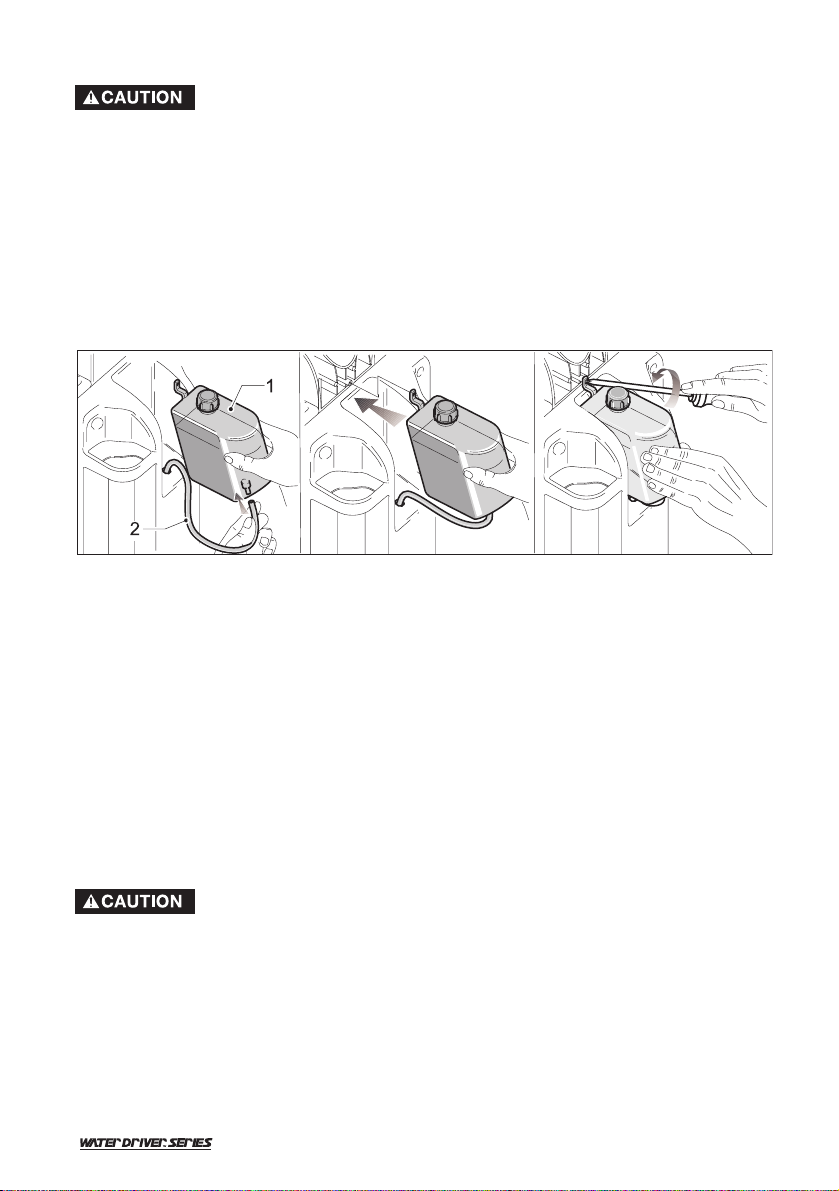
1 Insert the relevant suction tube (2) beneath the chemical solution reservoir.
2 Fill the reservoir (1) with suitable cleaning solution.
3 Insert the chemical solution reservoir into the relative compartment in the rear part of the
machine
4 Secure the chemical solution reservoir with the screw provided
5 Move the adjustable nozzle forward to the low pressure position by sliding collar toward the
nozzle. The chemical will automatically be mixed with the water and discharged through the
nozzle.
NOTE: When the adjustable nozzle is moved to the high pressure position, chemical will not be
discharged.
APPLICATION OF SOAP DEGREASER
1. Apply the solution to a DRY work surface. NOTE: WETTING THE SURFACE FIRST IS NOT
RECOMMENDED, AS IT DILUTES THE DETERGENT AND REDUCES ITS CLEANING ABILITY.
On a vertical surface, apply horizontally from side to side starting from the bottom to avoid
streaking.
2. Allow chemical to remain on the surface for a short time before rinsing
Damage may occur to painted surface if chemical is allowed to dry on the
surface. Wash and rinse a small section at a time. Avoid working on hot
surfaces or in direct sunlight.
3. Rinse with clean water under high pressure. On a vertical surface, first rinse from the bottom
up, then rinse from the top down. Hold nozzle 6 to 8 inches from the work surface at a 45°
angle using the flat spray as a peeling tool rather than a scrub brush.
NOTE: Insure that the chemical injection system is completely clean prior to switching from one
chemical to another.
14- ENG
D28921
APPLICATION OF LIQUID VEHICLE WAX
1. Immediately after cleaning, apply Pressure Washer Liquid Vehicle Wax using low pressure.
Pour wax into chemical solution reservoir.
2. Apply the wax sparingly in an even layer. Apply to wet surfaces from the bottom up for even
distribution and to avoid streaking.
3. Rinse off the surplus wax. NOTE – IF SURPLUS WAX IS NOT REMOVED, A HAZY FINISH
MAY RESULT.
4. Wipe dry to reduce water spotting.
4.7 END OF OPERATION
When you have completed use of the chemical injection system, remove tube from container,
continue to run in low pressure position and flush clean water through the chemical tank until it is
thoroughly cleaned. NOTE: Failure to clean properly will cause the injection system to become
clogged and inoperable.
l Stop the unit by pressing the ON/OFF button to the "OFF" position.
l Disconnect electrical plug.
l Turn off water and depressurize unit by squeezing trigger.
Turn off water supply and squeeze trigger to depressurize the unit. Failure
to do so could result in personal injury due to discharge of high pressure
water.
l Disconnect the high pressure discharge hose and the water inlet hose.
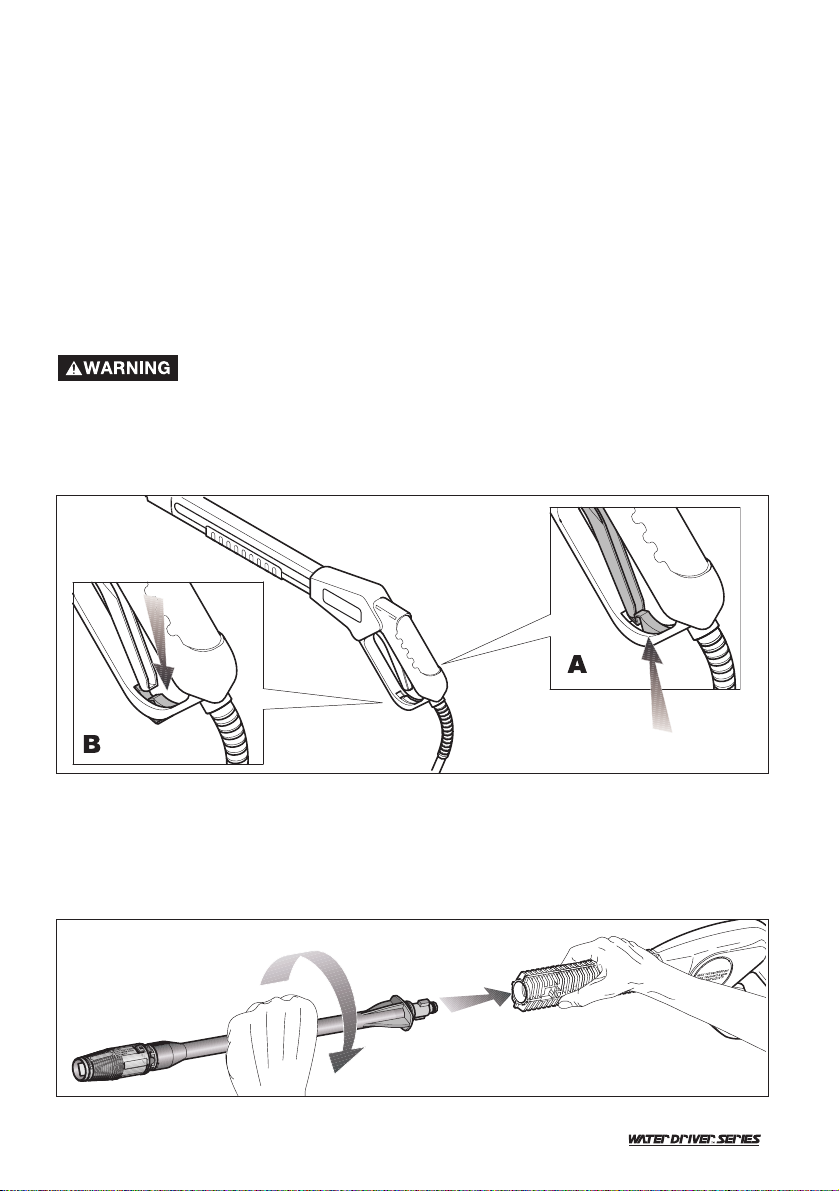
5.2 NOZZLE
The high pressure/low pressure adjustment of the nozzle should be lubricated regularly.
Clogging of the nozzle causes the pump pressure to be too high and cleaning is immediately
required.
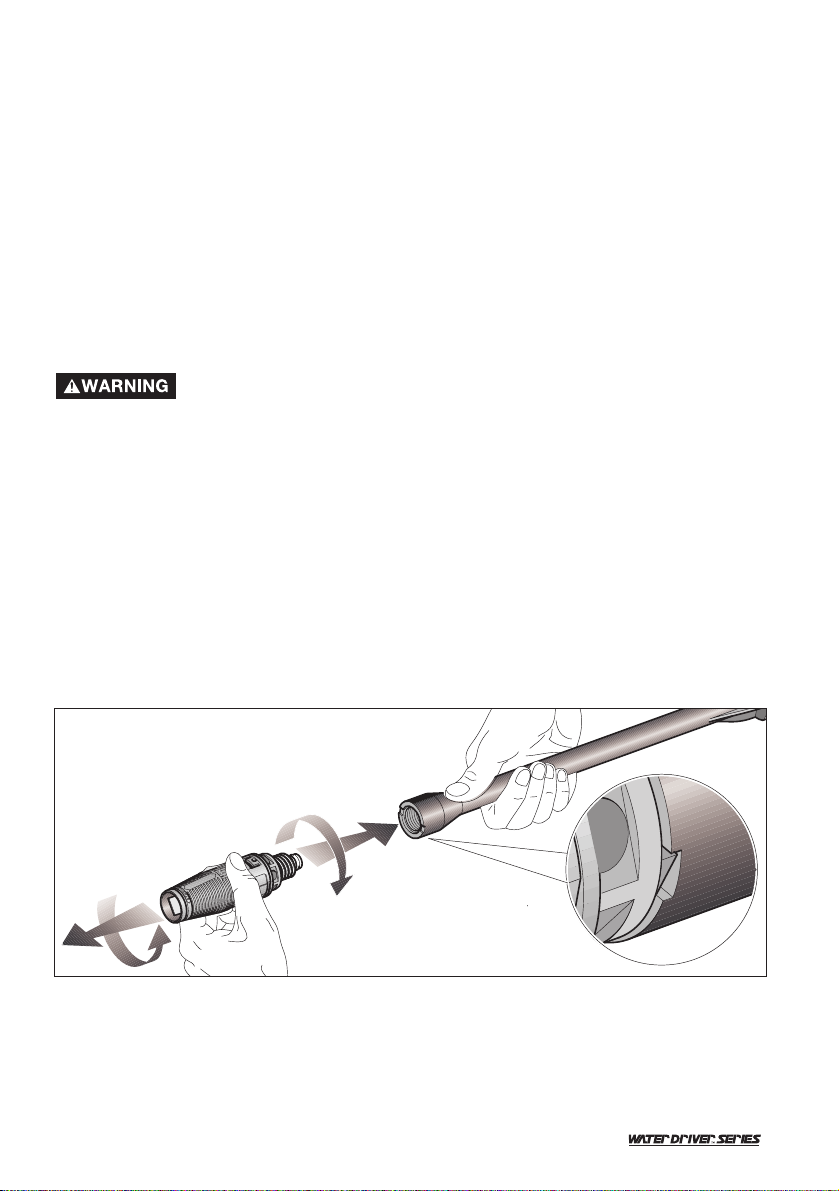
1. Separate the nozzle from the wand
2. Clear the nozzle.
5.0 MAINTENANCE
5.1 CONNECTIONS
Connections on Pressure Washer hoses, gun and spray wand should be cleaned regularly and
lubricated to prevent leakage and damage to the o-rings.
3. Flush the nozzle backwards with water
4. Reconnect the nozzle to the wand
NOTE: Completely screw the nozzles on the wand up to the complete lock. (see picture)
Restart the pressure washer and depress the trigger on the spray gun. If the pressure is still too
high, repeat above items 1-4.

15- ENG
D28921
6.0 MOVING AND STORAGE INSTRUCTIONS
Always store your pressure washer in a location where the temperature will
not fall below 32°F. The pump in this machine is susceptible to permanent
damage if frozen. FREEZE DAMAGE IS NOT COVERED BY THE WARRANTY.
If you must store your pressure washer in a location where the temperature is below 32°F, you can
minimize the chance of damage to your machine by utilizing the following procedure:
1. Stop the pressure washer and detach supply hose and high pressure hose.
2. Squeeze the trigger of the discharge gun to drain all water from the wand and hose.
3. Restart the pressure washer and let it run briefly (about 5 seconds) until water no longer
discharges from the high pressure outlet.
6.1 AFTER EXTENDED STORAGE
Scale deposits may form in the pump when it is not used for some time.
This causes the motor to run stiff or it may not start up at all.
Remove scale deposits from the piping.
l Connect machine to water supply and rinse thoroughly with water. Do not plug unit into
electrical outlet.
To avoid electrical overloading turn the motor shaft by hand.
5.4 WATER SCREEN
The pressure washer is equipped with a water inlet screen to protect the pump.
If the screen is not kept clean, the flow of water to the pressure washer will
be restricted and the pump may be damaged.
5.3 LUBRICATION
The pressure washer is designed with a permanent lubrication system. Conventional oil check and
oil changes are not necessary.
NOTE: IN CASE OF OIL LEAKAGE, CONTACT CUSTOMER SERVICE DEPARTMENT
CONCERNING REPAIR. A SMALL AMOUNT OF OIL LEAKAGE IS NORMAL.
l To clean inner water screen, remove quick connect and remove the filter screen from the
pump inlet. (see page 4, item 13)
l Backflush screen to clean
l Replace screen and quick connect immediately to prevent any foreign matter from entering the
pump.
Do not damage the screen while removing or cleaning. Any foreign
particles entering the pump may damage the pump.
5.5 COOLING SYSTEM
The air vents, located in and around the pressure washer, must be kept clean and free of any
obstructions to ensure proper air cooling of the motor during operation.
prevent water from penetrating the vents of the pressure washer to
minimize the risk of damage to the machine and to reduce the risk of shock
to the operator.
16- ENG
D28921
7.0 TROUBLESHOOTING
Proceed as follows:
l Disconnect unit from electrical outlet.
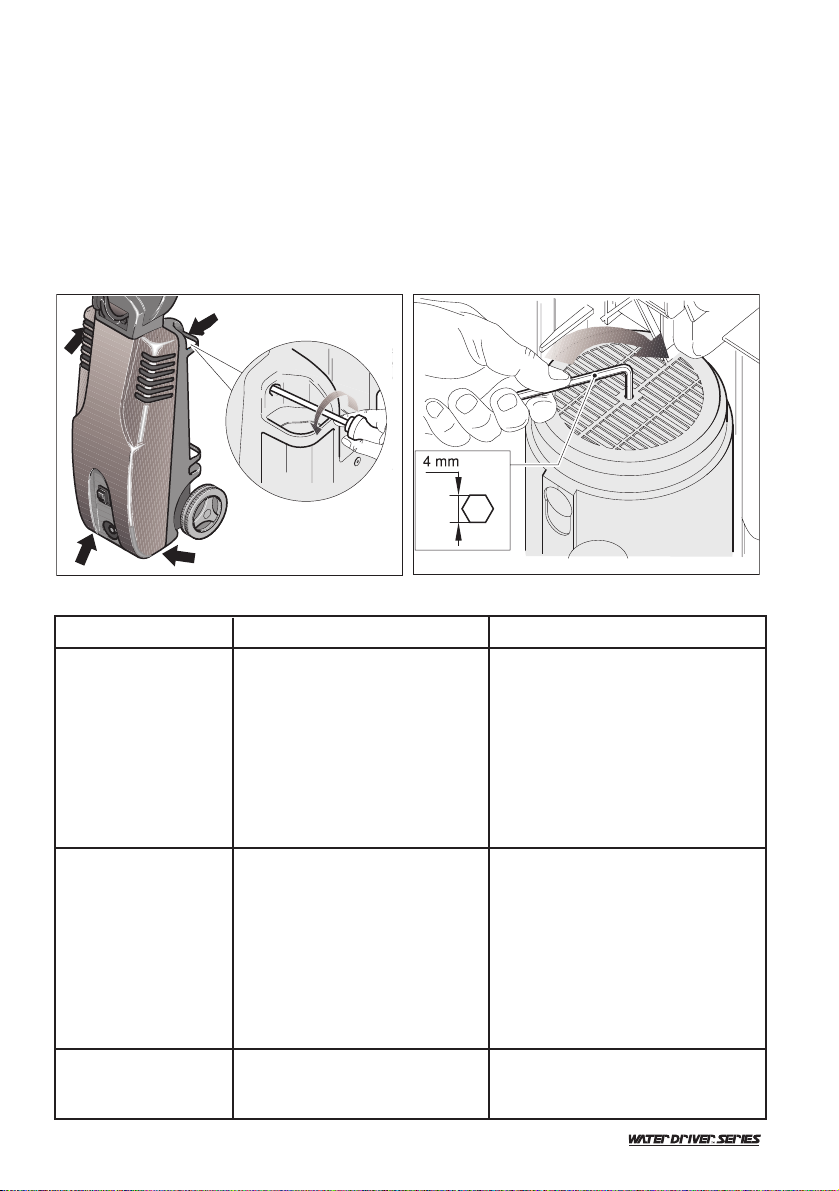
l Remove cover (Fig. A)
l Insert a suitable hexagon socket wrench (size 4 mm.) through the middle opening in the fan
cover and into the hexagon socket in the motor shaft.
l Turn the motor shaft clockwise by hand several times (Fig. B)
l Remove hexagon socket wrench
l Install cover
l Plug unit into electrical outlet
l Switch on machine with spray gun open.
Motor will not start or
stops while operating
GFCI tripped or not reset Turn off unit. Press GFCI reset
button firmly after it has been
connected to the electrical supply
Circuit breaker tripped or fuse
blown in circuit fuse box
Disconnect all other loads on the
same circuit and reset circuit breaker
or replace fuse
Loose or disconnected plug Reconnect plug
Tripped pressure washer
circuit breaker
Allow to cool and restart unit
Circuit breaker trips or
fuse blown in fuse box
Circuit Overload Check that the circuit is rated 15
amps or greater. Disconnect all
loads on the circuit
Extension cord too long or
wire size too small
Use proper extension cord as
recommended in Operator's Manual
Nozzle partially blocked
Clean nozzle as instructed in
Section 5.2
Excessive pressure
Reduce pressure by using pressure
adjustment knob
GFCI trips repeatedly
Incorrect voltage See Section 3.3
Internal short Call Customer Service Department
PROBLEM
POSSIBLE CAUSE
CORRECTION
Fig. A
Fig. b

17- ENG
D28921
Water or oil leaking
from bottom of pump
A small amount of leakage is
normal
If excessive leaking occurs call
Customer Service Department
Bypass valve not operating
properly
Call Customer Service Department
Faucet closed
Open faucet
Unit has been stored in freezing
temperatures
Thaw out unit completely including
hose, gun, and wand
No intake of chemicals
Injection tube not securely
inserted into pressure washer
Push firmly into machine
Tube cracked or split Replace tubing
Pressure increases
when gun is closed
Motor running but
pump not building
maximum pressure or
has irregular pressure
Water inlet screen clogged
Clean screen. See section 5.4
Air in pump
Let pressure washer run with gun
open and wand removed until
steady stream of water is released.
Adjustable pressure knob not
set to maximum position
Set to maximum position. See
Section 4.2
Suction or discharge valves
clogged or worn out
Call Customer Service Department
By-pass valve not operating
effectively
Call Customer Service Department
Wrong Nozzle setting Switch nozzle to low pressure
Injection tube strainer clogged Clean strainer
Dried chemicals in injector Dissolve by running warm water
through the injection tube
Gun safety lock engaged Release safety lock
Trigger will not move
PROBLEM
POSSIBLE CAUSE
CORRECTION
Nozzle Blocked Clean Nozzle. See Section 5.2

18- ENG
D28921
9.0 TECHNICAL DATA
Pump pressure 1600 psi MAX.
Operation Pressure
Electrical requirement 120V, 13 Amps, 60 Hz
Electrical cord 35 ft.
High Pressure Hose 23 ft.
Flow Rate at 1600 psi 1.6 gpm
Minimum Amperage source 15 amp
Pressure of inlet water 20 - 100 psi
Injection rate 2 - 4%
Inlet Water Cold Tap Water
Nozzle Spray Angle
High Pressure 0 - 60°
Nozzle Spray Angle
Low Pressure 0 - 90°
Turbo Nozzle Spray 30°
Manufacturing Tolerances (+-10%) on stated performances.
8.0 REPLACEMENT PARTS AND ACCESSORIES
THE FOLLOWING LIST OF ACCESSORIES AND REPLACEMENT PARTS ARE AVAILABLE
PLEASE CONTACT CUSTOMER SERVICE FOR MORE INFORMATION 1-800-888-2468
Code
Description
D28936 Detergent Tank
D28937 Detergent Tank Cap
D28939 Handle
D28940 Hubcap
D28941 Wheel
D28942 Locknut
D28943 Hose
D28944 Suction Fliter
D28945 Gun with hose
D28946 Multi-Reg Nozzle
D28947 Rotating Nozzle
D28949 Switch
D28950 Axle
D28921 Manual

19- ENG
D28921
Please Call Us First.
If there are missing or damaged parts,
DO NOT RETURN THIS PRODUCT TO THE STORE.
Our Customer Service Department
is available to help with any problems
and operational questions.
Our toll free number
1-800-888-2468
SEE OUR WEB SITE FOR REPLACEMENT AND OR MISSING PARTS
www.devap.com

20- ENG
D28921
DeVilbiss Air Power Company warrants to the original purchaser who uses the product in a consumer
application (personal, residential or household usage) that all products covered under this warranty are free from
defects in material and workmanship for one year from the date of purchase. All products covered by this limited
warranty which are used in commercial applications (i.e., income producing) are warranted to be free of defects
in material and workmanship for 90 days from the date of original purchase. Products covered under this
warranty include air compressors, air tools, service parts, pressure washers, and generators.
DeVilbiss Air Power Company will repair or replace, at DeVilbiss' option, products or components which have
failed within the warranty period. Service will be scheduled according to the normal work flow and business
hours at the service center location, and the availability of replacement parts. All decisions of DeVilbiss Air
Power Company with regard to this limited warranty shall be final.
This warranty gives you specific legal rights, and you may also have other rights which vary from state to state.
RESPONSIBILITY OF ORIGINAL PURCHASER (initial User):
• To process a warranty claim on this product, DO NOT return it to the retailer. The product must be evaluated
by an Authorized Warranty Service Center. For the location of the nearest Authorized Warranty Service Center
call 1-800-888-2468, 24 hours a day, 7 days a week or visit our web site @ devap.com.
• Retain original cash register sales receipt as proof of purchase for warranty work.
• Use reasonable care in the operation and maintenance of the product as described in the Owners Manual(s).
• Deliver or ship the product to the nearest Authorized Warranty Service Center. Freight costs, if any, must be
paid by the purchaser.
• Air compressors with 60 and 80 gallon tanks will be inspected at the site of installation. Contact the nearest
Authorized Warranty Service Center that provides on-site service calls for service call arrangements.
• If the purchaser does not receive satisfactory results from the Authorized Warranty Service Center, the
purchaser should contact DeVilbiss Air Power Company.
THIS WARRANTY DOES NOT COVER:
• Merchandise sold as reconditioned, used as rental equipment, or floor or display models.
• Merchandise that has become damaged or inoperative because of ordinary wear, misuse*, cold, heat, rain,
excessive humidity, freeze damage, use of improper chemicals, negligence, accident, failure to operate the
product in accordance with the instructions provided in the Owners Manual(s) supplied with the product,
improper maintenance, the use of accessories or attachments not recommended by DeVilbiss Air Power
Company, or unauthorized repair or alterations.
* An air compressor that pumps air more than 50% during a one hour period is considered misuse because
the air compressor is undersized for the required air demand.
• Repair and transportation costs of merchandise determined not to be defective.
• Costs associated with assembly, required oil, adjustments or other installation and start-up costs.
• Expendable parts or accessories supplied with the product which are expected to become inoperative or
unusable after a reasonable period of use, including but not limited to sanding disks or pads, saw and shear
blades, grinding stones, springs, chisels, nozzles, o-rings, air jets, washers and similar accessories.
• Merchandise sold by DeVilbiss Air Power Company which has been manufactured by and identified as the
product of another company, such as gasoline engines. The product manufacturer's warranty, if any, will
apply.
• ANY INCIDENTAL, INDIRECT OR CONSEQUENTIAL LOSS, DAMAGE, OR EXPENSE THAT MAY RESULT
FROM ANY DEFECT, FAILURE OR MALFUNCTION OF THE PRODUCT IS NOT COVERED BY THIS
WARRANTY. Some states do not allow the exclusion or limitation of incidental or consequential damages, so
the above limitation or exclusion may not apply to you.
• IMPLIED WARRANTIES, INCLUDING THOSE OF MERCHANTABILITY OR FITNESS FOR A PARTICULAR
PURPOSE, ARE LIMITED TO ONE YEAR FROM THE DATE OF ORIGINAL PURCHASE. Some states do
not allow limitations on how long an implied warranty lasts, so the above limitations may not apply to you.
213 Industrial Drive • Jackson, TN 38301-9615
Telephone: 1-800-888-2468
FAX: 1-800-888-9036
LIMITED WARRANTY

Manual de funcionamiento
para el modelo WD1600E
Pieza No. D28921 Rev. 0 3/17/03
Lavadora a presión
IMPORTANTE
Asegúrese de que la persona que va a usar esta herramienta lea
cuidadosamente y comprenda estas instrucciones antes de utilizarla.
Registre toda la información para
referencias futuras:
Fecha de compra:
Modelo N°
N° de serie
¿Consultas? 1-800-888-2468
Para conocer más su lavadora a
presión y registrarla en línea visite:
www.devap.com

22-SP
D28921
1.0 NORMAS OPERATIVAS Y DE SEGURIDAD
ÍNDICE
1.0 NORMAS OPERATIVAS Y DE
SEGURIDAD . . . . . . . . . . . . . . . . . . . pag. 22
2.0 CARACTERÍSTICAS RELATIVAS
A LA SEGURIDAD . . . . . . . . . . . . . . pag. 28
3.0 INSTALACIÓN . . . . . . . . . . . . . . . . . . pag. 29
3.1 MANGUERA DE
ALTA PRESIÓN . . . . . . . . . . . . . pag. 29
3.2 CONEXIÓN DEL AGUA . . . . . . . . pag. 29
3.3 EMPALME DE LA
ALIMENTACIÓN ELÉCTRICA . . . . pag. 29
4.0 INSTRUCCIONES DE USO . . . . . . . . . pag. 30
4.1 PROCEDIMIENTO DE
PUESTA EN MARCHA . . . . . . . . . pag. 30
4.2 CHORRO DE
ALTA PRESIÓN / TURBO . . . . . . pag. 31
4.3 BOQUILLA CHORRO
REGULABLE . . . . . . . . . . . . . . . . pag. 32
4.4 CHORRO DE
ALTA PRESIÓN / TURBO . . . . . . . pag. 32
4.5 USO DE PRODUCTOS
QUÍMICOS . . . . . . . . . . . . . . . . . . pag. 33
4.6 TÉCNICAS DE LIMPIEZA . . . . . . . pag. 33
4.7 FINALIZACIÓN
DE LA OPERACIÓN . . . . . . . . . . . pag. 34
5.0 MANUTENCIÓN USUARIO . . . . . . . . . pag. 34
5.1 CONEXIONES . . . . . . . . . . . . . . . pag. 34
5.2 BOQUILLA . . . . . . . . . . . . . . . . . . pag. 34
5.3 LUBRICACIÓN . . . . . . . . . . . . . . pag. 35
5.4 FILTRO AGUA . . . . . . . . . . . . . . . pag. 35
5.5 SISTEMA DE REFRIGERACIÓN . . pag. 35
6.0 MANIPULACIÓN Y
ALMACENAMIENTO . . . . . . . . . . . . . pag. 35
6.1 DESPUÉS DE UN ALMACENAMIENTO . .
PROLONGADO . . . . . . . . . . . . . . . . . pag. 35
7.0 LOCALIZACIÓN DE LAS
AVERÍAS . . . . . . . . . . . . . . . . . . . . . . pag. 36
8.0 PIEZAS DE REPUESTO Y
ACCESORIOS . . . . . . . . . . . . . . . . . . pag. 38
9.0 DATOS TÉCNICOS . . . . . . . . . . . . . . pag. 38
Indica una situación de
inminente riesgo, la cual, si
no es evitada, causará la muerte o lesiones
serias.
Indica una situación
potencialmente
riesgosa, que si no es evitada, podría resultar
en la muerte o lesiones serias.
Indica una situación
potencialmente
peligrosa, la cual, si no es evitada, podría
resultar en lesiones menores o
moderadas.
Usado sin el símbolo de
seguridad de alerta indica
una situación potencialmente riesgosa la que,
si no es evitada, podría causar daños en la
propiedad.
Este manual contiene importante información para que usted sepa y comprenda. Dicha
información se relaciona con la protección de SU SEGURIDAD Y LA PREVENCIÓN DE
PROBLEMAS AL EQUIPO. Para ayudarlo a reconocer esa información, utilizamos los símbolos
indicados más abajo. Sírvase leer el manual y prestar atención a dichos símbolos.
Lea el Manual de funcionamiento . Para su seguridad, armado,
funcionamiento e instrucciones de mantenimiento, no haga funcionar
el equipo hasta haber leído el Manual de funcionamiento.

23- SP
D28921
RIESGO DE DESCARGA ELÉCTRICA
RIESGO
QUÉ PUEDE OCURRIR
CÓMO PREVENIRLO
Un chorro de agua dirigido a tomacorrientes, interruptores
eléctricos u objetos conectados a un circuito eléctrico, puede
ocasionar una electrocución fatal.
Este producto está impulsado por electricidad.
Contiene y pulveriza agua y otros líquidos conductivos.
Su operación inadecuada podría ser causa de
electrocución.
El disyuntor diferencial, que protege ante la falta de
conexión a tierra (GFCI), no funcionará adecuadamente a
menos que su conexión eléctrica se encuentre hecha a un
circuito adecuadamente conectado a tierra.
• Los cordones de extensión pueden provocar choques
elécticos.
Conecte siempre el cableado a un circuito
polarizado a tierra. Su cableado viene equipado con
un interruptor difer
encial (GFCI) que protege su
seguridad personal ante la ausencia de conexión
a tierra.
No toquen el enchufe o la toma con las manos
mojadas.
En caso de estar dañado, deberá sustituirse el
conjunto completo del cableado, por medio de un
servicentro autorizado. Refiérase a las instrucciones
de conexión a tierra.
No usar con cordones de extensión.
• Desenchufe cualquier producto eléctrico en
funcionamiento antes de intentar limpiarlo. Dirija el
rociado alejado de salidas eléctricas e interruptores.
• Algunos fluidos para limpieza contienen sustancias que
pueden lesionar la piel, los ojos o los pulmones
.
• Use solamente fluidos para limpieza
específicamente recomendados para lavadoras
a alta presión. Siga las recomendaciones del
fabricante. No usar blanqueador de cloro ni
compuesto corrosivo alguno.
RIESGO DE EXPLOSIÓN O INCENDIO
RIESGO
QUÉ PUEDE OCURRIR
CÓMO PREVENIRLO
RIESGO DE INHALACIÓN
RIESGO
QUÉ PUEDE OCURRIR
CÓMO PREVENIRLO
No utilice ácidos, gasolina, querosén o cualquier
otro material inflamable en este producto. Utilice
únicamente detergentes, limpiadores y
desengrasantes recomendados para el uso en
lavadoras a presión. Trabaje en una zona bien
ventilada.
La utilización de ácidos, productos químicos no
aprobados o solventes inflamables en este producto
puede ocasionar lesiones o la muerte.
La restricción a cualquiera de las aberturas de
ventilación de la lavadora a presión, ocasionará un
serio recalentamiento y podría ser causa de incendio.
Jamás coloque objetos apoyados o encima de
la lavadora a presión. Opere la lavadora a
presión en una zona abierta; sepárela - por lo
menos - 30 centímetros (12 pulgadas) de
cualquier pared u obstrucción que pudiese
restringir el flujo del aire fresco a las aberturas
de ventilación.

24-SP
D28921
• Su lavadora opera a presiones de fluido y velocidades
elevadas, capaces de penetrar el tejido humano y
animal; ello podría determinar una amputación u otras
lesiones serias. Las pérdidas causadas por
conexiones flojas o gastadas, o mangueras dañadas
pueden determinar lesiones por inyección. ¡NO
TRATE A LA INYECCIÓN DE FLUIDO COMO A UN
SIMPLE CORTE! ¡Vea a un médico
inmediatamente!
• Jamás coloque su mano delante de la boquilla.
• No dirija el chorro de descarga a personas ni
animales.
• Asegúrese que las mangueras y acoples estén
ajustados y en buenas condiciones. Jamás agarre de
la boquilla o los acoples durante la operación.
• No opere la lavadora a presión con una manguera
gastada o erosionada.
• Jamás conecte o desconecte la varilla rociadora o los
acoplamientos mientras el sistema esté presurizado.
RIESGO DE INYECCIÓN DE FLUIDO
RIESGO
QUÉ PUEDE OCURRIR
CÓMO PREVENIRLO
•
Para liberar la presión del sistema, coloque el interruptor
on/off en la posición "off", cierre el suministro de agua, y
mantenga apretado el gatillo hasta que el agua deje de
fluir.
• Use solamente boquillas y accesorios para alta presión
clasificados para una presión más elevada que los psi
de su lavadora.
• Si no se reduce la presión antes de intentar el
mantenimiento o el desarmado, ello podría ser causa
de lesiones.
• El uso de ácidos, productos químicos tóxicos o
corrosivos, venenos, insecticidas o cualquier
clase de solventes inflamables con este producto,
puede ocasionar una seria lesión o la muerte.
• No utilice en este producto ácidos, gasolina,
kerosén, o cualquier otro material inflamable.
Utilice únicamente detergentes caseros,
limpiadores y desengrasantes recomendados para
el uso en lavadoras a presión.
Use atuendo de protección adecuado para la
preservación de sus ojos y piel, del contacto con
los materiales rociados.
RIESGO DE QUEMADURA QUÍMICA
RIESGO
QUÉ PUEDE OCURRIR
CÓMO PREVENIRLO
RIESGO DE OPERACIÓN INSEGURA
QUÉ PUEDE OCURRIR
CÓMO PREVENIRLO
RIESGO
• No use soluciones cloradas ni cualquier otro
compuesto corrosivo.
• Familiarícese con la operación y controles de la
lavadora a presión.
• Mantenga la zona de operaciones libre de personas,
animales domésticos y obstáculos.
• No opere el producto si está fatigado o bajo la
influencia del alcohol o drogas. Manténgase alerta en
todo momento.
• Jamás desactive los mecanismos de seguridad de
este producto.
• Jamás deje la varilla rociadora desatendida mientras
la unidad esté funcionando.
• Infórmese cómo detener el equipo y rápidamente
purgar la presión.
• La operación insegura de su lavadora a presión
puede ocasionar lesiones serias o la muerte a
usted u otras personas.

25- SP
D28921
• Las bombas de las lavadoras a presión contienen
partes expuestas en movimiento. El contacto con
dichas partes en movimiento puede ocasionar
serias lesiones.
• Jamás opere la máquina sin la protección de la
bomba.
• No opere la máquina con partes faltantes, rotas
o desautorizadas.
RIESGO DE OPERACIÓN INSEGURA
QUÉ PUEDE OCURRIR
CÓMO PREVENIRLO
RIESGO
• Eviten encendidos accidentales. Coloquen el
interruptor en OFF antes de conectar o
desconectar el cable eléctrico a una toma.
• No utilicen el cable para mover la
hidrolimpiadora de alta presión. No tirar del cable
para desconectar el equipo de la toma.
• Con el fin de evitar daños, el cable no debe ser
aplastado, no debe ser colocado cerca de
objetos cortantes ni de fuentes de calor.
• Desconecten el enchufe eléctrico de la toma
cuando no está en uso e, igualmente, antes de
desconectar la manguera de alta presión.
• Hay que utilizar exclusivamente las mangueras y
los lanzadores de la hidrolimpiadora de alta
presión.
• En las estaciones frías, antes de poner en
funcionamiento la hidrolimpiadora, controlen que
no se haya formado hielo en la misma.
• Para reducir al máximo la cantidad de agua que
podría entrar en la hidrolimpiadora de alta
presión, durante el uso, colocarla lo más lejos
posible de la zona que debe ser limpiada.
• Párese sobre una superficie estable y sostenga
firmemente el mango de la pistola/varilla
rociadora con ambas manos. Prevea el retroceso
de la pistola cuando apriete el gatillo.
• En todo momento, mantenga alejados a los
niños de la lavadora a presión.
• La operación insegura de su lavadora a presión
puede ocasionar lesiones serias o la muerte a
usted u otras personas.
• La pistola/varilla rociadora es una poderosa
herramienta de limpieza que un niño puede
imaginar como un juguete.
• La fuerza reactiva del rociado determinará que la
pistola/varilla rociadora se mueva y podría ser la
causa de que el operador se resbale, caiga, u
oriente el rociador hacia una dirección errónea. El
control inadecuado de la pistola/varilla puede
ocasionar lesiones a uno mismo u otras personas.
• El contacto con superficies calientes, puede
ocasionar serias quemaduras.
• Durante la operación, toque solamente las
superficies de control de la lavadora a presión.
Mantenga a los niños alejados en todo momento
de la lavadora a presión. Ellos podrían no darse
cuenta de los riesgos de este producto.
RIESGO DE SUPERFICIES CALIENTES
RIESGO
QUÉ PUEDE OCURRIR
CÓMO PREVENIRLO

26-SP
D28921
ISTRUCCIONES PARA LA PUESTA A TIERRA.
Este equipo debe poseer la puesta a tierra. En caso de funcionamiento defectuoso o de avería, la
puesta a tierra suministra un recorrido de resistencia mínima para la corriente eléctrica con el fin de
reducir el riesgo de sacudidas. El equipo está dotado de un cable que incluye un conductor y
enchufe de tierra. El enchufe debe ser introducido en una toma apropiada, instalada en modo
idóneo y con puesta a tierra según lo establecido por las leyes y disposiciones locales.
Una conexión impropia entre el equipo y el conductor de tierra puede
provocar sacudidas eléctricas. Si tienen dudas sobre la idónea puesta
a tierra de la toma, consulten con un electricista o con un encargado de la manutención. No
modifiquen el enchufe suministrado con el equipo; en caso contrario, adapten la toma
instalada con la ayuda de un electricista cualificado. No utilicen adaptadores para este
equipo.
• El rociado de los líquidos a alta velocidad puede
causar la rotura de algunos objetos proyectando
sus partículas a altas velocidades.
• Los objetos livianos o que no estén sujetos se
pueden convertir en proyectiles peligrosos.
•
Siempre usar anteojos de seguridad que cumplan
con la norma Z87 de ANSI. Siempre usar ropa
especial para protegerse del rociado.
• Nunca apuntar la varilla rociadora ni dirigir el
rociado a personas ni animales.
• Para evitar que se accione accidentalmente
siempre enganchar el seguro del gatillo cuando la
varilla rociadora no esté en uso.
• Nunca fijar el gatillo permanentemente en la
posición de abierto (open).
RIESGO DE LESIONES POR EL ROCIADO
RIESGO
QUÉ PUEDE OCURRIR
CÓMO PREVENIRLO
El chorro poderoso de su lavadora a presión es capaz de causar daño a
superficies tales como la madera, vidrio, pintura del automóvil, guardas rayadas,
adornos y objetos delicados tales como flores y arbustos. Antes de rociar,
verifique el ítem que debe ser lavado para asegurarse que el mismo es suficientemente fuerte como para
resistir el daño de la fuerza del rociado. Evite el uso del chorro concentrado excepto para superficies muy
fuertes, tales como concreto y acero.
CONSERVAR ESTAS INSTRUCCIONES

27- SP
D28921
DISEÑO PIEZAS
LISTA PIEZAS
1 Lanzador con Boquilla de Cabezal Rotatorio
2 Pistola
3 Tubo de alta presión
4 Porta-manguera alta presión
5 Interruptor ON/OFF
6 Conector manguera alta presión
7 Entrada agua
8 Lanzador con Boquilla Variable
9 Porta-accesorios
10 Tornillo (Depósito del liquido detergente)
11 Enchufe eléctrico con Interruptor diferencial automático de seguridad
12 Tapón agua
13 Filtro
14 Entrerrosca con conexión rápida
15 Depósito del liquido detergente
16 Portacable alimentación

28-SP
D28921
2.0 CARACTERÍSTICAS RELATIVAS A LA SEGURIDAD
La hidrolimpiadora de presión está dotada de un dispositivo de stop que detecta cuándo está
desenganchado/suelto el gatillo de la pistola. Abre el circuito eléctrico al motor y bloquea la
hidrolimpiadora de presión.
La hidrolimpiadora de presión está también dotada de un interruptor
eléctrico principal ON/OFF. Cuando la hidrolimpiadora no está en uso,
es necesario que dicho interruptor esté colocado siempre en OFF para prevenir posibles
accidentes o daños.
SOBRECARGA DEL MOTOR
El motor eléctrico de la hidrolimpiadora posee un dispositivo de protección contra la sobrecarga
que bloquea automáticamente el motor en el caso de exceso de corriente o en el caso de
recalentamiento.
El dispositivo se resetea automáticamente y reactiva las
condiciones normales de funcionamiento después de un
breve período.
PROTECCIÓN CON INTERRUPTOR DIFERENCIAL
AUTOMÁTICO DE SEGURIDAD
La hidrolimpiadora está dotada de un interruptor diferencial
automático de seguridad (GFCI) montado en el enchufe del
cable de alimentación eléctrica. Dicho dispositivo suministra
una protección adicional contra el riesgo de sacudidas. Si
fuere necesario substituir el enchufe o el cable, utilicen
exclusivamente repuestos similares provistos de protección
GFCI.
EXTENSIONES
No se aconseja el uso de extensiones si éstas no están conectadas a
un interruptor diferencial automático de seguridad, puesto en cajas
del circuito o en tomas protegidas.
Utilicen exclusivamente extensiones de 3 conductores que posean enchufes con puesta a tierra de
3 polos y conectores tripolares aptos para el enchufe del equipo. Usen exclusivamente extensiones
para uso exterior. Dichas extensiones están marcadas por la frase “Aptas para uso exterior: si no las
utilizan, colóquenlas en un lugar reparado”.
Usen solamente extensiones con una potencia eléctrica superior a la potencia nominal del equipo.
No utilicen extensiones dañadas. Antes del uso, controlen la extensión y si está dañada
substitúyanla. No la usen en modo incorrecto y no tiren del cable para desenchufar. Tengan a las
extensiones lejos de fuentes de calor y de ángulos cortantes. Antes de desconectar el equipo de la
extensión, desconecten siempre esta última de la toma.
Cuando se utilizan extensiones, respeten las siguientes características:
Longitud cable Calibres cable
Hasta 50 pies 14 AWG
De 50 a 100 pies 12 AWG
Para reducir la posibilidad de que el cable sea fulminado, mantengan
la extensión seca y fuera de tierra. No toquen el enchufe con las
manos mojadas.

29- SP
D28921
CONEXIÓN DEL AGUA
Unión del agua apropriada
Fig. 1
Agujero admisión máq
Conexión rápida
Manguera flexible jardín
Guarnición
3.0 INSTALACIÓN
3.1 TUBO DE ALTA PRESIÓN
Extraer y desechar el tapón del agua (lista piezas de repuesto 12) antes de conectar el tubo de
alta presión, introduciendo cuidadosamente la unión mediante el O-ring adentro de la salida de
alta presión y apretando manualmente la tuerca roscada.
3.2 CONEXIÓN DEL AGUA
Antes de efectuar la conexión, haga correr el agua en la manguera jardín (no incluida en el
suministro) para hacer salir los materiales extraños. Conecten la manguera jardín a la unión del
agujero de introducción de la hidrolimpiadora de alta presión.
3.3 ENLACE DE LA ALIMENTACIÓN ELÉCTRICA
La hidrolimpiadora está dotada de serie de un cable eléctrico y de un enchufe de alimentación con
interruptor diferencial automático de seguridad (GFCI). El cable deberá ser conectado únicamente
a una toma eléctrica instalada en conformidad con las normativas locales de seguridad.
NOTA: La corriente eléctrica deberá ser de 120V, 60 Hz con un circuito de por lo menos 15 amp.
Controlen el interruptor diferencial automático de seguridad (GFCI)
antes del uso. No utilicen la hidrolimpiadora si el control efectuado da
un resultado negativo.
Procedimiento para controlar el GFCI:
1. Conectar el GFCI en la toma de alimentación
2. Presionar RESET
3. Presionar el botón TEST. Aparecerá un indicador de color rojo en RESET
4. Presionar nuevamente RESET antes del uso
NOTA: El GFCI debe ser reseteado todas las veces que se conecta la hidrolimpiadora a una toma
eléctrica.

30-SP
D28921
A. Conecten sólo a una toma con una puesta a tierra idónea. No extraigan el enchufe de tierra
B. Controlen el cable antes del uso. Si está dañado, no lo utilicen.
C. Mantengan secas y fuera de tierra todas las conexiones
D. No toquen el enchufe con las manos mojadas
E. La hidrolimpiadora es suministrada con un interruptor diferencial automático de seguridad
instalado en el enchufe de alimentación. Si es necesario substituir el enchufe o la toma, usen
sólo piezas de repuesto del mismo tipo. Para una substitución correcta, contacten la Oficina
de Asistencia Clientes.
No se aconseja el uso de extensiones si no están introducidas en una toma protegida por el
interruptor diferencial automático de seguridad. Cualquier extensión utilizada debe ser del tipo
14AWG y la longitud no debe superar los 50 pies con el fin de prevenir una excesiva dispersión de
tensión. Utilicen sólo extensiones para uso exterior. Tales extensiones están señaladas con la
siguiente frase: “Idóneas para uso exterior; almacenar en lugar cerrado cuando no es utilizada.”
4.0 INSTRUCCIONES DE USO
Riesgo de penetración o de daños. NO descarguen el flujo sobre las
personas.
4.1 PROCEDIMIENTO DE PUESTA EN MARCHA
1. Asegúrense de que la alimentación del agua esté conectada.
2. Asegúrense de que el enchufe del equipo esté conectado y que el GFCI HAYA SIDO
RESETEADO.
3. Liberen la seguridad de la pistola si está bloqueada.
A. Bloqueo de seguridad “cerrado”
B. Bloqueo de seguridad “abierto”
4. Con el fin de permitir la salida de aire de la manguera, aprieten el gatillo de la pistola hasta
que salga un flujo regular por la boquilla.
5. Extraigan la suciedad o los materiales extraños de la salida de la pistola y del conector blando
del lanzador.
6. Introduzcan el lanzador en la unión rápida empujando enérgicamente y luego girando el
lanzador de ¼ de vuelta para bloquearlo en su sede.
NOTA: Asegúrense de que el bloqueo de seguridad esté cerrado.

31- SP
D28921
Cuando se requiere alta presión, sostener y hacer desplazar la abrazadera/brida y la boquilla lejos
de la pistola.
Si el lanzador no está bien bloqueado en su sede, cuando se utiliza la
pistola, podría ser expulsada debido a la alta presión, provocando
daños y perjuicios.
7 Presionen el gatillo en la pistola de chorro
8 Presionen la tecla ON/OFF para poner en marcha la hidrolimpiadora.
4.2 ALTA PRESIÓN / BAJA PRESIÓN
No desplacen la boquilla para regular la presión cuando el gatillo está
presionado.
La posición de la boquilla de alta presión (baja presión) es ideal para la limpieza. Cuando se
requiere presión alta, sostener y hacer desplazar la abrazadera/brida y la boquilla hacia la pistola.
NOTA: Asegúrense de que la abrazadera/brida esté toda atrás para cerrar la boquilla en la posición
de baja presión.

32-SP
D28921
Para disminuir el ángulo del chorro de la punta de “lápiz”, giren hacia la derecha.
Chorro Rotatorio
4.3 BOQUILLA CHORRO REGULABLE
La boquilla de chorro regulable, permite regular el chorro desde el ventilador hasta la punta del
“lápiz” tanto en posición de alta como de baja presión. El chorro se regula girando la boquilla
La regulación del chorro de la punta del lápiz puede dar resultados
“agresivos/corrosivos”. Aconsejamos utilizar para la mayor parte de las
aplicaciones de limpieza, un ángulo de chorro de veinte grados (20°) para no dañar las
superficies donde se necesita utilizar el chorro.
NOTA: La presión del chorro sobre la superficie que están limpiando aumenta en proporción al
acercamiento del lanzador sobre la superficie misma.
Para aumentar el ángulo de un chorro de ventilador, giren hacia la izquierda.
4.4 CHORRO DE ALTA PRESIÓN / TURBO
No actúen sobre la boquilla para modificar la presión.
La posición de la boquilla rotatoria de alta presión está diseñada para obtener el mejor resultado
de limpieza. Siempre mantener el lanzador de chorro a una distancia de 15 a 20cm (6" a 8") de la
superficie que desea limpiar.

33- SP
D28921
4.6 TÉCNICAS DE LIMPIEZA
Cuando se procede a la limpieza con la hidrolimpiadora, se pueden efectuar diferentes
operaciones sólo con el agua; en muchos casos, sin embargo, es conveniente utilizar también un
detergente. El uso de un detergente asegura un tratamiento inmediato de la suciedad, permitiendo
al agua con alta presión penetrar y eliminar eficazmente la suciedad. La posición de baja presión
suministra una aplicación delicada del producto químico. Recomendamos esta posición también
para enjuagar una superficie después de la aplicación de cera y de otras aplicaciones que
requieran la baja presión de una manguera de jardín. La baja presión equivale a una manguera de
jardín programada en el rendimiento más bajo para aplicar en modo correcto el producto químico.
PARA APLICACIONES CON PRODUCTOS QUÍMICOS, HAGAN DESPLAZAR LA
ABRAZADERA/BRIDA COMO ESPECIFICADO EN LA SECCIÓN 4.2.
4.5 USO DE PRODUCTOS QUÍMICOS
use tan solo productos químicos específicos para hidrolimpiadoras de
alta presión.
1 Inserte el tubo de aspiración (2) en su toma en el estanque
2 Rellene el estanque con detergente específico
3 Asiente el estanque con la solución química en su lugar adecuado en la parte posterior de la
máquina.
4 Asegure el estanque por medio del tornillo suministrado.
5 Muevan la boquilla regulable hacia la posición de baja presión haciendo desplazar la
abrazadera/brida hacia la boquilla. El producto químico será mezclado inmediatamente con el
agua y descargado a través de la boquilla.
NOTA: cuando la boquilla está ajustada para la erogación de alta presión, el producto químico no
será aspirado desde su estanque.
APLICACIÓN DE DESENGRASANTE A BASE DE JABÓN
1. Apliquen la solución de jabón de la hidrolimpiadora sobre una superficie de trabajo SECA.
NOTA: NO SE ACONSEJA MOJAR LA SUPERFICIE ANTES, PUESTO QUE DILUYE EL DE-
TERGENTE Y REDUCE SU CAPACIDAD DE LIMPIEZA. Ante la presencia de una superficie
vertical, apliquen el jabón horizontalmente comenzando por la parte baja para evitar estriados.
2. Antes de enjuagar, dejen el producto químico sobre la superficie durante un breve lapso de
tiempo.
Si se deja secar el jabón, las superficies pintadas podrían dañarse. Laven
y sequen una pequeña sección por vez. No trabajen sobre superficies
calientes o bajo la luz directa del sol.
3. Enjuaguen con agua limpia y con alta presión. Sobre las superficies verticales, comiencen a
enjuagar antes desde la parte baja hacia la parte alta y luego viceversa. Tengan la boquilla a
6/8 pulgadas de la superficie de trabajo con un ángulo de 45° utilizando el chorro turbo como
si fuera una herramienta para pelar en lugar de cepillo de acero.
NOTA: Asegúrense que el sistema de inyección de productos químicos esté completamente limpio
antes de cambiar productos químicos.

34-SP
D28921
APLICACIÓN DE LA CERA
1. Después de haber limpiado, apliquen la cera con la hidrolimpiadora regulada sobre la baja
presión. Coloquen la cera dentro el depósito del liquido detergente.
2. Apliquen la cera en un estrato uniforme. Apliquen sobre superficies mojadas desde abajo
hacia arriba, para distribuirla uniformemente y para evitar los estriados.
3. Eliminen el exceso de cera del aparato de baja presión. NOTA: SI EL EXCESO DE CERA NO
ES EXTRAÍDO, SE PUEDE OBTENER UN RESULTADO OPACO.
4. Efectúen el secado para reducir las manchas de agua.
4.7 FINALIZACIÓN DE LA OPERACIÓN
Cuando habrán concluido la utilización del sistema de inyección de productos químicos, extraigan
la manguera del recipiente, hagan funcionar aún a baja presión y hagan pasar agua limpia por el
depósito del liquido detergente hasta que esté completamente limpio. NOTA: La falta de una
limpieza a fondo puede provocar una obturación en el sistema de inyección y será inutilizable.
l Detengan el equipo presionando el botón on/off.
l Desconecten la toma eléctrica.
l Cierren el agua y depresuricen el equipo presionando el gatillo.
Cierren la alimentación del agua y presionen el gatillo para
depresurizar el equipo. La falta de depresurización puede provocar
daños a las personas debido a la descarga del agua de alta presión.
l Desconecten la manguera de descarga de la alta presión y la manguera de introducción del
agua.
3. Laven abundantemente con agua hacia la parte trasera de la boquilla.
4. Conectar nuevamente la boquilla al lanzador
NOTA: Atornillar completamente las boquillas en el lanzador hasta cerrar completamente (ver
dibujo)
Hacer arrancar nuevamente la hidrolimpiadora y bajar el gatillo de la pistola de chorro. Si la
boquilla está aún bloqueada o parcialmente bloqueada, repitan dichas operaciones desde el punto
1 hasta el punto 4.
5.0 MANUTENCIÓN
5.1 CONEXIONES
Las conexiones a mangueras, la pistola y el lanzador de chorro de la hidrolimpiadora, deberían ser
limpiados regularmente y lubricados para prevenir las pérdidas y la rotura de los o-rings.
5.2 BOQUILLA
El dispositivo de regulación de la alta/baja presión de la boquilla debe ser lubricado con
regularidad.
La obturación de la boquilla provoca el aumento de la presión de la bomba y, con toda
probabilidad, la distorsión de la forma del chorro. Se requiere una limpieza inmediata.
1. Separar la boquilla del lanzador
2. Limpien la boquilla.

35- SP
D28921
5.4 FILTRO DE AGUA
La hidrolimpiadora está dotada de un filtro de introducción de agua para proteger la bomba.
Si no se mantiene limpio el filtro, el flujo del agua hacia la
hidrolimpiadora se ve limitado y la bomba puede dañarse.
l Para limpiar el filtro más interno del agua, remuevan la conexión rápida y el filtro plástico de la
toma de la bomba (verla página 20, pos. 13).
l El filtro de retorno del flujo debe estar limpio.
l Remplacen de inmediato el filtro y la unión rápida para evitar que entre material extraño en la
bomba.
No dañen el filtro cuando lo extraen y limpian. Cualquier partícula
extraña que pudiera entrar en las bombas, podría dañarla.
5.5 SISTEMA DE REFRIGERACIÓN
Los respiraderos de aire colocados en la hidrolimpiadora y a su alrededor, deben ser mantenidos
limpios de cualquier obstrucción para garantizar la refrigeración del motor con aire limpio durante
el uso.
Eviten que el agua penetre en los respiraderos de la hidrolimpiadora
para que el riesgo de dañar la máquina sea mínimo y para reducir el
peligro de sacudida eléctrica al operador.
5.3 LUBRICACIÓN
La hidrolimpiadora ha sido creada con un sistema de lubricación permanente. No son necesarios
controles convencionales ni la substitución de aceites.
NOTA: EN EL CASO DE PÉRDIDA DE ACEITE, CONTACTEN AL SERVICIO CLIENTES DE LA
SOCIEDAD HD POWERWASHER, SECCIÓN REPARACIONES. UNA PEQUEÑA PÉRDIDA DE
ACEITE ES NORMAL.
6.0 MANIPULACIÓN Y ALMACENAMIENTO
Almacenen la hidrolimpiadora en un local cuya temperatura no
descienda por debajo de los 32°F. En el caso de congelamiento, la bomba
de este equipo está sujeta a daño permanente. LOS DAÑOS PROVOCADOS POR EL HIELO
NO ESTÁN CUBIERTOS POR LA GARANTÍA.
Si almacenan la hidrolimpiadora en un local donde la temperatura es inferior a los 32°F, pueden
disminuir el riesgo de daño del equipo siguiendo el siguiente procedimiento:
1. Detengan la hidrolimpiadora y desconecten la manguera de alimentación y la de alta presión.
2. Presionen el gatillo de la pistola de descarga para hacer salir toda el agua del “lanzador” y de
la manguera.
3. Pongan nuevamente en marcha la hidrolimpiadora y déjenla en funcionamiento durante un
breve período (unos 5 segundos) hasta que saldrá el agua por la salida de la alta presión.
6.1 DESPUÉS DE UN ALMACENAMIENTO PROLONGADO
Cuando no es utilizada durante mucho tiempo, se podrían formar en la bomba depósitos
calcáreos.
Ello podría implicar que el motor no funcione correctamente o que directamente no funcione.
Extraigan los depósitos calcáreos de la tubería.
l Conecten la máquina a la alimentación del agua y enjuaguen. No introduzcan el enchufe en el
conector principal.
Para evitar la sobrecarga eléctrica, giren el eje motor manualmente.

36-SP
D28921
Efectúen las siguientes operaciones:
l Desconecten el enchufe del conector principal.
l Extraigan el revestimiento de paneles (Fig.A)
l Introduzcan una llave de casquillo hexagonal apropiada (4 mm) a través de la apertura central
en la tapa del ventilador y en el alojamiento hexagonal en el eje motor.
l Giren algunas veces a mano el eje motor en sentido retrógrado (Fig.B)
l Saquen la llave de casquillo hexagonal
l Vuelvan a montar el revestimiento de paneles
l Introduzcan el enchufe del conector principal en la caja de la toma de corriente
l Enciendan el aparato con la pistola de chorro abierta
7.0 LOCALIZACIÓN DE LAS AVERÍAS
El motor no arranca o
se detiene durante el
funcionamiento
El GFCI salta o no resetea Apagar el equipo. Presionar la teda
Reset del GFCI después de haberlo
conectada al alimentador eléctrico.
El interruptor del circuito se
desconecta o los fusibles
están quemados en la caja de
fusibles
Desconectar todas las demás
cargas sobre el mismo circuito y
resetear el interruptor de circuito o
cambiar los fusibles
El interruptor de circuito de la
hidrolimpiadora ha saltado
Dejar enfriar descansar el equipo
Boquilla parcialmente
bloqueada
Limpien la boquilla como indicado
en la sección 5.2
Controlen que el circuito esté
regulado en 15 o más amp.
Desconecten todas las cargas del
circuito.
Extensión demasiado larga o
dimensión del cable
demasiado pequeña
Presión excesiva Reducir la pressión con la manopla
de regulación
PROBLEMAS
CAUSAS PROBABLES
SOLUIÓN
Enchufe flojo o no conectado
Reconectar el enchufe
L’interruptor de circuito
salta o están
quemados los fusibles
en la caja de fusibles
Sobrecarga circuito
Usen una extensión idónea como
aconsejado en el Manual del
Operador
Fig. A
Fig. b

37- SP
D28921
El GFCI se desconecta
continuamente
Voltaje equivocado Véase sección 3.3
Una pequeña pérdida es
normal
Si la pérdida es excesiva, hay que
contactar la Oficina de Asistencia
Clientes
Cortocircuito interior
Llamen a la Oficina de Asistencia
Clientes
La válvula de bypass no
funciona correctamente
Llamen a la Oficina de Asistencia
Clientes
El motor gira pero la
bomba no suministra
la máxima presión o
tiene una persión
irregular
Aire en la bomba Dejen en funcionamiento la
hidrolimpiadora con la pistola
abierta y el “lanzador” desplazado
hasta que se obtenga un flujo de
agua regular
La manopla de regulación de
la presión no se coloca en la
posición máxima
Calibrar en la posición máxima.
Véase sección 4.2
Hay pérdidas de agua
y aceite desde el
fonda de la bomba
Cuando la pistola está
cerrada aumenta la
presión
Grifo cerrado
Abran el grifo
El equipo ha sido almacenado
a temperaturas muy frias
Descongelar completamente el
equipo, incluidos las mangueras, la
pistola y el lanzador
La pantalla de indroducción
agua está obturada
Limpien la pantalla. Véase sección
5.4
Dirigrise a la Oficina de Asistencia
Clientes
Enderecen la manguera
Pliegues de la manguera de
jardín
Consulten con la Oficina de
Asistencia Clientes
Válvulas de aspiración o de
descargo obturadas o fuera de
uso
La válvula by-pass no funciona
correctamente
PROBLEMAS
CAUSAS PROBABLES
SOLUIÓN
No se obtiene la
introducción de
productos químicos
La manguera de inyección no
está conectada correctamente
a la hidrolimpiadora
Empujen con fuerza en el equipo
La manguera está arruinada o
rota
Cambiar
Regulación equivocada de la
boquilla
Desconecten la boquilla para bajor
la presión
El filtro de la manguera está
tapado
Limpiar el filtro
Los productos químicos se
han secado en el inyector
Disolver haciendo correr agua
corriente en la manguera de
inyección
Está conectado el bloqueo de
seguridad de la pistola
Desenganchen el bloqueo de
seguridad
El gatillo no se mueve
La boquilla está bloqueada Limpiar - Véase sección 5.2

38-SP
D28921
9.0 DATOS TÉCNICOS
Código Descripción
D28936 Tanque de Detergente
D28937 Tapa del Tanque de Detergente
D28939 Asa
D28940 Tapacubo
D28941 Rueda
D28942 Contratuerca
D28943 Manguera
D28944 Filtro de Succión
D28945 Pistola con Manguera
D28946 Boquilla de Regulación Múltiple
D28947 Boquilla Rotatoria
D28949 Interruptor
D28950 Eje
D28921 Manual
8.0 PIEZAS DE REPUESTO Y ACCESORIOS
ESTÁN A DISPOSICIÓN LOS ACCESORIOS Y LAS PIEZAS DE REPUESTO PRESENTADOS EN LA
SIGUIENTE LISTA
PARA MAYORES INFORMACIONES CONTACTEN EL SERVICIO CLIENTES 1-800-888-2468
Presión bomba 1600 psi MAX
Presión de uso man.
Necesidades de electricidad 120V, 13 Amp., 60 Hz
Cable eléctrico 35 pies
Manguera alta presión 23 pies
Capacidad a 1600 psi 1.6 gpm
Fuente mínima de amperaje 15 Amp.
Presión del agua de introducción de 20 a 100 psi
Caudal de inyección 2 - 4%
Agua de introducción Agua fría de grifo
Alta presión del ángulo del
chorro de la boquilla 0- 60°
Baja presión del ángulo del
chorro de la boquilla 0 – 90°
Chorro boquilla turbo 30 grados

39- SP
D28921
Llámennos inmediatamente
Si faltan piezas o hay piezas dañadas,
NO MANDEN SU EQUIPO AL ALMACÉN
Nuestra Oficina Asistencia Clientes
está siempre disponible para ayudarles para resolver cualquier problema
o para cuestiones operativas
Nuestro numero gratuito interurbano es
1-800-888-2468
VISITEN NUESTRO SITIO WEB PARA SUSTITUCIONES Y/O PARTES FALTANTES
www.devap.com

40-SP
D28921
GARANTÍA LIMITADA
DeVilbiss Air Power Company garantiza al comprador original que utilice este producto para uso personal (uso
personal, residencial o doméstico) que todos los productos cubiertos bajo esta garantía están libres de defectos en
materiales y mano de obra durante un año, a partir de la fecha de su compra. Todos los productos cubiertos por esta
garantía limitada que sean utilizados para usos comerciales (por ej. aquellos que produzcan utilidades) quedan
garantizados libres de defectos en materiales y mano de obra durante, 90 días a partir de la fecha de su compra original.
Los productos cubiertos bajo esta garantía incluyen compresores de aire, herramientas neumáticas, partes de servicio,
lavadoras a presión y generadores.
DeVilbiss Air Power Company reparará o reemplazará, a opción de DeVilbiss, productos o componentes que hayan
fallado dentro del periodo de garantía. El servicio será programado de acuerdo al flujo y al horario normal de trabajo del
domicilio del servicentro, y a la disponibilidad de piezas de reemplazo. Todas las decisiones de DeVilbiss Air Power
Company relacionadas con esta garantía limitada serán definitivas.
Esta garantía le otorga derechos legales específicos, aunque también usted podría tener otros derechos que podrán
variar entre estados.
RESPONSABILIDAD DEL COMPRADOR ORIGINAL (Usuario inicial):
• Para procesar un reclamo de garantía sobre este producto, NO lo devuelva al comercio vendedor. El producto
deberá ser evaluado por un servicentro autorizado para la atención de garantías. Para informarse de la ubicación
más cercana del servicentro autorizado para atención de garantías llame al 1-800-888-2468, que atiende 24 horas
diarias, los 7 días de la semana o visite nuestro sitio Web en devap.com .
• Retenga el recibido de venta original, como comprobante de su compra, para obtener la atención de su garantía.
• Mantenga un cuidado razonable en la operación y mantenimiento del producto, de acuerdo a lo descripto en
el(los) Manual(es) del propietario.
• Entregue o envíe el producto al servicentro autorizado para atención de garantías más cercano. Los costos de
flete, si hubiese alguno, deberán ser abonados por el comprador.
• Únicamente los compresores de aire con tanques de 60 y 80 galones serán inspeccionados en el sitio de
instalación. Contacte el servicentro autorizado para atención de garantías más cercano que provea atención
domiciliaria de solicitudes de servicio, para efectuar los arreglos para la prestación de dicho servicio.
• Si el comprador no obtuviese un resultado satisfactorio de parte del servicentro autorizado para atención de
garantías, deberá contactar a DeVilbiss Air Power Company.
ESTA GARANTÍA NO CUBRE:
• Mercadería vendida como reacondicionada, usada como equipo en alquiler y modelos de piso para exhibición.
• La mercadería que se encuentre dañada o inoperante debido al uso ordinario, inadecuado, frío, calor, lluvia,
humedad excesiva, dañada por congelamiento, uso de productos químicos inapropiados, negligencia, accidente,
fallas en la operación del producto relacionado con las instrucciones contenidas en el(los) Manual(es) del
propietario provistos con el producto, mantenimiento inadecuado, uso de accesorios o agregados no
recomendados por DeVilbiss Air Power Company, reparaciones no autorizadas o modificaciones.
* Un compresor de aire que bombea aire durante más del 50% durante una hora, está considerado como de uso
inadecuado, dado que el compresor está subdimensionado para la demanda de aire requerida.
• Los costos de reparación y transporte de la mercadería determinada no defectuosa.
• Los costos asociados con el armado, aceite requerido, regulaciones u otros costos de instalación y puesta en
marcha.
• Las partes consumibles o accesorios provistos con el producto cuya expectativa de desgaste e inoperatividad
luego de un periodo razonable de uso, incluido pero no limitado a discos de lijado o almohadillas, sierras y hojas
cortantes, piedras de amolar, resortes, cortantes, picos, o-rings, picos de aire, lavadoras y accesorios similares.
• La mercadería vendida por DeVilbiss Air Power Company que haya sido fabricada e identificada como producto
de otra empresa. En dicho caso tendrá validez la garantía extendida por su fabricante.
• CUALQUIER PÉRDIDA INCIDENTAL, CONSECUENTE, DAÑO O GASTO QUE PUDIESE RESULTAR DE
CUALQUIER DEFECTO, FALLA O MAL FUNCIONAMIENTO DEL PRODUCTO, NO QUEDA CUBIERTO EN
LOS ALCANCES DE ESTA GARANTÍA. Algunos estados no permiten la exclusión ni limitación de daños
incidentales o consecuentes, en dicho caso la limitación antes mencionada no será de aplicación en su caso.
• LAS GARANTÍAS IMPLÍCITAS, INCLUYENDO AQUELLAS RELACIONADAS CON LA COMERCIALIZACIÓN Y
CALIFICACIÓN PARA UN PROPÓSITO EN PARTICULAR, QUEDAN LIMITADAS A UN AÑO A PARTIR DE LA
FECHA ORIGINAL DE SU COMPRA. Algunos estados no permiten limitaciones en cuanto a la duración de una
garantía implícita, en tal caso, las limitaciones antes mencionadas no serán de aplicación en su caso.
213 Industrial Drive • Jackson, TN 38301-9615
Telephone: 1-800-888-2468
FAX: 1-800-888-9036

Laveuse à haute pression
Manuel de l'utilisateur
pour modèle WD1600E
Inscrivez tous les renseignements
pour références futures:
Marque :
Date d'achat :
N° de modèle :
N° de série :
Questions ? 1-800-888-2468
Enregistrez le produit en ligne
www.devap.com
IMPORTANT
L'utilisateur de cet équipement doit lire attentivement et bien comprendre
ces instructions avant d'utiliser l'équipement.
Nº de pièce D28921 03/17/03

42- FR
D28921
1.0 RÈGLES DE SÉCURITÉ ET D'UTILISATION
TABLE DES MATIÈRES
1.0 Règles de sécurité et d'utilisation .page 42
2.0 Caractéristiques de sécurité . . . . .page 48
3.0 Installation . . . . . . . . . . . . . . . . . . .page 49
3.1 Boyau de haute pression . . . . .page 49
3.2 Connexion d'eau . . . . . . . . . . .page 49
3.3 Branchement de
l'alimentation électrique . . . . . .page 49
4.0 Instructions d'utilisation . . . . . . . . .page 50
4.1 Procédure de mise en service .page 50
4.2 Haute pression /
basse pression . . . . . . . . . . . .page 51
4.3 Buse de vaporisation réglable .page 52
4.4 Buse à haute pression /
buse rotative . . . . . . . . . . . . . .page 52
4.5 Usage des produits chimiques .page 53
4.6 Techniques de nettoyage . . . . .page 53
4.7 Après l'utilisation . . . . . . . . . . .page 54
5.0 Entretien . . . . . . . . . . . . . . . . . . . .page 54
5.1 Connexions . . . . . . . . . . . . . . .page 54
5.2 Buse . . . . . . . . . . . . . . . . . . . .page 54
5.3 Lubrification . . . . . . . . . . . . . .page 55
5.4 Filtre d'eau . . . . . . . . . . . . . . .page 55
5.5 Système de refroidissement . . .page 55
6.0 Instructions de manutention et
d'entreposage . . . . . . . . . . . . . . . .page 55
6.1 Après l'entreposage prolongé .page 55
7.0 Suggestions de dépannage . . . . . .page 56
8.0 Pièces de rechange et accessoires page 58
9.0 Données techniques . . . . . . . . . . .page 58
Indique un danger
imminent qui, s'il n'est
pas évité, causera de graves blessures ou
la mort.
Indique la
possibilité d’un
danger qui, s’il n’est pas évité, pourrait
causer de graves blessures ou la mort
.
Indique la possibilité
d’un danger qui, s’il
n’est pas évité, peut causer des
dommages
mineures ou moyennes.
Sans le symbole d’alerte.
Indique la possibilité d'un
danger qui, s'il n'est pas évité, peut causer
des dommages à la propriété.
Ce guide contient des renseignements importants que vous deviez bien saisir. Cette information porte
sur VOTRE SÉCURITÉ et sur LA PRÉVENTION DE PROBLÈMES D’ÉQUIPEMENT. Afin de vous aider
à identifier cette information, nous avons utilisé les symboles à droite. Veuillez lire attentivement ce guide
en portant une attention particulière à ces sections.
Une utilisation ou un entretien non appropriés de ce produit peut causer
des blessures graves et des dommages à la propriété. Lisez attentivement
tous les avertissements et les directives d'utilisation avant d'utiliser cet appareil. Suivez les directives
d'entretien spécifiées dans ce guide.
MISE EN GARDE
MISE EN GARDE

43- FR
D28921
DANGER
RISQUE
PRÉVENTION
DANGER
RISQUE
PRÉVENTION
DANGER
RISQUE
PRÉVENTION
• Un jet de vaporisation dirigé vers les prises de courant, les
interrupteurs ou les objets branchés sur un circuit électrique
peut causer des chocs électriques mortels.
• Ce produit est alimenté par électricité. Il contient et
vaporise de l'eau ainsi que des liquides conducteurs. Une
utilisation inappropriée peut entraîner une électrocution.
• Le disjoncteur de fuite à la terre (DFT) ne fonctionnera
pas de manière appropriée, à moins qu'il ne soit
branché à un circuit électrique entièrement mis à la
terre.
•
Les rallonges peuvent entraîner des chocs
électriques.
•
Toujours brancher l'ensemble de cordon d'alimentation
dans un circuit électrique polarisé et mis à la terre de
façon appropriée. L'ensemble de cordon d'alimentation est
équipé d'un disjoncteur de fuite à la terre (DFT) pour votre
protection.
•
Ne pas toucher la fiche ou la prise de courant
avec les mains mouillées.
• Si l'ensemble de cordon d'alimentation est endommagé, il
doit être remplacé au complet dans un Centre de service
après-vente autorisé. Consulter les instructions sur la mise
à la terre.
•
Ne pas utiliser avec des rallonges.
RISQUE DE CHOCS
É
LECTRIQUES
•
Débrancher tout appareil électrique avant de
tenter de le nettoyer. Diriger le jet de vaporisation
loin de toutes prises de courant et interrupteurs.
RISQUE D'EXPLOSION OU D’INCENDIE
• L'utilisation d'acides, de produits chimiques toxiques ou
corrosifs, de poisons, d'insecticides ou de toute sorte de
solvant inflammable dans ce produit pourrait provoquer
des blessures graves ou la mort.
• Ne pas utiliser d'acides, d'essence, de kérosène ou
d'autres matières inflammables dans ce produit. N'utiliser
que des détergents, nettoyants et dégraissants
domestiques qui sont recommandés pour l'utilisation
dans une laveuse à pression. Travailler dans un endroit
bien aéré.
•
Une restriction de toute ouverture de ventilation
de la laveuse à pression causera une surchauffe
importante et risque de causer un incendie.
•
Ne placez jamais des objets contre ou sur la
laveuse à pression. Utilisez la laveuse à
pression dans un endroit ouvert, à une
distance minimum de 12 po (30 cm) de tout
mur ou de toute obstruction qui pourrait
restreindre le débit d'air frais vers les
ouvertures de ventilation.
RISQUE PAR INHALATION
•
Certains nettoyeurs liquides contiennent des substances
pouvant causer des lésions à la peau, aux yeux et aux
poumons.
• N'utiliser que des liquides de nettoyage recommandés
pour des laveuses à pression. Suivre les
recommandations du fabricant. Ne pas utiliser d'eau de
Javel ou tout autre produit corrosif.

44- FR
D28921
DANGER
DANGER
RISQUE
PRÉVENTION
DANGER
RISQUE
PRÉVENTION
RISQUE D'UNE UTILISATION NON SÉCURITAIRE
RISQUE
PRÉVENTION
RISQUE D'INJECTION D'UN FLUIDE
• On risque de subir des blessures si la pression du
système n'est pas diminuée avant de tenter tout
entretien ou démontage.
• La laveuse à pression fonctionne à une pression et à une
vitesse suffisamment élevées pour faire pénétrer le fluide
dans la peau de personnes ou d'animaux et causer des
blessures graves ou la nécessité d'une amputation. Une
fuite causée par des raccords relâchés ou usés ou par
un boyau endommagé peut aboutir à une blessure par
injection. NE PAS TRAITER L'INJECTION D'UN FLUIDE
COMME UNE SIMPLE COUPURE ! Consulter
immédiatement un médecin !
• Ne jamais placer la main devant la buse.
• Ne pas diriger le jet de vaporisation vers des personnes ou
des animaux.
• S'assurer que le boyau et les raccords sont bien serrés et
en bon état. Ne jamais se cramponner au boyau ou aux
raccords lors de l'utilisation de l'appareil.
• Ne pas utiliser la laveuse à pression avec un boyau usé ou
qui a subi une abrasion.
• Ne jamais mettre ni enlever les raccords de la lance ou du
boyau lorsque l'appareil est pressurisé.
• Pour dégager la pression de l'appareil, placer l'interrupteur
marche/arrêt « ON/OFF « dans la position « OFF «, couper
l'alimentation d'eau et enfoncer la détente jusqu'à ce que
l'eau arrête de s'écouler.
• N'utiliser qu'un boyau et des accessoires à haute pression
classés pour un service nominal plus élevé que la
puissance nominale (lb/po
2
) de l'appareil.
RISQUE DE BRÛLURES CHIMIQUES
• L'utilisation d'acides, de produits chimiques toxiques ou
corrosifs, de poisons, d'insecticides ou de toute sorte
de solvant inflammable dans ce produit pourrait
provoquer des blessures graves ou la mort.
• Ne pas utiliser d'acides, d'essence, de kérosène ou toute
autre matière inflammable avec cet appareil. N'employer
que des détergents, nettoyeurs ou dégraisseurs d'entretien
ménager qui sont recommandés pour une utilisation avec
une laveuse à pression.
• Porter un équipement et des vêtements de protection pour
se protéger les yeux et la peau contre tout contact avec
des matières vaporisées.
• Ne pas utiliser d'eau de Javel ou tout autre produit
corrosif.
• S'habituer au fonctionnement et aux commandes de la
laveuse à pression.
• Garder toutes les personnes non autorisées, les animaux
domestiques et les obstacles loin de l'aire de vaporisation.
• Ne pas utiliser l'appareil lorsque vous êtes fatigué ou sous
l'effet de boissons alcooliques ou de drogues. Restez
alerte à tout moment.
• Ne jamais contourner un dispositif de sécurité de cet
appareil.
• Ne jamais s'éloigner de la lance lorsque l'appareil est en
marche.
• Il faut savoir comment arrêter rapidement l'appareil
et comment dégager la pression.
• Une utilisation de la laveuse à pression qui n'est pas
conforme aux mesures de sécurité peut causer de
graves blessures ou la mort de l'utilisateur ou d'autres
personnes.

45- FR
D28921
RISQUE
PRÉVENTION
DANGER
• Évitez les démarrages involontaires. Placez
l'interrupteur sur l'unité à la position « ARRÊT »
avant de brancher ou de débrancher le cordon sur
les prises de courant.
• Ne jamais transporter votre laveuse à pression par
le cordon. Ne pas tirer sur le cordon pour le
débrancher de la prise de courant.
• Pour prévenir les dommages, le cordon ne devrait
pas être écrasé, placé près des objets effilés ou
coupants ou près d'une source de chaleur.
• Débranchez la fiche de la prise de courant quand
la laveuse n'est pas en usage et avant de
détacher le boyau à haute pression.
• Ne jamais nouer ou coincer le boyau à haute
pression. Ceci pourrait l'endommager.
• Avant d'activer la laveuse à pression en
température froide, assurez-vous qu'aucune glace
ne s'est formée sur une ou l'autre des pièces de
l'équipement.
• Pour minimiser la quantité d'eau pénétrant dans la
laveuse à pression, l'unité devrait être positionnée
aussi loin que possible du site de nettoyage
durant l'usage.
RISQUE DE SURFACES CHAUDES
DANGER
RISQUE
PRÉVENTION
RISQUE D'UNE UTILISATION NON SÉCURITAIRE
• Une utilisation de la laveuse à pression qui n'est pas
conforme aux mesures de sécurité peut causer de
graves blessures ou la mort de l'utilisateur ou d'autres
personnes.
• Le pistolet/la lance de vaporisation est un outil de
nettoyage puissant qui peut ressembler à un jouet aux
yeux d'un enfant.
• Garder les enfants éloignés de la laveuse à pression à
tout moment.
• La force de rétroaction du jet fait déplacer le pistolet/la
lance et peut faire tomber l'utilisateur ou provoquer un
changement de direction du jet. Une mauvaise maîtrise
du pistolet/lance peut causer des blessures à l'utilisateur
ou à d'autres personnes.
• Ne pas trop éloigner le pistolet du corps et ne pas se
tenir sur une surface instable. Saisir le pistolet/lance
fermement avec les deux mains. S'attendre à ressentir
un contre-coup lors du déclenchement.
• La pompe de la laveuse à pression contient des
pièces mobiles. Le contact avec des pièces
mobiles peut causer des blessures graves.
• Ne jamais utiliser l'appareil lorsque le protecteur
de la pompe est enlevé.
• Ne jamais utiliser un appareil auquel il manque des
pièces, qui comprend des pièces brisées ou non
autorisées par le fabricant.
• Le contact avec les surfaces chaudes, peut provoquer
des brûlures graves.
• Durant le fonctionnement de l'appareil, ne toucher
qu'aux surfaces de commande de la laveuse à pression.
Garder les enfants loin de la laveuse à pression en tout
temps. Les enfants ne sont pas nécessairement
capables de reconnaître les dangers que comporte cet
appareil.

46- FR
D28921
INSTRUCTIONS DE MISE À TERRE
Ce produit doit être mis à terre. En cas de défectuosité ou de panne, la mise à terre offre une voie
de moindre résistance au courant électrique pour réduire le risque de choc électrique. Ce produit
est équipé d'un cordon doté d'un conducteur de mise à terre de l'équipement et d'une fiche avec
mise à terre. La fiche doit être branchée dans une prise de courant appropriée installée de
manière adéquate et mise à terre en conformité avec tous les codes et les ordonnances locales.
La connexion inappropriée du conducteur de mise à terre de
l'équipement peut résulter en un risque d'électrocution. Adressezvous à un électricien qualifié ou une personne du service si vous êtes incertain concernant
la mise à terre correcte de la prise de courant. Ne pas modifier la fiche fournie avec ce
produit si elle ne s'adapte pas à la prise de courant installée par un électricien qualifié. Ne
pas utiliser aucun adaptateur avec ce produit.
DANGER
RISQUE
PRÉVENTION
RISQUE DE BLESSURES PAR VAPORISATION
• Un fluide vaporisé à haute vélocité peut causer le
bris d’objets et la propulsion de particules à
vitesse élevée.
• Les objets légers ou qui ne sont pas fixés
peuvent devenir de dangereux projectiles.
• Toujours porter des lunettes de sécurité Z87
homologuées par l’ANSI. Porter des vêtements de
protection pour se protéger contre toute
vaporisation accidentelle.
• Ne jamais vaporiser ni pointer la lance en direction
de personnes ou d’animaux.
• Toujours s’assurer que la détente est verrouillée
lorsque la lance n’est pas utilisée afin de prévenir
toute mise en marche accidentelle.
• Ne jamais fixer la détente en position enfoncée
(ouverte) de façon permanente.
Le puissant jet de la laveuse à pression est capable d'endommager les surfaces
fragiles telles que le bois, le verre, la peinture d'automobiles, les garnitures
d'auto ainsi que les objets délicats tels que les fleurs et arbustes. Avant de vaporiser, vérifiez l'objet à
nettoyer afin de vous assurer qu'il est assez robuste pour résister à la puissance du jet sans subir de
dommages. Évitez d'utiliser le jet à débit concentré sauf pour des surfaces très résistantes telles que le
béton ou l'acier.
CONSERVER CES DIRECTIVES
MISE EN GARDE

47- FR
D28921
DESSINS DES PIÈCES
LISTE DES PIÈCES
1. Lance avec tête de buse à jet rotatif
2. Pistolet de vaporisation
3. Boyau à haute pression
4. Crochet pour boyau à haute pression
5. Interrupteur de marche / d'arrêt
6. Connecteur de boyau à haute pression
7. Entrée d'eau filetée
8. Lance avec tête de buse à jet variable
9. Porte-accessoires
10. Vis (du réservoir de produit chimique)
11. Fiche électrique avec interrupteur de circuit de mise à terre (GFCI)
12. Bouchon d'entrée d'eau
13. Filtre
14. Embout d'admission d'eau avec raccord rapide de boyau d'arrosage
15. Réservoir pour produits chimiques
16. Crochet pour cordon d'alimentation électrique.

48- FR
D28921
2.0 CARACTÉRISTIQUES DE SÉCURITÉ
La laveuse à haute pression est équipée d'un dispositif d'arrêt qui réagit quand la détente du
pistolet est relâchée. Ce dispositif ouvrira le circuit d'alimentation au moteur et causera l'arrêt de
la laveuse à haute pression.
La laveuse à haute pression est aussi équipée d'un interrupteur
principal de marche / d'arrêt situé sur l'unité. Il devrait toujours
être placé en position d'arrêt quand la laveuse à haute pression n'est pas en usage pour
prévenir les blessures ou les dommages possibles.
SURCHARGE DU MOTEUR
Le moteur électrique dans cette laveuse à pression est équipé d'un dispositif de protection qui
arrêtera automatiquement le moteur si un excès de courant arrive au moteur ou si celui-ci devient
trop chaud. Le dispositif s'amorcera automatiquement de nouveau et le fonctionnement normal
résumera après une brève pause.
PROTECTION D'INTERRUPTEUR DE CIRCUIT DE MISE À
TERRE
Cette laveuse à pression est équipée d'un interrupteur de
circuit de mise à terre (GFCI) intégré dans la fiche du cordon
d'alimentation. Ce dispositif offre la protection
supplémentaire contre le risque de choc électrique. Si le
remplacement de la fiche ou du cordon devenait nécessaire,
n'utilisez que des pièces de remplacement identiques qui
incorpore la protection GFCI.
RALLONGES DE CORDON
Les rallonges de cordon ne sont
pas recommandées sauf si elles sont branchées dans une prise
équipée d'un interrupteur de circuit de mise à terre, trouvée dans les boîtes de circuit ou
dans les réceptacles protégés.
Utilisez seulement les rallonges à 3 fils équipés de fiches à 3 broches du type à mise à terre, avec
des connecteurs à 3 pôles qui acceptent la fiche installée sur le produit.
Utilisez seulement les rallonges qui sont destinées à l'usage à l'extérieur. Ces rallonges sont
identifiées par la remarque : « Acceptable pour usage avec appareils extérieurs; remiser à
l'intérieur quand elle n'est pas en usage. »
Utilisez seulement les rallonges ayant un indice d'intensité plus élevé que l'indice d'intensité du
produit.
Ne pas utiliser les rallonges de cordon endommagées. Examinez la rallonge de cordon avant de
l'utiliser et remplacez-la si elle est endommagée. Ne pas abuser la rallonge et ne jamais la
secouer pour la débrancher. Conservez la rallonge à l'écart de la chaleur et des objets coupants.
Toujours débrancher la rallonge de la prise de courant en premier, avant de séparer le cordon de
l'appareil et la rallonge.
Pour l'usage d'une rallonge de cordon, tenir compte des spécifications suivantes :
Longueur de câble Calibre de fil
Jusqu'à 15,2 cm (50') 14 AWG
15,2 cm à 30,4 cm (50' à 100') 12 AWG
Pour réduire le risque d'électrocution, conservez toutes les
connexions sèches et au-dessus du sol. Ne pas toucher une fiche
avec les mains mouillées.

49- FR
D28921
3.3 BRANCHEMENT DE L'ALIMENTATION ÉLECTRIQUE
La laveuse à pression est équipée d'un cordon d'alimentation installé à l'usine, qui est doté d'une
fiche à interrupteur de circuit de mise à terre (GFCI).
Ce cordon devrait être branché seulement sur une prise de courant électrique installée en
conformité avec les règles de sécurité locales.
REMARQUE : L'alimentation de courant doit être de 120 volts, 60 Hz, avec un circuit de 15
ampères au minimum.
Faire un test de l'interrupteur de circuit de mise à terre (GFCI)
avant chaque usage. NE PAS utiliser la laveuse à pression si le
test décrit ci-dessous échoue.
Procédure de test du GFCI :
1. Branchez la fiche GFCI dans la prise de courant.
2. Appuyez sur le bouton d'amorçage.
3. Appuyez sur le bouton de test.
4. Appuyez sur le bouton d'amorçage de nouveau pour l'utilisation.
REMARQUE : Le GFCI doit être amorcé de nouveau avec chaque branchement de la laveuse à
pression sur une prise de courant. Amorcez-le en appuyant simplement sur le bouton d'amorçage
de la fiche d'alimentation GFCI.
ALIMENTATION D'EAU
Raccord d'eau approprié.
3.0 INSTALLATION
3.1 BOYAU À HAUTE PRESSION
Retirez et jetez le bouchon de l'entrée d'eau (No. 12 de la liste des pièces). Attachez le boyau à
haute pression en insérant soigneusement le raccord avec joint torique dans la sortie de haute
pression et serrez l'écrou fileté à la main.
3.2 RACCORD D'ALIMENTATION D'EAU
Avant le raccordement, faire couler l'eau du boyau d'arrosage (non fourni) pour forcer tout corps
étranger hors du boyau. Attachez le boyau d'arrosage sur la connexion d'admission de l'eau de la
laveuse à pression.
Fig. 1
Entrée de la machine
Raccord rapide
Boyau d'arrosage
garniture
MISE EN GARDE

50- FR
D28921
A. Branchez seulement sur une prise correctement mise à terre.
B. Examinez le cordon avant l'usage. Ne pas utiliser la laveuse si le cordon est endommagé.
C. Conservez toutes les connexions sèches, au-dessus du sol.
D. Ne pas toucher la fiche avec les mains mouillées. Cette laveuse à pression est équipée d'un
interrupteur de circuit de mise à terre (GFCI) intégré dans la fiche du cordon d'alimentation. Si
le remplacement de la fiche ou du cordon devenait nécessaire, n'utilisez que des pièces de
remplacement identiques. Communiquez avec le Service à la Clientèle pour les pièces de
rechange appropriées.
Les rallonges de cordon ne sont pas recommandées sauf si elles sont branchées dans une prise
de courant équipée d'un interrupteur de circuit de mise à terre. Toute rallonge utilisée devrait être
de calibre 14 AWG n'excédant pas 15,2 m (50 pieds) de longueur pour prévenir la perte excessive
de tension. Utilisez seulement les rallonges qui sont destinées à l'usage à l'extérieur. Ces
rallonges sont identifiées par la remarque : « Acceptable pour usage avec appareils extérieurs;
remiser à l'intérieur quand elle n'est pas en usage. »
4.1 PROCÉDURE DE MISE EN SERVICE
1. Assurez-vous que l'alimentation d'eau est connectée et le robinet ouvert.
2. Assurez-vous que la fiche du cordon de l'unité est branchée et que le GFCI A ÉTÉ AMORCÉ.
3. Dégagez le cran de sûreté du pistolet s'il est verrouillé.
4.0 INSTRUCTIONS D'UTILISATION
Risque d'injection ou de blessures. Ne pas pointer la lance vers les
personnes.
A. Cran de sûreté « verrouillé »
B Cran de sûreté « dégagé »
4. Pour libérer l'air du boyau, appuyez sur la détente du pistolet jusqu'au moment où vous
obtenez un jet d'eau continu.
5. Enlevez toute saleté ou matière étrangère de la sortie du pistolet et du connecteur mâle de la
lance.
6. Insérez la lance désirée dans le raccord rapide du pistolet en poussant fermement et en
pivotant la lance par 1/4 de tour pour la bloquer en position.
REMARQUE : Assurez-vous que la lance est solidement bloquée en position.

51- FR
D28921
7 Appuyez sur la détente du pistolet de vaporisation.
8 Appuyez sur l'interrupteur de marche / d'arrêt pour mettre la laveuse en service.
Si la lance n'est pas solidement bloquée en position, elle pourrait
être éjectée par la poussée de haute pression durant l'usage du
pistolet, causant possiblement des blessures ou des dommages.
4.2 HAUTE PRESSION / BASSE PRESSION
Ne pas déplacer la buse pour régler la pression quand vous appuyez
sur la détente.
La position de haute pression de la buse est utilisée pour le nettoyage. Quand la haute pression
est requise, saisissez le collet et glissez le collet et la buse vers le pistolet.
REMARQUE : Assurez-vous que le collet est tiré à la position arrière extrême pour bloquer la buse
en position de haute pression.
EN MARCHE
ARRÊT
BASSE PRESSION
HAUTE PRESSION
HAUTE
PRESSION
BASSE
PRESSION
Quand la basse pression est requise, saisissez le collet et glissez le collet et la buse à la position
opposée du pistolet.
MISE EN GARDE

52- FR
D28921
4.3 BUSE DE VAPORISATION RÉGLABLE
La buse de vaporisation réglable peut être réglée du jet en éventail au jet à pointe fine dans les
deux positions de haute ou de basse pression. Le jet est réglé en pivotant la buse.
Le jet à pointe fine est très agressif. Nous recommandons pour la
plupart des applications, l'usage d'un angle de vingt degrés (20º) pour
éviter les dommages à la surface à nettoyer.
REMARQUE : La pression du jet sur la surface que vous nettoyez augmente quand la lance est
rapprochée de la surface.
Pour obtenir un jet en éventail, pivotez la buse dans le sens contraire des aiguilles d'une montre.
Pour obtenir un jet à pointe fine, pivotez la buse dans le sens des aiguilles d'une montre.
4.4 HAUTE PRESSION / JET ROTATIF
Ne pas déplacer la buse pour régler la pression.
La position du jet rotatif à haute pression est utilisée pour la puissance maximale du nettoyage.
Conservez la lance à une distance minimale de 15 cm à 20 cm (6'' à 8'') de la surface de
nettoyage en tout temps.
JET ROTATIF
MISE EN GARDE
MISE EN GARDE

53- FR
D28921
4.6 TECHNIQUES DE NETTOYAGE
Pour le nettoyage en utilisant une laveuse à pression, certaines tâches peuvent être accomplies en
utilisant l'eau seulement, cependant, pour la plupart des travaux, il est avantageux d'utiliser un
détergent. Le détergent assure le trempage de la saleté en premier pour permettre à l'eau sous
pression de mieux pénétrer et de nettoyer. La position de basse pression fournit une application
délicate du détergent. Cette position est aussi recommandée pour le rinçage d'une surface après
l'application de cire ou pour autres applications qui exigent la pression basse d'un boyau
d'arrosage. La basse pression de la laveuse est la pression équivalente à celle d'un boyau
d'arrosage réglé au débit le plus bas pour l'application appropriée des produits chimiques. POUR
L'APPLICATION DES PRODUITS CHIMIQUES, GLISSEZ LE COLLET SELON LES INSTRUCTIONS
DE LA SECTION 4.2.
4.5 USAGE DES PRODUITS CHIMIQUES DE NETTOYAGE
Utilisez les produits chimiques de nettoyage recommandés pour les
laveuses à pression seulement.
1. Insérez le tube de succion applicable (2) sous le réservoir de produits chimiques.
2. Remplissez le réservoir (1) avec une solution de nettoyage appropriée.
3. Insérez le réservoir de produit chimique dans le compartiment prévu à la partie arrière de la
laveuse.
4. Fixez le réservoir solidement en position en utilisant la vis fournie. Déplacez la buse réglable
vers l'avant à la position de pression la plus basse en glissant le collet vers la buse. Le produit
chimique sera automatiquement mélangé à l'eau et éjecté par la buse.
REMARQUE : Quand la buse réglable est déplacée à la position de haute pression, le produit
chimique ne sera pas éjecté.
APPLICATION DE SAVON DÉGRAISSEUR
1. Appliquez la solution sur une surface SÈCHE. REMARQUE : LE MOUILLAGE DE LA
SURFACE EN PREMIER N'EST PAS RECOMMANDÉ CAR CECI CAUSERAIT LA DILUTION DU
DÉTERGENT ET RÉDUIRAIT SA CAPACITÉ DE NETTOYAGE. Sur une surface verticale,
appliquez horizontalement d'un côté à l'autre, en débutant au bas pour prévenir les stries.
2. Laissez reposer le produit chimique sur la surface pour une courte période de temps avant de
rincer.
Des dommages pourraient être causés aux surfaces peintes si on
permet l'assèchement du produit chimique sur la surface. Lavez et
rincez une petite section à la fois. Évitez de travailler sur les surfaces réchauffées ou
exposées aux rayons directs du soleil.
3. Rincez à l'eau propre à haute pression. Sur une surface verticale, rincez de bas en haut en
premier, de haut en bas ensuite. Tenez le jet à 15 - 20 cm (6 à 8'') de la surface de travail à un
angle de 45º en utilisant le jet en éventail pour enlever la saleté au lieu d'une brosse dure.
REMARQUE : Assurez-vous que le système d'injection de produits chimiques est entièrement
propre avant de passer d'un produit à un autre.
MISE EN GARDE
MISE EN GARDE

54- FR
D28921
APPLICATION DE LA CIRE LIQUIDE POUR VÉHICULE
1. Après le nettoyage, appliquez la cire liquide de laveuse à pression pour véhicule en utilisant la
basse pression. Versez la cire dans le réservoir de produits chimiques.
2. Appliquez une couche mince et uniforme de cire. Appliquez sur les surfaces mouillées de bas
en haut pour distribution uniforme et pour prévenir les stries.
3. Rincez le surplus de cire. REMARQUE : SI LE SURPLUS DE CIRE N'EST PAS ENLEVÉ, UN
FINI OPAQUE POURRAIT RÉSULTER.
4. Asséchez avec un linge propre pour réduire les taches d'eau.
4.7 APRÈS L'UTILISATION
Après l'usage du système d'injection de produits chimiques, enlevez le tube du contenant,
continuez de fonctionner à basse pression et rincez le réservoir de produits chimiques à l'eau
propre jusqu'au nettoyage complet. REMARQUE : À défaut de nettoyer adéquatement le système
d'injection de produits chimiques, celui-ci sera obstrué et incapable de fonctionner correctement.
l Arrêtez l'unité en appuyant sur le bouton de marche / d'arrêt.
l Débranchez la fiche électrique.
l Fermez le robinet d'eau et libérez la pression en appuyant sur la détente du pistolet.
Fermez le robinet d'eau et libérez la pression en appuyant sur la
détente du pistolet. Sinon, des blessures pourraient être causées
par l'éjection à haute pression de l'eau.
l Déconnectez le boyau de haute pression et le boyau d'arrosage de l'entrée d'eau.
5.2 BUSE
Le mécanisme de réglage de haute pression et/ou de basse pression de la buse devrait être lubrifié
régulièrement. L'obstruction de la buse cause une pression trop élevée de la pompe et le nettoyage
est alors immédiatement requis.
1. Séparez la buse de la lance.
2. Nettoyez la buse.
5.0 ENTRETIEN
5.1 CONNEXIONS
Les connexions sur les boyaux de la laveuse à pression, le pistolet et la lance de vaporisation
devraient être nettoyées régulièrement et lubrifiées pour prévenir les fuites et les dommages aux
joints toriques.
3. Rincez la buse à l'eau en sens inverse.
4. Réassemblez la buse et la lance.
REMARQUE : Vissez les buses à fond sur la lance jusqu'au verrouillage complet. (Voir
l'illustration.)
Remettez la laveuse à pression en service et appuyez sur la détente du pistolet. Si la pression est
trop élevée, répétez la procédure de 1 à 4 ci-dessus.

55- FR
D28921
6.0 INSTRUCTIONS DE MANUTENTION ET D'ENTREPOSAGE
Toujours entreposer votre laveuse à pression dans un endroit où la
température ne sera pas moindre de 0º C (32º F). La pompe de cette
machine est susceptible aux dommages permanents si elle soumise au gel. LES
DOMMAGES CAUSÉS PAR LE GEL NE SONT PAS COUVERTS PAR LA GARANTIE.
S'il est nécessaire d'entreposer la laveuse à pression dans un endroit où la température sera moins
de 0º C (32º F), vous pouvez minimiser les chances d'endommager votre machine en appliquant la
procédure suivante :
1. Arrêtez la laveuse à pression et détachez le boyau d'alimentation d'eau et le boyau de haute
pression.
2. Appuyez sur la détente du pistolet pour vidanger l'eau de la lance et du boyau.
3. Redémarrez la laveuse à pression et la faire fonctionner pendant environ 5 secondes, jusqu'au
moment où l'eau est complètement évacuée de la sortie de haute pression.
6.1 APRÈS L'ENTREPOSAGE PROLONGÉ
Des dépôts calcaires pourraient se former dans la pompe quand elle n'est pas utilisée pour une
période prolongée.
Ceci causerait le fonctionnement erratique du moteur ou l'empêcher de démarrer.
Enlevez les dépôts calcaires de la tuyauterie.
l Connectez la machine à la source d'alimentation d'eau et rincez-la soigneusement à l'eau. Ne
pas brancher l'unité dans la prise de courant.
Pour éviter une surcharge électrique, pivotez l'arbre du moteur manuellement.
5.4 FILTRE À EAU
La laveuse à pression est équipée d'un filtre de l'entrée d'eau pour la protection de la pompe.
Si le filtre n'est pas nettoyé régulièrement, le débit d'eau à la laveuse à
pression sera limité et la pompe pourrait être endommagée.
5.3 LUBRIFICATION
La laveuse à pression incorpore un système de lubrification permanente. Les vérifications du
niveau d'huile et les changements d'huile ne sont pas nécessaires.
REMARQUE : EN CAS DE FUITE D'HUILE, COMMUNIQUEZ AVEC LE DÉPARTEMENT DU
SERVICE À LA CLIENTÈLE HD POWERWASH POUR LA RÉPARATION. UNE FUITE D'HUILE
MINIME EST NORMALE.
l Pour nettoyer le filtre à eau interne, enlever le raccord rapide et retirez le filtre de l'entrée d'eau
de la pompe. (Voir page 36, item 13.)
l Rincez le filtre en sens inverse.
l Replacez le filtre et le raccord rapide immédiatement pour prévenir la pénétration de matières
étrangères dans la pompe.
Soyez prudent pour ne pas endommager le filtre durant le retrait ou le
nettoyage. Toutes particules étrangères pénétrant dans la pompe
pourraient l'endommager.
5.5 SYSTÈME DE REFROIDISSEMENT
Les fentes d'aération sur et autour de la laveuse à pression doivent être conservées propres et
libres de toutes obstructions pour assurer le refroidissement approprié du moteur durant le
fonctionnement.
Évitez la pénétration de l'eau dans les fentes d'aération de la
laveuse à pression pour minimiser le risque de dommages à la
machine et pour réduire le risque de choc électrique pour l'utilisateur.
MISE EN GARDE
MISE EN GARDE
MISE EN GARDE

56- FR
D28921
7.0 DÉPANNAGE
Procédez de la manière suivante :
l Débranchez l'unité de la prise de courant.
l Enlevez le couvercle (Fig. A).
l Insérez une clé à six pans de dimensions appropriées (4mm) à travers l'ouverture centrale du
couvercle du ventilateur dans la douille à six pans de l'arbre du moteur.
l Tournez l'arbre du moteur dans le sens des aiguilles d'une montre à la main à plusieurs
reprises (Fig. B).
l Retirez la clé à six pans.
l Replacez le couvercle.
l Branchez l'unité dans la prise de courant.
l Mettez la machine en service avec la détente du pistolet ouverte.
Le moteur ne démarre
pas ou s'arrête durant
l'utilisation
Le GFCI est déclenché ou il
n'est pas amorcé.
Mettez l'unité hors de service.
Appuyez fermement sur le bouton
d'amorçage du GFCI après l'avoir
branché à la source d'alimentation du
courant.
Le disjoncteur est déclenché
ou le fusible est grillé dans la
boîte de fusibles du circuit.
Débranchez toutes les fiches du
même circuit et réarmez le
disjoncteur ou remplacez le fusible.
Fiche relâchée ou débranchée Branchez la fiche de nouveau.
Le disjoncteur de la laveuse à
pression est déclenché.
Laissez refroidir et redémarrez l'unité.
Le disjoncteur se
déclenche ou le fusible
grille dans la boîte des
fusibles.
Surcharge du circuit. Vérifiez que l'intensité du circuit est
de 15 ampères ou plus. Débranchez
toutes les fiches du même circuit.
La rallonge de cordon est trop
longue ou le calibre du fil est
trop petit.
Utilisez une rallonge appropriée telle
que recommandée dans le manuel
de l'utilisateur.
La buse est partiellement
obstruée.
Nettoyez la buse selon la section
5.2.
Pression excessive.
Réduisez la pression en utilisant le
bouton de réglage de pression.
Le GFCI se déclenche
à maintes reprises.
Tension incorrecte. Voir la section 3.3
Court-circuit interne.
Appelez le département du Service
à la Clientèle.
PROBLÈME CAUSE POSSIBLE SOLUTION
Fig. A
Fig. b

57- FR
D28921
Fuite d'eau ou d'huile
du fond de la pompe.
Une fuite minime est normale. Si la fuite est excessive, appelez le
département du Service à la
Clientèle.
La soupape de dérivation ne
fonctionne pas normalement.
Appelez le département du Service
à la Clientèle.
Le robinet est fermé.
Ouvrez le robinet.
L'unité a été entreposée sous
des températures de gel.
Dégelez l'unité complètement
incluant le boyau, le pistolet et la
lance.
Aucune admission de
produits chimiques.
Le tube d'injection n'est pas
inséré à fond dans la laveuse
à pression.
Poussez fermement dans la
machine.
Le tube est craqué ou fendu. Remplacez le tube.
La pression augmente
quand le pistolet est
fermé.
Le moteur fonctionne
mais la pompe
n'accumule pas la
pression maximale ou
la pression est
irrégulière.
Le filtre d'entrée d'eau est
obstrué.
Nettoyez le filtre. Voir la section 5.4.
Air dans la pompe.
Laissez fonctionner la laveuse à
pression avec le pistolet ouvert et la
lance enlevée, jusqu'au moment où
un jet d'eau continu est éjecté.
Le bouton de réglage de
pression n'est pas réglé à la
position maximale.
Réglez à la position maximale. Voir
la section 4.2.
Les soupapes de succion ou
d'éjection sont bouchées ou
usées.
Appelez le département du Service
à la Clientèle.
La soupape de dérivation ne
fonctionne pas normalement.
Appelez le département du Service
à la Clientèle.
Mauvais réglage de la buse. Réglez la buse à la position de
basse pression.
L'écumoire du tube d'insertion
est obstruée.
Nettoyez l'écumoire.
Produits chimiques séchés
dans l'injecteur.
Dissoudre en faisant circuler de
l'eau chaude dans le tube de
l'injecteur.
Le cran de sécurité est
engagé.
Dégagez le cran de sûreté.
La détente est
bloquée.
Buse bloquée.
Nettoyez la buse. Voir la section 5.2.
PROBLÈME CAUSE POSSIBLE SOLUTION

58- FR
D28921
9.0 DONNÉES TECHNIQUES
Pression de la pompe 110,3 bar (1 600 lbf/po²)
de pression maximale de fonctionnement
Spécifications électriques 120 volts, 15 ampères, 60 Hz
Cordon électrique 10, 7 m (35')
Boyau de haute pression 7 m (23')
Taux de débit @ 110,3 bar (1 600 lbf/po²) 6.1 L/min (1.6 gpm)
Intensité minimum de la source de courant 15 ampères
Pression de l'entrée d'eau 1,4 bar – 7 bar (20 – 100 lbf/po²)
Taux d'injection 2 – 4%
Eau d'entrée Robinet d'eau froide
Angle de vaporisation
à haute pression 0 - 60º
Angle de vaporisation
à basse pression 0 - 90º
Jet de buse rotative 30º
Tolérances d'usinage des spécifications de performance déclarées de ± 10%.
8.0 PIÈCES DE RECHANGE ET ACCESSOIRES
LES PIÈCES ET ACCESSOIRES LISTÉS CI-DESSOUS SONT DISPONIBLES.
S'IL VOUS PLAÎT, COMMUNIQUEZ AVEC LE SERVICE À LA CLIENTÈLE POUR D'AUTRES
RENSEIGNEMENTS : 1-800-888-2468
Code
Description
D28936 Réservoir de détergent
D28937 Bouchon de réservoir de détergent
D28939 Poignée
D28940 Chapeau de moyeu
D28941 Roue
D28942 Écrou de blocage
D28943 Boyau
D28944 Filtre de succion
D28945 Pistolet avec boyau
D28946 Buse à réglages multiples
D28947 Buse rotative
D28949 Interrupteur
D28950 Essieu
D28921 Manuel

59- FR
D28921
S'il vous plaît appelez-nous en premier.
S'il y a des pièces endommagées ou manquantes,
NE P
AS RENVOYER CE PRODUIT AU MAGASIN.
Notre département du Service à la Clientèle
est disponible pour vous aider avec tout problème
ou toutes questions concernant le fonctionnement.
Notre numéro d'appel sans frais :
1-800-888-2468
VOIR NOTRE SITE WEB POUR LES PIÈCES DE
RECHANGE ET OU LES PIÈCES MANQUANTES.
www.devap
.
com

D28921
GARANTIE LIMITÉE
DeVilbiss Air Power Company garantit à l'acheteur original, qui utilise le produit comme bien de consommation (utilisé à
des fins personnelles, résidentielles ou domestiques) que tous les produits couverts par cette garantie sont exempts de
défauts de matériaux et de fabrication pour une période d'un an à partir de la date d'achat. Tous les produits couverts
par cette garantie limitée qui sont utilisés à des fins commerciales (c.-à-d. produisant un revenu) sont exempts de
défauts de matériaux et de fabrication pour une période de 90 jours à partir de la date d'achat. Les produits couverts par
cette garantie comprennent les compresseurs d'air, les outils pneumatiques, les pièces de rechange, les laveuses à
pression et les génératrices.
DeVilbiss Air Power Company réparera ou remplacera, à sa discrétion, les produits ou composants s'étant avérés
défectueux dans les limites de la période de garantie. Les services seront effectués en respectant l'ordre normal des
travaux, lors d'une journée ouvrable, aux installations du Centre de service après-vente et selon la disponibilité des
pièces de rechange nécessaires. Toute décision prise par DeVilbiss Air Power Company en ce qui concerne cette
garantie limitée est finale.
Cette garantie vous donne certains droits particuliers. Il se peut que vous ayez d'autres droits, variant d'une province à
l'autre et d'un état à l'autre.
RESPONSABILITÉ DE L'ACHETEUR D'ORIGINE (utilisateur initial) :
• Pour faire une réclamation de garantie pour ce produit, NE retournez PAS le produit au détaillant. Le produit doit
être évalué par le personnel d'un Centre de service après-vente agréé. Pour connaître l'emplacement du Centre de
service après-vente agréé le plus près de chez vous, composez le 1-800-888-2468, 24 heures par jour, 7 jours par
semaine ou visitez notre site Web à www.devap.com.
• Conservez le reçu de caisse original comme preuve d'achat pour toute réparation sous garantie.
• Appliquez tous soins raisonnables lors de l'utilisation et de l'entretien du produit, conformément aux
recommandations dans le ou les guide(s) de l'utilisateur.
• Livrez ou expédiez le produit au Centre de service après-vente agréé le plus proche. Le fret doit, le cas échéant,
être acquitté par l'acheteur.
• Les compresseurs d'air à réservoir de 60 et 80 gallons (227 et 303 litres) seront inspectés sur les lieux de leur
installation. Veuillez communiquer avec le Centre de service après-vente agréé le plus proche offrant le service sur
place, pour faire les arrangements nécessaires dans un tel cas.
• Tout acheteur qui n'est pas satisfait de l'intervention du Centre de service après-vente agréé est prié de
communiquer directement avec DeVilbiss Air Power Company.
CETTE GARANTIE NE COUVRE PAS CE QUI SUIT :
• Marchandise remise à neuf, utilisée comme équipement de location ou modèles de salon ou d'exposition.
• Marchandise ayant cessé de fonctionner en raison d'usure normale, d'usage abusif*, d'exposition au froid, à la
chaleur, à la pluie, à l'humidité excessive ou au gel, d'usage de produits chimiques non appropriés, de négligence,
d'accidents, de tout manquement à observer les directives d'utilisation du produit figurant dans le ou les guide(s)
de l'utilisateur fournis avec le produit, d'un entretien non approprié, de l'utilisation d'accessoires ou de pièces non
recommandées par DeVilbiss Air Power Company, ou de réparations ou de modifications non approuvées.
* Un compresseur d'air pompant durant plus de 50% d'une heure sera considéré comme ayant subi un usage
abusif puisque sa capacité est inférieure à la demande d'air exigée.
• Frais de réparation et de transport de marchandise non reconnue comme étant défectueuse.
• Coûts associés à l'assemblage, l'ajout nécessaire d'huile, les réglages ou autres frais d'installation et de mise en
marche.
• Pièces ou accessoires consommables, fournis avec le produit, et qui deviennent inutilisables ou inopérants après
une période raisonnable d'utilisation, y compris, mais sans être limités aux disques ou tampons de ponçage,
lames de scie et de ciseaux, pierres meulières, ressorts, burins, buses, joints toriques, gicleurs d'air, rondelles et
accessoires similaires.
• Marchandise vendue par DeVilbiss Air Power Company mais fabriquée par et identifiée comme étant le produit
d'une autre compagnie. Dans ce cas, la garantie du fabricant du produit s'applique, si une telle garantie est offerte.
• TOUTE PERTE, TOUT DOMMAGE DIRECT OU INDIRECT OU TOUT FRAIS POUVANT RÉSULTER D'UN
DÉFAUT QUELCONQUE, D'UNE DÉFAILLANCE OU D'UN MAUVAIS FONCTIONNEMENT DU PRODUIT.
Certaines provinces et certains états ne permettent pas l'exclusion ni la limitation des dommages directs ou
indirects. Par conséquent, il se peut que les exclusions ou limitations mentionnées ci-dessus ne s'appliquent pas
dans votre cas.
• TOUTES GARANTIES IMPLICITES, Y COMPRIS CELLES PORTANT SUR LA VALEUR MARCHANDE ET
L'APPLICATION DU PRODUIT POUR UNE UTILISATION PARTICULIÈRE, SONT LIMITÉES À UN AN À
COMPTER DE LA DATE D'ACHAT D'ORIGINE. Certaines provinces et certains états ne permettent pas la
limitation de la période d'une garantie implicite. Par conséquent, il se peut que les limitations mentionnées cidessus ne s'appliquent pas dans votre cas.
213 Industrial Drive • Jackson, TN 38301-9615
Telephone: 1-800-888-2468
FAX: 1-800-888-9036
 Loading...