

Page 1
Electric Pressure Washer
Record All Information and attach sales
receipt here for future reference:
Purchase Date:__________________________
Serial #: ________________________________
Questions? 1-800-888-2468
Learn more about your pressure washer,
get answers to frequently asked questions,
and register on line at
www.excellpressurewasher.com
Model VR1600E
Table of Contents
Safety Guidelines/Definitions..................2
Consumer Saftey Information ................2
Important Safety Instructions ..............2-6
Specifications ..........................................6
Carton Contents ......................................7
Assembly Instructions .............................7
Operating Instructions ......................8-13
Maintenance .................................... 14-15
IMPORTANT
Please make certain that the person who is to use this equipment carefully
reads and understands these instructions before operating.
Accessories ...........................................15
Repairs ...................................................15
Storage ..................................................16
Trouble Shooting Guide ........................17
Warranty.................................................18
Français ........................................... 19-36
Español ............................................ 37-55
Part No. A17913 Rev. 0 5/10/06
Page 2

SAFETY GUIDELINES - DEFINITIONS
This manual contains information that is important for you to know and understand.
This information relates to protecting YOUR SAFETY and PREVENTING
EQUIPMENT PROBLEMS. To help you recognize this information, we use the
symbols below. Please read the manual and pay attention to these symbols.
Indicates an
situation which, if not avoided, will
result in death or serious injury.
which, if not avoided, could result in
death or serious injury.
reproductive harm. Wash hands after handling.
imminently hazardous
which, if not avoided, may result in
minor or moderate injury.
Indicates a potentially
hazardous situation
indicates a potentially hazardous
situation which, if not avoided, may
result in property damage.
This product contains chemicals, including lead, known to the
State of California to cause cancer, and birth defects or other
Indicates a potentially
hazardous situation
Used without the
safety alert symbol
IMPORTANT SAFETY INSTRUCTIONS
Do not operate this unit until you have read and understand
Instructions.
RISK OF EXPLOSION OR FIRE
• Use of acids, toxic or cor ro sive
chemicals, poisons, in sec ti cides, or
any kind of flam ma ble solvent with
this product could re sult in se ri ous
injury or death.
• Restricting any of the pressure
washer ventilation openings will
cause serious overheating and
could cause fire.
this Operators Manual for Safety, Operation, and Maintenance
READ AND SAVE THESE INSTRUCTIONS
WHAT CAN HAPPEN HOW TO PREVENT IT
• Do not spray flammable liquids.
• Never place objects against or on
top of pressure washer. Operate
pressure washer in an open area at
least 12 inches away from any wall
or obstruction that would restrict
the flow of fresh air to the ventilation
openings.
RISK TO BREATHING (ASPHYXIATION)
WHAT CAN HAPPEN HOW TO PREVENT IT
• Some clean ing fluids con tain substanc es which could cause injury to
skin, eyes or lungs.
A17913
• Use only clean ing fluids spe cif i cal ly
rec om mend ed for high-pressure
washers. Fol low manufacturers
recommendations. Do not use
chlorine bleach or any other
corrosive compound.
2- ENG
Page 3
RISK OF FLUID INJECTION AND LACERATION
WHAT CAN HAPPEN HOW TO PREVENT IT
• Your pressure washer operates at
fluid pressures and velocities high
enough to penetrate human and
animal flesh, which could result in
amputation or other serious injury.
Leaks caused by loose fittings or
worn or damaged hoses can result
in injection injuries. DO NOT TREAT
FLUID INJECTION AS A SIMPLE
CUT! See a physician immediately!
• Inspect the high-pressure hose
regularly. Replace the hose
immediately if it is damaged,
worn, has melted from contacting
the engine, or shows any signs
of cracks, bubbles, pinholes, or
other leakage. Never grasp a highpressure hose that is leaking or
damaged.
• Never touch, grasp or attempt to
cover a pinhole or similar water
leak on the high-pressure hose.
The stream of water IS under high
pressure and WILL penetrate skin.
• Never place hands in front of noz zle.
• Direct spray away from self and
others.
• Make sure hose and fit tings are
tightened and in good condition.
Never hold onto the hose or fittings
during op er a tion.
• Do not allow hose to contact muf fler.
• Never attach or remove wand
or hose fittings while sys tem is
pressurized.
• Injuries can result if system pressure
is not reduced before attempting
maintenance or disassembly.
• To relieve sys tem pres sure, place
on/off switch in off position, turn off
water sup ply, and pull gun trigger
until water stops flowing.
• Use only hoses and accessories
rated for pressure higher than your
pressure washer's PSI.
RISK OF INJUR Y FROM SPRAY
WHAT CAN HAPPEN HOW TO PREVENT IT
• High-velocity fluid spray can cause
objects to break, propelling particles
at high speed.
• Light or unsecured objects can
become hazardous projectiles.
• Always wear ANSI-approved Z87.1
safety glasses. Wear protective
clothing to protect against
accidental spraying.
• Never point wand at or spray people
or animals.
• Always secure trigger lock when
wand is not in service to prevent
accidental operation.
• Never permanently secure trigger in
pull-back (open) position.
3 - ENG
A17913
Page 4
RISK OF UNSAFE OPERATION
WHAT CAN HAPPEN HOW TO PREVENT IT
• Unsafe op er a tion of your pressure
wash er could lead to se ri ous in ju ry
or death to you or others.
• Do not use chlorine bleach or any
other corrosive compound.
• Be come fa mil iar with the op er a tion
and con trols of the pressure washer.
• Keep operating area clear of all
persons, pets and obstacles.
• Do not operate the product when
fatigued or under the influence of
alcohol or drugs. Stay alert at all
times.
• Never defeat the safety fea tures of
this prod uct.
• Never leave wand unattended while
unit is running.
• Pressure washer pump contains
moving parts. Contact with moving
parts can cause serious injury.
• Never operate machine with pump
guard removed.
• Do not op er ate machine with
missing, broken or un au tho rized
parts.
• The spray gun/wand is a powerful
clean ing tool that could look like a
• Keep chil dren away from the
pressure washer at all times.
toy to a child.
• Reactive force of spray will cause
gun/wand to kickback, and could
cause the op er a tor to slip or fall
or misdirect the spray. Im prop er
control of gun/wand can re sult in
in ju ries to self and others.
• Do not over reach or stand on an
unstable support.
• Do not use pressure washer while
standing on a ladder.
• Grip gun/wand firmly with both
hands. Expect the gun to kickback
when triggered.
RISK OF HOT SURFACES
WHAT CAN HAPPEN HOW TO PREVENT IT
• Con tact with hot sur fac es, such as
engines exhaust com po nents, could
result in se ri ous bur n.
A17913
• During op er a tion, touch only the
control surfaces of the pres sure
washer. Keep children away from
the pres sure washer at all times.
They may not be able to recognize
the haz ards of this product.
4- ENG
Page 5
RISK OF CHEMICAL BURN
WHAT CAN HAPPEN HOW TO PREVENT IT
• Use of acids, toxic or cor ro sive
chemicals, poisons, in sec ti cides, or
any kind of flam ma ble solvent with
this product could re sult in se ri ous
injury or death.
• Do not use ac ids, gasoline, kero sene, or any other flammable
materials in this product. Use only
household de ter gents, cleaners and
degreasers recommended for use in
pres sure washers.
• Wear pro tec tive clothing to protect
eyes and skin from con tact with
sprayed materials.
RISK OF
ELEC TRI CAL SHOCK
WHAT CAN HAPPEN HOW TO PREVENT IT
• Water spray di rect ed at elec tri cal
outlets or switch es, or ob jects connect ed to an elec tri cal circuit, could
re sult in a fatal electrical shock.
• This product is powered by electricity. It contains and sprays water and
other conductive liquids. Improper
operation could result in electrocution.
• Unplug any elec tri cal ly op er at ed
product before attempting to clean
it. Direct spray away from electric
out lets and switches.
• Always connect cordset to a properly grounded and polarized electrical circuit. Your cordset is equipped
with a Ground Fault Circuit
Interrupter (GFCI) for your personal protection.
• The Ground Fault Circuit Interrupter
(GFCI) will not function properly
unless connected to a fully grounded electrical circuit!
• Extension cords can lead to electri-
• If damaged, the entire cordset
assembly must be replaced by an
authorized service center. Refer to
Grounding Instructions.
• Do not use with extension cords.
cal shock.
RISK OF
INJURY FROM LIFTING
WHAT CAN HAPPEN HOW TO PREVENT IT
• Serious injury can result from
attempting to lift too heavy an
object.
• The pressure washer is too heavy
to be lifted by one person. Obtain
assistance from others before lifting.
The powerful spray from your pressure washer is capable
of causing damage to surfaces such as wood, glass,
automobile paint, auto striping and trim, and delicate objects such as
fl owers and shrubs. Before spraying, check the item to be cleaned to
assure yourself that it is strong enough to resist damage from the force of
the spray. Avoid the use of the concentrated spray stream except for very
strong surfaces like concrete and steel.
READ AND SAVE THESE INSTRUCTIONS
5 - ENG
A17913
Page 6

GROUNDING INSTRUCTIONS
This product must be grounded. If it should malfunction or breakdown, grounding
provides a path of least resistance for electric current to reduce the risk of electric
shock. This product is equipped with a cord having an equipment-grounding
conductor and a grounding plug. The plug must be plugged into an appropriate
outlet that is properly installed and grounded in accordance with all local codes
and ordinances.
Improper connection of the equipment-grounding
qualifi ed electrician or service personnel if you are in doubt as to whether
the outlet is properly grounded. Do not modify the plug provided with
the product-if it will not fi t the outlet, have a proper outlet installed by a
qualifi ed electrician. Do not use any type of adapter with this product.
operating pressure washer.
EXTENSION CORDS
Use additional length of high pressure hose instead of extension cords to avoid
voltage drop and power loss to the motor, and to prevent overheating. DO NOT
USE EXTENSION CORDS. NOTE: The use of additional length of high pressure
hose will lower the pressure washer's psi below 1600.
GROUND FAULT CIRCUIT INTERRUPTER PROTECTION
This pressure washer is provided with a ground fault circuit interrupter (GFCI)
built into the plug of the power supply cord. This device provides additional
protection from the risk of electric shock. Should replacement of the plug or
cord become necessary, use only identical replacement parts that include GFCI
protection.
conductor can result in risk of electrocution. Check with a
To prevent overloading circuit, do not operate any other
electrical device connected to the same circuit while
SPECIFICATIONS
Model VR1600E
PSI Max* 1600 (11031.6 kPa)
Operating PSI 1440 (9859.5 kPa)
GPM Max* 1.5
Operating GPM 1.35
* Water flow and maximum pressure ratings determined in accordance with
PWMA standard PW101.
A17913
6- ENG
Page 7
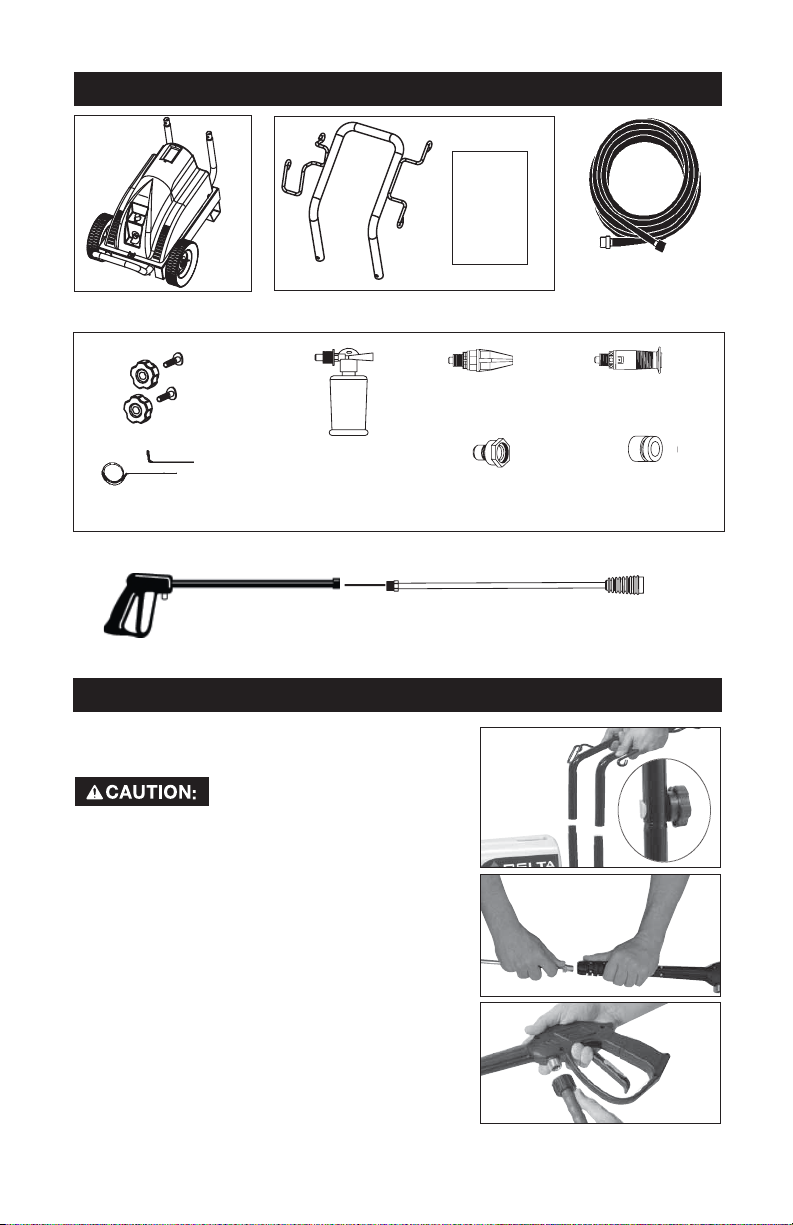
Motor, Frame, and
Wheel Assembly
Knobs
CARTON CONTENTS
English/
Spanish/
French
Operation
Manual
Handle
Bagged Handle
High Pressure
Hose
Rotary Nozzle
Saddle Bolts
Chemical
Nozzle Cleaning
application unit
Kit
Spray Gun
Quick-connect adapter
Parts Bag
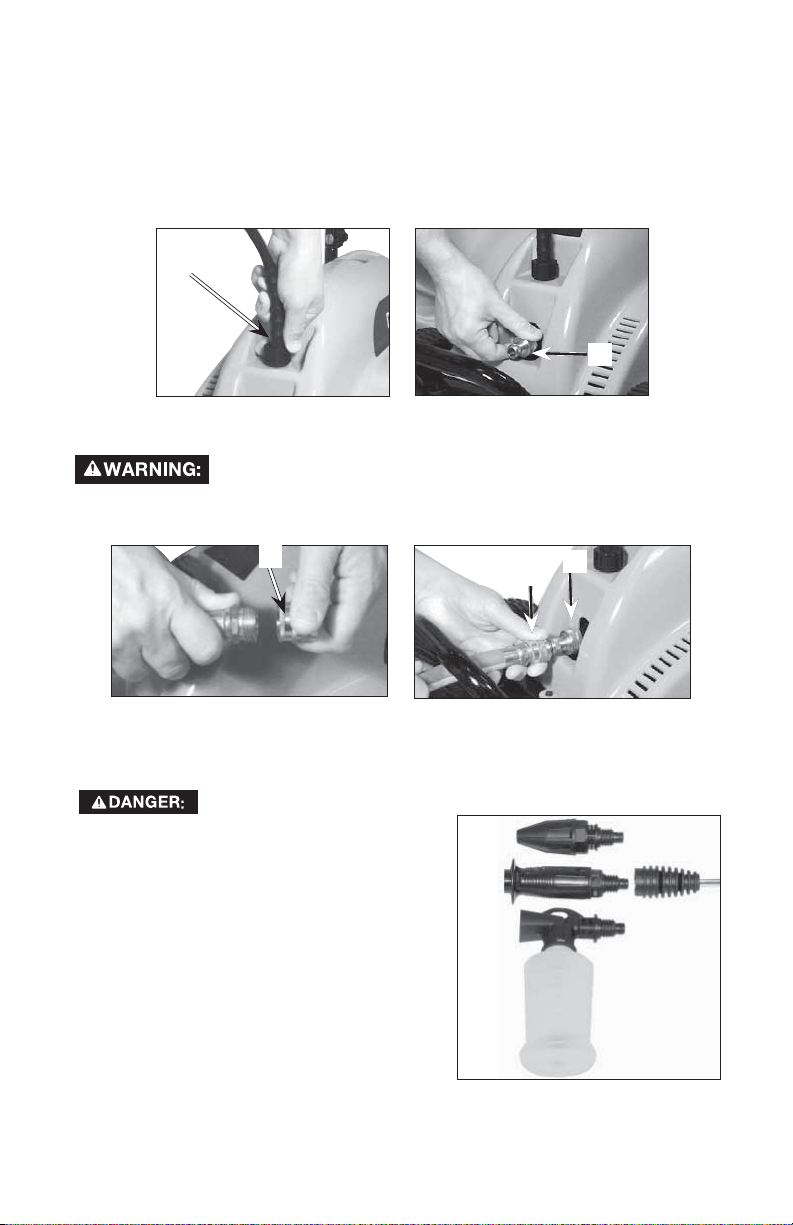
ASSEMBLY INSTRUCTIONS
1. Place handle assembly onto frame and
connect handle to frame.
Risk of personal injury. Avoid
handle and frame when assembling to prevent
pinching.
2. Connect spray wand to gun. Tighten
securely.
3. Attach high pressure hose to gun. Tighten
se cure ly .
placing hands between
Variable Spray Nozzle
Quick-connect
Spray Wand
7 - ENG
A17913
Page 8

OPERATING INSTRUCTIONS
READ THIS OWNER’S MANUAL AND SAFETY RULES BEFORE OPERATING
YOUR UNIT. Compare the illustrations with your unit to familiarize yourself with the
location of various controls and adjustments. Save this manual for future reference.
Spray
High Pressure Hose
Spray
Wand
with
Variable
Spray
Nozzle
Water
outlet
Gun
Electric
Cord
Motor
ON-OFF
switch
Motor
Water
inlet with
filter
High Pressure Pump
Quick-connect adapter
Quick-connect
Cleaning Solution
application unit
Rotary Nozzle
BASIC ELEMENTS OF A PRESSURE WASHER
High Pressure Pump (located inside the shroud): Increases the pressure of the
water supply.
Motor (located inside the shroud): Drives the high pressure pump.
High Pressure Hose: Carries the pressurized water from the pump to the gun and
wand.
Spray Gun: Connects with wand to control water flow rate, direction, and
pressure.
Spray Wand With Variable Spray Nozzle: Spray nozzle adjusts from a narrow
jet stream to a fan jet spray. The spray can be adjusted by twisting the nozzle
clockwise and/or counterclockwise.
Rotary Nozzle: increases cleaning efficiency by allowing you to cover more area
while using a concentrated spray pattern.
Cleaning Solution Application Unit: Used to apply cleaning solutions, see How
To Use Cleaning Solution Application Unit in this section.
PRESSURE WASHER TERMINOLOGY
Ground Fault Circuit Interrupter Protection (GFCI): This washer is provided with
a ground fault circuit interrupter (GFCI) built into the plug of the power supply
cord. This device provides additional protection from the risk of electric shock.
Should replacement of the plug or cord become necessary, use only identical
replacement parts that include GFCI protection.
A17913
8- ENG
Page 9
Total Stop System: This unit is equipped with a total stop system. When the
trigger is released the motor is shut off automatically. When the trigger is pressed
again the motor will au to mat i cal ly start. The time between release and en gagement must not be less than 4-5 seconds. DO NOT leave the unit in automatic
stop mode for more than 15 minutes.
PSI: Pounds per Square Inch. The unit of measure for water pressure. Also used
for air pressure, hydraulic pressure, etc.
GPM: Gallons Per Minute. The unit of measure for the flow rate of water through
the pressure washer.
CU: Cleaning Units. GPM multiplied by psi.
Water Supply: All pressure washers must have a source of water. The minimum
requirements for a water supply are 20 psi and 5 gallons per minute.
HOW TO USE
IMPORTANT: Read and understand how to use the pressure washer before
operating.
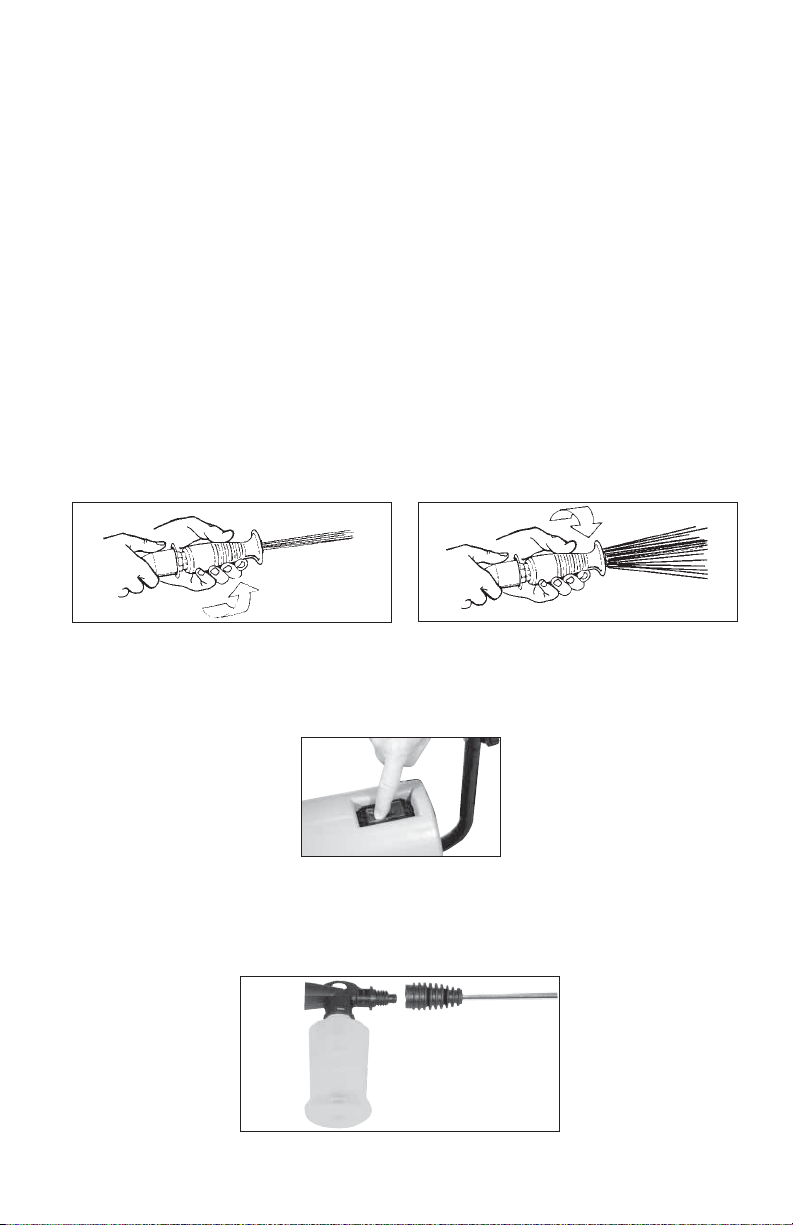
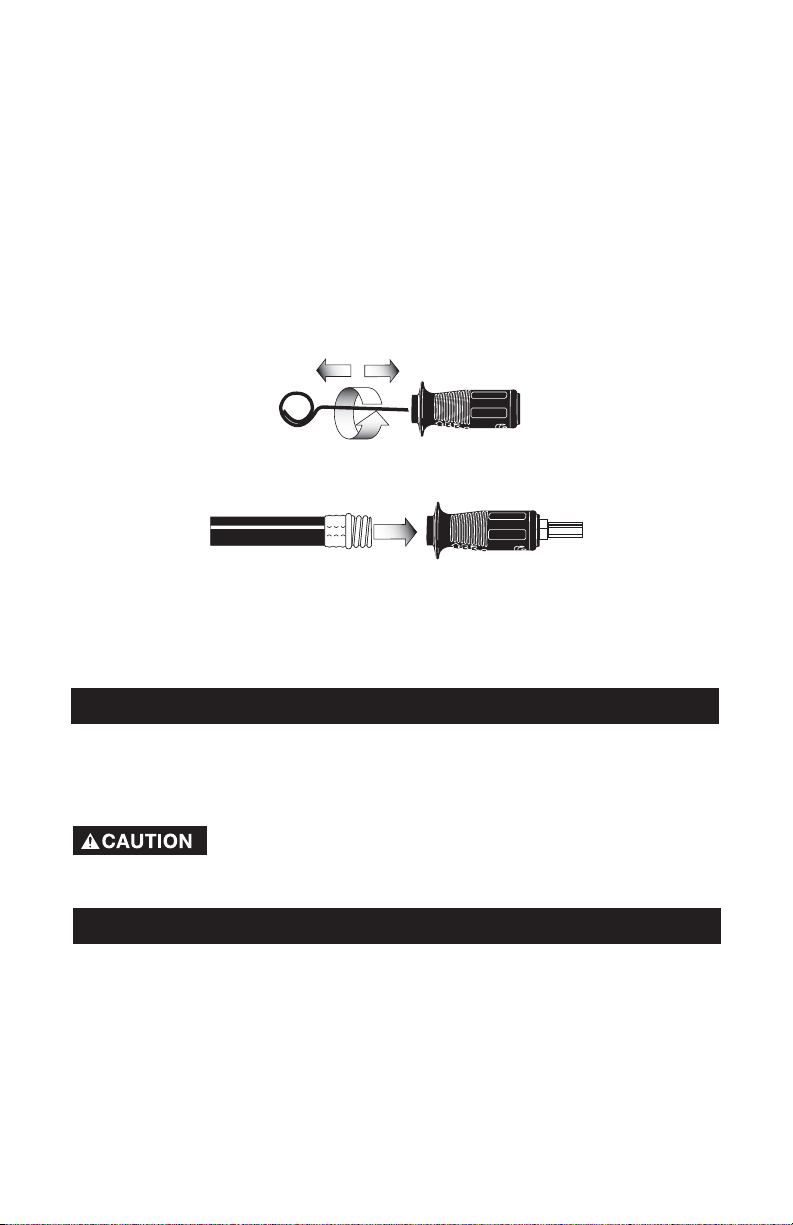
HOW TO USE SPRAY WAND
The nozzle at the end of the wand can be rotated to change from narrow jet
stream to fan jet, as shown.
jet stream
fan spray
HOW TO USE THE CLEANING SOLUTION APPLICATION UNIT
NOTE: Use only soaps and cleaning solutions designed for pressure washer
use. Do not use bleach.
1. Place the ON-OFF switch in the OFF position.
2. Turn off the water supply.
3. Attach cleaning solution application unit to wand as shown and tighten
securely. Grasp end of nozzle and turn until cleaning solution application unit
is oriented correctly.
9 - ENG
A17913
Page 10
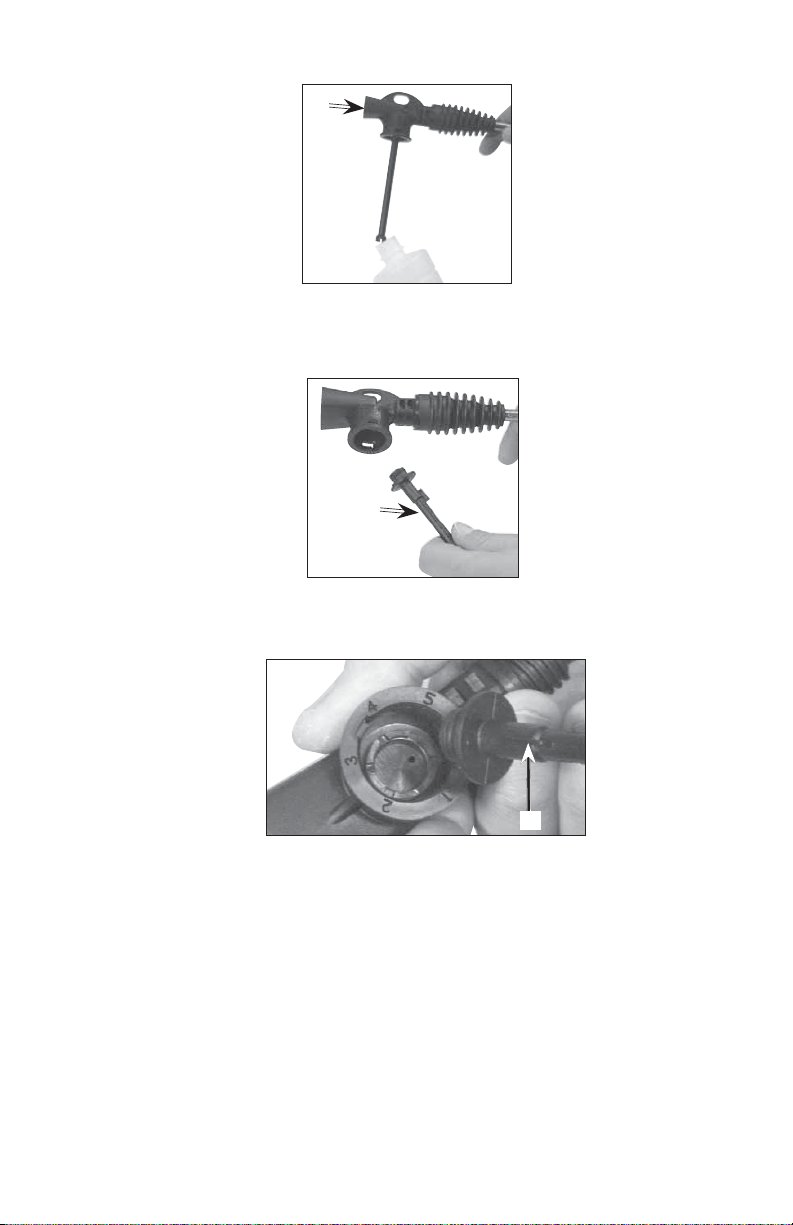
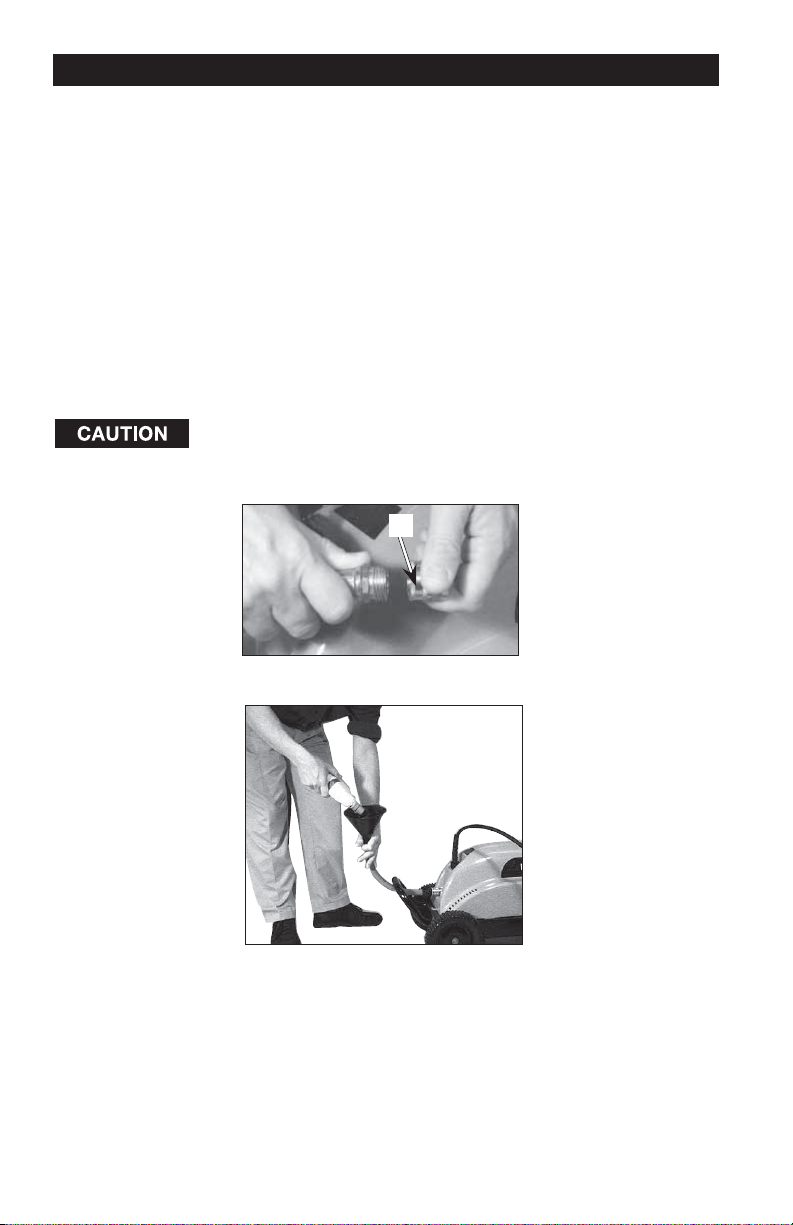
4. Remove the cleaning solution application tank from the application nozzle.
a
5. Soap mixture pressure can be adjusted by adjusting the pipe located in the
cleaning solution application nozzle (a).
a. Pull pipe (b) from cleaning solution application nozzle.
b
b. Position the notch (c) on the pipe to the desired soap mixture
1-6, 1 being the highest and 6 being the lowest.
c
c. Press pipe into position.
6. Fill application tank with detergent.
7. Push cleaning solution application tank onto cleaning solution application
nozzle. Turn to lock into place.
8. See Before Starting and Starting Your Pressure Washer paragraphs in
this section to continue.
A17913
10- ENG
Page 11
READ AND UNDERSTAND ALL W ARNINGS BEFORE STARTING UNIT
Risk of fluid injection and laceration. When using the high
pressure setting, DO NOT allow the high pressure spray to
come in contact with unprotected skin, eyes, or with any pets or animals. Serious injury can occur.
Your washer operates at fluid pressures and velocities high enough to
penetrate human and animal flesh, which could result in amputation or other
serious injury. Leaks caused by loose fittings or worn or damaged hoses can
result in injection injuries. DO NOT TREAT FLUID INJECTION AS A SIMPLE
CUT! See a physician immediately!
Never pull water supply hose to move pres sure washer. This
could damage hose and/or pump inlet.
DO NOT use hot water, use cold water only.
Never turn water supply off while pressure washer motor is running or damage
to pump will result.
This unit is equipped with an automatic stop mode. When the trigger is
released the motor is shut off automatically. When the trigger is pressed again
the motor will automatically start. The time between release and engagement
must not be less than 4-5 seconds. DO NOT leave the unit in automatic stop
mode for more than 15 minutes.
Stand on a stable surface and grip gun/wand firmly with both hands. Expect
the gun to kick when triggered.
This product is intended for intermittent use only. Operate pressure washer
one hour or less in a 2 hour period.
For outdoor use only. Store indoors.
If you do not understand these precautions please call 1-866-422-4286 to
speak to a service representative for further instructions.
BEFORE STARTING
1. Move pressure washer to level ground.
2. Make sure the ON/OFF switch is in the OFF position
To reduce the risk of electrocution, keep all connections
Do not use if cord is damaged.
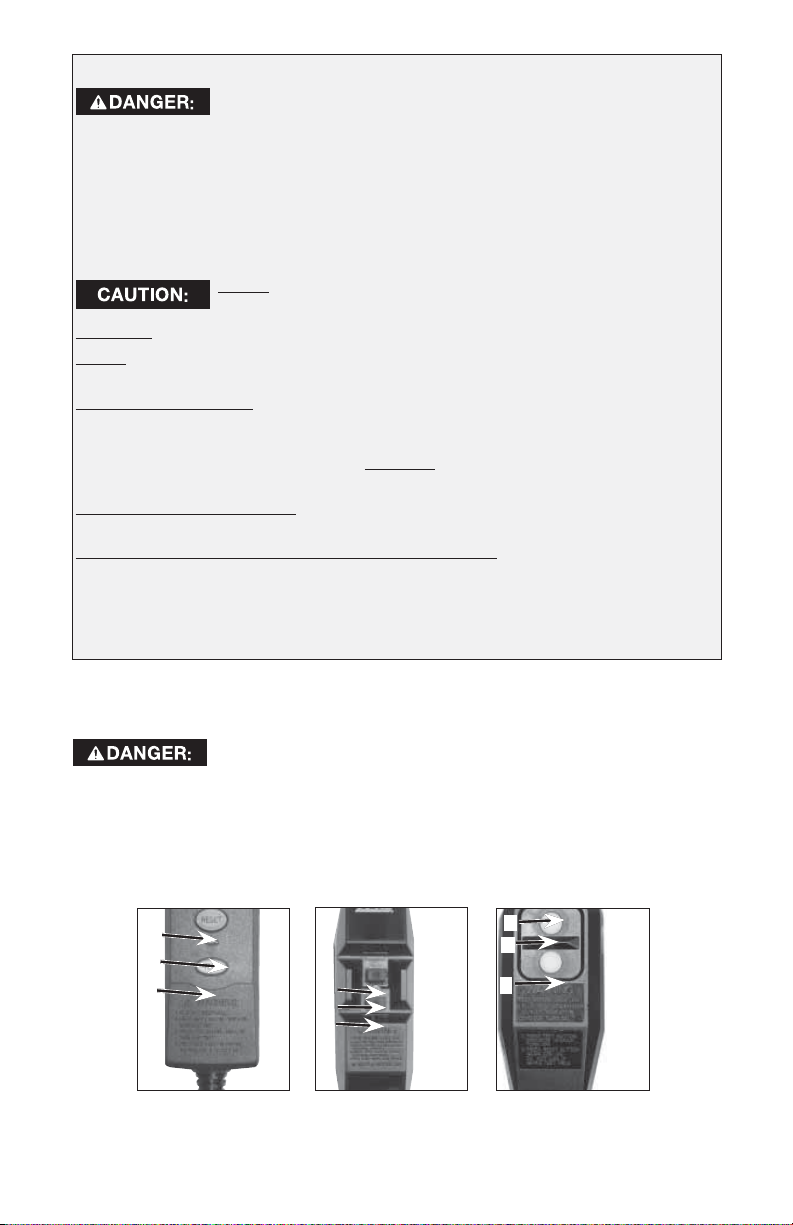
3. Plug the unit into an appropriate outlet that is properly installed and
grounded in accordance with all local codes and ordinances. See the
GROUNDING paragraph.
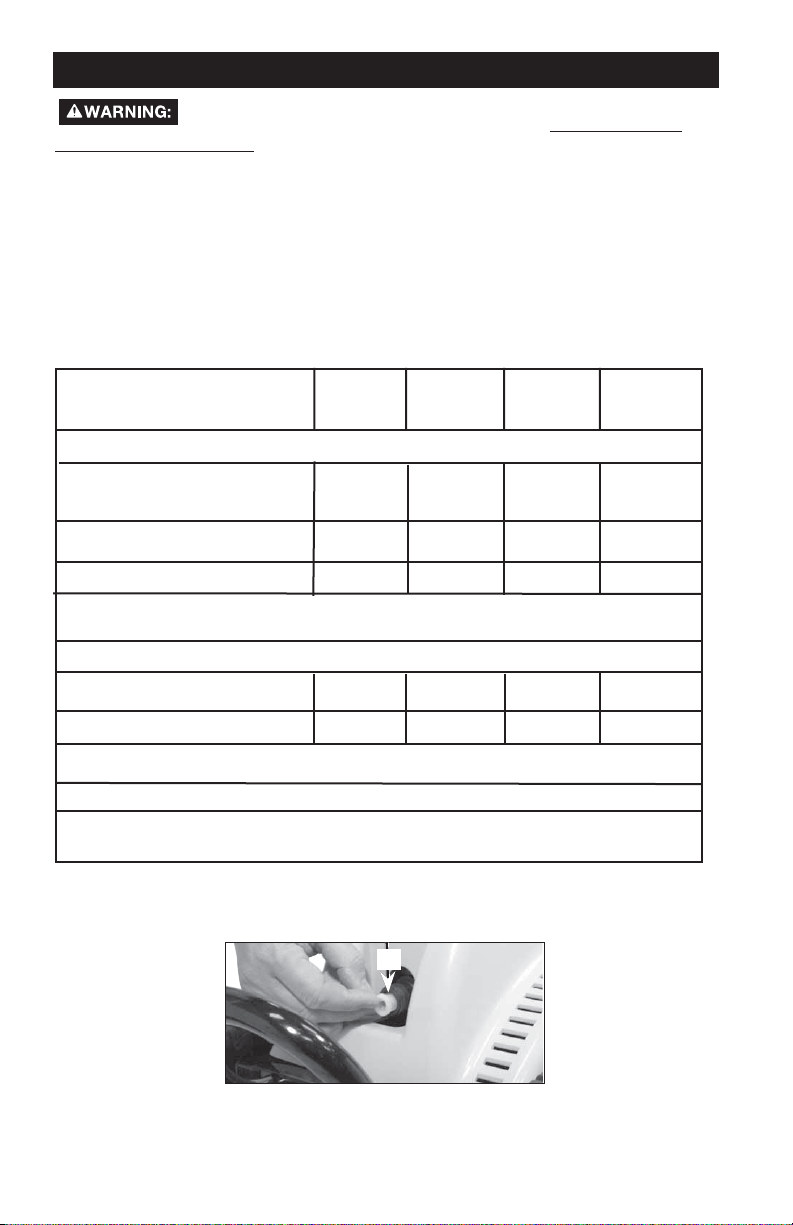
4. Press reset button and indicator light (a) will appear. You will have one of
the following GFCI switches shown below.
c
a
b
dry and off the ground. Do not touch plug with wet hands.
a
c
c
a
b
b
11 - ENG
A17913
Page 12
5. Test GFCI switch before each use, to test:
a. Press test button (b), indicator light will disappear.
c. Press reset button (c) to use unit. If indicator light does not reappear
DO NOT use unit, see troubleshooting guide.
6. Con nect the high pressure hose (i) to the water outlet on the unit. The
water outlet is marked OUT.
7. Assemble quick-connect adapter (k) to water inlet.
i
k
8. Connect the quick-connect (j) to the water supply hose.
Risk of property damage.
To reduce the possibility of
contamination always protect against backflow when
connected to a potable water system.
9. Connect quick-connect (j) to quick connect adapter (k) at the water inlet.
j
k
j
NOTE: The water supply must provide a minimum of 5 gallons per minute.
10. Make sure high pressure hose and water supply hose are securely
connected.
Risk of fluid injection and laceration. Always relieve sys tem
pres sure before changing
accessories. Place on/off switch in off
a
position, turn off water sup ply, and pull gun
trigger until water stops fl owing.
11. Connect the desired nozzle to spray
wand. To connect rotary (a) and variable
spray nozzle (b), turn clockwise until it
b
c
snaps into place. To remove nozzle, turn
nozzle counter clockwise to remove. To
connect chemical application unit (c)
see How To Use Cleaning Solution
Application Unit in this section.
12. Turn water supply on.
A17913
12- ENG
Page 13

STARTING
NOTE: Make sure water supply is turned
on.
1. Disengage the safety catch as shown.
Depress trigger to allow air to escape
and to discharge residual pressure in the
pipes.
2. With the trigger depressed, place the
ON-OFF switch in the On position. When starting motor, always keep the
trigger depressed.
Risk of fluid injection and laceration. Always engage the
cause accidental spraying.
unit off to prevent damage to the unit and see the troubleshooting guide
for instructions.
trigger lock when gun is not in use. Failure to do so could
Risk of property damage. If after running unit for a few
minutes it does not maintain steady water pressure, turn
RECOMMENDED CLEANING
• On vertical surfaces, work from the bottom upwards.
• Let the detergent sit for 1-2 minutes, DO NOT allow detergent to dry.
• To rinse detergent, apply the high pressure jet, keeping the nozzle at least
10 inches from the surface, work from the bottom up.
SHUTTING DOWN YOUR PRESSURE WASHER
1. Place the ON-OFF switch in the OFF position.
2. Turn off water supply.
3. Pull trigger on spray gun to relieve any water pressure in hose or spray gun.
4. Disconnect water supply hose from water inlet.
5. Disconnect high pressure hose from outlet.
6. If cleaning solution application unit was used, rinse cleaning solution
application tank and nozzle thoroughly.
13 - ENG
A17913
Page 14
MAINTENANCE
When performing maintenance, you may be exposed to hot
serious injury or death!
Before performing any maintenance or repair, unplug unit from power
source, let motor cool and release all water pressure.
To ensure efficient operation and longer life of your pressure washer, a routine
maintenance schedule should be prepared and followed. If the pressure washer is
used in unusual conditions, such as high-temperatures or dusty conditions, more
fre quent maintenance checks will be required.
Any maintenance or repair not listed should be performed by an Authorized
Warranty Service Center.
CUSTOMER RESPONSIBILITIES TABLE
MAINTENANCE TASK
PRESSURE WASHER
check high pressure hose for
leaks
check soap and chemical
hose and filter
check gun and wand for leaks
prepare for storage
HIGH PRESSURE PUMP
check/clean suction filter
surfaces, water pressure, or moving parts that can cause
Before
each use
Every 25
hours or
yearly
Every 50
hours or
yearly
Every 100
hours or
yearly
X
X
X
Prepare unit for storage if it is to remain idle for longer
than 30 days
X
check/change oil
*
* This pump does not require oil
MOTOR
Clean motor after each use. Using a cloth remove debris from motor. DO NOT
use water to clean motor.
SUCTION FILTER
1. Check and clean the suction filter (b) after every 50 hours of use.
b
A17913
14- ENG
Page 15
NOZZLE CLEANING
If the nozzle becomes clogged with foreign matter, such as dirt, excessive
pressure may develop. If the nozzle becomes partially clogged or restricted, the
pump pressure will pulsate. Clean the nozzle immediately using the nozzle kit
supplied and the following instructions:
1. Place the ON/OFF switch in the OFF position and turn off the water supply.
2. Unplug unit from power source
3. Pull trigger on gun handle to relieve any water pressure.
4. Disconnect the wand from the gun.
5. Clean the nozzle using the nozzle cleaner provided or a straightened paper
clip. Insert into the nozzle end and work back and forth until ob struc tion is
re moved.
6. Direct water supply into nozzle end to backflush loosened particles for 30
seconds.
7. Plug unit into appropriate outlet.
8. Reassemble the nozzle to the wand. Tighten securely to prevent leaks.
9. Reconnect wand to gun and turn on water supply.
10. Start pressure washer and place wand into high pressure setting to test.
ACCESSORIES
Recommended accessories for use with your pressure washer are available
for purchase from your local retailer or authorized service center. If you need
assistance in locating any accessory for your tool, please call
visit our website
branded accessories rated equal to or greater than the rating of the pressure
washer.
www.excellpressurewasher.com.
The use of any other accessory not recommended for
use with this tool could be hazardous. Use only EXCELL
1-800-888-2468 or
REPAIRS
To assure product SAFETY and RELIABILITY, repairs, maintenance and adjustment
should be performed by an Authorized Warranty Service Center. Always use identical
replacement parts. For the location of the nearest Authorized Warranty Service
Center call 1-800-888-2468 or visit our website www. excellpressurewasher .com.
15 - ENG
A17913
Page 16
STORAGE
1. Drain all water from high pressure hose, coil it, and store it in cradle of the
pressure washer handle.
2. Drain all water from spray gun and spray wand by holding spray gun in a
vertical position with nozzle end pointing down and squeez ing trigger. Store
in gun/hose holder.
3. Store chemical hose, high pressure hose, spray gun, and spray wand so
they are protected from dam age, such as being run over.
It is recommended that you follow these steps to protect the internal seals of the
pressure washer when STORING THE UNIT FOR MORE THAN 30 DAYS AND/OR
WHEN FREEZING TEMPERATURES ARE EXPECTED.
*RV antifreeze needs to be run through the pump as outlined in the steps below.
4. Obtain a funnel, six ounces of *RV antifreeze, and approximately 36 inches
of garden hose with a male hose connector attached to one end.
Risk of property damage. Use only RV antifreeze. Any other
an ti freeze is corrosive and can damage pump.
5. Connect the quick-connect (j) to the garden hose.
j
6. Connect 36 inch length of hose to water inlet of pump.
7. Add *RV antifreeze to hose as shown.
8. Place the ON-OFF switch in the On position then Off position until an ti-
freeze comes out of high pressure hose con nec tion of pump.
9. Remove garden hose from water inlet of pump.
* Windshield washer fluid may also be used
A17913
16- ENG
Page 17
PROBLEM
Motor will not
start and there
is no humming
sound
Power
source circuit
continues to
trip or blow
fuses
TROUBLE SHOOTING GUIDE
CAUSE
Pressure washer not plugged in.
“RESET” button on GFCI not
pushed.
Circuit breaker has tripped or fuse
is blown.
Too much load already on circuit.
Using an extension cord.
Plug in pressure washer.
Push “RESET” button.
Reset breaker or replace fuse.
Reduce load on circuit.
Try another 15 amp circuit.
DO NOT use extension cords.
CORRECTION
Motor hums but
will not start
No or low
pressure
Excess noise
Pressure
fluctuates without open ing gun
GFCI switch indicator light does
not appear after
depressed
GFCI test fails
Unit does not
maintain steady
water pressure
Unit continues
to trip GFCI
switch
Using an extension cord.
Supply voltage below required
minimum.
Low water supply.
High pressure hose is too long.
Worn nozzle.
Restricted, insufficient water
supply, or air in the water line.
Water temperature is too high.
Water leak in high pressure fittings,
hose, or gun.
Circuit breaker has tripped or fuse
is blown.
Circuit breaker has tripped or fuse
is blown.
Nozzle clogged Clean nozzle, if unit still does not
Nozzle clogged
DO NOT use extension cords.
Check the voltage of the main
supply line.
Water supply must be at least 5
GPM @ 20 psi.
Use high pressure hose under
100 feet.
Replace nozzle.
Check supply hose, faucet, and
inlet screen.
Do not use water from a hot
water source, use water only from
a cold water faucet.
Replace hose or gun. If problem
continues take to authorized
service center.
Reset breaker or replace fuse. If
indicator light still does not appear
have receptacle checked by a
qualified electrician.
Reset breaker or replace fuse. If
indicator light still does not appear
have receptacle checked by a
qualified electrician.
maintain steady water pressure,
turn unit off and contact customer
service at 1-866-422-4286
Clean nozzle, if unit still does not
maintain steady water pressure,
turn unit off and contact customer
service at 1-866-422-4286
17 - ENG
A17913
Page 18

LIMITED WARRANTY
ONE YEAR LIMITED WARRANTY ON PRODUCT COMPONENTS EXCLUDING IC2 PUMP
Black & Decker (U.S.) Inc. warrants to the original purchaser that the frame, wheels,
gun, hose, wand, spray nozzle(s) and other components (excluding the IC2 pump) of the
Excell pressure washers covered under this warranty are free from defects in material and
workmanship for one year from the date of purchase.
TWO YEAR LIMITED WARRANTY ON IC2 PUMP
Black & Decker warrants to the original purchaser that the IC2 pump of the Excell pressure
washers covered under this warranty is free from defects in material and workmanship
for two years from the date of purchase. The two year limited warranty applies to the IC2
pump only.
Black & Decker will repair or replace, at Black & Decker option, products or components
which have failed within the above warranty periods. Service will be scheduled according
to the normal work fl ow and business hours at the service center location, and the
availability of replacement parts. All decisions of Black & Decker with regard to this limited
warranty shall be fi nal.
This warranty gives you specifi c legal rights, and you may also have other rights which
vary from state to state.
RESPONSIBILITY OF ORIGINAL PURCHASER (Initial User):
• To process a warranty claim on your Excell pressure washer, return it to the place of
purchase.
• Retain original cash register sales receipt as proof of purchase for warranty work.
• Use reasonable care in the operation and maintenance of the product as described in
the Owners Manual(s).
THIS WARRANTY DOES NOT COVER:
• Merchandise sold as reconditioned, used as rental equipment, or fl oor or display
models.
• Merchandise that has become damaged or inoperative because of ordinary wear,
misuse, cold, heat, rain, excessive humidity, freeze damage, use of improper
chemicals, negligence, accident, failure to operate the product in accordance with the
instructions provided in the Owners Manual(s) supplied with the product, improper
maintenance, the use of accessories or attachments not recommended by Black &
Decker, or unauthorized repair or alterations.
• Repair and transportation costs of merchandise determined not to be defective.
• Costs associated with assembly, required oil, adjustments or other installation and
start-up costs.
• Expendable parts or accessories supplied with the product which are expected to
become inoperative or unusable after a reasonable period of use, including but not
limited to springs, nozzles, o-rings, washers, and similar accessories.
• Merchandise sold by Black & Decker which has been manufactured by and identifi ed
as the product of another company, such as gasoline engines. The product
manufacturer’s warranty, if any, will apply.
• ANY INCIDENTAL, INDIRECT OR CONSEQUENTIAL LOSS, DAMAGE, OR
EXPENSE THAT MAY RESULT FROM ANY DEFECT, FAILURE OR MALFUNCTION
OF THE PRODUCT IS NOT COVERED BY THIS WARRANTY. Some states do not
allow the exclusion or limitation of incidental or consequential damages, so the above
limitation or exclusion may not apply to you.
• IMPLIED WARRANTIES, INCLUDING THOSE OF MERCHANTABILITY OR
FITNESS FOR A PARTICULAR PURPOSE, ARE LIMITED TO ONE YEAR FROM
THE DATE OF ORIGINAL PURCHASE. Some states do not allow limitations on how
long an implied warranty lasts, so the above limitations may not apply to you.
A17913
18- ENG
Page 19

Registre toda la información y adhiera
el comprobante de compra aquí para
referencia futura.
Fecha de compra:_______________________
N° de serie: ____________________________
¿Consultas? 1-800-888-2468
Familiarícese con su lavadora a presión,
obtenga respuesta rápida a las preguntas
más frecuentes
y regístrela en línea en:
www.excellpressurewasher.com
Laveuse à pression
Modèle VR1600E
Table des matières
Mesures de sécurité/Définitions……… ........20
Mesures de sécurité importantes ...........20-24
Fiche technique ..............................................24
Contenu de la boîte .......................................25
Instructions d’assemblage ............................25
Instructions d’utilisation ........................... 26-31
Entretien ....................................................32-33
Accessoires ....................................................33
Réparations ....................................................33
Entreposage ...................................................34
Guide de dépannage .....................................35
Garantie ..........................................................36
English ........................................................1-18
Español .....................................................37-55
IMPORTANT
Assurez-vous que toute personne qui utilisera cet équipement lise
attentivement ces instructions avant de l’utiliser.
N° de pièce A17913 Rev. 0 5/10/06
Page 20

MESURES DE SÉCURITÉ - DÉFINITIONS
Ce guide contient des renseignements importants que vous deviez bien saisir. Cette
information porte sur VOTRE SÉCURITÉ et sur LA PRÉVENTION DE PROBLÈMES
D'ÉQUIPEMENT. Afi n de vous aider à identifi er cette information, nous avons utilisé
les symboles ci-dessous. Veuillez lire attentivement ce guide en portant une attention
particulière à ces symboles.
Indique un danger
pas évité, causera de graves blessures
ou la mort.
danger qui, s’il n’est pas évité, pourrait
causer de graves blessures ou la mort.
cancérigènes et pouvant entraîner des anomalies congénitales et d'autres dangers
relatifs à la reproduction. Se laver les mains après la manipulation de l'appareil.
imminent qui, s'il n'est
s'il n'est pas évité, peut causer des
blessures mineures ou moyennes.
Indique la
possibilité d’un
possibilité d’un danger qui, s’il n’est pas
évité, peut causer des dommages à la
propriété.
Ce produit contient des produits chimiques, dont du
plomb, reconnus par l'État de la Californie comme étant
Indique la possibilité
d'un danger qui,
Sans le symbole
d’alerte. Indique la
MESURES DE SÉCURITÉ IMPORTANTES
Lisez le Guide de l’utilisateur. Ne tentez pas d’utiliser cet
l’assemblage, l’utilisation et l’entretien de ce Guide de l’utilisateur.
RISQUE D'EXPLOSION OU D'INCENDIE
appareil avant d’avoir lu les directives sur la sécurité,
LISEZ ET CONSERVEZ CES INSTRUCTIONS
CE QUI PEUT SE PRODUIRE COMMENT L'ÉVITER
• L'utilisation d'acides, de produits chimiques
toxiques ou corrosifs, de poisons,
d'insecticides ou de toute sorte de solvant
inflammable dans ce produit pourrait
provoquer des blessures graves ou la mort.
• Une restriction de toute ouverture de
ventilation de la laveuse à pression
causera une surchauffe importante et
risque de causer un incendie.
RISQUE D'ASPHYXIE
CE QUI PEUT SE PRODUIRE COMMENT L'ÉVITER
• Certains liquides nettoyants contiennent
des substances pouvant provoquer des
blessures à la peau, aux yeux ou au
système respiratoire.
A17913
• Ne pas vaporiser des liquides
inflammables.
• Ne jamais placer des objets contre
ou sur la laveuse à pression. Utiliser
la laveuse à pression dans un endroit
ouvert, à une distance minimum de
30 cm (12 po) de tout mur ou de toute
obstruction qui pourrait restreindre le
débit d'air frais vers les ouvertures de
ventilation.
• Utiliser uniquement des liquides
nettoyants spécialement recommandés
pour les laveuses haute pression. Suivre
les recommandations des fabricants.
Ne pas utiliser de produit à blanchir au
chlore ou tout autre composé corrosif.
20- FR
Page 21

RISQUE D'INJECTION ET DE LACÉRATION
CE QUI PEUT SE PRODUIRE COMMENT L'ÉVITER
• Votre laveuse haute pression fonctionne
à des pressions de liquides et des
vitesses suffisamment élevées pour
pénétrer la peau de l'homme et
animale, ce qui pourrait se solder par
une amputation ou autre blessure
grave. Des fuites provoquées par des
raccords lâches ou des tuyaux usés ou
endommagés peuvent se solder par
des blessures par injection. NE PAS
TRAITER UN INJECTION DE LIQUIDE
COMME UNE SIMPLE COUPURE !
Consulter un médecin immédiatement !
• Inspecter périodiquement le tuyau haute
pression. Remplacer immédiatement
le tuyau s'il est endommagé, usé, s'il a
fondu en contact avec le moteur ou s'il
démontre un signe de fissure, des bulles,
des trous d'épingle ou tout autre fuite.
Ne jamais saisir untuyau haute pression
quifuit ou est endommagé.
• Ne jamais toucher, saisir ou essayer de
couvrir un trou minuscule ou tout autre
fuite similaire sur le tuyau haute pression.
Le jet d'eau EST sous haute pression et
PÉNÈTRERA la peau.
• Ne jamais mettre les mains
devantl'embouchure.
• Éloigner le jet, ne pas le diriger vers soimême ou autrui.
• S'assurer que le tuyau et les raccords
sont serrés et en bon état. Ne jamais
s'agripper au tuyau ou aux raccords en
cours de fonctionnement.
• Ne pas mettre le tuyau en contact avec
le silencieux.
• Ne jamais attacher ou retirer le tube ou
les raccords du tuyau avec le système
sous pression.
• Il y a risque de blessures si la pression
n'est pas réduite avant d'essayer
de procéder à un entretien ou un
démontage.
•
Pour dégager la pression de l'appareil, placer
l'interrupteur marche/arrêt « ON/OFF » dans la
position « OFF », couper l'alimentation d'eau
et enfoncer la détente jusqu'à ce que l'eau
arrête de s'écouler.
• Utiliser uniquement des tuyaux et
accessoires classés pour des pressions
plus élevées que le PSI de la laveuse
haute pression.
RISQUE DE BLESSURE PAR JET
CE QUI PEUT SE PRODUIRE COMMENT L'ÉVITER
• Un jet de liquide à haute vitesse peut
briser des objets et projeter les éclats à
haute vitesse.
• Des objets légers ou mal fixés peuvent
se transformer en projectiles dangereux.
• Toujours porter des lunettes de sécurité
conformes à la norme ANSI Z87.1 Porter
des vêtements protecteurs pour se
protéger de jets accidentels.
• Ne jamais diriger la lance ou le jet vers
une personne ou des animaux.
• Toujours fixer solidement le verrou de
la détentelorsque le tube pulvérisateur
est inutilisé pour empêcher tout
fonctionnement accidentel.
• Ne jamais fixer, de façon permanente, la
détente en position arrière (ouverte).
21 - FR
A17913
Page 22

RISQUE D'UTILISATION DANGEREUSE
CE QUI PEUT SE PRODUIRE COMMENT L'ÉVITER
• Une utilisation dangereuse de la laveuse
haute pression pourrait provoquer de
graves blessures, voire son propre
décès ou celle d'autres personnes.
• Ne pas utiliser de produit à blanchir au
chloreou tout autre composé corrosif.
• Se familiariser ave le fonctionnement
et les commandes de la laveuse haute
pression.
• Tenir la zone de travail exempte de
toutes personnes, animaux et obstacles.
• Ne pas utiliser le produit en cas de
fatigue ou sous l'emprise d'alcool ou de
drogues. Rester vigilant en tout temps.
• Ne jamais rendre inopérant les
caractéristiques de sécurité du produit.
• Ne jamais laisser le tube pulvérisateur
sans surveillance lors du fonctionnement
de l'appareil.
• La pompe de la laveuse à pression
contient des pièces mobiles. Le contact avec des pièces mobiles peut
causer des blessures graves.
• Le pistolet et le tube de pulvérisation sont
des outils de nettoyage puissants qui
• Ne jamais utiliser l'appareil lorsque le
protecteur de la pompe est enlevé.
• Ne pas utiliser l'appareil avec des pièces
manquantes, brisées ou non autorisées.
• Garder la laveuse haute pression hors de
portée des enfants en tout temps.
ressemblent à un jouet pour un enfant.
• Le pistolet et le tube de pulvérisation
réagissent à la pression du jet et
provoqueront un effet de rebond
qui pourrait faire glisser, ou tomber,
l'opérateur ou rediriger le jet. Une
maîtrise imparfaite du pistolet et de la
lance peut provoquer des blessures à
soi même et à autrui.
• Ne pas trop tendre les bras ou se tenir
debout sur une surface instable.
• Ne pas utiliser une laveuse haute
pression debout sur une échelle.
• Saisir solidement à deux mains
le pistolet/tube de pulvérisation.
S'attendre à un effet de rebond lors de
l'enclenchement de la détente.
ATTENTION SURFACES CHAUDES
CE QUI PEUT SE PRODUIRE COMMENT L'ÉVITER
• Le contact de surfaces chaudes comme
les composants d'échappement moteur,
pourrait provoquer des brûlures graves
• En cours de fonctionnement, ne toucher
que les surfaces de commande de la
laveuse haute pression. Tenir en tout
temps les enfants à l'écart de la laveuse
haute pression. Ils n'ont pas assez de
jugement pour reconnaître les dangers
inhérents au produit.
A17913
22- FR
Page 23
RISQUE DE BRÛLURE CHIMIQUE
CE QUI PEUT SE PRODUIRE COMMENT L'ÉVITER
• L'utilisation d'acides, de produits
chimiques toxiques ou corrosifs,
de poisons, d'insecticides, ou de tout
type de solvant inflammable avec le
produit risque de se solder par des
blessures graves, voire la mort.
• Ne pas utiliser d'acides, d'essence,
de kérosène ou tout autre matériel
inflammable avec ce produit.
Utiliser uniquement des détergents
domestiques, des nettoyants et
dégraissants recommandés pour les
laveuses haute pression.
• Porter des vêtements protecteurs pour
protéger les yeux et la peau contre le
contact avec les matériaux sous pression.
RISQUE DE
CE QUI PEUT SE PRODUIRE COMMENT L'ÉVITER
• Un jet en direction de prises électriques
ou d'interrupteurs ou tout objet branché
à un circuit électrique pourrait se solder
par un choc électrique..
• Ce produit est alimenté par électricité. Il
contient et vaporise de l'eau ainsi que des
liquides conducteurs. Une utilisation inappropriée peut entraîner une électrocution.
• Le disjoncteur de fuite à la terre (DFT) ne fonctionnera pas de manière appropriée, à moins
qu'il ne soit branché à un circuit électrique
entièrement mis à la terre.
•
Les rallonges peuvent entraîner des
chocs électriques.
RISQUE DE BLESSURE EN SOULEVANT LE PRODUIT
CE QUI PEUT SE PRODUIRE COMMENT L'ÉVITER
• Essayer de soulever un objet trop
lourd peut se solder par de graves
blessures.
CHOC ÉLECTRIQUE
• Débrancher tout produit fonctionnant
à l'électricité avant d'essayer de le
nettoyer. Éloigner le jet des prises
électriques et interrupteurs.
•
Toujours brancher l'ensemble de cordon
d'alimentation dans un circuit électrique polarisé
et mis à la terre de façon appropriée. L'ensemble
de cordon d'alimentation est équipé d'un disjoncteur de fuite à la terre (DFT) pour votre protection.
• Si l'ensemble de cordon d'alimentation est
endommagé, il doit être remplacé au complet
dans un Centre de service après-vente autorisé. Consulter les instructions sur la mise à la
terre.
•
Ne pas utiliser avec des rallonges.
• La laveuse haute pression est trop
lourde pour être soulevée par une
seule personne. Demander de l'aide
avant de la soulever.
Le puissant jet de la laveuse à pression est capable
la peinture d'automobiles, les garnitures d'auto ainsi que les objets délicats tels
que les fleurs et arbustes. Avant de vaporiser, vérifiez l'objet à nettoyer afin de
vous assurer qu'il est assez robuste pour résister à la puissance du jet sans subir
de dommages. Évitez d'utiliser le jet à débit concentré sauf pour des surfaces très
résistantes telles que le béton ou l'acier.
d'endommager les surfaces fragiles telles que le bois, le verre,
LISEZ ET CONSERVEZ CES INSTRUCTIONS
23 - FR
A17913
Page 24

INSTRUCTIONS DE MISE À LA TERRE
Ce produit doit être mis à la terre. S'il ne fonctionne pas de manière appropriée ou s'il subit une
panne, une bonne mise à la terre fournit une voie de moindre résistance pour le courant électrique
afin de réduire le risque de chocs électriques. Ce produit est doté d'un cordon avec conducteur
de mise à la terre de l'équipement et d'une fiche de mise à la terre. La fiche doit être branchée
dans une prise de courant appropriée qui a été installée et mise à la terre conformément à tous les
codes électriques et ordonnances locaux.
Un branchement inapproprié du conducteur de mise à la terre de
un électricien qualifié ou un technicien de service si vous avez des doutes
concernant la mise à la terre appropriée de votre appareil. Ne modifiez pas la fiche
fournie avec le produit ; si elle ne s'insère pas facilement dans la prise de courant,
faites installer une prise de courant appropriée par un électricien qualifié. N'utilisez
aucun type d'adaptateur avec ce produit.
de la laveuse haute pression.
l'équipement peut entraîner un risque d'électrocution. Consultez
Pour prévenir une surcharge de circuit, ne pas utiliser d’autre
dispositif électrique relié au même circuit lors du fonctionnement
RALLONGES
Utilisez un boyau à haute pression plus long au lieu de rallonges électriques afin d'éviter une
chute de tension et une perte de puissance du moteur et pour empêcher toute surchauffe.
N'UTILISEZ PAS DE RALLONGES.
REMARQUE : L'utilisation d'un boyau à haute pression plus long, réduira la puissance de la
laveuse à pression à une valeur inférieure à 1600 psi.
PROTECTION PAR DISJONCTEUR DE FUITE À LA TERRE
Cette laveuse à pression est dotée d'un disjoncteur de fuite à la terre (DFT) qui est
incorporé dans la fiche du cordon d'alimentation. Ce dispositif offre une protection
supplémentaire contre le risque de chocs électriques. Si vous devez remplacer la fiche
ou le cordon, utilisez seulement des pièces identiques avec une protection par DFT.
FICHE TECHNIQUE
Modèle
VR1600E
PSI Max* 1600 (11031,6 kPa)
PSI en Fonctionnement
GPM Max* 1,5 (5,7 L/min)
GPM en Fonctionnement
* Débit d'eau et limites maximales de pression déterminés en conformité avec la
norme PW101 de la PWMA américaine.
A17913
1440 (9859.5 kPa)
1,35 (5,1 L/min)
24- FR
Page 25

CONTENU DE LA BOÎTE
Guide de
l’utilisateur
en anglais,
espagnol et
français
Poignée
Ensemble de moteur,
châssis et roues
Boutons
Trousse de nettoyage
de la buse
Boulons
de selle
Unité d'application
de produit chimique
Pistolet de vaporisation
Poignée dans un sac
Buse rotative
Adaptateur à
connexion rapide
Sac de pièces
Lance de vaporisation
INSTRUCTIONS D'ASSEMBLAGE
1. Placez l’ensemble de poignée sur le châssis et
attachez la poignée au châssis.
Risque de blessures corporelles.
module et le cadre pour éviter de se pincer les mains.
2. Attachez la lance au pistolet et bien serrer.
3. Attachez le boyau à haute pression au pistolet et
bien serrer.
Ne pas placer les mains entre le
Boyau à haute
pression
Buse de vaporisation
variable
Raccord à
connexion
rapide
25 - FR
A17913
Page 26

INSTRUCTIONS D'UTILISATION
LISEZ CE GUIDE DE L’UTILISATEUR ET TOUTES LES MESURES DE SÉCURITÉ AVANT
D’UTILISER CET APPAREIL. Comparez les illustrations avec votre appareil afi n de vous
familiariser avec l’emplacement des commandes et des réglages. Conservez ce guide pour
les références futures.
Pistolet de
vaporisation
Cordon
d'alimentation
électrique
Interrupteur
marche/arrêt
du moteur
Moteur
Lance de
vaporisation
avec buse de
vaporisation
variable
Boyau à
haute
pression
Sortie
d'eau
Entrée
d'eau
avec
filtre
Pompe à haute pression
Adaptateur à connexion rapide
Raccord à connexion rapide
Unité
d'application
de solution
de nettoyage
Buse rotative
ÉLÉMENTS DE BASE D’UNE LAVEUSE À PRESSION
Pompe à haute pression (située à l’intérieur du bouclier)-: Augmente la pression de la source
d’eau.
Moteur (située à l’intérieur du bouclier) : Entraîne la pompe à haute pression.
Boyau à haute pression : Achemine l'eau pressurisée de la pompe jusqu'au pistolet et à la lance.
Pistolet de vaporisation : S'attache à la lance pour régler le débit d'eau, la direction et la pression.
Lance de vaporisation avec buse de vaporisation variable : La buse s'ajuste d'un jet
étroit à un jet en éventail. Le jet de vaporisation peut être réglé en tournant la buse dans le
sens des aiguilles d'une montre et/ou dans le sans contraire.
Buse rotative - La buse rotative augmente l'efficacité de nettoyage en vous permettant de
couvrir une surface plus grande tout en utilisant un jet de vaporisation concentré.
Unité d'application de solution de nettoyage - Cette unité est utilisée pour appliquer la
solution de nettoyage. Consultez la partie intitulée « Utilisation de l'unité d'application de
solution de nettoyage » de cette section.
TERMINOLOGIE DES LAVEUSES À PRESSION
Disjoncteur de fuite à la terre (DFT) : Cette laveuse à pression est dotée d'un disjoncteur
de fuite à la terre (DFT) qui est incorporé dans la fiche du cordon d'alimentation. Ce
dispositif offre une protection supplémentaire contre le risque de chocs électriques. Si vous
devez remplacer la fiche ou le cordon, utilisez seulement des pièces identiques avec une
protection par DFT.
A17913
26- FR
Page 27

Système d'arrêt total : Cet appareil est doté d'un système d'arrêt total. Lorsque la détente
est relâchée, le moteur s'arrête automatiquement. Lorsqu'on appuie sur la détente, le moteur
se remet automatiquement en marche. Le temps entre le relâchement et le réengagement
ne peut pas être inférieur à 4 ou 5 secondes. Ne laissez pas l'appareil en mode d'arrêt
automatique pendant plus de 15 minutes.
psi : Livres par pouce carré. Une unité de mesure de pression d'eau. Également utilisé pour
la pression d'air, la pression hydraulique, etc.
GPM : Gallons par minute. L'unité de mesure du débit d'eau dans la laveuse à pression.
CU : Unités de nettoyage. gal./min x psi.
Source d'eau : Toutes les laveuses à pression ont besoin d'une source d'eau. Les
exigences minimums pour la source d'eau sont de 20 psi et de 19 litres (5 gallons) à la
minute.
UTILISATION
IMPORTANT : Lisez attentivement la section sur l'utilisation de la laveuse à pression
avant d'utiliser l'appareil.
UTILISATION DE LA LANCE DE VAPORISATION
La buse à l'extrémité de la lance peut être tournée pour choisir un jet étroit ou un jet en
éventail, tel qu'illustré.
Jet étroit
Jet en éventail
UTILISATION DE L'UNITÉ D'APPLICATION DE SOLUTION DE
NETTOY AGE
REMARQUE : N'utilisez que des solutions de nettoyage conçues pour l'usage dans une
laveuse à pression. N'utilisez jamais de l'eau de Javel.
1. Réglez l'interrupteur marche/arrêt à la position d'arrêt « OFF ».
2. Fermez le robinet de la source d'eau.
3. Attachez l'unité d'application de solution de nettoyage à la lance tel qu'illustré et
serrez-la bien. Saisissez l'extrémité de la buse et tournez-la jusqu'à ce que l'unité
d'application de solution de nettoyage soit orientée correctement.
27 - FR
A17913
Page 28
4. Retirez le réservoir d'application de solution de nettoyage de la buse d'application.
a
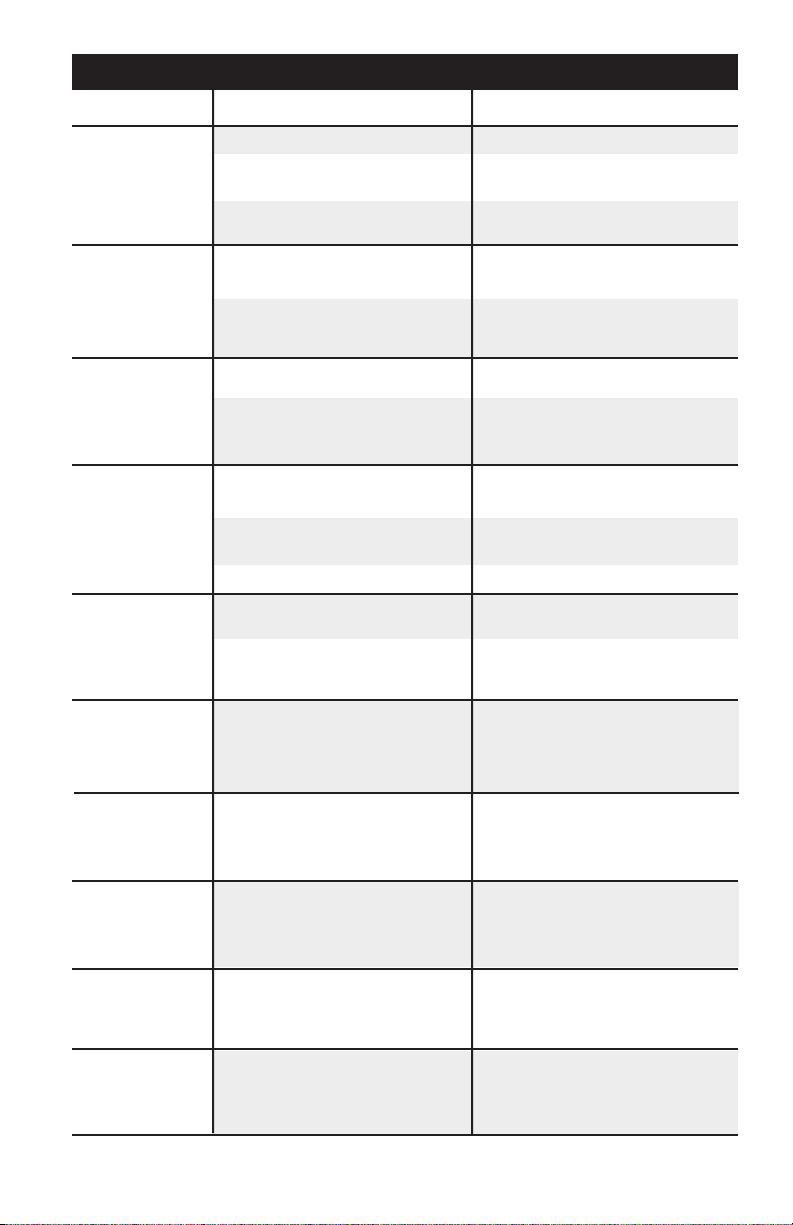
5. La pression du jet du mélange de savon peut être réglée en réglant le tuyau situé dans
la buse d'application de solution de nettoyage (a).
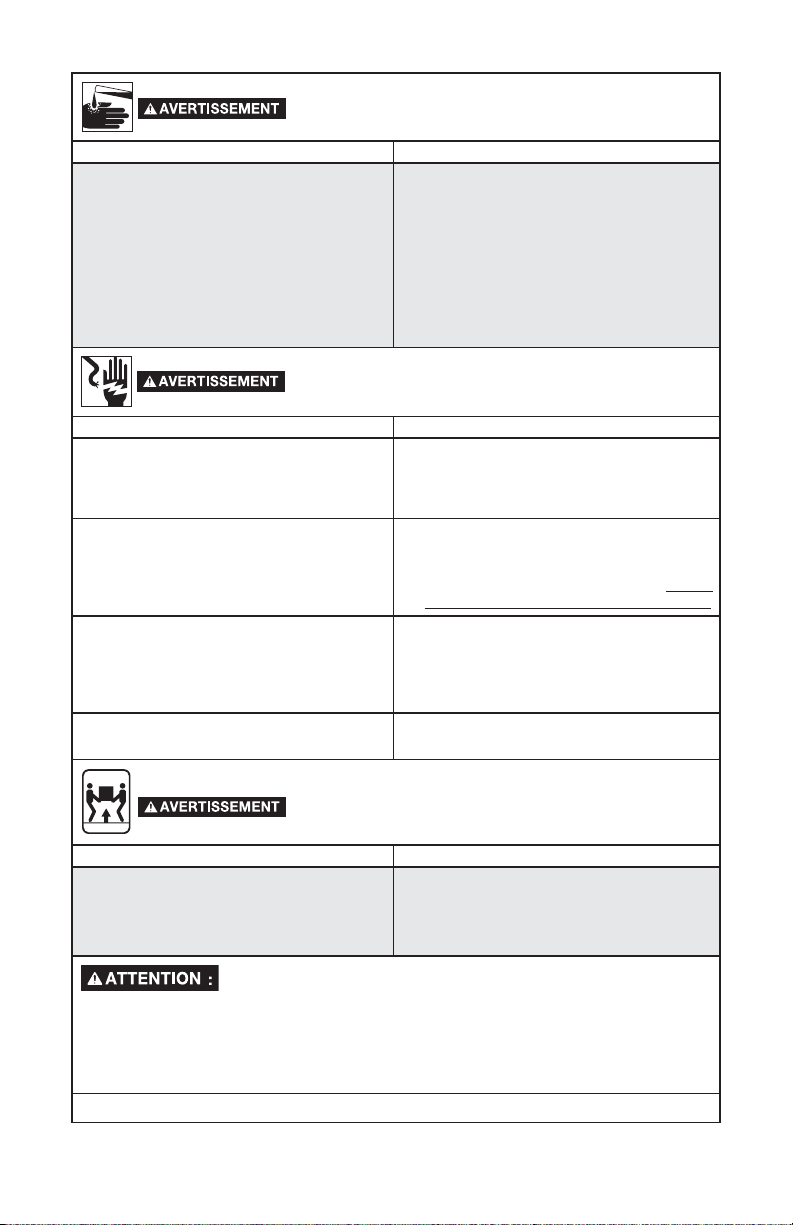
a. Tirez le tuyau (b) de la buse d'application de solution de nettoyage.
b
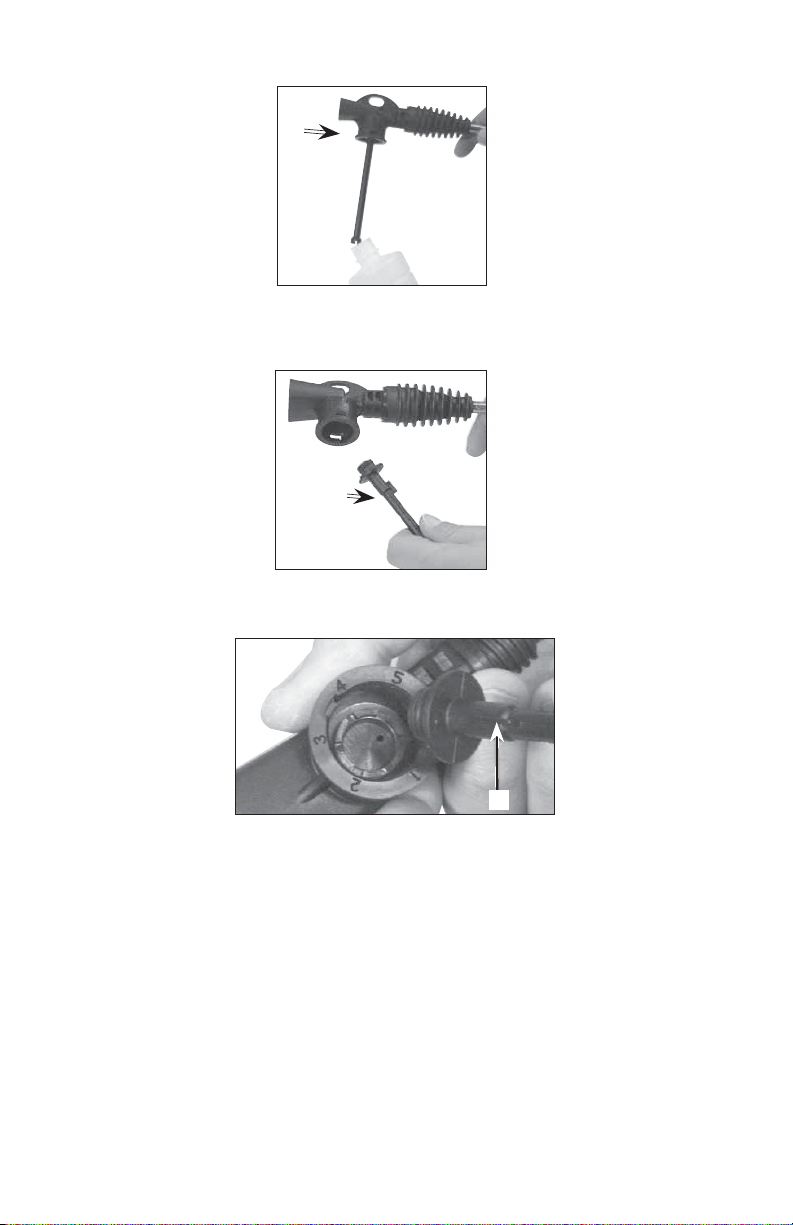
b. Positionnez l'encoche (c) du tuyau au niveau de mélange de savon désiré
(1 à 6) ; 1 est le mélange le plus élevé et 6 est le mélange le plus faible.
c
c. Poussez le tuyau à sa position originale.
6. Remplissez le réservoir d'application avec un détergent.
7. Poussez le réservoir d'application de solution de nettoyage sur la buse d'application
de solution de nettoyage. Tournez pour le verrouiller en place.
8. Consultez les paragraphes intitulés « Avant le démarrage » et « Démarrage de la
laveuse à pression » de cette section pour continuer.
A17913
28- FR
Page 29

LISEZ ATTENTIVEMENT TOUS LES AVERTISSEMENTS AVANT DE METTRE
L'APPAREIL EN MARCHE.
Risque d'injection de liquide et de lacération. Lorsque vous avez réglé
vaporisation à haute pression atteindre la peau nue, les yeux ou les animaux. Cela risque de
provoquer des blessures graves.
Votre laveuse à pression fonctionne à une pression et à une vitesse suffisamment élevées
pour faire pénétrer le fluide dans la peau de personnes ou d'animaux et causer des
blessures graves ou la nécessité d'une amputation. Une fuite causée par des raccords
desserrés ou par un boyau usé ou endommagé peut aboutir à une blessure par injection.
NE TRAITEZ PAS L'INJECTION D'UN FLUIDE COMME UNE SIMPLE COUPURE !
Consultez immédiatement un médecin !
de la pompe.
N'utilisez PAS d'eau chaude. Utilisez seulement de l'eau froide.
Ne fermez jamais le robinet de la source d'eau lorsque le moteur de la laveuse à pression
est en marche puisque cela risque d'endommager la pompe.
Cet appareil est doté d'un mode d'arrêt automatique. Lorsque la détente est relâchée,
le moteur s'arrête automatiquement. Lorsqu'on appuie sur la détente, le moteur se
remet automatiquement en marche. Le temps entre le relâchement et le réengagement
ne peut pas être inférieur à 4 ou 5 secondes. NE laissez PAS l'appareil en mode d'arrêt
automatique pendant plus de 15 minutes.
Tenez-vous sur une surface stable et saisissez le pistolet/la lance fermement avec les
deux mains. Attendez-vous à ressentir un contre-coup lors du déclenchement.
Ce produit a été conçu pour un fonctionnement intermittent seulement. N'utilisez la
laveuse à pression que pendant une heure ou moins dans une période de 2 heures.
Uniquement pour utilisation extérieure. Le ranger à l’intérieur.
Si vous ne comprenez pas ces mises en garde, veuillez nous téléphoner au
1-866-422-4286 et communiquer avec un représentant du service à la clientèle pour
obtenir de plus amples instructions.
l'appareil à la position de haute pression, NE laissez PAS le jet de
Ne tirez jamais sur le boyau d'alimentation d'eau pour déplacer la
laveuse à
pression. Cela risque d'endommager le boyau et/ou l'entrée
AVANT LE DÉMARRAGE
1. Placez la laveuse à pression sur une surface de niveau.
2. Assurez-vous que l'interrupteur marche/arrêt est à la position d'arrêt « OFF ».
Afin de réduire le risque d'électrocution, assurez-vous que toutes les
pas à la fiche avec des mains humides. N'utilisez pas le cordon s'il est endommagé.
3. Branchez l'appareil dans une prise de courant appropriée qui a été installée et mise à la
terre conformément à tous les codes et ordonnances locaux. Consultez le paragraphe
sur la MISE À LA TERRE.
4. Appuyez sur le bouton de rétablissement et le voyant lumineux (a) s'illuminera. Un des
interrupteurs à DFT montrés ci-dessous sera présent sur votre équipement.
connexions demeurent sèches et qu'elles ne sont pas par terre. Ne touchez
c
a
b
c
a
b
29 - FR
a
c
b
A17913
Page 30
5. Vérifiez le DFT avant chaque utilisation :
a. Appuyez sur le bouton d'essai (b) et le voyant lumineux s'éteindra.
b. Appuyez sur le bouton de rétablissement (c) pour utiliser l'appareil. Si le voyant
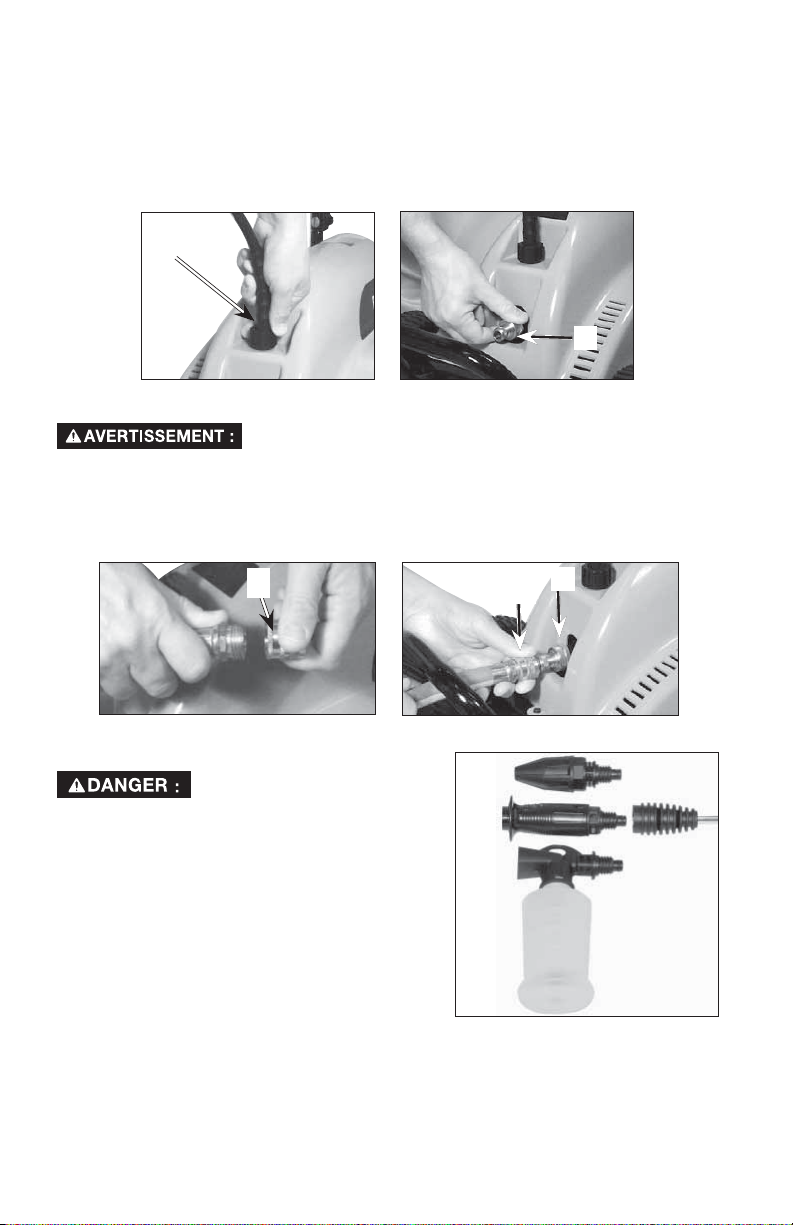
6. Branchez le boyau à haute pression (i) à la sortie d'eau de l'appareil. La sortie d'eau est
7. Posez l'adaptateur à connexion rapide (k) à l'entrée d'eau.
lumineux ne s'illumine pas de nouveau, N'utilisez PAS l'appareil. Consultez le
guide de dépannage.
identifiée par le mot « OUT ».
i
k
8. Posez le raccord à connexion rapide (j) au boyau d'alimentation d'eau.
Pour réduire la possibilité de contamination, toujours protéger
d’apport en eau potable.
9. Posez le raccord à connexion rapide (j) à l'adaptateur à connexion rapide (k), situé à
l'entrée d'eau.
REMARQUE : La source d'alimentation d'eau doit avoir un débit minimum de 19 litres par
minute (5 gallons par minute).
le système contre les refoulements s’il est raccordé au système
j
k
j
10. Assurez-vous que le boyau à haute pression et le boyau d'alimentation d'eau sont bien
connectés.
Risque d'injection de liquide et de
le système avant de changer un accessoire. Déplacer
l’interrupteur marche/arrêt en position d’arrêt, fermer
l’alimentation d’eau et appuyer sur la détente du
pistolet jusqu’à évacuation complète de l’eau.
11. Connectez la buse désirée à la lance. Pour
connecter la buse rotative (a) ou la buse de
vaporisation variable (b), tournez la buse dans
le sens des aiguilles d'une montre jusqu'à ce
qu'elle s'enclenche. Pour retirer la buse, tournezla dans le sens contraire des aiguilles d'une
montre. Pour connecter l'unité d'application de
produit chimique (c), consultez la partie intitulée
« Utilisation de l'unité d'application de solution de nettoyage » de cette section.
12. Ouvrez le robinet de la source d'eau.
A17913
lacération. Toujours décompresser
30- FR
a
b
c
Page 31

DÉMARRAGE DE LA LAVEUSE À PRESSION
REMARQUE : Assurez-vous que la source d'alimentation d'eau est ouverte.
1. Désengagez le verrou de sûreté, tel qu indiqué.
Appuyez sur la détente pour libérer l'air et pour
dégager la pression résiduelle dans les tuyaux.
2. Tout en appuyant sur la détente, réglez
l'interrupteur marche/arrêt à la position de marche
« ON ». Continuez à appuyer sur la détente lors
du démarrage du moteur.
Risque de blessure par jet. Verr ouiller la détente lorsque le pistolet
n'est pas utilisé pour empêcher une pulvérisation accidentelle.
Risque de dommages à la propriété. Si, après avoir utilisé
d'eau uniforme, arrêtez l'appareil pour éviter de l'endommager et consultez le guide de
dépannage pour obtenir des instructions.
l'appareil pendant plusieurs minutes, il ne conserve pas une pression
NETTOYAGE RECOMMANDÉ
• Pour nettoyer une surface verticale, commencez en bas et continuez vers le haut.
• Laissez le détergent travailler pendant 1 à 2 minutes, mais N'ATTENDEZ PAS jusqu'à
ce que le détergent soit sec.
• Pour rincer le détergent, utilisez le jet à haute pression, tout en maintenant la buse à
une distance minimum de 25 cm (10 po) de la surface à nettoyer et en travaillant du
bas en haut.
ARRÊT DE LA LAVEUSE À PRESSION
1. Réglez l'interrupteur marche/arrêt à la position d'arrêt « OFF ».
2. Fermez le robinet de la source d'alimentation d'eau.
3. Appuyez sur la détente du pistolet de vaporisation pour dégager toute pression d'eau
dans le boyau ou dans le pistolet.
4. Débranchez le boyau d'alimentation d'eau de l'entrée d'eau.
5. Débranchez le boyau à haute pression de la sortie.
6. Si vous avez utilisé l'unité d'application de solution de nettoyage, rincez bien le
réservoir d'application de solution de nettoyage et la buse.
31 - FR
A17913
Page 32

ENTRETIEN
Lorsque vous effectuez de l'entretien, vous pouvez être
aux pièces en mouvement qui peuvent causer des blessures graves ou la mort !
Avant d'effectuer tout entretien ou toute réparation, débranchez l'appareil de la sour ce
d'alimentation, laissez le moteur refroidir et dégagez toute la pression d'eau.
Afin d'assurer le bon fonctionnement et une durée de vie prolongée de votre laveuse à
pression, vous devez préparer et suivre un calendrier d'entretien régulier. Si votre laveuse à
pression est utilisée dans un environnement défavorable, tel qu'à des températures élevées
ou des conditions poussiéreuses, les vérifications d'entretien doivent être exécutées plus
souvent..
Confier tout entretien ou réparation non précisé(e) à un centre de réparation sous garantie
autorisé.
TABLEAU DES RESPONSABILITÉS DU CLIENT
TACHE D’ENTRETIEN
LAVEUSE À PRESSION
Vérification du boyau à haute
pression pour déceler des fuites
Vérification du boyau de
savon/produit chimique et du
filtre
Vérification du pistolet et de la
lance pour déceler des fuites
Préparation pour l’entreposage
POMPE À HAUTE
PRESSION
vérifier/nettoyer le filtre de
succion
Vérification/changement de
l’huile
* Cette pompe ne requiert pas d'huile.
MOTEUR
Nettoyez le moteur après chaque utilisation. Utilisez un chiffon pour enlever le débris du
moteur. NE nettoyez JAMAIS le moteur avec de l'eau.
exposé à des surfaces chaudes, à l'eau sous pression, ou
Avant
chaque
utilisation
X
X
X
Préparez l’appareil pour l’entreposage s’il ne sera pas
utilisé pendant 30 jours ou plus.
X
*
Toutes les
25 heures ou
annuellement
Toutes les
50 heures ou
annuellement
Toutes les
100 heures ou
annuellement
FILTRE DE SUCCION
1. Vérifiez et nettoyez le filtre d'aspiration (b) après toutes les 50 heures d'utilisation.
b
A17913
32- FR
Page 33

NETTOYAGE DE LA BUSE
Si la buse devient obstruée par des matériaux étrangers comme la poussière, une pression
excessive peut se développer. Si la buse devient partiellement obstruée ou le débit est
restreint, la pression de la pompe commencera à pulser. Nettoyez la buse immédiatement
en vous servant de la trousse de nettoyage de buse fournie et en suivant les directives
suivantes :
1. Réglez l'interrupteur marche/arrêt à la position d'arrêt « OFF » et fermez le robinet
de la source d'alimentation d'eau.
2. Débranchez l'appareil de la source d'alimentation électrique.
3. Appuyez sur la détente du pistolet afin de dégager l’eau sous pression.
4. Détachez la lance du pistolet.
5. Nettoyez la buse en vous servant du dispositif de nettoyage fourni ou d'un trombone redressé
en ligne droite. Insérez-le dans l'extrémité de la buse et déplacez-le dans un mouvement d'allerretour pour libérer l'obstruction.
6. Dirigez la source d'eau dans la buse et rincez les particules libérées pendant 30 secondes.
7. Branchez l'appareil dans une prise électrique appropriée.
8. Réassemblez la buse à la lance. Serrez fermement afin d'empêcher des fuites.
9. Attachez la lance au pistolet et ouvrez le robinet de la source d'eau.
10. Démarrez la laveuse à pression et réglez la lance à la position de haute pression pour
l'essayer.
ACCESSOIRES
Les accessoires recommandés pour la laveuse haute pression peuvent être achetés auprès
du distributeur local ou d’un centre de réparation autorisé. Pour toute assistance en matière
d’accessoire convenant à l’outil acheté, composer le numéro suivant : 1-800-888-2468 ou
consulter notre site Web www.excellpressurewasher.com.
l’utilisation de tout autre accessoire non recommandé avec
accessoires de marque EXCELL de classement égal ou supérieur à celui de la laveuse
haute pression.
cet outil pourrait s’avérer dangereuse. Utiliser uniquement des
RÉPARATIONS
Pour assurer la SÉCURITÉ et la FIABILITÉ du produit, les réparations, l’entretien et les
réglages doivent être réalisés par un centre de réparation sous garantie autorisé. Toujours
utiliser des pièces de rechange identiques. Pour connaître l’emplacement du centre de
réparation sous garantie autorisé le plus près, composer le 1-800-888-2468 ou consulter
notre site Web www.excellpressurewasher.com
33 - FR
A17913
Page 34

ENTREPOSAGE
1. Vidangez toute l'eau du boyau à haute pression, enroulez-le et rangez-le dans le
berceau de la poignée de la laveuse à pression.
2. Vidangez toute l'eau du pistolet et de la lance. Pour ce faire, maintenez le pistolet
en position verticale, en dirigeant la buse vers le bas, et appuyez sur la détente du
pistolet. Rangez ces pièces dans le porte-pistolet/boyau.
3. Entreposez le boyau de produit chimique, le boyau à haute pression, le pistolet de
vaporisation et la lance en les protégeant contre les dommages, surtout les dommages
causés en roulant sur ces pièces.
Nous vous recommandons de suivre les étapes ci-dessous pour protéger les joints
d'étanchéité internes de la laveuse à pression LORSQUE VOUS DEVEZ ENTREPOSER
L'APPAREIL PENDANT PLUS DE 30 JOURS ET(OU) LORSQUE DES TEMPÉRATURES DE
GEL SONT PRÉVUES.
* Vous devez passer de l'antigel pour véhicules récréatifs à travers la pompe, tel que stipulé
dans les étapes ci-dessous.
4. Obtenez un entonnoir, 177 ml (6 oz) d'antigel pour véhicules récréatifs, un boyau
d'arrosage d'une longueur d'environ 91 cm (36 po) doté d'un raccord mâle à une
extrémité.
Risque de dommages à la propriété. Utiliser uniquement de l’antigel
endommager la pompe.
5. Branchez le raccord à connexion rapide (j) au tuyau d'arrosage.
pour véhicule récréatif. Tout autre antigel est corrosif et peut
j
6. Connectez le boyau d'arrosage de 91 cm (36 po) à l'orifice d'entrée de la pompe.
7. Ajoutez l’antigel pour véhicules récréatifs, tel qu'illustré.
8. Placez l'interrupteur marche/arrêt «ON/OFF» à la position «ON» et ensuite à la
position «OFF» jusqu'à ce que l'antigel sorte de la connexion de haute pression de la
pompe.
9. Retirez le tuyau d'arrosage de l'orifice d'entrée de la pompe.
* Vous pouvez également utiliser du liquide de lave-glace
A17913
34- FR
Page 35

PROBLÈME
Le moteur ne
démarre pas et il
n'y a aucun bruit
de bourdonnement
Le circuit
d'alimentation
électrique coupe
souvent ou fait
sauter les fusibles
Le moteur
bourdonne mais ne
démarre pas
Aucune pression
ou basse pression
GUIDE DE DÉPANNAGE
CAUSE SOLUTION
La laveuse à pression n'est pas
branchée.
Le bouton de rétablissement
« RESET» du DFT n'est pas enfoncé.
Le disjoncteur est déclenché ou le
fusible est sauté.
Une charge trop élevée sur le circuit.
Utilisation d'une rallonge électrique.
Utilisation d'une rallonge électrique.
La tension d'alimentation est inférieure à
la valeur minimum.
Alimentation d'eau insuffisante.
Le boyau à haute pression est trop long.
Buse usée.
Branchez la laveuse à pression.
Appuyez sur le bouton de
rétablissement «RESET».
Réinitialisez le disjoncteur ou remplacez
le fusible.
Réduisez la charge sur le circuit.
Essayez un autre circuit de 15 A.
NE PAS utiliser des rallonges
électriques.
NE PAS utiliser des rallonges
électriques.
Vérifiez la tension de la conduite
principale d'alimentation.
La source d'eau doit avoir un débit
minimum de 19 litres ou 5 gal./min à 20
psi.
Utilisez un boyau à haute pression d'une
longueur inférieure à 30 m (100 pi) .
Remplacez la buse.
Bruit excessif
La pression subit
des fluctuations
sans avoir ouvert le
pistolet
Le voyant lumineux
de l'interrupteur à
DFT ne s'illumine
pas après
l'enfoncement.
L'essai du DFT a
échoué
L'appareil ne
conserve pas une
pression d'eau
uniforme
L'appareil
déclenche
continuellement
l'interrupteur à
DFT
Source d'alimentation d'eau restreinte
ou insuffisante, ou de l'air dans la
conduite d'eau.
La température de l'eau est trop élevée.
Fuite d'eau au niveau des raccords à
haute pression, du boyau ou du pistolet.
Le disjoncteur est déclenché ou le
fusible est sauté.
Le disjoncteur est déclenché ou le
fusible est sauté.
Buse obstruée
Buse obstruée
Vérifiez le boyau d'alimentation d'eau, le
robinet et l'écran d'entrée.
N'utilisez pas l'eau d'une source
d'alimentation d'eau chaude ; n'utilisez
que de l'eau d'un robinet d'eau froide.
Remplacez le boyau ou le pistolet. Si le
problème continue, apportez l'appareil à
un centre de service autorisé.
Réinitialisez le disjoncteur ou remplacez le fusible. Si le voyant lumineux
ne s'illumine toujours pas, demandez à
un électricien qualifié de vérifier la prise
électrique.
Réinitialisez le disjoncteur ou remplacez le fusible. Si le voyant lumineux
ne s'illumine toujours pas, demandez à
un électricien qualifié de vérifier la prise
électrique.
Nettoyez la buse. Si l'appareil ne
conserve toujours pas une pression
d'eau uniforme, arrêtez l'appareil et
contactez le service à la clientèle au
1-866-422-4286
Nettoyez la buse. Si l'appareil ne
conserve toujours pas une pression
d'eau uniforme, arrêtez l'appareil et
contactez le service à la clientèle au
1-866-422-4286
35 - FR
A17913
Page 36

GARANTÍA LIMITADA
LOS COMPONENTES DEL PRODUCTO TIENEN GARANTÍA LIMITADA DE UN AÑO, A
EXCEPCIÓN DE LA BOMBA DE IC2
Durante un año a partir de la fecha de compra, Black & Decker (U.S.) Inc. le garantiza al
comprador original que el armazón, las ruedas, la pistola, la manguera, la varilla, la/s boquilla/s
del pulverizador y otros componentes (salvo la Bomba de IC2) de las lavadoras a presión Excell
cubiertas por esta garantía están libres de defectos en los materiales y en la mano de obra.
GARANTÍA LIMITADA DE DOS AÑOS PARA LA BOMBA DE IC2
Durante dos años a partir de la fecha de compra, Black & Decker . le garantiza al comprador
original que la Bomba de IC2 de las lavadoras a presión Excell cubiertas por esta garantía está
libre de defectos de material y mano de obra. La garantía limitada de dos años sólo se aplica a
la Bomba de IC2.
Black & Decker reparará o reemplazará, según su criterio, los productos o componentes que
hayan fallado dentro de los períodos de garantía mencionados. El servicio se programará de
acuerdo con el fl ujo y las horas de trabajo normales del centro de mantenimiento y está sujeto a
la disponibilidad de los repuestos. Todas las decisiones que Black & Decker tome con respecto
a esta garantía limitada serán defi nitivas.
Esta garantía le concede derechos legales específi cos; pueden existir otros derechos que
varían según el estado.
RESPONSABILIDAD DEL COMPRADOR ORIGINAL (usuario inicial):
• Para procesar un reclamo por la garantía de su lavadora a presión Excell, devuélvala al
lugar de compra.
• Conserve el recibo de venta original emitido por la caja registradora como prueba de
compra para el trabajo que deberá realizarse en virtud de la garantía.
• Opere y mantenga los productos con el cuidado adecuado, como se describe en el/los
Manual/es del cliente.
ESTA GARANTÍA NO CUBRE:
• La mercadería vendida como reacondicionada, usada como equipo de alquiler o
modelos de piso o en exhibición.
• La mercadería que se haya dañado o no funcione a causa de desgaste común, uso
indebido, frío, calor, lluvia, humedad excesiva, daño por congelamiento, utilización
de productos químicos inadecuados, negligencia, accidente, uso del producto de
modo contrario a las instrucciones del Manual del cliente que se suministra con el
producto, mantenimiento inapropiado, empleo de accesorios o complementos no
recomendados por Black & Decker, o reparaciones o modifi caciones no autorizadas.
• El costo de la reparación y el transporte de la mercadería que se haya defi nido como
no defectuosa.
• Los costos asociados con el ensamblado, la lubricación, los ajustes necesarios y
otros gastos de instalación y puesta en marcha.
• Las piezas prescindibles o los accesorios suministrados con el producto que dejarán
de funcionar o serán inutilizables tras un período de uso razonable, incluidos, entre
otros, resortes, boquillas, anillos de pistón, arandelas y accesorios similares.
• La mercadería que haya vendido Black & Decker pero que otra compañía haya
fabricado e identifi cado como su producto, por ejemplo, los motores de nafta. Se
aplicará la garantía del fabricante, si la hubiere.
• ESTA GARANTÍA NO CUBRE NINGUNA PÉRDIDA, DAÑO O GASTO INCIDENTAL
O INDIRECTO QUE PUDIERA SER CONSECUENCIA DE CUALQUIER DEFECTO,
FALLA O MAL FUNCIONAMIENTO DEL PRODUCTO. Algunos estados no permiten
la exclusión ni la limitación de los daños incidentales o indirectos; por lo tanto, es
posible que la limitación o exclusión anterior no se aplique en su caso.
• LAS GARANTÍAS IMPLÍCITAS, INCLUSIVE LAS QUE SE REFIEREN A LA
COMERCIALIDAD O IDONEIDAD PARA UN PROPÓSITO DETERMINADO,
ESTÁN LIMITADAS A UN AÑO A PARTIR DE LA FECHA DE COMPRA ORIGINAL.
Algunos estados no permiten la limitación de la duración de las garantías implícitas;
por lo tanto, es posible que las limitaciones anteriores no se apliquen en su caso.
A17913
36- FR
Page 37
Lavador eléctrica a presión
Registre toda la información y adhiera
el comprobante de compra aquí para
referencia futura.
Fecha de compra:_______________________
N° de serie: ____________________________
¿Consultas? 1-800-888-2468
Familiarícese con su lavadora a presión,
obtenga respuesta rápida a las preguntas
más frecuentes
y regístrela en línea en:
www.excellpressurewasher.com
Modelo VR1600E
Contenido
Normas de seguridad/definiciones. . . . . . . .38
Instrucciones importantes de seguridad. . . . . .
. . . . . . . . . . . . . . . . . . . . . . . . . . . . . . . . . .38-42
Especificaciones . . . . . . . . . . . . . . . . . . . . . .42
Contenido de la caja . . . . . . . . . . . . . . . . . . .43
Instrucciones para el ensamblado . . . . . . . .43
Instrucciones de funcionamiento . . . . . .44-49
Mantenimiento . . . . . . . . . . . . . . . . . . . . .50-51
Accesorios . . . . . . . . . . . . . . . . . . . . . . . . . . .51
Reparacciones . . . . . . . . . . . . . . . . . . . . . . . .51
Almacenaje . . . . . . . . . . . . . . . . . . . . . . . . . . .52
Guía de diagnóstico de problemas. . . . . . . .53
Garantía . . . . . . . . . . . . . . . . . . . . . . . . . . . . .55
English . . . . . . . . . . . . . . . . . . . . . . . . . . . . 1-18
Français . . . . . . . . . . . . . . . . . . . . . . . . . .19-36
IMPORTANTE
Asegúrese de que la persona que va a usar esta herramienta lea cuidadosamente
y comprenda estas instrucciones antes de utilizarla.
Pieza No. A17913 Rev. 0 5/10/06
Page 38
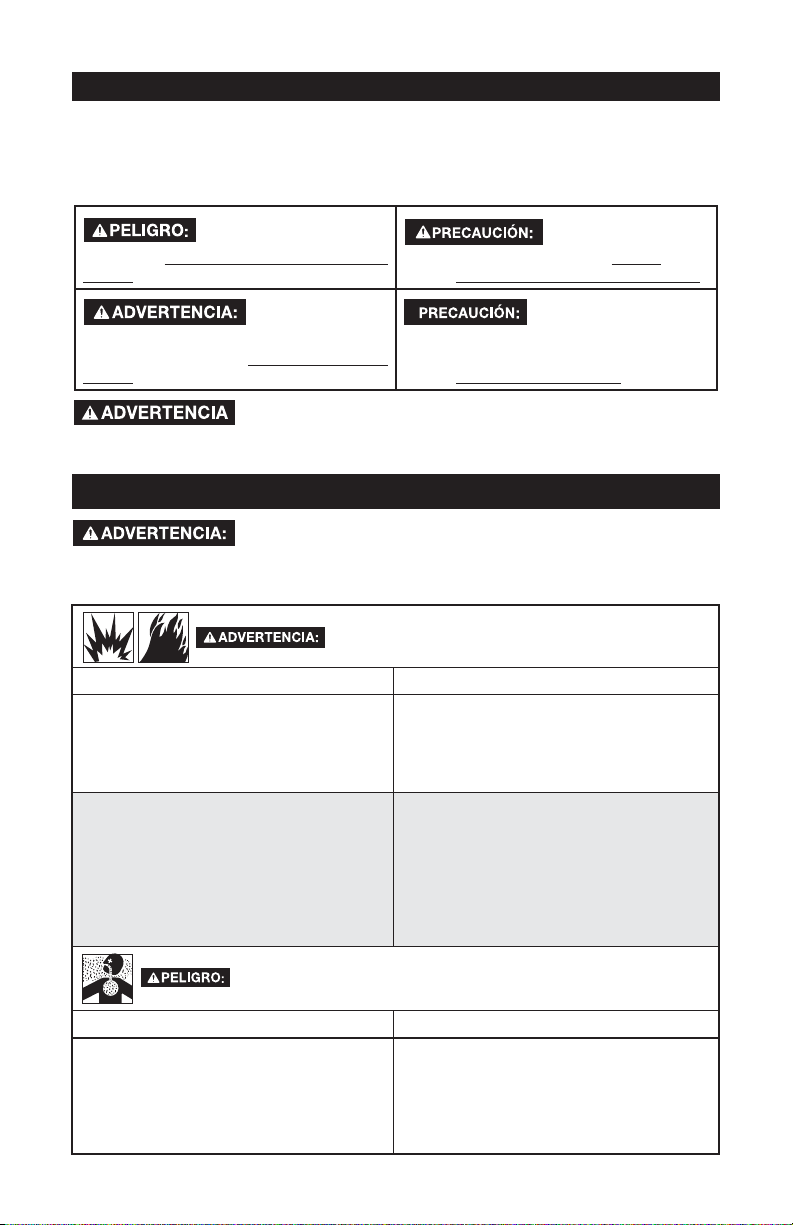
DEFINICIONES DE NORMAS DE SEGURIDAD
Este manual contiene importante información para que usted sepa y comprenda. Esta
información se relaciona con la protección de SU SEGURIDAD Y LA PREVENCIÓN DE
PROBLEMAS AL EQUIPO. Para ayudarlo a reconocer esa información, utilizamos los
símbolos indicados más abajo. Sírvase leer el manual y prestar atención a dichos
símbolos.
Indica una situación de
no se evita, causará la muerte o lesiones
serias.
potencialmente riesgosa, que si no se
evita, podría causar la muerte o lesiones
serias.
cáncer, defectos de nacimiento u otros problemas reproductivos. Lávese las manos
después de utilizarlo.
inminente riesgo, que si
peligrosa, que si no se evita, podría
causar lesiones menores o moderadas.
Indica una
situación
indica una situación potencialmente
riesgosa la que, que si no se evita, podría
causar daños a la propiedad.
Este producto contiene sustancias químicas -entre ellas, plomoreconocidas por el Estado de California como causantes de
Indica una situación
potencialmente
Usado sin el símbolo
de seguridad de alerta
INSTRUCCIONES IMPORTANTES DE SEGURIDAD
No opere este equipo hasta haber leído y entendido las
este Manual del Operador.
RIESGO DE EXPLOSIÓN O INCENDIO
instrucciones de seguridad, operación y mantenimiento en
LEA Y CONSERVE ESTAS INSTRUCCIONES
¿QUÉ PUEDE SUCEDER? CÓMO EVITARLO
• El uso de ácidos, productos químicos
tóxicos o corrosivos, venenos, insecticidas
o cualquier clase de solventes infl amables
con esta unidad, podría ocasionar lesiones
serias o la muerte.
• La restricción de cualquiera de las aberturas de ventilación de la lavadora a
presión, ocasionará un serio recalentamiento y podría ser causa de incendio.
• No rocíe líquidos infl amables .
• Nunca coloque objetos apoyados o
encima de la lavadora a presión. Opere
la lavadora a presión en una zona abierta; sepárela por lo menos 30 centímetros (12 pulgadas) de cualquier pared
u obstrucción que pudiese restringir el
flujo del aire fresco a las aberturas de
ventilación.
RIESGO RESPIRATORIO (ASFIXIA)
¿QUÉ PUEDE SUCEDER?
• Algunos líquidos para limpieza contienen
sustancias que podrían causar lesiones en
la piel, los ojos o los pulmones.
A17913
• Utilice solamente limpiadores
38- SP
CÓMO EVITARLO
recomendados específicamente para
lavadoras a alta presión. Siga las
recomendaciones de los fabricantes.
No use lejía de cloro ni otro compuesto
corrosivo.
Page 39

RIESGO DE INYECCIÓN DE LÍQUIDO Y LACERACIÓN
¿QUÉ PUEDE SUCEDER? CÓMO EVITARLO
• Su lavadora a presión opera el líquido con
una presión y velocidad lo suficientemente
altas como para penetrar la carne humana
y animal, y por ello podría ocasionar
una amputación u otra lesión grave. Las
pérdidas causadas por accesorios sueltos
o mangueras dañadas pueden producir
lesiones por inyección. NO TRATE LA
INYECCIÓN DE LÍQUIDO COMO SI
FUERA UN SIMPLE CORTE Consulte al
médico de inmediato.
• Podría resultar herido si la presión del
sistema no se reduce antes de intentar
realizarle mantenimiento o
desarmarlo.
• Inspeccione la manguera de alta presión
periódicamente. Reemplace la manguera
de inmediato si está dañada, gastada,
se derritió por contacto con el motor o
evidencia signos de grietas, burbujas,
agujeros u otros tipos de pérdida. Nunca
tome una manguera de alta presión que
tenga una pérdida o esté dañada.
• Nunca toque, tome ni trate de cubrir un
agujero o causa de pérdida de agua similar
en la manguera de alta presión. El flujo de
agua ESTÁ a alta presión y PENETRARÁ
la piel.
• Nunca coloque las manos frente a la
boquilla.
• No dirija el pulverizador hacia sí mismo u
otras personas.
• Asegúrese de que la manguera y los
accesorios estén ajustados y en buenas
condiciones. Nunca se sujete de la
manguera ni de los accesorios durante la
operación.
• No permita que la manguera entre en
contacto con el silenciador.
• Nunca coloque ni quite la varilla ni los
accesorios de la manguera mientras el
sistema esté presurizado.
•
Para liberar la presión del sistema,
coloque el interruptor on/off en la posición
"off", cierre el suministro de agua y
mantenga apretado el gatillo hasta que el
agua deje de fluir.
• Utilice solamente mangueras y accesorios
calificados para soportar presiones
superiores al PSI de su lavadora a presión.
RIESGO DE LESIÓN POR PUL VERIZACIÓN
¿QUÉ PUEDE SUCEDER? CÓMO EVITARLO
• La pulverización de líquidos a alta
velocidad puede hacer que los objetos
se rompan y lancen partículas a gran
velocidad.
• Los objetos livianos o no asegurados
pueden convertirse en
proyectiles peligrosos.
• Use siempre gafas de seguridad aprobadas
según la ANSI Z87.1. Utilice ropa que lo
proteja de una pulverización accidental.
• Nunca apunte el pulverizador a personas o
animales.
• Asegure siempre el bloqueador del
disparadorcuando la varilla no esté en uso
para evitar la operación accidental.
• Nunca asegure el disparador hacia atrás,
en posición abierta permanente.
39 - SP
A17913
Page 40

RIESGO DE OPERACIÓN INSEGURA
¿QUÉ PUEDE SUCEDER? CÓMO EVITARLO
• La operación insegura de su lavadora a
presión podría producir lesiones graves
o la muerte, a usted mismo o a otras
personas..
•
Las bombas de las lavadoras a presión
contienen partes expuestas en movimiento. El contacto con dichas partes
en movimiento puede ocasionar serias
lesiones.
• La pistola/varilla pulverizadora es una
herramienta de limpieza poderosa, que
podría parecer un juguete ante los ojos de
un niño.
• La fuerza reactiva de la pulverización hará
que la pistola/varilla retroceda, lo cual
podría hacer que el operador se resbale,
caiga o apunte el pulverizador hacia una
dirección incorrecta. El control inadecuado
de la pistola/varilla puede causar lesiones
al usuario y a otras personas.
• No utilice lejía de cloro ni otro
compuesto corrosivo.
• Familiarícese con las operaciones y los
controles de la lavadora a presión.
• Mantenga el área de operaciones libre de
personas, mascotas y obstáculos.
• No opere el producto cuando esté cansado
o bajo la influencia de alcohol o drogas.
Manténgase alerta en todo momento.
• Nunca anule las características de
seguridad de este producto.
• Nunca deje la varilla sin atención mientras
la unidad está en funcionamiento.
• Nunca opere la lavadora sin la cubierta
protectora de la bomba.
• No opere la máquina si faltan piezas, están
rotas o no son las autorizadas.
• Mantenga a los niños alejados de la
lavadora a presión en todo momento.
• No se estire demasiado ni se pare en una
superficie que no brinde estabilidad.
• No use la lavadora a presión cuando esté
subido a una escalera.
• Agarre la pistola/varilla firmemente con
ambas manos. Espere que la pistola
retroceda cuando la dispare.
RIESGO DE SUPERFICIES CALIENTES
¿QUÉ PUEDE SUCEDER? CÓMO EVITARLO
• El contacto con superfi cies calientes, tales
como los componentes de escape de
motores, podría causar quemaduras graves.
A17913
• Durante la operación, toque solamente
las superficies de los controles de la
lavadora a presión. Mantenga a los
niños alejados de la lavadora a presión
en todo momento. Es posible que ellos
no reconozcan los peligros de este pro-
ducto.
40- SP
Page 41

RIESGO DE QUEMADURA QUÍMICA
¿QUÉ PUEDE SUCEDER? CÓMO EVITARLO
• El uso de ácidos, químicos tóxicos o
corrosivos, venenos, insecticidas
o cualquier tipo de solvente inflamable
con este producto podría provocar una
lesión grave o la muerte
• No utilice ácidos, gasolina, kerosén o
cualquier otro material inflamable en
este producto. Sólo use detergentes,
limpiadores y desgrasadores domésticos
recomendados para su aplicación en
lavadoras de presión.
• Utilice ropa que le proteja los ojos y
la piel del contacto con los materiales
pulverizados.
RIESGO DE DESCARGA ELÉCTRICA
¿QUÉ PUEDE SUCEDER? CÓMO EVITARLO
• La pulverización de tomacorrientes
o interruptores eléctricos, u objetos
conectados a un circuito eléctrico podría
provocar una descarga eléctrica fatal.
• Esta unidad funciona con electricidad.
Contiene y pulveriza agua y otros líquidos conductivos. Su operación inadecuada podría ser causa de electrocución.
•
El interruptor (GFCI) desconecta la unidad si
detecta una corriente de falla a tierra.
• Los cordones de extensión pueden provocar choques eléctricos.
• La pulverización de tomacorrientes
o interruptores eléctricos, u objetos
conectados a un circuito eléctrico podría
provocar una descarga eléctrica fatal.
• Siempre conecte el cable a un circuito
polarizado con conexión a tierra. El
cable viene con un interruptor (GFCI)
que protege su seguridad personal
desconectando la unidad si detecta una
corriente de falla a tierra
• En caso de estar dañado, debe sustituirse el conjunto completo del cable en
un servicentro autorizado. Refiérase a las
instrucciones de conexión a tierra.
• No usar con cordones de extensión.
.
RIESGO DE LESIÓN POR LEVANTAR MUCHO PESO
¿QUÉ PUEDE SUCEDER? CÓMO EVITARLO
• El intento de levantar un objeto muy
pesado puede provocar lesiones graves.
El chorro poderoso de su lavadora a presión es capaz de
causar daño a superfi cies tales como la madera, vidrio, pintura
del automóvil, las guardas, adornos y objetos delicados tales como fl ores y
arbustos. Antes de rociar, verifi que el objeto por lavar para asegurarse que sea
sufi cientemente fuerte como para resistir la fuerza del chorro. Evite el uso del
chorro concentrado excepto para superfi cies muy fuertes, tales como concreto y
acero.
• La lavadora a presión es demasiado
pesada como para que la levante una
sola persona. Consiga la ayuda de otras
personas para levantarla.
LEA Y CONSERVE ESTAS INSTRUCCIONES
41 - SP
A17913
Page 42

INSTRUCCIONES PARA LA CONEXIÓN A TIERRA
Esta unidad debe quedar conectada a tierra. En caso de mal funcionamiento o rotura,
la conexión a tierra provee el paso de menor resistencia para la corriente eléctrica,
reduciendo así el riesgo de electrocución. Esta unidad está equipada con un cordón
eléctrico que tiene un conductor a tierra conectado a la masa del equipo y un enchufe
para conexión a tierra. El enchufe debe quedar conectado a un tomacorriente apropiado,
adecuadamente instalado y conectado a tierra de acuerdo a todos los códigos y
ordenanzas locales.
La conexión inadecuada del conductor eléctrico a tierra, puede
un electricista o personal califi cado de servicio verifi que que el tomacorriente
se encuentre adecuadamente conectado a tierra. Si el enchufe no encaja
completamente en el tomacorriente, haga que un electricista califi cado instale un
tomacorriente adecuado. No utilice adaptador de tipo alguno para enchufar esta
unidad.
opera la lavadora a presión.
exponer al riesgo de electrocución. En caso de duda, haga que
Para prevenir que el circuito se sobrecargue, no opere ningún otr o
dispositivo eléctrico que esté conectado al mismo circuito mientras
CORDONES DE EXTENSIÓN
Use mangueras adicionales de alta presión en lugar de cordones de extensión,
para evitar la caída de tensión y la pérdida de potencia del motor y prevenir así su
sobrecalentamiento. NO UTILICE CABLES DE EXTENSIÓN ELÉCTRICA. NOTA:
La utilización de mangueras adicionales de alta presión disminuirá la presión de las
lavadoras a presión por debajo de los 1600 PSI.
PROTECCIÓN DEL CIRCUITO CON UN INTERRUPTOR POR
CORRIENTE DE FALLA A TIERRA
Esta lavadora a presión viene provista con un interruptor por corriente de fallas a
tierra (GFCI) incorporado al enchufe del cordón de suministro eléctrico. Ese elemento
provee protección adicional contra el riesgo de electrocución. En caso de ser necesario
reemplazar el cable eléctrico y del enchufe, hágalo únicamente con piezas idénticas que
tengan protección GFCI.
ESPECIFICACIONES
Modelo VR1600E
PSI Max* 1600 (11031,6 kPa)
PSI de Operación 1440 (9859.5 kPa)
GPM Máx* 1,5 (5,7 L/min)
GPM de Operación 1,35 (5,1 L/min)
*Valores máximos de flujo y presión de agua determinados de acuerdo con la norma
PW101 de la PWMA (Asociación de fabricantes de lavadoras a presión).
A17913
42- SP
Page 43

CONTENIDO DE LA CAJA
Manual del
operador
(Inglés/
Español/
Francés)
Manillar
Motor, bastidor y
conjunto de ruedas
Perillas
Pernos
montantes
Juego limpiador
para la boquilla
Pistola rociadora
Embalaje del manillar
Contenedor
para químicos
limpiadores
Piezas embolsadas
Boquilla de
chorro rotativo
Adaptador de
conexión rápida
Tubo aplicador
INSTRUCCIONES PARA EL ENSAMBLADO
1. Coloque el conjunto del manillar en el bastidor y
fíjelo al mismo.
Riesgo de lesión personal. Evite
mango y el marco cuando realice el ensamblado para
no pellizcarse.
2. Conecte el tubo aplicador a la pistola y ajústelos
firmemente.
3. Conecte la manguera de alta presión a la pistola y
ajústela firmemente.
colocar las manos entre el
Manguera de
alta presión
Boquilla rociadora
regulable
Conector rápido
43 - SP
A17913
Page 44
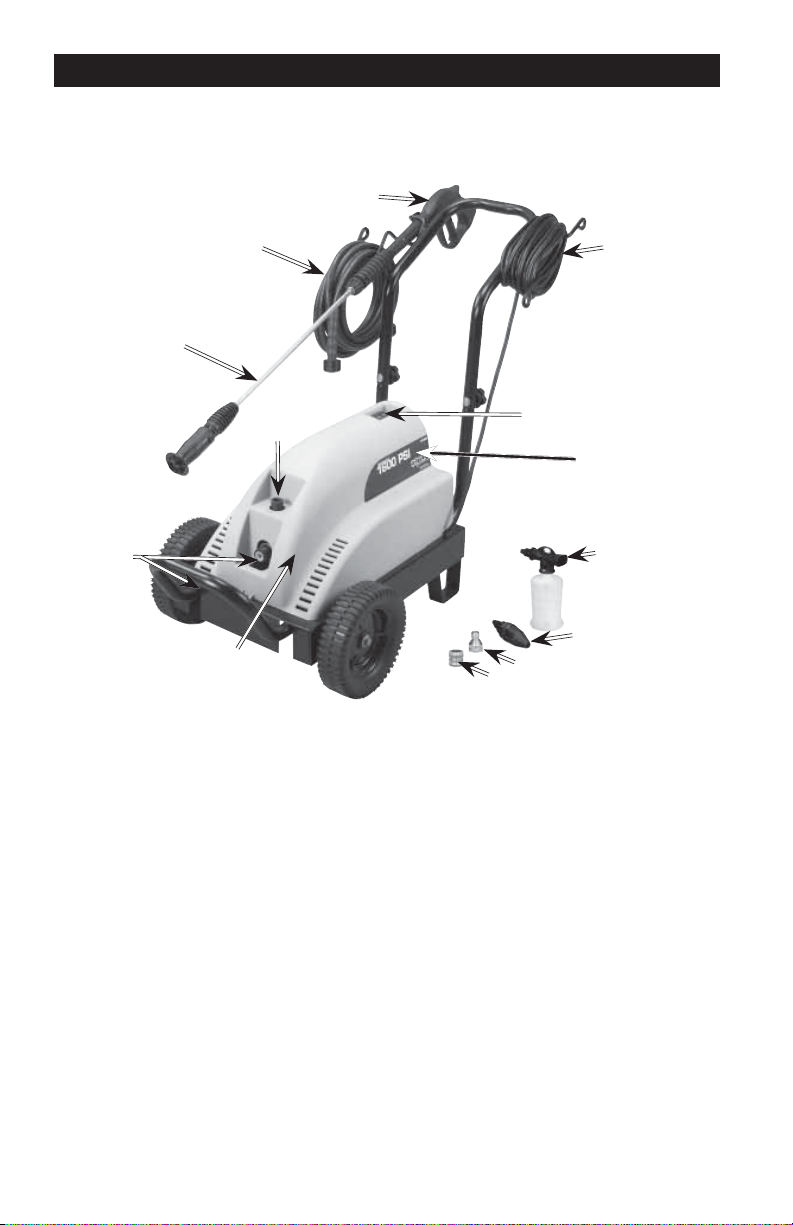
INSTRUCCIONES DE FUNCIONAMIENTO
LEA ESTE MANUAL DEL PROPIETARIO Y SUS REGLAS DE SEGURIDAD, ANTES
DE OPERAR LA UNIDAD. Compare las ilustraciones con su unidad y familiarícese
con la ubicación de sus controles y regulaciones. Conserve este manual para
referencias futuras.
Pistola
rociadora
Cordón
eléctrico
Interruptor
ON-OFF del
motor
Motor
Tubo aplicador con
boquilla
regulable
Manguera
de alta
presión
Salida del
agua
Entrada
de agua
con filtro
Bomba de alta presión
Conector rápido
Acople de conexión rápida
Contenedor
para químicos
limpiadores
Boquilla de
chorro rotativo
ELEMENTOS BÁSICOS DE LA LAVADORA A PRESIÓN
Bomba de alta presión (ubicada en el interior del casco): Incrementa la presión del agua
provista.
Motor (ubicada en el interior del casco): Impulsa la bomba de alta presión.
Manguera de alta presión: Lleva el agua a presión desde la bomba a la pistola y tubo
aplicador.
Pistola rociadora: Se conecta a el tubo aplicador para controlar el volumen del flujo del
agua, su dirección y la presión.
Tubo aplicador con boquilla de chorro regulable: la boquilla rociadora puede regularse
de un chorro angosto y concentrado, hasta un chorro de rociado en abanico. El chorro
puede regularse girando la boquilla en sentido horario y/o antihorario.
La boquilla de chorro rotativo incrementa la eficiencia de la limpieza, permitiéndole cubrir
una zona mayor que con el patrón de rociado con chorro concentrado.
Contenedor para químicos limpiadores: Se usa para aplicar de soluciones limpiadoras;
ver las instrucciones para su uso en ésta sección.
TERMINOLOGÍA DE LA LAV ADORA A PRESIÓN
Interruptor de circuito por corriente de falla a tierra (GFCI): Esta lavadora viene protegida
con un disyuntor diferencial (GFCI) incorporado al enchufe del cordón eléctrico. Este
dispositivo proporciona protección adicional contra el riesgo de electrocución. En caso
de tener necesidad de sustituir el enchufe o el cordón eléctrico, utilice únicamente partes
idénticas de repuesto que incluyan tengan protección GFCI.
A17913
44- SP
Page 45

Sistema de detención total: Esta unidad viene equipada con un sistema de protección total
que detiene al sistema. Cuando se suelta el gatillo, el motor se detiene automáticamente y
cuando se vuelve a apretar, el motor arranca nuevamente. El tiempo transcurrido entre que
se suelta y se vuelve a apretar el gatillo no debe ser menor a 4 ó 5 segundos. NO deje la
unidad detenida en modalidad automática durante más de 15 minutos.
PSI: (Pounds per Square Inch) Libras por pulgada cuadrada. Es la unidad de medida para
la presión del agua. También se usa para la presión del aire, presión hidráulica, etc.
GPM: (Gallons per Minute). Galones por minuto. Es la unidad de medida para el flujo
promedio del agua a través de la lavadora a presión.
CU: (Cleaning Units). Unidades de limpieza. GMP multiplicadas por PSI.
Suministro de agua: Todos los limpiadores a presión deben tener un suministro de agua.
Los requisitos mínimos para el suministro del agua son 20 PSI y 18,93 litros (5 galones) por
minuto.
COMO USAR
IMPORT ANTE: Lea y comprenda cómo usar la lavadora a presión antes de hacerla
funcionar .
CÓMO UTILIZAR EL TUBO APLICADOR
La boquilla rociadora del extremo de la varilla permite ser rotada para modificar de un chorro
angosto a otro en forma desplegada, tal como se muestra.
Chorro a
presión
Chorro en
abanico
CÓMO UTILIZAR EL CONTENEDOR DE PRODUCTOS LIMPIADORES
NOTA: utilice únicamente jabones y soluciones de limpieza diseñadas para el uso en
lavadoras a presión. No use lejía.
1. Coloque el interruptor ON/OFF en la posición OFF.
2. Interrumpa el suministro de agua.
3. Conecte el contenedor para soluciones limpiadoras en el tubo aplicador como se
muestra y ajústelo firmemente. Sujete el extremo de la boquilla y gírela hasta lograr la
orientación correcta del contenedor.
45 - SP
A17913
Page 46
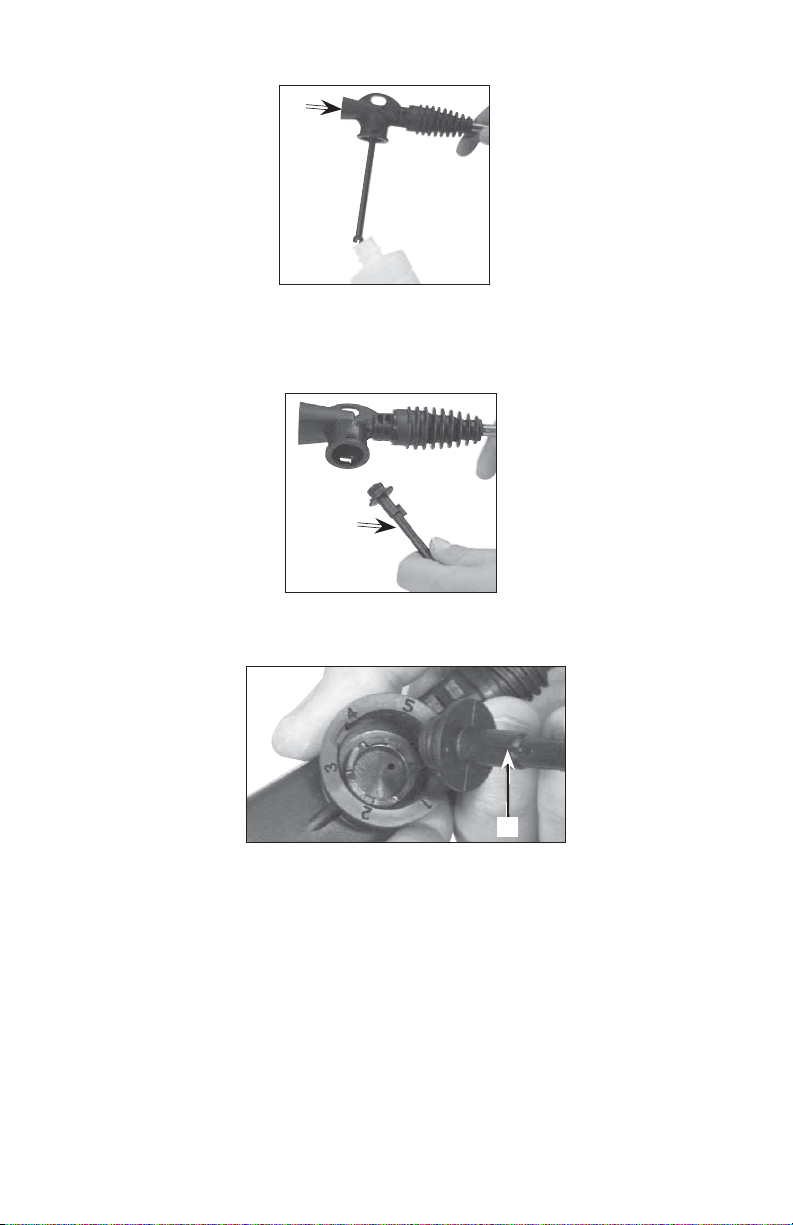
4. Extraiga la boquilla aplicadora de solución del contenedor de químicos limpiadores.
a
5. Puede graduarse la presión de rociado de la mezcla jabonosa regulando el tubo de
sifón ubicado en la boquilla aplicadora de químicos limpiadores (a).
a. Extraiga el tubo (b) de sifón de la boquilla aplicadora de químicos
limpiadores.
b
b. Posicione la muesca (c) del tubo de sifón de la mezcla jabonosa en la
presión deseada entre 1 y 6, siendo 1 la más elevada y 6 la menor.
c
c. Haga presión sobre el tubo colocándolo en posición.
6. Llene el contenedor con detergente.
7. Presione contenedor en la boquilla aplicadora de la solución limpiadora. Gírela para
trabarla en su posición.
8. Antes de continuar, lea los párrafos "ANTES DE COMENZAR" y "COMO PONER EN
FUNCIONAMIENTO LA LAVADORA A PRESIÓN" de esta sección.
A17913
46- SP
Page 47
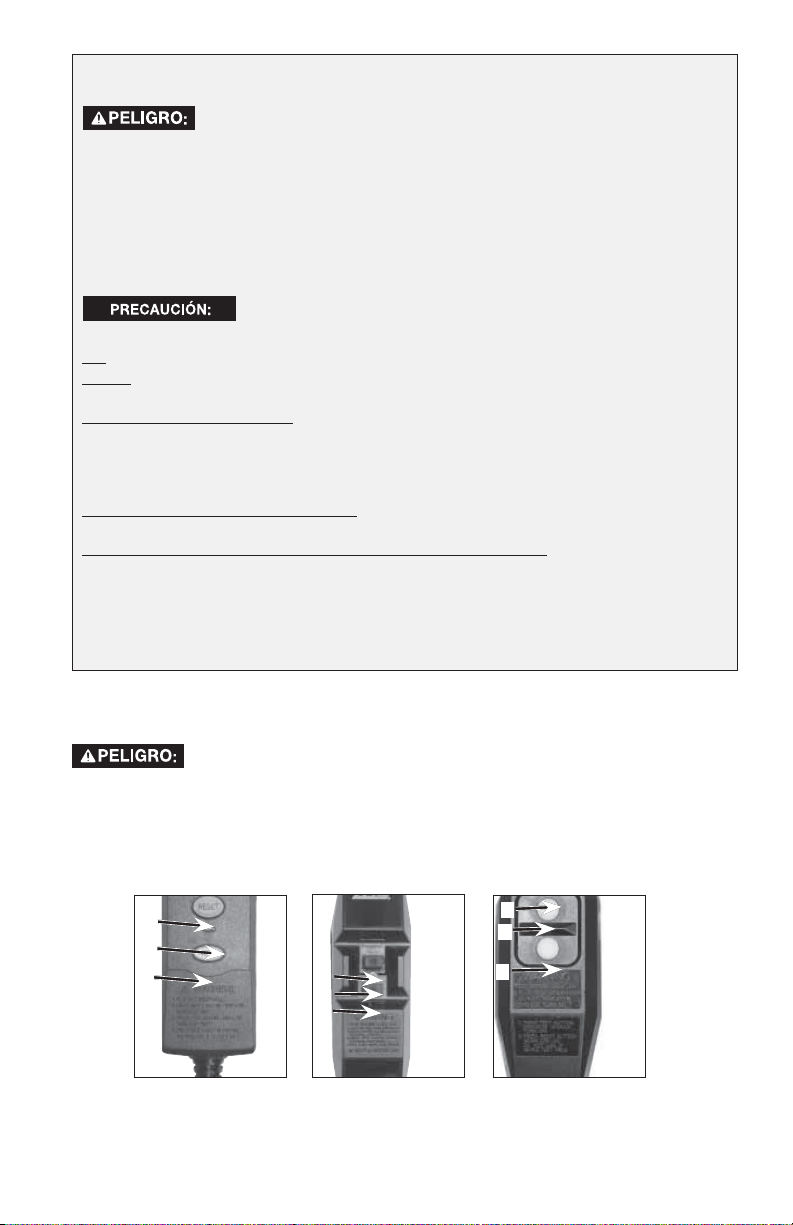
LEA Y COMPRENDA TODAS LAS ADVERTENCIAS ANTES DE PONER LA UNIDAD EN MARCHA
Riesgo de inyección de líquido y laceración.
desprotegida, los ojos, con mascotas o animales domésticos porque podría causar
lesiones serias.
Su lavadora dispara un chorro a presiones y velocidades capaces de penetrar el tejido
humano y animal, lo que podría determinar la necesidad de amputaciones o causar otro
tipo de lesiones serias. Las pérdidas por conexiones flojas, gastadas o dañadas de las
mangueras pueden causar lesiones por inyección. ¡NO CONSIDERE LAS LESIONES
OCASIONADAS POR INYECCIÓN DE LÍQUIDOS COMO UN SIMPLE CORTE!
¡Consulte a un médico inmediatamente!
de agua a la bomba.
NO use agua caliente; solamente agua fría.
Nunca cierre el paso del agua mientras el motor de la lavadora a presión esté
funcionando, de lo contrario se dañará la bomba.
Esta unidad viene equipada con un interruptor automático. Cuando se suelta el gatillo,
el motor se detiene automáticamente y cuando se vuelve a apretar, el motor arranca
nuevamente. El tiempo transcurrido entre que se suelta y se vuelve a apretar el gatillo no
debe ser menor a 4 ó 5 segundos. NO deje la unidad detenida en modalidad automática
durante más de 15 minutos.
Párese sobre una superficie estable y sujete la pistola / tubo aplicador firmemente con
ambas manos. Esté prevenido contra el retroceso que sobrevendrá al presionar el gatillo.
esta unidad está diseñada únicamente para uso intermitente . Opere la lavadora a
presión durante una hora o menos durante un periodo de dos horas.
Se debe usar en exteriores solamente. Guarde bajo techo.
En caso de no comprender estas precauciones, sírvase llamar al 1-866-422-4286
para conversar con nuestro representante de servicio y obtener instrucciones
adicionales.
para presión alta, NO permita que el chorro haga contacto con la piel
Nunca tire de la manguera de suministro de agua para mover la
lavadora a presión porque podría dañar la manguera y/o la entrada
Al graduar la lavadora
ANTES DE COMENZAR
1. Coloque la lavadora a presión al nivel del piso.
2. Asegúrese que el interruptor ON/OFF se encuentre en la posición OFF.
Para reducir el riesgo de electrocución, mantenga todas las conexiones
No utilice el equipo si el cable eléctrico se encuentra dañado.
secas y alejadas del piso. No toque el enchufe con las manos mojadas.
3. Enchufe la unidad en un tomacorriente instalado adecuadamente y conectado
a tierra de acuerdo a todos los códigos y ordenanzas locales. Lea el párrafo
CONEXIÓN A TIERRA.
4. Presione el botón de reactivación (Reset) y se encenderá la luz indicadora (A).
La unidad tendrá uno de los siguientes interruptores GFCI que se muestran.
c
a
b
c
a
b
47 - SP
a
c
b
5.
A17913
Page 48

Pruebe el interruptor GFCI de la siguiente forma:
a. Presione el botón de prueba (b), la luz indicadora se apagará.
b. Para volver a usar la unidad, presione el botón de reactivación (Reset). Si la luz
6. Conecte la manguera de alta presión (i) a la salida de agua de la unidad. La salida del agua
7. Ensamble el adaptador de conexión rápida (K) a la entrada del agua.
indicadora no se enciende, NO USE la unidad y refiérase a la Guía de Diagnóstico
de Problemas.
está identificada con la marca OUT.
i
k
8. Conecte el acople de conexión rápida (j) a la manguera de suministro de agua.
Para reducir la posibilidad de contaminación proteja siempre el
sistema de agua potable.
9. Conecte el acople de conexión rápida (j) al conector rápido (k) en la
NOTA: El suministro del agua debe proveer un flujo mínimo de 19 litros (5 galones) por
minuto.
sistema contra la contracorriente cuando realice una conexión al
entrada agua.
j
10. Asegúrese que la manguera de alta presión y la del suministro del agua estén conectadas
firmemente.
Riesgo de inyección de líquido
y laceración. Antes de cambiar
los accesorios, libere siempre la presión del sistema.
Coloque el interruptor de encendido/apagado en la
posición de apagado, cierre el suministro de agua y
tire del disparador de la pistola hasta que deje de salir
líquido
11. Conecte la boquilla deseada en el tubo
aplicador. Para conectar la boquilla de chorro
rotativo (a) y la boquilla rociadora regulable
(b), gírelas en sentido horario hasta que se
trabe en posición. Para quitar la boquilla,
gírela en sentido antihorario. Para conectar
el contenedor de productos químicos (c), lea
"CÓMO UTILIZAR EL CONTENEDOR PARA QUÍMICOS LIMPIADORES QUÍMICOS" en
esta sección.
12. Abra el paso del agua.
a
b
c
k
j
A17913
48- SP
Page 49

COMO PONER EN FUNCIONAMIENTO LA LAVADORA A PRESIÓN
NOTA: Asegúrese de tener abierto el suministro del agua.
1. Desenganche el seguro del gatillo como se
muestra. Presione el gatillo para permitir la
salida del aire y descargar la presión residual
de la línea.
2. Con el gatillo presionado, mueva el
interruptor ON-OFF a la posición ON.
Cuando el motor arranque, mantenga el
gatillo presionado.
Riesgo de lesión por pulverización. Trabe el bloqueador del
disparador cuando la pistola no esté en uso, a fin de evitar la
pulverización accidental.
Riesgo de daño a la propiedad.
Si después de hacer funcionar la
unidad por unos minutos no mantiene una presión constante
de agua, apague la unidad para evitarle daños y refiérase a la Guía para Diagnóstico
de Problemas.
RECOMENDACIONES PARA LAVAR
• Trabaje de abajo hacia arriba en las superficies verticales.
• Deje asentar el detergente durante 1 a 2 minutos. NO permita que el detergente se
seque.
• Para enjuagar el detergente, aplique el chorro de alta presión, manteniendo la
boquilla al menos a 25 cm (10 pulgadas) de la superficie y trabaje comenzando de
abajo.
DETENCIÓN DE LA LAVADORA A PRESIÓN
1. Coloque la palanca interruptora ON-OFF en la posición OFF.
2. Cierre el suministro del agua.
3. Presione el gatillo de la pistola rociadora para aliviar cualquier presión de agua en la
manguera o la pistola.
4. Desconecte la manguera de suministro de agua de la entrada en la unidad.
5. Desconecte la manguera de alta presión de la salida de la unidad.
6. Si se ha utilizado el contenedor para químicos limpiadores, enjuague cuidadosamente
el contenedor y su boquilla.
49 - SP
A17913
Page 50

MANTENIMIENTO
Al efectuar el mantenimiento, usted quedará expuesto a las
que podría ocasionar serias lesiones o la muerte.
Antes de ejecutar cualquier mantenimiento o reparación, desconecte la unidad de
su suministro eléctrico, deje enfriar al motor y libere toda la presión del agua.
Para asegurar una eficiente operación y larga vida de su lavadora a presión, se debería
programar y seguir una rutina de mantenimiento. Si la lavadora a presión se usa en
condiciones inusuales, tales como alta temperatura o polvo, se requiere un mantenimiento
más frecuente.
Las reparaciones y el mantenimiento que no estén enumerados deben ser llevados a
cabo por un Centro de mantenimiento con garantía autorizado.
TABLA DE RESPONSABILIDADES DEL CLIENTE
TAREA DE
MANTENIMIENTO
LAVADORA A PRESIÓN
inspeccione la manguera de alta
presión por péridas.
inspeccione la manguera del
jabón, productos químicos y el
filtro
inspeccione la existencia de
pérdidas en la pistola y varilla
rociadora
preparación para el almacenaje
BOMBA DE ALTA PRESIÓN
Control y limpieza del filtro de
succión
inspeccione / cambie el aceite
*Esta bomba no requiere aceite.
MOTOR
Limpie el motor después de cada uso. Utilizando un trapo, remueva la suciedad del
motor. NO USE agua para limpiar el motor.
superficies calientes, agua a presión, o partes en movimiento
Antes
de cada
uso
X
X
X
Prepare la unidad para su almacenaje si es que la
misma permanecerá inactiva por más de 30 días.
X
*
Cada 25
horas o
anualmente
Cada 50
horas o
anualmente
Cada 100
horas o
anualmente
FILTRO DE SUCCIÓN
1. Revise y limpie el filtro de succión (b) cada 50 horas de uso.
b
A17913
50- SP
Page 51

TUBO APLICADOR
Si la boquilla comienza a obturarse con materiales extraños, como suciedad, podría generar
presión excesiva. Si la boquilla se obstruye o restringe parcialmente, la presión de la
bomba comenzará a pulsar. Limpie la boquilla inmediatamente usando el juego limpiador de
boquillas provisto y siga estas instrucciones:
1. Coloque el interruptor ON - OFF en la posición Off y corte el suministro del agua.
2. Desenchufe la unidad del tomacorriente.
3. Apriete totalmente el gatillo de la pistola para liberar cualquier presión del agua.
4. Desconecte el tubo aplicador de la pistola.
5. Limpie la boquilla usando el limpiador provisto o un clip de papeles enderezado.
Insértelo dentro del extremo de la boquilla y muévalo hacia adelante y atrás hasta
eliminar la obstrucción.
6. Enjuague el extremo de la boquilla bajo el chorro de la llave de agua durante 30
segundos para desprender partículas sueltas.
7. Rearme la boquilla sobre el tubo aplicador.
8. Reconecte el tubo aplicador a la pistola y abra el paso del agua
9. Enchufe la unidad en el tomacorriente apropiado.
10. Ponga la lavadora a presión en marcha y gradúe el tubo aplicador a presión alta para
verificarla.
ACCESORIOS
Los accesorios que se recomiendan para su herramienta están disponibles para la compra en su
distribuidor local o en el centro de mantenimiento autorizado. Si necesita ayuda para conseguir
algún accesorio para su herramienta, llame al 1-800-888-2468 o visite nuestro sitio Web www.
excellpressurewasher.com.
El uso de accesorios no recomendados con esta herramienta
EXCELL, ya que tienen una capacidad nominal igual o mayor que la capacidad nominal
de la lavadora a presión.
puede resultar peligroso. Use solamente accesorios de marca
REPARACIONES
Para garantizar la SEGURIDAD y la CONFIABILIDAD del producto, las reparaciones, el
mantenimiento y los ajustes se deben realizar en un centro de mantenimiento autorizado.
Utilice siempre piezas de repuesto idénticas. Para conocer la ubicación del centro de
mantenimiento más cercano llame al 1-800-888-2468 o visite nuestro sitio Web
www.excellpressurewasher.com.
51 - SP
A17913
Page 52

ALMACENAJE
1. Drene toda el agua de la manguera de alta presión, enróllela y guárdela en el
soporte del manillar de la lavadora a presión.
2. Drene toda el agua de la pistola rociadora y del tubo aplicador sosteniendo la
pistola rociadora en posición vertical, con el extremo de la boquilla apuntando hacia
abajo y presionando el gatillo. Almacene la pistola y la manguera en el soporte del
manillar de la lavadora a presión.
3. Guarde la manguera para químicos y la de alta presión, la pistola rociadora y el tubo
aplicador de forma tal que queden protegidos contra daños, como ser pisotones.
CUANDO LA UNIDAD SEA ALMACENADA POR MÁS DE 30 DÍAS Y/O CUANDO SE
PREVEAN TEMPERATURAS DE CONGELAMIENTO, se recomienda que seguir estos pasos
para proteger los sellos interiores de la lavadora a presión.
*Se debe hacer pasar líquido anticongelante tipo RV a través de la bomba, como se
menciona en los pasos siguientes.
4. Obtenga un embudo, 0,178 litros de anticongelante *RV y una manguera de jardín de
aproximadamente 92 cm (36”) con un conector macho en un extremo.
Riesgo de daño a la propiedad.
Cualquier otro tipo de anticongelante es corrosivo y puede dañar
la bomba.
5. Conecte el acople de conexión rápida (j) a la manguera de jardín.
Use sólo anticongelante RV.
j
6. Conecte la manguera de 92 cm (36”) a la entrada de agua de la bomba.
7. Agregue anticongelante *RV a la manguera como se muestra.
8. Coloque el interruptor ON-OFF en la posición On y luego en la posición Off, hasta
que el anticongelante salga por la conexión de la manguera de alta presión de la
bomba.
9. Extraiga la manguera corta de la entrada de agua de la bomba.
* También puede utilizarse líquido lavaparabrisas anticongelante.
A17913
52- SP
Page 53

GUÍA DE DIAGNÓSTICO DE PROBLEMAS
PROBLEMA
El motor no
arranca y no existe
ruido de zumbido.
El interruptor de
circuito continúa
abriéndose o el
fusible volando.
CAUSA
La lavadora a presión no está
enchufada.
El botón "RESET" del GFCI no ha sido
presionado.
El interruptor automático se ha
disparado o el fusible del circuito ha
saltado.
Demasiada carga existente en el
circuito alimentador.
Se está utilizando un cordón de
extensión.
CORRECCIÓN
Enchufe la lavadora a presión.
Presione el botón "RESET".
Reactive el interruptor automático o
reemplace el fusible.
Reduzca la carga del circuito.
Intente otro circuito de 15 A.
NO utilice cordones eléctricos de
extensión.
El motor zumba
pero no arranca.
No hay presión o
está baja.
Ruido excesiv
La presión fluctúa
sin operar la
pistola.
La luz indicadora
del interruptor GFCI
no se enciende
después de presionarla.
La prueba del interruptor GFCI falla.
La unidad no
mantiene una
presión constante
de agua.
La unidad sigue
haciendo saltar el
interruptor GFCI
o
Se está utilizando un cordón de
extensión.
El voltaje del suministro está por
debajo del mínimo requerido.
Pobre alimentación de agua.
La manguera de alta presión es
demasiado larga.
Boquilla gastada.
Suministro de agua restringido,
insuficiente o existe aire dentro de la
tubería.
La temperatura del agua es
demasiado alta.
Pérdida de agua en las conexiones de
alta presión, manguera o la pistola.
El interruptor de circuito se ha abierto o
el fusible ha volado.
El interruptor de circuito se ha abierto o
el fusible ha volado.
Boquilla obstruida Limpiar la boquilla y si aún así no
Boquilla obstruida
NO utilice cordones eléctricos de
extensión.
Verifique el voltaje de la línea principal
de suministro.
El suministro de agua debe ser de
mínimo 19 L/min (5 gal/min) a 20 PSI.
Use manguera de alta presión menor a
30 metros (100’).
Reemplace la boquilla.
Verifique la manguera y la llave de
suministro de agua y el filtro de
entrada.
No use un suministro de agua caliente,
sólo use agua fría de la llave.
Reemplace la manguera o la pistola.
Si el problema persiste, llévela a un
servicentro autorizado.
Reactivar el interruptor de circuito o
cambiar el fusible. Si la luz indicadora
sigue sin encenderse, hacer que un
electricista calificado inspeccione el
tomacorriente.
Reactivar el interruptor de circuito o
cambiar el fusible. Si la luz indicadora
sigue sin encenderse, hacer que un
electricista calificado inspeccione el
tomacorriente.
mantiene una presión constante de
agua, apagar la unidad y llamar a
nuestro Dpto. de Servicios al Cliente al
1-866-422-4286.
Limpiar la boquilla y si aún así no
mantiene una presión constante de
agua, apagar la unidad y llamar a
nuestro Dpto. de Servicios al Cliente al
1-866-422-4286.
53 - SP
A17913
Page 54

Para reparación y servicio de sus herramientas eléctricas, favor de
dirigirseal Centro de Servicio más cercano:
CULIACAN, SIN
Av. Nicolás Bravo #1063
Sur
(667) 7 12 42 11
Col. Industrial Bravo
GUADALAJARA, JAL
Av. La Paz #1779
(33) 3825 6978
Col. Americana Sector
Juarez
MEXICO, D.F.
Eje Central Lázaro
Cardenas
No. 18
(55) 5588 9377Local D,
Col. Obrera
MERIDA, YUC
Calle 63 #459-A
MONTERREY, N.L.
Av. Francisco I. Madero
No.831(81) 8375 2313
Col. Centro
PUEBLA, PUE
17 Norte #205
(222) 246 3714
Col. Centro
QUERETARO, QRO
Av. Madero 139 Pte.
(442) 214 1660
Col. Centro
SAN LUIS POTOSI, SLP
Av. Universidad 1525
(444) 814 2383Col. San
Luis
TORREON, COAH
Blvd. Independencia, 96
Pte.
(871) 716 5265
Col. Centro
VERACRUZ, VER
Prolongación Díaz Mirón
#4280
(229)921 7016
Col. Remes
VILLAHERMOSA, TAB
Constitución 516-A
(993) 312 5111
Col. Centro
(999) 928 5038
Col. Centro
PARAOTRAS LOCALIDADES LLAME AL: (55) 5326 7100
Vea "Herramientas
eléctricas (Tools-Electric)"
– Páginas amarillas –
para Servicio y ventas
BLACK AND DECKER S.A. DE C.V.
BOSQUES DE CIDROS ACCESO RADIA TAS NO. 42
COL. BOSQUES DE LAS LOMAS.05120 MÉXICO,
D.FTEL. 55-5326-7100
A17913
54- SP
Page 55

GARANTIE LIMITÉE
GARANTIE LIMITÉE D’UN (1) AN SUR LES COMPOSANTS DU PRODUIT SAUF POUR LA
POMPE DE IC2
La société Black & Decker (É.-U.) Inc. garantit, auprès de l’acheteur initial, que le cadre, roues,
pistolet, tuyau, pôle, buse(s) et autres composants (sauf la pompe IC2) des laveuses à haute
pression Excell, couverts sous cette garantie, sont exempts de défaut de matériau ou de
fabrication pendant un an à partir de la date d’achat.
GARANTIE LIMITÉE DE DEUX (2) ANS SUR LA POMPE DE IC2
Black & Decker garantit, auprès de l’acheteur initial, que la pompe de IC2 des laveuses à haute
pression Excell, couverte sous cette garantie, est exempte de défaut de matériau et de fabrication
pendant deux ans à partir de la date d’achat. La garantie limitée de deux ans s’applique
uniquement à la pompe de IC2.
Black & Decker réparera ou remplacera, à son choix, les produits ou composants ayant fait défaut
au cours des périodes de garantie décrites ci-dessus. Les réparations seront programmées
suivant le fl ux normal de travail et les heures d’ouvertures des centres de réparations ainsi que de
la disponibilité des pièces de rechange. Toutes les décisions de Black & Decker concernant cette
garantie limitée sont fi nales.
Cette garantie vous accorde des droits légaux spécifi ques et vous pourriez avoir aussi d’autres
droits qui varient d’un État ou d’une province à l’autre.
RESPONSABILITÉ DE L’ACHETEUR INITIAL (utilisateur initial) :
• Pour une réclamation au titre de la garantie d’une laveuse à haute pression Excell, la
retourner au lieu d’achat.
• Conserver le reçu de caisse d’origine comme preuve d’achat pour toute réparation couverte
par la garantie.
• Utiliser une diligence raisonnable lors de l’utilisation et l’entretien du produit comme décrit
dans le ou les mode(s) d’emploi.
CETTE GARANTIE NE COUVRE PAS :
• Les marchandises vendues comme remises à neuf, utilisées comme équipement de location,
articles en montre ou modèles de présentation;
• Les marchandise endommagées ou inopérantes suite à une usure normale, une mauvaise
utilisation, une utilisation sous conditions froides, chaudes, pluvieuses, d’humidité excessive
ou sous le point de congélation, une utilisation avec produits chimiques inappropriés, une
négligence, un accident, une utilisation non conforme aux instructions comprises dans le
ou les mode(s) d’emploi fourni(s) avec le produit, un mauvais entretien, une utilisation avec
accessoires non recommandés par Black & Decker ou une réparation ou des modifi cations
non autorisées;
• Les frais de réparation et de transport de marchandises exemptes de défauts;
• Les frais associés avec l’assemblage, la lubrifi cation exigée, les réglages ou autres frais
d’installation ou de mise en marche;
• Les pièces ou accessoires non récupérables, fournis avec le produit, qui deviendront
inopérants ou inutilisables après une certaine période d’utilisation, y compris mais sans s’y
limiter , aux ressorts, buses, joints toriques, r ondelles et accessoir es similair es;
• La marchandise vendue par Black & Decker qui est fabriquée par et identifi ée comme le
produit d’un autre fabricant/entIC2 comme les moteurs à essence. La garantie du fabricant,
si offerte, s’appliquera dans ces cas.
• TOUTE PERTE, DOMMAGE, FRAIS ACCESSOIRES, CONSÉCUTIFS OU
INDIRECTS POUVANT PROVENIR DE TOUT DÉF AUT, DÉFAILLANCE OU MAUVAIS
FONCTIONNEMENT DU PRODUIT NE SONT PAS COUVER TS PAR CETTE GARANTIE.
Certains États ou provinces ne permettent pas l’exclusion ou la restriction de dommages
accessoires ou indirects, auquel cas, les exclusions ou limitations ci-dessus pourraient ne
pas être applicables.
• LES GARANTIES IMPLICITES, Y COMPRIS CELLES DE QUALITÉ MARCHANDE OU
D’ADÉQUATION À UN USAGE PARTICULIER, SONT LIMITÉES À UN AN À PARTIR DE
LA DATE D’ACHAT. Certains États ou provinces ne permettent pas les restrictions sur la
durée d’une garantie implicite, auquel cas, les restrictions pourraient ne pas être applicables.
55 - SP
A17913
Page 56

Trademarks noted with ® are registered in the United States Patent and Trademark Offi ce
and may also be registered in other countries. Other trademarks may apply. • Les marques
de commerce suivies du symbole ® sont enregistrées auprès du United States Patent and
Trademark Offi ce et peuvent être enregistrées dans d’autres pays. D’autres marques de
commerce peuvent également être applicables. • Las marcas comerciales con el símbolo ®
están registradas en la Ofi cina de patentes y marcas comerciales de Estados Unidos (United
States Patent and Trademark Offi ce), y también pueden estar registradas en otros países.
Posiblemente se apliquen otras marcas comerciales registradas.
 Loading...