

Page 1

EN
DeVilbiss® IntelliPAP™ Positive Airway Pressure Device
DV54 AutoAdjust® CPAP Series
CAUTION–Federal (U.S.A.) law restricts this device to sale by, or on the order of a physician.
Assembled in USA of US & Imported Parts. Latex Free. Instruction Guide
ES
Dispositivo de presión positiva en las vías respiratorias
IntelliPAP™ de DeVilbiss
Serie DV54 AutoAdjust
PRECAUCIÓN: La ley federal de EE. UU. limita la venta de este dispositivo a médicos o a personas que
dispongan de la correspondiente orden médica.
Montaje efectuado en EE. UU. con piezas fabricadas en EE. UU. e importadas. UU. Sin
látex. Guía de instrucciones
FR
Appareil de ventilation spontanée en pression positive
®
CPAP
IntelliPAP™ de DeVilbiss
DV54 AutoAdjust® CPAP Series
ATTENTION– En vertu de la loi fédérale américaine, cet appareil ne peut être vendu que par un médecin
ou sur ordonnance de ce dernier.
®
®
Assemblé aux États-Unis avec des pièces des États-Unis et des pièces importées. Sans latex.
Guide d’instructions
Page 2

EN
ENGLISH ............................................................................................................ 3
EN
ESPAÑOL ......................................................................................................... 25
ES
FRANÇAIS ......................................................................................................49
FR
tAble of contents
Table of ConTenTs
Symbol Definitions ..................................................................................................................3
Important Safeguards ..............................................................................................................3
Introduction .............................................................................................................................5
Intended Use/Indications for Use.....................................................................................5
Contraindictions ...............................................................................................................5
What Is Obstructive Sleep Apnea (OSA) .........................................................................5
How CPAP Therapy Works .............................................................................................6
Acclimating To Your Therapy ...........................................................................................6
Benefits Of Your Therapy ................................................................................................7
Helpful Resources ............................................................................................................7
Key Features ............................................................................................................................8
Unpacking The Contents .................................................................................................8
IntelliPAP Device ..............................................................................................................8
Keypad ..............................................................................................................................8
System Assembly without Humidification ...............................................................................9
Keypad and Display .................................................................................................................9
Operation ..............................................................................................................................10
Start Up ..........................................................................................................................10
Using The Comfort Delay Feature ................................................................................10
Shut Down .....................................................................................................................11
Advanced Menu Controls .....................................................................................................11
Advanced Menu List .......................................................................................................12
IntelliPAP Enable Menu List............................................................................................13
AutoAdjust Patient Menu ...............................................................................................14
CPAP Patient Menu ........................................................................................................14
Patient Messages ...................................................................................................................15
Reminders ......................................................................................................................15
Notifications ...................................................................................................................15
IntelliPAP Travel Information .................................................................................................16
IntelliPAP DC Operation .......................................................................................................16
Battery Power ................................................................................................................16
Supplemental Oxygen ...........................................................................................................16
Accessories/Replacement Items ............................................................................................18
Maintenance ..........................................................................................................................19
Cleaning .................................................................................................................................20
Troubleshooting .....................................................................................................................21
Specifications .........................................................................................................................23
Warranty ................................................................................................................................24
2
A-DV54
Page 3

symbol Definitions/
importAnt sAfeguArDs
symbol DefiniTions
Class II electrical protection–double Type BF equipment– applied part
insulated
Data Port Input/Output Standby – turns the blower on or off
EN
Next Item on LCD display
Previous Item on LCD display
Attention - Consult Accompanying Heat
Documents
DC Input: 12 VDC, center pin is 100 – 240 Volts AC input 50/60 Hz
positive
Increase value shown on LCD display
Decrease value shown on LCD display
Locked Unlocked
IPX1 Drip-Proof, Vertical
Delay – starts the delay cycle in CPAP mode, if prescribed
– reduces pressure to lower pressure limit in AutoAdjust mode
This device contains electrical and/or electronic equipment that must be recycled per
EC Directive 2002/96/EC - Waste Electrical and Electronic Equipment (WEEE)
IMPORTANT SAFEGUARDS
When using electrical products, basic safety precautions should always be followed. Read all
instructions before using this device. Important information is highlighted by the following
terms.
DANGER Urgent safety information for hazards that will cause serious injury or death.
WARNING Important safety information for hazards that might cause serious injury.
CAUTION Information for preventing damage to the product.
NOTE Information to which you should pay special attention.
Please ReaD all insTRUCTions befoRe UsinG
THis DeViCe.
SAVE THESE INSTRUCTIONS
Electric Shock Hazard – Do not use while bathing.
Electric Shock Hazard – Do not immerse this device into water or any
other liquid.
DANGER
A-DV54
3
Page 4

EN
Electric Shock Hazard – Do not attempt to open or remove the enclosure.
There are no user-serviceable internal components. If service is required,
return the product to your home care provider. Opening or tampering
with the product will void the warranty.
importAnt sAfeguArDs
WARNING
The DeVilbiss IntelliPAP™ should be used only with masks recommended
by DeVilbiss, your physician or respiratory therapist.
To avoid rebreathing of exhaled air, do not use a CPAP mask unless the
device is turned on and providing a supply of air. Venting in the mask
should never be blocked. When the device is turned on and providing a
fresh supply of air, exhaled air is flushed out of the mask vent. However,
when the device is not operating, exhaled air may be rebreathed.
Rebreathing of exhaled air for longer than several minutes can in some
circumstances lead to suffocation. This warning applies to most CPAP
devices.
The DeVilbiss IntelliPAP is not a life support device and may stop
operating with certain device faults or with a power failure. It is intended
to be used on spontaneously breathing individuals weighing 66 lbs/30 Kg
or greater.
To avoid electric shock, always unplug power cord from wall outlet power
source when performing cleaning.
Use only accessories recommended by DeVilbiss.
CAUTION–The circular data port connector located on the back of the IntelliPAP is used to
attach accessories to the device. The connector must only be used with accessories approved for
use by DeVilbiss. Do not attempt to attach any other device to this connector as it may damage
the CPAP or the accessory device.
CAUTION–Never rinse or place the device in water. Never allow liquids to get into or around
any of the ports, switches or air filter; doing so will result in device damage. If this occurs,
discontinue use and remove the power cord from the power source. Allow the device to
completely dry before use.
CAUTION–Do not place the IntelliPAP where it can be bumped onto the floor or where the
power cord may create a trip hazard.
CAUTION–Only the DeVilbiss DV5 series Heated Humidifier system is recommended for use
with the IntelliPAP. Other humidifier systems may prevent the device from detecting snoring and
may cause inappropriate pressure levels in the mask.
CAUTION–Oxygen is a prescription gas and should only be administered under the supervision
of a physician.
4
A-DV54
Page 5

introDuction
EN
inTRoDUCTion
Intended Use/Indications for Use
The DeVilbiss® IntelliPAP™ Model DV5 Series is intended for use in treating obstructive
sleep apnea in patients 66 lbs/30 kg and above.
Contraindication
Do not use IntelliPAP if your upper airway has been bypassed.
NOTE– Symptoms of dryness of the throat, nasal passages, and the mouth are common with positive airway
pressure therapy. This is especially true in dry climates and during the cold season when humidity in
the air is typically lower than at other times. The IntelliPAP features an optional humidifier system
to help minimize these effects.
What Is Obstructive Sleep Apnea (OSA)?
Obstructive Sleep Apnea (OSA) is a breathing disorder that affects more than 22 million
Americans – approximately 4% of middle-aged men and 2% of middle-aged women.
Physiological factors such as size of tonsils, shape of the nose, narrowing of the upper airway,
or any combination of these can contribute to the potential for having OSA. During sleep,
your airway can relax so much that it begins to collapse and becomes obstructed. Relaxation
allows the tissue at the back of your throat to vibrate as you breathe causing snoring. But as
your airway collapses more fully, it blocks your airflow and stops your breathing altogether.
(In fact, the word “apnea” is derived from a Greek term meaning “without breath.”)
This stoppage occurs repeatedly throughout the night, each episode lasting from just a few
seconds to more than a minute. As your blood oxygen level drops to dangerous levels, your
central nervous system triggers a sudden gasp for breath, partially awakening you and
preventing you from experiencing the sustained, deep sleep your body needs. As a result, it
is common to feel fatigued, stressed and irritable the following day – a less-than-optimal and
potentially dangerous condition in which to work, drive, and make decisions.
Soft Palate
Uvula
Pharynx
Unobstructed Airway
There are important medical concerns as well. OSA starves your heart, brain, and organs of
life-sustaining oxygen. Over time, this deprivation can seriously impact your health
Nasal Cavity
Hard Palate
Tongue
Epiglottis
Soft Palate
Uvula
Pharynx
During an apneic episode the soft
palate collapses blocking the airway
Nasal Cavity
Hard Palate
Tongue
Epiglottis
A-DV54
5
Page 6

EN
potentially resulting in memory loss, impotence, hypertension, coronary disease, strokes,
and heart attacks. Recent studies indicate that OSA has the same risk factor for heart
disease as smoking, high cholesterol and alcohol, and estimate that as many as 38,000
people a year die from the effects of OSA.
Clearly, OSA is a serious medical condition that requires attention and treatment.
introDuction
How CPAP Therapy Works
There are several treatments for OSA including surgery and CPAP therapy. However, CPAP
therapy has proven very effective for most patients. CPAP stands for “continuous positive
airway pressure” which is exactly what the DeVilbiss IntelliPAP device delivers to your
upper airway, acting as an “air splint” to keep the passage open while you sleep.
This reduces or eliminates the obstruction, allowing you to enjoy the deep, refreshing,
uninterrupted sleep you need. More importantly, your body will get the rest and oxygen it
needs with more continuous, uninterrupted sleep – helping you avoid some of the serious
health risks associated with OSA. And the IntelliPAP is designed to provide this therapy to
you quietly and comfortably so that you can sleep through the night without distraction.
The DeVilbiss IntelliPAP AutoAdjust® system automatically adjusts air pressure by
measuring your snoring and breathing patterns on a breath-by-breath basis, and
compensating to meet your pressure needs. Your breathing patterns are continuously
analyzed, stored and used to make any needed pressure adjustment.
The rate of pressure adjustment can be as high as 10 cmH2O in a 10 minute period with
changes made gradually enough to prevent disturbing your sleep yet quickly enough to
respond to your pressure needs. In the absence of respiratory events, the pressure is
reduced to maximize your comfort. The IntelliPAP AutoAdjust is also capable of operating in
CPAP mode – without the automatic functionality described above – to give your physician
maximum versatility in prescribing treatment for your sleep condition.
Acclimating To Your Therapy
Naturally anything new – including CPAP therapy – takes some getting used to. Having your
mouth or nose (or both) covered by a mask may make you feel anxious or claustrophobic.
Feeling the rush of air from your IntelliPAP may cause discomfort or concern. But don’t
worry – every successful, long-term CPAP user began where you are today with the same
reactions and concerns, and overcame them to enjoy the full benefits of their therapy.
Here are some steps to help you gradually ease into your therapy and overcome your
anxieties:
1. Try attaching the mask to the CPAP unit, and switching the unit “On.” Practice
breathing through the mask for one hour while watching television, reading, or
performing some other sitting activity.
2. If you nap, use the CPAP during this time.
3. Use CPAP at least during the first initial 3-4 hours of nighttime sleep.
4. Use CPAP through an entire night of sleep.
6
A-DV54
Page 7

introDuction
Advance through the above steps one step at a time and progress to the next step as soon
as you can carry out the current step without anxiety.
EN
Benefits Of Your Therapy
As a DeVilbiss IntelliPAP user, you are on your way to living a happier, healthier life – a life
free from the sleep disruptions and health risks associated with OSA. After you become
acclimated to CPAP therapy, you may be surprised at how much better you feel, both
physically and emotionally. CPAP therapy may give you the opportunity to finally experience
the deep, restful sleep you’ve been missing out on. Many patients find they have more
energy, better judgment, and improved concentration during the day. With effective therapy
you’ll be less stressed, less irritable and more like your old self again, with a healthy, positive
outlook on life. In fact, you may well wish you’d gotten your IntelliPAP sooner!
Helpful Resources
As you begin your IntelliPAP therapy, remember: you’re not in this alone! You’re part of a large
and growing network of CPAP users, and many resources are available to answer your questions,
address your concerns, and help make your therapy as effective and effortless as possible.
American Academy of Sleep Medicine
One Westbrook Corporate Ctr, Ste 920
Westchester IL 60154
Phone: (708) 492-0390
Fax: (708) 492-0943
www.aasmnet.org
American College of Chest Physicians
3300 Dundee Rd
Northbrook, IL 60062-2348
Phone: (847) 498-1400 or (800) 343-2227
Fax: (847) 498-5460
www.chestnet.org
The Sleep Apnoea Trust
12a Bakers Piece,
Kingston Blount
Oxon.
OX39 4SW
Tel: +44 845 60 60 685
www.sleepapnoea-trust.org
National Heart, Lung & Blood Institute
Information Center
P.O. Box 30105
Bethesda, MD 20824-0105
Phone: (301) 592-8573
Fax: (240) 629-3246
www.nhlbi.nih.gov
American Academy of Neurology
1080 Montreal Avenue
St. Paul, Minnesota 55116
Phone: (651) 695-2717 or (800) 879-1960
Fax: (651) 695-2791
www.aan.com
American Sleep Apnea Association
1424 K Street NW, Suite 302
Washington, DC 20005
Phone: (202) 293-3650
Fax: (202) 293-3656
www.sleepapnea.org
National Center on Sleep Disorder Research
National Heart Lung & Blood Institute (NIH)
6701 Rockledge Drive
Bethesda, MD 20892
Phone: (301) 435-0199
Fax: (301) 480-3451
www.nhlbi.nih.gov/sleep
National Sleep Foundation
1522 K Street, NW, Suite 500
Washington, DC 20005
Phone: (202) 347-3471
Fax: (202) 347-3472
www.sleepfoundation.org
A-DV54
7
Page 8

EN
Key feAtures
Key feaTURes
Unpacking The Contents
The following items are included in your DeVilbiss IntelliPAP system:
1. IntelliPAP device 5. Air supply tubing
2. Spare filter pack 6. User manual
3. AC line cord 7. DVD
4. Carrying case
If any of the above items are missing, please contact your home care provider.
NOTE– If you received a humidifier with your IntelliPAP system, please refer to the humidifier’s instruction
guide for additional information.
DeVilbiss IntelliPAP Device (Figures A and B)
1. Keypad/LCD Display (see Figure C)
2. Air Supply Port on Back
3. Air Supply Port on Bottom (for optional humidifier)
4. Air Supply Port Plug
5. Heater Power Connector (for optional humidifier)
6. AC Power Connector
7. DC Power Connector
8. Data Port
9. Power Cord (appropriate to
your wall outlet) (not shown)
10. Air Inlet Filter Opening
Keypad (Figure C)
1. On/Off
2. Previous Item
3. Next Item
4. Delay
5. Decrease Value
6. Increase Value
7. Heater Power LED (for optional humidifier)
Ask your home care provider for information about other
DeVilbiss masks, equipment, and accessories.
A
6
10
B
8
7
5
2
4
3
C
2
1
3
4
6
8
A-DV54
5
7
Page 9

system Assembly
EN
sysTem assembly wiTHoUT HUmiDifiCaTion
NOTE– If your system includes a humidifier, please refer to the instructions provided with the humidifier for
assembly and operation.
1. Locate the air supply port and heater accessory connector on the bottom of the IntelliPAP
device. Ensure that each opening has the appropriate soft cover securely attached.
2. Place the IntelliPAP on a stable surface such as a nightstand or table. If you wish, you
may also place the device on the floor at the bedside, being careful to place the unit
where it won’t be kicked or stepped on. Ensure that the air inlet in the back of the
device is not blocked by anything such as curtains or bedding.
NOTE– Never place the IntelliPAP system on a soft surface such as a bed or couch during operation.
CAUTION– The height of the IntelliPAP system must always be lower than the interface mask when using
a humidifier to prevent water from getting into the CPAP mask.
3. Insert the power cord into the back of the device. Make sure the power cord is fully
inserted into the connector. Plug the other end of the power cord into the AC wall outlet.
4. Attach the air supply tubing to the air supply interface in the back of the device.
5. Prepare the mask (supplied by your home care provider) by referring to the mask’s
instruction guide.
6. Connect the air supply tubing to the mask.
NOTE– The air supply tubing supplied with the device is specially designed to prevent kinking and allow you
to receive smooth airflow. Use only the 22 mm diameter, smooth-bore, kink-resistant tubing
supplied with this device or an air supply tubing recommended by your home care provider.
Keypad And Display
Basic DeVilbiss IntelliPAP Controls
Name Symbol Function
ON/OFF The ON/OFF button starts and stops the flow of air from the
HEATER
DELAY The Delay button activates the comfort delay feature and only
NOTE– The additional control buttons that you see on the IntelliPAP control panel provide advanced
controls for specific settings. Please refer to the ‘Advanced Menu Controls’ section on page 11 for
more details.
device.
If your IntelliPAP has a heater/ humidifier attached, these buttons
adjust the heater setting. Increase the setting for more humidity
and decrease the setting for less humidity.
functions if this feature has been enabled. To understand how to
set the parameters of this feature, please refer to the Using the
Comfort Delay Feature found on page 10.
A-DV54
9
Page 10

EN
operAtion
oPeRaTion
Startup
To begin operation, verify that your IntelliPAP is connected to a
‘live’ power source. When plugged in, the LCD display should
appear as noted.
Put on your CPAP mask and press the ON/OFF button on the keypad to turn on airflow OR
put on your CPAP mask and take a few breaths to turn on airflow automatically. The
pressure in your mask will rise to the set pressure in about 10 seconds.
NOTE– If the device does not automatically start after taking 2-3 breaths, this feature may have been
disabled. If Auto ON/OFF is disabled, you must manually press the ON/OFF button to start and
stop the device.
The keypad display shows the actual mask pressure while the
device is in use. Because this is the actual pressure, the device
pressure reading may vary slightly as you breathe. Your display
should appear as noted.
If your DeVilbiss IntelliPAP system includes a humidifier, its heater
controls and status are displayed as noted in the image.
NOTE– If the display on your device is not similar to those listed above, refer
to the chapter section titled “Patient Messages” on page 15.
P:10.0 Auto
P:10.0 Auto
OFF
Heat:Off
Using The Comfort Delay Feature
Your IntelliPAP has a comfort delay feature to help make it easier for you to fall asleep. The
airflow will start at a low pressure and then gradually ramp-up to the prescribed setting over
the last few minutes of the specified delay time.
NOTE– When the delay comfort feature is activated, a message will flash on the display periodically,
indicating the amount of time remaining in the delay.
You can adjust the amount of time spent in comfort delay by using
the advanced device controls. The Delay Time can be adjusted
from 0 to 45 minutes in 5-minute increments. Refer to page 15 for
details.
NOTE– If you are unable to change the delay time, your provider has locked this setting. Refer to the
keypad menu guide on page 12 for details.
Comfort delay is available in both IntelliPAP Standard and IntelliPAP AutoAdjust models, and
in all modes of operation.
Delay Running
10 Minutes Left
Comfort Delay Feature In Standard CPAP Mode
When you use the comfort delay feature while your device is operating in CPAP mode, the
airflow you receive at the beginning of your therapy is temporarily lowered to a pressure
selected by your physician when the device was setup.
10
A-DV54
Page 11

ADVAnceD menu controls
Press the delay button to activate the comfort delay feature. The airflow pressure will drop to
the prescribed comfort delay pressure.
In the final 10 minutes of the delay period, the pressure will gently rise to the pressure
prescribed for your therapy. You may repeat the comfort delay by pressing the delay button
again if you have not fallen asleep during the first use.
EN
Comfort Delay Feature in AutoAdjust Mode
When you use the comfort delay feature while your IntelliPAP is operating in AutoAdjust
mode, the airflow you receive at the beginning of your therapy is the lowest pressure
prescribed by your physician when the device was setup.
You do not need to activate the comfort delay; it will turn on automatically. The airflow
pressure will rise only to the low pressure setting and remain there for the duration of the
delay period. The AutoAdjust will not adjust the pressure setting during the comfort delay
period, allowing you to fall asleep without responding to early respiratory events.
Shut Down
Press the ON/OFF button to turn the device off. You may also simply remove your mask.
After a few seconds the device will display the message “Mask Off. Please check mask fit.” If
you do not put the mask on again the device will automatically turn off in about 20 seconds.
Pressing any button will remove the message from the display.
NOTE– If the DeVilbiss IntelliPAP does not turn off automatically, the feature may have been disabled. In this
case you must manually turn the device off.
aDVanCeD menU ConTRols
With the device on, press the “Next” or “Previous” buttons on the keypad to scroll through
the items on the display. Not all of the features in the table below are available in all models;
some are optional and some depend on what your physician and/or home care provider has
selected. The table shows the items you may see, and describes the feature associated with
each item. Also, some features are only available in AutoAdjust Mode or with the DeVilbiss
SmartLink™ Therapy Management Module – these are noted in the ‘Mode’ column below. If
you do not see some of these options, your model or configuration does not support them.
Name Symbol Function
PREVIOUS ITEM Pressing this button displays the previous menu option.
NEXT ITEM Pressing this button displays the next menu option.
SETTING CHANGE These buttons allow you to adjust the setting that is
shown on the display.
Please note that the values displayed are examples only.
A-DV54
11
Page 12

EN
ADVAnceD menu controls
Advanced Menu List
Display Example Mode Description
This is the default screen when the IntelliPAP is
P: 5.0 Auto
Heat:Off
Upper Limit
15.0 cmH20
Lower Limit
5.0 cmH20
Set Pressure
10.0 cmH20
Delay Time
45 minutes
Delay Pressure
5.0 cmH20
AutoAdjust
Mode
AutoAdjust
Mode
CPAP
Mode
CPAP
Mode
turned on. The actual mask pressure and heater
All
setting are shown. The displayed pressure may vary
slightly while breathing. If the heater system is not
connected, the heat setting will be blank.
This is a prescription setting which limits the
maximum pressure at which the IntelliPAP will
operate if in AutoAdjust mode. Your home care
provider programs this setting for you during device
setup.
This is a prescription setting which sets the
minimum pressure at which the IntelliPAP will
operate in AutoAdjust mode. Your home care
provider programs this setting for you during device
setup.
This is a prescription setting which controls the
operating pressure.
Selectable delay time setting. Your provider has set
the delay time. If the unlocked symbol is shown,
All
you are able to adjust this setting. If the locked
symbol is shown, this setting can only be adjusted
by your provider.
This is a prescription setting which controls the
operating pressure during the delay time.
Tubing Length
1.8 m (6 ft)
Enable Menu
Press
LCD Contrast Adj
50 %
Compliance Meter
123456.7 hours
Hourmeter
123456.7 hours
12
A-DV54
The standard tubing length supplied with the device
is 6 feet (1.8 meters). However, you can adjust your
IntelliPAP to accommodate an air supply tubing
All
length of 10 feet (3.0 meters). Replacement tubing
can be obtained through your home care provider
(part numbers listed at the end of this manual).
Pressing the down key enters the Enable menu.
All
Refer to next section for Enable Menu details.
This setting changes the contrast for the LCD
All
display. This only needs to be adjusted if you find it
difficult to see the display from your viewing angle.
The total number of hours (in 1/10 hour
All
increments) that the IntelliPAP has been providing
therapy.
The total number of hours (in 1/10 hour
All
increments) that the IntelliPAP has been in
operation.
Page 13

ADVAnceD menu controls
Display Example Mode Description
EN
Firmware Version
V0.01 01/06/2006
Serial Number
HD123456
SmartCode
FF28D9
All
Shows version of installed firmware.
Shows the serial number of the device.
All
SmartCodeTM is used for therapy management
reporting; therapy information is encoded in a series
All
of letters and numbers, and includes a special
character for error checking to ensure accuracy.
Intellipap Enable Menu List
The Enable menu is available in all modes and is a sub-menu that allows you to control
various functions of your IntelliPAP. It is accessed by pressing the down button while in this
Advanced Menu.
Display Example Description
Auto-ON
Enabled
Auto-OFF
Enabled
Mask Fit Check
Enabled
This option controls the Auto-ON feature, which automatically
starts the flow of air after breathing once or twice into the
mask.
This option controls the Auto-OFF feature, which
automatically stops the flow of air after taking off the mask.
The device may require up to 30 seconds to turn OFF
depending on the kind of mask used.
This option controls the mask fit check feature. The air flow to
your mask is constantly measured and if the amount of airflow
exceeds 95 liters/minute for more than 10% of the time used,
a notification will be created. This notification will be displayed
the next time you use the IntelliPAP.
Exit Menu
Press
Pressing the up key exits the Enable menu.
A-DV54
13
Page 14
EN
ADVAnceD menu controls
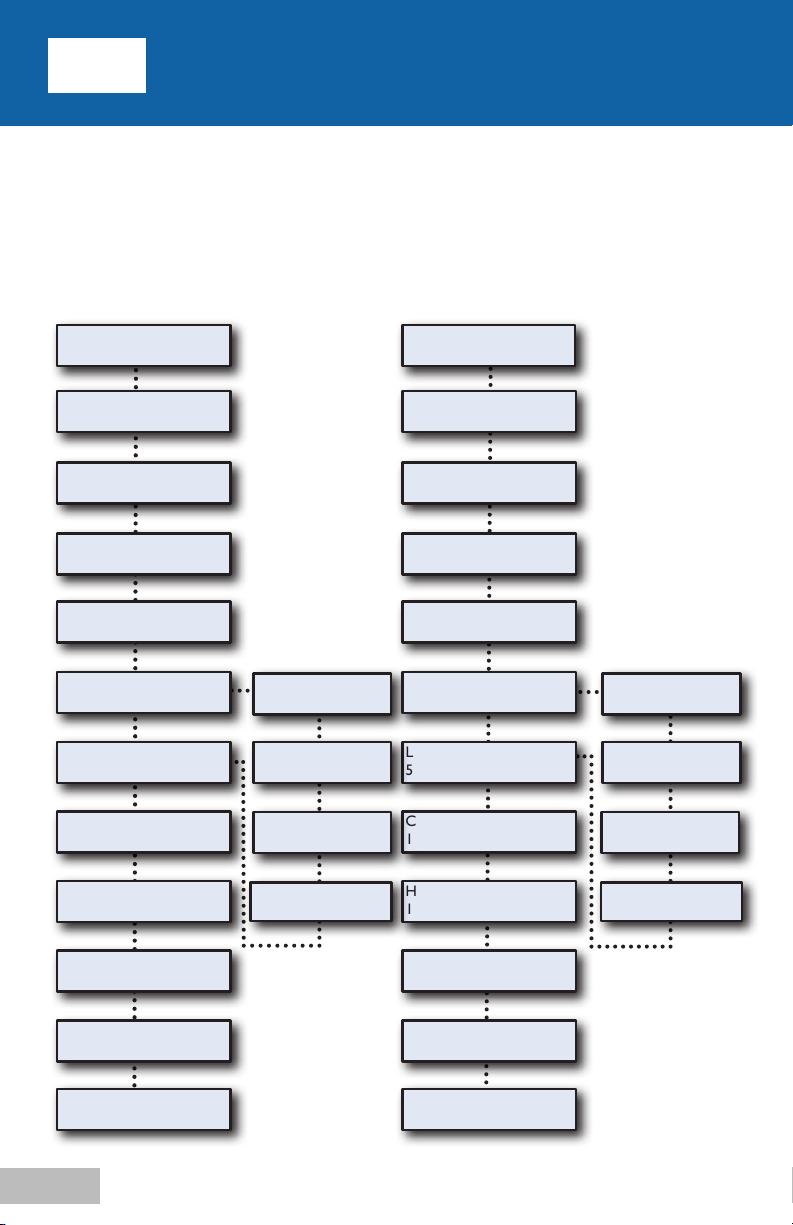
DV54 AutoAdjust Patient Menu Layout
The following chart shows by Mode each Display you will scroll through using the Next or
Previous buttons on the keypad. Pressing the Down key at the Enable Menu Display will
allow you to enter this submenu - then use Next or Previous buttons to scroll through it;
press the Up button to return to main menu. Once the final Display is reached, pressing the
Next button will return you to the first Display.
MENU - AutoAdjust Mode
MENU - CPAP Mode
P:10.0 Auto
Heat:5
Upper Limit
15.0 cmH20
Lower Limit
5.0 cmH20
Delay Time
10 minutes
Tubing Length
1.8 m (6 ft)
Enable Menu
Press
LCD Contrast Adj
50%
Compliance Meter
123456.7 hours
Hourmeter
123456.7 hours
Auto-ON
Enabled
Auto-OFF
Enabled
Mask Fit Check
Enabled
Exit Menu
Press
P:10.0 CPAP
Heat:5
Set Pressure
10.0 cmH20
Delay Time
10 minutes
Delay Pressure
5.0 cmH20
Tubing Length
1.8 m (6 ft)
Enable Menu
Press
LCD Contrast Adj
50%
Compliance Meter
123456.7 hours
Hourmeter
123456.7 hours
Auto-ON
Enabled
Auto-OFF
Enabled
Mask Fit Check
Enabled
Exit Menu
Press
Firmware Version
V0.09 05/01/2007
Serial Number
HD123456
SmartCode
FF28D9
14
A-DV54
Firmware Version
V0.019 05/01/2007
Serial Number
HD123456
SmartCode
FF28D9
Page 15

pAtient messAges
EN
PaTienT messaGes
Your IntelliPAP will alert you of issues that may require some action on your part in order to
make your therapy more effective. These messages are displayed when the device is turned
on, either by pressing the ON/OFF button or by breathing into the mask. You can press any
key or button to clear the message from the display, but the IntelliPAP will operate normally
even if the message is not cleared.
Two kinds of messages are displayed: Reminders and Notifications.
Reminders
Reminders alert you when parts of your system need to be replaced. Some components of
your system wear over time and, if not replaced, may compromise your therapy. If you see
a message on the display that is not listed below, you may have the optional DeVilbiss
SmartLink™ Module attached to your device, which provides additional messages. Refer to
the documentation that was provided with the SmartLink Module.
Clean Filter – The filter should be checked every 10 days for signs
of dirt or wear so that it can be cleaned as needed. This message
helps to remind you to check it regularly.
Notifications
Notifications identify conditions in your IntelliPAP that may require action by you or your
home care provider in order to maintain a high level of therapy. If you see a message on the
display that is not listed below, you may have the optional DeVilbiss SmartLink Module
attached to your device, which provides additional messages. Refer to the documentation that
was provided with the SmartLink Module.
NOTE-The values displayed are examples only.
Delay Running xx Minutes Left – While a comfort delay is active,
this message is flashed on the display every 5 seconds to let you
know how much time is left in the delay.
Mask Leak – This message means the IntelliPAP has detected a
large amount of airflow during therapy for at least 10% of the time
during your previous use session. This notification is displayed when
the device is turned on. If this message is displayed, put on the mask and adjust the headgear
to ensure the mask is properly fitted to your face. Follow the mask manufacturer’s directions
for adjusting the mask and headgear for proper fitting. Available on AutoAdjust models.
Mask Off – This message appears whenever a high airflow
condition occurs. High airflow is normally due to a poor mask fit or
a removed mask. Check for leak around the mask seal and make
adjustments as necessary according to the mask manufacturer’s instructions. This message
will be displayed until the high airflow problem is corrected. If the high airflow condition
persists for about 20 seconds, the device will automatically turn off (if AutoOFF is enabled).
Device Fault – If a device fault message is displayed, refer to
Troubleshooting for instructions.
Clean Filter
Delay Running
10 Minutes Left
Mask leak =
25 % Check Fit.
Mask Off. Please
check mask fit.
Device Fault E07
Call Provider
A-DV54
15
Page 16

trAVel/Dc operAtion/
EN
inTelliPaP TRaVel infoRmaTion
International Power Changes
Your DeVilbiss IntelliPAP is equipped with a universal power supply. This means that it is
automatically capable of accepting line voltages of 100 to 240V~ 50/60Hz. You do not need
to make any adjustments to the device if you are traveling to another country where the line
voltage is different than your domestic line voltage. Simply contact your home care provider
for the correct style power cord for the region in which you will be traveling (refer to
Accessories/Replacement Items for the correct part number).
Altitude
Your IntelliPAP automatically compensates for changes in altitude between sea level and
9000 ft (2750 m). You do not need to make adjustments to the device for changes in
altitude.
inTelliPaP DC oPeRaTion
Battery Power
Your IntelliPAP can be operated from a 12V DC power source in a motor home, boat or
other recreational vehicle. The power source can be used with a 12V DC accessory cable
or a 12 V DC stand-alone battery. Both parts are available from your home care provider
(refer to Accessories/Replacement Items for the correct part numbers). Both accessory
cables are required for stand-alone battery operation. The stand-alone battery connection
uses clamps that attach to the terminal connections of the battery.
supplementAl oxygen
NOTE– The heater for the IntelliPAP’s humidification system will not operate directly from a 12V DC power
source. If you need humidification, passover humidification is still available. Alternately, instead of
connecting12V DC power directly to the IntelliPAP, you can pass the DC power through an inverter
that will deliver AC power to the system. This will allow the heater to function. The power rating of
the inverter must be at least 200 watts @ 110V~ / 400 watts @ 220V~.
NOTE– The IntelliPAP will automatically switch power sources between AC and 12V DC if both sources are
available. If your unit is connected to both AC and 12V DC power sources, it will operate on AC
power as long as AC power is present, and automatically switch to 12V DC power if AC power is
lost. When AC power is restored, it will return to the AC source. You do not need to reset or adjust
any settings when the power source switches, but remember that your heater will not operate on
12V DC.
sUPPlemenTal oXyGen
Supplemental oxygen is sometimes prescribed in addition to CPAP for treatment of
Obstructive Sleep Apnea. If your physician prescribed oxygen for your sleep therapy, you
can add the oxygen in one of two ways:
1. Obtain the optional oxygen adapter (part #7353D-601) from your home care provider
and connect it to the outlet port on the IntelliPAP. Connect one end of the air supply
16
A-DV54
Page 17

supplementAl oxygen
tubing to the open end of the adapter and the other end of the air supply tubing to the
mask.
2. If your mask is equipped with an oxygen port, your physician may request that you
apply oxygen directly to your mask.
EN
WARNING-OXYGEN USE
Oxygen supports combustion. To avoid possible physical injury, do not
smoke while using this device with supplemental oxygen. Do not use this
device near hot objects, volatile substances or sources of open flames.
Always turn on the IntelliPAP before turning on the oxygen source. Turn
the oxygen source off before turning off the IntelliPAP.
This device is not suitable for use in the presence of a flammable
anesthetic mixture with air or oxygen, or nitrous oxide.
At a fixed flow rate of supplemental oxygen, the inhaled oxygen
concentration will vary depending on the pressure setting, patient
breathing pattern, mask selection, and leak rate. This warning applies to
most types of CPAP devices.
Never allow the oxygen source to run continuously while connected to the
IntelliPAP if the device is not in use. If the IntelliPAP is not being used,
turn off the oxygen flow.
CAUTION– Oxygen is a prescription gas and should only be administered under the supervision
of a physician.
CAUTION–The flow setting of the oxygen source must be specified by a physician.
A-DV54
17
Page 18

Accessories/
EN
aCCessoRies/RePlaCemenT iTems
Replacement Items
Air-inlet filter (4/pk) .............................................................................................. DV51D-602
Optional fine particle filter (4/pk) .........................................................................DV51D-603
Air supply tubing (6') .............................................................................................. 7351D-616
Air supply plug ...................................................................................................... DV51D-604
Heater connection cover ..................................................................................... DV51D-605
Oxygen adapter ...................................................................................................... 7353D-601
Carrying case ........................................................................................................ DV51D-610
Power Items
AC power cords
USA ................................................................................................................... DV51D-606
Europe, except U.K. ........................................................................................ DV51D-607
U.K. .................................................................................................................. DV51D-608
Australia ........................................................................................................... DV51D-609
DC power cord .................................................................................................... DV51D-619
DC battery clamp-on adapter .............................................................................. DV51D-696
replAcement items
Masks Recommended For Use With The DeVilbiss IntelliPAP:
DeVilbiss FlexSet® Mask ...............................................................................................9354D
DeVilbiss FlexSet® Shallow Mask ...................................................................................9354S
DeVilbiss FlexSet® Gel Mask.........................................................................................9354G
DeVilbiss FlexSet® Gel Shallow ................................................................................... 9354GS
DeVilbiss FlexAire® Mask..............................................................................................9353D
DeVilbiss FlexAire® Shallow Mask .................................................................................9353S
DeVilbiss Serenity® Mask ..............................................................................................9352D
DeVilbiss Serenity® Shallow Mask .................................................................................9352S
DeVilbiss Serenity® Gel Mask ....................................................................................... 9352G
DeVilbiss Serenity® Gel Shallow ................................................................................. 9352GS
Optional Heated Humidifier
DeVilbiss Heated Humidifier (cradle and chamber) ....................................................DV5HH
18
A-DV54
Page 19

mAintenAnce
inTelliPaP mainTenanCe
EN
Electric shock hazard – Do not attempt to open or remove the enclosure;
there are no user-serviceable components inside. If service is required,
contact your home care provider for instructions on obtaining service of
your device. Opening or attempting to service your device will void the
warranty.
DANGER
WARNING
If the operation of the device appears to deviate from normal operation or
begins to produce unusual sounds, discontinue use and contact your home
care provider for assistance.
If the device has been dropped, verify functionality of the device. If the
device does not function or the enclosure is damaged, discontinue use and
contact your provider.
If the device does not appear to be functioning properly refer to the
Troubleshooting section for instructions.
Pressure Accuracy–The IntelliPAP is designed to provide accurate pressure performance
from the factory without additional calibration. No routine service is required for a period of
2 years of use, provided the device is used in accordance with the manufacturer’s directions.
After 2 years the device should be inspected.
NOTE– Some countries require periodic servicing and calibration of this kind of medical device. Contact your
home care provider for further information.
Standard Air-Inlet Filter–Check the filter every 10 days and clean it if necessary. Replace
the filter every 6 months or sooner if it is damaged. The standard filter is designed to filter
particles larger than 3.0 microns in size. The IntelliPAP MUST have the standard filter in
place during operation.
Optional Fine Particle Filter–Check the filter every 10 days, and replace it if it is dirty or
damaged; otherwise replace the filter every 30 days. The optional fine particle filter is
designed to filter particles as small as 0.3 microns in size and larger.
Filter Maintenance–Refer to Cleaning for instructions.
A-DV54
19
Page 20

EN
inTelliPaP CleaninG
cleAning
WARNING
To avoid electric shock, always unplug the power cord from the wall outlet
power source before cleaning.
CAUTION– Never rinse or place the device in water. Never allow liquids to get into or around
any of the ports, switches or air filter; doing so will result in product damage. If this
occurs, do not use the device. Contact your home care provider for service.
Device Cabinet
1. Unplug the IntelliPAP from the power source. Wipe the enclosure with a clean, damp
cloth every few days to keep the enclosure dust free.
2. Allow the device to dry completely before plugging it into a power source.
Filters
Air-Inlet Filter (Standard)
1. The air-inlet filter should be checked every 10 days and cleaned as necessary. The filter
is located in the rear of the device.
CAUTION– Proper filter function is important for the operation of the device and to protect the
device from damage.
2. To clean, remove the dark outer foam filter from the frame.
3. Wash the filter in a solution of warm water and dishwashing detergent, and rinse with
water. Allow the filter to dry completely. If the filter (part #DV51D-602) is damaged,
contact your home care provider for a replacement.
4. Ensure the filter is completely dry before installation and use.
Fine Particle Filter (Optional)
1. If you have an optional fine particle filter (part #DV51D-603), inspect this filter and
replace it if it shows signs of dirt or damage. Do not wash.
2. Install the fine particle filter behind the standard filter.
NOTE– If the fine particle filter is not installed first according to the directions, the life of the filter will be
reduced requiring more frequent replacement.
Tubing
The air supply tubing should be cleaned daily. Remove the tubing from the device and mask.
Use a mild detergent and water to clean the inside of the tubing. Rinse the tubing and allow
to air dry.
Mask and Headgear
Clean the mask and headgear according to the manufacturer’s instructions.
20
A-DV54
Page 21

troubleshooting
TRoUblesHooTinG
EN
DANGER
Electric Shock Hazard - Do not remove the device cabinet; there are no
user-serviceable internal components. The cabinet should only be removed
by a qualified DeVilbiss provider.
If you are having trouble with the operation of your DeVilbiss IntelliPAP, please refer to the
table below for a list of problems with possible causes and remedies. If you are unable to
resolve the problem by following the instructions, contact your home care provider for
assistance.
Problem Probable Cause Remedy
Nothing shows
on the display.
The IntelliPAP
does not start
when breathing
into the mask.
The airflow has
stopped
unexpected
during use.
1. Device is not plugged in or
the power cord is not fully
inserted.
2. There is no outlet power.
1. The Auto-ON feature has
been disabled.
2. There is no power to the
device.
3. Breath is not deep enough for
the Auto-ON feature to
detect.
4. You are using a full face mask
that has an anti-asphyxia
valve.
5. The air supply port plug is
missing or not fully inserted.
6. The humidifier chamber is
not fully engaged into the
cradle or is missing.
1. The Auto-OFF feature has
detected large airflow because
of loosely fitting mask.
2. During use your mouth opens
and you being to mouth
breathe.
1a. Verify that power cord is firmly
connected to the IntelliPAP and
the power outlet.
1b. If you are using a DC power
source make sure the cable
connections are secure. Verify
that your battery is charged.
2. Locate a suitable functioning
power source.
1. Use the ON/OFF button to
start and stop the device.
2. Verify that the power cord is
firmly connected to the device
and the power outlet.
3. Breathe deeply in and out to
start the IntelliPAP
4. Auto-ON may not work
because your exhaled breath
escapes through the open valve.
Use the ON/OFF button to
start and stop the device.
5. Make sure the air supply port
plug is fully inserted into the
unit.
6. Slide the humidifier chamber
fully into the slot. Verify the
latching lever snaps into place.
1. Ensure you have a good mask fit;
adjust the mask and headgear as
needed.
2. Contact your home care
provider for a chin strap or
different mask which will help
prevent mouth breathing.
If problem is not resolved with
above remedies, disable Auto-OFF
feature in Advanced Menu options.
A-DV54
21
Page 22

EN
Problem Probable Cause Remedy
The display
shows a device
fault.
Symptoms of
OSA have
recurred.
Your skin
becomes
irritated where
the mask
touches your
face.
Dryness of
throat or nose.
Condensation of
water is
collecting in the
hose causing a
gurgling noise.
Air from flow
generator seems
to be too warm.
Nasal, sinus or
ear pain,
possibly with
runny nose.
An error has occurred in the
device and requires servicing.
1. Air filter may be occluded.
2. Sleep apnea condition has
changed.
1. Headgear is too tight or
improperly adjusted.
2. Your mask may not be
properly sized or is not the
most appropriate shape for
you.
Inadequate humidity. 1. Add a DeVilbiss DV5 Heated
1. Your humidification setting is
too high.
2. The room temperature
fluctuates from higher to
lower levels through the
night.
1. The air filter(s) is/are dirty.
2. The air inlet port is blocked.
3. The room temperature is too
high.
4. The IntelliPAP is located near
a heater.
You may have a reaction to air
flow pressure.
troubleshooting
Contact your home care provider
for service.
1. Clean or replace the air filter
and relocate device away from
drapes and other dusty surfaces.
2. Contact your physician.
1. Loosen the headgear to reduce
the contact pressure on your
face.
2. Contact your physician or home
care provider.
Humidifier.
2. Increase the heater setting on
the humidifier.
Reduce the humidifier heater
setting and/or increase the
temperature of the room.
1. Refer to the Cleaning section for
instructions on filter
maintenance.
2. Unblock the air inlet.
3. Reduce the room temperature.
4. Locate the device away from
the heat source so the air
being drawn into the device is
at room temperature.
If the problem persists contact
your home care provider.
Discontinue use and contact your
physician.
22
A-DV54
Page 23

specificAtions
EN
sPeCifiCaTions
Size ................................................ 4.2” H x 6.5” W x 6.9” D (10.7 cm x 16.5 cm x 17.5 cm)
Weight ............................................................................................................ 2.7 lbs. (1.22 kg)
Electrical Requirements ......................................................................... 100-240V~, 50/60 Hz
Maximum Power Consumption ....................................65 watts max from AC power source
(flow generator only)
AutoAdjust CPAP Pressure Range .......................................................................3-20 cmH2O
Operating Temperature Range .....................................................41°F to 104°F (5°C to 40°C)
Operating Humidity Range .................................................... 0% to 95% RH non-condensing
Operating Atmospheric Conditions ...................................................... Sea level to 9,000 feet
Storage & Transportation Temperature Range .....................-40°F to 158°F (-40°C to +70°C)
Storage & Transportation Humidity Range ............................ 0% to 95% RH non-condensing
Maximum Limited Pressure .......................................................20 cmH2O under normal use
Sound Level (tested per ISO 17510) ............................................................................. 26 dBA
Filter Specifications
Standard Filter > 3.0 micron particles
Optional Fine Particle Filter > 0.3 micron particles
Max Flow Rates
83 L/m @ 6.5 cmH2O (1/3 max pressure)
134 L/m @ 13 cmH2O (2/3 max pressure)
163 L/m @ 20 cmH2O (max pressure)
Pressure Accuracy ..............................................................................................± 1.0 cmH2O
Pressure Swings
(cmH2O peak to peak at 500mL tidal volume, sine wave profile)
Breaths per minute 10 15 20
@ 6.5 cmH2O 0.5 0.6 0.9
@ 13 cmH2O 1.0 1.0 1.2
@ 20 cmH2O 1.0 1.0 1.2
Warranty .....................................................................................................Three-year limited
Equipment classification with respect to protection from electric shock.....................Class II
Degree of protection from electric shock .............................................Type BF Applied Part
Degree of protection against ingress of liquids ................................................................IPX1
Equipment not suitable for use in the presence of a flammable anesthetic mixture with air or
with oxygen or nitrous oxide.
Mode of operation ................................................................................................ Continuous
A-DV54
23
Page 24

EN
wArrAnty
Clinical Specifications for Digital Outputs
Mask Pressure ...................................................................................0 to 25.5 cmH2O ± 0.5
Patient Flow .........................................................................-127 to +127 L/min ± 10 L/min
Leak Flow .................................................................................. 0 to +127 L/min ± 10 L/min
Estimated Tidal Volume .....................................................................................0 to 1023 mL
NOTE–Tidal Volume is an estimate. It is provided for trending purposes only.
waRRanTy
The DeVilbiss IntelliPAP device is warranted to be free from defective workmanship and
material for a period of three years from date of purchase. Any defective part(s) will be
repaired or replaced at DeVilbiss’s option if the device has not been tampered with or used
improperly during that period. Make certain that any malfunction is not due to inadequate
cleaning or failure to follow the instructions. If repair is necessary, contact your DeVilbiss
provider or DeVilbiss Customer Service Department for instructions:
U.S.A. 800-338-1988, 814-443-4881
Canada 800-263-3390
Europe 44-138-444-6688.
NOTE–This warranty does not cover providing a loaner device, compensating for costs incurred in rental
while said device is under repair, or costs for labor incurred in repairing or replacing defective part(s).
THERE IS NO OTHER EXPRESS WARRANTY. IMPLIED WARRANTIES, INCLUDING
THOSE OF MERCHANTABILITY AND FITNESS FOR A PARTICULAR PURPOSE, ARE
LIMITED TO THE DURATION OF THE EXPRESS LIMITED WARRANTY AND TO THE
EXTENT PERMITTED BY LAW ANY AND ALL IMPLIED WARRANTIES ARE EXCLUDED.
THIS IS THE EXCLUSIVE REMEDY AND LIABILITY FOR CONSEQUENTIAL AND
INCIDENTAL DAMAGES UNDER ANY AND ALL WARRANTIES ARE EXCLUDED TO
THE EXTENT EXCLUSION IS PERMITTED BY LAW. SOME STATES DO NOT ALLOW
LIMITATIONS ON HOW LONG AN IMPLIED WARRANTY LASTS, OR THE LIMITATION
OR EXCLUSION OF CONSEQUENTIAL OR INCIDENTAL DAMAGES, SO THE ABOVE
LIMITATION OR EXCLUSION MAY NOT APPLY TO YOU.
This warranty gives you specific legal rights, and you may also have other rights which vary
from state to state.
24
A-DV54
Page 25

ínDice
ES
ÍnDiCe
Definiciones de símbolos ..............................................................................................26
Precauciones importantes ............................................................................................26
Introducción .................................................................................................................28
Uso al que se destina/Indicaciones de uso ............................................................28
Contraindicaciones ................................................................................................28
¿Qué es la apnea obstructiva del sueño (AOS)? ....................................................28
Funcionamiento de la terapia CPAP ......................................................................29
Familiarizarse con la terapia ..................................................................................29
Ventajas de la terapia.............................................................................................30
Recursos de utilidad ..............................................................................................30
Componentes principales .............................................................................................31
Desembalaje del contenido ...................................................................................31
Dispositivo IntelliPAP ............................................................................................31
Teclado ..................................................................................................................31
Montaje del sistema......................................................................................................32
Teclado y pantalla .........................................................................................................32
Funcionamiento ............................................................................................................33
Inicio ......................................................................................................................33
Uso de la función de retardo de comodidad ........................................................33
Apagar el dispositivo .............................................................................................34
Controles del menú de propiedades avanzadas...........................................................34
Lista del menú de propiedades avanzadas ............................................................35
Lista del menú Activar de IntelliPAP .....................................................................36
Menú del paciente de AutoAdjust .........................................................................37
Menú del paciente de CPAP .................................................................................37
Mensajes del paciente ..................................................................................................38
Recordatorios ........................................................................................................38
Notificaciones ........................................................................................................38
Información de IntelliPAP en caso de viaje ..................................................................39
Funcionamiento de IntelliPAP con CC .........................................................................39
Alimentación de batería ........................................................................................39
Oxígeno suplementario ................................................................................................40
Accesorios/Piezas de repuesto .....................................................................................41
Mantenimiento .............................................................................................................42
Limpieza .......................................................................................................................43
Solución de problemas .................................................................................................44
Especificaciones ............................................................................................................46
Garantía ........................................................................................................................48
25
A-DV54
25
Page 26

Definiciones De símbolos/
ES
DefiniCiones De sÍmbolos
Protección eléctrica de clase II: Equipo tipo BF – pieza aplicada
doble aislamiento
Entrada/Salida del puerto de datos Pausa: enciende o apaga el ventilador
precAuciones importAntes
Elemento siguiente de la pantalla
LCD pantalla LCD
Elemento anterior de la pantalla
LCD pantalla LCD
Atención - Consultar documentos Calor adjuntos
Entrada de CC: 12 VCC, la clavija 100-240 Voltios de entrada CA 50/60 Hz
central es positiva
Aumenta el valor que se muestra en la
Disminuye el valor que se muestra en la
Asegurad Desaseg
IPX1 A prueba de goteo, vertical
Delay – inicia el ciclo de retardo en el modo de presión positiva continua en las vías
respiratorias (CPAP), si se prescribe – reduce la presión al límite inferior en el modo
Auto-ajuste
Este dispositivo contiene equipamiento eléctrico y/o electrónico que se debe reciclar
conforme a la directiva de la CE 2002/96/EC - Residuos de aparatos eléctricos y
electrónicos (RAEE)
PRECAUCIONES IMPORTANTES
Siempre que se utilicen aparatos eléctricos, deben tomarse algunas precauciones básicas de
seguridad. Lea todas las instrucciones antes de utilizar este dispositivo. Los siguientes
términos precederán a la información importante para resaltarla.
PELIGRO Información de seguridad urgente para situaciones peligrosas que
pueden provocar lesiones graves o incluso la muerte.
ADVERTENCIA Información de seguridad importante para situaciones peligrosas que
pueden provocar lesiones graves.
PRECAUCIÓN Información para evitar daños en el producto.
NOTA Información a la que debe prestar especial atención.
lea ToDas las insTRUCCiones anTes De
UTiliZaR esTe DisPosiTiVo.
GUARDE ESTAS INSTRUCCIONES
PELIGRO
Peligro de descargas eléctricas – No utilizar durante el baño.
26
A-DV54
Page 27

precAuciones importAntes
Peligro de descargas eléctricas – No sumergir este dispositivo en agua ni
en ningún otro líquido.
Peligro de descargas eléctricas – No intentar abrir ni retirar la carcasa. No
contiene componentes que el usuario pueda reparar o sustituir. Si es
necesario reparar el dispositivo, devuelva el producto a su proveedor de
servicios de atención sanitaria domiciliaria. Si abre o altera el producto, la
garantía quedará anulada.
ES
ADVERTENCIA
El dispositivo IntelliPAP™ de DeVilbiss sólo se debe utilizar con mascarillas
recomendadas por DeVilbiss, por el médico o por el terapeuta respiratorio.
Para evitar la reinhalación del aire espirado, no utilice la mascarilla de CPAP
a menos que el dispositivo esté encendido y suministrando aire. No bloquee
nunca la ventilación de mascarilla. Cuando el dispositivo está encendido y
suministrando aire, el aire espirado se expulsa por el sistema de ventilación
de la mascarilla. Sin embargo, si la unidad de CPAP no está funcionando, es
posible reinhalar el aire espirado. La reinhalación del aire espirado durante
más de unos minutos bajo determinadas circunstancias puede provocar
asfixia. Esta advertencia se aplica a la mayoría de dispositivos de CPAP.
La unidad IntelliPAP de DeVilbiss no es un equipo de soporte vital y puede
dejar de funcionar si se producen determinados errores en el dispositivo o
si falla el suministro de corriente eléctrica. Está destinado a pacientes con
respiración espontánea de peso superior a 30 kg (66 lbs).
Para evitar descargas eléctricas, desenchufe siempre el cable de la toma
de corriente de la pared antes de limpiar el dispositivo.
Utilice sólo accesorios recomendados por DeVilbiss.
PRECAUCIÓN–El conector circular del puerto de datos que se encuentra en la parte posterior
del dispositivo IntelliPAP permite conectar los accesorios. El conector sólo se deberá utilizar con
accesorios cuyo uso haya sido aprobado por DeVilbiss. No intente adjuntar ningún otro tipo de
dispositivo a este conector, ya que podría dañar la unidad o el dispositivo suplementario.
PRECAUCIÓN–No enjuague nunca el dispositivo ni lo sumerja en agua. Nunca permita que
entre ni haya líquido cerca de los puertos, de los interruptores o del filtro de aire, ya que podrían
producirse daños en el dispositivo. Si esto ocurriera, desenchufe el cable de la toma de corriente
inmediatamente. Deje que el dispositivo se seque completamente antes de volver a utilizarlo.
PRECAUCIÓN–No coloque el dispositivo IntelliPAP donde pueda sufrir una caída o donde
alguien pueda tropezar con el cable de corriente.
PRECAUCIÓN–Se recomienda usar sólo el sistema humidificador con calentador DeVilbiss
DV5 con el dispositivo IntelliPAP. Es posible que otros sistemas de humidificación impidan que el
dispositivo detecte los ronquidos y produzcan unos niveles de presión inadecuados.
PRECAUCIÓN–El oxígeno es un gas que se prescribe por orden de un médico y se puede
administrar únicamente bajo la supervisión de éste.
27
A-DV54
27
Page 28

ES
introDucciÓn
inTRoDUCCiÓn
Uso al que se destina/Indicaciones de uso
El uso del dispositivo DeVilbiss® IntelliPAP™ modelo DV5 Serie está indicado para el
tratamiento de la apnea obstructiva del sueño en pacientes con un peso igual o superior a 30
kg/66 lbs.
Contraindicaciones
No utilice el dispositivo IntelliPAP si se le ha practicado cirugía traqueal.
NOTA: Algunos síntomas como la sequedad de garganta, fosas nasales y boca son comunes con la terapia
de presión positiva continua en las vías respiratorias. Es de especial importancia en zonas geográficas
de clima seco y durante el invierno, cuando la humedad del aire suele ser inferior a la del resto de
estaciones del año. El dispositivo IntelliPAP incluye un sistema de humidificación opcional que le
ayudará a minimizar estos efectos.
¿Qué es la apnea obstructiva del sueño (AOS)?
La apnea obstructiva del sueño (AOS) es una afección respiratoria que afecta a más de 22
millones de americanos, aproximadamente el 4% de los hombres y el 2% de las mujeres de
mediana edad.
Los factores fisiológicos, como el tamaño de las amígdalas, la forma de la nariz, el
estrechamiento de las vías respiratorias superiores o cualquier combinación de los factores
anteriores, pueden causar AOS. Durante el sueño, las vías respiratorias se pueden relajar
hasta el punto de colapsarse y quedar obstruidas. La relajación hace que el tejido situado en
la parte posterior de la garganta vibre al respirar, lo que provoca ronquidos. Pero cuando las
vías respiratorias se colapsan por completo, se bloquea el flujo de aire y la respiración cesa.
(De hecho, la palabra “apnea” proviene de un término griego que significa “sin respiración”.)
Esta suspensión de la respiración se produce de forma repetida a lo largo de toda la noche,
pudiendo durar cada episodio desde tan sólo unos segundos hasta más de un minuto. El
nivel de oxígeno en sangre desciende hasta límites peligrosos, lo que hace que su sistema
nervioso central provoque un jadeo repentino que le despierta parcialmente y le impide
disfrutar del sueño profundo y continuo que su organismo necesita. Como resultado, es
frecuente sentirse cansado, estresado e irritable al día siguiente, un estado poco
recomendable y potencialmente peligroso para trabajar, conducir y tomar decisiones.
Paladar blando
28
Uvula
Faringe
Vías respiratorias no obstruidas
A-DV54
Cavidad nasal
Paladar duro
Lengua
Epiglotis
Paladar blando
Uvula
Faringe
Durante el episodio apneico, el paladar blando se
abate y bloquea las vías respiratorias
Cavidad nasal
Paladar duro
Epiglotis
Lengua
Page 29

introDucciÓn
También hay consecuencias médicas importantes. La AOS priva al corazón, el cerebro y los
órganos del oxígeno que necesitan para sobrevivir. Con el tiempo, esta privación podría
tener consecuencias graves para la salud, como pérdidas de memoria, impotencia,
hipertensión, enfermedades coronarias, infartos cerebrales y ataques al corazón. Estudios
recientes revelan que la AOS presenta el mismo factor de riesgo de sufrir un ataque al
corazón que el tabaco, un nivel alto de colesterol y el alcohol, y se estima que se producen
hasta 38.000 muertes al año a causa de los efectos de la AOS.
Está claro que la AOS es un problema médico grave que precisa atención y tratamiento.
ES
Funcionamiento de la terapia CPAP
Existen varios tratamientos para la AOS, entre los que se incluyen la cirugía y la terapia
CPAP. Sin embargo, la terapia CPAP ha resultado ser muy eficaz en la mayoría de los
pacientes. Las siglas CPAP significan en inglés “Continuous Positive Airway Pressure”
(presión positiva continua en las vías respiratorias), que es exactamente lo que suministra el
dispositivo IntelliPAP de DeVilbiss a las vías respiratorias superiores, actuando como una
“columna de aire” que mantiene las vías abiertas durante el sueño.
Esto reduce o elimina la obstrucción, lo que le permitirá disfrutar del sueño profundo,
reparador e ininterrumpido que necesita. Y lo que es más importante, su organismo obtendrá
el descanso y el oxígeno que necesita a través de un sueño ininterrumpido y continuo, lo que
le ayudará a reducir el riesgo de padecer los graves problemas médicos asociados a la AOS.
Además, el dispositivo IntelliPAP está diseñado para proporcionarle esta terapia de una forma
cómoda y silenciosa, lo que le permitirá dormir toda la noche sin distracciones.
El sistema IntelliPAP AutoAdjust® de DeVilbiss ajusta automáticamente la presión del aire.
Para logarlo, mide los patrones respiratorios y los ronquidos en cada respiración y compensa
la presión según sus necesidades. Sus patrones de respiración se analizan, almacenan y
utilizan constantemente para realizar cualquier ajuste de presión necesario.
La frecuencia de los ajustes de presión se puede aumentar hasta 10 cmH2O cada 10
minutos. Los ajustes se realizan con la suavidad suficiente para no perturbar el sueño, pero
lo bastante rápido como para suministrar la presión necesaria en cada momento. Si no se
producen episodios respiratorios, la presión se reducirá para maximizar su comodidad. El
sistema IntelliPAP AutoAdjust también funciona en modo CPAP (sin la función automática
descrita anteriormente) para que su médico disponga de la máxima versatilidad al
prescribirle un tratamiento para sus problemas durante el sueño.
Familiarizarse con la terapia
Como ocurre con todo lo nuevo, necesitará algún tiempo para acostumbrase a la terapia CPAP.
Al tener la boca o la nariz (o ambas) cubiertas con una mascarilla, es posible que se sienta
inquieto o claustrofóbico. Es posible que el flujo de aire procedente del dispositivo IntelliPAP le
haga sentirse incómodo o preocupado. Pero no se preocupe, todas las personas que llevan ya
tiempo utilizando la terapia CPAP con éxito tuvieron las mismas reacciones y preocupaciones
que usted y, tras superarlas, pudieron disfrutar de todas las ventajas de esta terapia.
Siga estos pasos para acostumbrase poco a poco a la terapia y superar la ansiedad:
1. Intente conectar la mascarilla a la unidad de CPAC y enciéndala. Practique la
respiración a través de la mascarilla durante una hora mientras ve la televisión, lee o
A-DV54
29
Page 30

ES
realiza cualquier otra actividad sentado.
2. Si ronca, utilice la unidad de CPAP en esos momentos.
3. Utilice la unidad de CPAP al menos durante las primeras 3 ó 4 horas de sueño nocturno.
4. Utilice la unidad de CPAP durante una noche entera de sueño.
Siga estos pasos uno a uno y avance al paso siguiente cuando pueda realizar el paso actual
sin sentir ansiedad.
introDucciÓn
Ventajas de la terapia
Como usuario del dispositivo IntelliPAP de DeVilbiss, podrá disfrutar de una vida más feliz y
saludable, una vida sin las interrupciones de sueño y los riesgos de salud asociados a la AOS.
Después de familiarizarse con la terapia CPAP, es posible que se sorprenda de lo bien que se
siente, tanto física como emocionalmente. La terapia CPAP le dará la oportunidad de
disfrutar al fin del sueño profundo y apacible que no ha podido tener hasta ahora. Muchos
pacientes sienten que gozan de más energía, un mejor juicio y una mayor capacidad de
concentración durante el día. Con una terapia eficaz, logrará estar menos estresado e
irritable y sentirse más identificado consigo mismo, con una actitud positiva y saludable ante
la vida. De hecho, es probable que desee haber descubierto IntelliPAP antes.
Recursos de utilidad
Al comenzar su terapia con IntelliPAP, recuerde que no está solo. Forma parte de una gran
comunidad de usuarios de CPAP que crece cada día, y dispone de muchos recursos que
darán respuesta a sus preguntas, calmarán su preocupaciones y le ayudarán a que su terapia
sea lo más eficaz y cómoda posible.
American Academy of Sleep Medicine
One Westbrook Corporate Ctr, Ste 920
Westchester IL 60154 (EE.UU.)
Teléfono: (708) 492-0390
Fax: (708) 492-0943
www.aasmnet.org
American College of Chest Physicians
3300 Dundee Rd
Northbrook, IL 60062-2348 (EE.UU.)
Teléfono: (847) 498-1400 ó (800) 343-2227
Fax: (847) 498-5460
www.chestnet.org
The Sleep Apnoea Trust
12a Bakers Piece, Kingston Blount
Oxon.
OX39 4SW
Tel: +44 845 60 60 685
www.sleepapnoea-trust.org
National Heart, Lung & Blood Institute
Information Center
P.O. Box 30105
Bethesda, MD 20824-0105 (EE.UU.)
Teléfono: (301) 592-8573
Fax: (240) 629-3246
www.nhlbi.nih.gov
30
A-DV54
American Academy of Neurology
1080 Montreal Avenue
St. Paul, Minnesota 55116 (EE.UU.)
Teléfono: (651) 695-2717 ó (800) 879-1960
Fax: (651) 695-2791
www.aan.com
American Sleep Apnea Association
1424 K Street NW, Suite 302
Washington, DC 20005 (EE.UU.)
Teléfono: (202) 293-3650
Fax: 202) 293-3656
www.sleepapnea.org
National Center on Sleep Disorder Research
National Heart Lung & Blood Institute (NIH)
6701 Rockledge Drive
Bethesda, MD 20892 (EE.UU.)
Teléfono: (301) 435-0199
Fax: (301) 480-3451
www.nhlbi.nih.gov/sleep
National Sleep Foundation
1522 K Street, NW, Suite 500
Washington, DC 20005 (EE.UU.)
Teléfono: (202) 347-3471
Fax: (202) 347-3472
www.sleepfoundation.org
Page 31

componentes principAles
ES
ComPonenTes PRinCiPales
Desembalaje del contenido
Su sistema IntelliPAP de DeVilbiss incluye los siguientes elementos:
1. Dispositivo IntelliPAP 5. Tubo de suministro de aire
2. Filtro de repuesto 6. Manual del usuario
3. Cable de CA 7. DVD
4. Funda para transporte
Si falta alguno de estos elementos, póngase en contacto con su proveedor de servicios de
atención sanitaria domiciliaria.
NOTA: Si ha recibido un humidificador con el sistema IntelliPAP, consulte la guía de instrucciones del
humidificador para obtener información adicional.
Dispositivo IntelliPAP de DeVilbiss
(Figuras A and B)
1. Teclado/Pantalla LCD (Figura C)
2. Puerto de suministro de aire trasero
3. Puerto de suministro de aire inferior (para el
humidificador opcional)
4. Clavija del puerto de suministro de aire
5. Conector de suministro eléctrico del calentador (para el
humidificador opcional)
6. Conector de suministro eléctrico de CA
7. Conector de suministro eléctrico de CC
8. Puerto de datos
9. Cable (adecuado para su toma de electricidad de la
pared) (no se muestra)
10. Orificio del filtro de entrada de aire
Teclado (Figura C)
1. Encendido/Apagado
2. Elemento anterior
3. Elemento siguiente
4. Delay
5. Disminuir valor
6. Aumentar valor
7. LED de encendido del calentador (para el humidificador
opcional)
Para obtener más información sobre las mascarillas, el equipo
y los accesorios de DeVilbiss, consulte con su proveedor de
servicios de atención sanitaria domiciliaria.
A
6
10
B
8
7
5
2
4
3
C
2
1
6
A-DV54
3
4
5
7
31
Page 32

ES
montAje Del sistemA
monTaJe Del sisTema sin HUmiDifiCaCiÓn
NOTA: Si su sistema incluye un humidificador, consulte las instrucciones sobre montaje y funcionamiento
incluidas con el humidificador.
1. Localice el puerto de suministro de aire y el conector suplementario del calentador en
la parte inferior del dispositivo IntelliPAP. Asegúrese de que todos los orificios tengan
bien insertadas las cubiertas flexibles adecuadas.
2. Coloque el dispositivo IntelliPAP sobre una superficie estable, como una mesa o una
mesita de noche. Si lo desea, también puede poner el dispositivo en el suelo junto a la
cama, pero debe tener cuidado de no colocarlo en un lugar donde pueda pisarlo o
darle una patada. Asegúrese de que nada bloquee la entrada de aire situada en la parte
posterior, como cortinas o ropa de cama.
NOTA: Mientras esté en funcionamiento, no coloque nunca el sistema IntelliPAP en una superficie blanda
como, por ejemplo, una cama o un sofá.
PRECAUCIÓN: Si se utiliza un humidificador, el sistema IntelliPAP debe estar siempre situado a una
altura inferior a la de la mascarilla facial, para impedir que entre agua en la mascarilla
del CPAP.
3. Inserte el cable en la parte posterior del dispositivo. Asegúrese de que el cable esté
insertado completamente en el conector. Enchufe el otro extremo del cable a la toma
de CA de la pared.
4. Conecte el tubo de suministro de aire a la salida de suministro de aire situada en la
parte posterior del dispositivo.
5. Prepare la mascarilla (proporcionada por su proveedor de servicios de atención
sanitaria domiciliaria).
6. Conecte el tubo de suministro de aire a la mascarilla.
NOTA: El tubo de suministro de aire incluido en el dispositivo está especialmente diseñado para no
plegarse y permitir así un flujo de aire constante. Utilice únicamente tubos de 22 mm de diámetro
con superficie interna lisa y antipliegues incluidos en su dispositivo o un tubo de suministro de aire
recomendado por su proveedor de servicios de atención sanitaria domiciliaria.
Teclado y Pantalla
Controles básicos del dispositivo IntelliPAP de DeVilbiss
Nombre Símbolo Función
ON/OFF El botón ON/OFF inicia y detiene el flujo de aire del dispositivo.
HEATER
DELAY El botón DELAY activa la función de retardo de comodidad y sólo
NOTA: Los demás botones del panel de control del dispositivo IntelliPAP se corresponden con controles
avanzados de funciones específicas. Para obtener información detallada, consulte la sección
‘Controles del menú de propiedades avanzadas’ en la página 34.
32
A-DV54
Si su dispositivo IntelliPAP tiene conectado un calentador/
humidificador, estos botones le permitirán ajustar la configuración
del calentador. Aumente el valor si desea obtener más humedad y
redúzcalo si desea menos humedad.
funcionará si se ha habilitado esta función. Para aprender a
configurar esta función, consulte la sección Uso de la función de
retardo de comodidad en la página 34.
Page 33

funcionAmiento
ES
fUnCionamienTo
Inicio
Antes de empezar a utilizar el dispositivo IntelliPAP, asegúrese de
que esté conectado a una toma de corriente ‘activa’. Una vez
enchufado el dispositivo, deberá aparecer la pantalla LCD tal como
se muestra en la imagen.
Póngase la mascarilla de CPAP y pulse el botón ON/OFF del teclado para activar el flujo de
aire O BIEN póngase la mascarilla de CPAP y respire varias veces hasta activar el flujo de
aire automáticamente. La presión de la mascarilla alcanzará la presión configurada en
aproximadamente 10 segundos.
NOTA: Si el dispositivo no se inicia automáticamente después de respirar 2 ó 3 veces, es posible que se
haya desactivado esta función. Si la función de encendido/apagado automático está desactivada,
deberá pulsar manualmente el botón ON/OFF para iniciar y detener el dispositivo.
La pantalla del teclado mostrará la presión actual de la mascarilla
mientras esté utilizando el dispositivo. Debido a que ésta es la
presión actual, la lectura de presión del dispositivo variará
ligeramente al respirar. La pantalla deberá aparecer tal como se
muestra en la imagen.
Si el sistema IntelliPAP de DeVilbiss incluye un humidificador, el
estado y los controles del calentador aparecerán como se muestra
en la imagen.
NOTA: Si lo que aparece en la pantalla no se parece a lo que se muestra en las imágenes anteriores,
consulte la sección “Mensajes del paciente” en la página 39 de este capítulo.
APAGADO
P:10,0 Auto
P:10,0 Auto
Calor:Apagadp
Uso de la función de retardo de comodidad
El dispositivo IntelliPAP dispone de una función de retardo que le permitirá conciliar el
sueño con facilidad. El flujo de aire comenzará con una presión baja y, durante los últimos
minutos del período de retardo especificado, aumentará gradualmente la presión hasta
alcanzar el nivel prescrito.
NOTA: Si la función de retardo de comodidad está activada, cada cierto tiempo aparecerá un mensaje
parpadeante en la pantalla que indicará el tiempo de retardo que queda.
Podrá ajustar la duración del período de retardo mediante los
controles avanzados del dispositivo. La duración del retardo se
puede ajustar entre 0 y 45 minutos en incrementos de 5 minutos.
Para obtener información detallada, consulte la página 39.
NOTA: Si no puede cambiar el tiempo de retardo, es posible que su proveedor haya bloqueado este
parámetro. Para obtener información detallada, consulte la guía de menús del teclado en la página
36.
La función de retardo de comodidad está disponible en los modelos IntelliPAP Standard e
IntelliPAP AutoAdjust, y en todos los modos de funcionamiento.
Func. Retardo
10 min. faltan
A-DV54
33
Page 34

controles Del menú De
ES
Función de retardo de comodidad en modo CPAP estándar
Si utiliza la función de retardo de comodidad mientras el dispositivo está en modo CPAP, el
flujo de aire se reducirá temporalmente durante el principio de la terapia a la presión
seleccionada por su médico cuando se configuró el dispositivo.
Pulse el botón DELAY para activar la función de retardo por comodidad. La presión del flujo
de aire descenderá hasta alcanzar la presión de retardo cómoda prescrita.
Durante los últimos 10 minutos del período de retardo, la presión aumentará gradualmente
hasta la presión prescrita para la terapia. Si no se ha dormido durante el período de retardo
y desea repetirlo, pulse de nuevo el botón DELAY.
Función de retardo de comodidad en modo Auto-ajuste
Si utiliza la función de retardo de comodidad mientras el dispositivo IntelliPAP se encuentra
en modo Auto-ajuste, el flujo de aire se reducirá temporalmente durante el principio de la
terapia a la presión más baja prescrita por su médico cuando se configuró el dispositivo.
No será necesario activar el retardo de comodidad, ya que se encenderá automáticamente.
La presión del flujo de aire sólo ascenderá hasta el valor de presión más bajo y permanecerá
así mientras dure el período de retardo. El modo Auto-ajuste no ajustará la presión durante
el período de retardo de comodidad si se producen episodios respiratorios, lo que le
permitirá dormirse fácilmente.
propieDADes AVAnzADAs
Apagar el dispositivo
Para apagar el dispositivo, pulse el botón ON/OFF. Otra opción para apagar el dispositivo es
simplemente quitarse la mascarilla. Transcurridos unos segundos, el dispositivo mostrará el
mensaje “Quitar máscara. Comp. ac. másc.” Si no se vuelve a poner la mascarilla, el
dispositivo se apagará automáticamente transcurridos aproximadamente 20 segundos. Pulse
cualquier botón para borrar el mensaje de la pantalla.
NOTA: Si el dispositivo DeVilbiss IntelliPAP no se apaga automáticamente, es posible que se haya
desactivado esa función. En este caso, deberá apagar el dispositivo manualmente.
ConTRoles Del menú De PRoPieDaDes
aVanZaDas
Cuando el dispositivo esté encendido, pulse los botones “Siguiente” o “Anterior” del teclado
para desplazarse por los elementos de la pantalla. No todas las funciones de la tabla
siguiente están disponibles en todos los modelos. Algunas son opcionales y otras dependen
de las opciones que haya seleccionado su médico o su proveedor de servicios de atención
sanitaria domiciliaria. La tabla muestra todas las opciones que podrá ver y describe la función
asociada a cada elemento. Además, algunas funciones sólo están disponibles en el modo
Auto-ajuste o en el módulo de gestión de terapias SmartLink™ de DeVilbiss (estas opciones
se incluyen en la columna ‘Modo’). Si no puede ver algunas de estas opciones, será porque
su modelo o su configuración no las incluye.
34
A-DV54
Page 35

controles Del menú De
propieDADes AVAnzADAs
Nombre Símbolo Función
ELEMENTO ANTERIOR
ELEMENTO SIGUIENTE
CAMBIAR VALOR
Tenga en cuenta que los valores que aparecen son sólo ejemplos.
Lista del menú de propiedades avanzadas
Ejemplo de pantalla Modo
P:5,0 Auto
Calor:Apagado
Límite superior
15,0 cmH20
Límite inferior 5,0
cmH20
Ajustar presión
10,0 cmH20
Todos
Mode
Autoajuste
Mode
Autoajuste
Modo
CPAP
Pulse este botón para ver la opción de menú anterior.
Pulse este botón para ver la opción de menú siguiente.
Estos botones permiten ajustar el valor que aparece en
la pantalla.
Descripción
Ésta es la pantalla predeterminada cuando el
dispositivo IntelliPAP está encendido. En ella se
muestra la configuración del calentador y la presión
de la mascarilla real. La presión mostrada puede variar
ligeramente al respirar. Si el sistema de calentador no
está conectado, el valor de configuración de calor
aparecerá en blanco.
Esta pantalla muestra la configuración de prescripción
que limita la presión máxima a la que funcionará el
dispositivo IntelliPAP si se encuentra en modo Autoajuste. Su proveedor de servicios de atención sanitaria
domiciliaria programará este valor por usted durante
la configuración del dispositivo.
Esta pantalla muestra la configuración de prescripción
que establece la presión mínima a la que funcionará el
dispositivo IntelliPAP si se encuentra en modo Autoajuste. Su proveedor de servicios de atención sanitaria
domiciliaria programará este valor por usted durante
la configuración del dispositivo.
Esta pantalla muestra la configuración de prescripción
que controla la presión de funcionamiento.
ES
Tiempo retardo
45 minutos
Presión Retardo
5,0 cmH20
Longitud tubo
1,8 m (6 pies)
Todos
Modo
CPAP
Todos
Configuración de tiempo de retardo seleccionable. Su
proveedor ha programado el tiempo de retardo. Si
aparece el símbolo desbloqueado, podrá ajustar este
valor. Si aparece el símbolo bloqueado, únicamente su
proveedor podrá ajustar este valor.
Esta pantalla muestra la configuración de prescripción
que controla la presión de funcionamiento durante el
tiempo de retardo.
La longitud estándar del tubo que se suministra con el
dispositivo es de 1,8 metros (6 pies). Sin embargo,
puede ajustar el dispositivo IntelliPAP para que admita
una longitud de tubo de suministro de aire de 3
metros (10 pies). Puede solicitar un tubo de repuesto
a su proveedor de servicios de atención sanitaria
domiciliaria (los números de referencia aparecen al
final de este manual).
A-DV54
35
Page 36

ES
controles Del menú De
propieDADes AVAnzADAs
Ejemplo de pantalla Modo
Menú activar
Pulse
Aj. contr. LCD
50%
Contador cumpl.
123456,7 horas
Medidor de horas
123456,7 horas
Versión Firmware
V0.019 05/01/2007
Número serie
HD123456
SmartCode
FF28D9
Todos
Todos
Todos
Todos
Todos
Todos
Todos
Descripción
Pulse la tecla hacia abajo para acceder al menú
Activar. Para obtener información detallada sobre el
menú Activar, consulte la siguiente sección.
En esta pantalla se cambia el contraste de la pantalla
LCD. Sólo será necesario ajustarlo si le resulta difícil
ver la pantalla desde su ángulo de visión.
El número total de horas (en incrementos de 1/10
hora) que el dispositivo IntelliPAP ha estado
proporcionando terapia.
El número total de horas (en incrementos de 1/10
hora) que el dispositivo IntelliPAP ha estado en
funcionamiento.
Muestra la versión del firmware instalada.
Muestra el número de serie del dispositivo.
Para registrar la información de adherencia se utiliza
el sistema SmartCode™; la información de adherencia
se codifica en una serie de letras y números e incluye
un carácter especial para comprobación de errores y
asegurar la exactitud a su médico.
Lista del menú Activar de Intellipap
El menú Activar está disponible en todos los modos y es un submenú que permite controlar
distintas funciones del dispositivo IntelliPAP. Para acceder a él, seleccione el menú de
propiedades avanzadas y pulse el botón hacia abajo.
Ejemplo de pantalla Descripción
Auto-Encendido
Activado
Auto-Apagado
Activado
Comp. ac. másc.
Activado
Menú Salir
Pulse
36
A-DV54
Esta opción controla la función Auto-Encendido, que inicia
automáticamente el flujo de aire una vez que se respira una o
dos veces con la mascarilla.
Esta opción controla la función Auto-Apagado, que detiene
automáticamente el flujo de aire una vez que se retira la
mascarilla. En función de la mascarilla que se utilice, es posible
que el dispositivo tarde hasta 30 segundos en apagarse.
Esta opción controla la función de comprobación del ajuste de
la mascarilla. El flujo de aire suministrado a la mascarilla se
medirá de forma constante y, si la cantidad de flujo de aire
excede los 95 litros/minuto durante más del 10% del tiempo
de uso, se generará una notificación. Esta notificación se
mostrará la próxima vez que utilice el dispositivo IntelliPAP.
Pulse la tecla hacia arriba para salir del menú Activar.
Page 37

controles Del menú De
propieDADes AVAnzADAs
Diseño de menús para el paciente de la serie DV54 AutoAdjust
La siguiente tabla muestra todas las pantallas a las que accederá en cada uno de los modos al
pulsar los botones Siguiente o Anterior del teclado. Pulse el botón Abajo en la pantalla Menú
activar para acceder a este submenú. A continuación, desplácese por las distintas opciones
mediante los botones Siguiente y Anterior. Pulse el botón Arriba para volver al menú
principal. Una vez que haya llegado a la pantalla final, pulse el botón Siguiente para volver a
la primera pantalla.
MENÚ - Modo Auto-ajuste
P:10,0 Auto
Calor:5
MENÚ - Modo CPAP
P:10,0 CPAP
Calor:5
ES
Límite superior
15,0 cmH20
Límite inferior
5,0 cmH20
Tiempo retardo
10 minutos
Longitud tubo
1,8 m (6 pies)
Menú activar
Pulse
Aj. contr. LCD
50%
Contador cumpl.
123456,7 horas
Medidor de horas
123456,7 horas
Versión Firmware
V0.019 05/01/2007
Auto-Encendido
Activado
Auto-Apagado
Activado
Comp. ac. másc.
Activado
Menú Salir
Pulse
Ajustar presión
10,0 cmH20
Tiempo retardo
10 minutos
Presión Retardo
5,0 cmH20
Longitud tubo
1,8 m (6 pies)
Menú activar
Pulse
Aj. contr. LCD
50%
Contador cumpl.
123456,7 horas
Medidor de horas
123456,7 horas
Versión Firmware
V0.019 05/01/2007
Auto-Encendido
Activado
Auto-Apagado
Activado
Comp. ac. másc.
Activado
Menú Salir
Pulse
Número serie
HD123456
SmartCode
FF28D9
Número serie
HD123456
SmartCode
FF28D9
A-DV54
37
Page 38

ES
mensAjes Del pAciente
mensaJes Del PaCienTe
El dispositivo IntelliPAP le advertirá de los posibles problemas que puedan requerir su
intervención para dotar a su terapia de una mayor efectividad. Estos mensajes se muestran
cuando el dispositivo está encendido, ya sea pulsando el botón ON/OFF o respirando con la
mascarilla. Puede pulsar cualquier tecla o botón para borrar el mensaje de la pantalla, aunque
el dispositivo IntelliPAP funcionará de la forma habitual aunque no se borre el mensaje.
Se pueden mostrar dos tipos de mensajes: Recordatorios y Notificaciones.
Recordatorios
Los recordatorios le advierten que debe sustituir piezas de su sistema. Algunos
componentes del sistema se desgastan con el tiempo y, si no se sustituyen, pueden afectar
negativamente a su terapia. Si ve un mensaje en la pantalla que no aparezca a continuación,
es posible que tenga conectado a su dispositivo el módulo opcional SmartLink™ de
DeVilbiss, que muestra mensajes adicionales. Consulte la documentación proporcionada con
el módulo SmartLink.
Limpiar filtro: El filtro se debe revisar cada 10 días para detectar
signos de suciedad o desgaste y poder limpiarlo según sea necesario.
Este mensaje le ayudará a recordar que debe revisarlo
periódicamente.
Notificaciones
Las notificaciones identifican posibles problemas con el dispositivo IntelliPAP que pueden
requerir su intervención o la de su proveedor de servicios de atención sanitaria domiciliaria
para mantener un nivel de efectividad elevado en la terapia. Si ve un mensaje en la pantalla
que no aparezca a continuación, es posible que tenga conectado a su dispositivo el módulo
opcional SmartLink de DeVilbiss, que muestra mensajes adicionales. Consulte la
documentación proporcionada con el módulo SmartLink.
Limpiar filtro
NOTA: Los valores que se muestran son sólo ejemplos de referencia.
Func. Retardo xx min. faltan: Mientras esté activo un retardo de
comodidad, este mensaje parpadeará en la pantalla cada 5 segundos
para informarle del tiempo restante de retardo.
Fuga Máscara: Este mensaje indica que el dispositivo IntelliPAP
ha detectado una cantidad elevada de flujo de aire durante al menos
un 10% del tiempo de terapia en su sesión anterior. Esta notificación
aparece cuando el dispositivo está encendido. Si aparece este mensaje, colóquese la
mascarilla y ajuste las tiras de sujeción para asegurarse de que la mascarilla se adapte
correctamente a su cara. Siga las instrucciones del fabricante de la mascarilla para obtener
una adaptación correcta de la mascarilla y las tiras de sujeción mediante su ajuste. Disponible
en modelos AutoAdjust.
Quitar máscara: Este mensaje aparece cuando se produce un
problema de flujo de aire elevado. Por lo general, obtendrá un flujo
38
A-DV54
Func. Retardo
10 min. faltan
Fuga Máscara = 25%
comp. másc.
Quitar máscara.
Comp.ac. másc
Page 39

en cAso De ViAje/
funcionAmiento con cc
de aire elevado si la mascarilla no está ajustada correctamente o si se ha retirado la
mascarilla. Compruebe si hay una fuga alrededor del borde de la mascarilla y realice los
ajustes necesarios conforme a las instrucciones del fabricante de la mascarilla. Este mensaje
se mostrará hasta que se haya corregido el problema de flujo de aire elevado. Si el problema
de flujo de aire elevado persiste durante aproximadamente 20 segundos, el dispositivo se
apagará automáticamente (si la función Auto-Apagado está activada).
Fallo dis.: Si se muestra un mensaje de error del dispositivo,
consulte las instrucciones de la sección Solución de problemas.
infoRmaCiÓn De inTelliPaP en Caso De ViaJe
Cambios internacionales de potencia eléctrica
Su dispositivo IntelliPAP de DeVilbiss está equipado con un transformador universal. De esta
forma, puede aceptar automáticamente voltajes de entrada de 100 a 240V~ 50/60Hz. No
será necesario realizar ningún ajuste en el dispositivo si viaja a otro país en el que el voltaje
de entrada sea distinto al voltaje de entrada de su país. Sólo tendrá que ponerse en contacto
con su proveedor de servicios de atención sanitaria para obtener información sobre el tipo
de enchufe correcto en la región a la que vaya a viajar (consulte el número de referencia
correcto en la sección Accesorios/Piezas de repuesto).
Altitud
Su dispositivo IntelliPAP compensa automáticamente los cambios de altitud entre el nivel del
mar y 2750 m (9000 pies). No será necesario realizar ajustes relativos a cambios de altitud
en el dispositivo
Fallo dis. E07
Llamar proveedor
ES
fUnCionamienTo De inTelliPaP Con CC
Alimentación de batería
El dispositivo IntelliPAP puede enchufarse a una toma de CC de 12V en una caravana, un
barco u otro vehículo recreativo. La toma de corriente se puede utilizar con un cable
accesorio de CC de 12V o con una batería independiente de CC de 12V. Puede solicitar
cualquiera de estos elementos a su proveedor de servicios de atención sanitaria domiciliaria
(consulte los números de referencia correctos en Accesorios/Piezas de repuesto). Para
utilizar la batería independiente, es necesario disponer de ambos cables accesorios. La
conexión con la batería independiente se realiza mediante unas pinzas que se conectan a los
bornes de la batería.
NOTA: El calentador del sistema de humidificación de IntelliPAP no puede funcionar directamente a través
de una toma de CC de 12V. En caso necesario, puede utilizar el sistema de humidificación
“passover”, que aún se encuentra disponible. También puede convertir la señal de CC en CA
mediante un inversor de corriente que suministre la CA al sistema en lugar de conectar
directamente la toma de CC de 12V a IntelliPAP. De esta forma, funcionará el calentador. El
inversor deberá tener una potencia de salida de al menos 200 vatios @ 110V~ / 400 vatios
@ 220V~.
A-DV54
39
Page 40

ES
NOTA: Si se encuentran disponibles ambas tomas de corriente, el dispositivo IntelliPAP alternará
automáticamente entre la de toma de CA y la toma de CC de 12V. Si la unidad está conectada
tanto a la toma de CA como a la de CC de 12V, funcionará con la toma de CA cuando ésta se
encuentre disponible y pasará automáticamente a la de CC de 12V en caso de que se pierda la
anterior. Cuando se restaure la CA, la unidad volverá a utilizar la toma de CA. No será necesario
que realice ningún tipo de restauración ni ajuste de parámetros cuando se produzcan los cambios
de tomas de corriente, pero recuerde que el calentador no funcionará con CC de 12V.
oxígeno suplementArio
oXÍGeno sUPlemenTaRio
A veces se prescribe el uso de oxígeno suplementario, además de CPAP, para el tratamiento
de la apnea obstructiva del sueño. Si su médico le indica que utilice oxígeno para la terapia
del sueño, podrá añadirlo de dos formas:
1. Solicite el adaptador de oxígeno opcional (número de referencia 7353D-601) a su
proveedor de servicios de atención sanitaria domiciliaria y conéctelo al puerto de salida
del dispositivo IntelliPAP. Conecte un extremo del tubo de suministro de aire al
extremo abierto del adaptador y el otro extremo del tubo a la mascarilla.
2. Si la mascarilla dispone de un puerto de oxígeno, es posible que su médico le pida que
aplique el oxígeno directamente a la mascarilla.
ADVERTENCIA-USO DE OXÍGENO
El oxígeno mantiene la combustión. Para evitar posibles daños físicos, no
fume mientras esté utilizando este dispositivo con oxígeno suplementario.
No utilice este dispositivo cerca de objetos calientes, sustancias volátiles ni
llamas.
Encienda siempre el dispositivo IntelliPAP antes de conectar la fuente de
suministro de oxígeno. Desconecte la fuente de suministro de oxígeno
antes de apagar el dispositivo IntelliPAP.
Este dispositivo no puede utilizarse en presencia de mezclas anestésicas
inflamables con aire, oxígeno u óxido nitroso.
A una velocidad fija de flujo de oxígeno suplementario, la concentración de
oxígeno inhalado variará dependiendo del parámetro de presión, del ritmo
de respiración del paciente, del tipo de mascarilla y del porcentaje de fuga
de la misma. Esta advertencia se aplica a la mayoría de los dispositivos CPAP.
Si no se está utilizando el dispositivo IntelliPAP, no permita nunca que la
fuente de suministro de oxígeno esté en funcionamiento mientras se
encuentre conectada al dispositivo. Si no se está utilizando el dispositivo
IntelliPAP, cierre el suministro de oxígeno.
PRECAUCIÓN: El oxígeno es un gas que se prescribe por orden de un médico y se puede
administrar únicamente bajo la supervisión de éste.
PRECAUCIÓN: El flujo del oxígeno debe ser especificado por el médico.
40
A-DV54
Page 41

Accesorios/
piezAs De repuesto
aCCesoRios/PieZas De RePUesTo
Piezas de repuesto
Filtro de entrada de aire (4/paquete) .....................................................................DV51D-602
Filtro de partículas finas opcional (4/paquete) .......................................................DV51D-603
Tubo de suministro de aire (6 pies (1,8 m) ...............................................................7351D-616
Conector de la fuente de suministro de aire ........................................................DV51D-602
Cubierta de conexión del calentador ....................................................................DV51D-605
Adaptador de oxígeno .............................................................................................7353D-601
Funda para transporte ...........................................................................................DV51D-610
Componentes eléctricos
Cables de CA
EE. UU. ..............................................................................................................DV51D-606
Europa, excepto Reino Unido ..........................................................................DV51D-607
Reino Unido ......................................................................................................DV51D-608
Australia ............................................................................................................DV51D-609
Cable de CC .........................................................................................................DV51D-619
Adaptador de pinza de batería de CC ..................................................................DV51D-696
ES
Mascarillas recomendadas para el dispositivo DeVilbiss IntelliPAP:
Mascarilla FlexSet® de DeVilbiss ................................................................................... 9354D
Mascarilla superficial FlexSet® de DeVilbiss ................................................................... 9354S
Mascarilla de gel FlexSet® de DeVilbiss ........................................................................9354G
Mascarilla superficial de gel FlexSet® de DeVilbiss ......................................................9354GS
Mascarilla FlexAire® de DeVilbiss ................................................................................. 9353D
Mascarilla superficial FlexAire® de DeVilbiss ................................................................. 9353S
Mascarilla Serenity® de DeVilbiss.................................................................................. 9352D
Mascarilla superficial Serenity® de DeVilbiss ................................................................. 9352S
Mascarilla de gel Serenity® de DeVilbiss ....................................................................... 9352G
Mascarilla de gel Serenity® de DeVilbiss ......................................................................9352GS
Humidificador con calentador opcional
Humidificador con calentador DeVilbiss (soporte y cámara) ...................................... DV5HH
A-DV54
41
Page 42

ES
mAntenimiento
manTenimienTo De inTelliPaP
PELIGRO
PELIGRO-Riesgo de descarga eléctrica: No intente abrir ni retirar la
carcasa del dispositivo; no contiene componentes que el usuario pueda
reparar o sustituir. Si necesita reparar el dispositivo, póngase en contacto
con su proveedor de servicios de atención sanitaria domiciliaria para
obtener instrucciones relativas al servicio de mantenimiento del
dispositivo. Si abre el dispositivo o intenta repararlo, la garantía se anulará.
ADVERTENCIA
ADVERTENCIA: Si el dispositivo parece no funcionar con normalidad o
empieza a emitir sonidos inusuales, deje de utilizarlo y póngase en
contacto con su proveedor de servicios de atención sanitaria domiciliaria
para obtener la ayuda necesaria.
ADVERTENCIA: Si el dispositivo ha sufrido una caída, compruebe si
funciona. Si no funciona o tiene dañada la carcasa, deje de utilizarlo y
póngase en contacto con su proveedor.
ADVERTENCIA: Si el dispositivo parece no funcionar correctamente,
consulte la sección Solución de problemas para obtener las instrucciones
necesarias.
Presión correcta: El dispositivo IntelliPAP está diseñado para ofrecer una presión correcta de
fábrica sin necesidad de calibración adicional. El dispositivo no necesita ningún servicio de
mantenimiento rutinario durante un período de uso de 2 años, siempre que se utilice de acuerdo
con las indicaciones del fabricante. El dispositivo se debe inspeccionar transcurridos 2 años.
NOTA: En algunos países, esta clase de dispositivos médicos se deben calibrar y revisar periódicamente.
Para obtener más información, póngase en contacto con su proveedor de servicios de atención
sanitaria domiciliaria.
Filtro de entrada de aire estándar: Compruebe el filtro cada 10 días y límpielo si es
necesario. El filtro debe reemplazarse cada 6 meses (o antes si está dañado). El filtro estándar
está diseñado para filtrar partículas de tamaño superior a 3 micras. El filtro estándar DEBE
estar colocado en el dispositivo IntelliPAP cuando éste se encuentre en funcionamiento.
Filtro de partículas finas opcional: Compruebe el filtro cada 10 días y reemplácelo si está
sucio o dañado. Aunque no llegue a ensuciarse ni recibir ningún daño, el filtro se debe
cambiar cada 30 días. El filtro de partículas finas opcional está diseñado para filtrar partículas
de tamaño superior o igual a 0,3 micras.
Mantenimiento del filtro: Consulte la sección Limpieza para obtener instrucciones al
respecto.
42
A-DV54
Page 43

limpiezA
ES
limPieZa De inTelliPaP
ADVERTENCIA
Para evitar descargas eléctricas, desenchufe siempre el cable de la toma
de corriente de la pared antes de limpiar el dispositivo.
PRECAUCIÓN: No enjuague nunca el dispositivo ni lo sumerja en agua. Nunca permita que
entre ni haya líquido cerca de los puertos, de los interruptores o del filtro de
aire, ya que podrían producirse daños en el equipo. Si ocurre esto, no utilice el
dispositivo. Póngase en contacto con el proveedor de servicios de atención
sanitaria domiciliaria para obtener asistencia técnica.
Caja del dispositivo
1. Desenchufe el dispositivo IntelliPAP de la toma de corriente. Limpie la carcasa con un
paño suave y limpio cada pocos días para que no se acumule en ella el polvo.
2. Deje secar el dispositivo completamente antes de volver a enchufarlo.
Filtros
Filtro de entrada de aire (estándar)
1. El filtro de entrada de aire se debe inspeccionar cada 10 días y limpiar si es necesario.
El filtro se encuentra en la parte posterior del dispositivo.
PRECAUCIÓN: Es importante que se realice una función de filtrado adecuada para que funcione el
dispositivo y para protegerlo de los daños.
2. Para efectuar la limpieza, retire el filtro de espuma exterior sucio del marco.
3. Lave el filtro con una solución de agua tibia y detergente para lavavajillas y enjuague
con agua. Deje que el filtro se seque por completo. Si el filtro (n° de referencia
DV51D-602) estuviera dañado, comuníqueselo a su proveedor de servicios de atención
sanitaria domiciliaria y pídale que lo sustituyan.
4. Asegúrese de que el filtro esté completamente seco antes de instalarlo y utilizarlo.
Filtro de partículas finas (opcional)
1. Si dispone de un filtro de partículas finas opcional (nº de referencia DV51D-603),
inspecciónelo y sustitúyalo si está sucio o dañado. No lo lave.
2. Instale el filtro de partículas finas situado detrás del filtro estándar.
NOTA: Si el filtro de partículas finas no se instala según las indicaciones su duración se verá reducida y
será necesario sustituirlo con más frecuencia.
Tubos
Los tubos de suministro de aire se deben limpiar a diario. Retire los tubos del dispositivo y la
mascarilla. Limpie el interior de los tubos con agua y un detergente suave. Enjuague los
tubos y deje que se sequen al aire.
Mascarilla y tiras de sujeción
Limpie la mascarilla y las tiras de sujeción según las instrucciones del fabricante.
A-DV54
43
Page 44

ES
soluciÓn De problemAs
solUCiÓn De PRoblemas
PELIGRO
Peligro de descargas eléctricas: No extraiga la caja del dispositivo; no hay
componentes internos cuyo mantenimiento o reparación pueda efectuar el
usuario. La caja sólo la deberá extraer un proveedor cualificado de
DeVilbiss.
Si tiene problemas con el funcionamiento del dispositivo IntelliPAP de DeVilbiss, en la tabla
siguiente encontrará una lista de problemas y sus posibles causas y soluciones. Si no puede
resolver el problema siguiendo las instrucciones que se especifican a continuación, póngase
en contacto con su proveedor de servicios de atención sanitaria domiciliaria.
Problema Causa probable Solución
No aparece
nada en la
pantalla.
El dispositivo
IntelliPAP no se
enciende al
respirar en la
máscara.
1. El dispositivo no está
enchufado o el cable no
está completamente
insertado.
2. No hay corriente.
1. La función de encendido
automático está
desactivada.
2. La corriente eléctrica no
llega al dispositivo.
3. La respiración no es lo
bastante profunda para
activar la función de
encendido automático.
4. Está utilizando una
mascarilla facial completa
con una válvula antiasfixia.
5. El conector de la toma de
suministro de aire falta o no
se ha insertado
completamente.
6. La cámara del humidificador
falta o no está
completamente encajada en
el soporte.
1a. Compruebe que el cable de
corriente esté conectado
correctamente al dispositivo
IntelliPAP y a la toma de corriente.
1b. Si está utilizando una toma de
corriente de CC, asegúrese de
que las conexiones del cable se
hayan insertado correctamente.
Compruebe que la batería esté
cargada.
2. Localice una toma de corriente
activa adecuada.
1. Encienda y apague el dispositivo
con el botón ON/OFF.
2. Compruebe que el cable de
corriente esté conectado
correctamente al dispositivo y a la
toma de corriente.
3. Inspire y espire profundamente
para encender el dispositivo
IntelliPAP.
4. Es posible que la función de
encendido no funcione porque el
aire espirado se escape a través de
la válvula abierta. Encienda y
apague el dispositivo con el botón
ON/OFF.
5. Compruebe que el conector de la
toma de suministro de aire esté
completamente insertado en la
unidad.
6. Deslice completamente la cámara
del humidificador en la ranura.
Compruebe que la palanca de
enganche esté bien encajada.
44
A-DV54
Page 45

soluciÓn De problemAs
Problema Causa probable Solución
El flujo de aire
se ha
interrumpido de
forma
inesperada
durante el uso.
La pantalla indica
un error del
dispositivo.
Han reaparecido
síntomas de
AOS.
La piel se le
irrita en la
superficie de
contacto de la
mascarilla.
Sequedad de
nariz o garganta.
Se está
acumulando
condensación de
agua en la
manguera, lo
que produce un
sonido de
gorgoteo.
1. La función de Auto-Apagado
ha detectado un gran flujo
de aire porque la mascarilla
no se ajusta bien.
2. Durante el uso, usted abre
la boca y comienza a
respirar por ella.
Se ha producido un error en el
dispositivo y es necesario
repararlo.
1. El filtro de aire puede estar
obstruido.
2. El estado de la apnea del
sueño ha cambiado.
1. Las tiras de sujeción están
demasiado apretadas o mal
ajustadas.
2. Es posible que la forma o el
tamaño de la máscara no
sean los más adecuados.
Humedad inadecuada. Aumente el valor de configuración
1. El valor de la humidificación
es demasiado alto.
2. La temperatura ambiente
fluctúa de niveles altos a
niveles más bajos a lo largo
de la noche.
1. Compruebe que la mascarilla se
ajuste bien, y ajuste
adecuadamente las tiras de
sujeción y la mascarilla.
2. Solicite una correa para la
mandíbula a su proveedor de
servicios de atención sanitaria
domiciliaria, que le ayudará a evitar
respirar por la boca.
Si las soluciones anteriores no
resuelven el problema, desactive la
función de Auto-Apagado en las
opciones del menú de propiedades
avanzadas.
Póngase en contacto con el
proveedor de servicios de atención
sanitaria domiciliaria para obtener
asistencia técnica.
1. Limpie o sustituya el filtro de aire
y coloque el dispositivo lejos de
cortinas y otras superficies con
polvo.
2. Póngase en contacto con su
médico.
1. Afloje las tiras de sujeción para
reducir la presión de contacto
sobre el rostro.
2. Póngase en contacto con su
médico o proveedor de servicios
de atención sanitaria domiciliaria.
del calentador en el humidificador.
1. Añada un humidificador con
calentador DeVilbiss DV5.
2. Reduzca el valor del calentador del
humidificador y/o aumente la
temperatura de la habitación.
ES
A-DV54
45
Page 46

ES
Problema Causa probable Solución
El aire
procedente del
generador de
flujo parece
demasiado
caliente.
Dolor nasal, de
los senos nasales
o de los oídos,
con posible
congestión nasal.
1. Los filtros de aire están
sucios.
2. El puerto de entrada de
aire está bloqueado.
3. La temperatura ambiente
es demasiado alta.
4. El dispositivo IntelliPAP se
encuentra cerca de una
fuente de calor.
Es posible que tenga una
reacción a la presión del flujo
de aire.
especificAciones
1. Consulte la sección de limpieza
para obtener información sobre el
mantenimiento del filtro.
2. Desbloquee la entrada de aire.
3. Reduzca la temperatura ambiente.
4. Coloque el dispositivo lejos de la
fuente de calor de modo que el
aire que penetre en el dispositivo
se encuentre a temperatura
ambiente.
Si el problema persiste, póngase en
contacto con su proveedor de
servicios de atención sanitaria
domiciliaria.
No siga utilizando el dispositivo y
póngase en contacto con su médico.
esPeCifiCaCiones
Dimensiones ......10,7 cm (4,2”) de alto x 16,5 cm (6,5”) de ancho x 17,5 cm (6.9”) de largo
Peso ...............................................................................................................1,22 kg. (2,7 lbs.)
Requisitos eléctricos ..............................................................................100-240V~, 50/60 Hz
Consumo máximo de energía .................................Máximo de 65 vatios de una toma de CA
(sólo generador de flujo)
Rango de presión de dispositivo AutoAdjust CPAP ............................................ 3-20 cmH2O
Rango de temperatura de funcionamiento ........................Entre 5 °C (41 °F) y 40 °C (104 °F)
Rango de humedad de funcionamiento ..................Entre 0% y 95% de HR sin condensación
Condiciones atmosféricas de funcionamiento .......................Desde el nivel del mar hasta una
altura de 2.743 m (9.000 pies)
Rango de temperatura para almacenamiento y transporte ..................Entre -40 °C (-104 °F)
y +70 °C y (+158 °F)
Rango de humedad para transporte y almacenamiento .....................Entre 0% y 95% de HR
sin condensación
Presión máxima limitada.................................. 20 cmH2O bajo condiciones normales de uso
Nivel de sonido (comprobación según ISO 17510) ..................................................... 26 dBA
Especificaciones de filtrado
Filtro estándar > partículas de 3,0 micras
Filtro opcional de partículas finas > partículas de 0,3 micras
46
A-DV54
Page 47

especificAciones
ES
Cantidades de flujo máximo
83 l/m ................................................................................a 6,5 cmH2O (1/3 de presión máx.)
134 l/m ...............................................................................a 13 cmH2O (2/3 de presión máx.)
163 l/m .......................................................................................... a 20 cmH2O (presión máx.)
Precisión de presión ............................................................................................ ± 1,0 cmH2O
Variabilidad de la presión
(en cmH2O de pico a pico con un volumen tidal de 500 mL, perfil de onda sinusoidal)
Respiraciones por minuto 10 15 20
a 6,5 cmH2O 0,5 0,6 0,9
a 13 cmH2O 1,0 1,0 1,2
a 20 cmH2O 1,0 1,0 1,2
Garantía .................................................................................................... Limitada a tres años
Clasificación del equipo respecto a protección contra descargas eléctricas ................Clase II
Grado de protección contra descargas eléctricas ............................ Pieza aplicada de tipo BF
Grado de protección contra la entrada de líquidos ......................................................... IPX1
Este equipo no resulta adecuado para su uso en presencia de una mezcla anestésica inflamable con aire, oxígeno u óxido nitroso.
Modo de funcionamiento ...........................................................................................Continuo
Especificaciones clínicas para salidas digitales
Presión de la mascarilla ............................................................... Entre 0 y 25,5 cmH2O ± 0,5
Flujo del paciente ..............................................................Entre -127 y +127 l/min ± 10 l/min
Flujo de fuga ...........................................................................Entre 0 y +127 l/min ± 10 l/min
Volumen tidal estimado .................................................................................Entre 0 y 1023 mL
NOTA: El volumen tidal es una estimación. Sólo se especifica como orientación.
A-DV54
47
Page 48

ES
gArAntiA
GaRanTÍa
Todos los dispositivos DeVilbiss IntelliPAP están garantizados frente a cualquier defecto de
mano de obra o de material por un período de tres años a partir de la fecha de compra.
Cualquier pieza defectuosa se reparará o sustituirá conforme a la decisión de DeVilbiss si el
dispositivo no ha sido forzado ni se ha utilizado de forma inadecuada durante dicho período.
Asegúrese de que el funcionamiento incorrecto del dispositivo no se deba a una limpieza
inadecuada ni al incumplimiento de las instrucciones. Si necesita reparar el dispositivo,
póngase en contacto con el proveedor de DeVilbiss o con el departamento de atención al
cliente de DeVilbiss y solicite instrucciones:
EE.UU. 800-338-1988, 814-443-4881
Canadá 800-263-3390
Europa 44-138-444-6688.
NOTA: Esta garantía no cubre el préstamo de otro dispositivo, ni la compensación de los costes en que se
incurra por el alquiler de otro dispositivo mientras el suyo se esté reparando, ni los costes de mano
de obra derivados de la reparación o la sustitución de las piezas defectuosas.
NO EXISTE NINGUNA OTRA GARANTÍA EXPRESA. LAS GARANTÍAS IMPLÍCITAS,
INCLUYENDO LAS DE COMERCIABILIDAD Y ADECUACIÓN A UN FIN CONCRETO,
ESTÁN LIMITADAS A LA DURACIÓN DE LA GARANTÍA LIMITADA EXPRESA Y, EN LA
MEDIDA EN QUE LA LEY LO PERMITA, TODAS Y CADA UNA DE LAS GARANTÍAS
IMPLÍCITAS QUEDAN EXCLUIDAS. ÉSTA ES LA ÚNICA GARANTÍA EXISTENTE Y LA
ÚNICA RESPONSABILIDAD QUE SE ASUMIRÁ POR DAÑOS CONSECUENTES O
INCIDENTALES. TODAS LAS GARANTÍAS QUEDAN EXCLUIDAS EN LA MEDIDA EN
QUE LA LEY LO PERMITA. ALGUNOS ESTADOS NO PERMITEN LIMITACIONES EN LA
DURACIÓN DE LA GARANTÍA IMPLÍCITA, NI LA LIMITACIÓN O EXCLUSIÓN DE
DAÑOS CONSECUENTES O INCIDENTALES, POR LO QUE ES POSIBLE QUE NO SE
LE APLIQUE LA LIMITACIÓN O EXCLUSIÓN ANTERIOR.
Esta garantía le otorga derechos legales específicos. Puede disponer también de otros
derechos según la legislación local.
48
A-DV54
Page 49

tAble Des mAtières
FR
Table Des maTièRes
Explication des symboles ..............................................................................................50
Mises en garde importantes .........................................................................................50
Introduction ..................................................................................................................52
Usage préconisé/Indications thérapeutiques .........................................................52
Contre-indications .................................................................................................52
Qu’est-ce que l’apnée obstructive du sommeil (AOS) ? .......................................52
Mode de fonctionnement d’un traitement par CPAP/PPC ...................................53
Acclimatation au traitement ..................................................................................54
Avantages du traitement .......................................................................................54
Ressources importantes ........................................................................................55
Caractéristiques principales .........................................................................................56
Déballage de l’appareil ..........................................................................................56
Appareil IntelliPAP .................................................................................................56
Clavier ...................................................................................................................56
Assemblage du système ...............................................................................................57
Clavier et Affichage ......................................................................................................57
Fonctionnement ...........................................................................................................58
Démarrage ............................................................................................................58
Utilisation de la fonction de délai confort (« Comfort Delay »)............................58
Arrêt ......................................................................................................................59
Utilisation du menu détaillé ..........................................................................................59
Liste du menu détaillé ...........................................................................................60
Liste du menu d’activation des fonctions de l’appareil IntelliPAP .........................61
Menu patient en mode AutoAdjust .......................................................................62
Menu patient en mode CPAP/PPC .......................................................................62
Messages pour le Patient ..............................................................................................63
Rappels ..................................................................................................................63
Notifications ..........................................................................................................63
Informations sur l’utilisation de l’appareil IntelliPAP en voyage ...................................64
Mode de fonctionnement de l’appareil IntelliPAP en courant continu ........................64
Puissance nominale de la batterie .........................................................................64
Oxygène d’appoint .......................................................................................................65
Accessoires et pièces de rechange ...............................................................................66
Entretien .......................................................................................................................67
Nettoyage .....................................................................................................................68
Dépannage....................................................................................................................69
Caractéristiques techniques .........................................................................................72
Garantie ........................................................................................................................74
A-DV54
49
Page 50

explicAtion Des symboles/
FR
eXPliCaTion Des symboles
Protection électrique de classe II Équipement – pièce appliquée de type
BF double isolation
Données d’entrée/Données de sortie Mode veille – Mise sous tension ou
Option suivante sur écran LCD
Option précédente sur écran LCD
Attention – Lisez attentivement Joints relatifs à l’humidification chauffante
les document
Tension d’entrée CC. : 12 VCC, la Tension/fréquence d’entrée (isolée) :
borne positive se trouve au centre 100 – 240 V c.a., 50/60 Hz
Bloqué Débloqué
Norme IPX1 - Appareil protégé contre les chutes verticales de gouttes d’eau
Fonction Délai –Démarre le cycle Délai en mode CPAP/PPC, si prescrit
Cet appareil contient du matériel électrique et/ou électronique qui doit être recyclé
conformément à la Directive 2002/96/CE – Déchets d’équipements électriques et
électroniques (DEEE).
mises en gArDe importAntes
hors tension du ventilateurf
Permet d’augmenter la valeur de réglage
affichée sur l’écran LCD
Permet de diminuer la valeur de réglage
affichée sur l’écran LCD
– diminue la pression jusqu’à la limite de réglage sélectionnée en mode
AutoAdjust
MISES EN GARDE IMPORTANTES
Respectez toujours des précautions de base lorsque vous utilisez un appareil
électrique. Veuillez lire toutes les instructions attentivement avant d’utiliser cet
appareil. Ce manuel contient des termes qui ont pour but d’attirer votre attention
sur des informations importantes.
DANGER Consignes de sécurité extrêmement importantes concernant un danger
entraînant des blessures graves, voire mortelles.
AVERTISSEMENT Consignes de sécurité importantes concernant un danger pouvant
entraîner des blessures graves.
ATTENTION Informations visant à éviter l’endommagement de l’appareil.
REMARQUE Informations auxquelles il convient de prêter une attention particulière.
VeUilleZ liRe ToUTes les insTRUCTions
aTTenTiVemenT aVanT D’UTiliseR CeT aPPaReil
CONSERVEZ CES INSTRUCTIONS
50
A-DV54
Page 51
mises en gArDe importAntes
FR
DANGER
Danger de décharge électrique – N’utilisez pas cet appareil en vous
baignant.
Danger de décharge électrique – N’immergez jamais cet appareil dans
l’eau ou dans tout autre liquide
Danger de décharge électrique – N’essayez jamais d’ouvrir ou de retirer le
boîtier. Cet appareil ne contient aucun composant interne réparable par
l’utilisateur. Contactez votre prestataire de soins à domicile pour toute
réparation de l’appareil. Toute ouverture ou altération de l’appareil annule
la garantie.
AVERTISSEMENT
Utilisez toujours l’appareil IntelliPAP™ de DeVilbiss uniquement avec les
masques recommandés par DeVilbiss, votre médecin ou votre
respirothérapeute.
Afin d’éviter la réinhalation de l’air expiré, ne portez le masque CPAP/PPC
que si l’appareil est sous tension et délivre de l’air. N’obstruez jamais les
orifices de ventilation du masque. Lorsque l’appareil est sous tension et
délivre de l’air frais, l’air expiré est expulsé par les orifices de ventilation
du masque. Toutefois, si l’appareil est hors tension, une réinhalation de
l’air expiré peut se produire. Si la réinhalation de l’air expiré dure plus que
quelques minutes, elle peut dans certains cas entraîner une asphyxie. Cet
avertissement s’applique à la plupart des modèles d’appareils CPAP/PPC.
L’appareil IntelliPAP de DeVilbiss n’est pas un appareil de survie. Son
fonctionnement peut être interrompu en cas de panne ou de coupure de
l’alimentation. Son usage est préconisé pour des personnes respirant
spontanément et pesant plus de 30 kg (66 lb).
Pour éviter toute décharge électrique, débranchez toujours l’appareil de
la prise murale avant de le nettoyer.
N’utilisez que les accessoires recommandés par DeVilbiss.
ATTENTION– Le connecteur rond du port de transmission des données situé à l’arrière de
l’appareil IntelliPAP est utilisé pour fixer les accessoires. Le connecteur ne doit
être utilisé qu’avec les accessoires agréés par DeVilbiss. N’essayez jamais de
fixer un autre appareil sur ce connecteur, cela pourrait endommager l’appareil
CPAP/PPC ou ses accessoires.
ATTENTION– Ne rincez jamais l’appareil et ne le mettez jamais dans l’eau. Ne laissez jamais
de liquide pénétrer dans l’appareil ou près des ports d’entrée-sortie,
interrupteurs ou filtre à air, car cela endommagerait l’appareil. Si de l’eau
pénètre dans l’appareil, arrêtez-le et débranchez-le. Laissez sécher l’appareil
complètement avant toute utilisation.
A-DV54
51
Page 52

FR
ATTENTION– Placez toujours l’appareil IntelliPAP dans un endroit où il ne peut pas être
renversé et où le câble d’alimentation ne ne risque pas de faire trébucher qui
que ce soit.
ATTENTION– Le système d’humidification chaude des modèles de séries DV5 de DeVilbiss
est le seul système recommandé pour une utilisation avec l’appareil IntelliPAP.
L’utilisation de tout autre système d’humidification peut empêcher l’appareil de
détecter le ronflement et causer un niveau de pression inadéquat dans le
masque.
ATTENTION– L’oxygène est un gaz fourni sur ordonnance seulement et qui ne doit être
administré que sous la surveillance d’un médecin.
introDuction
inTRoDUCTion
Usage préconisé/Indications thérapeutiques
Le modèle DV5 Series de l’appareil IntelliPAP™ de DeVilbiss® est préconisé pour un
traitement des patients adultes (pesant au moins 30 kg et plus) souffrant d’apnée
obstructive du sommeil.
Contre-indications
N’utilisez pas l’appareil IntelliPAP si vos voies aériennes supérieures sont court-circuitées.
REMARQUE– Une sécheresse nasale, buccale ou de la gorge sont des effets secondaires fréquents lors
d’un traitement par ventilation spontanée en pression positive continue. Ces effets
secondaires se produisent particulièrement dans les climats secs et durant l’hiver lorsque le
niveau d’humidité de l’air ambiant est généralement inférieur à la normale. L’appareil
IntelliPAP peut être utilisé avec un système d’humidification en option afin de pallier ces
effets secondaires.
Qu’est-ce que l’apnée obstructive du sommeil (AOS) ?
L’apnée obstructive du sommeil (AOS) est un trouble respiratoire qui touche plus de 22
millions d’Américains – environ 4 % des hommes d’âge moyen et 2 % des femmes d’âge
moyen.
Plusieurs facteurs anatomiques peuvent contribuer individuellement ou en combinaison à
l’AOS, notamment la taille des amygdales, la forme du nez ou le rétrécissement des voies
aériennes supérieures. Pendant le sommeil, se produit un relâchement musculaire qui
entraîne un affaissement et un blocage des voies respiratoires. Ce relâchement provoque la
vibration des tissus de l’arrière-gorge et déclenche le ronflement. Lorsque l’affaissement est
complet, se produit un blocage des voies respiratoires et des pauses respiratoires. (apnée
vient du mot grec « apnea » qui signifie « cesser de respirer »
Les pauses respiratoires se reproduisent pendant la nuit et peuvent durer de quelques
secondes à plus d’une minute. Lorsque le taux d’oxygène dans le sang chute à des niveaux
dangereux, le système nerveux central déclenche des réveils en sursaut, empêchant le
maintien du sommeil profond et réparateur dont notre corps a besoin. Ces événements
nocturnes entraînent fréquemment une fatigue diurne, ainsi qu’une tension et une irritabilité
52
A-DV54
Page 53

introDuction
– pouvant affecter les prises de décision d’une personne et créer des conditions
potentiellement dangereuses, notamment en conduisant ou en travaillant.
FR
Palais mou
Voile du
palais
Pharynx
Voies respiratoires sans blocage
Cavité nasale
Épiglotte
Palais dur
Langue
Palais mou
Voile du
palais
Pharynx
Pendant un événément apnéique le palais mou
s’affaisse, bloquant les voies respiratoires
Cavité nasale
Palais dur
Langue
Épiglotte
Les répercussions de l’apnée obstructive du sommeil sur la santé sont également
importantes. L’AOS prive le cœur, le cerveau, et les organes vitaux d’une oxygénation
continue. À la longue, cette privation d’oxygène est susceptible d’avoir des répercussions
graves sur la santé, qui se manifestent par exemple par des troubles de la mémoire,
l’impuissance, l’hypertension, des maladies coronariennes et des accidents vasculaires
cérébraux et des infarctus. Des recherches récentes indiquent que l’AOS comporte les
mêmes facteurs de risques de cardiopathies que les risques issus de la consommation de
tabac, d’alcool et d’un taux de cholestérol élevé. Il est estimé que 38 000 personnes
meurent chaque année des effets secondaires provoqués de l’AOS.
L’AOS est un trouble grave qui doit être surveillé et traité.
Mode de fonctionnement d’un traitement par ventilation
spontanée en pression positive continue (CPAP/PPC)
Il existe plusieurs traitements de l’AOS, notamment des traitements chirurgicaux, et le
traitement par ventilation spontanée en pression positive continue (CPAP/PPC). Le
traitement par CPAP/PPC s’avère très efficace chez la plupart des patients. PPC (de l’anglais
CPAP) est l’abréviation de ‘pression positive continue’. L’appareil IntelliPAP de DeVilbiss est
conçu précisément pour administrer une pression positive continue dans les voies aériennes
supérieures en agissant comme une « attelle pneumatique » qui sert à maintenir les voies
respiratoires ouvertes pendant le sommeil.
Le traitement réduit ou diminue tout blocage, et induit le sommeil profond, réparateur et
ininterrompu dont nous avons besoin. Le traitement répond avant tout aux besoins de
repos et d’oxygénation du corps, procurant ainsi un sommeil profond et ininterrompu, et
réduisant les risques graves liés à l’AOS. L’appareil IntelliPAP est conçu pour administrer un
traitement silencieux et confortable qui permet à l’utilisateur de dormir toute la nuit sans
interruption.
Le système AutoAdjust® de l’appareil IntelliPAP de DeVilbiss règle automatiquement la
pression d’air nécessaire en mesurant le ronflement et les cycles respiratoires de
l’utilisateur, et la modifie en fonction de ses besoins. Les données sur les cycles respiratoires
A-DV54
53
Page 54

FR
sont analysées et enregistrées en continu, et servent à modifier le réglage du niveau de
pression en conséquence.
Le niveau de pression peut être réglé pour atteindre jusqu’à 10 cmH2O en 10 minutes. Le
changement du niveau de pression est progressif pour ne pas perturber le sommeil de
l’utilisateur, mais suffisamment rapide pour répondre à ses besoins. Si aucun événement
respiratoire ne se produit, la pression est réduite pour assurer un confort maximal. La
fonction AutoAdjust de l’appareil IntelliPAP peut également être réglée pour un mode de
fonctionnement par CPAP/PPC sans la fonction de réglage automatique décrite
précédemment, donnant ainsi au médecin traitant une souplesse maximale pour adapter le
traitement aux troubles particuliers du sommeil de l’utilisateur.
introDuction
Acclimatation au traitement
Tout produit/traitement nouveau– notamment le traitement par CPAP/PPC - demande une
certaine période d’acclimatation. Le port d’un masque buccal ou nasal (parfois combiné)
peut susciter au début du traitement une sensation de claustrophobie ou d’anxiété. L’air
délivré par l’appareil IntelliPAP peut susciter une certaine gêne et préoccuper l’utilisateur.
Ces sensations sont de courte durée – au début d’un traitement à long terme chaque
utilisateur d’un appareil de traitement par CPAP/PPC éprouve de telles sensations, finit par
les surmonter, puis par apprécier pleinement les avantages d’un tel traitement.
Suivez les étapes indiquées ci-dessous pour vous habituer progressivement au traitement et
surmonter toute anxiété.
1. Fixez le masque sur l’appareil de traitement par CPAP/PPC et mettez l’appareil en
marche. Prenez le temps de vous habituer à respirer en portant le masque pendant une
heure alors que vous regardez la télévision, lisez ou exercez une activité en position
assise.
2. Si vous faites la sieste, profitez-en pour utiliser l’appareil de traitement par CPAP/PPC.
3. Commencez par utiliser l’appareil de traitement par CPAP/PPC au moins pendant les 3
ou 4 premières heures de sommeil.
4. Utilisez l’appareil de traitement par CPAP/PPC pendant toute une nuit.
Suivez chacune des ces étapes dans l’ordre; lorsque vous ne ressentez plus d’anxiété lors
d’une étape, passez aussitôt à l’étape suivante.
Avantages du traitement
En utilisant l’appareil IntelliPAP de DeVilbiss pour votre traitement, vous êtes sur la bonne
voie pour améliorer votre santé et la qualité de votre vie, bénéficier d’un sommeil
ininterrompu et éliminer les risques liés à l’AOS. Lorsque vous vous serez habitué(e) au
traitement par CPAP/PPC, vous serez sans doute surpris(e) par le bien-être physique et
émotionnel que vous ressentirez. Le traitement par CPAP/PPC vous permettra enfin de
faire l’expérience du sommeil profond et réparateur qui vous manquait. De nombreux
patients notent une amélioration de leur vitalité et de leur concentration quotidienne. Avec
un traitement efficace, vous serez moins tendu(e), moins irrité(e) et retrouverez une
perspective optimiste et saine. En fait, vous regretterez probablement de ne pas avoir pu
bénéficier de l’appareil IntelliPAP plus tôt !
54
A-DV54
Page 55

introDuction
FR
Ressources utiles
Alors que vous commencez à utiliser votre appareil de traitement IntelliPAP, n’oubliez pas
que vous n’êtes pas seul(e) ! Vous appartenez à un réseau important et en expansion
d’utilisateurs d’appareils de traitement par CPAP/PPC. De nombreuses ressources sont à
votre disposition pour répondre à toute question et tout problème, et vous permettre de
bénéficier d’un traitement aussi efficace et facile que possible.
American Academy of Sleep Medicine
One Westbrook Corporate Ctr, Ste 920
Westchester IL 60154
Téléphone : (708) 492-0390
Fax : (708) 492-0943
www.aasmnet.org
American College of Chest Physicians
3300 Dundee Rd
Northbrook, IL 60062-2348
Téléphone : (847) 498-1400 ou (800) 343-2227
Fax : (847) 498-5460
www.chestnet.org
The Sleep Apnoea Trust
12a Bakers Piece,
Kingston Blount
Oxon.
OX39 4SW
Tel: +44 845 60 60 685
www.sleepapnoea-trust.org
National Heart, Lung & Blood Institute
Information Center
P.O. Box 30105
Bethesda, MD 20824-0105
Téléphone : (301) 592-8573
Fax: (240) 629-3246 www.nhlbi.nih.gov
American Academy of Neurology
1080 Montreal Avenue
St. Paul, Minnesota 55116
Téléphone : (651) 695-2717 ou (800) 879-1960
Fax: (651) 695-2791
www.aan.com
American Sleep Apnea Association
1424 K Street NW, Suite 302
Washington, DC 20005
Téléphone : (202) 293-3650
Fax: (202) 293-3656 w
ww.sleepapnea.org
National Center on Sleep Disorder Research
National Heart Lung & Blood Institute (NIH)
6701 Rockledge Drive
Bethesda, MD 20892
Téléphone : (301) 435-0199
Fax: (301) 480-3451
www.nhlbi.nih.gov/sleep
National Sleep Foundation
1522 K Street, NW, Suite 500
Washington, DC 20005
Téléphone : (202) 347-3471
Fax: (202) 347-3472
www.sleepfoundation.org
A-DV54
55
Page 56

cArActÉristiQues
FR
CaRaCTÉRisTiQUes PRinCiPales
Déballage de l’appareil
Le système IntelliPAP de DeVilbiss est livré avec les éléments suivants :
1. Appareil IntelliPAP 5. Tube d’alimentation en air
2. Lot de filtres de rechange 6. Manuel de l’utilisateur
3. Câble d’alimentation CA 7. DVD
4. Sac de transport
Veuillez contacter votre prestataire de soins à domicile s’il vous manque un ou plusieurs des
éléments indiqués ci-dessus.
REMARQUE- Si un humidificateur vous a été livré avec votre système IntelliPAP, veuillez vous reporter au
guide d’instructions de l’humidificateur pour toute information supplémentaire.
principAles
Appareil IntelliPAP de DeVilbiss
(Figure A and B)
1. Clavier/Écran de commandes LCD (Figure C)
2. Entrée d’air à l’arrière
3. Entrée d’air en bas (pour humidificateur en option)
4. Prise d’entrée d’air
5. Connecteur d’alimentation du réchauffeur
(pour humidificateur en option)
6. Connecteur d’alimentation CA
7. Connecteur d’alimentation CC
8. Port de transmission des données
9. Câble d’alimentation (compatible
pour prise murale) (non illustré)
10. Entrée du filtre à air
Clavier (Figure C)
1. Marche/arrêt
2. Option précédente
3. Option suivante
4. Fonction Delai
5. Permet de diminuer la valeur de réglage
6. Permet d’augmenter la valeur de réglage
7. Voyant DEL de marche du réchauffeur
(pour humidificateur en option)
Contactez votre prestataire de soins à domicile pour toute
information sur les masques, le matériel, et les accessoires
DeVilbiss disponibles.
56
A-DV54
A
6
10
B
C
2
1
8
7
5
6
2
4
3
3
4
5
7
Page 57

AssemblAge Du système
FR
assemblaGe DU sysTème sans HUmiDifiCaTeUR
REMARQUE– Si votre système inclut un humidificateur, veuillez vous reporter à son mode d’emploi sur
l’assemblage et le fonctionnement.
1. Repérez l’entrée d’air et le connecteur pour réchauffeur situé en bas de l’appareil
IntelliPAP. Vérifiez que tous les orifices sont protégés par le couvercle de protection
souple approprié.
2. Placez l’appareil IntelliPAP sur une surface stable, une table de nuit ou une table par
exemple. Si vous placez l’appareil sur le sol près du lit, assurez-vous qu’on ne peut pas
le renverser ou marcher dessus. Assurez-vous que l’entrée d’air à l’arrière de l’appareil
n’est pas obstruée, par exemple par des rideaux ou la literie.
REMARQUE– Ne placez jamais l’appareil IntelliPAP en fonctionnement sur une surface molle, par exemple
un lit ou un fauteuil.
ATTENTION– Le système IntelliPAP doit toujours se trouver à un niveau inférieur à celui du masque lors
de l’utilisation d’un humidificateur afin d’empêcher l'eau de pénétrer dans le masque CPAP.
3. Insérez le câble d’alimentation à l’arrière de l’appareil. Veillez à insérer complètement
une extrémité du câble d’alimentation dans le connecteur. Branchez l’autre extrémité
du câble d’alimentation sur une prise murale CA.
4. Fixez le tube d’alimentation en air sur l’interface d’alimentation en air située à l’arrière
de l’appareil.
5. Préparez le masque (fourni par votre prestataire de soins à domicile) conformément au
guide d’instructions sur le masque.
6. Connectez le tube d’alimentation en air au masque.
REMARQUE– Le tube d’alimentation en air fourni avec l’appareil est spécialement conçu pour ne pas
s’enrouler et pour permettre un débit d’air régulier. Utilisez uniquement le tube de 22 mm
de diamètre, à parois lisses résistant à l’enroulement fourni avec cet appareil ou un tube
recommandé par votre prestataire de soins à domicile.
Clavier et Affichage
Touches de commandes de base de l’appareil de DeVilbiss IntelliPAP
Nom Symbole Fonction
ON/OFF La touche ON/OFF (marche/arrêt) permet d’activer ou d’arrêter
HEATER
DELAY La touche Delay active la fonction de délai confort. Cette fonction
REMARQUE– Les autres touches du panneau de commande de l’appareil IntelliPAP permettent d’afficher
des commandes détaillées de réglage spécifique. Veuillez vous reporter à la section
Utilisation du menu détaillé à la page 61 pour toute information complémentaire.
le débit d’air délivré par l’appareil.
Si votre appareil IntelliPAP est doté d’un humidificateur/réchauffeur
intégré, ces touches servent au réglage du réchauffeur. Elles
permettent d’augmenter la valeur de réglage pour obtenir plus
d’humidification et de la diminuer pour moins d’humidification.
n’est disponible que si elle est activée. Pour régler les paramètres de
la fonction de délai, veuillez vous reportez à la section Utilisation de
la fonction de délai confort (« Comfort Delay ») à la page 60.
A-DV54
57
Page 58

FR
moDe De fonctionnement
moDe De fonCTionnemenT
Démarrage
Avant de commencer le traitement, vérifiez que l’appareil
IntelliPAP est sous tension. Lorsque que l’appareil est branché,
l’affichage LCD apparaît comme indiqué.
Mettez votre masque de traitement par CPAP/PPC et appuyez sur la touche ON/OFF du
clavier pour activer le débit d’air OU respirez profondément plusieurs fois dans le masque
pour activer le débit d’air automatiquement. La pression dans le masque augmente jusqu’à la
pression de réglage en une dizaine de secondes.
REMARQUE– Si l’appareil ne démarre pas automatiquement après 2 ou 3 inspirations, cette fonction a
été probablement désactivée. Si la fonction Auto ON/OFF est désactivée, appuyez sur la
touche ON/OFF pour démarrer ou arrêter l’appareil
La mesure de la pression réelle dans le masque s’affiche lorsque
l’appareil est utilisé. Cette mesure, correspondant à la pression
réelle dans le masque, peut varier légèrement lorsque vous
respirez. La mesure de la pression s’affiche comme indiqué.
Si le système IntelliPAP de DeVilbiss est équipé d’un
humidificateur, les touches de commande du réchauffeur et l’état
du réchauffeur s’affichent comme indiqué.
P:10.0 Auto
P:10.0 Auto
Arrêt
Chauff : arrêt
REMARQUE– Si l’affichage de l’appareil diffère de l’affichage ci-dessus, reportez-vous à la section
Messages Patient à la page 65.
Utilisation de la fonction de délai confort
L’appareil IntelliPAP est doté d’une fonction de délai confort pour vous permettre de vous
endormir plus facilement. L’appareil augmente progressivement la pression en passant d’une
pression basse à la pression prescrite pour le traitement pendant les dernières minutes de la
durée de délai sélectionnée.
REMARQUE– Lorsque la fonction de délai confort est activée, un message s’affiche périodiquement pour
indiquer la durée de délai restante.
Ajustez la durée de délai confort au moyen des touches de
commande avancée de l’appareil. La durée peut être réglée de 0 à
45 minutes par incréments de 5 minutes. Reportez-vous à la page
65 pour des informations détaillées.
REMARQUE– Si le réglage de la durée de délai ne peut pas être modifié, c’est que cette fonction a été
La fonction de délai confort est disponible sur les modèles IntelliPAP Standard et IntelliPAP
AutoAdjust, et pour tous les modes de fonctionnement.
58
verrouillée par votre prestataire de soins. Reportez-vous au guide sur le menu du clavier à la
page 62 pour des informations détaillées.
A-DV54
Rampe en cours
10 min de plus
Page 59

utilisAtion Du menu DÉtAillÉ
FR
Fonction de délai confort en mode de
fonctionnement par CPAP/ PPC standard
Lorsque vous utilisez la fonction de délai confort en mode de fonctionnement par CPAP/
PPC, la pression du débit d’air au début du traitement est temporairement ramenée à la
pression sélectionnée par votre médecin au moment du réglage de l’appareil.
Appuyez sur la touche de délai pour activer la fonction de délai confort. La pression du débit
d'air tombe au niveau de la pression de réglage de la fonction « délai confort ».
Pendant les dix dernières minutes de la durée de délai, la pression augmente progressivement
pour passer à la pression de traitement prescrite. La fonction de délai peut être réinitialisée
en appuyant de nouveau sur la touche Delay si vous ne vous vous êtes pas endormi(e).
Fonction de délai confort en mode AutoAdjust
Si vous utilisez la fonction de délai confort lorsque l’appareil IntelliPAP fonctionne en mode
AutoAdjust, la pression du débit d’air au début du traitement est ramenée à la pression la
plus basse sélectionnée par votre médecin au moment du réglage de l’appareil.
La fonction de délai confort s’active automatiquement. La pression du débit d’air n’augmente
que jusqu’au niveau de pression basse sélectionnée et s’y maintient jusqu’à la fin de la durée
de délai. La fonction AutoAdjust ne règle pas la pression pendant la durée de délai confort,
vous permettant ainsi de vous endormir sans réponse aux événements respiratoires en
début de traitement.
Arrêt du traitement
Appuyez sur la touche ON/OFF pour arrêter l’appareil. Vous pouvez également arrêter le
traitement en retirant simplement votre masque. Au bout de quelques secondes le message
« Pb masque. Vérif. taille » s’affiche. Si vous ne remettez pas le masque, l’appareil s’arrête
automatiquement au bout de 20 secondes. Appuyez sur n’importe quelle touche pour
effacer le message.
REMARQUE– Si l’appareil IntelliPAP de DeVilbiss ne s’arrête pas automatiquement, cette fonction a été
probablement désactivée. Si la fonction est désactivée, arrêtez l'appareil manuellement.
UTilisaTion DU menU DÉTaillÉ
Mettez l’appareil en marche, appuyez sur les touches Next (suivant) ou Previous (précédent)
du clavier pour naviguer dans le menu d’affichage. Selon les modèles d’appareils, certaines
fonctions indiquées dans le tableau ci-dessous ne sont pas disponibles. Certaines fonctions
sont en option et d’autres dépendent de sélections faites par votre médecin ou prestataire
de soins à domicile. Le tableau ci-dessous montre les touches du clavier et indique leurs
fonctions. Certaines fonctions ne sont disponibles qu’avec le mode AutoAdjust ou le module
de gestion de traitement SmartLinkTM de DeVilbiss, et sont indiquées dans la colonne Mode.
Si votre modèle d’appareil ou sa configuration ne supporte pas certaines fonctions, ces
dernières ne s’affichent pas.
A-DV54
59
Page 60

FR
Nom : Symbole Fonction
PREVIOUS ITEM (OPTION
PRÉCÉDENTE)
NEXT ITEM
(OPTION SUIVANTE)
SETTING CHANGE
(MODIFIER LE RÉGLAGE)
utilisAtion Du menu DÉtAillÉ
Appuyez sur cette touche pour afficher les options du
menu précédent.
Appuyez sur cette touche pour afficher les options du
menu suivant.
Ces touches permettent de modifier les valeurs de
réglage affichées.
Notez que les valeurs illustrées ne sont données qu’à titre d’exemple.
Menu détaillé
Exemple d’affichage
P:10.0 Auto
Chauff :Arrêt
Limite Sup.
15,0 cmH20
Limite Inf.
5 cm H2O
Régl. Pression
10,0 cmH20
Durée : rampe
45 minutes
Pression rampe
5 cm H2O
Long. de tube
1,8 m (6 pi)
Activer Menu
Appuyez sur
Mode
Tous
Mode
AutoAdjust
Mode
AutoAdjust
Mode CPAP/
PPC
Tous
Mode CPAP/
PPC
Tous
Tous
Description
Cet écran s’affiche par défaut lorsque l’appareil
IntelliPAP est mis en marche. La pression réelle dans
le masque et l’état du réchauffeur s’affichent. La
mesure de pression affichée peut varier légèrement
avec la respiration. Si le système de réchauffage n’est
pas connecté, aucune valeur de réglage ne s’affiche.
Réglage prescrit par votre médecin limitant la
pression maximale en mode de fonctionnement
AutoAdjust de l’appareil IntelliPAP. Ce réglage est
effectué par votre prestataire de soins à domicile au
moment de l’installation de l’appareil.
Réglage prescrit limitant la pression minimale en
mode de fonctionnement AutoAdjust de l’appareil
IntelliPAP. Ce réglage est effectué par votre
prestataire de soins à domicile au moment de
l’installation de l’appareil.
Réglage prescrit contrôlant la pression de
fonctionnement.
Réglage de la durée de délai. Votre prestataire a réglé
la durée de délai. Si le symbole «Verrou ouvert »
s’affiche, vous pouvez modifier le réglage. Si le
symbole « Verrou fermé » s’affiche, seul votre
prestataire de soins peut modifier le réglage.
Réglage prescrit contrôlant la pression de
fonctionnement pendant la durée de délai.
La longueur du tube standard fourni avec l’appareil
est 1,8 mètre (6 pieds). Vous pouvez toutefois régler
l’appareil IntelliPAP pour fonctionner avec un tube
d’alimentation en air de 3 mètres (10 pieds). Pour
obtenir un tube de rechange contactez votre
prestataire de soins à domicile (la référence des
pièces de rechange figure à la fin de ce manuel).
Appuyez sur la touche de défilement vers le bas pour
activer le menu. Reportez-vous à la section suivante
Activer le menu pour des informations détaillées.
60
A-DV54
Page 61

utilisAtion Du menu DÉtAillÉ
FR
Exemple d’affichage
Régl. Contraste
50 %
Mode
Tous
Description
Cette fonction permet de modifier le contraste de
l’écran LCD. Réglez le contraste uniquement si vous
éprouvez des difficultés à voir ce qui s’affiche sur
l’écran de votre point de vue.
Mes. Observance
123456,7 heures
Compteur horaire
123456,7 heures
Version logiciel
V0.09 05/01/2007
Numéro de série
HD123456
SmartCode
FF28D9
Nombre total d’heures (par incréments de 1/10
Tous
d’heure) de traitement dispensés par l’appareil
IntelliPAP.
Nombre total d’heures (par incréments de 1/10
Tous
d’heure) de fonctionnement de l’appareil IntelliPAP.
Affiche la version du logiciel installé.
Tous
Affiche le numéro de série de l’appareil.
Tous
SmartCode™ est utilisé pour assurer le suivi
d'observation du traitement, les informations
d’observation du traitement sont codées sous forme
Tous
de séries de lettres et de nombres, incluant un
caractère spécial de détection d'erreur permettant
d'assurer l'exactitude des données fournies à votre
médecin.
Menu d’activation de l’appareil IntelliPAP
Le menu d’activation est disponible pour tous les modes. Il s’agit d’un sous-menu qui permet
de régler les différentes fonctions de l’appareil IntelliPAP. Appuyez sur la touche de
défilement vers le bas lorsque vous vous trouvez dans le Menu détaillé.
Exemple d’affichage Description
Marche-Auto
Activée
Arrêt auto
Activé
Cette option contrôle la fonction Auto-On, qui active
automatiquement le débit d’air après une ou deux
respirations dans le masque.
Cette option contrôle la fonction Auto-OFF, qui arrête
automatiquement le débit d’air lorsque le masque est retiré.
En fonction du masque utilisé il peut se passer jusqu’à 30
secondes avant que l’appareil S’ARRÊTE.
Vérif. Masque
Activé
Cette option contrôle la fonction d’ajustement du masque. Le
débit d’air dans le masque est mesuré continuellement. Si le
débit d’air dépasse 95 litres par minute pendant plus de 10 %
de la durée d’utilisation de l’appareil, une notification est
créée. Cette notification s’affiche la prochaine fois que vous
utilisez l’appareil IntelliPAP.
Quitter Menu
Appuyez sur
Appuyez sur la touche de défilement vers le haut pour quitter
le Menu d’activation.
A-DV54
61
Page 62

FR
utilisAtion Du menu DÉtAillÉ
Menu patient AutoAdjust DV54
Le tableau suivant illustre les options affichées par Mode que vous pouvez faire défiler en
appuyant sur les touches Next (option suivante) ou Previous (option précédente) du clavier.
Si vous appuyez sur la touche de défilement vers le bas lorsque s’affiche Activer Menu vous
pourrez naviguer dans un sous-menu en appuyant sur les touches de défilement Next ou
Previous. Appuyez sur la touche de défilement vers le haut pour revenir au menu
principal. Lorsque la dernière option s’affiche, appuyez sur la touche Next pour revenir à la
première option.
MENU – Mode AutoAdjust
P:10.0 Auto
Chauff.: 5
MENU – Mode CPAP
P:10.0 PPC
Chauff.: 5
Limite Sup.
15,0 cmH20
Limite Inf.
5 cm H2O
Durée rampe
10 minutes
Long. de tube
1,8 m (6 pieds)
Activer Menu
Appuyez sur
Régl. Contraste
50 %
Mes. Observance
123456,7 heures
Compteur horaire
123456,7 heures
Version logiciel
V0.09 05/01/2007
Marche-Auto
Activée
Arrêt auto
Activé
Vérif. Masque
Activé
Quitter Menu
Appuyez sur
Régl. Pression
10,0 cmH20
Durée rampe
10 minutes
Pression rampe
5 cm H2O
Long. de tube
1,8 m (6 pieds)
Activer Menu
Appuyez sur
Régl. Contraste
50 %
Mes. Observance
123456,7 heures
Compteur horaire
123456,7 heures
Version logiciel
V0.09 05/01/2007
Marche-Auto
Activée
Arrêt auto
Activé
Vérif. Masque
Activé
Quitter Menu
Appuyez sur
Numéro de série
HD123456
SmartCode
FF28D9
62
A-DV54
Numéro de série
HD123456
SmartCode
FF28D9
Page 63

messAges pour le pAtient
FR
messaGes PoUR le PaTienT
L’appareil IntelliPAP prévient de tout problème nécessitant une intervention de votre part
pour rendre le traitement plus efficace. Ces messages s’affichent lorsque l’appareil est mis
en marche, soit en appuyant sur la touche ON/OFF, soit en respirant dans le masque. Pour
effacer un message, appuyez sur n’importe quelle touche. Même si un message n’est pas
effacé, l’appareil IntelliPAP fonctionne normalement.
Deux types de messages s’affichent : Rappels et Notifications.
Rappels
Les messages de rappel vous préviennent que certaines pièces du système doivent être
remplacées. Certains composants de votre système s’usent. S’ils ne sont pas remplacés,
votre traitement peut en être affecté. Si le message qui s’affiche n’est pas indiqué ci-dessous,
le module en option SmartLink™ de DeVilbiss est sans doute branché sur votre appareil et
vous fournit des messages supplémentaires. Reportez-vous à la documentation fournie avec
le module SmartLink.
Nettoyage du filtre – Vérifiez l’état du filtre tous les dix jours pour
enlever toute saleté et vous assurer qu’il n’est pas usé. Le message
ci-contre vous rappelle de vérifier régulièrement l’état du filtre.
Notifications
Les notifications indiquent un état de votre appareil IntelliPAP nécessitant une intervention
de votre part ou de votre prestataire de soins à domicile afin d’assurer une qualité optimale
de traitement. Si le message qui s’affiche n’est pas indiqué ci-dessous, le module en option
SmartLink™ de DeVilbiss est sans doute branché sur votre appareil et vous fournit des
messages supplémentaires. Reportez-vous à la documentation fournie avec le module
SmartLink.
Nettoyer filtre
REMARQUE–Notez que les valeurs affichées ne sont données qu’à titre d’exemple.
Durée de délai en cours – xx minutes restantes) – Lorsque la
fonction de délai confort est activée, ce message clignote sur
l’écran toutes les 5 secondes pour vous indiquer la durée de délai
restante.
Fuite du masque – Ce message indique que l’appareil IntelliPAP a
déterminé que le débit d’air reçu lors du dernier traitement a
dépassé une certaine limite pendant au moins 10 % de la durée
d’utilisation de l’appareil. Cette notification s’affiche lorsque l’appareil est mis en marche. Si
ce message s’affiche, mettez le masque et ajustez parfaitement le harnais sur le visage.
Ajustez le masque et le harnais conformément aux instructions du fabricant. Disponible sur
les modèles AutoAdjust.
Problème de masque – Ce message s’affiche à chaque fois qu’un
débit d’air élevé est enregistré. Un débit d’air élevé est causé
habituellement par un masque mal ajusté ou qui a été retiré.
Rampe en cours
10 min de plus
Fuite masque :
25 % vér. taille
Pb masque
Vérifier masque
A-DV54
63
Page 64

en VoyAge/
FR
Vérifiez le masque pour détecter toute fuite et ajustez-le conformément aux instructions du
fabricant. Le message ci-contre s’affiche jusqu’à la correction du problème de débit d’air
élevé. Si le débit d’air continue à être élevé pendant plus de 20 secondes, l’appareil s’arrête
automatiquement (si la fonction AutoOFF est activée).
Panne de l’appareil – Si un message de panne s’affiche, reportez-
vous à la section Dépannage pour toute instruction détaillée.
infoRmaTion sUR l’UlisaTion De l’aPPaReil inTelliPaP
en VoyaGe
Variation de la tension du courant électrique à l’étranger
Votre appareil IntelliPAP de DeVilbiss est équipé d’une source d’alimentation universelle. Il
peut fonctionner automatiquement avec des courants/fréquences de 100 à 240 V~ 50/60Hz
et 120V~ 400Hz Aucun réglage spécial n’est requis si vous voyagez dans un pays où la
tension du courant électrique est différente de celle que vous utilisez. Contactez votre
prestataire de soins à domicile pour obtenir le câble d’alimentation avec adaptateur
approprié au pays dans lequel vous voyagez (reportez-vous à la section Accessoires/Pièces
de rechange pour obtenir le numéro de référence correspondant).
Altitude
Votre appareil IntelliPAP compense automatiquement les variations d’altitude du niveau de la
mer jusqu’à 2750 mètres (9000 pieds). Aucun réglage spécial n’est requis en cas de
variations d’altitude.
fonctionnement en cc
Panne App. E07
Appeler SAV
fonCTionnemenT De l’aPPaReil inTelliPaP en CC
Batterie
L’appareil IntelliPAP peut fonctionner à partir d’une source d’alimentation 12 Vcc dans une
autocaravane, un bateau ou tout autre véhicule de plaisance. L’appareil peut être branché à
la source d’alimentation avec un câble d’alimentation 12 Vcc ou fonctionner à partir d’une
batterie autonome 12 Vcc. Ces deux pièces sont disponibles auprès de votre prestataire de
soins à domicile (reportez-vous à la section Accessoires/Pièces de rechange pour obtenir le
numéro de référence correspondant). Deux câbles sont nécessaires pour un fonctionnement
sur batterie autonome. L’équipement de connexion pour fonctionnement autonome sur
batterie comporte des pinces permettant le branchement aux bornes de la batterie.
REMARQUE– Le système d’humidification chauffante de l’appareil IntelliPAP ne fonctionne pas
directement sur une source d’alimentation 12 Vcc. Si vous avez besoin d’un système
d’humidification, une humidification par léchage est disponible. Toutefois, au lieu de
connecter directement l’alimentation 12 Vcc à l’IntelliPAP, vous pouvez la connecter à un
convertisseur de courant continu en courant alternatif qui délivrera un courant CA à
l’appareil. Ce qui permettra d’activer le réchauffeur. La puissance nominale du convertisseur
doit être de 200 watts @ 110V~ / 400 watts @ 220V~ au minimum.
REMARQUE– l’appareil IntelliPAP passera automatiquement d’une source à l’autre (CA à 12 Vcc) si elles
64
A-DV54
Page 65

oxygène D’Appoint
sont disponibles. Si votre appareil est connecté à la fois sur CA et 12 V CC, il fonctionne en
mode CA tant que le câble d’alimentation CA est branché et passe automatiquement en
mode 12 Vcc si la source en CA n’est plus disponible. Lorsque la source en CA est restaurée,
aucun réglage n’est requis pour passer d’une source à l’autre, mais n’oubliez pas que le
réchauffeur ne fonctionne pas sur une source 12 vcc.
FR
oXyGène D’aPPoinT
Un appoint d’oxygène est parfois prescrit en complément d’un traitement par CPAP/PPC de
l’apnée obstructive du sommeil. Si votre médecin prescrit de l’oxygène, cet appoint peut
être délivré de deux manières :
1. Demandez à votre prestataire de soins à domicile de vous fournir un adaptateur en
option pour oxygène (réf. 7353D-601) et connectez l’adaptateur à la prise de sortie de
l’appareil IntelliPAP. Branchez un côté du tube d’alimentation en air sur l’extrémité libre
de l’adaptateur et l’autre côté sur le masque.
2. Si votre masque est équipé d’une prise pour oxygène, votre médecin peut prescrire un
appoint d’oxygène délivré directement dans le masque.
AVERTISSEMENT– UTILISATION D’OXYGÈNE
L’oxygène favorise la combustion. Pour éviter toute blessure, ne fumez pas
lorsque vous utilisez cet appareil avec un appoint d’oxygène. N’utilisez pas
l’appareil près d’objets chauds, de matières volatiles ou de sources
d’inflammation.
Mettez toujours l’appareil IntelliPAP sous tension avant d’activer la source
d’oxygène. Arrêtez la source d’oxygène avant d’arrêter l’appareil IntelliPAP.
Cet appareil ne peut pas être utilisé en présence d’un mélange anesthésique
inflammable contenant de l’air, de l’oxygène ou de l’oxyde d’azote.
À un taux fixe d’oxygène d’appoint, la concentration de l’oxygène inhalé
peut varier en fonction du réglage de pression, du mode de respiration du
patient, du type de masque choisi et du taux de fuite. Cet avertissement
s’applique à la plupart des appareils de traitement par CPAP/PPC.
Ne laissez jamais une source d’oxygène connectée à l’appareil IntelliPAP
fonctionner en continu lorsque ce dernier n’est pas en usage. Si l’appareil
IntelliPAP n’est pas utilisé, arrêtez le débit d’oxygène.
ATTENTION– L’oxygène est un gaz fourni sur ordonnance seulement et qui ne doit être
administré que sous la surveillance d’un médecin.
ATTENTION– Le débit de la source d’oxygène doit être spécifié par un médecin.
A-DV54
65
Page 66

Accessoires et pièces
FR
aCCessoiRes eT PièCes De ReCHanGe
Pièces de rechange
Filtre d’entrée d’air (paquet de 4) ...........................................................................DV51D-602
Filtre à particules fines en option (paquet de 4) .....................................................DV51D-603
Tube d’alimentation en air (6 pieds) .......................................................................... 7351D-616
Prise d’entrée d’air .................................................................................................DV51D-604
Couvercle de connexion du réchauffeur ................................................................DV51D-605
Adaptateur pour oxygène ........................................................................................ 7353D-601
Sac de transport .....................................................................................................DV51D-610
Accessoires pour l’alimentation électrique
Câbles d’alimentation CA
États-Unis ............................................................................................................DV51D-606
Europe, à l’exception du Royaume-Uni. ............................................................DV51D-607
Royaume-Uni ..................................................................................................... DV51D-608
Australie .............................................................................................................DV51D-609
Câble d’alimentation CC ........................................................................................DV51D-619
Pinces de batterie CC – sur adaptateur .................................................................DV51D-696
De rechAnge
Masques recommandés pour une utilisation avec l’appareil
IntelliPAP de DeVilbiss :
Masque FlexSet® de DeVilbiss ........................................................................................9354D
Masque FlexSet® de DeVilbiss peu profond ....................................................................9354S
Masque FlexSet® de DeVilbiss à gel ................................................................................9354G
Masque FlexSet® de DeVilbiss à gel peu profond ......................................................... 9354GS
Masque FlexAire® de DeVilbiss ......................................................................................9353D
Masque FlexAire® de DeVilbiss peu profond ..................................................................9353S
Masque Serenity® de DeVilbiss .......................................................................................9352D
Masque Serenity® de DeVilbiss peu profond ...................................................................9352S
Masque Serenity® de DeVilbiss à gel ..............................................................................9352G
Masque Serenity® de DeVilbiss à gel peu profond ....................................................... 9352GS
Humidificateur chauffant en option
Humidificateur chauffant de DeVilbiss (support et réservoir) .......................................DV5HH
66
A-DV54
Page 67

entretien
FR
enTReTien De l’aPPaReil inTelliPaP
DANGER
Danger de décharge électrique – N’ouvrez pas et ne démontez pas le
boîtier ; il ne contient aucun composant interne réparable par l’utilisateur.
Pour toute réparation nécessaire, contactez votre prestataire de soins à
domicile pour obtenir des informations sur la marche à suivre. Toute
ouverture ou réparation non autorisée de l’appareil annule la garantie.
AVERTISSEMENT
Si l’appareil ne fonctionne pas normalement ou produit des sons
inhabituels, arrêtez de l’utiliser et contactez votre prestataire de soins.
Si l’appareil est tombé, vérifiez son bon fonctionnement. Si l’appareil ne
fonctionne pas ou si son boitier est endommagé arrêtez de l’utiliser et
contactez votre prestataire des soins.
Si l’appareil semble ne pas fonctionner normalement, reportez-vous à la
section Dépannage pour obtenir des instructions détaillées.
Exactitude de la mesure de pression – l’appareil IntelliPAP qui a été étalonné en usine
est conçu pour fournir une mesure exacte de la pression, aucun réglage supplémentaire
n’est requis. Aucun entretien de routine n’est requis pendant une période d’utilisation de 2
ans si l’appareil est utilisé conformément aux directives du fabricant. Après 2 ans
d’utilisation, l’appareil doit être vérifié.
REMARQUE– Certains pays exigent un entretien et un étalonnage réguliers pour ce type d’appareil
médical. Contactez votre prestataire de soins à domicile pour obtenir toute information
complémentaire.
Filtre d’entrée d’air standard – Vérifiez l’état du filtre tous les 10 jours et nettoyez-le si
nécessaire. Remplacez le filtre tous les 6 mois ou plus tôt s’il est endommagé. Le filtre
standard sert à filtrer les particules de plus de 3 microns. Il doit se trouver sur l’appareil
IntelliPAP pendant le fonctionnement de celui-ci.
Filtre à particules fines en option – Vérifiez l’état du filtre tous les 10 jours et remplacezle s’il est sale ou endommagé. Sinon remplacez le tous les 30 jours. Le filtre à particules fines
en option sert à filtrer les particules à partir de 0,3 micron.
Entretien du filtre – Reportez-vous à la section Nettoyage pour obtenir des instructions
détaillées.
A-DV54
67
Page 68

FR
nettoyAge
neTToyaGe De l’aPPaReil inTelliPaP
AVERTISSEMENT
Pour éviter toute décharge électrique, débranchez toujours l’appareil de
la prise murale.
ATTENTION– Ne rincez jamais l’appareil et ne le mettez jamais dans l’eau. Ne laissez jamais
de liquide pénétrer dans l’appareil ou près des ports d’entrée-sortie,
interrupteurs ou filtre à air, car cela endommagerait l’appareil. Si de l’eau
pénètre dans l’appareil arrêtez de l’utiliser. Contactez votre prestataire de soins
à domicile pour le réparer.
Boitier de l’appareil
1. Débranchez l’appareil IntelliPAP. Essuyez le boitier avec un chiffon propre et humide
tous les deux ou trois jours pour qu’aucune poussière ne s’accumule.
2. Laissez sécher complètement l’appareil avant de le rebrancher.
Filtres
Filtre d’entrée d’air (standard)
1. L’état du filtre d’entrée d’air doit être vérifié tous les dix jours. Nettoyez-le si
nécessaire. Le filtre se trouve à l’arrière de l’appareil.
ATTENTION– Il est important que le filtre soit en bon état pour que l’appareil puisse fonctionner
normalement et éviter tout endommagement.
2. Pour le nettoyer, retirez le filtre extérieur en mousse de son cadre.
3. Lavez le filtre dans un mélange d’eau tiède et de détergent à vaisselle. Rincez-le à l’eau
du robinet. Laissez le filtre sécher complètement. Si le filtre (réf. DV51D-602) est
endommagé, contactez votre prestataire de soins à domicile pour obtenir un filtre de
rechange.
4. Assurez-vous que le filtre est complètement sec avant de l’installer et de l’utiliser.
Filtre à particules fines (en option)
1. Si l’appareil est équipé d’un filtre à particules fines en option (réf. DV51D-603), vérifiez
son état et remplacez-le s’il est sale ou endommagé. Ne lavez pas ce filtre.
2. Installez le filtre à particules fine derrière le filtre standard.
REMARQUE– Si le filtre à particules fines n’est pas installé conformément aux instructions cela réduira sa
durée de vie et il sera nécessaire de le remplacer plus souvent.
Tube
Nettoyez le tube d’alimentation en air tous les jours. Enlevez le tube et le harnais du
masque. Utilisez un mélange d’eau et de détergent doux pour nettoyer l’intérieur du tube.
Rincez le tube et laissez-le sécher à l’air.
Masque et Harnais
Nettoyez le masque et le harnais conformément aux instructions du fabricant.
68
A-DV54
Page 69

DÉpAnnAge
FR
DÉPannaGe
DANGER
Danger de choc électrique - Ne pas retirer le boîtier de l’appareil, il ne
contient aucun composant interne réparable par l’utilisateur. Le boîtier ne
doit être retiré que par un technicien DeVilbiss.
Pour tout problème de fonctionnement de votre appareil IntelliPAP de DeVilbiss, reportezvous à la liste de problèmes, causes possibles et solutions indiqués dans le tableau suivant. Si
vous ne parvenez pas à résoudre un problème après avoir essayé les suggestions ci-dessus,
contactez votre prestataire de soins.
Problème Cause possible Solution
Aucun message
ne s’affiche
L’appareil
IntelliPAP ne
démarre pas
lorsque vous
respirez dans le
masque.
1. L’appareil n’est pas branché ou le
câble d’alimentation n’est pas
inséré complètement.
2. L’appareil n’est pas alimenté
1. La fonction Auto ON (démarrage
automatique) a été désactivée.
2. L’appareil n’est pas alimenté
3. Vous ne respirez pas suffisamment
profondément pour que la
fonction Auto ON puisse le
détecter.
4. Vous utilisez un masque complet
équipé d’une valve anti-asphyxie.
5. La prise d’entrée d’alimentation
en air n’est pas installée ou n’est
pas complètement insérée.
6. Le réservoir de l’humidificateur
n’est pas installé ou n’est pas
complètement inséré dans le
support.
1a. Vérifiez que le câble
d’alimentation est bien branché
sur l’appareil IntelliPAP et sur la
source d’alimentation.
1b. Si vous utilisez une source CC
vérifiez que les connexions du
câble sont sûres. Vérifiez que la
batterie est chargée.
2. Repérez une source
d’alimentation appropriée.
1. Appuyez sur la touche ON/
OFF (marche-arrêt) pour
mettre en marche et arrêter
l’appareil.
2. Vérifiez que le câble
d’alimentation est bien branché
sur l’appareil IntelliPAP et sur la
source d’alimentation.
3. Respirez profondément pour
mettre en marche l’appareil
IntelliPAP
.4. La fonction Auto ON peut ne
pas marcher car l’air expiré
s’échappe de la valve ouverte.
Appuyez sur le bouton ON/
OFF pour mettre en marche et
arrêter l’appareil.
5. Vérifiez que la prise d’entrée
d’alimentation en air est
complètement insérée dans
l’appareil.
6. Insérez entièrement le
réservoir de l’humidificateur
dans le support. Vérifiez que le
levier de verrouillage
s’enclenche.
A-DV54
69
Page 70

FR
Problème Cause possible Solution
Le débit d’air
s’est arrêté
soudainement
pendant
l’utilisation de
l’appareil.
L’écran affiche un
message de
panne.
Les symptômes
d’apnée
réapparaissent.
Votre peau est
irritée au contact
du masque.
Sécheresse de la
gorge ou du nez.
L’eau se
condense sur le
tube et produit
un bruit de
gargouillement.
1. La fonction Auto-Off a détecté un
débit d’air important car le
masque n’est pas correctement
ajusté.
2. Pendant l’utilisation de l’appareil,
vous ouvrez la bouche et votre
respiration est buccale.
Une erreur s’est produite et
l’appareil doit être réparé.
1. Le filtre à air est peut-être
obstrué.
2. Les symptômes d’apnée ont
changé.
1. Le harnais est trop serré ou mal
ajusté.
2. La taille du masque ou sa forme
sont inappropriées pour votre
visage.
Le taux d’humidité est inadéquat 1. Ajoutez un humidicateur
1. Le taux d’humidité est trop élevé.
2. La température de la pièce monte
et descend pendant la nuit.
1. Assurez-vous que la taille du
masque est appropriée, ajustez
au besoin le masque et le
harnais.
2. Contactez votre prestataire de
soins pour obtenir une
mentonnière ou un masque
différent afin d’empêcher une
respiration buccale.
Si les solutions ci-dessus ne
parviennent pas à résoudre le
problème, désactivez la fonction
Auto-Off dans le menu détaillé.
Contactez votre prestataire de
soins à domicile pour réparer
l’appareil.
1. Nettoyez ou remplacez le filtre
à air et placez l’appareil dans un
endroit éloigné de tout rideau
ou de toute surface
poussiéreuse.
2. Appelez votre médecin.
1. Desserrez le harnais pour
diminuer la pression de contact
sur le visage.
2. Contactez votre médecin ou
votre prestataire de soins.
chauffant DeVilbiss DV5.
2. Augmentez le niveau d’humidité
en réglant l’humidificateur.
Diminuez le taux d’humidification
et/ou augmentez la température
de la pièce.
DÉpAnnAge
70
A-DV54
Page 71

DÉpAnnAge
Problème Cause possible Solution
L’air qui sort du
générateur
semble trop
chaud.
Douleurs nasales,
des sinus, des
oreilles, ou nez
qui coule.
1. Le(s) filtre(s) à air est/sont sales.
2. L’entrée d’air est obstruée.
3. La température dans la pièce est
trop élevée.
4. L’appareil IntelliPAP se trouve
près d’un radiateur.
Il est possible que cette réaction soit
causée par la pression du débit d’air.
1. Reportez-vous à la section
Nettoyage pour des
instructions sur l’entretien des
filtres.
2. Débouchez l’entrée d’air.
3. Baissez la température dans la
pièce.
4. Placez l’appareil loin du
chauffage pour que l’air entrant
dans l’appareil soit à
température ambiante.
Si le problème persiste, contactez
votre prestataire de soins à
domicile.
Arrêtez d’utiliser l’appareil et
contactez votre médecin.
FR
A-DV54
71
Page 72

FR
cArActÉristiQues techniQues
CaRaCTÉRisTiQUes TeCHniQUes
Taille (HxLxP) ............................................................................. 10,7 cm x 16,5 cm x 17,5 cm
Poids ............................................................................................................... 1,22 kg ( 2,7 lb)
Configuration électrique .......................................................................100-240 V~, 50/60 Hz
Consommation électrique maximale ............................65 watts max pour une source en CA
(générateur de flux uniquement)
Plage des pressions CPAP AutoAdjust ................................................................. 3-20 cmH2O
Plage des températures de fonctionnement ............................................................5°C à 40°C
Taux d’humidité limite de fonctionnement ....................0 % à 95 % HR (sans condensation)
Conditions atmosphériques de fonctionnement ....... Du niveau de la mer jusqu’à 9 000 pieds
Température de stockage et de transport .....................................................-40 °C à +70 °C
Taux d’humidité limite pour le stockage et le transport .................................0 % à 95 % H R
(sans condensation)
Pression limitée maximale ...................................................20 cm H2O en utilisation normale
Niveau sonore (conforme aux exigences de la norme ISO 17510) ...............................26 dBA
Caractéristiques des filtres
Filtre standard > 3 microns
Filtre à particules fines en option > 0,3 microns
Débit max
83 l/min.......................................................................... à 6,5 cm H2O (1/3 de pression max.)
134 l/min......................................................................... à 13 cm H2O (2/3 de pression max.)
163 l/min.................................................................................... à 20 cm H2O (pression max.)
Exactitude de la pression ...................................................................................± 1,0 cmH2O
Variations de la pression
(cm H2O crête à crête à un volume respiratoire de 500 ml, profil d’onde sinusoïdal)
Respirations par minute 10 15 20
à 6,5 cm H2O 0,5 0,5 0,5
à 13 cm H2O 1,0 1,0 1,0
à 20 cm H2O 1,0 1,0 1,0
72
A-DV54
Page 73

cArActÉristiQues techniQues
Garantie ........................................................................................ Trois ans de garantie limitée
Classification de l’appareil conformément aux
normes de protection contre les décharges électriques ...........................................Class II
Degré de protection contre les décharges électriques ..................Pièce appliquée de type BF
Degré de protection contre la pénétration de liquides .................................................... IPX1
Cet appareil ne convient pas à une utilisation en présence d’un mélange anesthésique
inflammable contenant de l’air, de l’oxygène ou de l’oxyde d’azote.
Mode de fonctionnement ............................................................................................. Continu
Spécifications cliniques des sorties numériques
Pression dans le masque .................................................................de 0 à 25,5 cmH2O ± 0,5
Débit patient ........................................................................de -127 à +127 l/min ± 10 l/min
Débit de fuite ............................................................................ de 0 à +127 l/min ± 10 l/min
Volume respiratoire estimé .............................................................................. de 0 à 1 023 ml
REMARQUE– Le volume respiratoire est une estimation. Il est fourni uniquement pour analyse
tendancielle.
A-DV54
73
Page 74

FR
gArAntie
GaRanTie
L’appareil IntelliPAP de DeVilbiss est garanti contre tout vice de fabrication et de matériau
pendant trois ans à compter de la date d’achat. Toute pièce défectueuse sera réparée ou
remplacée, à la discrétion de DeVilbiss à condition que l’appareil n’ait pas été altéré ou
utilisé de façon inappropriée pendant cette période. Vérifiez que tout mauvais
fonctionnement n’est pas simplement dû à un mauvais nettoyage ou au non-respect des
instructions. Si une réparation est nécessaire, contactez votre prestataire DeVilbiss ou le
service à la clientèle de DeVilbiss :
États-Unis 800-338-1988, 814-443-4881
Canada 800-263-3390
Europe 44-138-444-6688
REMARQUE– Cette garantie ne couvre pas la fourniture d’un appareil de remplacement, les frais
encourus pour la location d’un autre appareil pendant que ledit appareil est réparé, ni le
coût de main-d’œuvre pour la réparation ou le remplacement de la (des) pièce(s)
défectueuse(s).
IL N’EXISTE AUCUNE AUTRE GARANTIE EXPLICITE. LES GARANTIES IMPLICITES, Y
COMPRIS CELLES DE QUALITÉ MARCHANDE OU D’ADÉQUATION À UN USAGE
PARTICULIER, SONT LIMITÉES À LA DURÉE DE LA GARANTIE LIMITÉE EXPLICITE, ET
DANS LA MESURE AUTORISÉE PAR LA LOI. TOUTE GARANTIE IMPLICITE EST
EXCLUE. CETTE GARANTIE CONSTITUE LE SEUL RECOURS DE L’ACHETEUR ET LA
SEULE RESPONSABILITÉ ASSUMÉE PAR LE FABRICANT QUANT À DES DOMMAGES
INDIRECTS ET SECONDAIRES. TOUTE AUTRE GARANTIE EST EXCLUE DANS LES
LIMITES D’EXCLUSION AUTORISÉES PAR LA LOI. CERTAINS ÉTATS INTERDISENT LA
LIMITATION DE LA DURÉE DE VALIDITÉ D’UNE GARANTIE IMPLICITE, L’EXCLUSION
OU LA LIMITATION DES DOMMAGES INDIRECTS ET SECONDAIRES ; LA LIMITE ET
L’EXCLUSION STIPULÉES CI-DESSUS PEUVENT DONC NE PAS CONCERNER
L’ACHETEUR.
Cette garantie vous confère certains droits légaux spécifiques auxquels peuvent s’ajouter
d’autres droits selon votre pays.
74
A-DV54
Page 75

A-DV54
75
Page 76

DeVilbiss Healthcare
100 DeVilbiss Drive
Somerset, PA 15501-2125
USA
800-338-1988
814-443-4881
Sunrise Medical Canada, Inc.
237 Romina Drive, Unit 3
Concord, Ontario L4K 4V3
CANADA
905-660-2459
800-263-3390
Sunrise Medical Ltd.
Sunrise Business Park
High Street
Wollaston, West Midlands
DY8 4PS
Sunrise Medical Pty. Limited
15 Carrington Road, Unit 7
Castle Hill NSW 2154
AUSTRALIA
61-2-9899-3144
ENGLAND
44-138-444-6688
Sunrise Medical
Division Respiratoire
13 Rue de la Painguetterie
37390 Chanceaux / Choisille
FRANCE
33-274-55 44-00
Sunrise Medical
DeVilbiss Produkte
Kahlbachring 2-4
D-69254 Malsch/Heidelberg
GERMANY
49-7253-980-460
DeVilbiss Healthcare • 100 DeVilbiss Drive • Somerset, PA 15501
800-338-1988 • 814-443-4881 • www.DeVilbissHealthcare.com
Division of Sunrise Medical HHG, Inc.
©2007 DeVilbiss Healthcare 11.07
A-DV54 Rev. A
 Loading...