

Page 1

SET-UP INSTRUCTIONS
How can the DB91-TX be set
to act as a Streaming Audio Server,
sending audio to DB91-RX decoder/s
used as an IP Audio Client
Publish Date: 21-Jun-2017
Page 2

Contents
General information .........................................................................................................................4
Point-to-point audio transmission .................................................................................................. 4
Point to multi-point audio transmission .......................................................................................... 5
DB91-TX and DB91-RX Set-up ....................................................................................................... 5
DB91-TX Streaming Audio Server set-up ....................................................................................... 6
DB91-RX IP Audio client set-up ..................................................................................................... 9
Appendix A ....................................................................................................................................... 11
Appendix B ....................................................................................................................................... 15
Page 3

THIS PAGE
IS INTENTIONALLY
LEFT BLANK
Page 4
65 Aleksandar Stamboliyski Str., 8000 Bourgas, Bulgaria
E-mail: of[email protected] ,Web: www.devabroadcast.com
Tel: +359 56 820027, Fax: +359 56 836700
General information
The IP Audio encoder and decoder are controlled trough a build in WEB Server and a standard
web browser is used to monitor their status or to make some adjustments. To operate the devices
you need to know their IP Address. In case you are not aware of the IP Addresses and how to open
the WEB interface, please refer to “Appendix A - DB91-TX Quick User Guide” on page 7 and
“Appendix B - DB91-RX Quick User Guide” on page 13.
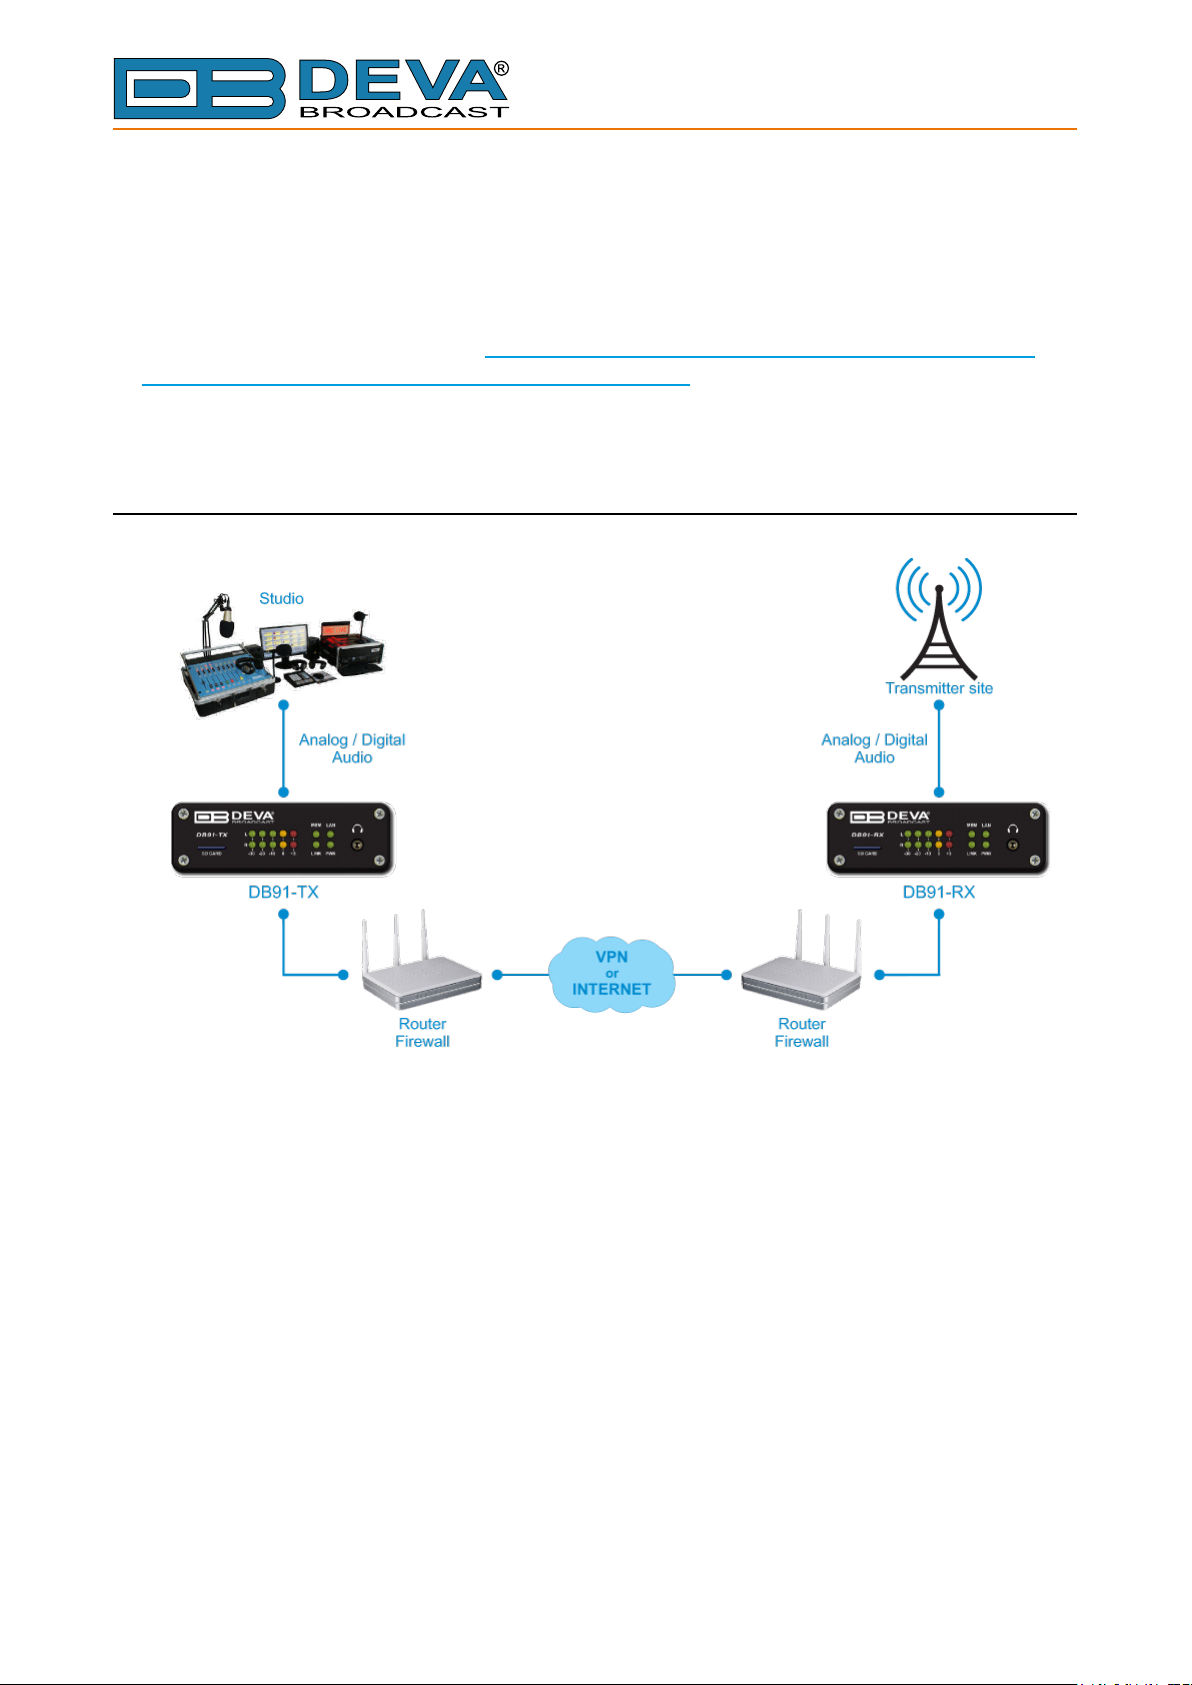
This conguration allows two types of applications:
POINT-TO-POINT AUDIO TRANSMISSION
- 4 -
Page 5
65 Aleksandar Stamboliyski Str., 8000 Bourgas, Bulgaria
E-mail: of[email protected] ,Web: www.devabroadcast.com
Tel: +359 56 820027, Fax: +359 56 836700
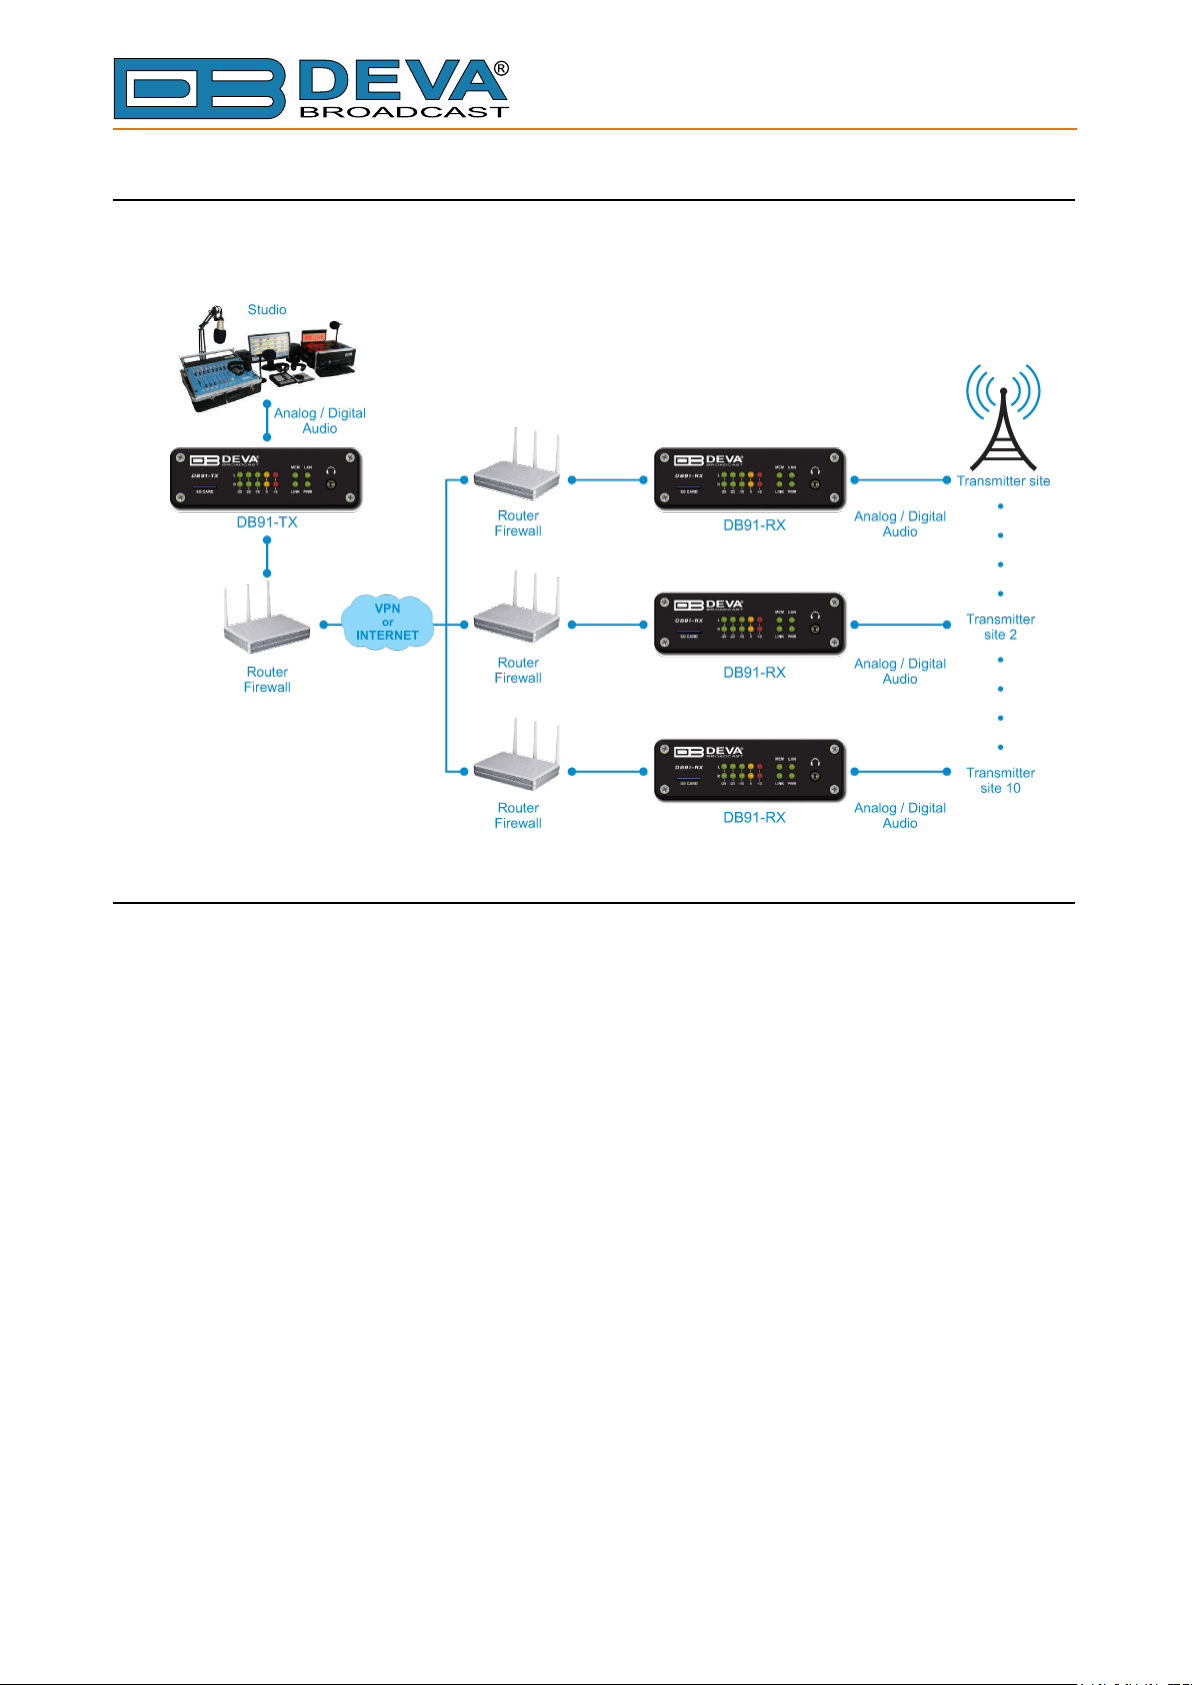
POINT TO MULTI-POINT AUDIO TRANSMISSION
IMPORTANT NOTE: One DB91-TX can send audio to maximum ten DB91-RXs. However,
in order for stable connectivity to be guaranteed, the recommended number of clients is 8.
DB91-TX AND DB91-RX SET-UP
Prior to implementing the below written adjustments, the following requirements should be
fullled:
• DB91-TX must have a static IP address;
• If the device is placed behind a router, you will have to make sure that the Stream Server
Port is properly NAT forwarded;
• DB91-RX may have a dynamic IP address;
• DB91-RX should have access to DB91-TX over the network (Internet or LAN).
- 5 -
Page 6
65 Aleksandar Stamboliyski Str., 8000 Bourgas, Bulgaria
E-mail: of[email protected] ,Web: www.devabroadcast.com
Tel: +359 56 820027, Fax: +359 56 836700
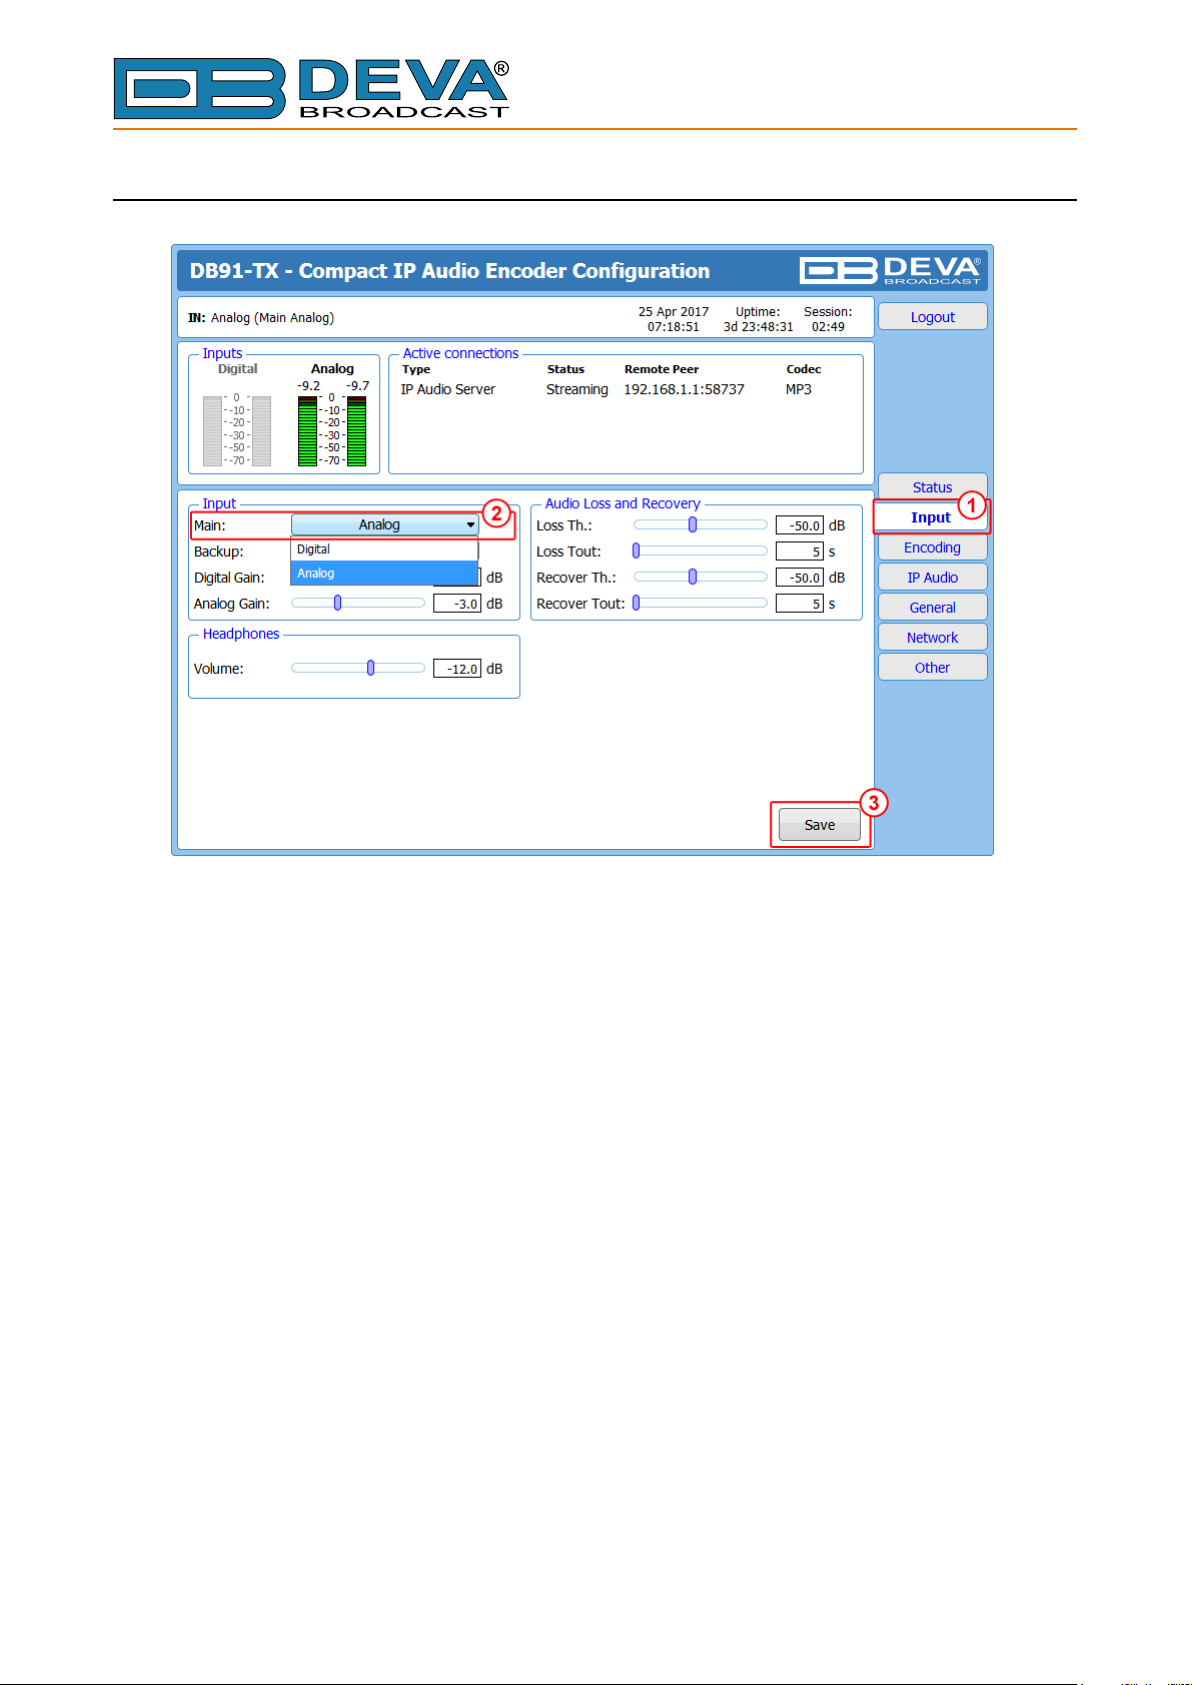
DB91-TX STREAMING AUDIO SERVER SET-UP
1. Go to Settings> Input;
2. Choose the preferred audio signal input;
3. Press [Save];
- 6 -
Page 7
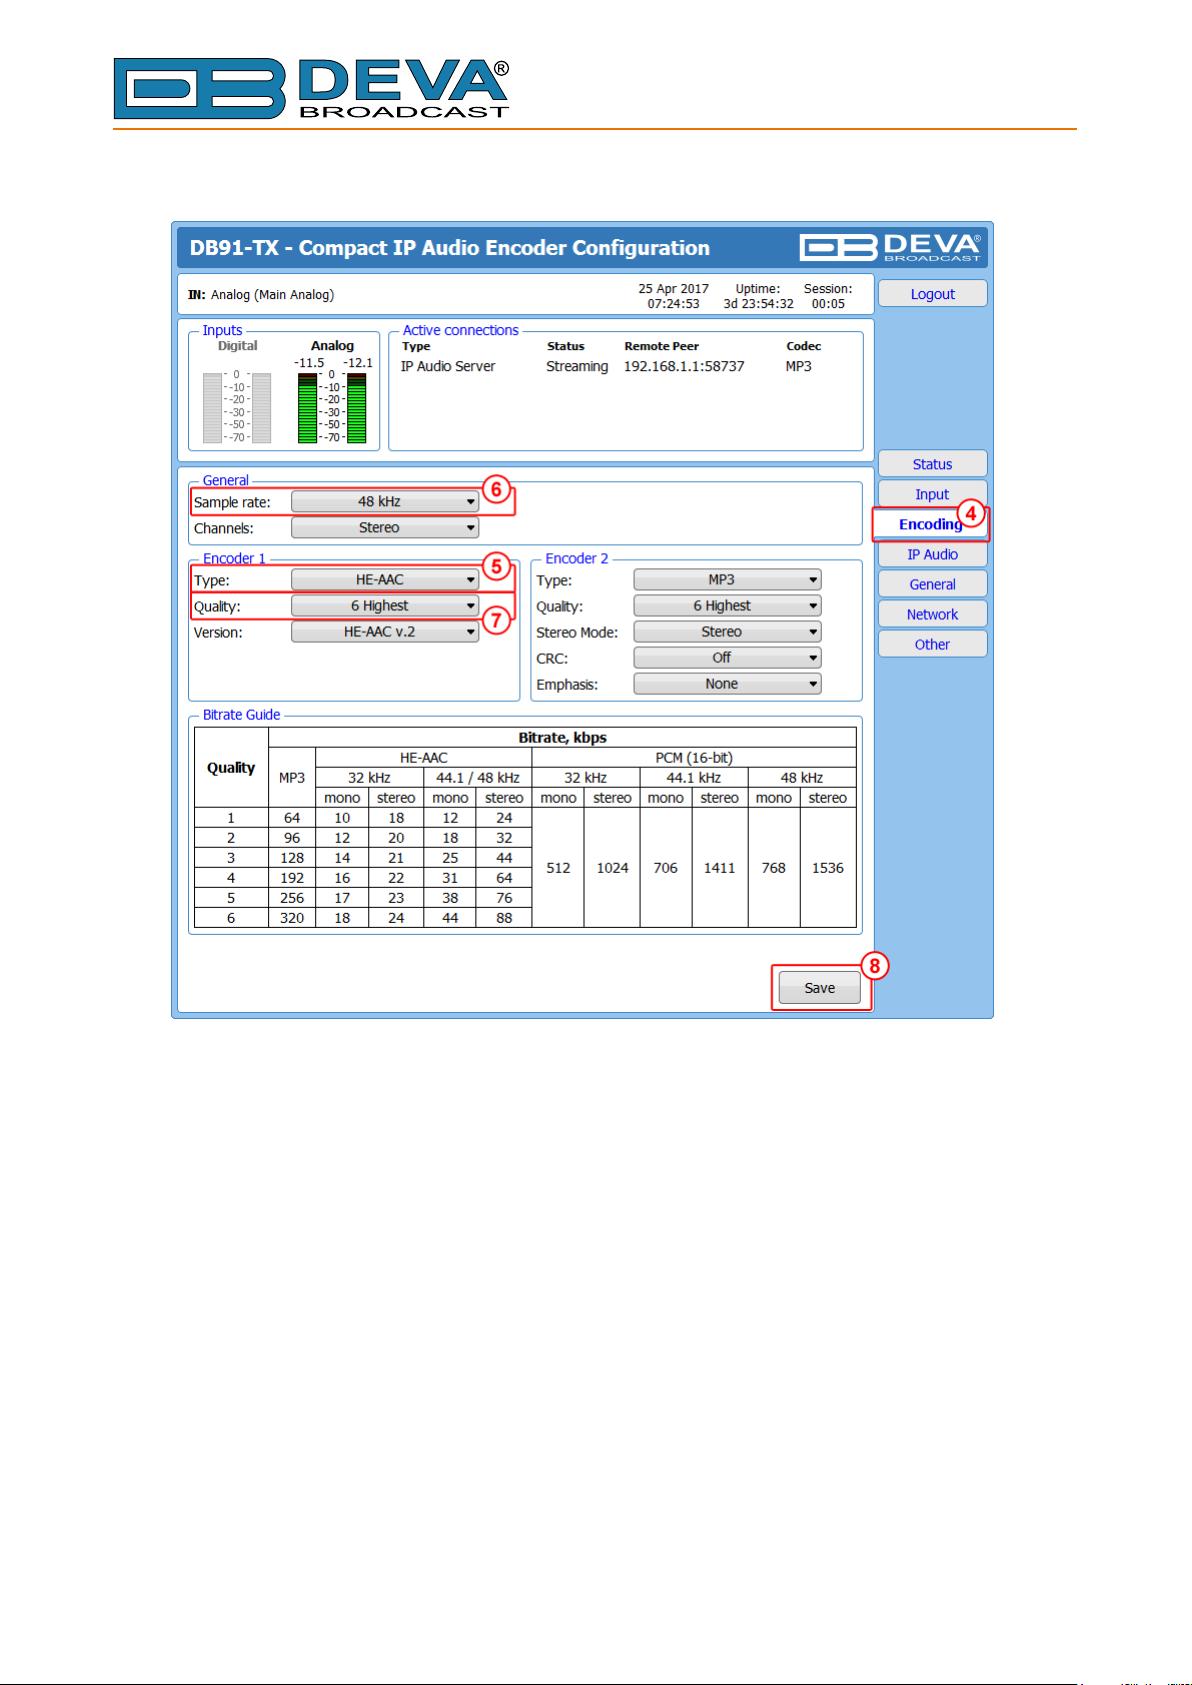
4. Go to Settings> Encoding;
65 Aleksandar Stamboliyski Str., 8000 Bourgas, Bulgaria
Tel: +359 56 820027, Fax: +359 56 836700
E-mail: of[email protected] ,Web: www.devabroadcast.com
5. Assign Encoder type;
6. Assign Sample rate;
7. Assign desired Signal Quality.
The combination of these parameters will dene the stream bitrate (see Bitrate Guide table at
the bottom of this screen). The network connection should have enough bandwidth to process
all the streams. As a rough estimate, the bandwidth should be at least twice the stream’s bitrate,
multiplied by the number of simultaneous connections;
8. Press [Save];
- 7 -
Page 8
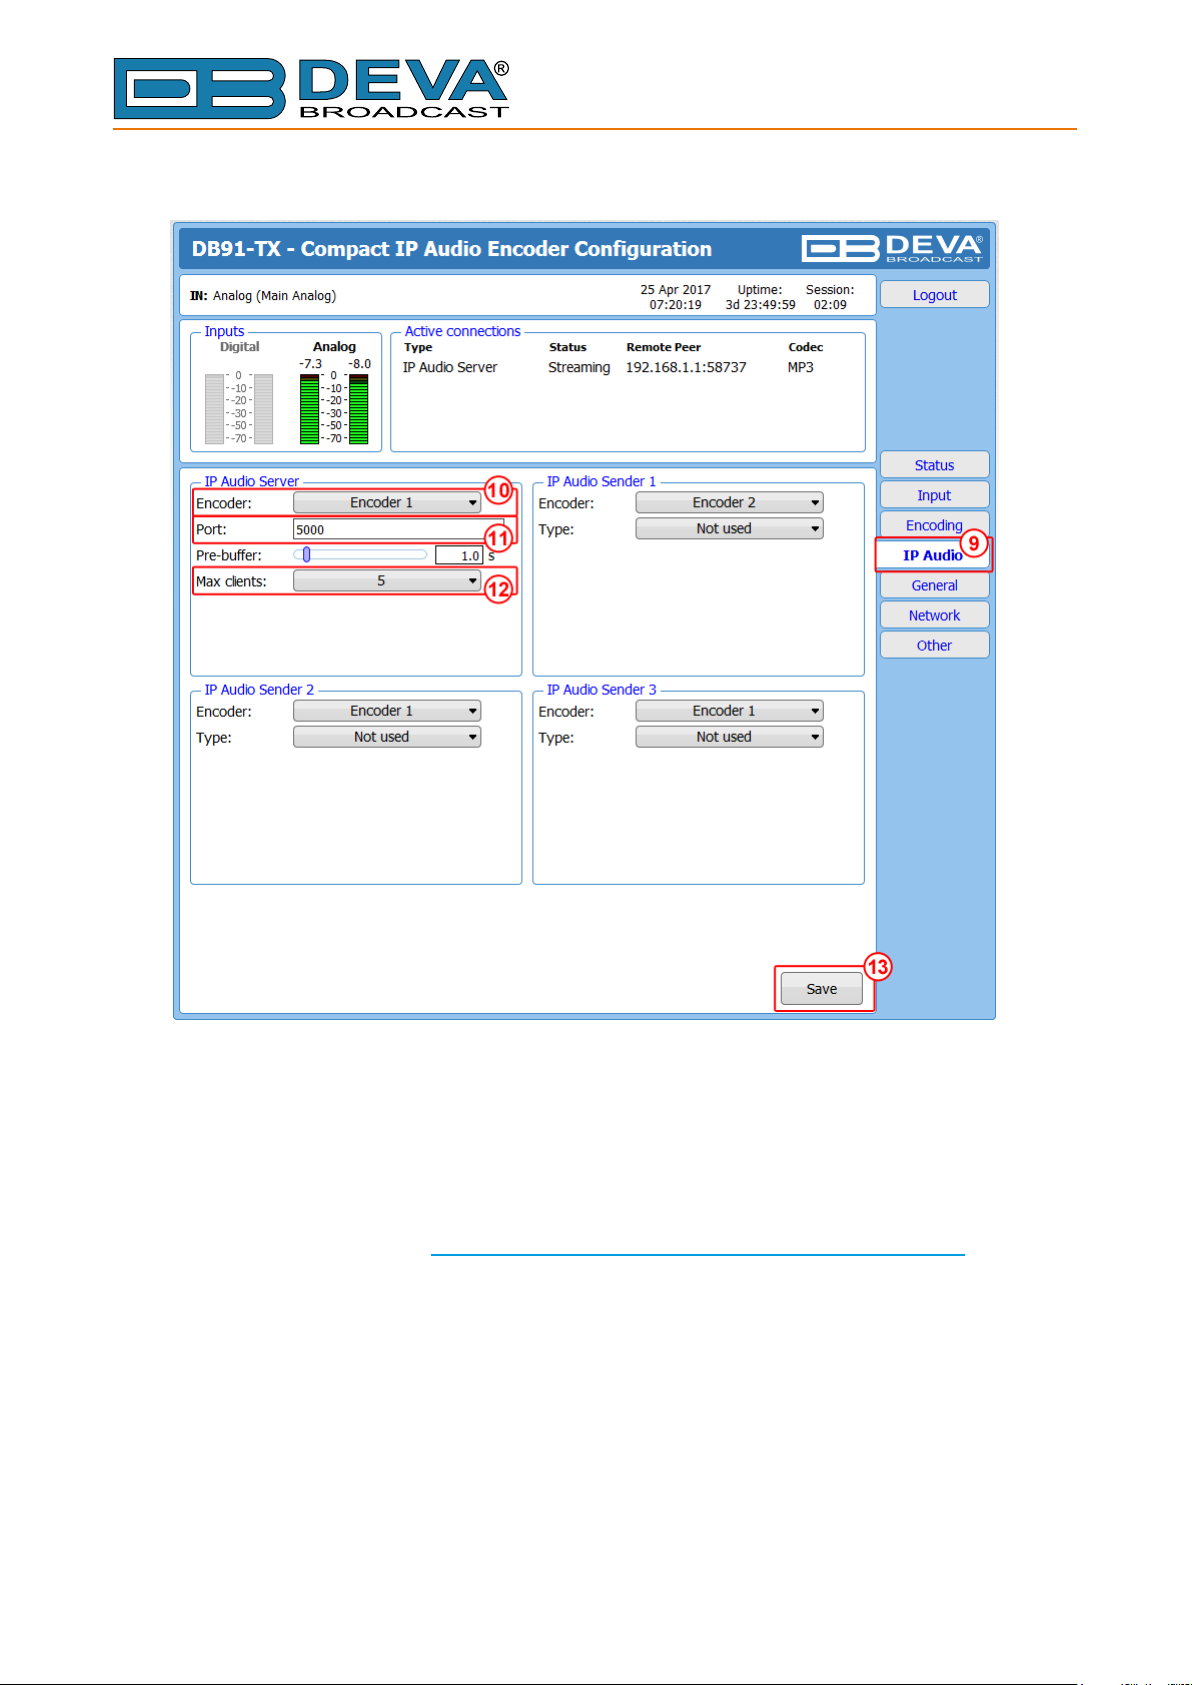
9. Go to Settings> IP Audio;
65 Aleksandar Stamboliyski Str., 8000 Bourgas, Bulgaria
Tel: +359 56 820027, Fax: +359 56 836700
E-mail: of[email protected] ,Web: www.devabroadcast.com
10. Then in IP Audio Server section - select Encoder from the drop-down menu;
11. Specify Port to be used;
12. Specify Maximum supported connections(clients);
13. Press [Save].
For detailed information and instructions on how communication with the DB91-TX can be
established, please refer to “Appendix A - DB91-TX Quick User Guide” on page 7.
- 8 -
Page 9
E-mail: of[email protected] ,Web: www.devabroadcast.com
DB91-RX IP AUDIO CLIENT SET-UP
65 Aleksandar Stamboliyski Str., 8000 Bourgas, Bulgaria
Tel: +359 56 820027, Fax: +359 56 836700
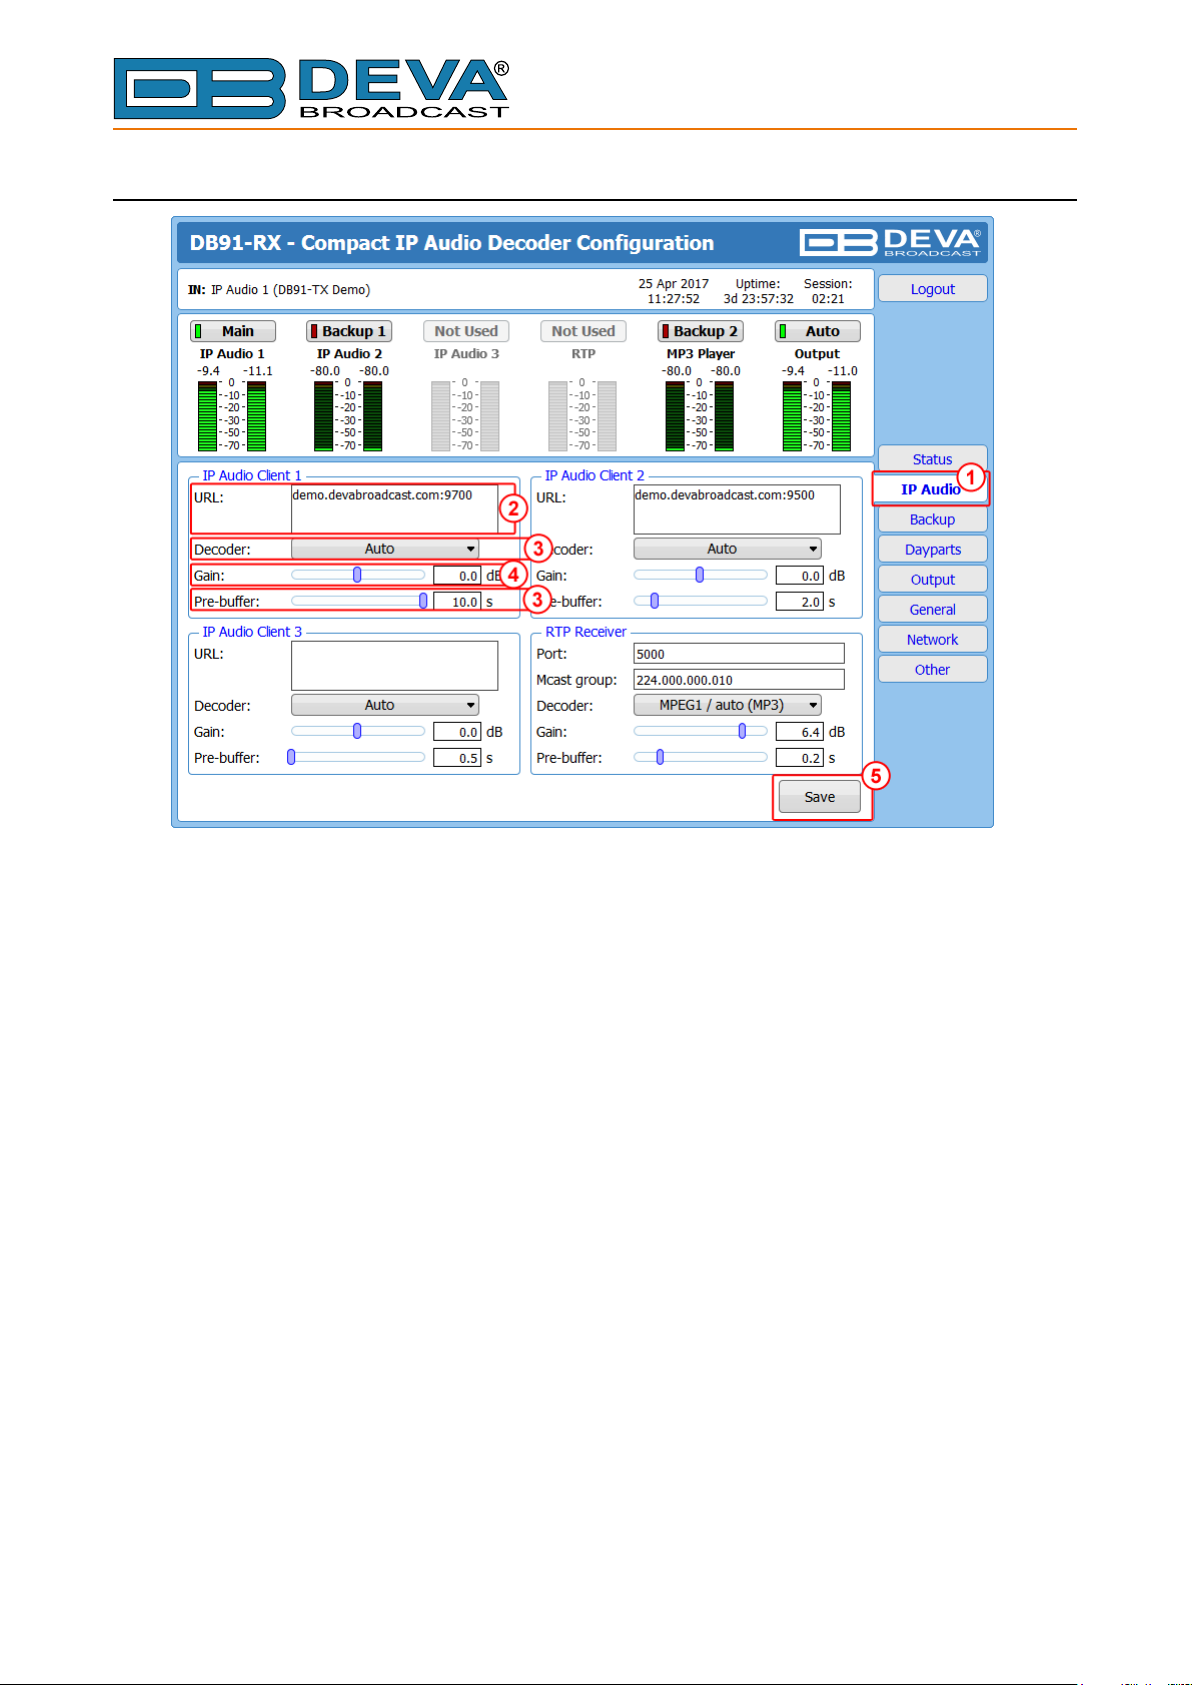
1. Go to Settings> IP Audio;
2. In IP Audio Client 1/2 or 3 section – URL of the DB91-TX Server should be specied.
The URL is a mandatory requisite needed in order for a connection with the server to be
established. The URL could be compound of DB91-TX’s IP Address and Server Port, ex.
192.168.1.20:5000;
3. Choose the preferred Decoder and Pre-buffer. The decoder set in the DB91-RX must
match the encoder specied in DB91-TX;
4. If needed, set new Gain adjustment settings;
5. Press [Save];
- 9 -
Page 10
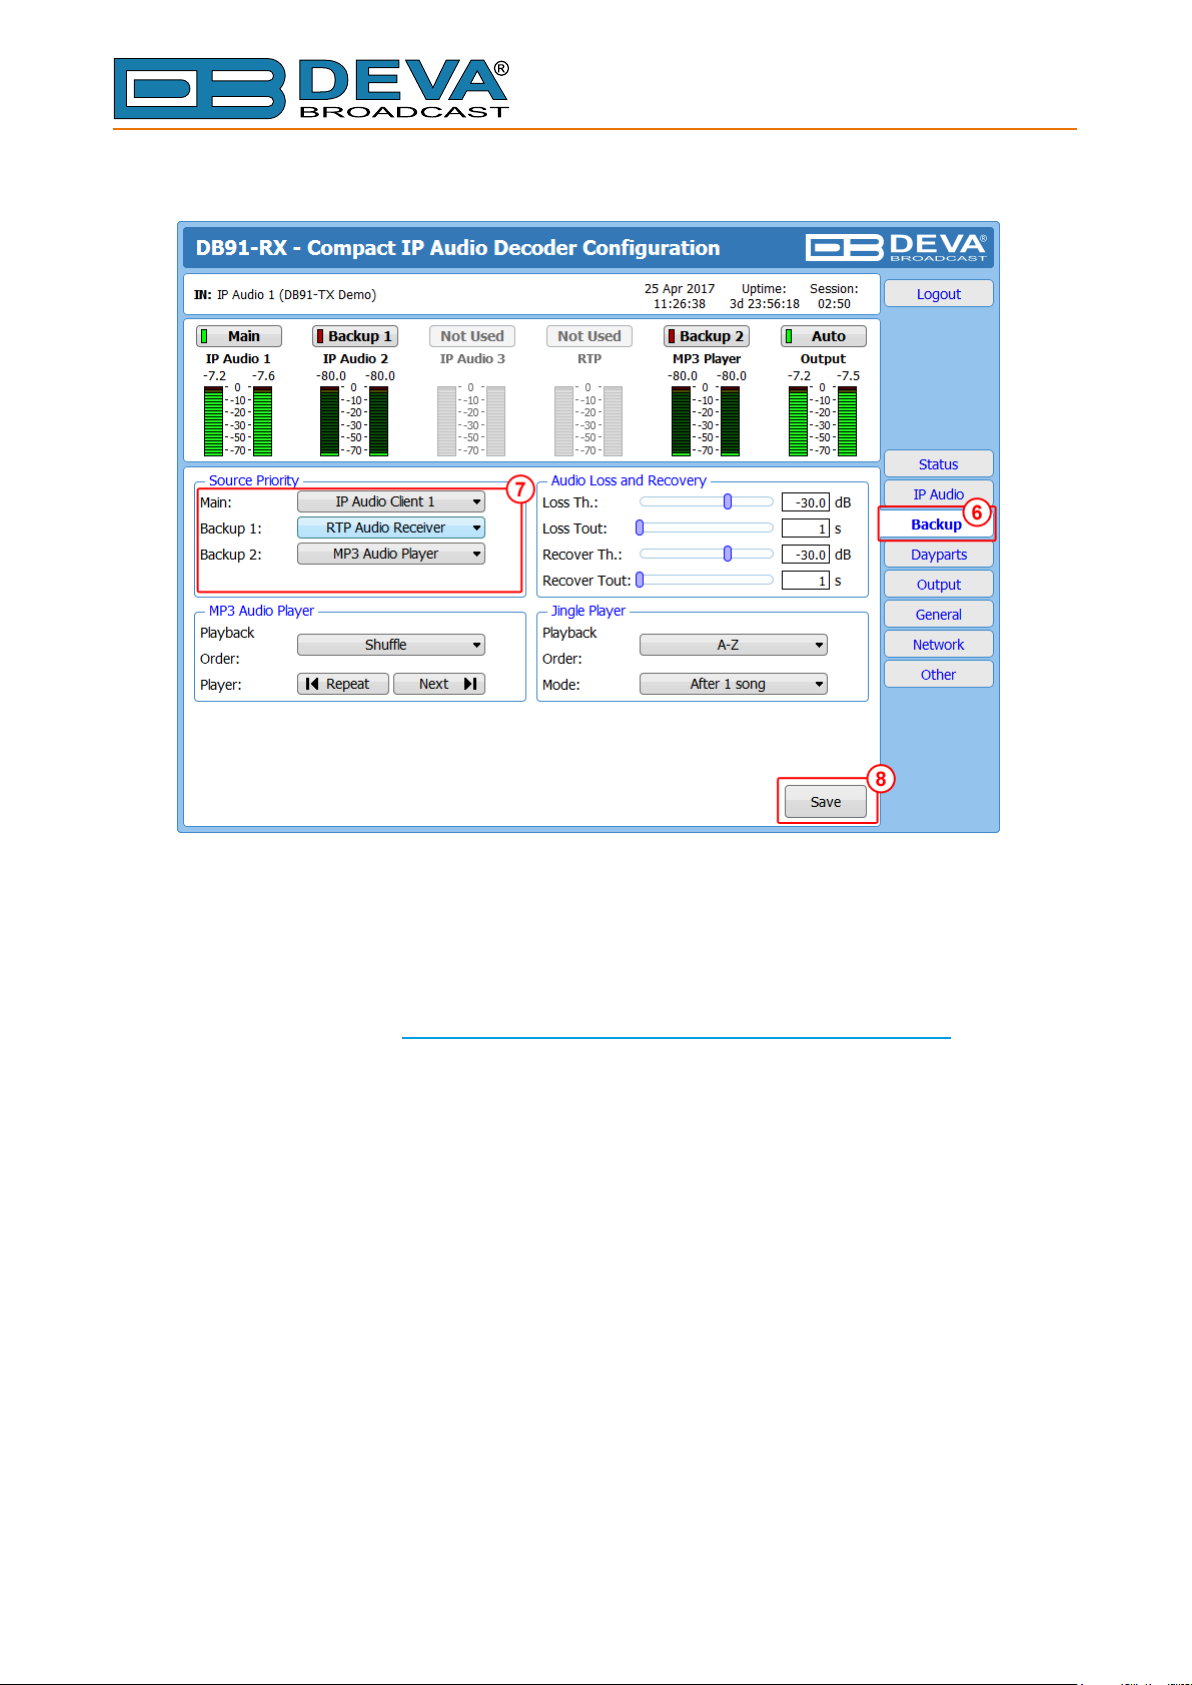
6. Go to Settings> Backup;
65 Aleksandar Stamboliyski Str., 8000 Bourgas, Bulgaria
Tel: +359 56 820027, Fax: +359 56 836700
E-mail: of[email protected] ,Web: www.devabroadcast.com
7. From the Source Priority Section set the priority of the IP Audio Client. Apply the same
settings to all IP Audio clients to be used in the conguration;
8. Press [Save];
For detailed information and instructions on how communication with the DB91-RX can be
established, please refer to “Appendix B - DB91-RX Quick User Guide” on page 13.
- 10 -
Page 11
65 Aleksandar Stamboliyski Str., 8000 Bourgas, Bulgaria
E-mail: of[email protected] ,Web: www.devabroadcast.com
Tel: +359 56 820027, Fax: +359 56 836700
Appendix A
Quick User Guide
DB91-TX
Compact IP Audio Encoder
BEFORE YOU USE THIS PRODUCT
In order to be able to enjoy all the benefits of owning your new
DEVA product, please verify first that the latest software and
firmware release were installed.
Visit www.devabroadcast.com/downloads for the most
recent software and firmware downloads, prior the installation.
- 7 -
Page 12
65 Aleksandar Stamboliyski Str., 8000 Bourgas, Bulgaria
E-mail: of[email protected] ,Web: www.devabroadcast.com
Tel: +359 56 820027, Fax: +359 56 836700
This Quick user guide will make the installation of quick and easy these principles, yo
ca simplify the process and save yourself extra time and effortDBFor more information about the Safety
n .
precautions and the Operating environment recommendations please refer to the User Manual
STEP 1
1. The encoder has to be connected to the local network or Internet by cable with RJ-45 connector;
2. As only one input at a time can be managed by the encoder, please select the preferred signal source
input - either analog or digital one:
For Analog audio use a cable that ends with two standard RCA jacks to connect the analog signal
source to the analog audio inputs of DB9 -TX;
For Digital audio use a cable that ends with standard RCA jack to connect the S/PDIF signal source to
the digital audio input of DB9 -TX;
3. Connect the device to the power supply.
1
1
STEP 2
1
DB9 -TX is controlled trough a build in WEB Server and a standard web browser can be used to monitor
its status or to make some adjustments.
91-TX
Connection
Configuration
. Applying u
.
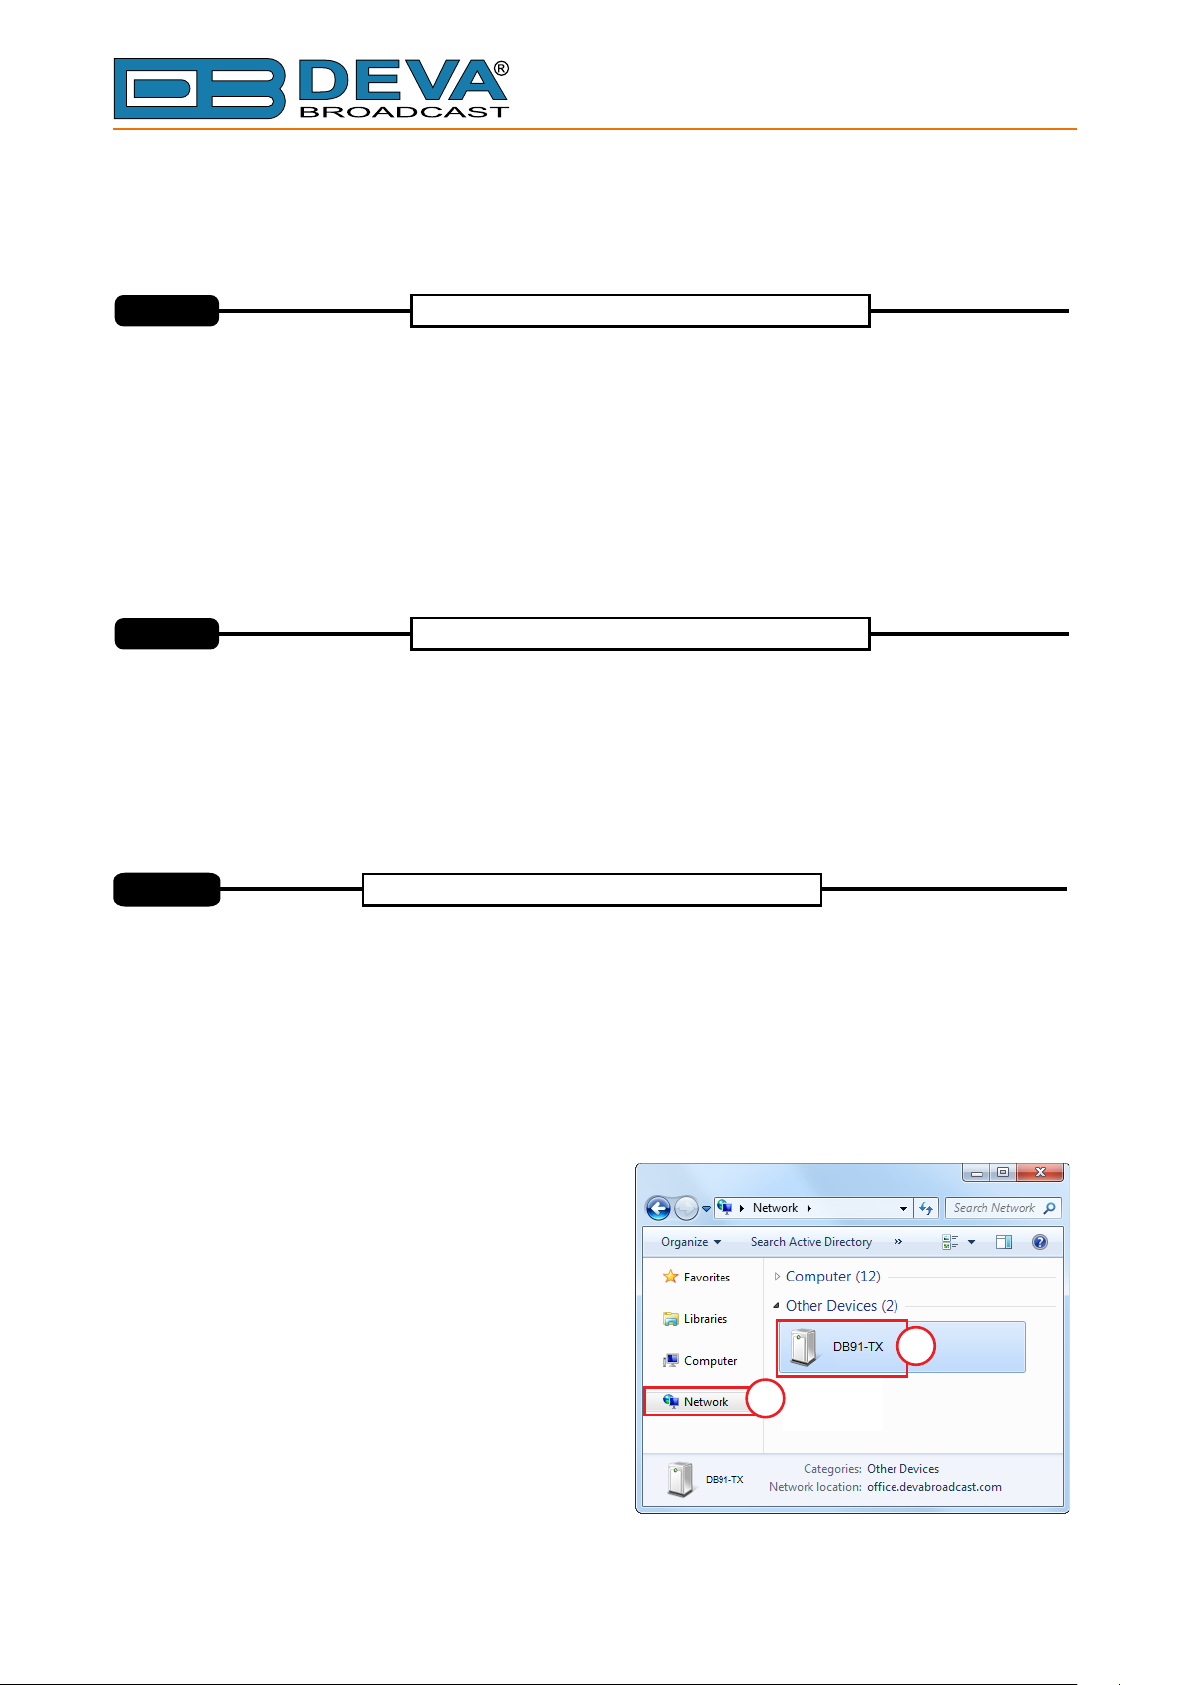
To operate the device you need to know its IP Address. In case you are not aware of it, you can hear it
through the headphones when you turn on the the device. Alternatively,use the Network discovery feature
at Local networks ( ).
STEP 3
Network discovery is a network setting that whether your computer can see (find) other computers
and devices on the network and whether other computers on the network can see your computer. By
default, Windows Firewall blocks network discover but you can enable it.
If you have already enabled this function on your computer just open a new Explorer bar and click on .
The device must be .displayed
Open Advanced sharing settings by clicking the
1.
Start butto , and then Control Panel . In the
search box, type network , click Network and
Sharing Center , and then, in the left pane click
Change advanced sharing settings
" ";
S your current network profile
2. elect ;
Turn on network discovery
Click , and then click
3.
Save changes If you're prompted for an
administrator password or confirmation, type the
password or provide confirmation.
for reference see Step 3
Network discovery for Windows 7
defines
y
(1)
n on " "
" " "
"
.
2
1
To access the device open a new Explorer bar and
4.
click on . If you have successfully enabled the
network discovery option, the device will be
displayed
WEB browser window requiring sername and
password. Default values being -Username: user
or admin, Password: pass
(1)
. Double click on will open a new
(2)
u
.
- 8 -
Page 13
65 Aleksandar Stamboliyski Str., 8000 Bourgas, Bulgaria
E-mail: of[email protected] ,Web: www.devabroadcast.com
Tel: +359 56 820027, Fax: +359 56 836700
STEP 4
WEB Interface
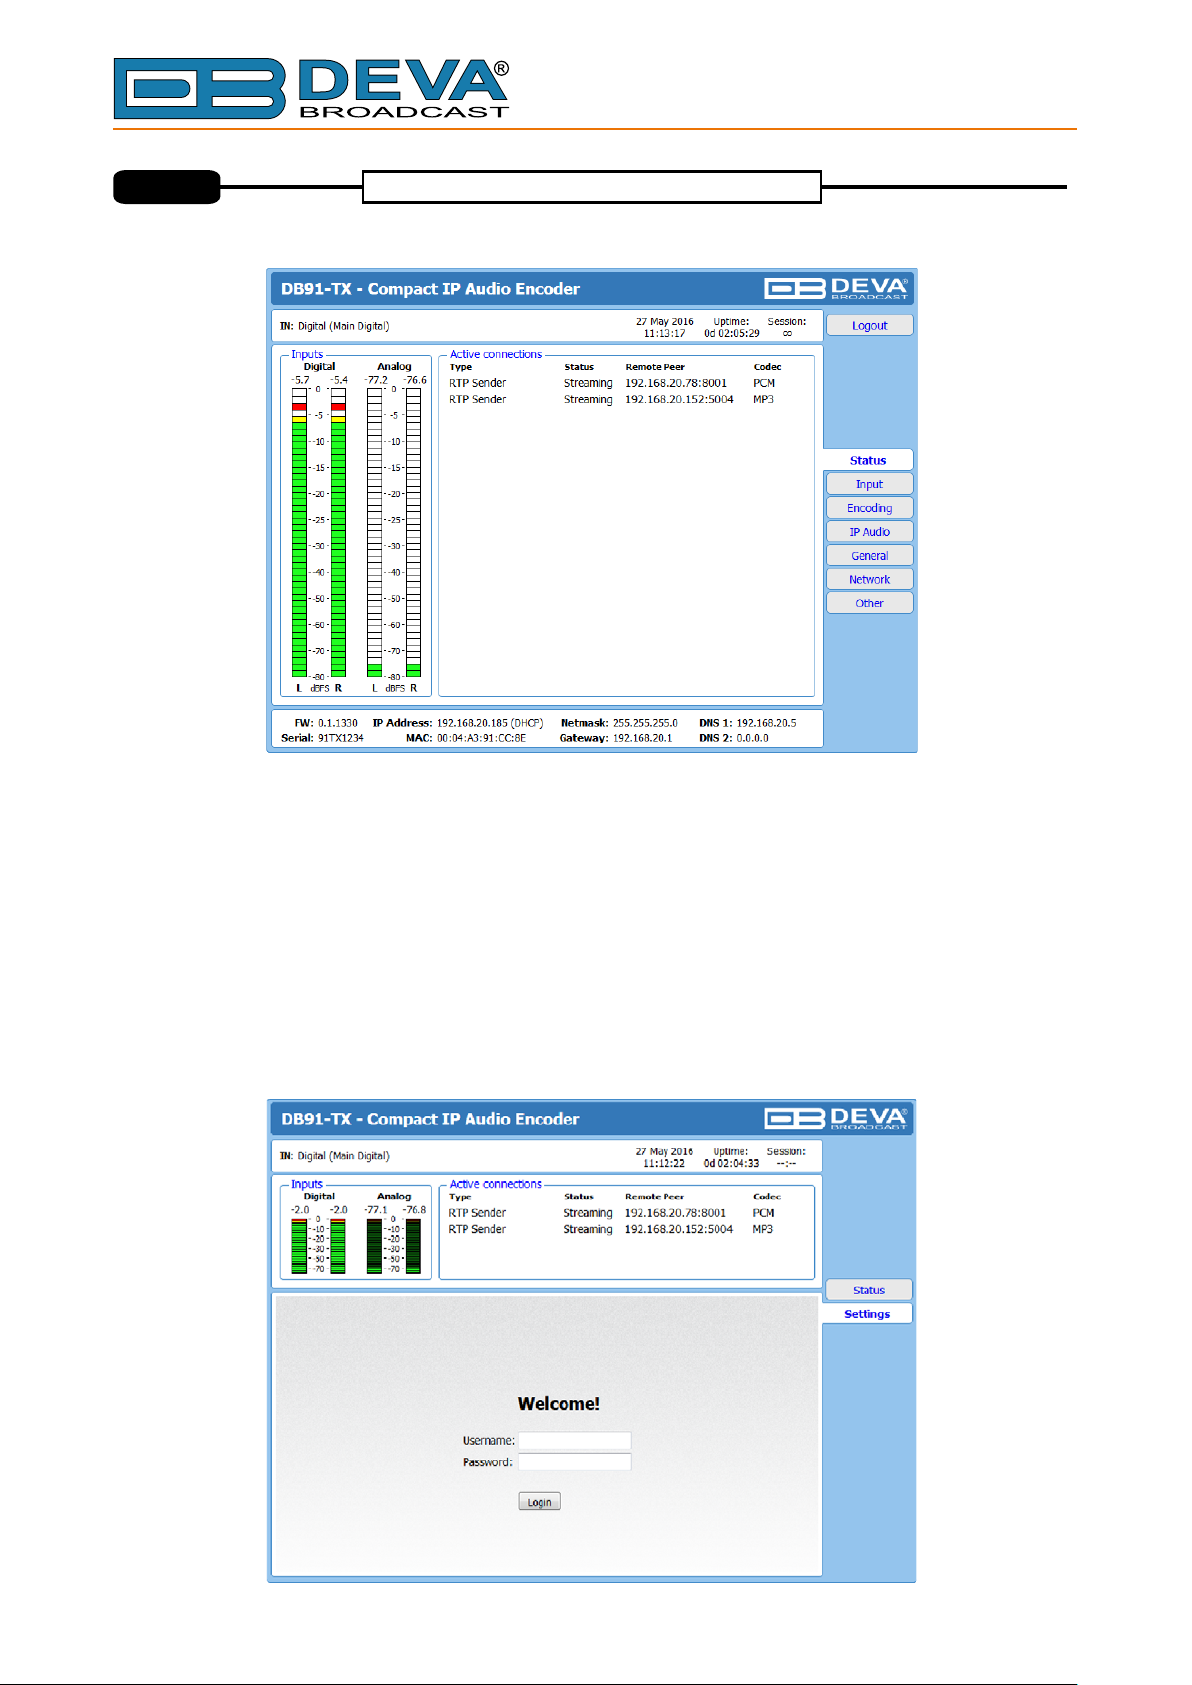
A successful log-in in the WEB Interface will look like this:
Upon opening the WEB interface, the main Status window will appear. The page contains information
on the device's current status - the LED bar-graph representation of the left and right Digital and
Analog audio levels in dBFS, as well as the Active connections - Type, Status, Remote Peer and
Codec.
At the top of the control window is placed a constant section, containing information about the input in
use, Date/Time and session timeout.
The DB provides you with protected access to the device settings.91-TX a Upon pressing the Settings
button, a window requiring username and password will appear.
ThisT .o make the necessary adjustments to the device log in as ADMINISTRATOR will give you full
control over the settings username: , password: );. The default values being admin pass
- 9 -
Page 14
65 Aleksandar Stamboliyski Str., 8000 Bourgas, Bulgaria
E-mail: of[email protected] ,Web: www.devabroadcast.com
Tel: +359 56 820027, Fax: +359 56 836700
STEP 5
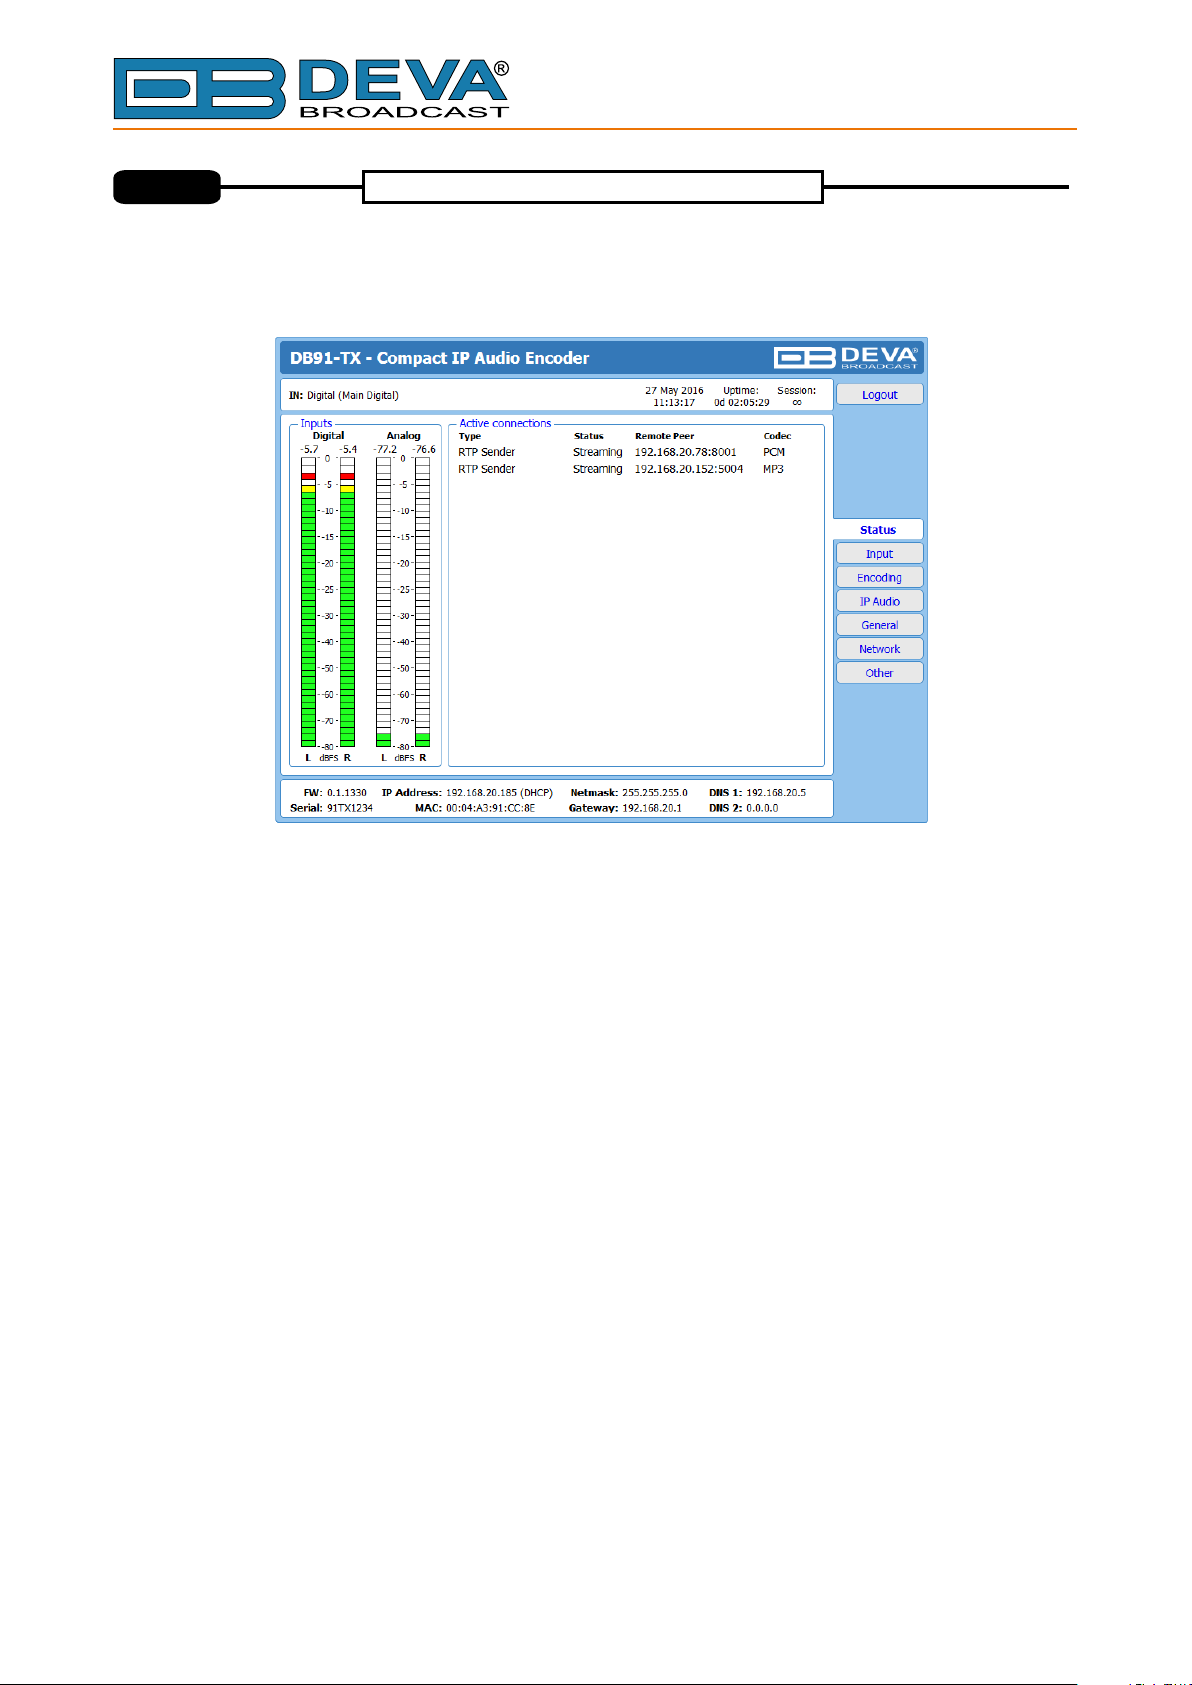
Upon entering the device's settings, you will be able to apply needed adjustments to the Inputs, Encoding
and IP Audio configuration of the DB91-TX.
Device Settings
For further information on the available options and features, which can be
found on www.devabroadcast.com/downloads, and the accompanying CD.
please refer to the User Manual
Thank you for choosing DEVA!
Please refer to the User manual for nformation on
how to your device
configure and explore .
detailed i
- 10 -
Page 15
65 Aleksandar Stamboliyski Str., 8000 Bourgas, Bulgaria
E-mail: of[email protected] ,Web: www.devabroadcast.com
Tel: +359 56 820027, Fax: +359 56 836700
Appendix B
Quick User Guide
DB91-RX
Compact IP Audio Decoder
BEFORE YOU USE THIS PRODUCT
In order to be able to enjoy all the benefits of owning your new
DEVA product, please verify first that the latest software and
firmware release were installed.
Visit www.devabroadcast.com/downloads for the most
recent software and firmware downloads, prior the installation.
- 13 -
Page 16
65 Aleksandar Stamboliyski Str., 8000 Bourgas, Bulgaria
E-mail: of[email protected] ,Web: www.devabroadcast.com
Tel: +359 56 820027, Fax: +359 56 836700
This Quick user guide will make the installation of quick and easy these principles, yo
ca simplify the process and save yourself extra time and effortDBFor more information about the Safety
n .
precautions and the Operating environment recommendations please refer to the User Manual
STEP 1
1. Connect the device to a local network or to the Internet by a cable with an RJ-45 connector;
2. Connect the DB9 -RX to the power supply.
will receive an IP address.
STEP 2
1 R
DB9 - X is controlled trough a build in WEB Server and a standard web browser can be used to monitor
its status or to make some adjustments.
To operate the device you need to know its IP Address. In case you are not aware of it, you can hear it
through the headphones when you turn on the the device. Alternatively,use the Network discovery feature
at Local networks ( ).
1
Preferably, connect the device to a DHCP Server network from which DB9 -RX
for reference see Step 3
91-RX
Connection
Configuration
.Applying u
.
1RECOMMENDATION:
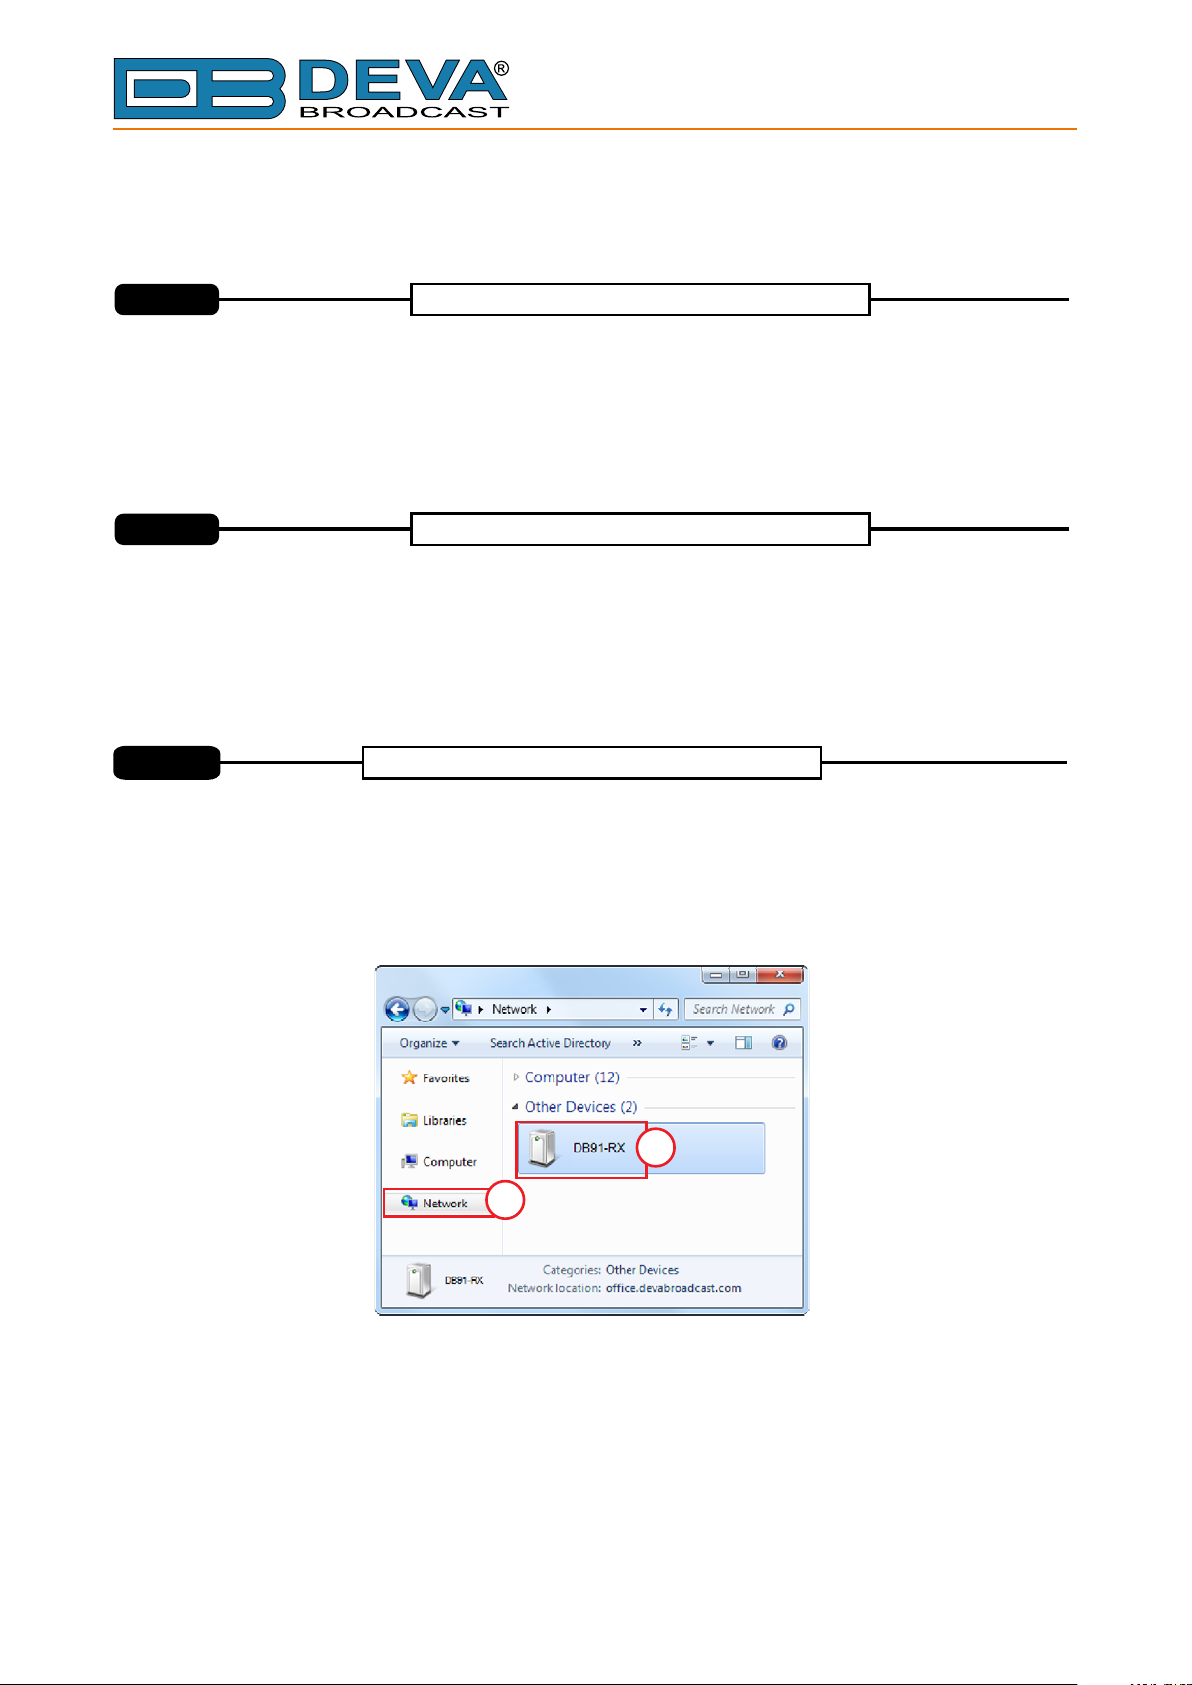
STEP 3
Network discovery is a network setting that whether your computer can see (find) other computers
and devices on the network and whether other computers on the network can see your computer. By
default, Windows Firewall blocks network discover but you can enable it.
If you have already enabled this function on your computer just open a new Explorer bar and click on .
The device must be .
displayed
Network discovery for Windows 7
defines
y
(1)
2
1
1. n on " "
Open Advanced sharing settings by clicking the Start butto , and then Control Panel . In the
search box, type network , click Network and Sharing Center , and then, in the left pane click Change
advanced sharing settings
2. elect ;
S your current network profile
3. .
administrator password or confirmation, type the password or provide confirmation.
4.
network discovery option, the device will be . Double click on will open a new WEB browser
window requiring sername and password. Default values being -Username: user or admin, Password:
pass
Turn on network discovery
Click , and then click Save changes If you're prompted for an
To access the device open a new Explorer bar and click on . If you have successfully enabled the
.
" " " " "
";
(1)
displayed
u
(2)
- 14 -
Page 17
65 Aleksandar Stamboliyski Str., 8000 Bourgas, Bulgaria
E-mail: of[email protected] ,Web: www.devabroadcast.com
Tel: +359 56 820027, Fax: +359 56 836700
STEP 4
WEB Interface
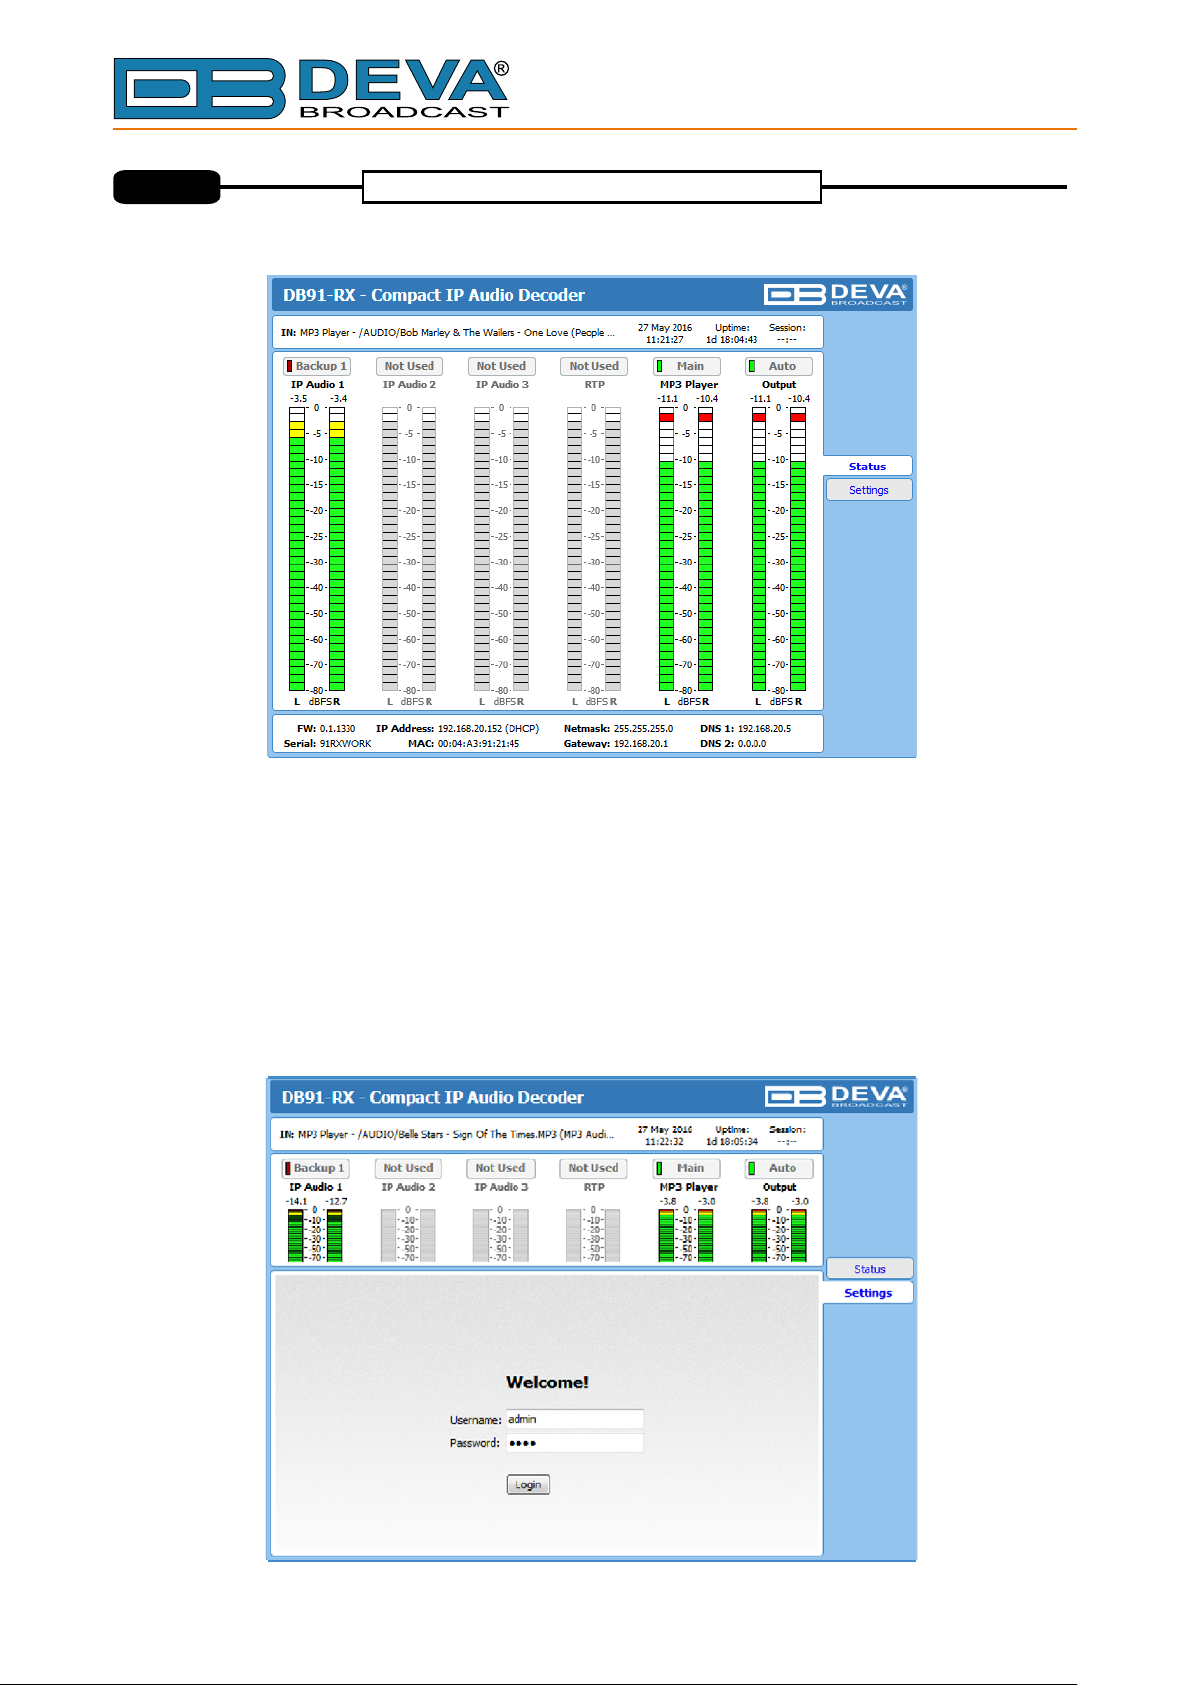
A successful log-in in the WEB Interface will look like this:
The main Status window contains information on the device's current status - the LED bar-graph
representation of the audio sources. The interactive buttons placed over the LED bar-graphs allow the
audio source to be manually changed.
If the mouse cursor is pointed at a label of an audio source, a balloon containing information for the Codec,
Bit rate and Sample rate will appear (as depicted above).
The DB provides you with protected access to the device settings.
91-RX a Upon pressing the Settings
button, a window requiring username and password will appear.
In order to make the necessary adjustments to the device please log in as ADMINISTRATOR which
will give you full control over the settings username: , password:
. The default values are .
admin pass
- 15 -
Page 18
65 Aleksandar Stamboliyski Str., 8000 Bourgas, Bulgaria
E-mail: of[email protected] ,Web: www.devabroadcast.com
Tel: +359 56 820027, Fax: +359 56 836700
STEP 5
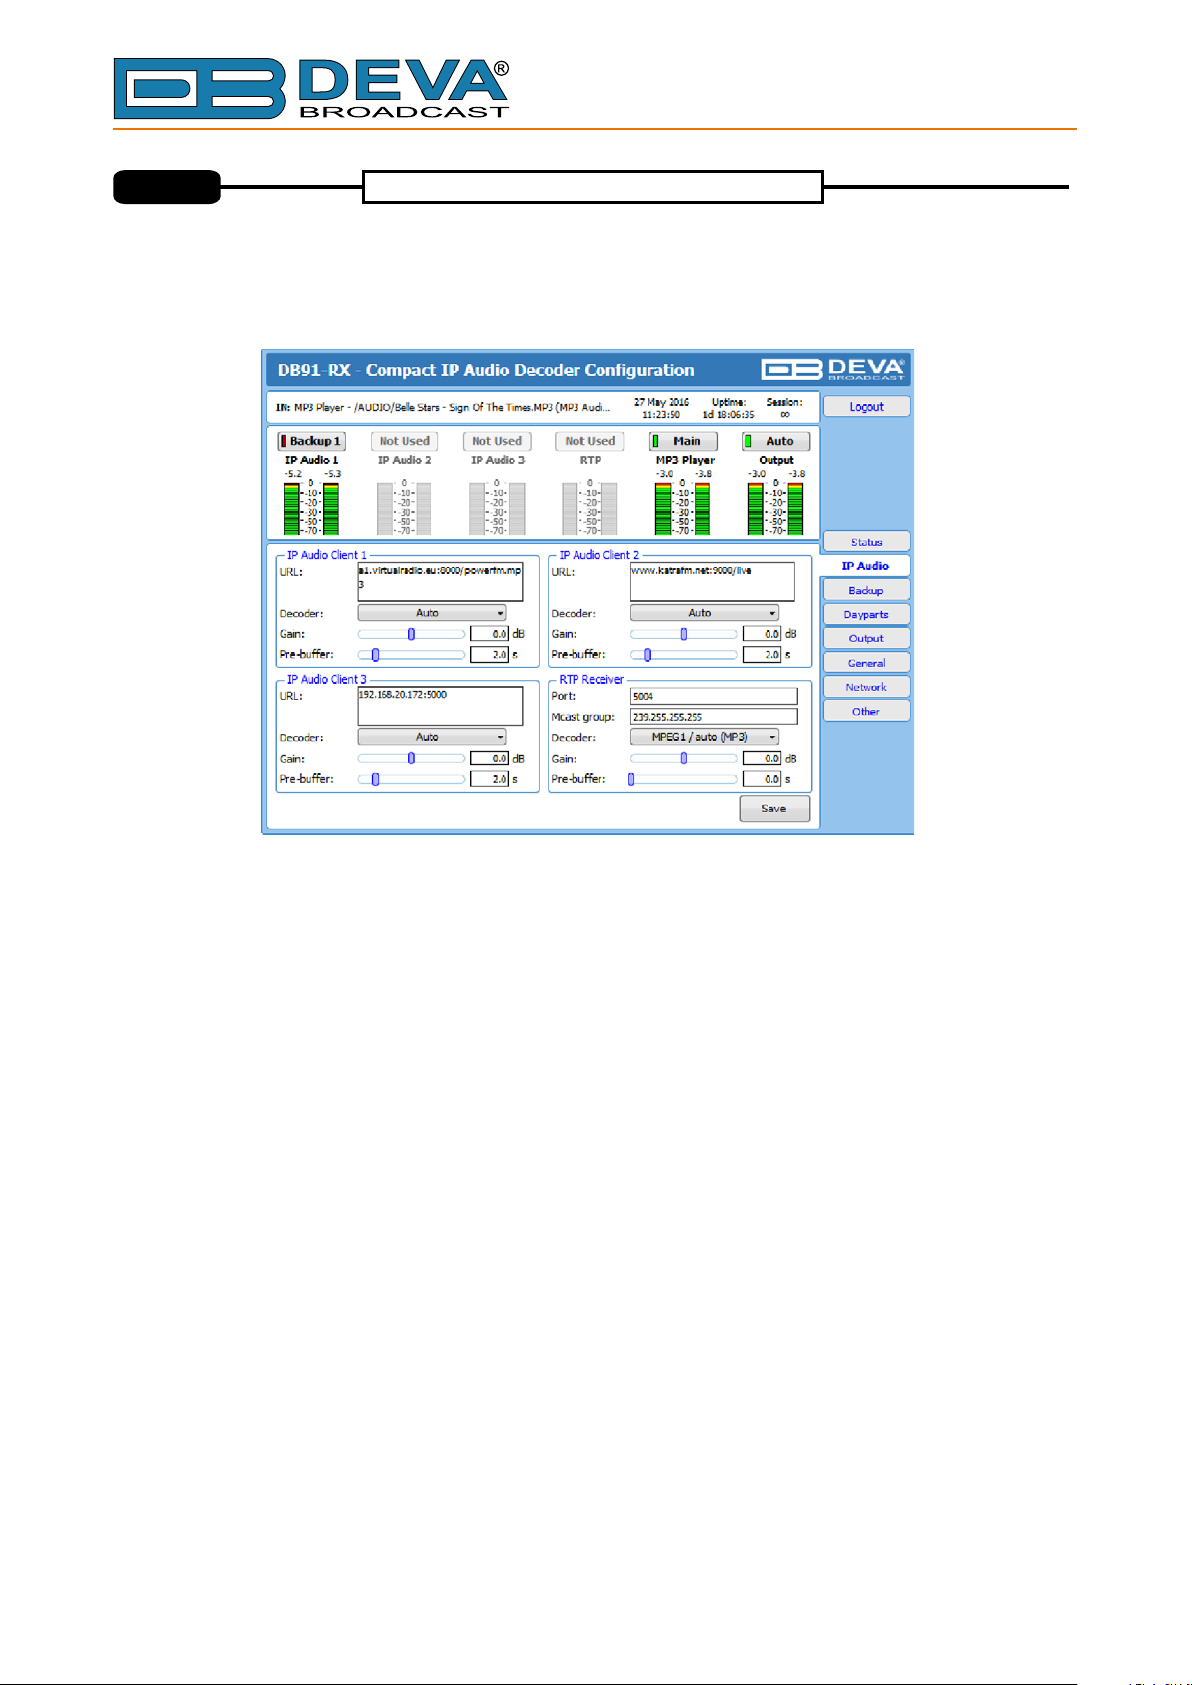
Upon entering the device's settings, you will be able to apply needed adjustments to the DB91-RX.
order the applied settings to be used press the [Save] button, placed on the bottom right part of
screen.
Device Settings
each
In
For further information on the available options and features, which can be
found on www.devabroadcast.com/downloads, and the accompanying CD.
please refer to the User Manual
Thank you for choosing DEVA!
Please refer to the User manual for nformation on
how to your device
configure and explore .
detailed i
- 16 -
 Loading...