

Page 1
Page 1 Driveway Monitor 33370
Driveway Monitor 33370 Page 2
v 0.5
Reference Guide
TM
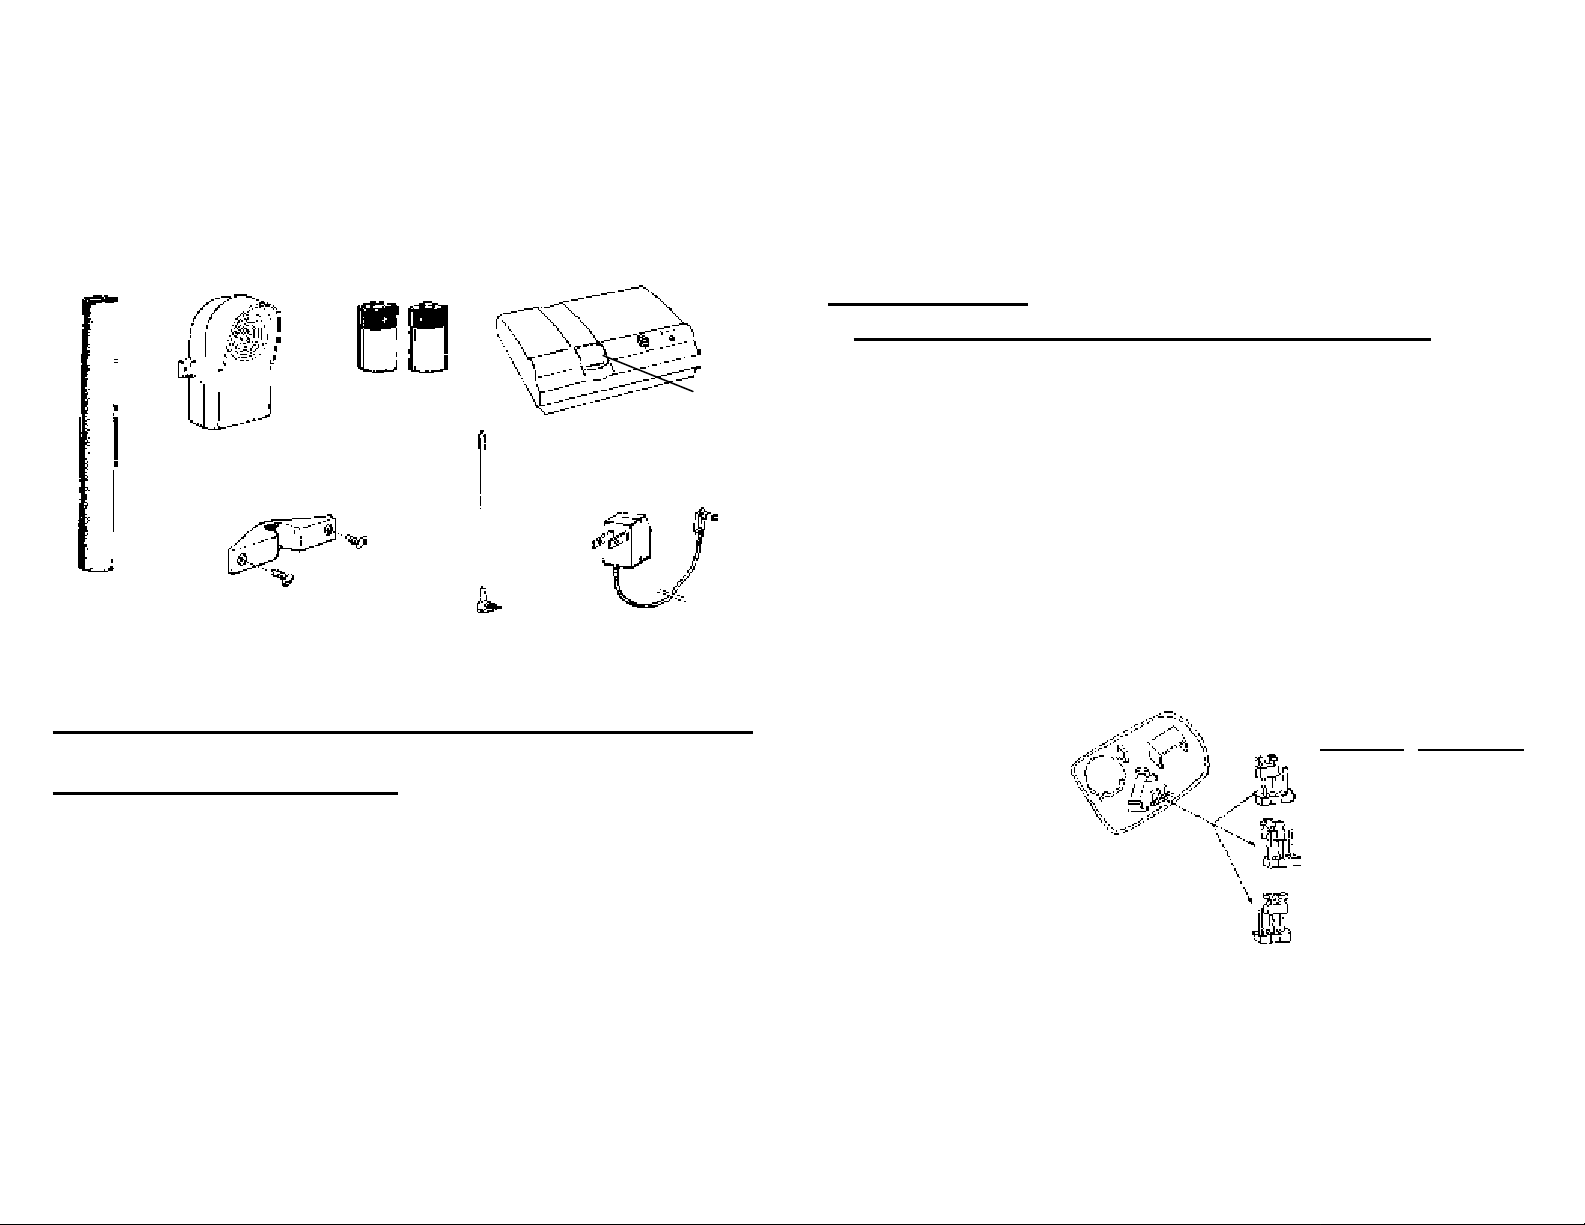
Wireless Driveway Monitor
Model # 33370
DesignTech's Driveway Monitor sends a wireless signal to your
home to alert you when a vehicle passes by the sensor.
Contents:
2 "C" Alka-
Mount-
ing
Stake
Driveway
Sensor (green)
Stake Clamp (green) with
2 Screws
line
Antenna
Indoor Receiver
(white)
AC Adapter
Red Alert
Light &
Reset
Button
The range of the Driveway Monitor system varies. Line-of-sight, the
driveway sensor should work up to 500 feet away from the receiver
when mounted to the plastic stake in the ground. The system will work
up to 1,000 ft away when mounted to a tree or larger post if placed 4 to
8 ft off the ground. If you do not have enough range - see the section
on Insufficient Range on page 5.
Troubleshooting:
1. False Activations or Not Activating When It Should: If you get
false activations when no vehicle is coming up the driveway, make
sure the driveway sensor is 25 feet or more from the street. If you get
false activations only on windy days, mount the driveway sensor to a
very solid object that will not sway in the wind. (The sensor will trigger
even if it is moved only a fraction of a degree).
If your system does not activate when it should or only responds to
large vehicles, try moving the sensor closer to your driveway. You can
test an installed driveway sensor without removing it from its mounted
location by moving a large steel tool (such as a shovel) near the
sensor.Please remember that the Driveway Monitor system will not
detect vehicles for about 15 seconds after the receiver has last chimed.
Follow the installation instructions in the separate attachment
How Driveway Monitor Works:
The driveway sensor uses a patented magnetometer sensor system.
Movement of any large metallic object close to the driveway sensor
will cause the sensor to transmit to the receiver. People and animals
will not trigger the driveway sensor.
The receiver chimes and the red ALERT light flashes when a vehicle
passes by the sensor. The red ALERT light continues to flash until the
red ALERT light is pressed. You can stop the red ALERT light from
blinking by pressing the flashing red ALERT light. However, the receiver will chime each time a vehicle passes by the sensor even if the
system is not reset each time. Note: The Driveway Monitor system
will not detect vehicles for about 15 seconds after the receiver has last
chimed.
Alternatively, you can
change the driveway
sensor's sensitivity
Sensitivity Sensor Range
Low Sensitivity
(7 ft)
level. The driveway sensor comes factory set to
the 'medium' sensitivity
Medium Sensitivity
(Factory Setting)
(10 ft)
setting which detects
vehicles up to 10 feet
High Sensitivity
(15 ft)
away. If you get false activations when no vehicle is coming up the driveway, you may want to
change the sensitivity setting to 'low', which detects vehicles up to 7
feet away. If on the other hand, your unit only responds to large vehicles or sometimes does not activate, change the sensitivity level to
'high', which will detect vehicles up to 15 feet away. Open the driveway sensor case and use the adjacent diagram to adjust the sensitivity.
Page 2

Note: The Driveway Monitor's battery life is affected by these sensi-
Page 3 Driveway Monitor 33370
Driveway Monitor 33370
Page 4
tivity settings:
3. Sensor Learning (do only if receiver does not respond to the
sensor):
Low = 1 ½ year battery life
Medium = 1 year battery life
High = 1 year battery life
A weak battery may cause false activations or missed detections. The
C cell Alkaline batteries in the Driveway Monitor sensor must be replaced every 1 to 1 ½ years, depending on the sensitivity setting.
2. Insufficient Range:
If your Driveway Monitor system works when the driveway sensor is
close to the house but not when the driveway sensor is far away, the
following adjustments may improve the range of the system:
• With the unit on the ground using the stake provided, you may not
get maximum range. Mount the driveway sensor 4-8 feet off the
ground to a tree or post (that will not sway in the wind) to increase
range.
• Move the receiver to a room closer to your driveway. Place the
receiver on a window sill that faces the driveway or on a table close
to the window.
• Move the receiver farther away from computers, CD players, and
cordless phones. These items may interfere with the operation of
your Driveway Monitor system if you place the receiver too close
to them.
• Moving the antenna 45° to the left or right of vertical will sometimes
improve the range of the system.
• An optional long-range antenna is available (see Optional Accessories Section), which gives the system up to double the regular
range.
There are two ways to teach new sensors to the receiver. The first
adds new sensors to the receiver. Existing sensors will still work with
the receiver. The second procedure erases all learned transmitters
and allows the user to re-teach new sensors to the receiver.
Adding New Sensors without erasing the original sensor
1. Unplug the power supply of the receiver.
2. Wait five seconds and then plug it in again.
3. Wait until the receiver has finished beeping during its powering
up sequence - and the green light goes out for a few seconds
While the green light is still out promptly press and hold the
ALERT light. You should hear a few short beeps. Release the
light.
4. The green power light should flash indicating the receiver is in
code learning mode. You have sixty seconds to learn the code
of the new sensor.
5. Activate the new sensor by rotating the sensor until you hear a
warbling chirp. (If you hear three separate chirps, like a small
bird, the receiver already has that sensor learned in memory).
6. When all sensors have been learned, press the ALERT light
briefly (you should hear several short beeps) and the receiver
resumes normal operation or simply wait an additional 60 seconds and the receiver automatically exits the programming
mode.
Clearing the Receiver's Memory and Re-learning New Sensors
1. Unplug the power supply of the receiver.
2. Wait five seconds and then plug it in again.
3. Wait until the receiver has finished beeping during its powering
up sequence - and the green light goes out for a few seconds
While the green light is still out promptly hold down the ALERT
light for about 5 seconds until you hear a steady tone. (When
you release the ALERT light you will hear five more beeps to
indicating that the memory is now empty).
4. The green power light will start to flash indicating the receiver is
in code learning mode. You now have sixty seconds to learn the
code of the new sensor.
Page 3

Driveway Monitor 33370 Page 6
5. Activate the new sensor by rotating the sensor until you hear a
Page 5
Driveway Monitor 33370
warbling chirp.
6. When all sensors have been learned, press the ALERT light
briefly (you will hear several short beeps) and the receiver will
resume normal operation or simply wait an additional 60 seconds and the receiver will automatically exit the programming
mode.
Sound Notification for Two or More Sensors:
For each additional sensor learned, the receiver sounds two or more
extra beeps when these sensors are triggered. These additional beeps
indicate the order in which the sensor was learned. The original sensor beeps the one alarm or chime sound when triggered. The second
learned sensor gives two extra beeps before the chime or alarm sound,
the third sensor learned gives three extra beeps, etc . . .
4. Temporally Silencing the Receiver
Sometimes you may wish to silence the receiver for several hours.
For example, perhaps the 5AM-garbage pickup triggers your sensor.
To silence the receiver for up to ten hours:
1. Press and hold the ALERT light until you hear a steady tone.
2. The silenced, “sleep” state is indicated by alternating short blinks
of the red and green lights for ten hours or until reset.
3. To resume normal operation, press the ALERT light again briefly.
NOTE: A power failure will cancel the sleep mode.
5. Adjusting the Volume
The receiver has two volume settings for the notification beep. The
receiver is factory set to the highest setting. To lower the volume setting:
1. Unplug the power supply and antenna from the receiver.
2. Use a small screwdriver and carefully pry open the receiver case
(often carefully prying the case open at the antenna jack area
works best).
3. When the top of the case is removed, you will notice a small
slide switch between the antenna jack and the power jack.
4. Slide the switch towards the power jack to increase the volume.
5. Slide the switch towards the antenna jack to decrease the volume.
6. Snap the case back together.
7. Plug in the power supply and antenna.
Volume
Lower Higher
Changing the volume level
Further Problems: Call DesignTech International, Inc. at 1-800-337-4468
and we will be glad to help you through any situations. DO NOT Return this
product to the retailer - DesignTech will warranty any product issues directly.
Page 4

Optional Accessories:
Page 7
Driveway Monitor 33370
The Long-Range Antenna increases the range of the Driveway
Monitor system up to double the regular range.
The Plug-In Siren increases the sound output of the Driveway
Monitor.
Motion AlertTM wirelessly detects the movement of anything that the
unit is attached to: back yard gates, a tool shed doors, a garage
door or anything else that can be moved.
You can use multiple sensors with one Driveway Monitor receiver. Each
type of sensor will produce a different chime from the receiver when
triggered. You can also have several Driveway Monitor sensors or
Driveway Monitor receivers work together as a system.
ITEM Part # Price
Long-Range Antenna 30316 $49.95
Additional Driveway Monitor Sensor 30075 $129.95
Motion Alert Sensor 30067 $49.95
Plug-In Siren 30319 $19.95
Additional Driveway Monitor Receiver 33333 $59.85
All prices are in US dollars and include shipping and handling. Contact your local dealer or call DesignTech to order.
This device complies with FCC Rules Part 15. Operation is subject to two conditions: 1) This device may not cause harmful interference, and
2) it must accept any interference received, including that which may cause undesirable operation.
User is cautioned that changes or modifications not expressly approved by DesignTech could
7955 Cameron Brown Court • Springfield, Virginia 22153 USA
void the user's authority to operate this equipment.
Covered under US Patent Numbers: 4,851,775 & 5,239,264
Tel: (703) 866-2000 or (800) 337-4468
FCC ID: ELGMOTION & ELGHOME
DOC: 1476 102 203 and 1476 102 203 A
www.designtech-intl.com
©2000 DesignTech International, Inc.
 Loading...