

Page 1
v 0.01
Door Announcer
User's Manual
TM
System
Model # 30052
Congratulations on the purchase of the DesignTech’s Door Announcer.
DesignTech’s Door Announcer is designed to alert you when a monitored objects like a door, gate or cabinet are opened or moved.
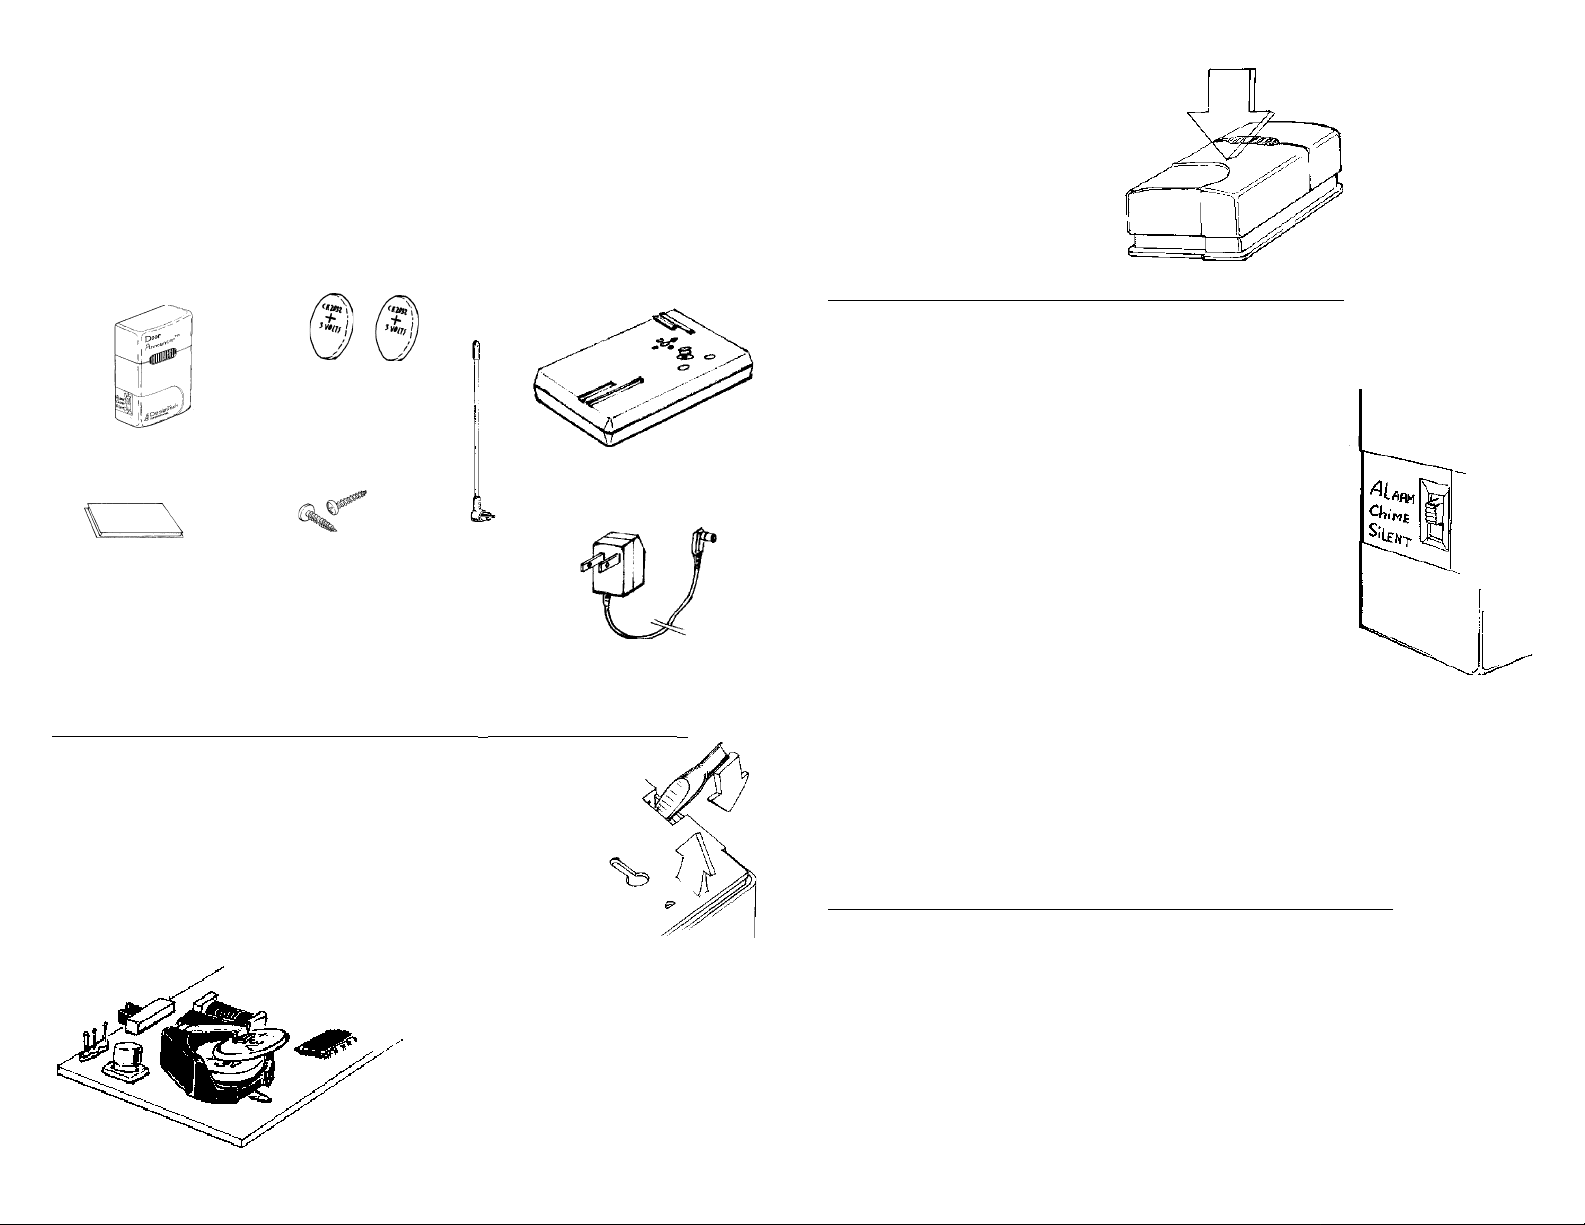
CONTENTS:
2 Lithium Batteries
(CR2032 type)
3. Push the case back together.
SETTING UP THE Door Announcer SENSOR:
The Door Announcer has a three-position slide switch on the side of the unit.
1. The position closest to the edge is the Silent Mode. In this position the Door
Announcer will make no sound when moved. (The Door Announcer will
still send a signal to the Smart Home Receiver that the
Door Announcer has been moved.
Door Sensor
(white)
DoubleStick Foam
2 Screws for
Mounting
Antenna
Remote Receiver
(white)
AC Adapter
INSTALLING THE BATTERIES IN THE Door Announcer:
1. Insert a small screwdriver blade into the slot in the side of
the case and gently pry up on each side of the case to open.
2. Slip the first battery in the battery clip
with the positive (+) side up, then slide
the second battery on top of the first battery but under the clip, making sure the
positive (+) sides of both batteries are face
up.
2. The center position of the switch is the Door Chime
Mode. In this position the Door Announcer will chime
each time the unit is moved and will automatically reset.
(The Door Announcer will send a signal to the Smart
Home Receiver that the Door Announcer has been
moved).
3. The position farthest from the edge is the Alarm Mode.
In this mode the Door Announcer will sound an alarm
sound for 45 seconds, then automatically reset. (The Door Announcer will
send an alarm signal to the Smart Home Receiver that the Door Announcer
has been moved. The Smart Home Receiver will sound for 25 minutes or
until reset).
TESTING THE SYSTEM PRIOR TO INSTALLATION
1. Select the operational mode of the Door Announcer, chime or alarm.
2. Set the Door Announcer on a solid surface and let it “rest” for 30 seconds
without touching it.
3. Rotate or move the Door Announcer.
4. The Door Announcer will chime or alarm to notify you that it has been moved.
Page 1 Door Announcer 30052 Door Announcer 30052 Page 2
Page 2
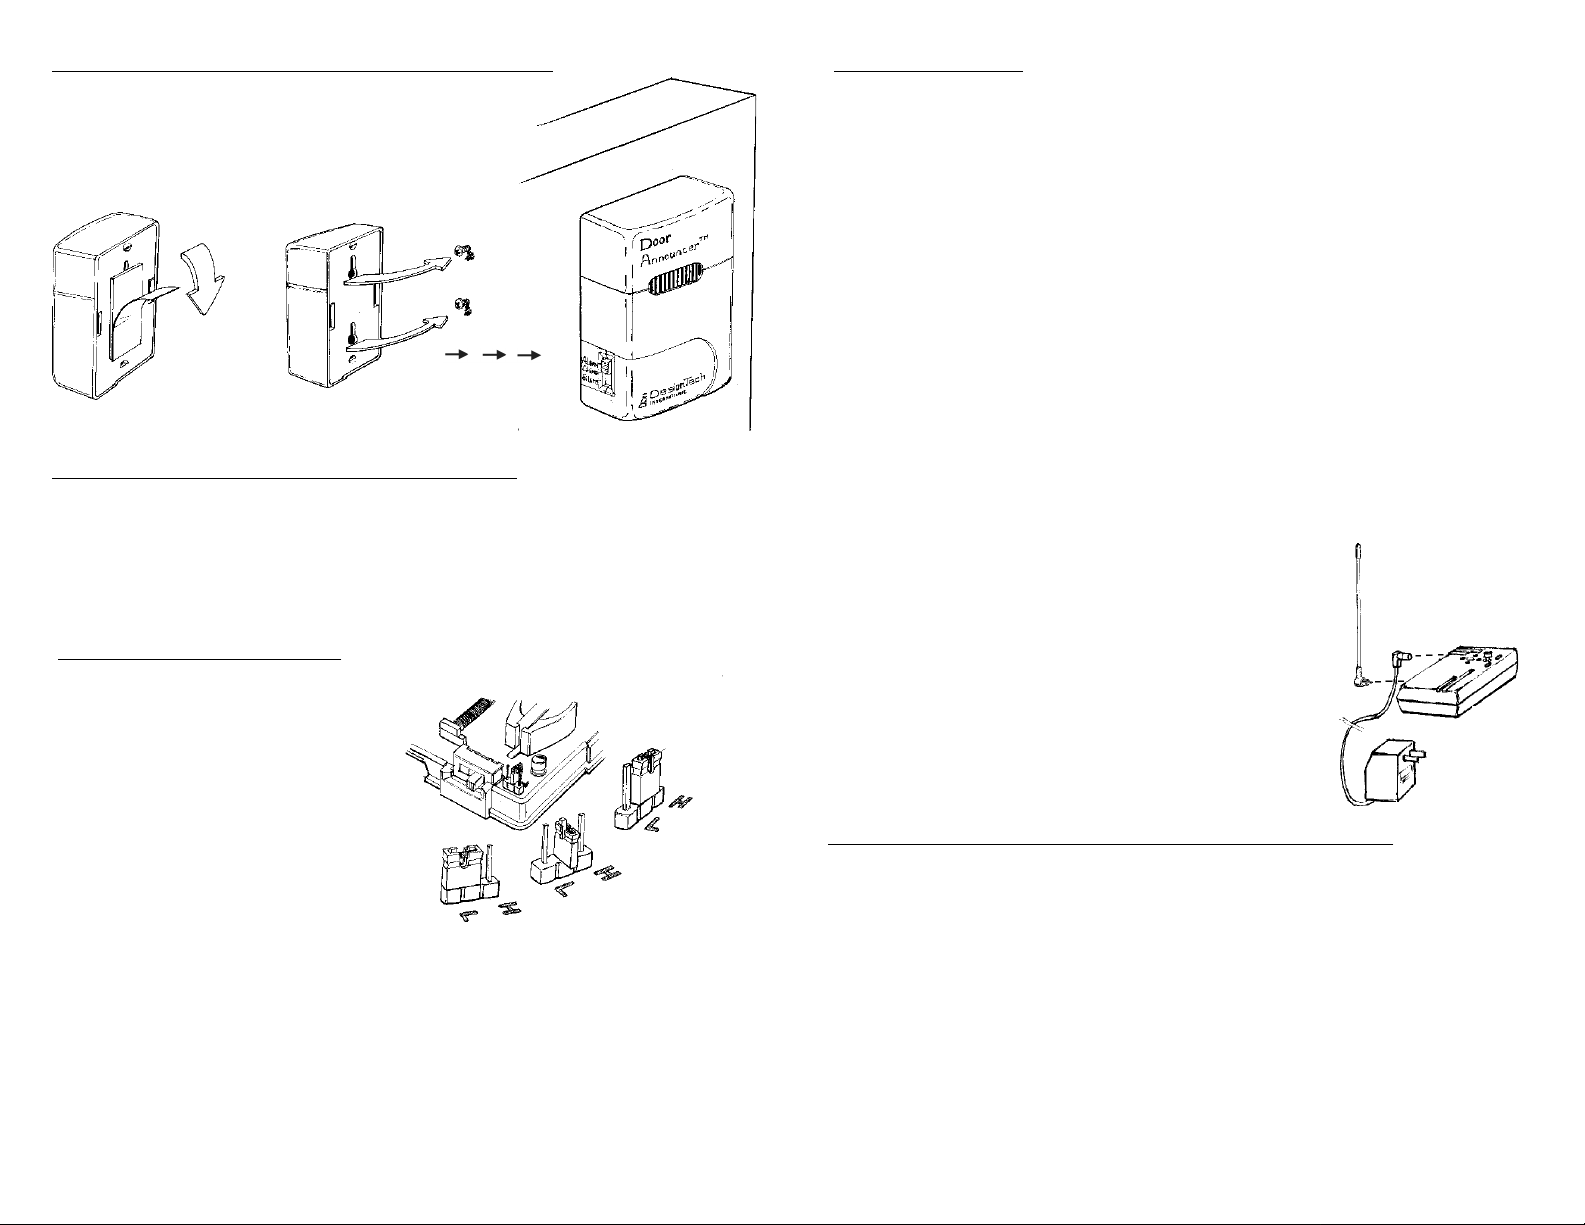
MOUNTING THE Door Announcer SENSOR:
Attach the Door Announcer to the object to be monitored using the double-stick foam tape or the Phillips
screws provided. The flat end of the case should lie
tight against the monitored object.
OR
HOW THE DOOR ANNOUNCER WORKS:
The Door Announcer uses a patented magnetometer sensor system. Moving
the monitored object causes the magnet field around the Door Announcer to
change, causing the Door Announcer to sound an alert. Once the motion has
stopped, the Door Announcer automatically resets and is ready for the next event.
SENSITIVITY SETTINGS:
The Door Announcer is factory set to
the medium setting, (the small jumper
inside the case is only connected to the
center pin). If the Door Announcer
does not respond to the motion of the
monitored object, the sensitivity may
have to be changed.
High Sensitivity
Moving the jumper to connect the lowest pin (marked with an “L”) and the
center pin, the sensitivity is in the lowest
setting. It will take a large movement
Low Sensitivity
of the Door Announcer to sound an
alert.
Moving the jumper to connect the highest pin (marked with an “H”) and the
center pin, the sensitivity is in the highest setting. A very small movement of the
Door Announcer will sound an alert.
Medium Sensitivity
Troubleshooting
1. False alerts when Door Announcer is not moved:
Movements of large metal objects, such as other large metal doors being opened
or closed near the Door Announcer may cause a false signal. Since the Door
Announcer senses changes in the surrounding magnetic field, large magnets found
in some speakers, television and computer monitors may also cause false signals.
Try moving the Door Announcer to a slightly different location.
2. If the Door Announcer constantly alerts:
Check the batteries. When the batteries are weak and need to be replaced, the
Door Announcer will start “chaining” or alert several times for just one event.
Replace with (2) CR2025 batteries with fresh ones and reset the unit.
3. If there is no response from the Door Announcer:
a) First check the batteries and replace if necessary . (Replace with (2) CR2025)
b) Check the position of the three-position slide switch (the unit may accidentally
switched to the Silent Operation Mode).
c) If the batteries are fresh, try setting the Door Announcer to another sensitiv-
ity setting (see the Sensitivity Setting Section). The Door Announcer maybe
having difficulty detecting changes in the surrounding magnetic field.
SETTING UP THE SMART HOME RECEIVER:
1. Plug the AC adapter into any standard electrical
wall outlet and the other end into the back of the receiver. The red POWER light will come on and the
receiver will chirp.
2. Door Announcer comes with a 9-inch antenna
which plugs into the antenna jack on the back of the
receiver. The antenna should be vertical.
TESTING THE SYSTEM PRIOR TO INSTALLATION
1. The sensor and receiver are factory set to a unique code. Prior to
installation, set the switch on the Door Announcer to CHIME and test the
system by rotating the sensor while you are more than 5 feet away from
the receiver. The receiver will chime and the green light will flash.
If the receiver does not chime or the green light does not come on, first
check that the red POWER light on the receiver is on and that the batteries are inserted correctly in the Door Announcer sensor. If the receiver
still does not respond, see the Sensor Learning section on the next page.
You may need to experiment with your application to find the best sensitivity
setting that works for you.
Page 3 Door Announcer 30052
Door Announcer 30052 Page 4
Page 3

4. SENSOR LEARNING (do only if receiver does not respond):
1. With the receiver plugged in
and the red POWER light on,
move the slide switch closest
to the antenna to the TRANS
LEARN position (toward the antenna wire). The green light will
glow steadily while in this sensor-learning position.
OPTIONAL ACCESSORIES:
The Long-Range Antenna increases the range of the Door Announcer
system up to double the regular range.
For louder sound, the Plug-In Siren makes a loud sound that can be heard
from anywhere in your home when the mail arrives.
DesignTech also makes a line of other sensors which can be used with
your Mail Alert system.
2. Push the Reset Button on the top of the case down for 1 second.
This will erase any previous learned codes.
3. Rotate the Door Announcer sensor . The receiver will chirp to indicate that it has learned the code from the Door Announcer sensor.
3. Slide the code-learning
switch back to the NORM USE
position (away from the antenna wire), for normal operation.
Do NOT press the RESET button before sliding the
switch back to the NORM USE
position, or the code will be
erased. The green light will
turn off.
5. ADJUSTING THE VOLUME:
The receiver comes factory set to
the louder volume setting. T o lower
the volume, set the volume switch
to the "-" setting (toward the edge
of the case). For louder volume,
set the switch back to the + setting
(toward the antenna).
Driveway Monitor
TM
alerts you anytime a vehicle arrives at or
departs from your driveway.
Mail Alert
TM
wirelessly detects the opening of your mail box door
when the mail man arrives..
You can use more than one of these sensors with one Door Announcer
receiver. Each type of sensor will produce a different chime from the receiver when triggered. You can also have several Door Announcer sensors and several receivers work together as a system (useful for large
homes).
ITEM Part # Price
Long-Range Antenna 30316 $49.95
Additional Door Announcer Sensors 30062 $44.95
Mail Alert Sensor 30065 $44.95
Driveway Monitor Sensor 30075 $129.95
Motion Alert Sensor 30067 $49.95
Plug-In Siren 30319 $19.95
Additional Door Announcer Receiver 30317 $59.95
All prices are in US dollars and include shipping and handling. Contact
your local distributor or call DesignTech to order .
This device complies with FCC Rules Part 15. Operation is subject to two conditions: 1) This device may not cause harmful interference, and
2) it must accept any interference received, including that which may cause undesirable operation.
User is cautioned that changes or modifications not expressly approved by DesignTech could
void the user's authority to operate this equipment.
Covered under US Patent #s 4,851,775 & 5,239,264
FCC ID: ELGMOTION & ELGHOME
DOC: 1476 102 203 and 1476 102 203 A
7955 Cameron Brown Court • Springfield, Virginia 22153 USA
Tel: (703) 866-2000 or (800) 337-4468 Fax: (703) 866-2001
www.designtech-intl.com
©2000 DesignTech International, Inc.
Door Announcer 30052 Page 6Page 5 Door Announcer 30052
 Loading...