

Page 1

1
El logotipo DERBI es marca registrada y propiedad de DERBI - Nacional Motor, S.A. Sociedad Unipersonal.
Prohibida la reproducción total o parcial de cualquier fotografía, gráfico o texto insertado en este manual.
© 2007 DERBI - Nacional Motor, S.A. Sociedad Unipersonal.
Impreso por Gràfiques Morán, S.L. - Palamós (Girona) Depósito Legal: GI - 71 - 2004
CODIGO MANUAL 864013
Page 2

2
DERBI - NACIONAL MOTOR, S.A.
Sociedad Unipersonal desea agradecerle la confianza depositada por
Ud. en la elección del modelo scooter ATLANTIS 50/100 c.c. 4T
En este manual se especifican los
principales detalles para el cuidado
de su ciclomotor / motocicleta, para
que obtenga el mejor funcionamiento y la mayor duración con un mínimo coste.
Cuide su ciclomotor / motocicleta; la
calidad DERBI se encargará del
resto, con los recambios originales y
una red Nacional de más de cuatro
mil agentes y talleres autorizados,
estamos seguros de que obtendrá
plena satisfacción en el uso del
vehículo.
Ante cualquier problema, dirigirse al
representante más próximo.
Bienvenido a DERBI
DERBI – NACIONAL MOTOR, S.A.
Sociedad Unipersonal, vous remercie du choix que vous avez fait en
achetant le scooter modèle
ATLANTIS 50/100 c.c. 4T
Ce manuel spécifie les soins les
plus importants pour l'entretien de
votre cyclomoteur / motocyclette
pour obtenir le meilleur fonctionnement et une durée optimale au
moindre coût. Prenez soin de votre
cyclomoteur/motocyclette et la qualité DERBI se chargera du reste en
vous offrant les pièces de rechange
et un réseau de plus de quatre mille
agents et garagistes autorisés qui
vous garantissent toute satisfaction
dans l'utilisation de votre véhicule.
Si vous avez n'importe quel problè-
me adressez-vous au concessionnaire le plus proche.
Soyez le bienvenu à DERBI
Bienvenue à DERBI
ef
Page 3

3
DERBI - NACIONAL MOTOR, S.A.
Sociedad Unipersonal desidera ringraziare la fiducia che Lei ha posto
nella scelta del modello scooter
ATLANTIS 50/1100 c.c. 4T.
In questo manuale si specificano i
dettagli principali per la cura del Suo
scooter / motocicletta e così ottenere il miglior funzionamento e maggiore durata con un costo minimo.
Abbia cura del Suo scooter / motocicletta: la qualità DERBI si occuperà
del resto, con pezzi originali e una
rete nazionale di oltre quattromila
agenti ed officine autorizzate, siamo
certi che Lei avrà piena soddisfazione nell’uso del veicolo.
Di fronte a qualsiasi problema, rivolgasi al rappresentante più vicino.
Benvenuto a DERBI.
Benvenuto a DERBI
DERBI-NACIONAL MOTOR, S.A.,
Sociedad Unipersonal, wishes to
thank you for the confidence you
have shown us in your purchase of
an ATLANTIS 50/100 cc 4-stroke
scooter.
In this manual we indicate the principal details of how to care for your
moped or motor scooter, so that you
will be able to operate it at its best
and extend its lifetime, at minimum
cost. Take care of your moped or
scooter, and DERBI Quality will take
care of the rest, with original spare
parts and a network of more than 40
thousand Agents and authorised
workshops throughout the country,
and we are sure that you will derive
total satisfaction from the use of
your vehicle.
If you experience any problem, please consult the closest DERBI representative.
Welcome to DERBI
DERBI - NACIONAL MOTOR, S.A.,
Einmanngesellschaft, möchte Ihnen
für das Vertrauen danken, dass Sie
uns durch den Erwerb des
Motorrollers Modell ATLANTIS.
50/100 ccm 4T unserer Marke
entgegengebracht haben.
Das vorliegende Handbuch enthält
die wichtigsten Informationen über
die Funktionen und Wartung Ihres
Motorrollers und soll dazu beitragen,
dass Ihnen bester Fahrbetrieb und
lange Lebensdauer zu niedrigsten
Kosten gewährleistet werden.
Pflegen Sie Ihren Motorroller,
DERBI übernimmt den Rest. Wir
halten sämtliche Originalersatzteile
bereit und bieten Ihnen in Spanien
ein Netz von über viertausend
Vertragshändlern und –werkstätten,
die sicherstellen, dass Sie viel
Freude mit Ihrem Fahrzeug haben
werden. Bei Auftreten jeglichen
Problems wenden Sie sich bitte an
Ihren Vertragshändler.
Willkomen bei DERBI
igd
Page 4

El manual
Las instrucciones de este manual han
sido preparadas principalmente para
ofrecerle una guía sencilla y clara de utilizar; se indican asimismo pequeñas
operaciones de mantenimiento y controles periódicos a los cuales se debe
someter el vehículo en los Concesionarios o en los Centros de Asistencia
Autorizados Derbi. Además, el manual
contiene las instrucciones para realizar
algunas reparaciones sencillas. Las
operaciones que no están descritas
explícitamente en la presente publicación, es porque necesitan equipos especiales y/o conocimientos técnicos específicos para su realización, le aconsejamos por lo tanto que se dirija a los Concesionarios o a los distribuidores Derbi.
Le manuel
Les instructions de ce manuel ont été
conçues surtout pour que vous disposiez d'un guide simple et clair où vous
trouverez également les petites opérations d'entretien et les révisions périodiques de votre véhicule chez les Concessionnaires ou chez les Garagistes autorisés par Derbi.
Ce manuel présente également les instructions pour que vous puissiez effectuer certaines réparations faciles. Les
opérations qui ne sont pas décrites dans
ces pages doivent être faites par des
spécialistes ayant les connaissances
techniques spécifiques. Nous vous conseillons donc de vous adresser aux
Concessionnaires ou aux distributeurs
Derbi.
El manual
Le manuel
4
Page 5

Il manuale
Le istruzioni di questo manuale sono
state preparate principalmente per offrirLe una guida dall’uso semplice e chiaro; sono inoltre indicate le piccole operazioni di manutenzione e i controlli periodici a cui deve sottoporre il veicolo presso i concessionari o nei Centri d’Assistenza Autorizzati Derbi. Il manuale contiene inoltre le istruzioni per realizzare
delle riparazioni semplici. Per le operazioni che non sono descritte esplicitamente nella presente pubblicazione si è
fatto così hanno bisogno di attrezzature
particolari e/o conoscenze tecniche specifiche per la loro realizzazione. Le consigliamo quindi di rivolgersi ai concessionari o ai distributori Derbi.
The Manual
The instructions in this Manual have
been prepared principally in order to
provide you with a simple clearly usable
guide; minor maintenance operations
are also shown, together with the regular check-ups which your vehicle should
have at Concessionaires or Authorised
DERBI Service Centres. In addition, the
manual contains instructions to enable
you to carry out a few simple repairs.
Operations which are not explicitly described in the present document require
special equipment and/or specialist
technical knowledge to carry out, and
we therefore recommend that you take
them to DERBI Concessionaires or distributors.
Das Handbuch
Mit diesem Handbuch sollen Ihnen leicht
verständliche und auf einfache Weise in
die Praxis umzusetzende Hinweise
gegeben werden. So finden Sie zum
Beispiel Angaben über kleinere
Wartungsarbeiten und regelmäßige
Revisionen, die von den
Vertragshändlern oder –werkstätten
Derbi vorzunehmen sind. Außerdem
finden Sie in dem Handbuch einige
Hinweise, wie Sie kleinere Reparaturen
selber durchführen können. Die in
dieser Anleitung nicht erwähnten
Arbeiten erfordern Spezialausrüstung
und/oder Fachkenntnisse. Wir
empfehlen Ihnen deshalb, sich in diesen
Fällen mit Vertragshändlern oder
–werkstätten von Derbi in Verbindung
zu setzen.
Il manuale • The Manual
Das Handbuch
5
Page 6

00
11
55
Seguridad de las personas
La falta de respeto total o parcial de
estas prescripciones puede comportar
peligro grave para la integridad física de
las personas.
Salvaguardia del ambiente
Indica el comportamiento correcto para
que el uso del vehículo no cause ningún
daño a la naturaleza.
Integridad del vehículo
La falta de respeto total o parcial de
estas prescripciones comporta el peligro
de serios daños al vehículo e incluso la
caducidad de la garantía.
Las señales que ven en esta página son
muy importantes. Sirven para resaltar
partes del libro en las que es necesario
detenerse con más atención. Como ven,
cada señal está compuesta de un símbolo gráfico diferente para facilitar inmediatamente y resaltar la colocación de
los argumentos en el texto.
Sécurité des personnes
Le non respect total ou partiel de ces
prescriptions peut entraîner un danger
pour l'intégrité physique des personnes.
Sauvegarde de l'environnement
Indique la meilleure utilisation du véhi-
cule causant le moins de dommage à
l'environnement.
Intégrité du véhicule
Le non respect total ou partiel de ces
prescriptions peut causer de sérieux
dommages à votre véhicule et peut
entraîner la perte de la garantie.
Les signes qui apparaissent sur cette
page sont très importants car ils soulignent les parties du manuel qui méritent
toute votre attention. Chaque signe est
un symbole graphique qui facilite la lecture aisée des recommandations des
différents chapîtres.
El manual
Le manuel
6
ef
Page 7

Sicurezza delle persone
L’inadempienza totale o parziale di
queste prescrizioni può implicare pericolo grave per l’incolumità delle persone.
Salvaguardia dell’ambiente
Indica l’atteggiamento corretto affinché
l’uso del veicolo non arrechi nessun
danno alla natura.
Integrità del veicolo
L’inadempienza totale o parziale di
queste prescrizioni implica il rischio di
danni seri al veicolo e addirittura la scadenza della garanzia.
I segnali che vedete su questa pagina
sono assai importanti. Servono a evidenziare parti del libro in cui è necessario fermarsi con più attenzione. Come
vedete, ogni segnale è formato da un
simbolo grafico diverso per rendere
immediatamente più facile ed evidenziare la collocazione dei temi nelle diverse
aree.
Personal Safety
Failure to observe these prescriptions
either in full or in part, may involve
serious risk to personal safety and to
others.
Protection of the Environment
Indicates correct procedures for the use
of the vehicle which causes no harm to
the environment.
Damage to the vehicle
Failure to observe these prescriptions
either in full or in part, may involve
serious risk of damage to the vehicle,
and even cancellation of the guarantee.
The symbols shown on this page are
very important. They are used to draw
attention to parts of this book where it is
necessary to pay special attention. As
you can see, each symbol is made up of
a different graphic image for immediate
recognition, and emphasise the organisation of the text in the different sections.
Sicherheit für die Personen
Durch die völlige oder teilweise
Nichtbeachtung dieser Vorschriften
kann eine ernste Gefährdung der
Unversehrtheit von Personen
hervorgerufen werden.
Umweltschutz
Mit diesem Zeichen wird angegeben,
wie Sie durch ein umsichtiges Fahren
mit Ihrem Motorroller zum Umweltschutz
beitragen können.
Betriebssicherheit des Fahrzeugs
Durch die völlige oder teilweise
Nichtbeachtung dieser Vorschriften
können schwere Schäden an dem
Fahrzeug hervorgerufen werden und
können sogar zum Verlust der Garantie
führen.
Die auf dieser Seite angegebenen
Zeichen sind von größter Wichtigkeit.
Mit ihnen werden Textstellen des
Handbuches angegeben, die höhere
Aufmerksamkeit verlangen. Die
einzelnen Zeichen unterscheiden sich
durch verschiedene graphische
Symbole, mit denen in den
verschiedenen Kapiteln die einzelnen
Hinweise gekennzeichnet und als
solche leicht zu erkennen sind.
7
igd
Page 8

8
❀
Así puede Vd. contribuir a
la conservación del medio
ambiente.
De su estilo de conducir depende
también el consumo de combustible
y, por lo tanto, el nivel de emisión
de contaminantes de su scooter
ATLANTIS
Asimismo, la manera de tratar el
vehículo influye en el nivel de ruidos
y en el desgaste del mismo.
En este Manual de Instrucciones se
incluyen una serie de informaciones
sobre una conducción ecológica y al
mismo tiempo económica de su
scooter ATLANTIS
Sírvase tener en cuenta todos los
textos de este Manual marcados
con un
❀
Contamos con Vd.
¡Proteja el medio
ambiente !
Vous pouvez contribuer
à la conservation de
l’environnement.
De votre manière de conduire
dépend également la consommation
de combustible et, donc, du taux
d’émission d’agents contaminants
de votre scooter ATLANTIS
La manière de traiter votre véhicule
a des répercutions sur le niveau de
bruits et la vie de votre scooter
ATLANTIS
Ce Manuel d’Instructions donne une
série d’informations sur une conduite écologique et économique de
votre scooter ATLANTIS
Voyez tous les textes de ce Manuel
marqués d’une
❀
Nous avons confiance
en vous.
Protégez
l’environnement!
ef
Page 9

9
Così può Lei contribuire
alla conservazione del
medio ambiente.
Dal suo modo di guidare dipende
pure il consumo di combustibile e,
quindi, il livello di emissione di contaminanti del suo scooter ATLANTIS
Inoltre, il modo in cui tratta il veicolo
influisce sul livello di rumore e nel
proprio logoramento.
In questo Manuale di Istruzioni si
allegano una serie di informazioni
sulla guida ecologica e contemporaneamente economica del suo scooter ATLANTIS
Voglia tener presente tutti i testi di
questo Manuale contrassegnati con
un
❀
Contiamo su di Lei.
Protegga il
medio ambiente!
This is how you can contribute to preserving the
environment.
The way you ride determines your
fuel consumption and therefore how
much your scooter ATLANTIS pollutes the atmosphere.
In the same way, the way you
treat your moped affects its noise
level and wear and tear on the scooter ATLANTIS
In the Owner’s instruction handbook you will find a series of points of
information on how to ride in an ecologically sound manner, which will
also be the most economic way to
ride your scooter ATLANTIS
Please pay attention to all the
points marked with a flower
❀
in
this handbook.
We are counting on you!
Protect the
environment!
So können Sie zum
Umweltschutz beitragen
Von Ihrem Fahrstil hängt der
Kraftstoffverbrauch ab und bestimmt
somit die Abgasemission Ihres
Motorrollers ATLANTIS.
Gleichermaßen hat Ihre Fahrweise
auch Auswirkungen sowohl auf den von
dem Motorroller verursachten
Lärmpegel als auch hinsichtlich des
Verschleißes.
Das vorliegende Handbuch enthält
eine Reihe von Informationen über
umweltfreundlichen und gleichzeitig
kostengünstigen Betrieb Ihres
Motorrollers ATLANTIS.
Beachten Sie in diesem Handbuch
bitte alle mit
❀
gekennzeichneten
Textstellen.
Wir rechnen auf Sie.
Schonen die
die Umwelt!
igd
Page 10

INDICE Pág.
1 VEHÍCULO
IDENTIFICACIONES.............................16
LLAVES, INDICACIONES.....................16
INSTRUMENTOS Y MANDOS .............18
PULSADOR DE ARRANQUE ...............20
CONMUTADOR INTERMITENTES,
LUCES Y PULSADOR CLAXON.......22
MANDO FRENO DELANTERO,
TRASERO Y GAS .............................24
CERRADURA DE CONTACTO ............26
PALANCA DE ARRANQUE Y COFRE
PORTA-OBJETOS ............................28
PORTABOLSAS....................................28
2 USO
CERRADURA SILLÍN Y DEPÓSITO
GASOLINA ........................................32
PUENTE ANTIRROBO .........................32
ARRANQUE DEL MOTOR....................36
CONDUCCIÓN......................................44
PARADA DEL MOTOR .........................48
CONDUCCIÓN SEGURA .....................52
3 MANTENIMIENTO
NIVEL ACEITE MOTOR........................60
NIVEL ACEITE CUBO TRASERO ........68
PRESIÓN NEUMÁTICOS .....................70
DESMONTAJE BUJÍA...........................73
INDEX Pag.
1 VÉHICULE
IDENTIFICATIONS ...............................16
CLÉS, INDICATIONS............................16
INSTRUMENTS ET
COMMANDES ...................................18
POUSSOIR DE DÉMARRAGE .............20
COMMUTATEUR CLIGNOTANTS
PHARE ET POUSSOIR KLAXON .....22
COMMANDE FREIN AVANT,
ARRIÈRE ET GAZ.............................24
SERRURE DE CONTACT ....................26
LEVIER DE DÉMARRAGE ET
COFFRE PORTE-OBJETS ...............28
PORTE-BAGAGES ...............................28
2 UTILISATION
SERRURE SELLE ET RÉSERVOIR
À ESSENCE ......................................32
PONT ANTIVOL....................................32
DÉMARRAGE DU MOTEUR ................36
CONDUITE............................................44
ARRÊT DU MOTEUR ...........................48
CONDUITE SANS RISQUES................52
3 ENTRETIEN
NIVEAU HUILE MOTEUR.....................60
NIVEAU HUILE MOYEU ARRIÈRE ......68
PRESSION DES PNEUS......................70
Índice
Index
10
ef
Page 11

Indice • Table of contents
Inhalt
11
INDICE Pag.
1 VEICOLO
IDENTIFICAZIONI.................................16
CHIAVI, INDICAZIONI...........................16
STRUMENTI E COMANDI....................18
PULSANTE D’ACCENSIONE ...............20
COMMUTATORE INDICATORI
DIREZIONE, LUCI E PULSANTE
AVVISATORE ACUSTICO ................22
COMANDO FRENO ANTERIORE,
POSTERIORE E ACCELERATORE .24
SERRATURA D’ACCENSIONE............26
LEVA D’AVVIAMENTO E BAULE
PORTAOGGETTI ..............................28
PORTASACCHI ....................................28
2 USO
SERRATURA SELLA E SERBATOIO
BENZINA ...........................................32
PONTE ANTIFURTO ............................32
AVVIAMENTO DEL MOTORE..............36
GUIDA...................................................44
ARRESTO DEL MOTORE ....................48
GUIDA SICURA ....................................52
3 MANUTENZIONE
LIVELLO OLIO MOTORE .....................60
LIVELLO OLIO MOZZO POSTERIORE
...68
PRESSIONE PNEUMATICI ..................70
SMONTAGGIO CANDELA....................73
TABLE OF CONTENTS page
1 VEHICLE
IDENTIFICATION MARKS....................16
KEYS, COMMENTS..............................16
INSTRUMENTS AND
CONTROLS.......................................18
STARTER BUTTON..............................20
INDICATOR AND LIGHT
SWITCHES, HORN BUTTON ...........22
FRONT AND REAR BRAKES AND
THROTTLE CONTROLS...................24
IGNITION LOCK....................................26
KICK-START PEDAL AND
CARRIER BOX ..................................28
BAG-CARRIER HOOK..........................28
2 OPERATION
SADDLE LOCK AND FUEL TANK........32
ANTI-THEFT SHACKLE........................32
STARTING THE ENGINE .....................36
RIDING..................................................44
STOPPING THE ENGINE.....................48
SAFE RIDING .......................................52
3 MAINTENANCE
ENGINE OIL LEVEL..............................60
REAR HUB OIL LEVEL.........................68
TYRE PRESSURES..............................70
REMOVING THE SPARK PLUG...........73
INHALT Seite
1 FAHRZEUG
FAHRZEUGIDENTIFIKATION ..............16
SCHLÜSSEL UND HINWEISE .............16
COCKPIT UND
BEDIENUNGSELEMENTE................18
ANLASSERTASTE................................20
SCHALTER RICHTUNGSBLINKER
UND HUPENTASTER .......................22
GRIFFE FÜR BREMSE VORNE +
HINTEN UND GAS ............................24
ZÜNDSCHLOSS ...................................26
KICKSTARTER UND STAUFACH........28
TASCHENHALTER...............................28
2 FAHRBETRIEB
SITZBANKSCHLOSS UND
TANKVERSCHLUSS.........................32
VORRICHTUNG ZUR
DIEBSTAHLSICHERUNG .................32
STARTEN DES MOTORS ....................36
FAHRWEISE.........................................44
AUSSCHALTEN DES MOTORS...........48
SICHERE FAHRWEISE........................52
3 WARTUNG
FÜLLSTAND MOTORÖL ......................60
ÖLFÜLLSTAND IN ÖLWANNE
HINTEN .............................................68
igd
Page 12

FILTRO DE AIRE ..................................76
FILTRO AIRE SECUNDARIO ...............78
FUSIBLE ...............................................80
BATERÍA...............................................82
FARO DELANTERO .............................90
AJUSTE RALENTÍ ................................92
CARACTERÍSTICAS FRENO
DE DISCO .........................................94
REGULACIÓN FRENO TRASERO.....102
INACTIVIDAD DEL VEHÍCULO ..........106
LIMPIEZA DEL VEHÍCULO.................106
BUSCAR AVERÍAS.............................112
PIEZAS DE RECAMBIO .....................118
4 CARACTERÍSTICAS TÉCNICAS
CARACTERÍSTICAS TÉCNICAS .......120
ESQUEMAS ELÉCTRICOS................126
5 MANTENIMIENTO PROGRAMADO
MANTENIMIENTO PROGRAMADO...130
6 ACCESORIOS .....................................140
DÉMONTAGE DE LA BOUGIE.............73
FILTRE À AIR........................................76
FILTRE À AIR SECONDAIRE...............78
FUSIBLE ...............................................80
BATTERIE.............................................82
PHARE AVANT.....................................90
RÉGLAGE RALENTI.............................92
CARACTÉRISTIQUES DU FREIN
À DISQUE..........................................94
RÉGLAGE DU FREIN ARRIÈRE........102
VÉHICULE NON UTILISÉ...................106
NETTOYAGE DU VÉHICULE.............106
DÉPISTAGE DES PANNES................112
PIÈCES DE RECHANGE....................118
4 CARACTÉRISTIQUES TECHNIQUES
CARACTÉRISTIQUES
TECHNIQUES .................................120
ECHEMA ELECTRIQUE.....................126
5 ENTRETIEN PROGRAMMÉ
ENTRETIEN PROGRAMMÉ...............130
6 ACCESSOIRES ...................................140
Índice
Index
12
ef
Page 13

Indice • Table of contents
Inhalt
13
FILTRO ARIA ........................................76
FILTRO ARIA SECONDARIO...............78
FUSIBILE ..............................................80
BATTERIA.............................................82
FARO ANTERIORE ..............................90
REGOLAZIONE MINIMO......................92
CARATTERISTICHE FRENO
A DISCO ............................................94
REGOLAZIONE FRENO
POSTERIORE .................................102
INATTIVITÀ DEL VEICOLO................106
PULIZIA DEL VEICOLO......................106
RICERCA DEL GUASTO....................112
PEZZI DI RICAMBIO...........................118
4 CARATTERISTICHE TECNICHE
CARATTERISTICHE TECNICHE .......120
SQUEMA ELECTRICO .......................126
5 MANUTENZIONE PROGRAMMATA
MANUTENZIONE
PROGRAMMATA ............................130
6 ACCESSORI ........................................141
AIR FILTER...........................................76
SECONDARY AIR FILTER ...................78
FUSE.....................................................80
BATTERY..............................................82
FRONT HEADLIGHT ............................90
ADJUSTING THE IDLE SPEED............92
FRONT BRAKE SPECIFICATIONS......94
ADJUSTING THE REAR BRAKE........102
LEAVING THE VEHICLE IDLE
FOR LONG PERIODS.....................106
CLEANING THE VEHICLE .................106
TROUBLESHOOTING ........................112
SPARE PARTS ...................................118
4 TECHNICAL SPECIFICATIONS
TECHNICAL SPECIFICATIONS.........120
ELECTRICAL WIRING DIAGRAM......126
5 PROGRAMMED MAINTENANCE
PROGRAMMED MAINTENANCE.......130
6 ACCESSORIES ...................................141
REIFENFÜLLDRUCK............................70
HERAUSNAHME DER KERZE.............73
LUFTFILTER.........................................76
SEKUNDÄRLUFTFILTER.....................78
SICHERUNG.........................................80
BATTERIE.............................................82
SCHEINWERFER VORNE ...................90
EINSTELLUNG DES LEERLAUFS.......92
MERKMALE DER
SCHEIBENBREMSE .........................94
EINSTELLUNG DER
HINTERRADBREMSE.....................102
AUSSERBETRIEBSETZUNG DES
FAHRZEUGS...................................106
REINIGEN DES FAHRZEUGS ...........106
STÖRUNGSSUCHE ...........................112
ERSATZTEILE ....................................118
4 TECHNISCHE DATEN
TECHNISCHE DATEN........................120
ELEKTROSCHEMA ............................126
5 REGELMÄSSIGE WARTUNG
REGELMÄSSIGE WARTUNG ............130
6 ZUBEHÖRTEILE .................................141
igd
Page 14

1 VEHÍCULO
IDENTIFICACIONES.............................16
LLAVES, INDICACIONES.....................16
INSTRUMENTOS Y MANDOS .............18
PULSADOR DE ARRANQUE ...............20
CONMUTADOR INTERMITENTES,
LUCES Y PULSADOR CLAXON.......22
MANDO FRENO DELANTERO,
TRASERO Y GAS .............................24
CERRADURA DE CONTACTO ............26
PALANCA DE ARRANQUE Y COFRE
PORTA-OBJETOS ............................28
PORTABOLSAS....................................28
1 VÉHICULE
IDENTIFICATIONS ...............................16
CLÉS, INDICATIONS............................16
INSTRUMENTS ET
COMMANDES ...................................18
POUSSOIR DE DÉMARRAGE .............20
COMMUTATEUR CLIGNOTANTS
PHARE ET POUSSOIR KLAXON .....22
COMMANDE FREIN AVANT,
ARRIÈRE ET GAZ.............................24
SERRURE DE CONTACT ....................26
LEVIER DE DÉMARRAGE ET
COFFRE PORTE-OBJETS ...............28
PORTE-BAGAGES ...............................28
14
ef
Page 15

1 VEICOLO
IDENTIFICAZIONI.................................16
CHIAVI, INDICAZIONI...........................16
STRUMENTI E COMANDI....................18
PULSANTE D’ACCENSIONE ...............20
COMMUTATORE INDICATORI
DIREZIONE, LUCI E PULSANTE
AVVISATORE ACUSTICO ................22
COMANDO FRENO ANTERIORE,
POSTERIORE E ACCELERATORE .24
SERRATURA D’ACCENSIONE............26
LEVA D’AVVIAMENTO E BAULE
PORTAOGGETTI ..............................28
PORTASACCHI ....................................28
1 VEHICLE
IDENTIFICATION MARKS....................16
KEYS, COMMENTS..............................16
INSTRUMENTS AND
CONTROLS.......................................18
STARTER BUTTON..............................20
INDICATOR AND LIGHT
SWITCHES, HORN BUTTON ...........22
FRONT AND REAR BRAKES AND
THROTTLE CONTROLS...................24
IGNITION LOCK....................................26
KICK-START PEDAL AND
CARRIER BOX ..................................28
BAG-CARRIER HOOK..........................28
1 FAHRZEUG
FAHRZEUGIDENTIFIKATION ..............16
SCHLÜSSEL UND HINWEISE .............16
COCKPIT UND
BEDIENUNGSELEMENTE................18
ANLASSERTASTE................................20
SCHALTER RICHTUNGSBLINKER
UND HUPENTASTER .......................22
GRIFFE FÜR BREMSE VORNE +
HINTEN UND GAS ............................24
ZÜNDSCHLOSS ...................................26
KICKSTARTER UND STAUFACH........28
TASCHENHALTER...............................28
15
igd
Page 16
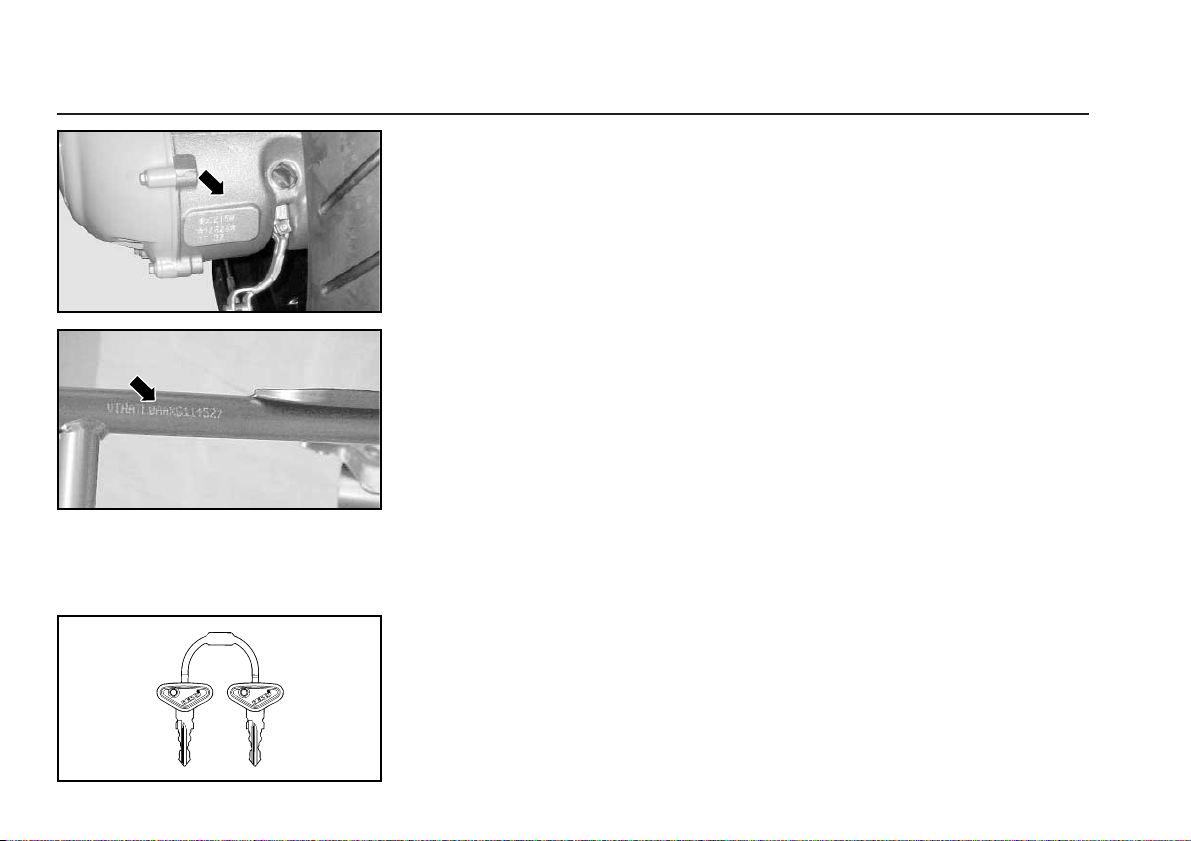
Emplazamiento del número de motor.
El número de motor está grabado en
la parte trasera del cárter izquierdo
Emplazamiento del número del
chasis.
El número del chasis está grabado en
el tubo lateral derecho del chasis en su
parte trasera inferior a la altura del
travesaño.
55
SE RECUERDA QUE CON LA
ALTERACIÓN DE LAS MATRÍCULAS
DE IDENTIFICACIÓN SE PUEDE
INCURRIR EN GRAVES SANCIONES
PENALES (SECUESTRO DEL VEHÍCULO, ETC.).
Llaves
Con el scooter se entregan dos llaves
para la cerradura de contacto. Guarde
la llave de repuesto en un lugar seguro.
Situation du numéro du moteur
Le numéro du moteur est gravé sur la
partie arrière du carter gauche
Situation du numéro du châssis
Le numéro du châssis est gravé sur le
tube latéral droit du châssis, sur son
côté arrière inférieur à la hauteur de la
traverse.
55
RAPPEL: MODIFIER LES SIGNES DES PLAQUES D'IDENTIFICATION PEUT ENTRAÎNER DE GRAVES
SANCTIONS (ARRÊT OBLIGATOIRE
DU VÉHICULE, ETC)
Clés
Deux clés de contact sont remises
avec le scooter. Placez la clé double en
lieu sûr.
Número motor, bastidor - Llaves
Numero moteur, châssis - Clés
16
ef
1-
VEHÍCULO
VÉHICULE
Page 17

Situazione del numero del motore
Il numero del motore è inciso nella
parte posteriore del carter sinistro.
Situazione del numero del telaio
Il numero del telaio è inciso sul tubo
laterale vicino al telaio, nella sua parte
posteriore inferiore, all’altezza della traversa.
55
È DA RICORDARSI CHE CON
LA CONTRAFFAZIONE DELLE TARGHE D’IDENTIFICAZIONE SI PUÒ
INCORRERE IN GRAVI SANZIONI
PENALI (SEQUESTRO DEL VEICOLO,
ECC.).
Chiavi
Con lo scooter si consegnano due chiavi
per la serratura d’accensione. Conservare le chiavi di ricambio in sede sicura.
Location of the engine number
The engine number is stamped on
the rear of the left hand crankcase half.
Location of the frame number
The frame number is stamped on the
rear lower face of the right hand side
frame tube at the level of the crossmember.
55
IT SHOULD BE REMEMBERED
THAT ALTERING IDENTIFICATION
MARKS MAY MAKE YOU LIABLE
FOR SERIOUS CRIMINAL PENALTIES
(SEIZURE OF THE VEHICLE, ETC.).
Keys
Two ignition keys are delivered with
your scooter. Keep your spare key in a
safe place.
Angabe der Motornummer
Die Motornummer ist auf der
Rückseite der linken Ölwanne
eingraviert.
Angabe der Fahrgestellnummer
Die Fahrgestellnummer ist auf der
rückwärtigen Seite des seitlichen Rohrs
des Fahrgestells in Höhe des
Querträgers eingraviert.
55
ES WIRD DARAUF HINGEWIESEN,
DASS DIE VERÄNDERUNG DER
IDENTIFIKATIONSNUMMERN SCHWERE
STRAFSANKTIONEN ZUR FOLGEN
HABEN KÖNNEN (BESCHLAGNAHME
DES FAHRZEUGS ETC.)
Schlüssel
Zum Lieferumfang des Motorrollers
gehören zwei Zündschlüssel. Bewahren
Sie den Ersatzschlüssel an einem
sicheren Ort auf.
17
Numero del motore, telaio - Chiavi • Engine and frame number - Keys
Angabe der Motornummer, Fahrgestellnummer - Schlüssel
igd
VEICOLO - VEHICLE
-1
FAHRZEUG
Page 18
Instrumentos y mandos
Instruments et commandes
18
1-
VEHÍCULO
VÉHICULE
6 9 1
7 8
4
5
3 2
Page 19

19
Strumenti e comandi • Instruments and controls
Instrumente und Bedienungselemente
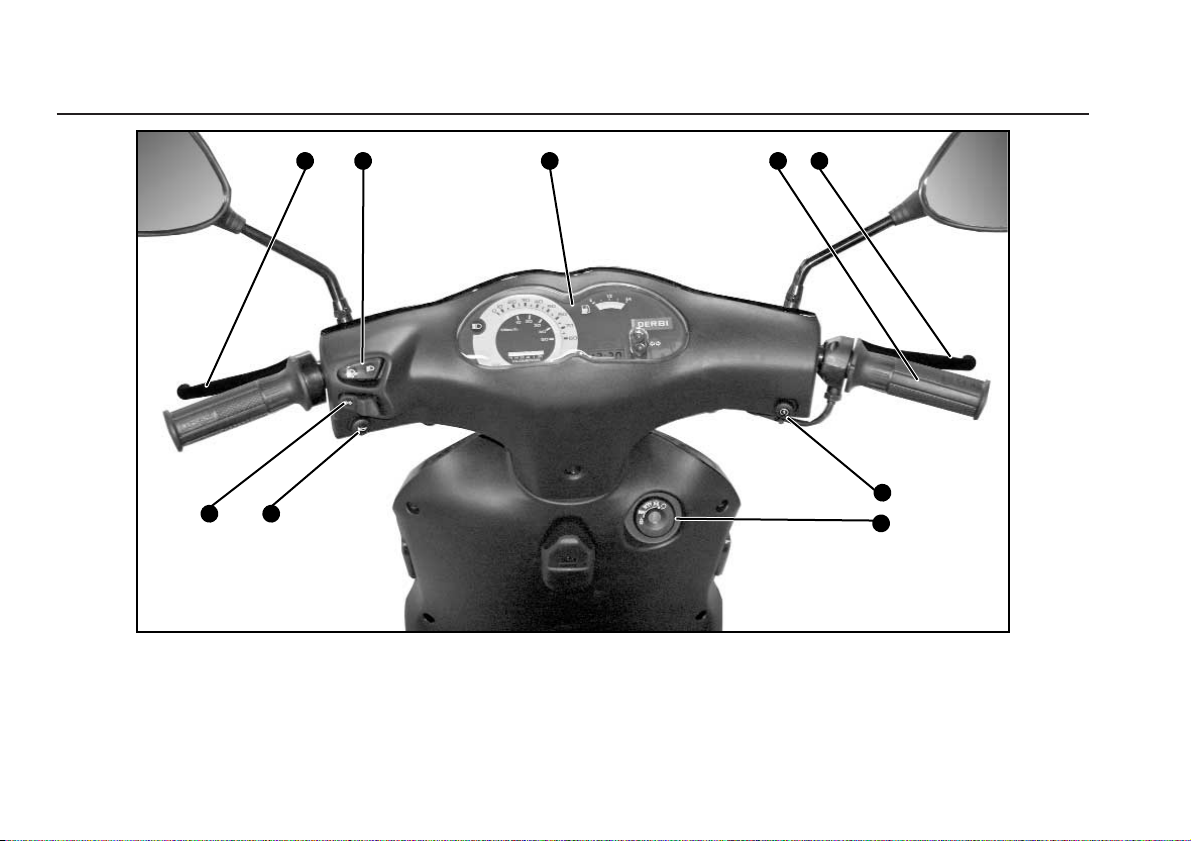
1.- Tablier
2.- Mando freno
delantero
3.- Mando de gas
4.- Pulsador de
arranque
5.- Cerradura
contacto
6.- Mando freno
trasero
7.- Conmutador
intermitentes
8.- Pulsador claxon
9.- Conmutador luces
1.- Tablier
2.- Commande frein
avant
3.- Commande du
gaz
4.- Poussoir
démarrage
5.- Serrure de
contacto
6.- Commande frein
arrière
7.- Commutateur
clignotants
8.- Poussoir klaxon
9.- Commutateur
lampes
1 - Cruscotto
2 - Comando freno
anteriore
3 - Comando
dell’acceleratore
4 - Pulsante
d’accensione
5 - Serratura
d’accensione
6 - Comando freno
posteriore
7 - Commutatore
indicatori
direzione
8 - Pulsante
avvisatore
acustico
9 - Commutatore luci
1.- Instrument panel
2.- Front brake lever
3.- Throttle twist grip
4.- Starter button
5.- Ignition switch
6.- Rear brake lever
7.- Indicator switch
8.- Horn button
9.- Light switch
1.- Cockpit
2.- Bremse, vorne
3.- Gas
4.- Anlassertaste
5.- Zündschloss
6.- Bremse, hinten
7.- Schalter
Richtungsblinker
8.- Hupe
9.- Lichtschalter
ef
i
g
d
VEICOLO - VEHICLE
-1
FAHRZEUG
Page 20
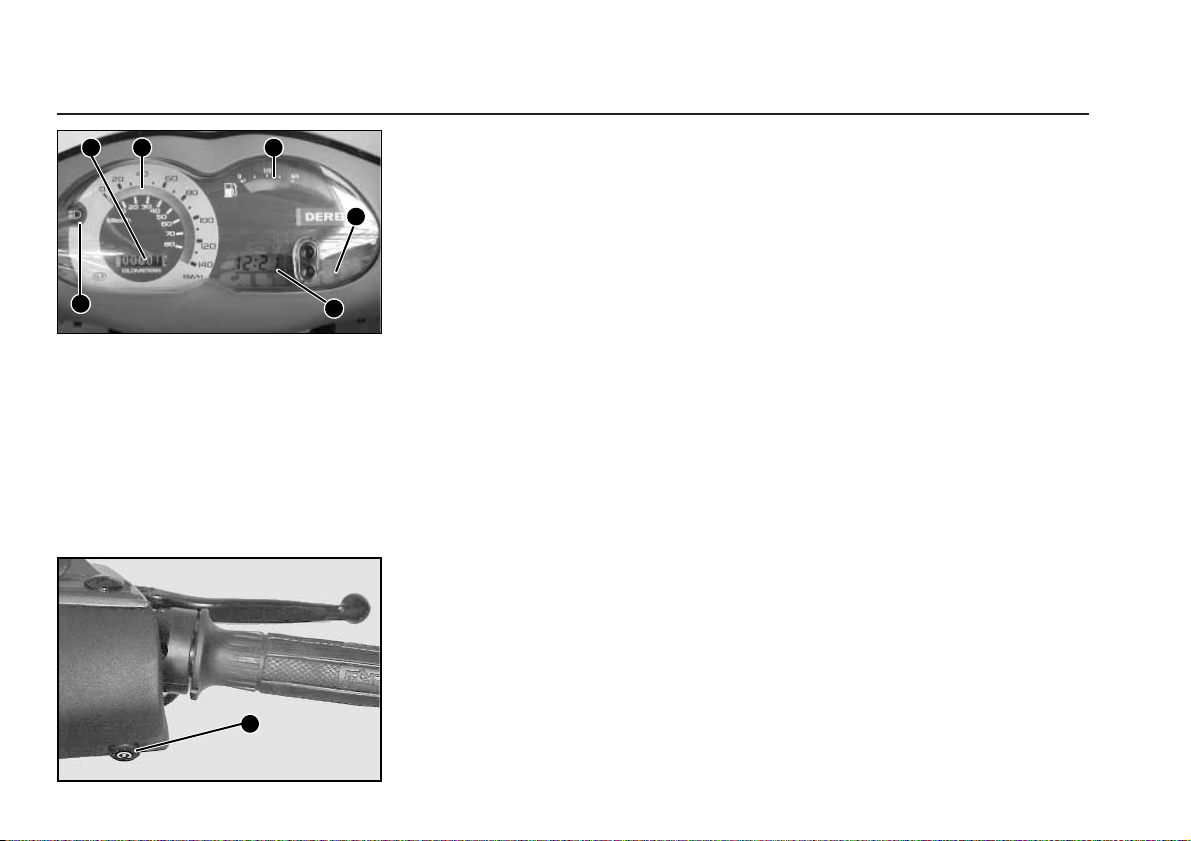
(1) Velocímetro. El velocímetro indica
la velocidad de marcha en kilómetros por hora.
(2) Cuentakilómetros. Totalidad de
kilómetros recorridos. La cifra del
extremo derecho indica el número
de hectómetros.
) (3) Indicador de intermitentes.
- (4) Indicador de luz intensiva.
& (5) Indicador reserva gasolina.
(6) Reloj Digital
Pulsador arranque
Situado en el lado derecho del
manillar (2). Pulsarlo en forma
continuada hasta que el motor se ponga
en marcha. Ver las instrucciones de
puesta en marcha en el apartado de
arranque.
(1) Compteur de vitesse. Le compteur
de vitesse indique la vitesse en
kilomètre par heure.
(2) Le compte-kilomètres. Indique le
total des kilomètres parcourus. Le
chiffre à droite indique les hectomètres.
) (3) Indicateur clignotants
- (4) Indicateur lumière de phare
& (5) INDICATEUR NIVEAU
ESSENCE
(6) HORLOGE NUMÉRIQUE
Poussoir démarrage
Situé sur le côté droit du guidon (2).
Presser de façon continue jusqu'à
démarrage du moteur. Voyez les instructions de mise en marche du paragraphe de démarrage.
Tablier
Tableau de bord
20
ef
1-
VEHÍCULO
VÉHICULE
2
4
1 5
6
3
2
Page 21

(1) Velocimetro. Il velocimetro indica la
velocità di marcia in chilometri per
ora.
(2) Contachilometri. Totalità dei chilo-
metri percorsi . La cifra dell’estremo destro indica gli ettometri.
) (3) Spia indicatori direzione.
- (4) Indicatore luce abbagliante
& (5) Indicatore scorta benzina.
(6) Orologio digitale
Pulsante accensione
È situato sul lato destro del manubrio
(2). Premerlo in modo continuato finché
il motore si accenda. Vedi le istruzioni di
avviamento nella sezione di avviamento.
(1) Speedometer. The speedometer
displays the road speed of the vehicle in kilometres per hour.
(2) Odometer. Total number of kilome-
tres run. The figure on the extreme
right displays the number of units of
one hundred metres.
) (3) Indicator switch.
- (4) High beam indicator.
& (5) Fuel indicator.
(6) Digital clock
Starter button
Located on the right-hand side of the
handlebar (2). Press and hold down until
the engine starts. See the starting instructions in the section on Starting the
vehicle.
(1) Tachometer. Der Tachometer zeigt
die Fahrzeuggeschwindigkeit in
Kilometern pro Stunde an.
(2) Kilometerzähler. Zeigt die
zurückgelegten Gesamtkilometer
an. Mit der Ziffer rechts außen
werden die Hektometer
angegeben.
) (3) Fahrtrichtungsanzeiger
- (4) Fernlichtanzeige
& (5) Benzinreserveanzeige
(6) Digital clock
Anlassertaste
Sie ist auf der rechten Seite des
Lenkers (2) angeordnet. Sie ist so lange
zu drücken, bis der Motor anspringt.
Siehe Anleitungen über die
Inbetriebsetzung im Kapitel Anlasser.
Cruscotto • Instrument Panel
Armaturenbrett
21
igd
VEICOLO - VEHICLE
-1
FAHRZEUG
Page 22
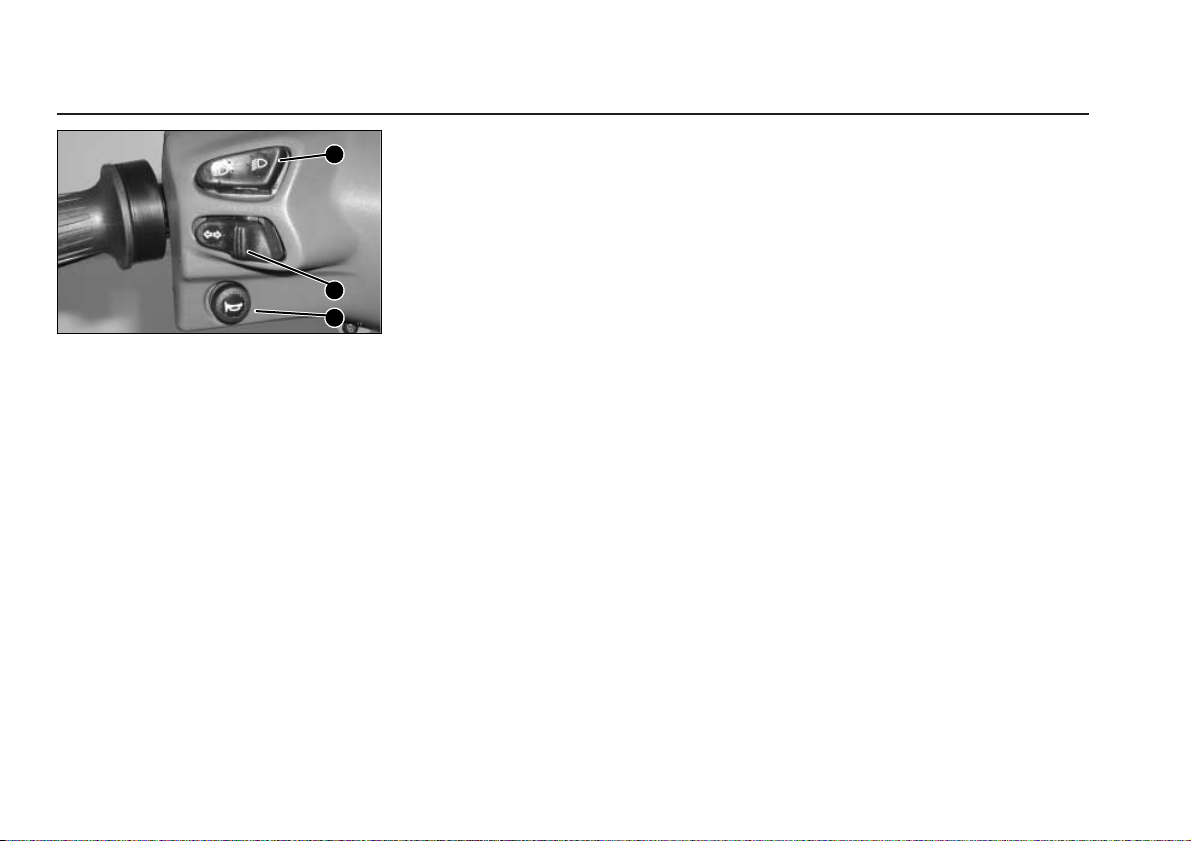
Conmutador intermitentes
Situado en el lado izquierdo del
manillar (2)
Centro - Intermitentes apagados
Derecha - Intermitentes lado
derecho encendidos
Izquierda - Intermitentes lado
izquierdo encendidos
El mando intermitentes después de
ser accionado a la derecha o izquierda, automáticamente vuelve a su
posición inicial. Para apagar los intermitentes, apretar el mando hacia
abajo.
Conmutador luces
Situado en el lado izquierdo del
manillar (3).
-
- Luz intensiva.
.
- Luz de cruce.
Pulsador claxon
El pulsador claxon está situado en el
lado izquierdo del manillar (1)
Commutateur clignotants
Situé sur le côté gauche du guidon (2)
Position:
au milieu - Clignotants éteints
à droite - Clignotants côté
droit allumés
à gauche - Clignotants côté
gauche allumés
Si on actionne la commande des
clignotants à droite ou à gauche elle
revient à sa position initiale automatiquement. Pour arrêter les clignotants il
faut positionner la commande vers le
bas.
Commutateur des lumières
Ce commutateur est situé sur le côté
gauche du guidon (3)
-
- Lumière de route
.
- Lumière de croisement
Pousseur klaxon
Le pousseur klaxon est situé sur le
côté gauche du guidon (1)
Conmutador intermitentes luces y pulsador claxon
Commutateur clignotants lampes et poussoir klaxon
22
ef
1-
VEHÍCULO
VÉHICULE
1
2
3
Page 23

Commutatore indicatori direzione
È situato sul lato sinistro del manu-
brio (2).
Centro - Indicatori di direzione
spenti
Destra - Indicatori di direzione lato
destro accesi
Sinistra - Indicatori di direzione lato
sinistro accesi
Il comando degli indicatori di direzione, dopo averlo azionato a destra o a
sinistra, ritorna automaticamente alla
sua posizione. Per spegnere gli indicatori di direzione, premere il comando in
giù.
Commutatore luci
Situato sul lato sinistro del manubrio
(3).
-
- Luce abbagliante
.
- Luce anabbagliante
Pulsante avvisatore acustico
Il pulsante avvisatore acustico è
situato sul lato sinistro del manubrio (1).
Indicator switch
Located on the left-hand side of the
handlebar (2)
Centre - Indicator lights OFF
Right - Right-hand indicator
lights ON
Left - Left-hand indicator
lights ON
The indicator control returns automatically to the initial central position after
being pushed to the right or to the left.
In order to switch the indicators off,
press the control downwards.
Light switch
Located on the left-hand side of the
handlebar (3).
-
- High beam
.
- Dipped beam
Horn button
The horn button is located on the lefthand side of the handlebar (1).
Schalter Richtungsblinker
Dieser Schalter ist auf der linken
Seite des Lenkers (2) angeordnet.
Schalter steht in der Mitte
Blinker ausgestellt
Schalter nach rechts
Die Blinker auf der rechten Seite
sind eingeschaltet
Schalter nach links
Die Blinker auf der linken Seite
sind eingeschaltet
Nach Betätigen des Schalters nach
rechts oder links kehrt der Schalter
automatisch in seine Ruhestellung
zurück. Zum Ausschalten der
Richtungsblinker ist der Schalter nach
unten zu drücken.
Lichtschalter
Dieser Schalter liegt auf der linken
Seite des Lenkers (3).
-
- Fernlicht
.
- Abblendlicht
Hupentaster
Der Taster ist auf der linken Seite
des Lenkers angeordnet (1).
Commutatore indicatori direzione, luci e pulsante avvisatore acustico
Indicator switch, light switch and horn button • Schalter Richtungsblinker und Hupentaster
23
igd
VEICOLO - VEHICLE
-1
FAHRZEUG
Page 24
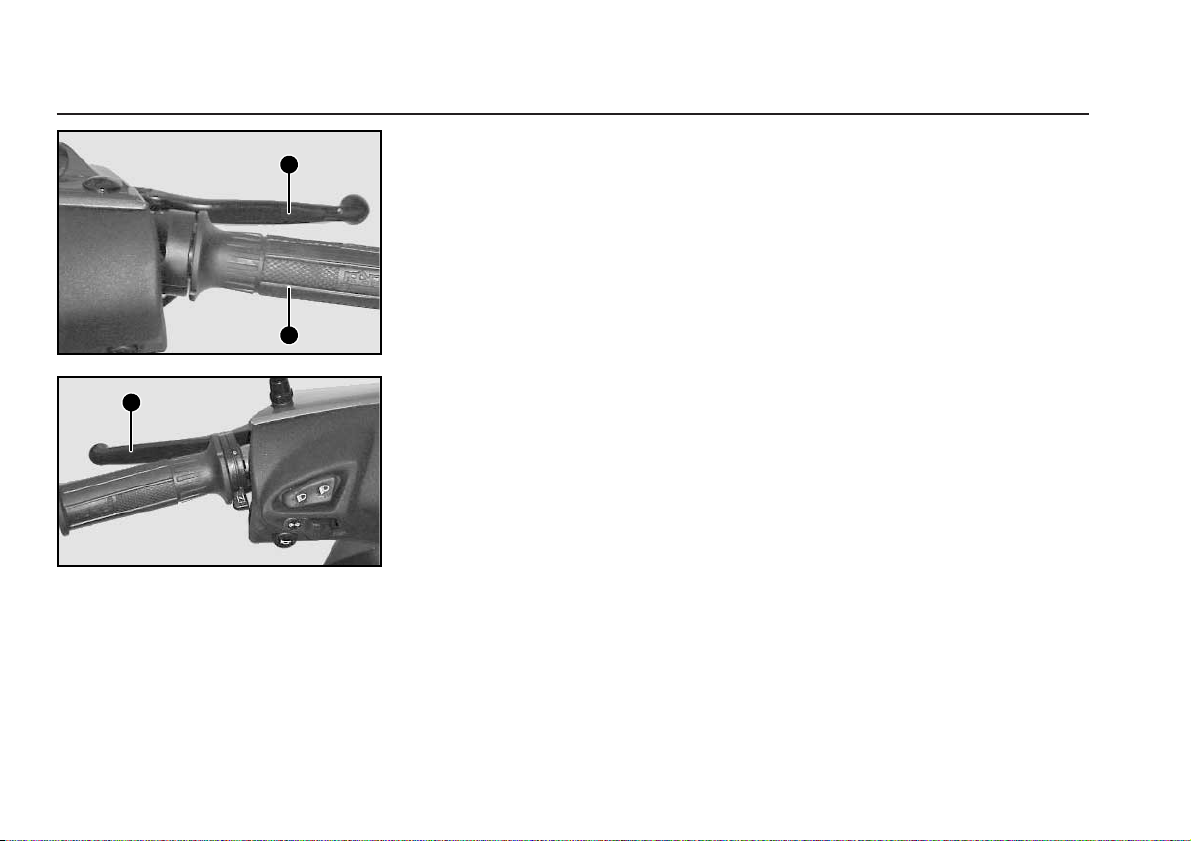
Mando freno delantero
Situado en el lado derecho del manillar (1). Poner especial atención en su
uso procurando siempre evitar el bloqueo de la rueda.
Mando de gas
Situado en el lado derecho del manillar (2). Con la rotación hacia adentro de
la empuñadura se obtiene la apertura
de la válvula del carburador.
Mando freno trasero
Situado en el lado izquierdo del manillar (3). Debe usarse preferentemente
cuando se desee reducir o detener
totalmente la velocidad del vehículo.
Combinar la utilización del freno trasero con el delantero según necesidades, de esta forma obtendrán frenadas
más eficaces.
Commande frein avant
Situé sur le côté droit du guidon (1).
Freinez de façon à éviter le blocage de
la roue.
Commande du gaz
Situé du côté droit du guidon (2). En
faisant une rotation de la poignée vers
soi on obtient l'ouverture de la soupape
du carburateur.
Commande frein arrière
Situé du côté gauche du guidon (3). Il
faut s'en servir lorsqu'on doit réduire la
vitesse ou arrêter le véhicule.
Combiner l'utilisation du frein avant et
du frein arrière selon les besoins pour
obtenir des freinées plus efficaces.
Mando freno delantero, trasero y gas
Commande frein avant, frein arrière et gaz
24
ef
1-
VEHÍCULO
VÉHICULE
1
2
3
Page 25

Comando freno anteriore
È situato sul lato destro del manubrio
(1). Avere speciale cura nel suo uso e
cercare di evitare sempre il bloccaggio
della ruota.
Comando dell’acceleratore
È situato sul lato destro del manubrio
(2). Quando si gira la manopola verso
l’interno si provoca l’apertura della valvola del carburatore.
Comando freno posteriore
È situato sul lato sinistro del manubrio (3). È da usarsi preferibilmente
quando si desideri ridurre o fermare
completamene la velocità del veicolo.
Bisogna combinare l’uso del freno
posteriore con quello anteriore, a seconda delle necessità: in questo modo si
otterranno delle frenate più efficaci.
Front brake lever
Located on the right-hand side of the
handlebar (1). Pay special attention
when using the front brake to avoid locking the wheel.
Throttle twist grip
Located on the right-hand side of the
handlebar (2). Rotating the twist grip
towards you opens the carburettor throttle valve.
Rear brake lever
Located on the left-hand side of the
handlebar (3). This brake should be
used for preference when it is desired to
reduce speed or to stop the vehicle
completely.
Use the rear brake and the front
brake together in combination as necessary, and in this way you will achieve
more efficient braking.
Griff für Bremse vorne
Der Bremsgriff ist auf der rechten
Seite des Lenkers angeordnet (1).
Achten Sie bei Betätigen der Bremse
besonders darauf, dass nicht eine
Blockierung des Rades ausgelöst wird.
Gasgriff
Der Gasgriff ist auf der rechten Seite
des Lenkers angeordnet (2). Bei Drehen
des Griffs in Fahrerrichtung öffnet sich
das Vergaserventil.
Griff für Bremse hinten
Der Bremsgriff ist auf der linken Seite
des Lenkers angeordnet (3). In erster
Linie ist er dann zu betätigen, wenn die
Geschwindigkeit des Fahrzeugs
vermindert oder dieses zum völligen
Stillstand gebracht werden soll.
Beim Bremsvorgang sollten beide
Bremsen gleichzeitig angezogen
werden, da auf diese Weise ein
effektiveres Bremsen erzielt wird.
25
Comando freno e acceleratore • Brake levers, throttle twist grip
Griffe für Bremse vorne und hinten und für Gas
igd
VEICOLO - VEHICLE
-1
FAHRZEUG
Page 26
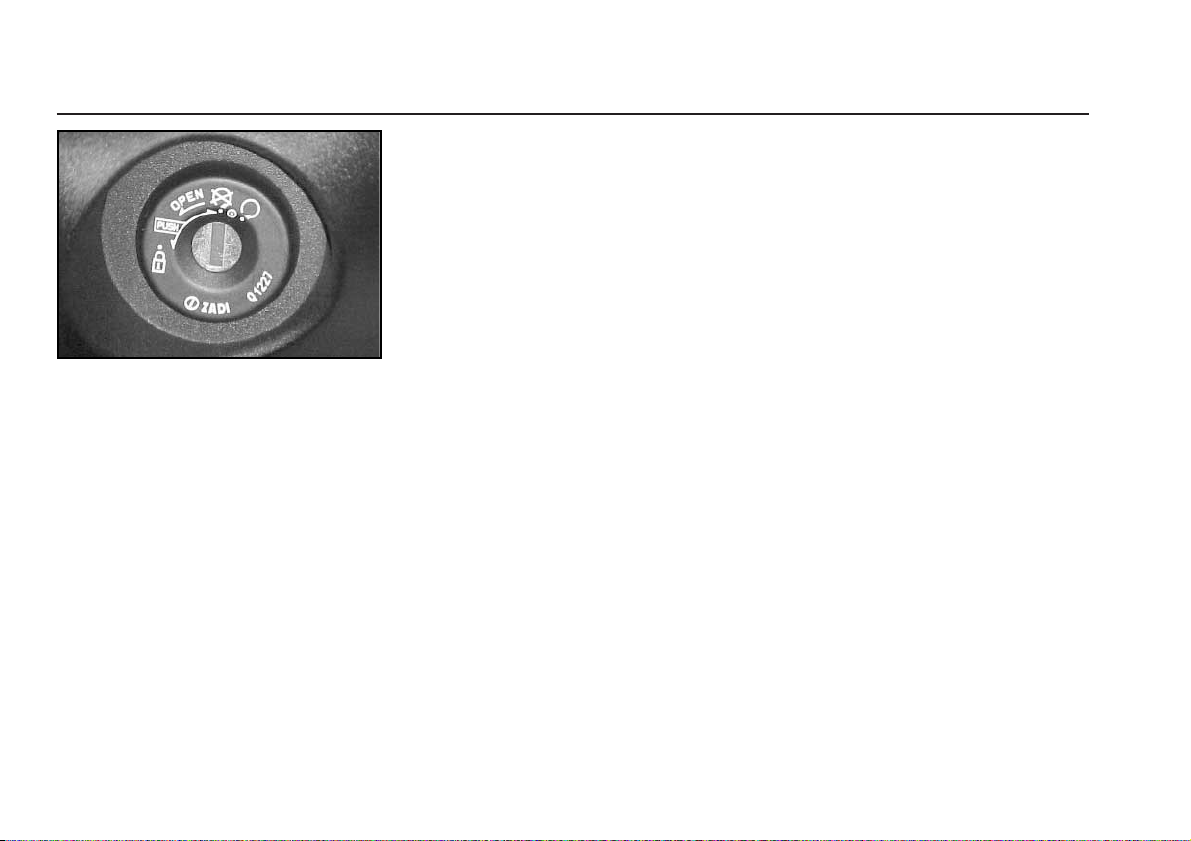
Cerradura de contacto
Posición de la llave
! En esta posición, el circuito de
encendido se cierra y es posible
arrancar el motor. La llave no
podrá extraerse de la cerradura
de contacto en esta posición.
# Motor parado y sin blocaje.
$ (bloqueo)
Para bloquear la dirección, gire el
manillar completamente hacia la
izquierda. Presione hacia abajo la
llave y después gírela hasta la
posición
$ y extráigala. Para des-
bloquear, presione la llave hacia
abajo y gírela hacia la derecha.
O
BSERVACION:
Antes de girar la llave hasta la posi-
ción
$ (bloqueo), ponga el scooter encima del caballete. No intente nunca
mover el scooter cuando la dirección
esté bloqueada, ya que podría perder el
equilibrio.
Serrure du contacto
Position de la clé
! Sur cette position, le circuit d'allu-
mage est fermé et le démarrage
peut avoir lieu. La clé ne peut pas
être extraite de la serrure de contact sur cette position.
# Moteur arrêté et non bloqué.
$ (blocage)
Pour bloquer la direction, tourner
à fond le guidon vers la gauche.
Poussez la clé vers le bas et faites-la tourner ensuite jusqu'à la
position
$. Enlever la clé. Pour la
débloquer, pousser la clé vers le
bas et faites-la tourner vers la
droite.
OBSERVATION:
Avant de faire tourner la clé sur la
position
$ (blocage), situez le scooter
sur sa fourche. Ne bougez pas votre
scooter lorsque la direction est bloquée,
vous risquez de le faire tomber.
Cerradura de contacto
Serrure du contact
26
ef
1-
VEHÍCULO
VÉHICULE
Page 27

Serratura d’accensione
Posizione della chiave
! In questa posizione il circuito
d’accensione si chiude ed è possibile accendere il motore. La chiave non potrà estrarsi dalla serratura d’accensione quando sia in
questa posizione.
# Motore fermo e senza bloccaggio
$ (bloccaggio)
Per bloccare lo sterzo, girare completamente il manubrio a sinistra.
Spingere la chiave in giù, girarla
dopo fino alla posizione
$ ed
estrarla. Per sbloccare, spingere
la chiave in giù e girarla a destra.
OSSERVAZIONE
Prima di girare la chiave fino alla
posizione
$ (bloccaggio) mettere lo scooter sul cavalletto. Non provare mai di
muovere lo scooter quando lo sterzo è
bloccato Lei perché potrebbe perdere
l’equilibrio.
Ignition switch
Position of the key
! In this position the ignition circuit
is closed and the engine can be
started. The ignition key can not
be removed when in this position.
# Engine stopped, steering not loc-
ked.
$ (steering lock)
In order to lock the steering , turn
the handlebar fully to the left.
Press the key in and turn to the
$
position, and then withdraw the
key. To unlock the steering, press
the key inwards, and turn it to the
right.
NOTE:
Before turning the key to the
$ (locked) position, put the scooter up on the
centre-stand. Do not try to move the
scooter when the steering is locked,
because it could easily fall over.
Zündschloss
Stellung des Zündschlüssels
! In dieser Stellung schließt sich der
Zündkreis und der Motor wird
gestartet. Der Schlüssel kann
in dieser Position nicht aus dem
Zündschloss abgezogen werden.
# Motor ausgeschaltet und nicht
blockiert
$ (Blockierung)
Zur Blockierung des Lenkers ist dieser
ganz nach links zu ziehen. Dann
drücken Sie den Zündschlüssel ins
Zündschloss, drehen ihn in die
Position
$ und ziehen ihn
anschließend heraus. Zum Aufheben
der Verriegelung den Zündschlüssel
einführen, nach unten drücken und ihn
dann nach rechts drehen.
ANMERKUNG:
Bevor Sie den Zündschlüssel in die
Position
$ (Blockierung) bringen, stellen Sie
den Scooter auf seinen Ständer. Versuchen
Sie auf keinen Fall, den Scooter zu
bewegen, wenn der Lenker blockiert ist,
denn dadurch könnte das Fahrzeug sein
Gleichgewicht verlieren.
Serratura d’accensione • Ignition switch
Zündschloss
27
igd
VEICOLO - VEHICLE
-1
FAHRZEUG
Page 28
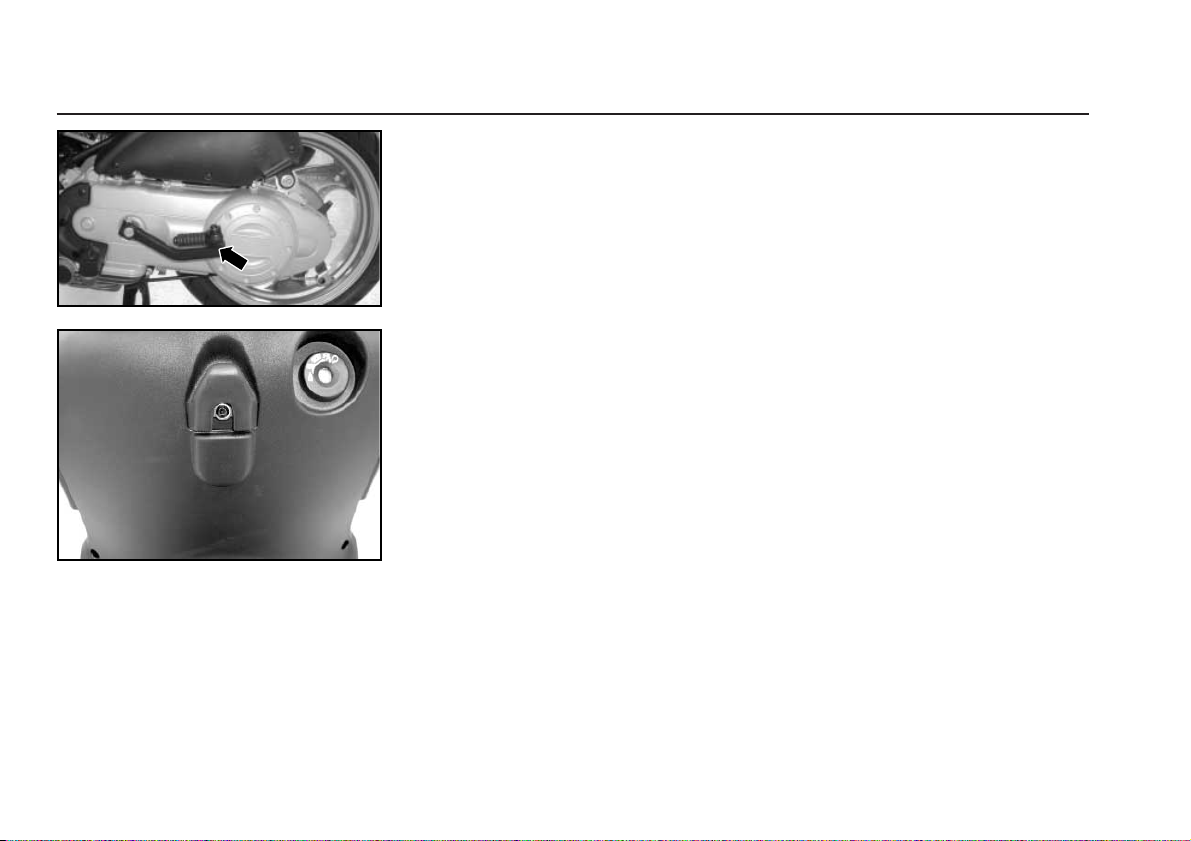
Palanca de arranque
La palanca de arranque está situada
en el lado izquierdo del motor. Para
poner el motor en funcionamiento, basta
con actuar sobre la palanca accionán-
dola enérgicamente hacia abajo con el
pie.
Portabolsas
Para el transporte de las bolsas o
similares, existe un portabolsas en el
que colgarlas.
Evitar poner una carga excesivamente pesada o aparatosa, para no perjudicar la estabilidad o la conducción del
vehículo
Levier de démarrage
Le levier de démarrage est situé sur
le côté gauche du moteur. Pour faire
démarrer le moteur il suffit d'actionner le
levier vers le bas avec le pied.
Porte-bagages
Pour transporter les sacs ou autres
colis il y a un porte-bagages pour les
accrocher. Éviter de transporter des
sacs trop lourds ou trop volumineux qui
pourraient destabiliser ou gêner le conducteur du véhicule.
Palanca de arranque y portabolsas
Levier de démarrage et porte-bagages
28
ef
1-
VEHÍCULO
VÉHICULE
Page 29

Leva d’avviamento
La leva d’avviamento è situata sul
lato sinistro del motore. Per avviare il
motore basta agire sulla leva azionandola energicamente in giù con il piede.
Portasacchi
Per il trasporto di sacchi e simili esiste un portasacchi in cui appenderli.
Evitare di metterci un carico troppo
pesante o voluminoso per non nuocere
la stabilità o la guida del veicolo.
Kick start pedal
The kick start pedal is located on the
left-hand side of the engine. To start the
engine, it is only necessary to operate
the pedal by kicking down hard with the
foot.
Bag Carrier Hook
For carrying shopping bags and similar objects, there is a bag-carrier hook
where they can be hung.
Avoid loading the hook with objects
which are excessively heavy or bulky, in
order to avoid having a negative effect
on the stability or driving characteristics
of the vehicle.
Kickstarter
Der Kickstarter liegt auf der linken
Seite des Motors. Um den Motor in
Betrieb zu setzen, ist dieser Hebel
lediglich mit dem Fuß kräftig nach unten
zu treten.
Taschenhalter
Zum Transport von Taschen oder
ähnlichen Gepäckstücken ist ein
Taschenhalter vorgesehen, in den diese
eingehängt werden können.
Es sollten jedoch keine zu schweren
oder voluminösen Gegenstände
transportiert werden, von denen das
Gleichgewicht des Fahrzeugs und die
Fahrweise ungünstig beeinflusst werden
könnten.
Leva d’avviamento, Portasacchi
Kick start pedal, Bag Carrier Hook • Kickstarter, Taschenhalter
29
igd
VEICOLO - VEHICLE
-1
FAHRZEUG
Page 30

30
ef
2 USO
CERRADURA SILLíN Y DEPÓSITO
GASOLINA ........................................32
PUENTE ANTIRROBO .........................32
ARRANQUE DEL MOTOR....................36
CONDUCCIÓN......................................44
PARADA DEL MOTOR .........................48
CONDUCCIÓN SEGURA .....................52
2 UTILISATION
SERRURE SELLE ET RÉSERVOIR
À ESSENCE ......................................32
PONT ANTIVOL....................................32
DÉMARRAGE DU MOTEUR ................36
CONDUITE............................................44
ARRÊT DU MOTEUR ...........................48
CONDUITE SANS RISQUES................52
Page 31

2 USO
SERRATURA SELLA E SERBATOIO
BENZINA ...........................................32
PONTE ANTIFURTO ............................32
AVVIAMENTO DEL MOTORE..............36
GUIDA...................................................44
ARRESTO DEL MOTORE ....................48
GUIDA SICURA ....................................52
2 OPERATION
SADDLE LOCK AND FUEL TANK........32
ANTI-THEFT SHACKLE........................32
STARTING THE ENGINE .....................36
RIDING..................................................44
STOPPING THE ENGINE.....................48
SAFE RIDING .......................................52
2 FAHRBETRIEB
SITZBANKSCHLOSS UND
TANKVERSCHLUSS.........................32
VORRICHTUNG ZUR
DIEBSTAHLSICHERUNG .................32
STARTEN DES MOTORS ....................36
FAHRWEISE.........................................44
AUSSCHALTEN DES MOTORS...........48
SICHERE FAHRWEISE........................52
31
igd
Page 32

Cerradura sillín
Para abrir el sillín, introduzca la llave en
la cerradura de contacto y gírela hacia
la izquierda "OPEN". Debajo del sillín
hay un amplio hueco para el casco
(cabe un casco integral). También se
encuentra debajo del sillín, el depósito
de gasolina. Para cerrar, ponga el sillín
a su posición inicial y por la parte trasera, presione hacia abajo.
Puente antirrobo
El puente antirrobo del scooter, está
situado en la parte inferior delantera del
chasis, lado izquierdo.
Serrure selle
Pour ouvrir la selle, introduire la clé
dans la serrure de contact et faire tourner vers la gauche «OPEN» Sous la
selle il y a un logement pour le casque
(on peut y placer un casque intégral).
Le réservoir à essence se trouve aussi
sous la selle Pour refermer la selle on
doit la remettre en position initiale en
pressant vers le bas la partie arrière.
Pont antivol
Le pont antivol du cyclomoteur est situé
sur la partie inférieure avant du châssis,
côté gauche.
Cerradura sillín y puente antirrobo
Serrure selle et pont antivol
32
ef
2-
USO
UTILISATION
Page 33

Serratura sella
Per aprire la sella, introdurre la chiave nella serratura d’accensione e girarla
a sinistra “OPEN”. Sotto la sella c’è un
ampio vano per l’elmetto (ci entra un
elmetto integrale). Sotto la sella c’è
anche il serbatoio della benzina. Per
chiudere, ripristinare la sella e spingerla
in giù dalla sua parte posteriore.
Ponte antifurto
Il ponte antifurto dello scooter è situato nella parte inferiore anteriore del
telaio, lato sinistro.
Saddle lock
To open the saddle, insert the key
into the ignition lock and turn to the left
to the “OPEN” position. Underneath the
saddle there is ample space for your
helmet (there is room for a full-face helmet). The fuel tank are also located
under the saddle. To close the saddle,
return the saddle to its initial position
and press down on the rear part.
Anti-theft shackle
The scooter has an anti-theft shackle
located underneath the lower front part
of the frame on the left-hand side.
Sitzbankschloss und tankverschluss
Um die Sitzbank hochzuklappen,
stecken Sie den Schlüssel in das
Zündschloss und drehen ihn nach links
bis in die Stellung „OPEN“. Unter der
Sitzbank befindet sich eine geräumige
Box für den Helm (ein ganzer Helm
passt in dieses Fach). Gleichermaßen
ist unter dem Sitz der Kraftstofftank.
Zum Schließen der Sitzbank bringen Sie
diese wieder in ihre ursprüngliche
Position und drücken dann deren
hinteren Teil nach unten.
Vorrichtung zur Diebstahlsicherung
Die Vorrichtung zur
Diebstahlsicherung des Scooters liegt
vorne links im unteren Teil des
Fahrgestells.
Serratura sella, Ponte antifurto • Saddle lock, Anti-theft shackle
Sitzbankschloss und tankverschluss, Vorrichtung zur Diebstahlsicherung
33
igd
USO - OPERATION
-2
FAHRBETRIEB
Page 34

Depósito de gasolina
Abastecer el depósito de carburante
con gasolina sin plomo (N.º de octano
mínimo 95).
Capacidad del depósito 7,500 litros y
una reserva de 1,900 litros
00
NO SE ACERQUE A LA BOCA
DEL DEPÓSITO CON UNA LLAMA O
UN CIGARRILLO ENCENDIDO: PELIGRO DE INCENDIO. TAMBIÉN EVITE
ACERCARSE DEMASIADO CON LA
CARA PARA NO INHALAR VAPORES
NOCIVOS.
00
ANTES DE REALIZAR EL
ABASTECIMIENTO DE LA GASOLINA, APAGAR EL MOTOR. LA GASOLINA ES EXTREMADAMENTE INFLAMABLE. EVITAR QUE DURANTE EL
ABASTECIMIENTO CAIGA GASOLINA DEL DEPOSITO.
Réservoir à essence
Le réservoir à essence doit être rempli d'essence sans plomb (95 octanes
minimum).
La capacité du réservoir est de 7,500
litres et la réserve est de 1,900 litres.
00
NE JAMAIS APPROCHER L'ORIFICE DU RÉSERVOIR AVEC UNE
FLAMME OU UNE CIGARETTE
ALLUMÉE CAR IL Y A DANGER D'INCENDIE. ÉVITEZ D'Y APPROCHER
VOTRE FIGURE POUR NE PAS INHALER DE VAPEURS NOCIVES.
00
AVANT DE FAIRE LE PLEIN
D'ESSENCE ÉTEIGNEZ LE MOTEUR.
L'ESSENCE S'ENFLAMME TRÈS
FACILEMENT ÉVITEZ TOUT ÉCOULEMENT D'ESSENCE HORS DU
RÉSERVOIR.
Depósito de gasolina
Réservoi à essence
34
ef
2-
USO
UTILISATION
Page 35

35
Serbatoio benzina • Fuel tank
Benzintank
igd
USO - OPERATION
-2
FAHRBETRIEB
Serbatoio benzina
Rifornire il serbatoio di carburante
con benzina senza piombo (n. ottani
minimo=95).
Capacità del serbatoio: litri 7,500 e
una scorta di litri 1,900.
00
NON AVVICINARSI ALLA
BOCCA DEL SERBATOIO CON UNA
FIAMMA O CON UNA SIGARETTA
ACCESA: PERICOLO D’INCENDIO.
EVITARE ANCHE DI AVVICINARCI
TROPPO LA FACCIA IN MODO DA
NON INALARNE I VAPORI NOCIVI.
00
PRIMA DI FARE IL PIENO DI
BENZINA, SPEGNERE IL MOTORE.
LA BENZINA È ESTREMAMENTE
INFIAMMABILE. EVITARE CHE
DURANTE IL RIFORNIMENTO FUORIESCA LA BENZINA DAL SERBATOIO.
Fuel tank
Refill the fuel tank with lead-free
petrol (minimum octane rating = 95).
The tank has a capacity of 7.5 litres
and a reserve of 1.9 litres.
00
DO NOT GO NEAR THE FUEL
TANK FILLER WITH A NAKED
FLAME OR LIGHTED CIGARETTE:
FIRE DANGER. ALSO AVOID PUTTING YOUR FACE TOO CLOSE TO
THE FUEL TANK FILLER IN ORDER
TO AVOID INHALING TOXIC
VAPOUR.
00
BEFORE REFUELLING WITH
PETROL, TURN OFF THE ENGINE.
PETROL IS HIGHLY INFLAMMABLE.
MAKE SURE THAT NO FUEL SPLASHES OUT OF THE TANKS WHILE
REFUELLING.
Benzintank
Der Benzintank hat ein
Fassungsvermögen von 7,5 Litern und
eine Reserve von 1,9 Litern.
Kraftstoff: Bleifrei ≥ 95
00
NÄHERN SIE SICH NICHT MIT
OFFENEM FEUER ODER EINER
BRENNENDEN ZIGARETTE DER
TANKÖFFNUNG: FEUERGEFAHR.
UM ZU VERMEIDEN, DASS SIE GIFTIGE DÄMPFE EINATMEN, SOLLTEN
SIE MIT DEM KOPF NICHT ZU DICHT
AN DIE TANKÖFFNUNG KOMMEN.
00
BEVOR SIE BENZIN TANKEN,
IST DER MOTOR AUSZUSCHALTEN.
BENZIN IST HOCHGRADIG ENTFLAMMBAR. ACHTEN SIE DARAUF,
DASS BEIM TANKEN KEIN BENZIN
AUS DEM TANK LÄUFT.
Page 36

Rodaje
55
DURANTE LOS PRIMEROS
1000 KM. NO UTILIZAR EL
VEHÍCULO A MÁS DEL 80% DE LA
VELOCIDAD MÁX. PREVISTA. EVITAR DE ABRIR COMPLETAMENTE
EL ACELERADOR Y NO MANTENER
POR MUCHO TIEMPO UNA VELOCIDAD CONSTANTE. DESPUES DE
LOS PRIMEROS 1.000 KM AUMENTAR DE FORMA GRADUAL LA
VELOCIDAD, DONDE ES PERMITIDO,
HASTA ALCANZAR EL MAXIMO
RENDIMIENTO.
Instrucciones para la puesta en marcha del motor (con arranque eléctrico)
-Téngase siempre la precaución de
accionar los mandos para la puesta
en marcha del motor con el scooter
encima del caballete central.
- Accionar la llave de contacto en la
posición de la derecha
!.
- Tener el puño de gas al mínimo.
- Accionar el mando freno trasero o
Rodaje
Rodage
36
ef
Rodage
55
AU COURS DES PREMIERS
1000 Km NE PAS UTILISER LE VÉHICULE À PLUS DE 80% DE SA VITESSE MAXIMALE. ÉVITER D'ACTIONNER À FOND L'ACCÉLÉRATEUR ET
MAINTENEZ UNE VITESSE CONSTANTE LONGTEMPS. APRÈS 1000
Km AUGMENTER GRADUELLEMENT
LA VITESSE, EN RESPECTANT LE
CODE DE LA ROUTE, JUSQU'À
OBTENTION DU RENDEMENT MAXIMUM.
Instructions pour la mise en marche
du moteur (démarrage électrique).
- Le cyclomoteur doit toujours reposer
sur sa béquille centrale avant d'actionner les commandes de démarrage.
- Actionner la clé de contact sur la posi-
tion de la droite
!.
- La poignée du gaz doit être actionnée
au minimum.
- Actionner la commande du frein arriè-
re ou avant.
C'est très important
2-
USO
UTILISATION
Page 37

Rodaggio
55
DURANTE I PRIMI 1.000 km
NON UTILIZZARE IL VEICOLO
OLTRE L’80% DELLA VELOCITÀ
MAX. PREVISTA. EVITARE DI APRIRE COMPLETAMENTE L’ACCELERATORE E DI MANTENERE A LUNGO
UNA VELOCITÀ COSTANTE. DOPO I
PRIMI 1.000 km, AUMENTARE PROGRESSIVAMENTE LA VELOCITÀ,
DOVE SIA PERMESSO DI FARLO,
FINO A RAGGIUNGERE IL MASSIMO
RENDIMENTO.
Istruzioni per l’avviamento del motore (con accensione elettrica)
- Avere sempre la precauzione di azio-
nare i comandi per l’avviamento del
motore con lo scooter sul cavalletto
centrale.
- Azionare la chiave di contatto nella
posizione della destra
!.
- Mantenere la manopola d’accelerazio-
ne al minimo.
È molto importante,
altrimenti il motore non si accende.
37
igd
USO - OPERATION
-2
FAHRBETRIEB
Running In
55
DURING THE FIRST 1,000 KM.
THE VEHICLE SHOULD NOT BE RUN
AT MORE THAN 80% OF THE MAXIMUM SPEED AVAILABLE. AVOID
OPENING THE THROTTLE FULLY OR
KEEPING THE SAME SPEED FOR
TOO LONG. AFTER THE FIRST 1,000
KM. INCREASE YOUR MAXIMUM
SPEED GRADUALLY, ONLY WHERE
LEGALLY PERMITTED, UNTIL YOU
REACH THE FULL PERFORMANCE
OF YOUR MACHINE.
Instructions for starting the engine
(with electric start)
- Always take care to operate the con-
trols for starting engine with your scooter up on the central stand.
- Insert the ignition and turn to the right
hand position,
!.
- Rotate the throttle twist grip fully clo-
sed.
- Apply the front or rear brake.
This is
very important, since the engine
will not start without the brake
applied.
Einlaufen des Motors
55
BEI DEN ERSTEN 1.000 KM SOLLTE
DAS FAHRZEUG NICHT MIT MEHR ALS
60% DER VORGESEHENEN
HÖCHSTGESCHWINDIGKEIT GEFAHREN
WERDEN. VERMEIDEN SIE, MIT VOLLGAS
UND ÜBER LÄNGERE ZEIT MIT EINER
GLEICHBLEIBENDEN GESCHWINDIGKEIT
ZU FAHREN. NACH DEN ERSTEN 1.000 KM
KANN DIE GESCHWINDIGKEIT
SCHRITTWEISE ERHÖHT UND – WO
ERLAUBT – MIT
HÖCHSTGESCHWINDIGKEIT GEFAHREN
WERDEN.
Hinweise zum Starten des Motors (mit
Elektrostarter)
- Beachten Sie immer die
Vorsichtsmaßnahmen und betätigen Sie die
Elemente zum Starten des Motors nur, wenn
der Scooter auf seinem Mittelständer steht.
- Drehen Sie den Zündschlüssel nach rechts in
die Position
!.
- Der Gasgriff ist in seine niedrigste Position zu
drehen.
- Den Griff für die Bremse hinten oder vorne
betätigen. Dieser Punkt ist sehr wichtig, da
Rodaggio • Running In
Einlaufen des Motors
Page 38

Arranque del motor
Démarrage du moteur
38
delantero. Es muy importante, de lo
contrario el motor no se pone en
marcha.
- Accionar el pulsador de arranque
mantenerlo pulsado hasta que el
motor se ponga en marcha al primer
intento.
- El tiempo necesario de accionamiento
del pulsador para una arrancada
suele ser de 1 a 2 segundos aproximadamente.
- Con el motor en marcha, sin gas y
con el freno trasero presionado, retirar
el caballete, a continuación, basta con
dar gas progresivamente, para que el
scooter le proporcione un viaje de verdadero placer.
1
No tenga el motor en marcha sin
necesidad. Arranque en seguida.
00
¡Aviso! Con el caballete puesto, no dar
nunca gas a fondo, pues de tocar la
rueda trasera al suelo, saldría el scooter a toda velocidad (recuerde que es
un variador centrífugo y gas a fondo
ef
sinon le cyclomoteur ne démarre
pas.
- Actionner le poussoir de démarrage
et le maintenir ainsi jusqu'à ce que le
moteur démarre du premier coup.
- Il faut actionner le poussoir de démarrage pendant une ou deux secondes
environ.
-Dès que le moteur tourne, presser le
frein avant et ne pas presser la manette à gaz pour enlever la béquille,
ensuite il suffit de donner du gaz progressivement pour que le cyclomoteur
vous permette un voyage plaisant.
1
Ne pas laisser le moteur tourner
si ce n'est pas nécessaire. Partez
dès le démarrage.
00
AVIS! Ne jamais actionner le gaz à fond
si le cyclomoteur repose sur la béquille,
si la roue venait à toucher le sol le
cyclomoteur serait projeté à toute vites-
2-
USO
UTILISATION
cADVERTÈNCIA
00
Amb el cavallet posat, no donar gas a
fons, si la roda del darrera toqués al
terra, sortiria l’scooter a tota velocitat
(recordi que és un variador centrífug i
gas a fons equival a una marxa llarga i
màxima velocitat.
Page 39

- Azionare il pulsante di accensione e
mantenerlo premuto finché il motore
non resti acceso al primo tentativo.
- Di solito il tempo necessario di azionamento del pulsante per ottenere
l’avviamento è di 1 a 2 secondi
approssimativamente.
- Con il motore avviato, senza il gas e
con il freno posteriore premuto, rimuovere il cavalletto dopodiché basta
accelerare progressivamente affinché
lo scooter Le possa dare un viaggio di
vero piacere.
1
Non tenere il motore avviato
senza bisogno di farlo. Partire
subito.
00
Avviso! Qualora il cavalletto sia alzato,
non accelerare al massimo perché, se
la ruota posteriore toccasse il suolo, lo
scooter partirebbe ad alta velocità
(ricordare che è un variatore centrifugo
e che accelerare al massimo è equivalente a una marcia lunga e massima
velocità).
39
USO - OPERATION
-2
FAHRBETRIEB
igd
- Press the starter button and keep it
pressed until the engine starts at the
first attempt.
- The time you will need to keep the
starter button pressed before the engine starts is usually approximately 1 or
2 seconds.
- When the engine starts, run at idle,
with the throttle at minimum and the
rear brake applied, and take the scooter off the centre stand: then slowly
apply the throttle and let your scooter
take you on a ride of pure pleasure.
1
Do not leave the engine running
unnecessarily. Start when you
mean to move off.
00
Warning! When the vehicle is up on the
centre stand, do not apply full throttle: if
the rear wheel touches the ground, the
scooter will move off at full speed
(remember that the vehicle is fitted with
a centrifugal variable speed drive, and
full throttle means top gear and full
speed).
der Motor sonst nicht anspringt.
- Die Starttaste
so lange drücken, bis der
Motor beim ersten Versuch gleich anspringt.
- Bis der Motor anspringt, muss die Starttaste
normalerweise ca. 1 bis 2 Sekunden gedrückt
werden.
- Bei laufendem Motor, ohne Gasgeben und
mit ausgelöster Hinterradbremse den
Mittelständer hochklappen. Anschließend
brauchen Sie nur zunehmend Gas zu geben,
damit das Fahren mit Ihrem Scooter für Sie
zu einem wirklichen Genuss wird.
1
Vermeiden Sie unnötiges Laufenlassen
des Motors. Fahren Sie gleich nach
dem Starten los.
00
Achtung! Geben Sie niemals Vollgas, solange
das Fahrzeug auf dem Ständer steht. Da das
Hinterrad auf dem Boden steht, würde der
Scooter mit voller Geschwindigkeit losfahren
(bedenken Sie, dass es sich hier um ein
Zentrifugalgetriebe handelt und Vollgas einem
hohen Gang und Höchstgeschwindigkeit
gleichkommt.)
Avviamento del motore • Starting the engine
Starten des motors
Page 40

equivale a una marcha larga y máxima
velocidad).
Instrucciones para la puesta en marcha del motor (con pedal).
-Téngase siempre la precaución de
accionar los mandos para la puesta
en marcha del motor con el scooter
encima del caballete central.
- Accionar la llave de contacto en la
posición de la derecha
!.
- Tener el puño de gas al mínimo.
- Simultáneamente con la operación
anterior accionar con el pie el pedal
de arranque, situado en el lado
izquierdo del motor.
- En tiempo muy frío al ponerse el
motor en marcha, mantenga durante
unos segundos el scooter sin dar gas
a tope, hasta que el motor esté caliente.
- Con el motor en marcha, sin gas y
con el freno trasero presionado, retirar
el caballete, a continuación, basta con
dar gas progresivamente para que el
scooter le proporcione un viaje de verdadero placer.
Arranque del motor
Démarrage du moteur
40
se (c'est un variateur centrifuge et à tout
gaz cela équivaut à un rapport long et à
la vitesse maximale).
Instructions pour la mise en marche
du moteur (au moyen de la pédale).
- Veillez à actionner les commandes de
démarrage du moteur uniquement si le
cyclomoteur se trouve sur sa béquille
centrale.
- Actionner la clé de contact sur la position de droite
!.
- La poignée du gaz doit être actionnée
au minimum.
- Simultanément, actionner avec le pied
la pédale de démarrage située du côté
gauche du moteur.
- Par temps très froid, il faut attendre
que le moteur se réchauffe avant d'actionner le gaz à fond.
- Avec le moteur en marche, sans gaz,
en actionnant le frein arrière, enlever
la béquille centrale et ensuite il suffit
de donner du gaz progressivement
pour que votre déplacement en cyclomoteur soit un vrai plaisir.
ef
2-
USO
UTILISATION
Page 41

Istruzioni per l’avviamento del motore (con pedale)
- Avere sempre l’accorgimento di azionare i comandi dell’avviamento del
motore con lo scooter sul cavalletto
centrale.
- Azionare la chiave di accensione nella
posizione della destra
!.
- Mantenere la manopola d’accelerazione al minimo.
- Contemporaneamente all’operazione
descritta, agire con il piede sul pedale
d’avviamento, situato sul lato sinistro
del motore.
- Quando si avvii il motore in clima
molto freddo, mantenere lo scooter
durante alcuni secondi senza accelerare al massimo, finché il motore non
sia caldo.
- Con il motore avviato, senza accelerare e con il freno posteriore premuto,
rimuovere il cavalletto dopodiché
basta accelerare progressivamente
affinché lo scooter Le possa dare un
viaggio di vero piacere.
1
Non tenere il motore avviato
senza bisogno di farlo. Partire
subito.
41
Instructions for starting the engine
(with kick-start)
- Always take care to operate the controls for starting engine with your scooter up on the central stand.
- Insert the ignition and turn to the right
hand position,
!.
- Rotate the throttle twist grip fully closed.
- Simultaneously with the previous operation, use your foot to kick the kickstart pedal down. This is located on
the left-hand side of the engine.
- When starting the engine in very cold
weather, keep the engine running without opening the throttle for a few
seconds to allow the engine to warm
up.
- When the engine starts, run at idle,
with the throttle at minimum and the
rear brake applied, and take the scooter off the centre stand: then slowly
apply the throttle and let your scooter
take you on a ride of pure pleasure.
1
Do not leave the engine running
unnecessarily. Start when you
mean to move off.
Hinweise zum Starten des Motors (mit
Kickstarter)
-
Halten Sie immer alle Vorsichtsmaßnahmen
ein und betätigen Sie die Elemente zum
Starten des Motors nur, wenn der Scooter auf
seinem Mittelständer steht.
-
Drehen Sie den Zündschlüssel nach rechts in
die Position
!
-
Der Gasgriff ist in seine niedrigste Position zu
drehen.
-
Während Sie wie in den vorstehenden
Punkten beschrieben vorgehen, betätigen Sie
den Kickstarter, der sich auf der linken Seite
des Motors befindet.
-
Lassen Sie bei kaltem Wetter den Motor nach
dem Starten einige Sekunden laufen, ohne
dabei Vollgas zu geben, damit sich der Motor
erwärmen kann.
-
Bei laufendem Motor, ohne Gasgeben und
mit ausgelöster Hinterradbremse den
Mittelständer hochklappen. Anschließend
brauchen Sie nur zunehmend Gas zu geben,
damit die Fahrt mit Ihrem Scooter für Sie zu
einem wirklichen Genuss wird.
1
Vermeiden Sie unnötiges Laufenlassen
des Motors. Fahren Sie gleich nach
dem Starten los.
igd
USO - OPERATION
-2
FAHRBETRIEB
Avviamento del motore • Starting the engine
Starten des motors
Page 42

1
No tenga el motor en marcha sin
necesidad. Arranque en seguida.
00
¡Aviso! Con el caballete pues-
to, no dar nunca gas a fondo, pues de
tocar la rueda trasera al suelo, saldría
el scooter a toda velocidad (recuerde
que es un variador centrífugo y gas a
fondo equivale a una marcha larga y
máxima velocidad).
55
CUALQUIER ADULTERACIÓN
PUEDE PROVOCAR GRAVES
DAÑOS AL MOTOR.
00
DEBIDO A HECHO DE QUE
EL CARBURADOR ESTA EQUIPADO
CON UNA BOMBA DE ACELERACION SE RECOMIENDA NO INSISTIR
CON EL MISMO MIENTRAS EL
MOTOR ESTE APAGADO PARA EVITAR QUE EL MISMO SE AHOGUE
ESPECIALMENTE EN CLIMAS CALIDOS.
Arranque del motor
Démarrage du moteur
42
1
Ne laissez pas le moteur tourner
sans nécessité. Partez tout de
suite.
00
¡Avis! Si le scooter est sur son
chevalet, ne jamais actionner les gaz à
fond, si la roue arrière frôlait le sol, le
scooter partirait à toute vitesse (le variateur est centrifuge et le gaz à fond équivaut à un rapport long à la vitesse maximum).
55
NE PAS RESPECTER CES
CONSEILS PEUT ENDOMMAGER
GRAVEMENT LE MOTEUR.
00
IL EST RECOMMANDÉ DE NE
PAS INSISTER SUR LE CARBURATEUR SI LE MOTEUR EST ARRÊTÉ
CAR IL EST MUNI D'UNE POMPE
D'ACCÉLÉRATION ET IL POURRAIT
SE NOYER SURTOUT DANS LES CLIMATS CHAUDS
ef
2-
USO
UTILISATION
cADVERTÈNCIA
00
Amb el cavallet posat, no donar gas a
fons, si la roda del darrera toqués al
terra, sortiria l’scooter a tota velocitat
(recordi que és un variador centrífug i
gas a fons equival a una marxa llarga i
màxima velocitat.
Page 43

00
Avviso! Qualora il cavalletto sia
alzato, non accelerare al massimo perché, se la ruota posteriore toccasse il
suolo, lo scooter partirebbe ad alta velocità (ricordare che è un variatore centrifugo e che accelerare al massimo è
equivalente a una marcia lunga e massima velocità).
55
QUALSIASI SOFISTICAZIONE
PUÒ ARRECARE GRAVI DANNI AL
MOTORE.
00
DOVUTO AL FATTO CHE IL
CARBURATORE È MUNITO DI UNA
POMPA DI ACCELERAZIONE, SI
CONSIGLIA DI NON INSISTERCI
MENTRE IL MOTORE SIA SPENTO,
PER EVITARE DI FARLO AFFOGARE,
SOPRATTUTTO IN AMBIENTI CALDI.
00
NON EFFETTUARE QUESTE
OPERAZIONI IN LOCALI CHIUSI
PERCHÉ I GAS DI SCAPPAMENTO
SONO TOSSICI.
43
00
Warning! When the vehicle is
up on the centre stand, do not apply full
throttle: if the rear wheel touches the
ground, the scooter will move off at full
speed (remember that the vehicle is fitted with a centrifugal variable speed
drive, and full throttle means top gear
and full speed.
55
DO NOT MODIFY THE ENGINE:
DOING SO CAN CAUSE SERIOUS
DAMAGE TO THE ENGINE.
00
BECAUSE THE CARBURETTOR IS FITTED WITH AN ACCELERATOR PUMP, WE RECOMMEND THAT
YOU SHOULD NOT OPERATE IT
WITH THE ENGINE STOPPED:
DOING SO WILL FLOOD THE CARBURETTOR, PARTICULARLY IN HOT
CLIMATES.
00
DO NOT PERFORM THESE
OPERATIONS IN CLOSED PREMISES: EXHAUST GASES ARE TOXIC
00
Achtung! Geben Sie niemals
Vollgas, solange das Fahrzeug auf dem
Ständer steht. Da das Hinterrad auf dem
Boden steht, würde der Scooter mit voller
Geschwindigkeit losfahren (bedenken Sie,
dass es sich hier um ein Zentrifugalgetriebe
handelt und Vollgas einem hohen Gang und
Höchstgeschwindigkeit gleichkommt.
55
DURCH JEGLICHE AM MOTOR
VORGENOMMENE VERÄNDERUNG
KÖNNEN SCHWERE SCHÄDEN
HERVORGERUFEN WERDEN.
00
DA DER VERGASER MIT EINER
BESCHLEUNIGUNGSPUMPE
AUSGESTATTET IST, EMPFIEHLT ES SICH,
DIESEN BEI AUSGESTELLTEM MOTOR
NICHT ZU BETÄTIGEN, UM SOMIT ZU
VERMEIDEN, DASS DER MOTOR
ABSÄUFT; INSBESONDERE TRIFFT
DIESES FÜR GEBIETE MIT WARMEM
KLIMA ZU:
00
DIESE OPERATIONEN SIND NICHT
IN GESCHLOSSENEN RÄUMEN
igd
USO - OPERATION
-2
FAHRBETRIEB
Avviamento del motore • Starting the engine
Starten des motors
Page 44

00
NO EFECTUAR ÉSTAS OPERACIONES EN LOCALES CERRADOS PORQUE LOS GASES DE
ESCAPE SON TÓXICOS.
00
ES IMPORTANTE QUE LA
PUESTA EN MARCHA CON EL
PEDAL DE ARRANQUE SE REALICE
CON EL VEHICULO SOBRE EL
CABALLETE.
Instrucciones para una correcta
conducción.
La técnica del bien conducir, es el
arte que permite sacar el máximo rendimiento del vehículo sin obligar su
mecánica.
Nuestra experiencia nos permite
aconsejarle:
¡Precaución!
1
Evite los acelerones. Dando gas
con tiento no sólo se logra reducir
considerablemente el consumo
de combustible, sino que también
disminuyen la contaminación y el
desgaste.
Conducción
Conduite
44
00
NE PAS EFFECTUER CES
OPÉRATIONS DANS DES LOCAUX
FERMÉS CAR IL Y A RISQUE D'INTOXICATION AVEC LES GAZ D'ÉCHAPPEMENT
00
IL EST IMPORTANT QUE LE
VÉHICULE REPOSE SUR SA BÉQUILLE POUR DÉMARRER.
Instructions pour une bonne
conduite.
La bonne conduite est l'art de tirer le
meilleur rendement du véhicule sans
forcer sa mécanique.
Notre expérience nous permet de vous
donner quelques conseils:
Précaution!
1
Évitez les accélérations brusques.
Actionner le gaz raisonnablement
pour réduire considérablement la
consommation de combustible et
éviter la pollution de l'air et l'usure
de votre cyclomoteur.
ef
2-
USO
UTILISATION
Page 45

00
È IMPORTANTE CHE L’AVVIAMENTO CON IL PEDALE DI
AVVIAMENTO SIA FATTO CON IL
VEICOLO SUL CAVALLETTO.
Istruzioni per una guida corretta
La tecnica della corretta guida è
l’arte che permette di ottenere la massima efficienza del veicolo senza forzarne
la meccanica.
La nostra esperienza ci permette di
consigliarLe:
Attenzione!
1
Evitare le forti accelerazioni. Se si
preme l’acceleratore con cura,
non soltanto si può ridurre marcatamente il consumo di combustibile, ma si diminuisce l’inquinamento e il logoramento.
- Ricordare sempre che si guida uno
scooter con variatore centrifugo. Qualora si accelera, il variatore, dotato di
un funzionamento progressivo, ha
bisogno che la forza centrifuga agisca
sui suoi meccanismi e sceglie il rapporto da Lei desiderato.
45
00
IT IS IMPORTANT TO KEEP
THE SCOOTER ON ITS CENTRE
STAND WHEN STARTING WITH THE
KICK-START PEDAL
Instructions for correct driving
The technique of good riding is an art
by which you achieve the highest possible performance from the vehicle without forcing the mechanism.
From our experience, we can recommend:
Caution!
1
Avoid sharp acceleration; by opening the throttle with care you not
only reduce fuel consumption
considerably, but also you reduce
pollution and wear and tear.
- Always remember that you are riding
a scooter with a centrifugal variable
speed drive. When you apply the
throttle, the variable speed drive operates progressively, and causes the
centrifugal force to operate on its
DURCHZUFÜHREN, DA DIE ABGASE
GIFTIG SIND.
00
ES IST UNBEDINGT ZU
BEACHTEN, DASS DER KICKSTARTER
NUR BETÄTIGT WERDEN DARF, WENN
DAS FAHRZEUG AUF SEINEM
MITTELSTÄNDER STEHT.
Hinweise für eine korrekte Fahrweise
Die Technik einer guten Fahrweise liegt in
der Kunst, dem Fahrzeug höchste Leistung
abzufordern, ohne dass dabei dessen
Mechanik Schaden leidet.
Aufgrund unserer Erfahrung sind wir in der
Lage, Ihnen hierzu einige Ratschläge zu
geben.
Vorsicht!
1
Vermeiden Sie plötzliche
Beschleunigungen. Durch ein
behutsames Gasgeben erzielen Sie
nicht nur einen geringeren
Benzinverbrauch, sondern Sie leisten
auch Ihren Beitrag zu einer geringeren
Luftverschmutzung und beugen
zusätzlich dem Fahrzeugverschleiß
vor.
igd
USO - OPERATION
-2
FAHRBETRIEB
Guida • Riding
Fahrweise
Page 46

- Recuerde siempre que conduce un
scooter con variador centrífugo. Al dar
gas el variador que tiene un funcionamiento progresivo, precisa que la fuerza centrífuga actúe en sus mecanismos, eligiendo la relación que Vd.
desee.
- Cuando suba por pendientes, aunque
mantenga el puño de gas a fondo, el
variador centrífugo elegirá la relación
adecuada automáticamente.
- Cuando realice descensos prolongados recuerde dar gas de vez en cuando, a fin de lubricar el motor.
1
Lleve siempre el motor en aquel
punto (3/4 de gas) en que siempre pueda dar algo más. Se ahorra combustible, se reducen los
ruidos y se alarga la vida del scooter.
- Al frenar cierre el gas.
- Frene con suavidad, vigilando el terreno que pisa. En asfalto seco inicie la
frenada con el freno delantero y
acabe con los dos. En terreno mojado, con arena o gravilla, no utilice
nunca el freno delantero y tome más
distancia para detener el scooter.
- Al arrancar, de gas suave y paulatinamente.
Conducción
Conduite
46
- N'oubliez pas que vous conduisez un
cyclomoteur avec variateur centrifuge.
En actionnant le gaz l'action du variateur est progressive, il faut que la
force centrifuge agisse sur les mécanismes, avec le rapport que vous
choisissez.
- Lorsque vous montez des côtes,
même si vous actionnez le gaz à fond,
le variateur centrifuge agira automatiquement avec le rapport adéquat.
- Dans les longues descentes veillez à
donner du gaz de temps en temps
pour lubrifier le moteur.
1
Le moteur doit tourner au point
(3.4 de gaz) où il peut être forcé
encore un peu plus. Vous dépenserez moins d'essence, vous
ferez moins de bruit et vous prolongerez la vie de votre cyclomoteur.
- Ne donnez pas de gaz si vous freinez.
- Freinez en douceur, adaptez-vous au
terrain sur lequel vous roulez. Sur
macadam sec commencez à freiner
avec le frein avant et ensuite avec l'avant et l'arrière. Sur sol mouillé, sur
terrain sableux ou sur des gravillons
ne jamais utiliser le frein avant et dans
ef
2-
USO
UTILISATION
Page 47

- Quando si vada in salita, sebbene si
mantenga la manopola dell’acceleratore al massimo, il variatore centrifugo
sceglierà automaticamente il rapporto
corretto.
- Quando esegua discese prolungate si
ricordi di accelerare ogni tanto e così
lubrificare il motore.
1
Guidare sempre il motore in quel
punto (3/4 del gas) in cui si può
dare sempre un po’ di più. Si risparmia combustibile, si riducono i
rumori e si allunga la vita dello
scooter.
- Quando si frena, togliere il gas.
- Frenare con soavità, avendo cura del
terreno che si calpesta. Sull’asfalto
secco cominciare la frenata con il
freno anteriore e finirla con entrambi.
Sul terreno bagnato, con sabbia o
ghiaietto, non usare mai il freno anteriore e mantenere una maggiore distanza per potere fermare lo scooter.
- Nell’avviamento, dare gas in modo
soave e progressivo.
1
Fermare il motore nelle situazioni
favorevoli del traffico.
47
mechanism, and to choose the gear
ratio you want.
- When climbing up hills, even if you
keep the throttle wide open, the centrifugal drive will select the appropriate
ratio automatically.
- When going down long hills, remember to open the throttle from time to
time, in order to lubricate the engine.
1
Always run the engine with the
throttle in such a position that the
engine can give a little more than
you are asking (3/4 throttle). This
way you will save fuel, keep the
noise down, and extend the life of
your scooter.
- When braking, close the throttle.
- Brake smoothly, keeping an eye on
the surface you are riding on. On dry
asphalt, start braking with the front
brake and brake to a standstill using
both brakes. On a wet surface, or
where there is sand or gravel, never
use the front brake, and also give
yourself a longer distance to stop the
scooter.
- When starting, open the throttle smoothly and gradually.
-
Vergessen Sie nicht, dass Sie einen Scooter
mit Zentrifugalgetriebe fahren. Beim
Gasgeben muss das progressiv arbeitende
Getriebe von der Zentrifugalkraft in dem von
Ihnen gewünschten Maße aktiviert werden.
-
Wenn Sie auf ansteigenden Strecken Vollgas
geben, arbeitet das Zentrifugalgetriebe
dennoch nur im angemessenen
Übersetzungsverhältnis.
-
Wenn Sie auf Strecken mit Gefälle fahren,
denken Sie daran, hin und wieder Gas zu
geben, damit der Motor mit Öl versorgt wird.
1
Halten Sie den Motor immer auf einer
Geschwindigkeit (3/4 Gas), die noch
etwas zu steigern ist. Auf diese Weise
sparen Sie Kraftstoff, senken den
Lärmpegel und verlängern außerdem
die Lebensdauer Ihres Scooters.
-
Nehmen Sie beim Bremsen das Gas weg.
-
Bremsen Sie sanft und achten Sie auf den
Untergrund, auf dem Sie fahren. Auf
trockenem Asphalt beginnen Sie den
Bremsvorgang bitte mit der
Vorderradbremse, um ihn danach mit beiden
Bremsen abzuschließen. Auf nassem
Untergrund, auf Sand und Kies ist in keinem
Fall die Vorderradbremse zu benutzen und
ein längerer Bremsweg für Ihren Scooter
einzukalkulieren.
-
Geben Sie beim Starten sanft und
schrittweise Gas.
igd
USO - OPERATION
-2
FAHRBETRIEB
Guida • Riding
Fahrweise
Page 48

1
Pare el motor en las ocasiones
propicias del tráfico.
Parada del motor
Sacar el gas, luego girar la llave de
contacto y en la posición
# motor para-
do sin blocaje, retirar la llave.
Transmisión automática
Para asegurar la máxima facilidad y
placer de conducción, el vehículo está
dotado de transmisión automática con
regulador y embrague centrífugo. El sistema está proyectado para suministrar
los mejores rendimientos tanto para la
aceleración como para el consumo, sea
la marcha en llano como en subida,
gracias a una regulación que tiene lugar
tanto en función del régimen de motor
como del par transmitido. En el cado de
detención en subida (semáforo, cola
etc.), usar sólo el freno para tener parado el vehículo dejando el motor al mínimo. Usar el motor para tener parado el
vehículo puede causar el recalentamiento del embrague. Este inconve-
Parada del motor - Transmisión automática
Arrêt du moteur - Transmission automatique
48
ces conditions la distance de sécurité
doit être plus grande pour arrêter le
véhicule.
- Au démarrage actionner le gaz en
douceur et progressivement.
1
Lorsque vous voulez vous arrêter,
faites-le lorsque le trafic le permet.
Arrêt du moteur
Fermer
le gaz, tourner ensuite la clé
de contact et en position
# moteur
arrêté non bloqué, ôter la clé.
Transmission automatique
Ce véhicule est équipé d'une transmission automatique avec régulateur et
embrayage centrifuge ce qui assure
une conduite plaisante et facile. Ce
système a été conçu pour les meilleurs
rendements d'accélération et de consommation, sur terrain plat ou en côte,
grâce à un réglage en fonction du régime du moteur et du couple transmis. Si
ef
2-
USO
UTILISATION
Page 49

Arresto del motore
Togliere gas, girare dopo la chiave
d’accensione e, in posizione
# motore
fermo senza bloccaggio, rimuovere la
chiave.
Trasmissione automatica
Per assicurare la massima facilità e
piacere durante la guida, il veicolo è
munito di una trasmissione automatica
con regolatore e frizione centrifuga. Il
sistema è concepito per fornire i migliori
rendimenti sia per l’accelerazione che
per il consumo, sia in piano che in salita, grazie a una regolazione che si ha
sia in funzione del regime del motore
che della coppia trasmessa. Nel caso di
arresto durante una salita (semaforo,
coda, ecc.), usare il freno soltanto per
mantenere il veicolo fermo, lasciando il
motore al minimo. Usare il motore per
mantenere fermo il veicolo può provocare il surriscaldamento della frizione.
Questo inconveniente è dovuto all’attrito
dei rulli della frizione sulla campana. È
perciò conveniente evitare di verificare
le condizioni di slittamento prolungato
della frizione con il relativo riscalda-
1
Stop the engine when traffic conditions require.
Stopping the engine
close the throttle, then turn the ignition key. when the ignition key reaches
the # position (engine stopped, stee-
ring lock off), you can remove the key.
Automatic transmission
In order to ensure the greatest simplicity and driving fun with your scooter,
the vehicle is fitted with an automatic
transmission with a speed governor,
and a centrifugal clutch. The system is
designed to give maximum performance
both in acceleration and in consumption
whether on the flat or climbing, thanks
to its regulator which works in response
to the engine speed in rpm and to the
torque delivered. When stopped on a
hill (traffic lights, traffic jams, etc.) only
use the brake to keep the vehicle stopped, leaving the engine running at a
minimum. Using the engine to keep the
vehicle at a standstill can cause the
clutch to over-heat. This problem is caused by the friction of the clutch weights
against the clutch hub. It is therefore
1
Stellen Sie den Motor ab, wenn eine
entsprechende Verkehrssituation dieses
erforderlich macht.
Fahrbetrieb
Das gas wegnehmen und anschliessend den
zÜndschlÜssel drehen. in der position
#
ist
der motor ausgeschaltet und der lenker nicht
blockiert. den zÜndschlÜssel abziehen.
Automatikgetriebe
Das Fahrzeug ist mit einem automatischen
Getriebe und einem Zentrifugalregler und einer
Zentrifugalkupplung ausgestattet und läßt sich
dadurch ausgesprochen leicht fahren und
bereitet somit viel Freude beim Fahren. Das
Motorsystem ist mit dem Ziel konzipiert
worden, dank der Übersetzung in Funktion des
Motorlaufs als auch des übertragenen
Drehmoments beste Leistung hinsichtlich der
Beschleunigung und dem Kraftstoffverbrauch
sowohl auf ebenen als auch auf ansteigenden
Strecken zu erbringen. Wenn auf
ansteigenden Strecken gehalten werden muss
(Ampel, Stau etc.) , sollte das Fahrzeug
lediglich mittels der Bremse im Stillstand
gehalten werden; der Motor sollte dabei mit
geringster Leistung laufen. Den Motor als
Bremse für das Fahrzeug einzusetzen, kann
zur Erhitzung der Kupplung führen. Dieser
igd
49
USO - OPERATION
-2
FAHRBETRIEB
Arresto del motore • Stopping the engine
Ausschalten des motors
Page 50

niente es debido a la fricción de las
masas del embrague sobre la campana. Por eso conviene evitar el comprobar las condiciones de deslizamiento
prolongado del embrague con recalentamiento del mismo (por ejemplo, además de la indicada antes, la marcha en
subida con carga total en pendientes o
salidas en pendientes superiores al
25%, etc.): Para tal fin se aconseja:
1. No insistir en estas condiciones de
uso.
2. Dejar enfriar el embrague con
motor al mínimo algunos minutos.
Escape catalítico
00
CUALQUIER TIPO DE MODlFlCAClÓN AL ESCAPE PUEDE PROVOCAR GRAVES MAL FUNCIONAMIENTOS AL MOTOR.
00
DEBIDO A LAS ELEVADAS
TEMPERATURAS QUE PUEDEN
ALCANZAR EN EL CATALIZADOR,
PRESTAR ATENCIÓN EN APARCAR
EL VEHÍCULO, QUE EL ESCAPE NO
TOQUE MATERIAL INFLAMABLE,
Transmisión automática - Escape catálítico
Transmission automatique - Échappement catalytique
50
le cyclomoteur doit s'arrêter en montée
(feux de circulation, trafic dense) se servir du frein en laissant tourner le moteur
au minimum. Utiliser le moteur peut provoquer un échauffement de l'embrayage dû à la friction des masses de l'embrayage sur la cloche. Éviter donc de
vérifier le glissement de l'embrayage
pour ne pas le chauffer (par exemple, le
rapport en montées avec charge totale
ou départs en descentes de plus de
25%, etc). Dans ces conditions:
1. Ne pas forcer
2. laisser refroidir l'embrayage en
laissant tourner le moteur quelques minutes.
Échappement catalytique
00
TOUTE MODIFICATION SUR LE
POT D'ÉCHAPPEMENT PEUT PROVOQUER DE SÉRIEUX DOMMAGES
DANS LE MOTEUR.
00
LE CATALYSEUR PEUT ÊTRE
TRÈS CHAUD, VEILLER À NE PAS
STATIONNER VOTRE CYCLOMO-
2-
USO
UTILISATION
cADVERTÈNCIA
00
Degut a les altes temperatures del
catalitzador, posar especial cura quan
aparqui el vehicle, evitant que
l’escapament entri en contacte amb
materials inflamables, i també amb la fi
d’evitar greus cremades al cos.
Page 51

51
USO - OPERATION
-2
FAHRBETRIEB
igd
mento (per esempio, oltre a quella già
indicata, la marcia in salita con carico
totale in pendii o salite in rampe superiori al 25%, ecc.). A tale scopo si consiglia di:
1. Non insistere in queste condizioni
di uso.
2 Lasciare raffreddare la frizione con
il motore al minimo durante alcuni
minuti.
Scappamento catalitico
00
QUALSIASI TIPO DI MODIFICA DELLO SCAPPAMENTO PUÒ
ARRECARE GRAVI DISFUNZIONI AL
MOTORE.
00
DOVUTO ALLE ELEVATE TEMPERATURE CHE POSSONO RAGGIUNGERSI NEL CATALIZZATORE,
AVERE CURA QUANDO SI PARCHEGGIA IL VEICOLO, IN MODO
CHE LO SCAPPAMENTO NON TOCCHI NESSUN MATERIALE INFIAMMABILE. AVERE ANCHE PARTICO-
recommended to avoid provoking conditions which cause continuous sliding of
the clutch weights leading to overheating of the clutch (for example, apart
from the conditions indicated above,
running uphill under full load, or starting
off on slopes of greater than 25%, etc. ).
To this end it is recommended:
1. Do not operate the scooter continuously in such conditions.
2. Allow the clutch and engine to
cool down to their minimum value
for a few minutes.
Exhaust catalyser
00
ANY TYPE OF MODIFICATION TO THE EXHAUST SYSTEM
MAY CAUSE SERIOUS MALFUNCTION IN THE ENGINE.
00
IN VIEW OF THE EXTREMELY
HIGH TEMPERATURES THAT MAY
BE REACHED IN THE CATALYSER
BE CAREFUL WHEN PARKING THE
SCOOTER THAT THE EXHAUST PIPE
IS NOT LEFT IN CONTACT WITH ANY
Nachteil wird durch die Reibung der
Kupplungsmasse auf der Glocke
hervorgerufen. Aus diesem Grund sollte
vermieden werden, ein länger anhaltendes
Rutschen der Kupplung und die damit
zusammenhängende Erhitzung derselben
auszuprobieren (z.B., zusätzlich zu dem
vorgenannten Fall, bei ansteigenden Strecken
mit voller Belastung oder bei Anfahren auf
Strecken mit einer Steigung von über 25%
etc.). In diesem Zusammenhang wird
Folgendes empfohlen: 1. Eine Weiterfahrt
unter diesen Bedingungen ist abzubrechen. 2.
Man muss die Kupplung einige Minuten lang
bei geringster Motordrehzahl abkühlen lassen.
Katalysator
00
DURCH JEGLICHE AN DER
AUSPUFFANLAGE VORGENOMMENEN
VERÄNDERUNGEN KÖNNEN SCHWERE
MOTORSCHÄDEN HERVORGERUFEN
WERDEN.
00
DA SICH DER KATALYSATOR
STARK ERHITZEN KANN, IST BEIM
ABSTELLEN DES FAHRZEUGS DARAUF ZU
ACHTEN, DASS DAS AUSPUFFROHR
NICHT MIT LEICHT BRENNBAREM
MATERIAL IN BERÜHRUNG KOMMT.
Trasmissione automatica - Scappamento catalitico
Automatic transmission - Exhaust catalyser • Automatikgetriebe - Katalysator
Page 52

PRESTAR TAMBIÉN MUCHA ATENCIÓN ADEMAS PARA EVITAR QUEMADURAS DEL CUERPO.
00
NO EFECTUAR OPERACIONES
DE APAGADO MOTOR CON EL
VEHÍCULO EN MARCHA. EN TAL
CASO LA GASOLINA NO QUEMADA
PUEDE LLEGAR AL CATALIZADOR
Y QUEMARSE PROVOCANDO EL
RECALENTAMIENTO Y LA RELATIVA DESTRUCCIÓN.
00
A CONTINUACION LES DAMOS
ALGUNOS CONSEJOS QUE LE
PERMlTlRAN UTILIZAR SU VEHICULO DIARIAMENTE CON UNA CONDUCCION TRANQUILA Y SEGURA.
00
CONDUCIR EN UN ESTADO DE
EMBRIAGUEZ, BAJO EL EFECTO DE
DROGAS O DE CIERTOS MEDICAMENTOS ES PELIGROSO PARA SI
MISMOS Y PARA LOS DEMAS.
Conducción segura
Conduite sans risques
52
TEUR À CÔTÉ DE MATÉRIAUX
INFLAMMABLES. FAITES ATTENTION DE NE PAS VOUS BRÛLER.
00
NE JAMAIS ÉTEINDRE LE
MOTEUR PENDANT QUE VOUS CIRCULEZ CAR L'ESSENCE PEUT ARRIVER AU CATALYSEUR ET BRÛLER
CE QUI PROVOQUERAIT DES DOMMAGES.
00
NOUS VOUS DONNONS QUELQUES CONSEILS POUR L'UTILISATION DU VÉHICULE TOUS LES
JOURS POUR UNE CONDUITE
TRANQUILLE ET SÛRE.
00
CONDUIRE EN ÉTAT D'IVRESSE, SOUS L'EFFET DE DROGUES OU
DE CERTAINS MÉDICAMENTS EST
DANGEREUX POUR LE CONDUCTEUR ET POUR LES AUTRES.
00
TOUTE MANIPULATION SUR
ef
2-
USO
UTILISATION
Page 53

53
LARE CURA PER EVITARE LE
USTIONI SUL CORPO.
00
NON REALIZZARE OPERAZIONI DI SPEGNIMENTO DEL MOTORE CON IL VEICOLO AVVIATO. IN
QUESTO CASO LA BENZINA INCOMBUSTA PUÒ RAGGIUNGERE IL
CATALIZZATORE E PROVOCARNE
IL SURRISCALDAMENTO E LA
RELATIVA DISTRUZIONE.
00
VI DIAMO IN SEGUITO ALCUNI CONSIGLI CHE VI PERMETTERANNO DI USARE IL VOSTRO VEICOLO OGNI GIORNO CON UNA
GUIDA TRANQUILLA E SICURA.
00
GUIDARE SOTTO GLI EFFETTI DELL’ALCOOL, DELLE DROGHE O
DI ALCUNI MEDICAMENTI È PERICOLOSO PER SE STESSI E PER GLI
ALTRI.
00
QUALSIASI LAVORO CHE
MODIFICHI I RENDIMENTI DEL VEICOLO, COME L’ALTERAZIONE DEI
INFLAMMABLE MATERIAL. EXTREME CARE SHOULD ALSO BE TAKEN
TO AVOID PERSONAL BURNS AND
INJURY.
00
IDO NOT START TURNING
OFF THE ENGINE WHILE THE VEHICLE IS IN MOTION. THIS MAY
ALLOW UNBURNT PETROL TO
REACH THE CATALYSER AND BURN
THERE. THIS WILL CAUSE THE
CATALYSER TO OVERHEAT AND
BECOME PARTIALLY DESTROYED.
00
BELOW WE GIVE A NUMBER
OF RECOMMENDATIONS WHICH
WILL ALLOW YOU TO USE YOUR
VEHICLE EVERY DAY WITHOUT
TROUBLE, AND GIVE YOU SAFE
TROUBLE-FREE RIDING.
00
RIDING WHILE DRUNK,
UNDER THE EFFECTS OF DRUGS
OR CERTAIN MEDICAMENTS IS
DANGEROUS TO YOURSELF AND
TO OTHERS.
AUSSERDEM IST VORSICHT WALTEN ZU
LASSEN, DAMIT SICH PERSONEN KEINE
VERBRENNUNGEN ZUZIEHEN.
00
KEINE ARBEITEN AM
ABGESTELLTEN FAHRZEUG MIT
LAUFENDEM MOTOR VORNEHMEN, DA IN
EINEM SOLCHEN FALL KRAFTSTOFF IN
DEN KATALYSATOR GELANGEN UND EINE
ÜBERHITZUNG EINTRETEN KANN, IN
DEREN FOLGE EIN RELATIV SCHWERER
SCHADEN HERVORGERUFEN WERDEN
KÖNNTE.
00
NACHSTEHEND ERHALTEN SIE
EINIGE HINWEISE DARÜBER, WIE SIE SICH
BEI TÄGLICHER BENUTZUNG IHRES
FAHRZEUGS EINE SICHERE UND RUHIGE
FAHRWEISE ANEIGNEN KÖNNEN:
00
UNTER DEM EINFLUSS VON
ALKOHOL, DROGEN ODER GEWISSER
MEDIKAMENTE ZU FAHREN, BEDEUTET
EINE GEFAHR NICHT NUR FÜR SIE
SELBER SONDER AUCH FÜR DIE
ÜBRIGEN VERKEHRSTEILNEHMER.
igd
USO - OPERATION
-2
FAHRBETRIEB
Guida sicura • Safe riding
Sichere fahrweise
Page 54

00
CUALQUIER TRABAJO QUE
MODIFIQUE LOS RENDIMIENTOS
DEL VEHÍCULO, COMO LAS ALTERACIONES DE PIEZAS ORIGINALES
DE LA ESTRUCTURA, HACE QUE EL
VEHÍCULO NO CORRESPONDA AL
TIPO HOMOLOGADO Y ES PELIGROSO PARA LA SEGURIDAD DE
CONDUCCIÓN.
Su habilidad y conocimiento del vehí-
culo forman la base de una conducción
segura. Pruebe el vehículo en zonas sin
tráfico hasta que haya adquirido un
buen conocimiento del vehículo. CONDUZCA SIEMPRE DENTRO DE LOS
LÍMITES DE SU CAPACIDAD
1. Antes de ponerse en marcha
recuerde Ilevar el casco y de ceñirlo
correctamente. 2. En carreteras con
superficie irregular reduzca la velocidad
y conduzca con prudencia. 3. Recuerde
que, después de haber recorrido un
largo tramo de carretera mojada sin haber accionado los frenos, el efecto frenante es inicialmente menor. En estas
condiciones de marcha es oportuno
Conducción segura
Conduite sans risques
54
00
LES PIÈCES DE RECHANGE
D'ORIGINE DE LA STRUCTURE DU
VÉHICULE FERAIT QUE CELUI-CI NE
CORRESPONDE PLUS AU TYPE
HOMOLOGUÉ ET ENTRAÎNERAIT UN
DANGER POUR LA SÉCURITÉ DE LA
CONDUITE.
Votre savoir-faire et une bonne connaissance de votre véhicule sont la base
pour une conduite sûre. CONDUISEZ
TOUJOURS DANS LES LIMITES DE
VOTRE CAPACITÉ.
1. Avant tout mettez toujours votre casque. 2. Sur les routes en mauvais état
réduisez la vitesse et soyez prudent. 3.
Après un long parcours sur sol mouillé,
sans que les freins n'aient été actionnés, rappelez-vous que l'effet de freinage sera moins efficace. Rappelez-vous
d'actionner les freins de temps en
temps. 4. Ne freinez pas à fond lorsque
le macadam est mouillé, irrégulier ou
glissant. Si vous devez freiner utiliser
les deux freins pour agir sur les deux
roues. 6. Avant de vous, installer sur le
ef
2-
USO
UTILISATION
Page 55

PEZZI ORIGINALI DELLA STRUTTURA, FA CHE IL VEICOLO NON
CORRISPONDA AL TIPO OMOLOGATO ED È PERICOLOSO PER LA
SICUREZZA DELLA GUIDA.
La Sua perizia e conoscenza del veicolo sono alla base di una guida sicura.
Provi il veicolo in zone senza traffico finché abbia acquistato una buona conoscenza del veicolo. GUIDI SEMPRE
ENTRO I LIMITI DELLE SUE CAPACITÀ.
1. Prima di mettersi in marcia ricordi
di mettersi l’elmetto e di stringerlo
correttamente. 2. Nelle strade con
superfici irregolari, riduca la velocità e
guidi con prudenza. 3. Ricordi che dopo
aver percorso un lungo tratto di strada
bagnata senza avere azionato i freni,
l’effetto frenante è inizialmente minore.
In queste condizioni di guida è opportuno azionare periodicamente i freni. 4.
Non frenare a fondo sull’asfalto bagnato, su terreno irregolare o su un tratto di
strada sdrucciolevole. 5. Se deve utilizzare i freni, lo faccia con tutti e due in
modo che l’azione del freno agisca su
55
00
CARRYING OUT ANY WORK
WHICH WILL MODIFY THE PERFORMANCE OF THE VEHICLE, SUCH AS
ALTERING THE ORIGINAL STRUCTURAL PARTS, WILL MAKE THE
VEHICLE DIFFERENT FROM THE
APPROVED TYPE AND IS DANGEROUS FOR SAFE RIDING.
Your skill and knowledge of the vehicle constitute the basis of safe riding.
Try out the vehicle in areas with little
traffic until you have acquired a good
knowledge of the vehicle. ALWAYS
RIDE WITHIN THE LIMITS OF YOUR
ABILITY.
1. Before starting off, remember to
put on your helmet and to tighten the
strap correctly. 2. On roads with an irregular surface, slow down and ride with
caution. 3. Remember that after riding
over a long stretch of wet road without
applying the brakes, the braking effect
will at first be reduced. Under these
riding conditions, it is a good idea to
apply the brakes every so often. 4. Do
not brake hard on wet asphalt, on une-
00
DA DURCH EINE AN DEN
ORIGINALTEILEN DES FAHRZEUGS
VORGENOMMENE VERÄNDERUNG DIESES
NICHT MEHR DEN
ZULASSUNGSBEDINGUNGEN
ENTSPRICHT, WIRD EINE SICHERE
FAHRWEISE NICHT MEHR
GEWÄHRLEISTET.
Ihre Erfahrung und Kenntnisse über das
Fahrzeug sind die Voraussetzung für eine
sichere Fahrweise. Probieren Sie das
Fahrzeug zunächst in verkehrsfreien Gebieten
aus, bis Sie an Fahrsicherheit gewonnen
haben. FAHREN SIE IMMER NUR IN
FUNKTION IHRER MÖGLICHKEITEN UND
LEISTUNGSFÄHIGKEIT.
1. Denken Sie daran, dass Sie sich vor
Fahrtantritt den Schutzhelm aufsetzen und
ordnungsgemäß festschnallen müssen. 2.
Reduzieren Sie auf Landstraßen mit unebener
Oberdecke die Geschwindigkeit und fahren Sie
vorsichtig weiter. 3. Denken Sie daran, dass,
wenn bei langen Fahrten auf nasser
Landstraße die Bremsen nicht betätigt werden,
die Bremswirkung zunächst geringer ist. In
diesem Fall ist es ratsam, die Bremsen
regelmäßig zu betätigen. 4. Machen Sie auf
nassem Asphalt, unebenem Untergrund oder
igd
USO - OPERATION
-2
FAHRBETRIEB
Guida sicura • Safe riding
Sichere fahrweise
Page 56

accionar periódicamente los frenos. 4.
No frene a fondo en asfalto mojado, en
terreno irregular o en un tramo de carretera resbaladizo. 5. Teniendo que utilizar los frenos use los dos, para que la
acción del freno actúe en las dos ruedas. 6. Evite que la salida se efectúe
subiendo en el vehículo colocado sobre
el soporte. En todo caso es necesario
que la rueda trasera no gire cuando
toma contacto con el terreno para evitar
salidas bruscas. 7. En caso de uso del
vehículo en carreteras sucias de arena,
barro nieve mixta con sal, etc. recomendamos limpiar frecuentemente el disco
freno con un detergente no agresivo
para evitar la formación de aglomerados abrasivos al interno de los ojales
con consecuente desgaste precoz de
las pastillas freno. 8. Recuerde que
todo trabajo que modifique los rendimientos del vehículo, como las alteraciones de piezas originales de la estructura, hace que el vehículo no corresponda al tipohomologado y es peligroso
para la seguridad de conducción.
Conducción segura
Conduite sans risques
56
cyclomoteur pour prendre le départ,
libérez la béquille pour que la roue
arrière touche le sol et ne tourne pas à
vide pour que le cyclomoteur ne démarre pas trop brusquement. 7. S'il y a des
zones de la route ensablées, embourbées ou enneigées veiller à nettoyer
souvent le disque à frein avec un détergent non agressif pour éviter la formation de conglomérats abrasifs qui provoqueraient une usure précoce des plaquettes de frein. 8.Souvenez-vous que
toute manipulation sur les pièces de
rechange d'origine dans les structures
ferait que le véhicule ne corresponde
plus au type homologué et constituerait
un danger pour la sécurité dans la conduite.
ef
2-
USO
UTILISATION
Page 57

57
entrambe le ruote. 6. Eviti che la partenza venga fatta salendo sul veicolo collocato sul supporto. In ogni modo è
necessario che la ruota posteriore non
giri quando è a contatto con il terreno,
in modo da evitare le partenze brusche.
7. Nel caso di usare il veicolo su strade
sporche di sabbia, fango, neve mista
con sale, ecc. si consiglia di nettare frequentemente il disco del freno con un
detersivo non aggressivo in modo da
evitare la formazione di agglomerati
abrasivi nell’interno dei fori con il conseguente logoramento precoce delle pastiglie del freno. 8. Ricordi che qualsiasi
azione che modifichi i rendimenti del
veicolo, come l’alterazione dei pezzi originali della struttura, fanno che il veicolo
non corrisponda con il tipo omologato
ed è pericoloso per la sicurezza della
guida.
ven surfaces, or on slippery stretches of
road. 5. When you have to use the brakes, use both at once so that the braking effect is applied through both wheels. 6. Avoid starting off by getting onto
the machine while it is up on the centre
stand. It is always important for the rear
wheel to be in contact with the ground
first, before it starts to rotate, to avoid
sudden rough starts. 7. Where the
machine is operated on roads covered
with sand, snow slush mixed with salt,
etc. we recommend that you should
clean the brake disc frequently with a
non-aggressive detergent in order to
prevent a build-up of abrasive deposits
inside the cooling holes of the disc,
which cause premature wear to the
brake pads. 8. Remember that carrying
out any work which will modify the performance of the vehicle, such as altering the original structural parts, will
make the vehicle different from the
approved type and is dangerous for
safe riding.
auf Landstraßen mit rutschiger Oberdecke
keine Vollbremsung. 5. Sollte eine Bremsung
erforderlich werden, sind beide Bremsen zu
betätigen, damit sich die Bremswirkung sowohl
auf das Vorderrad als auch das Hinterrad
überträgt. 6. Fahren Sie nicht los, wenn das
Fahrzeug noch auf seinem Ständer steht. Das
Hinterrad sollte sich bei Berührung mit dem
Boden in keinem Fall drehen, um abruptes
Losfahren zu vermeiden. 7. Wenn Sie mit dem
Fahrzeug auf durch Sand, SchneeSalzgemisch etc. verschmutzen Straßen
fahren müssen, ist es ratsam, die
Scheibenbremsen regelmäßig mit einem nicht
aggressiven Reinigungsmittel zu säubern, um
auf diese Weise zu vermeiden, dass sich im
Innenteil der Öffnungen Rückstände mit
abschleifender Wirkung bilden und somit den
vorzeitigen Verschleiß der Bremsbelege
verursachen. 8. Denken Sie daran, dass durch
eine jegliche, an den Originalteile des
Fahrzeugs vorgenommene Veränderung
dieses nicht mehr den Zulassungsbedingungen
entspricht und eine sichere Fahrweise nicht
mehr gewährleistet ist
igd
USO - OPERATION
-2
FAHRBETRIEB
Guida sicura • Safe riding
Sichere fahrweise
Page 58

3 MANTENIMIENTO
NIVEL ACEITE MOTOR........................60
NIVEL ACEITE CUBO TRASERO ........68
PRESIÓN NEUMÁTICOS .....................70
DESMONTAJE BUJÍA...........................73
FILTRO DE AIRE ..................................76
FILTRO AIRE SECUNDARIO ...............78
FUSIBLE ...............................................80
BATERíA...............................................82
FARO DELANTERO .............................90
AJUSTE RALENTÍ ................................92
CARACTERíSTICAS FRENO
DE DISCO .........................................94
REGULACIÓN FRENO TRASERO.....102
INACTIVIDAD DEL VEHíCULO ..........106
LIMPIEZA DEL VEHíCULO.................106
BUSCAR AVERíAS.............................112
PIEZAS DE RECAMBIO .....................118
58
3 ENTRETIEN
NIVEAU HUILE MOTEUR.....................60
NIVEAU HUILE MOYEU ARRIÈRE ......68
PRESSION DES PNEUS......................70
DÉMONTAGE DE LA BOUGIE.............73
FILTRE À AIR........................................76
FILTRE À AIR SECONDAIRE...............78
FUSIBLE ...............................................80
BATTERIE.............................................82
PHARE AVANT.....................................90
RÉGLAGE RALENTI.............................92
CARACTÉRISTIQUES DU FREIN
À DISQUE..........................................94
RÉGLAGE DU FREIN ARRIÈRE........102
VÉHICULE NON UTILISÉ...................106
NETTOYAGE DU VÉHICULE.............106
DÉPISTAGE DES PANNES................112
PIÈCES DE RECHANGE....................118
ef
Page 59

59
3 MANUTENZIONE
LIVELLO OLIO MOTORE .....................60
LIVELLO OLIO MOZZO POSTERIORE
...68
PRESSIONE PNEUMATICI ..................70
SMONTAGGIO CANDELA....................73
FILTRO ARIA ........................................76
FILTRO ARIA SECONDARIO...............78
FUSIBILE ..............................................80
BATTERIA.............................................82
FARO ANTERIORE ..............................90
REGOLAZIONE MINIMO......................92
CARATTERISTICHE FRENO
A DISCO ............................................94
REGOLAZIONE FRENO
POSTERIORE .................................102
INATTIVITÀ DEL VEICOLO................106
PULIZIA DEL VEICOLO......................106
RICERCA DEL GUASTO....................112
PEZZI DI RICAMBIO...........................118
3 MAINTENANCE
ENGINE OIL LEVEL..............................60
REAR HUB OIL LEVEL.........................68
TYRE PRESSURES..............................70
REMOVING THE SPARK PLUG...........73
AIR FILTER...........................................76
SECONDARY AIR FILTER ...................78
FUSE.....................................................80
BATTERY..............................................82
FRONT HEADLIGHT ............................90
ADJUSTING THE IDLE SPEED............92
FRONT BRAKE SPECIFICATIONS......94
ADJUSTING THE REAR BRAKE........102
LEAVING THE VEHICLE IDLE
FOR LONG PERIODS.....................106
CLEANING THE VEHICLE .................106
TROUBLESHOOTING ........................112
SPARE PARTS ...................................118
3 WARTUNG
FÜLLSTAND MOTORÖL ......................60
ÖLFÜLLSTAND IN ÖLWANNE
HINTEN .............................................68
REIFENFÜLLDRUCK............................70
HERAUSNAHME DER KERZE.............73
LUFTFILTER.........................................76
SEKUNDÄRLUFTFILTER.....................78
SICHERUNG.........................................80
BATTERIE.............................................82
SCHEINWERFER VORNE ...................90
EINSTELLUNG DES LEERLAUFS.......92
MERKMALE DER
SCHEIBENBREMSE .........................94
EINSTELLUNG DER
HINTERRADBREMSE.....................102
AUSSERBETRIEBSETZUNG DES
FAHRZEUGS...................................106
REINIGEN DES FAHRZEUGS ...........106
STÖRUNGSSUCHE ...........................112
ERSATZTEILE ....................................118
igd
Page 60

Nivel aceite motor
En los motores 4T el aceite del motor
es utilizado para la lubricación de los
órganos de la distribución, los soportes
principales y el grupo térmico. Una cantidad insuficiente de aceite puede provocar graves daños al motor. En todos
los motores 4T la disminución de las
características del aceite, como también un determinado consumo, deben
considerarse normales. Especialmente
el consumo puede ser determinado por
las condiciones de uso (ej.: conducir
siempre con el "gas totalmente abierto"
aumenta el consumo de aceite). Con el
objeto de prevenir cualquier inconveniente, se recomienda comprobar el
nivel del aceite cada vez que se utiliza
el vehículo.
Comprobacion nivel
Cada vez que se usa el vehículo,
con el motor frío, se debe realizar la
comprobación del nivel del aceite en el
motor, el cual debe estar siempre comprendido entre las marcas MAX y MIN
de la varilla representada en la figura;
Niveau huile moteur
Dans les moteurs 4T l'huile du
moteur est utilisé pour lubrifier les organes de distribution, les supports principaux et le groupe thermique. Un manque d'huile peut endommager sérieusement le moteur. Dans tous les moteurs
4T il est normal que l'huile perde certaines de ses caractéristiques La consommation d'huile dépend des conditions de
la conduite (par exemple, conduire « le
gaz tout ouvert » augmente la consommation d'huile). Avant le départ, vérifiez
toujours le niveau d'huile.
Vérification du niveau d'huile
Avant d'utiliser le véhicule, le moteur
étant froid, procéder à la vérification du
niveau d'huile dans le du moteur. Le
niveau doit se trouver entre les marques MAX et MIN de la tige illustrée
dans la figure.
Nivel aceite motor
Niveau huile moteur
60
ef
3-
MANTENIMIENTO
ENTRETIEN
B
A
Page 61

Livello olio motore
Nei motori 4T l’olio del motore viene
utilizzato per la lubrificazione degli organi di distribuzione, dei supporti principali
e del gruppo termico. Una quantità
insufficiente d’olio può arrecare gravi
danni al motore. In tutti i motori 4T la
diminuzione delle caratteristiche dell’olio
o anche un determinato consumo devono ritenersi normali. In particolar modo,
il consumo può essere determinato da
condizioni d’uso (p.e. guidare sempre
con il “gas totalmente aperto” aumenta
il consumo d’olio). Con lo scopo di prevenire qualsiasi inconveniente, si consiglia di verificare il livello dell’olio ogni
volta che venga utilizzato il veicolo.
Verifica livello
Ogni volta che si usa il veicolo con il
motore freddo, si deve effettuare la verifica del livello dell'olio nel motore, che
deve essere sempre compreso tra i
segni MAX e MIN dello spioncino indicato nella figura. Durante la verifica il
veicolo deve trovarsi appoggiato sul
cavalletto su una superficie orizzontale.
61
igd
MANUTENZIONE
-3
MAINTENANCE - WARTUNG
Engine oil level
In 4-stroke engines, the engine oil is
used for lubricating the distributor elements, the main components, and the
thermal combustion section. Too little oil
can cause serious damage to the engine. In all 4-stroke engines, deterioration
of the oil specifications and a certain
degree of oil use should be considered
normal. In particular, consumption can
be determined by the operating conditions (e.g. riding with the throttle always
wide open will increase oil consumption). In order to prevent any problems it
is recommended to check the oil level
every time the machine is used.
Checking the oil level
To check the oil level, unscrew the
dipstick-cap, clean it and screw it in
again. Then unscrew it once again and
check that the oil level is between the
MAX and MIN marks. While the oil is
being checked the machine should be
up on its centre stand and on a horizontal surface. If the oil is checked after
using the vehicle, that is to say with the
Füllstand Motoröl
Bei den Viertaktmotoren dient das Öl
zur Schmierung des Verteilers, der
wichtigsten Lager und der
Wärmegruppe. Durch eine zu geringe
Ölversorgung können schwere
Motorschäden hervorgerufen werden.
Die nachlassenden Öleigenschaften als
auch ein gewisser Ölverbrauch sind bei
allen Viertaktmotoren als normal
anzusehen. Insbesondere der
Ölverbrauch kann sich in Funktion der
Fahrweise ergeben (z.B. wird durch das
ständige Fahren mit Vollgas der
Ölverbrauch erhöht). Zwecks
Vermeidung eventuell auftretender
Störungen wird empfohlen, vor jedem
Fahrtantritt den Ölstand zu überprüfen.
Überprüfung des Ölstands
Vor jedem Fahrtantritt sollte der
Ölstand bei kaltem Motor überprüft
werden. Der Ölstand muss zwischen
den Markierungen MAX und MIN des
Messstabes liegen (s. Abb.). Bei der
Prüfung des Ölstandes muss das
Fahrzeug auf dem Ständer auf einer
waagerechten Fläche abgestellt sein.
Wenn diese Überprüfung nach
Livello olio motore • Engine oil level
Füllstand Motoröl
Page 62

Nivel aceite motor
Niveau huile moteur
62
ef
durante la comprobación el vehículo
debe estar apoyado sobre el caballete
en una superficie horizontal. En el caso
de comprobación después de haber
usado el vehículo, es decir con el motor
caliente, la línea del nivel será más
baja; para realizar una correcta compro-
bación es necesario esperar por lo
menos 10 minutos después de la parada del motor, para poder obtener un
nivel correcto.
Para comprobar el nivel de aceite,
desenroscar el tapón-varilla, limpiarlo y
volverlo a enroscar. Después volver a
desenroscar y comprobar que el nivel
de aceite esté entre las marcas MAX y
MIN.
55
HACER FUNCIONAR EL
MOTOR CON LUBRICACIÓN INSUFICIENTE O CON LUBRICANTES INADECUADOS ACELERA EL DESGASTE DE LAS PARTES EN MOVIMIENTO Y PUEDE DAR LUGAR A
AVERÍAS GRAVES.
Le cyclomoteur doit reposer sur sa
béquille sur un terrain plat. Si la vérification se fait lorsque le moteur est chaud,
la ligne de niveau sera plus basse il faut
donc attendre que le moteur refroidisse
pour vérifier si le niveau est correct.
Pour vérifier le niveau d'huile, dévisser le bouchon-tige, le nettoyer et le
revisser L'ouvrir de nouveau ensuite de
nouveau et vérifier que le niveau d'huile
est bien situé entre les repères MAX et
MIN.
55
FAIRE TOURNER LE MOTEUR
LORSQU'IL MANQUE DE L'HUILE OU
LE FAIRE TOURNER AVEC UNE
HUILE PAS APPROPRIÉE CONTRIBUE À L'USURE RAPIDE DES PARTIES EN MOUVEMENT ET PEUT
PROVOQUER DES PANNES GRAVES.
3-
MANTENIMIENTO
ENTRETIEN
Page 63

Nel caso di una verifica dopo aver usato
il veicolo, cioè, con il motore caldo, la
linea del livello sarà più bassa: per
effettuare una corretta verifica è necessario aspettare almeno 10 minuti dopo
l’arresto del motore per potere ottenere
un livello corretto.
Per verificare il livello dell'olio, svitare
il tappo con asta, pulirlo e avvitarlo di
nuovo. In seguito, svitarlo nuovamente
e verificare che il livello dell'olio si trovi
tra i segni MAX e MIN.
55
FARE FUNZIONARE IL MOTORE CON UNA LUBRIFICAZIONE
INSUFFICIENTE O CON UNA LUBRIFICAZIONE NON IDONEA ACCELERA L’USURA DELLE PARTI IN MOVIMENTO E PUÒ PROVOCARE DEI
GRAVI GUASTI.
63
igd
MANUTENZIONE
-3
MAINTENANCE - WARTUNG
engine still hot, the oil level line will be
lower. It is important to wait at least 10
minutes after stopping the engine in
order to obtain a correct level reading.
To check the oil level, unscrew the
dipstick-cap, clean it and screw it in
again. Then unscrew it once again and
check that the oil level is between the
MAX and MIN marks.
55
RUNNING THE ENGINE WITH
INSUFFICIENT ENGINE LUBRICATING OIL, OR USING THE WRONG
TYPES OF OIL, WILL ACCELERATE
WEAR AND TEAR TO MOVING
PARTS, AND MAY CAUSE SERIOUS
DAMAGE.
Abschluss einer Fahrt, d.h. mit heißem
Motor, vorgenommen wird, liegt der
Ölstand tiefer; damit ein korrekter Wert
abgelesen werden kann, muss nach
Ausschalten des Motors mindestens 10
Minuten gewartet werden.
55
LÄSST MAN DEN MOTOR MIT
NICHT AUSREICHENDER
SCHMIERUNG ARBEITEN ODER
WIRD EIN NICHT GEEIGNETES ÖL
VERWENDET, SO WIRD EIN
VORZEITIGER VERSCHLEISS DER
BEWEGLICHEN TEILE VERURSACHT
UND AUSSERDEM KÖNNEN
SCHWERE MOTORSCHÄDEN
HERVORGERUFEN WERDEN.
Technische Daten
Motoröl
Füllmenge ~ 850 ccm
Öl einfùllen
Das eventuell vorzunehmende
Nachfüllen von Öl ist nach Überprüfen
des Ölstandes vorzunehmen. Die
Markierung MAX darf dabei in keinem
Livello olio motore • Engine oil level
Füllstand Motoröl
Page 64

Características Técnicas
Aceite motor
Capacidad: - 850 cc
Llenado aceite
Eventuales llenados se deben realizar después de haber comprobado el
nivel y de todas maneras añadiendo
aceite sin superar nunca el nivel MAX.
Cada 3000 km está previsto efectuar,
en un Punto de Asistencia Autorizado
DERBI, un control y eventual llenado de
aceite en el motor.
Productos recomendados
AGIP SUPER 4T 20W50
Aceite para motor mineral API SJ +
CCMC G4 + ACEA A3-04 + JASO MA
Aceite mineral SAE 20W50 que supera
la especificación API SJ
Agip Super 4T 20w50
Características Técnicas
Aceite motor (al cambio aceite filtro)
650 cc
Nivel aceite motor
Niveau huile moteur
64
Caractéristiques techniques
Huile moteur
Capacité : 850 c.c.
Remplissage de l'huile
Dès qu'il manque de l'huile, remplir
sans dépasser la marque MAX.
Tous les 3000 km il est prévu d'effectuer une vérification et si nécessaire le
remplissage de l'huile du moteur, dans
un Centre Autorisé par DERBI.
Produits recommandés
AGIP SUPER 4T 20W50
Huile minérale pour moteur API SJ +
CCMC G4 + ACEA A3-04 + JASO MA
Huile minérale SAE20W50 qui dépasse
la spécification API SJ Agip Super 4T
20w50
Caractéristiques techniques
Huile moteur (remplacer huile , filtre)
650 cc
ef
3-
MANTENIMIENTO
ENTRETIEN
Page 65

65
Caratteristiche tecniche
Olio motore
Capacità 850 c.c.
Immissione olio
Eventuali immissioni sono da farsi
dopo aver verificato il livello e, in ogni
modo, aggiungendo l’olio senza superare mai il livello MAX. Ogni 3.000 km è
previsto realizzare presso un Punto di
Assistenza Autorizzato Derbi un controllo ed eventuale immissione di olio nel
motore.
Prodotti consigliati
AGIP SUPER 4T 20W50
Olio minerale per motore API SJ +
CCMC G4 + ACEA A3-04 + JASO MA
Olio minerale SAE 20W50 che supera
la specificazione API SJ
Agip Super 4T 20w50
Caratteristiche tecniche
Olio motore (al cambio olio filtro)
650 c.c.
Technical Specifications
Engine oil
Oil capacity – 850 cc
Filling with oil
The engine oil should be topped up,
if necessary, after checking the engine
oil level, and when adding oil it is vital
not to top up higher than the MAX oil
level mark. Every 3,000 kms, it is
necessary for your Authorised Derbi
Service Centre to carry out a check on
the engine oil and possibly to refill the
engine.
Recommended products
AGIP SUPER 4-stroke 20W50
API SJ + CCMC G4 + ACEA A3-04 +
JASO MA mineral engine oil
SAE 20W50 mineral oil that exceeds
specification API SJ
Agip Super 4-stroke 20w50
Technical Specifications
Engine oil (when changing the oil filter)
650 cc
Fall überschritten werden. Alle 3.000 km
sollte eine Kontrolle des Ölstandes und
ein eventuell erforderliches Nachfüllen
von Motoröl von einer
Vertragswerkstätte Derbi vorgenommen
werden.
Es werden folgende Produkte
empfohlen:
AGIP CITY 4T
Motoröl
HALBSYNTHETISCHES ÖL
API SJ „DONUT“ + JASO MA
Technische Daten
Motoröl (bei Wechseln des Ölfilters)
650 ccm
Ölwechsel
Der Ölwechsel und die Reinigung
des Ölfilters müssen alle 5.000
Kilometer von einer Vertragswerkstätte
DERBI vorgenommen werden. Das
Motoröl läßt man über die
Ablassschraube „B“ bei warmen Motor
abfließen. Damit das Öl leichter
abfließen kann, ist der Deckel „A“ und
anschließend der Deckel „C“ zu lösen
und der Netzfilter herauszunehmen.
Nach Reinigung des Netzfilters wird er
igd
MANUTENZIONE
-3
MAINTENANCE - WARTUNG
Livello olio motore • Engine oil level
Füllstand Motoröl
Page 66

Nivel aceite motor
Niveau huile moteur
66
Sustitución aceite
El cambio del aceite y la limpieza del
filtro se debe realizar cada 5.000 km. en
un Punto de Asistencia Autorizado
Derbi. El motor se debe vaciar dejando
que el aceite salga por el orificio de drenaje "B" con el motor caliente. Para
facilitar la salida del aceite aflojar el
tapón "A" y extraer el filtro de red. Después de haber limpiado el filtro de red y
haberlo montado nuevamente, apretar
el tapón "B" y llenar con aceite por el
orificio "A". Poner en marcha el motor,
dejarlo girar por algunos minutos y apagarlo, después de aproximadamente 5
minutos comprobar el nivel y eventualmente añadir sin superar nunca el nivel
MAX. Para añadir o cambiar utilizar
aceite nuevo del tipo recomendado.
11
EL ACEITE USADO CONTIENE
SUSTANCIAS PELIGROSAS PARA
EL AMBIENTE. PARA LA SUSTITUCIÓN DEL ACEITE ACONSEJAMOS
DE DIRIGIRSE EN UN CENTRO DE
ASISTENCIA AUTORIZADO DERBI
QUE ESTÁ EQUIPADO PARA ELIMINAR ACEITES USADOS EN EL RESPETO DE LA NATURALEZA Y DE
LAS NORMAS DE LEY.
Remplacement de l'huile
Remplacer l'huile et changer le filtre
tous les 5000 km dans un Centre d'Assistance autorisé Derbi. Le moteur
étant chaud, faire la vidange en laissant
couler l'huile par l'orifice de vidange "B".
Pour faciliter la vidange, desserrer le
bouchon "A" et extraire le filtre. Nettoyer
le filtre et le placer de nouveau, fermer
le bouton "B" et ajouter de l'huile par l'orifice "A". Mettre le moteur en marche,
le laisser tourner pendant quelques
minutes et l'éteindre; ensuite, au bout
de 5 minutes environ vérifier le niveau,
remplir éventuellement sans dépasser
le niveau MAX. Pour remplir ou vidanger, utiliser toujours de l'huile neuve du
type recommandé.
11
L'HUILE USÉE CONTIENT DES
SUBSTANCES DANGEREUSES
POUR L'ENVIRONNEMENT. POUR
REMPLACER L'HUILE S'ADRESSER
À UN CENTRE D'ASSISTANCE
AUTORISÉ DERBI ÉQUIPÉ POUR
ÉLIMINER LES DÉCHETS EN RESPECTANT LA NATURE ET LES
PRESCRIPTIONS DE LA LOI.
ef
3-
MANTENIMIENTO
ENTRETIEN
Page 67

67
Sostituzione olio
Il cambio dell'olio e la pulizia del filtro
devono essere realizzate ogni 5.000 km
presso un punto di assistenza autorizzato Derbi. Il motore deve essere svuotato, facendo uscire l'olio dal foro di drenaggio "B" con il motore caldo. Per facilitare l'uscita dell'olio bisogna allentare il
tappo "A" ed estrarre il filtro a rete.
Dopo aver pulito il filtro a rete ed averlo
nuovamente montato, stringere il tappo
"B" e riempire con olio attraverso il foro
"A". mettere in marcia il motore, farlo
girare per alcuni minuti e poi spegnerlo:
dopo circa 5 minuti, verificare il livello
ed eventualmente aggiungere olio
senza però superare mai il livello MAX.
Per aggiungere o cambiare l'olio, utilizzare olio nuovo del tipo raccomandato.
11
L’OLIO USATO HA SOSTANZE
PERICOLOSE PER L’AMBIENTE.
PER LA SOSTITUZIONE DELL’OLIO
CONSIGLIAMO DI RIVOLGERSI A UN
CENTRO D’ASSISTENZA AUTORIZZATO DERBI CHE È EQUIPAGGIATO
PER ELIMINARE OLI USATI NEL RISPETTO DELLA NATURA E DELLE
NORME DI LEGGE.
Changing the oil
Changing the oil and cleaning the filter
should be carried out every 5,000 km at
an Authorised Derbi Service Centre.
The oil should be drained out of the
engine through the drain outlet "B" while
the engine is hot. In order to help the oil
to flow, loosen the cap "A" and withdraw
the mesh filter. After cleaning and refitting the mesh filter, retighten the cap
"B" and refill with oil using aperture "A".
Start up the engine, leave it running for
a few minutes and then switch off. After
about five minutes, check the level and
if necessary top up, always taking care
not to go over the MAX level. When
adding or changing the oil, use new oil
of the recommended type.
11
THE OIL USED IN ENGINES
CONTAINS SUBSTANCES WHICH
ARE DANGEROUS FOR THE ENVIRONMENT. WHEN CHANGING THE
OIL WE RECOMMEND THAT YOU GO
TO YOUR AUTHORISED DERBI SERVICE CENTRE, WHICH WILL BE PROPERLY EQUIPPED TO DISPOSE OF
USED OILS WHILE OBSERVING DUE
RESPECT FOR NATURE AND
OBSERVING THE LAW AND REGULATIONS.
wieder eingesetzt und anschließend
zunächst der Deckel „C“ und danach
der Deckel „B“ festgeschraubt. Das Öl
wird durch die Öffnung „A“ eingefüllt.
Anschließend ist der Motor
einzuschalten und einige Minuten
laufenzulassen. Danach wird er
ausgeschaltet, um nach ca. 5 Minuten
den Ölstand zu kontrollieren. In
gegebenem Fall ist etwas Öl
nachzufüllen, ohne dabei die
Markierung MAX. zu überschreiten.
Zum Nachfüllen oder Ölwechsel ist
neues Öl der empfohlenen Sorte zu
verwenden.
11
ALTÖL ENTHÄLT
UMWELTSCHÄDLICHE SUBSTANZEN.
WIR EMPFEHLEN IHNEN, DEN
ÖLWECHSEL VON EINER DERBIVERTRAGSWERKSTÄTTE
VORNEHMEN ZU LASSEN, DIE ÜBER
ENTSPRECHENDE ERFAHRUNG UND
VORRICHTUNGEN FÜR DIE
ENTSORGUNG DES ALTÖLS UNTER
BEACHTUNG DES
UMWELTSCHUTZES UND DER
GESETZLICHEN VORSCHRIFTEN
VERFÜGT.
igd
MANUTENZIONE
-3
MAINTENANCE - WARTUNG
Livello olio motore • Engine oil level
Füllstand Motoröl
Page 68

Nivel aceite cubo
1) Colocar el vehículo sobre un
caballete en un suelo plano: 2) Desenroscar el asta del aceite «A», secarla
con un paño limpio e introducirla totalmente nuevamente («B» tapón de drenaje aceite); 3) Extraer el asta y verificar que el nivel del aceite roce la marca
"intermedia" (asta con 3 marcas). Con
el as-ta con dos marcas el nivel del
aceite debe quedar en la mitad inferior
de la misma. 4) Enroscar nuevamente
el asta y comprobar el apriete.
Nivel aceite cubo trasero
Comprobar que haya aceite en el
cubo trasero
Productos recomendados
Aceite cubo trasero
Aceite GEAR SYNTH 75W90
SINTÉTICO - API GL 5 - EP
Características técnicas
Aceite en el cubo trasero
Cantidad de aceite: ~ 100 cc.
Niveau d'huile dans le moyeu
1) Placer votre véhicule sur sa béquille sur un terrain plat. 2) Dévisser la tige
de mesure A, nettoyer avec un chiffon
propre et l'introduire à nouveau. (B bouchon de vidange de l'huile). 3 Extraire la
tige pour vérifier que le niveau de l'huile
se trouve sur la marque intermédiaire
(la jauge est marquée de 3 encoches)
Si la tige a 2 marques le niveau doit
arriver à la moitié inférieure. 4 Revisser
la jauge et bien serrer.
Niveau huile moyeu arrière
Vérifier s'il y a de l'huile dans le
moyeu arrière.
Produits recommandés
Huile moyeu arrière
Huile GEAR SYNTH 75W90
SINTETICO API GL 5 EP
Caractéristiques techniques
huile dans le moyeu arrière
Volume d'huile: ~ 100 cc
Nivel aceite cubo
Niveau d'huile dans le moyeu
68
ef
3-
MANTENIMIENTO
ENTRETIEN
Page 69

Livello olio mozzo
1) Collocare il veicolo su un cavalletto posto un terreno piano. 2) Svitare
l’asta dell’olio “A”, asciugarla con un
panno pulito e reintrodurla tutta; 3) Sfilare l’asta e verificare che il livello d’olio
sfreghi la tacca “intermedia” (asta con
tre tacche). Con l’asta di due tacche, il
livello dell’olio deve rimanere nella sua
metà inferiore. 4) Avvitare di nuovo
l’asta e verificarne la stretta.
Livello olio mozzo posteriore
Verificare che ci sia olio nel mozzo
posteriore
Prodotti consigliati
Olio mozzo posteriore
Olio GEAR SYNTH 75W90
SINTETICO - API GL5 - EP
Caratteristiche tecniche
Olio nel mozzo posteriore
Quantità d’olio: - 100 c.c.
69
igd
MANUTENZIONE
-3
MAINTENANCE - WARTUNG
Wheel hub oil level
1) Place the machine up on a stand
on a horizontal floor. 2) Unscrew the oil
dipstick, A,
dry it on a dry cloth, and insert it fully
again. (B is the oil drain plug.) 3) Withdraw the dipstick again and check that
the oil level just touches the “interme-
diate” mark (3-mark dipstick). In the
case of the dipsticks with two marks,
the oil level should be in the lower half
of the stick. 4) Screw the dipstick in
again, and check for tightness.
Rear hub oil level
Check that there is oil in the rear hub
Recommended products
Rear wheel hub oil
GEAR SYNTH 75W90
SYNTHETIC – API GL 5 – EP oil
Technical specifications
Rear wheel hub oil
Oil capacity – 100cc
Ölfüllstand in der Ölwanne
1) Das Fahrzeug auf seinen Ständer
auf eine waagerechte Fläche abstellen.
2) Den Ölmessstab „A“
herausschrauben und mit einem
sauberen Lappen abtrocknen und
anschließend wieder vollständig
einführen („B“ Öl-Ablassschraube). 3)
Den Messstab herausziehen und
überprüfen, ob der Ölstand bei der
mittleren Markierung (bei einem
Messstab mit 3 Markierungen) liegt. Bei
einem Messstab mit zwei Markierungen
für den Ölstand muss dieser in der
unteren Hälfte liegen. 4) Den Messstab
wieder einschrauben und seinen festen
Sitz überprüfen.
Ölstand in der hinteren Ölwanne
Es ist zu überprüfen, ob in der
hinteren Ölwanne Öl vorhanden ist.
Es werden folgende Produkte
empfohlen:
Öl für hintere Ölwanne
Öl GEAR SYNTH 75W90
SYNTHETIKÖL – API GL 5 – EP
Technische Daten
Öl für die hintere Ölwanne
Ölmenge: ~ 100 ccm
Livello olio mozzo • Wheel hub oil level
Ölfüllstand in der Ölwanne
Page 70

Presión de inflado en frio
Pression de gonflage à froid
Pressione di gonfiaggio a freddo
Cold tyre inflation pressure
Reifendruck bei kaltem Reifen
Neumático
delantero
Pneu avant
Pneumatico
anteriore
Front tyre
Vorderreifen
Neumático
trasero
Pneu arrière
Pneumatico
posteriore
Rear Tyre
Hinterreifen
Solo
Conducteur
seul
Solo
Rider only
Allein
1,8 Kg/cm
180 kPa
2
Con pasajero
Avec passager
Con passegero
Rider and
pillion passenger
Mit Beifahrer
1,9 Kg/cm
190 kPa
2
1,8 Kg/cm
180 kPa
2
2,0 Kg/cm
200 kPa
2
55
HACER FUNCIONAR EL
MOTOR CON LUBRICACIÓN INSUFICIENTE O CON LUBRICANTES INADECUADOS ACELERA EL DESGASTE DE LAS PARTES EN MOVIMIENTO Y PUEDE DAR LUGAR A
AVERÍAS GRAVES.
Las muescas en la varilla nivel aceite
cubo, con excepción de la que indica el
nivel MÁX, se refieren a otros modelos
de la casa y no tienen, en este vehículo, ninguna función específica.
Presión de los neumáticos
Una presión distinta a la señalada en
este apartado puede ser motivo de
defectos en la conducción del vehículo.
De ahí que resulte muy aconsejable el
controlar y corregir con frecuencia estas
presiones.
Observación.
La corrección de la presión de inflado
se hará solamente cuando los neumáticos estén fríos. Si están calientes, la
modificación de inflado se hará sólo en
los casos en que la presión sea demasiado baja.
Presión de los neumáticos
Pression des pneus
70
ef
55
FAIRE TOURNER LE MOTEUR
QUAND L'HUILE N'EST PAS AU
NIVEAU OU UTILISER UNE HUILE
NON APPROPRIÉE ENTRAÎNE UNE
USURE PRÉMATURÉE DES PIÈCES
EN MOUVEMENT CE QUI PEUT PROVOQUER DES PANNES GRAVES.
Seule compte l'indication MAX. Il ne
faut pas tenir compte des autres marques sur la tige de niveau de l'huile du
moyeu car elles se réfèrent à d'autres
modèles DERBI.
Pression des pneus
Si la pression n'est pas celle indiquée sur le tableau des défauts de conduite peuvent se produire. Vérifier et
corriger si nécessaire la pression des
pneus.
Observation:
Le réglage de la pression de gonflage doit se réaliser à froid. Si les pneus
sont chauds le faire uniquement en cas
de pression trop basse.
3-
MANTENIMIENTO
ENTRETIEN
Page 71

55
FARE FUNZIONARE IL MOTORE CON LUBRIFICAZIONE INSUFFICIENTE O CON LUBRIFICANTI NON
IDONEI ACCELERA IL LOGORAMENTO DELLE PARTI IN MOVIMENTO E
PUÒ DARE PIEDE A GRAVI GUASTI.
Le tacche nell’asta del livello dell’olio,
eccetto quelle che indicano livello MAX,
fanno riferimento ad altri modelli della
Casa e non hanno in questo veicolo
nessuna funzione specifica.
Pressione dei pneumatici
Una pressione diversa di quella indicata in questa sezione può essere motivo di difetti nella guida del veicolo. È
perciò molto consigliabile controllare e
correggere frequentemente queste
pressioni.
Osservazione:
La correzione della pressione di gonfiaggio si farà soltanto quando gli pneumatici siano freddi. Se sono caldi, la
modifica del gonfiaggio si farà soltanto
nel caso in cui la pressione sia troppo
bassa.
71
igd
MANUTENZIONE
-3
MAINTENANCE - WARTUNG
55
RUNNING THE ENGINE WITH
INSUFFICIENT ENGINE LUBRICATION OIL OR USING THE WRONG
TYPES OF OIL WILL ACCELERATE
WEAR AND TEAR TO MOVING
PARTS AND MAY CAUSE SERIOUS
DAMAGE.
The nicks in the oil level dipstick
other than the MAX level mark are
intended for use in other models in our
range, and have no specific function in
this machine.
Tyre pressures
Riding with a pressure different from
that indicated in this section can lead to
problems in the way the machine rides.
It is therefore strongly recommended to
check and correct tyre pressures frequently.
Note:
Tyre inflation pressures should only
be corrected while the tyres are cold. If
they are hot, tyre pressures should only
be adjusted if they are too low.
55
LÄSST MAN DEN MOTOR MIT
NICHT AUSREICHENDER
SCHMIERUNG ARBEITEN ODER WIRD
EIN NICHT GEEIGNETES ÖL
VERWENDET, SO WIRD EIN
VORZEITIGER VERSCHLEISS DER
BEWEGLICHEN TEILE VERURSACHT
UND AUSSERDEM KÖNNEN
SCHWERE MOTORSCHÄDEN
HERVORGERUFEN WERDEN.
Zusätzlicher Hinweis:
Die Kerben auf dem Messstab für die
Ölwanne, mit Ausnahme des Messstabes
mit der Markierung MAX, beziehen sich
auf andere Modelle der Marke und haben
für das vorliegende Fahrzeugmodell
keinerlei spezifische Bedeutung.
Reifenfülldruck
Stimmt der Reifenfülldruck nicht mit
den in diesem Kapitel angegebenen
Werten überein, kann davon die
Fahrweise ungünstig beeinflusst werden.
Deshalb ist es sehr zu empfehlen den
Reifenfülldruck regelmäßig zu
kontrollieren und gegebenenfalls
entsprechend zu korrigieren.
Anmerkung
Eine Korrektur des Reifenfülldruckes
ist ausschließlich mit kalten Reifen
Pressione dei pneumatici • Tyre pressures
Reifenfülldruck
Page 72

La presión de aire insuficiente en los
neumáticos no sólo acelera el desgaste
del neumático, sino que también afecta
seriamente a la estabilidad del scooter.
Asegúrese de que la presión de los
neumáticos esté dentro de los límites
especificados en el recuadro.
11
Un neumático con una presión
excesivamente baja, aumenta el consumo de combustible, repercutiendo ello
innecesariamente en el medio ambiente.
Comprobar periódicamente la presión
de cada neumático. Los neumáticos tienen un indicador de desgaste, por lo
tanto el cambio de neumático se debe
realizar apenas este indicador sea visible en la banda de rodamiento; en éste
caso dirigirse a un taller autorizado o de
todas maneras equipados para el desmontaje y montaje.
Desmontaje bujía
Proceder de la siguiente manera: Una
vez quitado la puerta de acceso a la
bujía ubicada en la cobertura central,
Presión de los neumáticos
Pression des pneus
72
Si la pression des pneus est insuffisante l'usure est bien plus rapide et la
stabilité du cyclomoteur est compromise. Assurez-vous que la pression de
vos pneus correspond bien à celle indiquée sur le tableau.
11
Une pression trop basse des
pneus entraîne une augmentation de la
consommation d'essence ce qui réper-
cute sur l'environnement.
Vérifier périodiquement la pression de
chacun des pneus. Sur la bande de roulement du pneu il y a un indicateur d'usure. Changer de pneus dès que cet
indicateur est visible, dans un atelier
agréé équipé pour le montage et
démontage.
Démontage de la bougie
Procéder de la façon suivante:
Après avoir ôté le volet du compartiment de la bougie situé dans la carcasse centrale, déconnecter le câble AT de
la bougie et la démonter avec la clé
spéciale remise avec le véhicule.
ef
3-
MANTENIMIENTO
ENTRETIEN
cADVERTÈNCIA
00
Procuri circular sempre amb els
pneumàtics en bones condicions. Els
pneumàtics molt desgastats redueixen
l'estabilitat de la conducció i poden
ocasionar pèrdua de control. Es
recomana canviar els pneumàtics quan
l’indicador de desgast sigui visible.Per
evitar el desgast innecessari dels
pneumàtics es recomana:
- Portar sempre els pneumàtics amb la
pressió d'inflat adequada.
- Conduir suaument evitant les
accelerades i les frenades brusques.
- Procurar no tocar les voreres amb les
rodes.
Page 73

73
La pressione d’aria insufficiente nei
pneumatici non soltanto accelera
l’usura del pneumatico, ma incide
anche seriamente sulla stabilità dello
scooter. Assicurarsi che la pressione
dei pneumatici sia entro i limiti specificati nella tabella.
11
Un pneumatico con una pressione
eccessivamente bassa aumenta il consumo di combustibile e ripercuote in
modo superfluo sull’ambiente.
Verificare periodicamente la pressione
di ogni pneumatico. I pneumatici hanno
un indicatore di usura per cui la sostituzione del pneumatico è da farsi appena
questo indicatore sia visibile nel battistrada; in questo caso, rivolgersi a
un’officina autorizzata o comunque
equipaggiata per lo smontaggio e montaggio.
Smontaggio candela
Procedere nel seguente modo: Dopo
aver rimosso la porta d’accesso alla
candela situata nel coperchio centrale,
Under-inflation of the tyres not only
accelerates wear and tear on the tyres,
but also has a serious effect on the stability of the scooter. Ensure that the tyre
pressures are within the limits set out in
the table.
11
A tyre with excessively low pressures increases fuel consumption, and
has a unnecessary adverse impact on
the environment.
Check the pressures of both tyres regularly. The tyres incorporate a wear indicator, and should be changed as soon
as the indicator becomes visible on the
tread. To do this, take your machine to
an authorised Service Centre, or at
least one which has installed the proper
equipment for removing and fitting
tyres.
Removing the Spark plug
Too change the spark plug use the
following procedure: After removing the
access hatch to the spark plug located
in the central fairing, disconnect the
H.T. cable from the spark plug and unscrew it using the box spanner supplied
vorzunehmen. Sie wird an warmen Reifen
nur dann durchgeführt, wenn der Druck
extrem niedrig ist.
Ein zu niedriger Reifenfülldruck hat
nicht nur einen erhöhten Verschleiß zur
Folge sondern er wirkt sich auch in
gefährlicher Weise auf die Stabilität des
Scooters aus. Stellen Sie sicher, dass der
Reifenfülldruck den in der nachstehenden
Tabelle angegebenen Werten entspricht.
11
Bei zu niedrigem Reifenfülldruck
erhöht sich der Kraftstoffverbrauch, der
wiederum mit ungünstigen Folgen für die
Umwelt verbunden ist.
Überprüfen Sie regelmäßig den Fülldruck
in den einzelnen Reifen. Die Reifen
verfügen über eine Verschleißmarkierung.
Sobald diese auf dem Laufflächenstreifen
sichtbar wird, wenden Sie sich bitte an
eine Vertragswerkstatt oder eine für die
Demontage und Montage der Reifen
entsprechend ausgerüstete Werkstatt.
Herausnahme der Kerze
Es ist folgendermaßen vorzugehen:
Nach Abnahme des im mittleren Teil
liegenden Zündkerzendeckels das
Hochspannungskabel der Zündkerze
abziehen und diese mit dem zum
igd
MANUTENZIONE
-3
MAINTENANCE - WARTUNG
Pressione dei pneumatici • Tyre pressures
Reifenfülldruck
Page 74

Desmontaje bujía
Démontage de la bougie
74
desconectar el cable de A.T. de la bujía
y desmontarla con la llave de tubo que
se suministra con el vehículo. Para el
montaje enroscar con la mano la bujía
en el orificio con la correcta inclinación:
usar la llave solo para el apriete.
Para el montaje de la puerta efectuar
las operaciones en secuencia contraria,
prestando atención a las pestañas de
encaje de la puerta de la bujía en sus
alojamientos en la cobertura central.
55
SE DEBE QUITAR LA BUJÍA
CON EL MOTOR FRÍO. EL USO DE
BUJÍAS CON GRADO TÉRMICO
DIFERENTE DEL ACONSEJADO
(VER SECCION "DATOS TÉCNICOS)
0 CON FlLETEADO IMPROPIO
PUEDE DAÑAR GRAVEMENTE EL
MOTOR. LA BUJíA DEBE SER SUSTITUIDA CADA 10.000 KM.
Características Técnicas
Bujía recomendada
NGK CR8 EB
Pour le montage, visser à la main la
bougie dans l'orifice, inclinée correctement: n'utiliser la clé que pour la serrer.
Pour le montage du volet effectuer les
même opérations à l'inverse, en prenant
soin de bien introduire les languettes
d'ancrage dans leurs logements dans la
carcasse centrale.
55
POUR ENLEVER LA BOUGIE
LE MOTEUR DOIT ÊTRE FROID. IL
NE FAUT PAS METTRE UNE BOUGIE
AYANT UN DEGRÉ THERMIQUE
DIFFÉRENT DE CELUI CONSEILLÉ
(VOIR DONNÉES TECHNIQUES)
REMPLACER LA BOUGIE TOUS LES
10.000 Km
Caractéristiques techniques
Bougie recommandée:
NGK CR8 EB
ef
3-
MANTENIMIENTO
ENTRETIEN
Page 75

75
staccare il cavo di A.T. della candela e
smontarla con la chiave a busta fornita
insieme al veicolo. Per il montaggio,
avvitare con la mano la candela nel foro
e con l’inclinazione corretta. Per il montaggio della porta effettuare le operazioni nell’ordine inverso, con particolare
cura nelle unghie di fissaggio della
porta della candela nelle loro sedi del
coperchio centrale.
55
LA CANDELA DEVE ESSERE
RIMOSSA CON IL MOTORE FREDDO.
L’USO DI CANDELE DAL GRADO
TERMICO DIVERSO DA QUELLO
CONSIGLIATO (VEDI SEZIONE “DATI
TECNICI”) PUÒ DANNEGGIARE
GRAVEMENTE IL MOTORE. LA CANDELA DEVE ESSERE SOSTITUITA
OGNI 10.000 km.
Caratteristiche tecniche
Candela consigliata
NGK CR8 EB
with the scooter. When installing the
spark plug, insert the plug into the orifice and tighten it by hand observing the
correctly inclined orientation: use the
spanner only for the final tightening.
When re-fitting the access cover, follow
the same procedure as for removal, in
inverse order, paying special attention
to fitting the locating lugs on the spark
plug cover into their seatings in the central fairing.
55
THE SPARK PLUG SHOULD BE
REMOVED WHILE THE ENGINE IS
COLD. USING SPARK PLUGS WITH
A DIFFERENT THERMAL GRADE
FROM THE RECOMMENDED SETTING (SEE THE SECTION ON “TECHNICAL DATA”), OR ONE THAT IS
WRONGLY ADJUSTED CAN CAUSE
SERIOUS DAMAGE TO THE ENGINE.
THE SPARK PLUG SHOULD BE
REPLACED EVERY 10,000 KMS.
Technical Specifications
Recommended spark plug
NGK CR8 EB
Lieferumfang des Fahrzeugs gehörenden
Schlüssels herausnehmen. Beim
Einsetzen der Zündkerze mit der Hand ist
darauf zu achten, dass sie in der richtigen
Schräglage eingeschraubt wird. Den
Schlüssel nur zum abschließenden
Festziehen benutzen. Bei Einsetzen des
Deckels ist in umgekehrter Reihenfolge
vorzugehen und dabei besonders auf die
Einpassnippel des Zündkerzendeckels zu
achten.
55
DIE KERZE AUSSCHLIESSLICH
BEI KALTEM MOTOR
HERAUSNEHMEN. DIE VERWENDUNG
VON KERZEN MIT EINEM ANDEREN
ALS DEM EMPFOHLENEN
WÄRMEWERT (s. ABSCHNITT
„TECHNISCHE DATEN“ ODER EINEM
UNGEEIGNETEN GEWINDE KÖNNEN
SCHWERE MOTORSCHÄDEN
VERURSACHEN. DIE ZÜNDKERZE
MUSS ALLE 12.000 KM
AUSGEWECHSELT WERDEN:
Technische Daten
Es wird die Verwendung folgender
Zündkerze empfohlen:
NGK CR8 EB
igd
MANUTENZIONE
-3
MAINTENANCE - WARTUNG
Smontaggio candela • Removing the Spark plug
Herausnahme der Kerze
Page 76

Desmontaje filtro aire
Después de haber quitado la correa
debajo del sillín, desenroscar los 7 tornillos con cabeza de cruz. Quitar la tapa
«A» y extraerla de su alojamiento. Quitar el elemento filtrante y limpiarlo con
agua y champú, luego secarlo con un
paño limpio y pequeños chorros de aire
comprimido y sumergirlo en una mezcla
de aceite recomendado y gasolina en
relación del 50%. Luego apretarlo entre
las manos sin estrujarlo, dejarlo secar y
montarlo nuevamente.
55
EN EL CASO DE RECORRIDOS
EN CALLES CON MUCHO POLVO
RECOMENDAMOS LIMPIAR EL FILTRO DEL AIRE CON MAYOR FRECUENCIA RESPECTO A LO INDICADO EN EL CAPITULO RELATIVO A
LA MANUTENCION PROGRAMADA
Productos recomendados
Aceite para filtros
AGIP filter oil
Desmontaje filtro aire
Démontage du filtre à air
76
Démontage du filtre à air
Après avoir ôté la courroie située
sous la selle, dévisser les 7 vis en croix.
Enlever le couvercle A . Enlever l'élé-
ment filtrant et nettoyer à l'eau et au
savon, sécher avec un chiffon propre et
passer des petits jets d'air comprimé.
Ensuite plongez-le dans un mélange
d'huile recommandée et d'essence dans
la proportions de 50%. Égoutter entre
les mains et laisser sécher. Monter-le à
nouveau.
55
SI VOUS ROULEZ SUR DES
PARCOURS POUSSIÉREUX IL FAUT
NETTOYER LE FILTRE PLUS SOUVENT QUE CE QUI EST INDIQUÉ
DANS LE CHAPITRE SUR L'ENTRETIEN PROGRAMMÉ.
Produits recommandés
Huile pour filtres
AGIP filter oil
ef
3-
MANTENIMIENTO
ENTRETIEN
Page 77

Smontaggio filtro aria
Dopo aver rimosso la cinghia sotto la
sella, svitare le 7 viti con testa a croce.
Rimuovere il coperchio “A” ed estrarlo
dalla sede. Rimuovere l’elemento filtrante e pulirlo con acqua e shampoo,
asciugarlo dopo con un panno pulito e
immergerlo in una miscela dell’olio consigliato e benzina con un rapporto del
50%. Stringerlo dopo tra le mani senza
strizzarlo, lasciarlo asciugare e montarlo
di nuovo.
55
NEL CASO DI PERCORSI SU
STRADE ASSAI POLVEROSE CONSIGLIAMO DI PULIRE IL FILTRO
D’ARIA CON MAGGIORE FREQUENZA RISPETTO A QUANTO INDICATO
NEL CAPITOLO RELATIVO ALLA
MANUTENZIONE PROGRAMMATA
Prodotti consigliati
Olio per filtri
AGIP filter oil
77
Disassembling the air filter.
After withdrawing the strap below the
saddle, unscrew the 7 cross-head securing screws. Remove the filter cover, A,
and withdraw it from its seating. Withdraw the filter element and wash it with
water and shampoo, and then dry it with
a clean cloth and light jets of compressed air; then submerge it in a 50% mix
of the recommended oil and petrol.
Then press it between the hands to
remove excess oil, but without wringing
it, leave it to dry, and then refit.
55
WHEN RIDING ON STREETS
WITH HIGH LEVELS OF DUST, WE
RECOMMEND THAT THE AIR FILTER
SHOULD BE CLEANED MORE
OFTEN THAN THE PERIODS SPECIFIED IN THE PROGRAMMED MAINTENANCE TABLE.
Recommended products
Oil filter
AGIP filter oil
Ausbau des Luftfilters
Nach Abnahme des unter der Sitzbank
liegenden Riemens die 7
Kreuzschlitzschrauben herausnehmen.
Den Deckel „A“ hochklappen und aus
seinem Sitz nehmen. Den Filtereinsatz
entnehmen und ihn mit Wasser und Seife
reinigen und anschließend mit einem
sauberen Tuch und einem schwachen
Druckluftstrahl abtrocknen und ihn danach
in eine Mischung aus je 50 % des
empfohlenen Öls und Benzin tauchen.
Danach mit den Händen ohne zu winden
ausdrücken. Dann läßt man ihn trocknen
und setzt ihn anschließend wieder ein.
55
BEI BEFAHREN VON SEHR
STAUBIGEN STRASSEN WIRD
EMPFOHLEN, DEN LUFTFILTER
HÄUFIGER ZU REINIGEN ALS IN DEM
ENTSPRECHENDEN KAPITEL ODER
BEI DER REGELMÄSSIGEN WARTUNG
ANGEGEBEN IST.
Es wird die Verwendung folgender
Produkte empfohlen:
Filteröl
Agip filter oil
igd
MANUTENZIONE
-3
MAINTENANCE - WARTUNG
Smontaggio filtro aria • Disassembling the air filter
Ausbau des Luftfilters
Page 78

Sistema de aire secundario
Système d'air secondaire
78
Sistema de aire secundario
Quitar los tres tornillos «A» de la
tapa de la caja de aire secundario. Desmontar la tapa de la caja y quitar el elemento filtrante de esponja «B». Lavar la
esponja con agua y jabón neutro y
luego secarla con un paño limpio y
pequeños chorros de aire comprimido.
Durante la operación de limpieza del filtro, comprobar la integridad de la válvula de Iáminas «C», luego introducirla
nuevamente en el alojamiento correspondiente en la caja. Antes de cerrar la
tapa de la caja SAS, verificar la integridad del O-Ring; en el caso que fuese
dañado o deformado sustituirlo.
La válvula se puede introducir en la
caja SAS por un solo lado.
00
PARA EFECTUAR DICHA OPERACION DIRlGlRSE A UN PUNTO DE
ASISTENCIA AUTORIZADA DERBI.
Système d'air secondaire
Enlever les 3 vis A du couvercle de
la boîte à air secondaire. Démonter le
couvercle de la boîte et enlever l'élé-
ment filtrant en mousse B. Lavez-le à
l'eau et au savon neutre et sécher avec
un chiffon propre et passer des jets d'air
comprimé. Au cours de cette opération
vérifier si la soupape à lames C est en
bon état . Introduisez-là dans son logement dans la boîte. Avant de fermer la
boîte SAS, vérifier l'intégrité de l'O-Ring,
le remplacer s'il est endommagé ou
déformé.
La soupape doit être introduite dans la
boîte SAS par un seul côté.
00
POUR RÉALISER CETTE OPÉ-
RATION S'ADRESSER À UN CENTRE
D'ASSISTANCE DERBI
ef
3-
MANTENIMIENTO
ENTRETIEN
Page 79

79
Sistema d’aria secondario
Rimuovere le tre viti “A” del coperchio della scatola d’aria secondaria.
Smontare il coperchio della scatola ed
estrarre l’elemento filtrante di espanso
“B ”. Lavare l’espanso con acqua e
sapone neutro e asciugarlo dopo con
un panno pulito e piccoli spruzzi d’aria
compressa. Durante l’operazione di
pulizia del filtro verificare l’integrità della
valvola a lamelle “C” e reintrodurla dopo
nella relativa sede all’interno della scatola. Prima di chiudere il coperchio della
scatola SAS, verificare l’integrità
dell’anello torico: nel caso che si rilevassero dei danni o fosse deformato, sostituirlo.
La valvola può venire introdotta nella
scatola SAS da un solo lato.
00
PER EFFETTUARE QUESTA
OPERAZIONE RIVOLGERSI A UN
PUNTO DI ASSISTENZA DERBI.
Secondary air system
Remove the three screws, A, securing the secondary air box cover. Remove the cover and withdraw the sponge
filter element, B. Wash the sponge with
water and neutral soap, and then dry it
with a clean cloth and light jets of compressed air. During the filter cleaning
operation, check that the reed valve
reeds, C, are undamaged, and then
replace the valve properly in its seating
in the secondary air box. Before closing
the Secondary Air System box cover,
check that the O-ring is undamaged. If
there is damage. or if it is deformed,
replace it.
The valve can only be inserted in the
box one way round.
00
THIS OPERATION SHOULD BE
CARRIED OUT BY AM AUTHORISED
DERBI SERVICE CENTRE.
SekundÄrluftsystem
Die drei Schrauben „A“ aus dem
Deckel des Sekundärluftgehäuses
herausnehmen. Den Deckel abnehmen
und den Filterschwammeinsatz „B“
entnehmen. Den Schwamm mit Wasser
und neutraler Seife waschen und
anschließend mit einem sauberen Tuch
und einem schwachen Druckluftstrahl
abtrocknen. Bei diesen
Reinigungsarbeiten ist die Unversehrtheit
der Klappe „C“ zu überprüfen. Danach ist
der Filter wieder in seinen
entsprechenden Sitz einzubauen. Bevor
Sie den Deckel des SekundärluftsystemKastens schließen, überzeugen Sie sich
noch von der Unversehrtheit des ORinges. Sollte dieser beschädigt oder
verbogen sein, ist er zu ersetzen.
Das Ventil kann in den
Sekundärluftsystem-Kasten nur von einer
Seite her eingebaut werden.
00
LASSEN SIE DIESE ARBEITEN
VOM TECHNISCHEN KUNDENDIENST
DERBI DURCHFÜHREN.
igd
MANUTENZIONE
-3
MAINTENANCE - WARTUNG
Sistema d’aria secondario • Secondary air system
SekundÄrluftsystem
Page 80

Fusible
55
No emplee nunca un fusible que
no sea de 4 Amp. ya que podría dañar
la parte eléctrica. En el caso que esto le
suceda en un corto período de tiempo,
deberá consultar a un Servicio Oficial
DERBI.
En el caso de tener que cambiar el
fusible del sistema eléctrico por haberse fundido, cerciorarse siempre que sea
del mismo amperaje o sea de 4 Amp.
El fusible se encuentra dentro del alojamiento de la batería; para su sustitución, quitarlo del soporte y cambiarlo
por uno nuevo.
55
PARA EVITAR DAÑOS A LA
INSTALACIÓN ELÉCTRICA, NO DESCONECTAR JAMÁS LOS CABLES
CON MOTOR EN MOVIMIENTO. NO
INCLINAR DEMASIADO EL
VEHÍCULO PARA EVITAR PELIGROSOS DERRAMES DEL ELECTRÓLITO
MISMO DE LA BATERÍA.
Fusible
Fusible
80
Le fusible
55
Il faut toujours utiliser un fusible
de 4 ampères pour ne pas endommager le système électrique. Si vous n'avez pas mis le fusible adéquat, consultez le plus rapidement le Service Officiel
DERBI.
Si le fusible du système électrique a
sauté il faudra le remplacer par un fusible de 4 ampères. Le fusible se trouve
dans le logement de la batterie. Pour le
remplacer enlevez-le de son support et
en mettre un nouveau.
55
POUR ÉVITER DES DOMMAGES SUR L'INSTALLATION ÉLECTRIQUE , NE JAMAIS DÉCONNECTER LES CÂBLES SI LE MOTEUR
TOURNE.
VEILLEZ À NE PAS INCLINER LE
CYCLOMOTEUR POUR NE PAS VERSER DANGEREUSEMENT L'ÉLECTROLYTE DE LA BATTERIE.
ef
3-
MANTENIMIENTO
ENTRETIEN
Page 81

Fusibile
55
Non usare mai un fusibile che
non sia di 4 A, giacché potrebbe danneggiare la parte elettrica. Nel caso in
cui questo succedesse in un corto
periodo di tempo, dovrà consultare un
Servizio Ufficiale DERBI.
Nel caso di dover sostituire il fusibile
del sistema elettrico perché si è bruciato, assicurarsi sempre che abbia lo
stesso amperaggio, cioè, 4 A. Il fusibile
si trova dentro del vano della batteria:
per cambiarlo basta estrarlo dal supporto sostituirlo con uno nuovo.
55
PER EVITARE DANNI
ALL’IMPIANTO ELETTRICO, NON
SCOLLEGARE MAI I CAVI CON IL
MOTORE IN MOVIMENTO. NON
INCLINARE TROPPO IL VEICOLO
PER EVITARE COSÌ PERICOLOSE
FUORIUSCITE DELL’ELETTROLITO
DELLA BATTERIA.
81
Fuse
55
Never use any fuse that is not 4amp rated, because this may damage
the electrical system. If the fuse blows
repeatedly over a short period of time,
an Official DERBI Service Centre
should be consulted.
If it is necessary to change the fuse
in the electrical system because it has
blown, always confirm that the replacement has the same rating, 4 amps. The
fuse is located in the battery compartment. When replacing the fuse remove
it from the fuse-holder and replace it
with a new one.
55
TO AVOID DAMAGE TO THE
ELECTRICAL SYSTEM, NEVER DISCONNECT THE CABLES WHILE THE
ENGINE IS RUNNING. NEVER TILT
THE MACHINE EXCESSIVELY TO
AVOID RISK OF SPILLING THE BATTERY ELECTROLYTE.
Sicherung
55
Verwenden Sie ausschließlich
Sicherung mit 4 Ampere, da sonst Schäden
im Stromkreis hervorgerufen werden
könnten. Wenn innerhalb kurzer
Zeitabstände Störungen auftreten, lassen
Sie sich bitte von einer DERBI
Vertragswerkstätte beraten.
Wenn in der elektrischen Anlage eine
durchgebrannte Sicherung ausgetauscht
werden muss, überzeugen Sie sich bitte
davon, dass die neue Sicherung die gleiche
Amperezahl, d. h. 4 Ampere, aufweist. Die
Sicherung befindet sich im Batteriekasten.
Zum Auswechseln der Sicherung ist diese
aus ihrer Halterung herauszunehmen und
durch eine neue zu ersetzen.
55
UM SCHÄDEN AN DER
ELEKTRISCHEN ANLAGE ZU
VERMEIDEN, SIND DIE KABEL IN
KEINEM FALL BEI LAUFENDEM
MOTOR ABZUNEHMEN. DAS
FAHRZEUG IST BEI DIESEN ARBEITEN
NICHT IN EINE ZU STARKE
SCHRÄGLAGE ZU BRINGEN, DA
SONST DIE GEFAHR BESTEHT, DASS
BATTERIEFLÜSSIGKEIT AUSLÄUFT.
igd
MANUTENZIONE
-3
MAINTENANCE - WARTUNG
Fusibile • Fuse
Sicherung
Page 82

Mantenimiento batería
Entretien de la batterie
82
Instrucciones de montaje
de la batería
- Desmontar los tres tornillos del cuerpo inferior sillín.
- Colocar la batería en su alojamiento.
- Conectar los bornes positivo y negativo.
- Es muy importante que el portafusible quede bien sujeto con la brida
fijación batería.
Mantenimiento batería
El buen mantenimiento de la batería debe incluir:
- Mantener siempre el nivel del agua
entre las líneas superior e inferior de
la parte frontal del recipiente. De ser
necesario reponerlo con agua destilada. Evitar la sobrecarga.
- Mantener los tapones de los vasos
perfectamente cerrados. Es importante.
- Mantener la parte superior completa-
mente limpia, seca y libre de materias
corrosivas, los bornes de la batería
deben estar limpios y engrasados,
para evitar la corrosión.
Instructions de montage
de la batterie
-Démonter les 3 vis du corps inférieur
de la selle
- Placer la batterie dans son logement
- Connecter les bornes positive et
négative
- Il est très important que le porte-fusible soit bien fixé au moyen de la bride
de fixation de la batterie.
Entretien de la batterie
Pour un parfait entretien de la batterie il
faut:
- Veiller à ce que le niveau d'eau reste
compris entre la ligne inférieure et
supérieure de la partie frontale du
récipient. Si nécessaire rajouter de
l'eau distillée en évitant les déborde-
ments.
- Il est important que les bouchons des
vases soient parfaitement fermés.
- Veiller à ce que la partie supérieure
reste toujours propre, sèche et sans
matières corrosives. Les bornes de la
batterie doivent être toujours propres
et bien graissées pour éviter la corrosion.
ef
3-
MANTENIMIENTO
ENTRETIEN
Page 83

83
Istruzioni di montaggio della batteria
- Smontare le tre viti del corpo inferiore
della sella.
- Collocare la batteria nella sua sede.
- Collegare i morsetti positivo e negativo.
- È molto importante che il portafusibile
rimanga ben saldo con la ghiera di fissaggio.
Manutenzione batteria
La buona manutenzione della batte-
ria deve includere:
- Mantenere sempre il livello dell’acqua
tra le linee superiore e inferiore della
parte frontale del recipiente. Se fosse
necessario ripristinarlo con acqua distillata. Evitare le sovraccariche.
- Mantenere i tappi dei vasi perfettamente chiusi. È importante.
- Mantenere la parte superiore completamente pulita, asciutta ed esente di
materie corrosive. I morsetti della batteria devono essere puliti e sgrassati
per evitare così la corrosione.
- Verificare la capacità residua della
batteria con un densimetro. Una densità di 1,265 o superiore è buona: se
Instructions for installing the battery
- Unscrew the three securing screws
from the lower saddle body
- Install the battery in its housing
- Connect the positive and negative terminals
- It is very important that the fuseholder
should be tightly secured with the battery securing strap.
Maintaining the battery
Proper maintenance of the battery
should include the following:
- Always keep the battery water level
between the upper and lower marks
on the front of the battery body. If
necessary, top up with distilled water.
Avoid over-charging.
- Keep the battery cell caps completely
closed. This is important.
- Keep the top of the battery completely
clean, dry and free of corrosive materials. The battery terminals should be
kept clean and well-greased, to avoid
corrosion.
- Check the residual capacity of the
battery using a densitometer. A density of 1.265 or higher is good, and if
Hinweise zum Einsetzen der Batterie
- Die drei Schrauben im unteren Teil der
Sitzbank herausnehmen.
- Die Batterie in ihre Halterung einsetzen.
- Den Minus- und Pluspol anschließen.
- Es ist vor äußerster Wichtigkeit, dass
der Sicherungshalter fest mit dem
Befestigungsbügel der Batterie
verbunden ist.
Wartung der Batterie
Zu der ordnungsgemäßen Wartung der
Batterie gehört Folgendes:
- Der Flüssigkeitsstand in den Zellen
muss zwischen der oberen und unteren
Linie liegen, ansonsten muss
destilliertes Wasser nachgefüllt werden.
Exzessives Auffüllen ist zu vermeiden.
- Es ist wichtig, die Deckel der einzelnen
Zellen gut verschlossen zu halten.
- Die Oberfläche der Batterie ist
vollständig sauber, trocken und rostfrei
zu halten. Die Batteriepole müssen zum
Schutz gegen Korrosion sauber und
eingefettet sein.
- Die verbleibende Batteriekapazität ist
mit einem Dichtenmesser zu
kontrollieren. Eine Dichte von 1.265
oder höher wird als guter Wert
angesehen. Sollte sie unter diesem
igd
MANUTENZIONE
-3
MAINTENANCE - WARTUNG
Manutenzione batteria • Maintaining the battery
Wartung der Batterie
Page 84

- Comprobar la capacidad residual de
la batería con un densímetro. Una
densidad de 1,265 ó superior es
buena, de ser inferior cárguese la
batería. La corriente recomendada de
carga es de 0,5 ÷ 1 A. máximo, hasta
que se consiga la densidad recomendada.
- La batería cuando no se usa se descarga aproximadamente entre un
0,5% y un 1% diario. Este promedio
aumenta con la temperatura. Para
compensar debe hacerse una vez al
mes una carga de recuperación.
- Una batería contiene ácido sulfúrico.
Evítese el contacto con la piel, ojos y
ropa.
¡Precaución!
Al recargar no deberá sobrepasarse
la intensidad de máximo 0,5 ÷ 1 Amperios hora, pues destruiría la batería.
Cambio de la Batería
Si hubiera que cambiar la batería,
habría que hacerlo por otra de igual
capacidad y tensión de 12 V 4 Ah.
- Contrôler la capacité résiduelle de la
batterie au moyen d'un densimètre
qui doit indiquer une densité de 1,265
ou plus Charger la batterie si elle est
inférieure. Le courant de charge
recommandé est de 0,5 1A maximum
jusqu'à atteindre la densité recommandée.
- La batterie se décharge si elle n'est
pas utilisée: (de 0,5% à 1% par jour et
plus par temps chaud). Rechargez-la
une fois par mois.
- Évitez le contact de l'acide sulfurique
avec la peau, les yeux ou les vêtements.
Précaution!
L'intensité maximum comprise entre
0,5 et 1 A ne doit pas être dépassée
lorsque vous rechargez la batterie pour
ne pas l'abîmer.
Changer la batterie
Remplacer la batterie par une batterie de même capacité et tension: 12 V
4Ah.
Mantenimiento batería
Entretien de la batterie
84
ef
3-
MANTENIMIENTO
ENTRETIEN
Page 85

fosse inferiore, bisognerà ricaricare la
batteria. La corrente di carica consigliata è di 0,5 - 1 A massimo, finché
sia raggiunta la densità consigliata.
- Quando non viene usta la batteria si
scarica approssimativamente tra uno
0,5% e un 1% ogni giorno. Questa
media aumenta con la temperatura.
Per compensarlo ogni volta al mese è
da farsi una ricarica di recupero.
- Una batteria contiene acido solforico.
Evitare il contatto con la pelle, gli
occhi e gli indumenti.
Attenzione!
Quando ricarichi non deve superare
l’intensità di 0,5-1 ampère-ora al massimo, giacché distruggerebbe la batteria.
Sostituzione della batteria
Se si dovesse sostituire la batteria, si
dovrebbe fare con un’altra della stessa
capacità e tensione di 12 V 4 Ah.
85
MANUTENZIONE
-3
MAINTENANCE - WARTUNG
igd
lower, the battery should be re-charged. The recommended charging
current is a maximum of 0.5 - 1 Amp,
until the recommended density is reached.
- When not in use, the battery discharges at between 0.5% and 1% per day.
This average increases with the temperature. To compensate this drop,
carry out a top-up re-charge once a
month.
- Batteries contain sulphuric acid. Avoid
contact with the skin, eyes, and clothes.
Caution!
When re-charging, the current of 0.5
to 1 Amp should not be exceeded: to do
so will destroy the battery.
Changing the battery
If it becomes necessary to change
the battery, it should be replaced with
one of the same capacity and with a
rating of 12V 4 Ah.
Wert liegen, ist die Batterie zu laden.
Es wird empfohlen, das Laden der
Batterien mit einer Stromstärke von
maximal 0,5 + 1 A vorzunehmen bis die
empfohlene Dichte erreicht wird.
- Wird das Fahrzeug nicht benutzt, findet
eine Entladung der Batterie von täglich
0,5 und 1,0 % statt. Dieser
Durchschnittswert erhöht sich mit
Anstieg der Temperatur. Um die
Entladung zu kompensieren, ist die
Batterie einmal im Monat nachzuladen.
- Die Batterie enthält Schwefelsäure.
Jeder Kontakt der Batterieflüssigkeit mit
Augen, Haut und Bekleidung ist zu
vermeiden.
Vorsicht!
Zum Aufladen der Batterie keinen
höheren Strom als 0,5 + 1 A verwenden,
da sie andernfalls unbrauchbar gemacht
werden könnte.
Auswechseln der Batterie
Sollte die Batterie ausgewechselt
werden müssen, ist sie durch eine mit der
gleichen Leistung und einer Spannung
von 12 V 4 Ah zu ersetzen.
11
Da die Entsorgung von alten Batterien
ein Problem darstellt, wird empfohlen, den
Manutenzione batteria • Maintaining the battery
Wartung der Batterie
Page 86

Mantenimiento batería
Entretien de la batterie
86
11
A causa del problema que representa
el desecho de baterías viejas, lo mejor es
hacer sustituir la batería por algún Servicio
Oficial DERBI. Las baterías contienen entre
otras sustancias, ácido sulfúrico y en ningún
caso deberán arrojarse a la basura doméstica.
55
EL ELECTRÓLITO CONTIENE
ÁCIDO SULFÚRICO: EVITAR EL CON-
TACTO CON LOS OJOS, PIEL, ROPAS.
EN CASO DE CONTACTO ACCIDENTAL
ENJUAGAR ABUNDANTEMENTE CON
AGUA Y CONSULTAR UN MÉDICO.
Larga inactividad
En caso de larga inactividad del vehí-
culo, la batería se sobrepone a un decaimiento del rendimiento. Esto sucede por
el natural fenómeno de autodescarga de
la batería misma y por posibles absorciones residuales del vehículo, debidas a los
componentes con alimentación constante.
El decaimiento del rendimiento de la batería es además función de las condiciones
ambientales y de la limpieza de los polos.
Para evitar posibles dificultades de arranque y/o daños irreversibles a la batería,
11
Ne jamais jeter la vieille batterie à
la poubelle pour éviter de polluer l'environnement avec les produits toxiques .
Nous vous recommandons de faire remplacer la batterie par un Service Officiel
Derbi.
55
L'ÉLECTROLYTE CONTIENT
DE L'ACIDE SULFURIQUE. ÉVITEZ
TOUT CONTACT AVEC LES YEUX,
LA PEAU OU LES VÊTEMENTS. EN
CAS DE CONTACT ACCIDENTEL
RINCEZ À GRANDE EAU ET CONSULTEZ VOTRE MÉDECIN.
Période de longue inactivité
Pendant de longues périodes d'inactivité le rendement de la batterie baisse
à cause des conditions de climat et de
l'état de propreté des bornes. Pour éviter des problèmes au démarrage et des
dommages irréversibles dans la batterie
veillez à procéder en suivant les recommandations suivantes.:
Faites démarrer le moteur au moins
une fois par mois et faites-le tourner
ef
3-
MANTENIMIENTO
ENTRETIEN
Page 87

11
Dovuto al problema che costituisce lo smaltimento delle batterie usate, è
meglio farsi sostituire la batteria da
qualche Servizio Ufficiale DERBI. Le
batterie contengono, tra altre sostanze,
acido solforico e in nessun casso deve
buttarsi nella spazzatura domestica.
55
L’ELETTROLITO CONTIENE
ACIDO SOLFORICO: EVITARE IL
CONTATTO CON GLI OCCHI, PELLE,
INDUMENTI. NEL CASO DI UN CONTATTO FORTUITO, RISCIACQUARE
ABBONDANTEMENTE CON ACQUA
E CONSULTARE UN MEDICO.
Lunga inattività
Nel caso di lunga inattività del veicolo,
la batteria patisce una diminuzione del
rendimento. Questo succede dovuto al
naturale fenomeno dell’autoscarico della
batteria stessa e a eventuali assorbimenti
residui del veicolo, dovute ai componenti
con alimentazioni costanti. La diminuzione
del rendimento della batteria è inoltre funzione delle condizioni ambientali e della
pulizia dei poli. Per evitare possibili difficoltà d’accensione e/o danni irreversibili,
87
MANUTENZIONE
-3
MAINTENANCE - WARTUNG
igd
11
In view of the problem caused by
the disposal of old batteries, the best
idea is to have your battery replaced by
an Official DERBI Service Centre. Batteries contain, among other substances,
sulphuric acid, and should under no circumstances be disposed of in the
domestic rubbish.
55
THE ELECTROLYTE CONTAINS SULPHURIC ACID: AVOID ALL
CONTACT WITH THE EYES, THE
SKIN, AND THE CLOTHES. IN THE
EVENT OF ACCIDENTAL CONTACT,
WASH THE AFFECTED AREA WITH
ABUNDANT WATER AND CONSULT
YOUR DOCTOR.
Long periods of inactivity
In the event that your machine will not
be used for a long time, the battery will
suffer a loss of performance. This occurs
as a result of the natural battery phenomenon of discharging and through possible residual drawings of current by components requiring constant power supply.
The loss of performance of the battery, is
also affected by environmental conditions,
and the state of cleanliness of the battery
Batteriewechsel von einer Derbi
Vertragswerkstatt vornehmen zu lassen.
Die Batterien enthalten u.a. Schwefelsäure
und dürfen deshalb auf keinen Fall mit dem
normalen Hausmüll entsorgt werden.
55
DIE BATTERIEFLÜSSIGKEIT
ENTHÄLT SCHWEFELSÄURE: JEDER
KONTAKT MIT AUGEN, HAUT UND
BEKLEIDUNG ZU VERMEIDEN. KOMMT
MAN DENNOCH MIT IHR IN
BERÜHRUNG, LANGE MIT KLAREM
WASSER SPÜLEN UND EINEN ARZT
AUFSUCHEN.
Lange Außerbetriebsetzung
Bei langer Außerbetriebsetzung des
Fahrzeugs stellt sich ein Leistungsabfall der
Batterie ein. Dieser läßt sich durch das
natürliche Phänomen der Selbstentladung
einerseits und den Verbrauch durch die
ständige Versorgung bestimmter
Komponenten andererseits erklären. Die
nachlassende Leistung der Batterie erfolgt
außerdem in Funktion der
Umweltbedingungen sowie der Sauberkeit
der Batteriepole. Zur Vermeidung
eventueller Startschwierigkeiten und/oder
dauerhafter Schäden an der Batterie sollte
folgendermaßen vorgegangen werden:
Mindestens einmal pro Monat sollte der
Motor angelassen werden und mit geringster
Manutenzione batteria • Maintaining the battery
Wartung der Batterie
Page 88

es oportuno proceder según una de las
siguientes modalidades: - Al menos una
vez por mes arrancar el motor y mantenerlo a régimen levemente superior al
mínimo, por 10-15 minutos. Esto permite
de mantener eficiente, además de la batería, todos los componentes del motor.
Efectuar la revisión del vehículo (como
indicado en la sección «El vehículo queda
inactivo) removiendo la batería. Esta tiene
que estar limpia, cargada completamente
y conservada en un lugar seco y aireado.
Restablecer la carga al menos una vez
cada dos meses.
55
ES ABSOLUTAMENTE INDISPENSABLE EVITAR LA DESCONEXIÓN
DE LOS CABLES DE LA BATERÍA CON
EL MOTOR EN MARCHA; ESTA OPERACIÓN PUEDE COMPORTAR UN
DAÑO IRREPARABLE A LA CENTRALITA ELECTRÓNICA DEL VEHÍCULO.
11
LAS BATERÍAS AGOTADAS SON
NOCIVAS PARA EL AMBIENTE. LA
RECOLECCIÓN Y LA ELIMINACIÓN
TIENEN QUE SER EFECTUADAS EN
EL RESPETO DE LAS NORMAS VIGENTES.
légèrement au-dessus du régime minimum pendant 10 – 15 minutes.
Cela permet de maintenir le fonctionnement de la batterie et des autres
composants du moteur. Suivez les indications du chapitre «inactivité du véhicule» et enlevez la batterie qui doit être
propre et tout à fait chargée. Gardez-la
dans un endroit sec et bien ventilé.
Rechargez la batterie au moins une fois
tous les deux mois.
55
NE JAMAIS DÉCONNECTER
LES CÂBLES DE LA BATTERIE
AVEC LE MOTEUR EN MARCHE
POUR NE PAS PROVOQUER DES
DOMMAGES IRRÉPARABLES DANS
LE SYSTÈME ÉLECTRONIQUE DU
VÉHICULE.
11
LES VIEILLES BATTERIES POLLUENT L'ENVIRONNEMENT. IL
FAUT S'EN DÉFAIRE EN RESPECTANT LES NORMES EN VIGUEUR.
Mantenimiento batería
Entretien de la batterie
88
ef
3-
MANTENIMIENTO
ENTRETIEN
Page 89

è conveniente agire seguendo una delle
seguenti modalità: - Almeno una volta al
mese accendere il motore e mantenerlo a
regime leggermente superiore al minimo,
durante 10-15 minuti. Questo permette di
mantenere efficace, oltre alla batteria, tutti
i componenti del motore. - Effettuare il
rimessaggio del veicolo (come indicato
nella sezione “Il veicolo rimane inattivo”)
rimovendo la batteria. Questa deve essere pulita, completamente carica e conservata in un luogo asciutto e arieggiato. Ristabilire la carica almeno una volta ogni
due mesi.
55
E ASSOLUTAMENTE INDISPENSABILE EVITARE DI STACCARE
I CAVI DELLA BATTERIA CON IL
MOTORE ACCESO: QUESTA OPERAZIONE PUÒ IMPLICARE UN
DANNO IRREPARABILE AL CENTRALINO ELETTRONICO DEL VEICOLO.
11
LE BATTERIE ESAURITE
SONO NOCIVE PER L’AMBIENTE. LA
RACCOLTA E LO SMALTIMENTO
DEVONO REALIZZARSI NEL RISPETTO DELLE NORME VIGENTI.
89
MANUTENZIONE
-3
MAINTENANCE - WARTUNG
igd
terminals. To avoid possible difficulties in
starting and/or irreversible damage to the
battery it is important to follow one of the
two following procedures: At least once a
month, start the engine and keep it running at slightly above idle speed for 10 to
15 minutes. This keeps all the components of the engine running efficiently, not
only the battery. - Put the scooter into storage (as shown in the section on “Leaving
the vehicle idle for long periods”), and
remove the battery. The battery should be
cleaned, brought to full charge, and kept
in a dry well-ventilated place. Re-charge
at least once every two months.
55
IT IS ABSOLUTELY INDISPENSABLE TO AVOID DISCONNECTING
THE BATTERY CABLES WITH THE
ENGINE RUNNING. SUCH AN OPERATION COULD INVOLVE IRREPARABLE DAMAGE TO THE ELECTRONICS UNIT OF THE VEHICLE.
11
EXHAUSTED BATTERIES ARE
DANGEROUS TO THE ENVIRONMENT. COLLECTION AND DISPOSAL
SHOULD BE CARRIED OUT IN
OBSERVANCE OF THE EXISTING
REGULATIONS.
Leistung 10-15 Minuten lang laufen. Auf
diese Weise wird nicht nur die
Leistungsfähigkeit der Batterie erhalten,
sondern auch die sämtlicher Motorteile. –
Das Fahrzeug ist einer Revision (wie im
Kapitel „Außerbetriebsetzung des
Fahrzeugs“ beschrieben) zu unterziehen, bei
der die Batterie herausgenommen wird.
Diese muss in sauberem Zustand,
vollständig aufgeladen an einem trockenen,
belüfteten Ort aufbewahrt werden. Das
Laden der Batterie ist mindestens einmal
alle zwei Monate vorzunehmen.
55
ES IST AUF ALLE FÄLLE ZU
UNTERLASSEN, DIE BATTERIEKABEL
BEI LAUFENDEM MOTOR
ABZUNEHMEN, DA HIERDURCH EIN
DAUERHAFTER SCHADEN AN DER
ELEKTRISCHEN ANLAGE DES
FAHRZEUGS VERURSACHT WERDEN
KANN.
11
ALTE BATTERIEN SIND
UMWELTSCHÄDLICH. IHRE
ENTSORGUNG HAT UNTER
BEACHTUNG DER GELTENDEN
VORSCHRIFTEN ZU ERFOLGEN.
Manutenzione batteria • Maintaining the battery
Wartung der Batterie
Page 90

Faro delantero
Para cambiar la lámpara del faro,
póngase al lado derecho del scooter y
pase la mano derecha por debajo del
faro, a continuación gire la goma protección portalámparas hacia la izquier-
da y tire hacia atrás. Para sacarla basta
con apretarla hacia dentro y girar hacia
la izquierda.
El faro debe estar orientado a la altu-
ra correcta para una conducción nocturna segura y no causar molestias a los
vehículos que circulan en dirección contraria.
Para orientar el faro, basta con ir
aflojando o apretando el tornillo situado
en la parte inferior derecha del conjunto
faro, y situar el faro de manera que a
una distancia de 5 metros de una pared
vertical, el centro del haz de luz del faro
coincida con la altura del centro del faro
al suelo, con el scooter bajado del
caballete y el conductor montado. Dicho
de otra manera, el eje del haz de luz
debe ser paralelo al suelo.
Phare avant
Pour remplacer la lampe du phare
avant, placez-vous du côté droit du
cyclomoteur et passez la main droite
sous le phare et faites tourner le caoutchouc de protection du porte-lampe
vers la gauche et poussez vers le fond.
Pour l'enlever il suffit de la serrer vers le
fond et de la faire tourner vers la gauche.
Le phare doit être orienté à la hauteur correcte pour une bonne visibilité
de nuit et ne pas gêner les conducteurs
qui circulent en sens contraire.
Pour orienter le phare, il suffit d'ajuster la vis située sur la partie inférieure
droite de l'ensemble phare de façon
qu'à une distance de 5 mètres de la verticale d'un mur, le centre du faisceau de
lumière du phare coincide avec la distance du centre du phare au sol, le conducteur étant assis sur le cyclomoteur
reposant au sol sans la béquille: l'axe
du faisceau de lumière doit être parallè-
le au sol.
Faro delantero
Phare avant
90
ef
3-
MANTENIMIENTO
ENTRETIEN
H
5 m
Page 91

Faro anteriore
Per sostituire la lampada del faro,
situarsi sul lato destro dello scooter e
passare la mano destra sotto il faro.
Girare dopo la gomma di protezione del
portalampade verso sinistra e tirare
indietro. Per estrarla, basta premerla
verso l’interno e girare a sinistra. I l
faro deve orientarsi all’altezza corretta
per una guida notturna sicura e non
causare molestie ai veicoli che circolano
in senso opposto.
Per orientare il faro basta allentare o
stringere la vite di fissaggio dell’ottica,
situata nella parte inferiore centrale del
complesso faro. Situare poi il faro in
modo che, a una distanza di metri 5 da
una parete verticale, il centro del fascio
della luce del faro coincida con l’altezza
del faro rispetto al suolo, con lo scooter
abbassato dal cavalletto e il conducente
montato. Detto in un altro modo, l’asse
del fascio di luce deve essere parallelo
al suolo.
91
MANUTENZIONE
-3
MAINTENANCE - WARTUNG
igd
Front headlight
In order the replace the headlight
bulb, stand on the right hand side of the
scooter and place your right hand
underneath the headlight, and then turn
the rubber bulb-holder protection to the
left and pull to the rear. To remove the
bulb, it is only necessary to press it
inwards and turn to the left.
The headlight should be set to the
correct height for safe night-time riding
without causing inconvenience to oncoming vehicles.
In order to set the headlight, it is only
necessary to rotate the screw located
underneath the right hand side of the
headlight assembly inwards or outwards, until the headlight is set in such
a way that the centre of the headlight
beam focussed on a vertical wall at a
distance of 5 metres is at the same
height from the ground as the centre of
the headlight. The scooter should be off
the stand and the rider seated on the
saddle. In other words, the headlight
beam should be parallel to the ground.
Scheinwerfer, vorne
Zum Auswechseln der Glühlampe des
Scheinwerfers stellen Sie sich auf die
rechte Seite des Scooters, greifen mit der
rechten Hand unter den Scheinwerfer und
drehen anschließend den Gummischutz
des Lampenhalters nach links und ziehen
ihn dann nach hinten. Um ihn
herauszunehmen brauchen Sie ihn nur
nach innen zu drücken und dann nach
links zu drehen.
Der Scheinwerfer muss auf eine
korrekte Höhe eingestellt sein, um nachts
eine sichere Fahrweise zu garantieren
und die entgegenkommenden Fahrzeuge
nicht zu blenden. Zur Einstellung des
Scheinwerfers braucht man nur die rechts
unten im Scheinwerferkasten angeordnete
Schraube zu lockern oder anzuziehen, um
den Scheinwerfer so auszurichten, dass
die Länge der zentralen Achse des
Lichtbündels bei einem Abstand von 5 m
von einer vertikalen Wand mit dem
Abstand zwischen zentraler Achse und
Boden übereinstimmt, wobei der Scooter
ohne Ständer auf dem Boden steht und
der Fahrer auf dem Fahrzeug sitzt. Anders
ausgedrückt, die Achse des Lichtbündels
muss parallel zum Boden verlaufen.
Faro anteriore • Front headlight
Scheinwerfer, vorne
Page 92

Reglaje del ralentí
00
DURANTE LAS OPERACIONES DE AJUSTE DEL RALENTI
PRESTAR ATENCION EN NO TOCAR
EL ESCAPE PARA EVITAR QUEMADURAS.
Características Técnicas
Régimen mínimo
1900 ÷ 2100 r.p.m.
Para el ajuste del ralentí es necesario
intervenir en el tornillo «D» en el carburador. Es necesario actuar en el doble
regulador «E» para la regulación del
juego de la transmisión mando gas. El
ajuste del ralentí se debe realizar sin
que la rueda trasera toque el suelo
(vehículo sobre el caballete) y con el
motor caliente: enroscar y desenroscar
el tornillo hasta obtener un régimen normal: Todo esto sin que la rueda trasera
se ponga en movimiento con la rotación
del motor. Se recomienda efectuar la
operación en un Punto de Asistencia
Autorizado DERBI.
Réglage du ralenti
00
PENDANT LES OPÉRATIONS
DE RÉGLAGE DU RALENTI VEILLEZ
À NE PAS TOUCHE LE POT D'ÉCHAPPEMENT POUR ÉVITER DES
BRÛLURES.
Caractéristiques techniques
Régime minimum
1900 ÷ 2100 r.p.m.
Régler le ralenti au moyen de la vis
D du carburateur. Il faut actionner le
double régulateur E pour ajuster le jeu
de la transmission de la commande
d'accélération. Pendant cette opération
la roue arrière ne doit pas toucher le
sol. (véhicule sur sa béquille), le moteur
étant chaud. Visser et dévisser la vis
jusqu'à arriver au régime normal. La
roue ne doit pas rouler pendant que le
moteur tourne. Il vaut mieux effectuer
cette opération dans un Atelier d'assistance autorisé DERBI.
Reglaje del ralentí
Réglage du ralenti
92
ef
3-
MANTENIMIENTO
ENTRETIEN
Page 93

Regime del minimo
00
DURANTE LE OPERAZIONI DI
REGOLAZIONE DEL MINIMO, AVERE
CURA DI EVITARE LE SCOTTATURE.
Caratteristiche tecniche
Regolazione del minimo
1.900 - 2.100 g.p.m.
Per la regolazione del minimo è
necessario agire sulla vite “D" del carburatore. È necessario agire sul doppio
regolatore “E” per la regolazione del
gioco della trasmissione comando del
gas. La regolazione del minimo è da
farsi senza che la ruota posteriore tocchi il suolo (veicolo sul cavalletto) e con
il motore caldo: avvitare e svitare la vite
fino ad avere un regime normale. Il tutto
senza che la ruota posteriore inizi il
movimento con la rotazione del motore.
Si consiglia di effettuare l’operazione
presso un Punto di Assistenza Autorizzato DERBI.
93
MANUTENZIONE
-3
MAINTENANCE - WARTUNG
igd
Adjusting the idle speed
00
DURING THE OPERATION OF
ADJUSTING THE IDLE SPEED, BE
CAREFUL NOT TO TOUCH THE
EXHAUST PIPE IN ORDER TO AVOID
BURNS.
Technical specifications
Minimum engine speed
1900 – 2100 rpm
In order to adjust the idle speed it is
necessary to turn screw, D, on the carburettor. It is necessary to operate the
double adjuster, E, to control the play in
the throttle control linkage. While adjusting the idle speed the rear wheel
should not touch the ground, (machine
on the centre stand) and the engine
should be hot: turn the screw in and out
until a normal engine speed is obtained.
While carrying out the entire operation
the rear wheel must not start turning as
the engine rotates. It is recommended
that this operation is carried out by your
Authorised DERBI Service Centre.
Einstellung des leerlaufs
00
UM VERBRENNUNGEN ZU
VERMEIDEN SOLLTE BEI
EINSTELLUNG DES LEERLAUFS
DARAUF GEACHTET WERDEN,
NICHT MIT DEM AUSPUFFROHR IN
BERÜHRUNG ZU KOMMEN.
Technische Daten
Leerlaufdrehzahl mind.
1900-2100 U/min.
Die Einstellung des Leerlaufs wird mit
der am Vergaser sitzenden Schraube „D“
vorgenommen. Außerdem erfolgt die
Einstellung des Transmissionsspiels für
den Gasgeber mit dem Doppelregler „E“.
Bei Einstellung des Leerlaufs muss das
Hinterrad auf dem Boden (und das
Fahrzeug auf seinem Ständer) stehen. Mit
warmem Motor wird die Schraube so
lange gelockert oder angezogen, bis eine
normale Drehzahl erreicht wird, wobei sich
das Hinterrad bei den Motorumdrehungen
nicht bewegen darf. Es wird empfohlen,
diese Einstellung in einer DERBIVertragswerkstätte vornehmen zu lassen.
Regime del minimo • Adjusting the idle speed
Einstellung des leerlaufs
Page 94

00
EN CASO DE PROBLEMAS
DURANTE LA OPERACION DE AJUSTE DEL RALENTI, PODRIA SER
NECESARIO LA REGULAClON DE
LAS EMISIONES DE GASES DEL
ESCAPE (CO). DICHA OPERACION
SE DEBE REALIZAR EN UN PUNTO
DE ASISTENCIA AUTORIZADO.
Características del freno de disco
Los frenos de disco comparados con
los de tambor tienen las siguientes
características y ventajas:
- La evacuación de calor de las superficies de fricción es muy eficaz, ya que
los discos giran en contacto directo
con el aire. Por este motivo siempre
tenemos una capacidad de frenada
estable, aún usando el freno repetidamente a altas velocidades. Dicho de
otra manera el riesgo de “Fadding” es
muy inferior.
- Ninguna de las piezas del freno de
disco está expuesta a deformación
alguna, por las elevadas temperaturas.
- El cambio de las pastillas de freno es
simple y no requiere ajustes complicados.
00
EN CAS DE PROBLÈMES PENDANT LES OPÉRATIONS DE RÉGLAGE DU RALENTI IL PEUT S'AVÉRER
NECESSAIRE DE RÉGLER LES
ÉMISSIONS DE GAS (CO) DU POT
D'ÉCHAPPEMENT. CETTE OPÉRATION DOIT ÊTRE EFFECTUÉE DANS
UN ATELIER AUTORISÉ.
Caractéristiques du frein à disque
Les freins à disque ont plus d'avanta-
ges que les freins à tambour.
Les caractéristiques des freins à dis-
que sont les suivantes:
- Les disques tournent en contact direct
avec l'air et la chaleur des surfaces de
friction est très bien évacuée. Donc la
capacité de freinage est stable, même
si les freins sont sollicités souvent et à
grande vitesse . Le risque de «Fad-
ding» est plus faible qu'avec des freins
à tambour.
- Aucune des pièces du frein à disque
n'est soumise à des déformations causées par les températures élevées.
- Le remplacement des plaquettes de
frein est rapide et aisé et ne requiert
pas de réglages compliqués.
Características del freno de disco
Caractéristiques du frein à disque
94
ef
3-
MANTENIMIENTO
ENTRETIEN
Page 95

00
IN CASO DI PROBLEMI
DURANTE L’OPERAZIONE DI REGOLAZIONE DEL MINIMO, POTREBBE
ESSERE NECESSARIA LA REGOLAZIONE DELLE EMISSIONI DI GAS
DELLO SCAPPAMENTO (CO). QUESTA OPERAZIONE È DA FARSI PRESSO UN PUNTO D’ASSISTENZA
AUTORIZZATO.
Caratteristiche del freno a disco
I freni a disco a confronto di quelli a
tamburo hanno le seguenti caratteristiche e vantaggi:
-L’evacuazione di calore delle superfici
d’attrito è molto efficace, giacché i dischi girano a contatto diretto con l’aria.
Per questo motivo abbiamo sempre
una capacità di frenata stabile anche
se usiamo ripetutamente il freno ad
alte velocità. Detto in un altro modo, il
rischio di “fadding” è molto inferiore.
- Nessuno dei pezzi del freno a disco è
esposto a nessuna deformazione
dovuta alle elevate temperature.
- La sostituzione delle pastiglie di freno
è semplice e non richiede regolazioni
complicate.
95
MANUTENZIONE
-3
MAINTENANCE - WARTUNG
igd
00
IN CASE OF PROBLEMS
DURING THE IDLE ADJUSTMENT
OPERATION, IT MAY BE NECESSARY TO ADJUST THE EXHAUST
GAS EMISSIONS (CO). THIS OPERATION SHOULD BE CARRIED OUT BY
AN AUTHORISED DERBI SERVICE
CENTRE.
Specifications of the disc brake
The disc brakes have the following
characteristics in comparison with drum
brakes:
- The release of heat from the friction
surfaces is very efficient, since the
discs rotate in direct contact with the
air. For this reason we always have
stable braking even when applying the
brakes repeatedly at high speed. In
other words the risk of brake fading is
much lower.
- None of the parts in the disc brake is
subject to deformation from exposure
to high temperatures.
- Changing the brake pads is simple
and does not require complex adjustments.
- Constant operation of the brakes is
00
WENN BEI EINSTELLUNG DES
LEERLAUFS PROBLEME
AUFTRETEN, KÖNNTE ES SICH ALS
NOTWENDIG ERWEISEN, DIE
ABGASEMISSION (CO)
EINZUSTELLEN. DIESE
EINSTELLUNG SOLLTE VON EINER
DERBI-VERTRAGSWERKSTÄTTE
VORGENOMMEN WERDEN.
Merkmale der Scheibenbremse
Im Vergleich zur Trommelbremsen
zeichnen sich die Scheibenbremsen durch
folgende Merkmale und Vorteile aus:
- Der Abzug der auf den Reibungsflächen
entstehenden Wärme erfolgt in sehr
effizienter Weise, da die sich drehenden
Bremsscheiben an der freien Luft liegen.
Aus diesem Grund wird immer eine
konstante, stabile Bremskapazität
gewährleistet, selbst wenn die Bremse
bei hoher Geschwindigkeit mehrmals
hintereinander betätigt wird. Anders
ausgedrückt: Das „Fadding“-Risiko wird
sehr gering gehalten.
- Bei keinem Teil der Bremsanlage
ergeben sich durch die hohen
Temperaturen Verformungen.
- Das Auswechseln der Bremsklötze ist
Caratteristiche del freno a disco • Specifications of the disc brake
Merkmale der Scheibenbremse
Page 96

- Se asegura un funcionamiento constante de los frenos, ya que aún estando el disco mojado, durante la marcha
en tiempo lluvioso, la capacidad de
recuperación de la fuerza de frenado
es excelente, debido a las características de extrema presión de las pastillas de freno.
- Tiene un tacto suave, ya que sólo
tiene una pequeña, pero suficiente,
zona de fricción.
Mantenimiento freno de disco
Líquido de freno:
Comprobar periódicamente el nivel del
depósito de líquido de freno situado en el
manillar. Reponerlo de ser necesario con
líquido hidráulico AGIP BRAKE FLUID
DOT 4, no mezcle nunca diferentes tipos
de líquidos.
Con el depósito abierto no apriete la
maneta de freno, de lo contrario podría
derramar el líquido y éste deteriorar las
superficies pintadas y los cristales.
Tenga cuidado no se mezcle agua con
el líquido de freno.
Debido a la absorción de humedad es
recomendable cambiar el líquido cada
dos años.
- L'efficacité des freins est constante
même si le disque est mouillé par
temps pluvieux, la capacité de récupé-
ration de la force de freinage est excellente à cause des caractéristiques de
pression extrême des plaquettes de
frein.
- Les freinées sont douces car la zone
de friction tout en n'étant pas grande
est suffisante.
Entretien du frein à disque
Le liquide de frein
Vérifier périodiquement le niveau du
liquide de frein du réservoir situé dans
le guidon.
Rajouter si nécessaire du liquide
hydraulique AGIP BRAKE FLUID DOT
4. Ne mélangez jamais des liquides de
type différent.
Si le réservoir est ouvert ne serrez
pas la manette de freins pour ne pas
verser de liquide qui pourrait abîmer les
surfaces peintes et les surfaces transparentes. Veillez à ce qu'il ne tombe
pas d'eau dans le liquide de frein. Il est
conseillé de changer de liquide de frein
Mantenimiento freno de disco
Entretien du frein à disque
96
ef
3-
MANTENIMIENTO
ENTRETIEN
Page 97

- È assicurato il funzionamento costante
dei freni giacché, anche se il disco è
bagnato durante la marcia in tempo
piovoso, la capacità di ricupero della
forza di frenaggio è eccellente, a
causa delle caratteristiche di estrema
pressione delle pastiglie di freno.
- Ha un tatto soave giacché ha soltanto
una piccola, ma sufficiente, zona
d’attrito.
Manutenzione freno a disco
Liquido di freno:
Verificare periodicamente il livello del
serbatoio del liquido di freno situato nel
manubrio. Rimetterlo se necessario con
liquido idraulico AGIP BRAKE FLUID
DOT 4, ma non mischiare mai diversi
tipi di liquido.
Con il serbatoio aperto, non stringere
la leva del freno, altrimenti potrebbe
fuoriuscire il liquido e deteriorare le parti
verniciate e i vetri.
Abbia cura di non mischiare acqua
con il liquido di freno.
A causa dell’assorbimento dell’umidità è consigliabile sostituire il liquido
ogni due anni.
97
MANUTENZIONE
-3
MAINTENANCE - WARTUNG
igd
ensured since even in contact with a
wet disc while riding in rainy weather,
recovery of braking power is excellent,
because of the characteristics of extremely high contact pressure of the
brake pads against the disc.
- The brake pad touch is smooth because there is only a small but highly
effective friction surface area.
Maintaining the disc brake
Brake fluid:
Check the brake fluid level in the
reservoir located on the handlebar from
time to time. Top up as necessary with
AGIP DOT 4 BRAKE FLUID hydraulic
fluid. Never mix different types of brake
fluid.
Never press the brake lever when
the cap is off the reservoir, otherwise
the fluid willl overflow and damage painted and glass surfaces.
Take care not to let any water become mixed with the brake fluid.
It is recommended to change the
brake fluid every two years because it
absorbs humidity from the air.
einfach und macht keine komplizierten
Einstellungen erforderlich.
- Es wird eine konstante Bremskraft
gewährleistet, da deren
Wiederherstellung selbst bei feuchten
Bremsscheiben, verursacht durch Regen
etc., dank des extremen, von den
Bremsbelegen ausgeübten Drucks
ausgezeichnet ist.
- Die Bremse arbeitet sanft, da sie nur
über eine kleine, aber ausreichende
Reibungsfläche verfügt.
Wartung der Scheibenbremse
Bremsflüssigkeit:
Der Flüssigkeitsstand in dem im Lenker
angeordneten Bremsflüssigkeitsbehälter
ist regelmäßig zu kontrollieren.
Gegebenenfalls ist hydraulische
Flüssigkeit AGIP BRAKE FLUID DOT 4
nachzufüllen. Nicht verschiedene Arten
von Bremsflüssigkeiten mischen.
Bei offenem Behälter die Bremse nicht
betätigen, da sonst Flüssigkeit austreten
kann, von der Schäden auf dem Lack und
den Glasflächen verursacht werden.
Achten Sie darauf, dass kein Wasser
mit der Bremsflüssigkeit vermischt wird.
Es wird empfohlen, auf Grund der
Feuchtigkeitsaufnahme die Flüssigkeit
alle zwei Jahre auszuwechseln.
Manutenzione freno a disco • Maintaining the disc brake
Wartung der Scheibenbremse
Page 98

Mantenimiento freno de disco
Entretien du frein à disque
98
Tubos flexibles y racordaje:
Comprobar periódicamente los tubos
hidráulicos flexibles, no se hayan deteriorado y que el racordaje no tenga pérdi-
das.
Aire en el sistema de frenado:
Si el recorrido de la palanca de freno se
hace excesivo o la palanca tiene un tacto
excesivamente blando o esponjoso, se
debe realizar una purga de aire del sistema de freno.
Purga de aire:
Montar un tubo de plástico transparente
en el purgador para evitar que el líquido
residual ensucie el sistema de frenado.
Apretar la maneta freno al máximo, aflojar
el purgador y volverlo a apretar, dejar de
apretar la maneta freno. Así sucesivamente hasta eliminar el aire existente en
el sistema de frenado. Una vez eliminado
el aire reponer el depósito de líquido
hidráulico AGIP BRAKE FLUID DOT 4.
Disco de freno:
La superficie del disco debe estar libre
de aceite. Para limpiarlo utilice alcohol y
un trapo suave.
tous les deux ans à cause de l'absorption d'humidité.
Tubes flexibles et raccords
Vérifier périodiquement l'état des
tubes hydrauliques flexibles et des raccords.
Air dans le système de freinage
Si le parcours du levier de frein
devient trop long ou si le levier à une
action trop faible ou spongieuse, il faut
effectuer une purge de l'air du système
de freinage.
Purge de l'air
Placer un tube en plastique transparent dans le purgeur pour éviter que le
liquide résiduel ne salisse le système
de freinage. Serrer la manette de frein
au maximum, desserrer le purgeur et
serrer à nouveau, lâcher la manette de
frein. Et ainsi de suite jusqu'à élimina-
tion complète de l'air du système de
freinage. Une fois la purge faite, remplir
le réservoir de liquide hydraulique AGIP
BRAKE FLUID DOT 4.
Disque
La surface du disque doit être propre, sans huile. Utilisez de l'alcohol en
cas de besoin et un chiffon doux pour le
nettoyer.
ef
3-
MANTENIMIENTO
ENTRETIEN
Page 99

Tubi flessibili e raccordi:
Verificare periodicamente che i tubi
idraulici flessibili non siano deteriorati e
che i raccordi non abbiano fughe.
Aria nel sistema di frenaggio:
Se il percorso della leva del freno
diventa eccessivo o la leva ha un tatto
eccessivamente molle o spugnoso,
deve farsi uno spurgo d’aria dal sistema
di frenaggio.
Spurgo dell’aria:
Montare nello spurgo un tubo di plastica trasparente per evitare che il liquido
residuale sporchi il sistema di frenaggio.
Stringere la leva del freno al massimo,
allentare lo spurgo e stringerlo di nuovo,
smettere di stringere la leva del freno. E
così via fino a eliminare l’aria esistente
nel sistema di frenaggio. Dopo aver eliminato l’aria rimettere nel serbatoio del
liquido idraulico AGIP BRAKE FLUID
DOT 4.
Disco di freno:
La superficie del disco deve essere
esente d’olio. Per pulirla utilizzi alcool e
un panno soave.
99
MANUTENZIONE
-3
MAINTENANCE - WARTUNG
igd
Flexible hoses and connectors:
Check the hydraulic hoses for damage from time to time, ensuring that the
connectors show no leaks.
Air in the brake system:
If the brake lever travel becomes
excessive, or if the lever develops an
excessively soft or spongy feel, the
brake system should be bled of air.
Bleeding air out of the system:
Fit a transparent tube over the bleed
nipple to prevent residual fluid dirtying
the brake system. Press the brake lever
fully down, open the bleed nipple and
close it again, and release the brake
lever. Repeat this procedure until all the
air has been expelled from the brake
system. Once all the air has been eliminated from the system, top up the brake
fluid reservoir with AGIP BRAKE FLUID
DOT 4 hydraulic fluid.
Brake disc:
The surface of the brake disc should
be kept free of oil. Use alcohol on a
clean cloth to clean it.
Schläuche und Anschlussstutzen
Die Hydraulikschläuche sind
regelmäßig auf eventuellen Verschleiß zu
überprüfen. Außerdem sind die
Anschlussstutzen auf ihre Dichtigkeit hin
zu kontrollieren.
Luft in der Bremsanlage:
Wenn der Weg des Bremsgriffs zu lang
wird oder ein zu weicher, schwammiger
Kontakt desselben bemerkt wird, muss ein
Entlüften der Bremsanlage vorgenommen
werden.
Entlüften der Bremsanlage:
An die Entlüftungsvorrichtung wird ein
durchsichtiger Gummischlauch
angeschlossen, mit dem vermieden
werden soll, dass Restflüssigkeit in die
Bremsanlage fließt. Den Bremsgriff bis
zum Anschlag anziehen, den Entlüfter
lockern und wieder festziehen, und den
Bremsgriff loslassen. Dieser Vorgang ist
zu wiederholen, bis die vorhandene Luft
aus der Bremsanlage entfernt worden ist.
Nach Entlüften ist der Behälter mit der
hydraulische Bremsflüssigkeit AGIP
BRAKE FLUID DOT 4 zu füllen.
Scheibenbremse:
Die Oberfläche der Bremsscheibe
muss ölfrei sein. Zur Reinigung sind
Alkohol und ein weicher Lappen zu
verwenden.
Manutenzione freno a disco • Maintaining the disc brake
Wartung der Scheibenbremse
Page 100

Mantenimiento freno de disco
Entretien du frein à disque
100
Desgaste de las pastillas de freno
00
ES NECESARIO CONTROLAR
PERIODICAMENTE (CADA 5000 KM.)
LAS CONDICIONES DE DESGASTE DE
LAS PASTILLAS DEL FRENO. SI EL
ESPESOR, AUNQUE SEA DE UNA
SOLA PASTILLA, ES DE 1,5 MM.,
AMBAS PASTILLAS DEBEN SER SUSTITUIDAS. RECOMENDAMOS REALIZAR DICHA OPERACION EN UN
PUNTO DE ASISTENCIA AUTORIZADO
DERBI. DESPUES DE LA SUSTlTUClON DE LAS PASTILLAS NO USAR EL
VEHICULO SIN HABER ACCIONADO
ANTES LA PALANCA DEL FRENO
VARIAS VECES, CON EL OBJETO DE
AJUSTAR LAS PASTILLAS Y RESTABLECER EL JUEGO DE LA MISMA
PALANCA
55
LA ACCION DE FRENADO DEBE
INICIAR DESPUES DE UN RECORRIDO
DE 1/3 DE LA PALANCA DEL FRENO.
Usure des plaquettes de frein
00
IL FAUT VÉRIFIER PÉRIODIQUEMENT L'ÉTAT D'USURE DES
PLAQUETTES DE FREIN. SI L'ÉPAISSEUR D'UNE DES PLAQUETTES EST
DE 1,5 mm, IL FAUT REMPLACER
LES DEUX PLAQUETTES. EFFECTUER CETTE OPÉRATION DANS UN
ATELIER AUTORISÉ DERBI. NE PAS
UTILISER LE VÉHICULE AVANT D'AVOIR ACTIONNÉ LE LEVIER DE
FREIN PLUSIEURS FOIS AFIN QUE
LES PLAQUETTES S'AJUSTENT ET
LE JEU DU LEVIER S'ÉQUILIBRE.
55
L'ACTION DU FREINAGE DOIT
COMMENCER APRÈS LE PARCOURS DE 1/3 DU LEVIER DU FREIN.
ef
3-
MANTENIMIENTO
ENTRETIEN
> 1,5 mm
 Loading...