

Denver WCT-8010 Service Manual
Wild Camera
DENVER WCT-8010
Instruction Manual
WWW.DENVER-ELECTRONICS.COM
ENG-1

Table of Contents
1. Instructions .......................................................................................................... 3
1.1 General Description .................................................................................... 3
1.2 Camera Body Interface .............................................................................. 3
1.3 Camera components and features ............................................................. 3
1.4 Shooting Information Display ..................................................................... 4
1.5 Supported Format ....................................................................................... 4
2. Cautions .............................................................................................................. 4
3.Easy Operation ................................................................................................... 5
3.1 Power Supply .............................................................................................. 5
3.2 Insert the Micro SD-card ............................................................................. 5
3.3 Enter into the TEST Mode .......................................................................... 6
3.3.1 Custom Settings ................................................................................ 6
3.3.2 Manual Capturing .............................................................................. 6
3.3.3 View Images or Videos ..................................................................... 6
3.4 Power Off .................................................................................................... 6
4 Advanced Operations ........................................................................................... 7
4.1 Settings Menu ............................................................................................. 7
4.1.1 Photo Setting ..................................................................................... 7
4.1.2 Video Setting ..................................................................................... 7
4.1.3 System Setting .................................................................................. 8
4.1.4 Default .............................................................................................. 8
4.1.5 General Settings ............................................................................... 8
4.1.6 Set Camera Mode ............................................................................. 9
4.1.7 Format SD-Card ................................................................................ 9
4.1.8 Set Photo Size ................................................................................... 9
4.1.9 Set Video Size ................................................................................... 9
4.1.10 Set Date and Time ......................................................................... 9
4.1.11 Set Multi ........................................................................................ 10
4.1.12 Set ISO ......................................................................................... 10
4.1.13 Set Video Length .......................................................................... 10
4.1.14 Set Video Sound .......................................................................... 10
4.1.15 Set Delay ...................................................................................... 10
4.1.16 Set Timer ...................................................................................... 11
4.1.17 Enter Password ............................................................................ 11
4.2 Playback ................................................................................................... 11
4.2.1 Viewing Photo or Video ................................................................... 11
4.2.2 Delete Photo or Video ..................................................................... 11
4.3 File Numbering ......................................................................................... 12
4.4 Firmware Upgrade ................................................................................... 12
Appendix : Technical SpecificationsⅠ .................................................................... 13
Appendix Ⅱ: Parts List…………………………………………….………………………………………………13
ENG-2
1. Instructions
1.1 General Description
This digital trail camera is a surveillance camera working automatically. It can be
triggered at once by any movement of human (or animals) in a certain region of
interested (ROI) monitored by a high sensitive Passive Infrared (PIR) motion sensor, and
then automatically captures high quality pictures (up to 12M pixels) or records 1080p HD
video clips.
At sunrise the unit begins to take color photos and video until there is insufficient light
(dusk) when it begins to take infrared (monochrome) photos and video.
It is easy to use, there is a 2.0 inch colorful LCD display on camera. It is resistant against
water and snow for outside uses.
1.2 Camera Body Interface
The camera has the following I/O interfaces: USB connector, SD-card slot, TV output.
Take a few moments to familiarize yourself following the camera controls and displays. It
is helpful to bookmark this section and refer to it as you read through the rest of the
manual.
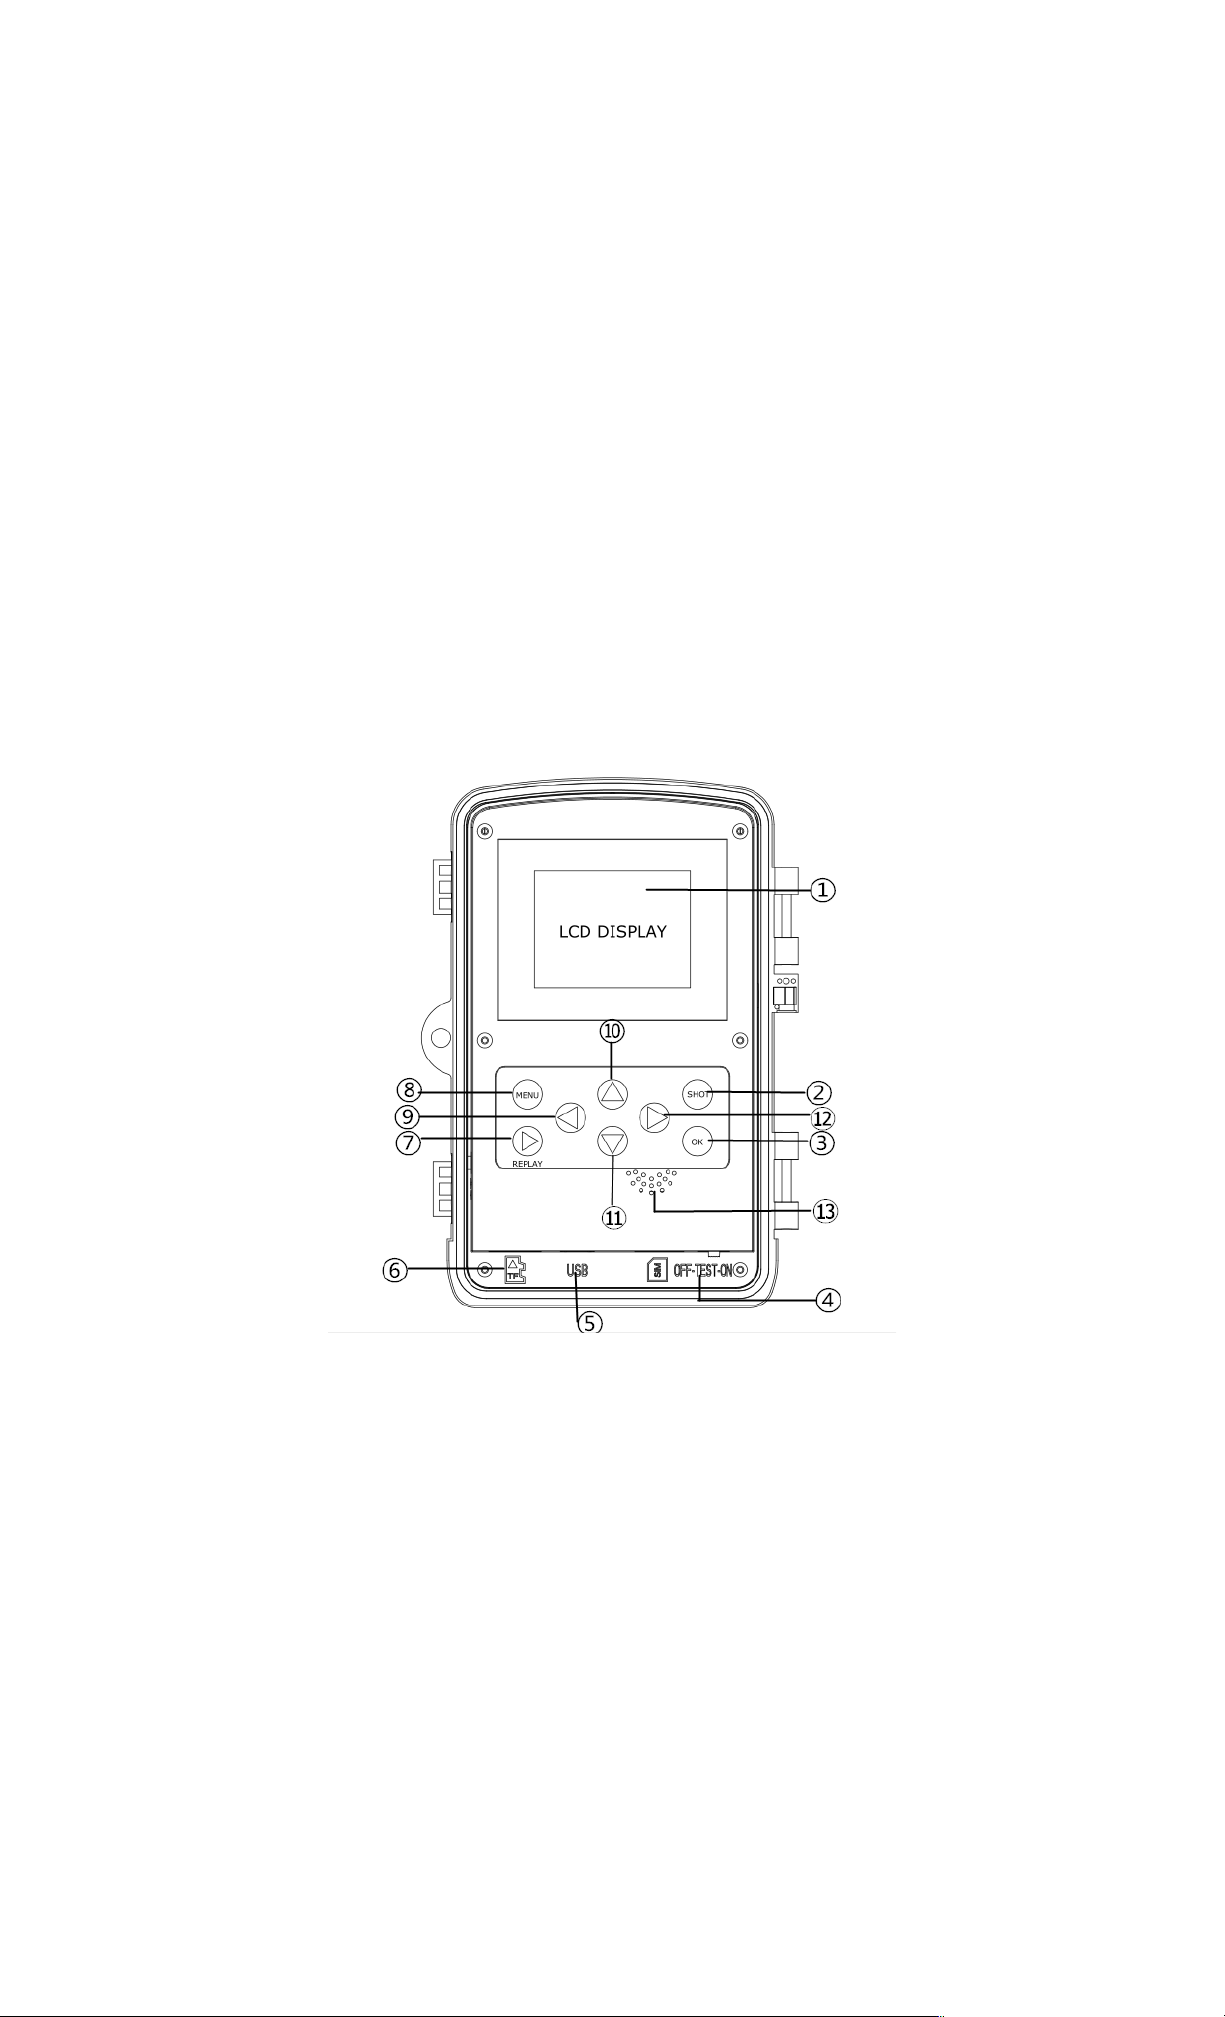
1.3 Camera components and features
2 inch color LCD Display
Shot button
OK button
Power Switch
USB connector
Micro SD card slot
Replay button
Menu button
Left button
10) Up button
11) Down button
12) Right button
13) Microphone
ENG-3
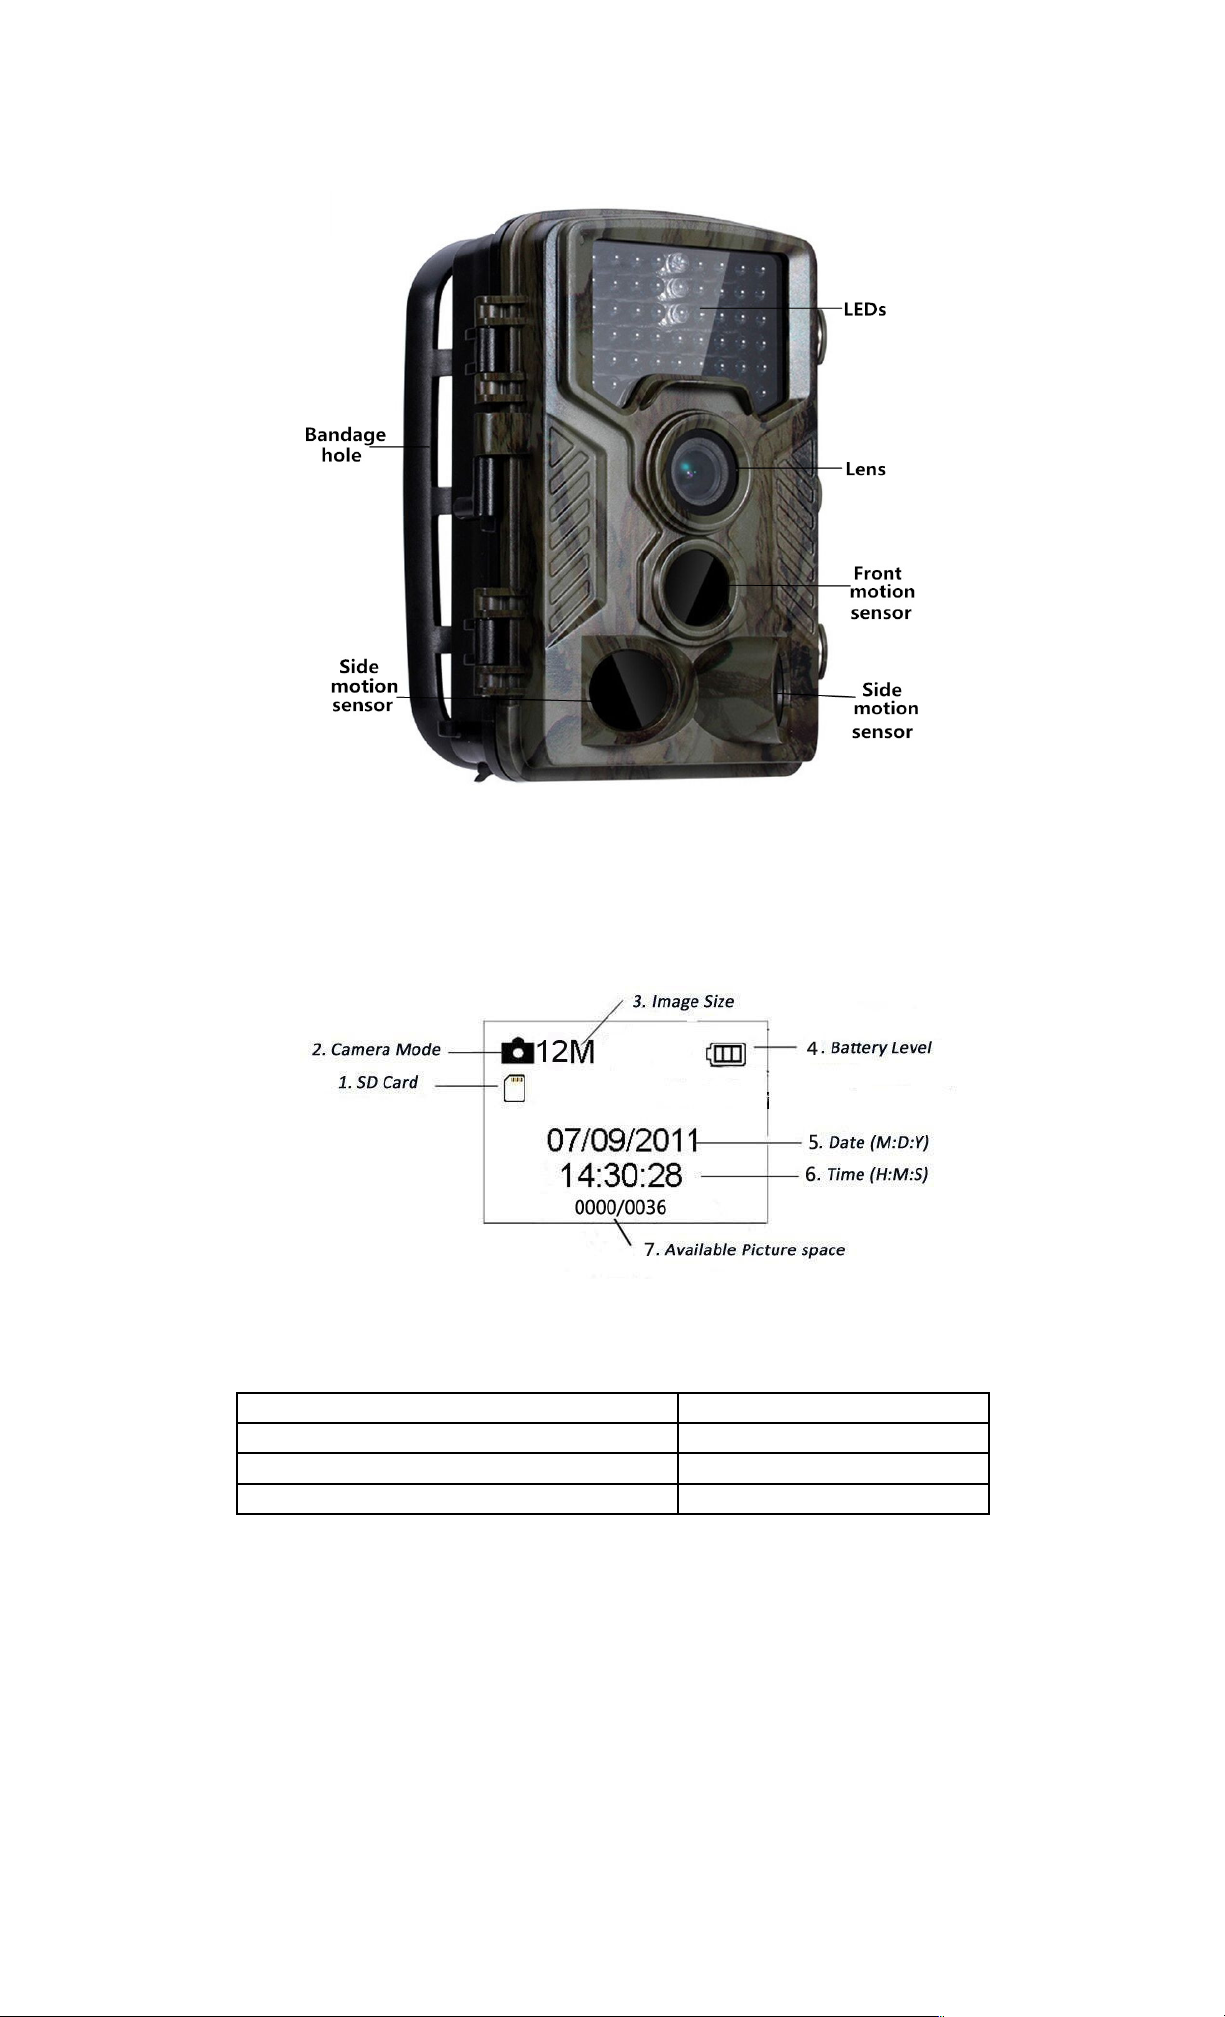
1.4 Shooting Information Display
When the camera is turned on (the power switch is slid to TEST position), the shooting
information will be displayed in the monitor.
1.5 Supported Format
Item Format
Photo JPG
Video AVI
File Format FAT32
Here are some important notices. You don’t need to concern about the file system
format of the camera unless you have problems with reading the Micro SD-card by your
other equipment. If this happened, please format the Micro SD-card in the camera or in
a computer at first and then reinsert the card into your camera to make a try.
2. Cautions
The working voltage of the camera is 6.0V. The camera is powered by 4 or 8 AA batteries.
Please unlock the write-protect before inserting the Micro SD-card.
Please insert the Micro SD-card when the power switch is at OFF position before testing
the camera.
Please do not insert or take out the Micro SD-card when the power switch is at ON
ENG-4

position.
It is recommended to format the SD-card by the camera when used at the first time.
The camera will be in USB mode when connected to a USB port of a computer. In this
case, the SD-card functions as a removable disk.
Please ensure sufficient power when having firmware upgrade, otherwise the upgrade
process could be interrupted incorrectly. If any fault occurs after improper upgrading
process, the camera may stop function properly.
3.Easy Operation
3.1 Power Supply
To supply power for the camera, 4 or 8 AA size batteries are needed.
Confirm that the power switch is at the OFF (Right) position, take out the battery depot.
Load the fully charged batteries into the depot according the polarities sign shown
below. Push back the battery compartment to the battery chamber.
The following batteries with 1.5V output can be used:
1. High-density and high-performance alkaline batteries (Recommended)
2. Rechargeable NiMH batteries
There are four battery slots. When in Test Mode, camera will be automatically shut
down to save power if without any operation within 3 minutes; it could be waked up by
any movement detection.
When in low-battery state, camera will be also automatically shut down. Please change
the batteries in time.
Insert the Micro SD-card
3.2
Insert Micro SD-card into the card slot with marked side upwards.
Please note that the Micro SD-card can only be plugged in one direction. Power on and
3.2.1 Enter into the ON Mode
Before switching on, please pay attention to the following:
1. Avoid temperature and motion disturbances that could be construed as animals
or humans such as trees that are exposed to direct sunlight for much of the day
ENG-5
 Loading...