

Page 1
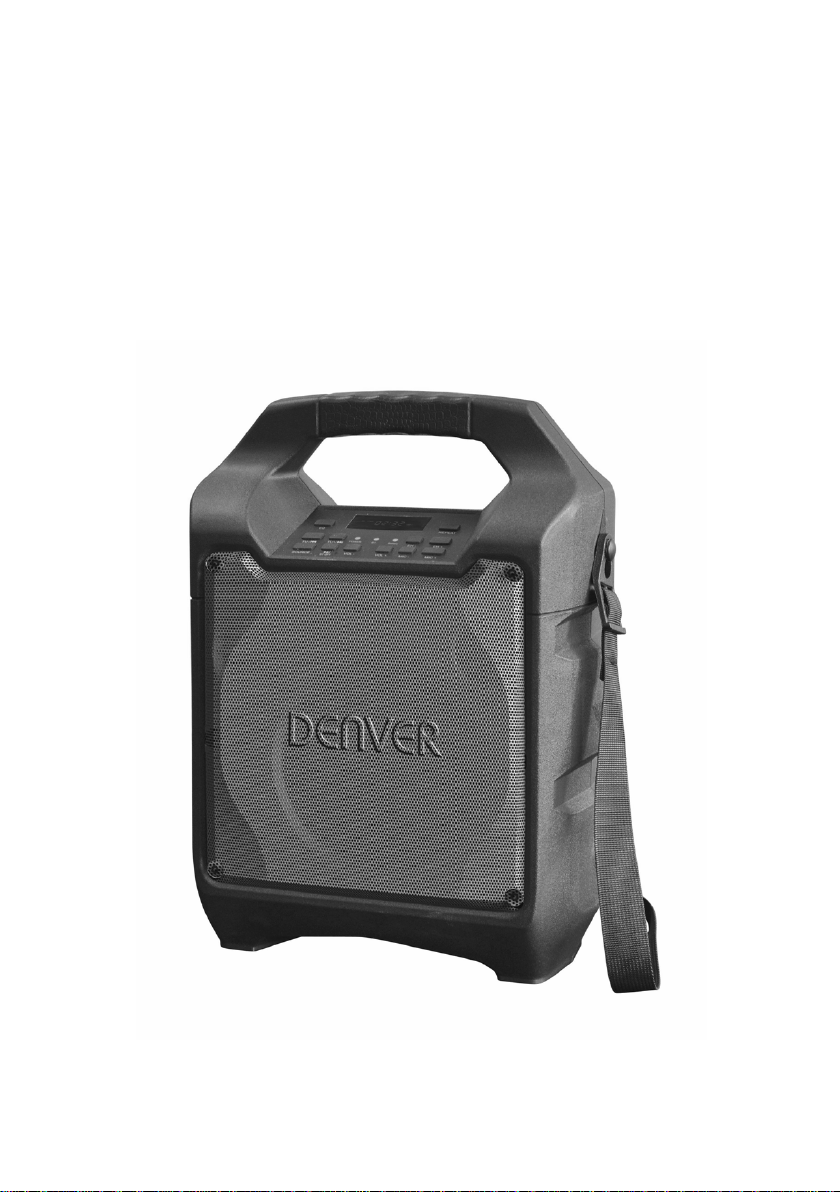
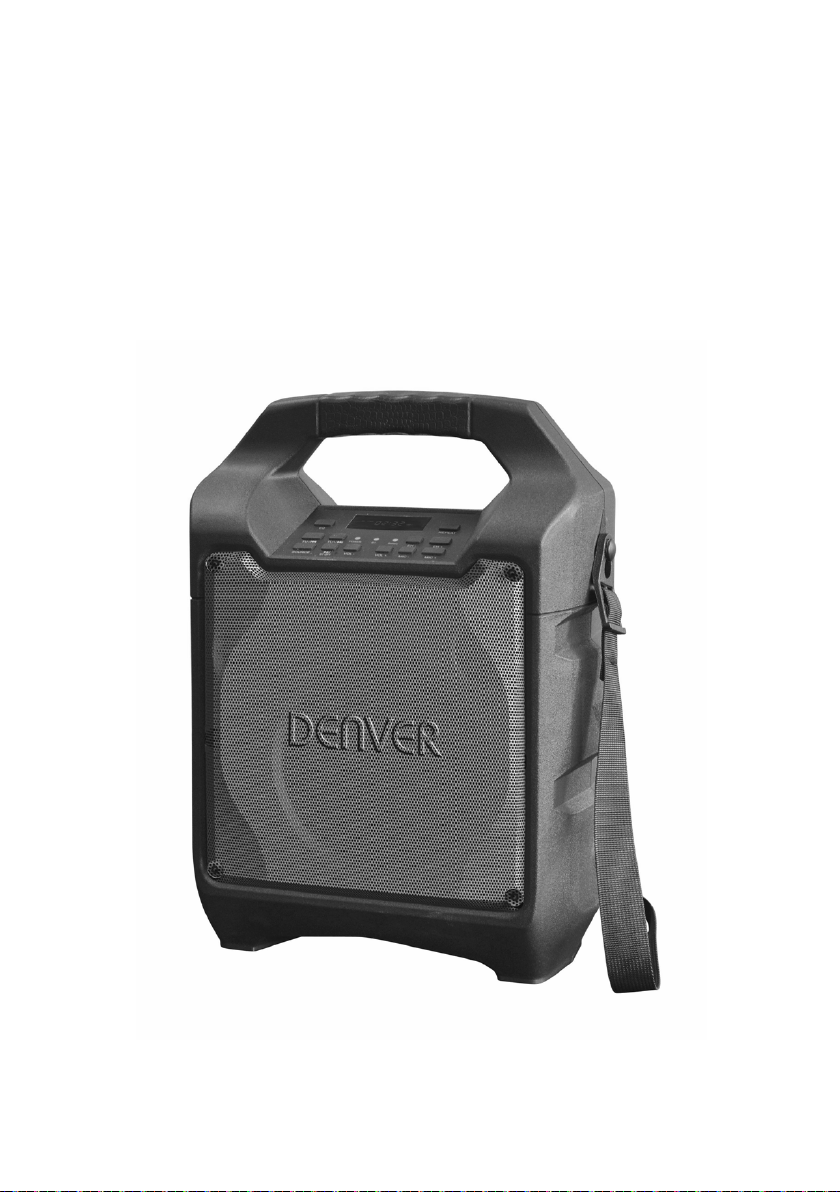
TSP-203
PORTABLE BLUETOOTH
SPEAKER
USER MANUAL
Page 2

Page 3

TABLE OF CONTENTS
PART DESCRIPTIONS .............................................................................. 2
SAFETY INSTRUCTIONS ......................................................................... 3
POWER CONNECTION ............................................................................. 4
RECHARGING ........................................................................................... 4
BLUETOOTH CONNECTION .................................................................... 4
FM RADIO .................................................................................................. 5
USB PORT ................................................................................................. 5
LINE IN ....................................................................................................... 6
SING-A-SONG ........................................................................................... 6
SOUND EFFECTS ..................................................................................... 6
TROUBLE SHOOTING .............................................................................. 6
CAUTION ................................................................................................... 8
EN-1
Page 4
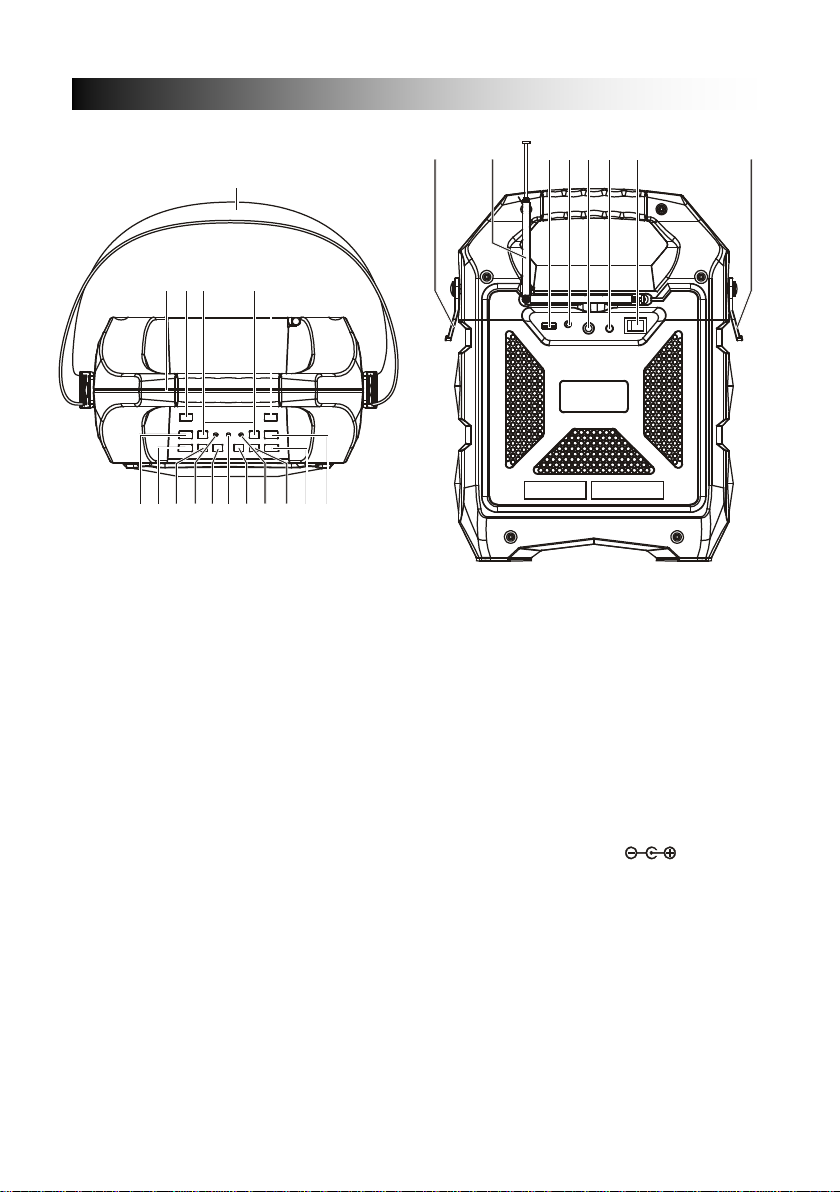
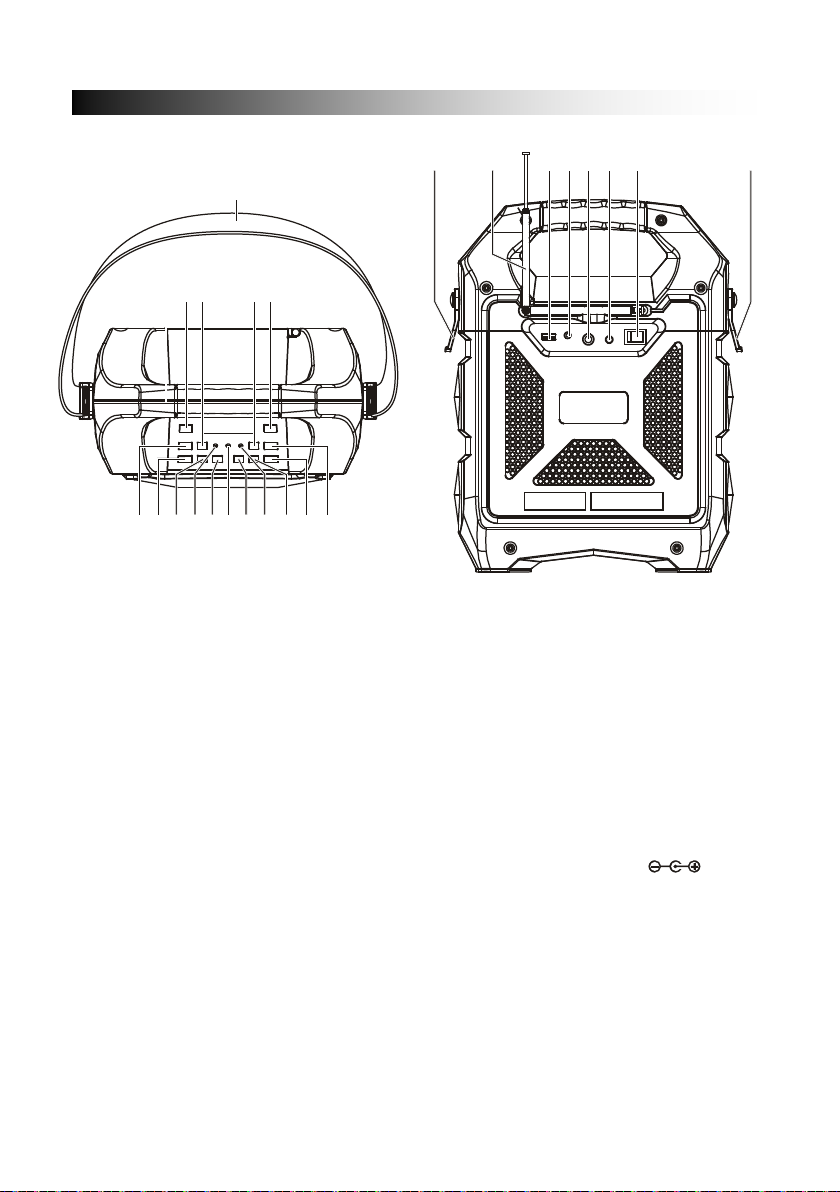
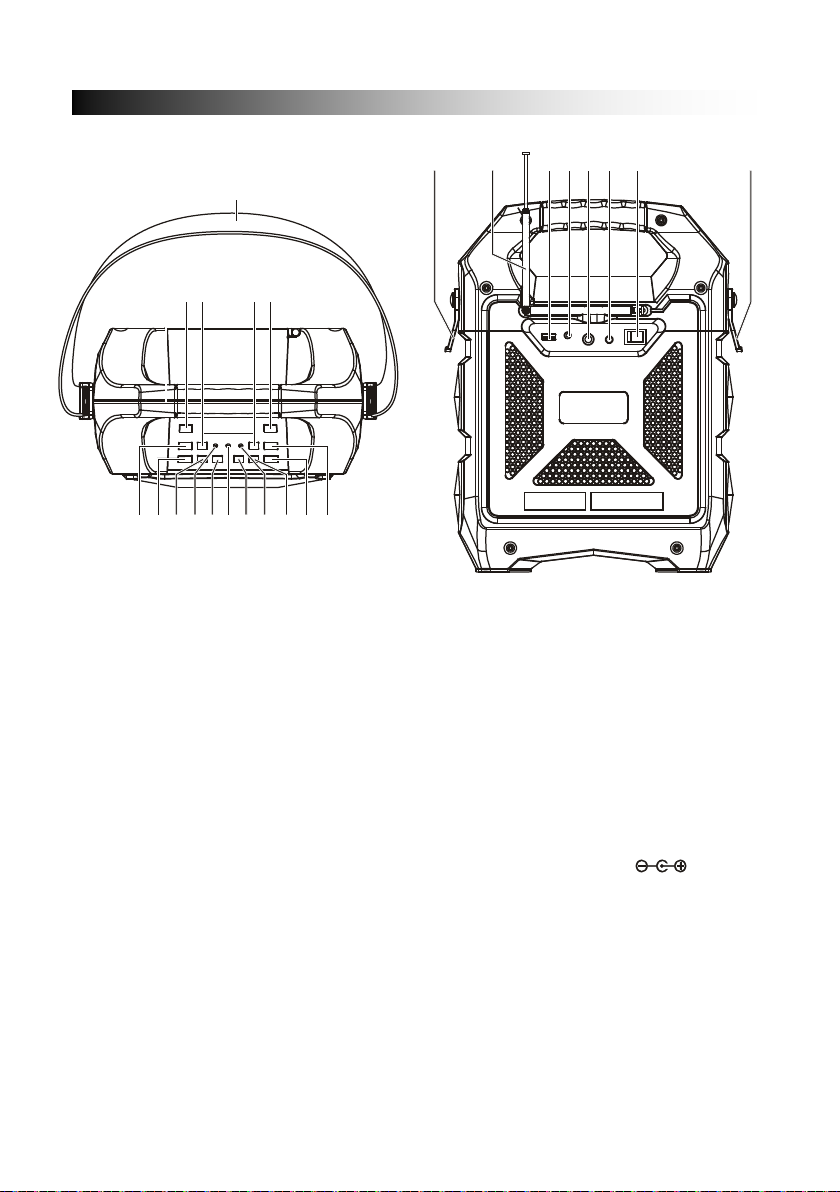
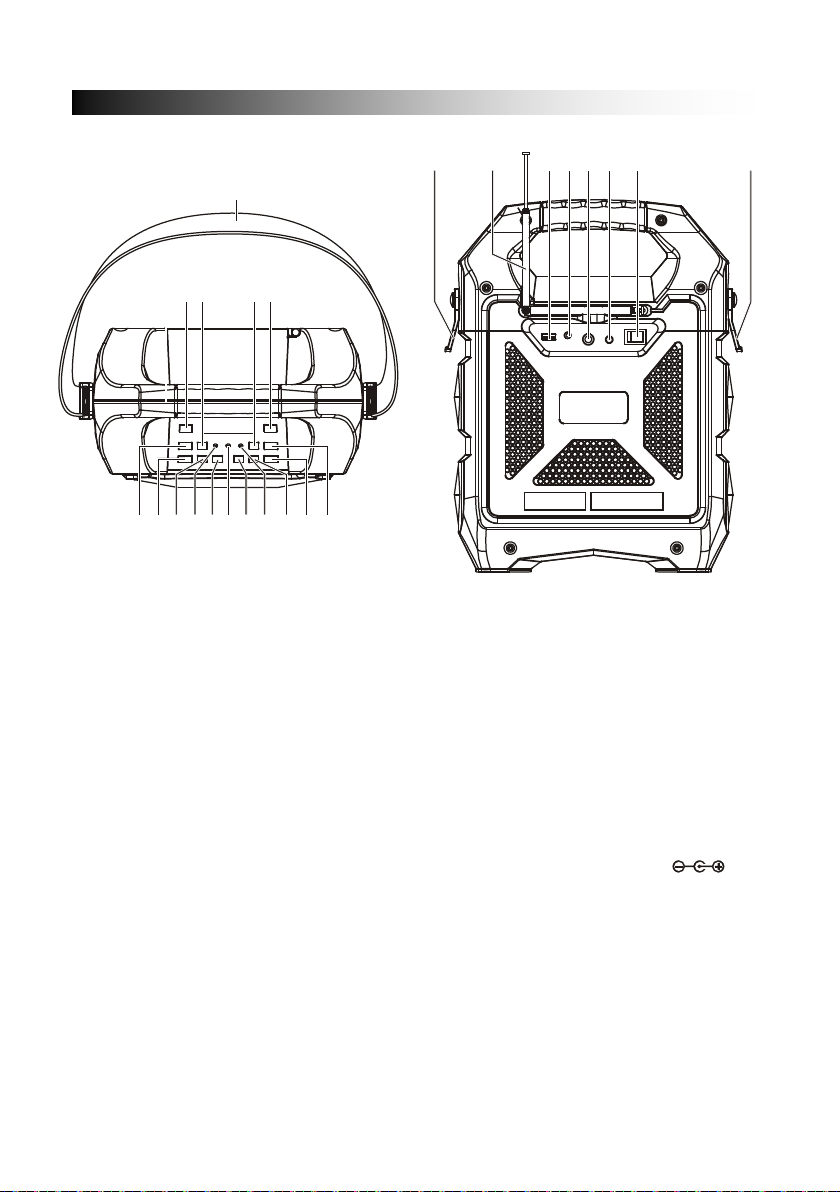
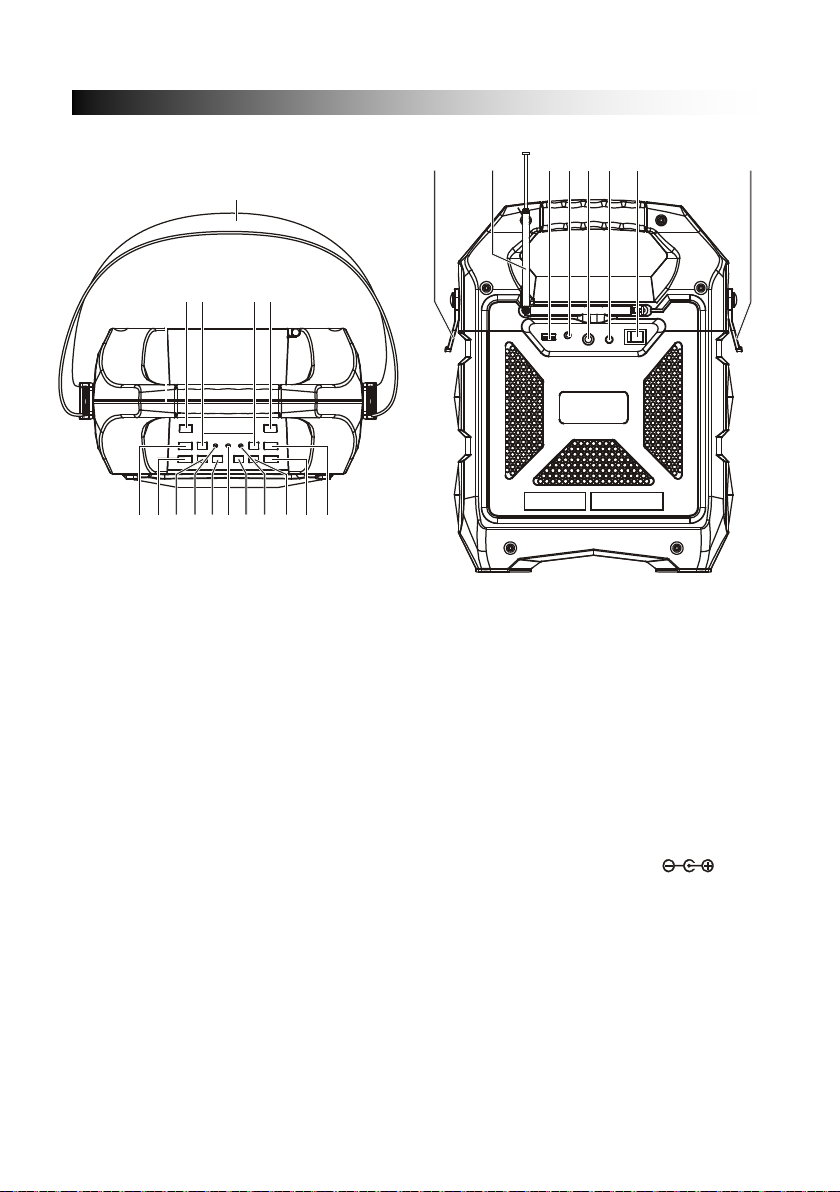
1. HANDLE
13. POWER INDICATOR
PART DESCRIPTIONS
1 2 3
4
5
6
7
8910
1112
13
14
1516
17 17
24
2221201918
23
2. EQ KEY
3. TUNING UP
4. ECHO DOWN
5. REPEAT KEY
6. ECHO UP
7. MIC VOLUME UP
8. MIC VOLUME DOWN
9. BATTERY INDICATOR
10. VOLUME UP KEY
11. BLUETOOTH INDICATO R
12. VOLUME DOWN KEY
14. PAUSE/PLAY/BT OFF
15. SOURCE
16. TUNING DOWN
17. BALDRIC CLIP
18. FM ANTENNA
19. USB PORT
20. LINE IN
21. MIC PORT
22. DC (15V 1.0A) INPUT
23. POWER ON/OFF KEY
24. SHOULDER STRAP
EN-2
Page 5
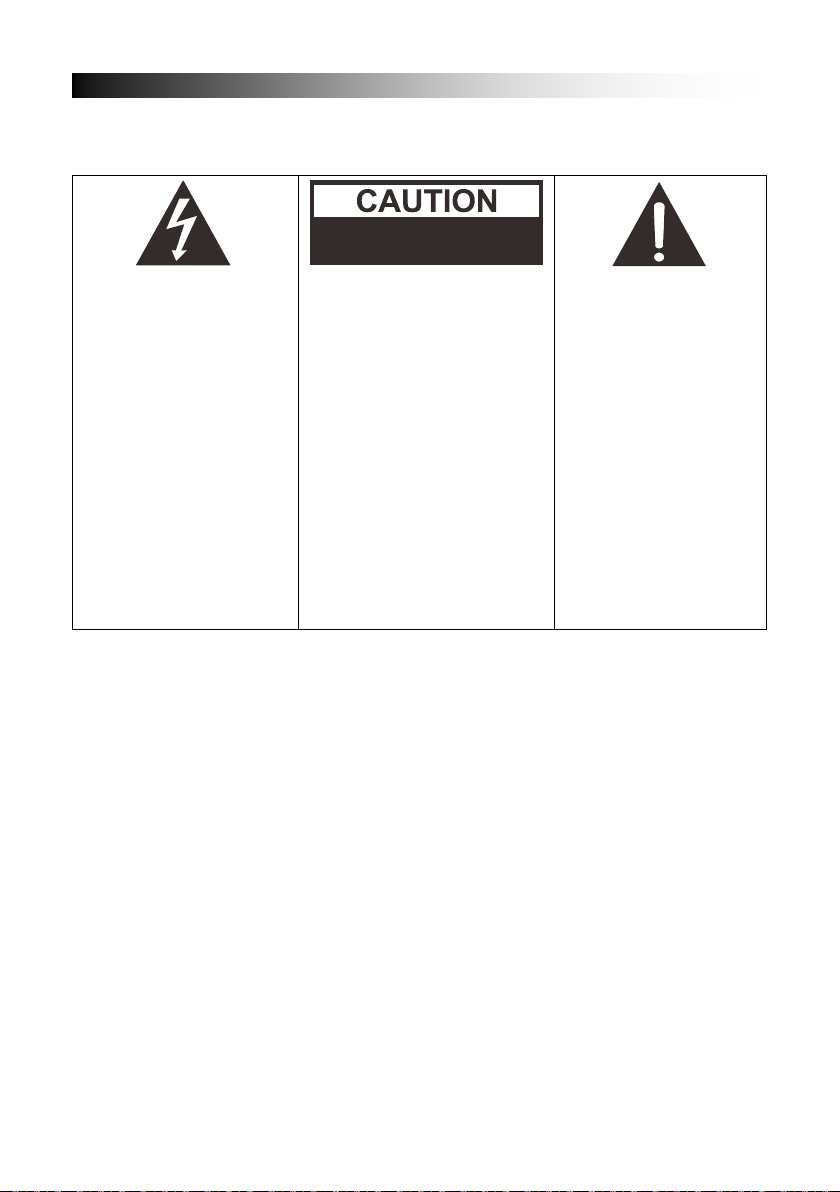
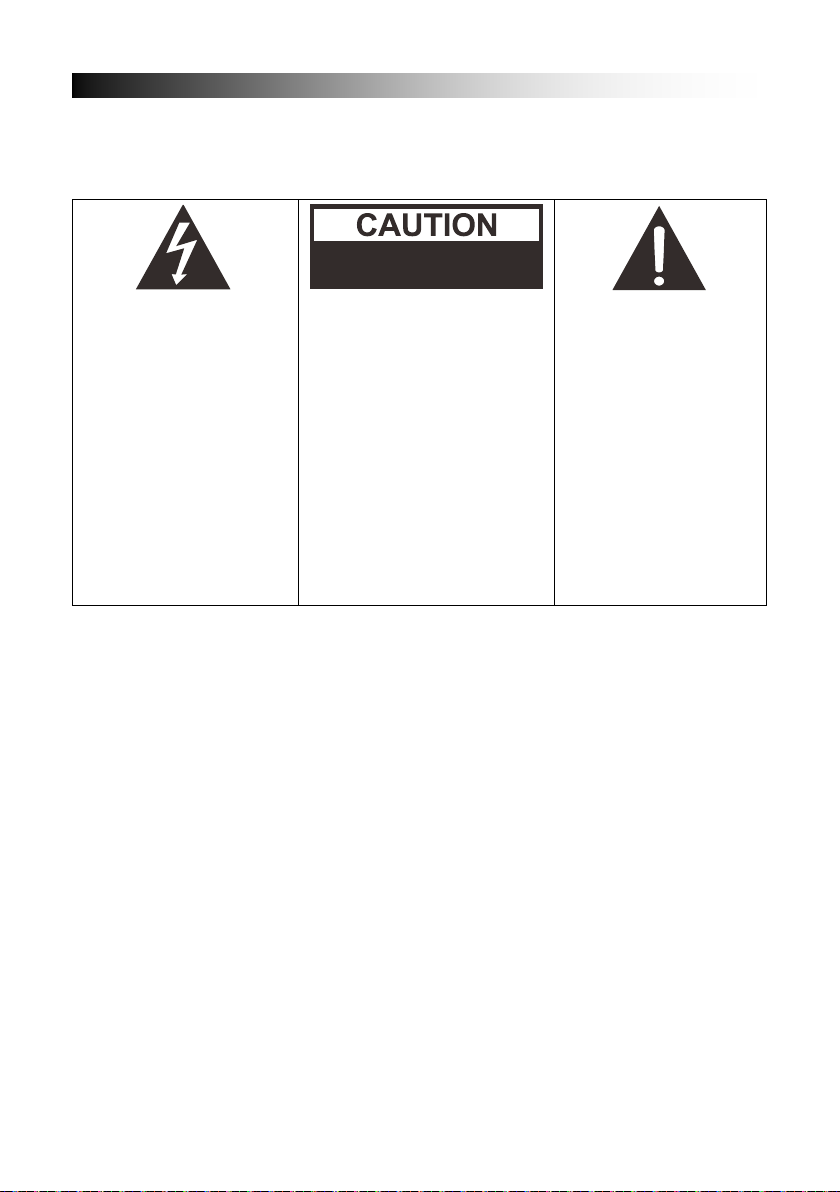
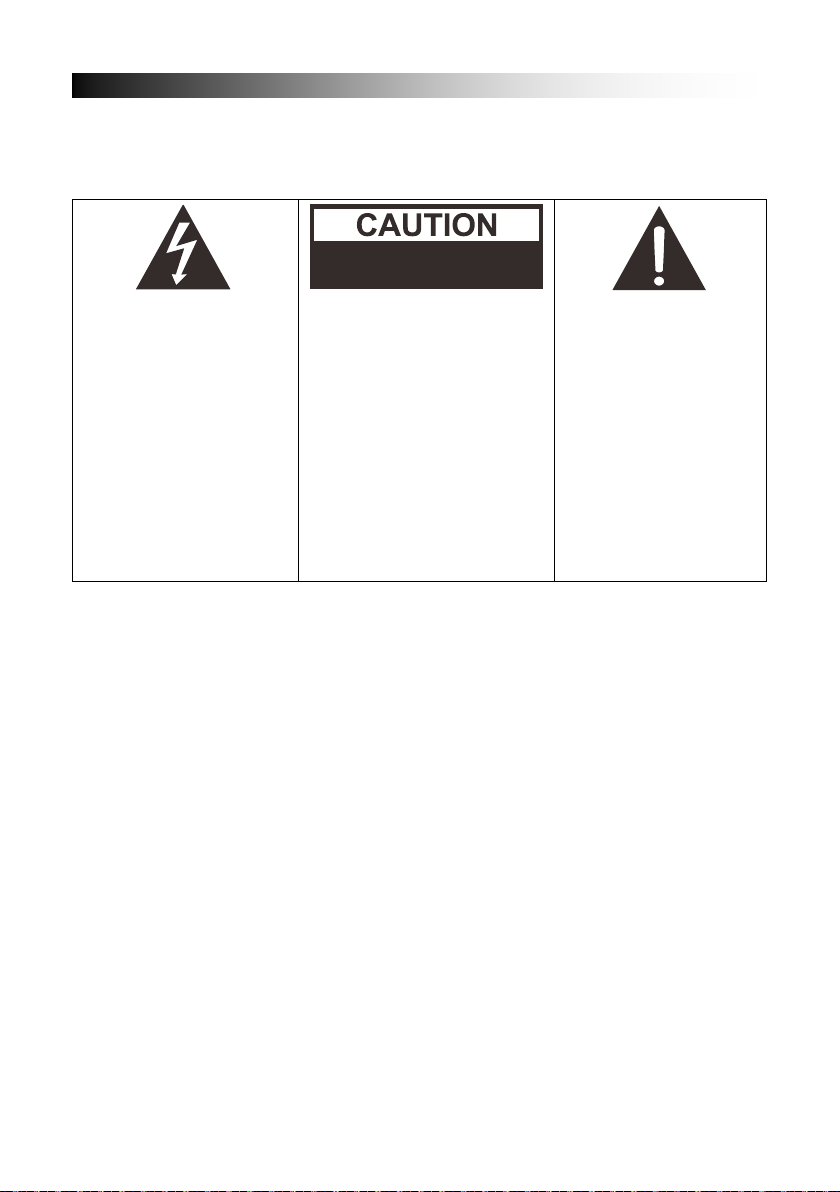
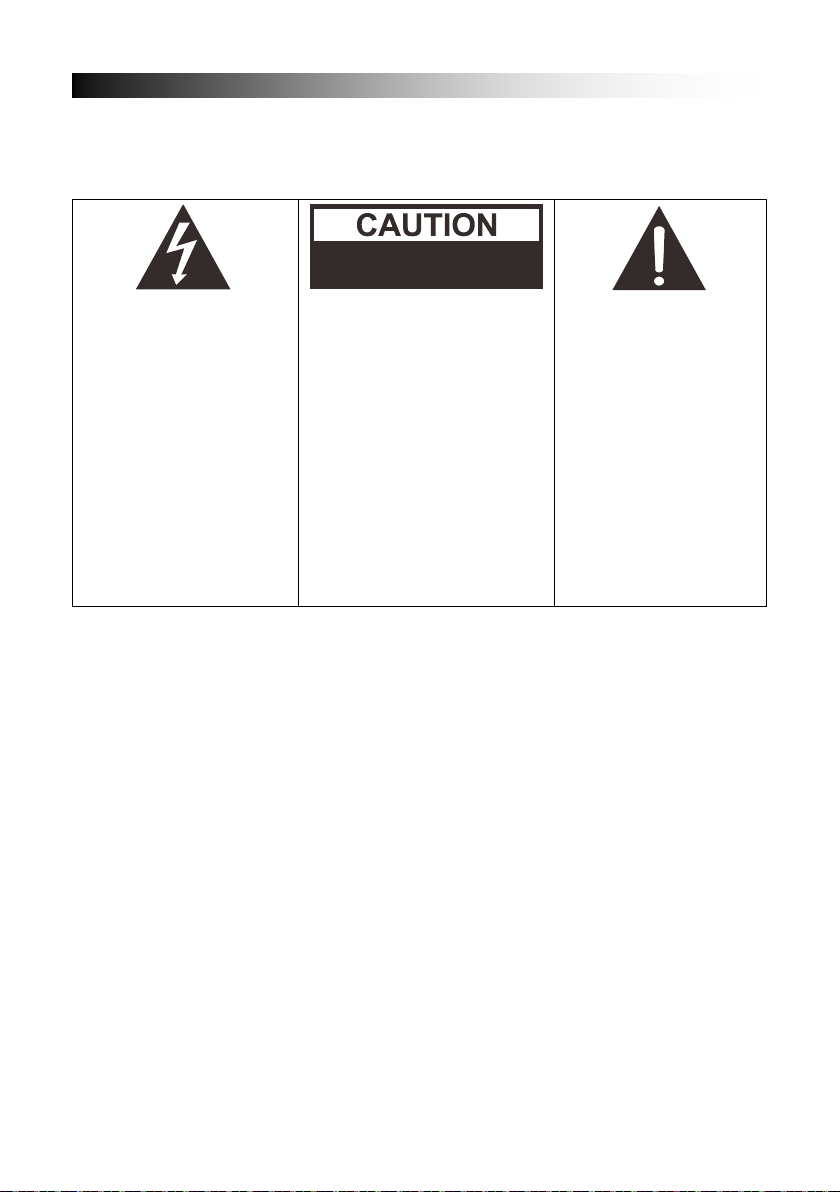
persons.
SAFETY INSTRUCTIONS
To ensure proper operation of the product and prevent fire or shock hazard, please
carefully read all information cont ained in these Safety Instructions.
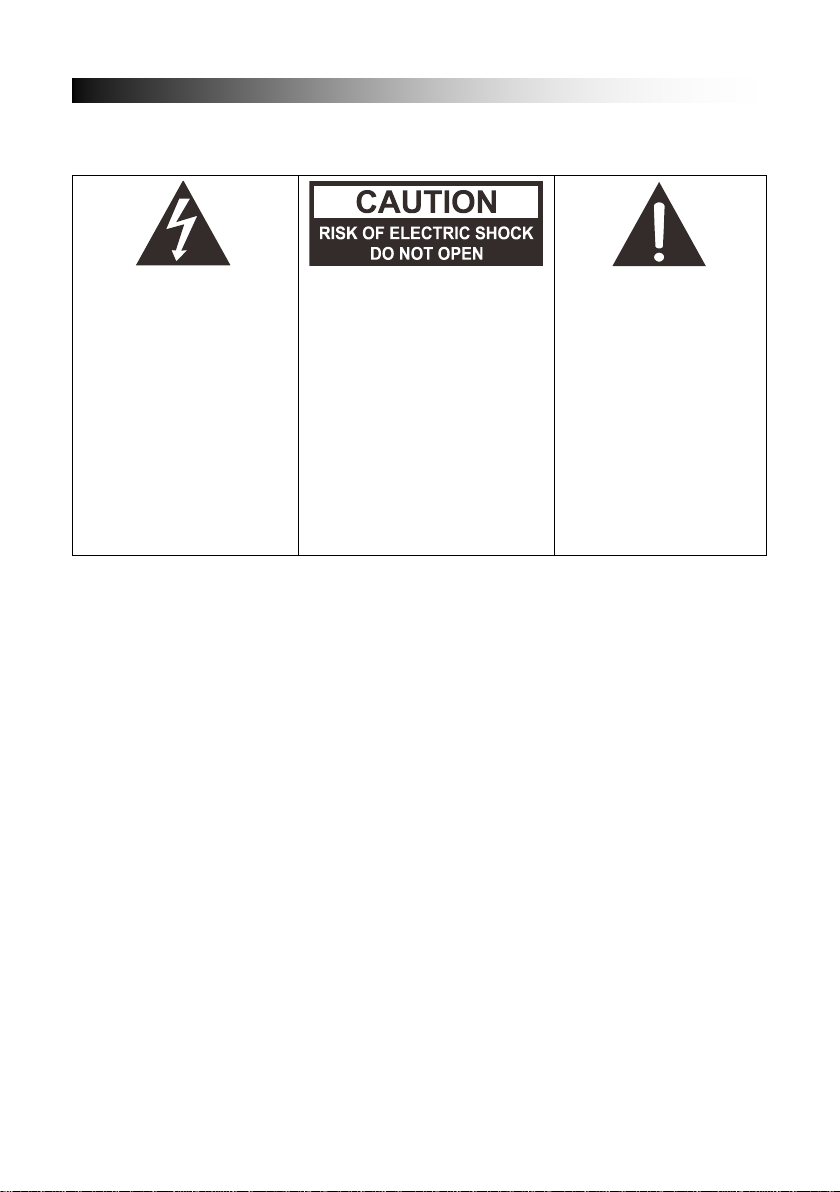
The lightning flash with
arrowhead symbol, within
an equilateral triangle, is
intended to alert the user
to the presence of
uninsulated "dangerous
voltage" within the
product's enclosure that
may be of sufficient
magnitude to constitute a
risk of electric shock to
UNPACKING:
Check that all the following items should be included in the box.
- Main Unit
- AC Power Adaptor
- User Manual
- Shoulder Strap
IMPORTANT INSTRUCTIONS:
1. Ensure the plug is fully inserted into the wall outlet and the product is operated on an
electric power source matched to i ts rated voltage.
2. Never operate the product if the cord or adaptor is damaged or overly hot.
3. Do not modify the cord or damage it in any way such as by bending, twist i ng or
pulling on it unnecessarily.
4. Do not attempt to modify, repair or in any way dismantle the produc t, other than
when discarding it at the end of its useful life.
5. Never unplug this product with wet hands.
6. Unplug the product from the wall outlet before cleaning and mainte nance. Do not
use liquid cleaners or aerosol cleaners.
7. The power cord should be unplugged from the wall outlet when unused for a long
period of time.
8. Store this product in dry area when not in use.
9. Do not use this product near water, heat sources or other apparatus that produce
heat.
WARNING: TOREDUCE
THE RISK OF ELECTRIC
SHOCK, DO NOT REMOVE
COVER (ORBACK). NO
USER-SERVICEABLE
PARTS INSIDE. REFER
SERVICING TO QUALIFIED
SERVICE PERSONNEL.
The exclamation point
within an equilateral
triangle is intended to
alert the user to the
presence of important
operating and
maintenance (servicing)
instructions in the
literature accompanying
the appliance.
EN-3
Page 6
POWER CONNECTION
BLUETOOTH CONNECTION
POWER
LINE IN
DC JACK
USB 1A CHARGER
MIC 1
ON
OFF
MIC 2
RECHARGING
10. Battery shall not be exposed to direct sunlight or fire.
11. Do not attempt to replace the battery. For repairing and servicing, please consult
from the store of purchase or customer s ervice centre designated by the stor e.
CAUTION: Danger of explosion if battery is incorrectly replaced.
12. Do not use any other power supply other than the one specially designed for this
product.
13. Keep this operating instruction i n a s afe place.
14. Contact an authorized service centre if you have any inquiry about this product.
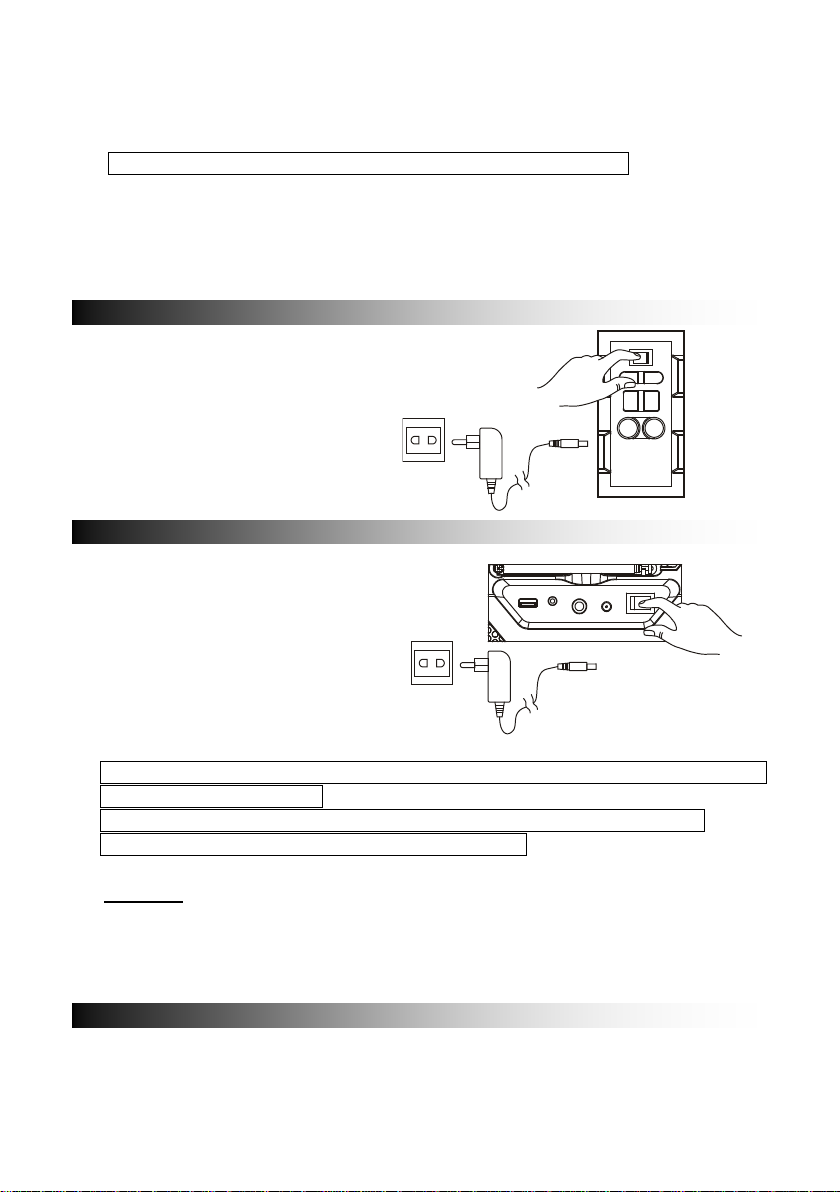
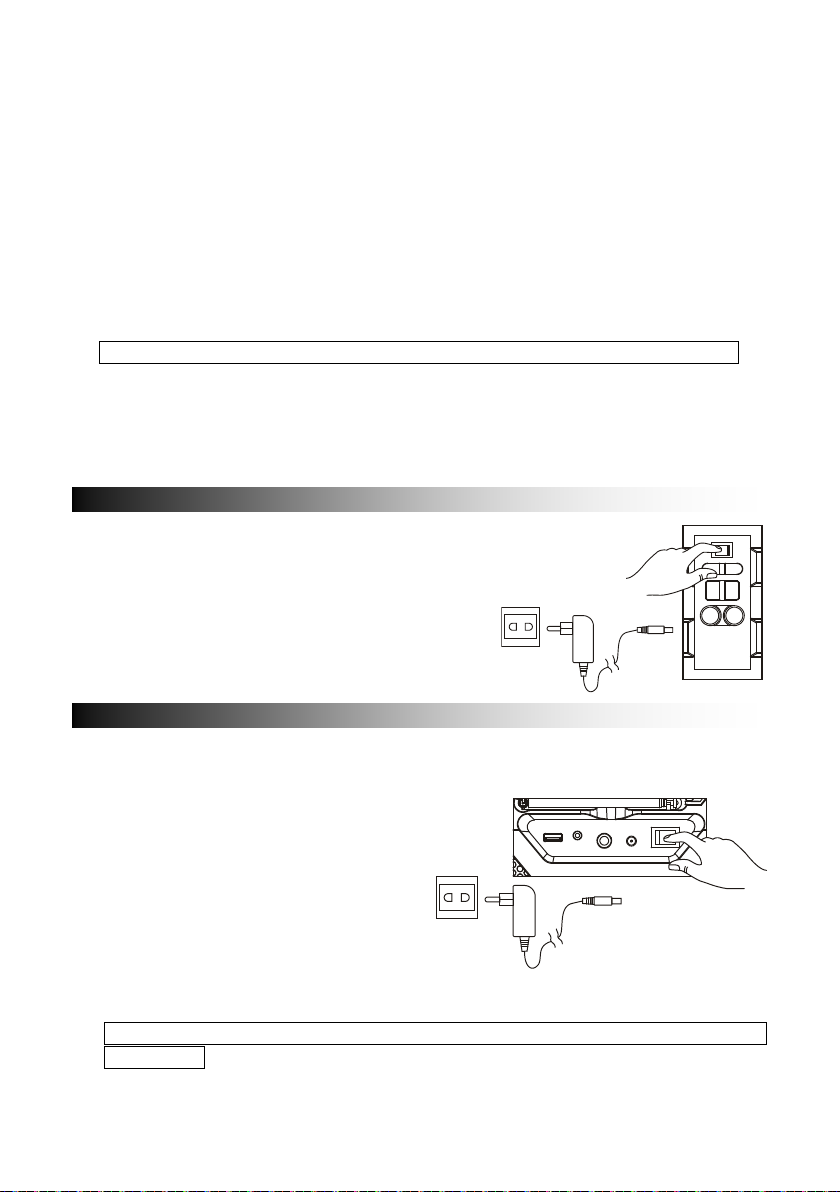
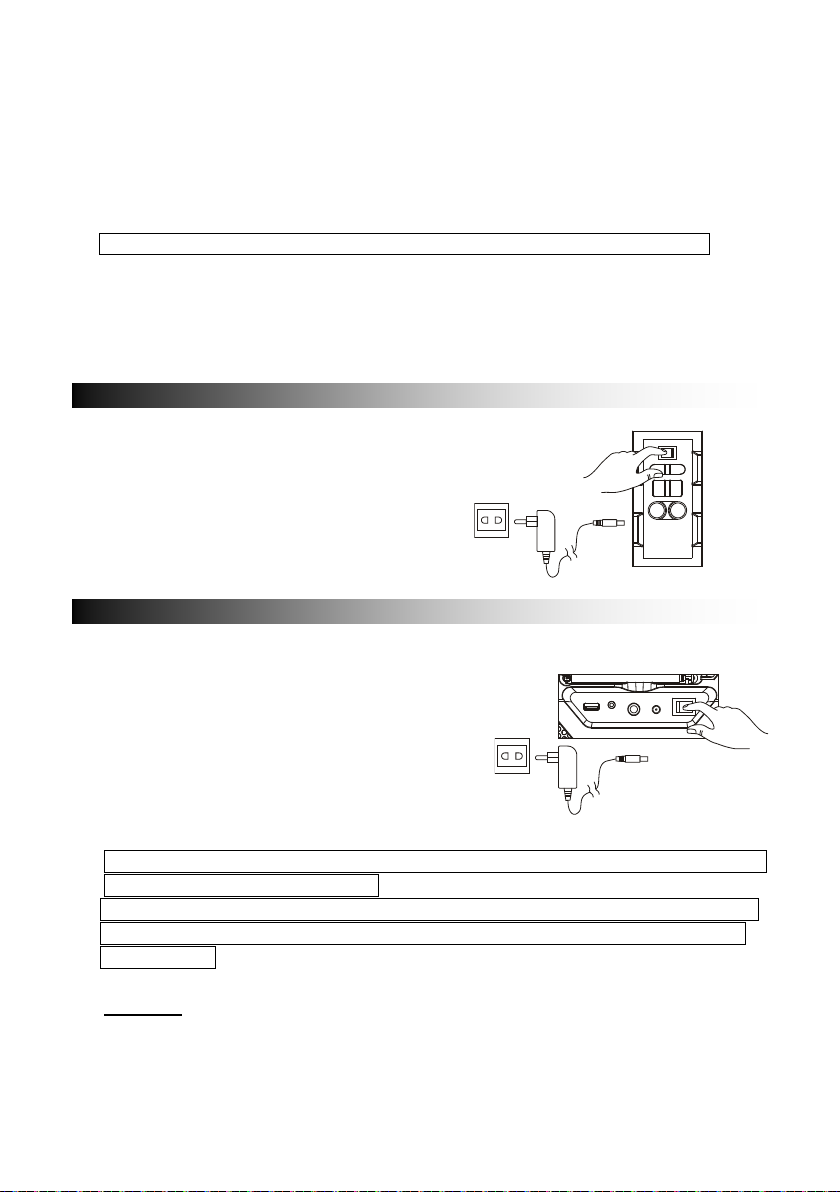
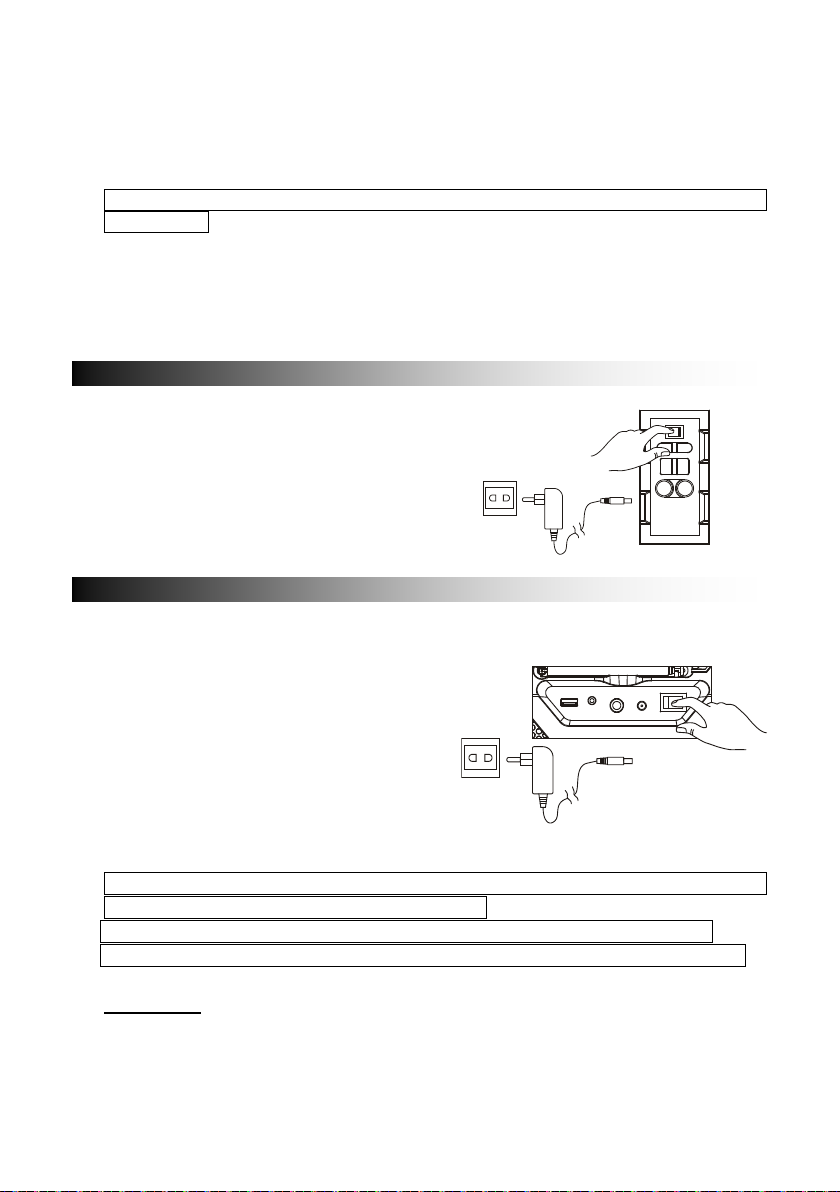
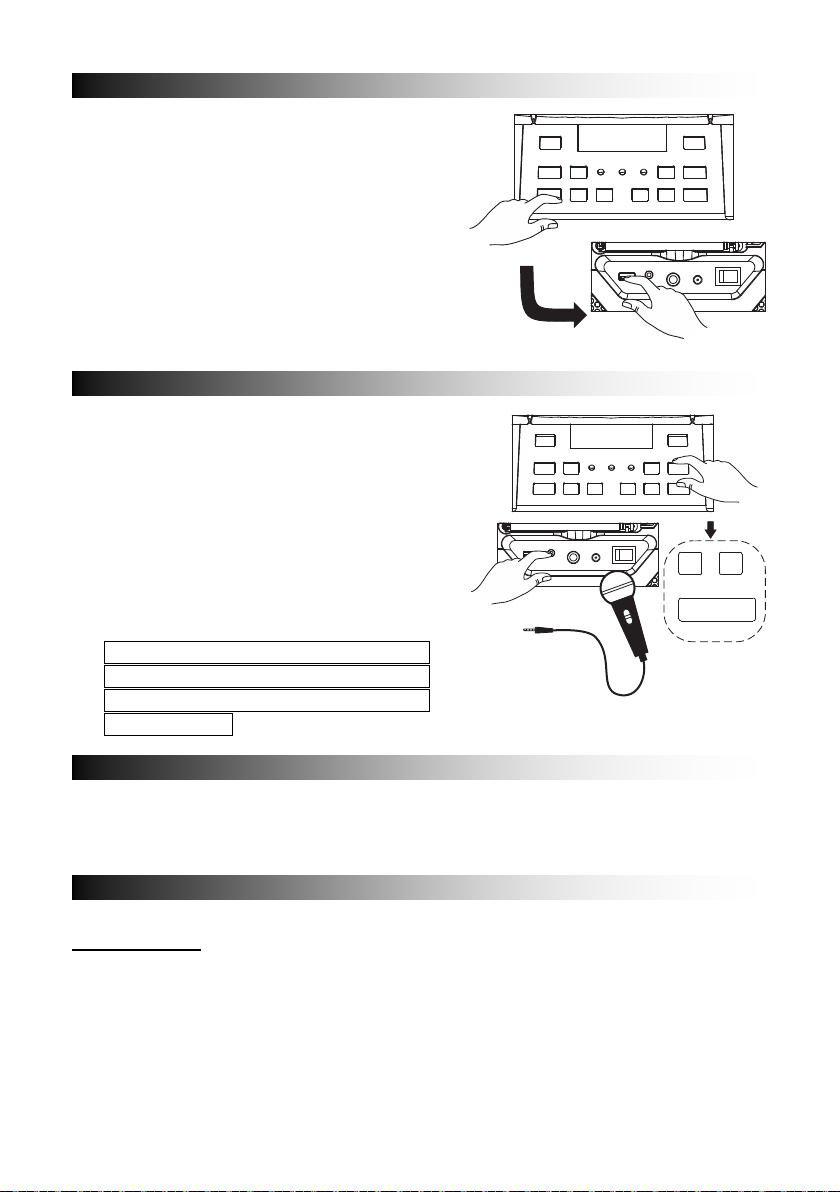
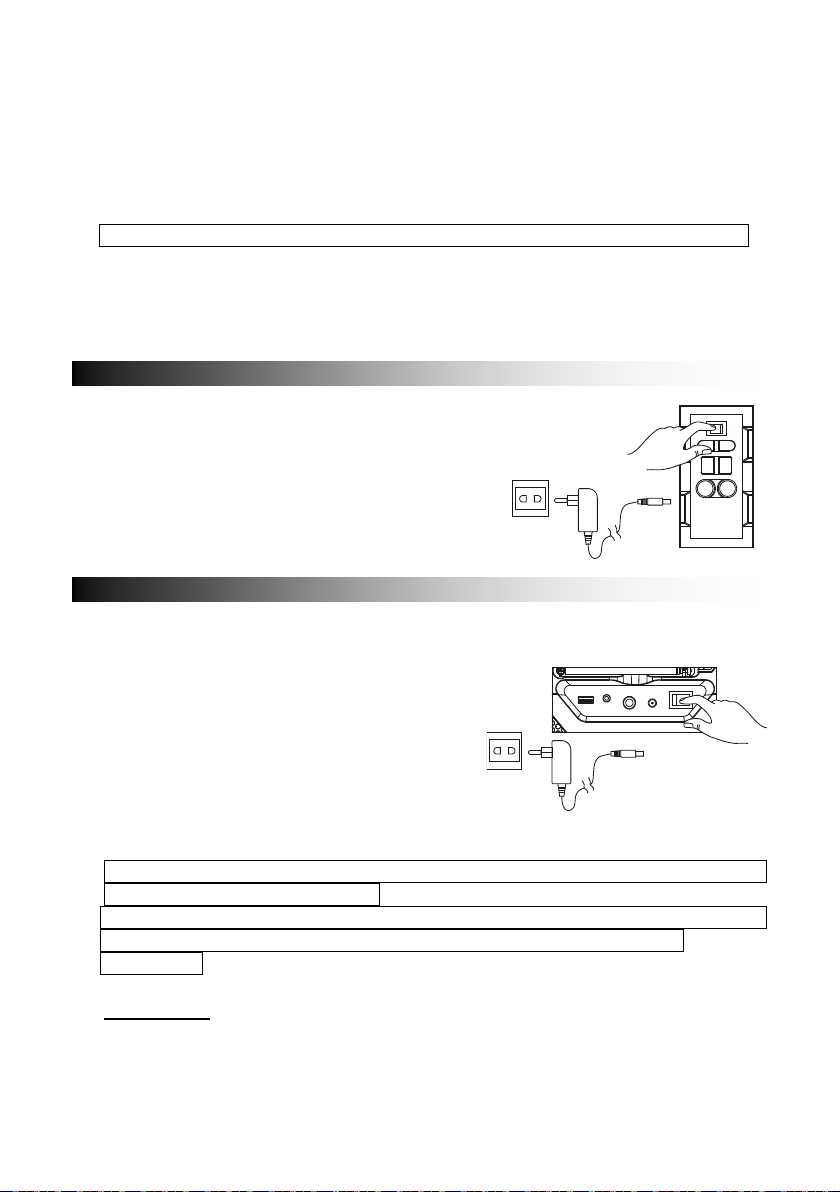
- Unpack this product, ensure
the power ON/OFF switch is
on "OFF".
- Connect the supplied AC
adaptor to this product, plug
the AC adaptor to the wall
outlet.
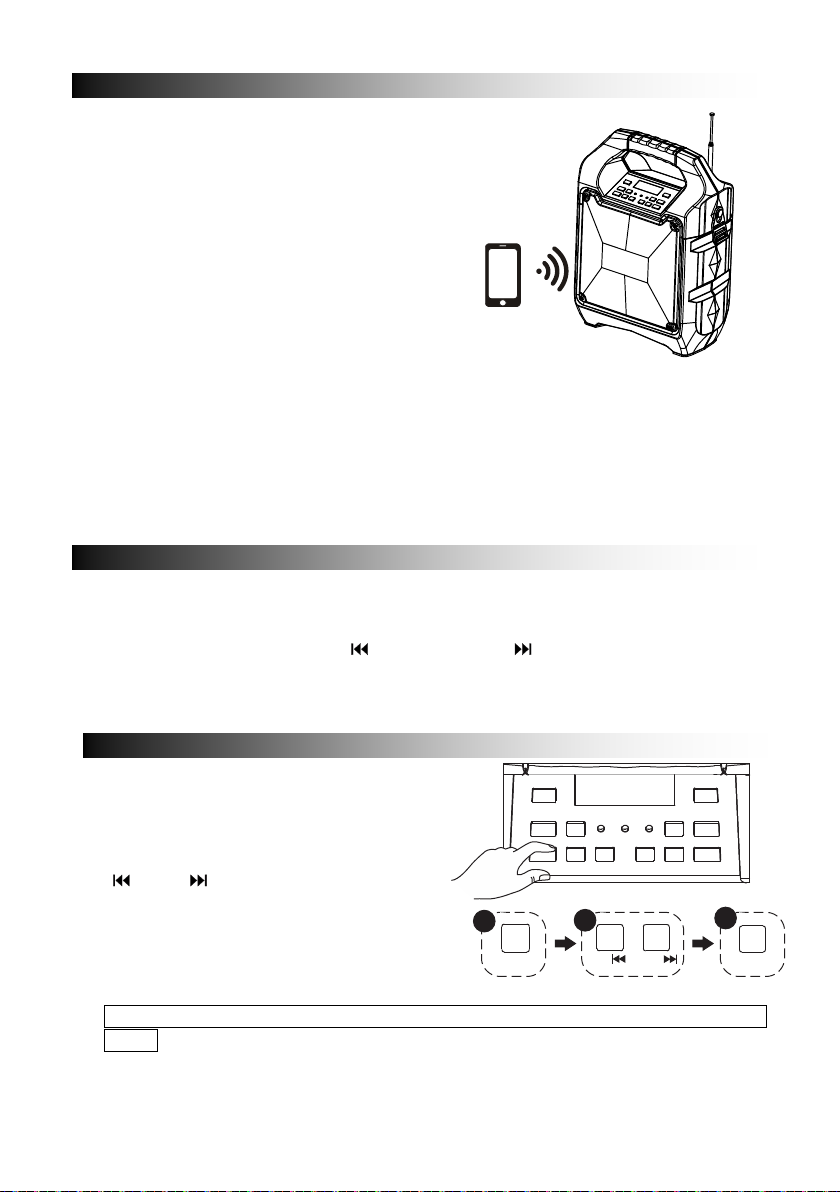
- Unit comes with a battery indicator
alert.
- If Battery LED flashes, it means the
battery level is low and recharging is
required.
- By connecting the AC power, the
Battery LED will turn red, it means
the unit is under recharging.
- When the Battery LED becomes green, it means the battery is fully charged.
It is recommended to charge the battery about 6 hours before you start using
the unit for the first time.
Energy Saving: If this product is idle for about 20 minutes, it will go to
standby mode automatically. It will auto power off
Caution: To keep the rechargeable battery in good conditi on, users should check
the unit and be sure to turn the Power On/Off switch on the back panel to "Off" every
time after using and before storage, it is highly recommended that users should fully
recharge the battery at least once every two months.
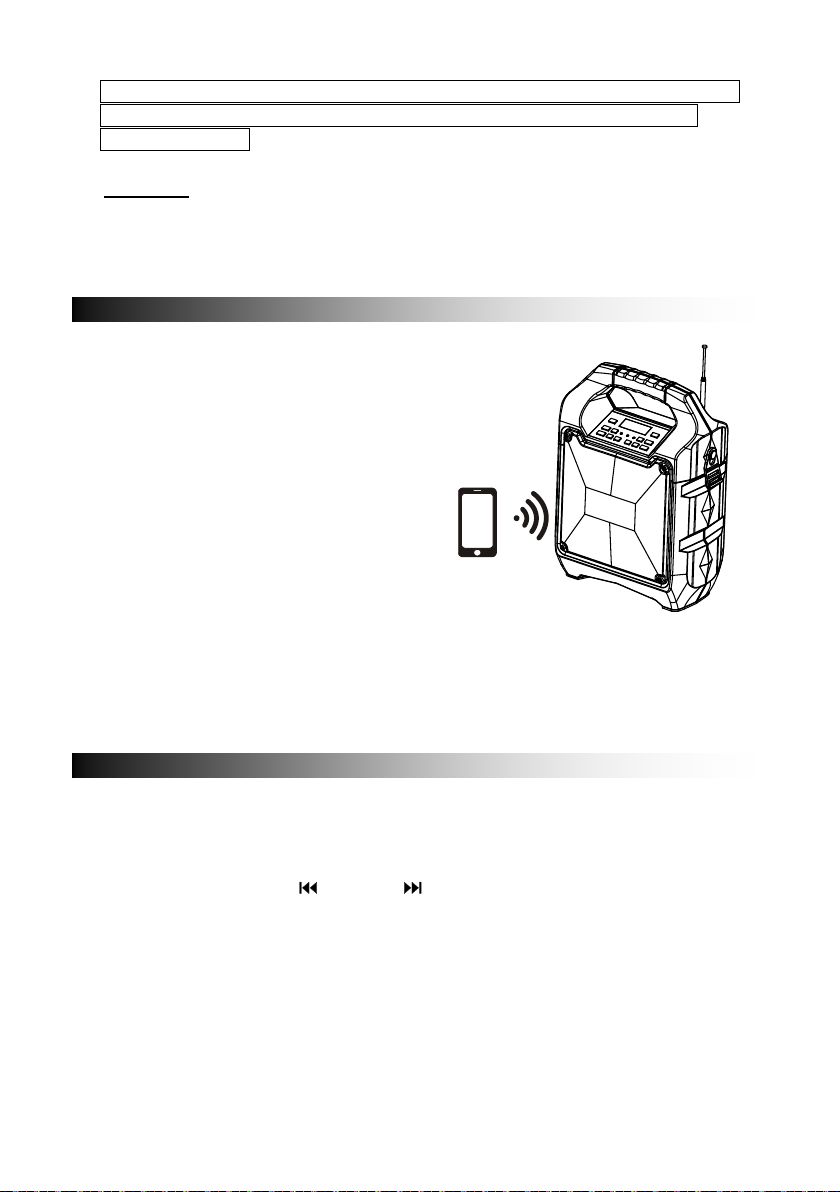
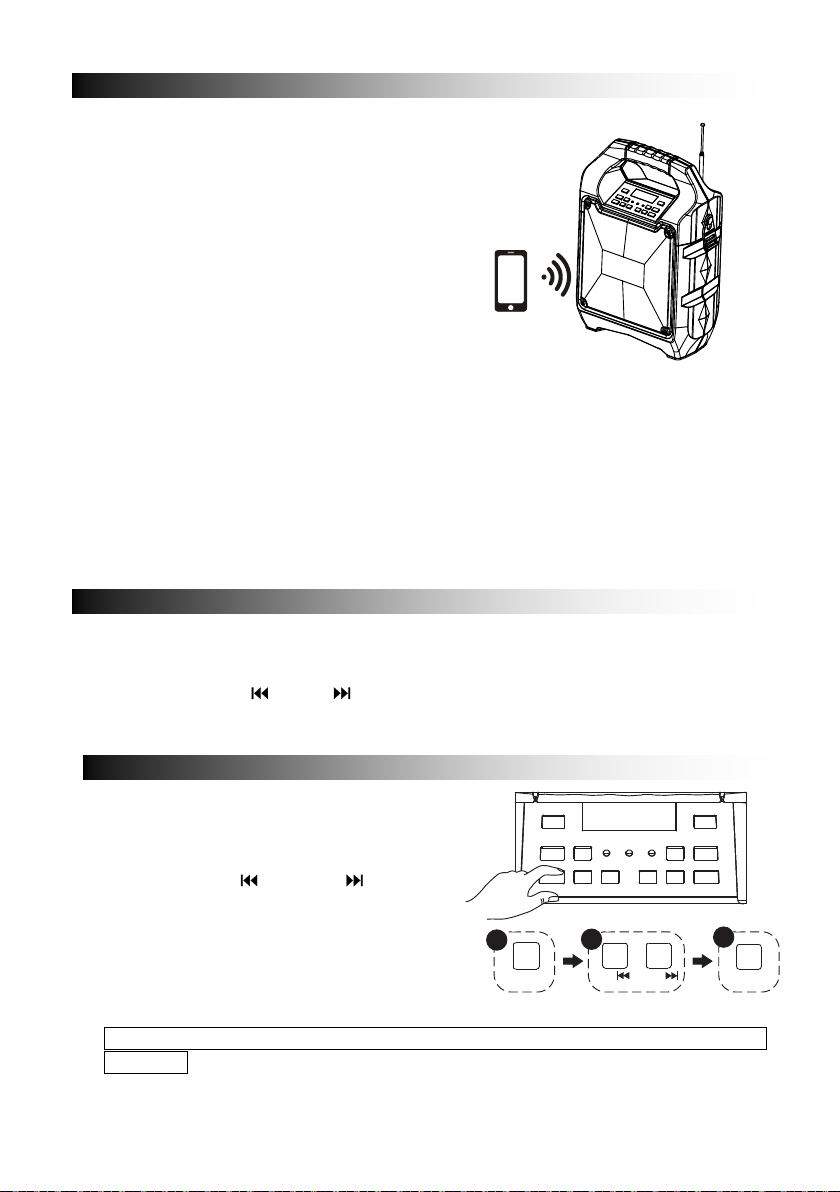
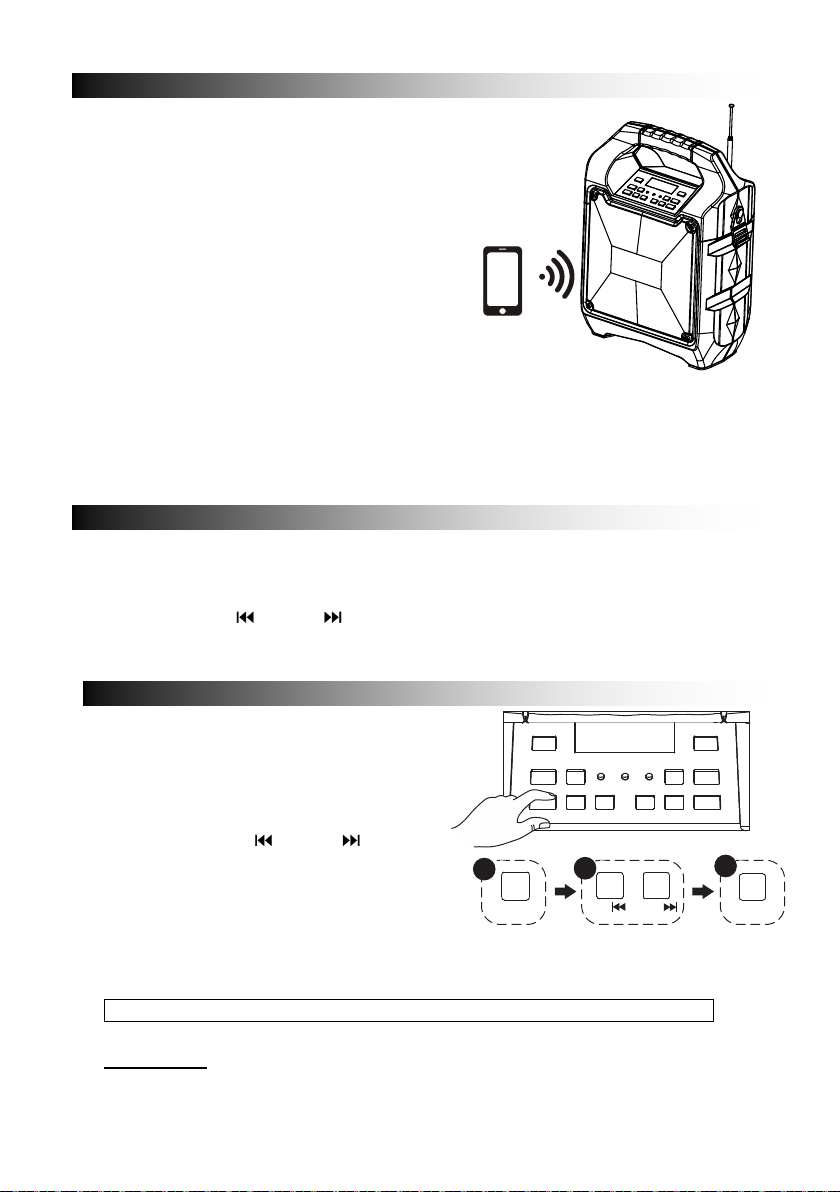
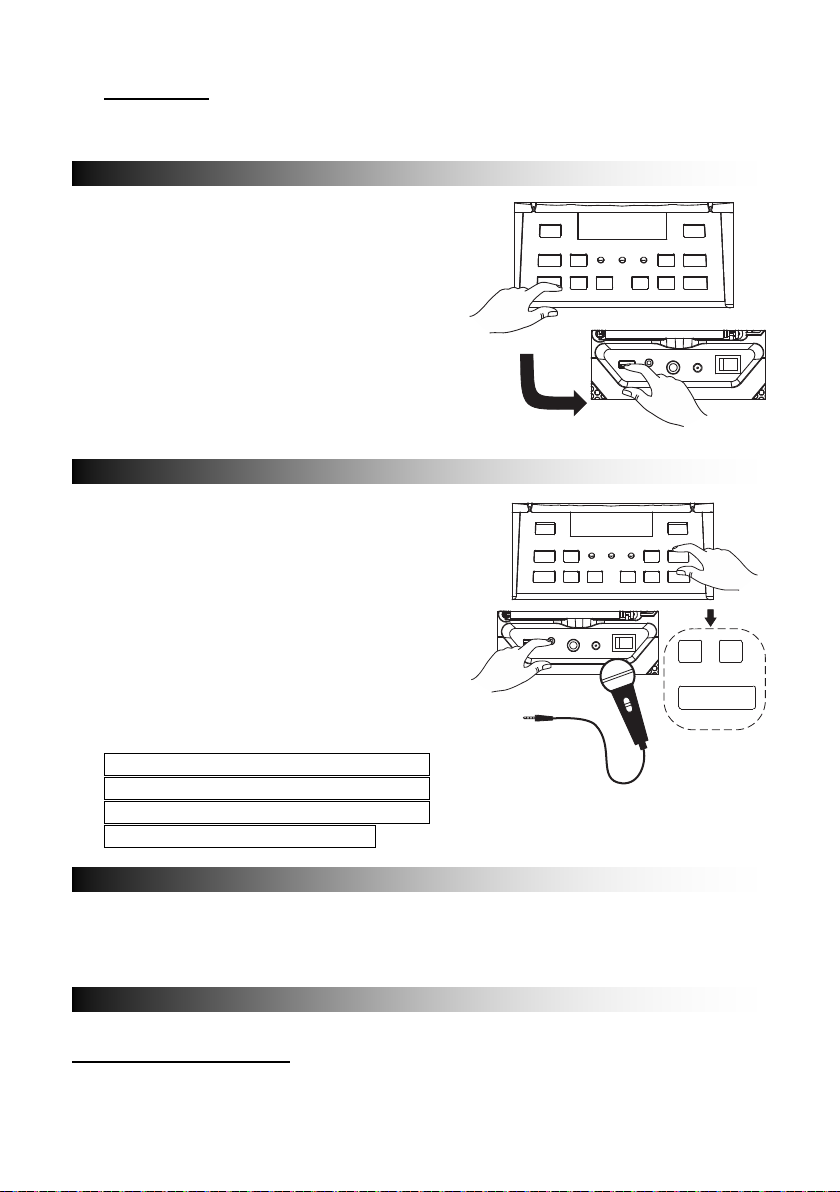
- Once the power switch is turned to "O n" , Bluetooth "BT" mode is set as default
- Blue LED indicator will be flash in pairing mode. The red LED display will show "bt"
EN-4
Page 7
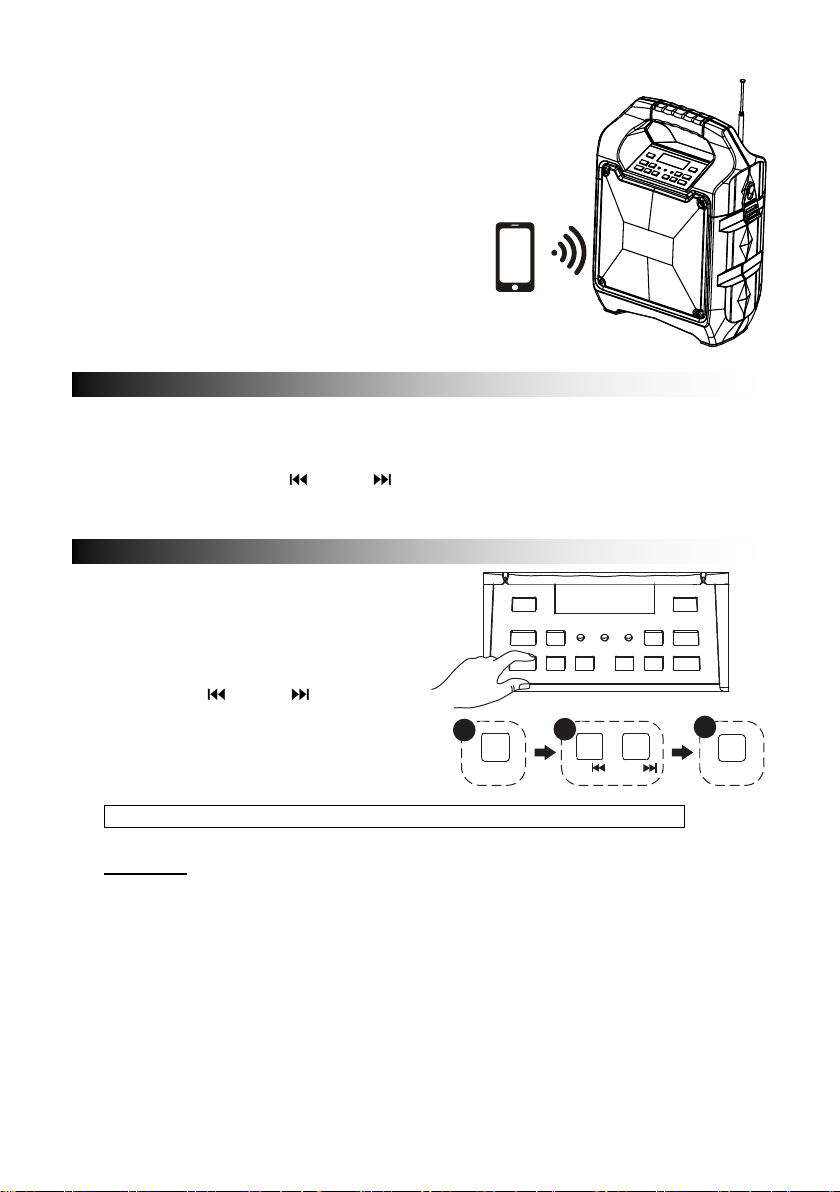
- Turn on the Bluetooth function on your device
FM RADIO
USB PORT
REPTU-/
TU+/
1 2
3
SOURCE
- Connected sound signal will be he ard and the
- Bluetooth connection is completed.
- Select the music from your Bluetooth device
- Holding the BT OFF key to disconnect paired
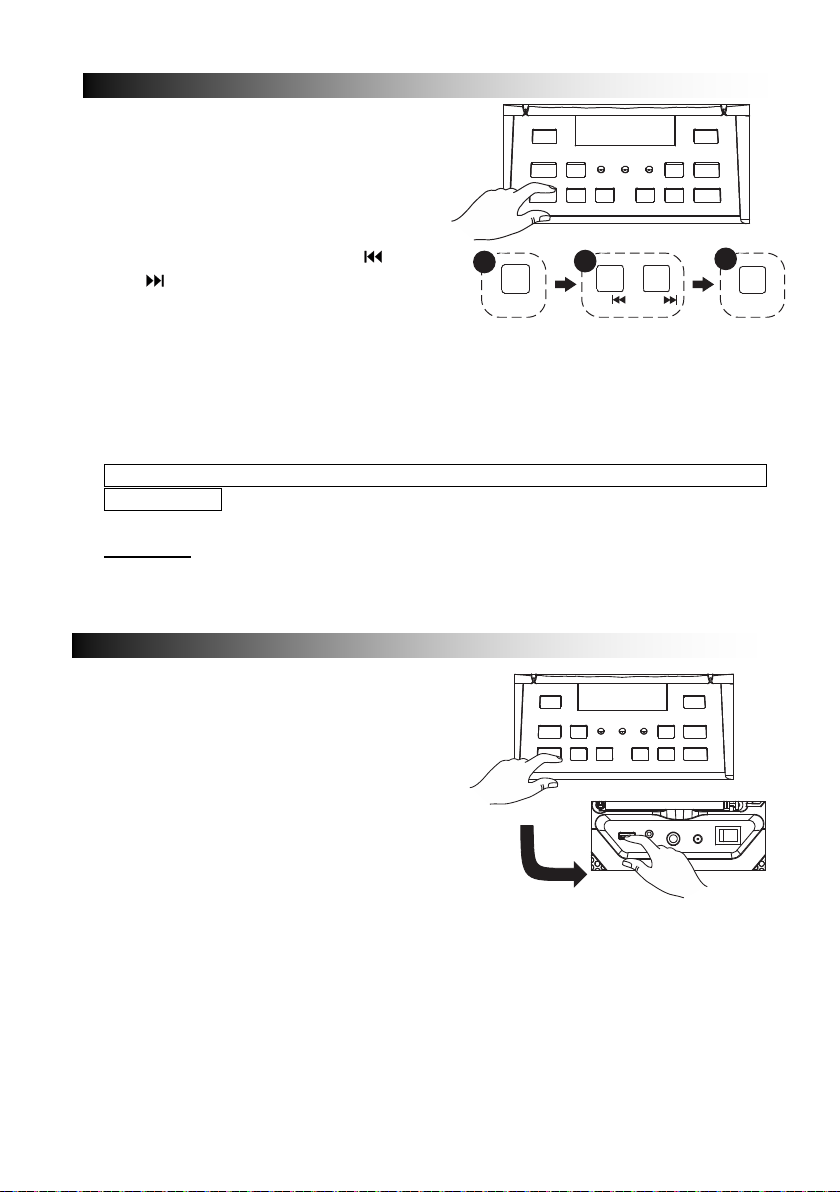
- Press the "Source" button and select Radio, the FM Radio Frequency will show on
- Press play/pause key to auto search and store.
- Press and hold the TU
- Press the "Source" button and select
- Insert the USB stick.
- Select your favorable music by
- Press "REP” to repeat once for the
and search for "TSP-203" then press to
connect.
blue led connection indicator will stop b linking
and stay steady.
and start playing.
device and enter pairing mode.
the red LED display.
or TU but tons to choose the next stored availa ble
station. Short press them to fine tune.
USB. USB will show on the red LED
display.
pressing TU
or TU .
current song, Press again "REP" to
repeat all songs. press the button three
times to enter the random play mode.
It will automatically switch to USB mode once insert the USB stick.
Important: The USB port is intended for data transfer only. Other devices cannot be
used with this USB connection. The use of USB extension cords is not
recommended.
EN-5
Page 8
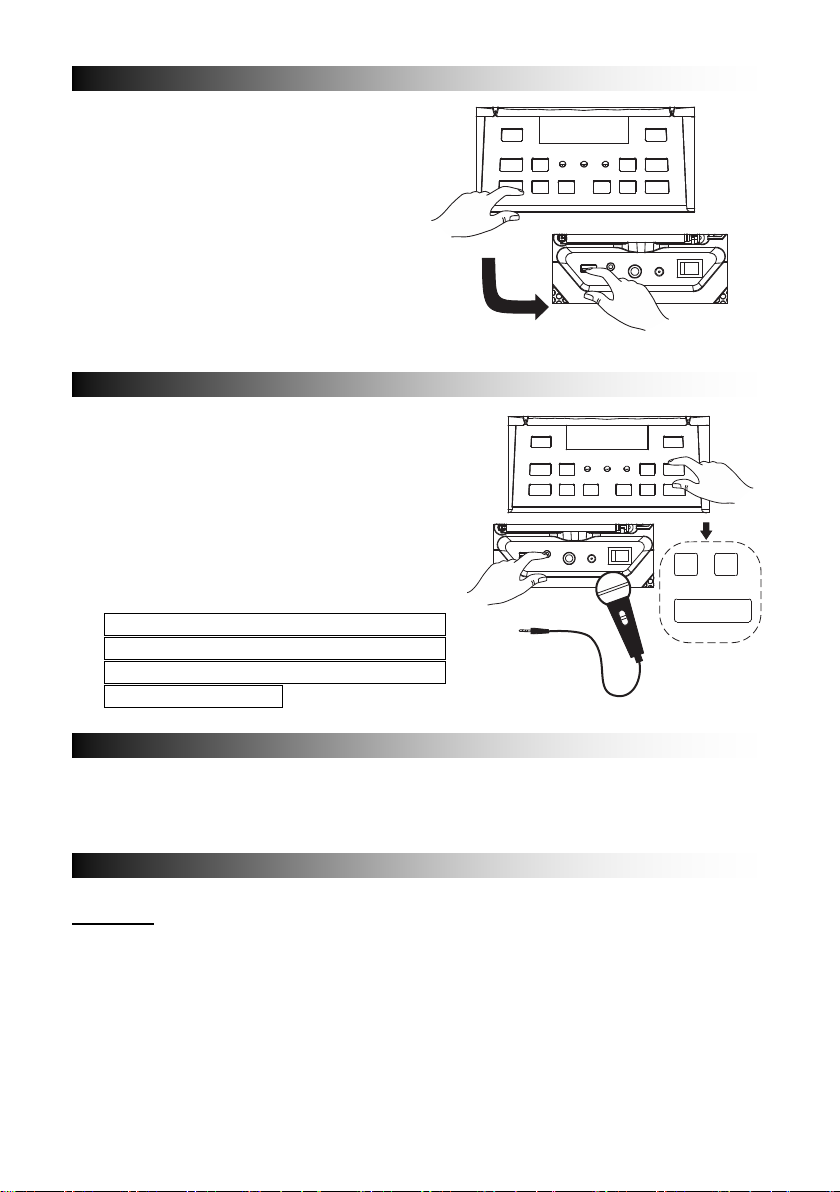
- Press the "Source" Button and select
SING-A-LONG
SOUND EFFECTS
TROUBLESHOOTING
MIC - MIC +
EH+EH-
LINE IN
LINE. LINE will show on the red LED
display.
- Plug in your 3.5mm cable into the LINE
Input on the back panel and the unit
will enter into LINE IN mode.
- You can connect any audio device th at
has 3.5mm audio output jack and
playback any audio from the
connected device.
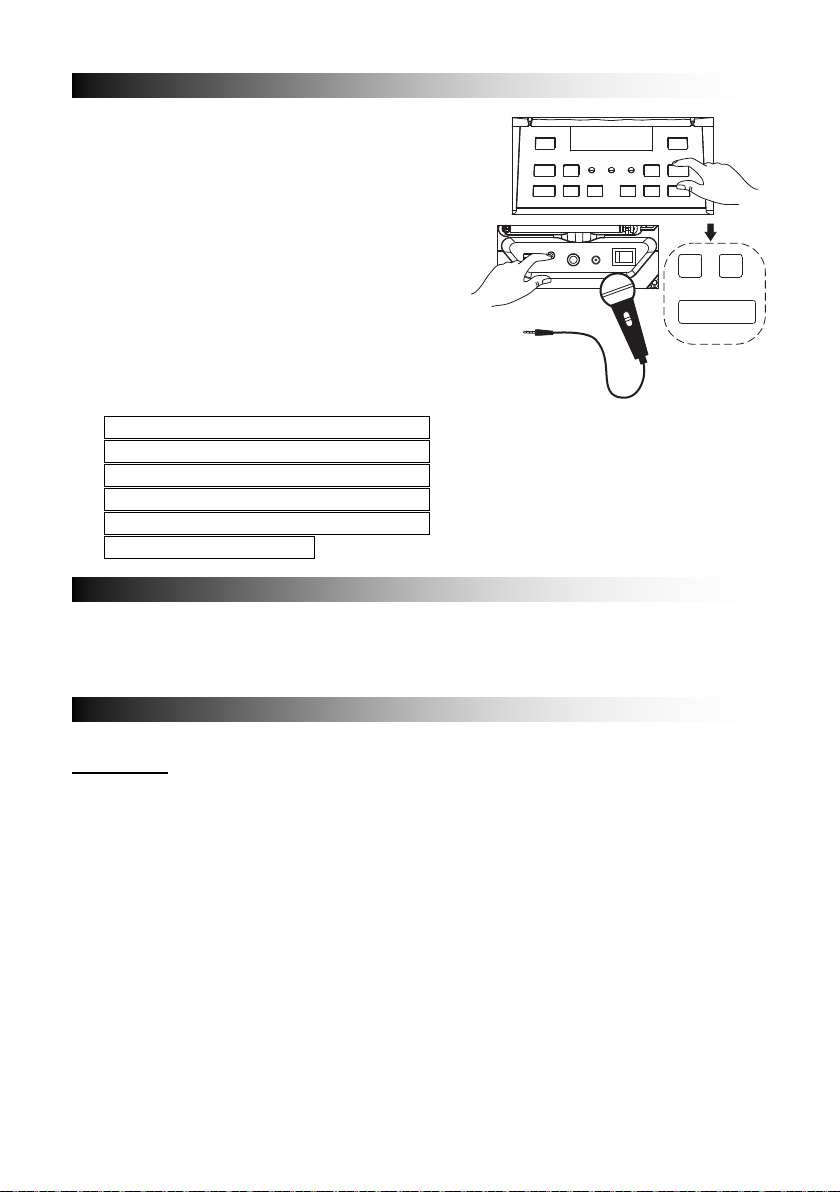
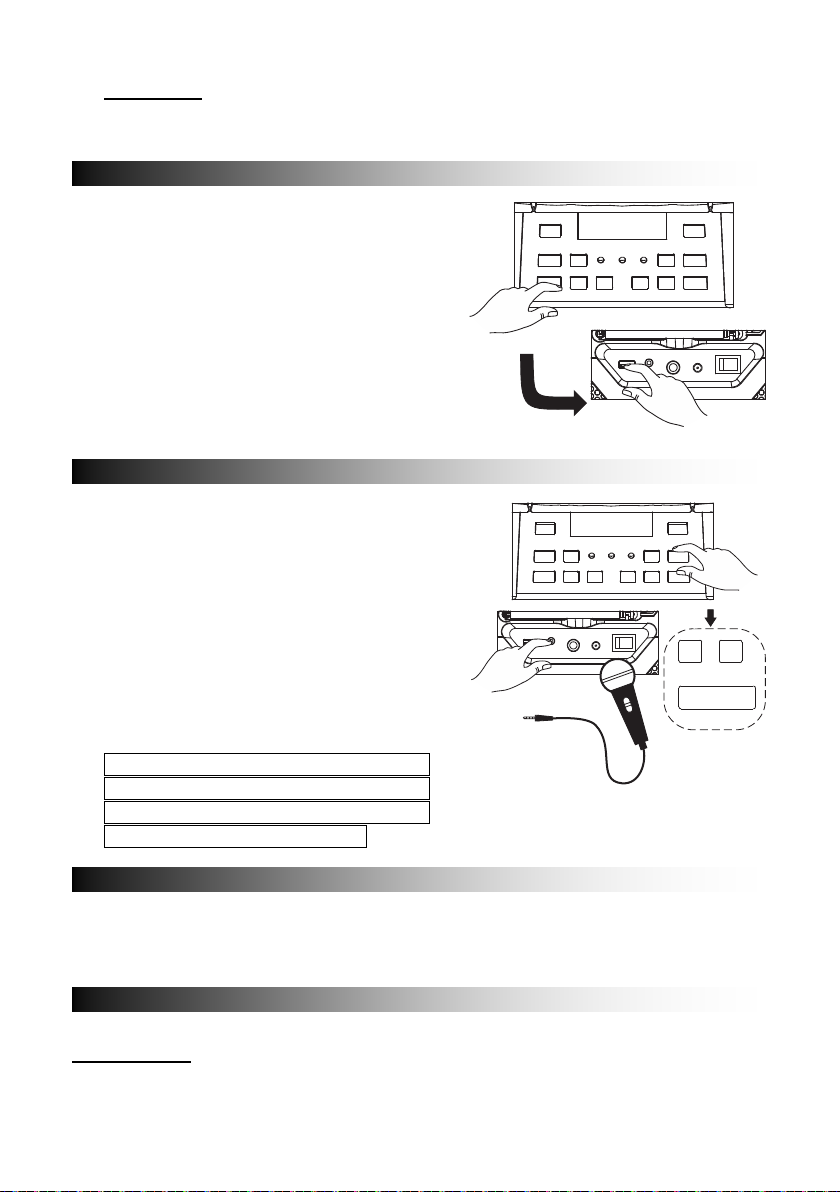
- This product allows you to sing-a-lo ng with
the songs that are playing either on BT,
USB or LINE IN mode.
- Plug in your Microphone cable into the side
panel marked "MIC"
- Adjust the MIC Volume "MIC + / MIC – " or
main volume on the top control panel.
- Adjust the Echo level " EH + /EH – ".
- Start to sing
WARNING: - If the MIC Volume and
ECHO level set too high or to the
maximum, be caution with the high
pitch reflection tone.
- " Customer’s model " has a bu i lt in Equalizer
- Press and select the preset sound effect for your music; FLAT, CLASSIC, POP,
ROCK and JAZZ
General
No power
- Check that AC adaptor is securel y inserted in the unit and the electric al outlet.
- Check the Power On/Off switch is turn to On position.
- If battery is flat Plug in the AC adaptor to charge and operate.
Keys no response
- Turn the Power On/Off switch to Off, and then On again to reset the unit.
- Unplug the AC adaptor and plug it back again.
EN-6
Page 9

No sound heard
- Make sure the LINE connected volume is turn to reasonable level.
- Make sure the Bluetooth connected device output the audio via BT out.
- Make sure the Bluetooth connected device volume is turn to reasonable l evel.
Bluetooth Operations
Audio quality is poor
- Bluetooth reception is poor. Move the Bluetooth device nearer to the speaker.
Cannot pair to Bluetooth device
- Make sure both Bluetooth device and s peaker are not connected to any other
Bluetooth device.
- Make sure the blue LED on the speaker is flashing quickly (Pairing mode).
- Turn Power switch to Off, and then On agai n, Press and hold BT off button for 2
seconds to enter into pairing mode.
EN-7
Page 10

CAUTION:
- The AC/DC adaptor and main unit shall not be exposed to dripping or s plashing and
that no objects filled with liquid s , such as vases, shall be placed on the app aratus
and AC/DC adaptor.
- Minimum distance of 10 cm around the apparatus for sufficient ventilatio n.
- The ventilation should not be imped ed by covering the ventilation ope nings with
items, such as newspapers, table-clot hs, curtains, etc.
- No naked flame sources, such as lighted candles, should be placed on the
apparatus.
- When the mains plug of AC/DC adaptor is used as the disconnect device, the
disconnect device shall remain readily operable.
To be completely disconnected the power input, t he AC/DC adaptor shall be
disconnected from the mains completely.
- The AC/DC adaptor should not be obstructed and s hould be easily accessed during
intended use.
- Do not use the apparatus in tropic al c l imates.
About Sealed Lead-Acid Battery:
This unit works either on the battery pack (Model no.: Tianchang 6-FM-2.6, 12V,
2600mAh) unplug the AC Po wer adapter from the DC input jack t o work on the batt ery
pack (after fully charged); plugging the AC Power adapter while the battery pack is
attached initiates the charging of this battery. The charged LED indicator lights red
during charging, when the battery is full y charged the indicator i s green. Fully charging
an empty battery pack may take 3 hours. A fully charged battery pack can last
approximately 2 hours of continuous playback. This playing time may vary with the
surrounding environment, the volume level of the speaker and the battery condition. It is
advised that you wait 10-20 minutes before r echarging the bat tery pack if i t has run flat
during operation.
EN-8
Page 11

ALL RIGHTS RESERVED, COPYRIGHT DENVER ELECTRONICS A/S
Electric and electronic equipment and included batteries contains materials,
components and substances that can be hazardous to your health and the environment,
if the waste material (discarde d electric and electronic equipment and batteries) is not
handled correctly.
Electric and electronic equipment and batteries is marked with the crossed out trash can
symbol, seen below. This symbol signifies that electric and electroni c equipment and
batteries should not be disposed of with other household waste, but should be disposed
of separately.
As the end user it is important that you submit your used batteries to the approriate and
designated facility. In this manner you make sure that the batteries are recycled in
accordance with legislature and will not harm the environment.
All cities have established collection points, where electric and electronic equipment
and batteries can either be submitted free of charge at recycling stations a nd other
collection sites, or be collected from the households. Additional information is availabl e
at the technical department of your ci ty.
Imported by:
DENVER ELECTRONICS A/S
Omega 5A, Soeften
DK-8382 Hinnerup
Denmark
www.facebook.com/denverelectronics
Hereby, Inter Sales A/S declares that the radio equ ipment type TSP-203 is in
compliance with Directive 2014/ 53/EU. The full text of the EU declaration of conformity
is available at the following internet address:
http://www.denver-electronics.com/denver-tsp-203/
EN-9
Page 12

Page 13
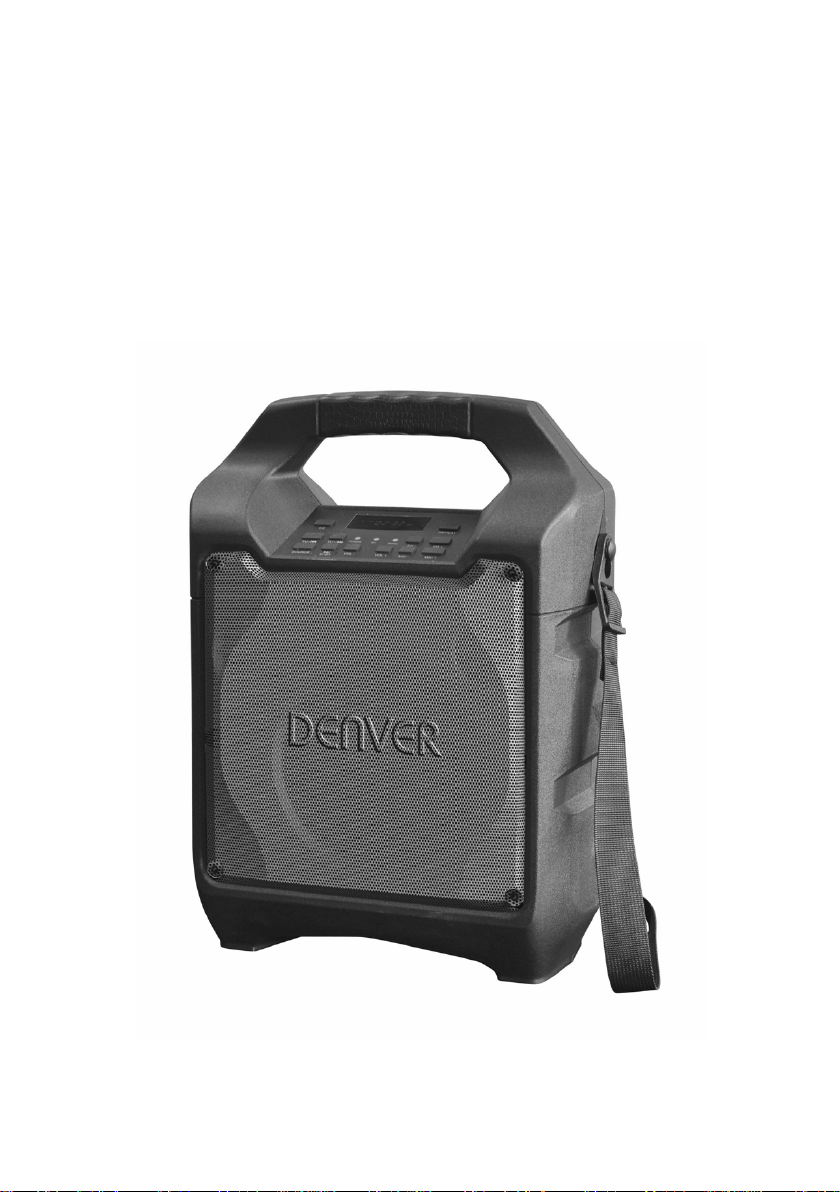
TSP-203
TRAGBARER
BLUETOOTH-LAUTSPRECHER
BEDIENUNGSANLEITUNG
Page 14

Page 15

INHALTSVERZEICHNIS
ÜBERSICHT DES GERÄTS ...................................................................... 2
SICHERHEITSHINWEISE .......................................................................... 3
ANSCHLUSS AN DIE STROMVERSORGUNG ........................................ 4
AUFLADEN ................................................................................................ 4
BLUETOOTH-ANSCHLUSS ...................................................................... 5
UKW-RADIO .............................................................................................. 5
USB-PORT ................................................................................................. 6
LINE-EINGANG ......................................................................................... 6
MITSINGEN ............................................................................................... 7
SOUNDEFFEKTE ...................................................................................... 7
STÖRBEHEBUNG ..................................................................................... 7
VORSICHT ................................................................................................. 9
DE-1
Page 16
1 2 3
4
5
6
7
8910
1112
13
14
1516
17 17
24
2221201918
23
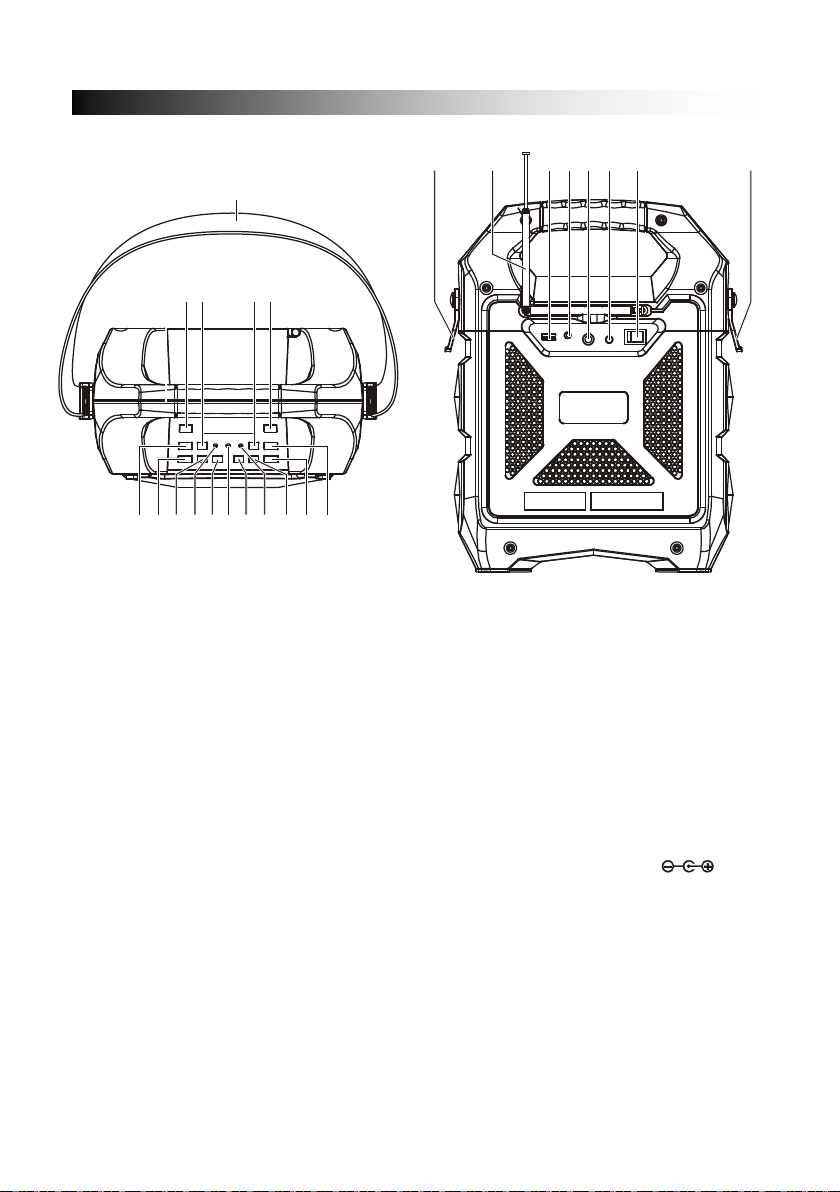
ÜBERSICHT DES GERÄTS
1. GRIFF
2. EQ-TASTE
3. SENDER AUFWÄRTS
4. ECHO REDUZIEREN
5. WIEDERHOLTE
WIEDERGABE
6. ECHO ERHÖHEN
7. MIKROFONLAUTSTÄRKE
ERHÖHEN
8. MIKROFONLAUTSTÄRKE
REDUZIEREN
9. BATTERIEANZEIGE
10. LAUTSTÄRKE ERHÖHEN
11. BLUETOOTH-ANZEIGE
12. LAUTSTÄRKE REDUZIEREN
13. STATUS-LED
14. PAUSE/WIEDERGABE/BT AUS
15. QUELLE
16. SENDER ABWÄRTS
17. BALDRISCHER KLIPP
18. UKW-ANTENNE
19. USB-PORT
20. LINE-EINGANG
21. MIKROFONANSCHLUSS
22. DC-EINGANG (15V 1,0A)
23. EIN-/AUSSCHALTEN
24. SCHULTERRIEMEN
DE-2
Page 17
DURCH FACHPERSONAL.
SICHERHEITSHINWEISE
STROMSCHLAGGEFAHR
Um einen ordnungsgemäßen Betrieb des Geräts zu gewährleisten und um Feuer sowie
Stromschläge zu vermeiden, lesen Sie alle Informationen in diesen
Sicherheitshinweisen sorgfältig durch.
Der Blitz mit Pfeilspitze
im gleichseitigen Dreieck
soll den Benutzer vor
nicht isolierter
gefährlicher Spannung im
Gehäuse des Geräts
warnen, die so hoch ist,
dass die Gefahr von
Stromschlägen besteht.
NICHT ÖFFNEN
WARNUNG: UM DIE
GEFAHR VON
STROMSCHLÄGEN ZU
VERMEIDEN, DIE
ABDECKUNG (ODER
RÜCKSEITE) NICHT
ÖFFNEN. ES BEFINDEN
SICH KEINE DURCH DEN
ANWENDER ZU
Das Ausrufezeichen im
gleichseitigen Dreieck
soll den Benutzer auf
wichtige Gebrauchs-
und
Wartungsanleitungen in
der Begleitliteratur des
Geräts hinweisen.
WARTENDEN TEILE IM
INNEREN. REPARATUR
UND WARTUNG NUR
AUSPACKEN:
Überprüfen Sie den Verpackungsinhalt auf Vollständigkeit.
- Hauptgerät
- Steckernetzteil
- Bedienungsanleitung
- Schulterriemen
WICHTIGE ANLEITUNGEN:
1. Vergewissern Sie sich, dass der Stecker vollständig in der Steckdose steckt und die
Stromversorgung mit den Spannungsangaben auf dem Typenschild übereinstimmt.
2. Verwenden Sie das Produkt nicht, falls das Netzkabel oder das Netzteil beschädigt
oder sehr heiß sind.
3. Modifizieren oder beschädigen Sie das Kabel nicht; vermeiden Sie, das Kabel
unnötig zu knicken, zu drehen oder daran zu ziehen.
4. Versuchen Sie nicht, das Produkt zu modifizieren, zu reparieren oder
auseinanderzubauen, es sei denn das Gerät hat das Ende seiner Nutzungsdauer
erreicht und wird entsorgt.
5. Trennen Sie den Netzstecker nicht mit nassen Händen.
DE-3
Page 18
Das Gerät verfügt über eine
die Batteriekapazität gering und die
Wenn Sie das Gerät an die
Batterieanzeige rot
ist die Batterie vollständig geladen.
POWER
LINE IN
DC JACK
USB 1A CHARGER
MIC 1
ON
OFF
MIC 2
AUFLADEN
ANSCHLUSS AN DIE STROMVERSORGUNG
6. Trennen Sie den Netzstecker, bevor Sie das Gerät reinigen oder warten. Keine
Flüssigreiniger oder Sprührein i ger verwenden.
7. Trennen Sie das Netzkabel während länger er Zeiten des Nichtgebrauchs.
8. Lagern Sie das Gerät während des Nichtgebrauchs an einem t rockenen Ort.
9. Verwenden Sie das Produkt nicht in der Nähe von Wasser, Wärmequellen oder
wärmeerzeugenden Geräten.
10. Schützen Sie die Batterie vor dir ek ter Sonneneinstrahlung oder Feuer.
11. Ersetzen Sie nicht die Batterie. Wenden Sie sich zwecks Reparatur und Wartung an
das Geschäft, in dem Sie das Gerät erworben haben, oder an den vom Geschäft
ernannten Kundendienst.
VORSICHT: Explosionsgefahr, wenn Batterien nicht korrekt eingesetzt werden.
12. Verwenden Sie nur das für dieses Gerät bestimmte Netzkabel.
13. Bewahren Sie diese Bedienungs anleitung gut auf.
14. Wenden Sie sich an einen autorisierten Kundendienst, falls Sie Fragen zum Produkt
haben.
- Packen Sie das Gerät aus.
Vergewissern Sie sich, dass der
EIN/AUS-Schalter auf der Position
„OFF“ steht.
- Schließen Sie das mitgelieferte
AC-Netzteil an das Gerät und dann an
eine Steckdose an.
Batteriestatusanzeige.
- Falls die LED-Batterieanzeige blinkt, ist
Batterie muss aufgeladen werden.
AC-Stromversorgung anschließen,
leuchtet die LEDund weist somit auf den Ladevorgang
hin.
- Wenn die LED-Anzeige grün leuchtet,
Es wird empfohlen, die Batterie ca. 6 Stunden vor dem erstmaligen Gebrauch
aufzuladen.
DE-4
Page 19
UKW-RADIO
BLUETOOTH-ANSCHLUSS
Energieeinsparung: Falls 20 Minuten lang keine Funktion ausgeführt wird,
aktiviert das Gerät automatisch den Standby-Modus. Es schaltet sich
automatisch aus.
Vorsicht: Um die wiederaufladbare Batterie in einem guten Zustand zu halten,
stellen Sie den Ein/Aus-Schalt er nach jedem Gebrauch und vor der Lagerung a uf
die „Off“-Position. Es wird empfohlen, die Batterie mindestens einmal alle zwei
Monate aufzuladen.
- Wenn Sie den Betriebsschalter auf die
„On“-Position stellen, aktiviert das Gerät
automatisch den Bluetooth-Modus „BT“.
- Aktivieren Sie an Ihrem externen Gerät
die Bluetooth-Funktion und suchen Sie
„TSP-203“; drücken Sie die
entsprechende Option zum Verbinden.
- Das verbundene Tonsignal wird
wiedergegeben und die blaue
LED-Anzeige hört auf zu blinken und
leuchtet stetig.
- Die Bluetooth-Verbindung ist nun
abgeschlossen.
- Wählen Sie an Ihrem externen Bluetooth-Gerät die gewünschte Musik aus und
starten Sie die Wiedergabe.
- Halten Sie die Taste BT OFF gedrückt, um das gekoppelte Gerät zu trennen und
den Kopplungsmodus zu aktivieren.
- Drücken Sie die Taste „Source“ zur Auswahl des Radio-Modus. Im LED-Display
erscheint die UKW-Radiofrequenz.
- Drücken Sie die Taste Wiedergabe/Pause, um Sender automatisch zu suchen und
zu speichern.
- Halten Sie die Taste TU
gespeicherten Radiosender zu suchen. Drücken Sie die Tasten kurz für die
Feineinstellung.
oder TU gedrückt, um den nächsten verfügbaren
DE-5
Page 20
abzuspielen.
Drücken Sie die Taste „Source“ zur
Eingang an der Rückseite des
Geräts an; das Gerät aktiviert den
mm Audioausgang anschließen und
Musikinhalte vom angeschlossenen
Gerät abspielen.
REPTU-/
TU+/
1 2
3
SOURCE
LINE-EINGANG
USB-PORT
- Drücken Sie die Taste „Source“ zur
Auswahl des USB-Modus. Im roten
LED-Display erscheint die Anzeige
USB.
- Schließen Sie einen USB-Stick an das
Gerät an.
- Wählen Sie mit der Taste TU
TU
die M us i kinhalte aus.
oder
- Drücken Sie die Taste „REP“ einmal,
um den aktuellen Titel wiederholt
abzuspielen. Drücken Sie „REP“ erneut,
um alle Titel wiederholt abzuspielen.
Drücken Sie die Taste ein drittes Mal,
um alle Titel in willkürlicher Reihenfolge
Sobald Sie einen USB-Stick anschließen, aktiviert das Gerät automatisch den
USB-Modus.
Wichtig: Der USB-Port ist nur für die Datenübertragung geeignet. Der
USB-Anschluss unterstützt nicht die Verwendung anderer Gerät e. Die Verwendung
von USB-Verlängerungskabeln wird nicht empfohlen
Auswahl des LINE-Eingangsmodus. Im
roten LED-Display erscheint die A nzeige
LINE.
- Schließen sie Ihr 3,5 mm Kabel an den
LINE-
LINE-Eingangsmodus.
- Sie können nun ein Audiogerät mit 3,5
DE-6
Page 21
Modi BT, USB und LINE zur Musik
Rückkopplung kommen.
MIC - MIC +
EH+EH-
STÖRBEHEBUNG
SOUNDEFFEKTE
MITSINGEN
- Dieses Produkt ermöglicht Ihnen, in de n
mitzusingen.
- Schließen Sie Ihr Mikrofonkabel an den
mit „MIC“ markierten Anschluss an der
Seite des Geräts an.
- Stellen Sie die Mikrofonlautstärke mit den
Tasten „MIC +/MIC -“ oder die
Hauptlautstärke mit den Tasten an der
Oberseite des Geräts an.
- Stellen Sie das Echo mit den Tas ten „EH
+/EH -“ ein.
- Sie können nun mitsingen.
WARNUNG: - Falls Sie die
Mikrofonlautstärke oder das ECHO zu
hoch einstellen oder die maximale
Einstellung auswählen, kann es zu
einer hohen akustischen
- Das „Kundenmodell“ verfügt über einen integrierten Equalizer.
- Drücken Sie die Taste, um einen der voreingestellten Soundeffekte auszuwählen:
FLACH, KLASSIK, POP, ROCK und JAZZ.
Allgemein
Kein Strom
- Überprüfen Sie, ob das AC-Netzteil s i c her am Gerät und an der Steckdose
angeschlossen ist.
- Vergewissern Sie sich, dass der Ein/A us-Schalter auf der Ein-Position s teht.
- Falls die Batterie leer ist, schli eßen Sie das AC-Netzteil an, um die Batterie
aufzuladen und das Gerät mit Strom zu versorgen.
Tasten ohne Funktion
- Stellen Sie den Ein/Aus-Schalter auf die Aus-Position und dann wied er auf die
Ein-Position, um das Gerät zurückzusetzen.
- Trennen Sie das AC-Netzteil und schließen Sie es dann erneut an.
Kein Ton
- Vergewissern Sie sich, dass die Lautstärke des mit dem LINE-Eingang
verbundenen Geräts angemessen eingestellt ist.
- Vergewissern Sie sich, dass die Mus ik des verbundenen Bluetooth-Geräts via BT
wiedergegeben wird.
DE-7
Page 22

- Vergewissern Sie sich, dass die Lautst ärke des via Bluetooth verbundenen Ger äts
angemessen eingestellt ist.
Bluetooth-Betrieb
Schlechte Audioqualität
- Schlechter Bluetooth-Empfang. Stellen Sie das Bluetooth-Gerät näher an den
Lautsprecher heran.
Bluetooth-Gerät kann nicht gekoppelt werden
- Stellen Sie sicher, dass weder das Bluetooth-Gerät noch der Lautsprecher mit
anderen Bluetooth-Geräten verbunden ist.
- Vergewissern Sie sich, dass die blaue LED-Anzeige am Lautsprecher zügi g blinkt
(Kopplungsmodus).
- Stellen Sie den Betriebsschalt er auf die Aus-Position und dann wieder auf die
Ein-Position. Halten Sie die Taste Bluetooth Aus 2 Sekunden lang gedrückt, um den
Kopplungsmodus zu aktivieren.
DE-8
Page 23

VORSICHT:
- Das AC/DC-Netzteil und das Gerät sind weder spritz- noch tropfwasserdicht. Stellen
Sie keine mit Flüssigkeit gefüllten Gegenstände wie Vasen auf das Gerät oder das
AC/DC-Netzteil.
- Halten Sie rings um das Gerät einen Abstand von mindestens 10 cm für
ausreichende Belüftung.
- Behindern Sie eine ausreichende Ventilation nicht, indem Sie das Gerät mit
Zeitungen, einem Tischtuch, Gardinen usw. abdecken.
- Stellen Sie keine offenen Flammen (wie brennende Kerzen) auf dem Gerät ab.
- Falls der Netzstecker des AC/DC-Netzteils als Trennvorrichtung verwendet wird,
muss diese Trennvorrichtung jederzeit einsatzfähig se i n.
Zum vollständigen Abtrennen des Geräts vom Stromnetz mus s das Netzteil
abgezogen werden.
- Das AC/DC-Netzteil darf nicht blocki ert werden und muss während des normalen
Gebrauchs immer frei zugänglich sein.
- Verwenden Sie das Gerät nicht in tropischen Klimazonen.
Hinweise zur verschlossenen Bleisäurebatterie:
Das Gerät kann via Batterie betrieben werden (Modell-Nr.: Tianchang 6-FM-2.6, 12V,
2600mAh). Trennen Sie das AC-Netzteil vom DC-Eingang des Geräts, um den
Batteriebetrieb zu ermöglichen ( nach vollständiger Aufladung); f al ls Sie das AC-Netzteil
während des Batteriebetriebs anschließen, wird die Batterie aufgeladen. Die
LED-Ladeanzeige leuchtet währe nd des Ladevorgangs rot und leuchtet grün, sobald
die Batterie vollständig geladen is t. Es dauert ca. 3 Stunden, die Batterie vollständi g
aufzuladen. Eine vollständig geladene Batterie ermöglicht einen Betrieb von ca. 2
Stunden bei kontinuierlicher Wiedergabe. Die Wiedergabedauer kann je nach
Umgebungsfaktoren, Lautstärkeeinstellung und Batteriezustand variieren. Es wird
empfohlen, mit dem Aufladen der Batterie 10-20 Minuten zu warten, falls diese während
des Betriebs vollständig entleer t wurde.
DE-9
Page 24

ALLE RECHTE VORBEHALTEN, URHEBERRECHTE DENVER
ELECTRONICS A/S
Elektrische und elektronische Geräte sowie Batterien enthalten Mat er ialien,
Komponenten und Substanzen, welche für Sie und Ihre Umwelt schädlich sein können,
sofern die Abfallmaterialien (entsorgte elektrisc he und elektronische Altgeräte sowie
Batterien) nicht korrekt gehandhabt werden.
Elektrische und elektronische Geräte sowie Batterien sind mit der dur c hgestrichenen
Mülltonne, wie unten abgebildet, kenntlich gemacht. Dieses Symbol bedeutet, dass
elektrische und elektronische Altgeräte sowie Batterien nicht mit dem Hausmüll entsorgt
werden dürfen, sie müssen separat entsorgt werden.
Als Endverbraucher ist es notwendig, dass Sie Ihre erschöpften Batter i en bei den
entsprechenden Sammelstellen ab geben. Auf diese Weise stellen Sie sicher, dass die
Batterien entsprechend der Geset z gebung recycelt werden und keine Umweltschäden
anrichten.
Städte und Gemeinden haben Sammelst ellen eingerichtet, an denen elektrische und
elektronische Altgeräte sowie Batterien kostenf r ei z um Recycling abgegeben werden
können, alternativ erfolgt auch Abholung. Weitere Informationen er halten Sie bei der
Umweltbehörde Ihrer Gemeinde.
Importeur:
DENVER ELECTRONICS A/S
Omega 5A, Soeften
DK-8382 Hinnerup
Dänemark
www.facebook.com/denverelectronics
Hiermit erklärt Inter Sales A/S, dass der Funkanlagentyp TSP-203 der Richtlinie
2014/53/EU entspricht. Der vollständige T ext der EU-Konformitätserklärung ist unter der
folgenden Internetadresse verfügbar:
http://www.denver-electronics.com/denver-tsp-203/
DE-10
Page 25
TSP-203
DRAAGBARE
BLUETOOTH-LUIDSPREKER
GEBRUIKSHANDLEIDING
Page 26

Page 27

INHOUDSOPGAVE
BESCHRIJVING VAN ONDERDELEN ...................................................... 2
VEILIGHEIDSINSTRUCTIES ..................................................................... 3
VOEDINGSAANSLUITING ........................................................................ 4
OPLADEN .................................................................................................. 4
BLUETOOTH-VERBINDING...................................................................... 5
FM-RADIO ................................................................................................. 5
USB-POORT .............................................................................................. 5
LIJN IN ....................................................................................................... 6
KARAOKE ................................................................................................. 6
GELUIDSEFFECTEN ................................................................................. 6
PROBLEEMOPLOSSING .......................................................................... 6
OPGELET .................................................................................................. 8
NL-1
Page 28
1 2 3
4
5
6
7
8910
1112
13
14
1516
17 17
24
2221201918
23
BESCHRIJVING VAN ONDERDELEN
1. HENDEL
2. EQ-TOETS
3. AFSTEMMEN OMHOOG
4. ECHO OMLAAG
5. HERHAALTOETS
6. ECHO OMHOOG
7. MIC VOLUMEVERHOGING
8. MIC VOLUMEVERLAGING
9. BATTERIJINDICATOR
10. TOETS VOLUMEVERHOGING
11. BLUETOOTH-INDICATOR
12. TOETS VOLUMEVERLAGING
13. AAN/UITINDICATOR
14. PAUZE/START/BT UIT
15. BRON
16. AFSTEMMEN OMLAAG
17. CLIP VOOR SCHOUDERRIEM
18. FM-ANTENNE
19. USB-POORT
20. LIJN IN
21. MICROFOONINGANG
22. DC (15V 1,0A) INGANG
23. AAN-/UITTOETS
24. SCHOUDERRIEM
NL-2
Page 29
L.
VEILIGHEIDSINSTRUCTIES
RISICO OP ELEKTRISCHE
Lees a.u.b. zorgvuldig alle informat ie in deze veilighe idsinst ructies, zodat u het product
correct weet te gebruiken en het ris i c o op brand of schokken wordt voorkomen.
De bliksemschicht
binnenin een gelijkzijdige
driehoek is bestemd de
gebruiker te wijzen op de
aanwezigheid van
ongeïsoleerde
"gevaarlijke spanning"
binnenin de
productbehuizing die
voldoende krachtig kan
zijn om een risico op
elektrische schokken te
vormen.
SCHOK
WAARSCHUWING: OM
HET RISICO OP
ELEKTRISCHE SCHOKKEN
TE VOORKOMEN, OPEN
NOOIT DE BEHUIZING (OF
ACHTERZIJDE). BINNENIN
BEVINDEN ZICH GEEN
ONDERDELEN DIE DOOR
DE GEBRUIKER
ONDERHOUDEN KUNNEN
WORDEN. VERWIJS
ONDERHOUD DOOR NAAR
GEKWALIFICEERD
Het uitroepteken binnen
een gelijkzijdige
driehoek is bedoeld om
de gebruiker te
waarschuwen op de
aanwezigheid van
belangrijke gebruik- en
onderhoudsinstructies
in de documentatie die
met het apparaat
meekomen.
ONDERHOUDSPERSONEE
UITPAKKEN:
Verifieer dat de doos de volgende onderdelen bevat.
- Hoofdeenheid
- AC-adapter
- Gebruikshandleiding
- Schouderriem
BELANGRIJKE INSTRUCTIES:
1. Zorg ervoor de stekker volledig in het stopcontact te steken en dat het product wordt
gevoed door een elektriciteitsbr on met een spanningsspecifi c atie die overeenkomt
met de nominale spanning van het product.
2. Gebruik het product nooit als de kabel of adapter beschadigd of t e heet is.
3. De kabel mag op geen enkele wijze worden gemodificeerd of beschadigd door deze
bijvoorbeeld te verbuigen, verdraaien of er onnodig aan te trekken.
4. Probeer het product op geen enkele wijze te modificeren, repareren of ontmantelen,
behalve wanneer u het product aan het einde van de levensduur ervan afdankt.
5. Haal nooit de stekker uit het stopcontact met natte handen.
6. Haal de stekker uit het st opcontact voorafgaand aan reiniging en onderhoud.
Gebruik geen vloeibare reinigi ngs middelen of spuitmiddelen.
7. Haal de stekker uit het st opcontact wanneer u het product voor langere tijd niet
gebruikt.
NL-3
Page 30
- Dit apparaat verstrekt een notificatie d.m.v.
de batterijindicator op groen springen.
POWER
LINE IN
DC JACK
USB 1A CHARGER
MIC 1
ON
OFF
MIC 2
OPLADEN
VOEDINGSAANSLUITING
8. Berg dit product op in een droge ruimte wanneer niet in gebruik.
9. Gebruik dit product niet in de buurt van water, hittebronnen of andere
hittegenererende apparatuur.
10. Batterijen mogen niet worden blootgesteld aan direct zonlicht of vuur.
11. Probeer de batterij niet te vervang en. Raadpleeg voor reparatie en service a.u.b. de
winkel waar u het product hebt aangeschaft of een klantendienst toegewezen door
de winkel.
OPGELET: Gevaar op ontploffing wanneer de batterij incorrect is geplaatst.
12. Gebruik geen enkele andere voedingsbron dan die specifiek ontworpe n v oor dit
product.
13. Bewaar deze gebruiksaanwijzingen op een veilige plek.
14. Neem contact op met een geautoriseer d s ervicecentrum als u nog vragen hebt ov er
dit product.
- Pak het product uit en zorg ervoor
dat de aan-/uitschakelaar op “OFF”
staat.
- Sluit de meegeleverde AC adapter
aan op het product en steek de AC
adapter vervolgens in het
stopcontact.
een batterijindicator.
- Als de batterijindicator knippert, bekent dit
dat het batterijvermogen laag is en de batterij
moet worden opgeladen.
- Wanneer de AC voeding is aangesloten, zal
de batterijindicator rood branden om a an te
geven dat het apparaat wordt opgeladen.
- Zodra de batterij volledig is opgeladen, zal
Wij raden u aan de batterij ongeveer 6 uur op te laden voordat u het apparaat
voor het eerst in gebruik neemt.
Energiebesparing: Als het product ongeveer 20 minuten niet wordt gebruikt,
zal deze automatisch op stand-by schakelen. Het apparaat zal automatisch
uitschakelen.
Opgelet: Om de oplaadbare batterij in goede staat t e houden, dient u het apparaat
te controleren en ervoor te zorgen dat de aan-/uitschakelaar op het achterpaneel op
“Off” staat telkens na gebruik en voorafg aand aan opslag. Wij raden u bovendien
aan de batterij minstens eenmaal elke twee maanden volledig op te lad en.
NL-4
Page 31
- De blauwe LED-indicator zal knipperen
functie in op uw
en druk
zijn, terwijl de blauwe
verbinding is nu tot stand
gepaarde apparaat te ontkoppelen en de
paringmodus te openen.
- Druk op de toets "Source" en selecteer
om uw
afspeelmodus te openen.
REPTU-/
TU+/
1 2
3
SOURCE
USB-POORT
FM-RADIO
BLUETOOTH-VERBINDING
- Zodra u de aan-/uitschakelaar op “On” ins telt,
wordt de Bluetooth-modus “BT” standaard
ingeschakeld.
wanneer in paringmodus. De rode LED-display
zal "bt" weergeven.
- Schakel de Bluetoothapparaat, zoek naar "TSP-203"
vervolgens op deze optie om de ver binding t ot
stand te brengen.
- Het verbonden geluidssignaal zal nu hoorba ar
LED-verbindingsindicator stopt met knipperen
en constant blijft branden.
- De Bluetoothgebracht.
- Selecteer de muziek op uw Bluetooth-apparaat
en start het afspelen.
- Houd de toets “BT OFF” ingedrukt om het
- Druk op de toets "Source" en selecteer de radiomodus; de FM-radiofrequentie zal
op de LED-display worden weergegeven.
- Druk op de start-/pauzetoets om automatisch te zoeken en op te slaan.
- Houd de toets TU
of TU ingedrukt om het volgende opgeslagen
beschikbare station te selecter en. Druk kort in om fijner af te stemmen.
USB. De rode LED-display zal “USB”
weergeven.
- Sluit de USB-stick aan.
- Druk op TU
favoriete muziek te selecteren.
of TU
- Druk op "REP” om de huidige track
eenmaal te herhalen en druk nogmaals
op "REP" om alle tracks te herhalen. Druk
driemaal op de toets om de willekeurige
Het apparaat schakelt automatisch op USB-modus zodra u de USB-stick
aansluit.
NL-5
Page 32
display zal “LINE”
gewenste audio afspelen via het
dit tot schelle feedback leiden.
MIC - MIC +
EH+EH-
PROBLEEMOPLOSSING
GELUIDSEFFECTEN
KARAOKE
LIJN IN
Belangrijk: De USB-poort is uitsluitend bestemd voor gegevensoverdracht. Andere
apparaten kunnen niet worden gebruikt met deze USB-a ansl uiting. Het gebr uik van
USB-verlengkabels is afgeraden.
- Druk op de toets "Source" en selecteer
LINE. De rode LEDweergeven.
- Steek uw 3,5mm kabel in de LINE-ingang
op het achterpaneel en het appar aat zal
op de modus “LINE IN” schakelen.
- U kunt elke gewenste audiobron met ee n
3,5mm audio-uitgang aansluiten en de
aangesloten apparaat.
- U kunt met dit product meezingen met
liedjes afgespeeld in de modus BT , USB
of LINE IN.
- Sluit uw microfoonkabel aan op de
ingang "MIC" op het zijpaneel.
- Pas het microfoonvolume aan met "MIC
+/MIC -" of pas het hoofdvolume aan op
het bovenpaneel.
- Pas het echoniveau aan met "EH +/EH
-".
- Begin nu te zingen.
WAARSCHUWING: - Als het
microfoonvolume of echoniveau te
hoog of op maximum is ingesteld, kan
- Het "Klantenmodel" is voorzien van een ingebouwde equalizer.
- Druk hierop om het gewenste standaard geluidseffect te selecteren voor uw muziek;
VLAK, KLASSIEK, POP, ROCK of JAZZ.
Algemeen
Geen voeding
- Verifieer dat de AC adapter stevig is aangesloten op het apparaat en stopcontact.
- Controleer of de aan-/uitschakelaar op de stand “AAN” is ingesteld.
NL-6
Page 33

- Als de batterij is uitgeput, sluit de AC adapter aan om op te laden en het apparaat te
kunnen gebruiken.
Toetsen reageren niet
- Schakel de aan-/uitschakelaar op “UIT ” en weer op “AA N” om het appar aat t erug te
stellen.
- Koppel de AC adapter los en sluit opnieuw aan.
Er klinkt geen geluid
- Zorg ervoor dat het via LINE verbonden volume op een redelijk niveau is inges teld.
- Zorg ervoor dat het via Bluetooth verbonden apparaat de audio via BT zendt.
- Zorg ervoor dat het volume van het via Bluetooth verbonden apparaat op een
redelijk niveau is ingesteld.
Bluetooth-bedieningen
Slechte audiokwaliteit
- Slechte Bluetooth-ontvangst. Houd het Bluetooth-apparaat dichter bij de
luidspreker.
Paring met Bluetooth-apparaat mislukt
- Verifieer dat zowel het Bluetooth-apparaat als de luidspreker niet z ij n v erbonden
met enigerlei ander Bluetooth-apparaat.
- Verifieer dat de blauwe LED op de luidspreker snel knippert (paringmodus).
- Schakel de aan-/uitschakelaar op “UIT” en weer op “AAN”, houd de toets “ BT Off” 2
seconden ingedrukt om de paringmodus te openen.
NL-7
Page 34

OPGELET:
- De AC/DC adapter en hoofdeenheid mogen niet worden blootgesteld aan druppels
of spetters en plaats geen met vloeistof gevulde voorwerpen, zoals een vaas, op het
apparaat of de AC/DC adapter.
- Behoud minimale afstanden van 10 cm rondom het apparaat voor voldoende
ventilatie.
- De ventilatie mag niet worden belemmerd door de ventilatieopeningen met
voorwerpen als kranten, tafelkleden, gordijnen, etc. te blokkeren.
- Plaats geen voorwerpen met open vlam, zoals brandende kaarsen, op het apparaat.
- Wanneer de netstekker van de AC/DC adapter wordt gebruikt om de voeding tot het
apparaat volledig los te koppelen, moet deze te allen tijde bereikbaar en gereed
worden gehouden.
Om de stroomtoevoer volledig te verbreken, moet de AC/DC-adapter volledig van
het elektriciteitsnet worden ontkoppeld.
- De AC/DC adapter mag niet worden belemmerd en moet tijdens het b eoogde
gebruik eenvoudig toegankelijk worden gehouden.
- Gebruik dit apparaat niet in tropisc he klimaten.
Over de verzegelde loodzuurbatterij:
Dit apparaat kan op het batterij blok werken (modelnumm er: Tianchang 6-FM-2,6, 12V,
2600mAh). Koppel de AC stroomadapt er lo s van de DC in gan g om het a ppar aat op h et
batterijblok te laten werken (na volledig te hebben opgeladen); door de AC
stroomadapter aan te sluiten terwijl het batterijblok is bevestigd, wordt deze batterij
opgeladen. De LED-laadindic ator is ro od tijdens het opl aden en s pringt op groen zodr a
de batterij volledig is opgeladen. Een leeg batterijblok volledig opladen kan 3 uur duren.
Een volledig opgeladen batterijblok is goed voor ongeveer 2 uur onafgebroken
afspeeltijd. Deze afspeeltijd kan variëren op basis van de directe omgeving, het
volumeniveau van de luidspr eker en de batteri jcondit ie. Wij raden u a an 10-20 minut en
te wachten voordat u het batterijblok oplaadt als deze tijdens gebruik uitgeput was
geraakt.
NL-8
Page 35

ALLE RECHTEN VOORBEHOUDEN, AUTEURSRECHT DENVER
ELECTRONICS A/S
Elektrische en elektronische a pparatuur en de inbegrepen batter i jen bevatten
materialen, componenten en stoffen die sch adelijk kunnen zijn voor uw gezondheid en
het milieu, indien de afvalproduc ten (afgedankte elektrische en elektronische
apparatuur en batterijen) niet cor rect worden verwerkt.
Elektrische en elektronische a pparatuur en batterijen zijn gem ar keerd met een
doorgekruist kliko-symbool, zoals hieronder afgebeeld. Dit symbool is ervoor bestemd
om de gebruiker er op te wijzen dat elektris che en elektronische apparatuur en
batterijen niet bij het overige huisvuil mogen worden weggegooid, m aar gescheiden
moeten worden ingezameld.
Als eindgebruiker is het belangrij k dat u uw verbruikte batterijen inl evert bij een
geschikte en speciaal daarvoor bestemde faciliteit. Op deze manier is het gegarandeerd
dat de batterijen worden hergebruikt in overeenstemming met de wetgeving en het
milieu niet aantasten.
Alle steden hebben specifieke inz amelpunten, waar elektrische of el ek tronische
apparatuur en batterijen kosteloos ingeleverd kunnen worden bij recyclestations of
andere inzamellocaties. In bepaalde gevallen kan het afval ook aan huis worden
opgehaald. Vraag om meer informatie bij uw plaatselijke autoriteiten.
Importeur:
DENVER ELECTRONICS A/S
Omega 5A, Soeften
DK-8382 Hinnerup
Denemarken
www.facebook.com/denverelectronics
Hierbij verklaar ik, Inter Sales A/S, dat het type rad ioapparatuur TSP-203 conform is
met Richtlijn 2014/53/EU. De volledige tekst van de EU-conformiteitsverklaring kan
worden geraadpleegd op het volgende internetadres:
http://www.denver-electronics.com/denver-tsp-203/
NL-9
Page 36

Page 37
TSP-203
HAUT-PARLEUR BLUETOOTH
PORTABLE
MANUEL D’UTILISATION
Page 38

Page 39

SOMMAIRE
DESCRIPTION DES PIECES .................................................................... 2
CONSIGNES DE SÉCURITÉ ..................................................................... 3
BRANCHEMENT DE L'ALIMENTATION ................................................... 4
RECHARGEMENT ..................................................................................... 4
CONNEXION BLUETOOTH....................................................................... 5
RADIO FM .................................................................................................. 5
PORT USB ................................................................................................. 5
ENTREE HAUT-NIVEAU ........................................................................... 6
KARAOKE ................................................................................................. 6
EFFETS SONORES ................................................................................... 6
DEPANNAGE ............................................................................................. 6
ATTENTION .............................................................................................. 8
FR-1
Page 40
1 2 3
4
5
6
7
8910
1112
13
14
1516
17 17
24
2221201918
23
DESCRIPTION DES PIECES
1. POIGNEE
2. TOUCHE EQ
3. RECHERCHE HAUT
4. ECHO BAS
5. TOUCHE DE REPETITION
6. ECHO HAUT
7. VOLUME MICRO HAUT
8. VOLUME MICRO BAS
9. INDICATEUR DE BATTERIE
10. TOUCHE DE VOLUME HAUT
11. INDICATEUR BLUETOOTH
12. TOUCHE DE VOLUME BAS
13. TÉMOIN D'ALIMENTATION
14. PAUSE/LECTURE/ARRET BT
15. SOURCE
16. RECHERCHE BAS
17. ATTACHE DE BAUDRIER
18. ANTENNE FM
19. PORT USB
20. ENTREE HAUT-NIVEAU
21. PORT MICRO
22. ENTREE DC (15V 1A)
23. TOUCHE MARCHE/ARRET
24. BANDOULIERE
FR-2
Page 41
COMPÉTENT.
CONSIGNES DE SÉCURITÉ
RISQUE DE CHOC
Pour assurer un fonctionnement correct du produit et prévenir un danger d’électrocution
ou d’incendie, veuillez lire attentivement toutes les informations continues dans ces
Instructions de sécurité.
Le symbole de l'éclair à
pointe de flèche à
l'intérieur d'un triangle
équilatéral, est destiné à
alerter l'utilisateur de la
présence de pièces sous
tension non isolées dans
le produit, d'une
magnitude pouvant
constituer un risque
d'électrocution.
ÉLECTRIQUE
AVERTISSEMENT : POUR
REDUIRE LE RISQUE
D’ELECTROCUTION, NE
PAS RETIRER LE
COUVERCLE (OU LE
REMETTRE). VOTRE
APPAREIL NE CONTIENT
AUCUNE PIÈCE
RÉP ARABLE. POUR TOUT
PROBLÈME, APPORTEZ
VOTRE APPAREIL À UN
Le symbole du point
d'exclamation, dans un
triangle équilatéral, sert
à avertir l'utilisateur que
d'importantes
consignes d'utilisation
et d'entretien
(localisation des
défauts) sont fournies
dans la documentation
fournie avec l'appareil.
CENTRE DE SERVICE
DEBALLAGE :
Vérifier que tous les éléments suiva nts sont dans la boite.
- Unité principale
- Adaptateur d’alimentation de courant AC
- Manuel d’utilisation
- Bandouliere
INSTRUCTIONS IMPORTANTES :
1. S’assurer que la fiche est bien insérée dans la prise de courant et que le produit est
sous une tension correspondant à sa t ens ion nominale.
2. Ne jamais faire fonctionner le produit si le cordon d’alimentation est endommagé ou
s’il est trop chaud.
3. Ne pas modifier le cordon de quelque manière que ce soit, comme en l e pliant, le
tordant ou en tirant dessus inconsidérément.
4. Ne pas essayer de modifier, réparer ou démonter le produit de quelque manière que
ce soit, sauf en le démontant à la fin de sa durée de vie.
5. Ne jamais débrancher ce pr oduit avec les mains humides.
6. Débrancher le produit de la prise avant de le nettoyer ou d’en faire la maintenance.
N'utilisez pas de détergents liquides ou en spray.
7. Le cordon d’alimentati on doit être débranché de la prise qu and il n’est pas utilisé
pour une durée prolongée.
8. Ranger ce produit sans un endroit sec quand il n’est pas utilisé.
FR-3
Page 42
L’unité est fournie avec une alerte
Si la LED de batterie clignote, cela
signifie que le niveau de batterie est
chargée.
POWER
LINE IN
DC JACK
USB 1A CHARGER
MIC 1
ON
OFF
MIC 2
RECHARGEMENT
BRANCHEMENT DE L'ALIMENTATION
9. Ne pas utiliser ce produit à proximité de l’eau, de sources de chaleur ou d’autres
appareils produisant de la chaleur.
10. La batterie ne doit pas être exposé e aux rayons directs du soleil ou mise au feu.
11. Ne pas essayer de remplacer la batter ie. Pour la réparation ou la révision, veuillez
consulter le magasin ou le service après-vente agréé par le magasin.
ATTENTION : Toute erreur de positionnement de la pile vous expose à un risque
d'explosion.
12. Ne pas utiliser une autre source d’é ner gie que celle spécialement conçu e pour ce
produit.
13. Garder ces instructions de sécur ité dans un endroit sûr.
14. Contacter le service après-ve nte si vous cherchez quelque chose à propos de ce
produit.
- Déballer ce produit, s’assurer que
l’interrupteur MARCHE/ARRET est
sur « OFF ».
- Connecter l’adaptateur AC fourni
avec ce produit, brancher
l’adaptateur dans la prise de
courant.
d’indicateur de batterie.
-
faible et que le rechargement est requis.
- En connectant le courant AC, la LED de
batterie devient rouge, cela signifie que
l’unité est en cours de chargement.
- Quand la LED de batterie devient verte,
cela signifie que la batterie est totalement
Il est recommandé de charger la batterie pendant environ 6 heures avant de
commencer à utiliser l’unité la première fois.
Economie d’énergie : Si ce produit n’est pas utilisé pendant environ 20
minutes, il se met en attente automatiquement. Il s’éteint automatiquement.
Attention : Pour conserver la batteri e en bon état, les utilisateurs doivent v érifier
l’unité et s’assurer que l’interrupt eur MARCHE/ARRET au dos est sur OFF après
chaque utilisation et avant de la ranger, il est fortement recommandé que les
utilisateurs rechargent totale m ent la batterie au moins une fois tous les deux mois.
FR-4
Page 43
La LED Bluetooth clignote en mode
Activer la fonction Bluetooth sur votre
», puis
l’indicateur bleu de connexion arrête de
Maintenir la touche BT OFF pour
mode d’appairage.
Sélectionner le morceau favori en
aléatoire.
REP
TU-/
TU+/
1 2
3
SOURCE
PORT USB
RADIO FM
CONNEXION BLUETOOTH
- Une fois que l’appareil est sous tension, le
mode Bluetooth « BT » est réglé par défaut.
d’appairage. La LED rouge affiche « BT »
-
appareil et rechercher « TSP-203
appuyer pour connecter.
- Le signal sonore connecté sera entendu, e t
clignoter et reste allumé.
- La connexion Bluetooth est complét ée.
- Sélectionner la musique de votre appareil
Bluetooth et commencer la lectur e.
déconnecter l’appairage et pour entrer en
- Appuyer sur la touche « Source » et s él ec tionner Radio, la fréquence de radio FM
sera indiquée sur l’affichage de LED rouge.
- Appuyer sur lecture/Pause pour la rec herche automatique et le stockage.
- Appuyer sur TU
ou TU pour choisir la station suivante stockée. Appuyer
rapidement pour la recherche fine.
- Appuyer sur « Source » et sélectionner
USB. USB sera indiqué sur l’affichage à
LED rouge.
- Insérer la clé USB.
appuyant sur TU ou TU .
- Appuyer sur « REP » une fois pour le
morceau en cours. Réappuyer sur
« REP » pour répéter tous les
morceaux. Appuyer trois fois sur la
touche pour entrer en mode de lecture
Il passe automatiquement en mode USB quand la clé USB est insérée.
Important : Le port USB n’est prévu que pour le transfert de données . D’autres
appareils ne peuvent pas être utilisés avec cette connexion USB. L’utilisation de
rallonge USB n’est pas recommandée.
FR-5
Page 44
». LINE sera indiqué sur
Brancher votre câble 3,5mm dans
temps que la chanson jouée soit en
à la saturation.
MIC - MIC +
EH+EH-
DEPANNAGE
EFFETS SONORES
KARAOKE
ENTREE HAUT-NIVEAU
- Appuyer sur « Source » et sélectionner
« LINE
l’affichage à LED rouge.
l’entrée LINE à l’arrière de l’appareil et
l’unité entre en mode LINE IN.
- Vous pouvez connecter un appareil audio
qui est muni d’une sortie 3,5mm et lire
une radio depuis l’appareil connect é.
- Ce produit permet de chanter en même
mode BT, USB ou LINE IN.
- Brancher le câble de microphone dans le
panneau latéral marqué « MIC »
- Ajuster le volume de « MIC +/MIC - » ou
le volume principal sur le panneau d e
contrôle en haut.
- Ajuster le niveau d’écho « EH +/EH - ».
- Commencer à chanter
AVERTISSEMENT : - Si le Volume de
MIC et le niveau d’ECHO sont trop
hauts ou au maximum, faire attention
- « Modèle de client » a un égaliseur intégr é
- Appuyer et sélectionner l’effet sonore préréglé pour votre musique : PLAT,
CLASSIQUE, POP, ROCK et JAZZ
Général
Pas de courant
- Vérifier que l’adaptateur AC est bien inséré dans l’unité et dans la prise de courant.
- Vérifier que l’interrupteur MARCHE/ARRET est en position ON.
- Si la batterie est déchargée, connecter l’adaptateur AC pour charger et faire
fonctionner.
Les touches ne répondent pas
- Mettre l’interrupteur MARCHE/ARRET sur OFF, puis sur ON pour réinitialiser l’unité.
FR-6
Page 45

- Débrancher l’adaptateur AC et le rebr ancher.
Pas de son
- S’assurer que le volume connecté s ur LINE est à un niveau raisonnable.
- S’assurer que l’appareil connect é Bluetooth sort l’audio par la sortie BT.
- S’assurer que le volume de l’appareil connecté Bluetooth est à un niveau
raisonnable.
Opérations Bluetooth
La qualité audio est faible
- La réception Bluetooth est faible. D éplacer l’appareil Bluetoot h v ers le haut-parleur.
Impossible d’appairer l’appareil Bluetooth
- S’assurer que l’appareil Bluetooth et le haut-parleur ne sont pas c onnectés à un
autre appareil Bluetooth.
- S’assurer que la LED bleue sur le haut-par leur clignote rapidement (mode
d’appairage).
- Mettre sur Off, puis à nouveau sur On. A ppuyer et maintenir BT Off pendant 2
secondes pour entrer en mode d’appairage.
FR-7
Page 46

ATTENTION :
- L’adaptateur AC/DC et l’unité principale ne doivent pas être exposés à l’égouttement
ou aux éclaboussures, et aucun objet rempli de liquide comme les vases ne doit être
placé sur l’appareil ni sur l’adaptateur AC/DC.
- Laissez un espace d'au moins 10 cm tout autour de votre appareil pour lui as surer
une aération suffisante.
- Veuillez à ce que les ouvertures d'aération ne soient pas obstruées ( par un journal,
une nappe, un rideau, etc.).
- Ne posez aucune source de flamme nue, par exemple une bougie allumée, s ur
votre appareil.
- Quand la fiche principale de l’adaptateur AC/DC est utilisée comme appareil de
déconnexion, l’appareil déconnecté doit rester prêt aux opérations .
Pour isoler votre appareil de l'alim entation secteur, débranchez complètement
l'adaptateur courant alternatif/courant continu de la prise secteur.
- L’accès à l’adaptateur AC/DC ne doit pas être obstrué et doit être facilement
accessible au cours de l’utilisat i on.
- Ne pas utiliser l’appareil sous des climats tropicaux.
Batterie scellée Plomb - Acide :
Cette unité fonctionne avec un pack de batterie (Modèl e n° : Tianchang 6-FM-2.6, 12V,
2600 mAh) débrancher l’adaptateur AC du j ack d’entrée D C pour charge ant le pack de
batterie (après la charge complète) ; brancher l’adaptateur AC quand le pack de batterie
est connecté initie le chargement de la batterie. L’indicateur à LED est rouge pendant le
chargement, quand la batterie est com plètement chargée, l’indicateur passe au vert.
Charger complètement la batterie peut prendr e 3 heures. Une batterie complètement
chargée peut durer environ 2 heures de lecture continue. La durée de lecture peut
varier selon l’environnement, le niveau sonore du haut-parleur et de l’état de la batterie.
Il est conseillé d’attendre 10 à 20 minutes avant de recharger la batterie si elle s’est
déchargée pendant les opérations.
FR-8
Page 47

TOUS DROITS RÉSERVÉS, COPYRIGHT DENVER ELECTRONICS A/S
Les appareils électriques et élect roniques et les batteries contienne nt des matériaux,
composants et substances qui peuvent nuire à votre santé et à l’environnement si ces
déchets ne sont pas traités de façon appropriée.
Les appareils électriques et élect roniques et les batteries sont marqués par le symbole
de poubelle avec roulettes et une croix dessus, voir ci-dessous. Ce symbole indique
que les appareils électriques et électroniques et les batteries doivent être collectés et
jetés séparément des ordures ménagèr es.
En tant qu’utilisateur final, il est important que vous jetiez les batteries usagées dans
des centres de collecte appropriés . En mettant au rebut les batteries pour être
recyclées conformément à la règlem entation vous contribuez à préserver
l’environnement.
Dans toutes les villes existent des points de collecte où les appareils électriques et
électroniques et les batteries peuvent y être déposés sans frais pour le recyclage. Vous
pouvez obtenir des informations supplémentaires auprès des autorit és locales de la
ville.
Importateur :
DENVER ELECTRONICS A/S
Omega 5A, Soeften
DK-8382 Hinnerup
Danemark
www.facebook.com/denverelectronics
Le soussigné, Inter Sales A/S, déclare que l' équipement radioélectrique du type
TSP-203 est conforme à la directive 2014/53/UE. Le texte complet de la déclarat ion U E
de conformité est disponible à l'adr es se internet suivante:
http://www.denver-electronics.com/denver-tsp-203/
FR-9
Page 48

Page 49
TSP-203
ALTOPARLANTE PORTATILE
BLUETOOTH
MANUALE D'USO
Page 50

Page 51

SOMMARIO
DESCRIZIONE COMPONENTI .................................................................. 2
NORME DI SICUREZZA ............................................................................ 3
COLLEGAMENTO DELL'ALIMENTAZIONE ............................................. 4
RICARICA .................................................................................................. 4
CONNESSIONE BLUETOOTH .................................................................. 5
RADIO FM .................................................................................................. 5
PORTA USB ............................................................................................... 5
LINE IN ....................................................................................................... 6
CANTA INSIEME ....................................................................................... 6
EFFETTI SONORI ...................................................................................... 6
RISOLUZIONE DEI PROBLEMI ................................................................ 6
ATTENZIONE ............................................................................................. 8
IT-1
Page 52
1 2 3
4
5
6
7
8910
1112
13
14
1516
17 17
24
2221201918
23
DESCRIZIONE COMPONENTI
1. MANIGLIA
2. TASTO EQ
3. SINTONIA SU
4. ECO GIÙ
5. TASTO REPEAT
6. ECO SU
7. VOLUME MIC SU
8. VOLUME MIC GIÙ
9. INDICATORE DELLA
BATTERIA
10. TASTO VOLUME SU
11. INDICATORE BLUET OOTH
12. TASTO VOLUME GIÙ
13. INDICATORE DI ACCENSIONE
14. P AUSA/PLAY/BT OFF
15. SOURCE
16. SINTONIA GIÙ
17. CLIP TRACOLLA
18. ANTENNA FM
19. PORTA USB
20. LINE IN
21. PORTA MIC
22. INGRESSO DC (15V 1.0A)
23. TASTO POWER ON/OFF
24. CINGHIA DA SPALLA
IT-2
Page 53
QUALIFICATO.
NORME DI SICUREZZA
RISCHIO DI SCARICHE
Per garantire il corretto funzionament o del prodotto e prevenire il rischio di incendi o
scosse elettriche, leggere con attenzione tutte le informazioni contenute in queste
istruzioni per la sicurezza.
Il simbolo del fulmine
all'interno di un triangolo
avverte l'utente della
presenza di una
"tensione pericolosa" non
isolata che può essere di
entità tale da costituire un
rischio di shock elettrico
per le persone.
ELETTRICHE
ATTENZIONE: PER
RIDURRE IL RISCHIO DI
SCOSSE ELETTRICHE,
NON RIMUOVERE IL
COPERCHIO (O IL RETRO).
ALL’INTERNO NON SONO
PRESENTI PARTI
RIPARABILI DALL’UTENTE.
PER L'ASSISTENZA,
RIVOLGERSI A
Il punto esclamativo
all'interno di un
triangolo equilatero
avverte l'utente della
presenza di istruzioni
importanti d'uso e
assistenza nella
documentazione che
accompagna il
prodotto.
PERSONALE
DISIMBALLAGGIO:
Controllare che tutti i seguenti elementi siano inclusi nella confezi one.
- Unità principale
- Adattatore AC di alimentazione
- Manuale d'uso
- Cinghia da spalla
ISTRUZIONI IMPORTANTI:
1. Assicurarsi che la spin a sia completamente inserita nella presa a muro e che il
prodotto sia collegato a una fonte di ali m entazione elettrica abbinata al la sua
tensione nominale.
2. Non utilizzare mai il prodotto se il cavo o l'adattatore sono danneggiati o
eccessivamente caldi.
3. Non modificare il cavo o danneggiarlo in alcun modo, piegandolo, torcendolo o
tirandolo inutilmente.
4. Non tentare di modificar e, riparare o comunque smontare il prodotto, se non per
disassemblarlo alla fine della sua v i ta utile.
5. Non scollegare questo pr odotto con le mani bagnate.
6. Scollegare il prodotto dalla presa a muro prima di pulizia e m anutenzione. Non
utilizzate detergenti liquidi o s pr ay.
7. Il cavo di alimentazione deve essere scollegato dalla pr esa quando non viene
utilizzato per un lungo periodo di t em po.
IT-3
Page 54
che il livello della batteria è basso ed è
carica.
POWER
LINE IN
DC JACK
USB 1A CHARGER
MIC 1
ON
OFF
MIC 2
RICARICA
COLLEGAMENTO DELL'ALIMENTAZIONE
8. Conservare il prodotto in un luogo asciutto quando non è in uso.
9. Non utilizzare questo prodotto in prossimità di acqua, font i di calore o altri
apparecchi che producono calore.
10. La batteria non deve essere espost a alla luce solare diretta o a fiamme.
11. Non tentare di sostituire la batteria. Per la riparazione e la manutenzione, consultare
il negozio di acquisto o il centro di servizio al cliente designato dal negozio.
ATTENZIONE: Un'erronea sostituzione delle batterie può causarne l'esplosione.
12. Non utilizzare nessun altro alimentatore diverso da quello appositamente progettato
per questo prodotto.
13. Conservare queste istruzioni operative in un luogo sicuro.
14. Contattare un centro di assistenza autorizzato per chiarimenti su questo prodotto.
- Disimballare il prodotto, assicurars i
che l’interruttore ON/OFF sia su
"OFF".
- Collegare un’estremità
dell'adattatore AC in dotazione al
prodotto e l’altra estremità alla presa
a muro.
- L’unità è dotata di un allarme indicatore di
batteria.
- Se il LED della batteria lampeggia, si gnifica
necessaria la ricarica.
- Collegando l'alimentatore AC il LED della
batteria diventa rosso; ciò significa che l'unità
è in fase di ricarica.
- Quando il LED della batteria diventa v erde,
significa che la batteria è completamente
Si raccomanda di caricare la batteria per circa 6 ore prima di usare
l'apparecchio per la prima volta.
Risparmio energetico: Se questo prodotto è inattivo per circa 20 minuti, andrà
automaticamente in modalità standby. Sarà attivato lo spegnimento
automatico.
Attenzione: Per mantenere la batteria ricaricabile in buone condizioni, gli utenti
devono controllare l'unità ed essere sic uri di posizionare l'interruttore ON/O FF sul
pannello posteriore su "OFF" ogni volta dopo l'uso e prima dello stoccaggio; gli
utenti dovrebbero ricaricare pienamente la batteria almeno una volta ogni due mesi.
IT-4
Page 55
- In modalità di accoppiamento l’indicatore LED
blu lampeggerà. Il display LED rosso
203", quindi premere per la
Verrà emesso un segnale sonoro di
connessione e l’indicatore LED blu di
connessione smetterà di lampeggiare e
Selezionare la musica dal dispositivo
Tenendo premuto il pulsante BT OFF per
in modalità di accoppiamento.
- Premere il pulsante "Source” e
modalità di riproduzione casuale.
REP
TU-/
TU+/
1 2
3
SOURCE
PORTA USB
RADIO FM
CONNESSIONE BLUETOOTH
- Una volta che l'interruttore è in posizione
"ON", la modalità Bluetooth "BT " è impostata
come predefinita.
mostrerà "bt"
- Attivare la funzione Bluetooth sul dispositivo e
cercare "TSPconnessione.
-
rimarrà costante.
- La connessione Bluetooth è completata.
-
Bluetooth e iniziare la riproduz i one.
scollegare il dispositivo associat o ed entrare
- Premere il pulsante "Source" e selezionare Radio, verrà visualizzata la f requenza
radio FM sul display LED rosso.
- Premere PLAY/PAUSA per la ricerca automatica e la memorizzazione.
- Tenere premuto il pulsante TU
o il pulsante TU per scegliere la prossima
stazione disponibile memorizzata. Premere brevemente per sintonizzare in modo
più accurato.
selezionare USB. USB apparirà sul
display LED rosso.
- Inserire la chiavetta USB.
- Selezionare la musica premendo TU
o TU .
- Premere "REP" per ripetere una volta il
brano corrente, premere di nuovo
"REP" per ripetere tutti i brani. Premere
il tasto tre volte per accedere alla
Una volta inserita la chiavetta USB passerà automaticamente alla modalità
USB.
IT-5
Page 56
Premere il pulsante "Source” e
selezionare LINE. LINE apparirà sul
LINE sul pannello posteriore e l'unità
Questo prodotto consente di cantare
al tono di riflessione del suono.
MIC - MIC +
EH+EH-
RISOLUZIONE DEI PROBLEMI
EFFETTI SONORI
CANTA INSIEME
LINE IN
Importante: La porta USB è destin ata solo al trasferim ento dei dati. Non posso no
essere utilizzati altri dispositivi con questo collegamento USB. L'uso di cavi di
prolunga USB non è raccomandato.
-
display LED rosso.
- Collegare il cavo da 3,5 mm nell'ingresso
entrerà in modalità LINE IN.
- È possibile collegare qualsiasi dispositivo
audio che dispone di un jack di uscita
audio da 3,5 mm e riprodurre suoni da
qualsiasi dispositivo collegato.
sulle canzoni in riproduzione in moda lità
BT, USB o LINE IN.
- Collegare il cavo del microfono nel
pannello laterale contrassegnat o con
"MIC"
- Regolare il volume MIC "MIC +/MIC -" o il
volume principale sul pannello di
controllo superiore.
- Regolare il livello di eco "EH +/EH -".
- Inizia a cantare
ATTENZIONE: - Se il volume del
microfono e il livello di ECO è troppo
alto o al massimo, prestare attenzione
- Il “modello del cliente" ha un equalizzatore incorporato
- Premere e selezionare l'effetto sonoro preimpostato per la musica; FLAT, CLASSIC,
POP, ROCK e JAZZ
Generale
Assenza di alimentazione
- Controllare che l'adattatore AC sia inserito saldamente nell’unità e alla presa
elettrica.
IT-6
Page 57

- Controllare che l'interruttore ON /OFF sia posizionato su ON.
- Se la batteria è scarica collegare all'adattatore AC per caricare e far funzionare.
I tasti non rispondono
- Portare l'interruttore ON/O FF su OFF e poi su ON per ripristinare l'unità.
- Scollegare l'adattatore AC e ricol legarlo di nuovo.
Assenza di suono
- Assicurarsi che il volume di LINE c ol legato sia impostato su un livello ragionevole.
- Assicurarsi che il dispositivo B luetooth collegato emetta audio via B T.
- Assicurarsi che il volume del dispositivo Bluetooth collegato sia impostato su un
livello ragionevole.
Funzioni Bluetooth
La qualità audio è scarsa
- La ricezione Bluetooth è scarsa. Spostare il dispositivo Bluetooth più vicino a chi
parla.
Non è possibile accoppiare al dispositivo Bluetooth
- Assicurarsi che il dispositivo Bluetooth e l'altoparlante non siano collegati a qualsiasi
altro dispositivo Bluetooth.
- Assicurarsi che il LED blu dell’altoparlante lampeggi rapidamente (modalità di
accoppiamento).
- Spostare l'interruttore accens ione su OFF, e poi di nuovo su ON. Premere e tenere
premuto il pulsante BT off per 2 second i per entrare in modalità di accoppiamento.
IT-7
Page 58

ATTENZIONE:
- L'adattatore e AC/DC e l’unità principale non devono essere esposti a gocce o
spruzzi e nessun oggetto contenente liquidi, come i vasi, deve essere situato su di
essi.
- Assicurarsi che il dispositivo disponga di almeno 10 cm di spazio libero tutt’intorno
per consentire un’adeguata aerazione.
- Non impedire l’aerazione ostruendo i fori di ventilazione con oggetti com e giornali,
tovaglie, tende ecc.
- Non collocare sul dispositivo ogg etti da cui possano scaturire fiamme libere, ad
esempio candele.
- Quando il dispositivo è scollegato dall’adattatore AC/DC, quest’ultimo deve essere
facilmente accessibile.
Per staccare l’alimentazione, dis i nserire completamente l’adattatore AC/DC dalla
presa.
- L’adattatore AC/DC non deve essere ostruito e deve essere facilmente raggiungibile
durante l'utilizzo.
- Non utilizzare l'apparecchio in cli m i tropicali.
Informazioni sulla batteria al piombo sigillata:
Questa unità funziona anche c on il gruppo batteria (Mod ello no.: Tianchang 6-FM-2.6,
12V, 2600mAh). Scollegare l'adattatore di alim entazi one AC dalla pres a di ingress o DC
per il funzionamento con gruppo bat teria (dopo carica com pleta); collegare l'ad attatore
di alimentazione AC mentre la batteria è coll egata ne av via l a ricarica. L’indicatore LED
della carica è rosso durante la carica, quando la batteria è completamente carica
l'indicatore è verde. Caricar e compl etamente un gruppo batteria v uoto può r ichieder e 3
ore. Una batteria completamente carica può durare per circa 2 ore di riproduzione
continua. Questo tempo di riproduzion e può variare a causa dell'ambiente circostante,
del livello del volume dell'altoparlante e dello stato della batteria. Si consiglia di
attendere 10-20 minuti prima di ricaric are la batteria se si verifica un cal o di tensione
durante il funzionamento.
IT-8
Page 59

TUTTI I DIRITTI RISERVATI, COPYRIGHT DENVER ELECTRONICS A/S
Le apparecchiature elettriche ed elettroniche e le batterie incluse c ontengono materiali,
componenti e sostanze che possono ess ere pericolose per la salute e per l'ambiente
nel caso in cui il materiale di scarto (apparecchiature elettriche ed elettroniche e batterie)
non venisse gestito correttamente.
Gli apparati elettrici ed elettronici e le batterie sono contrassegnati con il simbolo del
cestino barrato (vedere di seguito). Questo simbolo indica che le app ar ecchiature
elettriche ed elettroniche e le batterie non devono essere smaltit e con gli altri rifiuti
domestici, ma devono essere smalt i te separatamente.
È importante inviare le batterie us ate alle strutture appropriate e indicate. In questo
modo si ha la garanzia che le batterie verranno riciclate in conformità a ll a normativa
senza danneggiare l'ambiente.
Per le apparecchiature elettriche ed elettroniche e le batterie, tutte le città hanno
stabilito dei sistemi di smaltiment o che prevedono il conferimento gratuito presso le
stazioni di riciclaggio oppure di raccolta porta a porta. Ulterior i informazioni sono
disponibili presso l'ufficio tecnico m unicipale.
Importato da:
DENVER ELECTRONICS A/S
Omega 5A, Soeften
DK-8382 Hinnerup
Danimarca
www.facebook.com/denverelectronics
Il fabbricante, Inter Sales A/S, dichiara che il tipo di apparecchiatura radio TSP-203 è
conforme alla direttiva 2014/53/UE . Il testo completo della dichiarazione di conformità
UE è disponibile al seguente indiri z zo Internet:
http://www.denver-electronics.com/denver-tsp-203/
IT-9
Page 60

Page 61
TSP-203
ALTAVOZ BLUETOOTH
PORTÁTIL
MANUAL DE USUARIO
Page 62

Page 63

CONTENIDOS
DESCRIPCIÓN DE LOS COMPONENTES ............................................... 2
INSTRUCCIONES DE SEGURIDAD ......................................................... 3
CONEXIÓN DE ALIMENT ACIÓN .............................................................. 4
RECARGA ................................................................................................. 4
CONEXIÓN BLUETOOTH ......................................................................... 5
RADIO FM .................................................................................................. 5
PUERTO USB ............................................................................................ 6
ENTRADA DE LÍNEA ................................................................................ 6
SING-A-LONG ........................................................................................... 7
EFECTOS DE SONIDO ............................................................................. 7
SOLUCIÓN DE PROBLEMAS ................................................................... 7
PRECAUCIÓN ........................................................................................... 9
ES-1
Page 64
SUBIR VOLUMEN DE
BAJAR VOLUMEN DE
1 2 3
4
5
6
7
8910
1112
13
14
1516
17 17
24
2221201918
23
DESCRIPCIÓN DE LOS COMPONENTES
1. MANGO
2. RECLA EQ
3. SINTONIZAR HACIA ARRIBA
4. BAJAR ECO
5. TECLA DE REPETICIÓN
6. SUBIR ECO
7.
MICRÓFONO
8.
MICRÓFONO
9. INDICADOR DE BATERÍA
10. TECLA SUBIR VOLUMEN
11. INDICADOR BLUETOOTH
12. TECLA BAJAR VOLUMEN
13. INDICADOR DE ALIMENTACIÓN
14. PAUSA/REPRODUCCIÓN/BT OFF
15. FUENTE
16. SINTONIZAR HACIA ABAJO
17. SUJECIÓN TAHALÍ
18. ANTENA FM
19. PUERTO USB
20. ENTRADA DE LÍNEA
21. PUERTO DE MICRÓFONOQ
22. ENTRADA CC (15V 1.0A)
23. TECLA DE ENCENDIDO/APAGADO
24. BANDOLERA
ES-2
Page 65
INSTRUCCIONES DE SEGURIDAD
RIESGO DE DESCARGA
Para asegurar un correcto funcionamiento del producto y evitar un incendio o una
descarga eléctrica, por favor, lea detenidamente toda la información que contienen
estas instrucciones de seguridad.
El símbolo de un
relámpago acabado en
flecha, en el interior de un
triángulo equilátero
pretende alertar al
usuario de la presencia
de “tensiones peligrosas”
sin aislamiento en el
interior del equipo, que
pueden ser de magnitud
suficiente para constituir
un riesgo de descarga
eléctrica a las personas.
ELÉCTRICA
ADVERTENCIA:
PARA
REDUCIR EL RIESGO DE
DESCARGA ELÉCTRICA,
NO RETIRE LA CUBIERTA
(O LA PARTE POSTERIOR).
NO CONTIENE PIEZAS
QUE EL USUARIO PUEDA
REPARAR. REMITA LA
REPARACIÓN A
PERSONAL DE SERVICIO
CALIFICADO.
El signo de
exclamación dentro de
un triángulo equilátero
tiene como finalidad
alertar al usuario de la
presencia de
importantes
instrucciones
operativas y de
mantenimiento
(servicio) en la literatura
que acompaña al
aparato.
DESEMBALAJE:
Compruebe que todos los siguientes elementos están incluidos en la caj a.
- Unidad principal
- Adaptador de alimentación CA
- Manual de usuario
- Bandolera
INSTRUCCIONES IMPORTANTES:
1. Asegúrese de que el enchufe está totalmente insertado en la toma de pared y el
producto se opera con una Fuente de alimentación eléctrica que se corresponde
con su tensión nominal.
2. Nunca opera el producto si e l cable o el adaptador presentan daños o est án muy
calientes.
3. No modifique el cable o lo d añe doblándolo, retorciéndolo o t i r ando de él de forma
innecesaria.
4. No intente modificar, reparar o desmontar el producto, excepto cuando lo elimine al
final de su vida útil.
5. Nunca desenchufe el producto con las manos húmedas.
6. Desenchufe el product o de la toma de pared antes de limpiarlo y realizar su
mantenimiento. No use limpiadores l íquidos ni limpiadores aeros oles.
ES-3
Page 66
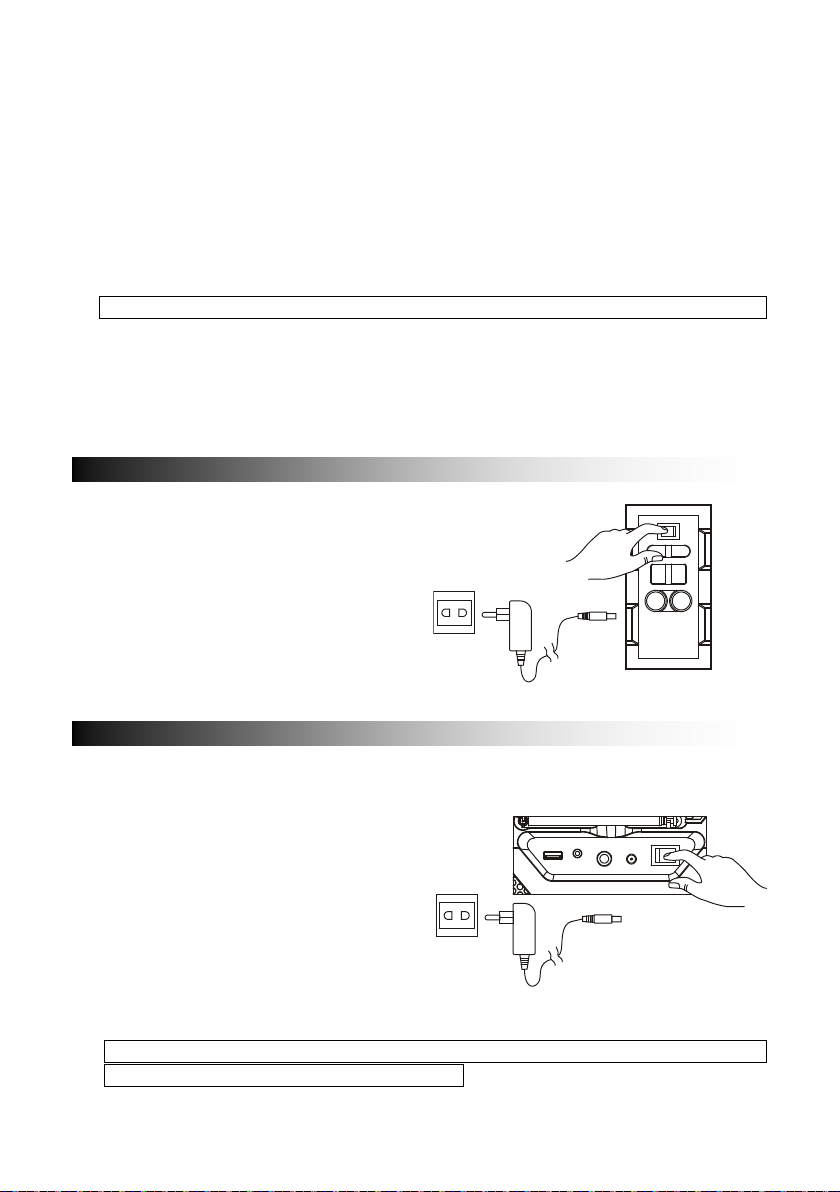
Si el LED de la batería parpadea,
cambiará a color rojo;
indica que la unidad se está
completamente cargada.
POWER
LINE IN
DC JACK
USB 1A CHARGER
MIC 1
ON
OFF
MIC 2
RECARGA
CONEXIÓN DE ALIMENT A CIÓN
7. El cable de alimentación debe desconectarse de la toma de pared cuando no vaya
a usarse durante un periodo prolongado de tiempo.
8. Guarde el producto en una z ona seca cuando no vaya a usarlo.
9. No use este producto cerca del agua, fuentes de calor u otros aparat os que
produzcan calor.
10. La batería no debe exponerse a la luz s olar directa o al fuego.
11. No intente sustituir la batería. Para la reparación y el mantenimient o, por favor,
consulte con el establecimiento de c ompra o con el centro de atención al c liente
designado por el establecimiento.
PRECAUCIÓN: Existe riesgo de explosión si la pila no se sustituye correctamente.
12. No use ninguna otra fuente de alimentac ión que la designada especialmente para
este producto.
13. Guarde estas instrucciones de funci onamiento en un lugar seguro.
14. Póngase en contacto con un centro de servicio autorizado si tiene cual quier duda
acerca de este producto.
- Desembale este producto, y
asegúrese de que el interruptor de
alimentación
ENCENDIDO/APAGADO está en la
posición "OFF".
- Conecte el adaptador CA que se
adjunta con este producto; conecte
el adaptador CA a una toma de
pared.
- La unidad se presenta con una alerta
del indicador de batería.
indica que el nivel de batería e4s bajo y
que es necesario recargarla.
- Al conectar la alimentación CA, el LED
de la batería
recargando.
- Cuando el LED de la batería cambi a a
color verde, indica que la baterí a está
Se recomienda cargar la batería aproximadamente 6 horas antes de que
empiece a usar la unidad por primera vez.
ES-4
Page 67
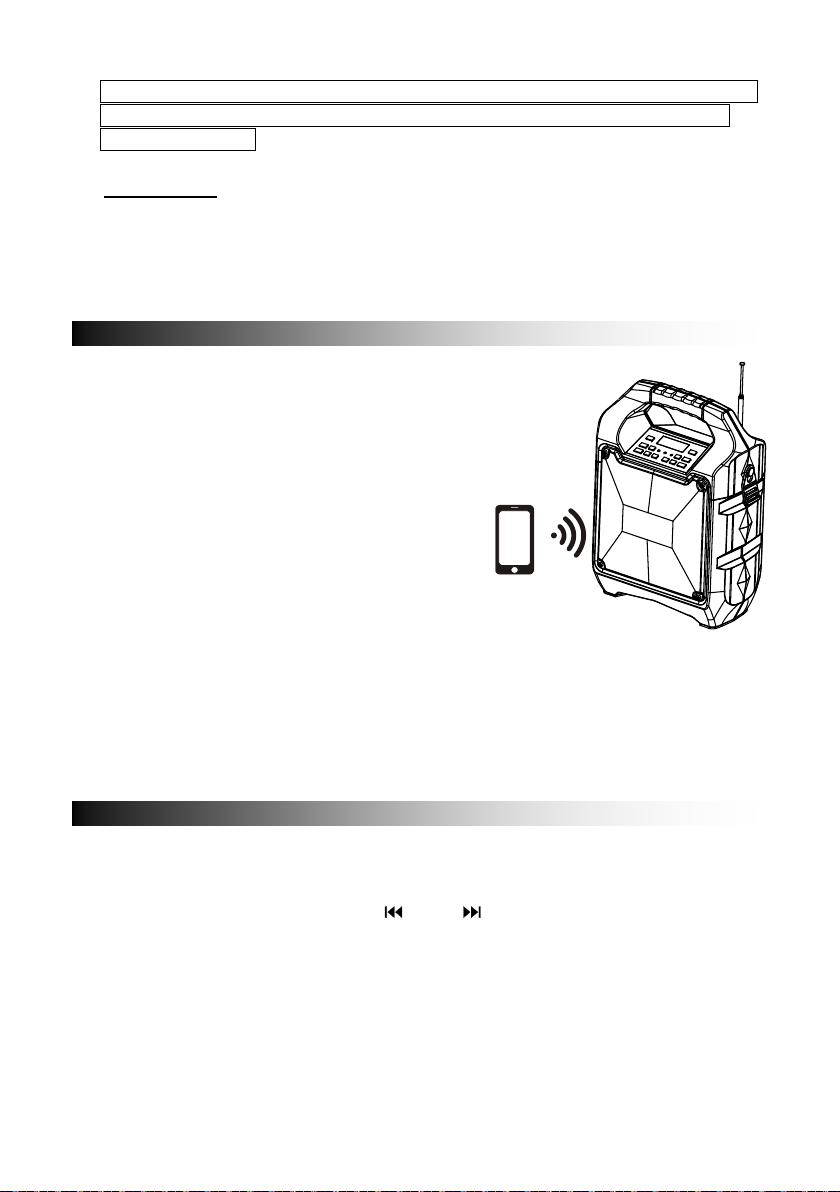
emparejamiento. La pantalla LED roja
203"; posteriormente, púlselo
Se oirá la señal Sonora de conexión y el
indicador de conexión LED azul dejará de
música de su dispositivo
Mantenga pulsada la tecla BT OFF para
en modo de emparejamiento.
RADIO FM
CONEXIÓN BLUETOOTH
Ahorro de energía: Si esté producto está inactivo durante aproximadamente
20 minutos, entrará de forma automática en modo en espera. Se apagará
automáticamente.
Precaución: Para mantener la batería recargable en buenas condiciones, los
usuarios deben comprobar la unidad y asegurarse de girar el interruptor de
encendido/apagado situado en el panel posterior a la posición "Off" siempre
después de usarlo y antes de guardarlo; se recomienda encarecidame nte que los
usuarios recarguen completamente la batería al menos una vez cada dos meses.
- Una vez que el interruptor de encendido se
gira a la posición "On", se fija por defecto el
modo Bluetooth "BT".
- El indicador LED azul parpadeará en modo
mostrará "bt"
- Conecte la función Bluetooth del disposi tivo y
busque "TSPpara conectarlo.
-
parpadear y permanecerá fijo.
- Se ha completado la conexión Bluetooth.
- Seleccione la
Bluetooth y empi9ee a reproducirla.
desconectar el dispositivo emparejado y entrar
- Pulse el botón "Source" y seleccione R adio; se mostrará la frecuencia de radio FM
en la pantalla LED roja.
- Pulse la tecla play/pause para buscar automáticamente y guardar.
- Mantenga pulsado los botones TU
guardada disponible. Púlselos brevemente para sintonizarla.
o TU para elegir la siguiente emisora
ES-5
Page 68
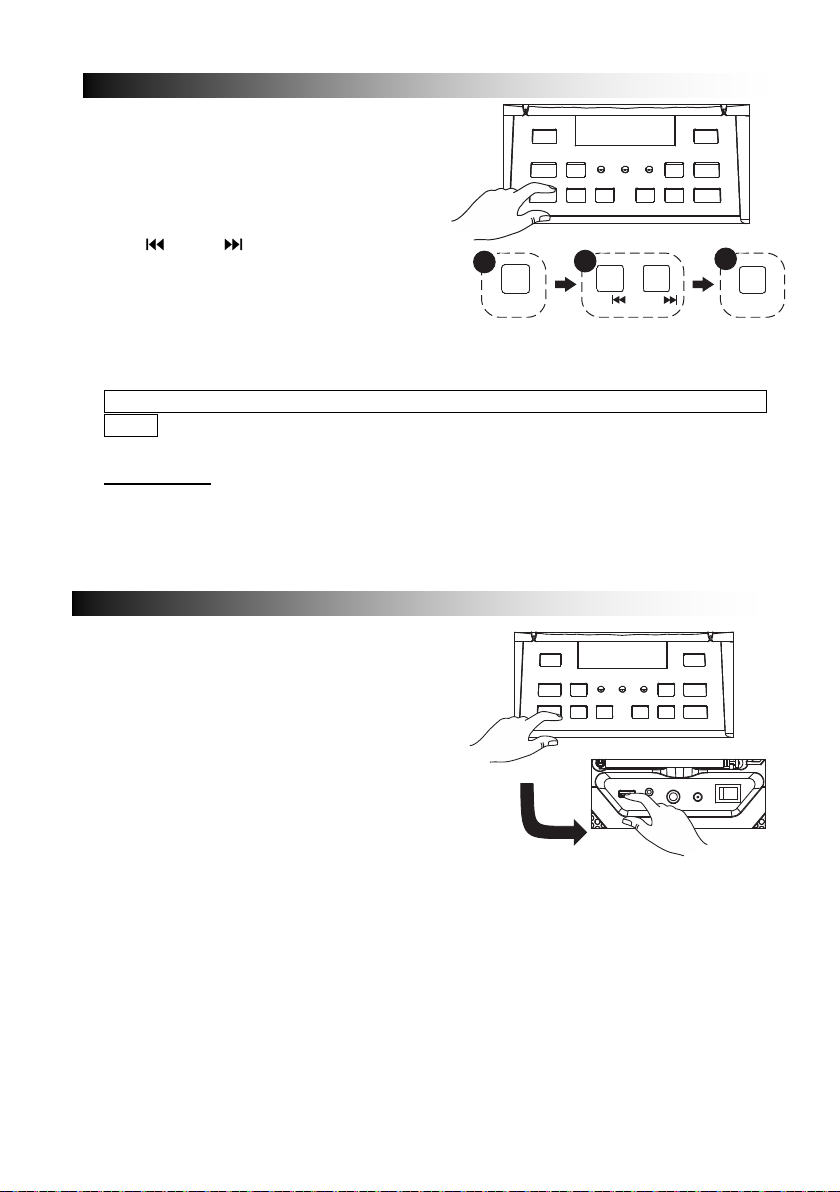
modo de reproducción aleatoria.
Pulse el botón "Source" y seleccione
audio desde el dispositivo conect ado.
REPTU-/
TU+/
1 2
3
SOURCE
ENTRADA DE LÍNEA
PUERTO USB
- Pulse el botón "Source" y seleccione
USB. USB aparecerá en la pantalla
LED roja.
- Inserte la memoria USB.
- Seleccione su música favorita pulsa ndo
o TU .
TU
- Pulse "REP” para repetir una vez la
canción actual; vuelva a pulsar "REP"
para repetir todas las canciones. Pulse
el botón tres veces para entrar en el
Cambiará automáticamente a modo USB una vez que inserte la memoria
USB.
Importante: El puerto USB tiene como finalidad únicamente la transferencia de
datos. No se pueden usar otros dispositivos con esta conexión USB. No se
recomienda el uso de cables de extensi ón USB.
LINE. Aparecerá LINE en la pantalla LED
roja.
- Conecte el cable de 3.5mm en la entrada
LINE situada en la parte posterior y la
unidad entrará en modo LINE IN.
- Puede conectar cualquier dispositivo de
audio que presente una toma de salida
de audio de 3.5mm y reproducir cualquier
ES-6
Page 69
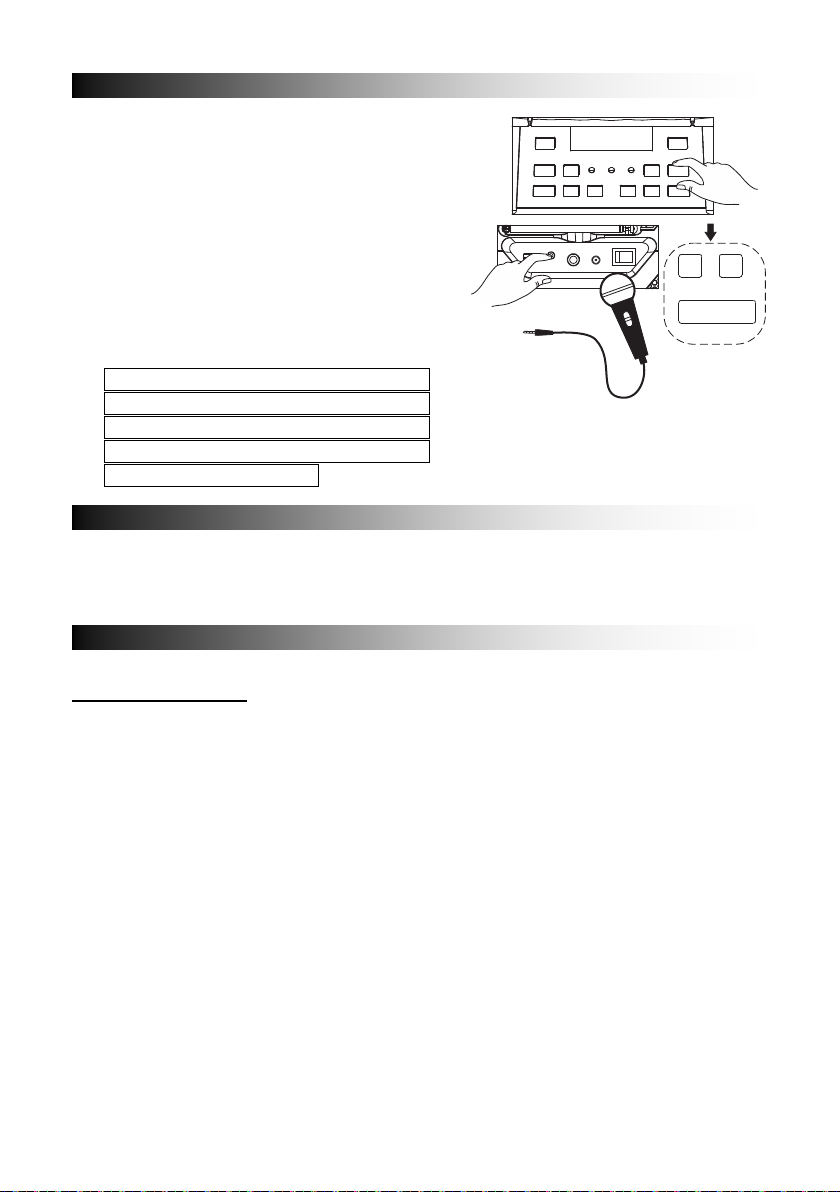
reflexión de un tono alto.
MIC - MIC +
EH+EH-
SOLUCIÓN DE PROBLEMAS
EFECTOS DE SONIDO
SING-A-LONG
- Este producto le permite usar la función
sing-a-long con las canciones que esté
reproduciendo bien en modo BT, US B o
LINE IN.
- Conecte el cable del micrófono en el
panel lateral marcado como "MIC"
- Ajuste el volumen del MICRÓFONO
"MIC +/MIC -" o el volumen principal
situado en el panel de control superior.
- Ajuste el nivel de eco "EH + /EH -".
- Empiece a cantar
ADVERTENCIA: - Si el volumen del
MICRÓFONO y el nivel de ECO está
fijados demasiado alto o al máximo,
tenga cuidado con el tono de
- "El modelo cliente " presenta un ecualizador integrado
- Púlselo y seleccione el efecto de son ido preestablecido para su música; PLANO,
CLÁSICO, POP, ROCK y JAZZ
General
No hay alimentación
- Compruebe que el adaptador CA está ins ertado debidamente en la u nidad y en la
toma eléctrica.
- Compruebe que el interruptor de encendido/apagado está en la posición O n.
- Si la batería está gastada conecte el adaptador CA para cargarlo y operar.
Las teclas no responden
- Gire el interruptor de encendido/ap agado a la posición Off y después de Nuev o a
ON para reiniciar la unidad.
- Desconecte el adaptador CA y vuelva a c onectarlo.
No se ningún sonido
- Asegúrese de que el volumen conectado a la LÏNEA se encuentra a un nivel
razonable.
- Asegúrese de que el dispositivo Blueto oth conectado sale hacia el audio mediante
la salida BT.
- Asegúrese de que el volumen del disposit ivo Bluetoot h conectado es tá fija do en un
nivel razonable.
ES-7
Page 70

Operaciones de Bluetooth
La calidad del audio es mala
- La recepción Bluetooth es mala. Mueva el dispositivo Bluetooth más cerca del
altavoz.
No se puede emparejar al dispositivo Bluetooth
- Asegúrese de que el dispositivo Bluetooth y el altavoz no están conectados a otro
dispositivo Bluetooth.
- Asegúrese de que el LED azul del altavoz parpadea rápidamente (modo
emparejamiento).
- Gire el interruptor de alimentación a la posición Off, y después de nuevo a On;
mantenga pulsado el botón BT off durante 2 segundos para entrar en el modo de
emparejamiento.
ES-8
Page 71

PRECAUCIÓN:
- El adaptador CA/CC y la unidad pri nc i pal no deben estar expuestos a goteo o
salpicaduras y no deben colocarse objetos llenos de líquidos, como jarrones,
encima del aparato o del adaptador CA/ C C.
- La distancia mínima alrededor del aparato para permitir suficiente ventilación es de
10 cm.
- No debe impedirse la ventilación cubriendo las aperturas con objetos como
periódicos, manteles, cortinas , etc.
- No debería colocar sobre el aparato ll am as desprotegidas, como velas encendidas.
- Cuando se emplea el enchufe del adaptador CA/CC como dispositivo de
desconexión, el dispositivo de des conexión debe permanecer totalmente operativo.
Para desconectar completamente la entrada de corriente, el adaptador de CA/CC
deberá desconectarse por completo de la alimentación.
- El adaptador CA/CC no debe estar obstruido y se debe accede a él fácilmente
durante el uso previsto.
- No use el aparato en climas tropicales .
Acerca de la batería de plomo ácido sellada:
Esta unidad funciona bien con el pack de la batería (Nº de modelo: Tianchang 6-FM-2.6,
12V, 2600mAh); desconecte el adaptador d e alimentación CA de la toma de entrada
CC para que funcione el pack de la batería (una v ez que esté totalmente cargada);
desconectar el adaptador de alimentación CA mientras se encuentra fijado el pack de la
batería inicia la carga de esta batería. El in dicador LED de carga se ilumina de color
rojo durante la carga; cuando la batería está totalmente cargada, el indicador de vuelve
de color verde. Cargar totalmente un pac k de batería vacía puede tardar 3 horas. Un
pack de batería completamente cargado puede durar aproximadamente 2 horas de
reproducción continua. Este tiempo de reproducción puede variar con el entorno
circundante, el nivel de volumen del altavoz y las condiciones de la batería. Se
aconseja que espere 10-20 minutos antes de cargar el pack de la batería si se ha
agotado durante su funcionamiento.
ES-9
Page 72

TODOS LOS DERECHOS RESERVADOS, COPYRIGHT DENVER
ELECTRONICS A/S
Los equipos eléctricos y electrónicos, y las pilas o baterías incluidas, contienen
materiales, componentes y sustancias que pueden ser perjudiciales para su salud y
para el medio ambiente, si el material de desecho (equipos eléctricos y electrónicos y
baterías) no se manipula correctam ente.
Los equipos eléctricos y electrónicos, y las pilas o baterías incluidas, llevan un símbolo
de un cubo de basura cruzado por un aspa, como el que se ve a continuación. Este
símbolo indica que los equipos eléctricos y electrónicos, y sus pilas o baterías, no
deberían ser eliminados con el res to de basura del hogar, sino que deben eliminarse
por separado.
Como usuario final, es importante que usted remita las pilas o baterías usadas al centro
adecuado de recogida. De esta manera s e asegurará de que las pilas y baterías se
reciclan según la legislación y no dañarán el medio ambiente.
Todas las ciudades tienen establecidos puntos de recogida, en los que puede depositar
los equipos eléctricos y electrónicos, y sus pilas o baterías gratuitamente en los centros
de reciclaje y en otros lugares de recog ida, o solicitar que sean recogidos de su hogar.
Puede obtener información adicional en el departamento técnico de su ciudad.
Importador:
DENVER ELECTRONICS A/S
Omega 5A, Soeften
DK-8382 Hinnerup
Dinamarca
www.facebook.com/denverelectronics
Por la presente, Inter Sales A/S declara que el tipo de equipo radioeléctrico TSP-203 es
conforme con la Directiva 2014/53/UE. El texto completo de la declaraci ón UE de
conformidad está disponible en la dir ección Internet siguiente:
http://www.denver-electronics.com/denver-tsp-203/
ES-10
Page 73
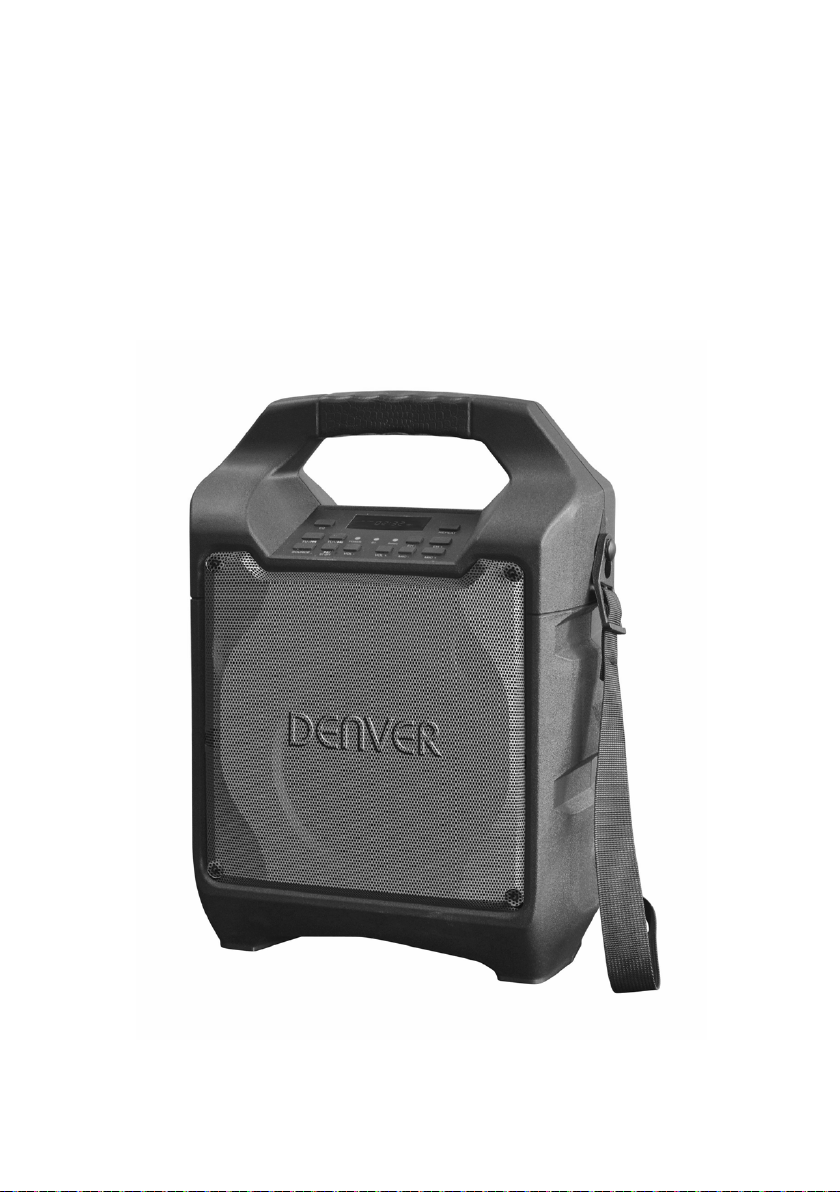
TSP-203
COLUNA BLUETOOTH
PORTÁTIL
MANUAL DO UTILIZADOR
Page 74

Page 75

CONTEÚDO
DESCRIÇÃO DOS COMPONENTES ........................................................ 2
INSTRUÇÕES DE SEGURANÇA .............................................................. 3
LIGAÇÃO DA ALIMENTAÇÃO .................................................................. 4
RECARREGAR .......................................................................................... 4
LIGAÇÃO BLUETOOTH ............................................................................ 5
RÁDIO FM .................................................................................................. 5
PORTA USB ............................................................................................... 6
ENTRADA .................................................................................................. 6
KARAOKE ................................................................................................. 7
EFEITOS DE SOM ..................................................................................... 7
RESOLUÇÃO DE PROBLEMAS ............................................................... 7
CUIDADO ................................................................................................... 9
PT-1
Page 76
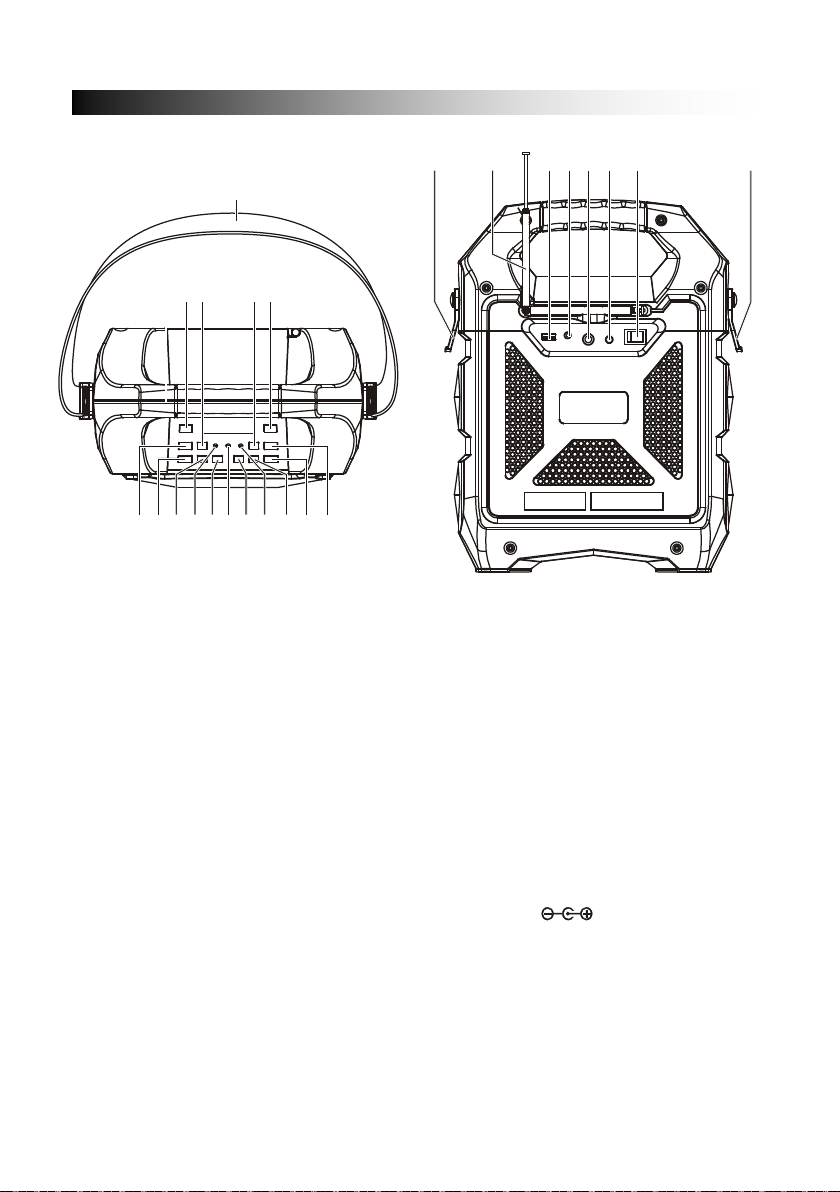
TECLA DE AUMENTO DE
TECLA DE REDUÇÃO DE
ÃO CC
1 2 3
4
5
6
7
8910
1112
13
14
1516
17 17
24
2221201918
23
DESCRIÇÃO DOS COMPONENTES
1. PEGA
2. TECLA EQ
3. AUMENTAR SINTONIZAÇÃO
4. REDUZIR ECO
5. TECLA REPETIR
6. AUMENTAR ECO
7. AUMENTAR VOLUME MIC
8. BAIXAR VOLUME MIC
9. INDICADOR DA BATERIA
10.
VOLUME
11. INDICADOR BLUETOOTH
12.
VOLUME
13. INDICADOR DE ALIMENTAÇÃO
14. PAUSA/REPRODUZIR/BT
DESLIGADO
15. FONTE
16. REDUZIR SINTONIZAÇÃO
17. CLIPE BALDRIC
18. ANTENA FM
19. PORTA USB
20. ENTRADA
21. PORTA MIC
22. ENTRADA DE ALIMENTAÇ
(15V 1.0A)
23. BOTÃO LIGAR/DESLIGAR
24. ALÇA DE OMBRO
PT-2
Page 77
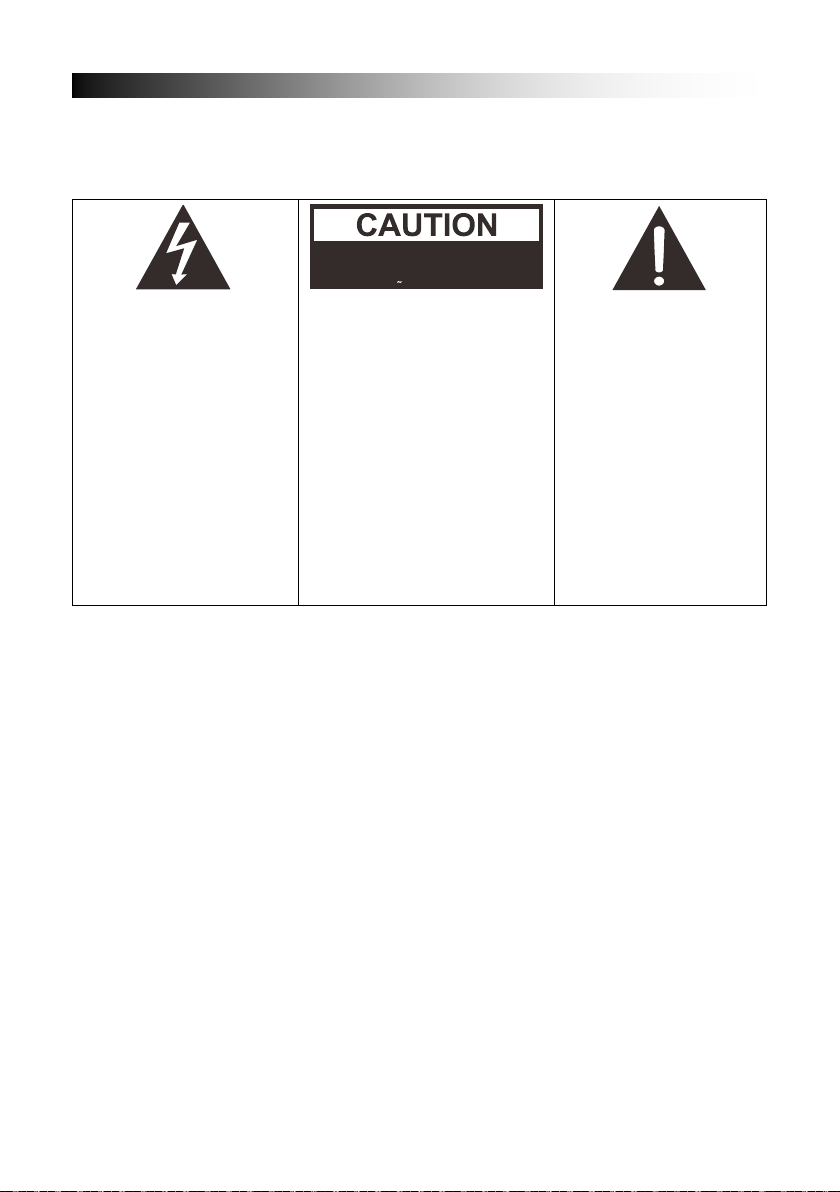
QUALIFICADO.
INSTRUÇÕES DE SEGURANÇA
RISCO DE CHOQUE
Para garantir um funcionamento corr eto do produto e im pedir a ocorr ência de inc êndio
ou o risco de choque elétrico, deve ler cui dadosamente toda a informação incluídas
nestas Instruções de segurança.
O símbolo do raio com
ponta de seta dentro dum
triângulo equilátero serve
para alertar o utilizador
para a presença de
“tensão perigosa” e não
isolada dentro do
envoltório do produto,
que pode ser de
magnitude suficiente para
constituir risco de
eletrocussão.
ELÉTRICO
ADVERTÊNCIA: PARA
REDUZIR O RISCO DE
CHOQUE ELÉTRICO, NÃO
RETIRAR A T AMP A (OU A
PARTE DE TRÁS). NÃO
EXISTEM NO INTERIOR
PARTES QUE POSSAM
SER REPARADAS PELO
UTILIZADOR. AS
REPARAÇÕES DEVEM
SER REALIZADAS APENAS
POR PESSOAL
O ponto de exclamação
num triângulo
equatorial destina-se a
alertar o utilizador da
presença de instruções
de funcionamento e
manutenção
importantes no manual
que acompanha o
aparelho.
DESEMBALAR:
Verificar se todos os itens seguintes estão incluídos na embalagem.
- Unidade principal
- Adaptador de Alimentação de CA
- Manual do Utilizador
- Alça de ombro
INSTRUÇÕES IMPORTANTES:
1. Assegurar que a ficha está t otalmente introduzida na tomada de p arede e que o
produto é operado com um fonte de alimentação elétrica que coincida com a tensão
nominal.
2. Nunca operar o produto caso o cabo ou o adaptador estiver danificado ou
demasiado quente.
3. Não modificar o cabo ou danificar o mesmo em circunstância alguma como dobrar,
torcer ou puxar o mesmo desnecessariamente.
4. Não tentar modificar ou reparar ou em circunstância alguma desmontar o produto
exceto quando for para o eliminar no fim da r espetiva vida útil.
5. Nunca desligar o produto com as mãos molhadas.
6. Desligar este produto da t om ada de parede antes de efetuar a limpeza e a
manutenção. Não utilizar detergentes líquidos ou aerossóis.
PT-3
Page 78
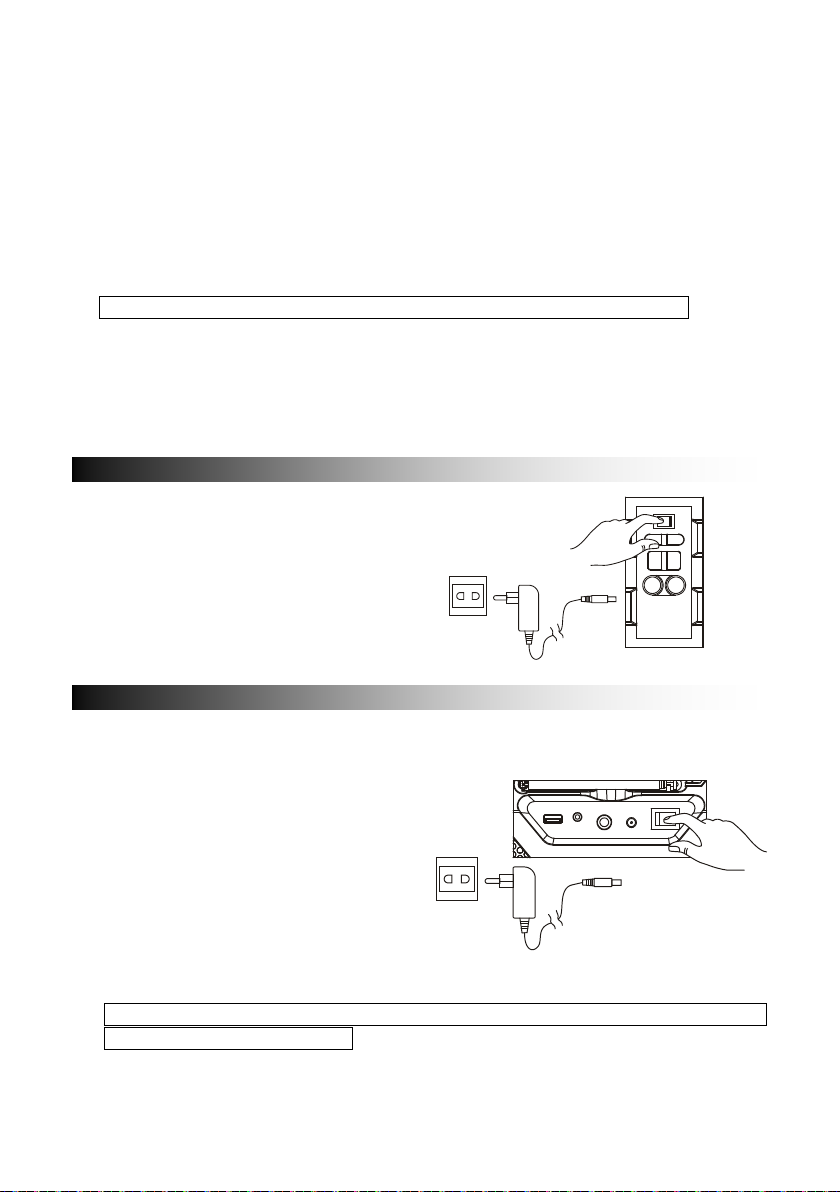
O aparelho vem equipado com um
fraco e é necessário recarregar a
carregada.
POWER
LINE IN
DC JACK
USB 1A CHARGER
MIC 1
ON
OFF
MIC 2
RECARREGAR
LIGAÇÃO DA ALIMENTAÇÃO
7. O cabo de alimentação dev e ser retirado da tomada de parede quando o mesmo
não for utilizado durante um longo per íodo de tempo.
8. Guardar este produto num espaço seco quando não estiver em uso.
9. Não usar este produto junto de água, fontes de calor ou outros aparelhos que
produzam calor.
10. A bateria não deve ser exposta à luz solar direta ou ao fogo.
11. Não tentar substituir a bateria. Para reparação e manutenção deve consultar o
estabelecimento comercial onde f ez a compra ou o centro de assistência ao c l iente
indicado pelo referido estabel ecimento.
CUIDADO: Perigo de explosão se a pilha for incorretamente substituída.
12. Não usar qualquer fonte de alimentação exceto a especificamente indicada para
este produto.
13. Guardar as instruções de funcionamento num lugar seguro.
14. Contactar um centro de assistênci a autorizado se tiver alguma dúvida acerca deste
produto.
- Desembalar este produto,
assegurar que o interruptor
LIGAR/DESLIGAR está na posição
“OFF”.
- Ligar o adaptador CA fornecido
para este produto, ligar o
adaptador à tomada de parede.
alarme indicador de bateria.
- Se o LED da bateria ficar intermitent e,
significa que o nível da bateria está
mesma.
- Ao ligar a alimentação CA, o LED da
bateria ficará vermelho, isso significa
que o aparelho está a recarregar.
- Quando o LED da bateria ficar verde,
significa que a bateria está totalme nte
É recomendado carregar a bateria durante cerca de seis horas antes de usar
o aparelho pela primeira vez.
PT-4
Page 79
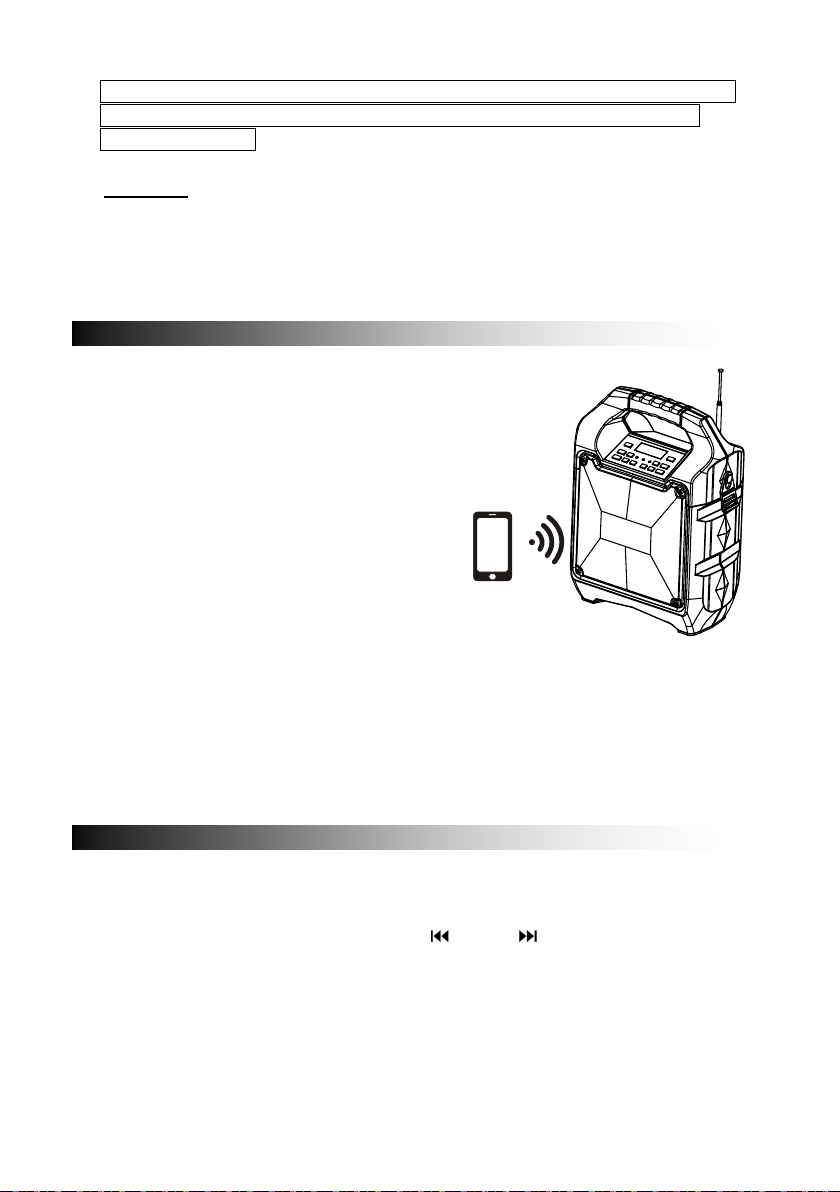
203” seguidamente
rtir do seu
dispositivo Bluetooth e começar a
Manter premida a tecla BT OFF para
no modo de emparelhamento.
RÁDIO FM
LIGAÇÃO BLUETOOTH
Poupança de energia: Se este produto estiver inativo durante cerca de 20
minutos, entrará automaticamente no modo em espera. Desligar-se-á
automaticamente.
Cuidado: Para manter a bateria recarregável em boas con dições, os utilizadores
devem verificar o aparelho e colocar o interruptor de Ligar/Desligar no painel
traseiro na posição de “Off” sempre que o u sar e antes de o guardar, é altamente
recomendado que os utilizadores carregue m totalmente a bateria p elo menos uma
vez em cada dois meses.
- Depois de o interruptor ser colocado na
posição “On”, o modo BT Bluetooth é
definido como predefinido.
- O indicador LED azul ficará i ntermitente no
modo de emparelhamento. O visor do LED
vermelho exibirá “bt”
- Ativar a função Bluetooth no seu dis positivo
e procurar por “TSPpremir para ligar.
- Será ouvido um sinal de som ligado e o
indicador de ligação do LED azul deixará de
piscar e ficará fixo.
- A ligação Bluetooth está concluída.
- Selecionar a música a pa
reproduzir.
desligar o dispositivo emparel hado e entrar
- Premir o botão “Source” e selecionar Rádio, a Frequência do Rádio FM será exibida
no visor do LED vermelho.
- Premir a tecla reproduzir/pausa para busca automática e memorizar.
- Premir e manter premidos os botões TU
seguinte disponível memorizada. Premir ligeiramente os mesmos para sintonização
fina.
ou TU para escolher a estação
PT-5
Page 80
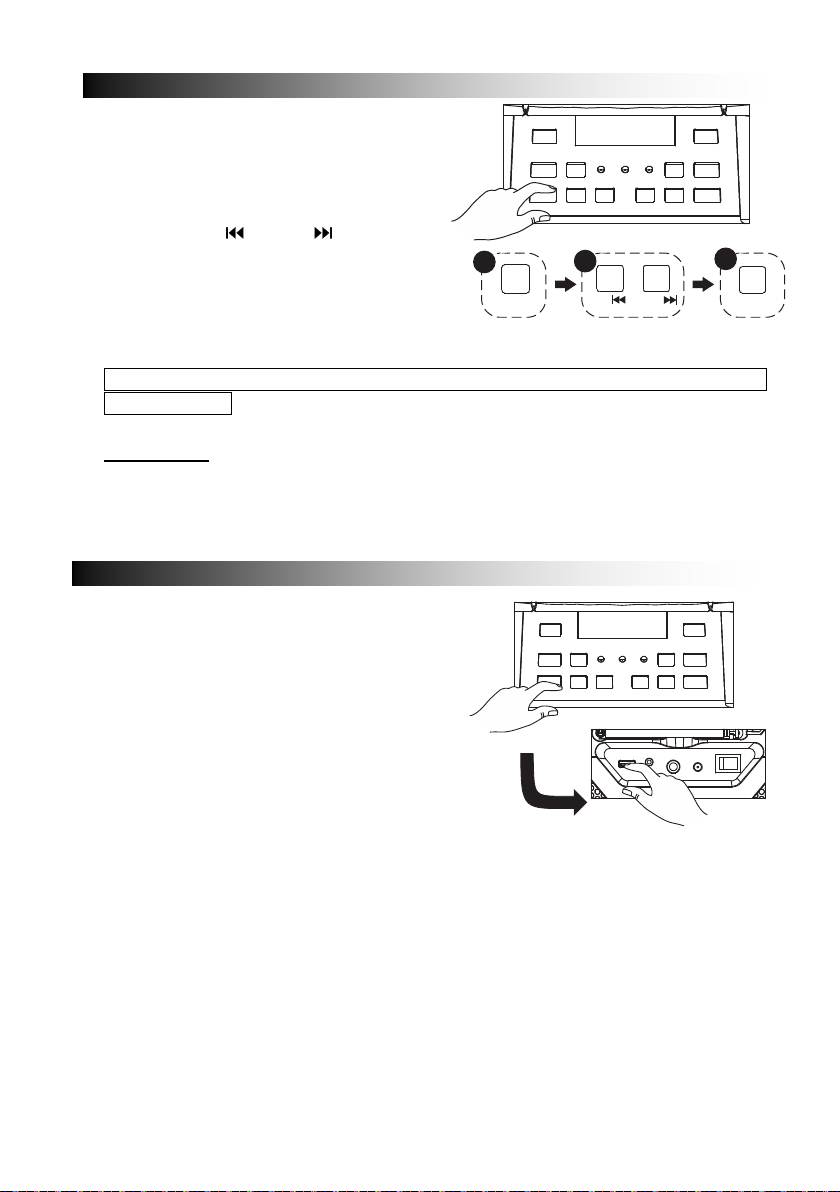
Selecionar a sua música favorita
de reprodução aleatória.
Premir o botão “Source” e selecionar
LINE no painel traseiro e o aparelho
REPTU-/
TU+/
1 2
3
SOURCE
ENTRADA
PORTA USB
- Premir o botão “Source” e selecionar
USB. Será exibido USB no visor do
LED vermelho.
- Inserir a unidade USB.
premindo TU ou TU .
- Premir “REP” para repetir uma vez para
a canção atual, premir de novo “REP”
para repetir todas as canções. Premir o
botão três vezes para entrar no modo
Mudará automaticamente para o modo USB depois de ter sido inserida a
unidade USB.
Importante: A porta USB é destinada apenas para a transferência de dados. Não
podem ser usados outros dispositivos com esta l igação USB. Não é recomendad o
o uso dos cabos de extensão USB.
LINE. Será exibido LINE no vi sor do LE D
vermelho.
- Ligar o seu cabo de 3,5 mm na entrada
entrará no modo LINE IN.
- Pode ligar qualquer dispositivo áudio qu e
tenha uma ficha de saída áudio de 3,5
mm e reproduzir qualquer áudio a partir
do dispositivo ligado.
PT-6
Page 81
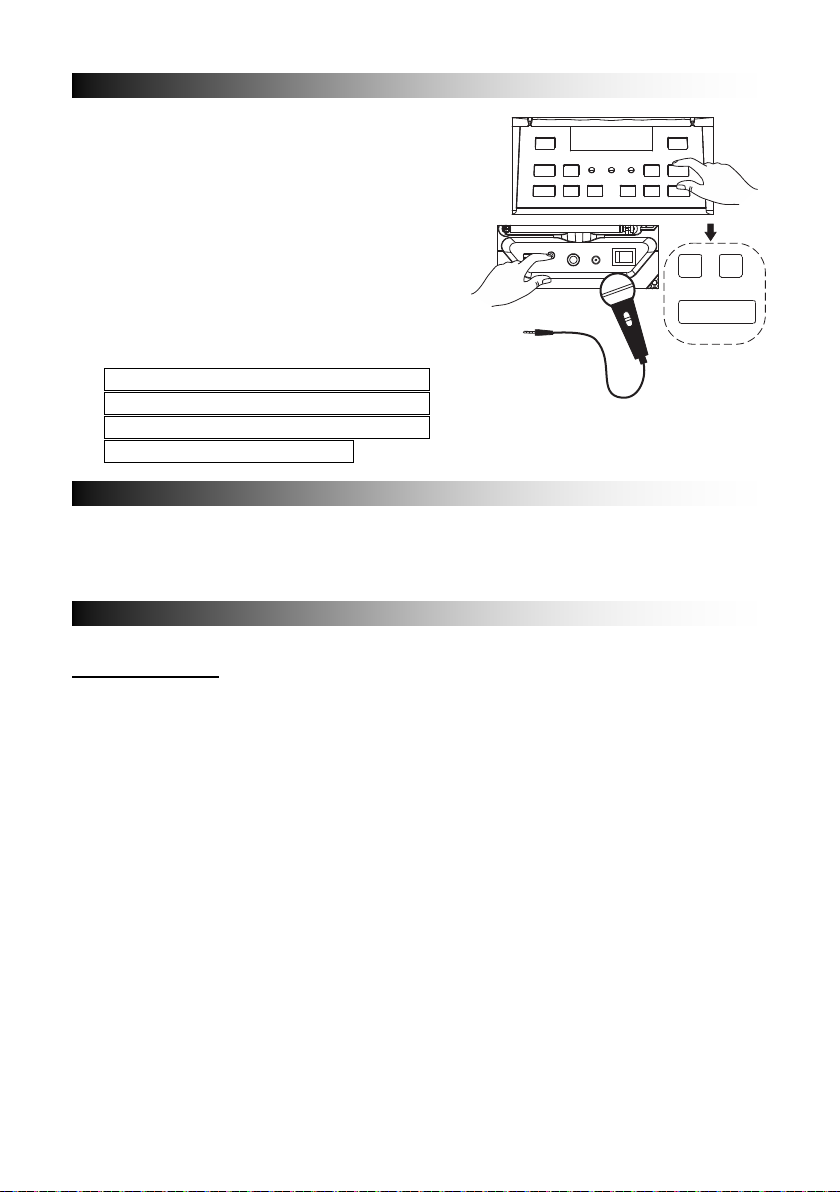
com canções que estão a ser
reproduzidas tanto no modo BT USB
som de reflexão dos agudos.
MIC - MIC +
EH+EH-
RESOLUÇÃO DE PROBLEMAS
EFEITOS DE SOM
KARAOKE
- Este produto permite-lhe fazer karaoke
como no modo LINE IN.
- Ligar o cabo do seu microfone no pain el
lateral marcado com “MIC”.
- Ajustar o volume MIC "MIC +/MIC -" ou o
volume principal na parte superior d o
painel de controlo.
- Ajustar o nível Eco “EH+/EH-”.
- Começar a cantar.
ADVERTÊNCIA: - Se o volume do MIC
e o nível ECO for definido demasiado
alto ou no máximo, ter cuidado com o
- O “modelo Cliente” tem um Equalizador integrado.
- Premir e selecionar o efeito de som predefinido para a sua música: LIGEIRA ,
CLÁSSICA, POP, ROCK e JAZZ.
Geral
Sem alimentação
- Verificar se o adaptador CA está inserido com firmeza no aparelho e a tomada
elétrica.
- Verificar se o interruptor Ligar/Desligar está na posição Ligar.
- Se a bateria estiver fraca ligar o adaptador CA para carregar e poder operar.
As teclas não respondem.
- Ligar o interruptor Ligar/Desligar na pos ição Desligar e seguidamente na posição
Ligar para reiniciar o aparelho.
- Desligar o adaptador CA e ligá-lo novamente.
Nenhum som ouvido
- Assegurar que o volume LINE ligado est á definido num nível aceitável.
- Assegurar que o dispositivo Bluetooth lig ado tem saída de áudio através da saída
BT.
- Assegurar que o volume do dispositivo Bluetooth ligado está definido num nível
aceitável.
PT-7
Page 82

Operações Bluetooth
A qualidade do áudio é fraca
- A receção do Bluetooth é fraca. Deslocar o dispositivo Bluetooth para mais perto da
coluna.
Não é possível emparelhar o dispositivo Bluetooth
- Assegurar que o dispositivo Bluetooth e acoluna não estão ligados a qualquer outro
dispositivo Bluetooth.
- Assegurar que o LED azul na coluna está a piscar rapidamente (modo de
emparelhamento).
- Desligar a alimentação e depois voltar aligá-la novamente, premir o botão BT Off
durante 2 segundos para entrar no modo de em par elh ame n to.
PT-8
Page 83

CUIDADO:
- O adaptador CA/CC e o aparelho principal não devem ser expostos a pingos ou
jactos de água e objetos contendo líquidos, tal como jarras não devem ser
colocadas por cima do aparelho e do adaptador CA/CC.
- Manter uma distância mínima de 10 cm à v olta do aparelho para ventilação
suficiente.
- A ventilação não deve ser obstruída através da cobertura das abert uras de
ventilação com objetos, como jornais , toalhas de mesa, cortinas, etc.
- Não colocar fontes de chama viva, com o velas acesas, perto da aparelhagem.
- A ficha elétrica do adaptador CA é usada para desligar o aparelho, o aparelho
desligado deve ser mantido pronto a funcionar.
Para desligar completamente a entrada de alimentação, o adaptador CA/CC deve
ser completamente desligado da c or rente elétrica.
- O adaptador CA/CC não deve estar obstruído ou deve ser facilmente acessí vel
durante o uso a que se destina.
- Não usar o aparelho em climas tropicais .
Acerca da bateria de ácido-chumbo selada:
Este aparelho funciona tanto com a bateria (Modelo nº: Tianchang 6-FM-2.6, 12V,
2600mAh) desligar o adaptador C A da ficha de entrada CC para funcionar a bateria
(depois de totalmente carregada), ligar o adaptador CA enquanto a bateria est á ligada
inicia ao carregamento da mesm a. As luzes do i ndicador LED carregado acen dem em
vermelho durante o carregamento, quando a bateria está totalmente carregada o
indicador fica verde. Carregar tot almente uma bateria descarregada pode levar até 3
horas. Uma bateria totalmente carrega da tem uma duração de cerca d e 2 horas de
reprodução contínua. O tempo de reproduç ão pode variar c om o ambiente em redor, o
nível de volume da coluna e o estado da bateria. É aconselhável aguardar 10-20
minutos antes de voltar a carregar a bateria se tiver ficado fraca durante o
funcionamento.
PT-9
Page 84

TODOS OS DIREITOS RESERVADOS, COPYRIGHT DENVER
ELECTRONICS A/S
Equipamentos elétricos e eletr ónicos, bem como as pilhas que os acompanham,
contêm materiais, componentes e substâncias que podem ser perigosos para a sua
saúde e para o meio ambiente, caso os mat eriais usados (equipamentos elétricos e
eletrónicos deitados fora, incluindo pilhas) não sejam eliminados corretamente.
Os equipamentos elétricos e eletrónicos, bem como as pilhas, vêm marc ados com um
símbolo composto de um caixote do lixo e um X, como mostrado abaixo. Este símbolo
significa que os equipamentos elétricos e eletrónicos, bem como as pilhas, não devem
ser eliminados em conjunto com o lixo doméstico, mas separadamente.
Como utilizador final, é important e que entregue as suas pilhas usadas n uma unidade
de reciclagem adequada. Assim, certamente as pilhas serão recic ladas de acordo com
a legislação e o meio ambiente não será prejudicado.
Todas as cidades possuem pontos de recolha específicos, onde os equipamentos
elétricos e eletrónicos, bem como as pilhas, podem ser enviados gratui tamente para
estações de reciclagem e para outros locais de recolha ou recolhidos na sua própria
casa. O departamento técnico da sua cidade disponibiliza informações adicionais
quanto a isto.
Importador:
DENVER ELECTRONICS A/S
Omega 5A, Soeften
DK-8382 Hinnerup
Dinamarca
www.facebook.com/denverelectronics
O(a) abaixo assinado(a) Inter Sales A/S declara que o presente tipo de equipamento de
rádio TSP-203 está em conformidade com a Diretiva 2014/53/UE. O texto integral da
declaração de conformidade está disponível no seguinte endereço de I nternet:
http://www.denver-electronics.com/denver-tsp-203/
PT-10
Page 85
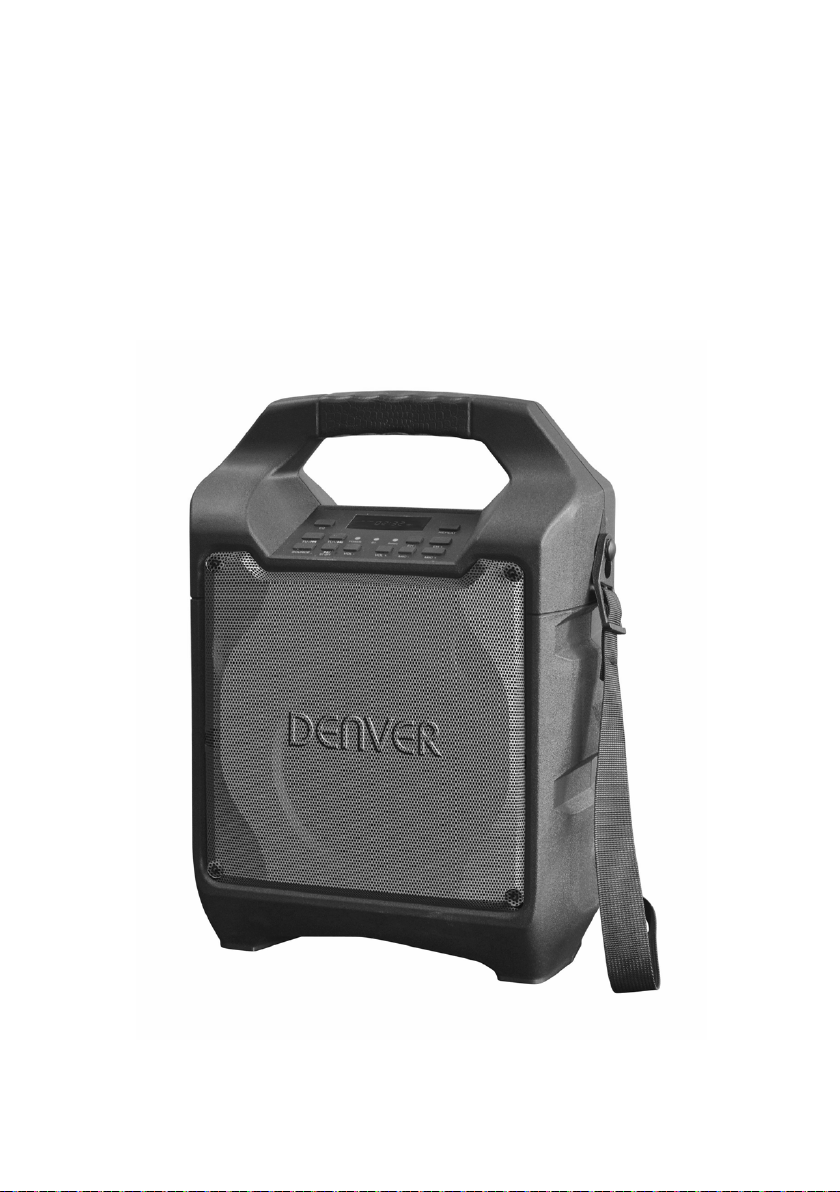
TSP-203
PRZENOŚ NY GŁOŚ NIK
BLUETOOTH
PODRŚ CZNIK OBSŁUGI
Page 86

Page 87

SPIS TRE•CI
OPIS ELEMENTÓW ................................................................................... 2
WSKAZÓWKI BEZPIECZE• STWA ........................................................... 3
PODŁŚ CZENIE ZASILANIA ...................................................................... 4
ŁADOWANIE ............................................................................................. 4
ZŁŚ CZE BLUETOOTH .............................................................................. 5
RADIO FM .................................................................................................. 5
PORT USB ................................................................................................. 6
WEJ• CIE LINIOWE ................................................................................... 6
• PIEWANIE ............................................................................................... 7
EFEKTY D• WI• KOWE .............................................................................. 7
ROZWI• ZYWANIE PROBLEMÓW ............................................................ 7
OSTRO• NIE .............................................................................................. 9
PL-1
Page 88
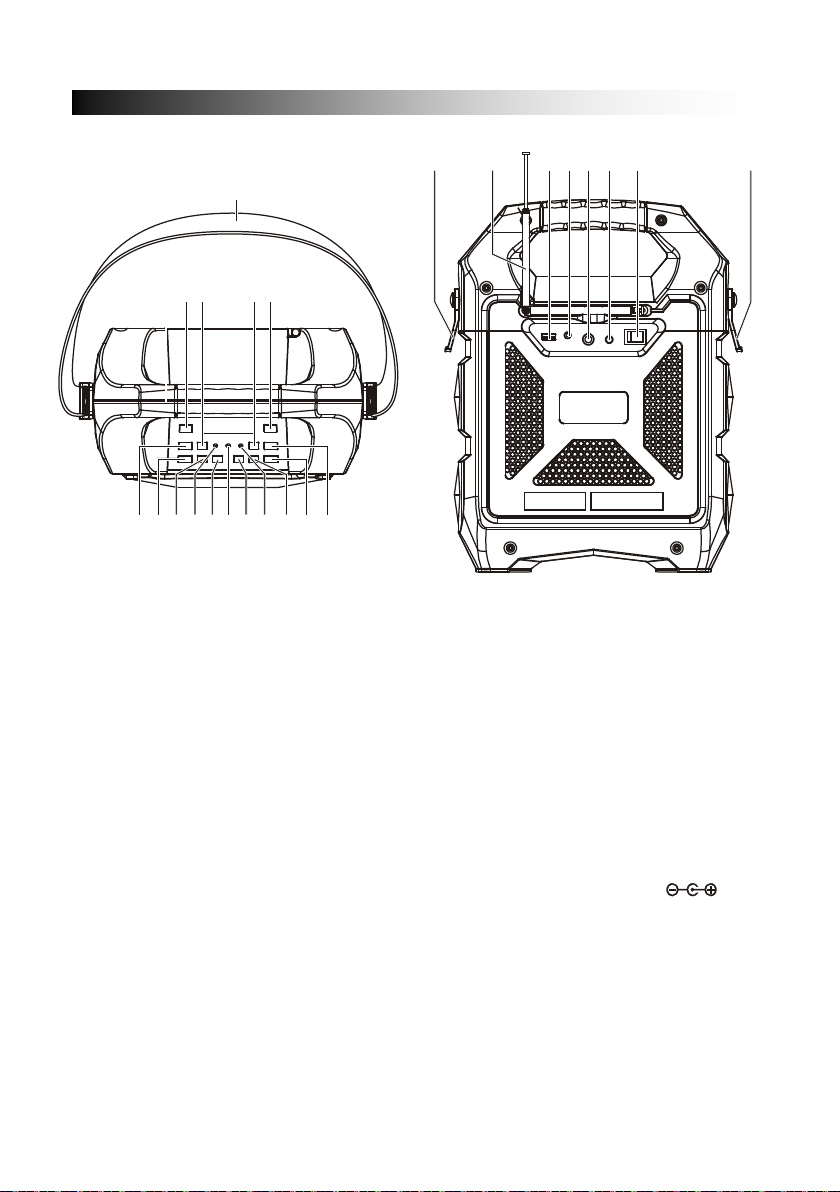
1 2 3
4
5
6
7
8910
1112
13
14
1516
17 17
24
2221201918
23
OPIS ELEMENTÓW
1. RĄCZKA
2. PRZYCISK KOREKTORA
3. DOSTRAJANIE W GÓRĘ
4. ECHO W DÓŁ
5. PRZYCISK POWTARZANIA
6. ECHO W GÓRĘ
7. GŁOŚNOŚĆ MIKROFONU W
GÓRĘ
8. GŁOŚNOŚĆ MIKROFONU W
DÓŁ
9. WSKAŹNIK AKUMULATORA
10. PRZYCISK GŁOŚNOŚCI W
GÓRĘ
11. WSKAŹNIK BLUETOOTH
12. PRZYCISK GŁOŚNOŚCI W DÓŁ
13. WSKAŹNIK ZASILANIA
14. WYŁ. PAUZA/ODTWARZANIE/BT
15. ŹRÓDŁO
16. DOSTRAJANIE W DÓŁ
17. ZACISK PASKA
18. ANTENA FM
19. PORT USB
20. WEJŚCIE LINIOWE
21. PORT MIKROFONU
22. WEJŚCIE DC (15 V 1,0 A)
23. WŁĄCZNIK/WYŁĄCZNIK
24. PASEK NA RAMIĘ
PL-2
Page 89
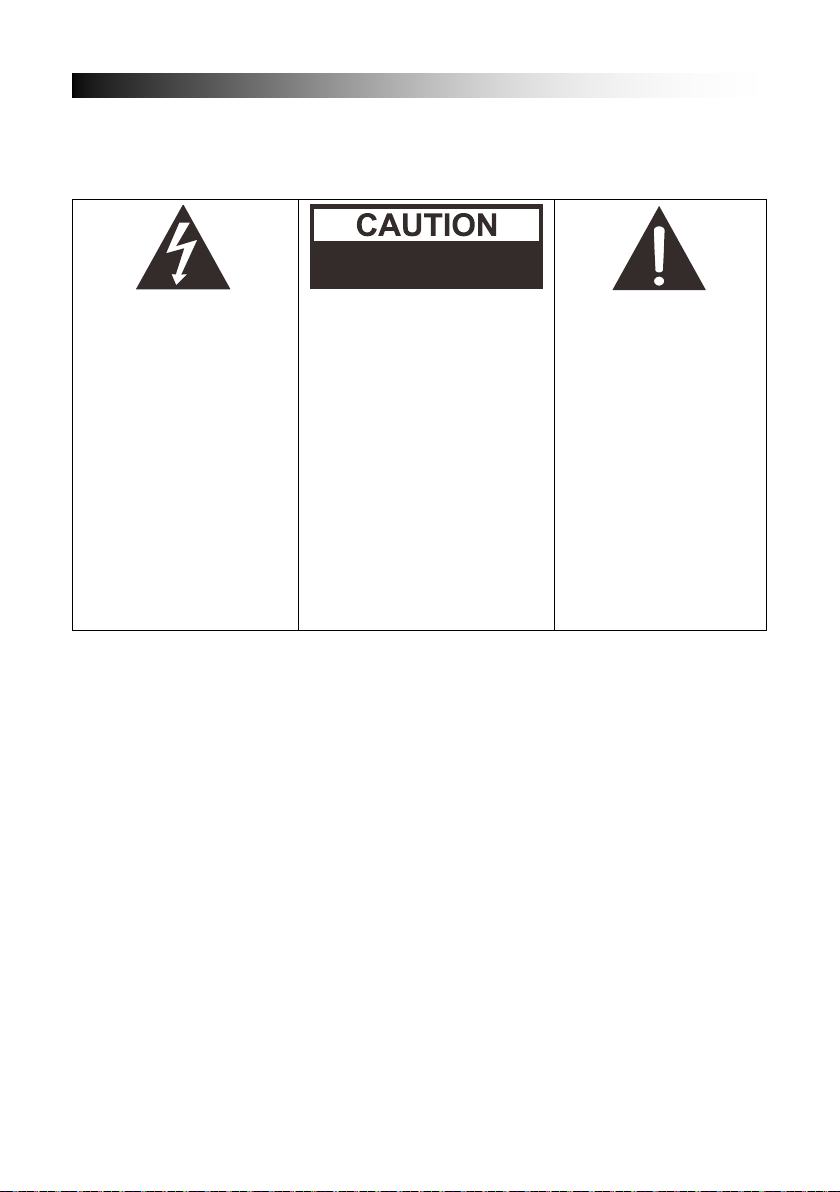
PERSONELOWI.
WSKAZÓWKI BEZPIECZE• STWA
RYZYKO PORA• ENIA
Aby zapewnić prawidłowe działanie produktu i zapobiec pożarowi lub zagrożeniu
porażeniem, należy uważnie przeczytać wszystkie informacje zawarte w niniejszych
wskazówkach bezpieczeństwa.
Symbol błyskawicy
wpisany w trójkąt
równoboczny ma za
zadanie zwrócić uwagę
użytkownika na obecność
nieosłoniętego
niebezpiecznego
napięcia wewnątrz
obudowy produktu,
którego natężenie jest
wystarczające, by
stanowić zagrożenie
porażenia prądem
PR• DEM
OSTRZE• ENIE: ABY
ZMNIEJSZYĆ
ZAGROŻENIE
PORAŻENIEM
ELEKTRYCZNYM, NIE
NALEŻY ZDEJMOWAĆ
OBUDOWY (ANI TYŁU). NIE
MA WEWNĄTRZ CZĘŚCI
PODLEGAJĄCYCH
SERWISOWI
UŻYTKOWNIKA. SERWIS
PROSZĘ POWIERZYĆ
WYKWALIFIKOWANEMU
Wykrzyknik na trójkącie
równobocznym
informuje użytkownika
o ważnych instrukcjach
działania i konserwacji
(serwisowania) w
literaturze dołączonej
do urządzenia.
elektrycznym.
ROZPAKOWANIE:
Sprawdź, czy wszystkie poniższe elementy znajdują się w pudełku.
- Jednostka główna
- Adapter zasilania AC
- Podręcznik obsługi
- Pasek na ramię
WA• NE INSTRUKCJE:
1. Upewnij się, że wtyczka jest w pełni wsunięta w gniazdo ścienne oraz że produkt
działa na źródle zasilania zgodnym z napięciem na tabliczce znamionowej.
2. Nigdy nie włączaj produktu, jeśli kabel zasilania lub adapter są uszkodzone lub
bardzo gorące.
3. Nie modyfikuj kabla zasilania oraz nie pozwól, by został uszkodzony przez
zaginanie, zakręcanie lub niepotrzebne ciągnięcie.
4. Nie próbuj modyfikować, naprawiać ani w żaden inny sposób rozmontowywać
produktu, chyba że podczas procesu likwidacji pod koniec jego żywotności.
5. Nigdy nie odłączaj produktu mokrymi rękoma.
6. Odłącz produkt od gniazda ściennego, zanim rozpoczniesz czyszczenie lub
konserwację. Nie używać ciekłych środków czystości lub aerozoli.
PL-3
Page 90
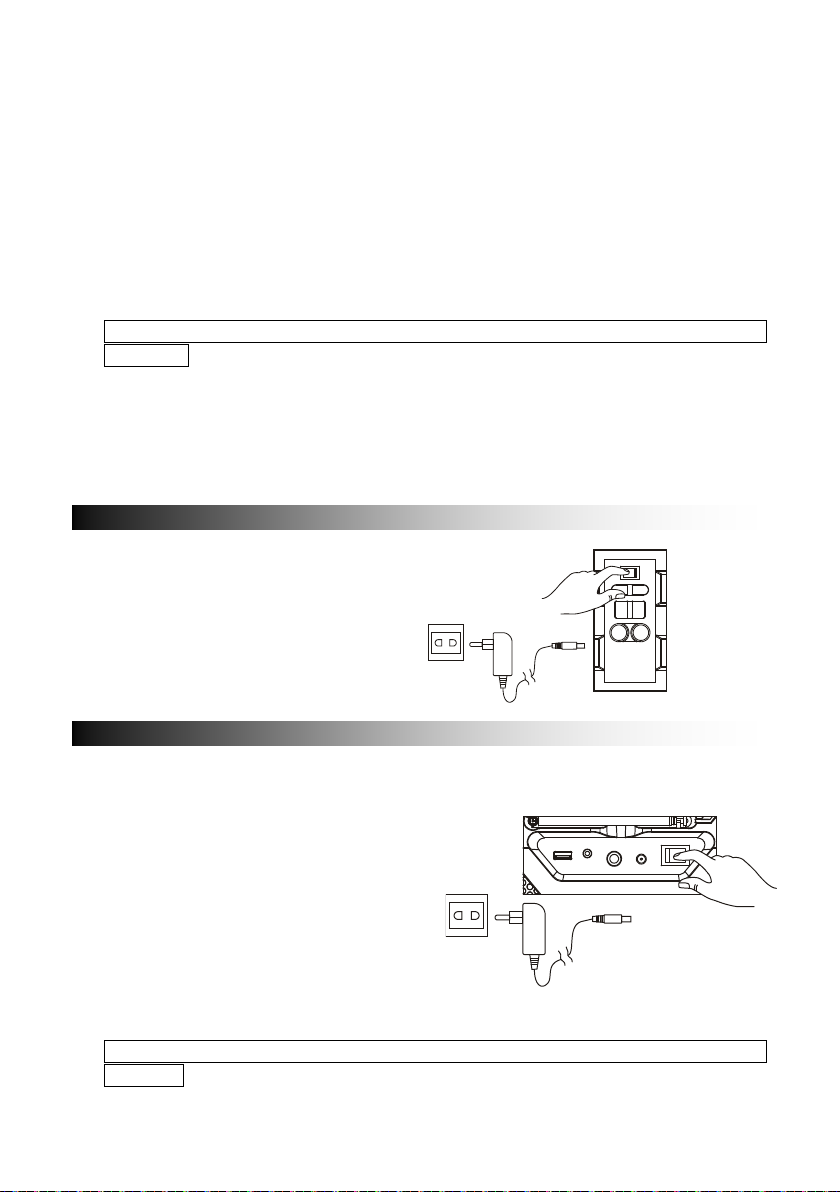
LED akumulatora zmieni kolor na
pełni naładowany.
POWER
LINE IN
DC JACK
USB 1A CHARGER
MIC 1
ON
OFF
MIC 2
ŁADOWANIE
PODŁŚ CZENIE ZASILANIA
7. Jeśli produkt nie będzie używany przez długi czas, urządzenie powinno być
odłączone od źródła zasilania.
8. Przechowuj produkt w suchym miejscu, jeśli nie jest używany.
9. Nie korzystaj z produktu w pobliżu wody, źródeł gorąca lub innych urządzeń
wytwarzających ciepło.
10. Akumulator nie powinien być narażony na bezpośrednie światło słoneczne lub
ogień.
11. Nie należy próbować wymieniać akumulatora. W celu napraw i serwisu należy
skonsultować się ze sklepem, w którym produkt zakupiono, lub z centrum obsługi
klienta podanym przez sklep.
OSTRO• NIE: Przy niewłaściwej wymianie akumulatora istnieje niebezpieczeństwo
eksplozji.
12. Nie korzystaj z żadnego innego źródła zasilania poza tymi przeznaczonymi dla tego
produktu.
13. Zachowaj niniejszą instrukcję obsługi w bezpiecznym miejscu.
14. W przypadku pytań na temat produktu skontaktuj się z autoryzowanym centrum
obsługi.
- Rozpakuj produkt, upewniając
się, że
WŁĄCZNIK/WYŁĄCZNIK jest
w pozycji „OFF”.
- Podłącz załączony adapter AC
do produktu, podłącz adapter
AC do gniazda ściennego.
- Urządzenie jest wyposażone we
wskaźnik stanu akumulatora.
- Jeśli wskaźnik LED akumulatora miga,
to znaczy, że stan naładowania jest
niski i konieczne jest ładowanie.
- Po podłączeniu zasilania AC, wskaźnik
czerwony, co będzie oznaczać
ładowanie urządzenia.
- Gdy wskaźnik LED akumulatora zmieni
kolor na zielony, akumulator będzie w
Przed pierwszym u• yciem urz•dzenia zalecamy ładowanie akumulatora przez
6 godzin.
PL-4
Page 91
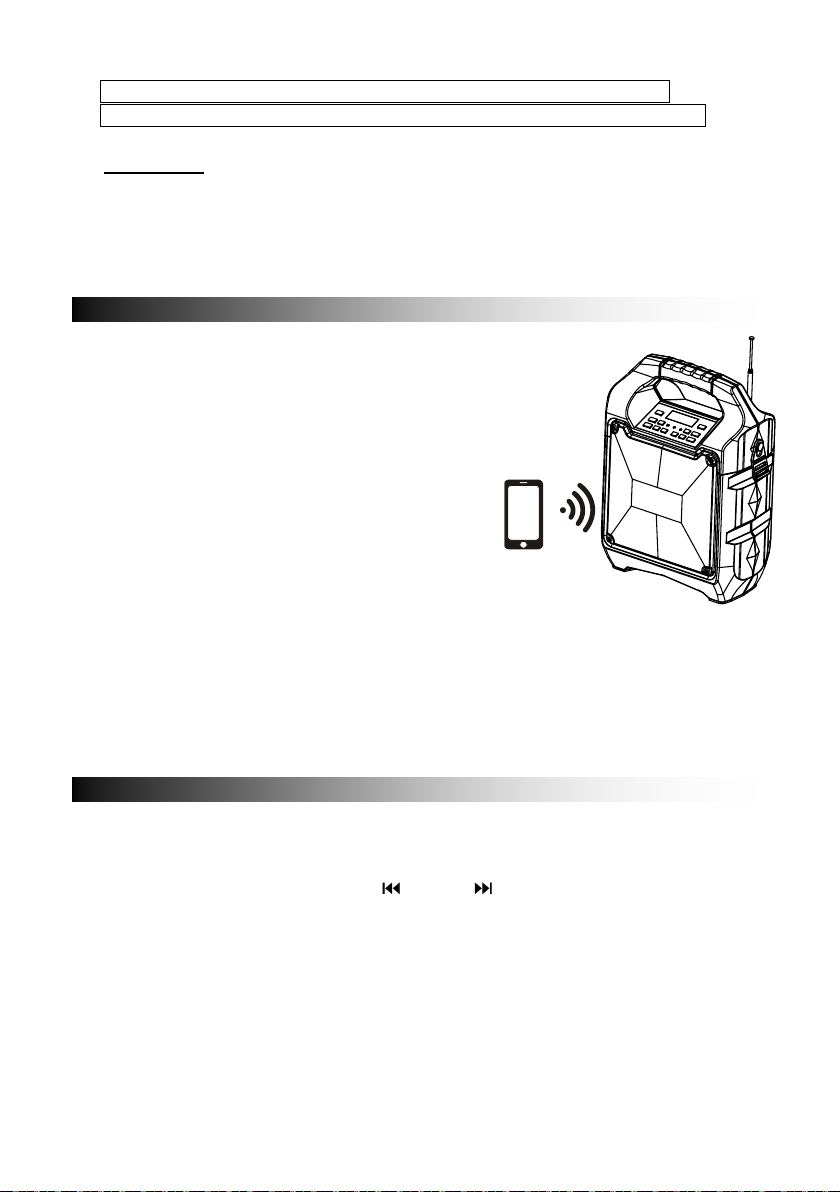
parowania.
RADIO FM
ZŁŚ CZE BLUETOOTH
Oszcz•dzanie energii: Je• li produkt nie pracuje przez 20 minut, to
automatycznie przejdzie w tryb gotowo•ci. Automatycznie si• w y ł Ś c z y.
Ostro•nie: Aby zachować akumulator w dobrym stanie, użytkownik powinien
sprawdzać urządzenie i pamiętać, by przełączyć włącznik do pozycji „Off” na tylnym
panelu za każdym razem, gdy urządzenie nie jest już używane oraz przed
składowaniem. Zalecamy, by użytkownik w pełni ładował akumulator przynajmniej
raz na dwa miesiące.
- Gdy włącznik jest ustawiony na „On”, tryb
Bluetooth „BT” włącza się jako domyślny.
- Niebieski wskaźnik LED będzie migać w trybie
parowania. Czerwony wyświetlacz LED pokaże
„BT”.
- Włącz funkcję Bluetooth w swoim urządzeniu i
wyszukaj „TSP-203”, a następnie naciśnij, by
połączyć.
- Rozlegnie się dźwięk oznaczający nawiązane
połączenie, a niebieski wskaźnik LED
połączenia przestanie migać i zapali się na
stałe.
- Łączenie Bluetooth zostało zakończone.
- Wybierz muzykę na swoim urządzeniu
Bluetooth i rozpocznij odtwarz anie.
- Przytrzymaj przycisk BT OFF, by odłączyć
sparowane urządzenie i przejść do trybu
- Naciśnij przycisk „Source” i wybierz Radio. Na czerwonym wyświetlaczu LED pojawi
się częstotliwość radiowa FM.
- Naciśnij przycisk odtwarzania/pauzy, by automatycznie wyszukać i zapisać.
- Naciśnij i przytrzymaj przyciski TU
stację. Naciśnij na krótko, by dostroić.
lub TU , by wybrać następną zapisaną
PL-5
Page 92
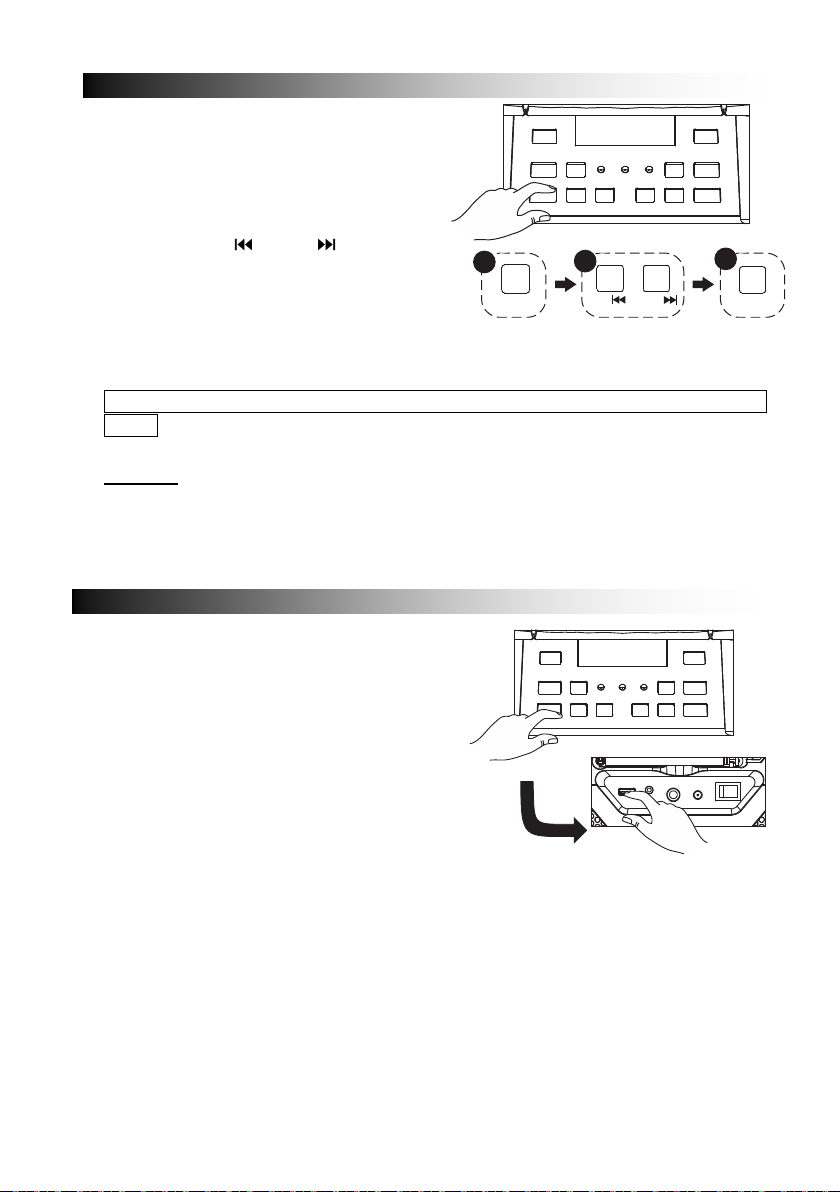
wejść do trybu losowego odtwarzania.
urządzenia.
REPTU-/
TU+/
1 2
3
SOURCE
WEJ• CIE LINIOWE
PORT USB
- Naciśnij przycisk „Source” i wybierz
USB. Na czerwonym wyświetlaczu LED
pojawi się USB.
- Wsuń pamięć USB.
- Wybierz swoją ulubioną muzykę,
naciskając TU
lub TU .
- Naciśnij „REP”, by powtórzyć jeden raz
bieżącą piosenkę. Naciśnij ponownie
„REP”, by powtórzyć wszystkie
piosenki. Naciśnij przycisk trzy razy, by
Po podłŚ czeniu pami• ci USB urz• dzenie automatycznie przełŚ czy si• na tryb
USB.
Wa•ne: Port USB przeznaczony jest wyłącznie do przesyłania danych. Inne
urządzenia nie mogą być używane z tym złączem USB. Korzystanie z przedłużacza
USB nie jest zalecane.
- Naciśnij przycisk „Source” i wybierz
LINE. Na czerwonym wyświetlaczu LED
pojawi się LINE.
- Podłącz kabel 3,5 mm do wejścia
liniowego LINE z tyłu urządzenia, a
przejdzie ono do trybu LINE IN.
- Możesz podłączyć jakiekolwiek
urządzenie audio wyposażone we
wtyczkę wyjścia 3,5 mm i odtwarzać
jakiekolwiek audio z podłączonego
PL-6
Page 93
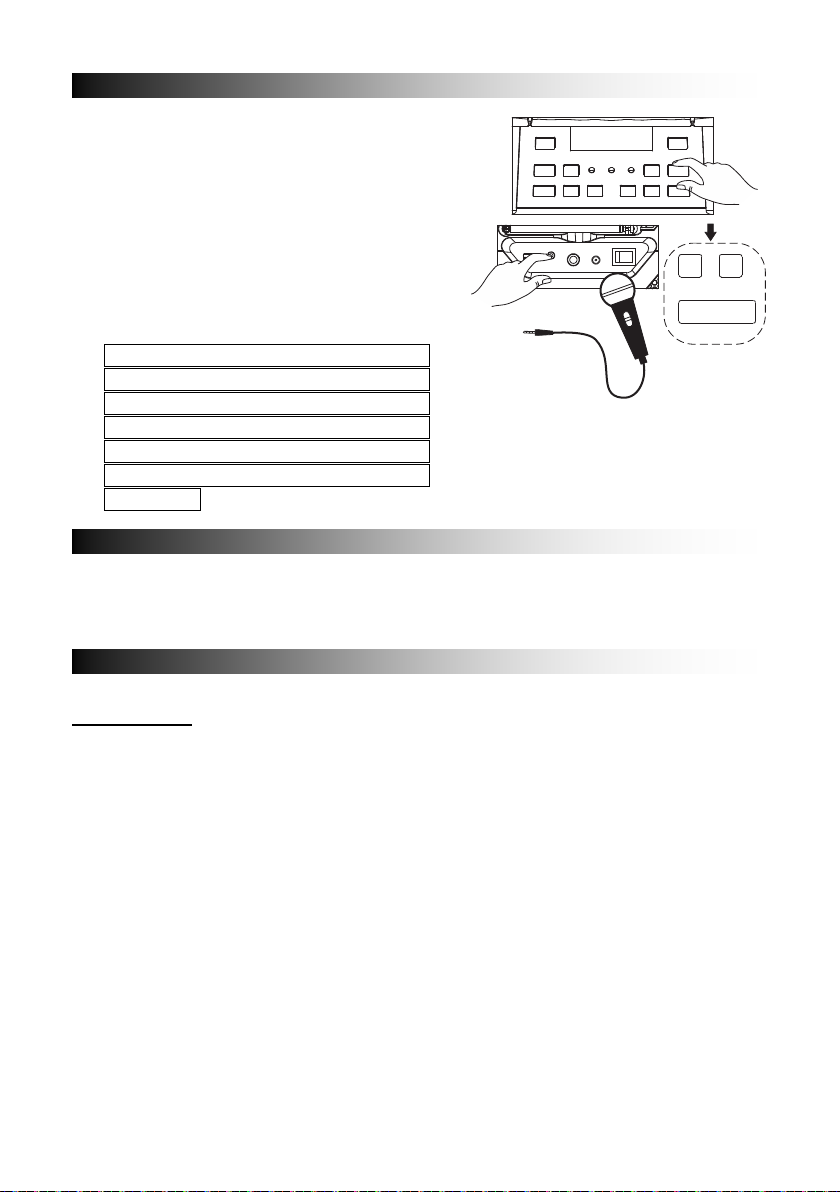
zwrotnego.
MIC - MIC +
EH+EH-
ROZWI• ZYWANIE PROBLEMÓW
EFEKTY D• WI• KOWE
• PIEWANIE
- Niniejszy produkt umożliwia śpiewanie z
piosenkami odtwarzanymi czy to z BT,
USB lub LINE IN.
- Podłącz kabel mikrofonu do bocznego
panelu oznaczonego „MIC”.
- Ustaw głośność MIKROFONU „MIC
+/MIC -” lub przy pomocy głównego
regulatora głośności na górnym panelu.
- Ustaw poziom echa „EH +/EH -”.
- Zacznij śpiewać
OSTRZE• ENIE: - Je• li poziom
głoŚ noŚ ci MIKROFONU i ECHA jest
zbyt wysoki lub ustawiony na
maksymalnym poziomie, nale•y
uwa•a• , by nie spowodowa•
wysokiego d• wi• ku sprz• • enia
- „Model klienta” ma wbudowany korektor
- Naciśnij i wybierz zaprogramowany efekt dźwiękowy muzyki: PŁASKI, KLASYCZNY,
POP, ROCK i JAZZ
Ogólne
Brak zasilania
- Sprawdź, czy adapter AC jest prawidłowo podłączony do urządzenia i gniazda
elektrycznego.
- Sprawdź, czy Włącznik jest ustawiony w pozycji On.
- Jeśli akumulator jest wyczerpany, podłącz adapter AC, by go naładować i włączyć
urządzenie.
Przyciski nie reagują
- Przestaw włącznik do pozycji Off, a następnie On, by zresetować urządzenie.
- Odłącz adapter AC i ponownie podłącz.
Brak dźwięku
- Upewnij się, że głośność urządzenia podłączonego do WEJŚCIA LINIOWEGO jest
ustawiona na odpowiednim poziomie.
- Upewnij się, że wyjście dźwięku podłączonego urządzenia Bluetooth jest wyjściem
BT.
- Upewnij się, że głośność podłączonego urządzenia Bluetooth jest ustawiona na
odpowiednim poziomie.
PL-7
Page 94

Obsługa Bluetooth
Słaba jakoŚ Ś dŚ wiŚ ku
- Słaby odbiór Bluetooth. Przesuń urządzenie Bluetooth bliżej głośnika.
Nie mo•na sparowa• urz•dzenia Bluetooth
- Upewnij się, że urządzenie Bluetooth oraz głośnik nie są połączone z żadnym innym
urządzeniem Bluetooth.
- Upewnij się, że niebieski wskaźnik LED na głośniku szybko miga (tryb parowania).
- Przełącz wyłącznik na Off, następnie ponownie na On. Naciśnij i przytrzymaj na 2
sekundy przycisk BT Off, by wejść do trybu parowania.
PL-8
Page 95

OSTRO• NIE:
- Adapter AC/DC oraz urządzenie nie mogą być narażone na kapanie wody lub jej
rozbryzgi, a przedmioty napełniane cieczą, jak wazony, nie powinny być na
urządzeniu ani adapterze AC/DC stawiane.
- Dla zachowania wystarczającej wentylacji urządzenie powinno mieć wolną
przestrzeń w odstępie około 10 cm.
- Wentylacja nie może być utrudniona przykryciem otworów wentylacyjnych takimi
przedmiotami jak gazety, serwetki, zasłony itd.;
- Na urządzeniu nie należy umieszczać otwartych źródeł ognia, takich jak palące się
świece.
- Jeśli wtyczka zasilania adaptera AC/DC służy do odłączania urządzenia i powinno
być zawsze możliwe jej łatwe wyjęcie.
Dla całkowitego odłączenia urządzenia od zasilania zasilacz AC/DC powinien być
całkowicie odłączony od sieci zasilania.
- Adapter AC/DC nie powinien być zablokowany i podczas korzystania należy
zachować swobodny do niego dostęp.
- Nie należy korzystać z urządzenia w klimacie tropikalnym.
O hermetycznym akumulatorze ołowiowo-kwasowym:
To urządzenie działa na zasilaniu akumulatorowym (model nr: Tianchang 6-FM-2,6, 12
V, 2600 mAh). Odłącz adapter zasilania AC od gniazda wejściowego DC, by urządzenia
pracowało na akumulatorze (po pełnym naładowaniu). Podłączenie adaptera zasilania
AC, gdy akumulator jest zainstalowany, uruchomi ładowanie akumulatora. Podczas
ładowania zapali się czerwony wskaźnik LED. Gdy akumulator jest w pełni naładowany,
kolor wskaźnika zmienia się na zielony. Pełne naładowanie rozładowanego
akumulatora może zająć 3 godziny. W pełni naładowany akumulator starcza na około 2
godziny nieprzerwanego odtwarzania. Ten czas odtwarzania może być nierównomierny
w zależności od otoczenia, poziomu głośności głośnika oraz stanu akumulatora. Jeśli
podczas pracy akumulator całkowicie się wyczerpie, zalecamy odczekanie 10-20 minut
przed ponownym jego ładowaniem.
PL-9
Page 96

WSZYSTKIE PRAWA ZASTRZEŻONE, PRAWA AUTORSKIE DENVER
ELECTRONICS A/S
Urządzenia elektryczne i elektroniczne oraz baterie zawierają materiały, komponenty i
substancje, które mogą być niebezpieczne dla zdrowia i środowiska, jeśli ze zużytymi
materiałami (wyrzucanymi urządzenia elektrycznymi i elektronicznymi oraz bateriami)
nie postępuje się właściwie.
Urządzenia elektryczne i elektroniczne oraz baterie są zaznaczone przekreślonym
symbolem pojemnika na śmieci, patrz poniżej. Ten symbol oznacza, że urządzenia
elektryczne i elektroniczne oraz baterie nie powinny być wyrzucane razem z innymi
odpadami domowymi, lecz powinny być wyrzucane oddzielnie.
Ważne jest, abyś jako użytkownik końcowy wyrzucał zużyte baterie w odpowiednich i
przeznaczonych do tego miejscach. W ten sposób zapewniasz, że baterie podlegają
procesowi recyklingu zgodnie z rozporządzeniami władz i nie będą szkodzić
środowisku.
We wszystkich miastach powstały punkty zbiórki, gdzie można oddać bezpłatnie
urządzenia elektryczne i elektroniczne oraz baterie do stanowisk recyklingu bądź
innych miejsc zbiorki, albo urządzenia i baterie mogą być odebrane z domu. Dodatkowe
informacje znajdują się w wydziale technicznym urzędu miasta.
Importer:
DENVER ELECTRONICS A/S
Omega 5A, Soeften
DK-8382 Hinnerup
Dania
www.facebook.com/denverelectronics
Inter Sales A/S niniejszym oświadcza, że typ urządzenia radiowego TSP-203 jest
zgodny z dyrektywą 2014/53/UE. Pełny tekst deklaracji zgodności UE jest dostępny pod
następującym adresem internetowym:
http://www.denver-electronics.com/denver-tsp-203/
PL-10
Page 97
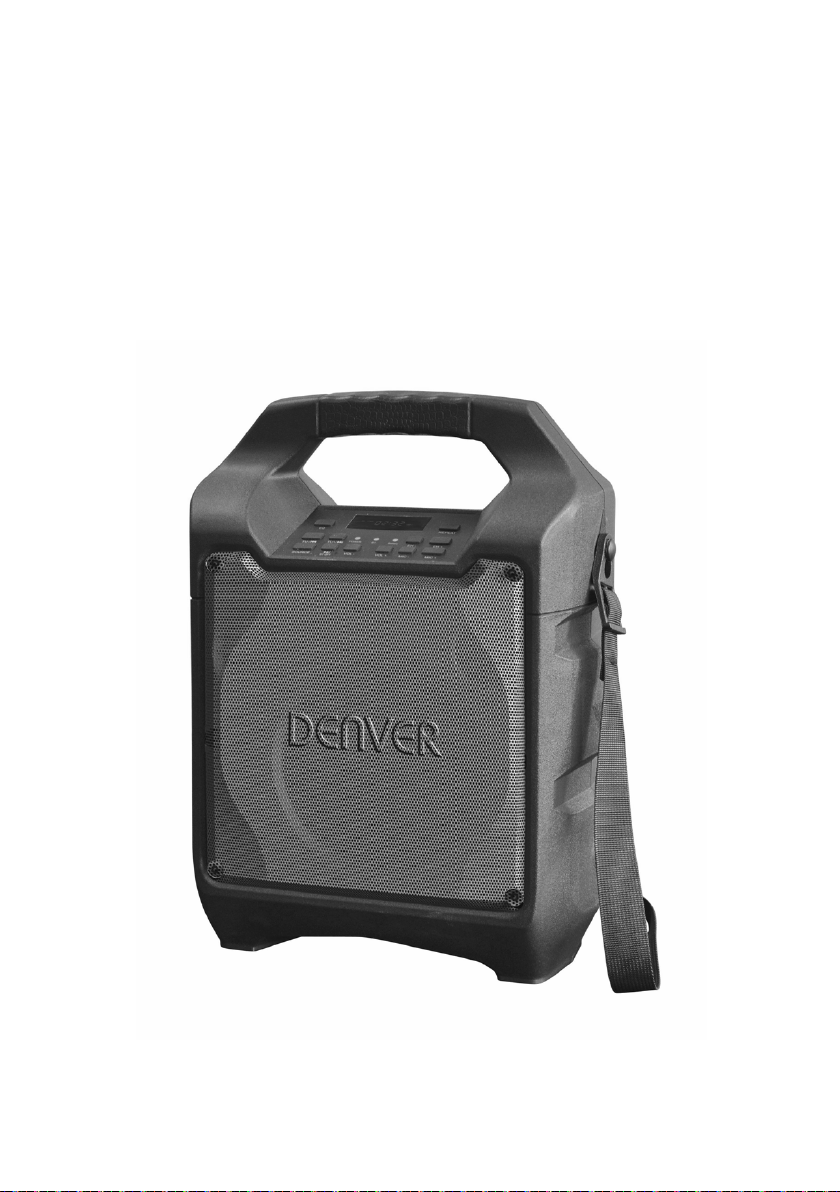
TSP-203
PRIJENOSNI BLUETOOTH
ZVU• NIK
KORISNI• KI PRIRU• NIK
Page 98

Page 99

SADRŽAJ
OPIS DIJELOVA ........................................................................................ 2
SIGURNOSNE UPUTE .............................................................................. 3
MREŽNO SPAJANJE ................................................................................ 4
PUNJENJE ................................................................................................ 4
POVEZIVANJE PUTEM BLUETOOT H A ................................................... 5
FM RADIO .................................................................................................. 5
USB PRIKLJU• AK .................................................................................... 5
ULAZNI PRIKLJU• AK .............................................................................. 6
SING-A-LONG ........................................................................................... 6
ZVU• NI EFEKTI ........................................................................................ 6
RJEŠAVANJE PROBLEMA ....................................................................... 6
OPREZ ....................................................................................................... 8
HR-1
Page 100
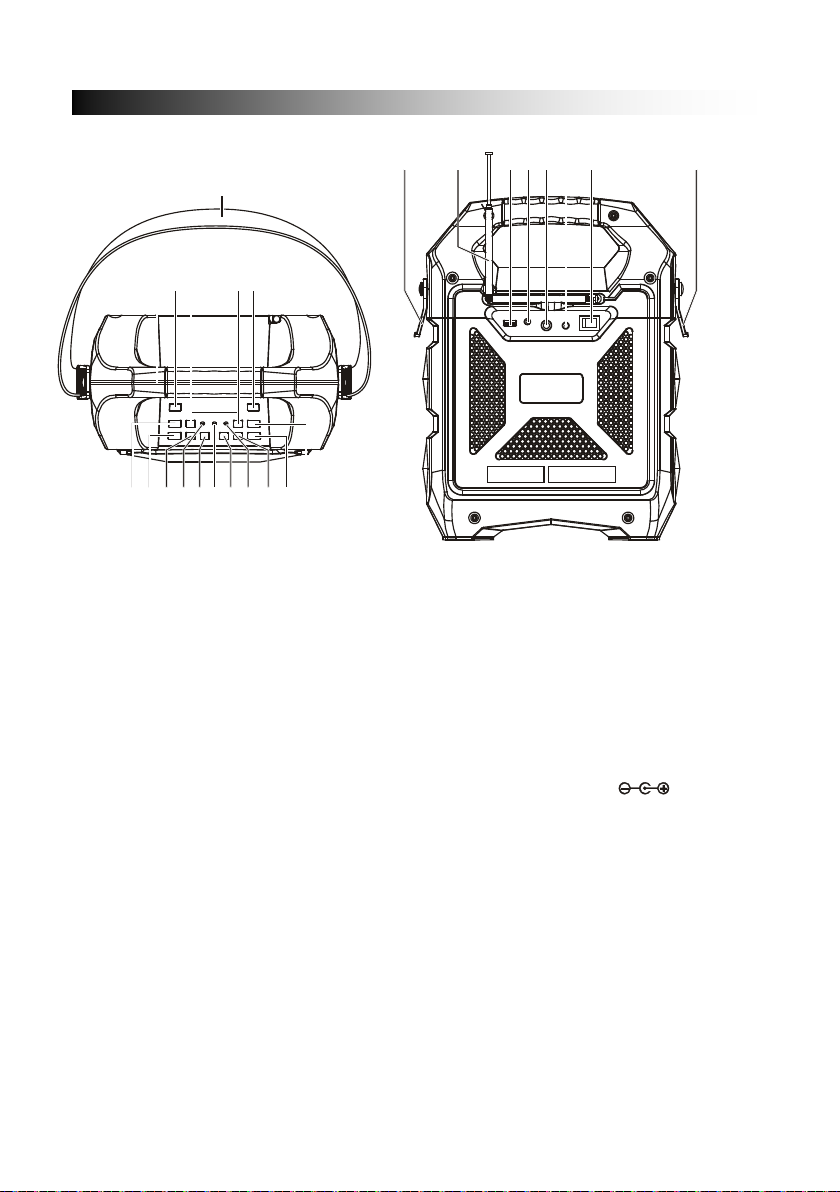
1 2 3
4
5
6
7
8910
1112
13
14
1516
17 17
24
2221201918
23
OPIS DIJELOVA
1. RUČKA
2. TIPKA EKVILIZATORA
3. UGAĐANJE NAVIŠE
4. SMANJENJE EHA
5. TIPKA ZA PONAVLJANJE
6. POVEĆANJE EHA
7. POVEĆANJE GLASNOĆE
MIKROFONA
8. SMANJENJE GLASNOĆE
MIKROFONA
9. INDIKATOR NAPUNJENOSTI
BATERIJE
10. TIPKA ZA POVEĆANJE
GLASNOĆE
11. BLUETOOTH INDIKATOR
12. TIPKA ZA SMANJENJE
GLASNOĆE
13. INDIKATOR NAPAJANJA
14. PAUZA/REPRODUKCIJA/BT OFF
15. IZVOR
16. UGAĐANJE NANIŽE
17. SPOJKA ZA REMEN ZA NOŠENJE
18. FM ANTENA
19. USB PRIKLJUČAK
20. ULAZNI PRIKLJUČAK
21. ULAZ ZA MIKROFON
22. ULAZ DC (15 V 1.0 A)
23. TIPKA NAPAJANJA
UKLJUČENO/ISKLJUČENO
24. NARAMENICA
HR-2
 Loading...