


User's Manual
TFD-2617DVBT
Operation
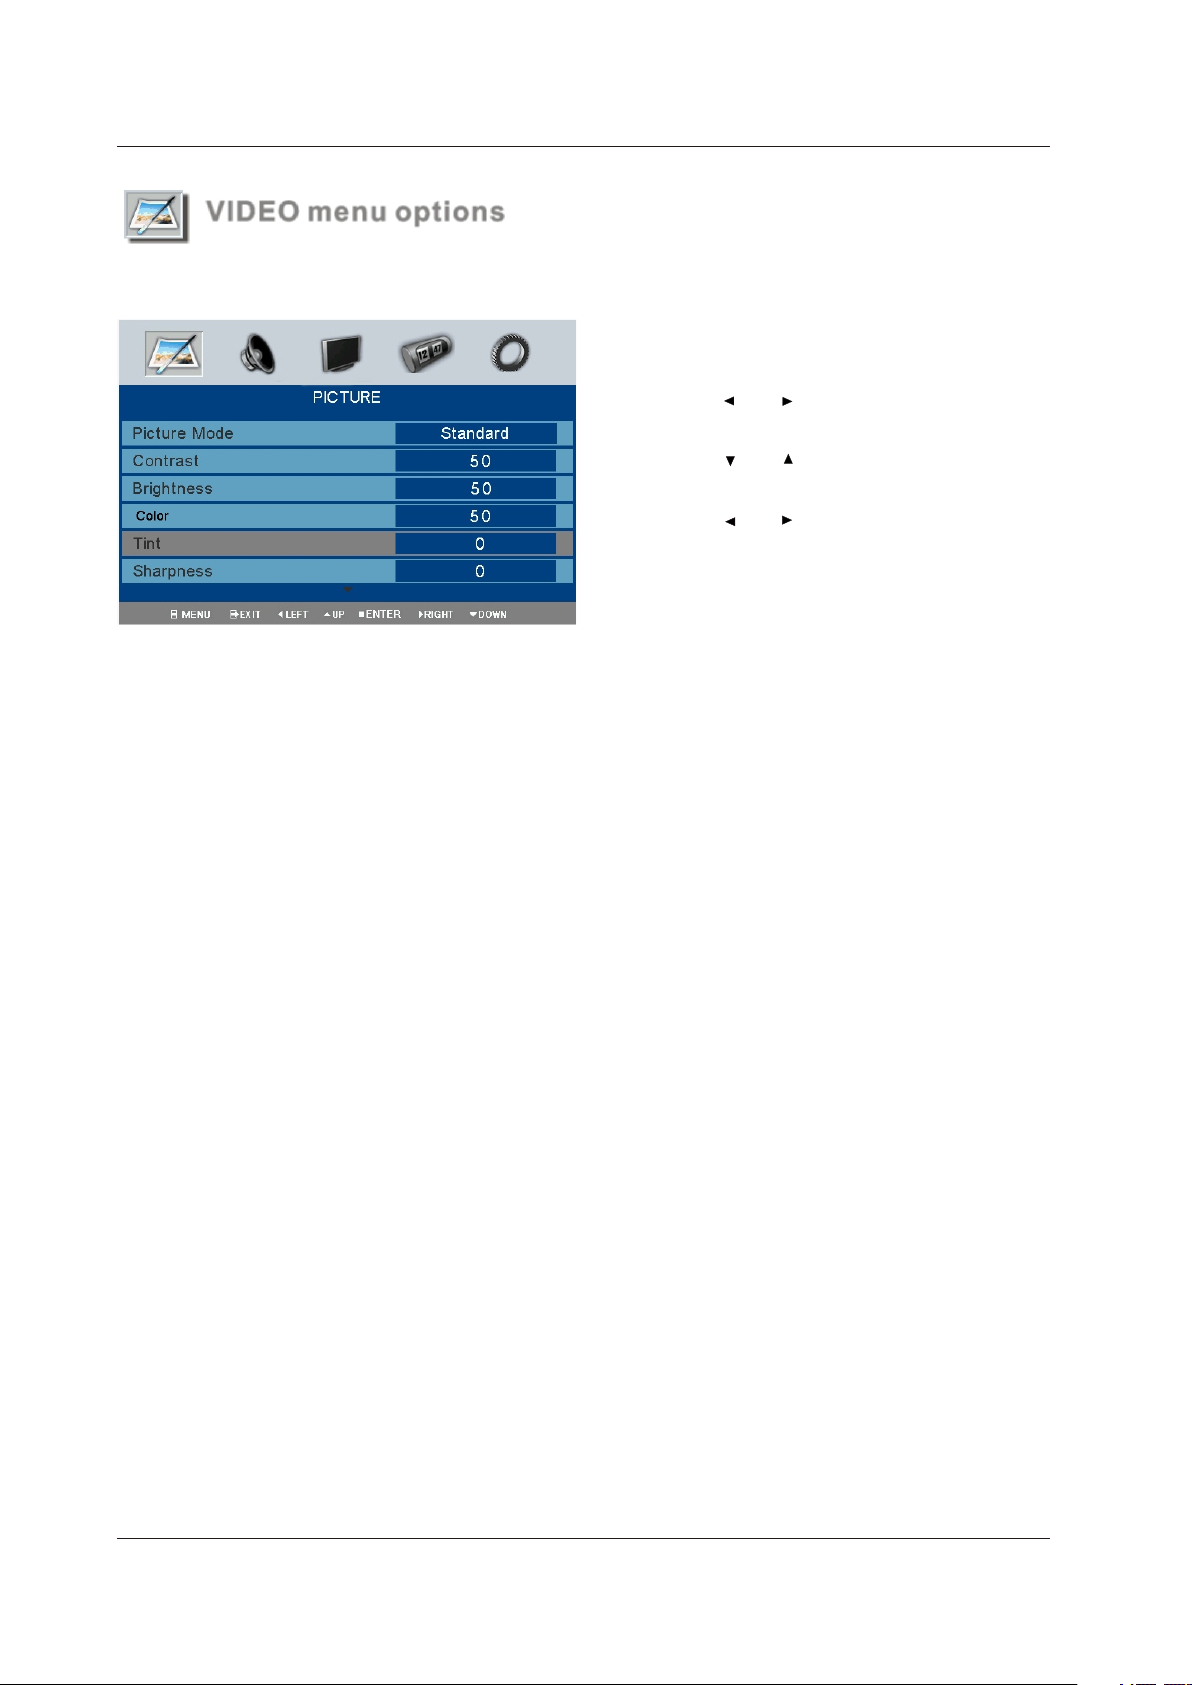
VIDEO menu optionsVIDEO menu options
Press the button on the front panel or on the remote control to display the main menu.LCD MENU Press the button on the front panel or on the remote control to display the main menu.
1. Press and to select PICTURE in the
main menu.
2. Press and to select the option you want
to adjust in the PICTURE menu.
3. Press and to adjust.
4. Press LCD MENU to return to previous menu or press
EXIT to exit the main menu.
Picture ModePicture Mode
Select Picture Mode in PICTURE menu. The above picture effe ct s ar e av ai la bl e: D yn am ic , St an da rd , Mi ld a nd U se r.
If you want to change the value of Contrast, Brightness, Color, Tint (NTSC only), Sharpness or Color temperature on
the picture menu, the User option is selected automatically. You may select the picture mode directly by pressing PMODE
button .
ContrastContrast
Adjust the contrast of the picture.
BrightnessBrightness
Adjust the brightness of the picture.
Color Color
Adjust the color saturation.
NOTE: This option is invalid in PC mode, and it will be shown in gray.
NOTE: This option is invalid in PC mode, and it will be shown in gray.
Tin tTin t
Adjust the tone of color when your system is in NTSC.
SharpnessSharpness
Adjust sharpness level of the picture.
Color temperatureColor temperature
Select an optimum color temperature mode among Normal (balance), Wa rm ( re dd is h) a nd C oo l (b lu is h) .
DNR (Digital Noise Reduction)DNR (Digital Noise Reduction)
If the broadcast signal received is weak, you can select the DNR option to reduce the video noise level between Auto,
Low, Mid, High and off.
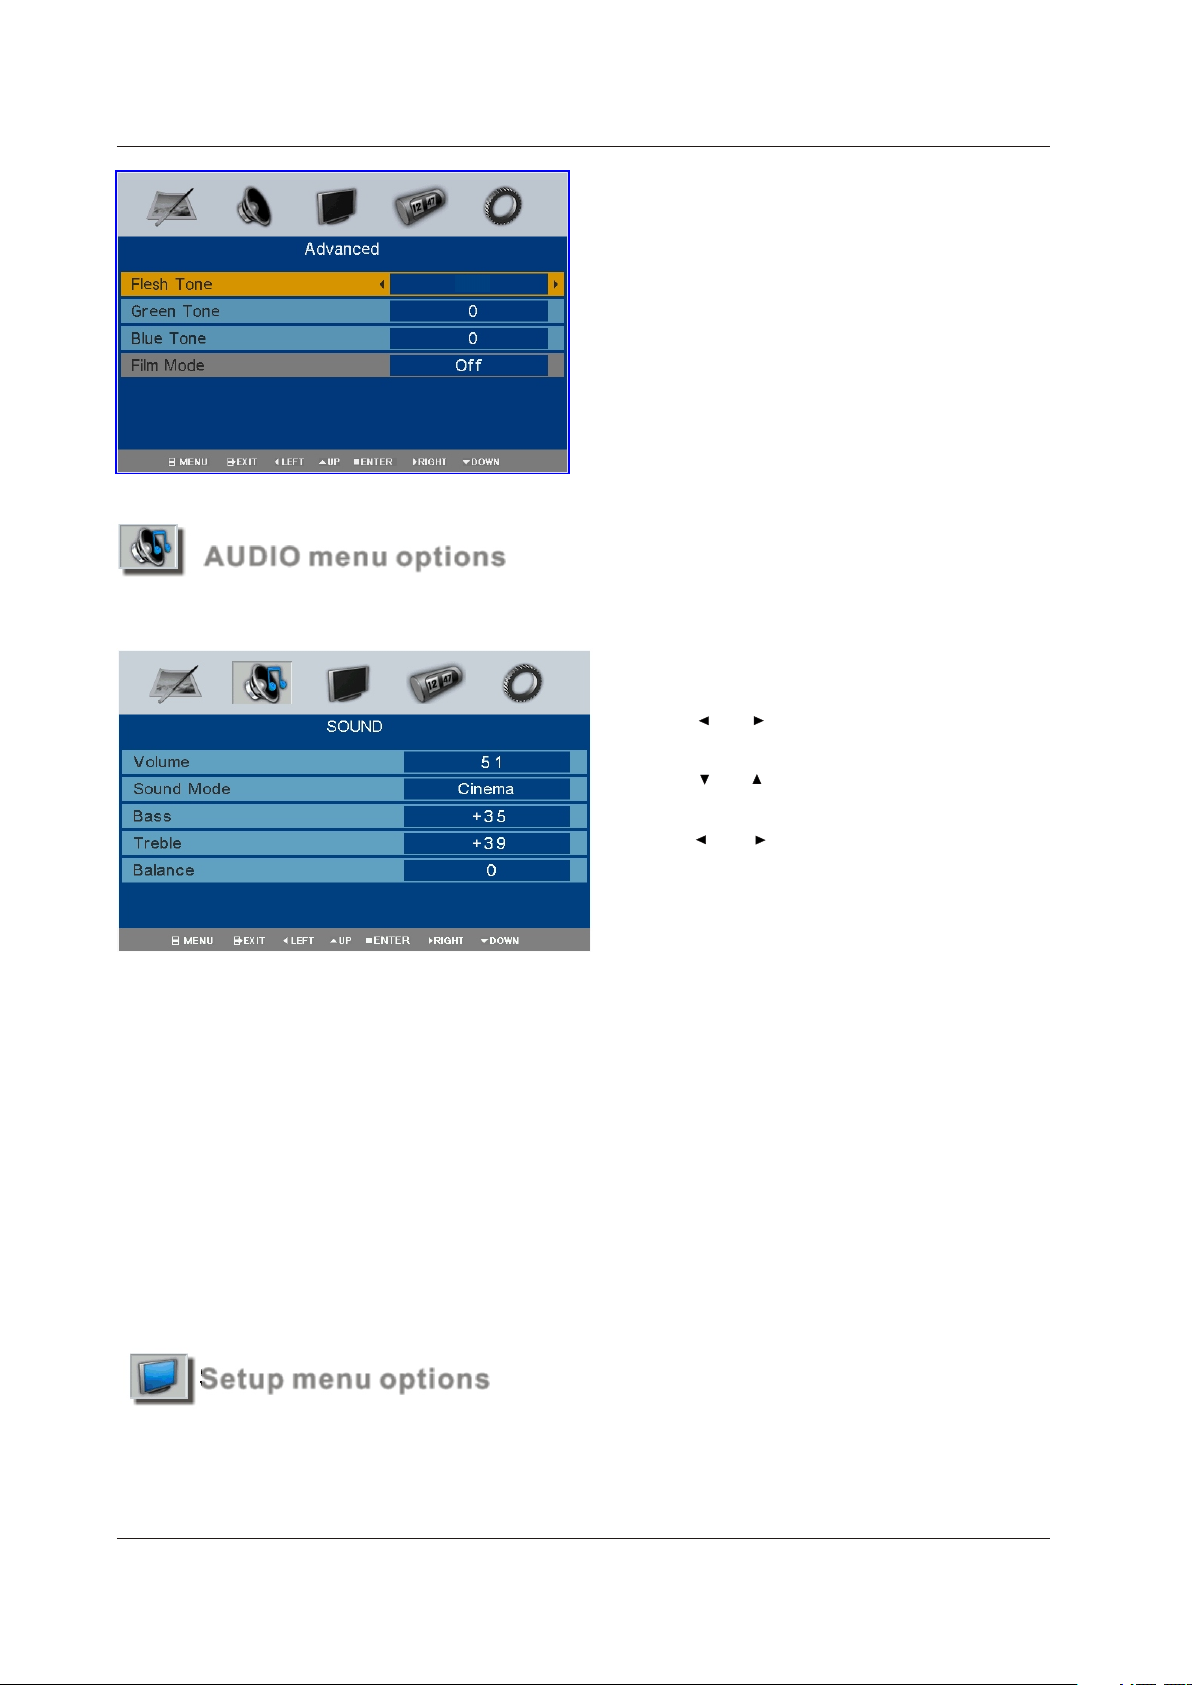
Advanced picture settingsAdvanced picture settings
This option allows you to adjust the fresh, by selecting the level of Fresh tone, Green tone, Blue tone or Film mode as
below.
Note: If cinema mode is set to Auto, cinema mode will be detected automatically when you are playing a movie with ci-
Note: If cinema mode is set to Auto, cinema mode will be detected automatically when you are playing a movie with ci-
nema mode.
nema mode.
2
Operation
00
AUDIO menu optionsAUDIO menu options
Press the button on the front panel or on the remote control to display the main menu.LC D ME N UPress the button on the front panel or on the remote control to display the main menu.
1. Press and to select SOUND inthe main
menu.
2. Press and to select the option you want
to adjust in the SOUND menu.
3. Press and to adjust.
4. P re ss L CD M EN U to r et ur n to t he p re vi ou s me nu
or press EXIT to exit the main menu.
VolumeVolume
Adjust the sound level.
Sound SystemSound System
Select SOUND menu. The following sound effe ct s ar e av ai la bl e: M us ic , Ne ws , Us er, S ta nd ar d, C in em a. I f yo u wa nt t o ch an ge
the value of Bass and Treble on the Sound menu, the User option is selected automatically. You may select the sound mode
directly by pressing SMODE.
BassBass
Increase or decrease the level of the lower-pitched sounds.
Tre bl eTre bl e
Increase or decrease the level of the higher-pitched sounds.
BalanceBalance
Adjust the audio output between left and right speakers.
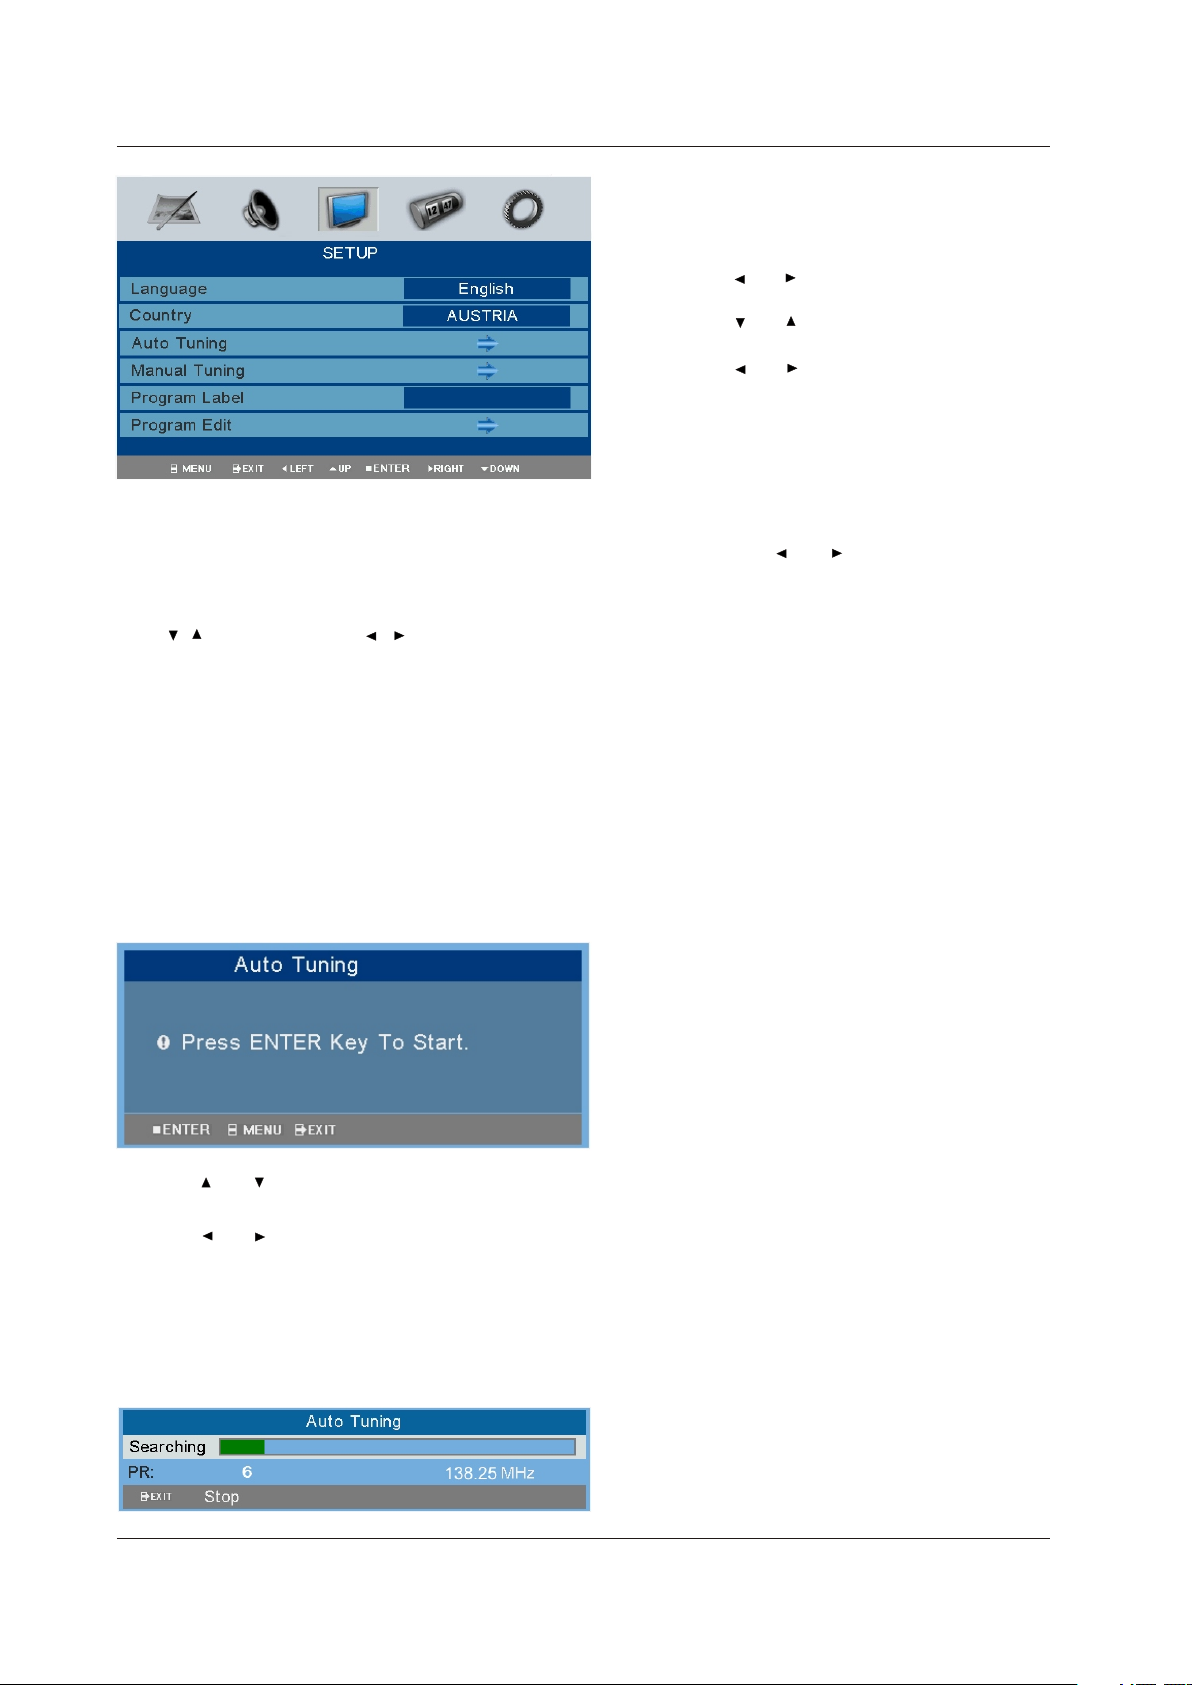
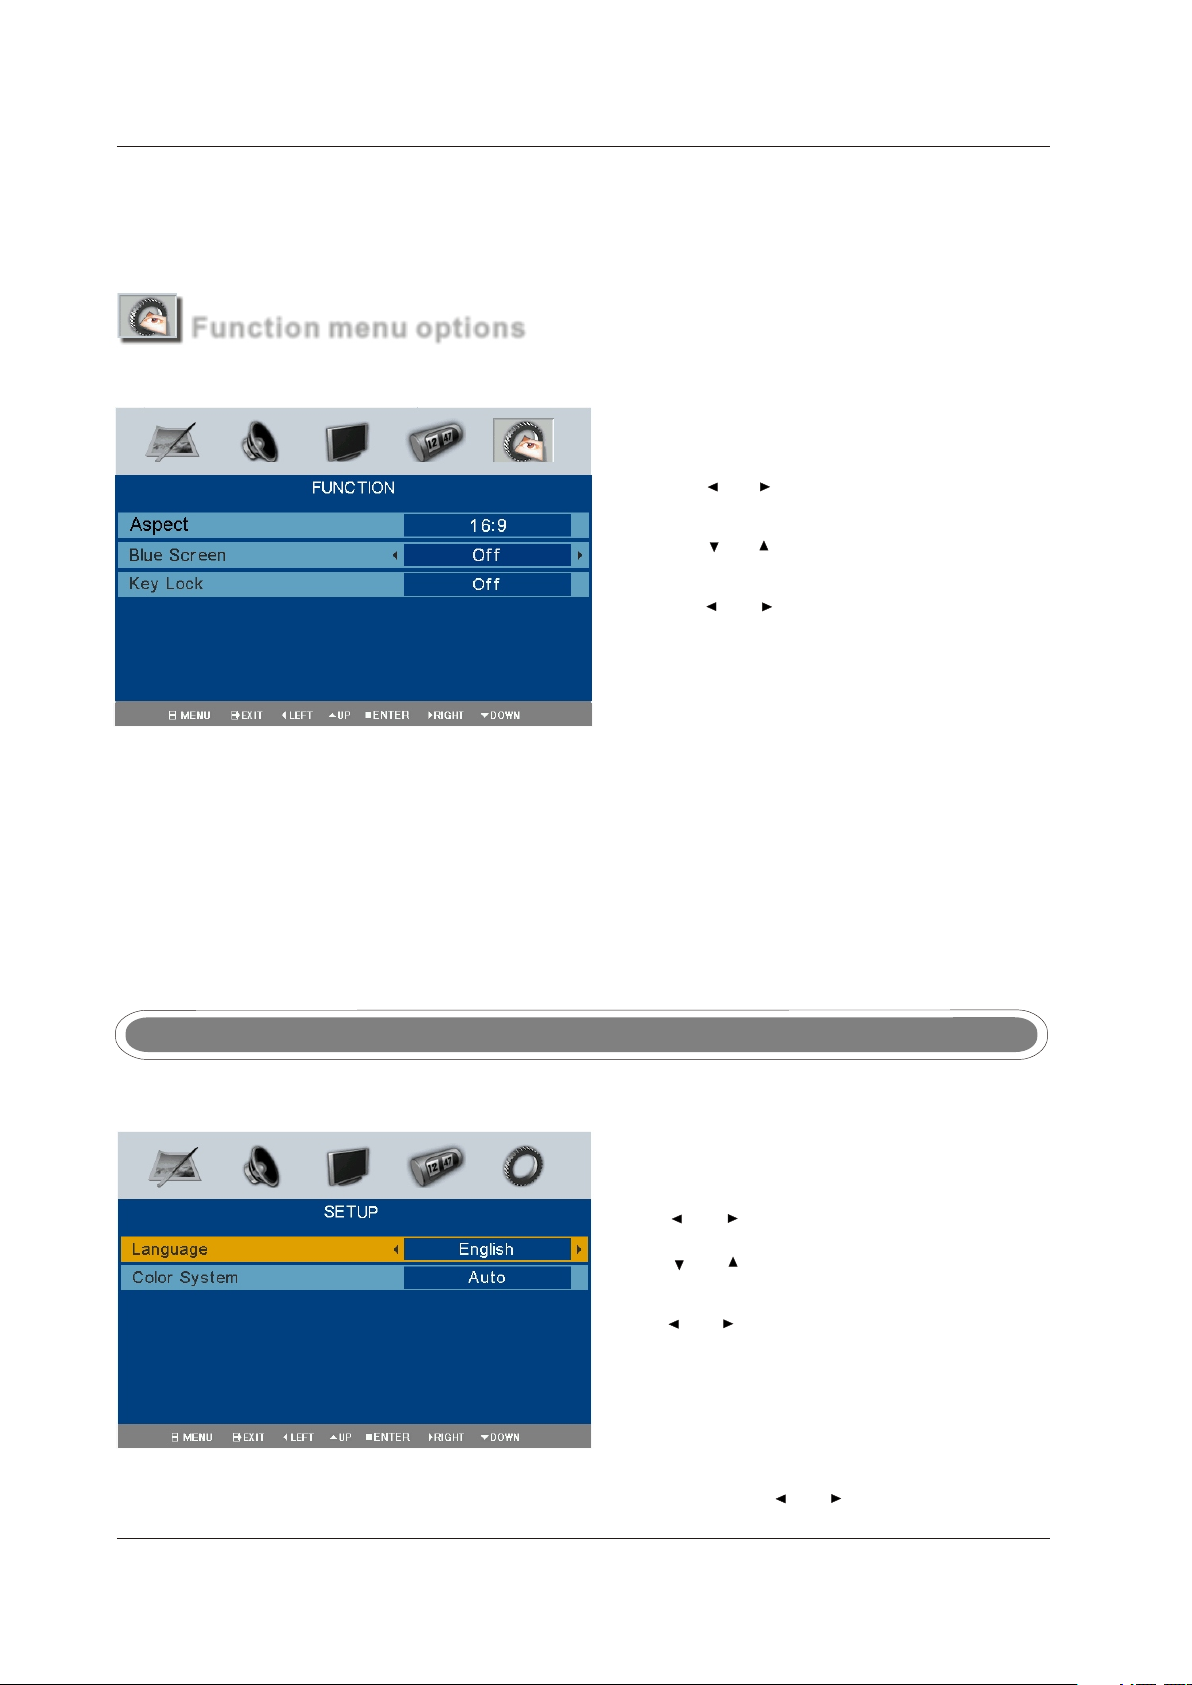
Setup menu optionsSetup menu options
Press the button on the front panel or on the remote control to display the main menu.LC D ME N UPress the button on the front panel or on the remote control to display the main menu.
3
Operation
1. Press and to select SETUP in the main menu.
2. Press and to select SETUP menu.
3. Press and to adjust.
4. P re ss L CD M EN U to r et ur n to t he p re vi ou s me nu
or press EXIT to exit the main menu.
LanguageLanguage
This option allows you to select the language of OSD (on screen display) by pressing and .
CountryCountry
Press / button and then use / to select one of country as following: AUSRIA/BELGIUMC/CROATIA/CZECH/DENMARK/
FINLAND/FRANCE/GERMANY/GREECE/HUNGARY/IRELAND/ITALY/LUXEMBOCERG/NETHERLAND and others.
NOTE:
NOTE:
- Your country is not included in the above list, please refer to page 30 (worldwide TV system)
. The selection of the country will effect the Auto Scan and Teletext functions. So please select the correct country
where the user in
.
Auto tuningAuto tuning
This option allows you to tune the channels that can be received automatically.
Note: Before you perform Auto Tuning, you must choose the country where you are by selecting COUNTRY op ti on i n th e
Note: Before you perform Auto Tuning, you must choose the country where you are by selecting COUNTRY op ti on i n th e
FUNCTION menu.
FUNCTION menu.
1. Press and to select Auto Tuning in SET UP me nu .
2. Press and to perform your selection.
3. Press ENTER to start Auto Tuning as below:
4. During searching, you can press EXIT to stop tuning
at any moment, and return to the previous menu.
4
Operation
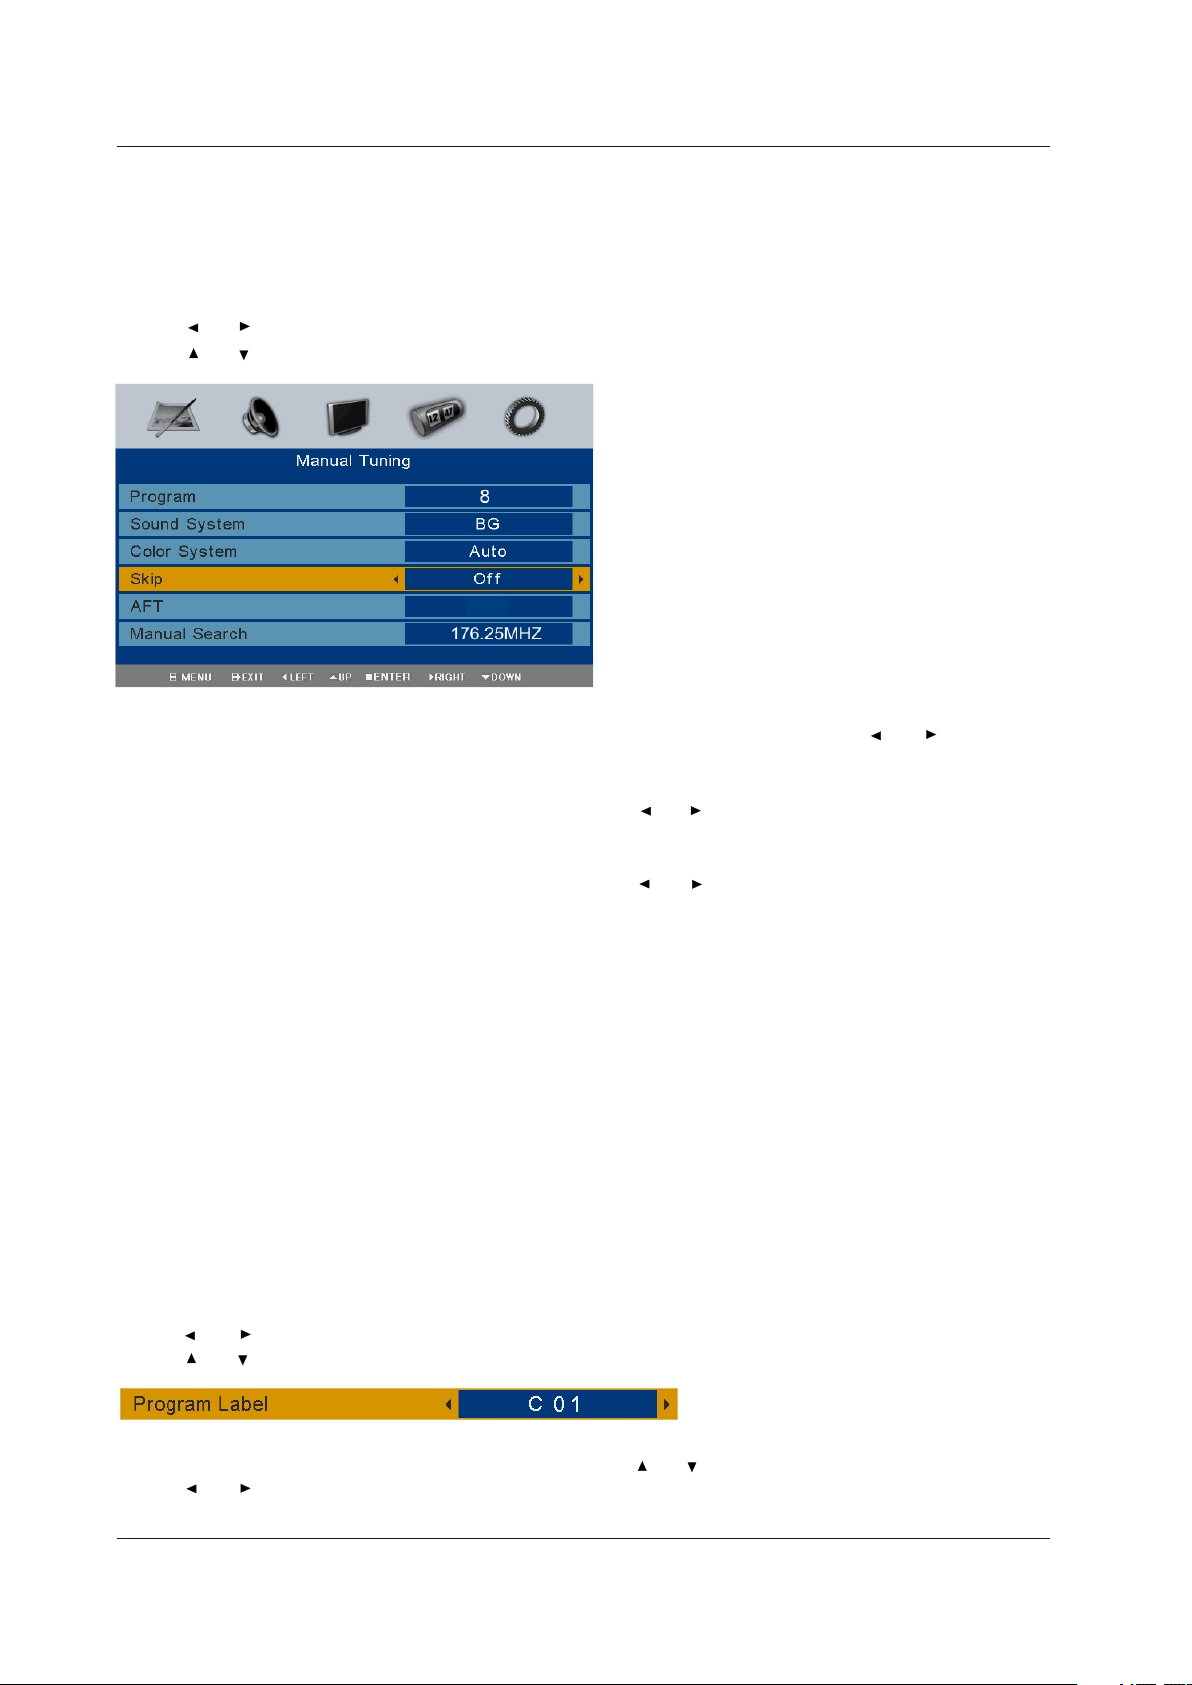
Manual TuningManual Tuning
This option allows you to perform Manual Tuning.
Note: Before you perform Manual Tuning, you must choose the country where you are by selecting Country option in the
Note: Before you perform Manual Tuning, you must choose the country where you are by selecting Country option in the
FUNCTION menu.
FUNCTION menu.
1. Press and to select Manual tuning in SETUP menu.
2. Press and to perform your selection, the menu of Manual tuning will display on the screen.
Auto
ProgramProgram
The current program number. Press and to select the
upper or lower program.
Sound SystemSound System
Press and to select a corresponding sound system, such
as BG/I/DK/L.
Color SystemColor System
Press and to select a corresponding color system, such as
PAL/SECAM.
SkipSkip
Skip option allows you to skip the current channel. When set
ON, the program number will be skipped when you select the
skipped channel with CH+/CH- . You can also select the skipped
channel by pressing the numeric buttons directly.
AFT (Auto Fine Tune)AFT (Auto Fine Tune)
Due to weak signals or a wrong antenna configuration, some of
the channels may not be turned to the best reception condition.
AFT function allows you to fine tune channel selected.
Manual SearchManual Search
Manual search option allows you to preset channels one by one.
Please press ENTER key to save the current channel if you want.
Program LabelProgram Label
This option allows you to name a channel, you can also rename the program which you have named.
1. Select a channel to be named.
2. Press and to select Program Label in SETUP menu.
3. Press and to perform your selection. The menu of program label will display as below:
4. Press the numeric buttons to input the numbers directly or press and to select the letters.
5. Press and to move the cursor.
6. Press LCD MENU to return to previous menu or press EXIT to exit.
5
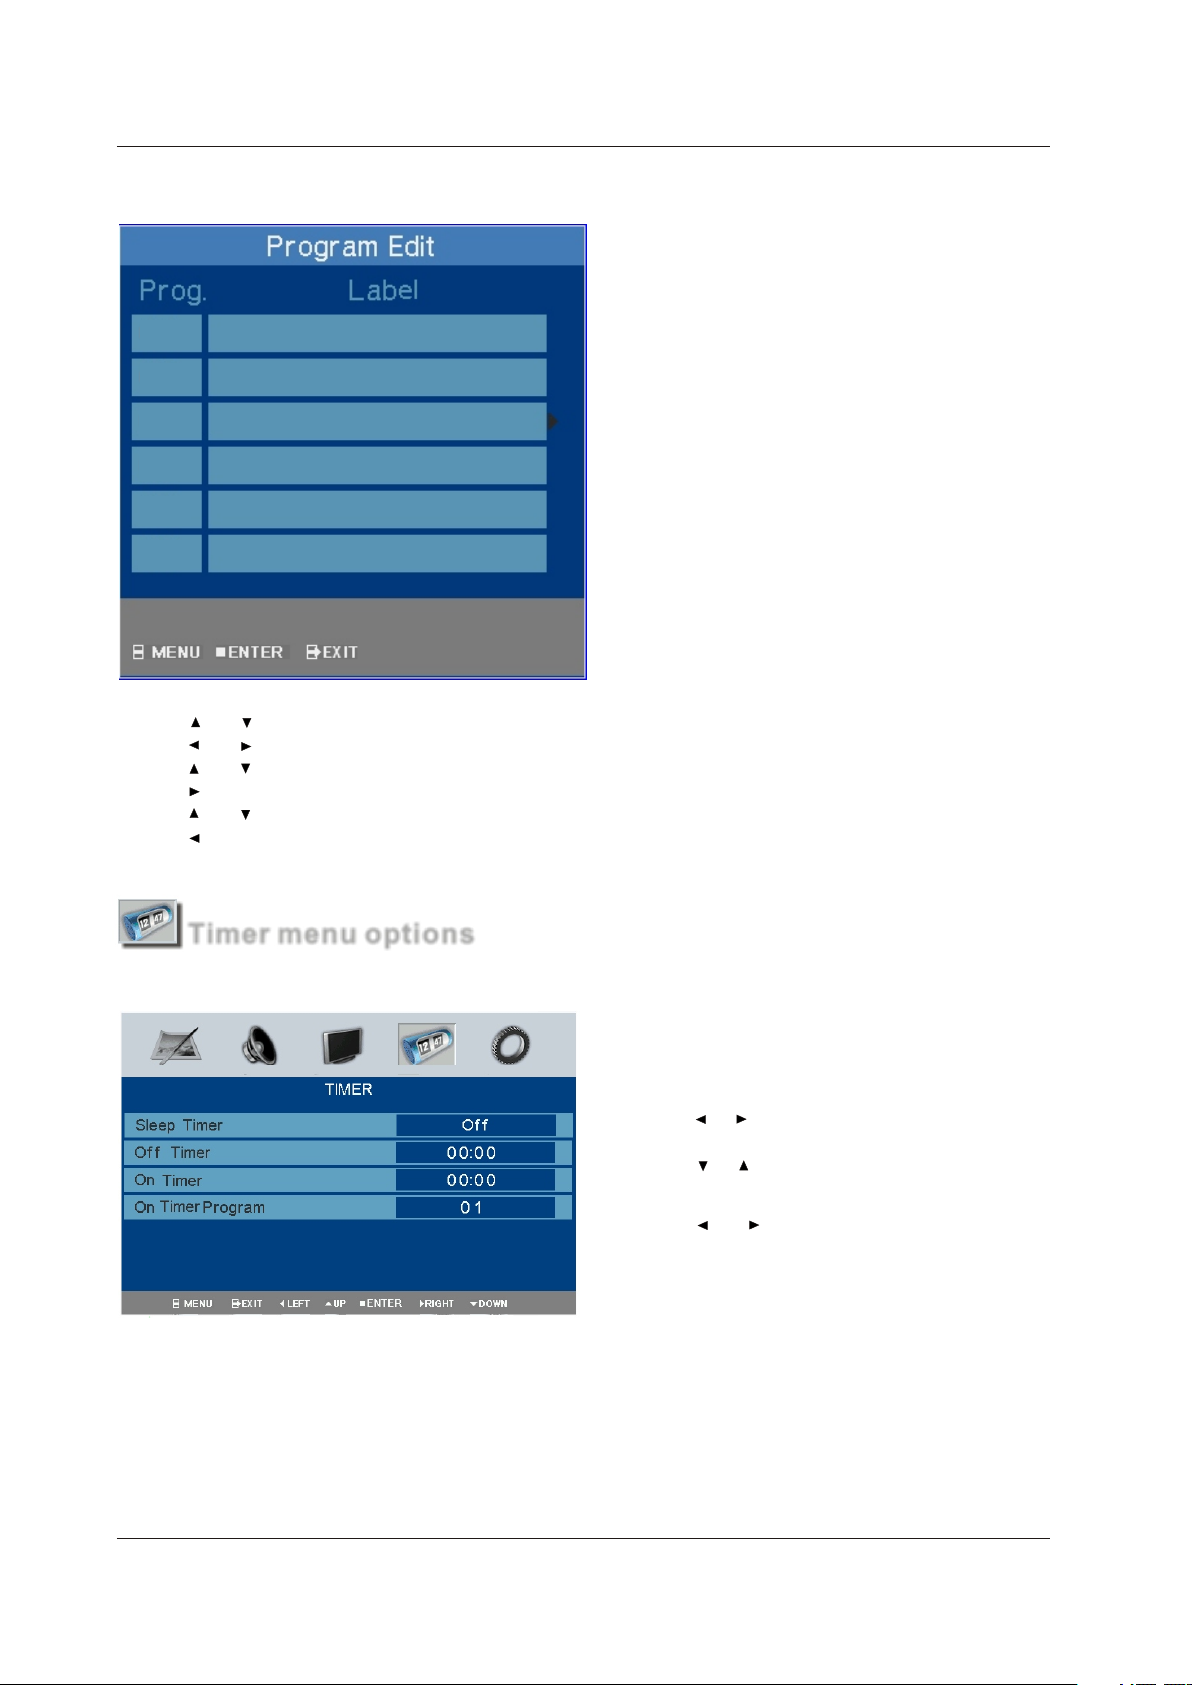
Program Edit Program Edit
This function allows you to sort the TV programs according to your preferences, as following:
000
001
002
003
004
005
Operation
1. Press and to select Program Edit in SETUP menu.
2. Press and to enter into the sub menu, a channel list will display.
3. Press and to select the channel in the list which you would like to sort.
4. Press to perform your selection.
5. Press and to select the location you would like to place the channel.
6. Press to perform you selection.
7 . After completed, press LCD MENU to return to the previous menu or press EXIT to exit.
Timer menu optionsTimer menu options
Press button to display the main menu.LC D ME N U Press button to display the main menu.
1. Press to select TIMER in the main menu.
2. Press to select your option what you want to
adjust in the TIMER menu.
3. Press and to adjust.
4. P re ss t he L CD M EN U to r et ur n to t he p re vi ou s me nu
or press the EXIT to exit the main menu.
Sleep TimerSleep Timer
Select the sleep time to put automatically the TV in standby mode. Timer can be set up from 15 minutes to 120 minutes.
You ma y se le ct t he s le ep t im e by p re ss in g SL EE P repeatedly.
Off TimerOff Timer
This LCD TV can be set to turn OFF after a certain time.
On Timer On Timer
This LCD TV can be set to turn ON after a certain time.
6
Operation
On Timer ProgramOn Timer Program
This option allows you to set a channel number to be played when the TV turn ON itself.
Function menu optionsFunction menu options
Press to display the main menu.L CD M EN U Press to display the main menu.
1. Press and to select FUNCTION in the main menu.
2. Press and to select the option you want to adjust
in the FUNCTION menu.
3. Press and to adjust.
4. W he n yo u ar e sa ti sf ie d wi th y ou r ad ju st me nt , pr es s
LCD MENU to return to the previous menu or press
EXIT to exit the main menu.
AspectAspect
This option allows you to select the screen display mode. 3 kinds of video size are available: 16:9 /16:9Sub /16:9Zoom /14:9/Auto.
Blue screenBlue screen
This option allows you to select the blue background ON or OFF. If ON, the screen background will turn blue when signal
is very weak or when there is no signal.
Key LockKey Lock
This option allows you to lock the buttons on the front panel and remote control, so that children may not accidentally change
your preferences.
SCART and S-VIDEO menuSCART and S-VIDEO menu
Press the button on the front panel or on the remote control to display the main menu.LC D ME N U Press the button on the front panel or on the remote control to display the main menu.
1. Press and to select SETUP in the main menu.
2. Press and to select the option you want to adjust
in the SETUP menu.
3. Press and to adjust.
4. P re ss t he L CD M EN U bu tt on t o re tu rn t o th e pr ev io us
menu or press the EXIT to exit the main menu.
LanguageLanguage
This option allows you to select the language of OSD (on screen display) by pressing and .
7
Color systemColor system
Select a corresponding color system, such as PAL/SECAM/PAL6 0/ AU TO/NTSC.
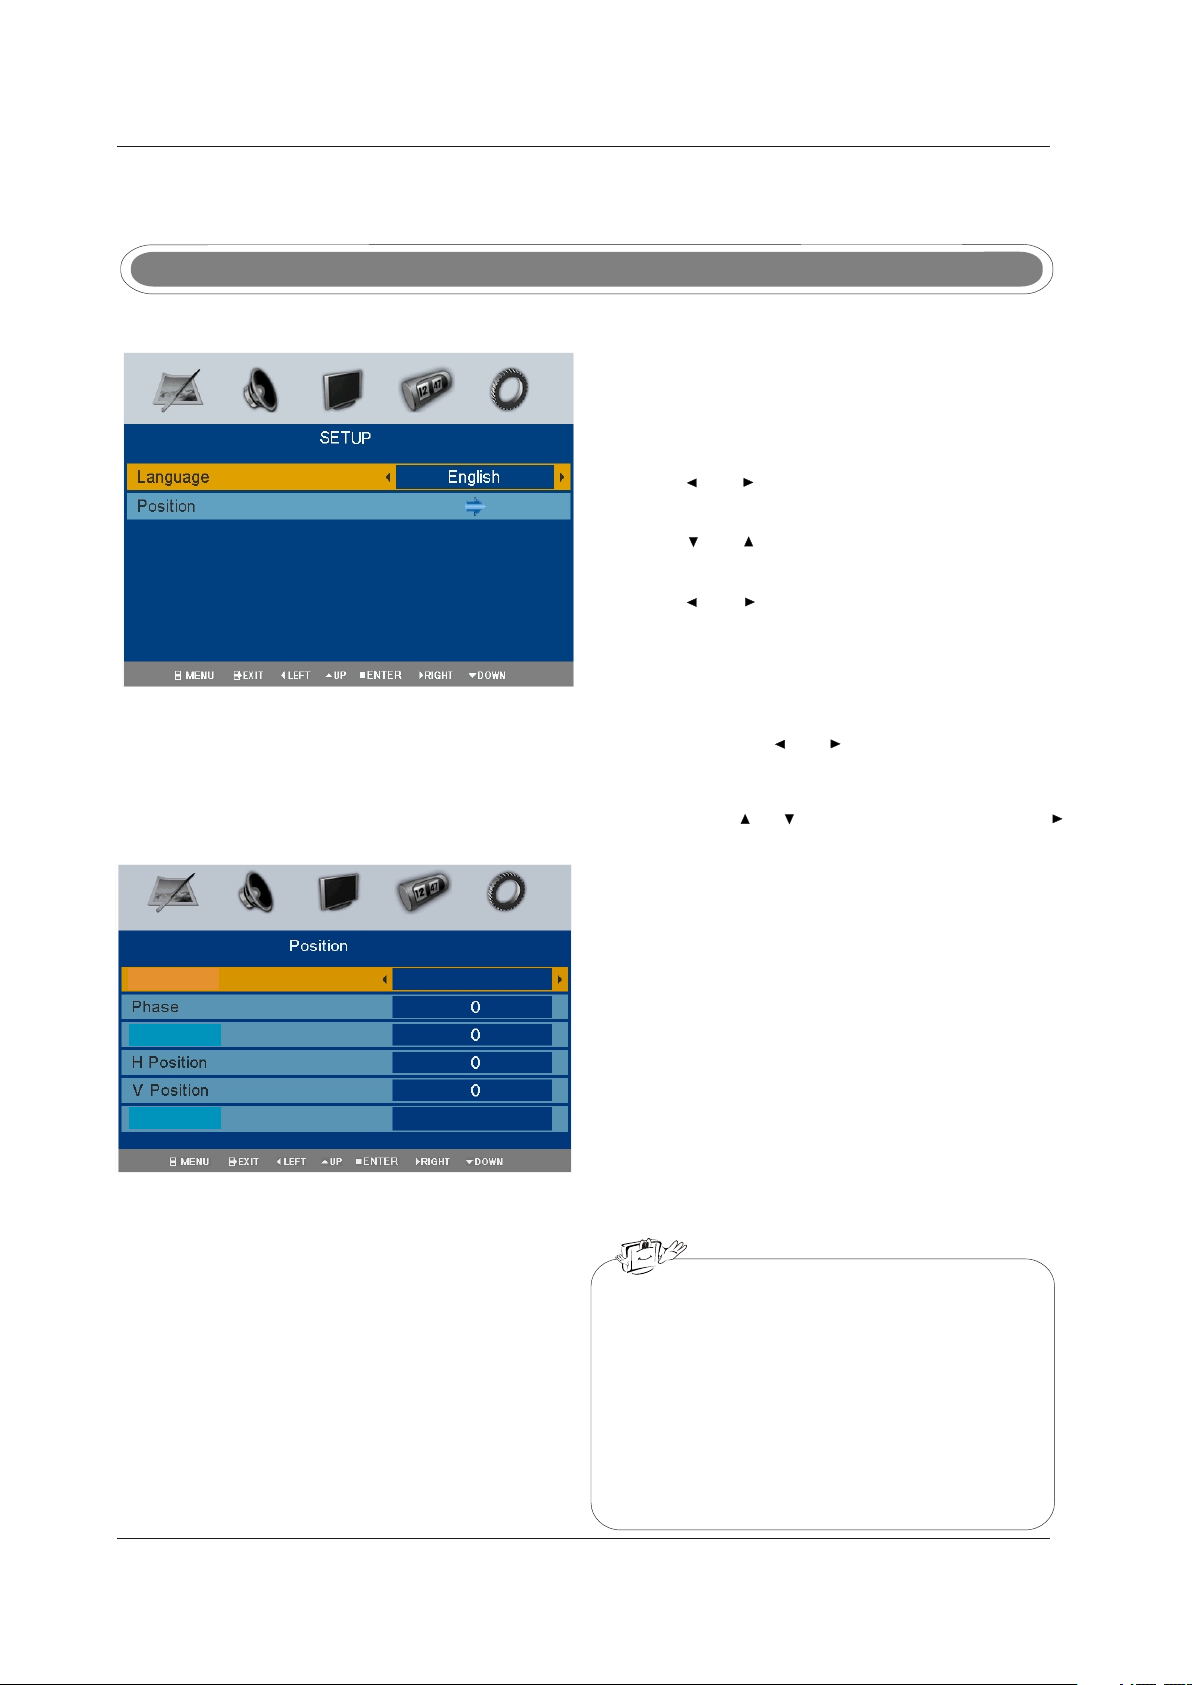
VGA menuVGA menu
Press the button on the front panel or on the remote control to display the main menu.LC D ME N U Press the button on the front panel or on the remote control to display the main menu.
1. Press and to select SETUP in the main menu.
2. Press and to select the option you want to adjust
in the SETUP menu.
3. Press and to adjust.
4. W he n yo u ar e sa ti sf ie d wi th y ou r ad ju st me nt , pr es s
LCD MENU to return to the previous menu or press
EXIT to exit the main menu.
LanguageLanguage
This option allows you to select the language of OSD (on screen display) by pressing and .
Operation
Position
Position
This option allows you to adjust the position in PC mode. In SETUP menu. Press and to select Position, then press
to enter into the sub menu as below:
Auto Sync
Clock
Reset
Auto Sync Auto Sync
Adjust screen settings automatically to optimize picture position.
Phase
Phase
Remove any horizontal interference.
ClockClock
Remove any vertical interference.
H (Horizontal) Position
H (Horizontal) Position
Adjust screen horizontal position.
V (Vertical) Position
V (Vertical) Position
Adjust screen vertical position.
ResetReset
Replace Phase, Clock, V Position and H Position with the
factory default values.
-Phase This function allows you to remove any
horizontal noise and clear or sharpen the
image of characters
-Clock This function is to minimize any vertical bars
or stripes visible on the screen background.
And the horizontal screen size also will change.
-Position This function is to adjust the picture to Left/Right
and Up/Down as you prefer..
.
8
Operation
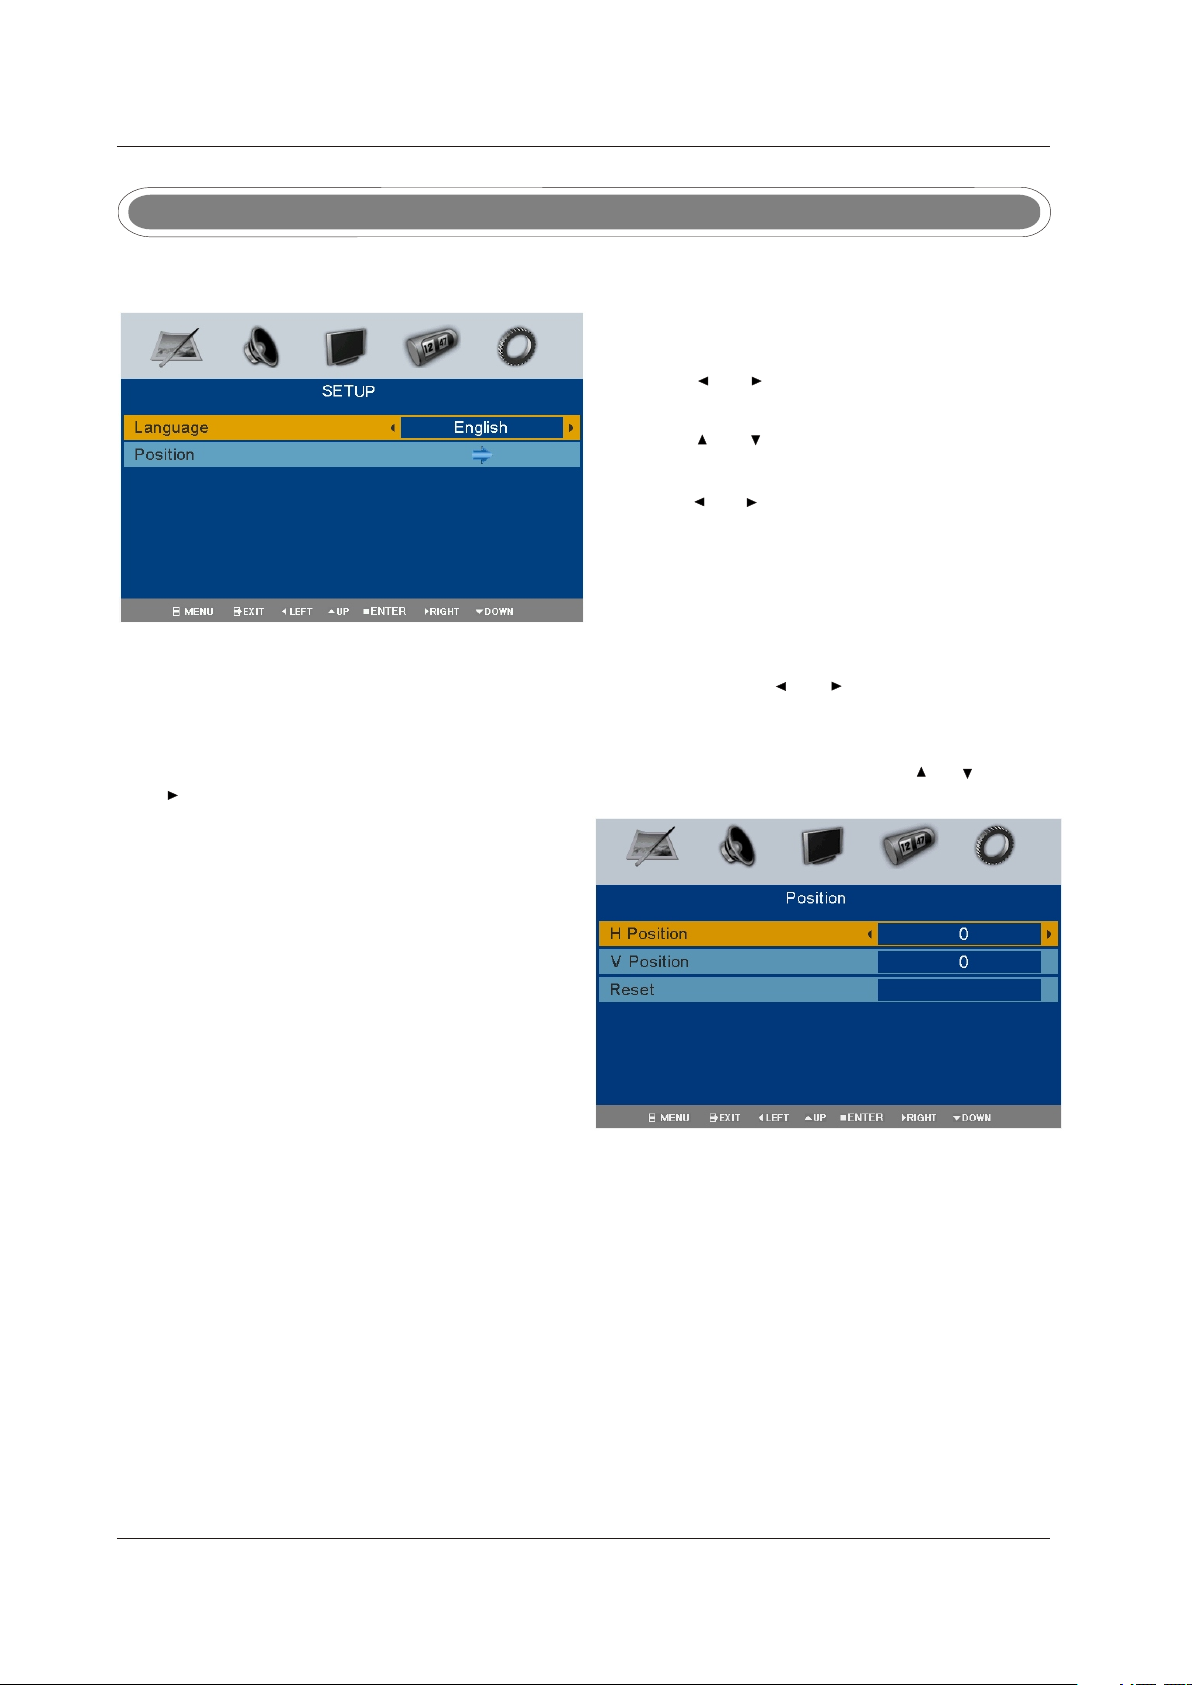
DVD/DVB-T/YPbPr/HDMI menuDVD/DVB-T/YPbPr/HDMI menu
Press LCD MENU to display the main menu.Press LCD MENU to display the main menu.
1. Press and to select SETUP in the main menu.
2. Press and to select the option you want to adjust
3. Press and to adjust.
4. W he n yo u ar e sa ti sf ie d wi th y ou r ad ju st me nt , pr es s
to return to the previous menu or press
LCD MENU
LCD MENU
EXIT to exit.
LanguageLanguage
This option allows you to select the language of OSD (on screen display) by pressing and .
PositionPosition
This option allows you to adjust the position in DVD/DVB-T/YPbPr/HDMI mode. In SETUP menu. Press and , to select position, then
press to enter into the sub menu as below.
H (Horizontal) positionH (Horizontal) position
Adjust the screen horizontal position.
V (Vertical) positionV (Vertical) position
Adjust screen vertical position.
ResetReset
Replace H position, V Position, H size and V size with the factory
default values.
9
 Loading...