


LTV-216CB11 V26方案 欧规 有 图 文
DVD MTK 1389L方 案
TFD-2214
22” TFT LCD TV+DVD COMBO
Operating Instructions
PAL/SECAM B/G,D/K,I
AC 110-240V 50/60Hz
SCART IN, PC IN
TELETEXT
NTSC PLAYBACK
INSIDE DVD
SUPPORT FORMAT: SVCD, VCD, WMA, HDCD,
KODAK PICTURE CD, DVD
MPEG4

TABLE OF CONTENTS
Table of Contents
Specifications
Installation
Warnings and Cautions
Setup
Functional Parts(TV)
Functional Parts(DVD)
Rear view of TV set
Remote Co ntrol unit
TELETEX T Operations
Remote Control Operation(DVD)
MENU Screens
4-5
8-9
10
11-12
13-14
1
Inital Settings(DVD)
2
Troubleshooting Tips
3
The Causes of interference
6
6
7
7
15-16
17
18
1
SPECIFICATIONS
Receiving System:
Colour System:
LCD Panel:
Ext.Antenna:
Ext. In/Out:
Speaker:
Audio Output:
Power consumption:
Standby power consumption:
Power Supply:
Dimension:
B/G,D/K,l
PAL,SECAM
548.6mm(22 inch) diagonal
75 Ohm Coaxial Cable
HDMI,YPbPr,AV,VGA Input, SCART IN,Earphone
8 Ohm
3W x 2
50W
<1W
AC 110-240V 50/60Hz
W534.6 X D200 X H411.3(mm)
Net Weight:
4.00KG
Note:Design and specifications are subject to change without prior notice.
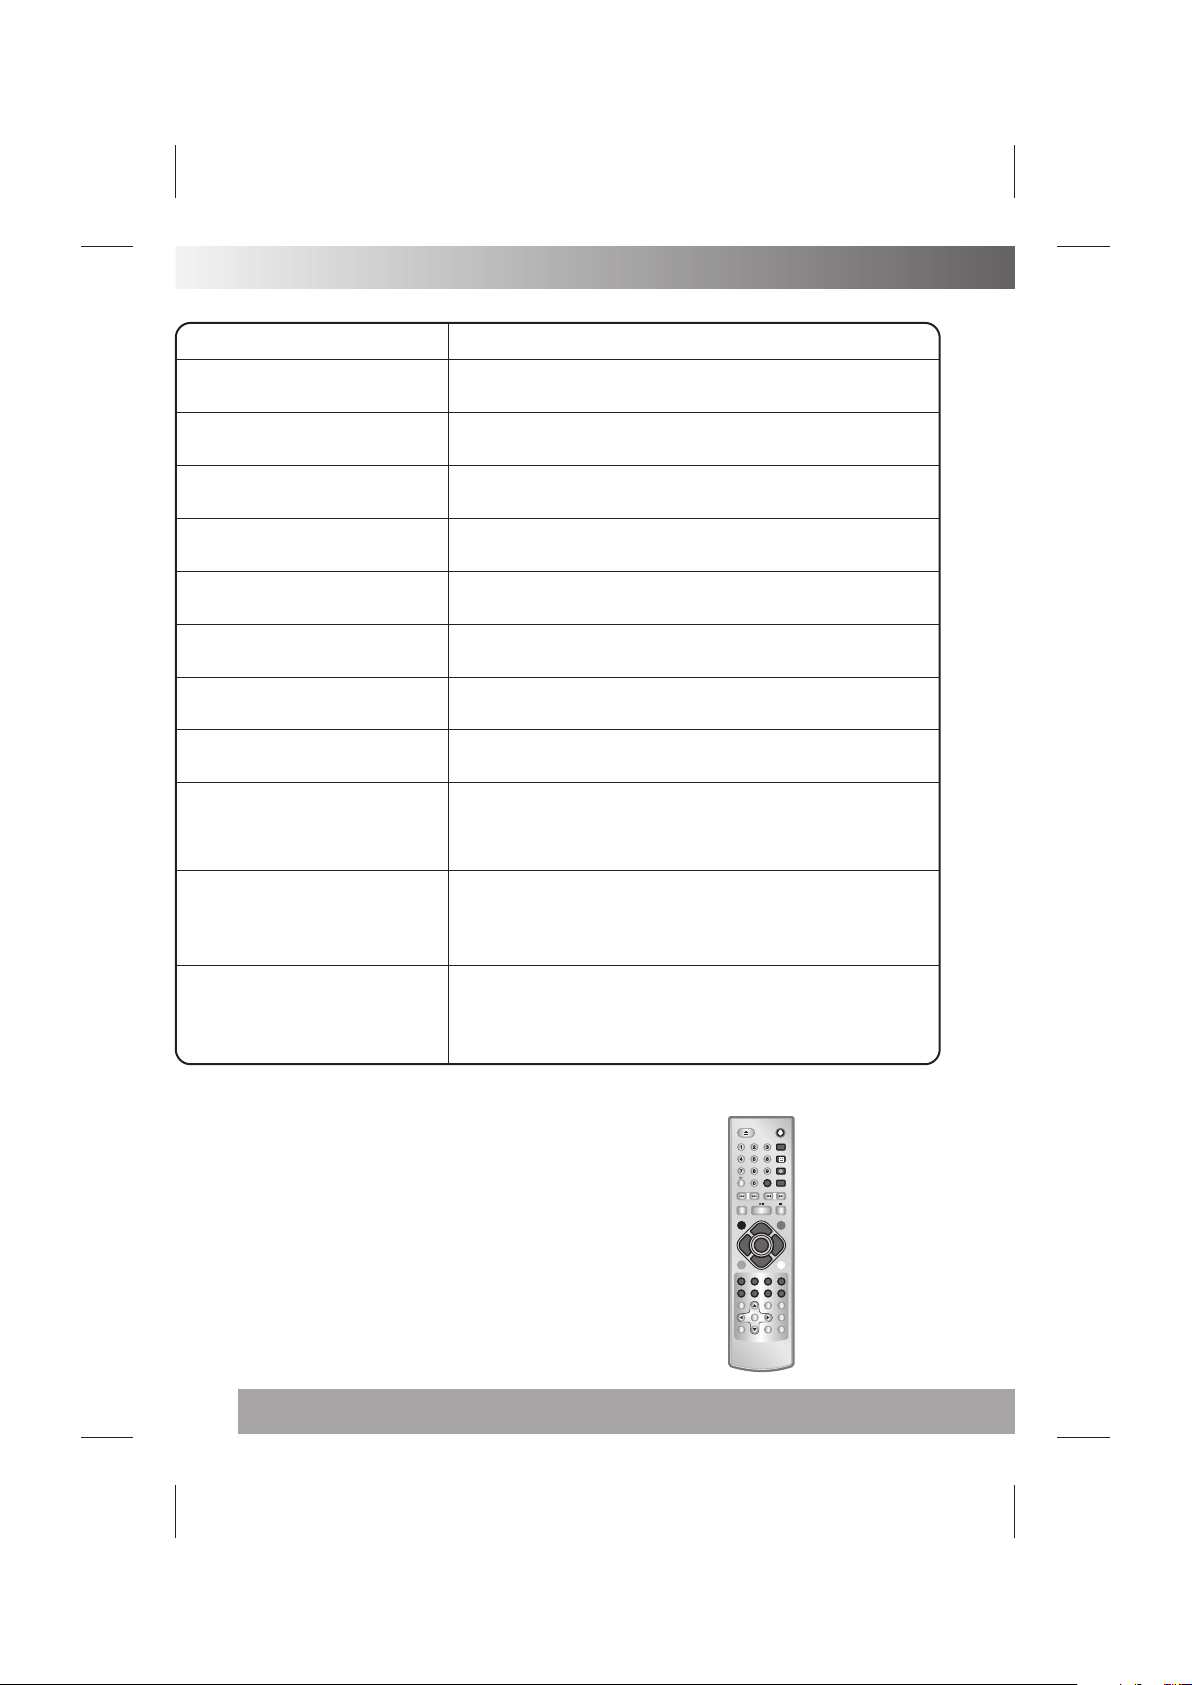
OPEN/CLOSE POWER
REMOTE CONTROL
Transmitting System :In frared
Power Supply :DC 3V
Q.
-/--
VIEW
REPEAT
MUTE SOURCE
PROG+
MENU
VOL-
ASPECT S.M
PROG-
STOP
REVEAL SIZE
TEXT
INDEX
ANGLE SL OW
TITLE
DVD MENU PROGRAM SUBTI TLE
ENTER
DVD SETUP
GOTO
P.P
SWAP
VOL+
MIX
SUB.PAGE
ZOOM
AUDIO
DISPLAY
2
INSTALLATION
Than k you v ery m uch f or yo ur pu rch ase o f this product, t he mo st na tur al Co lou r Tel evi sion Recei ver .
To enj oy yo ur se t to th e ful l fro m the v ery b eginning , rea d thi s man ual c are ful ly an d keep it hand y for r ead y
refe ren ce.
INSTALL ATION
Loca te th e rec eiv er in t he ro om wh ere d irect ligh t doe s not s tri ke th e scr een .
Tota l dar kne ss or a r efl ect ion o n the p icture screen c an ca use e yes tra in. S oft a nd indirect lig hti ng is
reco mme nde d for c omf ort abl e vie win g.
Allo w eno ugh s pac e bet wee n the r eceiver and the w all t o per mit v ent ila tio n.
Avoi d exc ess ive ly wa rm lo cat ion s to prevent poss ibl e dam age t o the c abi net o r premature com pon ent
fail ure .
This T V ope rat es on a D C sup ply p rov ide d by the AC-DC a dap tor . The v olt age i s as In dic ated on the la bel
on the b ack c ove r.O nly u se th e AC- DC ad aptor supp lie d wit h the T V and n eve r app ly an A C mains to the T V
dire ctl y. Th e AC- DC ad apt or op era tes on and AC ma ins s upp ly, t he vo lta ge is a s ind icated on th e lab el of
the AC -DC a dap tor . Con nec t the D C plu g of the AC-DC a dap tor t o the D C 12V s ock et at t he ba ck of the TV.
Conn ect t he AC -DC a dap tor a nd it s mai ns cord. Ins ert t he ma ins p lug i n the w all s ock et having a ma ins
volt age o f 110 -24 0V.
Do not i nst all t he re cei ver i n a loc ation near heat s our ces s uch a s rad iat or, a ir du cts, direc t sun lig ht ,o r
in a pla ce so mew her e lik e clo se co mpa rtment and c los e are a.
Do not c ove r the v ent ila tio n ope nings when usin g the s et.
CAUTION
Neve r tam per w ith a ny co mpo nen ts in side your se t, or a ny ot her a dju stm ent c ont rols not mentio ned i n
this m anu al. T he LC D pan el us ed in t his p roduct is ma de of g las s. Th ere for e,i t can b reak When th e pro duc t
is dro ppe d or ap pli ed wi th im pac t. Be c areful not to be in jur ed by b rok en gl ass p iec es in c ase the LCD pa nel
brea ks. Whe n you c lea n up du st or s tic k of a water dro p on th e LCD p ane l. Th e pow er co rd sh ould be pull ed
out fr om th e plu g rec ept acl e, th en wi pe the recei ver w ith d rie d sof t clo th .D uri ng thunder a nd li ght ing ,
unpl ug th e pow er co rd an d ant enn a cor d to prevent y our T V set f rom d ama ge. A ll te lev ision receive rs ar e
high v olt age i nst rum ent s. Al l "in side work" o n you r rec eiv er sh oul d be pe rfo rme d only by the TV s erv ice
pers onn el.
If som e abn orm al ph eno men a hap pen s , may be you hav e som e mis -op ert ion ,pl eas e tak e off power an d
rest art y our T V set .
IMPORTANT SAFETY INSTRUCTION
WARNING
RISK OF ELECTRIC SHOCK
DO NOT OPEN
WARNING: TO REDUCE THE RISK OF ELECTRIC SHOCK DO NOT
REMOVE COVER OR BACK. NO USER-SERVICEABLE PARTS INSIDE.
REFER SERVICING TO QUALIFIED SERVICE PERSONNEL.
The lighting flash with arrow head within a triangle is intended to tell the user that
parts inside the product are a risk of electric shock to persons.
The exclamation point within a triangle is intended to tell the user that important
operating and servicing instructions are in the papers with the appliance.
WARNING: TO REDUCE THE RISK OF ELECTRIC SHOCK DO NOT
APPARATUS TO RAIN OR MOISTURE AND OBJECTS FILLED WITH LIQUIDS,
SUCH AS VASES, SHOULD NOT BE PLACED ON THIS APPARATUS.
EXPOSE THIS
3
WARNINGS AND CAUTIONS
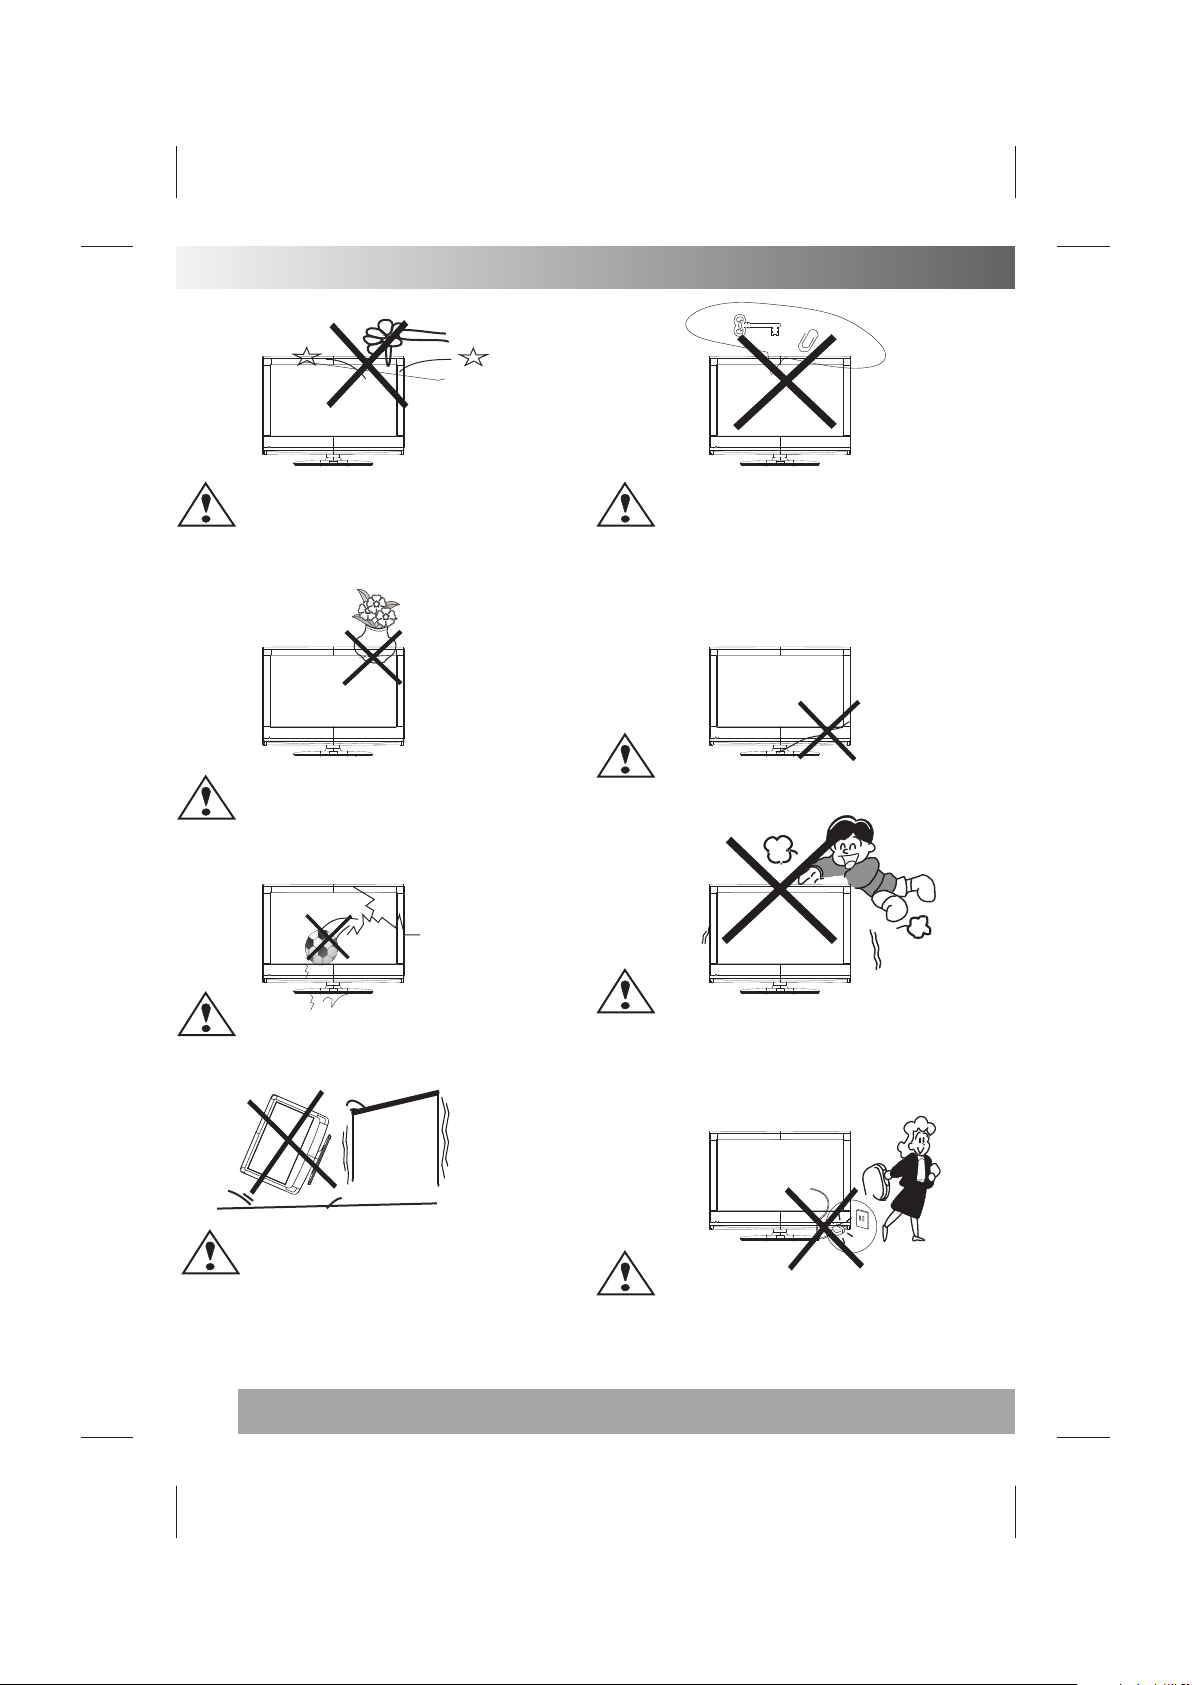
Caution
Do not d rop o r pus h obj ect s int o the t ele vision
cabi net s lot s or op eni ngs . Nev er sp ill any kind
of liq uid o n the t ele vis ion r ece ive r.
Caution
Do not p lac e obj ect s on th is un it, i t
may da mag e the s cre en su rfa ce.
Caution
Do not t hro w any thi ng at t he se t. Th e screen gla ss
may ex plo de by i mpa ct an d cau se se rio us injury.
Caution
Do not i nse rt an yth ing i n the v ent ilation holes . If
meta l or so met hin g fla mma ble e nte rs, it may res ult i n
fire o r ele ctr ic sh ock .
Caution
Do not s qua sh po wer s upp ly co rd un der t he
tele vis ion r ece ive r.
Caution
Neve r sta nd on , lea n on, o r sud den ly push the
tele vis ion o r its s tan d. Yo u sho uld p ay special
atte nti on to c hil dre n. Se rio us in jury may res ult i f it
shou ld fa ll.
Caution
Do not p lac e you r tel evi sio n on an u nst able
cart , s tan d , she lf or t abl e. Se rio us in jury to
an ind ivi dua l, an d dam age t o the t elevision,
may re sul t if it s hou ld fa ll.
4
Caution
When t he te lev isi on re cei ver i s not u sed for an
exte nde d per iod o f tim e, it i s adv isa ble to disco nne ct
the AC p owe r cor d fro m the A C out let .
WARNINGS AND CAUTIONS
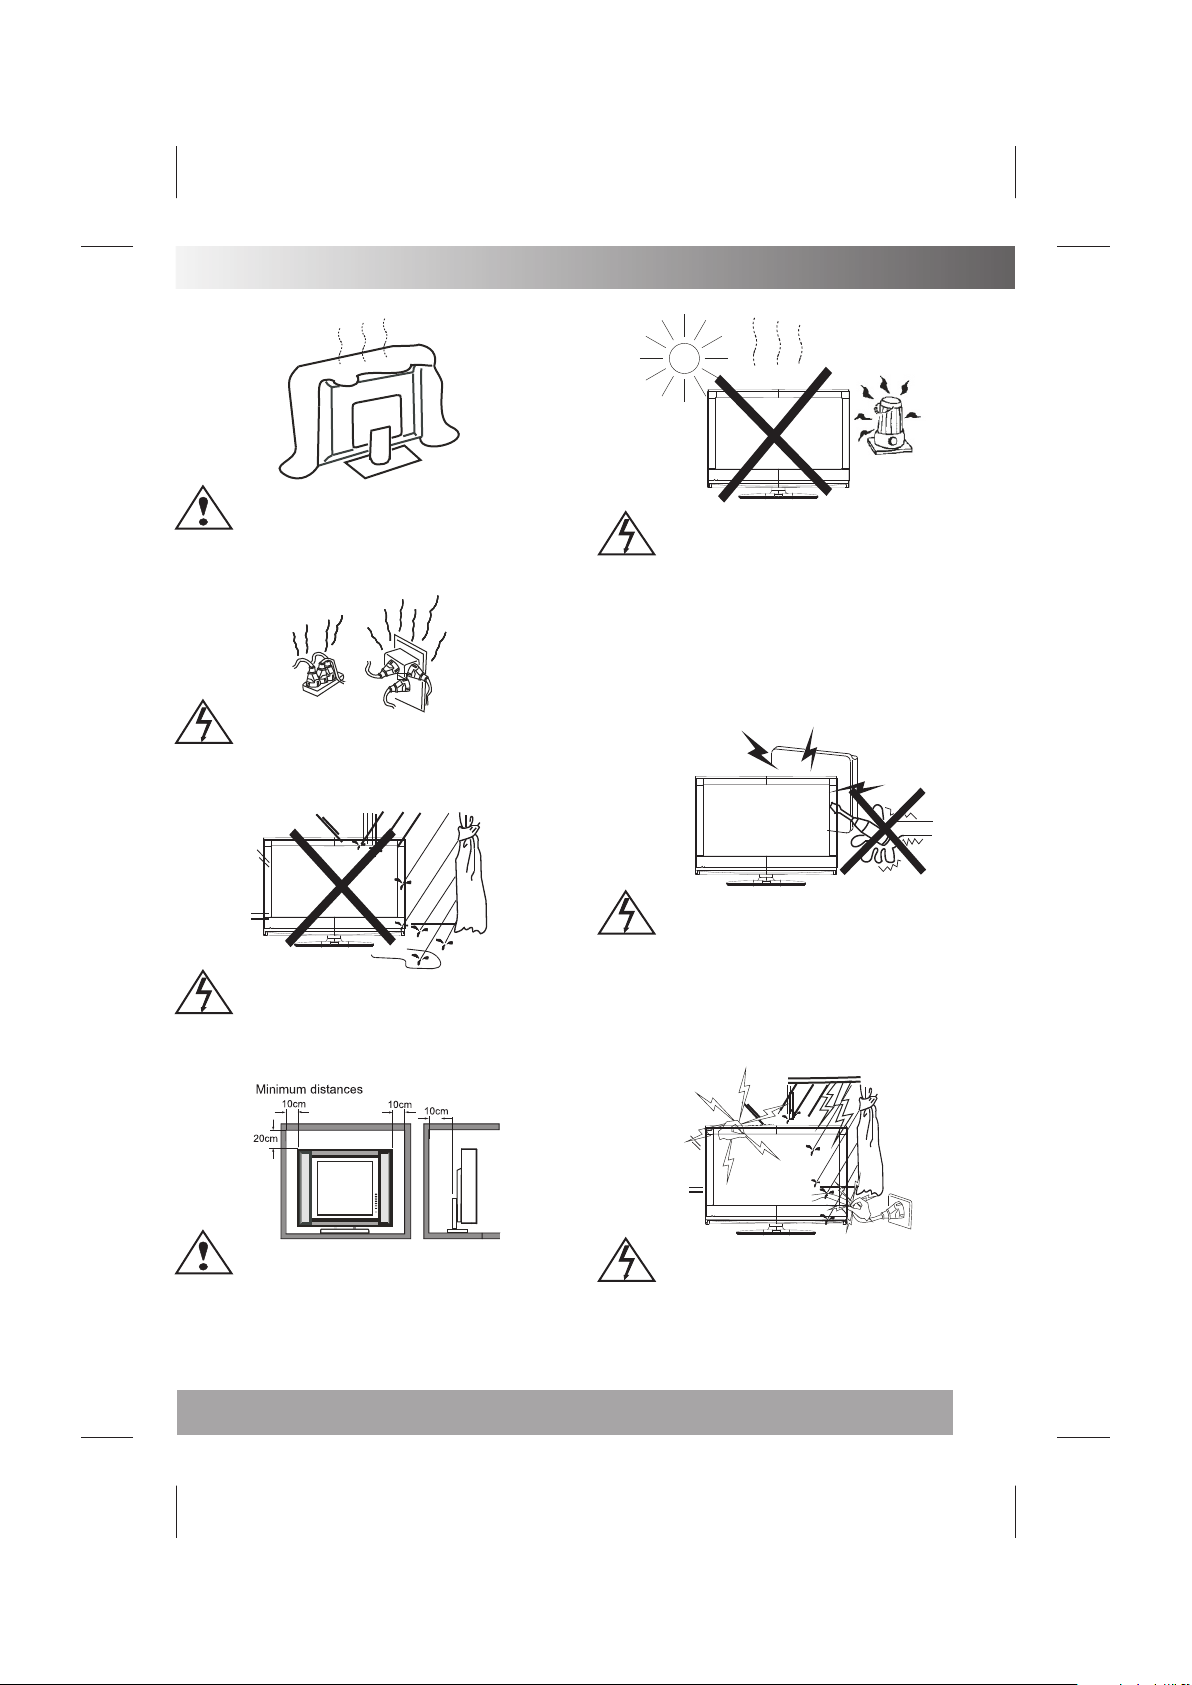
Caution
Do not b loc k the v ent ila tio n hol es in t he back
cove r. Ad equ ate v ent ila tio n is es sential to
prev ent f ail ure o f ele ctr ica l com ponent.
Warning
Take c are n ot to c onn ect m any a ppl ian ces to the
same m ain s soc ket a s thi s cou ld re sul t in fire or
elec tri c sho ck.
Warning
Avoi d exp osi ng th e tel evi sio n rec eiver to dir ect
sunl igh t and o the r sou rce o f the h eat. Do not stand
the te lev isi on re cei ver d ire ctl y on other produc es
whic h giv e off h eat . E.g .vi deo c ass ette playe rs.
Audi o amp lif ier s. Do n ot pl ace n ake d flame sour ces ,
such a s lig hte d can dle o n the t ele vis ion. Do not
expo se th e LCD s cre en su rfa ce to t he su n, it may
dama ge th e scr een s urf ace .
Warning
To pre ven t fir e or el ect ric al sh ock h azard, Do not
expo se th e tel evi sio n rec eiv er to r ain or moisture .
Caution
If the t ele vis ion i s to be b uil t int o a Com partment o r
simi lar ly en clo sed , the m ini mum d istances must b e
main tai ned . Hea t bui ld- up ca n red uce the serv ice
life o f you r tel evi sio n, an d can a lso b e dangerou s.
Warning
High v olt age s are u sed i n the o per ati on of this
tele vis ion r ece ive r.D o not r emo ve the cabin et
back f rom y our s et. R efe r ser vic ing t o qualified
serv ice p ers onn el.
Warning
For yo u own s afe ty, D o not t ouc h any p art of the set,
main l ead o r aer ial l ead d uri ng li ght ing storms .
5
简 介
SETUP
Remote Control Battery Installation
Requires two AAA batteries(supplied).
Procedure
1. Turn the remote control face down. Remove battery cover by pressing down on the marking on the
cover and sliding it off in the direction indicated.
2. Install batteries matching(+) and(-) polarity signs.
3. Replace the battery cover by sliding in reverse until the lock snaps.
Note: Incorrect installation can cause battery leakage and corrosion that will damage the Remote control.
Precautions
Replace batteries in pair.
Do not mix battery types(zinc carbon with alkaline).
Do not recharge, heat, short-circuit, disassemble, or burn batteries.
4. If you cause a static discharge when touching the unit, and the unit fails to function, simply unplug the
unit from the AC outlet, wait a few minutes, and plug it back in. The unit should return to normal operation.
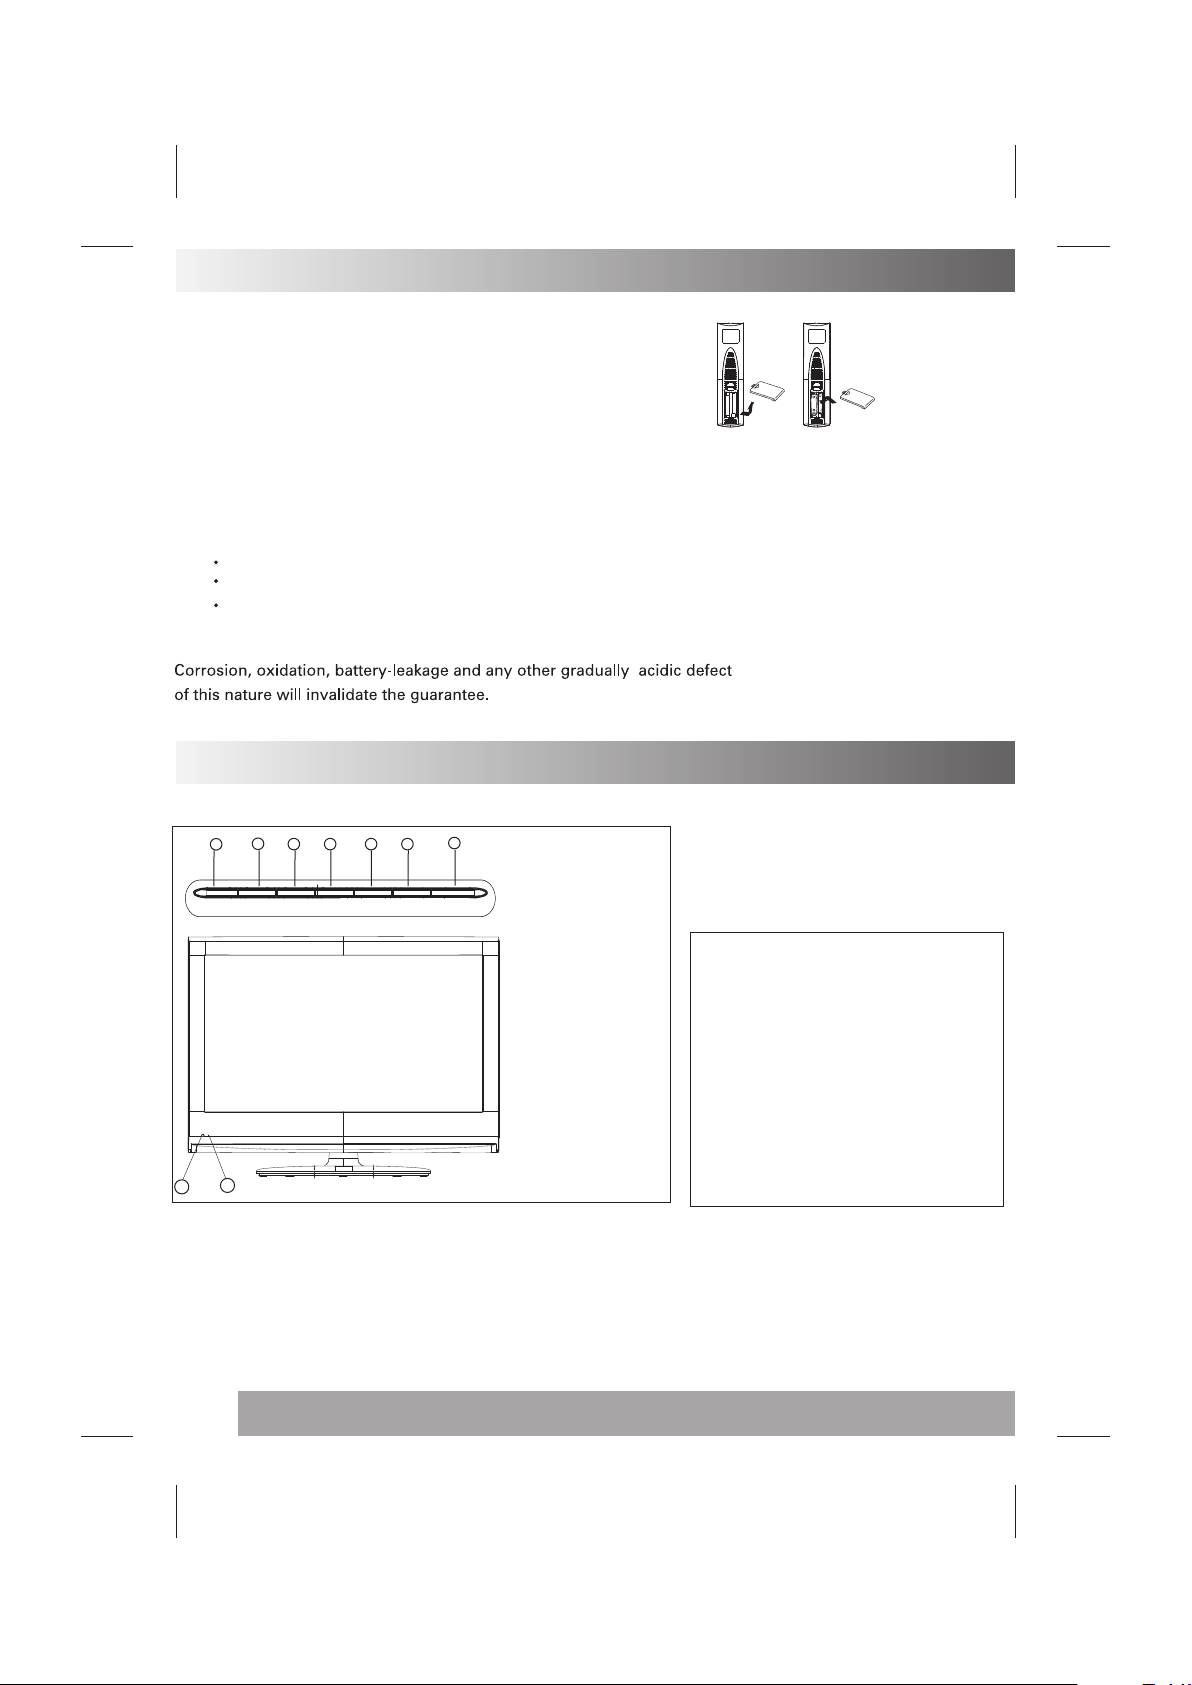
FUNCTIONAL PARTS(TV)
Fron t Vie w of LC D Set
SOUR CE
3
STAND BY
1. LED indicator lamp
2. Remote Sensor
3. Standby Button
4. ButtonSource
5. MENU Button
6. P+ Button
7. P- Button
8. V+Button
9. V- Button
NOTE
If TV is t he se lec ted i npu t wit hou t
sign al re cei ved a nd NO o per ati on
is per for med f or ab out 5 m inu tes
cont inu ous ly, t he TV s et wi ll en ter
stan dby m ode . For a ny in put s oth er
than T V, th e TV se t wil l not e nte r
stan dby m ode a uto mat ica lly w ith out
user s ins tru cti on. I f you a re no t
goin g to us e thi s TV se t for a l ong
time , swi tch o ff th e set a nd
disc onn ect t he po wer p lug f rom
the wa ll ou tle t.
8
9
V- V+ P- P+
1
2
To tur n the T V pow er ON
Put th e TV se t on th e cor rec t pla ce, t hen connect the D C plu g of th e AC- DC ad apt or to t he DC 12V socket
at the b ack o f the T V set . Con nec t the a daptor main cor d to th e wal l out let , the n the L ED indicator la mp
turn s red /gr een a nd th e TV se t is at S tandby/work M ode . At St and by Mo de, i f Sta ndb y Button is pr ess ed
the po wer i ndi cat or wi ll ch ang e to gr een. It take s a few s eco nds b efo re th e pic tur e appears.
To tur n the T V pow er OF F
Pres s the S tan dby B utt on to m ake t he TV s et in Standb y Mod e, th en di sco nne ct th e pow er plug from t he
wall o utl et.
5 4
67
MENU
6

FUNCTIONAL PARTS(DVD)
1. DVD Slot
2
Once y ou in ser t the d isk t o DVD slo t, th e player wil l suc k it in , and t he cu rre nt so urc e will be swit che d
to DVD s tat us au tom ati cal ly.
Note s:
1.Do n ot at tac h any s eal o r lab el to e ither side (the l abe led s ide o r the r eco rde d sid e) of a disc.
2.Do n ot us e irr egu lar ly sh ape d CDs ( e.g., Hear tsh ape d or oc tag ona l)s inc e they may res ult i n
malf unc tio ns.
3.So me pl ayb ack o per ati ons o f DVD s and Video CDs may b e int ent ion all y pro gra mme d by softwar e
manu fac tur ers . Thi s uni t pla ys DV DS and Video C Ds ac cor din g to di sc co nte nt de signed by th e
soft war e man ufa ctu rer , the ref ore some playba ck fe atu res m ay no t be av ail abl e or other fun cti ons
may be a dde d.
4
3
2. Play/Pause
3. Stop
4. Open/Close
1
REAR VIEW OF TV SET
TO DC IN 12V
TO POWER SOURCE
L
Pb
VID EO
Y
SCA RT
VGAPC- A IN
HDM I DC- 12V
R
ANT.
Pr
NOTE
Precautions when connecting to other equipment
When using external equipment with this TV set, please read the instruction manual of the external equipment.
Switch off all power supplies to the equipment and TV set before connection.
Always ensure that the input and output terminals are correctly connected.
7

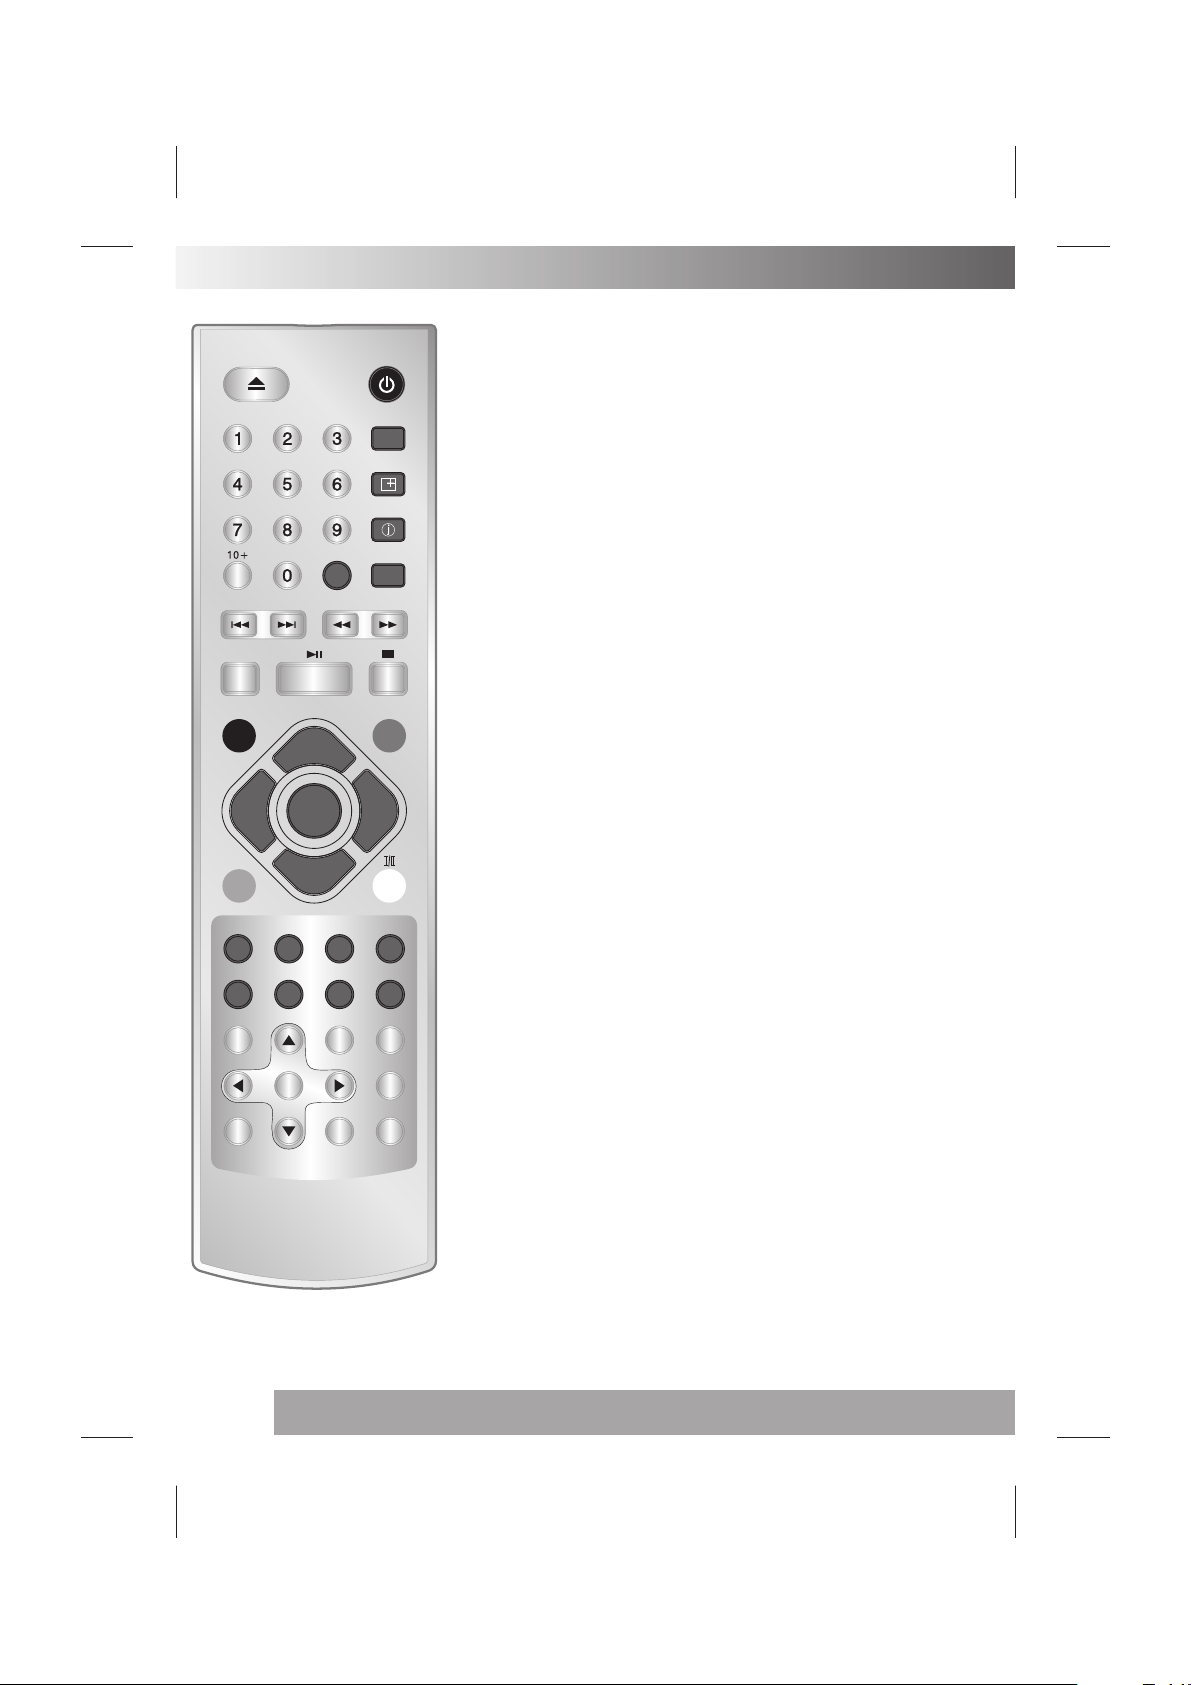
REMOTE CONTROL UNIT
POWER ON/STANDBY button
OPE N/CLO SE POW ER
P.P
Q.
-/ --
REPE AT
VIEW
SWAP
Press this button to switch on the TV when at standby mode or enter
standby mode.
MUTE button
Press this button to mute or restore sound.
P.P Button
Press this button to select the desired picture mode:
NORMAL/SOFT/DYNAMIC/CUSTOM
DISPLAY Button
Press this button to display the setting on the screen.
SLEEP Button
Press this button to set the sleep timer, the order
shown below(minutes):
OFF - 15 - 30 - 45 - 60-90-120
P.P
MUTE SOU RCE
PRO G+
TEXT
ENTER
MEN U
PRO G-
STOP
TITL E
GOTO
VOL+
MIX
SUB. PAGE
ZOOM
AUDI O
DISP LAY
VOL -
ASPECT
REVE AL SIZE
IND EX
ANGL E SLO W
DVD MEN U PRO GRAM SU BTITLE
DVD SE TUP
When the preset length of time has passed, the TV set
enters standby mode.
SOURCE Button
Press “SOURCE” button,there will be some word show on the right
top of the screen, press “PROG+/-” to select the AV source, and then
press “VOL+/-”to enter AV mode.
DIGIT Button(0-9)
This TV allows you to select channels from 1 to 254.
Press this button to select one-digit,two digit or three -digital channels
input options.
To select a one-digit channel(e.g. Channel 8),press this “-/--”button
to change channel selection to “-”on screen display and press the
“8”button only.
To select a two-digit channel(e.g. Channel 28),press this “-/--”button
to change channel selection to “--”on screen display and press“2”
and “8 ” buttons. To select a three-digit channel(e.g. Channel 128),
press this“-/--”button to change channel selection to “---”on screen
display and press“1”,“2”and “8” buttons.
8

REMOTE CONTROL UNIT
MENU Button
OPE N/CLO SE POW ER
P.P
Q.
-/ --
REPE AT
MUTE SOU RCE
PRO G+
VIEW
SWAP
Press this button to enter the menu screens for various optional
adjustable settings.
PROG+/- Button
Press the program up button to select the program forwards. Press
the program Down button to select the program Backwards.
VOL+/- Button
Press volume up/down buttons to adjust sound level.
Q.VIEW Button
Press this button to return to the previously viewed program.
Chanel Swap Button
You can adjust your TV program list order, press this button, the
program swap menu will displayed, as shown below. E.g. to swap
channel 1 and 7 , press “SWAP” button, press“PROG+/-” to
choose Channel 1 and press “VOL+/-” to set the channel number
as“0”,and as the same way to set the Channel 2 as“199”,last to do
choose the“Channel Swap” and press “VOL+/-” to implement this
fuction.
TEXT
ENTER
MEN U
PRO G-
STOP
TITL E
GOTO
VOL+
MIX
SUB. PAGE
ZOOM
AUDI O
DISP LAY
VOL -
ASPECT
REVE AL SIZE
IND EX
ANGL E SLO W
DVD MEN U PRO GRAM SU BTITLE
DVD SE TUP
ASPECT Butto n:
Press this button to select scaler mo de:
16:9 4:3 ZOO M PANORAMA
Button:
Press this button to select the stere o sound mode:
MONO NICAM A2
9
TELETEXT OPERATIONS (OPTIONAL)
For mo del s wit h Tel ete xt fu nct ion o nly.
OPE N/CLO SE POW ER
P.P
Q.
-/ --
REPE AT
MUTE SOU RCE
PRO G+
VOL -
ASPECT
REVE AL SIZE
IND EX
ANGL E SLO W
DVD MEN U PRO GRAM SU BTITLE
MEN U
PRO G-
TEXT
VIEW
STOP
TITL E
SWAP
VOL+
MIX
SUB. PAGE
ZOOM
TEXT Button
Press this button to enter or exit the teletext mode.
INDEX Button
Press the button to go to the index page.
REVEAL Button
Press this button to reveal the hidden information for
some Teletext pages(e.g. answers to puzzles or riddles).
Press again to hide the information.
MIX Button
Press this button enter to mix mode.(For SUBTITLE or
NEWSFLASH page, please use mix mode).
Press this button again to exit.
SIZE Button
Press this button to change the Teletext screen display
mode among the following:
- Upper half screen enlarged
- Lower half screen enlarged
- Normal screen state
STOP Button
Press this button to hold the Teletext page on display to prevent the
page from changing. Press again to release the hold state.
SUB.PAGE (Optional)
Press this button to display subpage.
NO SIL K BUT TON S:
Have n o fun cti on!
DVD SE TUP
10
ENTER
GOTO
AUDI O
DISP LAY

REMOTE CONTROL OPERATION(DVD)
DVD Mode:
OPE N/CLO SE POW ER
POWER
Pres s thi s but ton t o swi tch t ele vis ion on or off.
P.P
Q.
-/ --
REPE AT
MUTE SOU RCE
PRO G+
VOL -
ASPECT
REVE AL SIZE
IND EX
ANGL E SLO W
DVD MEN U PRO GRAM SU BTITLE
DVD SE TUP
MEN U
PRO G-
TEXT
ENTER
VIEW
STOP
TITL E
GOTO
SWAP
VOL+
MIX
SUB. PAGE
ZOOM
AUDI O
DISP LAY
OPEN/ CLOS E Butt on
Pres s OPE N/C LOS E but ton t o loa d dis c on disc tray. Hol d the d isc
with out t ouc hin g eit her o f its s urf aces, posi tio n it wi th th e pri nte d
titl e sid e fac ing u p, al ign i t wit h the guides, and p lac e it in i ts pr ope r
posi tio n. In c ase o f int era cti ve DV Ds with play bac k con tro l, a me nu
appe ars o n the T V scr een .
DVD MEN U Butt on
If pla y som e DVD d isc s, pr ess t his b utt on back to root men u scr een .
PROGR AM But ton
Place a t rack o n the pr ogram list.
Pres s PRO GRA M but ton , the n the “P ROG RAM” will
appe ar on T V scr een n ow yo u can p res s“> △ ▽ ”
and“EN TER”b utt on to s ele ct “ST ART” o pti on and
enjo y the d esi red t rac ks.
SUBTI TLE Bu tton
To pre ss th is bu tto n, yo u can c han ge th e subtitle l ang uag e fro m one
sele cte d to th e ini tia l set tin gs to a different l ang uag e, if a vai lab le.
DVD SET UP But ton
Pres s SET UP bu tto n you c an ac ces ses o r removes setup m enu .
AUDIO B utto n
To pre ss th is bu tto n, yo u can c han ge th e audio lang uag e fro m the
one se lec ted a t set tin gs to a d iff ere nt languag e, if a vai lab le.
GOTO Bu tton
Pres s thi s but ton t o go to d esi red p osi tion. The pl aye r pro vid es 3
sear ch mo de Wh en th e abo ve it ems a re sh owed on TV scr een , you
can in put n umb er to l oca te de sir e sec tor, then pr ess P LAY t o
comm enc e pla y The n umb er yo u inp ut is i nvalid if it i s bey ond t he
trac k's c apc ity .
DISPL AY But ton
To dis pla y pla yer O SD.
PREV/ NEXT B utto n( , )
Pres s the se bu tto n to go t o the p rev iou s/next cha pte r(D VD) .
FR/FF B utto n( , )
Thes e but ton s all ow sk ipp ing a hea d/back at 5- lev el sp eed . Pre ss
“PLAY”b utt on to r etu rn to n orm al pl ayb ack.
11

REMOTE CONTROL OPERATION(DVD)
OPE N/CLO SE POW ER
P.P
Q.
-/ --
REPE AT
MUTE SOU RCE
PRO G+
VOL -
ASPECT
REVE AL SIZE
IND EX
ANGL E SLO W
DVD MEN U PRO GRAM SU BTITLE
DVD SE TUP
MEN U
PRO G-
TEXT
ENTER
VIEW
STOP
TITL E
GOTO
SWAP
VOL+
MIX
SUB. PAGE
ZOOM
AUDI O
DISP LAY
DVD Mode:
REPEA T Butt on
To pre ss th is bu tto n you c an re pea ted ly play a titl e(D VD) o r all
trac ks( CD) w hen“A LL ”ap pea rs on T V scr een, you can
repe ate dly p lay a c hap ter ( DVD ) or a si ngle track (CD ) whe n“Rep eat
chap ter”a ppe ars o n TV sc ree n, yo u can c ancel repe at fu nct ion s
when n o“Rep eat o ff”ap pea rs on T V scr een .
PLAY/ PAUS E Butt on
Pres s thi s but ton t o sta rt pl ayb ack . Press this butt on ag ain t o
paus e pla yba ck.
STOP Bu tton
When t his b utt on is p res sed o nce , the u nit record s the s top ped
poin t, fr om wh ere p lay bac k wil l res ume (resume fun cti on) i f
“PLAY”i s pre sse d aft er wa rds . But i f STO P button is press ed
agai n ins tea d of PL AY bu tto n, th ere w ill be no resu me fu nct ion .
TITLE button
DVD disc:
Press TITLE button, then the DVD menu or titles available on the disc
will be displayed. Then you can use " " and ENTER button to select
programs.
VCD disc:
Press TITLE button,you can switch PBC on/off.
ZOOM bu tton
1.Pr ess Z OOM d uri ng pl ayb ack o r sti ll pl ayback to ac tiv ate t he
Zoom f unc tio n. Th e squ are f ram e app ears briefly in t he ri ght b ott om
of the p ict ure .
2. Eac h pre ss of t he ZO OM bu tto n cha nge s the TV scree n in th e
foll owi ng se que nce :
2X siz e 3X s iz e 4X size 1 /2 s iz e 1/3 s iz e 1/ 4 size no rm al s ize
3. Use t he bu tto ns to m ove t hro ugh t he zoomed pi ctu re.
4. To re sum e nor mal p lay bac k, pr ess Z OOM button unti l scr een
beco mes 1 X.
Note :Zo om ma y not w ork o n som e DVD s.
N
ANGLE b utto n
If the d isc c ont ain s sce nes r eco rde d at different ca mer a ang les , you
can ch ang e to a di ffe ren t cam era a ngl e during pla yba ck. P res s
ANGL E rep eat edl y dur ing p lay bac k to select a de sir ed an gle . Not e
that t he nu mbe r of th e cur ren t ang le appears on scr een .
Note :
N
The an gle i ndi cat or wi ll bl ink o n the T V screen dur ing s cen es
reco rde d at di ffe ren t ang les a s an in dication t hat a ngl e swi tch ing
is pos sib le.
SLOW Button
Press this button during playback to activate the slow function.
Each press on this button change the TV screen in the follow
sequence:1/2 - 1/4 - 1/8 - 1/16 normal play
12

MENU SCREENS
This TV allows you to adjust any setting from the menu screens using “MENU”,“VOL+/-”and “PROG+/-”
buttons.
Press “MENU”button to display the menu, press“PROG+/-”to change menu from one to another, “VOL+/-”
to enter the chosen menu, press“PROG+/-”to select the item, and then press “VOL+/-”to adjust each
item.
Press “MENU” again to exit the menu mode.
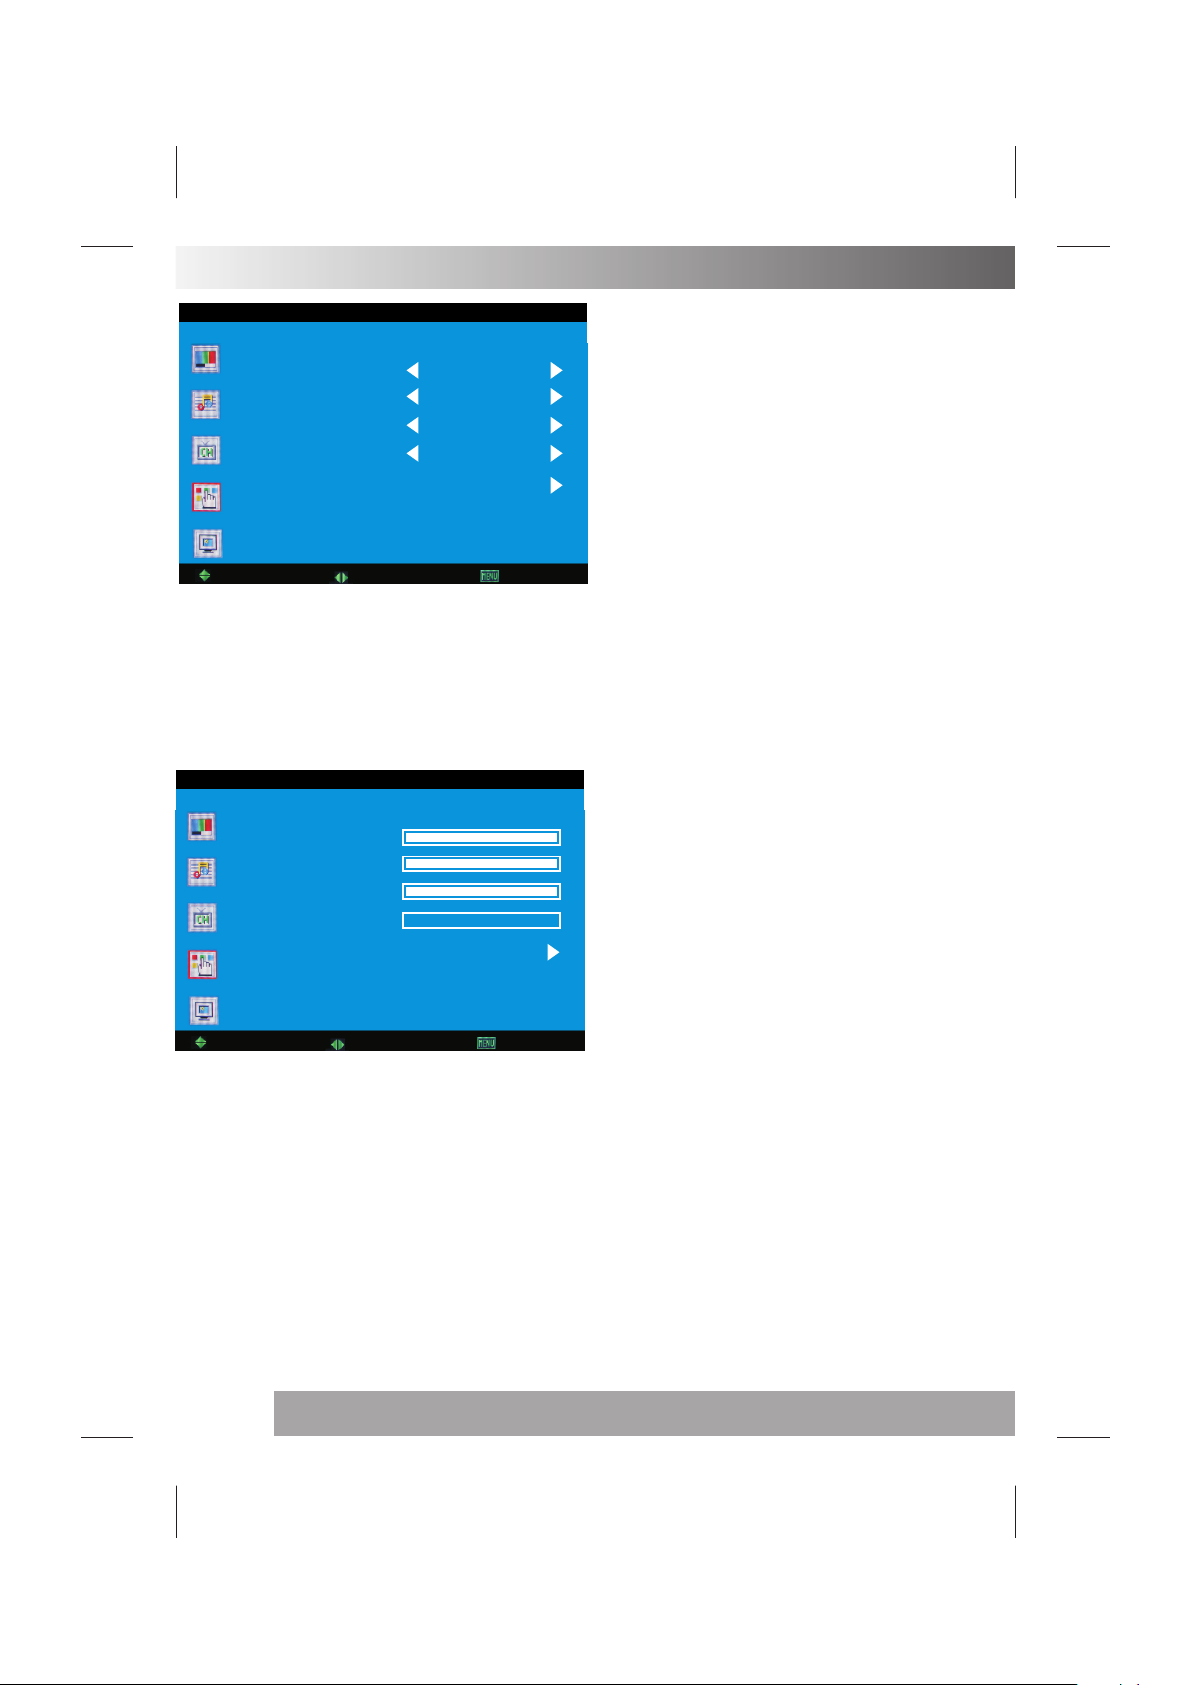
PICTURE MENU
You can adjust the contrast, brightness, Hue(NTSC only) ,saturation,sharpness.
SCALE(Remote silk is ASPECT): 16:9/4:3/AUTO
PICTURE MODE: NORMAL/SOFT/VIVID/USER
TV MENU(under TV mode only)
AUTO TUNE: Press“VOL+/-”to begin auto search
program, and press menu to exit auto search.
MANUAL TUNE: To enter manual setting
sub menu.
SOUND SYS. B/G,D/K,I,L,L’(optional)
SKIP: Set this item on to skip the channel which you
are Watching.
Fine Tune: Frequency data can be fine-tuned in upward
or downward by the VOL+/- buttons.
Chanel Swap: To swap two channels selected each other
SOUND MENU
Enter sound menu, you can adjust.
Volume SOUND BASS/TREBLE/BALANCE/SOUND MODE:
NORMAL/NEWS/MOVIE/USER
13
MENU SCREENS
Function
La nguag e
Bl ue Back
TT X Langu a ge
Co lor Tem p.
Re set
Move Select Exit
FUNCTION MENU
LANGUAGE:You can choose the osd language.
TXT LANGUAGE.You can choose the supported
teletext fonts among AUTO,WEST,EAST,RUSSIAN,
ARABIC and FARSI.
BULE BACK: You can set background ON or OFF.
COLOUR TEMP:You can set the colour temp mode :
NORMAL,WARM,COOL,USER
RESET: You can reset all the osd items setup
H- Pos ition
V- Po s itio n
Cl ock
Ph ase
Au to ad jus t
English
On
WEST
Normal
PC
Move Select Exit
PC MENU(under PC mode only)
H-POSITION/V-POSITION: Press the VOL+/- buttons to adjust the picture Horizontal and Vertical position.
CLOCK : Press the VOL+/- to minimize any vertical bars or stripes visible on the screen background.
PHASE : When necessary, adjust the pixel phase of the picture to avoid picture interference.
AUTO ADJUST : To adjust the screen position automatically. It will take a few seconds and during this
process the screen will be black.
.
NOTE:
If the set is cold ,there may be a small“flicker” when the set is switched on. It is normal, There is nothing
wrong with the set.
If possible, use the VESA 1024X768@60HZ video mode to obtain the best image quality for your LCD monitor.
Under other resolutions some scaled or processed pictures may appear on the screen.
Some dot defects may appear on the screen, like red, green or blue Spots, However,this will have no impact
oreffect on the monitor performance.
Do not press the LCD screen with your finger for a long time as it may incur some damage to the screen.
14

Inital Settings(DVD)
COMMON PROCEDURES OF INITIAL SETTINGS
Press SETUP button to get the setup menu. Use
direction buttons " " to select the preferred item .
After finishing settings, press SETUP again to TV
display.
The following menu items can be changed:
GENERAL: Selects the GENERAL SETUP PAGE menu.
AUDIO : Selects the AUDIO SETUP PAGE menu.
DOLBY : Selects the DOLBY DIGITAL SETUP PAGE
menu.
PREFERENCE: Selects the PREFERENCE SETUP PAGE
menu.
PASSWORD: Selects the PASSWORD SETUP PAGE
menu.
GENERAL SETUP PAGE
-- --
General Setup Page
TV Display
Angle Mark
Osd Lang Eng
Closed Captions On
Screen Saver
Go To General Setup Page
Ps
On
On
Dolby
4:3 PanScan
4:3 LetterBox
On
English
On
On
Off
Off
French
German
Italian
Spanish
Portuguese
16:9
Off
The following menu items can be changed:
TV DISPLAY: Selects the aspect ratio of the playback
picture.
4:3 PanScan: Pan & Scan display.
4:3 LetterBox: LetterBox display.
16:9: widescreen display.
ANGLE MARK: Viewing angles change option
(if available).
CLOSED CAPTIONS:Closed captions are data that are
hidden in the video signal of some discs.Before you
select this function,please ensure that the disc contains
closed captions information and your TV set also has
this function.
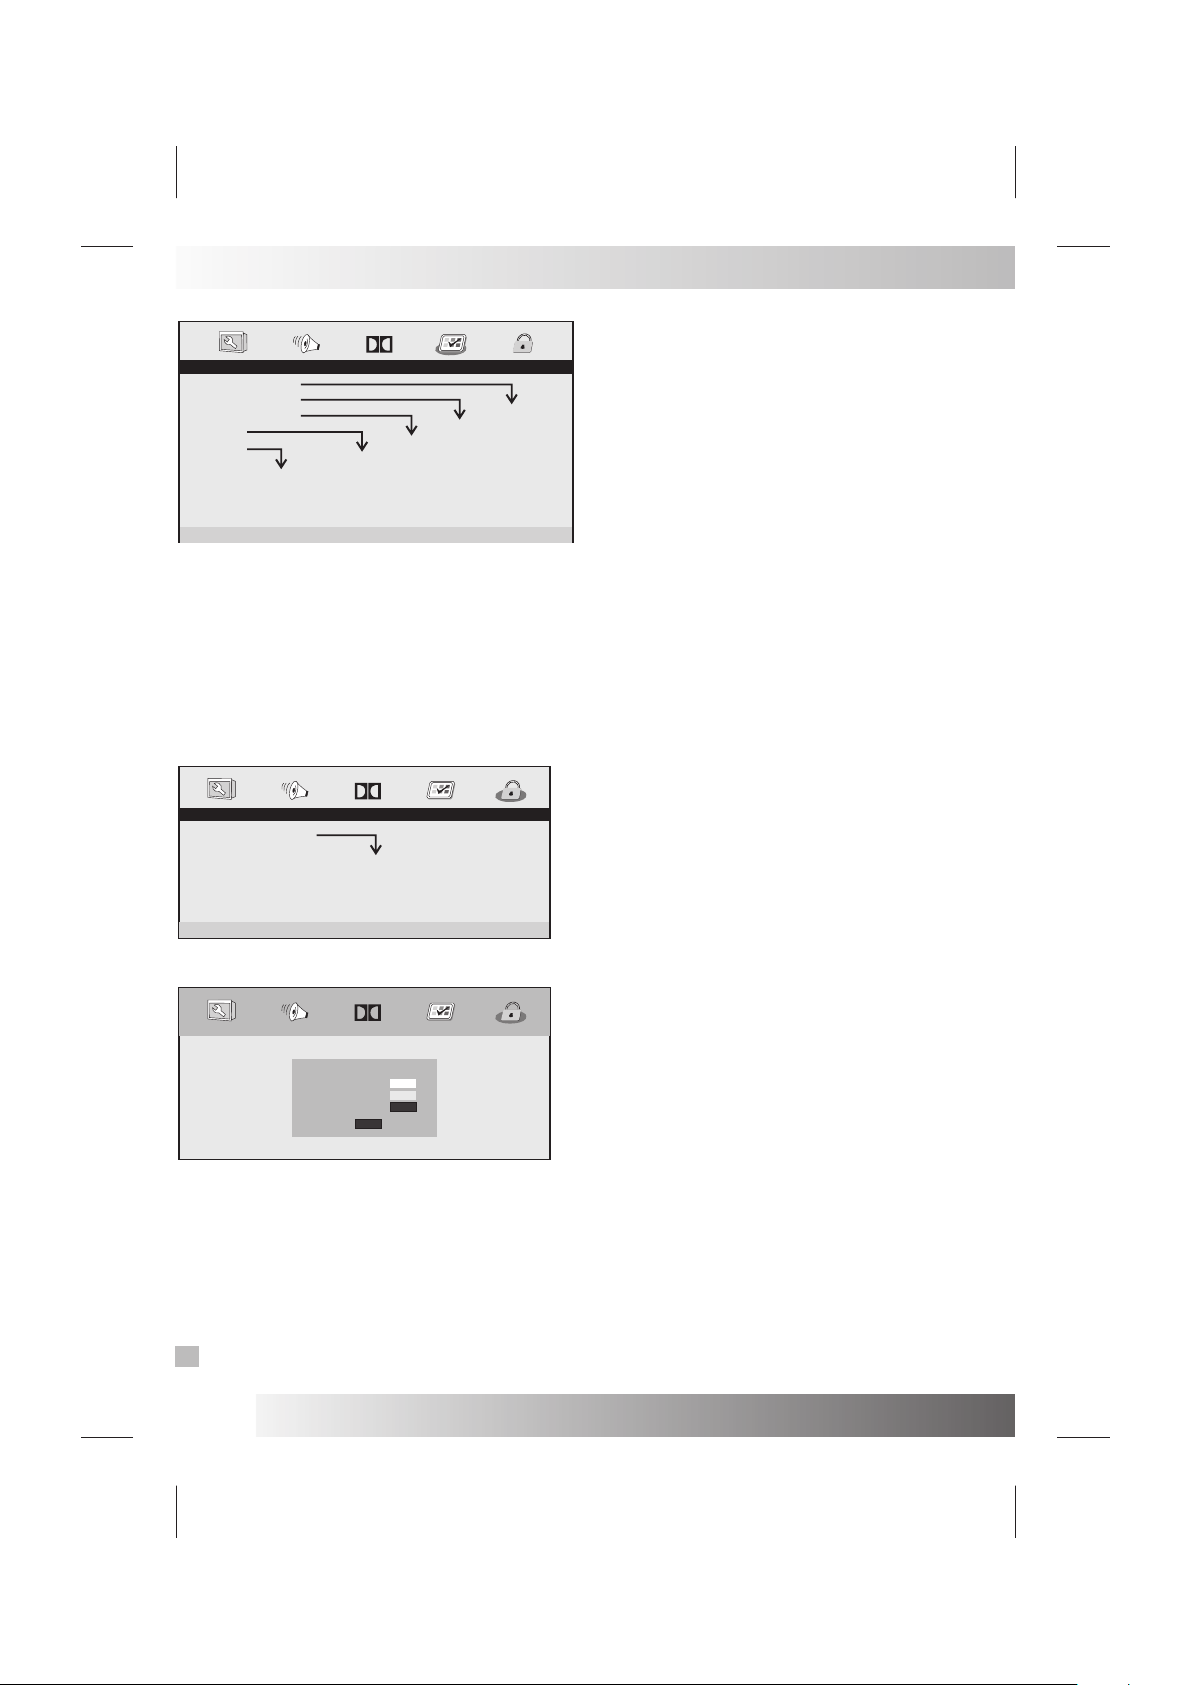
SCREEN SAVER: This is to turn on/off screen saver.
AUDIO SETUP PAGE
Dolby
-- --
Analog Audio Setup Page
Downmix
Go To Speaker Setup Page
Stereo
LT/RT
Stereo
This page is for setup speaker output.
DOWNMIX Stereo
LT/RT: 2ch output, main channel with surround.
STEREO: 2ch output, main right channel with right
surround; main left channel with left surround.
DOLBY DIGITALSETUP PAGE
Dolby
-- --
Dolby Digital Setup
Dual Mono
Dynamic
Go To Dolby Digital Setup
FULL
3/4
1/2
1/4
OFF
Stereo
L-Mono
R-Mono
Mix-Mono
The following menu items can be changed:
DUAL MONO: Reproduction mode, used only when the
input consists of two independent audio
channels(1/1 mode). Possible selections
are:
STEREO: Reproduce both channels as is.
L-MONO: Reproduce the left channel only.
R-MONO: Reproduce the right channel only.
The default is STEREO.
DYNAMIC: Dynamic range compression.
15
Inital Settings(DVD)
PREFERENCE SETUP PAGE
Dolby
-- --
Preference Page
Audio Eng
Subtitle
Disc Menu Eng
Parental
Default
Go To Preference Page
Eng
Reset
1 Kid
2 G
3 Pg
4 Pg 13
5 Pgr
6 R
7 Nc17
8 Adult
English
French
Spanish
Chinese
Japanese
Korean
Russian
The following menu items can be changed:
AUDIO: Selects a language for audio(if available).
SUBTITLE: Selects a language for subtitles(if available).
DISC MENU: Selects a language for DISC menus (if available).
PARENTAL[DVD only]: This is to disable the playing of specified DVDs which are unsuitable for children. Some
DVDs are encoded with specific rating level. If the rating level of the disc is higher than that preset in the setup
operation, playback of the disc will be prohibited. After selecting one of the PARENTAL items the screen will
change to the PASSWORD page, and password is required , The factory initial setting is 1369.
DEFAULT:Back to the factory setting.
PASS WO RD SETU P PA GE
Dolby
- - Password Setup Page - -
PASSWORD MODE ON
PASSWORD
ON
OFF
English
French
Spanish
Chinese
Japanese
Korean
Russian
English
French
Spanish
Chinese
Japanese
Korean
Russian
Go To Password Setup Page
PASS WOR D MOD E: Se t pas swo rd mo de on /of f. If set to off , cha nge p are nta l lev el wi ll no t check passwor d.
PASSW ORD: Select the menu p ass wor d cha nge p age .
Dolby
OLD PASSWORD
NEW PASSWORD
CONFIRM PWD
OK
OLD PA SSW ORD : Ent er th e OLD p ass wor d, (F actory set tin g is 13 69) , and t he cu rso r wil l jum p
auto mat ica lly t o NEW P ASS WOR D
NEW PA SSW ORD : Ent er th e NEW p ass wor d. En ter 4 digits f rom t he re mot e con tro l uni t num eri c buttons,
and th e cur sor w ill a uto mat ica lly j ump to CONFIRM PA SSW ORD .
CONF IRM P ASS WOR D: Co nfi rm th e NEW p ass word by enterin g it ag ain . If th e con fir mat ion i s incorrect,
the cu rso r wil l sta y in th is co lum n. Af ter entering, t he co rre ct ne w pas swo rd ag ain , the cursor will j ump
auto mat ica lly t o OK.
OK: Wh en cu rso r is on t his b utt on, p res s ENTER key to conf irm s ett ing .
Note : If th e pas swo rd ha s bee n cha nge d, the paren tal and d isc l ock c ode w ill a lso b e changed.
N
The de fau lt pa ssw ord (13 69) is al way s active eve n the p ass wor d has b een c han ged .
16

TROUBLESHOOTING TIPS
Befo re ca lli ng fo r ser vic e, yo u can c heck the follow ing i tem s on sy mpt oms a nd so lut ions.
No pict ure:
Chec k oth er ch ann el, m ayb e sta tio n problem.
Adju st th e tun ing c ont rol .
Ensu re th at th e inp ut se tti ng is a t TV state.
Ensu re th at th e LCD i s on.
Ensu re th at th e equ ipm ent i s con nec ted proper ly.
No sou nd an d dis tor ted s oun d:
Ensu re th at th e inp ut se tti ngs f or the TV and sound a re pr ope r.
Adju st th e tun ing c ont rol .
Prob abl y loc al in ter fer enc e, su ch as an applianc e.
Re-o rie nt ae ria l(i f ind oor t ype ).
Ensu re th at th e equ ipm ent i s con nec ted proper ly.
No rem ote C ont rol :
Chec k the b att ery a re in sta lle d wit h the correc t pol ari ty.
Poin t the r emo te co ntr ol un it at t he remote contr ol se nso r and o per ate .
Remo ve th e obs tac les b etw een t he re mote contr ol an d the r emo te co ntr ol se nso r.
Oper ate t he re mot e con tro l uni t at a distance of no t mor e tha n 8 met ers f rom t he re mot e control senso r.
Trou ble sho oti ng ti ps( PC mo de) :
“NO SIG NAL”d isp lay ed
Chec k if th e wir e is co nne cte d cor rec tly.
Ensu re th e com put er or o the r equ ipm ents are at po wer o n mod e.
Ensu re th e com put er is n ot at p owe r sav e mode.
Ensu re th e TV in put s ett ing i s at pc m ode .
“UNSU PPO RTE D”dis pla yed
Chec k if th e inp ut se tti ng is c omp ati ble to the mon ito r spe cif ica tio n.
Chec k if th e wir e is co nne cte d cor rec tly.
Led la mp in dic ato r on bu t no pi ctu re
Chec k the m oni tor s ett ing : con tra st ,brightnes s.
Chec k if th e wir e is co nne cte d cor rec tly.
Some u nus ual s pot s on sc ree n:
Some d ot de fec ts ma y app ear o n the s cre en, like red , gre en or b lue , Spo ts, H owe ver , this will ha ve no
impa ct or e ffe ct on t he mo nit or pe rfo rmance.
17

THE CAUSES OF INTERFERENCE
Inco rpo rat ed in y our T V rec eiv er ar e the most up-to- dat e dev ice s to el imi nat e int erferenc e.L oca l rad iat ion
howe ver , can c rea te di stu rba nce s which visibly a ffe ct yo ur pi ctu re. P rop er in stallation, a g ood a eri al ar e
your b est s afe -gu ard s aga ins t the se disturb anc es.
RF INTE RFER ENCE
Movi ng ri ppl es ac ros s the s cre en ar e caused by nearb y tra nsm itt ing o r rec eiv ing s hort-wave rad io
equi pme nt.
DIATH ERMY
Herr ing bon e pat ter n and p art ial p icture los s can r esu lt fr om th e ope rat ion o f dia thermy equ ipm ent f rom a
near by do cto r's s urg ery o r hospital .
SNOW
Weak T V sig nal s fro m lon g dis tan t sta tions result in a n ins tea d pic tur e and g ive t he effect of fall ing s now .
An ant enn a adj ust men t or an ten na amplifier ma y be ne ede d.
GHOST
Mult ipl e ima ge ca use d by TV s ign als r eflected back f rom s urr oun din g bui ldi ngs , hills, aircra ft, e ct. I s
mini miz ed by c orr ect a eri al po sit ioning.
CAR IGN ITIO N
Near by ca rs an d ele ctr ica l mot ors c an cause small st rea ks ac ros s the p ict ure o r mak e the picture rol l.
18

 Loading...