

Page 1
www.denver-electronics.com
29" COLOUR TELEVISION
ON SCREEN DISPLAY
REMOTE CONTROL
HYPERBAND TUNER
PERITELEVISION(SCART JACK)
Description:
Job No.
Ref:
REV:0
Engineering Dept:
Artwork By:
Checked By:
Approved By:
MANUAL
42089 DENVER
29SI
Brand Name:
P/No.
Scale:
Date:
Date:
Date:
DTX-2910
MANUAL
5P60
02-18-04
Page 2

SPECIFICATIONS
Receiving System : BG , DK , I
Colour System : PAL / NTSC Playback
Picture Tube : 74cm (29") diagonal
Ext. Antenna : 75 Ohm Coaxial Cable
Ext. In/Out :
Speaker : 8
Audio Output(MAX) : 1KHZ 0.5Vrms, 6Wx2
10% THD Audio Output Power : 1KHZ 0.5Vrms, 6Wx2
Power Consumption : AC 150-240V 50/60Hz, 150W MAX
Standby Power Consumption : AC 220V 50/60Hz, 5W MAX
Dimension : 786(W) x500(D) x 585(H)mm
Net Weight : 46 kg
REMOTE CONTROL
Transmitting System : Infrared
Power Supply : DC 3V (1.5 x 2)
Dimension :
Net Weight : 130 g
Design and specifications are subject to change without prior notice.
Peritelevision(Scart Jack),Side AV-In , S-Video
Ohm(12W) x 2
55(W) x 184(L) x 34(D)mm
Page 3

CONTENTS
INTRODUCTION...............................................................................................................................
WARNINGS and CAUTIONS ............................................................................................................
CONTROL LOCATION .......................................................................................................................
INPUT and OUTPUT .........................................................................................................................
OPERATION INSTRUCTIONS ...........................................................................................................
LOCATION OF CONTROL(REMOTE CONTROL UNIT) ....................................................................
LOCATION OF CONTROL(REMOTE CONTROL UNIT) (TELETEXT OPTION) ...................................
BATTERY INSTALLATION............................................. ....................................................................
SERVICE TIPS ..................................................................................................................................
2
3 - 4
5
6
7-10
11-12
13-14
15
16
-1-
Page 4
INTRODUCTION
Thank you very much for your purchase of this product-the most natural Colour Television Receiver.
To enjoy your set to the full from the very beginning, read this manual carefully and keep it handy for ready
reference.
INSTALLATION
Locate the receiver in the room where direct light does not strike the screen.
Total darkness or a reflection on the picture screen can cause eyestrain.
Soft and indirect lighting is recommended for comfortable viewing.
Allow enough space between the receiver and the wall to permit ventilation.
Avoid excessively warm locations to prevent possible damage to the cabinet or premature component
failure.
This TV receiver can be connected to AC 150-240 Volts. 50/60 Hz. Never connect to DC supply or any
other power supply.
Do not install the receiver in a location near heat sources such as radiator, air ducts, direct sunlight, or in
a place somewhere like close compartment and close area.
Do not cover the ventilation openings when using the set.
CAUTION
Never tamper with any components inside your set, or any other adjustment controls not mentioned in
this manual. All television receivers are high voltage instruments. Your PICTURE TUBE is highly evacuation.
If broken, glass fragments will be violently expelled. Scratching, chipping or undue pressure is dangerous
and should be avoided. When you clean up dust or stick of a water drop on the PICTURE TUBE FACE or
CABINET, the power cord should be pulled out from the plug receptacle, then wipe the receiver with dried
soft cloth. During thunder and lighting, unplug the power cord and antenna cord to prevent your TV set
from damage. All "inside work" on your receiver should be performed only by the TV service personnel.
-2-
Page 5
WARNINGS and CAUTIONS
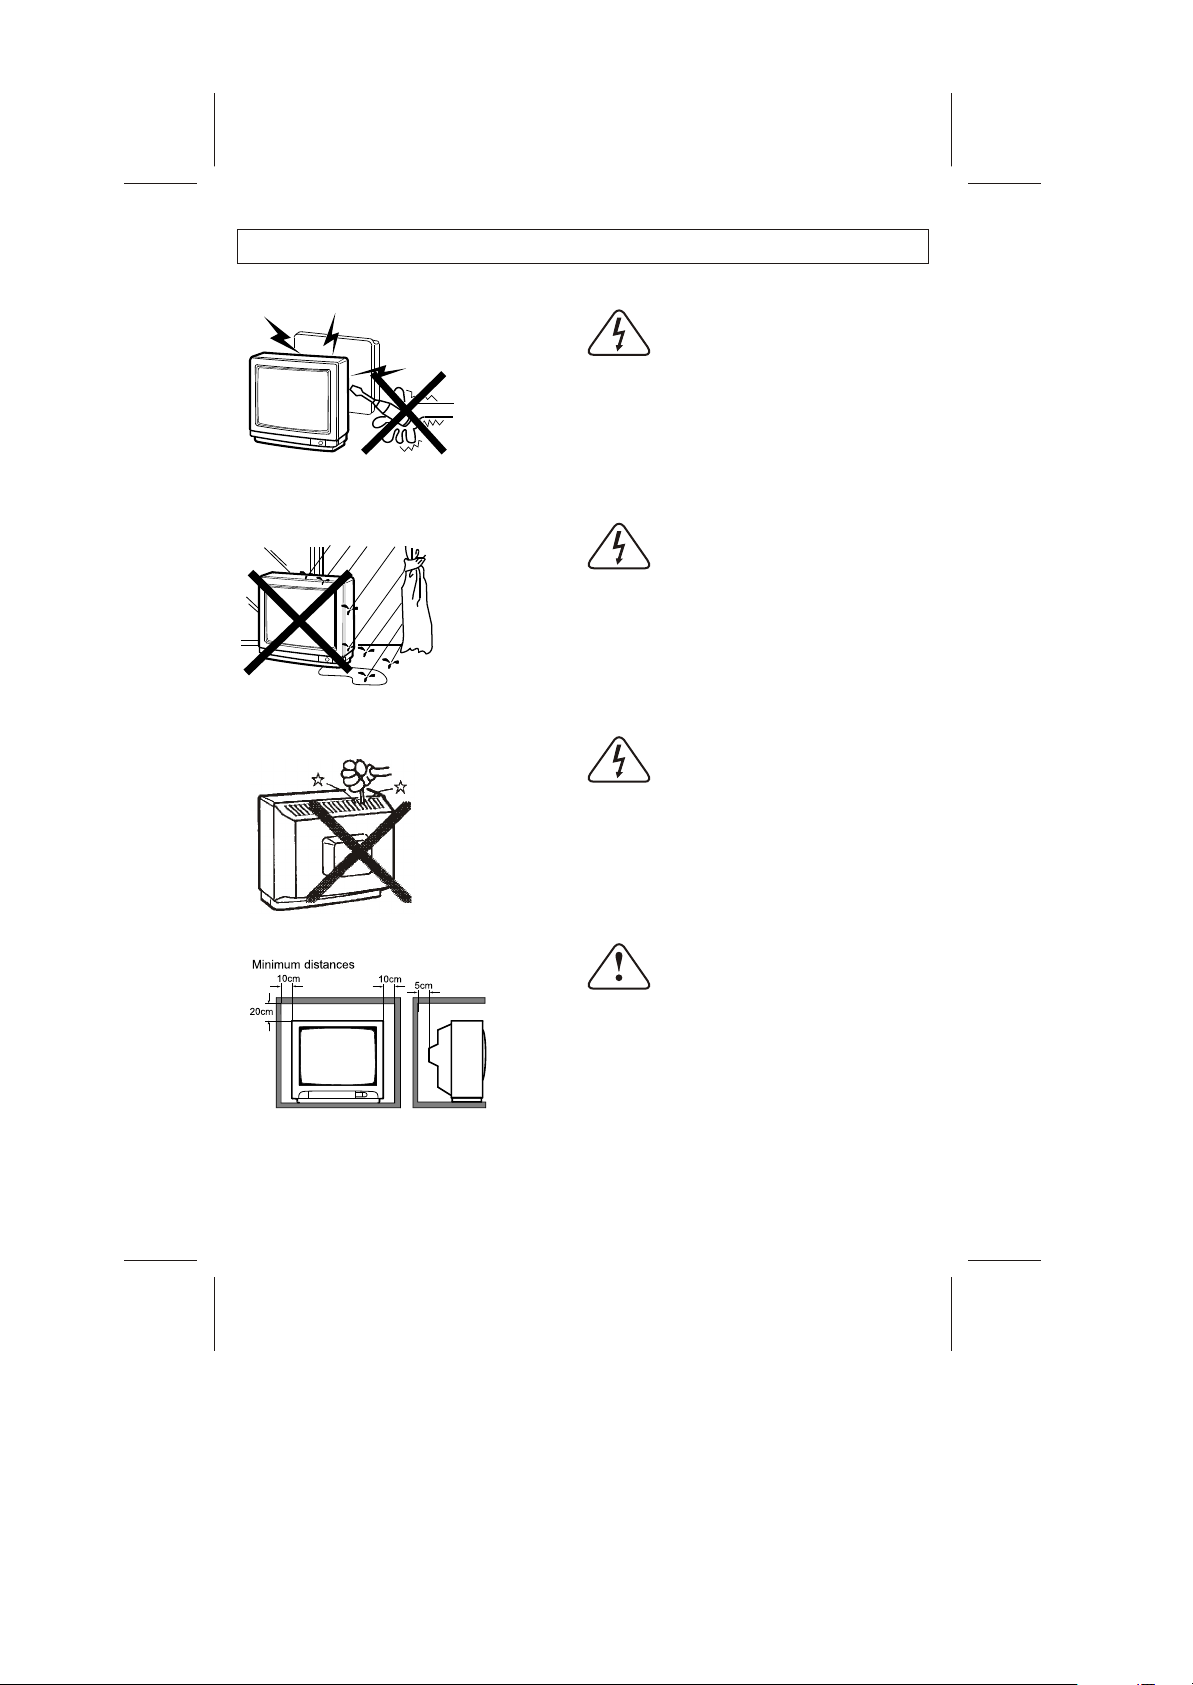
Warning
High voltages are used in the operation of this
television receiver. Do not remove the cabinet
back from your set.Refer servicing to qualified
service personnel.
Warning
To prevent fire or electrical shock hazard , do
not expose the television receiver to rain or
moisture.
Warning
Do not drop or push objects into the television cabinet slots or openings.
Never spill any kind of liquid on the televi-sion
receiver.
Caution
If the television is to be built into a
compartment or similarly enclosed , the
minimum distances must be maintained .
Heat build-up can reduce the service life
of your television , and can also be dangerous.
-3-
Page 6
WARNINGS and CAUTIONS
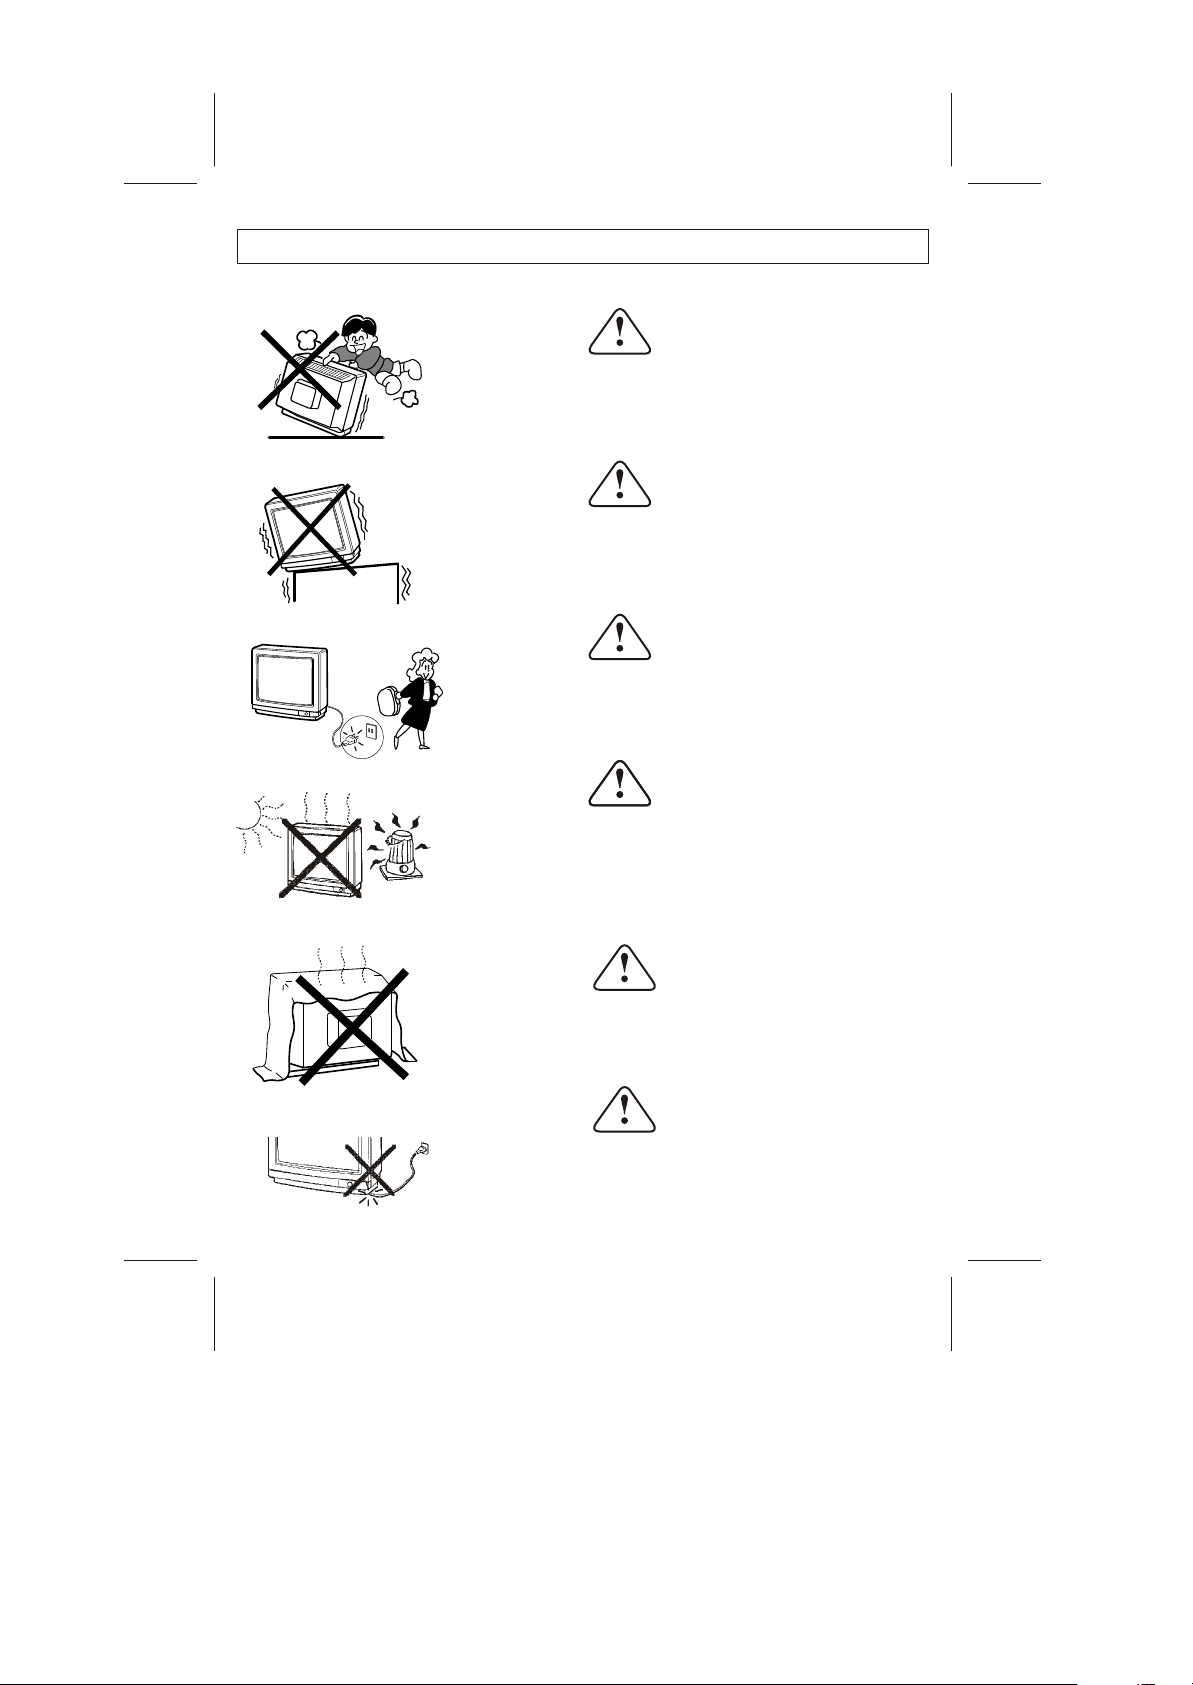
Caution
Never stand on, lean on or push suddenly the
television or its stand .You should pay special
attention to children. Serious injury may result if it
should fall.
Caution
Do not place your television on an unstable cart ,
stand , shelf or table .Serious injury to an individual ,
and damage to the television, may result if it
should fall.
Caution
When the television receiver is not used for an
extended period of time , it is advisable to
disconnect the AC power cord from the AC outlet .
Caution
Avoid exposing the television receiver to direct
sunlight and other source of the heat .
Do not stand the television receiver directly on
other produces which give off heat .E.g.video
cassette players. Audio amplifiers.
Caution
Do not block the ventilation holes in the back
cover.Adequate ventilation is essential to prevent
failure of electrical component.
Caution
Do not squash power supply cord under the
television receiver.
-4-
Page 7
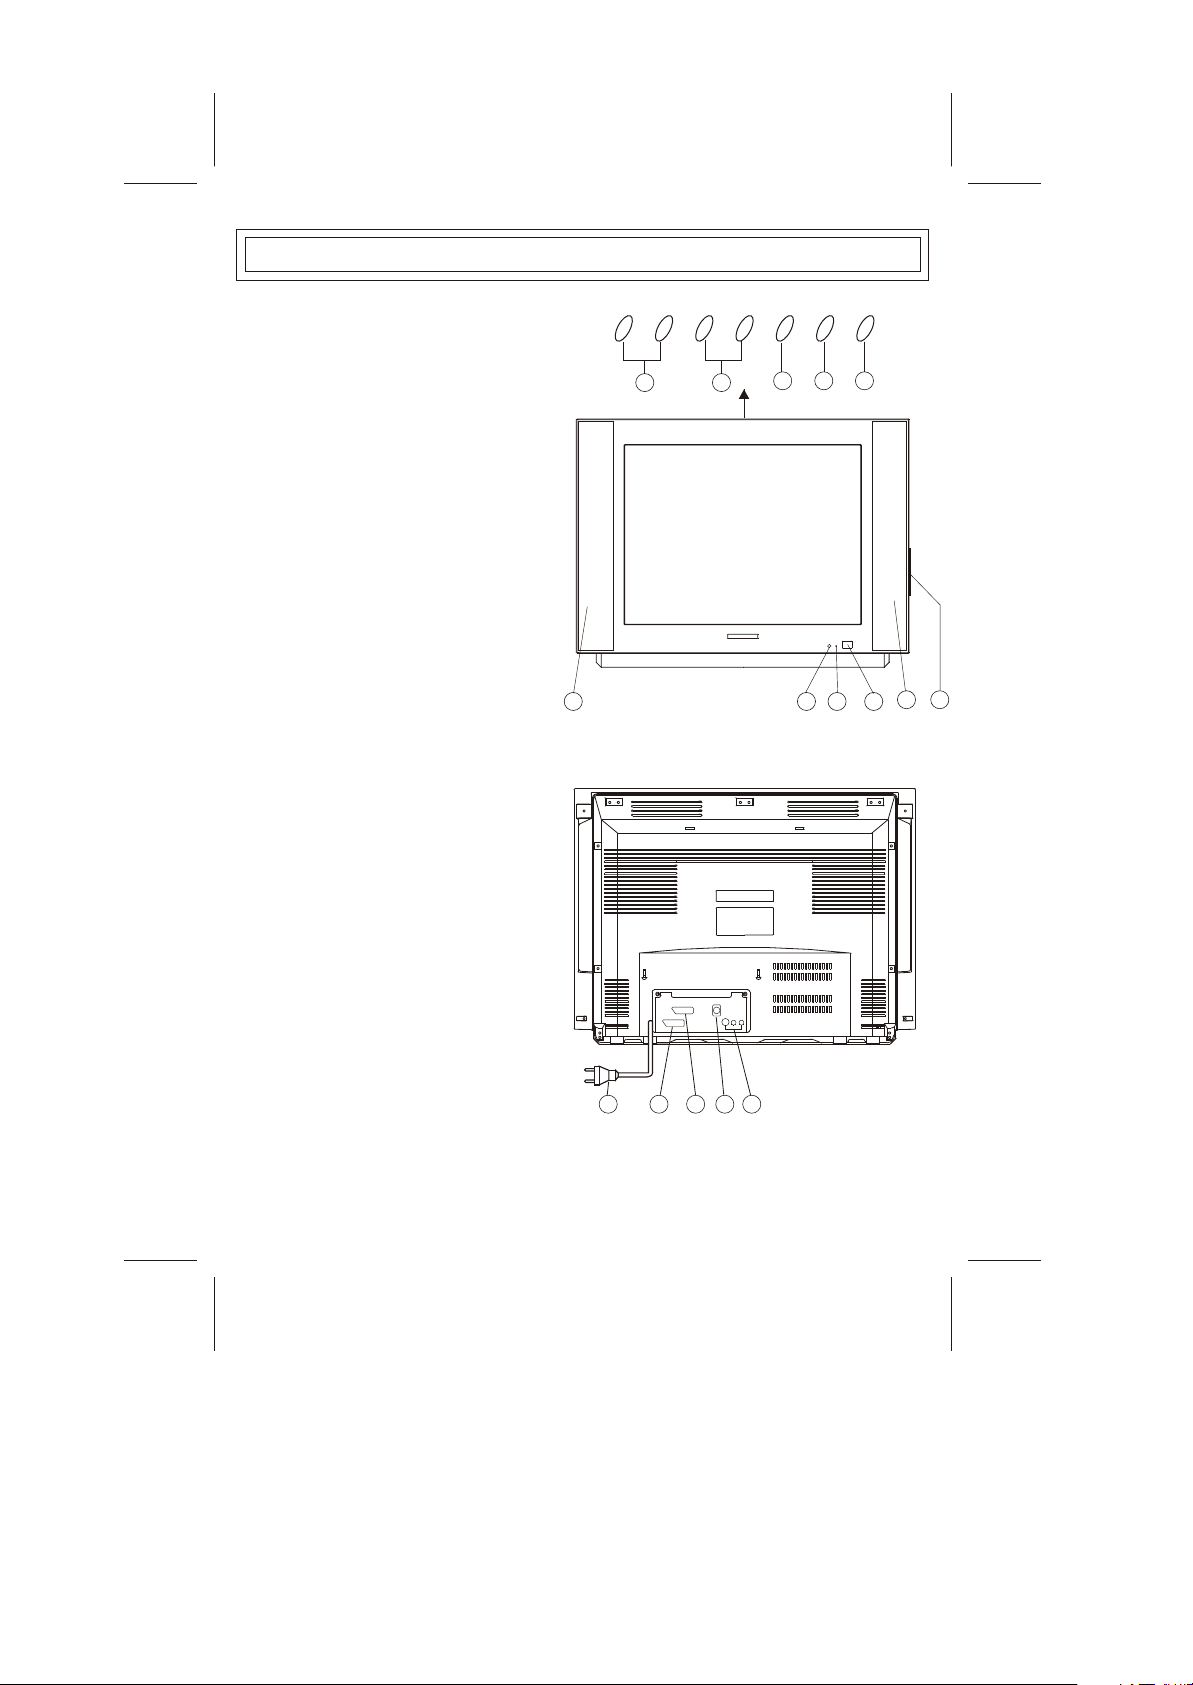
1. Main Switch
2. Power Indicator
3. Remote Sensor
4. Side AV In(option)
5. Speakers
6. Program Down / Up Button
7. Volume Down / Up Button
8.
Menu Button
9. Mute
10.
Button
AV/TV Button
11. AV In (Scart Jack)
12. Peritelevision(Scart Jack)
13. Antenna Input Socket(75 Ohm)
14. S-Video In
15. AC Power Cord
CONTROL LOCATION
6
5
7
8 9 10
5 4
123
-5-
11 12 13 1415
Page 8
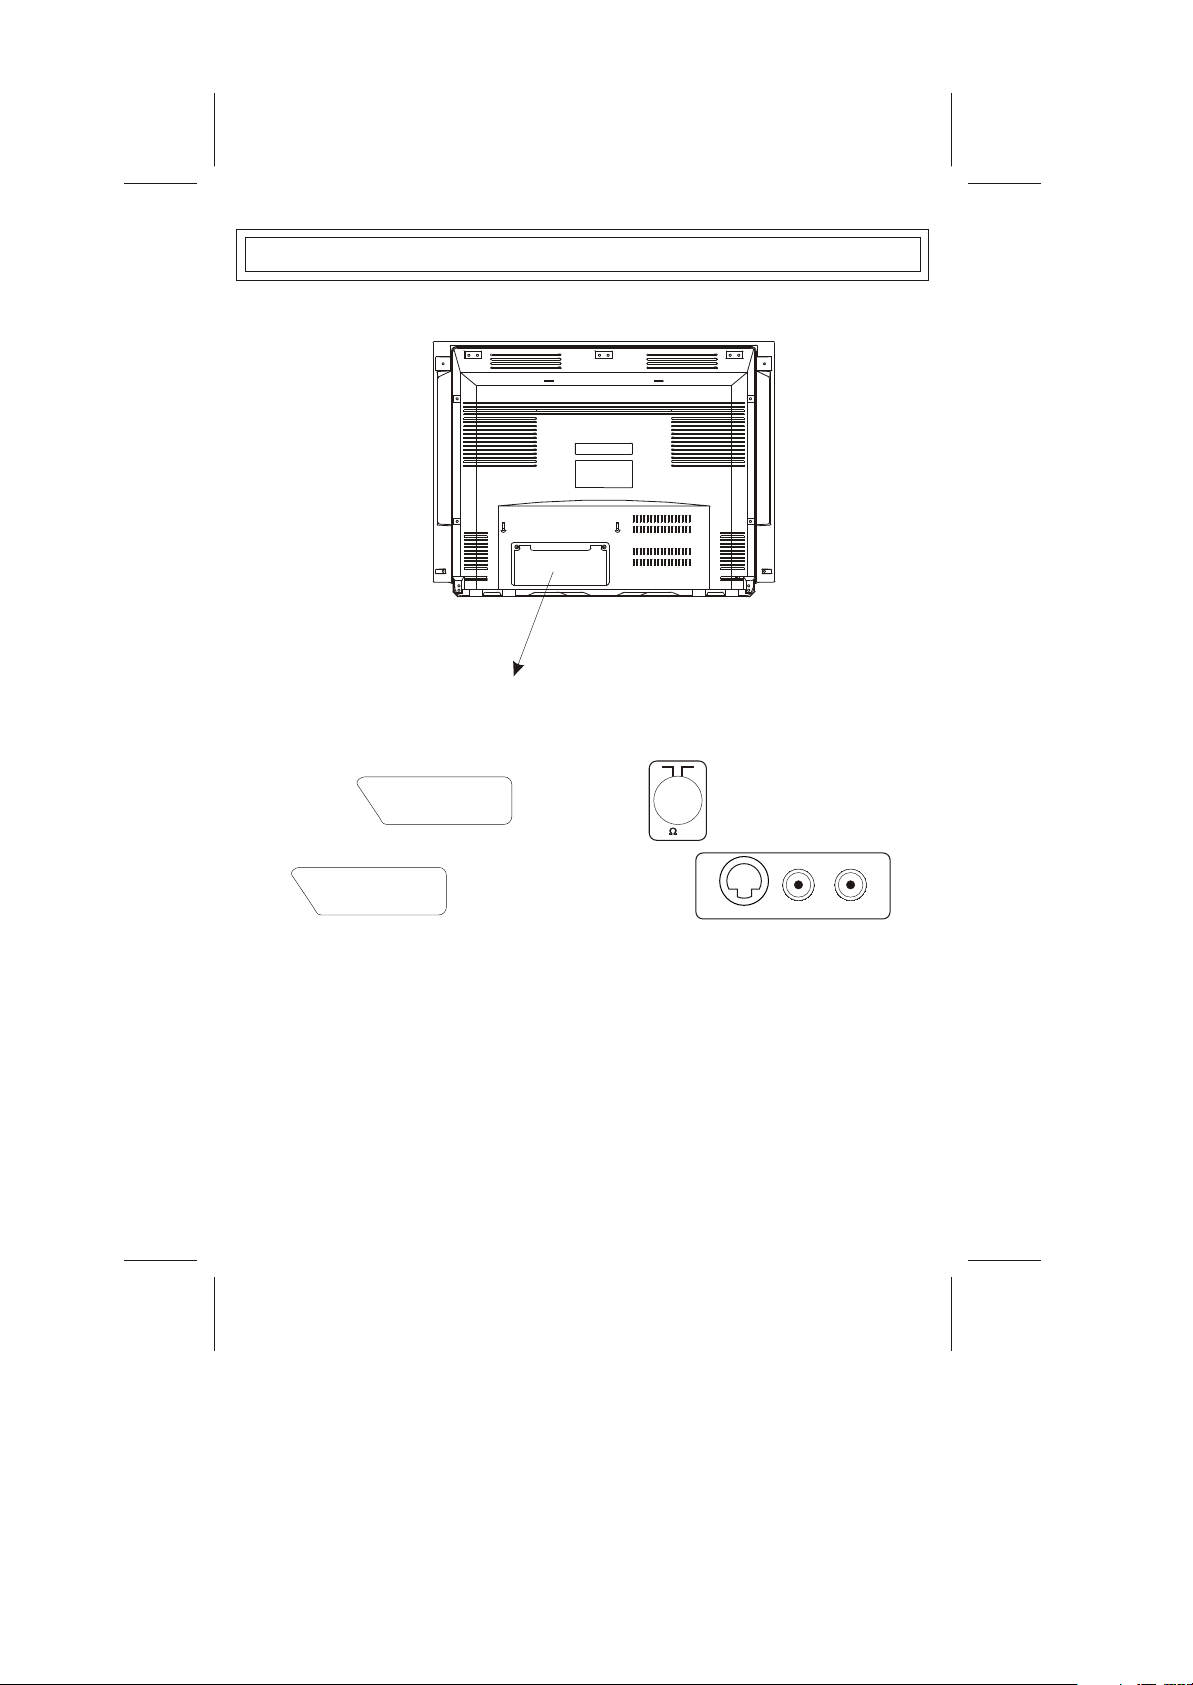
INPUT AND OUTPUT TERMINALS
PERITELEVISION
AV IN
75 ANT
S-VIDEO
S-VIDEO IN
RIGHT
LEFT
It can be connected to the following appliances: video-tape recorder, video camera, tape recorder and
audio amplifier, etc.....
*Please keep AC cord unplugged when connecting TV system.
*Donot Connect Side AV IN and AV IN together.
-6-
Page 9
OPERATION INSTRUCTIONS
WARNING: The Main Power Switch ( of the Control Location page ) is the Manually Operated
No.1h
Mechanical Switc . The Remote control can not cut off power supply to the TV set. For safety purpose,
push Main Switch to the OFF position and make sure the Power indicator go out when not use for long
time.Push the power "ON/OFF"switch to the ON position,and then Power indicator will light up,the
picture(or blue screen) will appear within a few seconds.
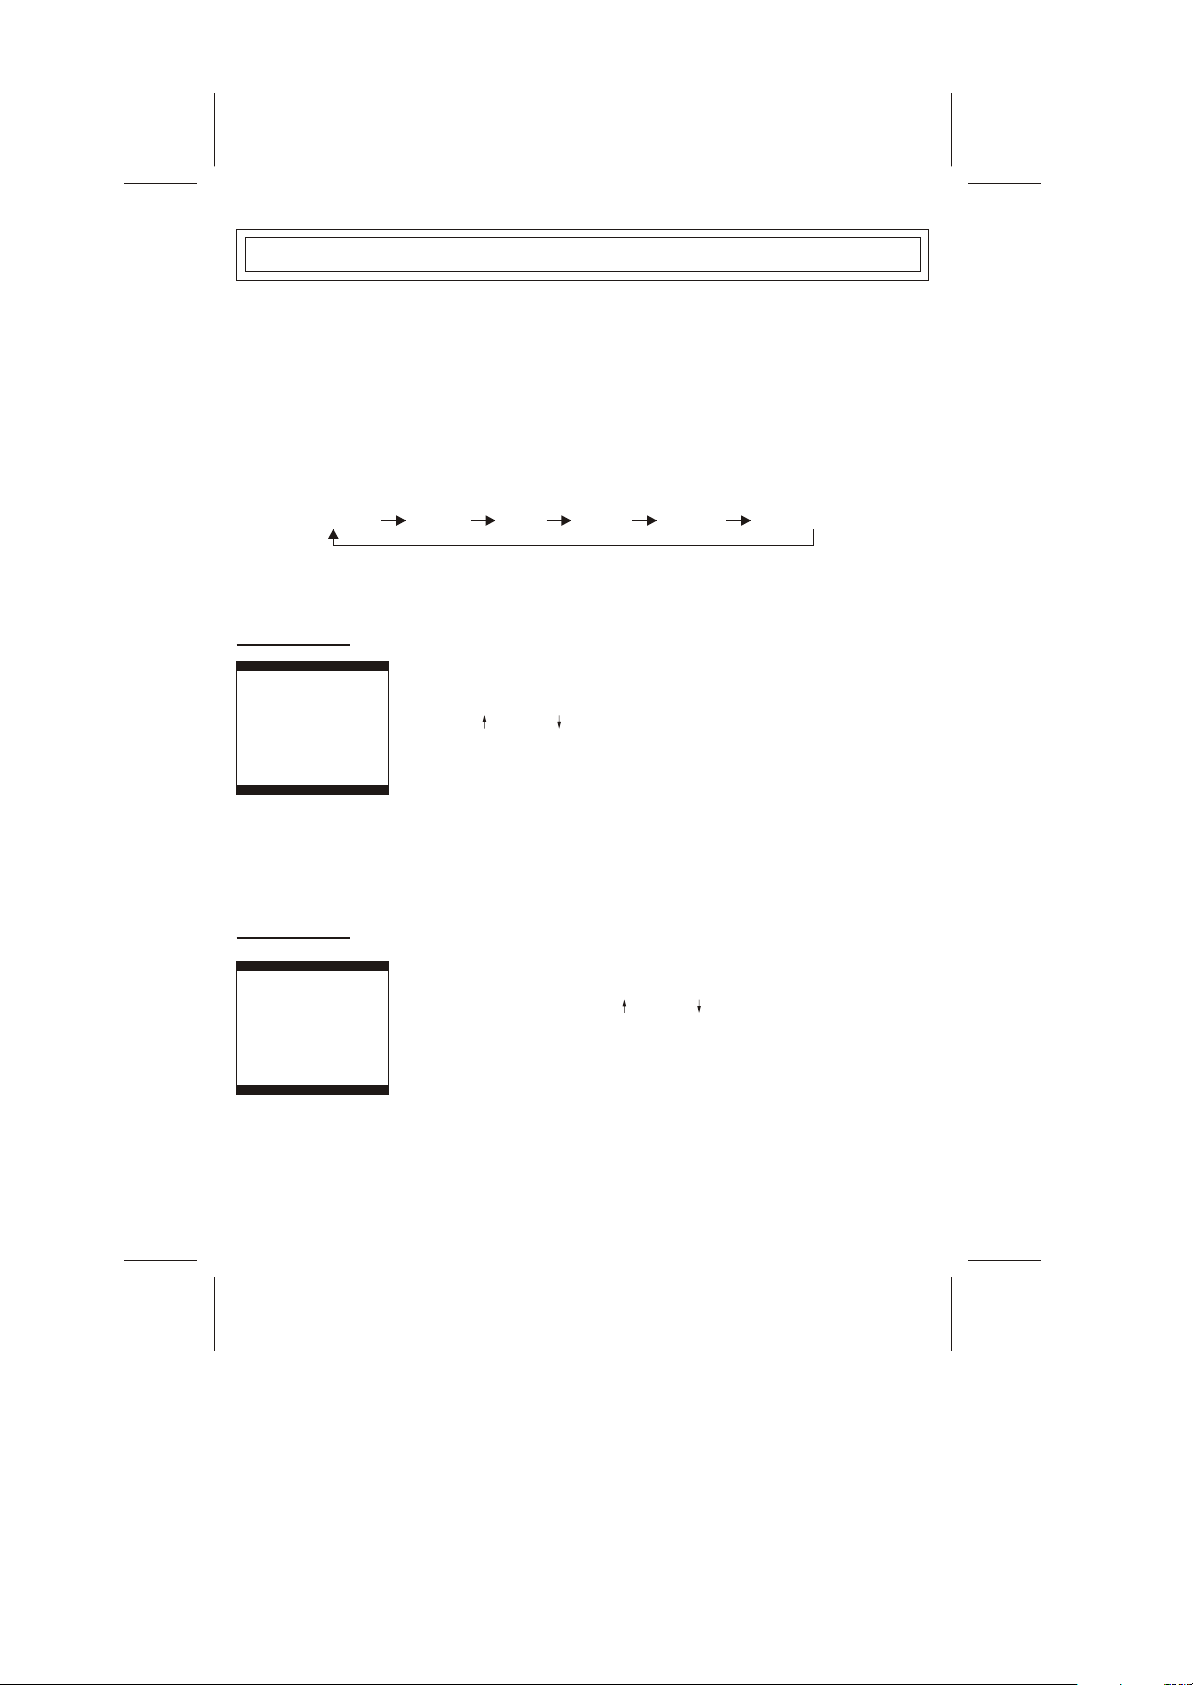
MENU BUTTON
1.Press this button to select PICTURE¡¢SOUND¡¢TIME¡¢SETUP¡¢TUNE¡¢EXCHANGE menu cyclically.
PICTURE SOUND TIME TUNE
SETUP
2.After entering into each menu, you can select submenu which you will adjust with PROG.+/- Buttons or
(GREEN) /BLUE buttons,Then you can adjust it with VOL.+/- Buttons or the +(RED) / - (YELLOW).
Picture Button
PICTURE
CONTRAST
BRIGHTNESS
COLOUR
SHARPNESS
HUE
BLACK STRETCH
TILT
COMB FILTER
Sound Button
75
48
48
75
0
OFF
0
ON
1.You can select the
CONTRAST.BRIGHTNESS.COLOUR.SHARPNESS.HUE.
BLACK STRETCH.TILT.COMB FILTER item by pressing PROG+/- buttons
Or (GREEN) / (BLUE) buttons.
2.You can adjust the
CONTRAST.BRIGHTNESS.COLOUR.SHARPNESS.HUE.
3.TILT item by press VOL+/- buttons or +(RED) / -(YELLOW) buttons.
*HUE is displayed only for NTSC system.
*TILT and COMB FILTER item is optional.
*TILT is for GEOMAGNETISM ,You can change the TILT to move
picture to a better position.
*When you set comb-filter ON ,the image quality will be improved sharply.
*Comb-filter cannot be set ON when no colour or in S-VIDEO mode.
EXCHANGE
VOLUME
BASS
TREBLE
BALANCE
TRUBASS
SURROUND
SOUND
1.You can select the
6
50
50
0
ON
ON
VOLUME.BASS.TREBLE.BALANCE.TRUBASS.SURROUND item with the
PROG+/- buttons or the (GREEN) / (BLUE) buttons.
2.You can adjust VOLUME.BASS.TREBLE item with VOL+/- buttons or
+(RED) / -(YELLOW) buttons.
3.You can turn the TRUBASS.SURROUND item ON or OFF with VOL+/buttons or +(RED) / -(YELLOW) buttons.
*TRUBASS item is optional.
*TRUBASS technology is incorporated under license from SRS Labs ,Inc.
-7-
Page 10

OPERATION INSTRUCTIONS
TIMERS
CLOCK
ON TIME
ON PROG
OFF TIME
SLEEP TIMER
REMIND TIME
REMIND PROG
TIME
--:--
--:- 1
--:- 20
--:- 1
1.CLOCK
Select hour or minute with
PROG+/- buttons or (GREEN) / (BLUE)
buttons
Adjust CLOCK time with
VOL+/- buttons or +(RED) / -(YELLOW)
buttons
You can press CLOCK buttons to display currently clock time.
2.ON TIME
Select hour or minute with
PROG +/- buttons or (GREEN) / (BLUE)
buttons.
Adjust ON TIME with
Vol+/- buttons +(RED) / -(YELLOW) buttons.
3.ON PROG.
Select ON PROGRAM with
VOL+or +(RED) buttons.
4.OFF TIMER
Select hour or minute with
PROG+/- buttons or (GREEN) / (BLUE)
buttons.
Adjust REMIND time with
buttons
.
VOL+/- buttons or +(RED) /-(YELLOW)
5.SLEEP TIMER
Set SLEEP TIME with
VOL+/- buttons or +(RED)/-(YELLOW) buttons.
6.REMINDER TIMER
Select hour or minute with
PROG+/- buttons or (GREEN)/ (BLUE)
buttons.
Adjust REMIND TIME with
VOL+/- buttons or +(RED)/-(YELLOW)
buttons.
7.REMIND PROG
Select REMIND PROGRAM with
VOL+/- buttons or +(RED)/-(YELLOW)
buttons.
* Timer function need reseting when you switch off the TV set by the
main power switch or unpluging the power cord,and which runs normally
when by remote control.
-8-
Page 11
OPERATION INSTRUCTIONS
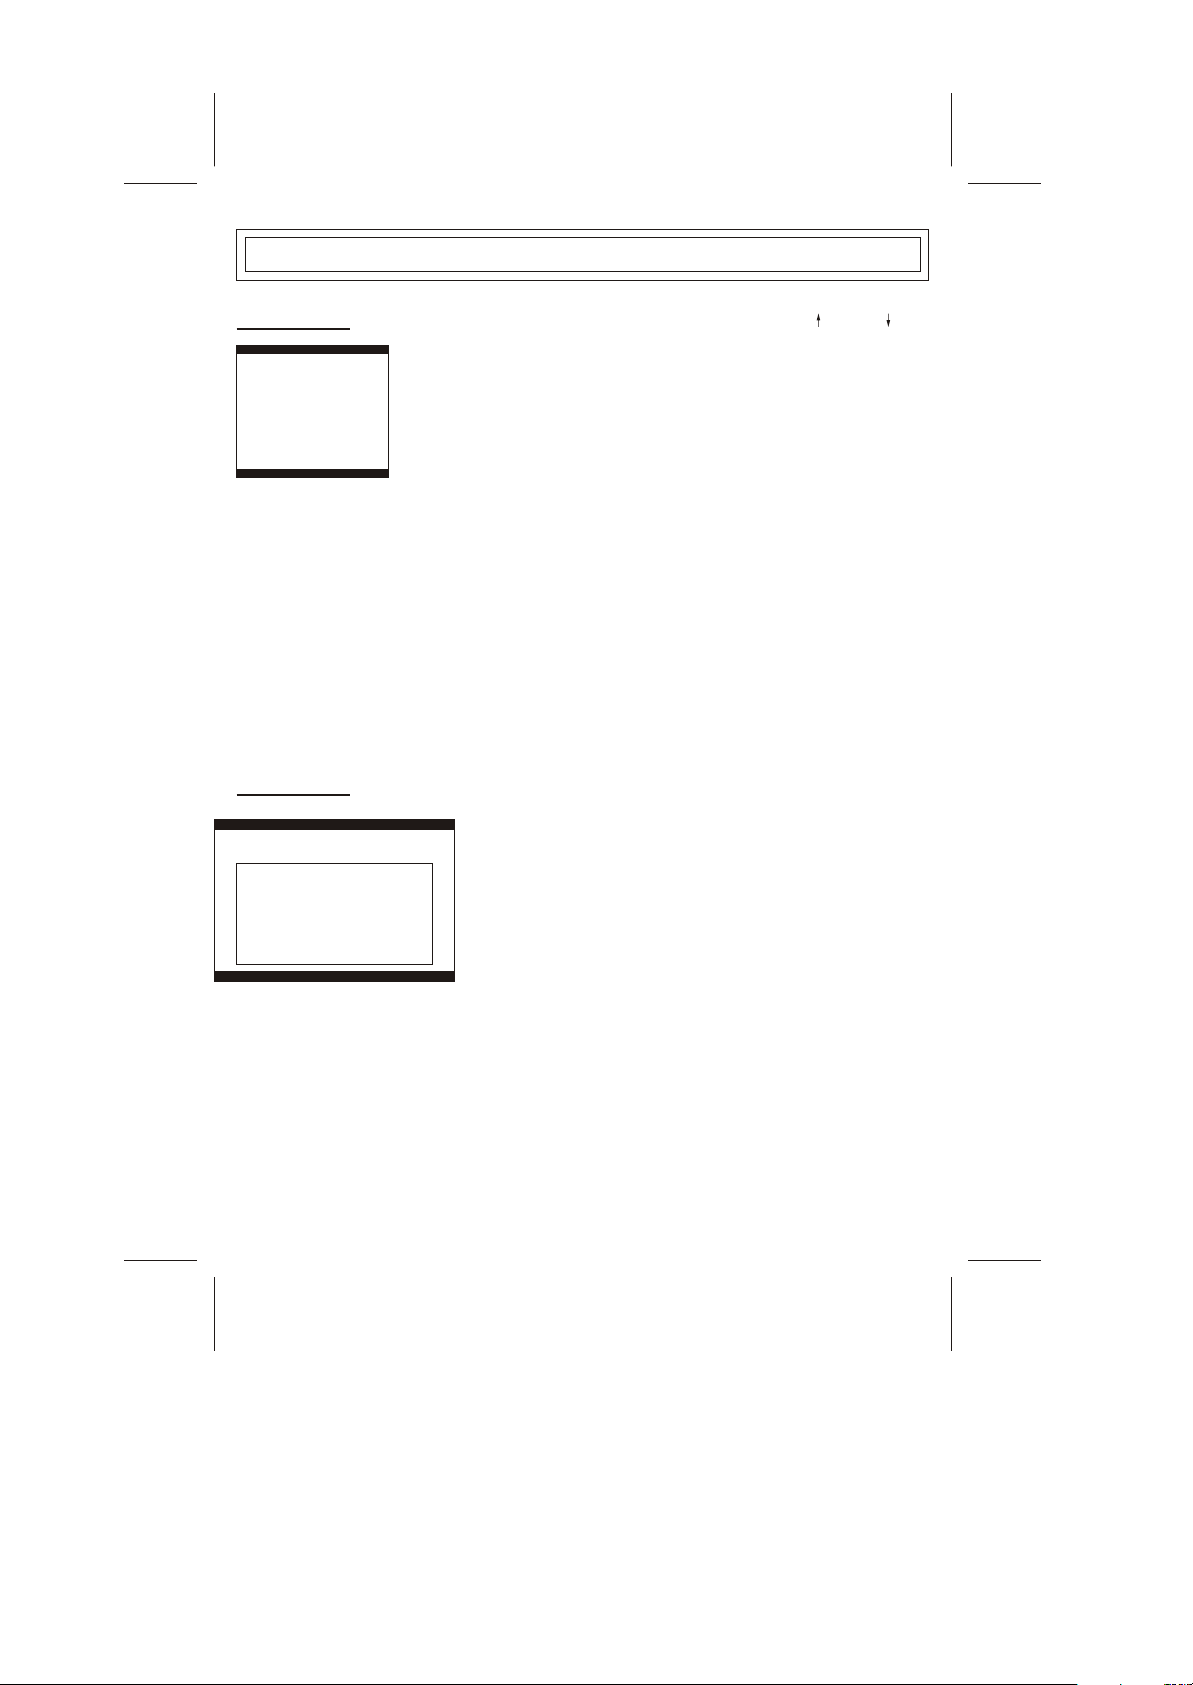
SETUP Button
SETUP
LANG.
BACK GROUND
NOISE REDUCE
CHILD LOCK
CALENDAR
ENGLISH
ON
OFF
OFF
CALENDAR
Y:2002 M:12 D:12
S M T W T F S
1
2 3 4 5 6 7
11 12
18 19
13
10
8
9
15
16
17
22
23 24 25 26 27 28
29
30 31
20 21
You can select the item by pressing PROG+/- buttons or (GREEN)/
(BLUE) Buttons.
then you can adjust it by Vol+/- buttons or +(RED)/-(YELLOW) buttons.
1.LANGUAGE
You can select the on-screen display language.
2.BACK GROUND
Press VOL+/- buttons or +(RED) / -(YELLOW) buttons to set it ON or
OFF.For BACKGROUND,only when no signal is input in TV mode.
3.NOISE REDUCE
Press VOL+/- buttons or +(RED) / -(YELLOW) buttons to set it ON or
OFF.For Noise REDUCE, only in TV mode.
4.CHILD LOCK
Press VOL+/- buttons or +(RED) / -(YELLOW) buttons to set it ON or OFF.
If you set it ON,the key on the TV set is disable and only the remote
control functions.
5.CALENDAR
Press VOL+/- buttons or +(RED) / -(YELLOW) buttons to enter into
CALENDAR menu.
* CALENDAR item is optional . Please see actual TV set.
1.Press VOL+/- buttons or +(RED) / -(YELLOW) buttons to select
YEAR,MONTH or DATE.
2.Press PROG+/- buttons or (GREEN) / (BLUE) buttons to adjust
YEAR,MONTH or DATE.
14
3.Press MENU Button to return.
-9-
Page 12
OPERATION INSTRUCTIONS
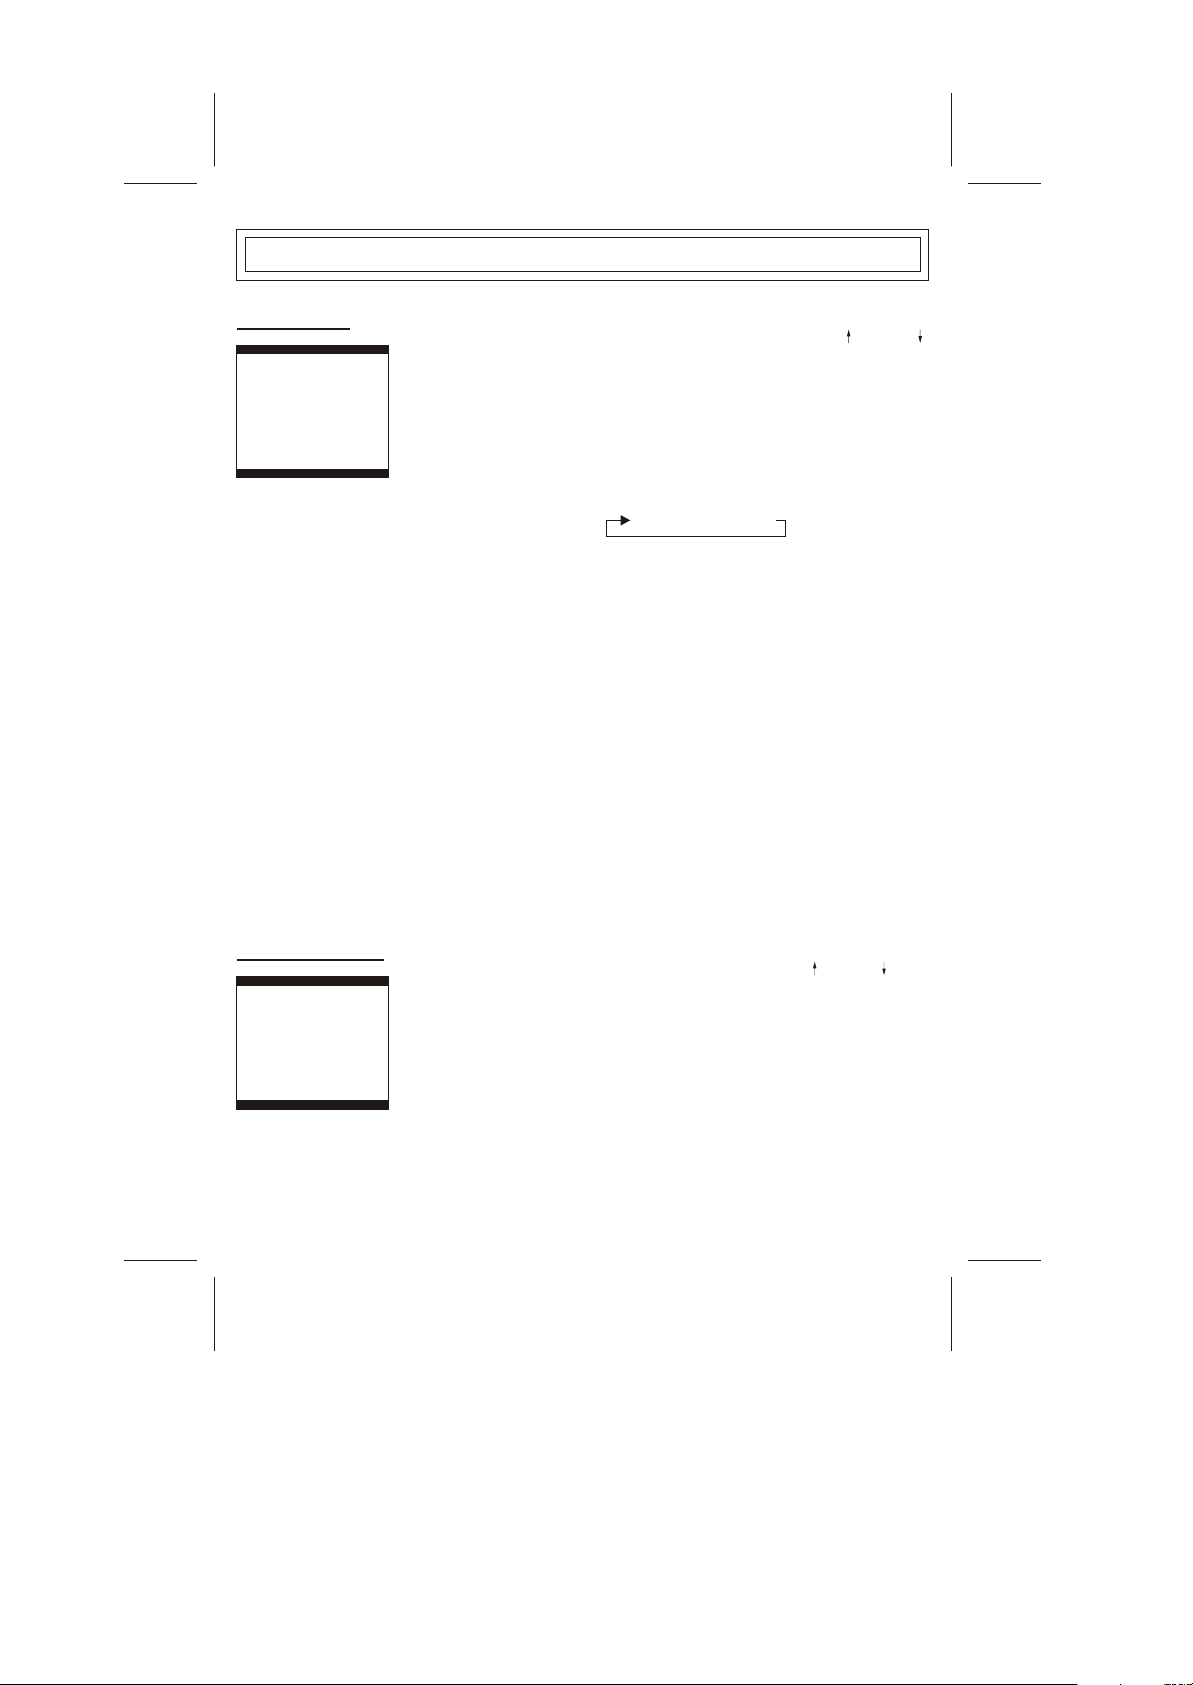
TUNE MENU
TUNE
COLOUR SYS
SOUND SYS
BAND
SKIP
PROGRAM
SEARCH
FINE TUNE
AUTO SEARCH
AUTO
M
VHF-L
OFF
2
You can select the item by press the PROG+/- buttons or the (GREEN) /
(BLUE) buttons,move to the menu you select and then do as follows.
1.COLOUR SYS
Press VOL+/- buttons or +(RED) / - (YELLOW) buttons to set the colour
system.
2.SOUND SYS
Press VOL+/- buttons or +(RED) / -(YELLOW) buttons to set the sound
system.
3.BAND
Press VOL+/- buttons or +(RED)/ -(YELLOW) buttons. You can select the
Band VHF-L.VHF-H or UHF.
VHF-L-----VHF-H-----UHF
4.SKIP
Press VOL+/- buttons or +(RED) / - (YELLOW) buttons to set skip on or
off,when you set skip on.this program will be hidden.
5.PROGRAM
Press VOL+/- buttons or+(RED)/-(YELLOW) buttons to set the
PROGRAM number.
6.FINE TUNE
For better quality with VOL+/- buttons or +(RED) / - (YELLOW) buttons.
7.SEARCH
Press VOL+/- buttons or +(RED) / -(YELLOW) buttons to search for next
or previous available program,the set will automatically stop while the
signal is received.
8.AUTO SEARCH
Press VOL+/- buttons or +(RED)/ -(YELLOW) buttons,the TV set will
automatically search in 3 bands and store every program.
*In AV mode,only COLOUR SYS displayed under this menu.
*After fine tune. The colour of program number will change from GREEN
to YELLOW.
EXCHANGE MENU
EXCHANGE
PROGRAM
PROGRAM
EXCHANGE
1
1
In AV mode ,this item will not be displayed.
Select the item by pressing the PROG+/- buttons or the (GREEN)/ (BLUE)
buttons.
PROGRAM 1
1.
Press VOL+/- buttons or +(RED) / -(YELLOW) buttons to adjust
PROGRAM 1.
2.PROGRAM 2
Press VOL+/- buttons or +(RED) / -(YELLOW) buttons to adjust PROGRAM 2.
3.Press VOL+/- buttons or +(RED) / -(YELLOW) buttons to exchange
PROGRAM 1 and PROGRAM 2.
-10-
Page 13
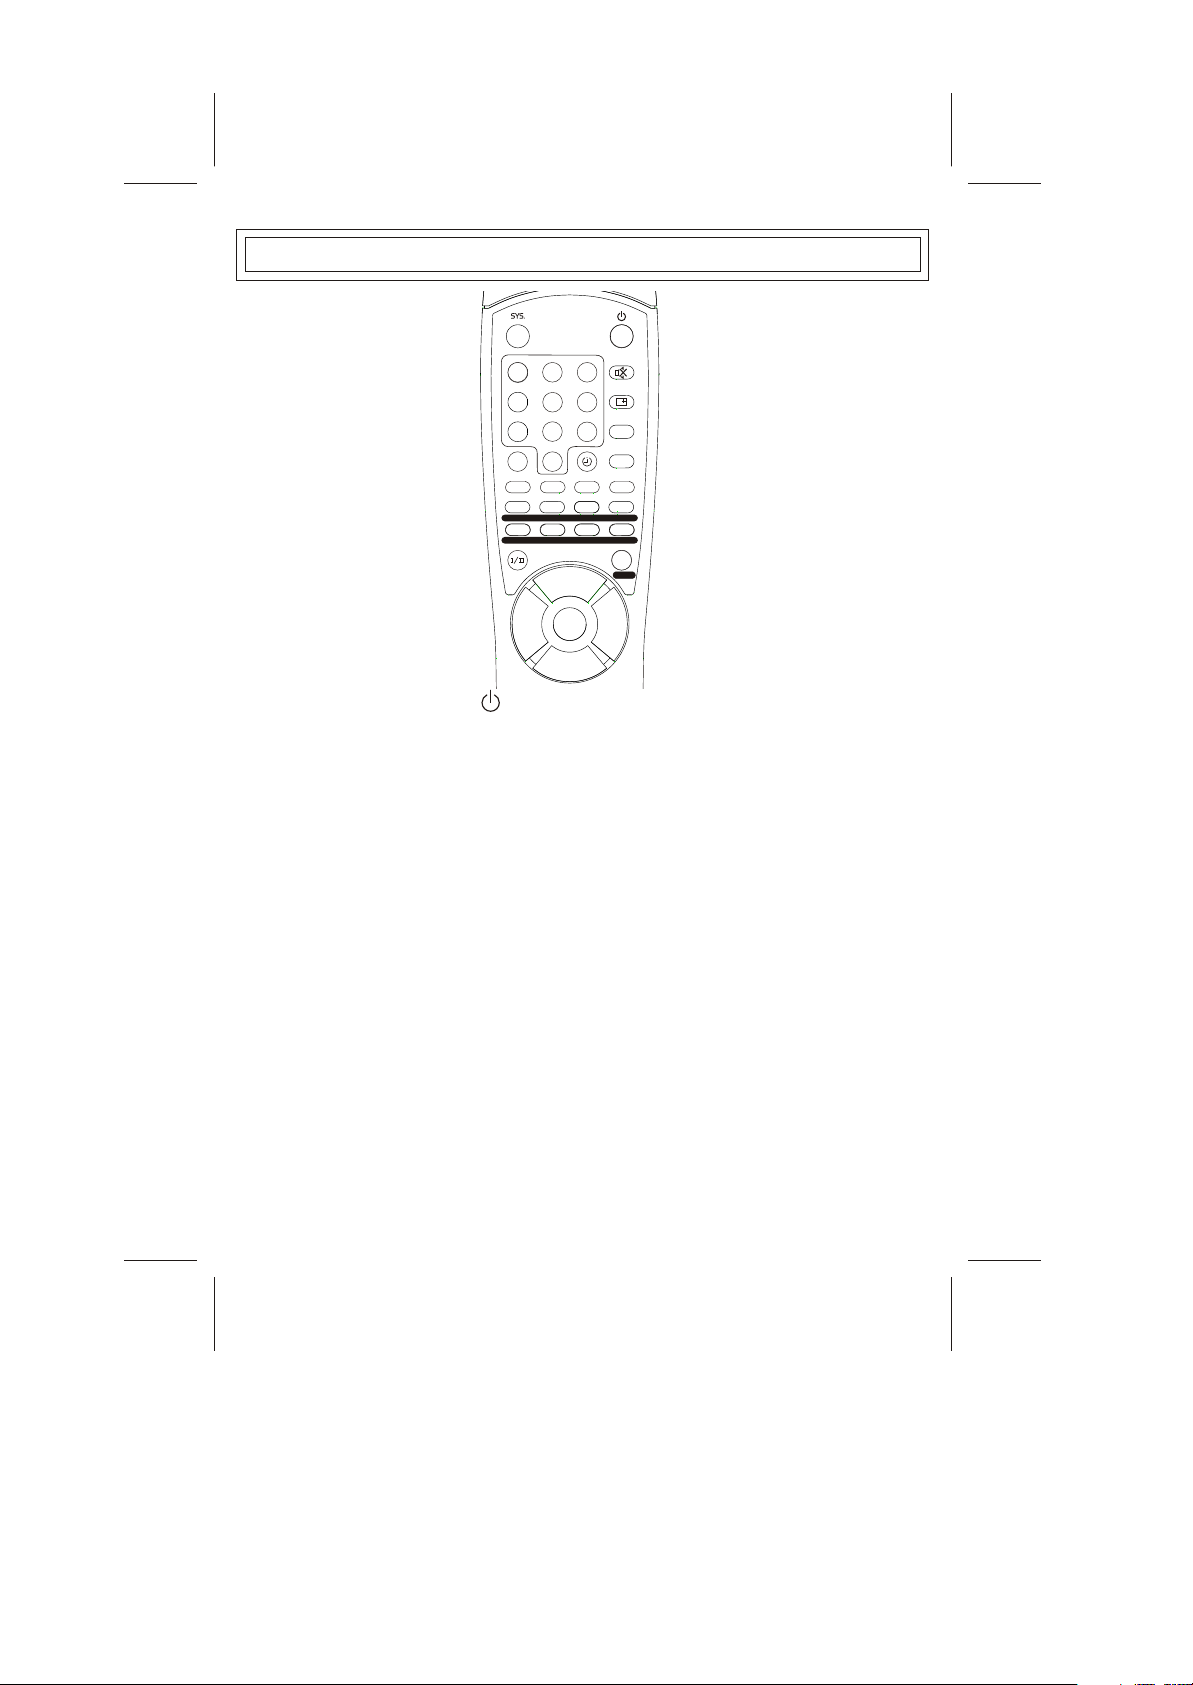
LOCATION OF CONTROL (REMOTE HANDSET UNIT)
11
22 33
55
66
9
44
8
7
MENU
PROG.+
PROG.-
VOL.+VOL.-
P.M.
A.V.
S.M.
TYPE
MIX
CANCEL
SUB.TIT
SIZE
HOLD
SUB.PAGE
REVEAL
LANG.
SOUND PIC SETUP TUNE
Q.VIEW
TEXTCLOCK.GAME
0
- -/- - -
POWER (STAND BY) BUTTON ( )
Press this button to turn the TV on/off. Press any Number Button or Program Up/Down Button, picture and
sound will appear on within a few seconds.
SLEEP BUTTON
This key is used to set the sleep timer from in 10 minutes step up to three hours. When the preset time
runs
To 0, the TV set will go into stand by mode.
*If no program received,the TV set will switch to stand by automatically in 5 minutes.
SOUND SYSTEM BUTTON (SYS.)
When the sound system is incorrect,Press this button to select the correct sound system.
STEREO/MONO DUAL I/II BUTTON(I/II)(OPTION)
The third line on the top right corner of the screen automatically changes to green when a NICAM
broadcast is received.
As stereo program is received.You can select STEREO.MONO.or FM by pressing the ST/MO/I/II button.
As bilingual program is received.You can select DUAL-1,DUAL-2 or FM by pressing the ST/MO/I/II button.
Remark: FM:Standard mode STEREO:Stereo mode MONO:Mono mode
DUAL-1:multi sound channel for language 1 DUAL-2:multi sound channel for language 2
PROGRAM UP/DOWN BUTTON (PROG +/-)
Press the Program Up Button to select the program forwards.
Press the Program Down Button to select the program backwards.
(Use this button for Page Up/Down to increase/decrease page number in TELETEXT mode.)
-11-
Page 14

LOCATION OF CONTROL (REMOTE HANDSET UNIT)
VOLUME UP/DOWN BUTTONS (VOL+/-)
Press Volume Up/Down Buttons to adjust sound level.
PROGRAM SELECTION BUTTONS(0-9)
Push the number for your desired program and the program indicator will be displayed on the screen.
Press number key 0-199 for program selection.
Press the number keys to select teletext pages in teletext mode.
MUTE BUTTON( )
Press once to mute the sound,press again to return to previously set sound level.MENU RECALL BUTTON.
MENU RECALL BUTTON( )
Press this button sequential to recall for the program number,system, logo etc on the screen..
SOUND MODE BUTTON(S.M.)
Press this button to select the desired sound mode,USER.SPEECH. and can be selected
cyclically.
PICTURE MODE BUTTON(P.M.)
Press this button to select the desired picture mode,RICH.USER.SOFT and STANDARD can be selected
cyclically.
DIGIT BUTTON(--/---)
Press this button to select program between 0-199 program.
To select a one-digit number:press "--/---" button to display "-",then press 0-9 to select a number 0-9,or
press the number 0-9 direvtly.
To select a two-digit number:press "--/---" button to display "--".then press 0-9 to select a number 10-99.
To select a three-digit number:press "--/---" button to display "1--".then press 0-9 to select a number 100-199.
THEATER MUSIC
COLOUR BUTTONS(RED/YELLOW/GREEN/BLUE)
In TV mode, the (GREEN)/ (BLUE) buttons has the same function as PROG+/- buttons;the+(RED)/(YELLOW) buttons has the same function as VOL+/-button.
In TELETEXT mode,press these colour buttons,the color of page no of teletext will change to the same
colour as that of the buttons.
*Both of the sound mode"SPEECH,MUSIC, THEATER" or picture mode "RICH,SOFT , STANDARD" are
fixed by factory,all the change of these settings will be saved into the" USER"mode automatically.
-12-
Page 15

LOCATION OF CONTROL (REMOTE HANDSET UNIT)(TELETEXT OPTION)
MENU BUTTON(MENU/INEDX)
In TV mode,this button is used as MENU command;in TELETEXT mode, used as INDEX key.
MENU:To use MENU button for the turning procedure,please refer to page 7-10 for the details.
INDEX:Press INDEX button to obtain the index page.
AV MODE BUTTON (AV/LANG.)
In TV mode, used as AV command;in TELETEXT mode, used as LANG. key.
AV:Press this button to display external video signal such as VCR or CD video player.
LANG. :Press this button to switch the teletext LANGUAGE such as English or Russian.
SOUND MENU BUTTON(SOUND/ RECALL)
In TV mode, used as SOUND menu command;In TELETEXT mode, used as REVEAL key.
SOUND:Press this button to enter into the SOUND menu directly.
RECALL :Sometimes the answers of quizes,jokes etc are hidden.Press REVEAL button to reveal the
hidden information.
PICTURE MENU BUTTON(PIC./SIZE)
In TV mode, used as PICTURE menu command;in TELETEXT mode, used as SIZE key.
PIC.:Press this button to enter into the PICTURE menu directly.
SIZE:The top or botton half of any page can be enlarged by pressing this button.
SETUP MENU BUTTON(SETUP/HOLD)
In TV mode, used as SETUP menu command;In TELETEXT mode, used as HOLD key.
SETUP:Press SETUP button to enter into the setup menu directly.
HOLD:Sub-pages will scroll automatically.Press HOLD button a hold a sub-page. To release the
page.press HOLD again.
TUNE MENU BUTTON(TUNE/SUB.PAGE)
In TV mode, used as TUNE menu command;In TELETEXT mode, used as SUB.PAGE key.
TUNE:Press this button to enter into the TUNE menu directly.
SUB.PAGE:Some pages attach sub-page,Page number may contain several subpages which are
automatically paged by the TV station.Press this button once.0001 will be displayed on screen,use
number key(0-9) to look for other sub-pages if available.If there is no sub-page,**** will be displayed.To
cancel this,press this button again.
-13-
Page 16

LOCATION OF CONTROL (REMOTE HANDSET UNIT)(TELETEXT OPTION)
GAME BUTTON(GAME/SUB.TITLE)
In TV mode, used as GAME command;In TELETEXT mode, used as SUB.TITLE key.
GAME:You can play the game on TV. To speed up with PRGO-,transform with PRGO+.Shift left with VOL,shift right with VOL+.
SUB.TITLE:Press SUB.TITLE button to view the sub-titles.
CLOCK BUTTON(CLOCK/TYPE)
In TV mode, used as CLOCK command;In TELETEXT mode, used as TYPE key.
CLOCK:Display the time on the top right corner of the screen.
TYPE:Press this button to switch the teletext TYPE such as west/east type.
TEXT/BUTON(ON/MIX/OFF)
Press this button to display TELETEXT signal,mix TELETEXT page with TV signal and return to TV.
Note:To avoid mixing of External R.G.B while viewing Teletext.Disconnect scart plug or switch off external
R.G.B Source.
Q.VIEW BUTTON(Q.VIEW/CANCEL)
In TV mode, used as Q.VIEW command;In TELETEXT mode, used as CANCEL key.
Q.VIEW:Press this button to return to the previously viewed program.
CANCEL:If you want to watch TV but not cancel the TELETEXT mode completely.Press the CANCEL
button.When the last selected page is updated,the page number will be appeared at the top of the TV
screen Press the CANNEL button again to reveal the page.
-14-
Page 17
BATTERY INSTALLATION (REMOTE CONTROL UNIT)
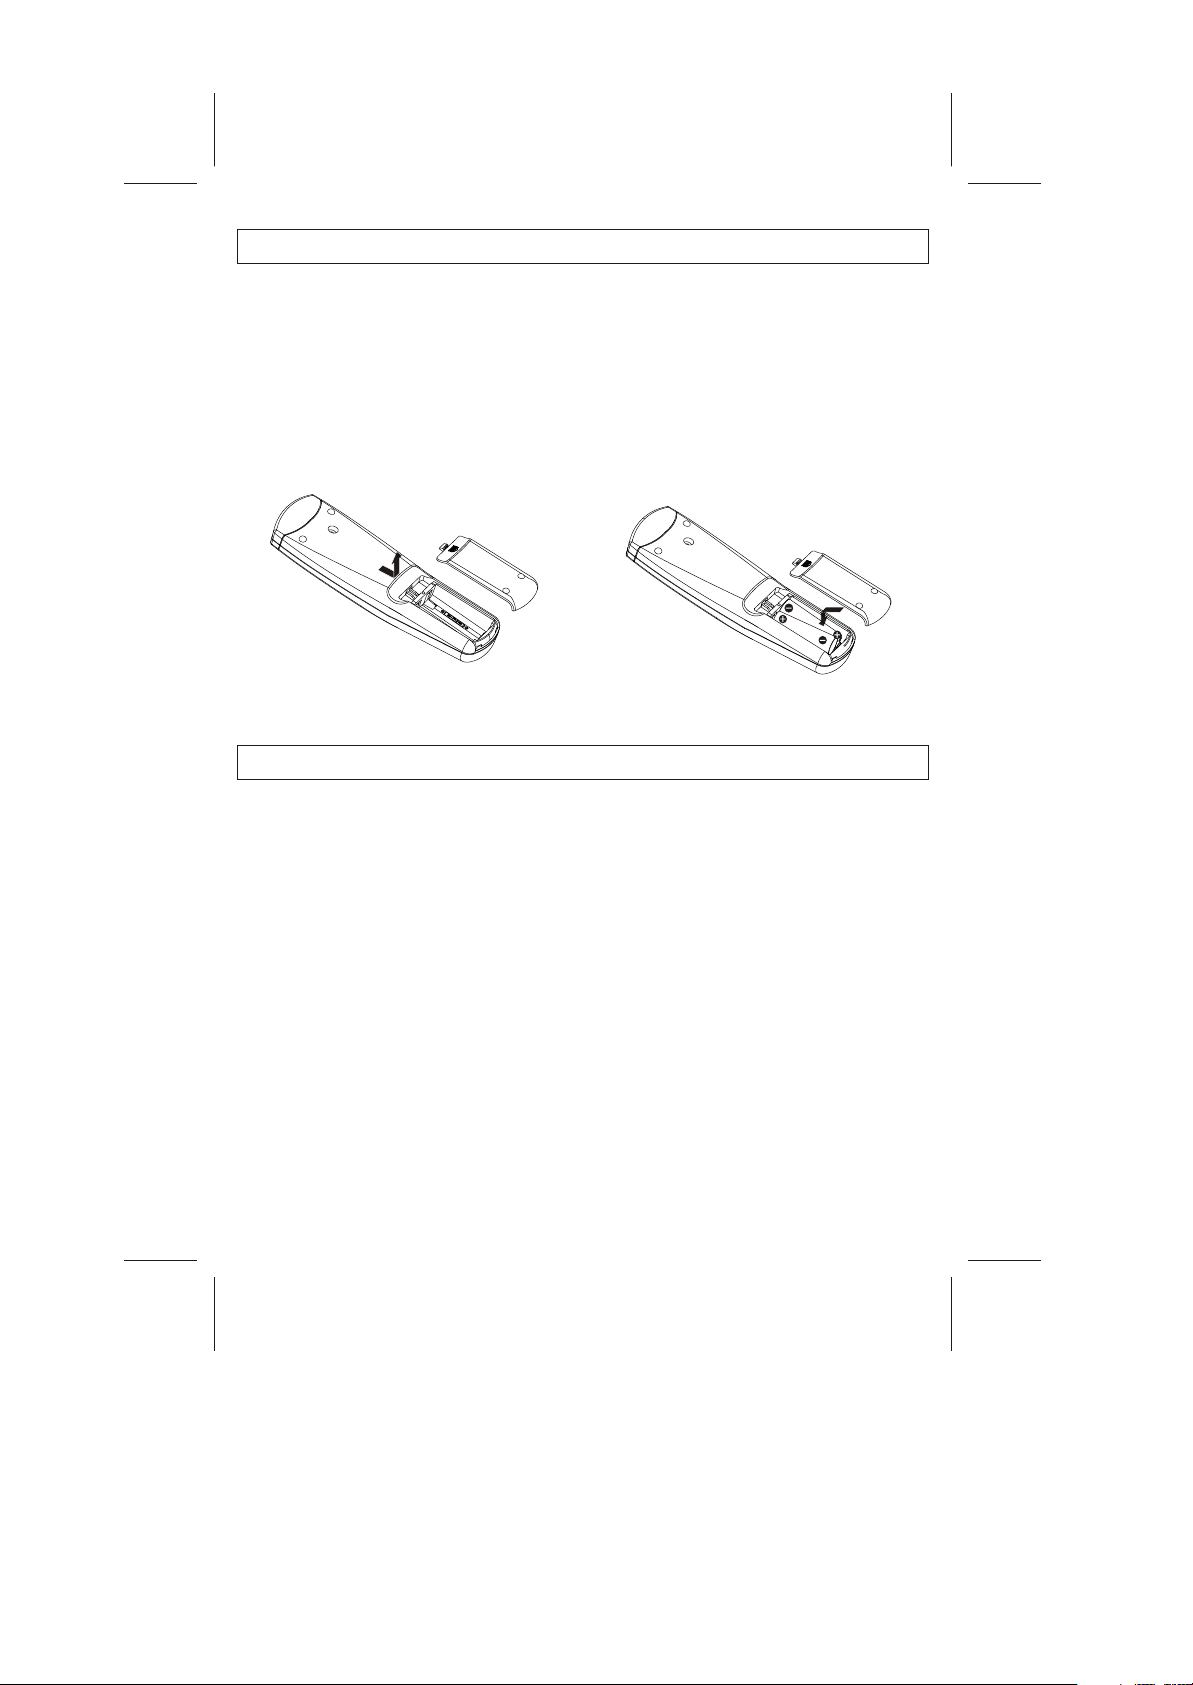
1. Remove the battery cover.
2. Insert the 2 UM3-AA 1.5V batteries making sure the polarity (+ or -) of the batteries matches the polarity
marks inside the unit.
3. Replace the battery cover.
Replace with new batteries when the TV set begins to show the following symptoms:
Operation is unsteady or erratic. Sometimes the TV set does not function with Remote Control
Unit.
Remark:
1) Alkaline Batterie Recommended
2) Remove batteries when they are exhausted or if the remote control is not to be used for a long time.
THE CAUSES OF INTERFERENCE
Incorporated in your TV receiver are the most upto-date devices to eliminate interference. Local
radiation however, can create disturbances which
visibly affect your picture. Proper installation, a
good aerial are your best safe-guards against
these disturbances.
RF INTERFERENCE
Moving ripples across the screen are caused by
nearby transmitting or receiving-short-wave radio
equipment.
DIATHERMY
Herringbone pattern and partial picture loss can
result from the operation of diathermy equipment
from a nearby doctor's surgery or hospital.
SNOW
Weak TV signals from long distant stations result
in an instead picture and give the effect of falling
snow. An antenna adjustment or antenna
amplifier may be needed.
GHOST
Multiple image caused by TV signals reflected
back from surrounding buildings, hills, aircraft, etc.
is minimized by correct aerial positioning.
CAR IGNITION
Nearby cars and electrical motors can cause small
streaks across the picture or make the picture roll.
-15-
Page 18
SERVICE TIPS
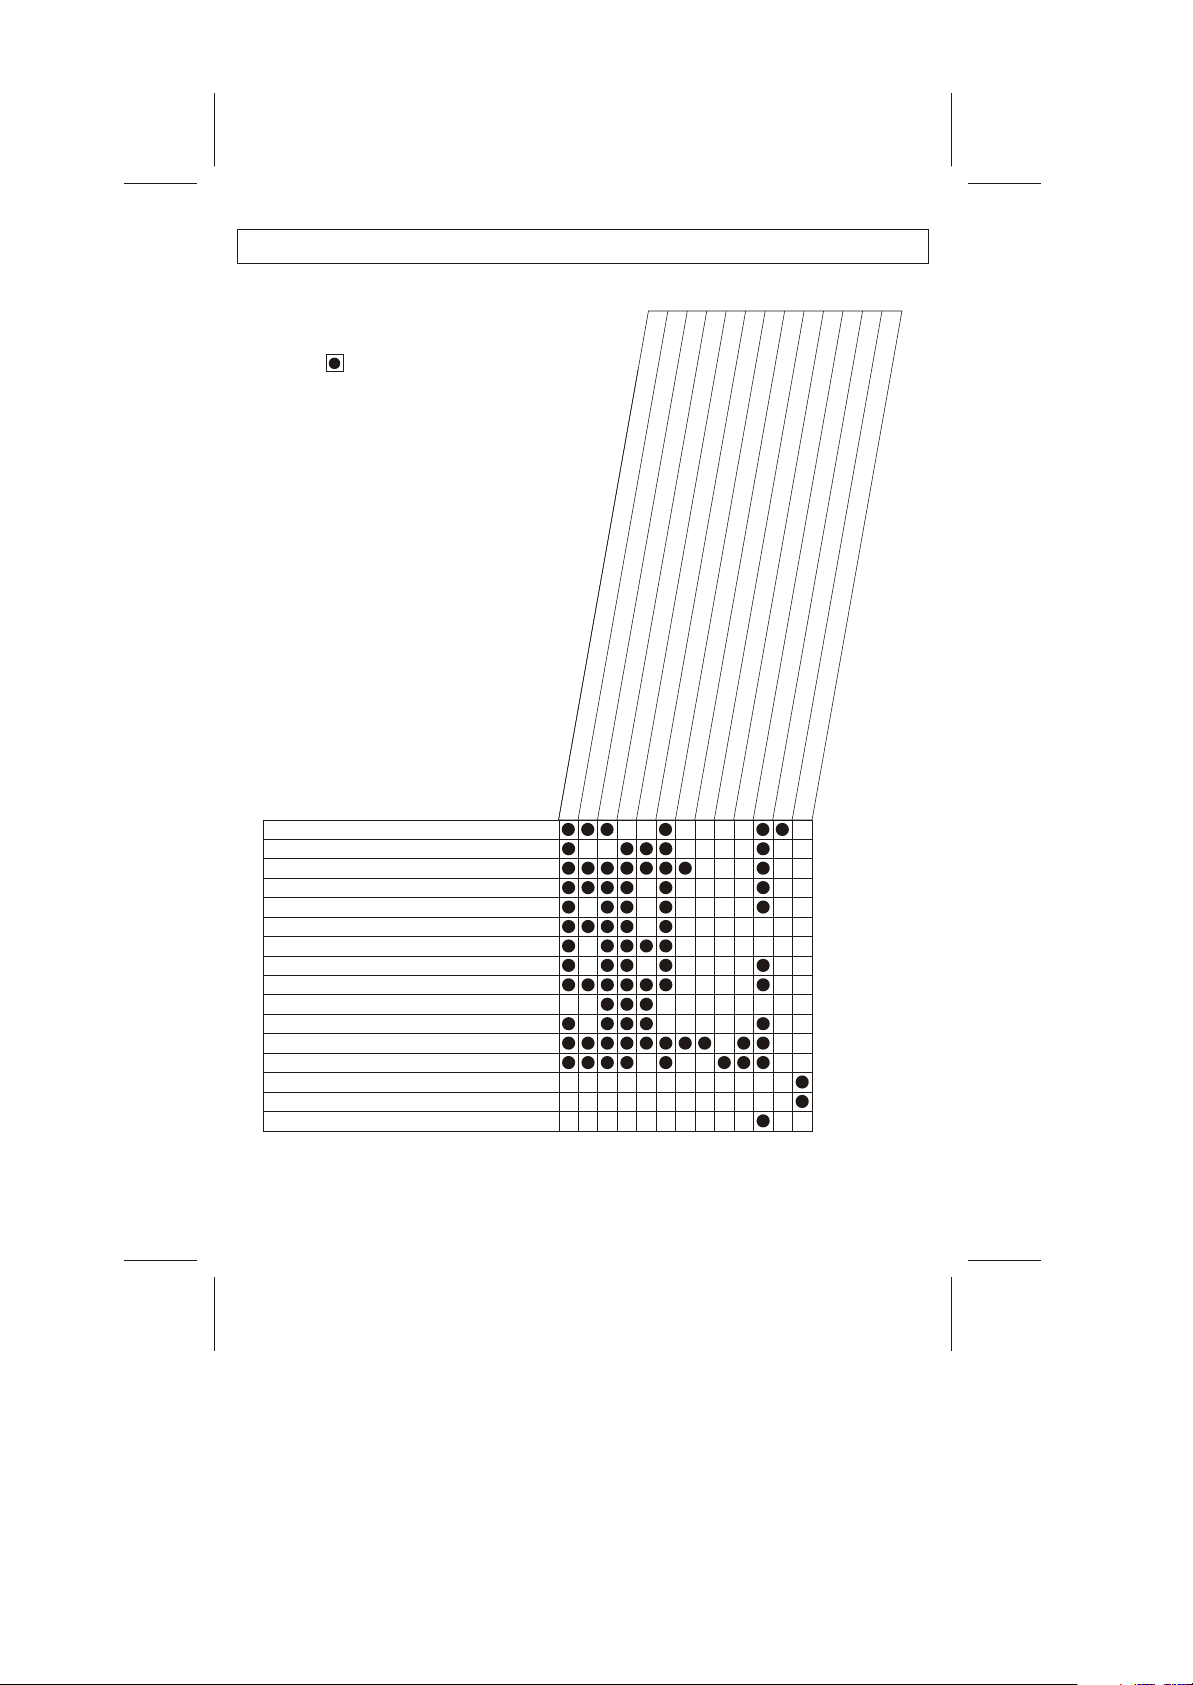
BEFORE CALLING FOR SERVICE, HAVE YOU
CHECKED ( ) THE FOLLOWING CHART
ON SYMPTOMS AND SOLUTIONS?
Symptoms
No picture, no sound
Poor sound, picture OK
Poor picture, sound OK
Weak picture
Blurred picture
Double image
Lines in picture
Distorted picture
Weak reception on some channels
Horizontal bars
Picture rolls vertically
Poor colour
No colour
Misoperation of Remote control
No Remote control
On Screen Display Control outside the screen
ouble
r
t
on
t
e
stati
s
f
ly
o
b
a
ck
b
a
o
r
b
p
n
es
,
r
K
o
s
wi
O
n
f
i
io
l,
oken
r
nne
b
a
r
onnect
h
o
c
c
f
l
t
ial
ia
n
feren
o
i
if
d
y
Tr
Solut
t
aer
aer
en
k
k
ri
c
o
e
ec
h
h
e-
C
C
R
e
anc
i
l
p
p
n a
a
as
uch
e)
s
p
,
e
ty
l
c
r
o
o
en
o
d
ontr
fer
n
s
(if i
ng c
nter
i
l i
ial
a
tun
htnes
oc
aer
e
l
rig
n
i
ly
b
f
t
ab
b
us
ust
j
j
o
Pr
Ad
Ad
r
u
o
l
co
sting
l
o
r
t
ol
n
oadca
l
r
tr
o
b
r
co
on
s
nt
i
c
o
t
n
s
c
e
r
io
a
t
tr
at
ou
t
n
s
sys
o
ol
c
c
if
if
t
k
k
st
c
us
j
ju
e
h
hec
d
d
A
C
A
C
ol
t
r
t
ec
n
rr
o
o
n"
c
e c
o
s
"
ot
s
h i
i
c
h
em
it
c
w
n R
s
wit
s i
m
f s
f
ie
o
/
er
n
tt
a
o
f
i
B
k
k
hec
hec
C
C
-16-
Page 19

www.denver-electronics.com
 Loading...