

Page 1

USER MANUAL
BETJENINGSVEJLEDNING
BRUKSANVISNING
BEDIENUNGSANLEITUNG
pvr
record tv programs
ci – common
interface
for pay
tv channels
to usb stick
T
T
for digital pay tv and free to air tv channels
usb port with pvr
Page 2

Important safety instructions to be kept with the product
Please read attentively
To prevent fire and electric shock, do not expose this receiver to rain or
moisture. In order to avoid any possible risk of electric shock, never
attempt to open the unit. In case of breakdown, reparation should be
made by qualified technicians. No part of this unit should be repaired by
users.
WARNING!
Presence of dangerous tension inside apparatus! Do not open. Risk of electric shock!
No part should be repaired by users. The maintenance of the receiver should be
carried out exclusively by qualified persons.
If the power cord is damaged, it must be replaced or repaired by the manufacturer, its
after-sales service, qualified electrician or persons of similar qualification in order to avoid
possible danger.
The product must be installed in accordance with national regulations.
The used batteries must be disposed of safely. Throw them in collection bins provided is
prohibited (inquire after your retailer for more details) in order to protect the environment.
HSILGNE
Proper Installation
- Place the receiver on a flat, firm and stable surface. Do not put it on a carpet or rug.
- Do not
overheating.
- Do not put anything above the unit (for example, CDs or magazines).
Sufficient Ventilation
- Place the receiver in a well-ventilated location to prevent accumulation of internal heat.
Allow a gap of at least 10cm to the rear and the top of the unit, as well as a space of 5cm to
both sides to avoid overheating.
- Do not obstruct any ventilation openings with items such as newspapers, tablecloths,
curtains, etc.
Protecting the Receiver from High Temperatures, Humidity, Water and Dust
- The receiver should not be exposed to dripping water or splashing.
- No objects filled with liquids, such as vases, shall be placed on the unit.
- Do not place any objec
candles).
place the receiver on top of another device, such as an amplifier. This may lead to
ts that might dam
age your unit near it (e.g. liquid filled objects or
- Do not place any source of flames such as lit candles on the receiver.
- This receiver is to be used in a temperate climate and should not be used in a tropical
climate.
Electricity Supply
1
Page 3

- Please unplug the receiver in case of prolonged non-use.
- If the power cord is damaged, it must be replaced or repaired by the manufacturer, its
after-sales service, qualified electrician or similar qualifications to those to avoid possible
danger.
- This device must be connected to a 240V ~ 50Hz electrical network.
- The plug must remain readily accessible after the installation of the product.
Welcome Section
Congratulations on choosing to buy a DENVER product. By doing so you now have the
assurance and peace of mind that comes with purchasing a product made by one of the
leading manufactory. All products brought to you by DENVER are manufactured to the
highest standards of performance and safety, and, as part of our philo
service and satisfaction, are backed by our comprehensive 1 Years Warranty.
Main featuresġ
Slim size
MPEG-2, MPEG-4(H.264) decoding
USB2.0 for software update , music ,image, movie and recording
LCN(Logical Channel Number) supported;
Parental control
Favorite lists
Timer
sophy of customer
HSILGNE
EPG/TXT/SUBTITLE supported
Digital sound through COAXIAL output (S/PDIF)
PVR ready supported
2
Page 4

Contents
1. Installation of STB..............................................................................................................6
1.1 Front Panel.....................................................................................................................6
1.2 Rear Panel .....................................................................................................................6
1.3 Connection.....................................................................................................................7
1.3.1 Connecting to cable signal................................................................................................... 8
1.3.2 Connecting to TV................................................................................................................. 8
1.3.3 Connecting to Digital Audio Amplifier................................................................................... 8
2. IR..........................................................................................................................................9
2.1 Remote...........................................................................................................................9
3. Basic functions ................................................................................................................10
3.1 First Installation ............................................................................................................10
3.2 Volume adjustment and Mute ......................................................................................10
3.3 TV/RADIO programs switch.........................................................................................10
3.4 Station switch...............................................................................................................10
3.5 Program list ..................................................................................................................10
3.6 Display information of programs ..................................................................................10
HSILGNE
3.7 Program return .............................................................................................................10
3.8 Audio language switch and L/R channel switch........................................................... 11
3.9 Electronic programs guide (EPG) ................................................................................11
3.10 Teletext .........................................................................................................................11
3.11 Subtitle .......................................................................................................................11
3.12 REC............................................................................................................................11
3.13 Time shift....................................................................................................................11
4. Installation ........................................................................................................................12
4.1 Auto Search................................................................................................................12
4.2 Manual Search ...........................................................................................................12
4.3 Channel Filter .............................................................................................................12
4.4 LCN ............................................................................................................................12
4.5 Acti
5. Channel.............................................................................................................................13
5.1 Channel Manager.......................................................................................................13
5.2 Favorite List................................................................................................................13
ve Antenna ...........................................................................................................12
6. Preference Setting ...........................................................................................................13
6.1 OSD Language ..........................................................................................................13
6.2 Preferred Subtitle .......................................................................................................13
3
Page 5

6.3 Hard Hearing ..............................................................................................................13
6.4 Preferred Audio ..........................................................................................................14
6.5 Multimedia..................................................................................................................14
6.6 PVR Config.................................................................................................................14
7. System Setting .................................................................................................................15
7.1 Timers ..........................................................................................................................15
7.2 Child Lock ....................................................................................................................15
7.3 Date Time.....................................................................................................................15
7.4 Common Interface .......................................................................................................15
7.5 Factory Reset...............................................................................................................16
7.6 Upgrade .......................................................................................................................16
7.7 Version.........................................................................................................................16
7.8 Auto Standby................................................................................................................16
8. AV Setting .........................................................................................................................16
8.1 Contrast........................................................................................................................16
8.2 Brightness ....................................................................................................................16
8.3 Saturation.....................................................................................................................16
HSILGNE
8.4 HUE..............................................................................................................................16
8.5 SPDIF...........................................................................................................................17
8.6 Aspect Ratio.................................................................................................................17
8.7 Video Output ................................................................................................................17
8.8 Video Resolution..........................................................................................................17
8.9 HDMI Color Space .......................................................................................................17
8.10 HDMI Deep Color.......................................................................................................17
9. OSD Game ........................................................................................................................17
10. Multi-Media .....................................................................................................................17
10.1 MOVIE........................................................................................................................17
10.1.1 Movie file browser............................................................................................................ 17
10.1.2 Movie playback ............................................................................................................. 18
10.2 MUSIC........................................................................................................................18
10.3 PHOTO ......................................................................................................................19
10.3.1 Photo file browser ......................................................................................................... 19
10.3.2 Photo playback ............................................................................................................. 19
10.3.3 Photo thumbnail ............................................................................................................ 20
10.4 NATIVE32 GAME.......................................................................................................20
10.5 RECORDER MANAGER ...........................................................................................20
10.5.1 Recorder manager browser .......................................................................................... 20
10.6 DISK MANAGER .......................................................................................................21
10.6.1 Disk manager browser .................................................................................................. 21
4
Page 6

10.6.2 Move/Copy.................................................................................................................... 21
10.7 E-Book .......................................................................................................................21
10.7.1 E-Book browser ............................................................................................................ 21
11. Upgrade...........................................................................................................................21
11.1 USB Upgrade .............................................................................................................21
12. Troubleshooting.............................................................................................................22
HSILGNE
5
Page 7

1. Installation of STB
1.1 Front Panel
1
: Switch between Standby mode and active mode.
2 CH+: Down channel
3 CH-: Up channel
HSILGNE
4 On/off:
5 IR : Receives the remote control signal
Power lamp, red color in Standby mode, green color in active mode
1.2 Rear Panel
1. RF OUT
To connect to TV.
2. RF IN
Connect cable signal.
3. HDMI
Connecting to the HDMI input on the TV set.
6
Page 8
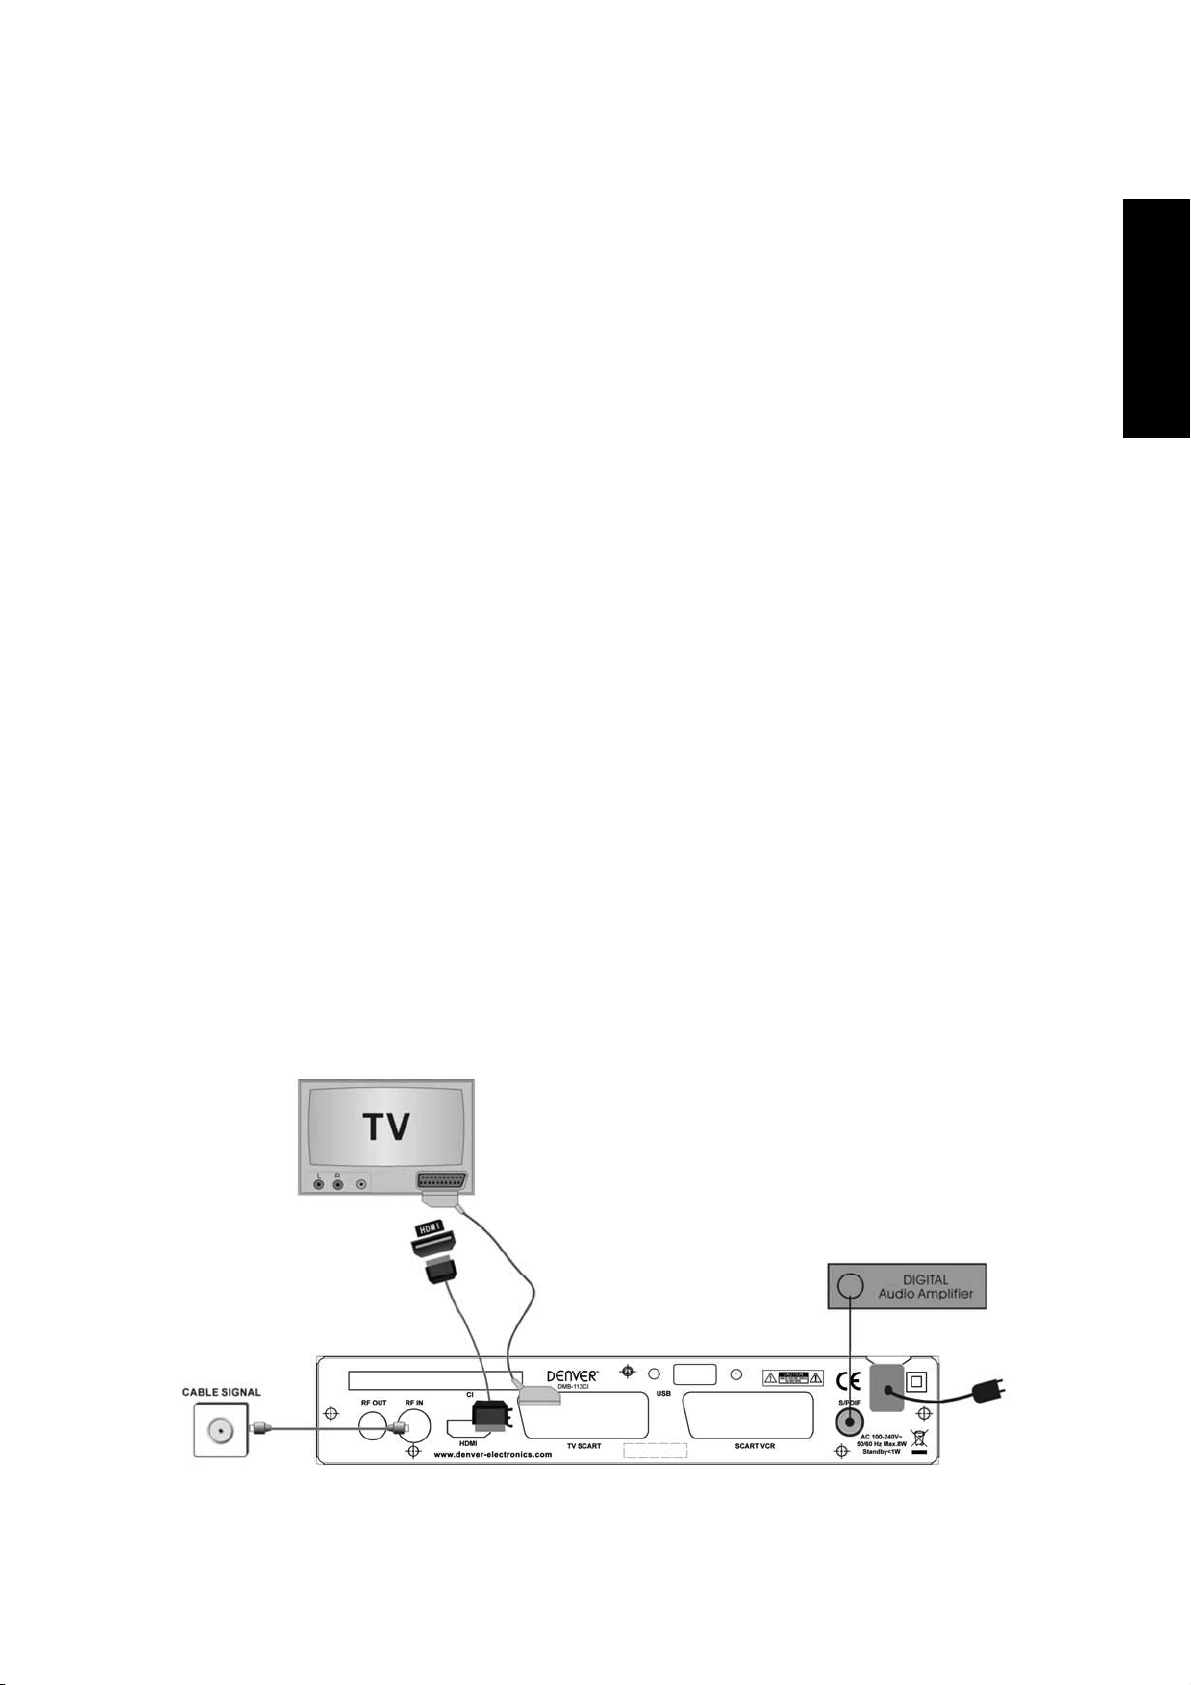
4.TV SCART Connector
Use this connector to connect your receiver to your video recorder using a SCART cable.
Your video signal will now be looped through your receiver to your TV set.
5. SCART VCR
Connect the external video input
6. S/PDIF
Digital audio signal output
7.CI
Insert CI module and Smart Card into CI slot, to decode pay tv programs
8. USB
It is used for playing media and PVR
USB harddisc on products with PVR function.
Please notice that we recommend using a hard disc with OWN power supply on this
unit. This is to ensure that it has enough power to work properly.
You can buy many hard discs without power supply, but our experience is that they
need too much power to work stable. MAXIMUM power for hard discs without
power supply is 500mAh.. If they use more than
9. Power Cord
this, they will fail when recording.
HSILGNE
1.3 Connection
Note: Before connect this STB to other devices, please close all devices’ power.
7
Page 9

1.3.1 Connecting to cable signal
To receive the broadcast signal, the cable signal should be connected to the CABLE IN
connector at the back of the receiver.
1.3.2 Connecting to TV
1. Connect the scart connectors at the back of the receiver to the scart connectors on
your TV set.
2. Connect the HDMI connector at the back of the receiver to the HDMI connector on
your TV set.
1.3.3 Connecting to Digital Audio Amplifier
Connect OPTICAL connector at the back of your receiver to appropriated input of your
Digital Audio
HSILGNE
8
Page 10

2.1 Remote
2. IR
1.ǍSTANDBYǎ switch of power supply
HSILGNE
2.ǍRECALLǎreturn to upper menu or previous program palyed.
3.ǍAUDIOǎ audio switch and left/right channel
4.ǍMUTEǎ mute control
5.ǍTV/RADIOǎ TV/RADIO switch
6.ǍFAVǎ enter channel/Fav list
7.ǍTXTǎ Teletext
8.ǍEPGǎ go to EPG
9.ǍINFOǎDisplay information of programs
10.ǍSUBǎ Subtitle
11.ǍMENUǎ Enter main menu
12.ǍCH+/-ǎ left/right channel
13.ǍRETURN/EXITǎ Exit to the menu or escape from the item
14.ǍVOLˇ/ˉǎ volume adjusting
15.Ǎ
16.ǍPAGE UP&DOWNǎ Page up&down
17.ǍNUMBERǎ digital strokes
18.ǍRECǎ enter REC
19.ǍDTV/VCRǎswitch DTV to VCR
20.ǍUSBǎ Into USB menu
21.ǍPLAY/PAUSEǎ play/pause key
22.ǍSTOPǎ stop playing USB Media
23.ǍREPEATǎ set repeat mode
24.ǍPREV & NEXTǎ play previous&next USB Media
/ / / & OKǎ move high_light and confirm
25.ǍREV & FWDǎ speed up&down while USB Media playing
26.ǍCOLOURǎUse to navigate between pages in teletext mode.
9
Page 11

3. Basic functions
3.1 First Installation
First installation shall setup some important configures.
User can select OSD Language,Country,Time Zone,Active
Antenna and LCN from this menu,when it is set
completely,User can use “Start Search”to search
channels.
3.2 Volume adjustment and Mute
1. Press “vol+/-” to adjust volume when system is in normal playing mode; and it will show
volume bar on the image.
2. Press “MUTE” to enter into the mode when normally playing and repress “MUTE” to back
the normal state.
3.3 TV/RADIO programs switch
HSILGNE
Press “TV/RADIO” to switch the programs when it is in full screen.
3.4 Station switch
1. Press “CH+/-” to switch to the previous or next program.
2. Press number keys to input program number.
3.5 Program list
1. Press “OK” to
class; press “UP/DOWN” to select program.
2.If there are some favorite programs that been set up, just press “FAV” key to enter into the
favorite program list.
3.6 Display information of programs
Press key “INFO” to show the information of current programs when it is in normal
playing state.
switch to the program list, press “LEFT/RIGHT” to select different program
3.7 Program return
Press “RECALL” under state of full-screen to return to the previous program palyed.
10
Page 12

3.8 Audio language switch and L/R channel switch
Press “AUDIO” key to switch the language of sound of current programs and switch among
“stereo”
3.9 Electronic programs guide (EPG)
1. You can press key “EPG” on the remote controller to enter into the EPG page to know
more about the programs to be played.
2. Press the colour key to choose the detailed information corresponding to the current
program.
3.10 Teletext
Press “TXT” on the remote to enter into Teletext page.
3.11 Subtitle
Press "SUB" key on the remote to enter the Subtitle menu for selecting subtitle
on/off/language.
“left” “right”(stereo left channel right channel).
3.12 REC
HSILGNE
Press “REC” key to record current program. You can press “INFO” key to watch current
recording information.
Press “STOP” key while recording, will stop record and resume normal playback mode.
3.13 Time shift
1) In TV full screen, Press Pause key to into time shift mode.
2)
In time shift mode, User can use PLAY/PAUSE/Fast forward/Fast backward.
3) In timeshift mode, Play/Pause icon is shown only for a few seconds, then disappear, if you
want to know current status, please press INFO button.
11
Page 13

4. Installation
Please input its password (0000) when entering into installation menu each time.
4.1 Auto Search
Auto search will scan all frequency and all programs based on your country setting.
4.2 Manual Search
Manual Search is for someone who know about how to select the exact frequency to scan.
4.3 Channel Filter
All channels or only unencrypted channels are set to be searched by selective settings.
HSILGNE
4.4 LCN
LCN Mode can control the channel whether sort by the sequence information in the streams.
4.5 Active Antenna
Enables/Disables the “Active Antenna”
12
Page 14

5. Channel
5.1 Channel Manager
Channel manager page includes channel deleting, moving, locking and rename.
5.2 Favorite List
1. As shown in the figure below via “Main menu->channel-> Favorite list”
HSILGNE
2. User can set channel favorite list.
6. Preference Setting
6.1 OSD Language
User can select OSD language
6.2 Preferred Subtitle
User can set 1
6.3 Hard Hearing
Enables/Disables the “hearing impaired”
st
and 2nd Preferred subtitle language.
13
Page 15

6.4 Preferred Audio
st
User can set 1
6.5 Multimedia
User can setting for media player.
6.6 PVR Config
and 2nd Preferred audio language.
HSILGNE
It contains six options as fallow˖
1ǃ
PVR File Format˖
Either of options, TS/PS
File Size˖
2ǃ
Any of options, 4G/3G/2G/1G, can be selected to set the size of the file to be recorded
Timeshift˖
3ǃ
Any of options, AUTO/OFF/ PAUSE, if AUTO is selected, timeshift operation will perform
automatically on the background, if OFF is selected, timesshift operation will stop; if
PAUSE is selected, timeshift operation will be Manual start by Pause key
Timeshift Length˖
4ǃ
Any of options, AUTO/30min/1h/2h, can be selected to set the time depth of the timeshift
5ǃ
Timeshift to Record˖
Either of options, ON/OFF, can be selected.
14
Page 16

7. System Setting
7.1 Timers
10 timers are supported. Setting for timer:
Date˖Specifies the timer date
Program Name˖Specifies the channel for which the timer is set
Start time˖Specifies the start time of the timer
End time˖Specifies the end time of the timer,be used in Recorder Type
HSILGNE
Duration˖Specifies the duration time of the timerˈbe used in Recorder Type
Mode˖Specifies the frequency of the timer. Duration can be any of the following˖
Once -timer will be triggered only once.
Daily -timer will be triggered daily at the specified time.
Weekly -timer will be triggered every week at the specified time.
Monthly- timer will be triggered every Monthly at the specified time.
7.2 Child Lock
User can set Enables or Disables the system lock, and also can set the parental rating
from 0 to 18.
7.3 Date Time
If the “Time Mode” is set to “Auto” then, “Time Zone” and “DST” shall be active for
editing. If the Mode is “Manual”, these options shall be disabled.
If the “Time Mode” is set to “Manual” then, “Date” and “Time” shall be active for editing.
If the Mode is “Auto”, these options shall be disabled.
7.4 Common Interface
Information about common interface
15
Page 17

7.5 Factory Reset
There will be Reset to default when this option be selected. The system will hint to input
“0000”; to set factory Reset
7.6 Upgrade
Software Upgrade
7.7 Version
Information about the stb
7.8 Auto Standby
Control the STB to standby automatically after any comportment for 3 hours.
8. AV Setting
TV setup provides convenient TV input mode, as shown in Figure
HSILGNE
8.1 Contrast
Contrast can be set from 0 to 24
8.2 Brightness
Brightness can be set from 0 to 24
8.3 Saturation
Saturation can be set from 0 to 24
8.4 HUE
Hue can be set from -30 to 30
16
Page 18

8.5 SPDIF
Used to select AVC mode –Mute,PCM and Bitstream
8.6 Aspect Ratio
Aspect Ratio can be set as 16: 9, 4: 3PanScan, 4: 3LetterBoxˈ16:9 PanScan
8.7 Video Output
Video Output can be set as RGB, CVBS
8.8 Video Resolution
Video Resolution can be set as 480p_60,480i_30,576p_50,576i_25, 720p-60, 720p_50,
1080i_30, 1080i_25, 1080p_60, 1080p_50
8.9 HDMI Color Space
HDMI Color Space can be set as YCbCr 4:4:4,xvColor,RGB, YCbCr 4:2:2
8.10 HDMI Deep Color
HDMI Deep Color setting Video Output mode can be set as 12 Bits,8 Bits,10 Bits
9. OSD Game
Four OSD games are provided include Box Man,Tetris,Hit Rat,Go Bang .
HSILGNE
10. Multi-Media
10.1 MOVIE
10.1.1 Movie file browser
Supported file formats are MPG, AVI, VOB, DAT, ASF, MKV, WMV, TS, QT.
17
Page 19

10.1.2 Movie playback
Key Stroke Action
KEY_PREV Shall stop this movie and play the previous movie in the list.
KEY_NEXT Shall stop this movie and play the next movie in the list.
KEY_PLAY play movie and show play icon.
KEY_PAUSE If the movie is playing, then this will pause and show pause icon
KEY_STOP Stop the movie and show the layout
KEY_FWD Fast forward the movie.
KEY_REV Fast reverse the movie.
KEY_RECALL The same as the key KEY_STOP
KEY_MUTE TV mute shall be toggled.
KEY_VOLUME Change the volume
HSILGNE
KEY_INFO Display
KEY_REC When playing movies or recorded material. Press REC button
to enter Goto function, so you can put in a time where you jump
to during the playback.
10.2 MUSIC
WMA, WAV, AAC,and MP3 format will be supported.
information of the playing movie
Key Stroke Action
KEY_PREV play the previous music
KEY_NEXT play the next music
KEY_PLAY play current music
KEY_PAUSE pause music
KEY_STOP stop the music
18
Page 20

KEY_FWD fast forward the music
KEY_REV fast reverse the music
KEY_NUM
10.3 PHOTO
10.3.1 Photo file browser
Supported file formats are JPG, TIF, PNG, GIF and BMP.
Key Stroke Action
KEY_ENTER press the key will play the selected photo.
the highlight shall change to the corresponding item according
to the input number.
HSILGNE
KEY_RECALL
KEY_NUM
KEY_YELLOW Shall show thumbnail menu.
10.3.2 Photo playback
Key Stroke Action
KEY_UP Shall rotate the image 180
KEY_DOWN Shall rotate the image 180
KEY_LEFT Shall rotate the image 270
KEY_RIGHT Shall rotate thr image 90
KEY_PREV
KEY_NEXT
press KEY_RECALL shall return from file list to filter selection
mode.
the highlight shall change to the corresponding item according
to the input number
Displays the previous image in the List. If the displayed image is
the first one then the key is ignored.
Displays the next image in the List. If the displayed image is the
last one then the key is ignored.
KEY_INFO Shall display the information of the image
19
Page 21

KEY_PAUSE Slide show was paused if press the key
KEY_PLAY Slide show was start to play if press the key
10.3.3 Photo thumbnail
The thumbnail view of the photos.
10.4 NATIVE32 GAME
Supported file formats are native32.
HSILGNE
Key Stroke Action
KEY_ENTER press the key will play the selected game.
KEY_RECALL
KEY_NUM
KEY_RED Change the type of game from native32 to NES
10.5 RECORDER MANAGER
10.5.1 Recorder manager browser
press KEY_RECALL shall return from file list to the filter
selection mode.
the highlight shall change to the corresponding item according
to the input number
Key Stroke Action
20
Page 22

KEY_ENTER press the key will play the selected recorded program
KEY_RECALL
KEY_RED press it will delete the selected item
KEY_GREEN press it will rename the selected item.
KEY_YELLOW press it will show list files of type
KEY_BLUE delete all
10.6 DISK MANAGER
10.6.1 Disk manager browser
Key Stroke Action
KEY_RED Show move/copy menu
KEY_GREEN Show rename menu.
KEY_YELLOW Delete the selected item
10.6.2 Move/Copy
press KEY_RECALL shall return from file list to the filter
selection mode
HSILGNE
In Move/copy menu user can move file or folder from one side to other side. It also can
copy the content at one side to other side.
10.7 E-Book
10.7.1 E-Book browser
User can read e-book in *.txt file.
11. Upgrade
11.1 USB Upgrade
User copy the upgrade file into the USB device and plug into the device for software
upgrade.
USB upgrade flow:
Insert contain upgrade file u-disk, press(menu -> setting -> upgrade -> usb
upgrade) enter USB directory list page, as show in the figure below:
Select upgrade file and press “enter” key to start upgrade, enter upgrade page
show information to prompt user upgrade progress;
The whole process of USB upgrade maybe need 30 second;
Please make sure don’t shut down the power in upgrade process;
When upgrade finish, system will automatic restart with the new fireware;
21
Page 23

12. Troubleshooting
There may be various reasons for the abnormal operation of the receiver. Check the receiver
according to the procedures shown below. If the receiver does not work properly after checking it,
please contact the dealer. Don’t open the receiver cover. This may cause a dangerous situation.
Symptom Cause Remedy
The LED display
on front panel
does not light up.
No picture or
sound
The power cord is not
plugged in.
Wrong connection of
the Audio/ Video
output of the receiver
to TV. Audio muting.
TV power off.
Check that the power cord is
plugged in to the wall outlet.
Connect the Audio/ Video output
of the receiver to TV correctly.
Press the MUTE button Turn TV
on.
HSILGNE
No picture The receiver can’t
receive the signal
Incorrect values of
some tuner
parameters Wrong
direction of the
antenna.
The remote control
does not work
Tips˖ If you refer to this troubleshooting, but no resolve that problem you encountered. Please you
contact the local dealer or technical support instantly, don’t to discover the machine, because that do is very
danger, and it damage that machine in that cases.
The batteries of the
remote control are not
inserted or exhausted
Check the antenna cable, replace
the cable, or connect the cable to
the receiver tightly. Set the values
of the tuner parameters correctly
in the installation menu. Check
the antenna connect.
Check whether the batteries are
inserted correctly in your remote
control. Check the batteries, and
if exhausted replace the batteries
in the remote control.
22
Page 24

Electric and electronic equipment and included batteries contains materials, components
and substances that can be hazardous to your health and the
environment, if the waste material (discarded electric and electronic
equipment and batteries) is not handled correctly.
Electric and electronic equipment and batteries is marked with the
crossed out trash can symbol, seen below. This symbol signifies that electric and
electronic equipment and batteries should not be disposed of with other household
waste, but should be disposed of separately.
As the end user it is important that you submit your used batteries to the approriate and
designated facility. In this manner you make sure that the batteries are recycled in
accordance with leg
All cities have established collection points, where electric and electronic equipment and
batteries can either be submitted free of charge at recycling stations and other collection
sites, or be collected from the households. Additional information is available at the
technical department of your city.
islature and will not harm the environment.
HSILGNE
ALL RIGHTS RESERVED:
COPYRIGHT DENVER ELECTRONICS A/S
www.denver-electronics.com
23
Page 25

Vigtige sikkerhedsanvisninger - bør læses omhyggeligt
Gem vejledningen, du kan få brug for den senere
Nedsæt risikoen for elektrisk stød ved aldrig at udsætte apparatet for regn
eller fugt. Undlad at fjerne dæksler (eller bagstykke) af hensyn til faren for
elektrisk stød. Apparatet indeholder ingen dele, som bruger selv kan
servicere. Overlad alt reparationsarbejde til kvalificeret servicepersonale.
ADVARSEL!
Apparatet indeholder strømførende dele! Må ikke åbnes. Risiko for elektrisk stød!
Apparatet indeholder ingen dele, som bruger selv kan reparere. Overlad alt
reparationsarbejde til kvalificeret servicepersonale.
Hvis netledningen beskadiges, bør den udskiftes af producenten eller en kvalificeret
servicereparatør, således at der ikke opstår farlige situationer.
Produktet skal installeres i overensstemmelse med lovgivningen på det sted, hvor apparatet
anvendes.
Bortskaf brugte batterier på en miljømæssigt forsvarlig måde. Beskyt miljøet ved at bortskaffe
brugte batterier i overensstemmelse med de anvisninger, der er gældende i dit lokale område
(nærmere oplysninger fås hos forhandleren).
DANISH
Opsætning af apparatet
- Placér apparatet på en plan, fast og stabil overflade. Undlad at placere
gulvtæppe.
- Undlad at placere produktet ovenpå en anden elektronisk enhed, som f.eks. en forstærker,
da dette kan forårsage overophedning.
- Undlad at placere genstande oven på apparatet (f.eks. CD'er eller ugeblade).
Tilstrækkelig ventilation
- Placér apparatet på et sted, hvor der er tilstrækkeligt med plads omkring det, således at der
ikke opstår overophedning. Sørg for, at der er mindst 10 cm frirum på apparatets over- og
bagside samt mindst 5 cm frirum på begge sider, således at der ikke opstår fare for
overophedning.
- Undlad at blokere apparatets ventilationsåbninger med genstande som f.eks. aviser, duge,
gardiner etc.
Undlad at udsætte apparatet for høje temperaturer, fugt, væske og støv
- Udsæt ikke apparatet for
- Placér ikke beholdere, der indeholder væsker (som f.eks. vaser) ovenpå apparatet.
- Undlad at placere andre potentielt skadelige genstande ovenpå produktet (f.eks. en
beholder, der indeholder væske, eller et tændt stearinlys).
- Undlad at placere nogen form for åben ild, som f.eks. tændte stearinlys, ovenpå apparatet.
dryp eller stænk.
apparatet på et
- Dette apparat er fremstillet med henblik på anvendelse i en tempereret klimazone. Apparatet
bør ikke anvendes i tropiske klimazoner.
1
Page 26

Tilslutning til lysnettet
- Tag stikket til netledningen ud af stikkontakten, hvis du ikke skal anvende apparatet i
længere tid.
- Hvis netledningen beskadiges, bør den udskiftes af producenten eller en kvalificeret
servicereparatør, således at der ikke opstår farlige situationer.
- Dette apparat skal tilsluttes en strømkilde på 240V ~ 50Hz.
- Der skal være nem adgang til den stikkontakt, apparatet er tilsluttet.
Introduktion
Tillykke med dit nye produkt fra DENVER. Med et produkt fra DENVER kan du altid være
sikker på, at du har fået et produkt af høj standard og fra en førende producent. Alle produkter,
som forhandles af DENVER, er fremstillet efter de højeste standarder for ydelse og sikkerhed,
og alle vore produkter sælges med en omfattende 1 års garanti.
Oversigt over apparatetġ
Slankt design
DANISH
MPEG-2, MPEG-4 (H.264) dekodning
USB2.0 til opdatering af software, musik- og billedfiler samt optagelse
Understøtter LCN (Logisk kanalnummer)
Børnesikring
Favoritlister
Timer
Understøtter EPG/TXT/SUBTITLE
Digital lyd gennem den COAXIALE udgang (S/PDIF)
PVR ready
2
Page 27

Indhold
1. Opsætning af STB'en.........................................................................................................6
1.1 Frontpanelet...................................................................................................................6
1.2 Bagpanelet.....................................................................................................................6
1.3 Tilslutninger....................................................................................................................7
1.3.1 Tilslutning til kabelsignaler ................................................................................................... 8
1.3.2 Tilslutning til TV ...................................................................................................................8
1.3.3 Tilslutning til digital audio-forstærker ................................................................................... 8
2. Infrarød fjernbetjening.......................................................................................................9
2.1 Fjernbetjeningen ............................................................................................................9
3. Grundlæggende funktioner.............................................................................................10
3.1 Førstegangsopsætning ................................................................................................10
3.2 Indstilling af lydstyrke og Mute, lyd fra.........................................................................10
3.3 Omskifter for TV/RADIO...............................................................................................10
3.4 Skift kanal.....................................................................................................................10
HSINAD
3.5 Programlisten...............................................................................................................10
3.6 Visning af oplysninger om programmerne ...................................................................10
3.7 Sidst sete kanal............................................................................................................10
3.8 Omskifter for Audio (lydspor) og L/R, højre/ venstre kanal..........................................11
3.9 Elektronisk program guide (EPG) ................................................................................11
3.10 Tekst-TV .......................................................................................................................11
3.11 Undertekster...............................................................................................................11
3.12 REC, optagelse .......................................................................................................... 11
3.13 Timeshift
4. Opsætning ........................................................................................................................12
4.1 Auto search, automatisk kanalsøgning ......................................................................12
4.2 Manual search, manuel kanalsøgning .......................................................................12
4.3 Channel Filter, kanalfilter............................................................................................12
4.4 LCN, logisk kanalnummer ..........................................................................................12
4.5 Active Antenna, aktiv antenne....................................................................................12
5. Kanaler..............................................................................................................................13
.....................................................................................................................11
5.1 Channel Manager, kanalmanager..............................................................................13
5.2 Favorite List, favoritliste .............................................................................................13
6. Opsætning af præferencer..............................................................................................13
3
Page 28

6.1 OSD Language, OSD sprog.......................................................................................13
6.2 Preferred Subtitle, sprog til undertekster ...................................................................13
6.3 Hard Hearing, hørehæmmede ...................................................................................13
6.4 Preferred Audio, lydspor.............................................................................................13
6.5 Multimedia..................................................................................................................14
6.6 PVR Config, konfiguration af video-optager...............................................................14
7. Opsætning af systemet ...................................................................................................15
7.1 Timerfunktioner ............................................................................................................15
7.2 Child Lock, børnesikring ..............................................................................................15
7.3 Date Time, dato & tid ...................................................................................................15
7.4 Common Interface .......................................................................................................15
7.5 Factory Reset, standardindstillinger.............................................................................16
7.6 Upgrade .......................................................................................................................16
7.7 Version.........................................................................................................................16
7.8 Auto Standby................................................................................................................16
8. AV Indstillinger .................................................................................................................16
8.1 Contrast, kontrast.........................................................................................................16
HSINAD
8.2 Brightness, lysstyrke ....................................................................................................16
8.3 Saturation, mætning.....................................................................................................16
8.4 HUE, farvetone.............................................................................................................17
8.5 SPDIF...........................................................................................................................17
8.6 Aspect Ratio, aspektrate..............................................................................................17
8.7 Video Output, udgangsformat ......................................................................................17
8.8 Video Resolution, opløsning ........................................................................................17
8.9 HDMI Color Space, farveområde.................................................................................17
8.10 HDMI Deep Color, farvedybde ...................................................................................17
9. Spil.....................................................................................................................................
10. Multimedier.....................................................................................................................17
10.1 VIDEO........................................................................................................................17
10.1.1 Video filoversigt ............................................................................................................... 17
10.1.2 Afspilning af video ......................................................................................................... 18
10.2 MUSIK........................................................................................................................18
10.3 FOTO .........................................................................................................................19
17
10.3.1 Foto filoversigt............................................................................................................... 19
10.3.2 Afspilning af foto ........................................................................................................... 19
10.3.3 Foto miniatureoversigt................................................................................................... 20
10.4 NATIVE32 SPIL..........................................................................................................20
10.5 OPTAGEMANAGER ..................................................................................................21
4
Page 29

10.5.1 Optagelse filoversigt...................................................................................................... 21
10.6 DISK MANAGER .......................................................................................................21
10.6.1 Oversigten Disk Manager.............................................................................................. 21
10.6.2 Move/Copy, flyt/ kopier.................................................................................................. 21
10.7 E-Bog .........................................................................................................................21
10.7.1 E-Bogslæser ................................................................................................................. 21
11. Opgradering....................................................................................................................22
11.1 Opgradering via USB .................................................................................................22
12. Fejlfinding.......................................................................................................................23
DANISH
5
Page 30

1. Opsætning af STB'en
1.1 Frontpanelet
1
: Tænder modtageren eller stiller den på standby
2 CH+: Kanal op
3 CH-: Kanal ned
HSINAD
4 On/off: Indikatoren lyser rødt under Standby og grønt, når modtageren er tændt
5 IR : Modtager signalet fra fjernbetjeningen
1.2 Bagpanelet
1. RF OUT
Forbindes til et TV.
2. RF IN
Tilsluttes kabelsignalet.
3. HDMI
Forbindes til HDMI-terminalen på dit TV.
6
Page 31

4. TV SCART
Via denne terminal kan du tilslutte en video-optager til modtageren ved hjælp af et
SCART-kabel. Videosignalet sendes nu gennem modtageren til dit TV.
5. SCART VCR
Her kan tilsluttes en ekstern videoenhed.
6. S/PDIF
Udgang for digitalt audio signal
7.CI
I denne terminal indsættes Common Interface modul og kort til dekodning af
betalingsprogrammer
8. USB
Anvendes ved afspilning af medier og video
USB harddisk til anvendelse med videofunktion
Vær opmærksom på, at vi anbefaler anvendelse af en ekstern harddisk med EGEN
strømforsyning til brug med dette produkt. Dermed sikrer du, at der altid er tilstrækkeligt med
strøm til, at alt kan køre gnidningsfrit.
Der findes mange harddiske i handelen, som ikke har egen strømforsyning, men vores
erfaring siger, at de kræver for meget strøm til
strømtilførsel til en harddisk uden egen strømforsyning vil være 500 mAh. Hvis disken kræver
mere end dette, kan den svigte, når der optages på den.
9. Netledning
at kunne fungere stabilt. Den MAKSIMALE
1.3 Tilslutninger
Bemærk: Sluk for strømmen til alle enheder, inden du forbinder denne STB til andre
enheder.
DANISH
7
Page 32

1.3.1 Tilslutning til kabelsignaler
Hvis du vil modtage kabel-TV, skal kabelsignalet forbindes til terminalen CABLE IN på
modtagerens bagpanel.
1.3.2 Tilslutning til TV
1. Forbind scart terminalen på modtagerens bagpanel til scart terminalen på dit TV.
Forbind HDMI terminalen på modtagerens bagpanel til HDMI terminalen på dit TV.
1.3.3 Tilslutning til digital audio-forstærker
Forbind den OPTISKE terminal på modtagerens bagpanel til den tilsvarende terminal på den
digitale audio-forstærker.
DANISH
8
Page 33

2.1 Fjernbetjeningen
2. Infrarød fjernbetjening
1.ǍSTANDBYǎT噂nder modtageren fra standby
2.ǍRECALLǎG噁r tilbage til foreg噁ende menu eller program.
3.ǍAUDIOǎ Omskifter for audio signalkilde samt venstre/ h噌jre
kanal
4.ǍMUTEǎ Sl噁r lyden midlertidigt fra
5.ǍTV/RADIOǎ Omskifter for TV/RADIO
6.ǍFAVǎ嘤bner listen med kanaler / favoritlisten
7.ǍTXTǎ Tekst-TV
8.ǍEPGǎ嘤bner EPG, Elektronisk Program Guide
9.ǍINFOǎViser oplysninger om programmerne
10.ǍSUBǎ Undertekster
11.ǍMENUǎ嘤bner hovedmenuen
12.ǍCH+/-ǎ Kanal op/ ned
13.ǍRETURN/EXITǎ Lukker menuen eller menupunktet
14.ǍVOLˇ/ˉǎ Justerer lydstyrken
15.Ǎ
bekr噂fter et valg
16.ǍPAGE UP&DOWNǎ Side op & side ned
17.Ǎ0 - 9ǎ Numeriske knapper
18.ǍRECǎ Starter en optagelse
19.ǍDTV/VCRǎSkifter mellem DTV og VCR
20.ǍUSBǎ嘤bner menuen USB
/ / / & OKǎ Flytter cursor rundt i menuen samt
DANISH
21.ǍPLAY/PAUSEǎ Afspil/ pause
22.ǍSTOPǎ Afbryder afspilning af USB-mediet
23.ǍREPEATǎ Valg af gentagefunktion
24.ǍPREV & NEXTǎ Afspil foreg噁ende eller n噂ste fra USB-mediet
25.ǍREV & FWDǎ Hurtigt frem eller tilbage under afspilning fra USB-medie
26.ǍFARVEKNAPPERǎAnvendes til navigation mellem siderne i Tekst-TV.
9
Page 34

3. Grundlæggende funktioner
3.1 Førstegangsopsætning
Under førstegangsopsætningen tages stilling til nogle
vigtige indstillinger.
Du kan vælge OSD Language (OSD sprog), Country
(land), Time Zone (tidszone), Active Antenna (aktiv
antenne) og LCN (logisk kanalnummer) fra denne menu,
når opsætning af modtageren er gennemført. Vælg
“Start Search” for at søge efter kanaler.
3.2 Indstilling af lydstyrke og Mute, lyd fra
1. Tryk på knappen “vol+/-” for at justere lydstyrken under normal afspilning. Volumenbjælken
vises oven i billedet.
2. Tryk på knappen “MUTE”, hvis du midlertidigt vil slå lyden fra. Tryk igen på knappen
“MUTE”, når du vil vende tilbage til normal afspilning.
HSINAD
3.3 Omskifter for TV/RADIO
Tryk på knappen “TV/RADIO” for at skifte mellem programmerne, når programmet vises
på fuld skærm.
3.4 Skift kanal
1. Tryk på knappen “CH+/-”, hvis du v
2. Tryk på de numeriske knapper, hvis du vil gå direkte til en bestemt kanal.
3.5 Programlisten
1. Tryk på knappen “ENTER” for at skifte til visning af programlisten. Tryk på pil “VENSTRE/
HØJRE” for at vælge en anden programgruppe; tryk på pil “OP/ NED” for at vælge kanal.
2. Hvis du har markeret et eller flere programmer som favoritter, skal du blot trykke på
knappen “FAV” for at åbne listen med favoritprogrammer.
3.6 Visning af oplysninger om programmerne
il gå frem eller tilbage til næste kanal på listen.
Tryk på knappen “INFO”, hvis du under normal afspilning af en station vil se oplysninger
om de programmer, der vises på andre stationer.
3.7 Sidst sete kanal
Tryk på knappen “RECALL” under visning på fuld skærm, hvis du vil gå tilbage
10
til den
Page 35

sidst sete kanal.
3.8 Omskifter for Audio (lydspor) og L/R, højre/ venstre kanal
Tryk på knappen “AUDIO”, hvis du vil ændre sproget på lydsporet for det aktuelle program og
skifte mellem “stereo”
3.9 Elektronisk program guide (EPG)
1. Du kan trykke på knappen “EPG” på fjernbetjeningen for at åbne den elektroniske program
guide og se yderligere oplysninger om de programmer, der vises.
2. Tryk på farveknapperne for at vælge detaljerede oplysninger om det aktuelle program.
3.10 Tekst-TV
Tryk på knappen “TXT” på fjernbetjeningen, hvis du vil åbne Tekst-TV.
3.11 Undertekster
Tryk på knappen SUBTITLE på fjernbetjeningen, hvis du vil åbne menuen Subtitle, hvor du
kan slå undertekster til eller fra samt vælge sprog.
“left” “right” (stereo venstre kanal højre kanal).
3.12 REC, optagelse
HSINAD
Tryk på knappen “REC” for at optage det aktuelle program. Du kan trykke på knappen “info”,
hvis du vil se de aktuelle optageoplysninger.
Tryk på knappen “stop”, når du vil afbryde optagelsen og vende tilbage til normal visning af
TV-program.
3.13 Timeshift
1) Tryk på knappen Pause i fuldskærmsmodus, hvis du vil aktivere timeshift.
2)
Med timeshift kan du anvende funktionerne AFSPIL/ PAUSE/ Hurtigt fremad/ Hurtigt
tilbage.
3) I timeshift tilstand bliver Play/pause ikonet kun vist I få sekunder, herefter forsvinder det.
Hvis du vil se status, venligst tryk INFO knappen.
11
Page 36

4. Opsætning
Indtast koden (0000) første gang, du åbner menuen 'Installation', opsætning.
4.1 Auto search, automatisk kanalsøgning
Autosøgningen gennemsøger alle frekvenser og finder alle programmer, der er
tilgængelige ud fra dit landevalg.
4.2 Manual search, manuel kanalsøgning
DANISH
Manuel søgning kan anvendes, hvis du ved nøjagtigt, hvilken frekvens du vil søge efter.
4.3 Channel Filter, kanalfilter
Brug filteret til at angive, om du vil søge efter alle kanaler, eller kun kanaler, der ikke er
krypteret.
4.4 LCN, logisk kanalnummer
Med LCN kan du sortere kanalerne efter de kanalnumre, de er udstyret med.
4.5 Active Antenna, aktiv antenne
Her kan du slå “Aktiv antenne” til eller fra.
12
Page 37

5. Kanaler
5.1 Channel Manager, kanalmanager
På siden Channel manager kan du slette, flytte, låse og omdøbe kanaler.
5.2 Favorite List, favoritliste
1. Se tegningen herunder. Findes via “Main menu -> Channel -> Favorite list”
2. Her kan du oprette en favoritliste.
6. Opsætning af præferencer
6.1 OSD Language, OSD sprog
Her kan du vælge sprog til OSD displayet.
DANISH
6.2 Preferred Subtitle, sprog til undertekster
Her kan du indsætte et første- og andetvalg for foretrukne sprog til undertekster.
6.3 Hard Hearing, hørehæmmede
Her kan du slå “hearing impaired”, hjælp til hørehæmmede, til eller fra.
6.4 Preferred Audio, lydspor
Her kan du indsætte et første- og andetvalg for foretrukne sprog til lydspor.
13
Page 38

6.5 Multimedia
Her foretages indstillinger for medie-afspilning.
6.6 PVR Config, konfiguration af video-optager
DANISH
Menuen indeholder seks punkter, som vist herunder˖
1ǃ
PVR File Format, filformat˖
Vælg en af mulighederne, TS/PS.
File Size, filstørrelse˖
2ǃ
Vælg en af mulighederne, 4G/3G/2G/1G. Valget har indflydelse på filstørrelsen for
optagelsen.
3ǃ
Timeshift˖
Vælg en af mulighederne, AUTO/OFF/ PAUSE. Hvis du vælger AUTO, udføres timeshift
automatisk i baggrunden. Hvis du vælger OFF, er funktionen, timeshift slået fra. Hvis
du vælger PAUSE, udføres timeshift manuelt og går i gang, når der trykkes på knappen
Pause.
Timeshift Length, bufferlængde˖
4ǃ
Vælg en af mulighederne AUTO/30min/1h/2h for at angive, hvor stor en buffer timeshift
skal anvende.
5ǃ
Timeshift to Record, optagelse˖
Vælg en af mulighederne ON/OFF.
14
Page 39

7. Opsætning af systemet
7.1 Timerfunktioner
Modtageren understøtter op til 10 timer-handlinger. Opsætning af timer:
Date˖Her angives datoen for timer-handlingen
Program Name˖Her angives den kanal, timer-handlingen vedrører
Start time˖Her angives, hvornår timer-handlingen skal starte
End time˖Her angives, hvornår timer-handlingen skal slutte. Anvendes i Recorder Type
Duration˖Her angives varigheden for timer-handlingen. Anvendes i Recorder Type
Mode˖Her angives udførelsesfrekvensen for timer-handlingen. Frekvensen kan være en
af følgende˖
Once - timer-handlingen udføres én gang.
Daily - timer-handlingen udføres en gang dagligt på det angivne tidspunkt.
Weekly - timer-handlingen udføres en gang pr. uge på det angivne tidspunkt.
Monthly- timer-handlingen udføres en gang pr. måned på det angivne tidspunkt.
7.2 Child Lock, børnesikring
Her kan du slå låsesystemet til eller fra samt indsætte en rating for børnesikringen fra 0
til 18.
7.3 Date Time, dato & tid
DANISH
Hvis du har indstillet “Time Mode” til “Auto”, kan du redigere punkterne “Time Zone” og
“DST”. Hvis du har valgt indstillingen “Manual”, vil disse punkter være slået fra.
Hvis du har indstillet “Time Mode” til “Manual”, kan du redigere punkterne “Date” og
“Time”. Hvis du har valgt indstillingen “Auto”, vil disse punkter være slået fra.
7.4 Common Interface
Oplysninger om common interface.
15
Page 40

7.5 Factory Reset, standardindstillinger
Hvis du vælger at gennemføre denne handling, vil modtagerens oprindelige
standardindstillinger blive gendannet. Systemet beder dig indtaste koden “0000”; før
standardindstillingerne kan gendannes.
7.6 Upgrade
Opgradering af software.
7.7 Version
Information om modtagerens versionsnummer.
7.8 Auto Standby
Modtageren går automatisk på standby, hvis der ingen aktivitet har været i 3 timer.
8. AV Indstillinger
I denne menu kan du foretage indstillinger for visning på TV-skærmen, som vist
herunder.
8.1 Contrast, kontrast
Kontrasten kan indstilles fra 0 til 24.
8.2 Brightness, lysstyrke
HSINAD
Lysstyrken kan indstilles fra 0 til 24.
8.3 Saturation, mætning
Farvemætningen kan indstilles fra 0 til 24.
16
Page 41

8.4 HUE, farvetone
Farvetonen kan indstilles fra -30 til 30.
8.5 SPDIF
Her vælges indstilling for AVC – Mute, PCM og Bitstream.
8.6 Aspect Ratio, aspektrate
Aspektraten kan indstilles til 16: 9, 4: 3PanScan, 4: 3LetterBox eller 16˖9 PanScan.
8.7 Video Output, udgangsformat
Video Output kan indstilles til RGB eller CVBS.
8.8 Video Resolution, opløsning
Video-opløsning kan indstilles til 480p_60, 480i_30, 576p_50, 576i_25, 720p-60, 720p_50,
1080i_30, 1080i_25, 1080p_60 eller 1080p_50.
8.9 HDMI Color Space, farveområde
HDMI farveområde kan indstilles til YCbCr 4:4:4, xvColor, RGB eller YCbCr 4:2:2.
8.10 HDMI Deep Color, farvedybde
HDMI farvedybde kan indstilles til
12 Bit, 8 Bit eller 10 Bit.
9. Spil
Modtageren tilbyder 4 spil, nemlig Box Man, Tetris, Hit Rat og Go Bang.
10. Multimedier
10.1 VIDEO
10.1.1 Video filoversigt
Understøttede filformater er MPG, AVI, VOB, DAT, ASF, MKV, WMV, TS og QT.
HSINAD
17
Page 42

10.1.2 Afspilning af video
Knap Handling
KNAP_PREV
KNAP _NEXT
KNAP _PLAY Afspiller videofilen og viser ikonet for afspilning.
KNAP _PAUSE Pauser afspilning af videofilen og viser ikonet for pause.
KNAP _STOP Afbryder afspilning af videofilen og viser oversigten.
KNAP _FWD Går hurtigt frem i videofilen.
KNAP _REV Går hurtigt tilbage i videofilen.
KNAP _RECALL Samme funktion som knappen KNAP_STOP.
KNAP _MUTE Slår lyden fra TV'et til eller fra.
KNAP _VOLUME Justerer lydstyrken.
KNAP _INFO Viser
KNAP_REC Når man afspiller film eller optaget material, tryk REC knappen
Afbryder afspilning af den aktuelle videofil og går tilbage til
foregående fil på listen.
Afbryder afspilning af den aktuelle videofil og går frem til næste
fil på listen.
oplysninger om den aktuelle videofil.
for at tilgå Goto funktionen. Her kan man indtaste et tidspunkt
hvor boksen hopper til i afspilningen.
HSINAD
10.2 MUSIK
Understøttede filformater er WMA, WAV, AAC og MP3.
18
Page 43

Knap Handling
KNAP _PREV Går tilbage til foregående musikfil.
KNAP _NEXT Går frem til næste musikfil.
KNAP _PLAY Afspiller den aktuelle musikfil.
KNAP _PAUSE Sætter afspilningen på pause.
KNAP _STOP Afbryder afspilningen.
KNAP _FWD Går hurtigt frem i musikfilen.
KNAP _REV Går hurtigt tilbage i musikfilen.
KNAP _NUM Flytter markeringen til filen med det indtastede nummer.
10.3 FOTO
10.3.1 Foto filoversigt
Understøttede filformater er JPG, TIF, PNG, GIF og BMP.
Knap Handling
KNAP_ENTER Tryk for at vise det valgte foto på skærmen.
KNAP_RECALL Tryk på KNAP_RECALL, hvis du vil gå til filterfunktionerne.
DANISH
KNAP_NUM Flytter markeringen til filen med det indtastede nummer.
KNAP_GUL Går til visning af miniature-oversigten.
10.3.2 Afspilning af foto
Knap Handling
KNAP_OP Roterer billedet med 180
KNAP_NED Roterer billedet med 180
KNAP_VENSTRE Roterer billedet med 270
o
o
o
19
Page 44

KNAP_HØJRE Roterer billedet med 90
o
KNAP_PREV
KNAP_NEXT
KNAP_INFO Viser oplysninger om den aktuelle billedfil.
KNAP_PAUSE Holder pause i afspilning af slide show.
KNAP_PLAY Starter afspilning af slide show.
10.3.3 Foto miniatureoversigt
Viser en oversigt med alle billedfiler i miniature.
10.4 NATIVE32 SPIL
Understøttet filformat er native32.
Viser den foregående billedfil på listen. Hvis det viste foto er
det første på listen, sker der intet ved tryk på denne knap.
Viser den næste billedfil på listen. Hvis det viste foto er det
sidste på listen, sker der intet ved tryk på denne knap.
DANISH
Knap Handling
KNAP_ENTER Tryk på denne knap for at spille det valgte spil.
KNAP_RECALL
KNAP_NUM Flytter markeringen til filen med det indtastede nummer.
KNAP_RØD Skifter spiltype fra native32 til NES.
Tryk på KNAP_RECALL, hvis du vil afslutte fillisten og gå til
filterfunktionerne.
20
Page 45

10.5 OPTAGEMANAGER
10.5.1 Optagelse filoversigt
Knap Handling
KNAP_ENTER Tryk for at afspille den markerede optagelse.
KNAP_RECALL
KNAP_RØD Tryk for at slette den valgte fil.
KNAP_GRØN Tryk for at omdøbe den valgte fil.
KNAP_GUL Tryk for at se fillisterne efter type.
KNAP_BLÅ Sletter alt.
10.6 DISK MANAGER
10.6.1 Oversigten Disk Manager
Knap Handling
KNAP_RØD Viser menuen Move/Copy, flyt/ kopier.
KNAP_GRØN Viser menuen Rename, omdøb.
KNAP_GUL Sletter den markerede fil.
Tryk på knappen KNAP_RECALL, hvis du vil afslutte fillisten
og gå til filterfunktionerne.
DANISH
10.6.2 Move/Copy, flyt/ kopier
I menuen Move/Copy kan du flytte filer eller mapper fra det ene vindue til det andet. Du
kan også kopiere indhold fra det ene vindue til det andet.
10.7 E-Bog
10.7.1 E-Bogslæser
Du kan læse e-bøger i formatet *.txt.
21
Page 46

11. Opgradering
11.1 Opgradering via USB
Kopier filen med opgraderingen til en USB-enhed og forbind enheden til modtageren
for at opgradere softwaren.
Sådan foregår opgradering via USB:
Forbind USB-nøgle eller -enhed til modtageren og vælg (menu -> setting ->
upgrade -> usb upgrade). Åben oversigten over indholdet på USB-enheden,
som beskrevet herunder:
Vælg filen med opgraderingen og tryk på knappen “enter” for at starte
opgraderingen. Skærmbilledet opgradering viser dig oplysninger om, hvor langt
modtageren er kommet i opgraderingen.
Hele processen med opgradering via USB tager ca. 30 sekunder.
Pas på ikke at slukke for strømmen, mens opgraderingen gennemføres.
Når opgraderingen er gennemført, genstarter systemet automatisk med den nye
firmware.
DANISH
22
Page 47

12. Fejlfinding
Der kan være forskellige årsager, hvis modtageren ikke opfører sig normalt. Tjek punkterne i
oversigten herunder, inden du sender modtageren til service. Hvis forslagene herunder ikke løser
problemet, kontakt forhandleren. Undlad at åbne modtagerens kabinet. Apparatet indeholder
strømførende dele, der kan give stød.
Symptom
LED indikatoren på
frontpanelet lyser
ikke
Intet billed eller lyd Du har forbundet de
Intet billede Modtageren kan ikke
Fjernbetjeningen
virker ikke
Årsag Mulig løsning
Netledningen er ikke
sat i.
forkerte video/audio
terminaler til TV'ets
indgangsterminaler.
Lyden er slået fra.
TV'et er slukket.
modtage signalet.
Du har indsat forkerte
værdier for
tunerparametre.
Antennen er justeret
forkert.
Batterierne er brugt
op, eller der er ingen
batterier i
fjernbetjeningen.
Forbind netledningen og sæt
stikproppen fast i stikkontakten.
Forbind modtagerens Audio/
Video udgange korrekt til TV'et.
Tryk på knappen MUTE.
Tænd TV'et.
Kontrollér antennekablet, skift om
nødvendigt kablet ud med et
andet, eller sæt stikket til kablet
godt fast i modtageren.
Indstil modtagerens
tunerparametre korrekt i menuen
opsætning.
Kontrollér antennen og indstil den
om nødvendigt.
Kontrollér, om batterierne ligger
korrekt i fjernbetjeningen.
Kontrollér, om batterierne skulle
trænge til udskiftning.
DANISH
Tip˖ Hvis du stadig har problemer, efter at have forsøgt med løsningsforslagene i denne guide til
fejlfinding, bør du kontakte din lokale forhandler eller den tekniske support. Forsøg aldrig selv at reparere på
apparatet. Apparatet indeholder strømførende dele, der kan udgøre en fare for personskade eller
beskadigelse af apparatet.
23
Page 48

Elektrisk og elektronisk udstyr samt medfølgende batterier indeholder materialer,
komponenter og stoffer, der kan være skadelige for menneskers sundhed og for miljøet,
hvis affaldet (kasseret elektrisk og elektronisk udstyr og batterier) ikke håndteres korrekt.
Elektrisk og elektronisk udstyr og batterier er mærket med nedenstående overkrydsede
skraldespand. Den symboliserer, at elektrisk og elektronisk udstyr og batterier ikke må
bortskaffes sammen med usorteret husholdningsaffald, men skal indsamles særskilt.
Som slutbruger er det vigtigt, at du afleverer dine udtjente batterier til de
ordninger, der er etablerede. På denne måde er du med til at sikre, at
batterierne genanvendes i overensstemmelse med lovgivningen og ikke
unødigt belaster miljøet.
Alle kommuner har etableret indsamlingsordninger, hvor k
udstyr samt bærbare batterier gratis kan afleveres af borgerne på genbrugsstationer og
andre indsamlingssteder eller bliver afhentet direkte fra husholdningerne. Nærmere
information kan fås hos kommunens tekniske forvaltning.
ALLE RETTIGHEDER FORBEHOLDES
COPYRIGHT DENVER ELECTRONICS A/S
www.denver-electronics.com
asseret elektrisk og elektronisk
DANISH
24
Page 49

Viktiga säkerhetsanvisningar att sparas med produkten
Läs igenom noggrant
För att förhindra brand eller elchock, utsätt inte denna mottagare för regn
eller fukt. För att undvika risker för elektriska stötar, öppna aldrig enheten.
I händelse av fel, ska reparation utföras av kvalificerad tekniker. Ingen del
av denna enhet får repareras av användare.
VARNING!
Förekomst av farlig spänning inuti apparat! Öppna inte. Risk för elektrisk stöt! Ingen
del får repareras av användare. Underhåll av mottagaren ska endast utföras av
kvalificerade personer.
Om elsladden skadas, ska den ersättas eller repareras av tillverkaren kvalificerad elektriker
eller en liknande kvalificerad person för att undvika fara.
Produkten måste installeras i enlighet med nationella bestämmelser.
Använda batterier måste bortskaffas på ett säkert sätt. Det är förbjudet att kasta dem direkt i
tillhandahållna insamlingsbehållare. Fråga din återförsäljare för mer information för att skydda
miljön.
Korrekt installation
- Placera mottagaren på en jämn, fast och stabil yta. Placera den inte på en matta eller filt.
- Placera inte mottagaren ovanpå en annan enhet, t.ex. en förstärkare. Detta kan leda till
överhettning.
- Placera inte saker på enheten (t.ex., CD-skivor eller tidningar).
Tillräcklig ventilation
- Placera mottagaren på en väl ventilerad plats för att förhindra ansamling av inre värme.
Tillåt ett utrymme på minst 10 cm på baksidan och toppen av enheten, samt ett utrymme på 5
cm till båda sidor att undvika överhettning.
- Blockera inte ventilationsöppningar med t.ex. tidningar, dukar, gardiner osv.
Skydda mottagaren från höga temperaturer, fukt, vatten och damm.
- Utsätt inte mottagaren för dropp eller stänk.
- Placera inte föremål fyllda med vätska, som vaser på apparaten.
- Placera inte föremål som kan skada din enhet i närheten av den (t.ex. vattenfyllda föremål
eller levande ljus).
HSIDEWS
- Placera inte en källa av lågor t.ex. tända stearinljus på mottagaren.
- Den här mottagaren ska användas i tempererat klimat och inte i tropiskt klimat.
Eltillförsel
- Koppla
ur mottagaren om den inte används under en längre period.
1
Page 50

- Om el-sladden skadas, ska den ersättas eller repareras av tillverkaren kvalificerad elektriker
eller en liknande kvalificerad person för att undvika fara.
- Denna enhet måste anslutas till ett 240V ~ 50Hz elnät.
- Kontakten måste vara åtkomlig efter installationen av produkten.
Välkomstdel
Grattis till ditt val att köpa enDENVER produkt. Genom att göra så kan du känna den säkerhet
och det lugn det medför att köpa en produkt som tillverkats av en av de ledande tillverkarna.
Alla DENVER-produkter är tillverkade till högsta prestanda och säkerhet, och, som en del av
vår filosofi om kundservice och tillfredsställelse, backas upp av vår omfattande 1 -års garanti.
Huvudfunktioner:
Smärt storlek
MPEG-2, MPEG-4(H.264) avkodning
USB2.0 för programuppdatering, musik, bild, film och inspelning
LCN (Logiska kanalnummer) stöds;
Föräldrakontroll
Favoritlistor
Tajmer
EPG/TXT/SUBTITLE stöds
Digitalljud genom koaxial-utgång (S/PDIF)
PVR-redo stöds
SWEDISH
2
Page 51

Innehåll
1. Installation av STB .............................................................................................................6
1.1 Frontpanel.........................................................................................................................6
1.2 Bakpanel...........................................................................................................................6
1.3 Anslutningar......................................................................................................................7
1.3.1 Anslut kabelsignal. ............................................................................................................... 8
1.3.2 Ansluta till TV ....................................................................................................................... 8
1.3.3 Anslut till digital ljudförstärkare ............................................................................................ 8
2. IR..........................................................................................................................................9
2.1 Fjärrkontroll.......................................................................................................................9
3. Basfunktioner...................................................................................................................10
3.1 Första installation.........................................................................................................10
3.2 Volymjustering och Tyst ...............................................................................................10
3.3 TV/RADIO programväxling ..........................................................................................10
3.4 Växla station.................................................................................................................10
3.5 Programlista.................................................................................................................10
3.6 Visar programinformation.............................................................................................10
3.7 Programretur................................................................................................................10
3.8 Växla audiospråk och växla L/R-kanal.........................................................................11
3.9 Elektronisk programguide (EPG) .................................................................................11
3.10 Teletext .........................................................................................................................11
3.11 Undertext....................................................................................................................11
3.12 SPELA IN ...................................................................................................................11
3.13 Tidsskifte ....................................................................................................................11
4. Installation ........................................................................................................................12
4.1 Automatisk sökning......................................................................................................12
4.2 Manuell sökning .........................................................................................................12
4.3 Kanalfilter ...................................................................................................................12
4.4 LCN ............................................................................................................................12
4.5 Aktiv a
5. Kanal .................................................................................................................................13
ntenn................................................................................................................12
HSIDEWS
5.1 Kanalhantering ...........................................................................................................13
5.2 Favoritlista..................................................................................................................13
6. Inställning .........................................................................................................................14
3
Page 52

6.1 OSD-språk..................................................................................................................14
6.2 Prioriterad undertext...................................................................................................14
6.3 Hörselproblem............................................................................................................14
6.4 Prioriterat ljud .............................................................................................................14
6.5 Multimedia..................................................................................................................14
6.6 PVR-konfig. ................................................................................................................14
7. Systeminställning ............................................................................................................15
7.1 Tajmers.........................................................................................................................15
7.2 Barnlås .........................................................................................................................16
7.3 Datum/tid......................................................................................................................16
7.4 Gemensamt gränssnitt.................................................................................................16
7.5 Fabriksinställning .........................................................................................................16
7.6 Uppgradera ..................................................................................................................16
7.7 Version.........................................................................................................................16
7.8 Automatiskt väntläge....................................................................................................16
8. AV-inställning......................................................................................................................16
8.1 Kontrast........................................................................................................................17
8.2 Ljusstyrka:....................................................................................................................17
8.3 Mättnad ........................................................................................................................17
8.4 FÄRG ...........................................................................................................................17
8.5 SPDIF...........................................................................................................................17
8.6 Aspektförhållande ........................................................................................................17
8.7 Video Output ................................................................................................................17
8.8 Videoupplösning...........................................................................................................17
8.9 HDMI färgomfång.........................................................................................................17
8.10 HDMI Deep Color.......................................................................................................17
9. OSD-spel...........................................................................................................................17
10. Multi-Media .....................................................................................................................18
10.1 FILM ...........................................................................................................................18
10.1.1 Filmfil webbläsare............................................................................................................ 18
10.1.2 Filmuppspelning............................................................................................................ 18
10.2 MUSIK........................................................................................................................18
HSIDEWS
10.3 FOTO .........................................................................................................................19
10.3.1 Foto webbläsare ........................................................................................................... 19
10.3.2 Fotouppspelning............................................................................................................ 20
10.3.3 Miniatyrbild av foto ........................................................................................................ 20
10.4 NATIVE32 SPEL ........................................................................................................20
10.5 INSPELNINGSHANTERARE.....................................................................................21
4
Page 53

10.5.1 Inspelningshanterare webbläsare ................................................................................. 21
10.6 DISKHANTERARE ....................................................................................................21
10.6.1 Diskhanterare webbläsare ............................................................................................ 21
10.6.2 Flytta/Kopiera................................................................................................................ 22
10.7 E-Bok .........................................................................................................................22
10.7.1 E-Bok webbläsare......................................................................................................... 22
11. Uppgradera.....................................................................................................................22
11.1 Uppgradera USB........................................................................................................22
12. Felsökning ......................................................................................................................23
SWEDISH
5
Page 54

1.1 Frontpanel
1.
: Växla mellan standby och aktivt läge.
2. CH+: Öka kanal
3. CH-: Minska kanal
1. Installation av STB
4. På/av: Lampan lyser rött i vänteläge och grön i aktivt läge
5. IR: Tar emot signalen från fjärrkontrollen
1.2 Bakpanel
1. RF OUT
Ansluta till en TV.
2. RF IN
HSIDEWS
Anslut kabelsignal.
3. HDMI
Anslut till HDMI-ingången på din TV.
4. TV SCART-kontakt
6
Page 55

Använd denna kontakt för att ansluta din mottagare till din videobandspelare med hjälp av en
SCART-kabel. Din videosignalen kommer nu att loopas genom din mottagare till din TV.
5. SCART VCR
Anslut den externa videoutgången
6. S/PDIF
Digital ljudsignaluteffekt
7. CI
Sätt in CI-modul och smartkort på CI-plats, för att avkoda betal-TV-program
8. USB
Används för att spela upp media och PVR
USB hårddisk på produkter med PVR-funktion.
Observera att vi rekommenderar att du använder en hårddisk med EGEN strömförsörjning på denna
enhet. Detta är för att garantera att den har tillräckligt med ström för att fungera korrekt.
Du kan köpa flera hårddiskar utan strömförsörjning, men vår erfarenhet är att de behöver för mycket
ström för att arbeta stabilt. Maxeffekten för hårddiskar utan strömförsörjning är 500mAh. Om de
der mer än detta, kommer de att upphöra att fungera vid inspelning.
använ
9. Nätsladd
1.3 Anslutningar
Obs: Innan du ansluter denna STB till andra apparater, stäng av alla andra apparater.
SWEDISH
7
Page 56

1.3.1 Anslut kabelsignal.
För att ta emot sändningssignalen, ska kabelsignalen vara ansluten till kabel-kontakten på baksidan
av mottagaren.
1.3.2 Ansluta till TV
1. Anslut scartkontakterna på baksidan av mottagaren till skartkontakterna på din TV.
2. Anslut HDMI-kontakten på baksidan av mottagaren till HDMI-kontakten på din TV.
1.3.3 Anslut till digital ljudförstärkare
Anslut OPTISK-kontakt på baksidan av din mottagare till lämplig ingång på din Digital Audio
SWEDISH
8
Page 57

2.1 Fjärrkontroll
2. IR
1.STANDBY stäng av strömförsörjningen
2.RECALL återgå till övre menyn eller föregående program.
3.AUDIO ljudläge växla vänster och höger kanal
4. TYST tyst
5. TV/RADIO växla TV/RADIO
6. FAV ange kanal/favoritlista
7. TXT Teletext
8. EPG gå till EPG
9. INFO Visa programinformation
10. SUB Undertext
11. MENY Öppna huvudmeny
12. CH+/- framåt/bakåt kanal
13. RETURN/EXIT Avsluta till menyn eller lämna posten
14. VOL+/- volymjustering
/ / / & OK flytta markering och bekräfta
15.
16. PAGE UP&DOWN Sida upp & ner
17. NUMBER digitala linjer
18. REC öppna REC
19. DTV/VCR växla DTV till VCR
20. USB I USB-meny
21. PLAY/PAUSE spela/pausknapp
22. STOP stoppar uppspelning av USB-media
23. REPEAT ställ in repetitionsläge
24. PREV & NEXT spela upp föregående & nästa USB-media
25. REV & FWD snabbspola bakåt & snabbspola framåt USB-media spelar
26. COLOUR Använd för att navigera mellan sidor i teletext-läge.
SWEDISH
9
Page 58

3. Basfunktioner
3.1 Första installation
I den första installationen ställs några viktiga konfigurationer
in.
Du kan välja OSD-språk, land, tidszon, aktiv antenn och
LCN från denna meny, när allt är inställt kan användaren
börja använda “Starta sökning” för att söka kanaler.
3.2 Volymjustering och Tyst
1. Tryck på“vol+/-” för att justera volymen när systemet är i normalt uppspelningsläge, och
volymindikatorn visas på bilden.
2. Press “MUTE” för att öppna läget vid normal uppspelning och tryck på“MUTE” igen för att
återgå till normalt läge.
3.3 TV/RADIO programväxling
Tryck på“TV/RADIO” för att växla program i helskärm.
3.4 Växla station
1. Tryck på “CH+/-” för att växla till föregående eller nästa program.
2. Tryck på nummertangenterna för att mata in programnummer.
3.5 Programlista
1. Tryck på“ENTER” för att växla till programlistan, tryck på“VÄNSTER/HÖGER” för att välja
en annan programklass; tryck på“UPP/NER” för att välja program.
2. Om några favoritprogram ställts in, tryck på “FAV” tangenten för åtkomst av listan över
favoritprogram:
3.6 Visar programinformation
Tryck på tangenten “INFO” för att visa informationen om aktuella prgram när den är i sitt
normala uppspelningsläge.
HSIDEWS
3.7 Programretur
Tryck på“RECALL” i läget helskärm för att återvända till programmet som spelades upp
tidigare.
10
Page 59

3.8 Växla audiospråk och växla L/R-kanal
Tryck på“AUDIO” tangenten för att växla ljudspråk för aktuella program och växla mellan
“stereo”
3.9 Elektronisk programguide (EPG)
1. Du kan trycka på “EPG” tangenten på fjärrkontrollen för åtkomst av EPG-sidan för att ta
reda på mer om programmen som ska spelas upp.
2. Tryck på färgtangenten för att välja detaljerad information som motsvara aktuellt program.
3.10 Teletext
Tryck på“TXT” på fjärrkontrollen för att öppna sidan Teletext.
3.11 Undertext
Tryck på“SUB” tangenten på fjärrkontrollen för att öppna menyn Undertext för att välja
undertext på/av/språk.
“vänster” “höger” (stereo vänster kanal höger kanal).
3.12 SPELA IN
Tryck på“REC” tangenten för att spela in aktuellt program. Du kan trycka på “info”-tangenten
för att se aktuell inspelningsinformation.
Tryck på“stop” tangenten under inspelning stoppar inspelningen och återupptar normalt
uppspelningsläge.
3.13 Tidsskifte
1) In TV fullskärm, tryck på pausknappen för att öppna läget tidsskifte.
2)
I läget tidsskifte, kan användare använda SPELA UPP/PAUS/Snabbspola
framåt/Snabbspola bakåt.
3) I läget för tidskift, Play/Pause (Spela/Pausa) visas ikonen endast i några sekunder, för att
därefter försvinna. Om du vill veta aktuell status, vänligen tryck INFO knappen.
HSIDEWS
11
Page 60

4. Installation
Ange lösenord (0000) varje gång du öppnar installationsmenyn.
4.1 Automatisk sökning
Automatiskt sökning söker igenom alla Automatisk sökning kommer att söka alla
frekvenser och alla program som baserats på inställningen för ditt land.
4.2 Manuell sökning
Manuell sökning är lämpligt för de som känner till hur man väljer den exakta frekvensen för
att skanna.
4.3 Kanalfilter
Alla kanaler eller bara okodade kanalerna är inställda på att sökas igenom med selektiva
inställningar.
4.4 LCN
LCN-läge kan styra huruvida kanal ska sorteras enligt sekvensinformationen i strömningen.
4.5 Aktiv antenn
Aktiverar/Inaktiverar “Aktiv antenn”
SWEDISH
12
Page 61

5. Kanal
5.1 Kanalhantering
Sidan Kanalhanterare inkluderar kanalradering, flytt, låsning och ge nytt namn.
5.2 Favoritlista
1. Som framgår av figuren nedan via "Huvudmeny-> kanal-> Favoritlista”
2. Användare kan ställa in kanal favoritlistan.
SWEDISH
13
Page 62

6.1 OSD-språk
Användare kan välja OSD språk
6.2 Prioriterad undertext
:a
Användare kan ställa i 1
6.3 Hörselproblem
Aktiverar/Inaktiverar “hörselskadade”
6.4 Prioriterat ljud
Användare kan ställa i 1
6.5 Multimedia
och “2:a prioriterat undertextspråk.
:a
och “2:a prioriterat ljudspråk.
6. Inställning
Använda kan ställa in mediaspelare.
6.6 PVR-konfig.
SWEDISH
Den innehåller sex följande alternativ:
14
Page 63

1. PVR filformat:
Alternativ, TS/PS
2. Filstorlek:
Något av alternativen, 4G/3G/2G/1G, kan väljas för att ställa in storleken på filen som
skall registreras
3. Tidsskifte:
Välj något av alternativen, AUTO/OFF/ PAUSE, om AUTO väljs, tidsskiftesfunktionen
utförs i bakgrunden, om OFF is vald, tidsskiftesfunktionen stoppar; omPAUSE är vald,
tidsskiftesfunktionen startas manuellt av knappen paus
4. Längd för tidsskifte:
Något av alternativen, AUTO/30min/1h/2h, kan väljas för att ställa in tidsdjup för
tidsskifte
5. Tidsskiftning för inspelning:
Något av alternativ, ON/OFF, kan väljas.
7. Systeminställning
7.1 Tajmers
10 tajmers har stöd. Inställning för tajmer:
Datum: Anger datum för tajmer
Programnamn: Anger kanalen för vilken tajmern är inställd
Starttid: Anger starttiden för tajmer
Sluttid: Anger sluttiden för tajmer, kan användas för inspelning
Längd: Anger längden för tajmer, kan användas för inspelning
Läge: Anger frekvens för tajmern. Längden kan vara något av följande:
SWEDISH
En gång -tajmern utlöses endast en gång.
Dagligen -tajmern kommer att utlösas dagligen vid den angivna tiden.
Veckovis -tajmern kommer att utlösas varje vecka vid den angivna tiden.
Månadsvis - tajmern kommer att utlösas varje månad vid den angivna tiden.
15
Page 64

7.2 Barnlås
Användaren kan ställa in Aktivera eller Inaktivera systemlås och även ställa in
föräldragradering från 0 till 18.
7.3 Datum/tid
Om “Time Mode” är inställt på “Auto” bör, “Time Zone” och“DST” vara aktivt för
redigering. är läget inställt på “Manual”, är dessa alternativ avaktiverade.
Om “Time Mode” är inställt på “Manual ” bör, “Date” och“Time” vara aktivt för
redigering. är läget inställt på “Auto”, är dessa alternativ avaktiverade.
7.4 Gemensamt gränssnitt
Information om gemensamt gränssnitt
7.5 Fabriksinställning
Återställning till standard sker när detta alternativ väljs. System uppmanar att ange “0000”;
för att ställa in fabriksinställning
7.6 Uppgradera
Mjuvaruuppgradering
7.7 Version
Information om stb
7.8 Automatiskt väntläge
Styr STB automatiskt till standbyläge efter systemåtgärder i 3 timmar.
8. AV-inställning
Med TV-installation får du ett bekvämt TV input läge, som på bilden nedan
HSIDEWS
16
Page 65

8.1 Kontrast
Kontrast kan ställas in från 0 till 24;
8.2 Ljusstyrka:
Ljusstyrka kan ställas in från 0 till 24;
8.3 Mättnad
Mättnad kan ställas in från 0 till 24;
8.4 FÄRG
Färg kan ställas in från -30 till 30;
8.5 SPDIF
Används för att välja AVC-läge –Tyst , PCM och Bitström
8.6 Aspektförhållande
Aspektförhållande kan ställas in som 16: 9, 4: 3PanScan, 4: 3LetterBox, 16:9 PanScan;
8.7 Video Output
Videouteffekt kan ställas in som RGB, CVBS;
8.8 Videoupplösning
Videoupplösning kan ställas in som 480p_60,480i_30,576p_50,576i_25, 720p-60, 720p_50,
1080i_30, 1080i_25, 1080p_60, 1080p_50;
8.9 HDMI färgomfång
HDMI färgomfång kan ställas in som YCbCr 4:4:4, xvColor, RGB, YCbCr 4:2:2;
8.10 HDMI Deep Color
HDMI Deep Color-inställning Video Output-läge kan ställas in som 12 Bits, 8 Bits och 10 Bits;
9. OSD-spel
SWEDISH
Fyra OSD-spel medföljer inklusive Box Man, Tetris, Hit Rat, Go Bang.
17
Page 66

10. Multi-Media
10.1 FILM
10.1.1 Filmfil webbläsare
Filformat med stöd är MPG, AVI, VOB, DAT, ASF, MKV, WMV, TS, och QT.
10.1.2 Filmuppspelning
Tangentnedslag Åtgärd
TANGENT_FÖREG Stoppar filmen och spelar upp föregående film i listan.
TANGENT_NÄSTA Stoppar filmen och spelar upp nästa film i listan.
TANGENT_SPELA
UPP
TANGENT_PAUS
TANGENT_STOPP Stoppar filmen och visar uppställning
TANGENT_FRM Snabbspolar filmen framåt.
TANGENT_BAK. Snabbspolar filmen bakåt.
TANGENT_ÅTERK
ALLA
TANGENT_TYST TV-tyst kan växlas.
TANGENT_VOLYM Ändra volymen
TANGENT_INFO Visa informati
TANGENT_REC När du tittar på film eller inspelat material. Tryck REC
Spela upp filmen och visa uppspelningsikon.
Om filmen spelas upp kommer detta att pausa och vis
pausikonen
Samma tangent som TANGENT_STOPP
on om filmen som spelas upp
knappen för ange Goto funktionen, så du kan ställa in en
tid som du kan hoppa till under uppspelning.
a
HSIDEWS
10.2 MUSIK
WMA, WAV, AAC och MP3-format har stöd.
18
Page 67

Tangentnedslag Åtgärd
TANGENT_FÖREG. spela upp föregående musik
TANGENT_NÄSTA spela upp nästa musik
TANGENT_SPELA
UPP
TANGENT_PAUS pausa musik
TANGENT_STOPP stoppa musiken
TANGENT_FRM snabbspolar filmen framåt
TANGENT_BAK. snabbspolar filmen bakåt
TANGENT_NUM
10.3 FOTO
10.3.1 Foto webbläsare
Stöder filformat JPG, TIF, PNG, GIF och BMP.
spela aktuell musik
markeringen kommer att ändra motsvarande post i enlighet
med angett nummer.
SWEDISH
Tangentnedslag Åtgärd
TANGENT_ENTERTryck på denna tangent kommer att spela upp markerat foto.
19
Page 68

TANGENT_ÅTER
KALLA
Tryck på TANGENT_ÅTERKALLA kommer återvända från
fillistan till läget filterval.
TANGENT_NUM
TANGENT_GUL Visar menyn miniatyrbild.
10.3.2 Fotouppspelning
Tangentnedslag Åtgärd
TANGENT_UPP Kommer att rotera bilden 180
TANGENT_NER Kommer att rotera bilden 180
TANGENT_VÄNS
TER
TANGENT_HÖGERKommer att rotera bilden 90
TANGENT_FÖREG.Visar föregående bild i Listan. Om den visade bilden är den
TANGENT_NÄSTAVisar nästa bild i Listan. Om den visade bilden är den sista
markeringen kommer att ändra motsvarande post i enlighet
med angett nummer
Kommer att rotera bilden 270
första ignoreras tangenten.
ignoreras tangenten.
TANGENT_INFO Kommer att visa bildinformation
TANGENT_PAUS Bildspel pausas vid tryck på tangent
TANGENT_SPEL
A UPP
10.3.3 Miniatyrbild av foto
Miniatyrvy av foton.
10.4 NATIVE32 SPEL
Understödda filformat är native32.
Bildspel startades vid tryck på tangent
SWEDISH
Tangentnedslag Åtgärd
20
Page 69

TANGENT_ENTERTryck på denna tangent kommer att spela markerat spel.
TANGENT_ÅTER
KALLA
TANGENT_NUM
TANGENT_RÖD Ändra typen av spel från native32 till NES
10.5 INSPELNINGSHANTERARE
10.5.1 Inspelningshanterare webbläsare
Tryck på TANGENT_ÅTERKALLA kommer återvända från
fillistan till läget filterval.
markeringen kommer att ändra motsvarande post i enlighet
med angett nummer
Tangentnedslag Åtgärd
TANGENT_ENTER
TANGENT_ÅTERK
ALLA
TANGENT_RÖD tryck kommer att ta bort de markerade objektet
TANGENT_GRÖN tryck kommer att ta ge nytt namn åt de markerade objektet.
TANGENT_GUL tryck kommer att visa typ av fillista
TANGENT_BLÅ radera allt
10.6 DISKHANTERARE
10.6.1 Diskhanterare webbläsare
Tangentnedslag Åtgärd
TANGENT_RÖD Visa flytta/kopiera meny
TANGENT_GRÖNVisa menyn ge nytt namn.
tryck på denna tangent kommer att spela upp inspelat
program.
tryck på TANGENT_ÅTERKALLA kommer återvända från
fillistan till läget filterval
SWEDISH
TANGENT_GUL Ta bort markerat objekt
21
Page 70

10.6.2 Flytta/Kopiera
I menyn Flytta/Kopiera kan användaren flytta fil eller mapp från ena till andra sidan. Den
kan också kopiera innehållet från ena till andra sidan.
10.7 E-Bok
10.7.1 E-Bok webbläsare
Användare kan läsa e-bok i *.txt file.
11. Uppgradera
11.1 Uppgradera USB
Användare kopierar den uppgraderade filen till USB-enheten och ansluter enheten
för programuppgradering.
Uppgradering av USB-flöde:
Sätt in fil u-disk för uppgradering, tryck på (Meny -> Inställningar ->
uppgradera -> USB-uppgradering) anger USB katalog listsidan som visas i
figuren nedan:
Välj uppgradera fil och tryck på "Enter " för att starta uppgraderingen, sidan
uppgradera öppnas och visar användaren information om
uppgraderingsprocessen;
Hela USB-uppgraderingsprocessen tar cirka 30 sekunder;
Se till att inte stänga av strömmen under uppgraderingsprocessen;
När uppgraderingen är klar kommer systemet automatiskt att starta om det nya
firmware;
SWEDISH
22
Page 71

12. Felsökning
Det kan finnas olika anledningar till onormal drift av mottagaren. Kontrollera att mottagaren enligt
instruktionerna som visas nedan. Om mottagaren inte fungerar korrekt efter kontroll, kontakta din
återförsäljare. Öppna inte locket på mottagaren. Detta kan orsaka en farlig situation.
Symptom Orsak Lösning
LED-skärmen på
frontpanelen tänds
inte.
Ingen bild eller ljud Fel anslutning av
Elsladden är inte
ansluten.
Audio/Video-utgången
på mottagaren till TV.
Inget ljud. Strömmen
avstängd på TV.
Kontrollera att nätsladden är
ansluten till vägguttaget.
Anslut Audio/Video-utgången på
mottagaren till TVn korrekt. Tryck
TYST för att sätt på TVn.
Ingen bild Mottagaren kan inte ta
emot signalen
felaktiga värden för
vissa
tunerinställningar fel
riktning på antennen.
Fjärrkontrollen
fungerar inte
Tips: Om du hänvisar till denna felsökning men inte löser problemet du stött på. Kontakta den lokala
återförsäljaren eller teknisk support direkt, öppna inte själv maskinen, eftersom det är mycket farligt och kan
skada produkten.
Batterierna i
fjärrkontrollen är inte
isatta eller slut
Kontrollera antennkabeln, byt ut
kabeln, eller anslut kabeln
ordentligt på mottagaren. Ställ
in värdena för tunerinställningar
korrekt i installationsmenyn.
Kontrollera antennanslutningen.
Kontrollera om batterierna är
korrekt isatta i din fjärkontroll.
Kontrollera batterierna, om de är
slut ersätt batterierna i
fjärrkontrollen.
SWEDISH
23
Page 72

Elektrisk och elektronisk utrustning och tillhörande batterier innehåller
material, komponenter och ämnen som kan vara skadliga för hälsan och
miljön om avfallet (kasserad elektrisk och elektronisk utrustning och
batterier) inte hanteras korrekt.
Elektrisk och elektronisk utrustning och batterier är märkta med en symbol i form av
en överstruken soptunna (syns nedan). Denna symbol visar att elektrisk och
elektronisk utrustning och batterier inte bör slängas tillsammans med annat
hushållsavfall, utan ska istället slängas separat.
Som slutanvändare är det viktigt att du lämnar in dina använda batterier i en för
ändamålet avsedd facilitet. På det viset säkerställer du att batterierna återvinns
lagenligt och att de inte skadar miljön.
Alla kommuner har etablerat uppsamlingsställen där elektrisk och elektronisk
utrustning och batterier antingen kan lämnas in kostnadsfritt i återvinningsstationer
eller hämtas från hushållen. Vidare information finns att tillgå hos din kommuns
tekniska förvaltning.
MED ENSAMRÄTT
UPPHOVSRÄTT DENVER ELECTRONICS A/S
www.denver-electronics.com
SWEDISH
24
Page 73

Wichtige Sicherheitsinformationen – Mit dem Produkt aufbewahren
Bitte sorgfältig durchlesen
Diesen Empfänger weder Regen noch Feuchtigkeit aussetzen, um Feuer
oder Stromschläge zu vermeiden. Um jegliche Gefahr eines Stromschlags
zu vermeiden, öffnen Sie niemals das Gerät. Bei Betriebsausfällen das
Gerät nur von einem Fachmann reparieren lassen. Keine der Teile dieses
Geräts sind vom Benutzer zu warten.
WARNUNG!
Gefährliche Hochspannung im Inneren des Geräts! Nicht öffnen. Stromschlaggefahr!
Keine der Teile dieses Geräts sind vom Benutzer zu warten. Die Wartung des
Empfängers darf nur von qualifiziertem Fachpersonal durchgeführt werden.
Ein beschädigtes Stromkabel darf nur vom Hersteller (falls dieser ein qualifizierter Elektriker
ist) oder einer ähnlich qualifizierten Person ersetzt oder repariert werden, um mögliche
Gefahren zu vermeiden.
Das Produkt muss unter Beachtung nationaler Vorschriften installiert werden.
Alte Batterien müssen sicher entsorgt werden. Die Entsorgung über den normalen
Haushaltsmüll ist verboten. Kontaktieren Sie Ihren Einzelhändler für nähere Informationen
zum Schutz der Umwelt.
Ordnungsgemäße Installation
- Stellen Sie den Empfänger auf einen flachen, festen und stabilen Untergrund. Nicht auf
he oder Läufer stellen.
Teppic
- Den Empfänger nicht auf andere Geräte wie z.B. einen Verstärker stellen. Dies kann zu
Überhitzung führen.
- Keine Gegenstände auf das Gerät stellen (z.B. CDs oder Zeitschriften).
Ausreichende Belüftung
- Stellen Sie den Empfänger an einen gut belüfteten Ort, um das Anstauen interner Hitze zu
vermeiden. Lassen Sie mindestens 10 cm Platz nach hinten und oben, und mindestens 5 cm
an beiden Seiten, um ein Überhitzen zu vermeiden.
- Belüftungsöffnungen nicht mit Gegenständen wie Zeitungen, Tischdecken, Gardinen, usw.
blockieren.
Schutz des Geräts vor hohen Temperaturen, Feuchtigkeit, Wasser und Staub
- Gerät vor Spritz- und Tropfwasser schützen.
- Keine mit Flüssigkeiten gefüllte Gegenstände wie Vasen auf das Gerät stellen.
- Keine Gegenstände, die das Gerät be
mit Flüssigkeit gefüllte Gegenstände oder Kerzen).
schädigen könnten,
in dessen Nähe aufstellen (z.B.
- Kein offenes Feuer wie angezündete Kerzen auf den Empfänger stellen.
- Dieser Empfänger ist für den Gebrauch in gemäßigten und nicht in tropische Klimazonen
geeignet.
1
NAMREG
Page 74

Stromversorgung
- Bei längerem Nichtgebrauch das Gerät vom Netz nehmen.
- Ein beschädigtes Stromkabel darf nur vom Hersteller (falls dieser ein qualifizierter Elektriker
ist) oder einer ähnlich qualifizierten Person ersetzt oder repariert werden, um mögliche
Gefahren zu vermeiden.
- Dieses Gerät an ein Netz von 240V ~ 50Hz anschließen.
- Nach der Installation muss der Stecker jederzeit zugänglich sein.
Liebe Kunden und Kundinnen
Herzlichen Glückwunsch zum Kauf Ihres DENVER Geräts. Dieses Gerät wurde von einem
der führenden Hersteller produziert und wird Ihnen sicher sehr viel Freude und Zufriedenheit
bereiten. DENVER Geräte werden gemäß höchster Leistungs- und Sicherheitsstandards
hergestellt. Sie als Kunde sind Teil unserer Unternehmensphilosophie bezüglich
Kundenservice
1-jährigen Garantie.
Eigenschaften ġ
Schlankes Design
und Zufriedenheit und kommen deshalb in den Genuss unserer umfassenden
MPEG-2, MPEG-4(H.264) Dekodierung
USB2.0 für Softwareaktualisierung, Musik, Bilder, Filme und Aufnahmen
Unterstützt LCN (Logische Kanalnummer);
Elternsicherung
Favoritenlisten
Timer
Unterstützt EPG/TXT/UNTERTITEL
Digitaler Ton über KOAXIAL-Ausgang (S/PDIF)
Unterstützt PVR
GERMAN
2
Page 75

Inhalt
1. Installation des Empfängers .............................................................................................6
1.1 Vorderseite........................................................................................................................6
1.2 Rückseite..........................................................................................................................6
1.3 Anschluss..........................................................................................................................7
1.3.1 Anschluss des Signalkabels ................................................................................................8
1.3.2 Anschluss an Fernsehgeräte............................................................................................... 8
1.3.3 Anschluss an digitalen Audioverstärker ............................................................................... 8
2. IR..........................................................................................................................................9
2.1 Fernbedienung...............................................................................................................9
3. Grundlegende Funktionen ..............................................................................................10
3.1 Erstgebrauch................................................................................................................10
3.2 Lautstärke und Stummschaltung..................................................................................10
3.3 Umschaltung TV/RADIO ..............................................................................................10
3.4 Einschalten von Sendern .............................................................................................10
3.5 Senderliste ...................................................................................................................10
3.6 Anzeige von Programminformationen..........................................................................10
3.7 Letzter Sender..............................................................................................................10
3.8 Einstellen von Audiosprache und L/R-Kanal................................................................ 11
3.9 Elektronische Programmzeitschrift (EPG) ...................................................................11
3.10 Teletext .........................................................................................................................11
3.11 Untertitel.....................................................................................................................11
3.12 REC............................................................................................................................11
3.13 Time-Shift...................................................................................................................11
4. Installation ........................................................................................................................12
4.1 Automatische Suche ..................................................................................................12
4.2 Manuelle Suche..........................................................................................................12
4.3 Sender filtern ..............................................................................................................12
4.4 LCN ............................................................................................................................12
4.5 Aktive Antenne ...........................................................................................................12
5. Sender...............................................................................................................................13
5.1 Sendermanager .........................................................................................................13
5.2 Favoritenliste..............................................................................................................13
6. Benutzerdefinierte Einstellungen...................................................................................14
3
NAMREG
Page 76

6.1 OSD-Sprache.............................................................................................................14
6.2 Bevorzugter Untertitel ................................................................................................14
6.3 Einstellung für Hörgeschädigte ..................................................................................14
6.4 Bevorzugte Audiosprache ..........................................................................................14
6.5 Multimedia..................................................................................................................14
6.6 PVR-Konfiguration .....................................................................................................14
7. Systemeinstellungen.......................................................................................................15
7.1 Timer ............................................................................................................................15
7.2 Kindersicherung ...........................................................................................................16
7.3 Datum, Uhrzeit .............................................................................................................16
7.4 Allgemeines Interface ..................................................................................................16
7.5 Rückstellung.................................................................................................................16
7.6 Aktualisierung...............................................................................................................16
7.7 Version.........................................................................................................................16
7.8 Automatisch Standby ...................................................................................................16
8. AV-Einstellungen..............................................................................................................16
8.1 Kontrast........................................................................................................................17
8.2 Helligkeit.......................................................................................................................17
8.3 Sättigung......................................................................................................................17
8.4 FARBTON ....................................................................................................................17
8.5 SPDIF...........................................................................................................................17
8.6 Seitenverhältnis............................................................................................................17
8.7 Videoausgang ..............................................................................................................17
8.8 Videoauflösung ............................................................................................................17
8.9 HDMI-
8.10 HDMI-Tiefenfarbe.......................................................................................................17
9. OSD-Spiele........................................................................................................................17
10. Multimedia ......................................................................................................................18
10.1 FILM ...........................................................................................................................18
10.1.1 Filmdatei-Browser............................................................................................................ 18
10.1.2 Wiedergabe von Filmen ................................................................................................ 18
10.2 MUSIK........................................................................................................................18
Farbraum ...........................................................................................................17
10.3 BILDER ......................................................................................................................19
10.3.1 Bilddatei-Browser.......................................................................................................... 19
10.3.2 Wiedergabe von Bildern................................................................................................ 20
10.3.3 Miniaturansicht.............................................................................................................. 20
10.4 SPIEL NATIVE32 .......................................................................................................20
10.5 Aufnahmen.................................................................................................................21
4
NAMREG
Page 77

10.5.1 Browser für aufgenommene Dateien............................................................................. 21
10.6 DISK-MANAGER .......................................................................................................21
10.6.1 Browser des Disk-Managers ......................................................................................... 21
10.6.2 Verschieben/Kopieren................................................................................................... 21
10.7 E-Book .......................................................................................................................22
10.7.1 E-Book Browser ............................................................................................................ 22
11. Aktualisierung ................................................................................................................22
11.1 USB-Aktualisierung ....................................................................................................22
12. Problembehebung .........................................................................................................23
GERMAN
5
Page 78

1. Installation des Empfängers
1.1 Vorderseite
1.
: Umschalten zwischen Standby und aktivem Modus.
2. CH+: Sender vorwärts suchen
3. CH-: Sender rückwärts suchen
4. On/off: Betriebsleuchte; rot während Standby, grün im aktiven Modus
5. IR: Empfänger für das Signal der Fernbedienung
1.2 Rückseite
1. RF OUT
Anschluss an Fernsehgerät.
2. RF IN
Anschluss des Signalkabels.
3. HDMI
Verbindung mit dem HDMI-Eingang des Fernsehgeräts.
4. TV SCART Anschluss
6
NAMREG
Page 79

Verbinden Sie Ihren Videorekorder mithilfe eines SCART-Kabels mit diesem Anschluss. Das
Videosignal wird dann über den Empfänger an Ihr Fernsehgerät übertragen.
5. SCART VCR
Verbindung eines externen Video-Eingangs
6. S/PDIF
Ausgang für digitales Audiosignal
7. CI
Zum Anschauen von Abonnementfernsehen ein CI-Modul oder eine Smart Card in den CI-Schlitz
einführen.
8. USB
Abspielen von Mediengeräten und PVR
USB-Festplatte auf Geräten mit PVR-Funktion
Wir empfehlen den Gebrauch einer Festplatte mit EIGENER Stromversorgung an diesem Gerät. Somit
soll eine ausreichende Stromversorgung für einen ordnungsgemäßen Gebrauch gewährleistet
werden.
Es sind viele Festplatten ohne eigene Stromversorgung erhältlich, diese benötigen für einen steten
Betrieb jedoch oft zu viel Strom. Die Verso
MAXIMAL 500mAh. Bei höherem Verbrauch wird das Gerät während Aufzeichnungen versagen.
9. Stromkabel
rgung für Festplatten ohne Netzanschluss beträgt
1.3 Anschluss
Hinweis: Schalten Sie vor dem Anschluss anderer Geräte an diesen Empfänger alle Geräte aus.
GERMAN
7
Page 80

1.3.1 Anschluss des Signalkabels
Schließen Sie für den Empfang von Übertragungssignalen das Signalkabel an den CABLE IN
Anschluss an der Rückseite des Empfängers an.
1.3.2 Anschluss an Fernsehgeräte
1. Verbinden Sie den SCART-Anschluss an der Rückseite dieses Geräts mit dem
SCART-Anschluss Ihres Fernsehgeräts.
2. Verbinden Sie den HDMI-Anschluss an der Rückseite dieses Geräts mit dem HDMI-Anschluss
Ihres Fernsehgeräts.
1.3.3 Anschluss an digitalen Audioverstärker
Verbinden Sie den OPTICAL Anschluss an der Rückseite Ihres Empfängers mit dem entsprechenden
Eingang Ihres digitalen Audiogeräts.
GERMAN
8
Page 81

2.1 Fernbedienung
2. IR
1.STANDBY Gerät ausschalten
2. RECALL zum übergeordneten Menü oder vorhergehenden
Sender zurückkehren.
3.AUDIO Audiomodus und linker/rechter Kanal
4. MUTE Ton ein-/ausschalten
5. TV/RADIO TV/RADIO
6. FAV Sender-/Favoritenliste aufrufen
7. TXT Teletext
8. EPG EPG-Menü
9. INFO Programminformationen anzeigen
10. SUB Untertitel
11. MENU Hauptmenü
12. CH+/- Sender vorwärts/rückwärts
13. RETURN/EXIT Zum Menü zurückkehren oder Einstellung
beenden
14. VOL+/- Lautstärke einstellen
/ / / & OK Markierung bewegen und bestätigen
15.
16. PAGE UP&DOWN Seite hoch & runter
17. NUMBER Digitale Nummern
18. REC REC-Modus öffnen
19. DTV/VCR Umschalten von DTV auf VCR
20. USB USB-Menü öffnen
21. PLAY/PAUSE Wiedergabe/Pause
22. STOP Wiedergabe von USB-Geräten beenden
23. REPEAT Wiederholungsmodus einstellen
24. PREV & NEXT Vorhergehenden & nächsten USB-Titel spielen
GERMAN
25. REV & FWD Während USB-Wiedergabe zurück- oder vorspulen
26. COLOUR Seitennavigation im Teletext-Modus.
9
Page 82

3. Grundlegende Funktionen
3.1 Erstgebrauch
Während der ersten Installation werden wichtige
Konfigurationen eingestellt.
Wählen Sie in diesem Menü OSD-Sprache, Land, Zeitzone,
aktive Antenne und LCN; wählen Sie nach vollständiger
Einstellung die Option „Suche starten“ um nach Sendern zu
suchen.
3.2 Lautstärke und Stummschaltung
1. Drücken Sie während der normalen Wiedergabe „vol+/-“ zum Einstellen der Lautstärke;
auf dem Bildschirm erscheint die Einstellungsleiste.
2. Drücken Sie während der normalen Wiedergabe „MUTE“ zum Ausschalten des Tons;
drücken Sie „MUTE“ erneut, um zum normalen Modus zurückzukehren.
3.3 Umschaltung TV/RADIO
Drücken Sie während der Vollbildanzeige „TV/RADIO“, um den Modus umzuschalten.
3.4 Einschalten von Sendern
1. Schalten Sie mit „CH+/-“ den nächsten oder vorhergehenden Sender ein.
2. Geben Sie mit den Nummerntasten eine Sendernummer ein.
3.5 Senderliste
1. Drücken Sie „ENTER“ zum Öffnen der Senderliste; drücken Sie die Pfeiltasten
„LINKS/RECHTS“, um eine Senderklasse auszuwählen; wählen Sie mit den Pfeiltasten
„HOCH/RUNTER“ einen Sender.
2. Falls Sie bereits Favoritensender gespeichert haben, drücken Sie einfach „FAV“, um die
Favoritenliste zu öffnen.
3.6 Anzeige von Programminformationen
Drücken Sie während der normalen Wiedergabe „INFO“, um die aktuellen
Programminformationen anzuzeigen.
3.7 Letzter Sender
Drücken Sie während der Vollbildanzeige „RECALL“, um zum zuletzt wiedergegebenen
Sender zurückzukehren.
10
NAMREG
Page 83

3.8 Einstellen von Audiosprache und L/R-Kanal
Drücken Sie „AUDIO“, um die Audiosprache des aktuellen Programms zu ändern oder um
zwischen „Stereo“
3.9 Elektronische Programmzeitschrift (EPG)
1. Drücken Sie „EPG“ auf der Fernbedienung, um die EPG-Seite zu öffnen und mehr
Informationen zum aktuell wiedergegebenen Programm zu erfahren.
2. Wählen Sie mit der entsprechenden Farbtaste die detaillierten Informationen des aktuellen
Programms.
3.10 Teletext
Drücken Sie „TXT“ auf der Fernbedienung zum Öffnen der Teletextseite.
3.11 Untertitel
Drücken Sie „SUB“ auf der Fernbedienung, um das Untertitelmenü zu öffnen und die
Untertitel ein- oder auszuschalten bzw. die gewünschte Sprache einzustellen.
„Links“ „Rechts“ (Stereo linker Kanal rechter Kanal) umzuschalten.
3.12 REC
Drücken Sie „REC“, um das aktuelle Programm aufzuzeichnen. Drücken Sie „info“ zum
Anzeigen der aktuellen Aufnahmeeinstellungen.
Drücken Sie während der Aufnahme „Stopp“, um die Aufnahme zu beenden und zur
normalen Wiedergabe zurückzukehren.
3.13 Time-Shift
1) Drücken Sie während der Vollbildanzeige die Pause-Taste, um den Time-Shift Modus zu
öffnen.
2)
Im Time-Shift Modus stehen die Funktionen WIEDERGABE/ PAUSE/ Vorspulen/
Zurückspulen zur Verfügung.
3) Im Timeshiftmodus wird das Wiedergabe/Pause-Symbol nur für einige Sekunden angezeigt
und dann ausgeblendet; zur Anzeige des aktuellen Status drücken Sie INFO.
NAMREG
11
Page 84

4. Installation
Geben Sie jedes Mal beim Öffnen des Installationsmenüs das Passwort (0000) ein.
4.1 Automatische Suche
Während der automatischen Suche werden alle Frequenzen und Sender basierend auf
Ihrer Ländereinstellung gescannt.
4.2 Manuelle Suche
Die manuelle Suche ist für Benutzer geeignet, die wissen, wie man die genaue Frequenz für
die Suche auswählt.
4.3 Sender filtern
Je nach Einstellung werden alle oder nur verschlüsselte Sender gesucht.
4.4 LCN
Im LCN-Modus können Sender anhand der Sequenzinformationen eindeutig identifiziert
werden.
4.5 Aktive Antenne
Aktivierung/Deaktivierung der „Aktiven Antenne“.
GERMAN
12
Page 85

5. Sender
5.1 Sendermanager
Auf der Seite des Sendermanagers können Sender gelöscht, verschoben, gesperrt oder
umbenannt werden.
5.2 Favoritenliste
1. Öffnen Sie folgendes Fenster über „Hauptmenü->Sender-> Favoritenliste“.
2. Sie können Sender in einer Favoritenliste speichern.
GERMAN
13
Page 86

6. Benutzerdefinierte Einstellungen
6.1 OSD-Sprache
Einstellung der OSD-Sprache.
6.2 Bevorzugter Untertitel
Sie können eine 1. und 2. bevorzugte Untertitelsprache einstellen.
6.3 Einstellung für Hörgeschädigte
Aktivierung/Deaktivierung der Einstellung für „Hörgeschädigte“.
6.4 Bevorzugte Audiosprache
Sie können eine 1. und 2. bevorzugte Audiosprache einstellen.
6.5 Multimedia
Einstellungen für den Mediaplayer.
6.6 PVR-Konfiguration
GERMAN
Folgende 6 Optionen stehen zur Auswahl˖
14
Page 87

1. PVR-Dateiformat˖
Wählen Sie eine der Optionen: TS/PS
2. Dateigröße˖
Wählen Sie eine der Optionen, 4G/3G/2G/1G, um die Größe für die aufzunehmende
Datei festzulegen.
3. Time-Shift˖
Wählen Sie eine der Optionen: AUTO/OFF/ PAUSE. Bei der Einstellung AUTO werden
die Time-Shift Funktionen automatisch im Hintergrund durchgeführt. Bei OFF wird
Time-Shift beendet. Bei PAUSE wird die Time-Shift Funktion manuell durch Drücken der
Pause-Taste aktiviert.
4. Time-Shift Dauer˖
Wählen Sie eine der Optionen, AUTO/30min/1h/2h, um die Dauer für Time-Shift
einzustellen.
5. Time-Shift für Aufnahmen˖
Wählen Sie eine der Optionen: ON/OFF.
7. Systemeinstellungen
7.1 Timer
Es werden 10 Timer-Einstellungen unterstützt:
Datum: Festlegung des Datums für den Timer
Sendername: Festlegung des Senders, für den der Timer gestellt wird
Anfangszeit: Festlegung der Anfangszeit des Timers
Endzeit: Festlegung der Endzeit des Timers; Verwendung während Aufzeichnungen
GERMAN
Dauer: Festlegung der Dauer des Timers; Verwendung während Aufzeichnungen
Modus: Festlegung der Häufigkeit des Timers; Optionen:
Einmal – Der Timer wird nur einmal aktiviert.
Täglich – Der Timer wird täglich zur programmierten Zeit aktiviert.
Wöchentlich – Der Timer wird jede Woche zur programmierten Zeit aktiviert.
Monatlich – Der Timer wird jeden Monat zur programmierten Zeit aktiviert.
15
Page 88

7.2 Kindersicherung
Benutzer können die Systemsperre aktivieren oder deaktivieren; es stehen Einstellungen
von 0 bis 18 zur Verfügung.
7.3 Datum, Uhrzeit
Wenn für „Time Mode“ die Option „Auto“ eingestellt ist, dann müssen „Time
Zone“ und „DST“ für die Bearbeitung aktiviert sein. Wenn die Option „Manual“ gewählt
wurde, dann sollten diese Einstellungen deaktiviert werden.
Wenn für „Time Mode“ die Option „Manual“ eingestellt ist, dann müssen „Date“ und
„Time“ für die Bearbeitung aktiviert sein. Wenn die Option „Auto“ gewählt wurde, dann
sollten diese Einstellungen deaktiviert werden.
7.4 Allgemeines Interface
Informationen über das allgemeine Interface
7.5 Rückstellung
Bei Einstellung dieser Option wird eine Rückstellung auf die Standardeinstellungen
durchgeführt. Sie werden aufgefordert, „0000“ einzugeben.
7.6 Aktualisierung
Aktualisierung der Software
7.7 Version
Informationen über den Empfänger
7.8 Automatisch Standby
Sie können den Empfänger so einstellen, dass sich dieser nach 3 Stunden ohne Ausführung
einer Funktion selbst ausschaltet.
8. AV-Einstellungen
Wie abgebildet, kann der TV-Eingangmodus bequem über die TV-Einstellungen eingestellt
werden.
16
NAMREG
Page 89

8.1 Kontrast
Kontrasteinstellung von 0 bis 24
8.2 Helligkeit
Helligkeitseinstellung von 0 bis 24
8.3 Sättigung
Sättigungseinstellung von 0 bis 24
8.4 FARBTON
Farbtoneinstellung von -30 bis 30
8.5 SPDIF
Auswahl des AVC-Modus – Stumm, PCM und Bitrate
8.6 Seitenverhältnis
Optionen sind 16: 9, 4: 3PanScan, 4: 3Briefkasten, 16:9 PanScan˗
8.7 Videoausgang
Optionen sind RGB, CVBS;
8.8 Videoauflösung
Optionen sind 480p_60,480i_30,576p_50,576i_25, 720p-60, 720p_50, 1080i_30, 1080i_25,
1080p_60, 1080p_50;
8.9 HDMI-Farbraum
HDMI-Farbraumeinstellungen sind YCbCr 4:4:4, xvColor, RGB, YCbCr 4:2:2;
8.10 HDMI-Tiefenfarbe
Einstellungen für HDMI-Tiefenfarbe und Videoausgang sind 12 Bits, 8 Bits und 10 Bits;
9. OSD-Spiele
GERMAN
Es stehen vier Spiele zur Verfügung: Box Man, Tetris, Hit Rat, Go Bang.
17
Page 90

10. Multimedia
10.1 FILM
10.1.1 Filmdatei-Browser
Unterstützte Dateiformate: MPG, AVI, VOB, DAT, ASF, MKV, WMV, TS und QT.
10.1.2 Wiedergabe von Filmen
Tastenkombination Funktion
KEY_PREV
KEY_NEXT
KEY_PLAY
KEY_PAUSE
KEY_STOP Beendigung des Films und Anzeige der Übersicht.
KEY_FWD Film vorspulen.
KEY_REV Film zurückspulen.
KEY_RECALL Gleiche Funktion wie bei Eingabe von KEY_STOP
KEY_MUTE Ton ein- bzw. ausschalten.
KEY_VOLUME Lautstärke ändern.
KEY_INFO
Beendigung des aktuellen Films und Wiedergabe des
vorhergehenden Films in der Liste.
Beendigung des aktuellen Films und Wiedergabe des
nächsten Films in der Liste.
Wiedergabe des Films und Anzeige des
Wiedergabesymbols.
Während der Wiedergabe eines Films wird die Wiedergabe
unterbrochen und das Pausesymbol angezeigt.
A
nzeige von Informationen des aktuell wiedergegebenen
Films.
KEY_REC
10.2 MUSIK
WMA, WAV, AAC und MP3 Format werden unterstützt.
Während der Film- oder Aufnahmematerialwiedergabe
drücken Sie REC zum Aufrufen der Suchfunktion (Goto).
Hier geben Sie den Zeitpunkt ein, zu dem Sie in der
Wiedergabe springen möchten.
18
NAMREG
Page 91

Tastenkombination Funktion
KEY_PREV Vorhergehenden Titel abspielen.
KEY_NEXT Nächsten Titel abspielen.
KEY_PLAY Aktuellen Titel abspielen
KEY_PAUSE Musikwiedergabe unterbrechen.
KEY_STOP Musikwiedergabe beenden.
KEY_FWD Titel vorspulen.
KEY_REV Titel zurückspulen.
KEY_NUM
10.3 BILDER
10.3.1 Bilddatei-Browser
Es werden die Formate JPG, TIF, PNG, GIF und BMP unterstützt.
Tastenkombination Funktion
KEY_ENTER Wiedergabe des ausgewählten Bildes.
Die Markierung bewegt sich je nach eingegebener Nummer
zu der entsprechenden Einstellung.
GERMAN
KEY_RECALL
Drücken Sie KEY_RECALL, um von der Liste zum
Auswahlmodus zurückzukehren.
19
Page 92

KEY_NUM
KEY_YELLOW Miniaturansicht.
10.3.2 Wiedergabe von Bildern
Tastenkombination Funktion
KEY_UP Bild um 180 Grad drehen.
KEY_DOWN Bild um 180 Grad drehen.
KEY_LEFT Bild um 270 Grad drehen.
KEY_RIGHT Bild um 90 Grad drehen.
KEY_PREV
KEY_NEXT
Die Markierung bewegt sich je nach eingegebener Nummer
zu der entsprechenden Einstellung.
Anzeige des vorhergehenden Bildes in der Liste. Falls es
sich um das erste Bild in der Liste handelt, wird der
Tastenbefehl ignoriert.
Anzeige des nächsten Bildes in der Liste. Falls es sich um
das letzte Bild in der Liste handelt, wird der Tastenbefehl
ignoriert.
KEY_INFO Anzeige der Bildinformationen.
KEY_PAUSE Slide Show wird unterbrochen.
KEY_PLAY Slide Show wird gestartet.
10.3.3 Miniaturansicht
Miniaturansicht der Bilder.
10.4 SPIEL NATIVE32
Es werden die Formate native32 unterstützt.
GERMAN
Tastenkombination Funktion
KEY_ENTER Anzeige des ausgewählten Spiels.
KEY_RECALL Drücken Sie KEY_RECALL, um von der Liste zum
20
Page 93

Auswahlmodus zurückzukehren.
KEY_NUM
KEY_RED Spieltyp von native32 zu NES umstellen.
10.5 Aufnahmen
10.5.1 Browser für aufgenommene Dateien
Tastenkombination Funktion
Die Markierung bewegt sich je nach eingegebener Nummer
zu der entsprechenden Einstellung.
KEY_ENTER Wiedergabe der ausgewählten, aufgenommenen Datei.
KEY_RECALL
KEY_RED Die ausgewählte Datei wird gelöscht.
KEY_GREEN Die ausgewählte Datei wird umbenannt.
KEY_YELLOW Anzeige von Dateilisten nach Typ.
KEY_BLUE Alle löschen.
10.6 DISK-MANAGER
10.6.1 Browser des Disk-Managers
Tastenkombination Funktion
KEY_RED Das Menü zum Verschieben/Kopieren wird geöffnet.
KEY_GREEN Das Menü zum Umbenennen wird geöffnet.
KEY_YELLOW Das ausgewählte Element wird gelöscht.
Drücken Sie KEY_RECALL, um von der Liste zum
Auswahlmodus zurückzukehren.
GERMAN
10.6.2 Verschieben/Kopieren
Im Verschieben/Kopieren-Menü können Dateien oder Ordner von einer Seite zur anderen
verschoben werden. Es kann auch der Inhalt einer Seite zur anderen kopiert werden.
21
Page 94

10.7 E-Book
10.7.1 E-Book Browser
E-Books können als *.txt Datei gelesen werden.
11. Aktualisierung
11.1 USB-Aktualisierung
Kopieren Sie die Aktualisierungsdatei auf das USB-Gerät und schließen Sie dieses
für die Aktualisierung der Software an den Empfänger an.
Gehen Sie wie folgt vor:
Schließen Sie das USB-Gerät, welches die Aktualisierungsdatei enthält, an
und öffnen Sie (Menü -> Einstellungen -> Aktualisierung ->
USB-Aktualisierung) das USB-Verzeichnis; siehe Abbildung unten.
Wählen Sie die Aktualisierungsdatei und drücken Sie „Enter“, um den
Prozess zu starten. Es erscheint eine Anzeige mit dem Fortschritt des
Aktualisierungsprozesses.
Die USB-Aktualisierung dauert ungefähr 30 Sekunden;
Stellen Sie sicher, dass die Stromzufuhr während der Aktualisierung nicht
unterbrochen wird;
Nach Abschluss der Aktualisierung wird das Gerät automatisch mit der neuen
Firmware gestartet;
GERMAN
22
Page 95

12. Problembehebung
Abnormale Funktionsweisen des Empfängers können viele Ursachen haben. Prüfen Sie das
Gerät anhand unten stehender Liste. Falls das Gerät nach der Prüfung immer noch nicht
ordnungsgemäß funktionieren sollte, kontaktieren Sie bitte Ihren Einzelhändler. Die Abdeckung
des Geräts nicht öffnen. Dies kann Gefahrensituationen verursachen.
Problem Ursache Behebung
Das LED Display
an der Vorderseite
leuchtet nicht
Kein Bild oder Ton Falsche Verbindung
Kein Bild Das Gerät kann kein
Fernbedienung
funktioniert nicht
Das Netzkabel ist
nicht angeschlossen.
der Audio-/
Videoausgänge mit
dem TV. Ton
ausgeschaltet. TV
ausgeschaltet.
Signal empfangen.
Die Werte einiger
Einstellungsparameter
sind falsch. Antenne
falsch ausgerichtet.
Die Batterien sind
nicht eingelegt oder
sind leer.
Schließen Sie das Netzkabel an
eine Steckdose an.
Verbinden Sie die Audio-/
Videoausgänge des Empfängers
ordnungsgemäß mit dem TV.
Stellen Sie mit der MUTE-Taste
den Ton am Fernseher ein.
Überprüfen Sie das
Antennenkabel, ersetzen Sie
dieses oder schließen Sie es fest
an den Empfänger an. Stellen Sie
die Parameter im
Installationsmenü richtig ein.
Prüfen Sie den Anschluss der
Antenne.
Stellen Sie sicher, dass die
Batterien richtig in die
Fernbedienung eingelegt sind.
Falls die Batterien leer sind,
tauschen Sie diese aus.
Tipps: Falls Sie Probleme Ihres Geräts mit oben stehender Liste nicht beseitigen können, kontaktieren
Sie bitte Ihren Einzelhändler oder den technischen Kundendienst. Nehmen Sie das Gerät unter keinen
Umständen auseinander, da dies Gefahrensituationen und außerdem Schäden am Gerät verursachen kann.
GERMAN
23
Page 96

Elektrische und elektronische Geräte sowie Batterien enthalten
Materialien, Komponenten und Substanzen, welche für Sie und Ihre
Umwelt schädlich sein können, sofern die Abfallmaterialien (entsorgte
elektrische und elektronische Altgeräte sowie Batterien) nicht korrekt
gehandhabt werden.
Elektrische und elektronische Geräte sowie Batterien sind mit der durchgestrichenen
Mülltonne, wie unten abgebildet, kenntlich gemacht. Dieses Symbol bedeutet, dass
elektrische und elektronische Altgeräte sowie Batterien nicht mit dem Hausmüll
entsorgt werden dürfen, sie müssen separat entsorgt werden.
Als Endverbraucher ist es notwendig, dass Sie Ihre erschöpften Batterien bei den
entsprechenden Sammelstellen abgeben. Auf diese Weise stellen Sie sicher, dass
die Batterien entsprechend der Gesetzgebung recycelt werden und keine
Umweltschäden anrichten.
Städte und Gemeinden haben Sammelstellen eingerichtet, an denen elektrische und
elektronische Altgeräte sowie Batterien kostenfrei zum Recycling abgegeben werden
können, alternativ erfolgt auch Abholung. Weitere Informationen erhalten Sie bei der
Umweltbehörde Ihrer Gemeinde.
ALLE RECHTE VORBEHALTEN
URHEBERRECHTE DENVER ELECTRONICS A/S
www.denver-electronics.com
24
GERMAN
 Loading...