

Page 1
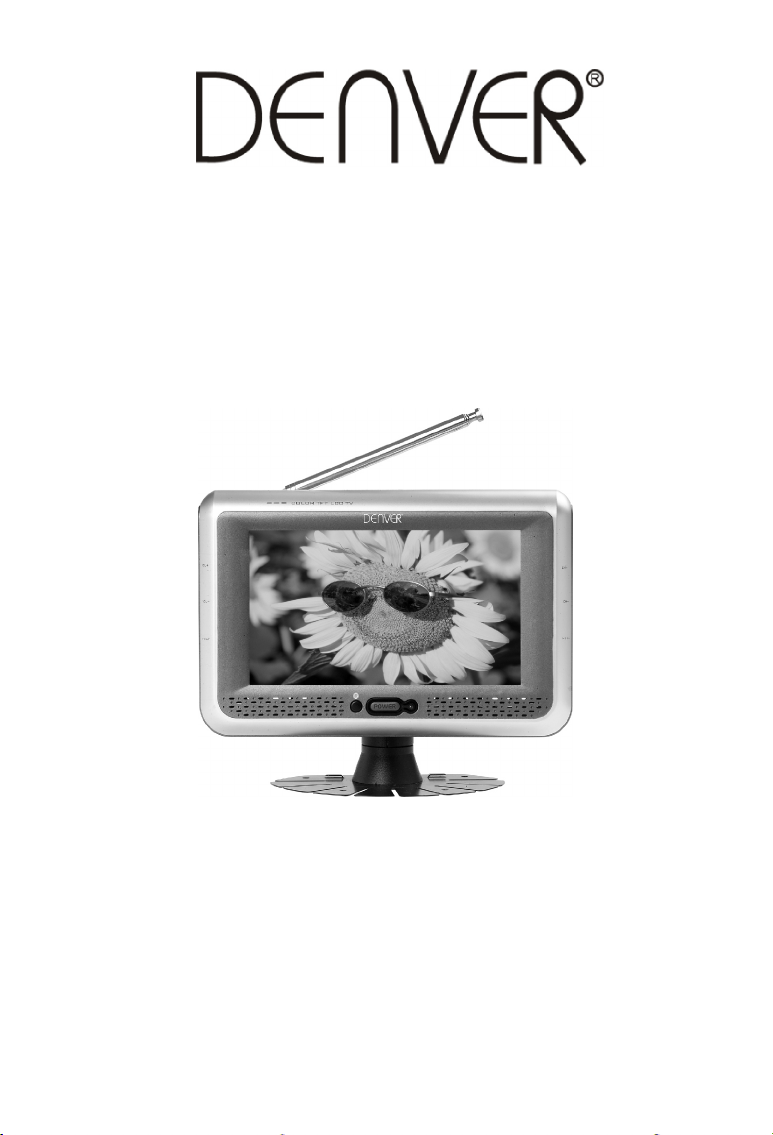
DFT-709
Operation Instructions
LCD Color TV Receiver
Page 2

Table of Contents
1.Precautions
2.Accessories
3.Appearance
4.Remote Controller Application
5.Basic Operation Methods
6.Menu Operation
6.1 Picture
6.2 Option
6.3 Clock
6.4 System
6.5 Preset
7.In order to receiver clearer picture
8.Before you request for repair
9.Technical Parameters
1
3
4
5
7
9
9
9
11
11
14
16
17
18
Page 3
1. Precautions
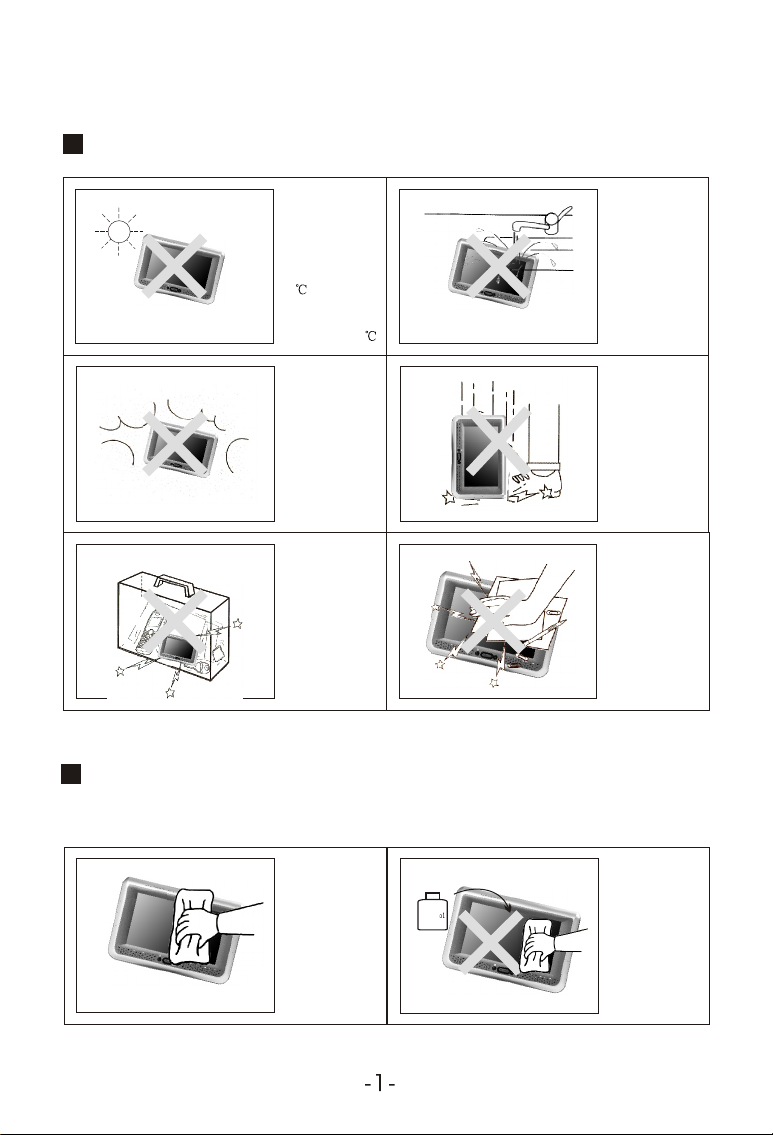
Storage and Keeping
Keep this machine
away from too hot
or too cold places.
The storage
temperature of this
machine is -20~
60 , the
application
temperature of this
machine is 0~40 .
Never make
the TV set
under effect
of moisture,
dust or oil
smoke etc.
environment.
Never put this
machine within
certain box at
your will or
place it at toooscillating
place and under
further severe
collision.
Never use this
machine near
bathtub,
washbasin, and
kitchen, etc places
with water or at
damp basement,
swimming pool or
similar places.
Avoid this
machine from
dropping or
impacting.
Never
extrude or
chafe this
machine with
sharp objects.
Maintenance
Please plug off all connection wires before you start cleaning this
machine.
Please wipe
the machine
cover, display
screen and
buttons with
soft cloth
dipped with
little soft
abluent.
Alcohol
Never wipe this
machine with
abrasion cloth,
abstergent powder,
alcohol and
benzene etc.
various
propellants or
chemical cleaning
media.
Page 4
Operation Precautions
1. Only the attached AC adapter and the automobile adapter (12V) are
suitable.
2. For the sake of safety, when you do not intended to use the display,
please plug off the AC adapter or automobile adapter.
Earphone Operation Precautions
1.Please don't tune your headphone / earphone to too high volume, otherwise,
it may lead inconvenience and danger to yourself and other people.
2.For open-designed earphone, to avoid influencing your periphery, please
tune down the volume.
3.In case of any tinnitus, please tune down the volume or stop using this
machine.
4.It is recommended by the aurists that never use the earphone continuously
for a long time.
Warning!
!
1. For the sake of safety for yourself and others, please don't watch
or turn on the TV set while driving.
2. It is very dangerous to watch or operate TV while driving.
!
Special Notice
A few highlights or dark spots may occur on the LCD screen. It is a
very common phenomenon to the active matrix display technology,
and never necessary means any defects or faults. Never try to repair
this machine by yourself. In case of any fault or failure, please turn
off the display at once, and notify our Company or the corresponding
dealer. The display is made up of many precision electronic components.
Any disassembly or modification may lead to damage or broken.
Page 5
2. Accessories
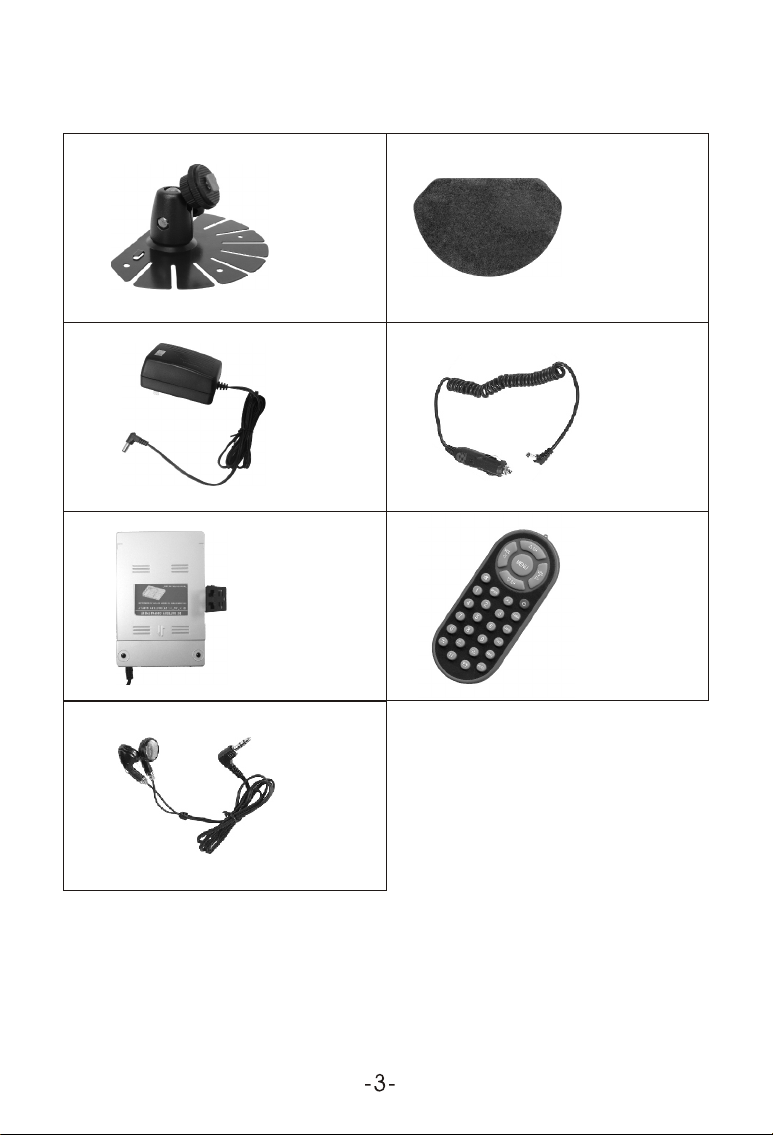
Base support
Double-side
adhesive tape
for base support
AC adapter
Battery
compartment
Earphone
Car adapter
Remote
controller
Page 6
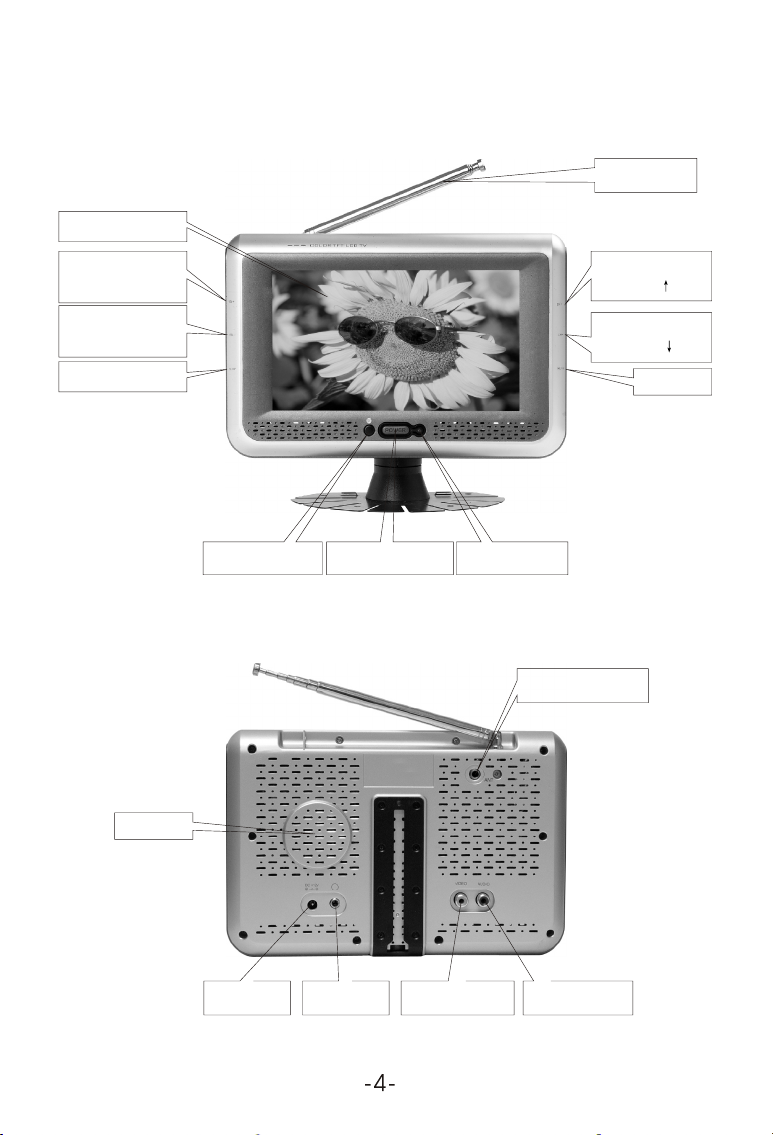
3. Appearance
TFT-LCD screen
Telescopic
antenna
Volume+
selection +
Volume selection -
AV / TV Shift
Loudspeaker
Remote receiving
window
Power ON/OFF
Power indicator
External antenna jack
Channel+
option
Channel option
Menu
12V DC IN
Earphone jack
VIDEO IN
AUDIO IN
Page 7

4. Remote Controller Operation
Channel Selection
Volume Adjust
Mute
Mode
Channel keys
Channel Shift
Flip Horizontal
Flip Vertical
Picture Mode
Menu
Power ON/OFF
Exit Game
Call
Timer
Language
Calendar
AV / TV Shift
Return
Auto Search
Caution
1) Please align the remote controller with the infrared-receiving
window on TV set in operation.
2) Never oppress, drop, wet or disassembly the remote controller.
3) Never press any button continuously and swiftly. Operation
interval is at least 2 seconds.
4) Press Power to turn on the machine before pressing CH+, CH- for
channel selection.
Channel keys (digit key (0-9) and - / - - ): There are 0 ~ 254 in total of
255channels available on the remote controller for your option by the 11
buttons of 0-9 and - / - - on the remote controller. When the channel is a
one-digit figure, just press the corresponding digit button. If the channel
is a two-digit figure, you should press - / - - first to show - / - - on the
display screen before further pressing the corresponding digit buttons.
Page 8

CH (Channel selection):
Press CH , the number of TV channel increases.
Press CH , the number of TV channel decreases.
VOL - / + (Volume adjust)
Press VOL - , the volume of TV set decreases.
Press VOL + , the volume of TV set increases.
MODE (Mode):
By pressing this button, users can realize the five picture mode of
Standard, Soft, Vivid ,Light and personal.
POWER (Power switch):
Press this button to turn on the TV set, press it again to turn off the
machine. Press this button in game status to exit game.
MENU(Menu button):
Press this button to display the following five submenus:PICTURE
OPTION CLOCK SYSTEM PRESET.
MUTE (Mute):
Press this button, sound disappears, press it again or VOL+/ VOL-
to resume normal sound.
CALL (Call):
Press this button to display the character of program currently watching.
TIMER:
Time setup of sleep off, it is used to set the time off within 120 minutes.
LANG:
Press this button can realize the switch of English, Chinese, Russian,
Italian, Spanish, Portuguese,German and Arabic OSD menu.
CALE:
Press this button to show Year, Month, Day and Week. Press CH - /CH +
to adjust the Year, press VOL - / VOL + to adjust the Month.
VIDEO (AV / TV shift):
Press this button to realize switch between AV and TV pictures.
AUTO:
Press and hold this button for 5 seconds can realize automatic channel
search.
(Return) :
Press this button can return to previous channel, press it again return
to current channel.
: Press this button to flip the picture horizontally, and press it again
to resume image.
: Press this button to flip the picture vertically, and press it again
to resume image.
: Picture Mode: Three screen modes in the zoom mode of 0.16:9;
1. 4:3, and 3. 16:9-1 are available for your option.
Page 9
5.Basic Operation Methods
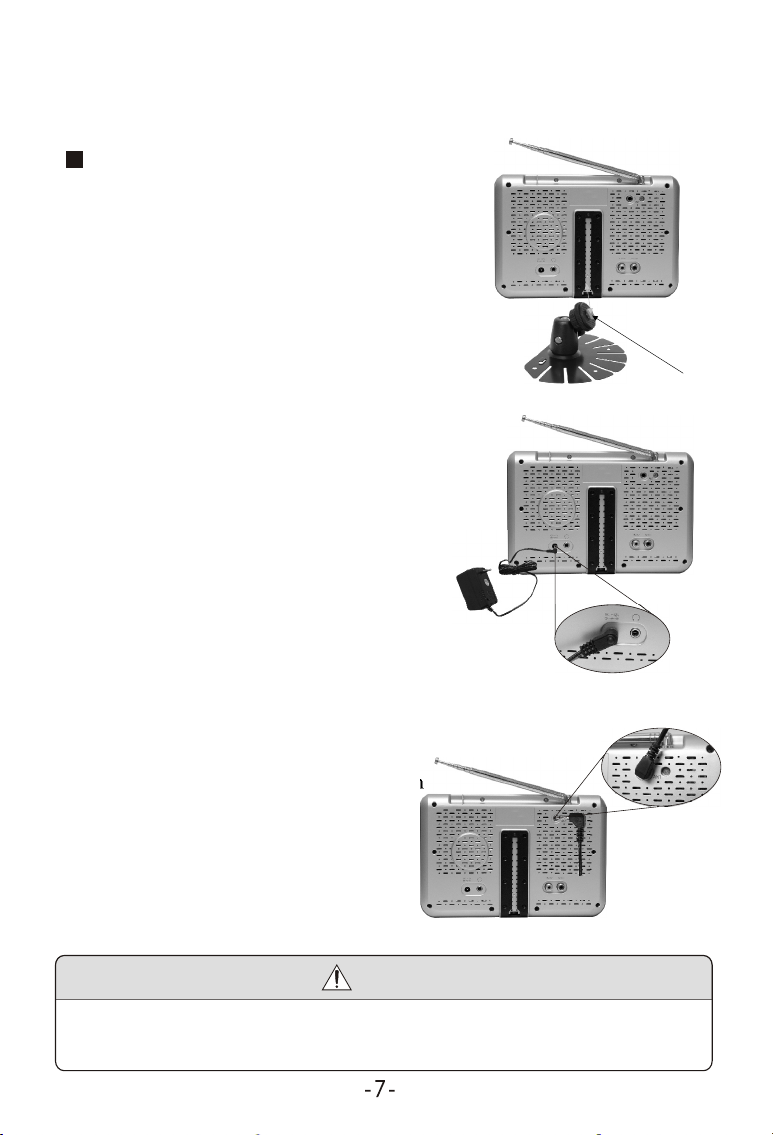
Basic interface connection
5.1 Installation Method of Base Support:
Align the hardware piece on base support
with the bottom groove on hardware piece
of rear TV cover before moving upward
and rotating the fixation button till fix the
TV set onto the support.
5.2 Connection Method of Power Supply:
Align the power supply plug on AC
adapter with the jack on the machine
cover marked with DC12V.
5.3 Connection Method of External
Antenna Conversion Line:
Align one end of the attached antenna
conversion line with the antenna jack
on TV set and connect the other end with
the plug of the external antenna.
Hardware piece
Notice
If receive with telescopic antenna, please pull out the antenna
conversion line.
Page 10
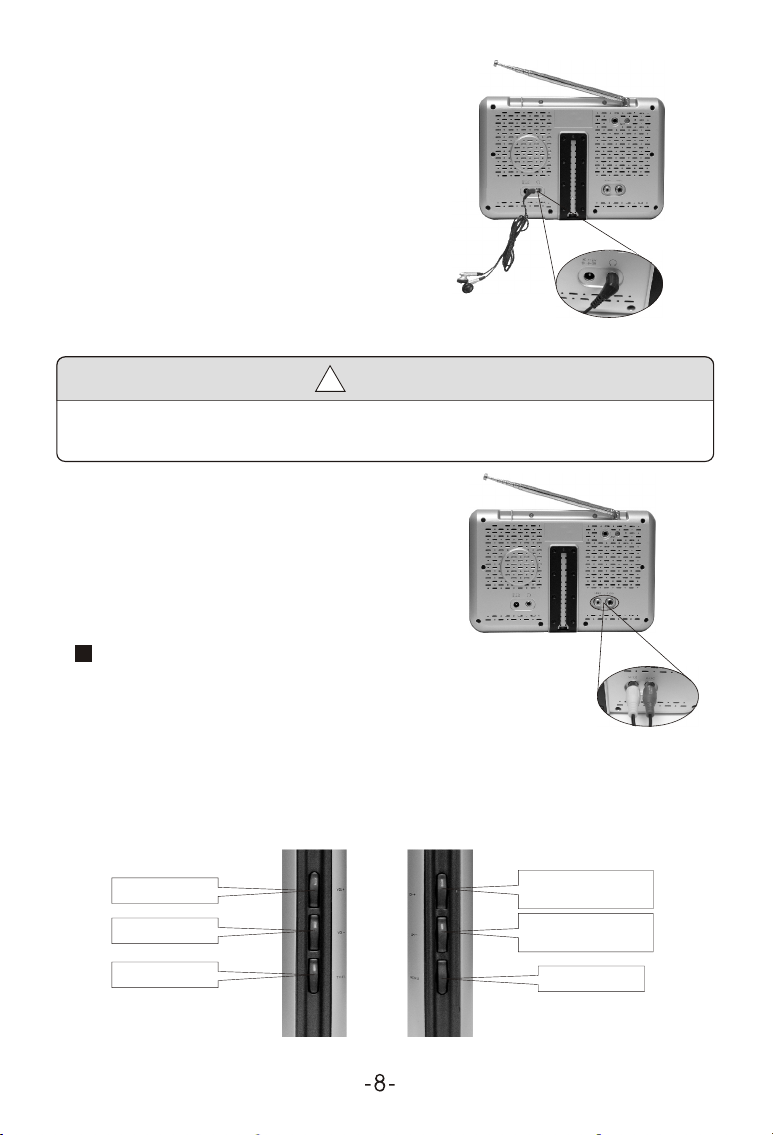
5.4.Connection Method of Earphone:
Align the earphone plug with the
earphone jack on the TV set, and
just plug in till its end is OK.
Caution
!
If earphone is applied, the sound only transmits through the earphone,
and no sound is available from the TV set.
5.5.Connection Method of AV Input
Just insert the external video line into
the yellow video jack, and audio line
into the red audio jack.
Basic operation methods of TV set
1. Connect with power supply and turn
on the power switch.
2. Pull out telescopic antenna.
3. Press CH-/CH+ to choose the desired channel.
4. Adjust the sound volume of the TV signal.
Volume increases
Volume decreases
AV / TV Shift
Change in order
of 1, 2, 3,
Change in order
of 3, 2, 1,
Menu
Page 11
6.Menu Operation
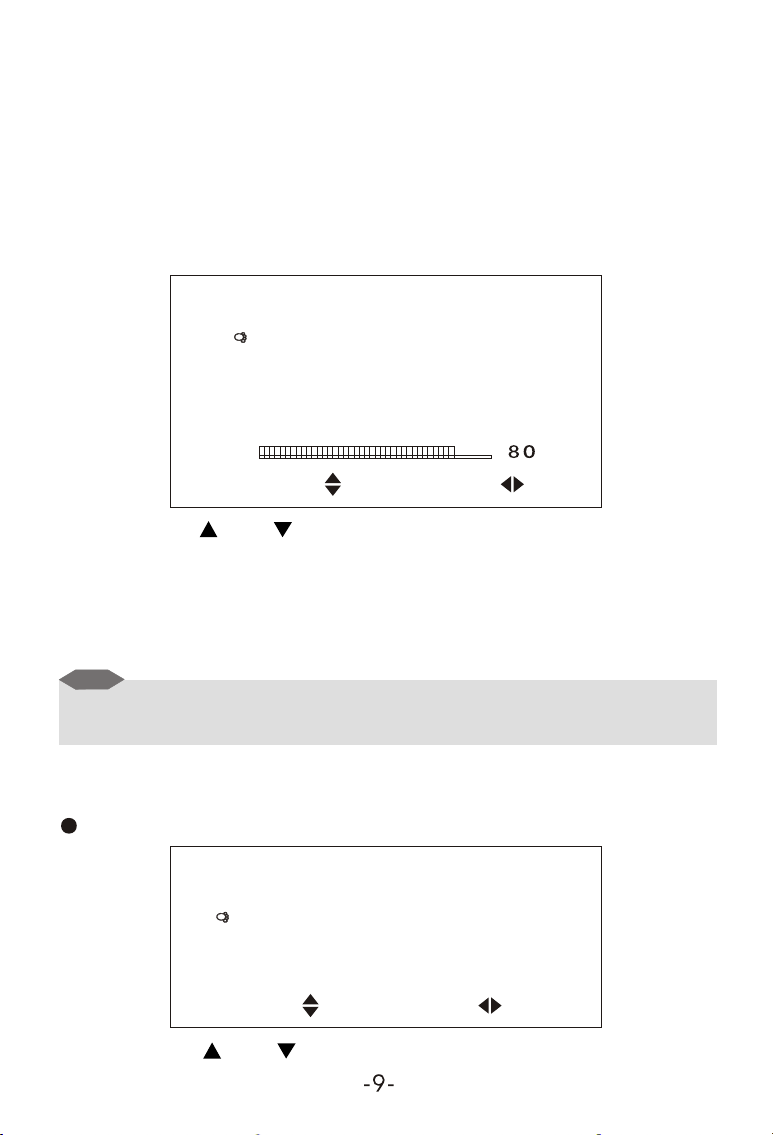
Press MENU to display options as follows:
PICTURE OPTION CLOCK
SYSTEM PRESET
6.1 Picture
Contrast, bright, color, Sharp and TINT displays on the screen as
illustrated below:
Picture
Contrast
Bright
Color
Sharp
Select Adjust
CH / CH Select VOL + / VOL - : Adjust
Press CH+ or CH- to select the item Contrast. Press VOL+ or VOL- to
adjust the analog quantity of Contrast. Press CH+ or CH- in turn to select
Bright, Color and Sharp, and can also adjust the analog quantity of
Bright, Color and Sharp.
Notice
Only when displaying the picture of NTSC system, it will show the
character of TINT in the Picture menu.
6.2 Option
Language Calendar and Game displays on the screen as illustrated below:
Press CH-/CH+ to select the item Language:
Option
Language English
Calendar
Game
80
80
60
50
Select Adjust
CH / CH Select VOL + / VOL - : Adjust
Page 12
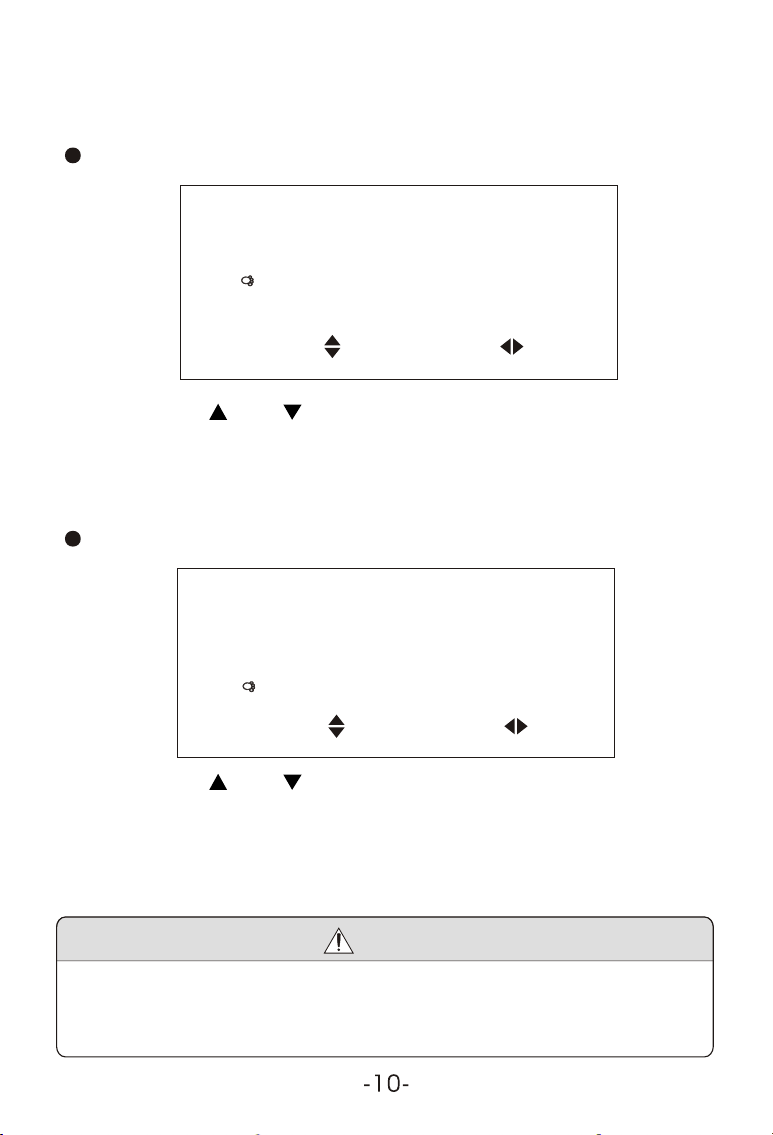
Press VOL - / VOL + can realize selection of English,Russian,Chinese,
Italian,Spanish,Potuguese,German and Arabic OSD menu.
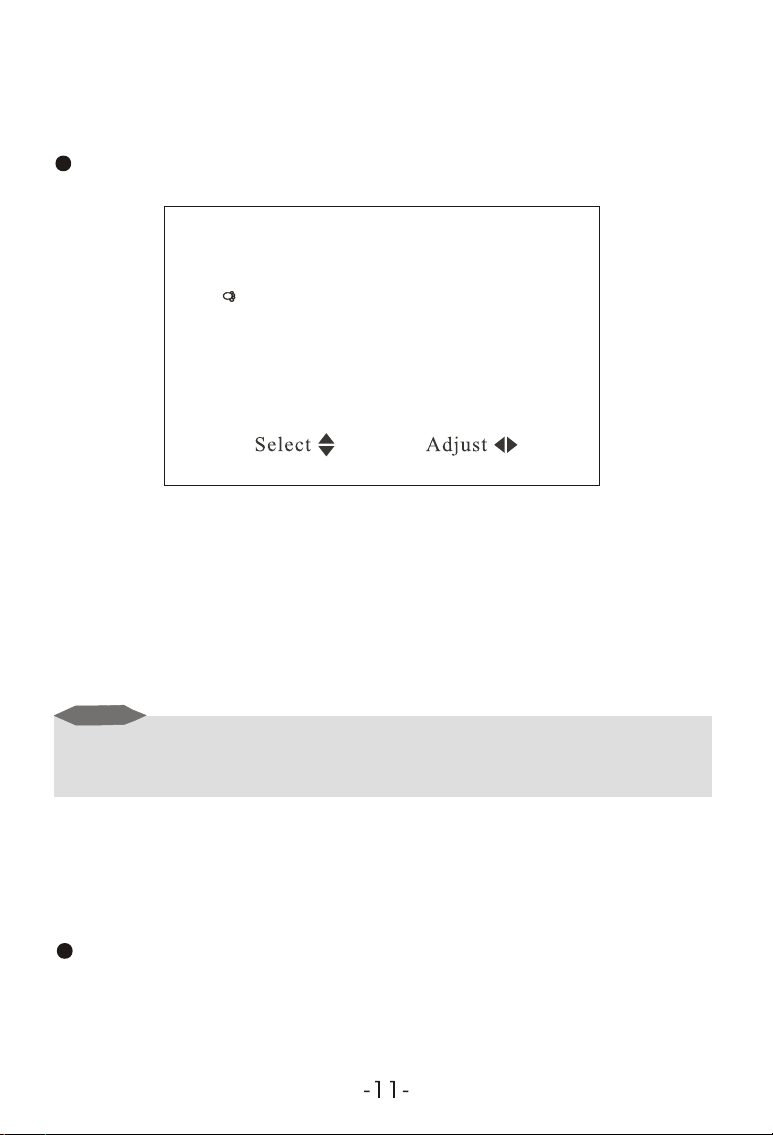
Press CH-or CH+ to select the item Calendar:
Option
Language English
Calendar
Game
Select Adjust
CH / CH Select VOL + / VOL - : Adjust
Press VOL-/VOL+ adjust calendar, then press CH+/CH- adjust year,
and press VOL-/VOL+adjust month.
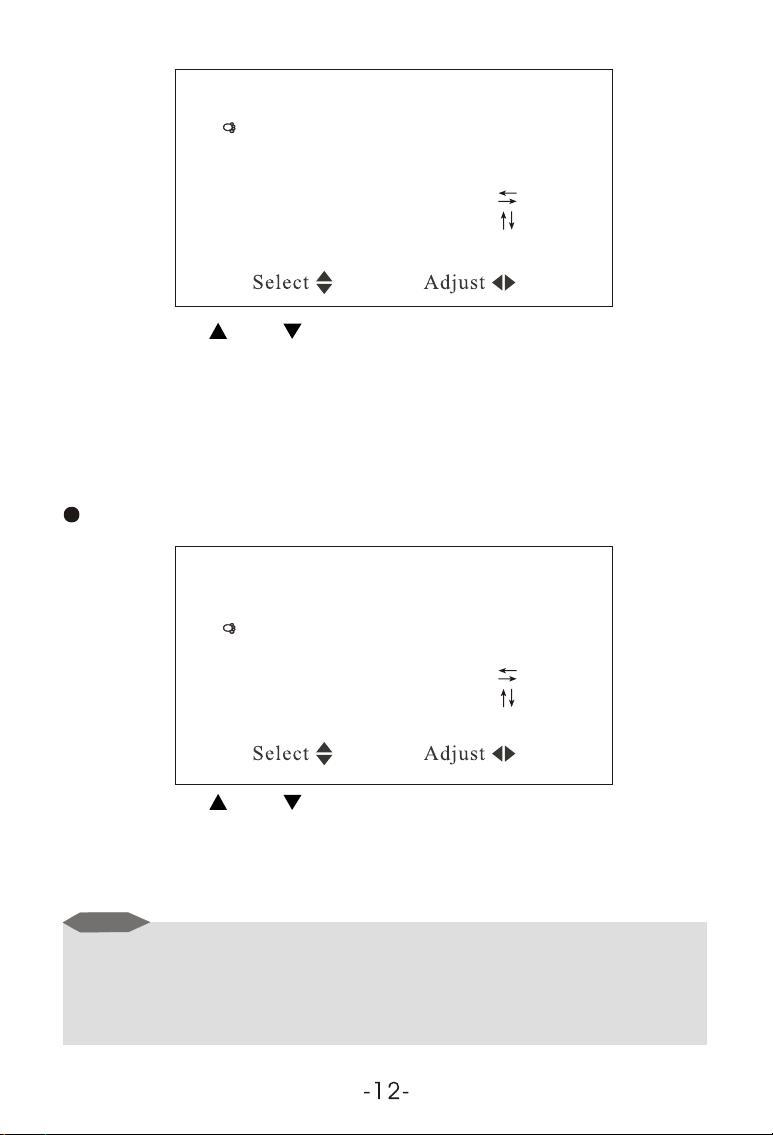
Press CH+/CH- to select the item Game:
Option
Language English
Calendar
Game
Select Adjust
CH / CH Select VOL + / VOL - : Adjust
Press VOL+ / VOL- to enter into Game, press VOL- to move leftward,
VOL +, rightward, CH -, quick downward, and CH+, rotate the game
by 360 degrees, press POWER to exit game and resume to picture or
video status.
Notice
When play games under weak or no signal, the game bar will twist
slightly. It is recommended to switch to video status before you
playing the game again.
Page 13
6.3 Clock
Time, ON Time, OFF Time, Attention, CH- Time, and Position will display
on the screen as illustrated below:
Press VOL-/VOL+ to set up clock, then press CH- / CH+ to choose ON
Time.
Clock
Time - - : - ON Time - - : - OFF Time - - : - Attention - - : - CH-Time - - : - Position -
VOL-Adjust hour VOL+ Adjust minute CH- / CH+ Select items to be setup
Press VOL-/VOL+ setup ON Time, press CH-/CH+ to choose CH- Time.
Upon setup, press CH-/CH+ again to choose Position, and press
VOL-/VOL+ to adjust till the channel number of desired program, and then
you can preserve your desired program
Notice
Adjustment of other items is the same as that On Time, and setup On Time
for all items is 24 hours at the most.
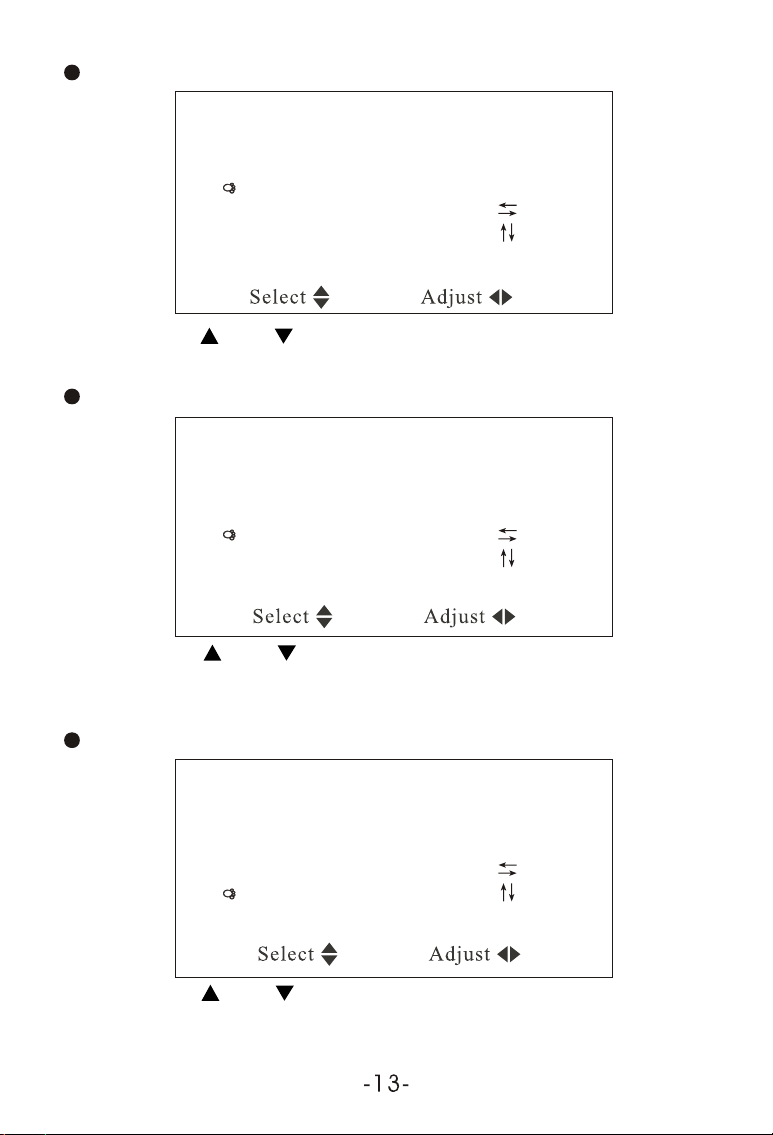
6.4 System
Color System, Sound System, Blue Back, Horizontal Vertical and
Picture Mode displays on the screen as illustrated below:
Press CH- or CH+ to select the item Color system:
Page 14
System
Color system AUTO
Sound system 6.5M
Blue back ON
Horizontal
Vertical
Zoom 0
CH / CH Select VOL + / VOL - : Adjust
Then press VOL or VOL+ to revolve the screen in the order of AUTO,
PAL , N3.58, N4.43 and SECAM. Please choose carefully this system
correctly. Otherwise, it may cause achromatic or inferior color. It is
recommended to select on AUTO position.
Press CH- or CH+ to select the item Sound system:
System
Color system AUTO
Sound system 6.5M
Blue back ON
Horizontal
Vertical
Zoom 0
CH / CH Select VOL + / VOL - : Adjust
Then press VOL+, the Sound System displays in the order of 5.5M,
6.0M and 6.5M.
Notice
1. Notes on Sound System: 5.5M means B/G, 6.0M stands for I, and
6.5M is D/K, please set the Sound System at local one.
2. In case with picture while without sound or with noise, please check
the Sound System for correct setup first.
Page 15
Press CH- or CH+ to select the item Blue back:
System
Color system AUTO
Sound system 6.5M
Blue back ON
Horizontal
Vertical
Zoom 0
CH / CH Select VOL + / VOL - : Adjust
Press VOL- / VOL+ can realize the ON / OFF of Blue Back under no signal.
Press CH-or CH+ to select the item Horizontal:
System
Color system AUTO
Sound system 6.5M
Blue back ON
Horizontal
Vertical
Zoom 0
CH / CH Select VOL + / VOL - : Adjust
Press VOL - / VOL + can realize horizontal , press again to resume
the picture.
Press CH or CH+ to select the item Vertical:
System
Color system AUTO
Sound system 6.5M
Blue back ON
Horizontal
Vertical
Zoom 0
CH / CH Select VOL + / VOL - : Adjust
Press VOL - / VOL + can realize vertical flip, press again to resume
the picture.
Page 16
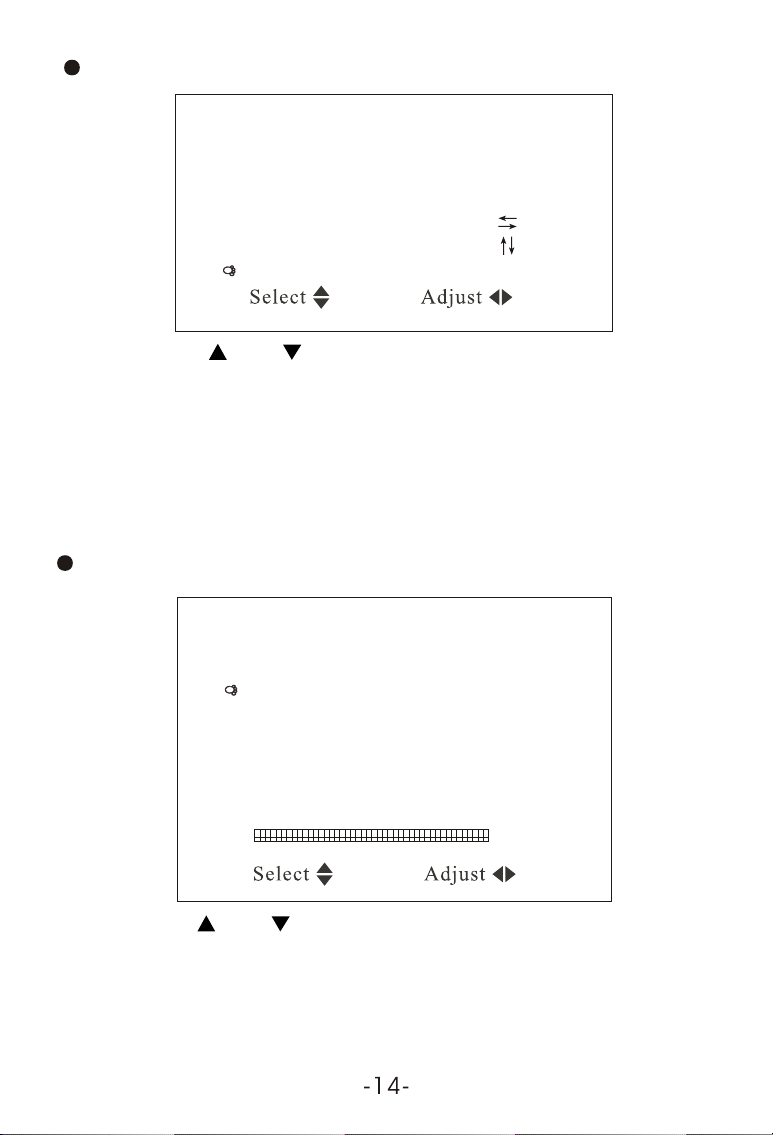
Press CH- or CH+ to select the item Zoom:
System
Color system AUTO
Sound system 6.5M
Blue back ON
Horizontal
Vertical
Zoom 0
CH / CH Select VOL + / VOL - : Adjust
Press VOL - / VOL + can realize the selection of picture modes:
0. 16:9 mode, 1. 4:3 mode, and 3. 16:9-1 picture enlargement mode.
6.5. Preset
Position, Remember, Band, Swap, Fine, Search, and Auto Search will
display on the screen as illustrated below:
Press CH- or CH+ to choose the item Remember:
Preset
Position 1
Remember ON
Band V-L
Swap 1
Fine
Search
Auto Search
CH / CH Select VOL + / VOL - : Adjust
Press VOL- or VOL+ to choose ON under the item Remember, it then
displays this channel upon changing program.In Off, it doesn't
display the Channel Number.
Page 17
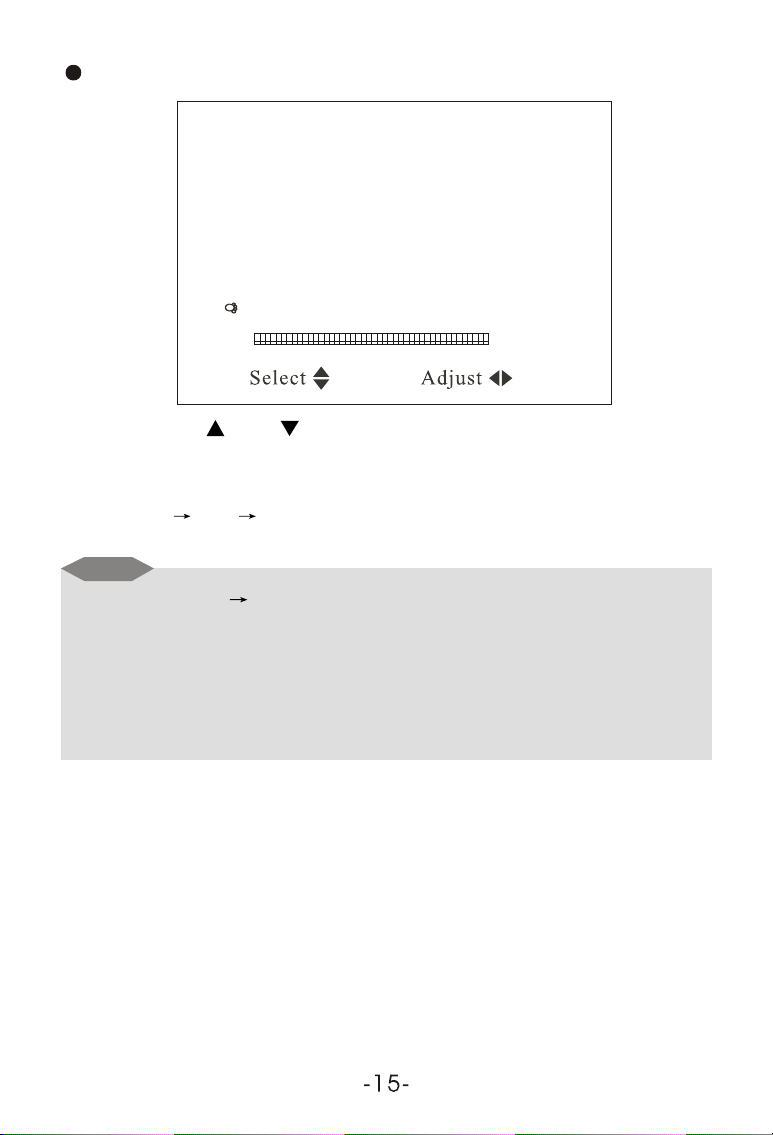
Press CH- or CH+ to select the item Auto Search:
Preset
Position 1
Remember ON
Band V-L
Swap 1
Fine
Search
Auto Search
CH / CH Select VOL + / VOL - : Adjust
Press VOL- or VOL+ to start Auto Search, and put into automatic
memory and storage upon completion of A uto Search. Choose channel in
order of V-L V-H UHF, and return to Program No. 0 upon completion.
Notice
(1)Auto Search Start from Program No. 0.
(2)When receive signal under Search, the Program Indication Bar should
turn from red into green, which means the optimum position for signal
storage. If channel under weak signal is received, the channel sto rage
system will automatically identify it as no signal.
Page 18
7. In order to receive clearer picture
Adjust the length, angle and direction of the telescopic antenna to obtain
optimum image.
Draw back the antenna from the butt end after usage.
!
Notice
In case the signal intensity is too weak, the image will remain inferior
whatever you adjust the antenna, and cause loud noise wave, shaking
image and inferior sound, etc., which is not TV fault. If the image
remains inferior when using telescopic antenna, please try to use the
external antenna or CATV.
Page 19
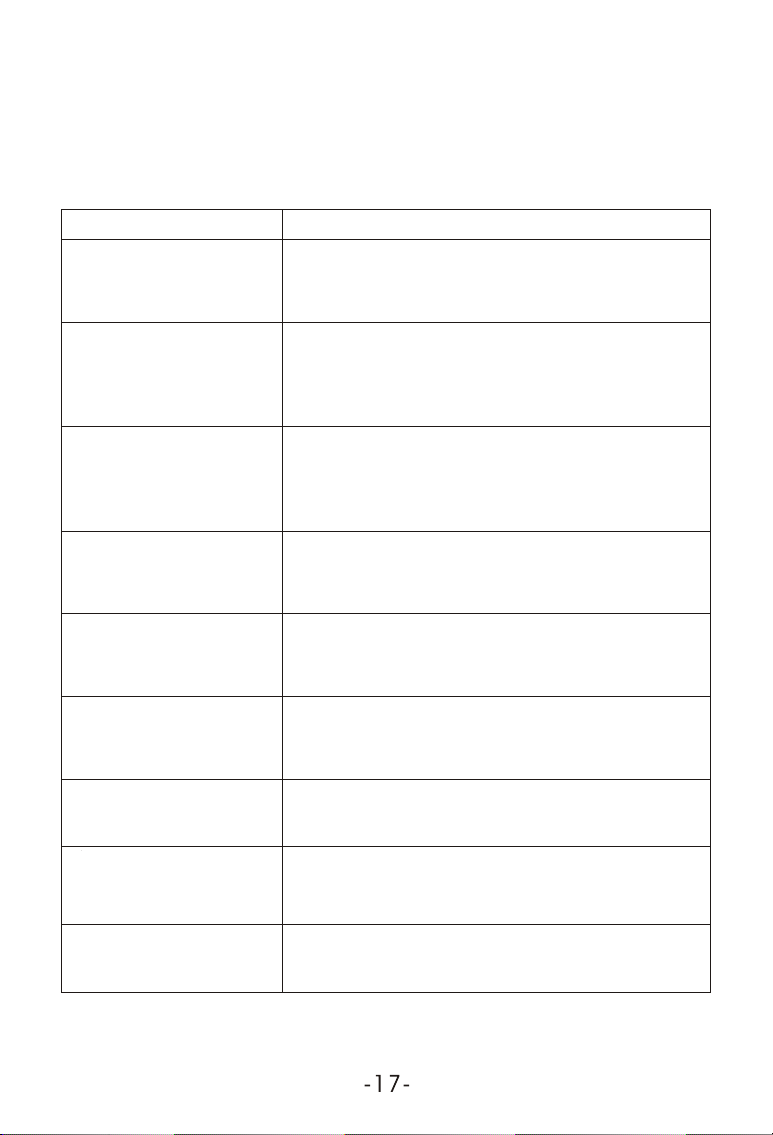
8. Before you request for repair
Phenomena below does not necessarily mean failure with TV set.
Please check following before you request for repair.
Phenomena
No picture, no sound
No image
No sound
Dark picture
Unclear or
unstable image
Superposed image
Snowstorm
Possible Causes
Improper connection with AC adapter or
Care adapter. Use of unauthorized power
supply. Power Switch is on OFF position.
Whether the correct Channel selected.
Automatically set up the Receiving Channel
again. Any new place is subject to re-setup
of channels.
Whether the sound is turned to the end or the
Sound System is incorrect. Whether earphone
plugged in. Whether ERASE functions under
too weak signal.
Whether brightness and contrast adjusted
correctly;
Whether environment temperature too low.
Whether antenna adjusted correctly;
Maybe too weak signal received at the
receiving place.
Whether the antenna is in proper direction;
Maybe received the building or reflected
signals nearby.
Maybe under wave interference of automobile
motor, train, high voltage line and neon light.
Achromatic or
flashing color
Upside down or lateral
inverted picture
Whether color adjusted well, whether the
decoloration actions under the Color system
with too weak proper signal.
Improperly adjusted Horizontal or Vertical
in the remote control.
Page 20
9. Technical Parameters
Product Name: LCD Color TV Receivere:
Display Device: Color TFT-LCD
Receiving Channel:
BG: VHF-L: CH2~4 48.25MHZ~62.25MHZ;
VHF-H: CH 5~12 175.25MHZ~224.25MHZ;
UHF: CH 21~69 471.25MHZ~855.25MHZ;
DK:VHF-L: CH1~5 49.75MHZ~85.25MHZ;
VHF-H: CH 6~12 168.25MHZ~216.25MHZ
UHF: CH 13~57 471.25MHZ~863.25MHZ
Sound System: DK I B G
Screen Size: 7 inches
Audio Output: 0.3W (Max)
Loudspeaker: one 4cm round loudspeakers.
Connecting Terminal: External antenna input jack, earphone jack,
Audio / Video (AV) input jack, External power supply jack.
Applicable Power Supply: 3 options:
1.AC Power supply-AC adapter
2.Automobile storage battery (12V) Car adapter
3.10 pcs. “aa” (um3) battery compartment
Power Consumption: about 10W
Outer Dimension: W 216mm H144mm T 33mm
Weight: about 622g
Dot Matrix: 0.129(H) 0.447 (V)
Resolution: 1440 (H) 234 (V)
Response Speed (ms): R: 30 / F:50
Visible Angle: U: 15 / D:35 R / L: 50
Brightness: 300cd/m
Contrast: 150:1
2
Page 21
Warning
This operation instruction is only intended for reference. No further
notice is available to any modification of all information contained
therein. Sound System, Color system and OSD menu language are
optional item, please check before usage.
Warning
No repairable components exist in the machine. Don't try to dismantle
and improve the TV set, and the high voltage in the machine may cause
danger. Maintenance and adjustment of the TV set is subject to
professionals.
ALL RIGHTS RESERVED
COPY RIGHT DENVER ELECTRONICS A/S
www.denver-electronics.com
Page 22
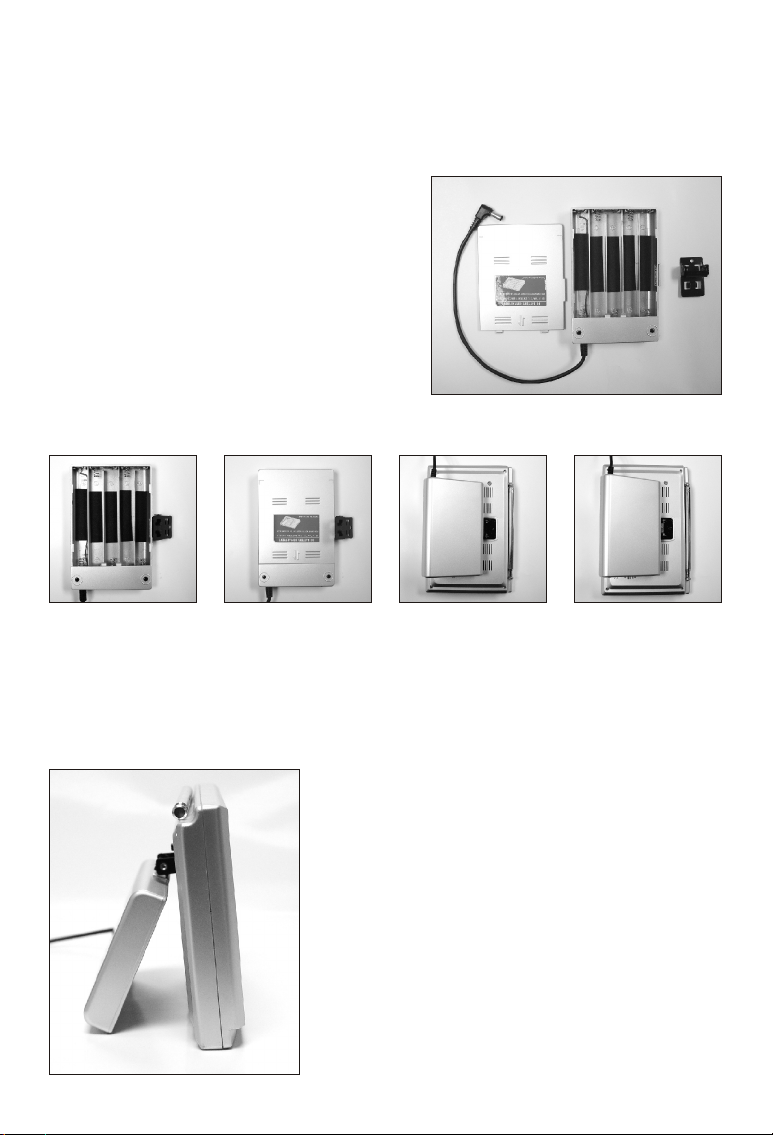
Instruction of Automatic battery power-supplying box
for LCD TV
The automatic power supplying box for TV makes up
of the box with 10 pcs of AA batteries and with fixed
parts (bracket and bolts) and wires leading to the jacks
of TV set. By way of right use of the automatic
power-supplying box, please carefully read this
instruction and properly operate it as follows.
1.Open the cover of battery box.
2.Connect bracket to box.
3.Insert the batteries.
Remarks!
Please insert with right direction of the poles! Do not
use batteries of different models, using condition and
capacity!
Don't allow water into the box! Don't use battery pack!!!
Step 1-3 Step 4 Step 5 Step 6
4.Close the cover of the box.
5.Fix the bracket to TV set by the bolts.
6.Connect power wire to corresponding power jack on TV set.
7.Press a button on front panel of TV set so that it will be turned on.
Product picture 1
Step 6
When you need recharge the batteries, you shall adjust the
switch on side face of the box to CHARGE and connect the
adapter to the jack on the battery box. In the state of connecting
the adapter, red indicator lights on. It takes 12 for full charging.
When using the box with charged batteries, you shall adjust the
switch to POWER and connect the box with batteries to TV set.
Your TV set will start to work. You may use battery box as a
support so as to see TV program or TV film conveniently.
Working time of the automatic battery power-supplying box
depends on the capacity of the batteries. If using batteries with
capacity 1200 mAh, the working time is about 2 hours for 5"
(127 mm) TV set or 1.5 hours for 7" (178 mm) TV set.
-20-
 Loading...