

Denver ACT-5020TW Quick Start Guide
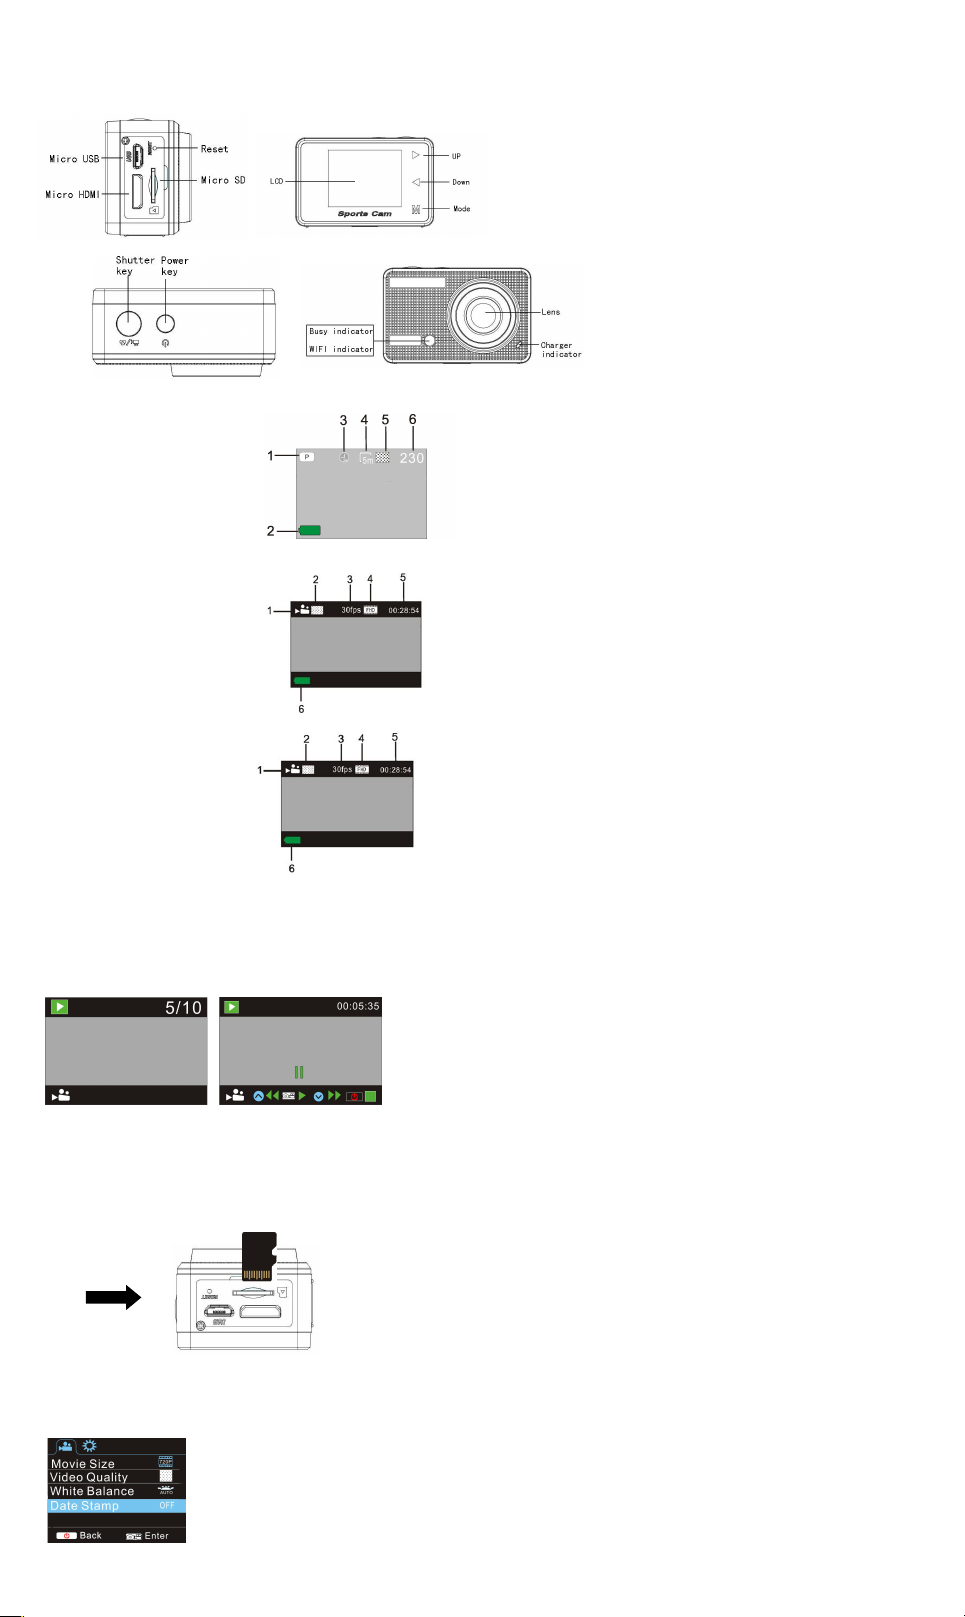
Camera Diagram:
LCD Display Diagram:
Turn on the Wi-Fi camera, the LCD will display the following status:
Photo mode
1. Photo mode;
2. Battery state;
3. Self-timer mode;
4. Photo resolution;
5. Photo quality;
6. Available shooting count;
recording mode
1. Recording mode;
2. Video quality;
3. Video framerate
4. Video resolution;
5. Available time to record;
6. Battery state;
vehicle-mounted mode
1. Recording mode;
2. Video quality;
3. Video framerate
4. Video resolution;
5. Available time to record;
6. Battery state;
Playback mode
Turn on the camera,you can touch the mode key to enter playback mode.and you can touch the Up/Down key to choose
CAR/VIDEO/JPG,then press the shutter key to enter preview.
Touch Mode key to enter playback mode to browse photo/video, play the video recorded by this camera.
Press Up/Down key to access to previous or next photo/video.
Play movie: Press the shutter key to start/pause play video, touch the Up/Down key to Retreat quickly /fast forward playback, press the power
key to stop play video
Using your camera:
1)When you use the camera for the first time, please:
Insert a micro SD or micro SDHC card (not included), as shown in the following picture.
A Class 10 Micro SD Card is required for this camera.
Turn off the camera before inserting or removing the card.
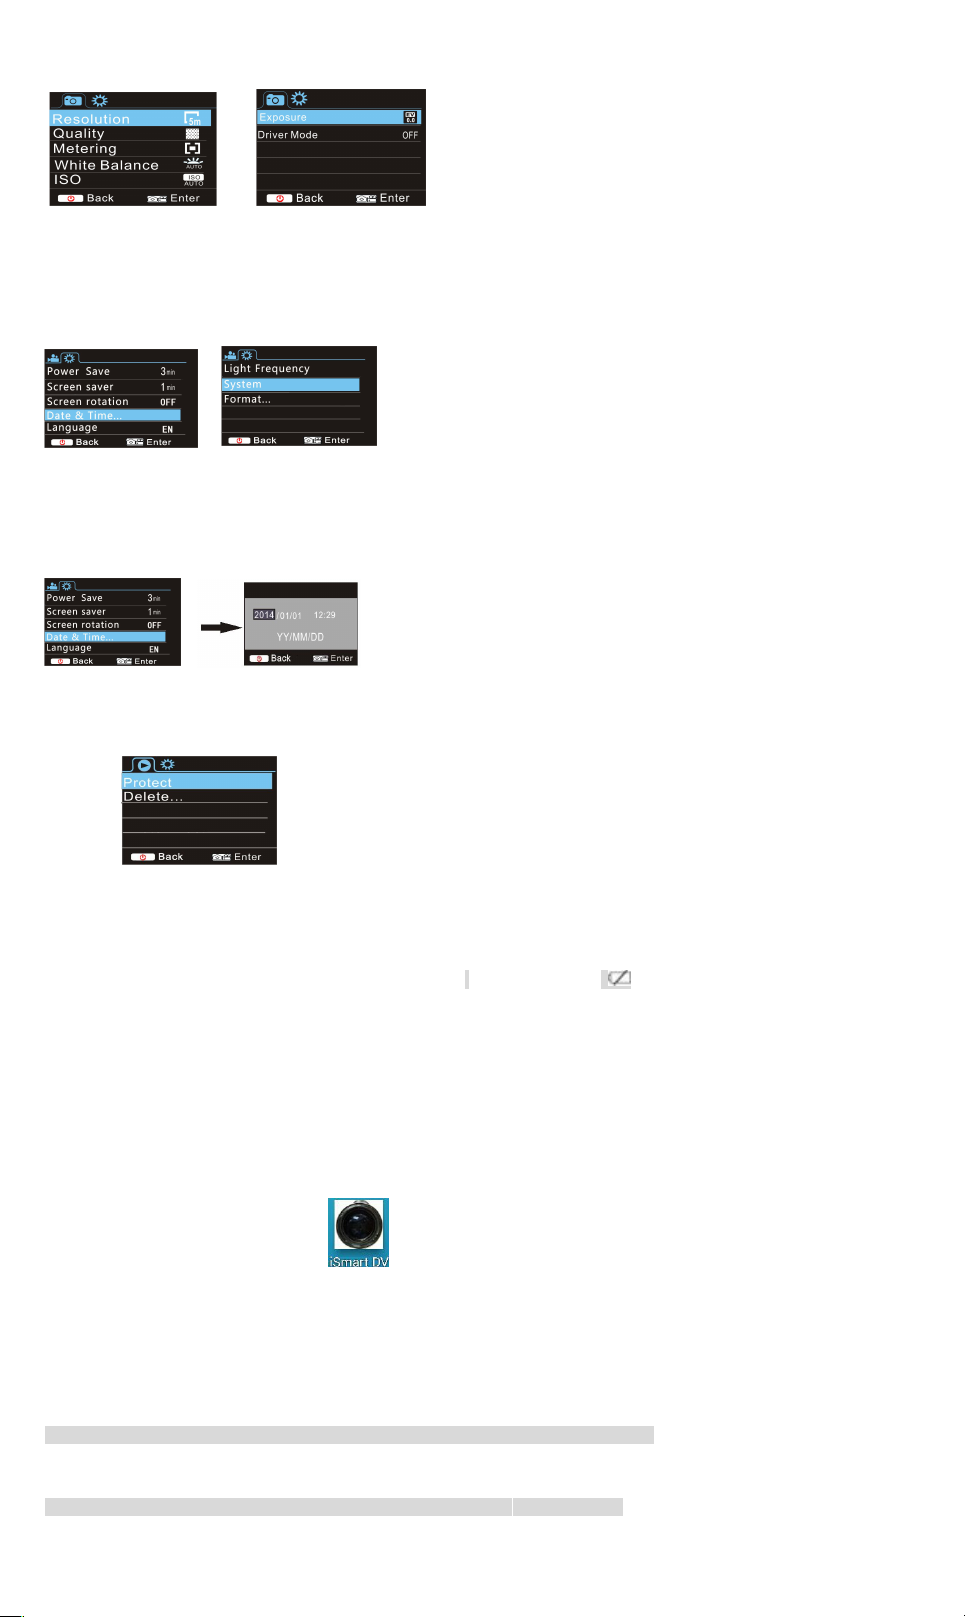
Menu Setting Mode
In photo, recording, vehicle-mounted and playback mode, press Power key to open the menu, and then press Up/Down key to select menu,
press the Shutter key to enter submenu. When selecting menu, the selected menu will be displayed with blue background.
Recording/vehicle-mounted menu mode:
ACT-5020TW Quick Start Guide
ENG 1
ACT-5020TW Quick Start Guide
Photo menu mode:
System mode menu setting
After opening the menu by pressing Power key, press mode key to switch
over to setting main menu, press Up/Down key to select menu, and after that
to press Shutter key for confirming to enter the submenu. In the submenu,
press Up or Down key to select menu, and press Shutter to confirm. After
returning to the main menu, press Power key to exit from the menu.
System menu mode:
Press Power key to open the menu, press Mode key to switch to setting menu, and then press Shutter key to confirm. Press Down key to
select “Date and time” in menu item, and then press Shutter key to enter setting window.
In setting window, press Mode key to select items (date, time) to be adjusted, and then press Up key or Down key to make adjustment, press
Shutter key for conformation at completion of adjustment, or press Power key to cancel setting and exit. Finally, press Power key to exit from
setting mode.
Setting date and time:
Press Power key to open the menu, press Mode key to switch to setting menu, and then press Shutter key to confirm. Press Down key to
select “Date and time” in menu item, and then press Shutter key to enter setting window.
In setting window, press Mode key to select items (date, time) to be adjusted, and then press Up key or Down key to make adjustment, press
Shutter key for conformation at completion of adjustment, or press Power key to cancel setting and exit. Finally, press Power key to exit from
setting mode.
Playback mode menu setting
In playback mode press power key to open playback main menu, press Up or Down key to select menu, press Shutter key to enter submenu.
In the submenu, press Up or Down key for selection, and press Shutter key to confirm. After returning to the main menu, press Mode key to
exit from the menu.
Startup/Startdown
1 Startup: press the POWERkey for 3 second, the camera will show startup screen and enters intoPOW ERONstate;
2 Shutdown:press the POWER key for 3 second when the camera is under idle mode to shutdown;
3 Auto shutdown: the camerawill be shut down automatically when the camera is under idle mode for acertain time to save power. The defaul
t time for auto shutdown is 3 min.
4 Shutdown under low power: when the batteryis under low power, the LCD will indicate “ ”. Please charge the battery timely. When the i
con turns red andflashes, the camera will be shut down automatically
Battery Charging:
The camera is equipped with built-in 3.7V lithium battery. Please ensure power available for the camera and timely charge it in case of low
battery.
Connect the camera to computer for charging under shutdown status. The charging indicator will be on when charging, and will be off when
the battery is fully charged. Generally, the battery can be fully charged after about 4 hours.
Pair the Camera to Your Smartphone or Pad.
APP (Support Android and ISO)
from Appstore ( (for iOS) or Google Play (for Android OS).
Insert the TF card and turn on the DV,When you want to turn on the wifi,you can press the shutter key about 3seconds,the LCD Screen
display”Waiting for WiFi connection” and the wifi indicator will flash.
Enable Wi-Fi on smartphone or tablet and search for wireless AP signal “ ACT-5020TW ” , then connect it to DV, until the system
displays”Connected successfully”.After it Connects successfully,the LCD Screen will turn off after about 15 seconds,and the wifi indicator will
not flash.
Kindly note: The first time connecting to DV,you need to enter password “1234567890”.
when you press shutter key to turn on the LCD Screen,the LCD Screen display “W iFi Connection Ready” and will turn off the WIFI
immediately.
Kindly note: “If you use LCD display, the Wifi connection will be lost and vice versa”
Download and install the app “ismart DV ”
ENG 2
 Loading...