

Page 1
Page 2

Copyright © DENSO, 1993
All rights reserved. No part of this publication may be reproduced in any form or by
any means without permission in writing from the publisher.
Specifications are subject to change without prior notice.
Microsoft
®
, MS-DOS®, and QuickBASIC® are registered trademarks of Microsoft Corpo-
ration.
®
IBM
, PC/AT®, and PS/2® are registered trademarks of International Business Machines
Corporation.
BHT, CU, and BHT-BASIC 3.0 are trademarks of DENSO CORPORATION.
Page 3

Preface
Please READ through these operating instructions carefully. It will enable you to
operate your BHT-4000 correctly.
After you have finished reading the instructions, keep this manual handy for speedy
reference.
Ni-Cd
The product that you have purchased contains a rechargeable
battery. The battery is recyclable. At the end of it's useful life,
under various state and local laws, it may be illegal to dispose of
this battery into the municipal waste stream. Check with your
local solid waste officials for details in your area for recycling
options or proper disposal.
Page 4

How this book is organized
This manual is made up of six chapters and appendices.
Chapter 1. Quick Guide
Describes the basic operating method of the BHT-4000 and the related notes.
Chapter 2. Getting Started the BHT-4000 and System Mode
Summarizes the BHT-4000 system configuration and describes the operation including
preparation and System Mode (which is required for the efficient use of application
programs).
Chapter 3. Communications Operations of BHT-4000
Describes the communications operations of the BHT-4000--the RS-232C interface
specifications, the basic communications specifications, and the BHT-protocol--for
data transmission with the host computer or other devices.
Chapter 4. Easy Pack 4.2
Describes Easy Pack 4.2 which is an application program provided in the "BHT-BASIC
3.0 System Pack." Easy Pack 4.2 is suitable for data collection which allows bar code
reading or data entry from the keypad.
Chapter 5. Error Messages
Lists the error messages which will appear on the LCD if some error occurs in the BHT-
4000.
Chapter 6. Handling the CU-4000
Describes the handling procedure of the CU-4000, the interfacing with the host computer, and the charging of the battery cartridge.
Appendix A: Specifications
Appendix B: A Typical Basic Operation
Page 5

■ Icons Used in This Book
This manual uses the following icons for greater ease in handling:
Precautions which require you to take special care in order to prevent the BHT4000 and programs from becoming damaged.
Notes which will help you understand the BHT-4000 and BHT-BASIC 3.0.
■ Related Publications
BHT-BASIC 3.0 Programmer's Manual
(For the differences of the BHT-4000 from other BHT series
in the BHT-3.0 syntax and applications programming, refer
to the "BHTC3.MAN" text file in the "BHT-BASIC 3.0 Compiler" floppy disk.)
Transfer Utility Guide
(For the detailed operating procedure, refer to the "TU3.MAN"
text file in the "Transfer Utility" floppy disk.)
■ DENSO WAVE INCORPORATED does not assume any product liability arising out
of, or in connection with, the application or use of any product, circuit, or application described herein.
■ Intellectual Property Precaution
DENSO WAVE INCORPORATED ("DENSO WAVE") takes reasonable precautions to
ensure its products do not infringe upon any patent of other intellectual property
rights of other(s), but DENSO WAVE cannot be responsible for any patent or other
intellectual property right infringement(s) or violation(s) which arise from (i) the
use of DENSO WAVE's product(s) in connection or in combination with other
component(s), product(s), data processing system(s) or equipment or software not
supplied from DENSO WAVE; (ii) the use of DENSO WAVE's products in a manner
for which the same were not intended nor designed; or (iii) any modification of
DENSO WAVE's products by other(s) than DENSO WAVE.
Page 6
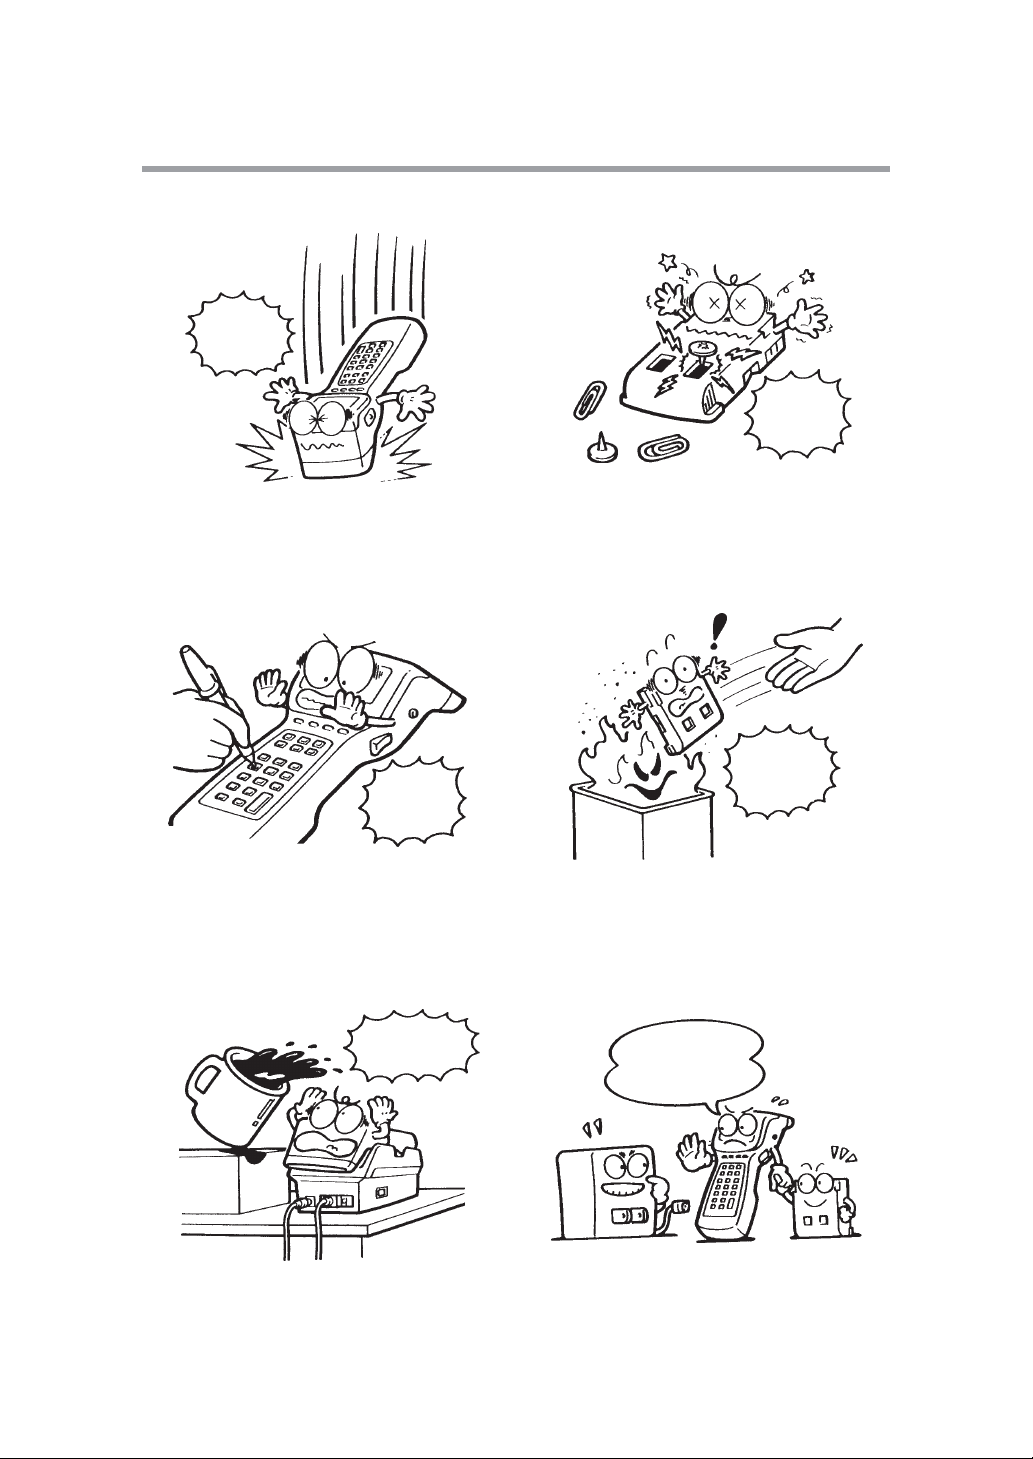
■ BE SURE TO OBSERVE THE FOLLOWING PRECAUTIONS:
● AVOID SHOCK OR IMPACT! ● AVOID SHORT-CIRCUITS!
Do not
drop me!
Do not
shortcircuit
me!
Avoid shock or impact; otherwise, the terminal will be broken.
● AVOID ROUGH TREATMENT!
Press the
keys with
fingers
only!
Do not punch the keys too hard.
● AVOID WATER!
Keep me
away from
water!
Short-circuiting the battery cartridge is
dangerous.
● NEVER DISASSEMBLE!
Never put
me into
fire!
Never put the battery cartridge into fire
or attempt to disassemble it.
● NEVER USE UNDEDICATED CHARGERS!
Charge only with
the dedicated
device.
Do not get water on the terminal, and
never operate it with wet hands, or wipe
it with a damp cloth.
Undedicated Dedicated
Do not charge the battery cartridge with
any charger other than the dedicated one.
Page 7
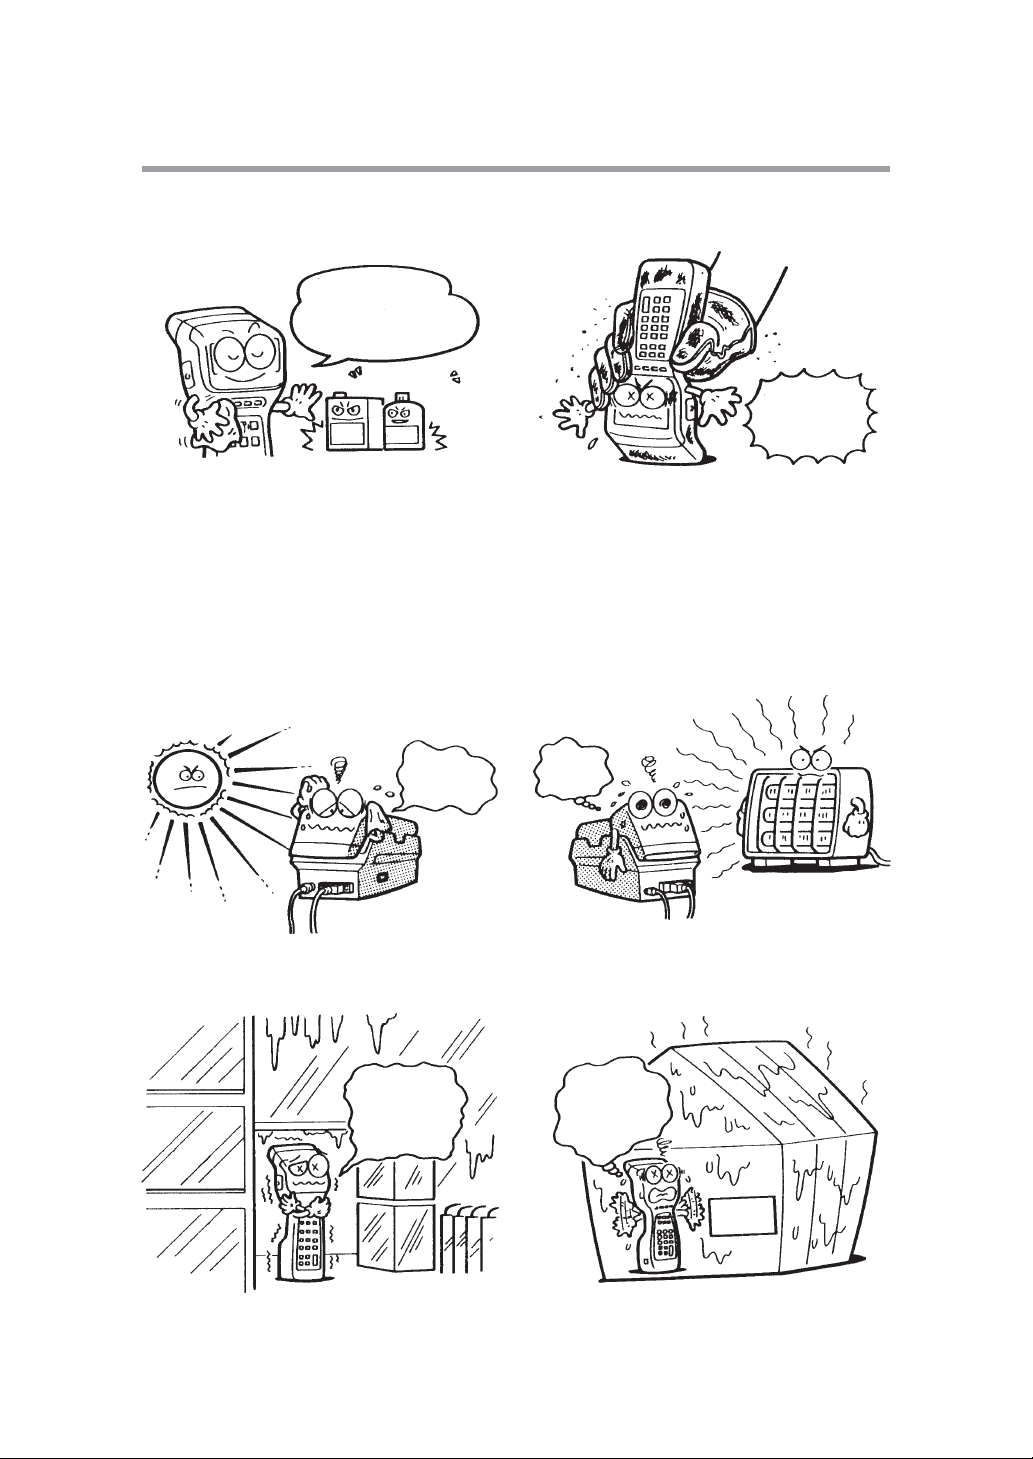
● AVOID THINNER!
Take care of me
with a dry soft cloth.
NO WAY!!
Thinner
Benzine
● AVOID DUST OR DIRT!
Clean
hands
only!
Never use thinner, benzine, or other organic solvents to clean the terminal.
Those fluids will mar or discolor the surfaces of the cases and keys.
● NEVER PUT ME IN THESE PLACES:
I'm
burning
up!
[ In direct sunshine ] [ Next to heating equipment ]
Refrigeration
I'm
freezing!
Refrigeration
Do not operate the terminal with gloves
contaminated with dust, dirt, or iron filings. They will result in malfunction.
I'm
roasting!
This
humidity
is killing
me!
Refrigeration
[ Rapid temperature changes ] [ Humid places ]
Hot-
house
Page 8

Content Overview
Chapter 1. Quick Guide ................................................................................................... 1
1.1 Reading Bar Codes ................................................................................................... 2
1.2 Using the Hand Belt and Neck Strap ..................................................................... 4
1.3 Setting the Backlight ................................................................................................ 6
1.4 Using the Keypad ..................................................................................................... 7
Chapter 2. Getting Started the BHT-4000 and System Mode.................................... 9
2.1 BHT-4000 System Configuration ............................................................................ 10
2.2 Components and Functions .................................................................................... 15
2.3 Preparation................................................................................................................ 17
2.3.1 Setting-up 1: Loading the Battery Cartridge ................................................ 17
2.3.2 Setting-up 2: Installing System Program and User Programs .................. 19
2.3.3 Adjusting the LCD Contrast & Beeper Volume, and Displaying
the Battery Voltage Level ................................................................................ 38
2.4 Operating in System Mode ..................................................................................... 39
2.4.1 Starting System Mode ..................................................................................... 39
2.4.2 Operating in System Mode ............................................................................. 41
2.4.3 Detailed Description of the Functions in System Mode .............................. 42
Chapter 3. Communications Operations of BHT-4000 ................................................ 71
3.1 RS-232C Interface Specifications ........................................................................... 72
3.1.1 For CU-4000 ....................................................................................................... 72
3.1.2 For BHT-4000 ..................................................................................................... 75
3.2 Basic Communications Specifications and Parameters ...................................... 77
3.2.1 Basic Communications Specifications ........................................................... 77
3.2.2 Communications Parameters.......................................................................... 80
3.3 BHT-Protocol ............................................................................................................. 81
3.3.1 Overview ............................................................................................................ 81
3.3.2 Control Characters ........................................................................................... 82
3.3.3 Basic Format of Transmission Messages ...................................................... 84
3.3.4 Transmission Control Sequences .................................................................. 85
3.3.5 Aborting Data Transmission ........................................................................... 93
3.3.6 BCC for Horizontal Parity Checking ................................................................ 94
3.3.7 Text Format ....................................................................................................... 95
Page 9

Chapter 4. Easy Pack 4.2 ................................................................................................. 97
4.1 Overview of Easy Pack 4.2 ...................................................................................... 98
4.1.1 Features ............................................................................................................. 98
4.1.2 Program Structure ............................................................................................ 100
4.2 Starting Easy Pack 4.2.............................................................................................. 104
4.3 Operating in Easy Pack 4.2 ...................................................................................... 106
4.3.1 User's Menu ...................................................................................................... 106
4.3.2 Manager's Menu ............................................................................................... 113
Chapter 5. Error Messages.............................................................................................. 123
5.1 System Errors ........................................................................................................... 124
5.2 Errors in System Mode ............................................................................................ 127
5.3 Errors in Easy Pack 4.2............................................................................................. 131
Chapter 6. Handling the CU-4000................................................................................... 133
6.1 Functions of the CU-4000 ........................................................................................ 134
6.2 Components and Functions .................................................................................... 134
6.3 Applying Power to the CU-4000 ............................................................................. 136
6.4 Communications with the Host Computer............................................................ 137
6.4.1 Interface Cable Connection ............................................................................. 137
6.4.2 Interfacing with the Host Computer ............................................................... 138
6.5 Charging the Battery Cartridge............................................................................... 139
6.5.1 Battery Cartridge Loaded in the BHT-4000 .................................................... 139
6.5.2 Battery Cartridge Alone ................................................................................... 141
Appendices......................................................................................................................... 145
Appendix A. Specifications ............................................................................................. 146
A.1 BHT-4000 ........................................................................................................... 146
A.2 CU-4000 ............................................................................................................. 150
Appendix B. A Typical Basic Operation......................................................................... 152
Page 10
Chapter 1. Quick Guide
Appendices
Chapter 2. Getting Started the BHT-4000 and System
Mode
Chapter 3. Communications Operations of BHT-4000
Chapter 4. Easy Pack 4.2
Chapter 5. Error Messages
Chapter 6. Handling the CU-4000
Page 11

Chapter 1. Quick Guide
Chapter 1
Quick Guide
This chapter describes the basic operating method of the BHT-4000 and the related
notes
1.1 Reading Bar Codes ............................................................................................................. 2
1.2 Using the Hand Belt and Neck Strap ................................................................................ 4
1.3 Setting the Backlight .......................................................................................................... 6
1.4 Using the Keypad ............................................................................................................... 7
1
Page 12
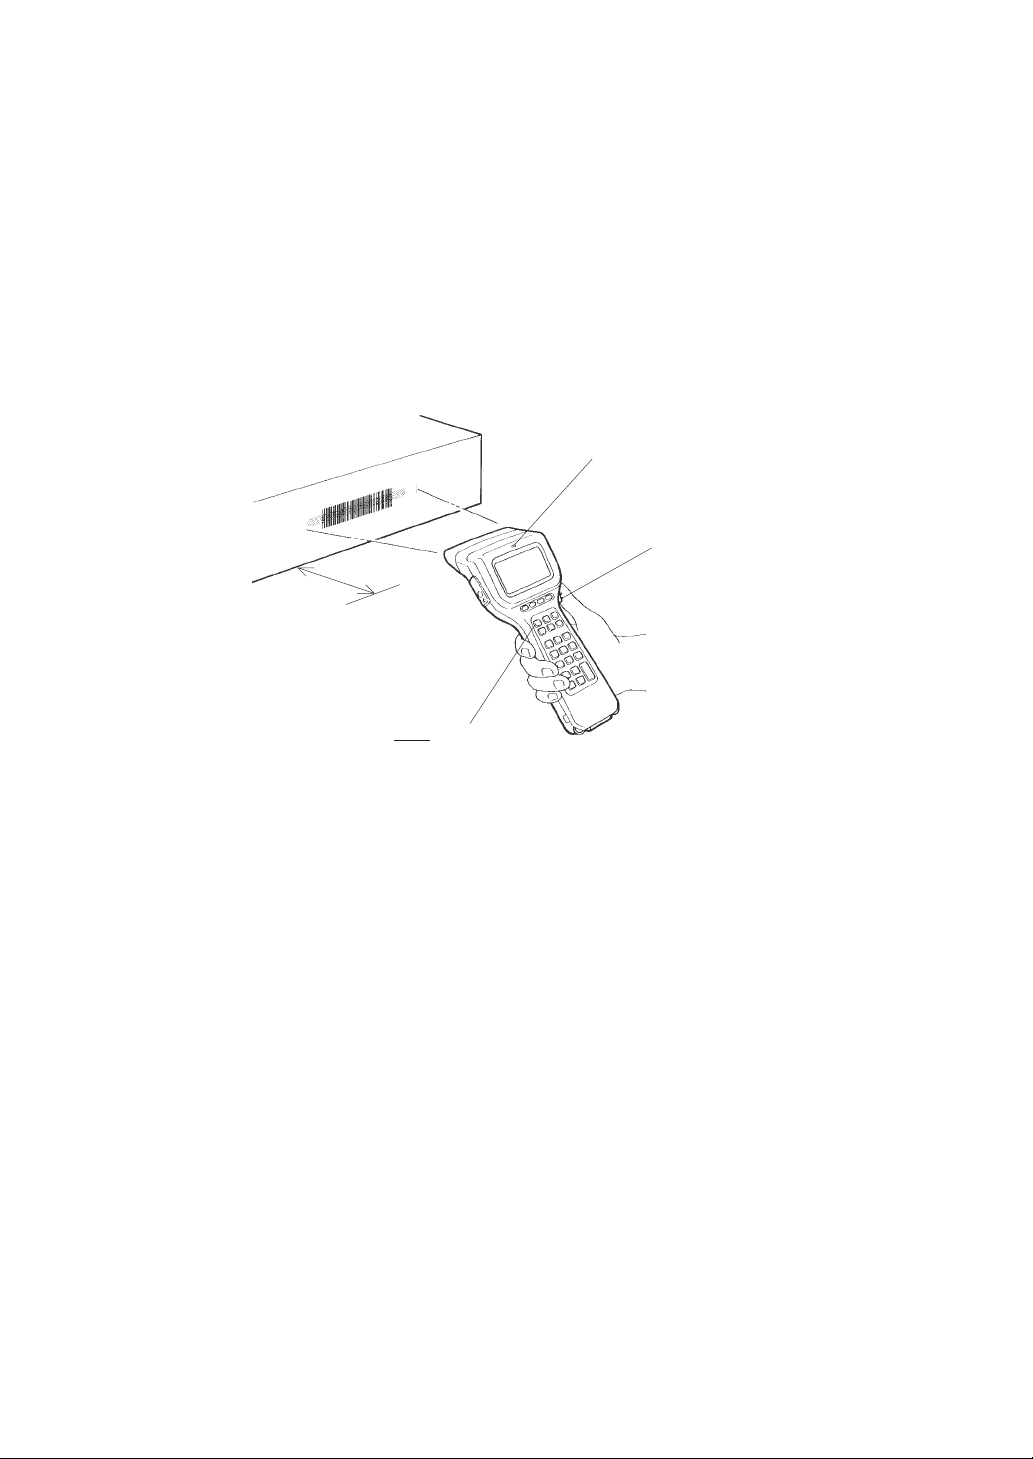
1.1 Reading Bar Codes
Turn on the terminal power, bring the bar-code reading window to a bar code to be
scanned, and press the trigger switch. The BHT-4000 lights the illumination LED and
reads the bar code.
When the BHT-4000 has read the bar code successfully, the reading confirmation LED
will illuminate in green.
Reading confirmation LED
(Illuminates in green when
the BHT-4000 has read the
bar code successfully.)
Trigger switch
Max. 31 cm
(12.21")
PW key
• If the BHT-4000 fails to read, change the reading angle of the bar-code reading
window or the distance from bar codes, and try it again.
• To read bar codes wider than the readable area of the bar-code reading window,
pull the bar-code reading window away from bar codes for long-range scanning
so that the entire bar code comes into the illumination range covered by the
illumination LED. The BHT-4000 can read bar codes at a maximum distance of
31 cm (12.21")* from the bar-code reading window.
*
Under the following conditions:
- Ambient illuminance: 500 lux (fluorescent lamp)
- ITF conforming to the UPC Shipping Container Code
- PCS value: 0.9 or more
- Minimum narrow bar width: 1.4 mm min. (55.1 mils min.)
2
Page 13
Chapter 1. Quick Guide
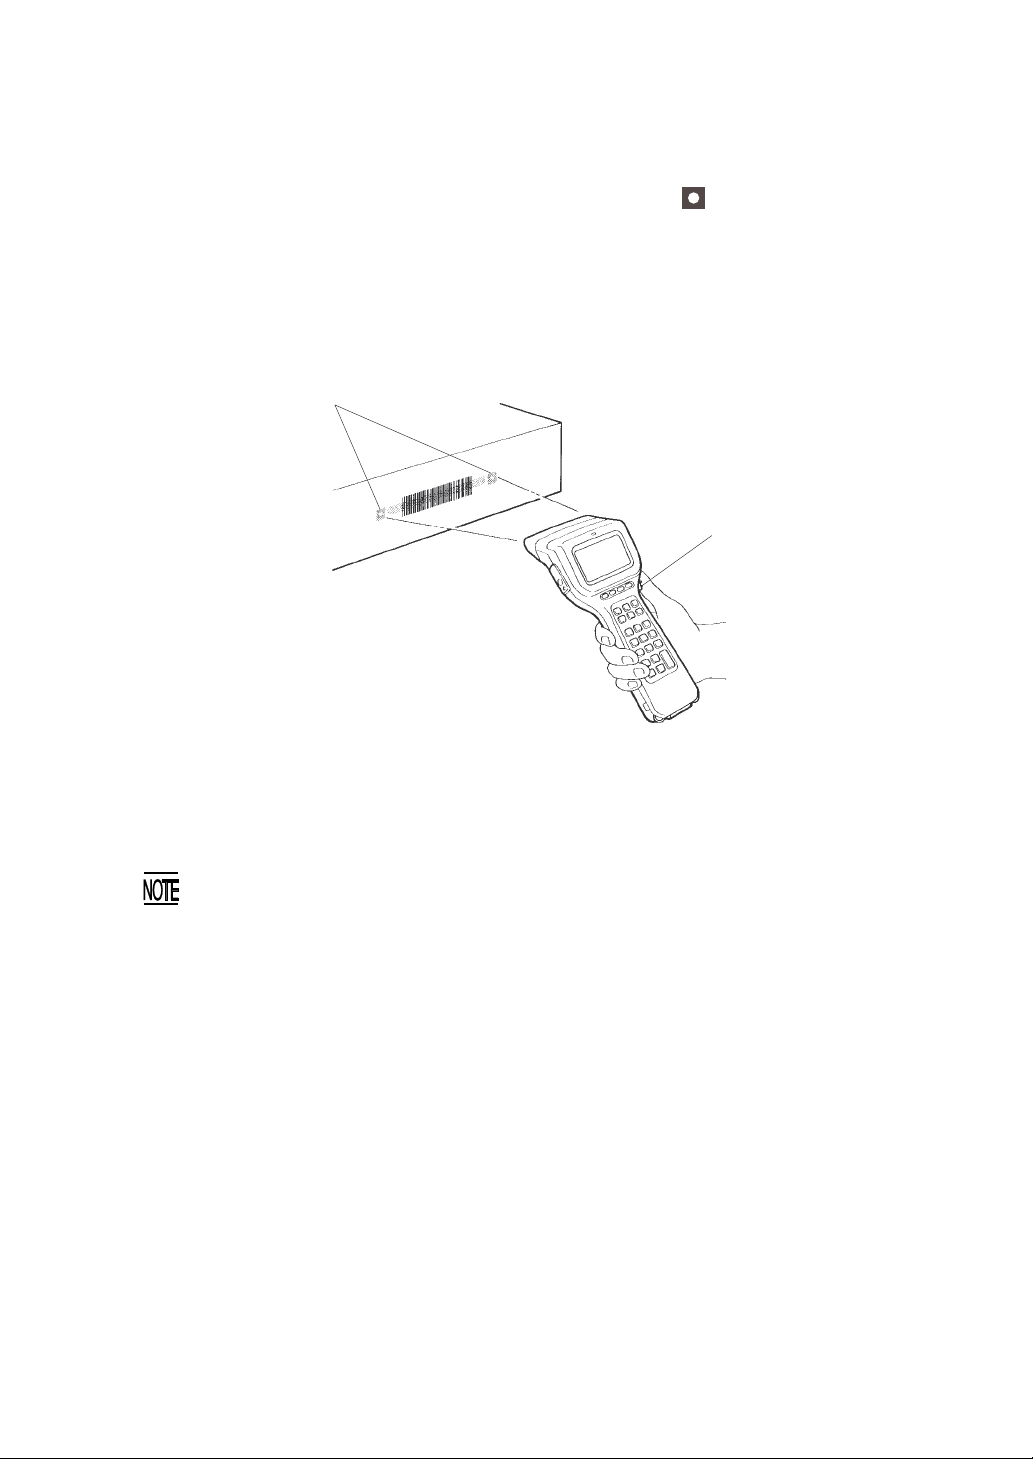
• If you cannot distinguish the illumination range covered by the illumination LED
when reading bar codes at distances from the bar-code reading window, you
may turn on the marker LEDs to show the markers on the object to be
scanned, indicating the readable area as shown below.
The marker LED indication function may be activated or deactivated (default) in
System Mode. (Refer to Subsection 2.4.3, [4] Setting.)
Markers
Trigger switch
• Before reading labels, clean them if stained.
• Avoid using the BHT-4000 under direct sunshine. The BHT-4000 might fail to
read.
• To read bar codes on curved surfaces, apply the bar-code reading window to
the center of each bar code at a right angle.
3
Page 14
1.2 Using the Hand Belt and Neck Strap
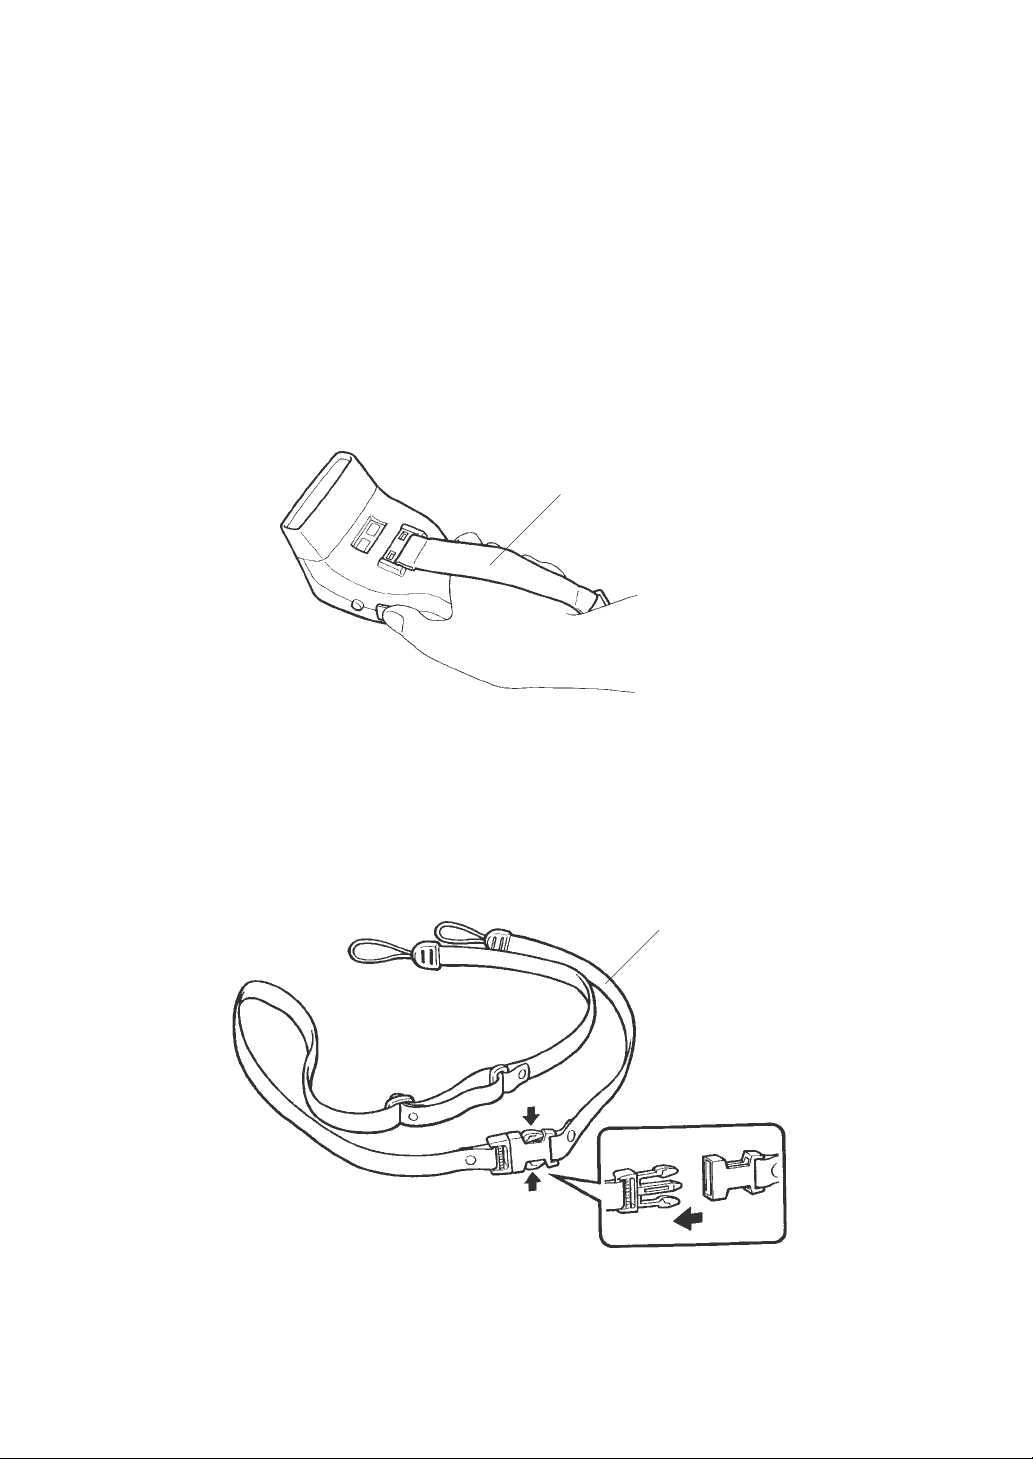
■ Using the Hand Belt
The BHT-4000 is equipped with a hand belt to prevent you from dropping the terminal
accidentally.
Hold the BHT-4000 as shown below.
Hand belt
■ Using the Optional Neck Strap
(1) Push the lock of the buckle to release it, as illustrated below.
Neck strap
Buckle
Push the lock.
4
Page 15
Chapter 1. Quick Guide
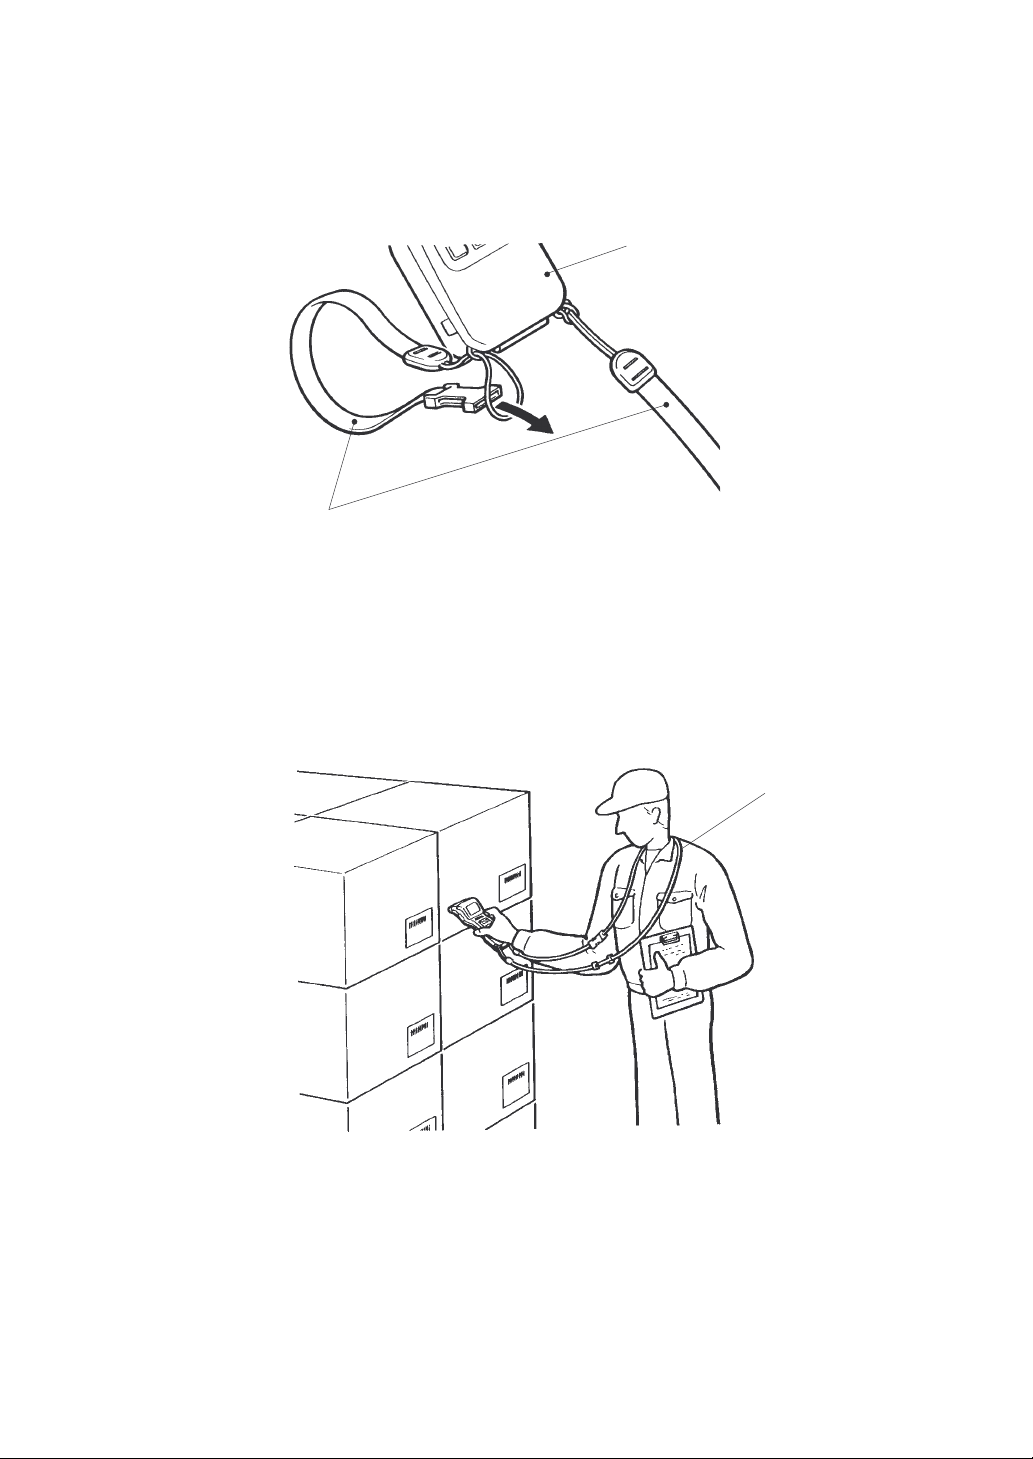
(2) Set each loop of the neck strap to the BHT-4000 as shown below and then
fasten the buckle.
BHT-4000
Neck strap
(3) Hang the neck strap over your neck when using the BHT-4000.
Neck strap
5
Page 16
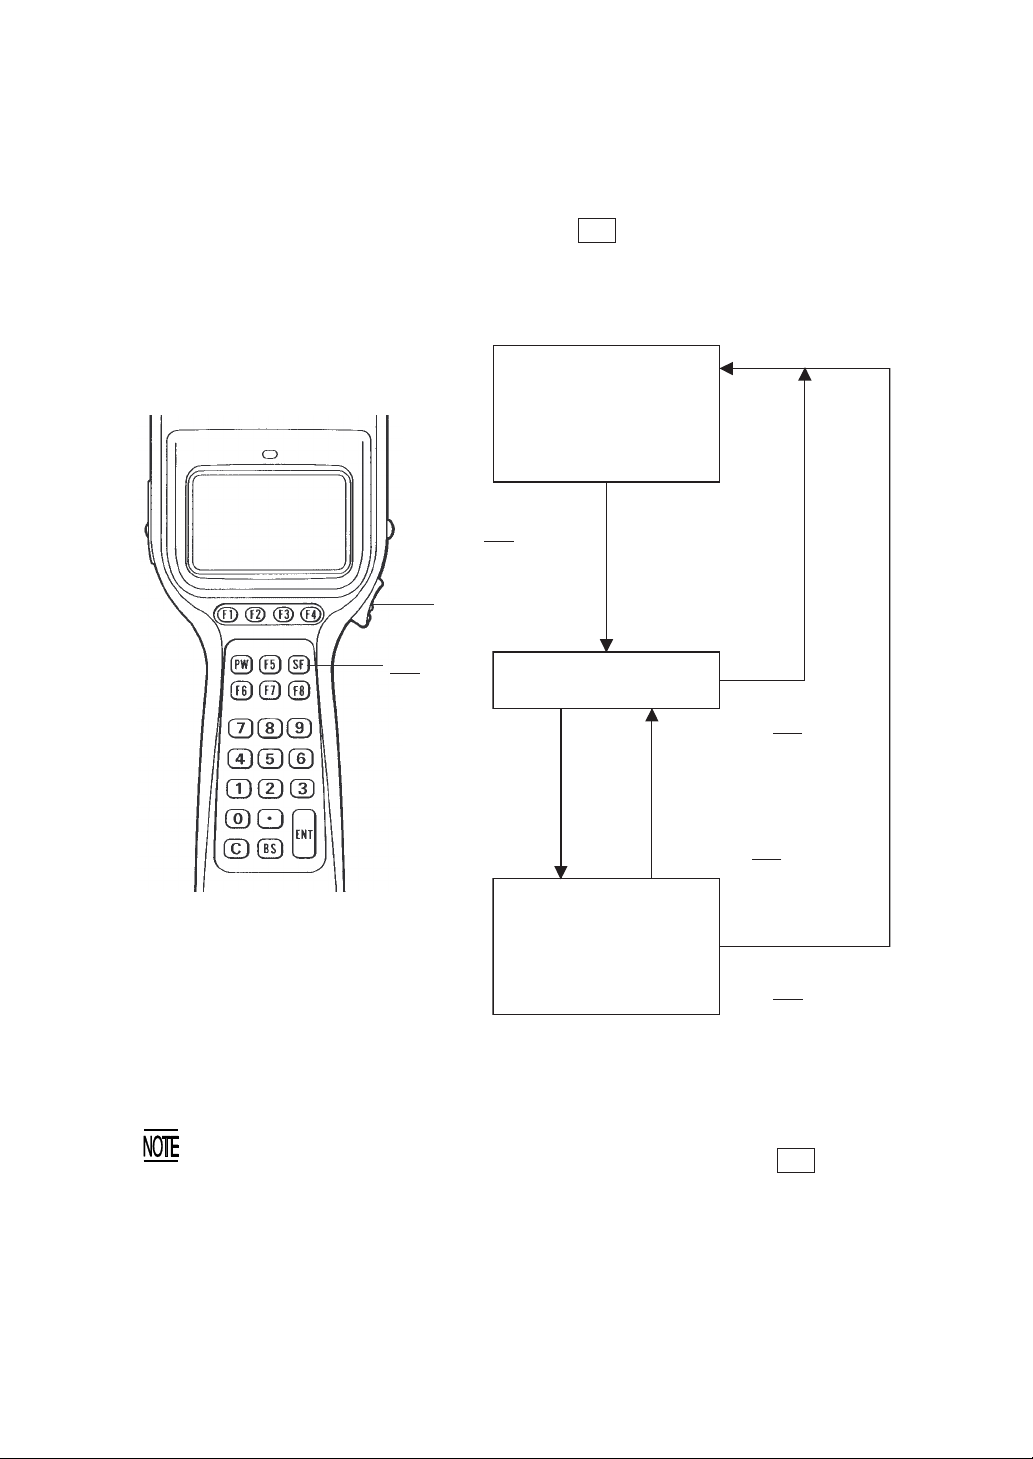
1.3 Setting the Backlight
Pressing the trigger switch while holding down SF (Shift) key activates or deactivates the backlight function.
Backlight OFF
(The backlight function
is OFF when you power
on the terminal.)
Press the trigger
switch while holding
down SF key.
Trigger switch
↑
← →
↓
SF key
If no key is pressed
for at least 3 seconds.
Backlight ON
Press the trigger
switch while holding
down SF key.
Press any key (except for
the simultaneous
depression of the trigger
switch and SF key).
Backlight OFF
(The backlight function
is ON.)
Press the trigger
switch while holding
down SF key.
In user programs, you can select the key to be used for activating or deactivating
the backlight function (instead of the default: combination of the SF key and
trigger switch), as well as modifying the ON-duration of the backlight before the
automatic turning-off.
6
Page 17

Chapter 1. Quick Guide
1.4 Using the Keypad
■ Entering Numerical Data
To enter numerical data e.g. the quantity of goods, use the ten numerical keys and
ENT key.
For example, to enter the number "120", press 1 , 2 , and 0 keys and then press
ENT key.
If you key in any wrong value, press C or BS key and then enter the correct one.
■ Selecting Tasks
If the LCD shows the selection items (xxx) prefixed by numerals (e.g., 1: xxx, 2: xxx),
use the numerical keys to select a desired one and press ENT key to execute.
If a YES/NO screen (e.g. 1: YES, 2: NO) appears, press 1 key for YES response; 2
key for NO response.
7
Page 18

8
Page 19

Chapter 2. Getting Started the BHT-4000 and System Mode
Chapter 2
Getting Started the BHT-4000 and System Mode
This chapter summarizes the BHT-4000 system configuration and describes the operation including preparation and System Mode (which is required for the efficient use of
application programs).
2.1 BHT-4000 System Configuration ..................................................................................... 10
2.2 Components and Functions ............................................................................................ 15
2.3 Preparation ....................................................................................................................... 17
2.3.1 Setting-up 1: Loading the Battery Cartridge ............................................................ 17
2.3.2 Setting-up 2: Installing System Program and User Programs ............................... 19
[ 1 ] Downloading System Program ............................................................................... 20
[ 2 ] Initializing the BHT-4000........................................................................................... 28
[ 3 ] Setting the Calendar Clock (date and time) ............................................................ 30
[ 4 ] Downloading User Programs or Easy Pack 4.2 ...................................................... 32
[ 5 ] Selecting an Execution Program to be Run when the Power is First Applied .... 37
2.3.3 Adjusting the LCD Contrast & Beeper Volume, and Displaying the Battery Voltage
Level ............................................................................................................................. 38
2.4 Operating in System Mode ............................................................................................. 39
2.4.1 Starting System Mode ................................................................................................ 39
2.4.2 Operating in System Mode ........................................................................................ 41
2.4.3 Detailed Description of the Functions in System Mode .......................................... 42
[ 1 ] Program Execution ................................................................................................... 42
[ 2 ] Downloading ............................................................................................................. 43
[ 3 ] Uploading ..................................................................................................................46
[ 4 ] Setting ....................................................................................................................... 48
[ 5 ] Testing ....................................................................................................................... 59
[ 6 ] System Program Version & RAM Capacity ............................................................ 69
9
Page 20
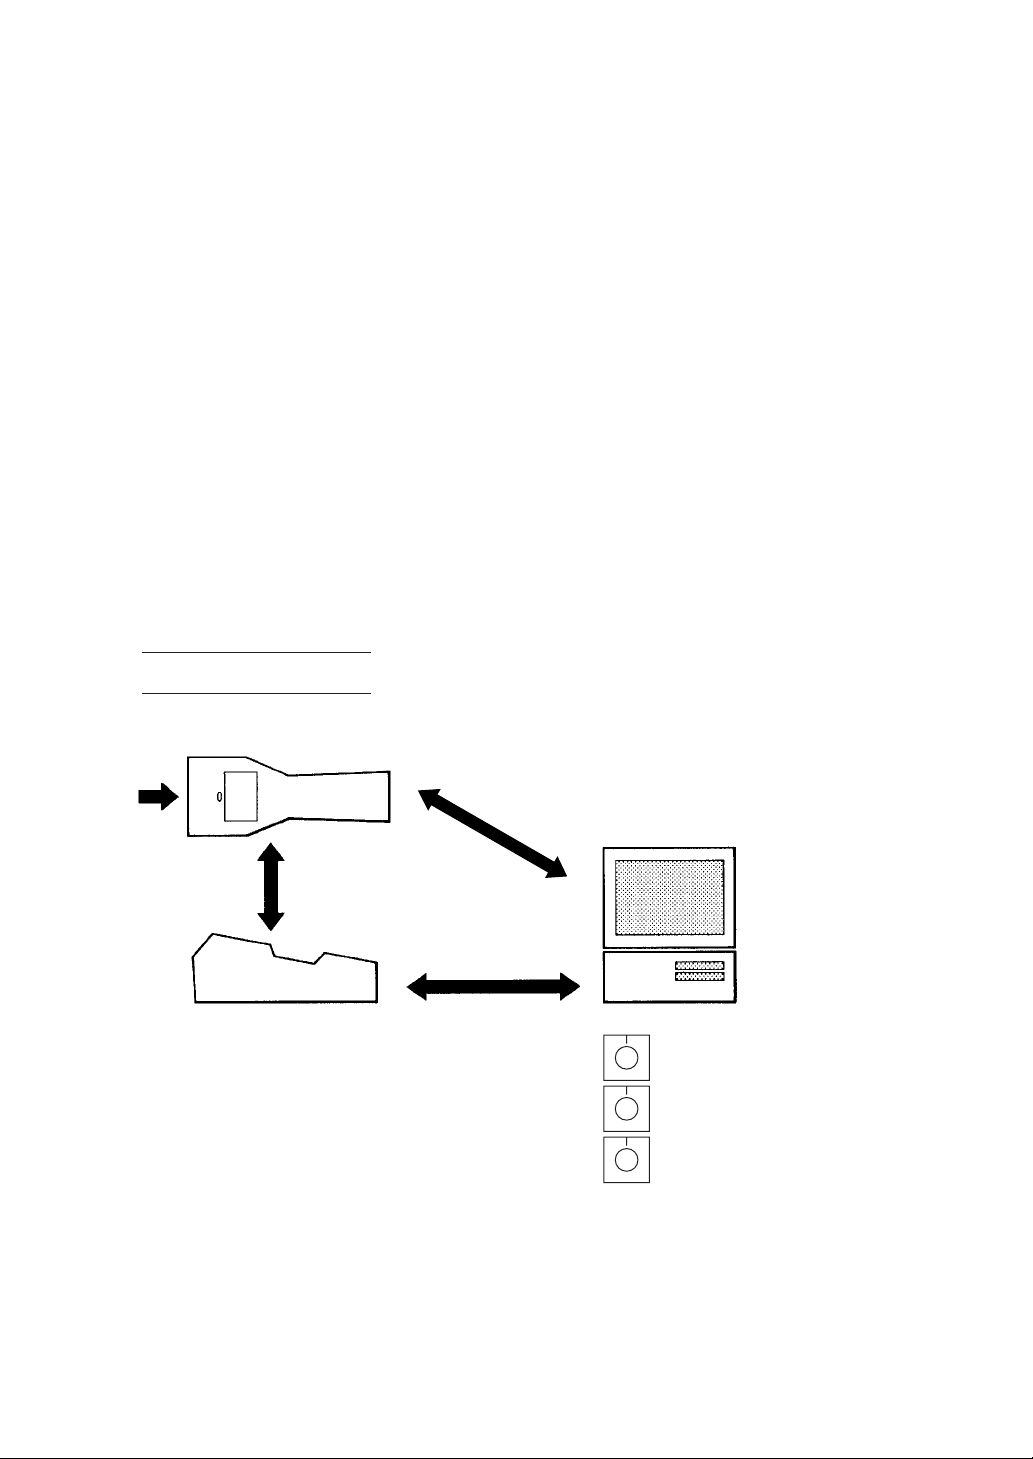
2.1 BHT-4000 System Configuration
As shown in the system configuration below, it is necessary to prepare not only the
BHT-4000 Bar Code Handy Terminal (which reads bar codes and accepts keypad entry)
but also the following hardware:
• Host computer: Allows you to download programs and data or edit/
manage them.
• CU-4000: Exchanges programs and data with the BHT-4000 optically and with the host computer via the RS-232C interface.
• RS-232C interface cable: Connects the CU-4000 and the host computer.
The basic software required for operating the BHT-4000 is "System Program" which is
contained in the "BHT-BASIC 3.0 System Pack." (The BHT-BASIC 3.0 System Pack is
provided in a 3.5" floppy disk.)
Optional software includes the BHT-BASIC 3.0 Compiler and Transfer Utility. (Each
software is provided in a 3.5" floppy disk.)
System Configuration
BHT-4000
RS-232C
Interface
Optical Communications
CU-4000 RS-232C Interface
Host Computer
BHT-BASIC 3.0 System Pack
(Containing System Program, Easy
Pack 4.2, and System Loader)
BHT-BASIC 3.0 Compiler (option)
Transfer Utility (option)
■ Host Computer
OS: MS-DOS Ver. 3.1 or a later version.
RAM: 640 kilobytes. At least 400-kilobyte area should be reserved as a work
area.
Models: IBM PC-AT, PS/2
Toshiba T-3100 series
10
Page 21

Chapter 2. Getting Started the BHT-4000 and System Mode
■ CU-4000 and RS-232C Interface Cable
The CU-4000 is an optical communications unit which exchanges data and programs
with the BHT-4000 optically and with the host computer via the RS-232C interface
cable.
You may directly connect two BHT-4000 terminals with each other by using a QM
connector cable. Joining a QM connector cable to an interface cable compatible with
the target host computer or modem makes it possible to directly connect the BHT-4000
with it. (NOTE: The direct-connect interface port of the BHT-4000 is not designed to
stand frequent connecting/disconnecting. It is, therefore, recommended to use the
CU-4000 when connecting the BHT-4000 to a host computer.)
■ BHT-BASIC 3.0 System Pack
The System Pack contains:
• System Program
• Easy Pack 4.2 : EASYPACK.PD3
• System Loader : TS3.EXE
System Program is essential for the BHT-4000. Easy Pack 4.2 is an application program designed by the manufacture for general bar-code data collection and data entry
from the keypad. System Loader allows you to download System Program and Easy
Pack 4.2 into the BHT-4000.
(Drivers, BHT-BASIC 3.0 Interpreter, and System Mode)
: _ _SYSPG0.SY3
■ BHT-BASIC 3.0 Compiler (option)
The compiler compiles a source program written in BHT-BASIC 3.0 by an editor of the
host computer running the MS-DOS, into the object program (user program) which
can be used in the BHT-4000. The compiled program file is named "XXX.PD3". You
should download it to the BHT-4000 by using Transfer Utility.
■ Transfer Utility (option)
The utility transfers files between the BHT-4000 and the host computer. For details,
refer to the "Transfer Utility Guide" issued separately.
11
Page 22
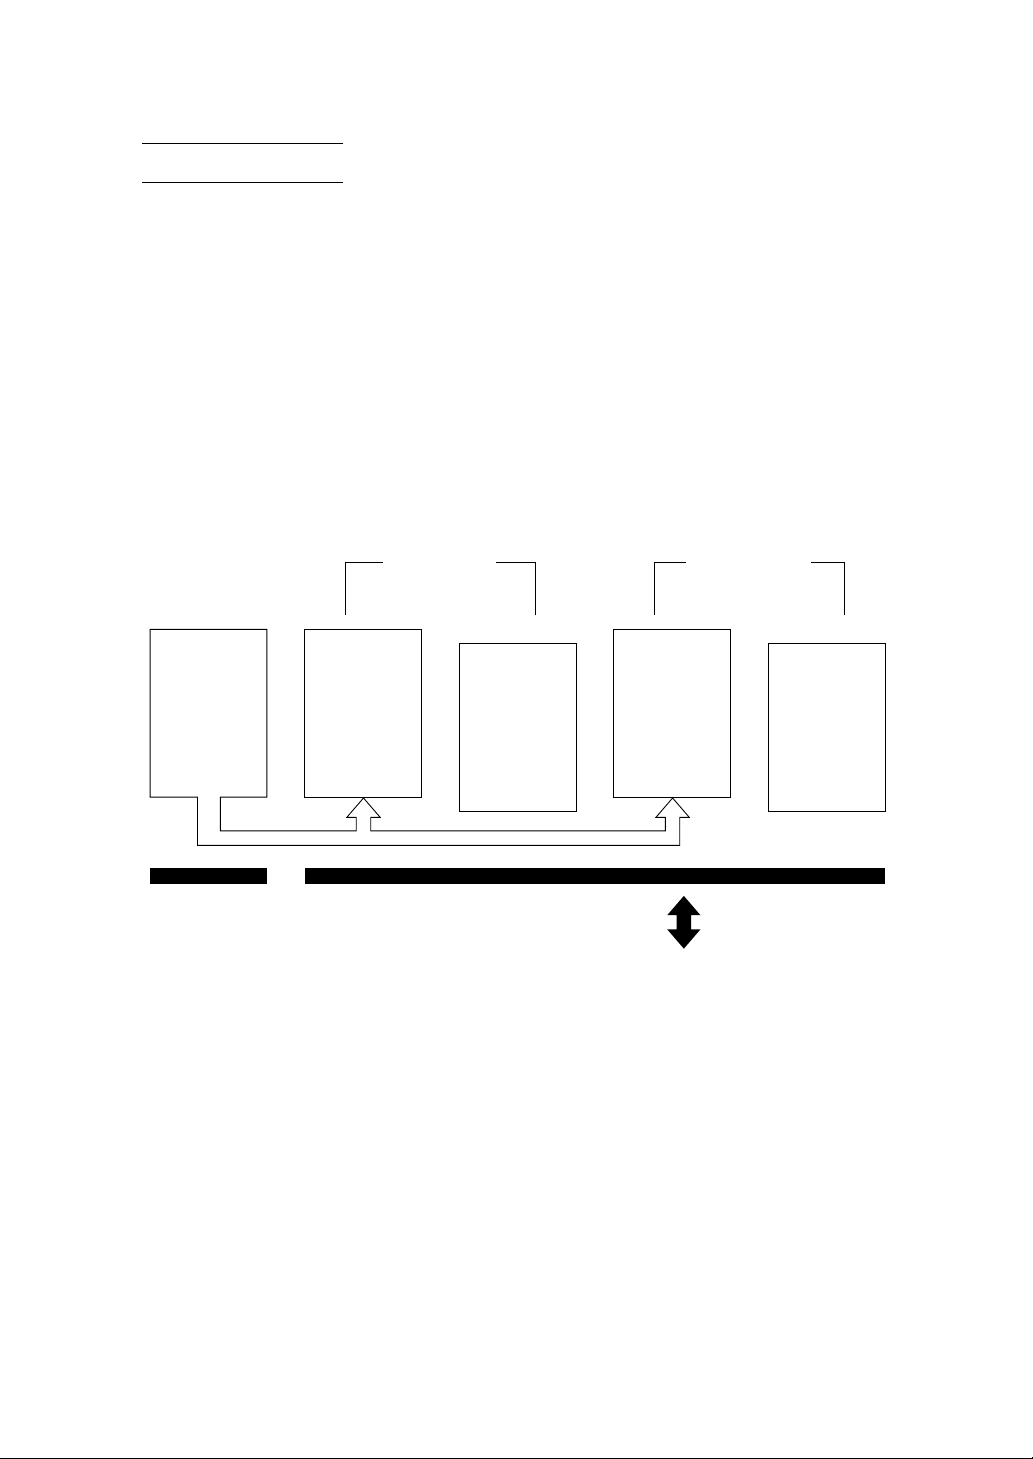
Software Structure
Before your first use of the BHT-4000, you should download System Program provided
in the BHT-BASIC 3.0 System Pack from the host computer to the BHT-4000. Also, you
should download Easy Pack 4.2 if necessary in the same manner. System Program
and Easy Pack 4.2 will be stored in the system area and user area of the RAM,
respectively. For detailed procedure, refer to Subsection 2.3.2 [1] Downloading System Program and Subsection 2.3.2 [4] Downloading User programs or Easy Pack 4.2.
To use user programs, you should download the program files into the RAM (user
area).
Prior to executing Easy Pack 4.2 or user programs, it is necessary to prepare a data file
for each of those programs before running the program. The data files will be stored
also in the user area of the RAM.
System Program
Program files
System Area User Area
Easy Pack 4.2 User Programs
RAM in the BHT-4000
Data files
Program files
Transfer
Host Computer
Data files
12
Page 23

Chapter 2. Getting Started the BHT-4000 and System Mode
■ System Program
System Program is essential for the BHT-4000. Prior to the first use of the BHT-4000,
they should be downloaded from the host computer to the BHT-4000. For the downloading procedure, refer to Subsection 2.3.2, [1] Downloading System Program.
System Program consists of the following three sets of programs:
Drivers
Drivers is a set of programs that directly controls the BHT-4000 hardware. It may be
called by the BHT-BASIC 3.0 Interpreter or System Mode.
BHT-BASIC3.0 Interpreter
The interpreter interprets and executes instructions in user programs or Easy Pack
4.2, which are written in BHT-BASIC 3.0.
System Mode
System Mode is a system program exclusively designed for the effective use of
Easy Pack 4.2 and user programs in the BHT-4000. It sets up the execution
environments for those programs; e.g., it prepares downloading conditions, sets
the calendar clock, and tests the BHT-4000 components including the LCD, beeper,
and keypad. Shown below is the System Mode menu.
SYSTEM MENU
1:Execute 2:Download
3:Upload 4:Set mode
5:Test 6:Version
13
Page 24

■ Easy Pack 4.2
Easy Pack 4.2 is an easy-to-use application program designed for general bar-code
data collection and data entry from the keypad. You can easily and directly apply this
program in your business. What you have to do is merely to make a data file (up to
four) matching your applications, collect bar-code data, and transfer the data file to the
host computer.
In System Mode, Easy Pack 4.2 is treated as one of user programs.
■ User Programs
You can develop application programs to meet individual job requirements by using
the BHT-BASIC 3.0 Compiler. To download those user programs to the BHT-4000, use
Transfer Utility (option).
14
Page 25
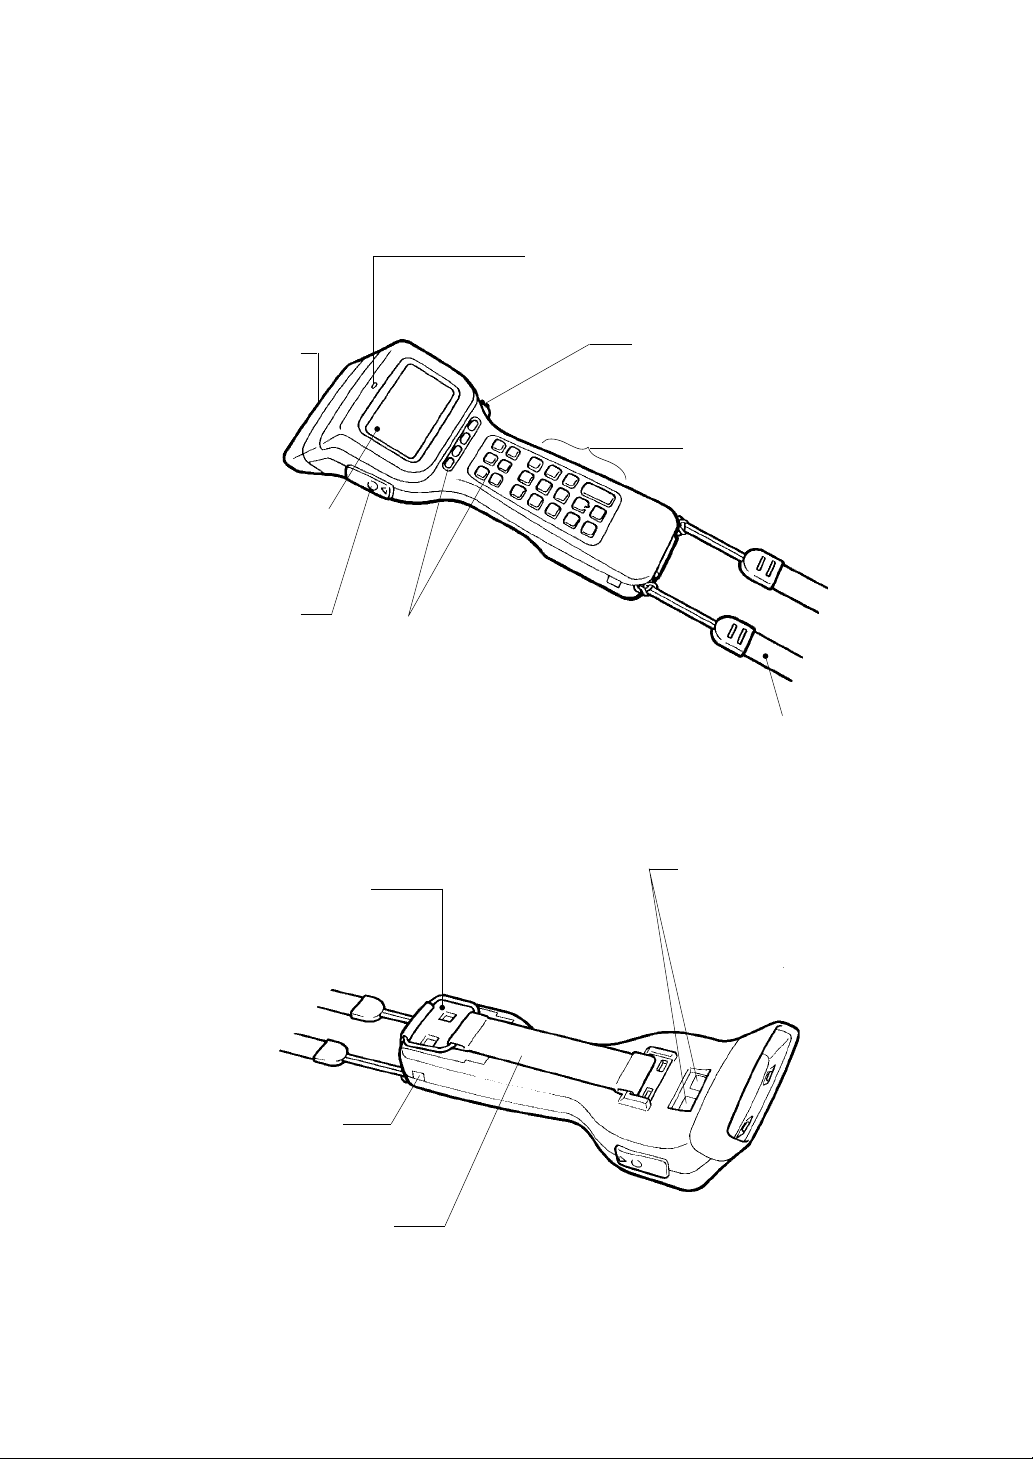
Chapter 2. Getting Started the BHT-4000 and System Mode
2.2 Components and Functions
• Reading Confirmation LED
Illuminates in green when the
BHT-4000 has successfully
read bar codes.
• Bar-code Reading
Window
• Liquid Crystal Display
(LCD)
Shows the characters
and graphic patterns.
• Connector Cover
Pull out the end marked
with 3 . The directconnect interface port
will be exposed.
• Battery Cartridge
Main power source of
the BHT-4000.
• Trigger Switch
Press this switch to start
bar-code reading.
• Numerical Keys
Used to key in data.
• Function Keys
Used to select functions.
• Neck Strap (option)
Enables you to wear the
BHT-4000 in easy reach.
• Optical Interface Port
Used to exchange data
with the host computer
via the optical communications unit CU-4000.
• Battery Release Button
Press this button to remove
the battery cartridge.
• Hand Belt
Put your hand through to
prevent dropping.
15
Page 26
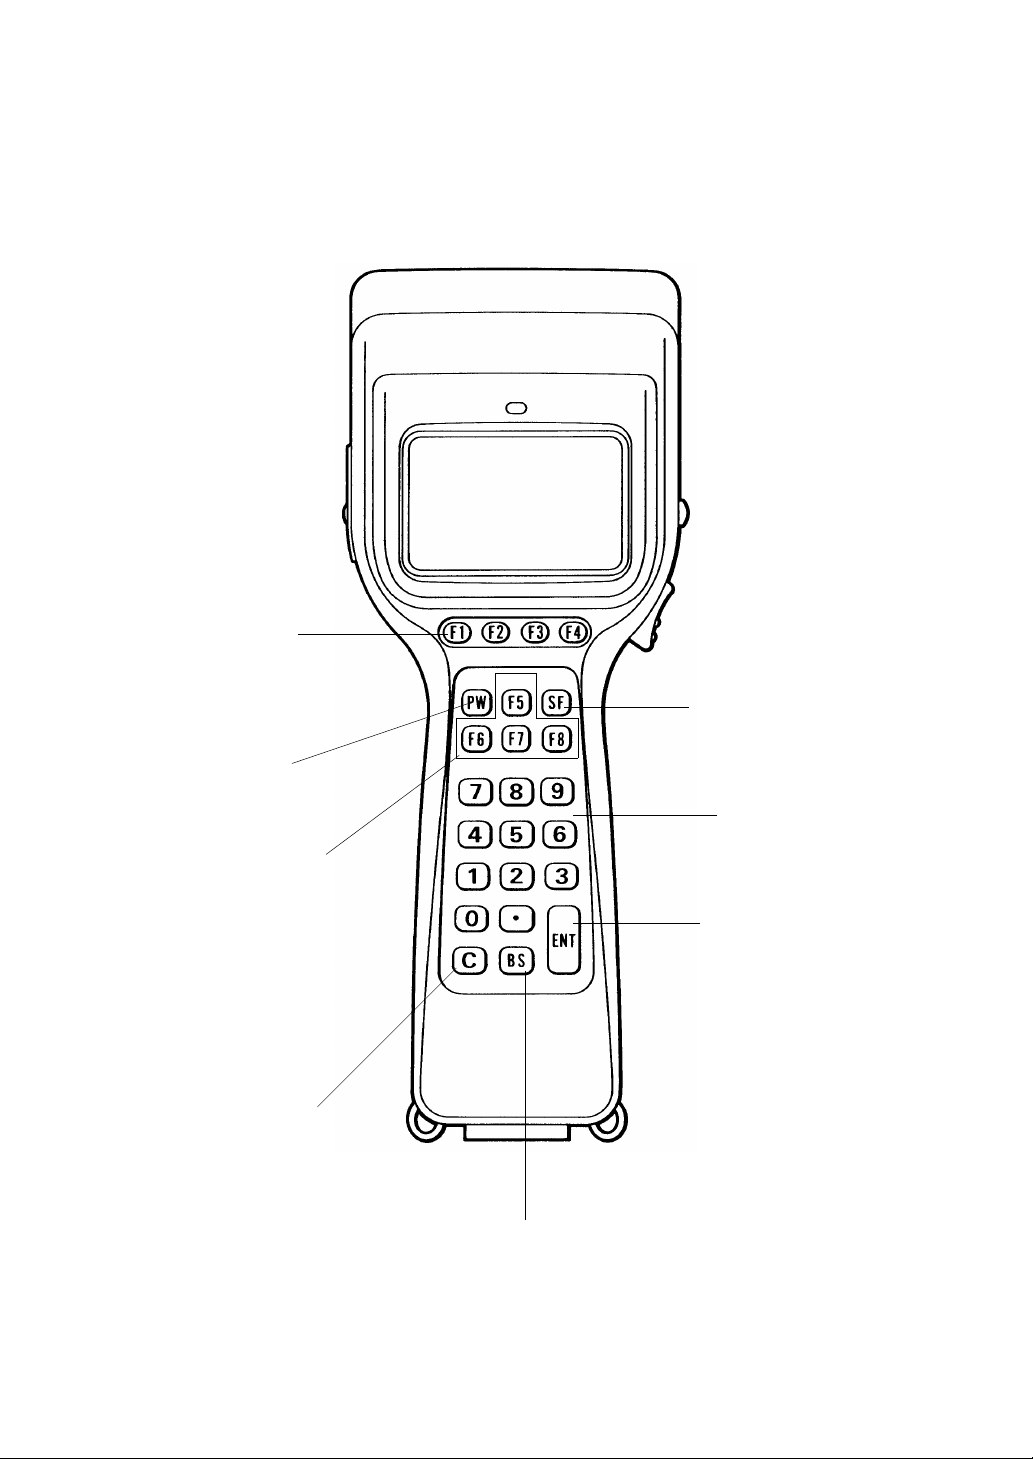
The functions of the keys may be set by user programs. What follows is a set of
sample functions when the BHT-4000 is used with Easy Pack 4.2.
• F1 MENU key
Switches to the user's menu
screen of Easy Pack 4.2.
• PW (Power) key
Turns the BHT-4000
on or off.
• F5-F8 Cursor keys
Used to move up to the
preceding line, down to the
next line, to the preceding
character, and to the next
character.
↑
← →
↓
A B C D E F G H I
J K L
M N O
P Q R
S T U V W X Y Z Sp
/ $ %+ –
∗
• SF (Shift) key
Used in combination
with numerical keys
for special input
procedures.
• Numerical keys
Used for numerical
input.
• ENT (Enter) key
Finalizes the inputted
data or operations,
and starts the corresponding processing.
•C (Clear) key
Clears the last inputted
data or returns to the
original screen.
• BS (Backspace) key
Moves back one character.
16
Page 27
Chapter 2. Getting Started the BHT-4000 and System Mode
2.3 Preparation
2.3.1 Setting-up 1: Loading the Battery Cartridge
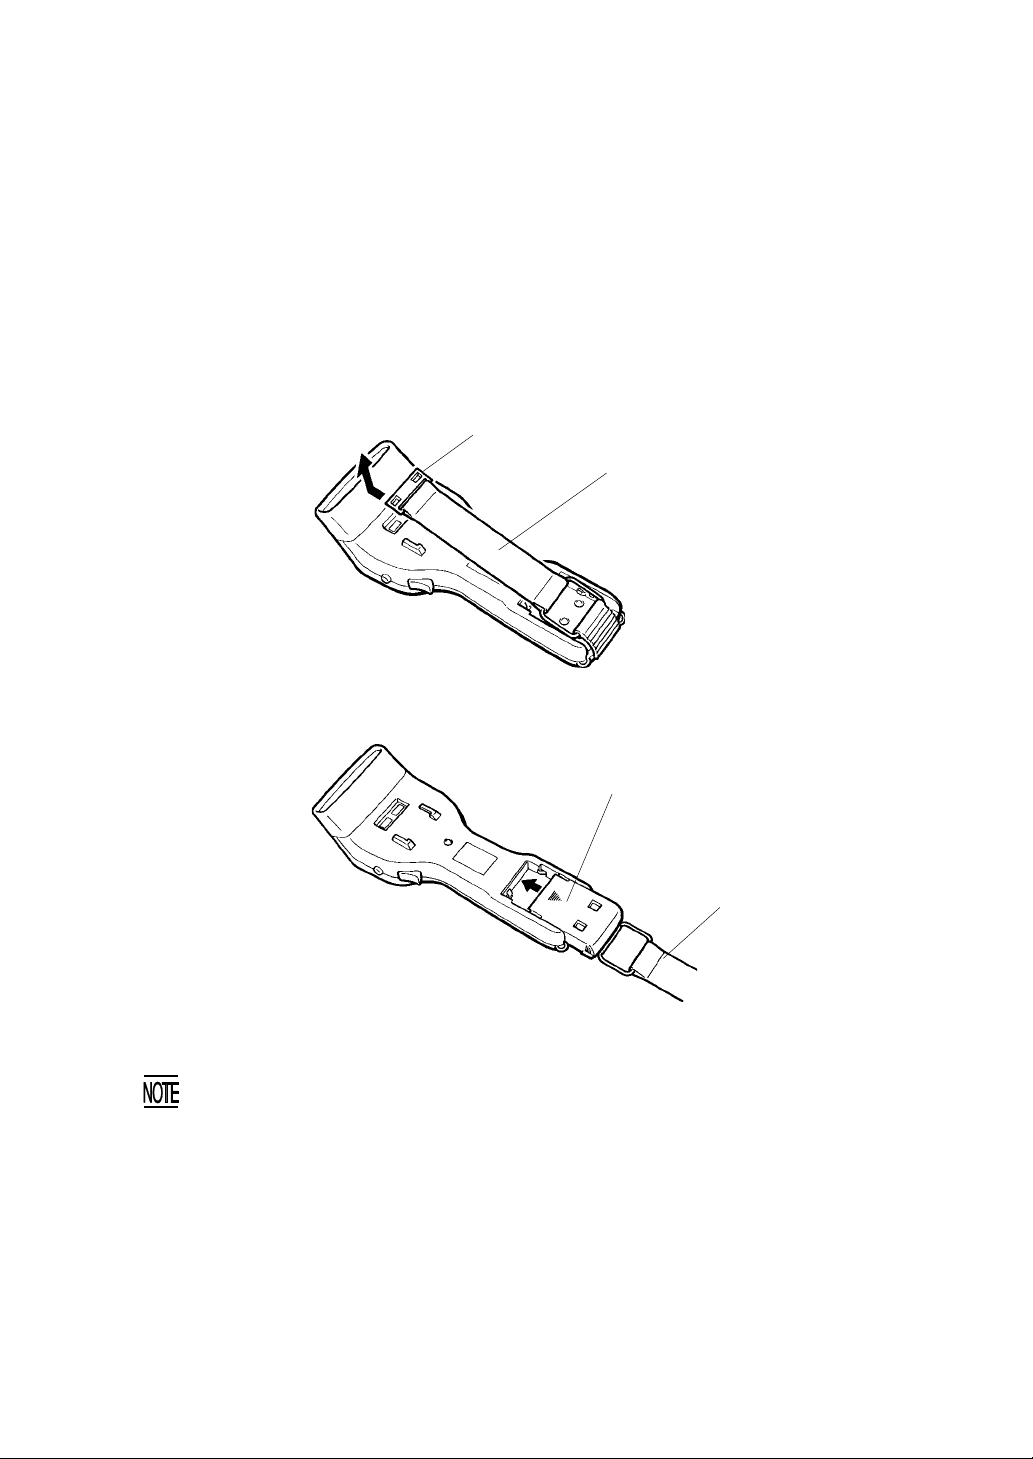
Before starting the BHT-4000, be sure to load the furnished battery cartridge according
to the steps below.
(1) Turn the BHT-4000 upside down.
(2) Release the hook of the hand belt by pulling it in the direction of the arrow as shown
below.
Hook
Hand belt
(3) Push the battery cartridge into the BHT-4000 until it clicks into place.
Battery cartridge
Hand belt
(4) Set the hook of the hand belt back to the original position.
•When you first load the battery cartridge after purchase or you load it after leaving
the BHT-4000 unused for a long time, do not remove the battery cartridge within
24 hours after that loading.
• To remove the battery cartridge, press the battery release button and slide out the
cartridge.
• Do not leave the BHT-4000 loaded with no battery cartridge for a long time. Otherwise, the contents of the memory may be lost, causing a system error while
showing the message "Report to the personnel in charge!!".
Reference: The BHT-4000 integrates a lithium battery which backs up the memory in the
BHT-4000 when no battery cartridge is loaded or the voltage level of the
battery cartridge drops below the specified level. The lithium battery is
automatically charged by the battery cartridge.
17
Page 28

Checking the Battery Voltage Level
You may check the current voltage level of the battery cartridge on the LCD which is
displayed either as an icon or a bar indicator.
The icon is displayed on the bottom of the LCD while the BHT-4000 is in operation
(except in System Mode) as default. You may erase the icon by turning off the
STATUS setting in System Mode. Refer to Subsection 2.4.3, [4.2] Setting the
message version and the system status indication.
The bar indicator will temporarily appear, by turning on the power while holding
down the trigger switch. For details, refer to Subsection 2.3.3 Adjusting the LCD
Contrast & Beeper Volume, and Displaying the Battery Voltage Level.
Low Battery Indication
If the battery voltage level drops below the specified level while the BHT-4000 is in
operation, the BHT-4000 displays the following message on the LCD, beeps five
times, and goes off automatically. Charge the battery cartridge (see the "Charging
the Battery Cartridge" below) or replace the current battery cartridge with a fullycharged one.
==`Ь~кЦЙ
=====нЬЙ=Д~ннЙку>>
Charging the Battery Cartridge
You may charge the battery cartridge with the optical communications unit CU4000 or the quick charger C-200 (option). For the charging procedure with the CU4000, refer to Chapter 6. For the charging procedure by the C-200, refer to the "C200 User's Manual."
18
Page 29
Chapter 2. Getting Started the BHT-4000 and System Mode
2.3.2 Setting-up 2: Installing System Program and User Programs
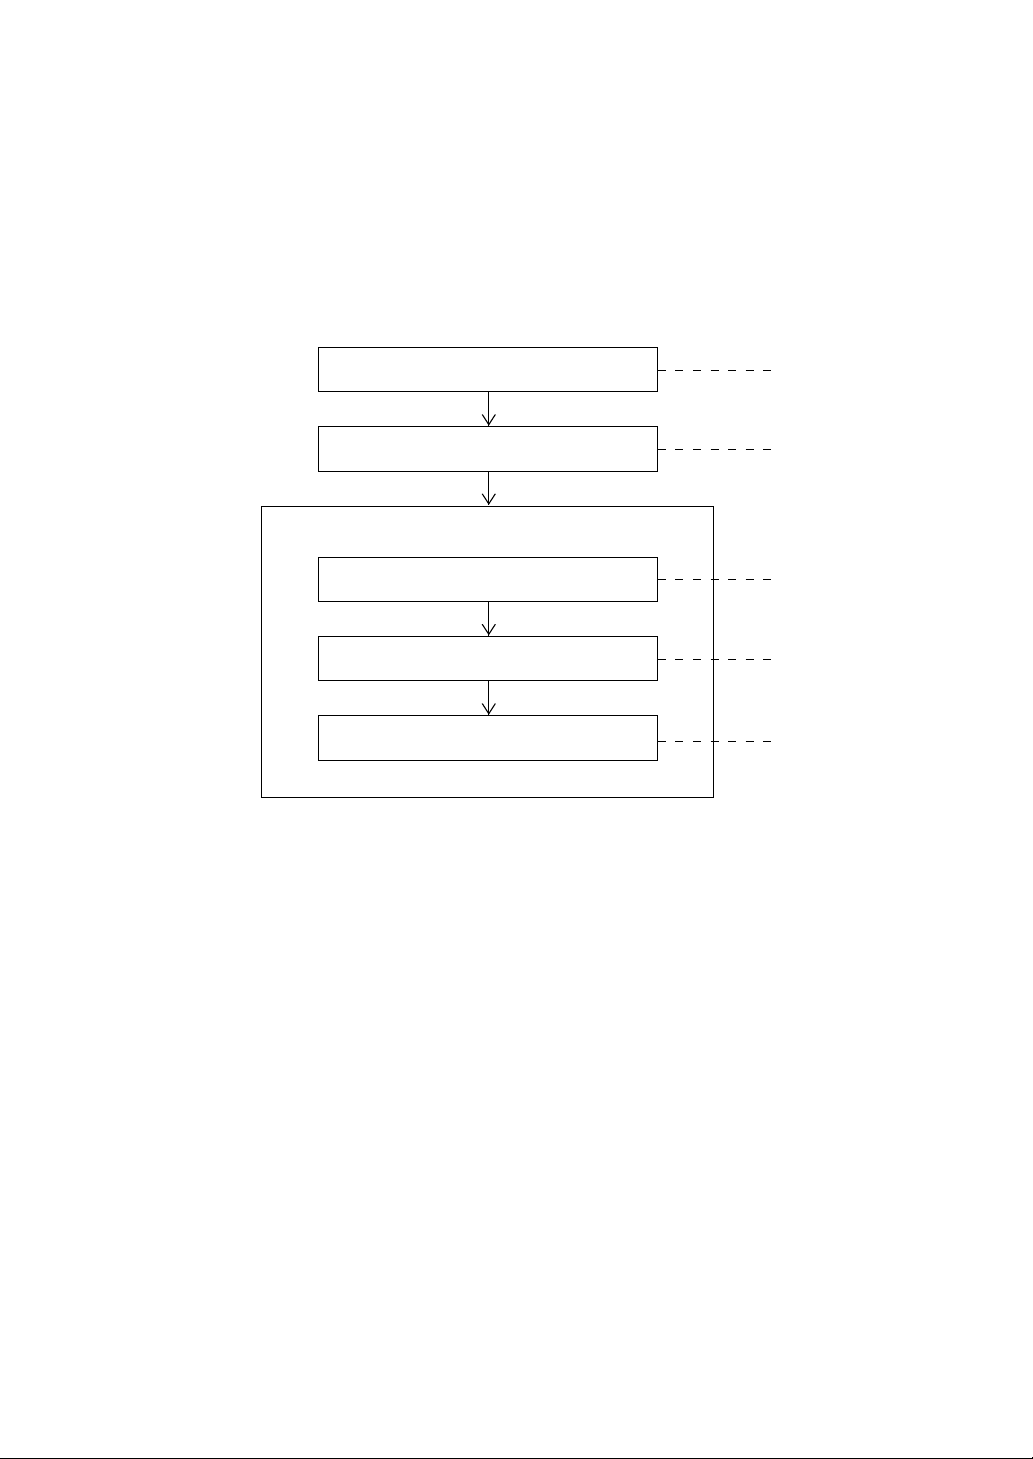
Install System Program provided in the "BHT-BASIC 3.0 System Pack" and user programs according to the procedure given below.
Download System Program.
Initialize the BHT-4000.
Run System Mode.
Set the calendar clock.
Download user programs or Easy Pack
4.2.
Select an execution program to be run
when the power is first applied.
[ 1 ]
[ 2 ]
[ 3 ]
[ 4 ]
[ 5 ]
19
Page 30

[ 1 ] Downloading System Program
System Program (which consists of Drivers, BHT-BASIC 3.0 Interpreter, and System
Mode) is provided in the "BHT-BASIC 3.0 System Pack" floppy disk together with
System Loader and Easy Pack 4.2. You should download System Program using the
System Loader.
This section describes the downloading procedure on the BHT-4000 and the host
computer, as well as the related setting-up work.
■ Preparation before Downloading
Make the following setting-up according to the interface to be selected:
To use the optical interface:
(1) Make sure that both the CU-4000 and the host computer are powered off. Then,
connect them with each other using the RS-232C interface cable. (For the interface
port Dsub-25S on the CU-4000 and its pin assignment, refer to Chapter 3, Subsection 3.1.1.)
(2) Turn on the host computer and start the MS-DOS.
(3) Turn on the CU-4000.
(4) Make sure that the BHT-4000 is powered off. Then, put it on the CU-4000.
To use the direct-connect interface:
(1) Make sure that the BHT-4000 and the host computer are powered off. Then, con-
nect them with each other using the RS-232C interface cable. (For the direct-connect interface port on the BHT-4000 and its pin assignment, refer to Chapter 3,
Subsection 3.1.2.)
(2) Turn on the host computer to start the MS-DOS.
20
Page 31
■ Operating the BHT-4000
DOWNLOAD SYSTEM
1:Optical
2:Connector
RAM Size XXXXX
ROM Ver. X.XXX
Chapter 2. Getting Started the BHT-4000 and System Mode
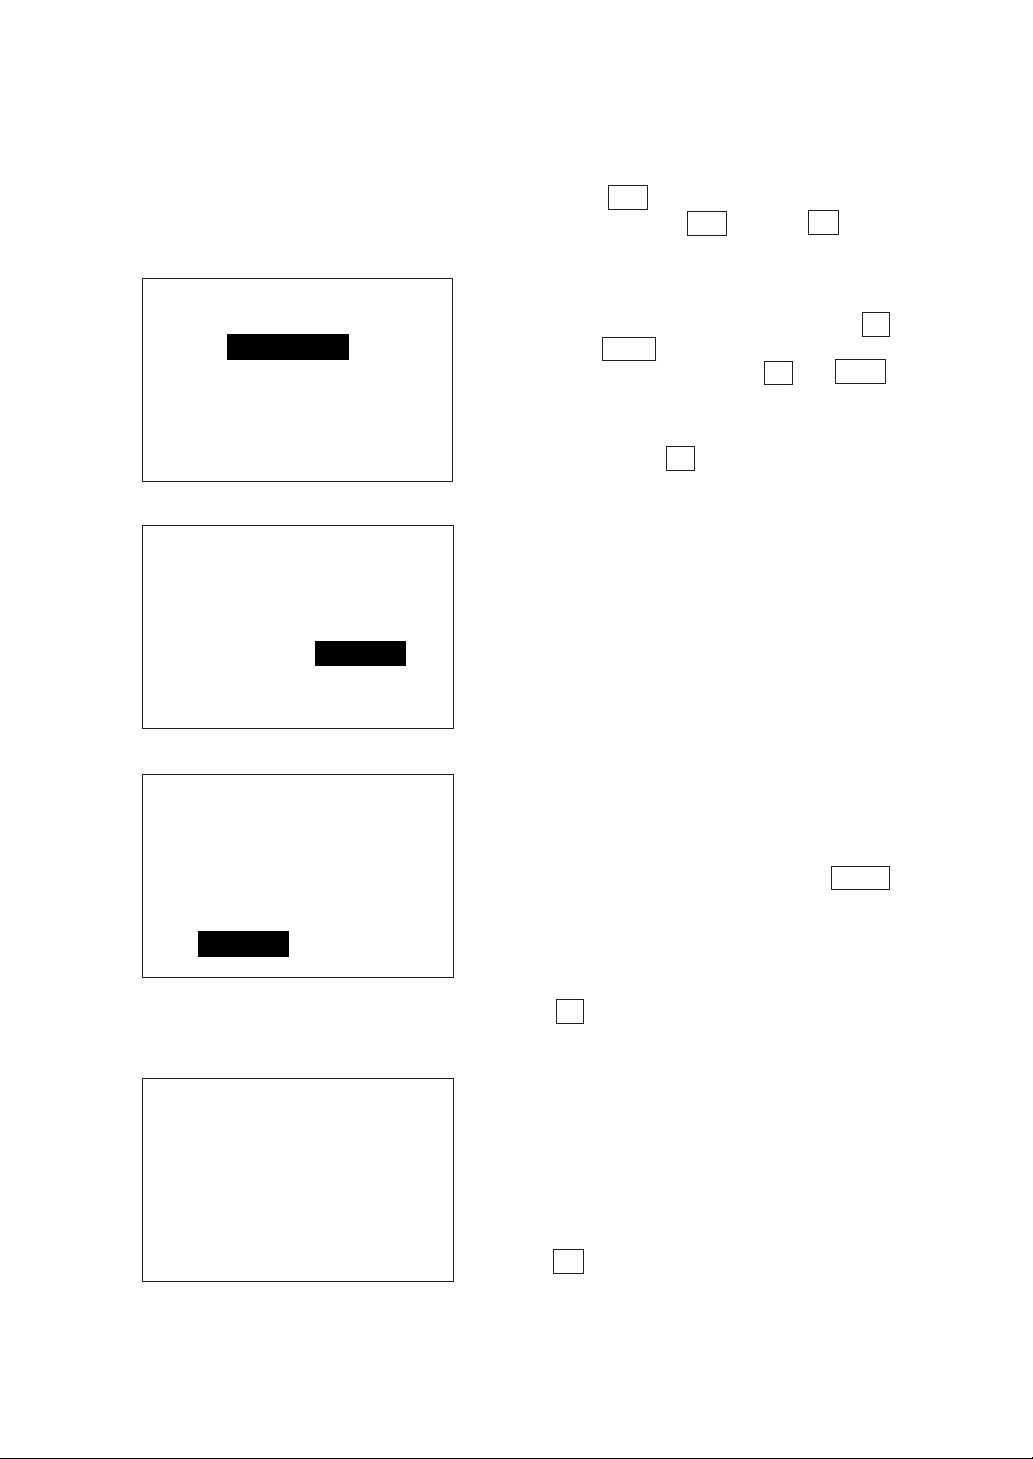
(1) Press PW key while holding down the
trigger switch, F1 key, and C key.
The DOWNLOAD SYSTEM menu screen
shown at left will appear.
(2) To use the optical interface, press 1
and ENT keys; to use the directconnect interface, press 2 and ENT
keys.
(To return to the DOWNLOAD SYSTEM
menu, press C key.)
DOWNLOAD SYSTEM
Optical Speed
1:2400 2: 4800
3:9600 4:19200
DOWNLOAD SYSTEM
I/F Connector Speed
1:2400 2: 4800
3:9600 4:19200
5:38400
DOWNLOAD SYSTEM
** Waiting **
Selecting the optical interface displays the
screen shown at left.
Selecting the direct-connect interface displays the screen shown at left.
(3) Select the transmission speed by using
the numerical keys and press ENT
key. (The transmission speed should be
the same as the speed to be specified in
the host computer.)
(To return to the previous screen, press
C key.)
The screen shown at left will appear, showing that the BHT-4000 is waiting for a file to
be downloaded.
(4) Proceed to the
■ Operating the Host
Computer.
(To return to the previous screen, press
C key.)
21
Page 32

■ Operating the Host Computer
(1) Load the "BHT-BASIC 3.0 System Pack" floppy disk into the drive of the host com-
puter.
(2) Enter the following at the MS-DOS command line to initiate System Loader con-
tained in the floppy disk, and the host computer will start downloading System
Program.
X>TS3 _ _SYSPG0.SY3
option
Where, "X" denotes the name of the drive in which you loaded the floppy disk. The
"
TS3" is the program file name of System Loader. The "_ _ SYSPG0.SY3" is the
file name of System Program to be downloaded. For the options, see below.
Option List
You may specify the options listed below for downloading System Program. If
no option is specified, the defaults will apply.
+B
transmissionspeed
+?
Sets the transmission speed. *
+B
n
n: 2400, 4800, 9600, 19200, or 38400*2 (bps)
Displays the help screen. Specifying this
option displays only the help screen without
downloading.
1
+B19200
(No help screen)
DefaultFunctionOptions
*1The transmission speed should be the same as specified on the BHT-4000.
*2The "+B38400" is available only when you have selected the direct-connect in-
terface of the BHT-4000.
22
Page 33

Chapter 2. Getting Started the BHT-4000 and System Mode
• More than one option should be delimited with spaces.
• System Loader makes no distinction between the uppercase and lowercase letters.
• Options may be specified following "
TS3".
• System Loader can download System Program and Easy Pack 4.2 only. It cannot
download other program files or data files. Neither can it upload System Program
or Easy Pack 4.2.
• The communications parameters in System Loader are fixed except for the transmission speed.
23
Page 34

■ Downloading
If downloading starts:
[ BHT-4000 ]
DOWNLOAD SYSTEM
** Loading **
XXX/YYY
[ Host computer ] The host computer displays the screen given
System Loader 3 VX.XX
Copyright (C) DENSO CORPORATION. 1993 all rights reserved
If downloading is completed normally:
[ BHT-4000 ]
The BHT-4000 displays the screen shown at
left.
The "
XXX" indicates the number of received
sectors; the "
tors of System Program.
below.
YYY", the total number of sec-
DOWNLOAD SYSTEM
** Completed **
[ Host computer ]
00 : Normal end.
The BHT-4000 displays the screen shown at
left, beeps once, and goes off automatically.
The host computer displays the screen
shown at left.
24
Page 35
Chapter 2. Getting Started the BHT-4000 and System Mode
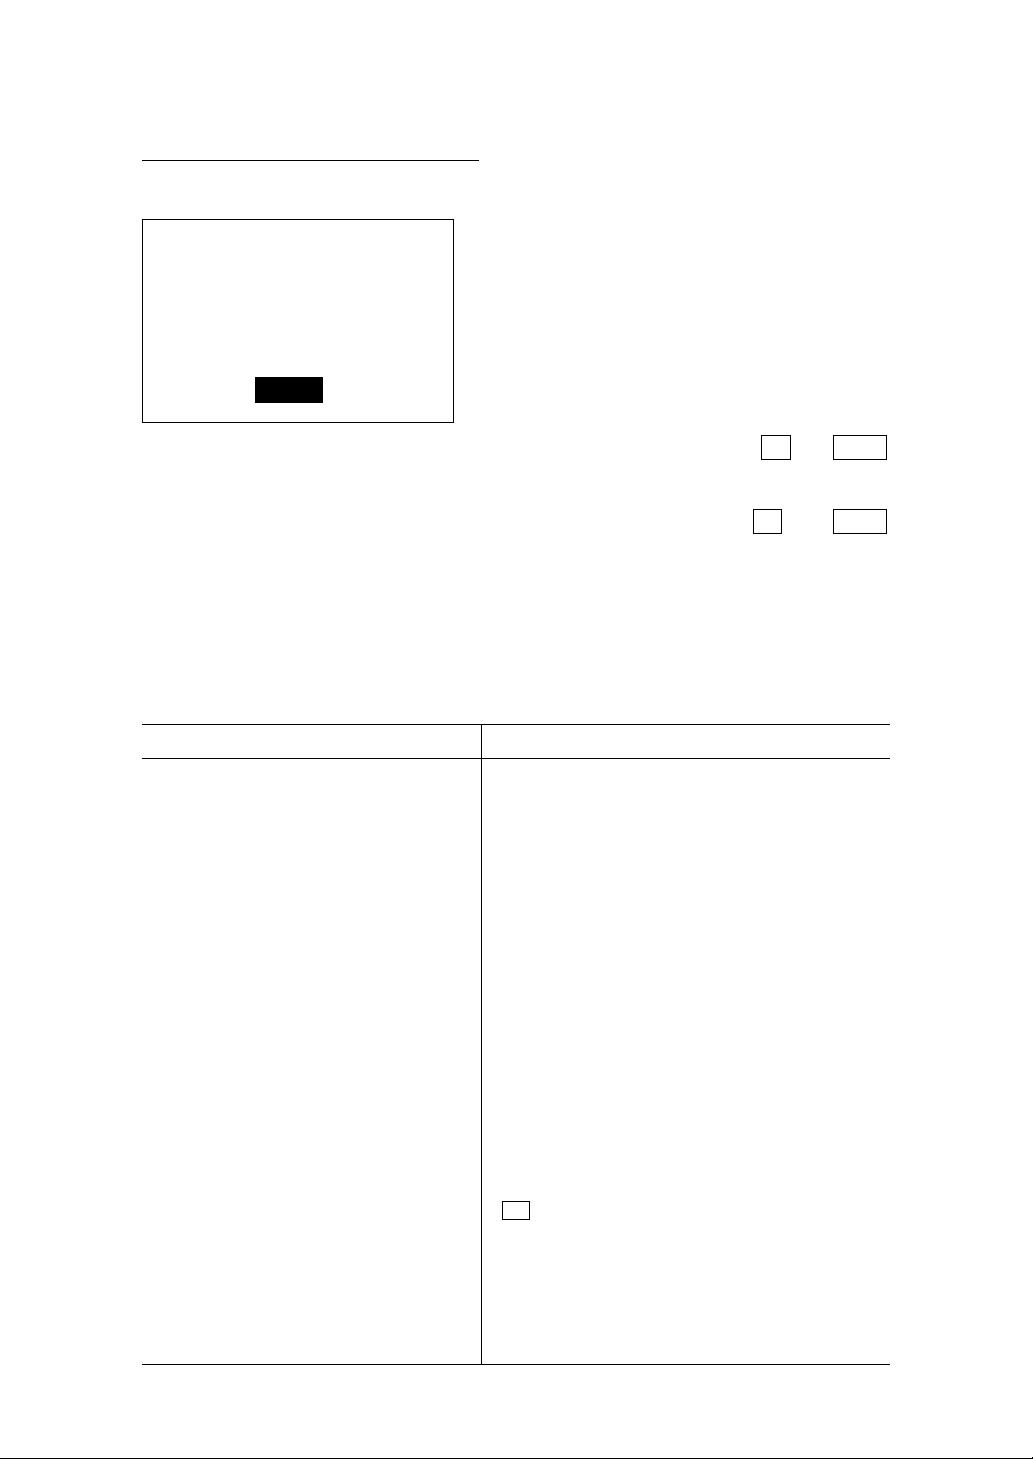
If an error occurs during downloading:
[ BHT-4000 ]
DOWNLOAD SYSTEM
left and beeps three times.
Check the error code & message shown on
The BHT-4000 displays the screen shown at
* Communication NG *
XXXX
RETRY? 1:Yes 2:No
the display of the host computer and take
the necessary recovery action according to
the table given below. (The "
on the LCD of the BHT-4000 indicates the
internal status.)
To retry downloading, press 1 and ENT
keys on the BHT-4000 and initiate System
Loader on the host computer again. To
cancel downloading, press 2 and ENT
keys, and the screen will return to the
DOWNLOAD SYSTEM menu.
[ Host computer ]
The host computer displays one of the following error codes & messages.
Error codes & messages Actions to be taken
01 Designated file not found.
02 File name entered in wrong
format.
09 Option mismatch.
51 Communication error.
52 Communication error.
53 Cancel received.
71 File read error.
90 Aborted by break key.
99 General failure.
Check the name of the file to be downloaded and
then retry downloading.
Check the name of the file to be downloaded and
then retry downloading.
Check the options which you specified at the
MS-DOS command line when initiating System
Loader, and retry downloading.
Check that:
• the RS-232C interface cable is connected
correctly,
• the transmission speed specified on the
BHT-4000 and that on the host computer
are the same, and
• the interface (optical or direct-connect interface) selected on the BHT-4000 and that
on the host computer are the same,
then, retry downloading.
Retry downloading. (This error will occur if the
BHT-4000 is powered down during downloading.)
Retry downloading. (This error will occur if the
C key of the BHT-4000 is pressed during down-
loading.)
Retry downloading. If the same error persists,
check the "BHT-BASIC 3.0 System Pack" floppy
disk for defective, using the CHKDSK.
If necessary, retry downloading.
Retry downloading.
XXXX" shown
25
Page 36
■ To Abort Downloading
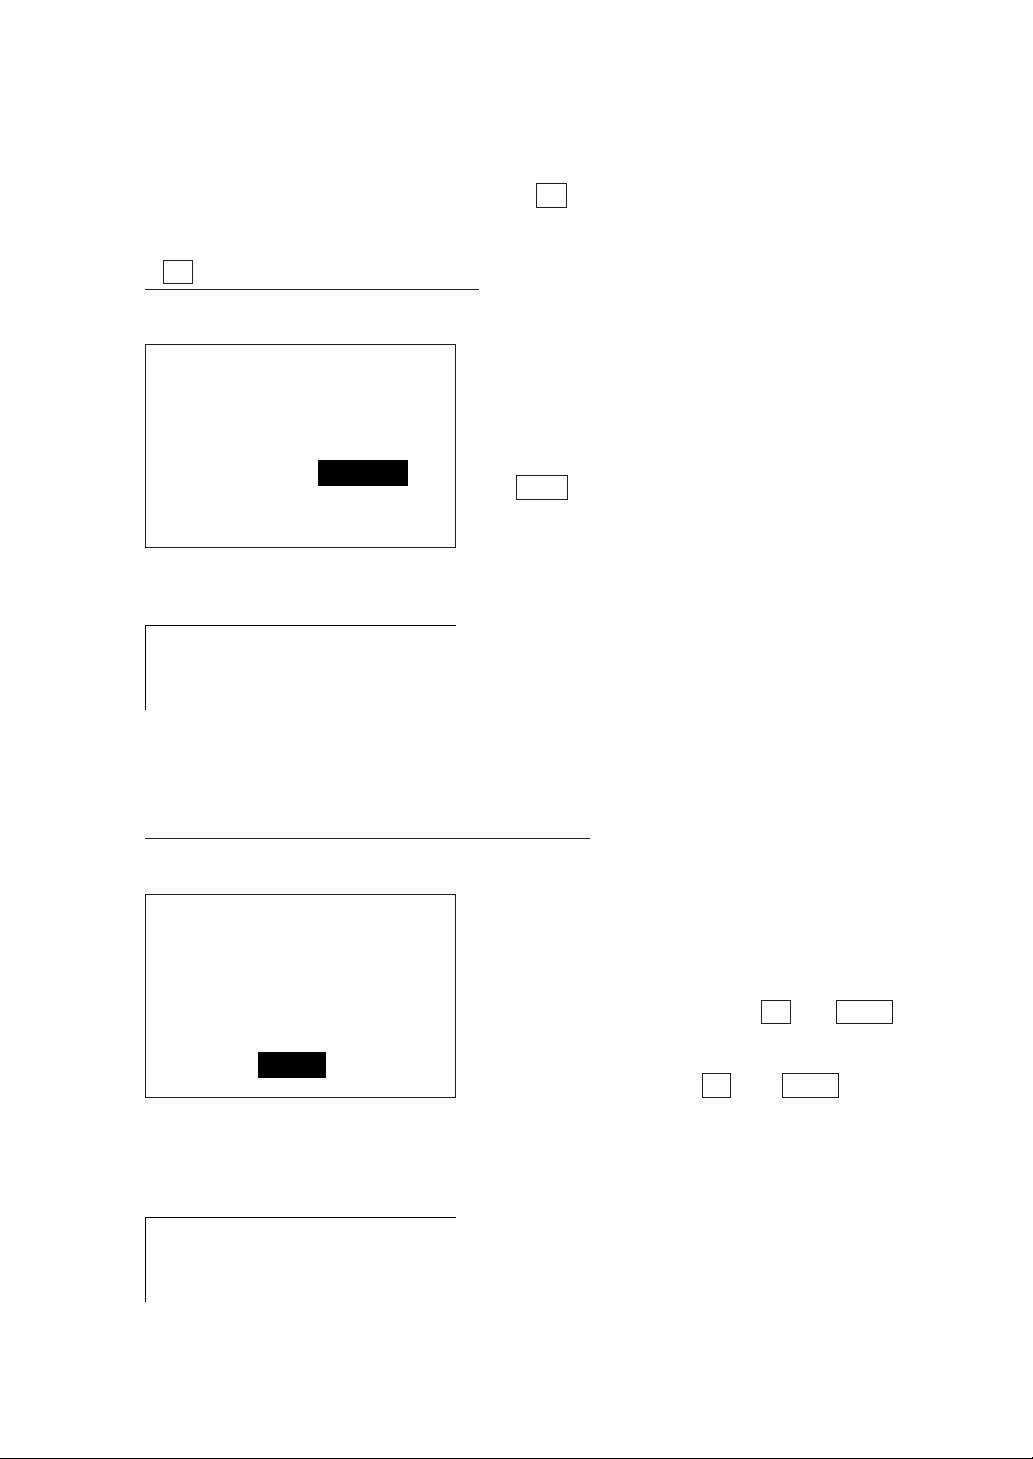
To abort downloading in progress, press C key on the BHT-4000 or press the
specified abort keys (BREAK and ALT keys, or their equivalent) on the host computer.
If C key is pressed on the BHT-4000:
[ BHT-4000 ]
DOWNLOAD SYSTEM
Optical Speed
1:2400 2: 4800
3:9600 4:19200
[ Host computer ]
53 : Cancel received.
If the abort keys are pressed on the host computer:
[ BHT-4000 ]
DOWNLOAD SYSTEM
* Communication NG *
XXXX
RETRY? 1:Yes 2:No
The screen returns to the transmission selection screen shown at left and the beeper
beeps three times.
To retry downloading, select a desired transmission speed by numerical keys and press
ENT key.
The host computer displays the error code
& message shown at left.
To retry downloading, initiate System Loader
again.
The BHT-4000 displays the screen shown at
left and beeps three times. (The "
shown on the LCD indicates the internal status.)
To retry downloading, press 1 and ENT
keys on the BHT-4000 and initiate System
Loader on the host computer. To cancel
downloading, press 2 and ENT keys,
and the screen will return to the DOWNLOAD SYSTEM menu.
XXXX"
[ Host computer ]
90 : Aborted by break key.
The host computer displays the error code
& message shown at left.
To retry downloading, initiate System Loader
again.
26
Page 37

Chapter 2. Getting Started the BHT-4000 and System Mode
After completion of downloading, be sure to initialize the BHT-4000 according to
the procedure given in [ 2 ] Initializing the BHT-4000. Powering on the BHT-4000
without initialization will display the message shown below either in English or
Japanese.
==oЙйзкн=нз
====нЬЙ=йЙклзееЙд
=======бе=ЕЬ~кЦЙ>>
===============EpF
= !
= !"#$%>>
================
EpF
27
Page 38
[ 2 ] Initializing the BHT-4000
Be sure to initialize the BHT-4000 according to the steps below.
The initialization operation will initialize the user area and the system work area (used
for storing system parameters and file directories) of the RAM, but not initialize the
system program area of the RAM. Therefore, System Program already downloaded
will not be affected by the initialization.
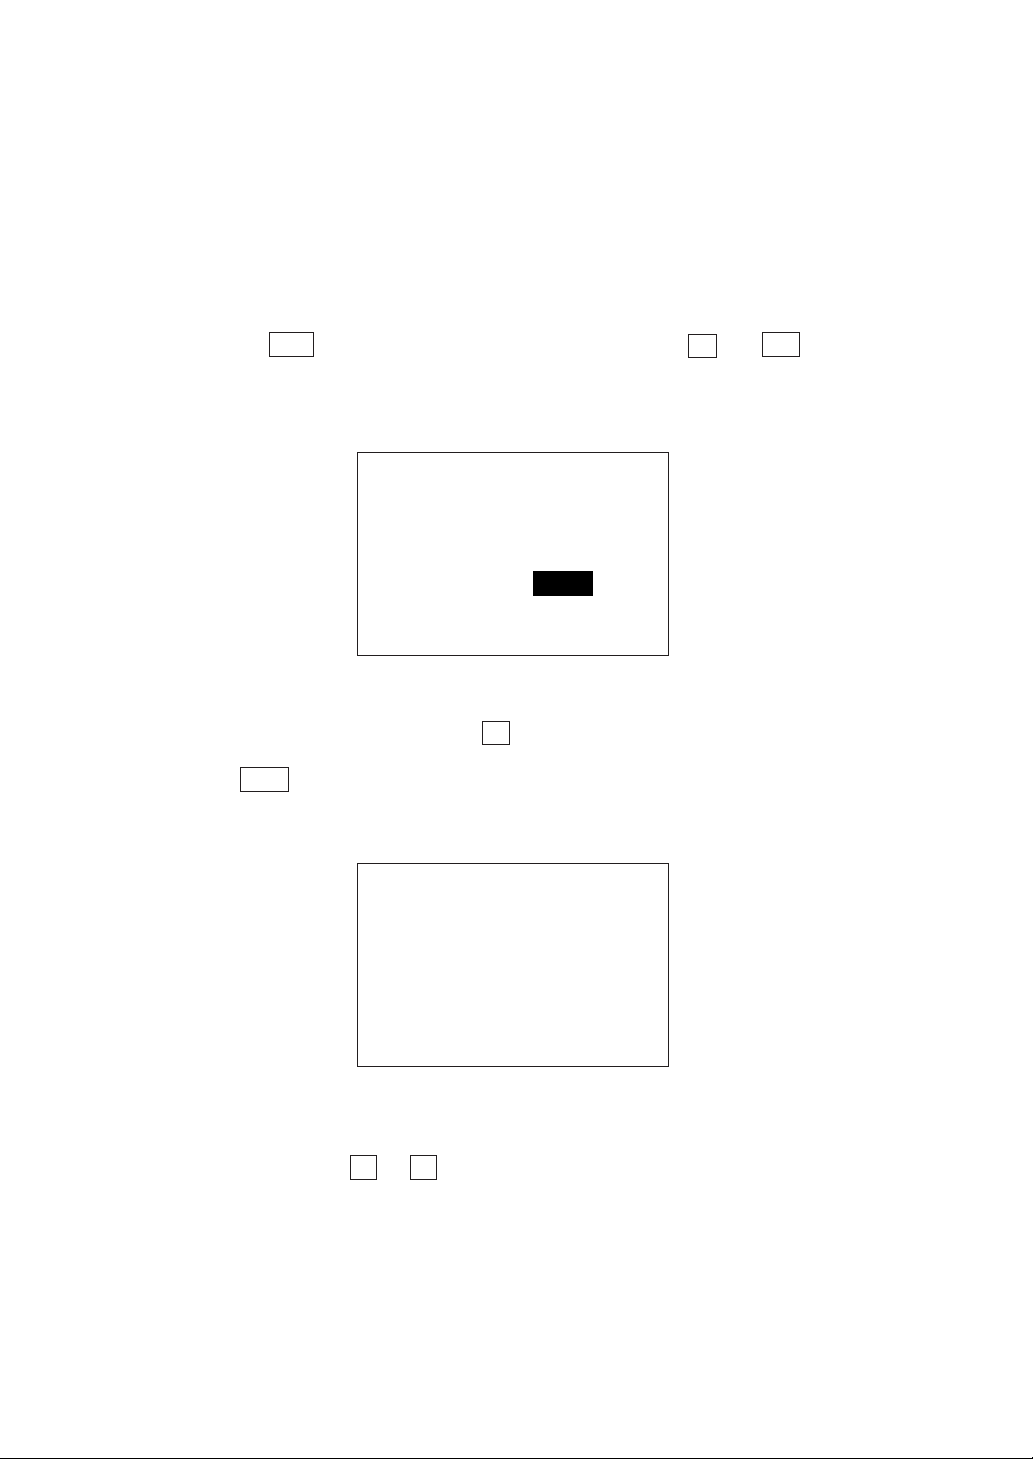
(1) Press the PW key while holding down the trigger switch, 0 and SF keys.
The YES/NO screen will appear on the LCD as shown below .
SYSTEM INITIALIZE ?
1:Yes 2:No
If the cursor is placed at NO, press 1 key to move the cursor to YES.
(2) Press ENT key.
The message version selection screen will appear as shown below.
SELECT MESSAGE
1:Japanese
2:English
(3) Select the Japanese or English message version (for Easy Pack 4.2 and System
Mode) by pressing 1 or 2 key, respectively.
28
Page 39
Chapter 2. Getting Started the BHT-4000 and System Mode
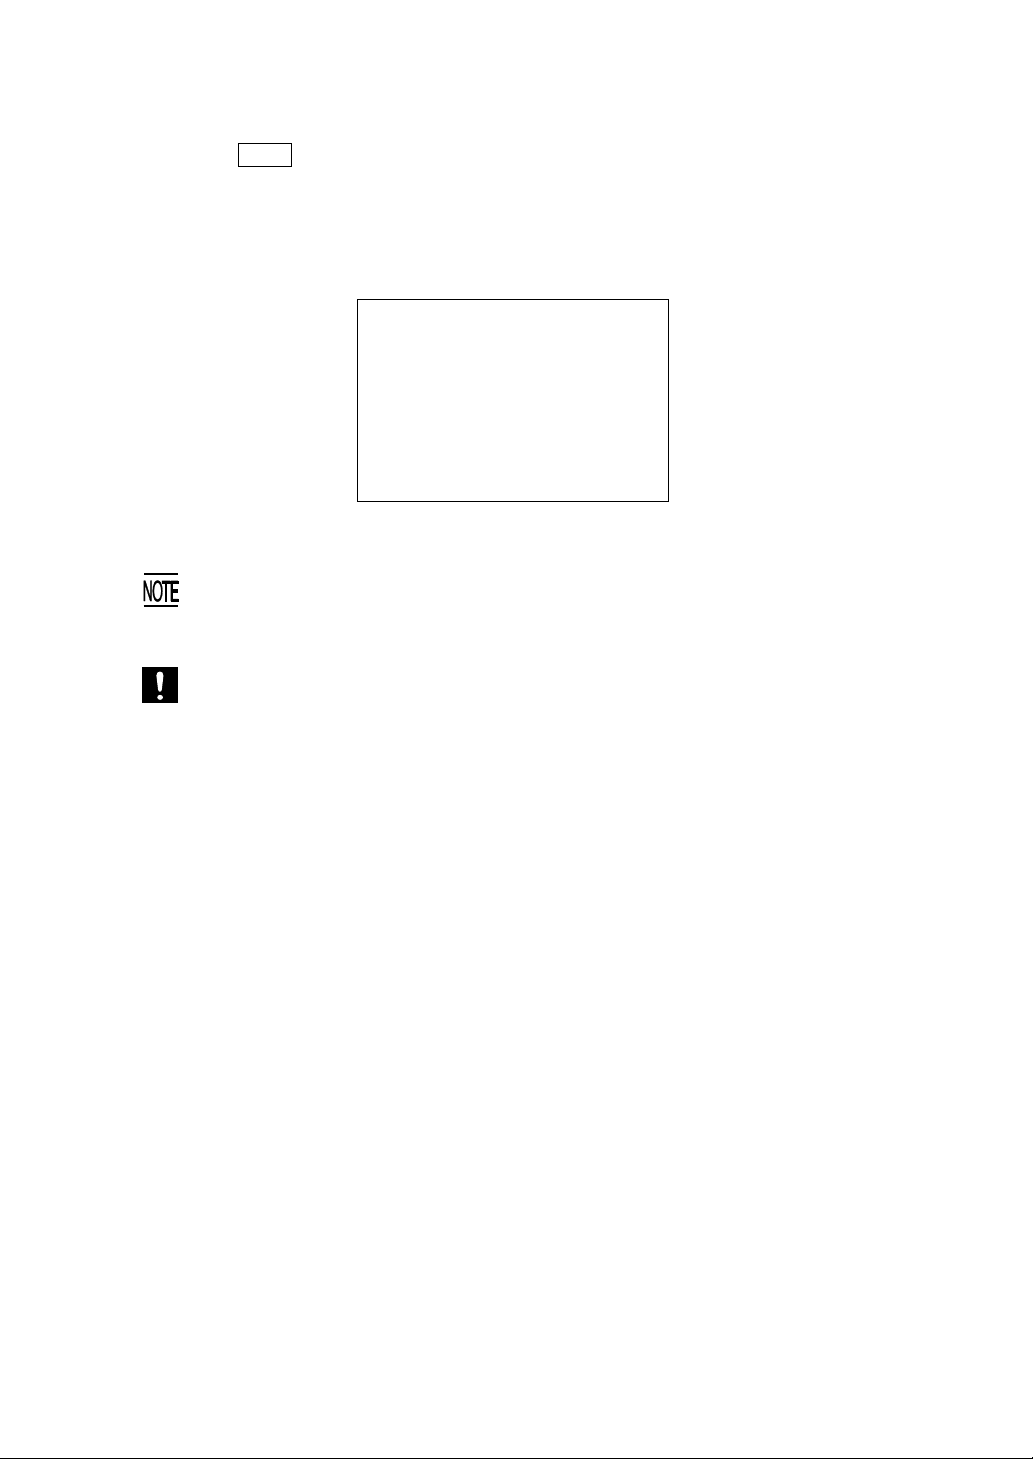
(4) Press ENT key.
The BHT-4000 starts initialization operation.
Upon completion of the initialization, it displays the following message and goes off
automatically.
SYSTEM INITIALIZE
** Completed **
If the message "Report to the personnel in charge!! (S)" appears as shown on page
27 although the initialization has completed, initialize the BHT-4000 again.
If you initialize the BHT-4000 after downloading user programs or data, all of
those programs or data stored in the user area of the RAM will be lost. Download
them again if necessary.
In addition, the LCD contrast level (refer to Subsection 2.3.3), communications
conditions and other settings (refer to Section 2.4) will be restored to the default
values, so modify them if necessary . After initialization, be sure to set the calendar
clock (refer to [ 3 ]).
29
Page 40
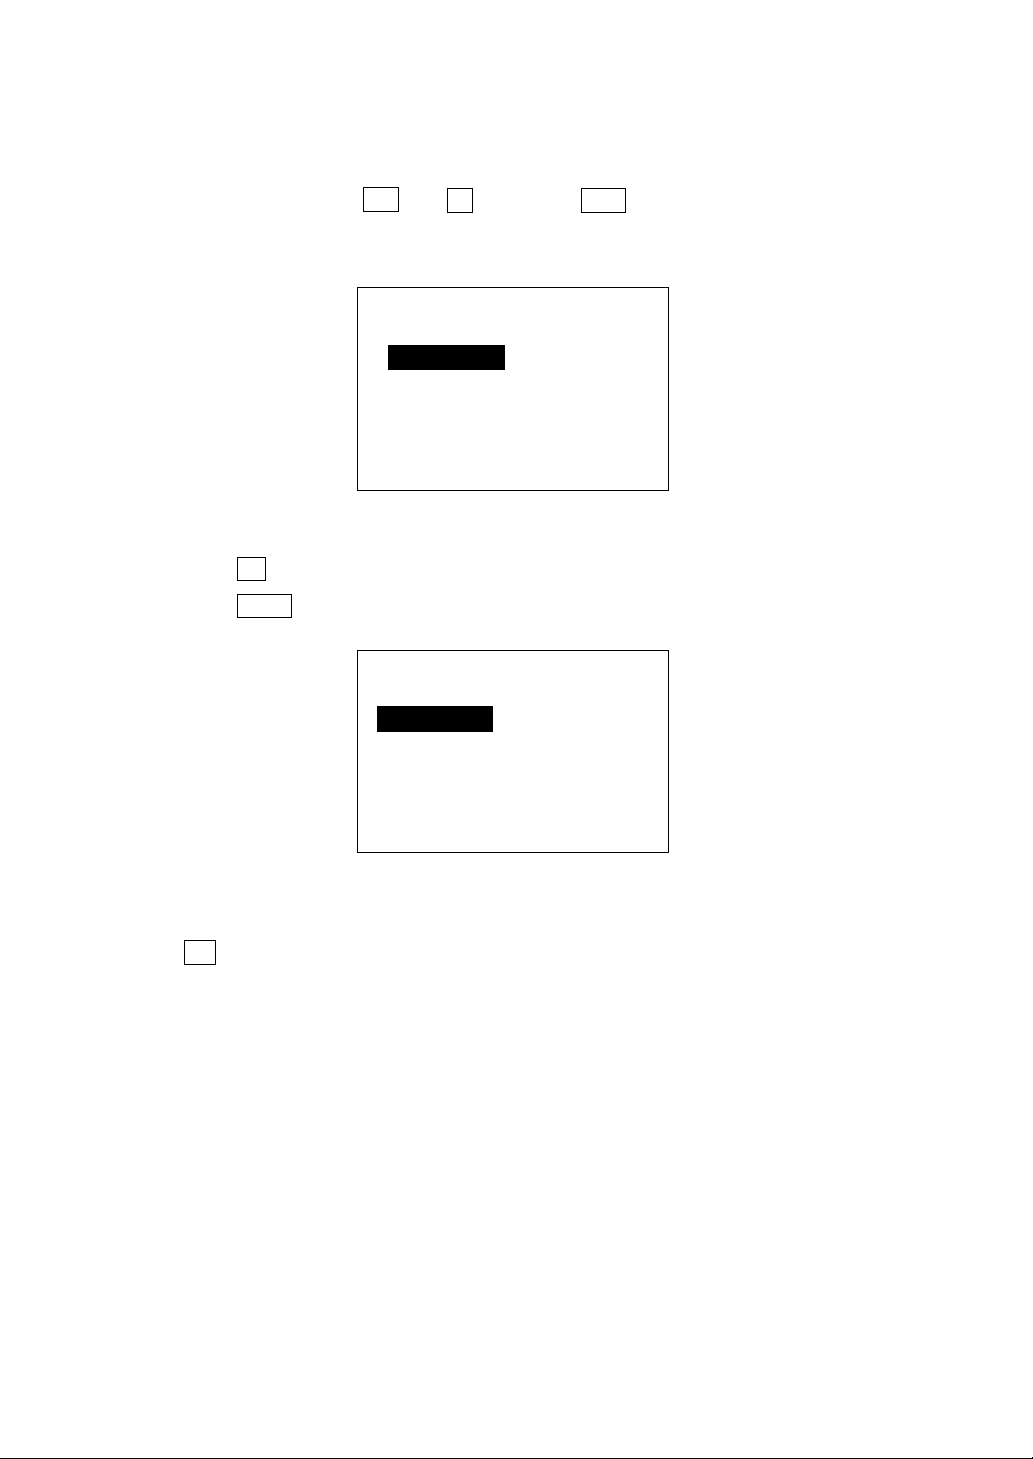
[ 3 ] Setting the Calendar Clock (date and time)
(1) While holding down SF and 1 keys, press PW key to start System Mode.
The following SYSTEM MENU screen will appear.
SYSTEM MENU
1:Execute 2:Download
3:Upload 4:Set mode
5:Test 6:Version
(2) Press 4 key to select the "Set mode".
Press ENT key, and the following SET SYSTEM screen will appear.
SET SYSTEM
1:Execute 2:Display
3:Date/Time 4:Barcode
5:Com 6:Switch
7:Others
(To return to the immediately preceding screen during this setting operation, press
C key.)
30
Page 41
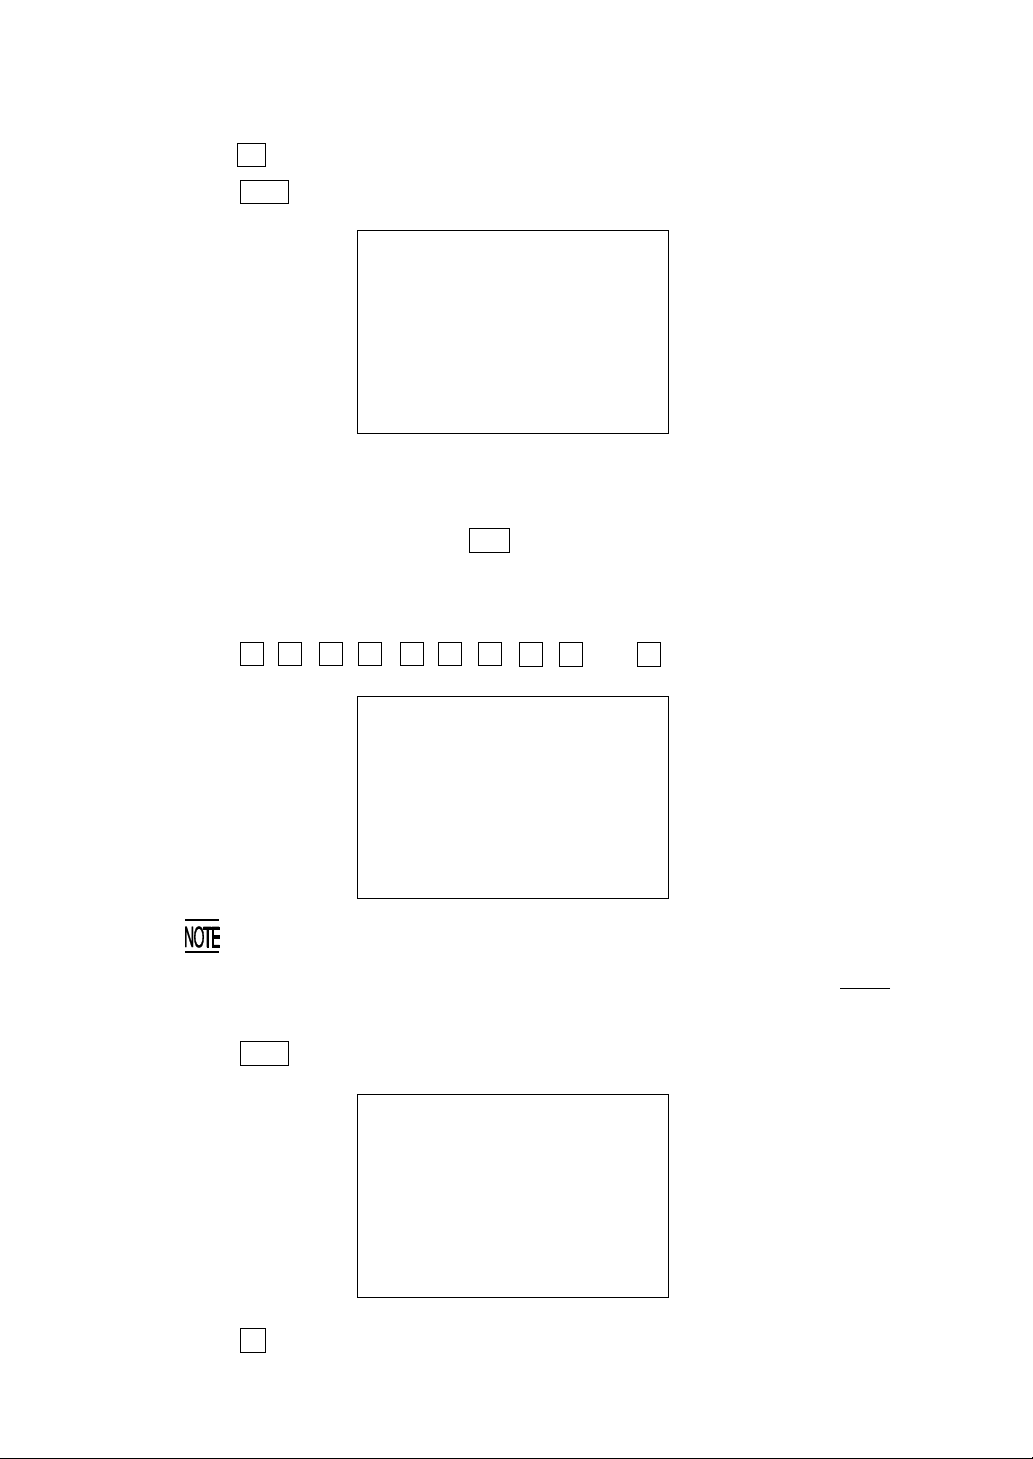
Chapter 2. Getting Started the BHT-4000 and System Mode
(3) Press 3 key on the SET SYSTEM screen to select "Date/Time".
Press ENT key, and the following screen will appear.
SET DATE/TIME
00/01/01 00:00
_ / / :
(4) Use the numerical keys to enter the year (only the last two digits), month, day, hour,
and minute in this order. If the data is in one digit, add 0 (zero) preceding the data.
If you make a wrong entry, press BS key to delete it and enter the correct data.
[Example] To set 1993, October 20, at 2:00 p.m.
Press 9 , 3 , 1 , 0 , 2 , 0 , 1 , 4 , 0 , and 0 keys.
SET DATE/TIME
00/01/01 00:00
93/10/20 14:00
• For the year, be sure to enter the last two digits of the year. For the hour,
enter it in the 24-hour format.
• If any of the year, month, day, hour, and minute is not entered, the ENT
key becomes inoperable.
(5) Press ENT key to register the above setting.
SET DATE/TIME
93/10/20 14:00
_ / / :
(6) Press C key to return to the SET SYSTEM screen.
31
Page 42

[ 4 ] Downloading User Programs or Easy Pack 4.2
Download user programs or Easy Pack 4.2.
This section describes the downloading procedure of Easy Pack 4.2 by using System
Loader provided in the "BHT-BASIC 3.0 System Pack" floppy disk.
For the downloading procedure of user programs, refer to the "Transfer Utility Guide"
separately issued.
■ Operating the BHT-4000
Make sure that the BHT-4000 is operating with System Mode while showing the SET
SYSTEM screen. If any other screen is displayed, start System Mode by referring to
[ 3 ] Setting the Calendar Clock, steps (1) and (2).
Setting the communications parameters and interface
•
The communications parameters values for System Mode should be identical with
those specified for System Loader. Since those default values for System Mode and
System Loader are designed to be identical, you may skip the communications parameters setting procedure unless you have modified any of those default values.
Listed below are the communications parameters of System Loader, where those
parameters values are fixed except for the transmission speed. The default transmission speed is 19200 bps. If you have modified the default transmission speed by
specifying option at the MS-DOS command line, you should set that modified value
also in System Mode (refer to Subsection 2.4.3, [4.5] Setting the communications
parameters and interface port).
If you have modified any of the default values of the communications parameters in
System Mode, it is necessary to check the communications parameters values of
System Loader and set the identical values in System Mode.
Communications parameters System Loader
Transmission speed 19200 bps (may be modified by specifying option
at the MS-DOS command line)
Character length 8 bits
Parity None
Stop bits 1 bit
Protocol Serial number ON: Adds serial numbers to
data blocks.
Horizontal parity ON: Enables horizontal parity
checking.
RS/CS control OFF: Disables the RS/CS control.
32
Page 43
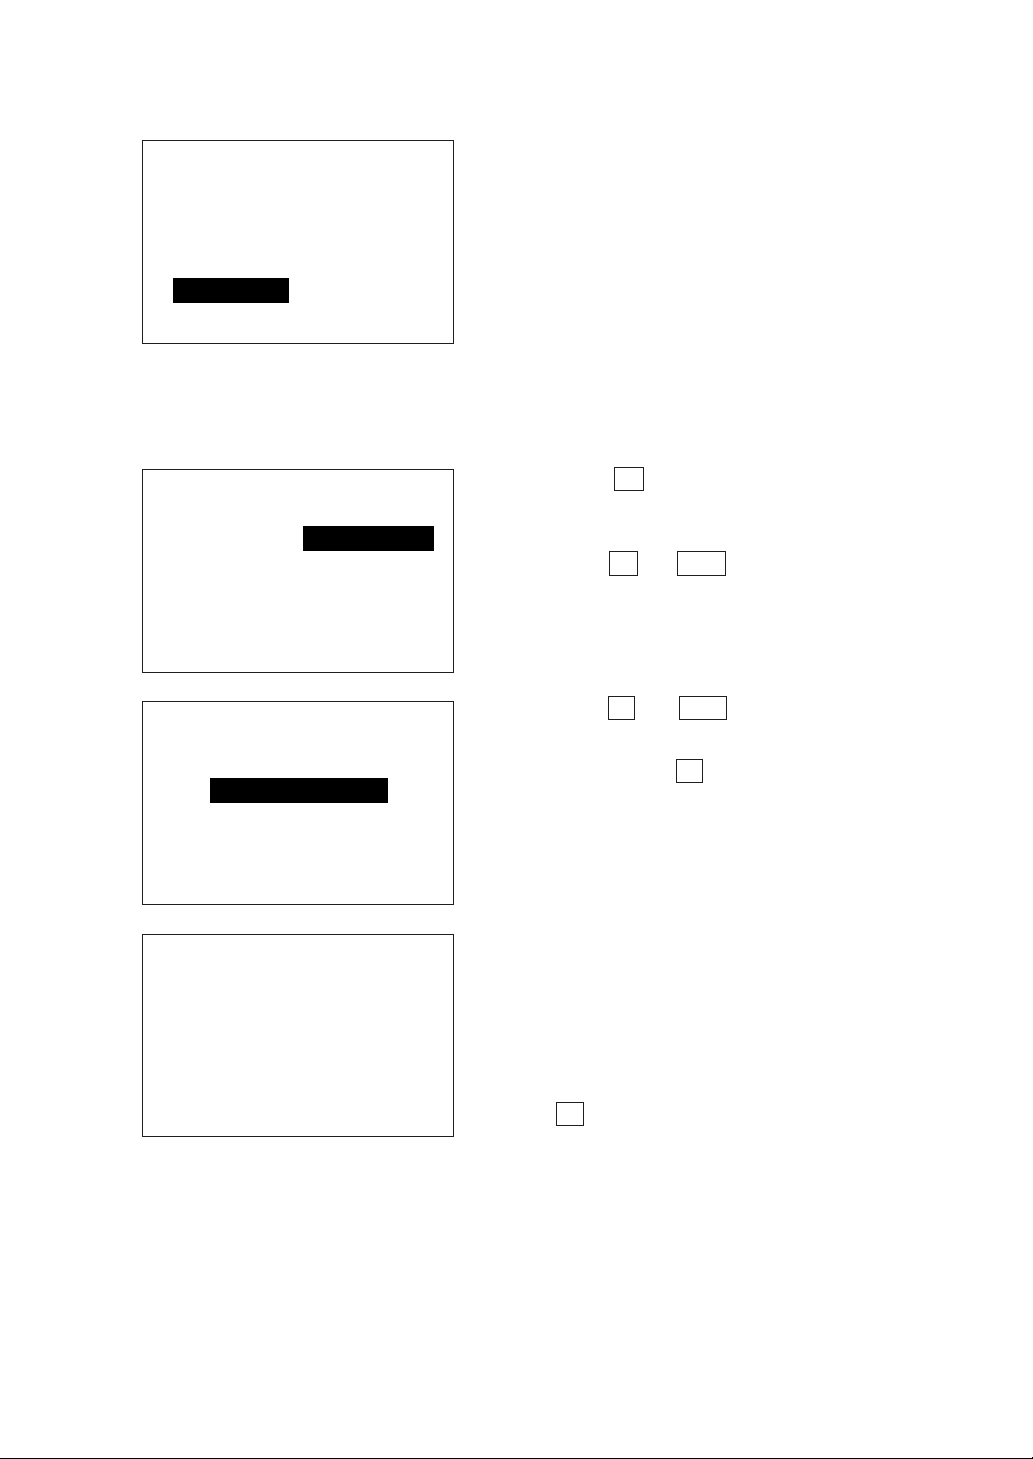
SET COM DEFAULT
BASIC
1:Optical 2:Connector
SYSTEM MODE
3:Optical 4:Connector
Starting downloading
•
SYSTEM MENU
1:Execute 2:Download
3:Upload 4:Set mode
5:Test 6:Version
Chapter 2. Getting Started the BHT-4000 and System Mode
Set a desired interface (optical or directconnect interface) to be used for SYSTEM
MODE on the screen shown at left. Refer to
Subsection 2.4.3, [4.5] Setting the communications parameters and interface port.
(1) Press C key on the SET SYSTEM
screen to return to the SYSTEM MENU
screen shown at left.
(2) Press 2 and ENT keys to display the
DOWNLOAD menu.
DOWNLOAD
1:Program File
2:Data File
DOWNLOAD PROGRAM FILE
** Waiting **
(3) Press 1 and ENT keys.
(To return to the SYSTEM MENU
screen, press C key.)
The screen shown at left will appear, showing that the BHT-4000 is waiting for a file to
be downloaded from the host computer.
(4) Proceed to the ■
Operating the Host
Computer.
(To return to the previous screen, press
C key.)
33
Page 44

■ Operating the Host Computer
(1) Load the "BHT-BASIC 3.0 System Pack" floppy disk into the drive of the host com-
puter.
(2) Enter the following at the MS-DOS command line to initiate System Loader con-
tained in the floppy disk, and the host computer will start downloading Easy Pack
4.2.
X>TS3 EASYPACK.PD3
Where, "X" denotes the name of the drive in which you loaded the floppy disk. The
"
TS3" is the program file name of System Loader. The "EASYPACK.PD3
name of Easy Pack 4.2 to be downloaded. For the options, refer to Subsection 2.3.2
[ 1 ] Downloading System Program.
Option
■ Downloading
If downloading starts:
[ BHT-4000 ]
The BHT-4000 displays the screen shown at
DOWNLOAD PROGRAM FILE
** Loading **
left.
"
is the file
DOWNLOAD PROGRAM FILE
EASYPACK.PD3
** Loading **
While the downloading operation is in
progress, the screen shown at left is displayed indicating the program file name
(
EASYPACK.PD3 on this screen) and the
number of received sectors/the total number
of sectors.
XXXXX/YYYYY
[ Host computer ] The host computer displays the screen given
below.
System Loader 3 VX.XX
Copyright (C) DENSO CORPORATION. 1993 all rights reserved
34
Page 45

Chapter 2. Getting Started the BHT-4000 and System Mode
If downloading is completed normally:
[ BHT-4000 ]
DOWNLOAD PROGRAM FILE
EASYPACK.PD3
** Completed **
YYYYY/YYYYY
[ Host computer ]
The BHT-4000 displays the screen shown at
left and beeps once. (The
on the screen shown at left is the program
name of Easy Pack 4.2.)
EASYPACK.PD3
00 : Normal end.
If an error occurs during downloading:
[ BHT-4000 ]
The BHT-4000 beeps three times while showing the error message (refer to Subsection
2.4.3, [ 2 ] Downloading).
To retry downloading, press 1 and ENT keys; to abort it, press 2 and ENT
keys.
[ Host computer ]
The host computer displays the error code and message.
For the details about the error codes & messages which may appear during downloading of Easy Pack 4.2 with System Loader (TS3), refer to Subsection 2.3.2, [ 1 ] Downloading System Program.
To retry downloading, initiate System Loader (or Transfer Utility) at the MS-DOS
command line again.
The host computer displays the screen
shown at left.
35
Page 46
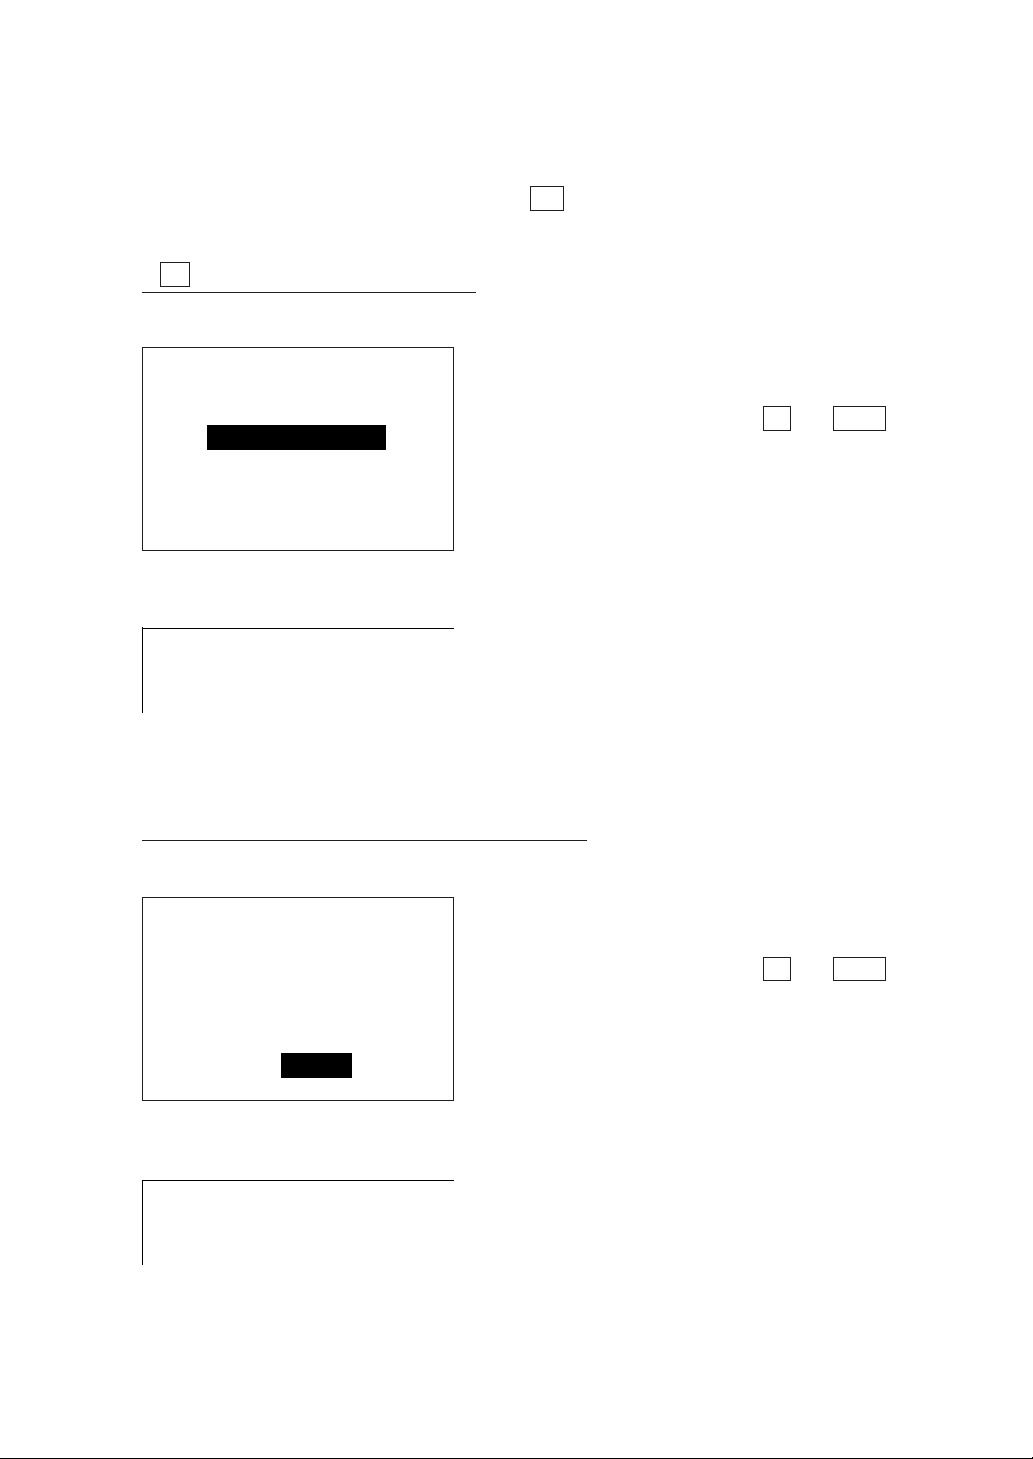
■ To Abort Downloading
To abort downloading in progress, press C key on the BHT-4000 or press the
specified abort keys (BREAK and ALT keys, or their equivalent) on the host computer.
If C key is pressed on the BHT-4000:
[ BHT-4000 ]
The screen returns to the DOWNLOAD
DOWNLOAD
screen shown at left.
1:Program File
To retry downloading, press 1 and ENT
keys.
2:Data File
[ Host computer ]
53 : Cancel received.
If the abort keys are pressed on the host computer:
[ BHT-4000 ]
DOWNLOAD PROGRAM FILE
Communication error !!
The host computer displays the error code
& message shown at left.
To retry downloading, initiate System Loader
(or Transfer Utility) again.
The BHT-4000 displays the error message
screen as shown at left.
To retry downloading, press 1 and ENT
keys.
RETRY? 1:Yes 2:No
[ Host computer ]
90 : Aborted by break key.
The host computer displays the error code
& message shown at left.
To retry downloading, initiate System Loader
(or Transfer Utility) again.
36
Page 47
Chapter 2. Getting Started the BHT-4000 and System Mode
[ 5 ] Selecting an Execution Program to be Run when the Power is
First Applied
(1) After completion of downloading, press C key twice to return to the SYSTEM
MENU screen shown below.
SYSTEM MENU
1:Execute 2:Download
3:Upload 4:Set mode
5:Test 6:Version
(2) Press 4 key to select "Set mode".
Press ENT key, and the following SET SYSTEM screen will appear.
SET SYSTEM
1:Execute 2:Display
3:Date/Time 4:Barcode
5:Com 6:Switch
7:Others
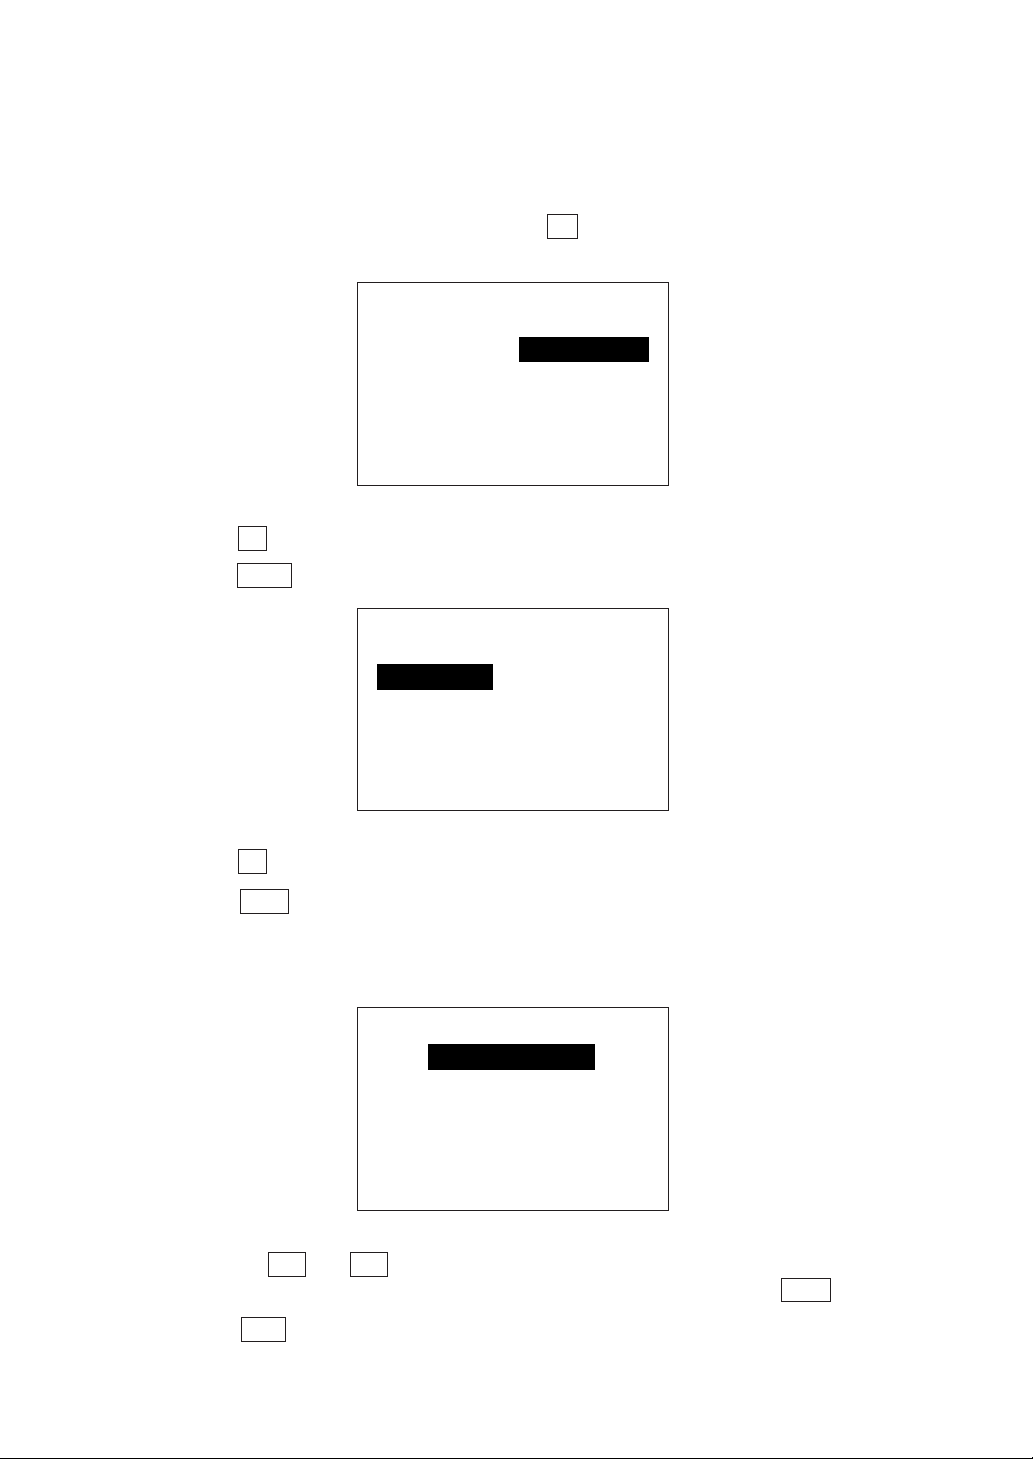
(3) Press 1 key to select "Execute".
Press ENT key, and the following screen will appear. (The
program file name of Easy Pack 4.2. To run Easy Pack 4.2 practically, it is necessary
to create a file matching the job content in advance by referring to Chapter 4, Subsection 4.3.2.)
EASYPACK.PD3 is the
SET EXECUTE PROGRAM
EASYPACK.PD3
SAMPLE1.PD3
SAMPLE2.PD3
SAMPLE3.PD3
(4) By using F5 and F7 keys, move the cursor to a desired program (Easy Pack or
User Program) to be run when the power is first applied. Then press ENT key.
(5) Press PW key to turn off the BHT-4000.
37
Page 48
2.3.3 Adjusting the LCD Contrast & Beeper Volume, and Displaying the Battery Voltage Level
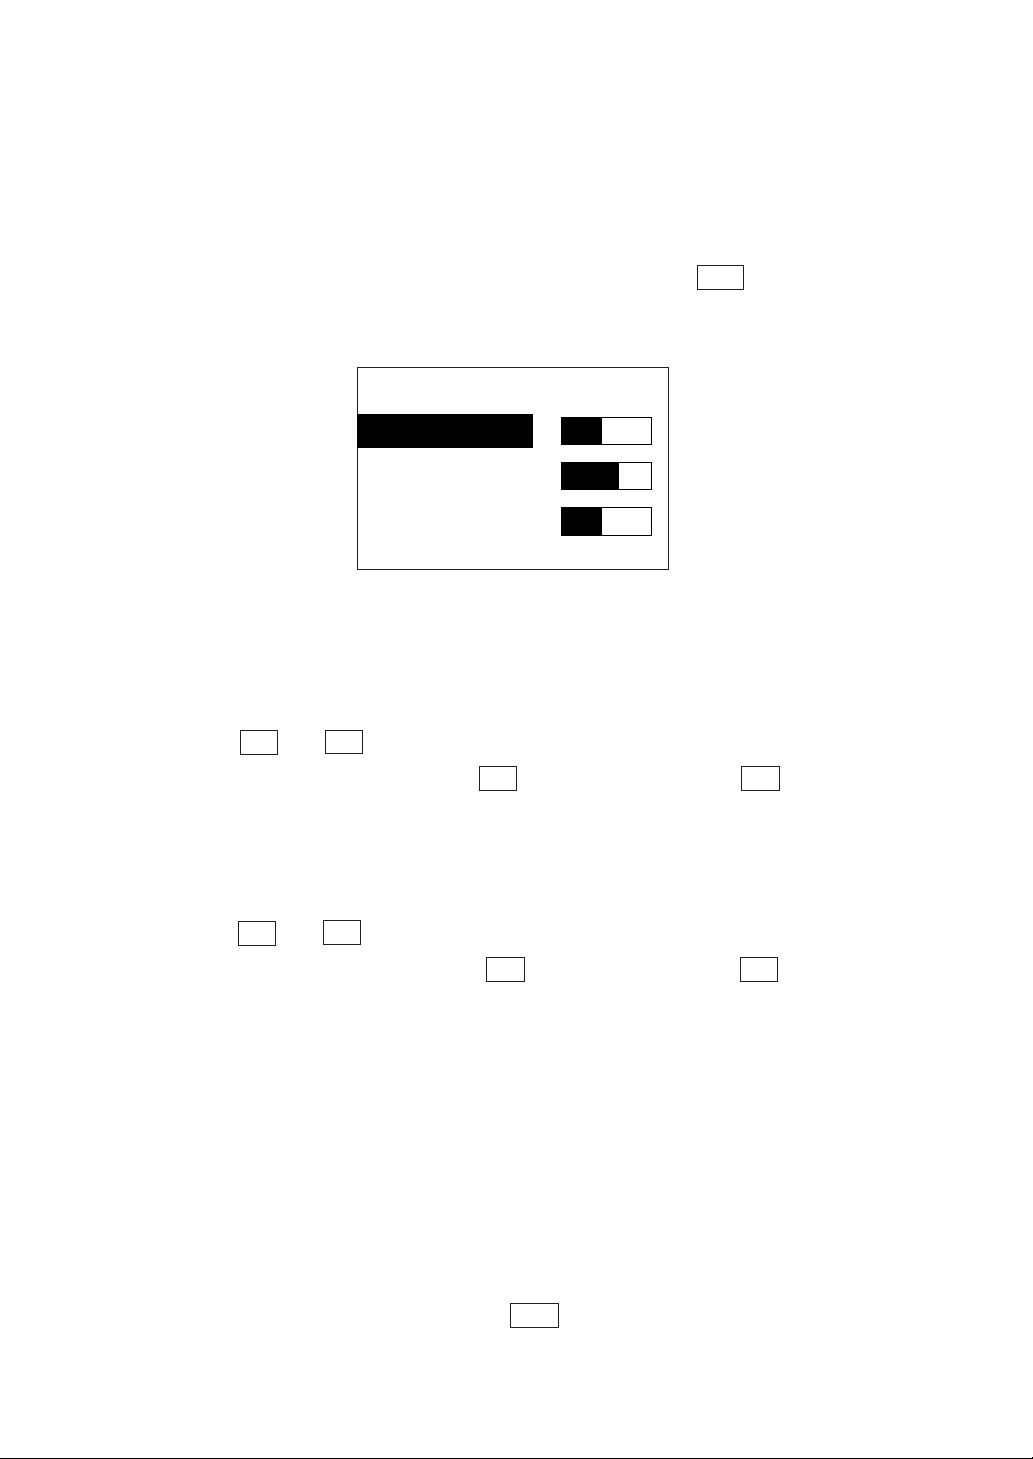
You can adjust the LCD contrast and beeper volume or check the battery voltage level
on the LCD. While holding down the trigger switch, turn the PW key on, and the
following screen will appear on the LCD. This screen will disappear if no keys are
pressed for five seconds.
iÅÇ`çåíê~ëí
_ЙЙйЙкsздмгЙ
_~ннЙкуiЙоЙд
(The current selection is reverse-displayed.)
■ Adjusting the LCD Contrast
You can adjust the LCD brightness to eight contrast levels.
1) Use F5 and F7 keys to select the LcdContrast line.
2) To decrease the contrast, press F6 key; to increase it, press F8 key.
■ Adjusting the Beeper Volume
You can adjust the beeper volume to four levels from OFF to MAX.
1) Use F5 and F7 keys to select the BeeperVolume line.
2) To turn down the volume, press F6 key; to turn it up, press F8 key.
■ Displaying the Battery Voltage Level
You can check the battery voltage level by displaying the screen shown above.
When the remaining voltage level has decreased to only one quarter of the bar on
the LCD, it is recommended to charge or replace the battery cartridge.
(You can not only check the battery voltage level temporarily as described above
but also monitor it by a visible voltage level icon while the BHT-4000 is in operation. You may erase the icon by turning off the STATUS setting in System Mode.
Refer to Subsection 2.4.3, [4.2] Setting the message version and the system status
indication.)
After making the above setting, press the ENT key or press no keys for five seconds,
and the new setting will be set and the above screen will disappear.
38
Page 49
Chapter 2. Getting Started the BHT-4000 and System Mode
2.4 Operating in System Mode
System Mode is an operating software exclusively designed for the effective use of the
BHT-4000, which includes various functions as shown on the next page.
2.4.1 Starting System Mode
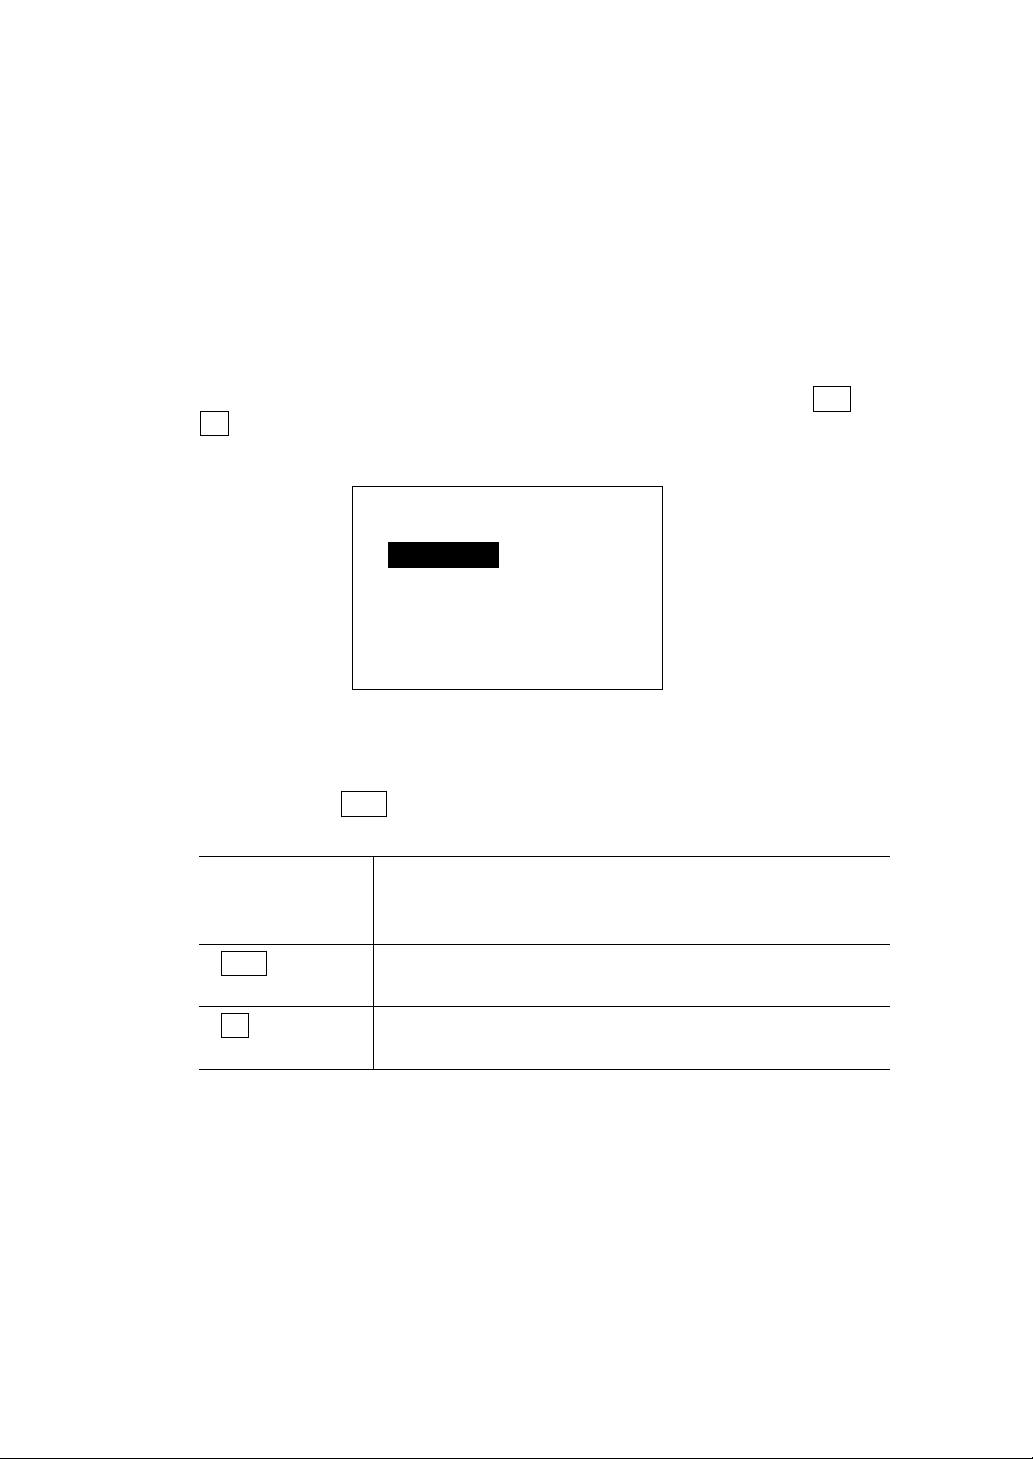
To start up System Mode, power on the BHT-4000 while holding down SF and
1 keys. This operation displays the SYSTEM MENU on the LCD as shown
below.
SYSTEM MENU
1:Execute 2:Download
3:Upload 4:Set mode
5:Test 6:Version
The function selected is reverse-displayed (white-on-black) with the cursor. To
select a desired item in System Mode, press the corresponding numerical key
and then press ENT key. The keys have the same functions as listed below
after the screen has shifted to the selected next screen.
Numerical keys Press a numerical key corresponding with a desired
menu number to select the desired item displayed on
the screen.
ENT Press this key to register the selected item and execute
the corresponding function.
CPress this key to return to the immediately preceding
screen.
The power-on default is "Execute" which is reverse-displayed. Once any other
item is selected, the selected item will be reversed with the cursor when you
turn back to the SYSTEM MENU screen.
39
Page 50
■ Structure of System Mode
SYSTEM MENU
1:Execute 2:Download
3:Upload 4:Set mode
5:Test 6:Version
C key
1 and
ENT
keys
2 and
ENT
keys
3 and
ENT
keys
4 and
ENT
keys
5 and
ENT
keys
6 and
ENT
keys
EXECUTE PROGRAM
EASYPACK.PD3
SAMPLE1.PD3
SAMPLE2.PD3
SAMPLE3.PD3
DOWNLOAD
1:Program File
2:Data File
UPLOAD
1:Program File
2:Data File
SET SYSTEM
1:Execute 2:Display
3:Date/Time 4:Barcode
5:Com 6:Switch
7:Others
TEST MENU
1:Barcode 2:Memory
3:Key 4:LCD
5:Aging 6:Com
7:Beeper
SYSTEM/RAM INFORMATION
SYSTEM Ver. X.XXX
RAM : XXXXX
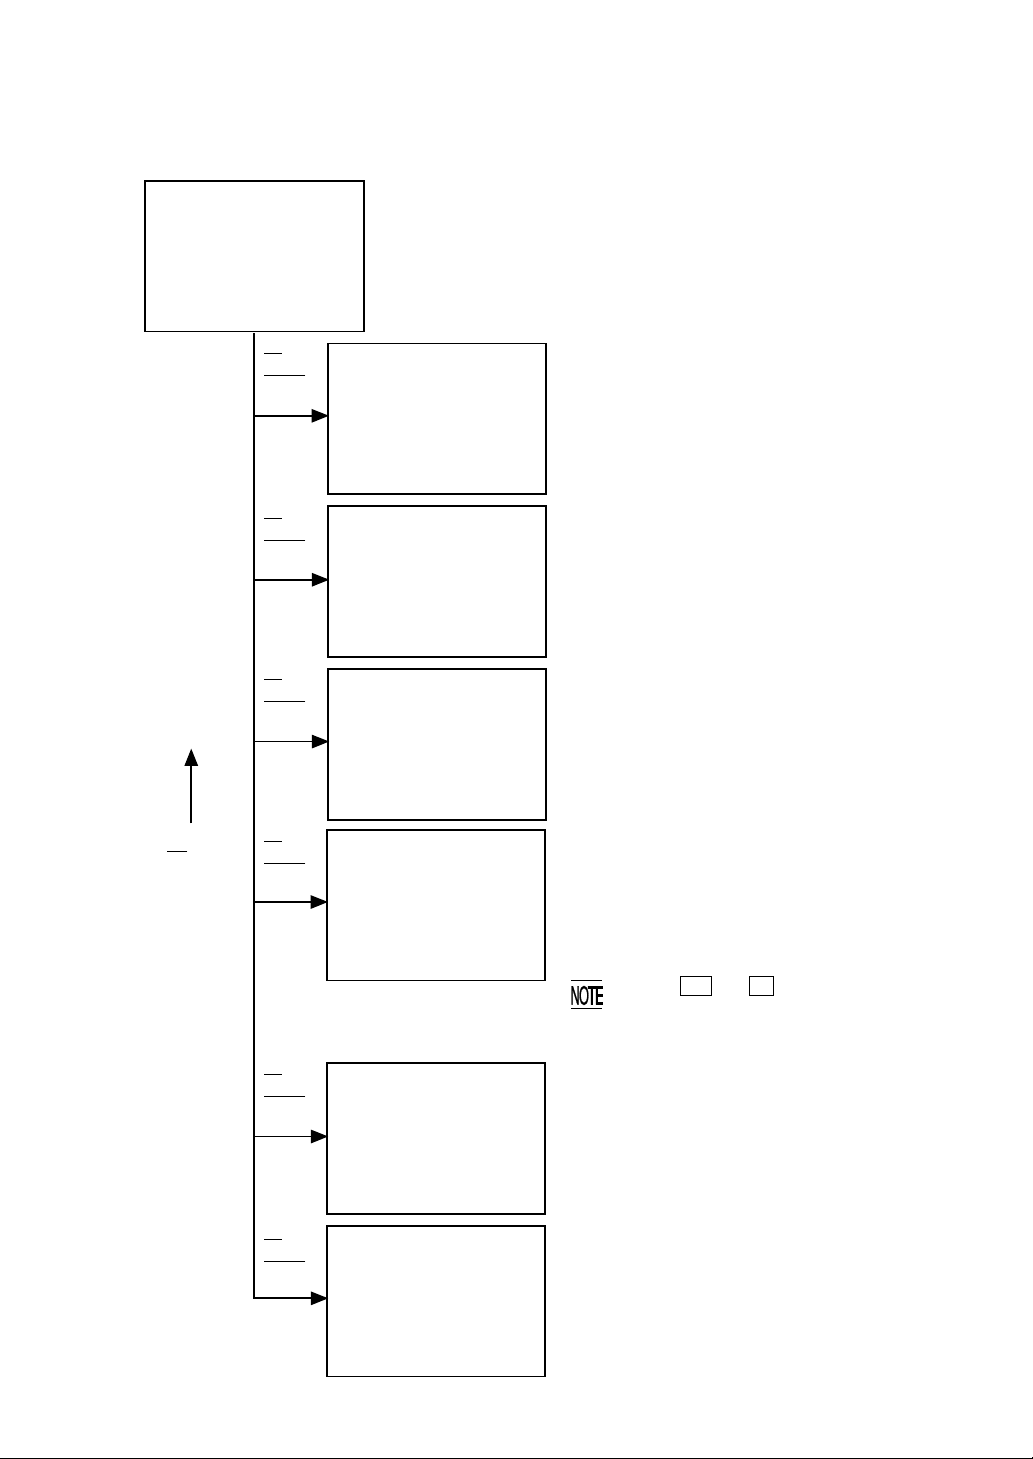
Program Execution
Allows you to select a desired user program
(including Easy Pack 4.2) to be executed immediately.)
(Refer to Subsection 2.4.3, [ 1 ].)
Downloading
Transfers user program files (including Easy
Pack 4.2) or data files from the host computer to
the BHT-4000.
(Refer to Subsection 2.4.3, [ 2 ].)
Uploading
Transfers user program files (including Easy
Pack 4.2) or data files from the BHT-4000 to the
host computer.
(Refer to Subsection 2.4.3, [ 3 ].)
Setting
Sets a variety of environmental conditions including the execution software, message version (Japanese or English), system status indication (voltage level icon and shift-key icon),
calendar clock, special bar-code scanning parameters, and communications parameters
(Transmission speed, character length, parity,
stop bits, and communications protocol),
resume function, and shift-key function.
Pressing SF and 0 keys on the SET
SYSTEM shifts to the Delete screen where
you can delete program files and data files.
(Refer to Subsection 2.4.3, [ 4 ].)
Testing
Used for the bar-code reading test, memory
test, key-entry test, beeper test, LCD indication
test, reading confirmation LED test, marker LED
test, aging test, and communications test.
(Refer to Subsection 2.4.3, [ 5 ].)
System Program Version & RAM Capacity
Displays the version of the System Program
resident in the system program area of the integrated RAM and the capacity of the RAM.
(Refer to Subsection 2.4.3, [ 6 ].)
40
Page 51
Chapter 2. Getting Started the BHT-4000 and System Mode
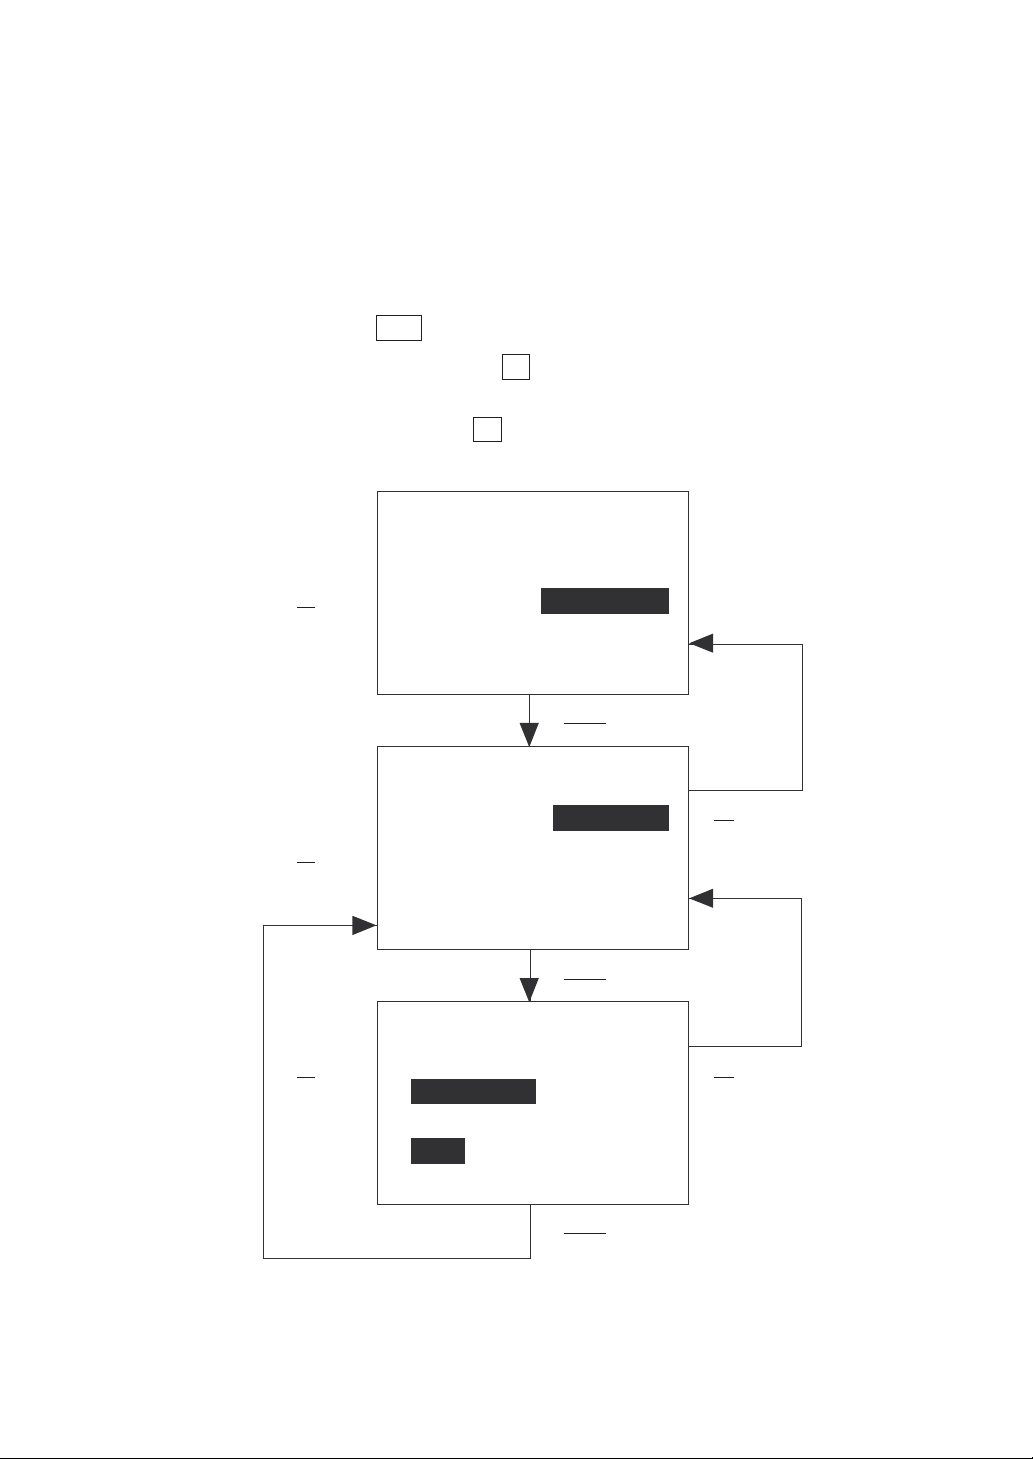
2.4.2 Operating in System Mode
Some functions in System Mode have several screens to be shifted, as shown in the
example below.
To select a desired item on the current screen, use the numerical key, and the selected
item will be reverse-displayed (white-on-black). To establish it and proceed to the
subsequent screen, press ENT key.
To return to the preceding screen, press C key.
When you complete setting on the last screen, the screen will automatically return to
the preceding screen. Each time the C key is pressed, the screen goes back to the
preceding screen.
SYSTEM MENU
1:Execute 2:Download
4 key
2 key
1 key
3:Upload 4:Set mode
5:Test 6:Version
ENT key
SET SYSTEM
1:Execute 2:Display
3:Date/Time 4:Barcode
5:Com 6:Switch
7:Others
ENT key
SET DISPLAY
MESSAGE
1:Japanese 2:English
STATUS
3:ON 4:OFF
C key
C key
41
ENT key
Page 52
2.4.3 Detailed Description of the Functions in System Mode
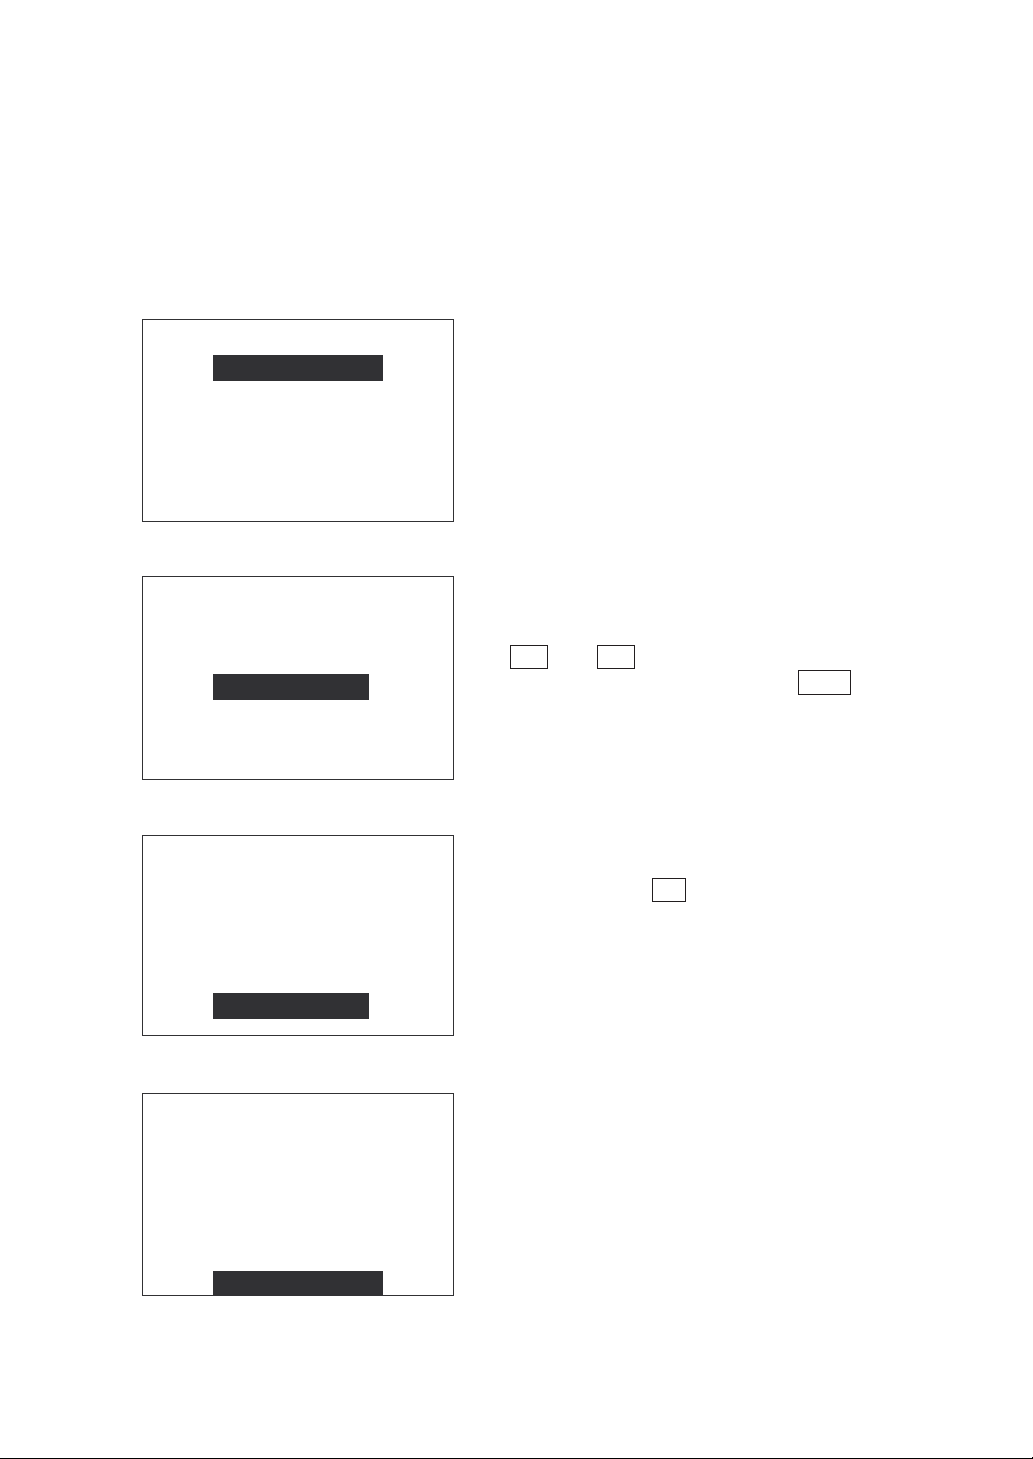
[ 1 ] Program Execution
Selecting "Execute" on the SYSTEM MENU
EXECUTE PROGRAM
EASYPACK.PD3
SAMPLE1.PD3
SAMPLE2.PD3
SAMPLE3.PD3
EXECUTE PROGRAM
EASYPACK.PD3
SAMPLE1.PD3
SAMPLE2.PD3
SAMPLE3.PD3
SAMPLE4.PD3
SAMPLE5.PD3
SAMPLE6.PD3
SAMPLE7.PD3
⇓
displays the screen shown at left.
The
EASYPACK.PD3 is the program file
name of Easy Pack 4.2.
If more than one program (Easy Pack 4.2
and user programs) has been downloaded
to the user area of the RAM, use
F5 and F7 keys to move the cursor to a
desired program, and then press ENT key.
EXECUTE PROGRAM
EASYPACK.PD3
SAMPLE1.PD3
SAMPLE2.PD3
SAMPLE3.PD3
SAMPLE4.PD3
SAMPLE5.PD3
SAMPLE6.PD3
SAMPLE7.PD3
⇓
EXECUTE PROGRAM
SAMPLE4.PD3
SAMPLE5.PD3
SAMPLE6.PD3
SAMPLE7.PD3
SAMPLE8.PD3
SAMPLE9.PD3
SAMPLE10.PD3
SAMPLE11.PD3
If more than eight programs have been
downloaded, it will be necessary to scroll
the screen with F7 key.
In the sample shown at left, twelve programs (including Easy Pack 4.2) are downloaded.
42
Page 53
[ 2 ] Downloading
If you download a file having the same name as that already used in the user area
of the RAM in the BHT-4000, the newly downloaded file replaces the old one.
For downloading to the BHT-4000 from another BHT-4000 without routing the
CU-4000, first select the direct-connect interface port in System Mode (refer to
[ 4.5 ] in this subsection) at each BHT-4000. Next, pull out the connector cover
on each BHT-4000 so that the direct-connect interface port will be exposed, and
then use the QM connector cable to connect them directly. (For details about the
interface cable, refer to Subsection 3.1.2.)
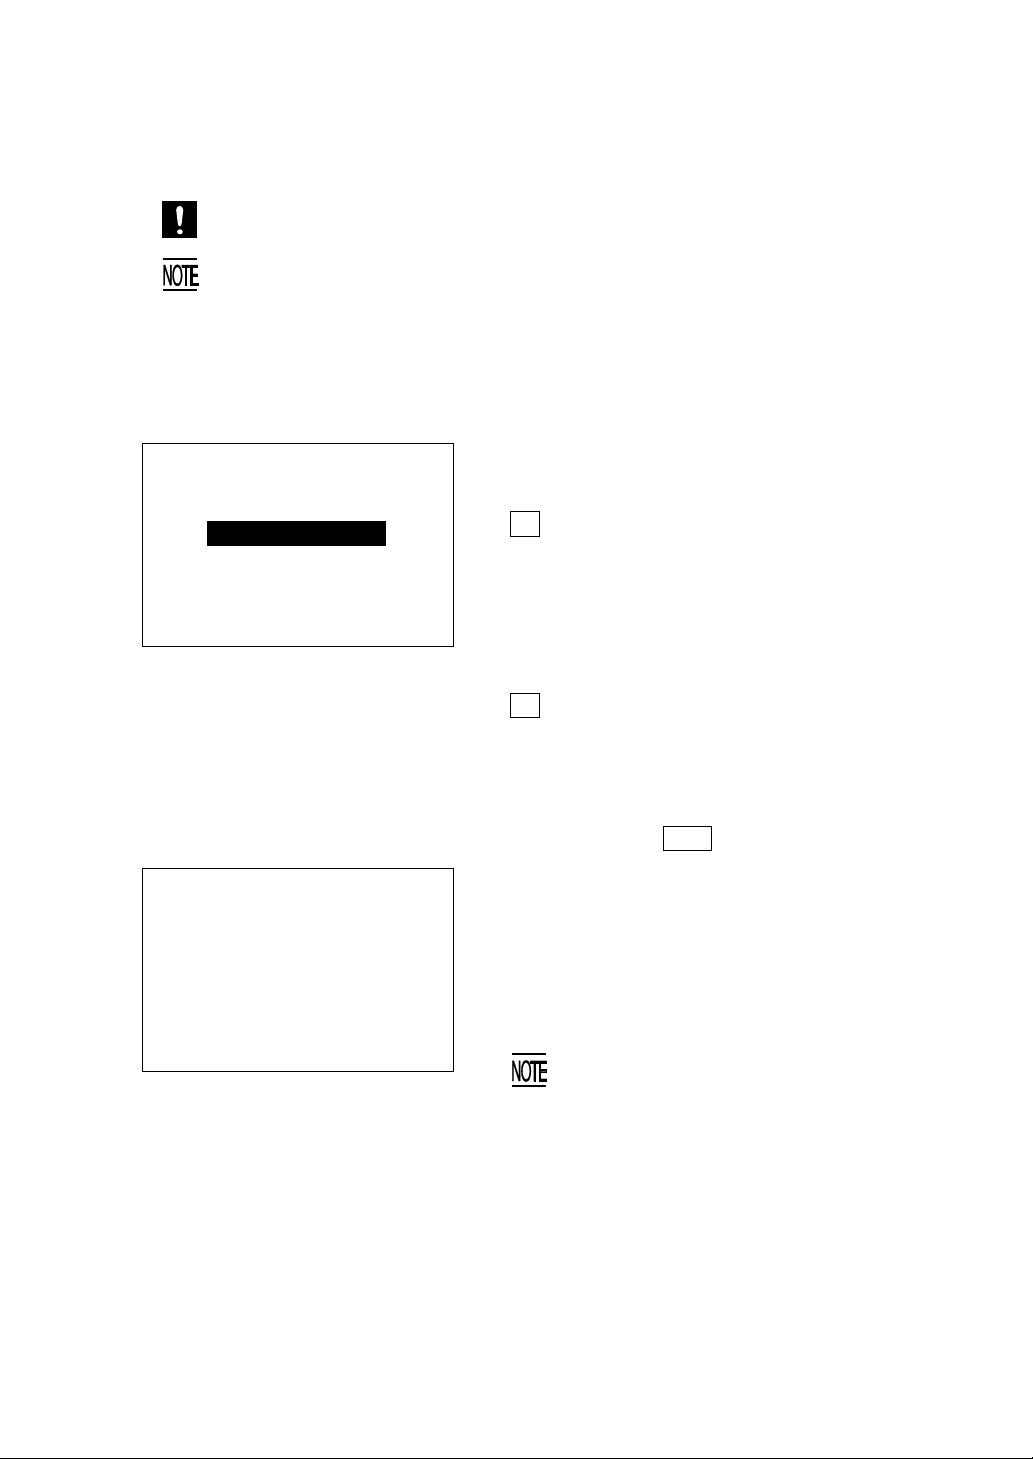
DOWNLOAD
Chapter 2. Getting Started the BHT-4000 and System Mode
Selecting "Download" on the SYSTEM
MENU displays the screen shown at left.
1:Program File
2:Data File
⇓
DOWNLOAD PROGRAM FILE
** Waiting **
⇓
1 Program File : Downloads a user pro-
gram file or Easy Pack
4.2 (compiled by the
BHT-BASIC 3.0 Compiler), to the user area
of the RAM integrated
in the BHT-4000.
2 Data file : Downloads a data file to
be used by a user program, to the user area
of the RAM.
Select a desired file by using the numerical
keys, then press ENT key.
In the center of the top line appears the
selected file--PROGRAM or DATA. The
screen shown at left selects PROGRAM file.
The BHT-4000 is waiting for a program file
(or a data file) to be downloaded.
For downloading to the BHT-4000
from another BHT-4000, it is also necessary to select a program file or data
file on the UPLOAD menu at the sending BHT-4000.
The extension of program files to be
downloaded should be one of .PD3,
.EX3, and .FN3. (The .EX3 and .FN3
are reserved for future functional expansion.) The extension of data files
should be other than .PD3, .EX3, and
.FN3.
43
Page 54

DOWNLOAD PROGRAM FILE
** Loading **
⇓
DOWNLOAD PROGRAM FILE
SAMPLE3.PD3
** Loading **
Upon start of optional Transfer Utility or its
equivalent program (upon receipt of an ENQ
code from the host computer), the BHT-4000
displays the screen shown at left.
(Refer to the "Transfer Utility Guide.")
While the downloading operation is in
progress, the screen shown at left is displayed indicating the file name (on the 4th
line) and the number of received records/
the total number of records (on the 8th line).
XXXXX/YYYYY
⇓
DOWNLOAD PROGRAM FILE
SAMPLE3.PD3
** Completed **
YYYYY/YYYYY
To abort the downloading operation,
press C key. The screen will shift back to
the DOWNLOAD menu.
Upon completion of downloading, the
number of received records becomes equal
to the total number of records and the beeper
beeps for one second. Pressing C key
will shift back to the DOWNLOAD menu.
44
Page 55
Chapter 2. Getting Started the BHT-4000 and System Mode
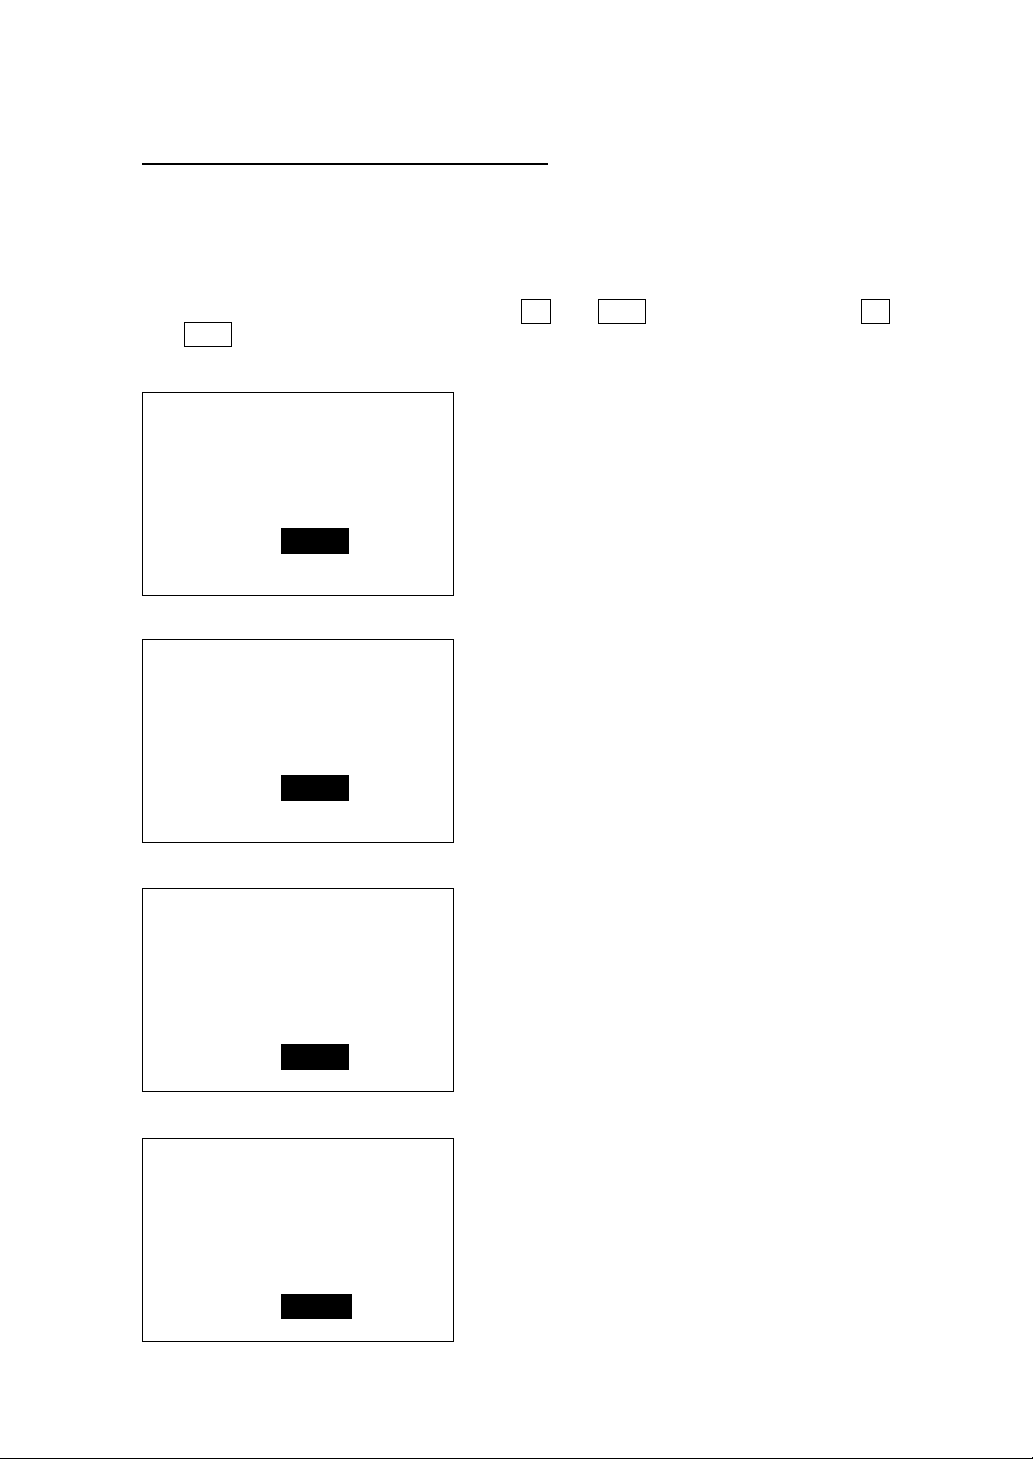
If an error occurs during downloading
If some error occurs during downloading, one of the following screens will appear
depending upon the error type. In any case, the beeper beeps three times and the
prompt "RETRY?" appears. For the probable causes and recovery actions to be taken,
refer to Chapter 5, Section 5.2.
To retry the downloading operation, press 1 and ENT keys; to abort it, press 2
and ENT keys.
DOWNLOAD PROGRAM FILE
Out of memory !!
RETRY? 1:Yes 2:No
DOWNLOAD PROGRAM
Too many files !!
RETRY? 1:Yes 2:No
DOWNLOAD DATA FILE
The memory capacity is insufficient.
Forty files are already stored.
The file type--program or data file (identified by the extension)--fails to match the
destination file.
File mismatch !!
RETRY? 1:Yes 2:No
DOWNLOAD PROGRAM FILE
Communication error !!
RETRY? 1:Yes 2:No
A communications error has occurred.
45
Page 56
[ 3 ] Uploading
For uploading from the BHT-4000 to another BHT-4000, first select the
direct-connect interface port in System Mode (refer to [ 4.5 ] in this subsection) at each BHT-4000. Next, pull out the connector cover on each BHT4000 so that the direct-connect interface port will be exposed, and then use
the QM connector cable to connect them directly. (For details about the
interface cable, refer to Subsection 3.1.2.)
UPLOAD
Selecting "Upload " on the SYSTEM MENU
displays the screen shown at left.
1:Program File
2:Data File
⇓
UPLOAD PROGRAM FILE
EASYPACK.PD3
SAMPLE1.PD3
⇓
UPLOAD PROGRAM FILE
1 Program File : Uploads a user pro-
gram or Easy Pack 4.2
stored in the user area
of the RAM, to the host
computer.
2 Data File : Uploads a data file
stored in the user area
of the RAM, to the host
computer.
Select a desired file by using the numerical
keys, then press ENT key. If more than
one file has been stored in the user area of
the RAM, use F5 and F7 keys to move
the cursor to the desired one and then press
ENT key.
In the center of the top line appears the
selected file--PROGRAM or DATA. The
screen shown at left selects PROGRAM file.
** Waiting **
⇓
The BHT-4000 is waiting for a program file
(or a data file) to be uploaded.
For uploading from the BHT-4000 to
another BHT-4000, it is also necessary to select a program file or data
file on the DOWNLOAD menu at the
receiving BHT-4000.
46
Page 57

UPLOAD PROGRAM FILE
** Loading **
⇓
UPLOAD PROGRAM FILE
SAMPLE3.PD3
** Loading **
XXXXX/YYYYY
⇓
UPLOAD PROGRAM FILE
SAMPLE3.PD3
** Completed **
Chapter 2. Getting Started the BHT-4000 and System Mode
Upon start of optional Transfer Utility or its
equivalent program (upon receipt of an ACK
code from the host computer), the BHT-4000
shows the screen shown at left.
(Refer to the "Transfer Utility Guide.")
While the uploading operation is in progress,
the screen shown at left is displayed indicating the file name (on the 4th line) and the
number of sent records/the total number of
records (on the 8th line).
To abort the uploading operation, press
C key. The screen will shift back to the
UPLOAD menu.
Upon completion of uploading, the number
of sent records becomes equal to the total
number of records and the beeper beeps for
one second. Pressing C key will shift back
to the UPLOAD menu.
YYYYY/YYYYY
If an error occurs during uploading
If an error occurs during downloading, the following screen will appear with the
prompt "
recovery actions to be taken, refer to Chapter 5, Section 5.2.
To retry the uploading operation, press 1 and ENT keys; to abort it, press 2
and ENT keys.
UPLOAD PROGRAM FILE
Communication error !!
RETRY? 1:Yes 2:No
RETRY?" and the beeper beeps three times. For the probable causes and
A communications error has occurred.
47
Page 58

[ 4 ] Setting
SET SYSTEM
1:Execute 2:Display
3:Date/Time 4:Barcode
5:Com 6:Switch
7:Others
Selecting "Set mode" on the SYSTEM MENU
displays the screen shown at left.
1 Execute : Sets an execution pro-
gram to be run when the
power is first applied.
2 Display : Sets the message version
(English or Japanese) and
the system status indication (voltage level icon
and shift-key icon).
3 Date/Time : Sets the calendar clock
(date and time).
4 Barcode : Sets special bar-code
scanning parameters (the
black-and-white inverted
label reading, the touch
scanning/long-range
scanning, the marker indication, the bar-code
scanning status indication, and the decoding
level).
5 Com : Sets the communications
parameters and interface
port.
6 Switch : (Reserved for future func-
tional expansion. Do not
disturb the defaults "OFF";
otherwise, the BHT-4000
operation will not be assured.)
7 Others : Sets the resume function
and shift-key function.
Select a desired item by using the numerical keys, then press ENT key.
0 with SF : Deletes a user program
held down
48
file or data file.
Page 59
Chapter 2. Getting Started the BHT-4000 and System Mode
[ 4.1 ] Setting an execution program
Selecting "Execute" on the SET SYSTEM
SET EXECUTE PROGRAM
menu displays the screen shown at left.
EASYPACK.PD3
SAMPLE1.PD3
SAMPLE2.PD3
SAMPLE3.PD3
If more than one program (Easy Pack 4.2
and user programs) has been downloaded
to the user area of the RAM, use F5 and
F7 keys to move the cursor to a desired
execution program to be run when the power
is first applied, and then press ENT key.
EASYPACK.PD3 is the program file
The
name of Easy Pack 4.2
To return to the SET SYSTEM menu, press
C key.
You cannot select System Mode as an
execution program in the BHT-4000.
[ 4.2 ] Setting the message version (English or Japanese) and the
system status indication (battery voltage level icon and shiftkey icon)
SET DISPLAY
MESSAGE
1:Japanese 2:English
STATUS
3:ON 4:OFF
Selecting "Display" on the SET SYSTEM
menu displays the screen shown at left.
MESSAGE : Switches the message version
to English or Japanese, for the
indications and messages on
the self diagnosis, LCD contrast, beeper volume, battery
voltage level screens.
Depending upon this selection,
also Easy Pack 4.2 and System
Mode are expressed in English
or Japanese.
STATUS : Turns on or off the system sta-
tus indication. If it is set to on,
the battery voltage level icon
and shift-key icon appear on
the bottom of the LCD as
shown on the next page.
Select a desired setting by using the numerical keys, then press ENT key.
To return to the SET SYSTEM menu, press
C key.
Reference: You may turn on or off the system
status indication also by using the
OUT statement in user programs.
Refer to the "BHT-BASIC 3.0 Programmer's Manual."
49
Page 60
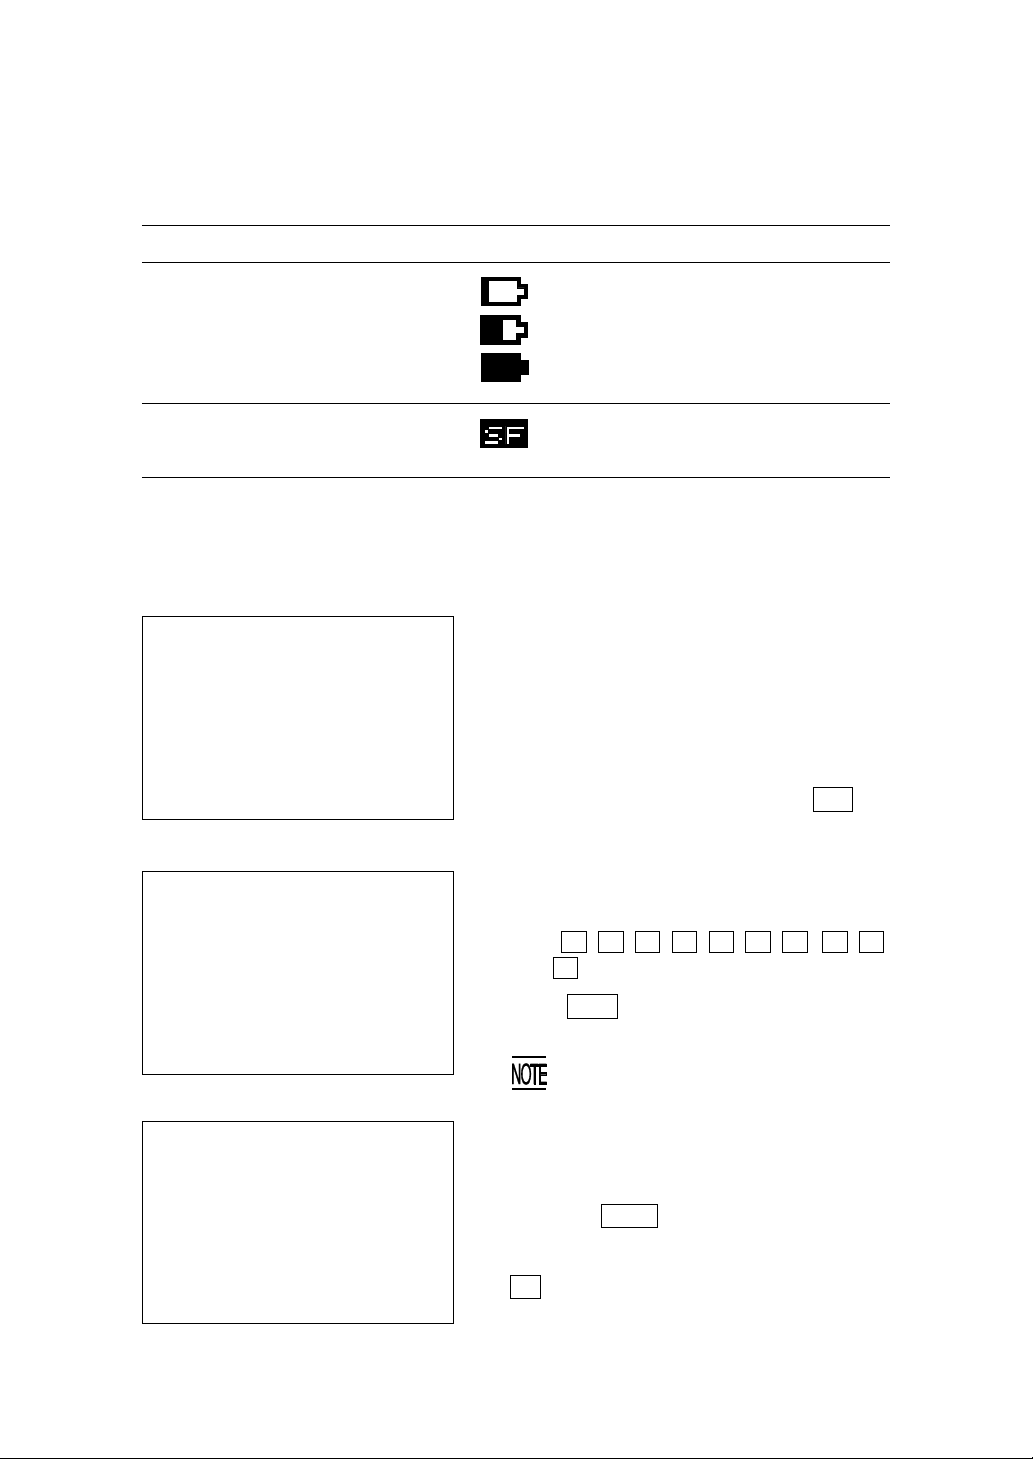
• System Status Indication
Turning on the system status indication displays the following icons:
Indication Icons Description
Voltage level of the
battery cartridge
Shift state of the keys on
the keypad
Displays the battery voltage
level at three levels.
Appears when the keys on
the keypad are shifted.
[ 4.3 ] Setting the calendar clock (date and time)
Selecting "Date/Time" on the SET SYSTEM
SET DATE/TIME
00/01/01 00:00
_ / / :
menu displays the screen shown at left.
Use the numerical keys to enter the year
(only the last lower two digits), month, day,
hour, and minute in this order. If the data is
in one digit, add 0 (zero) preceding the data.
If you make a wrong entry, press BS key
to delete it and enter the correct data.
SET DATE/TIME
00/01/01 00:00
93/10/20 14:00_
⇓
SET DATE/TIME
93/10/20 14:00
_ / / :
[Example] To set 1993, October 20, at 2:00
p.m.
Press 9 , 3 , 1 , 0 , 2 , 0 , 1 , 4 , 0 ,
and 0 keys.
Press ENT key to register the above setting.
• For the year, be sure to enter only
the last two digits of the year. For
the hour, enter it in the 24-hour format.
• If any of the year, month, day, hour,
and minute is not entered, the
ENT key becomes inoperable.
To return to the SET SYSTEM menu, press
C key.
50
Page 61

Chapter 2. Getting Started the BHT-4000 and System Mode
[ 4.4 ] Setting the special bar-code scanning parameters
Selecting "Barcode" on the SET SYSTEM
SET BARCODE
menu displays the screen shown at left.
1:Option
2:Decode level
1 Option : Shifts to the BARCODE
OPTION screen where
you may set the blackand-white inverted label
reading function, touch
scanning/long-range
scanning, marker indication, and bar-code
scanning status indication. (For detailed description of these functions, see below.)
2 Decode level : Shifts to the DECODE
LEVEL setting screen.
Select a desired setting by using the numerical keys, then press ENT key.
To return to the SET SYSTEM menu, press
C key.
Black-and-white inverted label reading function (Invert)
This function makes it possible to read white bars on a black background.
Touch scanning/long-range scanning (Touch Read)
You may select touch scanning or long-range scanning. The touch scanning is a
method in which you bring the bar-code reading window to a bar code to be
scanned. The long-range scanning allows you to read bar codes wider than the
readable area of the bar-code reading window by pulling the bar-code reading
window away from bar codes. (The BHT-4000 can read bar codes at a maximum
distance of 31 cm (12.21") from the bar-code reading window.)
If "Touch Read" is set to ON on the BARCODE OPTION screen, the reading speed
increases in touch scanning. In long-range scanning, however, this setting may
decrease the reading speed and efficiency when the ambient illuminance is low or
too high.
If "Touch Read" is set to OFF, the BHT-4000 can scan bar codes irrespective of the
ambient illuminance. This setting, therefore, is suitable for long-range scanning.
Note that the scanning speed will slightly decrease.
51
Page 62
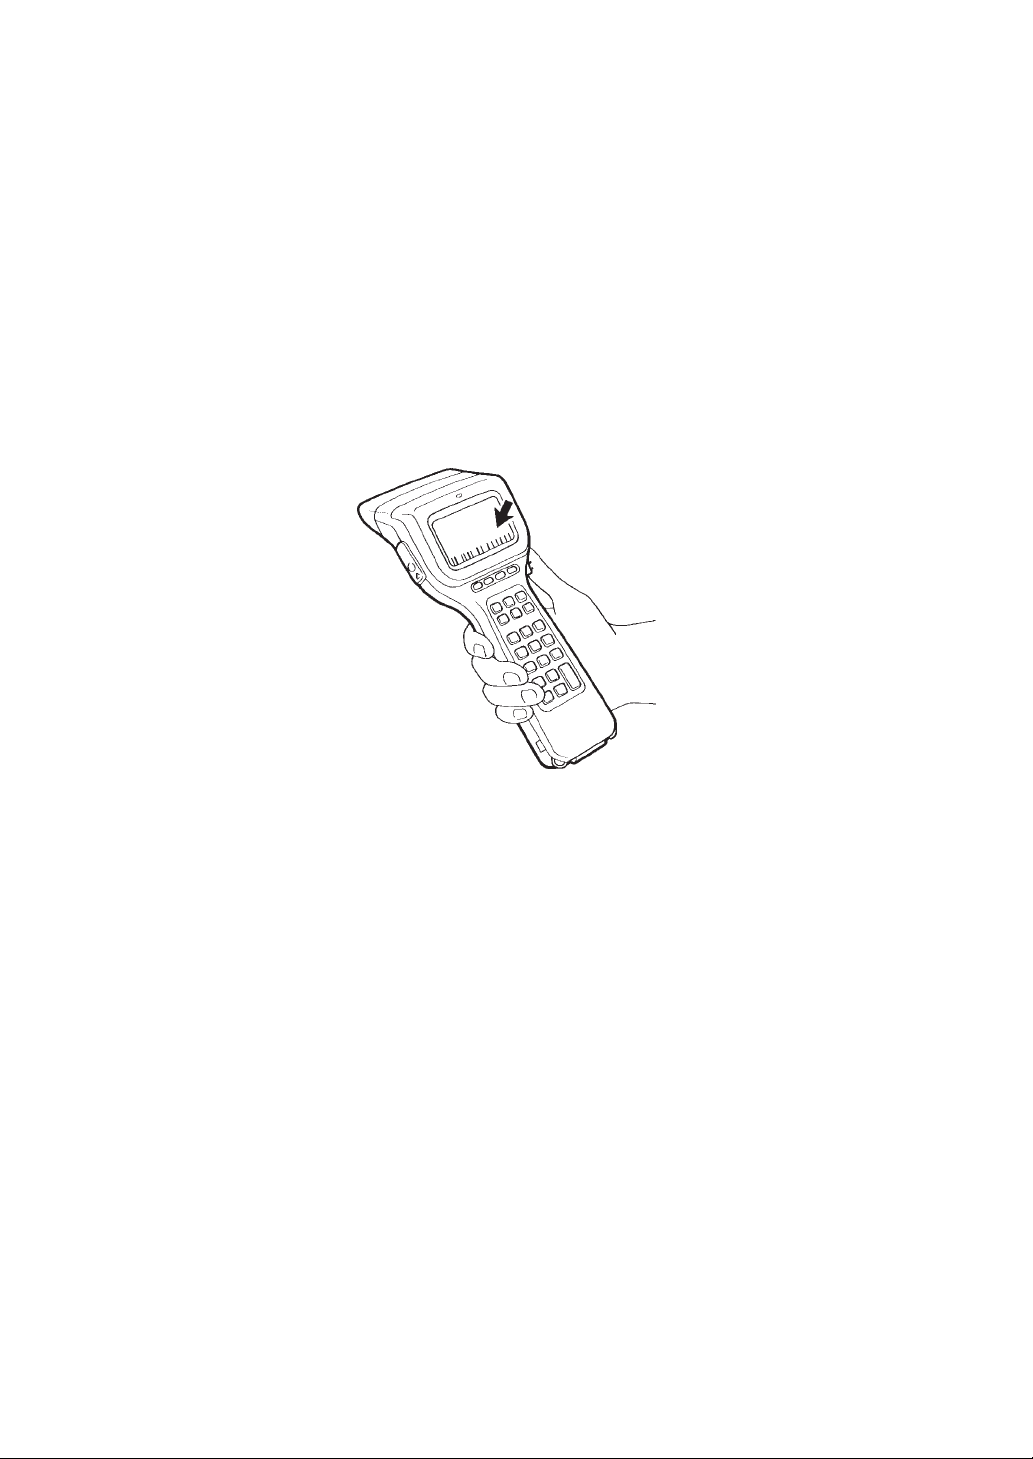
Marker indication (Marker)
Setting the "Marker" to ON turns on the marker LEDs when you press the trigger
switch, showing the markers on the object to be scanned. The markers help you
distinguish the readable range or the illumination range covered by the illumination LED in long-range scanning.
Bar-code scanning status indication (Viewfinder)
You may display the scanning status of the CCD sensor when you press the trigger
switch. When the CCD sensor is scanning, the vertical bars flicker across the
bottom of the screen.
Decode level
You may set the recognition level. Decreasing the level value increases the barcode reading efficiency, but the BHT-4000 might misread low-quality bar codes
(split or stained). To the contrary, increasing the level value decreases the bar-code
reading efficiency, but it preclude almost all possibilities of misreading.
The default "2" is recommended.
52
Page 63
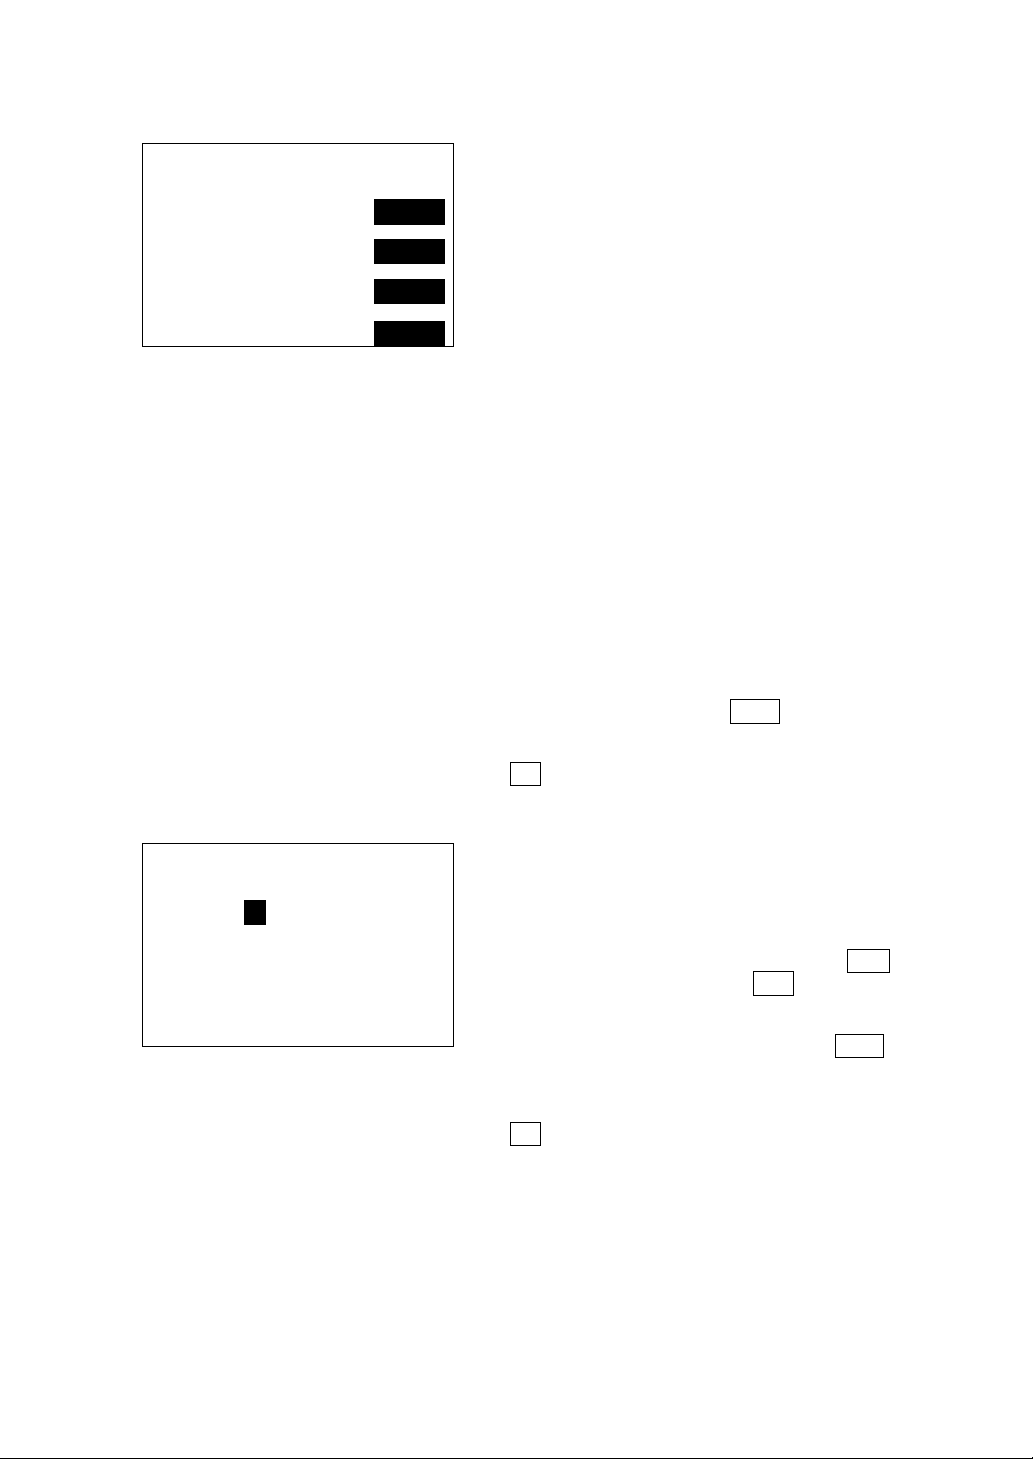
BARCODE OPTION
Invert 1:ON 2:OFF
Touch Read 3:ON 4:OFF
Marker 5:ON 6:OFF
Viewfinder 7:ON 8:OFF
Chapter 2. Getting Started the BHT-4000 and System Mode
Selecting "Option" on the SET BARCODE
menu displays the screen shown at left. Reversed are the current settings. (The defaults are "OFF".)
Invert : Activates or deactivates the
black-and-white inverted label
reading function.
Touch Read : Switches to the touch scan-
ning (ON) or long-range scanning (OFF).
Marker : Turns on or off the marker
indication on the object to be
scanned.
Viewfinder : Turns on or off the barcode
scanning status indication.
This setting takes effect only
when the system status indication is set to ON (refer to
[4.2]).
DECODE LEVEL
Count 2
Select a desired setting by using the numerical keys, then press ENT key.
To return to the SET BARCODE menu, press
C key.
Selecting "Decode level" on the SET
BARCODE menu displays the screen shown
at left. Reversed is the current setting. (The
default is "2".)
To increase the decode level, press F5
key; to decrease it, press F7 key. The
setting range is from 1 to 9.
After selecting the level value, press ENT
key.
To return to the SET BARCODE menu, press
C key.
53
Page 64
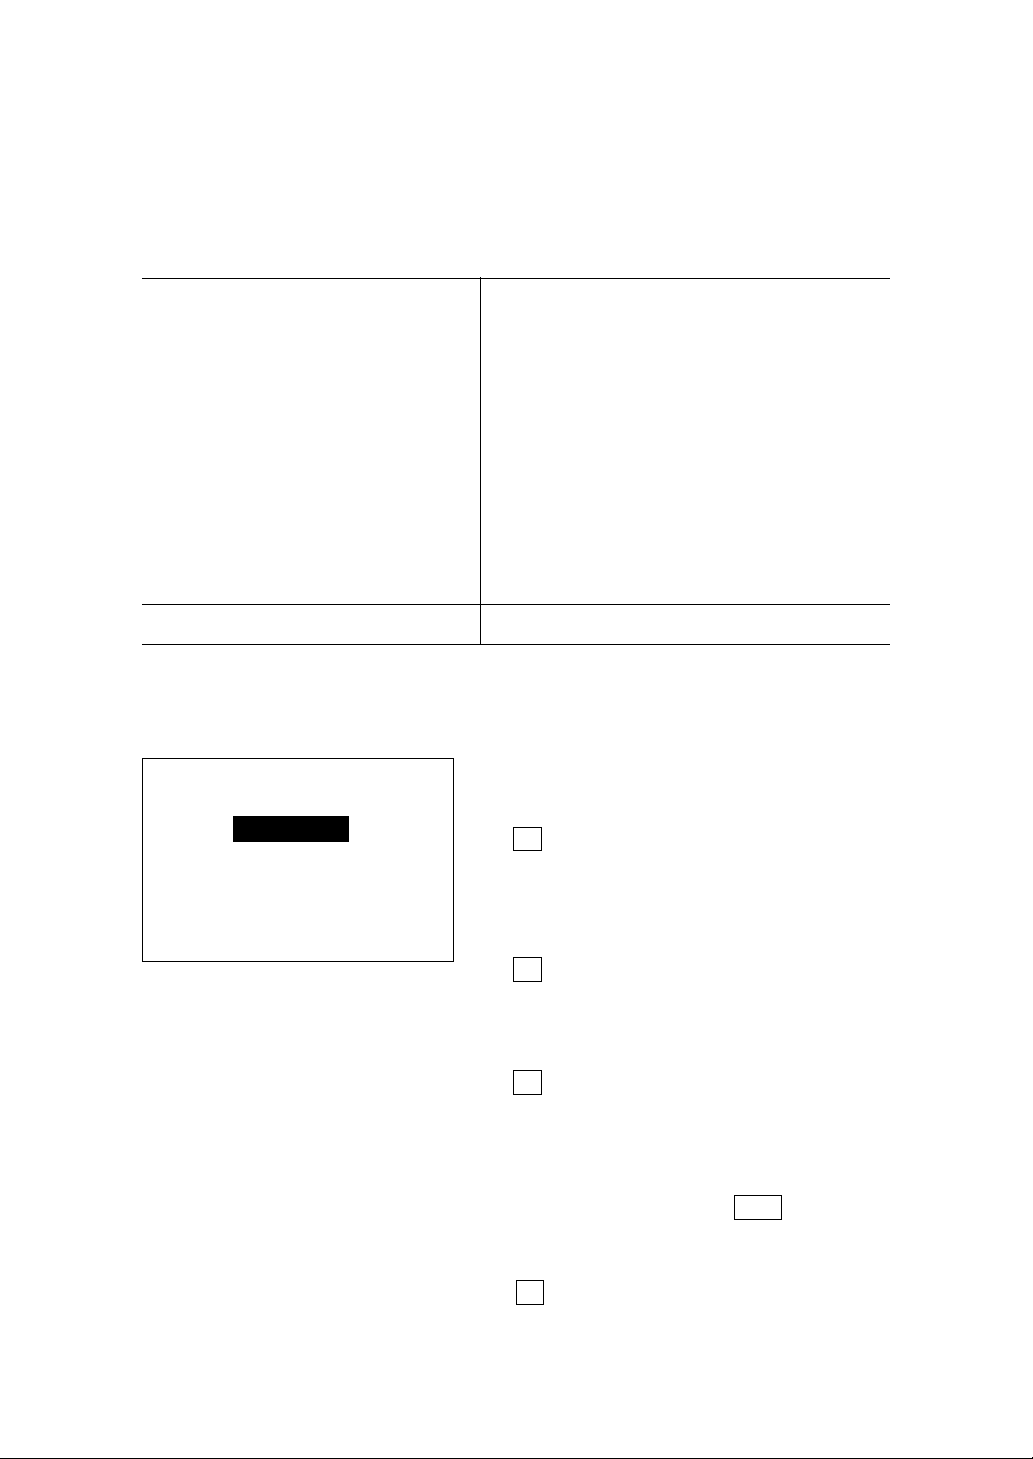
[ 4.5 ] Setting the communications parameters and interface port
When the BHT-4000 is initialized, the communications parameters and the interface
port to be used are set as listed in the default table below. Do not access unless
necessary.
Communications parameters
Transmission speed (Bit rate) 19,200 bps
Character length 8 bits
Parity None
Stop bits 1 bit
Protocol Serial number ON: Adds serial numbers
to data blocks.
Horizontal parity ON: Enables horizontal
parity cheking.
RS/CS control OFF: Disables the RS/CS
control.
Interface port Optical interface port
SET COM ENVIRONMENT
1:Optical
2:Connector
3:Default
Selecting "Com" on the SET SYSTEM menu
displays the screen shown at left.
1 Optical : Shifts to the communica-
tions parameter menu
screen for the optical interface. (The CU-4000 is
required.)
2 Connector : Shifts to the communica-
tions parameter menu
screen for the direct-connect interface.
3 Default : Shifts to the interface port
setting screen.
Select a desired item by using the numerical keys and then press ENT key to shift
to the selected setting screen.
To return to the SET SYSTEM menu, press
C key.
54
Page 65

Chapter 2. Getting Started the BHT-4000 and System Mode
Setting the communications parameters
Selecting "Optical" or "Connector" on the
SET COM OPTICAL
1:Speed 2:Data
3:Parity 4:Stop bit
5:Protocol
SET COM CONNECTOR
1:Speed 2:Data
3:Parity 4:Stop bit
5:Protocol
SET COM ENVIRONMENT menu displays the
corresponding screen shown at left. The
selected interface port (OPTICAL or CONNECTOR) is shown on the 2nd line of the
LCD.
1 Speed : Shifts to the speed setting screen where you may select the transmis-
sion speed: 300, 1200, 2400, 4800, 9600, 19200, 38400* bps, or High
Speed.**
(*38400 bps is available only when the direct-connect interface port has
been selected.)
(**The "High Speed" is available only in Transfer Utility, provided that
the RS-232C interface cable is specially connected. Refer to Chapter 3,
Subsection 3.1.2.)
2 Data : Shifts to the character length setting screen where you may select 7 or
8 bits.
3 Parity : Shifts to the parity setting screen where you may select none, even, or
odd parity.
4 Stop bit : Shifts to the stop bit setting screen where you may select 1 or 2 bits.
5 Protocol : Shifts to the protocol setting screen where you may set the following:
- Serial On/Off: Selects whether or not the system should
add serial numbers to data blocks.
- Parity On/Off: Selects whether or not the system should
add a horizontal parity.
- RS/CS Control On/Off: Selects whether or not the system should
control the RS/CS signal.
Select a desired item by using the numerical keys and press ENT key to shift to the
corresponding setting screen.
To return to the previous screen, press C key.
55
Page 66

Setting the interface port
SET COM DEFAULT
BASIC
1:Optical 2:Connector
SYSTEM MODE
3:Optical 4:Connector
Selecting "Default" on the SET COM ENVIRONMENT menu displays the screen shown
at left.
BASIC : Selects the optical or di-
rect-connect interface
port to be used for user
programs written in BHTBASIC 3.0 ("COM." or
XFILE statements) or for
Easy Pack 4.2.
SYSTEM MODE : Selects the optical or di-
rect-connect interface
port to be used for downloading and uploading
files in System Mode.
Select a desired setting by using the numerical keys and press ENT .
To return to the SET COM ENVIRONMENT
menu screen, press C key.
56
Page 67

Chapter 2. Getting Started the BHT-4000 and System Mode
[ 4.6 ] Setting the resume function and shift-key function
Selecting "Others" on the SET SYSTEM
SET OTHERS
Resume
1:ON 2:OFF
[SF]key
3:NonLock 4:OneTime
menu displays the screen shown at left. Reversed are the current settings.
Resume : Activates or deactivates the
resume function which resumes
the display shown before the
power was turned off, when the
BHT-4000 is powered up.
[ SF ] key : Switches the function of SF
key.
NonLock: The keypad will be
shifted only when the SF key
is held down.
OneTime: Once the SF key is
pressed, the next one key
pressed will be shifted and the
following keys will not be
shifted.
Select a desired setting by using the numerical keys, then press ENT key.
To return to the SET SYSTEM menu, press
C key.
Reference: The BHT-4000 automatically dis-
plays the shift-key icon on
the bottom of the LCD (as default) when the keys are shifted.
You may erase it by modifying
the system status indication setting on the SET DISPLAY menu
(refer to [4.2]) or by using the
OUT statement in user programs
(refer to the "BHT-BASIC 3.0 Programmer's Manual").
57
Page 68
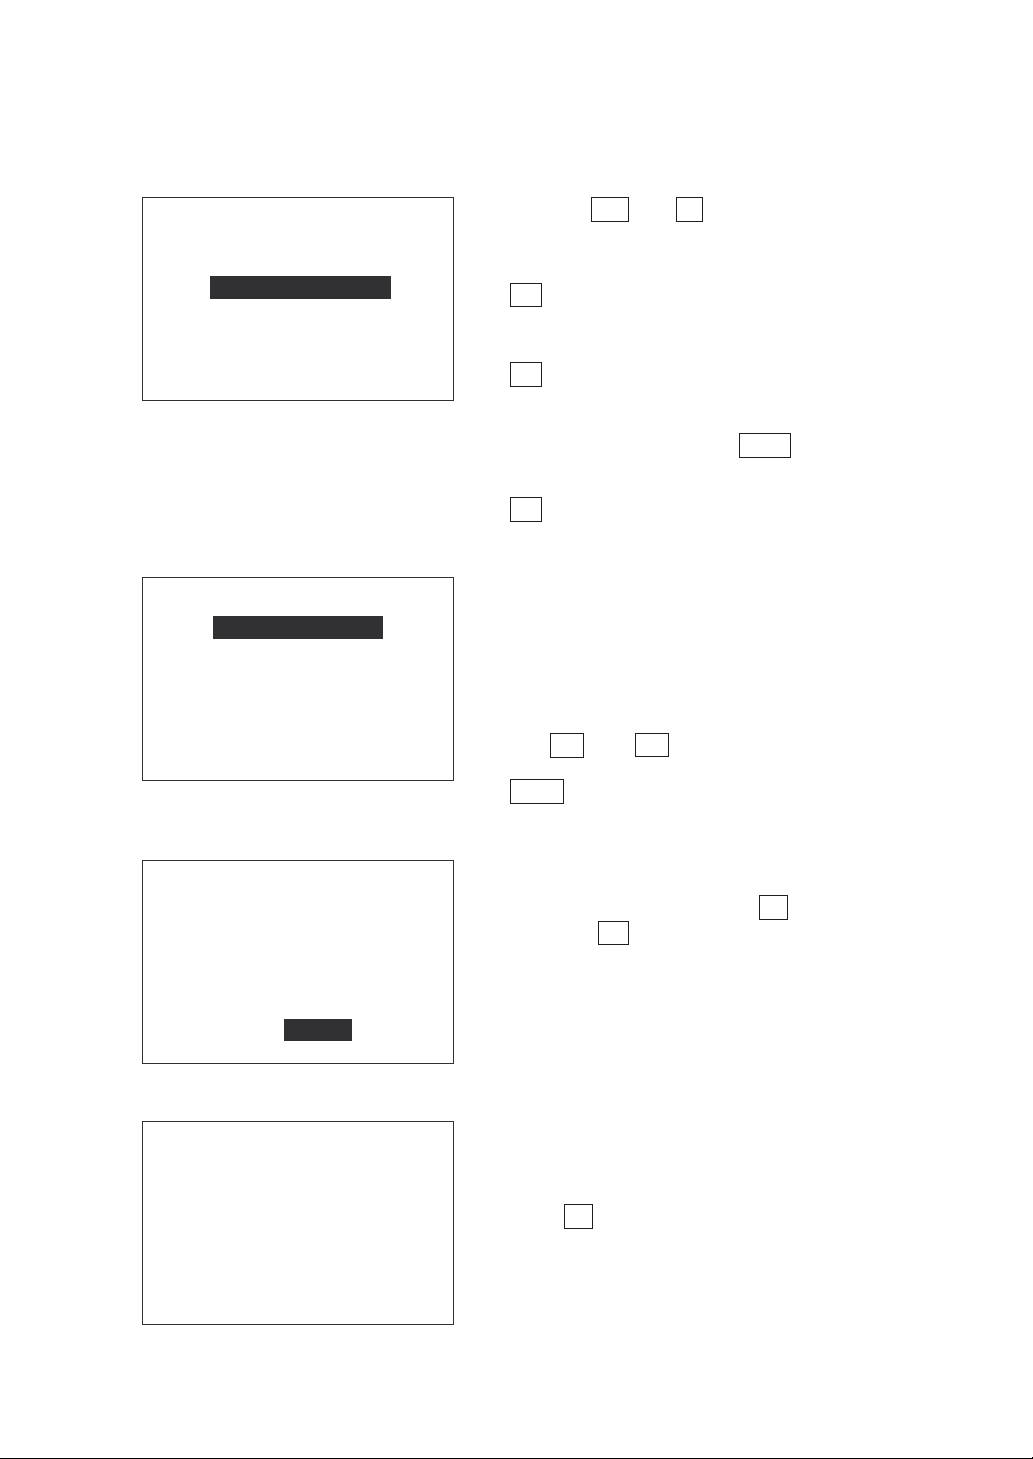
[ 4.7 ] Deleting a user program file or data file
DELETE
1:Program File
2:Data File
⇓
DELETE PROGRAM
EASYPACK.PD3
SAMPLE1.PD3
SAMPLE2.PD3
SAMPLE3.PD3
⇓
Pressing SF and 0 keys on the SET SYSTEM menu screen displays the screen shown
at left.
1 Program File : Deletes a user program
file (including Easy Pack
4.2).
2 Data File : Deletes a data file.
Select the file to be deleted by using the
numerical keys and press ENT key.
To return to the SET SYSTEM menu, press
C key.
The selected file type (PROGRAM or DATA)
is shown on the 2nd line of the LCD. In the
screen shown at left, the PROGRAM file is
selected.
If more than one program file is stored in
the user area of the RAM as shown at left,
use F5 and F7 keys to move the cursor
to the program to be deleted and then press
ENT key.
DELETE PROGRAM
SAMPLE1.PD3
Delete ?
1:Yes 2:No
⇓
DELETE PROGRAM
SAMPLE1.PD3
** Completed **
The screen shown at left will appear.
To delete the program, press 1 key; to cancel, press 2 key.
When the designated file is deleted, the
screen shown at left appears.
To return to the SYSTEM MENU screen,
press C key two times.
58
Page 69
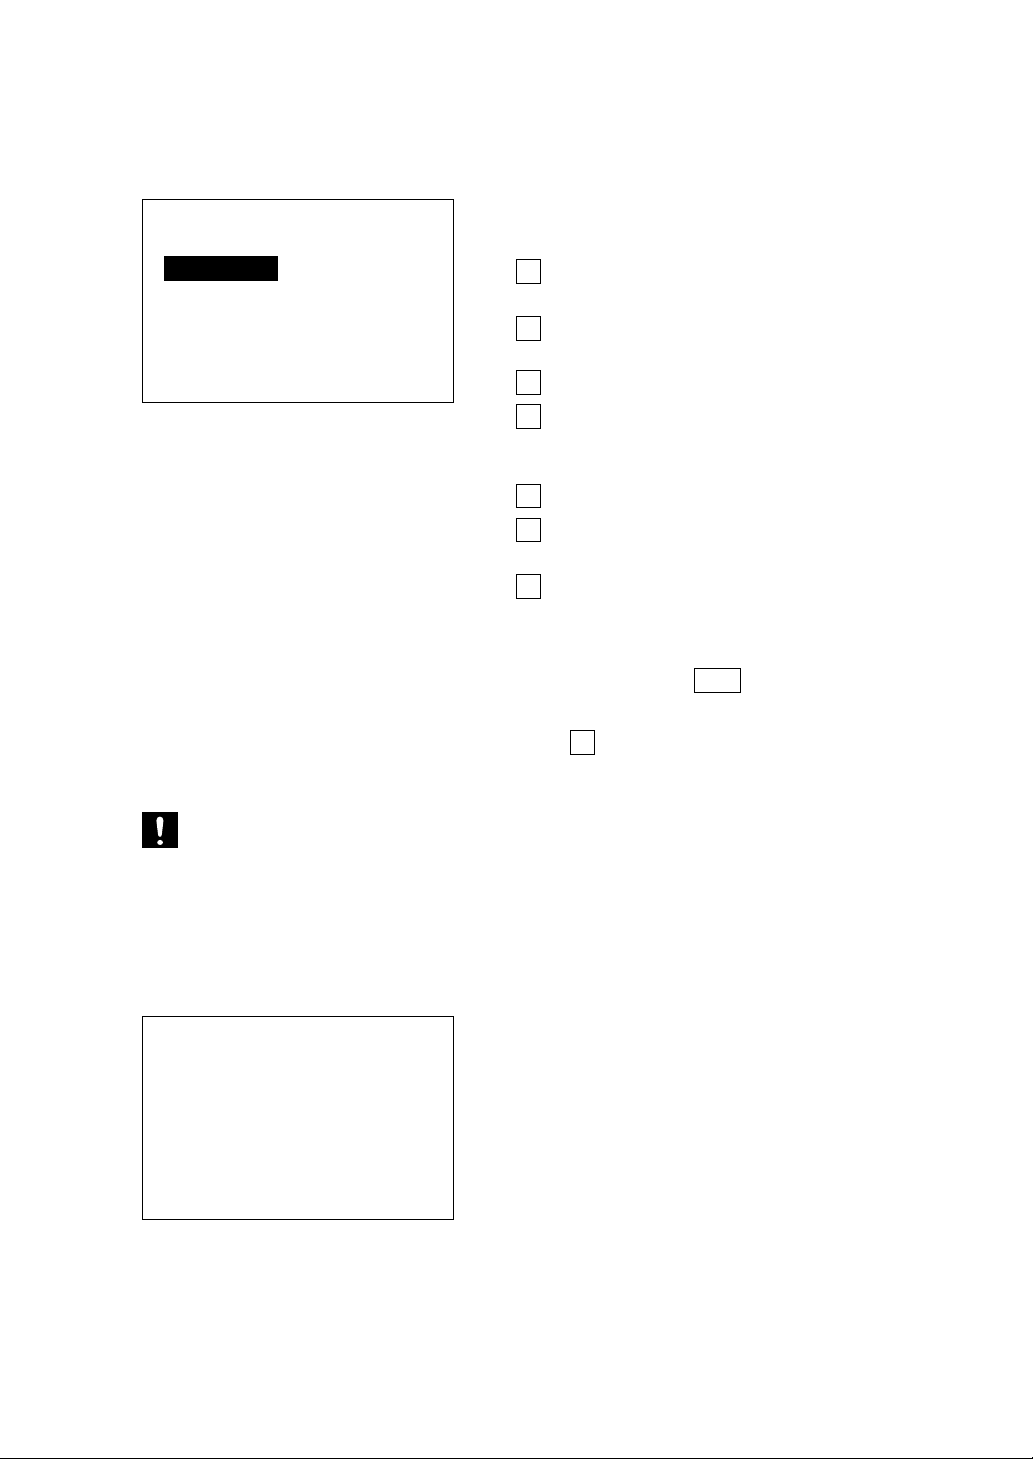
[ 5 ] Testing
Chapter 2. Getting Started the BHT-4000 and System Mode
TEST MENU
1:Barcode 2:Memory
3:Key 4:LCD
5:Aging 6:Com
7:Beeper
Selecting "Test" on the SYSTEM MENU displays the screen shown at left.
1 Barcode : Selects the bar-code read-
ing test.
2 Memory : Selects the ROM and RAM
tests.
3 Key : Selects the key entry test.
4 LCD : Selects the LCD, reading
confirmation LED, and
marker LEDs tests.
5 Aging : Selects the aging test.
6 Com : Selects the communica-
tions test.
7 Beeper : Selects the beeper test.
Select a desired item by using the numerical keys, then press ENT key.
To return to the SYSTEM MENU screen,
press C key.
If an error occurs in any of the above tests, contact your nearest dealer.
[ 5.1 ] Bar-code reading test
TEST BARCODE
Selecting "Barcode" on the TEST MENU displays the screen shown at left.
Actually read bar codes with the BHT-4000
and check the read data displayed on the
LCD.
59
Page 70

Bar-code type
Number of digits of the bar code
TEST BARCODE
B 08 49400403
Data
Listed below is a table showing the relationship between the bar-code types and the
identifier letters to be displayed on the LCD.
(CODE39 sample)
TEST BARCODE
M 20 12345678901234567890
Upon completion of bar-code reading, the
BHT-4000 beeps, turns on the reading confirmation LED in green, and displays the
read data together with the bar-code type
and the number of data digits.
Bar-code Type ID Letters
EAN-13, UPC-A A
EAN-8 B
UPC-E C
Standard 2 of 5 (STF) H
Interleaved 2 of 5 (ITF)* I
CODABAR (NW7) N
CODE39 M
CODE93 L
CODE128 K
* The BHT-4000 can read only those
ITF bar codes having 4 digits or more
in length.
To return to the TEST MENU screen, press
C key.
60
Page 71

Chapter 2. Getting Started the BHT-4000 and System Mode
[ 5.2 ] ROM and RAM tests
TEST MEMORY
ROM Testing
TEST MEMORY
ROM Test OK
RAM Testing xxxx/yyyy
TEST MEMORY
ROM Test OK
RAM Test NG XXXX/YYYY
Address : hhmmll
Write : AA
Read : BB
Selecting "Memory" on the TEST MENU displays the screen shown at left and starts
testing the ROM and RAM.
Upon normal completion of the ROM test,
the BHT-4000 automatically starts testing the
RAM.
The screen shows the "tested RAM capacity/total RAM capacity" in kilobytes.
If any error is detected, the BHT-4000 beeps,
shows the message as shown at left, and
terminates the test. (This example indicates
that an error has occurred in the RAM.)
Where,
hhmmll: Address where an error has oc-
curred.
AA: Data to write
BB: Data read out from the RAM
TEST MEMORY
ROM test OK
RAM Test OK yyyy/yyyy
To return to the TEST MENU screen, press
C key.
Upon normal completion of the ROM and
RAM tests, the BHT-4000 beeps, shows the
message as shown at left, and returns to the
TEST MENU screen.
61
Page 72

[ 5.3 ] Key entry test
Selecting "Key" on the TEST MENU displays
TEST KEY
The table below shows the relationship among the keys, the identifier letters to be
displayed on the LCD, and the frequencies (Hz) of the beeper.
Key Letter Beeper Key Letter Beeper Key Letter Beeper
(Hz) (Hz) (Hz)
F1 A 261 F8 H 587 2 2 1318
F2 B 293 7 7 659 3 3 1396
F3 C 329 8 8 698 0 0 1567
F4 D 349 9 9 783 . . 1760
F5 E 391 4 4 880 C I 1975
SF _ 440 5 5 987 BS J 2093
F6 F 493 6 6 1046 ENT = 2349
F7 G 523 1 1 1174
the screen shown at left and makes the BHT4000 ready for entry from the keypad.
Pressing individual keys displays the identifier letters in the positions preassigned to
those keys on the LCD and sounds the
beeper. (While the individual key is held
down, the beeper continues beeping.)
Pressing the same key again erases the displayed letter.
TEST KEY
ABCDE_FGH
7894561230.
IJ=
After all keys are pressed and displayed on
the LCD, this test automatically ends and
the screen returns to the TEST MENU screen.
To stop this test in progress, turn the power
off and on.
62
Page 73
Chapter 2. Getting Started the BHT-4000 and System Mode
[ 5.4 ] LCD, reading confirmation LED, and marker LEDs tests
Selecting "LCD" on the TEST MENU displays
the test pattern shown at left on the LCD
and turns on the reading confirmation LED
in green.
Each time ENT key is pressed, the screen
shifts to the next test pattern.
To stop this test in progress, press C key.
ENT key
⇓
The screen shown at left appears and the
reading confirmation LED lights in red.
⇓
⇓
⇓
ENT key
The checker pattern shown at left appears,
the reading confirmation LED goes off, and
the marker LEDs come on to display the
markers.
ENT key
The checker pattern is reversed and the
marker LEDs go off.
ENT key
63
Page 74
⇓
⇓
⇓
ENT key
The fine checker pattern shown at left appears.
ENT key
The fine checker pattern is reversed.
ENT key
⇓
ENT key
After showing all of the test patterns, the
screen automatically displays symbols, and
alphanumerics.
Upon completion of this test, the BHT-4000
beeps once and returns to the TEST MENU
screen.
64
Page 75
Chapter 2. Getting Started the BHT-4000 and System Mode
[ 5.5 ] Aging test
TEST AGING
DATE 93/10/20
TIME 15:00:00
Once this test is selected, the automatic powering-off function becomes disabled.
Be sure to turn the power off or press C key to return to the TEST MENU screen.
[ 5.6 ] Communications test
Selecting "Aging" on the TEST MENU proceeds to the aging test while showing the
current date and time on the LCD. (This test
is intended for personnel which check the
BHT-4000 in the factory.)
To return to the TEST MENU screen, press
C key.
Before starting the communications test in System Mode, it is necessary to jump back
the RS-232C interface ports on the CU-4000 and on the BHT-4000 with the testing
connectors arranged as shown on the next page.
Interface port Testing connectors required
Optical interface port on the CU-4000 25-pin D-sub connector (DB-25P)
Direct-connect interface port on the
BHT-4000
QM connector
65
Page 76
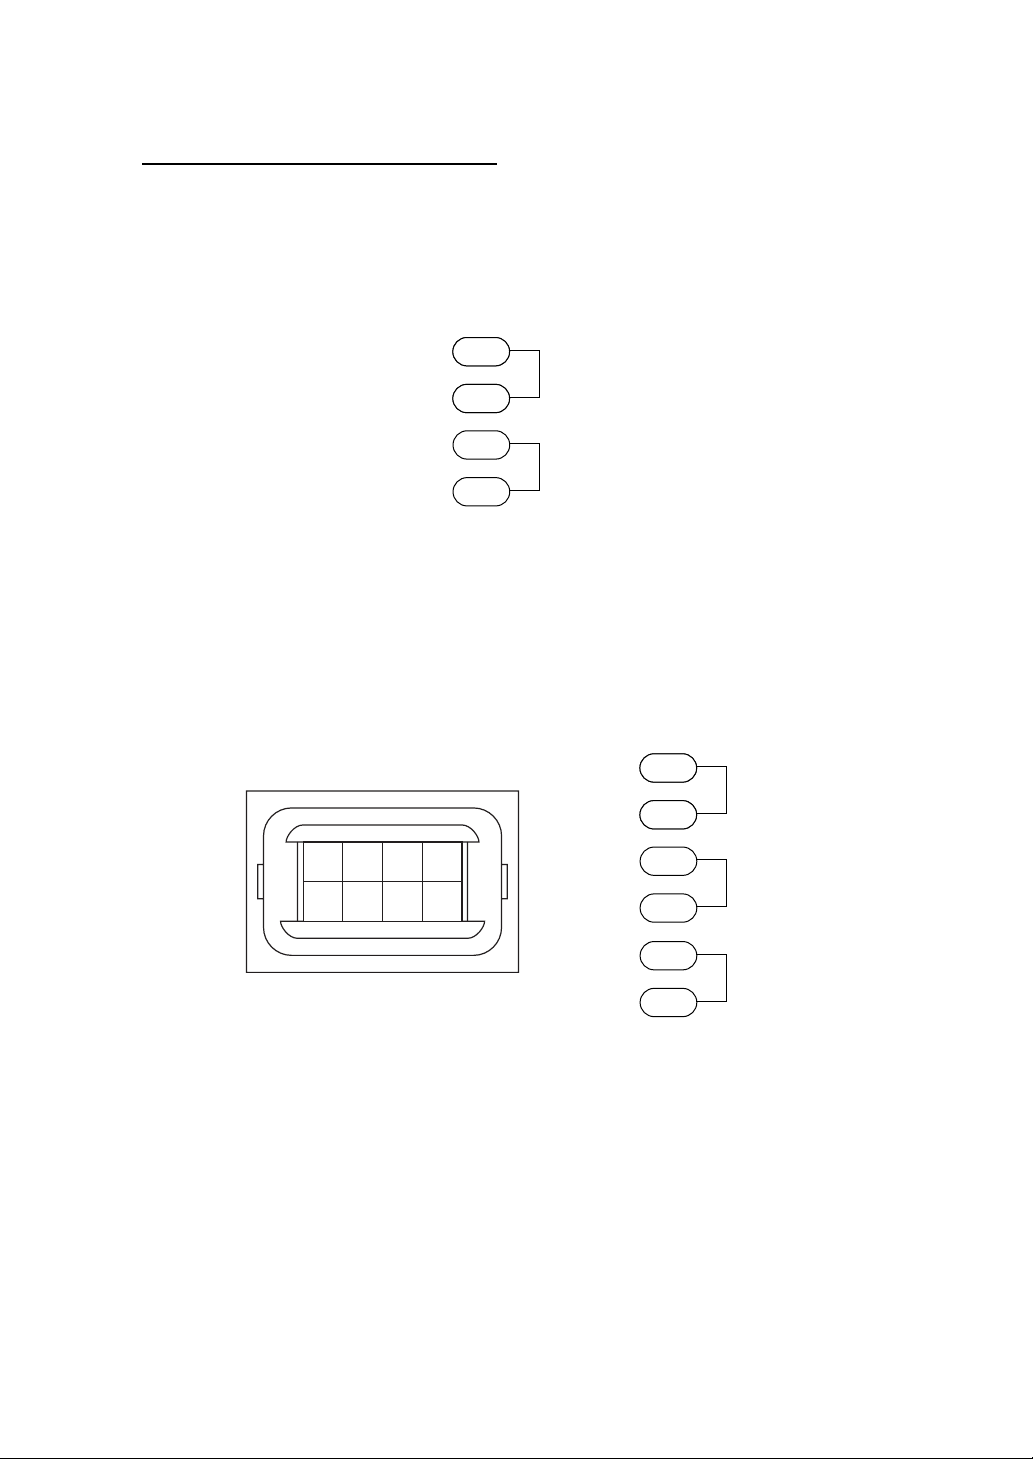
Preparation for the communications test
(1) Jump back the optical interface port on the CU-4000
Arrange the Dsub-25P (DB-25P) connector as illustrated below and connect it to the
interface port on the CU-4000.
Pin No.
SD
RD
RS
CS
2
3
4
5
(2) Jump back the direct-connect interface port on the BHT-4000
Arrange the QM connector as illustrated below, then connect it to the direct-connect
interface port on the BHT-4000.
Pin No.
2
3
4
5
2 4 6 8
1 3 5 7
SD
RD
RS
CS
(Test loop terminating connector)
(3) Place the BHT-4000 on the CU-4000.
66
CD
ER
6
7
Page 77

TEST COMMUNICATION
Chapter 2. Getting Started the BHT-4000 and System Mode
Selecting "Com" on the TEST MENU displays the screen shown at left.
1:Optical
2:Connector
TEST COMMUNICATION
< Optical >
** Testing **
TEST COMMUNICATION
< Optical >
** Test NG **
1 Optical : Tests the optical interface
port.
2 Connector : Tests the direct-connect in-
terface port.
Select the interface port to be tested by using the numerical keys, then press ENT
key.
During the test, the screen shown at left is
displayed, showing the selected interface
port (optical or direct-connect interface) in
the center of the LCD. (This example is
testing the optical interface port.)
If an error occurs, the beeper beeps three
times and the error message shown at left
appears. Press C key to return to the TEST
MENU screen.
TEST COMMUNICATION
< Optical >
** Test OK **
Upon normal completion of the test, the
BHT-4000 beeps once and displays the
screen shown at left.
Press C key to return to the TEST MENU
screen.
67
Page 78

[ 5.7 ] Beeper test
TEST BEEPER
Selecting "Beeper" on the TEST MENU displays the screen shown at left and makes
the beeper sound at three octaves.
Upon completion of this test, the BHT-4000
automatically returns to the TEST MENU
screen.
To stop this test in progress, turn the power
off and on.
68
Page 79

Chapter 2. Getting Started the BHT-4000 and System Mode
[ 6 ] System Program Version & RAM Capacity
SYSTEM/RAM INFORMATION
SYSTEM Ver. X.XXX
RAM : XXXXKB
Selecting "Version" on the SYSTEM MENU
displays the screen shown at left, indicating
the System Program version and the RAM
capacity.
Press C key to return to the SYSTEM
MENU screen.
69
Page 80

70
Page 81

Chapter 3. Communications Operations of BHT-4000
Chapter 3
Communications Operations of BHT-4000
This chapter describes the communications operations of the BHT-4000--the RS-232C
interface specifications, the basic communications specifications, and the BHTprotocol--for data transmission with the host computer or other devices.
3.1 RS-232C Interface Specifications .................................................................................... 72
3.1.1 For CU-4000 ................................................................................................................. 72
3.1.2 For BHT-4000 ...............................................................................................................75
3.2 Basic Communications Specifications and Parameters................................................ 77
3.2.1 Basic Communications Specifications ...................................................................... 77
3.2.2 Communications Parameters ..................................................................................... 80
3.3 BHT-Protocol ..................................................................................................................... 81
3.3.1 Overview ...................................................................................................................... 81
3.3.2 Control Characters ...................................................................................................... 82
3.3.3 Basic Format of Transmission Messages .................................................................. 84
3.3.4 Transmission Control Sequences .............................................................................. 85
3.3.5 Aborting Data Transmission....................................................................................... 93
3.3.6 BCC for Horizontal Parity Checking ........................................................................... 94
3.3.7 Text Format .................................................................................................................. 95
71
Page 82
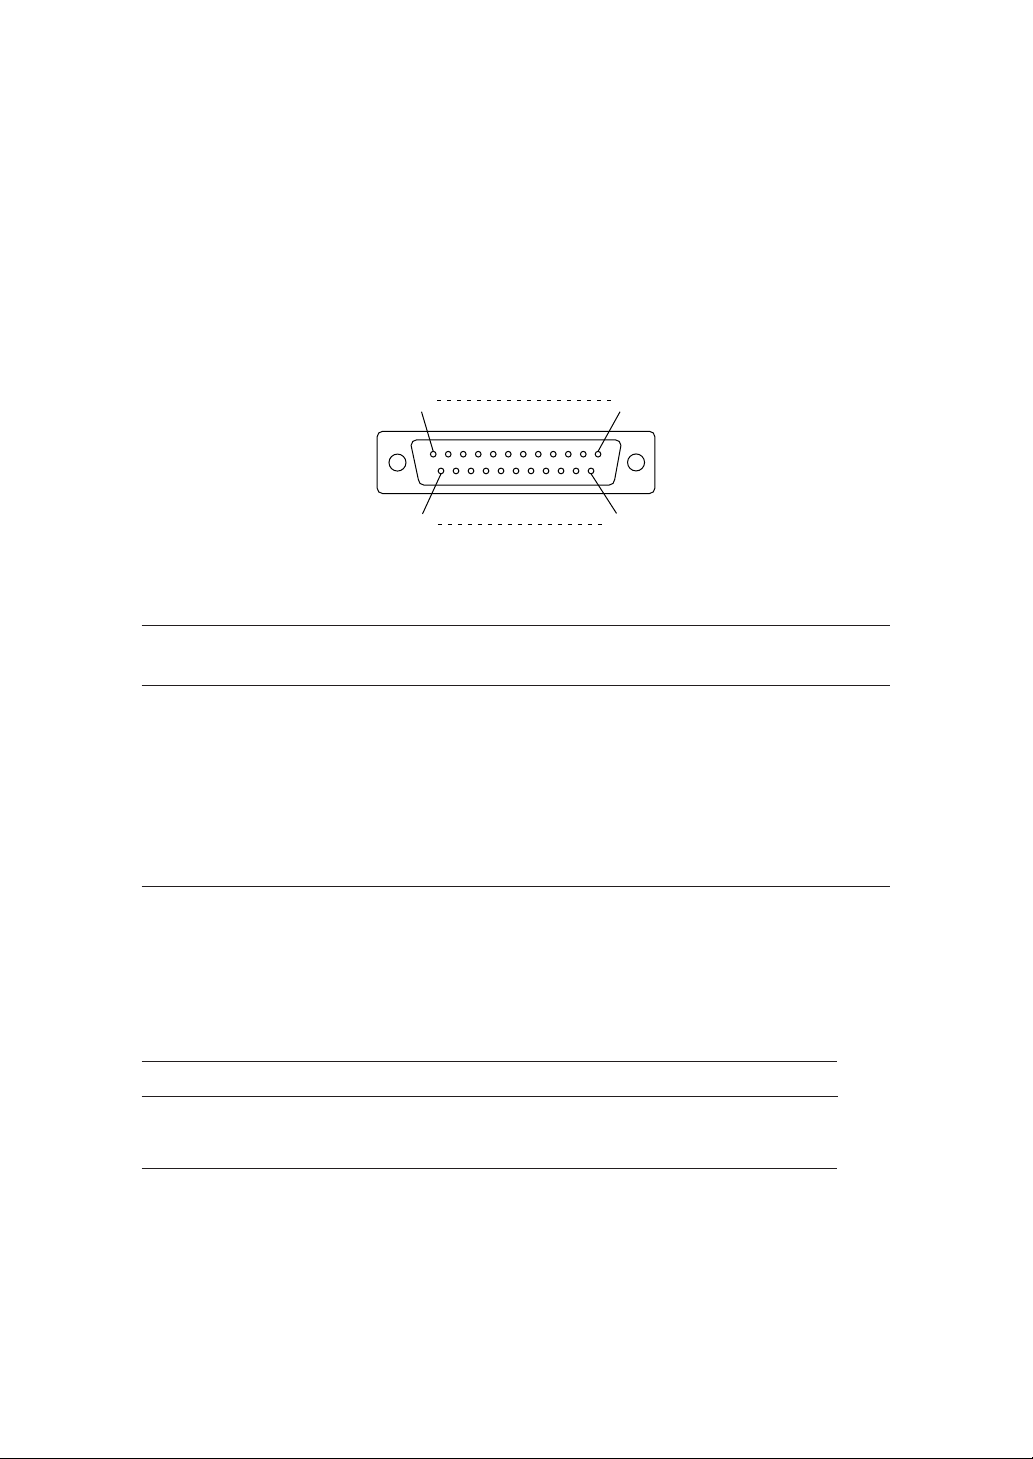
3.1 RS-232C Interface Specifications
3.1.1 For CU-4000
[ 1 ] Interface Connector and Pin Assignment
The CU-4000 has an RS-232C interface port (Dsub-25S).
13
25
RS-232C interface port (Dsub-25S) on the CU-4000
Pin No. Signal Functions Signal Input/Output
2SDSend data →
3RDReceive data ←
4RSRequest to send →
5CSReady to send ←
7SGSignal ground —
20 ER Data terminal equipment ready →
Pins 1 (FG), 6 (DR), and 8 (CD) are not connected.
1
14
CU-4000 External device
The input/output voltage threshold for the logical valued signal is listed below.
Logical Value Input Voltage Threshold Output Voltage Threshold
0 3V min. 5V min.
1 -3V max. -5V max.
72
Page 83
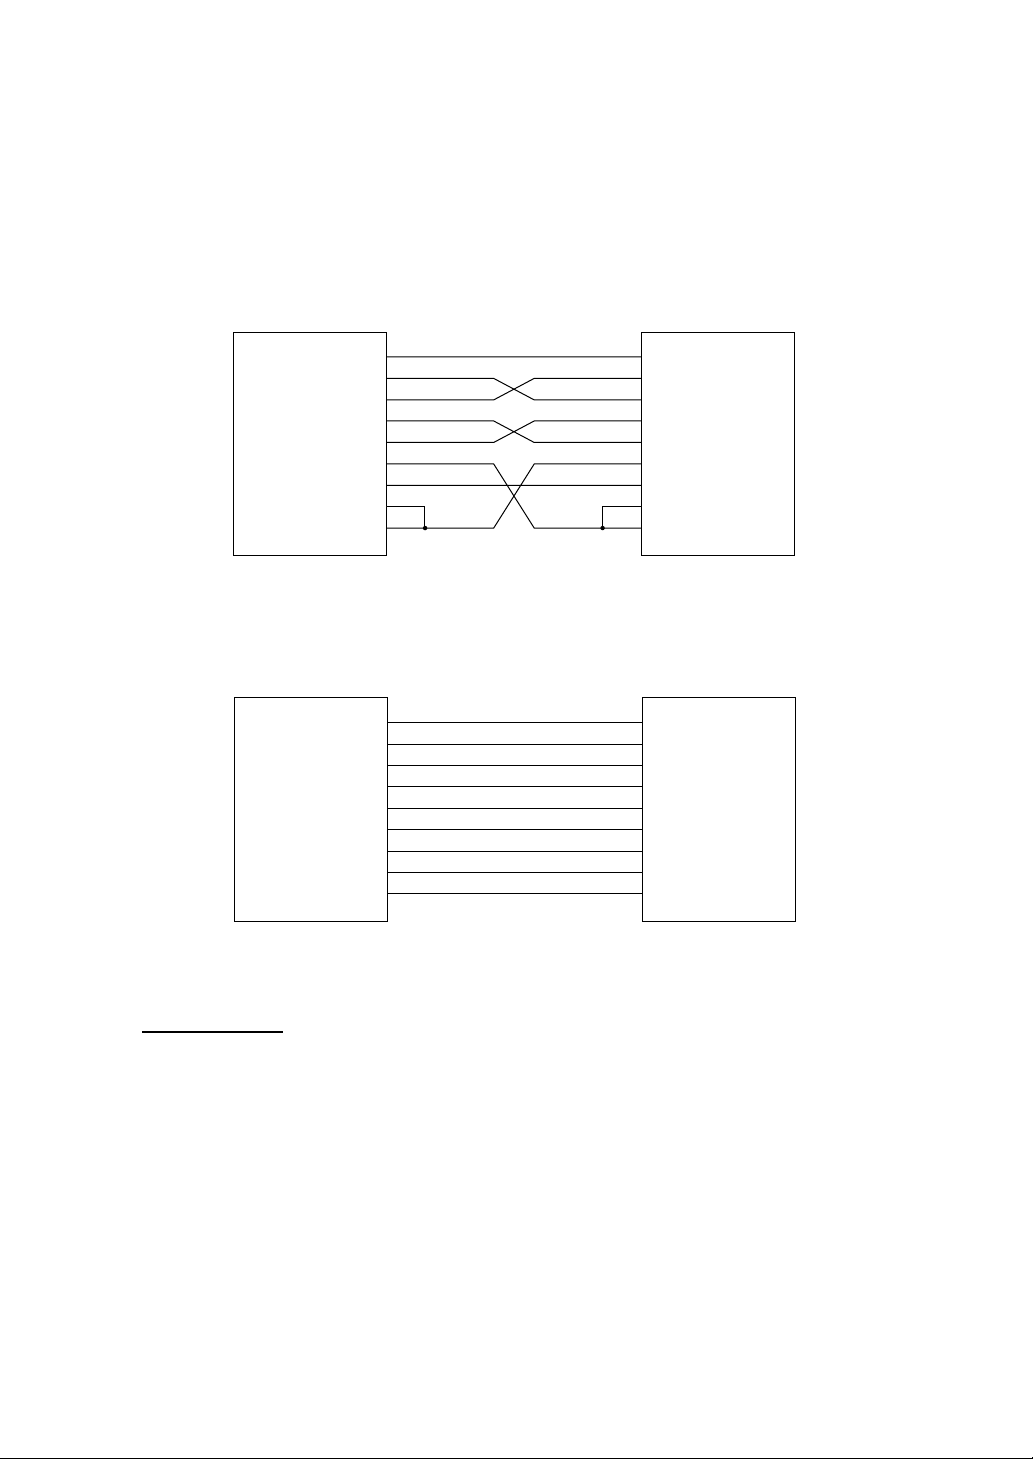
Chapter 3. Communications Operations of BHT-4000
[ 2 ] Interface Cable Connection
As illustrated below, connect the CU-4000 (which is joined with the BHT-4000) to a host
computer with a cross-mode cable. To connect it to a modem, use a straight-mode
cable.
CU-4000
(DTE)
Host Computer
(DTE)
1
2
3
4
5
6
7
8
20
Cable Connection between CU-4000 and Host Computer
CU-4000
(DTE)
1
2
3
4
5
6
7
8
20
FG
SD
RD
RS
CS
DR
SG
CD
ER
FG
SD
RD
RS
CS
DR
SG
CD
ER
Modem
(DCE)
Cable Connection between CU-4000 and Modem
DTE and DCE
In the RS-232C interface specifications, the DTEs (Data Terminal Equipment) shall be
generally connected with each other by a cross-mode cable; the DTE and DCE (Data
Circuit-terminating Equipment) shall be connected with each other by a straight-mode
cable.
The DTE is one piece of equipment connected at both ends of a communications line
as a sender or receiver of data (such as CU-4000 joined with the BHT-4000 and a host
computer).
The DCE is one piece of equipment connected to the intermediate point between the
DTE and the communications line. It terminates communications lines and exchanges
information between those lines without any change in contents (such as modem).
73
Page 84
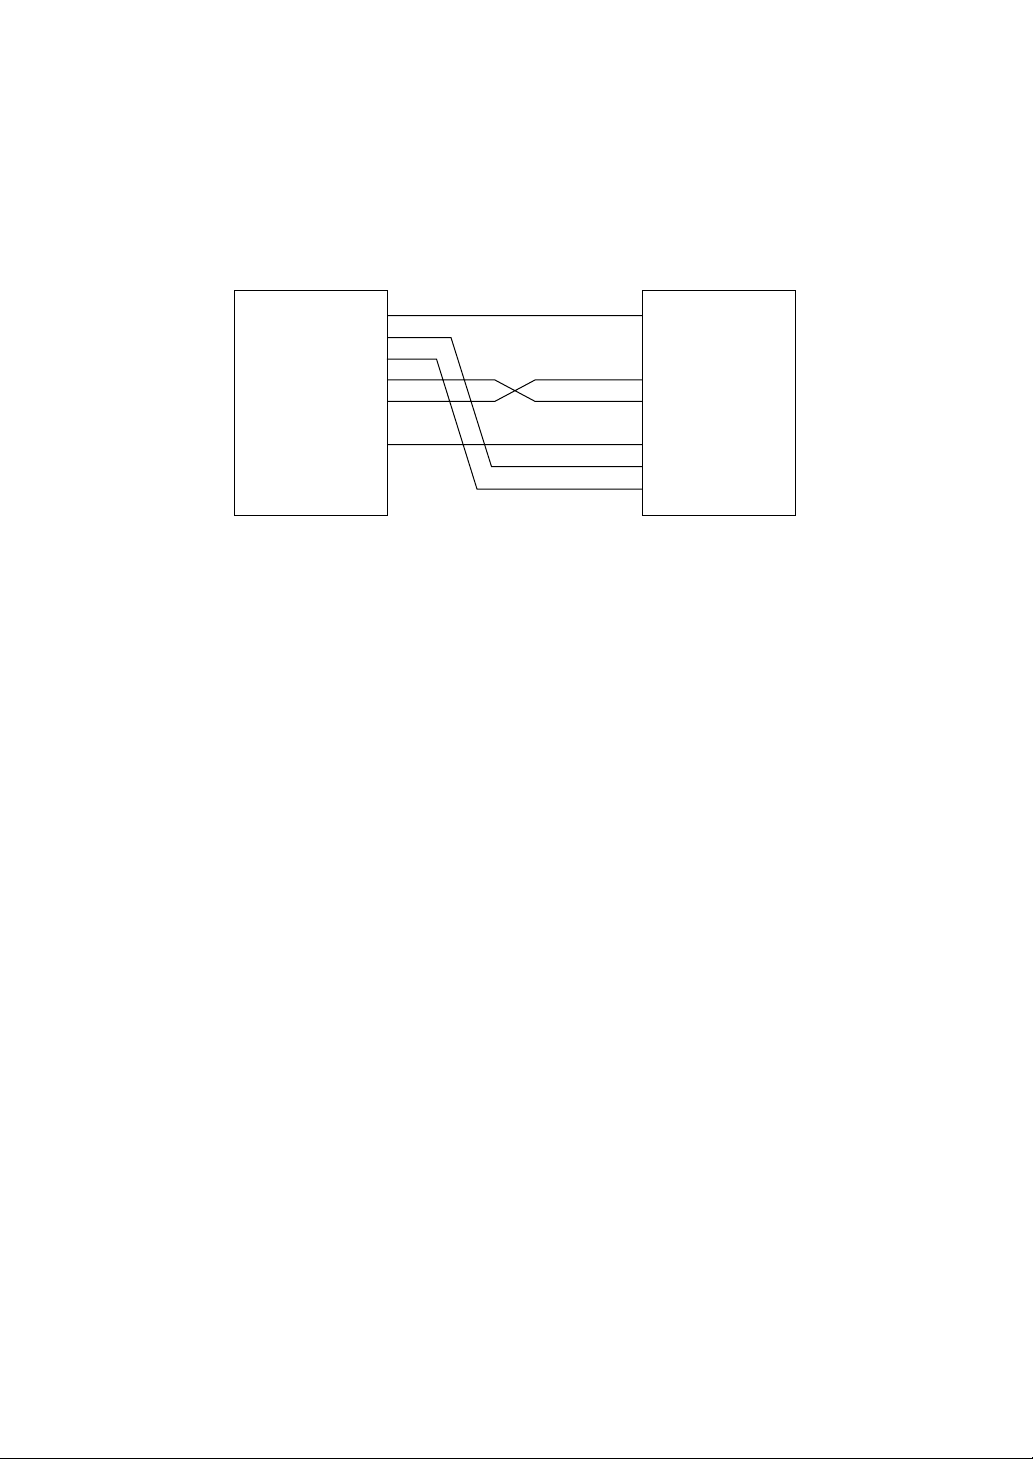
To transfer files at High Speed in Transfer Utility, connect the CU-4000 to a host
computer as illustrated below.
CU-4000
Host Computer
1
2
3
4
5
7
FG
RS
CS
SG
CD
ER
74
Page 85
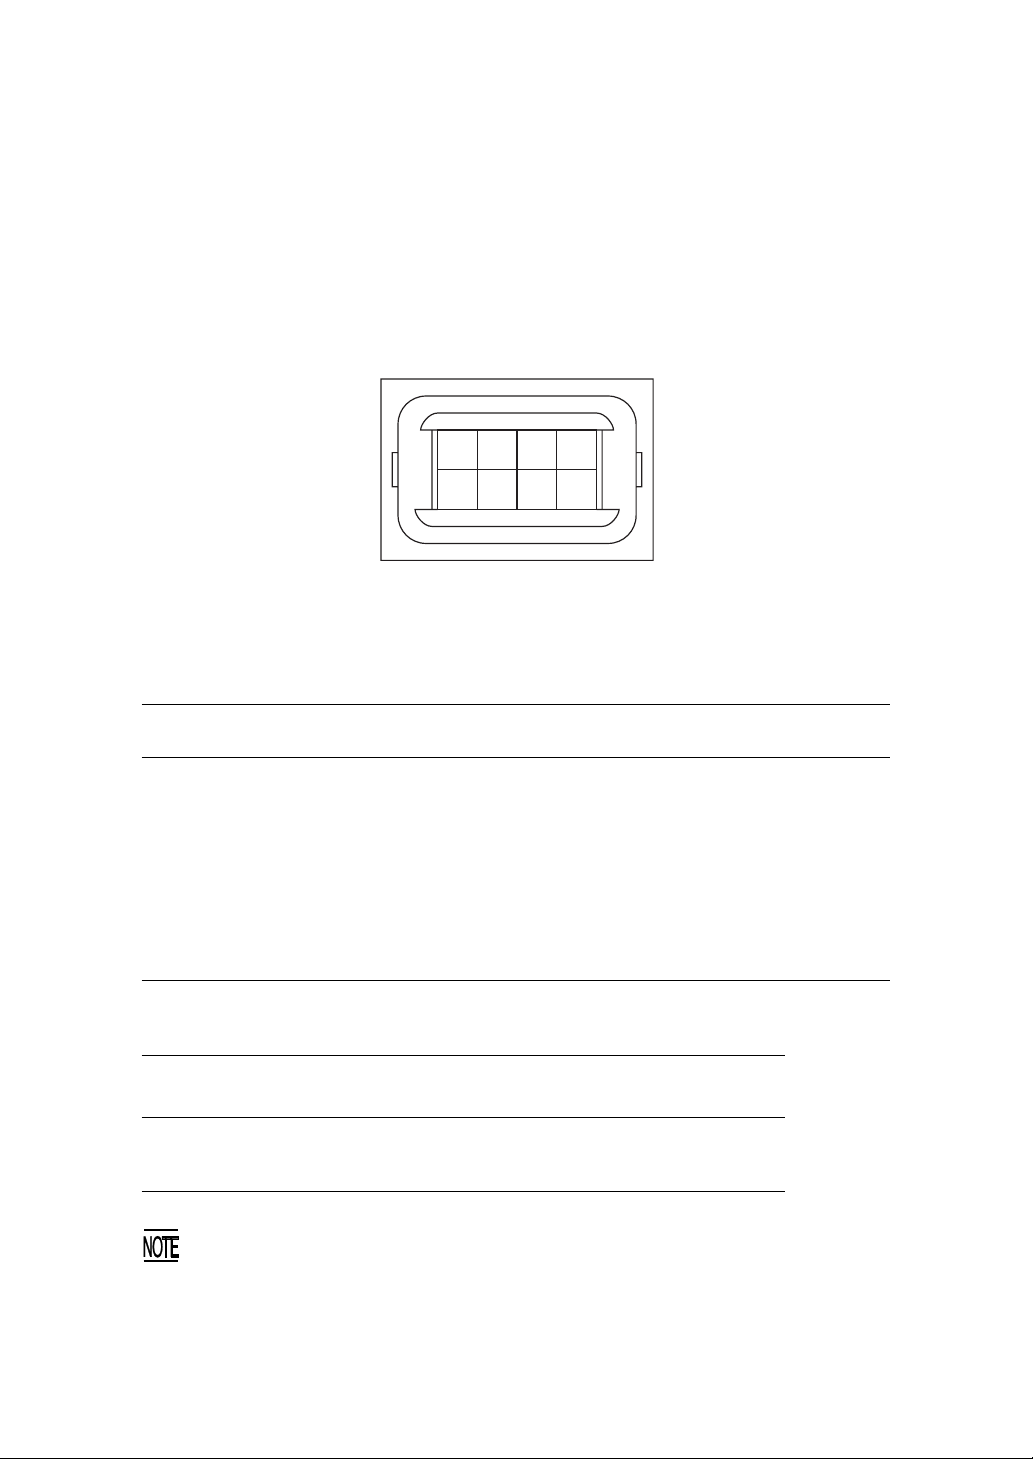
Chapter 3. Communications Operations of BHT-4000
3.1.2 For BHT-4000
[ 1 ] Interface Connector and Pin Assignment
The BHT-4000 has a direct-connect interface port (QM connector) as shown below,
which allows you to directly connect the BHT-4000 to a host computer or modem (or
another BHT-4000) without any routing through the CU-4000. It supports a subset of
the RS-232C interface.
2 4 6 8
1 3 5 7
Direct-connect Interface Port (QM connector) on the BHT-4000
The connector to be joined to the above port should be the Hirose QM connector
(without locking, with hood).
Pin No. Signal Functions
1 SD (GND) Ground for signals and charging pin —
2SDSend data →
3RDReceive data ←
4RSRequest to send →
5CSReady to send ←
6CDCarrier detect ←
7ERData terminal equipment ready →
8 CHG Charging pin ←
The input/output voltage threshold for the logical valued signal is listed below.
Logical Value Input Voltage Threshold Output Voltage Threshold
(RD) (SD)
0 3V min. 5V min.
1 -3V max. -5V max.
Signal Input/Output
BHT-4000 External device
The direct-connect interface port is not designed to stand frequent connecting/
disconnecting. Do not plug and unplug basically more than one time a day;
otherwise, the service life of the interface port will shorten. To connect the BHT4000 to a host computer frequently, use the CU-4000.
75
Page 86
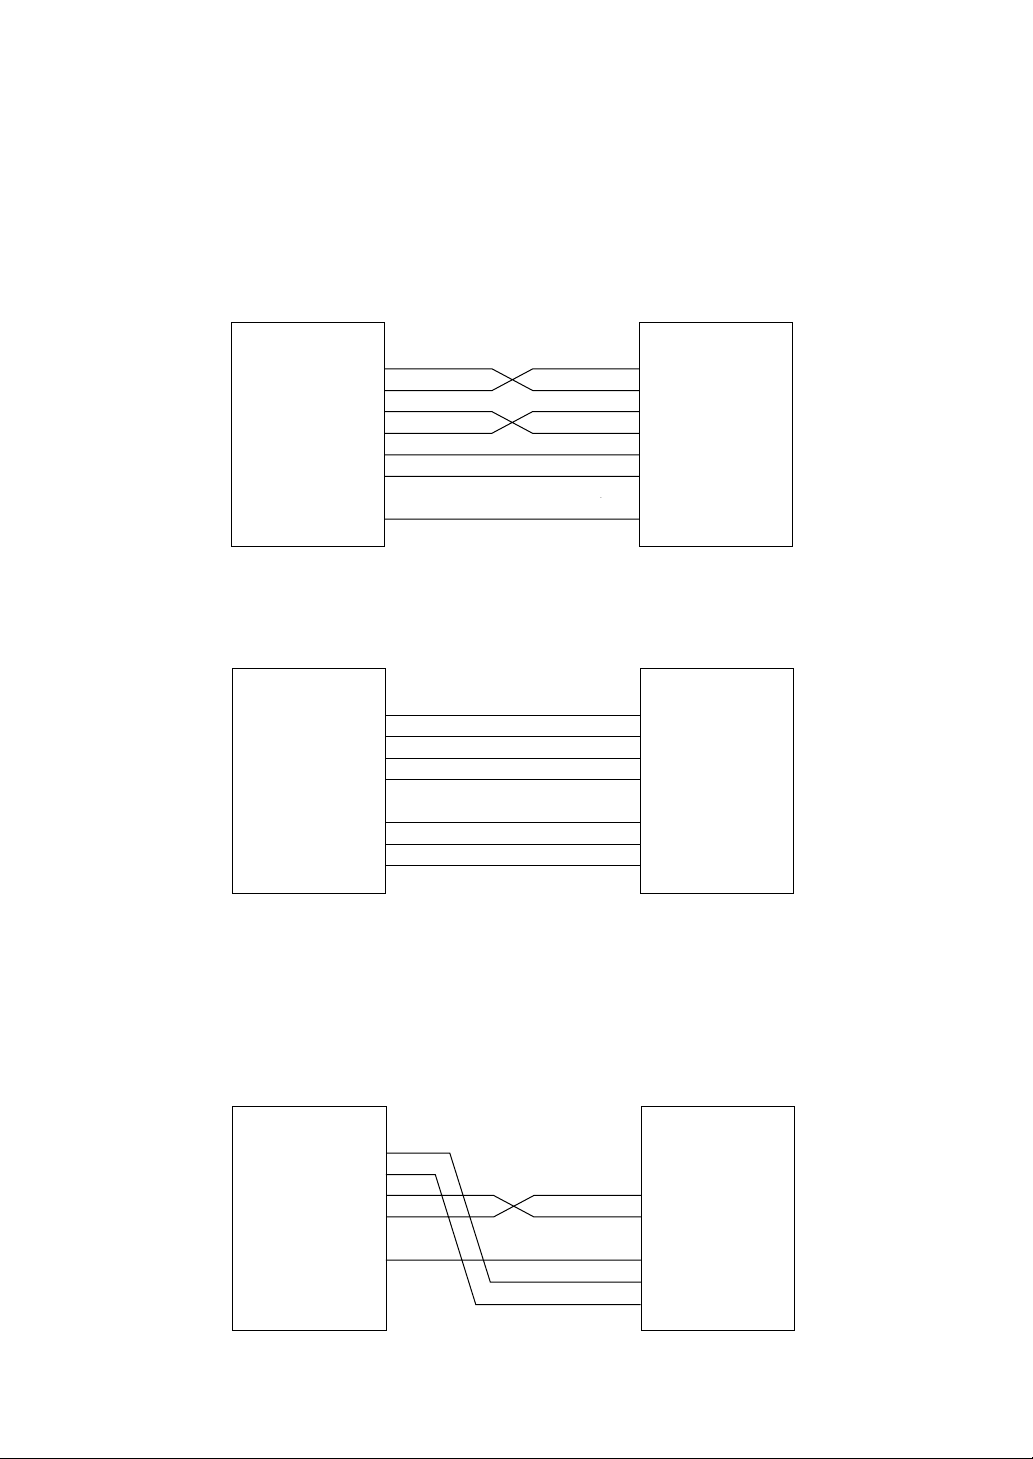
[ 2 ] Interface Cable Connection
Connect the BHT-4000 directly to a host computer, a modem, or a printer with a directconnect interface cable as illustrated below.
BHT-4000
Direct-connect Interface
2
3
4
5
7
1
6
Cable Connection between BHT-4000 and Host Computer
BHT-4000
Direct-connect Interface
2
3
4
5
1
6
7
Host Computer
FG
SD
RD
RS
CS
DR
SG
ER
Modem
FG
SD
RD
RS
CS
DR
SG
CD
ER
Cable Connection between BHT-4000 and Modem
To transfer files at High Speed in Transfer Utility, connect the CU-4000 to a host
computer as illustrated below.
BHT-4000
Direct-connect Interface
2
3
4
5
1
Host Computer
RS
CS
SG
CD
ER
76
Page 87

Chapter 3. Communications Operations of BHT-4000
3.2 Basic Communications Specifications and Parameters
3.2.1 Basic Communications Specifications
Listed below are the communications specifications when the BHT-4000 transacts data
with a host computer through the optical interface (CU-4000) or direct-connect interface.
Synchronization Start-stop
Transmission Speed 300, 600, 1200, 2400, 4800, 9600, 19200, 38400* bps, or
High Speed**
Transmission Code JIS 7-bit/8-bit codes***
Transmission Bit Order LSB (Least significant bit) first
Response Method ACK/NAK response
Vertical Parity Even, odd, or none
Transparency Non-transparent mode
RS/CS Control Enabled or disabled
* Available only when the direct-connect interface port (QM connec-
tor) has been selected.
** Available only in Transfer Utility.
*** Including 7-bit/8-bit ASCII codes
■ Synchronization
For accurate data transaction, it is very important to synchronize the transmission
between the sender and receiver. To do this, it is required to previously define the
bit order and position, the character length, and the beginning and end of the
character to be transmitted.
The start-stop synchronization is an asynchronous system which synchronizes
each character as a unit; that is, it externally adds start and stop bits to the leading
and trailing bit positions of the character to be transmitted, respectively. A clock
starts counting on receiving the start bit and it falls into a non-communication state
on receiving the stop bit. The number of the stop bits is selectable (1 or 2 bits).
■ Transmission Speed
Maximum number of bits to be transmitted per second. Expressed in bps (bits per
second).
77
Page 88
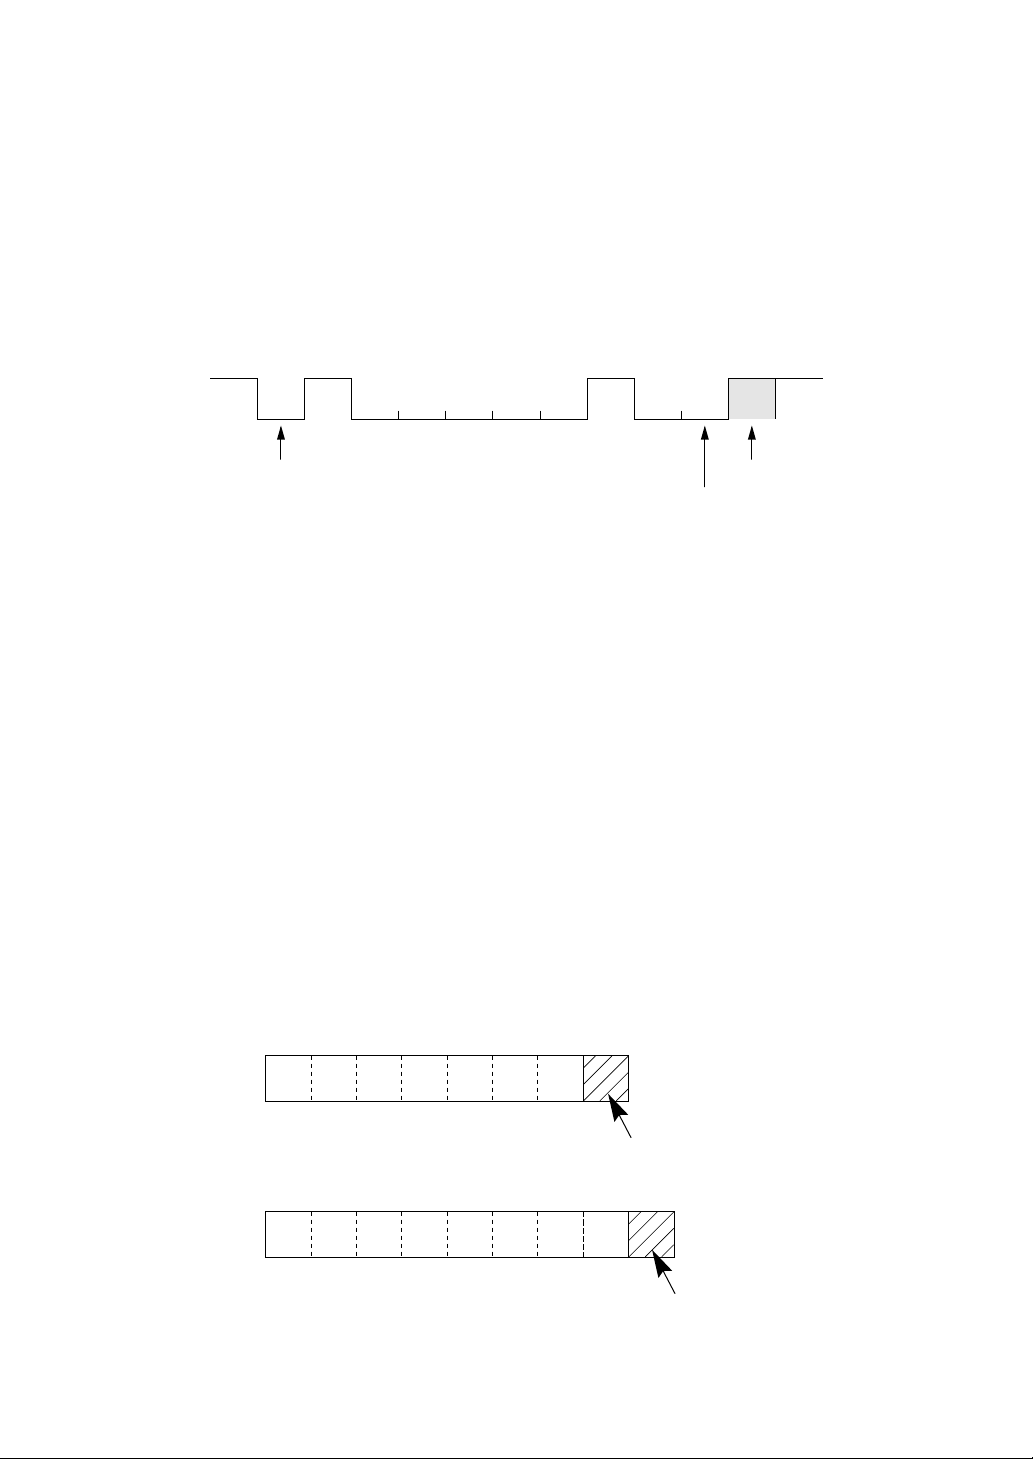
■ Transmission Code and Bit Order
All characters should be coded to 7- or 8-bit code for data transmission. The
standard data exchange code of the BHT-4000 is JIS 7- or 8-bit code. The transmission bit order is LSB (Least significant bit) first.
What follows is an example for transmitting character A (41h, 01000001b) coded to
JIS 8-bit code with an even parity and a single bit each for start and stop bits.
LSB MSB
10 0 000100
Start bit
Stop bit
Parity bit
■ Response Method
When two devices initiate communications, they exchange signals for correct data
transmission. This procedure is called "handshaking." The sender sends a control
code ENQ (05h) to the receiver meaning "Are you ready to receive data?", and the
receiver replies to it with a control code ACK (06h) or NAK (15h) meaning "Positive"
or "Negative" for starting data transmission, respectively. This sequence is also
called "data link establishment phase."
■ Vertical Parity
A vertical parity bit is a redundancy bit which is added to every character to be
transmitted in order to check that data has been transmitted accurately. The parity
bit should be set to "1" or "0" depending upon the parity parameter setting, to make
the number of set bits in the character even or odd. The receiver counts the
number of set bits in the transmitted character code to make sure that it has the
selected number (even or odd) of set bits.
The vertical parity bit is positioned immediately following the MSB (Most significant bit) as shown below.
LSB MSB
b0 b1 b2 b3 b4 b5 b6
(For 7-bit data)
LSB MSB
b0 b1 b2 b3 b4 b5 b6
(For 8-bit data)
b7
78
Vertical parity bit
Vertical parity bit
Page 89

Chapter 3. Communications Operations of BHT-4000
■ Transparency
The BHT-4000 uses the non-transparent mode which handles the control characters
and codes (e.g. STX, ETX, and SOH) as starting or ending markers and does not
allow them to be transmitted as normal data in the transmission texts.
■ RS/CS Control
Depending upon whether the RS/CS control is enabled or disabled in System
Mode, the BHT-4000 operation will differ as follows:
RS/CS Control BHT-4000 Operation
Enabled (ON) If the CS signal is ON when the BHT-4000 is ready to send,
the BHT-4000 will send data. If it is OFF, the BHT-4000 will
wait for the CS signal to go ON until the timeout occurs.
When the BHT-4000 becomes ready to receive data, it will
turn the RS signal ON.
Disabled (OFF) The BHT-4000 does not check the CS signal when starting
data transmission.
The RS signal is always ON.
The timeout length is fixed to three seconds in System Mode or Easy Pack 4.2. In
user programs written in BHT-BASIC 3.0, the timeout length is programmable. If
not designated in programming, it becomes three seconds.
For the RS/CS control in user programs written in BHT-BASIC 3.0, refer to the "BHTBASIC 3.0 Programmer's Manual."
79
Page 90

3.2.2 Communications Parameters
In each of System Mode, Easy Pack 4.2, and user programs written in BHT-BASIC 3.0,
you may set the communications parameters listed below.
Communications Port Optical interface or direct-connect interface
Transmission Speed 300, 600*, 1200, 2400, 4800, 9600, 19200, 38400** bps, or
High Speed***
Character Length 7 or 8 bits
Vertical Parity Odd, even, or none
Stop Bits 1 or 2 bits
RS/CS Control Enable or disable
* Not available in System Mode.
** Available only when the direct-connect interface port
(QM connector) has been selected.
*** Available only in Transfer Utility.
In System Mode
Refer to Chapter 2, Subsection 2.4.3 Detailed Description of the Functions in System
Mode, [ 4.5 ] Setting the communications parameters and interface port.
In Easy Pack 4.2
Refer to Chapter 4, Subsection 4.3.2 Manager Menu, [ 3 ] "Set Condition" Mode.
In BHT-BASIC 3.0
To set the transmission speed, character length, and the number of stop bits, use the
OPEN "COM:" statement in BHT-BASIC 3.0.
OPEN "COM: ... " Opens the interface port selected in System Mode.
OPEN "COM1: ..." Opens the optical interface port for data transmission routing
through the CU-4000, irrespective of the setting in System Mode.
OPEN "COM2: ..." Opens the direct-connect interface port for direct data transmis-
sion, irrespective of the setting in System Mode.
Note that it is impossible to open both the optical interface port and the direct-connect
interface port concurrently.
Through the interface port opened by the OPEN "COM:" statement, the XFILE statement transmits a designated file.
80
Page 91

Chapter 3. Communications Operations of BHT-4000
3.3 BHT-Protocol
3.3.1 Overview
The BHT-protocol is the communications procedure used to transmit files between the
BHT-4000 and a host (or between the BHT-4000 terminals). It adopts the response
method using ACK/NAK codes.
The BHT-protocol is composed of a defined set of the control character sequences
including the following three phases:
Phase 1: Establishment of data link
The sending station confirms that the receiving station is ready to
receive data.
Phase 2: Data transmission
The sending station transmits data to the target receiving station.
Phase 3: Release of data link
The sending station confirms whether or not all of the transmitted
data has been correctly received by the receiving station. If yes, the
sending station terminates the data transmission and releases the
data link.
81
Page 92

3.3.2 Control Characters
The control characters are classified into two groups: transmission control characters
and text control characters.
(1) Transmission control characters
The transmission control characters listed below are used to compose transmission
control sequences in phases 1 through 3.
Symbol Value Meaning Function
EOT 04h End Of Transmission Releases a data link (Phase 3).
Requests abort of transmission
(Phase 2).
ENQ 05h Enquiry Requests establishment of a data link
(Phase 1).
Prompts the receiver to respond to
the sent text (Phase 2).
ACK 06h Acknowledge Acknowledgment response to ENQ
(Phase 1).
Acknowledgment response to text
(Phase 2).
Acknowledgment response to EOT
(Phase 3).
NAK 15h Negative Acknowledge Negative acknowledgment response
to ENQ (Phase 1).
Negative acknowledgment response
to text (Phase 2).
82
Page 93

Chapter 3. Communications Operations of BHT-4000
(2) Text control characters
The text control characters are used to format transmission text. In the BHT-protocol,
they include the following headers and a terminator.
Symbol Value Meaning Function
SOH 01h Start Of Heading Indicates the start of heading text (Phase
2).
STX 02h Start Of Text Indicates the start of data text (Phase 2).
ETX 03h End Of Text Indicates the end of data text (Phase 2).
You may designate headers and a terminator by the protocol functions in BHT-BASIC
3.0. If you designate none of them in a user program, the BHT-4000 may apply those
as listed above. Refer to the "BHT-BASIC 3.0 Programmer's Manual."
83
Page 94
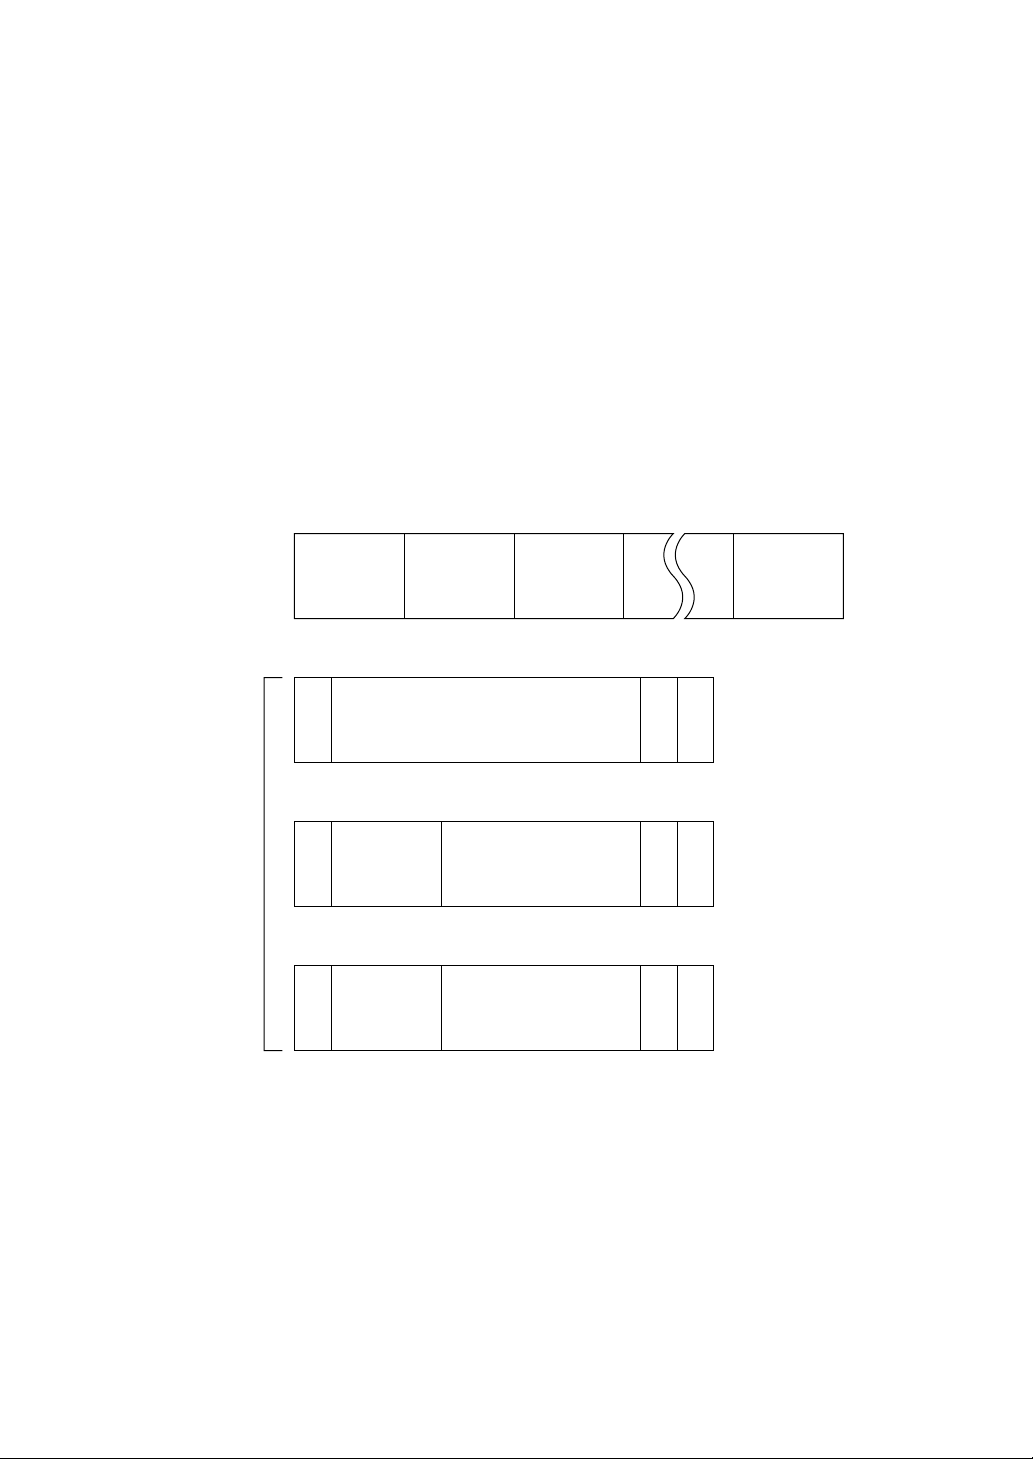
3.3.3 Basic Format of Transmission Messages
Basically, the BHT-4000 transmits data as a unit of a file. First, it transmits a heading
text which includes the attribute information of a file (e.g. file name and the number of
data texts) to be transmitted. Following the heading text, it transmits the data text in
the file. A heading text and data text comprise a text.
In actual text transmission, the text is divided into several blocks, and a header and
terminator are added to each block. If the serial number management or error
checking by BCC (Block Check Character) are required, the serial number and BCC are
also added to each block. This procedure forms a transmission block. A set of
transmission blocks comprises a transmission message.
Shown below is an example of a transmission message formed with the BHT-protocol.
Text
Transmission
Message
Heading text
S
O
H
S
Serial
T
number
X
S
Serial
T
number
X
Data text 1
Heading text
Data text 2
Data text 1
. . .
Data text n
Data text n
B
E
Transmission block
C
T
C
X
B
E
Transmission block
C
T
C
X
B
E
Transmission block
C
T
C
X
In the above figure, SOH, STX, and ETX are text control characters as described in
Subsection 3.3.2. The serial number is added to every data text in order to identify
those texts. For BCC, refer to Subsection 3.3.6.
84
Page 95
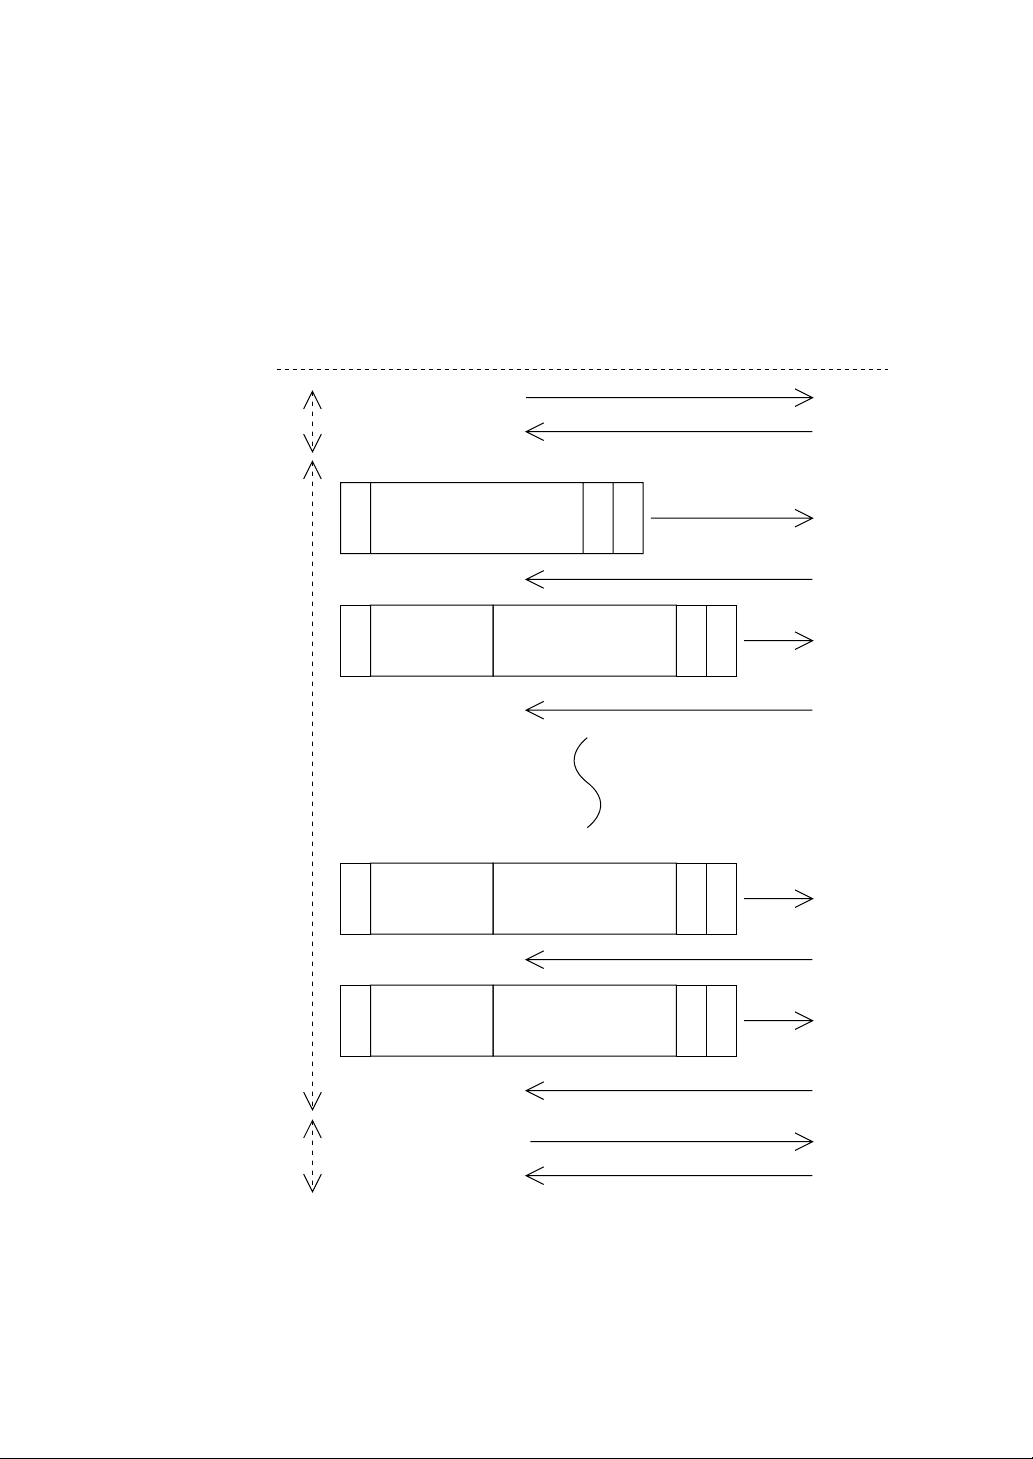
Chapter 3. Communications Operations of BHT-4000
3.3.4 Transmission Control Sequences
Shown below is a typical message transmission sequence supported by the BHTprotocol. This sequence does not include transmission errors or negative responses.
Establishment of
Data Link
(Phase 1)
Data Transmission
(Phase 2)
S
O
H
S
T
Serial number
X
S
T
Serial number
X
Sending
Station
ENQ
Heading text
E
T
X
Data text 1
Data text n-1
Receiving
Station
ACK
B
C
C
ACK
E
B
T
C
X
C
ACK
E
B
T
C
X
C
Release of Data
Link
(Phase 3)
S
T
Serial number
X
EOT
85
Data text n
ACK
E
B
T
C
X
C
ACK
ACK
Page 96
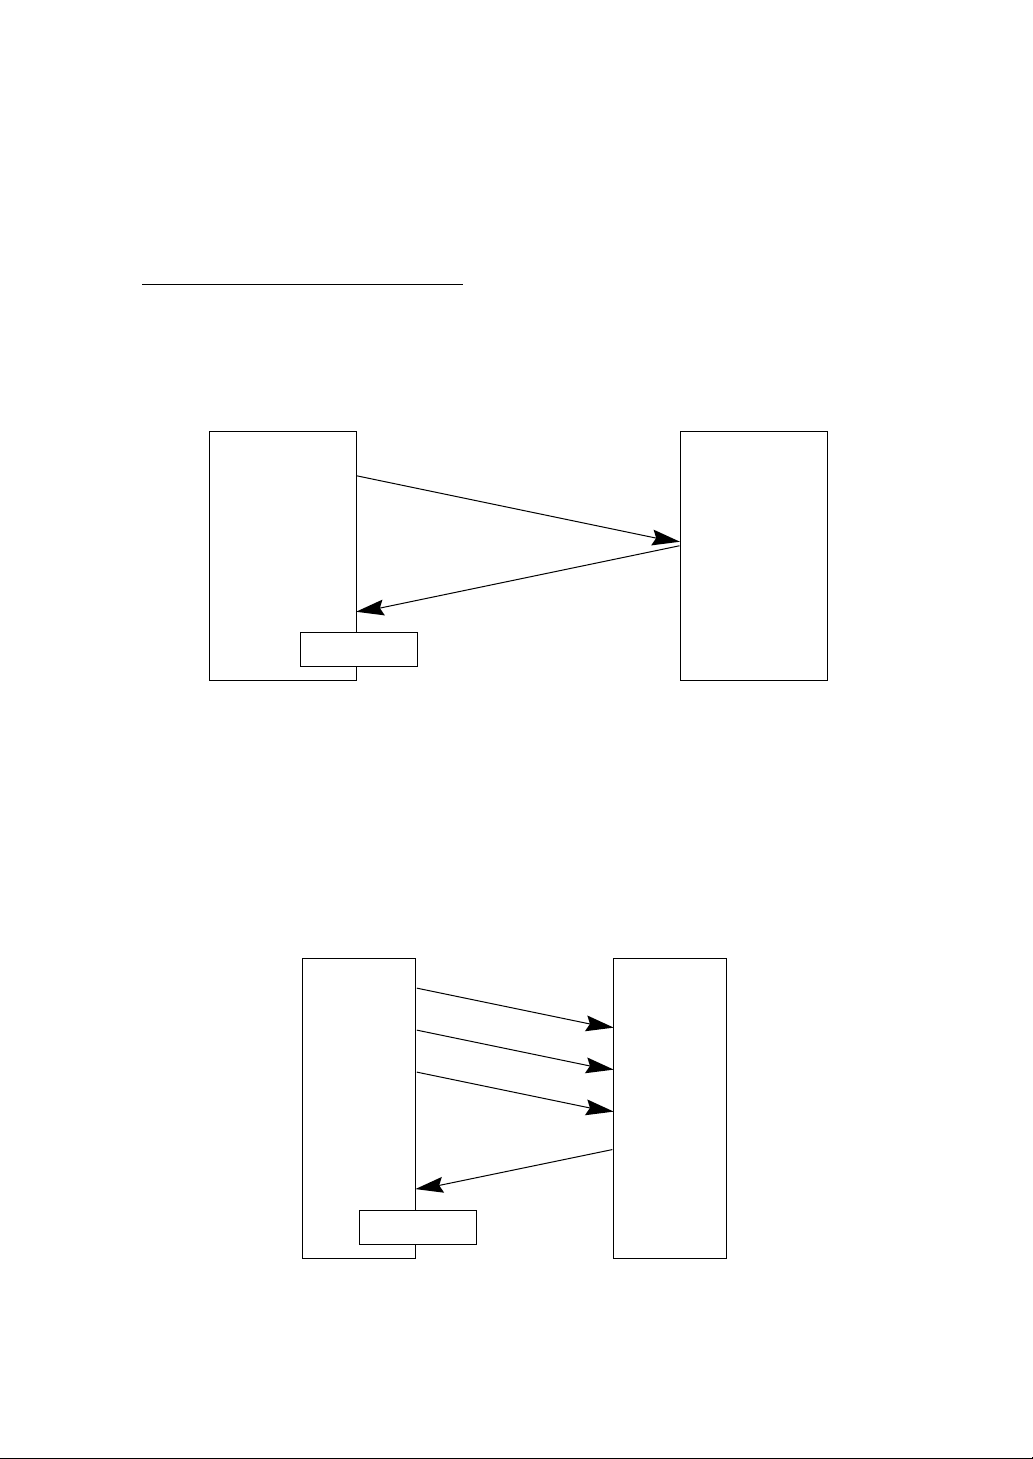
Data transmission may accidentally involve various types of errors. The BHT-protocol
is designed to recover from those errors as frequently as possible. What follows is the
BHT-protocol for phases 1 through 3.
Phase 1: Establishment of Data Link
■ Normal phase 1
The sending station transmits an ENQ to the receiving station. Upon receipt of an
ACK from the receiving station, the sending station shifts to phase 2.
Sending station
ENQ
Receiving station
ACK
To phase 2.
■ Phase 1 with no response or invalid response
If the sending station receives no response or any invalid response from the
receiving station in response to the ENQ sent, it iterates sending of an ENQ at
three-second intervals up to 10 times.
If the sending station receives an ACK before sending an ENQ ten times, it shifts to
phase 2.
Sending
station
3 sec.
3 sec.
ENQ
ENQ
ENQ
Receiving
station
To phase 2.
ACK
86
Page 97
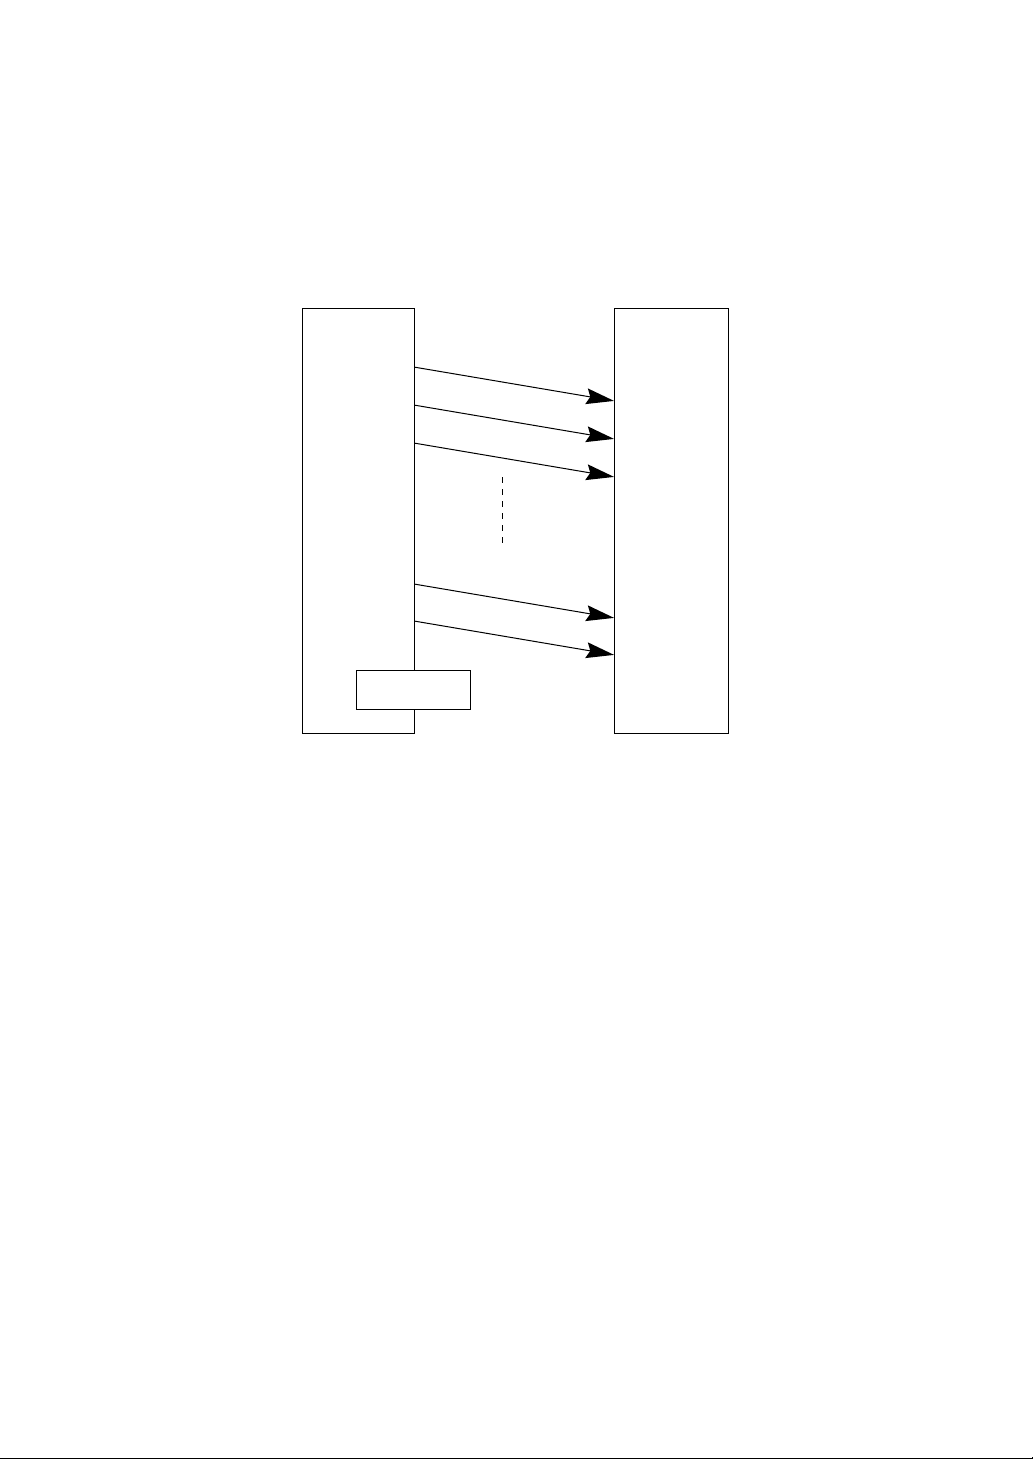
Chapter 3. Communications Operations of BHT-4000
■ Abnormal termination of phase 1 (Abort of phase 1)
If the sending station receives no ACK from the receiving station after sending an
ENQ 10 times in succession, it sends an EOT to the receiving station after three
seconds from the 10th ENQ to terminate the message transmission abnormally.
Sending
station
3 sec.
3 sec.
3 sec.
Abnormal
termination
Receiving
station
ENQ(1)
ENQ(2)
ENQ(3)
ENQ(10)
EOT
87
Page 98
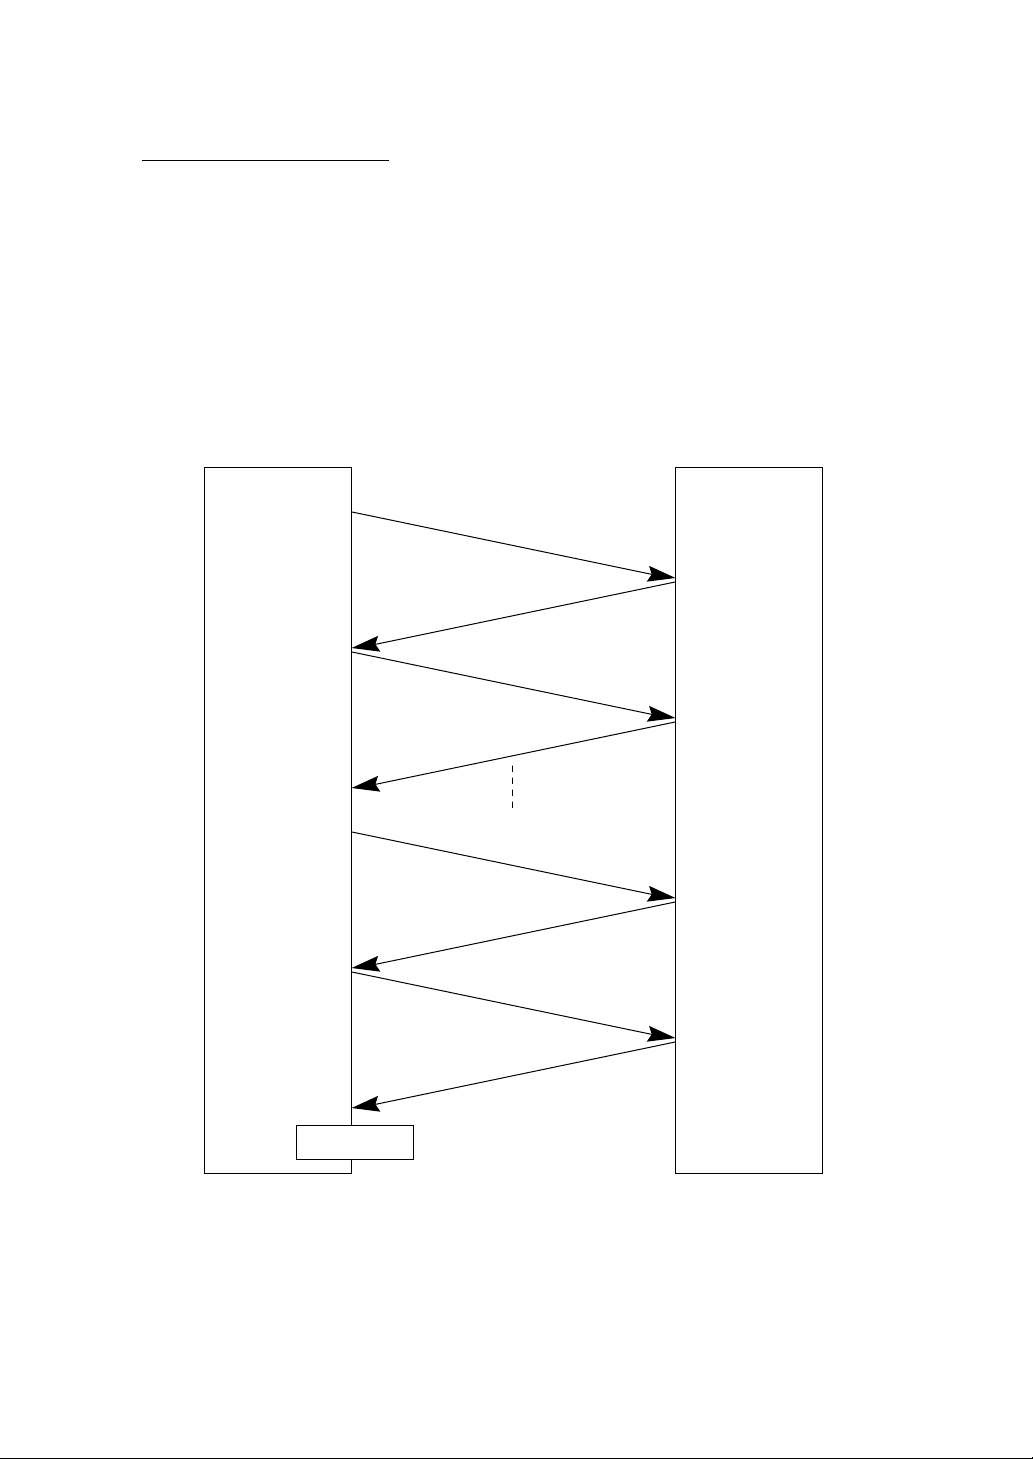
Phase 2: Data Transmission
■ Normal phase 2
The sending station first sends a transmission block containing the heading text.
Each time the sending station receives an ACK from the receiving station, it sends a
transmission block containing the data texts as shown below. Upon receipt of an
ACK in response to the last transmission block (data text n), the sending station
shifts to phase 3.
If a transmission message contains no data text, the sending station transmits the
heading text only.
Sending station
Receiving station
Heading text
ACK
Data text 1
ACK
Data text n-1
ACK
Data text n
ACK
To phase 3.
88
Page 99
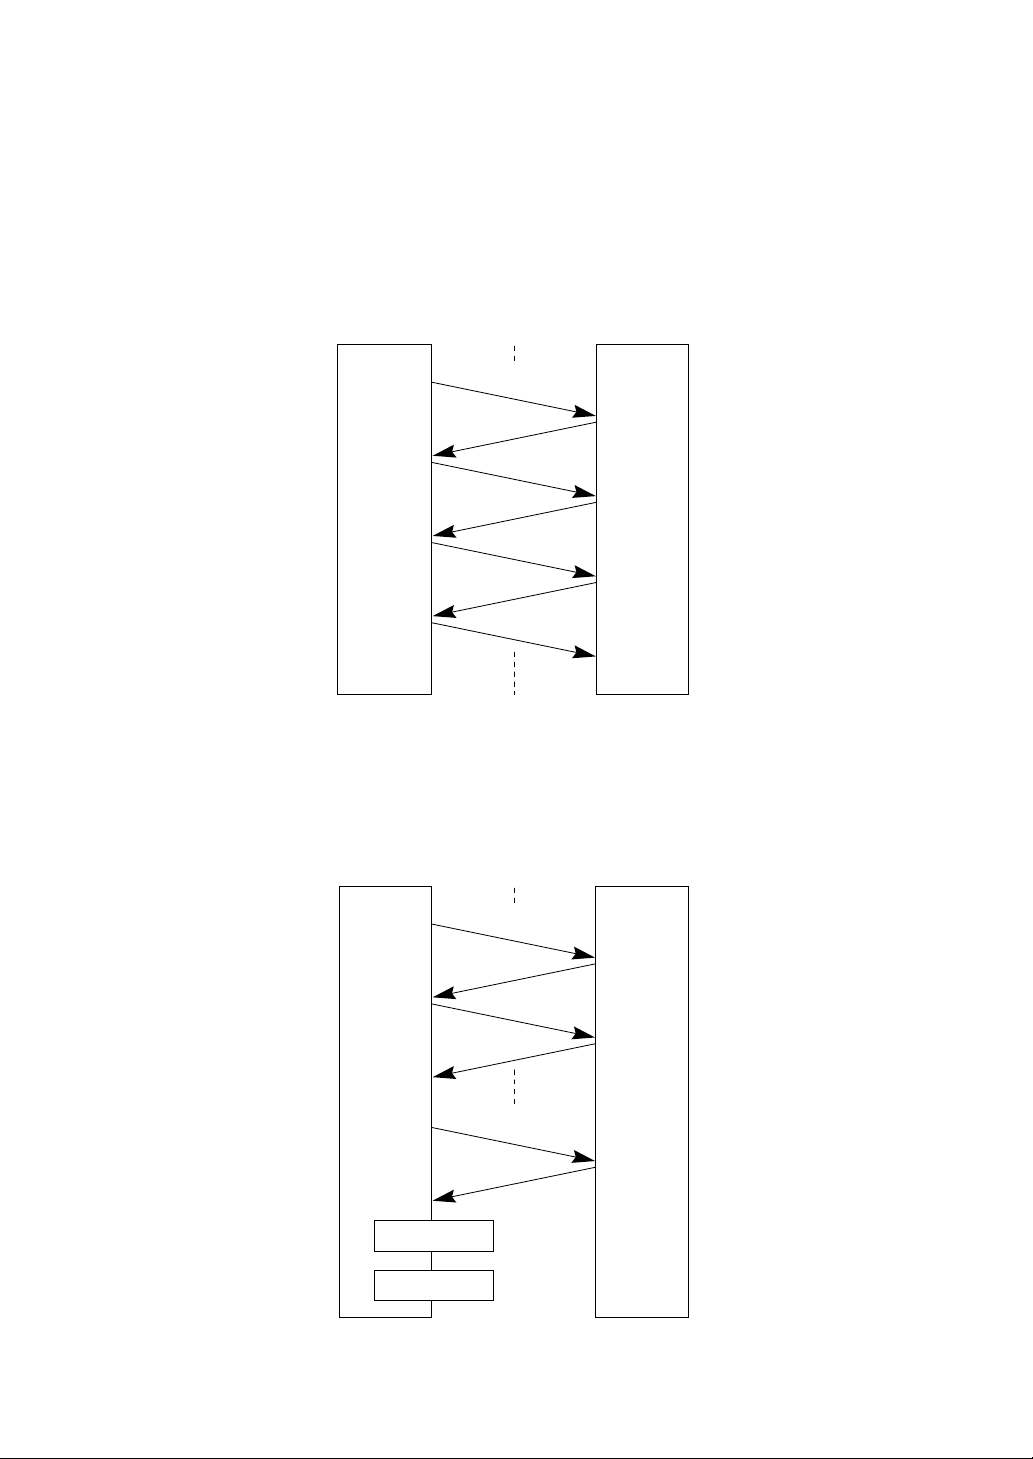
Chapter 3. Communications Operations of BHT-4000
■ Phase 2 with NAK
If the sending station receives a NAK from the receiving station in response to a
transmission block containing text data m, it sends that transmission block again
immediately as shown below.
If the sending station receives an ACK before receiving a NAK 10 times in succession, it continues the subsequent message transmission.
Sending
station
Data text m
NAK
Data text m
NAK
Data text m
ACK
Data text m+1
Receiving
station
If the sending station receives a NAK 10 times in succession or it fails to send a
same transmission block, it shifts to phase 3 to terminate the message transmission abnormally. Even if the phase 3 terminates normally, the transmission results
in an abnormal end.
Sending
station
Data text m
(1)
Receiving
station
Occurrence
of an error
To phase 3.
NAK
Data text m
NAK
Data text m
NAK
89
(2)
(10)
Page 100
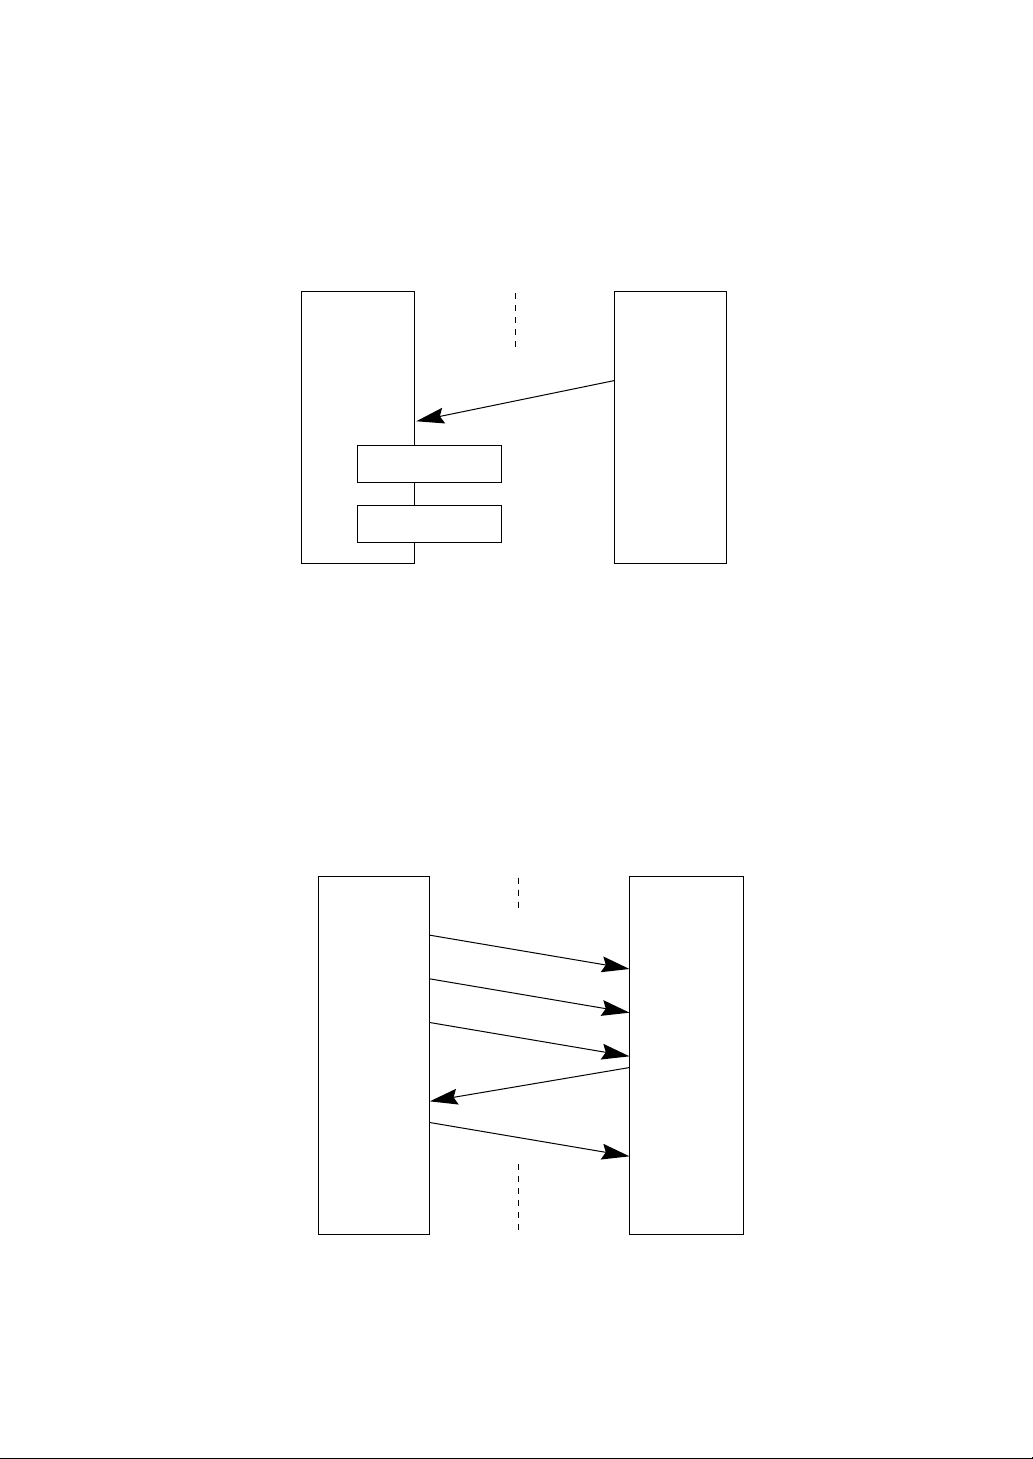
■ Phase 2 with EOT
If the sending station receives an EOT anytime during phase 2, it shifts to phase 3 to
terminate the message transmission abnormally. Even if the phase 3 terminates
normally, the transmission results in an abnormal end.
Sending
station
Receiving
station
EOT
Occurrence of
an error
To phase 3.
■ Phase 2 with no response or invalid response
If the sending station receives no response or any invalid response from the
receiving station in response to the transmission block sent, it iterates sending of
an ENQ at three-second intervals up to nine times.
If the sending station receives an ACK before sending an ENQ nine times, it
continues the subsequent message transmission.
Sending
station
3 sec.
3 sec.
Data text m
ENQ
ENQ
ACK
Data text m+1
90
Receiving
station
 Loading...