

Page 1
Page 2

Copyright © DENSO WAVE INCORPORATED, 2004
All rights reserved. No part of this publication may be reproduced in any form or by any means without
permission in writing from the publisher.
Specifications are subject to change without prior notice.
All products and company names mentioned in this manual are trademarks or registered trademarks of
their respective holders.
Page 3

Page 4

Preface
Please READ through this manual carefully. It will enable you to operate your BHT-300B correctly.
After you have finished reading the instructions, keep this manual handy for speedy reference.
i
Page 5

How this book is organized
This manual is made up of five chapters and appendices.
Chapter 1 Quick Guide
Describes the basic operating method of the BHT-300B and the related notes.
Chapter 2 Getting Started the BHT and System Mode
Outlines the system configuration and presents the operating procedures for the BHT-300B, including
preparation and System Mode operation. In System Mode, you can set various parameters to efficiently
run application programs.
Chapter 3 Communications Operations of BHT
Outlines the BHT's communications capabilities necessary for performing data and program transfer
between the BHT-300B and host PC or other devices: infrared (Ir) communication, RS-232C interface
specifications, and the basic communications specifications.
Cha pter 4 Error Messages
Lists the error messages which will appear on the LCD if some error occurs in the BHT.
Chapter 5 Handling the CU-300 (Option)
Describes the handling procedure of the communication unit CU-300, the interfacing with the host PC,
and the charging of the battery cartridge. This chapter also describes the LAN-support communication
unit CU-311.
Appendix A: Specifications
Appendix B: A Typical Basic Operation
ii
Page 6

Technical Terms Used in This Manual
Source Program and Object Program (User Program)
Generally, a source program is translated into an object program by a compiler. This manual calls an
object program a user program.
BHT-BASIC
This manual expresses BHT-BASIC 4.0 as BHT-BASIC.
Related Publications
BHT-BASIC Programmer's Manual (BHT-300 series)
BHT-BASIC 4.0 Transfer Utility User's Guide
Screen Indication
The lettering in the screens in this manual is a little different from that in the actual screens. File names
used are only for description purpose, so they will not appear if you have not set files having those
names.
iii
Page 7
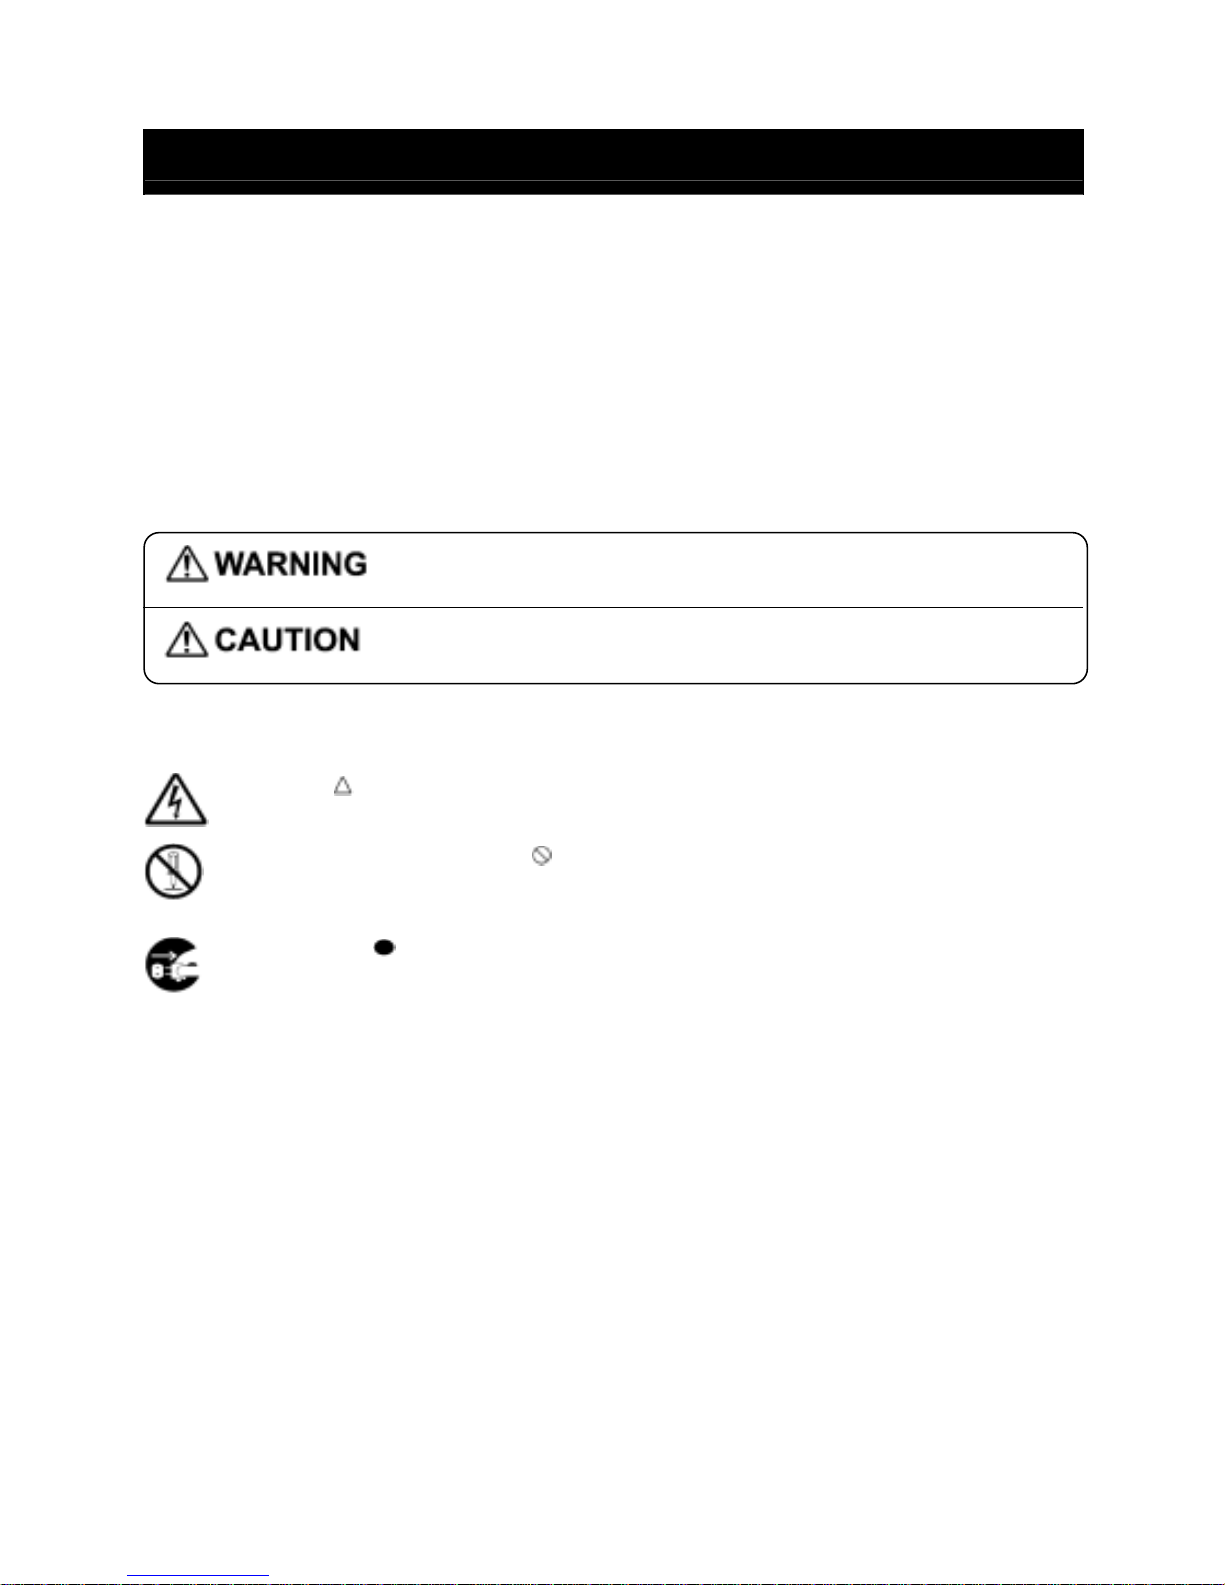
SAFETY PRECAUTIONS
Be sure to observe all these safety precautions.
Please READ through these instructions carefully. They will enable you to use the BHT and CU
correctly.
Always keep this manual nearby for speedy reference.
Strict observance of these warnings and cautions is a MUST for preventing accidents that could result in
bodily injury and substantial property damage. Make sure you fully understand all definitions of these
terms and symbols given below before you proceed to the text itself.
Alerts you to those conditions which could cause serious bodily injury or
death if the instructions are not followed correctly.
Alerts you to those conditions which could cause minor bodily injury or
substantial property damage if the instructions are not followed correctly.
Meaning of Symbols
A triangle ( ) with a picture inside alerts you to a warning of danger. Here you see the warning
for electrical shock.
A diagonal line through a circle ( ) alerts you to something you should not do; it may or may
not have a picture inside. Here you see a screwdriver inside the circle, meaning that you
should not disassemble.
A black circle ( ) with a picture inside alerts you to something you MUST do. This example
shows that you MUST unplug the power cord.
iv
Page 8
To System Designers:
• When introducing BHTs in those systems that could affect human lives (e.g., medicines
management system), develop applications carefully through redundancy and safety design
which avoids the feasibility of affecting human lives even if a data error occurs.
Handling the battery cartridge
• Never disasse mble or heat the battery cart ridge, nor put it into fire or water; doing so could
cause battery-rupture or leakage of battery fluid, resulting in a fire or bodily injury.
• Do not carry or store the battery cartridge together with metallic ball-point pens, necklaces,
coins, hairpins, etc.
Doing so could short-circuit the terminal pins, causing the batteries to rupture or the battery
fluid to leak, resulting in a fire or bodily injury.
• Never put the battery cartridge into a microwave oven or high-pressure container.
Doing so could cause the batteries to break, generate heat, rupture or burn.
• Avoid dropping the battery cartridge or letting it undergo any shock or impact.
Doing so could cause the batteries to break, generate heat, rupture or burn.
• Only use the dedicated charger for charging the battery cartridge.
Using a different type of charger could cause battery-rupture or leakage of battery fluid and
result in a fire, bodily injury, or serious damage to property.
• Never charge the lithium-ion battery cartridge where any inflammable gases may be
emitted; doing so could cause fire.
Handling the BHT
• Never put the BHT into a microwave oven or high-pressure container.
Doing so could cause the BHT to break, generate heat, rupture or burn.
Handling the CU
• If smoke, abnormal odors or noises come from the CU, immediately unplug the AC adapter
from the wall socket, disconnect the interface cable, and contact your nearest dealer.
Failure to do so could cause fire or electrical shock.
• Never put the CU into a microwave oven or high-pressure container.
Doing so could cause the CU to break, generate heat, rupture or burn.
v
Page 9
• If foreign material or water gets into the CU, immediately unplug the AC adapter from the
wall socket or CU, disconnect the interface cable, and contact your nearest dealer.
Failure to do so could cause fire or electrical shock.
• If you drop the CU so as to damage its housing, immediately unplug the AC adapter from the
wall socket or CU, disconnect the interface cable, and contact your nearest dealer.
Failure to do so could cause fire or electrical shock.
• Never use the CU for charging anything other than the specified battery cartridges.
Doing so could cause heat, battery-rupture, or fire.
• Never bring any metals into contact with the output terminals.
Doing so could produce a large current through the CU, resulting in heat or fire, as well as
damage to the CU.
• Use the dedicated AC adapter only.
Failure to do so could result in fire.
• Never use the CU on the line voltage other than the specified level.
Doing so could cause the CU to break or burn.
• If the power cord of the AC adapter is damaged (e.g., exposed or broken lead wires), stop
using it and contact your nearest dealer.
Failure to do so could result in a fire or electrical shock.
Handling the battery cartridge
• Never charge a wet or damp rechargeable battery cartridge.
Doing so could cause the batteries to break, generate heat, rupture, or burn.
Handling the BHT
• Never put the BHT in places where there are excessively high temperatures, such as inside
closed-up automobiles, or in places exposed to direct sunlight.
Doing so could affect the housing or parts, resulting in a fire.
• Avoid using the BHT in extremely humid or dusty areas, or where there are drastic
temperature changes.
Moisture or dust will get into the BHT, resulting in malfunction, fire or electrical shock.
vi
Page 10
• Never disassemble or modify the BHT; doing so could result in an accident such as break or
fire.
Never
disas-
semble
• If smoke, abnormal odors or noises come from the BHT, immediately turn of f the power , pull
out the battery cartridge, and contact your nearest dealer.
Failure to do so could cause smoke or fire.
• If foreign material or water gets into the BHT, immediately turn off the power, pull out the
battery cartridge, and contact your nearest dealer.
Failure to do so could cause smoke or fire.
• If you drop the BHT so as to damage its housing, immediately turn off the power, pull out the
battery cartridge, and contact your nearest dealer.
Failure to do so could cause smoke or fire.
• Do not use batteries or power sources other than the specified ones; doing so could
generate heat or cause malfunction.
• In environments where static electricity can build into significant charges (e.g., if you wipe
off the plastic plate with a dry cloth), do not operate the BHT. Doing so will result in
malfunction or machine failure.
• When connecting or disconnecting the direct-connect interface cable to/from the BHT, do
not plug or unplug it at an angle and do not pull the cable strongly. Doing so will result in a
machine failure.
• If the BHT has been stored in a hot (50°C to 60°C, 122°F to 140°F) and humid place, allow
it to sit at room temperature and humidity for at least one day before use. Using the BHT
with its inside being hot will fail to scan or result in a machine failure.
Handling the CU
• Never put the CU in places where there are excessively high temperatures, such as inside
closed-up automobiles, or in places exposed to direct sunlight.
Doing so could affect the housing or parts, resulting in a fire.
• Avoid using the CU in extremely humid or dusty areas, or where there are drastic
temperature changes.
Moisture or dust will get into the CU, resulting in malfunction, fire or electrical shock.
• Never disassemble or modify the CU; doing so could result in an accident such as fire or
malfunction.
vii
Page 11
• If you will not be using the CU for a long time, be sure to unplug the AC adapter from the wall
socket and disconnect the interface cable for safety.
Failure to do so could result in a fire.
• When caring for the CU, unplug the AC adapter from the wall socket and disconnect the
interface cable for safety.
Failure to do so could result in an electrical shock.
• Never cover or wrap up the CU or AC adapter in a cloth or blanket.
Doing so could cause the unit to heat up inside, deforming its housing, resulting in a fire.
Always use the CU and AC adapter in a well-ventilated area.
• Do not place the CU anyplace where it may be subjected to oily smoke or steam, e.g., near
a cooking range or humidifier.
Doing so could result in a fire or electrical shock.
• Keep the power cord away from any heating equipment.
Failure to do so could melt the sheathing, resulting in a fire or electrical shock.
• Do not insert or drop foreign materials such as metals or anything inflammable through the
openings or vents into the CU.
Doing so could result in a fire or electrical shock.
DENSO WAVE INCORPORATED does not assume any product liability arising out of, or in
connection with, the application or use of any product, circuit, or application described herein.
If it is judged by DENSO WAVE INCORPORATED that malfunction of the product is due to the
product having been dropped or subjected to impact, repairs will be made at a reasonable charge
even within the warranty period.
Intellectual Property Precaution
DENSO WAVE INCORPORATED ("DENSO WAVE") takes reasonable precautions to ensure its
products do not infringe upon any patent of other intellectual property rights of other(s), but DENSO
WAVE cannot be responsible for any patent or other intellectual property right infringement(s) or
violation(s) which arise from (i) the use of DENSO WAVE's product(s) in connection or in combination
with other component(s), product(s), data processing system(s) or equipment or software not
supplied from DENSO WAVE; (ii) the use of DENSO WAVE's products in a manner for which the
same were not intended nor designed; or (iii) any modification of DENSO WAVE's products by
other(s) than DENSO WAVE.
viii
Page 12
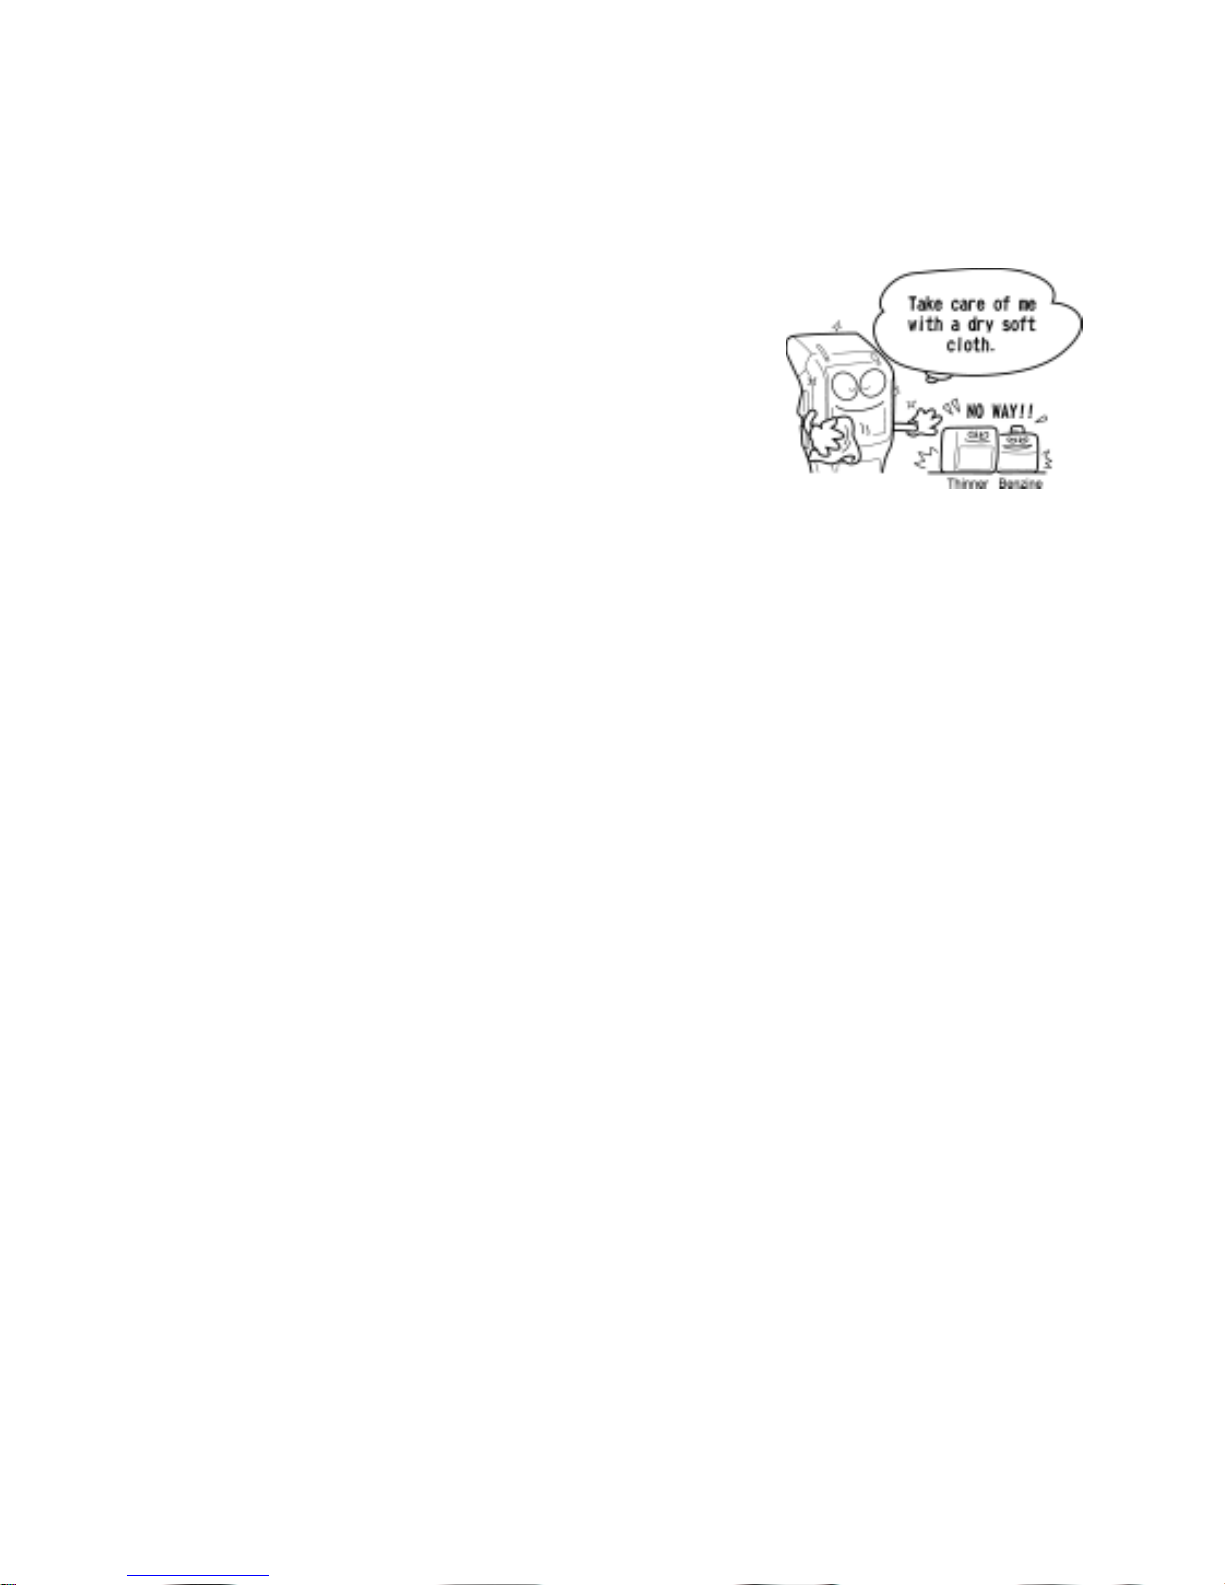
Proper Care of the BHT and CU
Clean the BHT's charge terminals and battery cartridge terminals with a cotton swab or the like
periodically. Clean the BHT housing with a dry, soft cloth. Before cleaning, be sure to turn the BHT off
and unplug the AC adapter of the CU.
• Never use benzene, alcohol, or other organic solvents. The housing
may be marred or the paint may come off.
• Never rub or strike the liquid crystal display (LCD) with anything
hard. The LCD surface will be easily scratched or broken.
• When cleaning the keypad, do not scrub the surface too hard.
Doing so may break the keys.
• If the BHT or CU becomes smudged, moisten a soft cloth with neutral detergent and wring it out
thoroughly. Wipe the BHT or CU with the cloth and then go over it again with a dry cloth.
Dust or dirt accumulating on the clear plate of the bar-code reading window will affect reading
performance. If you use the BHT in dusty areas, therefore, periodically check the clear plate of the
bar-code reading window and clean it if dusty.
• T o clean the plate, first blow the dust away with an airbrush. Then wipe the plate with a cotton swab or
the similar soft one gently.
• If sand or hard particles have accumulated, never rub the plate; doing so will s cratch or damage it.
Blow the particles away with an airbrush or a soft brush.
Limited Warranty on Software Products
In no event will DENSO WAVE INCORPORATED be liable for direct, indirect, special, incidental, or
consequential damages (including imaginary profits or damages resulting from interruption of operation
or loss of business information) resulting from any defect in the software or its documentation or
resulting from inability to apply the software or its documentation.
ix
Page 13

FCC Regulations
This device complies with Part 15 of the FCC Rules.
Operation is subject to the following two conditions:
(1) this device may not cause harmful interference, and
(2) this device must accept any interference received, including interference that may cause undesired
operation.
NOTE: This equipment has been tested and found to comply with the limits for a Class A digital device,
pursuant to Part 15 of the FCC Rules. These limits are designed to provide reasonable protection
against harmful interference when the equipment is operated in a commercial environment. This
equipment generates, uses, and can radiate radio frequency energy and, if not installed and used in
accordance with the instruction manual, may cause harmful interference to radio communications.
Operation of this equipment in a residential area is likely to cause harmful interference in which case the
user will be required to correct the interference at his own expense.
FCC WARNING: Changes or modifications not expressly approved by the party responsible for
compliance could void the user’s authority to operate the equipment.
Canadian Interference-Causing Equipment Regulations
This Class A digital apparatus complies with Canadian ICES-003.
Cet appareil numérique de la classe A est conforme à la norme NMB-003 du Canada.
x
Page 14

Chapter 1 Quick Guide
Chapter 2 Getting Started the BHT and System Mode
Chapter 3 Communications Operations of BHT
Chapter 4 Error Messages
Chapter 5 Handling the CU-300 (Option)
Appendices
Page 15

Chapter 1
Quick Guide
This chapter describes the basic operating method of the BHT-300B and the related notes.
1.1 Reading Bar Codes.......................................................................................................................................................2
1.2 Setting and Using the Hand Strap.................................................................................................................................3
1.3 Setting the Backlight......................................................................................................................................................4
1.4 Using the Keypad..........................................................................................................................................................5
1.5 Transferring Data...........................................................................................................................................................6
1
Page 16
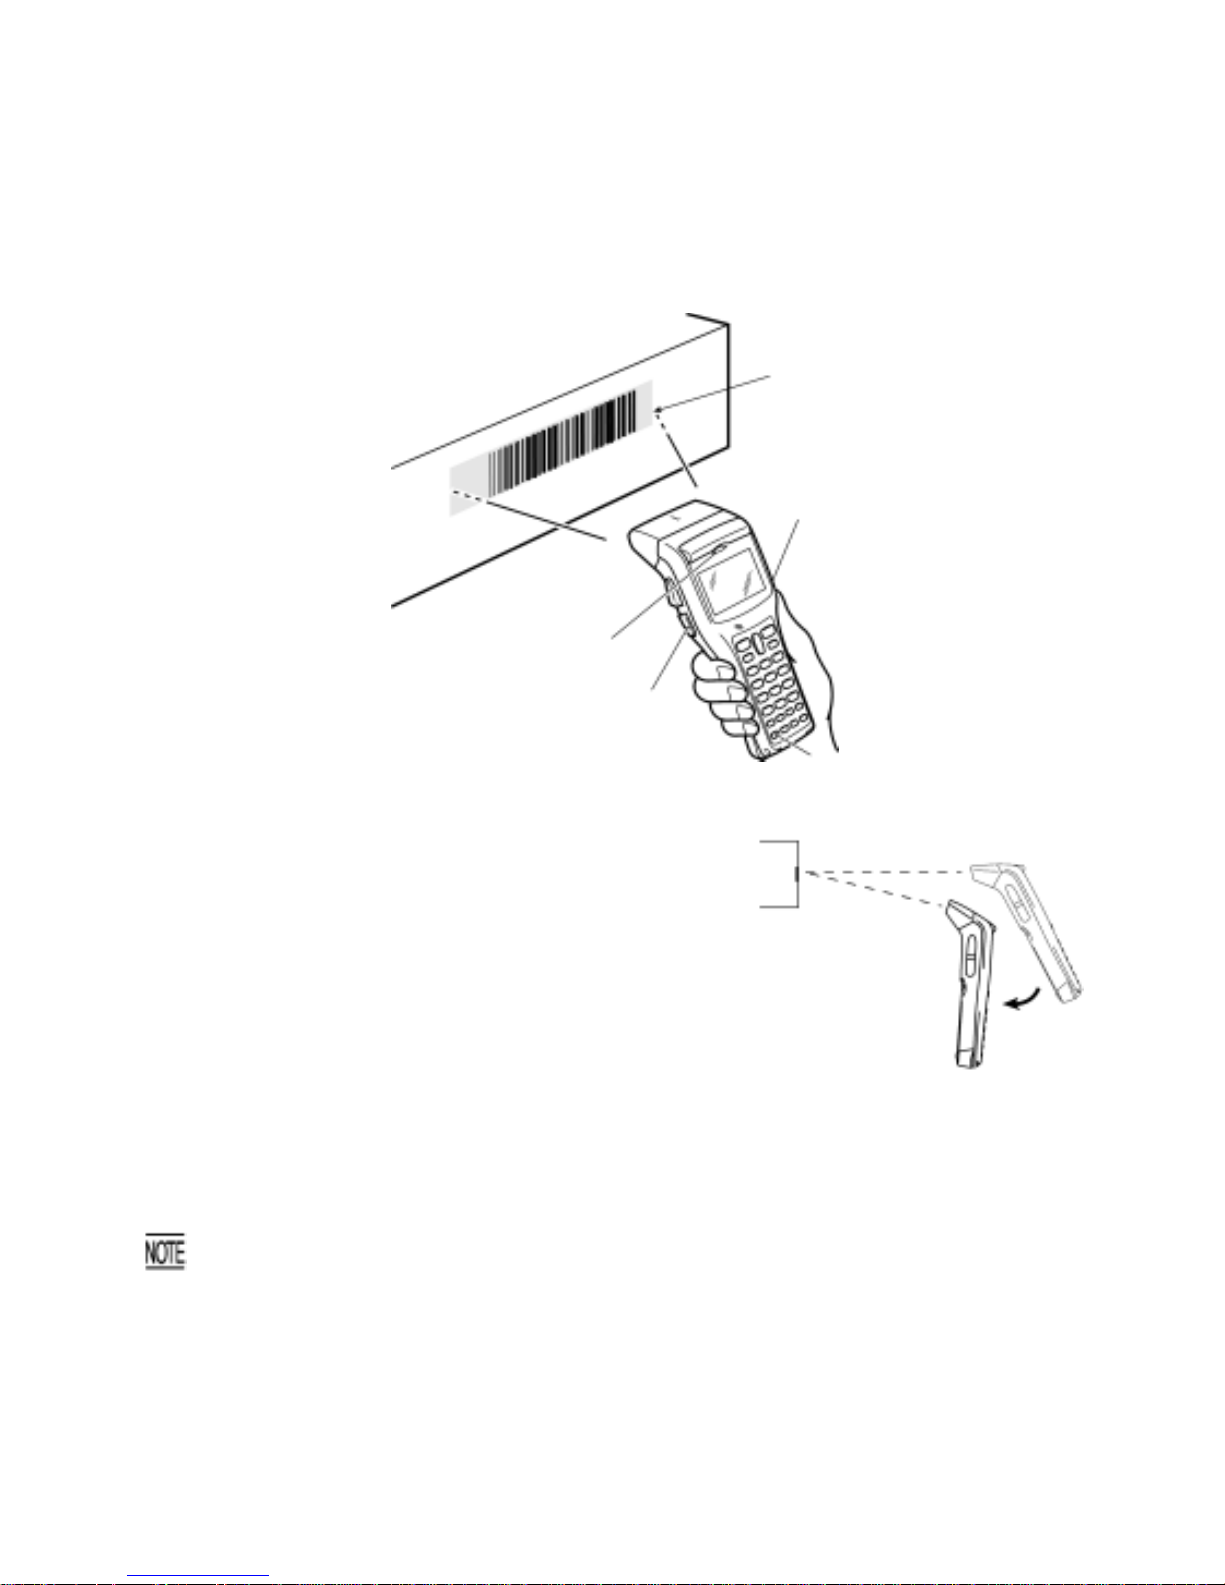
1.1 Reading Bar Codes
Turn the BHT on, bring the bar-code readin g window to a bar code to be scanned, and press the trig ger
switch. The BHT turns on the illumination LED to scan the bar code.
When the BHT has read the bar code successfully, the indicator LED will illuminate in green.
Illumination range covered
by the illumination LED
Trigger switch (M4 key)*
Indicator LED
(Illuminates in green when the
BHT has read the bar code
successfully.)
Trigger switch
(M3 key)*
Power key
* The trigger switch function is assigned to
both of the M3 and M4 keys by default.
• If the BHT fails to read due to spec ular effects or other factors,
change the scanning angle of the reading window or the distance
from codes as shown at right, and try it again. (Specular effects
occur when the reflection of the light from the bar code becomes
excessively strong. This can easily happ en when the reflecting
surface is polished or covered with vinyl.)
• To read bar codes wider than the readable area of the bar-code
reading window, pull the bar-code reading window away from bar
codes.
• The BHT can read bar codes at a maximum distance of 45 cm (17.7")** from the bar-code reading window.
(**For details about the scanning conditions, refer to Appendix A.)
• The bar code reading procedure may differ depending upon the application used, so follow the application’s
manual.
• Before reading bar codes, clean their labels if stained.
• Avoid using the BHT in direct sunlight. The BHT might fail to read correctly.
• To read bar codes on curved surfaces, apply the bar-code reading window to the center of each ba
r
code at a right angle.
• If you pull the bar-code reading window away from bar codes, the actual scanning range will
become narrower than the range covered by the illumination LED.
• The light intensity of the illumination LED will vary depending upon the scanning conditions and
variation of its elements.
2
Page 17
Chapter 1 Quick Guide
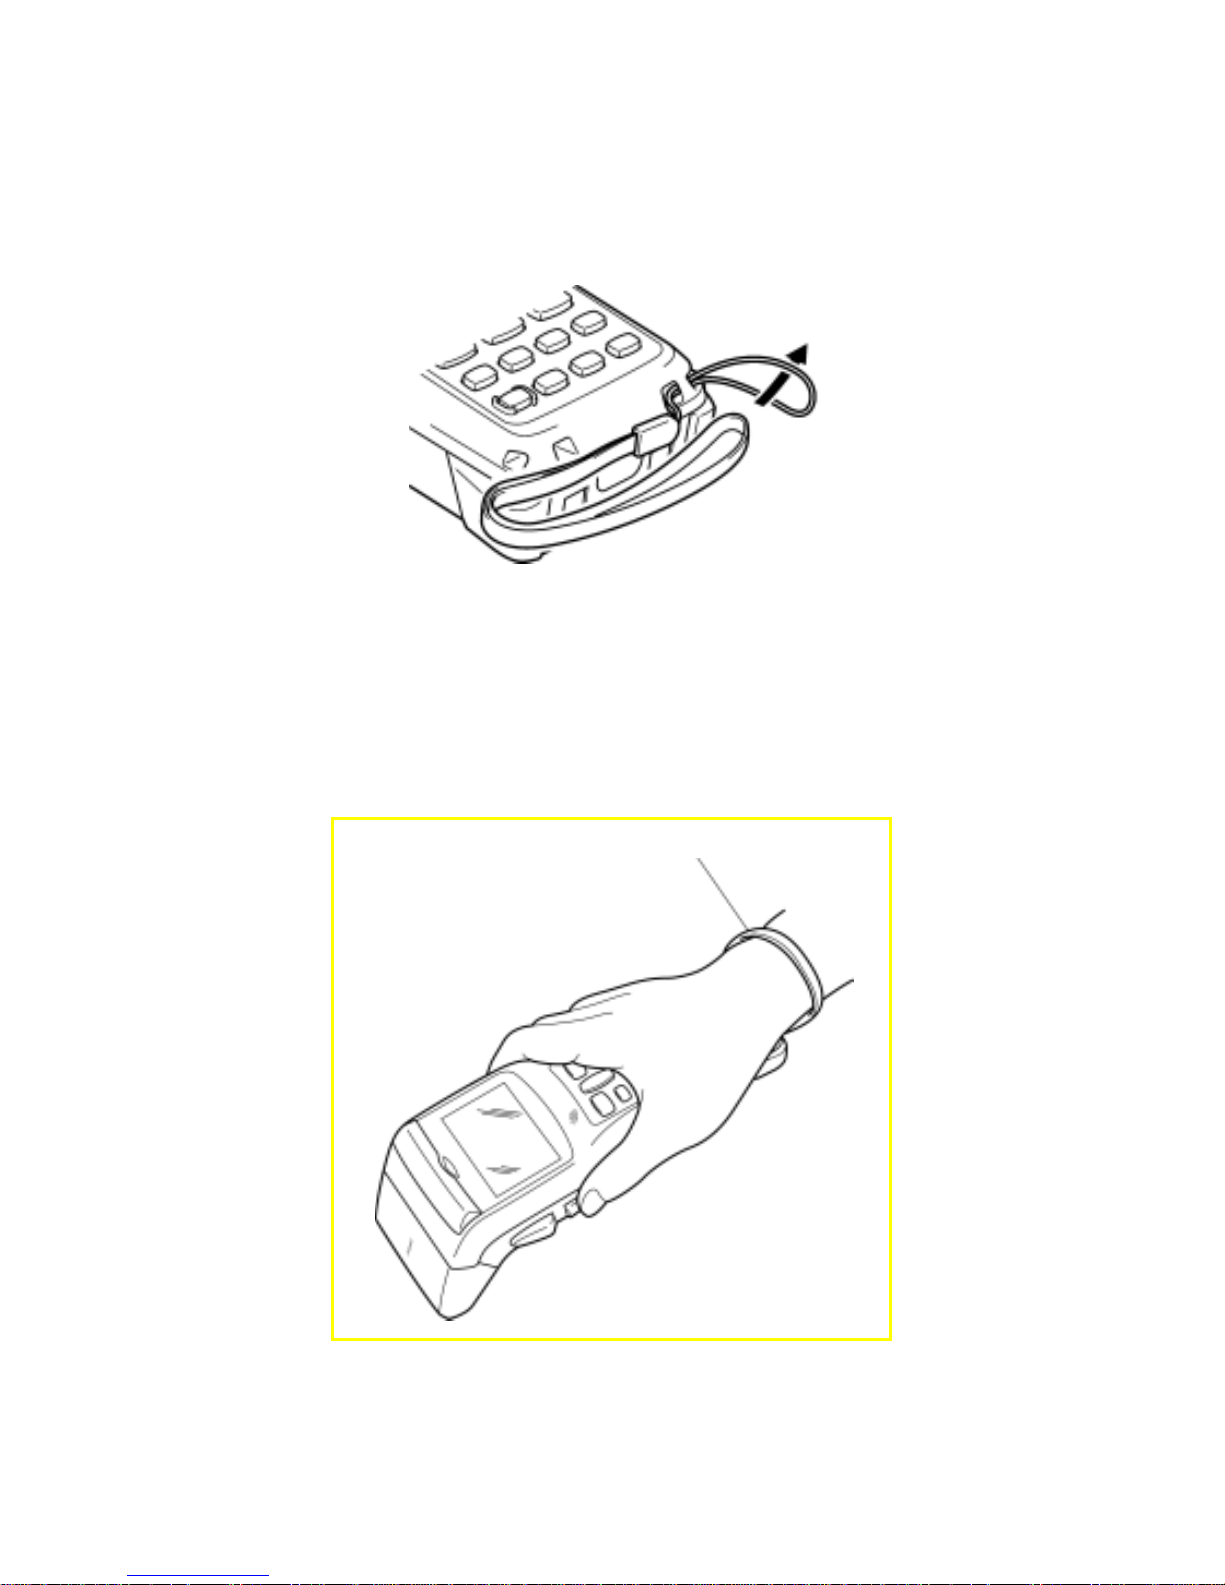
1.2 Setting and Using the Hand Strap
Setting the hand strap
Using the hand strap
Put your hand through the hand strap and hold the BHT as shown below. This will prevent you from
dropping the BHT accidentally.
Hand strap
3
Page 18
1.3 Setting the Backlight
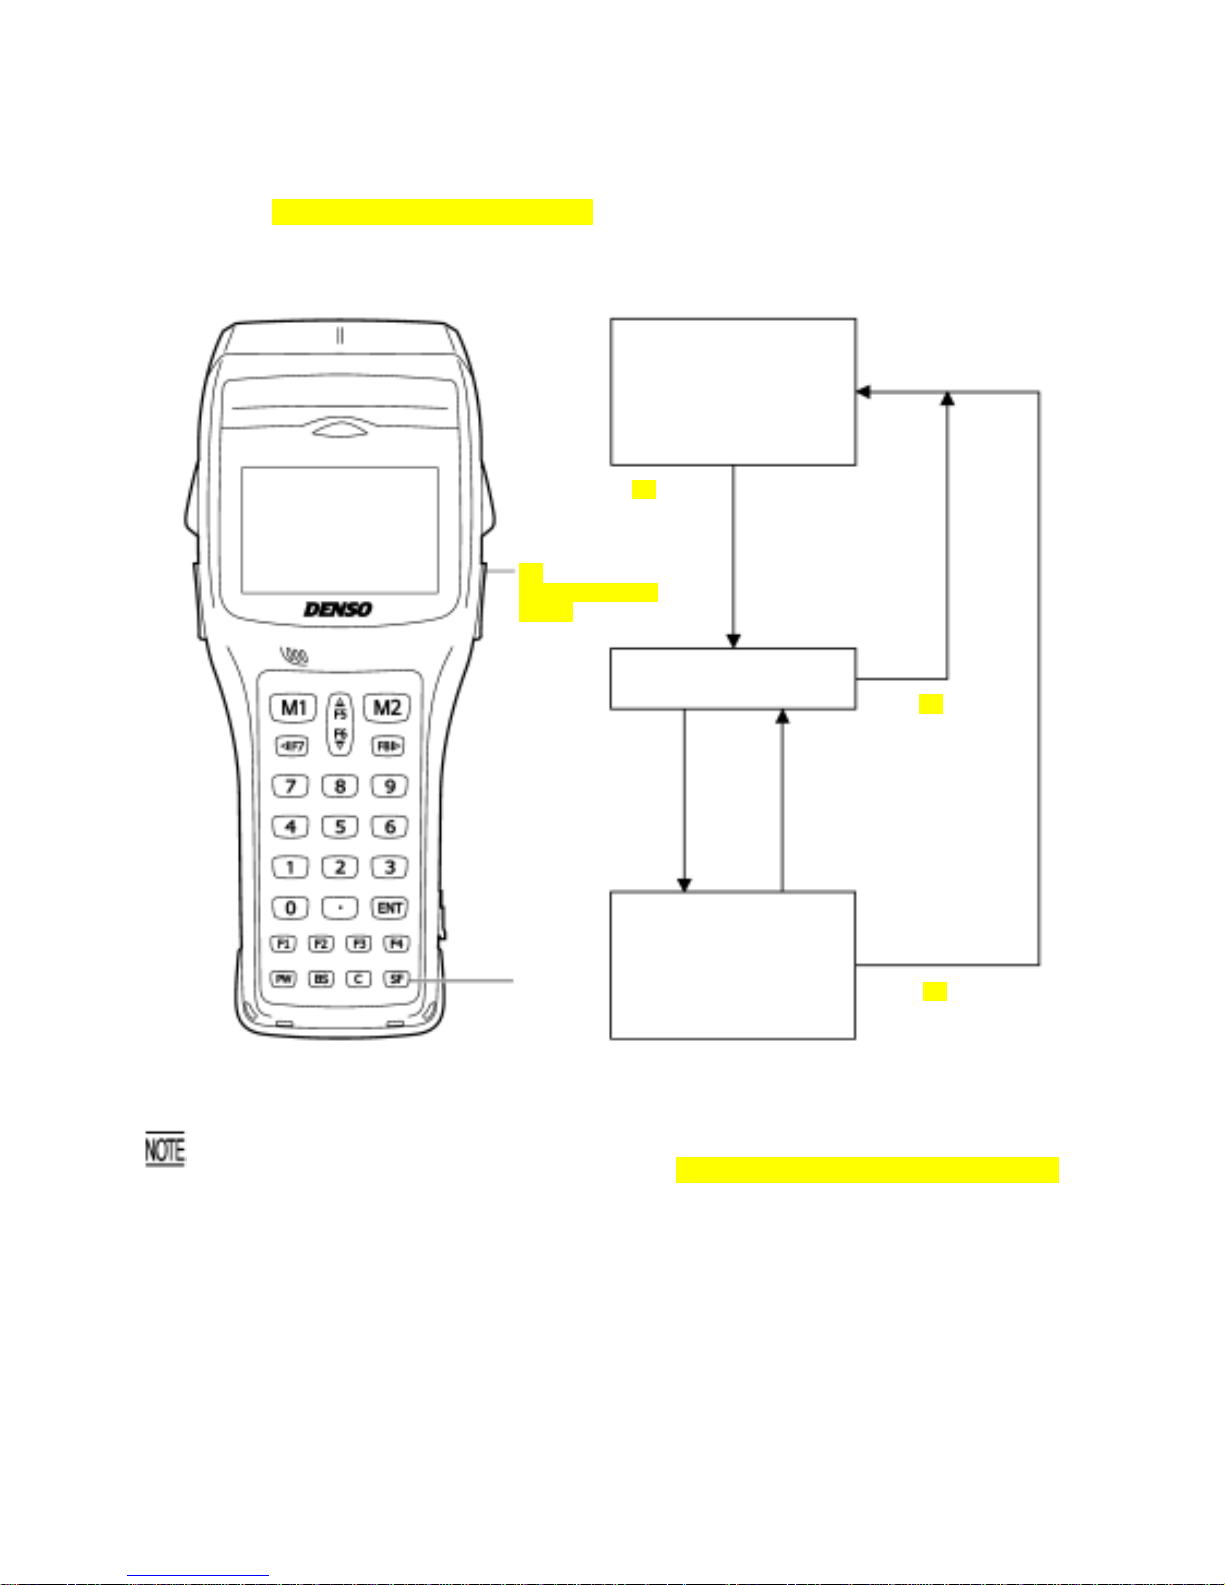
Pressing the M4 key (right-hand trigger switch) while holding down the SF (Shift) key activates or
deactivates the backlight function.
Backlight OFF
(The backlight function is
OFF when you turn the
BHT on.)
Press M4 while
holding down SF.
M4
(right-hand trigger
switch)
Backlight ON
Press M4 while
holding down SF.
If no key is
pressed for
approx. 3
seconds.
Press any key (except
for the simultaneous
depression of SF and
M4.)
Backlight OFF
(The backlight function
is kept ON.)
SF
Press M4 while
holding down SF.
In user programs, you can select the key to be used for activating or deactivating the backlight
function (instead of the initial setting: combination of SF and M4 key (right-hand trigger switch)), as
well as modifying the ON-duration of the backlight before the automatic turning-off.
4
Page 19

Chapter 1 Quick Guide
1.4 Using the Keypad
Entering Numerical Data
To enter numerical data, e.g., the quantity of goods, use the numerical keys and the ENT key.
For example, to enter the number "120," press the 1, 2 and 0 keys and then press the ENT key.
If you key in any wrong value, press the C key or BS key and then enter the correct one.
Selecting Tasks
If the LCD shows the selection items (xxx) prefixed by numerals (e.g., 1: xxx, 2: xxx), use the numerical
keys to select a desired item and press the ENT key to execute. If a YES/NO screen (e.g., 1: YES, 2:
NO) appears, press the 1 key for YES response and 2 key for NO response.
Entering Alphabetic Characters
The BHT supports the alphabet input function which allows you to enter alphabetic characters, space,
and symbols from the keypad during execution of a user program. For the alphabet input procedure,
refer to the "BHT-BASIC Programmer's Manual."
5
Page 20
6
1.5 Transferring Data
Using infrared link
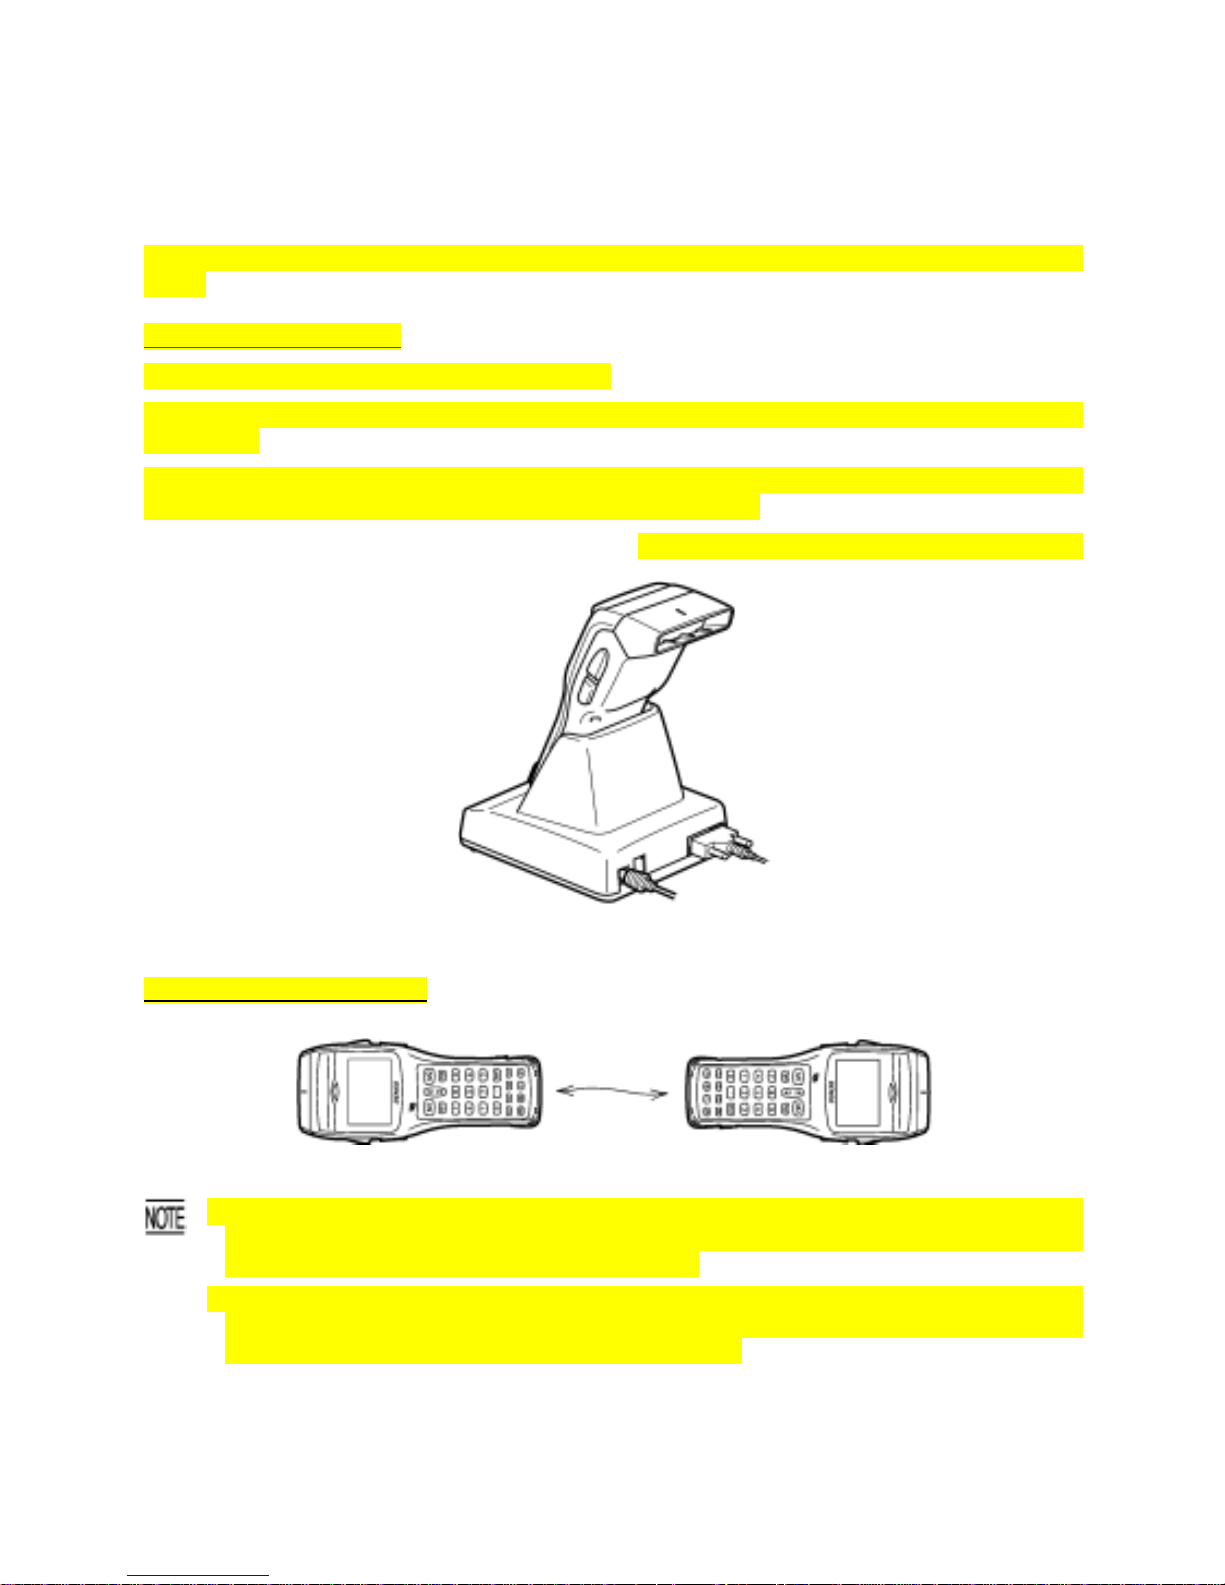
The BHT uses infrared rays to transfer data to IrDA-compliant devices (communication unit CU or other
BHTs).
Communication with the CU
Place the BHT on the CU (option) as shown below.
The CU-301 or CU-321 can be connected to the host with an RS-232C or USB interface cable,
respectively.
In a LAN communications system, use the combination of the LAN-support BHT* (as a LAN client) and
the CU-311 connected to Ethernet with an Ethernet interface cable.
*BHT on which LAN-support software is installed
Communication between BHTs
BHT
BHT
•Make sure that there is no obstruction in the light path between the BHT and a ny t arget stations. In
infrared communication, you need to keep the BHT and any target stations within the effective
infrared radiation range, usually 15 cm (5.91") or less.
•Shield the IrDA interface from direct sunlight, am bient intense lighting (inverter -driven fluorescen
t
lighting, in particular), and other potential sources of infrared radiation. Sources to watch out fo
r
include remote control units for television sets and the like.
Page 21

Chapter 2
Getting Started the BHT
and System Mode
This chapter outlines the system configuration and presents the operating procedures for the BHT-300B,
including preparation and System Mode operation. In System Mode, you can set various parameters to
efficiently run application programs.
2.1 BHT System Configuration............................................................................................................................................9
2.2 Components and Functions ........................................................................................................................................14
2.3 Preparation..................................................................................................................................................................16
2.3.1 Setting-up 1: Loading the Battery Cartridge.......................................................................................................16
2.3.2 Setting-up 2: Setting the Calendar Clock...........................................................................................................20
2.3.3 Adjusting the LCD Contrast & Beeper Volume and Switching the Beeper & Vibrator .......................................22
2.3.4 Displaying the Battery Voltage Level and System Status..................................................................................24
[ 1 ] Displaying the Battery Voltage Level..............................................................................................................24
[ 2 ] Displaying the System Status.........................................................................................................................24
2.3.5 Battery Replacement Notes...............................................................................................................................26
2.3.6 BHT Turning-off Notes .......................................................................................................................................28
[ 1 ] "Shutdown in progress" message...................................................................................................................28
[ 2 ] If the BHT is shut down abnormally................................................................................................................28
[ 3 ] About "$$BRKLST.SYS" ................................................................................................................................30
[ 4 ] If invalid files are found...................................................................................................................................31
2.4 Initializing the BHT System .........................................................................................................................................32
2.5 Operating in System Mode..........................................................................................................................................36
2.5.1 Starting System Mode........................................................................................................................................36
2.5.2 Operating in System Mode.................................................................................................................................41
[ 1 ] Calling up the desired set screen...................................................................................................................41
[ 2 ] Selecting a desired setting.............................................................................................................................42
2.5.3 Detailed Description of the Functions in System Mode......................................................................................43
[ 1 ] Program Execution.........................................................................................................................................43
[ 2 ] Downloading...................................................................................................................................................44
[ 3 ] Uploading .......................................................................................................................................................50
[ 4 ] System Environment Setting..........................................................................................................................53
[ 5 ] Testing............................................................................................................................................................75
7
Page 22

[ 6 ] System Information.........................................................................................................................................90
[ 7 ] Downloading/Uploading by FTP (in LAN-support software only) ...................................................................92
[ 8 ] Deleting Program/Data Files ..........................................................................................................................97
[ 9 ] Deleting Font Files..........................................................................................................................................98
[ 10 ] Downloading/Uploading the BHT System Parameter File..............................................................................99
[ 11 ] Setting the Remote Wakeup.........................................................................................................................104
[ 12 ] Downloading/Uploading the System Message File......................................................................................105
[ 13 ] Updating the Systems ..................................................................................................................................110
2.6 Downloading System Reconfig Files and Updating the Current Systems ................................................................114
2.6.1 Updating the BHT System................................................................................................................................114
2.6.2 Updating the CU-311 System (in LAN-support software only).........................................................................115
2.7 Starting Up User Programs.......................................................................................................................................116
8
Page 23
Chapter 2 Getting Started the BHT and System Mode
2.1 BHT System Configuration
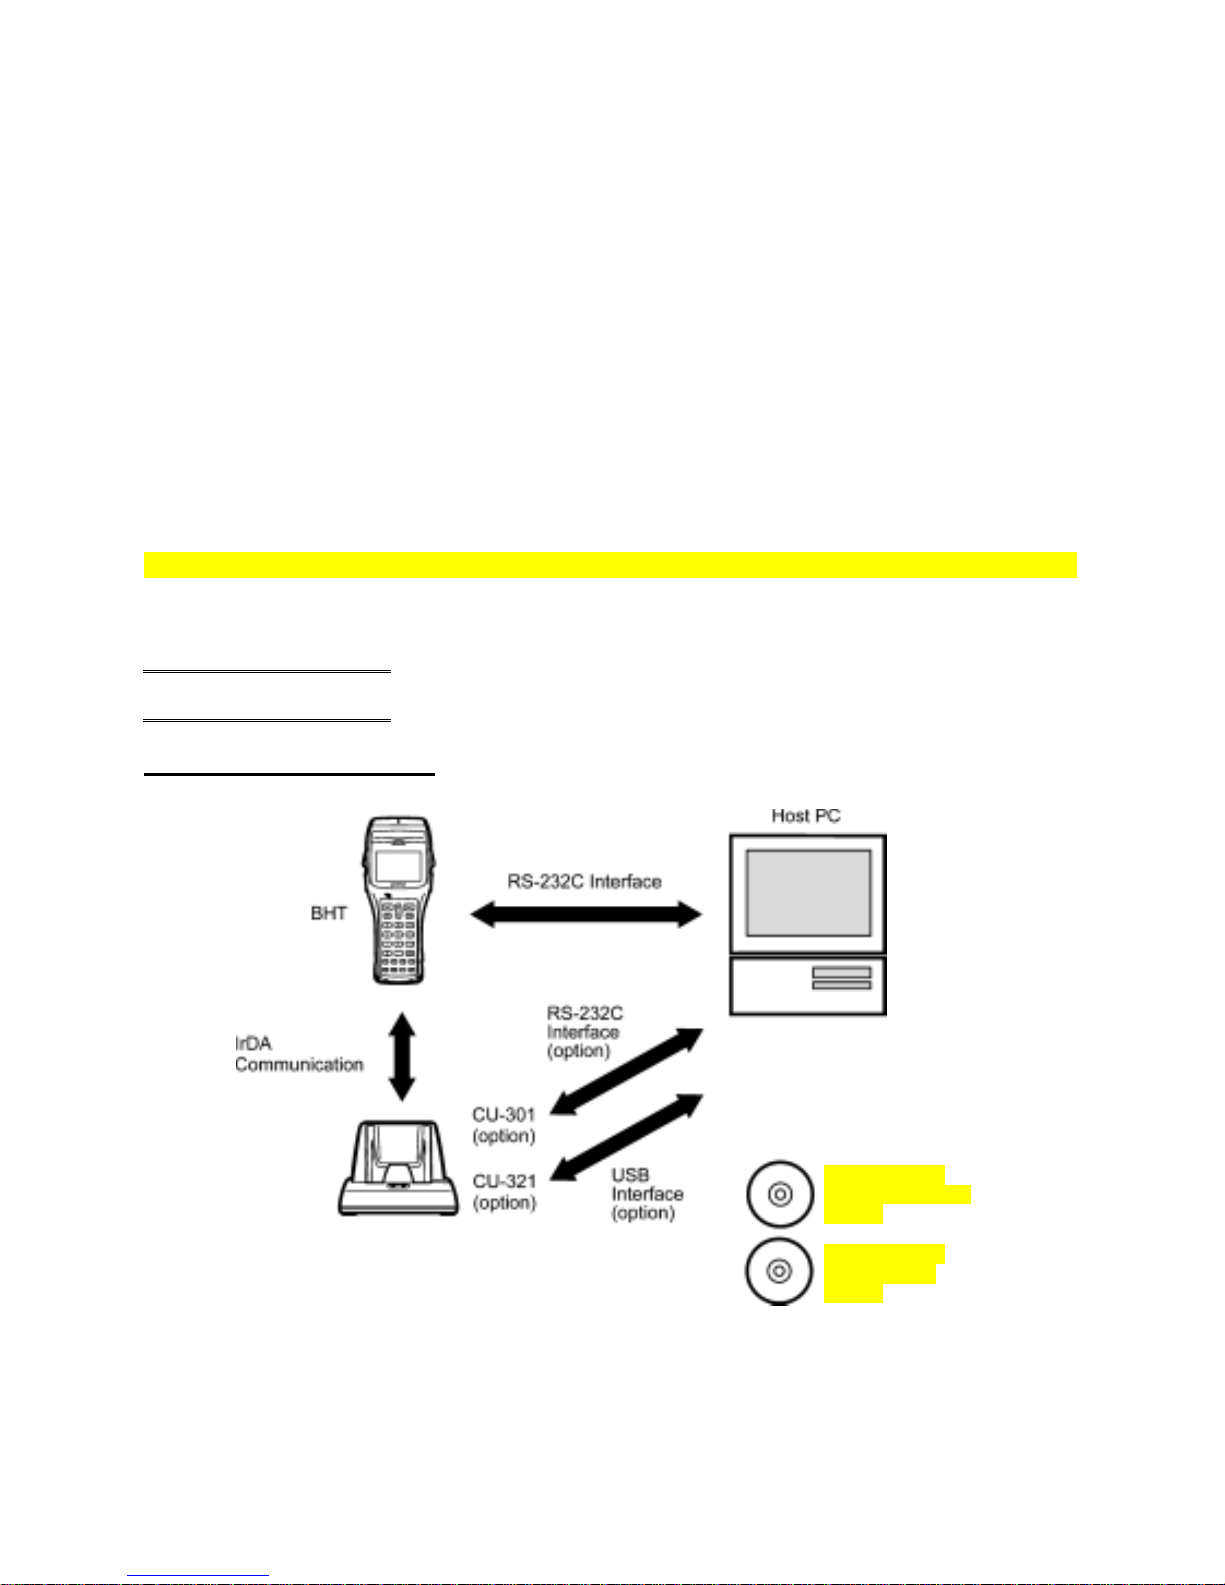
The BHT barcode data collection system requires the following hardware as well as the BHT Bar Code
Handy Terminal (which reads bar codes and accepts keypad entry) as illustrated below:
• Host PC: Allows you to edit, manage and download user programs and
data, as well as downloading system programs.
• CU-301/321 (option): Exchanges programs and data with the BHT via the IrDA
interface and with the host PC via the RS-232C interface
(CU-301) or USB interface (CU-321).
ith the host PC via the RS-232C interface
(CU-301) or USB interface (CU-321).
• RS-232C interface cable (option): Connects the CU-301 and the host PC with each other. • RS-232C interface cable (option): Connects the CU-301 and the host PC with each other.
• USB interface cable (option): Connects the CU-321 and the host PC with each other. • USB interface cable (option): Connects the CU-321 and the host PC with each other.
Direct cable connection between the BHT and host PC is also possible. Direct cable connection between the BHT and host PC is also possible.
Optional software includes the BHT-BASIC 4.0 Development Pack and BHT -BASIC4.0 Transfer Utility.
System Configuration
IrDA communications system
BHT-BASIC 4.0
Development Pack
(option)
BHT-BASIC 4.0
Transfer Utility
(option)
9
Page 24
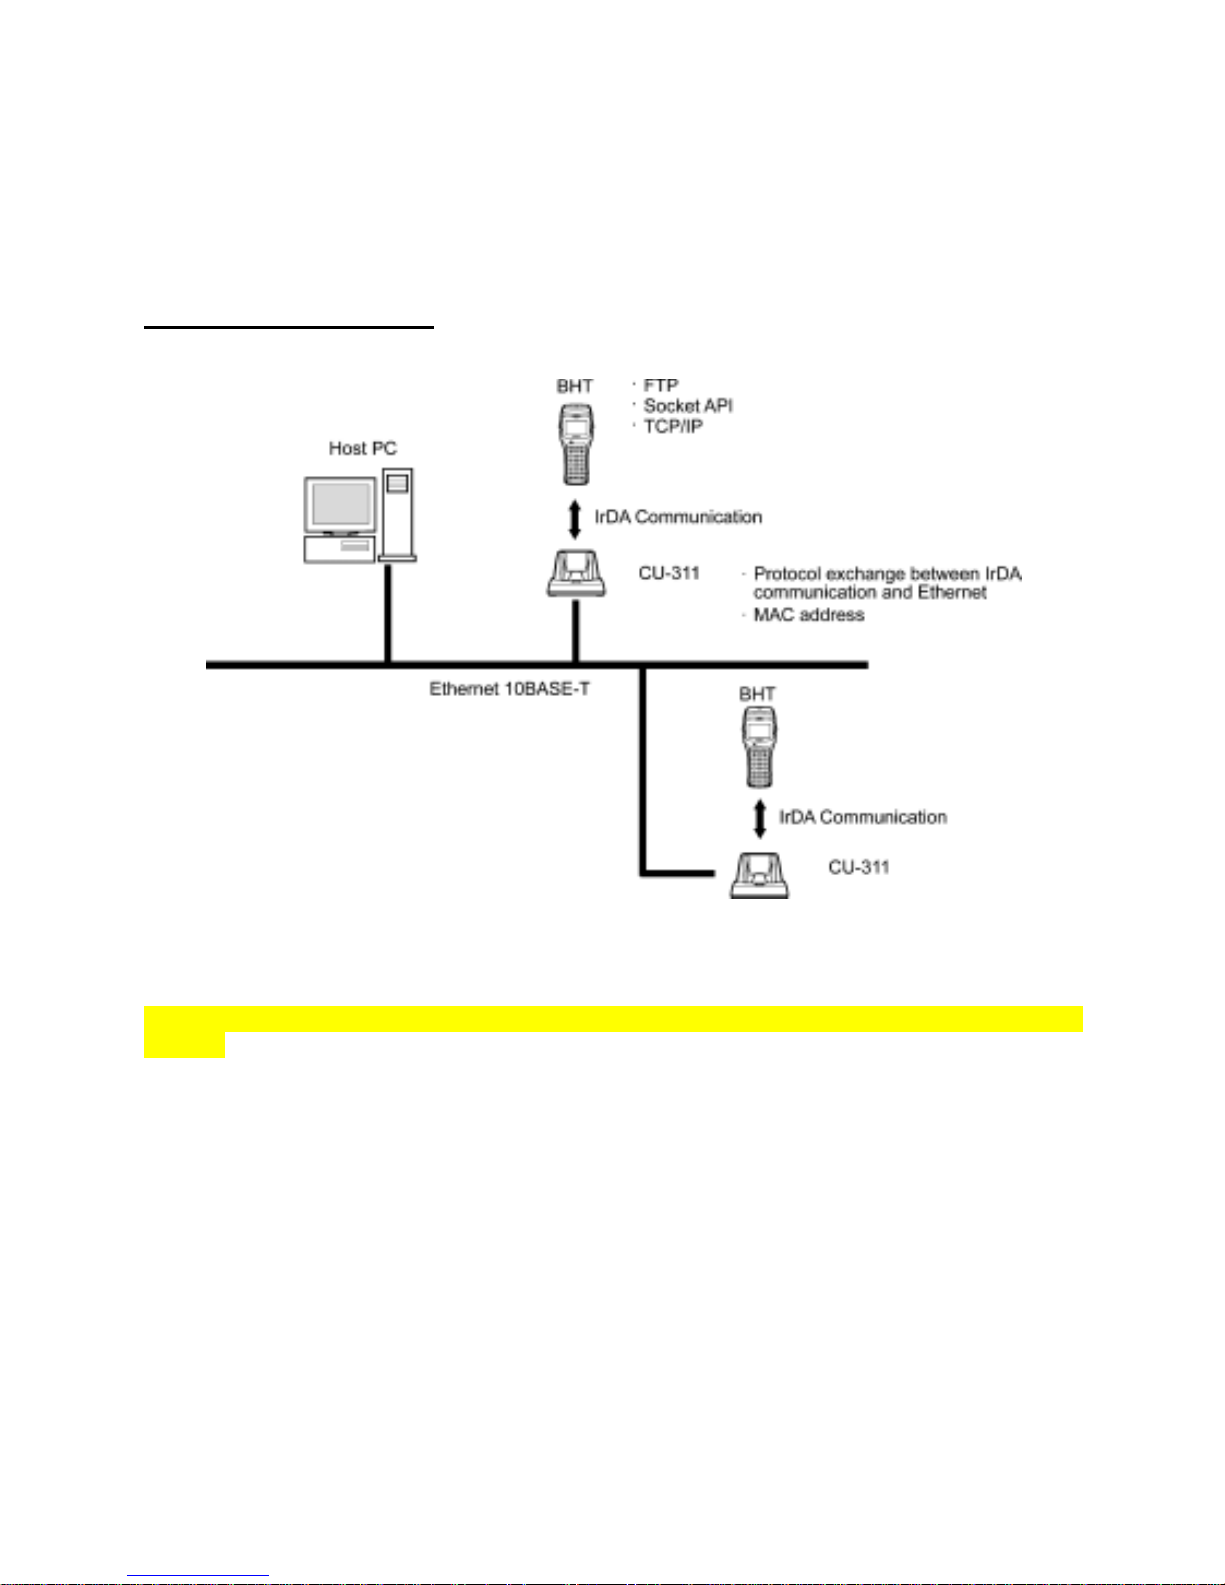
The LAN-support BHT can operate as a LAN client in a LAN communications system by connecting to
Ethernet via the LAN-support communication unit CU-311 (option).
• CU-311 (option): Exchanges programs and data with the BHT via the IrDA interface and with the
host PC via Ethernet.
LAN communications system
For details about FTP and Socket API, refer to the BHT-BASIC Programmer's Manual.
NOTE: LAN configurations are available only with LAN-support BHT s on which LAN-support software is
installed.
10
Page 25
Chapter 2 Getting Started the BHT and System Mode
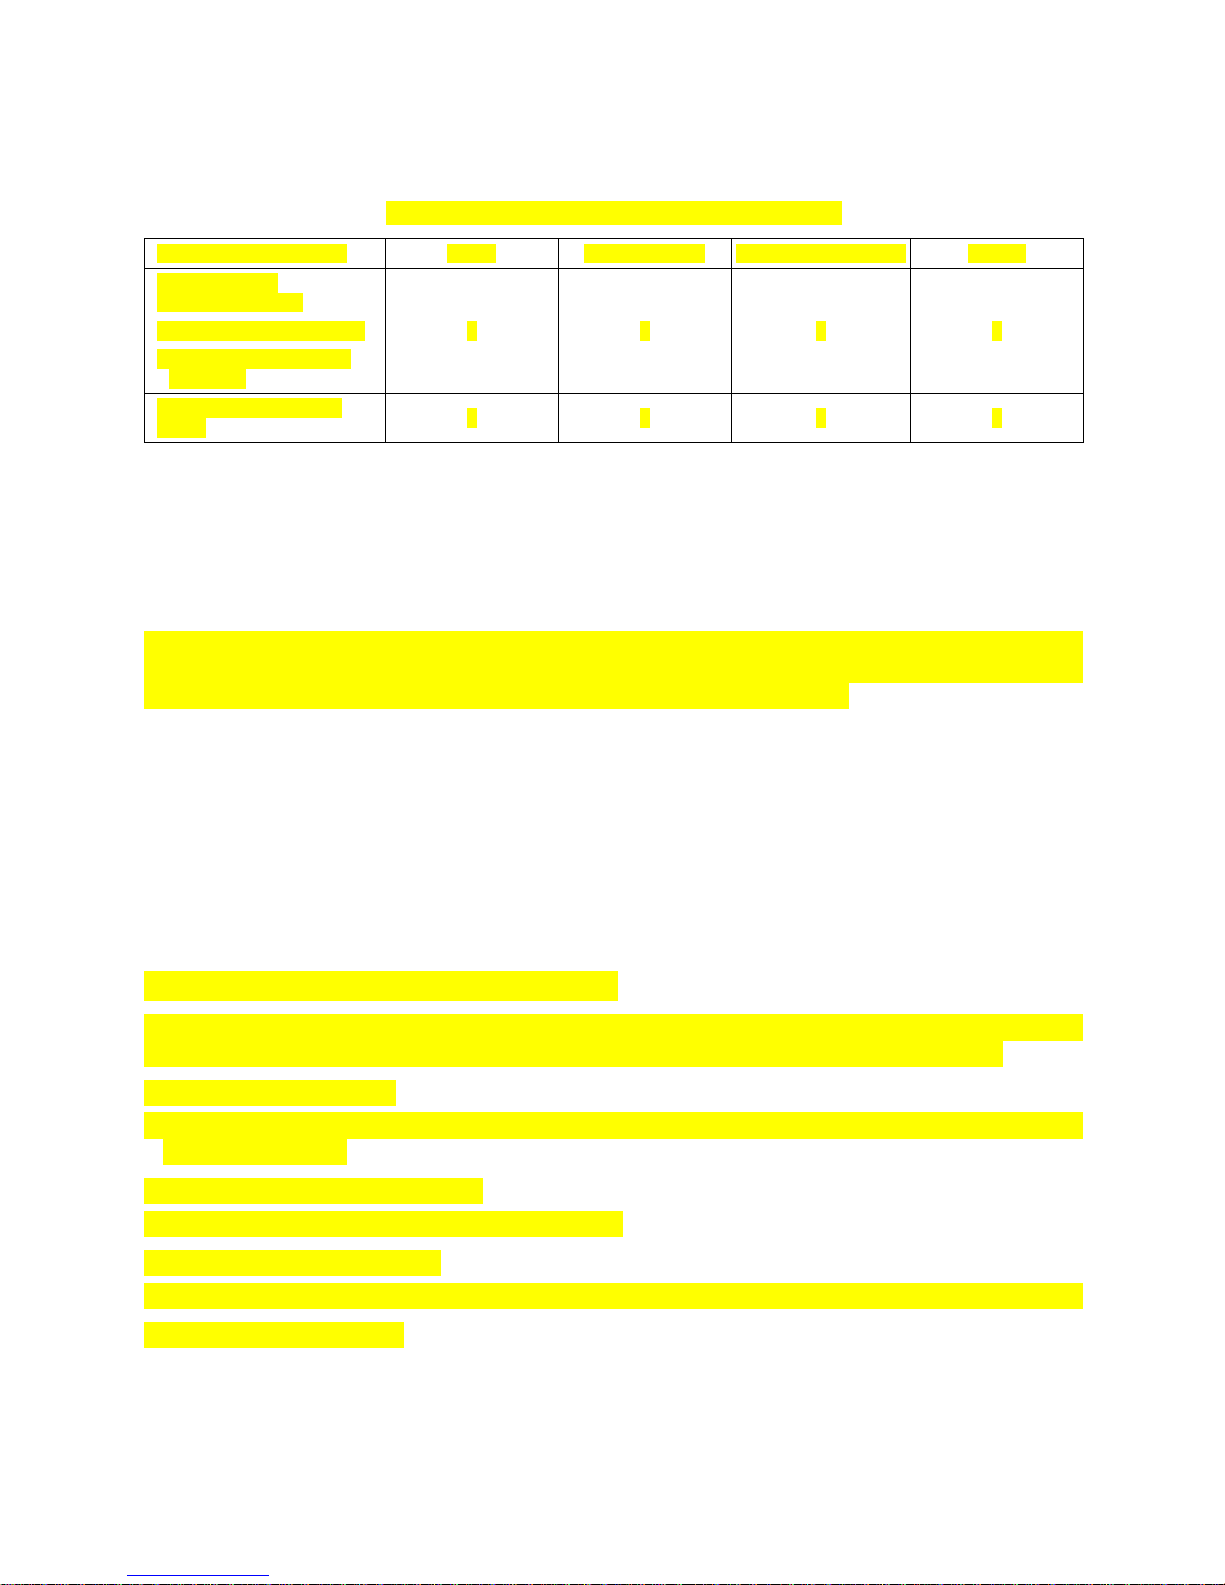
Host PC
Models: PC/AT, PS/2
Operating Systems and Optional Application Programs
Operating Systems (OS) Win98 WinNT 3.51/4.0 Win2000 Professional Win XP
BHT-BASIC 4.0
Development Pack
• BHT-BASIC 4.0 Compiler
• BHT-BASIC4.0 Remote
Debugger
– – √ √
BHT-BASIC4.0 T r ansfer
Utility*
√ √ √ √
*This application does not activate any built-in IrDA interface port.
CU-301/321 and RS-232C/USB Interface Cable (options)
The CU-301/321 is an optical communication unit for the BHT-300B. It controls data and program
transfer between the BHT and host PC. It communicates with the BHT using infrared (Ir) light and with
the host PC over an RS-232C cable (for CU-301) or USB cable (for CU-321).
You can directly connect two BHTs with each other by using a commercially available metal cable
having 3-pole mini stereo plugs (as a direct-connect interface cable). You also connect the BHT directly
with the host PC or with the modem by using the direct-connect interface cable compatible with the
target equipment. (NOTE: The direct-connect interface port of the BHT is not designed to stand frequent
connecting/disconnecting. You are, therefore, recommended to use the CU-301/321 where you expect
to do a lot of connecting and disconnecting of the BHT to/from a host PC.)
BHT-BASIC 4.0 Development Pack (option)
The BHT-BASIC 4.0 development pack is a package that contains a full set of tools necessary for
developing applications for the BHT series. It allows you to jump-start your development work.
• BHT-BASIC 4.0 Compiler
Compiles and links a source program written in BHT-BASIC 4.0 to create a user program executable
on the BHT (*.PD4).
• BHT-BASIC 4.0 Remote Debugger
Debugs application programs running on the BHT.
• BHT-BASIC4.0 Transfer Utility
Transfers a user program (*.PD4) to the BHT. For details, see “BHT-BASIC4.0 Transfer Utility” below.
• BHT-PC Cable (RS-232C)
11
Page 26
BHT-BASIC4.0 Transfer Utility (option)
Running on the host PC, this utility transfers files between the BHT and the host PC, using YMODEM or
BHT-Ir protocol.
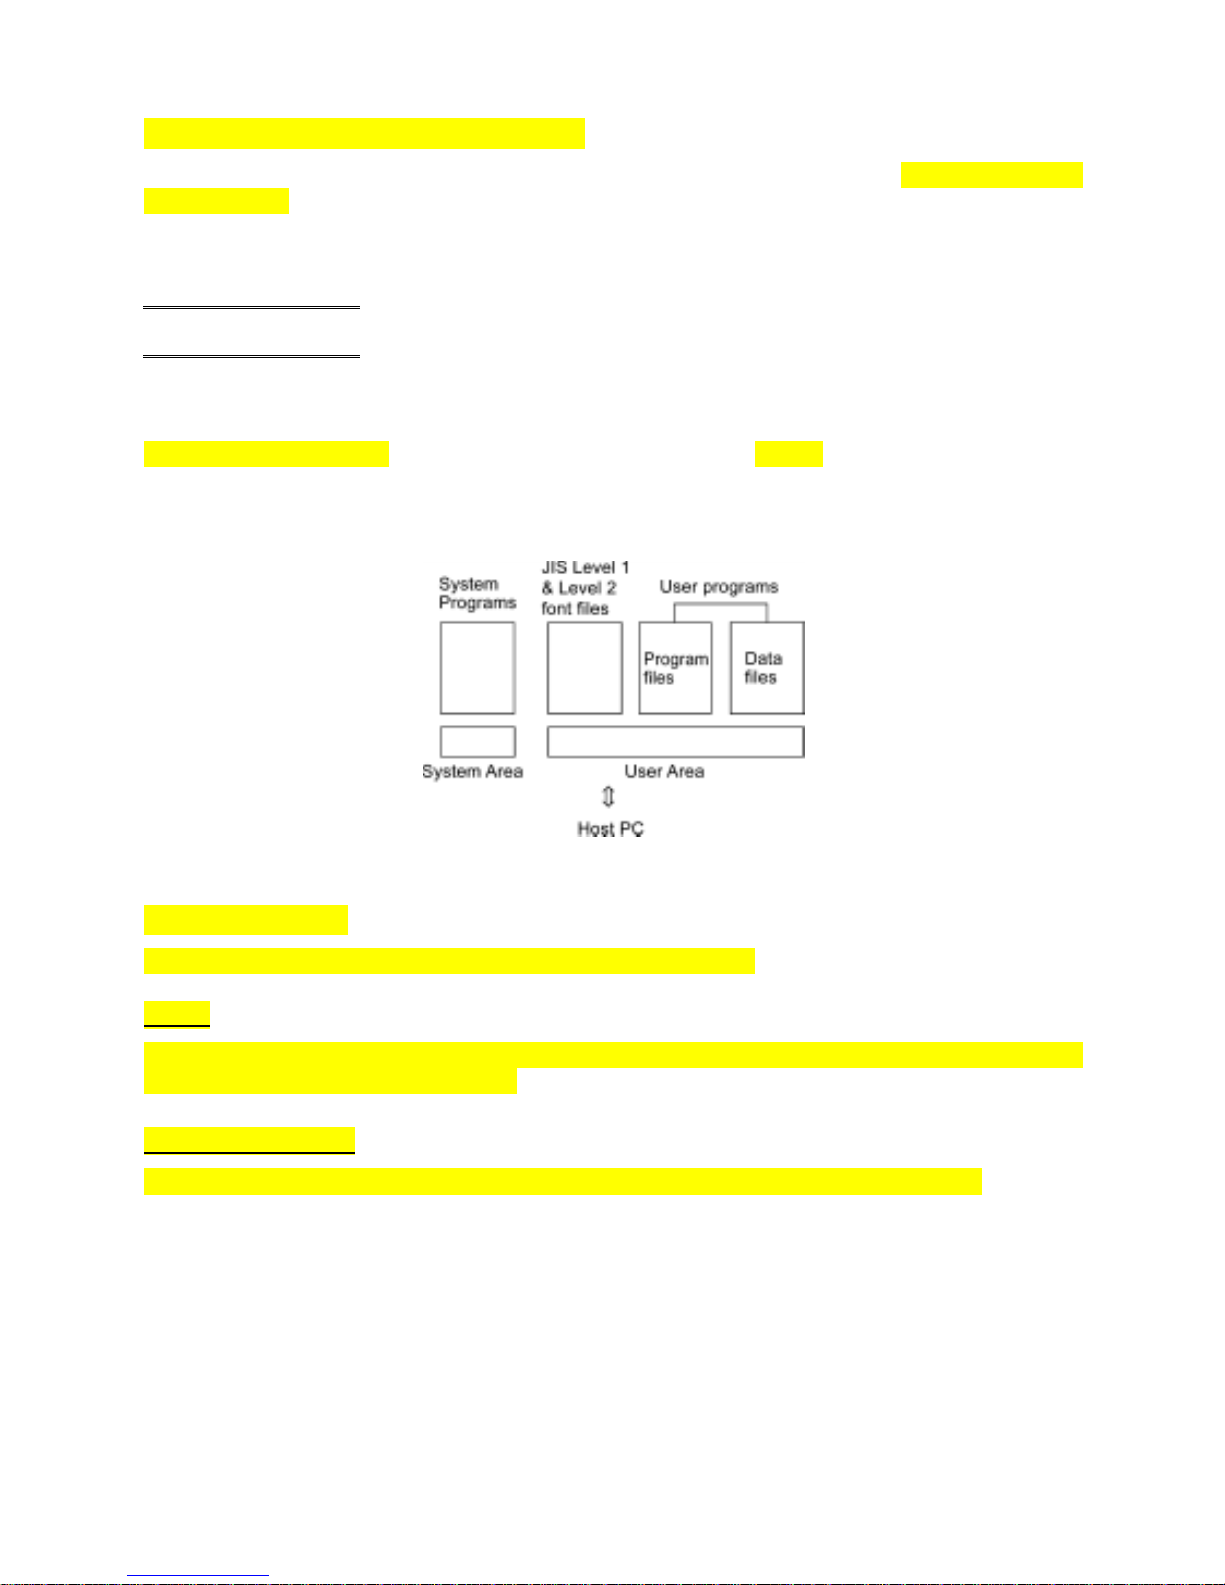
Software Structure
System Programs and JIS Level 1 & Level 2 fonts are resident in the system area and user area,
respectively.
To execute user programs, you should download the program files (*.PD4) into the user area.
To use data files (e.g., good master files) required for execution of user programs, you should download
those data files before execution of user programs. Those files will be stored in the user area.
System Programs
The system programs include the following three sets of programs:
Drivers
Drivers is a set of programs that directly controls the BHT hardware. It can be called up by the
BHT-BASIC Interpreter or System Mode.
BHT-BASIC Interpreter
The interpreter interprets and executes instructions in user programs written in BHT-BASIC.
12
Page 27
Chapter 2 Getting Started the BHT and System Mode
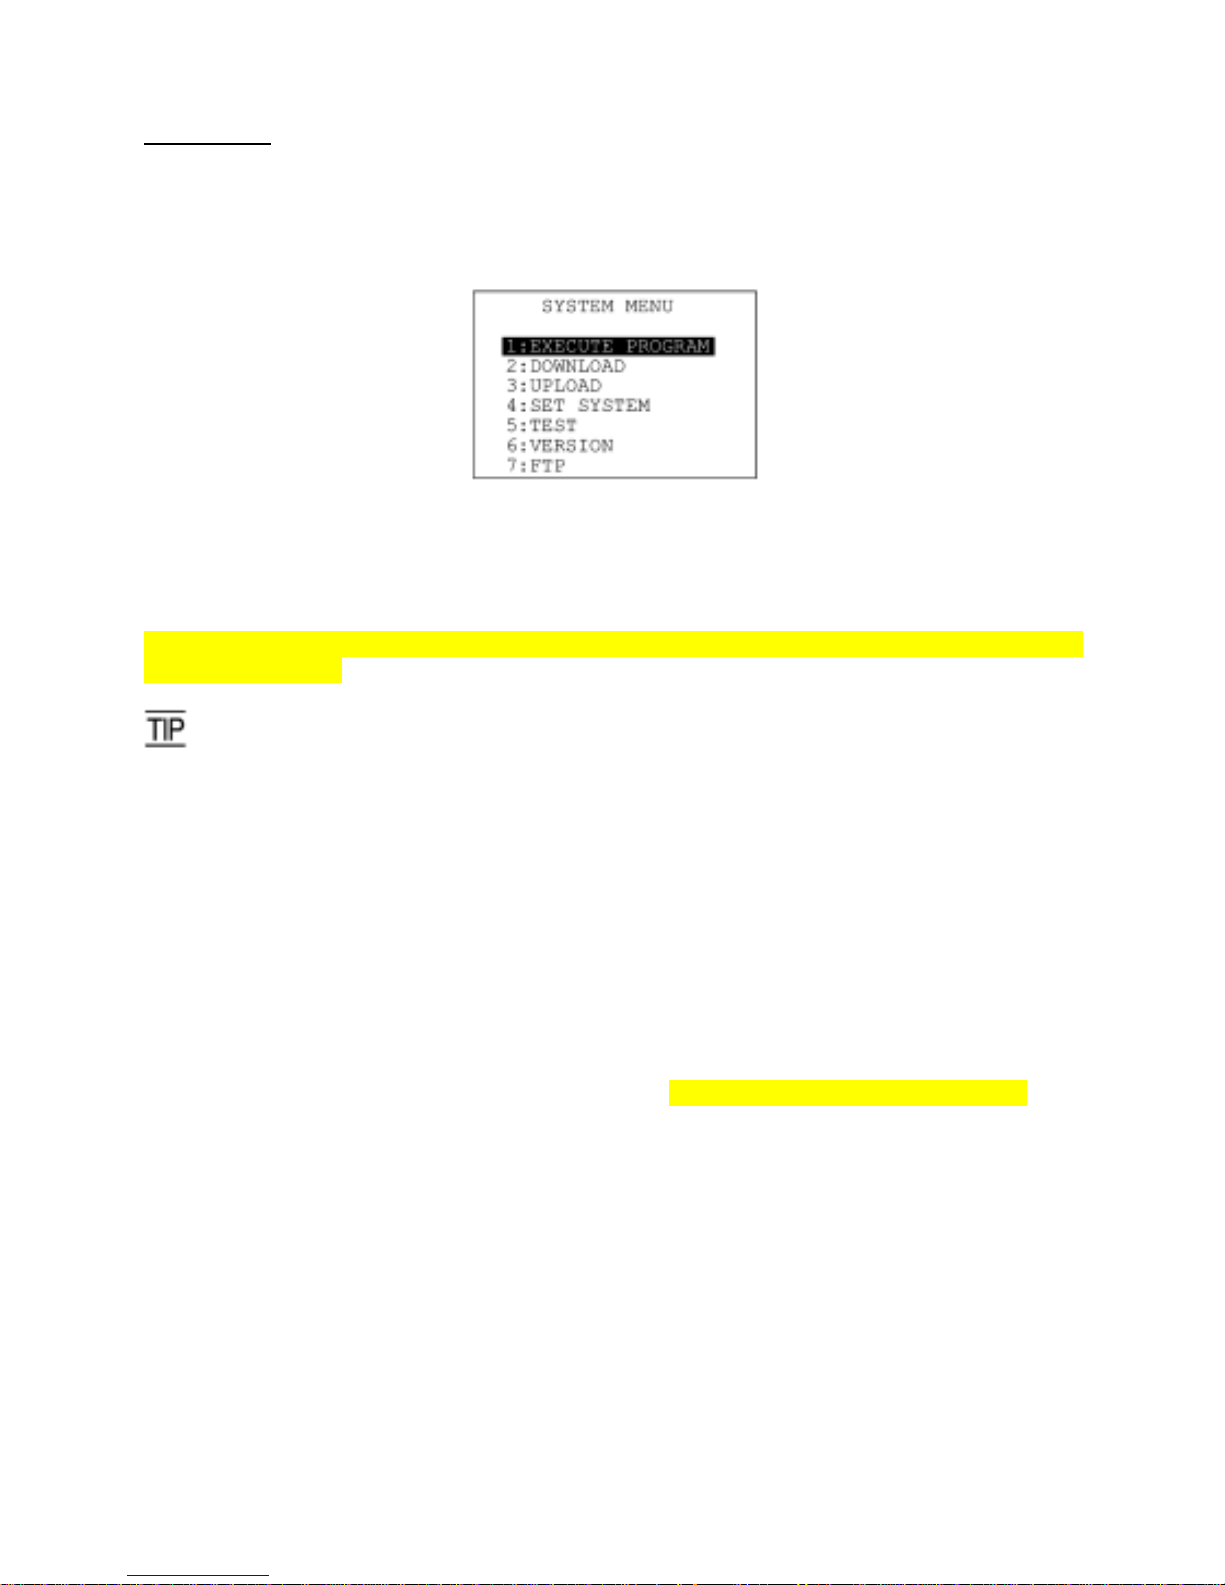
System Mode
System Mode is a system program exclusively designed for the effective use of user programs in the
BHT. It sets up the execution environments for those programs; e.g., it prepares downloading/uploading
conditions, sets the calendar clock, and tests the BHT components including the LCD, beeper, and
keypad. Shown below is the System Mode menu (SYSTEM MENU).
JIS Level 1 and Level 2 Font Files
These files contain font data required for displaying Kanji characters on the LCD.
The BHT can display Kanji characters of 16-dot and 12-dot fonts and their double-width ones in
application programs.
If you do not need to display Kanji characters, you may delete these JIS font files. After deletion, the
memory area which was occupied by these files can be used as a user area. For the deleting procedure,
refer to Section 2.4, "Initializing the BHT System" or Section 2.5.3, "[ 9 ] Deleting Font Files."
The names of the JIS font files are:
FNT16J1.FN3 (JIS Level 1 font, 16-dot)
FNT16J2.FN3 (JIS Level 2 font, 16-dot)
FNT12J1.FN3 (JIS Level 1 font, 12-dot)
FNT12J2.FN3 (JIS Level 2 font, 12-dot)
User Programs
You can develop application programs to meet individual job requirements by using the BHT-BASIC
Compiler. To download those user programs to the BHT, use the BHT-BASIC4.0 Transfer Utility.
13
Page 28
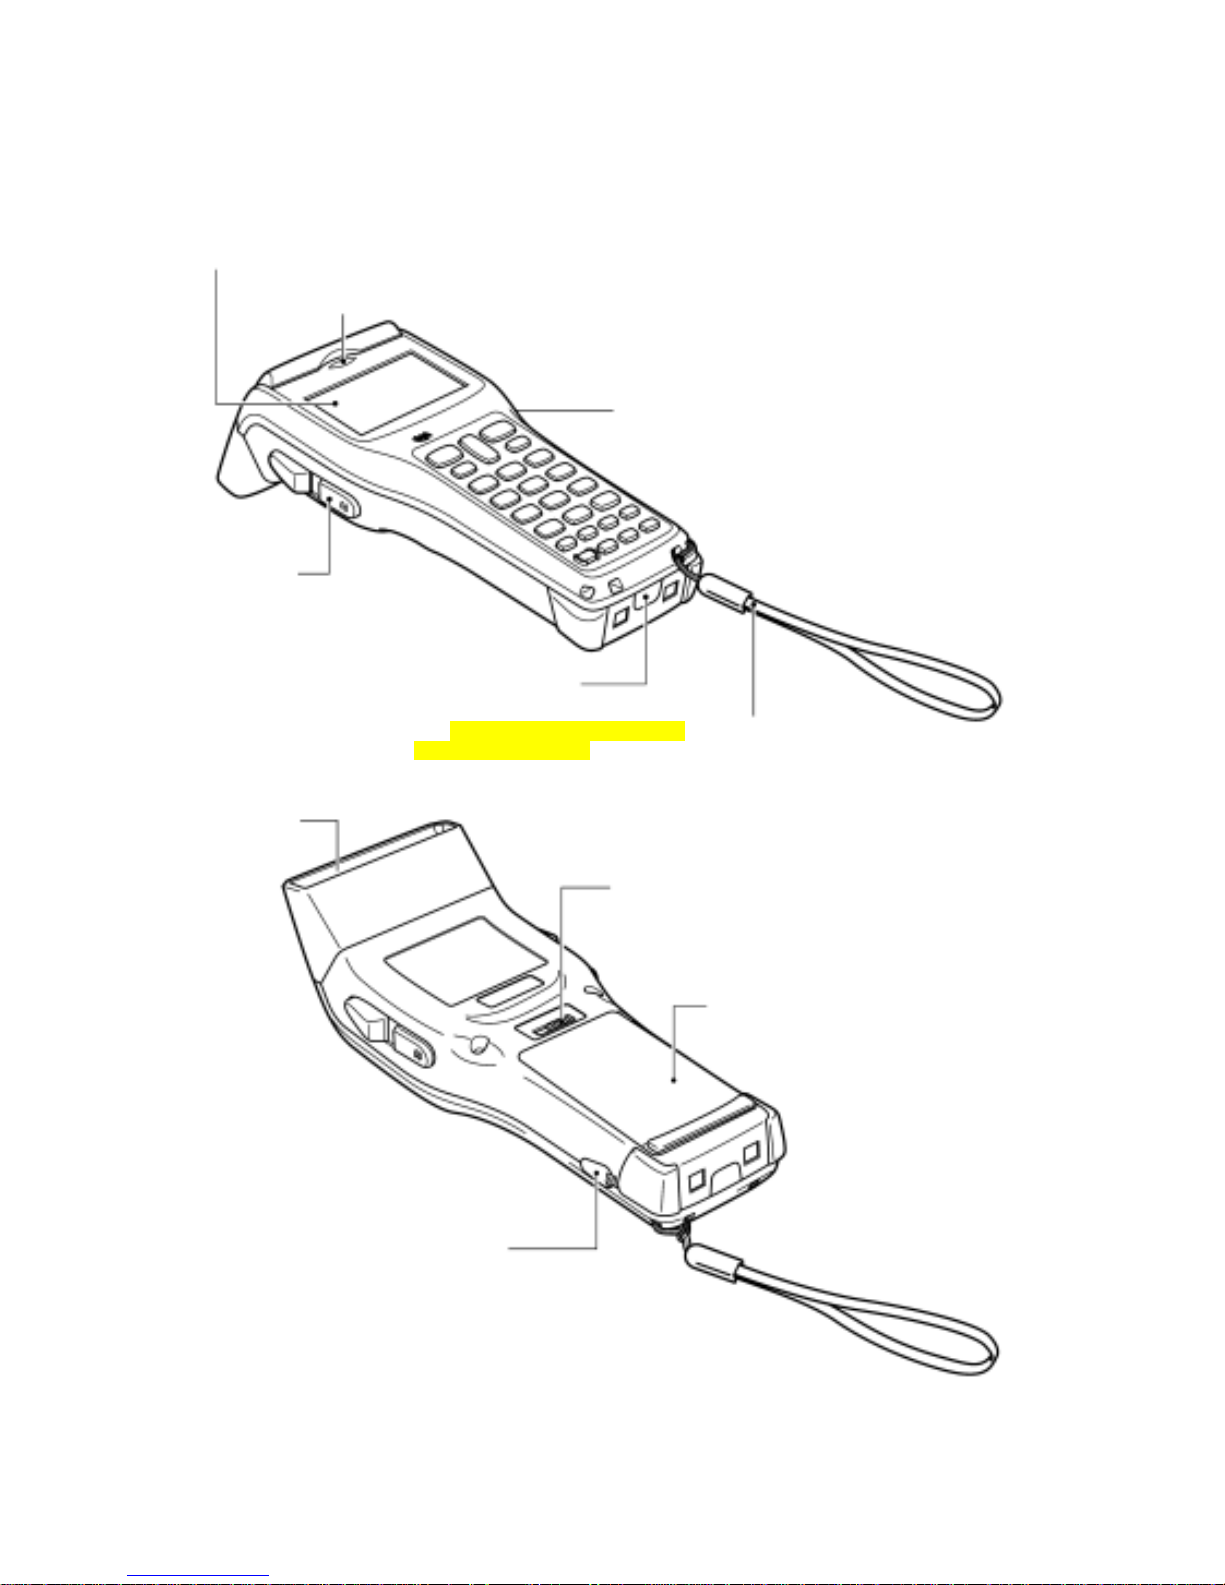
2.2 Components and Functions
Indication LED
Illuminates in green when the BHT has successfully read a bar code.
Liquid crystal display (LCD)
Shows the characters and graphic
patterns.
Trigger switch (M4 key)
Press this switch to start bar-code reading.
Trigger switch
(M3 key)
Press this switch to start
bar-code reading.
IrD
A
interface port
Used to exchange data/programs
with the optical communication unit
CU-300 or other BHTs.
Hand strap
Be sure to put your hand
through this strap to
prevent you from dropping
the BHT accidentally.
Bar-code
reading
window
Battery cover lock
Use this to lock or unlock the battery
cover.
Battery cover
Remove this cover to replace the
battery cartridge.
Connector cover
Inside this cover is the
direct-connect interface port.
14
Page 29
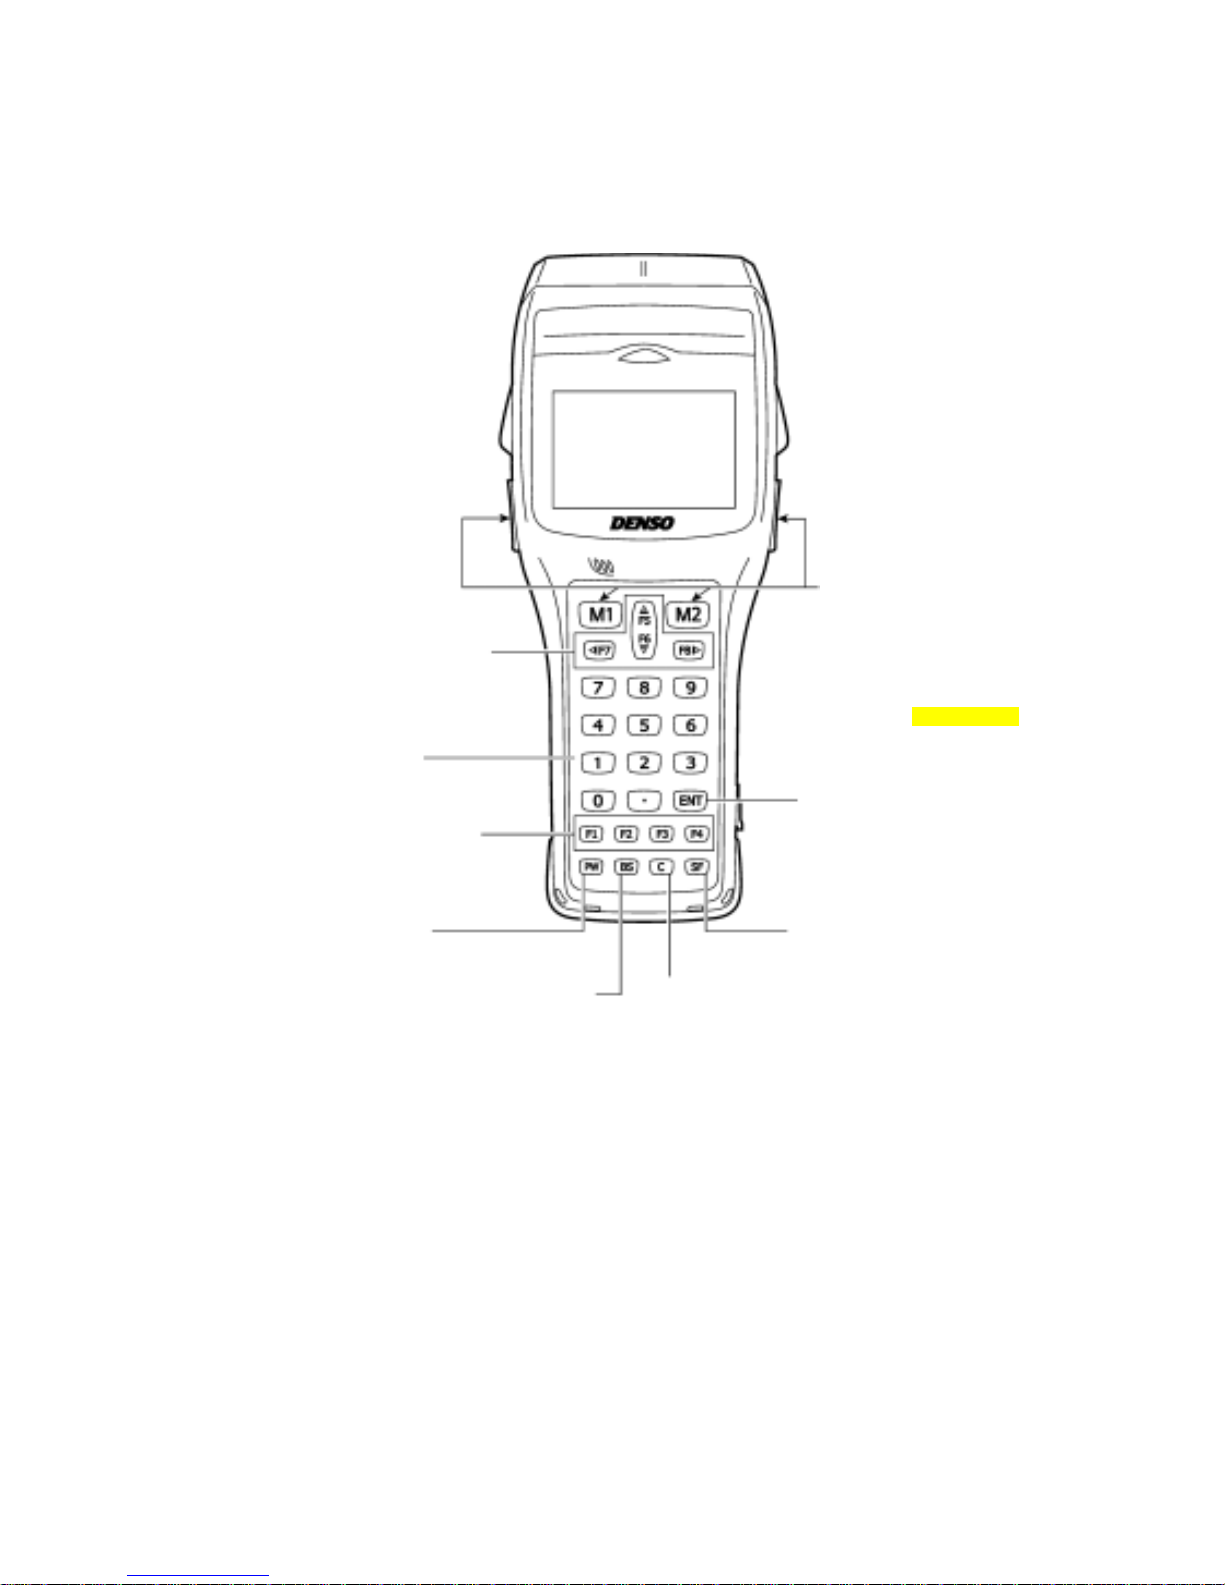
Chapter 2 Getting Started the BHT and System Mode
The functions of the keys can be set by user programs. Shown below is a set of sample functions.
Trigger switch
(M3 key)
Trigger switch
(M4 key)
Magic keys (M1 to M4)
Each of the M3 and M4 keys is
assigned a trigger switch by
default.
Depending upon definition in
System Mode or in user programs,
M1 to M4 keys can also be used as
any of the trigger switch, SF key,
ENT key and backlight function
on/off key. These keys can be also
assigned string data.
Cursor keys (F5 to F8)
Used to move up to the
preceding line, down to the next
line, to the preceding character,
and to the next character.
Numerical keys
Used for data input.
ENT (Enter) key
Finalizes the input data or operations,
and starts the corresponding
processing.
Function keys
Used for choosing
functions.
C (Clear) key
Clears the last entered data or
returns to the original screen.
SF (Shift) key
Used in combination with
numerical keys for special input
procedures.
Power key
Turns the BHT on or off.
BS (Backspace) key
Moves back one
character.
15
Page 30
2.3 Preparation
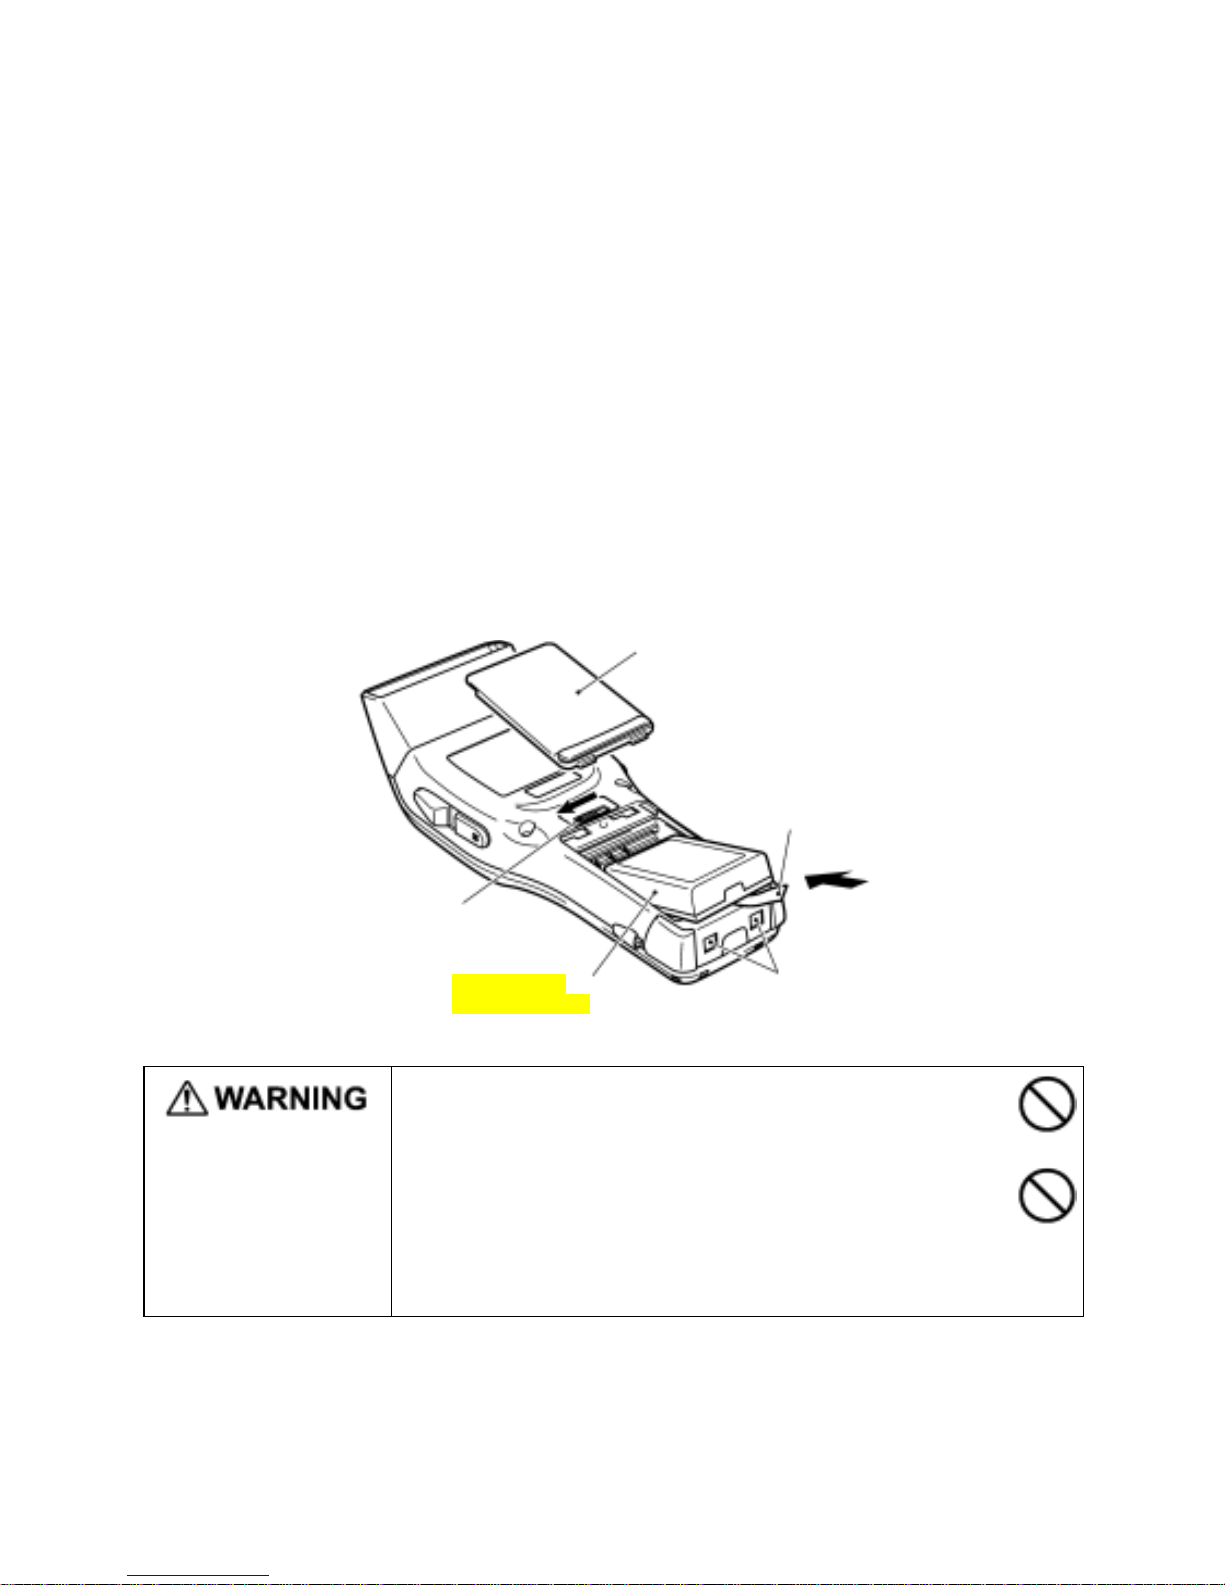
2.3.1 Setting-up 1: Loading the Battery Cartridge
Before the first use of the BHT, be sure to load the battery cartridge as shown below. The battery
cartridge is not loaded in the BHT when shipped from the factory.
(1) Turn the BHT upside down.
(2) As shown below, slide the battery cover lock in the direction of the arrow and remove the battery
cartridge cover.
(2) As shown below, slide the battery cover lock in the direction of the arrow and remove the battery
cartridge cover.
(3) Check the polarity (positive and negative) of the battery cartridge. Then, load it so that the end of the
battery pull strap appears above the battery cartridge as shown below. This facilitates easy removal
of the battery cartridge.
(3) Check the polarity (positive and negative) of the battery cartridge. Then, load it so that the end of the
battery pull strap appears above the battery cartridge as shown below. This facilitates easy removal
of the battery cartridge.
(4) Put the battery cartridge cover back into place taking care not to pinch the battery pull strap between
its cover and the bottom cover. Then, return the battery cover lock to its original position.
(4) Put the battery cartridge cover back into place taking care not to pinch the battery pull strap between
its cover and the bottom cover. Then, return the battery cover lock to its original position.
(5) Place the BHT on the CU-300 to charge the battery cartridge. (5) Place the BHT on the CU-300 to charge the battery cartridge.
Battery cartridge cover
Battery pull strap
Battery cover lock
Rechargeable
battery cartridge
Charge terminals
• Never disassemble or heat the battery cartridge, nor put it into
fire or water; doing so could cause battery-rupture or leakage
of battery fluid, resulting in a fire or bodily injury.
• Do not carry or store the battery cartridge together with
metallic ballpoint pens, necklaces, coins, hairpins, etc.
Doing so could short-circuit the terminal pins, causing the
batteries to rupture or the battery fluid to leak, resulting in a
fire or bodily injury.
16
Page 31
Chapter 2 Getting Started the BHT and System Mode
• Avoid dropping the battery cartridge or letting it undergo any
shock or impact.
Doing so could cause the batteries to break, generate heat,
rupture or burn.
• Never charge the battery cartridge where any inflammable
gases may be emitted; doing so could cause fire.
• Do not use batteries or power sources other than the specified
ones; doing so could generate heat or cause malfunction.
• The BHT has an integrated rechargeable backup power source which backs up the memory and
calendar clock in the BHT when no battery cartridge is loaded or the voltage level of the battery
cartridge drops below the specified level. The backup power source is automatically charged by the
battery cartridge.
When you first load the battery cartridge after purchase or you load it after leaving the BHT unuse
d
for a long time, do not remove the battery cartridge for 1 0 minutes or more after that loading. T his is
for charging the memory backup source integrated in the BHT.
• If you leave the BHT without a battery cartridge loaded for a long time, the memory contents will
no longer be backed up so that the message "Contact your administrator.
N
ote the error number.
(XXXX)" or "Set the current date and time." may appear on the LCD.
• If you will not be using the BHT for a long time, follow the instructions given in Section 2.3.5,
"Battery Replacement Notes."
• Avoid storing the rechargeable battery cartridge in a hot place. The battery capacity may be
decreased.
• Do not touch the charge terminals of the battery cartridge or stain them. Doing so could result in
a
BHT failure or cartridge charging failure. It is recommended that you wipe those battery cartridge
terminals and the BHT's charge terminals with a dry, soft cloth periodically.
Checking the Battery Voltage Level
Pressing the ENT key while holding down the SF key displays the c urrent voltage level of the power
source (battery cartridge) as a bar indicator. (Releasing those keys erases the indication.)
For details, refer to Section 2.3.4, "Displaying the Battery Voltage Level and System Status."
17
Page 32
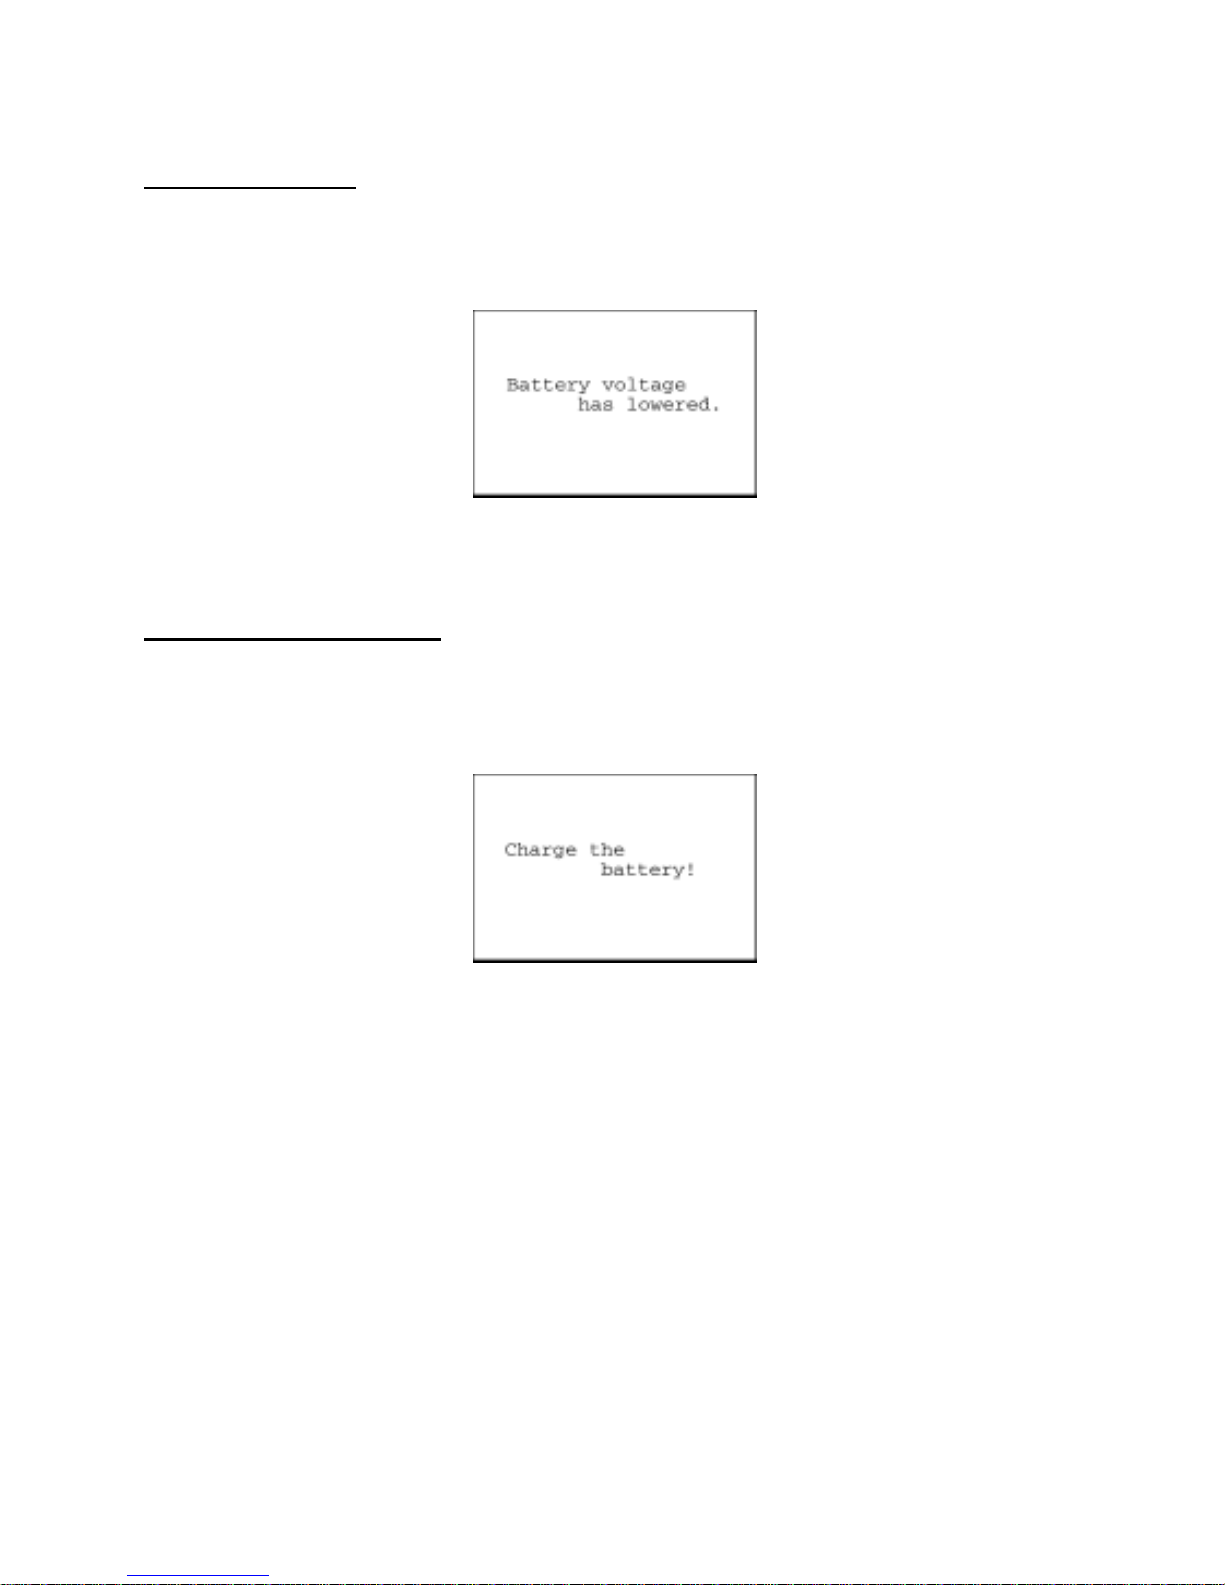
Low Battery Indication
Low battery warning
If the output voltage (of the battery cartridge) drops below a specified lower level while the BHT is in
operation, the BHT displays the following warning message for approx. 2 seconds and beeps three
times. After that, it will resume the previous regular operation.
The battery cartridge will need to be recharged before long. Recharge it as soon as possible.
Shutdown due to low battery
If you continue to use the BHT without replacement or recharge of the battery cartridge after the low
battery warning message appears, then the BHT displays the following message, beeps five times, and
then turns itself off. Depending upon the battery level, the beeper may not sound five times.
Replace or recharge the battery cartridge.
18
Page 33
Chapter 2 Getting Started the BHT and System Mode
• Before battery replacement, be sure to turn the BHT off. Within three m inutes from the rem oval of
the battery cartridge, load the battery cartridge to avoid data loss. After battery replacement, turn
the BHT on and check its operation.
• You may charge the battery cartridge with the optional CU-301/321/311 communication unit o
r
optional CH-351/CH-201 charger. For the charging procedure using the CU-301/321/311, refer to
Chapter 5. For that using the CH-351/CH-201, refer to the "CH-351 User's Manual"/"CH-201
User's Manual."
• If the "Replace the batteries!" or "Charge the battery!" message appears after the BHT undergoes
any shock or impact, turn the BHT off and on and then check the battery output level. The battery
may not have run out.
Only use the dedicated charger (CU-301/321/311 or
CH-351/CH-201) for charging the rechargeable battery
cartridge.
Using a different type of charger could cause battery-rupture or
leakage of battery fluid and result in a fire, bodily injury, or
serious damage to property.
Never charge a wet or damp battery cartridge.
Doing so could cause the batteries to break, generate heat,
rupture or burn.
19
Page 34
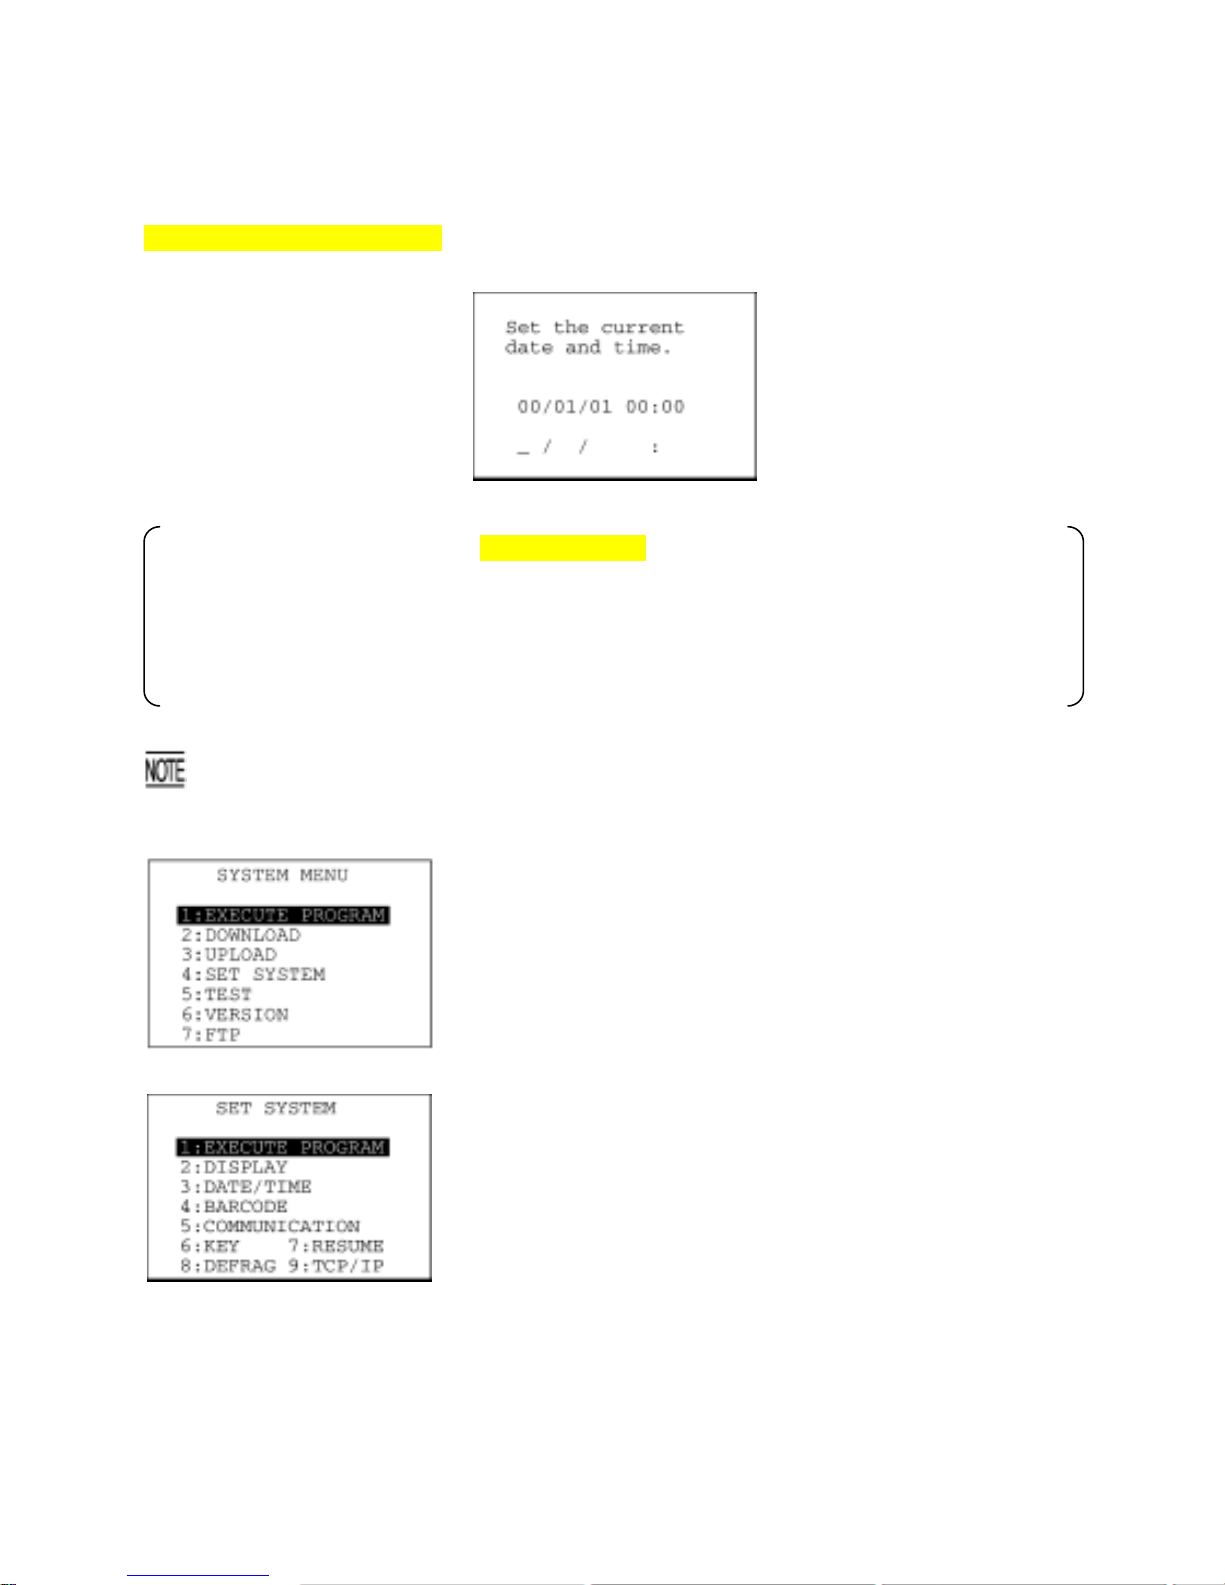
2.3.2 Setting-up 2: Setting the Calendar Clock
Turn the BHT on by pressing the PW key.
The following message appears.
In the following cases, the above message appears. In such instances, it is necessary to set the
date and time. (The indication "00/01/01 00:00" will differ depending upon the calendar clock
state.)
• The BHT is first turned on from the time of purchase.
• The BHT is turned on after the memory backup power source is completely discharged.
It is recommended that you upload font files beforehand for such cases that you would mistakenly
delete font files or a memory storage error would cause font files to be erased.
(1) While holding down the SF and 1 keys, press the PW key to start
System Mode. The SYSTEM MENU shown at left will appear.
(2) On the SYSTEM MENU, press the 4 key to select the "SET
SYSTEM" and press the ENT key. The screen shown at left will
appear. (To return to the immediately preceding screen during
this setting procedure, press the C key.)
20
Page 35
Chapter 2 Getting Started the BHT and System Mode
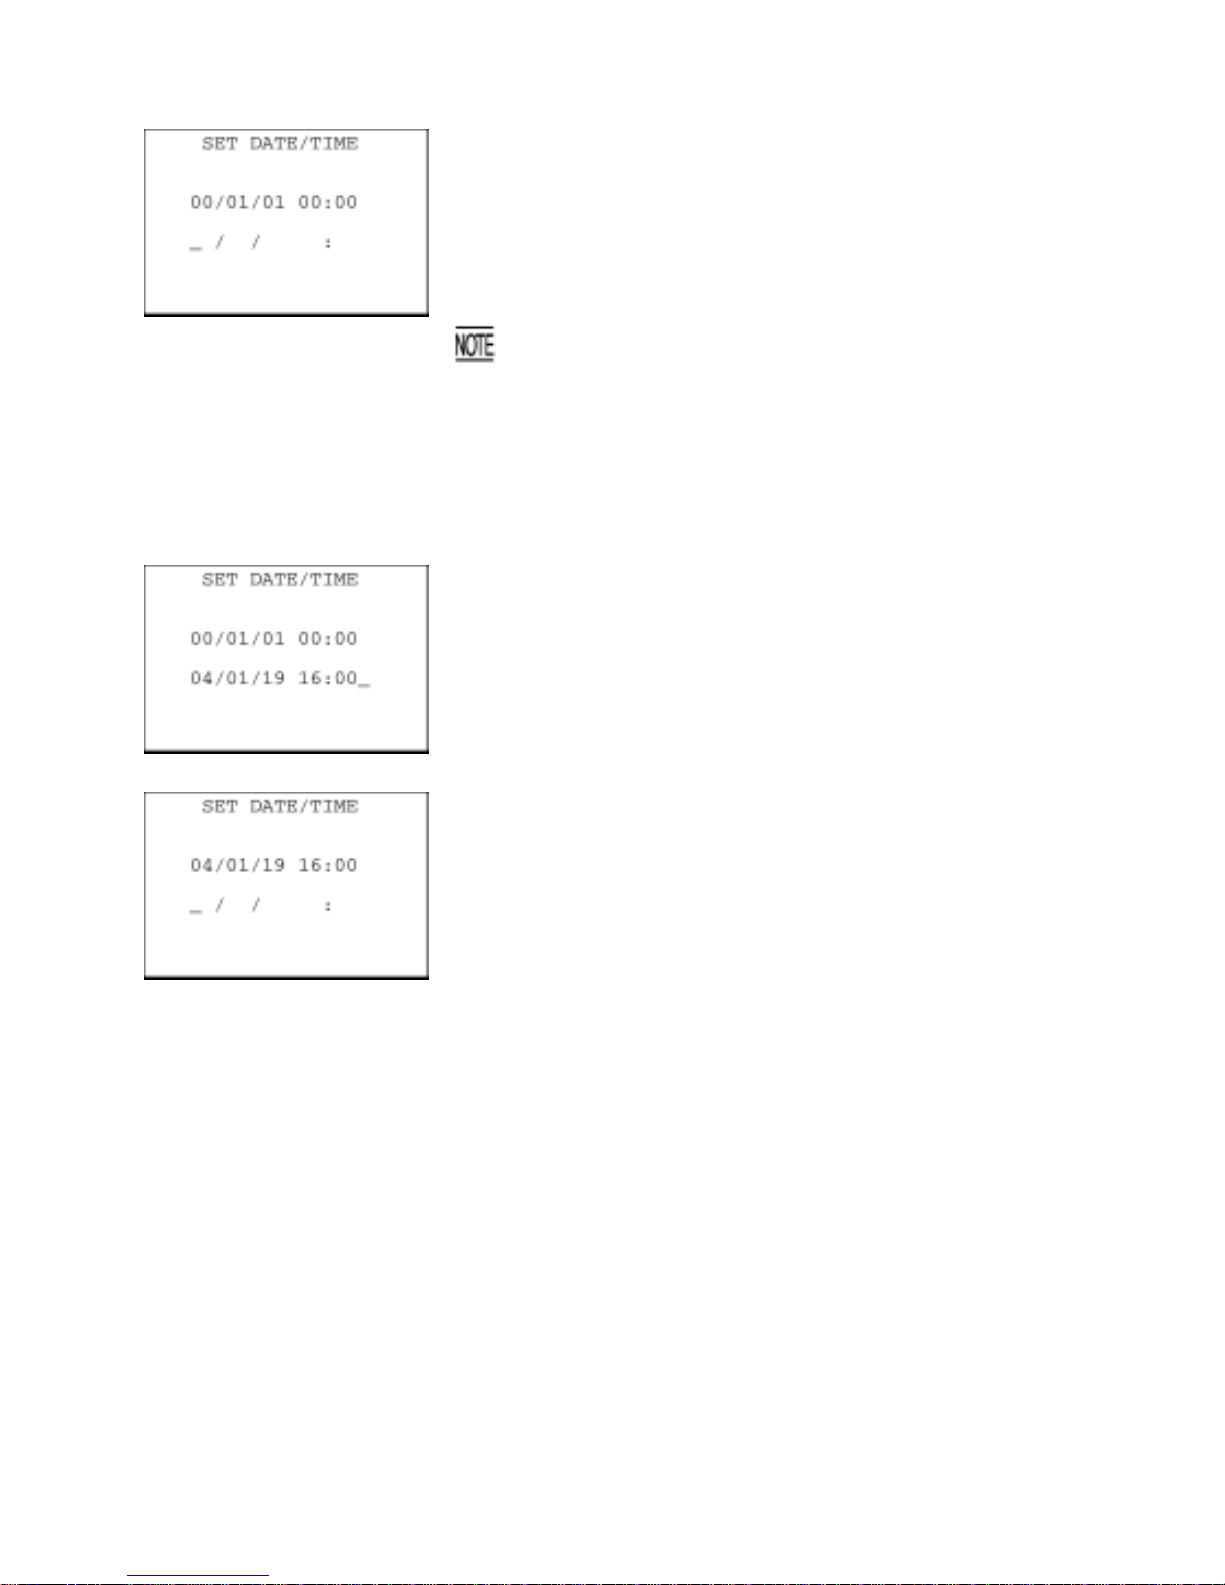
(3) On the SET SYSTEM screen, press the 3 key to select the
"DATE/TIME" and then press the ENT key. The screen shown at
left will appear.
(4) Use the numerical keys to enter the year (only the last two digits),
month, day, hour, and minute in this order. If the data is in a single
digit, add a 0 (zero) preceding the data.
For the year, be sure to enter the last two digits of the year. For the
hour, enter it in the 24-hour format.
If any of the year, month, day, hour, and m inute is not ent ered, the
ENT key will be deactivated.
If you make a wrong entry, press the BS key to delete it and then
enter the correct data.
[Example] To set 2004, January 19, at 4:00 p.m.
Press 0 , 4 , 0 , 1 , 1 , 9 , 1 , 6 , 0 , and 0.
(5) Press the ENT key to register the above setting.
(6) Press the C key to return to the SET SYSTEM screen.
21
Page 36
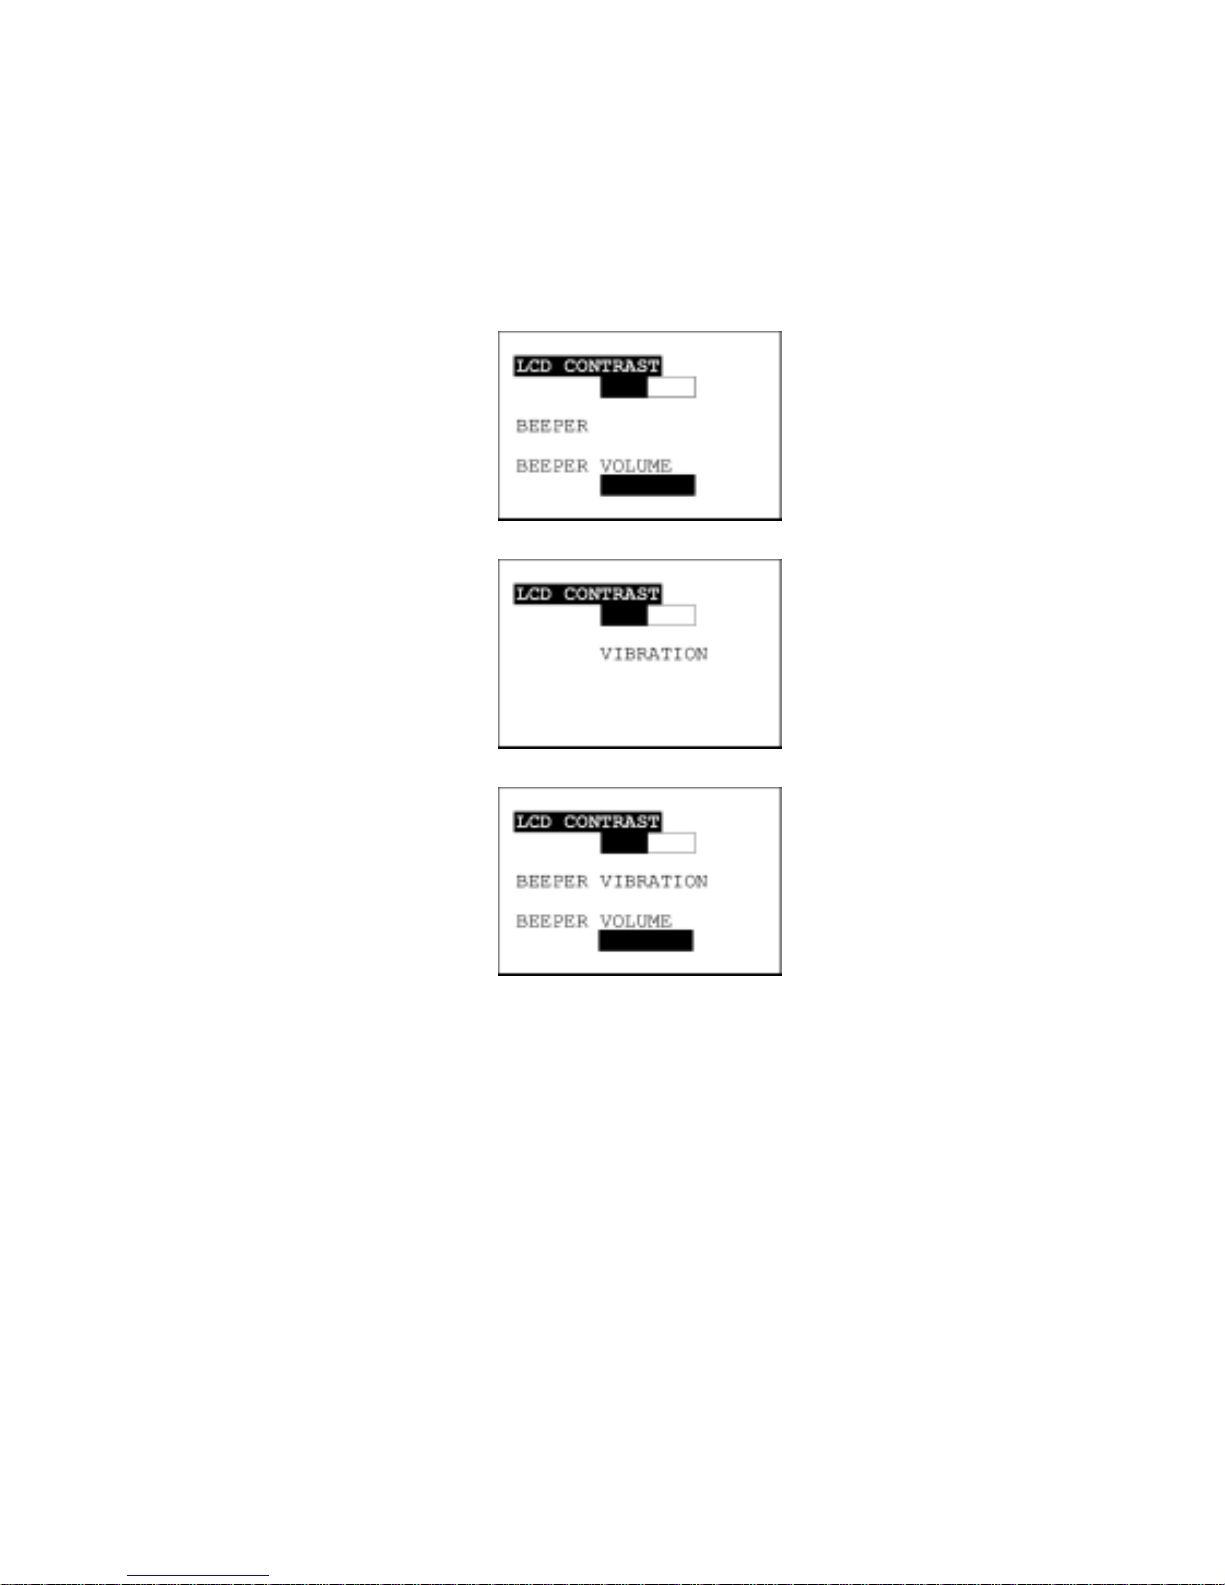
2.3.3 Adjusting the LCD Contrast & Beeper Volume and
Switching the Beeper & Vibrator
While holding down the M1 or M4 key (right-hand trigger switch), press the PW key, and any of the
following screens will appear on the LCD. This screen will disappear if you press the ENT key or no keys
for five seconds.
When the beeper is selected
(default)
When the vibrator is selected
When both the beeper and
vibrator are selected
(The current selection is highlighted.)
22
Page 37
Chapter 2 Getting Started the BHT and System Mode
Adjusting the LCD contrast
You can adjust the LCD brightness to eight contrast levels.
(1) Use the F5 and F6 keys to select the LCD CONTRAST line.
(2) To decrease the contrast, press the F7 key; to increase it, press the F8 key.
Switching the beeper & vibrator
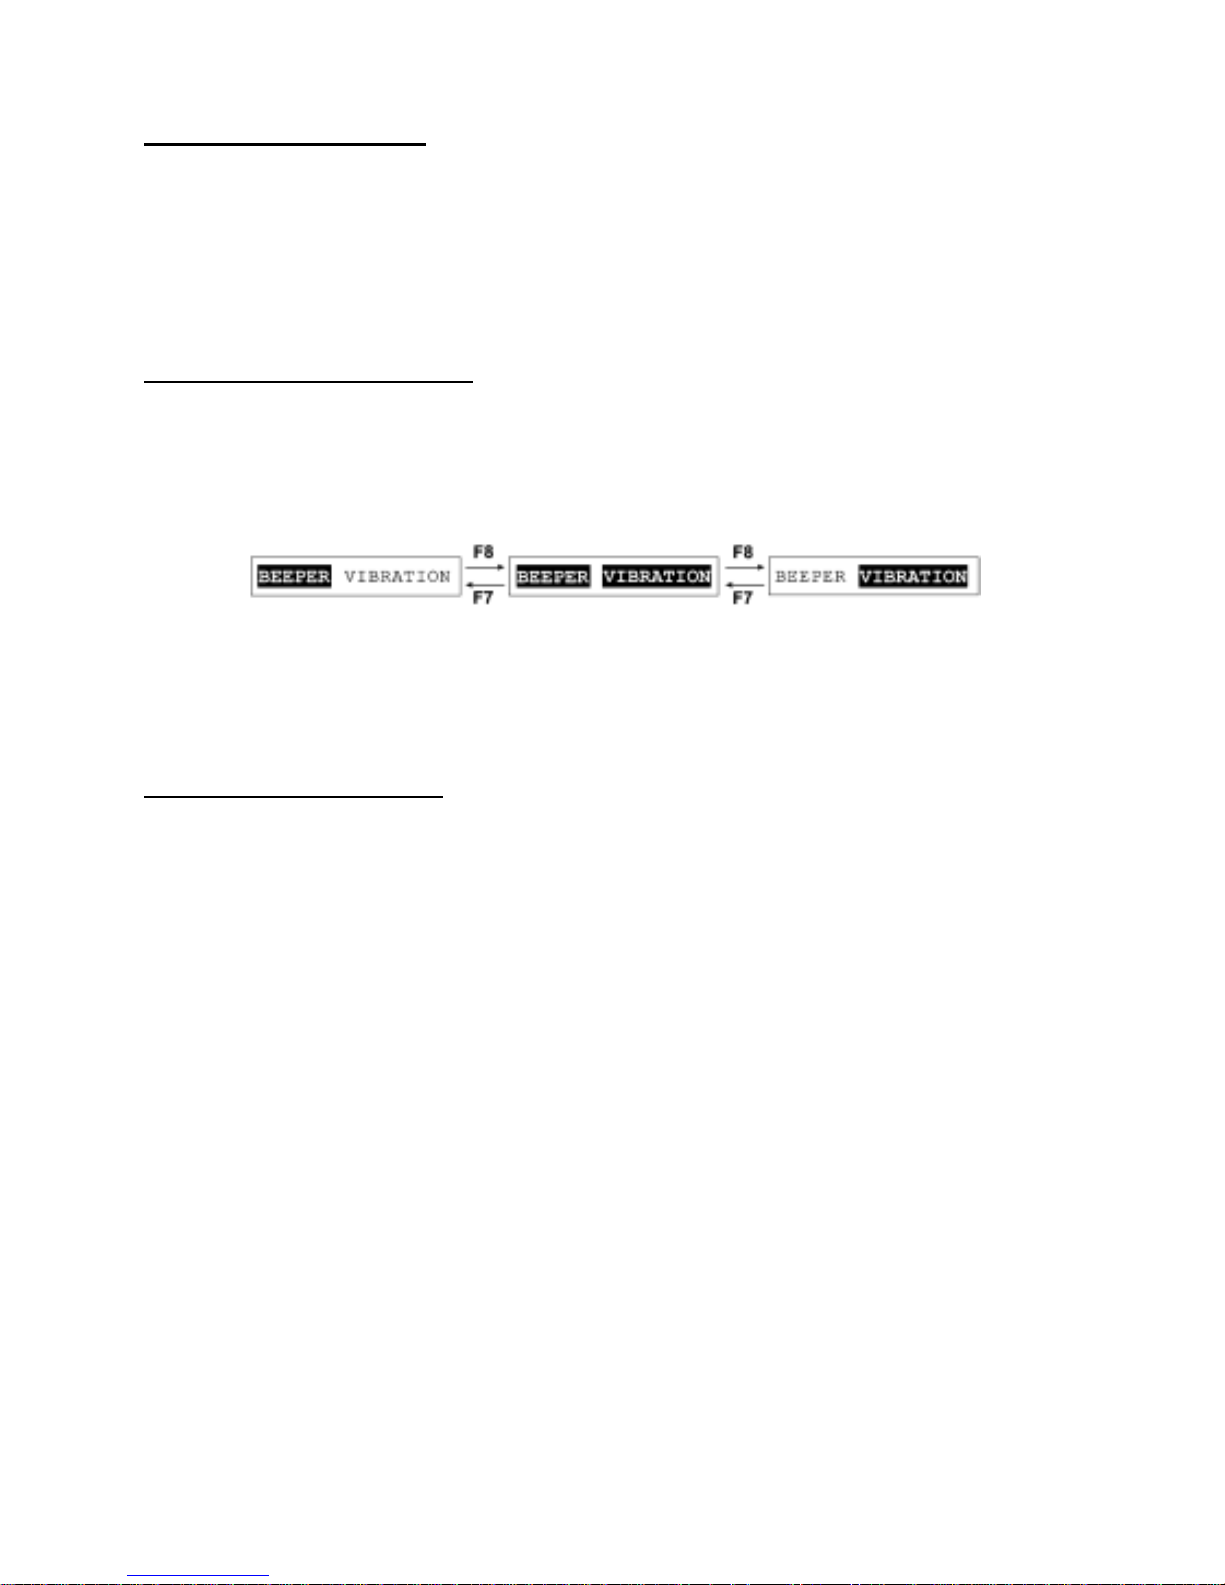
You can choose any of three ways—beeping only, vibrating only, or beeping & vibrating as a confirmation of
completion of bar-code reading.
(1) Use the F5 and F6 keys to select the BEEPER VIBRATION line that will be highlighted in any one of
the following three states:
(2) Highlight the desired way(s) by using the F7 and F8 keys.
Adjusting the beeper volume
You can adjust the beeper volume to four levels--High, Medium, Low, and OFF.
(1) Use the F5 and F6 keys to select the BEEPER VOLUME line.
(2) To turn down the volume, press the F7 key; to turn it up, press the F8 key.
After making the above setting, press the ENT key or no key for five seconds. The new setting will be
fixed and the above screen will disappear.
23
Page 38
2.3.4 Displaying the Battery Voltage Level and System Status
[ 1 ] Displaying the Battery Voltage Level
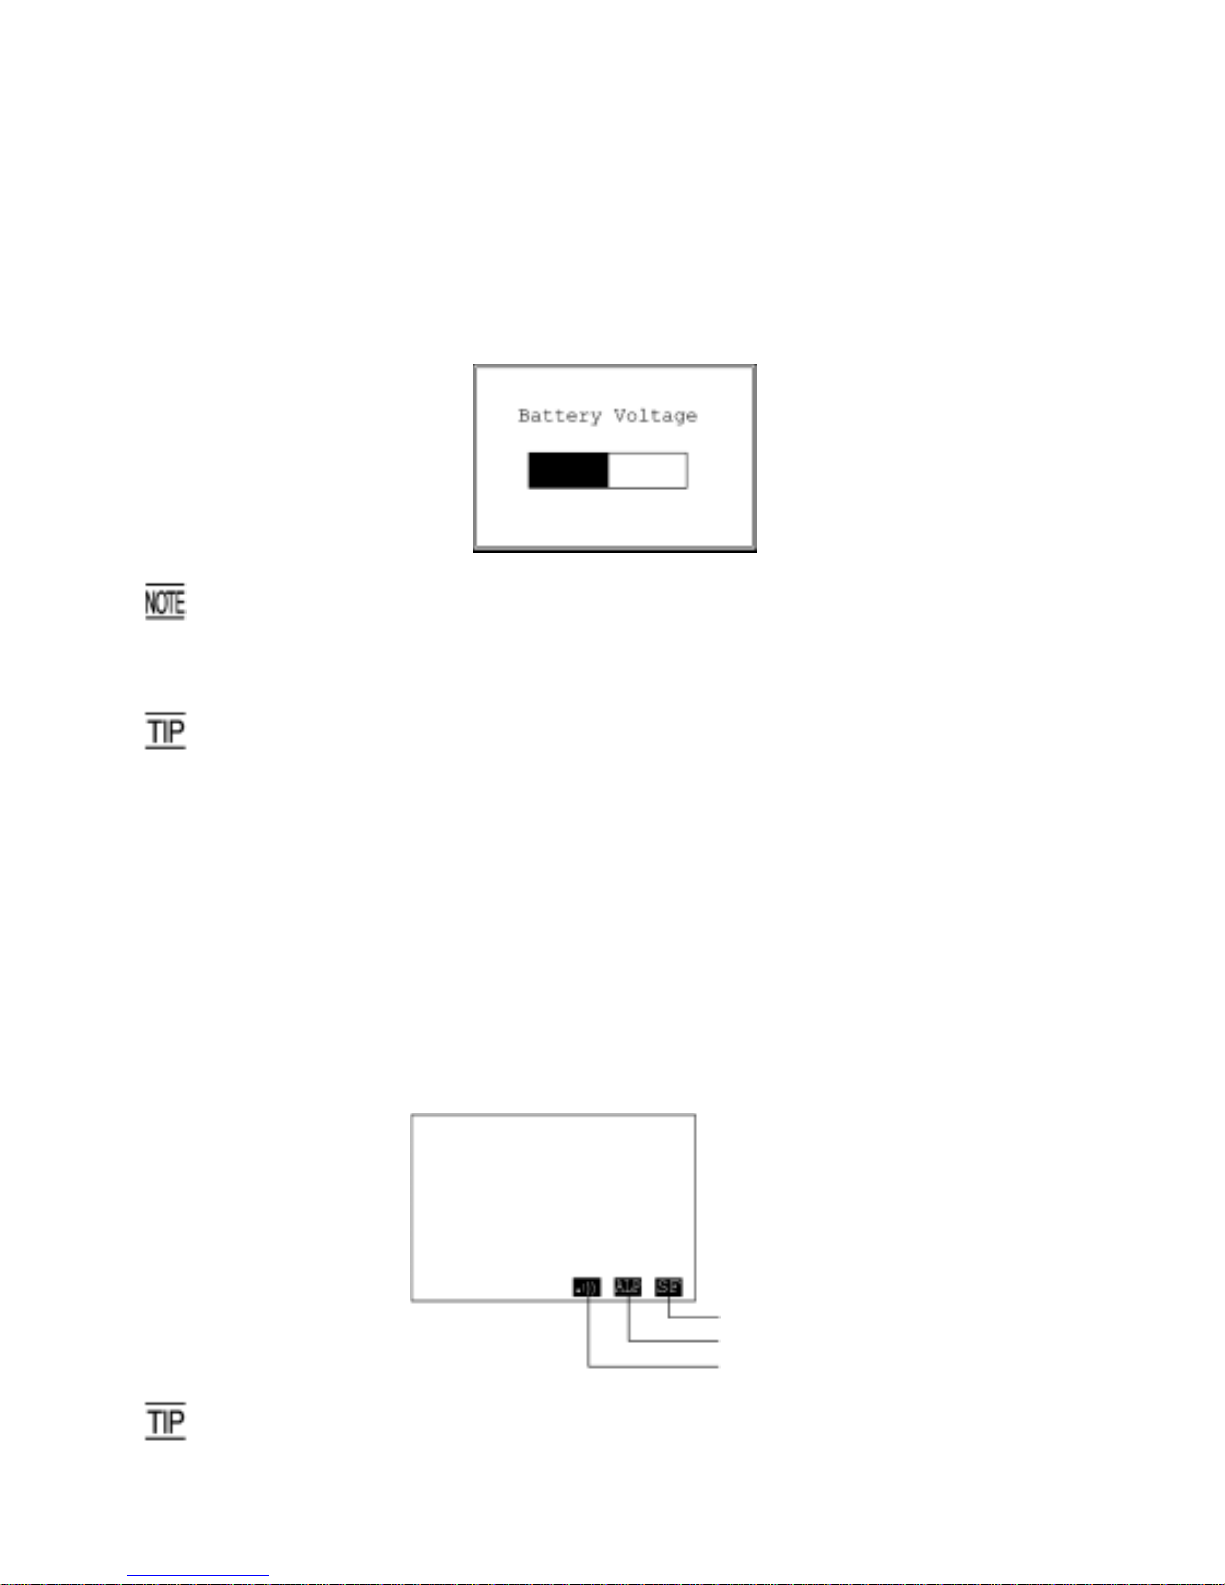
On the SYSTEM MENU or during execution of user programs, pressing the ENT key while holding down
the SF key will display the battery voltage level.
As long as you hold down those keys, the following screen is displayed.
• If the BHT is placed in the alphanumeric entry system in user programs, the combination of the SF
and ENT keys cannot be used for displaying the battery voltage level. This is because in the
alphanumeric entry system the SFkey is used for switching between the numeric and alphabet entry
modes as described in [ 2 ] below.
• In user programs, you may select the key to be used for di splaying the bat tery voltage le vel (instea d
of the default: combination of SF and ENT keys).
• The displayed battery level shows the terminal voltage of the battery, not how much power is left.
The actual voltage level varies depending upon the operation of the BHT, so the displayed level also
may vary.
[ 2 ] Displaying the System Status
The BHT can display the system status--shift state of the keys, alphabet entry mode and
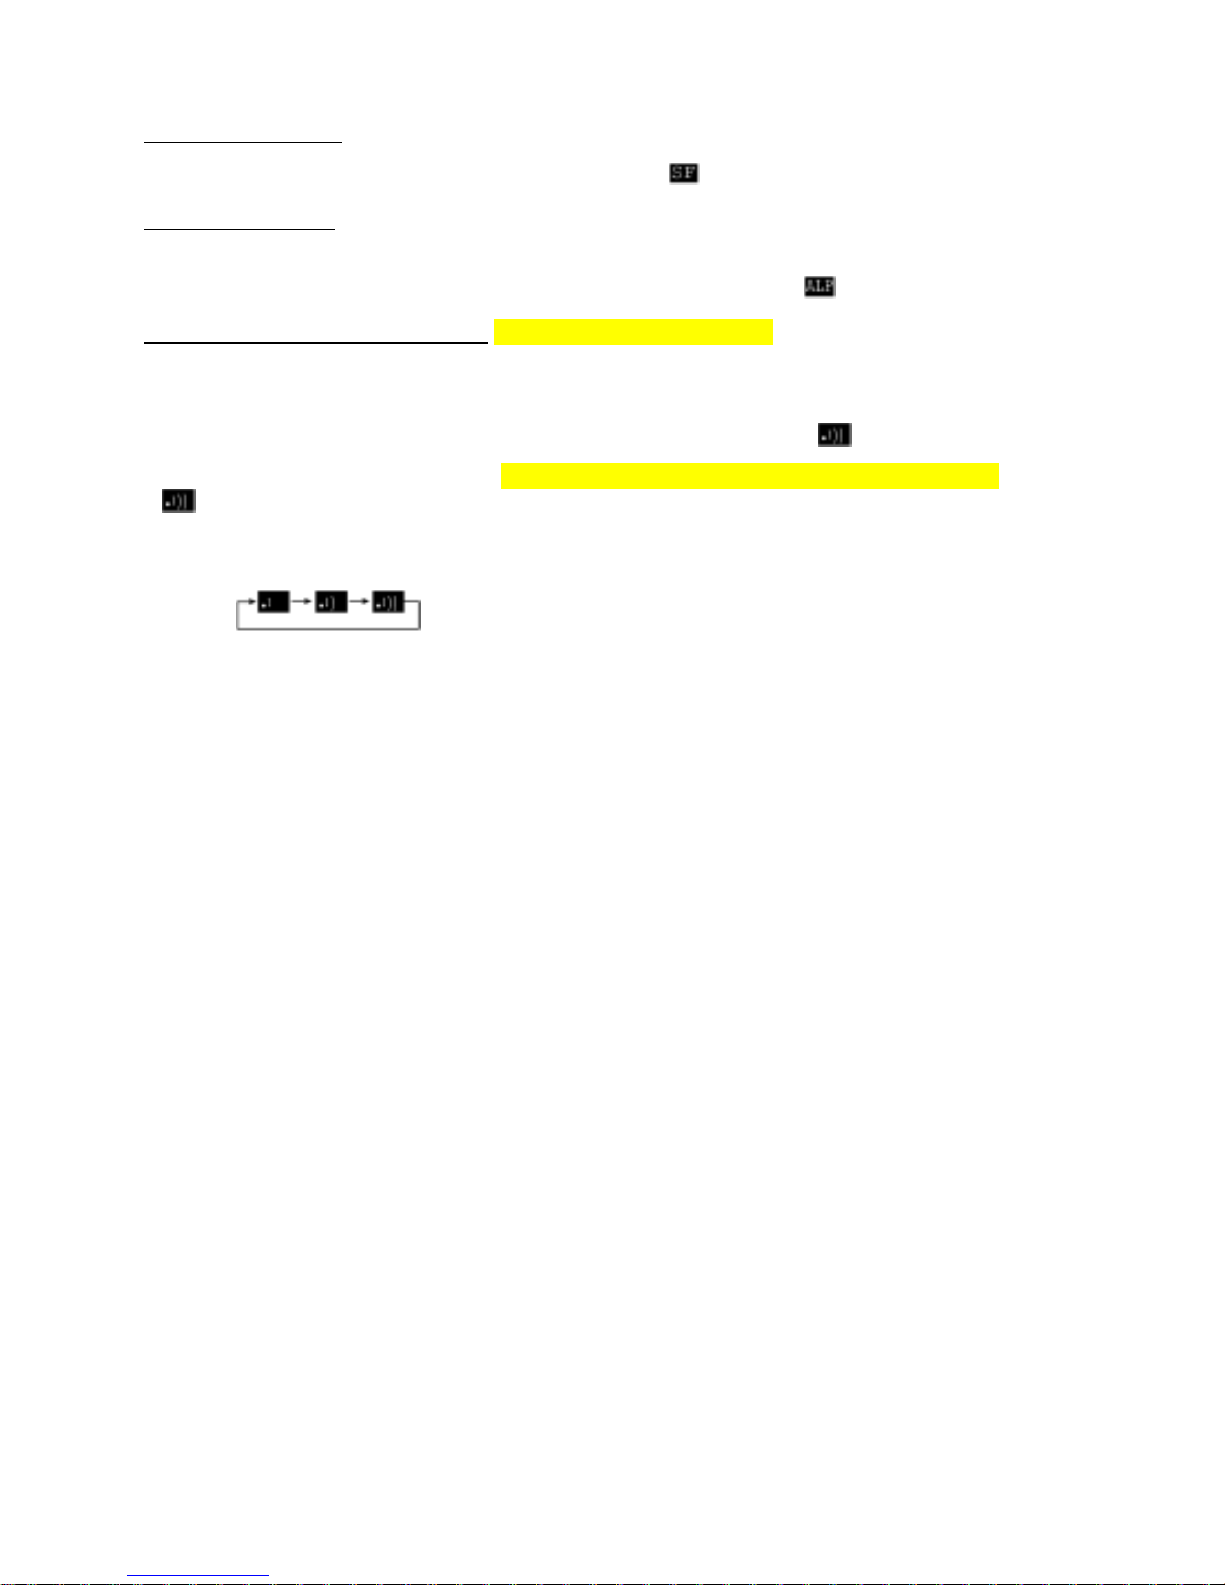
communications link with the CU-311 on the bottom line of the LCD, using the icons shown below. For
those icons, refer to the next page.
Shift state of the keys
A
lphabet entry mode
Communications link with the CU-311
You may select whether or not to display the system status in SYSTEM MENU (refer to Section
2.5.3, [4.2]) or in user programs. The default is to display the system status.
24
Page 39
Chapter 2 Getting Started the BHT and System Mode
Shift state of the keys
Pressing the SF key will shift the keys and show the icon
in the right bottom corner of the LCD.
Alphabet entry mode
If the alphanumeric entry system has been selected in user programs, pressing the SF key will switch
from the numeric entry mode to alphabet entry mode and show the icon
.
Communications link with the CU-311 (in LAN-support software only)
- When the communications device is closed or the communications link has not been established with
the CU-311, no communications link icon appears.
- When the communications link is established with the CU-311, the icon
appears.
- When the BHT tries to communicate with the CU-311 that has not been linked with the BHT, the icon
flashes.
- When the BHT receives no response from the CU-311 or when it is waiting for the link to be
established with or released from the CU-311, the three icons appear cyclically as shown below.
25
Page 40
2.3.5 Battery Replacement Notes
When is battery replacement needed?
If the "Charge the battery!" appears on the LCD, replace the battery cartridge with a fully charged one.
If you leave the BHT without replacing the battery cartridge, the integrated calendar clock or data will no
longer be backed up so that the calendar clock will stop or the message "Contact your administrator.
Note the error number. (XXXX)" will appear on the LCD.
Be sure to turn the BHT off before replacing the battery cartridge.
Replace the battery cartridge quickly. Load a charged battery cartridge within 3 minutes after the
removal in order to avoid data loss.
After replacement, be sure to turn the BHT on and check its operation.
If you will use the BHT more than one time per month:
Keep the battery cartridge loaded in the BHT.
If you will not be using the BHT for more than one month:
Remove the battery cartridge from the BHT and then store the BHT. When doing so, be sure to follow
the procedure given below.
(1) When removing the battery cartridge:
Hold down the PW key for more than 3 seconds to turn the BHT off.
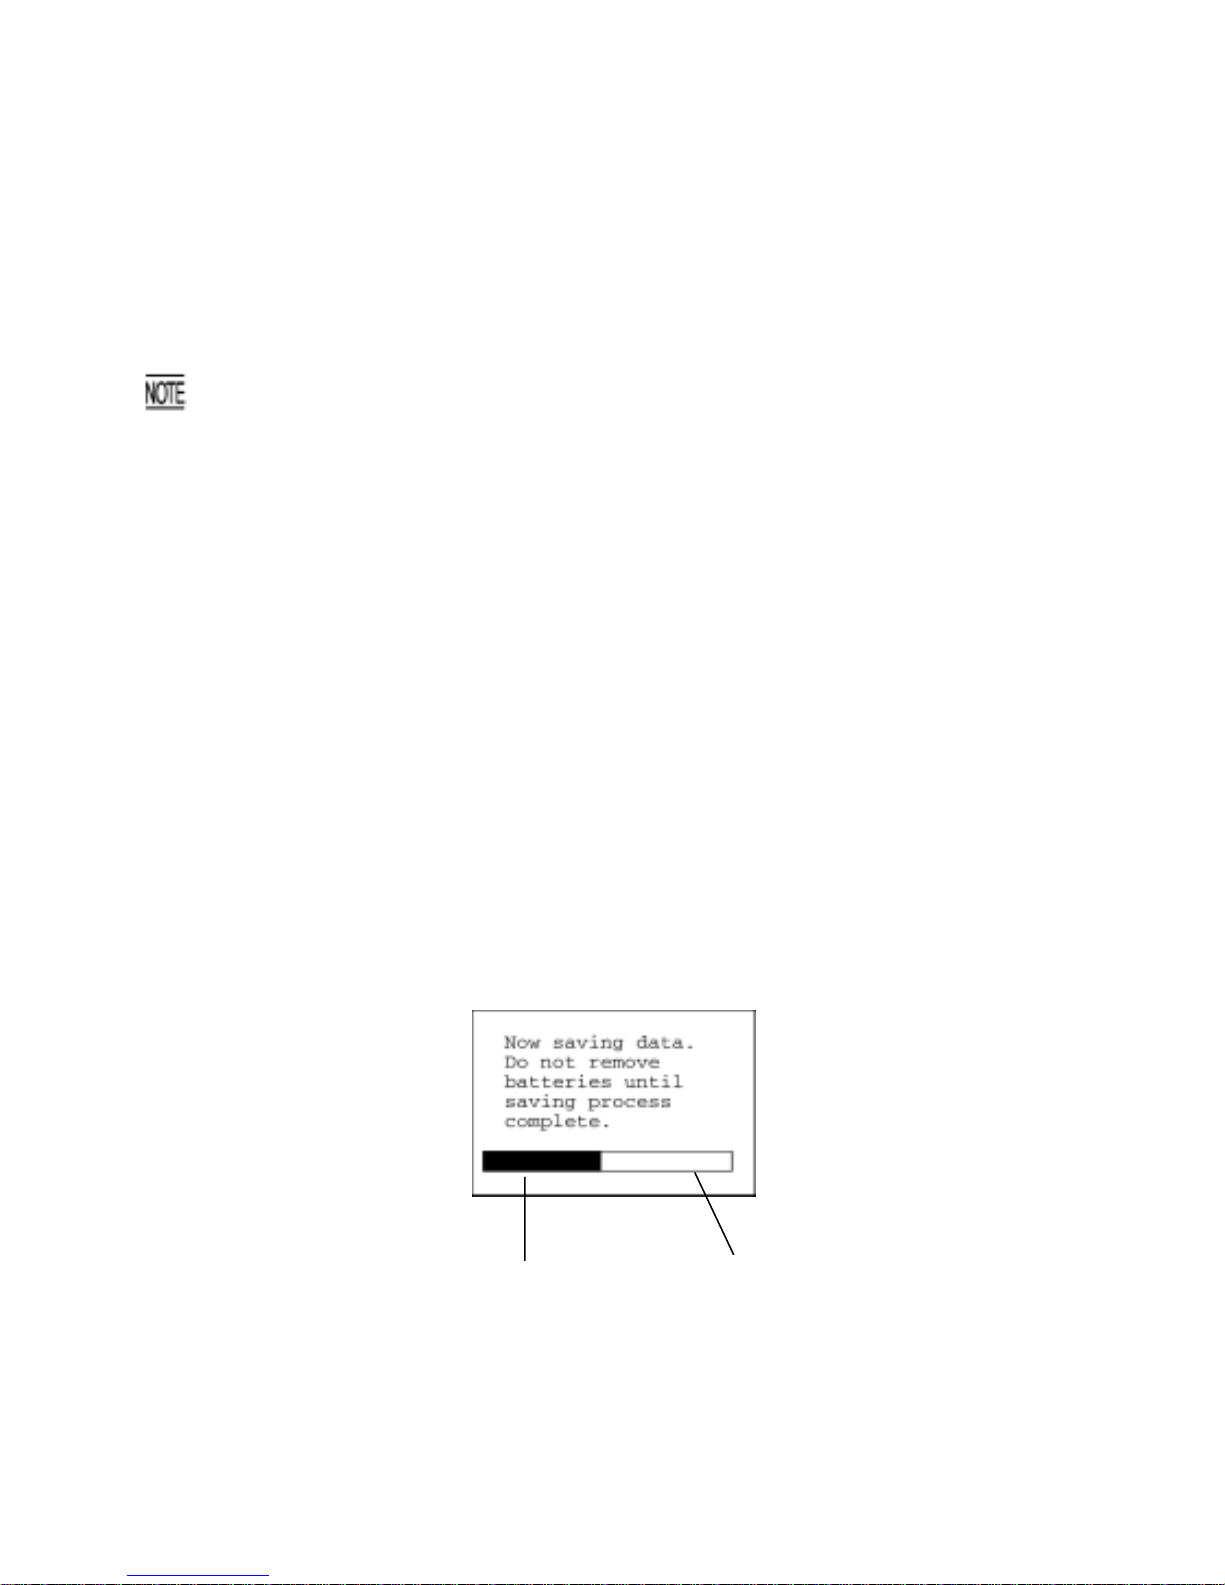
The following message will appear on the LCD and the BHT will start backing up data. After
completion of the backup operation so that the message disappears, remove the battery cartridge.
(The backup operation may take several tens of seconds depending upon the volume of data to be
backed up.)
Shows the total volume of data
to be backed up.
Shows the current backup state
in progress.
26
Page 41
Chapter 2 Getting Started the BHT and System Mode
(2) When turning the BHT on after storage without a battery cartridge loaded:
Even after the removal of the battery cartridge, the calendar clock will work with the backup power
source for a while.
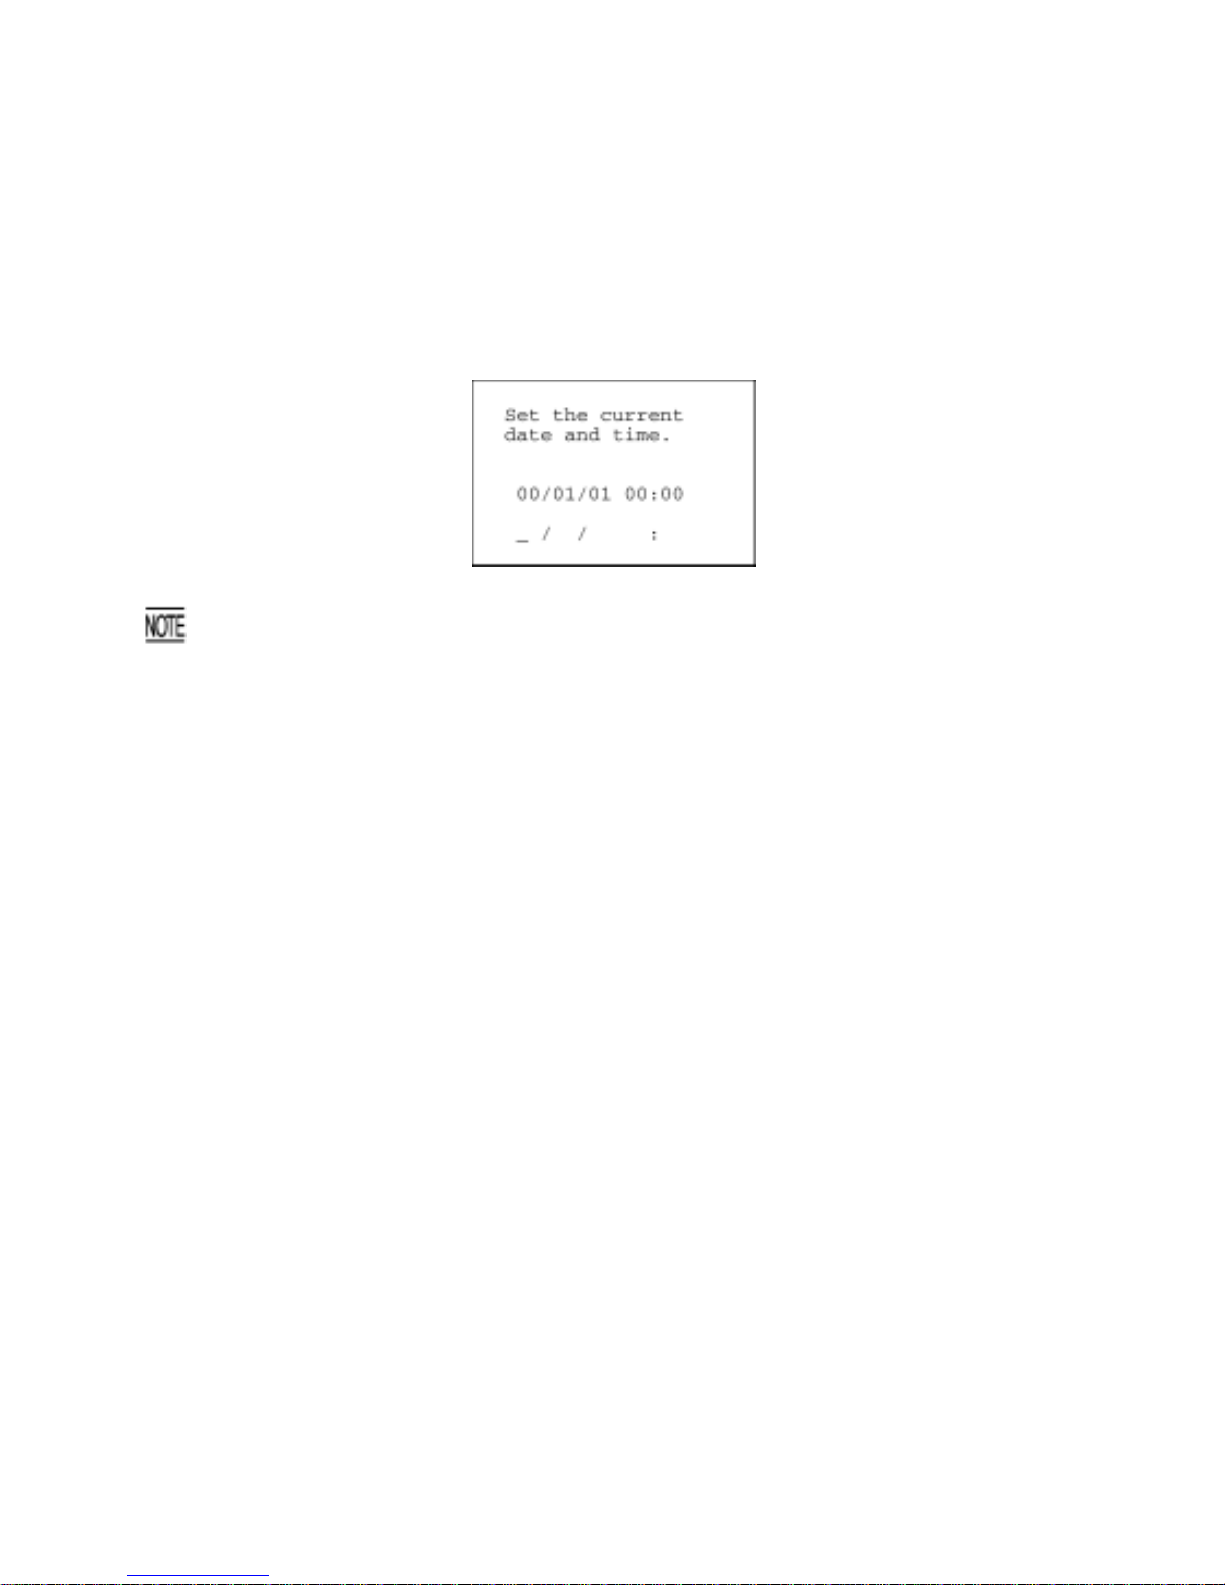
If the calendar clock backup has stopped, loading the battery cartridge and turning the BHT on will
display the following message, prompting you to set the current date and time.
Set the calendar clock according to the procedure given in Section 2.3.2.
(The indication "00/01/01 00:00" will vary depending upon the calendar clock state.)
• The rechargeable battery cartridge can be recharged hundreds of times, but it will eventually wear
out. If the operation time of the fully recharged battery cartridge is noticeably shorter than normal,
replace the battery cartridge with a new one.
• Use only DENSO WAVE-authorized battery cartridges and chargers.
• Never dispose of battery cartridges into a fire.
• Battery cartridges should be recycled properly in conformity with local codes and regulations. Do
not throw them in a trash. Cover their terminal pins with vinyl tape to prevent short-circuits.
27
Page 42
2.3.6 BHT Turning-off Notes
[ 1 ] "Shutdown in progress" message
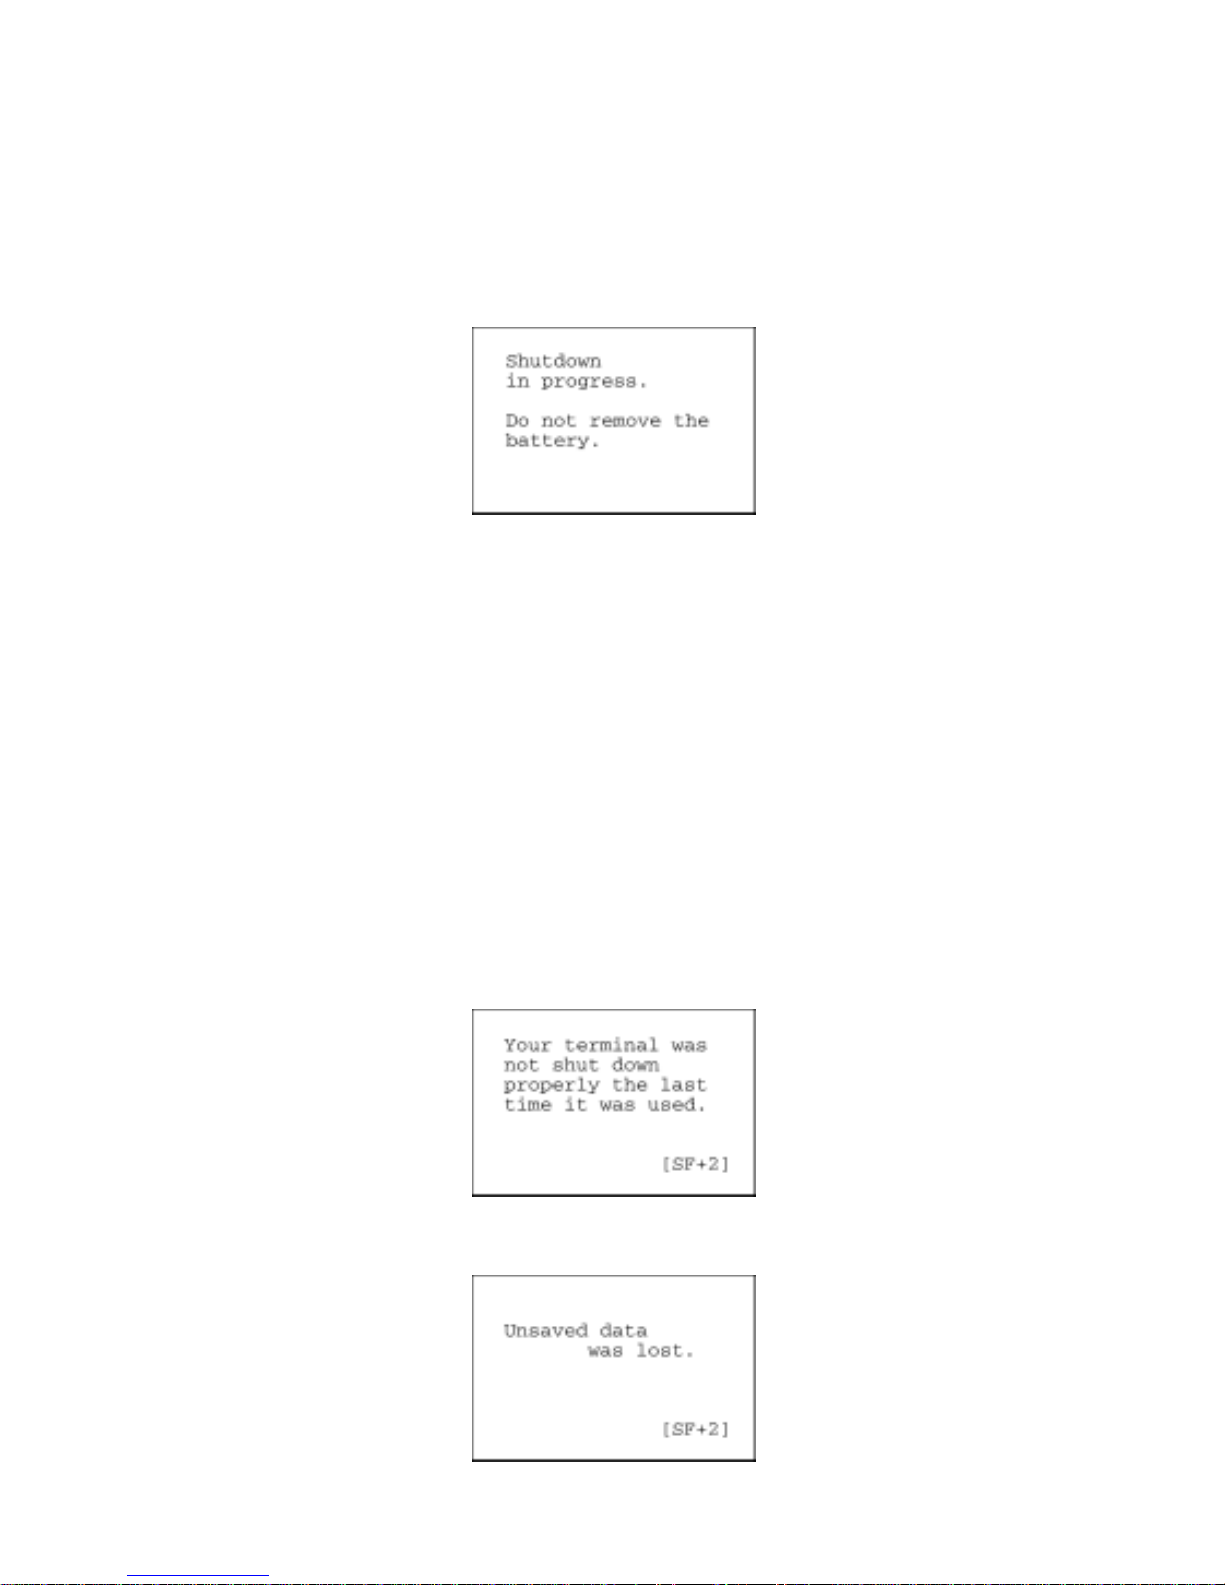
When the BHT is turned off by pressing the PW key or by the auto power-off feature, it displays the
following message and starts preparation for shutdown.
When the above message is displayed, do not remove the battery cartridge.
If you do so and leave the BHT without a battery cartridge loaded for one hour or more, then the error
message "Contact your administrator. Note the error number. (20XX)" may appear when turning the
BHT on at the next time.
[ 2 ] If the BHT is shut down abnormally
If the BHT is shut down abnormally* and is left without a battery cartridge or with a discharged battery
cartridge loaded, then unsaved data may be lost.
(*"Normally shut down" refers to "turned off with the PW key or by the auto power-off feature.")
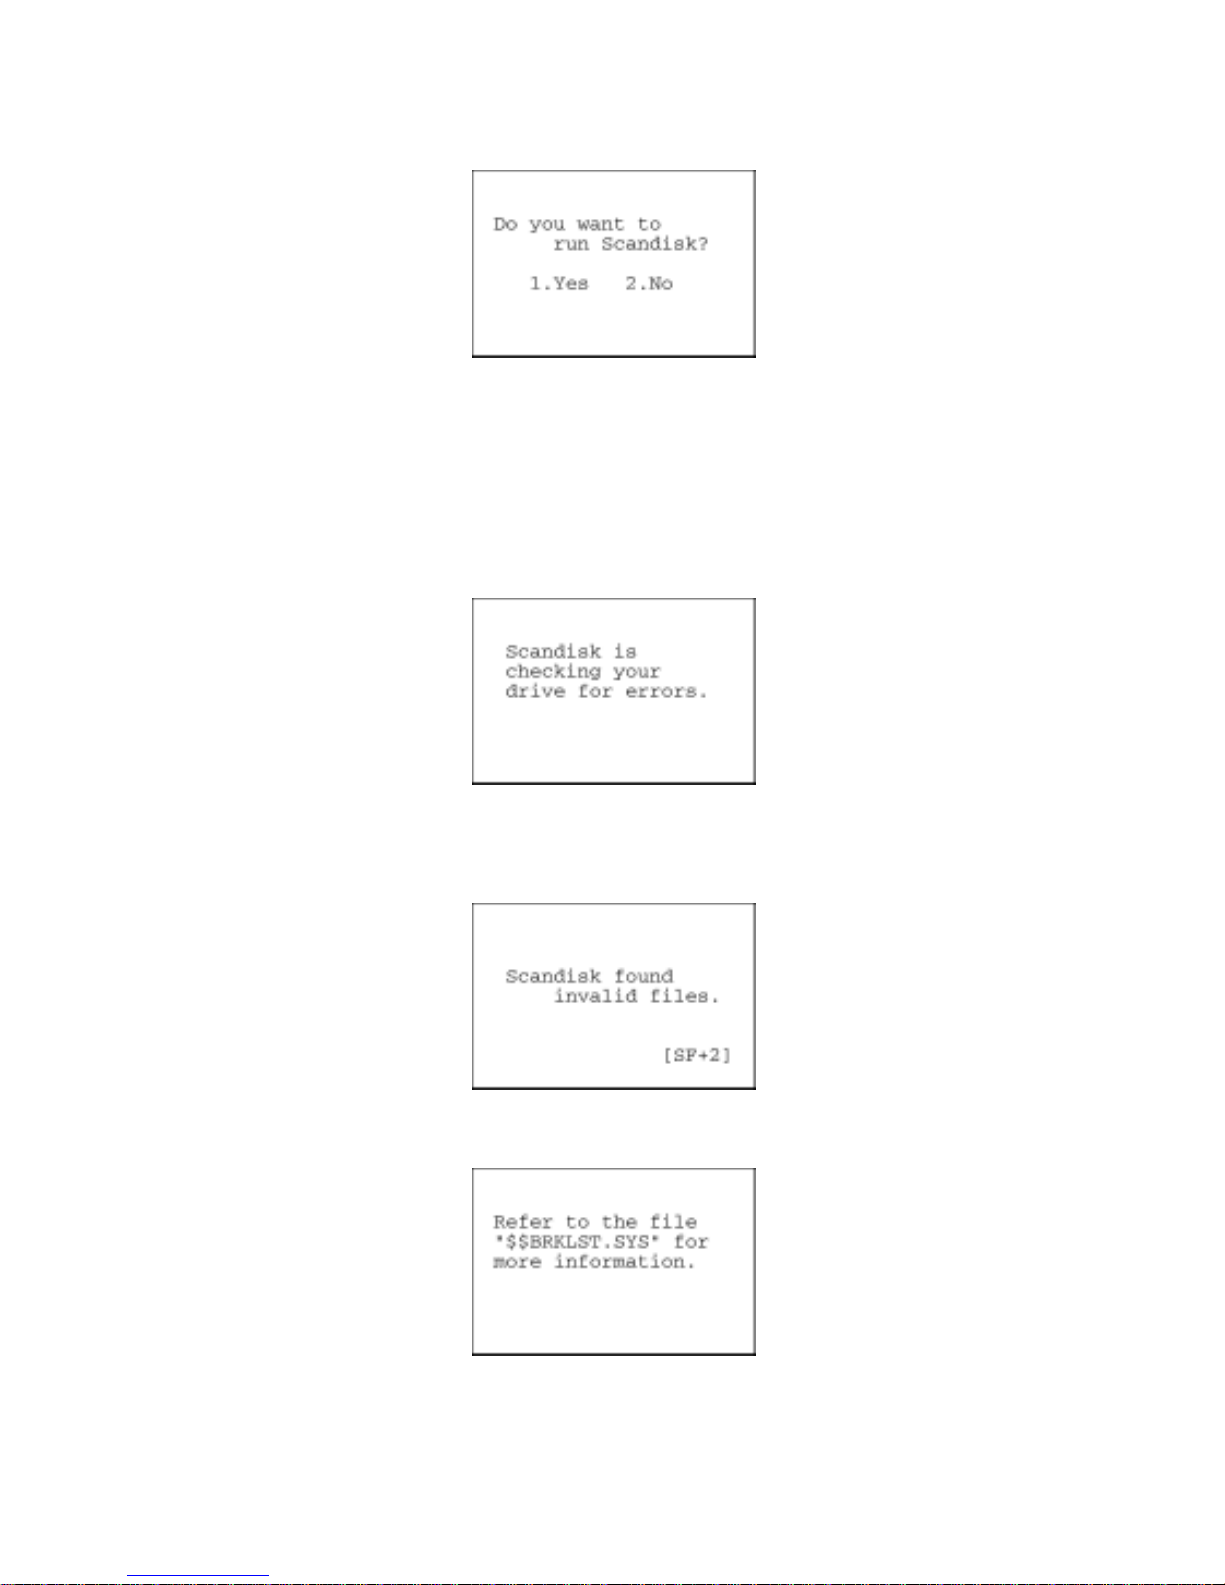
If the above problem has arisen, the following message will appear when you load a charged battery
cartridge and turn the BHT on.
(1) Press the 2 key while holding down the SF key. The screen will switch to the following:
28
Page 43
Chapter 2 Getting Started the BHT and System Mode
(2) Press the 2 key while holding down the SF key again. The screen will switch to the following:
[1] YES: Run Scandisk and start the System.
[2] NO: Turn the BHT off.
(3) Choose YES or NO with the numerical keys and press the ENT key.
When Scandisk is in progress, the following message is displayed:
If Scandisk finds an invalid file(s), the following screen will appear. As long as an invalid file exits, the
screen displays every time the BHT System is started up.
(4) Press the 2 key while holding down the SF key. The screen will switch to the following:
(5) Press the ENT key to start up the BHT System.
29
Page 44
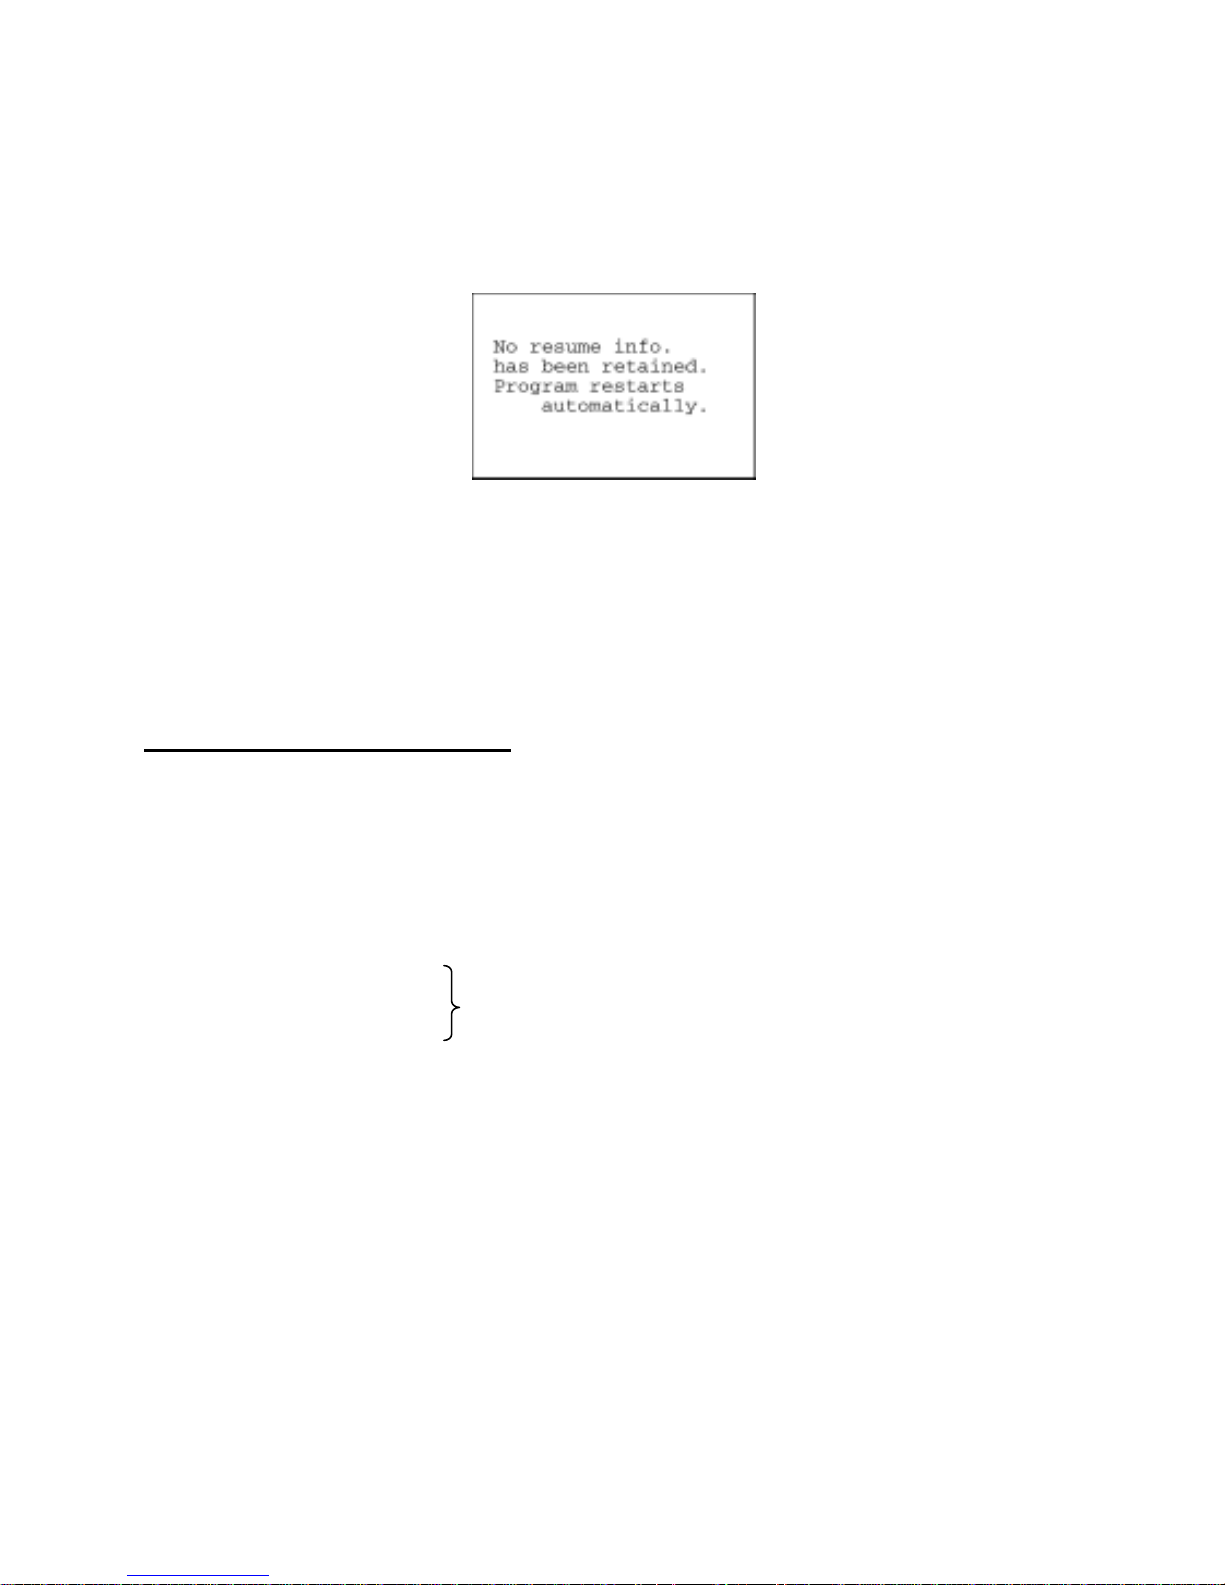
Scandisk when the resume function is enabled
If Scandisk runs when the resume function is enabled, the screen given below may appear. The screen
may also appear when the calendar clock built in the BHT stops, even without running Scandisk.
The BHT displays the screen for three seconds and then automatically runs the execution program from
the beginning.
[ 3 ] About "$$BRKLST.SYS"
If Scandisk finds an invalid file(s), it will automatically create the "$$BRKLST. SYS" file. To check the
contents of the file, upload the file in System Mode to the host PC. (Refer to Section 2.5.3, "[ 3 ]
Uploading.")
Contents of the "$$BRKLST.SYS" file
Records (1) File name
(2) Error factor + (Broken since the BHT has not been turned off normally)
* (Broken due to any other causes)
(3) Broken records e.g. 01000-01200 (Data in records numbered 1000 to 1200 is lost)
(Example)
SAMPLE1.DAT + 01000-01050
SAMPLE1.DAT + 01200-01250
SAMPLE1.DAT + 01600-01650
SAMPLE2.DAT * 00250-00275
SAMPLE3.DAT * 00100-00150
↑ ↑ ↑
(1) (2) (3)
If more than one sequence of records is broken in a same file, they
will be written into the subsequent records in the
"$$BRKLST.SYS."
30
Page 45

Chapter 2 Getting Started the BHT and System Mode
[ 4 ] If invalid files are found
Even invalid files can be uploaded, so upload them to the host PC according to your needs.
After uploading,
- Delete those invalid files. (Refer to Section 2.5.3, "[ 8 ] Deleting Files.")
or
- Download valid files having the same names as invalid ones. (Refer to Section 2.5.3, "[ 2 ]
Downloading.")
31
Page 46
2.4 Initializing the BHT System
Initializing the system will lose program files and data files stored in the user area and make system
settings revert to the factory defaults.
You can delete font files by selecting the whole user area to be initialized.
You need to initialize the system if:
(1) You want to delete all of the program files and data files.
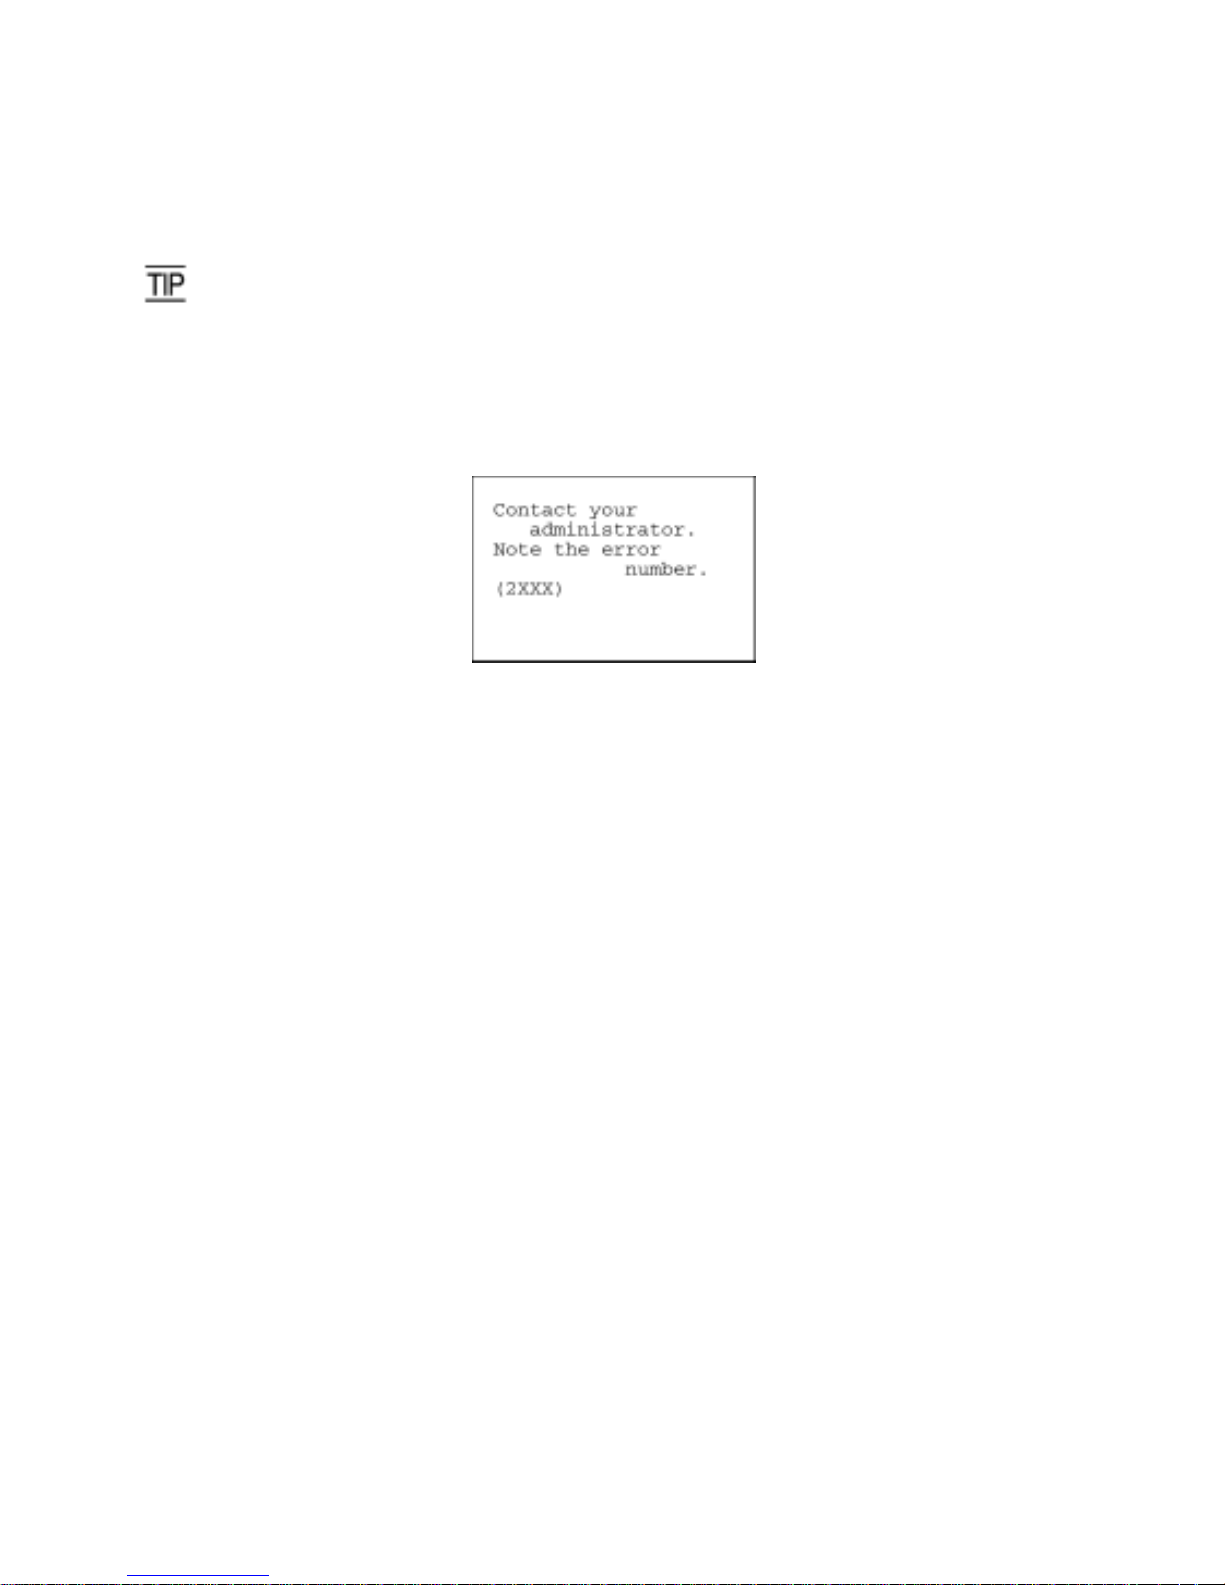
(2) The following message appears when the BHT is turned on.
On the following pages is an initialization procedure.
32
Page 47
Chapter 2 Getting Started the BHT and System Mode
(1) Selecting the memory area to be initialized
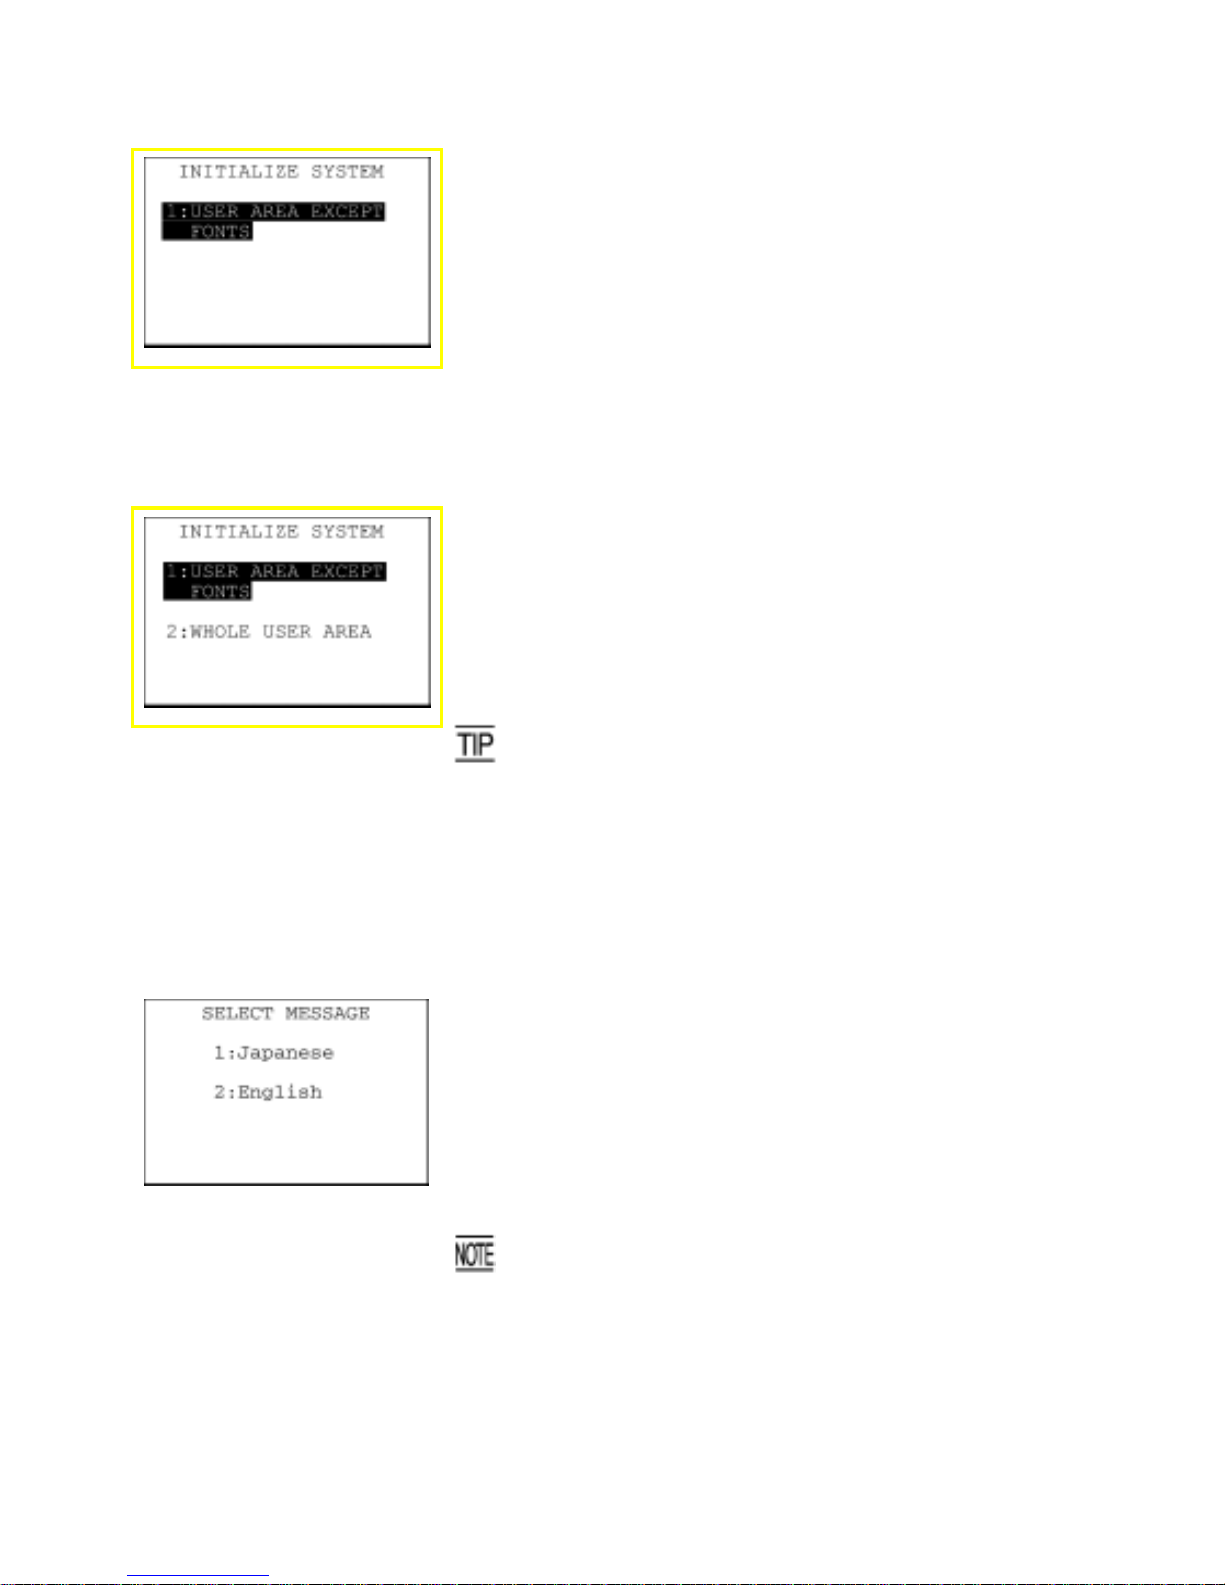
Press the PW key while holding down the SF, M1 and 0 keys
together.
The screen shown at left will appear.
To initialize the user area except for the font file area, press the ENT
key. The screen switches to the confirmation display given in step (3)
below.
To initialize the whole user area including the font file area, press the
2 key while holding down the SF key. The "2:WHOLE USER AREA"
item will appear.
(Area selection screen)
[1] USER AREA EXCEPT FONTS:
Initializes the user area except for the font file area.
[2] WHOLE USER AREA:
Initializes the whole user area including the font file
area.
If the message "Contact your administrator. Note the error
number. (2XXX)" appears on the LCD, you need to select "2:
WHOLE USER AREA" to initialize the whole user area.
Select an area to be initialized by using the numerical keys, then
press the ENT key. The screen switches to the SELECT MESSAGE
display given in step (2).
(2) Selecting the English or Japanese message version
Preceding the execution of initialization, the message version
selection screen will appear as shown at left.
[1] Japanese: Switches the message version to Japanese.
[2] English: Switches the message version to English.
Select a desired item by using the numerical keys, then press the
ENT key.
If there is no system message file in the BHT, selecting
"1:Japanese" cannot switch to the Japanese message version.
The English version applies instead.
33
Page 48
(3) Confirming the memory area selected for initialization
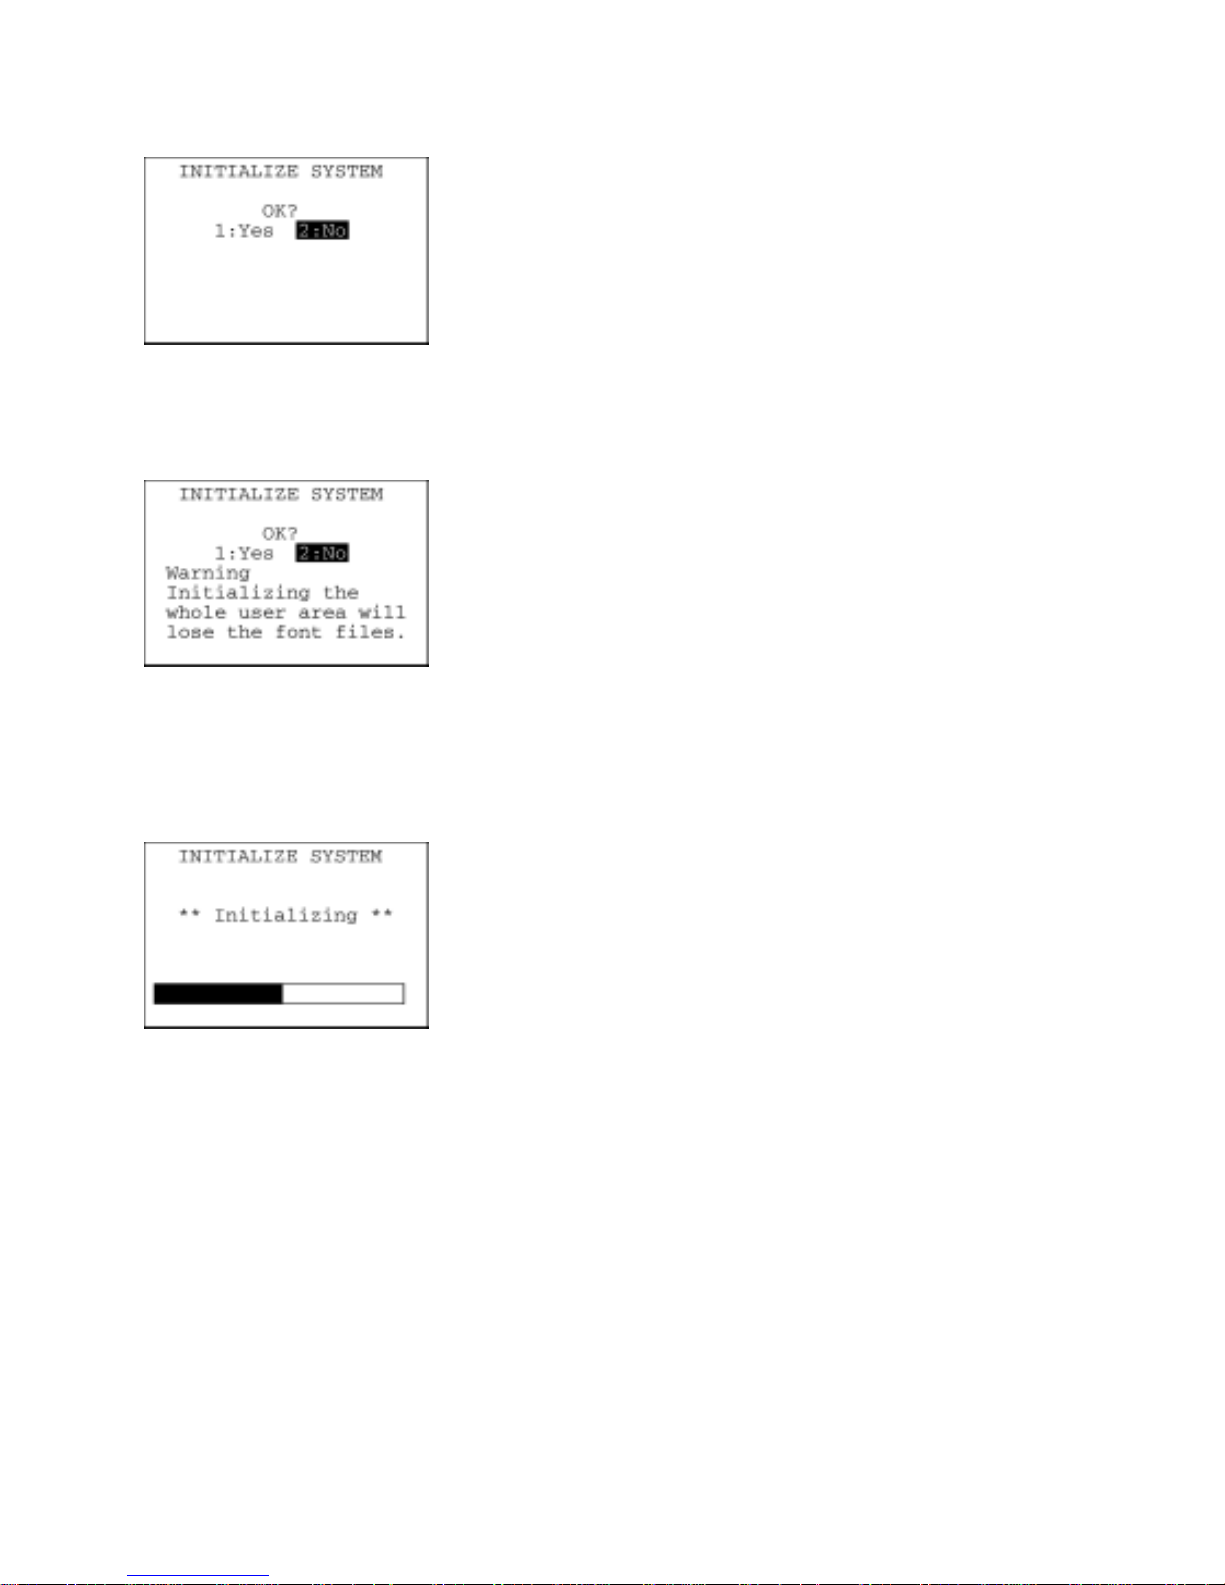
Selecting the "USER AREA EXCEPT FONTS" in step (1) above will
call up the confirmation screen shown at left.
[1] Yes: Starts initialization.
[2] No: Cancels initialization and turns the power off.
Select a desired item by using the numerical keys, then press the
ENT key.
Pressing the C key will switch the screen back to the area selection
screen.
Selecting the "WHOLE USER AREA" in step (1) above will call up the
screen shown at left.
[1] Yes : Starts initialization.
[2] No : Cancels initialization and turns the power off.
Select a desired item by using the numerical keys, then press the
ENT key.
Pressing the C key will switch the screen back to the area selection
screen.
(4) During initialization
During initialization, the screen shown at left is displayed.
34
Page 49

Chapter 2 Getting Started the BHT and System Mode
(5) Completion of initialization
Upon completion of the initialization, the BHT displays the screen
shown at left for a second and turns itself off automatically.
• Do not turn the BHT off until the above initialization completion screen appears. A too-early
turning-off will interrupt initialization, requiring you to initialize the BHT again.
• If the message "Contact your administrator. Note the error number. (2XXX)" appears although the
initialization has been finished, you need to initialize the BHT again.
• If you initialize the BHT after downloading user programs and data, all of those programs and data
stored in the target memory area will be lost. Download them again if necessary.
• Initialization will restore the LCD contrast level (refer to Section 2.3.3), communications
conditions and other settings to the default values, so modify them again if necessary. Afte
r
initialization, be sure to set the calendar clock (refer to Section 2.3.2).
35
Page 50
2.5 Operating in System Mode
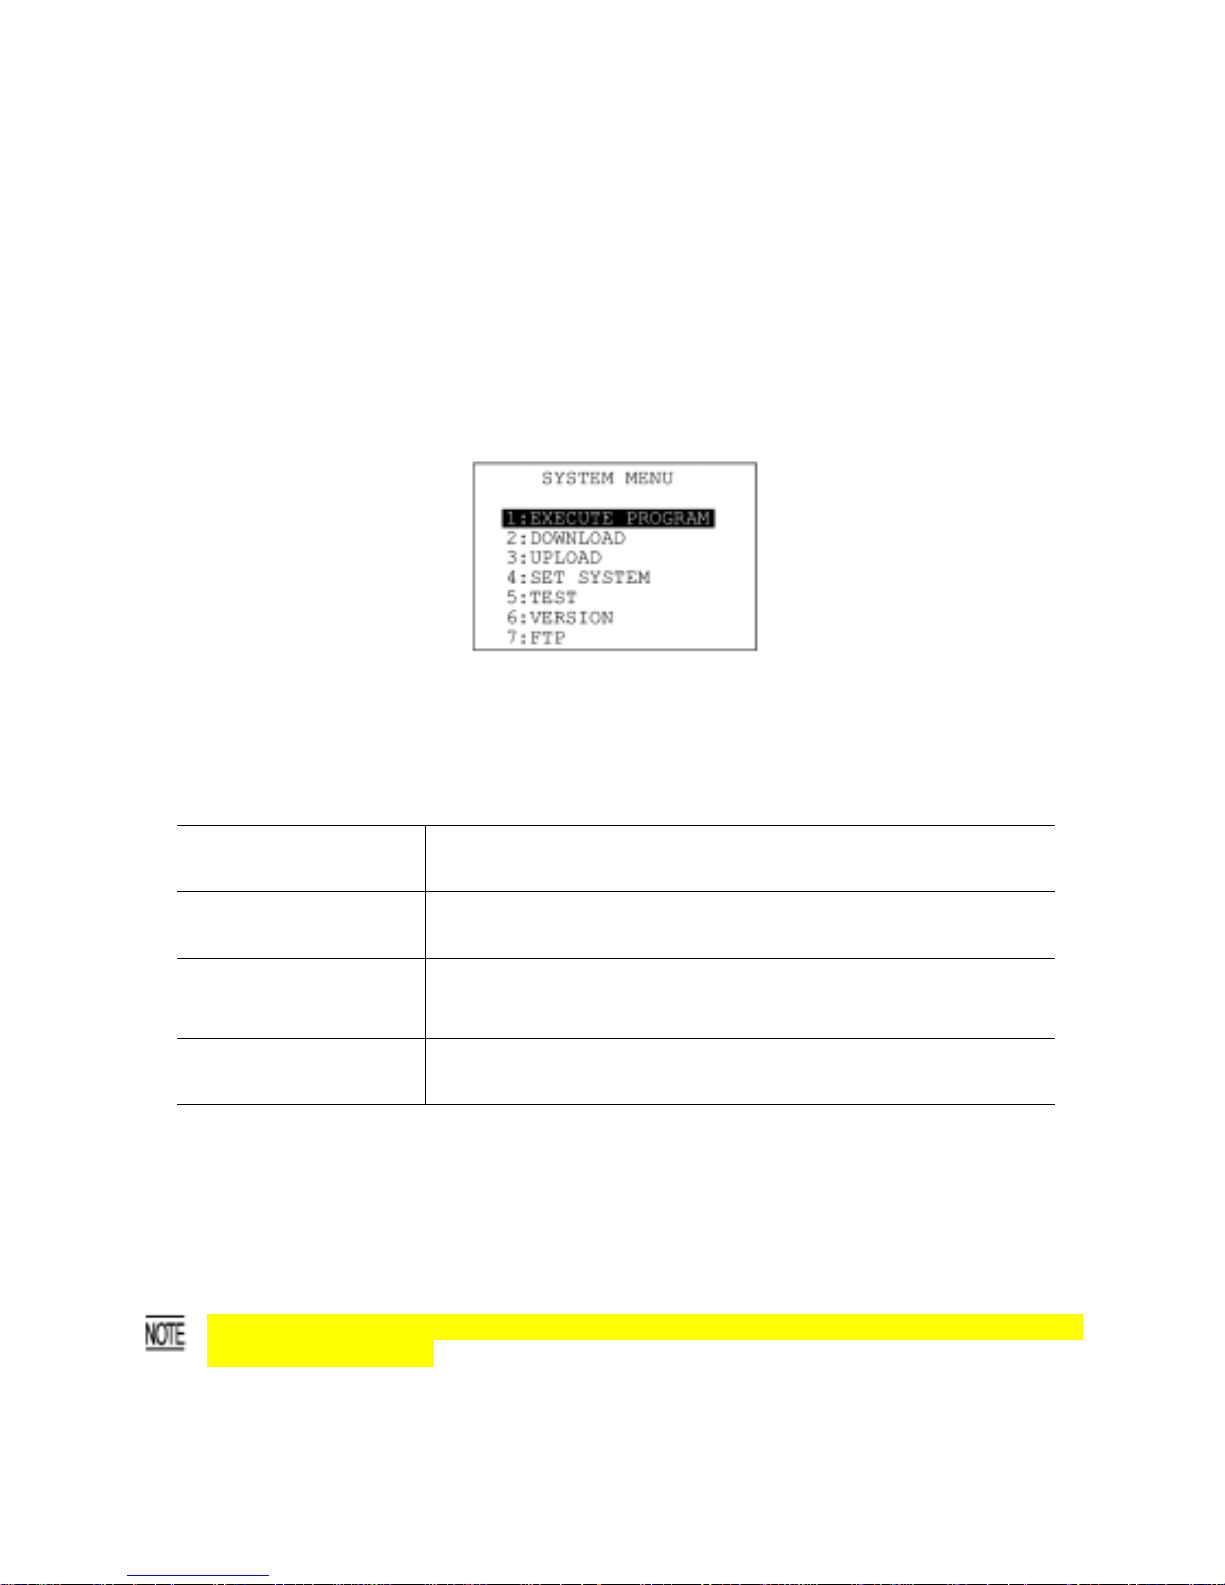
System Mode is an operating software exclusively designed for the effective use of the BHT, which
includes various functions as shown on the following pages.
2.5.1 Starting System Mode
To start up System Mode, turn the BHT on while holding down the SF and 1 keys. This operation calls up
the SYSTEM MENU on the LCD as shown below.
The function selected is highlighted (white-on-black) with the cursor. To select a desired item in System
Mode, press the corresponding numerical key and then press the ENT key.
The keys below are so designed that the function of each key is consistent in every screen.
Numerical keys Pressing a numerical key corresponding with a desired menu
number selects the desired item displayed on the screen.
ENT key Pressing this key registers the selected item and executes the
corresponding function.
F5 and F6 keys
Pressing the F5 and F6 keys moves the cursor up and down,
respectively, to select a desired item.
F7 and F8 keys Pressing the F7 and F8 keys moves the cursor to the left and right,
respectively, to select a desired setting.
The C key is disabled on the SYSTEM MENU. On other screens, pressing the C key returns to the
immediately preceding screen.
The power-on default on the SYSTEM MENU is "EXECUTE PROGRAM" which is highlighted. Once any
other item is selected, the selected item will become highlighted with the cursor when you turn back to
the SYSTEM MENU.
On BHTs with no LAN-support software loaded, selecting LAN-related items (e.g., FTP and TCP/IP
setting) produces nothing.
36
Page 51
Chapter 2 Getting Started the BHT and System Mode
Structure of System Mode
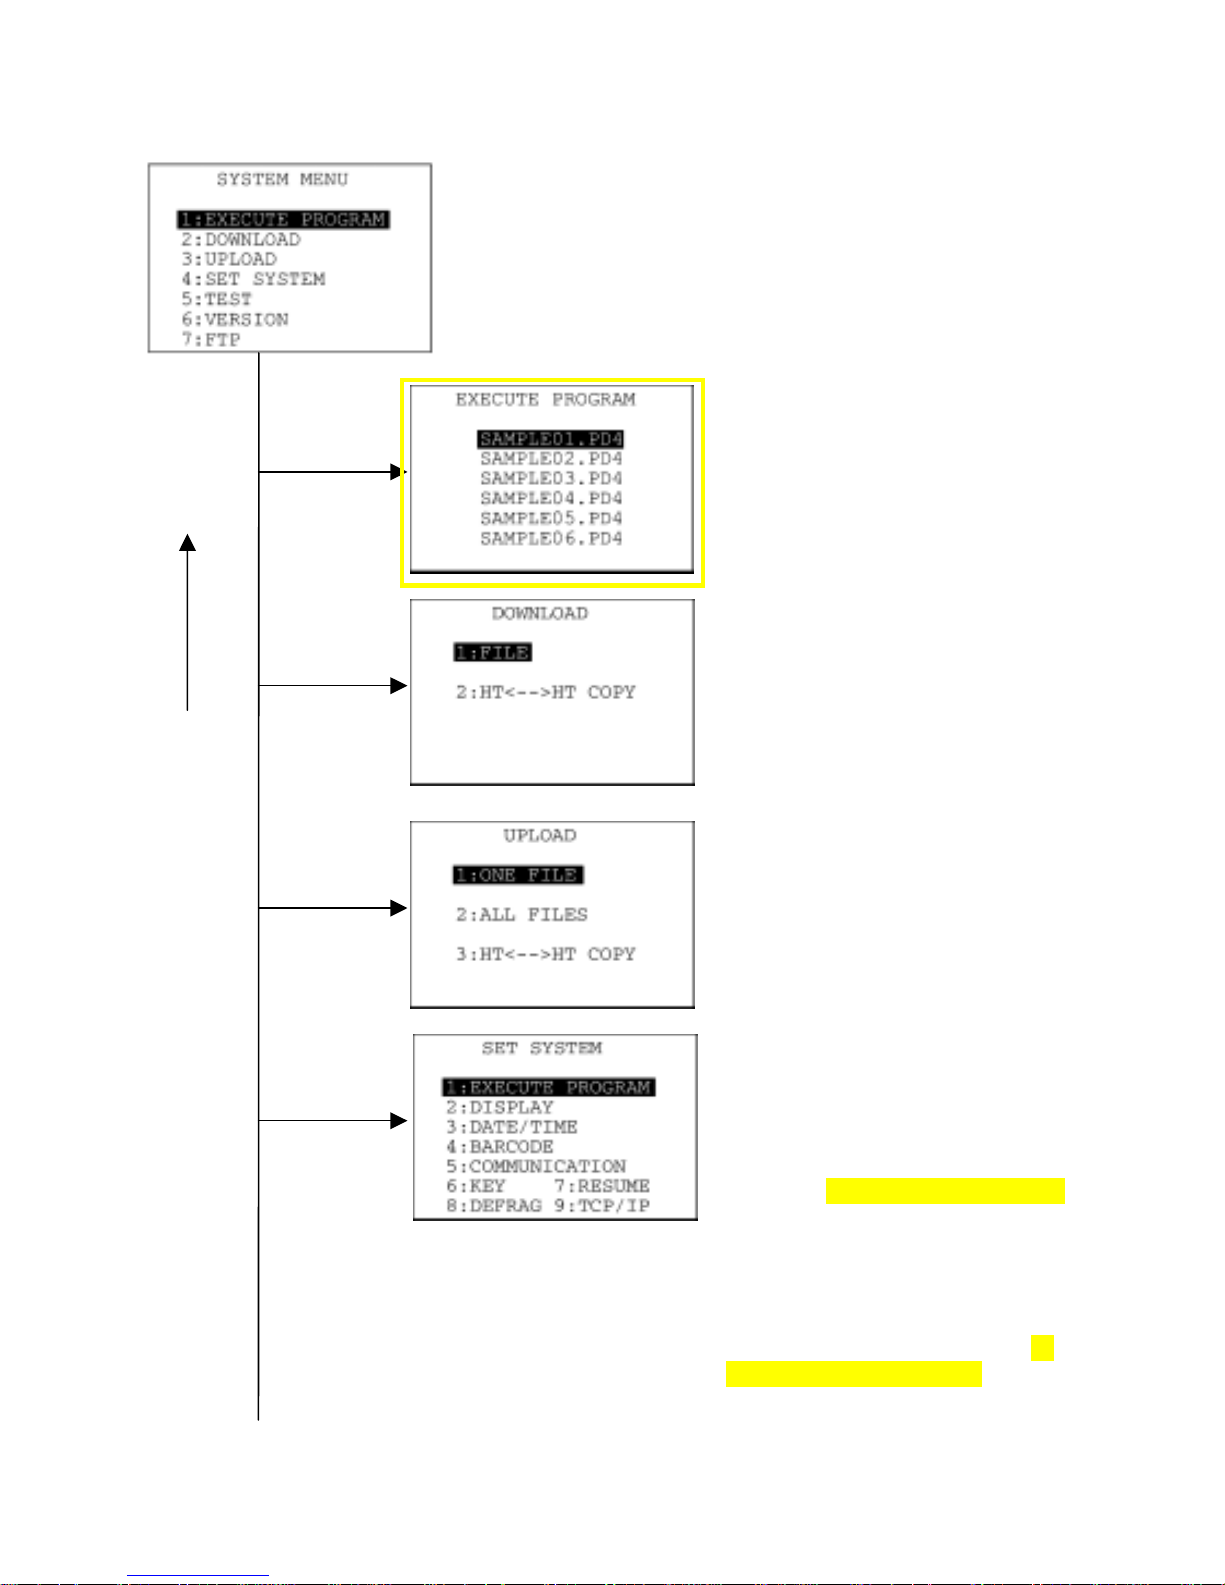
SYSTEM MENU ← Press the PW key while holding down the SF
and 1 keys.
Program Execution
Allows you to select a desired user
program to be executed immediately.
(Refer to Section 2.5.3, [ 1 ].)
Downloading
Transfers user program files or data
files from the host PC to the memory
integrated in the BHT. Downloading
between the BHTs is also possible.
(Refer to Section 2.5.3, [ 2 ].)
Uploading
Transfers user program files and data
files stored in the memory of the BHT to
the host PC.
(Refer to Section 2.5.3, [ 3 ].)
System Environment Setting
Sets a variety of environmental
conditions--an execution program,
message version (English or
Japanese), system status indication,
BHT-5000 screen compatibility mode,
calendar clock, special bar-code
scanning parameters, interface port,
communications parameters, shift key
& magic key functions, resume
function, drive defragmentation, and
TCP/IP, FTP and DHCP settings (in
LAN-support software only).
(Refer to Section 2.5.3, [ 4 ].)
1 and ENT
keys
2 and ENT
ke
y
s
C key
3 and ENT
ke
y
s
4 and ENT
keys
37
Page 52
7 and ENT
keys
6 and ENT
keys
5 and ENT
ke
y
s
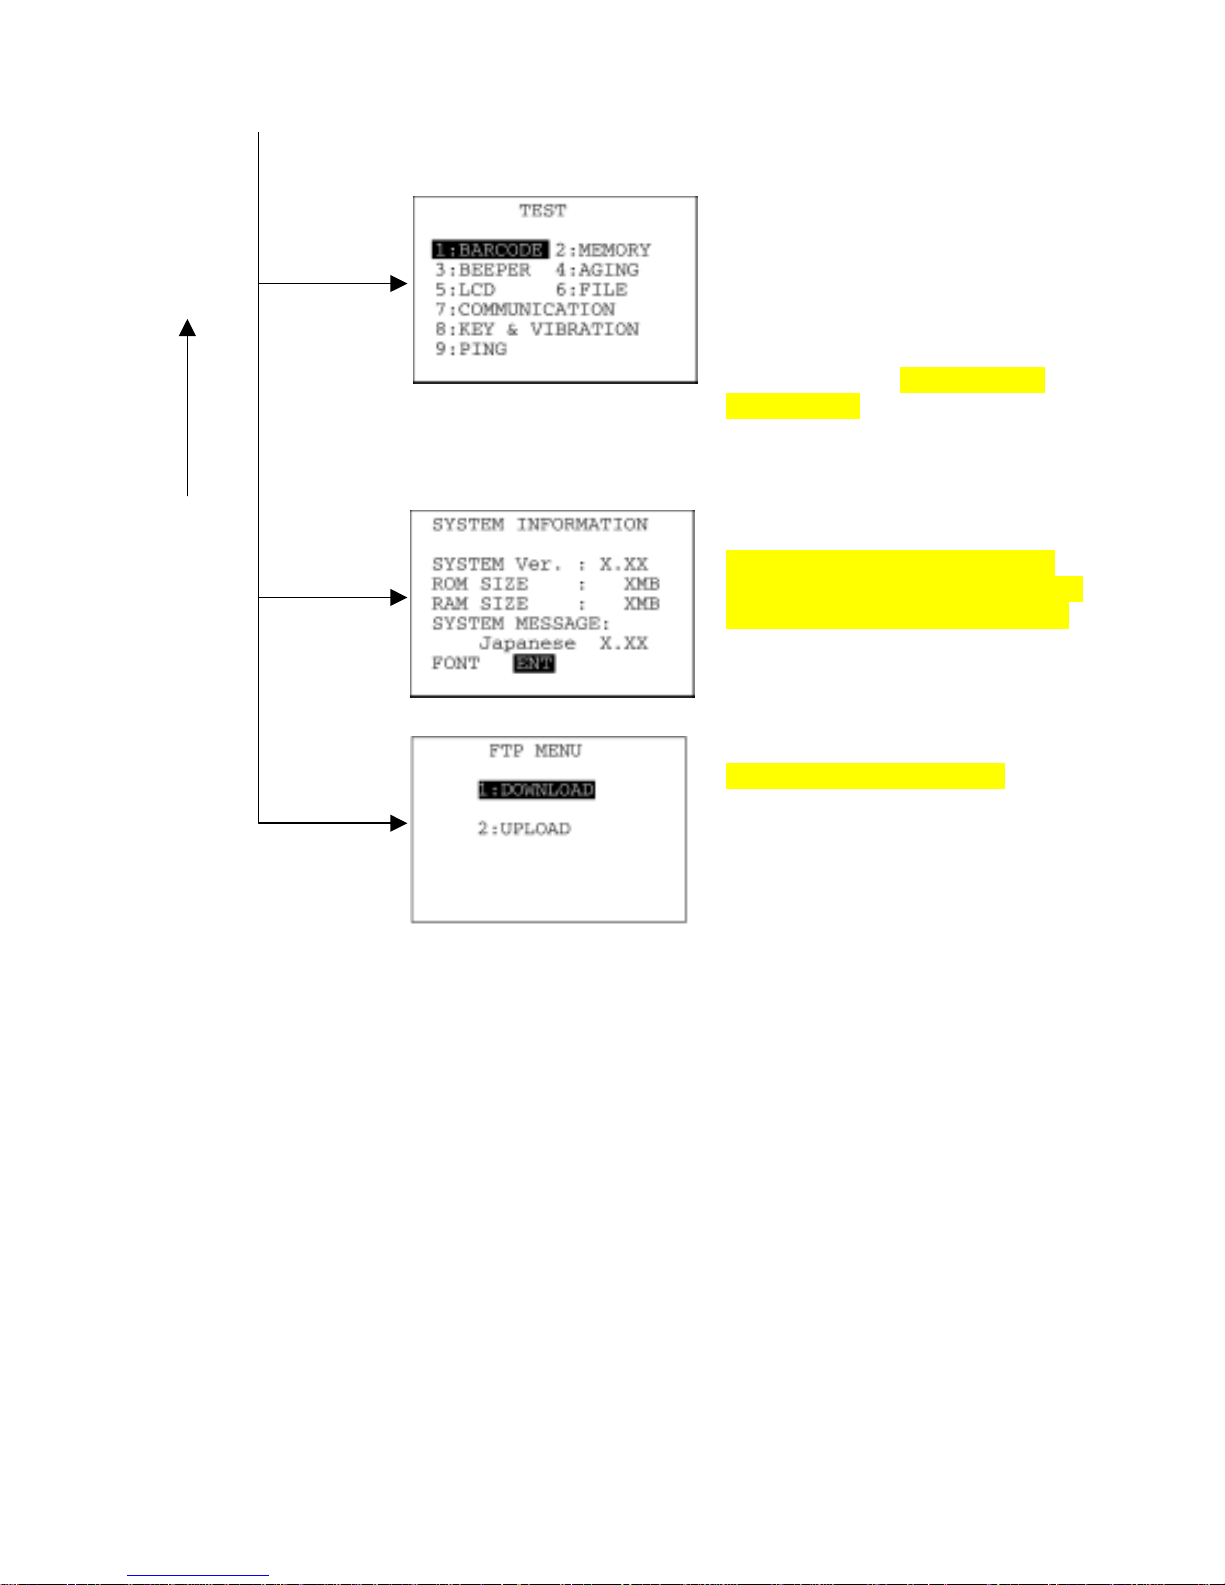
Testing
Used for the bar-code reading test,
memory test, beeper test, aging test,
LCD indication test, indicator LED test,
file test, communications test,
key-entry test, vibrator test, and
execution of PING (in LAN-support
software only).
(Refer to Section 2.5.3, [ 5 ].)
System Information
Shows the system program version,
ROM and RAM sizes, system message
version, and font type and its version.
(Refer to Section 2.5.3, [ 6 ].)
C key
Downloading/Uploading by FTP
(in LAN-support software only)
Downloads or uploads files by FTP.
(Refer to Section 2.5.3, [ 7 ].)
38
Page 53
Chapter 2 Getting Started the BHT and System Mode
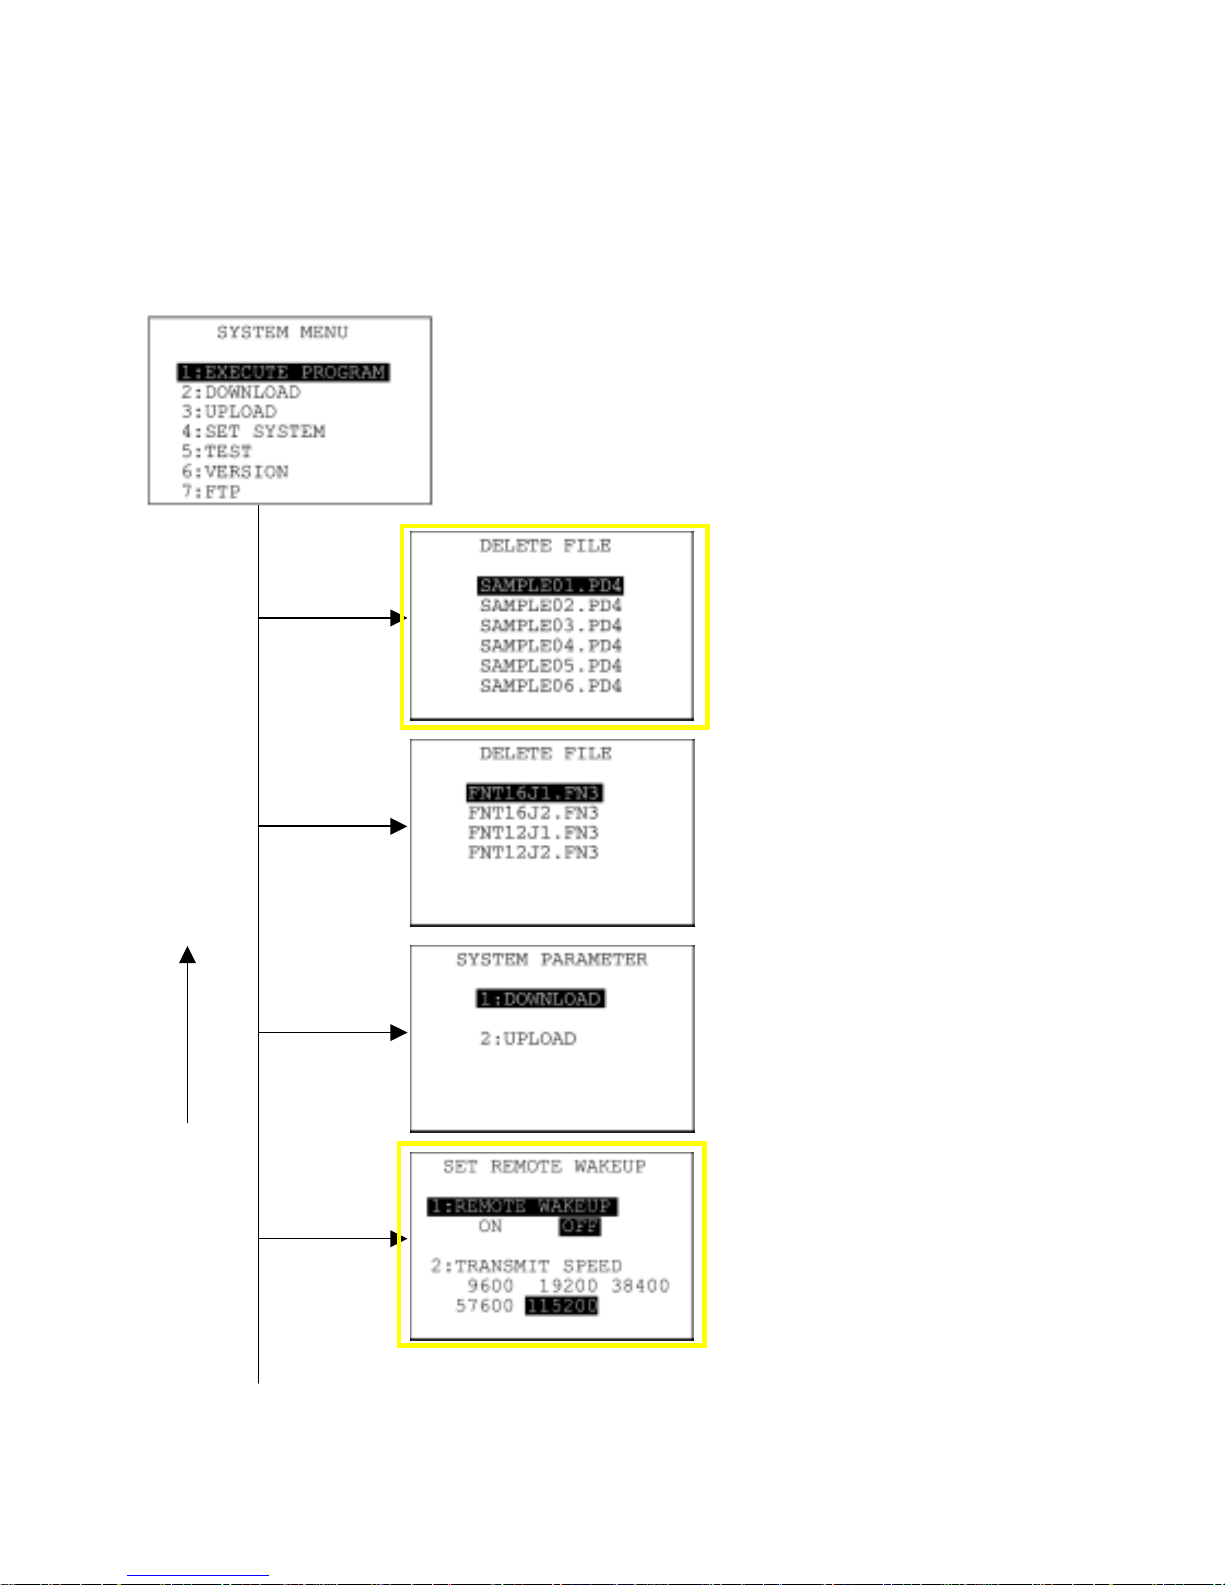
In addition to the functions given on the preceding pages, System Mode has these six functions:
Deleting program/data files, Deleting font files, Downloading/uploading the BHT system parameter file,
Setting the remote wakeup parameters, Downloading/uploading the system message file, and Updating
the systems.
To call up these functions, press the 0, 2, 3, 4, 6 or, period (.) key, respectively, while holding down the
SF key when the SYSTEM MENU is displayed.
SYSTEM MENU ← Press the PW key while holding down the SF
and 1 keys.
Deleting program/data files
Deletes a program file or data file
stored in the memory.
(Refer to Section 2.5.3, [ 8 ].)
Deleting font files
Deletes a font file stored in the
memory.
(Refer to Section 2.5.3, [ 9 ].)
Downloading/uploading the BHT
system parameter file
Downloads or uploads the system
parameter file.
(Refer to Section 2.5.3, [ 10 ].)
Setting the remote wakeup
Sets the remote wakeup parameters.
(Refer to Section 2.5.3, [ 11 ].)
4 with SF
held down
3 with SF
held down
C key
0 with SF
held down
2 with SF
held down
39
Page 54
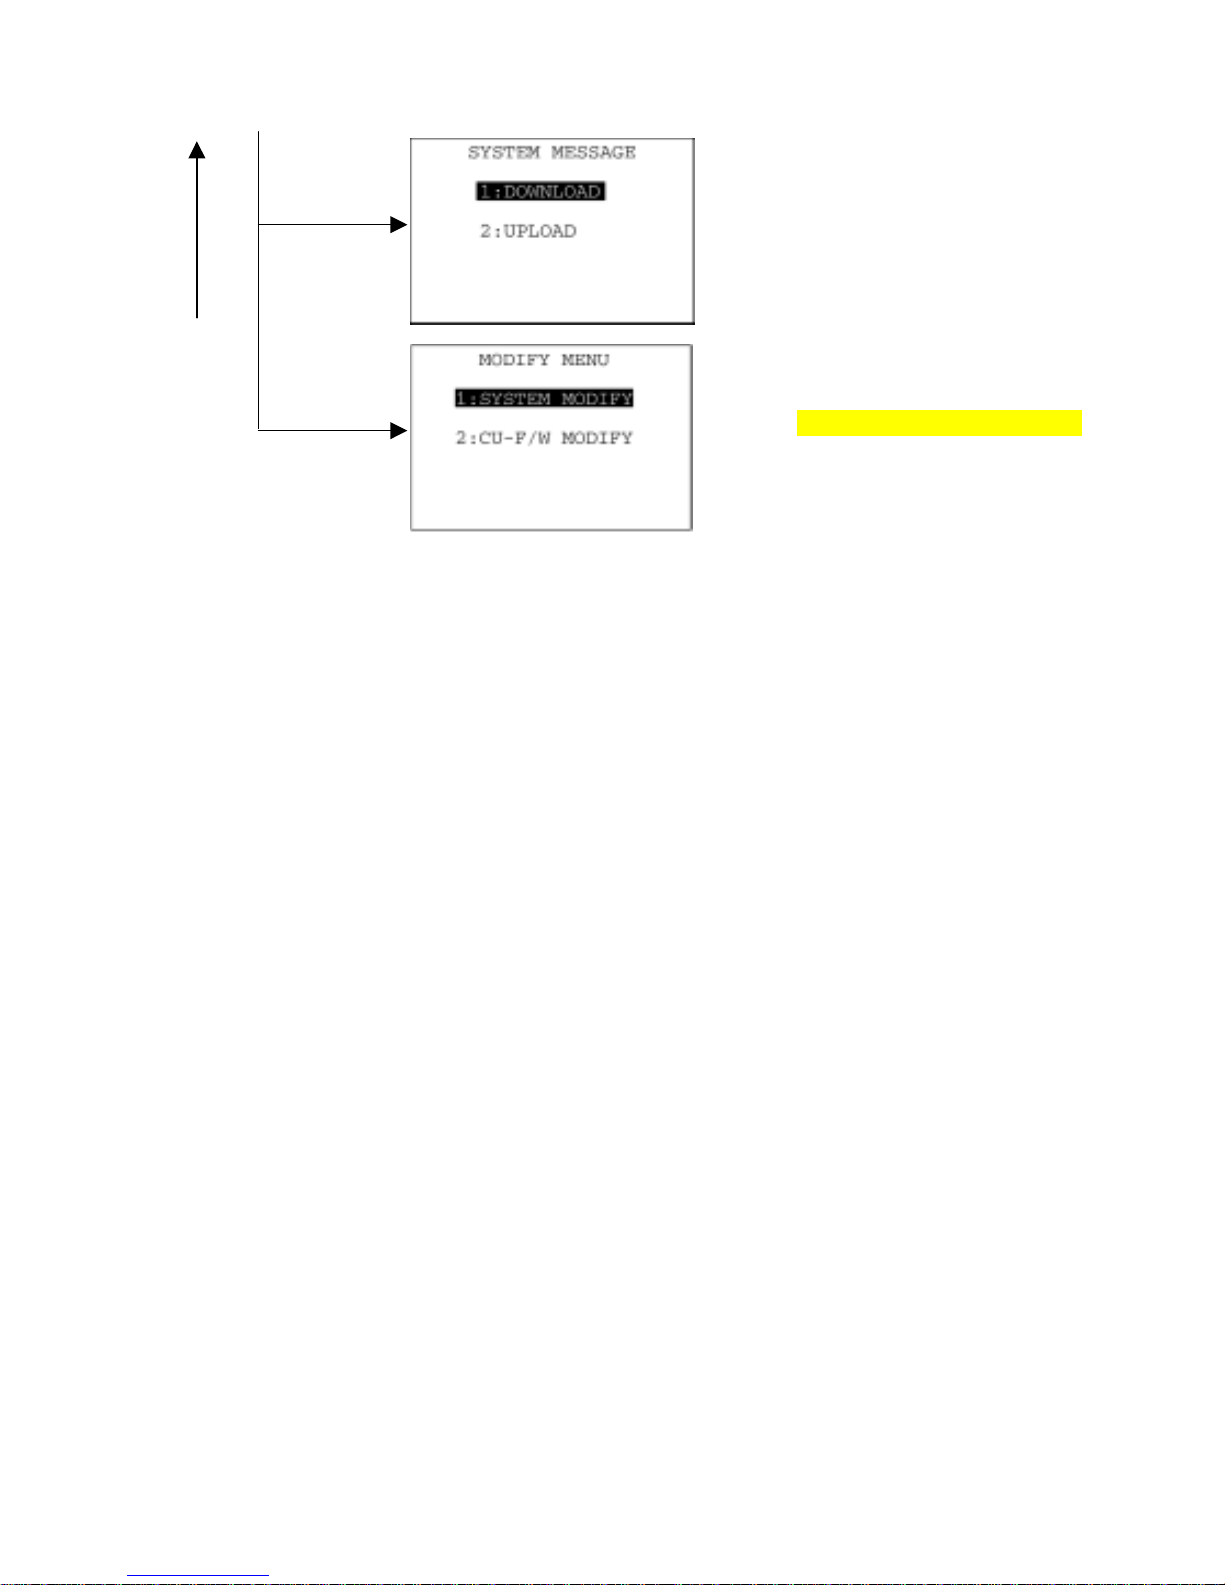
6 with SF
held down
Period (.)
with SF held
down
C key
Downloading/uploading the system
message file
Downloads or uploads the system
message file.
(Refer to Section 2.5.3, [ 12 ].)
Updating the Systems
Updates the BHT system and CU-311
system (in LAN-support software only).
(Refer to Section 2.5.3, [ 13 ].)
40
Page 55
Chapter 2 Getting Started the BHT and System Mode
2.5.2 Operating in System Mode
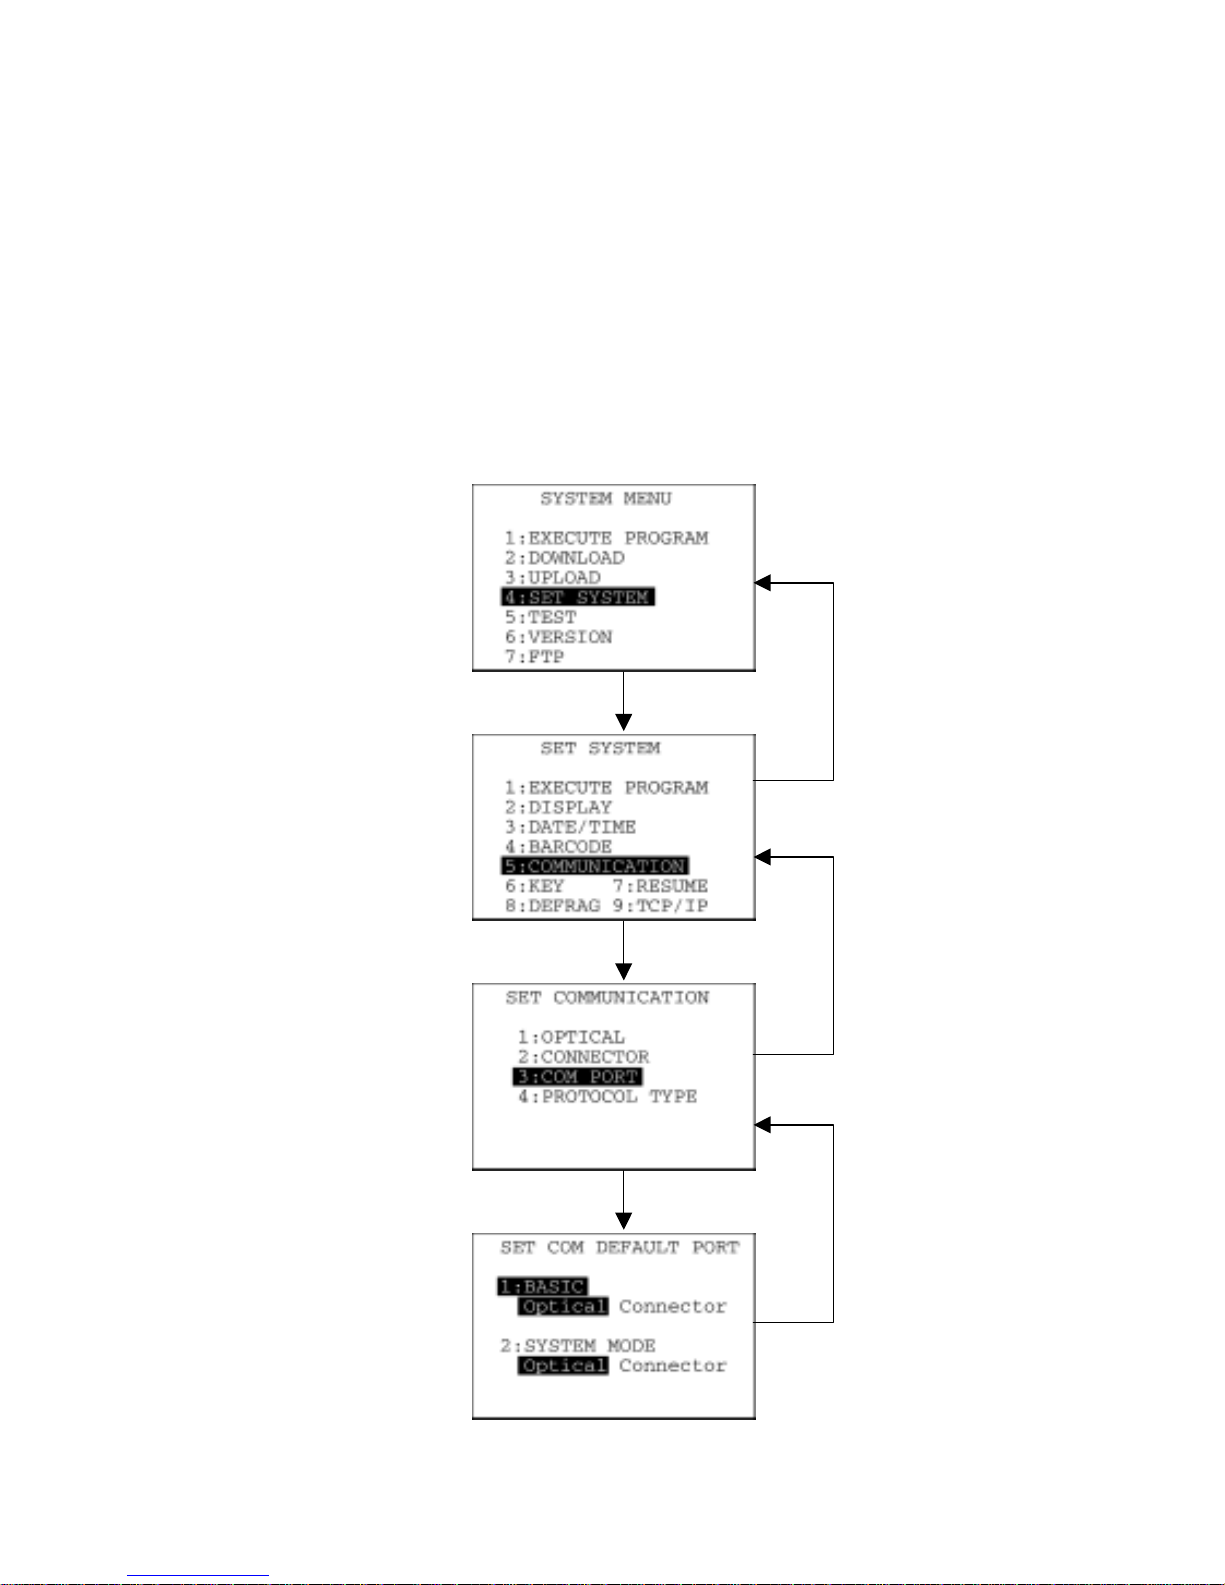
Some functions in System Mode require several screens to be shifted, as shown in the example below.
[ 1 ] Calling up the desired set screen
First, select a desired item on the current screen by using the numerical key or the cursor keys (F5 and
F6) so as to highlight the desired item.
Press the ENT key to establish the selected item and proceed to the subsequent screen.
To return to the preceding screen, press the C key.
Press 4 or use F5 and F6
to select "4:SET
SYSTEM."
ENT key
C key
Press 5 or use F5 and F6
to select
"5:COMMUNICATION."
ENT key
C key
Press 3 or use F5 and F6
to select "3:COM
PORT."
ENT key
C key
41
Page 56
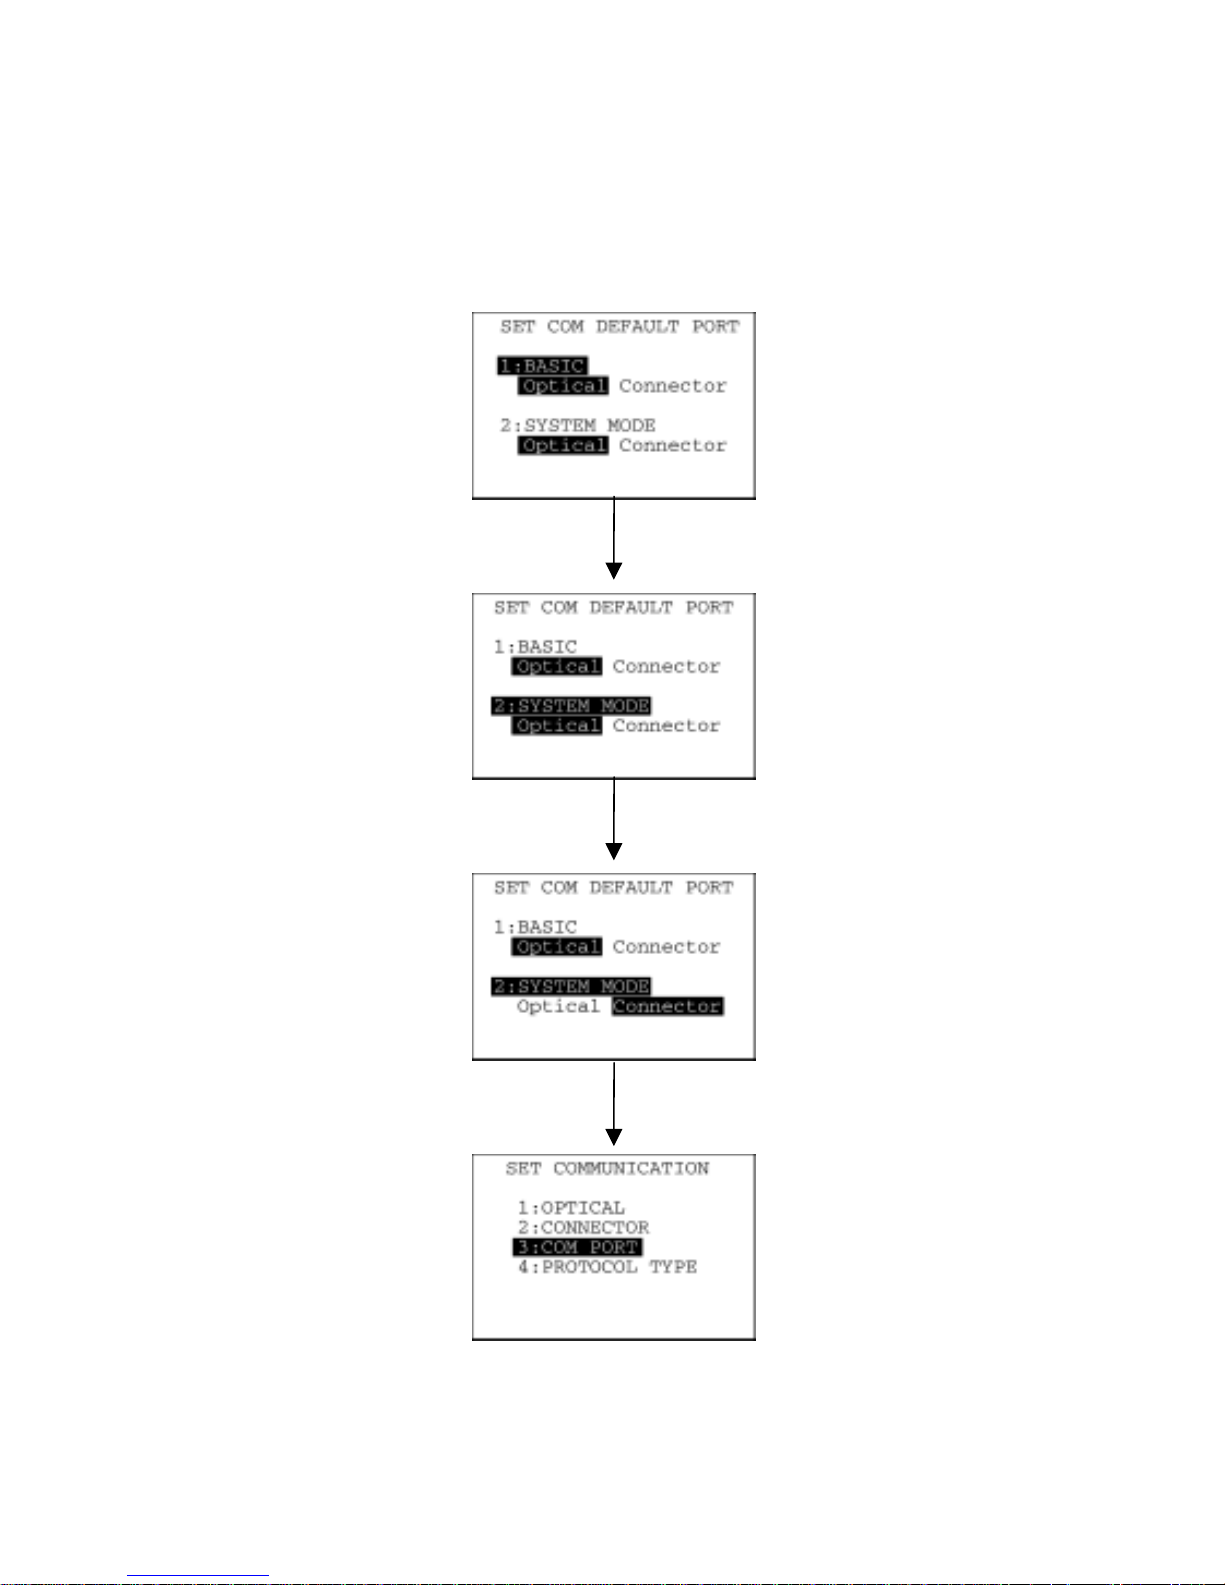
[ 2 ] Selecting a desired setting
First, select a desired item on the current screen by using the numerical key or the cursor keys (F5 and
F6) so as to highlight the desired item.
Use the F7 and F8 keys to select a desired setting and then press the ENT key. The screen returns to
the previous selection screen.
Press 2 key or use F5 and F6 keys
to select the desired set item.
Use F7 and F8 keys to select the
desired setting.
ENT key
42
Page 57
Chapter 2 Getting Started the BHT and System Mode
2.5.3 Detailed Description of the Functions in System Mode
[ 1 ] Program Execution
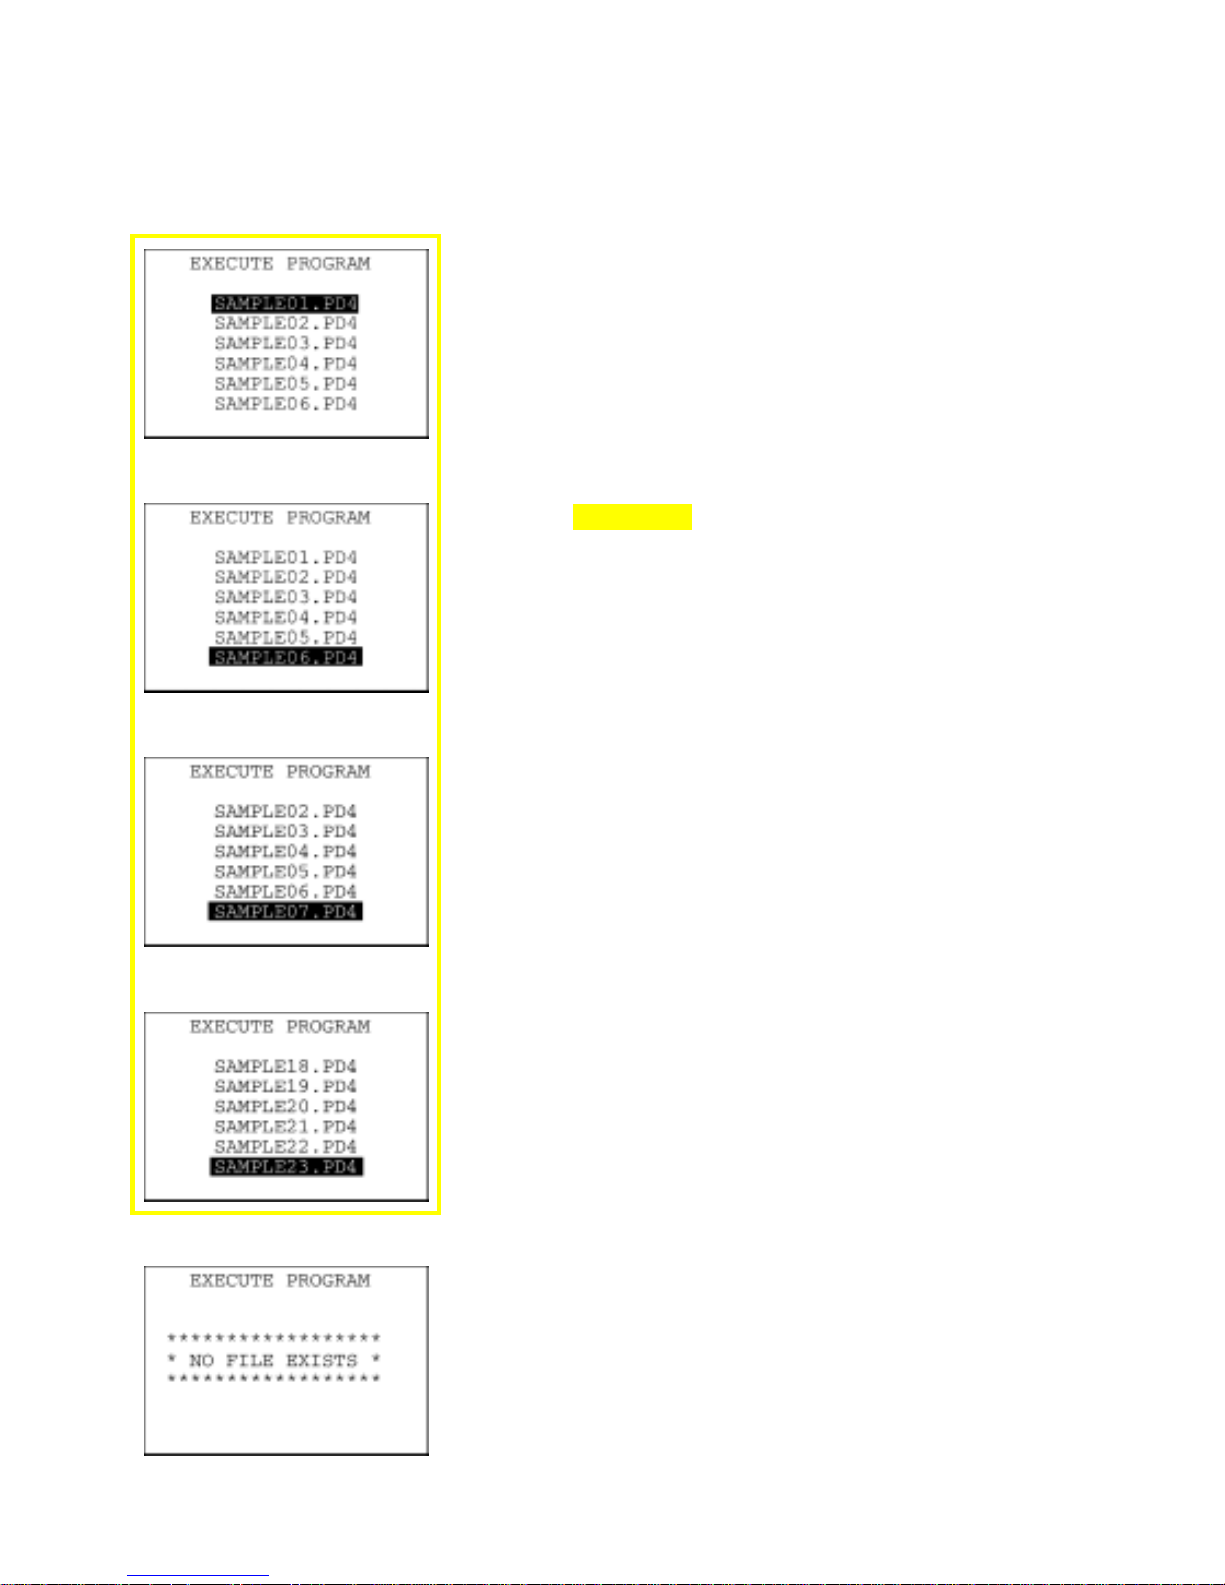
On the SYSTEM MENU, selecting "1:EXECUTE PROGRAM" calls up
the screen shown at left.
If more than one program has been downloaded to the user area o
f
the target memory, use the F5 and F6
keys to move the cursor to a
target program, and then press the ENT key.
To return to the SYSTEM MENU, press the C key.
If more than six programs have been downloaded, you may need to
scroll the screen with the F6 key.
⇓
⇓
In the example shown at left, 23 programs are downloaded.
If no program file is downloaded in the memory, the message shown
at left will appear.
To return to the SYSTEM MENU, press the C key.
43
Page 58
[ 2 ] Downloading
If you download a file having t he same name as one already used in the use r area of the target memory
in the BHT, then the newly downloaded file replaces the old one.
If no auto-start executable program has been specified (in Section 2.5.3, [4.1]), turning the BHT o n
lets the directory manager start the first loaded one out of user programs (.PD4) in the BHT--the
p
rogram that appears on the top of the EXECUTE PROGRAM menu shown on the previous page.
Taking this into account, determine the file downloading order. For details, refer to Section 2.7,
"Starting Up User Programs."
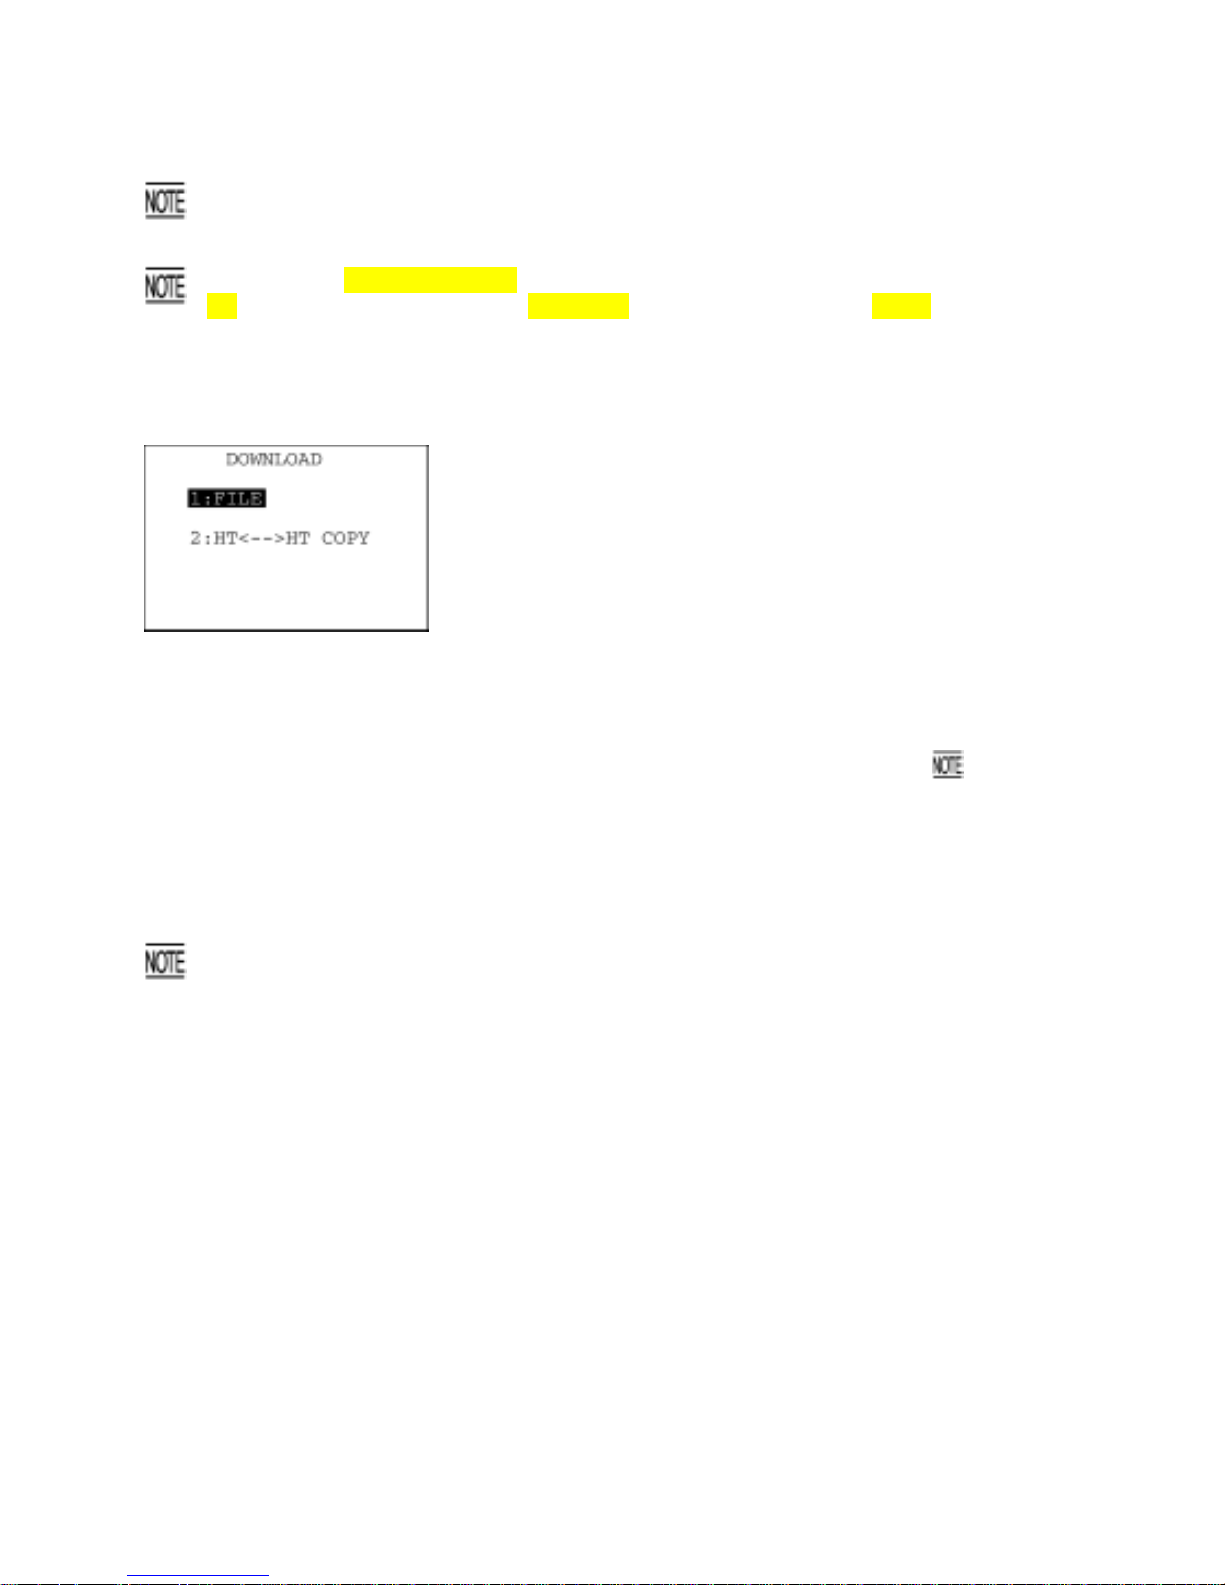
On the SYSTEM MENU, selecting "2: DOWNLOAD calls up the
screen shown at left.
[1] FILE: Downloads a user program file or data file to
the user area of the BHT.
[2] HT<-->HT COPY: Downloads all of the files, system
parameters, and calendar clock data stored
in the connected BHT.
This function enables copying between the
BHTs.
For the preparation to be made preceding the
start of this function, refer to
below.
Select a desired item by using the numerical keys or F5 and F6 keys,
and the selected item becomes highlighted. Then press the ENT key.
To return to the SYSTEM MENU, press the C key.
Preparation for Copying between the BHTs
Before downloading to the BHT from another BHT, make the following preparation:
• At each BHT, set the interface port. The default is an IrDA interface (Optical).
Interface setting procedure: Starting on the SYSTEM MENU, select "4:SET SYSTEM,"
"5:COMMUNICATION," and "3:COM PORT." On the SET COM DEFAULT PORT screen,
select the IrDA interface (Optical) or direct-connect interface (Connector) of "2:SYSTEM
MODE."
• At each BHT, set the FIELD SPACE to "Ignore" on the communications protocol option screen to
trim trailing spaces in data fields. The default is "Ignore." For t he setting procedure, refer to Section
2.5.3, [4.5].
• When using the direct-connect interface, pull out the connector cover on each BHT to expose the
direct-connect interface port. Connect the BHTs via those ports with the direct-connect interface
cable (having 3-pole mini stereo plugs). For the details about the cab le, refer to Chap ter 3, Section
3.2.
• On the uploading BHT, run System Mode and select "3:UPLOAD" and "3:HT<-->HT COPY."
44
Page 59

Chapter 2 Getting Started the BHT and System Mode
Data that can be copied from one BHT to another BHT
The copying function between BHTs copies the following set data:
LCD contrast level
Beeper volume
Switching between beeper and vibrator
Execution program to be run automatically when the BHT is turned on
Message version (English or Japanese)
Display font size
System status display
Date
Time
Setting of black-and-white inverted label reading function
Decode level
Minimum number of digits to be read for ITF
Minimum number of digits to be read for STF
Minimum number of digits to be read for Codabar (NW-7)
Interface port to be used in user programs
Interface port to be used in System Mode
Communications parameters for the IrDA interface
Communications parameters for the direct-connect interface
Communications protocol options for the IrDA interface
Communications protocol options for the direct-connect interface
Communications protocol type
Shift key function defined
M1 key function defined
M2 key function defined
M3 key function defined
M4 key function defined
Resume function
Remote wakeup setting (enable/disable)
Transmission speed for remote wakeup
Remote wakeup history
45
Page 60

BHT-5000 screen compatibility mode
YMODEM option
IP address of FTP server
User name of FTP server
Password of FTP server
Default directory for FTP server
FTP option, Line delimiters (CR/LF)
FTP option, Treatment of line delimiters
FTP option, Treatment of trailing spaces in data fields
FTP option, Upload mode
FTP option, Verbose mode
IP address of host PC for ping
Data size of echo request
Echo request intervals
Timeout period for echo request
No. of echo requests to be sent
Echo request send timing
TCP/IP operation device
TCP/IP link layer
Transmission speed between BHT and CU
No. of retries for link establishment command to be sent
Link establishment command intervals
No. of retries for link release command to be sent
Link release command intervals
Link release period
Timeout for getting the IP configuration from the DHCP server
46
Page 61
Chapter 2 Getting Started the BHT and System Mode
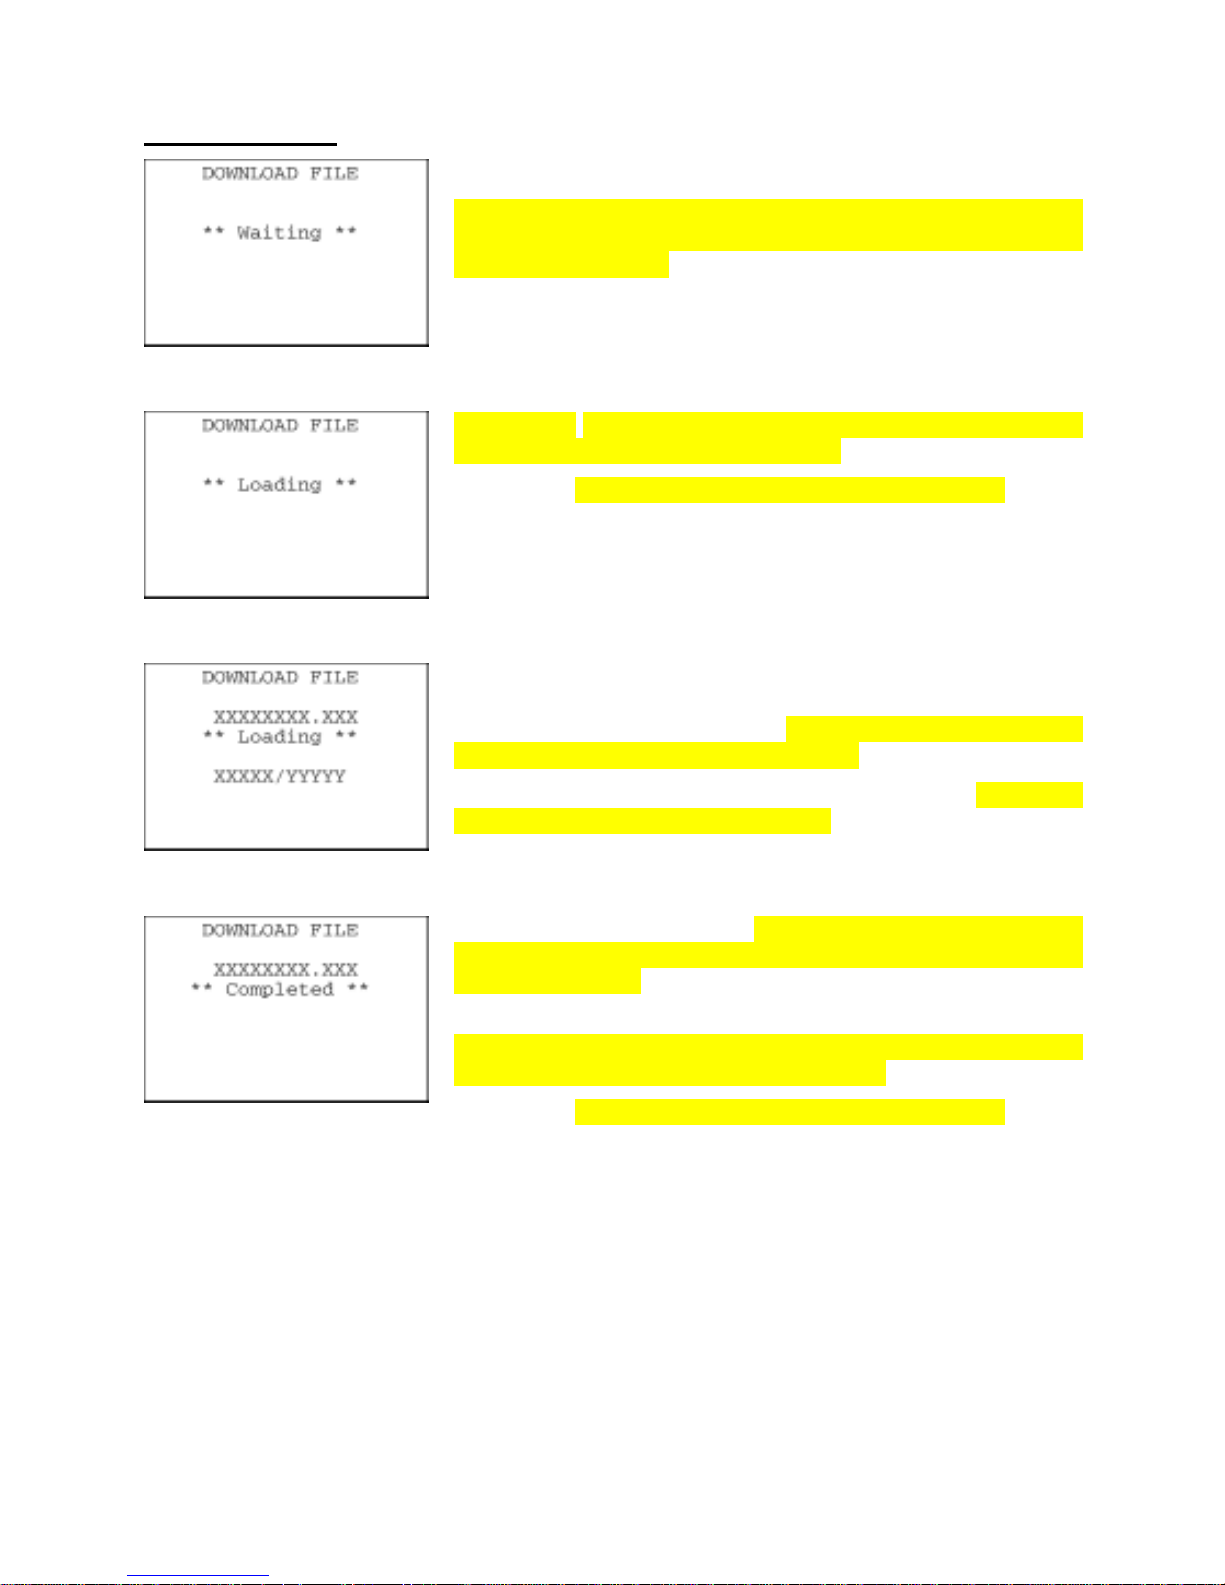
Download screens
With this screen displayed, the BHT waits for a file to be downloaded.
Selecting "2:HT<-->HT COPY" on the DOWNLOAD menu displays
"HT<-->HT" in the center of the 2nd line; selecting "1:FILE" displays
nothing on the 2nd line.
⇓
Upon start of BHT-BASIC4.0 Transfer Utility or equivalent program,
the BHT displays the screen shown at left.
(Refer to the "BHT-BASIC4.0 Transfer Utility User's Guide.")
⇓
While the downloading operation is in progress, the screen shown at
left is displayed indicating the file name and the number of received
records/the total number of records (the received file size/the total file
size (in kilobytes) in transfer with YMODEM).
To abort the downloading operation, press the C key. The screen
switches back to the DOWNLOAD menu.
⇓
Upon completion of downloading, the number of received records (or
the received file size) becomes equal to the total number of records
(or the total file size) and the beeper beeps once. Press the C key to
return to the DOWNLOAD menu.
With this screen displayed on the BHT, downloading another new file
from the host PC lets the BHT start receiving it.
(Refer to the "BHT-BASIC4.0 Transfer Utility User's Guide.")
If you have selected "2: HT<-->HT COPY" on the DOWNLOAD menu,
a sequence of the above screens will be repeated by the number o
f
files to be downloaded.
47
Page 62
If an error occurs during downloading
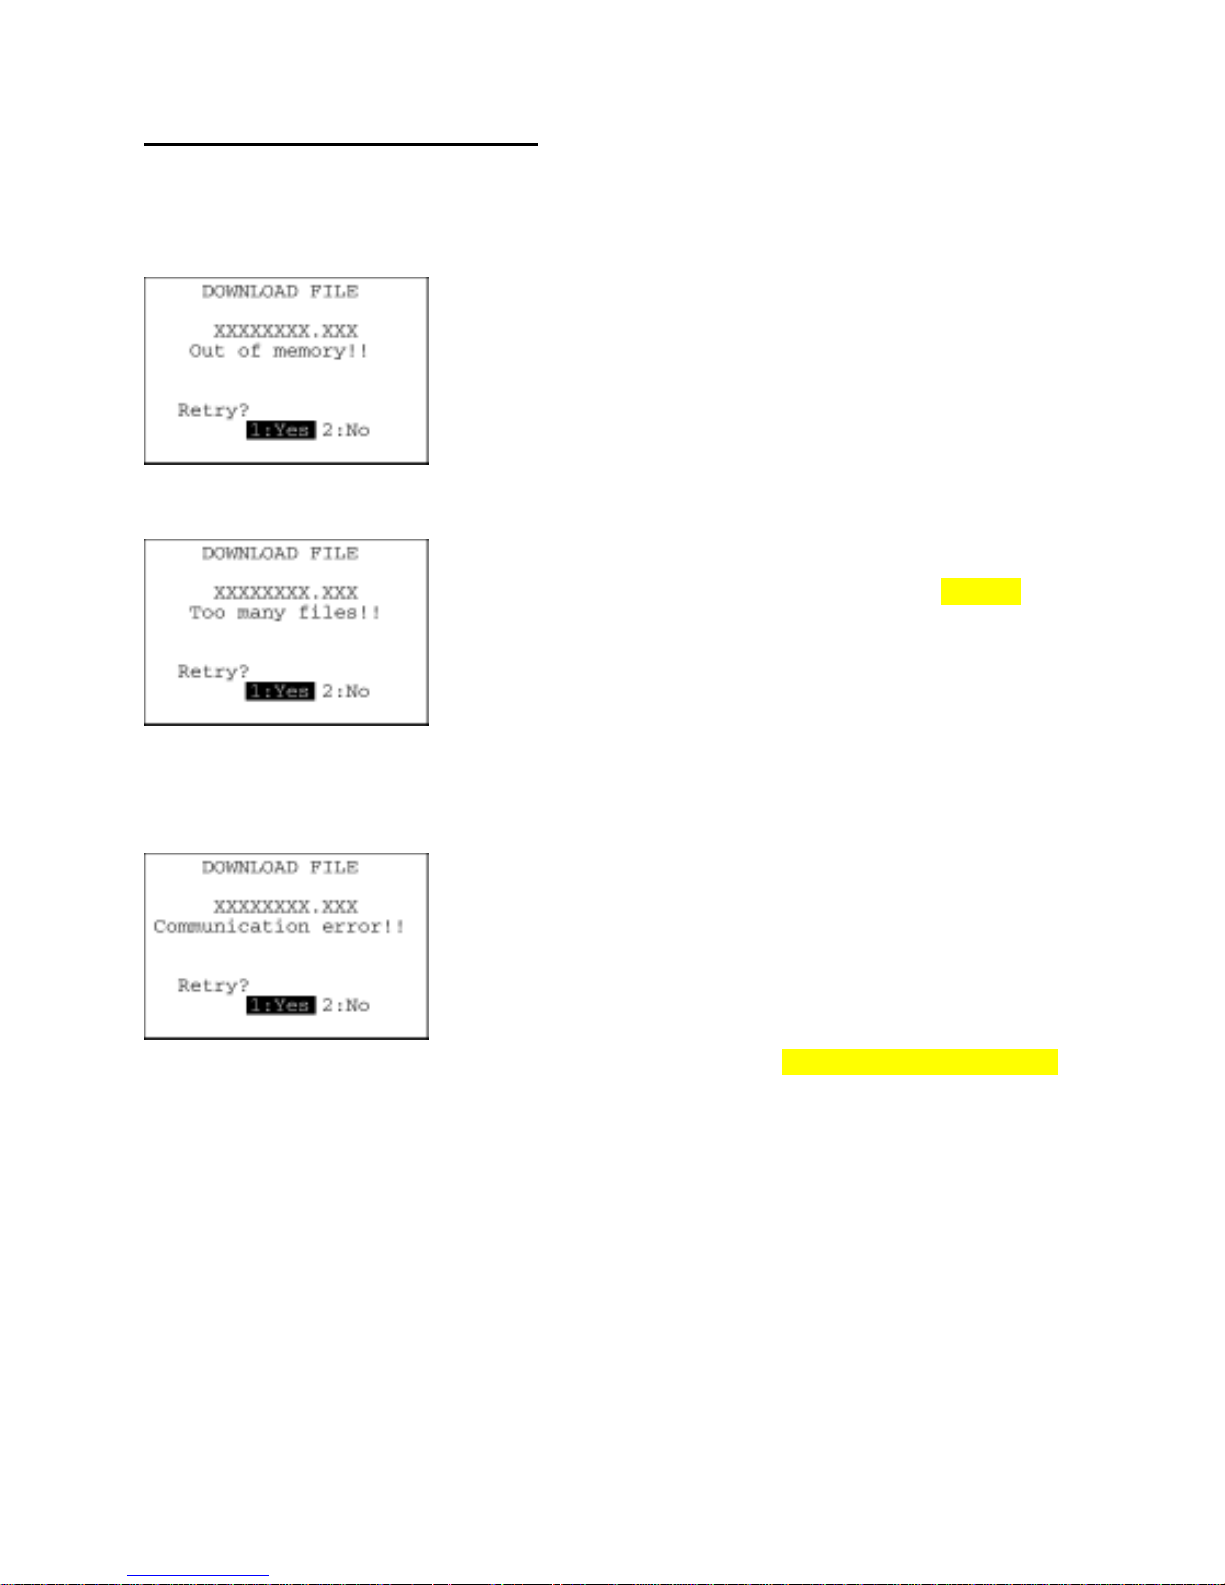
If some error occurs during downloading, the BHT beeps three times and shows one of the following
screens with the prompt "Retry?":
To retry the download, press the 1 and ENT keys; to abort it, press the 2 and ENT keys.
Problem
The memory is insufficient for storing files to be downloaded.
Solution
Press the 2 key to return to the SYSTEM MENU, then delete
unnecessary files in the memory or decrease the size of the file to be
downloaded. (Refer to Section 2.5.3, [ 8 ] and [ 2 ].)
Problem
The current download will exceed the maximum of 120 files in the
memory.
Solution
Press the 2 key to return to the SYSTEM MENU. Delete unnecessary
files in memory or decrease the number of files to be downloaded i
f
you attempted to download more than one file (Refer to Section 2.5.3,
[ 8 ] and [ 2 ].)
Problem
Downloading has failed.
Solution
To retry downloading, press the 1 key.
To return to the SYSTEM MENU, press the 2 key. Check the interface
port, communications parameters, and communications protocol in
the SET SYSTEM menu or perform the communications test in the
TEST menu. (Refer to Section 2.5.3, [4.5] and [5.7].)
It is also necessary to check the communications parameters setup o
f
the host PC.
48
Page 63

Chapter 2 Getting Started the BHT and System Mode
Problem
You attempted to download an invalid program file.
Solution
Check whether the program file you attempted to download is
available to your BHT model. If it is not available, download the
appropriate program.
49
Page 64
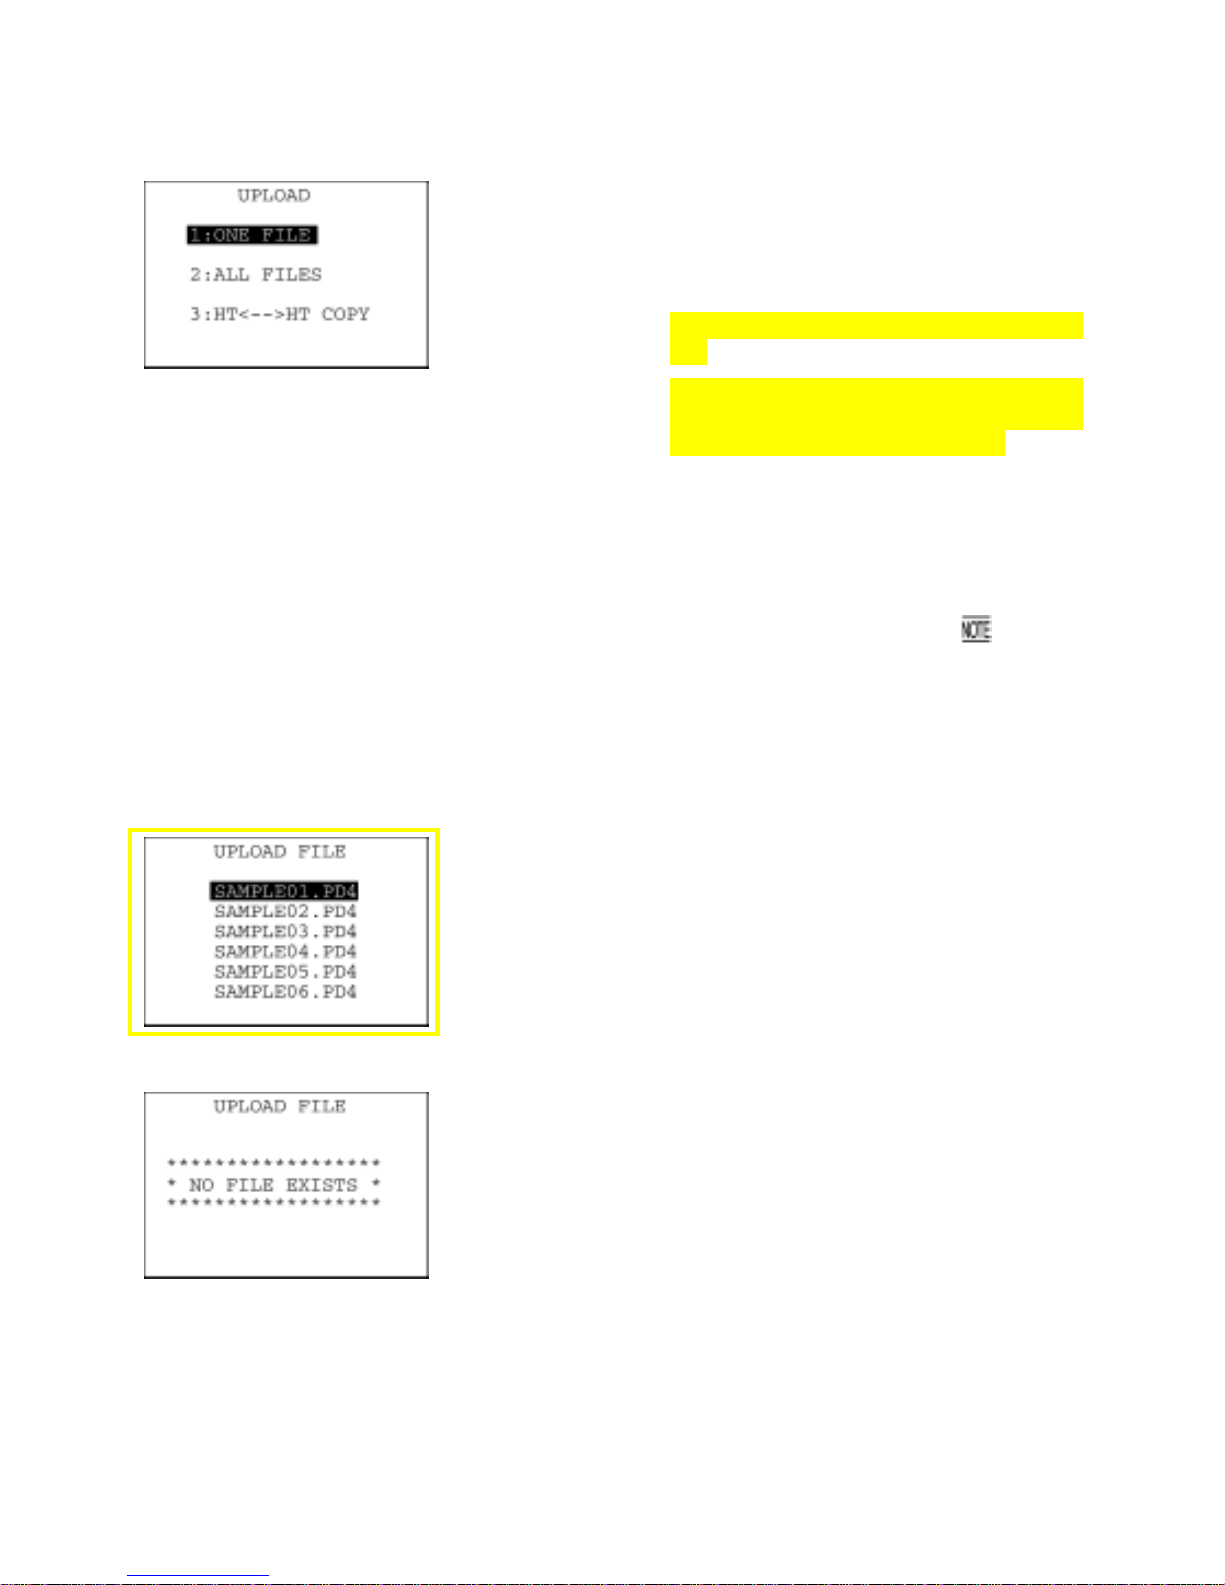
[ 3 ] Uploading
On the SYSTEM MENU, selecting "3: UPLOAD" calls up the screen
shown at left.
[1] ONE FILE: Uploads a user program file or data file stored
in the memory.
[2] ALL FILES: Uploads all files in the memory except font
files.
[3] HT<-->HT COPY: Uploads all files in the memory except font
files to another BHT, together with system
parameters and calendar clock data.
This function enables copying between the
BHTs. At the receiving BHT, select "2:
DOWNLOAD" and "2: HT<-->HT COPY" in
System Mode.
For the preparation to be made preceding the
start of this function, refer to
given on
page 44.
Select a desired item by using the numerical keys or F5 and F6 keys,
and the selected item becomes highlighted. Then press the ENT key.
To return to the SYSTEM MENU, press the C key.
If you select "1: ONE FILE" on the UPLOAD menu, the file selection
screen as shown at left appears, listing all of the program files and
data files stored in the memory. Select a file(s) you want to upload
and press the ENT key.
If you select "2: ALL FILES" or "3: HT<-->HT COPY" on the UPLOAD
menu, the "ALL" or "HT<-->HT" will appear in the center of the 2nd
line, respectively.
If you select "1: ONE FILE" or "2: ALL FILES" on the UPLOAD menu
when no files are stored in the memory, the message shown at left
appears.
Pressing the C key returns to the UPLOAD menu.
50
Page 65
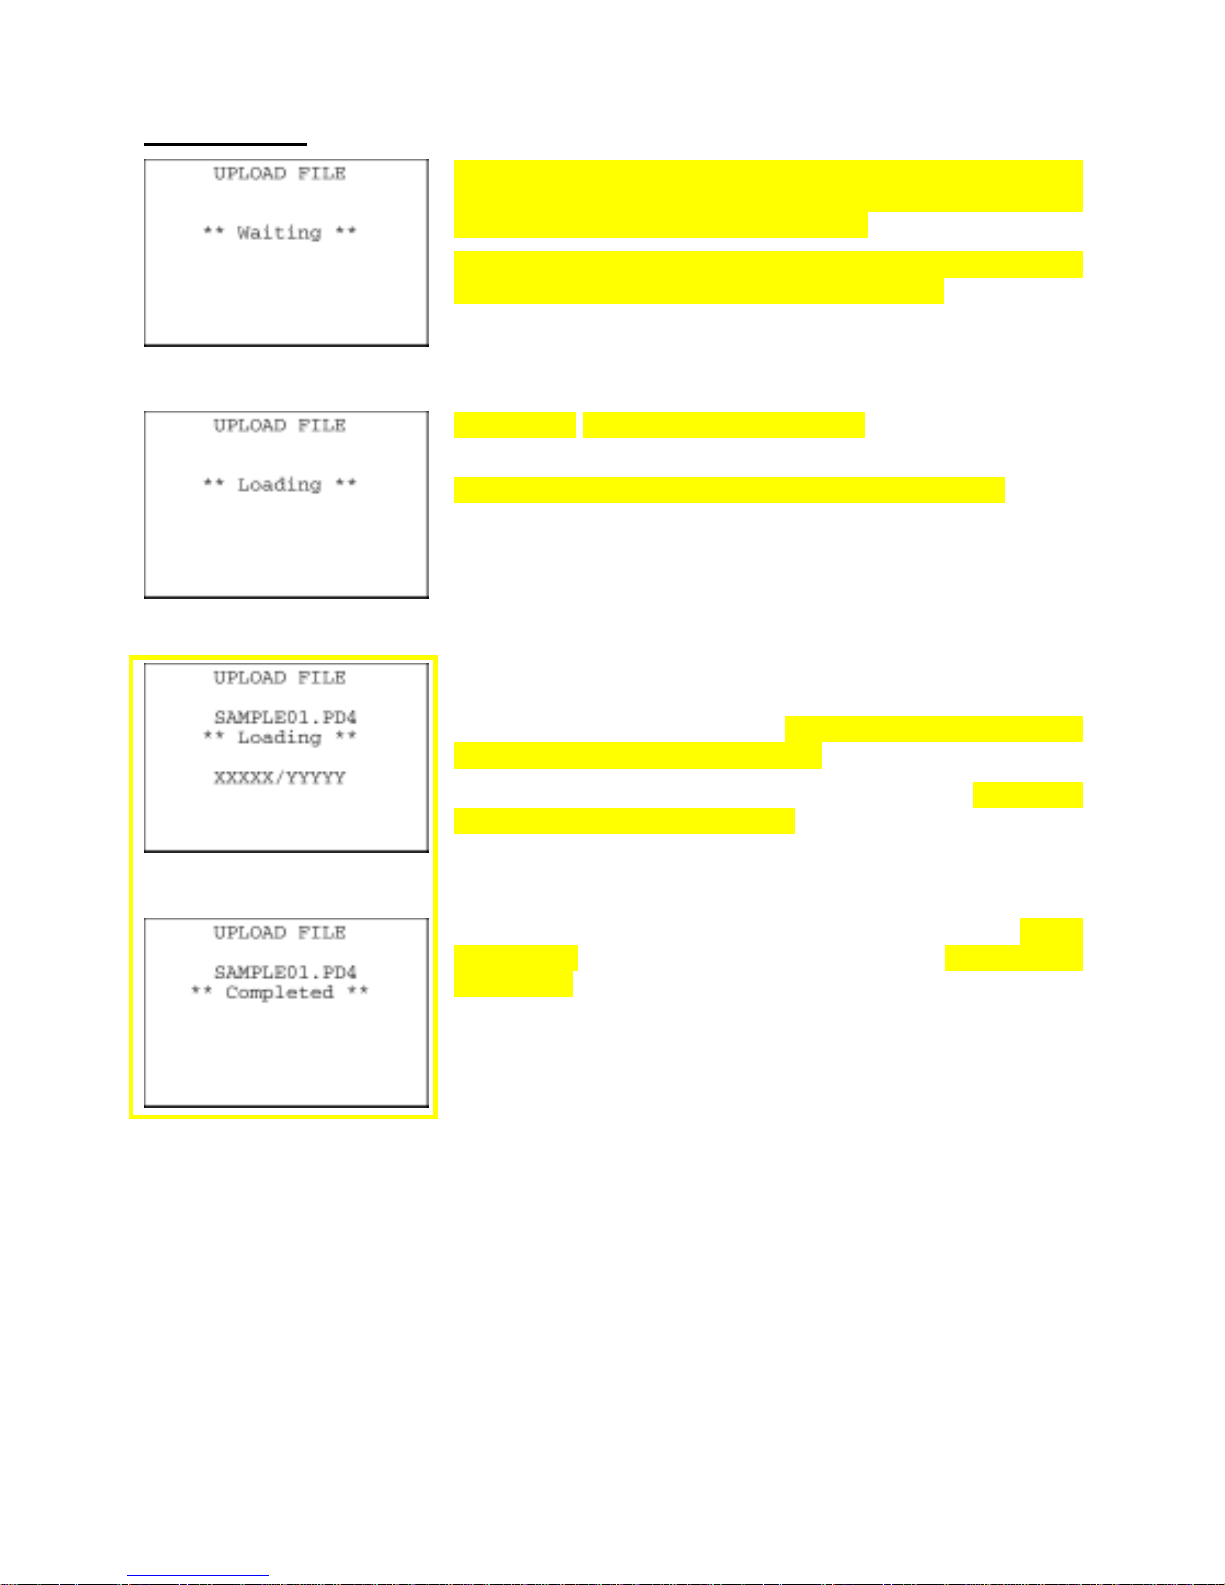
Chapter 2 Getting Started the BHT and System Mode
Upload screens
If you select "1: ONE FILE" and choose a file to be uploaded or if you
select the "2: ALL FILES" or "3:HT<-->HT COPY" on the UPLOAD
menu, then the screen shown at left appears.
Selecting "2: ALL FILES" or "3: HT<-->HT COPY" displays "ALL" or
"HT<-->HT" in the center of the 2nd line, respectively.
Showing this screen, the BHT waits for a file(s) to be uploaded.
⇓
Upon start of BHT-BASIC4.0 Transfer Utility or equivalent program,
the BHT displays the screen shown at left.
(Refer to the "BHT-BASIC4.0 Transfer Utility User's Guide.")
⇓
While the uploading operation is in progress, the screen shown at left
is displayed indicating the file name and the number of sent
records/the total number of records (the sent file size/the total file size
(in kilobytes) in transfer with YMODEM).
To abort the uploading operation, press the C key. The screen
switches back to the UPLOAD menu.
⇓
Upon completion of uploading, the number of sent records (or the
sent file size) becomes equal to the total number of records (or the
total file size) and the beeper beeps once. Press the C key to return to
the UPLOAD menu.
If you have selected "2: ALL FILES" or "3: HT<-->HT COPY" on the
UPLOAD menu, a sequence of the above screens will be repeated by
the number of files to be uploaded.
51
Page 66
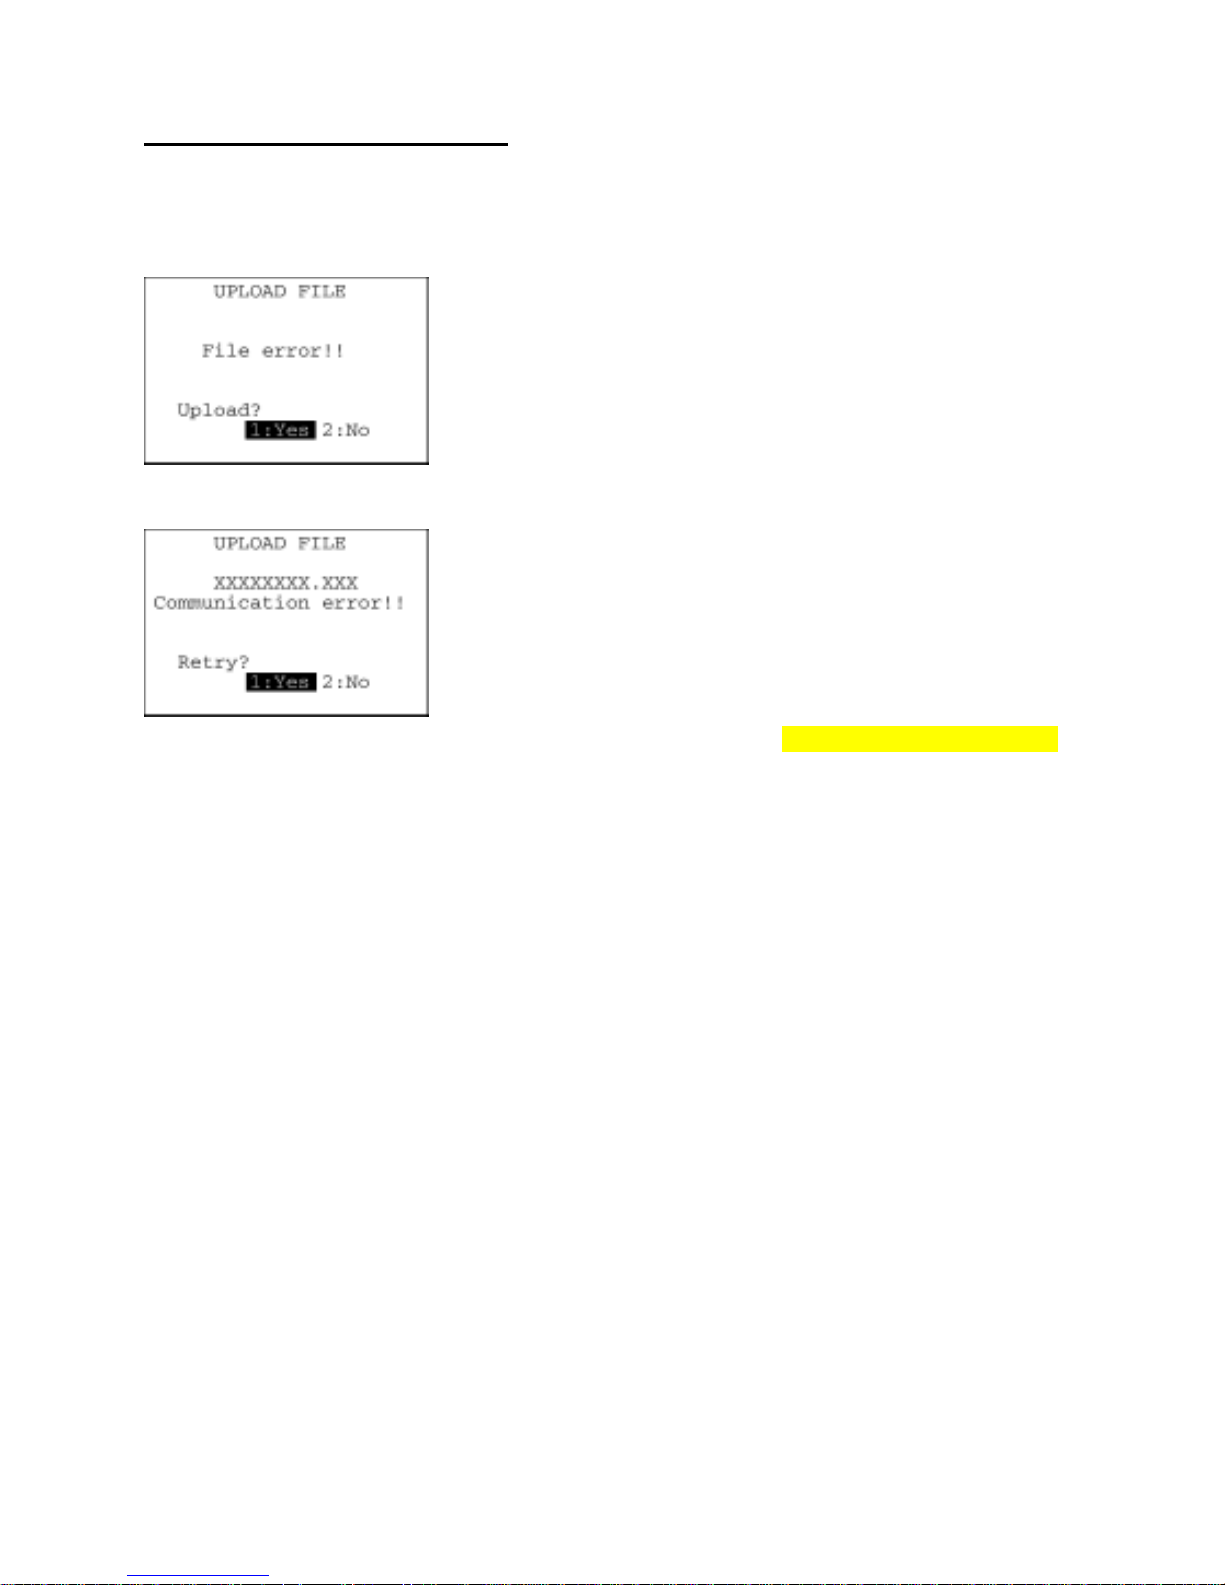
If an error occurs during uploading
If some error occurs during uploading, the BHT beeps three times and shows one of the following
screens:
To retry the uploading operation, press the 1 and ENT keys; to abort it, press the 2 and ENT keys.
Problem
The file you attempted to upload is damaged.
Solution
To upload the damaged file as is, press the 1 key.
Problem
Uploading has failed.
Solution
To retry uploading, press the 1 key.
To return to the SYSTEM MENU, press the 2 key. Check the interface
port, communications parameters, and communications protocol in
the SET SYSTEM menu or perform the communications test in the
TEST menu. (Refer to Section 2.5.3, [4.5] and [5.7].)
It is also necessary to check the communications parameters setup o
f
the host PC.
52
Page 67
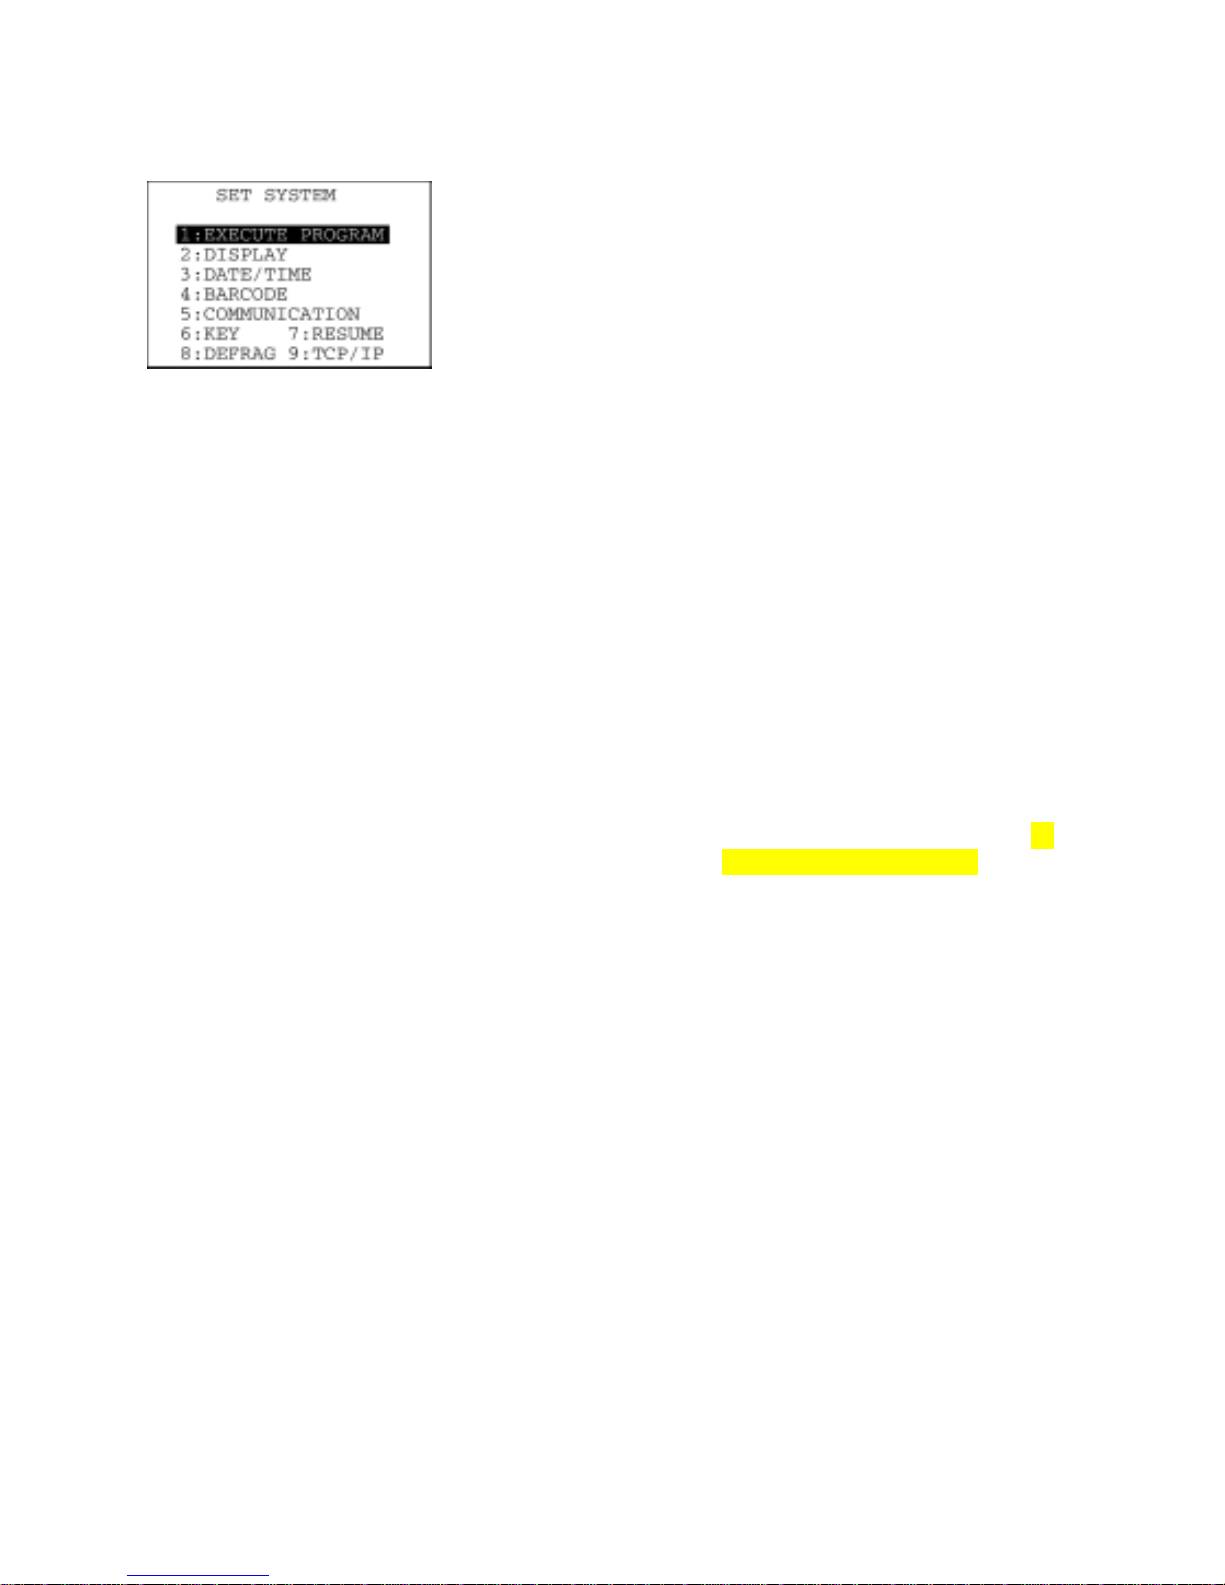
Chapter 2 Getting Started the BHT and System Mode
[ 4 ] System Environment Setting
On the SYSTEM MENU, selecting "4: SET SYSTEM" calls up the
screen shown at left.
[1] EXECUTE PROGRAM: Sets an auto-start execution program to
be run when the power is turned on.
[2] DISPLAY: Sets the message version (English o
r
Japanese).
[3] DATE/TIME: Sets the calendar clock (date and time).
[4] BARCODE: Sets the special barcode scanning
parameters (the black-and-white
inverted label reading and the decoding
level) and the minimum number of digits
to be read for bar codes (ITF, STF and
Codabar).
[5] COMMUNICATION: Sets the communications environments
(interface port and communications
parameters).
[6] KEY: Defines the functions of the shift key
and magic keys.
[7] RESUME: Sets the resume function.
[8] DEFRAG: Defragments the drive.
[9] TCP/IP: Sets the TCP/IP, FTP and DHCP (in
LAN-support software only).
Select a desired item by using the numerical keys or F5 and F6 keys,
and the selected item becomes highlighted. Then press the ENT key.
Press the C key to return to the SYSTEM MENU.
53
Page 68
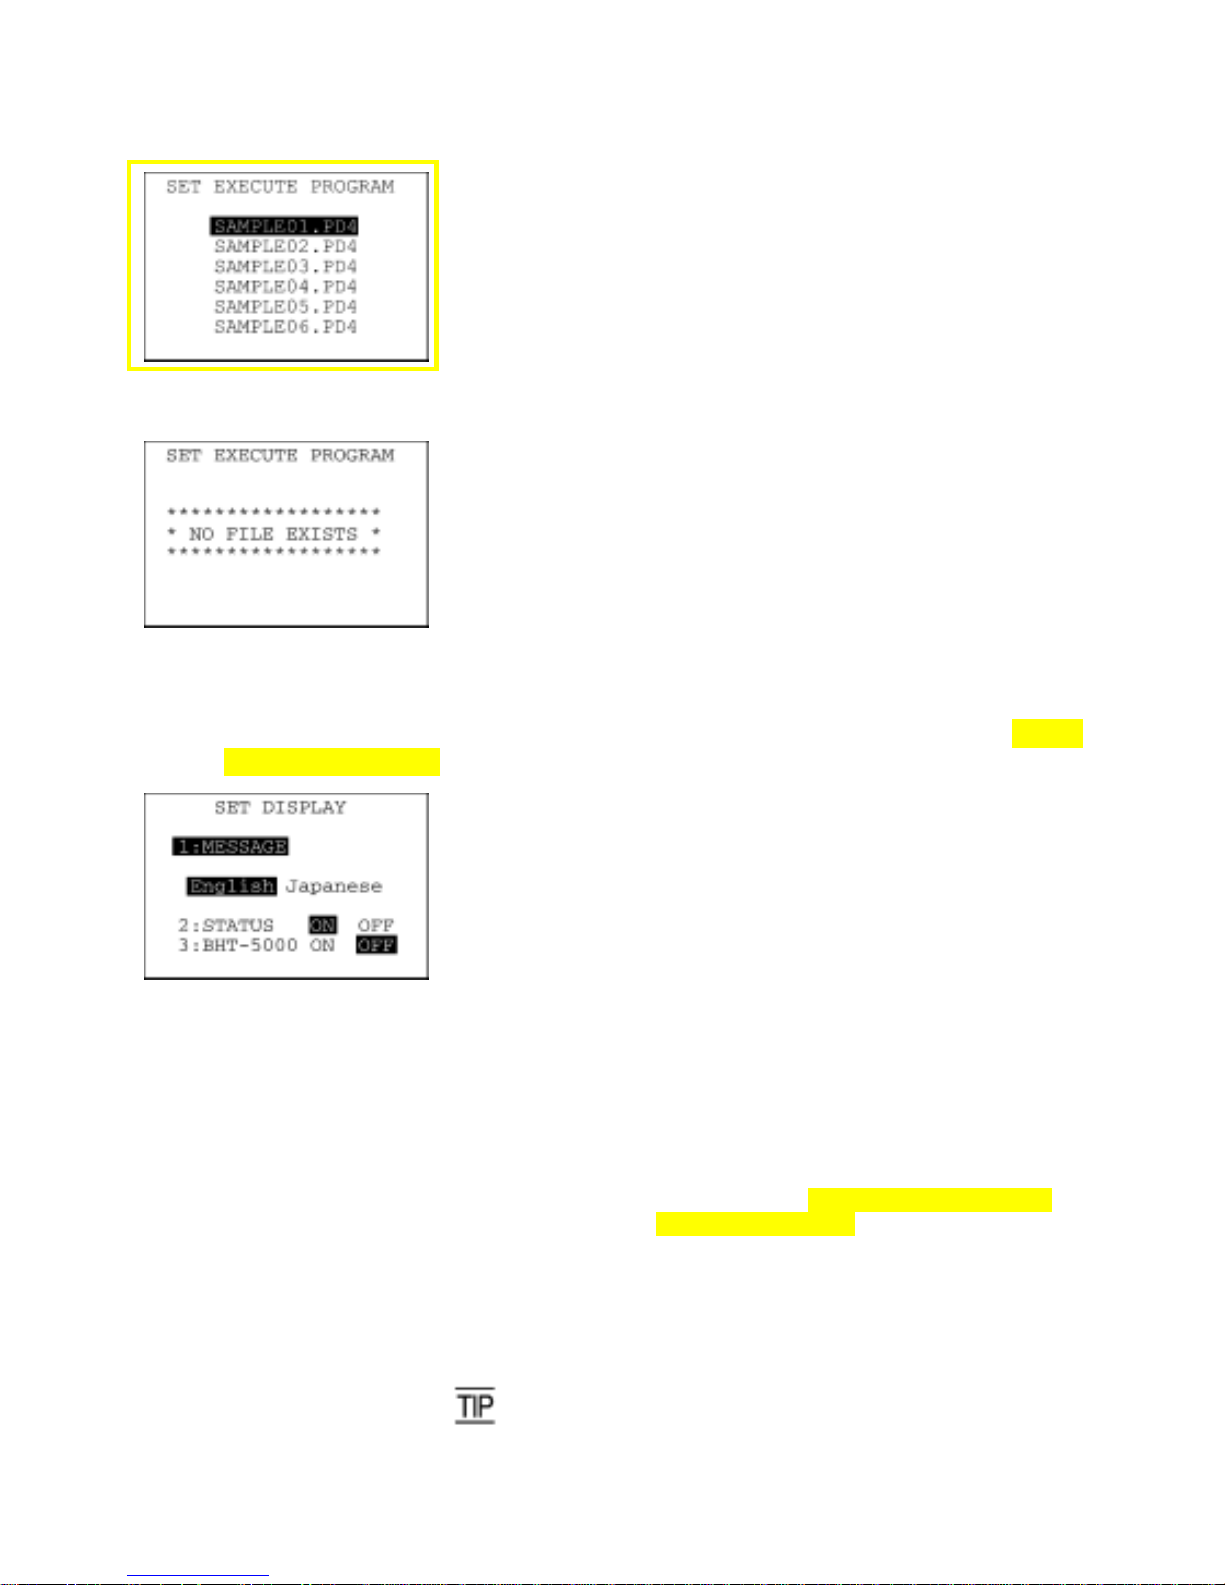
[4.1] Setting an auto-start execution program
On the SET SYSTEM menu, selecting "1: EXECUTE PROGRAM"
calls up the screen shown at left.
Highlighted is the current setting.
Use the F5 and F6 keys to move the cursor to a desired execution
program to be run automatically when the power is applied, and then
press the ENT key.
To return to the SET SYSTEM menu, press the C key.
If no program files are stored in the memory, the screen shown at left
will appear.
To return to the SET SYSTEM menu, press the C key.
[4.2] Setting the message version, system status indication, and BHT-5000 screen
compatibility mode
On the SET SYSTEM menu, selecting "2: DISPLAY" calls up the
screen shown at left.
Highlighted is the current setting.
[1] MESSAGE: Switches the message version to English o
r
Japanese for system error messages and
indications on the LCD contrast, beeper volume,
beeper & vibrator switching, and battery voltage
level screens. (The default is the message version
that you selected in the initializing sequence.)
[2] STATUS: Turns the system status indication on or off. Setting
this to ON displays the shift state of the keys,
alphabet entry mode and communications link with
the CU-311, using the icons shown on the next
page.
[3] BHT-5000: Turns the BHT-5000 screen compatibility mode on
or off. (See the next page.)
Select a desired item by using the numerical keys or F5 and F6 keys,
then select a desired setting by using the F7 and F8 keys.
Press the ENT key.
To return to the SET SYSTEM menu, press the C key.
You can turn the system status indication on or off also by using
the OUT statement in user programs. Refer to the "BHT-BASIC
Programmer's Manual."
54
Page 69
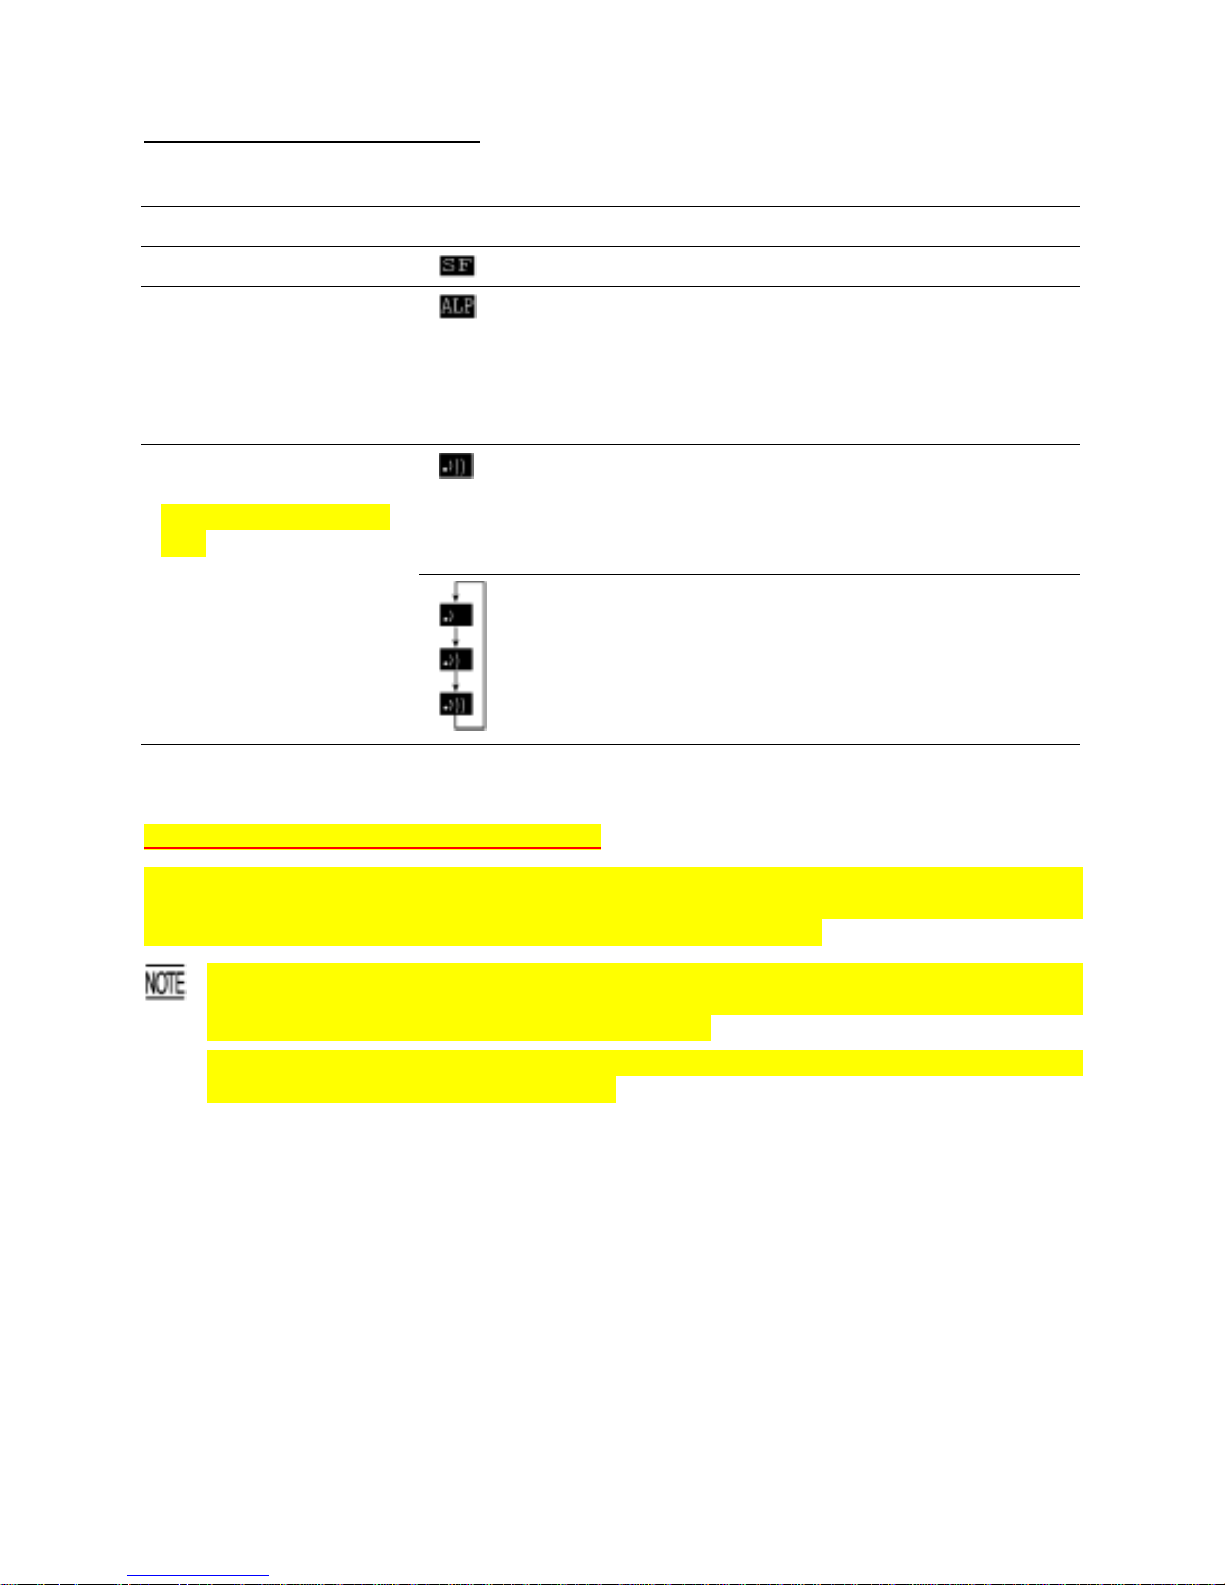
Chapter 2 Getting Started the BHT and System Mode
STATUS (System Status Indication)
Turning on the system status indication displays the following icons in the bottom line of the LCD:
Indication Icon Description
Shift state of the keys
Appears when the keys on the keypad are shifted.
Alphabet entry mode
Appears when the BHT is placed in the alphabet entry
mode.
(If the alphanumeric entry system has been selected in
user programs, pressing the SF key will switch from the
numeric entry mode to alphabet entry mode.)
Appears when the communications link is established
with the CU-311.
Flashes when the BHT tries to communicate with the
CU-311 that has not been linked with the BHT.
Communications link
with the CU-311
(in LAN-support software
only)
Appear cyclically when the BHT receives no response
from the CU-311 or when it is waiting for the link to be
established with or released from the CU-311.
BHT-5000 (BHT-5000 Screen Compatibility Mode)
This compatibility mode makes the screen layout and key assignment of the BHT-300 series downward
compatible with the ones of the BHT-5000. Using this mode can minimize modification in source code to
run application programs written for the BHT-5000 on the BHT-300 series.
The BHT-5000 screen compatibility mode does not assure full compatibility. The transmission speed,
communications link type and others for the IrDA interface, for example, are incompatible. Fo
r
details, refer to the "BHT-BASIC Programmer's Manual."
Enabling the BHT-5000 screen compatibility mode automatically switches the current
communications protocol to the BHT-protocol.
55
Page 70
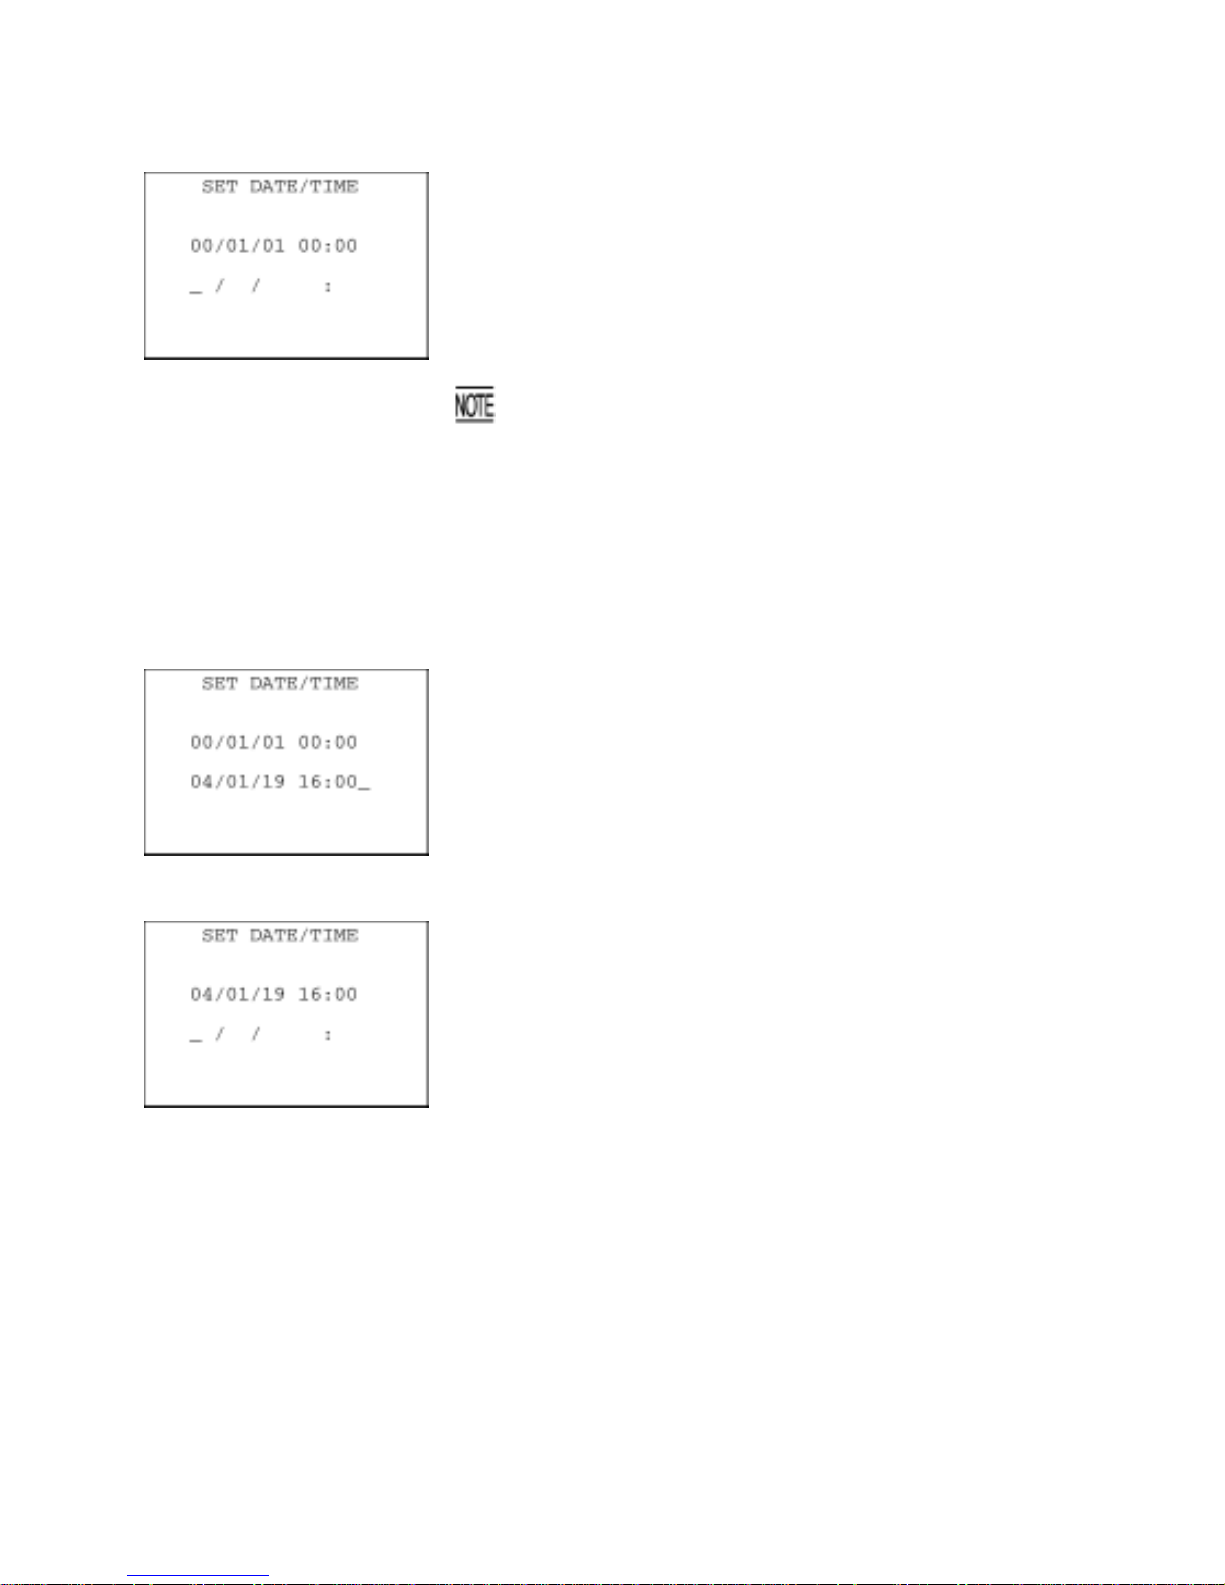
[4.3] Setting the calendar clock
On the SET SYSTEM menu, selecting "3: DATE/TIME" calls up the
screen shown at left.
Use the numerical keys to enter the year (only the last two digits),
month, day, hour, and minute in this order, and then press the ENT
key. If the data is in a single digit, add a 0 (zero) preceding the data.
For the year, be sure to enter the last two digit s of the year. For the
hour, enter it in the 24-hour format.
If any of the year, month, day, hour, and m inute is not ent ered, the
ENT key will be deactivated.
If you make a wrong entry, press the BS key to delete it and then enter
the correct data.
To return to the SET SYSTEM menu, press the C key.
⇓
[Example] To set 2004, January 19, at 4:00 p.m.
Press 0, 4, 0, 1, 1, 9, 1, 6, 0, and 0.
⇓
Press the ENT key to register the above setting.
56
Page 71
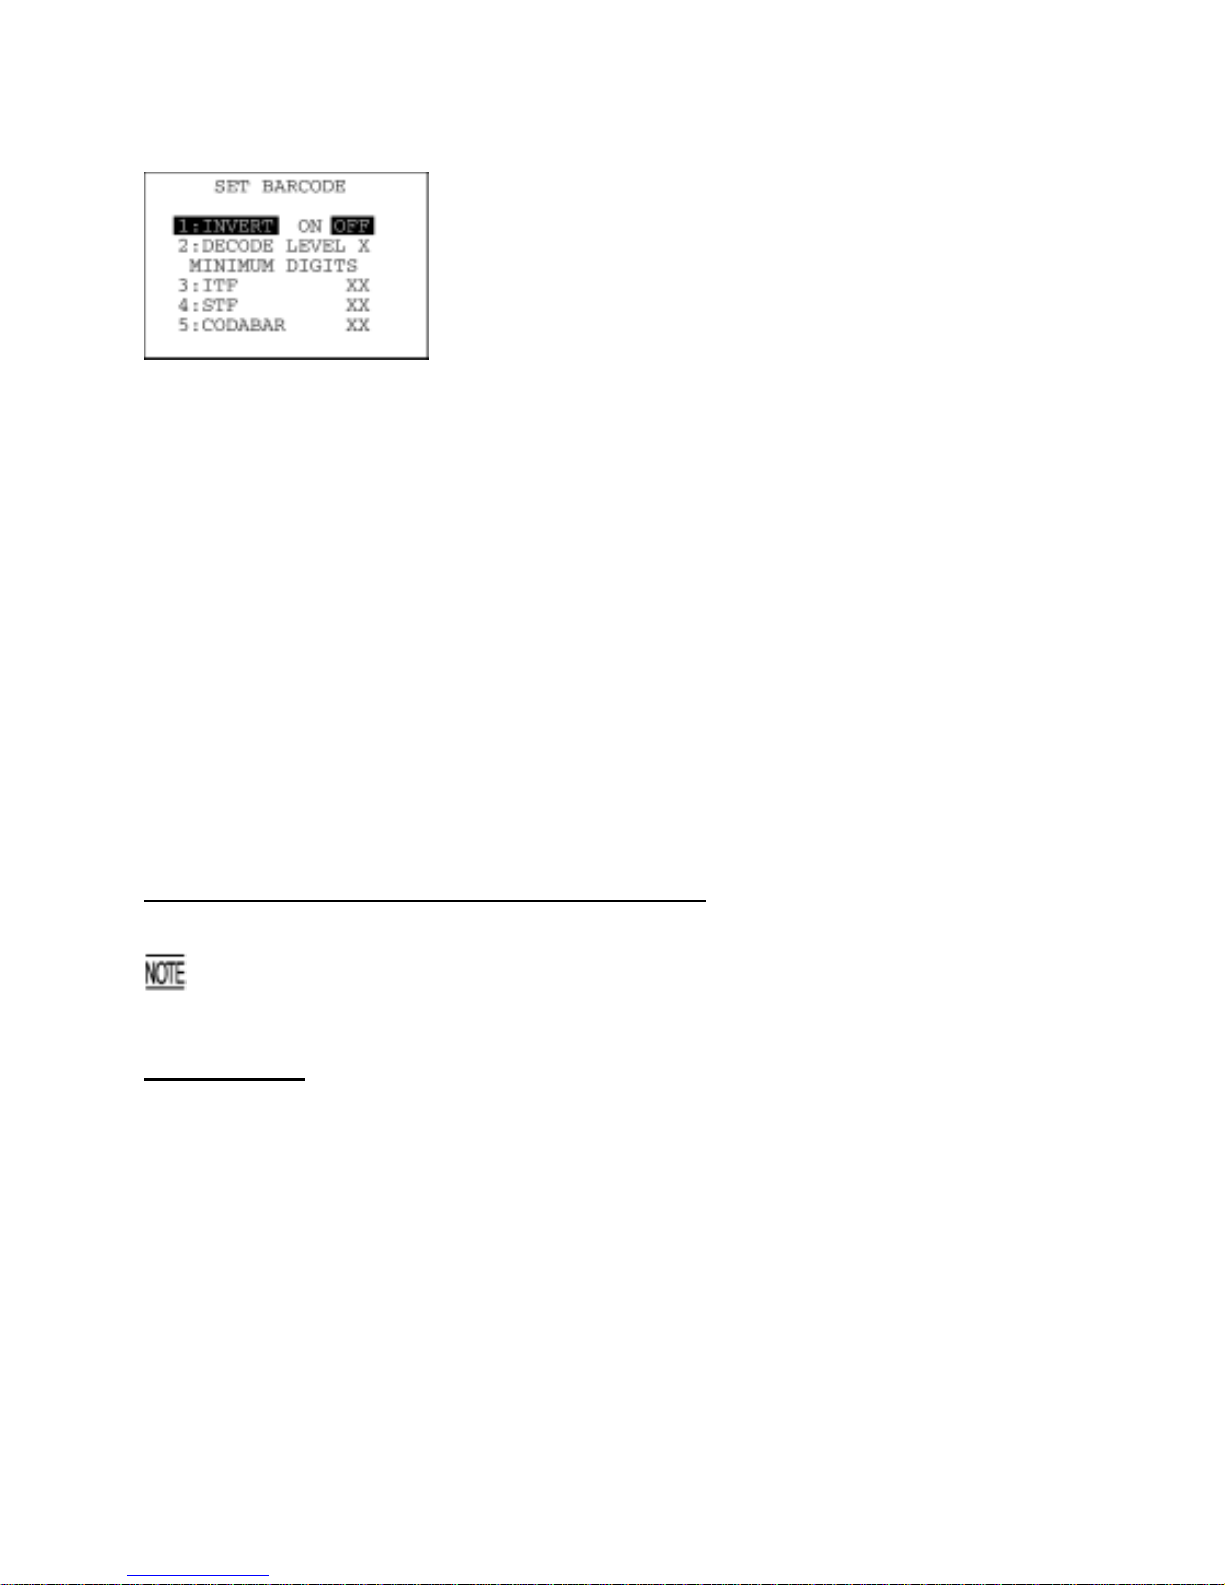
Chapter 2 Getting Started the BHT and System Mode
[4.4] Setting the special bar-code scanning parameters
On the SET SYSTEM menu, selecting "4: BARCODE" calls up the
screen shown at left.
Highlighted is the current setting.
[1] INVERT: Activates or deactivates the black-and-white
inverted label reading function.
[2] DECODE LEVEL: Sets the decode level.
[3] ITF: Sets the minimum number of digits to be read
for ITF.
[4] STF: Sets the minimum number of digits to be read
for STF.
[5] CODABAR: Sets the minimum number of digits to be read
for Codabar.
Select a desired item by using the numerical keys or F5 and F6 keys,
and then select a desired setting by using the F7 and F8 keys.
To increase the decode level, press the F8 key; to decrease it, press
the F7 key.
To increase the number of digits to be read for ITF, STF or Codabar,
press the F8 key; to decrease it, press the F7 key.
Press the ENT key.
To return to the SET SYSTEM menu, press the C key.
INVERT (Black-and-white inverted label reading function)
This function makes it possible to read white bars on a black background.
Activating this function might increase the frequency of ba r-code reading errors. T his function shoul
d
usually be set to OFF.
DECODE LEVEL
You can set the decode level. Decreasing the level value increases the bar-code reading efficiency, but
the BHT might misread low-quality bar codes (split or stained). To the contrary, increasing the level
value decreases the bar-code reading efficiency, but it will diminish the possibility of misreading.
The entry range of the level value is from 1 to 9 and the default is 4.
57
Page 72

MINIMUM DIGITS (Minimum number of digits to be read for ITF, STF, or Codabar)
You can determine the minimum number of digits to be read for ITF, STF, and Codabar. Setting a small
number of digits increases the frequency of digit-missing reading or misreading depending upon how to
scan bar codes or the quality of bar codes. On the other hand, setting a large number will diminish the
possibility of those errors.
The entry range is from 2 to 20 for ITF, from 1 to 20 for STF, and from 3 to 20 for Codabar. The default
is 4 for ITF and Codabar, and 3 for STF.
58
Page 73

Chapter 2 Getting Started the BHT and System Mode
[4.5] Setting the communications environments
After the BHT is initialized, the interface port and communications parameters are set as listed in the
default table below. Do not access them unless necessary.
Interface port Optical (IrDA interface port)
Communications protocol YMODEM
Communications parameters
for the IrDA interface port
Defaults
TRANSMIT SPEED 115200 bps
SERIAL No.: ON (Adds serial numbers to data
blocks.)
H. PARITY: ON (Adds a horizontal parity.)
LINKUP TIME: 30 seconds
PROTOCOL (Protocol options)
FIELD SPACE: Ignore (Trim)
Listed below are the default communications parameters for the direct-connect interface.
Communications parameters
for the direct-connect interface port
Defaults
TRANSMIT SPEED 115200 bps
PARITY BIT (Vertical parity) None
DATA BIT (Character length) 8 bits
STOP BIT (Stop bit length) 1 bit
SERIAL No.: ON (Adds serial numbers to data
blocks.)
H. PARITY: ON (Adds a horizontal parity.)
LINKUP TIME: 30 seconds
PROTOCOL (Protocol options)
FIELD SPACE: Ignore (Trim)
59
Page 74
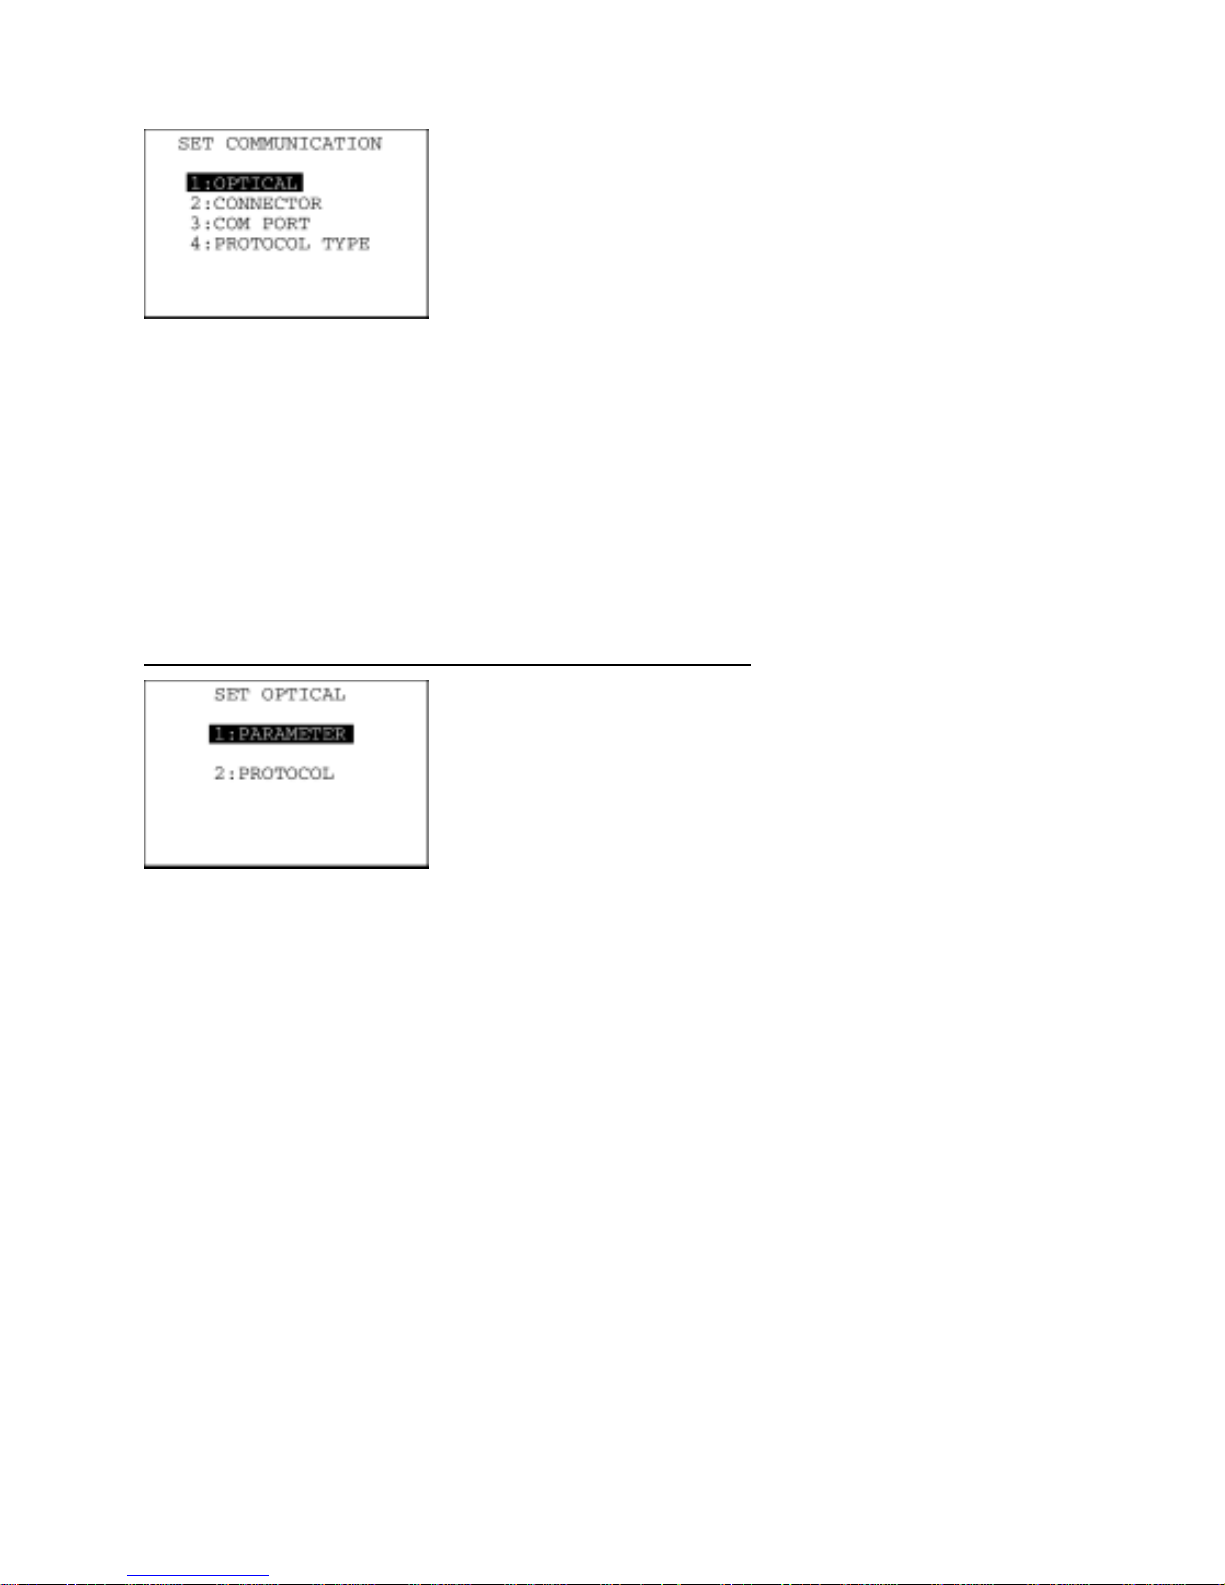
On the SET SYSTEM menu, selecting the "5: COMMUNICATION "
calls up the screen shown at left.
[1] OPTICAL: Switches to the communications parameters
setting screen for the IrDA interface.
[2] CONNECTOR: Switches to the communications parameters
setting screen for the direct-connec
t
interface.
[3] COM PORT: Switches to the interface port setting screen.
[4] PROTOCOL TYPE: Switches to the communications protocol
type setting screen.
Select a desired screen by using the numerical keys or F5 and F6
keys, and then press the ENT key.
To return to the SET SYSTEM menu, press the C key.
Setting the communications parameters for the IrDA interface
On the SET COMMUNICATION menu, select "1: OPTICAL" to call up
the screen shown at left.
[1] PARAMETER: Switches to the communications parameters
setting screen.
[2] PROTOCOL: Switches to the communications protocol option
screen.
Select a desired screen by using the numerical keys or F5 and F6
keys, and then press the ENT key.
To return to the SET COMMUNICATION menu, press the C key.
60
Page 75
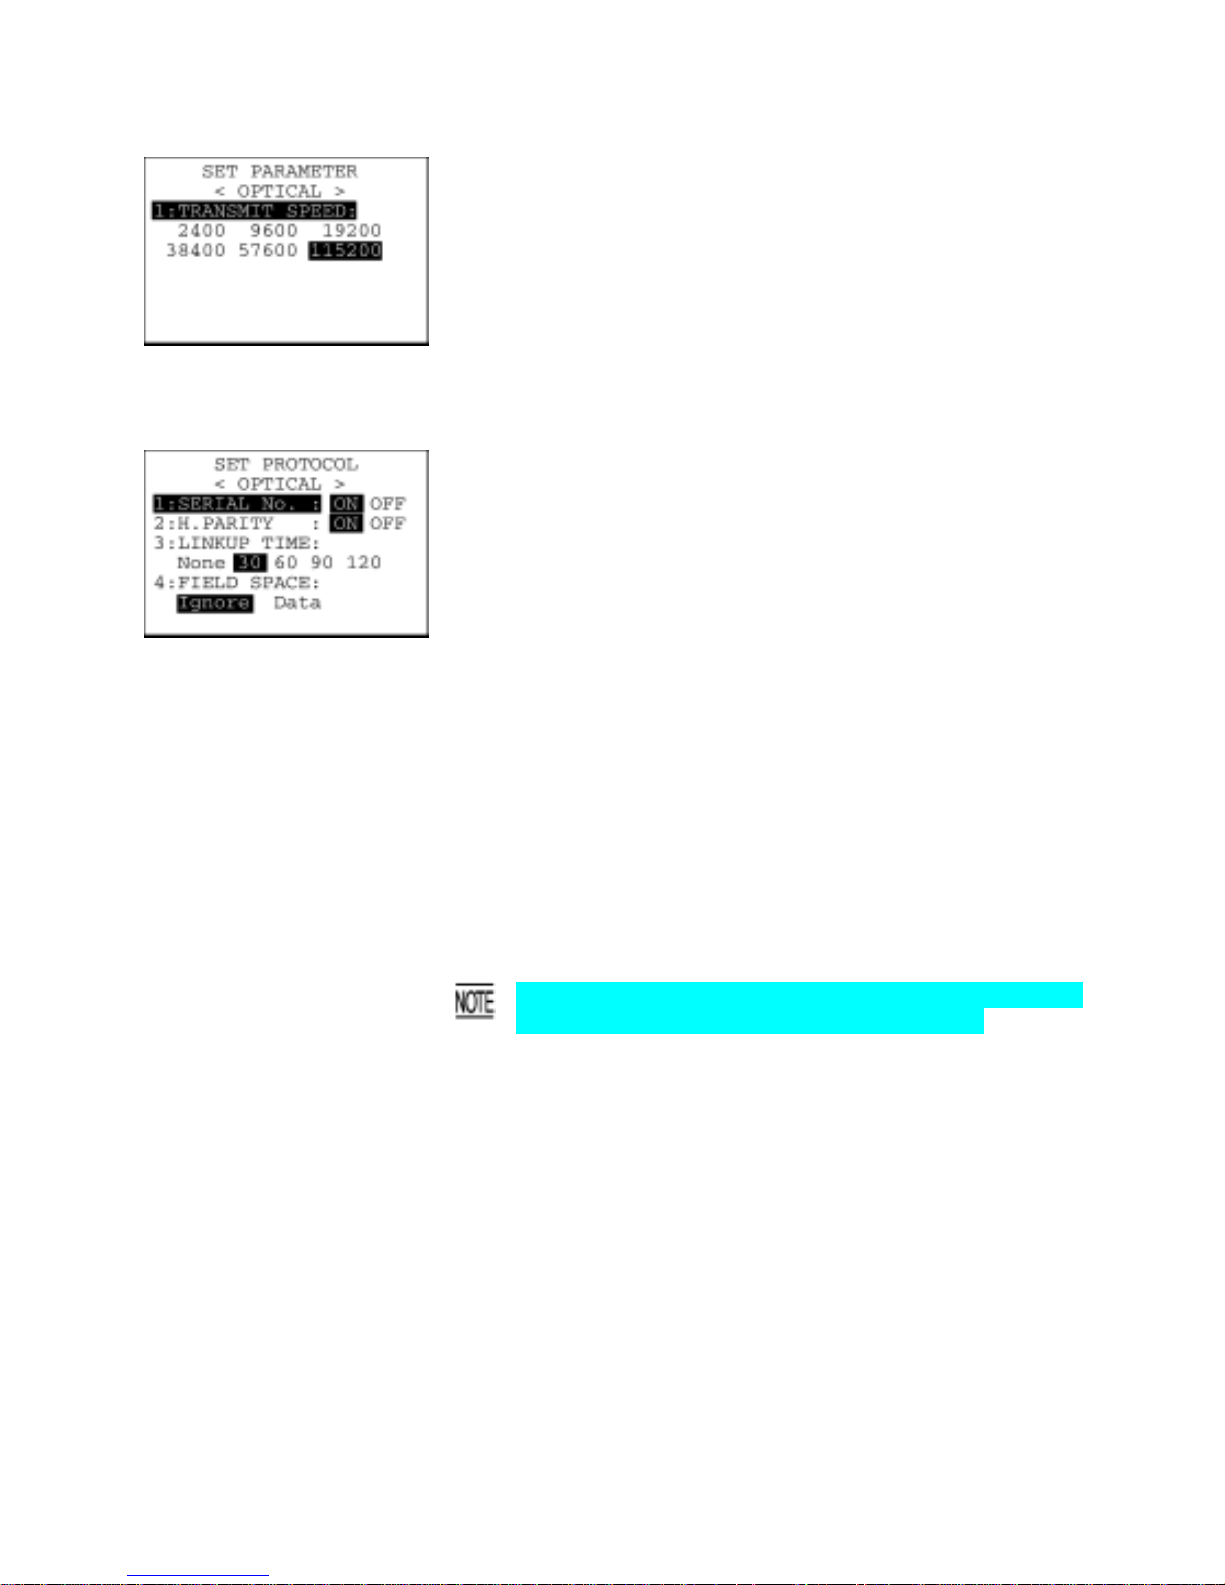
Chapter 2 Getting Started the BHT and System Mode
(1) Communications parameters setting screen
On the SET OPTICAL screen, select "1: PARAMETER" to call up the
screen shown at left.
Highlighted is the current setting.
Select the desired transmission speed by using the numerical keys o
r
F7 and F8 keys, and then press the ENT key.
To return to the SET OPTICAL screen, press the C key.
(2) Communications protocol option screen
On the SET OPTICAL screen, select "2: PROTOCOL" to call up the
screen shown at left.
Highlighted is the current setting.
[1] SERIAL No.: Selects whether or not to add serial numbers to
data blocks.
[2] H. PARITY: Selects whether or not to add a horizontal parity.
[3] LINKUP TIME: Selects the timeout length (in seconds) to be
applied when a link is to be established.
[4] FIELD SPACE: Specifies the treatment of trailing spaces in
fields.
To trim trailing spaces in fields, select Ignore; to
retain them as data, select Data.
Select a desired item by using the numerical keys or F5 and F6 keys.
Then select a desired setting by using the F7 and F8 keys.
To return to the SET OPTICAL screen, press the C key.
If the BHT-Ir protocol or YM ODEM ha s been select ed, the serial
number and horizontal parity settings will be ignored.
61
Page 76
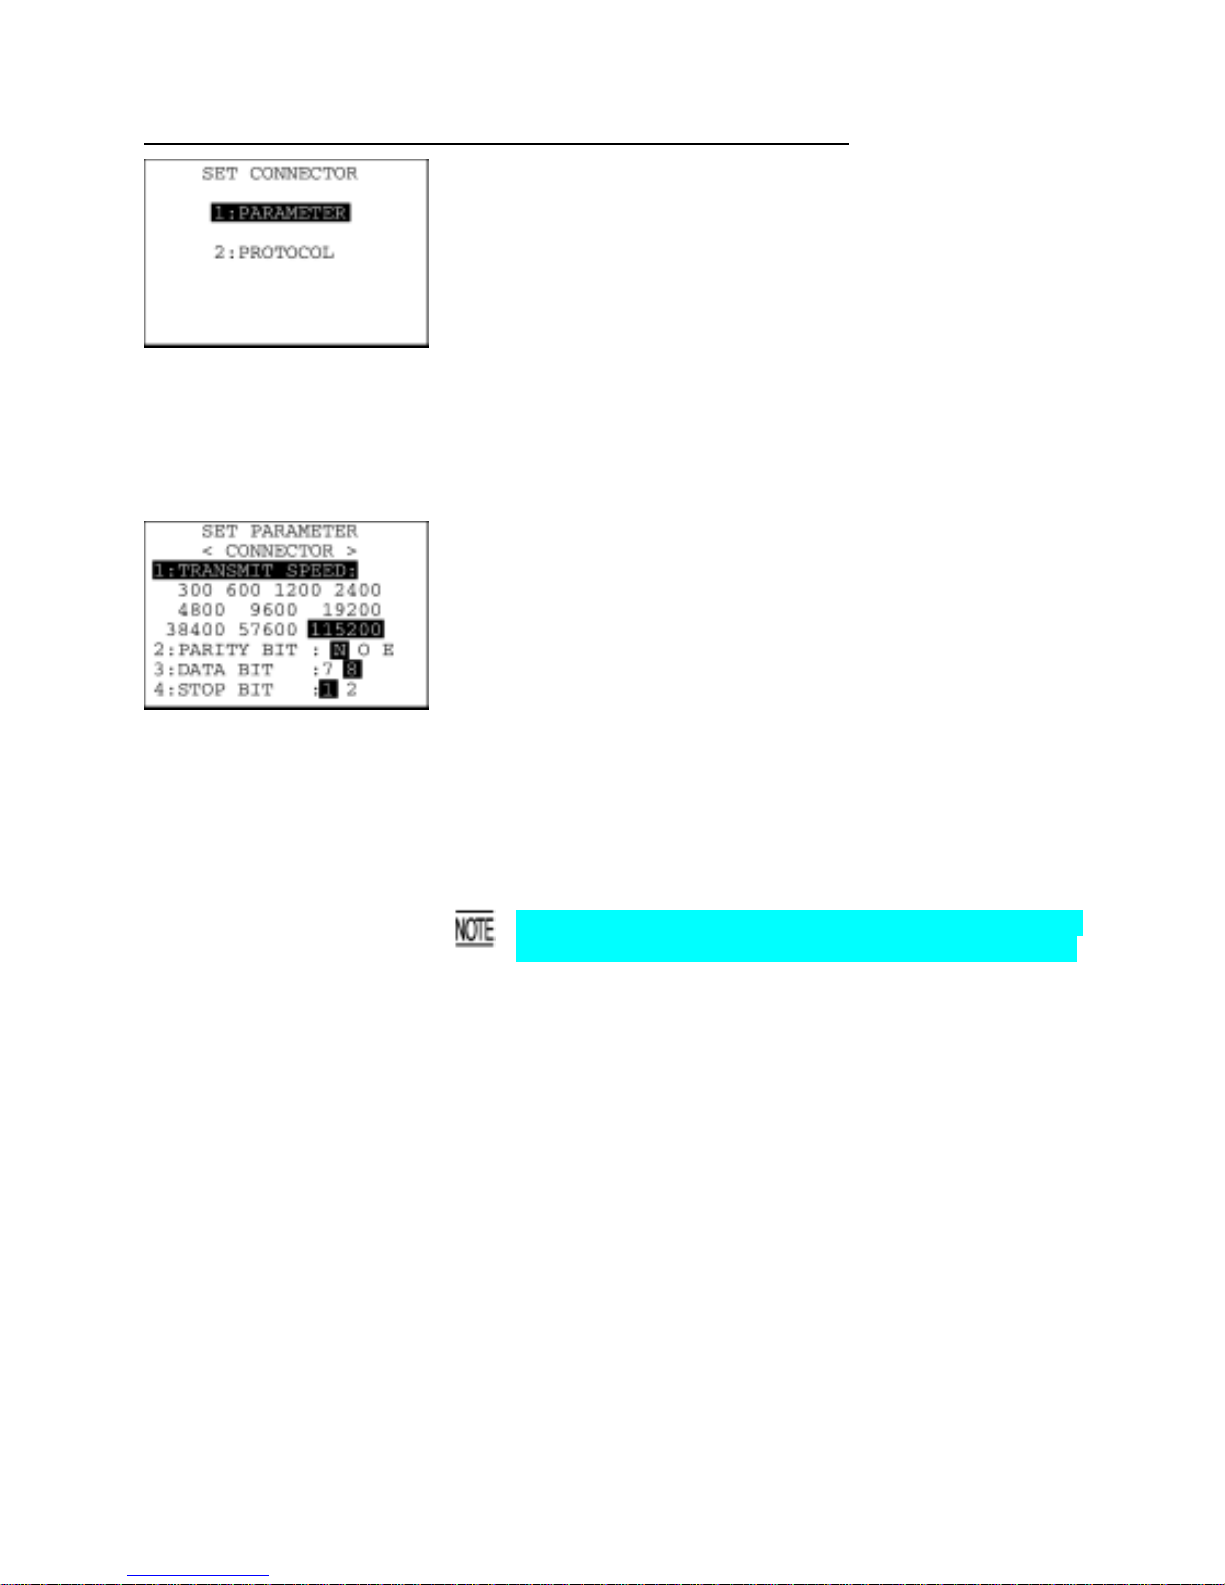
Setting the communications parameters for the direct-connect interface
On the SET COMMUNICATION menu, select "2: CONNECTOR" to
call up the screen shown at left.
[1] PARAMETER: Switches to the communications parameters
setting screen.
[2] PROTOCOL: Switches to the communications protocol screen.
Select a desired screen by using the numerical keys or F5 and F6
keys, and then press the ENT key.
To return to the SET COMMUNICATION menu, press the C key.
(1) Communications parameters setting screen
On the SET CONNECTOR screen, select "1: PARAMETER" to call
up the screen shown at left.
Highlighted is the current setting.
[1] TRANSMIT SPEED: Sets the transmission speed.
[2] PARITY BIT: Sets the vertical parity: none, odd, or even.
[3] DATA: Sets the character length.
[4] STOP: Sets the stop bit length.
Select a desired item by using the numerical keys or F5 and F6 keys.
Then select a desired setting by using the F7 and F8 keys.
To return to the SET CONNECTOR screen, press the C key.
If the BHT-Ir protocol or YM ODEM has been selected, the parity
bit, character length, and stop bit length settings will be ignored.
62
Page 77
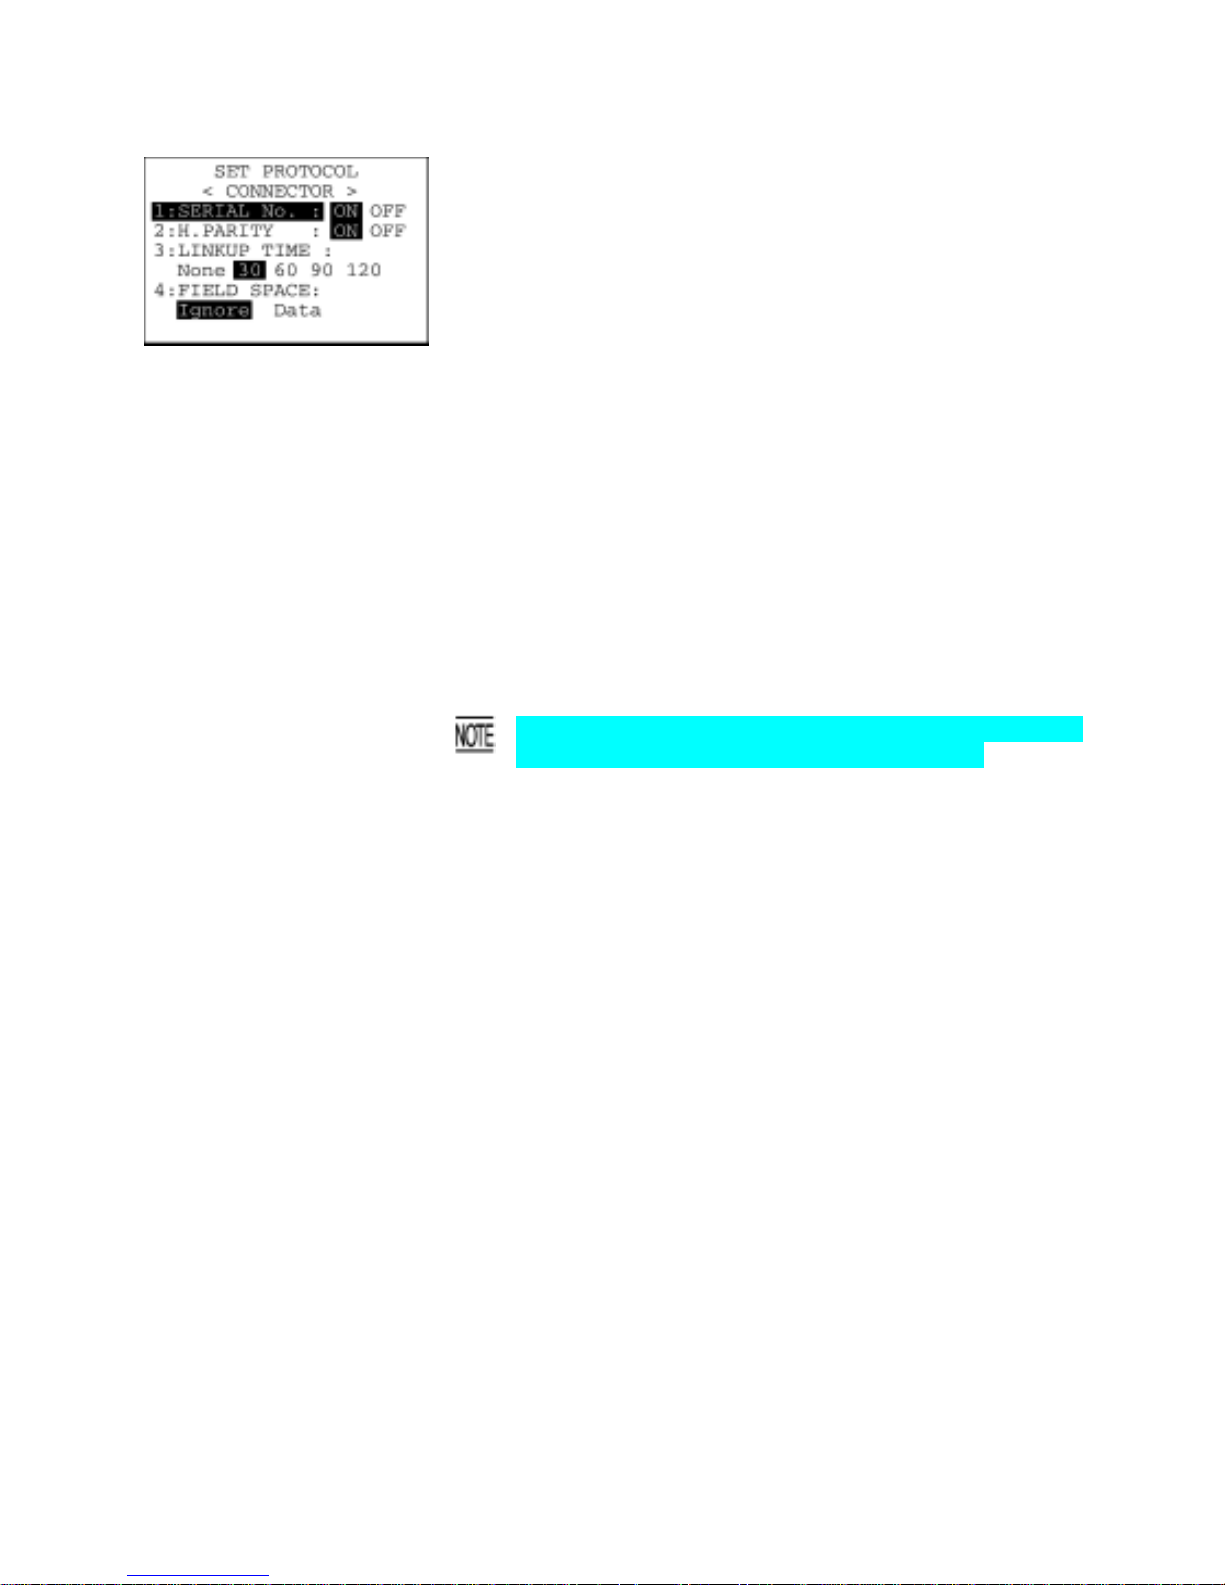
Chapter 2 Getting Started the BHT and System Mode
(2) Communications protocol option menu
On the SET CONNECTOR screen, select "2: PROTOCOL" to call up
the screen shown at left.
Highlighted is the current setting.
[1] SERIAL No.: Selects whether or not to add serial numbers
to data blocks.
[2] H. PARITY: Selects whether or not to add a horizontal
parity.
[3] LINKUP TIME: Selects the timeout length (in seconds) to be
applied when a link is to be established.
[4] FIELD SPACE: Specifies the treatment of trailing spaces in
fields.
To trim trailing spaces in fields, select Ignore;
to retain them as data, select Data.
Select a desired item by using the numerical keys or F5 and F6 keys.
Then select a desired setting by using the F7 and F8 keys.
To return to the SET CONNECTOR screen, press the C key.
If the BHT-Ir protocol or YM ODEM ha s been select ed, the serial
number and horizontal parity settings will be ignored.
63
Page 78
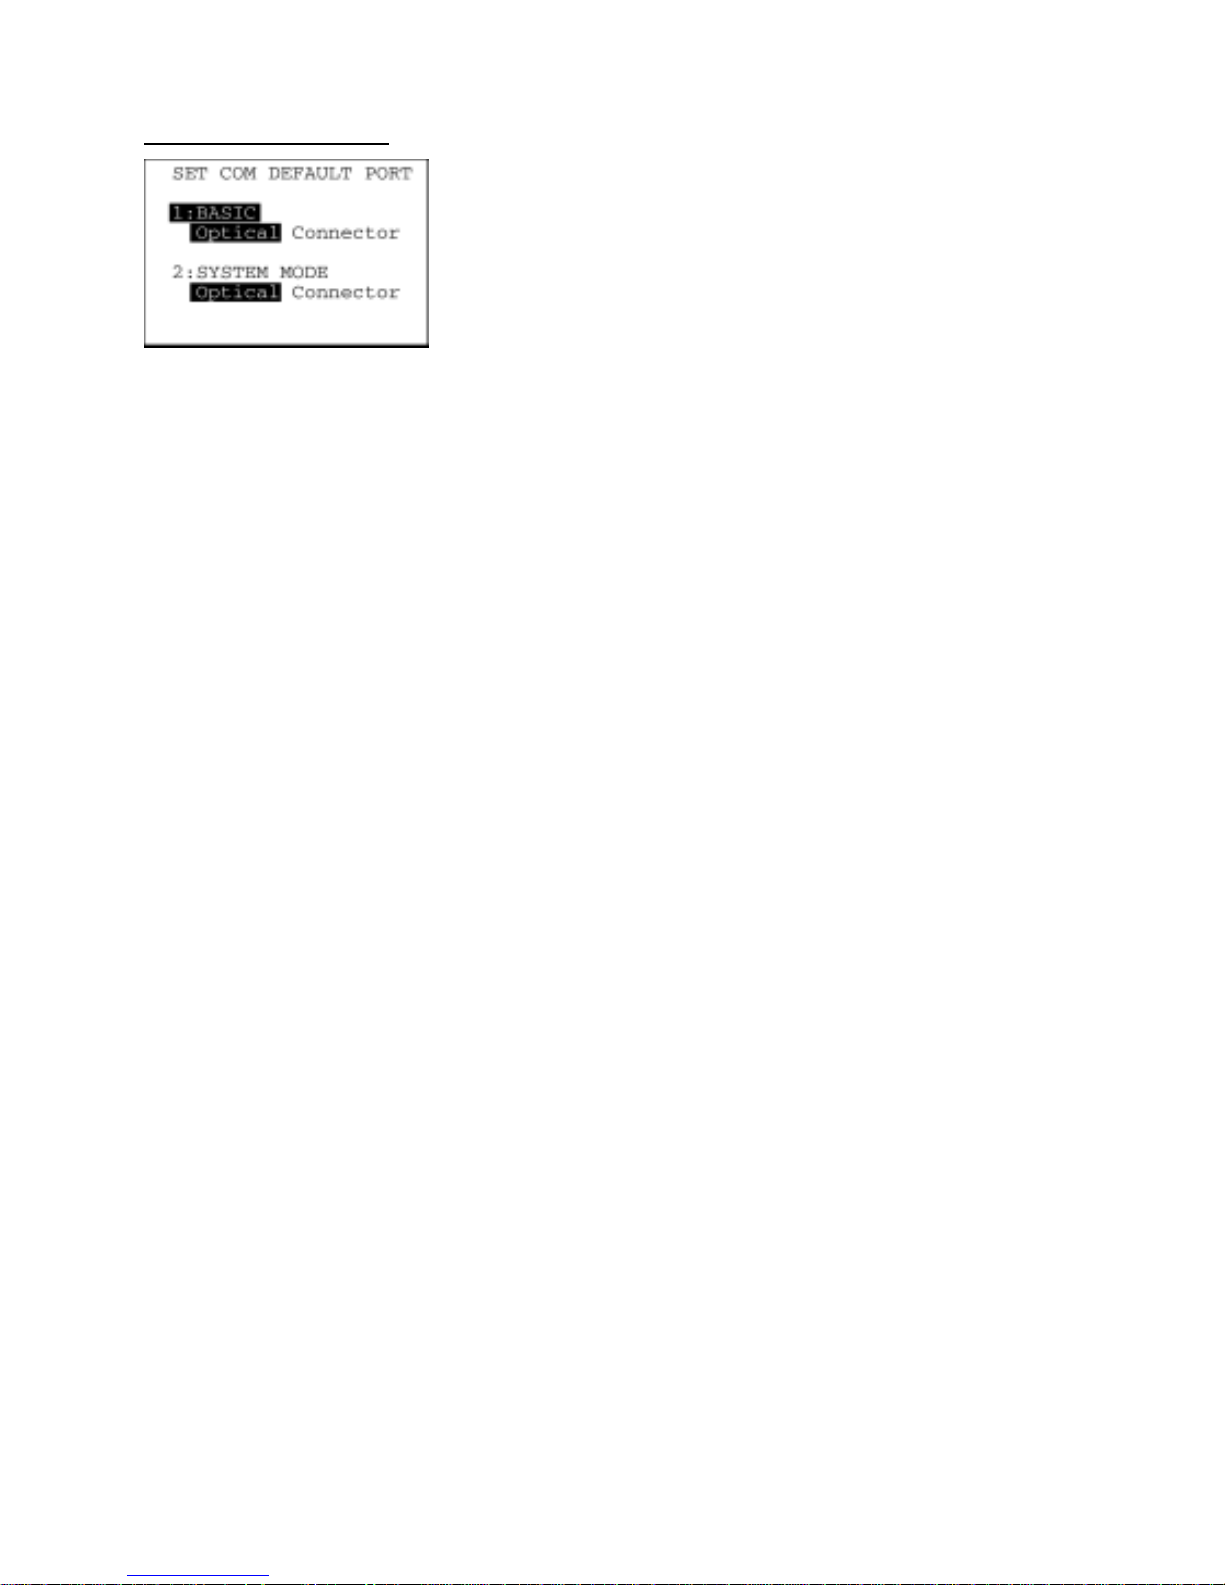
Setting the interface port
On the SET COMMUNICATION menu, select the "3: COM PORT" to
call up the screen shown at left.
Highlighted is the current setting.
[1] BASIC: Selects the IrDA (Optical) or direct-connect
(Connector) interface port to be used for use
r
programs written in BHT-BASIC (OPE
N
"COM:").
[2] SYSTEM MODE: Selects the IrDA (Optical) or direct-connect
(Connector) interface port to be used fo
r
downloading or uploading files in System
Mode.
Select a desired item by using the numerical keys or F5 and F6 keys.
Then select a desired setting by using the F7 and F8 keys.
To return to the SET COMMUNICATION menu, press the C key.
64
Page 79
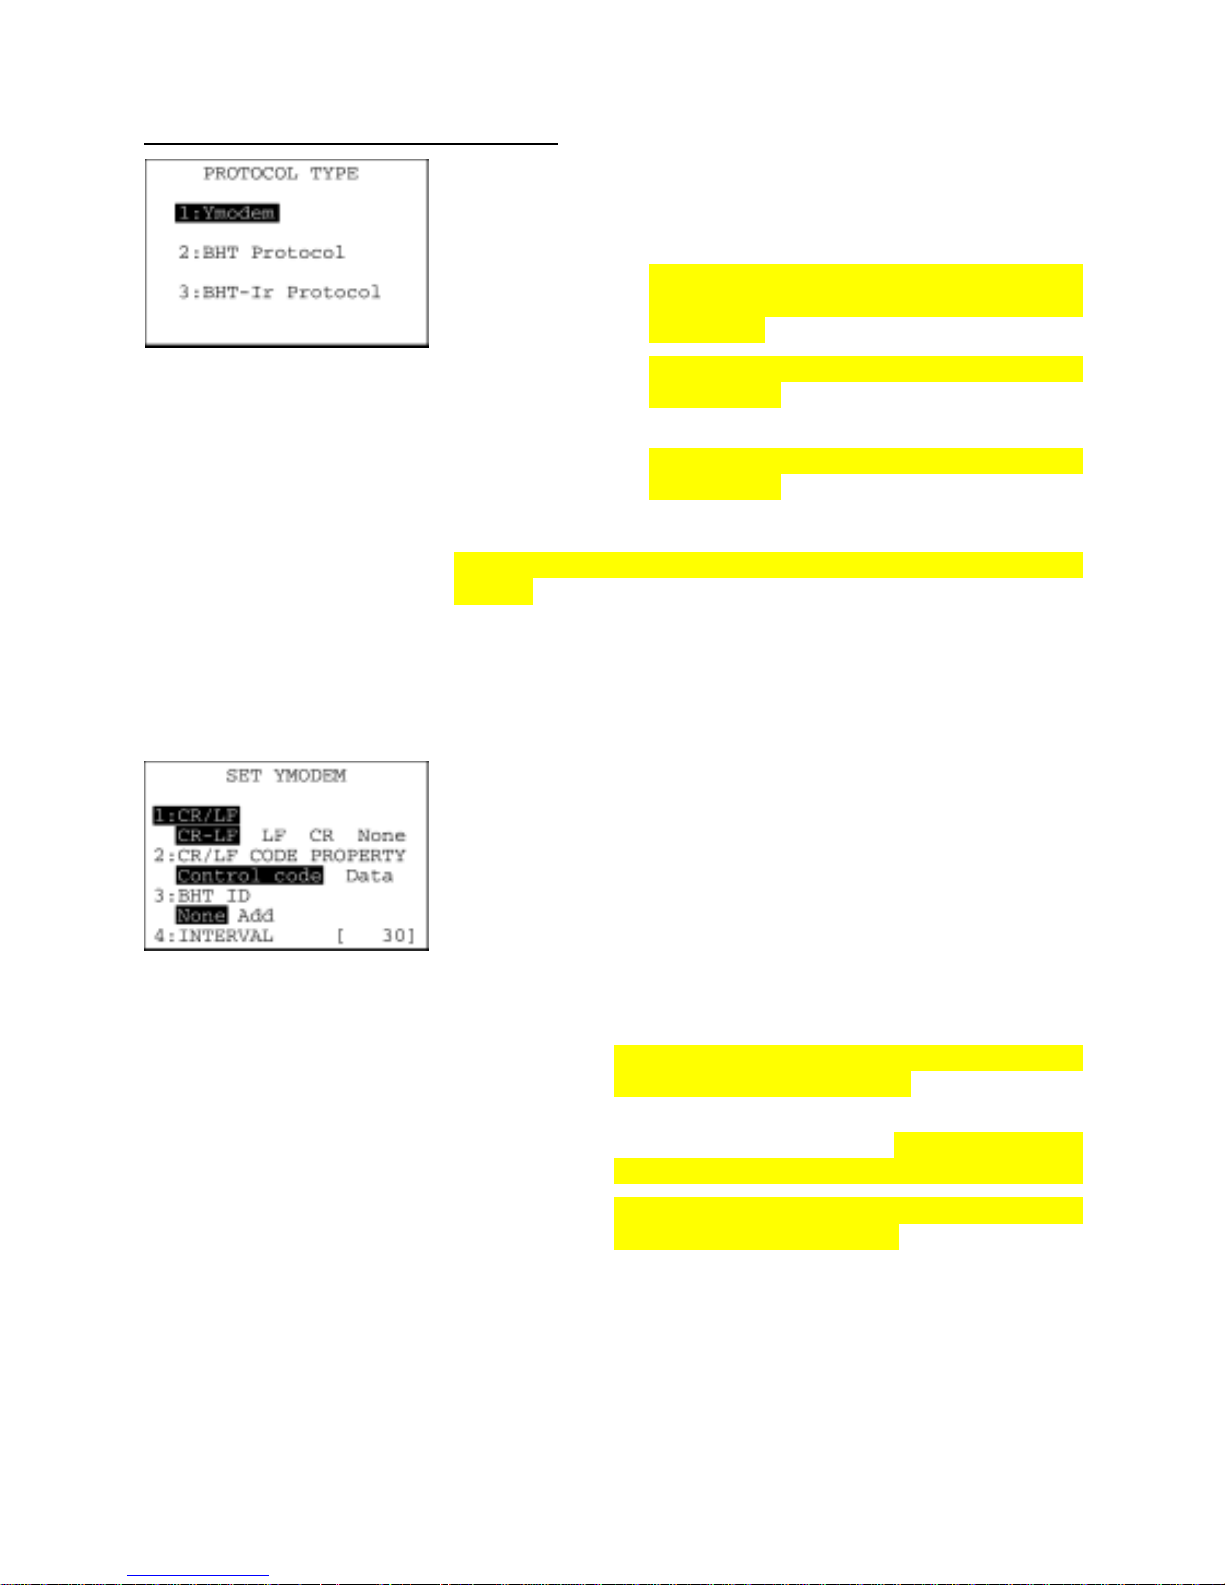
Chapter 2 Getting Started the BHT and System Mode
Setting the communications protocol type
On the SET COMMUNICATION menu, select "4: PROTOCOL TYPE"
to call up the screen shown at left.
Highlighted is the current setting.
[1] Ymodem: Selects Ymodem for file transfer in System
Mode or for the execution of XFILE statement in
BHT-BASIC.
[2] BHT Protocol: Selects the BHT-protocol for file transfer in
System Mode or for the execution of XFILE
statement in BHT-BASIC.
[3] BHT-Ir Protocol: Selects the BHT-Ir protocol for file transfer in
System Mode or for the execution of XFILE
statement in BHT-BASIC.
To use BHT-BASIC4.0 Transfer Utility, select Ymodem or BHT-Ir
protocol.
Select a desired item by using the numerical keys or F5 and F6 keys,
and then press the ENT key.
To return to the SET COMMUNICATION menu, press the C key.
On the PROTOCOL TYPE screen, select "1: Ymodem" to call up the
screen shown at left.
[1] CR/LF: Specifies line delimiters.
[2] CR/LF PROPERTY:
Specifies the treatment of line delimiters in records
when data files are downloaded.
To treat line delimiters in records as separators,
select Control code; to treat them as data, select
Data.
[3] BHT ID: Specifies whether or not to add the BHT ID number
to packets in YMODEM transfer.
Usually select None. To add the BHT ID number in
a transfer tool, select Add. (This setting is not
supported. Changing this setting produces nothing.)
[4] INTERVAL: Specifies the retry interval within the range from 1
through 255 in units of 100 ms.
Select a desired item by using the numerical keys or F5 and F6 keys.
Then select a desired setting by using the F7 and F8 keys.
65
Page 80
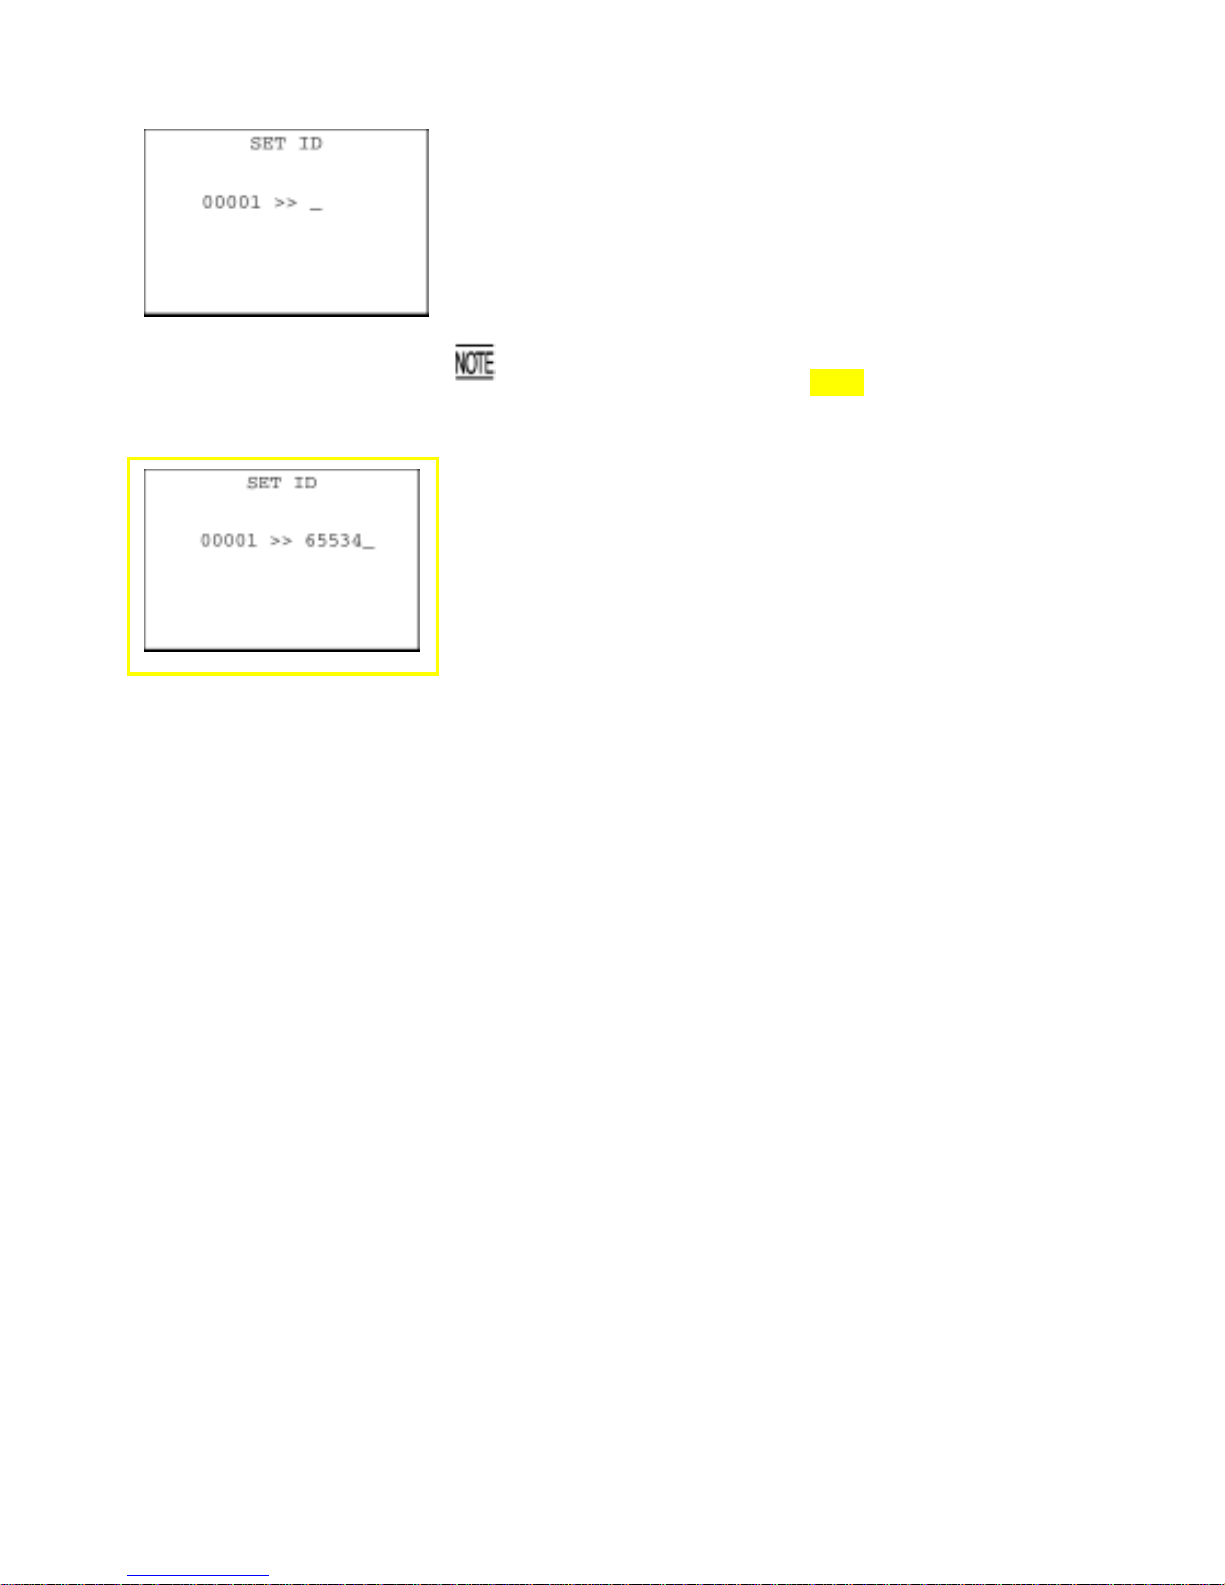
On the PROTOCOL TYPE screen, select the "3: BHT-Ir Protocol" to
call up the screen shown at left.
Enter the ID number of the BHT by using the numerical keys, and
then press the ENT key. If you do not need to modify the current
setting, press the ENT key only.
An ID number should be a five-digit decimal character string.
The entry range is from 00001 to 65534. If the entry value is less
than five digits, the ENT key will be deactivated.
If you make a wrong entry, press the BS key to delete it and then
enter the correct data.
To return to the SET COMMUNICATION menu, press the C key.
66
Page 81
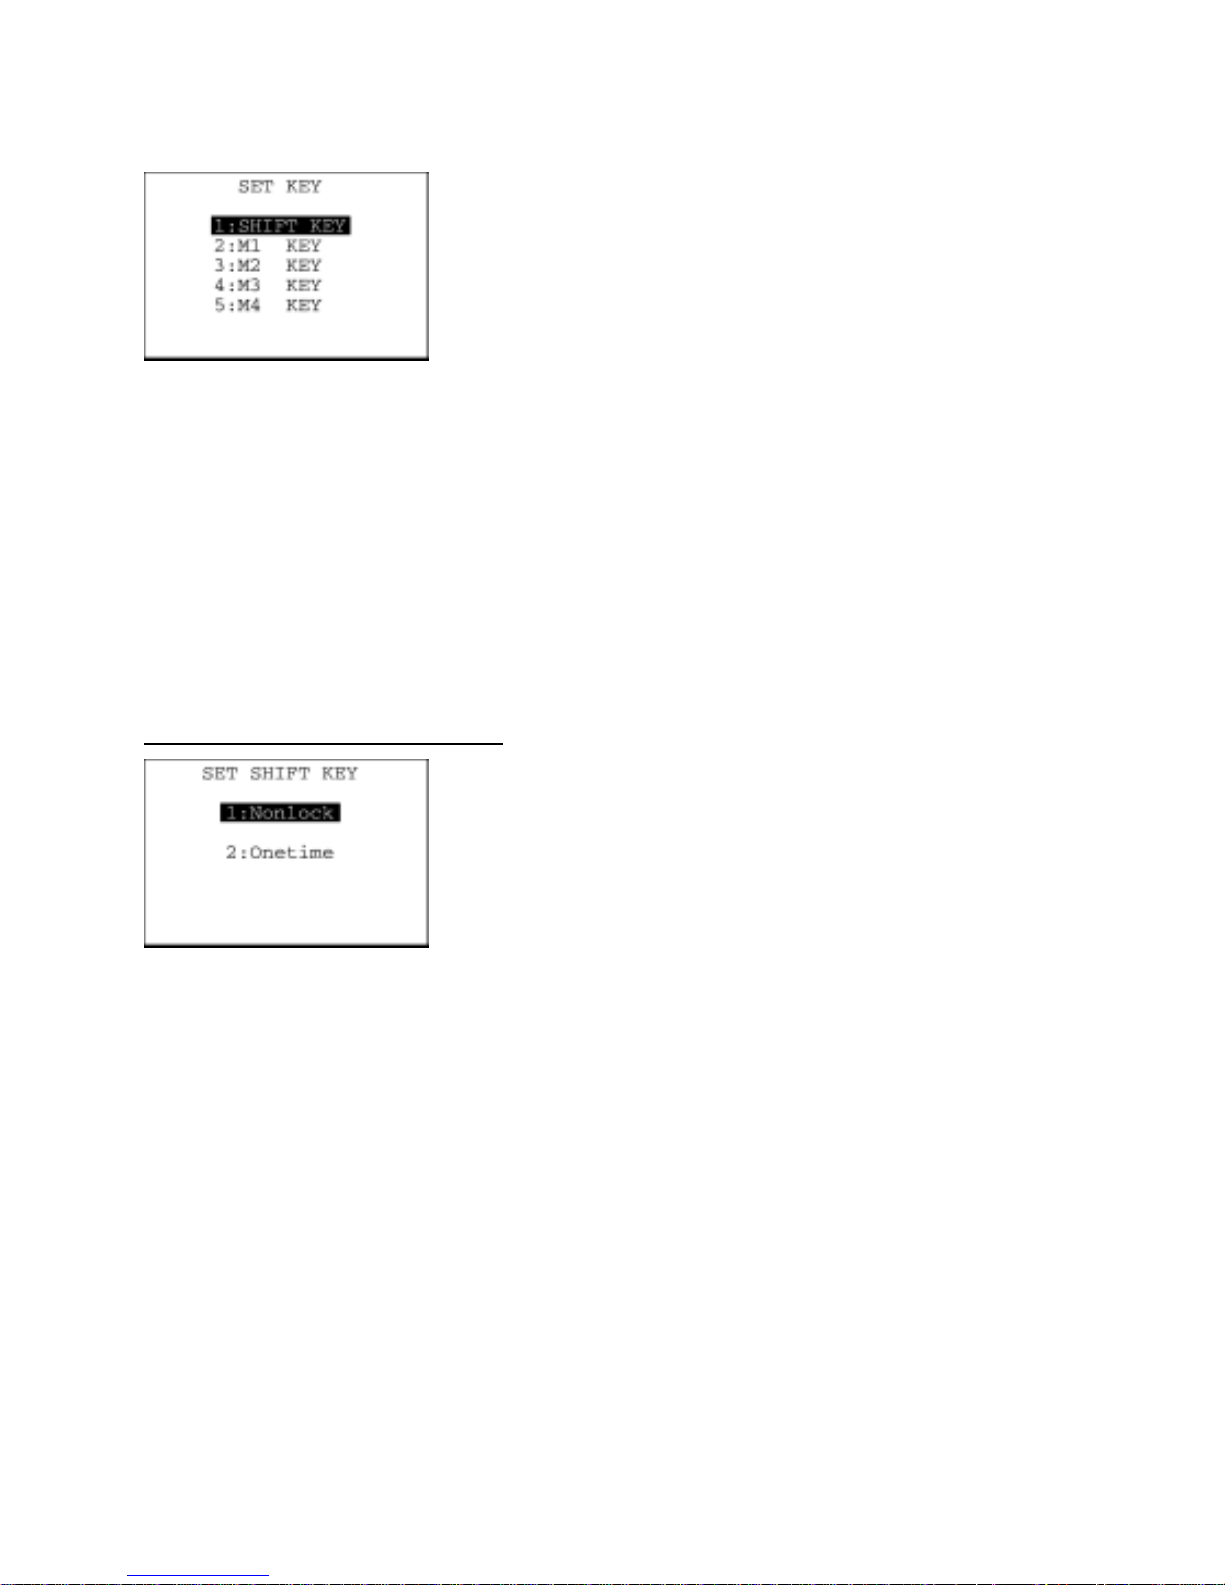
Chapter 2 Getting Started the BHT and System Mode
[4.6] Defining the functions of the shift key and magic keys
On the SET SYSTEM menu, selecting the "6: KEY" calls up the
screen shown at left.
Highlighted is the current setting.
[1] SHIFT KEY: Switches to the SF key definition screen.
[2] M1 KEY: Switches to the M1 key definition screen.
[3] M2 KEY: Switches to the M2 key definition screen.
[4] M3 KEY: Switches to the M3 (left-hand trigger switch) key
definition screen.
[5] M4 KEY: Switches to the M4 (right-hand trigger switch) key
definition screen.
Select a desired screen by using the numerical keys or F5 and F6
keys, and then press the ENT key.
To return to the SET SYSTEM menu, press the C key.
Defining the function of the shift key
On the SET KEY menu, select "1: SHIFT KEY" to call up the screen
shown at left.
Highlighted is the current setting.
[1] Nonlock: Shifts the keypad only when the SF key is held
down.
[2] Onetime: Shifts only one key pressed immediately after the SF
key is pressed. (The following keys will not be
shifted.)
Select a desired setting by using the numerical keys or F5 and F6
keys, and then press the ENT key. The screen returns to the SET
KEY menu.
67
Page 82
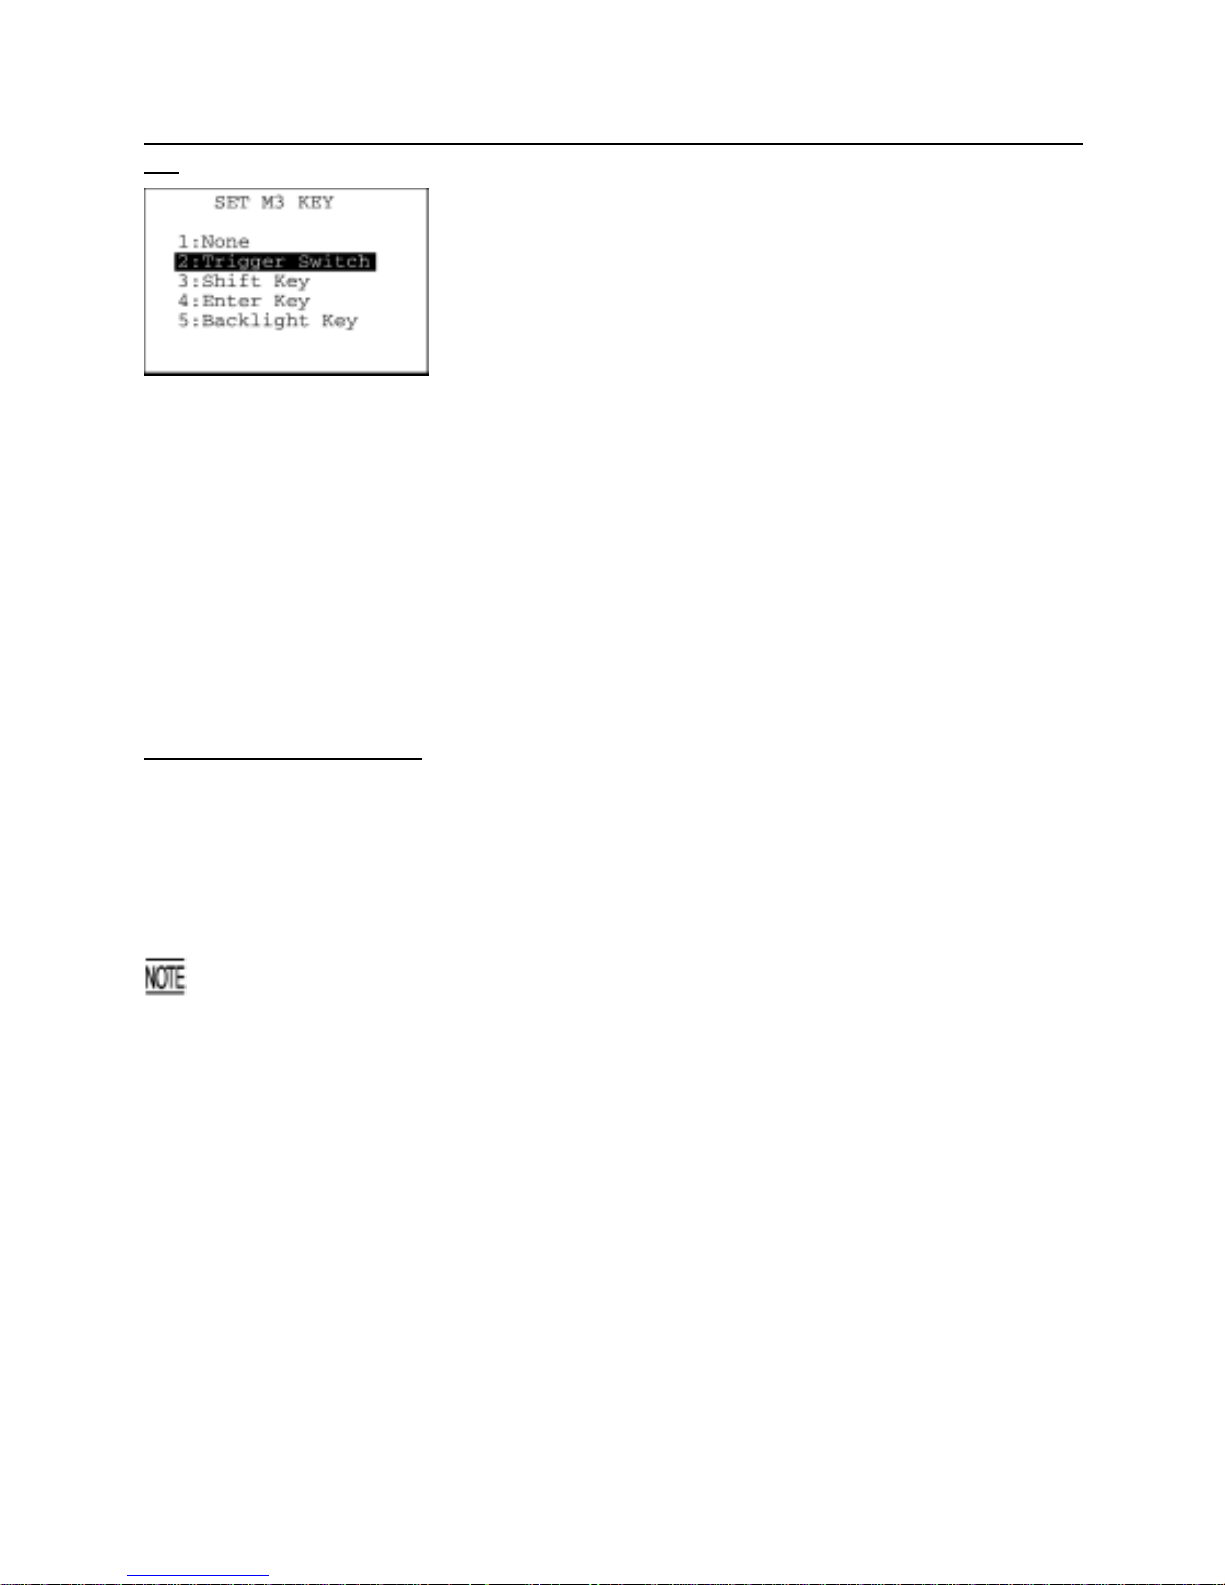
Defining the function of M1 , M2 , M3 (left-hand trigger switch), or M4 (right-hand trigger switch)
key
On the SET KEY menu, select "2: M1 KEY," "3: M2 KEY," "4: M3
KEY" or "5: M4 KEY" to call up the screen as shown at left. (This
example appears when the "4: M3 KEY" is selected.)
Highlighted is the current setting.
The M1 , M2 , M3 or M4 key can function as listed below.
[1] None: The key entry will be ignored.
[2] Trigger Switch: As a trigger switch.
[3] Shift Key: As a SF key.
[4] Enter Key: As an ENT key.
[5] Backlight Key: As a backlight function on/off key.
Select a desired setting by using the numerical keys or F5 and F6
keys, and then press the ENT key. The screen returns to the SET
KEY menu.
Magic keys (M1 through M4)
The M3 and M4 keys are assigned the trigger switch function by default. You can make them serve as a
SF key, ENT key, or backlight function on/off key.
If you define the M1 key as a backlight function on/off key, pressing the M1 key activates or deactivates
the backlight function.
In user programs, a string data can be also assigned to these magic keys.
The backlight function on/off key can be assigned only to any one of M1 through M4 keys. The key
defined more recently will act as a backlight function on/off key and one defined earlier will be
ignored.
That is, if you define the M1 and M2 keys a s a backlight fu nction on/off key in this orde r, the M2 key
will work as a backlight function on/off key and the M1 key's entry will be ignored.
68
Page 83
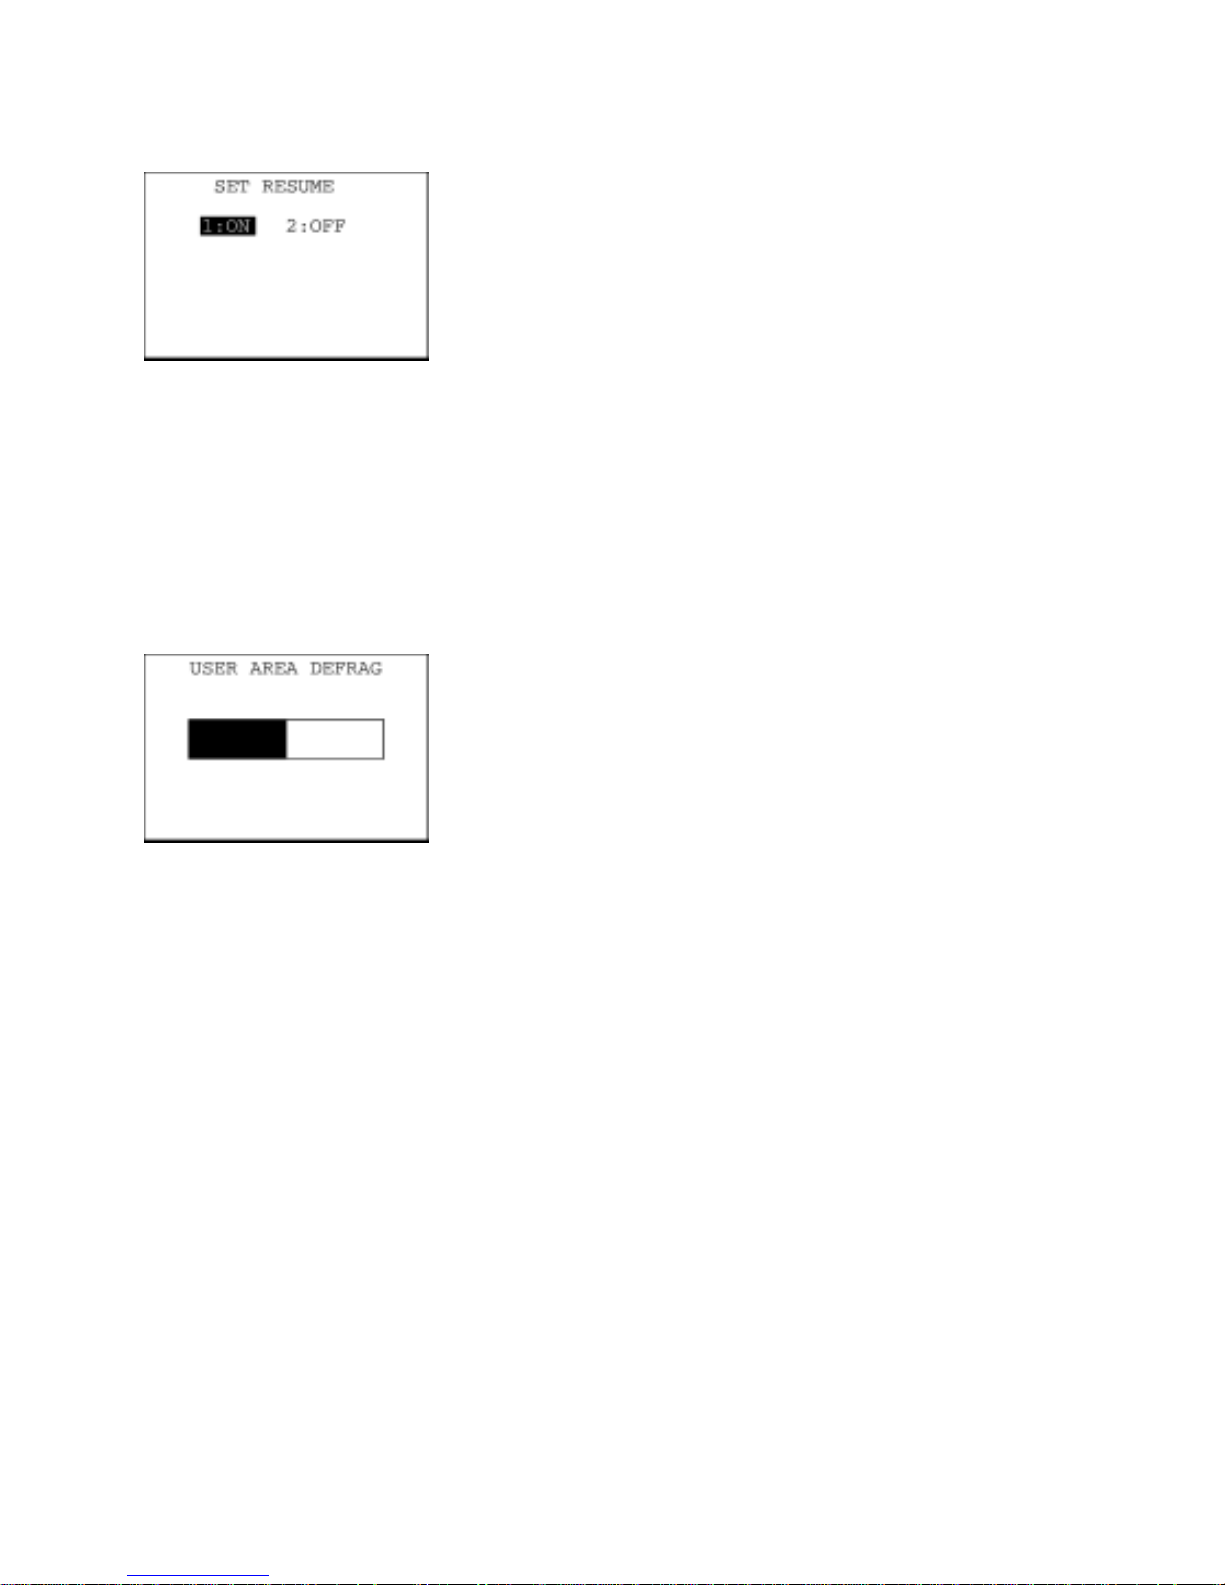
Chapter 2 Getting Started the BHT and System Mode
[4.7] Setting the resume function
On the SET SYSTEM menu, selecting "7: RESUME" calls up the
screen shown at left.
Highlighted is the current setting.
[1] ON: Activates the resume function that resumes the current
BHT status (screen) where the BHT was turned off, when
the BHT is turned on.
[2] OFF: Deactivates the resume function.
Select a desired item by using the numerical keys or F5 and F6 keys,
and then press the ENT key.
To return to the SET SYSTEM menu, press the C key.
[4.8] Defragmenting the drive
On the SET SYSTEM menu, selecting "8: DEFRAG" starts
defragmenting the whole user area of the drive.
Defragmentation will reorganize the user area so that it may increase
the empty space.
If defragmented, the BHT may download files more efficiently than
before execution of defragmentation.
During defragmentation, a bar graph will appear indicating the
defragmentation progress.
Upon completion of defragmentation, the screen will automatically
return to the SET SYSTEM menu.
69
Page 84
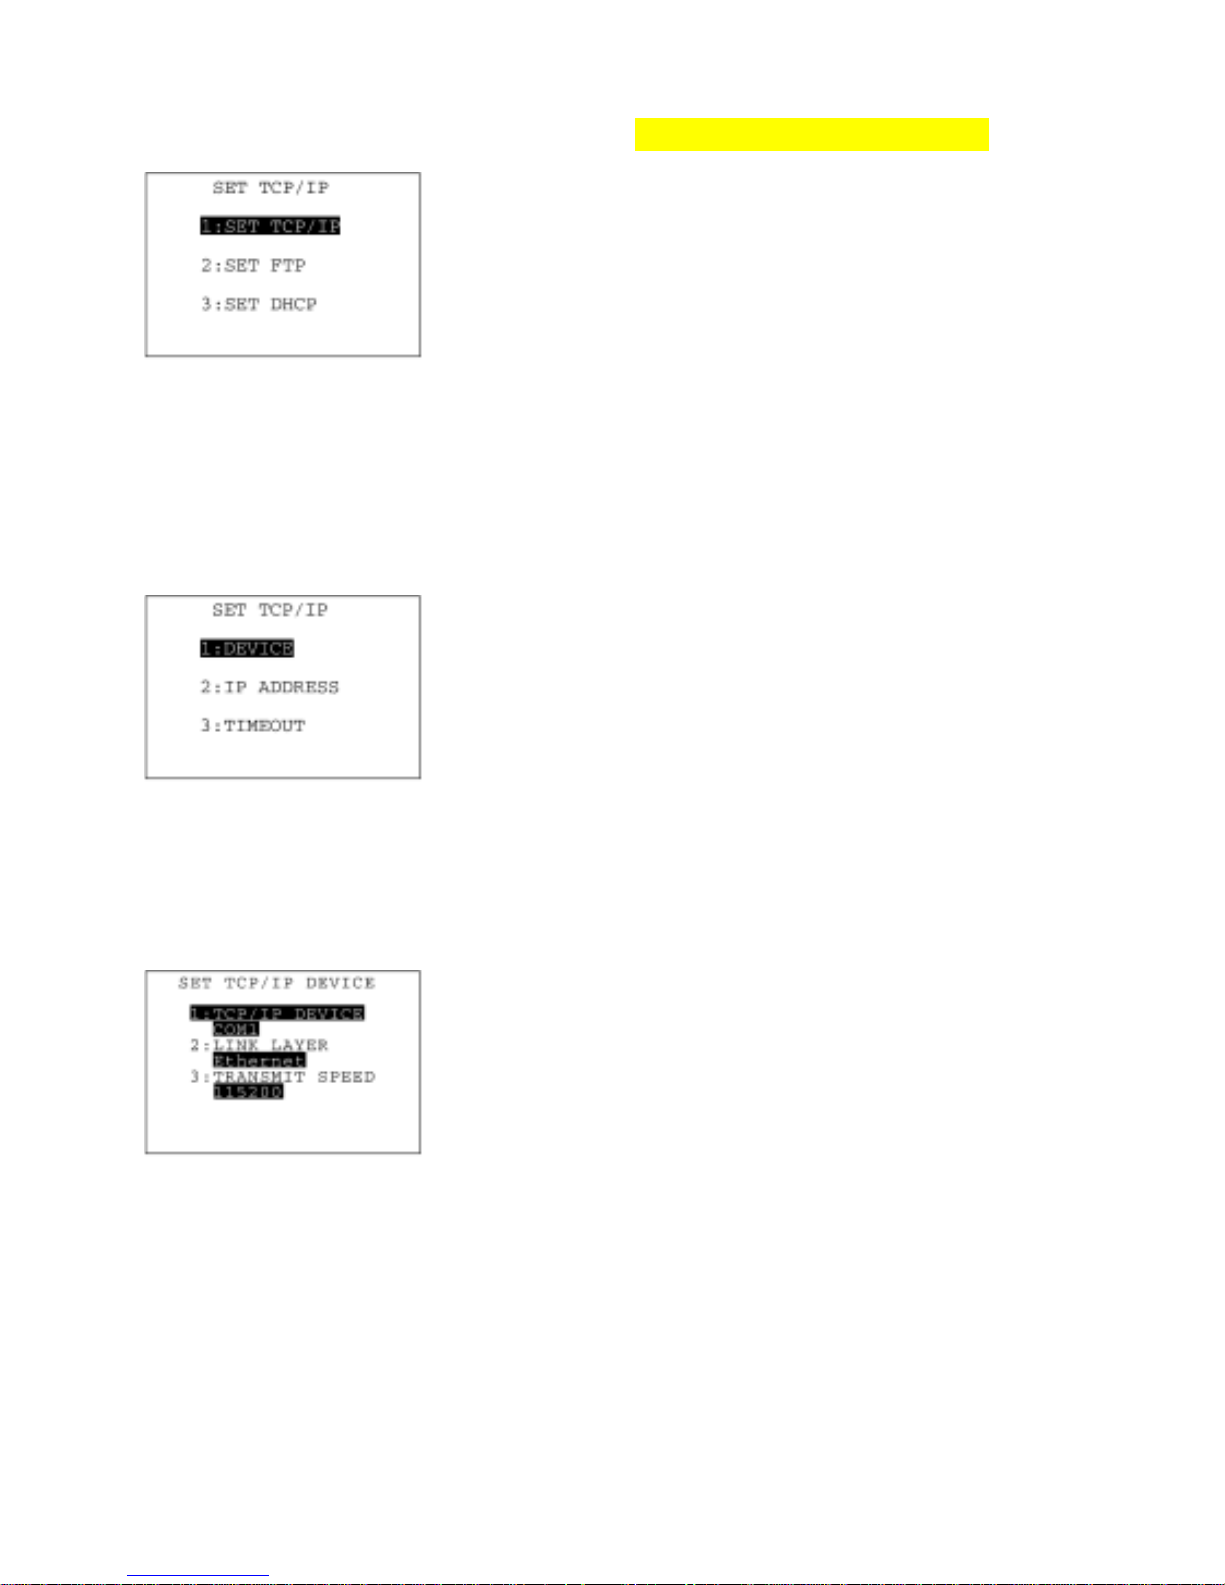
[4.9] Setting the TCP/IP, FTP and DHCP (in LAN-support software only)
On the SET SYSTEM menu, selecting "9: TCP/IP" calls up the screen
shown at left.
[1] SET TCP/IP: Switches to the TCP/IP setting screen.
[2] SET FTP: Switches to the FTP setting screen.
[3] SET DHCP: Switches to the DHCP setting screen.
Select a desired item by using the numerical keys or F5 and F6 keys,
and then press the ENT key.
To return to the SET SYSTEM menu, press the C key.
[4.9-1] Setting the TCP/IP
On the SET TCP/IP, FTP and DHCP menu, selecting "1: SET
TCP/IP" calls up the screen shown at left.
[1] DEVICE: Switches to the TCP/IP DEVICE screen.
[2] IP ADDRESS Switches to the IP ADDRESS screen.
[3] TIMEOUT: Switches to the TIMEOUT screen.
Select a desired item by using the numerical keys or F5 and F6 keys,
and then press the ENT key.
To return to the SET TCP/IP, FTP and DHCP menu, press the C key.
(1) TCP/IP device screen
On the SET TCP/IP screen, select "1: DEVICE" to call up the screen
shown at left where the current communications device, link layer,
and transmission speed are displayed.
To return to the SET TCP/IP screen, press the C key.
70
Page 85
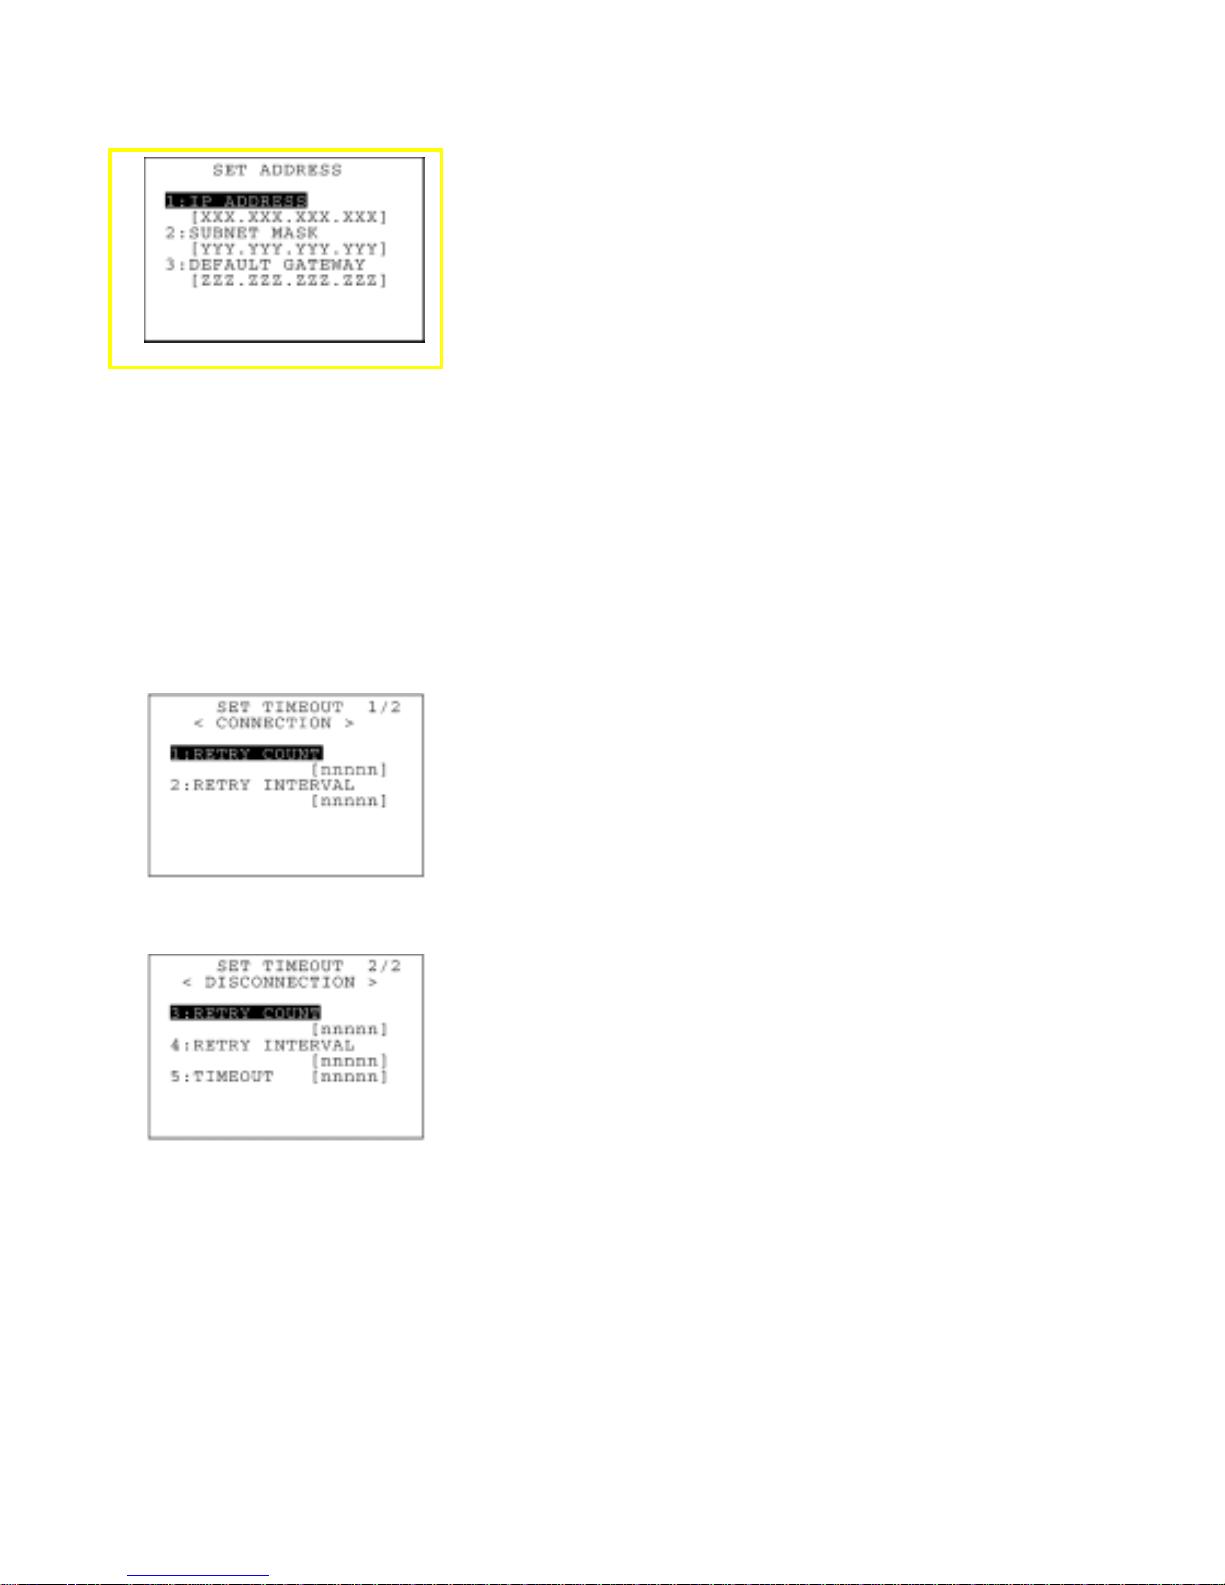
Chapter 2 Getting Started the BHT and System Mode
(2) IP address screen
On the SET TCP/IP screen, select "2: IP ADDRESS" to call up the
screen shown at left where the current settings are displayed.
Select a desired item by using the numerical keys or F5 and F6 keys,
and then press the ENT key. The entry box of the selected item
becomes ready to accept entry and shows a cursor.
Enter the desired value by using the numerical keys and period (.)
key, and then press the ENT key.
In the entry mode, to delete a single character, press the BS key. To
delete the whole entry you made, press the C key.
To return to the SET TCP/IP screen, press the C key when any item is
highlighted.
If all of the IP address, subnet mask and default gateway are set to
[0.0.0.0], the DHCP is enabled.
(3) Timeout screen
F5 key ⇑ ⇓ F6 key
On the SET TCP/IP screen, select "3: TIMEOUT" to call up the screen
shown at left where the current settings are displayed.
Select a desired item by using the numerical keys or F5 and F6 keys,
and then press the ENT key. The entry box of the selected item
becomes ready to accept entry and shows a cursor.
Enter the desired value by using the numerical keys, and then press
the ENT key.
In the entry mode, to delete a single character, press the BS key. To
delete the whole entry you made, press the C key.
To return to the SET TCP/IP menu, press the C key when any item is
highlighted.
71
Page 86
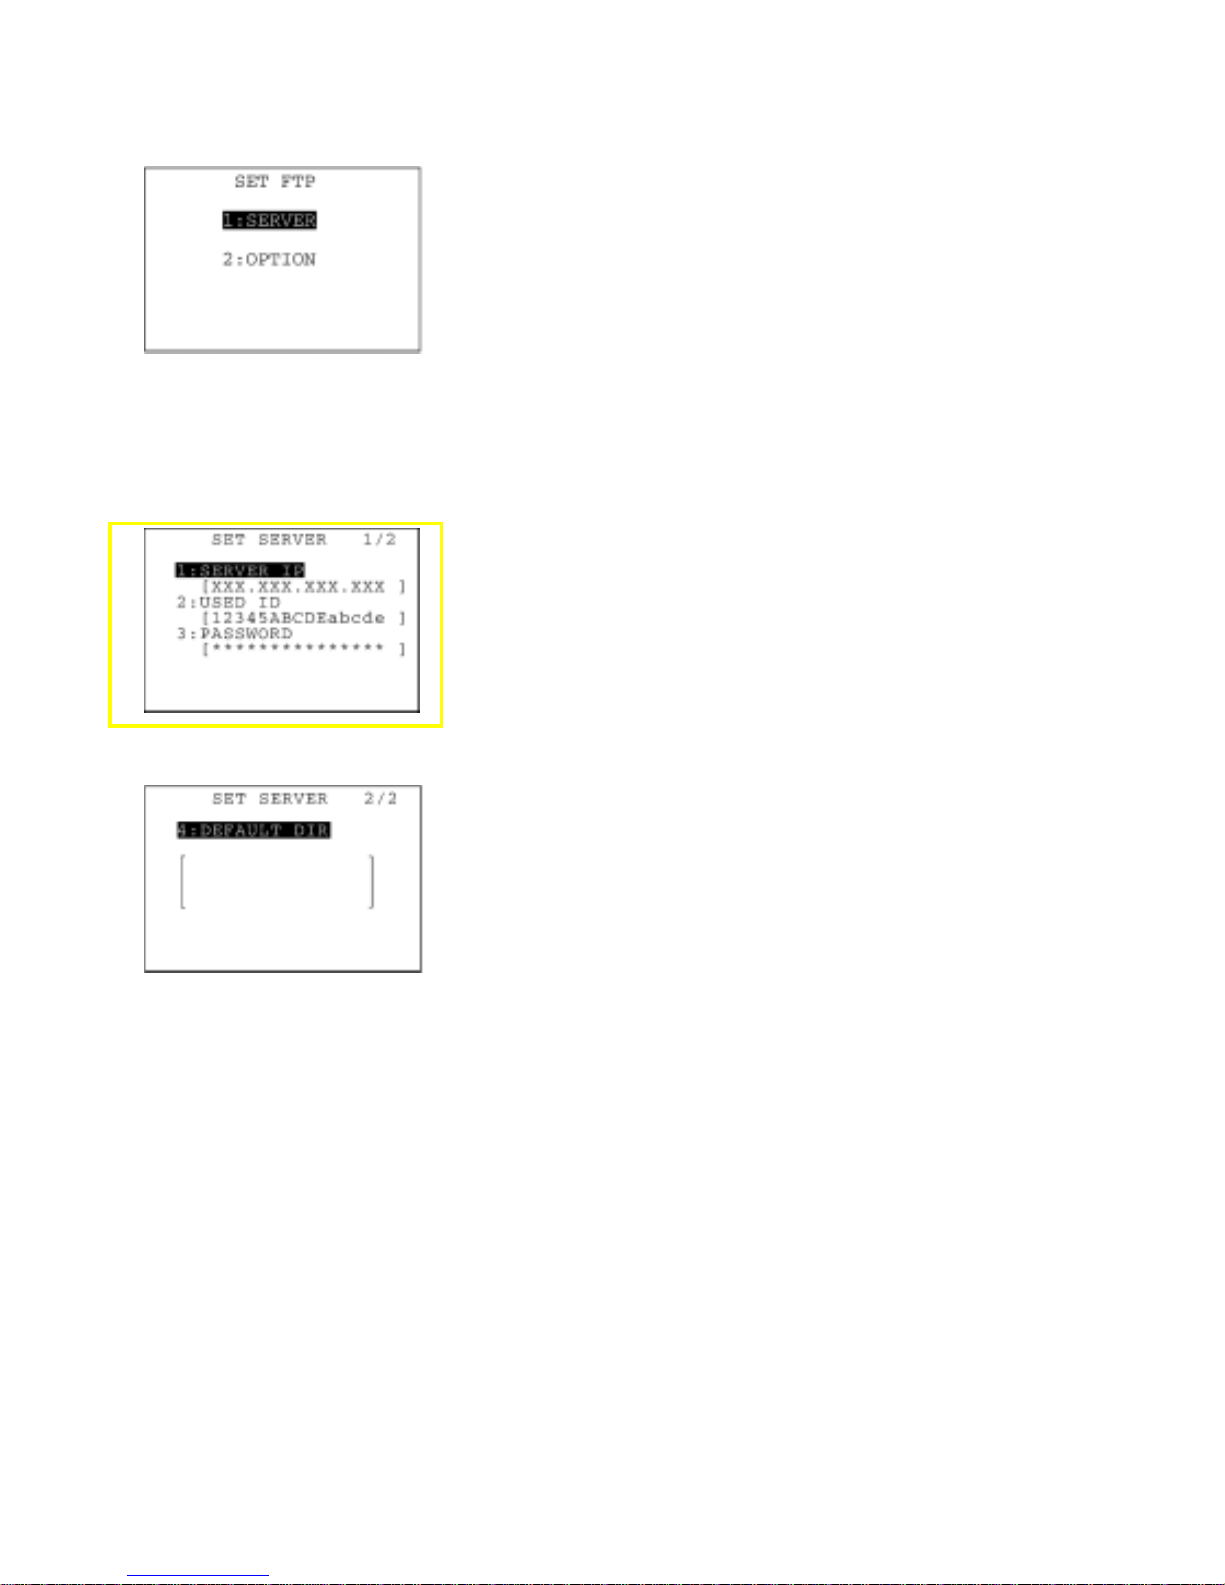
[4.9-2] Setting the FTP
On the SET TCP/IP, FTP and DHCP menu, select "2: SET FTP" calls
up the screen shown at left.
[1] SERVER: Switches to the FTP server connection environments
screen.
[2] OPTION: Switches to the data transfer parameters screen.
Select a desired item by using the numerical keys or F5 and F6 keys,
and then press the ENT key.
To return to the SET TCP/IP, FTP and DHCP menu, press the C key.
(1) FTP server connection environments screen
F5 key ⇑ ⇓ F6 key
On the SET FTP menu, select "1: SERVER" to call up the screen
shown at left where the current settings are displayed.
[1] SERVER IP: Sets the IP address of an FTP server.
[2] USER ID: Sets a user name.
[3] PASSWORD: Sets a password.
[4] DEFAULT DIR: Specifies an initial directory through which the
FTP server will search for files for transfer first
when the FTP client gets connected to the
server.
Select a desired item by using the numerical keys or F5 and F6 keys,
and then press the ENT key. The entry box of the selected item
becomes ready to accept entry and shows a cursor.
Enter the desired value by using the numerical keys and period (.) key
and then press the ENT key.
Pressing the SF key switches the entry mode between the numeric
mode (without a guidance) and alphabet mode.
In the entry mode, to delete a single character, press the BS key. To
delete the whole entry you made, press the C key.
To return to the SET FTP menu, press the C key when any item is
highlighted.
72
Page 87
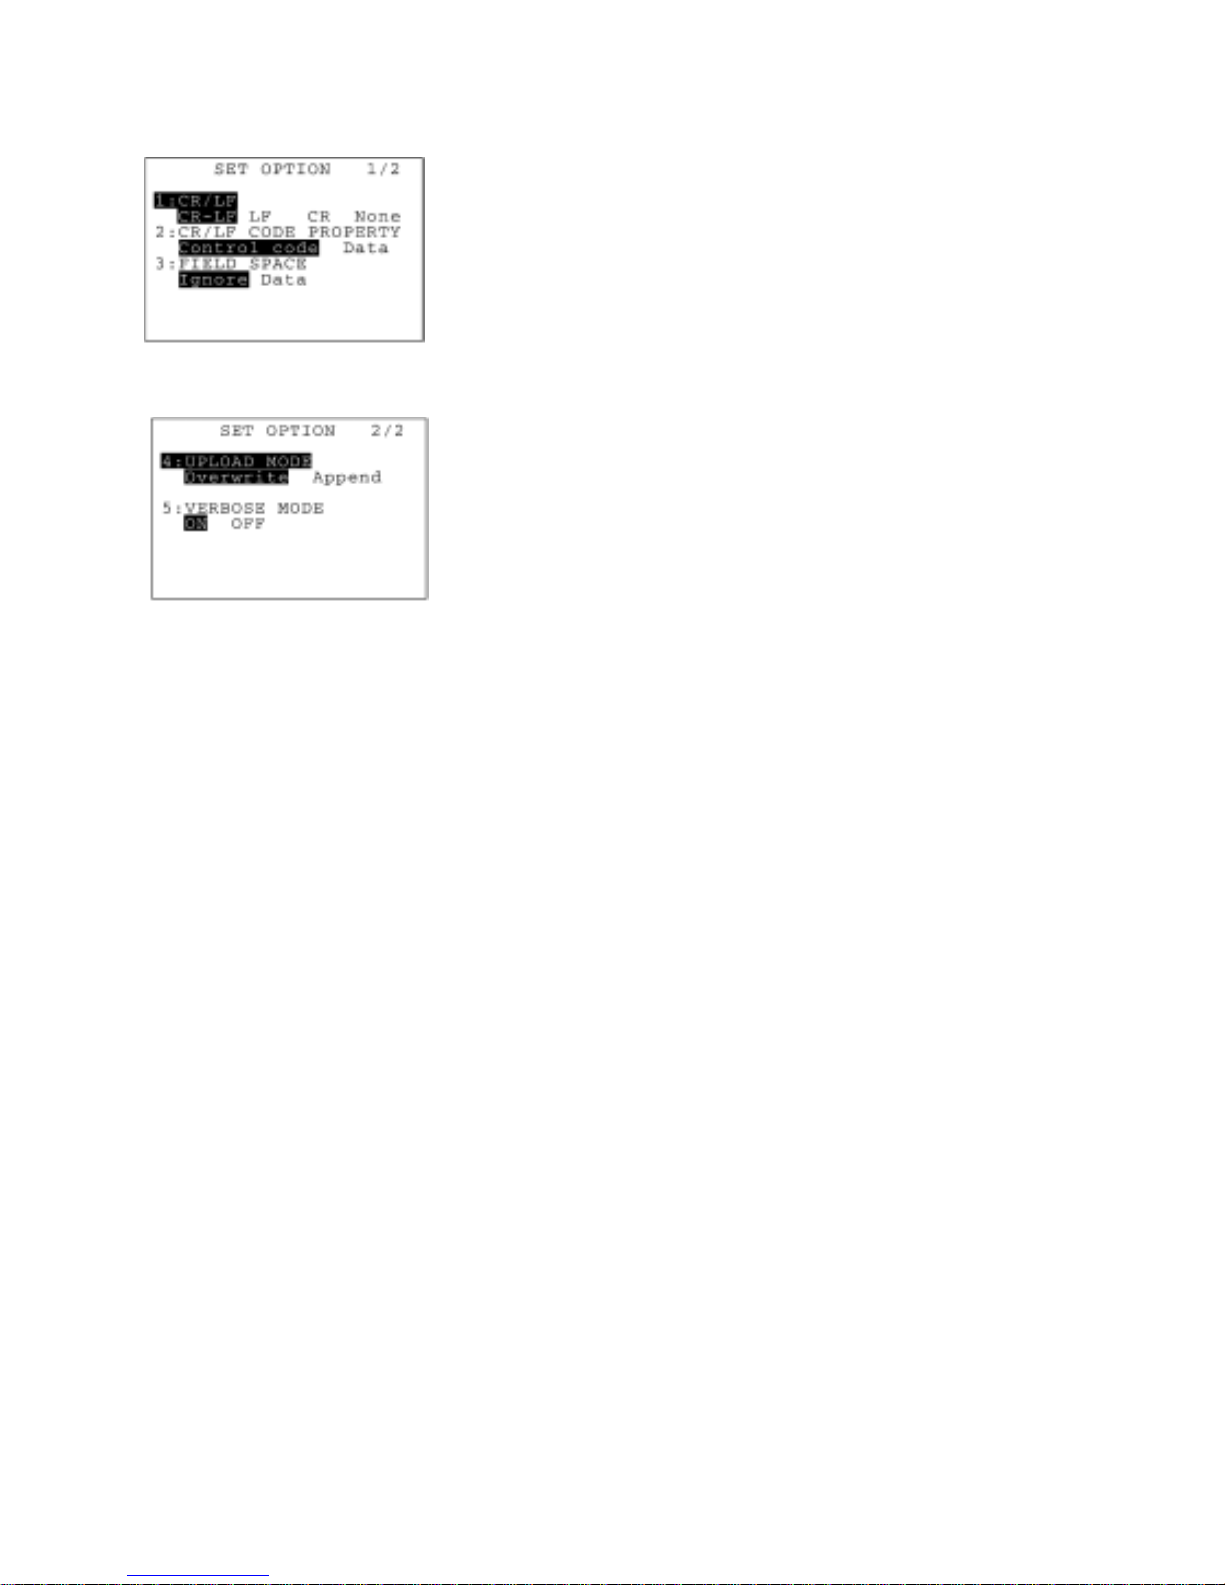
Chapter 2 Getting Started the BHT and System Mode
(2) FTP options screen
F5 key ⇑ ⇓ F6 key
On the SET FTP menu, select "2: OPTION" to call up the screen
shown at left where the current settings are displayed.
[1] CR/LF: Specifies line delimiters that should match
ones used in the server OS.
[2] CR/LF CODE PROPERTY:
Specifies the treatment of line delimiters in
records when data files are downloaded.
To treat line delimiters in records as
separators, select Control code; to treat them
as data, select Data.
[3] FIELD SPACE: Specifies the treatment of trailing spaces in
fields.
To trim trailing spaces in fields, select Ignore;
to retain them as data, select Data.
[4] UPLOAD MODE: Selects whether uploaded files will be written
over the existing files or appended to them.
[5] VERBOSE MODE: Selects whether or not to display reply codes
& messages (given on page 96) sent by the
FTP server on the FTP client.
If the VERBOSE MODE is set to OFF, no
such reply codes will display but only the
messages (given on page 95) issued by the
BHT will appear.
If it is set to ON, both will display.
Select a desired item by using the numerical keys or F5 and F6 keys.
Then select a desired setting by using the F7 and F8 keys.
To return to the SET FTP menu, press the C key.
73
Page 88
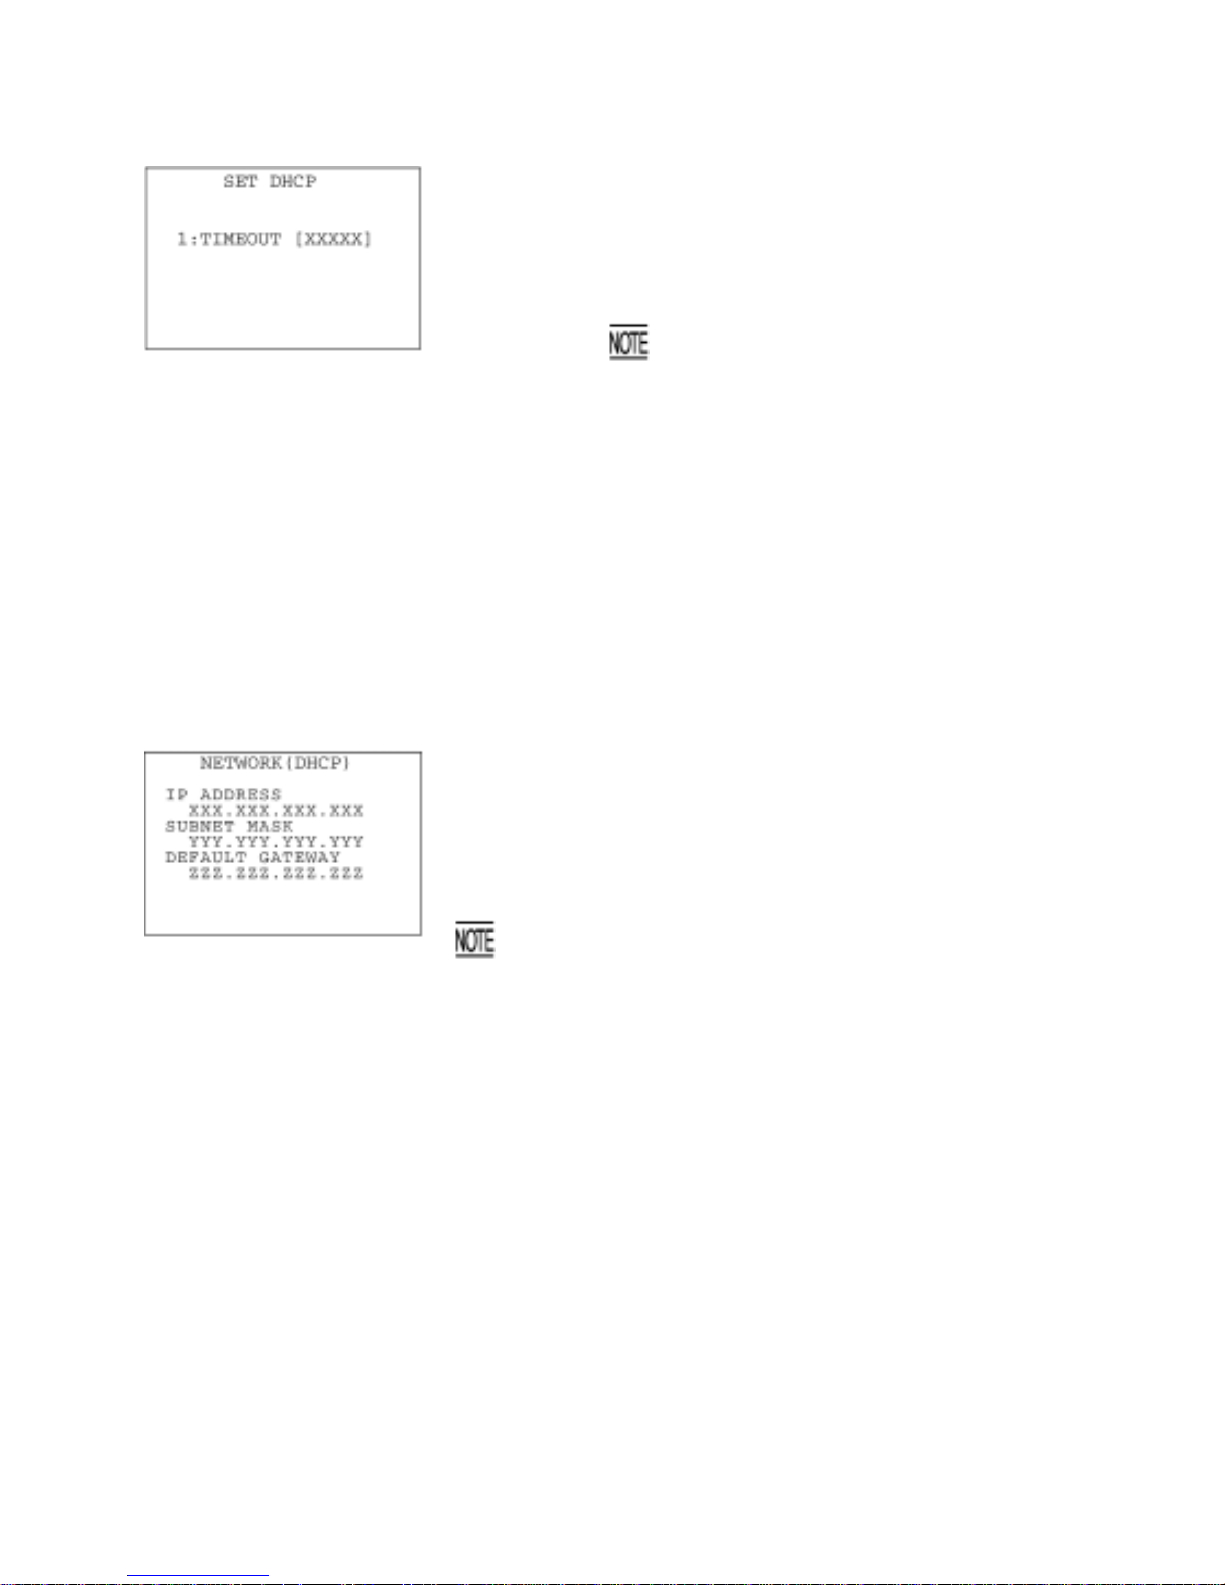
[4.9-3] Setting the DHCP
On the SET TCP/IP, FTP and DHCP menu, selecting "3: DHCP" calls
up the screen shown at left. The current setting is displayed.
[1] TIMEOUT: Sets the timeout for getting the IP configuration from
the DHCP server. The entry range is from 00001 to
32767 seconds.
You can enter up to 32767 seconds, but in
actual operation, a maximum of 190 seconds
are available since the number of retries and
retry intervals are determined in your system.
C key ⇑ ⇓ Period (.) key with
SF held down
Press the ENT key. The entry box of the selected item becomes ready
to accept entry and shows a cursor.
Enter the desired value by using the numerical keys and then press
the ENT key.
In the entry mode, to delete a single character, press the BS key. To
delete the whole entry you made, press the C key.
To return to the SET TCP/IP, FTP and DHCP menu, press the C key
when any item is highlighted.
If you press the period (.) key while holding down the SF key, the
obtained IP configuration appears as shown at left. To return to the
SET DHCP screen shown above, press the C key.
If you display the obtained IP configuration when any of th e IP
address, subnet mask and default gateway is set to any value other
than "0.0.0.0," the (DHCP) does not appear on the screen shown
at left.
74
Page 89
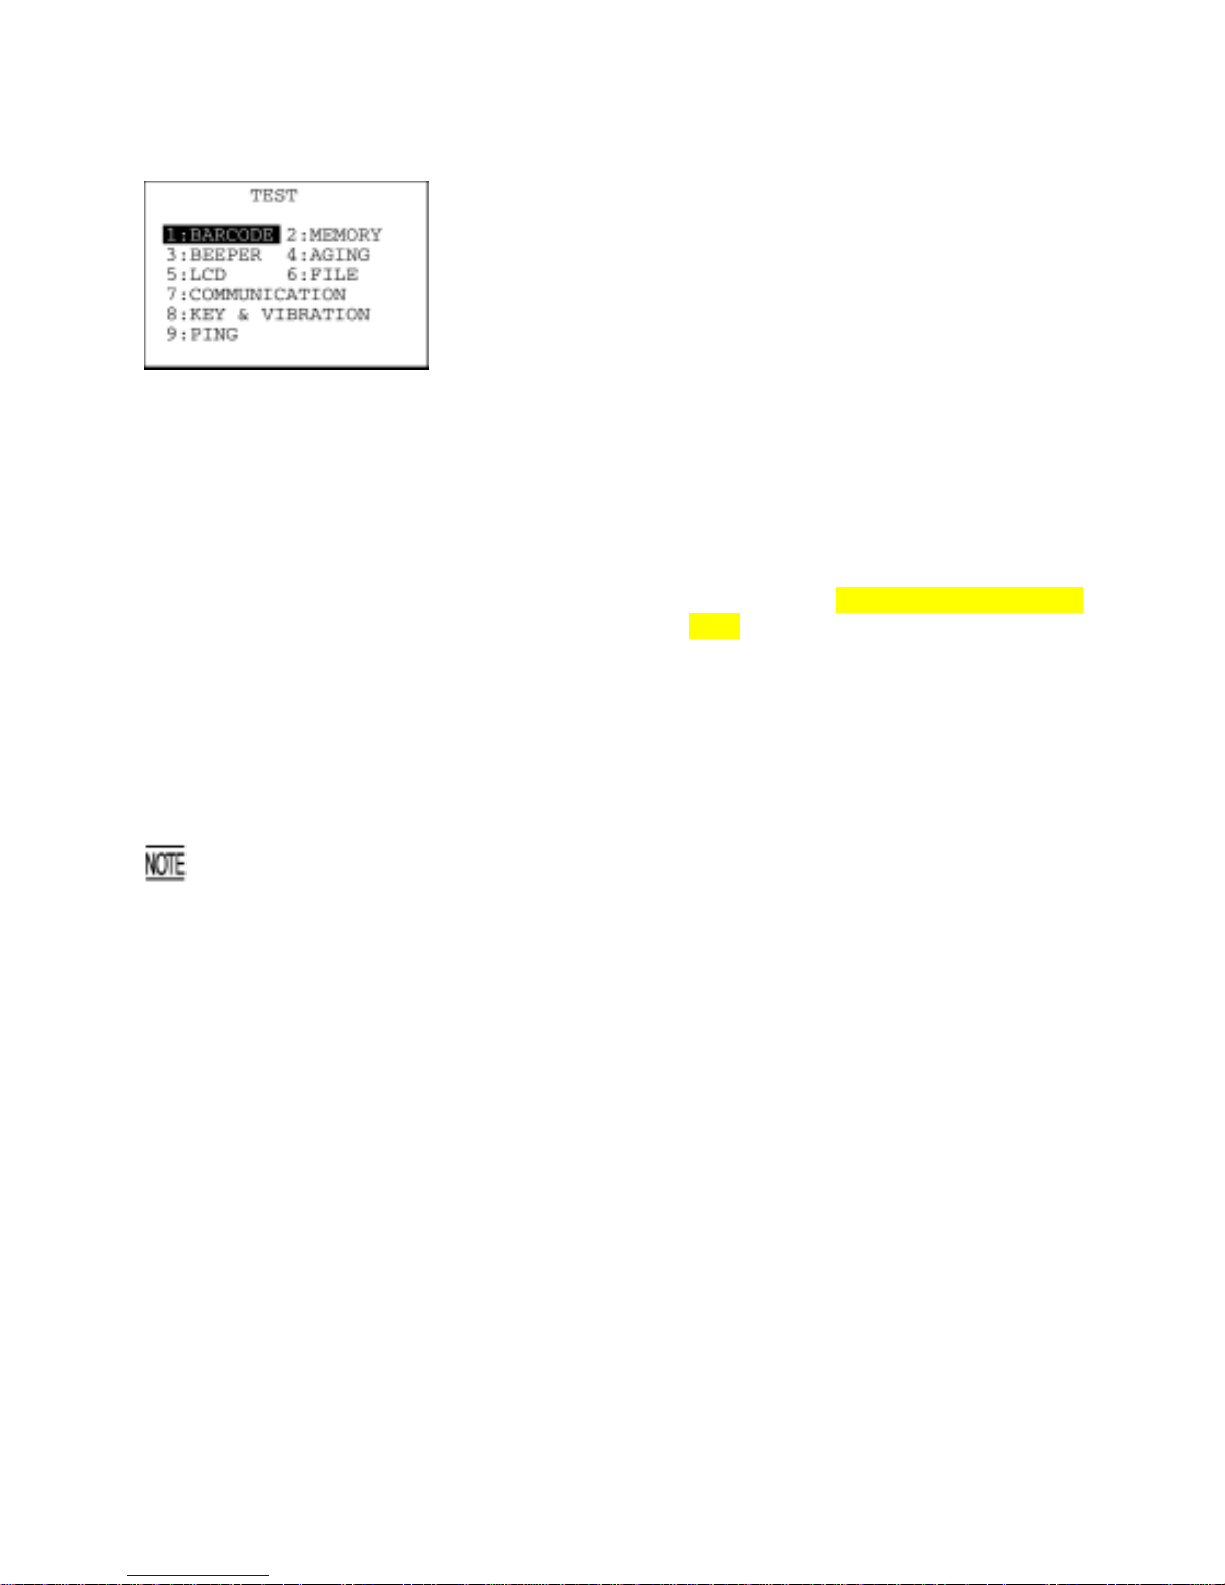
Chapter 2 Getting Started the BHT and System Mode
[ 5 ] Testing
On the SYSTEM MENU, selecting "5: TEST" calls up the screen
shown at left.
[1] BARCODE: Selects the bar-code reading test.
[2] MEMORY: Selects the RAM read/write test.
[3] BEEPER: Selects the beeper scale test.
[4] AGING: Selects the aging test.
[5] LCD: Selects the LCD and indicator LED tests.
[6] FILE: Selects the file checksum test.
[7] COMMUNICATION: Selects the communications test.
[8] KEY & VIBRATION: Selects the key entry, beeper and vibrato
r
tests.
[9] PING: Selects PING (in LAN-support software
only).
Select a desired setting by using the numerical keys or F5 and F6
keys, and then press the ENT key. The selected test will start.
Highlighted is the currently selected item.
To return to the SYSTEM MENU, press the C key.
If an error occurs in any of the above tests, contact your nearest dealer.
75
Page 90
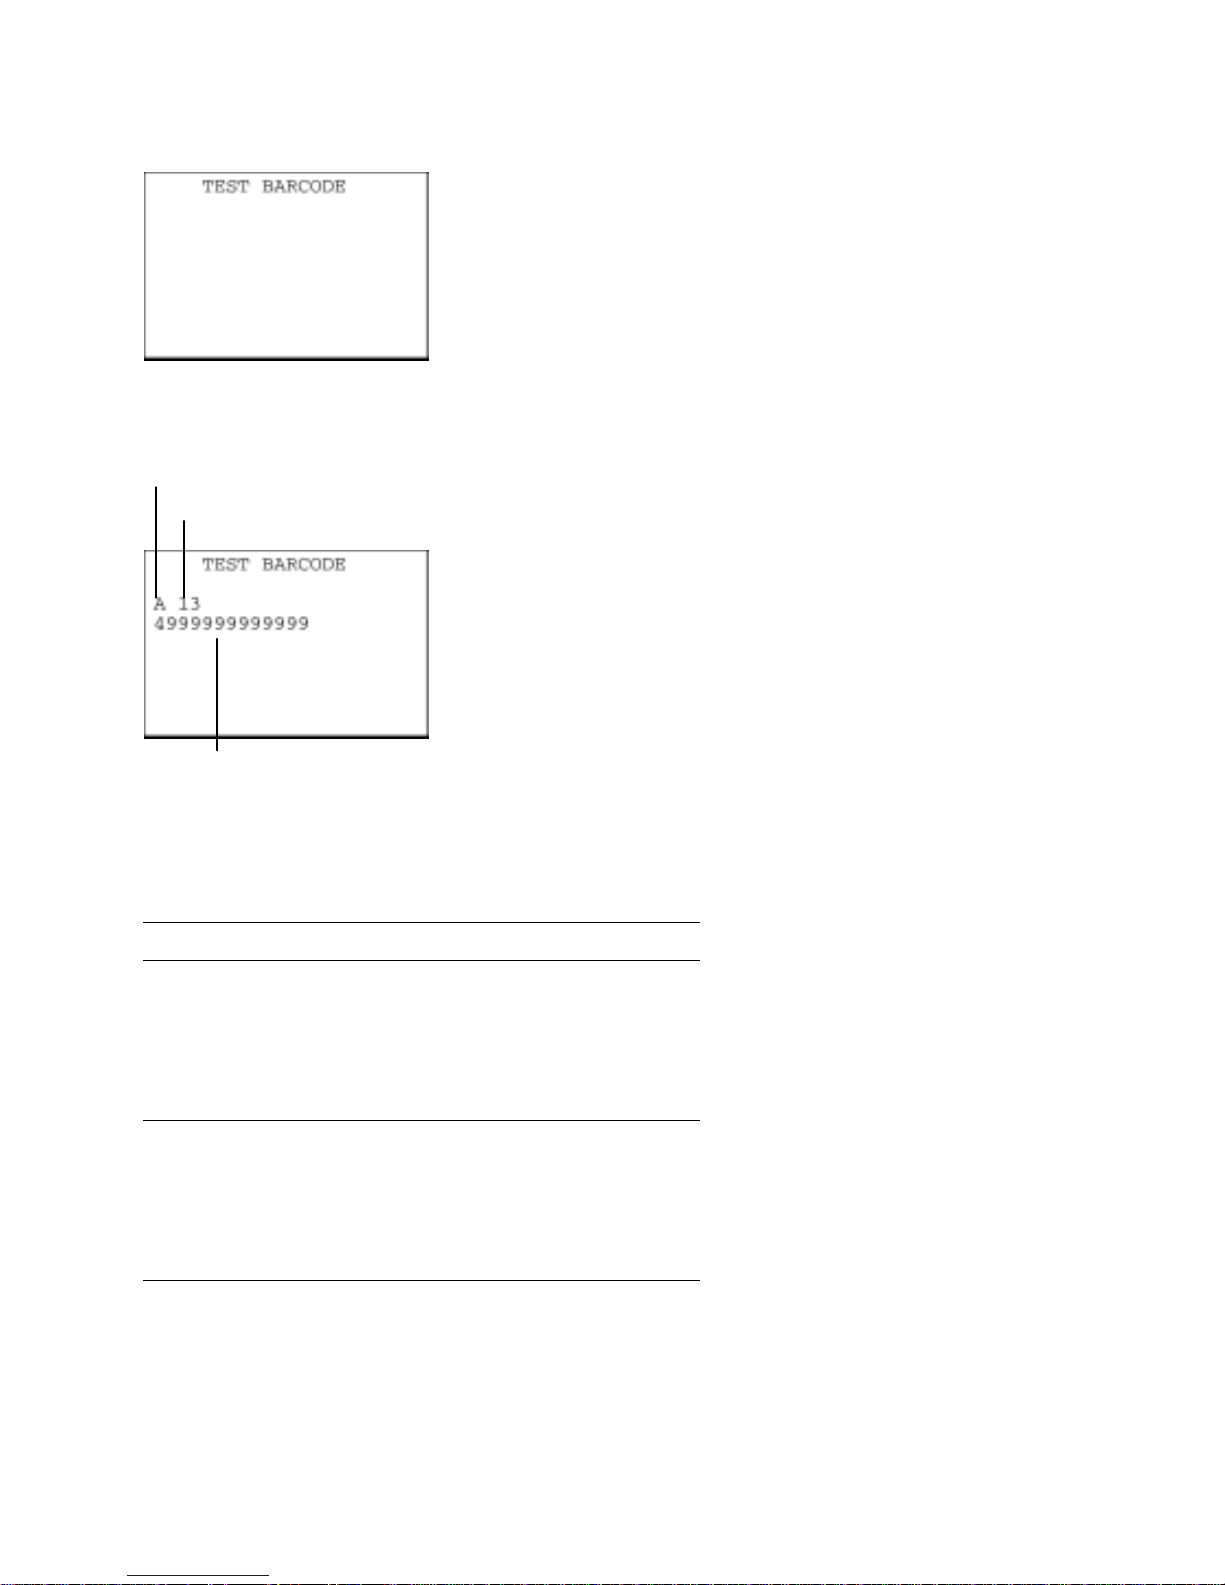
[5.1] Bar-code reading test
On the TEST menu, selecting "1: BARCODE" calls up the screen
shown at left.
Actually read bar codes with the BHT and check the read data
displayed on the LCD.
⇓
Bar-code type
Upon completion of bar-code reading, the BHT beeps, turns on the
indicator LED in green, and displays the read data together with the
barcode type and the number of digits.
To return to the TEST menu, press the C key.
Number of digits of the bar code
Data
Listed below is a table showing the relationship between the bar-code types and the identifier letters to
be displayed on the LCD.
Bar-code Type ID Letters
EAN-13, UPC-A
EAN-8
UPC-E
Standard 2of5 (STF)
Interleaved 2of5 (ITF)*
A
B
C
H
I
Codabar (NW-7)
Code 39
Code 93
Code 128
EAN-128
N
M
L
K
W
* The BHT can read only those ITF bar codes having 4 digits or more in length.
76
Page 91
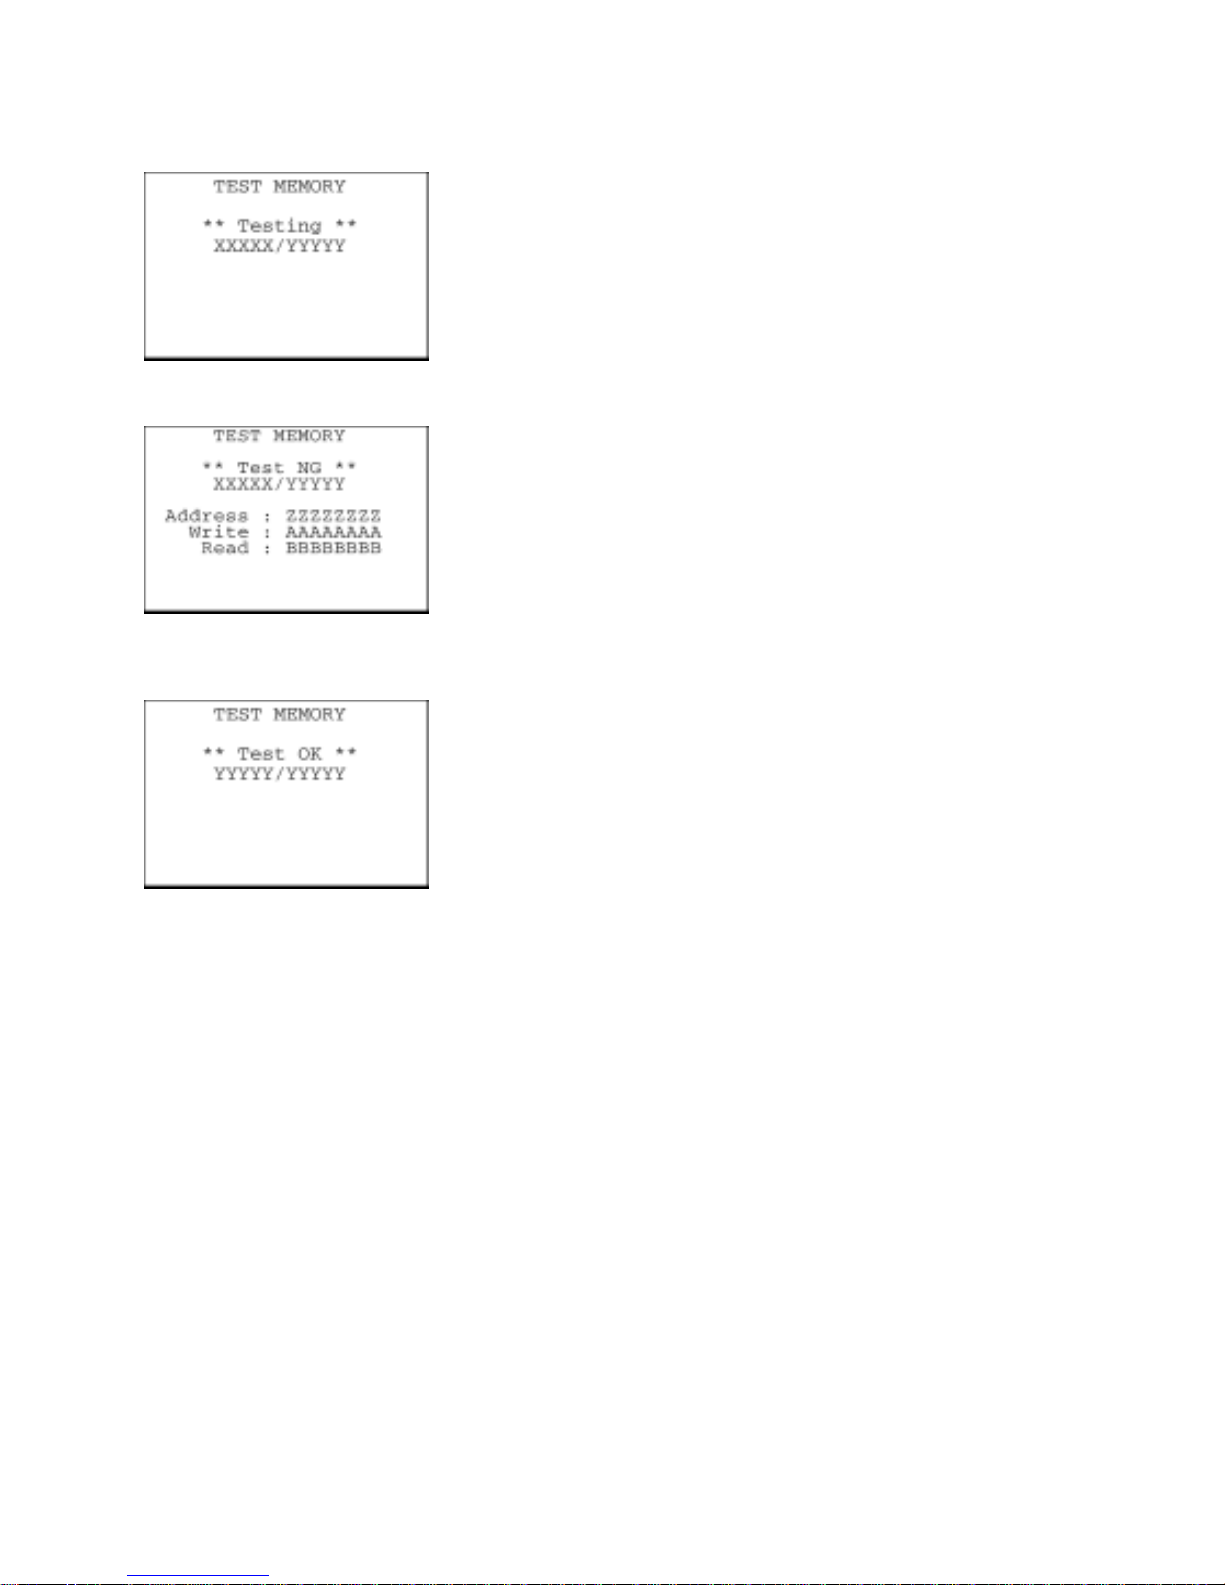
Chapter 2 Getting Started the BHT and System Mode
[5.2] Memory test
On the TEST menu, selecting "2: MEMORY" calls up the screen
shown at left and starts writing and reading onto/from all areas of the
RAM as well as checking the address.
XXXXX: Tested RAM capacity (unit: kilobytes)
YYYYY: Total RAM capacity (unit: kilobytes)
If any error is detected, the BHT beeps three times, shows the
message as shown at left, and terminates the test.
Where,
ZZZZZZZZ: Address where an error has occurred.
AAAAAAAA: Data to write.
BBBBBBBB: Data read out from the RAM.
To return to the TEST menu, press the C key.
Upon normal completion of the RAM test, the BHT beeps once,
shows the message as shown at left, and returns to the TEST menu.
77
Page 92
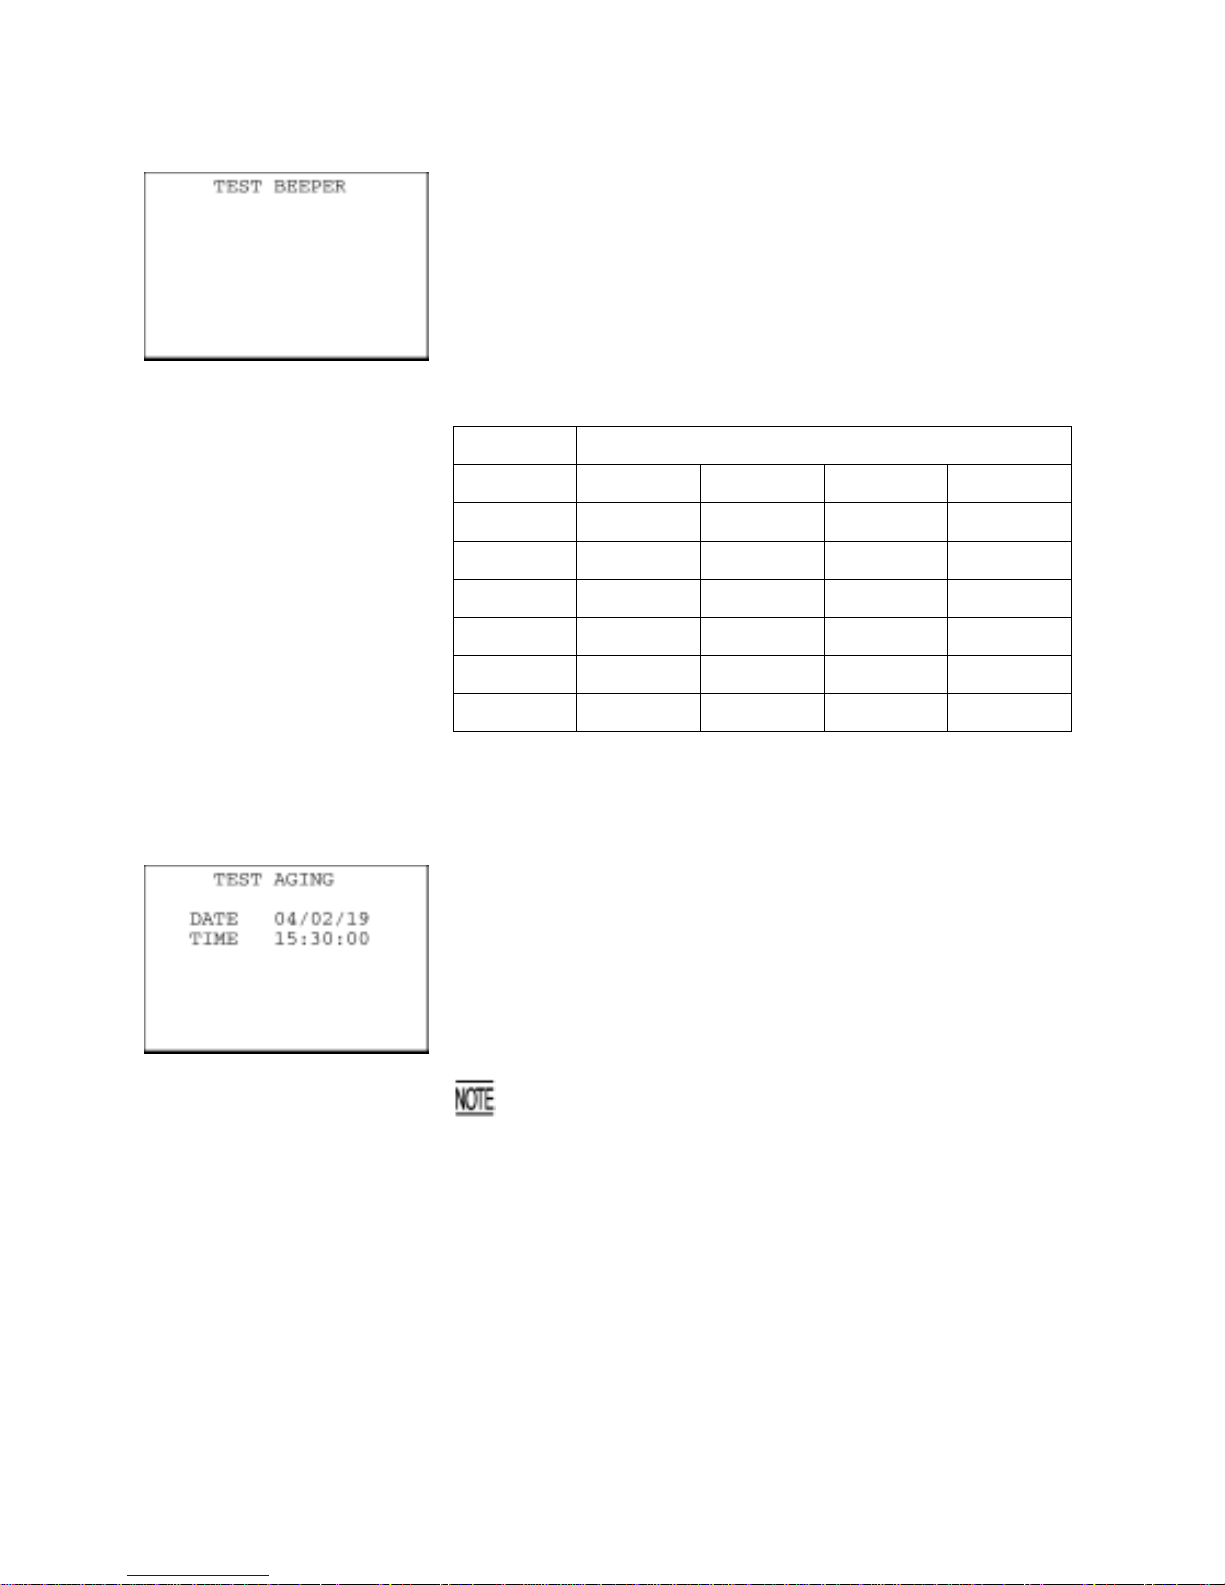
[5.3] Beeper scale test
On the TEST menu, selecting "3: BEEPER" calls up the screen
shown at left and makes the beeper sound at three octaves listed
below.
Upon completion of this test, the BHT automatically returns to the
TEST menu.
To stop this test while in progress, turn the BHT off.
Scale Frequency (Hz)
do 523 1046 2093 4186
re 587 1174 2349 -
mi 659 1318 2637 -
fa 698 1396 2793 -
sol 783 1567 3135 -
la 880 1760 3520 -
ti 987 1975 3951 -
[5.4] Aging test
On the TEST menu, selecting "4: AGING" proceeds to the aging test
while showing the current date and time on the LCD. (This test is
intended for personnel which check the BHT in the factory.)
Once this test is selected, the automatic powering-off function
becomes disabled. To terminate this test, press the C key to return
to the TEST menu or turn the BHT off.
78
Page 93

Chapter 2 Getting Started the BHT and System Mode
[5.5] LCD and indicator LED tests
On the TEST menu, selecting "5: LCD" calls up the test pattern shown
at left on the LCD. The indicator LED is off.
Each time the ENT key is pressed, the screen shifts to the next test
pattern. To return to the previous screen, press the BS key.
To stop this test while in progress, press the C key.
BS key ⇑ ⇓ ENT key
As shown at left, the entire screen turns black. The indicator LED
lights in green.
BS key ⇑ ⇓ ENT key
As shown at left, everything disappears and the indicator LED lights in
red.
BS key ⇑ ⇓ ENT key
An outline with a width of one dot appears.
Press the ENT key, and the BHT beeps once and returns to the TEST
menu.
79
Page 94
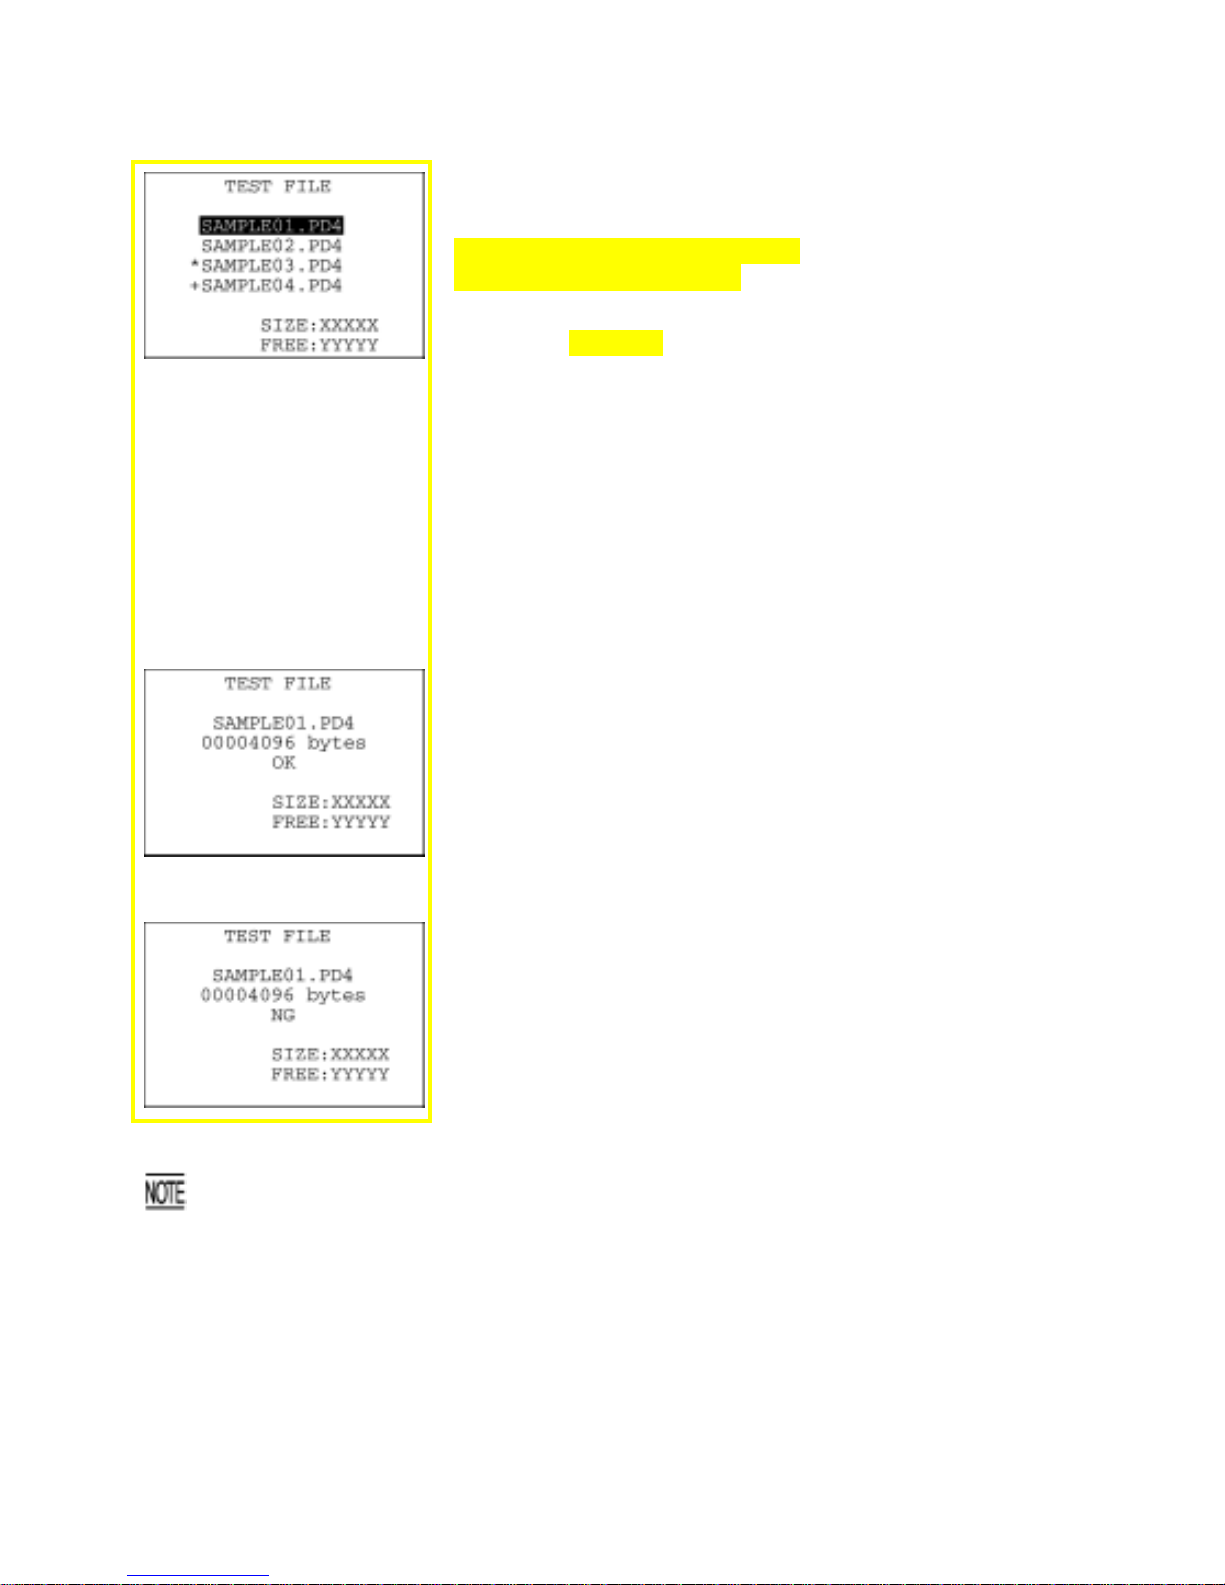
[5.6] File test
On the TEST menu, selecting "6: FILE" calls up the screen shown at
left.
XXXXXX: Memory space being used
YYYYYY: Free memory space
If any of the files stored in the memory is defective, an asterisk (*) o
r
plus sign (+) is prefixed to the name of the defective file (s). For details
about the (*) and (+), refer to Section 2.3.6, "[ 3 ] About
"$$BRKLST.SYS."
Selecting a particular file on this screen will show the file size and the
test result.
To select a file, use the F5 and F6 keys to move the cursor to the
desired file. If there are more than four files, the screen will scroll.
Highlighted is the currently selected file.
Press the C key to return to the TEST menu.
The file name, file size, and test result (OK or NG) appear as shown at
left.
Press the C key to return to the file selection screen.
If a defective file is found, delete it or overwrite it with the same name file.
Even a defective file can be uploaded on the UPLOAD menu. It is, therefore, recommended tha
t
important files be uploaded before deleted.
80
Page 95
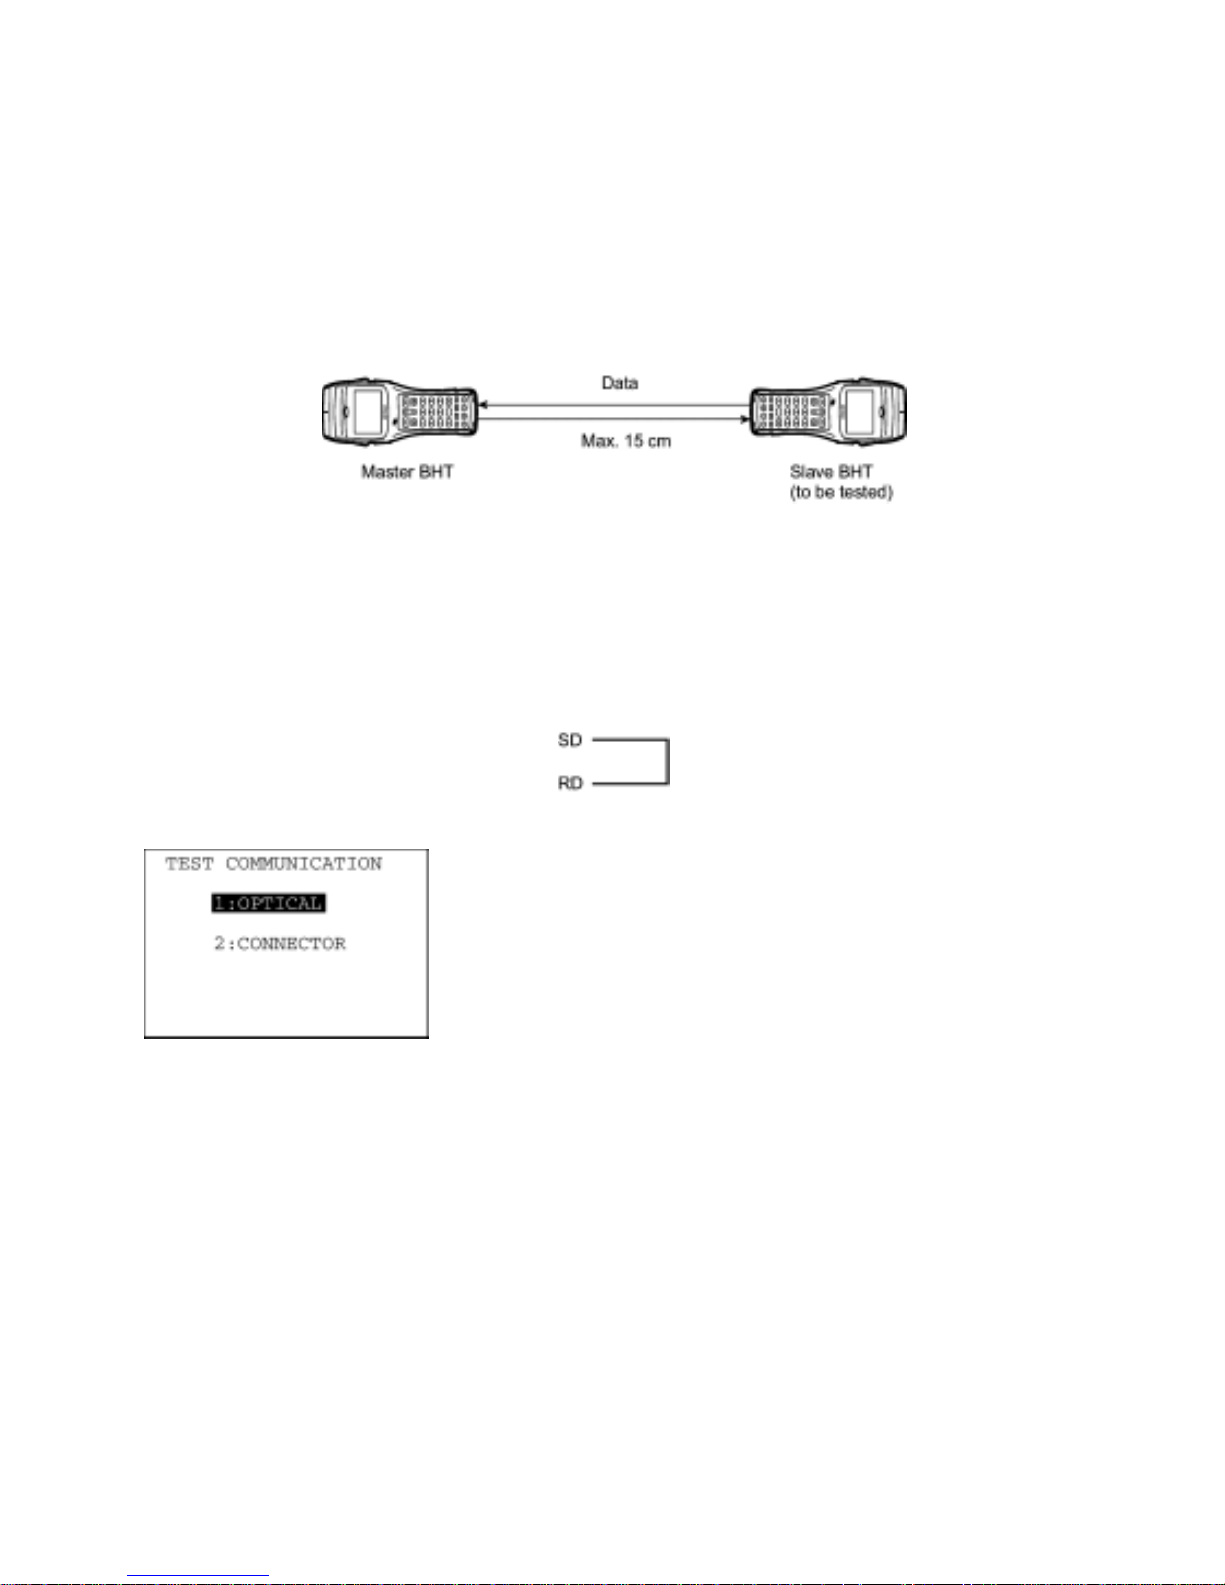
Chapter 2 Getting Started the BHT and System Mode
[5.7] Communications test
In System Mode, you can test the IrDA interface port and direct-connect interface port.
Preparation for the IrDA interface test
Arrange two BHTs, one as a master station and the other as a slave station (to be tested) with their IrDA
interface ports facing each other as illustrated below. In this test, the slave BHT transmits data to the
master BHT and receives the data sent back from the master BHT.
Preparation for the direct-connect interface test
Arrange a 3-pole mini stereo plug as illustrated below and connect it to the direct-connect interface port
on the BHT.
On the TEST menu, selecting the "7: COMMUNICATION" calls up the
screen shown at left.
[1] OPTICAL: Switches to the MASTER/SLAVE selection
screen for the IrDA interface test.
[2] CONNECTOR: Tests the direct-connect interface port.
Select a desired item by using the numerical keys or F5 and F6 keys,
then press the ENT key.
81
Page 96
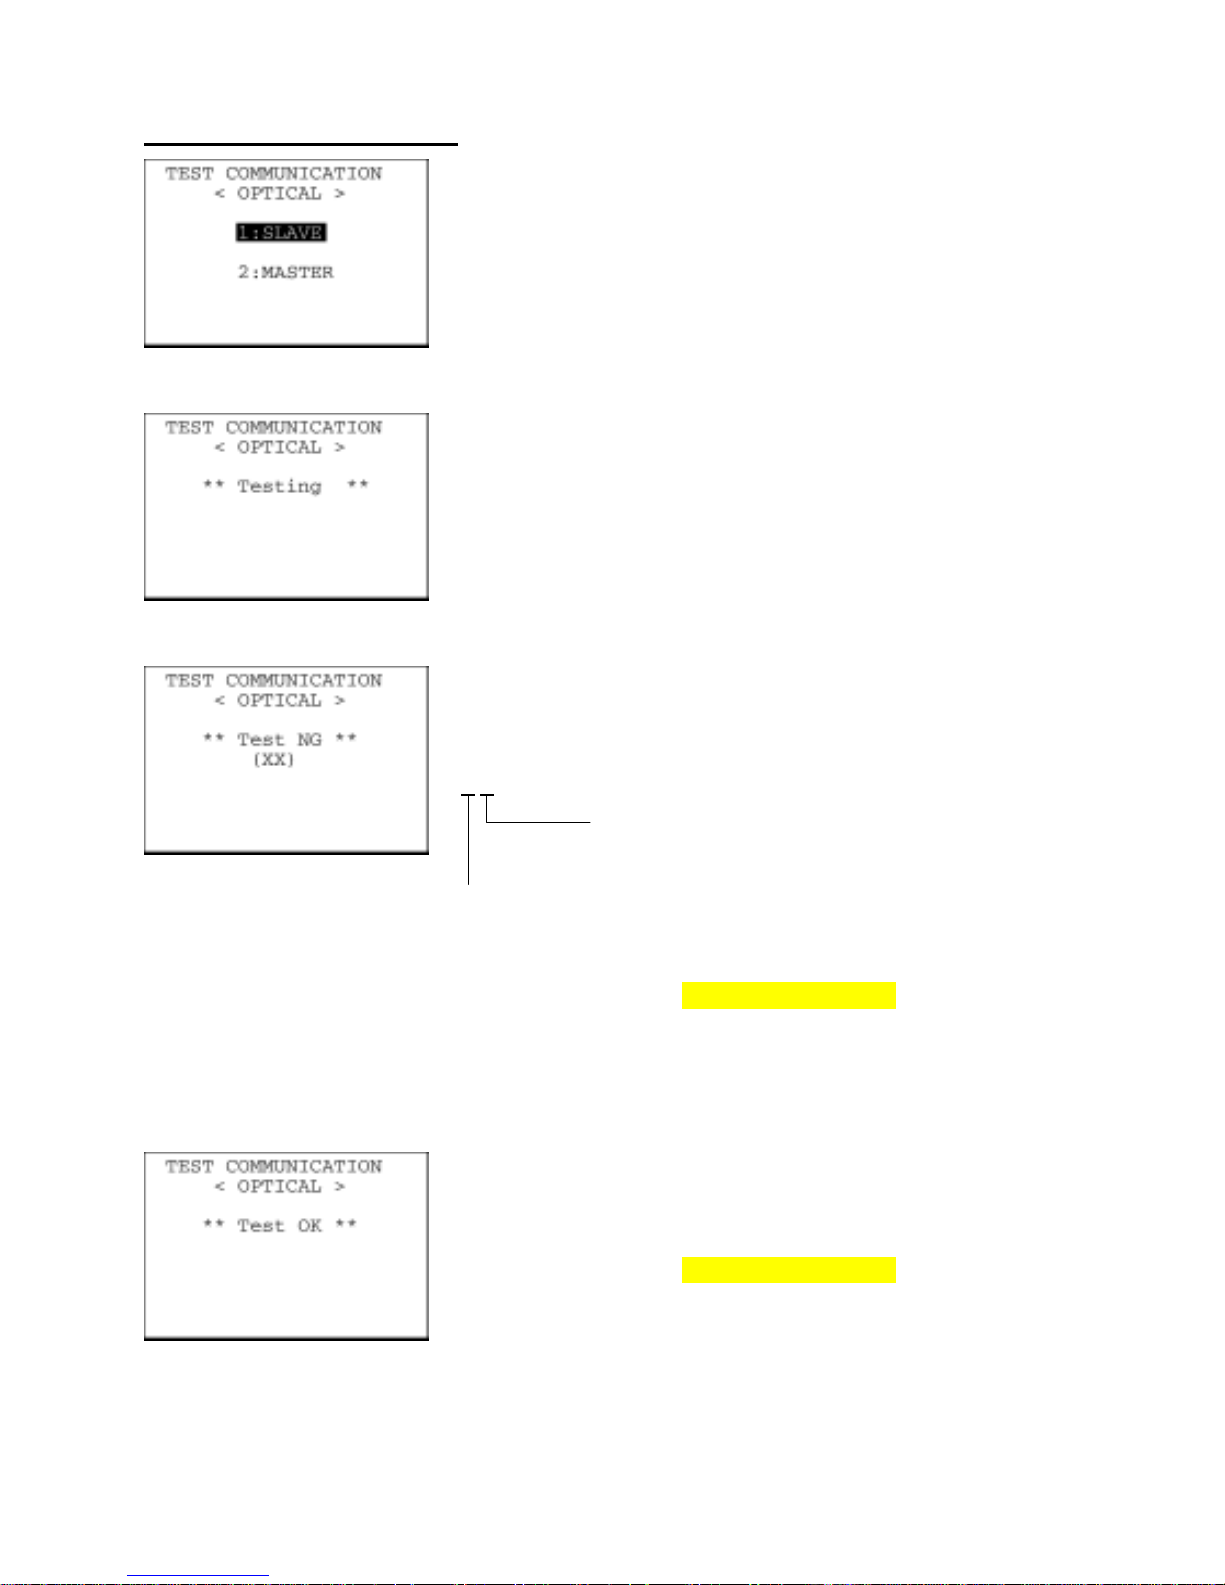
Testing the IrDA interface port
On the TEST COMMUNICATION menu, selecting "1: OPTICAL" calls
up the screen shown at left.
At the slave BHT to be tested, select the "1: SLAVE" and at the
master BHT, select the "2: MASTER." Then press the ENT key.
During the test, the screen shown at left is displayed.
If any error occurs, the tested slave BHT beeps three times and
shows the screen at left.
In parentheses are error codes which have the following meanings:
(X
X)
1: The received data is different from the sent data.
2: A timeout has occurred during standby for data
reception.
1: 2400 bps
2: 9600 bps
3: 115200 bps
The master BHT automatically returns to the TEST
COMMUNICATION menu after 10 seconds from the occurrence of an
error.
Press the C key to return to the TEST COMMUNICATION menu.
Upon normal completion of the test, the tested slave BHT beeps once
and shows the screen at left.
Press the C key to return to the TEST COMMUNICATION menu.
The master BHT automatically returns to the TEST
COMMUNICATION menu.
82
Page 97
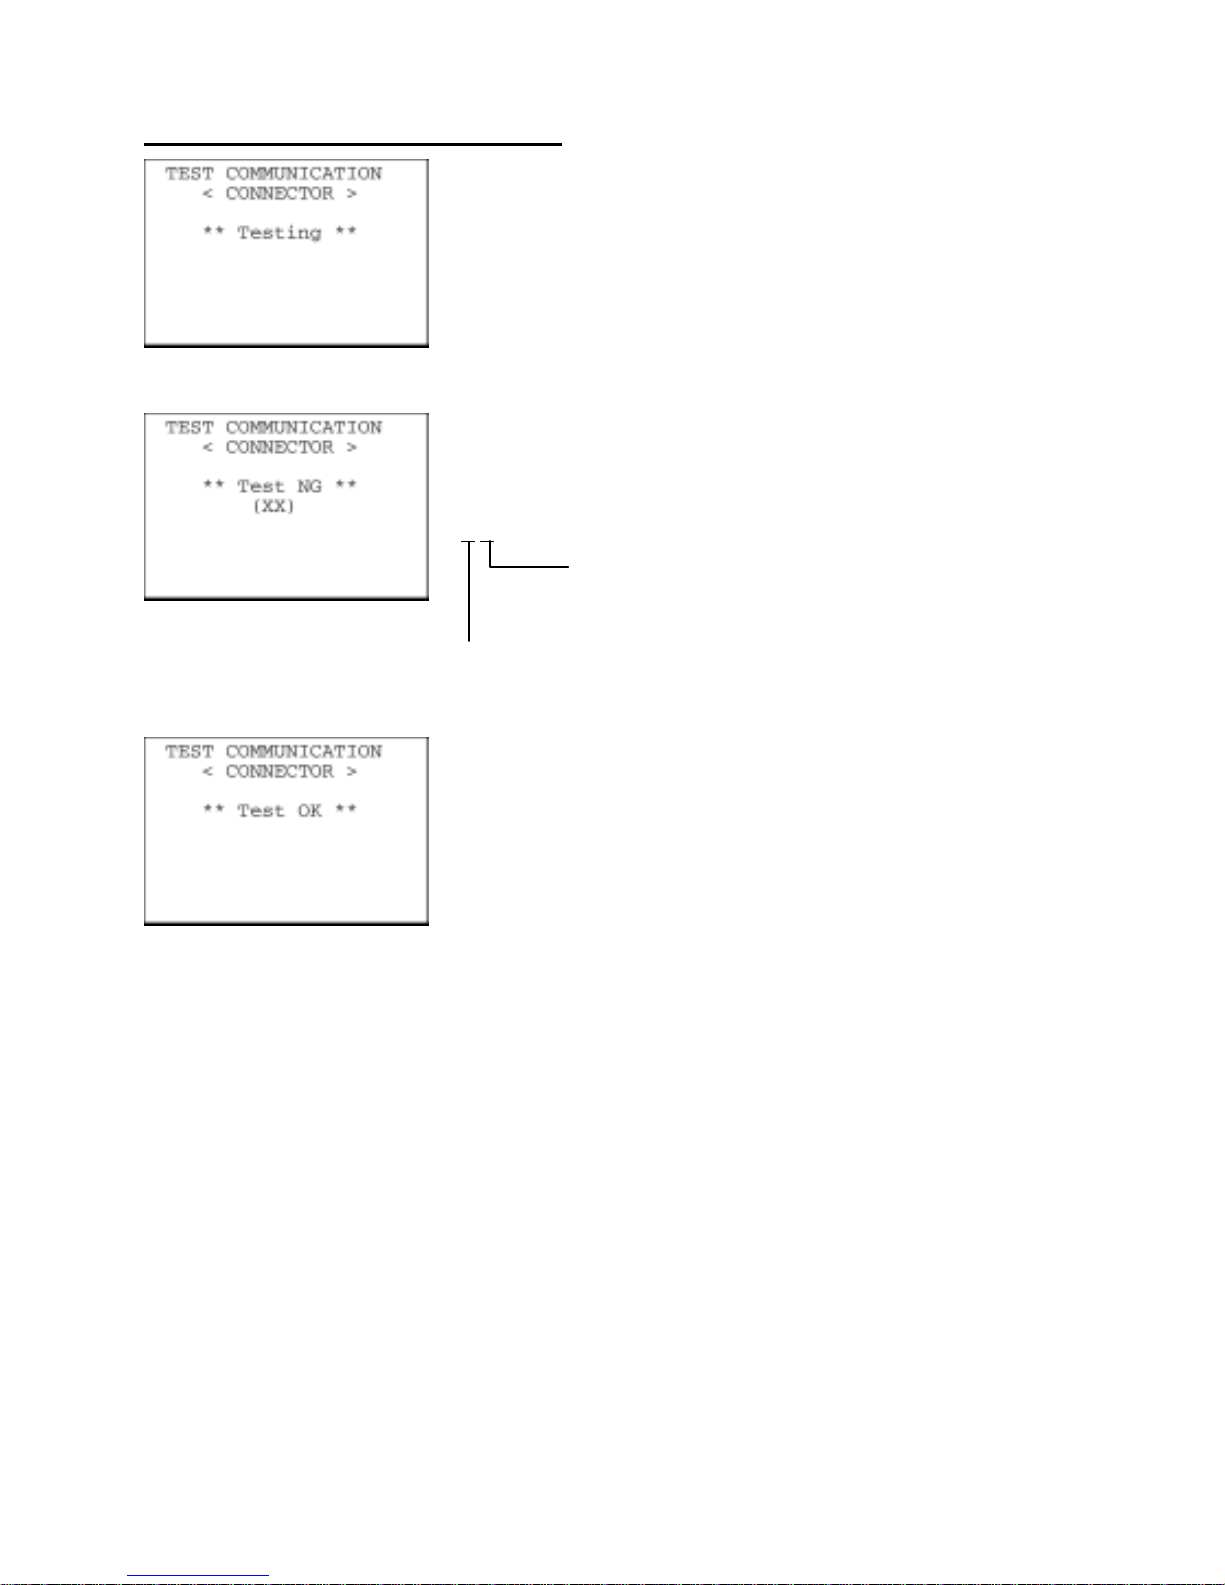
Chapter 2 Getting Started the BHT and System Mode
Testing the direct-connect interface port
On the TEST COMMUNICATION menu, selecting "2: CONNECTOR"
displays the screen shown at left and then starts testing the
direct-connect interface port.
If any error occurs, the BHT beeps three times and shows the screen
at left.
In parentheses are error codes which have the following meanings:
(X
X)
1: The received data is different from the sent data.
2: A timeout has occurred during standby for data
reception.
1: 300 bps
2: 115200 bps
Upon normal completion of the test, the BHT beeps once and shows
the screen at left.
Press the C key to return to the TEST COMMUNICATION menu.
83
Page 98
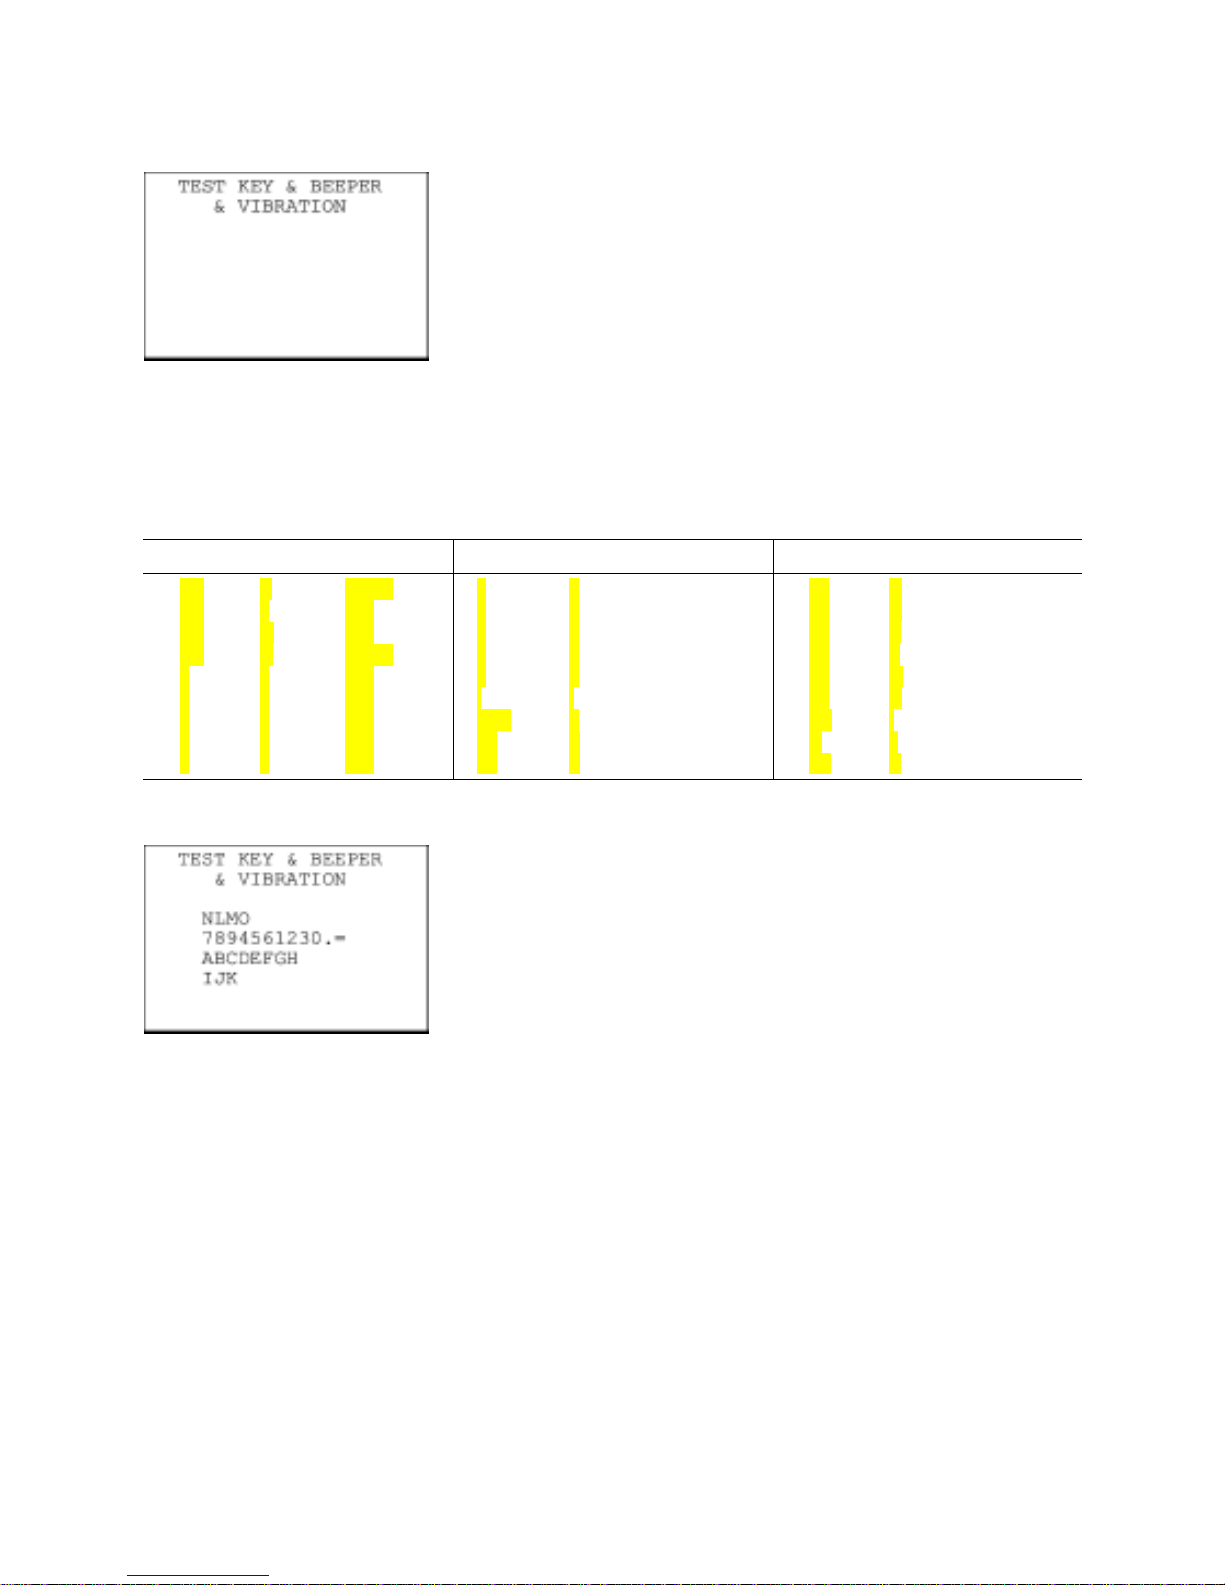
[5.8] Key-entry, beeper and vibrator test
On the TEST menu, selecting "8: KEY & VIBRATION" calls up the
screen shown at left and makes the BHT ready for entry from the
keypad.
Pressing individual keys displays the identifier letters in the positions
pre-assigned to those keys on the LCD as well as sounding the
beeper or running the vibrator. (As long as the individual key is held
down, the BHT continues beeping or vibrating.)
Pressing the same key again erases the displayed letter.
The table below shows the relationship between the keys, the identifier letters to be displayed on the
LCD, and the frequencies (Hz) of the beeper.
Key Letter Beeper (Hz) Key Letter Beeper (Hz) Key Letter Beeper (Hz)
M3
M1
M2
M4
7
8
9
4
5
N
L
M
O
7
8
9
4
5
(Note)
293
329
(Note)
391
440
493
523
587
6
1
2
3
0
.
ENT
F1
F2
6
1
2
3
0
.
=
A
B
659
698
783
880
987
1046
1174
1318
1396
F3
F4
F5
F6
F7
F8
BS
C
SF
C
D
E
F
G
H
I
J
K
1567
1760
1975
2093
2349
2637
2793
3135
3520
(Note) Only when the M3 (left-hand trigger switch) or M4 key (right-hand trigger switch) is pressed, the vibrator works.
After all keys are pressed and displayed on the LCD, this test
automatically ends and the screen returns to the TEST menu.
To stop this test, turn the BHT off.
84
Page 99
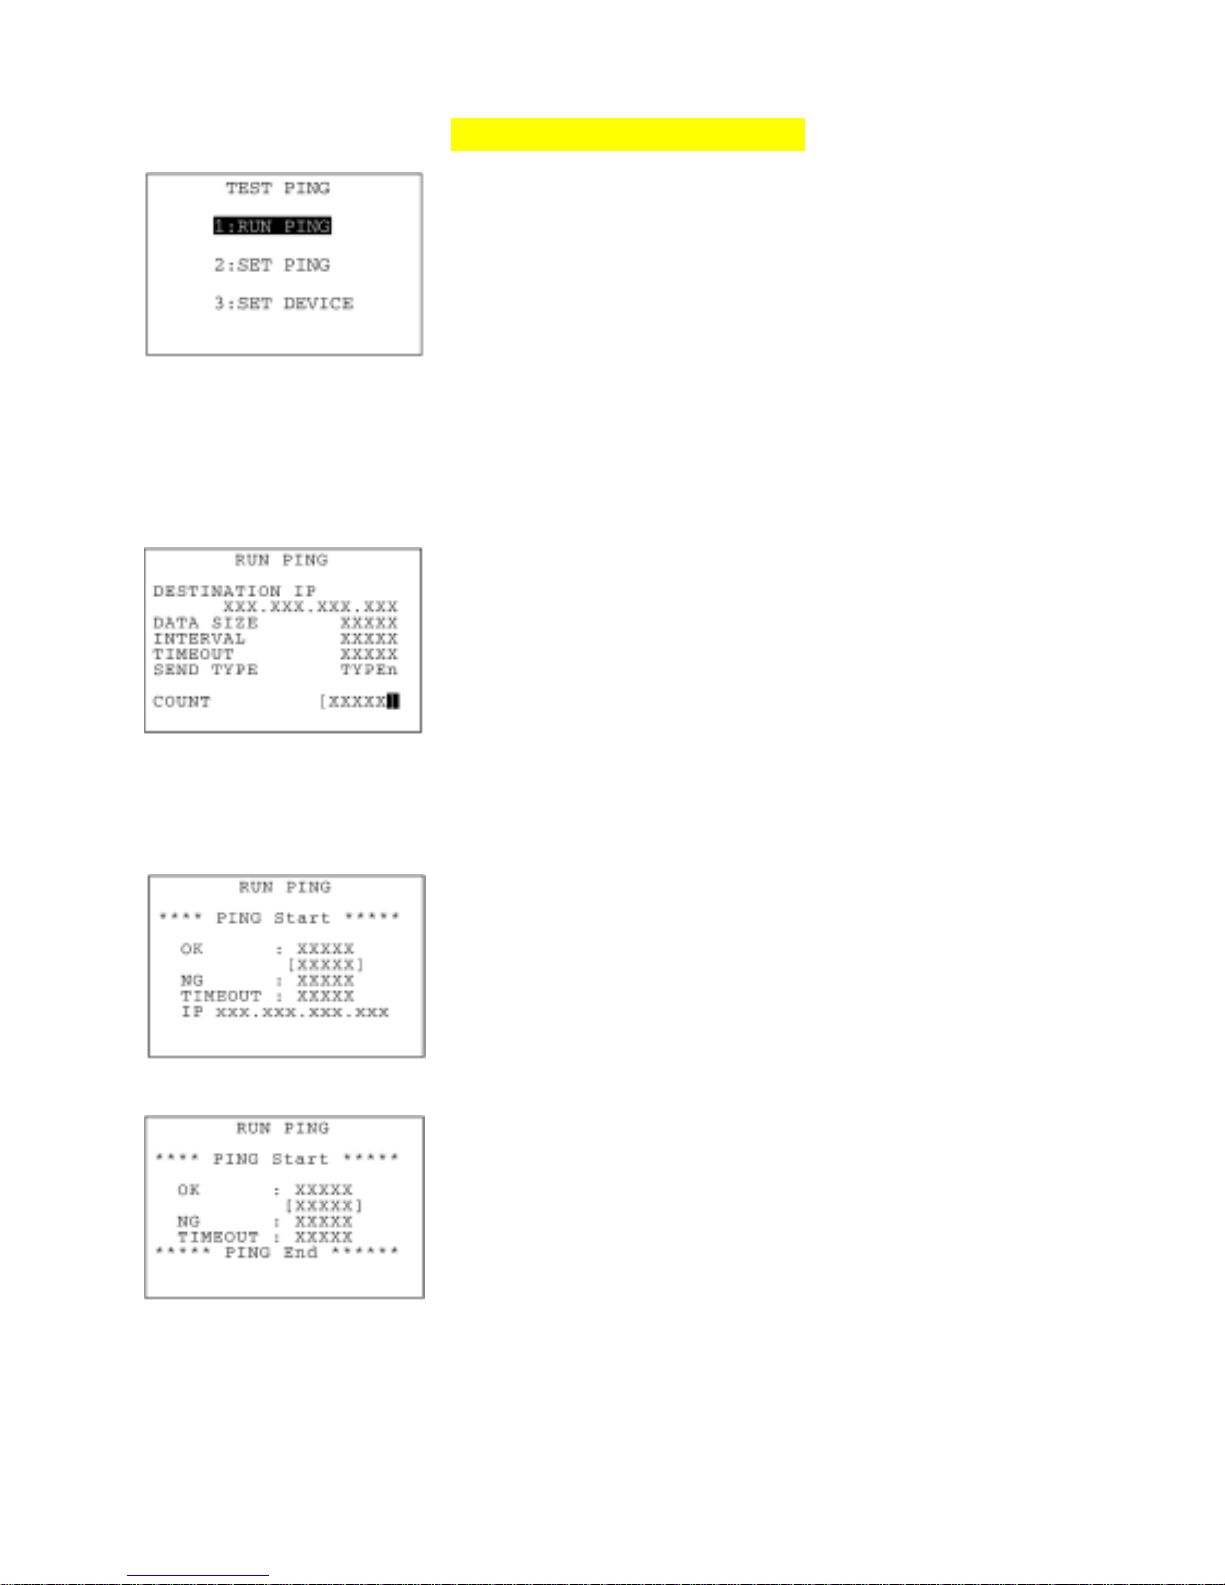
Chapter 2 Getting Started the BHT and System Mode
[5.9] Testing with PING (in LAN-support software only)
On the TEST menu, selecting "9: PING" calls up the screen shown at
left.
[1] RUN PING: Runs PING.
[2] SET PING: Switches to the PING parameter setting screen.
[3] SET DEVICE: Switches to the PING device setting screen.
Select a desired item by using the numerical keys or F5 and F6 keys,
and then press the ENT key.
To return to the TEST menu, press the C key.
(1) PING screen
⇓
On the TEST PING menu, select "1: RUN PING" to call up the screen
shown at left where the current settings are displayed.
The COUNT entry box enclosed with brackets is ready to accept data.
If you want to modify the number of echo requests displayed, ente
r
the desired value by using the numerical keys.
To delete a single character, press the BS key. To delete the whole
entry you made, press the C key.
Press the ENT key to start PING.
(PING running screen)
(PING end screen)
Once PING starts running, the message shown at left will appear.
To stop PING, press the C key.
The PING result may include the following:
OK: Displays the number of echo replies.
[XXXXX]: Echo reply time in milliseconds
NG: Displays thenumber of errors found during execution o
f
PING.
TIMEOUT: Displays the number of timeouts (for echo replies) that
took place during execution of PING.
IP: Displays the BHT's IP address during execution o
f
PING only.
85
Page 100
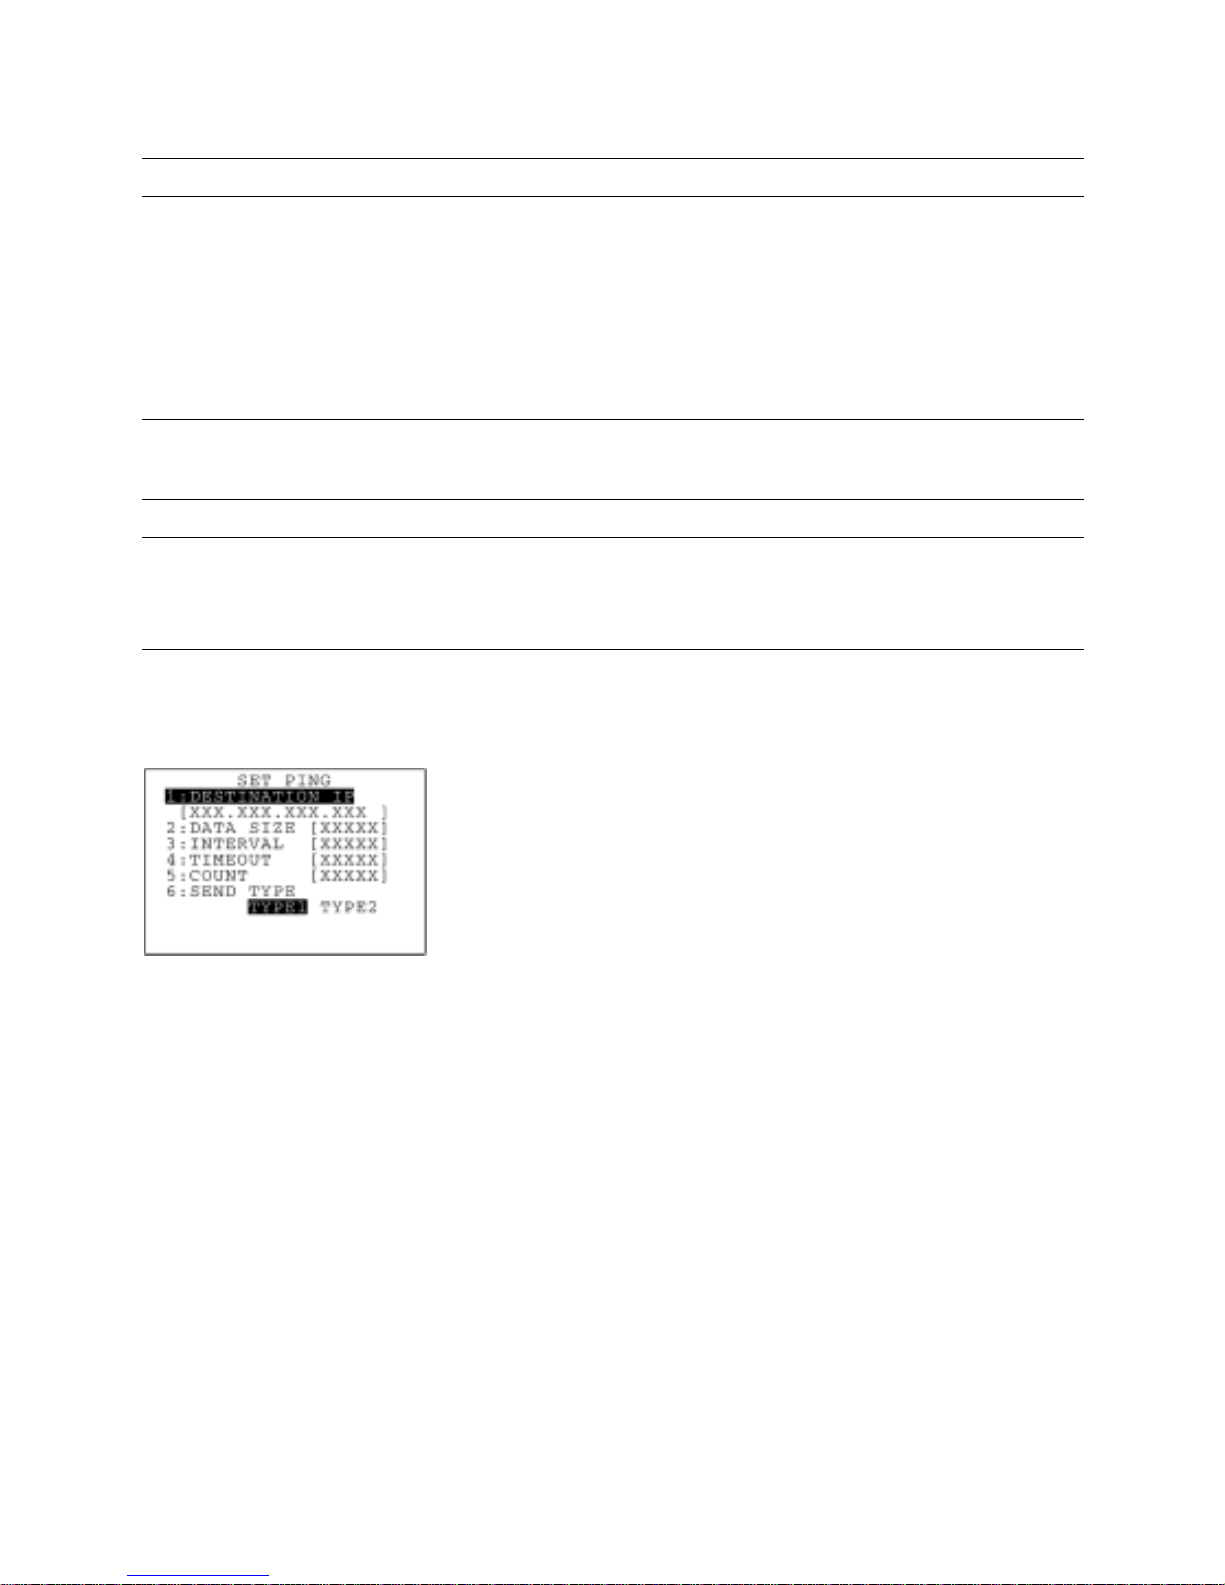
PING run-time messages (that will appear in the middle of the LCD)
Message Displays when:
Waiting Setting up PING.
Opening TCP/IP Opening devices.
Routing TCP/IP Connecting to the TCP/IP communications pathway.
PING start Starting PING.
Device error Failed to open a device.
TCP/IP error Failed to connect to the TCP/IP communications pathway.
PING termination messages (that will appear in the bottom of the LCD)
Message Displays when:
PING end PING has ended normally.
PING aborted PING has aborted.
PING error An error has occurred during running of PING.
(2) Setting PING parameters
On the TEST PING menu, select "2: SET PING" to call up the screen
shown at left where the current settings are displayed.
[1] DESTINATION IP: Specifies the IP address of a host PC that you
want to ping.
[2] DATA SIZE: Specifies the data size of an echo request.
[3] INTERVAL: Specifies the echo request intervals (in units
of 100 ms).
[4] TIMEOUT: Specifies the timeout period (in units of 100
ms) for an echo request.
[5] COUNT: Specifies the number of echo requests to be
sent.
[6] SEND TYPE: Selects the echo request send timing TYPE 1
or TYPE 2. (See page 88.)
The entry range for each of "2:DATA SIZE" through "5:COUNT" items
is listed on the next page.
Select a desired item by using the numerical keys or F5 and F6 keys.
86
 Loading...