

Page 1
1
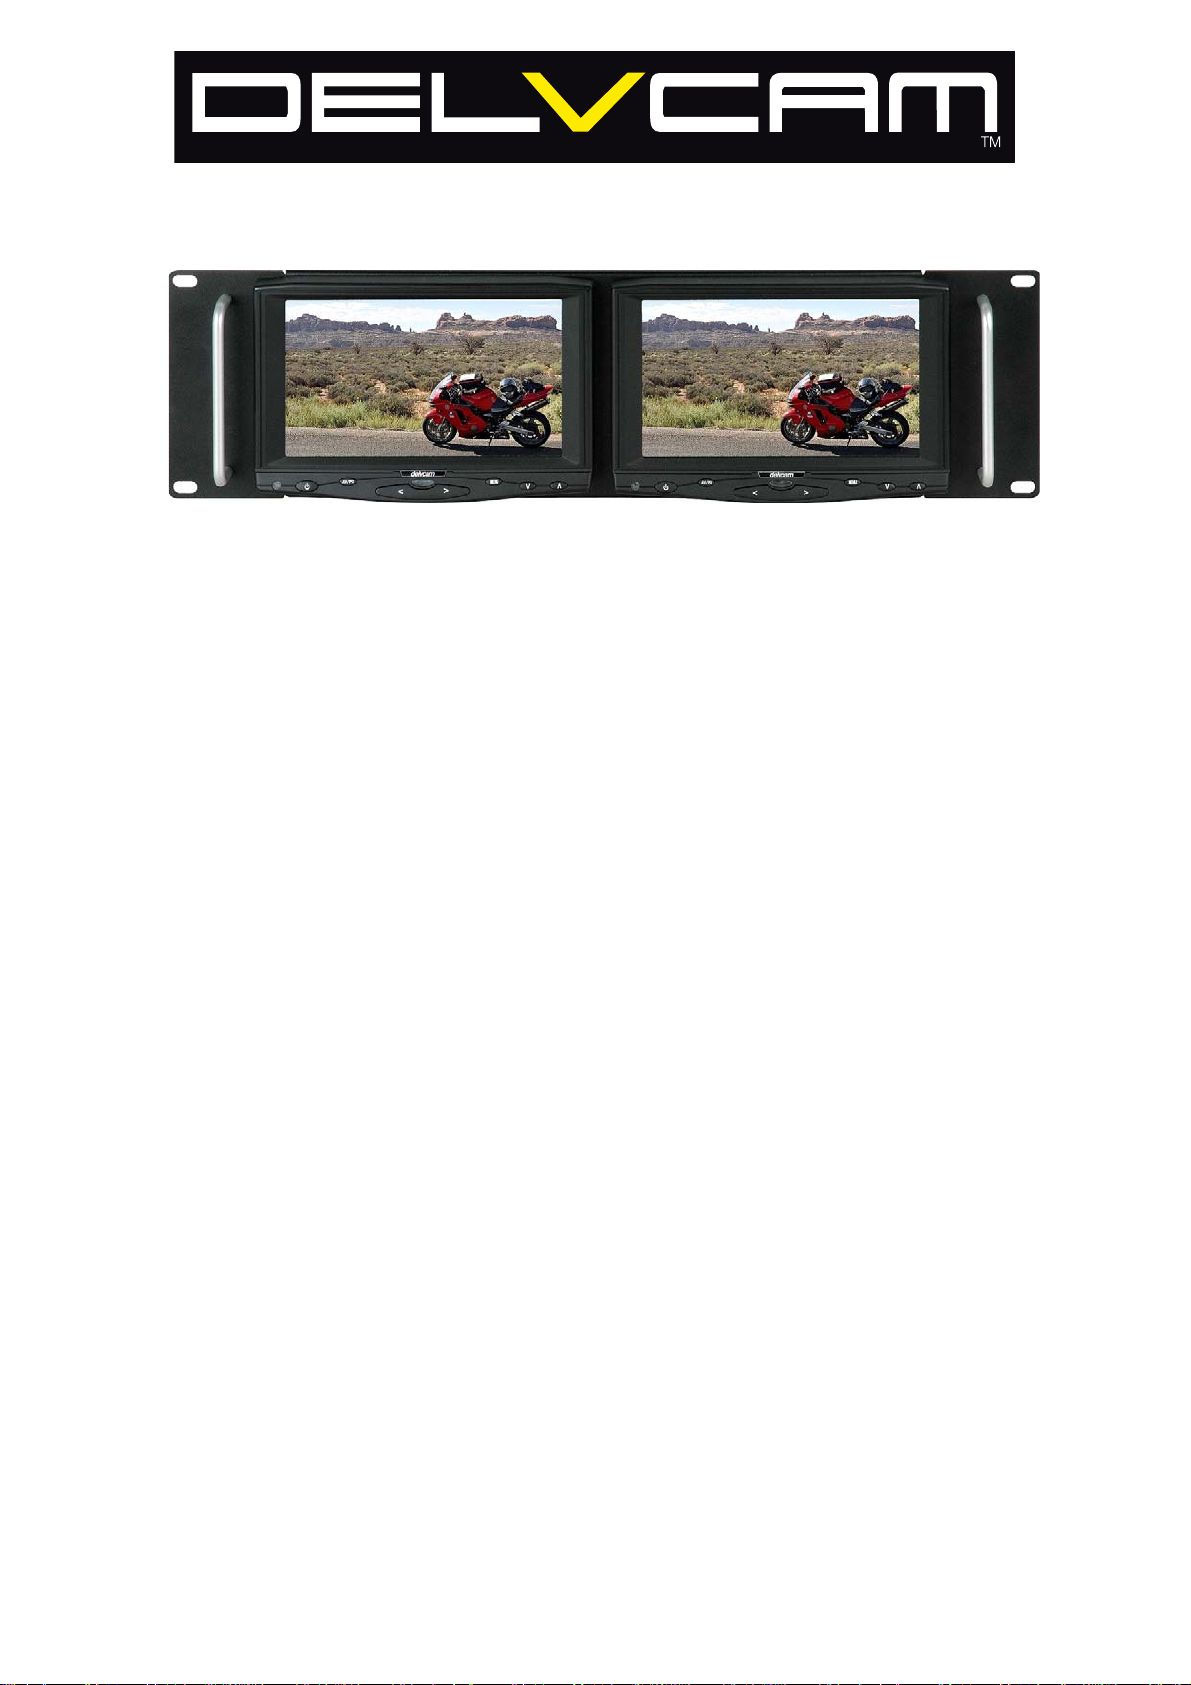
DELV-HD7RM DUAL RACK MOUNT
HDMI-VGA TOUCH SCREEN MONITOR
With Dual Composite Video & Audio
USER MANUAL
Thank you for purchasing the DELVCAM HD7RM High Definition liquid crystal display monitor. This
product employs new integrate circuits and high quality TFT LCD modules. It operates with low power
consumption, emits no radiation, and is a compact form factor. The color TFT LCD is the most suitable
display for VGA,VCD DVD and GPS system for motorcars and ships. It can also be used in the
high-end media facilities for in-line monitoring of HDMI, VGA and Composite Video signals. This
product is manufactured to the highest standards and will operate well in all applications where
performance is demanded but for a cost effective price.
Page 2

2
To ensure the best use of the unit
Please read this handbook carefully beforehand.
CAUTION
1. Please use the AC adapter attached in the accessory kit.
2. Do not expose this product to direct sunlight, heat or humid conditions.
3. Keep away from strong light while using this product to obtain the
best quality visible image.
4. Please avoid heavy impact: do not drop this product.
5. Do not use chemical solutions to clean this unit. Please simply wipe with a clean soft cloth.
6. If the product does not operate normally when the instructions are followed. Adjust only
those controls that are covered by the instructions. Improper adjustment of other controls may
require extensive service.
CONTENTS
1. PRODUCT DESCRIPTION ------------------------------------------------------------3
DESCRIPTION OF MONITOR FUNCTIONS ----------------------3
DESCRI
REMOT
2. MANUAL MENU OPERATIONS-------------------------------------------------------7
3. TOUCH SCREEN & PRODUCT SPECIFICATIONS----------------------------12
PTION OF REAR PANEL CONNECTORS---------------
E CONTROL OPERATIONS----------------------------------6
4
Page 3
3
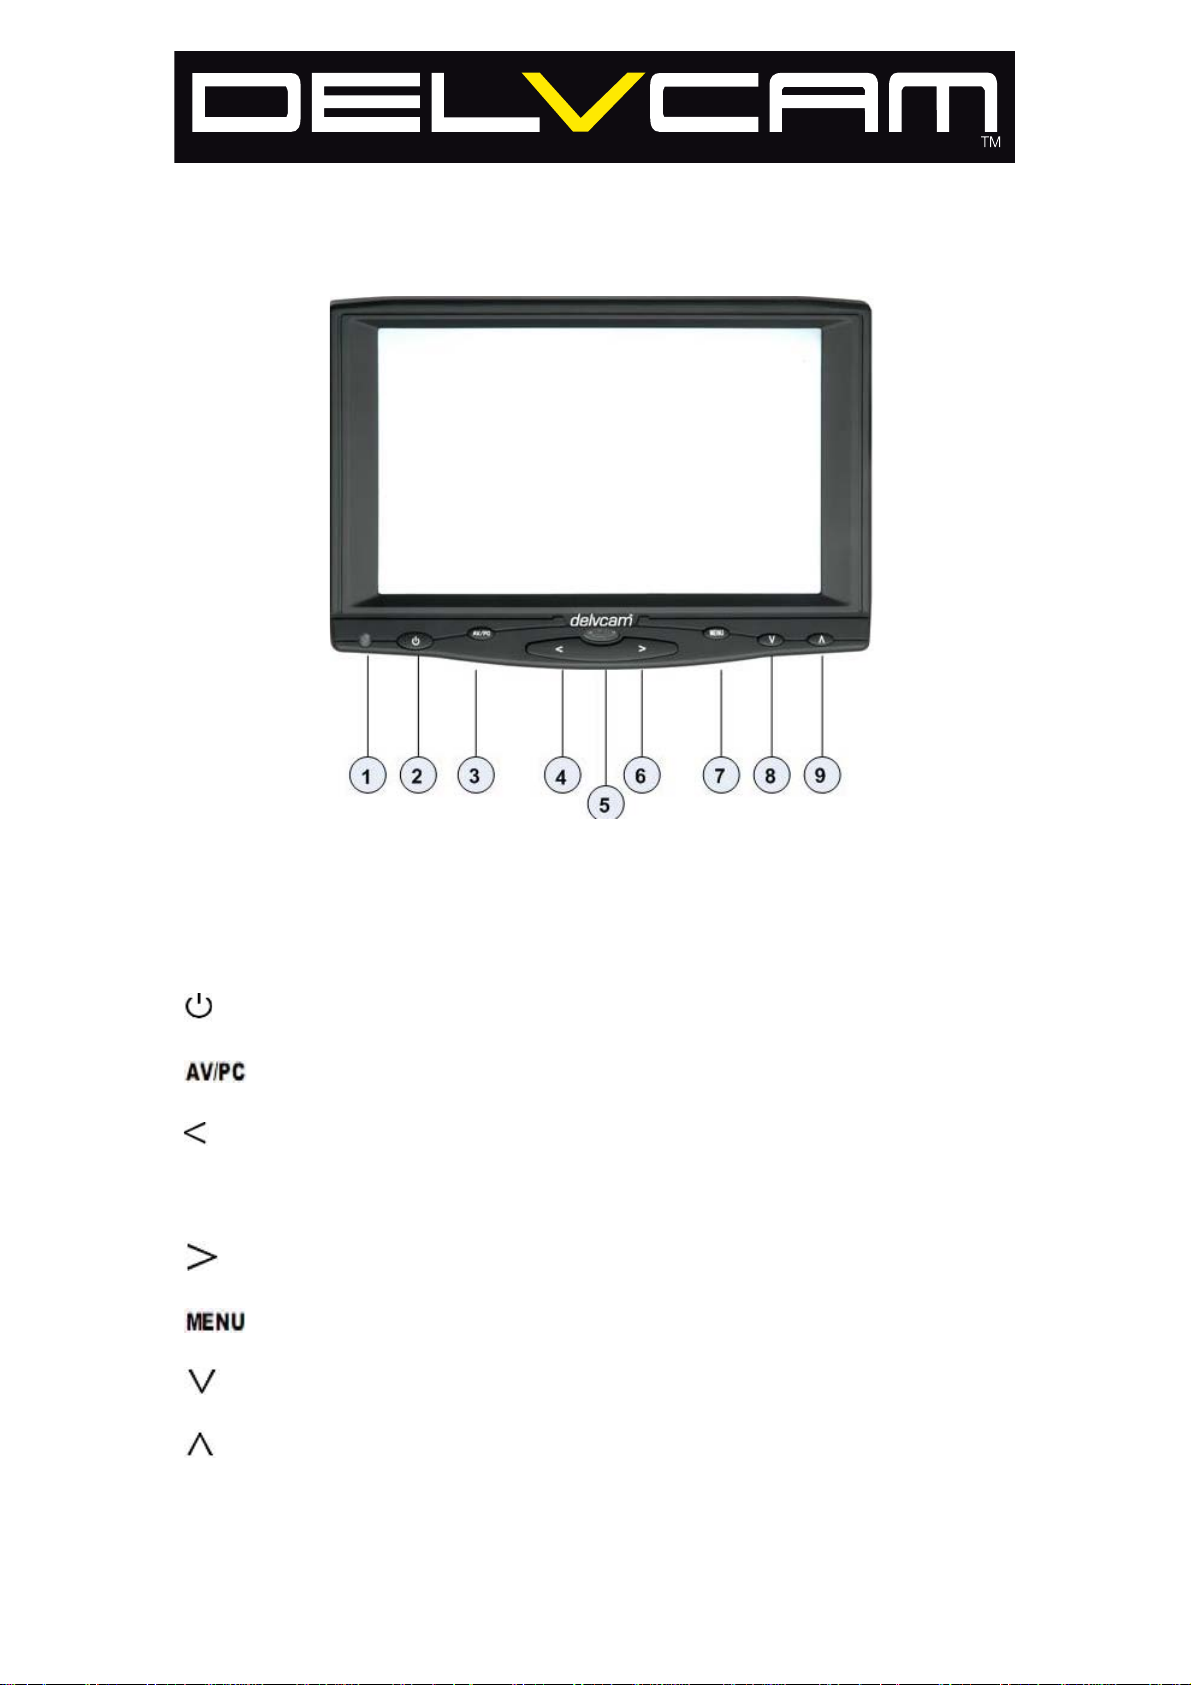
DESCRIPTION OF MONITOR FUNCTIONS
Picture 1(A)
1. Indicator light
2.
: Power on/off
3.
:(VGA), AV switch.
4.
:Volume down or to adjust the value of setting function
5. Infrared receiving window
6.
:Volume up or to adjust the value of setting function
7.
:To activate OSD menu.
8.
:Selection key, to adjust phase directly.
9.
:Selection key, to adjust the brightness directly.
Page 4
4
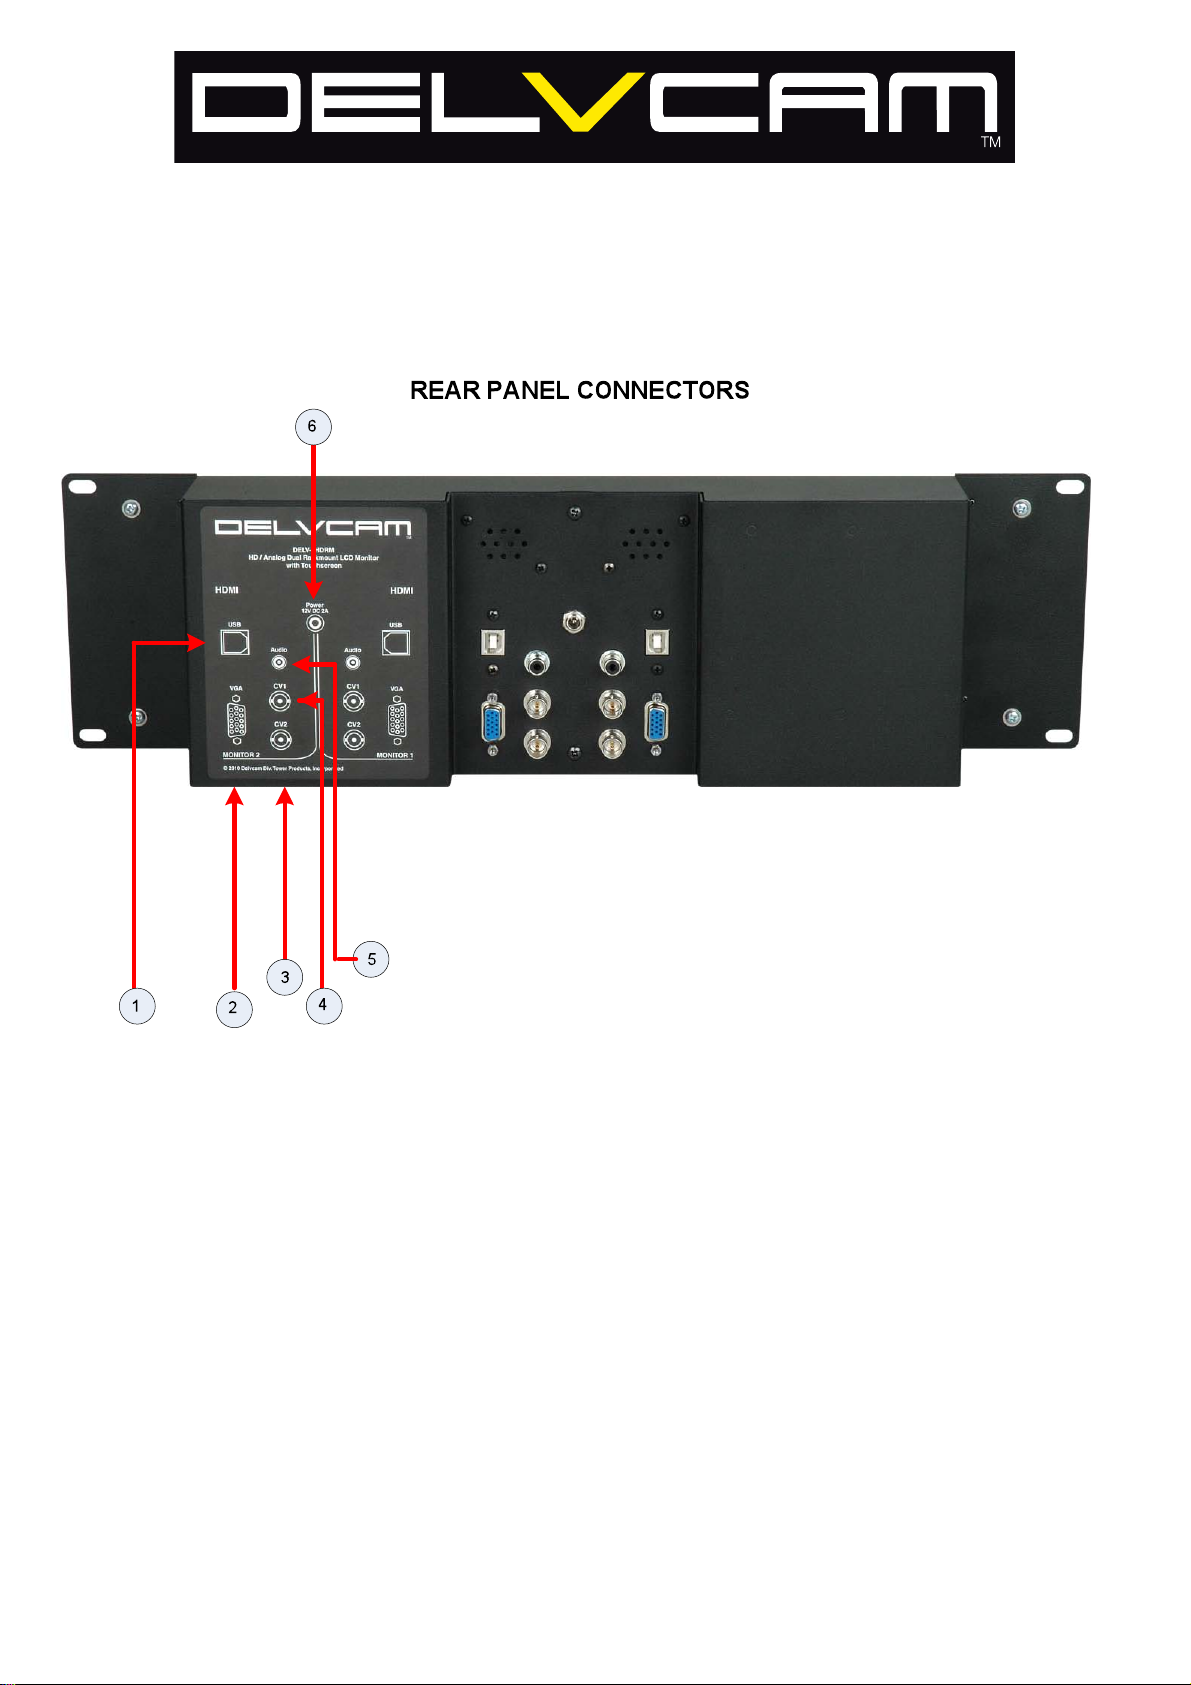
NOTE: THE GRAPHIC ON THE LEFT REAR PANEL INDICATES THE INPUT/OUTPUTS FOR
BOTH MONITORS.
1. USB INTERFACE JACK FOR TOUCH SCREEN OPERATION
2. VGA PORT FOR VGA INPUT
3. COMPOSITE VIDEO #2 INPUT
4. COMPOSITE VIDEO #1 INPUT
5. AUDIO INPUT
6. 12 VOLT DC 2AMP POWER INPUT
Page 5

5
7. HDMI INPUT
8. SPEAKER
Page 6

6
REMOTE CONTROLLER
1.
:Power on/off
2.
: MUTE
3.
: To activate OSD menu.
4.
: Volume down or to adjust the value of setting function
5.
: Volume up or to adjust the value of setting function
6.
: Selection key, to adjust the brightness directly
7.
: Selection key, to adjust phase directly
8.
: Aspect ratio switch, 4:3/16:9
9.
:UP/ DOWN Switch
10.
:Right/Left Switch
11.
:AV1/AV2/ PC(VGA) Switch
Page 7

7
Manual Menu Operation
After connecting power, the unit will be in standby state(red light). Press ” ” on the unit or on the
remote controller, the buttons of the unit will blue light, at that time the unit begins to work. Press the
same button again the unit will return to its standby state (Note the blue button will black out in 5 or 6
seconds soon after you turn off unit.). Push “PC (VGA)/AV” on the unit or on the remote
controller to switch between AV and (PC)(VGA).
OSD in (VGA) mode:
OSD in AV mode:
You can press “ ”/“ ” on the unit or on the remote controller to select the items:
(COLOR) (ADJUST) (MENU) (EDIT) (VOLUME), and confirm
buy pressing “
”/“ ” on the unit or on the remote controller, then push “ ”/“ ”
again to adjust the items. Push “
” to exit the OSD after your adjust.
Page 8

8
Description of OSD:
In (VGA) mode:
(Color):
After enter into “Color” item of OSD, use “ ”/“ ”to select and then push“ ”/“ ”to adjust.
Brightness: To adjust the brightness.
Contrast: To adjust the contrast of image.
Color Temp:To adjust the contrast of Color Temp.
Color temperature of OSD is adjustable. Press “</>”on the unit or on the remote controller to select
“Color Temp”, then you can choose to set color temperature such as: 6500 Ks, 7500 Ks or 9300 Ks
by pressing“ ”/“ ” . You can also adjust a color temperature that wants the options “USER" then
you can adjust RED, GREEN and BLUE at will by pushing ”/“
Page 9

9
Note: when you select the “USER” item a mini box will appear in the right bottom corner of the OSD
as pictured below.
(Adjust):
Auto Config:To adjust automatically .If the auto-adjust is not satisfy your request, you can
adjust manually.
※ H Position:To adjust the picture in horizontal.
※ V Position:To adjust the picture in vertical.
※ Phase:To adjust the phase.
※ Clock:To adjust the clock, make field and line synchronization.
(OSD):
※ Language:2 languages for OSD as below:
English 简体中文
※ H Position: To adjust the OSD position in horizontal.
※ V Position: To adjust the OSD position in vertical.
※ OSD Timeout: To adjust the clock.
※ Transparent: To adjust the level of transparency.
Page 10

10
(Function):
※ Reset:Back to original setting.
※ Display Ratio:To change the display ratio,16:9/4:3.
※ LR Rotation:To change the picture left/right.
※ UD Rotation:To change the picture up/ down.
(Sound):
Volume: To adjust the volume.
In AV mode:
(Color):
Brightness: To adjust the brightness.
Contrast: To adjust the contrast.
Hue: To adjust the hue adjust in NTSC mode.
Saturation: To adjust the saturation.
Page 11

11
(OSD):
※ Language:2 languages for OSD as below:
English 简体中文
※ H Position: To adjust the OSD position in horizontal.
※ V Position:To adjust the OSD position in vertical.
※ OSD Timeout:To adjust the clock.
※ Transparent:To adjust the level of transparent.
(Function):
※ Reset:Back to original setting.
※ Display Ratio:To change the display ratio,16:9/4:3.
※ LR Rotation:To change the picture left/right.
※ UD Rotation:To change the picture up/ down.
(Sound):
※ Volume: To adjust the volume.
Page 12

12
TOUCH SCREEN OPERATION
The DELV-HD7RM is equipped for Touch Screen Operation with PC based computers. This converts the screen of the
monitor to act as a GUI for PC based software applications. To use this feature you will need to use the USB cable that is
provided and load the driver software. The software is available from the your dealer or distributor. Once you have the
software just run it and follow the instructions. For assistance please call tech support.
SPECIFICATIONS:
INPUTS (Per Display) DUAL COMPOSITE VIDEO 1Vpp into 75 ohms
VGA 15pin HD Dsub
HDMI 1.3
Mono Audio
DISPLAY PANEL TFT LCD 7” LCD MONITOR 144000 Pixels
RESOLUTION 800X480 (VGA)
UP RESOLUTION 1920X1440 (VGA)
BRIGHTNESS 300 cd/m
CONTRAST 500:1
VIEWING ANGLE 70deg/70deg, 50deg/50deg (L/R, UD)
INPUT VIDEO 0.7 to 1.4Vpp/75 ohm (composite video)
VGA SIGNAL INPUT H:30 @60Hz, V:60@75Hz
SPEAKER Sensitivity: 250mW/8 ohms
COLOR FORMAT NTSC/3.58 • PAL/4.43
POWER 12 VDC @ 10 WATTS
SIGNAL INPUTS TYPE HDMI1.3, VGA, AV1, AV2 with Mono Audio
OPERATING TEMPERATURE -20deg C to 55deg C
DIMENSIONS 19” W X 5.25” H X 3.00” D (RACK MOUNT)
Copyright 2010 Tower Products, Inc.
2
Delvcam
812 Kings Highway
Saugerties, NY 12477
Tel 845-246-0428
Fax 845-246-0626
 Loading...