

Page 1

The power behind competitiveness
Delta UPS - Amplon Family
RT Series, Single Phase
5/6/10 kVA
User Manual
www.deltapowersolutions.com
Page 2

NSave This Manual
This manual contains important instructions and warnings that you should follow during
the installation, operation, storage and maintenance of this product. Failure to heed these
instructions and warnings will void the warranty.
Copyright © 2012 by Delta Electronics Inc. All Rights Reserved. All rights of this User Manual (“Manual”),
including but not limited to the contents, information, and gures are solely owned and reserved by Delta
Electronics Inc. (“Delta”). The Manual can only be applied to the operation or the use of this product. Any
disposition, duplication, dissemination, reproduction, modi cation, translation, extraction, or usage of this
Manual in whole or in part is prohibited without the prior written permission of Delta. Given that Delta will
continuously improve and develop the product, changes may be made to the information in this Manual
at any time without obligation to notify any person of such revision or changes. Delta will make all possible efforts to secure the accuracy and the integrity of this Manual. Delta disclaims any kinds or forms
of warranty, guarantee, or undertaking, either expressly or implicitly, including but not limited to the completeness, faultlessness, accuracy, non-infringement, merchantability or tness for a particular purpose
of the Manual.
Amplon RT Series
ii
Page 3

Table of Contents
NTable of Contents
Chapter 1: Important Safety Instructions ------------------------------------------------- 1
Placement Warnings ----------------------------------------------------------------------------------------- 1
Connection Warnings ---------------------------------------------------------------------------------------- 1
Usage Warnings ---------------------------------------------------------------------------------------------- 1
Glossary of Symbols ----------------------------------------------------------------------------------------- 2
Standard Compliance ---------------------------------------------------------------------------------------- 2
Chapter 2: Introduction ------------------------------------------------------------------------- 3
General Overview -------------------------------------------------------------------------------------------- 3
Package Contents -------------------------------------------------------------------------------------------- 3
Features --------------------------------------------------------------------------------------------------------- 4
Storage ---------------------------------------------------------------------------------------------------------- 5
Front Panel ----------------------------------------------------------------------------------------------------- 6
Rear Panel ----------------------------------------------------------------------------------------------------- 7
Chapter 3: Installation --------------------------------------------------------------------------- 8
Rack Mounting ------------------------------------------------------------------------------------------------ 8
Tower Mounting ----------------------------------------------------------------------------------------------- 8
Connection --------------------------------------------------------------------------------------------------- 10
Chapter 4: Operation ----------------------------------------------------------------------------12
UPS Start-up ------------------------------------------------------------------------------------------------- 12
UPS Turn-off ------------------------------------------------------------------------------------------------- 14
LCD Display in Different Operation Modes ----------------------------------------------------------- 14
Firmware Version Look-up ------------------------------------------------------------------------------- 15
Operation Modes ------------------------------------------------------------------------------------------- 16
Chapter 5: Communication Interface -----------------------------------------------------17
RS232 port --------------------------------------------------------------------------------------------------- 17
Remote Control Port --------------------------------------------------------------------------------------- 17
SNMP Slot ---------------------------------------------------------------------------------------------------- 18
SMART Slot -------------------------------------------------------------------------------------------------- 19
External Battery Pack Connector ----------------------------------------------------------------------- 19
Parallel Connector ------------------------------------------------------------------------------------------ 21
iii
Page 4

Chapter 6: Optional Accessories ----------------------------------------------------------23
Optional Accessory List ----------------------------------------------------------------------------------- 23
Optional Accessory Installation-------------------------------------------------------------------------- 24
Chapter 7: Maintenance ------------------------------------------------------------------------26
UPS ------------------------------------------------------------------------------------------------------------ 26
Battery --------------------------------------------------------------------------------------------------------- 26
Fan ------------------------------------------------------------------------------------------------------------- 26
Chapter 8: Troubleshooting ------------------------------------------------------------------27
Chapter 9: Speci cations ---------------------------------------------------------------------28
Chapter 10: Warranty ---------------------------------------------------------------------------29
Amplon RT Series
iv
Page 5
Chapter 1 Important Safety Instructions
NChapter 1: Important Safety Instructions
Placement Warnings
Install the UPS in a well ventilated area, away from excess moisture, heat, dust, flammable
z
gas or explosives.
Leave adequate space (at least 15cm) around all sides of the UPS for proper ventilation.
z
Do not mount the UPS with its front or rear panel facing down at any angle.
z
Connection Warnings
The UPS must be well grounded due to a possible risk of current leakage.
z
The installation of upstream and downstream protective devices is highly recommended when
z
the UPS is connected to the mains and the load.
The protective devices connecting to the UPS must be installed near the UPS and must be
z
easily accessible for operation.
Do not use extension cords to connect the UPS to an AC outlet.
z
Usage Warnings
This is a class-A product. In a domestic environment, this product may cause radio interfer-
z
ence, in which case, the user is required to take adequate measures.
The UPS can be used to power computers and associated peripheral devices, such as moni-
z
tors, modems, cartridge tape drives, external hard drives, etc.
The external slits and openings in the UPS are provided for ventilation. To ensure reliable
z
operation of the UPS and to protect the UPS from overheating, these slits and openings must
not be blocked or covered. Do not insert any object into the slits and openings that may hinder
ventilation.
Before usage, you must allow the UPS to adjust to room temperature (20°C~25°C or
z
68°F~77°F) for at least one hour to avoid moisture condensing inside the UPS.
Do not put beverage containers on the UPS, battery pack, cabinet or any other accessory as-
z
sociated with the UPS.
The risk of dangerous high voltage is possible when the batteries are still connected to the
z
UPS even though the UPS is disconnected from the mains. Do not forget to pull out the battery
cable to completely cut off the battery source.
Do not open or mutilate the battery or batteries. The released electrolyte is harmful to the skin
z
and eyes and may be toxic.
1
Page 6
Do not dispose of the battery or batteries in a re. The batteries may explode.
z
All maintenance services must be performed by quali ed service personnel.
z
removing the cover of the UPS to avoid high voltage electric shock.
You must contact quali ed service personnel if either of the following events occur:
z
1. Liquid is poured or splashed on the UPS.
2. The UPS does not run normally after this User Manual is carefully observed.
NOTE:
If you use the UPS in an area that generates or incurs dust, you should install a dust lter
in the UPS to ensure normal product life and function.
Glossary of Symbols
Symbol Description Symbol Description
The UPS is in on-line mode. Protective earthing conductor
The UPS is in battery mode. Bonded to ground
The UPS is in bypass mode. Positive battery terminal
The UPS has an internal fault. Negative battery terminal
UP button Phase
DOWN button Warning
Do not connect any computer
to the charger detection port.
DC voltage
Note
Forbid open
ing or
CE
z
IEC62040-1
z
IEC62040-2 C2
z
IEC61000-4-2 (ESD) Level 4
z
IEC61000-4-3 (Radiated Field) Level 3
z
IEC61000-4-4 (EFT) Level 4
z
IEC61000-4-5 (Surge) Level 4
z
Amplon RT Series
Standard Compliance
2
Page 7

Chapter 2 Introduction
NChapter 2: Introduction
General Overview
This RT series UPS, available in 5kVA, 6kVA, and 10kVA, is a true on-line double-conversion UPS providing reliable and consistent sine-wave quality power to your sensitive electronic equipment. It adopts
the latest technology and the highest quality components providing output power factor up to 0.9, and its
ef ciency in on-line mode and in economy mode can reach at maximum 92% and 96% respectively. With
its outstanding features, the UPS not only provides safe, reliable and uninterrupted power to your
tive electronic equipment at all times, but also produces greater electric power ef ciency at less cost.
Package Contents
The UPS package contains the following items. Please carefully inspect the UPS and check the included
accessories. If there is any damage or anything missing, please immediately contact the dealer from
whom you purchased the unit. If the UPS needs to be returned, carefully repack the UPS and all of the
accessories using the original packing material that came with the unit.
10kVA: 6 PCS
Item Quantity
UPS 1 PC
z
User Manual 1 PC
z
Software CD –SMART2000 1 PC
z
Battery Cable 1 PC
z
RS232 Cable 1 PC
z
Parallel Cable 1 PC
z
Tower Stand 1 SET (4 PCS)
z
Bracket Ear 1 SET (2 PCS)
z
Terminal 5/ 6kVA: 8 PCS
z
sensi-
3
Page 8

Features
True on-line design UPS protects your sensitive electronic equipment from power interruption.
z
Wide AC input voltage range (100Vac~300Vac) reduces frequent transfer
z
battery mode to save battery consumption and prolong battery life.
Smart battery charger design performs auto-charging and reduces the charging time.
z
Automatic input frequency detection enables operation at 50Hz or 60Hz.
z
The input power factor correction and the high frequency pulse-width-modulated inverter give
z
the UPS excellent performance characteristics in this compact design.
Battery-Start powers on the UPS to provide stable AC power when there is no AC line avail-
z
able.
Remote Control Port: Use this port to either shut down the UPS completely (REPO) or switch
z
off the inverter only (ROO).
Built-in RS232 communication port allows the monitoring and management of the UPS via
z
SMART2000 software.
from on-line mode
to
Optional accessories include
z
TVSS
cation and surge protection.
State-of-the-art microprocessor technology performs self-detection and displays the UPS sta-
z
tus on LCD.
Surge protection and EMI lter functions.
z
Automatic restart:
z
1) The UPS will restart in on-line mode automatically right after the AC line resumes following
a low battery shutdown.
2) The UPS returns automatically to on-line mode from bypass mode after the overload condition is cleared.
External battery pack connector is provided to connect an external battery pack to extend the
z
backup time.
Optional ECO Mode: When the utility input voltage and frequency are
z
voltage ±10% and rating frequency ±6%, the UPS will transfer to bypass mode; otherwise, the
UPS will transfer to on-line mode to reach higher ef ciency.
Auto-detect the bypass mode voltage: Automatically detects whether the bypass voltage is out of
z
rating voltage (240Vac output: 156~276Vac; 200/ 208/ 220/ 230Vac output: 156~264Vac). If yes,
the UPS will stop the supply to the load to protect your electronic equipment.
Automatically detects and shows whether the fan(s) is operating normally.
z
Amplon RT Series
cards for
network communication
Mini SNMP, Mini Relay I/O, Mini USB, Mini ModBus
and
, dry contact, USB communication, ModBus communi-
within the range of rating
4
Mini
Page 9
Chapter 2 Introduction
Normal start-up function even when the UPS is not connected to the batteries.
z
WARNING:
Please note that when the UPS is not connected to the batteries, it will not protect your
equipment if the utility power is lost.
Enables set up of “1+1” parallel redundant system (with optional manual bypass box) to in-
z
crease the system availability and reliability.
The fan(s) automatically adjusts the fan speed to prolong fan life.
z
Storage
Prior to installation:
z
If the UPS needs to be stored prior to installation, it should be placed in a dry area. The allowable storage temperature is between -15°C and +50°C (5°F~122°F).
After usage:
z
Press the ‘OFF’ button, make sure the UPS is shutdown, disconnect the UPS from the utility
power, remove all equipment from the UPS, and store the UPS in a dry and well-ventilated
area at a temperature between -15°C and +50°C (5°F~122°F). Idle batteries must be recharged fully approximately every three months if the UPS needs to be stored for an extended
period of time. The charging time must not be less than 24 hours each time.
NOTE: After storage and before start-up of the UPS, you must allow the UPS to adjust to
room temperature (20°C~25°C or 68°F~77°F) for at least one hour to avoid moisture condensing inside the UPS.
5
Page 10
Front Panel
(Figure 2-a) Front Panel
No. Item Description
1
On-line LED Indicates that the UPS is in on-line mode.
2
Battery LED
3
Fault LED Indicates that the UPS has an internal fault.
4
Bypass LED Indicates that the UPS is in bypass mode.
5
Backlight LCD Display
ON Button
6
OFF Button
7
8
and Buttons
Indicates that the UPS is currently in battery mode and the external
battery is discharging now.
The LCD display shows the status of the UPS and relevant information.
Press this button for 3~5 seconds to start up the UPS. In on-line
mode with utility power available, press this button for 3 seconds to
execute the 10-second battery discharge test.
Press this button for over 3 seconds to shut down the inverter of
the UPS.
Use these two buttons to set up the output frequency, voltage, operation mode and the LCD. Press either
than 3 seconds to disable ‘BEEP’.
or button for more
Amplon RT Series
6
Page 11
Chapter 2 Introduction
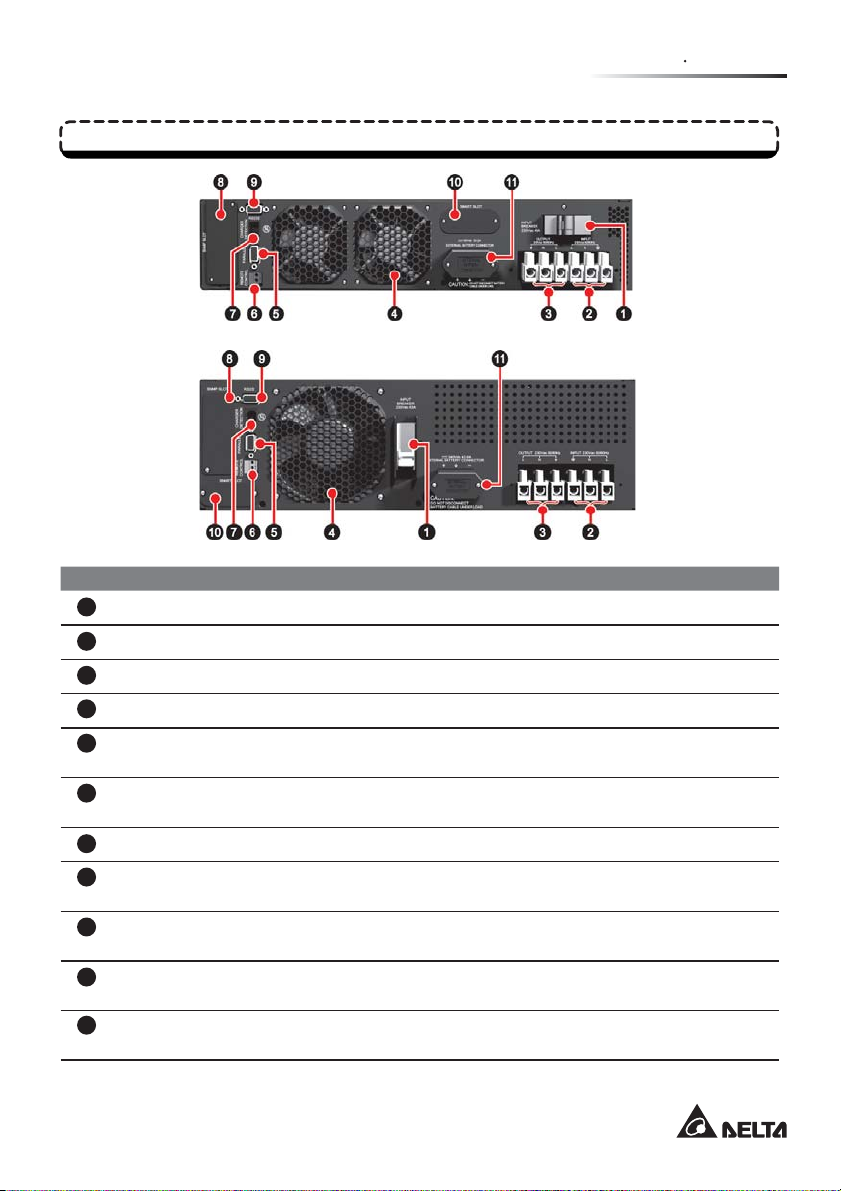
Rear Panel
(Figure 2-b)
5kVA/ 6kVA
Rear Panel
(Figure 2-c)
10kVA Rear Panel
No. Item Description
Input Breaker Protects the utility power from further damage when the UPS fails.
1
Input Terminal Block Connects the UPS to the mains.
2
Output Terminal Block Connects to the load.
3
Fan Cools and ventilates the UPS.
4
Parallel Connector For UPS parallel communication, please see Chapter 5 for detailed
5
Remote Control Port Shuts down the UPS completely or switches off the inverter only.
6
Charger Detection Connects to the charger box and detects the charger status.
7
SNMP Slot Accepts SNMP/ Relay I/O/ ModBus card. Please see Chapter 5 for
8
RS232 Port Communication interface port. Please see Chapter 5 for detailed
9
Smart Slot Accepts Mini SNMP/ Mini Relay I/O/ Mini USB/ Mini ModBus/ Mini
10
11
External Battery Pack
Connector
information.
Please see Chapter 5 for detailed information.
detailed information.
information.
TVSS card. Please see Chapter 5 for detailed information.
Connects to the external battery pack. Please see Chapter 5 for
detailed information.
7
Page 12

NChapter 3: Installation
Use the included bracket ears and screws to mount the UPS in a rack by following the proce-
z
dures below.
1. Attach the included bracket ears to the lateral mounting holes of the UPS. See Figure 3-a.
2. Follow steps 1 to 4 to install the UPS in Delta’s rail kit (optional). See Figure 3-b.
Stepn: Adjust the length of the rail according to the rack.
StepY: Tighten the nuts.
StepZ: Fix the rail on the rack.
Insert the UPS in the rack and tighten the screws.
Step[:
3. If you want to use a non-Delta
(Figure 3-a) UPS Bracket Ear
Installation
Rack Mounting
rail kit,
please only follow Step[.
(Figure 3-b) Rack Mounting
4
1
3
2
3
Use the included tower stands to mount the UPS in an upright tower position by following the
z
steps below.
1. Stepn: Assemble the tower stands by inserting the tenons into the grooves according to
the size of the UPS. See Figure 3-c.
2. StepY: Pull out the UPS control panel and rotate it 90° clockwise. See Figure 3-d.
3. StepZ: Carefully lift the UPS upright with the Delta logo shown on the control panel facing
up. See Figure 3-e.
4. Step[: Place the UPS inside the tower stands. See Figure 3-f.
Leave adequate space (at least 15cm) around all sides of the UPS for good ventilation.
z
Amplon RT Series
NOTE: If you need the optional rail kit, please contact your local dealer.
Tower Mounting
NOTE:
A minimum of two people are required to execute StepZ and Step[.
8
Page 13

(Figure 3-c) Assemble the Tower Stands
1
(Figure 3-d) Rotate the UPS Control Panel
2
(Figure 3-e) Place the UPS Upright
Chapter 3 Installation
3
(Figure 3-f) Place the UPS inside the Tower Stands
4
9
Page 14

Connection
UPS Connection Warnings:
z
1.
When connecting the UPS to the mains and the load, it is highly recommended that you install
the protective devices. The protective devices must use approved components that meet
safety certi cations. Please refer to the table and diagram below.
UPS Power
Rating
5kVA C curve- 40 A NADER: NDM1-63C 40/2 &
6kVA C curve- 40 A NADER: NDM1-63C 40/2 &
10kVA D curve- 63 A NADER: NDB2-63D 63/2
2. Prior to providing any power to the UPS, the UPS must be suitably grounded.
3. The power supply to the UPS must be single-phase in accordance with its rating label.
Input/ Output Connection:
z
1. Please see the gures below for input/ output connection.
(Figure 3-g) 5kVA/ 6kVA (Figure 3-h) 10kVA
Suggested
Protective Device
Suggested Supplier
GE: 674609
GE: 674609
Amplon RT Series
10
Page 15

Chapter 3 Installation
2. Cable selection:
Rating Temperature 5kVA 6kVA 10kVA
60°C 6mm
75°C 6mm
2
2
8mm
8mm
2
13mm2 or #6AWG (Cu)
2
13mm2 or #6AWG (Cu)
(In accordance with National Electrical Code (NEC), please install the suitable
conduit and bushing.)
3. When connecting the input/ output power cord, please observe the following rules.
1) Turn off the UPS and cut off not only the AC source but also the battery source before
connection.
2) Calculate the power consumption of the load to ensure that an overload condition will
not occur.
3) Ensure that the screws are tightly fixed after the connection. The tightening torque
should be 18±2Kgf.cm.
4. After the UPS is connected to the utility power, the following sequence of events will
1) The fan(s) in the rear panel comes on.
2) The LCD will rst show the message below.
3) After above message appears, the LCD will show the UPS is in ‘BYPASS MODE’, and
the bypass LED
will illuminate (yellow).
occur.
NOTE: All of the readings shown in the LCD diagrams presented in this manual are
for reference only. Actual readings depend on the operation of the UPS.
11
Page 16

NChapter 4: Operation
UPS Start-up with AC Input:
z
Press the ‘ON’ button for 3~5 seconds to start up the UPS. After the button is pressed for 3~5
seconds, the system will beep. Release the button and the UPS will start up. The UPS performs self-diagnosis and the LCD automatically shows the following messages in order.
UPS Start-up
The UPS will auto detect the input frequency to determine
n
the output frequency (the default value is 50Hz).
Auto displays input voltage and frequency.
Y
Auto checks the recti er. If ok, it will show RECTIFIER OK.
Z
Auto checks the charger. If ok, it will show CHARGER OK.
[
Auto checks the battery. If ok, it will show BATTERY OK.
\
Auto checks the DC BUS voltage. If ok, it will show DC BUS OK.
]
Amplon RT Series
Auto tests the inverter.
^
When the inverter test result is ok, it will show INVERTER
_
OK.
NOTE: When the LCD shows each screen (n~_), the
bypass LED
Now, the UPS is in on-line mode and the on-line LED
`
illuminates (green).
12
will illuminate (yellow).
Page 17

UPS Start-up with Battery:
z
Press the ‘ON’ button for 3~5 seconds to start up the UPS.
1. When you press the ‘ON’ button, the LCD will show the message below.
Chapter 4 Operation
After the
2.
ton and the UPS will start up. The UPS performs self-diagnosis and the LCD automatically
shows the following messages in order.
‘ON’
button is pressed for 3~5 seconds, the system will beep. Release the but-
As there is no input signal available, the UPS will select
n
the default frequency as the output frequency (the default value is 50Hz).
Auto displays input voltage and frequency.
Y
Auto checks recti er. If ok, it will show RECTIFIER OK.
Z
Auto executes battery test. If ok, it will show BATTERY
[
OK.
Auto checks DC BUS voltage. If ok, it will show DC BUS
\
OK.
Auto tests the inverter.
]
When the inverter test result is ok, it will show INVERT-
^
ER OK.
NOTE: When the LCD shows each screen (n~^), no
LED will illuminate.
The UPS automatically displays the battery capacity
_
and the battery LED
13
illuminates (green).
Page 18

UPS Turn-off
In online mode, press the ‘OFF’ button for 3 seconds to shut down the inverter (the system will beep) and
the UPS will transfer to bypass mode. At this moment, the bypass LED
the LCD shows ‘BYPASS MODE’. In backup mode, press the ‘OFF” button for 3 seconds to shut down
the inverter (the system will beep) and the UPS turns off and the LCD shows the following message.
illuminates (yellow) and
WARNING:
You can remove the UPS only after the above message is off, the fan(s) stops running, the utility power is shut off and the batteries are removed.
LCD Display in Different Operation Modes
In different operation modes, the LCD will display different information.
Amplon RT Series
NOTE:
ÚPlease use the UP “ ” and DOWN “ ” buttons on the front
control panel to switch back and forth between screens.
The UPS supports multi-language LCD display. If you need to
Ú
change the default language setting, please contact your local dealer or customer service.
14
Page 19

Chapter 4 Operation
LCD Display Messages:
z
LCD Message Meaning
ONLINE MODE Indicates the UPS is in online mode.
STANDBY MODE Indicates the UPS is in standby mode
ECO MODE Indicates the UPS is in ECO mode.
BATTERY MODE Indicates the UPS is in battery mode.
BYPASS MODE Indicates the UPS is in bypass mode.
CONVERTER MODE Indicates the UPS is in converter mode.
STANDALONE Indicates that there is only one UPS.
PARALLEL: MASTER
PARALLEL: SLAVE
INPUT VOLTAGE Indicates the input voltage.
BYPASS VOLTAGE Indicates the bypass voltage.
OUTPUT VOLTAGE Indicates the output voltage.
BATTERY CAPACITY Indicates the battery capacity.
REMAINING TIME Indicates the remaining battery time.
ONLINE XKVA Indicates the UPS power rating, rmware version and
Indicates that, in parallel mode, this is the MASTER
UPS.
Indicates that, in parallel mode, this is the SLAVE UPS.
compatible version code.
Firmware Version Look-up
Check the UPS rmware version from the LCD.
z
V00: UPS Firmware Version
CV00: Compatible Version Code.
When two units are in parallel, each detects whether the compatible version code of the other
z
is the same. If not, the UPS won’t turn on and the alarm message below appears.
If the message above appears, please contact your local dealer to upgrade the rmware.
z
15
Page 20

Operation Modes
Online Mode:
z
During on-line mode, the on-line LED
the inverter, which derives its power from the utility AC power, and the UPS charges the batteries as needed and provides power protection to the equipment.
Standby Mode:
z
In standby mode, the input power is from the utility AC power and the UPS charges the batteries.
ECO Mode:
z
You can manually set the UPS to ECO mode. In ECO mode, when the utility input voltage and
frequency are within the range of rating voltage ±10% and rating frequency ±6%, the load is
supplied by the utility power and the bypass LED
the load is supplied by the inverter and the on-line LED
Battery Mode:
z
When the UPS is operating during a power outage, the batteries provide DC power, which
maintains inverter operation to support the critical load. During battery mode, the battery LED
illuminates (green). The status of the battery is as follows.
Battery Capacity Buzzer LCD Display
Full The alarm beeps once every
Mid
Low The alarm beeps once every
Under Long Beep SHUT DOWN DUE TO
10 seconds.
(Beep is ON for 0.1 sec +
Beep is OFF for 9.9 sec).
0.5 second.
(Beep is ON for 0.1 sec. +
Beep is OFF for 0.4 sec).
illuminates (green). The critical load is supplied by
illuminates (yellow); if out of the range,
illuminates (green).
BATTERY CAPACITY
00V/000%
BATTERY CAPACITY
00V/000%
DEPLETED BATTERY
Bypass Mode:
z
During bypass mode, the bypass LED
supplied by the utility power and the batteries are charged.
Converter Mode:
z
When the UPS is manually set in converter mode, the output frequency can be set as 50Hz
or 60Hz. After the output frequency is set up, the system will automatically disable the bypass
function. Please note that once the inverter shuts down, there is no bypass output. During converter mode, the on-line LED
Amplon RT Series
illuminates (yellow). The critical load is directly
illuminates (green).
16
Page 21

Chapter 5 Communication Interface
NChapter 5: Communication Interface
NOTE: The UPS can still function properly without making the connections below.
RS232 Port
RS232 port (9-pin female connector) is built into the UPS rear panel. You can use the provided RS232
cable to connect the UPS with a computer and use the included CD to install the SMART2000 software
to check and monitor the UPS status via a computer.
RS232 port provides the following functions:
z
1. Monitor UPS status:
Load level, battery status, battery voltage, UPS mode, input voltage, input frequency, out-
put voltage, and unit inside temperature
2. Set shut-down delay time
3. Enable/ disable beep
4. Remote shut-down
Pin Assignment:
z
1. PIN 2: TXD <Transmitting Data>
2. PIN 3: RXD <Receiving Data>
3. PIN 5: GND <Signal Ground>
Hardware:
z
1. Baud Rate ……. 2400bps
2. Data Length ……8 bit
3. Stop Bit …………1 bit
4. Parity ……………None
NOTE:
ÚYou can also download the software from the link, http://59.125.232.140.
ÚBefore you use the RS232 port, please make sure that you have removed a mini-size card from
the SMART slot. Do not use RS232 port and SMART slot at the same time.
Remote Control Port
This interface is for connection to a facility’s Remote Emergency Power Off (REPO) circuit. When the
UPS is connected to the REPO circuit, it enables emergency shutdown of the UPS and the UPS has
no output. Connect this remote control port to a user-supplied normally-closed or normally-open switch.
Please refer to Figure 5-a.
Figure 5-a: Use a screwdriver to push the area shown by the two black arrows to open the Remote Control Port, and connect the port to a user-supplied normally-closed or normally-open switch.
17
Page 22

(Figure 5-a)
User-Supplied
Switch
NOTE: This remote control port can also be used for the ROO application, which lets you remotely
turn on/ off the inverter. If you need detailed ROO information or ROO setup service, please contact
your local dealer or customer service. Please note that this port can only be modi ed by a quali ed
service technician.
SNMP Slot
Install an SNMP card in this SNMP slot to remotely control and monitor the UPS status via a network.
You can also insert the Relay I/O or ModBus card in this slot to let the UPS have dry contact and ModBus communication functions respectively. Please see Figure 5-b & 5-c.
(Figure 5-b) 5kVA/ 6kVA
(Figure 5-c) 10kVA
Amplon RT Series
18
Page 23

Chapter 5 Communication Interface
SMART Slot
This SMART slot is for mini-size cards. You can install the Mini SNMP, Mini Relay I/O, Mini USB, Mini
ModBus, or Mini TVSS card in this slot to give the system network communication, dry contact, USB
communication, ModBus communication, and surge protection functions respectively. Please see Figure
5-d & 5-e
.
(Figure 5-d) 5kVA/ 6kVA
(Figure 5-e) 10kVA
NOTE: Please note that RS232 port will disable if you insert a mini-size card in the SMART slot.
External Battery Pack Connector
This connector is for connection to an external battery pack. Please see below for relevant information.
Battery:
z
1. Charge Voltage:
1) 5kVA/ 6kVA: 217.6Vdc
2) 10kVA: 272.0Vdc
2. Charge Current:
1) 5kVA/ 6kVA: 0.7A (default)
2) 10kVA: 1.5A (default)
19
Page 24

WARNING:
Ú
Please refer to the table below to select the charge current for 5kVA/ 6kVA/ 10kVA UPS.
Ú If you need to modify the charge current default setting,
dealer or customer service.
5kVA/ 6kVA Level 1 Level 2 Level 3 Level 4
Total Battery Capacity 5~9Ah 9~17Ah 18~30Ah 27~40Ah
Charge Current 0.7A 1.4A 3A 4A
10kVA Level 1 Level 2 Level 3 Level 4
Total Battery Capacity 9~17Ah 13~20Ah 20~30Ah 27~40Ah
Charge Current 1.5A 2A 3A 4A
3. Low Battery Shutdown:
1) 5kVA/ 6kVA: 168V±3%
2) 10kVA: 210V±3%
4. The number of batteries:
1) 5kVA/ 6kVA: 12V x 16PCS
2) 10kVA: 12V x 20PCS
External Battery Pack:
z
1. To increase the battery backup time, you can connect several external battery packs to the
UPS.
2. Delta external battery pack (optional):
Please refer to the Quick Guide, User Manual or Installation & Operation Guide included in
the package of the external battery pack.
3. Non-Delta external battery pack:
When connecting a non-Delta external battery pack with the UPS, please install the fuse
or DC breaker first. Do not use an AC breaker. Please follow the actual discharge current
to decide the breaker’s current capacity.
5kVA/ 6kVA: 200Vdc breaker or 200Vdc fuse is suggested.
1)
2) 10kVA: 250Vdc breaker or 250Vdc fuse is suggested.
please contact your local
Amplon RT Series
NOTE: Please contact your local dealer or customer service for external battery pack
connection and replacement.
20
Page 25

Chapter 5 Communication Interface
Battery/ Battery Pack Connection Warnings:
z
1. Only use the same type of batteries from the same supplier. Never use old, new and different Ah batteries at the same time.
2. The number of batteries must meet UPS requirements.
3. Do not connect the batteries in reverse.
4. Use the voltage meter to measure whether the total voltage, after
is around 12.5Vdc × the total number of batteries.
NOTE:
Ú
Turn off the UPS and cut off the AC source before performing battery/ battery pack
replacement.
Ú
A battery can present a risk of electric shock and high short-circuit current.
Ú
Servicing of batteries and battery packs must be performed or supervised by quali ed
service personnel knowledgeable in batteries, battery packs and the required precautions. Keep unauthorized personnel away from batteries and battery packs.
battery pack connection
Parallel Connector
This is for UPS parallel communication. Only two UPS units with the same capacity, voltage and frequency can be coupled via the provided parallel cable to run in parallel mode. The total load will be shared
equally by the two units.
If one of the two parallel units fails:
z
1. If the total load is less than a single UPS capacity, the inverter of the failing UPS will shut
down to let the load be supplied by the other unit.
2. If the total load exceeds a single UPS capacity, the inverter of the failing UPS will shutdown and the other unit will overload. At that time, the two units will simultaneously transfer into bypass mode.
In parallel mode, the two UPS units can share the battery pack to decrease the cost, but the
z
start-up of UPS via battery can’t be performed in this mode.
,
In parallel mode, the UPS can be repaired without power supply interruption by using a manu-
z
al bypass box (optional).
Please see below Figure 5-f & 5-g for parallel UPS.
z
21
Page 26

(Figure 5-f) Rack Style
Parallel Cable
Manual Bypass
Box
Input Power Cord
Output Power Cord
UPS
Battery Cable
(Figure 5-g) Tower Style
Parallel Cable
Battery Cable
External
Battery Pack
Tower
Stand
External Battery
Pack
UPS
Input Power Cord
Output Power Cord
Manual Bypass
Box
NOTE: If you need UPS parallel service, please contact your local dealer or customer service.
Amplon RT Series
22
Page 27

Chapter 6 Optional Accessories
NChapter 6: Optional Accessories
Optional Accessory List
There are several optional accessories available for this RT series UPS. Please refer to the table below
for the optional accessories and their part numbers.
Item Part No.
No.
1. Manual Bypass Box
(for single UPS)
2. Manual Bypass Box
(for parallel UPS)
3. Charger Box CHG252C2D1000-N
4. Dust Filter 5/6kVA; 3915100835-S00
5. Rail Kit 3915100011
6. External Battery Pack
(with batteries)
7. Empty Battery Pack
(without batteries)
8. EnviroProbe EMS1000000
9. SNMP/WEB Card 3915100120-S
10. Relay I/O Card 3915100147-S
11. ModBus Card 3915100422-S
12. Mini TVSS Card 3915100482-S
13. Mini USB Card 3915100476-S
14. Mini SNMP Card 3915100473-S
15. Mini Relay I/O Card 3915100474-S
16. Mini ModBus Card 3915100748-S
3915100706-S35
3915100707-S35
10kVA; 3915100840-S00
5/6kVA; GES161B105700
10kVA; GES201B109700
5/6kVA; GES161B105700-N
10kVA; GES201B109700-N
23
Page 28

Optional Accessory Installation
This User Manual only presents installation guidelines for the Mini SNMP/ Mini Relay I/O/ Mini USB/ Mini
ModBus/ Mini TVSS cards installation. For detailed installation and operation of any other optional accessory, please refer to the Quick Guide, User Guide, or Installation & Operation Guide included in the package of the relevant optional accessory.
Mini SNMP/ Mini Relay I/O/ Mini USB/ Mini ModBus Card Installation:
z
1. For 5kVA/ 6kVA UPS:
1) Remove the SMART SLOT cover from the rear panel. (Picture 1)
2) Loosen the top cover’s screws to remove the top cover. (Picture 2)
3) Install the flat cable in the Mini SNMP/ Mini Relay I/O/ Mini USB/ Mini ModBus card.
(Picture 3-1/ 3-2)
4) Insert the Mini SNMP/ Mini Relay I/O/ Mini USB/ Mini ModBus card into the slot and
tighten the screws. (Picture 4)
5) Insert the other end of the at cable into CNG3. (Picture 5)
6) Replace the top cover and tighten the screws. (Picture 6/ 6-1/ 6-2)
1 2
3-1
2. For 10kVA UPS:
1) Remove the SMART SLOT cover from the rear panel. (Picture 1)
2) Loosen the top cover’s screws to remove the top cover. (Picture 2)
3) Install the flat cable in the Mini SNMP/ Mini Relay I/O/ Mini USB/ Mini ModBus card.
Amplon RT Series
(Picture 3)
24
Page 29

Chapter 6 Optional Accessories
4) Insert the Mini SNMP/ Mini Relay I/O/ Mini USB/ Mini ModBus card into the slot and
tighten the screws. (Picture 4)
5) Insert the other end of the at cable into CNG3. (Picture 5)
6) Replace the top cover and tighten the screws. (Picture 6/ 6-1/ 6-2)
1
3
4 5
6
2
MINI RELAY CARD
Mini TVSS Card Installation:
z
MINI SNMP CARD
MINI MODBUS CARD
MINI USB CARD
CNG3
6-1 6-2
MINI USB CARD
1. For 5kVA/ 6kVA UPS:
1) Remove the SMART SLOT cover from the rear panel. (Picture 1)
2) Insert the Mini TVSS card into the slot and tighten the screws. (Picture 2/ 2-1)
1
TVSS
2
2. For 10kVA UPS:
1) Remove the SMART SLOT cover from the rear panel. (Picture 1)
2) Insert the Mini TVSS card into the slot and tighten the screws. (Picture 2/ 2-1)
MINI SNMP CARD
MINI RELAY CARD
2-1
1
NOTE:
Please contact your local dealer for more information about the optional cards.
2 2-1
25
Page 30

NChapter 7: Maintenance
UPS
UPS Cleaning:
z
Regularly clean the UPS, especially the slits and openings, to ensure that the air freely flows
into the UPS to avoid overheating. If necessary, use an air-gun to clean the slits and openings
to prevent any object from blocking or covering these areas.
UPS Regular Inspection:
z
Regularly check the UPS every half year and inspect:
1. Whether the UPS, LED, or alarm function has any abnormality.
2. Whether the UPS works in bypass mode (normally, the UPS will work in on-line mode). If
yes, check if any error, overload, internal fault, etc. occurs.
3. Whether battery voltage is normal. If battery voltage is too high or too low, find the root
cause.
Battery
The RT series UPS uses sealed lead-acid batteries. The battery life depends on the temperature, the
usage, and charging/ discharging frequency. High temperature environments and high charging/ discharging frequency will quickly shorten the battery life. Please follow the suggestions below to ensure a
normal battery lifetime.
Keep the usage temperature between 15°C~25°C (59°F~77°F).
z
When the UPS needs to be stored for an extended period of time, the battery must be re charged
z
once every three months and the charging time must not be less than 24 hours each time.
Fan
The higher the temperature, the shorter the fan life is. When the UPS is running, please check if the
fan(s) works normally and make sure UPS is ventilated properly. If not, replace the fan.
NOTE:
Please ask your local dealer or customer service for more maintenance information. Do
not perform maintenance if you are not trained for it
Amplon RT Series
.
26
Page 31

Chapter 8 Troubleshooting
NChapter 8: Troubleshooting
When you see the following problems appear on the LCD, please follow the solutions shown below.
Problem Possible Cause Solution
+DC BUS HIGH
+DC BUS LOW
- DC BUS HIGH
- DC BUS LOW
BUS OVP FAIL
OUTPUT SHORT Output has short circuit issue. Check whether output has short
OVER
TEMPERATURE
OUTPUT SCR FAIL 1. Output SCR has no driver signal.
BYPASS SCR FAIL 1. Bypass SCR has no driver signal.
RECTIFIER FAIL 1. Recti er has no driver signal.
INVERTER FAIL Inverter is damaged. Contact the dealer.
I/P FUSE BROKEN Input fuse is broken. Contact the dealer.
O/P FUSE BROKEN Output fuse is broken. Contact the dealer.
FAN FAIL Fan is damaged or stuck. Contact the dealer.
OVERLOAD UPS is overloaded. Remove the unnecessary load.
PARALLEL FAULT Parallel cable is not well connected. Check whether the parallel cable
NO BATTERY Battery is not connected. Check whether the battery and
CHARGER FAIL Charger is damaged. Contact the dealer.
REDUNDANCY LOSS Overload causes redundancy failure. 1. Decrease the load.
UPS1/ UPS2 FW VER
NOT COMPATIBLE
Output has capacitive load or
inductive load.
1. Phase difference in parallel system.
2. UPS has an internal fault.
The UPS temperature is too high. 1. Choose a well-ventilated area.
2. Output SCR has short issue.
2. Bypass SCR has short issue.
2. Recti er has short issue.
The rmware versions between the two
parallel units are different.
Decrease the load.
Contact the dealer.
circuit or not. If yes, contact the
dealer.
2. Decrease the load.
Contact the dealer.
Contact the dealer.
Contact the dealer.
is well connected.
battery cable are well connected.
2. Disable redundancy function.
Contact the dealer.
27
Page 32

NChapter 9: Specifications
Model RT5k RT6k RT10k
1. Power (Va/W)
2. Waveform
5000VA/4500W *
3. Input
3.1 Input Voltage (Single)
3.2 Input Current 29.7A 35.9A 56.1A
- Inrush Current < 200A
- Power Factor (Full Load) > 0.99
3.3 Ef ciency (Full Resistance Load)
- On Line Mode (Full Load) 92%
- ECO Mode (Full Load) 96%
3.4 Input Frequency 40 ~ 70 Hz
4. Output
4.1 RMS Output Voltage (Single) 200Vac/208Vac/220Vac/230Vac(default)/240Vac
4.2 Overload Capability 106% ~ 110%: 10 minutes; 111% ~ 125%: 5 minutes; 126% ~ 150%: 30 seconds
4.3 The Overload Release (Rating Load) 95%
4.4 Output Frequency (Battery Mode) 50/60 Hz ± 0.05 Hz
4.5 Crest Factor (CF) 3:1
5. Battery & Charger
5.1 Type Sealed Lead-Acid Battery
5.2 Number of Battery 12V x 16 pcs 12V x 20 pcs
5.3 Charge Current 4A (maximum) 4A (maximum)
6. Operation- Audible Noise
7. Appearance
7.1 Dimensions- Width x Depth x Height
(I/P & O/P Box Included)
7.2 Net Weight 15.5 Kg 21.3 Kg
8. Environment
8.1 Operating Temperature 0 ~ 40°C
8.2 Storage Temperature -15 ~ 50°C
8.3 Relative Humidity 0 ~ 95% (non-condensing)
1
6000VA/5400W *
Pure Sine Wave
100 ~ 155Vac (50% ~ 100% load) 100 ~ 180Vac (50% ~ 100% load)
156 ~ 280Vac (100% load) /
281 ~ 300Vac (90% load)
440.0 x 670.5 x 88.5 mm 440.0 x 623.0 x 130.6 mm
54 dBA *
1
180 ~ 280Vac (100% load) /
281 ~ 300Vac (90% load)
2
10000VA/9000W *
1
NOTE:
Ú Refer to the rating label for the safety rating.
Ú All speci cations are subject to change without prior notice.
Ú For power factor modi cation, please contact your local dealer or customer service.
*1: The power factor can be modi ed into 0.8 to let the UPS rating change from 5kVA/ 4.5kW, 6kVA/ 5.4kW and 10kVA/ 9kW into 5.5kVA/ 4.4kW,
7kVA/ 5.6kW and 11kVA/ 8.8kW respectively.
*2: At room temperature, at a distance of 1 meter in front of the UPS and when the load is 70% of the rating load.
Amplon RT Series
28
Page 33

Chapter 10 Warranty
NChapter 10: Warranty
Seller warrants this product, if used in accordance with all applicable instructions, to be free from original
defects in material and workmanship within the warranty period. If the product has any failure problem
within the warranty period, Seller will repair or replace the product at its sole discretion according to the
failure situation.
This warranty does not apply to normal wear or to damage resulting from improper installation, operation, usage, maintenance or irresistible force (i.e. war, fire, natural disaster, etc.), and this warranty also
expressly excludes all incidental and consequential damages.
Maintenance service for a fee is provided for any damage out of the warranty period. If any maintenance
is required, please directly contact the supplier or Seller.
WARNING:
The individual user should take care to determine prior to use whether the environment and the
load characteristic are suitable, adequate or safe for the installation and the usage of this product. The User Manual must be carefully followed. Seller makes no representation or warranty
as to the suitability or fitness of this product for any specific application.
29
Page 34

Page 35

Page 36

 Loading...