

Page 1

Startup Guide
RMC100 and RMCWin
Motion Controller Motion Software
for
Page 2

RMC100 Startup Guide
Version 2.3
February 25, 2010
Copyright © 2010, Delta Computer Systems, Inc.
www.deltamotion.com
2
deltamotion.com
Page 3

RMC100 Startup Contents
Contents
Contents ............................................................................................. 3
Overview ............................................................................................. 5
Obtaining a Manual ........................................................................... 6
Getting Started ................................................................................... 7
PC Requirements ........................................................................................ 7
Installation .................................................................................................. 7
Starting RMCWin ...................................................................................... 7
Starting the RMC100 Controller ................................................................ 9
Tuning the System .................................................................................... 13
Saving Configuration Settings .................................................................. 13
Step-by-Step Example .............................................................................. 14
Communications ....................................................................................... 14
Features of the RMC100 .................................................................. 15
Control Options ........................................................................................ 15
Programming ............................................................................................ 18
Diagnostic Tools ...................................................................................... 19
RMC100 Modules ............................................................................. 23
Configuri ng an RMC100 .......................................................................... 23
Communications Choices ......................................................................... 24
Communications Compatibility with Common Host Systems ................. 26
Drive and Transducer Interface Choices .................................................. 29
Transducer Compatibility with Common Manufacturers ......................... 33
Appendix A: Wiring ......................................................................... 35
General Wiring Information. .................................................................... 35
RMC Drive Outputs ................................................................................. 35
Wiring the Analog Feedback Module ...................................................... 36
Wiring the MDT Feedback Module ......................................................... 37
Wiring the SSI Feedback Module ............................................................ 39
Wiring the QUAD Feedback Module ....................................................... 39
Wiring the St epper Mo dule ...................................................................... 42
Appendix B: Tuning ........................................................................ 45
General T uning Guidelines ...................................................................... 45
Tuning a Position Axis ............................................................................. 46
Tuning a Torque Motor ............................................................................ 48
Tuning a Position/Pressure System .......................................................... 50
Appendix C: An Example ................................................................ 59
Example Setup & Tuning of a Hydraulic System .................................... 59
deltamotion.com
3
Page 4

Page 5

RMC100 Startup Overview
RMC100
Position Control
Velocity Control
Pressure Control
PLC or
Industrial PC
Machine Control
Sequencing
Fault Monitoring
HMI
Actuators
and
Feedback
Feedback:
MDT
SSI
Quadrature
Analog
Output:
±10 Volts
Step/Direction
Communication:
Ethernet
Modbus Plus
PROFIBUS-DP
DI/O
Serial
PC running
RMCWin
Setup and
Diagnostics
RS 232 Serial
Ethernet
Overview
The RMC100 series br i ngs the benefits of modular, high-performance motion
control to a wide range of industrial applications. Communicatio ns options—
ranging from high-speed field buses to discrete I/O and a four-line
display/keypad—make these compact, DIN rail mounted controllers an excellent
choice for large and small systems. The ability to “mix and match” position
feedback transducers, plus powerful control modes—including synchronized
moves, pos ition/pressure control, gearing, s plines, a nd teach mode—provide
optimum control for a wide range of applications.
RMCWin is a powerful setup, tuning and diagnostics software package provided
with the RMC100 motion controller.
Figure 1 shows a typical installation of an RMC100 controller and the RMCWin
software on a PC. The PC and RMCWin software are only required when setting
up and monitoring the RMC100, and are not required for normal machine operation.
Figure 1. Typical RMC100 and RMCWin installation.
5
deltamotion.com
Page 6

Obtaining a Manual RMC100 Startup Guide
Obtaining a Manual
The RMC100 motion controller manual is available in the following formats:
• Complete and up-to-date information is available in the online help in the
RMCWin software.
• A manual containing the same information as the online help is availab le
as a Portable Document Format (PDF) file from our web site at
www.deltamotion.com.
• If you need a hard-copy manual, contact Delta by telephone at
360-254-8688 or email at sales@deltamotion.com.
6
deltamotion.com
Page 7

RMC100 Startup Getting Started
Getting Started
This chapter describes the minimum hardware requirements, how to install and run
RMCWin, and how to set up a system with an RMC100 controller.
PC Requirements
Operating System Windows 98/ME/NT/2000/XP/Vista/7
Disk Space 20 Mbytes
Memory 8 Mbytes
Serial Port RS-232 or Ethernet connection required for
or Ethernet communication with RMC100.
Installation
1. Obtain a copy of RMCWin either from the CD or diskettes included with the
RMC100 controller or by downloading it from our web site’s download page at
http://www.deltamotion.com/dloads/
.
Starting RMCWin
Getting Help
2. If installing from CD, insert the CD and run drive:\SETUP.EXE where drive is
the letter of the CD drive. Follo w the instructions for installation. It is also
possible to run RMCWin from the CD. Do this by running
drive:\rmcwin\rmcwin.exe.
3. If installing from the web site, run the self-extracting zip file and follow the
instructions.
4. If installing from diskette, insert disk 1 into drive a: and r un SETUP.EXE.
Follow the instructions for insta lla tion.
After installing RMCWin, start it b y clicking the Start menu, clicking Programs and
then RMCWin.
RMCWin inc ludes an extensive online help facility designed to p rovide infor mation
about all aspects of connecting, starting, and using RMCWin and the RMC100
controller. To access Help, click on the Help menu in the RMCWin display and
select Help Topics. To access context-sensitive Help, place the cursor on the
display feature where help is desired and press F1.
In the remaining discussion, references to online Help take one of two forms:
deltamotion.com
7
Page 8

Getting Started RMC100 Startup Guide
Status
Command
Toolbar
Status
Menu
Bar
Plot
Time
Parameter
Area
Index/views/selecti ng
The RMCWin Display
Area
1.
Index/stored commands/Editing the Stored Command Table.
This means to display the online Help, select the Index tab, type the words
stored command on the edit line, and select the topic Editing the Stored
Command Table.
2.
Contents/Using RMCWin/Setup Options/Selecting a Serial Po rt to Use.
This means to display the online Help, sele c t the Contents tab, display Using
RMCWin, select Setup Options, and select the topic Selecting a Serial Port to
Use.
Figure 2 shows the RMCW in main window.
Area
Bar
Figure 2. RMCWin Display.
Note: If RMCWin starts in Read mode (see the status bar), double click on Read to
change it to Write. RMCWin should be in Write mode during RMC100 controller
setup.
In the display, each feedback device has a column of associated data. For example,
Axis0 is one feedback device, while Axis1 is another. Numbers displayed in the
form 0xNNNN are hexadecimal numbers that represent individual bits.
Note: If the RMC100 has 6 or 8 axes the display may be difficult to read in the
default layout. Change to the half view layout (see the help topic listed at left), and
resize the window by dragging a corner with the mouse.
Status area —T hi s area shows important information about what is happening in
the RMC100 controller. It shows the actual position, the drive output, program step
number, actual speed, and the status word, which contains information about the
state of the controller and whether there are any faults.
8
deltamotion.com
Page 9

RMC100 Startup Getting Started
Index/stored
commands/Editing the Stored
Command Table
Contents/U s ing
RMCWin/Setup Options/Selecting
a Serial Port to Use
Contents/Communication
Types/RS-232/Wiring.
Index/specification/general/
power
Command area — The six registers in this area are used to send commands to the
RMC100 controller.
Parameter area — The sixteen registers in this area are the operational parameters.
This area contains information on scaling, tuning, and configuration for fault
detection.
Plot Time — Specifies plot duration, or length of data log, in seconds.
Toolbar — Tools in the toolbar include:
Opens a new board file.
Ope ns an existing board file .
Saves the current board file.
Sends parameters listed in the Parameter area of the display to the RMC100
controller and initializes the axis.
Halts a selected axis (ramps the axis to a stop).
Kills all axes (sets the drive outputs to 0 Volts).
Saves contro lle r information to non-volatile memor y.
Retrieves a plot of the selected axis from the RMC100 controller.
These buttons are pre-programmed commands that you can execute by clicking on
the appropriate number. Instead of entering values in the COMMAND area of the
display you can pre-program c ommands into each button, then by clicking a butt on
or pressing a shortcut key, quickly execute the pre-programmed command.
Status Bar — Indicates the state of the serial communications to the RMC100,
Read or Write mode, and CAPS LOCK.
Starting the RMC100 Controller
deltamotion.com
1. Connect power to the RMC100 controller.
Note: The RMC100 controller requires 24 VDC at various current levels up to 750
mA, depending on the communication and transducer interface modules used.
2. Connect the PC to the RMC100 controller using one of the following two
methods.
• Connect a standard null-modem DB-9 RS-232 serial cable from the PC to
the RMC100 controller.
− If the serial port is configured correctly, the Offline me ssage in the
lower right corner of the RMCWin status bar will change to Online
and a pop-up message window will indicate that RMCWin can
communicate with the RMC100 controller.
− If the display indicates Offline and a n RMC100 controller is connected
and has power, try changing the serial port by double-clicking on
COM in the lower right corner of the RMCWin status bar. The
9
Page 10

Getting Started RMC100 Startup Guide
Index/wiring/topic for your
transducer type.
Index/configuration/MDT
Index/configuration/SSI
Contents/U s ing
RMCWin/Connecting to an
RMC/Communication
Drivers/TCP/IP Direct to RMC-
ENET Configuration
Options dialog box appears. From the Communication tab in the
Options dialog box, select the correct com port.
− If the display indicates Closed after starting RMCWi n, a nother
program may be using the serial port. Try closing other programs that
may be using the serial port.
• If the RMC100 is equipped with an Ethernet communications module and
the PC is equipped with a TCP/IP interface (such as an Ethernet adapter or
modem with TCP/IP installed), yo u may wish to connect the PC to the
RMC100 via Ethernet for noticeably faster communication. Plug an
Ethernet cable into the RMC100 Ethernet module. Use a regular patch
cable when using a hub or router and a crossover cable when connected
directly from the PC to the RMC.
− On the Tools menu, click Options, and then click the
Communication tab.
− Under Communic ation Driver, click TCP/IP Direct to RMC-ENET.
− Select the desired RMC. If the IP address of the RMC is all zeros, you
must configure the RMC100 Ethernet by clicking the Configure
button and entering the correct settings. See the help for more details.
− Click OK.
Connect and Verify a Feedback Device
This section describes wiring and testing connections to feedback devices, such as
MDTs (Magnetostrictive Displacement Transducers) and quadrature encoders.
See the Wiring section in this document for detailed wiring feedback module
diagrams. The online Help also provides wiring information. In all cases, shielded
twisted pair wiring must be used.
Note: Always turn off power to the RMC100 and the feedback device when
connecting wiring from the device to the RMC100 controller.
Decide which axis on the selected RMC100 you want to use and connect the wiring
from the feedback device to that axis according to the wiring diagrams in the Wiring
section of t his document. After connecting t he wiring, re-apply power to the
RMC100 and feedback device. When power is re-applied the RMC100 controller
should indicate that it is online in the RMCW in lower right status bar.
The RMC100 needs to be configured properly before it will communicate with
some types of transducers.
MDT: First, in the RMCWin Tools menu, select Module Config ura tion. Select the
slot for the axis you are configuring, and click on Slot Option. Select either
Standard or Short bla nking period. This setting is transducer de pendent, and
is available in the transducer datasheet. Next, double click on the CONFIG
parameter in the Parameter area to display the MDT Axis Configura tion
Word dialog box. Select the transducer type you are using. Click OK and
10
deltamotion.com
then click t he
to initialize the RMC100
SSI: In the RMCWin Tools menu, select Module Configuration. Select the slo t for
the axis you are configuring, and click on Slot Option. Complete the
necessary information for your transducer type and your application.
Page 11

RMC100 Startup Getting Started
Index/drive /Drive
Index/stepper/wiring
Index/confi guration/analog
transducer
Index/configuration/quadrature
Analog Transducers: Fir st, in the RMCWin Tools menu, s e le c t M odule
Configuration. Select the tab for the axis you are configuring, and click on
Slot Option. Select the option corresponding to the type of application you
have. Next, double click on the CONFIG parameter in the Parameter area to
display the Analog Axi s C onfigurat ion Word dialog box. Select the vol tage
Quadrature Encoders: Double click on the CONFIG parameter in the Parameter
In the Statu s area of the R MCWin disp l ay, the value of COUNTS should now
change. Move the axis manually and look for a corresponding change in the
displayed value of COUNTS, in the status area.
If COUNTS do not change, the most common problem is incorrect wiring. Refer to
the online Help topics.
Connect and Verify an Actuator
This section describes wiring and testing drive output connec t ions and test ing
actuator motion.
For most types of actuators, Drive outp ut wiring consists of a ±1 0V drive outp ut
and a common. For stepper motors a Step and a Direction signal are used.
Note: Always turn off power to the RMC100 and the actuator/amplifier when
connecting wiring from the actuator to the RMC100 controller.
Use the same axis number for the actuator as you did for the feedback device.
Connect the wiring from the actuator to that axis. Refer to the approp r ia te wiring
information in the online Help, or in the specification sheets. After connecting the
wiring, re-apply power to the RMC100, the feedback device, and the actuator.
or current range for your transducer. Click O K and then c lick the
to
initialize the RMC100.
area to display the Quadrature Axis Configuration Word dialog box. Select
the polarity of the Fa ult, Limits, Index (Z) and Home (H) inputs and t he
action of the Homes status bit depending on your application. Click OK and
then click t he
to initialize the RMC100.
Test Actuator Motion
deltamotion.com
The axis is not currently initialized , but it reads counts and you may see a sl ight
movement when the drive output is connected. Test the drive output in either of
these ways:
1. Unplug the drive output from the system and check o utput voltages from the
RMC. Use the open loop (“O”) command described in the following section.
2. Connect the drive output from the RMC100 to the actuator and supply output
voltages to see if the actuator moves. This method is described in the follo wi ng
section.
Connecting drive output from the RMC100 to the actuator and supplying output
voltage is the quickest method of testing actuator motion and dir e c tion. If there is
no movement, remove the connector and verify that the actuator receives a voltage.
Note: Read this section completely before executing any commands on the RMC.
Note: Verify the Simulate bit is NOT set in the CONFIG word.
11
Page 12

Getting Started RMC100 Startup Guide
In the Command area of the RMCWin display, select the correct axis and enter the
following (see Figure 3):
MODE 0x0001
ACCEL 10
DECEL 10
SPEED 0
COMMAND VALUE 100
These values cause the output voltage to change to 100 mV at a rate of 10 mV/ms.
Figure 3. Initial values to verify drive.
Note: Be prepared to stop the system with the
button or ALT+K. Both issue a
Kill (K) command, which will set the drive output to 0 volts.
Send an open loop command by typing O and then ENTER in the Command field
or by pressing ALT+SHIFT+O. You should see t he value of DR IVE in the s t atus
area of the RMCWin display change to 100. You should be able to measure
roughly 100 mV with a voltmeter on the drive output connector.
Observe the COUNTS value in the RMCWin display Status Area, and note whether
the value is increasing or decreasing.
One of three things could have happened at this point:
1. The actuator moved and the COUNTS increased. In this case you are ready to
go to the next section and s et the SCALE.
2. The actuator moved and the COUNTS decreased. In this case you must use the
Reverse Drive Mode bit in the CONFIG parameter to reverse the direction.
Double click on the CONFIG parameter, check the Reverse Drive Mode option
in the dialog box (see Figure 4). Click OK, and then click the
to initialize
the RMC100.
Figure 4. Setting Reverse drive mode.
12
deltamotion.com
Page 13

RMC100 Startup Getting Started
Index/scale/scale and offset
calibration utility
Contents/Transducer Types/Your
Transducer Type/Scaling
Contents/Starting Up the
RMC/Setup Details/
Tuning a
Position Axis
Index/step-by-step startup.
Scroll to Step 10.
3. The actuator does not move. In this case check the output voltage, check that
the actuator is enabled, verify the Si mu la te bit is not set in the CONFIG word,
increase the voltage and repeat the process above.
Note: It is essential that the COUNTS increase when a positive output voltage is
specified with the “O” command. If this condition is not met, you will not be able
to control the axis in closed loop.
At this point the drive has moved in one directi on. Verif y that it moves in the
opposite direction with the fol lowing steps:
Setting the Scale
Tuning the System
1. Click
2. In the COMMAND area of the RMCWin display, select the drive axis and
enter a -100 for the COMMAND VALUE (-100 mV).
3. Send an open loop command by entering ALT+SHIFT+O.
You should see the value of DRIVE in the status area of the RMCWin display
change to -100 and the drive should move in the opposite direction.
It is important to specify the measurement units to be used. Setting the SC A LE
converts the informati on from the t ransducer into meaningful measurement units.
Most transducer types use this parameter with the Prescale Divisor bits in the
CONFIG parameter to convert from the change in transducer counts to a change in
the actual position. Refer to the online Help topics at left for more information.
Note: SCALE is a signed number. If you want your system’s position units to
increase when the COUNTS decrease, set the SCALE to a negative value.
Once the system is set up, it must be tuned in order to operate. Tuning gets the
system to move in a controlled manner, with minimal oscillation, overshoot, or lag
error. Tuning allows the system to a c hieve the best efficiency and stability.
or press ALT+K to turn drive voltage off.
Saving Configuration S e t ti ngs
deltamotion.com
See the Tuning section in this document for instructions on how to tune your
system.
Make sure you save your configuration settings or they may be lost! There are three
ways to save configuration settings.
1. Save settings on the controller in FLASH. Certain types of configur ation
settings may only be set via RMCWin on the PC and stored in FLASH.
To save configuration infor matio n to FL A SH, c lick the
Update Flash (U) command.
2. Save settings o n disk on the P C .
3. Save settings o n the PLC. T he PLC can then send this i nformation to the
controller on startup.
13
button or issue an
Page 14

Getting Started RMC100 Startup Guide
Index/digital
I/O/communication
Index/step-by-step startup. Scroll to
Step 9.
After performing the startup, save your configuration settings. See the appropriate
online Help topic for more information.
Step-by-Step Example
Appendix D contains a step-by-step, illustrated example of setting up and tuni ng a
hydraulic cylinder. Read this to see the practical details of setup and to learn how to
use the plots to tune the axis. T his will help you to quickly set up and control a
hydraulic system!
Communications
After setting up and tuni ng your system, it is rea dy to be programmed and
integrated into the rest of your application. The RMC100 offers numerous
communication options for this purpose.
The purpose of communications is to issue commands and read back status
information. Available RMC100 communications modules include Modbus Plus,
PROFIBUS-DP, Serial, and Ethernet. A simple communications interface between
the RMC100 and the system controller or Programmable Controller (P/C) is also
provided by the Digital I/O module.
See the RMC Modules section of this document for a short overview of each, and
the communications section of the online Help for more detailed infor matio n.
14
deltamotion.com
Page 15

RMC100 Startup Features of the RMC100
Index/Open Loop/Open Loop
Features of the RMC100
The RMC100 contains a host of useful features that will enable you to precisely and
efficiently control any complex motion application. These features include
powerful control options, flexib le programming capabilities, effective diagnostic
tools, a diverse set of feedback options, and support for many popular
communication types.
Control Options
Trapezoidal Profile
Closed-loop motion moves made with the RMC100 have a trapezoidal speed
profile, a s s hown in the following figure.
The axis moves from position A to positio n B in the following manner:
• Accelerates from zero speed to speed S.
• Moves at a constant speed S.
• Decelerates to zero speed and ends at position B.
The RMC100 allows the user to independently specify the acceleration,
deceleration, and speed po rtions of the move. This flexibility is a powerful tool for
any motion control application.
Open Loop (Direct Drive Output)
Although the RMC100 is designed for precise closed-loop motion control, it does
have an ope n-loop mode. In open-loop mode, the user specifies the amount of drive,
and the RMC100 outputs that amount. The RMC100 automaticall y re ver ts to the
open-loop state after certain faults.
Open loop is useful for jogging the axis under manual control and determining
whether the system is working co r rectly after initial setup.
deltamotion.com
15
Page 16

Features of the RMC100 RMC100 Startup Guide
Index/Splines/S
pline Overview
Index/gearing/Gearing Axes
Index/s curves/S curves
scroll to bit 7
S Curves
For applications requiring smooth motion with more gradual starts and stops and
higher peak speeds, the RMC100 offers an "S-curve" option for the trapezoidal
motion profile. When this option is selected, the RMC100 calculate s an s -shaped
target as shown below.
Splines
Gearing
Some applications require that the motion controller move between a number of
given positions. The splines feature of the RMC100 greatly simplifi es such
applications. The user only needs to enter the desired points at certain intervals and
the RMC100 automatically calculates the intermediate positions while maintaining
smooth motion free from jerks or discontinuities.
The splines positions can be placed as a function of time, position units from an
axis, or counter ticks from a digital I/O input. This makes the splines feature a
powerful tool for applications such as curve sawing, animatronics, cyclical testing
and electronic camming among others.
Gearing is u s ed when one axis (the geared axis) must move i ncrementally and
proportionately to another axis (the gear master). The RMC100 easily performs this
so-called electronic gearing (as opposed to mechanical gearing) and allows the user
many options.
The RMC100 allows any axis to be geared to another axis or to a position input
encoder. Setup is simple since the master axis does not need to do anything to be
the master. Multiple axes may be geared to the same master.
The user specifies the gear ratio, which can be changed at any time. When issuing a
gearing command, the geared axis must change its speed to the speed dictated by
the user-specified gear ratio. This is called clutching. The RMC100 has 3 methods
of specifying clutching, which makes the task of synchronizing the a xis to the rest
of the system simple.
16
deltamotion.com
Page 17

RMC100 Startup Features of the RMC100
Index/pressure control/
Using
Analog Channels as Pressure
Inputs
Index/position-pressure
transition/Position-Pressure
Overview
Index/quick mode/quick mode
scroll to Bit 6.
Pressure or Differential Force
The RMC100 excels in pressure control applications. Control can be performed
with either s ingle-ended or double-ended pressure feedback. With double-ended
pressure feedback on a hydraulic systems, the differential force on the piston can be
calculated, allowing force to be controlled. The RMC100 firmware is specifically
designed to handle the characteristics of hydraulic pressure and force control.
Position/Pressure or Position/Differential force.
The RMC100 not only excels at pressure and force control, but is also designed to
smoothly transition from posit ion control to pressure control. This functionality
makes the RMC100 perfect for applications such as injection molding, powder
metal presses, hydroforming and many others.
Pressure Regulating Mode
Pressure or force is controlled in the RMC100 in the same manner as position. That
is, the pressure is made to go to the value to which it is commanded. The RMC100
corrects for any errors while the pressure is changing and when it has reached the
commanded pressure.
Pressure or Differential Force Limit
To fill the needs of pressure control applications requiring more than the sta nd a rd
pressure regulating mode, the RMC100 has a pressure control mode available with
special firmware: Pressure (or force) Limit. This type of pressure control allows the
user to set a maximum value of pressure which is not to be exceeded. The axis can
then be controlled for position. If the pressure approaches the user-defined
maximum pressure, the positio n is li mited so that the pressure does not surpass this
value.
This functionality is very useful in applications where movement is made while
required to remain under a certain pressure, such as molding, extrusion, gripping
and many others.
Quick Mode
A typical move in closed-loop control with the RMC100 is constrained to follow a
certain target path defined by the user. In some applications, the user does not care
about the target path during the initial p ortion of the move.
For these applications, the Quick Mode can be used. The RMC100 simply outputs
an open-loop drive defined by the user and does not enter closed loop control until
the axis approaches the commanded position. It then ramps the speed down and
reaches the commanded position.
This is usef ul for quickly reaching the commanded position because full drive can
be given to the axis initially. Nor mally, this might cause the axis to fault if it were in
full closed-loop control.
deltamotion.com
17
Page 18

Features of the RMC100 RMC100 Startup Guide
Index/analog
transducer/overview
Index/reference
command/Reference Command
Index/command/command
Index/event control/overview
Analog Reference
The RMC100 analog modules can be used as reference inputs. This is very useful
for applications requiring an external target generator or joystick. This externally
generated voltage or current signal can then be used to generate a position or
velocity target for another axis.
Filtered Reference
The RMC100 has very flexible and powerful reference capabilities, allowing any
input axis to be used as a reference axis. Thus, an MDT, SSI, quadrature or analog
signal can be used as a reference. In addition, the RMC100 has digital filtering
capabilities that can be applied to any reference axis to reduce noise.
Programming
Commands
The RMC100 has a simple and consistent, yet versatile command structure. In
addition to the command itself, there a r e 5 command fields that may contain
information for each command. These fields are:
Event Control
• Mode
• Acceleration
• Deceleration
• Speed
• Command Value
For example, the Go ("G") command uses the Mode to determine what type of
move to make, the Acceleration and Deceleration fields determine the accelerations,
and the Speed determines the speed of the move.
Other commands use these same fields, altho ugh they may not have anything to do
with accelerations or speeds. Every command that is issued, regardless of the
method, must also have all the fields set correctly.
The Event Control feature allows a sequence of commands to be executed without
intervention from the Progra mmable Co ntroller (P/C). This lets the module respond
to events within the cont rol-loop time (1ms or 2ms) rather than the scan rate of the
P/C. It also reduces the controller programming required.
Event Control consists of a series of Steps that are linked together in sequences.
The Steps consist of a command area containing the instruction to be executed and a
link area that specifies the next Step number and its trigger. There are a total of 256
Steps that can be shared by all axes.
18
deltamotion.com
The Event Control has many functions that allow powerful progra mmi ng of
complex motion applications. Some are listed here:
• Wait for inputs or states
Page 19

RMC100 Startup Features of the RMC100
Index/plots/
using
• Compare functions
• Math capabilities
• Trigger an event sequence from a digital input
• Conditional branching
Master Control (PLC or PC)
The RMC100 may be controlled from a PLC, a PC or other programmable
controller. The RMC100 provides a full range of communication options between
the RMC and the programmable controller. This enables the user to choose
between broadband control of the RMC for complex applications or limited control
for simpler applications.
The RMCWin on-line help contains highl y d e ta ile d information for controlling the
RMC with each method o f communication. The www.deltamotion.com
also contains many demonstration PLC programs.
This complete programming ability allows complex motions to easily be performed
by the RMC100.
web site
Diagnostic Tools
Plots
The RMC100 contains diagnostic tools for monitoring and troubleshooting every
aspect of any motion it performs. A description of each follows.
The plotting utility in the RMC100 is very powerful. Each move automatica lly
initiates a plot, in addition to the user being able to start a plot at any time. Each plot
contains the following useful information from an axis:
• Actual Position
• Target Position
• Drive
• Status Word
• Actual Speed
• Target Speed
• 2 user-selected pieces of data
The plotting utility is essential for tuning an axis. The user can view exactly wha t
happens at a resolution of down to 1 msec. The plotting utility also calculate s the
Sum Error
2
, a quantitative measure of how close the actual trajectory follows the
target trajectory.
deltamotion.com
The plot data can also be viewed in numerical spreadsheet form.
19
Page 20

Features of the RMC100 RMC100 Startup Guide
Index/status/Using the Status
Bits Window
Index/ i/o Bit Monitor /Using
the I/O Bit Monitor
Index/ parameter error:list/
parameter erro r:list
Index/stat us word/statu s wor d
Index/command log/
Command
Log
Command Log
When debugging problems with a system that is using the RMC, it is of ten difficult
to determine whether the problem is caused by an action of the RMC or the
Programmable Controller (P/C). To help with this problem, the Command Log is
available. The Command Log holds the last 256 commands received through the
communication module; commands sent by RMCWin or the event step table are not
displayed. Therefore, the Command Log can be used to determine which
commands were actually received by the RMC.
Status Words
The Status Words are values showing the state of certain axis properties. These
status words are updated constantly and can be viewed from RMCWin or read from
the RMCWin by a PLC or PC. The status words provide a complete picture of what
is happening in the RMC100. The status words are:
Command Position
Target Position
Actual Position
Transduce r Counts
Axis Status Word
Status Bits and Status Bits Window
The Status register is a collection of 16 bits to provide a summary of the state of the
axis. Eight bits are generally used for error bits. Each of the error bits latch on
when the error is detected.
The Status register is displayed in RMCWin as a 16-bit hexadecimal number. To
make it easier to view each bit, RMCWin provides the Status Bits Window, which
labels each bit independently. These bits are very useful for showing the state of the
axis.
These bits can also be captured and viewed in the plots.
I/O Bit Monitor
The RMC100 provides a visual to ol, called the I/O Bit Monitor, for keeping track of
all the digital inputs and digital outp uts. This tool constantly updates the sta te of
each input for the viewer to see. This simplifies design and verification o f digital
I/O.
Drive
Actual Speed
Null Drive
Step
Link Value
Parameter Error List
20
deltamotion.com
Problems related to user-issued commands cause the Parameter Error bit to be set.
There are dozens of specific problems that can lead to this bit being set. These
problems can identified by using the Parameter Error Lis t Window. T his window
lists the most recent parameter er rors along with a short description.
Page 21

RMC100 Startup Features of the RMC100
Index/ stored commands/
using
Stored Commands
Stored Commands are u s eful when se t ting up and tuning an a xis. Setup and tuning
require repetitively moving the axis. Stored Commands allow the user to enter the
desired mo ves, and issue them with a simple key combination (e.g. CTRL-2) or by
the click of a button in RMCWin. Thi s s peeds up an otherwise monotonous and
time-consuming task.
deltamotion.com
21
Page 22

Page 23

RMC100 Startup RMC100 Modules
Look for this button
on the website!
RMC100 Modules
This sectio n gives an overview of the communications and feedback capabilities of
the modules available for the RMC100.
Configuring an RMC100
The RMC100 series motion controllers have a modular design for configuration
flexibility to meet the needs of a wide variety of applications. Due to this modular
design, Delta is typically able to ship any of the more than 500 available
configurations in 2 weeks or less. However, unlike many modular systems, each
RMC controller is configured at the factory and fully assembled and tested as a
complete unit before shipping.
The RMC100 controllers are packaged in compact din-rail mount enclosures.
Within the package, the first two mod ules ar e the c ommunications and the CPU.
Then, one to four modules are added for I/O. Each module adds 1 inch to the
package wid th, resulti ng in four different fo otprints ranging fro m 4.12 x 5.95 to
7.12 x 5.95 inches. All of the RMC100 motion modules handle two axes resulting
in configurations with two, four, six, or eight axes. Almost a ny combination can be
specified to fit almost any applica tion: linear or rotary, position, pressure, or
position/pressure control.
Configuration Tool
The RMC Configuration Tool on the Delta website at www.deltamotion.com
makes deter mining t he b e st motion controller for a specific application quick and
easy.
The RMC Configuration Tool provides informative screens that show all
communication, control, and interface choices that are available for the RMC100
family of motion controllers. Links are provided to detailed information on every
RMC100 module, and users can request a price quote and additional information on
any specific configuration.
,
deltamotion.com
23
Page 24

RMC100 Modules RMC100 Startup Guide
Comm
EtherNet/IP, CSP,
10Mb, non-deterministic,
9.6kb to 12Mb, deterministic,
Modbus Plus with or
1Mb, deterministic, flexibility
Command Mode, Input to
Index/ENET/RMC Ethernet
Module Overview
Communications Choices
The versatile RMC100 Motion Controllers can be configured with one of five
different communication modules supporting more than 25 protocols. The busbased communication module s are not just for motion data acquisitio n—they
support full motion control via the host system. (RMC100 motion contro lle rs also
have an RS232 serial port for use with Delta’s RMCWin setup, tuning and
diagnostics package.) Your choice of a Comm Module will depend on the required
performance and compatibility match with your communication architecture.
Module Protocols and Modes Performance
Ethernet (-ENET)
-ENET
-PROFI
-MB+
-SERIAL
-DI/O
A short description of each communication module follows. The RMC part number
designation of each module is in parentheses.
The RMC100 offers a communication module for EtherNet/IP. This protocol is an
open protocol that has steadily been gaining popularity in the industrial world.
EtherNet/IP is innovative in that it combines the traditional messaging services with
higher-performance and more deterministic I/O services. The RMC ENET supports
both EtherN et/IP messaging and I/O. The Ethermet module can be used to
communicate with RMCWin.
Modbus/TCP, CAMP, ISOon-TPC, FINS, HEI
PROFIBUS DP Message
Mode or Compact Modes
without Global Data
A-B DF1, Modbus/RTU,
Mitsubishi No Protocol
Mode, consult Delta for
others
Event, Parallel Event,
Parallel Posit ion
High data transfer, update
times vary
high data transfer with
Message mode
allows high data transfer
RS232/RS422/RS485, 9.6kb
to 115,200kb data transfer.
Update times vary
Low data transfer. Events
can be triggered quickly
24
deltamotion.com
Page 25

RMC100 Startup RMC100 Modules
Index/Modbus plus/
Overview
Index/Serial module/RMC
Serial overview
Index/digital i/o /
communication
Index/Profibus/Overview
Profibus (-PROFI)
The RMC100 offers a communication module for the PROFIBUS-DP open
industrial Fieldbus. This Fieldbus is vendor independent and therefore a large range
of Programmable Controllers (P/C) or other PROFIBUS masters can control the
RMC100.
• Operating b aud-rates: 9.6Kbaud to 12Mbaud
• Supported: Freeze mode, sync mode, automatic baud-rate detect, set slave
address
• Modularity: the RMC100 is a modular station that can have one module
selected at a time.
Modbus Plus (-MB+)
The RMC100 offers a communication module for the Modbus Plus local area
network system, whic h supports up to 64 devices (nodes) and transfers data at 1
million bits per second (1Mbaud). The RMC100 acts as a slave, which means it will
respond to master requests, but will not initiate requests.
Serial (-SERIAL)
DI/O (-DI/O)
The SERIAL module adds a single ser ia l port to the RMC for communica tions with
other devices such as HMIs and PLCs. This port cannot be used for RMCWin or
RMCCOM communications, but has a great amount of flexibilit y:
• Protocols: Modbus/RTU, All en-Bradley DF1 (Full- a nd Half-duplex),
Mitsubishi Binary
• Baud Rate: 9,600 to 115,200.
• Parity: Odd, Even, or None
• Line Drivers: RS-232, RS-422, and RS-485
• Flow Control (RS-232 only): None or Hardware (RTS/CTS)
• Termination and Biasing (RS-422/485 only): Both software selectable on Rx
and Tx wire pairs
The Digital I/O module provides a simple communications interface between the
motion controller and the system controller or Programmable Controller (P/C). The
Communication Digital I/O can operate in four modes:
• Parallel Position Mode
− The user can give simple Go and Open Loop commands using just the
discrete inputs.
deltamotion.com
• Input to Event Mode
− Each input is used to trigger certain Event Steps . Can be used when the
positions to which an axis will be moved are known and can be preprogrammed.
25
Page 26

RMC100 Modules RMC100 Startup Guide
• Command Mode
− Allows any command to be sent to the motion controller and a llows a
wide range of status information to be sent back. This mode is more
complicated than the other modes and requires a PLC for the
communications, is much more capable than the other Communication
Digital I/O modes.
• Parallel Event Mode
− Can give commands to up to four axes at a time. This mode is intended for
use with devices that can provide parallel outputs, such as PLCs and
thumb-wheel switc hes.
Communications Compati bility with Common Host Systems
Host
System
A-B
CompactLogix
A-B ControlLogix
A-B MicroLogix
A-B PLC-2, PLC-3
A-B PLC5/x0
A-B SLC500
A-B SoftLogix
5800
A-B SoftLogix 5
DirectLogic
DL205/405
GE Fanuc
Series 90-30
GE Fanuc
Series 90-70
Mitsubishi FX2N
Modicon 800
Series (*1), other
Modicon Premium
Modicon TSX
Momentum
RMC100 Family Communication Module
-ENET -PROFI -MB+ -SERIAL
A-B# 1761-NET-ENI A-B DF1
A-B# 1756-ENBT SST# SST-PFB-CLX A-B DF1
A-B# 1761-NET-ENI
ProSoft# 3300-MBP A-B DF1
Built-in with PLC5/x0E PLCs or use
A-B# 1785-ENET
Built-in with SLC
5/05. Others use
A-B# 1761-NET-ENI
Any Windows comp
Ethernet card
Any Windows comp
Ethernet card
Automation Direct#
H2-COM, H4-COM
Ethernet available
on new models
SST# SST-PFB-GE
Modicon#
TSXETY110
SST# SST-PFB-PLC5 ProSoft# 3300-MBP A-B DF1
(SLC 5/03 or later)
SST# SST-PFB-SLC
A-B DF1
SST# 5136-PFB-PCI
or 5136-PFB-ISA
Horner Electric#
HE693PBM101
Modicon#
TXSPBY100
Modicon#
170 DNT 110 00
(SLC 5/02 or later)
ProSoft# 3350-MBP
Many options available
from Schneider Electric
Many options available
from Schneider Electric
Many options available
from Schneider Electric
A-B DF1 (1500
LRP Recommnd)
A-B DF1
Modicon
Modbus/RTU
RS-232 – Call
Delta for info
Use No Protocol
Mode
Modicon
Modbus/RTU
Modicon
Modbus/RTU
Modicon
Modbus/RTU
26
deltamotion.com
Page 27

RMC100 Startup RMC100 Modules
Modicon TSX
Quantum (*2)
Omron C200
Omron CJ1, CJ1M
and CS1
Omron CV
PC (ISA)
PC (PCI)
PC (3U
CompactPCI)
PC (PC/104)
PC (PCMCIA)
Reliance AutoMax
Siemens Simatic
505 (*3), S5
Siemens Simatic
S7-300, S7-400
SoftPLC
VMEbus (*4)
Modicon#
140 NOE 211 00
Omron# CS1W
Omron#
CV500-ETN01
PC-based SCADA
or control software
that supports any of
the controllers in this
chart that can
communicate over
Ethernet
SST# SST-PFB-REL
(505)
CTI# CTI 2572
Siemens#
CP 343/443-1
PC-based—Ethernet
support standard
SST# 5136-PFB-VME
Modicon#
140 GRP 811 00
SST# 5136-PFB-ISA or
5136–PBMS-ISA
Lan# SMS-CIF30-PB or
SMS-CIF30-DPM
SST# 5136-PFB-PCI
Lan# SMS-CIF50-PB
App# Several versions
App# CPCI1000PFB
or CPCI-DPIO
SST# 5136-PFB-104
Lan# SMS-CIF104-PB
or SMS-CIF104-DPM
App# PCI104PFB
or PC104-DPI
SST# 5136-PFB-PCM
Lan# SMS-CIF60-PB
Many options available
from Siemens
Many options available
from Siemens
Many options available
from Schneider Electric
Schneider Electric#
SA85
Lan# SMS-CIF30-MBP
App# PCI2000MBP
Lan# SMS-CIF104-MBP
Modicon
Modbus/RTU
RS-422/485 – Call
Delta for info
PC-based
software that
supports DF1 or
Modbus/RTU
-ENET -PROFI -MB+ -SERIAL
*See Delta’s Bus-based Products for other Motion Control options for these
platforms: (*1) MMC188/40, MMC188/41, (*2) MMC120, (*3) TMC188/40,
TMC188/40-Q, TMC188/40-TA, TMC188/40-TQ, TMC188/40-TQA, (*4)
VMC186/40, VMC186/40-A, VMC186/40-Q
This is only partial list. The RMC100 motion controllers can communicate with the
above PLCs or any other PLC using the DI/O module. The RMC100 can also
communicate directly to many HMIs via Ethernet, A-B DF1, or Modbus RTU or
other protocols.
This list is provided for the convenience of our customers. Delta shall have no
liability whatsoever for the use of this information, the accuracy or completeness of
the list or of the availability or suitability of any products referenced.
All registered or trademarked names are the property of their respective companies.
A-B: Allen-Bradley (www.ab.com)
App: Applicom (www.applicom-int.com)
deltamotion.com
27
Page 28

RMC100 Modules RMC100 Startup Guide
Automation Direct (www.automationdirect.com)
CTI: Control Technology, Inc. (www.controltechnology.com)
Delta: Delta Computer Syste ms, Inc. (www.deltamotion.com)
GE Fanuc (www.geindustrial.com, www.gefanuc.com)
Hilscher (www.hilsche r.com) available through Lantronix
Horner Electric APG (www.heapg.com)
Lan: Lantronix (formerly Synergetic Micro Systems, Inc.) (www.synergetic.com)
Mitsubishi (www.mitsubishielectric.com)
Modicon or Schnieder Electric: (www.modicon.com)
Omron (oeiweb.omron.com)
Reliance (www.reliance.com)
ProSoft Technology, Inc. (www.psft.com)
Siemens (www.sea.siemens.com) or (www.aut.sea.siemens.com)
SoftPLC Corp (www.softplc.com)
SST: (www.mysst.com)
28
deltamotion.com
Page 29

RMC100 Startup RMC100 Modules
RMC100
Module
Compatibility
Drive and Transducer Interface Choices
Nine different I/O modules are availab le for the RMC100 Motion Controllers. E a c h
motion I/O module handles two axes, and RMC100 controllers can be configured
with one, two, three, or four I/O modules. I/O modules can be “mixed and
matched” for control of as many as eight axes with one mo tion controller. Whe n
combined with the communication module choices, this I/O module flexibility
results in more than 500 configurations of the RMC100 motion controller available
off-the-shelf. Motion I/O modules are available with analog or stepper drive
outputs and interfaces for a wide variety of position feedback devices. Your choice
of Interface Modules will depend on the required performance and compatibility
match with your feedback devices and physical system.
Interface
Motion Modules (Position Interface, Drive Outputs)
-Mn
-Sn
-Qn
-QSTn
-SSTn
Motion or Auxiliary Modules (Analog Inputs for Position, Pressure, etc. Drive Outputs)
-Hn
-Gn
Outputs
2 Drive, ±10V*,
12-bit analog
2 Drive, ±10V*,
12-bit analog
2 Drive, ±10V*,
12-bit analog,
2 Enables
2 Drive, Step &
Direction,
2 Enables
2 Drive, Step &
Direction,
2 Enables
2 Drive, ±10V*
12-bit analog,
+10V Exciter
2 Drive, ±10V*
12-bit analog,
+10V Exciter
2 MDT, PWM or
Start/Stop, RS-422
differential
2 SSI, Binary or Gray
Code, 8-25 bits, RS422 differential
2 Quadrature (A, B, Z),
RS422 differential, and
6 discrete, 5-24Vdc
2 Quadrature (A, B, Z)
RS422 differential, and
6 discrete, 5-24 Vdc
2 SSI, Binary or Gray
Code, 8-25 bits, RS422 differential
4, 16-bit differential
analog
2, 16-bit differential
analog
Inputs
Transducer
Most MTS (Temposonics),
Balluff, and similar types
Absolute rotary encoders,
MDTs with compatible SSI
Quadrature encoders with
RS422 signals
Quadrature encoder
optional (with RS422
signals)
SSI transducer optional
(Absolute rotary encoders,
MDTs with compatible
SSI)
0-10V, ±10V, 0-5V, ±5V,
4-20mA
0-10V, ±10V
Absolute position, 120MHz count
rate for 0.001” res (one recirc)
Absolute or incremental position,
High resolution, noise immunity
Incremental position, 4,000,00 0
counts/sec, fast response to
index and home
Drives up to 1 MHz, open or
closed loop, 4,000,000
counts/sec quadrature
Drives up to 1 MHz, open or
closed loop, High resolution, high
noise immunity SSI, absolute
position
Absolute Position, Pressure or
Force, Position/Pressure
Absolute Position, Pressure or
Force, Position/Pressure
Performance
Auxiliary Modules
-An
-Dn
deltamotion.com
None
8 discrete SSR
(Solid State
Relay), 2.5kV
isolation
4, 12-bit differential
analog
18 discrete, sinking,
Logic Polarity
configurable, 2.5kV
isolation
0-10V, ±10V, 0-5V, ±5V,
4-20mA
Outputs: ±30V, ±100mA,
1.5ms propagation delay
Inputs: 5-24V 6-10mA
max 2.0ms response
Analog reference, Pressure or
Force
Comm DI/O, Fast response to /
triggering external events
*Use Delta’s VC2100 Voltage-to Current converter to convert ±10 V olts to current
29
Page 30

RMC100 Modules RMC100 Startup Guide
Index/MDT/Overview
Index/SSI/Overview
Index/quadrature/Overview
drive for servo valves. The full-scale output of the VC2100 is adjustable from ±10
to ±200mA in 10mA steps.
A short description of each communication module follows. The RMC part number
designation of each module is in parentheses.
MDT Input with Analog Output (-Mn)
Magnetostrictive displacement transducers are designed for use in rugged industrial
environments. They are non-contact, wear-free, highly reliable, and offer accurate
and repeatable linear position meas urement. In the motion control industry
magnetostrictive displacement transducers are typically inserted into hydraulic
cylinders for measurement of the cylinders’ extension/retraction position.
An MDT transducer communicates the position measurement via Start/Stop pulse or
Pulse Width Modulation.
SSI Input with Analog Output (-Sn)
Synchronous Serial Interface (SSI) is a widely accepted controller interface.
Position data from the sensor is encoded in a binary or Gray Code format and
transmitted over a high-speed synchronous interface.
SSI transducers and absolute encoders offer the following advantages:
• Linear or Rotary
• High resolution. Up to 2 µm (approx. 0.00008")
• Noise immunity
• Cost effective data transfer (only one 6-wire cable is needed)
• Transmissi on rate independent of data lengt h and resolution
• Transmission over long distances
• Direct connection to the RMC’s SSI interface module
Quadrature Input with Analog Output (-Sn)
The QUAD interface allows the RMC100 control a wide range of motors and linear
actuators with quadrature encoder feedback.
• Features of the Quadrature Encoder Interface:
− 4,000,000 counts/second
− A and B Input s
− Index Input with High-speed 125ns Position Latch
• Drive Amplifier Interface:
30
deltamotion.com
− Isolated ±10V, 12-bit Analog Drive Output
− Amplifier Enable Output
− Amplifier Fault Input
Page 31

RMC100 Startup RMC100 Modules
Index/analog/Overview
Index/analog/
Overview
Index/stepper/Overview
• Additional Inputs:
− Extend (CW) Travel Li mi t Input
− Retract (CCW) Travel Limit Input
− Home Input with High-speed 50µs Position Latch
− Status LED
• Digital Noise Filters on All Inputs
• All Discrete Inputs are Isolated
• Use with Servo Drives in Velocity or Torque/Force Modes
Analog Input (-An)
The RMC100 offers a 12-bit Analog Input module with no output and wit h optional
pressure control capabilities.
• Four analog inputs wit h 12-bit Analog/Digital Converters.
• No analog out puts.
• Able to utilize Pressure control firmware.
• Uses: speed reference (joystick), position reference (joystick), transitioned
pressure control, transitioned differential force control, and pressure reference.
Analog Input with Analog Output (-Hn, -Gn)
The RMC100 offers a 16-bit Analog module with input and o utput and wit h
optional pressure control capabilities.
• Four analog inputs wit h 16-bit Analog/Digital Converters.
• Two analog outputs with 12-bit Digital/Analog Converters assi gned to analog
channels 0 and 2.
• Uses: position control, velocity control, speed reference (jo ystick), position
reference (joystick), pressure control, differential force control, and pressure
reference.
Stepper Output with Quadrature Input (-QSTn)
The RMC100 offers a quadrature interface module with stepper output. The
quadrature-encoder interface does not have to be used; the motor can be controlled
open loop, but still ca n take advantage of the RMC’s host o f target generating
methods including trapezoidal and s-curve point-to-point moves, gearing,
synchronization, and splines.
deltamotion.com
When used with quadrature feedback, faults can be triggered on following errors,
and motor compensation can be enabled. See Stepper Compensation for details on
this feature.
The stepper has the same features as the quadrature except for the Stepper Motor
Interface:
• 1 MHz Maxi mum Output Frequency
31
Page 32

RMC100 Modules RMC100 Startup Guide
Index/ digital i/o /sensor
• Step Output
• Direction Output
• Drive Enable Output
• Drive Fault Input
Stepper Output with SSI Input (-SSTn)
The RMC100 offers an SSI interface module with stepper output. It combines the
features of the SSI module with the Stepper output.
Additional Digital Inputs and Outputs (-Dn)
The RMC100 offers a Digital I/O module consisting of eighteen digital inputs and
eight digital outputs. The outputs can be set using commands. The inputs on the
Sensor Digital I/O can be used for the following:
• Triggering event sequences using the Input to Event table.
• Controlling transitions betwee n Step s in the Event Step table.
• As an edge or quadrature counter (only inputs 16 and 17).
When used in combination with a Communication DI/O using Paralle l Event mode,
the inputs can be used as part of that mode. Refer to Parallel Event mode for
details.
32
deltamotion.com
Page 33

RMC100 Startup RMC100 Modules
Manufacturer
RMC100 Family Interface Option
-Q, -QST
Quadrature
-H, -G
Analog
Transducer Compatibility with Common Manufacturers
Transducer
Balluff
800-543-8390
www.balluff.com
Baumer Electric Ltd.
800-937-9336
www.baumerelectric.com
BEI Industrial Encoder
800-350-2727
www.beiied.com
Heidenhain
847-490-1191
www.heidenhain.com
MTS Systems Corp
Sensors Division
800-633-7609
www.mtssensors.com
Patriot Sensors & Control
Corp
800-635-0289
www.patriotsensors.com
Stegmann, Inc
800-811-9110
www.stegmann.com
-MDT -SSI
Start-Stop and
PWM supported
(either edge)—
specify external
interrogation*
Start-Stop and
PWM
supported,
specify external
interrogation*
Start-Stop and
PWM
supported,
specify external
interrogation*
MDTs: Specify a
BTL5-S1xx-Mxxx-xSU040-xxx SSI
synchronous
transducer for motion
control**
Absolute rotary
encoders
Absolute rotary
encoders
Absolute rotary
encoders
MDTs: Specify
Synchronous Mode—
output type Sxxxx02—
for motion control**
Absolute rotary
encoders
Quadrature
encoders
Quadrature
encoders
Quadrature
encoders
Quadrature
encoders
Quadrature
encoders
0-10V, ±10V
(All)
0-5V, ±5V,
4-20mA (H
only)
0-10V,
±10V, 0-5V,
±5V, 420mA
0-10V,
±10V, 0-5V,
±5V, 420mA
*For magnetostrictive displacement transducers (MDTs), the Star t-Stop
configuration is the native mode of operation, and typically gives the best
price/performance when used with compatible motion controllers such as the
RMC100 Series.
**Many MDTs are available with an optional synchronous serial interface (SSI).
This extra-cost option offers several advantages including higher resolution and
factory gain compensation wh ile retaining the absolute position characte r istics.
This is only partial list. The RMC100 motion controllers can interface with
transducers from a wide range of manufacturers providing they meet the industrystandard interface specifications supported by the RMC100.
This list is provided for the convenience of our customers. Delta shall have no
liability whatsoever for the use of this information, the accuracy or completeness of
list or of the availability or suitability of any products referenced.
All registered or trademarked names are the property of their respective companies.
33
deltamotion.com
Page 34

Page 35

RMC100 Startup Appendix A: Wiring
Index/wiring/general
Appendix A : Wiring
This section describes how to wire the following RMC modules to feedback
transducers and drives:
• Analog
• MDT
• SSI
• Quadrature
• Quadrature (with stepper output)
General Wiring Informa t ion.
For CE compliance and to minimize electrical interference:
• Use twisted pairs for all wiring where p ossible.
• Use shielded cables for all wiring.
RMC Drive Outputs
• Keep RMC wiring separate from AC mains or conductors carrying high
currents. Especially high frequency switch ing power such as conduc tors
between servo drives and motors or amplifiers and proportional valves.
For UL and C-UL compliance:
• Power supply must be Class 2.
• All RMC inputs and outputs must be co nnected to Class 2 circuits only.
Four-Pin Plug-in Terminal Block
Pin Function
1 Axis 0 Drive
2 Drive Common
3 Axis 1 Drive
4 Case
When positive voltage is sent to an axis ’s drive, the axis must exte nd. The exte nd
direction is defined as the direction that causes the transducer to return increasing
counts. The extend dir ection of a magnetostrictive tra ns ducer is away from the
head.
CAUTION: If the outputs from the RMC are reversed, the axis will be
uncontrollable when power is connected. Confirm that your wiring is co r rect!
deltamotion.com
35
Page 36

Appendix A: Wiring RMC100 Startup Guide
Index/wiring/analog
Index/wiring/
analog
Wiring the Analog Feedback M odule
Voltage Feedback Transducers
Voltage feedback transducers can be connected directly to the +In and -In
connections for the desired channel. The Res connection is unused for voltage
transducers. The following configuration is recommended:
TIP: If you are using a 10 V transducer output, but are only using values in the low
5V, it is recommended that you select a 5 V setting to increase the resolution of the
analog to digital conversion.
Current Feedback Transducers
Current feedback transducers are connected in the same way as voltage transducers
except that a jumper must be inserted between the +In and Res connections. This
places a resistor internal to the RMC across the two inputs, thus converting the
current to a voltage input. The following wiring diagram shows a suggested
configuration:
36
deltamotion.com
Page 37

RMC100 Startup Appendix A: Wiring
Index/wiring/MDT
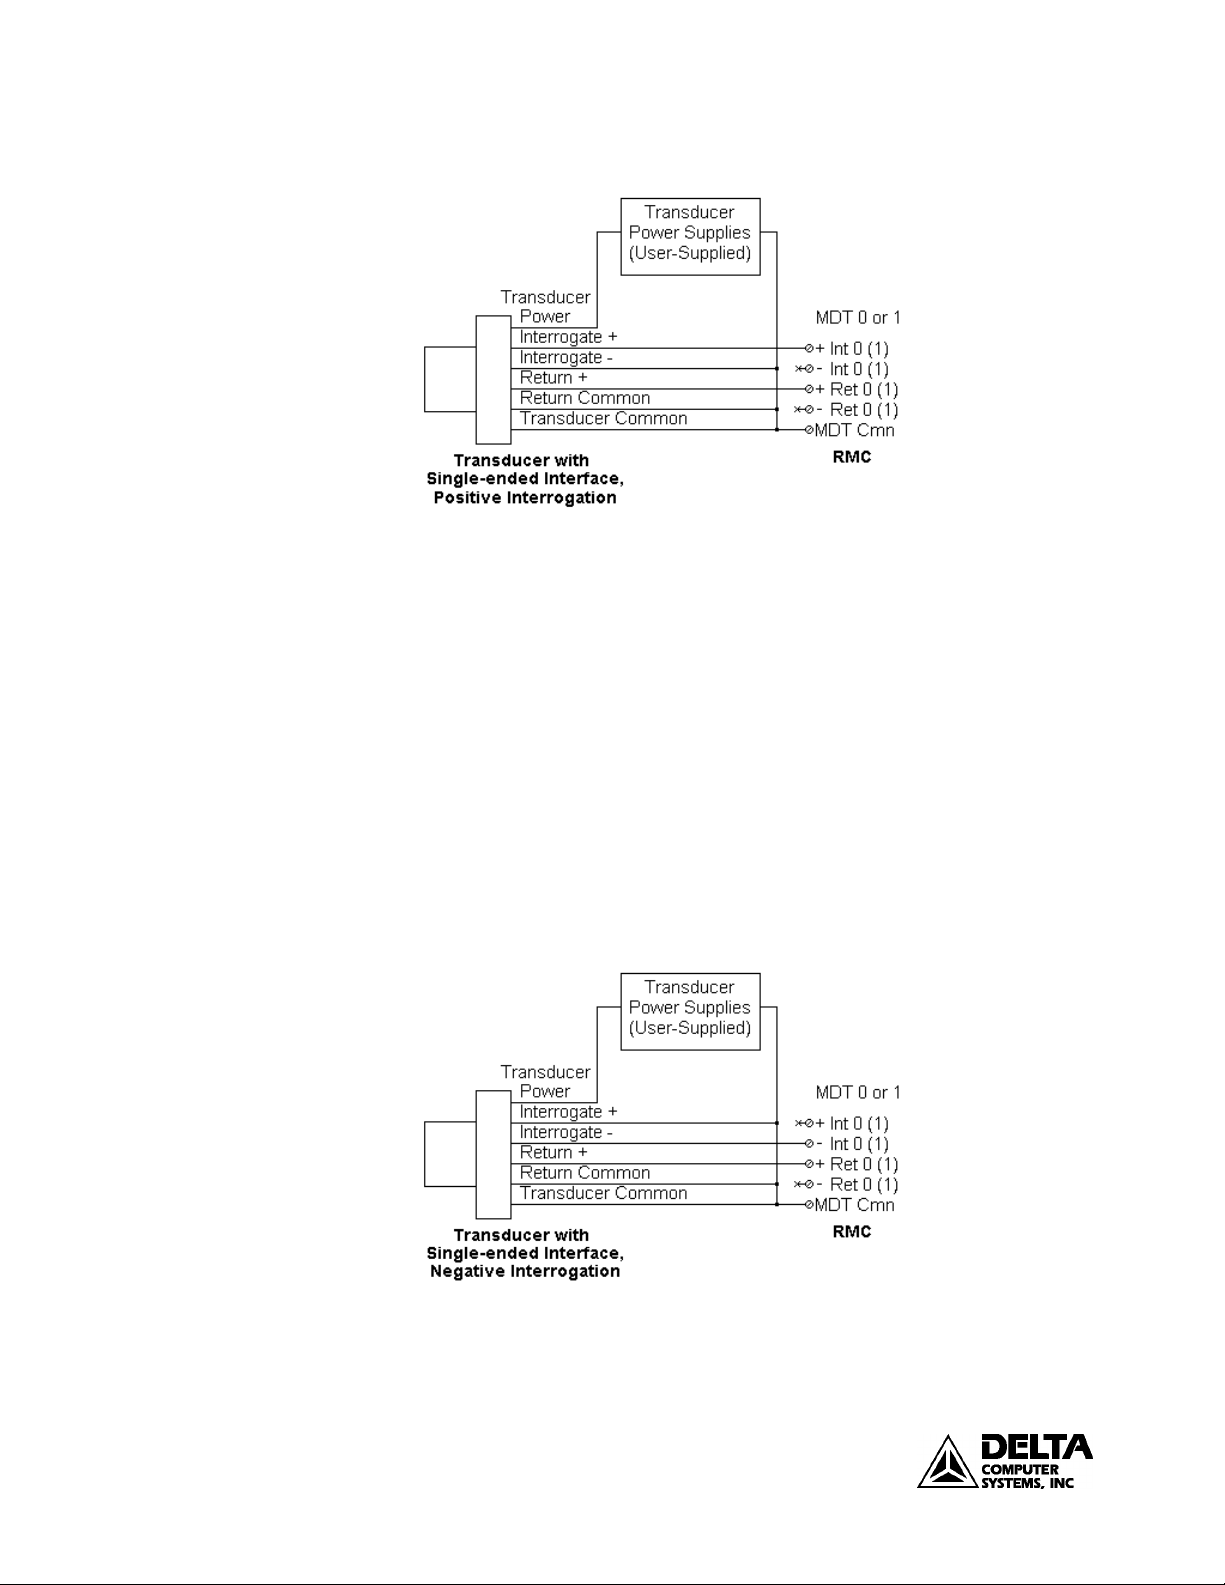
Wiring the MDT Feedback Module
RMC MDT Six-Pin Plug-in Terminal Block Pin-out
Pin Function
1 MDT Axis + Interrogation
2 MDT Axi s - Interrogation
3 MDT Axis Common
4 MDT Axis + Return
5 MDT Axi s - Return
6 Case
The RMC can interface to Magnetorestrictive Displacement Transducers with either
single-ended (TTL) or Differential Line Driver (RS422) interrogation signals.
NOTE: The following example schematics do no t include transducer pin numbers,
color codes, or power supply requirements, since these vary between different
transducers. To determine your power supply needs and connector pin-outs or cable
color codes, consult your transducer manufacturers’ documentation.
RS422 signals
• Connect both the '+Int' and '-Int' between the transducer and the RMC for the
interrogati on signal, and the '+Ret' and '-Ret' between the transducer and the
RMC for the r eturn signal.
• Connect the transduce r DC ground t o MDT Cmn.
Single-ended (TTL) transducers with positive interrogation
• Connect the transducer '- interrogation in' wire to the ‘MDT Cmn’ pin a nd the
transducer '+ interrogation in' wire to the '+ Int' pin.
• CONNECT NOTHING TO THE '-Int' PIN OF THE RMC.
• Connect the transduce r return pl us wire to the '+Ret’ pin on the RMC and the
transducer return common wire to ‘MDT Cmn’ on the RMC.
• CONNECT NOTHING TO THE '-Ret' PIN OF T HE RMC.
37
deltamotion.com
Page 38
Appendix A: Wiring RMC100 Startup Guide
Temposonics I transducer users
• Connect the transducer '+ interrogation in' wire to the ‘MDT Cmn’ pin and the
transducer '- interrogation in' wire to the '-Int' pin.
• CONNECT NOTHING TO THE '+Int' PIN OF THE RMC.
• Connect the transducer return plus wire to the '+Ret’ pin on the RMC and the
transducer return common wire to ‘MDT Cmn’ on the RMC.
• CONNECT NOTHING TO THE '-Ret' PIN OF T HE RMC.
• Some Temposonics I transducers from MTS have 200 Ohm termination
resistors installed between their interrogation pins and common. If yours do
not, it may be necessary to install them as close to the transducers as possible to
reduce electrical noise in the system.
38
deltamotion.com
Page 39

RMC100 Startup Appendix A: Wiring
Index/wiring/SSI
Index/wiring/quadrature
Wiring the SSI Feedback Module
RMC SSI Input Six-Pin Plug-in Terminal Block Pin-out
Pin Function
1 SSI Axis + Clock
2 SSI Axis - Clock
3 SSI Axis Common
4 SSI Axis + Data
5 SSI Axis - Data
6 Case
The SSI module uses differential line driver (RS422) clock and data signals.
• Connect both the +Clock and -Clock between the RMC and transducer for the
clock signal, and both the +Data and -Data between the RMC and transducer
for the data signal.
• The power (+24V) and ground is not provided by the RMC, and therefore must
be provided externally to the transducer.
• Connect the transduce r DC ground t o SSI Cmn.
Wiring the QUAD Feedback Module
Quadrature module DB 25S Pin-out
Pin Function Wire Color Pin Function Wire Color
1 A- Enc: white/blue 14 Index (Z)- Enc: white/green
2 A+ Enc: blue/white 15 Index (Z)+ Enc: green/white
3 B- Enc: white/or ange 16 Encoder Cmn Enc: brown/white
4 B+ Enc: ora nge/white Enc: white/brown
5 N/C 17 N/C
6 Retract Lim- Lim: white/orange 18 Home- Lim: white/green
7 Retract Lim+ Lim: or a nge/white 19 Home+ Lim: green/white
8 Extend Lim- Lim: white/blue 20 Fault- Drv: white/green
9 Extend Lim+ Lim: blue/white 21 Fault+ Drv: green/ white
10 N/C 22 N/C
deltamotion.com
39
Page 40

Appendix A: Wiring RMC100 Startup Guide
11 N/C 23 N/C
12 Drive* Drv: blue/white 24 Enable*- Drv: white/orange
13 Drive Cmn* Drv: white/blue 25 Enable*+ Drv: orange/white
Notes:
• "*" indicates outputs, all others ar e inp uts
• Color codes are for cable part number RMC-CB-QUAD-01. This cable has
three wire groups: encoder, limit s, a nd drive. The wire color column lists the
wire group and the indivi dual wire color within that group .
• The encoder common should be connected to both wires listed.
Encoder Wiring
5 Volt differential driver:
Input Wiring (Home and Limits)
NPN Proximity sensors
Normally Open recommended for Home
Normally Closed recommended for Limits
PNP Proximity sensors
Normally Open recommended for Home
40
deltamotion.com
Page 41

RMC100 Startup Appendix A: Wiring
Normally Closed recommended for Limits
Drive Output Wiring
Fault Input Wiring
From TTL out put:
From Open Collector Output:
Enable Output Wiring
41
deltamotion.com
To TTL input (high = enabl e):
Page 42

Appendix A: Wiring RMC100 Startup Guide
Index/wiring/
stepper
To active low Enable input:
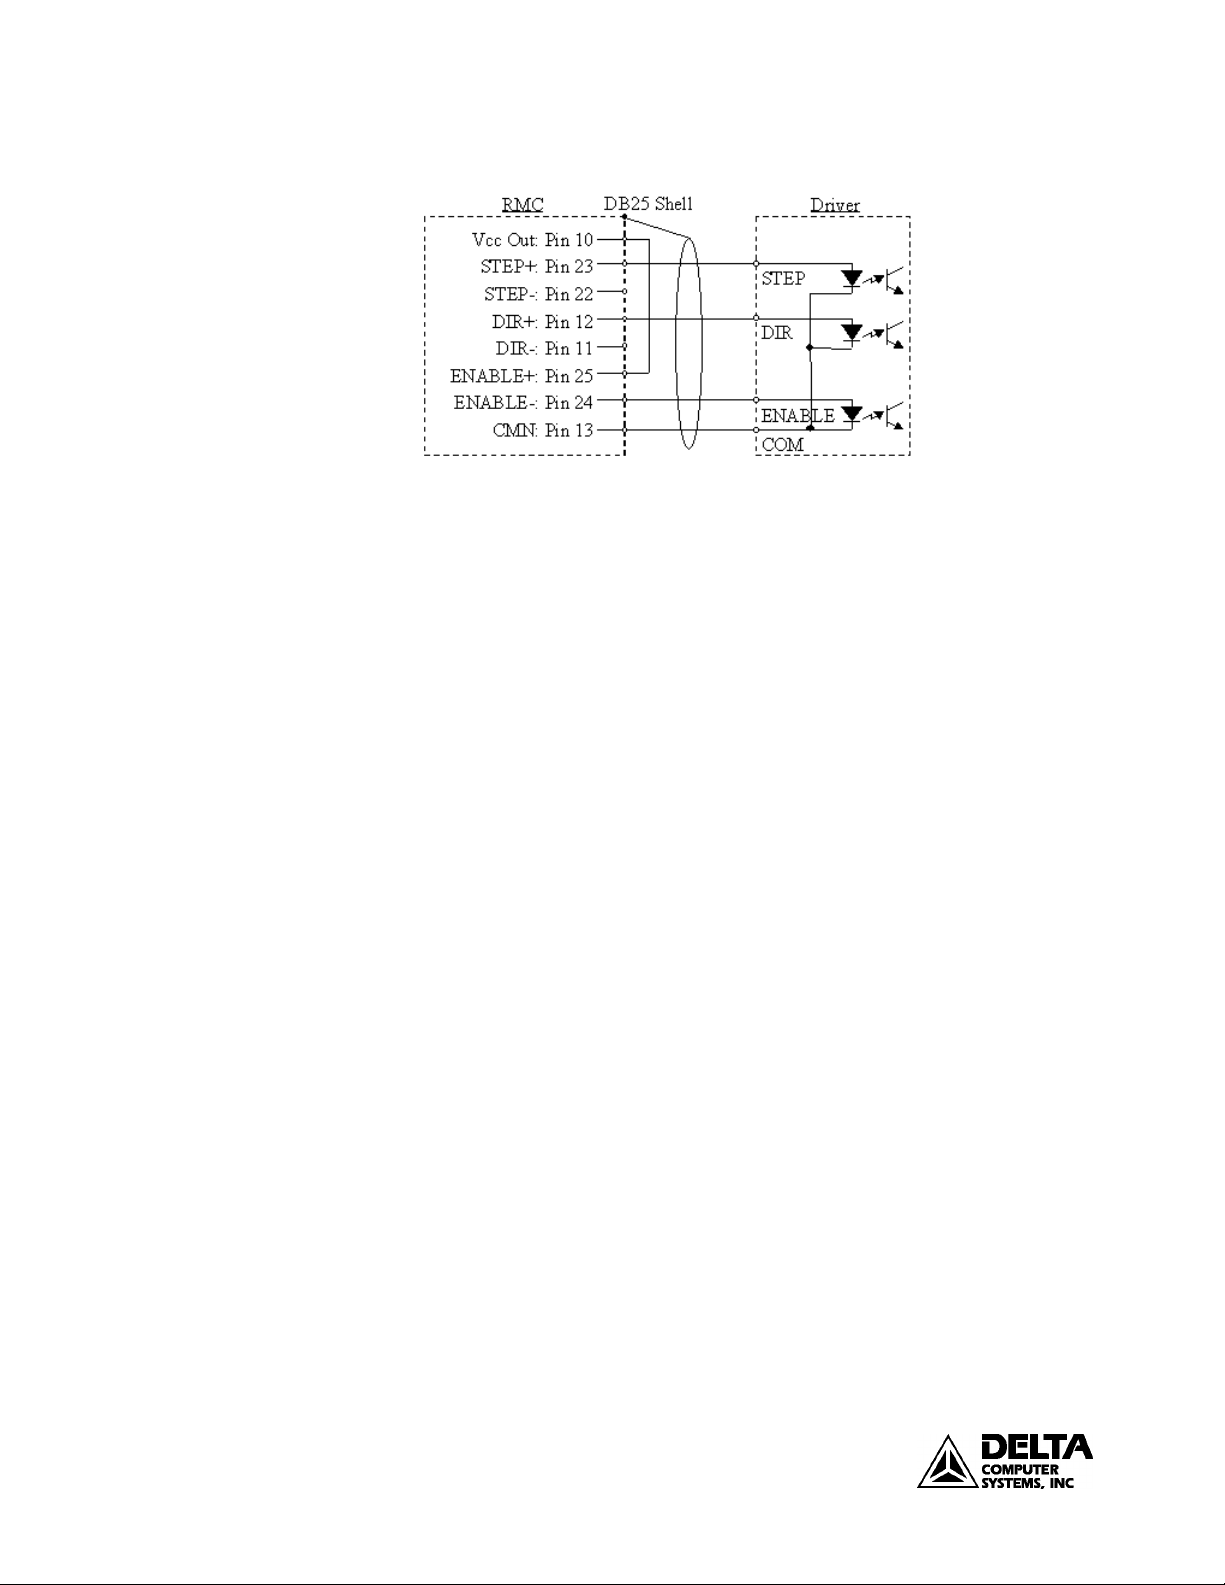
Wiring the Stepper Module
Use shielded twisted pairs for all co nnections to inputs and o ut puts. Route the
quadrature encoder wiring separate from other wiring. You must provide the power
supplies needed by your quadrature encoders and drives, although the RMC can
provide +5 VDC for the optoisolators on the drive module as shown in the Stepper
Output Wiring section below.
DB25S Pin-out
Pin Function Pin Function
1 A- 14 Index (Z)2 A+ 15 Index (Z)+
3 B- 16 Encoder Co mmon
4 B+ 17 N/C
5 N/C 18 Home6 Retract Lim- 19 Home+
7 Retract Lim+ 20 Fault8 Extend Lim- 21 Fault+
9 Extend Lim+ 22* Step10* Vcc Out 23* Step+
11* Direction- 24* Drive E nable12* Direction+ 25* Drive Enable+
13* Drive C ommon
*Outputs, all others ar e inputs
42
deltamotion.com
Page 43

RMC100 Startup Appendix A: Wiring
Stepper Output Wiring
NOTE: Do not use Vcc Out to power your encoder because:
• This output’s voltage is not regulated.
• 50 mA is not adequate current to power the encoder. Each of the encoder
outputs (A, B, and Z) requires 20 to 25 mA in addition to the current used by
the encoder’s internal circuit.
• Using this output to power the encoder would violate the isolation that exists
between the inputs and outputs.
NOTE: The Step and Dir outputs are generated by a differential driver, but the
Enable output is a relay. Therefore, power must be provided through the Enable
output, as s hown in the d iagrams below.
Drive with bipolar inputs:
Drive with c ommon anode inputs:
deltamotion.com
43
Page 44
Appendix A: Wiring RMC100 Startup Guide
Drive with c ommon cathode inputs:
Input Wiring
The wiring for all inputs is identical to the wiring for the quadrature inter face
module with analog outputs. See t he Quadrature wiring section for diagrams on
these input s .
44
deltamotion.com
Page 45

RMC100 Startup Appendix B: Tuning
Index/tuni ng/overview
Index/go
Index/plots/using
Index/stored commands/using
Index/plot time
Appendix B: Tuning
After setting up your system, it must be tuned in order to control it. T he b e tte r tuned
a system is, the better it follows the desired trajectory and holds position.
Tuning procedures differ depending on the type of system. This section contains
procedures that may work for the following s ys tems:
• A Hydraulic Position Axis or Motor in Velo c ity Mode
• A Motor in Torque Mode
• A Position/Pressure System
Please read the "General Tuning Guidelines" before continuing to any of the tuning
procedures.
General Tuning Guideli ne s
Keep these general guidelines in mind throug hout the tu ning proc edure.
There is no s ubstitute for experience when tuning an axis. The procedures offer
some guidelines, tips, and suggestions for tuning your system. While t he steps will
work for many systems, they may not be the best for a particular system.
• The tuning procedure is a reiteration of the following general steps. Use these
steps throughout the tuning procedure:
− Make a move. Use the Go (G) command for making moves.
− View the plotted move. See the Plots topic for more information. Viewing
the plot will help you determine which parameters must be changed.
− Change a parameter. To do this, edit the parameter in RMCWin and then
click
− Repeat these steps using the same move until the parameter is at the
desired value. See the Stored Commands topic for repeating moves.
• Use the Sum of Errors Squared in the R M CWin plotting utility to determine
how the last parameter change affected the system. The Sum of Errors Squared
indicates how closely the Actua l Position is tracking the Target Po sition. If this
number decreases significantly, the last parameter change was good. If this
number increases significantly, the last parameter change was bad.
• Remember, that in order to use the Sum of Errors Squared to compare moves,
the moves must be identical.
• Begin the tu ning proc edure with lo ng, slow moves and lo w Accelerations. This
will prevent you from losing co ntrol of and potentiall y damaging t he system.
• To obtain the greatest tuning pr e c isio n, use the shortest Plot Time possible.
This will spread the move across the e ntire plot window and allow you to see
precisely how the system is responding. See the Plot Time topic in the online
help.
to initialize the RMC100 with this value.
deltamotion.com
• You may want to turn off some of the Auto Stop bits. The Auto Stop turns off
the Drive if an error occurs. In the i nitial stages of tuning, a Following Error or
other error may occur, causing an undesired halt. Setting these bits to "Status
45
Page 46

Appendix B: Tuning RMC100 Startup Guide
Only" will make the RMC ignore t he errors so you can tune t he axis. Thi s may
not be possible on some systems because of safety concerns. Remember to set
these bits to either "S oft Stop" or "Hard Stop" when you ha ve gained sufficient
control of the axis.
• When changing the parameters, r emember that they are not updated in the
Tuning a Position Axis
RMC until the Set Parameters (P) command
stored into the RMC FLASH me mory until the Update FLASH command
is issued.
The following procedure may be used to tune many hydraulic position axes and
motors in velocity mode.
1. Set all Gains and Feed Forwards to zero
This is done by editing the values in t he main RMCWin window. Then clic k
the
2. Set the Null Drive
The drive it takes to hold the axis in position is referred to as the Null drive. I f
the axis tends to drift significantly when you give it an Open Loop drive of 0,
you should set the null drive. This drive is then always added to the total d r ive
output and helps the RMC100 a c c ura te ly follow the motion profile. To se t the
null drive, issue a P command to hold the axis i n position in closed loop, then
issue the N command.
3. Check Dead Band
If your system has a large dead band, you will need to set the Dead Band
Eliminator value. To find your d ead band, give increasi ng amounts of drive to
the system with the Open Loop command. The value of drive at which the
system starts to move is your dead band. If this value is app roximately 400 or
greater, the Dead Band Eliminator should probably be used. If it is less, it is
left to the discretion of the designer.
to initialize the RMC100.
is issued. They are not
4. Adjust the Proportional Gain
The Proportional Gain must be ad justed to gain some control over the syste m
for continuing the tuning proced ure. Adjust the Proportional Gain by slowly
increasing it and maki ng moves. When the system gets close to final position
reasonably quickly, continue to the nex t step. If the system begins to oscillate ,
decrease the gain.
5. Adjust the Feed Forwards
In many hydraulic systems the feed forward parameters (Extend Feed Forward
and Retract Feed Forward) are the most important parameters for position
tracking during a move.
Make a long move without any oscillation or overdrive. Then issue the Set
Feed Forward command. This command will automatically adjust the Feed
Forward parameter for the direction of that move.
6. Adjust the Acceleration Feed Forwards
The Acceleration Feed Forward terms help eliminate following errors while
accelerating. It is particularly useful for systems moving large masses with
relatively small cylinders. Such systems often have a delay before the start of
46
deltamotion.com
Page 47

RMC100 Startup Appendix B: Tuning
movement. The Acceleration Feed Forward terms can help compensate for this
delay.
Look for following errors during acceleration and deceleration. Increase the
Extend and Retract Acceleration Feed Forward terms until the errors disappear.
For large masses the Acceleration Feed Forward may be in the tens of
thousands.
7. Readjust the Proportional Gain
Proportional Gain affects the responsiveness of the system. Low gains make
the system sluggish and unrespo ns ive. Gains that are too high make the axis
oscillate or vibrate.
Slowly increase the gain. When you see a tendency to oscillate as the axis
moves or stops, reduc e the gain by 10 to 30 percent.
At this point, if you have gained s ufficient co ntrol of the system, yo u may want
to increase the speed, accel and decel of your moves and further adjust the
proportional gain. A value of proportional gain that may seem good at low
speeds and accels, may not work at higher speeds.
8. Adjust the Integral Gain
The Integral Gain is helpful for ge tting into p osition and for tracking during
long, slow moves. It will not significantly affect tracking during short, fast
moves. Many hydraulic systems do not require a large Integral Gain. However,
it is usually desirable to have some Integral Gain (5 to 50 units) to help
compensate for valve null drift or changes in system dynamics. Some systems
may require larger Integral Gain, in particular if they are moving a large mass
or are nonlinear. Too much Integral Gain will cause oscillations and overshoot.
9. Adjust the Differential Gain
Differential Gain may greatly enhance performance on many hydraulic
systems. It is used mainly on systems that have a tendency to oscillate. T his
happens when heavy loads are moved with relatively small cylinders.
Differential Gain will tend to da mpen out oscillations and help the axis tra c k
during acceleration and deceleration. This will positively aff e c t short, fast
moves.
Important: If you use Differential Gain, you may be able to increase the
Proportional Gain somewhat without causing the system to oscillate .
If the drive o utput duri ng the constant velocity portion of the move is smooth,
the Differential Gain is perha ps not set high enough. The drive out put may
look "fuzzy." This indicates that the drive is responding to the minute errors of
the axis. Note that not all systems allo w the differential gain to be set high
enough for the drive to be "fuzzy".
A disadvantage of Differential Gain is that it amplifies positio n measurement
noise. If the re is too much noise or the gain is to o high, this can cause the
system to chatter or oscillate.
10. Increase System Speed
Gradually increase the Speed and Acceleration values while making long
moves. Look for following errors, overshoot, or oscillations.
• If an overdrive error occurs, there is not enough drive capacity to drive the
axis at the requested Speed or Acceleration. Should this occur, reduce the
Speed and/or Acceleration and Deceleration.
deltamotion.com
47
Page 48

Appendix B: Tuning RMC100 Startup Guide
• If a following error occurs during acceleration and deceleration and
adjusting the Gains and Acceleration Feed Forward does not help, the
Acceleration and Deceleration ramps are too steep for the response of the
system.
• If the actual position lags or leads the target positio n d uring the entire
constant velocity section of the move, adjust the Feed Forwards.
• Should the system seem a little sloppy, try adjusting the Proportional Gain.
• If the Drive i s not high, t he gains can probably be increased for better
control. If the Drive is t oo high, or an overdrive error occurs, the system is
not capable of performing the requested move. The Speed, and/or
Accelerations may need to be decreased.
• If the system vibrates while in p osition, the Dead Band value may need to
be increased. However, if the oscillation is not caused by a deadband in
the system then this will not help! A rule o f thumb is to set the Dead Band
Eliminator value to half of the peak-to-peak oscillation of the drive output
while in position.
The final tuning of the system should be made at the speed of intended
operation.
Tuning a Torque Motor
The following procedure may be used to tune motors running in torque mode.
1. Set all Gains and Feed Forwards to zero.
This is done by editing the values in the main RMCWin window. Then click
the
2. Set the Null Drive
The drive it takes to hold the axis in position is referred to as the Null drive. I f
the axis tends to drift significantly when you give it an Open Loop drive of 0,
you should set the null drive. This dr ive is then always added to the total drive
output and helps the RMC100 a c c ura te ly follow the motion profile. To se t the
null drive, issue a P command to hold the axis i n position in closed loop, then
issue the N command.
3. Check Dead Band
If your system has a large dead band, you will need to set the Dead Band
Eliminator value. To find your d ead band, give increasi ng amounts of drive to
the system with the Open Loop command. The value of drive at which the
system starts to move is your dead band. If this value is approximately 400 or
greater, the Dead Band Eliminator should probably be used. If it is less, it is
left to the discretion of the designer.
4. Adjust the Differential Gain
Torque moto rs generally do not ha ve much da mping. Damping must be
provided for the system, or it will be d iffic ult to c ontrol. Providing some
Differential Gain will effectively dampen the system. Do the following:
to initialize the RMC100.
a) Set all the gains to zero. Issue an Open Loop (O) command of zero.
b) Increase the Differential Gain. Issue a Set Parameters (P) command to put
the axis in closed loop control.
48
deltamotion.com
Page 49

RMC100 Startup Appendix B: Tuning
c) Repeat b until sufficient damping is obtained. There are several methods
to do this, depending on the system:
− For small motors, rotate the motor manually to get a feel for the
resistance to movement (da mp ing). Repeat step b until the damping is
significant. If the motor chatters or oscillates, decrease the gain.
− For systems that cannot be moved manually, repeat step b until the
motor starts humming (or chat t ering or oscillating) and then back the
Differenti al Gain off significantly, perhaps even 50%, to avoid
oscillating later while making moves.
− For finer adjustment on large systems, repeat step b, and then
momentarily (e.g. 5 milliseco nds) give a drive output to the motor.
The Event Step table (see the Event Control help topic) can be used to
do this with the Open Loop command. This jolt to the system will
provide a clear indication of whether the Differential Gain is to o high.
Do not set the Differential Gain too high! Remember that the point here is only
to provide some damping for continuing the tuning process. The Differential
Gain will be fine-tuned later. Keep in mind that motors often require a very
high Differ ential Gain.
5. Adjust the Proportional Gain
Adding Proportional Gain will now improve system performance. Adjust the
Proportional Gain by slowly incr easing it and making moves. If the system
begins to oscillate, decrease the gain.
6. Adjust the Feed Forwards
In torque motor applications, feed forward parameters (Extend Feed Forward
and Retract Feed Forward) often do not require high values. Adjust these
parameter s by making a l ong move wit hout any osc illation or overdrive. Then
issue the Set Feed Forward command. This command will automatically adjust
the Feed Forward parameter for the direction of that move.
7. Adjust the Acceleration Feed Forwards
The Acceleration Feed Forward terms help minimize errors during acceleration
and deceleration. Increase the Extend and Retract Acceleration Feed Forward
terms until the errors disappear.
8. Adjust the Integral Gain
The Integral Gain is helpful for maintaining position. It will not significantly
affect trac king during short, fast moves. Increase the Int egral Ga in until the
system starts oscillating, then back it down some. Motors may require a high
Integral Gain.
9. Readjust the Differential Gain
Differential Gain tends to dampe n o ut oscilla tions and help the axis track
during acceleration and deceleration. This will positively aff e c t short, fast
moves.
deltamotion.com
Important: If you increase the Differential Gain, you may be able to increase
the Proportional Gain somewh a t without causing the system to o scilla te .
If the drive o utput duri ng the constant velocity portion of the move is smooth,
the Differ ential Gain is perha ps not set high enough. The drive out put may
look "fuzzy." This indicates that the drive is responding to the minute errors of
49
Page 50

Appendix B: Tuning RMC100 Startup Guide
Index/tuni ng/
position-pressure
Index/position-pressure
transition/position-pressu re setup
the axis. Note that not all systems allo w t he d ifferential gain to be set high
enough for the drive to be "fuzzy".
A disadvantage of Differential G a in is t hat it amplifies position measurement
noise. If the re is too much noise or the gain is to o high, this can cause the
system to chatter or oscillate.
10. Increase System Speed
Gradually increase the Speed and Acceleration values while making long
moves. Look for following errors, overshoot, or oscillations.
− If an overdrive error occurs, there is not enough drive capacity to drive the
axis at the requested Speed or Acceleration. Should this occur, reduce the
Speed and/or Acceleration and Deceleration.
− If a following error occurs during acceleration and deceleration and
adjusting the Gains and Feed Forwards does not help, the Acceleration and
Deceleration ramps are too steep for the response of the system.
− Should the system seem a little sloppy, try adjusting the Proportional Gain.
− If the Drive is not high, the gains can probably be increased for better
control. If the Drive is t oo high, or an overdrive error occurs, the system is
not capable of performing the requested move. The Speed, and/or
Accelerations may need to be decreased.
− If the system vibrates while in position, the Dead Band value may need to
be increased.
The final tuning of the system should be made at the speed of intended
operation.
Tuning a Position/Pressure System
Tuning a position/pressure system is not a trivial task. In order to be successful, the
system must be set up proper ly. Read the Position/Pressure Setup, the
Position/Pressure Tuning Procedure, and t he Position/Pressure Example in the
online help before beginning the procedure.
Position/Pressure Setup
Steps for Setting Up Position/Pressure Control:
1. Configure the Axes
Once the RMC is correctly wired to the transducers, the modules must be
correctly configured.
a) Configure the Position Axis
The follo wing procedur e is for configuring MDT modules. If you have a
different module, look up its configuration procedure in the on-line help.
i. Set blanking period (if required)
50
deltamotion.com
• If you have a clevis-mounted transducer, see MDT configuration
to change the blanking period from the default 21 ms to 5 ms,
otherwise do nothing he re.
ii. Configuration word
• Double-click the Confi g Word for t he MDT axis.
Page 51

RMC100 Startup Appendix B: Tuning
• Select the transducer type you have. See MDT configuration for
more details on the Configuration word.
iii. Set scale and offset
• On the Tools menu, click MDT Scale/Offset Calibration.
• In the Desired Position Units field, enter the desired measurement
units. Many position/pressure applications use 1000 units per
inch.
• In the Transducer field, enter the transducer data. This
information is available from the transducer specifications.
• The Offset field allows you to set your zero point at any point
along the transducer. Move the cylinder to where you want your
zero point to be. Click the button in the Of fset field to
automatically enter the counts into the counts box.
• If you wish your measurement to be in the opposite direction of
the transducer counts, select decreasing position units in the
Increasing counts equals field.
• Set the desired extend and retract limits in the Extend/ R etract
Limits field.
• Click Apply or Done when you are finished.
• Issue a Set Parameters (P)
command to initialize the axis
with these s ettings.
b) Confi gure the Analog Axis
The following procedure is for configuring the analog a xis for pressure
control.
i. Module Configuration
• On the Tools menu, click Module Configuration.
• In the Slots list, select an analog module.
• Click Slot options.
• Click the Channels 0-1 or Channels 2 -3 tab depending on which
channel your pressure transducer is connected to.
• Click an option button to set the correct channels for either
auxiliary pressure if you are using s ingle-ended pressure, or
auxiliary force if you a re using do uble-ended (differential)
pressure.
• Click Update RM C.
• The Update Module Configuration dialog box will be displayed to
indicate the progress. If the RMC could not be reset
automatically, you may be prompted to reset the RMC manually.
deltamotion.com
• In the RMC Configuration dialog b ox, click Close.
ii. Configuration word
51
Page 52

Appendix B: Tuning RMC100 Startup Guide
• Double-click the Confi g Word (in the parameter area of the main
screen) for the pressure axis.
• In the Input type field, select the type of feedback of your pressure
transducer.
iii. Set scale and offset
• On the Tools menu, click Scale/Offset Calibration.
• If the axis is pressure control:
Enter the desired Actual Pressure for two different pressure counts
(the counts are the feedback from the transducer). The scale and
offset will be automatically calculated.
• If the axis is force (differential pressure) control:
Enter the following informatio n:
− Maximum gauge reading
− Actuator Type
− Cylinder Dimensions
− Desired Force Units
− Desired Force Direction
This information allows the Actual Pressure in the Status area of
the main screen to display the net force on the cylinder.
• Click Apply or Done when you are finished.
2. Assign the Pressure Axis to a Position Axis
The RMC performs pressure control using two or more inputs from transducers
and one dri ve output to the hydraul ic valve. Any position axis with analog
drive output (not stepper output) can be used to provide the drive output and
position input. To enable pressure control on this position axis, you must
assign a pre s sure-enabled analog axis to the position axis. In this configuration,
the analog inputs—whet her using two transducers monito ring differ ent ial force,
or a single transducer monitoring s i ngle-ended pressure—are then used t ogether
with the position axis to control both position and pressure.
To assign a pressure axis to a p osition axis:
a) Double-click the Config Word for the position axis. This will open
the Config Word dialog box.
b) In the Pressure Axis field, click the desired Pressure Axis.
c) Click OK.
c) Issue a Set Parameters (P) command to cause these bits to take effect.
d) If you want the axis assignment to be remembered after the RMC
power is cycled, then issue an Update FLASH (U) command
This needs to be done only once.
3. Set Up the Event Step Table
Setting up and tuning position/pressure control requires issui ng multiple
52
deltamotion.com
.
Page 53

RMC100 Startup Appendix B: Tuning
Mode
Sets Ramp Type, Ramp Time and Integrator
Pressure Set A
Pressure at which Pressure control begins.
Pressure Set B
Pressure at which Pressure control ends.
Ramp Ti me
Time to ramp to commanded pressure.
Command Pressure
The pressure the syste m will go to when
commands numerous times. Doing this from a PLC or by typing commands in
RMCWin is very awkward. To simplify the proc ess, Event Steps i n RMCWin
should be used for setting up and tuning position/pressure control.
To perform position/pressure c ontrol, the following steps must be set up in the
Event Step Table:
1. Issue a P command so the axis will hold position.
2. Issue a Set Null Drive to Integral Drive (n) command. This updates the
null drive (drive needed to hold p osition), which is critical for pressure
control.
3. Move the axis to the correct starting po sition. Normally, t he axis should be
at a position where the pressure is below the desired entry pressure
(Pressure Set A).
4. Set up the pressure control mode. This sets up the parameters that the
pressure axis will use when it enters pressure regulating mode. This is done
by issuing t he Set Pressure (^) co mmand.
Note: this step does not put the axis into pressure regulating mode.
This step sets up the following p a rameters:
Mode
regulating pressure.
5. Move in the direction of increasing pressure with the monitor pressure bit
set (pressure monitoring mode). When the pressure reaches Pressure Set A,
the axis enters pressure regulating mode. The axis enters pressure control
according to the parameters previously set up by the Set Pressure
command.
6. Control the pressure as desired.
The following sample Event Step Table illustrates these steps:
deltamotion.com
53
Explanation of each step in the Event Step table:
Page 54

Appendix B: Tuning RMC100 Startup Guide
Step 0: This step is normally linked to after finishing a sequence. If the e vent
control is at step 0, it usually means the event control has stopped.
This step d oes nothing.
Step 1: Issues a P command so the axis will hold position. Waits for 1/2 sec
so the drive output will stabilize for the next step.
Step 2: Issues a Set Null Drive to Integral Drive. This updates the null drive
(drive needed to hold positio n), which is critical for pressure control.
Step 3: This step moves to 36.0 in. at 10 in./sec (assuming it is set up for a
resolution of 0.001 in., then 36000 = 10 in. and 10000 = 10 in.) It then
waits unti l bit 1 (the In Position bit) is on before continuing to the next
step.
Step 4: This step sets up the pressure parameters that will be used in step 5.
The Mode word is set up to Calculate Ramp Time and Integrator
Active Only at Pressure. Pressure Set A is 1000, Pressure Set B is 500,
and the Command Pressure is 5000. This step waits 0 msec and goes
to step 5. Note that the Ramp Time, set to 200, is not used since
Calculate Ramp Time has been selected.
Step 5: This step moves toward 40 in. with the Monitor Pressure bit set in the
Mode word. Once the pressure reaches Pressure Set A (as set in step
4), it will begin controlling pressure. It will go to a pressure of 5000 (
as set in step 4). This step waits until bit 0 ( At P r e ssure) is on before
continuing to step 6.
Step6: This step changes the Command Pressure to 6000, with the same
Pressure Set A and B as in step 4 and a Ramp Time of 50. The
pressure will ramp to 6000, and then the step waits 1000 msec before
continuing to step 7.
Step 7: This step changes the Command Pressure to 5000, with the same
Pressure Set A and B and Ramp Time values as in step 6. The
pressure will ramp to 5000, and then the step waits for 1000 msec
before continuing to step 5. Steps 5 a nd 6 will repeat until a Quit
Events (Q) command is issued. Ramping the pressure up and down in
this manner is very useful when tuning the pre s sure. It is important
that the Ramp Time be fairly short, because parameters suitable for
slow changes (long Ra mp Times) may make the system unstable for
fast changes.
Notes on using event control for position/pressure:
• To begin an Event Step sequence, enter the desired event number in the
Command Value field and issue a Start Events (E) command by typing "E"
in the Command field on the main screen.
• Before any commands may be issued to an axis, a Set Parameters (P)
command must be issued. T his initia liz e s the axis.
• Event contr ol is only all owed on position axes. However, when a pressure
command is entered in an Event Step on a position axis that has an
assigned pressure axis, then the command is issued to the pressure axis
instead of the position axis.
• For a list of pressure commands that will be sent to the pressure axis, refer
to Command. Notice, however, that the Set Mode (M), Open Loop (O),
54
deltamotion.com
Page 55

RMC100 Startup Appendix B: Tuning
Index/position-pressure
transition/tuning a position-
pressure system
and Set Parameters (P) commands will not be sent to the pressure axis
because they are also valid on the position axis.
• When editi ng the event ta ble you will have to kee p in mind that for
pressure commands, you should enter values for Pressure Set A in the
Acceleration field, values for Pressure Set B in the Deceleration field, and
values for Ramp Time in the Speed field.
Once you ha ve set up your Event Steps table, continue to T uning a
Position/Pressure System.
Position/Pressure Tuning Procedure
The following procedure may be used to tune a syste m t hat transitions from position
control to pressure control.
There is no s ubstitute for experience when tuning an axis. This procedure offers
some guidelines, tips, and suggestions for tuning your system. While these steps
will work for some systems, they ma y not b e the best for a particular system.
1. Tune the Position Gains
The position gains should be tuned before attempting to tune the axis for
pressure. Obtaining control of the axis' position greatly simplifies the t uning of
the pressure gains. If you have not yet tuned the position gains, follow the
procedure outlined in Tuning a P osition Axis before cont inuing.
2. Set Null Drive.
When the axis is holding position (stopped) in closed loop, issue a Set Null
Drive to Integral Drive (n) command. For best accuracy, this should be done
after the axis has been in position for a while, such as 1 second.
The null drive is the drive require d to hold the axis in position. In some
systems, s uch as hydra ul ics with servo valves, this value may change with
time. Therefore, this step should be performed periodically.
For the remainder of the tuning procedure, use an Event Step sequence as
described in the Position/Pressure Setup topic and illustrated in the
Position/Pressure Example
3. Adjust the Proportional Gain
The Prop ortional Gain should be adjusted first to gain some control over the
pressure before continuing the tuning procedure.
Note: If negative drive causes an increase in pressure, use negative values
throughout the tuning p rocedure.
• Set the Proportional Gain to a small value, such as 2.
• Use an Event Step table that makes a p osition move with the Monitor
Pressure bit set so the axis will tra nsition to pressure control when the
Pressure Set A threshold is crossed. Use a fairly long ramp time initially,
such as 1000 msec.
• Once the axis is in pressure control, ramp the pressure between two
pressures (this is best done in Event Steps). Gradually increase the
proportional gain to minimize the following error. When you see a
tendency to oscillate as the axis moves or stops, decrease the gain 10 to 30
percent.
deltamotion.com
55
Page 56

Appendix B: Tuning RMC100 Startup Guide
4. Add Filter if Necessary
If the pressure feedback signal is excessively noisy, it may cause instability and
will likely have been noticed already in the previous step. Adding a filter may
help. This is done using the Filter TC parameter. See Filter TC for detailed
information.
5. Adjust the Integral Gain
The Integral Gain helps get to the command pressure quickly.
• Use the same Event Step sequence as previously to ramp between two
pressures. You may want to increase the delay between the steps to more
clearly see the effect of this tuning step.
• Adjust the Integral Gain so that the pressure gets to commanded pressure
quickly.
• Too much Integral Gain will cause oscillations and overshoot. If this
happens, decrease the Integral Gain.
6. Adjust the Differential Gain
Differential Gain greatly enhances performance on many hydraulic systems.
Differential Gain will tend to da mpen out oscillations and help the axis track
during acceleration and deceleration. This will positively affect short, fast
moves.
• Continue ramping between two pressures.
• If the drive output is always smooth, the Differential Gain can pro bably be
increased. The drive output should look "fuzzy." This indicates that the
drive is correctly responding to the minute errors of the axis.
• A disadvantage of Differential G a in is t hat it amplifies measurement noise.
If there is too much noise or the gai n is too high, this can cause the system
to chatter or oscillate. In this case, decrease the Differential Gain.
7. Readjust the Proportional Gain
Once the Differential Gain has been adjusted, the Proportional Gain may be
readjusted. It affects the responsiveness of the system. Low gains make the
system sluggish and unresponsive. Gains that a re too high make the axi s
oscillate or vibrate.
• Continue ramping between two pressures.
• Slowly increase the gain. When you see a tendency to oscillate as the
pressure changes or stops, reduce the gain by 10 to 30 percent.
8. Tune the Transition.
Now that bo th the positi on and pressure gains have been tu ned, the transition
may be tuned.
• Use the Event Step sequence to tr a nsition from position to pressure.
• If necessary, adjust the previously tuned pressure parameters for a
smoother transition.
• If there is oscillation and overshoot or other undesirable behavior at the
transition that cannot be avoided with tuning the gains, the Ra mp T ime
may need to be changed, or the speed going into the transition may be need
to be slower.
56
deltamotion.com
Page 57

RMC100 Startup Appendix B: Tuning
• Selecting Calculate Ramp Time in the Mode word allows the RMC to
automatically calculates the Ramp Time. This is useful if it is difficult to
determine a Ramp Time.
• The following three steps also address parameters affecting the transition.
9. Adjust the Feed Forwards
The Extend and Retract Feed Forwards provide extra drive when extending or
retracting.
• Adjust the Feed Forwards to help the actual pressure track the target
pressure when it is cha nging.
• If the actual pressure leads the target pressure, decrease the Feed Forwards.
• The Feed Forwards may need to change for different rates of pressure
change. See Feed Forwards for more information.
10. Integrato r P reload
Upon transition from position control to pressure control, the d rive normally
goes immediately toward zero. In some cases, this is undesirable. The
integrator preload can be set to some value (positive or negative) to provide
some drive immediately upon the transition. If your system overshoots or
undershoo ts when entering press ure control , you may want to adjust t his value.
See Integrator Preload for more information.
Using the Integrator Prelo a d is useful for systems with predictable position-topressure transitions. It always provides the same amount of drive.
11. Drive Transfer Percent
The Drive Transfer Percent acts similarly to the Integrator Preload. The
difference is that the Integrator Preload places a constant value into the integral
drive term, while the Drive Transfer Percent places a certain percentage
(positive or negative) of the current drive i nto the inte gral drive te rm. If your
system overshoots or undershoots when entering pressure control, you may
want to adjust this value. See Drive Transfer Percent for more information.
Using the Dr ive Transfe r Percent is useful for systems with unpredictab le
position-to-pressure transition s, such as entering with different speed s.
Because it is a percentage, the transferred drive will vary with the drive
required immediately prior.
12. Fine-tune the System
The final tuning of the system should be made at the speed of intended
operation.
Look for following errors, overshoot, or oscillations.
• Should the system seem a little sloppy, try adjusting the Proportional Gain.
• If the actual position lags or leads the target position during the entire
constant velocity section of the move, adjust the Feed Forwards.
deltamotion.com
• If an overdrive error occurs, there is not enough drive capacity to drive the
axis at the requested rate of pressure change. Should this occur, increase
the Ramp Time or decrease the speed of the system.
• If the Drive is not high, the gains can probably be increased for better
control, depending on system stability.
57
Page 58

Appendix B: Tuning RMC100 Startup Guide
• Adding or changing the Filter TC value may help if noisy feedback is
suspected.
• Note that tu ning pressur e is often very difficult because of the large change
in pressure for a small c hange in pos ition.
58
deltamotion.com
Page 59
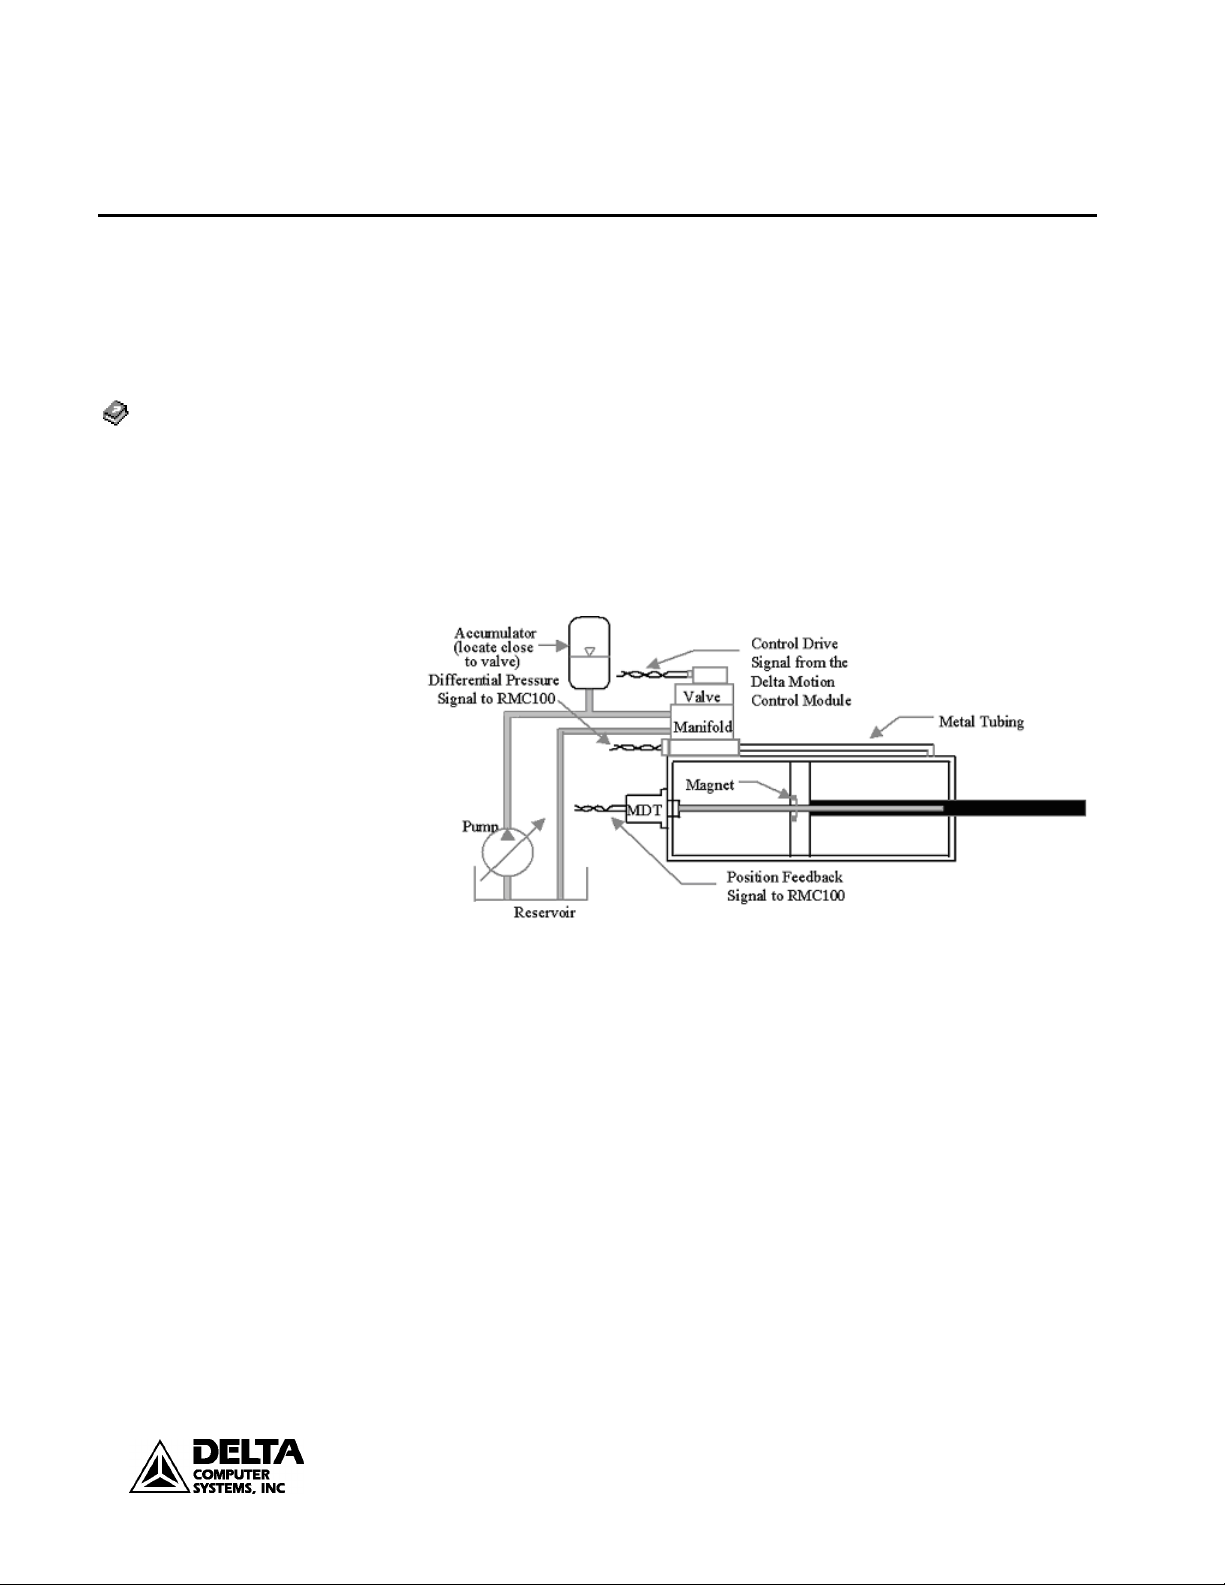
RMC100 Startup Appendix C: An Example
Index/position-
pressure
transition/position-pressure
example
Appendix C: An Example
Example Setup & Tuning of a Hydraul ic System
This illustrated step-by-step exa mpl e covers setting up and tuning a hydraulic
position axis. This example uses a hydraulic system set up for position/pressure
control, but will only treat the po sition portion. For a position/pressure example,
see the online help.
This example uses an RMC101-M1-A1-ENET, a common configuration for
position/pressure control. The system itself is a hydraulic cylinder with MDT
feedback (start/stop rising edge).
1. System Design
A typical hydraulic system for position/pressure control looks like t his:
deltamotion.com
Note the good design practices:
• Metal tubi ng between valve and cylinder.
• An accumulator close to valve.
• Use of a zero-overlap valve.
2. Wiring
It is important to wire the transducer c orrectly. See the wiring section in this
document for details.
For this example the system is wired as follows:
• The position feedback is wired to MDT channel 0.
• The MDT Drv 0 is wired to the valve.
3. RMCWin View
When connected to this RMC, the main RMCWin window loo ks as follows:
59
Page 60

Appendix C: An Example RMC100 Startup Guide
• Axes 0 and 1 are the two MDT axes.
• The other axes are for pressure and can be ignored for this example.
4. Configuring the MDT position axis.
To scale the MDT position axis, do the following:
• On the Tools menu, click Module Configura tion.
• In the Slots field, click on MDT, which opens the following window:
• It is already set to 21 µs, which is correct. If the MDT transducer is a
clevis-mount type, choose 5 µs.
• Click Update RMC.
• Double-click the Axis 0 Config Word, which opens the following window:
60
deltamotion.com
Page 61

RMC100 Startup Appendix C: An Example
• In the Transducer Type field, select Start/Stop (Rising Edge).
• Leave all the other settings as they are.
• Click OK.
• Issue a Set Parameters (P) command to Axis 0.
5. Scaling the MDT position axis.
To scale the MDT position axis, do the following:
• Click on any Axis 0 field.
• On the Tools menu, click MDT Scale/Offset Calibration. The following
window opens:
deltamotion.com
61
Page 62

Appendix C: An Example RMC100 Startup Guide
• The position feedback is to be measured in thousandths of inches, so 1000
position units per inch is entered in the Desired Position Units field.
• The transducer gradient informati on in the Transducer field is found on
the transducer.
• To set the offset, the following steps are performed
− Retract the cylinder all the way. This can be done by issuing anOpen
Loop (O) command with a small amount of drive.
− When the cylinder is all the way retracted, the transducer shows 1024
counts in this example.
− If this is the desired zero point, click the button in the Offset field and
it automatically enters 1024 into the counts field.
− …increasing counts is selected in the Increa sing counts equal…
field.
• Set the desired extend and retract limits to 0.100 and 52 inches. This
system can extend 52.700 inches, but it is undesirable to ever reach either
end.
• Click Apply and Done.
• Issue a Set Parameters (P) command.
The main RMCWin window looks no w like this:
6. Tuning position.
Now the system is set up and ready to tune for position. The procedure in
Tuning a Position Axis is follo wed:
• Issue Open Loop (O) commands with small positive and nega tive drives to
see if the cylinder goes in the right direction.
• If the cylinder moves in the wrong direction, the wiring to the drive may be
swapped, or Reverse Drive mode can be selected in the Config word.
62
deltamotion.com
Page 63

RMC100 Startup Appendix C: An Example
• Check the deadband. This system has a very small deadband, approx 5
millivolts, so we will not worry about it.
• Set the gains and feed forwards to zero and issue a Set Parameters (P)
command.
• Double-click the Axis 0 Auto Stop word (in the Parameters field).
− Set the Overdrive, Integrator Windup and Overdrive bits to Status
only.
• Set the proportional gain to a small value, such as 5. Issue a Set
Parameters (P) command.
• Set the Plot Time for Axis 0 to 4.
• Now m ake a move. The tuning process will consist of repeatedly making
moves. To easily make repeated moves, use Stored Commands:
− To edit and view the Stored Commands, click Sto r e d C ommand
Editor on the Stored Commands menu. The following window
appears:
deltamotion.com
− For example, ALT-1 on axis 1 will issue a Go cmd to 4000 at a speed
of 10 in/sec, with acceleration rates of 100 in/(sec*sec). These are
common values for moving hydraulic systems. These values are
editable from this window.
− To use the stored commands, click on any Axis 0 field, then press e.g.
ALT-1 to move to 4 in. and ALT-5 to move to 20 in. The command
will be issued to the axis where the cursor is located.
• Using the Stored Commands, a move is made in this example from 2 in. to
8 in. The move will take less ti me than what the Plot Time is set to so that
the entire move can be viewed.
• Press the Insert key. This opens the Plot window with the last move. It
looks like t his:
63
Page 64

Appendix C: An Example RMC100 Startup Guide
− The detail window in the plot ma y be opened by clicking Show De tail
Window on the Data menu. The detail windo w provides much useful
information.
− In this plot, the colored lines repr e sent:
Red ........................................... Actual Position
Dark Blue-Green ...................... Target Position (Desired Positio n)
Blue .......................................... Actual Speed
Pink .......................................... Tar get Speed
Green........................................ Drive Output (volts)
Yellow ...................................... Pressure
2
− Note the Sum Error
. This number gives an indication of the position
error throughout the entire move. If the same move is repeated, this
value can be compared to previous moves to determine whether the
control has improved or worsened. If the number decreases, the
control has improved.
• If the system controls fairly well, which this one does, increase the speed.
Here it is increased to 20.000 in/sec. The plot time can also be reduced to
2.
• Increase the proportional gain until some oscillation appears, then back off
10-20%. On this system that point is about 70. T he plot looks like this:
− The Sum Error2 decreased from 53 million to 27 million.
64
deltamotion.com
Page 65
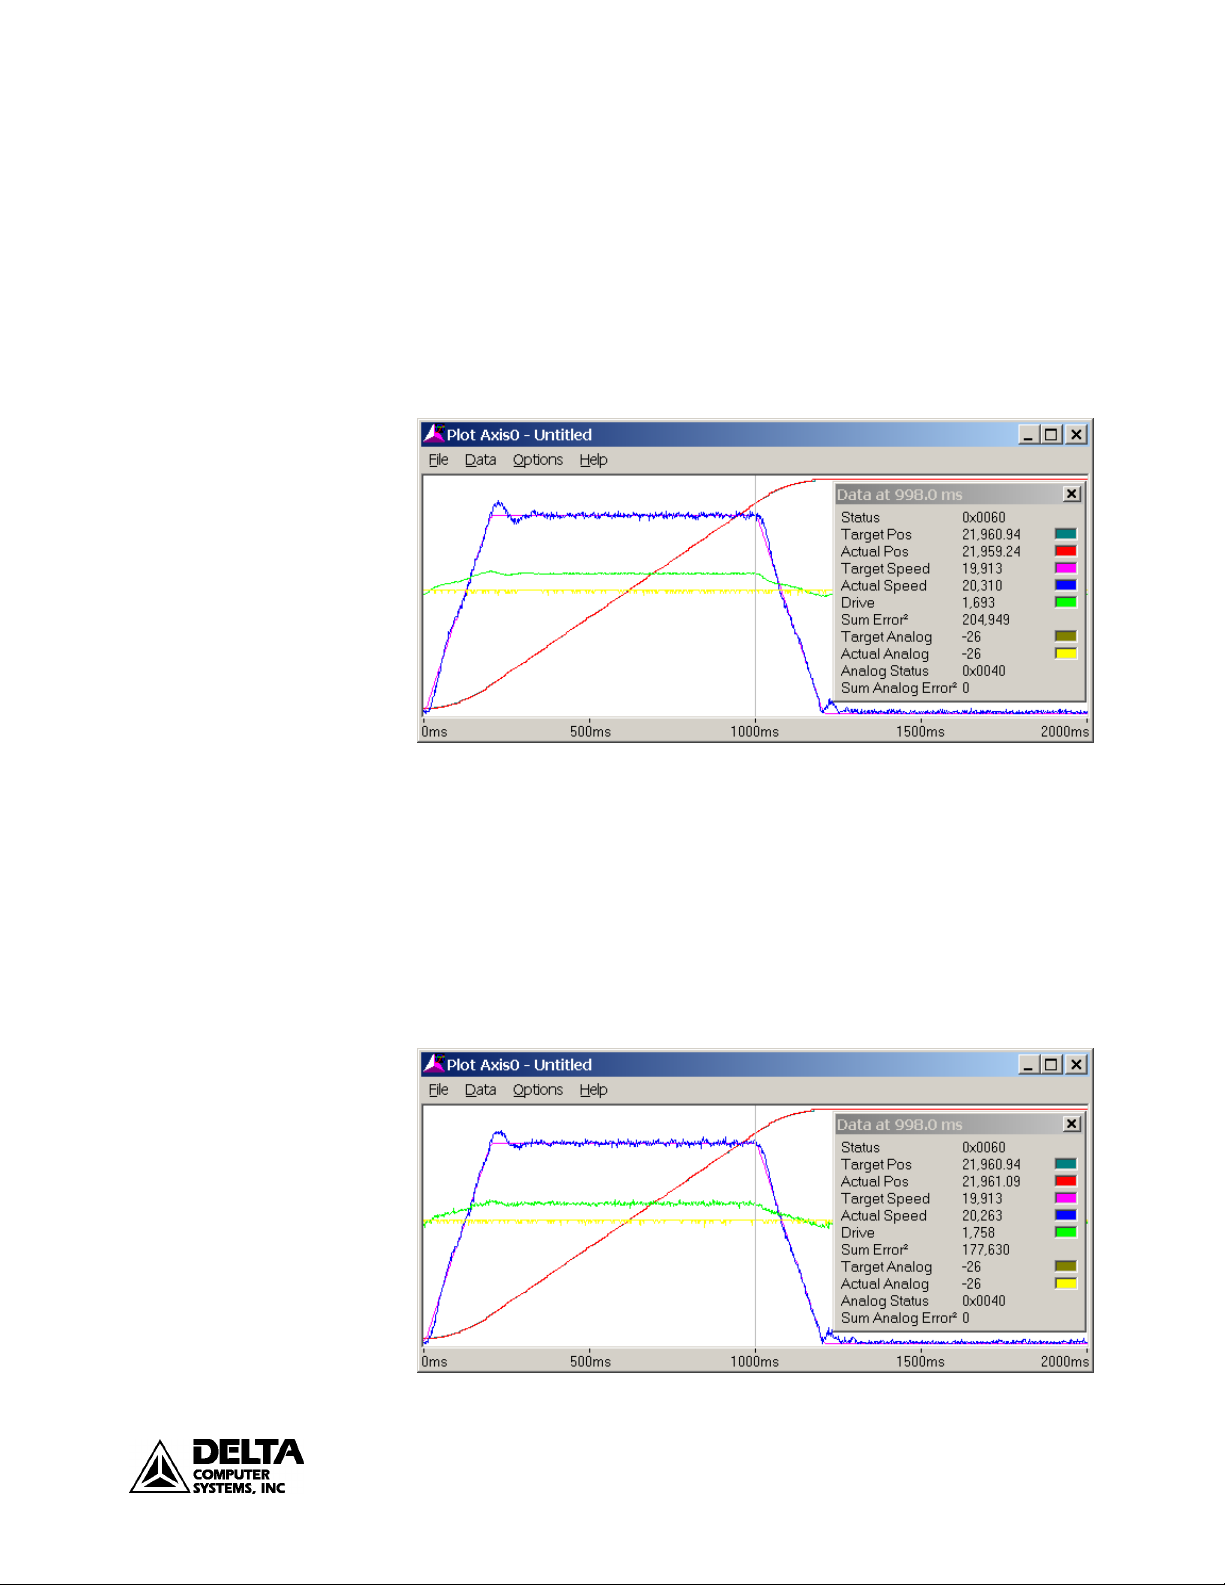
RMC100 Startup Appendix C: An Example
− The position lags duri ng the constant speed portion of the move, whic h
the next step will address.
• Make a fairly long move without any oscillations. Issue a Feed Forward
Adjust (F) command. The Retract Feed Forward value is automatically
updated to 84 in this case.
• Make a move in the opposite direction. Issue a Feed Forward Adjust (F)
command. The Extend Feed Forward value is automatically updated to 84
in this case.
• Make a move. The axis should track much better now:
− The Sum Error2 decreased from 27 million to 204,000!
• The next step is the integral gain. Gradually increase it as long as it does
not adversely affect the system. Generally, the Integral gain does not need
to be extremely high. In this example, 150 was deemed enough. The plot
(not shown) did not change much from the previ ous one. This does not
mean the integral gain won't help! It is important for dynamic changes that
may be encountered during system operation and may not be present
during the t uning.
• Increase the Differential Gain. In this example, it was increased to 250.
When the Differential gain is high enough, t he drive output may look
fuzzy:
deltamotion.com
65
Page 66

Appendix C: An Example RMC100 Startup Guide
− If the system starts oscillating or chattering, decrease the Differential
Gain.
2
− The Sum Error
decreased to 177,000.
• Increase the Acceleration Feed Forwards to get rid of the following errors
during acceleration and deceleration.
• After increasing the Acceleration Feed Forwards to 200, the plot looks like
this:
− The Sum Error
2
decreased to 13,000!
− The overshoot disappeared.
− The Extend and Retract Feed Forwards are generally not the same for
hydraulic systems.
• The position is now fairly wel l tuned. To check that this will work at
higher speeds, increase the Accel and Decel to 300 and the speed to 40000.
The plot (plot time = 1 sec) looks like this:
− The parameters work well for the higher speed (no lagging, overshoot
or oscillation) and will be left unchanged.
− The Sum Error
2
increased, but that is only because of the higher speed,
which inherently results in grea te r position errors.
66
deltamotion.com
Page 67
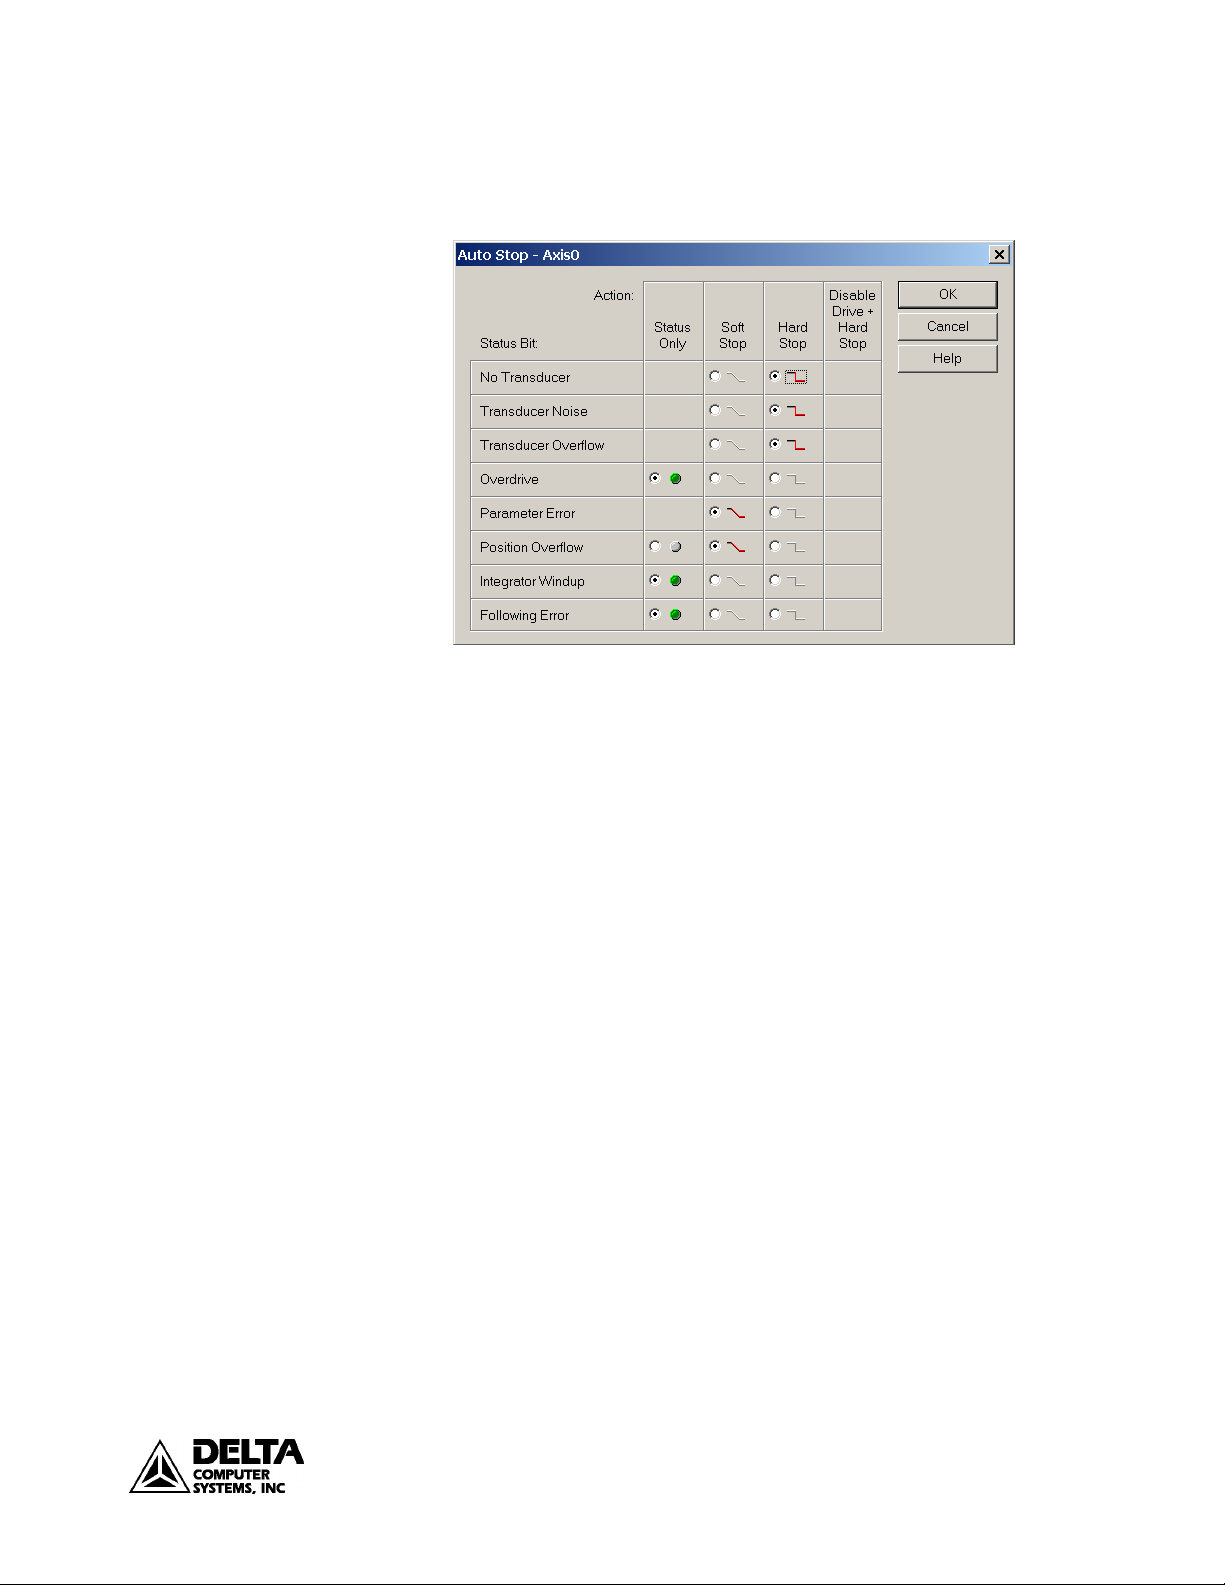
RMC100 Startup Appendix C: An Example
• Now that the system is tuned, it is i mporta nt to enable any Auto Stops that
were set to Status Only. Double-click t he Axis 0 Auto Stop field. The
following window appears:
• On most systems, it is preferable to have any axis errors cause a Soft or
Hard Stop for safety. Additionally, Soft Stops are often desirable because
they slowly stop the axis. A Hard Stop immediately puts the drive output
to 0 volts, which in some cases can cause a sudden (and potentially
dangerous) jerk in the system. Carefully consi der your system
requirements before deter mining how to set the Auto Stop bits. In this
case, it was decided to set all the Auto Stops are set to Soft Stop. This is
done by clicking the Soft Stop but t on for each S tatus Bit. Clicking OK
exits the wi ndow and issuing a P command initial izes the axis with the s e
parameters.
deltamotion.com
• TheIn Po sition, At Pressure, and Follo wing Error parameters should also
be set properly.
− The In Position parameter specifies the size of the window in which
the axis is considered to be in po sition. Once the axis is in this
window, the In Position bit is turned on. This is useful for
determining whether the axis has reached the commanded position. In
this example, the axis is consider e d to be in position when it is within
0.050 inches, so the In Position parameter is set to 50.
− The At Pressure parameter is similar to the In Position parameter, but
is for the differential pressure a xis. In this example, it is set to 50,
which is 50 lbs.
− The Following Error parameter determines how large the difference
between the Target Position and Ac tual Position can get before the
Following Error bit is set in the Status word. Normally, this parameter
is set to greater than the worst-case following error to avoid
unnecessarily causing an error. In this exampl e, the Following Error
parameter is set to 250 (0.25 in.).
67
Page 68

Appendix C: An Example RMC100 Startup Guide
• The RMCWin window now looks like this:
• The system is now ready to be used for more complicated commands,
such as speed control, gearing, splines, synchronized moves, etc.
68
deltamotion.com
 Loading...