

Page 1

Page 2

Page 3

English-1
English
HDMP-S100 Signage Player User’s Manual
Table of Contents
Introduction ..........................................................................English-2
Package Contents ...............................................................English-2
Additional Requirements......................................................English-2
Setting Up ............................................................................English-2
Power Up Messages............................................................English-3
Principle of Operation ..........................................................English-4
Configurable Options ...........................................................English-4
Firmware Upgrade ...............................................................English-6
Technical Specification ........................................................English-7
Troubleshooting and FAQ....................................................English-8
Appendix A: HDMP-S100 Play List User Guide ..................English-9
Appendix B: Adfotain Central MZ User's Guide.................English-17
Page 4
English-2
English
Introduction
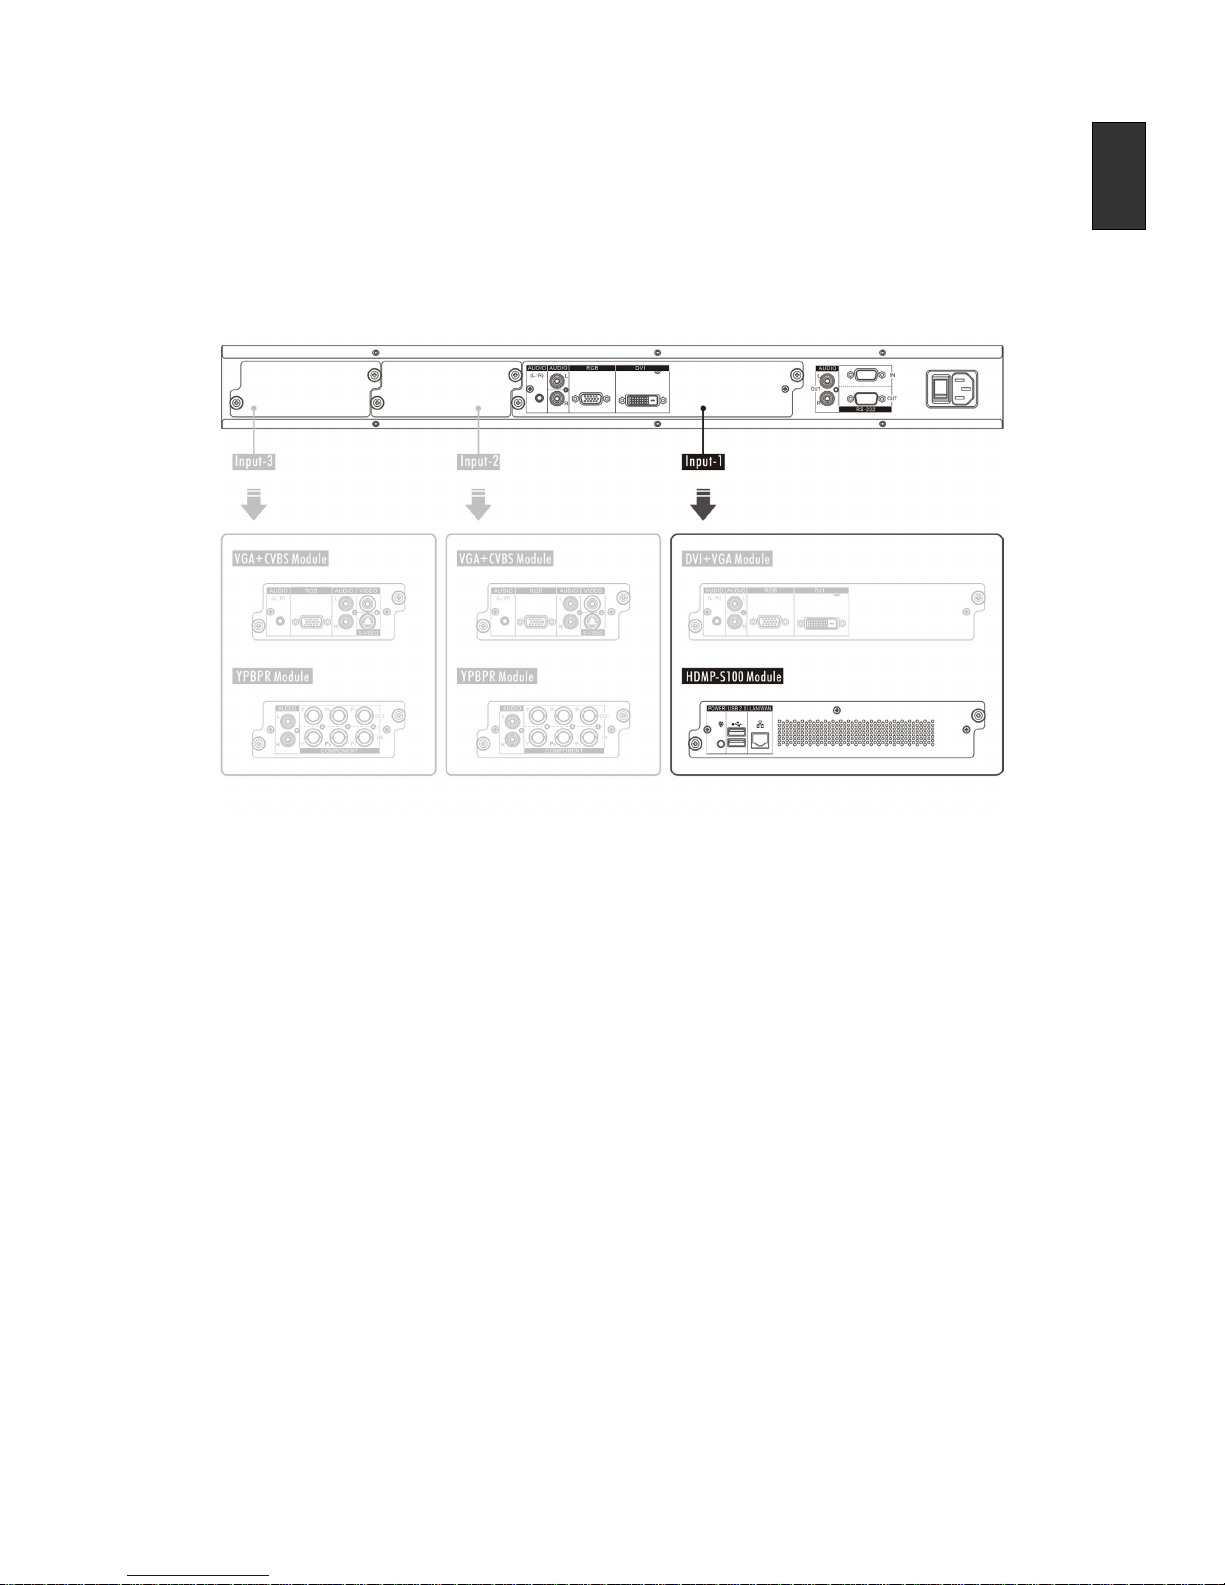
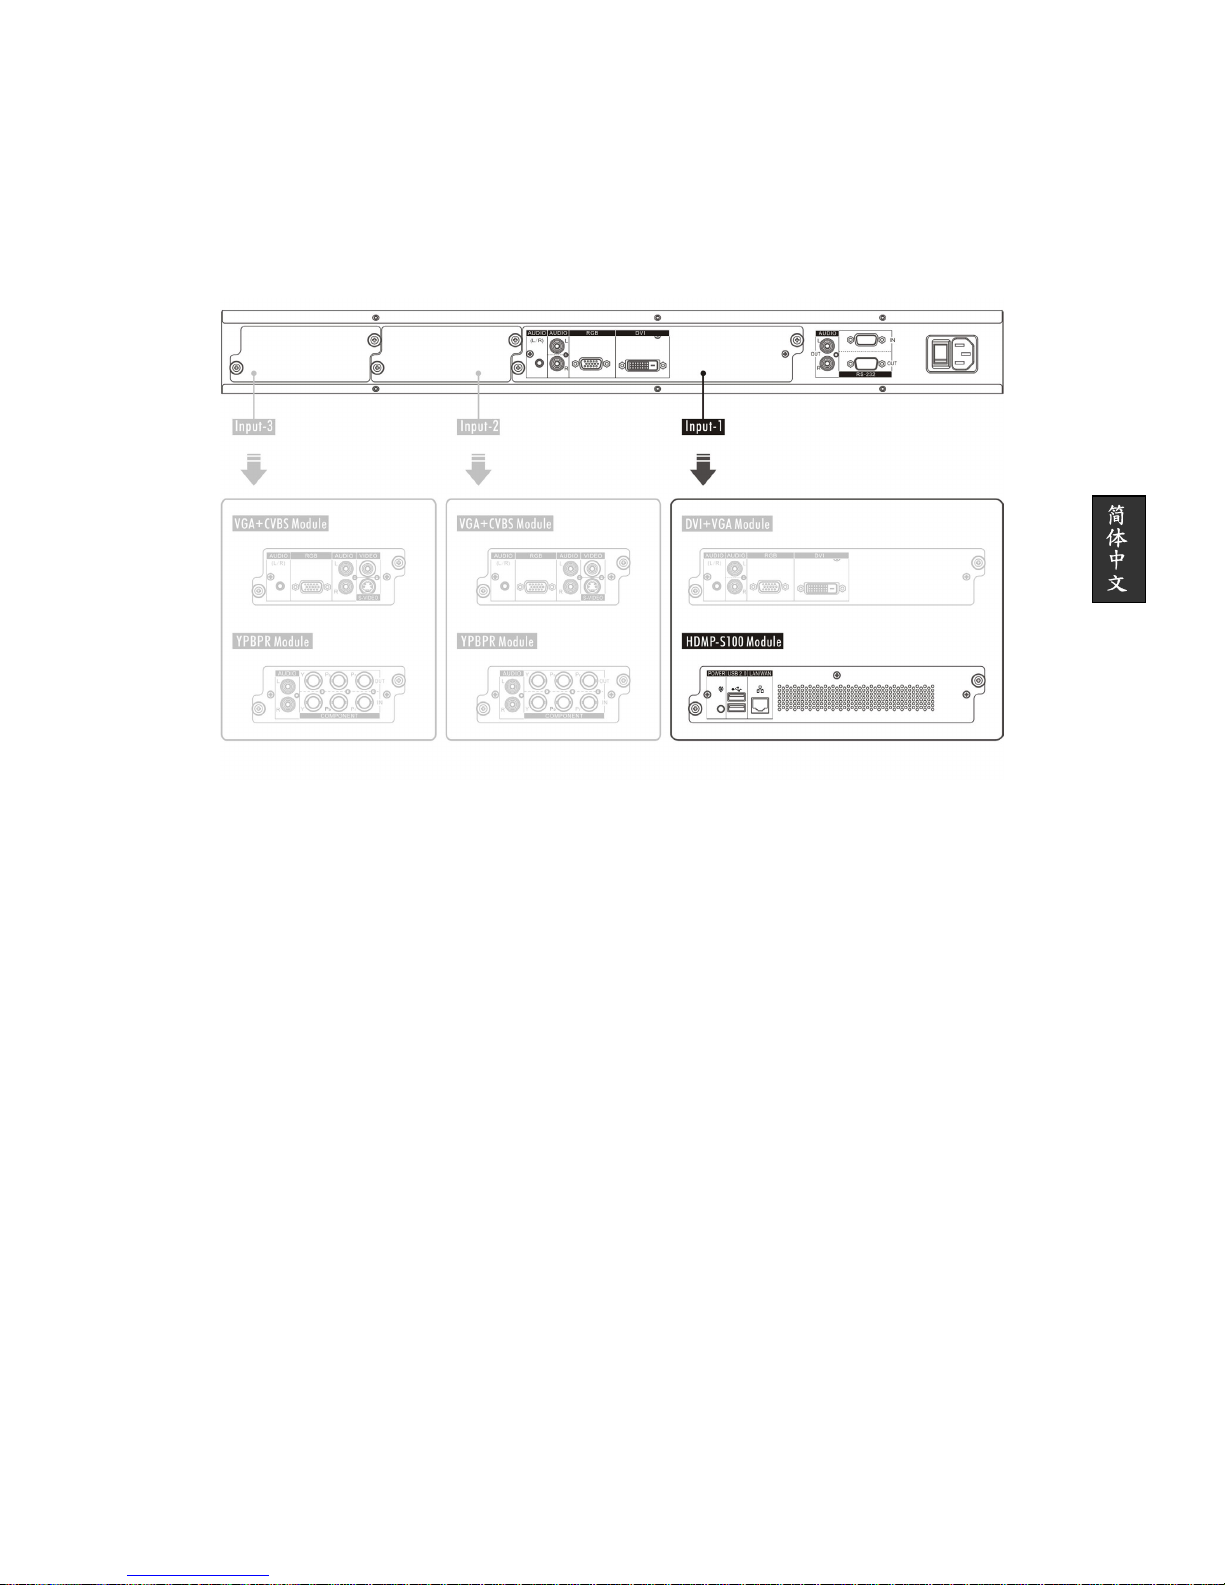
The HDMP-S100 is a High Definition Digital Signage Player expansion module with simple
web management interface to deliver high definition (720p) digital signage contents over
any TCP/IP network. This expansion module must be plugged into the expansion bay of a
compatible display device designed to work with HDMP-S100.
The HDMP-S100 has additional functions to connect to peripheral devices via the USB
ports to facilitate interactivity. Utilization of the USB ports is for upgrade and configuration
only.
This documentation describes the basic operations of the device.
Package Contents
1. HDMP-S100 Digital Signage Player x 1
2. User’s Manual for HDMP-S100 Digital Signage Player x 1
Additional Requirements
You will need the following additional items to operate the HDMP-S100 Signage Player:
1. A 2.5” hard drive (default configuration) or a Compact Flash (CF) memory card
(optional).
2. An Ethernet connection to the Internet. DHCP (Dynamic Host Configuration Protocol)
service on the Ethernet connection is recommended. Please consult with your
network engineer if you are uncertain whether you have DHCP service.
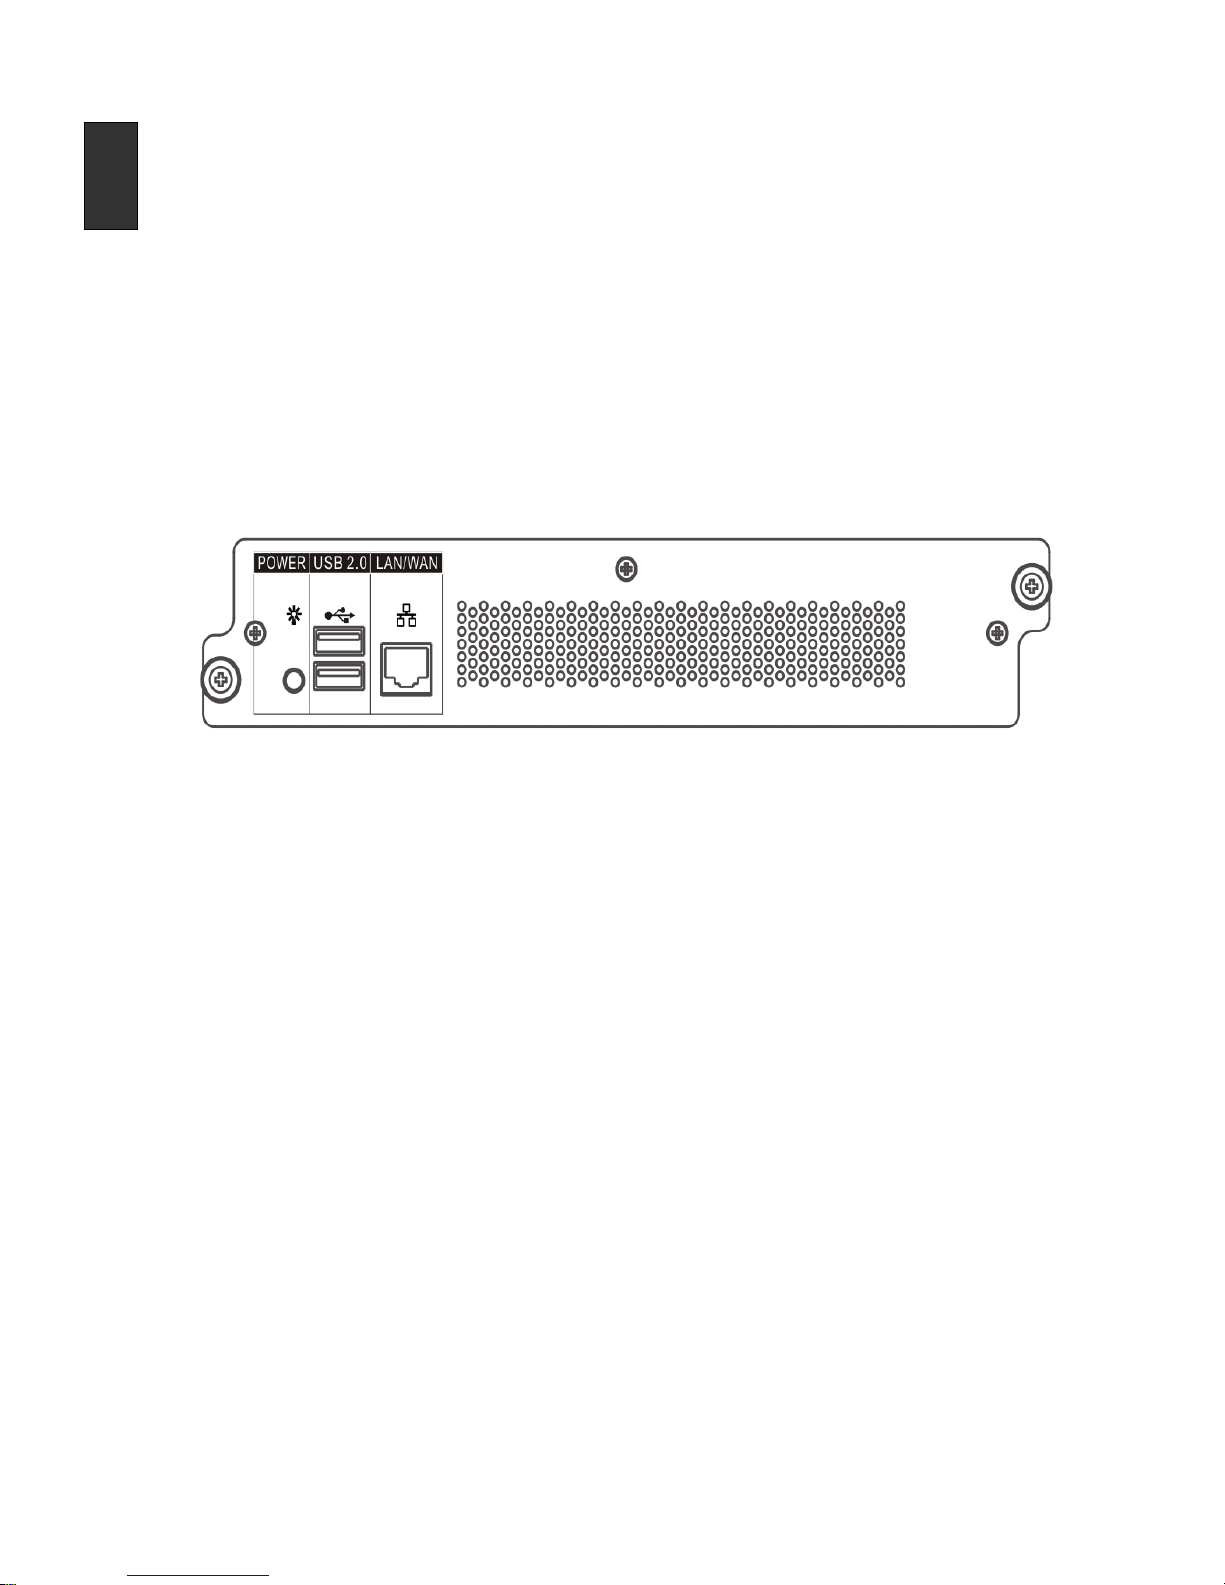
Setting Up
1. Please ensure to turn off main power switch of the display and detach the power cord.
2. Remove the protective cover of the input slot that by loosening the thumbscrew.
3. Insert the expansion module with correct orientation (see illustration) and carefully
push in the module all the way with the faceplate flushed and aligned at the base.
(Expansion module will not be able to be inserted all the way in with wrong
orientation)
4. Tighten the thumbscrew.
5. Attach the power cord and turn on the main power switch on the back and switch on
the power key on the display or on the remote control, the expansion module will be
detected automatically by the display monitor.
6. The green color LED power indicator on the expansion module should be lit.
Page 5
English-3
English
Warning:
1. The main power switch must be off and the power cord must be detached before
installation of the expansion module.
2. Do not pull out the expansion module when the display is in use, doing so may result
in damaging the expansion module and the display monitor permanently.
3. Installation of the expansion module must be done by a qualified technician and don't
touch these pin inside black connector to prevent ESD.
After installing the HDMP-S100 expansion module to the display, please follow the
instructions in the User’s Manual for setting up digital signage content management
services software resided in the module.
Power Up Messages
After turning on the display with the HDMP-S100 module installed, you should see the
following message appeared on the screen,
1. Startup logo on screen.
2. In a few seconds, you should see additional text information showing of the screen,
a. MAC address (unique network identifier of the HDMP-S100)
b. DHCP status (“NO DHCP” if DHCP service is not found)
c. IP address assigned by DHCP service (“169.254.1.1” if no DHCP service is
found)
d. Operation mode: LAN or WAN (Local Area Network or Wide Area Network)
mode. The factory default is set to WAN mode. Please follow the instructions if
other mode of operation is desired.
3. If you are in WAN mode, the Digital Signage Player will try to reach out and connect to
a designated server.
Page 6
English-4
English
Principle of Operation
The HDMP-S100 Digital Signage Player is a hardware MPEG-1/2/4 video decoder with
network connectivity. Contents intended to be played on the HDMP-S100 Digital Signage
Player will need to be converted into MPEG-1/2/4 formats before they are played back.
When properly connected to a network (LAN or WAN) or via direct connection to a
personal computer with a network patch (cross-over) cable, the HDMP-S100 can be
configured with a standard web browser. Once configured, the device can,
1. Connect to an Adfotain Central Management Server (subscribed separately, fees may
apply, please refer to Appendix B) for global, hierarchical, web-based management
(WAN mode). By utilizing WAN mode operation, a robust and scalable digital signage
service can be setup under different network conditions (ie. Different network
infrastructure, locations, firewall settings), monitoring hardware heartbeat conditions
and managing schedules ensuring timely delivery of media contents.
2. Or, playback media contents with the built-in control scripts language (see Appendix A)
for small-scale digital signage needs (LAN mode). By using LAN mode operation, a
simple non-hierarchical type of digital signage network can be setup quickly with
simple scheduling and file management.
Configurable Options
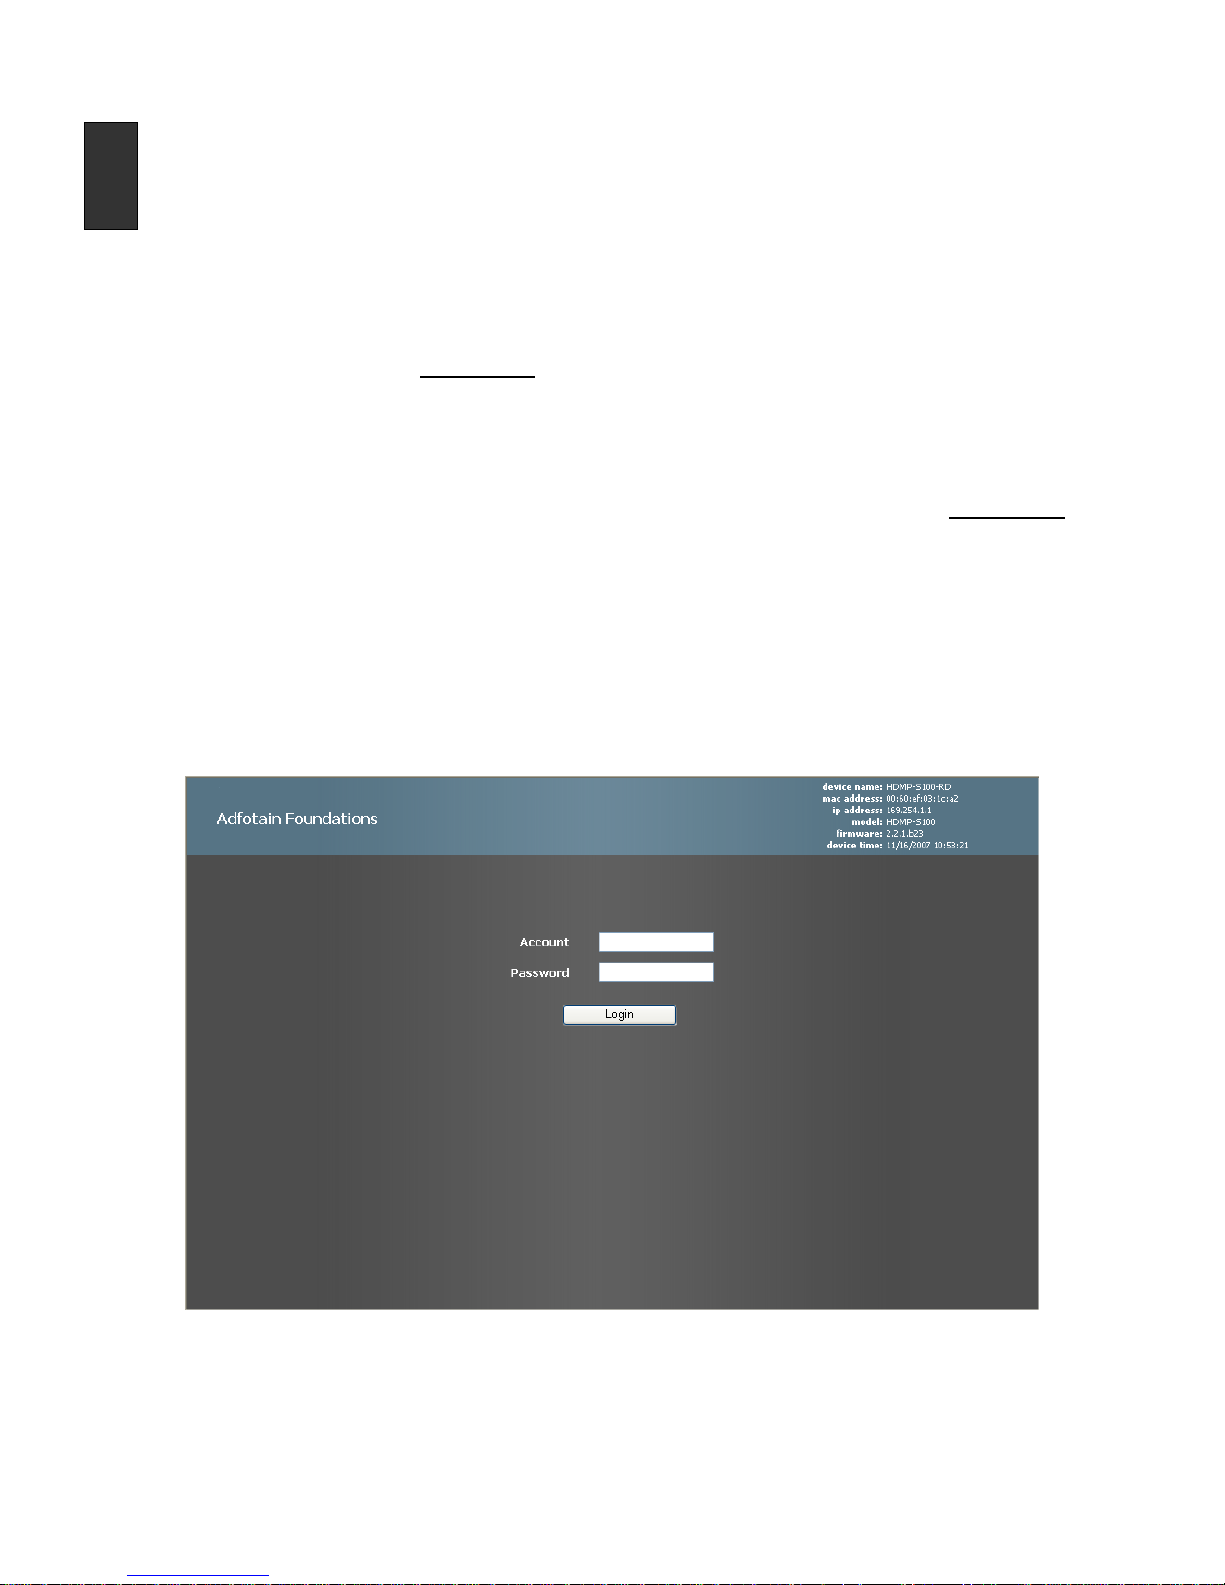
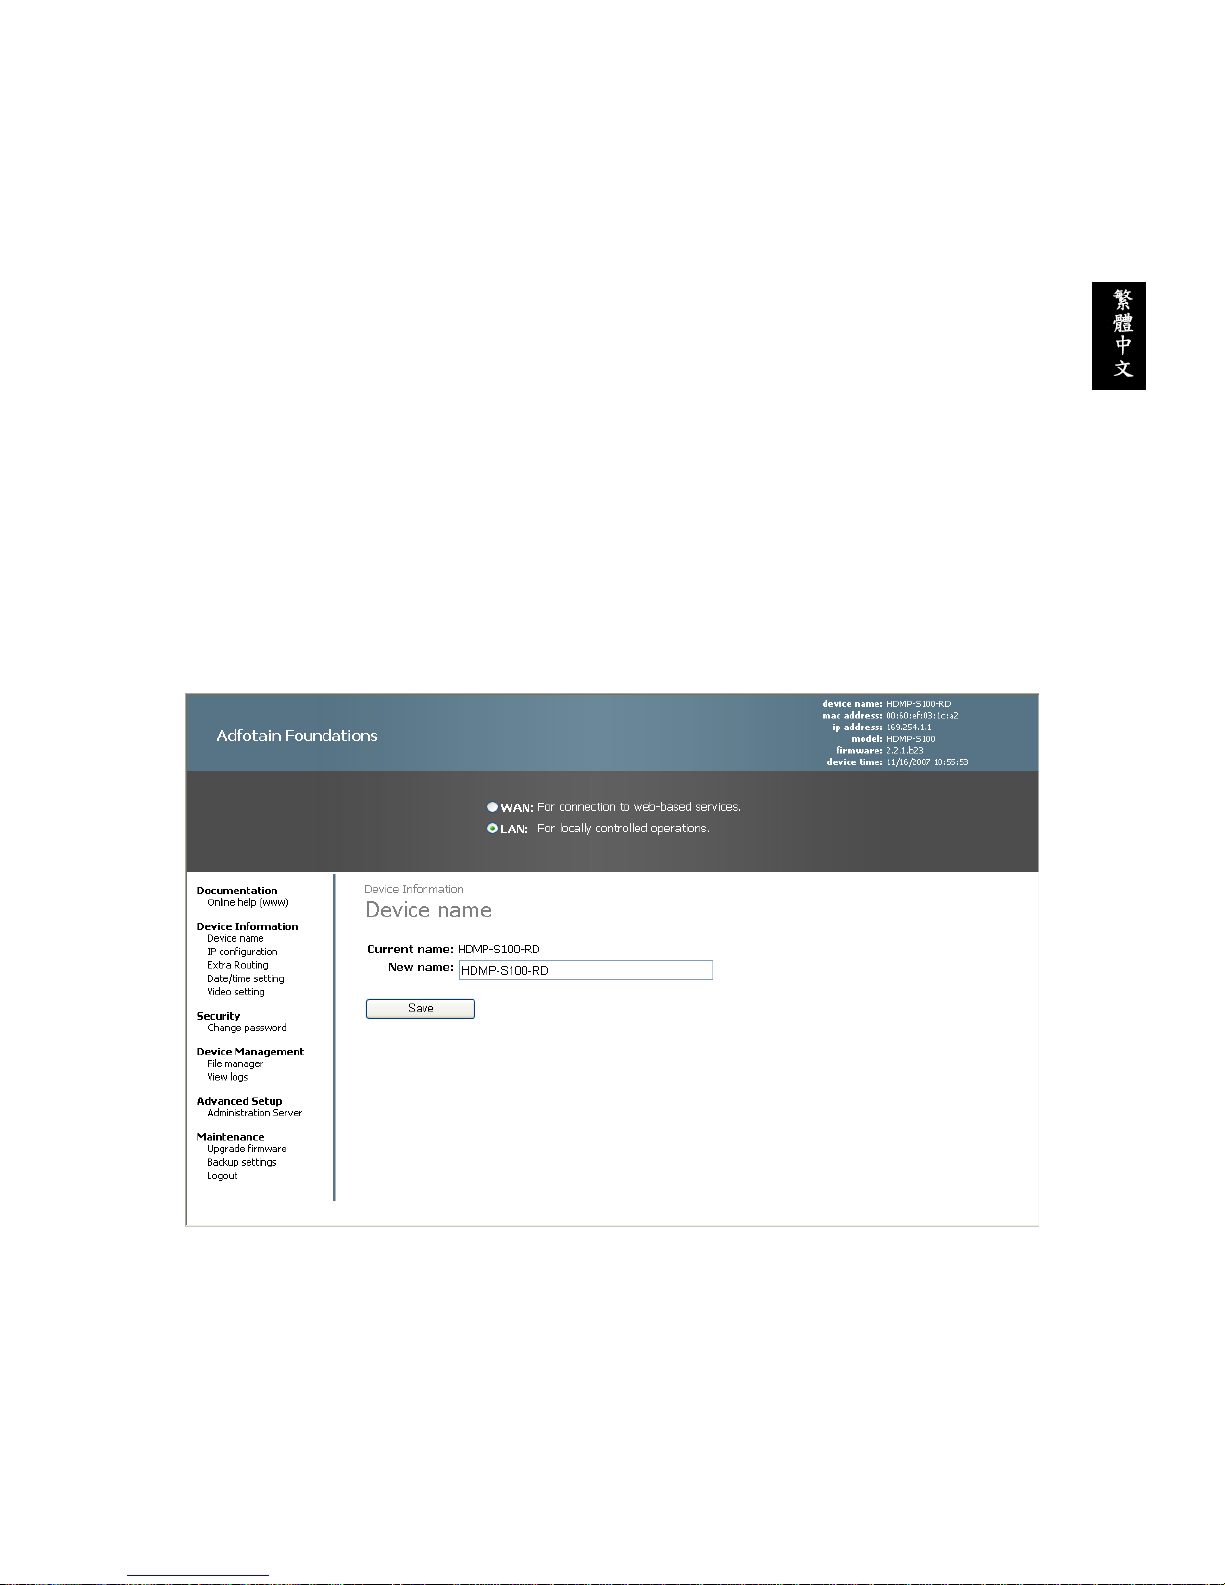
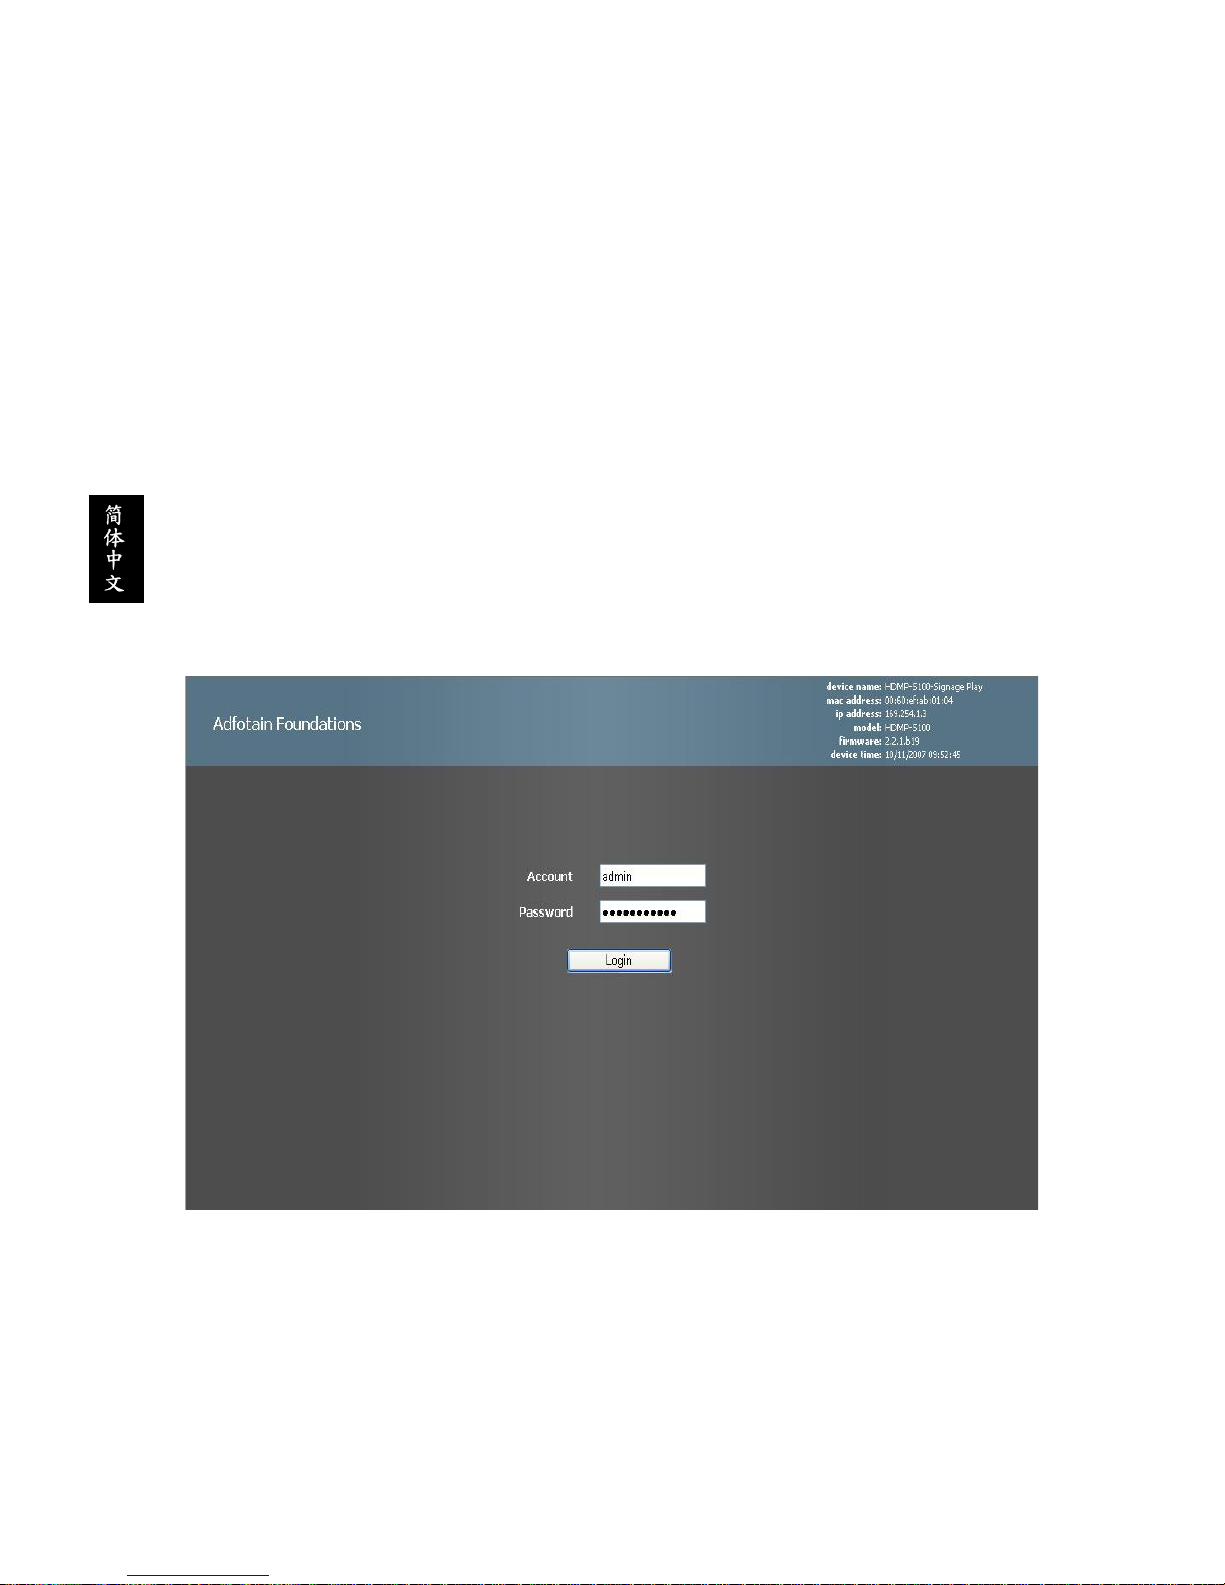
The HDMP-S100 has a built-in web interface allowing you to change configuration options
via a web browser. Key in IP address on web browser you can see below login page. The
default login account name is “admin” and the default password is “digiSignage” without
the quotation marks.
Page 7

English-5
English
After logging in you should see a list of configurable options,
1. Device name (Used in UPnP – Universal Plug-and-Play detection)
2. IP configuration (DHCP, static, etc.)
3. Extra Routing (Setting five extra routing)
4. Date/Time Setting (Allows automatic adjustment of internal clock from time servers)
5. Video Setting (Logical and output resolution)
6. Change password
7. File manager (For LAN mode operation in file management)
8. View logs (Record play list status under LAN mode operation)
9. Administration Server (To access WAN mode Adfotain Central server)
10. Upgrade firmware
11. Backup setting (Save default setting parameter)
12. Logout
Page 8
English-6
English
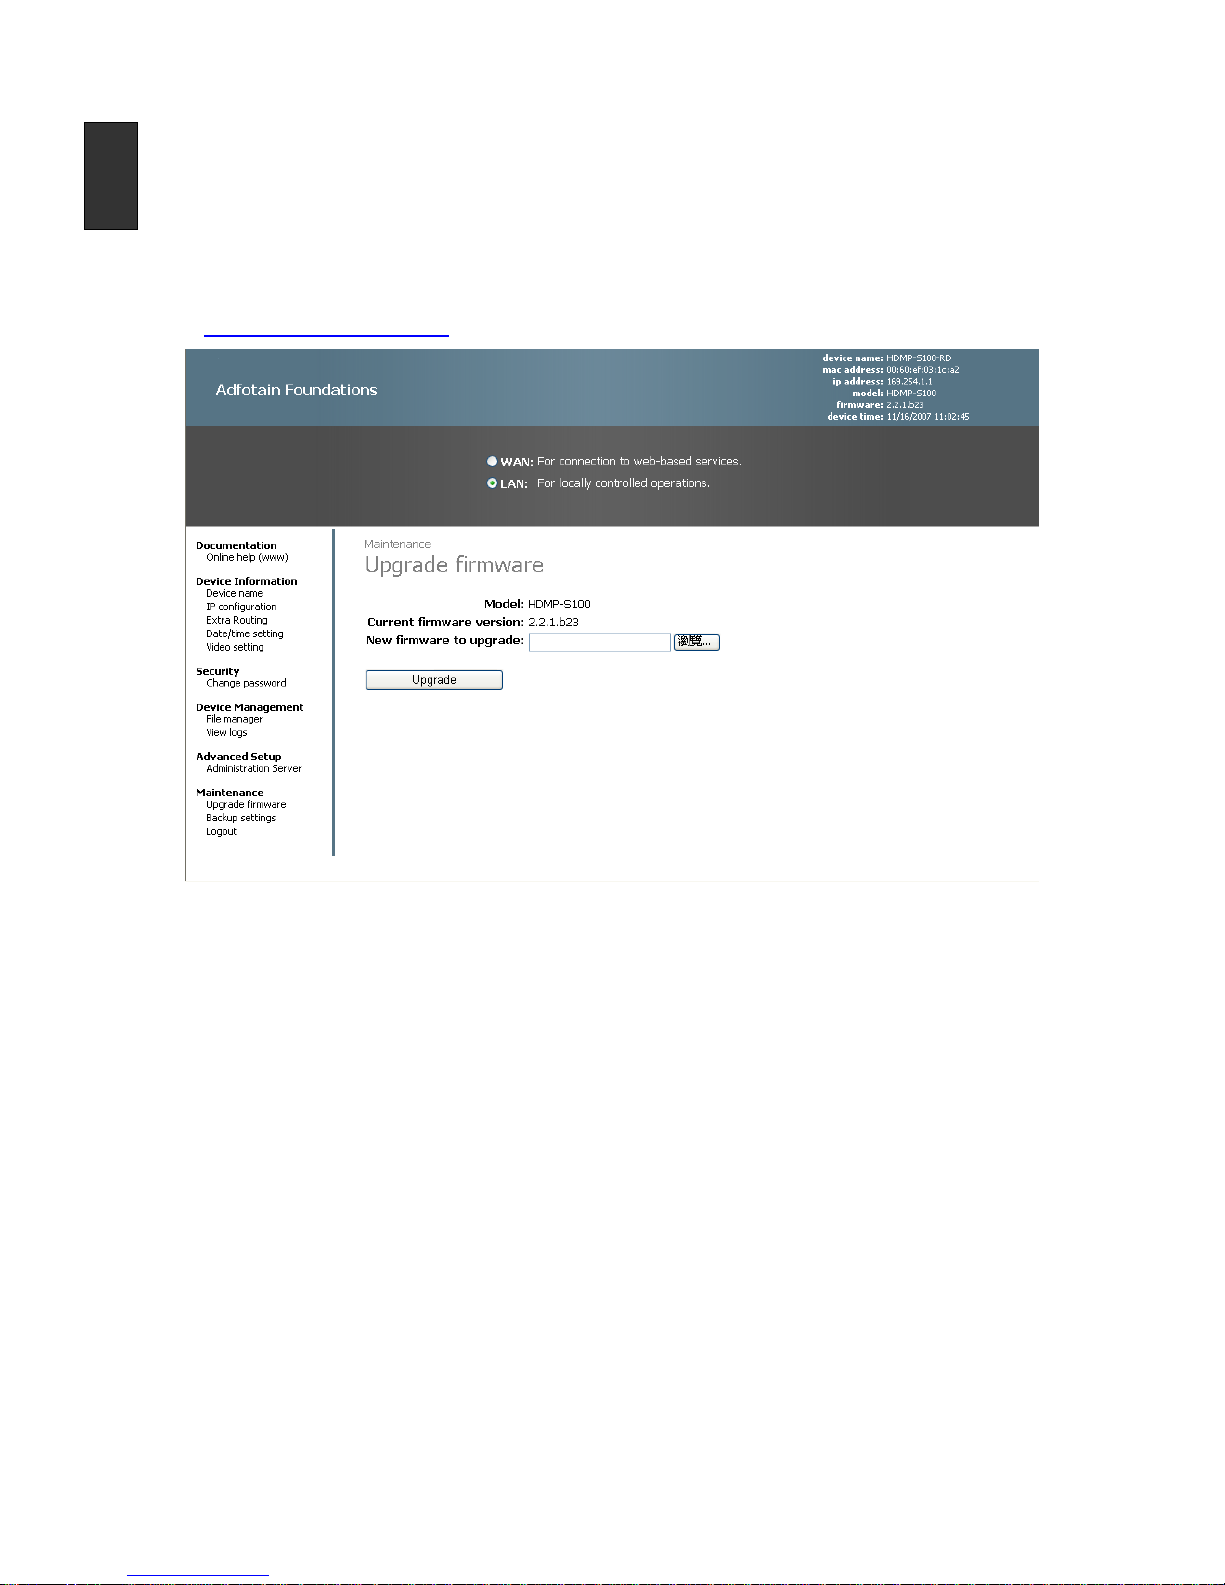
Firmware Upgrade
1. Please follow the instruction below carefully if a firmware upgrade is deemed
necessary by your authorized dealer or technical support.
2. After logging in the device web configuration page, switch the device to LAN mode.
3. Click on the “Upgrade firmware”, and browse for the firmware package file. The
firmware update can be obtained from your authorized dealer. Or please email to
vdservice@delta.com.tw to obtain the latest firmware.
4. The firmware upgrading progress will be shown on the screen.
Warning: Please ensure not to interrupt the upgrade process by keeping power on all the
time. Any interruption during the upgrade will cause the upgrade process to fail and
damage the system permanently.
Page 9

English-7
English
Technical Specification
Processor Sigma Designs EM8621L
System Memory 64 MB DDR RAM
Operating System Kernel µCLinux Kernel
Max. Output Resolution 1920x1080@60Hz
Recommended Media
Resolution
1280x720(720p)
1024x768(XGA)
Supported Mass Storage*
2.5" Slim HDD (Default); 80G(max)
Compact Flash Card (Optional); 8G(max)
USB Connector USB 2.0 x 2 port (A type)
RJ-45 Jack IEEE 802.3 Ethernet 10/100 Base-T
Indicator Light Power On (Green LED)
Power Requirement DC-12V / 12W(max)
Operating Environment 0 ~ 40°C, 5% to 95% RH
Storage Environment -20 ~ 60°C, 5% to 95% RH
Dimensions (WxHxD)
212 x 150 x 40 (mm)
8.35” x 5.91” x 1.57”
Net weight
0.95 kg
2.09 lbs.
* Only one type of mass storage device can be installed and operated
Page 10

English-8
English
Troubleshooting and FAQ
Setting Up
1. I do not see the green LED light go on when I plug the in module into the display.
a. Please check power connection and turn on the display power (please consult to
the User’s Manual of the display).
2. I see the green LED light on, but there is nothing shown on the screen.
a. Please make sure to switch to the correct input (ie. Input 1) for the display
monitor by toggling the “Input” button on the display or “Source” button on
remote control.
b. If this cannot be resolved, turn off the main system power on the back of the
display and turn it back on.
3. The video shown on the screen seems to be flashing, moving, or in the wrong color
(greenish).
a. This is often caused by incorrect output configuration. Please login to the system
and use the LAN mode configuration to set the device to the proper output
format.
b. If this cannot be resolved, turn off the main power from the back of the display,
remove the power cable and remove and reinstall the expansion module.
Content Authoring
1. How do I create and author content for portrait type of display (9:16 vertically
mounted)?
2. You need rotate the 9:16 picture or video counter clockwise 90 degrees into horizontal
layout before uploading it to the player.
3. If my authoring tool cannot produce MPEG-1/2/4 video, what is the recommendation?
4. Please produce Microsoft Windows WMV file format whenever possible for playback.
5. What is the recommended specification for the MPEG-1/2/4 video?
6. MPEG-1/2: 1280x780, 30 fps, 5 Mbps. MPEG-4: DivX (Advanced Simple Profile)
1280x720, 30 fps, 5 Mbps.
Page 11
English-9
English
Appendix A: HDMP-S100 Play List User Guide
Playlist file
A playlist file is intended to be used for the HDMP-S100 digital signage player to operate in
LAN mode to control the playback of media files (please refer to section - Principle of
Operation for explanation of different modes of operation). The HDMP-S100 can execute
up to three independent playlist files simultaneously. The playlist file is composed with a
simple scripting language and can be written by any text editor such as Microsoft Notepad
on a personal computer. The syntax, file naming, and encoding of the playlist file need to
follow a strict guideline to work properly, please refer to the following instructions to create
the playlist file.
1. All parameters, syntax and filenames are case sensitive. Playlist files will not execute
correctly when incorrect uppercase/lowercase letters are used.
2. The playlist file has to be saved using ASCII encoding.
3. The acceptable names for playlist files are: “PLAYLIST.0”, “PLAYLIST.1”, and
“PLAYLIST.2”. The HDMP-S100 can work with one, two, three or four playlist files;
however there can be only one playlist file contains video play back at anytime.
4. Always load the playlist file and preview the playback in HDMP-S100 before use it for
production.
5. A playlist may contain logic errors, please ensure to separate headers and commands
to avoid logical errors.
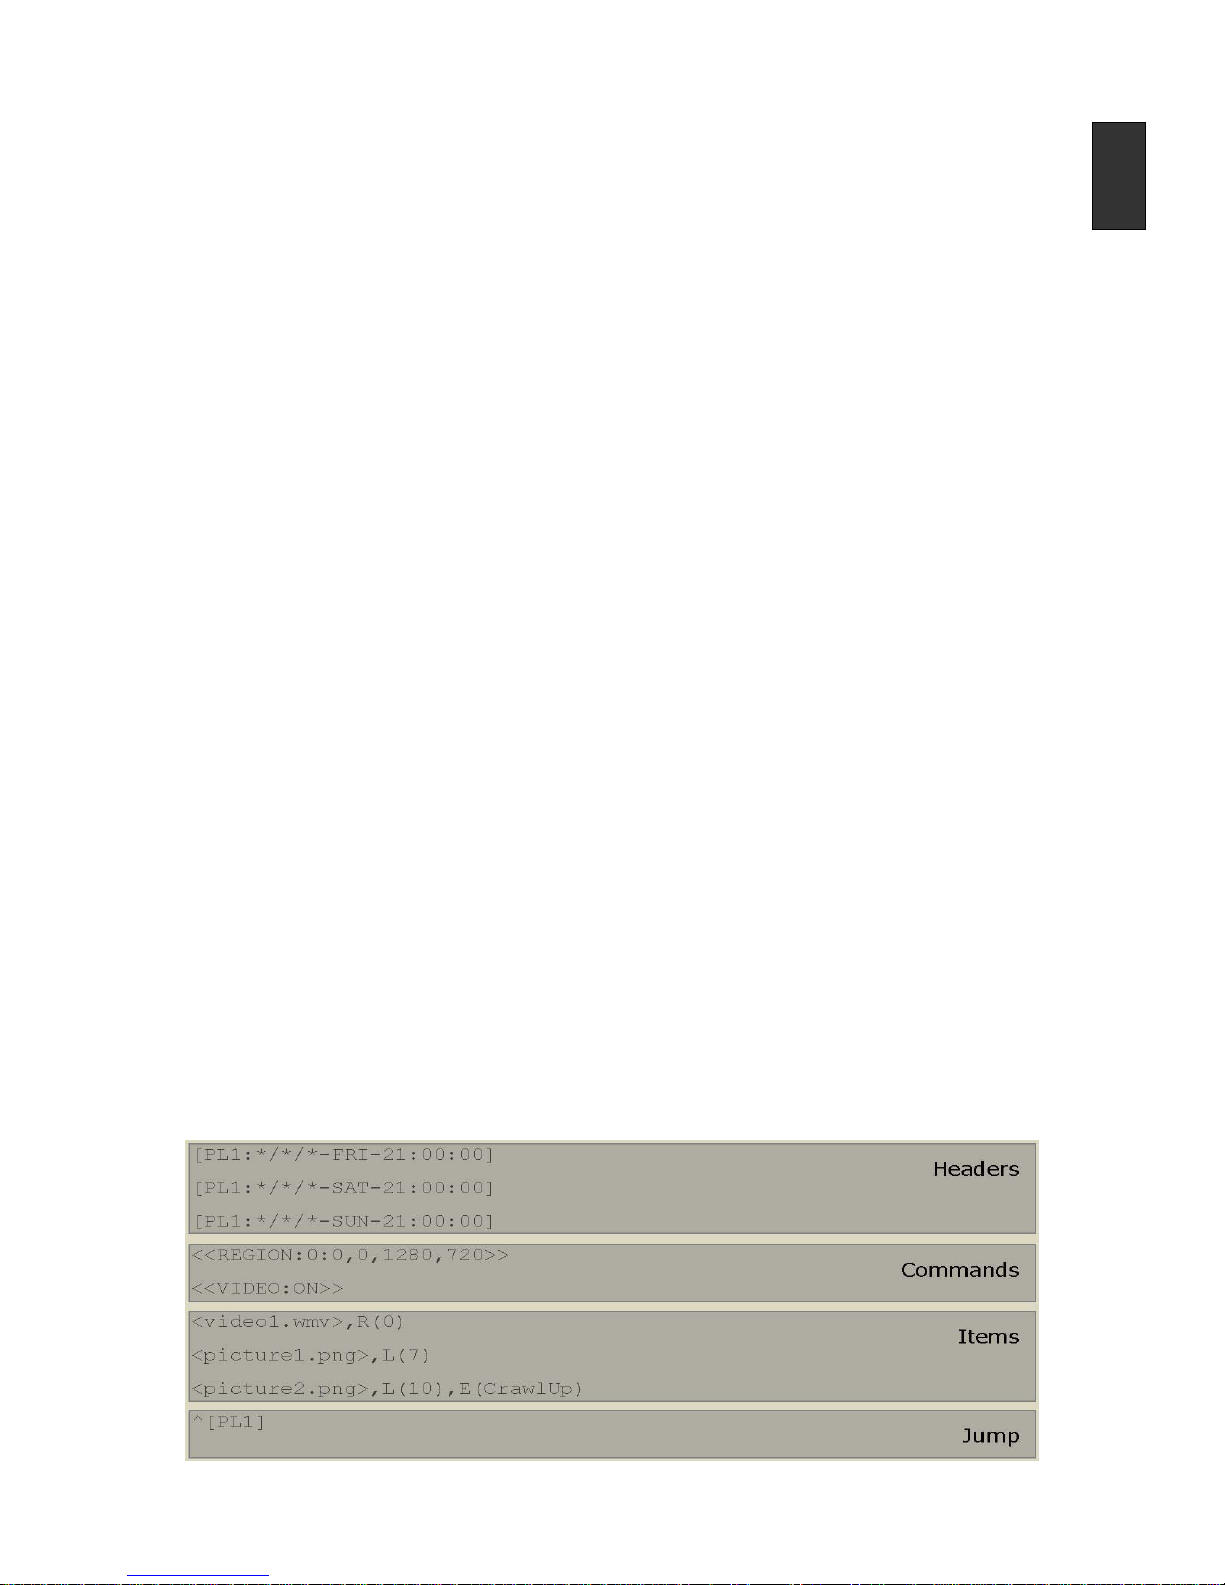
Following example is a typical playlist file that plays media items in 1280x720 area with top
left corner coordinate at (0, 0) every Friday, Saturday, and Sunday at 9:00pm.
[PL1:*/*/*-FRI-21:00:00]
[PL1:*/*/*-SAT-21:00:00]
[PL1:*/*/*-SUN-21:00:00]
<<REGION:0:0,0,1280,720>>
<<VIDEO:ON>>
<video1.wmv>,R(0)
<picture1.png>,L(7)
<picture2.png>,L(10),E(CrawlUp)
^[PL1]
A playlist file usually consists of at least one section. Each section usually comprises four
parts: headers, commands, items, and the jump. The following figure shows how to identify
each part on last example.
Page 12

English-10
English
Section
Each section is actually a playlist itself. It will be triggered by one of its headers, and then
proceed the commands or playbacks in sequence. Usually at the end of playbacks, there
will be a jump to indicate what to do afterward. In following paragraph, the following syntax
convention will be used.
Syntax Convention:
{ } = Require input parameter
( ) = Optional parameter
Section Headers
Section headers are the starting points of a section. If multiple headers are used for a
section, any of the headers can trigger the section. There are three types of headers:
section ID, time triggered and hard triggered.
Section ID
This type of header is simply an indicator of the starting of a section. Since it won’t start
the section by itself, usually it relies on other trigger events such as JUMP event.
Syntax:
[PL{id}]
Valid parameter values:
{id} = 0-255
Examples:
[PL0]
[PL123]
Note that the header is an indicator of starting of a section, but it is NOT the ending of
other section. This is a common misconception. For example,
[PL1:start]
<video1.wmv>
[PL2]
<video2.wmv>
[PL2] is simply a start point of the section (PL2), but it is not the end point of [PL1].
Therefore the flow of this playlist file will be:
1. Start with section header (PL1) because of the hard triggered.
2. Play video1.wmv
3. Proceed section (id=2)
4. Play video2.wmv
5. Stop
Page 13

English-11
English
Time Triggered
The section will have triggered by specific time or a range of time that indicated in the
headers. With support of wildcard, to schedule media that plays in a routine (i.e. every
Monday, every weekend, etc) becomes very easy.
Syntax:
[PL{id}:{time}(flag)]
Valid parameter values:
{id} = 0-255
{time} = {Year}/{Month}/{MonthDay}-{WeekDay}-{Hour}:{Minute}:{Second}
{Year} = {Wildcard} | 2000-2050
{Month} = {Wildcard} | 1-12
{MonthDay} = {Wildcard} | 1-31
{WeekDay} = {Wildcard} | SUN | MON | TUE | WED | THU | FRI | SAT | 0-7
{Hour} = {Wildcard} | 0-23
{Minute} = {Wildcard} | 0-59
{Second} = {Wildcard} | 0-59
{Wildcard} = *
(flag) = :+ | :SMOOTH
Examples:
[PL20:2007/01/01-MON-12:00:00]
[PL20:2007/01/*-0-12:00:00]
[PL100:2007/*/*-TUE-14:00:00:SMOOTH]
FAQ:
1. Wildcard means any value can be in that field.
2. The {WeekDay} field will be taking effect only when {MonthDay} is a wildcard.
3. When using integer for {WeekDay}, both 0 and 7 represent Sunday.
4. If multiple sections are scheduled at the same time, the one of the largest section id
will be executed.
Hard Triggered
Hard triggered header can be considered as the default section to play. If there is other
header that fulfills its triggered condition such as time reached, the triggered header will
take effect in stead of the hard triggered header.
Syntax:
[PL{id}:start]
Valid parameter values:
{id} = 0-255
Examples:
[PL1:start]
Note that there can be only one hard triggered section. Multiple is hard triggered headers
are considered as bad playlist file and the playlist file won’t get loaded to device.
Page 14

English-12
English
Section Commands
Section commands define the settings of this playlist instance. Current support settings are
region setting and video setting. Although the previous example places the commands
after section headers, it can be placed anywhere in the section. Once the command is
executed, the setting will be in effect until some other commands overwrite it; changing
sections won’t reset the setting. For example,
[PL1:start]
<<VIDEO:ON>>
<video1.wmv>
^[PL1]
[PL2:2007/01/01-MON-12:00:00]
<<VIDEO:OFF>>
^[PL2]
[PL3:2007/*/02-*-12:00:00]
<video2.wmv>
^[PL3]
If the device time is 2006/12/01, the flow will be the following:
1. Hard triggered header (PL1) is triggered because none of time triggered headers has
reached their time yet.
2. Turn on the video output.
3. Play video1.wmv
4. Jump to section header (PL1) and repeat step 1, 2, 3, and 4 until 12:00:00 on
2007/01/01 is reached.
5. At 12:00:00 on 2007/01/01, section (id=2) is triggered.
6. Turn off the video output and repeat step 5 and 6 until 12:00:00 on 2007/01/02 is
reached.
7. At 12:00:00 on 2007/01/02, section (id=3) is triggered.
8. Error occurred when try to Play video2.wmv, because the video output is off!
From this example, it shows the video on/off commands is persistent no matter which
section is currently executing. Furthermore, it demonstrates a careless design that will
cause device malfunctioning after 2007/01/02 at 12:00:00.
Region Setting
The region setting defines the coordinate of the left-top corner and the size of the display
region. The media file can choose to display in defined region by giving the region id.
Syntax:
<<REGION:{id}:{x},{y},{width},{height}>>
Valid parameter values:
{id} = 0-15
{x} = integer
{y} = integer
{width} = integer
{height} = integer
Page 15

English-13
English
Examples:
<<REGION:0:0,0,1280,720>>
<<REGION:1:200,0,1080,720>>
Note: set {x}, {y}, {width}, and {height} to zero to define a full-screen region.
Video Setting
The video setting can turn on/off the output video signal.
Syntax:
<<VIDEO:{OnOff}>>
Valid parameter values:
{OnOff}= ON | OFF
Examples:
<<VIDEO:ON>>
<<VIDEO:OFF>>
Note: when using more than one playlist file (i.e. multi-zone application); use only a playlist
controls the video setting. Control the video setting in multiple playlist is doable file, but it
can easily create logic error, thus generate unexpected results.
Section Items
Section items are the media items with optional specifications. There can be more than
one specification for a single media items but not all specifications can be used for all type
of media item (i.e. picture, video). The supported specifications are: region, play length,
and play effect.
Region Specification
This specification is used for multi-zone application. The media file can be specified to play
on a predefined region (referred to Region Setting in Section Commands).
Syntax:
<{MediaFileName}>(RegionSpec)
Valid parameter values:
{MediaFileName} = valid media file name under media folder
(RegionSpec) = ,R({RegionId})
{RegionId} = 0-15
Examples:
<video1.wmv>,R(0)
FAQ:
1. If there is no region specification, the default region is full-screen.
2. If bad coordination is used (i.e. bigger than display region), full-screen region will be
used instead.
3. The media will be scaled to fit the specified region.
Page 16

English-14
English
Play Length Specification
Play length specification controls the duration of the playback of specified media item.
There should always have this specification when play image items.
Syntax:
<{MediaFileName}>(LengthSpec)
Valid parameter values:
{MediaFileName} = valid media file name under media folder
(LengthSpec) = ,L({hour}:{miniute}:{second})
| ,L({miniute}:{second})
| ,L({second})
Examples:
<video1.wmv>,L(5:30)
<image1.png>,L(90)
FAQ:
1. Values of {second} and {minute} can exceed 60.
2. If specified length is shorter than the media playback length, the media will stop to
play and continue to next item at the specified duration.
3. If media playback length is shorter than specified length, the specification won’t take
effect.
4. If there is no length specification indicated for an image item, the image will play for
unpredicted short amount of duration.
Play Effect Specification
There are two types of effects: picture effect and display effect. Note that the effects are
file type dependent. The picture effect can only be applied to image files while display
effect is used on video files.
Picture Effect
This effect is used to apply effects on text pictures. There are limitations on the picture size,
maximum of 1920 x 100. The {param} has effect on CrawlLeft and CrawlRight only; it
controls the speed of crawling. The recommended range values are 10 to 60. For
CrawlDown and CrawlUp, it is recommended to add play length specification; otherwise
the text will scroll over the region without pause.
Syntax:
<{MediaFileName}>(EffectSpec)
Valid parameter values:
{MediaFileName} = valid media file name under media folder
(EffectSpec) = ,E({effect})
| ,E({effect},{param})
Picture effect:
{effect} = Appear | CrawlLeft | CrawlRight | CrawlUp | CrawlDown
{param} = integer
Page 17

English-15
English
Example:
<image1.png>,E(CrawlLeft,20)
<image2.jpg>,E(CrawlDown),L(5)
Display Effect
The display effect controls how media show on the screen. The letterbox effect will fit the
media to entire screen; black edges may be added on top/bottom or left/right side if the
dimension ratio of the media is not same as the screen. The pan and scan will adjust the
media items by cropping off some edges to maximize the display of the media item. The
stretch effect is the only effect that will change the proportion of media dimension. The
media item will be stretch to fill the entire screen.
Syntax:
<{MediaFileName}>(EffectSpec)
Valid parameter values:
{MediaFileName} = valid media file name under media folder
(EffectSpec) =,E({effect})
Display effect:
{effect} = LetterBox | PanScan | Stretch
Example:
<video1.wmv>,E(PanScan)
<video2.wmv>,R(2),E(LetterBox)
Full Example
[PL0:start] # CONFIGURATION
^[PL102] # PL102:1280x720
[PL200] # SLIDESHOW
^[PL2] # PL1:Picture, PL2:Video, PL3:OSD(png file)
[PL102] # 1280x720
<<REGION:1:0,0,416,648>> # Left-Screen: Picture
<<REGION:2:416,0,864,648>> # Right-Screen: Video
<<REGION:3:864,0,416,648>> # Right-Screen: Picture
<<REGION:4:0,0,864,648>> # Left-Screen: Video
<<REGION:5:0,648,1280,72>> # OSD(png file)
^[PL200]
[PL1]
<picture1.jpg>,L(8),R(1)
<picture2.jpg>,L(8),R(1)
^[PL1]
[PL2]
<video1.wmv>,R(2),E(PanScan)
<video2.wmv>,R(2),E(PanScan)
^[PL2]
Page 18

English-16
English
[PL3]
<textImage1.png>,E(CrawlLeft,64),R(5)
<textImage2.png>,E(CrawlLeft,64),R(5)
^[PL3]
FAQ:
1. How will device respond when loaded with a faulty playlist file?
The device won’t play any media files if the playlist file is faulty. Nothing will be shown
on the display screen.
2. If the media specified in playlist does not exist under device’s media folder, will device
skip those missing files automatically?
Missing files is considered as critical condition. The device treats missing files and
corrupted files equally; any of these errors occurred more than 10 times, the system
will enter into maintenance stats for 10 min, and then it will reboot itself. The “check
file system” process will fix the corrupted data problem, but the faulty playlist will need
to fix it manually.
Page 19

English-17
English
Appendix B: Adfotain Central MZ User's Guide
Introduction
Adfotain central management server is a powerful application allows users to control their
digital signage network under the WAN mode for HDMP-S100. With friendly user
interfaces, users only need very little training to start to manage their digital signage
devices over the Internet. This document introduces the functionality of the management
server and provides basic understanding of the application.
Before You Begin
Ensure that you have the following information ready in order to access the program.
1. Account Name
2. Access password
※ To obtain Account Name/Password, please register at http://passport.IAdea.net/
Logging In
Access your Adfotain Central MZ - Digital Signage Management System
1. Open your web browser and type the following address into the address bar:
http://www.adfotain.net/mz
2. When you first connected to Adfotain Central MZ, you will see the Adfotain central
welcome screen (Figure 1). The Adfotain central sever will redirect you to the Login
page in 5 seconds.
Figure 1: Adfotain Central Welcome Screen
Page 20

English-18
English
3. Once you are in the Login page (Figure 2), enter your User ID and password to login.
It is very important that you enter your Adfotain central account information as
accurately as possible. Your user ID and access password are case sensitive.
Figure 2: Login Page
4. After you have successfully login, you will be transferred to the Adfotain central device
management screen (Figure 3) where you can begin configuring the program
according to your need.
Figure 3: Adfotain Central Management Screen
Page 21

English-19
English
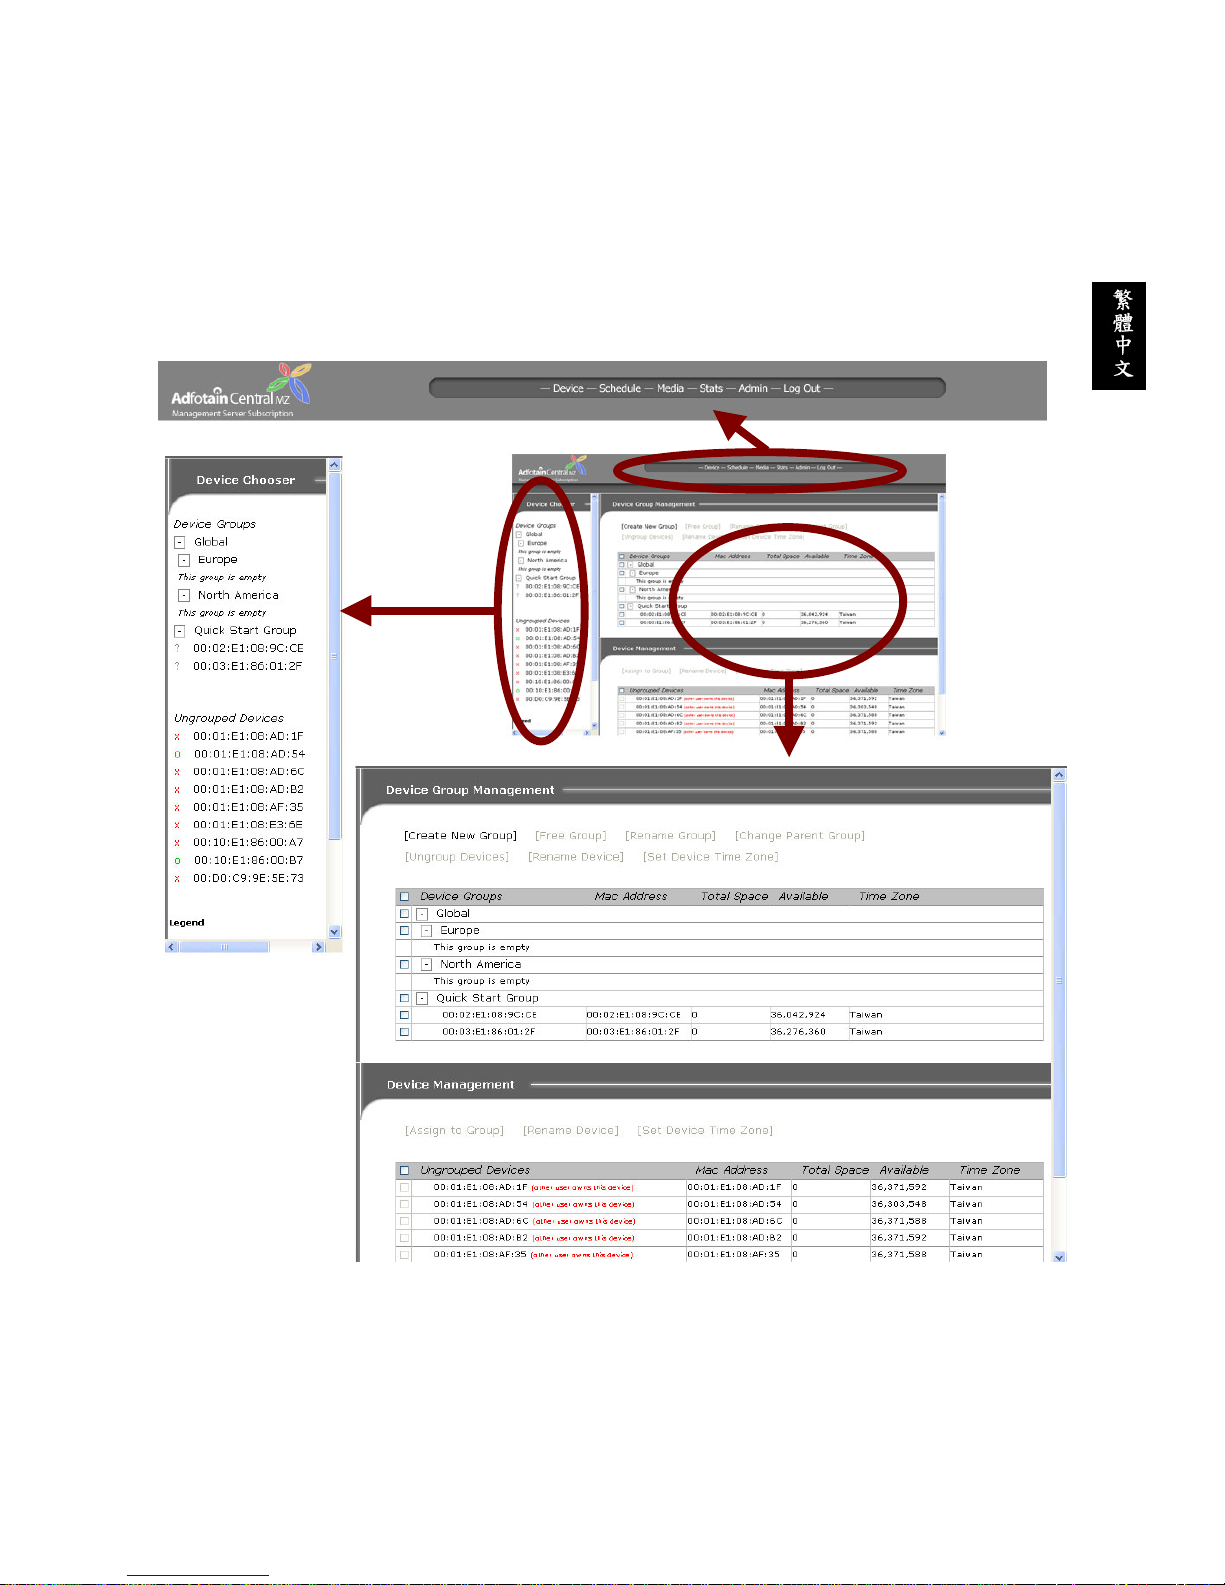
Management Interface Overview
Adfotain central management server is organized into three frames:
1. Function navigator frame. (Figure 4a)
2. Device chooser frame. (Figure 4b)
3. Selected function display frame. (Figure 4c)
Please refer to image below.
Figure 4: Management Interface
Function Navigator Overview
There are five main functions listed on function navigator: Device, Schedule, Media, Stats
and Admin. Each of them will be described in detail later in the chapters.
Figure 4a: Function navigator
Figure 4b: Device chooser
Figure 4c: Function display
Page 22
English-20
English
Device Chooser Overview
The device chooser allows you to have easy access and reference to all the devices. A
legend is provided for a quick reference on device online status.
Function Display Overview
All control buttons are listed on top of the corresponding information table (Figure 5).
Figure 5: Function display overview
Many of the control buttons may be disabled in the beginning. These disabled control
buttons require certain pre-action to enable them. For more information about the
pre-action will be provided in later chapters.
Device Management
The device management provides basic information on all registered devices and allows to
organizing devices into groups.
Control buttons
Information table
Page 23
English-21
English
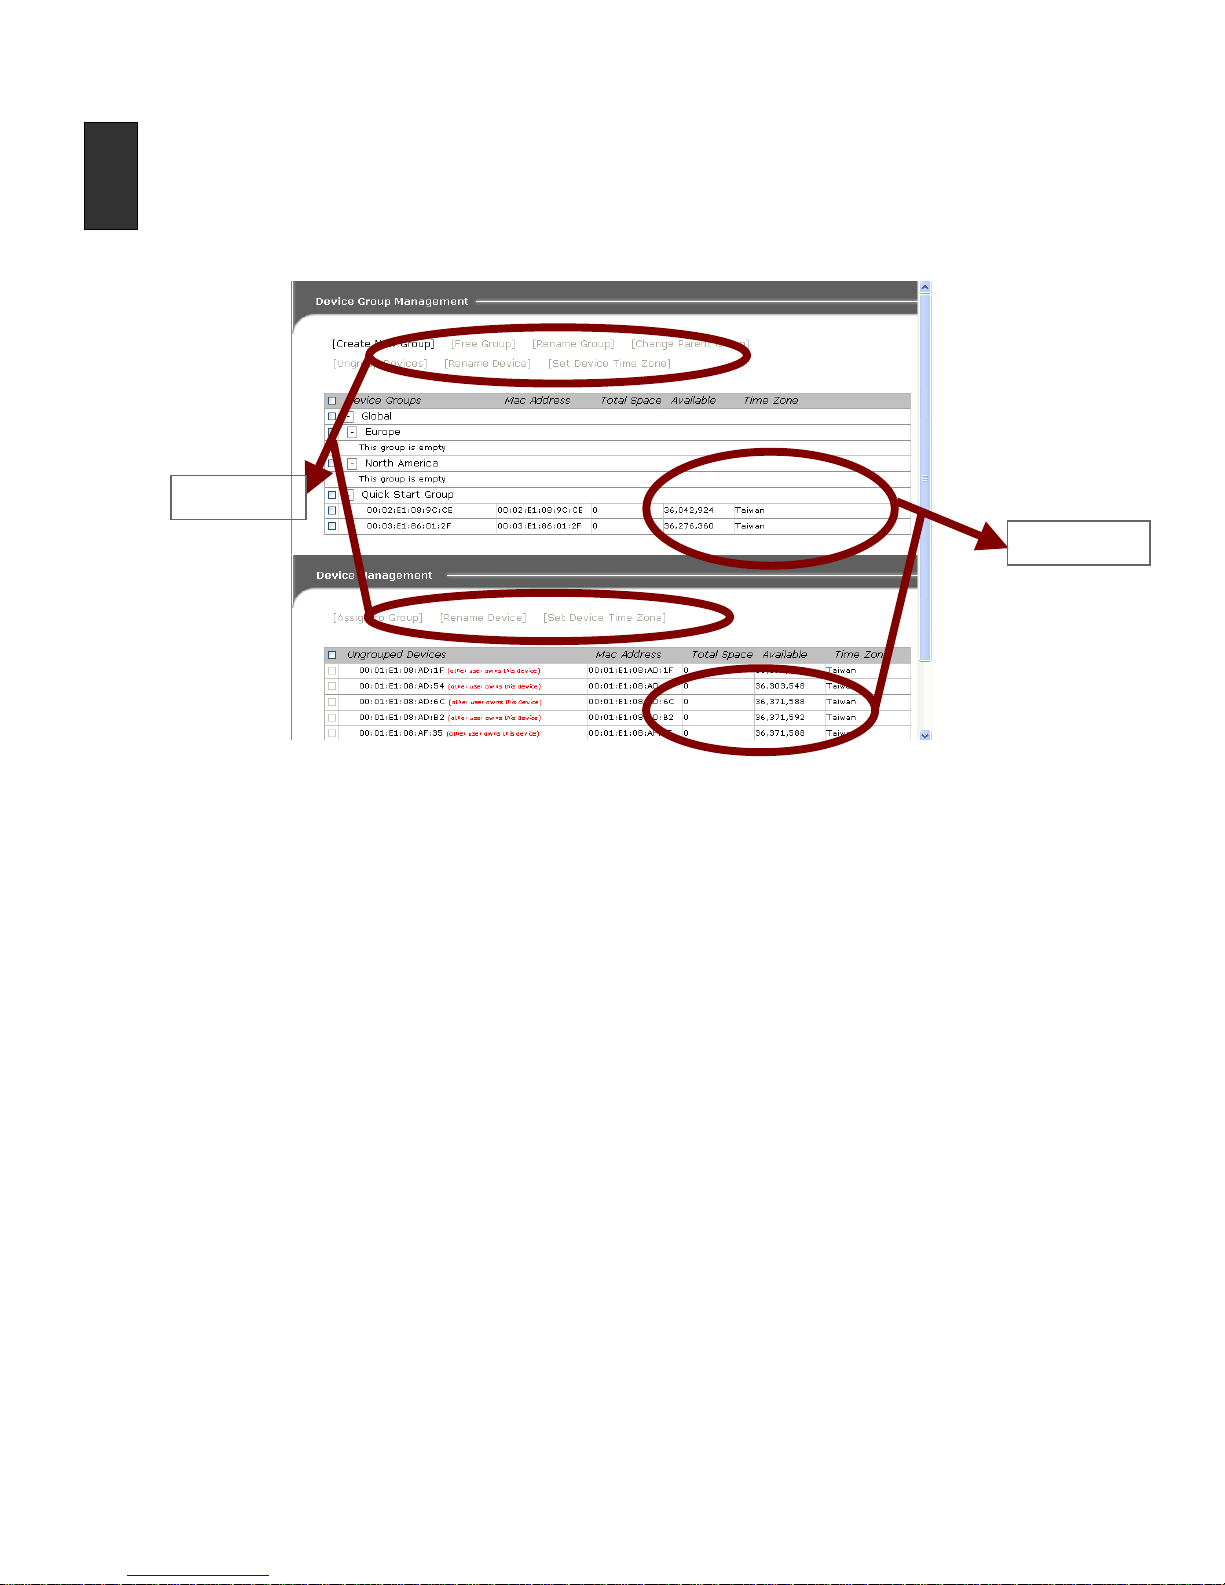
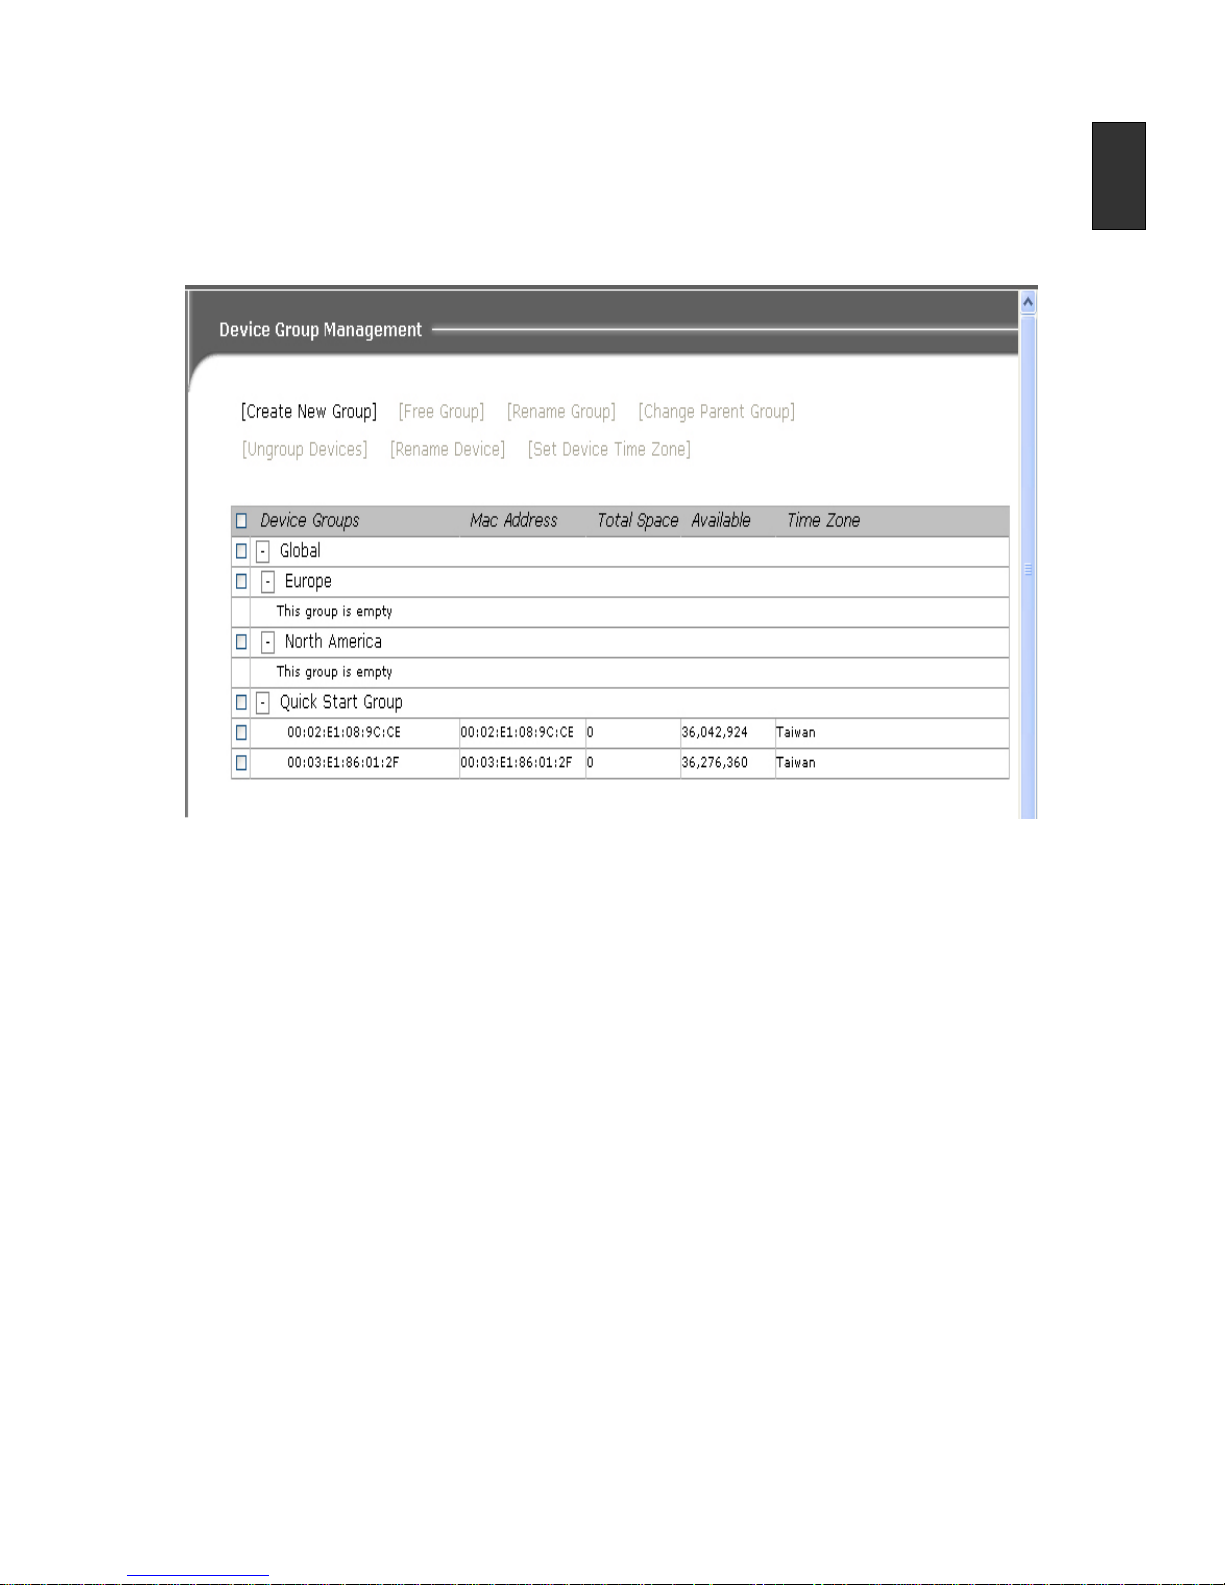
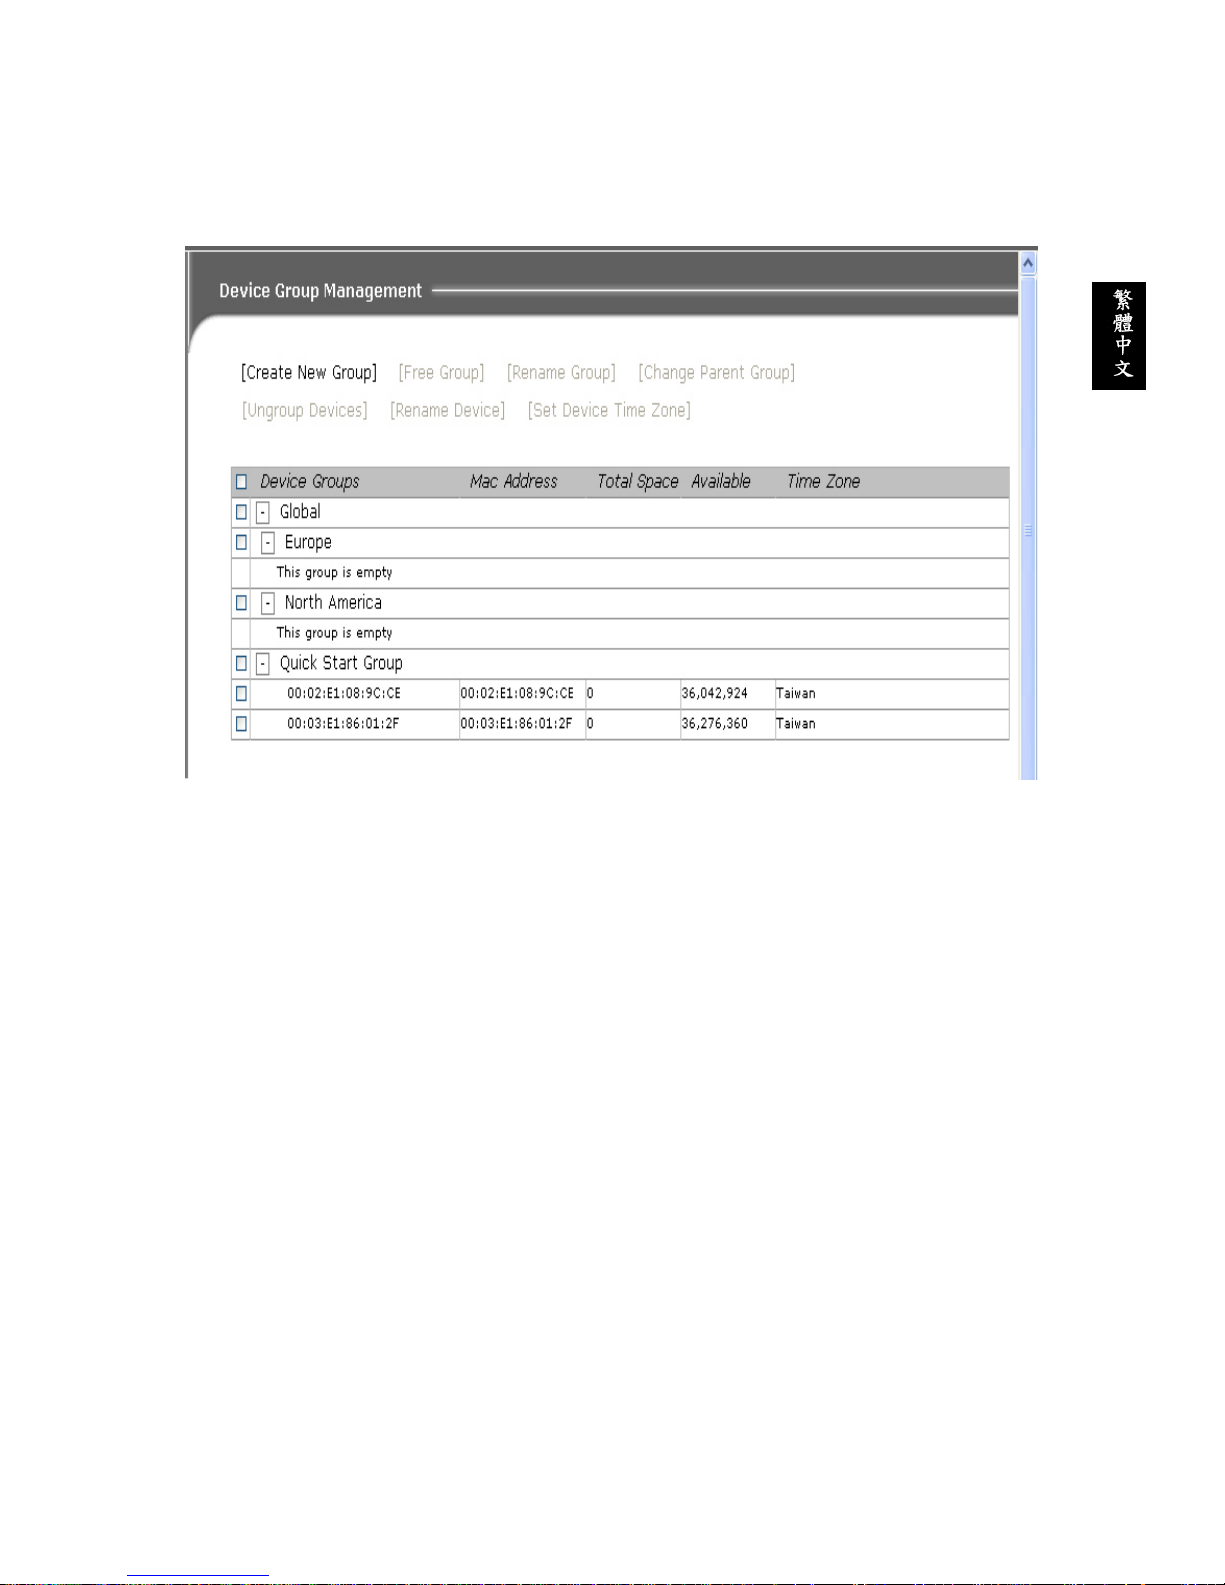
Device Group Management
Organize devices into groups make easy the device management. All devices under the
device group will inherit the schedule of the group. In Adfotain central MZ, we introduce a
multi-level grouping mechanism. Each group can be assigned under another group to
create a tree like grouping structure. Child groups will inherit the schedule of its parent
groups.
Figure 6: Device group management
Control Buttons
Create New Group
1. Click [Create New Group], a pop-up icon appears.
2. Type the group name in the New name field. Since this should be the first group, there
is no choice available on Create group under.
3. Click OK. The system responds with a confirmation indicating the change has been
accepted or failed.
4. Upon successfully creating the new group, an easy reference for the grouping would
also be indicated in the device chooser frame.
Create Sub-Group
1. Click [Create New Group], a pop-up icon appears.
2. Type the sub-group name in the New name field.
3. Select the parent group you want the sub-group to be part of from the list provided
under [Create group under].
4. Click OK. The system responds with a confirmation indicating the change has been
accepted.
Page 24

English-22
English
Free Group
1. Select groups by clicking on the check box beside the group you wish to disable.
2. Click on [Free Group].
3. A warning message will prompt up. Click OK to confirm the action.
Note that all sub-groups and devices that were assigned to the group will be deleted as
well.
Rename Group
1. Click on the check box beside the group you wish to rename.
2. Click on [Rename Group].
3. Type in the new group name then click OK to confirm the changes
Change Parent Group
1. Click on the check box beside the groups you wish to make the change.
2. Click on [Change Parent Group].
3. Select a desired parent group. Click OK to confirm the action.
Note: To avoid circular grouping, only the possible parent groups will be display for
selection.
Ungroup Device
1. Click on the check box beside the devices you wish to ungroup.
2. Click on [Ungroup Devices].
3. A warning message will prompt up. Click OK to confirm the action.
Note: When a device is ungrouped it will automatically get transfer to the Device
management table
Rename Device
1. Click on the check box beside the device you wish to rename.
2. Click on [Rename Device].
3. Type in the new device name in the pop up box. Click OK to confirm the changes.
Set Device Time Zone
1. Click the check box beside the devices you wish to set the time zone.
2. Click on [Set Device Time Zone].
3. Choose the time zone you desire then click OK to confirm the action.
Page 25
English-23
English
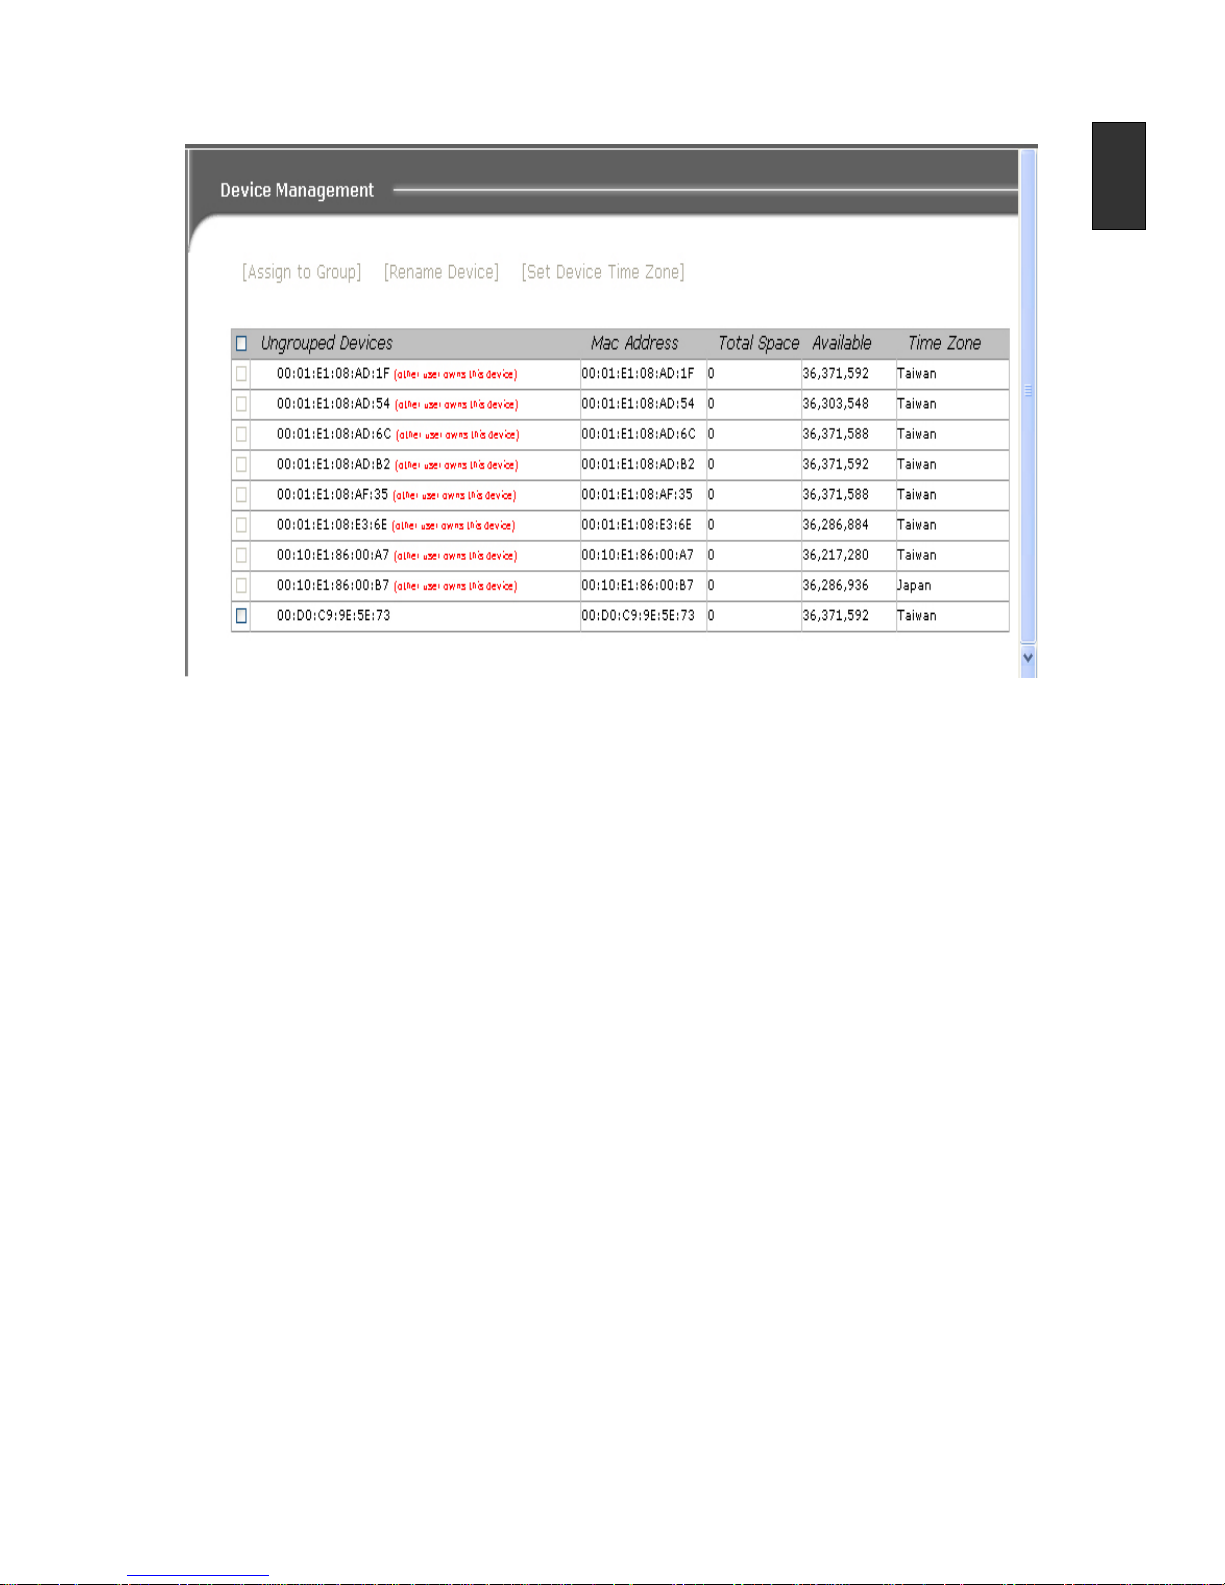
Device Management
Figure 7: Device management
Control Buttons
Assign to Group
1. Click on the check box beside the devices you wish to assign to a certain group.
2. Click on [Assign to Group].
3. Select the desire group from the pull down menu. Click OK to confirm the action.
Rename Device
1. Click on the check box beside the device you wish to rename.
2. Click on [Rename Device].
3. Type in the new device name in the pop up box. Click OK to confirm the changes.
Set Device Time Zone
1. Click the check box beside the devices you wish to set the time zone.
2. Click on [Set Device Time Zone].
3. Choose the time zone you desire then click OK to confirm the action.
Schedule Management
The schedule management provides functions that allow users to design their play back
contents on the device.
Page 26

English-24
English
Month Schedule View
Clicks Schedule option on function navigator bar, a monthly schedule will be shown up in
function display frame.
Figure 8: Month schedule
Month schedule is based on Greenwich Mean Time (GMT+0). For passed days, numbers
are strikethrough and background color is grayed out. All devices or device groups that
have play slot scheduled will be shown up here. Click on the device/device group name
will link to the corresponding schedule.
Device Group Information
Device group information displays the number of devices assigned to this group. The pie
chart shows the online status of all devices in this group.
Figure 9: Device group information
Page 27
English-25
English
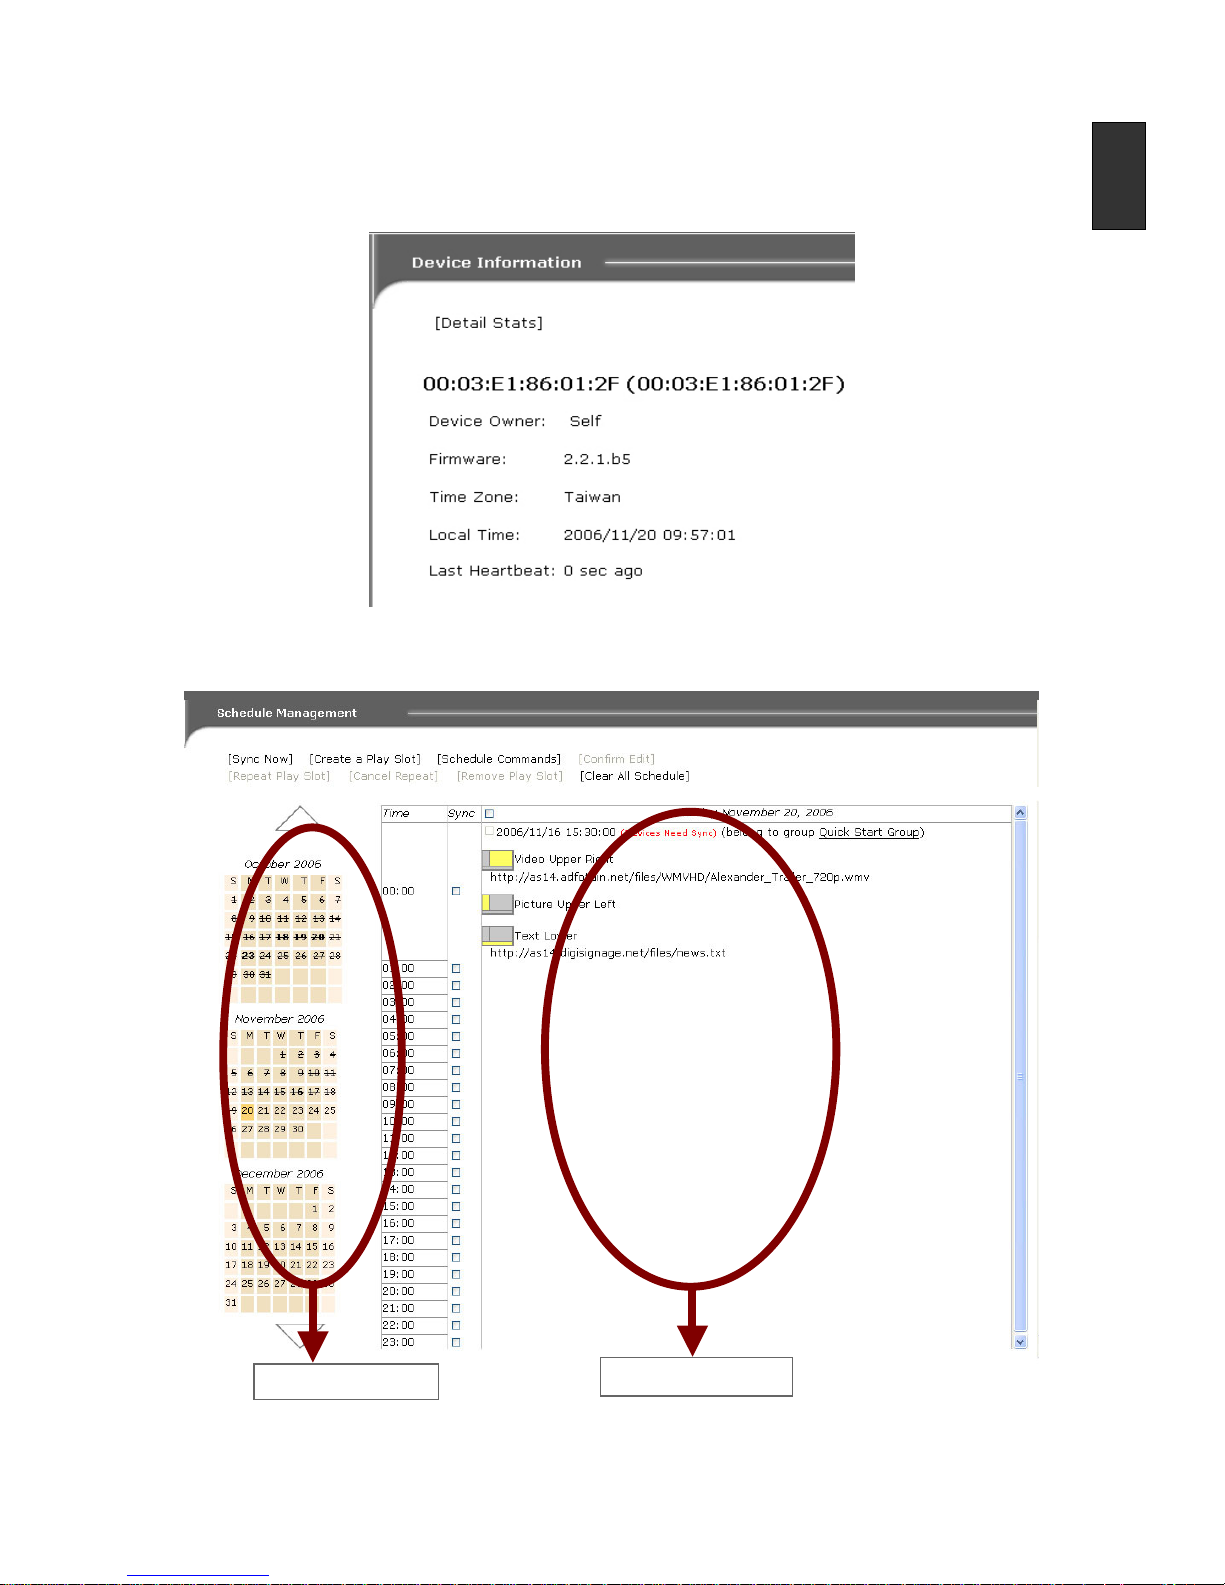
Device Information
The device information displays the owner, firmware, time zone, local time and last
heartbeat of the device. The Detail Stats button provides a fast link to device's statistic
page.
Figure 10: Device information
Schedule Management
Figure 11: Schedule Management
Figure 11a: Calendar
Figure 11b: Timetable
Page 28
English-26
English
Calendar
1. Days already passed are displayed with a strike-through.
2. Selected date is highlighted in orange. User can change display date by simply click
on the desired date on calendar.
Timetable
Display the schedule of the selected date.
Sync Column
User can request an update to device by checking the check box of the sync column.
Device will perform necessary download and change its playlist at the checked sync point.
Control Buttons
Sync Now
By choosing this function, the device is forced to perform an update right away. In other
words, a sync point of current time will be inserted to the device’s schedule.
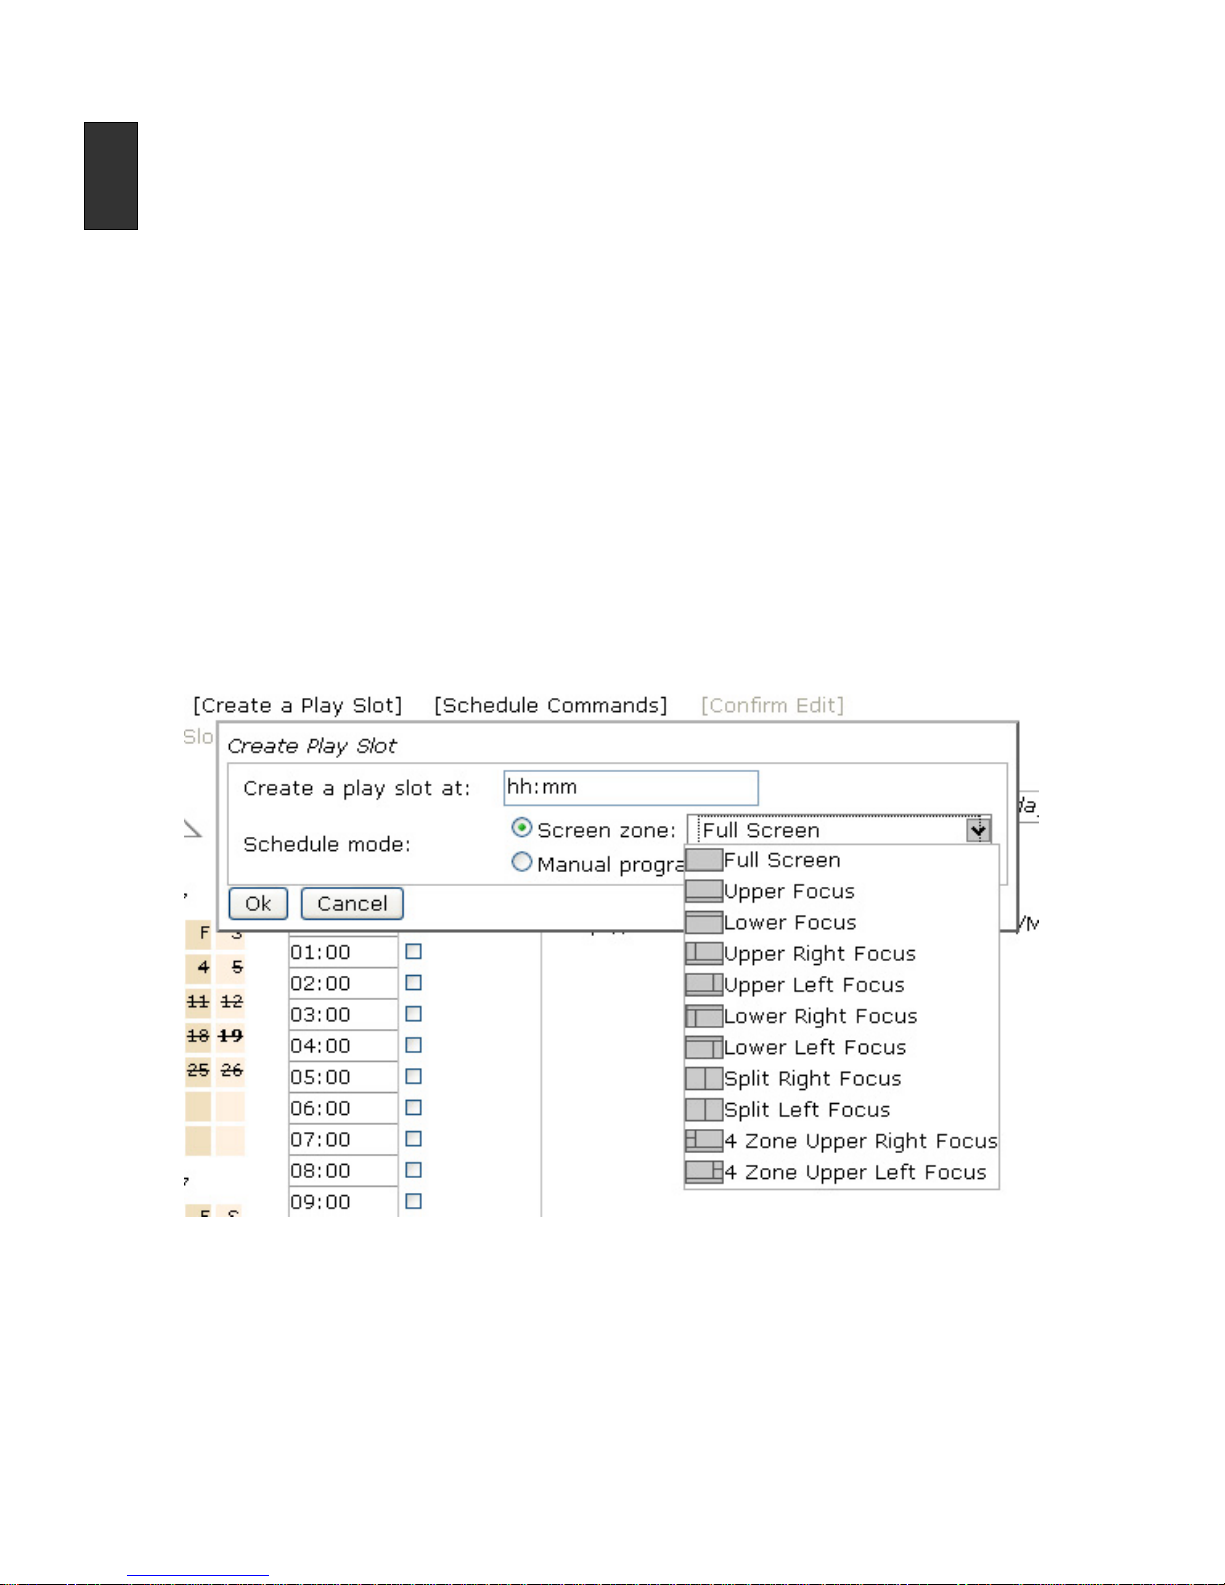
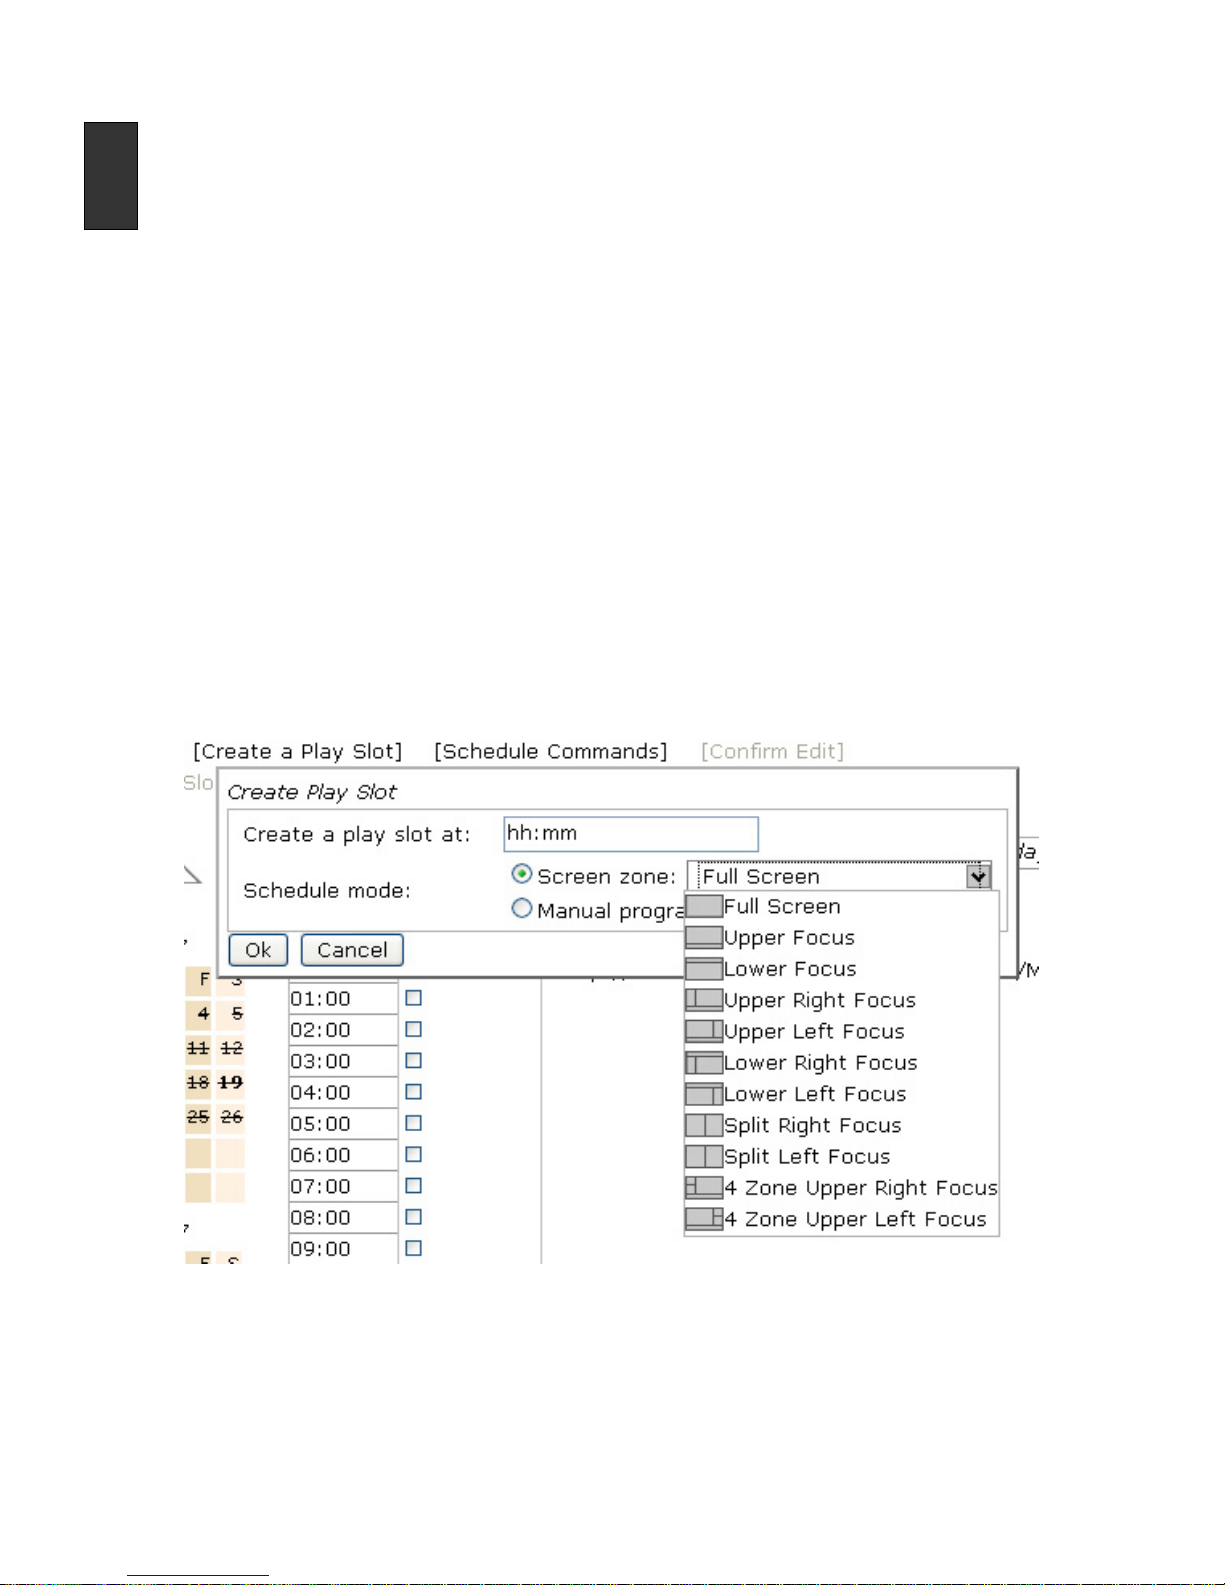
Create a Play Slot
Play slot is a reserved time to play certain media. On the zone selection there are eleven
types of zone configurations. After a slot is created, click on the slot will bring you to
playlist editor where you can schedule your registered media item to play at this play slot.
Figure 12: Screen Zone Selections
Confirm Editing
To avoid device sync currently editing play slot, all play slots need to be committed before
it can be read by device.
Page 29

English-27
English
Remove Play Slot
1. Select removing play slot by checking on the check box beside play slots; a select all
check box is provide on the header where displays the selected date.
2. Click on Remove Play Slot.
3. A warning message will be prompt, click OK to confirm the action.
Schedule Commands
1. Click on [Schedule Commands] button.
2. On the prompt up menu, select the command and enter the time.
3. Click OK to confirm schedule.
Repeat Play Slot
There are two repeat methods. One is to keep the relationship with original slot, the other
will make a copy to repeaters. When the relationship with original slot is maintained,
modifications on the original play slot will apply to all repeaters. In the other hand, make a
copy of original slot provides flexibility to customize schedule contents based on original
slots.
1. Select the play slots by clicking on the check boxes beside play slots.
2. Click on [Repeat Play] Slot button.
3. On the prompt up menu, choose type of repeat and enter number of cycles to repeat.
4. Check on Save repeated slot as a copy if you want to make a copy to all repeater.
Leave it unchecked will maintain the relationship between original slot and its
repeaters.
5. Click on OK to confirm the action.
Cancel Repeat
[Cancel Repeat] will remove the repeating effect from those repeated slots that still
maintain relationship with its original slots.
Clear All Schedule
This function will delete all play slots of this group or device. Note that inherited play slots
won't get affected.
Page 30
English-28
English
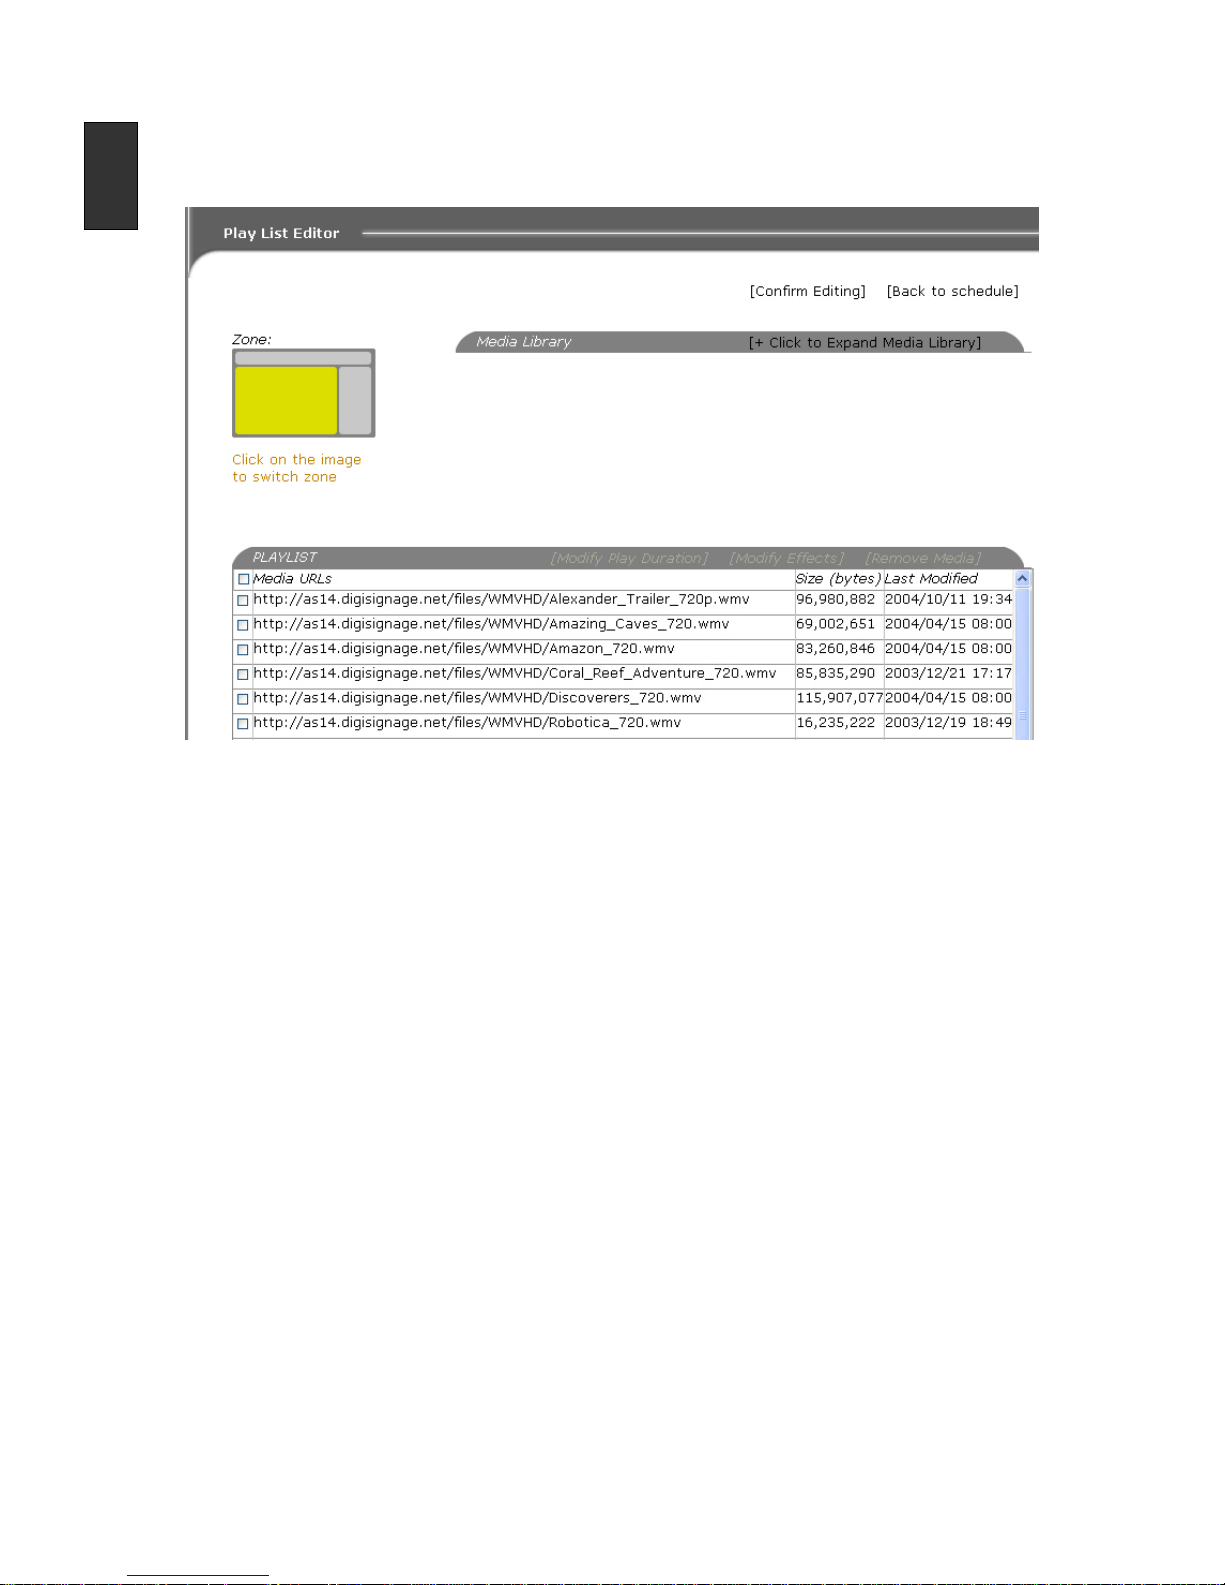
Play List Editor
Click on any valid play slot will brought you to play list editor page. In this page, user can
assign media item to corresponding screen zone and decide the play back orders.
Figure 13: Play list editor
Page 31
English-29
English
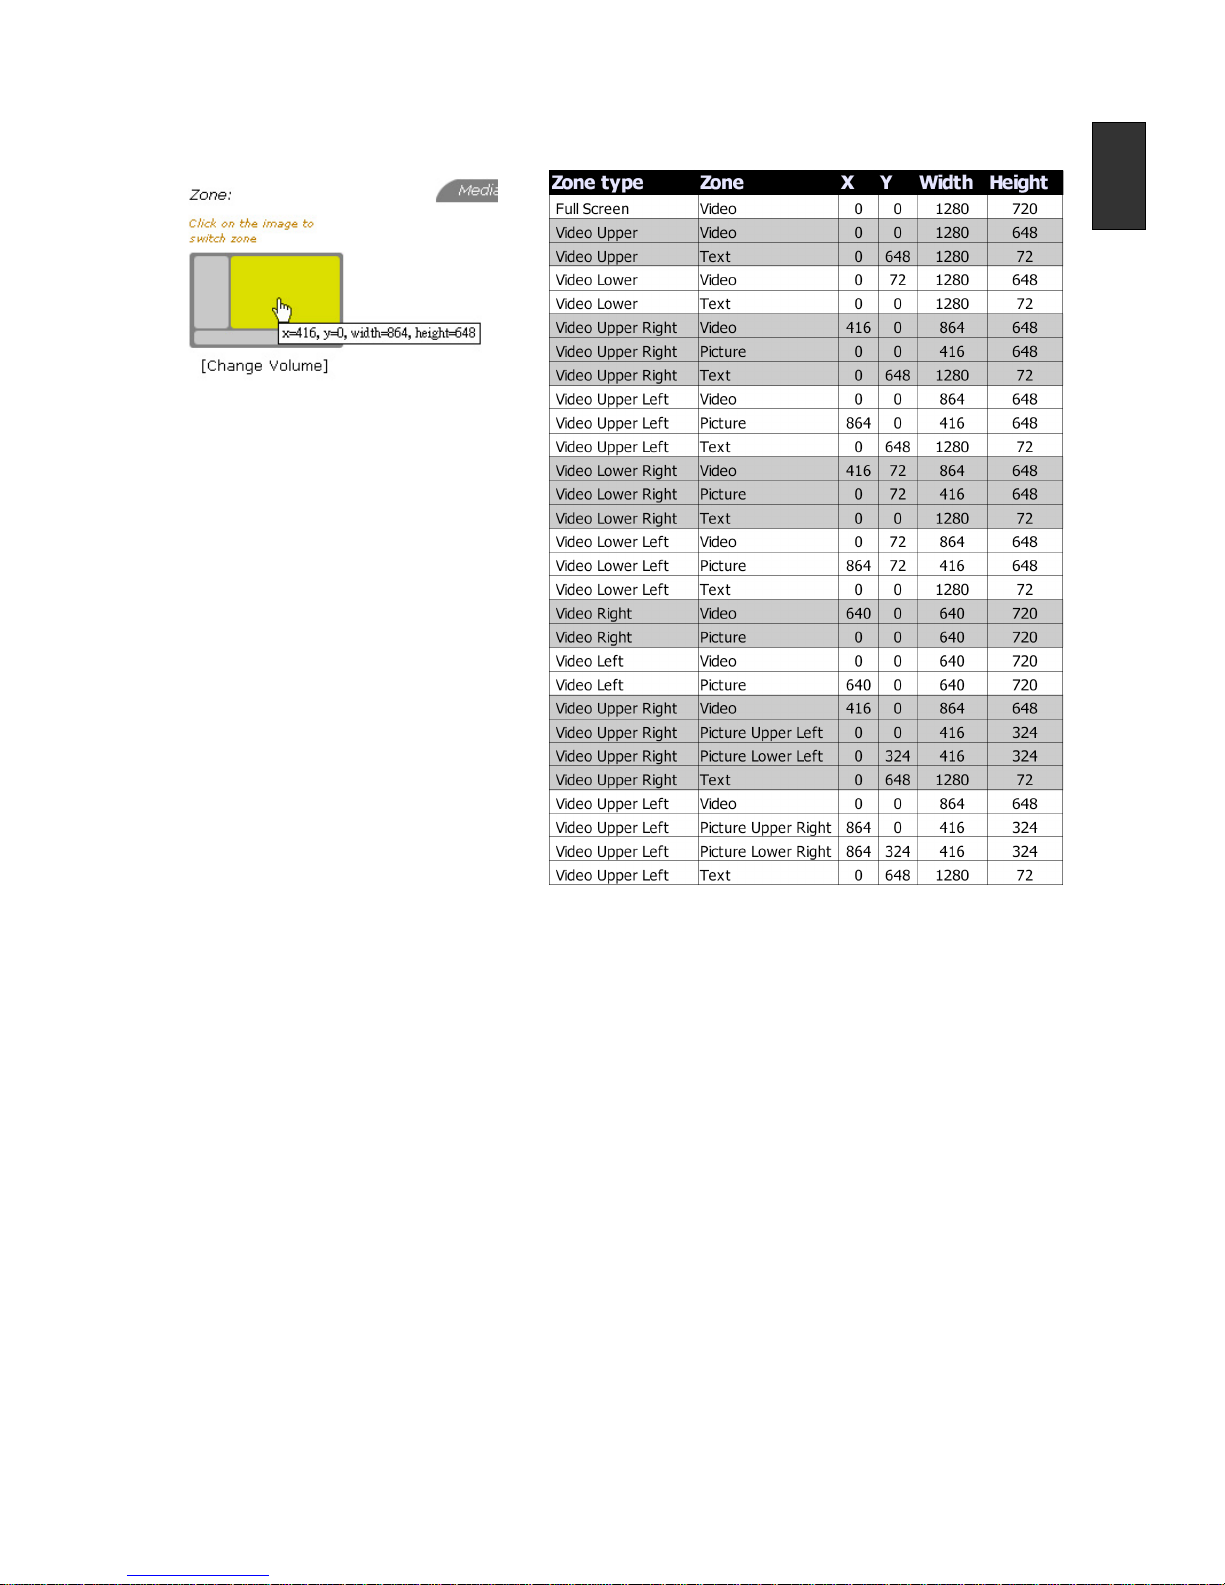
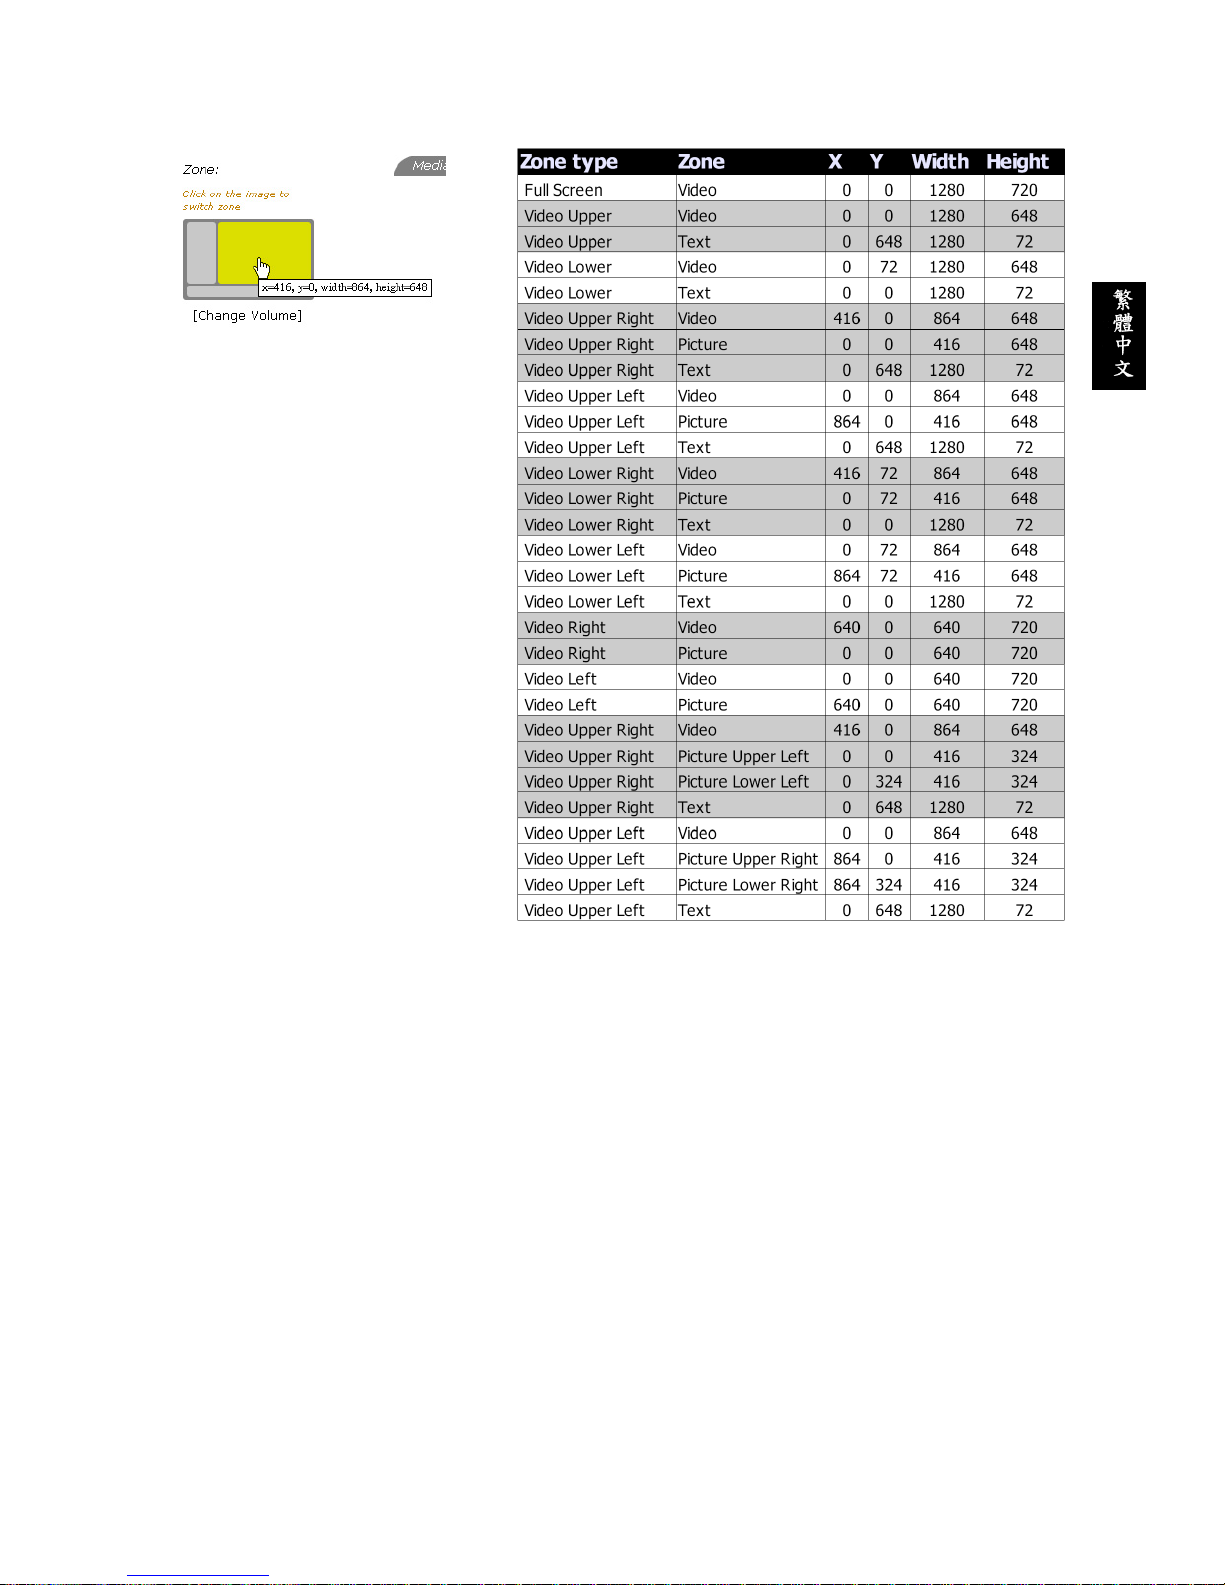
Move the mouse over the screen zone image, the dimensions of the pointed zone will be
shown as image below.
The table on right hand side lists all
screen zone dimensions.
Control Buttons
Assign Clip to Play List
1. Click on desired screen zone on zone image. The selected zone will be highlighted by
yellow color.
2. Click on [+ Click to Expand Media Library] to expand the media library. [Assign Clip to
Play List] button will be shown at the bottom of the media library.
3. Click on the check boxes beside media items or predefine playlists which you want to
assign to desired screen zone for play back.
4. Click on [Assign Clip to Play List] to assign media items to selected screen zone.
Modify Play Duration
1. Click on desired screen zone on zone image, corresponding assigned media will be
shown in playlist table.
2. Click on the check boxes beside the media item which you want to change its play
duration.
3. Click on [Modify Play Duration].
4. Input desired play length in seconds.
5. Click OK to confirm modifications.
Page 32

English-30
English
Modify Effects
1. Click on text zone on zone image. Note: effects can only apply to text media files only.
2. Click on the check boxes beside the text media items which you want to change its
effects.
3. Click on [Modify Effects].
4. Configure desired effects on prompt up Modify Effects Menu.
5. Click on OK to confirm the changes.
Remove Media
1. Click on the check boxes beside the media items which you no long want to play in
the zone.
2. Click on [Remove Media].
Media Management
Media management provides the functions for user to organize their media URLs. Once
media is registered into the library, it can be scheduled to play on device. Commonly used
media clips can also organized into predefined playlists which make scheduling process
even easier.
Media Library
Figure 14: Media library
Page 33

English-31
English
Control Buttons
Register Video/Image URL
1. Click on [Register Video/Image URL].
2. Type in the URL in the text area of the prompt out dialog box.
Note: multiple URLs can be registered at once. Hit an enter after each URL to
separate URLs to different lines.
3. If the URLs is protected by http basic authentication, User and Password fields are
required.
4. Click OK to register. A report will be generated to inform if the URLs are registered
successfully.
Register Text URL
1. Click on [Register Text URL].
2. Type in the URL in the text area of the prompt out dialog box.
Note: multiple URLs can be registered at once. Hit an enter after each URL to
separate URLs to different lines.
3. Click OK to register. A report will be generated to inform if the URLs are registered
successfully.
Unregister
1. Click on the check box beside the media items which you want to unregister.
2. Click [Unregister], a confirmation message will prompt up.
3. Confirm unregister will remove the selected media items from the library.
Add/Modify Authentication
1. The function provide user to be able to add or modify according to the new
authentication settings of the URL.
2. Click on the check box beside the media items.
3. Click [Add/Modify Authentication] then key in the new user name and password.
4. Confirm the settings by clicking on OK button.
Assign Clip to Predefine Play List
1. Click on the check box beside the media item which you want to group into predefine
play list.
2. Click on [Assign Clip to Predefine Play List].
3. Select the desired play list then click OK.
Modify Play Duration
1. Click on the check box beside the media item which you want to change its play
duration.
2. Click on [Modify Play Duration].
3. Input desired play duration in seconds.
4. Click OK to confirm the changes.
Page 34
English-32
English
Update
A registered URL can be missing or removed. The media library will block the unavailable
media URLs after the devices attempt to download it three times. Once the URL is blocked,
all devices will skip this URL if it presents in the device's schedule. To unblock the URL,
user will have to update the file to media server then use “Update” function in Adfotain
media library to release the URL.
1. Click on the check boxes beside the media items which you want to update its
information from media server.
2. Click on [Update].
Media Library Playlist
Figure 15: Predefine playlist
Control Buttons
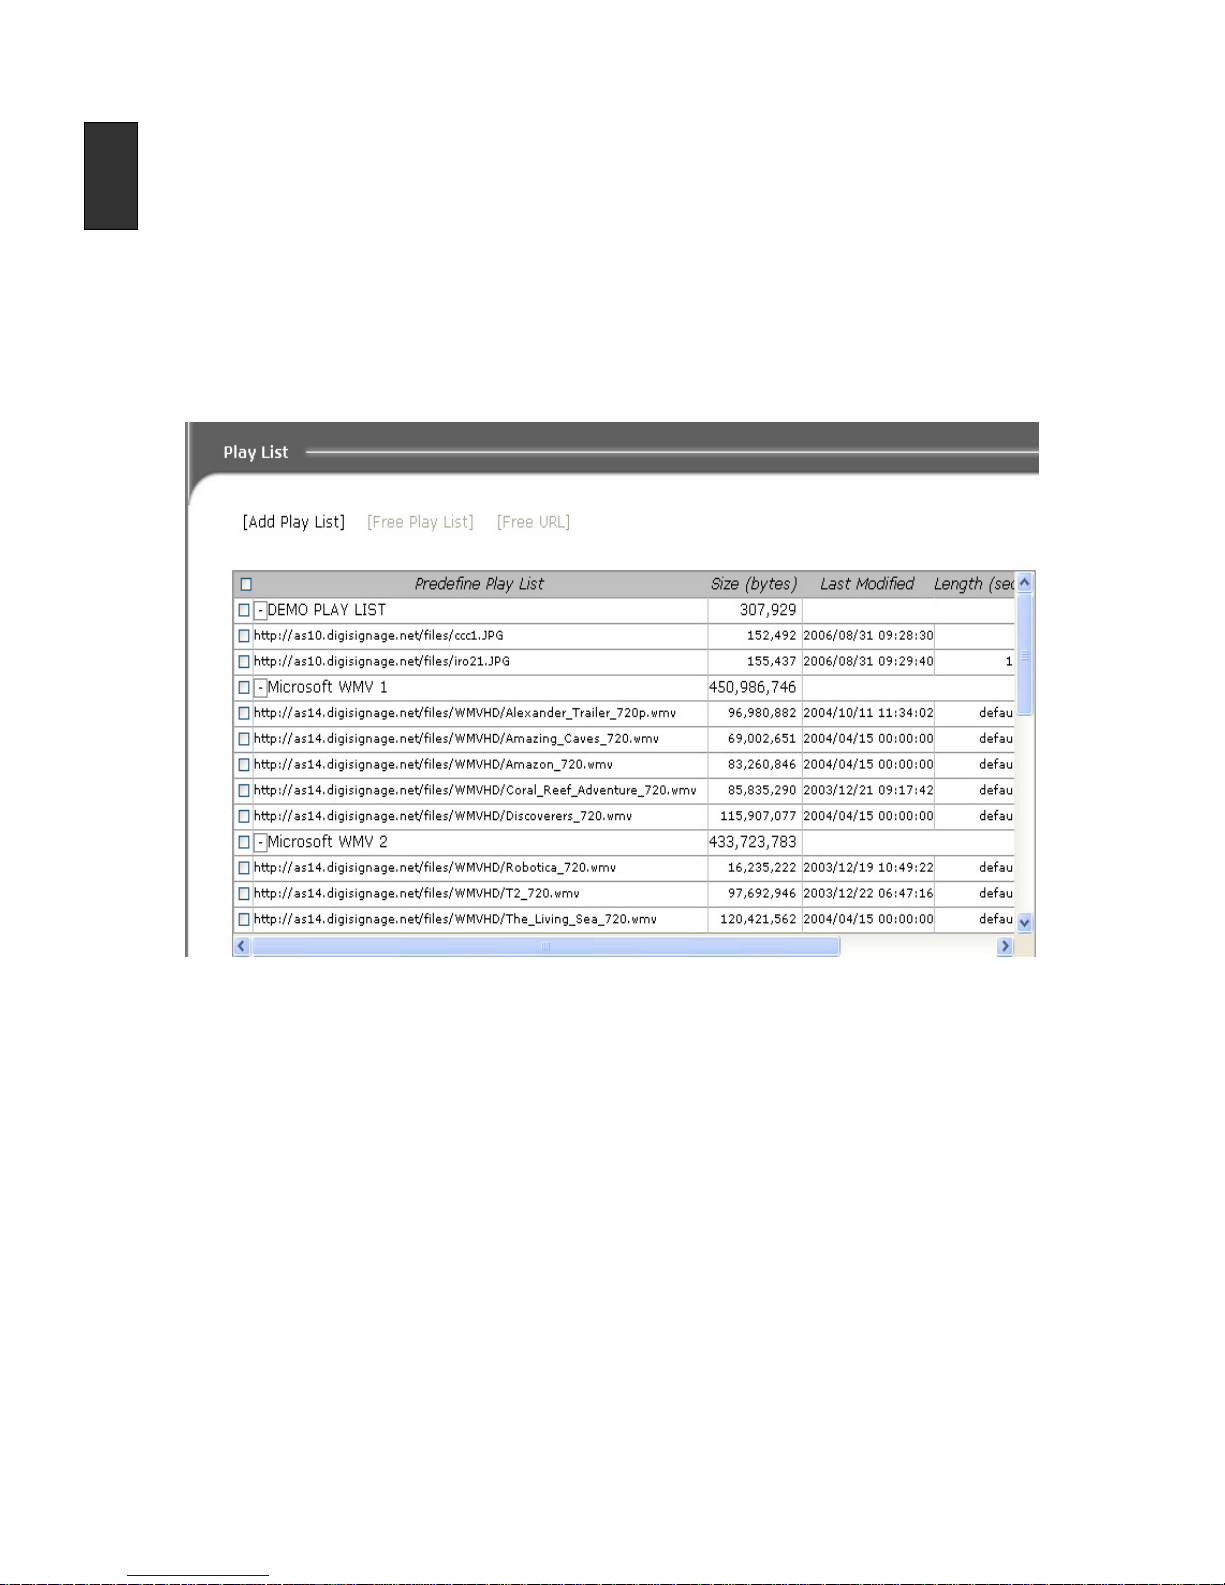
Add Play List
1. Click on [Add Play List].
2. Input a name for predefine play list.
3. Click OK to confirm the action.
Free Play List
1. Click on the check boxes beside the play lists which you want to dismiss.
2. Click on [Free Play List].
Free URL
1. Click on the check boxes beside the grouped media item which you want to remove
from its predefine play list.
2. Click on [Free URL].
Page 35

English-33
English
Stats
Stats management function allows user to easily monitor their digital signage network.
Overview
Click the Stats function on the function navigator bar, this action will brought you to stats
overview page. In this page, you will find a summary table of most recent events of all
devices.
Figure 16: Statistic overview
Page 36

English-34
English
Device stats
Click on View Individual Device Stats or Detail Stats to get to the detail statistic page
(Figure 10) of the device. This page contains basic device information, device contents,
device events and device play record.
Figure 17: Device statistic
Page 37

English-35
English
Administration
Modify Alarm Email
Each device can have one or multiple alarm email address. Central server will send out an
alarm notification to the assigned email address when there are critical situations
concerning the device.
User can modify or re-assigned the Alarm email under Administration Management screen.
1. Click on the check boxes besides the devices.
2. Click on [Modify Alarm Email].
3. On the prompt up menu, all selected device will be listed with a text box to enter email.
Separate emails by comma (,) or semi-column(;) if there are multiple recipients.
4. Click OK to confirm the settings.
Format Storage
User will be able to format storage remotely. Note that all contents will be erased. If the
devices have schedule content, all media will be re-downloaded after format.
Force Reboot
Force reboot will soft reboot the device remotely.
Change Password
User can change the original password, as giving at the time of registering for the Adfotain
Central MZ system, from the administration management screen.
To change your password:
1. Click on Admin function.
2. Scroll down until you see [change password].
3. You will have to enter the old password in the assigned box. Then entered the desired
new password.
4. Re-enter the new password again for confirmation.
5. Click on the [change password] button to make the change.
6. A message will show up to confirm the change.
Page 38

Page 39

繁體中文-1
繁體中文
HDMP-S100 電子看板播放器使用手冊
目錄
簡介................................................................................... 繁體中文-2
包裝內容 ........................................................................... 繁體中文-2
額外需求 ........................................................................... 繁體中文-2
安裝................................................................................... 繁體中文-2
開機訊息 ........................................................................... 繁體中文-3
操作原則 ........................................................................... 繁體中文-4
設定選項 ........................................................................... 繁體中文-4
韌體升級 ........................................................................... 繁體中文-6
技術規格 ........................................................................... 繁體中文-7
疑難排解及 FAQ................................................................ 繁體中文-8
附錄 A:HDMP-S100 播放清單使用指南.......................... 繁體中文-9
附錄 B: Adfotain Central MZ 使用指南........................... 繁體中文-17
Page 40

繁體中文-2
English
簡介
HDMP-S100 是一高畫質數位電子看板播放器(High Definition Digital Signage Player)之擴
充模組,具備簡易的網路管理介面,並可透過任何 TCP/IP 網路來傳進高畫質(720p)的數
位電子看板內容。此擴充模組必須插入專為搭配 HDMP-S100 所設計之相容顯示裝置的擴充
插槽內。
HDMP-S100 具有透過 USB 連接埠連接周邊裝置來增進其互動性的附加功能;此附加功能僅
作為升級和設定之用。
本文件將說明有關此裝置的一些基本操作。
包裝內容
1. HDMP-S100 數位電子看板播放器 x 1
2. HDMP-S100 數位電子看板播放器使用手冊 x 1
額外需求
操作 HDMP-S100 電子看板播放器所需之額外項目如下:
1. 一部 2.5 吋硬碟機(預設配置)或一張 Compact Flash(CF)記憶卡(選用)。
2. 乙太網路(Ethernet)網際網路連線。建議使用具有動態主機配置協定(DHCP,Dynamic
Host Configuration Protocol)服務的乙太網路(Ethernet)連線。若您不確定是否有 DHCP
服務,請洽詢您的網路工程師。
安裝
1. 請確認已關閉顯示器主電源開關,並拔除電源線。
2. 將指旋螺絲鬆脫,並移除輸入插槽的保護蓋。
3. 以正確方向(參考圖示說明)插入擴充模組,並小心地將模組推入至底,直到面板與基
座齊平。(若方向錯誤,擴充模組將無法插入至底)
4. 鎖緊指旋螺絲。
5. 接上電源線並打開後方的主電源開關,然後打開顯示器或遙控器上的電源鍵,顯示器將
自動偵測到擴充模組。
6. 此時擴充模組上的綠色 LED 電源指示燈應該亮起。
Page 41

繁體中文-3
繁體中文
注意:
1. 安裝擴充模組之前,務必關閉主電源開關並拔除電源線。
2. 請勿於顯示器使用中拔出擴充模組,否則可能造成擴充模組與顯示器永久性之損壞。
3. 擴充模組之安裝必須由合格技術人員操作及不要觸摸黑色連接器裡的針腳以防止靜電產
生。
將 HDMP-S100 擴充模組安裝至顯示器後,請遵照使用手冊的指示安裝模組的數位電子看板
內容管理服務軟體。
開機訊息
打開已安裝 HDMP-S100 模組的顯示器後,您將會在畫面上看到以下訊息:
1. 螢幕上出現啟動畫面。
2. 幾秒鐘後,您將看到其他文字資訊顯示在畫面中:
a. MAC 位址(HDMP-S100 的唯一網路代號)
b. DHCP 狀態(若找不到 DHCP 服務,則會顯示「NO DHCP」)
c. 由 DHCP 服務指派的 IP 位址(若找不到 DHCP 服務,則會顯示「169.254.1.1」)
d. 運作模式:LAN 或WAN(Local Area Network 區域網路或Wide Area Network 廣
域網路)模式。出廠預設為 WAN 模式。如欲使用其他運作模式,請遵照指示設定。
3. 若您使用 WAN 模式,數位電子看板播放器將嘗試尋找並連接至指定的伺服器。
Page 42

繁體中文-4
English
操作原則
HDMP-S100 數位電子看板播放器為具備 MPEG-1/2/4 視訊解碼功能及網路連線特性的硬體
裝置。欲在 HDMP-S100 數位電子看板播放器上播放的內容必須先轉換為 MPEG-1/2/4 格式
才可順利播放。若適當連結網路(LAN 或WAN)或是以網路跳接線直接連結個人電腦,則
可透過標準網路瀏覽器設定 HDMP-S100。設定完成後,此裝置即可:
1. 連接至 Adfotain 中央管理伺服器(需另外購買,費用另計,詳情請參考附錄B),以進行
整體性、階層式、網路式管理(WAN 模式)。使用 WAN 運作模式時,可將健全、可擴
充的數位電子看板服務安裝於不同的網路環境下(亦即不同的網路基礎架構、據點、防
火牆設定),以便監視硬體運作情形並管理排程計畫,進而確保媒體內容能及時傳遞。
2. 或是,能以內建的控制指令碼語言(參考附錄 A)播放媒體內容,此方式適合小規模數
位電子看板應用之需求(LAN 模式)。使用 LAN 運作模式時,可透過簡易排程與檔案管
理快速架設一簡單的非階層式類型之數位電子看板網路。
設定選項
HDMP-S100 內建網路介面,您可透過網路瀏覽器變更設定選項。在網路瀏覽器上輸入開機
畫面所顯示 IP 位置即會顯示以下登入畫面。預設登入帳號名稱為「admin」,預設密碼為
「digiSignage」(不包括引號)。
Page 43
繁體中文-5
繁體中文
登入後,您將會看到設定選項的列表:
1. 裝置名稱(Device name)(使用於通用隨插即用(UPnP,Universal Plug-and-Play)之偵
測)
2. IP 設定(IP configuration)(DHCP、靜態等)
3. 指定網路路徑 (Extra Routing) (可設定 5 組路徑)
4. 日期/時間設定(Date/Time Setting)(可從時間伺服器自動調整內部時鐘)
5. 視訊設定(Video Setting)(媒體原始解析度與輸出解析度)
6. 變更密碼(Change password)
7. 檔案管理員(File manager)(此功能僅適用於 LAN 運作模式)
8. 檢視記錄資料(View logs)(記錄播放清單狀態,僅適用於 LAN 運作模式)
9. 系統管理伺服器(Administration Server)(在WAN 模式下用以存取 Adfotain Central
伺服器)
10. 升級韌體(Upgrade firmware)
11. 備份設定(Backup setting)(儲存預設設定參數)
12. 登出(Logout)
Page 44

繁體中文-6
English
韌體升級
1. 若您的授權經銷商或技術支援人員認為您需要將韌體升級,請小心遵照以下指示進行升
級。
2. 在登入裝置網路設定頁面後,將裝置切換至 LAN 模式。
3. 點按[韌體升級(Upgrade firmware)],然後瀏覽韌體套件檔案。您可自授權經銷商處取
得韌體更新。或者,亦可寄電子郵件至vdservice@delta.com.tw取得最新版本韌體。
4. 畫面將顯示韌體升級進度。
注意:請保持電源開啟狀態,以確保升級過程不中斷。若升級過程發生中斷情形,將造成升
級失敗與系統永久性損壞。
Page 45

繁體中文-7
繁體中文
技術規格
處理器
Sigma Designs EM8621L
系統記憶體
64 MB DDR RAM
作業系統核心 µCLinux 核心
最大輸出解析度
1920x1080@60Hz
建議多媒體解析度
1280x720(720p)
1024x768(XGA)
大容量儲存裝置支援*
2.5 吋薄型硬碟機(預設);80G
(最大)
Compact Flash 記憶卡(選用);8G(最大)
USB 連接器 2組 USB 2.0 連接埠 (A 型式)
RJ-45 連接器 IEEE 802.3 乙太網路 10/100 Base-T
指示燈 電源打開(綠色 LED)
電源需求 DC-12V/12W(最大)
操作環境 0至 40°C,5%至 95% RH
貯藏環境 -20 至 60°C,5%至 95% RH
尺寸(WxHxD)
212 x 150 x 40 (mm)
8.35” x 5.91” x 1.57”
淨重
0.95 kg
2.09 lbs.
* 僅可同時安裝及操作一種大容量儲存裝置
Page 46

繁體中文-8
English
疑難排解及 FAQ
安裝
1. 將模組插入顯示器之後,綠色LED 燈並沒有亮起。
a. 請檢查電源線連接情形,並打開顯示器電源(請參閱顯示器的使用手冊)。
2. 綠色LED 燈雖然已亮起,但畫面上什麼都沒有顯示。
a. 請切換顯示器上的「輸入(Input)」按鈕或遙控器上的「來源(Source)」按鈕,
確認顯示器已切換至正確的輸入來源(亦即輸入訊號 1)。
b. 若仍無法解決問題,請關閉顯示器後方的主系統電源,然後重新打開電源。
3. 畫面上顯示的視訊似乎一直閃爍、移動或者顏色不對(顏色偏綠)。
a. 通常這是由不正確的輸出設定所造成的。請登入系統並使用 LAN 模式設定,以將
裝置設定為適當的輸出格式。
b. 若仍無法解決問題,請關閉顯示器後方的主電源、移除電源線,並移除擴充模組重
新安裝。
內容製作
1. 我要如何在直立式顯示器(9:16 直立安裝)上建立與製作內容?
您必須將 9:16 的圖像或影片逆時針旋轉 90 度,變成水平版面後輸入撥放器。
2. 如果我的內容製作工具無法製作 MPEG-1/2/4 影片,請問有何建議?
為能順利播放,請盡可能製作成 Microsoft Windows Video(WMV)的檔案格式。
3. 推薦使用的 MPEG-1/2/4 影片規格為何?
MPEG-1/2:1280x780,30 fps,5 Mbps. MPEG-4:DivX(進階簡易設定檔)1280x720,
30 fps,5 Mbps.
Page 47

繁體中文-9
繁體中文
附錄 A:HDMP-S100 播放清單使用指南
播放清單檔案
播放清單檔案係用於讓HDMP-S100 數位電子看板播放器以LAN 運作模式來控制媒體檔案的
播放(關於不同運作模式的說明,請參考「操作原則」章節)。HDMP-S100 最多可同時執行
三個獨立的播放清單檔案。播放清單檔案是由簡單的指令碼語言所組成,可利用任何文字編
輯程式編寫,例如個人電腦上的 Microsoft Notepad。語法、檔案命名以及播放清單檔案的編
碼必須遵守嚴格的規範才能正常運作,請參考以下指示來建立播放清單檔案。
1. 所有參數、語法和檔案名稱皆有大小寫之分。若使用不正確的大寫/小寫字母,播放清
單檔案將無法正確執行。
2. 播放清單檔案必須使用ASCII 編碼儲存。
3. 可接受的播放清單檔案名稱為:「PLAYLIST.0」、「PLAYLIST.1」和「PLAYLIST.2」。
HDMP-S100 可同時執行一個、兩個、三個或四個播放清單檔案;然而,同一時間只能
有一個播放清單檔案含有視訊播放。
4. 請務必在製作前將播放清單檔案載入,並於HDMP-S100 中預覽播放。
5. 播放清單可能包含邏輯性錯誤,請確認已將標頭與命令分開,以避免邏輯性錯誤。
6. 下面為一典型播放清單檔案的範例,其媒體項目是以1280x720 大小播放,座標(0, 0)
為畫面左上角的起始點,播放時間則為每週五、六、日的晚上 9 點。
[PL1:*/*/*-FRI-21:00:00]
[PL1:*/*/*-SAT-21:00:00]
[PL1:*/*/*-SUN-21:00:00]
<<REGION:0:0,0,1280,720>>
<<VIDEO:ON>>
<video1.wmv>,R(0)
<picture1.png>,L(7)
<picture2.png>,L(10),E(CrawlUp)
^[PL1]
播放清單檔案通常至少由一個區段所組成。每一區段通常包含四個部分:標頭(headers)、
命令(commands)、項目(items)以及跳至(jump)。下圖說明如何區分以上範例中的每一
部分。
Page 48

繁體中文-10
English
區段(Section)
每一區段實際上即為一播放清單。區段將會被其中一個標頭觸發,然後依序進行命令處理或
播放。通常於播放結束時,會出現一個跳至指令碼,指出接下來要如何進行。在接下來的段
落中將使用如下所述的語法規則。
語法規則:
{ } = 要求輸入參數
( ) = 選用參數
區段標頭(Section Headers)
區段標頭為一個區段的起始點。若於一區段中使用多個標頭,則任一標頭皆可能觸發該區段。
標頭共有三種:區段 ID(section ID)、時間觸發(time triggered)以及立即觸發(hard
triggered)。
區段 ID(Section ID)
此種標頭僅用於標示區段的開始。其本身並不會啟動區段,因此通常需藉助其他觸發事件,
例如跳至(JUMP)事件。
語法:
[PL{id}]
有效參數值:
{id} = 0-255
範例:
[PL0]
[PL123]
請注意標頭雖然為區段開始之標示,但並不是其他區段的結束。此為常見的誤解。例如,
[PL1:start]
<video1.wmv>
[PL2]
<video2.wmv>
[PL2]只是區段(PL2)的起始點,並不是[PL1]的結束點。所以,此一播放清單檔案的執行流
程將為:
1. 立即觸發的起始區段標頭(PL1)
2. 播放video1.wmv
3. 進行另一區段(id=2)
4. 播放video2.wmv
5. 停止
Page 49

繁體中文-11
繁體中文
時間觸發(Time Triggered)
區段中被標頭指定的特定時間或觸發時間範圍。由於可支援萬用字元,媒體例行播放排程(亦
即每週一、每一週末等等)將變得非常容易。
語法:
[PL{id}:{time}(flag)]
有效參數值:
{id} = 0-255
{time} = {Year}/{Month}/{MonthDay}-{WeekDay}-{Hour}:{Minute}:{Second}
{Year} = {Wildcard} | 2000-2050
{Month} = {Wildcard} | 1-12
{MonthDay} = {Wildcard} | 1-31
{WeekDay} = {Wildcard} | SUN | MON | TUE | WED | THU | FRI | SAT | 0-7
{Hour} = {Wildcard} | 0-23
{Minute} = {Wildcard} | 0-59
{Second} = {Wildcard} | 0-59
{Wildcard} = *
(flag) = :+ | :SMOOTH
範例:
[PL20:2007/01/01-MON-12:00:00]
[PL20:2007/01/*-0-12:00:00]
[PL100:2007/*/*-TUE-14:00:00:SMOOTH]
FAQ:
1. 萬用字元意指該欄位可以為任意值。
2. {WeekDay}欄位僅在{MonthDay}為萬用字元時才會生效。
3. 當使用整數於{WeekDay}時,0 和 7 皆代表週日。
4. 若於同一時間安排多個區段,將會執行其中id 值最大的區段。
立即觸發(Hard Triggered)
立即觸發標頭可視為預設播放區段。若有其他標頭符合觸發條件(如時間已到),則該觸發標
頭將會代替非立即觸發標頭生效。
語法:
[PL{id}:start]
有效參數值:
{id} = 0-255
範例:
[PL1:start]
請注意,只能有一個立即觸發區段。包含多個立即觸發標頭會被視為錯誤的播放清單檔案,
因此將不會載入裝置中。
Page 50

繁體中文-12
English
區段命令(Section Commands)
區段命令係用以定義播放清單實體的設定。目前支援的設定有區域設定與視訊設定。雖然在
前一範例中,命令被放於區段標頭之後,但命令亦可放於區段中的任何位置。一旦命令被執
行,設定即會生效,直到被其他命令覆寫為止;更換區段並不會將設定重設。例如,
[PL1:start]
<<VIDEO:ON>>
<video1.wmv>
^[PL1]
[PL2:2007/01/01-MON-12:00:00]
<<VIDEO:OFF>>
^[PL2]
[PL3:2007/*/02-*-12:00:00]
<video2.wmv>
^[PL3]
若裝置時間為 2006/12/01,則執行流程如下:
1. 由於尚未到時間觸發標頭所指定的時間,因此立即觸發標頭(PL1)被觸發。
2. 打開視訊輸出。
3. 播放video1.wmv。
4. 跳至區段標頭(PL1),然後重複步驟 1、2、3 和 4,直到 2007/01/01 的12:00:00 為止。
5. 在2007/01/01 的 12:00:00 時,區段(id=2)被觸發。
6. 關閉視訊輸出,然後重複步驟5 和 6,直到 2007/01/02 的 12:00:00 為止。
7. 在2007/01/02 的 12:00:00 時,區段(id=3)被觸發。
8. 嘗試播放video2.wmv,但因視訊輸出已關閉而發生錯誤!
此範例說明了視訊打開/關閉命令將會持續生效,無論目前正執行哪一區段。此外,並說明
了有一設計上的疏忽,其將造成裝置在 2007/01/02 的 12:00:00 之後無法運作。
區域設定(Region Setting)
區域設定係用以定義顯示區域的左上角座標及其大小。媒體檔案可透過指定區域 id 選擇已定
義的區域作為顯示區域。
語法:
<<REGION:{id}:{x},{y},{width},{height}>>
有效參數值:
{id} = 0-15
{x} = 整數
{y} = 整數
{width} = 整數
{height} = 整數
Page 51

繁體中文-13
繁體中文
範例:
<<REGION:0:0,0,1280,720>>
<<REGION:1:200,0,1080,720>>
注意:可將{x}、{y}、{width}和{height}設定為 0,以定義全螢幕區域。
視訊設定(Video Setting)
視訊設定係用以打開/關閉視訊輸出訊號。
語法:
<<VIDEO:{OnOff}>>
有效參數值:
{OnOff}= ON | OFF
範例:
<<VIDEO:ON>>
<<VIDEO:OFF>>
注意:當使用一個以上的播放清單檔案時(亦即多區域應用),只需使用一個播放清單控制視
訊設定即可。在多個播放清單中控制視訊設定雖然可行,但容易產生邏輯性錯誤,因而導致
不可預期的結果。
區段項目(Section Items)
區段項目為帶有選用規格的媒體項目。單一媒體項目可能有一種以上的規格,但並非每一規
格皆可使用於所有類型的媒體項目(亦即圖像、影片)。支援的規格有:區域、播放長度以及
播放效果。
區域規格(Region Specification)
此規格使用於多區域應用。您可指定媒體檔案在預先定義的區域中播放(請參考「區段命令
(Section Commands)」的「區域設定」章節)。
語法:
<{MediaFileName}>(RegionSpec)
有效參數值:
{MediaFileName} = 媒體資料夾內的有效媒體檔案名稱
(RegionSpec) = ,R({RegionId})
{RegionId} = 0-15
範例:
<video1.wmv>,R(0)
FAQ:
1. 若無指定區域規格,則預設區域為全螢幕。
2. 若使用錯誤的座標(亦即大於顯示區域),則將以全螢幕區域取代。
3. 媒體將會被調整為符合所指定的區域。
Page 52

繁體中文-14
English
播放長度規格(Play Length Specification)
播放長度規格係用以控制指定媒體項目的播放時間長度。播放影像項目時,務必定義此規格。
語法:
<{MediaFileName}>(LengthSpec)
有效參數值:
{MediaFileName} = 媒體資料夾內的有效媒體檔案名稱
(LengthSpec) = ,L({hour}:{miniute}:{second})
| ,L({miniute}:{second})
| ,L({second})
範例:
<video1.wmv>,L(5:30)
<image1.png>,L(90)
FAQ:
1. {second}和{minute}的值可以超過 60。
2. 若指定長度比媒體播放長度短,則媒體將會停止播放,然後以指定的時間長度進行下一
項目的播放。
3. 若媒體播放長度比指定長度短,所指定的規格將為無效。
4. 若未針對影像項目指定長度規格,則影像播放時間長度將短而不可預期。
播放效果規格(Play Effect Specification)
播放效果共有兩種:圖像效果和顯示效果。請注意效果與檔案種類相關。圖像效果僅可套用
於影像檔案,而顯示效果僅可使用於視訊檔案。
圖像效果(Picture Effect)
圖像效果係用以將效果套用至文字圖像上。圖像的大小有其限制,最大為1920 x 100。{param}
可控制移動速度,此參數僅對 CrawlLeft 與 CrawlRight 有效。{param}數值的建議範圍為:
10 至 60。針對 CrawlDown 與 CrawlUp,建議增加其播放長度規格,否則文字將移動經過區
域,而不會暫停。
語法:
<{MediaFileName}>(EffectSpec)
有效參數值:
{MediaFileName} = 媒體資料夾內的有效媒體檔案名稱
(EffectSpec) = ,E({effect})
| ,E({effect},{param})
圖像效果:
{effect} = Appear | CrawlLeft | CrawlRight | CrawlUp | CrawlDown
{param} = 整數
範例:
<image1.png>,E(CrawlLeft,20)
<image2.jpg>,E(CrawlDown),L(5)
Page 53

繁體中文-15
繁體中文
顯示效果(Display Effect)
顯示效果可控制將媒體顯示於畫面上的方式。信箱效果可將媒體以原始比例顯示在整個螢幕
上;若媒體大小比例和螢幕比例不同,可能會於上/下或左/右側加入黑邊。全畫面效果將
藉由裁切邊緣來調整媒體項目,使其顯示最大化。延展效果是唯一會改變媒體大小比例的效
果。媒體項目將會延展至佔滿整個螢幕的大小。
語法:
<{MediaFileName}>(EffectSpec)
有效參數值:
{MediaFileName} = 媒體資料夾內的有效媒體檔案名稱
(EffectSpec) =,E({effect})
顯示效果:
{effect} = LetterBox | PanScan | Stretch
範例:
<video1.wmv>,E(PanScan)
<video2.wmv>,R(2),E(LetterBox)
完整範例
[PL0:start] # CONFIGURATION
^[PL102] # PL102:1280x720
[PL200] # SLIDESHOW
^[PL2] # PL1:Picture, PL2:Video, PL3:OSD(png file)
[PL102] # 1280x720
<<REGION:1:0,0,416,648>> # Left-Screen: Picture
<<REGION:2:416,0,864,648>> # Right-Screen: Video
<<REGION:3:864,0,416,648>> # Right-Screen: Picture
<<REGION:4:0,0,864,648>> # Left-Screen: Video
<<REGION:5:0,648,1280,72>> # OSD(png file)
^[PL200]
[PL1]
<picture1.jpg>,L(8),R(1)
<picture2.jpg>,L(8),R(1)
^[PL1]
[PL2]
<video1.wmv>,R(2),E(PanScan)
<video2.wmv>,R(2),E(PanScan)
^[PL2]
[PL3]
<textImage1.png>,E(CrawlLeft,64),R(5)
<textImage2.png>,E(CrawlLeft,64),R(5)
^[PL3]
Page 54

繁體中文-16
English
FAQ:
1. 若載入錯誤的播放清單檔案,裝置將會有何反應?
若播放清單檔案錯誤,裝置便不會播放任何媒體檔案,畫面上也不會顯示任何內容。
2. 若播放清單中指定的媒體在裝置的媒體資料夾中不存在,裝置是否會自動跳過那些遺失
的檔案?
檔案遺失會被視為是嚴重情況。裝置對檔案遺失與檔案損壞的處理均為相同;若此種錯
誤發生超過 10 次,系統將進入維護狀態 10 分鐘,然後自動重開機。資料損壞問題可利
用「檢查檔案系統(check file system)」程序加以修復,但播放清單錯誤則必須手動修
復。
Page 55

繁體中文-17
繁體中文
附錄 B: Adfotain Central MZ 使用指南
簡介
Adfotain central 管理伺服器係一功能強大的應用程式,可讓使用者在 HDMP-S100 的 WAN
模式下控制其數位電子看板網路。Adfotain 具有易於使用的介面,使用者只需稍加訓練便可
透過網際網路開始管理其數位電子看板裝置。本文件將介紹 Adfotain 管理伺服器的功能,幫
助您對此應用程式有一些基本的了解。
開始之前
存取此程式之前,請確認您已備妥以下資訊。
1. 帳號名稱
2. 存取密碼
※ 請於 http://passport.IAdea.net/ 註冊, 以取得帳號名稱/存取密碼。
登入(Login)
存取 Adfotain Central MZ - 數位電子看板管理系統
1. 打開您的網路瀏覽器,然後在網址列輸入下面位址:http://www.adfotain.net/mz
2. 在您首次連結Adfotain Central MZ 時,您將會看到 Adfotain central 歡迎畫面(圖1)。
Adfotain central 伺服器將會於 5 秒鐘後引導您至登入(Login)頁面。
圖 1:Adfotain Central 歡迎畫面
Page 56

繁體中文-18
English
3. 當您進入登入(Login)頁面(圖 2)時,請輸入您的使用者 ID(User ID)和密碼(password)
並登入系統。請注意,盡可能輸入正確的Adfotain central 帳號資訊是非常重要的,使用
者 ID 和存取密碼皆有大小寫之分。
圖 2:登入頁面
4. 在您成功登入後,系統將轉換至Adfotain central 裝置管理畫面(圖 3),透過此畫面,
您可根據您的需求開始設定程式。
圖 3:Adfotain Central 管理畫面
Page 57
繁體中文-19
繁體中文
管理介面簡介
Adfotain central 管理伺服器將畫面分為三個框架:
1. 功能導覽框架(圖4a)。
2. 裝置選取框架(圖4b)。
3. 選取功能顯示框架(圖4c)。
請參考下面圖示。
圖 4:管理介面
功能導覽簡介
功能導覽中共有五項主要功能:播放器(Device)、排程(Schedule)、媒體(Media)、統計
(Stats)和管理(Admin)。每一功能將詳述於後面章節。
圖 4a:功能導覽
圖 4b:裝置選取
圖 4c:功能顯示
Page 58

繁體中文-20
English
播放器選取簡介
播放器選取可讓您輕鬆存取及查詢所有裝置。系統將提供圖例,以利快速查詢裝置線上狀態。
功能顯示簡介
所有控制按鈕皆列示於所對應的資訊圖表上方(圖 5)。
圖 5:功能顯示簡介
一開始時可能會有某些控制按鈕停用的情形。這些停用的控制按鈕需要由某些前置動作啟
用。更多有關前置動作的資訊,將於後面章節中說明。
播放器管理(Device Management)
播放器管理能提供有關所有已註冊裝置的基本資訊,並可讓您將裝置分成群組。
控制按鈕
資訊圖表
Page 59
繁體中文-21
繁體中文
播放器群組管理(Device Group Management)
將播放器分成群組可讓裝置管理更容易。裝置群組下的所有裝置將會繼承該群組的排程計
畫。我們在 Adfotain central MZ 中導入了多層群組機制。每一群組皆可指派於另一群組之下,
藉以建立樹狀群組結構。子群組將繼承其所屬父群組的排程計畫。
圖 6:裝置群組管理
控制按鈕
新增群組(Create New Group)
1. 點按[新增群組(Create New Group)],畫面將出現一彈出式圖示。
2. 在新群組名(New name)欄位內輸入群組名稱。由於是新增第一個群組,在[新增群組
於(Create group under)]內將不會有任何選擇。
3. 點按確定(OK)。系統將會回應一確認訊息,指出已接受變更或是失敗。
4. 成功新增群組之後,該群組將會加入裝置選取框架中,以方便查詢該群組之資訊。
建立子群組(Create Sub-Group)
1. 點按[新增群組(Create New Group)],畫面將出現一彈出式圖示。
2. 在新增名稱(New name)欄位內輸入子群組名稱。
3. 從[新增群組於(Create group under)]所列示的清單中,選擇您希望此子群組成為其一
部分的群組作為父群組。
4. 點按確定(OK)。系統將會回應一確認訊息,指出是否已接受變更。
Page 60

繁體中文-22
English
清除群組(Free Group)
1. 在您想要停用的群組旁,點按其核取方塊以選取群組。
2. 點按[清除群組(Free Group)]。
3. 畫面將會出現警告訊息。點按確定(OK)以確認動作。
注意,該群組之下的所有子群組與裝置將會一併刪除。
群組重新命名(Rename Group)
1. 在您想要重新命名的群組旁,點按其核取方塊。
2. 點按[群組重新命名(Rename Group)]。
3. 輸入新的群組名稱,然後點按確定(OK)以確認變更。
改變所屬群組(Change Parent Group)
1. 在您想要變更的群組旁,點按其核取方塊。
2. 點按[改變所屬群組(Change Parent Group)]。
3. 選擇您想要的父群組。點按確定(OK)以確認動作。
注意:為避免產生循環性群組,只有可用的父群組才會顯示出來供您選擇。
退出群組(Ungroup Device)
1. 在您想要取消群組的裝置旁,點按其核取方塊。
2. 點按[退出群組(Ungroup Devices)]。
3. 畫面將會出現警告訊息。點按確定(OK)以確認動作。
注意:裝置取消群組之後,將會自動移至裝置管理(Device management)表中。
播放器重新命名(Rename Device)
1. 在您想要重新命名的裝置旁,點按其核取方塊。
2. 點按[播放器重新命名(Rename Device)]。
3. 在彈出式輸入框中輸入新的裝置名稱。點按確定(OK)以確認變更。
設定播放器時區(Set Device Time Zone)
1. 在您想要設定時區的裝置旁,點按其核取方塊。
2. 點按[設定播放器時區(Set Device Time Zone)]。
3. 選擇您想要的時區,然後點按確定(OK)以確認動作。
Page 61

繁體中文-23
繁體中文
播放器管理(Device Management)
圖 7:播放器管理
控制按鈕
設定(Assign to Group)
1. 在您想要指派至某一群組的裝置旁,點按其核取方塊。
2. 點按[設定(Assign to Group)]。
3. 從下拉式選單中選取您想要的群組。點按確定(OK)以確認動作。
播放器重新命名(Rename Device)
1. 在您想要重新命名的裝置旁,點按其核取方塊。
2. 點按[播放器重新命名(Rename Device)]。
3. 在彈出式輸入框中輸入新的裝置名稱。點按確定(OK)以確認變更。
設定播放器時區(Set Device Time Zone)
1. 在您想要設定時區的裝置旁,點按其核取方塊。
2. 點按[設定播放器時區(Set Device Time Zone)]。
3. 選擇您想要的時區,然後點按確定(OK)以確認動作。
排程管理(Schedule Management)
排程管理提供了可讓使用者在裝置上設計其播放內容的功能。
Page 62

繁體中文-24
English
每月排程(Month Schedule)檢視
點按功能導覽列上的排程(Schedule)選項後,月計畫會顯示在功能顯示框架中。
圖 8:月計畫
月計畫係以格林威治標準時間(Greenwich Mean Time,GMT+0)為準。已過去的日期將於
數字上加刪除線並以灰色背景標示。所有具有播放時槽排程計畫的裝置或裝置群組都將顯示
於此。點按裝置/裝置群組名稱即可連結至其所對應的排程計畫。
播放器群組資訊(Device Group Information)
播放器群組資訊將顯示所有指派至該群組的裝置數目。圓形統計圖可顯示該群組中所有裝置
的線上狀態。
圖 9:播放器群組資訊
Page 63

繁體中文-25
繁體中文
播放器資訊(Device Information)
播放器資訊將顯示擁有者、韌體、時區、當地時間以及最後使用裝置的時間。詳細統計數值
(Detail Stats)按鈕則可提供快速連結至裝置統計數值頁面的介面。
圖 10:播放器資訊
排程管理(Schedule Management)
圖 11:排程管理
圖 11a:行事曆
圖 11b:時間表
Page 64
繁體中文-26
English
行事曆(Calendar)
1. 已過去的日期將以刪除線標示。
2. 選取的日期將以橘色加強顯示。使用者只需在行事曆上點按想要的日期便可變更顯示日
期。
時間表(Timetable)
顯示所選取日期的排程計畫。
同步(Sync)欄
使用者可勾選同步(sync)欄中的核取方塊,要求裝置進行更新。裝置將執行必要的下載,
並在勾選的同步點變更其播放清單。
控制按鈕
立即同步(Sync Now)
選擇此功能可強制裝置立即執行更新。換言之,一個設定為目前時間的同步點將會插入裝置
的排程計畫中。
新增播放節目(Create a Play Slot)
播放時槽為播放某一媒體的預定時間。區域選取共有11 種區域設定可供選擇。在建立時槽之
後,點按時槽將可前往播放清單編輯器,您可利用編輯器將已註冊的媒體項目排程到該時槽
播放。
圖 12:螢幕區域選取
確認編輯(Confirm Editing)
為避免裝置對目前編輯中的播放時槽執行同步動作,所有播放時槽皆須經過確認,裝置才能
夠讀取。
Page 65

繁體中文-27
繁體中文
移除播放時段(Remove Play Slot)
1. 勾選播放時槽旁的核取方塊,以選取欲移除的播放時槽;系統也在顯示所選取日期的表
頭處提供了選擇全部(select all)的核取方塊。
2. 點按移除播放時段(Remove Play Slot)。
3. 畫面將會出現警告訊息。點按確定(OK)以確認動作。
編排指令(Schedule Commands)
1. 點按[編排指令(Schedule Commands)]按鈕。
2. 在出現的選單中選取命令,然後輸入時間。
3. 點按確定(OK)以確認排程。
複製(Repeat Play Slot)
共有兩種重複方法可供使用。一種是與原始時槽維持關係,另一種是進行複製變成重複時槽。
若與原始時槽的關係仍然存在,原始播放時槽的修改亦將套用於所有重複時槽。換言之,複
製原始時槽的方法提供了以原始時槽為基礎自定排程計畫內容的彈性。
1. 點按播放時槽旁的核取方塊,以選取播放時槽。
2. 點按[複製(Repeat Play Slot)]按鈕。
3. 在出現的選單中選擇重複類型,然後輸入欲重複的週期次數。
4. 若您欲複製以產生重複時槽,請勾選複製儲存重複時槽(Save repeated slot as a copy)
選項。若該選項未勾選,則原始時槽與重複時槽之間將存在關係。
5. 點按確定(OK)以確認動作。
取消重複(Cancel Repeat)
[取消重複(Cancel Repeat)]將移除仍與原始時槽維持關係之重複時槽的重複效果。
清除所有播放時段(Clear All Schedule)
此功能將刪除該群組或裝置的所有播放時槽。請注意繼承的播放時槽將不受影響。
Page 66

繁體中文-28
English
播放清單編輯器(Play List Editor)
點按任一有效的播放時槽將可前往播放清單編輯器頁面。在此頁面中,使用者可將媒體項目
指定給對應的螢幕區域並決定播放順序。
圖 13:播放清單編輯器
Page 67
繁體中文-29
繁體中文
移動滑鼠至螢幕區域圖示的上方,滑鼠所指區域的大小將如下圖所示。
所有螢幕區域的大小列示於右表
中。
控制按鈕
指定剪輯至播放清單(Assign Clip to Play List)
在區域圖示上點按您想要的螢幕區域,所選取的區域將以黃色加強標示。
點按[+ 點按以擴充媒體庫(+ Click to Expand Media Library)]以擴充媒體庫。[指定剪輯至
播放清單(Assign Clip to Play List)]按鈕將顯示於媒體庫下方。
在您欲指定至想要的播放螢幕區域之媒體項目或預先定義播放清單旁,點按其核取方塊。
點按[指定剪輯至播放清單(Assign Clip to Play List)],以將媒體項目指定至選取的螢幕區
域。
修改播放時間長度(Modify Play Duration)
1. 在區域圖示上點按您想要的螢幕區域,所對應的指定媒體將顯示於播放清單表中。
2. 在您想要變更播放時間長度的媒體項目旁,點按其核取方塊。
3. 點按[修改播放時間長度Modify Play Duration]。
4. 輸入您想要的播放長度,單位為秒。
5. 點按確定(OK)以確認修改。
Page 68

繁體中文-30
English
修改效果(Modify Effects)
1. 在區域圖示上點按文字區域。注意:效果僅可套用於文字媒體檔案。
2. 在您想要變更效果的文字媒體項目旁,點按其核取方塊。
3. 點按[修改效果(Modify Effects)]。
4. 在出現的修改效果選單(Modify Effects Menu)中,設定您想要的效果。
5. 點按確定(OK)以確認變更。
移除媒體(Remove Media)
1. 在您不再需要於區域中播放的媒體項目旁,點按其核取方塊。
2. 點按[移除媒體(Remove Media)]。
媒體管理(Media Library)
媒體管理提供了使用者組織其媒體 URL 的功能。媒體一經註冊至媒體庫,便可在裝置上排程
播放。常用媒體剪輯亦可安排於預先定義的播放清單中,以讓排程程序更為容易。
媒體總管(Media Library)
圖 14:媒體庫
Page 69

繁體中文-31
繁體中文
控制按鈕
註冊影片及圖片網址(Register Video/Image URL)
1. 點按[註冊影片及圖片網址(Register Video/Image URL)]。
2. 在出現的對話框中的文字區域輸入URL。
注意:一次可註冊多個 URL。在每一 URL 後按enter 鍵可將 URL 分行輸入。
3. 若URL 受 http 基本驗證保護,則必須輸入使用者(User)與密碼(Password)欄位。
4. 點按確定(OK)以進行註冊。系統將產生一份報表,通知您URL 是否註冊成功。
註冊文字檔網址(Register Text URL)
1. 點按[註冊文字檔網址(Register Text URL)]。
2. 在出現的對話框中的文字區域輸入URL。
注意:一次可註冊多個 URL。在每一 URL 後按enter 鍵可將 URL 分行輸入。
3. 點按確定(OK)以進行註冊。系統將產生一份報表,通知您URL 是否註冊成功。
解除註冊(Unregister)
1. 在您想要取消註冊的媒體項目旁,點按其核取方塊。
2. 點按[解除註冊(Unregister)],畫面將出現確認訊息。
3. 確認解除註冊之後,您所選取的媒體項目將自媒體庫中移除。
新增/更改保密設定(Add/Modify Authentication)
1. 此功能可讓使用者根據新的URL 驗證設定進行新增或修改。
2. 點按媒體項目旁的核取方塊。
3. 點按[新增/更改保密設定(Add/Modify Authentication)],然後輸入新的使用者名稱和
密碼。
4. 點按確定(OK)按鈕以確認設定。
設定(Assign Clip to Predefine Play List)
1. 在您想要歸類至預先定義播放清單的媒體項目旁,點按其核取方塊。
2. 點按[設定(Assign Clip to Predefine Play List)]。
3. 選擇您想要的播放清單,然後點按確定(OK)。
更改播放長度(Modify Play Duration)
1. 在您想要變更播放時間長度的媒體項目旁,點按其核取方塊。
2. 點按[更改播放長度(Modify Play Duration)]。
3. 輸入您想要的播放時間長度,單位為秒。
4. 點按確定(OK)以確認變更。
Page 70

繁體中文-32
English
更新(Update)
已註冊的 URL 可能會遺失或被移除。媒體庫在裝置嘗試下載 URL 三次失敗之後,將會封鎖
無法存取的媒體 URL。若 URL 遭到封鎖而出現在裝置的排程計畫中,則所有裝置將會跳過
該 URL。如欲解除 URL 封鎖狀態,使用者必須更新媒體伺服器中的檔案,並使用Adfotain
媒體庫中的[更新(Update)]功能釋放該 URL。
1. 在您想要從媒體伺服器更新其資訊的媒體項目旁,點按其核取方塊。
2. 點按[更新(Update)]。
媒體庫播放清單(Media library Playlist)
圖 15:預先定義播放清單
控制按鈕
新增播放清單(Add Play List)
1. 點按[新增播放清單(Add Play List)]。
2. 輸入預先定義播放清單的名稱。
3. 點按確定(OK)以確認動作。
清除播放清單(Free Play List)
1. 在您想要清除的播放清單旁,點按其核取方塊。
2. 點按[清除播放清單(Free Play List)]。
清除 URL(Free URL)
1. 在您想要自預先定義的播放清單中移除之媒體項目群組旁,點按其核取方塊。
2. 點按[清除URL(Free URL)]。
Page 71

繁體中文-33
繁體中文
統計(Stats)
統計管理功能可讓使用者輕鬆監視其數位電子看板網路的狀況。
簡介
點按位於功能導覽列的[統計(Stats)]功能後,將會帶您前往統計數值總覽頁面。在該頁面
中,您會看到一份摘要表格,其內包含所有裝置的最新事件。
圖 16:統計數值總覽
Page 72

繁體中文-34
English
播放器統計數值
點按[檢示播放器狀態(View Individual Device Stats)]或[詳細統計(Detail Stats)],即可前
往裝置的詳細統計數值頁面(圖 10)。該頁面包含了基本的裝置資訊、裝置內容、裝置事件
以及裝置播放記錄。
圖 17:播放器統計數值
Page 73

繁體中文-35
繁體中文
管理
更改警報電子郵件(Modify Alarm Email)
每一裝置可以有一或多個警示電子郵件地址。當發生與裝置有關的緊急狀況時,中央伺服器
將會發出警示通知至指定的電子郵件地址。
使用者可在系統管理(Administration Management)畫面上修改或重新指定警示電子郵件。
1. 點按裝置旁的核取方塊。
2. 點按[更改警報電子郵件(Modify Alarm Email)]。
3. 在出現的選單中將會列出所有選取的裝置,並提供一文字框用以輸入電子郵件。若有多
個收件者,請以逗號(,)或分號(;)分隔電子郵件。
4. 點按確定(OK)以確認設定。
格式化儲存設備(Format Storage)
使用者可在遠端將儲存裝置格式化。請注意此動作將會清除所有內容。若裝置有排程內容,
則在格式化之後將會重新下載所有媒體。
強迫重開機(Force Reboot)
強迫重開機可讓您在遠端進行裝置的軟式重新開機。
更改密碼(Change Password)
使用者可從系統管理畫面變更其在 Adfotain Central MZ 系統註冊時系統所給的原始密碼。
如欲變更您的密碼:
1. 點按管理(Admin)功能。
2. 往下捲動畫面,直到看見[更改密碼(change password)]。
3. 您必須在指定的輸入框內輸入舊的密碼,然後再輸入欲使用的新密碼。
4. 再次輸入新的密碼,以作確認的動作。
5. 點按[更改密碼(change password)]按鈕進行變更。
6. 畫面將顯示一訊息,供您確認該變更。
Page 74

Page 75

简体中文-1
简体中文
HDMP-S100 电子广告牌播放器使用手册
目录
简介 ................................................................................................ 简体中文-2
包装内容 ......................................................................................... 简体中文-2
其他要求 ......................................................................................... 简体中文-2
安装 ................................................................................................ 简体中文-2
开机信息 ......................................................................................... 简体中文-3
操作原则 ......................................................................................... 简体中文-4
设置选项 ......................................................................................... 简体中文-4
固件升级 ......................................................................................... 简体中文-6
技术规格 ......................................................................................... 简体中文-7
疑难排解及常见问题 ....................................................................... 简体中文-8
附录 A:HDMP-S100 播放清单使用指南 ........................................ 简体中文-9
附录 B:Adfotain Central MZ 使用指南......................................... 简体中文-17
Page 76

简体中文-2
简体中文
简介
HDMP-S100 是一种高画质数字电子广告牌播放器(High Definition Digital Signage Player)
的扩充模块,具备简易的网络管理接口,可通过任何 TCP/IP 网络来提供高画质(720p)的
数字电子广告牌内容。此扩充模块必须插入专为 HDMP-S100 设计的兼容显示设备的扩充插
槽内。
HDMP-S100 具有通过 USB 连接端口连接外围设备来增强互动性的附加功能;此附加功能仅
用于升级和设置。
本文件将说明有关此设备的一些基本操作。
包装内容
1. HDMP-S100 数字电子广告牌播放器 x 1
2. HDMP-S100 数字电子广告牌播放器使用手册 x 1
其他要求
操作 HDMP-S100 电子广告牌播放器所需之其他项目如下:
1. 一块 2.5 英寸硬盘(默认配置)或一张 Compact Flash(CF)存储卡(选配)。
2. 连接因特网的以太网络(Ethernet)。建议使用具有动态主机配置协议(DHCP,Dynamic
Host Configuration Protocol)服务的以太网络(Ethernet)。如果您不确定是否具有 DHCP
服务,请向您的网络工程师咨询。
安装
1. 请确认已关闭显示器主电源开关,并拔掉电源线。
2. 将指旋螺丝松脱,并拆下输入插槽的护盖。
3. 以正确方向(参考图示说明)插入扩充模块,并小心地将模块推到底部,直到面板与基
座齐平。(如果方向错误,扩充模块将无法插到底部)
4. 锁紧指旋螺丝。
5. 接上电源线并打开背面的主电源开关,然后打开显示器或遥控器上的电源键,显示器将
自动探测到扩充模块。
6. 此时扩充模块上的绿色 LED 电源指示灯应该亮起。
Page 77
简体中文-3
简体中文
注意:
1. 安装扩充模块之前,务必关闭主电源开关并拔掉电源线。
2. 请勿在使用显示器时拔出扩充模块,否则可能造成扩充模块与显示器的永久性损坏。
3. 必须由合格技术人员完成扩充模块的安装,为防止产生静电,不要触摸黑色连接器里的
插针。
将 HDMP-S100 扩充模块安装在显示器背面,按照使用手册的说明安装模块的数字电子广告
牌内容管理服务软件。
开机信息
打开已安装 HDMP-S100 模块的显示器后,您将会在画面上看到以下信息:
1. 屏幕上出现启动画面。
2. 几秒钟后,您将看到其它文字信息显示在画面中:
a. MAC地址(HDMP-S100 的唯一网络标识)
b. DHCP状态(如果找不到DHCP服务,则会显示“NO DHCP”)
c. 由DHCP服务分配的IP地址(如果找不到DHCP服务,则会显示“169.254.1.1”)
d. 工作模式:LAN或WAN(Local Area Network局域网或Wide Area Network广域网)
模式。出厂预设为WAN模式。如果要使用其它工作模式,请按照说明设置。
3. 如果您使用 WAN 模式,数字电子广告牌播放器将尝试寻找并连接至指定的服务器。
Page 78
简体中文-4
简体中文
操作原则
HDMP-S100 数字电子广告牌播放器是一种硬件 MPEG-1/2/4 视频解码器,具备网络连接能
力。要在 HDMP-S100 数字电子广告牌播放器上播放的内容必须先转换为 MPEG-1/2/4 格式
才可以顺利播放。如果适当连接网络(LAN 或 WAN)或是以网络跳接线直接连接个人电脑,
可通过标准网络浏览器设置 HDMP-S100。设置完成后,此设备即可:
1. 连接至 Adfotain 中央管理服务器(需另外购买,费用另计,详情请参考附录 B),以进行
全局、层级、网络式管理(WAN 模式)。使用 WAN 工作模式时,可将健全、可扩充的
数字电子广告牌服务安装在不同的网络环境下(也就是不同的网络基础架构、位置、防
火墙设置),以便监视硬件工作情况并管理工作安排,进而确保媒体内容能及时传递。
2. 或者以内置的控制脚本语言(参考附录 A)播放媒体内容,此方式适应小规模数字电子
广告牌应用的需求(LAN 模式)。使用 LAN 工作模式时,可通过简单的工作安排与文件
管理快速架设一种简单的非层级式类型的数字电子广告牌网络。
设置选项
HDMP-S100 具有内置网络接口,您可通过网络浏览器更改设置选项。在网络浏览器上输入
开机画面所显示 IP 地址即会显示以下登入画面。预设登录账号名称为“admin”,预设密码
为“digiSignage”(不包括引号)。
Page 79

简体中文-5
简体中文
登录后,您将会看到设置选项的列表:
1. 设备名称(Device name)(用于通用随插即用(UPnP,Universal Plug-and-Play)探测)
2. IP 设置(IP configuration)(DHCP、静态等)
3. 指定网络路径 (Extra Routing) (可设定 5 组路径)
4. 日期/时间设置(Date/Time Setting)(可从时间服务器自动调整内部时钟)
5. 视频设置(Video Setting)(媒体原始逻辑与输出分辨率)
6. 更改密码(Change password)
7. 文件管理员(File manager)(此功能仅适用于 LAN 工作模式)
8. 查看记录(View logs)(记录播放清单状态,仅适用于 LAN 工作模式)
9. 管理服务器(Administration Server)(在 WAN 模式下用以存取 Adfotain Central 服务器)
10. 升级固件(Upgrade firmware)
11. 备份设置(Backup setting)(储存缺省设置参数)
12. 注销(Logout)
Page 80

简体中文-6
简体中文
固件升级
1. 如果您的授权经销商或技术支持人员认为您需要进行固件升级,请小心按照以下说明进
行升级。
2. 在登录设备网络设置页面后,将设备切换至 LAN 模式。
3. 点击[固件升级(Upgrade firmware)],然后浏览固件包文件。您可以从授权经销商处获
得固件更新。或者,向vdservice@delta.com.tw发送电子邮件,获取最新版本固件。
4. 画面将显示固件升级进度。
注意:请保持电源开启,以确保升级过程不被中断。如果升级过程发生中断,将造成升级失
败和系统永久性损坏。
Page 81

简体中文-7
简体中文
技术规格
处理器
Sigma Designs EM8621L
系统内存
64 MB DDR RAM
闪存 16MB 闪存
操作系统内核 µCLinux 内核
最大输出分辨率
1920x1080@60Hz
建议多媒体分辨率
1280x720 (720p)
1024x768 (XGA)
大容量储存器支持*
2.5 英寸超薄硬盘(默认);80G(最大)
CF 闪存卡(选配);8G(最大)
USB 插座 2个 USB 2.0 端口 (A 型)
RJ-45 插座 IEEE 802.3 以太网络 10/100 Base-T
指示灯 电源打开(绿色 LED)
电源要求 DC-12V/12W(最大)
工作环境 0至 40℃,5%至 95%相对湿度
存放环境 -20 至 60℃,5%至 95%相对湿度
尺寸(宽 x 高 x 深)
212 x 150 x 40 (mm)
8.35” x 5.91” x 1.57”
净重
0.95 kg
2.09 lbs.
* 只可以同时安装及操作一种大容量储存器
Page 82

简体中文-8
简体中文
疑难排解及常见问题
安装
1. 将模块插入显示器之后,绿色 LED 灯并没有亮起。
a. 请检查电源线连接情况,并打开显示器电源(请参阅显示器的使用手册)。
2. 绿色 LED 灯虽然已亮起,但画面上什么都没有显示。
a. 请切换显示器上的「输入(Input)」按钮或遥控器上的「来源(Source)」按钮,
确认显示器已切换至正确的输入来源(即输入信号 1)。
b. 如果仍无法解决问题,请关闭显示器背面的主系统电源,然后重新打开电源。
3. 画面上显示的视频开起来一直闪烁、移动或者颜色不对(颜色偏绿)。
a. 通常这是由不正确的输出设置造成的。请登录系统并使用 LAN 模式设置,以将设
备设置为适当的输出格式。
b. 如果仍无法解决问题,请关闭显示器背面的主电源、拔下电源线,并拔下扩充模块
重新安装。
内容制作
1. 我应该怎样在立式显示器(9:16 直立安装)上建立与制作内容?
您必须将 9:16 的图像或影片逆时针旋转 90 度,变成水平版面,然后再输入播放器。
2. 如果我的内容制作工具无法制作 MPEG-1/2/4 影片,请问有何建议?
为了能够顺利播放,请尽可能制作成 Microsoft Windows Video(WMV)的文件格式。
3. 推荐使用哪种 MPEG-1/2/4 影片规格?
MPEG-1/2:1280x780,30 fps,5 Mbps。MPEG-4:DivX(高级简易设置档)1280x720,
30 fps,5 Mbps。
Page 83

简体中文-9
简体中文
附录 A:HDMP-S100 播放清单使用指南
播放清单文件
播放清单文件用于让 HDMP-S100 数字电子广告牌播放器以LAN 工作模式来控制媒体文件的
播放(关于不同工作模式的说明,请参考“操作原则”章节)。HDMP-S100 最多可同时执行
三个独立的播放清单文件。播放清单文件是由简单的指令码语言组成,可利用任何文本编辑
器编写,例如个人电脑上的 Microsoft Notepad。语法、文件命名以及播放清单文件的编码必
须遵守严格的规范才能正常工作,请参考以下说明来建立播放清单文件。
1. 所有参数、语法和文件名称皆区分大小写。如果使用不正确的大写/小写字母,播放清单
文件将无法正确执行。
2. 播放清单文件必须使用 ASCII 编码储存。
3. 可接受的播放清单文件名称为:“PLAYLIST.0”、“PLAYLIST.1”和“PLAYLIST.2”。
HDMP-S100 可同时执行一个、两个、三个或四个播放清单文件;然而,同一时间只能有
一个播放清单文件含有视频播放。
4. 请务必在制作前将播放清单文件载入,并在 HDMP-S100 中预览播放。
5. 播放清单可能包含逻辑性错误,请确认已将标头与指令分开,以避免逻辑性错误。
下面为一典型播放清单文件的示例,其媒体项目是以 1280x720 大小播放,坐标(0, 0)为 画
面左上角的起始点,播放时间则为每周五、六、日的晚上 9 点。
[PL1:*/*/*-FRI-21:00:00]
[PL1:*/*/*-SAT-21:00:00]
[PL1:*/*/*-SUN-21:00:00]
<<REGION:0:0,0,1280,720>>
<<VIDEO:ON>>
<video1.wmv>,R(0)
<picture1.png>,L(7)
<picture2.png>,L(10),E(CrawlUp)
^[PL1]
播放清单文件通常至少由一个区段组成。每一个区段通常包含四个部分:标头(headers)、
指令(commands)、项目(items)以及跳转(jump)。下图说明如何区分以上示例中的每一
部分。
Page 84

简体中文-10
简体中文
区段(Section)
每个区段实际上就是一个播放清单。区段将会被其中一个标头触发,然后按照顺序进行指令
处理或播放。通常在播放结束时会出现一个跳转指令码,指出接下来要如何进行。在接下来
的段落中将使用如下所述的语法规则。
语法规则:
{ } = 要求输入参数
( ) = 选用参数
区段标头(Section Headers)
区段标头为一个区段的起始点。如果在一区段中使用多个标头,则任何一个标头都可能触发
该区段。标头共有三种:区段 ID(section ID)、时间触发(time triggered)以及立即触发(hard
triggered)。
区段 ID(Section ID)
此种标头仅用于标示区段的开始。其本身并不会启动区段,因此通常需要借助其它触发事件,
例如跳转(JUMP)事件。
语法:
[PL{id}]
有效参数值:
{id} = 0-255
示例:
[PL0]
[PL123]
请注意标头虽然为区段开始的标示,但并不是其它区段的结束。此为常见的误解。例如,
[PL1:start]
<video1.wmv>
[PL2]
<video2.wmv>
[PL2]只是区段(PL2)的起始点,并不是[PL1]的结束点。所以,此一播放清单文件的执行流
程将为:
1. 立即触发的起始区段标头(PL1)
2. 播放 video1.wmv
3. 进行另一区段(id=2)
4. 播放 video2.wmv
5. 停止
Page 85

简体中文-11
简体中文
时间触发(Time Triggered)
区段中被标头指定的特定时间或触发时间范围。由于支持通配符,媒体例行播放安排(即每
周一、每周末等)将变得非常容易。
语法:
[PL{id}:{time}(flag)]
有效参数值:
{id} = 0-255
{time} = {Year}/{Month}/{MonthDay}-{WeekDay}-{Hour}:{Minute}:{Second}
{Year} = {Wildcard} | 2000-2050
{Month} = {Wildcard} | 1-12
{MonthDay} = {Wildcard} | 1-31
{WeekDay} = {Wildcard} | SUN | MON | TUE | WED | THU | FRI | SAT | 0-7
{Hour} = {Wildcard} | 0-23
{Minute} = {Wildcard} | 0-59
{Second} = {Wildcard} | 0-59
{Wildcard} = *
(flag) = :+ | :SMOOTH
示例:
[PL20:2007/01/01-MON-12:00:00]
[PL20:2007/01/*-0-12:00:00]
[PL100:2007/*/*-TUE-14:00:00:SMOOTH]
常见问题:
1. 通配符指该字段可以为任意值。
2. {WeekDay}字段仅在{MonthDay}为通配符时才会生效。
3. 当使用整数于{WeekDay}时,0 和 7 皆代表周日。
4. 如果在同一时间安排多个区段,将会执行其中 id 值最大的区段。
立即触发(Hard Triggered)
立即触发标头可视为预设播放区段。如果有其它标头符合触发条件(如时间已到),则该触发
标头将会代替非立即触发标头生效。
语法:
[PL{id}:start]
有效参数值:
{id} = 0-255
示例:
[PL1:start]
请注意,只能有一个立即触发区段。包含多个立即触发标头会被视为错误的播放清单文件,
因此将不会加载到设备中。
Page 86

简体中文-12
简体中文
区段指令(Section Commands)
区段指令系用来定义播放清单实体的设置。目前支持的设置有区域设置与视频设置。虽然在
前一示例中,命令被放于区段标头之后,但命令也可放在区段中的任何位置。一旦命令被执
行,设置即会生效,直到被其它命令覆盖为止;更换区段并不会将设置重设。例如,
[PL1:start]
<<VIDEO:ON>>
<video1.wmv>
^[PL1]
[PL2:2007/01/01-MON-12:00:00]
<<VIDEO:OFF>>
^[PL2]
[PL3:2007/*/02-*-12:00:00]
<video2.wmv>
^[PL3]
如果设备时间为 2006/12/01,则执行流程如下:
1. 由于尚未到时间触发标头所指定的时间,因此立即触发标头(PL1)被触发。
2. 打开视频输出。
3. 播放 video1.wmv。
4. 跳至区段标头(PL1),然后重复步骤 1、2、3 和 4,直到 2007/01/01 的 12:00:00 为止。
5. 在 2007/01/01 的 12:00:00 时,区段(id=2)被触发。
6. 关闭视频输出,然后重复步骤 5 和 6,直到 2007/01/02 的 12:00:00 为止。
7. 在 2007/01/02 的 12:00:00 时,区段(id=3)被触发。
8. 尝试播放 video2.wmv,但因视频输出已关闭而发生错误!
此示例说明了视频打开/关闭命令将会持续生效,无论目前正执行哪一区段。此外,它也说
明了有一设计上的疏忽,它将造成设备在 2007/01/02 的 12:00:00 之后无法工作。
区域设置(Region Setting)
区域设置用来定义显示区域的左上角坐标及其大小。媒体文件可通过指定区域 id 选择已定义
的区域作为显示区域。
语法:
<<REGION:{id}:{x},{y},{width},{height}>>
有效参数值:
{id} = 0-15
{x} = 整数
{y} = 整数
{width} = 整数
{height} = 整数
Page 87

简体中文-13
简体中文
示例:
<<REGION:0:0,0,1280,720>>
<<REGION:1:200,0,1080,720>>
注意:可将{x}、{y}、{width}和{height}设置为 0,以定义全屏幕区域。
视频设置(Video Setting)
视频设置用于打开/关闭视频输出信号。
语法:
<<VIDEO:{OnOff}>>
有效参数值:
{OnOff}= ON | OFF
示例:
<<VIDEO:ON>>
<<VIDEO:OFF>>
注意:当使用一个以上的播放清单文件时(即多区域应用),只需使用一个播放清单控制视频
设置即可。在多个播放清单中控制视频设置虽然可行,但容易产生逻辑性错误,因而导致不
可预期的结果。
区段项目(Section Items)
区段项目为带有选用规格的媒体项目。单一媒体项目可能有一种以上的规格,但并非每一规
格皆可用于所有类型的媒体项目(即图像、影片)。支持的规格有:区域、播放长度以及播放
效果。
区域规格(Region Specification)
此规格用于多区域应用。您可指定媒体文件在预定义的区域中播放(请参考“区段命令
(Section Commands)”的“区域设置”章节)。
语法:
<{MediaFileName}>(RegionSpec)
有效参数值:
{MediaFileName} = 媒体文件夹内的有效媒体文件名称
(RegionSpec) = ,R({RegionId})
{RegionId} = 0-15
示例:
<video1.wmv>,R(0)
常见问题:
1. 如果没有指定区域规格,则预设区域为全屏幕。
2. 如果使用错误的坐标(即大于显示区域),则将以全屏幕区域取代。
3. 媒体将会被调整为符合所指定的区域。
Page 88

简体中文-14
简体中文
播放长度规格(Play Length Specification)
播放长度规格用于控制指定媒体项目的播放时间长度。播放图片项目时,务必定义此规格。
语法:
<{MediaFileName}>(LengthSpec)
有效参数值:
{MediaFileName} = 媒体文件夹内的有效媒体文件名称
(LengthSpec) = ,L({hour}:{miniute}:{second})
| ,L({miniute}:{second})
| ,L({second})
示例:
<video1.wmv>,L(5:30)
<image1.png>,L(90)
常见问题:
1. {second}和{minute}的值可以超过 60。
2. 如果指定长度比媒体播放长度短,则媒体将会停止播放,然后以指定的时间长度进行下
一项目的播放。
3. 如果媒体播放长度比指定长度短,所指定的规格将为无效。
4. 如果未针对图片项目指定长度规格,则图片播放时间长度将短而不可预期。
播放效果规格(Picture Effect Specification)
播放效果共有两种:图像效果和显示效果。请注意效果与文件种类相关。图像效果仅可用于
图片文件,而显示效果仅可用于视频文件。
图像效果(Picture Effect)
图像效果用于将效果用到文字图像上。图像的大小有限制,最大为 1920 x 100。{param}可
控制移动速度,此参数仅对 CrawlLeft 与 CrawlRight 有效。{param}数值的建议范围为 10 至
60。针对 CrawlDown 与 CrawlUp,建议增加其播放长度规格,否则文字将移动经过区域,
而不会暂停。
语法:
<{MediaFileName}>(EffectSpec)
有效参数值:
{MediaFileName} = 媒体文件夹内的有效媒体文件名称
(EffectSpec) = ,E({effect})
| ,E({effect},{param})
图像效果:
{effect} = Appear | CrawlLeft | CrawlRight | CrawlUp | CrawlDown
{param} = 整数
Page 89

简体中文-15
简体中文
示例:
<image1.png>,E(CrawlLeft,20)
<image2.jpg>,E(CrawlDown),L(5)
显示效果(Display Effect)
显示效果可以控制将媒体显示在画面上的方式。信箱效果可将媒体以原始比例显示在整个屏
幕上;如果媒体大小比例和屏幕比例不同,可能会在上/下或左/右侧加入黑边。全画面效
果将通过裁切边缘来调整媒体项目,使其显示最大化。延展效果是唯一会改变媒体大小比例
的效果。媒体项目将会延展至占满整个屏幕的大小。
语法:
<{MediaFileName}>(EffectSpec)
有效参数值:
{MediaFileName} = 媒体文件夹内的有效媒体文件名称
(EffectSpec) =,E({effect})
显示效果:
{effect} = LetterBox | PanScan | Stretch
示例:
<video1.wmv>,E(PanScan)
<video2.wmv>,R(2),E(LetterBox)
完整示例
[PL0:start] # CONFIGURATION
^[PL102] # PL102:1280x720
[PL200] # SLIDESHOW
^[PL2] # PL1:Picture, PL2:Video, PL3:OSD(png file)
[PL102] # 1280x720
<<REGION:1:0,0,416,648>> # Left-Screen: Picture
<<REGION:2:416,0,864,648>> # Right-Screen: Video
<<REGION:3:864,0,416,648>> # Right-Screen: Picture
<<REGION:4:0,0,864,648>> # Left-Screen: Video
<<REGION:5:0,648,1280,72>> # OSD(png file)
^[PL200]
[PL1]
<picture1.jpg>,L(8),R(1)
<picture2.jpg>,L(8),R(1)
^[PL1]
[PL2]
<video1.wmv>,R(2),E(PanScan)
<video2.wmv>,R(2),E(PanScan)
^[PL2]
[PL3]
<textImage1.png>,E(CrawlLeft,64),R(5)
<textImage2.png>,E(CrawlLeft,64),R(5)
^[PL3]
Page 90

简体中文-16
简体中文
常见问题:
1. 如果加载错误的播放清单文件,设备将会有何反应?
如果播放清单文件错误,设备就不会播放任何媒体文件,画面上也不会显示任何内容。
2. 如果播放清单中指定的媒体在设备的媒体文件夹中不存在,设备是否会自动跳过那些丢
失的文件?
文件丢失会被视为严重情况。设备对文件丢失与文件损坏的处理均为相同;如果此种错
误发生超过 10 次,系统将进入维护状态 10 分钟,然后自动重开机。数据损坏问题可利
用“检查文件系统(check file system)”程序加以修复,但播放清单错误则必须手动修
复。
Page 91
简体中文-17
简体中文
附录 B:Adfotain Central MZ 使用指南
简介
Adfotain central 管理服务器是一种功能强大的应用程序,可让使用者在 HDMP-S100 的 WAN
模式下控制其数字电子广告牌网络。Adfotain 具有易于使用的界面,使用者只需稍加训练便
可通过因特网开始管理其数字电子广告牌设备。本文件将介绍 Adfotain 管理服务器的功能,
帮助您对此应用程序有一些基本的了解。
开始之前
访问此程序之前,请确认您已备妥以下信息。
1. 账号名称
2. 存取密码
※ 请于 http://passport.IAdea.net/ 注册, 以取得帐号名称/存取密码。
登录
访问 Adfotain Central MZ - 数字电子广告牌管理系统
打开您的网络浏览器,然后在地址栏输入下面地址:http://www.adfotain.net/mz
1. 在您首次连接 Adfotain Central MZ 时,您将会看到 Adfotain central 欢迎画面(图 1)。
Adfotain central 服务器将会在 5 秒钟后将您引导到登录(Login)页面。
图 1:Adfotain Central 欢迎画面
Page 92

简体中文-18
简体中文
2. 当您进入登录(Login)页面(图 2)时,请输入您的用户名(User ID)和密码(password)
并登录系统。请注意,尽可能输入正确的 Adfotain central 账号信息是非常重要的,用户
名和访问密码皆区分大小写。
图 2:登录页面
3. 在您成功登录后,系统将转换至 Adfotain central 设备管理画面(图 3),通过此画面,
您可根据您的需求开始设置程序。
图 3:Adfotain Central 管理画面
Page 93
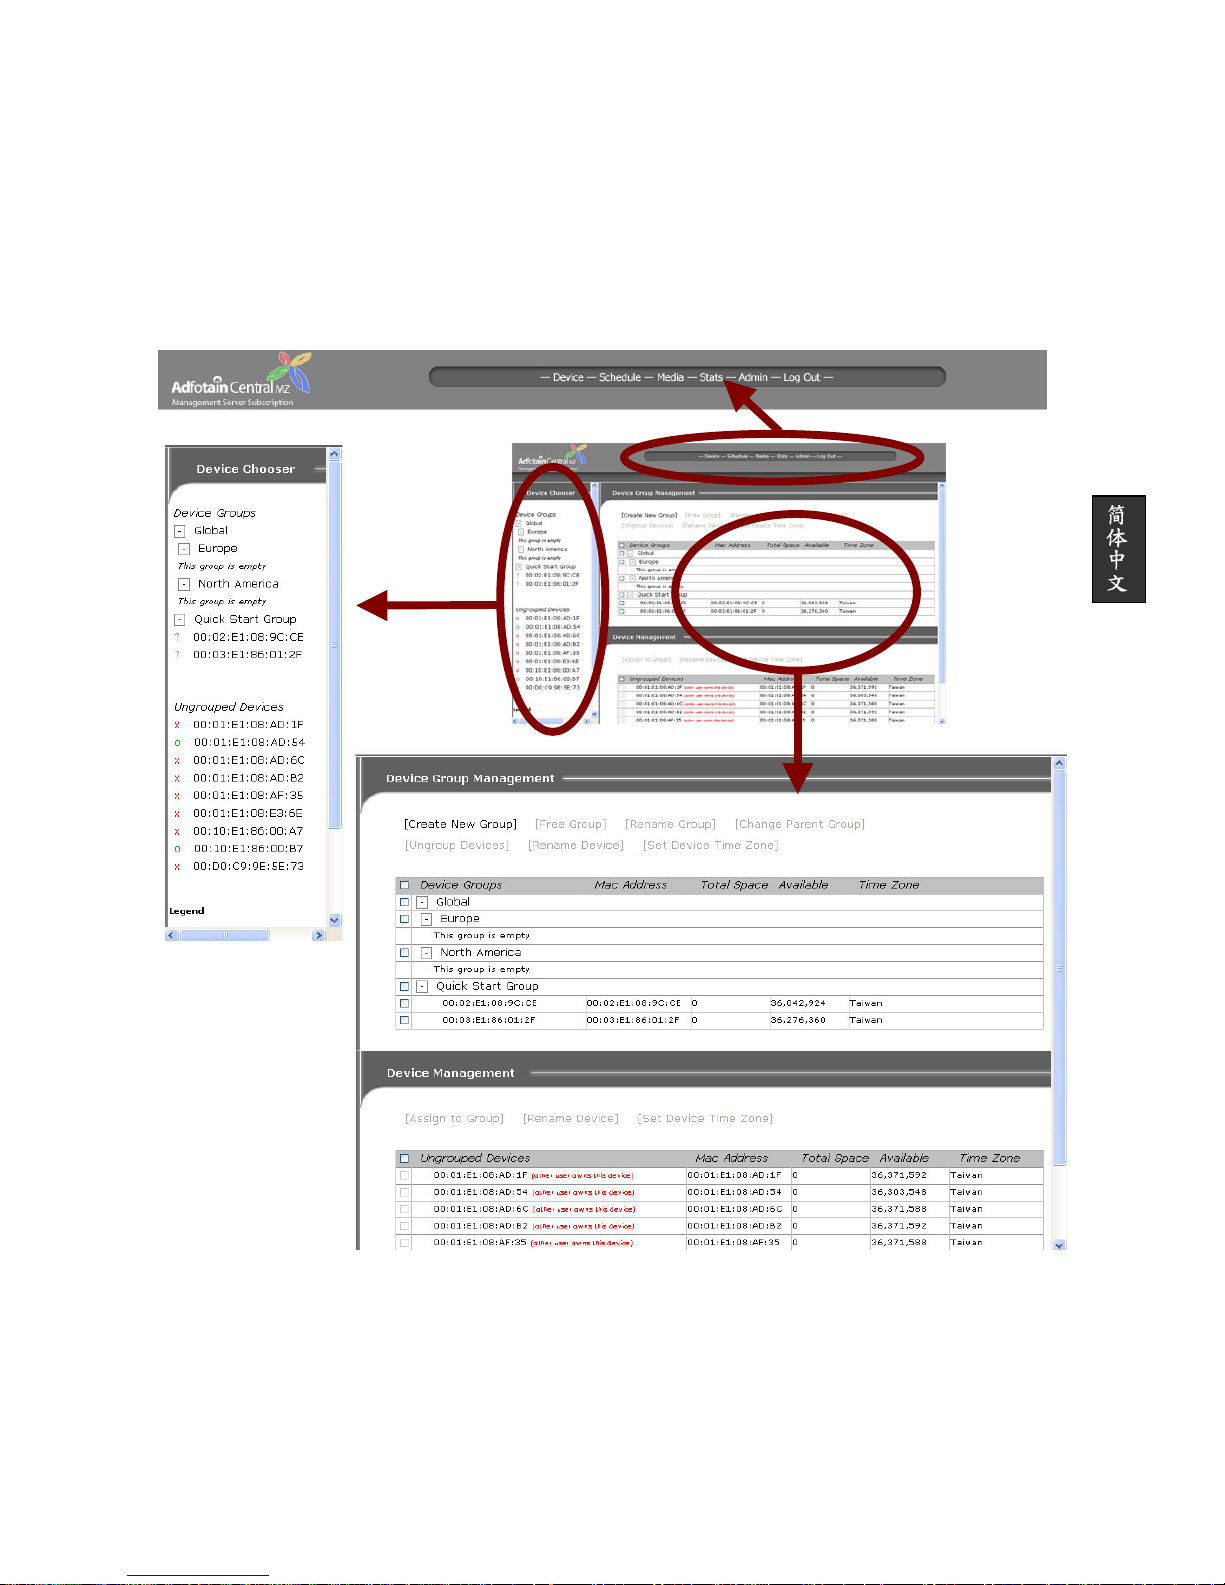
简体中文-19
简体中文
管理接口简介
Adfotain central 管理服务器将画面分为三个框:
1. 功能导览框(图 4a)。
2. 设备选取框(图 4b)。
3. 选取功能显示框(图 4c)。
请参考下面图示。
图 4:管理界面
功能导览简介
功能导览中共有五项主要功能:播放器(Device)、安排(Schedule)、媒体(Media)、统计
(Stats)和管理(Admin)。每一功能将在后面章节中详细说明。
图
4a:
功能导览
图 4b:设备选取
图 4c:功能显示
Page 94
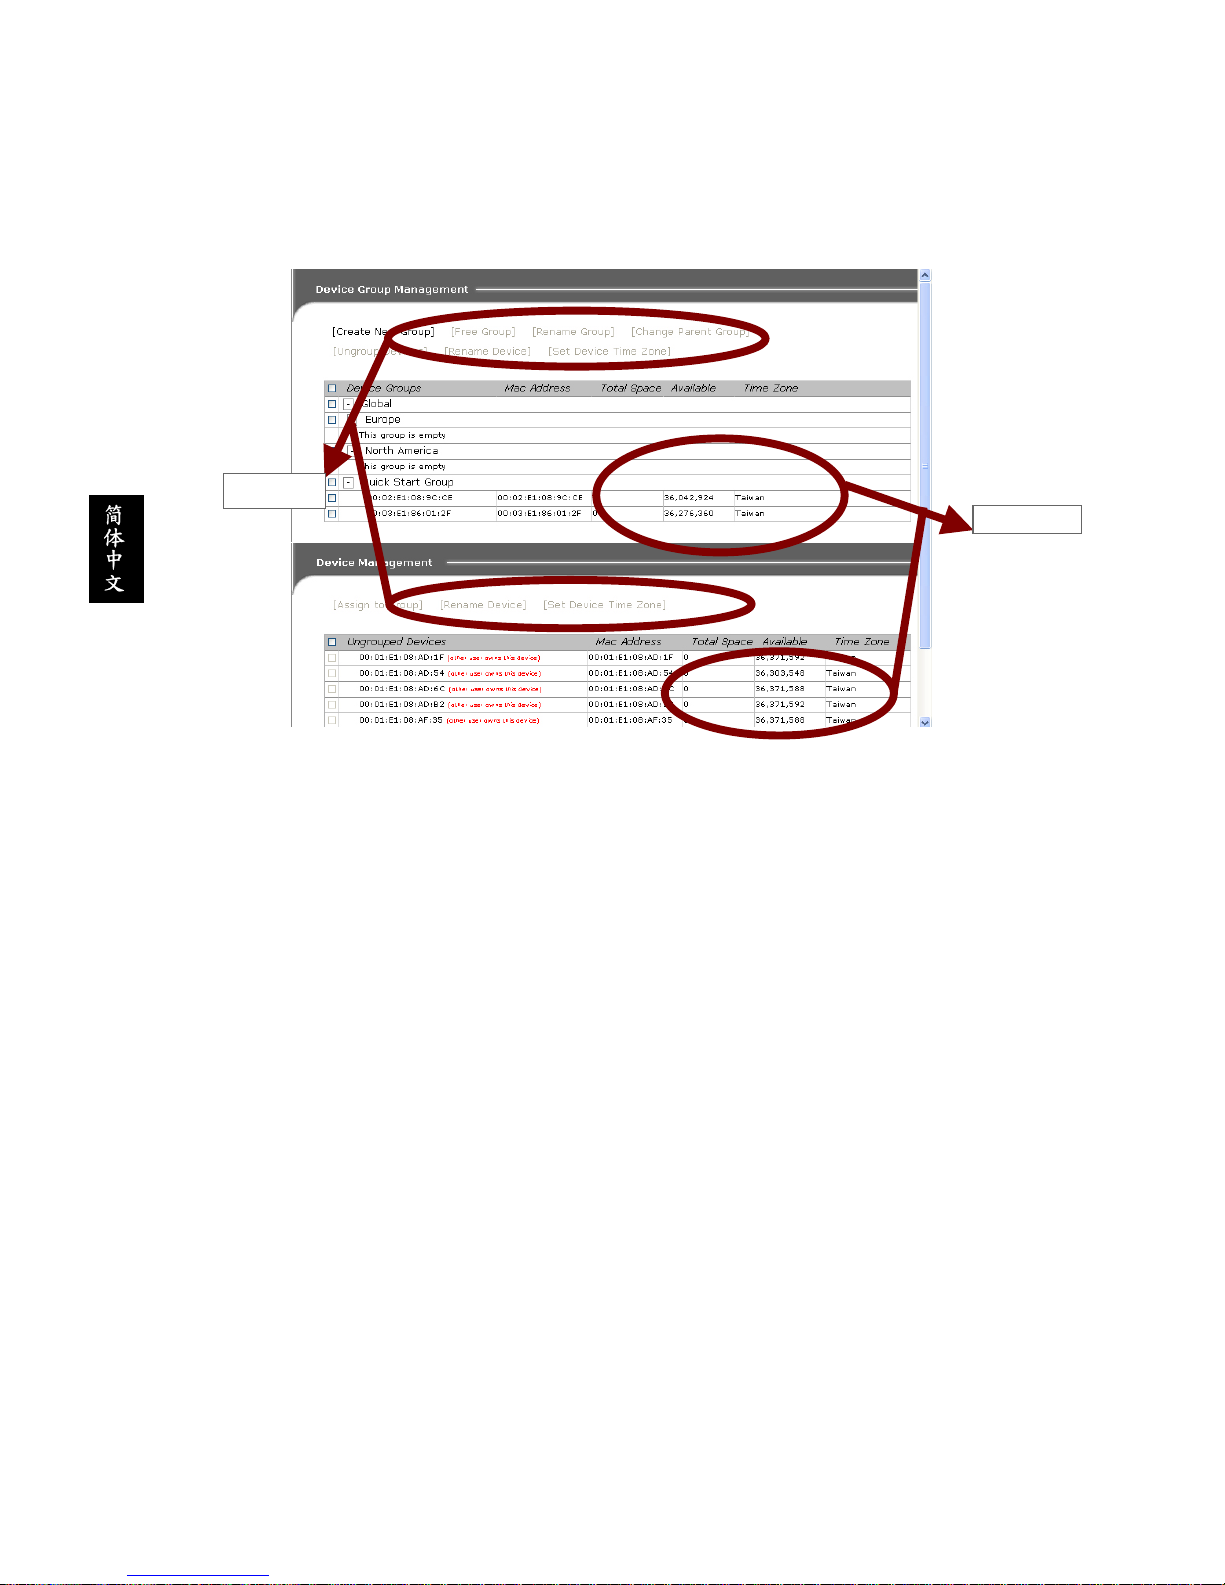
简体中文-20
简体中文
播放器选择简介
播放器选择可让您轻松访问及查询所有设备。系统将提供图例,以利快速查询设备在线状态。
功能显示简介
所有控制按钮皆列示于所对应的信息图表上方(图 5)。
图 5:功能显示简介
一开始时可能会有某些控制按钮禁用的情况。这些禁用的控制按钮需要由某些前置动作启
用。更多有关前置动作的信息,将于后面章节中说明。
播放器管理(Device Management)
播放器管理能提供有关所有已注册设备的基本信息,并可让您将设备分成群组。
控制按钮
信息图表
Page 95
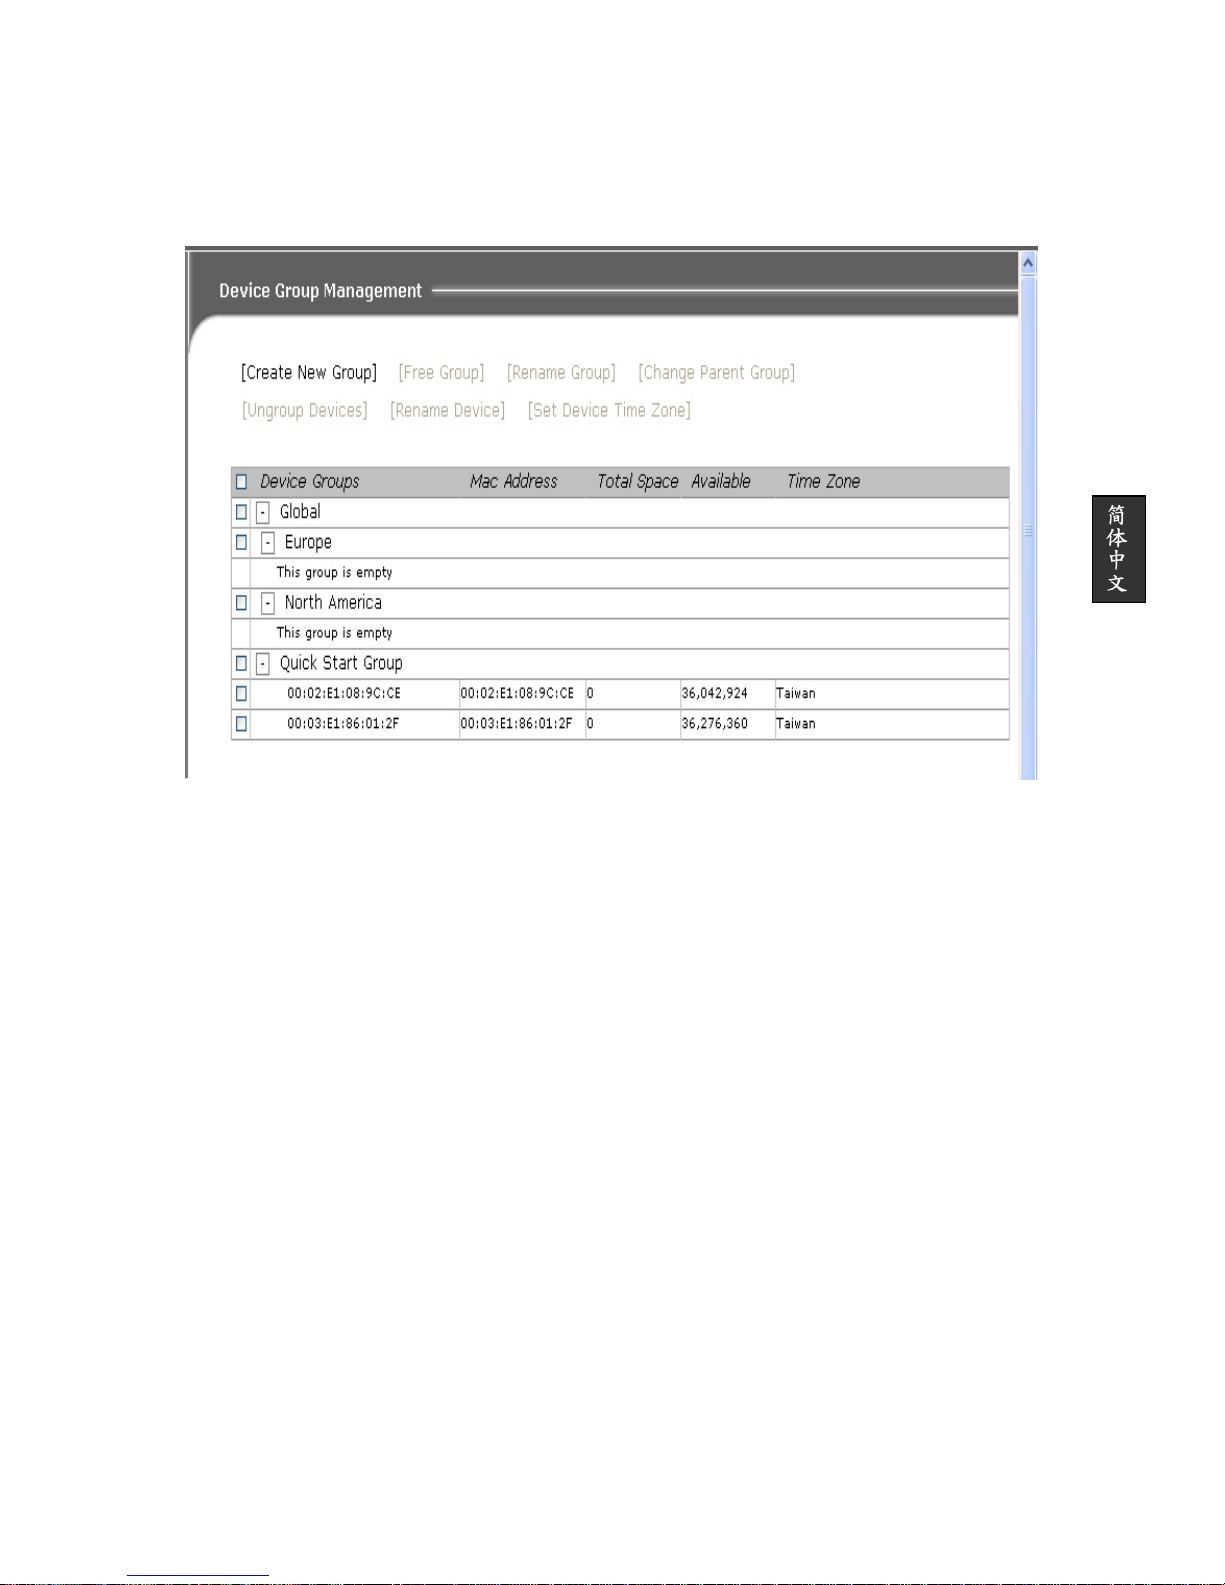
简体中文-21
简体中文
播放器群组管理(Device Group Management)
将播放器分成群组可让设备管理更加容易。设备群组下的所有设备将会继承该群组的安排计
划。我们在 Adfotain central MZ 中导入了多层群组机制。每一群组都可分配于另一群组之下,
以此建立树状群组结构。子群组将继承其所属父群组的安排计划。
图 6:设备群组管理
控制按钮
新增群组(Create New Group)
1. 点击[新增群组(Create New Group)],画面将出现一弹出式图示。
2. 在新群组名(New name)字段内输入群组名称。由于是新增第一个群组,在[新增群组
于(Create group under)]内将不会有任何选择。
3. 电击确定(OK)。系统将会响应一条确认信息,指出已接受更改或失败。
4. 成功新增群组之后,该群组将会加入设备选取框中,以方便查询该群组之信息。
建立子群组(Create Sub-Group)
1. 点击[新增群組(Create New Group)],画面将出现一弹出式图标。
2. 在新增名称(New name)字段内输入子群组名称。
3. 从[新增群组于(Create group under)]所列示的清单中,选择您希望此子群组成为其一
部分的群组作为父群组。
4. 点击确定(OK)。系统将会响应一确认信息,指出是否已接受更改。
Page 96

简体中文-22
简体中文
清除群组(Free Group)
1. 在您想要停用的群组旁,点击其复选框以选取群组。
2. 点击[清除群组(Free Group)]。
3. 画面将会出现警告信息。点击确定(OK)以确定操作。
注意,该群组之下的所有子群组与设备将会一并删除。
组群重新命名(Rename Group)
1. 在您想要重新命名的群组旁,点击其复选框。
2. 点击[组群重新命名(Rename Group)]。
3. 输入新的群组名称,然后点击确定(OK)以确认更改。
改变所属群组(Change Parent Group)
1. 在您想要更改的群组旁,点击其复选框。
2. 点击[改变所属群组(Change Parent Group)]。
3. 选择您想要的父群组。点击确定(OK)以确认操作。
注意:为避免产生循环性群组,只有可用的父群组才会显示出来供您选择。
退出群组(Ungroup Device)
1. 在您想要取消群组的设备旁,点击其复选框。
2. 点击[退出群组(Ungroup Devices)]。
3. 画面将会出现警告信息。点击确定(OK)以确认操作。
注意:设备取消群组之后,将会自动转移到设备管理(Device management)表中。
播放器重新命名(Rename Device)
1. 在您想要重新命名的设备旁,点击其复选框。
2. 点击[播放器重新命名(Rename Device)]。
3. 在弹出式输入框中输入新的设备名称。点击确定(OK)以确认更改。
设置播放器时区(Set Device Time Zone)
1. 在您想要设置时区的设备旁,点击其复选框。
2. 点击[设定播放器时区(Set Device Time Zone)]。
3. 选择您想要的时区,然后点击确定(OK)以确认操作。
Page 97

简体中文-23
简体中文
播放器管理(Device Management)
图 7:播放器管理
控制按钮
设置(Assign to Group)
1. 在您想要指派至某一群组的设备旁,点击其复选框。
2. 点击[设置(Assign to Group)]。
3. 从下拉式选单中选取您想要的群组。点击确定(OK)以确认操作。
播放器重新命名(Rename Device)
1. 在您想要重新命名的设备旁,点击其复选框。
2. 点击[播放器重新命名(Rename Device)]。
3. 在弹出式输入框中输入新的设备名称。点击确定(OK)以确认更改。
设置播放器时区(Set Device Time Zone)
1. 在您想要设置时区的设备旁,点击其复选框。
2. 点击[设定播放器时区(Set Device Time Zone)]。
3. 选择您想要的时区,然后点击确定(OK)以确认操作。
排程管理(Schedule Management)
排程管理提供了可让使用者在设备上设计其播放内容的功能。
Page 98

简体中文-24
简体中文
每月排程(Month Schedule)查看
点击功能导览列上的排程(Schedule)选项后,月计划会显示在功能显示框架中。
图 8:月计划
月计划系以格林威治标准时间(Greenwich Mean Time,GMT+0)为准。已过去的日期将于
数字上加删除线并以灰色背景标示。所有具有播放时段排程计划的设备或设备群组都将显示
于此。点击设备/设备群组名称即可连接到其所对应的排程计划。
播放器群组信息(Device Group Information)
播放器群組信息将显示所有分配给该群组的设备数目。圆形统计图可显示该群组中所有设备
的在线状态。
图 9:播放器群组信息
Page 99

简体中文-25
简体中文
播放器信息(Device Information)
播放器信息将显示所有者、固件、时区、当地时间以及最后使用设备的时间。详细统计数值
(Detail Stats)按钮则可提供快速连接到设备统计数值页面的接口。
图 10:播放器信息
排程管理(Schedule Management)
图 11:排程管理
图 11a:日历
图 11b:时间表
Page 100

简体中文-26
简体中文
日历(Calendar)
1. 已过去的日期将以删除线标示。
2. 选取的日期将以桔黄色高亮显示。使用者只需在日历上点击想要的日期便可更改显示日
期。
时间表(Timetable)
显示所选取日期的安排计划。
同步(Sync)栏
使用者可勾选同步(sync)栏中的复选框,要求设备进行更新。设备将执行必要的下载,并
在勾选的同步点更改其播放清单。
控制按钮
立即同步(Sync Now)
选择此功能可强制设备立即执行更新。换言之,一个设置为目前时间的同步点将会插入设备
的安排计划中。
新增播放节目(Create a Play Slot)
播放时槽为播放某一媒体的预定时间。区域选取共有 11 种区域设置可供选择。在建立时段之
后,点击时段将可前往播放清单编辑器,您可利用编辑器将已注册的媒体项目安排到该时段
播放。
图 12:屏幕区域选择
确认编辑(Confirm Editing)
为避免设备对目前编辑中的播放时段执行同步动作,所有播放时段皆须经过确认,设备才能
够读取。
 Loading...