

Delphi SkyFi SA10046-11B1, SA10046 - XM SKYFi Marine, SkyFi XM Marine Kit Installation Manual
Page 1
Guide
Installation
Delphi XM® SKYFi
™
Contents:
Delphi XM SKYFi Marine Kit components
· · · ·
2
XM Marine Antenna installation
· · · · · · · · · · · ·
4
XM Universal Audio Adaptor installation . . . . . 8
Hooking up the cradle
· · · · · · · · · · · · · · · · · · · · ·
10
Marine Mount installation
· · · · · · · · · · · · · · · · · ·
12
Warning: This manual and the SKYFi Operating Guide contain important
safety and operating information. Please read and follow the instructions in these
manuals. Failure to do so could result in personal injury, death, and/or damage to
your SKYFi Receiver and/or to your boat or other property.
Marine Kit
Page 2
Delphi XM SKYFi Marine Kit Set-up
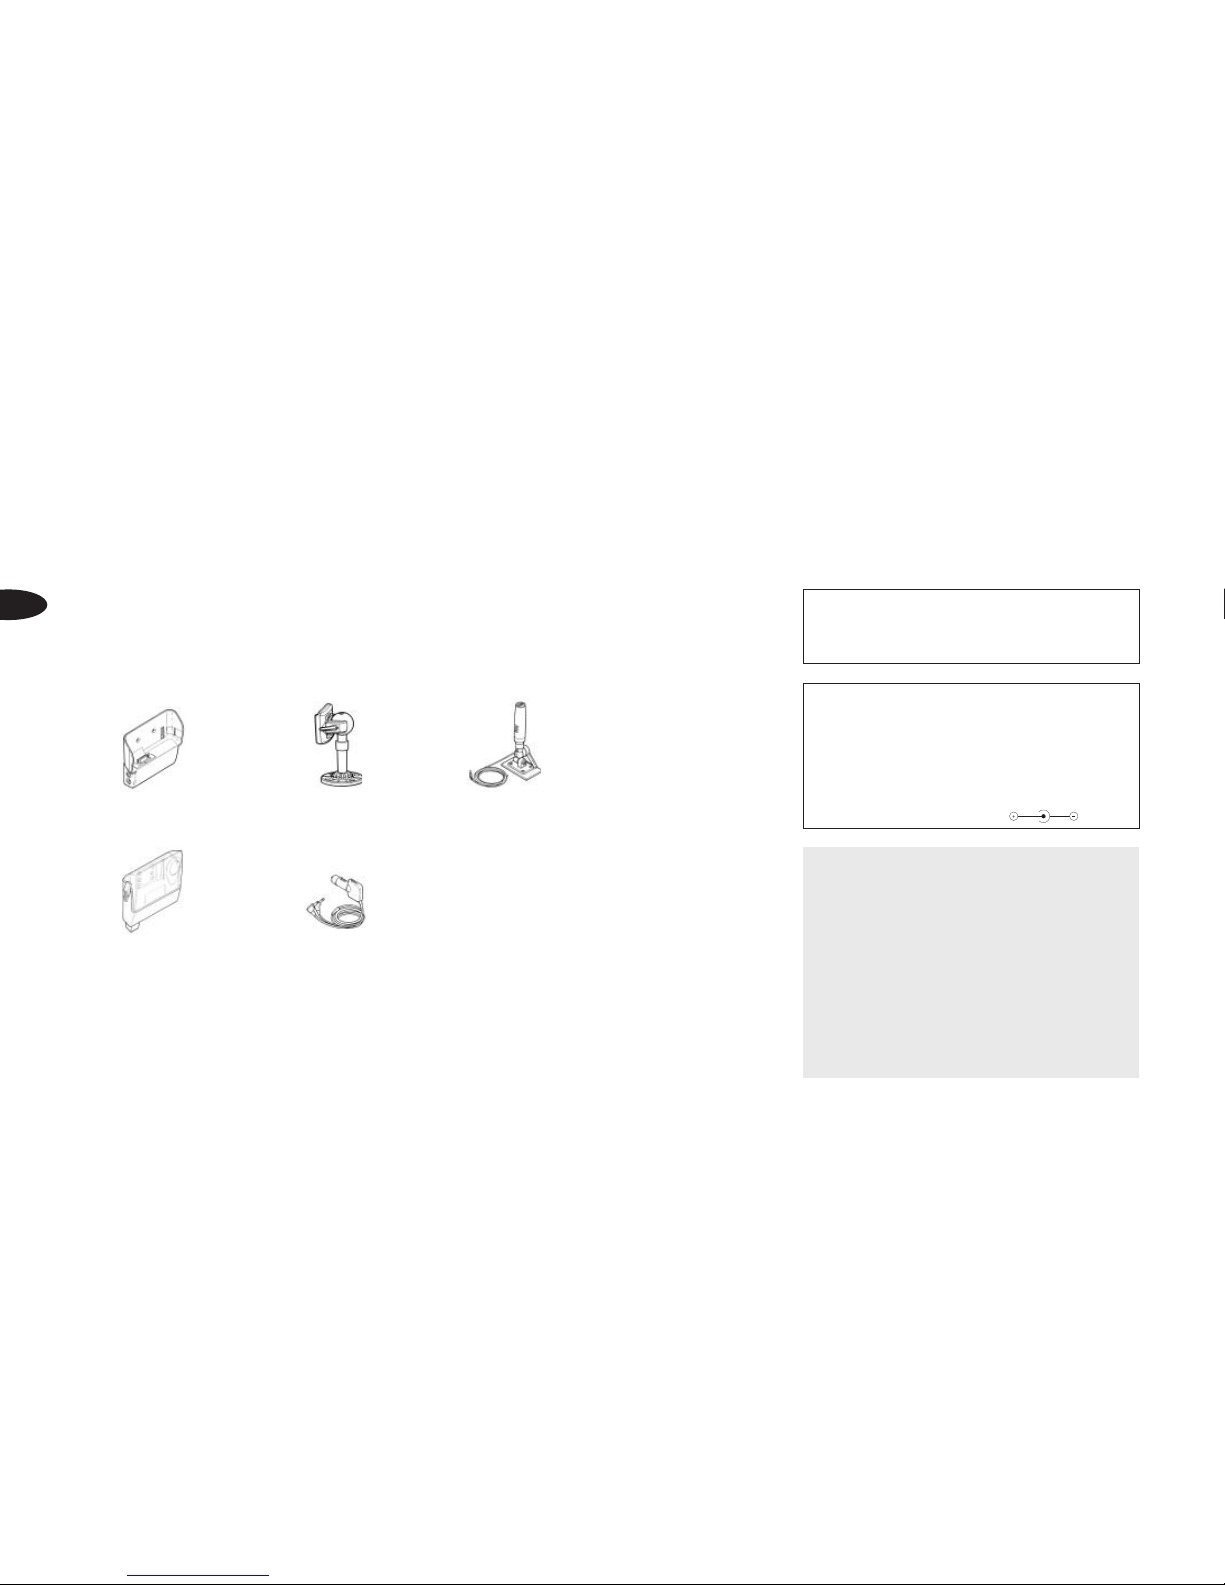
The Delphi XM SKYFi Marine Kit is designed for XM radio reception on recreational marine
craft such as fishing boats, sport boats, yachts, and sailboats. Your Delphi XM SKYFi Marine
Kit contains the following components:
2
XM Marine
Antenna with
20' coaxial
antenna cable
Cradle
XM Universal
Audio Adaptor
For use when mounting
the ball-joint mounting
bracket, your kit also
includes:
• Extra Adhesive Pad
• Surface Preparation
Cleaning Kit
• Alcohol Prep Pad
• Two 5/8" rubber
sealing bands
Marine mount with 1-1/2"
extension, flexible adhesive
mounting pad, and solid
mounting plate
Figure 1. Delphi XM SKYFi Marine Kit components
Splash-proof case with
rubber gasket
Caution: Connect only appropriate input devices to
the cradle jacks. Connecting an incorrect input device
may damage the system and/or the external electronic
device. It is recommended that you use only the D/C
power adaptor that came with your Delphi XM SKYFi
Marine Kit. If you need to use a different adaptor, it must
be a 6V, 1000mA DC adaptor and must contain a unified
polarity-type jack, identified by the symbol.
Caution: The Delphi XM SKYFi Marine Kit is splashresistant, NOT waterproof. The Delphi XM SKYFi Marine
Kit is not intended for use on personal watercraft (i.e.,
Jetskis and similar). Doing so will void your warranty.
Before You Begin
Please read all instructions thoroughly
before installing your Delphi XM SKYFi
Marine Kit.
Note: See SKYFi Operating Guide
for important user information.
Page 3
3
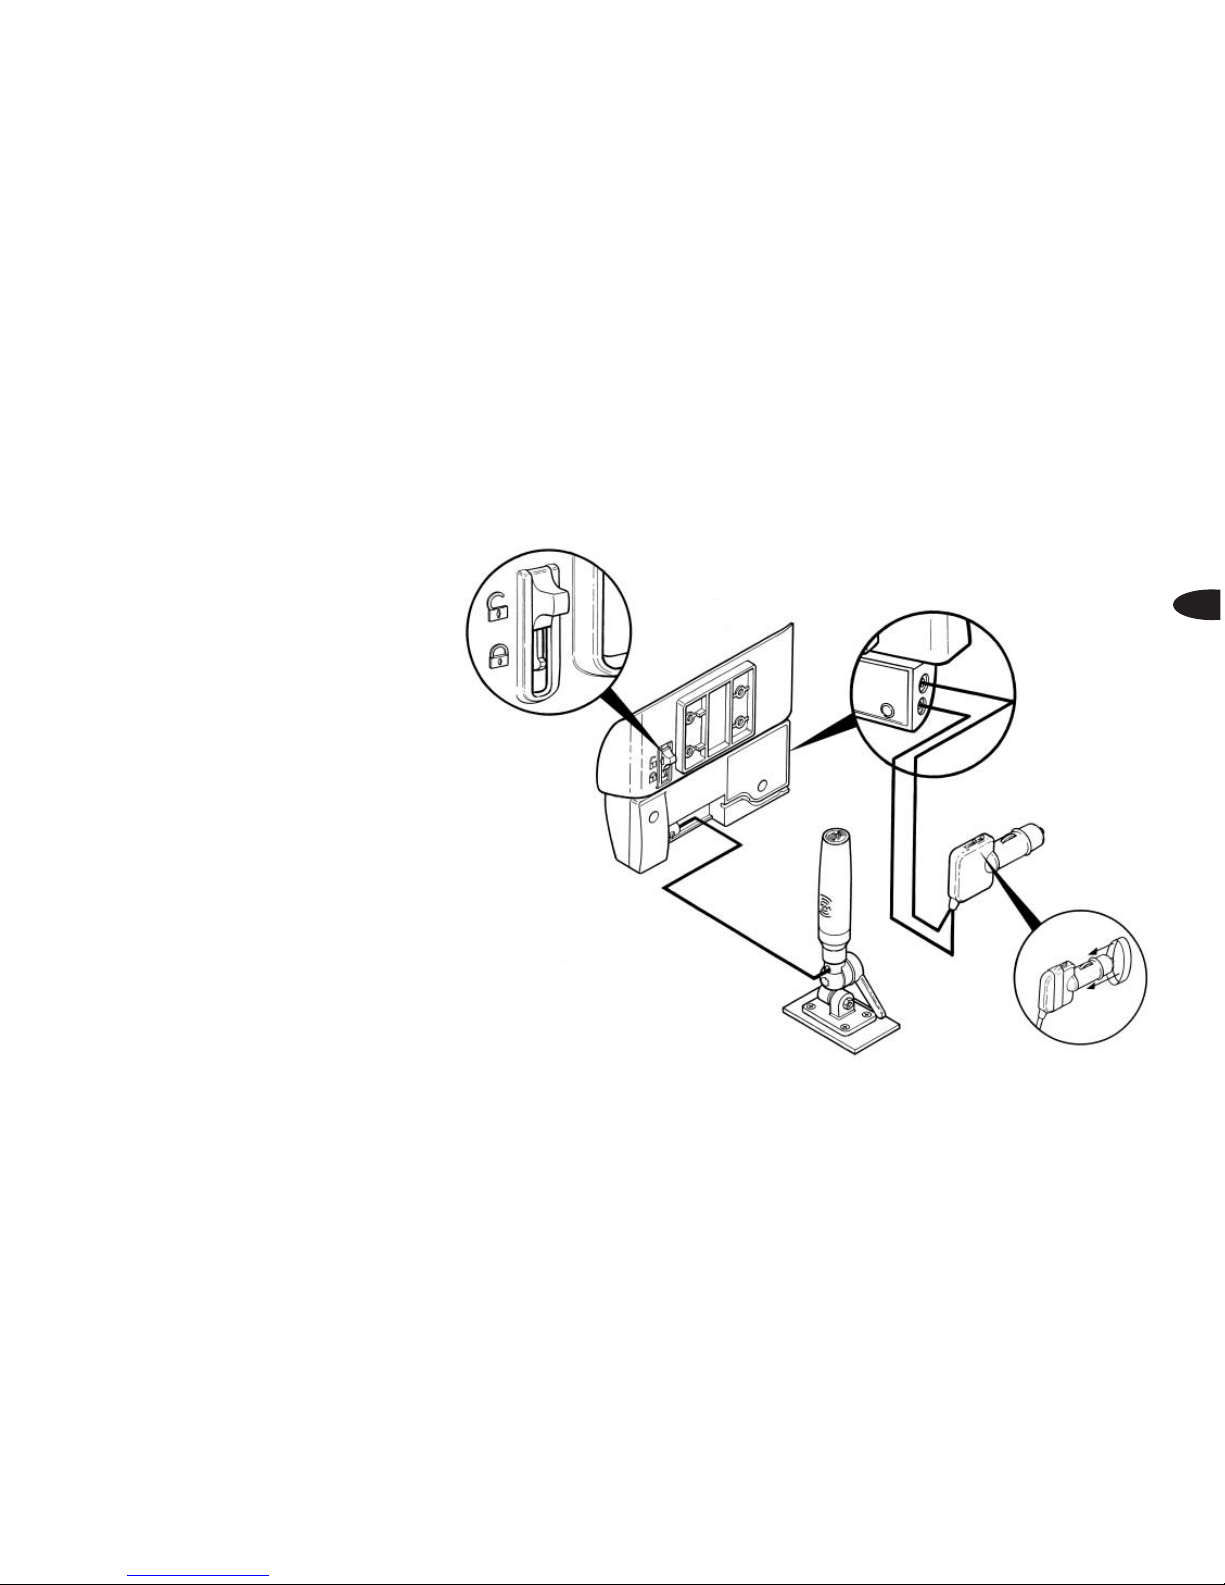
Figure 2. Connect accessories to the cradle as shown.
Hooking Up The Cradle For SkyFi Receiver
To help protect
your Universal
Audio Adaptor,
cover the switches
with rubber sealing
bands as shown.
Page 4

XM Marine Antenna Installation
The XM Marine Antenna is easy to install
on most boats using the following steps:
Pre-installation signal check
• Before starting, make sure SKYFi is not
docked in its cradle.
• Firmly push the end of the antenna cable
into the corresponding color-coded (pink)
connector on the cradle.
Note: Before per-
manently installing your antenna cable, you
will need to attach the pink connecting
shroud to the end of the cable. See figure
7 on page 7 for more information.
• Temporarily mount the antenna (see
figures 3 and 4 for suggested locations).
• Re-dock SKYFi in its cradle. With power
connected, check to see if you are receiving
a signal and that no error messages are
displayed.
• If you do not receive a signal or the display
reads “NO SIGNAL,” it may be because you
are in an area where the signal is blocked,
i.e. by a bridge. Move the boat to another
location, or try a different mounting location
for the antenna.
• If you are receiving an “ANTENNA” error
message, do the following:
1. Turn SKYFi off, wait 10 seconds, then turn
it back on.
2. Recheck the antenna connection.
3. Inspect the cable to ensure it is not
crimped, cut, or otherwise damaged.
4. If these actions do not have any effect,
please contact your retailer.
4
Caution: Installation of the XM Marine Antenna may
require special tools as well as knowledge of marine
mechanical procedures. If you are not comfortable with
or are unsure of these procedures, please seek the
services of a professional.
Page 5
5
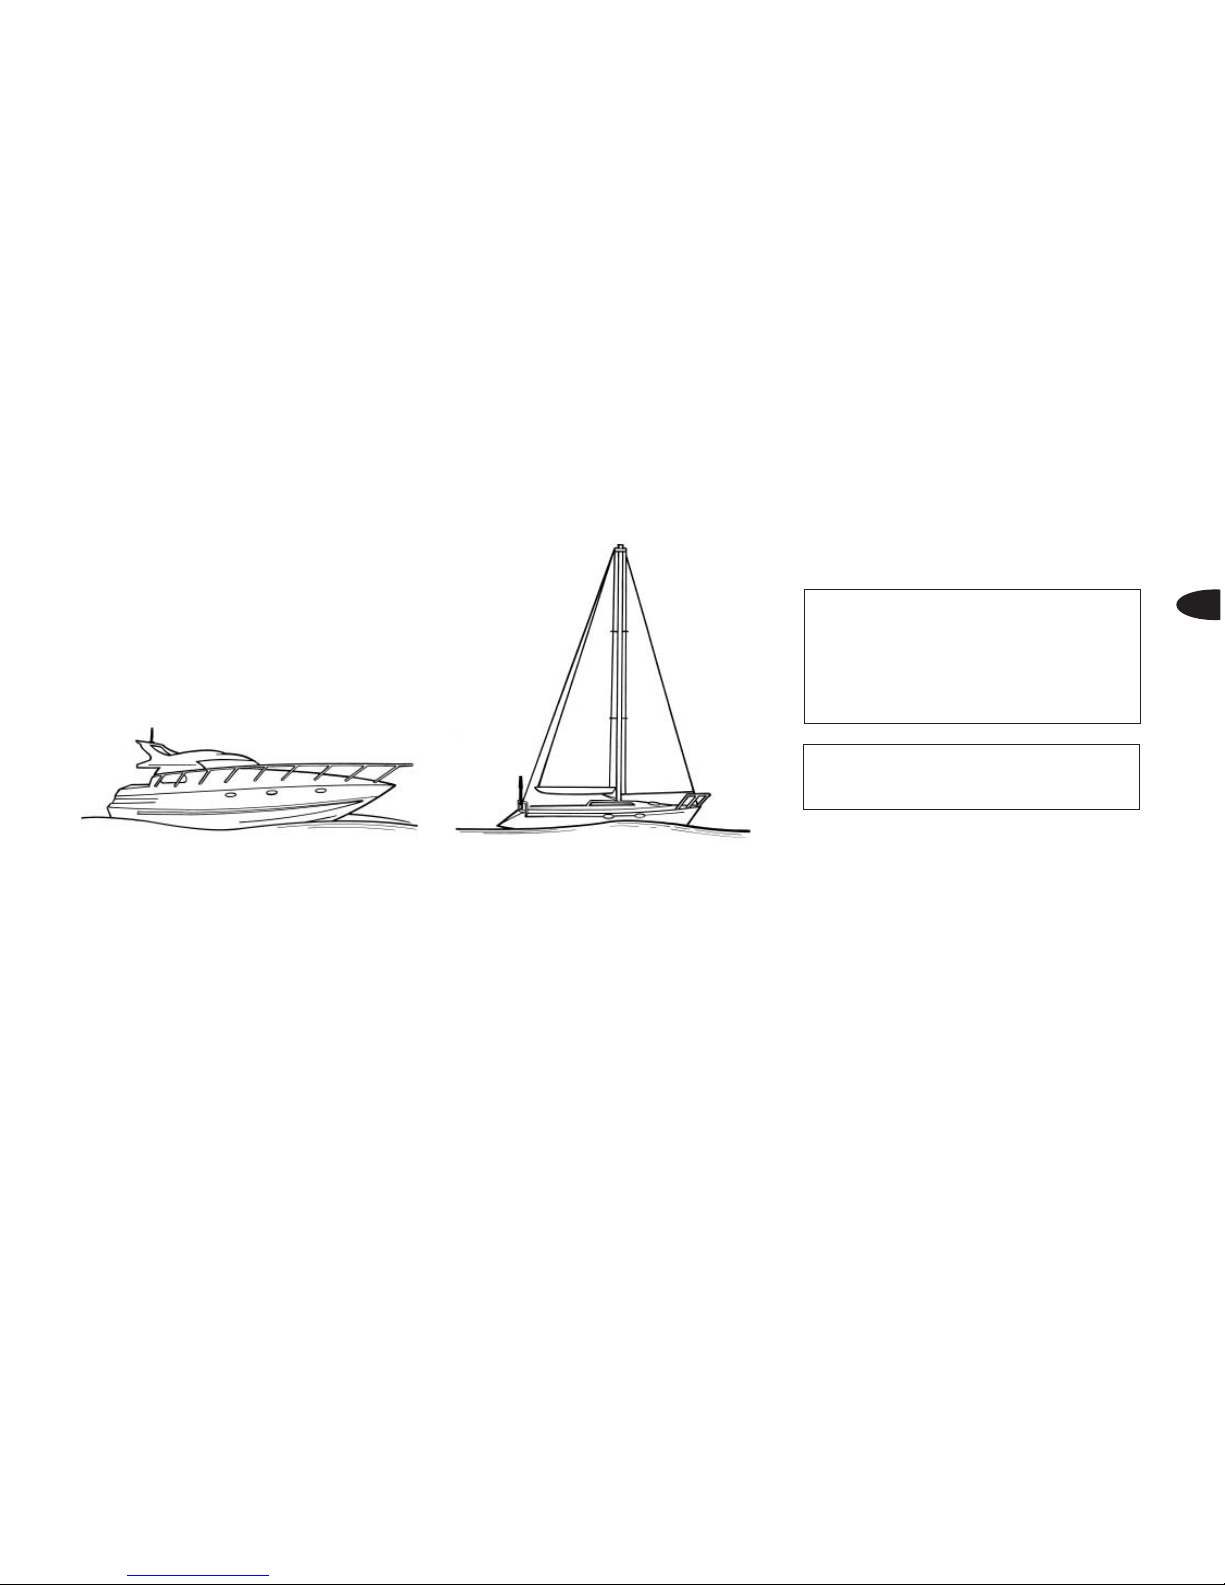
Figure 4. The antenna can be installed on the stern
of a sailboat.
Caution: Refrain from using food or drinks near the
SKYFi Receiver. Spilling food or drinks into the unit
could damage it.
Caution: Do not cut the antenna cable and attempt to
splice it or attach alternative connectors or cable. The
cable and connectors used in your Delphi XM SKYFi
Marine Kit are specially chosen and attached at the
factory to ensure they will work with XM’s unique frequency band. Failure to do so could damage the unit.
Coil and secure any excess cable.
Note: When mounted in this configuration on
a sailboat, the mast and sails may interfere
with reception when the craft is at certain
angles to the satellite.
Figure 3. The antenna can be installed on a fly bridge or
electronics arch on powerboats.
Page 6

Positioning and pre-application
• Select a location that is not enclosed or
surrounded by metal that may interfere
with reception. If placing the antenna on
a metal fly bridge, make sure the antenna
protrudes at least 5" above the bridge’s
top edge. Antenna extensions are available
to increase the height above the boat.
(e.g. Shakespeare 5228-4. Several lengths
are available from multiple suppliers,
including Boaters World and West Marine.)
• The antenna should be placed in a location
with at least a 20-degree clearance from
any metallic obstruction on all sides.
(See figure 5.)
• Once you have a desired antenna location,
plan how to route the antenna cable from
this location to the receiver, avoiding blocked
passages and any obstructions that could
kink, crimp, twist, or chafe the cable.
Final installation
1. Turn off all audio systems and other
electrical devices. Disconnect the
(-) negative lead from the boat’s battery.
2. Verify that the antenna is in its final
desired location.
3. Install the mounting bracket as shown in
figure 6. First, hold the bracket in the
desired position and mark the holes
for drilling.
4. Drill 7/64" starter holes. Applying masking
tape over the area to be drilled will help
reduce splintering of the gelcoat and
fiberglass.
5. Secure the bracket with the four stainless
screws provided.
6. To provide a finished look, apply a small
bead of white silicone around the bracket’s
bottom edge.
6
Figure 5. Correct and incorrect locations to mount
the antenna.
Clear Signals
Correct
20° Clearance
Incorrect
Blocked Signals
Page 7
7. Route the antenna cable through the
antenna extension (if used) and out
through the access hole on the side of
the mounting bracket. If an antenna
extension is not used, firmly tighten
the antenna directly to the bracket by
screwing it on. If an extension is used,
tighten the antenna to the extension, and
the extension to the bracket.
8. Begin routing the cable from the antenna
toward the receiver location, using existing
holes in the boat’s hull, along or behind
interior walls below deck, or through a
cabin window opening. Drill new holes
as necessary.
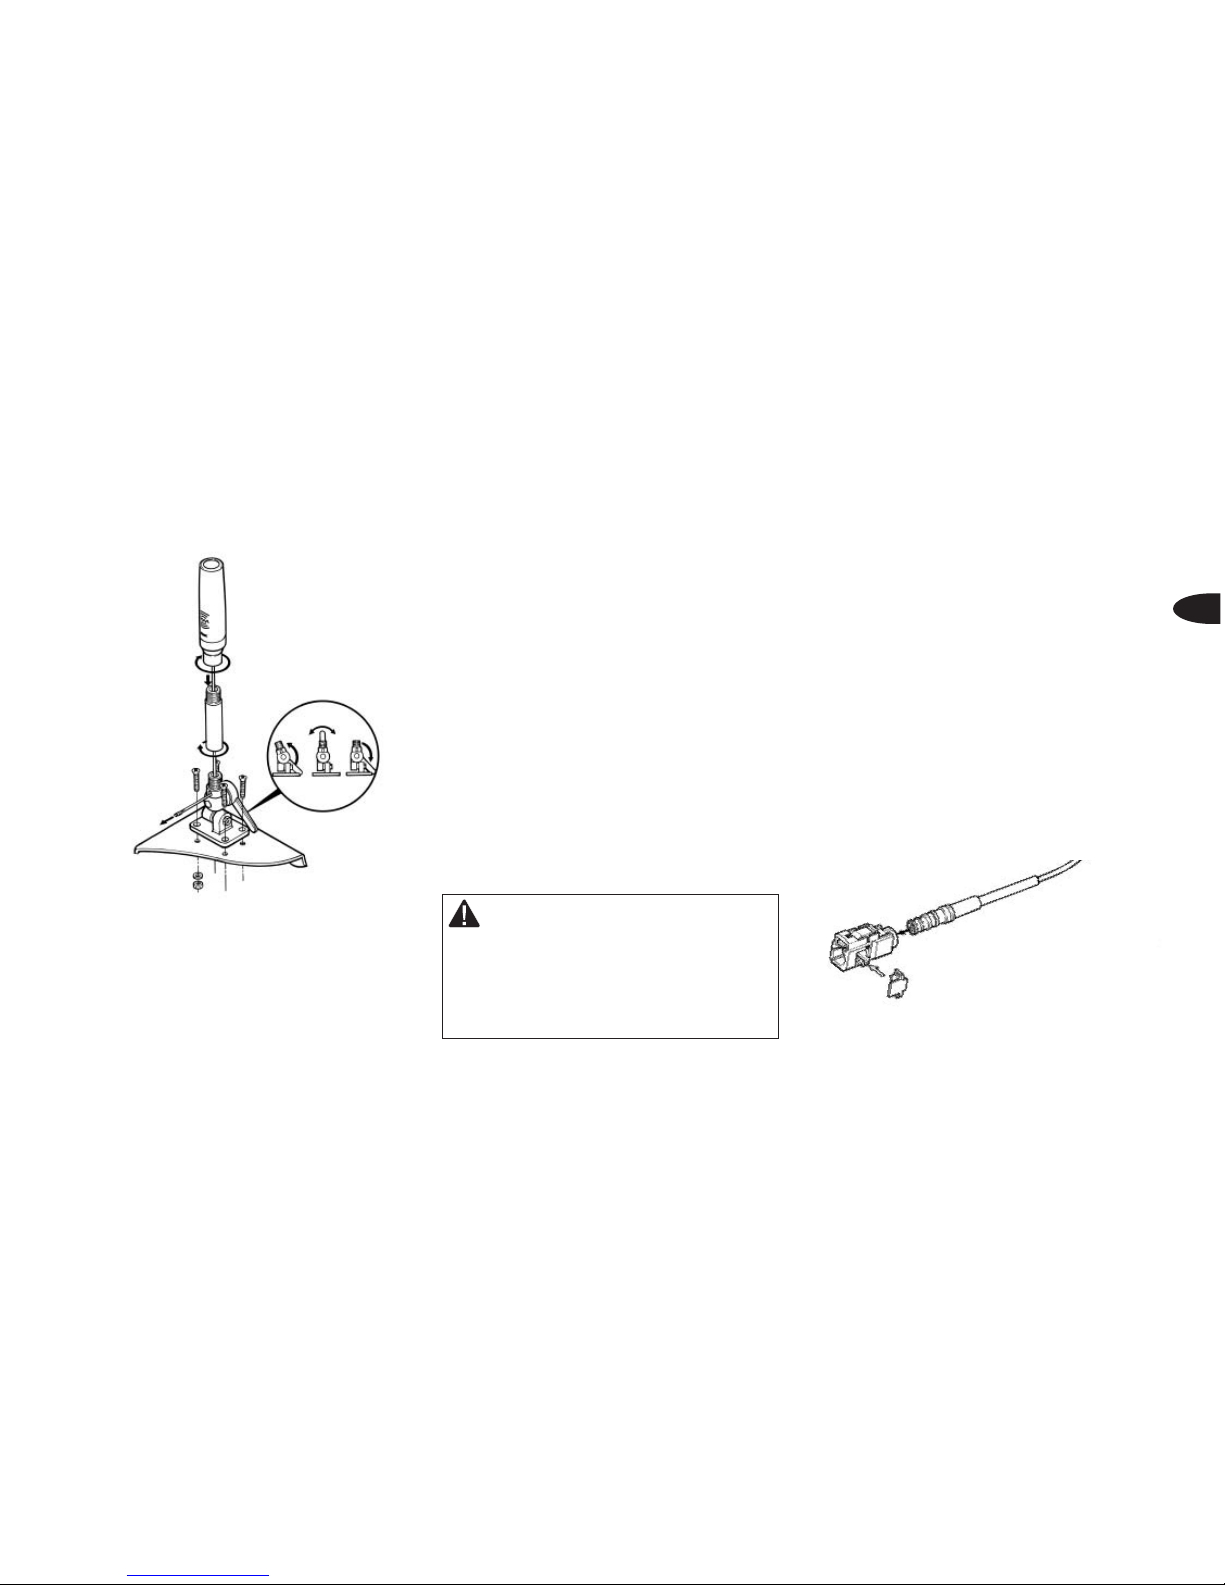
9. When you reach the receiver location, follow these steps to attach the antenna cable:
• Attach the pink connecting shroud
as shown in figure 7.
• Verify that the connector is clear of
obstructions and that the cable is
not kinked, crimped, or chafed.
• Gently push the connecting shroud
over the pink lead on the cradle
until it locks in place.
7
Figure 6. Installing the antenna.
Note: Your antenna is equipped with an
adjustable ratchet tilt. The angle may be
adjusted to improve reception, or folded
out of the way when not in use.
Warning: Take note of all fuel lines, cables, and
electrical wiring near where you are installing the
antenna to avoid damaging these lines and wiring
and to avoid the risk of injury and or property damage.
Use extreme caution when cutting or drilling around
these areas. Always wear protective eyewear when
using tools.
Figure 7. Attaching the connecting shroud to the antenna cable.
Page 8

XM Universal Audio Adaptor
(FM Modulator) Installation
You can listen to XM Satellite Radio directly
through your FM radio using the XM
Universal Audio Adaptor. To install the adaptor,
follow the steps below. (See figure 2 on page 3.)
1. Insert the adaptor into a cigarette lighter
or 12V power outlet.
Note: A red indicator
light on the adaptor signals that it is
receiving 12V power and will remain on
during normal operation.
2. Insert the right-angle power connector
at the end of the XM Universal Audio
Adaptor cable into the SKYFi marine
cradle input labeled “6V.”
3. Insert the right-angle audio connector
at the end of the XM Universal Audio
Adaptor cable into the plug on the SKYFi
marine cradle labeled “Line Out.”
Configuring the Adaptor
The XM Universal Audio Adaptor works by
changing the XM Satellite Radio audio output
to an FM signal that can be received by
your FM radio. You may experience some
interference if a local FM station is broadcasting at the same frequency, so for the
best performance it is important to pick an
open frequency using the following steps:
1. Tune your radio to each of the following
FM frequencies and note which one does
NOT have a current FM station on it and
has the least amount of bleed over from
a nearby station and then tune your
radio to that frequency.
88.1 88.3 88.5 88.7
107.1 107.3 107.5 107.7
Note: When in highly populated metro
areas with a large number of FM stations,
you may have difficulty finding an available
FM frequency. When moving to a new
location, you may have to select a new
open frequency.
8
Page 9

9
2. Set the frequency you selected on the
XM Universal Adaptor using the two
switches on the top edge of the adaptor.
First use the switch labeled “88 107” to
select either the high band (107.xMHz) or
the low band (88.xMHz). Next use the
other switch to set the exact frequency
setting: xxx.1MHz, xxx.3MHz, xxx.5MHz,
or xxx.7MHz.
Note: The radio frequency
must always be set to the same value as
the XM Universal Audio Adaptor frequency
to hear the XM programming.
Note: Help protect your Universal Audio
Adaptor by covering the switches with
the two rubber sealing bands supplied
with your Delphi XM SKYFi Marine Kit.
See figure 2 on page 3.
Auto-On/Auto-Off Feature
The XM Universal Audio Adaptor will
automatically switch on when your SKYFi
Receiver is turned on. (There may be a
10-15 second delay between turning the
SKYFi Receiver on and the Audio Adaptor
green light being displayed.) The adaptor will
also switch off when your SKYFi Receiver is
turned off.
Note: A green indicator light on
the adaptor is visible as long as there is an
XM Satellite Radio signal available from the
receiver. There may be situations under
normal use where the green indicator light
remains on for a short period of time (up to
a minute) after the receiver is switched off.
Page 10

Inserting Marine Cradle in
Splash-proof Case
Your Delphi XM SKYFi Marine Kit includes a
splash-proof case designed to help protect
your SKYFi Receiver from water damage. The
cradle can be installed in the case as follows:
1. First, attach all of the components as
shown in figure 8. Put your SKYFi
Receiver into the cradle and verify that
the system is working. Disassemble the
system and proceed with step 2. When
removing the antenna connector, be sure
to push down on the tab and pull on the
plastic connector directly (do NOT pull
on cable or you may damage it).
10
Figure 8. Insert the cradle into the splash-proof case
as shown and secure with two stainless screws.
Page 11

2. Thread the component cables through
the hole in the bottom of the splashproof case, and reconnect them to the
cradle as shown in figure 2 on page 3.
3. Being careful to situate the cables at the
bottom of the splash-proof case, align the
raised square on the back of the cradle
with the recessed square in the splashproof case and gently snap into position.
4. Using the two enclosed stainless screws,
screw the cradle to the splash-proof case.
5. The top half of the splash-proof case may
be placed on top of the lower half, making
sure the rubber gasket completes a seal.
Snap the two clamps (one on each side)
into place to secure your splash-proof case.
Note: To operate your SKYFi Receiver
when installed in the splash-proof case,
either remove the clear top cover
momentarily, or use the remote control.
11
Warning: The Delphi XM SKYFi Marine Kit
case is splash-proof, NOT waterproof. Do not submerge
the case containing your SKYFi Receiver. Doing so
could result in personal injury, and/or damage to your
SKYFi Receiver. The cover needs to be completely
closed and the latches should be locked in order for
the case to be splash-proof.
Page 12

Marine Mount Installation
Your Delphi XM SKYFi Marine Kit comes with
a marine ball-joint mount that can be installed
as follows:
1. Attach the splash-proof case to the
ball-joint mount. Use the four stainless
machine screws provided to attach the
mount to the back of the splash-proof case
(see figure 8).
2. Identify a hard, flat-as-possible surface to
allow the optimum viewing position for
the primary user while avoiding areas
that could be easily bumped into by
passengers. This position should be chosen
to minimize glare or direct sunlight on
the display. Do not install the ball-joint
mount where it could block your vision
or access to controls. Do not install the
ball-joint mount on a leather surface.
Also be sure to identify access routes for
the cables, XM Universal Audio Adaptor
access, and antenna cable.
The marine ball-joint mount can be mounted
in one of two ways: it may be screwed in
place using the solid mounting plate or it can
be attached with the adhesive pad. Decide
which method is appropriate, and follow the
instructions on page 13. See figure 9.
12
Figure 9. Install the mount to a flat surface using either the
adhesive pad or screw mount.
Note: Extension piece may be removed,
creating additional mounting location options.
A shorter screw is provided if you wish to
attach your mount without the extension piece.
Warning: Take note of all fuel lines, cables, and
electrical wiring near where you are installing the
antenna to avoid damaging these lines and wiring
and to avoid the risk of injury and or property damage.
Use extreme caution when cutting or drilling around
these areas. Always wear protective eyewear when
using tools.
Page 13

Screw Mount (recommended)
1. After selecting the mounting location,
hold the solid mounting plate in the
desired position and mark the holes
for drilling.
2. Drill 7/64" starter holes. Applying
masking tape over the area to be drilled
will help reduce splintering of the gelcoat
and fiberglass.
3. Secure base of mount with the stainless
screws provided.
4. To provide a finished look, apply a small
bead of white silicone around the base.
Adhesive Mount (optional)
Note: The adhesive used on the mounting
pad is not easily repositioned when installed,
so please use care when choosing the location
and placing the mount.
1. Clean the mounting surface with the
enclosed Surface Preparation Cleaning
Kit. Wipe with the towelette in only one
direction. Do not wipe the surface in a
circular motion or back and forth. Dry area
with a clean, dry cloth, wiping in the same
direction and then repeat this cleaning
process. Allow to air dry thoroughly.
2. Clean the same surface with the enclosed
Alcohol Prep Pad. Wipe in the same direction and manner as with the towelette. Dry
the area with a clean, dry cloth, wiping in
one direction. Allow to air dry thoroughly.
Ensure that the surface is at least 60°F.
3. If necessary, warm the ball-joint mount’s
adhesive pad by using a hair dryer or similar means. Remove the liner from the
adhesive pad and adhere to the selected
surface. Make sure you accurately place the
pad on the first try since in many cases it
will bond almost immediately. 3M recommends a 72-hour curing time for maximum
adhesion before attaching a load (e.g.,
Delphi XM SKYFi Marine Kit) to the mount.
Note: You can also mount the splashproof case directly to a flat surface using
the enclosed extra adhesive pad. Follow
these mounting directions, making sure
you adhere the correct side of the case.
13
Caution: Be sure to route the antenna cable and
modulator cords away from controls so they will not
interfere with your ability to control the boat. Failure
to do so may compromise operation of the boat resulting
in personal injury, death, and/or property damage.
Caution: Never use a commercial heat gun or
paint-stripping gun. This could result in damage to the
unit and/or to your boat.
Page 14

4. You can remove a mount attached with an
adhesive pad by taking the following steps:
• Lift one edge of the adhesive pad
gently with fingers or the rounded
edge of a spoon. Once enough of the
edge is loosened to grip with your
fingers, pull the pad gently from the
mounting surface at a 90-degree
angle. Avoid using sharp tools that
could damage the surface.
• If the pad fails to loosen, warm it
with a hair dryer for 2-3 minutes to
soften the adhesive. Be careful not
to apply too much heat, which could
damage the mounting surface.
•
If any adhesive remains on the surface,
it can easily be removed by rubbing
your thumb or finger across it.
Delphi XM SKYFi Marine Kit
Limited Consumer Warranty
Delphi Product and Service Solutions (“Delphi”) warrants
all Delphi XM SKYFi Marine Kit Products sold by Delphi
(“Products”) to be free of defects in material and workmanship, subject to the following conditions.
The duration of Delphi’s warranty with respect to Delphi
XM SKYFi Marine Kit Products is limited to one (1) year
from the date of sale to the original consumer purchaser.
No other express warranties are made with respect to
any Product. All implied warranties, including warranties of merchantability and fitness for a particular
purpose are limited to the warranty period set forth
above. This warranty is not transferable and applies
only to the original consumer purchaser of the Product.
Delphi will, as its sole obligation under this warranty,
replace or repair, at its option, any Product that does
not conform to this warranty. Products may be repaired
or replaced with new or with refurbished items. This
limited warranty does not cover defects in appearance,
14
Caution: The Delphi Marine Kit is splash-resistant,
NOT waterproof. The Delphi XM SKYFi Marine Kit is
not intended for use on personal watercraft (i.e., Jetskis
and similar). Doing so will void your warranty.
Page 15

15
cosmetic, or decorative items, including any non-operative
parts. Under no circumstances will Delphi be liable for
any incidental or consequential damages under this
warranty or any implied warranties. These remedies are
the customer’s exclusive remedies for breach of warranty.
This limited warranty only extends to customers who
purchase the Products in the United States.
Delphi will not be responsible for damage resulting
from any (i) deviation from Delphi’s operating instructions
as printed in Delphi’s catalog or on any packaging, labels,
or other literature provided with a Product, (ii) installation
of a Product in a manner which is inconsistent with Delphi’s
written instructions, (iii) alteration or modification of a
Product, (iv) misuse, (v) neglect, (vi) abuse, (vii) accident,
(viii) normal wear and tear, (ix) commercial use, (x)
improper storage, (xi) excessive temperature, (xii) service
by anyone other than a Delphi authorized repair facility,
(xiii) other improper application, installation or operation
of the Product, or (xiv) defects or malfunctions of which
Delphi is not advised within ten (10) days of the expiration
of the limited warranty period.
How you (the Customer) can get service:
To obtain warranty service during the first thirty (30)
days after the date of purchase, you must return the
defective Product with the original receipt to the original
place of purchase. To obtain warranty service during the
remainder of the warranty period, you must contact Delphi
by phone at 1.877.GO DELPHI or by fax at 1.866.790.3675.
When contacting Delphi by fax, please include a letter
detailing your complaint and provide a daytime phone
number where you may be reached. If further clarification
or additional information is required from Delphi, you
may call Delphi at 1.877.GO DELPHI (1.877.463.3574).
If warranty service is needed at any time during the
warranty period, the purchaser will be required to furnish
a sales receipt/proof of purchase indicating the date of
purchase, amount paid and place of purchase. Customers
who fail to provide such proof of purchase will be charged
for the repair/replacement of any Product.
How state law relates to the warranty:
Some states do not allow limitations on how long
implied warranties last, or the exclusion or the limitation of incidental or consequential damages. So the
above limitations or exclusions may not apply to you.
This warranty gives you specific legal rights. You may
also have other rights that may vary from state to state.
NO PERSON IS AUTHORIZED BY DELPHI TO MODIFY
OR ADD TO THIS LIMITED WARRANTY.
To purchase accessories for your Delphi satellite radio,
visit http://www.shopdelphi.com.
Page 16

Delphi Corporation
1441 West Long Lake Road
Troy, Michigan 48098-5090
U.S.A.
Customer Service: [1] 877.GO DELPHI
www.delphi.com
Printed on Recycled Paper
©2004 Delphi Corporation. All rights reserved.
DPSS-04-E-035
The SKYFi name, XM name, and related logos
are trademarks of XM Satellite Radio Inc.
This device complies with part 15 of the
FCC Rules. Operation is subject to the
following two conditions: (1) This device
may not cause harmful interference, and
(2) this device must accept any interference
received, including interference that may
cause undesired operation.
Changes or modifications not expressly
approved by Delphi could void the user’s
authority to operate this equipment.
 Loading...