

Page 1

Page 2

Page 3

Page 4

Page 5
Page 6

Page 7
Page 8

Page 9

Guide
Installation
SKYFi2
™
Home and Vehicle Kits
Contents:
SKYFi2 Vehicle Adaptor Kit Setup · · · · · · · · · · · · 2
SKYFi2 Installation · · · · · · · · · · · · · · · · · · · · · · · · · 6
XM Antenna Setup · · · · · · · · · · · · · · · · · · · · · · · · 11
SKYFi2 Home Adaptor Kit Setup · · · · · · · · · · · · 15
Warranty · · · · · · · · · · · · · · · · · · · · · · · · · · · · · · · · · 18
Warning: This manual and the SKYFi2
Satellite Radio Receiver User Guide contain
important safety and operating information.
Please read and follow the instructions in
these manuals. Failure to do so could result
in personal injury, death, and/or damage to
your SKYFi2 Receiver, accessories, and/or to
your vehicle or other property.
Page 10

This device complies with Part 15 of the
FCC rules. Operation is subject to the following two conditions:
1. This device may not cause
harmful interference, and
2. This device must accept any interference received, including interference
that may cause undesired operation.
The Delphi XM
®
SKYFi2™Satellite Radio
Receiver incorporates an FM transmitter
and is therefore classified as an intentional
transmitter. Changes or modifications to
the unit not expressly approved by Delphi
can void your authority to operate this
equipment.
Important: The FCC and FAA have not
certified the Delphi XM SKYFi2 Satellite
Radio Receiver for use in any aircraft
(neither portable nor permanent installation). Therefore, Delphi cannot support
this type of application or installation.
2
Cassette audio
adaptor
Vehicle swivel mount
SKYFi2 Cradle
Vent mount
12V power adaptor
XM Vehicle Antenna
Figure 1. SKYFi2 Vehicle Adaptor Kit components.
Your kit also includes:
• Extra adhesive pad
• Surface preparation
cleaning kit
• Alcohol prep pad
• Cable wrap
• Adhesive-backed
Velcro
®
pads
SKYFi2 Vehicle Adaptor Kit(SA10102) Setup
Your Delphi XM SKYFi2 Vehicle Adaptor Kit contains the following components:
Nokia®-style button
mount converter
Page 11

3
Hooking up Your SKYFi2 Receiver Cradle
Figure 2. Connect accessories to your SKYFi2 Cradle as shown.
Caution: Connect only appropriate input devices
to the SKYFi2 Vehicle Adaptor Kit. Connecting any
incorrect input devices may damage the system and/
or the external electronic device. It is recommended
that you use only the 12V to 6V conversion power
adaptor that came with your SKYFi2 Vehicle Adaptor Kit.
Page 12

Cassette Adaptor:
Direct Connect:
FM Modulator:
Audio Quality
Good Better Best
4
The SKYFi2 Vehicle Adaptor Kit
offers you many ways of connecting
your SKYFi2 to your vehicle’s radio.
All options provide excellent sound
quality and stereo separation.
Review and consider your own
unique situation when choosing
from the three options.
Page 13

Cassette Adaptor
For vehicles with a built-in cassette
player. Due to its superior audio quality,
this configuration is recommended
over the wired or wireless FM
modulator configurations if a
cassette slot is available in the vehicle.
Direct Connect
The Delphi FM Direct Adaptor
(SA10112) (sold separately) can provide
audio input through the vehicle’s
antenna lead. (Some vehicles may
require special antenna lead adaptors.)
Wireless FM Modulator
For the ultimate ease of installation,
SKYFi2 has a built-in wireless FM
modulator that allows you to hear XM
programming on any nearby FM
radio. This FM modulator is turned on
whenever the cassette adaptor or any
other audio cable is unplugged from
the SKYFi2 Cradle. See the SKYFi2
Satellite Radio Receiver User Guide
for more details.
5
Page 14
6
Note: If using the wireless FM modulator or
the Delphi FM Direct Adaptor, set the SKYFi2
Receiver and the FM radio to the same
frequency. See the SKYFi2 User Guide section
on “Listening to XM Using Any FM Radio.”
SKYFi2 Installation
Because every vehicle is different,
these instructions are provided as a
general guideline only. If you need
help, consult a professional installer.
1. Decide which method (cassette
adaptor, wireless FM modulator, or
direct connect) is most appropriate
for your vehicle and where you live.
2. Verify the system is working by
completing a test. Before installing
the system, connect the XM Antenna,
12V power adaptor, and audio
connector or cassette adaptor (if
used) to the SKYFi2 Vehicle Adaptor
cradle with the SKYFi2 Receiver
inserted. Plug the 12V power adaptor into the cigarette lighter and
place the XM Antenna on the roof
of your vehicle. Make sure you are
outdoors and not surrounded by
tall buildings or trees. Turn on
both your vehicle’s radio and
SKYFi2 Receiver. Tune the SKYFi2
Receiver to XM channel 1. You
should be able to hear the XM
Preview channel. If not, check all
connections.
Warning: Do not install the mount where it
or SKYFi2 could block your vision or usage of
controls, or interfere with any safety devices
such as airbags. Failure to correctly place
SKYFi2 could result in injury to you or others if
the unit becomes detached during an accident
and/or obstructs the deployment of an airbag.
Page 15

7
3. Turn off the radio and SKYFi2
Receiver. Disconnect all cables.
4. Find a place where you can mount
your SKYFi2 Vehicle Adaptor
where it is most convenient for
you to use. It should be mounted
to a hard, flat surface if possible or
to a horizontal in-dash air vent. Be
certain the air vent is rigid enough
to hold the weight of both the
SKYFi2 Receiver and the SKYFi2
Vehicle Adaptor Kit.
b. Vent mount: Assemble the
mount (if not assembled) by
inserting the two clips into the
main piece. Clip the assembly
onto the vent, and then position the pivoting kickstand at
the bottom. The orientation of
the clips must match each
other and may need to be
rotated in one of two possible
orientations depending on the
design of the air vent being
used. Be careful when
installing and removing the
vent mount clips to prevent
damaging the vent fins.
5. The SKYFi2 Vehicle Adaptor Kit
has three mounting options: flat
mount, vent mount, or swivel
mount.
a. Flat mount: Use the included
Velcro pads or extra adhesive
pad, attaching them to the back
of the SKYFi2 vehicle cradle
and then to a flat surface in
your vehicle. Do not install the
mount on a leather surface.
Page 16

8
c. Swivel mount: This mount allows
you to adjust the angle of your
SKYFi2 Vehicle Adaptor after it
is installed. This mount uses a
strong adhesive that is not easily repositioned when installed,
so use care when choosing the
location of and placing the
mount. Do not install this mount
on a leather surface. Install the
mount only if the temperature
is at least 60°F.
– Clean the mounting surface
with the enclosed surface
preparation cleaning kit.
Wipe the towelette in one
direction only. Do not wipe
the surface in a circular
adhesive pad and adhere to
the vehicle’s surface. Make
sure you accurately place the
pad on the first try since in
many cases it will bond
almost immediately. For best
results, do not touch or apply
pressure to the vehicle mount
for 72 hours.
motion or back and forth. Dry
the area with a clean, dry
cloth. Repeat the cleaning
process. Allow to air dry
thoroughly.
– Clean the same surface with
the enclosed alcohol prep
pad. Wipe in one direction
only. Dry the area with a
clean, dry cloth. Allow to air
dry thoroughly.
– Warm the vehicle mount
adhesive pad by using a hair
dryer or by placing the vehicle
mount on top of the vehicle’s
defrost outlet for several
minutes with the heater on.
Remove the liner from the
Page 17

9
6. Clip the SKYFi2 vehicle cradle
onto the vent or swivel mount
(figures 3 and 4).
7. Reassemble the system as in step 2.
8. Attach the antenna as explained on
page 11 and route the antenna
cable as described on page 13.
Figure 3. Vent mount.
To vehicle
dashboard
Figure 4. Attach vehicle mount to back of
SKYFi2 as shown.
Page 18

10
Removing swivel mount
from your dashboard
You can remove the swivel mount
from your dashboard by following
these steps:
1. Lift one edge of the adhesive pad
gently with fingers or the rounded
edge of a spoon. Once enough of
the edge is loosened to grip with
your fingers, pull the pad gently
from the mounting surface at a
90-degree angle. Do not use
sharp tools that could damage
the vehicle’s interior.
2. If the pad fails to loosen, warm it
with a hair dryer for 2 to 3 minutes
to soften the adhesive. Be careful
not to apply too much heat, which
could damage the mounting
surface. Repeat step 1.
3. If any adhesive remains on the
dashboard surface, the adhesive
can easily be removed by rubbing
your thumb or finger across it.
4. As necessary, use a mild household
cleaner to clean the dashboard
surface.
Caution: Never use a commercial heat gun or
a paint-stripping gun. This can damage the
unit or your vehicle.
Page 19

11
Middle
Front
Rear
Important: Do not install antenna inside the
vehicle passenger compartment. An antenna
mounted on the dashboard or on the rear window
deck area of the vehicle will likely experience signal
interruption issues and must be avoided. Mounting
the antenna on a nonmetallic surface will also
result in severe degradation in reception.
XM Antenna Setup
For best reception, follow these
recommendations:
• Mount the XM Antenna on the metal
surface of the vehicle roof in the center
of an area with at least 12" x 12" of
surface area and a minimum of 6"
from a window or sunroof. Figure
5 shows three typical mounting
locations. Due to the small size of
this antenna, there are many possible
locations for installation depending
on the vehicle. Improper positioning
of the antenna could cause brief
interruptions in the signal reception.
Figure 5. The design flexibility of your XM Antenna
allows mounting on many types of vehicles. Trunk
mounting of the antenna is an alternative only for
hard- or soft-top convertibles with nonmetallic rooftops. All other vehicles should have roof mounting.
Warning: Failure to properly install the
antenna may result in injury to you or others if it
becomes detached during an accident.
Page 20

12
If an appropriate antenna mounting
location cannot be identified, contact
your local retailer installation department for additional guidance.
• If you use the wireless FM modulator,
place the antenna as close to the
vehicle’s FM antenna as possible.
Note that the FM antenna may be
embedded in the windshield or rear
window.
A suitable compromise between
installation location and reception
quality must be assumed by the user.
• If the vehicle has roof racks or skid
ribs, you may mount the antenna
off-center.
• If the vehicle is a hard- or soft-top
convertible, then the antenna can
be mounted on the metal trunk lid
at least 4" from the rear window.
Ensure that the antenna does not
interfere with the opening or closing
of the convertible top and that the
cable is free to move and not prone
to wear. Where exposed to wind, it
is best to route the cable parallel to
the airflow.
Page 21

Routing the Cable
Figure 6 illustrates a typical method of
routing the antenna cable.
• Avoid kinking, crimping, twisting, or
chafing the cable. If the cable comes
into contact with a rough metal opening, use a rubber grommet to prevent
damage.
• For antennas mounted at the front or
middle of the roof, route the cable
along the door jamb and into the vehicle. (See figure 6.) In some vehicles,
you may route the cable through the
same grommet that carries power
window and power lock wires.
13
Front or Middle Mounting Option
Figure 6. Route XM Antenna through
windshield as shown.
Page 22

Figure 7. Route XM Antenna wiring as shown.
Rear Mounting Option
14
If the antenna cable does not fit easily through the grommet, do not try to
force it through; instead, route the
cable under the weather seal near the
bottom of the door.
• For antennas mounted at the rear of
the roof, route the cable into the
trunk as shown in figure 7. Always
use the weather seal at the lowest
part of the trunk to reduce water
leaks.
• Use pre-existing wiring channels
when possible.
Page 23

Audio cable
XM High-gain
Indoor/Outdoor
Home Antenna
with 25 ft. cable
6V AC power
adaptor
SKYFi2 Home Stand
Figure 8. SKYFi2 Home Adaptor Kit components.
SKYFi2 Home
Adaptor Kit
(SA10103) Setup
Your Delphi XM SKYFi2 Home Kit
contains the following components:
Hooking up Your
SKYFi2 Receiver Home Stand
Note: See SKYFi2 User Guide for important
user information.
Caution: Connect only the appropriate input
devices to the SKYFi2 Home Adaptor Kit jacks.
Connecting any incorrect input device may
damage the system and/or the external electronic device. It is recommended that you use
only the AC power adaptor that came with
your SKYFi2 Home Adaptor Kit. If you need to
use a different adaptor, it must be a 6V, 1000
mA DC adaptor and must contain a unified
polarity-type jack, identified by the
symbol.
15
Page 24

Installation instructions:
1. Turn off both your SKYFi2
Receiver and home stereo.
2. Connect cables as illustrated in
figure 9.
3. Position the XM Antenna so that it
is facing south. Ideally, it should
point through a window.
4. Turn on your SKYFi2 Receiver and
the stereo. Tune to XM channel 1.
You should be able to hear the XM
Preview channel. If not, check all
connections.
Note: The Delphi SA10006 Antenna
Extension Cable (sold separately) is
designed to work with the SKYFi2 Home
Adaptor Kit and provides an additional 50
feet of cable length to the standard XM
Home Antenna.
Figure 9. Connect the SKYFi2 Home Stand to power, antenna, and home stereo as shown.
16
Page 25
Aiming the XM Home Antenna
For best reception, aim the home
antenna by following these
instructions:
1. Press the “menu” button on the
SKYFi2 Receiver.
2. Use the scroll wheel to select the
“Antenna Aiming” option. Press
the “XM” button to confirm selection.
3. This display will remain on until
you press the “menu” button
again, so you have plenty of time
to aim the antenna. Slowly turn
and tilt the antenna. The “satellite”
and “terrestrial” signal bars will
change. Find the position that gives
the strongest signal strength (at
least two bars) on either “satellite”
or “terrestrial.”
4. Once you are convinced you have
determined the proper position to
receive the best possible signal,
press the “menu” button to return
to normal operation.
17
Figure 10. Signal strength indicator.
Page 26

Delphi Limited Consumer Warranty
Delphi Product and Service Solutions
(“Delphi”) warrants all Portable XM
Satellite Radio Accessory Products sold by
Delphi (each “Product”) to be free of
defects in material and workmanship,
subject to the following conditions:
The duration of Delphi’s warranty with
respect to each product is limited to one
(1) year from the date of sale to the original
consumer purchaser.
No other express warranties are made with
respect to any Product. All implied warranties,
including warranties of merchantability and
fitness for a particular purpose are limited
to the warranty period set forth above. This
warranty is not transferable and applies
only to the original consumer purchaser of
the Product.
Delphi will, as its sole obligation under this
warranty, replace or repair, at its option,
any Product that does not conform to this
warranty. Products may be repaired or
replaced with new or with refurbished
items. This limited warranty does not cover
defects in appearance, cosmetic or decorative items, including any non-operative
parts. Under no circumstances will Delphi
be liable for any incidental or consequential
damages under this warranty or any
implied warranties. These remedies are the
customer’s exclusive remedies for breach
of warranty. This limited warranty only
extends to customers who purchase the
Products in the United States.
Delphi will not be responsible for damage
resulting from any (i) deviation from
Delphi’s operating instructions as printed in
Delphi’s catalog or on any packaging,
labels, or other literature provided with a
Product, (ii) installation of a Product in a
manner which is inconsistent with Delphi’s
written instructions, (iii) alteration or
modification of a Product, (iv) misuse,
(v) neglect, (vi) abuse, (vii) accident, (viii)
normal wear and tear, (ix) commercial use,
(x) improper storage, (xi) environmental
conditions, including excessive temperature
or humidity, (xii) service by anyone other
than a Delphi authorized repair facility,
(xiii) other improper application, installation
or operation of the Product, or (xiv) defects
or malfunctions of which Delphi is not
advised within ten (10) days of the expiration
of the limited warranty period.
18
Page 27

How you (the Customer) can get service:
To obtain warranty service, you must return
the defective Product with the original
receipt to the original place of purchase. If
further clarification or additional information
is required from Delphi, you may call Delphi
at: 1.877.GO DELPHI (1.877.463.3574). If
warranty service is needed at any time during
the warranty period, the purchaser will be
required to furnish a sales receipt/proof of
purchase indicating the date of purchase,
amount paid and place of purchase.
Customers who fail to provide such proof
of purchase will be charged for the
repair/replacement of any Product.
How state law relates to the warranty:
Some states do not allow limitations on the
duration of implied warranties, or the
exclusion or the limitation of incidental or
consequential damages. So the above limitations or exclusions may not apply to you.
This warranty gives you specific legal
rights. You may also have other rights that
may vary from state to state. NO PERSON
IS AUTHORIZED BY DELPHI TO MODIFY
OR ADD TO THIS LIMITED WARRANTY.
19
Page 28
Delphi Corporation
1441 West Long Lake Road
Troy, Michigan 48098-5090
U.S.A.
Customer Service: [1] 877.GO DELPHI
www.delphi.com
Printed on Recycled Paper
©2004 Delphi Corporation. All rights reserved.
DPSS-04-E-065
The SKYFi2 name, XM name, TuneSelect, and
related logos are trademarks of XM Satellite
Radio Inc. All other trademarks are the property
of their respective owners.
Page 29

Guide
User
SKYFi2
™
Radio
Satellite
Receiver
Warning: This manual and the SKYFi2 Installation Guide contain important safety and
operating information. Please read and follow the instructions in these manuals. Failure to do so
could result in personal injury, death, and/or damage to your SKYFi2 Receiver, accessories,
and/or to your vehicle or other property.
Page 30

This device complies with
Part 15 of the FCC rules.
Operation is subject to the
following two conditions:
1. This device may not cause
harmful interference, and
2. This device must accept any
interference received, including
interference that may cause
undesired operation.
Welcome
Thank you for purchasing a Delphi
XM SKYFi2 Satellite Radio Receiver.
Your SKYFi2 gives you access to over
130 XM Satellite Radio channels of
music, news, and information from
coast to coast.*
2
*XM subscription required for reception of XM service.
Not available in Alaska or Hawaii.
The Delphi XM®SKYFi2™Satellite
Radio Receiver incorporates an
FM transmitter and is therefore
classified as an intentional transmitter. Changes or modifications
to the unit not expressly approved
by Delphi can void your authority
to operate this equipment.
Important: The FCC and FAA
have not certified the Delphi XM
SKYFi2 Satellite Radio Receiver
for use in any aircraft (neither
portable nor permanent installation). Therefore, Delphi cannot
support this type of application
or installation.
Page 31

SKYFi2 improves upon the awardwinning SKYFi Satellite Radio Receiver
by offering these new features:
• Built-in FM wireless modulator.
Listen to XM through any nearby
FM radio without using any wires.
• 30-Minute Replay. Pause and
replay up to 30 minutes of live
XM broadcast.
• TuneSelect
™
. Find your favorite
songs by song title or artist name
if they’re currently playing on any
XM channel.
• Personalized stock and sports
tickers. Track your favorite stocks
and sports scores on your SKYFi2’s
display while listening to your
favorite music.
• A brighter, white LED backlit display
for even better visibility.
• More versatile vehicle mounting
options than previous model.
Caution: Your SKYFi2 must be used with the enclosed connecting devices or other approved accessories
to ensure maximum performance. Do not modify or alter wires or connections in any way. Shortening
wires or connections may prevent proper functioning of the electrical circuit, which may damage your
receiver and will void your warranty.
3
To use the SKYFi2 Satellite Radio
Receiver, you must have a Vehicle
Adaptor Kit (SA10102), Home Adaptor
Kit (SA10103), or Marine Adaptor Kit
(SA10046), or Delphi portable audio
system (each sold separately). We do
not recommend using the old SKYFi
Vehicle Adaptor Kit (SA10002) with
the SKYFi2 Receiver since the SA10102
has been designed to maximize the
performance of SKYFi2.
Page 32

About Delphi
Delphi is a worldwide leader in mobile
electronics, vehicle components, and
audio technology. Delphi created the
first in-dash car radio in 1936 and continues its strong tradition of innovation
in the audio industry. Now Delphi
technology has helped make satellite
radio a reality, and Delphi continues
to expand its in-vehicle and consumer
electronics technologies. With its exciting
line of satellite radio products, Delphi
offers a broad portfolio of products to
answer a wide variety of information
and entertainment needs—in the
vehicle, home, office, or anywhere.
About XM
One big idea can change everything.
And XM Satellite Radio is one big
idea: Radio to the Power of X
®
.
America’s most popular satellite radio
service offers over 130 digital channels
of sheer variety: music, sports, talk,
comedy, drama, news, traffic and
weather, kids programming, and more.
All 68 XM music channels are 100 percent commercial-free, and XM’s instant
traffic and weather channels provide the
most comprehensive, in-depth information on traffic incidents, delays, and
road conditions available on radio.
These services are available for a low
monthly subscription, and additional
devices may qualify for a reduced fee
through the XM Family Plan*.
*XM subscription required for reception of XM service.
Not available in Alaska or Hawaii.
4
Page 33

5
Contents
Getting Started
Activating Your SKYFi2 . . . . . . . . . 6
SKYFi2 Receiver
Controls . . . . . . . . . . . . . . . . . . . . . 7
Display Screen . . . . . . . . . . . . . . . . 8
Remote Control . . . . . . . . . . . . . . . 9
Basic Operations
Turning SKYFi2 On and Off . . . . 10
Selecting Channels . . . . . . . . . . . 10
Changing the Display . . . . . . . . . 12
Memorizing Song Information . . 13
Advanced Features
Listening to XM Using Any
FM Radio . . . . . . . . . . . . . . . . . . 14
Adjusting the Audio Level . . . . . 15
Auto-On . . . . . . . . . . . . . . . . . . . . 16
Adjusting the
Brightness and Contrast . . . . . 16
Auto-Off and Sleep Timer . . . . . . 16
Aiming the Home Antenna . . . . . 17
TuneSelect . . . . . . . . . . . . . . . . . . 18
Stock Ticker . . . . . . . . . . . . . . . . . 19
Info Extras . . . . . . . . . . . . . . . . . . 20
30-Minute Replay . . . . . . . . . . . . . 20
Recall Last Channel . . . . . . . . . . . 21
Direct Tune . . . . . . . . . . . . . . . . . . 22
Search . . . . . . . . . . . . . . . . . . . . . . 22
Skipping Channels While Tuning . 24
Setting the Clock . . . . . . . . . . . . . 25
Restoring Factory Defaults . . . . . 25
Setting the Display Screen Mode . . 26
Reference
Care of Your SKYFi2 . . . . . . . . . . 27
Accessories . . . . . . . . . . . . . . . . . 27
Troubleshooting . . . . . . . . . . . . . . 28
Contacting Technical Support
and Customer Service . . . . . . . 30
Technical Information . . . . . . . . . 30
Warranty
Delphi Limited Consumer
Warranty . . . . . . . . . . . . . . . . . . 30
Page 34
6
Warning: Failure to properly follow all
installation instructions could result in personal
injury, death, and/or damage to your SKYFi2
Receiver, accessories, and/or to your vehicle or
other property.
Warning: When using this product it is
always important to keep your eyes on the road
and your hands on the wheel. Failure to do so
could result in personal injury, death, and/or
damage to your SKYFi2 Receiver, accessories,
and/or to your vehicle or other property.
Getting Started
Getting Started
Activating Your SKYFi2
To quickly begin enjoying XM
Satellite Radio with your SKYFi2,
follow these simple steps:
1. Set up your SKYFi2 Receiver using
the installation instructions included
in the SKYFi Home Kit, SKYFi
Vehicle Kit, Delphi XM SKYFi
Marine Kit, any of the available
audio systems, or with the help of
a professional installer.
2. Press to turn on your SKYFi2
and verify that it is playing channel
1, the XM Preview channel.
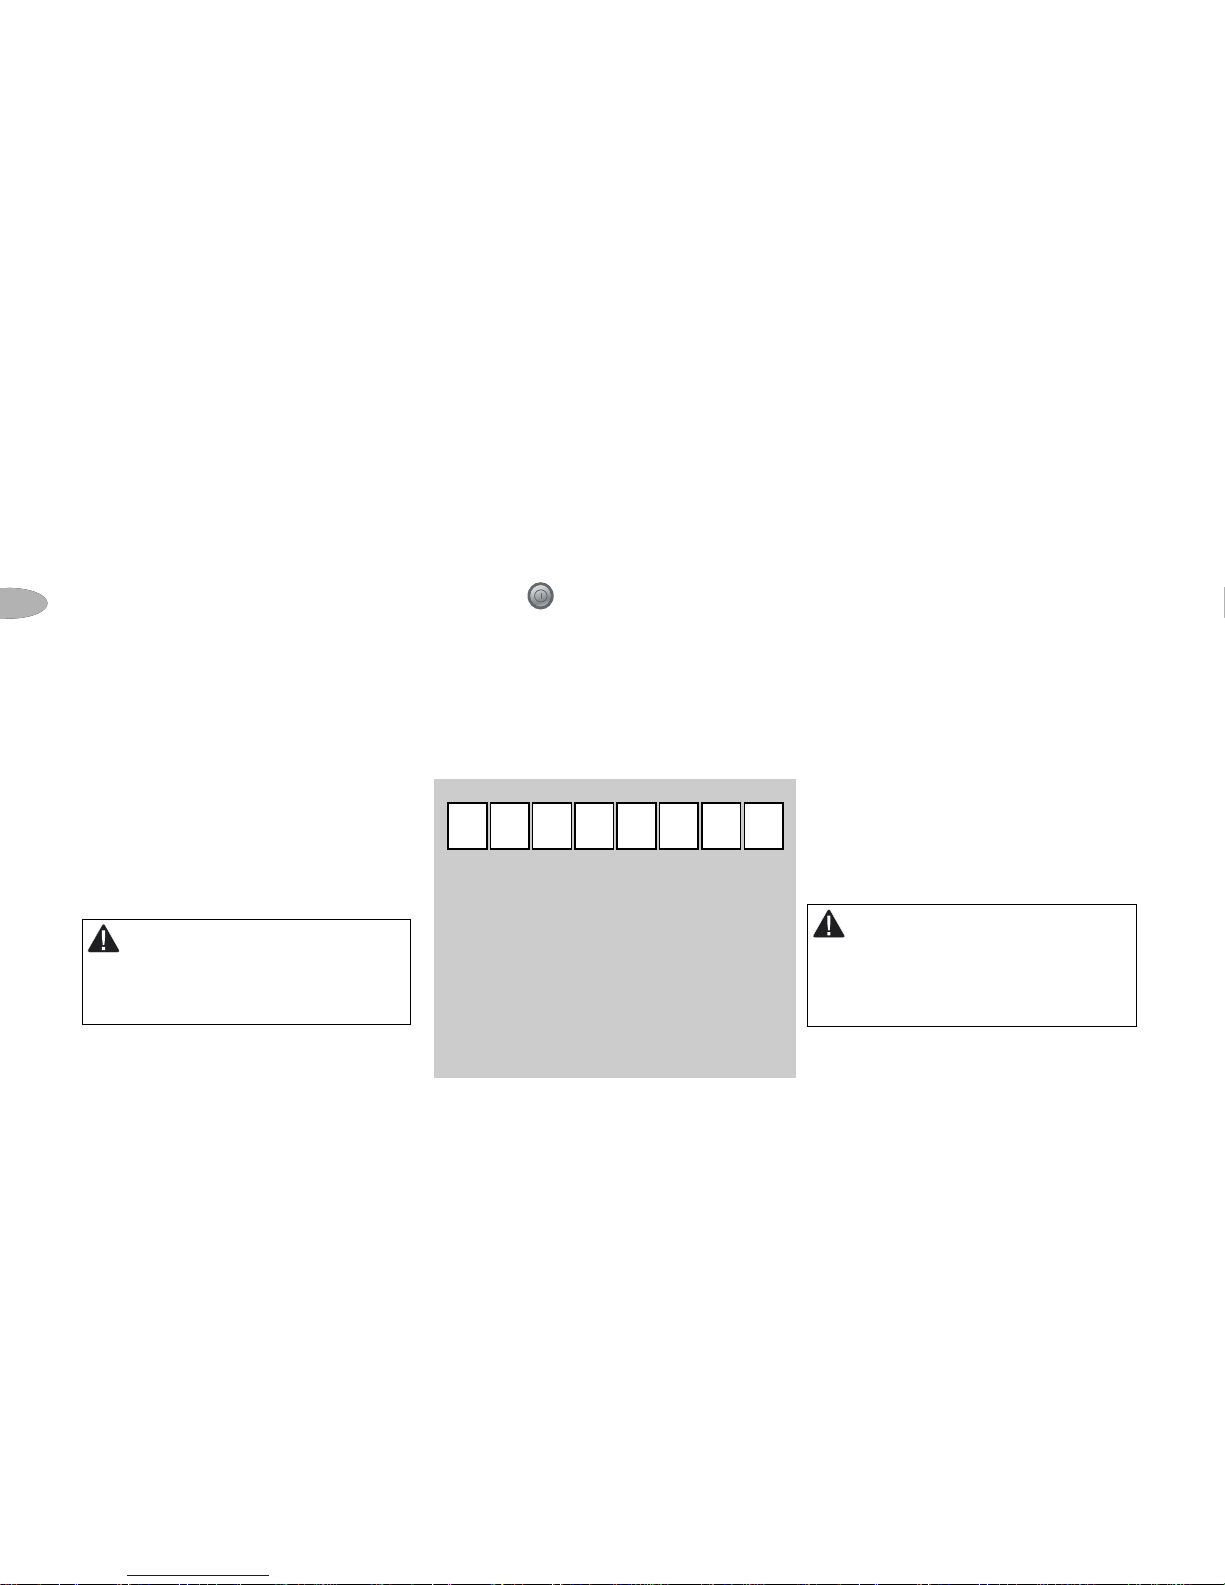
3. Select channel 0. The receiver’s
eight-character XM Satellite Radio
ID will appear on the display.
Write the ID here:
Note: Carefully check your XM Radio ID.
The letters I, O, S, and F are not used.
4. Activate your XM Satellite Radio
service. To subscribe, make sure
you have your XM Satellite Radio
ID and a major credit card. Contact
XM at http://activate.xmradio.com
or by calling 1.800.XM.RADIO
(1.800.967.2346).
5. After subscribing, make sure you
keep your receiver on for at least
one hour in order to complete the
activation process. The process is
complete when you can access the
full channel lineup on your SKYFi2.
Page 35

7
SKYFi2 Receiver
Figure 1. SKYFi2 Receiver.
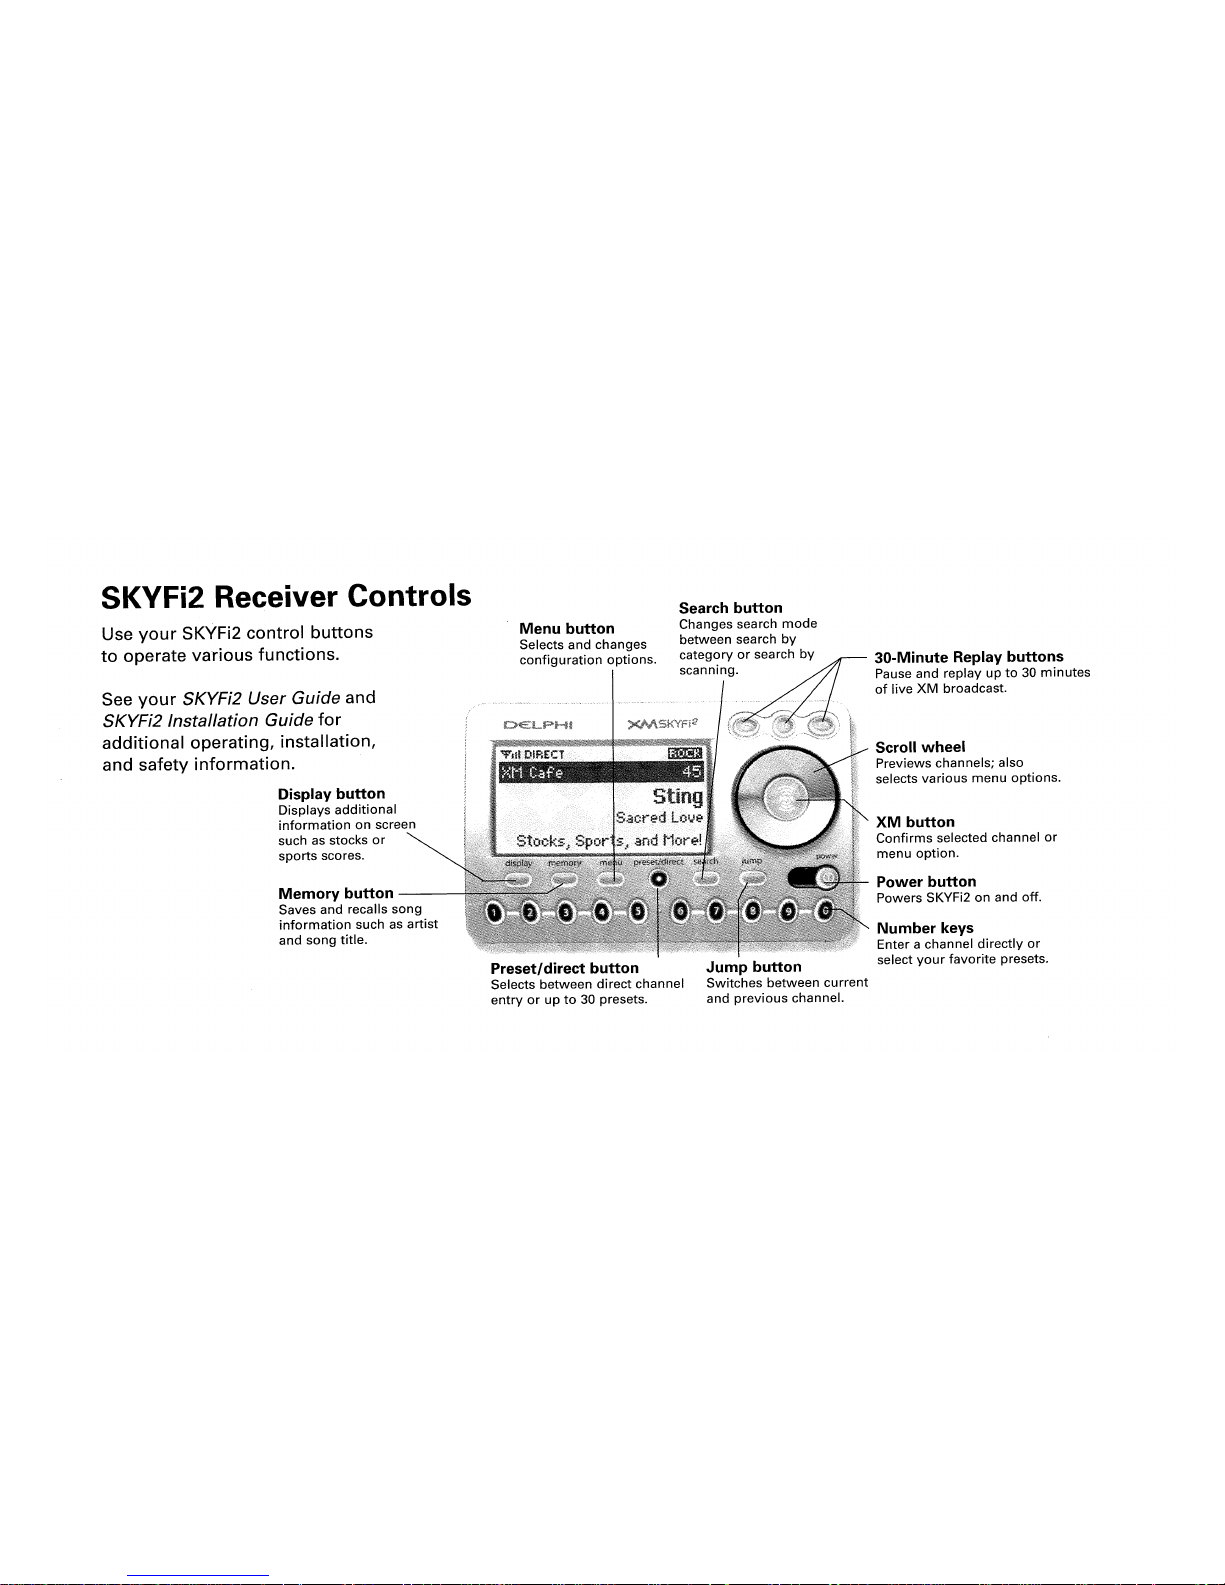
SKYFi2 Receiver
Receiver Controls
Use your SKYFi2 control buttons
to operate various functions.
30-Minute Replay buttons
Pause and replay up to 30 minutes
of live XM broadcast.
Number keys
Enter a channel directly or
select your favorite presets.
Jump button
Switches between current
and previous channel.
Search button
Changes search mode
between search by
category or search by
scanning.
Preset/direct button
Selects between direct channel
entry or up to 30 presets.
Menu button
Selects and changes
configuration options.
Memory button
Saves and recalls song
information such as artist
and song title.
Display button
Displays additional
information on screen
such as stocks or
sports scores.
Power button
Powers SKYFi2 on and off.
XM button
Confirms selected channel or
menu option.
Scroll wheel
Previews channels; also
selects various menu options.
Page 36

8
SKYFi2 Receiver
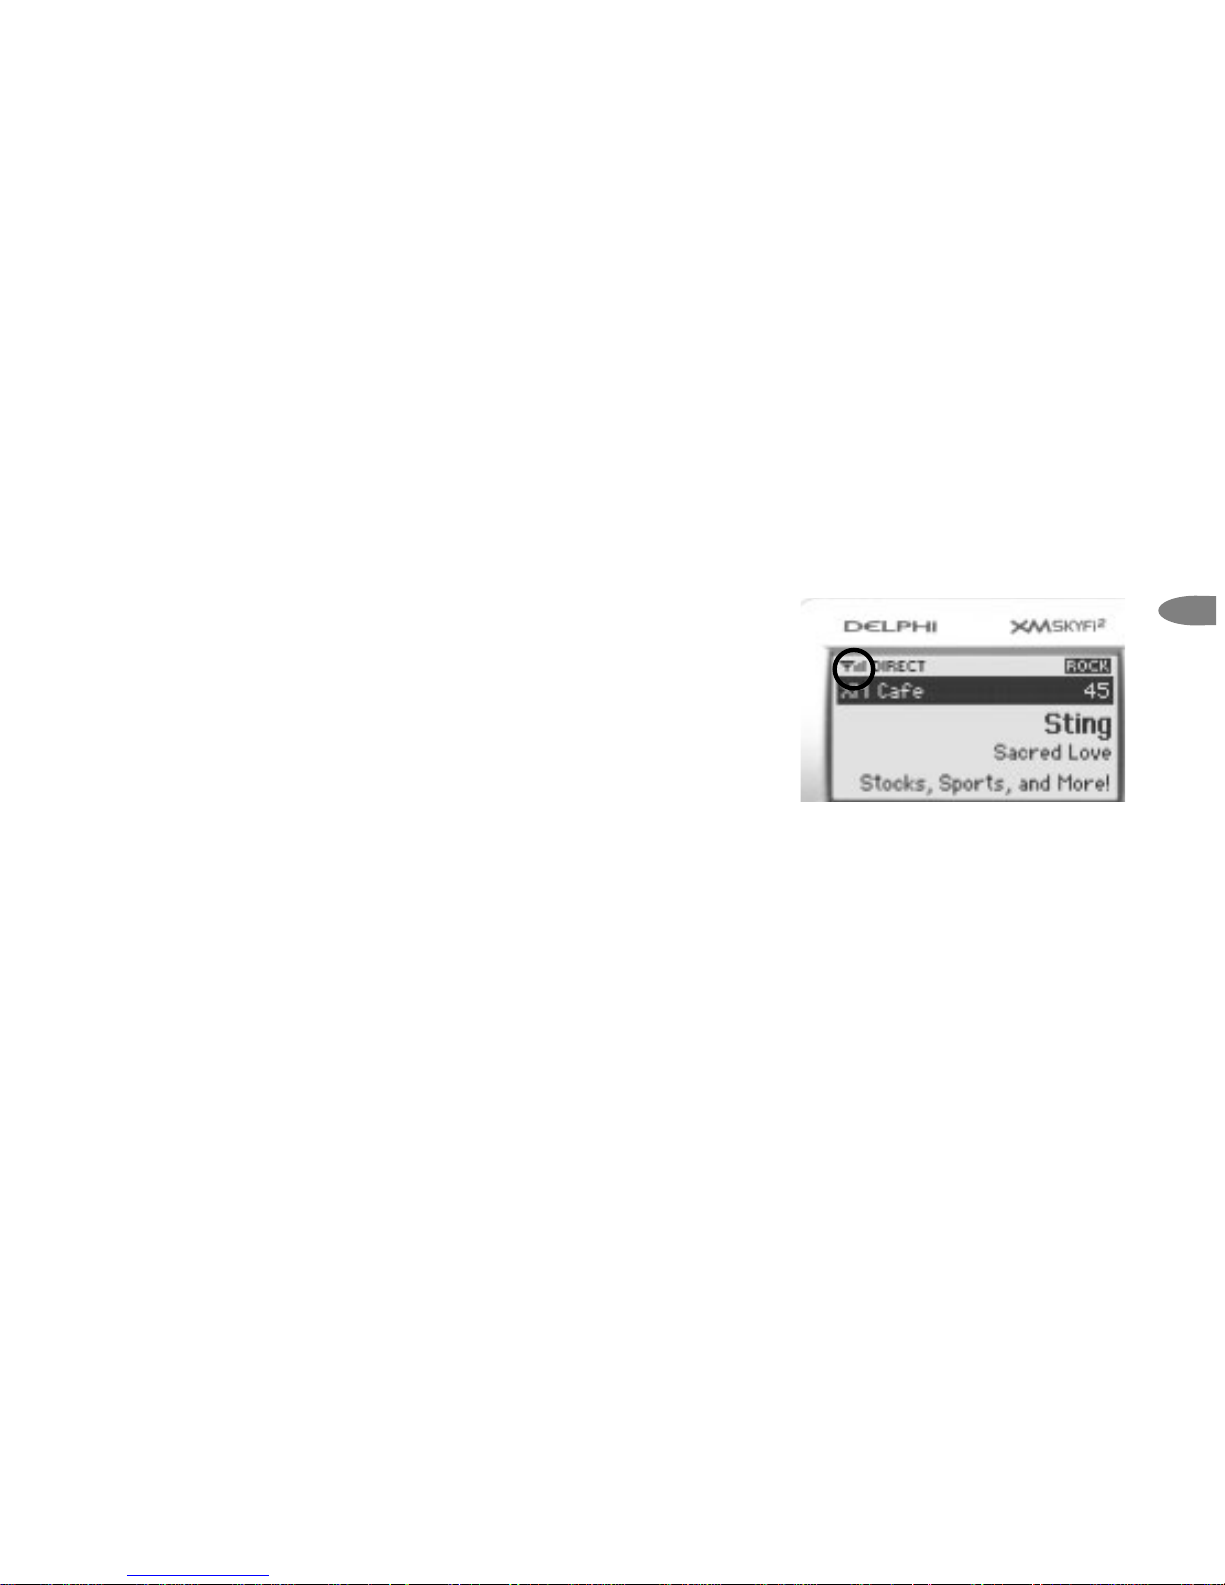
Display Screen
While tuned to an XM channel, the
SKYFi2 default display contains
information about that channel and
the SKYFi2 settings. See figure 2.
Your SKYFi2 display can be
customized. See the Basic Operations
section, beginning on page 10.
Figure 2. SKYFi2 Receiver display screen.
Signal strength
indicator
(zero to three bars)
Mode (DIRECT, Preset A,
Preset B, or Preset C)
Additional
information
(such as stocks or
sports tickers)
Artist name
Song title
Channel number
Channel name
Category name
or clock
Indicates that internal FM modulator is
turned on and set to an FM frequency
Page 37

9
SKYFi2 Receiver
Remote Control
Figure 3. SKYFi2 Remote Control.
Power button
Powers SKYFi2 on and off.
30-Minute Replay buttons
Pause and replay up to 30 minutes of live
XM broadcast.
Channel button
Previews channels; also selects various menu
options.
XM button
Confirms selected channel or menu option. Push
and hold to select song or artist for TuneSelect.
Search button
Changes search mode between search by category
or search by scanning.
Mute button
Mutes the audio.
+- buttons
Immediately select a different channel (and
control volume in some audio systems).
Jump button
Switches between current and previous channel.
Preset/direct button
Selects between direct channel entry or up to
30 presets.
Number keys
Enter a channel directly or select your favorite
presets.
Memory button
Saves and recalls song information such as artist
and song title.
Display button
Changes the display mode, providing a different
appearance and additional information such as
stocks or sports scores.
Page 38

10
Basic Operations
Warning: When using this product it is
always important to keep your eyes on the road
and your hands on the wheel. Failure to do so
could result in personal injury, death, and/or
damage to your SKYFi2 Receiver, accessories,
and/or to your vehicle or other property.
Basic Operations
Turning SKYFi2 On and Off
1. To turn on: press .
2. To turn off: press and hold for
2 seconds.
If SKYFi2 is installed in a vehicle, you
may use the ignition key to power
SKYFi2 on or off. This will not affect
SKYFi2 in any way.
Selecting Channels
You may select channels by using the
scroll wheel, by pushing one of the preset buttons, or by keying in the channel
number directly. You can also use the
equivalent buttons on the remote control.
Using the Scroll Wheel
1. Turn the scroll wheel.
2. When you find your desired
channel, press the “XM” button
to select it.
You can also set up SKYFi2 so that you
do not have to press the “XM” button
to select a channel. See “Direct Tune”
(page 22).
Page 39

11
Basic Operations
Direct Entry
1. Press the “preset/direct” button
until the “DIRECT” icon appears in
the display.
2. Press the number keys corresponding to the channel number. For
example, for channel 31, press
“3” followed by “1.” You can
select the channel faster by
pressing the “XM” button after
entering the channel number.
Using Presets
There are 30 presets in all: Each bank
(A, B, and C) holds 10 presets. Press
the “preset/direct” button to select
the proper bank. Use these banks to
organize your favorite channels or
to create separate preset banks for
additional users to enjoy.
To set a channel preset:
1. Tune to the desired channel.
2. Press the “preset/direct” button
until the appropriate “Preset” icon
(preset bank A, B, or C) appears in
the display.
3. Press and hold the number key
that corresponds to the preset you
would like to set. SKYFi2 beeps
when the channel is stored.
To select a stored preset:
1. Press the “preset/direct” button
until the appropriate “Preset” icon
(preset bank A, B, or C) appears in
the display.
2. Press one of the number keys.
SKYFi2 will tune to that channel.
Note: If a number key is pressed that has
not been assigned to a favorite channel,
SKYFi2 will automatically tune to channel 1
or the XM Preview channel, reminding you
to make a selection.
Page 40

12
Basic Operations
Changing the Display
Press the “display” button to select
any one of four screens.
Display Option 4
Large display of artist and song title
Display Option 3
Scrolls information extras at bottom of screen
Display Option 2
Scrolls stock ticker at bottom of screen
Display Option 1
Default display
Figure 4. SKYFi2 screen displays.
Page 41

13
Basic Operations
Memorizing Song Information
SKYFi2 can remember the artist name
and title of the song or programming
you are currently listening to.
1. Press and release the “memory”
button to save the information of
the current song or program.
SKYFi2 can remember up to 20
entries, after which any new information that is saved will replace
the oldest entry in memory.
2. To recall saved information, press
and hold the “memory” button for
3 seconds. Turn the scroll wheel or
use the up and down buttons on
the remote to view the entire list
of songs or programs.
Page 42

14
Advanced Features
Advanced Features
Listening to XM
Using Any FM Radio
SKYFi2 has a built-in wireless FM
modulator that transmits the XM
audio signal to any nearby FM radio.
You can use the wireless FM modulator
in a vehicle, in your home, in an
office, or even on a boat using the
appropriate kit.
1. Make sure your SKYFi2 is turned
off. Unplug any accessory from
SKYFi2’s audio jack.
2. Turn on an FM radio and place it
close to your SKYFi2.
3. Tune the FM radio to each of the
following FM frequencies:
88.1, 88.3, 88.5, 88.7, 88.9, 106.7,
106.9, 107.1, 107.3, 107.5, 107.7,
and 107.9.
4. Note the frequency that has no FM
station or the least amount of
interference.
5. Turn on your SKYFi2.
6. Press the “menu” button.
7. Use the scroll wheel to select
“FM Frequency.” Press the “XM”
button to confirm.
8. Use the scroll wheel to select the
frequency noted in step 4. Press
the “XM” button to confirm.
9. Press the “menu” button to return
to the main menu and then again
to return to the play screen.
10. You should now hear XM programming over your FM radio. If the
sound is not clear or you hear
interference or static, try another
frequency by repeating the process
above.
Note: If you are not using the wireless FM
modulator, set the FM frequency to “FM Off”
for the best audio quality.
Page 43

15
Advanced Features
Note: If you are traveling long distances, you
may need to repeat this procedure periodically
if you hear interference from local FM stations.
This is due to the differences in the strength
of FM stations being broadcast in these
areas, and not to any problems associated
with your SKYFi2.
In the rare situation that you cannot
find an acceptable open FM frequency,
consult a professional audio installer.
You may improve the audio quality
by using the Delphi FM Direct Adaptor
(SA10112), sold separately.
Adjusting the Audio Level
The factory default setting should
work well in most situations.
However, if you hear distortion, you
should decrease the audio level. If the
XM audio level is too low compared
to other sources such as CD, cassette,
or other FM stations, you may want to
increase the audio level.
1. Press the “menu” button.
2. Use the scroll wheel (or remote) to
select “Audio Level.” Press the
“XM” button to confirm.
3. Use the scroll wheel (or remote) to
select the desired level. Press the
“XM” button to confirm selection.
4. Press the “menu” button to return
to the main menu and then again
to return to normal operation.
Note: This is not a volume control. This
feature should be used to better match the
SKYFi2 audio level with the other audio
sources in the receiver. Set the volume
using the audio system or FM radio
connected to your SKYFi2.
Page 44

16
Advanced Features
Auto-On
Normally, SKYFi2 turns on whenever
it receives power. If SKYFi2 is wired to
a power source that is always on, you
should disable the “Auto-On” option:
1. Press the “menu” button.
2. Use the scroll wheel (or remote) to
select “Auto-On.” Press the “XM”
button to confirm selection.
3. Select “Off.” Press the “XM”
button to confirm selection.
4. Press the “menu” button to return
to the main menu and then again
to return to normal operation. You
must now use the button to
turn SKYFi2 on or off.
Adjusting the Brightness
and Contrast
1. Press the “menu” button.
2. Use the scroll wheel (or remote) to
select “Brightness” or “Contrast.”
Press the “XM” button.
3. Use the scroll wheel (or remote) to
select the desired level. Press the
“XM” button to confirm.
4. Press the “menu” button to return
to the main menu and then again
to return to normal operation.
Auto-Off and Sleep Timer
You can set SKYFi2 to automatically
shut off between 15 minutes to three
hours after your last input or action.
Use this feature if SKYFi2 continues
to receive power even after you
remove the ignition key; setting AutoOff prevents SKYFi2 from draining the
vehicle battery. You may also use
Auto-Off as a “sleep” feature to turn
SKYFi2 off automatically after a period
of time.
Page 45

17
Advanced Features
To set Auto-Off:
1. Press the “menu” button.
2. Use the scroll wheel (or remote) to
select “Auto-Off/Sleep Timer.”
Press the “XM” button to confirm
selection.
3. Use the scroll wheel (or remote) to
select the time period. Press the
“XM” button to confirm selection.
4. Press the “menu” button to return
to the main menu and then again
to return to normal operation.
Aiming the Home Antenna
For the best reception possible, aim
the home antenna using the following
method:
1. Press the “menu” button.
2. Use the scroll wheel (or remote) to
select “Antenna Aiming.” Press the
“XM” button to confirm selection.
3. Slowly turn and tilt the antenna.
The “Satellite” and “Terrestrial”
signal bars will change. Find the
position that gives the strongest
signal strength on either
“Satellite” or “Terrestrial.”
4. Press the “menu” button to return
to the main menu and then again
to return to normal operation.
Page 46

18
Advanced Features
TuneSelect
TuneSelect notifies you when a
favorite song or artist is playing on a
channel other than the one you are
currently listening to. You can choose
to search for songs either by song title
or by the artist name, configurable in
the menu under TuneSelect.
To add a song to the TuneSelect list:
1. Press the “menu” button and
select the “TuneSelect” option.
You can choose “Select by Song”
(factory default) or “Select by
Artist.” Press the “menu” button
to return to normal operation.
2. While the song is playing, press
and hold the “XM” button for 2
seconds. SKYFi2 will beep and
display “Artist/Song Selected.”
SKYFi2’s TuneSelect feature can
remember up to 20 songs or artists
(not both); when the list is full, any
new entry will replace the oldest
song or artist in the list.
3. When any song in the list plays on
any channel, SKYFi2 beeps and
displays “Artist/Song Found” and
the name of the song.
4. While the “Artist/Song Found”
message is displayed, press the
“XM” button to switch to the
channel playing the song.
Page 47

19
Advanced Features
To delete a song from the
TuneSelect list:
1. Press the “menu” button.
2. Use the scroll wheel (or remote) to
choose “TuneSelect.” Press the
“XM” button to confirm selection.
3. You may erase all songs or artists
in the list, or erase individual
songs or artists. Use the scroll
wheel (or remote) and “XM” but-
ton to select the desired option
and follow the instructions on the
SKYFi2 display.
4. Press the “menu” button to return
to the main menu and then again
to return to normal operation.
Stock Ticker
SKYFi2 can track up to 20 of your
favorite stock symbols, displaying
the price and daily movement on
the screen.*
To add a stock symbol:
1. Press the “menu” button.
2. Use the scroll wheel (or remote) to
select “Stock Ticker.” Press the
“XM” button to confirm.
3. Select “Add Stocks.”
4. Use the scroll wheel (or remote)
to select each letter in the desired
stock symbol. Press the “XM”
button after each letter.
Note: SKYFi2 has an embedded list of
more than 9,000 regularly traded stock
symbols that helps complete partial
entries and prevents you from entering
a non-existent symbol.
5. Press the “XM” button to confirm
and save the stock symbol in
memory.
6. Press the “menu” button to return
to the main menu and then again
to return to normal operation.
7. Press the “display” button to
select mode 2 to view your
personal Stock Ticker.
*You can track any stock and most indices listed on the NYSE, AMEX, or NASDAQ. Market information is
delayed approximately 25 minutes. Stock data provided by ComStock, Inc.
Page 48

20
Advanced Features
To delete a stock symbol:
1. Press the “menu” button.
2. Use the scroll wheel (or remote) to
select “Stock Ticker.” Press the
“XM” button to confirm.
3. Select “Erase Stocks.”
4. SKYFi2 gives you a choice of
deleting individual or all symbols.
Use the scroll wheel (or remote)
and the “XM” button to make
your choice.
5. Press the “menu” button to return
to the main menu and then again
to return to normal operation.
Info Extras
XM Satellite Radio will broadcast additional information such as sports scores
and other useful information features
throughout the time you own and use
your SKYFi2. To view the most recent
list of available information, press the
“menu” button and select “Info Extras.”
Then just follow the instructions on the
display to choose the type of Info Extras
you are interested in, personalize it to
view as little or as much as you like, and
look for new information that has been
added.
30-Minute Replay
30-Minute Replay gives users the
opportunity to finally “hear that song
again.” This feature applies to the
current listening session only. Turning
your SKYFi2 off removes all songs
from the up-to-30-minute buffer.
Page 49

21
Advanced Features
To rewind to the beginning of a song:
1. Press the button. If a song has
been playing for less than 5 seconds,
SKYFi2 rewinds to the beginning of
the previous song. If the song has
been playing for longer than 5
seconds, SKYFi2 rewinds to the
beginning of the current song.
2. Pressing the button again skips
backward to previous songs in the
order they played. SKYFi2 allows
you to access up to 30 minutes of
previously listened to live broadcast.
3. Pressing the button skips
forward.
4. To exit 30-Minute Replay and
return to the live XM broadcast,
press and hold the button until
SKYFi2 displays “LIVE” at the top
of the screen.
To pause a song:
1. Press the button. The word
“PAUSE” appears in the display.
2. To resume playback from where
you had paused, press the
button again.
3. To return to the live XM broadcast,
press and hold the button
until SKYFi2 beeps and displays
“LIVE” at the top of the screen.
Recall Last Channel
Press the “jump” button to switch to
the channel that was previously being
listened to. Pressing the “jump” button
more than once allows you to switch
between two channels at a time.
Page 50

22
Advanced Features
Direct Tune
Normally, you can use the scroll
wheel (or the remote’s up and down
buttons) to preview the artists and
song titles on other channels. You
must press the “XM” button to tune
to the desired channel. To change this
so that you do not have to press the
“XM” button and SKYFi2 behaves like
an FM radio or television, change the
“Direct Tune” option to “On.”
1. Press the “menu” button.
2. Use the scroll wheel (or remote) to
select “Direct Tune.” Press the
“XM” button to confirm.
3. Use the scroll wheel (or remote) to
select “On.” Press the “XM” button
to confirm.
4. Press the “menu” button to return
to the main menu and then again
to return to normal operation.
Search
SKYFi2 allows you to search channels
by category, scan through all presets,
or scan through all channels. Select
the search method through the menu.
To search by category:
1. Press the “menu” button. Select
“Search Mode,” then select
“Search by Category.” Return to
normal operation by pressing the
“menu” button. (“Search by
Category” is the factory default.)
2. Press the “search” button to enter
category mode.
3. Press the “search” button repeatedly
until you find the desired category.
4. Turn the scroll wheel to view
channels within that category.
Press the “XM” button to select a
channel.
Page 51

23
Advanced Features
To scan all presets:
1. Press the “menu” button. Select
“Search Mode,” then select
“Search by Scanning.” Return to
normal operation by pressing the
“menu” button.
2. Press the “preset/direct” button to
select one of the preset banks.
3. Press the “search” button. SKYFi2
plays each preset channel for 5
seconds, then advances to the
next preset.
4. Press the “search” button again to
stop scanning.
To scan all channels:
1. Press the “menu” button. Select
“Search Mode,” then select
“Search by Scanning.” Return to
normal operation by pressing the
“menu” button.
2. Press the “preset/direct” button
to select direct mode.
3. Press the “search” button. SKYFi2
plays each channel for 5 seconds,
then advances to the next channel.
4. Press the “search” button again to
stop scanning.
Note: When searching, SKYFi2 does not
play any channel that you skipped using
the “Channel Skip/Add” feature. You can
always tune to these channels using the
scroll wheel or by direct entry.
Page 52

24
Advanced Features
Skipping Channels
While Tuning
You can choose to skip over certain
channels when using the scroll wheel.
1. Press the “menu” button.
2. Use the scroll wheel (or remote) to
select “Channel Skip/Add.” Press
the “XM” button to confirm.
3. SKYFi2 displays a list of channels.
In front of each channel is a “+”
(meaning the channel is not
skipped) or a “-“ (meaning the
channel is skipped).
4. To skip a channel, use the scroll
wheel (or remote) to highlight that
channel. Press the “XM” button to
change the “+” to a “-.“
5. To add a channel back, use the
scroll wheel (or remote) to highlight that channel. Press the “XM”
button to change the “-“ to a “+.”
6. Press the “menu” button to return
to the main menu and then again
to return to normal operation.
Note: You can still tune to skipped channels
by entering the channel number (in direct
entry mode) or by pressing a preset (in preset
mode) if that channel has already been
stored. This is not considered an appropriate
method for performing “parental control.” To
completely block access to any XM channel,
contact XM Listener Care at 1.800.XM.RADIO
(1.800.967.2346).
Page 53

25
Advanced Features
Setting the Clock
1. Press the “menu” button.
2. Use the scroll wheel (or remote) to
select “Set Clock.” Press the “XM”
button to confirm.
3. You can use a 12-hour or 24-hour
(“military” time) format. Use the
scroll wheel (or remote) and “XM”
button to make your choice.
4. Use the scroll wheel (or remote) to
choose your local time zone. You
can also choose whether or not to
adjust settings for daylight-saving
time. Press the “XM” button to
confirm. XM automatically sets
the minutes.
5. Press the “menu” button to return
to the main menu and then again
to return to normal operation.
Restoring Factory Defaults
This feature erases all of your personal settings in the presets, TuneSelect,
memory, Stock Ticker, and Sports
Ticker, and resets all other settings to
the original factory configuration.
1. Press the “menu” button.
2. Using the scroll wheel (or remote),
select “Set Factory Defaults.”
Press the “XM” button to confirm.
3. Select “Yes” to restore the factory
default settings. Press the “XM”
button to confirm. Otherwise,
press the “menu” button to return
to the main menu and then again
to return to normal operation.
Page 54

26
Advanced Features
Setting the Display
Screen Mode
You may change the appearance of
the display to suit your preference,
or to improve visibility in bright sunlight or cold weather by disabling the
scrolling text to allow information to
be viewed without scrolling.
1. Press the “menu” button.
2. Use the scroll wheel (or remote)
to select “Display Screen Mode.”
Press the “XM” button to confirm.
3. You may select between white
characters on black background or
black characters on white background (using “Background Mode”)
or scrolling versus non-scrolling
(using “Scrolling Mode”).
4. Press the “menu” button to return
to the main menu and then again
to return to normal operation.
Warning: Failure to follow these instructions
could result in personal injury, death, and/or
damage to your SKYFi2 Receiver, accessories,
and/or to your vehicle or other property.
Caution: Refrain from consuming or storing
food or drinks near your SKYFi2. Spilling food
or drink on the unit could damage it. Improperly
installing the antenna cable could cause leaks
that can damage your SKYFi2, accessories,
vehicle, or other property.
Page 55

27
Reference
Accessories (sold separately)
There are various accessories
available for your SKYFi2. Consult
your local retailer or www.delphi.com
or www.xmradio.com for availability.
Vehicle Adaptor Kit by Delphi (SA10102)
Use the Vehicle Kit to install SKYFi2 in
another vehicle. Includes an antenna, 12V
power adaptor, cradle, and various mounts.
Home Adaptor Kit by Delphi (SA10103)
Allows you to use SKYFi2 in your home or
office. Includes a high-gain home antenna,
an AC power adaptor, home stand, and
audio cable.
Marine Adaptor Kit by Delphi (SA10046)
Allows you to use SKYFi2 on a boat.
Includes a splash-proof case, marine
antenna, mount, and FM modulator.
Antenna Extension Cable for
XM Home Antenna (SA10006)
Extends the antenna cable by 50 feet.
Includes all necessary cables and
connectors.
FM Direct Adaptor by Delphi (SA10112)
For geographic areas with many FM stations
and few open FM channels, the Delphi FM
Direct Adaptor minimizes interference. A
professional installer can advise you whether
this adaptor is suitable for your vehicle
and driving conditions. You may require
additional antenna cable adaptors depending
on your vehicle; consult your installer.
Reference
Care of Your SKYFi2
Important:
• Use only a soft, dry cloth to clean
the outside of your SKYFi2, any
peripherals, and any accessories.
• Do not use any solvents, chemicals,
or cleaning solutions containing
alcohol, ammonia, or abrasives.
• Do not allow liquids to spill on
the unit.
• Do not use sprays near your SKYFi2.
• It is best to keep SKYFi2 out of
direct sunlight or other sources
of extreme heat.
• Avoid placing SKYFi2 in places where
air cannot circulate around the unit.
Page 56

28
Reference
Troubleshooting
SKYFi2 is designed and built to provide
you with trouble-free performance
without the need for servicing. If it
does not appear to be functioning
properly, follow these troubleshooting
steps first to try to remedy the situation
yourself:
1. Attach all connections firmly and
securely.
2. Make sure the cigarette
lighter/auxiliary power socket is
clean and free of corrosion.
3. If you have installed SKYFi2 in a
vehicle and it does not power on,
check the 12V adaptor fuse by
unscrewing the ribbed end of the
12V adaptor. If required, replace
If you see this on the display:
NO SIGNAL
Cause: the XM signal is being
blocked.
ANTENNA
Cause: the XM antenna is not
plugged into SKYFi2.
OFF AIR
Cause: the channel selected is
not currently broadcasting.
You should:
Move SKYFi2’s antenna away from the obstructed area,
e.g., an underground garage. Make sure the vehicle
antenna is mounted outside the vehicle or the home
antenna is positioned near a south-facing window.
Make sure the antenna is correctly attached to
SKYFi2 and that the cable is not damaged or kinked.
Turn SKYFi2 off, then on, to reset this message.
Tune to another channel.
with a 1-amp fuse only. If the 12V
adaptor does not have a removable
end-cap, it has an internal fuse that
resets itself after it is left unplugged
for a period of time.
Page 57

29
Reference
If this happens:
You do not receive all XM channels
you have subscribed to.
Audio sounds distorted.
Audio is too soft.
You cannot tune to a channel.
No song title or artist name
displayed.
Audio has static while listening
through an FM radio.
Audio on XM instant traffic and
weather channels sounds different
from other XM channels.
You should:
Contact XM Satellite Radio (see page 6).
Reduce audio output level (see page 15).
Increase audio output level (see page 15).
Check that you have not chosen to skip that channel (see page 24). If the problem persists, contact
XM Satellite Radio at 1.800.967.2346. Verify that you are authorized to receive that channel as part
of your XM subscription, and that you have not asked XM Satellite Radio to block that channel.
Nothing is wrong with your SKYFi2. That information may be in the process of being updated.
On some sports and news channels, there is no title or artist information.
Change to another FM frequency (see page 14). If the problem persists and you are using the
wireless FM modulator in a vehicle, change to a hard-wired FM modulator (see page 15, page 27).
Nothing is wrong with your SKYFi2. These channels use a different audio technology than the
other XM channels.
Page 58

Delphi Limited Consumer Warranty
Delphi Product and Service Solutions
(“Delphi”) warrants all Portable XM
Satellite Radio Accessory Products sold
by Delphi (each “Product”) to be free of
defects in material and workmanship,
subject to the following conditions:
The duration of Delphi’s warranty with
respect to each Product is limited to one
(1) year from the date of sale to the original
consumer purchaser.
No other express warranties are made with
respect to any Product. All implied warranties,
including warranties of merchantability and
fitness for a particular purpose are limited
to the warranty period set forth above. This
warranty is not transferable and applies
only to the original consumer purchaser of
the Product.
Delphi will, as its sole obligation under this
warranty, replace or repair, at its option,
30
Reference
Contacting Technical Support
and Customer Service
For additional information in solving
problems with your SKYFi2, contact
Delphi at 1.877.GO DELPHI
(1.877.463.3574).
• Customer Service: Monday—Friday,
8:00 a.m.—4:30 p.m. Eastern Time
• Technical Support: Monday—Friday,
8:00 a.m.—8:00 p.m. Eastern Time
Customer service and technical support
are also available at www.delphi.com.
Technical Information
Dimensions
SKYFi2 Receiver: 4.65 in. W x 2.91 in. H x
1.26 in. D (118 mm x 74 mm x 32 mm)
SKYFi2 Remote Control: 1.58 in. W x 4.65 in.
H x .87 in. D (40 mm x 118 mm x 22 mm)
Weight
SKYFi2 Receiver: 5.20 oz. (147 g)
SKYFi2 Remote Control: 1.60 oz. (45 g)
Inputs and Outputs (when connected to
car cradle or home stand)
Antenna: 1 RF SMB connector
Power: 6V, 1000 mA maximum current,
P13 connector, positive polarity
Audio output: 3.5 mm diameter
mini-stereo jack
Page 59

any Product that does not conform to this
warranty. Products may be repaired or
replaced with new or with refurbished
items. This limited warranty does not cover
defects in appearance, cosmetic or decorative items, including any non-operative
parts. Under no circumstances will Delphi
be liable for any incidental or consequential
damages under this warranty or any
implied warranties. These remedies are the
customer’s exclusive remedies for breach
of warranty. This limited warranty only
extends to customers who purchase the
Products in the United States.
Delphi will not be responsible for damage
resulting from any (i) deviation from
Delphi’s operating instructions as printed in
Delphi’s catalog or on any packaging,
labels, or other literature provided with a
Product, (ii) installation of a Product in a
manner which is inconsistent with Delphi’s
written instructions, (iii) alteration or
modification of a Product, (iv) misuse,
(v) neglect, (vi) abuse, (vii) accident, (viii)
normal wear and tear, (ix) commercial use,
(x) improper storage, (xi) environmental
conditions, including excessive temperature
or humidity, (xii) service by anyone other
than a Delphi authorized repair facility,
(xiii) other improper application, installation
or operation of the Product, or (xiv) defects
or malfunctions of which Delphi is not
advised within ten (10) days of the expiration
of the limited warranty period.
How you (the Customer) can get service:
To obtain warranty service, you must return
the defective Product with the original
receipt to the original place of purchase. If
further clarification or additional information
is required from Delphi, you may call Delphi
at 1.877.GO DELPHI (1.877.463.3574). If warranty service is needed at any time during
the warranty period, the purchaser will be
required to furnish a sales receipt/proof of
purchase indicating the date of purchase,
amount paid, and place of purchase.
Customers who fail to provide such proof
of purchase will be charged for the
repair/replacement of any Product.
How state law relates to the warranty:
Some states do not allow limitations on the
duration of implied warranties, or the
exclusion or the limitation of incidental or
consequential damages. So the above limitations or exclusions may not apply to you.
This warranty gives you specific legal
rights. You may also have other rights that
may vary from state to state. NO PERSON
IS AUTHORIZED BY DELPHI TO MODIFY
OR ADD TO THIS LIMITED WARRANTY.
31
Warranty
Page 60
Delphi Corporation
1441 West Long Lake Road
Troy, Michigan 48098-5090
U.S.A.
Customer Service: [1] 877.GO DELPHI
www.delphi.com
Printed on Recycled Paper
©2004 Delphi Corporation. All rights reserved.
DPSS-04-E-064
The SKYFi2 name, XM name, TuneSelect, and related
logos are trademarks of XM Satellite Radio Inc.
Page 61

Page 62

Page 63

Page 64

Page 65

Page 66

Page 67

 Loading...