

Page 1

I:>E:LPHI
Delphi Audio System
Installation
~
~
~
.........,
~
SATELLiTE
RADiO
Page 2
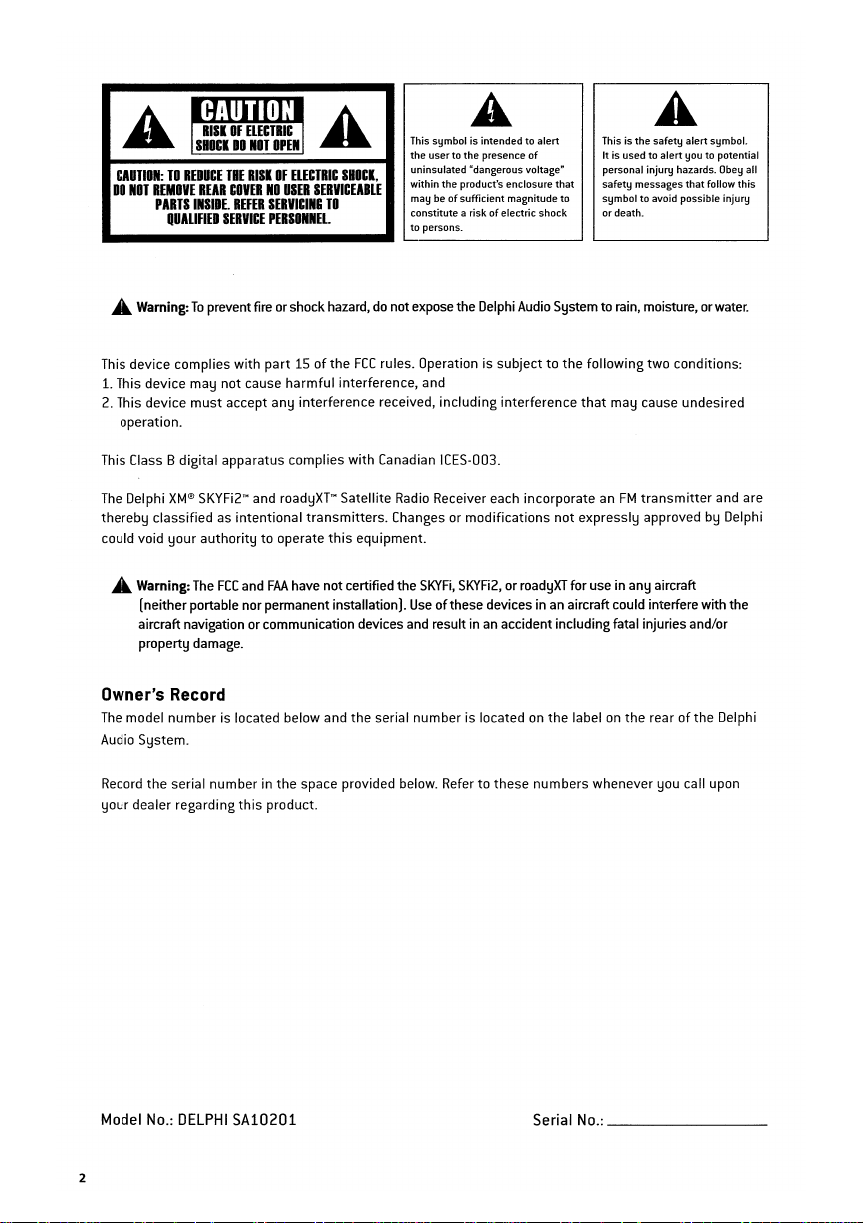
A
CAUTION:TOREDUCE
DO
NOT
REMOVE
PARTS
A.
Warning:Toprevent fire or shock hazard,donotexpose the Delphi Audio System to rain, moisture, orwater.
THE
REAR
COVERNOUSER
INSIDE.
QUALIfiED
SERVICE
RISIOfELECTRIC
REFER
SERVICEABLE
SERVICING
PERSONNEL.
SHOCI.
TO
This symbol is intendedto alert
the user to the presence
uninsulated "dangerous voltage"
within the product's enclosure
maybeof
sufficient magnitude to
constitute a risk
to persons.
of
electric shock
of
This is the safety alert symbol.
It is used to alert you to potential
personal injury hazards.
that
safety messages
symbol to avoid possible injury
or death.
that
Obey
follow this
all
This device complies
1.
This device may
2. This device
operation.
This Class B digital apparatus complies
The
Delphi
thereby
could void
Owner's
The
Audio System.
Record
your dealer regarding
XM®
classified as
your
A.
Warning:
[neitherportable nor permanent installation].
aircraft navigation or communication devices and result in
property damage.
Record
model
number
the
serial number in
with
part15of
not
cause
must
accept any interference received,
n
SKYFi2
, and
intentional
authoritytooperate
The
FCC
and
FAA
is located below and the serial
this
product.
the
harmful
interference, and
with
roadyXrMSatellite Radio Receiver each incorporate anFMtransmitter
transmitters.
this
have not certified the
the
space provided below. Refertothese
FCC
rules. Operation is subjecttothe
Canadian ICES-003.
equipment.
following
including
Changes or
SKYFi,
Useofthese devices inanaircraft could interfere with the
number
interference
modifications
SKYFi2,
or roadyXT for use in any aircraft
an
accident including fatal injuries and/or
is locatedonthe
that
not
expressly approved by Delphi
labelonthe
numbers whenever you call upon
two conditions:
may cause undesired
rearofthe Delphi
and are
Model No.: DELPHI
2
SA10201
Serial No.: _
Page 3
What's in
the
Box - 4
Settingupthe
Using
SKYFilSKYFi2
Using
roadyXT
Using
the
Settingupthe
Positioning
Optimizing
Installing
Indoor
Outdoor
Using
the
Volume 8
Bass
Headphones
Precautions
Delphi Audio
with
Delphi Audio
Antenna
theXMAntenna
Antenna
theXMAntenna on
Installation
InstallationorIndoor
Delphi Audio
System
with
the
Delphi Audio
the
Delphi Audio
System
with
Position/Signal
the
on a Flat Surface ?
Wall
System
System
System
Batteries
Rearofthe
Mounting
Delphi Audio
System
&Treble 9
4
5
5
6
6
6
6
?
?
8
9
9
Troubleshooting
Maintenance
Specifications
Warranty
10
10
11
11
Page 4
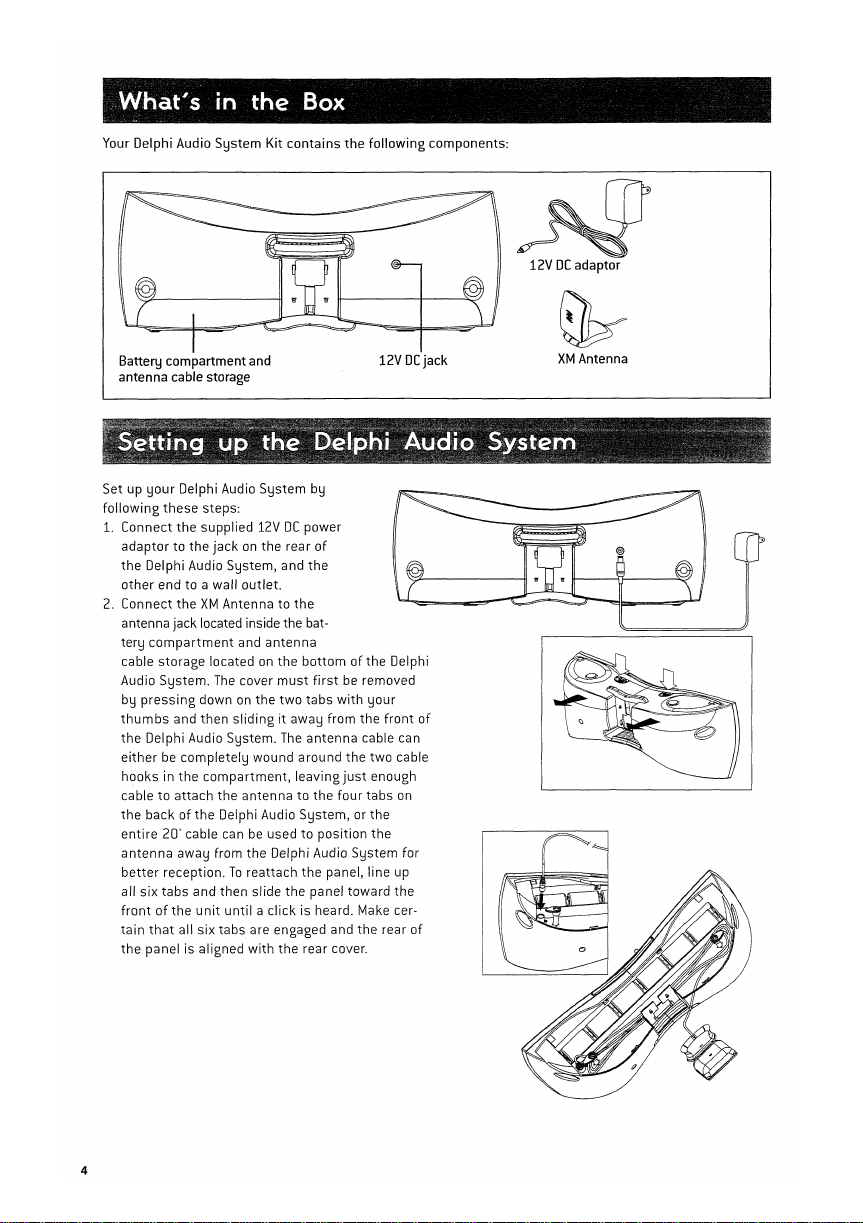
What's in the
Box
Your Delphi Audio
Battery compartment and
antenna cable storage
Set up
your
following
1.
Connect
adaptortothe
the
Delphi Audio System, and
other
2. Connect
antenna jack located inside the bat-
compartment
tery
cable
Audio
pressing
by
thumbs
the
Delphi Audio System.
eitherbecompletely
hooksinthe
cable
the
backofthe
entire
antenna
better
six
all
frontofthe
tain
that
the
panel is aligned
System
Kit
Delphi Audio
these
the
supplied 12VDCpower
endtoa wall
theXMAntennatothe
storage
System.
downonthe
and
then
to
attach
20'
cable can be usedtoposition
away from
reception.Toreattach
tabs
and
unit
all
six
System
steps:
jackonthe
outlet.
and
antenna
located on
The
cover
slidingitaway from
wound
compartment,
the
antennatothe
Delphi Audio
the
Delphi Audio
then
slide
untilaclick
tabs
are engaged and
with
contains
the
by
rear
of
the
the
bottomofthe
must
first
two
The
the
be removed
tabs
with
antenna
around
the
leaving
just
four
System,orthe
System
the
panel, line up
the
panel
toward
is heard. Make cer-
rear cover.
following
12V
Delphi
your
the
front
cable can
two
enough
tabs
the
the
the
rear
DC
cable
on
for
of
jack
of
components:
12VDCadaptor
XM
Antenna
4
Page 5
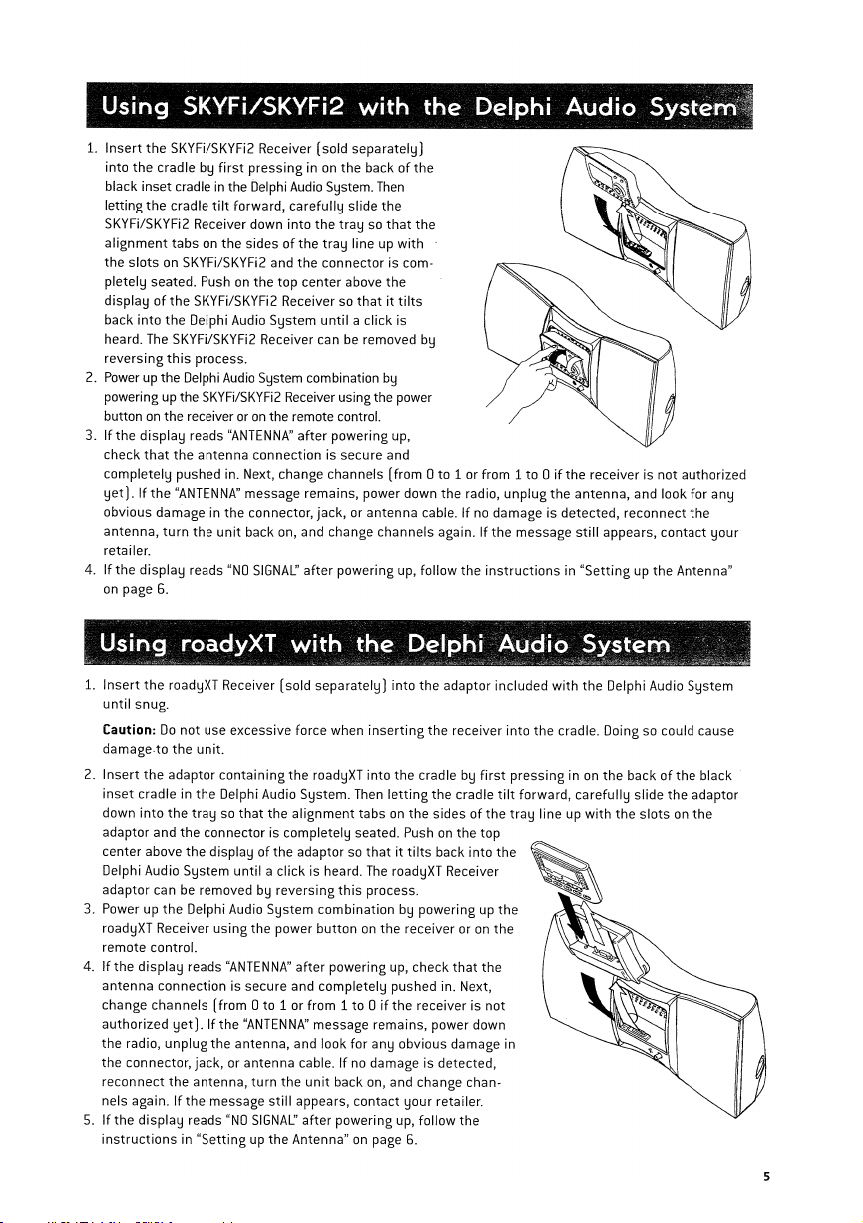
Using
1.
Insert
into
black inset cradle in the Delphi Audio System.
letting
SKYFi/SKYFi2 Receiver down
alignment
the
pletely seated. Push
displayofthe
back
heard.
reversing
SK'Y'FilSK¥Fi2
the
SKYFi/SKYFi2 Receiver (sold
the
cradle by
the
slots
into
The
first
pressing
in on
cradle
tilt
forward,
carefully
into
top
the
the
center
tray
connector
tabsonthe
sidesofthe
on SKYFi/SKYFi2 and
on
the
SKYFi/SKYFi2 Receiver so
the
Delphi Audio System
until
SKYFi/SKYFi2 Receiver can be removed by
this
process.
wittl ttle Delptli Audio
separately)
the
backofthe
Then
slide
the
traysothat
line up
with
is com-
above
the
thatittilts
a click is
2. Power up the Delphi Audio System combination by
powering up the SKYFi/SKYFi2 Receiver using the power
buttononthe receiver oronthe remote control.
3.Ifthe
display
reads
check
that
the
antenna
completely pushed in. Next, change channels
"ANTENNA"
yet).Ifthe
"ANTENNA"
after
powering up,
connection is secure and
(from0to
message remains, power down
obvious damage in the connector, jack, or antenna cable.
antenna,
turn
the
unit
back on, and change channels again.Ifthe
retailer.
4.Ifthe
display
reads
"NO
SIGNAL'
after
on
page 6.
• J
Using
;{
;{
1.
Insert
until
Caution:
damage.to
2.
Insert
inset
down
adaptor and
center above
I'2QadyXT
~¥=
"d}f.';-i"r;,)t> >'»4.«
,,"h
~«
the
roadyXT Receiver (sold
snug.
Do
not
use excessive force when
the
unit.
the
adaptor
cradle in
the
into
the
traysothat
the
connector is completely seated. Pushonthe
the
displayofthe adaptor so
Delphi Audio System
adaptor can be removed by
3.
Power up
the
roadyXT Receiver
Delphi Audio System
using
>-
containing
Delphi Audio System. Then
the
untilaclick
reversing
the power
powering up, follow
witH tHe Delphi
1;:.
'"
:{,<,<
=¥«w
....
1(~..
«".
separately)
into
inserting
the
roadyXT
into
the
letting
alignment
tabsonthe
thatittilts
is heard.
The
roadyXT Receiver
this
process.
combination
by powering up
buttononthe
remote control.
4.Ifthe
display
reads
antenna
connection is secure and completely pushed in. Next,
change
channels
authorized
the
radio,
the
connector, jack, or antenna cable.Ifno damage is detected,
reconnect
nels again.Ifthe
5.Ifthe
display
yet).Ifthe
unplug
the
antenna,
reads
(from
the
message
"NO
instructionsin"Settingupthe
"ANTENNA"
after
powering up, check
0 to 1 or from 1to0ifthe
"ANTENNA"
antenna, and look
turn
SIGNAL'
message remains, power down
for
the
unit
still
back on, and change chan-
appears, contact
after
powering up, follow the
Antenna"onpage
any obvious damage in
the
1 or from 1to0ifthe
the
radio,
If
the
:-".,.
Vq'Zm
;>;~,;-;t<
~ ~
W";:~Jo>
the
adaptor included
the
receiver
cradle by
the
cradle
sidesofthe
back
into
receiver or on
that
receiver is
your
retailer.
6.
-
receiver is
unplug
the
message
antenna, and look
reconnect
still
appears,
no damage is detected,
instructionsin"Settingupthe
~
~md'iQ
~~::."':
jJ~k''''1;.;
into
first
pressing
tilt
forward,
tray
System
:
"",
..
jP~';««
f.0.~~"'~;~}}~~?C%W~~~
with
the
Delphi Audio System
the
cradle. Doing so could cause
in on
the
backofthe
carefully
line up
with
the
top
the
the
the
the
not
S~stem~
...
"
.,-~;
not
authorized
for
any
the
contact
your
Antenna"
z"..
"'j;7,:,Jj~wJ
%i
..}
':,..,':.
~~~~~7~~1;Wr~ti
1
o$i
black
slide
the
adaptor
slotsonthe
Page 6
Using the Delphi Audio System
The
Delphi Audio System canbeused
to
supplied)
other locations
Alkaline or rechargeable
Battery life will
operated and the
recommended
source for the Delphi Audio System in order to preserve
battery life.
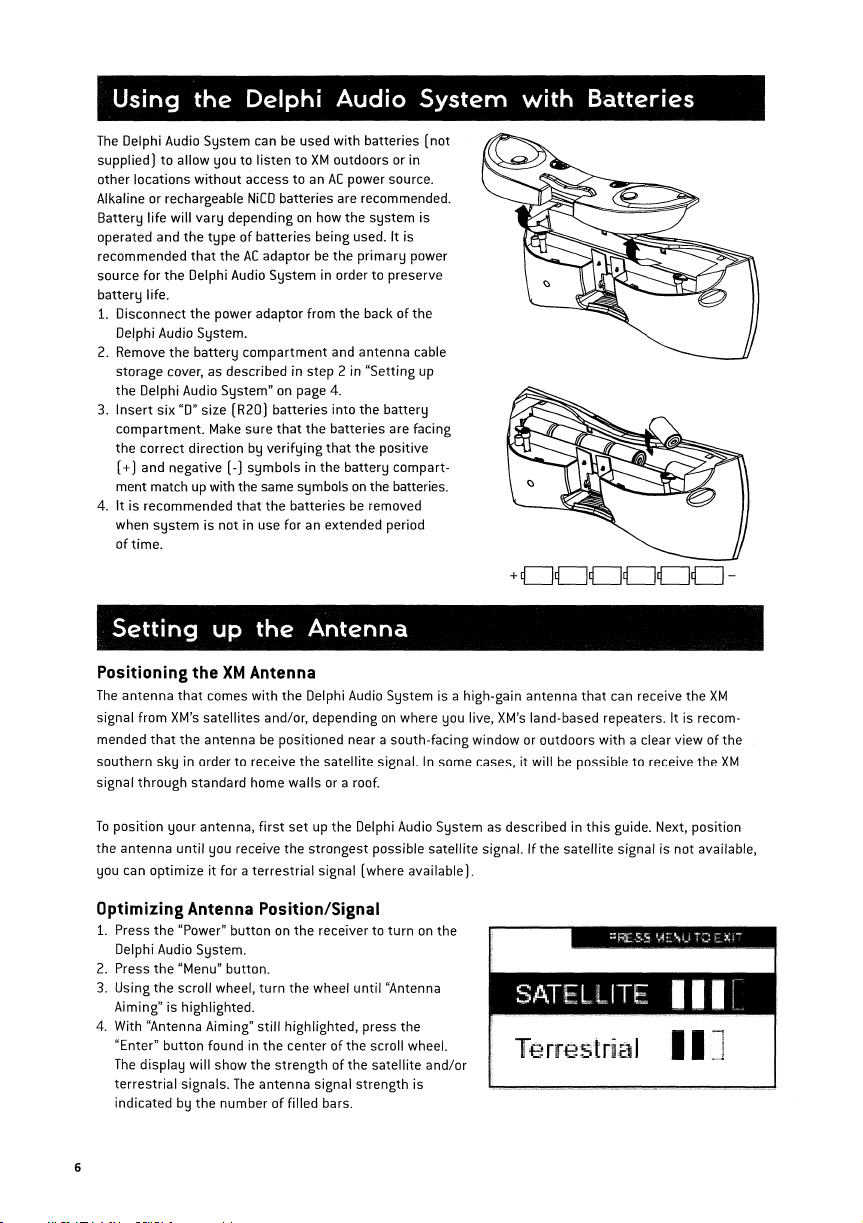
1.
Disconnect the power adaptor from the backofthe
Delphi Audio System.
2.
Remove the battery
storage cover, as described in step 2 in "Setting up
the Delphi Audio System"
3.
Insert six "0" size (R20) batteries into the battery
compartment. Make sure
the correct direction by
(+) and negative (-) symbols in the battery compart-
ment match
4. It is recommended
when
of
allow you to listen toXMoutdoors or in
without
access to anACpower source.
NiCD
vary
dependingonhow the system is
typeofbatteries being used. It is
that
theACadaptorbethe primary power
compartment
verifying
up
with the same symbolsonthe batteries.
that
the batteriesberemoved
time.
system
is not in use for an extended period
with
batteries (not
batteries are recommended.
and antenna cable
on
page 4.
that
the batteries are facing
that
the positive
with
Batteries
+000000-
Setting
Positioning
The
antenna
signal from
that
mended
southern
signal through standard home walls or a roof.
To
position your antenna,
the antenna
you can optimize
up
the
Antenna
theXMAntenna
that
comes with the Delphi Audio System is a high-gain antenna
XM's
satellites and/or, dependingonwhere you live,
the antennabepositioned near a south-facing window or outdoors with a clear viewofthe
sky
in order to receive the satellite signal. In some cases,itwillbepossible to receive the
first
set up the Delphi Audio Systemasdescribed in
until
you receive the strongest possible satellite signal.Ifthe satellite signal is not available,
it
for a terrestrial signal (where available).
Optimizing Antenna Position/Signal
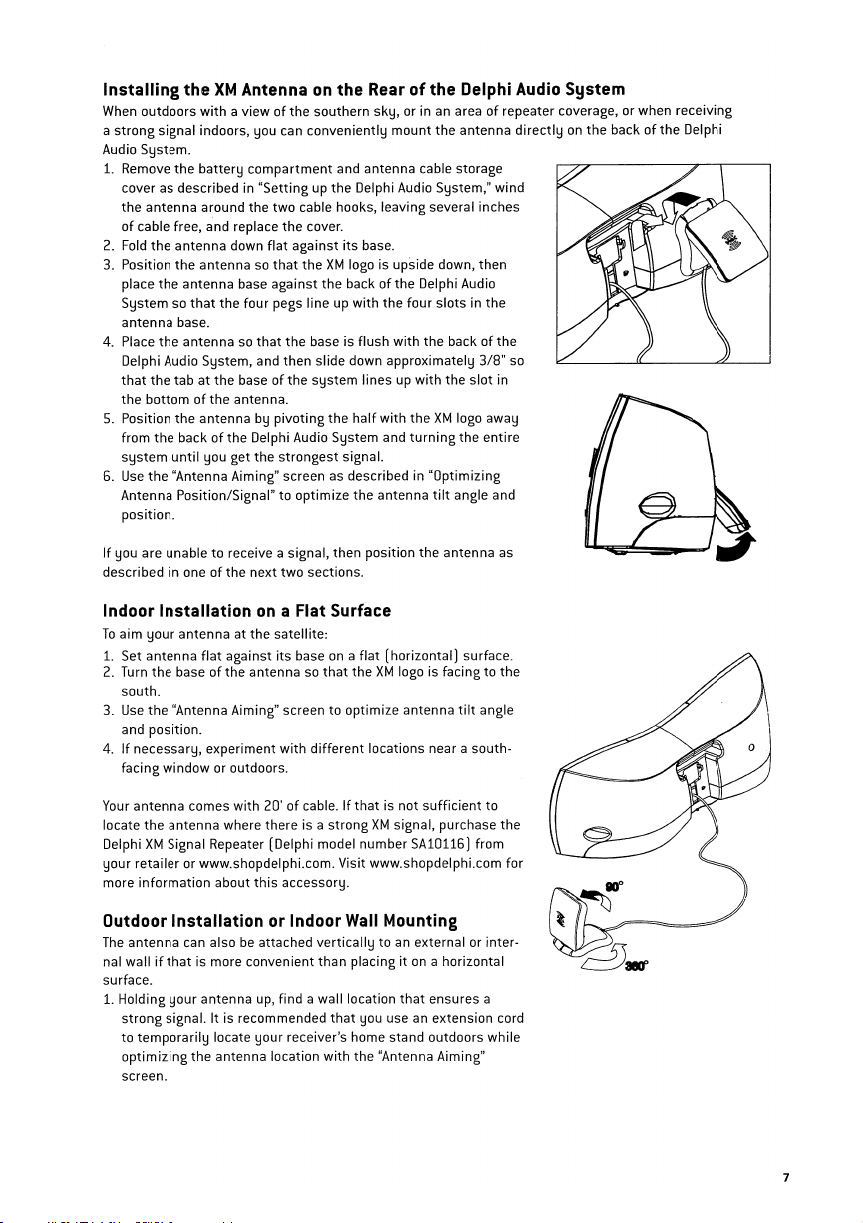
1.
Press the "Power" buttononthe receiver to
Delphi Audio System.
2.
Press the "Menu" button.
3.
Using the scroll wheel,
Aiming" is highlighted.
4.
With "Antenna Aiming"
"Enter" button found in the center
The
display will show the strengthofthe satellite and/or
terrestrial signals.
indicated by the number
6
turn
the wheel
still
highlighted, press the
The
antenna signal strength is
of
filled bars.
turnonthe
until
"Antenna
of
the scroll wheel.
that
can receive the
XM's
land-based repeaters. It is recom-
this
guide. Next, position
XM
XM
II
Page 7
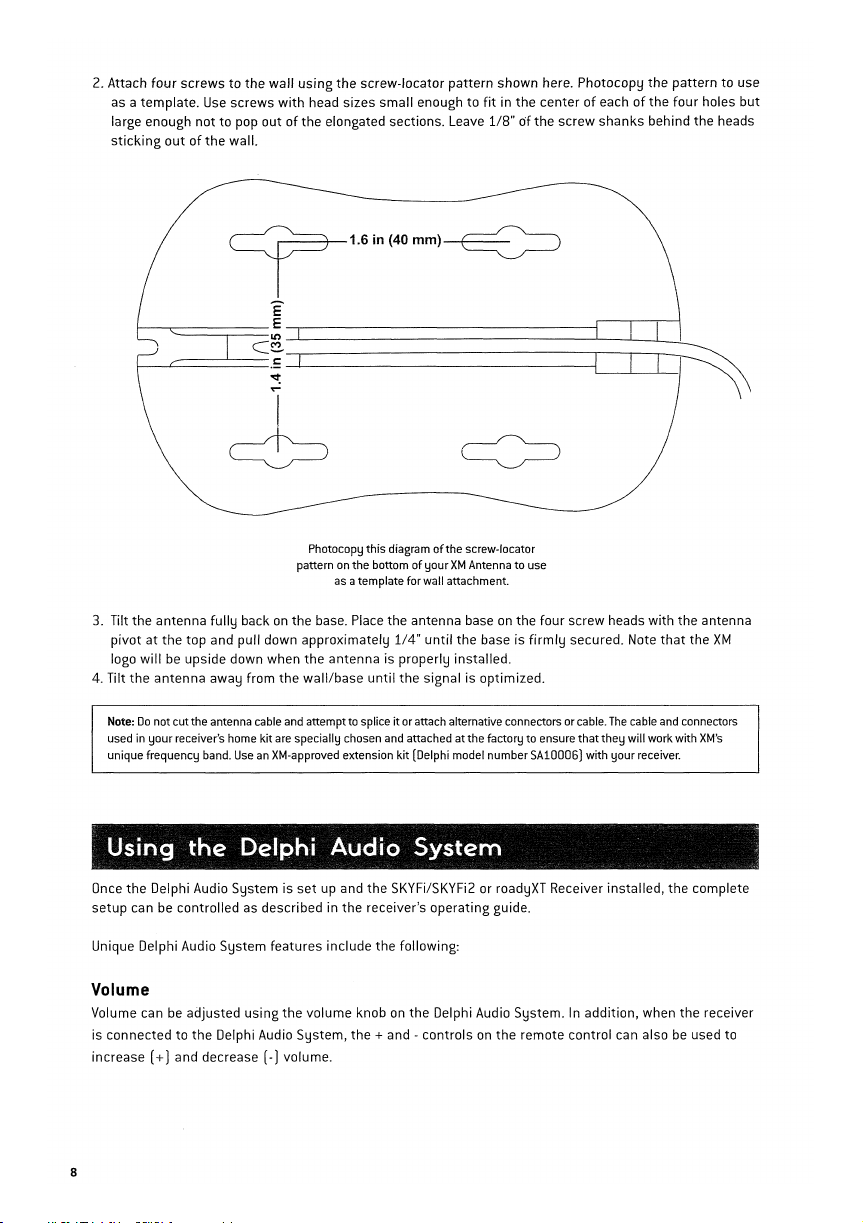
Installing theXMAntennaonthe
When outdoors
a strong signal indoors, you can conveniently mount the antenna
Audio System.
1.
Remove the battery
cover as described in "Setting up the Delphi Audio System," wind
the antenna around the two cable hooks, leaving several inches
of
cable free, and replace the cover.
2.
Fold
3. Position the antenna
place
System so
antenna base.
4. Place
Delphi Audio System, and then slide down approximately
that
the bottom
S.
Position
from
system
5.
Use
Antenna Position/Signal" to optimize the antenna
position.
If
you are unable to receive a signal, then position the antenna
described in oneofthe next two sections.
with
a viewofthe southern sky, or in an areaofrepeater coverage, or when receiving
compartment
the
antenna down
the
antenna base against the backofthe Delphi Audio
that
the
antennasothat
the tab at the baseofthe system lines up with the slot in
of
the
antenna by pivoting the
the
backofthe Delphi Audio System and
until
you get the strongest signal.
the
"Antenna Aiming" screen as described in "Optimizing
flat
against its base.
so
that
theXMlogo is upside down, then
the four pegs line up with the four slots in the
the
the antenna.
Rear
of the
and antenna cable storage
base is flush
with
the backofthe
half
with theXMlogo away
turning
tilt
Delphi
3/8"
the entire
angle and
Indoor Installationona Flat Surface
To
aim
your
antenna at the satellite:
1.
Set antenna
2.
Turn
south.
3.
Use
and position.
4.
If
necessary, experiment
facing window or outdoors.
flat
the
the "Antenna Aiming" screen to optimize antenna
against its baseona
baseofthe antennasothat
with
flat
(horizontal) surface.
theXMlogo is facing to the
different
locations near a south-
tilt
angle
Audio
System
directlyonthe backofthe Delphi
so
as
Your
antenna comes with 20'ofcable.Ifthat
locate the antenna where there is a strong
XM
Delphi
your retailer or www.shopdelphi.com. Visit www.shopdelphi.com for
more information about
Outdoor
The
nal wall
surface.
1.
Signal Repeater (Delphi model number SA10115) from
this
accessory.
InstallationorIndoor
antenna can alsobeattached vertically toanexternal or inter-
if
that
is more convenient than placingiton
Holding your antenna
strong signal. It is recommended
to temporarily locate your receiver's home stand outdoors while
optimizing
screen.
the antenna location with the "Antenna Aiming"
up,
find a wall location
is not
sufficient
XM
signal, purchase the
Wall
Mounting
a horizontal
that
that
you use an extension cord
ensures a
to
7
Page 8
2. Attach
four
as a template. Use screws
large enough not to pop outofthe elongated sections. Leave
sticking
screws to the wall
outofthe
wall.
using
the
with
screw-locator pattern shown here. Photocopy the patterntouse
head sizes small enough to
T1.6in(40mm)~
fitinthe
centerofeachofthe
1/8"ofthe
screw
shanks
four
holes
behind the heads
but
I---..-------E--,--------------------I
-----y--C-~--L------------------l---.L---L~
.=
~
~
N
I
~
Photocopy
this
E
diagramofthe
the
pattern on
3. Tilt the antenna fully backonthe base. Place the antenna baseonthe four screw heads with the antenna
pivotatthe top and pull down approximately
logo willbeupside down when the antenna is properly installed.
the
4. Tilt
~»~
Once
setup can be controlled
antenna away from the wall/base
Note:Donotcut
used in
unique frequency band.
tJsiAg
;(
the
the
your
antenna cable and attempt to spliceitor attach alternative connectors or cable.
receiver's home
the Delphi A.\ldie System
Delphi Audio System is
kit
are specially chosen and attached at
UseanXM-approved extension kit (Delphi model
setupand
as
described in the receiver's operating guide.
bottomofyourXMAntennatouse
as atemplate forwall attachment.
1/4"
until
the
~
(
the
SKYFi/SKYFi2 or roadyXT Receiver installed, the complete
screw-locator
until
the base is
signal is optimized.
the
factory to ensure
number
firmly
secured. Note
that
SA10006) with
that
The
cable and connectors
they
will work with
your
receiver.
the
XM
XM's
¥
~
~
Unique Delphi Audio System features include the following:
Volume
Volume canbeadjusted using
is connected to
increase
8
the
Delphi Audio System, the + and - controlsonthe
(+) and decrease (-) volume.
the
volume knobonthe Delphi Audio System. In addition, when the receiver
remote control can alsobeused to
Page 9
Note
that
the
"Line Out Level"
volume
control
in
a car cradle or home
automatically
returntothe
shouldbeusedtocontrol
cannotbereset
stand
and
prior
while
the
receiver is in
the
audio
output
instead.Ifthe
the
receiverislater reconnectedtothe
setting
the
next
timeitis used in a vehicle adaptor or home adaptor.
Bass8cTreble
Bass and
treble
canbeadjusted by
theminthe
This
receiverisremoved and used in a vehicle adaptor or home adaptor,
receiver
tems.
and
feature
willbe"flat"
When
treble
same
only
the
receiver is
settings.
mannerasother
appears and
or "zero"
pressing
menu
only
applies when
since
the
returnedtothe
the
"Menu"
button,
functions.
the
receiver is seated in
audio signal
Delphi Audio System,itwill
will
be processed by
Headphones
The
Delphi Audio System has a headphone
frontofthe
plugs
and/or
unit.
Many popular
adaptors
fit
the
industry
styles
jack
conveniently
and
typesofheadphones or earbuds canbeused as longastheir
standard 3.5mmdiameter
located
the
Delphi Audio System
line
out
Delphi Audio System,itwill
selecting
"Bass + Treble", and
the
the
bass and treble
the
returntothe
nexttothe
stereo jack.
Delphi Audio System.Ifthe
vehicle or home audio
setting
previously
volume
since
is adjusted
then
settings
outofthe
used bass
controlonthe
the
while
setting
sys-
A Warning: Hearing damage from loud noise is almost undetectable until
adaptto highervolumesofsound. Sound
Take
precautions by adjusting the volume controlonyour audio system to a safe sound level before
your hearing adapts to it.
To
help avoid hearingloss ordamage, do
1.
Adjust
the
2.
1.
On
volume controltothe lowest setting.
Increasevolume slowly until you hear comfortably and clearly.
power sources:
• ForACoperation, it is recommended
use
another
one, make sureitis a
•
The
satellite
radio receiver is
connected to
• Unplug
of
time.
• For
battery
•
The
icon
the
rea r cover.
Caution:
caused by
the
wall
outlet,
theACpower adaptor from the wall
operation, use six
indicating
When the batteries are
battery
operating
leakage or corrosion.
that
the
following:
that
12V,
1500mADCadaptor
not
disconnected
evenifthe
"0"
voltage, power
not
satellite
size
(R20]
being used, remove
seems normal canbeloud and harmful to your hearing.
only the suppliedACpower adaptor is used.Ifyou need to
withaunified
from theACpower source
radio receiver has been
outlet
whenitis
batteries.
consumption,
not
etc. is located nexttothe
themtoavoid possible damage
it
is too late. Your hearing can
polarity-type
(mains]aslongasit
turned
off
used
for
an extended period
jack.
or detached.
power
jack
that
can
is
on
be
9
Page 10

2.Onplacement:
•
Do
not
place the Delphi Audio Systemonan
•
Do
not
place
anything
within
1/2"ofthe
be
unobstructed
components.
• Since a
or
spring-wound
Do
not
3.
, "
immerse
• This
product
• Before
openingorshutting
water, dust, or sandonthe
•Ifthe
Delphi Audio System is splashed
withasoft
with
an electric
•
The
suppliedACpower adaptor is not
Delphi Audio System near
• Water in
strong
dry
the
for
the
magnet
watches
in water.
is not
meanttobe
cloth.Donot
hair
dryer.
headphone
Delphi Audio Systemtooperate properly and prolong
is used
for
the
away from
immersedinwater
the
receiver cradle or
outsideofthe
wash under
water
duringACoperation.
jack
may cause
inclined
or unstable surface.
sideofthe
speakers, keep personal
the
unit
unit.
with
running
water
rusting
cabinet.
to prevent possible damage from
or come in
battery
compartment
salt
water, wipe clean
water; do
resistant.Toprevent
and possible
not
The
audio/ventilation
the
credit
cards
using
the
continuous
use soap or detergent; do
malfunction.
contact
panel, be suretowipe
with
a damp cloth, and then
shock
hazard, avoid
ports
lifeofits
magnetic
magnetic
with
water.
using
must
not
coding
fields.
off
dry
dry
the
mlj(lIlDI~sm(lmlimg
1.
The
power is
not
on:
• Connect
• Make
• Replace all
2. There is no audio:
• Unplug
3. Noise is heard
• Someone is
theACpower adaptortoa wall
AC
output.
110V
sure
the
batteries are
the
batteries
the
satellite
coming
through
using
a portable telephone or other
antenna
(-2.3GHz).Tosolve
outlet
securely and make sure
inserted
correctly.
with
new
onesifthey
radio receiver from the Delphi Audio System and
the
Delphi Audio System:
this
problem, move
are weak.
equipment
the
that
emits
portable telephone, etc. away from
the
wall
outlet
re-insert
it.
radio waves near the
has
the
unit.
"
To
clean
the
cabinet panel and controls, use a
Do
not
use any
typeofabrasive pad,
Note:
UnplugtheACpower
10
adaptor
before
cleaningtoavoid
soft
cloth
slightly
moistened
scouring
powder, or solvent, such as alcohol or benzene.
any
electric shock
hazard.
withamild
detergent
solution.
Page 11
Specifications
ITEM
1
Continuous average W
power
output
UNIT
2 Total harmonic %
distortion
Sensitivity mV
3
Frequency response
4
to
noise ratio
Signal
5
Channel separation
6
7
Input impedance
Ohm
8 Max noise ratio
9
Battery power range V
10 Dimensions
in./mm
Hz
dB
dB
mV
SPECIFICATION
NOMINAL
>4
>0.6
180
65-22K
>65
>45
-
- -
>4.1K >4.5K
3
7-16
18
3/4"Wx
(476
135 mm
LIMITED
7" H x 55/16" 0
mmWx178 mm H x
D)
>3.5
>1.0
140-235
70-20K
>60
>40
-
5
7.5-15
Rated
output
Output: 0.5 W
Line
input
-3
dB
Levell
Input: Short
Normal
input
Floating
input
Line
input
Input: Short
Operation fine
REMARK
(10%) at 1
Frequency: 70Hz-
Frequency: 70Hz-
odB: 0.175
0 dB: 2.0
Levell
Frequency 1
Vll
KHz
KHz
20
20 KHz
Vll
KHz
0 dB: 2.0
KHz
KHz
Vll
KHz
Warranty
Delphi Limited Consumer Warranty (United States)
Delphi Product and Service Solutions ("Delphi") warrants allXMSatellite
in material and workmanship, subject to the following conditions:
The
durationofDelphi's warranty with respect to
No
other
express warranties are made
fitness foraparticular
the
original consumer purchaserofthe
Delphi will,asits
Products may
cosmetic or decorative items, including any non-operative parts. Under
damages under
limited warranty only extends to customers who purchase the Products in the United States.
Delphi will not
any packaging, labels or other literature provided with a Product, (ii) installationofa Product in a manner which is inconsistent with Delphi's
written instructions,
tear, (ix) commercial use, (x) improper storage, (xi) environmental conditions, including excessive temperature
anyone other than a Delphi authorized repair facility, (xiii) other improper application, installation
defects or malfunctions
(the
How you
To
obtain warranty service during the
original receipt to the original place of purchase.
purpose are
sole obligation under this warranty, replaceorrepair, at its option, any Product that does not conform to
be
repaired or replaced with new or with refurbished items. This limited warranty does not cover defects in appearance,
this
warrantyorany implied warranties.
be
responsible for damage resulting from any (i) deviationofDelphi's operating instructionsasprinted in Delphi's catalogoron
(iii)
alteration or modificationofa Product, (iv) misuse, (v) neglect, (vi) abuse, (vii) accident, (viii) normal wear and
of
Customer) can get service
which Delphi is not advised within ten (10) daysofthe expirationofthe limited warranty period.
each
with
limitedtothe
first
Product is limited to
respecttoany Product. All implied warranties,
warranty period
Product.
These
thirty
(30)
days after the dateofpurchase, you must return the defective Product with the
To
obtain warranty service during the
Radio
Products soldbyDelphi (each "Product") tobefreeofdefects
one
(1) year from the date of sale to the original consumer purchaser.
set
forth
above. This
no
circumstances will Delphibeliable for any incidental or consequential
remedies are the customer's exclusive remedies for breachofwarranty. This
including
warrantyisnot
first
thirty
warrantiesofmerchantability
transferable
or
operationofthis Product,or(xiv)
(30)
days for Products purchased from
and applies only
this
or
humidity, (xii) service by
and
warranty.
to
11
Page 12

www.delphLcom and for all products for the remainderofthe limited warranty period, you must contact Delphi by phone at
[1.877.463.3574).
(1.877.463.3574).
If
warranty service is neededatany time during the warranty period, the purchaser will be required to furnish a sales receipt/proof
purchase indicatingthe dateofpurchase, amount paid. and placeofpurchase. Customers who fail to provide such proofofpurchase will
be
charged for the repair/replacementofany Product.
How
state law relates to the warranty
Some
damages.
rights
Iffurther
clarification or additional information is required from Delphi, you may call Delphi at
statesdonot allow limitationsonthe durationofimplied warranties, or the exclusion or the limitationofincidental or consequential
So
the above limitations or exclusions may not apply to you. This warranty gives you specific legal rights.
that
may vary from state to state.
NO
PERSONISAUTHORIZEDBYDELPHITOMODIFYORADDTOTHIS
LIMITED
1.877.GO
DELPHI
You
may also have other
WARRANTY.
1.877.GO
DELPHI
of
Delphi Limited Consumer Warranty (Canada)
Delphi Product and Service Solutions ("Delphi") warrants allXMSatellite
in material and workmanship, subject to the following conditions:
The
durationofDelphi's warranty with respect to each Product is limited to
Delphi makesnoexpress warranties with respect to any Product exceptasset forth herein.
ing the implied conditions and warranties of merchantable quality and fitness for a particular purpose are limited to the warranty period
set forth above. This warranty is not transferable and applies only to the original consumer purchaser
Delphi will,asits sole obligation under
Products may
or decorative items, including any non-operative parts. Under
failure to realize expected savings (collectively, "Economic Loss") under
are the customer's exclusive remedies for breach
the Products in
Delphi will notberesponsible for damage resulting from any
any packaging, labelsorother literature provided with a Product, (ii) installation of a Product in a manner which is inconsistent with Delphi's
written instructions,
tear, (ix) commercial use,
anyone other than a Delphi authorized repair facility, [xiii) other improper application, installation or operationofthis
defects or malfunctions
How you
To
original receipt to the original place of purchase.
www.delphLcom and for all Products for the remainder
[1.877.463.3574).
(1.877.463.3574).
If
purchase indicatingthe date of purchase. amount paid. and placeofpurchase. Customers
be
How
Some
Loss.
rights
be
repairedorreplaced with neworwith refurbished items. This limited warranty does not cover defects in appearance, cosmetic
Canada.
(iii)
alteration or modificationofa Product, (iv) misuse, (v) neglect, (vi) abuse, (vii) accident, (viii) normal wear and
of
(the
Customer] can get service
obtain warranty service during the
Iffurther
warranty service is needed at any time during the warranty period. the purchaser willberequired to furnish a sales receipt/proof
charged for the repair/replacement of any Product.
provincial
law
provincesdonot allow limitationsonthe durationofimplied conditionsorwarranties, or the exclusionorthe limitationofEconomic
So
that
relates to the warranty
the above limitationsorexclusions may not apply to you. This warranty gives you specific legal rights.
may vary from province to province.
this
warranty, replace or repair, at its option, any Product that does not conform to this warranty.
of
conditions or warranty. This limited warranty only extends to customers who purchase
[x)
improper storage,
which Delphi is not advised within ten
clarificationoradditional information is required from Delphi, you may call Delphi at
first
[xi)
environmental conditions, including excessive temperatureorhumidity, (xii) service
thirty
(30)
days after the date of purchase, you must return the defective Product with the
To
obtain warranty service during the
of
the limited warranty period, you must contact Delphi by phone at
NO
PERSONISAUTHORIZEDBYDELPHITOMODIFYORADDTOTHIS
Radio
Products sold by Delphi (each "Product") tobefreeofdefects
one
(1)
year from the dateofsale to the original consumer purchaser.
no
circumstances will Delphibeliable for any lossofrevenue, lossofprofits or
this
warrantyorany implied conditionsorwarranties.
(i)
deviationofDelphi's operating instructionsasprinted in Delphi's catalog or
[10]
daysofthe expirationofthe limited warranty period.
All
implied conditions and warranties. includ-
of
the Product.
first
thirty
[30)
days for Products purchased from
1.877.GO
who
fail to provide such proofofpurchase will
You
LIMITED
These
Product,or(xiv)
1.877.GO
DELPHI
may also have other
WARRANTY.
remedies
DELPHI
of
on
by
I:>E:LPHI
Delphi Corporation
1441 West Long Lake
Troy,
Michigan 48098-5090
U.s.A.
Customer Service
Road
[1]
8?7.GO
DELPHI
Page 13
DE:LPHI
user
gUlde
SA10175
o
9
XM
A
Satellite
Important:
This
tl'lc!
lnstructlol'\SInthis
Iccessorles.andlor to your vehlde or property.
manual
Radio
Receiver
((.~o»)
contains importllntsafetyand operatinginformation. Please read.underst/llnd.llnd
manual.
FailuRe
ttl
dosocould
I'QSUltInpl!rSOI'IsllnJury,dClath,.ancl/ordamagCl
tel
your
follow
roadyXT.
Page 14

FCC ID: RS2SA10177
IC: 5697A-SA10177
This device complies with Part 15 of the FCC Rules.
Operation is subject to the following two conditions:
1. This device may not cause harmful interference, and
2. This device must accept any interference received,
including interference that may cause undesired operation.
The Delphi XM®roadyXT Satellite Radio Receiver incorporates an FM transmitter and is therefore classified as an
intentional transmitter. Changes or modifications to the unit
not expressly approved by Delphi can void your authority to
operate this equipment.
Warning: The FCC and FAA have not certified the Delphi
XM roadyXT Satellite Radio Receiver for use in any aircraft
(neither portable nor permanent installation). Therefore,
Delphi cannot support this type of application or installation.
This is the safety alert symbol. It is used to
alert you to potential personal injury hazards.
Obey all safety messages that follow this
symbol to avoid possible injury or death.
Page 15

T
bl
f
C
Table of ContentsTable of Contents
A Brief History· · · · · · · · · · · · · · · · · · · · · · · · · 4
About Delphi· · · · · · · · · · · · · · · · · · · · · · · · · 5
About XM· · · · · · · · · · · · · · · · · · · · · · · · · · · · · 5
Let’s Get Started· · · · · · · · · · · · · · · · · · · · · · 6
First, some important
reminders · · · · · · · · · · · · · · · · · · · · · · · · · · · · · 6
Controls · · · · · · · · · · · · · · · · · · · · · · · · · · · · · · · 7
Display· · · · · · · · · · · · · · · · · · · · · · · · · · · · · · · · · 8
Remote Control · · · · · · · · · · · · · · · · · · · · · 9
Activating Your
roadyXT · · · · · · · · · · · · · · · · · · · · · · · · · · · · · · · · · 10
Listening to XM · · · · · · · · · · · · · · · · · · · · · · · 11
Selecting channels · · · · · · · · · · · · · · · · · 11
Searching for channels
by category· · · · · · · · · · · · · · · · · · · · · · · · · · · 12
Searching for channels
by scanning · · · · · · · · · · · · · · · · · · · · · · · · · · 13
Using presets· · · · · · · · · · · · · · · · · · · · · · · · 14
Memory and jump
Personalizing Your roadyXT· · · · · · · 16
Making any FM radio an
XM radio · · · · · · · · · · · · · · · · · · · · · · · · · · · · · · 16
Screen color· · · · · · · · · · · · · · · · · · · · · · · · · · 17
Contrast · · · · · · · · · · · · · · · · · · · · · · · · · · · · · · · 17
· · · · · · · · · · · · · · · · · 15
Audio level
Aiming the antenna · · · · · · · · · · · · · · · 18
TuneSelect
· · · · · · · · · · · · · · · · · · · · · · · · · · · 17
™
· · · · · · · · · · · · · · · · · · · · · · · · · · 18
Stock Ticker· · · · · · · · · · · · · · · · · · · · · · · · · · 19
Info Extras · · · · · · · · · · · · · · · · · · · · · · · · · · · · 20
Changing display information · · 21
Direct Tune · · · · · · · · · · · · · · · · · · · · · · · · · · · 21
Auto-On · · · · · · · · · · · · · · · · · · · · · · · · · · · · · · · 21
Auto-Off and “sleep” timer · · · · · 22
Resetting to factory default · · · · · 22
Other Things You
Should Know · · · · · · · · · · · · · · · · · · · · · · · · · · 23
Care · · · · · · · · · · · · · · · · · · · · · · · · · · · · · · · · · · · · 23
Accessories (sold separately) · · · 23
Troubleshooting · · · · · · · · · · · · · · · · · · · · 24
Contacting Technical Support · · 28
Technical Information · · · · · · · · · · · · · 28
Warranty · · · · · · · · · · · · · · · · · · · · · · · · · · · · · · · · 29
Delphi Limited Consumer
Warranty
· · · · · · · · · · · · · · · · · · · · · · · · · · · · · · 29
How you (the Customer)
can get service · · · · · · · · · · · · · · · · · · · · · · 31
How state law relates to
the warranty · · · · · · · · · · · · · · · · · · · · · · · · · 31
3
a
e o
ontents
Page 16

A Brief History
4
A Brief History
The new Delphi roadyXT Satellite Radio Receiver—smaller, lighter, and
more versatile than the best-selling Roady2®.
• Dock your roadyXT into cradles that are easily installed in your vehicles
or your home. One simple motion connects your roadyXT’s power, audio,
and antenna.
• A built-in FM transmitter allows you to hear XM programming on any
nearby FM radio, using any unused frequency on the FM band.
• Exclusive Info Extras and Stock Ticker bring you personalized stock
information, sports scores, and more.
• TuneSelect™alerts you when your favorite song is being played on
any XM channel.
Page 17

About Delphi
Delphi is a worldwide leader in mobile electronics, vehicle components,
and audio technology. Delphi created the first in-dash car radio in 1936 and
continues its strong tradition of innovation in the audio industry. Now
Delphi technology has helped make satellite radio a reality, and Delphi continues to expand its in-vehicle and consumer electronics technologies. With
its exciting line of satellite radio products, Delphi offers a broad portfolio of
products to answer a wide variety of information and entertainment
needs—in the vehicle, home, office, or virtually anywhere.
About XM
XM Satellite Radio is the nation’s leading provider of satellite radio with
more than 4 million subscribers. XM offers more than 150 digital radio
channels: 67 commercial-free music channels, ranging from hip hop to
opera, rock to bluegrass, big band to reggae; 64 talk radio channels, including news, sports, comedy, and children’s programming; and 21 channels of
round-the-clock traffic and weather reports. Subscribers pay $12.95 a
month for the XM service, which was named Best Radio Service by the
music industry’s leading magazine Billboard at the 2004 Digital
Entertainment Awards. Exclusive programming on XM includes Major
League Baseball®games for every team, all season long. You can listen to
XM on a variety of satellite radio receivers for the vehicle, home, and
portable use. In-dash XM radios are available in more than 120 vehicle
models for the 2005 model year. XM is broadcast via satellite from coast to
coast, so you can listen to XM continuously as you travel across the country.
A Brief History
5
*To receive the XM service, you must subscribe to XM. Available in the continental United States and Canada
only. Satellite radio reception depends on the ability of the antenna to receive a signal. The signal may not be
available in buildings or if obstructed (e.g., by mountains, trees, bridges, etc).
Page 18
Let’s Get Started
6
Let’s Get Started
First, some important reminders
We know you’re eager to turn on your new roadyXT and listen to XM.
Please take a moment to remember the following:
Warning: This manual contains important safety
and operating information. Please read, understand, and
follow the instructions in this manual. Failure to do so
could result in personal injury, death, and/or damage to
your roadyXT, accessories, and/or to your vehicle or
property.
Warning: When using this product it is always
important to keep your eyes on the road and your
hands on the wheel. Not doing so could result in
injury and/or death to yourself or to others and/or in
property damage.
Caution: Use your roadyXT only with the enclosed
components or approved accessories. Do not modify
wires or other connectors in any way; you could cause
a malfunction, which could damage your roadyXT and
will void your warranty.
Caution: Refrain from using food or drinks near your
roadyXT. Spilling food or drinks on the unit can damage it. Also, improperly installing the antenna cable
can cause leaks, which can damage your roadyXT
and/or your vehicle.
Page 19
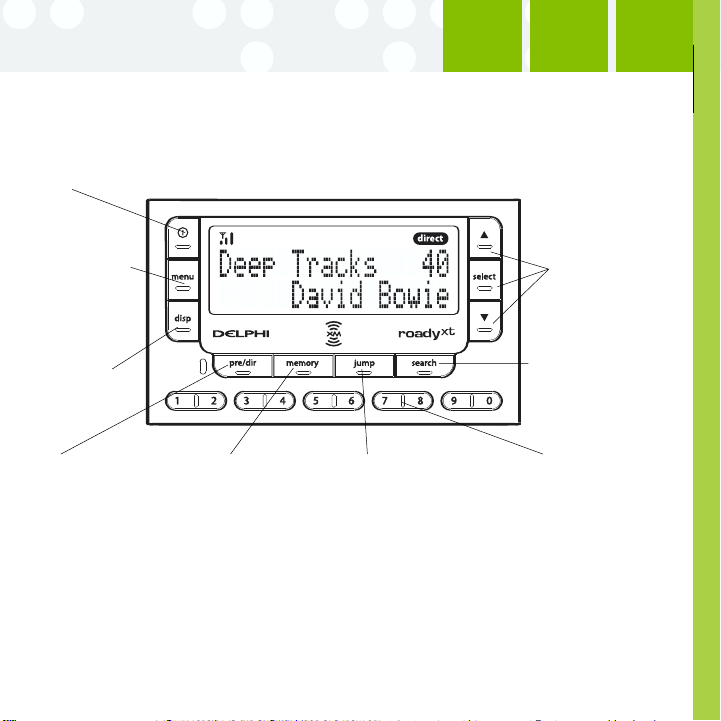
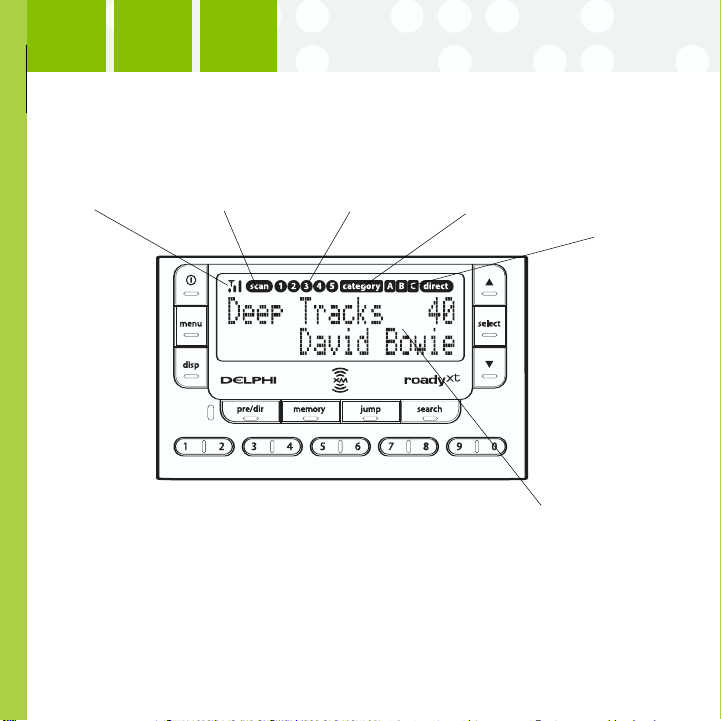
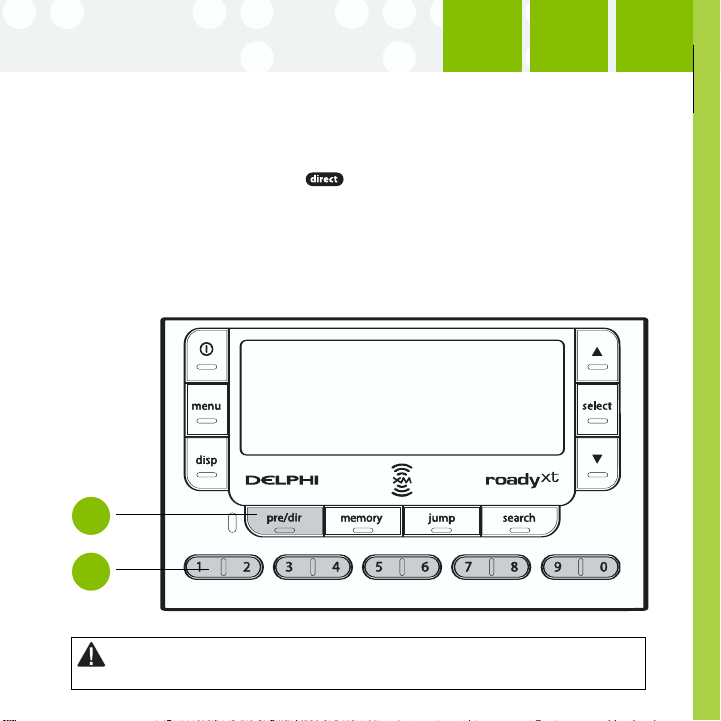
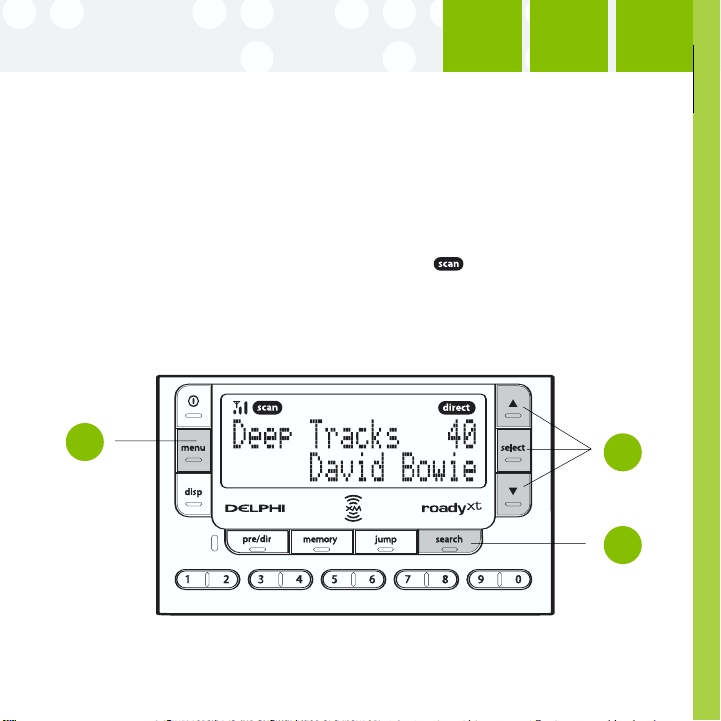
Controls
power
menu – access
advanced features
and configuration
options
up and down arrows,
select – change chan-
nels, choose menu
options, TuneSelect
Let’s Get Started
7
™
disp – change
what you see on
the display
pre/dir – select
between direct
channel entry or
up to 30 presets
memory – save
and recall up to
20 artist names
or song titles
jump – return to
previous channel;
press and hold to
select one of last
six FM frequencies
used for transmitter
search – look up channels
by category or scan all
channels
numbers – enter a
channel directly or
select favorite presets
Page 20
Let’s Get Started
8
Display
signal strength –
1 to 3 bars
search by scanning
all channels
display
modes 1-5
search channels
by category
additional info – channel
name, channel number,
artist, song title, Stock
Ticker, and Info Extras
channel selection
mode – direct
entry or preset
banks A, B, or C
Page 21

Remote Control*
up and down arrows,
select – change channels,
choose menu options,
™
TuneSelect
search – look up channels
by category or scan all
channels
pre/dir – select between
direct channel entry or
up to 30 presets
display – change what
you see on the display;
show artist name, song
title, channel number,
stock quotes, or Info
Extras
power
menu – access advanced
features and configuration
options
+ and - – change channels, or
control volume if roadyXT is
placed in an audio system
jump – return to previous channel;
press and hold to select one of
last six FM frequencies used for
modulator
numbers – enter a channel
directly or select favorite presets
memory – save and recall
up to 20 artist names or
song titles
Let’s Get Started
9
*Sold separately
Page 22
Activating Your roadyXT
10
Activating Your roadyXT
Use the arrow buttons to find channel 0, then push the “select” button to
choose it. You should see an 8-character XM Radio ID in the display. (The
XM Radio ID should also be on the bottom of your roadyXT, and on the
package.) Write the ID here:
Activate your XM Satellite Radio service by contacting XM at
http://activate.xmradio.com or by calling 1.800.XM.RADIO (1.800.967.2346).
You will need the XM Radio ID and a major credit card.
XM will send a signal from the satellites to activate the full channel lineup.
Activation normally takes 10 to 15 minutes, but during peak busy periods,
you may need to keep your roadyXT on for up to an hour to complete the
activation process. When you can access the full channel lineup on your
roadyXT, you’re done!
Note: Carefully check your XM Radio ID. The letters I, O, S, and F are not used.
Warning: When using this product it is always
important to keep your eyes on the road and your hands
on the wheel. Not doing so could result in injury and/or
death to yourself or to others and/or in property damage.
Warning: Failure to properly follow all installation instructions may result in personal injury, death,
and/or damage to your roadyXT, accessories, and/or to
your vehicle or property.
Page 23
Listening to XM
Selecting channels
Select a channel directly by entering its channel number. Press the
“pre/dir” button (step 1) until appears on the screen. Then press the
number buttons (step 2) corresponding to the channel. Channel 12 can be
entered as “1,” then by “2,” or as “0,” “1,” and “2.”
Or press the up and down arrows to quickly step through each channel.
When you find one you like, press the “select” button.
Step
1
Step
2
Listening to XM
11
Warning: When using this product it is always important to keep your eyes on the road and your hands on the
wheel. Not doing so could result in injury and/or death to yourself or to others and/or in property damage.
Page 24
Listening to XM
12
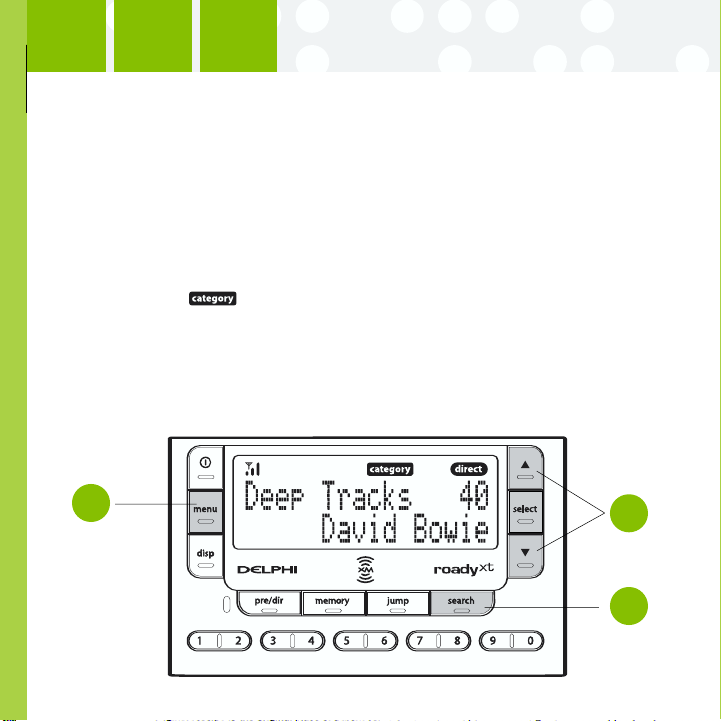
Searching for channels by category
XM channels are arranged by categories, or neighborhoods. This allows
you to see all channels in the “Rock” category, for example.
Press the “menu” button (step 1), go to “Search Mode,” and select “By
Category.”
Each press of the “search” button (step 2) tunes you to the first channel of
a new category.
Notice that the icon is highlighted in the display.
Use the arrow buttons (step 3) to sample the channels within a category.
Press the “select” button to choose a channel.
If you do nothing for 10 seconds, the radio automatically returns to the
normal channel selection method.
Step
1
Step
3
Step
2
Page 25
Searching for channels by scanning
Your roadyXT can also scan through each channel, pausing long enough to
hear the programming before moving on to the next one.
Press the “menu” button (step 1), go to “Search Mode,” and select “By
Scanning” (step 2).
Press the “search” button to begin scanning (step 3). Each channel plays
for about 5 seconds. While scanning channels, blinks in the display.
Press the “search” button again to stop on a channel.
Listening to XM
13
Step
1
Step
2
Step
3
Page 26

Listening to XM
14
Using presets
Your roadyXT can store up to 30 of your favorite channels as presets.
The presets are organized into three banks (A, B, or C) that each contain
10 presets.
Press the “pre/dir” button one or more times to select bank A, B, or C (step 1).
After you’ve tuned to your desired channel, press and hold a number
button to save the channel into that preset (step 2).
Whenever you want to quickly tune to that channel, simply press that
button again.
You can use the preset banks to organize your channels in different
ways: Store your favorite channels in bank A, and someone else’s favorite
channels in bank B. Or use one bank for music, another for news.
Step
1
Step
2
Page 27

Memory and jump
Press the “memory” button to remember a song’s artist or title. Your
roadyXT can remember up to 20 entries. (After 20, any new entry replaces
the oldest entry in memory.)
To recall the list of songs, press and hold the “memory” button, then use
the up and down arrow buttons to step through the list.
Press the “jump” button to return to the previous channel you were
listening to.
You can press and hold the “jump” button for FM presets. See page 16
for more information.
Listening to XM
15
Page 28

Personalizing Your roadyXT
16
Personalizing Your roadyXT
You can easily adapt your roadyXT to suit your listening habits. Simply
press the “menu” button to see the options you can customize. If you ever
get lost or decide not to change anything, press the “menu” button several
times to return to normal operation. Or just wait about 15 seconds and
roadyXT automatically cancels whatever you’re doing.
Making any FM radio an XM radio
Your roadyXT contains a built-in FM transmitter that sends the XM audio
signal to a car, home, or marine FM radio.
1. Turn on your FM radio, and turn off your roadyXT.
2. Unplug any cassette adaptor or audio cable from the roadyXT cradle.
3. Find an FM frequency that is not being used by any commercial FM
4. Turn on your roadyXT.
5. Press the “menu” button and select “FM Frequency.”
6. Match the FM frequency that you found in step 3.
7. You should now hear XM programming on your FM radio. If the sound
8. Pressing and holding the “jump” button for 2 seconds pulls up a list of
If you are using the Delphi FM Direct Adaptor (model SA10112, sold
separately), connect it to the vehicle cradle.
station. Tune your FM radio through the FM band and note which
frequency has no FM station or the least amount of interference.
isn’t clear or you hear noise or static, try another FM frequency. If you’re
traveling, you may need to retune periodically; this is due to the differences in signal strength of local FM stations and is not a problem with
your roadyXT.
the last six FM frequencies you selected. This allows you to quickly tune
to unused FM frequencies when using the FM transmitter. Use the arrow
buttons and the “select” button to choose the frequency you want.
Page 29

Screen color
To change the color of the display, press the “menu” button and select
“Screen Color.” Use the arrow and the “select” buttons to choose a color;
to cancel, press the “menu” button.
Contrast
To vary the contrast of the display, press the “menu” button and select
“Contrast.” Use the arrow buttons to adjust the contrast, and press the
select” button to confirm.
“
Audio level
You may adjust roadyXT’s audio output level if it is too high (causing
distortion) or too low. Choose a setting so that the XM audio matches your
other audio sources, such as your CD player or FM radio. To change the
audio output level, press the “
the arrow buttons to adjust the level and the “select” button to confirm.
Press the “menu” button to exit.
Most users should NOT need to change this level from the factory setting.
This is not a volume control; you should set the volume using the audio
system that is connected to your roadyXT.
menu” button and select “Audio Level.” Use
Personalizing Your roadyXT
17
Page 30

Personalizing Your roadyXT
18
Aiming the antenna
Note: For use with the Home Kit, sold separately.
Your roadyXT can help you choose the best antenna position and
orientation.
1. Press the “menu” button. Use the arrow and “select” buttons to choose
2. Slowly turn and tilt the antenna. The signal bars on the display will
3. The antenna aiming screen remains as long as it’s needed to help you
TuneSelect™
TuneSelect can alert you whenever one of your favorite songs or artists is
playing on any XM channel.
1. Press the “menu” button and select the “TuneSelect” option, then select
2. When you hear one of your favorite songs or artists, press and hold the
3. When any song or artist on the list is currently playing on any XM channel,
4. Press the “select” button to switch to that channel.
5. To edit the list, press the “menu” button and choose the “TuneSelect”
“Antenna Aiming.”
change. Find the position that gives at least two bars on either “satellite”
or “terrestrial.”
position the antenna. When you’ve found the best position, press the
menu” button twice to return to normal operation.
“
“Song or Artist.” You can choose to select “By Song” (factory default) or
“By Artist.” Press the “menu” button again to return to normal operation.
“select” button until you hear a beep. This indicates that roadyXT has
saved the song or artist information to its TuneSelect list. The list holds
up to 20 entries; when it is full, any new entry replaces the oldest song
in the list.
your roadyXT beeps and flashes “Artist / Song Found” on its display.
option, then the “Erase” option. You can either erase specific songs or
artists on the list, or erase all songs and artists.
Page 31

Stock Ticker
You can track up to 20 stock symbols and see their prices and movements
right on the roadyXT’s display.*
TO ADD A STOCK SYMBOL:
1. Press the “menu” button, select “Stock Ticker,” and select “Add Stocks.”
2. Use the arrow buttons to add each letter of the desired stock symbol.
Press the “select” button after choosing each letter. (Your roadyXT has a
list of more than 9,000 stock symbols, and will not only help you complete
each entry but prevents you from entering incorrect symbols.)
3. When you’ve entered all your desired stock symbols, press the “
menu”
button several times (or simply wait a few seconds) until your roadyXT
returns to normal operation.
4. Press the “disp” button until you see “Stocks” and a ticker across the
bottom of the screen.**
Personalizing Your roadyXT
19
TO ERASE A STOCK SYMBOL:
1. Press the “
menu” button , select “Stock Ticker,” and select “Erase Stocks.”
2. Choose “Erase All” or “Erase Some.”
3. If you’re erasing some stocks, press the arrow buttons to select the stock to
be deleted. Press the “select” button to erase the chosen stock symbol.
4. Press the “menu” button several times to return to normal operation.
*Quotes are provided by ComStock, Inc. and cover most stocks listed on the NYSE, AMEX, or NASDAQ.
Market information is delayed by approximately 25 minutes.
** Extreme cold temperatures can affect the performance of the LCD in “Scroll” mode. We recommend you
change to the “Pages” mode until the temperature rises.
Page 32

Personalizing Your roadyXT
20
Info Extras
XM Satellite Radio will broadcast information such as sports scores and
other features at various times.*
Press the “menu” button and select “Info Extras” (step 1). Use the arrow
buttons to see what’s available (step 2).
Press the “select” button to add or remove the Info Extras item (step 3).
“-” indicates that you have not yet selected the item; “+” means you’ve
chosen the item.
To view the Info Extras that you chose, press the “disp” button until you
see the Info Extras items at the bottom of the screen (display mode 5).
Step
1
*Sports scores are provided by Stats, Inc.
Step
2
Step
3
Page 33

Changing display information
The Stock Ticker and Info Extras can either be scrolled (moving from right
to left in the display) or paged (one symbol at a time). To switch from one
option to the other:
1. Press the “menu” button and select “Display Mode.”
2. Choose either “Pages” or “Scroll.” Press the “select” button to confirm.
Direct Tune
Normally as you press the arrow buttons, you can preview what’s playing
on other XM channels before actually selecting a channel. To automatically
tune to a channel without having to press the “select” button, set the
following option:
1. Press the “menu” button.
2. Select “Direct Tune.”
3. Select “On.” To return to the factory-default method, select “Off.”
Auto-On
When you use your roadyXT in a car or truck, it normally turns on when
you switch on the vehicle’s ignition. If you prefer to manually turn on your
roadyXT using its power button, set the following option:
1. Press the “menu” button.
2. Select “Auto-On.”
3. Select “On.” To return to the factory default, select “Off.”
You should also set this option to “Off” if your roadyXT is connected to a
power source that is always live.
Personalizing Your roadyXT
21
Page 34

Personalizing Your roadyXT
22
Auto-Off and “sleep” timer
You can set your roadyXT to shut off the radio 1 to 3 hours after being
turned on. Set this option if you have connected your roadyXT to a
power source in your vehicle that is always live. Your roadyXT will then
automatically shut off and prevent you from draining your vehicle’s battery.
You can also use this feature as a “sleep” timer.
1. Press the “menu” button.
2. Select “Auto-Off.”
3. Select the desired time interval. Choose “Off” if you do not want to use
Resetting to factory default
You can return your roadyXT to the state it was shipped from the factory.
Be careful: this will erase all settings, including Stock Ticker, Info Extras,
presets, display options, and audio options.
1. Press the “menu” button.
2. Select “Factory Default.”
3. Select “Yes” to restore your roadyXT to the factory settings.
the sleep timer.
Page 35

Other Things You Should Know
Care
You should be able to use your roadyXT during most of your daily
activities. However, you should remember:
• If your roadyXT does get dirty, wipe the case with a soft cloth (lightly
moistened with water if necessary), then wipe dry with another cloth.
Avoid chemicals such as paint thinner, alcohol, or abrasive cleansers.
• It is best to keep your roadyXT out of direct sunlight or other sources of
extreme heat.
Caution: Refrain from using food or drinks near the roadyXT. Spilling food or drinks on the unit could damage
it. Also, improper antenna cable installation can cause a leak that could result in damage to your roadyXT
and/or your vehicle.
Accessories (sold separately)
We’re always developing useful and clever accessories for your
roadyXT such as a Home Kit. Check our web sites, www.xmradio.com
or www.delphi.com, or your favorite electronics retailers.
Other Things You Should Know
23
Page 36

Other Things You Should Know
24
Troubleshooting
Your roadyXT should provide you with trouble-free performance without
needing any servicing. If it does not appear to be working properly, first try
to remedy the problem by following these steps:
1. Attach all connections firmly and securely.
2. Ensure the cigarette lighter adaptor or auxiliary power socket is clean
and free of corrosion.
3. Check the adaptor fuse by unscrewing the ribbed end of the adaptor. If
required, replace with a 2-amp fuse only. If your cigarette lighter adaptor
does not have a removable end cap, then it is equipped with an internal
fuse that resets itself after it is left unpowered for a period of time.
If you see this on the display:
You should:
NO SIGNAL
Cause: The XM
signal is being blocked.
ANTENNA
Cause: Possible problem with XM antenna.
ANTENNA
Cause: When using home stand or
vehicle cradle, home or car antenna is
not plugged in.
OFF AIR
Cause: The channel selected is not
currently broadcasting.
Move your roadyXT away from the
obstructed area (e.g., an underground
garage).
Connect the antenna. Make sure the cable
and connectors are not damaged or kinked.
Make sure the home or car antenna is
plugged into the home stand or vehicle
cradle.
Tune to another channel.
Page 37

Other Things You Should Know
25
If you see this on the display:
UPDATING
Cause: Your roadyXT is being updated with
the latest encryption code.
--Cause: You may have tried to tune to a
channel that you have blocked or that
you cannot receive with your subscription
package.
You should:
Simply wait a few seconds until the update
is done.
To receive that channel, contact XM
Satellite Radio at 1.800.967.2346.
Page 38

Other Things You Should Know
26
If this happens:
The display is blank; nothing happens
when you push the power button.
You do not receive all XM channels you
have subscribed to.
Audio sounds distorted when using the
built-in FM transmitter.
Audio is too soft when using the built-in
FM transmitter.
No audio from your audio system.
You cannot tune to a channel.
No song title or artist name displayed.
No audio when listening through an FM
radio.
You should:
Check the power connections to your
roadyXT.
Your roadyXT may not be activated.
Contact XM Satellite Radio (see page 10).
Reduce audio output level (see page 17).
Increase audio output level (see page 17).
Check whether your audio system can play
a CD, or regular AM or FM stations. Then
check the audio connections between your
audio system and your roadyXT.
Contact XM Satellite Radio at 1.800.967.2346.
Verify that you are authorized to receive that
channel as part of your XM subscription,
and that you have not asked XM Satellite
Radio to block that channel.
Nothing is wrong with your roadyXT. That
information may be in the process of being
updated. On some sports and news channels, there is no title or artist information.
Make sure that the FM radio and your
roadyXT are set to the same frequency
(see page 16).
Page 39

Other Things You Should Know
27
If this happens:
Audio has static while listening through an
FM radio.
Audio on XM instant traffic and weather
channels sounds different from other XM
channels.
You should:
Change to another FM frequency (see page
16). If the problem persists and you are
using the wireless FM transmitter in a
vehicle, use the Delphi FM Direct Adaptor
(model SA10112, sold separately).
Nothing is wrong with your roadyXT.
These channels use a different audio
technology than the other XM channels.
Page 40
Other Things You Should Know
28
Contacting Technical Support
For additional information in solving problems with your roadyXT,
contact Delphi Technical Support at 1.877.GO DELPHI (1.877.463.3574),
8:00 a.m.— 8:00 p.m. Eastern Time, Monday — Friday.
Technical Support is also available at www.delphi.com.
Technical Information
DIMENSIONS
receiver, without cradle: 2.25 in (H) x 3.7 in (W) x 0.7 in (D)
remote: 3.7 in (H) x 1.7 in (W) x 0.6 in (D)
WEIGHT
receiver, without cradle: 2.6 oz
remote: 1 oz
POWER
receiver: 5 V, 2000 mA maximum current, positive polarity
remote: 1 CR2032 3 V cell
INPUTS AND OUTPUTS
antenna: 1 RF SMB connector
audio: 3.5 mm diameter mini-stereo jack
5.7 cm (H) x 9.4 cm (W) x 1.8 cm (D)
9.4 cm (H) x 4.3 cm (W) x 1.5 cm (D)
76 g
30 g
Page 41

Warranty
Delphi Limited Consumer Warranty
Delphi Product and Service Solutions (“Delphi”) warrants all XM Satellite
Radio Products sold by Delphi (each “Product”) to be free of defects in
material and workmanship, subject to the following conditions:
The duration of Delphi’s warranty with respect to each Product is limited to
one (1) year from the date of sale to the original consumer purchaser.
No other express warranties are made with respect to any Product. All implied
warranties, including warranties of merchantability and fitness for a particular
purpose are limited to the warranty period set forth above. This warranty is not
transferable and applies only to the original consumer purchaser of the
Product.
Delphi will, as its sole obligation under this warranty, replace or repair, at its
option, any Product that does not conform to this warranty. Products may
be repaired or replaced with new or with refurbished items. This limited
warranty does not cover defects in appearance, cosmetic or decorative items,
including any non-operative parts. Under no circumstances will Delphi be
liable for any incidental or consequential damages under this warranty or
any implied warranties. These remedies are the customer’s exclusive remedies
for breach of warranty. This limited warranty only extends to customers who
purchase the Products in the United States.
Delphi will not be responsible for damage resulting from any (i) deviation of
Delphi’s operating instructions as printed in Delphi’s catalog or on any
packaging, labels or other literature provided with a Product, (ii) installation of
a Product in a manner which is inconsistent with Delphi’s written instructions,
Warranty
29
Page 42

Warranty
30
(iii) alteration or modification of a Product, (iv) misuse, (v) neglect, (vi) abuse,
(vii) accident, (viii) normal wear and tear, (ix) commercial use, (x) improper
storage, (xi) environmental conditions, including excessive temperature or
humidity, (xii) service by anyone other than a Delphi authorized repair facility,
(xiii) other improper application, installation or operation of this Product, or
(xiv) defects or malfunctions of which Delphi is not advised within ten (10)
days of the expiration of the limited warranty period.
Page 43

How you (the Customer) can get service
To obtain warranty service during the first thirty (30) days after the date of
purchase, you must return the defective Product with the original receipt to
the original place of purchase. To obtain warranty service during the first
thirty (30) days for Products purchased from www.delphi.com and for all
Products for the remainder of the limited warranty period, you must contact
Delphi by phone at 1.877.GO DELPHI (1.877.463.3574) or by fax at
1.866.790.3675. When contacting Delphi by fax, please include a letter
detailing your complaint and a daytime telephone number where you can
be reached. If further clarification or additional information is required from
Delphi, you may call Delphi at 1.877.GO DELPHI (1.877.463.3574).
If warranty service is needed at any time during the warranty period, the
purchaser will be required to furnish a sales receipt/proof of purchase
indicating the date of purchase, amount paid, and place of purchase.
Customers who fail to provide such proof of purchase will be charged
for the repair or replacement of any Product.
How state law relates to the warranty
Some states do not allow limitations on the duration of implied warranties,
or the exclusion or the limitation of incidental or consequential damages.
So the above limitations or exclusions may not apply to you. This warranty
gives you specific legal rights. You may also have other rights that may
vary from state to state. NO PERSON IS AUTHORIZED BY DELPHI TO
MODIFY OR ADD TO THIS LIMITED WARRANTY.
Warranty
31
Page 44

Delphi Corporation
1441 West Long Lake Road
Troy, Michigan 48098-5090
U.S.A.
Customer Service: [1] 877.GO DELPHI
www.delphi.com
roadyXT, the XM name, TuneSelect, Roady2, and related
logos are trademarks of XM Satellite Radio Inc.
Printed on Recycled Paper
©2005 Delphi Corporation. All rights reserved.
DPSS-05-E050
Page 45

Page 46

Controhs
surface prepa-
ration
kit
~-
~1.J
vehicle
vent
mount
cassette adaptor
signal
strength
1
t03bars
-
roadyXT
r8CelVer
home
searchbyscanning
all channels
antenna
home
vehicleswivel
mount
power
adaptor
display
modes1-5
vehicle
power
adaptor
aucfro
cables
search channels
byeategory
!/
vehicle antenna
power
(i)
1'.1
DeeF'
Tr·.~ck$
David
"'-
.........
-..
......................I14-
memory
- save
and recallupto
20 artist names
or
song titles
; .
jump
previous channel;
press and hold
select oneoflast
sixFMfrequencies
used
CD
40
select select- change chan-
Bowie
................
iii;;;;,;;,................
- return
for
transmitter
Remembertopull out the clear plastic
tab from the remote battery compartment
To
remove the battery from the remote,
use
your
the battery tray and pullitout. Replace
the battery with the equivalent size and
voltage, taking care to insert
positive
..,
--I----+_
to
to
before using the remote.
thumbtopress the center
(+) side up.
up
and
down
nels, choose menu
options, TuneSelecC
search
-lookupchannels
~~ac~~:~sory
numbers- enter a
channel directly
select favorite presets
or
it
with the
or
arrows,
scan all
of
adcfmonal info - channel
name, channel number,
~~~~~
~0~9/~~~'E~~~
pre/cir
- select between
direct channel entry
upto30 presets
cflSp
- change
see on the display;
artist name, song title,
channel number, stock
quotes,orInfo Extras
*Sold
what
separately
or
you
show
"'-""""'r--l---
b~:=:5l"o.~f----
menuadvanced features and
configuration options
jump
channel; press and hold
to
select one
FM frequencies used
modulator
numbers - enter a
channel directly
select favorite presets
memory - save and
recallupto
namesorsong titles
access
- returntoprevious
of
last six
for
or
20 artist
Page 47

Because every vehicle is different, we can
guidelines.
• Decide which method (cassette adaptor, wired connection,
FM
Audio
If
you need help, consult a professional installer.
transmitter) is best
for
your
quality
only
provide some general
vehicle and location.
Audio Quality
CassetteAdaptor
Wired
FM
WirelessFM
or
wireless
Use
the CASSETIE
if
yourvehicle's audio system
has a built-in cassette player.
The
WIRELESSFMTRANSMIT-
TER
is the easiest and quickest
way
to
hearXMprogramming
in your vehicle. Simply set your
FM
radio and your roadyXT to
the same frequency.
ADAPTOR
?~ac~ng
For best reception, place theXMantenna on the vehicle's metallic roof,
6"
of
If
the metal trunk lid. It should be at least4"from the
the antenna and cable
convertible
the
antenna
from any
the roof.
windoworsunroof. It
can
be placed in the front,
the car is a hard-orsoft-top convertible, you
don't
interfere
with
the
may
result in injury to yourselfor to
wamlng:
others
top
and the trunk lid.
Failure
to properly install
jf
it
becomes
detached
the
antenna
duringanaccident.
may
Page 48

We've included
your vehicle's interior.
two
types of mounts to help you install your roadyXT
in
Turn off your roadyXT and your home
stereo. Connect your roadyXT to your
as
stereo
illustrated.
Place the antenna on a
windoworan
that it points south.
exterior wall
caution: Never use a commercial
ortoyour
vehicle.
Vent
Mount
Find a horizontal air vent thatisstrong
enough to hold your roadyXT and its
cradle. Clip the vent mount into the vent.
To
remove the mount, push it into
~~~~~~
~~~
Carefully extract the mount. .
~~~~~~~:~gt~t~y
heat
gunorpaint-stripping gun. This
You
can
by using a screwdriver.
th.~
:~n~e~:~!::~;::!::::i:::::;:::;::::·:::!::::::::::;::::.::::'::::::::::;::::::::::::::::::::::::::
....:.....':..:'.
ll.iJJtTh
could
resultindamagetothe
adjust the tensionofthe swivel mount
unit
:::I:·j.::
i·!·l·!!:.\.·;!!:··!::::::::.::.:l.·:.::::.!ll.::··:l,':::.:.!.:
..
Waming:
roadyXT shouldbeplaced in your vehicle whereitwill
le.g., deploymentofairbagsl. Failuretocorrectly place roadyXT may result in death and/or injurytoyourselforto
othersifthe unit becomes detached during an accident and/or obstructs the deploymentofan airbag.
not
interfere
with
the functionofsafety features
Page 49
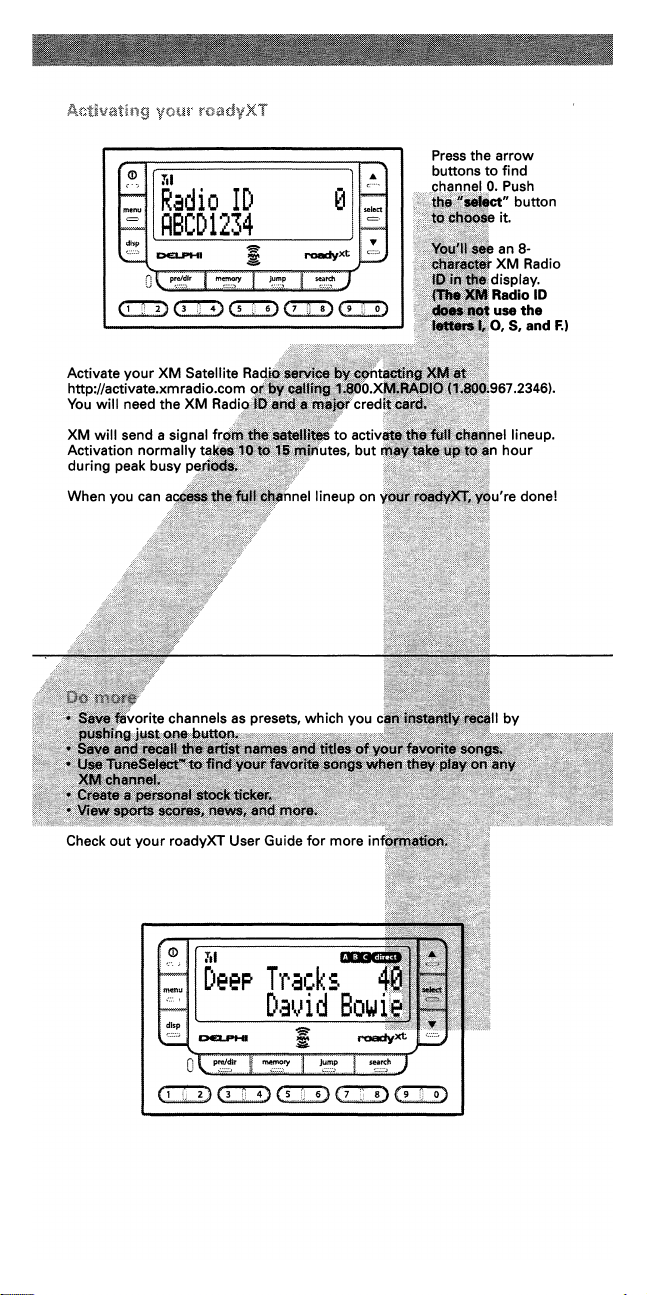
(j)
111
Radio
RBCD1234
dl~p
D€LPHI
1D
9
~
roedyxt
0
C'"
select
=,
A.
..
;
(i)!
~
':'.
; i
. menu .
dlsp
i
c~~~~~~~
<IJ:D(~.....
~.:
.....
4)
<IID
cr::::D
<IJ::D
Page 50

ro8dyXT, theXMname, TuneSelect, and related
logos are trademarks
ePrintedOn
C200S Delphi Corporation
DPSS-QS-E-QS1
ofXM
Recycled Paper
Satellite Radio
All
rights reserved
Inc
Page 51
To
activate your
satellite radio, call
XM
Listener Care Center
at
1-800-XM-RADI0
or
(1-800-96'7-2346)
log
on
to:
http://www.xmradio.com
~
~
1-1I
)(M
~
~
SATELliTE
RADi
refertoyour
0
For
addItional
C>E:
setup
LP
Instructions,
the
User
GUide
Page 52
To
purchase
accessories
Delphi
satellite
for
your
radio
visit:
http://www.shopdelphi.com
~
,...
I:>E:
LPI-I
XM
I
~
SATELLiTE
RADiO
~
Page 53
DE~ADES
4
5
6
7
8
9
COUNTRY
10
11
12
13
14
15
16
POP&HITS
20
21
22
23
24
25
27
28
29
CHRISTIAN
31
32
33
ROCK
40
41
43
44~
45
46
47
48
50
51
52
53
54
HIP-HOP&URBAN
60
61
62
64
65
66
67_
JAZZ.
70
71
72
73
74
L1FESffiE
75
76
77
DANCE
80
81
82THe~
83
XM
PreviewsonChannell.
XL
May
Please
(1-800-967-2346)
iJi)
Ch.129
'2~:
Channellineupeffective6l10/0S-Allprogrammingsubjecttochange.
BIG
..
4<)~
50s
mill.
~
nlBOs
.,·9
4M~I~
NIlslillfm!
~",T""Y
~
~
BLUEGRASS
JUNCIION
V'tLLAGE
Ufghway(D
(<0,120100120
~
fl\l'J.
the
iiblendG)
~mm~~.I.~~
==
~'Ufl»i
-
,~
SPIRrr
~Jk
_G)EillJ
XMY
xMcafe
1il~co;5
~TlU:;1...
)6.Uih
'Lon
musiclab
~
funcms
lliW
SUIt
""flow
Suite62
Uili!r:Ir:1UE:
~~
Raw
&
BLUES
@
AlA'~1!C6Lnl.S
rEYOIiO
all
F~~:t
bluesville
~.
FINE
~~~s
mOVE
bpm
Oltune
include
~ci~
BAND/SWING/FORTIES
FIFTIES
HITS
SIXTIES
HITS
SEVENTIES
HITS
EIGHTIES
Os
heart.
TUNING
callXMListener
airs
~r~Y6~U'~~S~~~~:d~~;~~
HITS
NINETIES
HITS
CLASSIC
COUNTRY
90s&TODAY'S
PROGRESSIVE
TRADITIONAL
BLUEGRASS
FOLK
TOP
COUNTRY
TOP20HITS
TODAY'S
HIT
MUSIC
MODERN
POP
LOVE
SONGS
BEAUTIFUL
MUSIC
ADULT
HITS-PAST&TODAY
MOVIE
SOUNDTRACKS
SHOW
TUNES
EURO&GLOBAL
CHRISTIAN
ROCK
CHRISTIAN
POP
GOSPEL
DEEP
ALBUM
HARD
ROCK
XL
COLLEGE/INDIE/NEW
DEEP
CLASSIC
SOFT
ALTERNATIVE
CLASSIC
ROCK
90s&TODAY'S
HARD
ALTERNATIVE
ACOUSTIC
ROCK
JAMBANDS/PROG
UNSIGNED
ARTISTS
PUNK/HARDCORE/SKA
ALTERNATIVE
CLASSIC
SOUL
NEOSOUL
TODAY'SR&B
OLD
SCHOOL
CLASSIC
HIP-HOP/RAP
UNCUT
HIP-HOP
URBAN
TOP
40
TRADITIONAL
CONTEMPORARY
MODERN
JAZZ
AMERICAN
STANDARDS
BLUES
HEAR
MUSICMATSTARBUCKS
ECLEGIC
NEW
AGE
UNDERGROUND
DANCE
HITS
ELEGRONICA
DISCO
frequent
explicit
language.
Care
at
1-800-XM-RADIO
for
Parental
SAMET-6PMETMon.-Fri.
Control/Blocking
COUNTRY
COUNTRY
COUNTRY
HITS
HITS
CHART
HITS
ROCK
MUSIC
ALTERNATIVE
ALTERNATIVE
XL
ROCK
XL
HITS
R&B
XL
XL
JAZZ
JAZZ
DANCE
Option.
~-~~~s~iaJu~~un.
LATIN
9O~
Q9()D~IQ
92
94
~
95
WORLD
100
101
102
CLASSICAL
110
112
113
rOS
115
116
121
122
123
124
125
127
N129
130
131
I}]I}]t!lWORLDSERVICE
132
133
134
SPORTS'"
140
141
142
.143
144
145
146
147
»'1ftOJ177VIJ
175
176-189
190
191-193
194-196
197-199
150
151
152
155
156
.161
162
163
164
165
166
167
169
170
171
,,200
202
I
XM
INSTANT
210-230
247
I
PREMIUM
205
.....
Visit
broadcast
for
college
Spanish
All
schedules
k
Visit
VlSitxmradio.comforupdates.
LATIN
HITS
REGIONAL
MEXICAN
TROPICAL
LATIN
~
~
joint
Nam.lA
~L\ssics
VOX
XN@~
-m=
~
~.
H~dlineNews.
O:"EWS&TALY
a'
-;Ji"
PIC!9L"berg
~~
~g
XM~~\~~
~
~
i:S!iFii;:":;
•
Spo~
IlIJJI1!JffFi!1
flllIII!lE!!i!l.@
Ii.
~~
~,
~~
~-
1kmtI.
XM~'W
~,
iii
R
Ull
~
a
=
~??Ask!
-
~t
. ,
llb\ver
•
~
[mmmJ
)(M.,ive.
~Cffi.4k
PLAYBOY:"-
RADIO~.
nascar2.xmradio.com
Sports
xmradio.com
JAZZ
WORLD
REGGAE
AFRICAN
TRADITIONAL
OPERA/CLASSICAL
POPULAR
CLASSICAL
CHILDREN
CHILDREN
FOX
NEWS
CNN
CNN
HEADLINE
ABC
NEWS&TALK
THE
WEATHER
CNBC
BLOOMBERG
MSNBC
BBCWORLD
C-SPAN
RADIO
XM
PUBLIC
RADIO
CNNENESPANOL
SPORTSTALK/PLAY-BY-PLAY
SPORTS
NEWS
SPORTSTALK
SPORTS
TALK
NASCAR'
RADIO
IN-RACE
DRIVER
THE
PGA
TOUR
PLAY-BY-PLAYENESPANOL
MLB
HOME
PLATC
14
MLBN
PLAY-BY-PLAY
PLAY-BY-PLAYENESPANOL
ACC
ACC
FOOTBALLIBASKETBALL
PAC-10FOOTBALLIBASKETBALL
BIG
TEN
FOOTBALLIBASKETBALL
COMEDY
XL
FAMILY
COMEDY
EXTREME
TALK
MTVRADIO
VH1
RADIO
DISCOVERY
RADIO
E!
ENTERTAINMENT
BOOKS&DRAMA
OLD
TIME
RADIO
EXPERTS&ADVICE
CONSERVATIVETALK
PROGRESSIVE
AFRICAN-AMERICAN
CHRISTIAN
TALK
TRUCKERS'
CHANNEL
CONCERTS/SPECIAL
OPIE&ANTHONYSHOW
lllAFFIC&WEATHER
<1>21
MAJOR
MARKETS
XM
EMERGENCY
ADULT
XL
for
Visit
collegesports.xmradio.com
schedules.
Games
Ch.147
begins
subjecttochange.
for
Ch.
200
NASCAR2Ch.14S
July,200S.
special
©200SXM5atelliteRadio.
schedules.
game
CLASSICAL
RADIO
SERVICE
NETWORK
TALK
xmradio.com
VOCALS
NEWS
CHANNEL
AUDIO
24/7
NEWS&TALK
CHANNELS
TALK
FEATURES
XL
ALERT
subjecttoavailability.
event
dates
and
times.
Page 54
Page 55

Vehicle Installation Guidelines for
This
XM
Receiver offers the listener a varietyofoptions for connecting
Satellite
show that using a vehicle cassette adapter
between the best sound quality and
does
retailer or visit www.xmradio.com.click
Radiotoyour vehicle's
FM
radio.
XM
can
best maximize the relationship
easeofinstallation.Ifyour vehicle kit
not
include a cassette adapter, one should be available at your local
..
ShopXMRadio."
Audio Quality
XM
Satellite Radio
XM
research and lab test results
Cassette
Wired
Wireless
Adaptor
FM
FM
••••
1. Cassette Adapter
Using a
solution.
radio antenna and securing the
2. Wired FM (Professional Installation Recommended)
A wired
installation.
you cannot get acceptable performance
3. Wireless FM
TheXMreceiverisequipped with aFMmodulator which
XM
IMPORTANT:
locate the satellite radio antenna in a location thatisin close proximity
the vehicle'sFMantenna.
For
rear fender or
location (option 1).IfyourFMantennaislocated on a front fender,
the
closer the satellite radio antenna
wireless
cassette
FM
adapter for audioisthe most popular and best sounding
Please
follow steps 1 through 4 below for mounting the satellite
XM
receiver and
cables.
installation kitisavailable from your retailer for professional
See
your retailer for details. This solutionisrecommended
with
the wirelessFMmodulator.
Modulator
can
transmit the
audiotoyour
example, with referencetoFigure1,if
XM
antenna near the windshield location (option 2). Remember, the
FM
car'sFMradio
For
best wireless
topofthe roof,
without
mount
wires.
FM
Modulator performance, you must
theXMantenna near the rear
canbeto
reception and sound quality will
yourFMantennaislocated on a
theFMantenna, the better the
be.
if
to
window
mount
In
ordertooptimize the operationofthe wirelessFMmodulator,follow the
installation guidelines outlined in steps
First,
determine the proper location for your satellite radio antenna based on
1through 4 below:
thefollowing criteria for yourspecific vehicle:
•
You
must locate
of
the
rear
radio antenna will perform bestifmagneticallyattachedtoa steel surface
an
unobstructed viewofthe
surrounding the antenna.
• When routing the antenna cable along the windshieldorrear window,
antenna cable under
installation andtoavoid loose wires on the exteriorofthe
susceptibletodamage. Follow the interior cable routing diagram depicted by
dashed lines in Figure 1 where possible.
the
window
satellite radio antenna on
(option 1) or behind
open sky and
the
window
the
sealtomaintain a professional looking
the
topofthe
windshield (option
minimumof3to6 inchesofmetal
roof
either in
2).
The satellite
tuck
vehicle which are
front
with
the
Page 56
Fig
Keep
excess
1
behind
dashboard
or
cable
under
the
• For bestFMModulatorperformance, you must locate
in a location
• Avoid kinking,crimping,twisting or chafing
channels when possible.
•
For
option
shown. Always cross
water
through
trimorunder
leave
damaged.
• For
option
and
into
bottomofthe
Be
suretolocate your car cradle and receiver below the
yourvehicle
thatisin close proximitytothe
1 and rear
leaks.
From
available wire channels and then along
the
cable loose in
2 and
the
vehicleasshown. Route
to
keep the product within
mounting
the
the
trunk,route
the
carpettothe
front
mounting
doortoreduce water leaks.
weather
the
passenger
locations,route
sealatthe
the
frontofthe
locations,route
the
cable
compartment
vehicle'sFMantenna.
the
lowest partofthe
into
passenger compartment. Do
cable across
easy
lower location in your installation should also make
the
satellite radio antenna
cable.
Use
pre-existing wire
the
cable
into
the
trunk
as
the
door
likelytobe
the
door
seal
near
jam
not
jam
the
the
passenger
the
floor under
whereitis
the
cable along
the
trunktoreduce
compartment
weather
topofthe dash in
reach while driving. Choosing a
it
easiertomanage the
cables and achieve a more desirable appearance when the installation
completed. A lower location for the receiver in the vehicle will ensure that
not
cause
the installation does
interference with otherFMradios outside the
vehicle.
See
illustration below
shaded
area.
(Fig
2) and be sure
to
locate your car cradle within the
is
Fig
2
Page 57
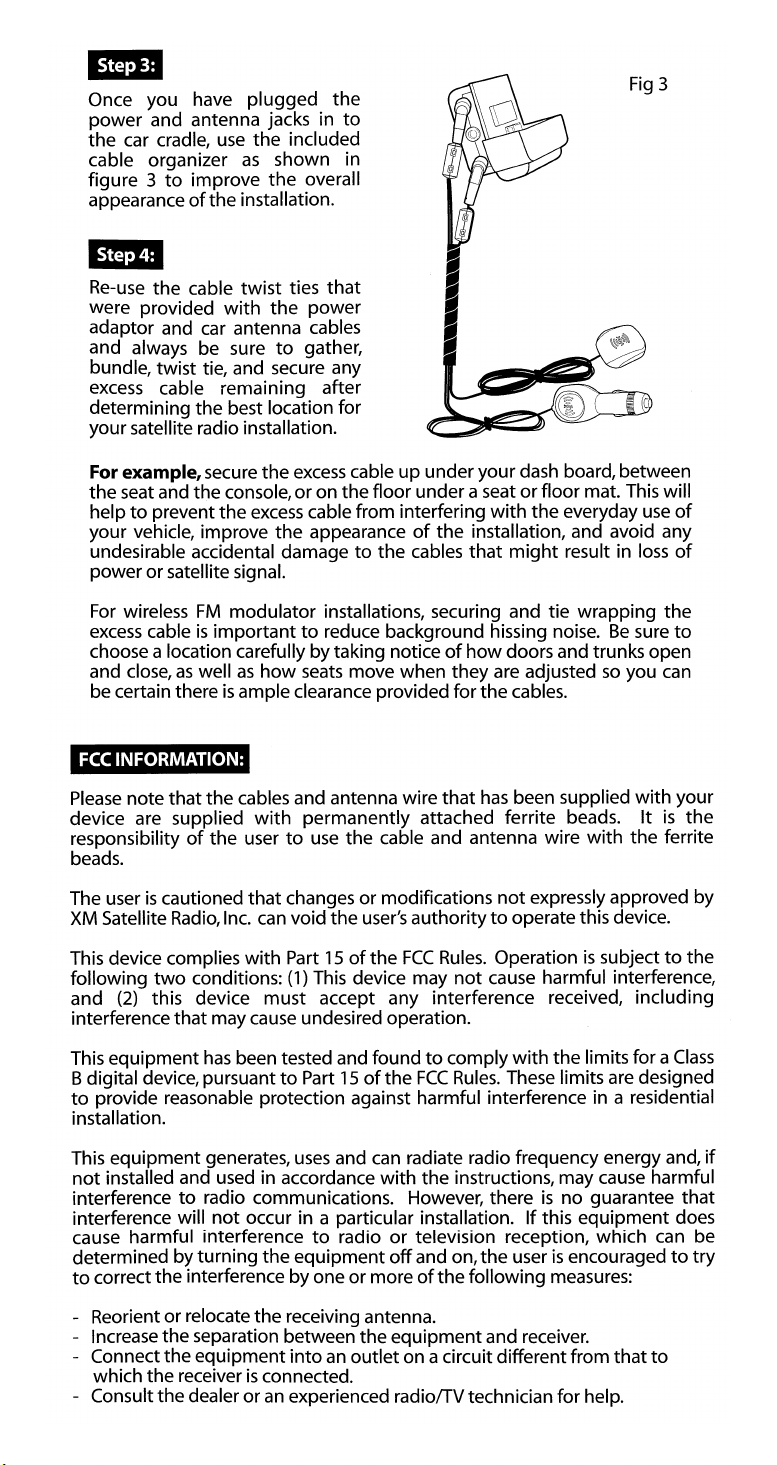
Once you have plugged the
power and antenna jacks in
the car cradle,
cable organizer
figure 3
appearance
use
the included
as
to
improve the overall
of
the installation.
shown in
to
Re-use
were provided
the cable twist ties
with
the
that
power
adaptor and car antenna cables
and always be sure
to
gather,
bundle, twist tie, and secure any
excess
cable remaining after
determining the best location for
your satellite radio installation.
For example, secure the
the seat and the console, or on the floor under a seat or floor mat.
to
help
prevent the
excess
cable up underyour dash board, between
excess
cable from interfering
with
the everyday
This
your vehicle, improve the appearanceofthe installation, and avoid any
undesirable accidental damage
the cables that
might
result in
loss
to
power or satellite signal.
For
wireless
excess
choose a location carefully bytaking noticeofhow
and close,
FM
modulator installations, securing and tie wrapping the
cableisimportanttoreduce background hissing noise.Besure
doors and trunks open
as
wellashow
seats
move when they are adjustedsoyou
be certain thereisample clearance provided for the cables.
FCC
INFORMATION:
Please
note that the cables and antenna wire that
with
device are supplied
responsibility
of
the usertouse
permanently attached ferrite beads.
the cable and antenna wire with the ferrite
has
been supplied
with
beads.
will
use
of
of
to
can
your
Itisthe
is
The user
XM
Satellite
This device complies
following
and
interferencethat may
This equipment
Bdigital device, pursuanttoPart 15ofthe
to
provide reasonable protection against harmful interference in a residential
cautioned that changes or modifications
Radio,
Inc.
can
void the
with
two
(2) this device must accept any interference received, including
conditions: (1)
has
Part 15ofthe
cause
undesired operation.
been tested and foundtocomply
This
user's
authoritytooperate this device.
FCC
device may
FCC
not
expressly approved by
Rules.
Operationissubjecttothe
not
cause harmful interference,
with
the limits for a
Rules.
These
limits
are
designed
installation.
This equipment generates,
not
installed and used in accordance
interference
interference will
to
radio communications. However, thereisno guarantee that
not
cause harmful interference
determined by turning the equipment
to
correct the interference by one or moreofthe following measures:
uses
and
can
radiate radio frequency energy and,
with
the instructions, may
cause
occur in a particular installation.Ifthis equipment does
to
radio or television reception, which can be
off
and on, the userisencouragedtotry
- Reorient or relocate the receiving antenna.
- Increase the separation between the equipmentand receiver.
an
- Connectthe equipment into
outlet on a circuit different from that
which the receiverisconnected.
an
- Consultthe dealer or
experienced radiofTV technician for help.
Class
if
harmful
to
Page 58

=
A
..
In order
Radio operates properly you must
install these attached "ferrites"
Place
adapter
the ferrite.
the bottom
the plastic cover
inside
IMPORTANT
INSTALLATION
to
ensure that your new
How
XM
the
car
cable
the ferrite.
Satellite
power
into
Be
sure
edge
of
is
NOTICE
to
attach
the
Radio
XM
to
both
lead and
adaptor lead
Doing
installation which
make
not
snap
POWER
o
the
interfere
on
"ferrite"
ADAPTER
Snap
closed.
you
pinching the
cable.
XM
soisan
sure
the ferrite
are
Be
not
that
sure
Satellite Radio antenna
the
with
to
cigarette lighter
as
illustrated below.
important
is
your
other
part
required
XM
Radio will
radios.
the
of
the
to
cable.
The
o
ferrite
tightly around the
cable.
should
fit
((.~.»)
Thisishow the
ferrite
you
attached
correctly.
•
will look if
have
it
Page 59

Howtoattach
the
snap
on
"ferrite"tothe
XM
Satellite
loop
Radio
antenna
cable.
,0
1
f1\Place the XM car antenna
'0
cable
into
theferrite.
h\2
\V
Wrap
around
the
antenna
the ferrite once.
cable
Wrap
CD
around
second
the
antenna
the
ferrite a
timeasshown.
cable
f4\Snap
\:::.J
FCC
In
order
use
the
the
ferrite closed.
Be
sure you are
pinching the cable.
not
REQUIREMENT:
to
avoid
optional
interference
home
mini-to-RCA cable. In
canbe
set
to
"Off';set
f5\The cable should
\.::..J
tight
ferrite.
against
with
fit
the
nearby
cradle accessory kit,
your
it
to
XM radio
"OW
menu,
f6\ This
\.::!./
radios in
and
if
lookifyou have
it correctly.
use
the
FM Frequency
is
how
your
the
the
ferrite will
attached
home,
included
Page 60

Expand
Po
Your
55ib
iii
tie
DELPHI
5.
RoadyXTHome Kit
(SA10l?6
Conveniently
office
environment
Home
Kit.
For
Special Offers & Discounts, visit
J
add RoadyXTtoahome
with
the
Roady
XT
or
..
IiiiI
Conveniently
vehicle
Vehicle
Additional RoadyXTVehicle Kit
(SA10l?8)
add RoadyXTtoasecond
with
this
additional
Kit.
Roady
XT
www.delphioffer.com/roadyxt3
For
additional information on these exciting accessories check your
or
visit
local retailer
Effortlessly
your
home
two
great
enjoy
with
accessories.
www.shopdelphi.com.
XM"
in
these
XM
Signal
XM
Signal Repeater
[SA10116]
Wirelessly
XM
signal
your
even
and
Signal
Repeater
Power Adaptor.
Offer valid while supplies last.
XM,
theXMlogo and Roady
©2006
retransmits
throughout
entire
home
through
floors.
Transmitter,
Delphi Corporation.
walls
Includes
Antenna,
Transmitter
the
-
XM
and
AC
Offer
valid
are
trademarksofXM
All
rights
reserved.
for
U.S.
Repeater
Antenna
Customers only.
Satellite
Radio, Inc.
 Loading...