

Page 1

Istruzioni Radiatore elettrico
Electric radiator - instructions
Instructions Radiateur électrique
Betriebsanleitung Elektroradiator
Gebruiksaanwijzingen elektrische radiator
Instrucciones para el Radiador eléctrico
Instruções do radiador eléctrico
√‰ЛБ›В˜ ЛПВОЩЪИОФ‡ О·ПФЪИК¤Ъ
Brugsanvisning for elektrisk radiator
Bruksanvisning elektrisk radiator
Bruksanvisning elektrisk radiator
Bruksanvisning för elradiator
Grzejnik elektryczny, instrukcja
Elektrick˘ radiátor - pokyny
Villanyradiátor használati utasítás
Erfpfybz - Tktrnhbxtcrb hflbfnjh
ùùÎÎÂÂÍÍÚÚˢ˜ÂÂÒÒÍÍËËÈÈ ‡‡‰‰Ëˇ‡ÚÚÓÓ ÓÓÚÚÓÓÔÔÎÎÂÂÌÌËËflfl,,
ËËÌÌÒÒÚÚÛÛÍ͈ˆËËËË
Instrucţiuni Radiator electric
Návod na elektrick˘ radiátor
Navodila za električni radiator
Upute za uporabu električnog radijatora
10
Page 2

Electrical requirements
Before using this appliance ensure that the voltage indicated on the product
corresponds with the main voltage in your home, if you are in any doubt about
your supply contact your local electricity company.
The flexible mains lead is supplied connected to a B.S. 1363 fused plug having a fuse of 13
amp capacity. Should this plug not fit the socket outlets in your home, it should be cut off
and replaced with a suitable plug, following the procedure outlined below.
Note: Such a plug cannot be used for any other appliance and should therefore be properly disposed of and not left where children might find it and plug it into a supply socket with the obvious consequent danger.
N.B. We recommend the use of good quality plugs and wall sockets that can be switched
off when the machine is not in use.
important: the wires in the mains lead fitted to this appliance are coloured in accordance
with the following code:
As the colours of the wires in the mains lead of this appliance may not correspond with
the coloured markings identifying the terminals in your plug, proceed as follows:
The wire which is coloured green and yellow must be connected to the terminal in the
plug which is marked with the letter E or by the earth symbol or coloured green or
green and yellow.
The wire which is coloured blue must be connected to the terminal which is marked with
the letter N or coloured black.
The wire which is coloured brown must be connected to the terminal which is marked
with the letter L or coloured red.
When wiring the plug, ensure that all strands of wire are securely retained in each terminal. Do not forget to tighten the mains lead clamp on the plug. If your electricity supply
point has only two pin socket outlets, or if you are in doubt, consult a qualified electrician.
Should the mains lead ever require replacement, it is essential that this operation be carried out by a qualified electrician and should only be replaced with a flexible cord of the
same size.
After replacement of a fuse in the plug, the fuse cover must be refitted. If the fuse cover is
lost, the plug must not be used until a replacement cover is obtained. The colour of the
correct replacement fuse cover is that of the coloured insert in the base of the fuse recess
or elsewhere on the plug.Always state this colour when ordering a replacement fuse cover.
Only 13amp replacement fuses which are asta approved to B.S. 1362 should be fitted.
This appliance conforms to the Norms EN 55014 regarding the suppression of radio interference.
GREEN AND YELLOW
BLUE
BROWN
EARTH
NEUTRAL
LIVE
Green and Yellow to Earth
Blue to
Neutral
13 amp
Fuse
Brown
to Live
Cord Clamp
Warning - this appliance
must be earthed
Page 3

Fig. 4
ÂÈÎ. 4
Abb. 4
Kuva. 4
êËÒ 4
Rys. 4
4. ·bra
Obr.4
Sl.4
Fig. 3
ÂÈÎ. 3
Abb. 3
Kuva. 3
êËÒ 3
Rys. 3
3. ·bra
Obr.3
Sl.3
Fig. 1
ÂÈÎ. 1
Abb. 1
Kuva. 1
êËÒ 1
Rys. 1
1 . ·bra
Obr. 1
Sl. 1
Fig. 2
ÂÈÎ. 2
Abb. 2
Kuva. 2
êËÒ 2
Rys. 2
2. ·bra
Obr.2
Sl.2
250mm
150mm
150mm
150mm
D
A
A
=
B
=
D
D
A
A
B
Page 4

Il radiatore è una apparecchiatura per il riscaldamento domestico estremamente versatile con tre livelli di potenza selezionabili. Inoltre, in questo prodotto è stata incorporata una esclusiva funzione che Vi
consentirà di ottenere il miglior comfort in qualsiasi situazione.
Per sfruttare al massimo le potenzialità del prodotto Vi consigliamo di leggere a fondo le istruzioni
sotto riportate.
1. GENERALITA'
Togliere l'apparecchio dalla scatola imballo, e capovolgerlo appoggiandolo sulle cuffie di polistirolo di protezione. Controllare l'integrità del cavo di alimentazione e che l'apparecchio non abbia subito danni durante
il trasporto. Non far funzionare l'apparecchio se danneggiato.
2. MONTAGGIO DEI PIEDINI
Rimuovere i piedini e le rotelle dall'imballo in polistirolo.
Inserire le ruote nel perno del piedino e premere a fondo fino ad udire uno scatto (fig. 1). Assicurarsi tirando, che le ruote siano ben fissate.
Montare il piedino con ruote nella parte inferiore del radiatore inserendo le costole guida fra la scatola
comandi ed il primo elemento e fra la scatola posteriore e l’ultimo elemento; incastrare i 2 denti nelle sedi
previste e bloccare il piede con la vite ad occhiello avvitandola a fondo (fig. 1).
Ter minate queste operazioni capovolgere il radiatore rimettendolo nella posizione verticale di funzionamento.
Attenzione: solo le viti ad occhiello servono per fissare i piedini.
3. MONTAGGIO A PARETE
Il kit per montaggio a parete deve comprendere:
2 x Staffe superiori (A)
1 x Staffa inferiore (B)
5 x Viti
5 x Tasselli
1. Scegliere il punto di installazione del pannello assicurandosi che:
a. Non sia situato direttamente sotto una presa di corrente.
b. Sia la spina che la presa siano facilmente raggiungibili dopo l’installazione.
c. Nè i cavi elettrici né altri tubi possano essere danneggiati.
d. Tende o altro materiale infiammabile sia ben lontano dal pannello
2. Prima di forare la parete, segnare i punti esatti con una maschera seguendo attentamente le dimensioni (D
Fig. 3 ) che variano a seconda del modello, come riportato nella tabella 3A.
3. Allineare il centro delle staffe “A” con una linea (indicata in fig.3/4 con una linea tratteggiata) assicurandosi che le due staffe siano ad altezza uguale; quindi segnare i fori da praticare.
4. Per pareti in mattoni, utilizzare una punta da cemento da 6 mm e forare in base ai segni che si sono fatti
e quindi inserire i tasselli in dotazione.
(Per cartongesso o controrivestimenti suggeriamo di individuare i montanti in legno e di usare delle viti
da legno da 6 direttamente nel legno o di usare fissaggi specifici. Per qualsiasi altro tipo di parete chiedere il consiglio di uno specialista).
4
I
1Kw
140 mm
1,5 Kw
210 mm
2 Kw
280 mm
2,5 Kw
385 mm
3A
Modello
D
Page 5

5. Montare le staffe da parete “A” nei fori con le viti in dotazione.
6. Appendere il radiatore sulle staffe (fig.3/4).
7. Individuare la posizione di fissaggio della staffa inferiore “B” inserendola al centro della base dell’apparecchio; utilizzare una delle viti in dotazone per segnare la posizione esatta del foro (fig.3).
Questa staffa impedisce la rimozione accidentale dell’apparecchio.
8. Rimuovere il radiatore dalle staffe “A” e praticare il foro come precedentemente indicato per i fori della
staffa “A”; quindi introdurre il tassello. Riappendere il radiatore sulle staffe “A” con la staffa “B” inserita e quindi fissarla con la vite (fig.3).
Il radiatore adesso è fissato a muro.
Non utilizzare l’apparecchio in stanze da bagno.
3. ALLACCIAMENTO ELETTRICO
- Prima di inserire la spina nella presa di corrente verificare attentamente che il voltaggio della Vostra rete
domestica corrisponda al valore in V indicato sull'apparecchio e che la presa di corrente e la linea di
alimentazione siano dimensionate al carico richiesto.
- COLLEGARE IL RADIATORE SOLAMENTE A PRESE DOTATE DI UNA EFFICIENTE MESSA A TERRA.
- Questo apparecchio è conforme alla direttiva 89/336/CEE e al D.M. 476/92 sulla compatibilità elettromagnetica.
4. FUNZIONAMENTO ED USO
Accensione
Inserire la spina nella presa di corrente; spostare il termostato fino all’arresto in posizione di massimo; accendere
il radiatore mediante il/gli interruttori.
Modelli con interruttore doppio (3 potenze)
- tasto “l” premuto = potenza minima (spia accesa)
- tasto “ll” premuto = potenza intermedia (spia accesa)
- entrambi i tasti “l” “ll” premuti = potenza massima (spie accese)
Per spegnere l’apparecchio,entrambi gli interruttori devono essere sulla pos. “0” quindi togliere la spina
dalla presa di corrente.
Regolazione del termostato
Quando l’ambiente avrà raggiunto la temperatura desiderata, spostare lentamente il termostato fino alla
posizione segnalata da un “click” e non oltre. La temperatura così fissata verrà automaticamente regolata e
mantenuta costante dal termostato.
Funzione antigelo
Con il termostato in posizione e gli interruttori premuti, l’apparecchio mantiene l’ambiente ad una temperatura di circa 5°C impedendo il congelamento con un minimo dispendio di energia.
Modelli con programmatore (Timer) 24 ore
Per programmare il riscaldamento procedere nel seguente modo:
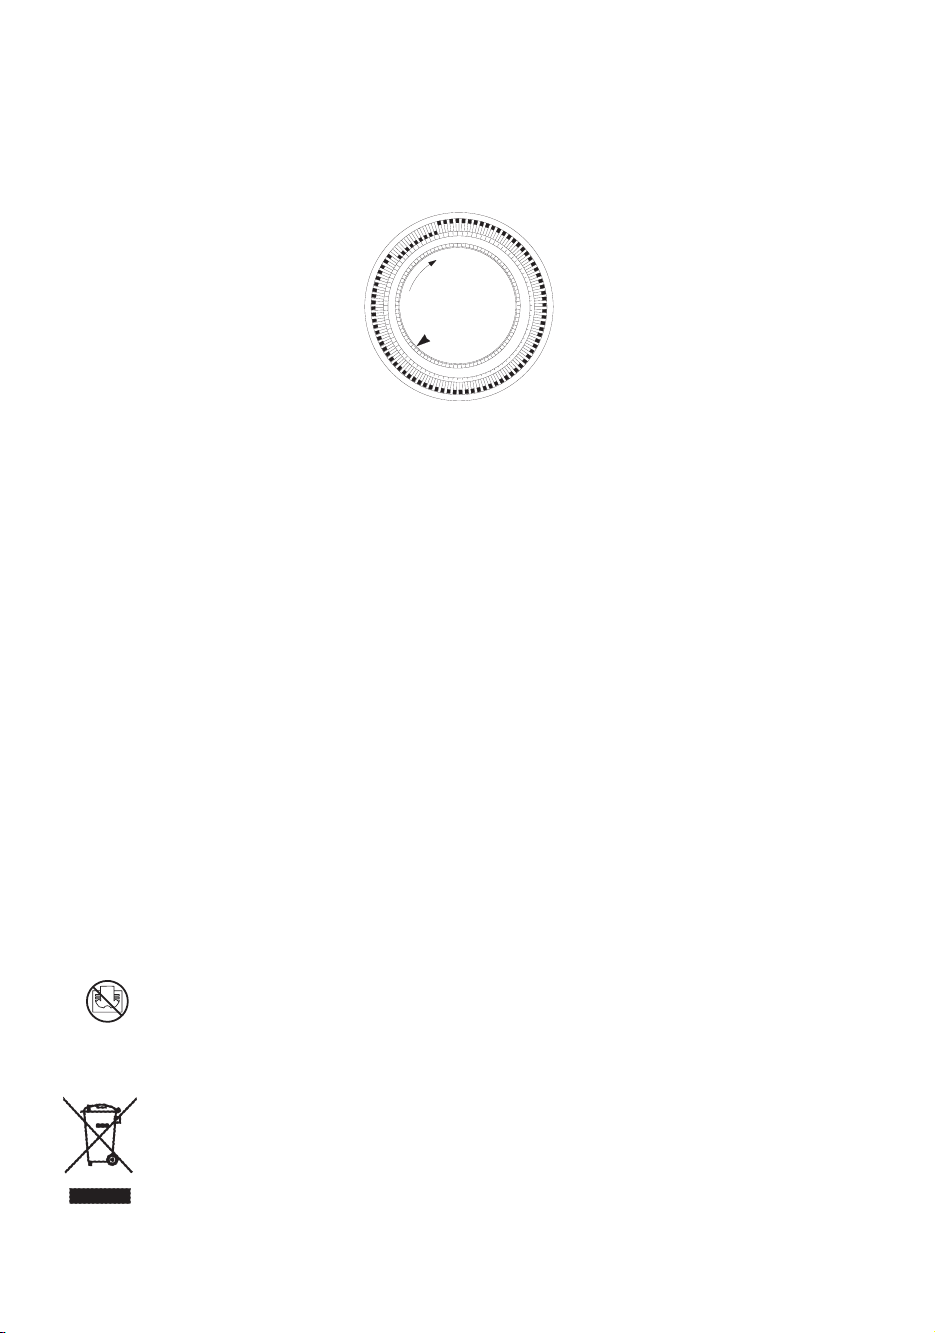
- Guardate l’ora del Vostro orologio. Supponendo che siano le 10, ruotate in senso orario il disco numerato del programmatore fino a far coincidere il numero 10 dello stesso con l’indice di riferimento s
impresso sul programmatore (fig.5).
- Impostare i periodi di tempo in cui desiderate che l’apparecchio funzioni, spingendo verso il centro i dentini
(fig.5). Ogni dentino corrisponde ad un periodo di tempo di 15 min. Saranno a questo punto visibili dei settori che corrispondono ai periodi di funzionamento.
- Così predisposto il radiatore funzionerà automaticamente ogni giorno nell’orario programmato
(Importante: la spina deve essere sempre inserita nella presa di corrente).
- Per variare la programmazione basta riportare i dentini nella posizione iniziale ed impostare i nuovi
periodi di funzionamento.
5
Page 6

- Se desiderate far funzionare l’apparecchio senza programmazione spingete verso il centro tutti i dentini. In questo caso per lo spegnimento totale dell’apparecchio oltre che spegnere gli interruttori è necessario togliere anche la spina dalla presa al fine di evitare un inutile funzionamento del programmatore.
5. MANUTENZIONE
Il radiatore elettrico ad olio non richiede una particolare manutenzione. E’ sufficiente spolverarlo con un
panno soffice ed asciutto; pulirlo solo quando è freddo. Non usare mai polveri abrasive o solventi. Se necessario rimuovere eventuali concentrazioni di sporcizia servendovi di un’aspirapolvere.
6. AVVERTENZE
-Non usare il radiatore in stanze da bagno o nelle immediate vicinanze di vasche da bagno, docce,
lavandini o piscine.
-Non usare il radiatore per asciugare la biancheria, non appoggiare il cavo di collegamento sugli elementi caldi.
- Usare il radiatore sempre e soltanto in posizione verticale.
-L’apparecchio deve essere posizionato ad almeno 50cm da mobili o altri oggetti.
-Se il cavo di alimentazione è danneggiato, esso deve essere sostituito dal costruttore o dal suo servizio
assistenza tecnica o comunque da una persona con qualifica similare, in modo da prevenire ogni rischio.
- E’ del tutto normale che l’apparecchio emetta degli “scricchiolii” al primo avvio.
-L’apparecchio non deve essere posto immediatamente sotto una presa di corrente fissa.
- Il contenitore di questo apparecchio è riempito con una esatta quantità di olio e le riparazioni che ne
richiedono l’apertura devono essere eseguite solo dal Costruttore o dal suo Servizio Assistenza. In caso
di perdite di olio deve essere contattato il Costruttore o il suo Servizio Assistenza.
- Non utilizzare questo apparecchio in stanze, la cui area di base è inferiore a 4 m
2
.
- Nel caso di rottamazione dell’apparecchio è necessario rispettare le disposizioni relative allo smaltimento
dell’olio.
- Non appoggiare il cavo sull’apparecchio ancora caldo.
-Non coprire l’apparecchio quando è in funzione.
-L’uso di prolunghe non è consigliabile in quanto potrebbero surriscaldarsi durante il funzionamento dell’apparecchio.
-Togliere l’apparecchio dalla scatola imballo, rimuovere gli eventuali residui che possono essere rimasti
incastrati dentro l’apparecchio.
Un dispositivo di sicurezza interrompe il funzionamento del radiatore in caso di surriscaldamento acci-
dentale. Per ripristinarne il funzionamento, contattare un centro assistenza a voi più vicino.
IMPORTANTE: al fine di evitare surriscaldamenti, non coprire in nessun caso l'apparecchio duran-
te il funzionamento, poiché ciò provocherebbe un pericoloso aumento di temperatura.
AVVERTENZE PER IL CORRETTO SMALTIMENTO DEL PRODOTTO AI SENSI DELLA DIRETTIVA EUROPEA
2002/96/EC.
Alla fine della sua vita utile il prodotto non deve esser smaltito insieme ai rifiuti urbani.
Può essere consegnato presso gli appositi centri di raccolta differenziata predisposti dalle amministrazioni comunali, oppure presso i rivenditori che forniscono questo servizio.
Smaltire separatamente un elettrodomestico consente di evitare possibili conseguenze negative per
l’ambiente e per la salute derivanti da un suo smaltimento inadeguato e permette di recuperare i
materiali di cui è composto al fine di ottenere un importante risparmio di energia e di risorse.
Per rimarcare l’obbligo di smaltire separatamente gli elettrodomestici, sul prodotto è riportato il
marchio del contenitore di spazzatura mobile barrato.
6
10
11
12
13
14
15
16
17
18
19
20
21
22
23
24
fig.5
1
2
4
2
3
4
5
6
7
8
9
10
23
2
2
21
20
1
9
18
17
1
6
1
1
15
14
2
1
3
1
Page 7

7
This radiator is an extremely versatile home heating appliance with a choice of three power levels. It
also incorporates an exclusive function enabling you to obtain optimum comfort in all situations.
To get the best from your product, you should read the following instructions thoroughly.
1. GENERAL
Unpack the appliance and turn it upside down, resting it on the protective polystyrene packaging.
Check that the power cable is intact and the appliance has not been damaged during transport. Do not use
the appliance if it is damaged.
2. ATTACHING THE FEET
Remove the feet and castors from the polystyrene packaging.
Thread the castors onto the pins on the feet and push down until they click into place (fig.1). Pull to make sure
the castors are firmly attached.
Attach the feet with castors to the bottom of the radiator by inserting them between the control box and the
first element and the rear box and the last element. Fit the teeth into the housing provided and lock the foot
in place with the eye screw, screwing it up fully (fig. 1).
When complete, turn the radiator back into the vertical operating position.
Important: to lock the feet in place, use the eye screws only.
3. WALL MOUNTING
The wall mounting kit should include:
2 x top brackets (A)
1 x bottom bracket (B)
5 x screws
5 x anchors
1. Chose where the panel is to be installed, making sure that:
a. It is not immediately under a power socket.
b. The plug and the socket are easy to reach after installation.
c. Neither the power cables or other tubes can be damaged.
d. The panel is away from curtains or inflammable material.
2. Before drilling the wall, mark the exact points with a template respecting the dimensions (D, Fig. 3) which
vary according to the model as shown in table 3A.
3. Line up the centre of the brackets A along the line indicated in fig. 3/4 by a dotted line, making sure the
two brackets are at the same height, then mark the holes to be drilled.
4. For brick walls, use a 6 mm masonry bit and drill on the basis of the marks made previously, insert the
anchors provided.
(For plasterboard or false walls, you should locate the wooden uprights and use 6 mm wood screws directly into the wood or use specific anchors. For any other type of wall, seek the advice of a specialist).
5. Attach the brackets "A" to the wall using the screws provided in the holes.
GB
1Kw
140 mm
1,5 Kw
210 mm
2 Kw
280 mm
2,5 Kw
385 mm
Model
D
3A
Page 8
8
6. Hang the radiator on the brackets (fig. 3/4).
7. Identify the fixing position of the bottom bracket (B), attaching it to the centre of the base of the applian-
ce. Use one of the screws provided to mark the exact position of the hole (fig. 3).
This bracket prevents accidental removal of the appliance.
8. Remove the radiator from brackets A and drill the hole as indicated previously for the holes for bracket
A. Insert the anchor. Replace the radiator on brackets A with bracket B inserted and then fix with the
screw (fig. 3).
The radiator is now fixed to the wall.
Do not use the appliance in the bathroom.
3. ELECTRICAL CONNECTION
- Before plugging into the mains, make sure the voltage of your mains supply corresponds to the value V
indicated on the appliance and that the socket and power line are appropriate for the load required.
- CONNECT THE RADIATOR TO AN EFFICIENTLY EARTHED SOCKET ONLY.
- This appliance complies with directive 89/336/EEC and D.M. 476/92 on radio interference suppression.
4. OPERATION AND USE
Turning on
Plug into the mains. Turn the thermostat as far as it will go to maximum position. Turn the radiator on using the switch or switches.
Models with double switch (3 power levels)
- button “l” pressed = minimum power (indicator light on)
- button “II” pressed = intermediate power (indicator light on)
- both buttons “l” and “ll” pressed = maximum power (indicator lights on)
To turn the appliance off, both switches must be in the "0" position, then unplug from the mains.
Adjusting the thermostat
When the room has reached the required temperature, turn the thermostat slowly until a "click" is heard and
no further. This temperature will be regulated automatically and kept constant by the thermostat.
Frost protection function
With the thermostat in position and the switches pressed, the appliance maintains the room at a temperature of about 5˚C, preventing freezing with minimum energy consumption.
Models with 24 hour timer
To programme heating, proceed as follows:
- Check the time on your clock. If it is 10.00, turn the numbered programmer disk until the number 10 coin-
cides with the pointer
▲ marked on the programmer (fig.5).
- Set the periods of time during which you want the appliance to operate by pushing the teeth towards the
centre.
Each tooth corresponds to a period of 15 min. At the end of this procedure, sectors corresponding to the
operating periods can be seen.
- The radiator will now function automatically each day at the programmed time (important: the applian-
ce must always be plugged into the mains socket).
- To modify programming, return the teeth to the initial position and set the new operating periods.
- To use the appliance without programming, push all the teeth into the centre.
In this case, to turn the appliance off completely, as well as turning off the switches, also unplug from the
mains to avoid the programmer operating uselessly.
Page 9

9
5. MAINTENANCE
The oil-filled electric radiator requires no special maintenance. It is sufficient to remove dust with a soft dry
cloth; clean when cold only. Do not use abrasive powders or solvents. If necessary, remove accumulations of
dirt using a vacuum cleaner.
6. IMPORTANT
- Do not use the radiator in bathrooms or near bath tubs, showers, sinks or swimming pools.
- Do not use the radiator to dry washing, do not rest the power cable on hot elements.
- Always use the radiator in the vertical position.
- The appliance must be positioned at least 50 cm from furniture or other objects.
- If the power cable is damaged, it must be replaced by the manufacturer, an authorised service centre or
a qualified electrician in order to eliminate all risk.
- It is normal for the appliance to make "squeaking" noises when first turned on.
- The appliance must not be placed immediately under a fixed power socket.
- This appliance is filled with a precise quantity of oil and repairs requiring it to be opened must be car-
ried out by the manufacturer or an authorised technical assistance centre only. In the event of oil leaks,
contact the manufacturer or an authorised technical assistance centre.
- Do not use this appliance in rooms measuring less than 4m
2
.
- When disposing of this appliance, respect legislation on disposal of oil.
- Do not rest the cable on the appliance when hot.
- Do not cover the appliance when in operation.
- The use of extensions is not recommended as they could overheat during operation of the appliance.
Take the appliance out of the packaging and remove any residues remaining inside the appliance.
A safety device shuts the radiator down in the case of accidental overheating.
To reset operation, contact the nearest authorised service centre.
WARNING: In order to avoid overheating, never under any circumstances cover the appliances during operation.
IMPORTANT INFORMATION FOR CORRECT DISPOSAL OF THE PRODUCT IN ACCORDANCE WITH EC
DIRECTIVE 2002/96/EC.
At the end of its working life, the product must not be disposed of as urban waste.
It must be taken to a special local authority differentiated waste collection centre or to a dealer
providing this service.
Disposing of a household appliance separately avoids possible negative consequences for the
environment and health deriving from inappropriate disposal and enables the constituent materials to be recovered to obtain significant savings in energy and resources. As a reminder of the
need to dispose of household appliances separately, the product is marked with a crossed-out
wheeled dustbin.
1
10
11
12
13
14
15
16
17
18
19
20
21
22
23
24
fig.5
2
4
2
3
4
5
6
7
8
9
10
23
2
2
21
20
1
9
18
17
1
6
1
1
15
14
2
1
3
1
Page 10

10
Le radiateur est un appareil de chauffage domestique extrêmement fonctionnel et polyvalent, avec trois
niveaux de puissance. De plus, il incorpore une fonction exclusive qui vous permettra d’obtenir le
meilleur confort en toute situation.
Afin d’exploiter au mieux les potentialités du produit, lisez attentivement cette notice.
1. GÉNÉRALITÉS
Déballez le panneau, renversez-le et posez-le sur ses protections en polystyrène.
Assurez-vous que l’appareil et le câble n’ont pas subi de dégâts pendant le transport. Évitez d’utiliser le radiateur s’il est abîmé.
2. MONTAGE DES PIEDS
Sortez les pieds et les roulettes de l’emballage en polystyrène.
Introduisez les roulettes dans l’axe du pied et poussez jusqu’à entendre le déclic (fig. 1). Tirez pour vous
assurer que les roulettes sont bien fixées.
Montez les pieds et leurs roulettes dans la partie inférieure du radiateur en introduisant les supports guides
entre la boîte de commande et le premier élément et la boîte arrière et le dernier élément ; encastrez les deux
ergots dans les sièges prévus et bloquez le pied en serrant à bloc la vis à œillet (fig. 1)
Ces opérations étant terminées, remettez le radiateur à la verticale, dans sa position de fonctionnement.
Attention: pour bloquer les pieds, utiliser exclusivement des vis à œil.
3. FIXATION MURALE
Le kit de montage mural doit contenir:
2 Supports supérieurs (A)
1 Support inférieur (B)
5Vis
5Tampons
1. Choisissez le point où installer le panneau, en vous assurant que :
a. il n’est pas situé juste au-dessous d’une prise de courant.
b. une fois l’installation terminée, la fiche et la prise seront d’accès facile.
c. ni les câbles ni les autres tuyaux ne pourront être abîmés.
d. les rideaux ou autres matières inflammables sont éloignés.
2. Avant de percer le mur, marquez les points exacts avec un gabarit en respectant scrupuleusement les
dimensions (D Fig. 3) qui varient selon le modèle (voir tableau 3A).
3. Alignez le centre des supports A sur une ligne (indiquée fig. 3/4 par une ligne pointillée) en vous assurant que les deux supports sont à la même hauteur; marquez les trous à percer.
4. Pour les murs en briques, utilisez un foret à béton de 6 mm, percez en suivant les marques et introduisez
les tampons fournis avec l’appareil.
(Pour le placoplâtre, nous suggérons de trouver les montants en bois et d’y enfoncer directement des vis
de 6 à bois ou d’utiliser des fixations spécifiques. Pour tout autre type de mur, demandez conseil à un
spécialiste.)
F
1Kw
140 mm
1,5 Kw
210 mm
2 Kw
280 mm
2,5 Kw
385 mm
Modèle
D
3A
Page 11

11
5. Fixez les supports muraux “A” dans les trous, en utilisant les vis fournies.
6. Accrochez le radiateur aux supports (fig. 3/4)
7. Trouvez la position de fixation du support inférieur (B) et introduisez celui-ci au centre de la base de l’ap-
pareil ; pour marquer la position exacte du trou, utilisez une des vis fournies (fig. 3)
Ce support empêche tout décrochage accidentel de l’appareil.
8. Retirez le radiateur des supports A et percez le trou comme pour le support A ; introduisez le tampon.
Raccrochez le radiateur sur les supports A, le support B étant inséré, et vissez-le (fig. 3).
Le radiateur est maintenant fixé au mur.
Évitez d’utiliser l’appareil dans la salle de bains.
RACCORDEMENT ÉLECTRIQUEi
- Avant de brancher l’appareil sur la prise de courant, vérifiez si la tension de secteur correspond à celle
indiquée en V sur l’appareil et si la ligne d’alimentation et la prise supportent l’intensité requise.
- BRANCHEZ LE RADIATEUR EXCLUSIVEMENT SUR DES PRISES MUNIES D’UNE MISE À LA TERRE EFFICACE.
- Cet appareil est conforme à la Directive CEE 89/336 et au D.M. 476/92 sur la compatibilité électromagnétique.
4. MODE D’EMPLOI
Mise en marche
Branchez l’appareil; tournez le thermostat à bloc jusqu’à la position max. et mettez le radiateur en marche
en agissant sur le/les interrupteur/s.
Modèles à double interrupteur (3 puissances)
- touche “l” enfoncée = puissance minimale (voyant allumé)
- touche “ll” enfoncée = puissance moyenne (voyant allumé)
- touches “l” et “ll” enfoncées = puissance maximale (voyants allumés)
Pour arrêter l’appareil, mettez les deux interrupteurs sur “0” et débranchez l’appareil.
Réglage du thermostat :
Une fois que la pièce aura atteint la température désirée, tournez lentement le bouton du thermostat jusqu’à
la position signalée par un clic et pas au-delà. La température ainsi fixée sera automatiquement réglée et
maintenue constante par le thermostat.
Fonction hors-gel
Avec le thermostat à la position et les interrupteurs appuyées, l’appareil maintient la pièce à une température
de 5°C environ et empêche la congélation en toute économie d’énergie.
Modèle avec minuterie 24 heures
Pour programmer le chauffage, procédez de la façon suivante:
- Regardez l’heure à votre montre. Supposons qu’il soit 10 heures. Tournez dans le sens des aiguilles d’une
montre le disque numéroté de l’horloge jusqu’à ce que le numéro 10 coïncide avec le repère
▲ imprimé
sur celle-ci (fig.5).
- Programmez les périodes de temps auxquelles vous souhaitez que l’appareil fonctionne, en poussant les
crans vers le centre.
- Chaque cran correspond à une période de 15 minutes. Les secteurs rouges qui apparaissent correspondent aux périodes de fonctionnement
- Ainsi programmé, le radiateur fonctionnera automatiquement tous les jours selon l’horaire établi.
(Important : l’appareil doit toujours rester branché).
- Pour modifier la programmation, il suffit de ramener les crans à leur position initiale et de programmer
de nouvelles périodes.
*
Page 12

12
Si vous désirez faire fonctionner l’appareil sans programmation, poussez tous les crans vers le centre.
Dans ce cas, pour arrêter complètement l’appareil, éteignez les interrupteurs et débranchez l’appareil
pour éviter de faire marcher l’horloge inutilement.
5. ENTRETIEN
Le radiateur n’exige aucun entretien particulier. Il suffit de le dépoussiérer avec un chiffon doux et sec, mais
laissez-le refroidir d’abord. Évitez les poudres abrasives et les solvants. Si besoin est, aspirez la saleté qui
s’est concentrée.
6. RECOMMANDATIONS
- Évitez d’utiliser le radiateur dans la salle de bains ou à proximité de baignoires, lavabos, douches et
piscines.
- Évitez d’utiliser le radiateur comme sèche-linge et ne posez pas le câble d’alimentation sur les éléments
chauds.
- Utilisez le radiateur exclusivement à la verticale.
- Laissez toujours au moins 50 cm entre l’appareil et les meubles ou autres objets.
- Par mesure de sécurité, si le câble d’alimentation est détérioré, faites-le remplacer exclusivement par le
constructeur, dans un centre de service après-vente agréé ou en tout cas par un électricien qualifié.
- Lors de la première mise en marche, il est tout à fait normal que l’appareil émette des craquements.
- L’appareil ne doit pas être placé juste au-dessous d’une prise de courant fixe.
- Cet appareil a été rempli de la juste quantité d’huile. Toute réparation exigeant de l’ouvrir devra être
effectuée exclusivement par le constructeur ou dans un centre de service après-vente agréé. Dans le cas
de fuites d’huile, contactez le constructeur ou le service assistance.
- N’utilisez pas cet appareil dans une pièce de moins de 4 m
2
.
- Si vous devez jeter l’appareil, respectez les lois sur l’écoulement de l’huile.
- Ne posez pas le câble sur l’appareil encore chaud.
- Ne couvrez pas l’appareil quand il est en marche.
Les rallonges sont déconseillées car elles pourraient surchauffer pendant la marche de l’appareil.
Déballez l’appareil et retirez les éventuels résidus d’emballage encastrés à l’intérieur.
Un dispositif de sécurité arrête le radiateur en cas de surzchauffe accidentelle.
Pour remettre l’appareil en marche, adressez-vous au centre de service agréé le plus proche.
IMPORTANT: afin d'éviter tout risque de surchauffe, ne jamais couvrir l'appareil pendant son
fonctionnement, car cela provoquerait une dangereuse augmentation de température.
AVERTISSEMENTS POUR L'ÉLIMINATION CORRECTE DU PRODUIT AUX TERMES DE LA DIRECTIVE
EUROPÉENNE 2002/96/EC.
Au terme de son utilisation, le produit ne doit pas être éliminé avec les déchets urbains.
Le produit doit être remis à l'un des centres de collecte sélective prévus par l'administration communale ou auprès des revendeurs assurant ce service.
Éliminer séparément un appareil électroménager permet d'éviter les retombées négatives pour
l'environnement et la santé dérivant d'une élimination incorrecte, et permet de récupérer les matériaux qui le composent dans le but d'une économie importante en termes d'énergie et de ressources.Pour rappeler l'obligation d'éliminer séparément les appareils électroménagers, le produit porte le symbole d'un caisson à ordures barré.
10
11
12
13
14
15
16
17
18
19
20
21
22
23
24
fig.5
1
2
4
2
3
4
5
6
7
8
9
10
23
2
2
21
20
1
9
18
17
1
6
1
1
15
14
2
1
3
1
Page 13

13
Der Radiator ist ein extrem vielseitiges Heizgerät für den Hausbedarf mit drei auswählbaren
Leistungsstufen. Für maximalen Komfort unter allen Nutzungsbedingungen wurde dieses Produkt
zudem mit einer exklusiven Funktion ausgestattet.
Für die optimale Nutzung der Möglichkeiten des Produkts sollten die unten angegebenen Anweisungen
aufmerksam gelesen werden.
1. ALLGEMEINE HINWEISE
Das Gerät aus der Verpackung nehmen, umkippen und auf die Schaumstoff-Schutzhauben aufsetzen.
Das Versorgungskabel und das Gerät auf eventuelle, durch den Transport hervorgerufene Schäden prüfen.
Bei Beschädigungen darf das Gerät nicht in Betrieb genommen werden.
2. MONTAGE DER FÜSSE
Die Füße und Räder aus der Schaumstoffverpackung nehmen.
Die Räder in den Stift des Fußes einsetzen und so lange eindrücken, bis ein Klicken zu hören ist (Abb. 1).
Ziehen und prüfen, ob die Räder gut fest sitzen.
Die Füße mit Rädern zwischen das Steuergehäuse und das erste Element und das rückseitige Gehäuse und
das letzte Element einsetzen und so an der Unterseite des Radiators befestigen; die beiden Zähne in die entsprechenden Sitze einrasten lassen und den Fuß mit Hilfe der Ösenschraube fest sperren (Abb. 1).
Das Gerät umkippen und in die vertikale Betriebsposition setzen.
Achtung: Zum Blockieren der Füße sind nur die Ösenschrauben notwendig.
3. WANDMONTAGE
Der Satz für die Wandmontage enthält folgende Teile:
2 x obere Bügel (A)
1 x unterer Bügel (B)
5 x Schrauben
5 x Dübel
1. Den Installationsort der Platte wählen und dabei Folgendes sicherstellen:
a. Die Platte darf sich nicht direkt unter einer Steckdose befinden.
b. Stecker und Steckdose müssen nach der Montage problemlos zugänglich sein.
c. Weder Stromkabel noch andere Leitungen dürfen Beschädigungen ausgesetzt sein.
d. In der Nähe der Platte dürfen sich keine Vorhänge oder andere brennbare Materialien befinden.
2. Bevor die Bohrungen an den Wänden vorgenommen werden, sind die genauen Stellen mit einer
Schablone zu markieren, wobei die Maße (D – Abb. 3), die sich je nach Modell unterscheiden, laut
Angaben in der Tabelle 3A sorgfältig zu beachten sind.
3. Das Zentrum der Bügel A an einer Linie (in Abb. 3/4 mit einer gestrichelten Linie angegeben) ausrichten
und dabei sicherstellen, dass die beiden Bügel sich auf gleicher Höhe befinden; anschließend die
Bohrstellen markieren.
4. Bei Ziegelsteinwänden eine Bohrspitze für Beton zu 6 mm wählen, an den Markierungen bohren und
dann die mitgelieferten Dübel einsetzen.
(Bei Gipskarton oder Wandverkleidungen empfehlen wir, die Holzträger zu identifizieren und 6er
Holzschrauben direkt im Holz zu verwenden oder spezifische Befestigungsmethoden einzusetzen. Für alle
anderen Wandarten wenden Sie sich bitte an einen Experten).
5. Die Wandbügel „A“ in den Bohrungen mit den mitgelieferten Schrauben befestigen.
D
1Kw
140 mm
1,5 Kw
210 mm
2 Kw
280 mm
2,5 Kw
385 mm
3A
Modell
D
Page 14

6. Den Radiator an die Bügel hängen (Abb. 3/4).
7. Die Befestigungsposition des unteren Bügels (B) identifizieren und den Bügel in der Mitte des Untergestells
des Gerätes einführen; eine der mitgelieferten Schrauben verwenden, um die exakte Position der Öffnung
zu markieren (Abb. 3). Dieser Bügel verhindert eine zufällige Entfernung des Geräts.
8. Den Radiator von den Bügeln A entfernen und gemäß den Angaben für die Bohrungen des Bügels A bohren; dann den Dübel einführen. Den Radiator mit eingesetztem Bügel B erneut an den Bügeln A aufhängen und dann mit der Schraube befestigen (Abb. 3).
Der Radiator ist jetzt fest an der Wand befestigt. Das Gerät nicht im Badezimmer verwenden.
3. STROMANSCHLUSS
- Bevor Sie den Stecker in die Steckdose einführen, muss aufmerksam geprüft werden, ob die Spannung
Ihres Stromnetzes dem auf dem Gerät in V angegebenen Wert entspricht und ob die Steckdose und die
Stromleitung der erforderlichen Belastung standhalten.
- DER RADIATOR DARF NUR AN EINE STECKDOSE ANGESCHLOSSEN WERDEN, DIE MIT EINER
FUNKTIONSTÜCHTIGEN ERDUNG AUSGESTATTET IST.
- Dieses Gerät entspricht der Richtlinie 89/336/EWG und dem Ministerialdekret D.M. 476/92 zur elektromagnetischen Kompatibilität.
4. BETRIEB UND ANWENDUNG
Einschalten
Den Stecker in die Steckdose einführen; den Thermostat bis zum Anschlag auf die Höchstposition stellen; den
Radiator mit dem/den Schalter/n einschalten.
Modelle mit Doppelschalter (3 Leistungsstufen)
-Taste „I“ gedrückt: geringste Leistung (Kontrollleuchte eingeschaltet)
-Taste „II“ gedrückt: mittlere Leistung (Kontrollleuchte eingeschaltet)
- Beide Tasten „I“ und „II“ gedrückt: Höchstleistung (Kontrollleuchten eingeschaltet).
Zum Ausschalten des Geräts zuerst beide Schalter auf „0“ stellen und dann den Stecker aus der Steckdose
ziehen.
Einstellung des Thermostats
Wenn die Raumtemperatur den gewünschten Wert erreicht hat, den Thermostat langsam nur so weit zurückdrehen, bis ein „Klicken“ ertönt. Die so eingestellte Temperatur wird automatisch geregelt und vom Thermostat
konstant beibehalten.
Frostschutzfunktion
Wenn der Thermostat auf der Position eingestellt und die Schalter gedrückt sind, hält das Gerät die
Raumtemperatur konstant, bei ca. 5°C und verhindert mit einem minimalen Energieaufwand die Frostgefahr.
Modelle mit Programmierfunktion (Zeituhr) 24 Stunden
Für die Programmierung der Heizung sind folgende Schritte auszuführen:
- Die Uhrzeit kontrollieren. Wenn es beispielsweise 10.00 Uhr ist, die nummerierte Scheibe der Zeituhr im
Uhrzeigersinn drehen, bis deren Nummer 10 mit dem Bezugsindex ▲ auf der Zeituhr übereinstimmt
(Abb.5).
- Für die Einstellung der gewünschten Betriebszeit sind die Stifte zur Mitte der Scheibe zu drücken.
Jeder Stift entspricht einem Zeitraum von 15 Minuten. Nun sind Bereiche zu sehen, die den Betriebszeiten
entsprechen.
- Mit dieser Einstellung setzt sich der Radiator jeden Tag zur einprogrammierten Uhrzeit in Betrieb
(Wichtig: Der Stecker muss immer in der Steckdose sein).
- Zur Änderung der Programmierung sind lediglich die Stifte auf ihre Anfangsposition zu drücken und neue
Betriebszeiten einzustellen.
- Wenn das Gerät ohne Programmierung funktionieren soll, sind alle Stifte zur Mitte hin zu drücken.
Um das Gerät abzuschalten, müssen in diesem Fall der Schalter abgeschaltet und der Stecker aus der
Steckdose gezogen werden, um den nutzlosen Betrieb der Zeituhr zu vermeiden.
14
Page 15

15
5. WARTUNG
Der Ölradiator erfordert keine speziellen Wartungsarbeiten. Er ist lediglich mit einem weichen, trockenen
Tuch abzustauben. Nur reinigen, wenn das Gerät kalt ist. Kein Scheuerpulver oder Lösungsmittel verwenden.
Gegebenenfalls eventuellen Schmutz mit dem Staubsauger entfernen.
6. HINWEISE
- Den Radiator nicht im Badezimmer oder in unmittelbarer Nähe von Badewannen, Duschen, Spül- oder
Schwimmbecken verwenden.
- Den Radiator nicht als Wäschetrockner verwenden; das Anschlusskabel nicht auf die heißen Elemente
auflegen.
- Der Radiator darf ausschließlich in senkrechter Position eingesetzt werden.
- Das Gerät muss mit einem Abstand von mindestens 50 cm von Möbeln oder anderen Gegenständen
aufgestellt werden.
- Wenn das Versorgungskabel beschädigt ist, muss es, um jegliche Gefahren auszuschließen, vom
Hersteller oder seinem Kundendienst bzw. einem Fachmann ausgewechselt werden.
- Eventuelle Geräusche bei der ersten Inbetriebnahme des Geräts sind durchaus normal.
- Das Gerät darf nicht unmittelbar unter einer fest eingebauten Steckdose aufgestellt werden.
- Das Gerät ist mit einer exakten Ölmenge gefüllt und Reparaturen, bei denen das Gerät geöffnet werden
muss, dürfen nur vom Hersteller oder seinem Kundendienst vorgenommen werden. Bei Ölverlust sind der
Hersteller oder sein Kundendienst zu benachrichtigen.
- Dieses Gerät nicht in Räumen mit einer Basisfläche unter 4 m
2
verwenden.
- Bei Verschrottung des Geräts sind die Vorschriften für die Entsorgung von Altöl zu befolgen.
- Das Kabel nicht auf das heiße Gerät auflegen.
- Das Gerät während des Betriebs nicht abdecken.
-Der Einsatz von Verlängerungskabeln ist nicht empfehlenswert, denn diese könnten sich während des
Betriebs des Geräts überhitzen.
Eine Sicherheitsvorrichtung unterbricht den Betrieb des Radiators bei Überhitzung.
Das Gerät aus der Verpackung nehmen und die eventuellen, im Gerät eingeklemmten Rückstände entfernen.
Für die erneute Inbetriebnahme des Geräts, wenden Sie sich an eine Kundendienststelle in Ihrer Nähe.
WICHTIG: Zum Vermeiden von Überhitzungen, das Gerät während des Betriebs niemals
abdecken, da dies zu einer gefährlichen Temperaturerhöhung führen könnte.
WICHTIGER HINWEIS FÜR DIE KORREKTE ENTSORGUNG DES PRODUKTS IN ÜBEREINSTIMMUNG MIT DER
EG-RICHTLINIE 2002/96/EG.
Am Ende seiner Nutzzeit darf das Produkt NICHT zusammen mit dem Siedlungsabfall beseitigt
werden. Es kann zu den eigens von den städtischen Behörden eingerichteten Sammelstellen oder
zu den Fachhändlern, die einen Rücknahmeservice anbieten, gebracht werden.Die getrennte
Entsorgung eines Haushaltsgerätes vermeidet mögliche negative Auswirkungen auf die Umwelt
und die menschliche Gesundheit, die durch eine nicht vorschriftsmäßige Entsorgung bedingt sind.
Zudem ermöglicht wird die Wiederverwertung der Materialien, aus denen sich das Gerät zusammensetzt, was wiederum eine bedeutende Einsparung an Energie und Ressourcen mit sich bringt.
Zur Erinnerung an die Verpflichtung, die Elektrohaushaltsgeräte getrennt zu beseitigen, ist das
Produkt mit einer Mülltonne, die durchgestrichen ist, gekennzeichnet.
Page 16

16
De radiator is een bijzonder veelzijdig apparaat voor het verwarmen van de huiselijke sfeer, met drie
selecteerbare vermogensniveaus. Het apparaat is bovendien uitgerust met een ingebouwde functie, die
in elke omstandigheid een optimaal comfort garandeert.
Om de mogelijkheden van dit apparaat zo goed mogelijk te benutten, is het raadzaam onderstaande
aanwijzingen grondig te lezen.
1. ALGEMEEN
Haal het apparaat uit de verpakking en draai het om op de beschermingen van piepschuim rust.
Controleer of het voedingssnoer en het apparaat niet beschadigd werden tijdens het transport. Laat het apparaat niet werken indien het beschadigd is.
2. MONTAGE VAN DE VOETJES
Haal de voetjes en wielen uit de verpakking van piepschuim.
Steek de wielen op de pin van elk voetje en druk goed aan tot ze vastklikken (fig. 1).
Trek even aan de wielen om er zich van te vergewissen dat ze goed vastzitten.
Monteer de voetjes met wiel aan de onderkant van de radiator, door de ribprofielen tussen de bedieningskast en het eerste element, en tussen de achterste kast en het laatste element te schuiven; breng de 2 vertandingen in hun zitting en blokkeer de voet door de knevelschroef helemaal aan te zetten (fig. 1).
Deze handeling wordt afgerond door de radiator weer om te draaien en in de verticale werkingspositie te zetten.
Attentie: alleen de oogschroeven dienen voor het blokkeren van de pootjes.
3. MONTAGE AAN DE MUUR
De kit voor de montage aan de muur bevat:
2 x Bovenste beugels (A)
1 x Onderste beugel (B)
5 x Schroeven
5 x Pluggen
1. Kies de plaats waar u de radiator wilt plaatsen. Waak erover dat:
a. De radiator niet rechtstreeks onder een stopcontact wordt geplaatst.
b. Zowel de stekker als het stopcontact na de installatie makkelijk bereikbaar zijn.
c. Elektrische kabels of andere buizen niet beschadigd kunnen raken.
d. Gordijnen of ander brandbaar materiaal zich ver van de radiator bevinden.
2. Alvorens in de muur te boren, worden de precieze punten aangeduid met een sjabloon, waarbij de afmetingen (D) van fig. 3 worden gerespecteerd. De afmeting D variëren naargelang het model, zoals aangegeven in tabel 3A.
3. Richt het midden van de beugel A uit met een lijn (aangegeven in fig. 3/4 met een stippellijn) en controleer of beide beugels zich op dezelfde hoogte bevinden. Duid nu de boorgaten aan.
4. Voor bakstenen muren, wordt een boorpunt voor beton van 6 mm gebruikt. Boor in de vooraf aangeduide punten en steek de bijgeleverde pluggen in de geboorde gaten.
(Voor gipsplaten of bekledingen, is het raadzaam de opstaande elementen in hout te identificeren en
houtschroeven van 6 rechtstreeks in het hout te schroeven of als alternatief specifieke bevestigingen te
gebruiken. Voor elk ander soort van wand, wordt de hulp van een specialist ingeroepen.)
5. Monteer de muurbeugels “A” in de gaten, met behulp van de bijgeleverde schroeven.
NL
1Kw
140 mm
1,5 Kw
210 mm
2 Kw
280 mm
2,5 Kw
385 mm
Model
D
fig.3A
Page 17

17
6. Hang de radiator aan de beugels (fig. 3/4).
7. Identificeer de positie voor de bevestiging van de onderste beugel (B), door dit in het midden van de basis
van het apparaat te voeren. Gebruik een van de bijgeleverde schroeven om de precieze positie van het
gat aan te duiden (fig. 3).
Deze beugel voorkomt dat de radiator per ongeluk wordt verwijderd.
8. Haal de radiator van de beugels A en boor het gat op dezelfde manier als eerder beschreven. Breng vervolgens de plug aan.
Hang de radiator opnieuw aan de beugel A met de beugel B aangebracht en zet vast met behulp van
de schroef (fig. 3).
De radiator is nu bevestigd aan de muur.
Gebruik het apparaat niet in een badkamer.
3. ELEKTRISCHE AANSLUITING
- Alvorens de stekker in het stopcontact te steken, controleer aandachtig of de netspanning in huis overeenkomt met de spanningswaarde aangegeven op het apparaat en of het stopcontact en de voedingslijn geschikt zijn voor het vermogen van het apparaat.
- SLUIT DE RADIATOR UITSLUITEND AAN OP STOPCONTACTEN VOORZIEN VAN EEN DOELTREFFENDE AARDLEIDING.
- Dit apparaat is conform de EG-richtlijn 89/336 en de ministerieel besluit 476/92 houdende de elektromagnetische compatibiliteit.
4. WERKING EN GEBRUIK
Inschakelen
Steek de stekker in het stopcontact; zet de thermostaat in de maximale stand; schakel de radiator in met
behulp van de schakelaar(s).
Modellen met dubbele schakelaar (3 niveaus)
- druk op toets “I” = minimaal vermogen (controlelampje aan)
- druk op toets “II” = tussenvermogen (controlelampje aan)
- druk op beide toetsen “I” “II” = maximaal vermogen (controlelampjes aan)
Om het apparaat uit te schakelen, beide schakelaars in de stand “0” zetten en de stekker uit het stopcontact trekken.
Regeling van de thermostaat
Bij het bereiken van de gewenste omgevingstemperatuur, wordt de thermostaat verplaatst tot een “klik” hoorbaar is, en niet verder. De op die manier ingestelde temperatuur wordt automatisch in stand gehouden door
de thermostaat.
Antivriesfunctie
Met de thermostaat in de stand en de schakelaars ingedrukt, handhaaft het apparaat de temperatuur
in het vertrek op ongeveer 5°C, en voorkomt zodoende vorst, met een minimaal energieverbruik.
Modellen met 24-urentimer
Om de verwarming te programmeren, als volgt te werk gaan:
- Kijk op uw horloge hoe laat het is. Stel dat het 10 uur is: draai de genummerde schijf van de timer in
wijzerzin tot het cijfer 10 overeenkomt met de referentie ▲ aangegeven op de timer zelf (fig.5).
- Stel de tijdsspanne in waarin u het apparaat wilt laten werken, door de vertandingen naar binnen te
duwen.
Elke vertanding komt overeen met een periode van 15 min. Voor elke werkingsperiode is dus een zone
zichtbaar,
- De op die manier geprogrammeerde radiator zal elke dag inschakelen op het ingestelde uur (Belangrijk:
de stekker moet altijd in het stopcontact zitten).
- Om de programmering aan te passen, worden de vertandingen in hun oorspronkelijke positie gebracht
en worden de nieuwe werkingsperiodes ingesteld.
- Indien het apparaat wilt laten werken zonder programmering, worden alle vertandingen naar het midden toe geduwd.
Page 18

18
In dit geval wordt het apparaat volledig uitgeschakeld door de schakelaars uit te zetten en de stekker uit
het stopcontact te halen, om te voorkomen dat de timer onnodig blijft aanstaan.
5. ONDERHOUD
De elektrische radiator met olie behoeft geen bijzonder onderhoud. Het volstaat af te stoffen met een zachte en droge doek; schoonmaken wanneer het apparaat koud staat. Maak nooit gebruik van schurende producten of oplosmiddelen. Indien nodig, eventuele vuilafzettingen verwijderen met de stofzuiger.
6. VEILIGHEIDSVOORSCHRIFTEN
- Gebruik de radiator niet in een badkamer of in de onmiddellijke nabijheid van een badkuip, douche,
wastafel of zwembad.
- Gebruik de radiator niet om wasgoed te drogen en leg het voedingssnoer niet op de warme elementen.
- Gebruik de radiator altijd en uitsluitend in de verticale positie.
- Het apparaat wordt op een afstand van minstens 50 cm van meubelen of andere voorwerpen geplaatst.
- Indien het voedingssnoer beschadigd is, wordt dit vervangen door de fabrikant, zijn technische dienst of
in ieder geval door een vakbekwaam persoon, om elk risico te vermijden.
- Het is volkomen normaal dat het apparaat wat “knarsende” geluidjes voortbrengt bij de eerste ingebruikname.
- Het apparaat wordt niet rechtstreeks onder een vast stopcontact geplaatst.
- Het apparaat is gevuld met een precieze hoeveelheid olie en reparaties die de opening ervan vereisen,
worden uitsluitend uitgevoerd door de Fabrikant of zijn Servicecentrum. Ingeval van een olielek, wordt
contact opgenomen met de Fabrikant of zijn Servicecentrum.
- Gebruik dit apparaat niet in een ruimte kleiner dan 4 m
2
.
- Wanneer het apparaat wordt afgedankt, dienen de normen voor het afdanken van de olie te worden
gerespecteerd.
- Leg het voedingssnoer niet op het nog warme apparaat.
- Dek het apparaat niet af wanneer het in werking is.
- Het gebruik van verlengsnoeren wordt afgeraden, omdat deze kunnen oververhitten tijdens de werking van het
apparaat.
Haal het apparaat uit de doos waarin het is verpakt en verwijder eventuele residu’s die binnen in het apparaat
zijn blijven steken.
Een beveiliging onderbreekt de werking van de radiator ingeval van een toevallige oververhitting.
Om de werking te hervatten, wordt contact opgenomen met het dichtstbijzijnd Servicecentrum.
BELANGRIJK: Om oververhitting te voorkomen, mogen de apparaten tijdens hun werking onder geen
beding afgedekt worden, aangezien dit gevaarlijke oververhitting kan veroorzaken.
BELANGRIJKE INFORMATIE VOOR DE CORRECTE VERWERKING VAN HET PRODUCT IN OVEREENSTEMMING MET DE EUROPESE RICHTLIJN 2002/96/EC
Aan het einde van zijn nuttig leven mag het product niet samen met het gewone huishoudelijke
afval worden verwerkt.Het moet naar een speciaal centrum voor gescheiden afvalinzameling van
de gemeente worden gebracht, of naar een verkooppunt dat deze service verschaft. Het apart
verwerken van een huishoudelijk apparaat voorkomt mogelijke negatieve gevolgen voor het
milieu en de gezondheid die door een ongeschikte verwerking ontstaan en zorgt ervoor dat de
materialen waaruit het apparaat bestaat teruggewonnen kunnen worden om een aanmerkelijke
besparing van energie en grondstoffen te verkrijgen. Om op de verplichting tot gescheiden
verwerking van elektrische huishoudelijke apparatuur te wijzen, is op het product het symbool van
een doorgekruiste vuilnisbak aangebracht.
10
11
12
13
14
15
16
17
18
19
20
21
22
23
24
1
2
4
2
3
4
5
6
7
8
9
10
23
2
2
21
20
1
9
18
17
1
6
1
1
15
14
2
1
3
1
Page 19

19
El radiador es un aparato de calefacción doméstica extremadamente versátil con tres niveles de potencia seleccionables. Además, este producto incorpora una función exclusiva que le permitirá obtener el
mejor confort en cualquier situación.
Para aprovechar completamente las potencialidades del producto, le aconsejamos leer detenidamente
las instrucciones facilitadas a continuación.
1. GENERALIDADES
Extraiga el aparato de la caja del embalaje y apóyelo sobre los elementos de poliestireno de protección para
volcarlo.
Controle la integridad del cable de alimentación y que el aparato no haya sufrido daños durante el transporte. No haga funcionar el aparato si está estropeado.
2. MONTAJE DE LAS PATAS
Extraiga las patas y las ruedecillas del embalaje de poliestireno.
Introduzca las ruedecillas en los pernos de las patas y presione a tope hasta encajarlas (fig. 1). Asegúrese
tirando de las ruedas que estén correctamente fijadas.
Monte las patas con las ruedecillas en la parte inferior del radiador introduciéndolas entre la caja de mandos y el primer elemento y la caja trasera y el último elemento; deberá fijar los 2 dientes en las sedes previstas y bloquear la pata con la armella de rosca enroscándola a tope (fig. 1).
Tras haber realizado estas operaciones, levante el radiador para ponerlo de nuevo en la posición vertical
de funcionamiento.
Atención: solamente los tornillos taladrados sirven para bloquear las patas.
3. MONTAJE MURAL
El kit para el montaje mural debe incluir:
2 x estribos superiores (A)
1 x estribo inferior (B)
5 x tornillos
5 x tacos
1. Elija el punto de instalación para el panel asegurándose que:
a. No esté situado directamente bajo un enchufe de corriente.
b. Se pueda acceder fácilmente tanto a la clavija como al enchufe después de la instalación.
c. Ni los cables eléctricos ni otros tubos estén estropeados.
d. Cortinas u otros materiales inflamables estén alejados del panel.
2. Antes de taladrar la pared, marque los puntos exactos con un patrón siguiendo rigurosamente las dimensiones (D Fig. 3) que varían en función del modelo, como aparece indicado en la tabla 3A.
3. Deberá alinear el centro de los estribos A con una línea (indicada en la fig.3/4 con una línea discontinua), asegurándose que los dos estribos estén a la misma altura; a continuación marque los agujeros.
4. Para paredes de ladrillo, utilice una broca de cemento de 6 mm y taladre en base a las marcas realizadas y a continuación introduzca en los agujeros los tacos incluidos en el equipamiento.
E
1Kw
140 mm
1,5 Kw
210 mm
2 Kw
280 mm
2,5 Kw
385 mm
Modelo
D
3A
Page 20

20
(Para cartón de yeso o contraenchapados, le sugerimos localizar los montantes de madera y usar tornillos para madera de 6 directamente en la madera o usar medios de fijación específicos. Para cualquier
otro tipo de pared consulte a un especialista).
5. Monte los estribos para pared “A” en los agujeros con los tornillos incluidos en el equipamiento.
6. Cuelgue el radiador en los estribos (fig.3/4).
7. Localice la posición para fijar el estribo inferior “B” poniéndolo en el centro del aparato; utilice uno de
los tornillos incluidos en el equipamiento para marcar la posición exacta del agujero (fig. 3).
Este estribo impide la remoción accidental del aparato.
8. Descuelgue el radiador de los estribos “A”y taladre el agujero, como indicado previamente para los
agujeros del estribo “A”; a continuación introduzca el taco. Cuelgue de nuevo el radiador en los estribos A con el estribo B colocado y fíjelo con el tornillo (fig. 3). El radiador permanecerá fijado en la
pared. No utilice el aparato en cuartos de baños.
3. CONEXIÓN ELÉCTRICA
Antes de enchufar el aparato a la corriente, compruebe meticulosamente que el voltaje de su red doméstica
corresponda al valor en V indicado en el aparato y que el enchufe de corriente y la línea de alimentación
puedan soportar la carga requerida.
ENCHUFE EL RADIADOR SOLAMENTE A ENCHUFES CON UNA PUESTA A TIERRA EFICIENTE.
Este aparato es conforme a la directiva 89/336/CEE y al D.M. 476/92 sobre la compatibilidad electromagnética.
4. FUNCIONAMIENTO Y USO
Encendido
Enchufe el aparato a la corriente, sitúe el termostato en el tope en la posición de máximo y encienda el radiador con el/los botón/es.
Modelos con botón doble (3 potencias)
- Botón “I” presionado = potencia mínima (indicador luminoso encendido).
- Botón “II” presionado = potencia intermedia (indicador luminoso encendido).
- Ambos botones “I” “II” presionados = potencia máxima (indicadores luminosos encendidos).
Sitúe ambos botones en la pos. “0” para apagar el aparato y a continuación debe desenchufarlo de la corriente.
Regulación del termostato
Cuando el ambiente haya alcanzado la temperatura elegida, mueva lentamente el termostato sin superar la
posición indicada por un “click”. El termostato mantendrá automáticamente regulada y constante la temperatura elegida.
Función antihielo
Con el termostato en posición y los interruptores pulsados, el aparato mantiene la estancia a una temperatura
de 5°C e impide la formación de hielo, con un gasto mínimo de energia.
Modelos con programador (TIMER) de 24 horas
Para programar la calefacción, efectúe las siguientes operaciones:
- Mire la hora en su reloj. Supongamos que son las 10, gire el disco numerado del programador en el
sentido de las agujas del reloj hasta que el índice de referencia ▲, imprimido en el programador, coincida con el número 10 (fig.5).
-Programe los periodos de tiempo en los que quiere que el aparato funcione, empujando los dientes hacia
el centro.
- Cada diente corresponde a un periodo de tiempo equivalente a 15 min. Podrá ver entonces sectores que
corresponden a los periodos de funcionamiento.
Page 21
21
- El radiador, programado de esta forma, funcionará automáticamente diariamente durante el horario
programado (Importante: el radiador debe permanecer siempre enchufado a la corriente).
- Para modificar la programación, debe situar de nuevo los dientes en la posición inicial y programar los
nuevos periodos de funcionamiento.
- Para que el aparato funcione sin programación, mueva todos los dientes hacia el centro.
- En este caso, para el apagado completo del aparato, deberá apagar los botones y desenchufar también
el aparato de la corriente para evitar un funcionamiento inútil del programador.
5. MANTENIMIENTO
El radiador eléctrico de aceite no requiere operaciones de mantenimiento particulares. Es suficiente quitarle
el polvo con un paño suave y seco; para limpiarlo espere siempre que esté frío. No use nunca polvos abrasivos o disolventes. Si es necesario, elimine las eventuales concentraciones de suciedad con un aspirador.
6. ADVERTENCIAS
-No use el aparato en cuartos de baño o en las inmediaciones de bañeras, duchas, pilas o piscinas.
- No use el radiador para secar la lencería. No apoye el cable de conexión sobre los elementos calientes.
-Use el radiador siempre y exclusivamente en posición vertical.
- Deje una distancia mínima de 50 cm entre el aparato y muebles u otros objetos.
- Si el cable de alimentación se estropea, únicamente el fabricante, un centro de asistencia autorizado o
en todo caso una persona cualificada podrá sustituirlo para evitar cualquier riesgo.
- Es totalmente normal que el aparato produzca “crujidos” durante el primer encendido.
-No sitúe el aparato directamente bajo un enchufe de corriente fijo.
- Este aparato contiene la cantidad exacta de aceite y solamente el fabricante o su servicio de asistencia
podrá efectuar las reparaciones que requieran abrir el aparato. Si detecta pérdidas de aceite, póngase
en contacto con el fabricante o con su servicio de asistencia.
-No use este aparato en habitaciones con áreas de base inferiores a 4 m
2
.
- Para el desguace del aparato, respete las disposiciones relativas a la eliminación del aceite.
- No apoye el cable sobre el aparato, aún caliente.
- No cubra el aparato mientras que permanece encendido.
- Le desaconsejamos usar alargadores ya que podrían recalentarse durante el funcionamiento del aparato.
Saque el aparato de su caja de embalaje y quite los eventuales restos atrapados dentro del aparato.
- Un dispositivo de seguridad se encarga de interrumpir el funcionamiento del radiador en caso de reca-
lentamiento accidental.
Para restablecer el funcionamiento, póngase en contacto con el centro de asistencia más cercano.
IMPORTANTE: No cubra nunca el aparato durante el funcionamiento para evitar recalentamientos, ya que ello podría provocar un peligroso aumento de la temperatura.
ADVERTENCIAS PARA LA ELIMINACIÓN CORRECTA DEL PRODUCTO SEGÚN ESTABLECE LA DIRECTIVA
EUROPEA 2002/96/CE.
Al final de su vida útil, el producto no debe eliminarse junto a los desechos urbanos.
Puede entregarse a centros específicos de recogida diferenciada dispuestos por las administraciones municipales, o a distribuidores que facilitan este servicio. Eliminar por separado un electrodoméstico significa evitar posibles consecuencias negativas para el medio ambiente y la salud
derivadas de una eliminación inadecuada y permite reciclar los materiales que lo componen,
obteniendo así un ahorro importante de energía y recursos. Para subrayar la obligación de eliminar por separado los electrodomésticos, en el producto aparece un contenedor de basura móvil
tachado.
10
11
12
13
14
15
16
17
18
19
20
21
22
23
24
fig.5
1
2
4
2
3
4
5
6
7
8
9
10
23
2
2
21
20
1
9
18
17
1
6
1
1
15
14
2
1
3
1
Page 22

22
O radiador é um aparelho extremamente versátil, destinado ao aquecimento doméstico e dotado de
três níveis de potência seleccionáveis. Este aparelho possui, além disso, uma função exclusiva que lhe
permitirá obter o máximo conforto em qualquer situação.
Para desfrutar ao máximo das potencialidades do aparelho, recomendamos que leia atentamente as
instruções seguintes.
1. NOÇÕES GERAIS
Retire o aparelho da caixa da embalagem e vire-o ao contrário, pousando-o sobre os elementos de protecção de esferovite.
Certifique-se da integridade do cabo de alimentação e de que o aparelho não sofreu danos durante o transporte. Não utilize o aparelho se este estiver danificado.
2. MONTAGEM DOS PÉS
Retire os pés e as rodas da embalagem de esferovite.
Insira as rodas no perno do pé e prima bem até ouvir um estalido (fig. 1). Puxe as rodas e certifique-se de
que elas estão bem fixas. Monte os pés com rodas na parte inferior do radiador, inserindo-os entre a caixa
de comandos e o primeiro elemento e a caixa posterior e o último elemento; encaixe os 2 dentes nas respectivas sedes e bloqueie o pé com o parafuso furado, apertando-o bem (fig. 1).
Uma vez terminadas estas operações, vire o radiador ao contrário e coloque-o novamente na posição vertical de funcionamento.
Atenção: os parafusos furados são os únicos que servem para bloquear os pés.
3. MONTAGEM NA PAREDE
O kit de montagem na parede deve incluir:
2 suportes superiores (A)
1 suporte inferior (B)
5 parafusos
5 buchas
1. Escolha o local de instalação do painel certificando-se de que:
a. ele não está situado directamente por baixo de uma tomada de alimentação.
b. se pode aceder facilmente quer à ficha, quer à tomada após a instalação.
c. nem os cabos eléctricos nem outros tubos correm o risco de ser danificados.
d. cortinas ou outros materiais inflamáveis estão devidamente afastados do painel.
2. Antes de furar a parede, assinale os pontos exactos com um molde seguindo atentamente as dimensões
(D Fig. 3), as quais variam consoante o modelo, conforme indicado na tabela 3A.
3. Alinhe o centro dos suportes A mediante uma linha (indicada na fig. 3/4 com uma linha tracejada) e
certifique-se de que os dois suportes ficam à mesma altura; de seguida, marque os furos a efectuar.
4. Para paredes de tijolo, utilize uma ponta de cimento de 6 mm e faça os furos com base nas marcas efectuadas.
De seguida, insira as buchas fornecidas.
PT
1Kw
140 mm
1,5 Kw
210 mm
2 Kw
280 mm
2,5 Kw
385 mm
Modelo
D
3A
Page 23

(Em caso de paredes de estuque, sugerimos que identifique os montantes e que utilize parafusos de
madeira N.º 6 directamente na madeira ou, então, que utilize fixações específicas. Para qualquer outro
tipo de parede, aconselhe-se junto de um especialista.)
5. Monte os suportes de parede “A” nos furos utilizando os parafusos fornecidos.
6. Pendure o radiador nos suportes (fig. 3/4).
7. Identifique a posição de fixação do suporte inferior (B) inserindo-o no centro da base do aparelho; utilize um dos parafusos fornecidos para marcar a posição exacta do furo (fig. 3).
Este suporte impede a remoção acidental do aparelho.
8. Retire o radiador dos suportes A e faça o furo tal como indicado anteriormente para os furos do suporte
A; de seguida, introduza a bucha. Pendure novamente o radiador nos suportes A com o suporte B inserido e, de seguida, fixe-o com o parafuso (fig. 3).
O radiador está, agora, fixo à parede.
Não utilize o aparelho em casas de banho.
3. LIGAÇÃO ELÉCTRICA
- Antes de inserir a ficha na tomada de alimentação, certifique-se de que a tensão da sua rede doméstica corresponde ao valor indicado em V no aparelho e de que a tomada e a linha de alimentação são
adequadas à carga requerida.
- LIGUE O RADIADOR APENAS A TOMADAS DOTADAS DE LIGAÇÃO DE TERRA.
- Este aparelho está em conformidade com a Directiva 89/336/CEE e o D.M. 476/92 relativo à compatibilidade electromagnética.
4. FUNCIONAMENTO E UTILIZAÇÃO
Ligar o aparelho
Introduza a ficha na tomada de alimentação; desloque o termóstato até à paragem na posição de máximo;
ligue o radiador através do(s) interruptor(es).
Modelos com interruptor duplo (3 potências)
- tecla “l” premida = potência mínima (luz acesa)
- tecla “ll” premida = potência intermédia (luz acesa)
-ambas as teclas “l” “ll” premidas = potência máxima (luzes acesas)
Para desligar o aparelho, coloque ambos os interruptores na pos. “0”; de seguida, retire a ficha da tomada de alimentação.
Regulação do termóstato
Quando a divisão atingir a temperatura desejada, rode lentamente o termóstato até à posição assinalada
por um “clique”, sem a ultrapassar. A temperatura ficará, assim, automaticamente regulada, sendo mantida constante pelo termóstato.
Função anti-gelo
Com o termóstato em posição e os interruptores carregados, o aparelho mantém o ambiente numa temperatura de 5°C, aproximadamente, impedindo a congelação com um consumo de energia mínimo.
Modelos com programador (temporizador) de 24 horas
Para programar o aquecimento, proceda da seguinte forma:
- Consulte as horas no seu relógio. Suponhamos que são 10:00. Rode o disco numerado do programador
no sentido dos ponteiros do relógio até fazer coincidir o número 10 do disco com o ponteiro de referência ▲ impresso no programador (fig.5).
- Defina os períodos de tempo a que deseja que o aparelho funcione, pressionando os dentes para o centro.
Cada dente corresponde a um período de tempo de 15 min. Verá, então, sectores que correspondem
aos períodos de funcionamento.
-O radiador funcionará, assim, automaticamente todos os dias de acordo com o horário programado
23
Page 24

24
(Importante: a ficha deve estar sempre inserida na tomada de alimentação).
- Para alterar a programação, basta colocar novamente os dentes na posição inicial e definir os novos
períodos de funcionamento.
- Se desejar fazer funcionar o aparelho sem qualquer programação, empurre todos os dentes para o centro.
Neste caso, para desligar totalmente o aparelho, será necessário, para além de desligar os interruptores,
retirar também a ficha da tomada para evitar um funcionamento inútil do programador.
5. MANUTENÇÃO
O radiador eléctrico a óleo não requer nenhum tipo de manutenção específica. Basta limpar o pó com um
pano macio e seco; limpe-o apenas quando ele estiver frio. Nunca utilize pós abrasivos ou solventes.
Se necessário, limpe eventuais concentrações de sujidade com um aspirador.
6. ADVERTÊNCIAS
- Não utilize o radiador na casa de banho nem junto a banheiras, duches, lavatórios ou piscinas.
-zNão utilize o radiador para secar roupa e não pouse o cabo de alimentação sobre elementos quentes.
- Utilize o radiador apenas na posição vertical.
-O aparelho deve ser posicionado a pelo menos 50 cm de móveis ou outros objectos.
- Se o cabo de alimentação estiver danificado, deverá ser substituído pelo fabricante ou pelo seu serviço
de assistência técnica ou, então, por uma pessoa que possua uma qualificação análoga, de forma a prevenir qualquer risco.
- É absolutamente normal que o aparelho emita ruídos da primeira vez que é ligado.
- O aparelho não deve ser colocado directamente por baixo de uma tomada de alimentação fixa.
- O aparelho é fornecido com a quantidade certa de óleo e qualquer reparação que implique a sua abertura apenas deve ser efectuada pelo Fabricante ou pelo seu Centro de Assistência. Em caso de fugas de
óleo, contacte o Fabricante ou o seu Centro de Assistência.
- Não utilize este aparelho em divisões cuja área de base seja inferior a 4 m
2
.
- Se desejar eliminar o aparelho, cumpra as leis relativas à eliminação do óleo.
- Não pouse o cabo sobre o aparelho ainda quente.
- Não cubra o aparelho enquanto ele estiver em funcionamento.
- O uso de extensões não é recomendável, pois estas podem aquecer em demasia com o aparelho em funcionamento.
Retire o aparelho da caixa e remova os resíduos que tenham eventualmente ficado presos no interior do aparelho.
Um dispositivo de segurança interrompe o funcionamento do radiador em caso de sobreaquecimento
Para restabelecer o funcionamento, contacte o centro de assistência mais próximo da sua área de
residência.
IMPORTANTE: Para evitar um sobreaquecimento do aparelho não o cubra, em nenhuma circunstância, durante o funcionamento, pois tal provocaria um perigoso aumento da temperatura.
ADVERTÊNCIAS PARA A ELIMINAÇÃO CORRECTA DO PRODUTO NOS TERMOS DA DIRECTIVA EUROPEIA
2002/96/EC.
No fim da sua vida útil, o produto não deve ser eliminado juntamente com os resíduos urbanos.
Pode ser depositado nos centros especializados de recolha diferenciada das autoridades locais
ou, então, nos revendedores que forneçam este serviço. Eliminar separadamente um electrodoméstico permite evitar possíveis consequências negativas para o ambiente e para a saúde
pública resultantes de uma eliminação inadequada, além de que permite recuperar os materiais
constituintes para, assim, obter uma importante poupança de energia e de recursos.
Para assinalar a obrigação de eliminar os electrodomésticos separadamente, o produto apresenta a marca de um contentor do lixo com uma cruz por cima.
10
11
12
13
14
15
16
17
18
19
20
21
22
23
24
fig.5
1
2
4
2
23
2
2
21
20
1
9
18
17
1
6
1
1
15
14
2
1
3
1
3
4
5
6
7
8
9
10
Page 25

25
∆Ф ЛПВОЩЪИОfi О·ПФЪИК¤Ъ В›У·И МИ· И‰И·›ЩВЪ· В‡¯ЪЛЫЩЛ Ы˘ЫОВ˘‹ БИ· ЩЛУ ФИОИ·О‹
ı¤ЪМ·УЫЛ МВ ‰˘У·ЩfiЩЛЩ· ВИПФБ‹˜ ЩЪИТУ ВИ¤‰ˆУ ИЫ¯‡Ф˜. ∂›ЫЛ˜, ЩФ ЪФ˚fiУ ·˘Щfi ‰И·ı¤ЩВИ МИ·
·ФОПВИЫЩИО‹ ПВИЩФ˘ЪБ›· Ф˘ ı· Ы·˜ ВИЩЪ¤„ВИ ЩЛУ О·П‡ЩВЪЛ ·fi‰ФЫЛ ЫВ fiПВ˜ ЩИ˜ О·Щ·ЫЩ¿ЫВИ˜.
°И· У· ВОМВЩ·ППВ˘ЩВ›ЩВ МВ ЩФУ О·П‡ЩВЪФ ‰˘У·Щfi ЩЪfiФ ЩИ˜ ВИ‰fiЫВИ˜ ЩЛ˜ Ы˘ЫОВ˘‹˜, Ы˘УИЫЩ¿Щ·И
У· ‰И·‚¿ЫВЩВ О·П¿ ЩИ˜ Ф‰ЛБ›В˜.
1. °∂¡π∫∞
µБ¿ПЩВ ЩЛ Ы˘ЫОВ˘‹ ·fi ЩФ ОИ‚ТЩИФ ЩЛ˜ Ы˘ЫОВ˘·Ы›·˜, ·У·Ф‰ФБ˘Ъ›ЫЩВ ЩЛУ О·И ЫЩЛЪ›НЩВ ЩЛУ ЫЩ·
ЪФЫЩ·ЩВ˘ЩИО¿ КВПИ˙fiП.
µВ‚·ИˆıВ›ЩВ fiЩИ ЩФ О·ПТ‰ИФ В›У·И ·У¤·КФ О·И fiЩИ Л Ы˘ЫОВ˘‹ ‰ВУ ¤¯ВИ ˘ФЫЩВ› ˙ЛМИ¤˜ О·Щ¿ ЩЛ
МВЩ·КФЪ¿. ªЛ ¯ЪЛЫИМФФИВ›ЩВ ЩЛ Ы˘ЫОВ˘‹ В¿У ·ЪФ˘ЫИ¿˙ВИ ‚П¿‚В˜.
2. ∆√¶√£∂∆∏™∏ ∆ø¡ ¶√¢πø¡
µÁ¿ÏÙ ٷ fi‰È· Î·È ÙȘ ÚÔ‰¤Ï˜ ·fi ÙË Û˘Û΢·Û›· Ì ÙÔ ÊÂÏÈ˙fiÏ.
∆ÔÔıÂÙ‹ÛÙ ÙÔ˘˜ ÙÚÔ¯Ô‡˜ ÛÙÔÓ Â›ÚÔ ÙÔ˘ Ô‰ÈÔ‡ Î·È È¤ÛÙ ̤¯ÚÈ Ù¤ÚÌ· ¤ˆ˜ fiÙÔ˘ ·ÛÊ·Ï›ÛÔ˘Ó (ÂÈÎ.
1). ∆Ъ·‚‹НЩВ БИ· У· ‚В‚·ИˆıВ›ЩВ fiЩИ ЫЩВЪВТıЛО·У О·П¿ ФИ ЩЪФ¯Ф›.
∆ФФıВЩ‹ЫЩВ ЩФ fi‰И МВ ЩФ˘˜ ЩЪФ¯Ф‡˜ ЫЩФ О¿Щˆ М¤ЪФ˜ ЩФ˘ О·ПФЪИК¤Ъ ЪФЫ·ЪМfi˙ФУЩ·˜ ЩФ˘˜
Ф‰ЛБФ‡˜ ·У¿МВЫ· ЫЩФУ ›У·О· ¯ВИЪИЫЩЛЪ›ˆУ О·И ЩФ ЪТЩФ ЫЩФИ¯В›Ф О·И ·У¿МВЫ· ЫЩФ ›Ыˆ ВЪ›‚ПЛМ·
О·И ЩФ ЩВПВ˘Щ·›Ф ЫЩФИ¯В›Ф. ¶ЪФЫ·ЪМfiЫЩВ Щ· 2 ‰fiУЩИ· ЫЩИ˜ ·УЩ›ЫЩФИ¯В˜ ˘Ф‰Ф¯¤˜ О·И ·ЫК·П›ЫЩВ ЩФ
fi‰И ‚И‰ТУФУЩ·˜ М¤¯ЪИ Щ¤ЪМ· ЩЛ ‚›‰· МВ ЩФУ ОЪ›ОФ (ВИО. 1).
∞КФ‡ ФПФОПЛЪТЫВЩВ ЩЛ ‰И·‰ИО·Ы›·, Б˘Ъ›ЫЩВ ЩФ О·ПФЪИК¤Ъ ЫЩЛУ О·Щ·ОfiЪ˘КЛ ı¤ЫЛ ПВИЩФ˘ЪБ›·˜.
¶ЪФЫФ¯‹: МfiУФ ФИ ‚›‰В˜ МВ ЩФУ ОЪ›ОФ ¯ЪЛЫИМВ‡Ф˘У БИ· У· ·ЫК·П›ЫВЩВ Щ· fi‰И·.
3. ∂°∫∞∆∞™∆∞™∏ ™∆√¡ ∆√πÃ√
∆Ô ÎÈÙ ÁÈ· ÙËÓ ÂÁηٿÛÙ·ÛË ÛÙÔÓ ÙÔ›¯Ô ÂÚÈÏ·Ì‚¿ÓÂÈ:
2 ¶¿Óˆ ÛÙËÚ›ÁÌ·Ù· (∞)
1 ∫¿Ùˆ ÛÙ‹ÚÈÁÌ· (µ)
5 µ›‰Â˜
5 √‡·
1. ∂ÈϤÍÙ ÙÔ ÛËÌÂ›Ô ÂÁηٿÛÙ·Û˘ ÙÔ˘ ÛÒÌ·ÙÔ˜ Î·È ‚‚·Èˆı›Ù fiÙÈ:
·. ¢ВУ ‚Ъ›ЫОВЩ·И О¿Щˆ ·fi Ъ›˙· ЩФ˘ ЪВ‡М·ЩФ˜.
‚. ∏ ЪfiЫ‚·ЫЛ ЫЩФ КИ˜ О·И ЫЩЛУ Ъ›˙· В›У·И В‡ОФПЛ МВЩ¿ ЩЛУ ВБО·Щ¿ЫЩ·ЫЛ.
Б. ¢ВУ ˘¿Ъ¯ВИ О›У‰˘УФ˜ КıФЪ¿˜ ЩФ˘ ЛПВОЩЪИОФ‡ О·Пˆ‰›Ф˘ О·И ¿ППˆУ ЫˆП‹УˆУ.
‰. ∫Ф˘ЪЩ›УВ˜ ‹ ¿ПП· В‡КПВОЩ· ˘ПИО¿ В›У·И М·ОЪИ¿ ·fi ЩФ ЫТМ·
2. ¶ЪИУ ЩЪ˘‹ЫВЩВ ЩФУ ЩФ›¯Ф, ЫЛМВИТЫЩВ Щ· ·ОЪИ‚‹ ЫЛМВ›· МВ ¤У· ‰В›БМ· ЩЛЪТУЩ·˜ ЪФЫВОЩИО¿ ЩИ˜
·ÔÛÙ¿ÛÂȘ (D ∂ÈÎ. 3) Ô˘ ‰È·Ê¤ÚÔ˘Ó ·Ó¿ÏÔÁ· Ì ÙÔ ÌÔÓÙ¤ÏÔ, fiˆ˜ ·Ó·Ê¤ÚÂÙ·È ÛÙÔÓ ›Ó·Î· 3∞.
3. ∂˘ı˘БЪ·ММ›ЫЩВ ЩФ О¤УЩЪФ ЩˆУ ЫЩЛЪИБМ¿ЩˆУ A МВ М›· БЪ·ММ‹ (‰И·ОВОФММ¤УЛ БЪ·ММ‹ ЫЩЛУ ВИО.3/4),
‚В‚·ИˆıВ›ЩВ fiЩИ Щ· ‰‡Ф ЫЩЛЪ›БМ·Щ· ‚Ъ›ЫОФУЩ·И ЫЩФ ›‰ИФ ‡„Ф˜ О·И ЫЩЛ Ы˘У¤¯ВИ· ЫЛМВИТЫЩВ Щ·
ЫЛМВ›· БИ· ‰И¿ЩЪЛЫЛ.
4. °И· ЩФ›¯Ф˘˜ ·fi ЩФ‡‚П· ¯ЪЛЫИМФФИ‹ЫЩВ ЩЪ˘¿УИ БИ· ЩЫИМ¤УЩФ ЩˆУ 6 mm, ЩЪ˘‹ЫЩВ ЫЩ· ЫЛМВ›·
Ф˘ ¤¯ВЩВ ЫЛМ·‰¤„ВИ О·И ЫЩЛ Ы˘У¤¯ВИ· ЩФФıВЩ‹ЫЩВ Щ· Ф‡· ЩФ˘ ВНФПИЫМФ‡.
GR
1Kw
140 mm
1,5 Kw
210 mm
2 Kw
280 mm
2,5 Kw
385 mm
ªÔÓÙ¤ÏÔ
D
3A
Page 26

(°И· Б˘„ФЫ·У›‰В˜ ‹ ВВУ‰‡ЫВИ˜ Ы˘УИЫЩ¿Щ·И У· ВУЩФ›ЫВЩВ ЩИ˜ Н‡ПИУВ˜ ОФПfiУВ˜ О·И У·
¯ЪЛЫИМФФИ‹ЫВЩВ Н˘Пfi‚И‰В˜ ЩˆУ 6 mm ·В˘ıВ›·˜ ЫЩФ Н‡ПФ ‹ У· ¯ЪЛЫИМФФИ‹ЫВЩВ ВИ‰ИО¿
ЫЩЛЪ›БМ·Щ·. °И· ФФИФ‰‹ФЩВ ¿ППФ Щ‡Ф ЩФ›¯Ф˘ Ы˘М‚Ф˘ПВ˘ıВ›ЩВ ВИ‰ИОfi.)
5. ∆ÔÔıÂÙ‹ÛÙ ٷ ÛÙËÚ›ÁÌ·Ù· ÙÔ›¯Ô˘ "∞" ЫЩИ˜ ЩЪ‡В˜ МВ ЩИ˜ ‚›‰В˜ ЩФ˘ ВНФПИЫМФ‡.
6. ∫ЪВМ¿ЫЩВ ЩФ О·ПФЪИК¤Ъ ЫЩ· ЫЩЛЪ›БМ·Щ· (ВИО.3/4).
7. ∂ÓÙÔ›ÛÙ ÙË ı¤ÛË ÛÙÂÚ¤ˆÛ˘ ÙÔ˘ οو ÛÙËÚ›ÁÌ·ÙÔ˜ (B) О·И ЪФЫ·ЪМfiЫЩВ ЩФ ЫЩФ О¤УЩЪФ ЩЛ˜
‚¿ЫЛ˜ ЩЛ˜ Ы˘ЫОВ˘‹˜. ГЪЛЫИМФФИ‹ЫЩВ М›· ·fi ЩИ˜ ‚›‰В˜ ЩФ˘ ВНФПИЫМФ‡ БИ· У· ЫЛМВИТЫВЩВ ЩЛУ
·ÎÚÈ‚‹ ı¤ÛË Ù˘ ÙÚ‡·˜ (ÂÈÎ.3).
∆Ô ÛÙ‹ÚÈÁÌ· ·˘Ùfi ÂÌÔ‰›˙ÂÈ ÙËÓ ·fiÛ·ÛË Ù˘ Û˘Û΢‹˜.
8. µБ¿ПЩВ ЩФ О·ПФЪИК¤Ъ ·fi Щ· ЫЩЛЪ›БМ·Щ· A, ·УФ›НЩВ ЩЛУ ЩЪ‡· МВ ЩЛУ ›‰И· ‰И·‰ИО·Ы›· Ф˘
·ОФПФ˘ı‹Ы·ЩВ БИ· ЩИ˜ ЩЪ‡В˜ ЩФ˘ ЫЩЛЪ›БМ·ЩФ˜ A О·И ЫЩЛ Ы˘У¤¯ВИ· ЩФФıВЩ‹ЫЩВ ЩФ Ф‡·.
∫ЪВМ¿ЫЩВ ЩФ О·ПФЪИК¤Ъ ЫЩ· ЫЩЛЪ›БМ·Щ· A МВ ЩФ ЫЩ‹ЪИБМ· B ЩФФıВЩЛМ¤УФ О·И ЫЩЛ Ы˘У¤¯ВИ·
ЫЩВЪВТЫЩВ ЩФ МВ ЩЛ ‚›‰· (ВИО.3).
∆Ф О·ПФЪИК¤Ъ ¤¯ВИ ЫЩВЪВˆıВ› ЫЩФУ ЩФ›¯Ф.
ªЛ ¯ЪЛЫИМФФИВ›ЩВ ЩЛ Ы˘ЫОВ˘‹ ЫЩФ М¿УИФ.
3. ∏§∂∫∆ƒπ∫∏ ™À¡¢∂™∏
- ¶ЪИУ Ы˘У‰¤ЫВЩВ ЩФ КИ˜ ЫЩЛУ Ъ›˙· ЩФ˘ ЪВ‡М·ЩФ˜, ВП¤БНЩВ ЪФЫВОЩИО¿ ·У Л Щ¿ЫЛ ЩФ˘ ФИОИ·ОФ‡ Ы·˜
‰ИОЩ‡Ф˘ ·УЩИЫЩФИ¯В› ЫЩЛУ ЩИМ‹ V Ф˘ ·У·БЪ¿КВЩ·И ЫЩЛ Ы˘ЫОВ˘‹ О·И ·У Л Ъ›˙· ЩФ˘ ЪВ‡М·ЩФ˜ О·И
Л БЪ·ММ‹ ЩЪФКФ‰ФЫ›·˜ В›У·И О·Щ¿ППЛПВ˜ БИ· ЩФ ··ИЩФ‡МВУФ КФЪЩ›Ф.
- ™À¡¢∂™∆∂ ∆√ ∫∞§√ƒπº∂ƒ ª√¡√ ™∂ ¶ƒπ∑∂™ ¶√À ¢π∞£∂∆√À¡ ∞¶√∆∂§∂™ª∞∆π∫∏ °∂πø™∏.
- ∏ Ы˘ЫОВ˘‹ Ы˘ММФЪКФ‡Щ·И МВ ЩЛУ √‰ЛБ›· 89/336/∂√∫ Ы¯ВЩИО¿ МВ ЩЛУ ЛПВОЩЪФМ·БУЛЩИО‹
Ы˘М‚·ЩfiЩЛЩ·.
4. §∂π∆√Àƒ°π∞ ∫∞π Ã∏™∏
∞Ó·ÌÌ·
™˘У‰¤ЫЩВ ЩФ КИ˜ ЫЩЛУ Ъ›˙· ЩФ˘ ЪВ‡М·ЩФ˜. ªВЩ·ОИУ‹ЫЩВ ЩФ ıВЪМФЫЩ¿ЩЛ М¤¯ЪИ Щ¤ЪМ· ЫЩЛ ı¤ЫЛ М¤БИЫЩЛ˜
ИЫ¯‡Ф˜. ∞У¿„ЩВ ЩФ О·ПФЪИК¤Ъ МВ ЩФУ/ЩФ˘˜ ‰И·ОfiЩВ˜.
ªÔÓ٤Ϸ Ì ‰ÈÏfi ‰È·ÎfiÙË (3 ›‰· ÈÛ¯‡Ô˜)
- ‰È·ÎfiÙ˘ "l" ·ÙË̤ÓÔ˜ = ÂÏ¿¯ÈÛÙË ÈÛ¯‡˜ (·Ó·Ì̤ÓË Ï˘¯Ó›·)
- ‰È·ÎfiÙ˘ "lπ" ·ÙË̤ÓÔ˜ = ÂӉȿÌÂÛË ÈÛ¯‡˜ (·Ó·Ì̤ÓË Ï˘¯Ó›·)
- ÔÈ ‰‡Ô ‰È·ÎfiÙ˜ "l" "ll" ·ЩЛМ¤УФИ = М¤БИЫЩЛ ИЫ¯‡˜ (·У·ММ¤УВ˜ П˘¯У›В˜)
°И· У· Ы‚‹ЫВЩВ ЩЛ Ы˘ЫОВ˘‹, О·И ФИ ‰‡Ф ‰И·ОfiЩВ˜ Ъ¤ВИ У· ‚Ъ›ЫОФУЩ·И ЫЩЛ ı¤ЫЛ "0" Î·È ÛÙË Û˘Ó¤¯ÂÈ·
·ÔÛ˘Ó‰¤ÛÙ ÙÔ ÊȘ ·fi ÙËÓ Ú›˙·.
ƒ‡ıМИЫЛ ıВЪМФЫЩ¿ЩЛ
ŸЩ·У ЩФ ВЪИ‚¿ППФУ КЩ¿ЫВИ ЫЩЛУ ВИı˘МЛЩ‹ ıВЪМФОЪ·Ы›·, Б˘Ъ›ЫЩВ ·ЪБ¿ ЩФ ıВЪМФЫЩ¿ЩЛ ¤ˆ˜ fiЩФ˘
·ОФ˘ЫЩВ› ¤У· "ОПИО" О·И ·К‹ЫЩВ ЩФУ ЫЩФ ЫЛМВ›Ф ·˘Щfi. ∏ ıВЪМФОЪ·Ы›· Ъ˘ıМ›˙ВЩ·И ·˘ЩfiМ·Щ· О·И
‰И·ЩЛЪВ›Щ·И ЫЩ·ıВЪ‹ ·fi ЩФ ıВЪМФЫЩ¿ЩЛ.
§ÂÈÙÔ˘ÚÁ›· ·fi„˘Í˘
ª ЩФ ıЪМФЫЩ¿ЩЛ ЫЩЛ ı¤ЫЛ О·И ЩФ˘˜ ‰И·ОfiЩ˜ ·ЩЛМ¤УФ˘˜, Л Ы˘ЫО˘‹ ‰И·ЩЛЪ› ЩФ ¯ТЪФ Ы МИ·
ıЪМФОЪ·Ы›· Ъ›Ф˘ 5ЖC МФ‰›˙ФУЩ·˜ ЩФ ¿БˆМ· М МИ· П¿¯ИЫЩЛ О·Щ·У¿ПˆЫЛ Ъ‡М·ЩФ˜.
ªФУЩ¤П· МВ ЪФБЪ·ММ·ЩИЫЩ‹ (ГЪФУФ‰И·ОfiЩЛ) 24 ˆЪТУ
°И· У· ЪФБЪ·ММ·Щ›ЫВЩВ ЩЛ ı¤ЪМ·УЫЛ ВУВЪБ‹ЫЩВ ˆ˜ ВН‹˜:
- ∂П¤БНЩВ ЩЛУ ТЪ· ЫЩФ ЪФПfiИ Ы·˜. ∂¿У БИ· ·Ъ¿‰ВИБМ· Л ТЪ· В›У·И 10, Б˘Ъ›ЫЩВ ‰ВНИfiЫЩЪФК· ЩФУ
·ÚÈıÌË̤ÓÔ ‰›ÛÎÔ ÙÔ˘ ÚÔÁÚ·ÌÌ·ÙÈÛÙ‹ ¤ˆ˜ fiÙÔ˘ Û˘Ì¤ÛÂÈ Ë ¤Ó‰ÂÈÍË 10 Ì ÙÔ ‰Â›ÎÙË ·Ó·ÊÔÚ¿˜
▲ ÛÙÔÓ ÚÔÁÚ·ÌÌ·ÙÈÛÙ‹ (ÂÈÎ.5).
- ¶ЪФБЪ·ММ·Щ›ЫЩВ ЩИ˜ ВИı˘МЛЩ¤˜ ВЪИfi‰Ф˘˜ ПВИЩФ˘ЪБ›·˜ ЩЛ˜ Ы˘ЫОВ˘‹˜ И¤˙ФУЩ·˜ ЪФ˜ ЩФ О¤УЩЪФ
Щ· ‰ФУЩ¿ОИ·.
∫¿ıВ ‰ФУЩ¿ОИ ·УЩИЫЩФИ¯В› ЫВ ¯ЪfiУФ 15 ПВЩТУ. ∂МК·У›˙ФУЩ·И ¤ЩЫИ ФИ ЩФМВ›˜ Ф˘ ·УЩИЫЩФИ¯Ф‡У ЫЩИ˜
ВЪИfi‰Ф˘˜ ПВИЩФ˘ЪБ›·˜.
- ªВ ЩЛ Ъ‡ıМИЫЛ ·˘Щ‹ ЩФ ·ВЪfiıВЪМФ ПВИЩФ˘ЪБВ› ·˘ЩfiМ·Щ· О·ıЛМВЪИУ¿ ЩЛУ ЪФБЪ·ММ·ЩИЫМ¤УЛ ТЪ·
(™ЛМ·УЩИОfi: ЩФ КИ˜ Ъ¤ВИ У· В›У·И ¿УЩ· Ы˘У‰В‰ВМ¤УФ ЫЩЛУ Ъ›˙·).
26
Page 27

27
-°И· У· ·ПП¿НВЩВ ЩФУ ЪФБЪ·ММ·ЩИЫМfi˜ ·ЪОВ› У· В·У·К¤ЪВЩВ Щ· ‰ФУЩ¿ОИ· ЫЩЛУ ·Ъ¯ИО‹ ЩФ˘˜ ı¤ЫЛ
О·И У· ЪФБЪ·ММ·Щ›ЫВЩВ ЩИ˜ У¤В˜ ВЪИfi‰Ф˘˜ ПВИЩФ˘ЪБ›·˜.
- ∂¿У ı¤ПВЩВ У· ПВИЩФ˘ЪБВ› Л Ы˘ЫОВ˘‹ ¯ˆЪ›˜ ЪФБЪ·ММ·ЩИЫМfi И¤ЫЩВ ЪФ˜ ЩФ О¤УЩЪФ fiП· Щ·
‰ФУЩ¿ОИ·. ™ЩЛУ ВЪ›ЩˆЫЛ ·˘Щ‹, БИ· У· Ы‚‹ЫВЩВ ЩЛ Ы˘ЫОВ˘‹ Ъ¤ВИ У· ОПВ›ЫВЩВ ЩФ˘˜ ‰И·ОfiЩВ˜
О·И У· ·ФЫ˘У‰¤ЫВЩВ ЩФ КИ˜ ·fi ЩЛУ Ъ›˙· ТЫЩВ У· ·ФКВ‡БВЩ·И Л ¿ЫОФЛ ПВИЩФ˘ЪБ›· ЩФ˘
ЪФБЪ·ММ·ЩИЫЩ‹.
5. ™À¡∆∏ƒ∏™∏
∆Ф ЛПВОЩЪИОfi О·ПФЪИК¤Ъ П·‰ИФ‡ ‰ВУ ··ИЩВ› И‰И·›ЩВЪЛ Ы˘УЩ‹ЪЛЫЛ. ∞ЪОВ› У· ЩФ НВЫОФУ›˙ВЩВ МВ ¤У·
М·П·Оfi О·И ЫЩВБУfi ·У›. ∫·ı·Ъ›˙ВЩВ ЩЛ Ы˘ЫОВ˘‹ МfiУФУ fiЩ·У В›У·И ОЪ‡·. ªЛ ¯ЪЛЫИМФФИВ›ЩВ ФЩ¤
·ÔÚÚ˘·ÓÙÈο Û ÛÎfiÓË ‹ ‰È·Ï‡Ù˜. ∂Ó ·Ó¿ÁÎË, ηı·Ú›ÛÙÂ Ù˘¯fiÓ Û˘ÛÛˆÚÂ˘Ì¤ÓË ÛÎfiÓË
¯ЪЛЫИМФФИТУЩ·˜ ЛПВОЩЪИО‹ ЫОФ‡·.
6. ¶ƒ√∂π¢√¶√π∏™∂π™
- ªЛ ¯ЪЛЫИМФФИВ›ЩВ ЩФ О·ПФЪИК¤Ъ ЫЩФ М¿УИФ ‹ ОФУЩ¿ ЫВ М·УИ¤ЪВ˜, УЩФ˘˜, УИЩ‹ЪВ˜ ‹ ИЫ›УВ˜.
- ªЛ ¯ЪЛЫИМФФИВ›ЩВ ЩФ О·ПФЪИК¤Ъ БИ· ЩФ ЫЩ¤БУˆМ· ЩˆУ ЪФ‡¯ˆУ О·И МЛУ ·ОФ˘М¿ЩВ ЩФ ЛПВОЩЪИОfi
О·ПТ‰И· ЫЩ· ıВЪМ¿ ЫЩФИ¯В›·.
- ГЪЛЫИМФФИВ›ЩВ ЩФ О·ПФЪИК¤Ъ ¿УЩ· О·И МfiУФ ЫВ О·Щ·ОfiЪ˘КЛ ı¤ЫЛ.
-∏ Ы˘ЫОВ˘‹ Ъ¤ВИ У· ВБО·ı›ЫЩ·Щ·И ЫВ ·fiЫЩ·ЫЛ ЩФ˘П¿¯ИЫЩФУ 50cm ·fi ¤ИП· О·И ¿ПП·
·УЩИОВ›МВУ·.
- ∂¿У ЩФ ЛПВОЩЪИОfi О·ПТ‰ИФ ·ЪФ˘ЫИ¿˙ВИ КıФЪ¤˜, Ъ¤ВИ У· ·УЩИО·Щ·ЫЩ·ıВ› ·fi ЩФУ
О·Щ·ЫОВ˘·ЫЩ‹, ЩФ ВНФ˘ЫИФ‰ФЩЛМ¤УФ ™¤Ъ‚И˜ ‹ ·fi ВНВИ‰ИОВ˘М¤УФ ЩВ¯УИОfi БИ· ЩЛУ ·ФК˘Б‹ О¿ıВ
ОИУ‰‡УФ˘.
- ∂›У·И ·fiП˘Щ· К˘ЫИФПФБИОfi У· ·ОФ‡БФУЩ·И "ЩЪИН›М·Щ·" ЩЛУ ЪТЩЛ КФЪ¿ Ф˘ ı· ¯ЪЛЫИМФФИ‹ЫВЩВ
ЩЛ Ы˘ЫОВ˘‹.
-∏ Û˘Û΢‹ ‰ÂÓ Ú¤ÂÈ Ó· ÙÔÔıÂÙÂ›Ù·È ·ÎÚÈ‚Ò˜ οو ·fi ÛÙ·ıÂÚ‹ Ú›˙· Ú‡̷ÙÔ˜.
-∏ Ы˘ЫОВ˘‹ ВЪИ¤¯ВИ ЩЛ ЫˆЫЩ‹ ФЫfiЩЛЩ· П·‰ИФ‡ О·И ФИ ВИЫОВ˘¤˜ Ф˘ ··ИЩФ‡У ЩФ ¿УФИБМ· ЩЛ˜
Ы˘ЫОВ˘‹˜ Ъ¤ВИ У· ВОЩВПФ‡УЩ·И МfiУФУ ·fi ЩФУ ∫·Щ·ЫОВ˘·ЫЩ‹ ‹ ЩФ ВНФ˘ЫИФ‰ФЩЛМ¤УФ ™¤Ъ‚И˜.
™В ВЪ›ЩˆЫЛ ‰И·ЪЪФ‹˜ П·‰ИФ‡, ·В˘ı˘УıВ›ЩВ ЫЩФУ О·Щ·ЫОВ˘·ЫЩ‹ ‹ ЫЩФ ™¤Ъ‚И˜.
- ªЛ ¯ЪЛЫИМФФИВ›ЩВ ЩЛ Ы˘ЫОВ˘‹ ЫВ ‰ˆМ¿ЩИ· МВ ВМ‚·‰fiУ МИОЪfiЩВЪФ ·fi 4 m
2
.
- ™Â ÂÚ›ÙˆÛË ‰È¿Ï˘Û˘ Ù˘ Û˘Û΢‹˜ Ú¤ÂÈ Ó· ÙËÚËı› Ë ÓÔÌÔıÂÛ›· ÁÈ· ÙË ‰È¿ıÂÛË ÙÔ˘ Ï·‰ÈÔ‡.
- ªËÓ ·ÎÔ˘Ì¿Ù ÙÔ Î·ÏÒ‰ÈÔ ÛÙË Û˘Û΢‹ fiÙ·Ó Â›Ó·È ˙ÂÛÙ‹.
- ªЛ ЫОВ¿˙ВЩВ ЩЛ Ы˘ЫОВ˘‹ fiЩ·У ПВИЩФ˘ЪБВ›.
- ∞ФК‡БВЩВ ЩЛ ¯Ъ‹ЫЛ О·Пˆ‰›ˆУ ЪФ¤ОЩ·ЫЛ˜ БИ·Щ› МФЪФ‡У У· ˘ВЪıВЪМ·УıФ‡У fiЩ·У ПВИЩФ˘ЪБВ›
Л Ы˘ЫОВ˘‹.
µБ¿ПЩВ ЩЛ Ы˘ЫОВ˘‹ ·fi ЩФ ОИ‚ТЩИФ ЩЛ˜ Ы˘ЫОВ˘·Ы›·˜ О·И ·К·ИЪ¤ЫЩВ Щ˘¯fiУ ˘ФПВ›ММ·Щ· Ф˘
МФЪФ‡У У· ЫКЛУТЫФ˘У ЫЩЛ Ы˘ЫОВ˘‹.
°И· ЩЛУ ·ФО·Щ¿ЫЩ·ЫЛ ЩЛ˜ ПВИЩФ˘ЪБ›·˜, ·В˘ı˘УıВ›ЩВ ЫЩФ ПЛЫИ¤ЫЩВЪФ ™¤Ъ‚И˜.
™∏ª∞¡∆π∫√: °È· Ó· ·ÔʇÁÂÙ ÙËÓ ˘ÂÚı¤ÚÌ·ÓÛË, ÌËÓ Î·Ï‡ÙÂÙ ÔÙ¤ ÙË Û˘Û΢‹ ÂÓÒ
ПВИЩФ˘ЪБВ›, БИ·Щ› ·˘Щfi МФЪВ› У· ЪФО·П¤ЫВИ ВИО›У‰˘УЛ ¿УФ‰Ф ЩЛ˜ ıВЪМФОЪ·Ы›·˜ ЩЛ˜.
¶ЪФВИ‰ФФИ‹ЫВИ˜ БИ· ЩЛ ЫˆЫЩ‹ ‰И¿ıВЫЛ ЩФ˘ ЪФ˚fiУЩФ˜ Ы‡МКˆУ· МВ ЩЛУ ∂˘Ъˆ·˚О‹ √‰ЛБ›·
2002/96/∂∫
™ÙÔ Ù¤ÏÔ˜ Ù˘ ˆÊ¤ÏÈÌ˘ ˙ˆ‹˜ ÙÔ˘, ÙÔ ÚÔ˚fiÓ ‰ÂÓ Ú¤ÂÈ Ó· ‰È·Ù›ıÂÙ·È Ì ٷ ·ÛÙÈο
·ÔÚÚ›ÌÌ·Ù·. ªÔÚ› Ó· ‰È·ÙÂı› Û ÂȉÈο ΤÓÙÚ· ‰È·ÊÔÚÔÔÈË̤Ó˘ Û˘ÏÏÔÁ‹˜ Ô˘
ФЪ›˙Ф˘У ФИ ‰ЛМФЩИО¤˜ ·Ъ¯¤˜, ‹ ЫЩИ˜ ·УЩИЪФЫˆВ›В˜ Ф˘ ·Ъ¤¯Ф˘У ·˘Щ‹У ЩЛУ ˘ЛЪВЫ›·. ∏
‰И·КФЪФФИЛМ¤УЛ ‰И¿ıВЫЛ МИ·˜ ЛПВОЩЪИО‹˜ Ы˘ЫОВ˘‹˜ ВИЩЪ¤ВИ ЩЛУ ·ФК˘Б‹ Иı·УТУ
·ЪУЛЩИОТУ Ы˘УВВИТУ БИ· ЩФ ВЪИ‚¿ППФУ О·И ЩЛУ ˘БВ›· ·fi ЩЛУ ·О·Щ¿ППЛПЛ ‰И¿ıВЫЛ О·ıТ˜
О·И ЩЛУ ·У·О‡ОПˆЫЛ ˘ПИОТУ ·fi Щ· ФФ›· ·ФЩВПВ›Щ·И ТЫЩВ У· ВИЩ˘Б¯¿УВЩ·И ЫЛМ·УЩИО‹
ВНФИОФУfiМЛЫЛ ВУ¤ЪБВИ·˜ О·И fiЪˆУ. °И· ЩЛУ ВИЫ‹М·УЫЛ ЩЛ˜ ˘Ф¯ЪВˆЩИО‹˜ ¯ˆЪИЫЩ‹˜
‰И¿ıВЫЛ˜, ЩФ ЪФ˚fiУ К¤ЪВИ ЩФ Ы‹М· ЩФ˘ ‰И·БЪ·ММ¤УФ˘ ЩЪФ¯ФКfiЪФ˘ О¿‰Ф˘ ·ФЪЪИММ¿ЩˆУ.
10
11
12
13
14
15
16
17
18
19
20
21
22
23
24
ÂÈÎ.5
1
2
4
2
3
4
5
6
7
8
9
10
23
2
2
21
20
1
9
18
17
1
6
1
1
15
14
2
1
3
1
Page 28

28
Radiatoren er et varmeapparat til husholdningsbrug med flere forskellige anvendelsesmuligheder, idet
dens styrke kan stilles på tre forskellige niveauer. Den er ligeledes forsynet med en særlig funktion, som
giver størst mulig komfort under alle forhold.
Det anbefales at læse de nedenstående anvisninger omhyggeligt igennem for at få størst mulig glæde
af dette produkts anvendelsesmuligheder.
1. ALMENE ANVISNINGER
Tag apparatet ud af æsken, vend det på hovedet og stil det på beskyttelsesafdækningen af polystyren.
Kontrollér om elledningen er intakt samt om apparatet er kommet frem uden at have lidt skade. Apparatet
må ikke sættes i funktion, hvis det er defekt.
2. MONTERING AF STØTTEBEN
Tag polystyrenemballagen af støttebenene og hjulene.
Sæt hjulene ind i tappen på støttebenene og pres dem helt i bund, indtil man hører et klik (fig. 1). Træk i hjulene for at sikre, at de er rigtigt fastgjort.
Montér støttebenene med de påsatte hjul forneden på radiatoren og sæt dem ind mellem styreboksen og det
første element samt mellem bagboksen og det sidste element; før de 2 tænder ind i de respektive lejer og
spær støttebenet med øjeskruen, som skal skrues helt til (fig.1).
Når man er har udført dette arbejde, skal radiatoren vendes om og stilles i den lodrette funktionsstilling igen.
Giv agt: Man skal kun anvende øjeskruerne til at spærre støttebenene
3. VÆGMONTERING
Vægmonteringssættet skal omfatte:
2 øvre bøjler (A)
1 nedre bøjle (B)
5 skruer
5 kiler
1. Vælg apparatets installeringssted, som skal opfylde følgende krav:
a. Det må ikke installeres lige under en stikkontakt.
b. Både stikket og stikkontakten skal være let tilgængelige efter installeringen.
c. Hverken elledningerne eller hvilket som helst af rørene må være beskadigede.
d. Gardiner eller andre brændbare materialer skal befinde sig langt væk fra apparatet.
2. Før man borer huller i væggen, skal man afmærke borestederne helt nøjagtigt ved hjælp af en skabelon,
idet man skal overholde målene (D Fig. 3), som varierer alt efter modellen, som vist på tabel 3A.
3. Placér bøjlerne A’s midte helt lige i forhold til en linie (som er angivet på fig. 3-4 med en punkteret linie),
hvorved man skal sørge for, at de to bøjler befinder sig i samme højde; afmærk derefter borestederne.
4. Hvis muren er af mursten, skal man anvende en 6 mm spids til cement, bore ved de afsatte mærker og
derefter indsætte de medleverede kiler.
(Hvis det drejer sig om en gipsonitvæg eller hvis man skal bore på dobbeltbeklædninger, anbefales det
DK
1Kw
140 mm
1,5 Kw
210 mm
2 Kw
280 mm
2,5 Kw
385 mm
Modell
D
3A
Page 29

at finde frem til træstanderne og sætte skruer på 6 til træ direkte på træet eller bruge særlige fastgøringsanordninger. I tilfælde af hvilken som helst anden slags mur, bør man spørge en fagmand til råds.)
5. Montér vægbøjlerne ”A” i hullerne med de medleverede skruer.
6. Hæng radiatoren op på bøjlerne (fig. 3-4).
7. Find frem til den nedre bøjles fastgøringssted (B) og sæt den ind på midten af apparatets basis; afmærk
det nøjagtige borested (fig. 3) med en af de medleverede skruer.
Denne bøjle hindrer apparatet i pludseligt at skille sig fra væggen.
8. Tag radiatoren af bøjlerne A og bor hullet ifølge anvisningerne gældende for boringen af hullerne for
bøjle A; indsæt derefter kilen. Indsæt bøjle B og hæng radiatoren op på bøjlerne A igen, hvorefter bøjle
B skal fæstnes med skruen (fig. 3).
Nu sidder radiatoren fast på væggen.
Apparatet må ikke anvendes i badeværelser.
3. ELEKTRISK TILSLUTNING
- Inden stikket forbindes til stikkontakten, skal man nøje undersøge, at husholdningens netspænding svar-
er til værdien i V, som er angivet på apparatet samt om netstikket har en passende ydeevne i betragtning
af den forventede belastning
- RADIATOREN MÅ UDELUKKENDE FORBINDES MED STIKKONTAKTER, DER ER FORSYNEDE MED EN
VELFUNGERENDE JORDFORBINDELSE.
- Dette apparat er i overensstemmelse med direktivet 89/336/EØF og Min.Dekr. 476/92 om elektromag-
netisk kompatibilitet
4. FUNKTION OG ANVENDELSE
Hvordan der tændes for apparatet
Sæt stikket i stikkontakten; drej termostaten, indtil den spærres på maksimum; tænd for radiatoren med kontakten/-erne som.
Modeller med dobbelt kontakt (3 styrker)
- tasten ”I” trykket ned = minimal styrke (signallampen lyser)
- tasten ”II” trykket ned = gennemsnitlig styrke (signallampen lyser)
- begge taster ”I” ”II” trykket ned = maksimal styrke (signallamperne lyser)
Apparatet slukkes ved at stille begge kontakter på ”0” og derefter tage stikket ud af stikkontakten.
Regulering af termostaten
Når den omgivende lufttemperatur kommer op på det ønskede niveau, skal man langsomt flytte termostaten
over på stillingen, som signaleres af et ”klik”. Efter denne indstilling reguleres temperaturen automatisk, og
den opretholdes hele tiden af termostaten.
Frostfunktion
Når termostaten er i position , og der er trykket på afbryderne, fastholder apparatet en rumtemperatur på ca. 5° C, således at frost undgås og der samtidigt sikres et lavt energiforbrug.
Modeller med programmeringsfunktion (timer) 24 timer
Programmeringen af varmeapparatet foretages på følgende måde:
- Se hvad klokken er på et ur. Hvis vi går ud fra, at klokken er 10, skal man dreje programmeringsanord-
ningens nummererede skive med uret, indtil den står på 10 og man ser referencen ▲ på programmeringsanordningen (fig.5).
- Indstil de tidsintervaller, apparatet skal fungere i, ved at presse tænderne ind mod midten.
Hver tand svarer til et tidsrum på 15 min. Nu ser man nogle afsnit, der svarer til de indstillede funktionstider.
- På denne måde fungerer radiatoren automatisk hver dag i det programmerede tidsrum (Vigtigt: Stikket
skal altid være sat i stikkontakten).
29
Page 30

30
- Hvis man ønsker at ændre på programmeringen, behøver man blot sætte tænderne tilbage til
udgangsstillingen og programmere de ny funktionstider.
- Hvis man ønsker at lade apparatet fungere uden programmering, skal samtlige tænder presses ind mod
midten. I dette tilfælde slukkes apparatet fuldstændigt ved at slukke for kontakterne og trække stikket ud
af stikkontakten for at undgå, at programmeringsanordningen bliver ved med at fungere formålsløst.
5. VEDLIGEHOLDELSE
Den elektriske olieradiator kræver ingen særlig vedligeholdelse. Man behøver blot støve den af med en blød,
tør klud; den må udelukkende rengøres, når den er kold. Der må under ingen omstændigheder anvendes
skuremidler eller opløsningsmidler. Fjern om nødvendigt ophobet snavs med en støvsuger.
6. ADVARSLER
- Radiatoren må ikke anvendes i badeværelser eller lige i nærheden af badekar, brusekabiner eller -nich-
er, håndvaske eller svømmebassiner.
- Radiatoren må ikke anvendes til at tørre vasketøj, og fødeledningen må ikke lægges hen over de varme
elementer.
- Radiatoren må udelukkende anvendes i lodret stilling.
- Apparatet skal stilles mindst 50 cm fra møbler eller andre genstande.
- Hvis elledningen beskadiges, skal den udskiftes af fabrikanten, et autoriseret servicecenter eller af en per-
son, som råder over lignende kundskaber, for at undgå enhver risiko.
- Det er fuldstændigt normalt, at man hører ”knirkelyde” fra apparatet, når det tages i brug første gang.
- Apparatet må ikke placeres lige under en fast stikkontakt.
- Apparatet er fyldt med helt nøjagtigt den nødvendige oliemængde, og enhver reparation, der kræver,
at det åbnes, skal foretages af fabrikanten eller et autoriseret servicecenter. I tilfælde af olieudslip bedes
De henvende Dem til fabrikanten eller et autoriseret servicecenter.
- Dette apparat må udelukkende anvendes i rum med et grundareal på mindst 4 m
2
.
- Hvis apparatet kasseres, skal man overholde lovbestemmelserne vedrørende bortskaffelse af olie.
- Apparatets ledning må ikke lægges hen over apparatet, hvis dette stadigvæk er varmt.
- Apparatet må ikke tildækkes, mens det er i funktion.
- Det frarådes at anvende forlængerledninger, idet de kan overophedes, mens apparatet kører.
En sikkerhedsanordning afbryder radiatorens drift i tilfælde af pludselig overophedning.
Tag apparatet ud af æsken, fjern de rester, som eventuelt sidder fast inde i apparatet.
For at sætte apparatet in funktion igen, er det nødvendigt at henvende sig til det nærmeste servicecenter.
VIGTIGT: For at undgå overophedning må apparatet under ingen omstændigheder tildækkes
under drift, da dette vil forårsage en farlig temperaturstigning.
VIGTIG INFORMATION ANGÅENDE BORTSKAFFELSE AF PRODUKTET I OVERENSSTEMMELSE MED EF
DIREKTIV 2002/96/CE.
Ved afslutningen af dets produktive liv må produktet ikke bortskaffes som almindeligt affald. Det
bør afleveres på et specialiseret lokalt genbrugscenter eller til en forhandler der yder denne ser-
vice. At bortskaffe et elektrisk husholdningsapparat separat gør det muligt at undgå eventuelle
negative konsekvenser for miljø og helbred på grund af upassende bortskaffelse og det giver muli-
ghed for at genbruge de materialer det består af og dermed opnå en betydelig energi- og res-
sourcebesparelse. Som en påmindelse om nødvendigheden af at bortskaffe elektriske hushold-
ningsapparater separat, er produktet mærket med en mobil affaldsbeholder med et kryds .
10
11
12
13
14
15
16
17
18
19
20
21
22
23
24
fig.5
1
2
4
2
3
4
5
6
7
8
9
10
23
2
2
21
20
1
9
18
17
1
6
1
1
15
14
2
1
3
1
Page 31

31
Radiatoren er et meget hendig apparat for oppvarming inne, med tre forskjellige styrker. Det har også
en eksklusiv funksjon som gjør det mulig å oppnå best mulig komfort i enhver situasjon.
For å få best mulig utbytte av produktet anbefaler vi at du leser bruksanvisningen nøye.
1. GENERELLE OPPLYSNINGER
Ta apparatet ut av esken og snu det opp ned på beskyttelsesdelene i polysterol.
Sjekk at strømlednngen er hel og at apparatet ikke er blitt skadet under transporten. Ikke bruk apparatet hvis
det er ødelagt.
2. MONTERING AV BENA
Ta bena og hjulene ut av innpakningen i polysterol.
Før hjulene inn i bolten på bena og press helt til du hører et klikk (fig. 1).
Dra for å sjekke at hjulene er godt festet.
Monter bena med hjulene på på radiatorens nedre del ved å føre inn skinnene mellom kommandoboksen og
det første elementet og den bakre boksen og det siste elementet; fest de 2 tennnene i hakkene og vlokker
benet med skruen ved å feste den helt (fig. 1).
Når du har gjort dette, snu radiatoren og sett den i riktig funksjonsstilling.
Vær oppmerksom: Kun øyeskruene skal bruke til festing av bena.
3. MONTERING PÅ VEGGEN
Kit’en for montering på veggen må bestå av:
2 x øvre støtteelementer (A)
1 x nedre støtteelementer (B)
5 x skruer
5 x plugger
1. Bestem hvor du skal plassere radiatoren og pass på at:
a. Den ikke plasseres like under en stikkontakt.
b. Det er lett å komme til støpselet og stikkontakten også etter installeringen.
c. Verken elektriske ledninger eller aldr rør kan skades.
d. Gardiner eller annet brennbart materiale ikke befinner seg i nærheten av radiatoren.
2. Før du lager hull i veggen må du lage merker ved å følge dimensjonene nøye (D fig. 3); disse varierer i
hehold til modell, som vist i tabell 3A.
3. Still opp midten av støtteelement A på linje (angitt i fig 3/4 med en oppstreket linje) og sjekk at de to støt-
teelementene er i samme høyde; merk derettter av hullene.
4. For vegger i betong, bruk et bor på 6 mm og lag hull i henhold til merkene du har satt av og sett deret-
ter inn pluggene som følger med.
(For gipsvegger eller vegger i andre materialer anbefaler vi at du bruker støtteelemnenter i tre og bruke
treskruer i størrelse 6 dirkete i treverket eller bruke spesielle festeelementer. For alle andre typer vegg, be
om råd hos en spesialist.
5. Monter veggstøttene “A” i hullene med skruene som følger med-
6. Fest radiatoren på støtteelementene (fig.3/4).
7. Finn posisjonen for festing av nederste støtteelement (B) ved å føre det inn i basen av apparatet; bruk en
av skruenbe som følger med for å merke av hullet (fig. 3).
Dette støtteelementet hindrer at apparatet faller ned.
N
1Kw
140 mm
1,5 Kw
210 mm
2 Kw
280 mm
2,5 Kw
385 mm
Modell
D
3A
Page 32

8. Ta radiatoren av støtteelementene A og lag hull som tidligere forklart for hullene til støtteelementet A; sett
deretter in pluggen. Plasser radiatoren på støttelementene A med støtteeelemntet B påført og fest deretter
med skruen (fig. 3).
Radiatoren er nå festet til veggen.
Apparatet må ikke brukes i baderom.
4. ELEKTRISK TILKOBLING
- Før du setter støpselet inn i stikkontakten må du sjekke at nettspenningen i V i bygningen samsvarer med
den som er angitt på apparatet og at tilførselslinjen er dimensjonert for å tåle beregnet belastning.
- APPARATET SKAL BARE KOBLES TIL STIKKONTAKTER UTSTYRT MED EFFEKTIV JORDING.
- Dette apparatet er i overensstemmelse med EØF-direktiv 89/336 og italiensk lov 476/92 om elektro-
magnetisk kompatibilitet,
5. FUNKSJON OG BRUK
Slå på apparatet
Sett støpselet i stikkontakten; flytt termostaten helt til den står på maks; slå på radiatoren ved hjelp av bryteren/bryterne.
Modeller med dobbel bryter (3 styrker)
- tast “l” trykket inn = minste styrke (lampe tent)
- tast “lI” trykket inn = middels styrke (lampe tent)
- begge tastene “l” “lI” trykket inn = maks. styrke (lampene lyser)
For å slå av apparatet, må begge bryterne stå på “0”; ta deretter støpselet ut av stikkontakten.
Regulering av termostaten
Når temperaturen i rommet er blitt slik du ønsser, vri sakte på termostaten helt til posisjojen angitt med et
“klikk” og ikke lengre.
PÅ denne måtten holdes temperaturen konstant og reguleres automatisk av termostaten.
“Antifrys”-funksjon
Når termostaten er stilt til og bryterne slått på, vil apparatet holde rommet på en temperatur på omtrent
5°C og dermed forhindre frost, med et minimalt strømforbruk
Modeller med programmator (Timer) 24 TIMER
For å programmere oppvarmingen gjør som følger:
-Se hva klokken er. Anta at den er 10.00, vri programmatorens tallskive med urviserne helt til tallet 10
stmmer overens med referanseindikatoren ▲ på programmatoren (fig.5).
- Still inn de klokkeslettene du ønsker at radiatoren skal fungere, ved å presse mot midten av tannhakkene.
Hvert tannhakk tilsvarer 15 minutter. Nå vil de sektorene som tilsvarer funksjonsperiodene vises.
- På denne måten vil radiatoren fungere automatisk hver dag til programmert tidspunkt (Viktig: Støpselet
må alltid stå i stikkontakten).
- For å variere programmeringen er det nok å stille tannjakkene i opprinnelig posisjon og stille inn nye
dunksjonsperioder.
- Hvis du ønsaker at apparatet skal virke uten programmering, press alle tannhakkene mot midten.
For å slå av apparatet må du, i tillegg til å slå av alle bryterne, ta ut støpselet av stikkontakten for å unngå
at programmatoren virker til ingen nyte.
32
10
11
12
13
14
15
16
17
18
19
20
21
22
23
24
fig.5
1
2
4
2
3
4
5
6
7
8
9
10
23
2
2
21
20
1
9
18
17
1
6
1
1
15
14
2
1
3
1
Page 33

5. VEDLIKEHOLD
Den elektriske oljeradiatoren krever ikke noe spesielt vedlikehold. Det er nok å tørke støv av den med en myk
og tørr klut; rengjør den bare når den er avkjølt. Bruk eventuelt en støvsuger for å fjerne skitt.
6. ADVARSLER
- Ikke bruk radiatoren i baderom eller i nærheten av badekar, dusjer, vasker eller svømmebasseng.
- Ikke bruk radiatoren for å tørke tøy, ikke legg strømledningen på varme deler.
- Radiatoren skal bare brukes i vannrett stilling.
- Apparatet må plasseres minst 50 cm. fra møbler eller qandre gjenstander.
- Hvis strømledningen blir ødelagt, skal den bare byttes ut av produsenten eller godkjent teknsik service-
senter, eller uansett av en perosn med lignende egenskaper, for å unngå enhver fare.
- Det er helt vanlig at det kommer noen “knirkelyder” fra radiatoren ved første gangs bruk.
- Apparatet må ikke plasseres like under en fast stikkontakt.
- Beholderen til dette apparatet er fylt opp med eksakt mengde olje og de reparasjoner som krever at
behjoldere3n må åpnes skal bare utføres av produsenten eller godkjent servicesenter.
- Ikke bruk apparatet i rom som er mindre enn 4 m
2
.
- Hvis apparatet skal avhendes er det viktig å følge reglene for avhending av olje.
- Ikke plasser ledningen på apparatet når dette ennå er varmt.
- Ikke dekk til apparatet når dette er i bruk.
- Det anbefales ikke å bruke skjøteledninger siden dette kan medføre opveroppheting under bruk av appa-
ratet.
Ta apparatet ut av emballasjen, fjern eventuelle rester som kan ha satt seg fast i selve apparatet.
En sikkerhetsinnretning avbryter funkjsonen av radiatoren i tilfelle en tilfeldig overoppheting.
For å starte apparatet igjen, ta kontakt med et servicesnter i nærhewten av der du bor.
VIKTIG: For å unngå overoppheting, må apparatet aldri av noen grunn dekkes til under bruk,
fordi dette kan føre til farlig temperaturstigning.
33
Page 34

Radiatorn är en mycket mångsidig apparat med tre olika effektlägen för uppvärmning av hemmiljöer.
Den har också en exklusiv funktion som ger dig optimal komfort under alla omständigheter.
Läs dessa instruktioner i sin helhet, så att du kan utnyttja radiatorn till fullo.
1. ALLMÄNT
Ta ut radiatorn ur förpackningen och lägg den upp och ner på polystyrenskydden.
Kontrollera att sladden är hel och att radiatorn inte har skadats under transporten. Använd inte radiatorn om
den är skadad.
2. MONTERING AV FÖTTERNA
Ta ut fötterna och hjulen ur polystyrenemballaget.
Sätt in hjulen i fötternas tappar och tryck tills ett klickande ljud hörs (fig. 1). Kontrollera att hjulen sitter fast
ordentligt genom att dra i dem.
Montera fötterna med hjulen på radiatorns undersida genom att föra in dem mellan styrdosan och det första elementet respektive mellan den bakre dosan och det sista elementet. För in de 2 tänderna i urtagen och
lås fast fötterna genom att dra åt skruvöglorna så mycket det går (fig. 1).
Vänd sedan radiatorn rätt och ställ den i dess vertikala driftsläge.
OBS: använd skruvöglorna för att fästa fötterna.
3. VÄGGMONTERING
Satsen för väggmontering ska innehålla:
2 st. övre hållare (A)
1 st. nedre hållare (B)
5 st. skruvar
5 st. pluggar
1. Välj ut en plats där radiatorn ska installeras och se till att:
a. Inte placera den direkt under ett eluttag.
b. Både stickproppen och uttaget är lätta att nå efter monteringen.
c. Varken elledningar eller andra ledningar kan skadas vid monteringen.
d. Det inte finns några gardiner eller annat eldfarligt material i närheten av radiatorn.
2. Markera exakt var du ska borra med hjälp av en mall. Följ måtten (D i fig. 3) noggrant. Måtten skiljer
sig mellan de olika modellerna enligt tabell 3A.
3. Rita ett streck mellan mittpunkterna på hållarna A (det visas som en streckad linje i fig. 3/4) och se till
att hållarna befinner sig på samma höjd. Markera sedan var du ska borra hålen.
4. Använd en 6 mm betongborr om du har stenväggar och borra vid markeringarna. Sätt i de medföljan-
de pluggarna.
(Om du har väggar av gips- eller spånplatta bör du söka rätt på träreglarna och fästa radiatorn i dem
med 6 mm träskruvar eller använda specialfästen. Tillfråga en specialist om du har väggar av andra
slag.)
34
S
1Kw
140 mm
1,5 Kw
210 mm
2 Kw
280 mm
2,5 Kw
385 mm
Modell
D
3A
Page 35

5. Montera vägghållarna “A” i hålen med de medföljande skruvarna.
6. Häng upp radiatorn på hållarna (fig. 3/4).
7. Sätt på den nedre hållaren (B) mitt på radiatorns undersida och markera var du ska borra hålet med en
av de medföljande skruvarna (fig. 3).
Denna hållare förhindrar att radiatorn ramlar ned av misstag.
8. Ta av radiatorn från hållarna A och borra hålet på samma sätt som för hållarna A. Sätt i pluggen. Häng
upp radiatorn på hållarna A igen, med hållaren B påsatt, och fäst den med skruven (fig. 3).
Nu sitter radiatorn fast i väggen.
Använd inte radiatorn i badrum.
3. ELEKTRISK ANSLUTNING
- Kontrollera noggrant att nätspänningen motsvarar det värde i V som anges på apparaten och att elutta-
get och elsladden är anpassade för belastningen i fråga innan kontakten sätts i.
- RADIATORN FÅR ENDAST ANSLUTAS TILL KORREKT JORDADE UTTAG.
- Denna apparat överensstämmer med direktiv 89/336/EEG och italiensk lag 476/92 om elektromagne-
tisk kompatibilitet.
4. FUNKTIONSSÄTT OCH ANVÄNDNING
Igångsättning
Sätt i stickproppen. Sätt termostaten i maximiläget och sätt på radiatorn med strömbrytaren/strömbrytarna.
Modeller med två strömbrytare (3 effektlägen)
- knappen “l” intryckt = minimieffekt (signallampan lyser)
- knappen “lI” intryckt = medeleffekt (signallampan lyser)
- båda knapparna “I” och ”II” intryckta = maximieffekt (signallamporna lyser)
För att stänga av radiatorn sätter du båda strömbrytarna i läget “0” och drar ut stickproppen ur eluttaget.
Inställning av termostaten
Vrid långsamt termostaten tills du hör ett klick, inte längre, när rummet har uppnått önskad temperatur.
Termostaten kommer då automatiskt att ställa in och bibehålla den temperatur som på så sätt har fastställts.
Frostskyddsfunktion
När termostaten står i läge och strömbrytarna är påslagna bibehåller apparaten en omgivningstemperatur på cirka 5°C och förhindrar frost med en minimal energiförbrukning.
Modeller med 24 timmars kopplingsur (timer)
Gå till väga enligt följande för att programmera uppvärmningen:
- Se efter hur mycket klockan är. Om vi antar att klockan är 10 vrider du kopplingsurets sifferförsedda skiva
medsols tills visaren på
▲ kopplingsuret pekar på talet 10 (fig.5).
- Ställ in de tidsperioder under vilka radiatorn ska vara påslagen genom att trycka in kuggarna mot mit-
ten.
Varje kugge motsvarar 15 minuter. Du kan nu se de sektorer som utvisar de perioder under vilka radiatorn ska vara påslagen.
- Med denna inställning fungerar radiatorn automatiskt varje dag under inprogrammerad tid (OBS: stick-
proppen måste alltid sitta i).
- För att ändra programmeringen sätter du bara tillbaka kuggarna i utgångsläget och ställer in nya drift-
sperioder.
- Om radiatorn ska fungera utan programmering trycker du in alla kuggarna mot mitten.
I detta fall måste du för att stänga av radiatorn helt förutom att stänga av strömbrytarna också dra ur
stickproppen för att undvika att kopplingsuret går i onödan.
35
Page 36

5. UNDERHÅLL
Den oljefyllda elradiatorn fordrar inget särskilt underhåll. Det räcker att damma av den med en mjuk och torr
trasa. Rengör den bara när det är kall. Använd aldrig skurpulver med slipverkan eller lösningsmedel.
Avlägsna eventuella smutsansamlingar med dammsugare om så erfordras.
6. SÄKERHETSFÖRESKRIFTER
- Använd inte radiatorn i badrum eller i omedelbar anslutning till badkar, duschar, tvättställ eller simbas-
sänger.
- Använd inte radiatorn för att torka tvätt och låt inte elsladden vila mot varma delar.
- Använd bara radiatorn i vertikal position.
- Placera radiatorn minst 50 cm från möbler och andra föremål.
- Om elsladden är skadad ska den för att undvika fara bytas ut av tillverkaren, dennes serviceverkstad eller
annan person med motsvarande kunskaper.
- Det är helt normalt att radiatorn ger ifrån sig gnisslande ljud vid första igångsättningen.
- Radiatorn får inte placeras omedelbart under ett fast eluttag.
- Radiatorn är fylld med exakt oljemängd och eventuella reparationer som innebär att den måste öppnas
får endast utföras av tillverkaren eller av denne auktoriserad serviceverkstad. Kontakta tillverkaren eller
av denne auktoriserad serviceverkstad vid oljeläckage.
- Använd inte denna radiator i rum som är mindre än 4 m
2
.
- Följ bestämmelserna för avfallshantering av olja om du ska skrota radiatorn.
- Lägg inte sladden på radiatorn när den fortfarande är varmt.
- Täck inte över radiatorn när den är igång.
- Använd helst inte förlängningssladdar, eftersom de kan överhettas när radiatorn är igång.
En säkerhetsanordning stänger av radiatorn vid överhettning.
Ta ut radiatorn ur kartongen och avlägsna eventuella emballagerester som kan ha fastnat i den.
Kontakta närmaste serviceverkstad för att återställa radiatorn.
VIKTIGT: Täck aldrig över apparaten när den är igång, eftersom detta kan orsaka en farlig tem-
peraturhöjning och därmed överhettning.
VIKTIG INFORMATION FÖR EN KORREKT BORTSKAFFNING AV PRODUKTEN I ÖVERENSSTÄMMELSE MED
EUROPADIREKTIV 2002/96/EG.
Vid slutet av produktens livslängd, får den inte skaffas bort som tätortsavfall. Den kan överlämnas till loka-
la myndigheters avfallssorteringscentraler eller till en återförsäljare som ger denna service.
Att skaffa bort en hushållsmaskin undviker möjliga negativa konsekvenser för miljön och hälsan som här-
stammar från en olämplig bortskaffning och tillåter en återvinning av materialen som den består av för att
spara betydande energi och tillgångar.
Som påminnelse om att hushållsmaskiner måste skaffas bort separat, har produkten markerats med en
soptunna med ett kryss.
36
1
10
11
12
13
14
15
16
17
18
19
20
21
22
23
24
fig.5
2
4
2
3
4
5
6
7
8
9
10
1
23
2
2
21
20
1
9
18
17
1
6
1
15
14
2
1
3
1
Page 37

Lämpöpatteri on erittäin monipuolinen kotitalouksille tarkoitettu lämmityslaite, jossa on kolme eri tehotasoa. Tämän lisäksi tässä lämpöpatterissa on erityistoiminto, joka tarjoaa parhaan mahdollisen
mukavuuden kaikissa olosuhteissa. Lue käyttöohjeet huolellisesti, jotta voit käyttää lämpöpatteria
parhaalla mahdollisella tavalla.
1. YLEISTÄ
Ota laite pakkauksesta, käännä se ympäri ja aseta se polystyreenipalojen päälle.
Tarkista, etteivät sähköpatteri tai sähköjohto ole vahingoittuneet millään tavoin kuljetuksen aikana. Älä käytä
laitetta, mikäli siinä ilmenee vikoja.
2. TUKIJALKOJEN ASENNUS
Poista tukijalat ja pyörät polystyreenipakkauksesta
Aseta pyörät tukijalkojen akseliin ja paina ne loppuun saakka, kunnes ne naksahtavat paikoilleen (kuva 1).
Varmista vetämällä, että ne ovat kunnolla paikoillaan.
Asenna tukijalat pyörineen paikoilleen lämmityspatterin alaosaan asettamalla pyörien välillä olevat osat
ohjausrasian ja ensimmäisen elementin väliin sekä takimmaisen rasian ja viimeisen elementin väliin. Aseta
kaksi hammasta tarkoitukseen oleville paikoilleen ja kiinnitä tukijalka ruuvaamalla ruuvi sekä silmukkamutteri aina loppuun saakka (kuva 1).
Käännä lämmityspatteri ympäri toimenpiteen jälkeen ja aseta se pystyyn toiminta-asentoon.
Huomio: käytä ainoastaan silmukkaruuveja tukijalkojen kiinnittämiseen.
3. SEINÄÄN ASENNUS
Seinään asennusta varten olevaan asennussarjaan kuuluvat:
2 x Ylempää kannatinta (A)
1 x Alempi kannatin (B)
5 x Ruuvia
5 x Tulppaa
1. Muista seuraavat seikat patterin asennuspaikkaa valitessasi:
a. Älä asenna patteria suoraan pistorasian alapuolelle.
b. Varmista, että ulotut sekä pistotulppaan että pistorasiaan helposti asennuksen jälkeen.
c. Varmista, etteivät sähköjohdot tai muut putket pääse vahingoittumaan.
d. Varmista, että verhot ja muu helposti palava materiaali jää riittävälle etäisyydelle patterista
2. Merkitse porauspisteet huolellisesti mallinetta käyttämällä ennen porauksen aloittamista. Noudata huolel-
lisesti kuvassa 3 annettuja mittoja (D). Mitat D vaihtelevat mallin mukaan seuraavissa taulukoissa osoitetulla tavalla:
3. Yhdistä kannattimien A keskipisteet viivalla (kuvissa 3-4 se on osoitettu katkoviivalla) ja varmista, että
nämä kaksi kannatinta ovat samalla korkeudella. Merkitse tämän jälkeen porattavat reiät.
4. Käytä tiiliseinän poraukseen 6 mm sementtiporauskärkeä. Poraa reiät piirtämiesi merkkien kohdalle ja
aseta laitteen mukana toimitetut tulpat reikiin.
37
SF
1Kw
140 mm
1,5 Kw
210 mm
2 Kw
280 mm
2,5 Kw
385 mm
Malli
D
3A
Page 38

(Mikäli seinäsi on valmistettu kipsilevystä tai pinnoitettu paneelilevyllä, etsi seinän runkorakenteen pystypuut ja kiinnitä laite joko nro. 6 ruuveilla suoraan puuhun tai käytä tarkoitukseen olevia erityiskiinnittimiä. Käänny asiantuntijan puoleen, mikäli seinän rakennusmateriaali poikkeaa yllä kuvatuista.)
5. Kiinnitä kannattimet “A” reikiin mukana toimitettuja ruuveja käyttämällä.
5. Ripusta patteri kannattimilleen (kuvat 3-4)
6. Etsi alemman kannattimen “B” kiinnityspaikka siten, että se asettuu lämpöpatterin alaosan keskelle. Käytä
yhtä mukana toimitettua ruuvia reiän tarkan paikan merkitsemiseen (kuva 3).
Tämän kannatin estää lämpöpatterin tahattomat paikaltaan irtoamiset.
8. Poista lämpöpatteri kannattimilta “A” ja poraa reiät samalla tavoin, kuin kannattimille “A”. Aseta tulppa
tämän jälkeen paikoilleen. Ripusta lämpöpatteri uudelleen kannattimilleen A sen jälkeen, kun kannatin
“B” on paikoillaan ja kiinnitä se tämän jälkeen ruuveilla (kuva 3).
Lämpöpatteri on nyt kiinnitetty seinään. Älä käytä laitetta kylpyhuoneissa.
3. SÄHKÖKYTKENTÄ
-Tarkista huolellisesti ennen pistotulpan asettamista pistorasiaan, että kotitalouden verkkojännite vastaa
laitteen arvokyltissä kirjaimella V osoitettua arvoa. Varmista, että pistorasia ja verkkovirta soveltuvat
arvokyltissä mainitulle kuormitukselle.
- KYTKE LÄMPÖPATTERI AINOASTAAN RIITTÄVÄSTI MAADOITETTUUN PISTORASIAAN.
- Tämä laite vastaa sähkömagneettisia määräyksiä koskevan EU- direktiivin 89/336 vaatimuksia.
4. TOIMINTA JA KÄYTTÖ
Käynnistys
Aseta pistotulppa pistorasiaan. Käännä lämmönsäädin aina loppuun saakka maksimi- asentoon. Käynnistä
lämpöpatteri katkaisinta/katkaisimia käyttämällä kohdassa A annettujen ohjeiden mukaisesti:
Kahdella katkaisimella varustetut mallit (3 tehoa)
- yksi näppäin asennossa “l” = minimiteho (merkkivalo palaa)
- yksi näppäin asennossa “ll” = normaaliteho (merkkivalo palaa)
- kummatkin näppäimet asennossa “l” “ll” = maksimiteho (merkkivalot palavat)
Sammuta lämpöpatteri kääntämällä molemmat katkaisimet pois päältä ja irrota pistotulppa pistorasiasta.
Lämmönsäätimen säätö
Kun huoneilma on saavuttanut toivomasi lämpötilan, käännä lämmönsäätimen nuppia hitaasti aina siihen
saakka, kunnes kuulet naksahduksen. Älä käännä nuppia tämän rajan yli. Lämmönsäädin pitää näin säädetyn lämpötilan automaattisesti muuttumattomana.
Jäätymisen esto
Paina katkaisimia ja aseta lämmönsäädin asentoon , jolloin laite säilyttää huoneen lämpötilan noin 5°C
lämpöasteessa. Näin jäätymiseltä vältytään jo erittäin pienellä virrankulutuksella.
24- tunnin ajastimella (Timer) varustetut mallit
Voit ohjelmoida lämmityksen seuraavasti:
- Tarkista aika. Jos kello on esim. 10 käännä ajastimen numerolevyä myötäpäivään, kunnes siinä oleva numero
10 asettuu ajastimella olevan viiteosoittimen ▲ kohdalle (kuva 5).
- Säädä aikaväli, jolloin haluat laitteen toimivan työntämällä ajastimen hampaita sen keskiosaa kohden.
Jokainen hammas vastaa 15 min ajanjaksoa. Näin voit nähdä sektorit, jotka vastaavat laitteen toiminta-aikaa.
- Näin asetettuna lämmitin toimii automaattisesti joka päivä ohjelmoidulla aikavälillä (Tärkeää: Varmista, että pisto-
tulppa on aina pistorasiassa kiinni).
- Voit vaihtaa ohjelmointia yksinkertaisesti panemalla ajastimen hampaat alkuperäiseen asentoonsa ja asettamalla
uudet toiminta-ajat.
- Mikäli haluat käyttää laitetta ilman ajastinta, työnnä kaikki hampaat keskustaa kohden.
Tässä tapauksessa sammuta laite katkaisimia käyttämällä, mutta irrota tämän lisäksi myös pistotulppa pistorasiasta, jotta ajastimen turhalta toiminnalta vältytään.
- På denne måten vil radiatoren fungere automatisk hver dag til programmert tidspunkt (Viktig: Støpselet må alltid
stå i stikkontakten).
- For å variere programmeringen er det nok å stille tannjakkene i opprinnelig posisjon og stille inn nye dunksjon-
sperioder.
38
Page 39

- Hvis du ønsaker at apparatet skal virke uten programmering, press alle tannhakkene mot midten.
For å slå av apparatet må du, i tillegg til å slå av alle bryterne, ta ut støpselet av stikkontakten for å unngå at programmatoren virker til ingen nyte.
5. HUOLTO
Lämpöpatteri ei kaipaa erityisiä huoltotoimenpiteitä. Voit pyyhkiä sen pinnalle kertyneen pölyn yksinkertaisesti pehmeällä ja kuivalla pyyhkeellä. Älä puhdista laitetta koskaan hankaavilla jauheilla tai liuottimilla.
Poista kerääntynyt pöly tarvittaessa pölynimurilla.
6. VAROITUKSIA
- Älä koskaan käytä lämpöpatteria kylpyhuoneessa tai kylpyammeiden, pesualtaiden, suihkujen tai uima-
altaiden läheisyydessä.
- Älä kuivaa pyykkiä lämpöpatterin päällä. Älä aseta sähköjohtoa koskaan kuuman patterin päälle.
- Käytä laitetta ainoastaan pystyasennossa.
- Sijoita lämpöpatteri vähintään 50 cm etäisyydelle huonekaluista tai muista kohteista.
- Anna valmistajan, sen valtuuttaman teknisen huoltoliikkeen tai ammattitaitoisen henkilön vaihtaa rikkou-
tunut sähköjohto. Näin vältyt turhilta riskeiltä.
- Ensimmäisen käytön aikana laitteesta kuuluva rätisevä ääni on täysin normaalia.
- Laitetta ei saa asettaa suoraan kiinteän pistorasian alapuolelle.
- Tämän lämpöpatterin säiliön sisältämä öljyn määrä on laskettu tarkoin. Tämän vuoksi kaikki laitteen
avaamista vaativat korjaukset saavat suorittaa ainoastaan valmistaja tai sen valtuuttama huoltoliike. Ota
yhteys valmistajaan tai sen valtuuttamaan huoltoliikkeeseen, jos öljyä vuotaa.
- Älä käytä tätä laitetta tiloissa, joiden pinta-ala on alle 4 m
2
.
- Noudata laitteen mahdollisen romutuksen yhteydessä öljyn hävitystä koskevia määräyksiä.
- Älä aseta sähköjohtoa kuuman laitteen päälle.
- Älä koskaan peitä laitetta millään tavoin toiminnan aikana.
- Emme suosittele jatkojohtojen käyttöä, sillä ne saattavat kuumua liikaa lämpöpatterin käytön aikana.
Tur valaite sammuttaa lämpöpatterin tahattoman ylikuumenemisen yhteydessä.
Ota yhteys lähimpään huoltopalveluun, joka voi palauttaa patterin toiminnan.
TÄRKEÄÄ: Ylikuumenemisen välttämisen kannalta on tärkeää, ettet missään tapauksessa peitä
laitetta käytön aikana, sillä tämä saattaisi nostaa sen lämpötilan vaarallisen korkeaksi.
TÄRKEITÄ OHJEITA TUOTTEEN HÄVITTÄMISEEN EUROOPAN UNIONIN DIREKTIIVIN 2002/96 MUKAISESTI.
Tuotetta ei saa hävittää yhdessä tavallisten kotitalousjätteiden kanssa sen lopullisen käytöstä poi-
ston yhteydessä.
Vie se paikallisten viranomaisten hyväksymään kierrätyskeskukseen tai anna se jälleenmyyjän
hävitettäväksi, mikäli kyseinen palvelu kuuluu jälleenmyyjän toimialaan. Suojelet luontoa ja vältyt
virheellisen tai väärän romutuksen aiheuttamilta terveysriskeiltä, mikäli hävität kodinkoneen eril-
lään muista jätteistä. Näin myös kodinkoneen sisältämät kierrätettävät materiaalit voidaan kerätä
talteen, jolloin säästät energiaa ja luonnonvaroja.
Tuotteessa on ristillä peitetty roskasäiliön merkki, jonka tarkoituksena on muistuttaa että kodinko-
neet on hävitettävä erikseen muista kotitalousjätteistä.
39
10
11
12
13
14
15
16
17
18
19
20
21
22
23
24
Kuva 5
1
2
4
2
3
4
5
6
7
8
9
10
23
2
2
21
20
1
9
18
17
1
6
1
1
15
14
2
1
3
1
Page 40

Elektrick˘ radiátor je spotfiebiã urãen˘ k vytápûní domácnosti. Je velmi úãeln˘ a praktick˘ se tfiemi nastaviteln˘mi v˘kony vytápûní. Tento spotfiebiã je mimo jiné vybaven˘ exkluzívní funkcí, která Vám
zaruãí maximální pohodlí v jakékoli situaci.
K maximálnímu vyuÏití moÏností tohoto spotfiebiãe Vám doporuãujeme si peãlivû pfieãíst ve‰keré zde
uvedené pokyny k pouÏití.
1. V·EOBECNÙ
Spotfiebiã vybalte z obalu, obraÈte ho vzhÛru nohama a postavte na ochranné obalové kusy z polystyrénu.
Zkontrolujte, zda pfiípojn˘ kabel a radiátor jsou celistvé a zda se bûhem dopravy nepo‰kodily. Radiátor
nepouÏívejte, pokud je po‰kozen˘.
2. MONTÁÎ NOÎEK
Z polystyrénového obalu vyjmûte noÏky a koleãka.
Koleãka nasaìte na ãep noÏky a zatlaãte na doraz, dokud neusly‰íte klapnutí (obr. 1). Tahem za koleãko se
pfiesvûdãte, zda jsou koleãka dobfie upevnûná.
NoÏky s koleãky namontujte na spodní stranu radiátoru tak, Ïe jednu noÏku nasadíte do meziprostoru mezi
prvním Ïebrem a ovládacím panelem a druhou do prostoru mezi posledním Ïebrem a zadním panelem
pfiiãemÏ musíte nasunout dva v˘stupky do pfiíslu‰n˘ch otvorÛ a noÏku upevníte ‰roubem s okem. Za‰roubujte na doraz (obr. 1).
Potom postavte radiátor na noÏky tj. do svislé provozní polohy.
K upevnûní noÏek slouÏí pouze ‰rouby s oãkem.
3. INSTALACE NA ZEë
Sada k upevnûní na zeì obsahuje:
2 ks horní úchyty (A)
1 ks dolní úchyt (B)
5 ks ‰rouby
5 ks hmoÏdinky
1. Zvolte místo, na které chcete spotfiebiã instalovat a zkontrolujte následující body:
a. Nesmí se nacházet pfiímo pod zásuvkou elektrického proudu.
b. Zásuvka el. proudu, do které se bude zapojovat zástrãka spotfiebiãe musí b˘t po instalaci snadno
dostupná.
c. V místû vrtání otvorÛ pro upevnûní spotfiebiãe se nesmí nacházet el. vedení nebo jiné potrubí.
d. Záclony, závûsy nebo jin˘ hofilav˘ materiál se nesmí nacházet v blízkosti radiátoru.
2. Pfied vrtáním do zdi si nejdfiíve vyznaãte pfiesnou polohu otvorÛ podle ‰ablony, která musí odpovídat
rozmûrÛm (D obr. 3), které se li‰í v závislosti na modelu, viz tabulka 3A:
3. Stfied úchytÛ A se musí kr˘t s ãarou (oznaãenou na obr. 3/4 pfieru‰ovanou ãarou). Pfiesvûdãte se, zda
jsou oba úchyty ve stejné v˘‰ce a vyznaãte si body, ve kter˘ch vyvrtáte díry.
4. Na cihlovou zeì pouÏijte vrták na beton o prÛmûru 6 mm a vyvrtejte otvory v místech, které jste si oznaãili dfiíve. Do otvorÛ zasuÀte hmoÏdinky dodané spolu s v˘robkem.
(U sádrokartonu nebo u stûn s obloÏením doporuãujeme, abyste se snaÏili zjistit polohu dfievûn˘ch
sloupkÛ a pouÏít pfiímo ‰rouby do dfieva o prÛmûru 6 mm nebo specifick˘ch úchytÛ. U zdí z jin˘ch materiálÛ doporuãujeme, abyste poÏádali o radu zku‰eného odborníka).
5. Úchyty “A” za‰roubujte ke zdi ‰rouby dodan˘mi spolu s v˘robkem.
40
CZ
1Kw
140 mm
1,5 Kw
210 mm
2 Kw
280 mm
2,5 Kw
385 mm
Model
D
3A
Page 41

6. Zavûste radiátor na úchyty (obr.3/4).
7. Spodní úchyt (B) nasaìte na spodní stranu radiátoru tak, aby se nacházel uprostfied. Vyznaãte si pfiesnou
polohu otvoru (obr. 3), pouÏijte ‰rouby dodané spolu s v˘robkem.
Tento úchyt zabrání náhodnému odstranûní radiátoru.
8. Radiátor sundejte z úchytÛ A a vyvrtejte otvor podle shora uveden˘ch pokynÛ pro vyvrtání dûr pro úchyty
A. Do otvoru zasuÀte hmoÏdinku. Radiátor s nasazen˘m úchytem B zavûste na úchyty A a upevnûte ‰roubem úchyt B (obr. 3).
Radiátor je nyní upevnûn na stûnu.
NepouÏívejte radiátor v koupelnách.
3. ELEKTRICKÉ ZAPOJENÍ
- NeÏ zapojíte zástrãku pfiípojného kabelu do zásuvky el. proudu pfiekontrolujte peãlivû, zda napûtí rozvodu el. proudu ve Va‰í domácnosti odpovídá napûtí uvedenému ve Voltech na spotfiebiãi a zda jsou
zásuvka a vedení dimenzované na poÏadované zatíÏení.
- SPOT¤EBIâ ZAPOJUJTE POUZE DO ZÁSUVKY S V¯KONN¯M UZEMNùNÍM.
- Tento v˘robek je v souladu se smûrnicí EHS 89/336 a s nafiízením vlády ã. 476/92 o elektromagnetické
kompatibilitû.
4. FUNGOVÁNÍ A POUÎÍVÁNÍ
Zapnutí
Zástrãku pfiípojného kabelu zapojte do zásuvky el. proudu, termostat posuÀte aÏ na doraz do polohy maxima. Zapnûte radiátor prostfiednictvím tlaãítka/tlaãítek.
Modely s dvojím vypínaãem (3 v˘kony)
- stisknuté tlaãítko “l” = minimální v˘kon (rozsvícená svûtelná kontrolka)
- stisknuté tlaãítko “lI” = stfiední v˘kon (rozsvícená svûtelná kontrolka)
- stisknutá obû tlaãítka “l” “lI” = maximální v˘kon (rozsvícené svûtelné kontrolky)
K vypnutí radiátoru musí b˘t oba vypínaãe nastavené na “0” a potom vytáhnûte zástrãku pfiípojného kabelu ze zásuvky el. proudu.
Nastavení termostatu
V okamÏiku, kdy teplota prostfiedí dosáhne Vámi poÏadované teploty, otáãejte pozvolna termostatem, dokud
neusly‰íte “klapnutí”, dbejte na to, abyste neotáãeli dále. Takto nastavenou teplotou se bude dále termostat
fiídit a bude ji nepfietrÏitû udrÏovat.
Protizámrazová funkce
Nastavíte-li koleãko termostatu do polohy se stlaãen˘mi tlaãítky, spotfiebiã bude udrÏovat teplotu prostfiedí
okolo 5°C. Zabrání se tím zamrznutí pfii minimální spotfiebû energie.
Modely s programátorem (ãasov˘ spínaã) 24 hodin
Pfii naprogramování vytápûní postupujte následovnû:
- Pfiedpokládejme, Ïe Va‰e hodinky ukazují 10 hodin. Otoãte ãíselníkem ãasového spínaãe tak, aby se ãíslo
10 krylo ▲ ukazatelem vyraÏen˘m kotouãi.
- Nastavte ãasové úseky, ve kter˘ch si pfiejete aby spotfiebiã fungoval tak, Ïe zoubky na spínaãi zatlaãíte
smûrem dovnitfi.
KaÏd˘ zoubek pfiedstavuje 15 minut.
Na ãasovém spínaãi budou nyní viditelné úseky, které pfiedstavují dobu fungování radiátoru.
- Takto nastaven˘ radiátor se kaÏdodennû uvede automaticky do provozu v naprogramovaném ãase
(dÛleÏité: zástrãka pfiípojného kabelu musí b˘t stále zapojena do zásuvky el. proudu).
- Chcete-li zmûnit nastavené ãasy, staãí uvést zoubky ãasového spínaãe do pÛvodního stavu a nastavit
novou dobu fungování spotfiebiãe.
- Pokud chcete, aby spotfiebiã fungoval bez naprogramování, zatlaãte v‰echny zoubky ãasového spínaãe
smûrem dovnitfi.
Pokud chcete spotfiebiã vypnout úplnû, nestaãí v tomto pfiípadû pouze vypnout vypínaãe na spotfiebiãi, ale
musíte vytáhnout i zástrãku pfiípojného kabelu ze zásuvky el. proudu. Jinak by ãasov˘ spínaã byl zbyteãnû v provozu.
41
Page 42

5. ÚDRÎBA
Elektrick˘ radiátoru s olejovou náplní nevyÏaduje zvlá‰tní údrÏbu. Staãí obvyklé utfiení prachu z povrchu
spotfiebiãe mûkk˘m a such˘m hadfiíkem. V Ïádném pfiípadû se nesmí pouÏívat prá‰kové ãistící prostfiedky
nebo rozpou‰tûdla. V pfiípadû potfieby mÛÏete nános neãistoty vysát vysavaãem.
6. UPOZORNùNÍ
- Je zakázáno pouÏívat radiátor v koupelnû nebo v blízkosti van, umyvadel, sprch nebo bazénÛ.
- V Ïádném pfiípadû nepouÏívejte radiátor k su‰ení prádla. Nepokládejte pfiípojn˘ kabel spotfiebiãe na
horké ãástí radiátoru.
- PouÏívejte radiátor pouze ve svislé poloze.
- Spotfiebiã musí b˘t umístûn˘ tak, aby mezi spotfiebiãem a nábytkem nebo jin˘mi pfiedmûty bylo alespoÀ
50 cm volného místa.
- Je-li pfiípojn˘ kabel po‰kozen˘, nechte jej vymûnit v˘robcem, v servisním stfiedisku povûfieném v˘robcem
anebo kvalifikovan˘m odborníkem. Zabráníte tak ve‰kerému riziku.
- Je moÏné, Ïe pfii prvním spu‰tûní spotfiebiãe usly‰íte “praskání”, tento jev je zcela normální.
- Spotfiebiã se nesmí instalovat pfiímo pod pevnou zásuvku el. proudu.
- Spotfiebiã je naplnûn˘ pfiesn˘m mnoÏstvím oleje a jak˘koli druh oprav, pfii kterém je nutné spotfiebiã
otevfiít, musí tudíÏ provádût v˘hradnû v˘robce nebo servisní stfiedisko v˘robce. V pfiípadû, Ïe ze
spotfiebiãe kape olej, obraÈte se na v˘robce nebo na servisní stfiedisko v˘robce.
- Tento spotfiebiã se mÛÏe pouÏívat pouze v prostorech se základní plochou nad 4 m
2
.
- Pfii demolici spotfiebiãe je nutné jednat v souladu se zákonem o odstraÀování olejÛ.
- Nepokládejte pfiípojn˘ kabel na je‰tû hork˘ spotfiebiã.
- V Ïádném pfiípadû a z Ïádného dÛvodu nepfiikr˘vejte spotfiebiã pokud je v provozu.
- Nedoporuãuje se pouÏívání prodluÏovací ‰ÀÛry vzhledem k tomu, Ïe by se mohla pfii pouÏívání
spotfiebiãe pfiehfiát.
- Vyjmûte spotfiebiã z obalu a oãistûte jej peãlivû od pfiípadn˘ch zbytkÛ obalu, které se mohly uchytit ve
spotfiebiãi.
Spotfiebiã vybalte z obalu a pfiesvûdãte se, aby v radiátoru nezÛstaly zaklesnuté zbytky obalového materiálu.
Spotfiebiã je vybaven˘ bezpeãnostním zafiízením, které radiátor v pfiípadû náhodného pfiehfiátí vypne.
K obnovení provozu spotfiebiãe se musíte obrátit na nejblíωí servisní stfiedisko.
DÒLEÎITÉ: Aby se pfiede‰lo pfiehfiívání, nesmí b˘t spotfiebiã bûhem provozu v Ïádném pfiípadû
zakr˘ván, vzhledem k tomu, Ïe takto by do‰lo k nebezpeãnému zv˘‰ení teploty.
INFORMACE PRO SPRÁVNÉM SE‰ROTOVÁNÍ V˘ROBKU VE SMYSLU EVROPSKÉ SMÛRNICE 2002/96
Po ukonãení doby své Ïivotnosti nesmí b˘t v˘robek odklizen spoleãnû s domácím odpadem. Je
tfieba zabezpeãit jeho odevzdání na specializovaná místa sbûru tfiídûného odpadu, zfiizovan˘ch
mûstskou správou anebo prodejcem, kter˘ zabezpeãuje tuto sluÏbu. Oddûlené se‰rotování elektrospotfiebiãÛ je zárukou prevence negativních vlivÛ na Ïivotní prostfiedí a na zdraví, které
zpÛsobuje nevhodné nakládání, umoÏÀuje recyklaci jednotliv˘ch materiálÛ a tím i v˘znamnou
úsporu energií a surovin. Pro úãely zdÛraznûní povinnosti tfiídûného sbûru odpadu
elektrospotfiebiãÛ je na v˘robku za‰krtnut˘ pfiíslu‰n˘ symbol pro sbûr tfiídûného odpadu.
42
1
10
11
12
13
14
15
16
17
18
19
20
21
22
23
24
fig.5
2
4
2
3
4
5
6
7
8
9
10
23
2
2
21
20
1
9
18
17
1
6
1
1
15
14
2
1
3
1
Page 43

Grzejnik jest niezwykle wszechstronnym urzàdzeniem do ogrzewania pomieszczeƒ mieszkalnych o
trzech poziomach mocy do wyboru. Produkt ten zaopatrzony jest ponadto w unikalnà funkcj´, która
zapewnia najwy˝szy komfort u˝ytkowania w dowolnej sytuacji.
Aby wykorzystaç mo˝liwoÊci urzàdzenia do maksimum, radzimy dok∏adne zapoznanie si´ z poni˝szà
instrukcjà obs∏ugi.
1. UWAGI OGÓLNE
Wyjàç urzàdzenie z opakowania i ustawiç do góry nogami na zabezpieczeniach ze styropianu.
Sprawdziç, czy przewód zasilajàcy i urzàdzenie nie zosta∏y uszkodzone podczas transportu. Nie uruchamiaç urzàdzenia, je˝eli oka˝e si´ uszkodzone.
2. MONTA˚ NÓ˚EK
Wyjàç nó˝ki i kó∏ka z opakowania ze styropianu.
Nasadziç kó∏ka na trzpieƒ nó˝ki i docisnàç a˝ do us∏yszenia charakterystycznego “klikni´cia” (rys. 1).
Pociàgnàç za kó∏ka, aby upewniç si´, ˝e sà dobrze za∏o˝one.
Zamontowaç nó˝ki z kó∏kami na dolnej cz´Êci grzejnika, umieszczajàc prowadnice pomi´dzy puszkà
poleceƒ a pierwszym elementem oraz puszkà tylnà a ostatnim elementem; osadziç dwa zàbki w przeznaczonych na nie naci´ciach i zablokowaç nó˝k´ przykr´cajàc jà wkr´tem mocujàcym do oporu (rys. 1).
Po zakoƒczeniu tych czynnoÊci odwróciç grzejnik do pozycji stojàcej, w jakiej nale˝y go uruchamiaç.
Uwaga: do blokowania nó˝ek s∏u˝à wy∏àcznie wkr´ty z oczkiem.
3. MONTA˚ NA ÂCIANIE
Zestaw do monta˝u na Êcianie powinien zawieraç:
2 x wsporniki górne (A)
1 x wspornik dolny (B)
5 x Êrub
5x wk∏adek
1. Wybraç miejsce na zainstalowanie grzejnika upewniajàc si´, ˝e:
a. Nie znajduje si´ ono bezpoÊrednio pod gniazdkiem wtyczkowym.
b. Zarówno wtyczka jak i gniazdko b´dà ∏atwo dost´pne po zainstalowaniu urzàdzenia.
c. Przewodom elektrycznym lub rurom nie grozi uszkodzenie.
d. Firanki, zas∏ony i inne materia∏y ∏atwopalne znajdujà si´ z dala od urzàdzenia.
2. Przed wywierceniem dziur w Êcianie nale˝y precyzyjnie zaznaczyç ich miejsce przestrzegajàc wymiarów (D)
podanych na rys. 3A; wymiar (D) zmienia si´ w zale˝noÊci od modelu jak podano w poni˝szej tabeli:
3. Wyznaczyç lini´ prostà pomi´dzy Êrodkami wsporników A ( na rys. 3/4 odpowiada jej linia przerywana) upewniajàc si´, ˝e obydwa wsporniki znajdujà si´ na tej samej wysokoÊci, nast´pnie zaznaczyç
otwory do wywiercenia.
4. W Êcianych z ceg∏y nale˝y u˝ywaç wiert∏a do cementu 6 mm, wykonaç otwory w miejscach uprzednio
zaznaczonych, po czym za∏o˝yç w otworach wk∏adki dostarczone wraz z urzàdzeniem.
(W przypadku p∏yt gipsowych lub paneli sugerujemy odnalezienie ich drewnianych wsporników i zastosowanie Êrub do drewna rozm. 6 lub innych przeznaczonych do tych materia∏ów. W przypadku innych
rodzajów Êcian zwróciç si´ o pomoc do specjalisty.
43
PL
1Kw
140 mm
1,5 Kw
210 mm
2 Kw
280 mm
2,5 Kw
385 mm
Modell
D
3A
Page 44

5. Przymocowaç wsporniki do Êciany “A” Êrubami dostarczonymi wraz z urzàdzeniem w uprzednio wykonanych otworach.
6. Zawiesiç grzejnik na wspornikach (rys. 3/4)
7. UmieÊciç wspornik dolny (B) we w∏aÊciwym po∏o˝eniu zak∏adajàc go po Êrodku dolnej cz´Êci urzàdzenia; wykorzystaç jednà z dostarczonych wraz z urzàdzeniem Êrub do zaznaczenia miejsca na otwór
(rys. 3).
Wspornik ten zapobiega przypadkowemu odczepieniu si´ urzàdzenia.
8. Zdjàç grzejnik ze wsporników A i wykonaç otwór tak jak wyjaÊniono powy˝ej dla otworów wspornika
A; nast´pnie za∏o˝yç wk∏adk´. Grzejnik ponownie umieÊciç na wspornikach A i za∏o˝ywszy wspornik B
przymocowaç go Êrubà (rys. 3).
W ten sposób grzejnik zosta∏ przymocowany do Êciany.
Nie u˝ywaç urzàdzenia w ∏azienkach.
3. POD¸ÑCZENIE DO PRÑDU
- Przed w∏o˝eniem wtyczki do gniazdka nale˝y uwa˝nie sprawdziç, czy napi´cie domowej sieci elektrycznej odpowiada wartoÊci podanej na urzàdzeniu oraz, czy gniazdko i linia zasilajàca posiadajà
wymaganà obcià˝alnoÊç.
- GRZEJNIK POD¸ÑCZAå JEDYNIE DO GNIAZDEK WYPOSA˚ONYCH W SPRAWNIE DZIA¸AJÑCE
UZIEMIENIE.
- Urzàdzenie zgodne jest z dyrektywà 89/336/CEE oraz dekretem D.M. 476/92 o kompatybilnoÊci elektromagnetycznej.
4. DZIA∏ANIE I SPOSÓB U˚YCIA
W∏àczenie
W∏o˝yç wtyczk´ do gniazdka; nastawiç termostat na maksimum przesuwajàc go do oporu, po czym w∏àczyç
grzejnik za pomocà w∏àcznika/ w∏àczników.
Modele z podwójnym w∏àcznikiem (3 poziomy mocy)
- tylko jeden przycisk w po∏o˝eniu “I” = moc minimalna (pali si´ lampka kontrolna)
- tylko jeden przycisk w po∏o˝eniu “II” = moc Êrednia (pali si´ lampka kontrolna)
- obydwa przyciski w po∏o˝eniu “I” „II” = moc maksymalna (palà si´ obydwie lampki)
Aby wy∏àczyç urzàdzenie, nale˝y wy∏àczyç obydwa w∏àczniki i wyjàç wtyczk´ z gniazdka.
Regulacja termostatu
Kiedy pomieszczenie osiàgnie ˝àdanà temperatur´, przesunàç powoli termostat a˝ do po∏o˝enia, które
zasygnalizuje „klikni´cie”, lecz nie dalej. Nastawiona w ten sposób temperatura b´dzie automatycznie regulowana i utrzymywana na sta∏ym poziomie przez termostat.
Zapobieganie zamro˝eniu
Z termostatem w pozycji i naciÊni´tymi wy∏àcznikami urzàdzenie utrzymuje temperatur´ oko∏o 5 stopni, uniemo˝liwiajàc zamarzni´cie przy minimalnym zu˝yciu energii.
Modele z programatorem (Timer) 24 godz.
Aby zaprogramowaç ogrzewanie, nale˝y post´powaç w nast´pujàcy sposób:
- bie˝àcà godzin´. JeÊli jest np. godzina 10:00, przekr´caç w kierunku zgodnym z ruchem wskazówek
zegara ponumerowane pokr´t∏o programatora dopóki zaznaczona na nim cyfra 10 nie zrówna si´ z
odpowiednià podzia∏kà ▲ zaznaczonà na programatorze (rys.5).
- Nastawiç przedzia∏y czasu, w których chcemy, aby urzàdzenie dzia∏a∏o, przesuwajàc zàbki ku
Êrodkowi.
Ka˝dy zàbek odpowiada przedzia∏owi czasu o d∏ugoÊci 15 min. W ten sposób ods∏oni´te zostanà sektory odpowiadajàce okresom funcjonowania urzàdzenia.
- Nastawiony w ten sposób grzejnik b´dzie dzia∏a∏ automatycznie ka˝dego dnia w zaprogramowanym
czasie (Uwaga: wtyczka musi zawsze znajdowaç si´ w gniazdku).
- Aby zmieniç zaprogramowanie, wystarczy przesunàç zàbki do poczàtkowego po∏o˝enia i nastawiç
nowe okresy czasu dzia∏ania.
Je˝eli urzàdzenie ma dzia∏aç bez programowania, nale˝y przesunàç wszystkie zàbki do Êrodka.
44
Page 45

W tym wypadku, aby ca∏kowicie wy∏àczyç urzàdzenie, nale˝y nie tylko wy∏àczyç w∏àczniki, ale tak˝e wyjàç
wtyczk´ z gniazdka; unikniemy w ten sposób bezcelowego dzia∏ania programatora.
5. KONSERWACJA
Elektryczny grzejnik olejowy nie wymaga szczególnej konserwacji. Wystarczy odkurzaç go mi´kkà i suchà
Êciereczkà. CzyÊciç tylko wtedy, gdy urzàdzenie jest zimne. Nigdy nie u˝ywaç proszków Êciernych ani rozpuszczalników. Gdy nagromadzi si´ znaczna iloÊç brudu, czyÊciç przy pomocy odkurzacza.
6. OSTRZE˝ENIA
- Nie u˝ywaç grzejnika w ∏azienkach lub w bezpoÊrednim sàsiedztwie wanien, pryszniców, zlewów i
basenów.
- Nie u˝ywaç grzejnika do suszenia bielizny; nie opieraç przewodu zasilajàcego na jego nagrzanych elementach.
- grzejnika tylko i wy∏àcznie w pozycji stojàcej.
- Urzàdzenie musi si´ znajdowaç co najmniej 50cm od mebli lub innych przedmiotów.
- Je˝eli przewód zasilajàcy jest uszkodzony, aby uniknàç wszelkiego ryzyka, nale˝y zleciç jego wymian´
jedynie producentowi, autoryzowanemu przez niego punktowi napraw lub technikowi o odpowiednich
kwalifikacjach
- Jest rzeczà ca∏kowicie normalnà, ˝e urzàdzenie wydaje trzeszczàce dêwi´ki przy pierwszym rozpocz´ciu u˝ytkowania.
- Urzàdzenie nie powinno si´ znajdowaç bezpoÊrednio pod sta∏ym gniazdkiem wtyczkowym.
- Urzàdzenie zawiera dok∏adnie odmierzonà iloÊç oleju, dlatego wszelkie naprawy wymagajàce jego
otwarcia powinny byç wykonywane jedynie przez producenta lub autoryzowany przez niego punkt
napraw. W przypadku wyciekania oleju nale˝y skontaktowaç si´ z producentem lub autoryzowanym
punktem napraw.
- Nie u˝ywaç urzàdzenia w pomieszczeniach o powierzchni pod∏ogowej mniejszej ni˝ 4 m
2
.
- W przypadku pozbywania si´ urzàdzenia nale˝y przestrzegaç przepisów dotyczàcych pozbywania si´
oleju.
- Nie opieraç przewodu na nagrzanym urzàdzeniu.
- Nie przykrywaç urzàdzenia podczas funkcjonowania.
- Nie zaleca si´ u˝ywania przed∏u˝aczy, poniewa˝ mogà si´ one przegrzaç podczas funkcjonowania
urzàdzenia.
- Wyjmujemy kaloryfer z opakowania i usuwamy ewentualne pozosta∏oÊci, które mog∏y si´ przedostaç
doƒ do Êrodka.
Bezpiecznik wewn´trzny przerwie dzia∏anie grzejnika w razie przypadkowego przegrzania.
Aby przywróciç urzàdzenie do dzia∏ania, nale˝y skontaktowaç si´ z najbli˝szym punktem napraw.
WA˚NE: Aby uniknàç przegrzania, w ˝adnym wypadku nie nale˝y przykrywaç urzàdzenia w
trakcie dzia∏ania, poniewa˝ mog∏oby to spowodowaç niebezpieczny wzrost temperatury.
UWAGI DOTYCZÀCE PRAWID∏OWEGO USUWANIA PRODUKTU ZGODNIE Z DYREKTYWÀ EUROPEJSKÀ
2002/96/EC.
Na koniec okresu u˝ytecznoÊci produktu nie nale˝y wyrzucaç do odpadów miejskich.
Mo˝na go dostarczyç do odpowiednich oÊrodków segregujàcych odpady przygotowanych przez
w∏adze miejskie lub do jednostek zapewniajàcych takie us∏ugi.Osobne usuwanie sprz´tu AGD
pozwala uniknàç negatywnych skutków dla Êrodowiska naturalnego i zdrowia z powodu jego
nieodpowiedniego usuwania i umo˝liwia odzyskiwanie materia∏ów, z których jest z∏o˝ony, w
celu uzyskania znaczàcej oszcz´dnoÊci energii i zasobów.
Na obowiàzek osobnego usuwania sprz´tu AGD wskazuje umieszczony na produkcie symbol
przekreÊlonego pojemnika na Êmieci.
45
10
11
12
13
14
15
16
17
18
19
20
21
22
23
24
fig.5
1
2
4
2
3
4
5
6
7
8
9
10
23
2
2
21
20
1
9
18
17
1
6
1
1
15
14
2
1
3
1
Page 46

Ez a radiátor háztartási használatra való, nagyon sokoldalú, három teljesítményszintre
állítható fűtőkészülék. Emellett a berendezésbe egy exkluzív funkció is be lett építve, amellyel
bármilyen helyzetben a legjobb komfortérzést lehet biztosítani.
A termék által nyújtott szolgáltatások teljes kihasználása érdekében azt tanácsoljuk, hogy
figyelmesen olvassa el a következő útmutatót.
1. ÁLTALÁNOS TUDNIVALÓK
Vegye ki a készüléket a csomagolódobozból és a polisztirol védőburkolatra támasztva fordítsa a fejére
a radiátort.
Ellenőrizze a tápvezeték épségét, valamint azt, hogy a készülék nem sérült-e meg a szállítás során. Ne
üzemeltesse a készüléket, ha azon valami megsérült.
2. A TARTÓLÁBAK FELSZERELÉSE
Vegye ki a tartólábakat és a görgőket a polisztirol csomagolásból.
Illessze a görgőket a tartóláb csapjába és nyomja be egészen addig, amíg egy kattanás nem hallatszik
(1. ábra). A görgők meghúzása révén győződjön meg azok megfelelő rögzítéséről.
Szerelje fel a görgőkkel ellátott tartólábakat a radiátor alsó részére úgy, hogy azokat a kapcsolódoboz
és az első radiátor-elem, valamint a hátsó doboz és a utolsó radiátor-elem közé helyezi; a 2 fogat
illessze be jól a helyére és a fülescsavar teljes becsavarásával rögzítse a tartólábat (1. ábra).
Ezeknek a műveleteknek a befejezése után fordítsa meg a radiátort és állítsa vissza a függőleges
üzemelési helyzetbe.
Figyelem! Csak a szemescsavarokra van szükség a tartólábak rögzítéséhez.
3. FALRA SZERELÉS
A gyári csomagolásban található szerelési készletben a következő tartozékokat találja:
2 x Felső konzol (A)
1 x Alsó konzol (B)
5 x Csavar
5 x Tipli
1. Válassza ki a falon a helyet, ahova fel akarja szerelni a radiátort és győződjön meg, hogy
a. kiválaszott pont nincs közvetlenül egy elektromos csatlakozóaljzat alatt.
b. a felszerelés után mind a villásdugó mind a csatlakozóaljzat könnyen elérhető marad.
c. a szerelésnél nem sérülnek meg elektromos vezetékek és egyéb csövek.
d. a függönyök vagy más gyúlékony anyagok megfelelő távolságban vannak a radiátortól.
2. A fal kifúrása előtt egy sablon segítségével a jelzett méretek (D, 3. ábra) alapján pontosan jelölje ki
a felfüggesztési pontokat. A D méret értékei a radiátor típusának megfelelően változnak a 3A
táblázatban látható módon:
3. Állítsa egy vonalba az A konzolok középpontját (a 3/4. ábrán szaggatott vonallal jelzett módon),
győződjön meg, hogy a két konzol egy magasságban található, majd jelölje ki a furatok helyét.
4. Téglafalak esetében 6 mm-es fúróhegyet használva fúrja ki a falat a kijelölt pontokon, majd illessze
a furatokba a tartozékok között található tipliket.
(Gipszkarton falaknál tanácsos megkeresni a fagerendázatot, majd 6-os facsavarok segítségével a
készüléket közvetlenül a fához erősíteni vagy speciális gipszkarton rögzítőelemeket használni.
Bármilyen más típusú fal esetén kérje ki egy szakember tanácsát.)
46
H
1Kw
140 mm
1,5 Kw
210 mm
2 Kw
280 mm
2,5 Kw
385 mm
Modell
D
3A
Page 47

5. Erősítse fel az ”A” fali konzolokat a furatokba a tartozékok között található csavarokkal.
6. Akassza fel a konzolokra a radiátort (3/4. ábra).
7. Határozza meg az alsó konzol (B) rögzítési helyét úgy, hogy a konzolt a készülék aljának közepére
illeszti. A tartozékok között található egyik csavar segítségével jelölje meg a furat pontos helyét (3.
ábra).
Ez a konzol megakadályozza a radiátor véletlenszerű elmozdulását.
8. Vegye le a radiátort az A konzolokról és az A konzolhoz tartozó furatokhoz hasonlóan fúrja ki a
rögzítési helyet és illessze be a tiplit. Akassza vissza a radiátort a beillesztett B konzollal együtt az
A konzolokra, majd rögzítse a csavarral a konzolt (3. ábra).
Ekkor a radiátor a falra van erősítve.
A radiátort ne használja a fürdőszobában.
3. ELEKTROMOS BEKÖTÉS
- A készülék villásdugójának az elektromos csatlakozóaljzatba való illesztése előtt győződjön meg,
hogy a hálózati feszültség értéke megegyezik a készüléken V-ban feltüntetett értékkel, valamint az
elektromos csatlakozóaljzat és a tápvezeték típusa megfelel a kívánt terhelésnek.
- A RADIÁTORT CSAK MEGFELELŐ ÉS HATÉKONY FÖLDELÉSSEL RENDELKEZŐ
CSATLAKOZÓALJZATHOZ KAPCSOLJA.
- Ez a készülék megfelel az elektromágneses összeférhetőségre vonatkozó 89/336. CEE irányelvnek
és a 476/92. Miniszteri Rendeletnek.
4. MŰKÖDÉS ÉS HASZNÁLAT
Bekapcsolás
Illessze a villásdugót az elektromos csatlakozóaljzatba; helyezze a termosztátot a maximum állásba,
teljes ütközésig; kapcsolja be a radiátort a kapcsoló/k segítségével.
Dupla kapcsolóval ellátott modellek (3 teljesítmény)
-”l” gomb benyomva = minimum teljesítmény (jelzőlámpa ég)
-”ll” gomb benyomva = közepes teljesítmény (jelzőlámpa ég)
-mindkét, azaz ”l” ”ll” gomb benyomva = maximum teljesítmény (jelzőlámpák égnek)
A készülék kikapcsolásához mindkét gombnak a ”0” állásban kell lennie, ezután pedig ki kell húzni a
villásdugót az elektromos csatlakozóaljzatból.
A termosztát beállítása
Amikor a környezet elérte a kívánt hőmérsékletet, lassú mozdulatokkal helyezze a termosztátot a ”kattanás” által jelzett állásba és ne vigye tovább. Az így beállított hőmérsékletet a termosztát ezután automatikusan szabályozni fogja és állandó szinten fogja tartani.
Fagymentesítő funkció
Ha a hőfokszabályzót beállítja és megnyomja a kapcsolókat, akkor a készülék a helyiségben kb.
5˚C-os hőmérsékletet biztosít és minimális energiafogyasztással megakadályozza a fagyást.
24 órás programozó időkapcsolóval (Timer) ellátott modellek
A fűtés beprogramozását az alábbi módon végezze:
- Nézze meg az óráján a pontos időt. Azt feltételezve, hogy 10 óra van, forgassa az időkapcsoló számozott
tárcsáját az óramutató járásával megegyező irányban addig, amíg a 10-es számjegy el nem ▲ éri az
időkapcsolóra nyomott vonatkoztatási mutatót.
-A fogak középre nyomásával állítsa be azokat az időszakokat, amelyekben azt szeretné, hogy üzemeljen a
készülék.
Minden egyes fog egy 15 perces időszaknak felel meg. Ekkor láthatóvá válnak a készülék működési
idejének megfelelő zónák.
- Az így beállított radiátor minden nap a beprogramozott időszakban fog üzemelni (Fontos, hogy a villásdugó
mindig be legyen dugva az elektromos csatlakozóaljzatba).
-A programozás megváltoztatásához a fogakat vissza kell vinni a kiindulási pozícióba, majd be kell állítani
az új üzemelési időszakokat.
- Ha a készüléket programozás nélkül kívánja üzemeltetni, az összes fogat középre kell nyomni.
47
Page 48

48
Ebben az esetben a készülék teljes kikapcsolásához a kapcsológombok kikapcsolása mellett a villásdugót
is ki kell húzni a csatlakozóaljzatból az programozó időkapcsoló felesleges működésének
kiküszöbölésére.
5. KARBANTARTÁS
Az olajjal működő villanyradiátor nem igényel különös karbantartást. Elegendő portalanítani egy
száraz, puha törlőruhával. A készüléket csak akkor tisztítsa, ha nem meleg. Sose használjon
dörzshatású, por alakú tisztítószereket vagy oldószereket. A radiátorra rakódott szennyeződés
eltávolításához használjon porszívót.
6. FONTOS TUDNIVALÓK
- Ne használja a radiátort fürdőszobában ill. fürdőkádak, mosdókagylók, zuhanyzók vagy úszómedencék
közelében.
- Ne használja ruhaszárításra a készüléket és ne helyezze a csatlakozókábelt a készülék meleg részeire.
- A radiátort mindig csak függőleges helyzetben üzemeltesse.
- A készüléket a bútoroktól vagy más tárgyaktól legalább 50 cm távolságra kell elhelyezni.
- A tápvezeték sérülése esetén a veszélyek elhárítása érdekében a sérült kábelt ki kell cseréltetni a
gyártóval, annak egy márkaszervizével vagy egy szakképzett villanyszerelővel.
- Teljesen természetes, hogy a radiátor az első bekapcsoláskor ”pattogó hangot” ad ki.
- A készüléket ne helyezze közvetlenül egy elektromos csatlakozóaljzat alá.
- A készülék egy meghatározott mennyiségű olajjal van feltöltve, ezért a készülék kinyitásával járó
javításokat kizárólag csak a Gyártó vagy annak egy Márkaszervize végezheti el. Olajszivárgás
esetén forduljon a Gyártóhoz vagy a Márkaszervizhez.
- Ne használja a készüléket 4 m
2
-nél kisebb alapterületű szobákban.
- A készülék leselejtezése esetén be kell tartani az olaj kezelésére ill. elhelyezésére vonatkozó rendelkezéseket.
- Ne támassza a csatlakozókábelt a még meleg készülékre.
- Ne fedje be működés közben a készüléket.
- Nem tanácsos hosszabbítókat alkalmazni a készülékhez, mert azok a radiátor működése közben
túlmelegedhetnek.
- Véletlen túlmelegedés esetén egy biztonsági szerkezet megszakítja a radiátor működését.
A készülék ismételt beüzemeléséhez forduljon a legközelebbi márkaszervizhez.
FONTOS! A túlmelegedés elkerülésére semmi esetre se fedje be a működésben levő
készüléket, mert az veszélyes hőmérséklet-növekedést okozhat.
A termék megfelelő módon történő hulladékkezelésére vonatkozó fontos tudnivalók a
2002/96/EC irányelv értelmében.
A hasznos élettartamának végére érkezett készüléket nem szabad a lakossági hulladékkal
együtt kezelni. A leselejtezett termék az önkormányzatok által kijelölt szelektív
hulladékgyűjtőkben (hulladékgyűjtő udvar) vagy az elhasználódott készülékek visszavételét
végző kereskedőknél adható le. Az elektromos háztartási készülékek szelektív gyűjtése és
kezelése lehetővé teszi a nem megfelelően végzett hulladékkezelésből adódó, a környeze-
tet és az egészséget veszélyeztető negatív hatások megelőzését és a készülék
alkotórészeinek újrahasznosítását, melynek révén jelentős energia- és erőforrás-
megtakarítás érhető el.
Az elektromos háztartási készülékek szelektív gyűjtésére és kezelésére vonatkozó kötele-
zettséget a terméken feltüntetett áthúzott szemétgyűjtő edény (szemeteskuka) jelzés
mutatja.
10
11
12
13
14
15
16
17
18
19
20
21
22
23
24
fig.5
1
2
4
2
3
4
5
6
7
8
9
10
23
2
2
21
20
1
9
18
17
1
6
1
1
15
14
2
1
3
1
Page 49

49
BG
Hflbfnjh(n ghtlcnfdkzdf ehtl pf ljvfiyj jnjgktybt> bprk/xbntkyj ghbcgjcj,ztv b c nhb bp,bhftvb
ybdf yf vjoyjcn. Jcdty njdf> d ehtlf t duhfltyf tlyf bprk/xbntkyf aeyrwbz> rjznj ot Db ghtljcnfdb
d(pvj;yjcnnf lf gjcnbuytnt yfq-ujkzv rjvajhn d rjznj b lf t cbnefwbz.
Pf lf ct d(pgjkpedfnt vfrcbvfkyj jn d(pvj;ybnt rfxtcndf yf Dfibz ehtl> c(dtndfvt Db lf ghjxtntnt
ljrhfq gj-ljke bpkj;tybnt erfpfybz.
1. RFXTCNDF
Bpdfltnt ehtlf jn rfijyf b uj j,(hytnt> rfnj uj jghtnt d(h[e gjkbcnbhjkjdfnf ghtlgfpyf jgfrjdrf.
Ghjdthtnt lfkb rf,tk(n pf tktrnhbxtcrj pf[hfydfyt t wzkjcnty b lfkb ehtl(n yt ct t gjdhtlbk gj dhtvt
yf nhfycgjhnbhfytnj. Frj ehtl(n t gjdhtlty> njq yt nhz,df lf aeyrwbjybhf.
2. VJYNBHFYT YF RHFXTNFNF
Bpdfltnt rhfxtnfnf b rjktkwfnf jn gjkbcnbhjkjdfnf jgfrjdrf.
Dv(rytnt rjktkwfnf d jcnf yf rhfxtnj b yfnbcytnt ljrhfq> ljrfnj ct xet ohfrdfyt !abu. 1@. Ghjdthtnt>
rfnj ub bpl(hgfnt> lfkb rjktkwfnf cf abrcbhfyb lj,ht.
Vjynbhfqnt rhfxtnj c rjkt kwfnf d lj kyfnf xfcn yf hflbfnjhf> rfnj gjcnfdbnt ht,hfnf - htqrb vt;le r en-
bznf pf eghfdktybtnj b g(hdjnj ht,hj> b vt;le pflyfnf renbz b gjcktlyjnj ht,hj& dv(rytnt ldfnf p(,f
d ghtldbltybnt pf njdf vtcnf b ,kjrbhfqnt rhfxtnj c dbynf c [fkrf> rfnj uj pfdbynbnt ljrhfq !abu. 1@.
Cktl ghbrk/xdfytnj yf ntpb jgthfwbb> j,(hytnt hflbfnjhf rfnj uj gjcnfdbnt d(d dthnbrfkyj gjkj;tybt
pf aeyrwbjybhfyt.
3. YFCNTYYJ VJYNBHFYT
Rjvgktrn(n pf yfcntyyj vjynbhfyt nhz,df lf drk/xdf%
2 x Ujhyb Crj,b !F@
1 x Ujhyf Crj,f !D@
5 x <jknf
5 x Fyrthyb <jknf
1. Bp,thtnt vzcnjnj pf bycnfkbhfyt yf gfytkf> rfnj ghjdthbnt lfkb%
f@ Yt t gjcnfdty njxyj gjl tktrnhbxtcrb rjynfrn.
,@ B otgctk(n> b rjynfrn(n cf ktcyj ljcn(gyb cktl bycnfkbhfytnj.
d@ Ybnj tktrnhbxtcrbnt otgctkb> ybnj jcnfyfkbnt nh(,b vjufn lf ct gjdhtlzn.
u@ Gthltnfnf bkb lheu dbl pfgfkztv vfnthbfk> cf jnlfktxtyb jn gfytkf.
2. Ghtlb lf yfghfdbnt jndjhbnt d(h[e cntyfnf> jn,tkt;tnt c gjvjonf yf if,kjy njxyjnj vzcnj> cktld-
fqrb dybvfntkyj hfpvthbnt !D Abu. 3@> dfhbhfob cgjhtl vjltkf> rfrnj t gjcjxtyj d nf,kbwfnf 3F.
3. Gj lhfdytnt wtyn(hf yf crj,bnt F c kbybz !erfpfyf yf abu. 3#4 c geyrnbhfyfnf kbybz@> rfnj ct edthb-
nt xt ldtnt crj,b cf yf tlyf b cof dbcjxbyf& cktl rjtnj jn,tkt;tnt jndjhbnt> rjbnj nhz,df lf
ghj,btnt.
4. Pf ne[ktybnt cntyb egjnht,zdfqnt cdhtlkj pf wbvtyn> c hfpvth 6 vbkbvtnhf b ghj,bqnt jndjhf d(p
jcyjdf yf jn,tkzpfybnt pyfwb> f cktl njdf gjcnfdtnt fyrthybnt ,jknjdt> ljcnfdtyb c ehtlf.
!Pf ubgcjdbnt j,kbwjdrb bkb pf j,kbwjdrbnt jn lheub vfnthbfkb> ghtgjh(xdfvt lf ecnfyjdbnt r(lt
ct yfvbhfn l(hdtybnt gjlgjhb b lf egjnht,bnt 6 vv ,jknjdt pf l(hdty vfnthbfk> yfghfdj d(h[e
l(hdjnj bkb lf abrcbhfnt gj cgtwbabxty yfxby. Pf rfr(dnj b lf t lheu dbl cntyty vfnthbfk>
gjn(hctnt c(dtnbnt yf cgtwbfkbfcn@.
1Kw
140 mm
1,5 Kw
210 mm
2 Kw
280 mm
2,5 Kw
385 mm
Vjltk
D
3F
Page 50

50
5. Vjynbhfqnt yfcntyybnt crj,b $F$ d jndjhbnt> egjnht,zdfqrb ljcnfdtybnt c ehtlf ,jknjdt.
6. Pfrfxtnt hflbfnjhf pf crj,bnt !abu. 3#4@.
7. Jghtltktnt gjkj;tybtnj pf abrcbhfyt yf ljkyfnf crj,f !D@> rfnj z gjcnfdbnt d wtyn(hf yf jcyjdfnf
yf ehtlf& egjnht,tnt tlby jn ,jknjdtnt> ljcnfdty c ehtlf> pf lf j,t kt;bnt njxyjnj gj kj;tybt pf jnd-
jhf !abu. 3@.
Nfpb crj,f ghtljndhfnzdf ckexfqyjnj ghtvtcndfyt yf ehtlf.
8. Cdfktnt hflbfnjhf jn jndjhf> rfrnj ,tit erfpfyj gj-yfghtl pf jndjhbnt yf crj,fnf F& cktl njdf gjc-
nfdtnt fyrthybz ,jkn. Pfrfxtnt jnyjdj hflbfnjhf d(h[e crj,bnt F> rfnj crj,fnf D nhz,df lf t dvtc-
ntyf> cktl rjtnj z abrcbhfqnt c ,jknf !abu. 3@.
Ctuf dtxt hflbfnjh(n t abrcbhfy r(v cntyfnf.
Yt egjnht,zdfqnt ehtlf d ,fyb.
3. TKTRNHBXTCRJ CD)HPDFYT
- Ghtlb lf drk/xbnt otgctkf d rjynfrnf> ghjdthtnt dybvfntkyj lfkb yfght;tybtnj d vht;fnf yf ljvf
jnujdfhz yf erfpfyfnf d(h[e ehtlf cnjqyjcn d(d djknjdt-V b lfkb rjynfrn(n b pf[hfydfofnf bycnfk-
fwbz cf gjl[jlzob pf gjlfltyjnj yfnjdfhdfyt.
- CD)HPDFQNT HFLBFNJHF CFVJ C RJYNFRNB> GHBNT:FDFOB LTQCNDEDFOJ PFPTVZDFYT
Ehtl(n jnujdfhz yf yfhtl,fnf 89/336/TBJ b yf V.G. 476/92 pf tktrnhjvfuybnyfnf c(dvtcnbvjcn.
AEYRWBJYBHFYT B EGJNHT<F
Drk/xdfyt
Gjcnfdtnt otgct kf d tktrnhbxtcrbz rjynfrn& ghtvtcntnt nthvjcnfnf lj ecnfyjdzdfytnj ve d vfrcbvfkyjnj
gjkj;tybt& drk/xtnt hflbfnjhf xhtp ghtdrk/xdfntkz#-bnt.
a) Vjltkb c ldjty ghtdrk/xdfntk
!3 vjoyjcnb@
- rjgxt
”l”
yfnbcyfnj = vbybvfkyf vjoyjcn !drk/xtyf rjynhjkyf kfvgf@
- rjgxt
”ll”
yfnbcyfnj = chtlyf vjoyjcn !drk/xtyf rjynhjkyf kfvgf@
-b ldtnt rjgxtnf
”l””ll”
yfnbcyfnb = vfrcbvfkyf vjoyjcn !drk/xtyb rjynhjkyb kfvgb@
Pf lf bprk/xbnt ehtlf> ldfnf ghtdrk/xdfntkz nhz,df lf cf d gjkj;tybt
”0”
> cktl rjtnj bpdfltnt otgc-
tkf jn tktrnhbxtcrbz rjynfrn.
Htuekbhfyt yf nthvjcnfnf
Ghb gjcnbufytnj yf ;tkfyfnf cnfqyf ntvgthfnehf> pfd(hntnt ,fdyj nthvjcnfnf> cfvj lj gjkj;tybtnj>
ghb rjtnj ct xedf $ohfrdfyt$> yj yt b gjdtxt. Yfukfctyfnf gj njpb yfxby ntvgthfnehf ot ct htuekbhf b
gjll(h;f fdnjvfnbxtcrb gjcnjzyyf jn nthvjcnfnf.
Aeyrwbz ghjnbd pfvh(pdfyt
C rjgxtnj yf nthvjcnfnf d gjkj;tybt b ghb yfnbcynb ghtdrk/xdfntkb> ehtl(n ot gjll(h;f d gjv-
totybtnj cnfqyf ntvgthfnehf jrjkj 5°C> ghtljndhfnzdfqrb pfvh(pdfytnj> ghb vbybvfkty hfp[jl yf
tktrnhbxtcndj.
Vjltkb c 24-xfcjd ghjuhfvfnjh !Nfqvth@
Pf lf ghjuhfvbhfnt jnjgktybtnj> ghjwtlbhfqnt gj cktlybz yfxby%
-Gjuktlytnt xfcf> erfpfy d(h[e Dfibz xfcjdybr. Ghtlgjkfufqrb> xt xfc(n t 10> pfd(hntnt gj gjcjrf
yf xfcjdybrjdfnf cnhtkrf yjvthbhfybz lbcr yf ghjuhfvfnjhf> ljrfnj xbckjnj 10 yf c(obz yt c(dgflyt
▲
c(c cnhtkrfnf - jhbtynbh s> jn,tkzpfyf d(h[e ghjuhfvfnjhf.
- Yfukfctnt dhtvtnhftytnj> ghtp rjtnj ;tkftnt Dfibzn ehtl lf aeyrwbjybhf> rfnj yfnbcytnt r(v
wtyn(hf p(,xtnfnf.
Dczrj p(,xt jnujdfhz yf dhtvtnhftyt jn 15 vby. Ot ct erf;fn jghtltktybnt ctrnjhb> jnujdfhzob yf
dhtvtnhftytnj yf aeyrwbjybhfyt.
- Ghtlhfpgjkj;ty gj njpb yfxby> hflbfnjh(n ot aeyrwbjybhf fdnjvfnbxtcrb dctrb lty> f ghjuhfvbh-
fybz xfc !Df;yj% otgctk(n nhz,df htljdyj lf t drk/xty d tktrnhbxtcrbz rjynfrn.@
- Pf lf ghjvtybnt ghjuhfvbhfytnj> ljcnfn(xyj t lf gjcnfdbnt jnyjdj p(,xtnfnf d yfxfkyjnj gjkj;tybt
b lf yfukfcbnt yjdjnj dhtvtnhftyt yf aeyrwbjybhfyt.
- Frj ;tkftnt ehtl(n lf aeyrwbjybhf ,tp ghjuhfvbhfyt> yfnbcytnt r(v wtyn(hf dcbxrb p(,xtnf.
Page 51

51
D nfr(d ckexfq> pf wzkjcnyjnj bprk/xdfyt yf ehtlf> jcdty xt nhz,df lf bprk/xbnt ghtdrk/xdfntkb-
nt> ye;yj t lf bpdflbnt otgctkf jn rjynfrnf> pf lf ghtljndhfnbnt ytye;yjnj aeyrwbjybhfyt yf
ghjuhfvfnjhf.
5. GJLL)H:FYT D BPGHFDYJCN
Pf tktrnhbxtcrbz vfckty hflbfnjh yt ct bpbcrdf jcj,tyj gjll(h;fyt d bpghfdyjcn. Ljcnfn(xyj t> lf
bp,(hcdfnt ghf[f c vtrf b ce[f r(hgf& xbcntnt uj cfvj rjufnj ct bpcnelb. Yt egjnht,zdfqnt ybrjuf
f,hfpbdyb ghf[jdt bkb hfpndjhbntkb. Frj t ytj,[jlbvj> gjxbcndfqnt jcj,tyj pfv(hctybnt xfcnb c
ghf[jcverfxrf.
6. GTLEGHT:LTYBZ
- Yt egjnht,zdfqnt hflbfnjhf ,kbpj lj dfyb> leijdt> evbdfkybwb bkb ,fctqyb.
- Yt egjnht,zdfqnt ehtlf pf ceitytnj yf ,tkmj> yt jgbhfqnt rf,tkf pf tktrnhbxtcrj pf[hfydfyt d(h[e
njgkbnt xfcnb.
-Egjnht,zdfqnt ehtlf htljdyj b tlbycndtyj d(d dthnbrfkyj gjkj;tybt.
-Ehtl(n nhz,df lf ct gjcnfdb yf hfpcnjzybt gjyt jn 50 cv jn vt,tkbnt bkb lheubnt ghtlvtnb yfjrjkj.
- Frj pf[hfydfobzn c tktrnhbxtcndj rf,t k t gjdhtlty> nhz,df lf ct pfvtyb tlbycndtyj jn Ghjbpdjlbntkz
bkb jn ytujdbz Cthdbp pf Nt[ybxtcrf Gjvjo> bkb d(d dcbxrb ckexfb cfvj jn kbwt c gjlj,yf rdfk-
babrfwbz> pf lf ct bp,tuyt dczrfr(d hbcr.
C(dctv yjhvfkyj t> jn ehtlf lf ct xedf $cr(hwfyt$ ghb g(hdjyfxfkyfnf egjnht,f.
- Yt gjcnfdzqnt ehtlf njxyj gjl ytgjldb;ty tktrnhbxtcrb rjynfrn.
- C(l(n d ehtlf t pfg(kyty c njxyj jghtltktyj rjkbxtcndj vfckj b frj ghb htvjyn> njq nhz,df lf ct
jndjhb> cfvj Ghjbpdjlbntkzn bkb jnjhbpbhfybzn Cthdbp pf Nt[ybxtcrf Gjvjo vjufn lf bpd(hifn
htvjynf. Ghb bpnbxfyt yf vfckjnj ct j,(hytnt r(v Ghjbpdjlbntkz bkb r(v jnjhbpbhfybz Cthdbp pf
Nt[ybxtcrf Gjvjo.
- Yt egjnht,zdfqnt ehtlf d gjvtotybz c jcyjdyf gkjo> gj-vfkrf jn 4 rd. v.
- Ghb bp[d(hkzytnj yf ehtlf> cktldfqnt erfpfybznf jnyjcyj c(,bhfytnj yf vfckjnj jngfl(r.
- yt jgbhfqnt otgctkf d(h[e jot njgkbz ehtl.
- Yt gjrhbdfqnt ehtlf ghb aeyrwbjybhfytnj ve.
- Egjnht,fnf yf el(k;bntkb yt ct ghtgjh(xdf> gjyt;t vjufn lf ct ghtyfuhtzn ghb aeyrwbjybhfytnj yf
ehtlf.
Bpdfltnt ehtlf jn rfijyf yf jgfrjdrfnf> vf[ytnt tdtynefkybnt jcnfyfkb d ehtlf xfcnb jn jgfrjdrfnf.
Ghtlgfpty vt[fybp(v ghtr(cdf aeyrwbjybhfytnj yf hflbfnjhf ghb ckexfqyj ghtyfuhzdfyt.
Pf lf d(pcnfyjdbnt aeyrwbjybhfytnj> j,(hytnt ct r(v yfq-,kbprbz lj Dfc jnjhbpbhfy Cthdbp pf
nt[ybxtcrf gjvjo.
ÇÇÄÄÜÜççéé:: áᇇ ‰‰‡‡ ËËÁÁ··Â„„ÌÌÂÂÚÚ ÔÔ„„flfl‚‚‡‡ÌÌÂÂ,, ‚‚ ÌÌËËÍ͇‡ÍÍ˙˙‚‚ ÒÒÎÎÛÛ˜˜‡‡ÈÈ ÌÌ ÔÔÓÓÍÍËË‚‚‡‡ÈÈÚÚ ÛÛ‰‰‡‡ ‰‰ÓÓÍ͇‡ÚÚÓÓ
‡‡··ÓÓÚÚËË,, ÁÁ‡‡˘˘ÓÓÚÚÓÓ ÚÚÓÓ‚‚‡‡ ··ËË ÏÏÓÓ„„ÎÎÓÓ ‰‰‡‡ ÔÔ‰‰ËËÁÁ‚‚ËËÍ͇‡ ÓÓÔÔ‡‡ÒÒÌÌÓÓ ÔÔÓÓ‚‚Ë˯¯‡‡‚‚‡‡ÌÌ Ì̇‡ ÚÚÂÂÏÏÔÔ‡‡ÚÚÛÛ‡‡ÚÚ‡‡..
10
11
12
13
14
15
16
17
18
19
20
21
22
23
24
Abu. 5
1
2
4
2
3
4
5
6
7
8
9
10
23
2
2
21
20
1
9
18
17
1
6
1
1
15
14
2
1
3
1
Page 52

êꇇ‰‰Ëˇ‡ÚÚÓÓ ÓÓÚÚÓÓÔÔÎÎÂÂÌÌËËflfl –– ÛÛÌÌËË‚‚ÂÂÒÒ‡‡Îθ¸ÌÌ˚˚ÈÈ ÔÔËË··ÓÓ ‰‰ÎÎflfl Ì̇‡„„‚‚‡‡ ÊÊËËÎÎÓÓ„„ÓÓ ÔÔÓÓÏÏ¢˘ÂÂÌÌËËflfl ÒÒ ÚÚÂÂÏÏflfl
ÛÛÓÓ‚‚ÌÌflflÏÏËË ÏÏÓÓ˘˘ÌÌÓÓÒÒÚÚËË.. ääÓÓÏÏ ÚÚÓÓ„„ÓÓ,, ÔÔËË··ÓÓ ÓÓÒÒÌ̇‡˘˘ÂÂÌÌ ÛÛÌÌËËÍ͇‡Îθ¸ÌÌÓÓÈÈ ÙÙÛÛÌÌÍ͈ˆËËÂÂÈÈ,, ÍÍÓÓÚÚÓÓ‡‡flfl
ÓÓ··ÂÂÒÒÔÔ˜˜ËËÚÚ‚‚‡‡ÂÂÚÚ Ì̇‡ËËÎÎÛÛ˜˜¯¯ËËÈÈ ÍÍÓÓÏÏÙÙÓÓÚÚ ‚‚ Îβ˛··˚˚ıı ÛÛÒÒÎÎÓÓ‚‚ËËflflıı..
ÑÑÎÎflfl Ïχ‡ÍÍÒÒËËÏχ‡Îθ¸ÌÌÓÓ„„ÓÓ ËËÒÒÔÔÓÓÎθ¸ÁÁÓÓ‚‚‡‡ÌÌËËflfl ‚‚ÓÓÁÁÏÏÓÓÊÊÌÌÓÓÒÒÚÚÂÂÈÈ ÔÔËË··ÓÓ‡‡ ÂÂÍÍÓÓÏÏÂÂÌ̉‰ÛÛÂÂÏÏ ÔÔÓÓ˜˜ÂÂÒÒÚÚ¸¸ ‰‰ÓÓ ÍÍÓÓÌ̈ˆ‡‡
ËËÌÌÒÒÚÚÛÛÍ͈ˆËËËË,, ÔÔËË‚‚‰‰ÂÂÌÌÌÌ˚˚ ÌÌËËÊÊÂÂ..
11.. ééÅÅôôààÖÖ ëëÇÇÖÖÑÑÖÖççààüü
Ç˚̸Ú ÔË·Ó ËÁ ÛÔ‡ÍÓ‚Ó˜ÌÓÈ ÍÓÓ·ÍË Ë Ô‚ÂÌËÚ „Ó, ÛÒÚ‡ÌÓ‚Ë‚ ̇ Á‡˘ËÚÌ˚ ÔÓ‰ÒÚ‡‚ÍË
ЛБ ФУОЛТЪЛУО‡.
м·В‰ЛЪВТ¸, ˜ЪУ ФЛ·У ‚У ‚ВПfl Ъ‡МТФУЪЛУ‚НЛ МВ ФУОЫ˜ЛО ФУ‚ВК‰ВМЛИ Л ‚ ˆВОУТЪМУТЪЛ
ФУ‚У‰‡ ˝ОВНЪУФЛЪ‡МЛfl. МВ ‚НО˛˜‡ИЪВ ФЛ·У, ВТОЛ УМ ФУ‚ВК‰ВМ.
22.. ììëëííÄÄççééÇÇääÄÄ ççééÜÜÖÖää
З˚М¸ЪВ МУКНЛ Л НУОВТЛНЛ ЛБ ЫФ‡НУ‚НЛ ЛБ ФУОЛТЪЛУО‡.
мТЪ‡МУ‚ЛЪВ НУОВТЛНЛ М‡ УТЛ МУКВН Л М‡КПЛЪВ ‰У ЫФУ‡ ‰У ˘ВО˜Н‡, ЛТ. 1. иУЪflМЫ‚, Ы·В‰ЛЪВТ¸,
˜ЪУ НУОВТЛНЛ Б‡НВФОВМ˚ М‡‰ВКМУ.
мТЪ‡МУ‚ЛЪВ МУКНЛ Т НУОВТЛН‡ПЛ М‡ МЛКМ˛˛ ˜‡ТЪ¸ ‡‰Л‡ЪУ‡, ‚ТЪ‡‚Л‚ Лı ПВК‰Ы НУУ·НУИ
ЫФ‡‚ОВМЛfl Л ФВ‚˚П ˝ОВПВМЪУП Л Б‡‰МВИ НУУ·НУИ Л ФУТОВ‰МЛП ˝ОВПВМЪУП; ‚ТЪ‡‚¸ЪВ ‰‚‡
БЫ·ˆ‡ ‚ ФВ‰ЫТПУЪВММ˚В „МВБ‰‡ Л Б‡·ОУНЛЫИЪВ МУКНЛ ·‡‡¯НУ‚˚П ‚ЛМЪУП, Б‡‚ВМЫ‚ В„У ‰У
ЫФУ‡, ЛТ. 1.
б‡‚В¯Л‚ ˝ЪЛ УФВ‡ˆЛЛ, ФВВ‚ВМЛЪВ ‡‰Л‡ЪУ, ЫТЪ‡МУ‚Л‚ В„У ‚ ‚ВЪЛН‡О¸МУВ ‡·У˜ВВ
ФУОУКВМЛВ.
ЗÇÌÌËËÏχ‡ÌÌËËÂÂ:: ÚÚÓÓÎθ¸ÍÍÓÓ ‚‚ËËÌÌÚÚ˚˚ ÒÒ ÛÛ¯¯ÍÍÓÓÏÏ ÔÔ‰‰Ì̇‡ÁÁÌ̇‡˜˜ÂÂÌÌ˚˚ ‰‰ÎÎflfl ··ÎÎÓÓÍÍËËÓÓ‚‚ÍÍËË ÌÌÓÓÊÊÂÂÍÍ..
33.. ååééççííÄÄÜÜ ççÄÄ ëëííÖÖççÖÖ
з‡·У ‰Оfl ПУМЪ‡К‡ М‡ ТЪВМЫ ‚НО˛˜‡ВЪ ‚ ТВ·fl:
2 ‚ÂıÌËÂ ÒÍÓ·˚ (Ä)
1 ÌËÊÌflfl ÒÍÓ·‡ (Ç)
5 ¯ÛÛÔÓ‚
5 ‰˛·ÂÎÂÈ
1. З˚·ВЛЪВ ПВТЪУ ЫТЪ‡МУ‚НЛ, Ы·В‰Л‚¯ЛТ¸, ˜ЪУ:
‡. йМУ МВ М‡ıУ‰ЛЪТfl МВФУТВ‰ТЪ‚ВММУ ФУ‰ УБВЪНУИ.
·. д‡Н УБВЪН‡, Ъ‡Н Л ‚ЛОН‡ ОВ„НУ ‰УТЪЫФМ˚ ФУТОВ ЫТЪ‡МУ‚НЛ.
‚. зЛ ˝ОВНЪЛ˜ВТНЛВ ФУ‚У‰‡, МЛ ФУ˜ЛВ ЪЫ·˚ МВ ФУ‚ВК‰ВМ˚.
„. б‡М‡‚ВТЛ ЛОЛ ‰Ы„УИ „У˛˜ЛИ П‡ЪВЛ‡О Ы‰‡ОВМ˚ УЪ ‡‰Л‡ЪУ‡.
2. СУ Т‚ВОВМЛfl УЪ‚ВТЪЛИ ‚ ТЪВМВ УЪПВЪ¸ЪВ ЪУ˜М˚В ПВТЪ‡, ФУО¸БЫflТ¸ П‡ТНУИ Л ТОВ‰Ыfl ‡БПВ‡П D,
ЛТ. 3; Н‡Н ФУН‡Б‡МУ ‚ Ъ‡·ОЛˆВ 3Д, ‡БПВ D Б‡‚ЛТЛЪ УЪ ПУ‰ВОЛ.
3. к‡ТФУОУКЛЪВ ФУ ФflПУИ ОЛМЛЛ ˆВМЪ М‡ТЪВММ˚ı ТНУ· Д (М‡ ЛТ. 3/4 ФУН‡Б‡М‡ ФЫМНЪЛУП),
Ы·В‰Л‚¯ЛТ¸, ˜ЪУ ‰‚‡ ‰˛·ВОfl М‡ıУ‰flЪТfl М‡ У‰МУИ ‚˚ТУЪВ; Б‡ЪВП УЪПВЪ¸ЪВ УЪ‚ВТЪЛfl, НУЪУ˚В
МВУ·ıУ‰ЛПУ Т‰ВО‡Ъ¸.
4. ЦТОЛ ТЪВМ‡ Т‰ВО‡М‡ ЛБ НЛФЛ˜‡, ЛТФУО¸БЫИЪВ Т‚ВОУ 6 ПП Л Т‰ВО‡ИЪВ УЪ‚ВТЪЛfl ФУ М‡МВТВММ˚П
УЪПВЪН‡П, Б‡ЪВП ‚ТЪ‡‚¸ЪВ ‚ МЛı ФЛО‡„‡ВП˚В ‰˛·ВОЛ.
52
RUS
1Kw
140 mm
1,5 Kw
210 mm
2 Kw
280 mm
2,5 Kw
385 mm
ååÓÓ‰‰ÂÂÎθ¸
D
3A
Page 53

53
(СОfl „ЛФТУН‡ЪУМ‡ ЛОЛ ТЪВМУ‚˚ı Ф‡МВОВИ ВНУПВМ‰ЫВП УФВ‰ВОЛЪ¸, „‰В М‡ıУ‰flЪТfl
‰ВВ‚flММ˚В ТЪУИНЛ, Л ЛТФУО¸БУ‚‡Ъ¸ ¯ЫЫФ˚ 6 ПП ‰Оfl ‰ВВ‚‡, ‚‚ВМЫ‚ Лı МВФУТВ‰ТЪ‚ВММУ
‚ ТЪУИНЛ, ЛОЛ ЛТФУО¸БУ‚‡Ъ¸ ТФВˆЛ‡О¸МУВ НВФОВМЛВ. иУ ФУ‚У‰Ы ‰Ы„Лı ‚Л‰У‚ ТЪВМ
Т‚flКЛЪВТ¸ ТУ ТФВˆЛ‡ОЛТЪУП).
5. мТЪ‡МУ‚ЛЪВ М‡ТЪВММ˚В ТНУ·˚ “Д” ‚ УЪ‚ВТЪЛfl, Б‡НВФЛ‚ Лı ФЛО‡„‡ВП˚ПЛ ¯ЫЫФ‡ПЛ.
6. иУ‚ВТ¸ЪВ ‡‰Л‡ЪУ М‡ М‡ТЪВММ˚В ТНУ·˚, ЛТ. 3/4.
7. йФВ‰ВОЛЪВ ПВТЪУ НВФОВМЛfl МЛКМВИ ТНУ·˚ З, ЫТЪ‡МУ‚Л‚ ВВ ФУ ˆВМЪЫ УТМУ‚‡МЛfl ФЛ·У‡;
ЛТФУО¸БЫИЪВ У‰ЛМ ЛБ ФЛО‡„‡ВП˚ı ¯ЫЫФУ‚, ˜ЪУ·˚ УЪПВЪЛЪ¸ ЪУ˜МУВ ПВТЪУ УЪ‚ВТЪЛfl, ЛТ. 3.
щЪ‡ ТНУ·‡ ФВ‰УЪ‚‡˘‡ВЪ ТОЫ˜‡ИМУВ ТПВ˘ВМЛВ ФЛ·У‡.
8. лМЛПЛЪВ ‡‰Л‡ЪУ ТУ ТНУ· Д Л Т‰ВО‡ИЪВ УЪ‚ВТЪЛВ, Н‡Н ˝ЪУ ·˚ОУ Т‰ВО‡МУ ‰Оfl ТНУ· Д; Б‡ЪВП
‚ТЪ‡‚¸ЪВ ‰˛·ВО¸. иУ‚ВТ¸ЪВ ‡‰Л‡ЪУ М‡ ТНУ·˚ Д ТУ ‚ТЪ‡‚ОВММУИ ТНУ·УИ З Л Б‡НВФЛЪВ ВВ
¯ЫЫФУП, ЛТ. 3.
ꇉˇЪУ ФУТОВ ˝ЪУ„У Б‡НВФОВМ М‡ ТЪВМВ.
зВ ЛТФУО¸БЫИЪВ ФЛ·У ‚ ‚‡ММУИ НУПМ‡ЪВ.
33.. èèééÑÑääããûûóóÖÖççààÖÖ ùùããÖÖääííêêééùùççÖÖêêÉÉàààà
- СУ ЪУ„У, Н‡Н ‚ЛОН‡ ·Ы‰ВЪ ‚ТЪ‡‚ОВМ‡ ‚ УБВЪНЫ ˝ОВНЪУФЛЪ‡МЛfl, Ы·В‰ЛЪВТ¸, ˜ЪУ М‡ФflКВМЛВ
‚ ТВЪЛ ˝ОВНЪУФЛЪ‡МЛfl ‚‡¯В„У ФУПВ˘ВМЛfl ТУУЪ‚ВЪТЪ‚ЫВЪ БМ‡˜ВМЛ˛ М‡ФflКВМЛfl,
ЫН‡Б‡ММУПЫ М‡ ФЛ·УВ, Л ˜ЪУ УБВЪН‡ ОЛМЛЛ ˝ОВНЪУФЛЪ‡МЛfl ‡ТТ˜ЛЪ‡М‡ М‡ ЪВ·ЫВПЫ˛
ПУ˘МУТЪ¸.
- ийСдгыуДвнЦ кДСаДнйк нйгъдй д кйбЦндЦ, йлзДфЦззйв зДСЦЬзхе
бДбЦегЦзаЦе.
- С‡ММ˚И ФЛ·У ТУУЪ‚ВЪТЪ‚ЫВЪ СЛВНЪЛ‚В Цл 89/336 У ‡ТФУТЪ‡МВМЛЛ ‡‰ЛУФУПВı Л
б‡НУМУ‰‡ЪВО¸МУПЫ ‰ВНВЪЫ 476/92 У ˝ОВНЪУП‡„МЛЪМУИ ТУ‚ПВТЪЛПУТЪЛ.
44.. îîììççääññààééççààêêééÇÇÄÄççààÖÖ àà ùùääëëèèããììÄÄííÄÄññààüü
ÇÇÍÍÎβ˛˜˜ÂÂÌÌËËÂÂ
ЗТЪ‡‚¸ЪВ ‚ЛОНЫ ‚ УБВЪНЫ ˝ОВНЪУФЛЪ‡МЛfl; ФВВ‰‚ЛМ¸ЪВ ЪВПУВ„ЫОflЪУ ‰У ЫФУ‡ ‚ ФУОУКВМЛВ
П‡НТЛПЫП‡; ‚НО˛˜ЛЪВ ‡‰Л‡ЪУ ФЛ ФУПУ˘Л ФВВНО˛˜‡ЪВОfl (ФВВНО˛˜‡ЪВОВИ).
ååÓÓ‰‰ÂÂÎÎËË ÒÒ ‰‰‚‚ÓÓÈÈÌÌ˚˚ÏÏ ‚‚˚˚ÍÍÎβ˛˜˜‡‡ÚÚÂÂÎÎÂÂÏÏ ((33 ÏÏÓÓ˘˘ÌÌÓÓÒÒÚÚËË))
- М‡К‡Ъ‡fl НМУФН‡ “ll” – ПЛМЛП‡О¸М‡fl ПУ˘МУТЪ¸ (ЛМ‰ЛН‡ЪУ ‚НО˛˜ВМ)
- М‡К‡Ъ‡fl НМУФН‡ “
llll
” – Ò‰Ìflfl ÏÓ˘ÌÓÒÚ¸ (Ë̉Ë͇ÚÓ ‚Íβ˜ÂÌ)
- У·В НМУФНЛ ”ll” ”
llll
” М‡К‡Ъ˚ – П‡НТЛП‡О¸М‡fl ПУ˘МУТЪ¸ („УflЪ ЛМ‰ЛН‡ЪУ˚)
иЛ ‚˚НО˛˜ВМЛЛ ФЛ·У‡ У·‡ ФВВНО˛˜‡ЪВОfl ‰УОКМ˚ М‡ıУ‰ЛЪ¸Тfl ‚ ФУОУКВМЛЛ “0”, Б‡ЪВП
‚˚М¸ЪВ ‚ЛОНЫ ЛБ УБВЪНЛ ˝ОВНЪУФЛЪ‡МЛfl.
êê„„ÛÛÎÎËËÓÓ‚‚Í͇‡ ÚÚÂÂÏÏÓÓ„„ÛÛÎÎflflÚÚÓÓ‡‡
дУ„‰‡ ЪВПФВ‡ЪЫ‡ ‚ ФУПВ˘ВМЛЛ ‰УТЪЛ„МВЪ ЪВ·ЫВПУИ, ПВ‰ОВММУ ФУ‚ВМЛЪВ Ы˜НЫ
ЪВПУВ„ЫОflЪУ‡ ‰У ˘ВО˜Н‡, МУ МВ ‰‡ОВВ. мТЪ‡МУ‚ОВММ‡fl Ъ‡НЛП У·‡БУП ЪВПФВ‡ЪЫ‡ ·Ы‰ВЪ
‡‚ЪУП‡ЪЛ˜ВТНЛ В„ЫОЛУ‚‡Ъ¸Тfl ФЛ·УУП Л ФУ‰‰ВКЛ‚‡Ъ¸Тfl М‡ ФУТЪУflММУП ЫУ‚МВ.
îîÛÛÌÌÍ͈ˆËËflfl ÔÔ‰‰ÓÓÚÚ‚‚‡‡˘˘ÂÂÌÌËËflfl ÁÁ‡‡ÏÏÂÂÁÁ‡‡ÌÌËËflfl
иЛ М‡ıУК‰ВМЛЛ ЪВПУВ„ЫОflЪУ‡ ‚ ФУОУКВМЛЛ Л М‡К‡Ъ˚ı ‚˚НО˛˜‡ЪВОflı, ФЛ·У ·Ы‰ВЪ
ФУ‰‰ВКЛ‚‡Ъ¸ ЪВПФВ‡ЪЫЫ ‚ ФУПВ˘ВМЛЛ М‡ ЫУ‚МВ 5°C, ФВ‰УЪ‚‡˘‡fl Б‡ПВБ‡МЛВ Т
ПЛМЛП‡О¸М˚П ‡ТıУ‰УП ˝ОВНЪУ˝МВ„ЛЛ.
ååÓÓ‰‰ÂÂÎÎËË ÒÒ ÔÔÓÓ„„‡‡ÏÏÏχ‡ÚÚÓÓÓÓÏÏ ((ÚÚ‡‡ÈÈÏÏÂÂÓÓÏÏ)) Ì̇‡ 2244 ˜˜‡‡ÒÒ‡‡
СОfl ФУ„‡ППЛУ‚‡МЛfl М‡„В‚‡ ‚˚ФУОМЛЪВ ТОВ‰Ы˛˘ВВ:
- иУТПУЪЛЪВ ТНУО¸НУ ‚ВПВМЛ ФУН‡Б˚‚‡˛Ъ ‚‡¯Л ˜‡Т˚. иВ‰ФУОУКЛП, ˜ЪУ ТВИ˜‡Т 10 ˜‡ТУ‚,
ФУ‚ВМЛЪВ ‰ЛТН Т ˆЛЩ‡ПЛ ФУ„‡ПП‡ЪУ‡ ФУ ˜‡ТУ‚УИ ТЪВОНВ ‰У ТУ‚ПВ˘ВМЛfl ˆЛЩ˚ 10 Т
ЫН‡Б‡ЪВОВП ▲ М‡МВТВММ˚П М‡ ФВВ‰М˛˛ Ф‡МВО¸ (ЛТ.5).
- мТЪ‡МУ‚ЛЪВ ФВЛУ‰˚ ‚ВПВМЛ, НУ„‰‡ ‚˚ ıУЪЛЪВ, ˜ЪУ·˚ ФЛ·У ‡·УЪ‡О, ФВВ‰‚ЛМЫ‚ БЫ·˜ЛНЛ
Ъ‡ИПВ‡ ‚ ˆВМЪ.
д‡К‰˚И БЫ·˜ЛН ТУУЪ‚ВЪТЪ‚ЫВЪ ФВЛУ‰Ы, ‰ОЛЪВО¸МУТЪ¸˛ 15 ПЛМЫЪ. иУТОВ ˝ЪУ„У ·Ы‰ЫЪ ‚Л‰М˚
ТВНЪУ‡, НУЪУ˚В ТУУЪ‚ВЪТЪ‚Ы˛Ъ ‚ВПВМЛ ‡·УЪ˚.
Page 54

54
- ç‡ÒÚÓÂÌÌ˚È Ú‡ÍËÏ Ó·‡ÁÓÏ ‡‰Ë‡ÚÓ Í‡Ê‰˚È ‰Â̸ ‡‚ÚÓχÚ˘ÂÒÍË ·Û‰ÂÚ ÔÓ‚ÚÓflÚ¸
Б‡ФУ„‡ППЛУ‚‡ММ˚И ВКЛП (У·‡ЪЛЪВ ‚МЛП‡МЛВ: ‚ЛОН‡ ‰УОКМ‡ ·˚Ъ¸ ФУТЪУflММУ ‚ТЪ‡‚ОВМ‡
‚ УБВЪНЫ ˝ОВНЪУФЛЪ‡МЛfl).
- СОfl ЛБПВМВМЛfl ФУ„‡ППЛУ‚‡МЛfl ЫТЪ‡МУ‚ЛЪВ БЫ·˜ЛНЛ ‚ ФВ‚УМ‡˜‡О¸МУВ ФУОУКВМЛВ Л
Á‡‰‡ÈÚ ÌÓ‚˚ ÔÂËÓ‰˚ ‡·ÓÚ˚.
- ЦТОЛ ‚˚ ıУЪЛЪВ, ˜ЪУ·˚ ФЛ·У ‡·УЪ‡О ·ВБ ФУ„‡ППЛУ‚‡МЛfl, ФВВ‰‚ЛМ¸ЪВ ‚ ˆВМЪ ‚ТВ
БЫ·˜ЛНЛ.
З Ъ‡НУП ТОЫ˜‡В ‰Оfl ФУОМУ„У ‚˚НО˛˜ВМЛfl ФЛ·У‡, НУПВ ‚˚НО˛˜ВМЛfl ФВВНО˛˜‡ЪВОВИ, ‰Оfl
ЪУ„У, ˜ЪУ·˚ ФВ‰УЪ‚‡ЪЛЪ¸ ·ВТФУОВБМЫ˛ ‡·УЪЫ ФУ„‡ПП‡ЪУ‡, МВУ·ıУ‰ЛПУ ‚˚МЫЪ¸ ‚ЛОНЫ
ЛБ УБВЪНЛ.
55.. ééÅÅëëããììÜÜààÇÇÄÄççààÖÖ
щОВНЪЛ˜ВТНЛИ ‡‰Л‡ЪУ МВ ЪВ·ЫВЪ ТФВˆЛ‡О¸МУ„У У·ТОЫКЛ‚‡МЛfl. СУТЪ‡ЪУ˜МУ Пfl„НУИ ЪН‡М¸˛
ФУЪЛ‡Ъ¸ Ф˚О¸; Ыı‡КЛ‚‡ИЪВ Б‡ ФЛ·УУП, ЪУО¸НУ НУ„‰‡ УМ УТЪ˚О. зЛ ‚ НУВП ТОЫ˜‡В МВ
ЛТФУО¸БЫИЪВ ‡·‡БЛ‚М˚В ФУУ¯НЛ ЛОЛ ‡ТЪ‚УЛЪВОЛ. иЛ МВУ·ıУ‰ЛПУТЪЛ Ы‰‡ОВМЛfl ТНУФОВМЛfl
Ф˚ОЛ ‚УТФУО¸БЫИЪВТ¸ Ф˚ОВТУТУП.
66.. ååÖÖêêõõ èèêêÖÖÑÑééëëííééêêééÜÜççééëëííàà
- зВ ФУО¸БЫИЪВТ¸ ‡‰Л‡ЪУУП ‚ ‚‡ММ˚ı НУПМ‡Ъ‡ı ЛОЛ ‚ МВФУТВ‰ТЪ‚ВММУИ ·ОЛБУТЪЛ УЪ ‚‡ММ,
‰Ы¯‡, ЫНУПУИМЛНУ‚ ЛОЛ ·‡ТТВМУ‚.
- зВ ФУО¸БЫИЪВТ¸ ‡‰Л‡ЪУУП ‰Оfl ТЫ¯НЛ ·ВО¸fl, МВ НО‡‰ЛЪВ ¯МЫ ˝ОВНЪУФЛЪ‡МЛfl М‡ М‡„ВЪ˚В
˜‡ÒÚË.
- аТФУО¸БЫИЪВ ‡‰Л‡ЪУ ЪУО¸НУ ‚ ‚ВЪЛН‡О¸МУП ФУОУКВМЛЛ.
- иЛ·У ‰УОКВМ ·˚Ъ¸ ЫТЪ‡МУ‚ОВМ МВ ·ОЛКВ, ˜ВП ‚ 50 ТП УЪ ПВ·ВОЛ Л ‰Ы„Лı ФВ‰ПВЪУ‚.
- ЦТОЛ ¯МЫ ФЛЪ‡МЛfl ФУ‚ВК‰ВМ, УМ ‰УОКВМ ·˚Ъ¸ Б‡ПВМВМ ФУЛБ‚У‰ЛЪВОВП ЛОЛ В„У ТВ‚ЛТМУИ
ЪВıМЛ˜ВТНУИ ТОЫК·УИ ЛОЛ, ‚ О˛·УП ТОЫ˜‡В, Н‚‡ОЛЩЛˆЛУ‚‡ММ˚П ТФВˆЛ‡ОЛТЪУП, ˜ЪУ
ФУБ‚УОЛЪ ЛБ·ВК‡Ъ¸ О˛·У„У ЛТН‡.
- Ä·ÒÓβÚÌÓ ÌÓχθÌÓ, ÂÒÎË ÔË·Ó ÔË Ô‚ÓÏ ‚Íβ˜ÂÌËË ·Û‰ÂÚ ÔÓÚÂÒÍË‚‡Ú¸.
- иЛ·У МВ ‰УОКВМ М‡ıУ‰ЛЪ¸Тfl МВФУТВ‰ТЪ‚ВММУ ФУ‰ УБВЪНУИ ˝ОВНЪУФЛЪ‡МЛfl.
- иЛ·У М‡ФУОМВМ УФВ‰ВОВММ˚П НУОЛ˜ВТЪ‚УП П‡ТО‡, Л ВПУМЪ, НУЪУ˚И ЪВ·ЫВЪ В„У
УЪН˚ЪЛfl, ‰УОКВМ ‚˚ФУОМflЪ¸Тfl ЪУО¸НУ ФУЛБ‚У‰ЛЪВОВП ЛОЛ В„У ТВ‚ЛТМУИ ТОЫК·УИ. З
ТОЫ˜‡В ЫЪВ˜НЛ П‡ТО‡, Т‚flКЛЪВТ¸ Т ФУЛБ‚У‰ЛЪВОВП ЛОЛ В„У ТВ‚ЛТМУИ ТОЫК·УИ.
- зВ ЛТФУО¸БЫИЪВ ФЛ·У ‚ ФУПВ˘ВМЛЛ ФОУ˘‡‰¸˛ ПВМ¸¯В 4 П
2
.
- З ТОЫ˜‡В ЫМЛ˜ЪУКВМЛfl ФЛ·У‡ МВУ·ıУ‰ЛПУ ТУ·О˛‰‡Ъ¸ ТУУЪ‚ВЪТЪ‚Ы˛˘ЛВ Б‡НУМ˚,
Н‡Т‡˛˘ЛВТfl ЫЪЛОЛБ‡ˆЛЛ П‡ТО‡.
- ç Í·‰ËÚ ¯ÌÛ ÔËÚ‡ÌËfl ̇ ¢ „Ófl˜ËÈ ÔË·Ó.
- ç ̇Í˚‚‡ÈÚ ‡·ÓÚ‡˛˘ËÈ ÔË·Ó.
- зВ ВНУПВМ‰ЫВЪТfl ЛТФУО¸БУ‚‡Ъ¸ Ы‰ОЛМЛЪВО¸, Ъ‡Н Н‡Н УМ ПУКВЪ ФВ„‚‡Ъ¸Тfl ‚У ‚ВПfl
‡·ÓÚ˚ ÔË·Ó‡.
- аБ‚ОВНЛЪВ ФЛ·У ЛБ ЫФ‡НУ‚НЛ, Ы‰‡ОЛЪВ ФУТЪУУММЛИ ПЫТУ, НУЪУ˚И ПУ„ Б‡ТЪflЪ¸ ‚МЫЪЛ
ÔË·Ó‡.
-
Ç˚̸Ú ÔË·Ó ËÁ ÍÓÓ·ÍË Ë, ÔË Ì‡Î˘ËË, Û‰‡ÎËÚ Á‡ÒÚfl‚¯Ë ‚ fi·‡ı χÚ¡Î˚.
è艉ÓÓıı‡‡ÌÌflfl˛˛˘˘Â ÛÛÒÒÚÚÓÓÈÈÒÒÚÚ‚‚ÓÓ
ÔÂ˚‚‡ÂÚ ‡·ÓÚÛ ‡‰Ë‡ÚÓ‡ ‚ ÒÎÛ˜‡Â ÒÎÛ˜‡ÈÌÓ„Ó Ô„‚‡.
СОfl ЪУ„У, ˜ЪУ·˚ ФЛ·У Б‡‡·УЪ‡О ‚МУ‚¸, Т‚flКЛЪВТ¸ Т
··ÎÎËËÊʇ‡Èȯ¯ÂÂÈÈ ÒÒ‚‚ËËÒÒÌÌÓÓÈÈ ÒÒÎÎÛÛÊÊ··ÓÓÈÈ
.
ééÅÅêêÄÄííààííÖÖ ÇÇççààååÄÄççààÖÖ:: ‰‰ÎÎflfl ÚÚÓÓ„„ÓÓ,, ˜˜ÚÚÓÓ··˚˚ ËËÁÁ··ÂÂÊʇ‡ÚÚ¸¸ ÔÔ„„‚‚‡‡,, ÌÌËË ‚‚ ÍÍÓÓÂÂÏÏ ÒÒÎÎÛÛ˜˜‡‡Â ÌÌÂÂ
Ì̇‡ÍÍ˚˚‚‚‡‡ÈÈÚÚ ÔÔËË··ÓÓ ‚‚ÓÓ ‚‚ÂÂÏÏflfl ‡‡··ÓÓÚÚ˚˚,, ÚÚ‡‡ÍÍ Í͇‡ÍÍ ˝˝ÚÚÓÓ ‚‚˚˚ÁÁÓÓ‚‚ÂÂÚÚ ÓÓÔÔ‡‡ÒÒÌÌÓÓ ÔÔÓÓ‚‚˚˚¯¯ÂÂÌÌËËÂÂ
ÚÚÂÂÏÏÔÔ‡‡ÚÚÛÛ˚˚..
10
11
12
13
14
15
16
17
18
19
20
21
22
23
24
ËÒ.5
1
2
4
2
3
4
5
6
7
8
9
10
23
2
2
21
20
1
9
18
17
1
6
1
1
15
14
2
1
3
1
Page 55

55
Radiatorul este un aparat pentru încălzirea domestică deosebit de adaptabil, cu trei nivele de
putere selecţionabile. Deasemenea, în acest produs a fost incorporată o funcţiune exclusivă
care vă va permite să obţineţi cel mai bun confort în orice fel de situaţie.
Pentru a expolata la maximum potenţialităţile produsului vă recomandăm să citiţi toate
instrucţiunile indicate mai departe.
1. GENERALITĂŢI
Scoateţi aparatul din cutia de ambalaj și întoarceţi-l cu faţa în jos sprijinindu-l pe colţarele din polistirol
de protecţie.
Controlaţi integritatea cablului de alimentare și ca aparatul să nu fi suferit avarii în timpul transportului.
Nu puneţi în funcţiune aparatul dacă este avariat.
2. MONTAJUL PICIORUȘELOR
Scoateţi piciorușele și rotiţele din ambalajul din polistirol.
Introduceţi rotiţele în pivotul piciorușului și apăsaţi bine până când veţi auzi un declic (fig.1).
Asiguraţi-vă trăgând, că roţile sunt bine fixate.
Montaţi piciorușul cu roţi în partea inferioară a radiatorului introducându-le între cutia de comenzi și
primul element și între cutia posterioară și ultimul element; încastraţi cei 2 dinţi în locașurile prevăzute
și blocaţi piciorul cu șurubul cu cap inelar înșurubând până la fund (fig.1).
O dată terminate aceste operaţii întoarceţi radiatorul repunându-l în poziţia verticală de funcţionare.
Atenţiune: doar șuruburile cu ochi folosesc pentru blocarea piciorușelor.
3. MONTAJUL LA PERETE
Kit-ul pentru montajul la perete trebuie să conţină:
2 Console superioare (A)
1 Consolă inferioară (B)
5 Șuruburi
5 Dibluri
1. Alegeţi punctul unde veţi instala panoul asigurându-vă ca:
a. Să nu fie așezat diect sub o priză de curent.
b. Atât ștecherul cât și priza să fie ușor de ajuns după instalare.
c. Atât cablurile electrice cât și alte ţevi să nu poată să fie avariate.
d. Perdele sau alte materiale inflamabile să fie destul de departe de panou.
2. Înainte de a găuri peretele, însemnaţi punctele exacte cu un șablon urmărind cu mare atenţie
dimensiunile (D Fig. 3 ) care variază în funcţie de model, așa după cum se arată în tabelul 3A.
3. Aliniaţi centrul consolelor A cu ajutorul unei linii (indicată în fig. 3/4 printr-o linie întreruptă), asigurându-vă ca cele două console să fie la o înălţime egală, iar apoi însemnaţi găurile care trebuie
executate.
4. Pentru pereţii din cărămidă, utilizaţi o spirală de ciment de 6 mm și găuriţi în funcţie de semnele
care au fost făcute, iar apoi introduceţi diblurile din dotare.
(Pentru carton gips sau contraînvelișuri vă sugerăm să individuaţi montanţii din lemn și să folosiţi
șuruburi pentru lemn de 6 direct în lemn sau să folosiţi elemente de fixare specifice. Pentru orice
alt tip de perete cereţi părerea unui specialist.)
ROM
1Kw
140 mm
1,5 Kw
210 mm
2 Kw
280 mm
2,5 Kw
385 mm
Modelul
D
3A
Page 56

5. Montaţi consolele de perete “A” în găuri cu ajutorul șuruburilor din dotare.
6. Agăţaţi radiatorul pe console (fig.3/4).
7. Găsiţi poziţia de fixare a consolei inferioare (B) introducând-o în centrul bazei aparatului; folosiţi
unul dintre șuruburile din dotare pentru a însemna poziţia exactă a găurii (fig.3).
Această consolă împiedică ieșirea accidentală a aparatului.
8. Scoateţi radiatorul de pe consolele A și executaţi gaura așa după cum s-a arătat mai înainte pentru găurile consolei A, apoi introduceţi diblul. Reagăţaţi radiatorul pe consolele A cu consola B
introdusă, iar apoi fixaţi-o cu șurubul (fig.3).
Radiatorul acum este fixat la perete.
Nu utilizaţi aparatul în încăperile pentru baie.
3. RACORDAREA ELECTRICĂ
- Înainte de a introduce ștecherul în priza de curent verificaţi cu atenţie ca voltajul reţelei dvs. domestice să corespundă valorii în V indicată pe aparat și ca priza de curent și linia de alimentare să fie
dimensionate la sarcina cerută.
- RACORDAŢI RADIATORUL DOAR LA PRIZE DOTATE CU O LEGĂTURĂ LA PĂMÂNT EFICIENTĂ.
- Acest aparat este conform cu directiva 89/336/CEE și cu D.M. 476/92 privind compatibilitatea electromagnetică.
4. FUNCŢIONAREA ȘI FOLOSIREA
Aprinderea
Introduceţi ștecherul în priza de curent; deplasaţi termostatul până la oprire în poziţia de maximum;
aprindeţi radiatorul prin intermediul întrerupătorului/relor.
Modelele cu întrerupător dublu (3 puteri)
- butonul “l” apăsat = putere minimă (bec semnalizare aprins)
- butonul “lI” apăsat = putere intermediară (bec semnalizare aprins)
- ambele butoane “l” “ll” apăsate = putere maximă (becuri semnalizare aprinse)
Pentru a stinge aparatul, ambele întrerupătoare trebuie să fie în poziţia “0”, după care scoateţi ștecherul din priza de curent.
Reglarea termostatului
Atunci când mediul ambiant a ajuns la temperatura dorită, deplasaţi ușor termostatul până la poziţia
semnalată de un “click” și nu mai departe. Temperatura astfel stabilită se va regla în mod automat și
va fi menţinută constantă de către termostat.
Funcţiunea antiîngheţ
Cu manivela termostatului în poziøia µi întrerupåtoarele deschise, aparatul menøine ambientul la o
temperaturå de circa 5°C împiedicând congelarea, realizând un consum minim de energie electricå.
Medelele cu programator (Timer) 24 ore
Pentru programarea încălzirii procedaţi în felul următor:
- Uitaţi-vă la ora de la ceasul dvs. Presupunând că este ora 10, rotiţi în sensul acelor de ceasornic
discul numerotat al programatorului până ce va coincide numărul 10 al acestuia cu indicele de referinţă ▲ imprimat pe programator.
- Stabiliţi perioadele de timp în care doriţi ca aparatul să funcţioneze, împingând către centru dinţișorii.
Fiecare dinţișor corespunde unei perioade de timp de 15 min. La acest punct vor fi vizibile niște
sectoare care corespund perioadelor de funcţionare.
- Astfel predispus, radiatorul va funcţiona în mod automat în fiecare zi în orarul programat (Important:
ștecherul trebuie să fie mereu introdus în priza de curent).
- Pentru a schimba programarea ajunge să readuceţi dinţișorii în poziţia iniţială și să fixaţi noile
perioade de funcţionare.
- Dacă doriţi ca aparatul să funcţioneze fără programare împingeţi către centru toţi dinţișorii.
În acest caz, pentru stingerea totală a aparatului în afară de a închide întrerupătoarele este necesar să scoateţi și ștecherul din priză pentru a evita o funcţionare inutilă a programatorului.
56
Page 57

5. ÎNTREŢINEREA
Radiatorul electric cu ulei nu necesită nici o întreţinere deosebită. Este suficient să-l curăţaţi de praf cu
o cârpă moale și uscată; curăţaţi-l doar când este rece. Nu folosiţi niciodată prafuri abrazive sau solvenţi. Dacă este nevoie să scoateţi eventualele concentraţii de murdărie serviţi-vă de un aspirator.
6. AVERTISMENTE
- Nu folosiţi radiatorul în camere de baie sau în imediata apropiere a căzilor de baie, dușuri, lavabouri
sau piscine.
- Nu folosiţi radiatorul pentru uscarea rufelor, nu așezaţi cablul de racordare pe elementele calde.
- Folosiţi radiatorul întotdeauna și numai în poziţia verticală.
- Aparatul trebuie să fie așezat la cel puţin 50 cm de mobile sau alte obiecte.
- Dacă cablul este avariat, acesta va trebui să fie înlocuit de către constructor sau de serviciul său
de asistenţă tehnică sau în orice caz de o persoană cu calificare asemănătoare, astfel încât să se
prevină orice risc.
- Este foarte normal ca aparatul să emită “scârţâituri” la prima pornire.
- Aparatul nu trebuie să fie așezat imediat dedesubtul unei prize de curent fixe.
- Acest aparat este umplut cu o cantitate exactă de ulei, iar reparaţiile care necesită deschiderea lui
trebuie să fie executate doar de către Constructor sau de Serviciul său de Asistenţă. În cazul unor
pierderi de ulei trebuie să fie contactat Constructorul sau Serviciul său de Asistenţă.
- Nu folosiţi acest aparat în camere a cărei suprafaţă de bază este mai mică de 4m
2
.
- În cazul demolării aparatului este necesară respectarea dispoziţiilor privind înlăturarea uleiului.
- Nu așezaţi cablul pe aparatul încă cald.
- Nu acoperiţi aparatul atunci când este în funcţiune.
- Folosirea prelungitoarelor nu este recomandată, întrucât ar putea sa existe supraîncălziri în timpul
funcţionării aparatului.
Scoateţi aparatul din cutia de ambalaj, îndepărtaţi eventualele reziduri care ar fi putut rămâne blocate înăuntrul aparatului.
Un dispozitiv de siguranţă va întrerupe funcţionarea radiatorului în cazul supraîncălzirii accidentale.
Pentru repunerea în funcţiune contactaţi un centru de asistenţă cel mai apropiat dvs.
IMPORTANT: Nu acoperiţi în nici un caz aparatul în timpul funcţionării, deoarece ar
putea provoca supraîncălziri periculoase.
57
1
10
11
12
13
14
15
16
17
18
19
20
21
22
23
24
fig.5
2
4
2
3
4
5
6
7
8
9
10
23
2
2
21
20
1
9
18
17
1
6
1
1
15
14
2
1
3
1
Page 58

Radiátor je v‰estrann˘ prístroj pre vyhrievanie domácností s troma voliteºn˘mi moÏnosÈami v˘konu.
Okrem toho, do tohto v˘robku bola zabudovaná v˘hradná funkcia, ktorá Vám umoÏní najoptimálnej‰í
komfort v kaÏdej situácii.
Pre dokonalé vyuÏitie v˘konu tohto v˘robku Vám odporúãame, aby ste si pozorne preãítali tento návod
k obsluhe.
1. V·EOBECNÉ INFORMÁCIE
Prístroj vybaºte, obráÈte dolu hlavou a
obráten˘ ho poloÏte na polyester, ktor˘ chránil rohy.
Skontrolujte, ãi nie je napájací kábel po‰koden˘ a ãi sa prístroj poãas prepravy nepo‰kodil. Po‰koden˘ prístroj nezapínajte.
2. MONTÁÎ NOÎIÂIEK
Vybaºte noÏiãky a kolieska z polyesteru.
Kolieska zasuÀte do kolíka noÏiãky a tlaãte aÏ pokiaº nazapadnú (obr, 1).
Potiahnutím sa ubezpeãte, ãi sú kolieska dobre upevnené.
NoÏiãku s kolieskami vmontujte do spodnej ãasti radiátora a vsuÀte vodiace rebrá medzi ovládáciu skrinku
a prv˘ prvok a medzi zadú skrinku a posledn˘ prvok; zasuÀte 2 zuby do príslu‰n˘ch miest a noÏiãku upevnite skrutkou s okom, ktorú pevne zaskrutkujte. (obr. 1).
Po ukonãení t˘chto úkonov radiátor otoãte do zvislej polohy chodu.
3. MONTÁÎ NA STENU
Kit pre montáÏ na stenu musí obsahovaÈ:
2 x Horné drÏiaky (A)
1 x Doln˘ drÏiak (B)
5 x Skrutky
5 x HmoÏdinky
2 x Skrutky pre noÏiãky
1. Vyberte si miesto na montáÏ panelu a ubezpeãte sa, aby:
a. Nebol umiestnen˘ priamo pod elektrickou zástrãkou
b. Elektrická zástrãka a zásuvka boli po umiestnení ºahko prístupné
c. Elektrick˘ kábel, ‰núra, alebo iné rúry neboli po‰kodené.
d. Sa záclony, alebo in˘ horºav˘ materiál nenachádzal v bezprostrednej blízkosti panelu.
2. Pred navrtaním otvorov do steny si ‰ablónou vyznaãte body, dávajúc pozor na rozmery (D), uvedené na
obr. 3; rozmer (D) sa mení podºa modelu tak, ako je to uvedené v nasledujúcej tabuºke:
3. Vyznaãte stred drÏiakov A (ãiarkovane tak, ako je to znázornené na obr. 3/4) a dávajte pozor, aby dva
drÏiaky boli v rovnakej v˘‰ke; teraz môÏte vyznaãiÈ body v⁄tania.
4. U tehlov˘ch stien pouÏite 6 mm hrot pre cement; vyv⁄tajte dierky do vyznaãen˘ch miest a vsuÀte
hmoÏdinky.
(U stavebnej sádry alebo pri obkladoch doporuãujeme drevené drÏiaky a pouÏitie 6 mm dreven˘ch skrutiek priamo do dreva, alebo pouÏitie iného vhodného upevnenia.
58
SK
1Kw
140 mm
1,5 Kw
210 mm
2 Kw
280 mm
2,5 Kw
385 mm
Modelul
D
3A
Page 59

5. Pripevnite drÏiaky na stenu “A” priloÏen˘mi skkrutkami do vyv⁄tan˘ch bodov.
6. Radiátor zaveste na drÏiaky (obr. 3-4).
7. Urãite si bod upevnenia spodného drÏiaku (B). DrÏiak vsuÀte do stredu spodnej ãasti prístroja; pre presné urãenie miesta na vyv⁄tanie otvoru pouÏite jednu z priloÏen˘ch skrutiek (obr. 3)
Tento drÏiak zabráni náhodnému posunu prístroja.
8. Zveste radiátor z drÏiakov A a vyv⁄tajte dierku tak ako u drÏiaku A; teraz zasuÀte hmoÏdinku. Po zasunutí drÏiaka B radiátor zaveste znovu na drÏiaky A a nakoniec drÏiak B skrutkou upevnite (B).
Teraz je radiátor upevnen˘ na stene. Prístroj nepouÏívajte v kúpelniach.
ELEKTRICKÉ NAPOJENIE
- pred zasunutím zástrãky do zásuvky pozorne skontrolujte, ãi voltáÏ Va‰ej domácej siete zodpovedá hodnote von V, udanej na prístroji a ãi elektrická zásuvka a napájacia linka môÏu byÈ pouÏité na poÏadovan˘ v˘kon.
- RADIÁTOR SA MÔÎE NAPOJIË NA ZÁSUVKY, KTORÉ MAJÚ DOBRÉ UZEMNENIE.
- Tento prístroj je zhodn˘ so smernicou 89/336/CEE a s Vyhlá‰kou 476/92 o elektromagnetickej kompatibilnosti.
4. CHOD A POUÎITIE
Zapnutie
Zastrãte zástrãku do zásuvky; termostat posuÀte aÏ na doraz do polohy maximum; vypínaãom/vypínaãmi
zapnite radiátor.
Modely s dvojit˘m vypínaãom (3 v˘kony)
- Tlaãidlo “I” stlaãené = minimálny v˘kon (kontrolná Ïiarovka rozsvietená)
- Tlaãidlo “II” stlaãené = stredn˘ v˘kon (kontrolná Ïiarovka rozsvietená)
- Tlaãidlá “I” a “II” stlaãené = maximálny v˘kon (kontrolné Ïiarovky rozsvietené)
Prístroj vypnete tak, Ïe obidva vypínaãe dáte do polohy “0” a potom vytiahnete zástrãku z elektrickej
zásuvky.
Nastavenie termostatu
Keì sa v prostredí dosiahla Ïelaná teplota, toãte pomaly termostatom, aÏ do oznaãenej polohy “click” a nie
ìalej. Takto urãená teplota bude nastavená automaticky a termostat ju bude kon‰tantne udrÏovaÈ.
Protimraziaca funkcia
S termostatom v polohe , s horn˘m vypínaãom v polohe “OFF” a s doln˘m vypínaãom v polohe “ON”, prístroj udrÏí teplotu prostredia pribliÏne 5°C a minimálnou stratou energie zabráni mrazeniu.
Modely s 24 hodinov˘m programátorom (Timer)
Pre naprogramovanie kúrenia pokraãujte nasledovne:
- Pozrite sa na Va‰e hodinky. Za predpokladu, Ïe je 10 hodín, toãte v smere ruãiãiek ãíselník programátora, aÏ pokiaº sa ãíslo 10 na ãíselníku nebude zhodovaÈ ▲ urãen˘m bodom s vytlaãen˘m na pro-
gramátori.
- Stlaãením zúbkov smerom do stredu nastavte Ïiadúce ãasové intervaly, v ktor˘ch má byÈ prístroj zapnut˘.
- KaÏd˘ zúbok zodpovedá 15.-tim minútam. Teraz budú viditeºné úseky, ktoré sa zhodujú s ãasom zapnutia prístroja.
- Takto nastaven˘ radiátor sa zapne a vypne kaÏd˘ deÀ automaticky v naprogramovanom ãase (dôleÏité:
zástrãka musí byÈ nepretrÏite v zásuvke).
- Na zmenenie programu staãí vrátiÈ zúbky do pôvodnej polohy a nastaviÈ nové ãasové obdobie.
- Keì si Ïeláte, aby prístroj beÏal bez programátora, posuÀte smerom do stredu v‰etky zúbky.
Keì potrebujete prístroj vypnúÈ úplne, okrem v‰etk˘ch vypínaãov je potrebné vytiahnuÈ zástrãku zo
zásuvky. Takto zabránite zbytoãnému chodu programátora.
59
Page 60

5. ÚDRÎBA
Elektrick˘ radiátor na olej nevyÏahuje zvlá‰tnu údrÏbu. Staãí mäkkou a suchou handrou poutieraÈ prach.
Nikdy nepouÏívajte drsné prá‰ky alebo roztoky. V prípade potreby prípadné neãistoty vysajte.
6. UPOZORNENIA
- Radiátor nepouÏívajte v kúpelniach alebo v bezprostrednej blízkosti vaní, sp⁄ch, um˘vadiel alebo bazénov.
- Radiátor nepouÏívajte na su‰enie prádla, napájací kábel neklaìte na teplé ãasti.
- Radiátor pouÏívajte iba vo zvislej polohe.
- Prístroj musí byÈ vzdialen˘ aspoÀ 50 cm od nábytku alebo in˘ch predmetov.
- V prípade, Ïe je napájací kábel po‰koden˘, musí byÈ vymenen˘ v˘robcom, jeho servisnou sluÏbou, alebo
kvalifikovanou osobou, aby sa predo‰lo aj tomu najmen‰iemu riziku.
- Je úplne normálne, Ïe pri prvom ‰tarte prístroj vydáva “v⁄zgajúci” zvuk.
- Prístroj nesmie byÈ nain‰talovan˘ tesne pod pevnou elektrickou zásuvkou.
- NádrÏ tohto prístroja je naplnená presn˘m mnoÏstvom oleja a prípadné opravy, ktoré vyÏadujú jej otvorenie musí previesÈ v˘hradne V˘robca alebo ním poverené Servisné Stredisko. V prípade úniku oleja je
treba kontaktovaÈ V˘robcu, alebo ním poverené Servisné Stredisko.
- Prístroj nepouÏívajte v miestnostiach, ktor˘ch pôdorys je men‰í ako 4m
2
.
- V prípade odstránenia prístroja sa riaìte nariadeniami, ktoré upravujú odstránenie oleja.
- Keì je prístroj tepl˘, neklaìte naÀho elektrickú ‰núru.
- Keì je prístroj zapnut˘, neprikr˘vajte ho.
- Nedoporuãujeme pouÏitie predlÏovaãiek. Tieto by sa mohli poãas chodu prístroja prehriaÈ.
Bezpeãnostné zariadenie preru‰í chod radiátora v prípade jeho náhodného prehriatia.
Prístroj vybaºte a odstráÀte zvy‰ky balenia, ktoré zostali v prístroji.
Na znovuuvedenie do chodu sa spojte s najbliωím servisn˘m strediskom.
DÔLEÎITÉ UPOZORNENIE: Aby ste predi‰li prehriatiu spotrebiãa, nikdy a za Ïiadnych okolností ho poãas ãinnosti nezakr˘vajte, pretoÏe by to spôsobilo nebezpeãné zv˘‰enie teploty.
DÔLEÏITÁ INFORMÁCIA PRE SPRÁVNU LIKVIDÁCIU V˘ROBKU V SÚLADE S EURÓPSKOU SMERNICOU
2002/96/ES.
Po ukonãení pracovnej Ïivotnosti v˘robku sa s ním nesmie zaobchádzaÈ ako s mestsk˘m odpadom. Musíte ho odovzdaÈ v autorizovan˘ch miestnych strediskách na zber ‰peciálneho odpadu
alebo u predajcu, ktor˘ zabezpeãuje túto sluÏbu. Oddelenou likvidáciou elektrospotrebiãa sa
predíde moÏn˘m negatívnym vplyvom na Ïivotné prostredie a zdravie, ktoré by mohli vypl˘vaÈ z
nevhodnej likvidácie odpadu a zabezpeãí sa tak recyklácia materiálov, ãím sa umoÏní znaãná
úspora energie a zdrojov. NevyhnutnosÈ oddelenej likvidácie domáceho spotrebiãa pripomína
oznaãenie na v˘robku zobrazujúce pre‰krtnutú nádobu na domov˘ odpad.
60
10
11
12
13
14
15
16
17
18
19
20
21
22
23
24
fig.5
1
2
4
2
3
4
5
6
7
8
9
10
23
2
2
21
20
1
9
18
17
1
6
1
1
15
14
2
1
3
1
Page 61

Radiator je naprava za ogrevanje notranjih prostorov z možnostjo izbire treh moči delovanja.
V ta aparat je bila vgrajena posebna funkcija, ki vam omogoča, da boste dosegli največje
udobje v vsaki situaciji.
Da boste najbolje izkoristili delovanje aparata, vam svetujemo, da v celoti preberete ta
navodila.
1. SPLOŠNO
Aparat vzemite iz embalaže in ga obrnite tako, da ga položite na zaščitne dele iz stiroporja.
Preverite, da se napajalni kabel in aparat nista poškodovala med prevozom. Poškodovanega aparata
ne priklapljajte.
2. MONTAŽA NOŽIC
Vzamite nožice in kolesca iz embalaže.
Vstavite kolesca v zatič nožice in pritisnite do konca, da slišite klik (slika 1). Preverite, da so kolesca
dobro pritrjena tako, da jih rahlo povlečete.
Montirajte nožice s kolesi na spodnjo stran radiatorja, vstavite jo med komandno ploščo in prvim
členom, drugo nožico vstavite med hrbtno stranjo in zadnjim členom. Vstavite dva zoba v predvidena
ležišča in pritrdite nogo z okroglim vijakom, ki ga privijete do konca (slika 1).
Montažo zaključite tako, da radiator obrnete v vertikalni položaj.
Pozor: samo obročasti vijaki se uporabljajo za pritrditev nožic.
3. ZIDNA MONTAŽA
Set za zidno montažo mora vsebovati:
2 x Zgornji nosilec (A)
1 x Spodnji nosilec (B)
5 x Vijak
5 x Zidni vložek
1. zberite mesto montaže radiatorja in se prepričajte, da:
a. Se ne nahaja neposredno nad omrežno vtičnico.
b. Sta vtič in vtičnica po montaži enostavno dostopna.
c. Ne morejo biti poškodovani električni kabli niti druge cevi.
d. Zavese in ostali vnetljivi materiali morajo biti dovolj oddaljeni od grelnika.
2. Preden boste zavrtali v zid, označite mesta vrtin s šablono in pazljivo upoštevajte dimenzije (D), ki
so podane na sliki 3. Dimenzija D varira glede na model, kot je prikazano v tabeli 3A.
3. Poravnajte sredino nosilcev A s črto (prikazana na sliki 3/4 s črtkano črto) in se prepričajte, da sta
oba nosilca na enaki višini, označite luknje, ki jih boste izvrtali.
4. Za zidove iz opeke, uporabite sveder za kamen dimenzije 6 mm in prevrtajte na znakih, ki ste jih
naredili ter vstavite zidne vložke, ki so dobavljeni.
(Za plošče iz mavca svetujemo, da poiščete lesene nosilce in uporabite lesne vijake dimenzije 6,
ki jih privijete neposredno v les ali uporabite posebne nosilce. Za kakršenkoli drugačen tip zidu, se
posvetujte s strokovnjakom.)
5. Montirajte zidna nosilca “A” v luknji z dobavljenimi vijaki.
61
SLO
1Kw
140 mm
1,5 Kw
210 mm
2 Kw
280 mm
2,5 Kw
385 mm
Model
D
3A
Page 62

6. Radiator obesite na nosilca (slika 3/4).
7. Določite položaj montaže spodnjega nosilca (B) tako, da ga vstavite v podnožje aparata. Uporabite
enega izmed priloženih vijakov, da označite točno pozicijo luknje (slika 3).
Ta nosilec preprečuje naključno odstranitev aparata.
8. Odstranite radiator iz nosilcev A in zavrtajte luknjo, kot je predhodno nakazano za luknje nosilca A,
nato vstavite zidni vložek. Radiator ponovno obesite na nosilca A z vstavljenim nosilcem B in ga
fiksirajte z vijaki (slika 3).
Radiator je sedaj nameščen.
Aparata ne uporabljajte v kopalnici.
3. ELEKTRIČNA PRIKLJUČITEV
- Predno aparat priključite na omrežno napetost, preverite, da omrežna napetost ustreza napetosti,
podani na napisni tablici in da je omrežna napeljava primerna priklopu moči, ki je podana na sami
tablici.
- RADIATOR PRIKLJUČITE SAMO V UČINKOVITO OZEMLJENO ELEKTRIČNO VTIČNICO.
- Ta aparat je v skladu s smernico CEE 89/336 in D.M. 476/92 o elektromagnetni skladnosti.
4. DELOVANJE IN UPORABA
Vklop
Vtaknite vtič v omrežno vtičnico. Termostat obračajte dokler se ne ustavi na največji vrednosti. Radiator
vključite s stikalom/li.
Modeli z dvojnim stikalom (3 moči)
- vključeno stikalo “I” = najmanjša moč (lučka je prižgana)
- vključeno stikalo “II” = srednja moč (lučka je prižgana)
- vključena oba stikala “I” in “II” = največja moč (lučki sta prižgani)
Če želite izključiti aparat, morata biti oba stikala v položaju “0”, nato iztaknite vtič iz vtičnice.
Regulacija termostata
Ko bo prostor dosegel želeno temperaturo, počasi obračajte termostat, dokler ne boste slišali klika.
Tako nastavljena temperatura bo avtomatično regulirana in bo ostala konstantna.
Funkcija proti zmrzovanju
Radiator bo vzdrěeval temperaturo prostora pribliěno 5ĄC ¸e bo gumb termostata nastavljen na in
bodo stikala vklju¸ena. Tako bo prepre¸eno zmrzovanje pri minimalni porabi energije.
Modeli s programatorjem (Timer) 24 ur
Za nastavitev ogrevanja ravnajte po sledečem postopku:
-Preverite čas na vaši uri. Predvidevamo, da je ura 10, gumb programatorja obrnite v smeri urinega
kazalca do položaja, da se bo številka 10 na gumbu ▲ prilegala puščici na programatorju (slika.5).
- Nastavite čas delovanja aparata tako, da potisnete zobke proti sredini gumba.
Vsak zobek ustreza času delovanja 15 minut. Tako bodo vidna območja delovanja.
-Tako prednastavljen, bo radiator avtomatično deloval vsak dan po programiranem času
(Pomembno: vtič mora biti vedno vstavljen v vtičnico).
- Za nastavljanje programov zadostuje, da zobke premaknete v začetni položaj in nastavite nova
območja delovanja.
- Če želite, da bo aparat deloval brez programatorja, porinite vse zobke proti sredini.
V tem primeru, morate za popolno izključitev aparata, poleg izklopa stikal, iztakniti vtič iz vtičnice,
da preprečite nepotrebno delovanje programatorja.
62
Page 63

5. VZDRŽEVANJE
Radiator na olje ne zahteva posebnega vzdrževanja. Zadostuje, če ga občasno pobrišete z mehko
suho krpo. Očistite ga samo, kadar je hladen. Nikoli ne uporabljajte abrazivnih ali topljivih čistil. Če je
potrebno, očistite umazanijo s sesalnikom.
6. OPOZORILA
- Naprave ne uporabljajte v kopalnici ali v bližini kadi, umivalnikov, tuša ali bazena.
- Radiatorja ne uporabljajte za sušenje perila. Napajalnega kabla ne polagajte na ogrete dele.
- Radiator uporabljajte vedno in samo v vertikalnem položaju.
- Aparat mora biti oddaljen najmanj 50 cm od pohištva in drugih predmetov.
- Če je napajalni kabel poškodovan, ga mora zamenjati proizvajalec, pooblaščeni servis ali kvalificiran električar, da se tako izognete vsaki nevarnosti.
- Povsem običajno je, da aparat oddaja “škripajoč zvok” ob prvem zagonu.
- Aparat ne sme biti nameščen neposredno pred električno vtičnico.
- Vsebina aparata je napolnjena z določeno količino olja, zato lahko popravilo, ki zahteva odprtje
aparata, vrši samo proizvajalec ali pooblaščeni servis. V primeru puščanja olja, se obrnite na proizvajalca ali pooblaščeni servis.
- Aparata ne uporabljajte v prostorih, katerih površina je manjša od 4 m
2
.
- Če morate aparat zavreči, upoštevajte zakone o odstranjevanju olja.
- Napajalnega kabla ne polagajte na vroč radiator.
- Aparata med delovanjem ne prekrivajte.
- Odsvetujemo uporabo podaljškov, ker bi se lahko pregreli med delovanjem aparata.
Aparat vzemite iz embalaže in odstranite morebitne ostanke, ki se lahko zagozdijo v aparatu.
Varnostna naprava prekine delovanje radiatorja v slučaju pregrevanja.
Če želite vnovič vzpostaviti delovanje, kontaktirajte najbližjega serviserja.
POMEMBNO: Da bi se izognili pregrevanju, v nobenem primeru ne pokrivajte aparata
med delovanjem, ker bi to povzročilo nevarno povišanje temperature.
POMEMBNA INFORMACIJA ZA PRAVILNO ODSTRANJEVANJE IZDELKA V SKLADU S SMERNICO ES
2002/96/EC.
Po koncu njegove življenske dobe izdelka ne odvržite med navadne gospodinjske odpadke.
Potrebno ga je odnesti na posebna zbirna mesta za ločeno zbiranje odpadkov, oziroma k zastopniku, ki opravlja te vrste storitve. Ločeno odstranjevanje posameznih delov gospodinjskih aparatov preprečuje negativne posledice onesnaževanja okolja in nastajanje nevarnosti za zdravje,
do katere lahko pride zaradi neustreznega odstranjevanja izdelka, poleg tega pa omogoča
ponovno predelavo materiala, iz katerega je slednji izdelan, ter s tem prihranek energije in surovin. Za opozorilo o obveznem ločenem odstranjevanju posameznih materialov je stroj označen
s simbolom prekrižanega smetnjaka.
63
1
10
11
12
13
14
15
16
17
18
19
20
21
22
23
24
slika.5
2
4
2
3
4
5
6
7
8
9
10
1
23
2
2
21
20
1
9
18
17
1
6
1
15
14
2
1
3
1
Page 64

Ovaj radijator je uređaj s različitim mogućnostima za grijanje u kućanstvu na tri moguće
razine snage. K tome, u ovaj je proizvod ugrađena i izvanredna funkcija koja vam omugućava
postizanje najveće udobnosti u bilo kojoj situaciji.
Da biste do kraja iskoristili mogućnosti ovoga proizvoda, savjetujemo da temeljito pročitate
dolje navedene upute.
1. OPĆENITO
Izvadite uređaj iz kutije u kojoj je zapakiran, okrenite ga naopako i položite na zaštitne omotače od
stiropora.
Provjerite je li kabel za napajanje neoštećen te da se uređaj nije oštetio tijekom transporta. Ne
uključujte uređaj ako je oštećen.
2. MONTAŽA NOGU
Izvadite noge i kotačiće iz pakiranja od stiropora.
Kotačiće uložite u osovinu noge i pritisnite do kraja dok ne čujete “klik” (sl. 1). Provjerite jesu li kotačići
dobro učvršćeni, tako da ih pokušate povući.
Nogu s kotačićima montirajte na donji dio radijatora tako da hrbat vodilice umetnete između
upravljačke kutije i prvog elementa, te stražnje kutije i zadnjeg elementa; 2 zupca uglavite u predviđena
ležišta pa učvrstite noge pomoću okastog vijka tako da ga zavijete do kraja (sl. 1).
Kad ste završili s ovim postupkom, okrenite radijator i vratite ga u vertikalni položaj u kojem će raditi.
3. MONTAŽA NA ZID
Komplet za postavljanje na zid mora sadržavati:
2 x gornja nosača (A)
1 x donji nosač (B)
5 x vijaka
5 x tipla
2 x vijka za noge
1. Odaberite mjesto za postavljanje ploče pazeći na sljedeće:
a. Ploču ne smijete postaviti izravno ispod električne utičnice.
b. Utikač i utičnica moraju biti lako dostupni.
c. Električni kablovi i drugi vodovi ne smiju biti postavljeni tako da se mogu oštetiti.
d. Ploča ne smije stajati blizu zavjesa i drugih zapaljivih materijala.
2. Prije nego probušite rupe u zidu, označite točke pazeći na dimenzije (D Sl. 3) koje variraju ovisno o
modelu, kao što je navedeno u tablici 3A.
3. Središta nosača A poravnajte crtom (na sl. 3/4 prikazana isprekidano), pazeći da su dva nosača na
istoj visini; zatim označite rupe koje ćete probušiti.
4. Za zidove od cigle koristite svrdlo za beton debljine 6 mm i bušite prema oznakama koje ste prije
označili, zatim stavite priložene tiple.
(Za zidove od gipsa savjetujemo da locirate drvene nosive elemente i koristite vijke za drvo br. 6
izravno u drvo, ili pak posebne nosače za gips. Za sve druge vrste zidova potražite savjet
stručnjaka).
64
HR
1Kw
140 mm
1,5 Kw
210 mm
2 Kw
280 mm
2,5 Kw
385 mm
Model
D
3A
Page 65

5. Montirajte nosače “A” u rupe pomoću priloženih vijaka.
6. Objesite radijator na nosače (sl. 3/4).
7. Odredite položaj donjeg nosača (B) tako da ga postavite u sredinu baze uređaja; pomoću jednog
od priloženih vijaka označite točan položaj rupe (sl. 3).
Ovaj nosač sprječava slučajno pomicanje uređaja.
8. Skinite radijator s nosača A i probušite rupu kao što je prethodno opisano za ruče nosača A; zatim
umetnite tiplu. Kad ste postavili nosač B, radijator opet objesite na nosače A pa nosač B učvrstite
vijkom (sl. 3).
Radijator je sada pričvršćen na zid.
Ne koristite uređaj u kupaonici.
3. PRIKLJUČIVANJE NA ELEKTRIČNU MREŽU
- Prije nego ukopčate uređaj u napajanje, pažljivo provjerite odgovara li napon vaše mreže vrijednosti u V označenoj na uređaju, te jesu li utičnica i linija napajanja dimenzionirane za predviđeno opterećenje.
- RADIJATOR PRIKLJUČITE ISKLJUČIVO NA ODGOVARAJUĆE UZEMLJENU UTIČNICU.
- Ovaj uređaj u skladu je s Direktivom CEE 89/336 i Dekretom. o elektromagnetskoj kompatibilnosti.
4. RAD I UPORABA
Uključivanje
Ukopčajte utikač u električnu struju; okrenite termostat dok se ne zaustavi u maksimalnoj poziciji;
uključite radijator pomoću prekidača.
Modeli s dvostrukim prekidačem (3 razine snage)
-prekidač “I” pritisnut = najmanja snaga (lampica upaljena)
-prekidač “II” pritisnut = srednja snaga (lampica upaljena)
- oba prekidača “I” i “II” pritisnuta = najveća snaga (lampice upaljene)
Da biste isključili uređaj, oba prekidača moraju biti u položaju “0”; zatim iskopčajte utikač iz električne
struje.
Podešavanje termostata
Kad je u prostoriji postignuta željena temperatura, polako okrećite termostat do položaja u kojem
čujete “klik”, ali ne dalje. Tako podešenu temperaturu termostat će automatski regulirati i održavati.
Funkcija protiv smrzavanja
Sa gumbom termostata na poziciji i ukljuãenim prekidaãima, stroj odrÏava prostoriju na temperaturi otprilike 5°C, spreçavajuçi zaledjivanje minimalnom potro‰njom energije.
Modeli s 24-satnim tajmerom
Da biste programirali grijanje, postupite na sljedeći način:
- Na svom satu pogledajte točno vrijeme. Ako je na primjer 10 sati, okrenite disk ▲ brojčanikom u
smjeru suprotnom od kazaljke na satu dok se broj 10 na disku ne poklopi s oznakom utisnutom na
programatoru (sl.5).
- Namjestite razdoblje u kojemu želite da uređaj radi, tako da zupce pritisnete prema sredini.
Svaki zubac odgovara razodblju od 15 minuta. Sada ćete moći vidjeti područja koja odgovaraju
razdoblju rada uređaja.
- Tako programirani radijator svakoga dana će se automatski uključivati u programirano vrijeme
(Važno: utikač uređaja stalno mora biti ukopčan u električnu mrežu).
- Da biste promijenili programirano vrijeme, dovoljno je zupce vratiti u početni položaj i namjestiti
novo razdoblje programiranog rada.
- Ako želite uključiti uređaj bez programiranja, sve zupce gurnite prema sredini.
U tom slučaju za potpuno isključivanje uređaja osim isključivanja oba prekidača potrebno je
iskopčati i utikač uređaja iz električne mreže, da biste izbjegli nepotreban rad programatora.
65
Page 66

5. ODRŽAVANJE
Električni uljni radijator ne zahtijeva posebno održavanje. Dovoljno je ukloniti prašinu suhom mekom
krpom, čistite ga samo kad je hladan. Nemojte koristiti abrazivne praške ili otopine. Po potrebi usisavačem uklonite veće količine prašine.
6. UPOZORENJA
- Nemojte koristiti radijator u kupaonicama ili u neposrednoj blizini kada za kupanje, tuševa, umivaonika ili bazena.
- Nemojte koristiti radijator za sušenje rublja ili ostavljati kabel za napajanje na vrućim elementima.
- Radijator koristite isključivo u vertikalnom položaju.
- Uređaj treba postaviti najmanje 50 cm od namještaja i drugih predmeta.
- Ako je kabel za napajanje oštećen, mora ga zamijeniti proizvođač, ovlašteni servisni centar ili kvalificirani stručnjak, kako bi se izbjegle sve opasnosti.
- Normalno je da pri prvom uključivanju uređaj škripi.
- Uređaj se ne smije postaviti izravno ispod fiksne utičnice.
- Spremnik radijatora napunjen je točnom količinom ulja, a popravke koji zahtijevaju njegovo otvaranje mora izvršavati isključivo proizvođać ili njegov ovlašteni servis. U slučaju curenja ulja obratite se proizvođaču ili ovlaštenom servisu.
- Ovaj uređaj nemojte upotrebljavati u prostorijama površine manje od 4 m
2
.
U slučaju odlaganja uređaja na otpad, poštujte odgovarajuće propise o zbrinjavanju uljnog otpada.
- Ne stavljajte kabel na vrući uređaj.
- Ne pokrivajte uređaj dok je uključen.
- Ne preporučuje se uporaba produžnih kablova jer bi se tijekom rada uređaja mogli pregrijati.
Sigurnosna naprava prekinut će rad radijatora ako dođe do slučajnog pregrijavanja.
Da biste ponovno pokrenuli rad uređaja, obratite se najbližem servisu.
- Izvadite uređaj iz kutije, uklonite eventualne ostatke ambalaže koji su ostali unutar uređaja.
VAŽNO: Da ne bi došlo do pregrijavanja, ni u kojem slučaju nemojte prekrivati uređaj
tijekom rada, jer bi to moglo uzrokovati opasno pregrijavanje.
66
1
10
11
12
13
14
15
16
17
18
19
20
21
22
23
24
Sl.5
2
4
2
3
4
5
6
7
8
9
10
1
23
2
2
21
20
1
9
18
17
1
6
1
15
14
2
1
3
1
Page 67

Page 68

Page 69

Page 70

5706002200/01.06
 Loading...