

Page 1

Proudly distributed by
De’Longhi Australia Pty Limited
P.O. BOX 4540
CASULA MALL NSW 2170
Customer Service Ph: 1800 126 659
Fax: 1800 706932
www.delonghi.com.au
e-mail: info.au@delonghigroup.com
De’Longhi New Zealand Limited
99 Khyber Pass Road
Grafton 1023
Auckland, New Zealand
P.O. Box 58-056 Botany
MANUKAU 2163
Customer Service Ph: 0508 200 300
Fax: 0508 200 301
www.delonghi.co.nz
e-mail: info.nz@delonghigroup.com
De’Longhi Appliances via Seitz, 47 31100 Treviso Italia www.delonghi.com
5718510911/11.16
Page 2
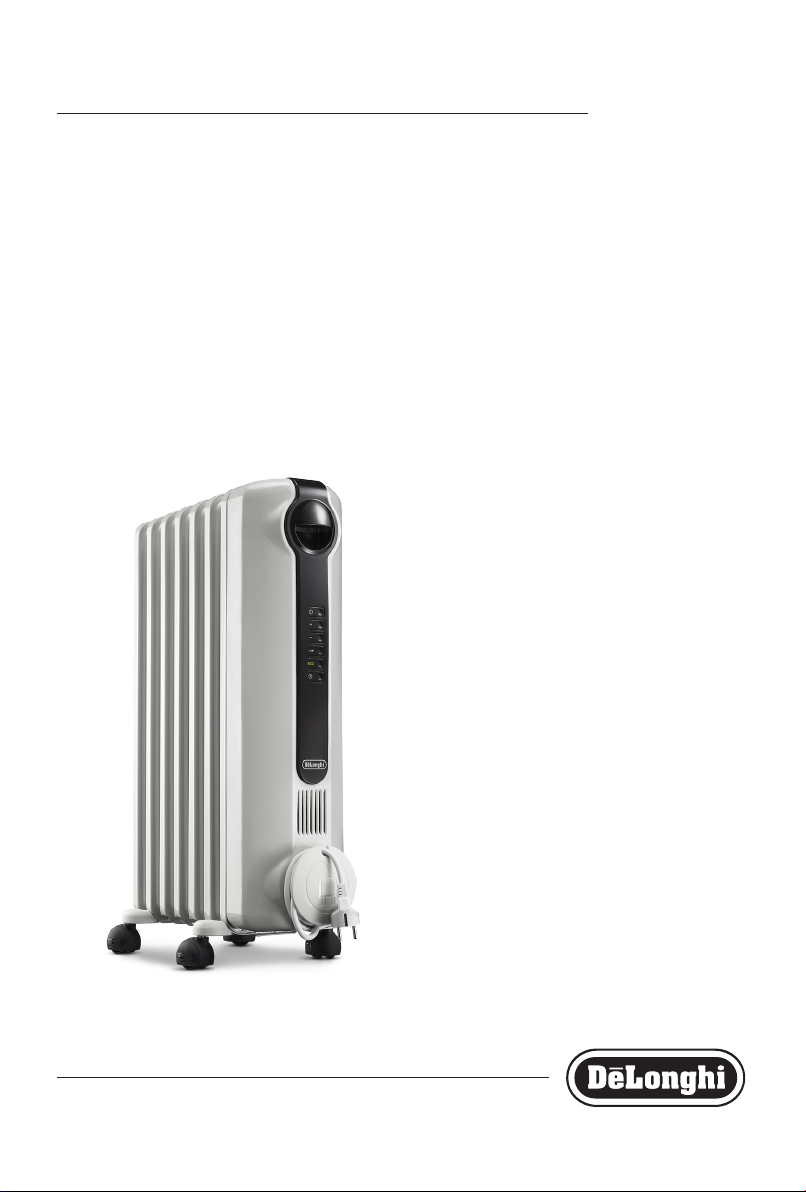
TRRSE Series
OIL FILLED RADIATOR
Instructions for use
Page 3
A
B
C
D
E
F
G
H
I
2
Page 4

IMPORTANT WARNINGS
Safety warnings
Danger!
Failure to observe the warning may result in life threatening
injury by electric shock.
- The appliance must not be located
immediately below a xed socketoutlet.
- Do not use the heater in the vicinity of
bathtubs, wash basins, showers, sinks
and swimming pools.
- Only use the heater in an upright
position.
Important!
Failure to observe the warning could result in injury or
damage to the appliance.
- This appliance can be used by children
aged from 8 years and above and
persons with reduced physical, sensory
or mental capabilities or lack of
experience and knowledge if they have
been given supervision or instruction
concerning use of the appliance in a
safe way and understand the hazards
involved. Children shall not play with
the appliance. Cleaning and user
maintenance shall not be made by
children without supervision.
- Children of less than 3 years should
be kept away unless continuously
supervised.
- Children aged from 3 years and less
than 8 years shall only switch on/
o the appliance provided that it
has been placed or installed in its
intended normal operating position
and they have been given supervision
or instruction concerning use of
the appliance in a safe way and
understand the hazards involved.
Children aged from 3 years and less
than 8 years shall not plug in, regulate
and clean the appliance or perform
user maintenance.
CAUTION — Some parts of this
product can become very hot and
cause burns. Particular attention
has to be given where children and
vulnerable people are present.
- The body of this radiator is lled with
a precise quantity of special oil, so that
repairs requiring the opening of the
oil body must only be made by the
service agent. Any oil leakage must be
reported to the Customer Experience,
see enclosed guarantee for details.
- If the power cable has been damaged, it
must be replaced by the manufacturer
or the technical service centre or by a
qualied person so as to avoid all risks.
- ATTENTION: in order to avoid any
danger caused by an accidental
resetting of the safety system, this
appliance must not be powered
through an external timer.
- We recommend that you not place the heater in a
draught, because strong draughts of air may adversely
aect the equipment’s operational eciency.
Danger of burns!!
Failure to observe the warning could result in burns or scalds.
- WARNING: In order to avoid
overheating, never under
any circumstances cover the
appliances during operation, as this
would lead to dangerous overheating.
- The use of an extension lead is not recommended, as
overheating of the extension lead may occur during the
operation of the heater.
- Never use the heater to dry laundry.
- Never place the power cable on top of the heater while
it is hot.
3
Page 5

Please note:
This symbol indicates recommendations and important
information for the user.
- The heater must be positioned at least 50cm from
furniture or other objects.
- The rst time you use the appliance, operate it of at
least 2 hours at maximum power level and maximum
temperature set to eliminate the “new” smell. A little
smoke due to the protective substances applied to the
heating element before transport may be given o, for
this reason we suggest you ventilate the room during
this operation.
- Do not obstruct the hot air outlet grilles or the air intake
grille on the bottom of the appliance.
- Position the appliance so that the plug and the outlet
can be easily reached even after installation.
- Do not use the appliance in rooms less than 4 m2 in area.
- The appliance is tted with a safety device which will
switch o it in case of accidental overheating.
To reset, please contact Customer Experience, see
enclosed guarantee.
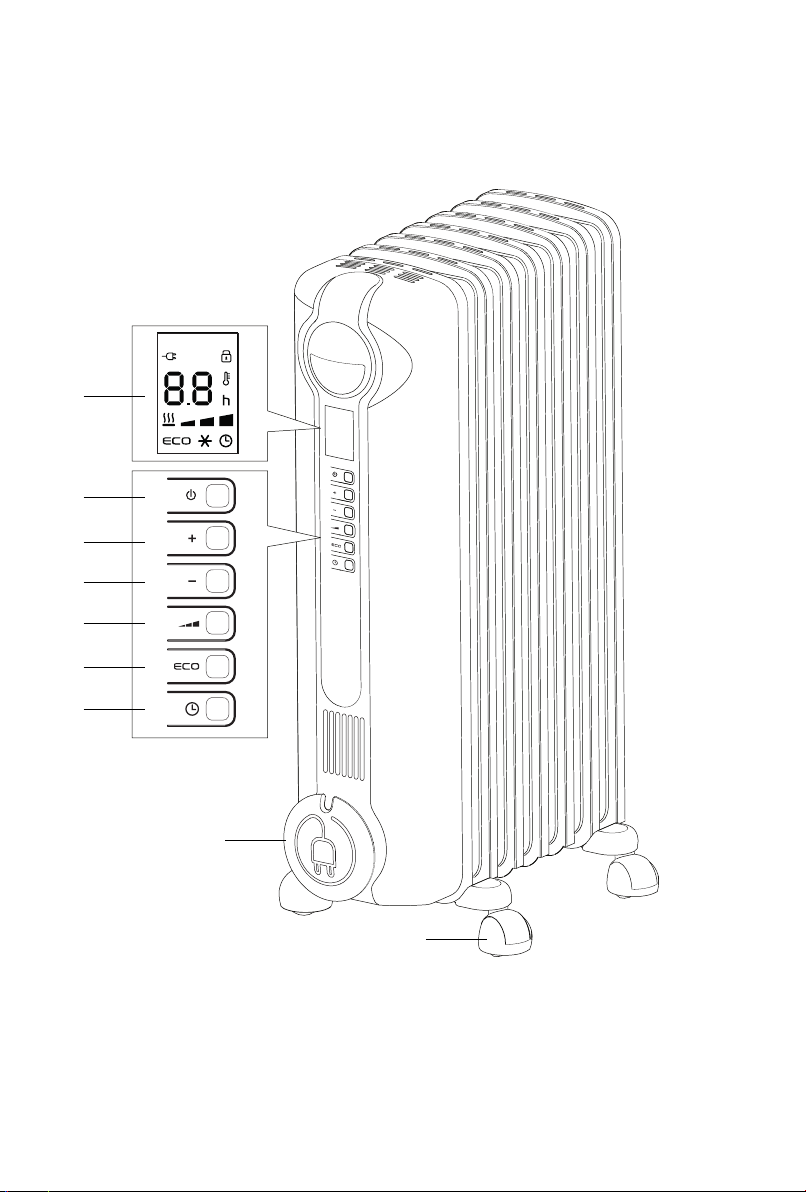
DESCRIPTION
A display
B on-standby button
C increase button
D decrease button
E power button
F eco button
G timer button
H cord holder
I wheel
outlet. Do not use this radiator in rooms having a surface area
of less than 43 square feet (4 sq.m.).
Power connection
- Before using the appliance check that your supply
voltage is the same of that shown on the rating label
of the unit and that the power socket and power supply
line correspond to the load specied.
- Check also the current capacity of your fuses.
- This appliance complies with directive 2004/108/ec on
electromagnetic compatibility.
Plug in the heater, the appliance will be set in the standby condition. The display will show the symbol. Keep
loose clothing or bedding, furniture and ammable material
away from the power outlet where the heater is plugged in.
After an interruption of the power supply (power failure or
appliance unplugged) the unit goes always to stand-by.
Heating function
To turn the appliance on, press the (B) button.
Press button (E) to set the required power level:
MIN ( ); MED ( ); MAX ( ). To select the
desired temperature, press button + or - (C or D). By pushing
the + or - button once, the temperature (shown on the
display) will increase or decrease by 1°C. Keeping the + or
- button depressed the value will increase o decrease rapidly.
USE
"Easy wheel" system
Turn the radiator upside down on a rug or a soft surface in
order to prevent damaging the paint nish.
Fully unfold the wheels by turning them outwards (Fig. 1).
Turn the radiator back to its upright position.
Fig. 1
Location
The heater must not be placed immediately below a power
The appliance allows to set the temperature from 5° to 28°C.
Anti-freeze function
Setting the temperature to 5°C with the "-" button, the
appliance will activate the Antifreeze function.
The display will show the symbol, in this way the
appliance will turn on automatically, at the max power,
only if the room temperature falls below 5°C. If you wish to
go back to the Heating function, press the "+" button once.
After an interruption of the power supply (probe failure or
appliance unplugged) the unit goes always to stand-by.
Eco function
When this function is active the appliance automatically sets
4
Page 6

the most appropriate power level to guarantee optimum
comfort while reducing energy consumption.
To activate this function press the "ECO" (F) button. The
display will show symbol. If the selected temperature
is much higher than the actual room temperature, the
appliance will start automatically and rapidly to heat the
room.
The appliance will automatically select the most convenient
power level (MAX-MED-MIN-OFF).
If MAX power level has been selected using the
button, the appliance will cycle between: MAX-MED-MIN-
OFF.
If MED power level has been selected, the appliance will cycle
between: MED-MIN-OFF.
If MIN power level has been selected, the appliance will cycle
between: MIN-OFF.
Working indicator
The symbol indicates the heating status by means of its
colors.
RED: the unit is heating at the maximum power.
ORANGE: the unit is heating at the medium power.
GREEN: the unit is heating at the minimum power.
absent: the unit is not heating.
Delayed stop: with the appliance on, press the timer button
. The hours left before the appliance goes to stand-by
mode, the power level and in case the function selected are
displayed together with the symbol and "h" symbol
ashing. Change the hours using the + and - buttons, then
wait a few seconds for the program to be stored. The current
settings and symbol are displayed. At the end of the set
time the appliance switches to standby mode automatically. To
go back to operating without the timer, press the timer button
twice. The timer symbol disappears from the display.
Please note: the time is settable from 0.5 to 24 hours.
Key lock
In order to avoid accidental operation, you can lock the
keyboard using the keylock function. To activate this function
during on mode, press buttons + and - together for at least
3 seconds. The display shows the symbol and a double
acoustic signal will be emitted. To disactivate the function
proceed in the same way.
Timer function
This function can be activated in two dierent ways.
Delayed start: With the appliance in standby mode, press
the timer button (G) . The hours left before the appliance
comes on is displayed together the symbol and "h"
symbol ashing.
Change the hours using the + and - buttons, then wait a few
seconds for the program to be stored.
The display will return to o and the symbols remains on.
When the programmed time has elapsed, the appliance will
come on with the previous settings.
Change of the temperature scale
The display can show the temperature in both °F and °C.
To select the desired temperature scale, when the unit is in
standby position, press and hold the "+" and "ECO" keys for
at least 10 seconds, then release.
The change of scale will be indicated by two short beeps.
Brightness of the display
The appliance allows two dierent brightness settings for the
display. The highest is active when any key button is pressed.
After a few seconds of key board inactivity, the brightness will
decrease to the operating brightness level. This lower level
can be adjusted in this way:
- with the appliance in on mode after pressing for 5
seconds the ECO button the display will show:
5
Page 7

- With the + and - button is possible to select the desired
brightness (three brightness levels available).
- After 5 seconds without to press any button, the
brightness level will be memorized and the operating
conditions will be the same ones previously set.
Alarms
The appliance has a diagnostic system that makes it possible
to signal malfunctions.
In case of problems, the display will show an alarm message:
- (Probe Failure) blinking
With this alarm the appliance does not operate. Contact
the De'Longhi Customer Service.
- (High temperature)
When the product’s internal temperature is too high,
the heating power will progressively and automatically
be reduced.
The display shows for two seconds, blinking. To
remove the cause of this alarm check that the unit is not
covered and let the appliance cool down.
- n (Tos alarm) blinking
The appliance could be tipped over or positioned in
a improper way. Make sure the appliance is standing
upright on a at surface. Position the appliance
correctly.
SAFETY DEVICE
A safety device switches the heater o in the event of
overheating.
To restart the heater, call the De'Longhi Customer Service.
MAINTENANCE
Always remove the plug from the power outlet and allow the
radiator to cool. Wipe radiator with a soft damp cloth, do not
use detergents and abrasives. Should the radiator not be in
use over a certain length of time, wind the cord around the
cord holder and store it in a dry place. This appliance has been
built to give many years of trouble free service.
In case of malfunction or doubt, do not try to repair the heater
by yourself: this may result in a re hazard or electric shock.
Call the De'Longhi Customer Service (see attached list of
De'Longhi Customer Service).
TECHNICAL CHARACTERISTICS
Supply voltage See rating plate
Absorbed power “
TROUBLESHOOTING
PROBLEM CAUSE SOLUTION
The display doesn't work Be sure it is plugged in and that the
electrical outlet is working
Plug into the power outlet
The safety device may have switched o
the appliance
The appliance doesn't warm up The temperature may be set too low
The display shows: blinking
The display shows:
(High temperature) blinking
The display shows: n (Tos alarm)
blinking
It indicates that the room temperature
sensor has failed
The unit has reached a too high internal
temperature
The tip-over switch has been activated Make sure the appliance is standing
6
Remove the obstruction and let the
appliance cool down. If the appliance
doesn't work please contact the
Customer Service
Set the temperature to a higher value
Please contact the De'Longhi Customer
Service
Check that the unit is not covered
the appliance cool down
internal temperature decreases, the alarm
will disappear.
If the appliance doesn't work please contact
the
De'Longhi Customer Service
upright on a at surface. If the appliance
doesn’t work please contact De'Longhi
Customer Service
De'Longhi
and let
. When the product
 Loading...