

Page 1

De’Longhi Appliances via Seitz, 47 31100 Treviso Italia www.delonghi.com
5711010841/04.14_00
Page 2

TRDS4 0820E - TRDS4 1025E
DRAGON 4
OIL FILLED RADIATOR
Page 3
DESCRIPTION
L
A
M
B
C
D
I
F
G
H
E
N
O
2
Page 4

INSTRUCTIONS FOR USE
Read these instructions carefully before using the appliance.
Failure to comply with these instructions can lead to injury to
persons and damage to the machine.
The manufacturer is not liable for damage deriving from the
failure to comply with the user instructions.
Symbols used in these instructions
Important warnings are identied by the symbols below.
It is important to respect the warnings.
Failure to respect the warnings could lead to electric shock,
serious injury, burns, re or damage to the appliance.
Danger!
Failure to observe the warning may result in life threatening
injury by electric shock.
Important!
Failure to observe the warning could result in injury or damage
to the appliance.
Danger of burns!!
Failure to observe the warning could result in burns or scalds.
Please note:
This symbol indicates recommendations and important
information for the user.
Fundamental recommendations regarding safety
Dear Customer – The plug on this appliance will get ‘warm’
during use, this is perfectly normal. This product is A HIGH POWER
HEATING APPLIANCE designed to our usual high standards but
please make sure your wall sockets are in good condition and the
plug is inserted correctly to avoid any accidental overheating. We
suggest that you check the plug AND THE SOCKET regularly if the
heater is in prolonged use, if you are in any doubt please consult
an electrician.
SAFETY WARNINGS
Danger!
As the appliance operates using electricity, reducing the risk of
electric shock is essential.
Therefore, follow the safety recommendations given:
- To avoid risk of cable overheating, extension leads
must not be used in powering this appliance.
- If the power cable is damaged, it must be replaced by the
manufacturer or an authorised service centre in order to
eliminate all risk. Please contact Customer Experience, see
enclosed guarantee.
- Do not use the heater in a bathroom or in the vicinity of
bathtubs, washbasins, showers or swimming pools.
Important!
- This appliance can be used by children
aged from 8 years and above and persons with reduced physical, sensory or
mental capabilities or lack of experience
and knowledge if they have been given
supervision or instruction concerning use
of the appliance in a safe way and understand the hazards involved. Children
shall not play with the appliance. Cleaning and user maintenance shall not be
made by children without supervision.
- Children of less than 3 years should be
kept away unless continuously supervised.
- Children aged from 3 years and less than
8 years shall only switch on/o the appliance provided that it has been placed
or installed in its intended normal operating position and they have been given
supervision or instruction concerning use
of the appliance in a safe way and understand the hazards involved. Children
aged from 3 years and less than 8 years
shall not plug in, regulate and clean the
appliance or perform user maintenance.
CAUTION — Some parts of this pro-
duct can become very hot and cause
burns. Particular attention has to
be given where children and vulnerable people are present.
- The heater must be positioned at least 50cm from furniture
or other objects.
- Do not use this appliance in rooms measuring less than
4m².
- Do not cover or place items over the radiator (such as to dry
washing).
- In order to avoid a hazard due to inadvertent resetting of
the thermal cutout, this appliance must not be supplied
through an external switching device such as a timer, or
connected to a circuit that is regularly switched on and o
by the utility.
3
Page 5

Danger of burns!!
- Do not rest the power cable on hot elements.
WARNING: In order to avoid overheating, never
under any circumstances cover the appliances
during operation, as this would lead to dangerous
overheating.
Please note:
- The appliance must not be placed immediately under a
xed power socket.
- Always use the radiator in the vertical position.
- When you turn the appliance on for the rst time, operate
it at maximum for at least two hours.
- It is normal for the appliance to make "creaking" noises
when rst turned on.
- This appliance is lled with a precise quantity of oil and
repairs must be carried out by the manufacturer or an
authorised technical assistance centre only. In the event of
oil leaks, please contact Customer Experience, see enclosed
guarantee.
- As with any electrical appliance, whilst the instructions
aim to cover as many eventualities as possible, caution
and common sense should be applied when operating your
appliance, particularly in the vicinity of young children.
Use in compliance with intended use
Use this heater only as described in this manual. All other
use is considered improper. This appliance is not suitable for
commercial use. The manufacturer is not liable for damage
deriving from improper use of the appliance. This is a household
appliance only. It is not intended to be used in:
• sta kitchen areas in shops, oces and other working
environments;
• farm houses;
• by clients in hotels, motels and other residential type
environments;
• bed and breakfast type environments.
Use in this manner will invalidate the manufacturers warranty.
Disposing of the appliance
In compliance with European directive 2002/96/
EC, the appliance must not be disposed of with
household waste, but taken to an authorised waste
separation and recycling centre.
Introduction
Thank you for choosing the Dragon 4 Oil Filled Radiator. We hope
you enjoy using your new appliance. Take a few minutes to read
these instructions. This will avoid all risks and damage to the
appliance.
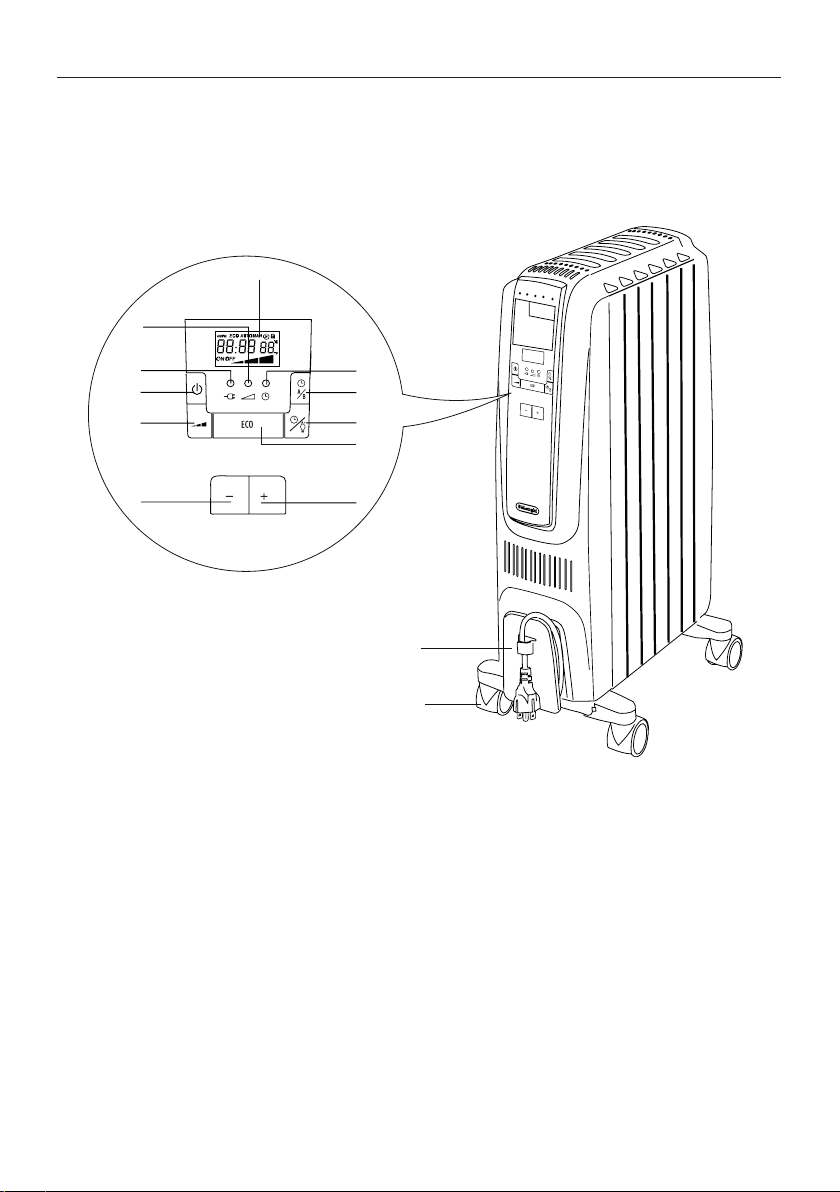
DESCRIPTION
(see gure on pag. 2).
The terminology below will be used repeatedly in the following
pages.
A Display
B On-standby button
C Power level button
D Decrease button
E Increase button
F Timer button A/B
G Menu button
H Eco button
I Timer indicator light
L Working indicator light
M Power supply indicator light
N Cord holder
O Easy wheels
USE
"Easy wheel" system
Turn the radiator upside down on a rug or a soft surface in order
to prevent damaging the paint nish.
Fully unfold the wheels by turning them outwards (Fig. 1).
Turn the radiator back to its upright position.
Fig. 1
Location
The heater must not be placed immediately below a power
outlet. Do not use this radiator in rooms having a surface area of
less than 43 square feet (4 sq.m.).
Power connection
Electrical connection
- Before plugging the radiator into the mains, check that
your supply voltage is the same as that shown on the rating
plate of the appliance.
- If using more than one radiator at a time, it is important to
ensure that the house mains is adequate to cope with the
power requirements.
4
Page 6

- It is important to ensure that the socket is adequately
°
C
:
°
C
:
°
C
:
earthed.
- This appliance complies with directive 2004/108/ec on
electromagnetic compatibility.
Keep loose clothing or bedding, furniture and ammable
material away from the power outlet where the heater is
plugged in.
First use
The rst time the appliance is used, run it at the maximum
power for at least two hours. During this time, ventilate the
room thoroughly to eliminate the “new” smell released by the
appliance. It is completely normal for the appliance to emit
“creaking” sounds the rst time it is run.
How to use your heater
Connect the plug to the electric socket, the light (M) will
come on. Switch the appliance on by pressing the “ON/STANDBY “ button (B). The dispaly will show “0:00” blinking.
Now set the clock as given in pargraph: “setting the clock”.
Setting the clock
Set the clock to the correct time,
proceeding as follows:
- Press button “+” (E) or “-” (D)
until the display shows the
current time.
- To change the preset time
press the “MENU” button, 5 times so the display will show
the set time ashing. To adjust the time press button “+”
or “-”. To move through the hours or minutes quickly keep
the “+” or “-” button pressed for longer than 6 seconds.
When setting the correct time, the numbers will ash on the
display. The clock will continue to ash for a few seconds after the
adjustment has been made.
Manual operation (without timer)
To operate the heater without timer press the “POWER LEVEL
BUTTON” until the desired power level is showed on the display
see gure.
:
:
current time
°
C
Minimum power
°
C
Medium power
:
°
C
:
The working indicator light (L), indicates the heating status by
means of its colors.
RED: the unit is heating at the maximum power.
YELLOW: the unit is heating at the medium power.
GREEN: the unit is heating at the minimum power.
absent: the unit is not heating.
Setting the temperature (thermostat)
Once the power has been selected,
press the “+” or “ -” button to select
the desired comfort temperature
from 10°C to 28°C (shown on the
right side of the display). This will
increase or decrease by 1°C. Keep
either button pressed down to move through the temperature
in fast move.
“ECO” Function
The “ECO” function can be selected either with the manual or
with the timer function.
Press the “ECO BUTTON”, the display will show “ECO “.
Press the “power level button” to limit the maximum input
power consumption. When the ambient temperature is close
to the set temperature, the appliance will automatically reduce
the power consumption, keeping the desired comfort with a
considerable consumption saving.
The display will always show the maximum allowed level whilst
the color of the working indicator light (L) will vary accordingly
to the operating power level. (red light: maximum power level;
yellow light: medium power level; green light: minimum power
level).
Antifreeze operating mode
Press button “ - ” to set the temperature to 5°C.
When the display shows 10°C and button “ - ” is pressed again,
the temperature set point is xed to 5°C, Symbol Celsius ashes
and this situation will persist as long as the anti-freeze function
is active. When set in this way, the appliance will switch on
automatically only if the room temperature falls below 5°C,
thereby preventing freezing.
Note: In this function the power level and the Eco function
can not be adjusted. The power level will be set to the maximum
power.
Maximum power
:
set temperature
°
C
5
Page 7

Set the programs "A" and "b" of the Timer function
ON
ON
OFF
OFF
The "MENU" button (G) allows you to set two programs called
program A and program b in a 24h period.
To set the program A or b proceed as follows:
To set the switch on time, press the “MENU” button (G) till the
display will show:
- The ashing message “-:-“ or the previuosly set time, the
message “ON” at the bottom left (ON time setting)and the
symbol “A or b” at the right of the display indicating that
either the start time is being set for program "A"
During programming, the Timer indicator light (I) ashes.
Activating the timer function
Press timer button A/B (F) till the display will show the desired
program “A”, “ b” or “Ab”. The timer LED (I) comes on to indicate
that the timer function has been activated.
00:00
or else for program "b"
- To set the starting time press button “-” or “+” till the
desired time is showed.
The four dashes
ON ON
by pressing either the “-“ or “+” button thus passing from
23:59 to 0:00. If the setting for the four dashes coincides
with the start time for either program A or b then as soon
as the respective program (A or b) is activated by means of
the Timer A/b (F) button the appliance will start to operate.
Conrmation of the “ON” time will be by pressing the “MENU"
button again or automatically if 5 seconds have passed since
the previous setting.
To set the switch o time proceed as follow:
Press the “MENU” button (G) till the display will show:
- The ashing message “-:-“ or the previuosly set time, the
message “OFF” at the bottom left (OFF time setting) and the
symbol “A or b" at the right of the display indicating that
either the switch-o time is being set for program "A"
:
or else for program "b"
- To set the switching o time press button “ - ” or “+” till the
desired time is showed.
The four dashes
OFF OFF
by pressing either the “-“ or “+” button thus passing from
23:59 to 0:00. If the setting for the four dashes coincides
with the switch-o time for either program A or b then
as soon as the respective program (A or b) is activated by
means of the Timer A/b (F) button the appliance can be
turned o by disactivating the program either by pressing
the Timer A/b (F) button or else by switching to stand-by
means of button (B).
Conrmation of the “OFF” time will be by pressing the “MENU"
button again or automatically if 5 seconds have passed since the
previous setting.
Note: After setting the time intervals for programs A and b see
the paragraph "activating the timer function" to activate the
required program.
can be selected
:
.
can be selected
.
Once the desired program has been selected, the appliance
will operate at the times intervals associated with the selected
program.
If program Ab is displayed both programs “A” and “b” will operate.
For example:
assuming that for program A a start time of 11:00 has been set
together with switch-o time of 13:00 and that for program b a
start time of 12:00 has been set together with switch-o time of
16:00. If both programs A and b are then selected, the appliance
will switch on at 11:00 and o again at 16:00.
When the appliance reaches the operating set time, the display
will show “AUTO”:
AUTO
The power level and the temperatures can be adjusted whenever
desired. If you wish to see the set temperatures, press button “ - ”
or “+”. The timer function will remain active until either standby mode is selected by pressing button (B) or else the timer
function is cancelled by pressing the Timer A/B (F) button.
6
Page 8

Display
When programming or adjusting any value the display has
the maximum brightness but it will dimish after 5 min. since
last adjustment. If you wish to increase/decrease the display
brightness press the MENU button till the display will show:
Press button “ - ” or “+” to adjust the display brightness.
You can obtain the complete darkness of the display pressing
repeatedly button “-”. By pressing any button the display will be
restored to the maximum brigtness for approx. 5 min.
Keyboard lock
You can lock the keyboard by pressing simultaneously for 3 secs.,
both power level (C) and Eco button (H). When the keyboard is
locked the display will show . To restore the keyboard press
once more on the same buttons for approx. 3 sec.
SAFETY DEVICE
A safety device shuts the radiator down in the case of
overheating. To start the radiator up again, contact Customer
Experience. See enclosed guarantee leaet.
MAINTENANCE AND SERVICE
Before performing any operations on the appliance, always
unplug from the main socket and leave to cool.
Wipe the radiator with a soft damp cloth without using
detergents or abrasives. If the radiator is not to be used for a
long period of time, wrap the cable around the cable tidy and
store tha appliance in a dry place. This appliance has been
made to last many years without problems. In the event of
malfunction or doubt, do not try and repair on your own. There
would be the danger of re or electric shock. Please refer to the
enclosed guarantee leaet for service and assistance details.
For further information or help, please visit www.delonghi.co.uk
TROUBLESHOOTING
PROBLEM CAUSE SOLUTION
The appliance doesn't work
The three indicator lights ashes
Be sure it is plugged in and that the electrical
outlet is working.
Check for any obstruction.
The temperature may be set too low.
The Key lock may be activated.
The timer is not correctly programmed.
The temperature sensor is malfunctioning
7
Plug into the power outlet.
Remove the obstruction and let the
appliance cool down. If the appliance
doesn't work please contact
Experience.
Set the temperature to a higher position.
See the section "Key lock".
Program the timer correctly.
Contact the nearest costumer service.
Customer
Page 9

ELECTRICAL REQUIREMENTS
Before using this appliance ensure that the voltage indicated
on the product corresponds with the main voltage in your
home, if you are in any doubt about your supply contact your
local electricity company. The exible mains lead is supplied
connected to a B.S. 1363 fused plug having a fuse of 13 amp
capacity. Should this plug not t the socket outlets in your
home, it should be cut o and replaced with a suitable plug,
following the procedure outlined below.
Note: Such a plug cannot be used for any other appliance and
should therefore be properly disposed of and not left where
children might nd it and plug it into a supply socket - with the
obvious consequent danger.
Please note: We recommend the use of good quality plugs
and wall sockets that can be switched o when the machine
is not in use.
IMPORTANT: The wires in the mains lead tted to this
appliance are coloured in accordance with the following code:
GREEN AND YELLOW EARTH
BLUE NEUTRAL
BROWN LIVE
Green and Yellow to Earth
13 amp Fuse
that this operation be carried out by a qualied electrician and
should only be replaced with a exible cord of the same size.
After replacement of a fuse in the plug, the fuse cover must
be retted. If the fuse cover is lost, the plug must not be used
until a replacement cover is obtained. The colour of the correct
replacement fuse cover is that of the coloured insert in the base
of the fuse recess or elsewhere on the plug. Always state this
colour when ordering a replacement fuse cover.
Only 13amp replacement fuses which are asta approved to B.S.
1362 should be tted.
This appliance conforms to the Norms EN 55014 regarding the
suppression of radio interference.
Warning - this appliance must be earthed
Blue to
neutral
Brown to live
Cord Clamp
As the colours of the wires in the mains lead of this appliance
may not correspond with the coloured markings identifying the
terminals in your plug, proceed as follows:
- The wire which is coloured green and yellow must be
connected to the terminal in the plug which is marked with
the letter E or by the earth symbol or coloured green
or green and yellow.
- The wire which is coloured blue must be connected to the
terminal which is marked with the letter N or coloured black.
- The wire which is coloured brown must be connected to the
terminal which is marked with the letter L or coloured red.
When wiring the plug, ensure that all strands of wire are
securely retained in each terminal. Do not forget to tighten the
mains lead clamp on the plug. If your electricity supply point
has only two pin socket outlets, or if you are in doubt, consult a
qualied electrician.
Should the mains lead ever require replacement, it is essential
8
 Loading...