

Page 1

IMPORTANT
• Read these instructions carefully.
• Before use, check that the mains voltage corresponds to the voltage indicated on the rating
plate under the handle of the appliance.
• Connect the appliance to an efficiently earthed socket with a minimum current rating of 10 A
only. It is not necessary to earth double insulated appliances (see symbol on rating plate).
• When not in use or before cleaning or maintenance, always unplug the appliance from the
mains socket.
• NEVER wash the appliance with triethylene or other solvents.
• NEVER unplug the appliance by pulling the power cable or the appliance itself.
• NEVER leave the appliance turned on when unattended. Keep away from children and unfit
persons.
• NEVER run the appliance over the power cable to avoid damaging the cable insulation.
• NEVER vacuum up inflammable or corrosive liquids.
• NEVER vacuum up matches, ash or cigarette ends when still lit.
• DO NOT use the appliance if it appears to be faulty or if the power cable or plug is
damaged.
• Avoid closing the door on the cable or rubbing it over sharp edges. Keep it away from hot
surfaces.
• Protect the appliance from atmospheric agents (rain, frost, sun, etc).
• Avoid vacuuming up hard or sharp objects as they could damage the dust bag or the
appliance itself. Never use the appliance to vacuum up nails, pins, screws or metal objects.
• Before starting the appliance, make sure the filters are in position.
• The appliance is designed for domestic use only according to the instructions in this manual
and only with the tools provided. The manufacturer declines all liability for damage deriving
from improper use of the appliance.
• For all repairs and for replacement of the power cable if damaged contact your dealer or an
authorised service centre to maintain the efficiency of your appliance and the validity of the
guarantee. For the same reasons, you are always recommended to use original spare parts.
• Bear in mind that a considerable quantity of air is given off from the air outlet grill during
use. This could be unpleasant if directed at people, particularly the face.
• The appliance is not intended for use by young children or infirm persons without
supervision.
• Young children should be supervised to ensure that they do not play with the appliance.
The manufacturer reserves the right to modify appliances and tools without warning.
Original spare parts and tools should be used to maintain the efficiency of your appliance.
Failure to do so invalidates the guarantee.
11GB12
Page 2

DESCRIPTION (see page 2)
1) ON/OFF vacuum switch
2) Power regulator (certain models only)
3) Pump switch (for extraction washing)
4) Air outlet grill with microfilter
5) Handle
6) Motor head
7) Suction outlet + suction hose coupling
8) Detergent tube connection
9) Motor housing
10)Motor head clips
11)Tank
12)Castors
13)Liquid collection drum/unit with tool trolley
14)Motor protection polyurethane filter
15)Dust bag holder accessory
16)Large dust bag (certain models only)
17)Hose
18)Handgrip with mechanical power regulator and detergent lever
19)Detergent tube
20)Telescopic tube or extension tube (according to the model)
21)Crevice tool
22)Multipurpose nozzle
23)Carpet/floor brush (certain models only)
24)Two-position carpet/floor brush (certain
models only)
25)Frame for inserts (certain models only)
26)Wet vacuuming insert (certain models
only)
27)Bristle insert (certain models only)
28)Carpet/rug insert (certain models only)
29)Large triangular nozzle
30)Rubber frame
31)Small triangular nozzle (certain models
only)
32)Detergent bottle
ASSEMBLY INSTRUCTIONS
Release the head by pulling the clips
outwards (fig.1).
Remove the accessories from the drum (fig.2).
Turn the drum upside down and fix the four
castors in place by pushing them into the
holes in the bottom of the drum (fig. 3).
According to the model, the telescopic tube
can be extended either by pushing the button
on the joint or by rotating the joint itself and
at the same time pulling out the required
length of extractable tube (fig. 4).
DRY VACUUMING
Make sure the polyurethane filter (15) is dry,
clean and in place on the motor housing (fig.
5).
Rest the cardboard part of the dust bag on
the bottom of the bag holder (fig. 6) then
push from the top to secure it firmly in place
in the holder guides. Finally, fit the bag
holder with bag onto the tube connected to
the suction outlet of the appliance (fig. 7).
Make sure the arrow marked on the tool is
facing towards the suction outlet (7).
Attach the hose to the suction outlet (fig. 8).
To remove, press the tabs and pull (fig. 9).
Fit one end of the telescopic tube to the
handgrip and the other to the most suitable
tool for the operation to be performed.
Plug the appliance into the mains socket and
turn on by pressing the ON/OFF switch on
the cover.
Never press the extraction washing pump
switch (3) when the appliance is being used
for dry vacuuming only.
Page 3
13
Tools suitable for dry vacuuming.
Carpet/floor brush (certain models only)
Automatically adapts to the surface to be
cleaned..
Two-position carpet/floor brush (certain
models only)
Efficiently removes dust from floors (marble
or tiled), rugs or carpets.
When the pedal is pushed towards the "hard
floors" symbol ( ), the bristles protrude
to clean hard floors more efficiently. This position is recommended for in-depth cleaning
of floors and for floors with pronounced
joints. When the pedal is pushed towards the
"carpets" symbol ( ), the bristles retract
and the brush is ready to clean fabric surfaces and delicate floors such as parquet, marble, etc.
Frame with brush insert for hard floors or
carpet/rug insert (certain models only)
Fit the required insert to the frame. To change
the insert, press the two tabs on the sides of
the frame downwards.
Crevice tool
Can be used to collect crumbs, dust and small
debris. Perfect for hard-to-reach corners such
as radiators, car interiors, etc.
Multipurpose nozzle
Use to clean sofas, upholstery, car interiors,
curtains, etc.
WET VACUUMING
To tackle those minor household emergencies
such as:
- blocked sinks or drains, small floods
(washing machine, dishwasher),
accidental spills of liquid, refrigerator or
freezer defrosting, etc.
Remove the holder and dust bag and make
sure the polyurethane filter (15) is in place on
the motor housing (fig. 4).
Fit the most suitable cleaning tool for the
operation to be performed directly onto the
handgrip. Fit the detergent tube (already
attached to the extraction washing tool) to the
hose handgrip (fig. 10) and attach the clips
Page 4

14
to the extension tubes.
Plug the appliance into the mains socket and
turn on by pressing the ON/OFF switch on
the cover.
Never press the extraction washing pump
switch (3) when the appliance is being used
for dry vacuuming only.
Important: The liquid collection unit can
contain about 9 litres of water. Beyond
this point, a device shuts off suction and
the motor revolutions increase. The motor
must be turned off, the appliance
unplugged and the liquid collection drum
emptied.
Tools suitable for wet vacuuming.
Large transparent nozzle
Attach to the extension tube or directly onto
the handgrip, making sure the coupling fits
perfectly onto the handgrip coupling or extension tube by pushing as far as it will go.
Small transparent nozzle (certain models
only)
Suitable for vacuuming up liquids
accidentally spilt on upholstery, sofas,
furniture, etc.
Fit directly onto the handgrip. Connect the
delivery tube to the hose handgrip.
Crevice tool
Use to vacuum up liquids from hard-to-reach
points and blocked sinks.
EXTRACTION WASHING
For extraction washing, proceed as follows:
- spray the detergent onto the surface to be
cleaned using the delivery lever (18) and
at the same time vacuum from the front
backwards.
- pass a number of times over the surface
to be treated vacuuming only (in other
words, without pressing the detergent
lever), then turn off the switch (3). The
treated surfaces will be almost completely
dry and the dirt will be removed.
Important: make sure the fabrics and
surfaces to be cleaned are suitable for and
resistant to extraction washing. If in doubt, try
on a corner of the rug or surface to be
cleaned and wait until completely dry to
verify the result.
The use of cleaning products other than those
supplied absolves the manufacturer of all
liability for possible damage to rugs, carpets,
armchairs, upholstery etc.
Remove the holder and dust bag and make
sure the polyurethane filter (14) is in place on
the motor housing (fig. 5).
Put the motor unit back on the drum and
connect the hose to the suction outlet of the
appliance by rotating the hose coupling
clockwise until it is firmly in place.
Connect the liquid tube (19) to the motor unit
by pushing it until the release/lock button
clicks (fig. 11).
Page 5

15
Filling the tank for extraction washing
Remove the detergent suction tube from the
motor unit.
Lift the tank out and fill with the shampoo
solution and warm water (max. 50/60°C, in
contact with the hand, the water should not
scald) following the proportions indicated on
the shampoo bottle. The tank holds about 3
litres.
Replace the tank and fit the detergent suction
tube to the connection on the motor unit.
Tools for extraction washing
Fix the detergent tube to the suction hose
using the plastic clips.
Attach the handgrip to the hose and fit the
triangular nozzle to the opposite end.
Fit the detergent tube (already attached to the
extraction washing tool) to the hose handgrip
and attach the clips to the telescopic tube.
Large triangular nozzle (29)
For washing floors (or rugs/carpets).
Insert for vacuuming hard floors (30)
To use the large transparent nozzle on hard
floors, fit the special insert (30). Slide it
carefully onto the guides on the nozzle,
making sure it does not come detached
during use.
Small triangular nozzle (31)
Designed for extraction washing of
upholstery, divans, vertical fabrics etc.
Frame with wet vacuuming insert (25 and
26)
Fit the rubber insert to the frame. To change
the insert, press the two tabs on the sides of
the frame downwards.
Starting extraction cleaning
Fit the required tool to the appliance, plug
into the mains and turn on by pressing both
the washing (3) and suction (1) switches.
Subsequently, with the detergent lever
released, pass a number of times over the
surface washed with vacuuming only.
IMPORTANT: noise levels. After setting up the
appliance, when turned on the noise levels
will be greater for the first few seconds. This
is not due to faulty operation, but to water
entering into circulation for the first time. If
the noise should continue for more than 15
seconds, check that the suction tube is
correctly fitted onto the motor unit. When the
water in the tank is exhausted, noise levels
will increase again. The appliance should be
turned off and filled as described in the
manual.
Page 6

16
REGULATING SUCTION POWER
Models with electronic regulation
The electronic version has a knob to regulate
suction force. This enables the power to be
reduced during extraction washing and other
uses, adapting it to the type of fabric being
treated.
Models with manual regulation
The hose handgrip incorporates a
mechanical suction regulator. This enables
suction power to be regulated rapidly and
practically by simply moving the slide.
CLEANING AND MAINTENANCE
Important: before cleaning and
maintenance, make sure the appliance is
unplugged from the mains socket.
To guarantee hygiene, after wet vacuuming,
rinse the tools by vacuuming up several litres
of clean water. This will clean the tools and
the inside of the hose.
After wet vacuuming, always empty the liquid
collection drum.
After emptying and rinsing the drum, remove
the polyurethane filter, wash with running
water and leave to dry.
To extend the working life of the filter, keep
dry otherwise the filters will deteriorate.
When the dust bag is full, replace.
Cleaning the microfilter
The microfilter in the air outlet grill retains
dust, pollen etc. To maintain efficiency, it
should be replaced every 2/3 months. To
replace, remove the grill by pulling upwards.
Remove the exhausted filter and insert the
new one, making sure it is hooked correctly
in place.
hooks
Page 7

17
Having positioned the new filter, replace the
grill by inserting it from the top and sliding it
down with the hand.
Check regularly that the float in the motor housing is free to move by raising the head of the
appliance and shaking.
To put the appliance away, place the tools on
the tool-holder (fig. 12), wrap the cable
around the handle and fix with the special
clip.
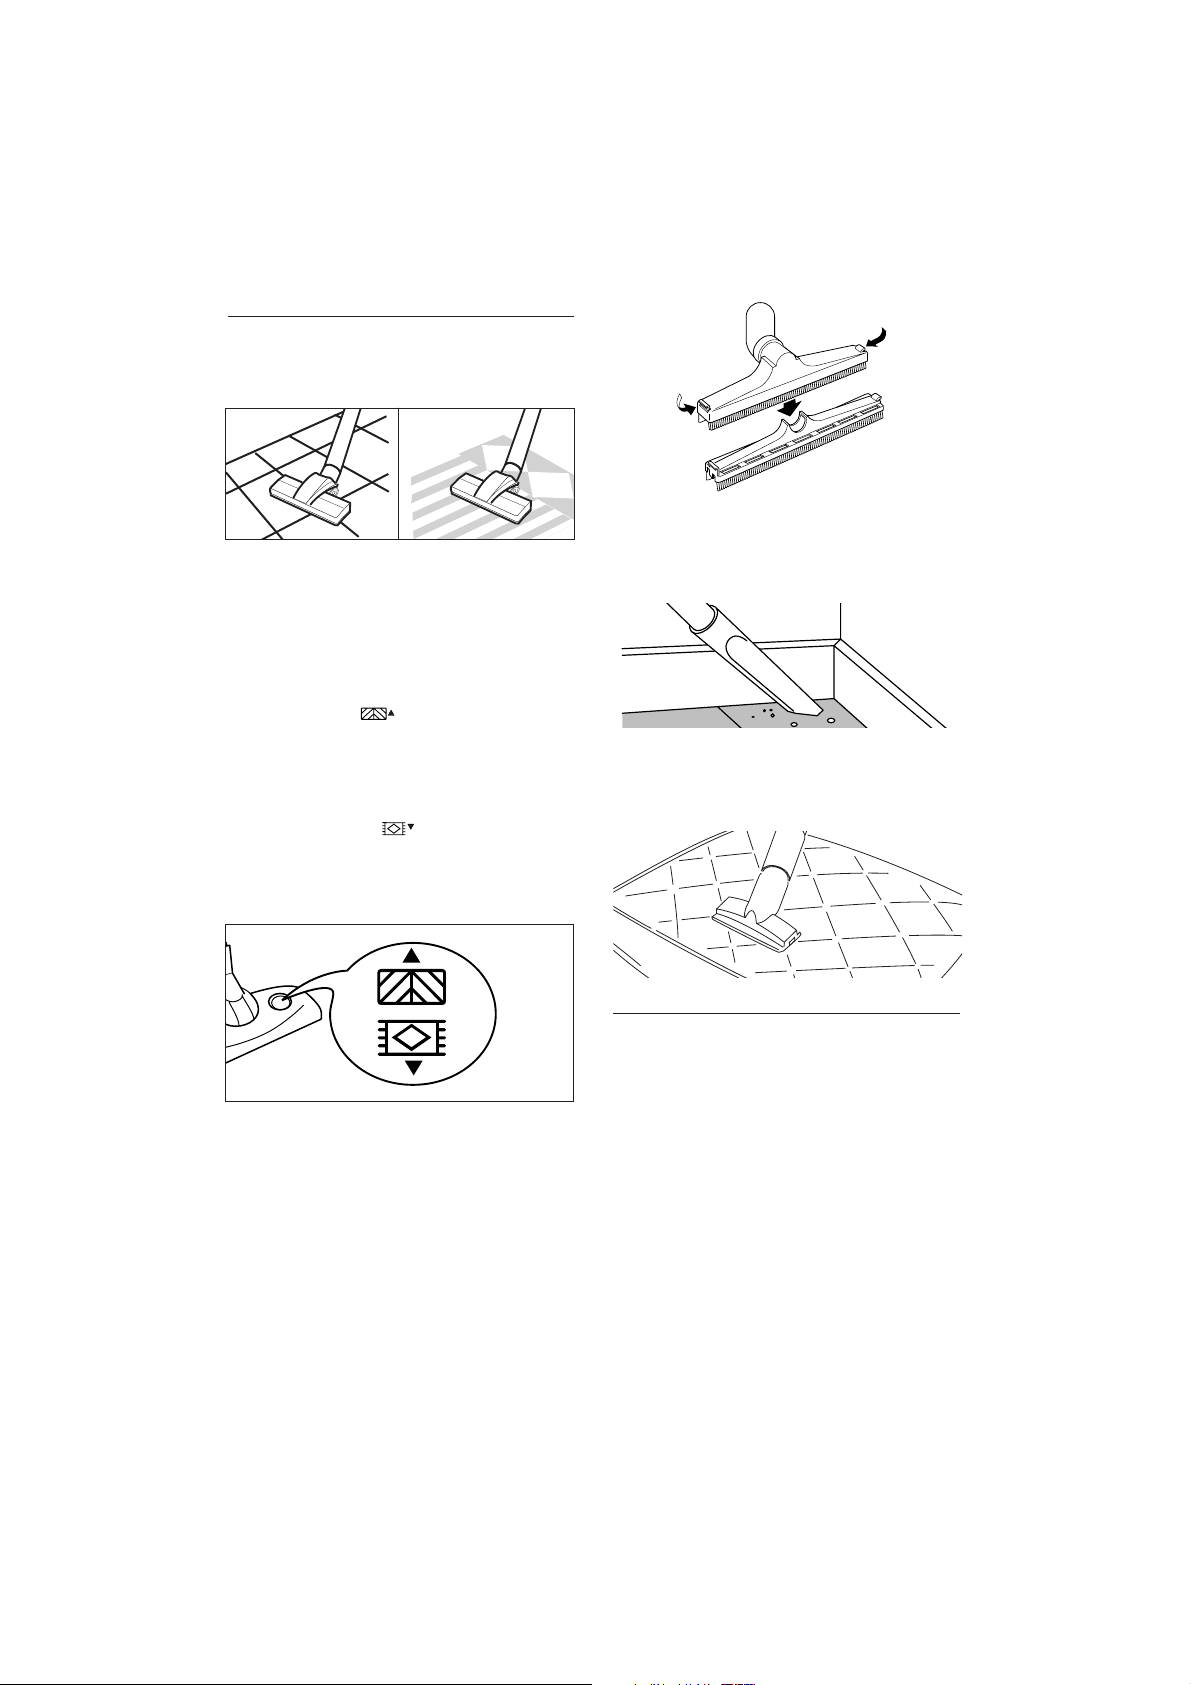
Triangular nozzles
Should the tool spray the detergent unevenly
or if no liquid is delivered, the nozzle (fig. 16)
should be removed and cleaned.
Floor brush (23 or 24)
After finishing cleaning, make sure no dirt is
left on the brush, tubes or wheels.
ELECTRICAL CONNECTION (U.K. ONLY)
A) If your appliance comes fitted with a plug, it will incorporate a 13 Amp fuse. If it does not fit your socket, the
plug should be cut off from the mains lead, and an appropriate plug fitted, as below.
WARNING: Very carefully dispose of the cut off plug after removing the fuse: do not insert in a 13 Amp socket elsewhere in the house as this could cause a shock hazard. With alternative plugs not incorporating a fuse, the circuit
must be protected by a 15 Amp fuse. If the plug is a moulded-on type, the fuse cover must be re-fitted when changing the fuse using a 13 Amp Asta approved fuse to BS 1362. In the event of losing the fuse cover, the plug must
NOT be used until a replacement fuse cover can be obtained from your nearest electrical dealer.
The colour of the correct replacement fuse cover is that as marked on the base of the plug.
B) If your appliance is not fitted with a plug, please follow the instructions provided below:
IMPORTANT
The wires in the mains lead are coloured in accordance with the following code:
Blue: Neutral
Brown: Live
As the colours of the wires in the mains lead of this appliance may not correspond with the coloured markings identifying the terminals in your plug, proceed as follows:
The wire which is coloured blue must be connected to the terminal which is marked with the letter N or coloured
black.
The wire which is coloured brown must be connected to the terminal which is marked with the letter L or coloured
red.
 Loading...