

Page 1

SBATTITORE E IMPASTATORE
MIXER AND BEATER
BATTEUR ET PÉTRISSEUR
ªπ•∂ƒ
RÜHR- UND TEIGMASCHINE
Istruzioni per l’uso
Instructions for use
Mode d’emploi
√‰ËÁ›Â˜ ¯Ú‹Û˘
Bedienungsanleitung
FM265 30-05-2002 12:25 Pagina 1
Page 2

ELECTRICAL CONNECTION (U.K. ONLY)
A) If your appliance comes fitted with a plug, it will incorporate a 13 Amp fuse. If it does not fit your socket, the plug should be cut off from the
mains lead, and an appropriate plug fitted, as below.
WA RN ING: Very carefully dispose of the cut off plug after removing the fuse: do not insert in a 13 Amp socket elsewhere in the house as this could
cause a shock hazard. With alternative plugs not incorporating a fuse, the circuit must be protected by a 15 Amp fuse. If the plug is a mouldedon type, the fuse cover must be re-fitted when changing the fuse using a 13 Amp Asta approved fuse to BS 1362. In the event of losing the fuse
cover, the plug must NOT be used until a replacement fuse cover can be obtained from your nearest electrical dealer.
The colour of the correct replacement fuse cover is that as marked on the base of the plug.
B) If your appliance is not fitted with a plug, please follow the instructions provided below:
IMPORTANT
The wires in the mains lead are coloured in accordance with the following code:
Blue: Neutral
Brown: Live
As the colours of the wires in the mains lead of this appliance may not correspond with the coloured markings identifying the terminals in your
plug, proceed as follows:
The wire which is coloured blue must be connected to the terminal which is marked with the letter N or coloured black.
The wire which is coloured brown must be connected to the terminal which is marked with the letter L or coloured red.
FM265 30-05-2002 12:25 Pagina 2
Page 3
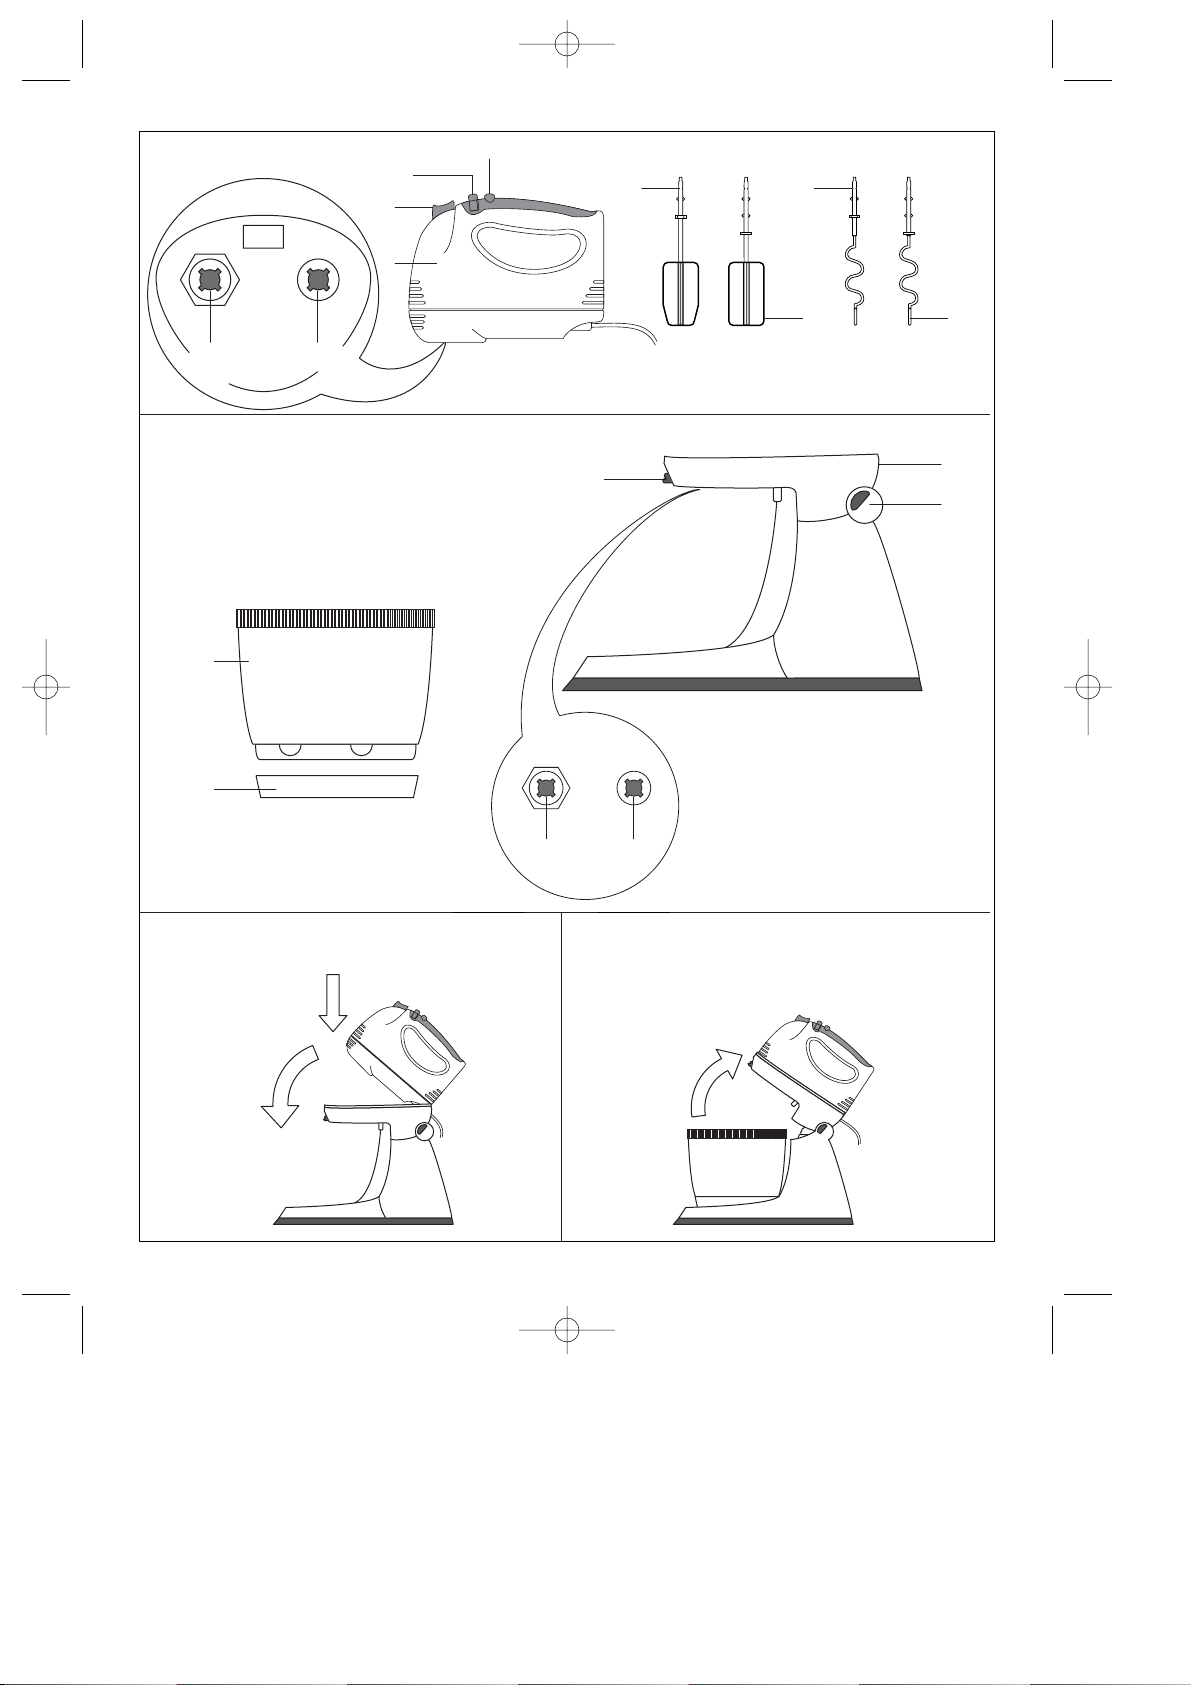
A1 A2
C
E
D
B
Mod. KF352C
Fig. 1 Fig. 2
N
1
2
H
L
M
I1 I2
F1
F2
G2
G1
O
Solo in alcuni modelli
Only for some models
seulement sur certains modéles
ЫВ МВЪИО¿ МФУЩ¤П·
nicht bei allen Modellen
FM265 30-05-2002 12:25 Pagina 3
Page 4

AVVERTENZE GENERALI
- Dopo aver tolto l’imballaggio, assicurarsi del-
l’integrità del prodotto. In caso di dubbio, non
utilizzare l’apparecchio e rivolgersi esclusivamente a personale qualificato.
- Il sacchetto di plastica contenente il prodotto
non deve essere lasciato alla portata dei bambini in quanto potenziale fonte di pericolo.
- In caso di incompatibilità tra la presa e la spina
dell’apparecchio, fare sostituire la presa con
altra di tipo adeguato da personale qualificato.
É sconsigliabile l’uso di adattatori, prese multiple, e/o prolunghe. Qualora il loro uso si rendesse necessario, utilizzare esclusivamente
adattatori semplici o multipli e prolunghe
conformi alle vigenti norme di sicurezza, facendo attenzione a non superare il limite di potenza marcato sull’adattatore e/o prolunga.
- Qualora l’apparecchio smettesse di funzionare
rivolgersi esclusivamente a un centro di assistenza autorizzato.
-L’apparecchio dovrà essere destinato esclusiva-
mente all’uso per il quale è stato espressamente
concepito. Ogni altro uso è da considerarsi
improprio e quindi pericoloso. Il costruttore non
potrà essere ritenuto responsabile di eventuali
danni derivanti da uso improprio, erroneo e
irresponsabile e/o da riparazioni effettuate da
personale non qualificato.
Osservare in particolare le seguenti norme fondamentali di sicurezza:
- Non toccare l’apparecchio con le mani bagna-
te o umide.
- Non usare l’apparecchio a piedi nudi o bagnati.
-Non sfilare la spina dalla presa tirando il cavo
di alimentazione.
- Non lasciare l’apparecchio esposto agli agenti
atmosferici (pioggia, sole, gelo, ecc.).
- Non permettere che l’apparecchio sia usato da
bambini o da incapaci senza sorveglianza.
- Disinserire la spina dalla presa di corrente
quando l’apparecchio non viene utilizzato.
- Non lasciare l’apparecchio inutilmente acceso
perché potenziale fonte di pericolo.
- Non immergere l’apparecchio in acqua.
- In caso di danneggiamento del cavo, farlo sostituire tempestivamente da personale qualificato.
-Prima di effettuare qualsiasi operazione di pulizia o di manutenzione, scollegare l’apparecchio dalla rete di alimentazione elettrica staccando la spina.
- In caso di guasto e/o di cattivo funzionamento,
spegnere l’apparecchio senza manometterlo. Per
eventuali riparazioni rivolgersi esclusivamente a
centri di assistenza tecnica qualificati richiedendo
l’utilizzo di ricambi e accessori originali.
- Qualora si decida di eliminare definitivamente
l’apparecchio, dopo aver scollegato la spina dalla
presa di corrente, si raccomanda di renderlo inservibile recidendone il cavo di alimentazione.
- Conservare con cura le presenti istruzioni per
ulteriori consultazioni.
I materiali e gli oggetti destinati al contatto con prodotti alimentari sono conformi alle prescrizioni della
direttiva CEE 89/109.
LEGGERE ATTENTAMENTE LE PRESENTI ISTRUZIONI PRIMA DI UTILIZZARE L’APPARECCHIO
I
DESCRIZIONE
A1. Foro (per frusta “F1” e impastatore “G1”)
A2. Foro (per frusta “F2” e impastatore “G2”)
B. Corpo motore
C. Pulsante espulsione accessori
D. Leva ON/OFF e regolazione velocità
E. Pulsante “TURBO”
F1. Frusta (per foro “A1”)
F2. Frusta (per foro “A2”)
G1. Impastatore (per foro A1)
G2. Impastatore (per foro A2)
Solo in alcuni modelli
H. Ciotola
I1. Foro (per frusta “F1” e per impastatore “G1”)
I2. Foro (per frusta “F2” e per impastatore “G2”)
L. Base di appoggio per ciotola
M. Pulsante sgancio apparecchio
N. Braccio oscillante
O. Pulsante oscillazione
4
FM265 30-05-2002 12:25 Pagina 4
Page 5

5
UTILIZZO DEGLI ACCESSORI
FRUSTE (F1/F2): Sono ideali per montare l’albume
e la panna, per preparare creme (es. inglese,
pasticcera, chantilly, ecc.), salse (es. maionese),
budini, impasti leggeri (crêpes, frittate). Nella preparazione di paste morbide servono all’inizio della
lavorazione per amalgamare bene gli ingredienti,
che verranno poi impastati correttamente dagli
accessori impastatori.
IMPASTATORI (G1/G2): sono ideali per preparare
paste secche (es. pasta sfoglia, pasta frolla, plum
cake, paste brisée) e paste morbide (es. brioches,
torta margherita, torte morbide).
CIOTOLA ROTANTE CON SUPPORTO (H) (solo in
alcuni modelli): é ideale quando si devono preparare grandi quantità di pasta e questa necessita di
un lungo periodo di miscelazione (es. pasta frolla,
ecc.).
PRIMA DELL’USO
Verificare che la tensione di rete corrisponda a
quella indicata sulla targhetta dell’apparecchio.
Prima di utilizzare l’apparecchio per la prima volta,
lavare e asciugare accuratamente tutti gli accessori
MONTAGGIO DEGLI ACCESSORI
Gli accessori devono essere montati solo quando
l’apparecchio è spento e disinserito dalla rete di
alimentazione.
Fruste (F1/F2)
• Inserire bene fino in fondo la frusta F1 nel foro
A1 (o I1) ruotandola leggermente per favorire
l’innesto (fino a sentire un “click”). Inserire poi
nell’altro foro la frusta G2.
Impastatori (G1/G2)
• Inserire bene fino in fondo l’impastatore G1 nel
foro A1 (o I1) ruotandolo leggermente per favo-
rire l’innesto (fino a sentire un “click”). Inserire
poi nell’altro foro l’impastatore G2.
Nel caso in cui gli impastatori non siano inseriti correttamente, gli ingredienti non si amalgameranno.
UTILIZZO DELL’APPARECCHIO
•Non fare mai funzionare l’apparecchio a vuoto.
Accendere l’apparecchio solo quando gli
accessori sono collocati dentro il contenitore
con gli alimenti da lavorare.
• Accertarsi che la leva ON/OFF (D) sia in posizione “0” e che l’apparecchio sia disinserito
dalla rete di alimentazione.
•Montare gli accessori desiderati nel corpo
motore seguendo le istruzioni indicate nel precedente paragrafo.
• Inserire la spina alla rete di alimentazione.
• Introdurre gli accessori dentro il recipiente contenente l’alimento da lavorare.
• Azionare l’apparecchio spostando la leva (D)
verso destra e posizionarla in una delle velocità
disponibili a seconda della quantità e consistenza dell’alimento da trattare.
Si consiglia di iniziare tutti i tipi di lavorazione
partendo dalla velocità minima e poi lentamente selezionare quella maggiore:
1: velocità Minima
5: velocità Massima.
Non inserire mai le dita o la mano e nessuno
oggetto (quali cucchiai o coltelli) fra gli accessori
quando l’apparecchio è in funzione.
La quantità di alimento da trattare non deve mai
superare gli anelli di metallo posti sugli accessori.
UTILIZZO DELLA FUNZIONE “TURBO”
La funzione “TURBO” è stata creata per avere la
massima flessibilità di utilizzo dell’apparecchio. Il
pulsante “TURBO” (E) porta l’apparecchio alla massima potenza.
Quando il pulsante viene rilasciato, lo sbattitore
torna subito alla velocità impostata.
La funzione è disattivata quando il regolatore (D) è
sullo “0”.
SMONTAGGIO DEGLI ACCESSORI
Il Vostro apparecchio è dotato di un sistema di
antiespulsione che non vi permette di smontare gli
accessori finché l’apparecchio non è spento.
Attendere che gli accessori siano fermi prima di
procedere al loro smontaggio.
• Una volta terminato di utilizzare l’apparecchio,
spegnerlo agendo sul regolatore di velocità (D) e
disinserire la spina dalla rete di alimentazione;
•Premere quindi il pulsante “EJECT” (C) per
espellere tali accessori dal corpo motore.
FM265 30-05-2002 12:25 Pagina 5
Page 6

6
UTILIZZO DELL’APPARECCHIO CON LA CIOTOLA
• Accertarsi che il regolatore di velocità (D) sia in
posizione di spento e che l’apparecchio sia
disinserito dalla rete di alimentazione.
• Agganciare il corpo motore (B) sul braccio
oscillante (N) inserendo prima la parte posteriore e quindi quella anteriore fino a sentire il
click (fig. 1).
•Premere il pulsante (O) e ruotare il braccio oscillante in posizione verticale (fig. 2).
• Posizionare la ciotola (H) sulla base del supporto.
•Montare le fruste o gli impastatori come descritto nel precedente paragrafo.
•Premere il pulsante (O) e sistemare il braccio
sulla sua posizione di lavoro.
• Inserire la presa nella rete di alimentazione.
• Azionare l’apparecchio come descritto nel
paragrafo utilizzo dell’apparecchio.
Non fare mai funzionare l’apparecchio a vuoto.
Accendere l’apparecchio solo quando gli accessori sono collocati dentro il contenitore con gli alimenti da lavorare.
In caso di lavorazioni che richiedono un’iniziale
amalgama degli ingredienti (es. pasta all’uovo) è
consigliabile utilizzare la ciotola e lo sbattitore
senza supporto. Proseguire poi la lavorazione per il
tempo necessario montando lo sbattitore e la ciotola sul supporto.
ROTAZIONE DELLA CIOTOLA
Lo sbattitore ha una ciotola rotante automatica,
spinta dallo sbattitore stesso.
La ciotola ruota più velocemente all’aumentare
della velocità dell’apparecchio. Per poter agire
sulla velocità della ciotola, bisogna quindi agire
sulle velocità dell’apparecchio.
Per assicurare la rotazione della ciotola è importante che gli accessori siano montati correttamente
(vedi paragrafo “Montaggio degli accessori”).
RIMOZIONE DELLO SBATTITORE DAL SUPPORTO.
• Accertarsi che il regolatore di velocità (D) sia in
posizione di spento e che l’apparecchio sia
disinserito dalla rete d’alimentazione.
•Tenere il supporto apparecchio oscillante nella
posizione di lavoro.
•Premere il pulsante di sgancio (M).
•Tenendo il pulsante premuto sollevare la parte
anteriore del corpo motore. Rimuovere quindi
l’apparecchio.
PULIZIA DELL’APPARECCHIO E DEGLI ACCESSORI
• Non immergere il corpo motore in acqua, ma
pulirlo con un panno umido.
• Non procedere mai al lavaggio degli accessori
con questi ancora agganciati al corpo motore.
• Ricordare sempre che:
- possono essere immersi in acqua tiepida
saponata solo gli accessori e la ciotola rotante; non devono comunque essere lasciati in
acqua per un lungo periodo di tempo;
- per pulire il corpo motore, è sufficiente utiliz-
zare un panno umido;
- nessun componente in plastica può essere
lavato in lavastoviglie. É possibile però lavare in lavastoviglie gli accessori in metallo (fruste, impastatori).
FM265 30-05-2002 12:25 Pagina 6
Page 7

7
Grazie agli accessori in dotazione, il vostro apparecchio consente di preparare in poco tempo e senza fatica un
gran numero di cibi: maionese, salse, pastelle per frittate, crêpes e frittelle, panna montata, albumi montati a
neve, impasti per torte, pane e grissini, omogeneizzati, minestre, passati di verdura, frullati di frutta, bevande,
cocktails.
In questo ricettario sono contenute alcune ricette di vario tipo come primo aiuto. Sicuramente la vostra esperienza e la vostra fantasia permetteranno di utilizzare questo ricco apparecchio n ella preparazione di moltissimi altri piatti, salse e dolci.
Tutto questo vi sarà reso più facile dalla regolazione elettronica della velocità di rotazione degli accessori (possibilità di scegliere una velocità adeguata al tipo di alimento) e dalla ciotola rotante automatica con supporto
(solo in alcuni modelli), che trasforma l’apparecchio in impastatore automatico di grande capacità.
RICETTARIO
MAIONESE
•1 uovo intero • 1/2 litro d’olio
•1 cucchiaino di succo di limone
• un pizzico di sale
Mettere l’uovo in una ciotola di dimensione contenuta e aggiungere subito il sale ed il limone.
Azionare la frusta ed impostare la velocità 3.
Aggiungere l’olio a poco a poco e lavorare il composto finché non è ben montato.
SALSA ROSA
•Maionese • 2 cucchiai di ketchup
•1 cucchiaino di Cognac
•Worchester
Mettere in una ciotola ala maionese, quindi aggiungere il cognac, il ketchup, il worchester (qualche
goccia) e amalgamare bene il tutto, usando le fruste.
PURÉ
• 75gr. di puré liofilizzato • 150cc d’acqua
• 300cc di latte • un pizzico di sale
Portare ad ebollizione i 300cc di latte ed i 150gr di
acqua. Appena inizia a bollire, togliere la pentola
dal fuoco, versare i fiocchi di patate e con le fruste (F)
mescolate fino ad ottenere un impasto omogeneo.
Per un puré più ricco aggiungete anche una noce di
burro e del formaggio grana.
PANNA MONTATA/ALBUME MONTATO A NEVE
• 1dl. di panna
•1 o più albumi
Sbattere l’albume o la panna in una ciotola e azionare le fruste (F) alla massima velocità (5). Lavorare
il composto fino a quando è ben montato.
FM265 30-05-2002 12:25 Pagina 7
Page 8

8
CREMA PASTICCERA
•6 tuorli • 170gr. di zucchero
• 40gr. di farina • 1/2l. di latte
• zucchero vanigliato • scorza di 1/2 limone
•1 bustina di vanillina
In un pentolino scaldare il latte con una bustina di
vanillina. Nel frattempo, in una casseruola montare
lo zucchero con le uova, azionando le fruste a velocità 5. Quando il composto risulterà ben amalgamato, sostituire le fruste con gli impastatori, aggiungere la farina setacciata e lavorare fino ad ottenere
un impasto omogeneo. Versare il latte bollente e
continuare a mescolare, utilizzando le fruste a velocità 2. Mettere la casseruola sul fuoco a fiamma
bassa e sempre con l’utilizzo delle fruste a velocità
minima, mescolare fino a quando la crema risulterà
densa.
FRITTATA AI FUNGHI
•6 uova • 300gr. di funghi
•prezzemolo • olio
• burro • sale
Cuocere i funghi per circa 20 minuti in olio e burro; si
possono usare a piacere porcini, chiodini o funghi coltivati. Quando sono cotti, versare il tutto in una ciotola
con le uova ed il sale ed azionare lo sbattitore a potenza 2 per 30 secondi circa. Versare l’impasto in una
padella, in cui avrete fatto sciogliere un pezzetto di
burro e spolverare di prezzemolo; fare rapprendere la
frittata, avendo cura che non si attacchi sul fondo.
PLUM CAKE
CRÊPES
• 50gr. di farina • 30gr. di burro fuso
•4 uova • 1dl di latte
• sale
Mettere la farina, le uova, il sale ed il burro fuso in una
terrina e lavorare il composto con le fruste a velocità 3;
poi diluirlo con il latte aumentando gradatamente la
velocità fino a raggiungere la massima. In una padella fare sciogliere del burro, versare un mestolo di composto e fare in modo che si distribuisca uniformemente sul fondo. Lasciare cuocere qualche secondo facendo attenzione che non si attacchi, poi girare la crêpe
con la spatola e farla cuocere dall’altra parte. Quando
sarà cotta in entrambe i lati, metterla in un piatto e farcirla a piacere.
P ASTA FROLLA
• 250gr. di farina • 110gr. di zucchero
• 125gr. di burro • 1 uovo intero + 1 tuorlo
• un pizzico di sale
Mettere nella terrina la farina, il burro (precedentemente ammorbidito) tagliato a pezzettini, lo zucchero,
il sale e le uova. Lavorare per circa 5/7 minuti gli ingredienti con gli impastatori, inizialmente a velocità 2 e
successivamente a velocità 4/5. Stendere la pasta in
una tortiera (già imburrata ed infarinata) e cuocerla
per 50 minuti a 180°C.
• 250gr. di burro • 250gr. di zucchero
•3 uova + 2 tuorli • 250gr. di farina
• 70gr. di uvetta sultanina • sale
• 50gr. di uvetta di Corinto
• 50gr. di arancia e cedro canditi
•1 bicchierino di rum
In una terrina lavorare a crema il burro (precedentemente ammorbidito) con gli sbattitori a velocità 5.
Aggiungere, poco alla volta, lo zucchero e continuare a
lavorare l’impasto sempre alla stessa velocità, finché
sarà diventato bianco. Unire le uova, una ad una, i
tuorli, la farina setacciata ed un pizzico di sale. Portare
gli impastatori alla velocità 1 ed incorporare lentamente il rum, l’uvetta (fatta rinvenire in acqua tiepida) ed i
canditi. Versare il composto in uno stampo rettangolare, foderato di carta da forno unta di burro. Cuocere in
forno per 90 minuti a 180°C. Sfornare quando sarà
completamente freddo.
FM265 30-05-2002 12:25 Pagina 8
Page 9

9
GB
READ THE FOLLOWING INTSTRUCTIONS CAREFULLY BEFORE USING THIS APPLIANCE
GENERAL DIRECTIONS
- After having removed the appliance from the
packaging, make sure that it is complete in all of its
components. If there is any doubt, do not use the
appliance and return it to be checked by qualified
personnel.
- The plastic bag containing the appliance should be
kept away from children as it may represent a suffocation hazard.
- In the case that the plug is not compatible with the
electrical outlet being used, have it substituted with
a suitable one by qualified personnel. The use of
adapters, multi-way plugs, and/or extension cords
is not recommended. Wherever their use might
become necessary, use simple or multiple adapters
and/or extension cords conforming to the safety
laws, taking care to not exceed the power limits
marked on the adapter or the extension cord.
- Should the appliance stop working, go to an authorised service centre.
- The appliance should be destined exclusively to the
use for which it has been created. Any other use is
to be considered inappropriate and therefore dangerous. The maker cannot be held responsible for
any damage caused by improper, erroneous or irresponsible use and/or by repairs made by unqualified personnel.
Note the following fundamental safety rules:
- Do not touch the appliance with wet or damp hands.
- Do not use the appliance with bare or wet feet.
- Do not unplug the appliance by pulling the plug out
of the outlet by the cord.
- Do not the leave the appliance exposed to atmospheric agents (rain, sun, freezing temperatures,
etc.)
- Do not allow the appliance to be used by children
or anyone unable to use it without supervision.
- Remove the plug from the electrical outlet when the
appliance is not in use.
- Do not leave the appliance on when not in use as
this may potentially be hazardous.
- Do not immerse the appliance in water.
- In the case that the cord is damaged, have it repaired immediately by service centre personnel.
- Before beginning any cleaning or maintenance procedures, disconnect the plug of the appliance from
the electrical outlet.
- In case of malfunction and/or breakdown, turn the
appliance off without touching it. For eventual
repairs, go to a qualified service centre requesting
the use of original parts or accessories.
- Should it be decided to eliminate the appliance definitively, after having disconnected the plug from the
electrical outlet, it is recommended that the appliance be rendered useless by cutting the power cord.
- Keep these instructions for further reference.
The materials and the parts which come into contact
with food products are in full compliance with the regulations of the EEC Directive 89/109.
DESCRIPTION
A1. Hole (for beater “F1” and dough hook “G1”)
A2. Hole (for beater “F2” and dough hook “G2”)
B. Motor housing
C. Attachment release button
D. ON/OFF switch and speed regulator
E. “TURBO” button
F1. Beater attachment for hole “A1”
F2. Beater attachment for hole “A2”
G1. Dough hook attachment for hole A1
G2. Dough hook attachment for hole A2
Only for some models
H. Bowl
I1. Hole (for beater “F1” and dough hook “G1”)
I2. Hole (for beater “F2” and dough hook “G2”)
L. Support base for the bowl
M. Appliance release button
N. Oscillating arm
O. Oscillation switch
FM265 30-05-2002 12:25 Pagina 9
Page 10

USE OF THE ACCESSORY ATTACHMENTS
BEATERS (F1/F2): The beaters are ideal for beating
egg whites or whipping cream, preparing sweet
cream sauces (ex. English, pastry or chantilly, etc.),
savoury sauces (ex. mayonnaise), puddings, light
batters (crepes, pancakes). During the preparation
of soft batters, the ingredients should be mixed slightly with the beater attachments before then being
mixed accurately with the dough hook attachments.
DOUGH HOOK (G1/G2): The dough hooks are
ideal for preparing dry doughs (ex. puff pastry,
sweet crust pastry, plum cake, short crust) or soft
doughs (ex. brioches, butter cake, sponge cakes).
ROTATING MIXING BOWL WITH SUPPORT (H)
(only for some models): This bowl is ideal for the
preparation of large quantities of dough which
require a longer mixing time (ex. sweet pastry crusts, etc.)
BEFORE USE
Check that the voltage of the electrical outlet corresponds to the one indicated on the label of the
appliance.
Before using the appliance for the first time, it is
recommended that the accessories and attachments
be thoroughly washed and dried.
ASSEMBLY OF THE ATTACHMENTS
The attachments must be mounted onto the
appliance only when it is turned off and unplugged from the electrical outlet.
Beaters (F1/F2)
• Insert the beater (F1) tightly into the hole (A1 or I1)
turning it slightly in order to favour the coupling
(until a “click” can be heard). Insert the other beater F2 into its hole.
Dough hooks (G1/G2)
• Insert the dough hook (G1) tightly into the hole (A1
or I1) turning it slightly in order to favour the coupling (until a “click” can be heard). Insert the other
dough hook G2 into its hole.
If the dough hooks are not inserted properly,
the ingredients will not be mixed properly
USE OF THE APPLIANCE
• Never operate the appliance when it is empty.
Turn on the appliance only when the attachments are in the recipient/bowl with the ingredients to be processed.
• Make sure that the ON/OFF switch (D) is in the
off position and that the appliance is not connected to the electrical outlet.
• Mount the attachments desired into the motor
housing following the instructions indicated in
the previous paragraph.
• Insert the plug into the electrical outlet.
• Introduce the attachments into the recipient containing the food to be processed.
• Operate the appliance by moving the switch (D)
toward the right and position it at an available
speed according to the quantity and consistency
of the ingredients to be processed.
It is advisable to begin all types of processing
starting with the minimal speed and then increasing the speed level slowly:
1:minimum speed
5: maximum speed.
Never insert the fingers or the hands or any object
(such as spoons or knives) between the attachments while the appliance is on.
The quantity of food to be processed must never
surpass the metal rings around the attachments.
USE OF THE “TURBO” FUNCTION
The “Turbo” function was created in order to give
the maximum flexibility of use to the appliance. The
“Turbo” button (E) brings the appliance to its maximum power.
When the button is released, the mixer returns
immediately to the speed selected.
The functions is deactivated when the speed regulator (D) is on the “0”..
DISASSEMBLY OF THE ACCESSORY ATTACHMENTS
The appliance is equipped with a blocking system
which does not allow the attachments to be removed
until the appliance is turned off.
Wait until the attachments have stopped moving
before removing them from the machine.
• Once the appliance is no longer to be used, turn
it off by adjusting the speed regulator (D) and
remove the plug from the electrical outlet;
•Press the “EJECT” button (C) to release the
accessories from the motor housing.
10
FM265 30-05-2002 12:25 Pagina 10
Page 11

USE OF THE APPLIANCE WITH THE BOWL
• Make certain that the speed regulator (D) is in
the off position and that the appliance has been
unplugged.
• Attach the motor housing (B) onto the oscillating
arm (N) inserting the back side first and then the
front until a click can be heard.
•Press the (O) button and rotate the oscillating
arm into a vertical position.
• Place the bowl (H) onto the base of support.
•Mount the beaters or the dough hooks as
described in the previous paragraph.
•Press the (O) button and arrange the arm into its
working position.
• Insert the plug into the electrical outlet.
• Operate the appliance as described in the previous paragraph “use of the appliance”.
Never operate the appliance when empty. Turn on
the appliance only when the attachments are in
place and the food is ready to be processed.
If the recipe requires an initial mixing of the ingredients (ex. egg noodle pasta), it is advisable to use
the bowl and the mixer without the support arm.
Then proceed with the processing for the required
time, assembling the mixer and the bowl onto the
support arm.
ROTATION OF THE BOWL
The mixer has a automatic rotating bowl, turned by
the mixer itself.
The bowl turns more quickly when the speed of the
appliance is increased. In order to change the
speed of the bowl’s rotation, the speed of the mixer
must be changed.
To assure the rotation of the bowl, it is important
that the attachments are correctly mounted (see the
paragraph “Assembly of the attachments”)
REMOVAL OF THE MIXER FROM THE SUPPORT.
• Make sure that the speed regulator (D) is in the
off position and that the appliance has been
unplugged.
• Maintain the oscillating arm support in the
working position.
•Press the release button (M).
• Keeping the button pressed, raise the front part
of the motor housing. Remove the appliance.
CLEANING THE APPLIANCE AND THE ACCESSORY
ATTACHMENTS
•Never immerse the motor housing in water, but
rather, clean it with a damp cloth.
• Never proceed with the cleaning of the attachments while these are still hooked into the motor
housing.
• Remember:
- only the attachments and the rotating bowl
can be immersed in lukewarm soapy water;
however they must never be left in water for
long periods of time;
- to clean the motor housing, use a clean damp
cloth;
- no plastic component can be washed in the
dishwasher. However, the metal attachments
(beaters, dough hooks, etc.) may be washed
in the dishwasher.
11
FM265 30-05-2002 12:25 Pagina 11
Page 12

12
Thanks to the accessory attachments, your appliance will allow you to prepare quickly and easily a great variety
of foods: mayonnaise, sauces, pancake batters, crepes, whipped cream, whipped egg whites, cake batters,
dough for breads and breadsticks, baby foods, soups, vegetable purees, fruit fools and drinks.
In this collection, we have included some recipes of various types to get you started. Surely your own creativity
and experience will allow you to use this appliance for the preparation of many other dishes, sauces and desserts.
All this will be made easier by the electronic speed regulation of the rotation of the attachments (the possibility
of choosing a speed adapted to the kind of food being prepared) and by the automatic rotating bowl and support arm (only for some models) which transforms the appliance into an automatic mixer of enormous capability.
RECIPE COLLECTION
MAYONNAISE
• one egg • 1/2 litre of oil
•1 spoon of lemon juice
•a pinch of salt
Place the egg into a small bowl and add the salt and
lemon juice. Operate the beaters and select speed
3. Add the oil a little at a time and process the mixture until it is light and fluffy.
PINK SAUCE
• Mayonnaise •
2 tablespoons of ketchup
•1 spoon of Cognac
•Worcestershire sauce
Put the mayonnaise into a bowl and add the
cognac, ketchup, and a few drops of Worcestershire
sauce and mix well, using the beater attachments.
POTATO PUREE
•
75 gr. dried potato flakes
• 150 cc of water
• 300 cc of milk • a pinch of salt
Bring the 300 cc of water and 150 cc of milk to a boil.
As soon as it begins to boil, remove the pan from the
heat, pour in the potato flakes and with the whisks
(F) mix until it is thoroughly blended. For a richer
puree, a knob of butter and some grated cheese
may be added at the end.
WHIPPED CREAM/WHIPPED EGG WHITES
•1 dl. whipping cream
•1 or more egg whites
Beat the egg whites or the cream in a bowl and use
the beaters (F) at the maximum speed (5). Process
the mixture until it is well beaten.
FM265 30-05-2002 12:25 Pagina 12
Page 13

13
P ASTRY CREAM
•6 egg yolks • 170 gr. sugar
• 40 gr. flour • 1/2l. milk
• vanilla sugar • rind from 1/2 lemon
•1 sachet of vanilla flavouring
In pan, heat the milk with the vanilla flavouring
sachet. Meanwhile, beat the sugar with the egg
yolks in a heat proof casserole, using the beater
attachments at speed 5. When the mixture seems
well mixed, substitute the beaters for the dough
hook attachments, add the sifted flour and process
until the mixture is thoroughly blended. Pour in the
boiling milk and keep mixing, using the beater attachments at speed 2. Place the casserole on a very
low heat and cook while mixing on minimum speed
until the cream becomes dense.
MUSHROOM OMELET
•6 eggs • 300 gr. mushrooms
• parsley • oil
• butter • salt
Sauté the mushrooms for 20 minutes in the oil and
butter; porcini, chiodini or white button mushrooms
can be used as desired. When they are cooked, pour
it all into a bowl with the eggs and the salt and operate the mixer at speed 2 for approximately 30 seconds.
Pour the mixture into a frying pan with melted butter
and parsley. Cook the eggs until done, being careful
that they don’t stick to the pan.
PLUM CAKE
CREPES
• 50 gr. flour • 30 gr. melted butter
•4 eggs • 1 dl. milk
• salt
Place the flour, eggs, salt and melted butter in a casserole and process the mixture with the beaters on
speed 3. Add the milk slowly while concurrently
increasing the speed of the mixer until it is at the maximum. Melt some butter in a frying pan, add a small
quantity of batter and turn the pan until the bottom of
the pan is covered with the batter. Let it cook for a few
seconds making sure that it doesn’t stick, then turn the
crepe over and cook the other side. When both sides
are cooked, put it on a plate and fill as desired.
SWEET CRUST DOUGH
• 250 gr. flour • 110 gr. sugar
• 125 gr. butter • a pinch of salt
•1 whole egg and 1 egg yolk
Put the flour, the butter, cut into pieces, the sugar, the
salt and the egg and yolk into a bowl. Process the
mixture for 5/7 minutes with the dough hook attachments, starting at speed 2 and gradually working up
to speed 4/5. Roll out the dough in a buttered and
floured cake pan and bake it at 180° for 50 minutes.
• 250 gr. butter • 250 gr. sugar
• 50 gr. Corinth raisins • 250 gr. flour
• 70 gr. sultana raisins • salt
•3 whole eggs and 2 egg yolks
• 50 gr. candied fruit and peel
•1 shot glass of rum
In a bowl, beat the softened butter with the beaters on speed 5
until creamy. Add the sugar a little at a time and beat at the
same speed until the mixture turns white. Add the eggs, one at
a time, the yolks, the sifted flour and a pinch of salt. Bring the
mixer to speed 1 and add the rum, the raisins (after plumping
them a bit in warm water) and the candied fruit. Pour the mixture into a rectangular baking pan which has been lined with
buttered waxed paper. Bake for 50 min. at 180°. Remove from
the oven when and cool completely.
FM265 30-05-2002 12:25 Pagina 13
Page 14

14
F
LIRE ATTENTIVEMENT LE PRÉSENT MODE D’EMPLOI AVANT D’UTILISER L'APPAREIL
AVERTISSEMENTS GÉNÉRAUX
-Après avoir enlevé l’emballage, contrôler que
l’appareil est intact. En cas de doute, ne pas utiliser l’appareil et s’adresser exclusivement à un
personnel qualifié.
- Ne pas laisser le sachet en plastique contenant le
produit à la portée des enfants étant donné qu’il
peut représenter pour eux une source de danger.
- En cas d’incompatibilité entre la prise de courant
et la fiche de l’appareil, la prise doit être remplacée par une prise de type approprié, par un
personnel qualifié. Il est déconseillé d’utiliser des
adaptateurs, des prises multiples et/ou des rallonges. Si leur utilisation s’avère absolument
nécessaire, utiliser exclusivement des adaptateurs
simples ou multiples ainsi que des rallonges
conformes aux normes de sécurité en vigueur, en
veillant à ne pas dépasser la puissance maximale indiquée sur l’adaptateur et/ou sur la rallonge.
- En cas de panne et/ou mauvais fonctionnement,
s’adresser exclusivement à un centre de service
après-vente agréé.
-L’appareil ne doit être destiné qu’à l’usage pour
lequel il a été expressément conçu. Tout autre
usage doit être considéré comme impropre et,
par conséquent, dangereux. Le Fabricant décline toute responsabilité pour les éventuels dommages dérivant d’une utilisation impropre,
erronée et illogique, et/ou de réparations effectuées par un personnel non qualifié.
Nous vous conseillons de suivre en particulier les
règles de sécurité fondamentales suivantes:
- Ne pas toucher l’appareil avec les mains mouillées ou humides.
- Ne pas utiliser l’appareil en ayant les pieds nus
ou mouillés.
-Ne pas débrancher la fiche de la prise de courant en tirant sur le cordon d’alimentation.
-Ne pas laisser l’appareil exposé aux agents
atmosphériques (pluie, soleil, gel, etc.).
-Ne pas laisser l’appareil à la portée des enfants
ou de personnes incapables sans surveillance.
- Débrancher la fiche de la prise de courant lorsque l'appareil n’est pas utilisé.
- Ne pas laisser l’appareil branché inutilement étant
donné qu’il peut représenter une source de danger.
- Ne jamais plonger l'appareil dans l’eau.
- Si le cordon est abîmé, le faire remplacer immédiatement par un personnel qualifié.
-Avant de procéder à toute opération de nettoyage ou d’entretien, débrancher l’appareil du
secteur en enlevant la fiche.
- En cas de panne et/ou mauvais fonctionnement,
éteindre l'appareil sans intervenir personnellement. Pour toute réparation, s’adresser exclusivement aux centres de service après-vente qualifiés en exigeant l’utilisation de pièces de
rechange et accessoires originaux.
- Lorsque l’on décide de ne plus se servir de l'appareil, il est recommandé, après avoir débranché la fiche de la prise de courant, de le rendre
inutilisable en coupant le cordon d’alimentation.
- Conserver soigneusement ce mode d’emploi
pour toutes autres consultations futures.
Les matériaux et les objets destinés au contact avec
des produits alimentaires sont conformes aux prescriptions de la directive CEE 89/109.
DESCRIPTION DE L’APPAREIL
A1. Orifice (pour fouet “F1” et pour malaxeur “G1”)
A2. Orifice (pour fouet “F2” et pour malaxeur “G2”)
B. Corps moteur
C. Bouton poussoir éjection accessoires
D. Levier ON/OFF et régulateur de vitesse
E. Bouton poussoir “TURBO”
F1. Fouet (pour orifice “A1”)
F2. Fouet (pour orifice “A2”)
G1. Malaxeur (pour orifice “A1”)
G2. Malaxeur (pour orifice “A2”)
Seulement sur certains modéles
H. Bol
I1. Orifice (pour fouet “F1” et pour malaxeur “G1”)
I2. Orifice (pour fouet “F2” et pour malaxeur “G2”)
L. Base d’appui pour bol
M. Bouton poussoir dégagement appareil
N. Bras oscillateur
O. Bouton poussoir oscillation
FM265 30-05-2002 12:25 Pagina 14
Page 15

15
UTILISATION DES ACCESSOIRES
FOUETS (F1/F2): Accessoires idéaux pour monter
des blancs d’œufs, fouetter la crème fraîche, préparer des crèmes (par ex. anglaise, pâtissière,
chantilly, etc.), des sauces (par ex. mayonnaise),
des flans, des pâtes légères (crêpes, omelettes).
Dans la préparation de pâtes tendres, les fouets
s’emploient en début de préparation pour bien
amalgamer les ingrédients, qui seront ensuite
malaxés parfaitement au moyen des malaxeurs.
MALAXEURS (G1/G2): Accessoires idéaux pour préparer des pâtes sèches (par ex. pâte feuilletée, pâte
brisée, plum-cake) et des pâtes tendres (par ex. brioches, gâteaux à base d’œufs, gâteaux moelleux).
BOL TOURNANT AVEC SUPPORT (H) (seulement
sur certains modéles): Accessoire idéal pour préparer
de grandes quantités de pâte nécessitant une longue
période de malaxage (par ex. pâte brisée, etc.).
AVANT LA MISE EN SERVICE
Vérifiez que la tension de secteur correspond bien
à la tension indiquée sur la plaque signalétique de
l’appareil.
Avant d’utiliser pour la première fois votre appareil,
lavez et essuyez soigneusement tous les accessoires.
MISE EN PLACE DES ACCESSOIRES
Les accessoires ne doivent être mis en place que
lorsque l'appareil est éteint et la fiche est
débranchée de la prise de courant.
Fouets (F1/F2)
• Introduisez bien à fond la fouet F1 dans l’orifice A1 (ou I1) en le faisant tourner légèrement
pour faciliter l’enclenchement (jusqu’au moment
où vous entendez un déclic). Introduisez ensuite
dans l’autre orifice la fouet F2.
Malaxeurs (G1/G2)
• Introduisez bien à fond le malaxeur G1 dans l’orifice A1 (ou I1) en le faisant tourner légèrement
pour faciliter l’enclenchement (jusqu’au moment
où vous entendez un déclic). Introduisez ensuite
dans l’autre orifice le malaxeur G2.
Si les malaxeurs ne sont pas introduits correctement, les ingrédients ne seront pas bien
mélangés.
UTILISATION DE L’APPAREIL
• Ne faites jamais fonctionner l’appareil vide.
Placez les accessoires dans le récipient contenant les aliments à préparer avant de mettre
l'appareil en marche.
•Vérifiez que le levier ON/OFF (D) est sur la
position d’arrêt et que l’appareil n’est pas branché au réseau d’alimentation.
• Montez les accessoires désirés sur le corps
moteur en suivant les instructions fournies au
paragraphe précédent.
• Branchez la fiche à la prise de courant.
•Placez les accessoires dans le récipient contenant les aliments à travailler.
• Actionnez l’appareil en déplaçant le levier (D)
vers la droite et en le positionnant sur une des
vitesses disponibles en fonction de la quantité et
de la consistance des aliments à préparer.
Il est conseillé de commencer tous les types de
préparation en partant de la vitesse minimum et
en sélectionnant ensuite progressivement la
vitesse supérieure.
1: vitesse minimum
5: vitesse maximum.
N’introduisez jamais les doigts ou la main, ni
d’autres objets (tels que cuillères ou couteaux),
entre les accessoires lorsque l’appareil est en marche. La quantité d’aliments à travailler ne doit
jamais dépasser les anneaux métalliques présents
sur les accessoires.
UTILISATION DE LA FONCTION “TURBO”
La fonction “Turbo” a été conçue pour garantir la
flexibilité maximale de l'appareil.
Le bouton poussoir “Turbo” (E) règle l'appareil sur la
puissance maximale. Dès que ce bouton poussoir est
relâché, le batteur revient à la vitesse sélectionnée.
La fonction est désactivée lorsque le régulateur (D)
se trouve sur “0”.
DÉMONTAGE DES ACCESSOIRES
Votre appareil est équipé d’un système anti-éjection
qui empêche de démonter les accessoires avant que
l'appareil ne soit éteint.
Attendez que les accessoires soient arrêtés avant
de les démonter.
FM265 30-05-2002 12:25 Pagina 15
Page 16

• Quand vous avez fini d’utiliser l'appareil, étei-
gnez-le au moyen du régulateur de vitesse (D) et
enlevez la fiche de la prise de courant.
• Appuyez ensuite sur le bouton poussoir “EJECT”
(C) pour éjecter les accessoires du corps moteur.
UTILISATION DE L'APPAREIL AVEC LE BOL
• Assurez-vous que le régulateur de vitesse (D) est
bien sur la position d’arrêt et que l’appareil est
débranché du réseau d’alimentation.
•Accrochez le corps moteur (B) sur le bras oscillateur (N) en insérant d’abord la partie arrière
puis la partie avant jusqu’au moment où vous
entendez le déclic.
• Appuyez sur le bouton poussoir (O) et tournez
le bras oscillateur dans la position verticale.
• Placez le bol (H) sur la base du support.
• Montez les fouets ou les malaxeurs comme
décrit au paragraphe précédent.
• Appuyez sur le bouton poussoir (O) et placez le
bras dans sa position de travail.
• Branchez la fiche à la prise de courant.
• Actionnez l'appareil comme décrit au paragraphe “Utilisation de l'appareil”.
Ne faites jamais fonctionner l'appareil vide.
Placez les accessoires dans le récipient contenant
les aliments à préparer avant de mettre l'appareil
en marche.
Dans le cas de préparations nécessitant un mélange initial des ingrédients (par ex. pâte aux œufs), il
est conseillé d’utiliser le bol et le batteur sans support. Continuez ensuite la préparation pendant le
temps nécessaire en montant le batteur et le bol sur
le support.
ROTATION DU BOL
Le batteur est équipé d’un bol tournant automatique, poussé par le batteur même. Le bol tourne plus
rapidement avec l’augmentation de la vitesse de
l'appareil. Pour agir sur la vitesse de rotation du
bol, il faut par conséquent agir sur la vitesse de
l'appareil. Afin de garantir la parfaite rotation du
bol, il est indispensable que les accessoires soient
montés correctement (voir paragraphe “Montage
des accessoires”).
DÉGAGEMENT DU BATTEUR DE SON SUPPORT
• Assurez-vous que le régulateur de vitesse (D) est
bien sur la position d’arrêt et que l’appareil est
débranché du réseau d’alimentation.
•Maintenez le support bras oscillateur dans sa
position de travail.
• Appuyez sur le bouton poussoir de dégagement
de l'appareil (M).
• En maintenant pressé le bouton poussoir, soulevez la partie avant du corps moteur. Enlevez
ensuite l'appareil.
NETTOYAGE DE L’APPAREIL ET DES ACCESSOIRES
•Ne plongez jamais le corps moteur dans l’eau,
mais nettoyez-le avec un chiffon humide.
•Ne nettoyez jamais les accessoires lorsqu’ils
sont encore accrochés au corps moteur.
• N’oubliez jamais que:
- seulement les accessoires et le bol tournant
peuvent être plongés dans de l’eau tiède
savonneuse en évitant toutefois de les laisser
tremper longtemps dans l’eau;
-pour nettoyer le corps moteur, utilisez tout
simplement un chiffon humide;
- aucun élément en plastique ne peut être lavé
en lave-vaisselle. Il est toutefois possible de
laver en lave-vaisselle les accessoires en métal
(fouets, malaxeurs, etc.).
16
FM265 30-05-2002 12:25 Pagina 16
Page 17

17
Grâce aux accessoires, votre appareil vous permettra de préparer en peu de temps et en toute facilité d’innombrables aliments: mayonnaise, sauces, pâtes pour omelettes, crêpes et beignets, crème Chantilly, blancs
battus en neige, pâtes pour gâteaux, pain et gressins, homogénéisés, potages, soupes, milk-shakes aux fruits,
boissons.
Ce recueil propose plusieurs recettes de différent type comme premiers exemples. Votre expérience et votre fantaisie vous permettront certainement d’utiliser ce précieux appareil pour préparer d’innombrables plats, sauces
et gâteaux.
Tout cela est facilité par le réglage électronique de la vitesse de rotation des accessoires (possibilité de choisir la
vitesse appropriée au type d’aliment) et par le bol tournant automatique avec support (seulement sur certains
modéles) qui transforme l'appareil en un malaxeur automatique de grande capacité.
RECUEIL DE RECETTES
MAYONNAISE
•1 œuf entier • 1 / 2 litre d’huile
•1 cuillerée à thé de jus de citron
• une pincée de sel
Mettre l’œuf dans un bol de petite dimension et
ajouter immédiatement le sel et le citron. Actionner
le fouet et sélectionner la vitesse 3. Ajouter l’huile
petit à petit et travailler le mélange jusqu'à ce qu’il
soit consistant.
SAUCE ROSE
• Mayonnaise • Worchester
•
2 cuillerées à soupe de ketchup
•1 cuillerée à thé de Cognac
Mettre la mayonnaise dans un récipient, puis ajouter le cognac, le ketchup, le worchester (quelques
gouttes) et bien amalgamer le tout en utilisant les
fouets.
PURÉE
• 75g de purée lyophilisée • 150 cc d'eau
• 300 cc de lait • une pincée de sel
Porter à ébullition le lait et l'eau. Dès le début de l’ébullition, enlever la casserole du feu. Verser dans la
casserole les flocons de pommes de terre et au
moyen des fouets (F) battre de manière à obtenir un
mélange homogène. Pour préparer une purée plus
riche, ajouter aussi une noix de beurre et du fromage râpé.
CRÈME FRAÎCHE/BLANCS D’ŒUF BATTUS EN NEIGE
•1 dl de crème fraîche
•1 ou plusieurs blancs d’œuf
Mettre les blancs d’œuf ou la crème fraîche dans un
bol et actionner les fouets (F) sur la vitesse maximum
(5). Travailler le mélange jusqu'à ce qu’il soit bien
monté.
FM265 30-05-2002 12:25 Pagina 17
Page 18

18
CRÈME PÂTISSIÈRE
•6 jaunes d’oeuf • 170 g de sucre
• 40 g de farine • 1/2 l de lait
• sucre vanillé • l’écorce d’1/2 citron
•1 petit sachet de vanille
Faire chauffer dans un petit poêlon le lait avec un
petit sachet de vanille. Entre-temps, battre dans une
casserole le sucre avec les œufs, en actionnant les
fouets sur la vitesse 5. Lorsque le mélange sera bien
amalgamé, remplacer les fouets par les malaxeurs,
ajouter la farine tamisée et travailler de manière à
obtenir un mélange homogène. Verser le lait bouillant et continuer à mélanger en réglant la vitesse
des fouets sur 2. Mettre la casserole sur feu doux et
mélanger toujours à l’aide des fouets sur la vitesse
minimum jusqu'à ce que la crème ait l’épaisseur
souhaitée.
OMELETTE AUX CHAMPIGNONS
•6 œufs • sel
• 300 g de champignons • persil
• huile • beurre
Cuire les champignons pendant environ 20 minutes dans l’huile
et le beurre; vous pouvez utiliser au choix des cèpes, des champignons de Paris ou des autres champignons. Lorsqu’ils sont
cuits, verser le tout dans un bol avec les œufs et le sel, puis
actionner le batteur sur la puissance 2 pendant environ 30
secondes. Faire fondre un morceau de beurre dans une poêle et
y verser le mélange en le saupoudrant de persil. Laisser cuire l’omelette à feu moyen en la soulevant tout autour avec une fourchette afin qu’elle ne s’attache pas au fond de la poêle.
PLUM-CAKE
CRÊPES
• 50 g de farine • 30 g de beurre fondu
•4 œufs • 1 dl de lait
• sel
Mettre la farine, les œufs, le sel et le beurre fondu dans un
plat profond et travailler le mélange avec les fouets sur la
vitesse 3; diluer ensuite le mélange avec le lait en augmentant progressivement la vitesse jusqu'à atteindre la
vitesse maximum. Faire fondre du beurre dans une poêle,
y verser une louche de pâte et faire en sorte que la pâte se
distribue uniformément sur le fond de la poêle. Laisser
cuire quelques secondes en contrôlant que la préparation
ne s’attache pas au fond de la poêle. Tourner ensuite la
crêpe à l’aide de la spatule et la laisser cuire de l’autre côté.
Quand elle sera cuite des deux côtés, la mettre sur une
assiette et la fourrer selon les goûts.
PÂTE BRISÉE
• 250 g de farine • 110 g de sucre
• 125 g de beurre • une pincée de sel
•1 œuf entier +1 jaune d’œuf
Mettre dans un plat profond la farine, le beurre (précédemment ramolli) coupé en petits dés, le sucre, le sel
et les œufs. Travailler les ingrédients pendant environ
5/7 minutes avec les malaxeurs, au début sur la vitesse 2 et ensuite sur la vitesse 4/5. Étendre la pâte dans
un moule à tarte (préalablement beurré et fariné) et la
faire cuire pendant 50 minutes à 180°C.
• 250 g de beurre • 250 g de sucre
•3 œufs + 2 jaunes d’œuf
• 250 g de farine • sel
• 70 g de raisins secs
• 50 g de raisins de Corinthe
• 50 g d’orange et de cédrat confits
•1 petit verre de rhum
Dans un bol, travailler en crème le beurre (précédemment ramolli avec les batteurs sur la vitesse 5). Ajouter,
petit à petit, le sucre et continuer à travailler le mélange
toujours à la même vitesse, jusqu'à ce qu’il devienne
blanc. Ajouter les œufs, un à la fois, les jaunes d’œuf,
la farine tamisée et une pincée de sel. Régler la vitesse
des malaxeurs sur 1 et ajouter le rhum, les raisins
trempés préalablement dans de l'eau tiède et les fruits
confits. Verser le mélange dans un moule rectangulaire, recouvert de papier à four huilé de beurre. Cuire au
four pendant 90 minutes à 180°C. Enlever du four
quand il sera complètement froid.
FM265 30-05-2002 12:25 Pagina 18
Page 19

19
GR
¢π∞µ∞™∆∂ ¶ƒ√™∂∫∆π∫∞ ∆π™ √¢∏°π∂™ ∞À∆∂™ ¶ƒπ¡ Ã∏™πª√¶√π∏™∂∆∂ ∆∏ ™À™∫∂À∏
°∂¡π∫∂™ ¶ƒ√∂π¢√¶√π∏™∂π™
- ∞КФ‡ ·К·ИЪ¤ЫВЩВ ЩЛ Ы˘ЫОВ˘·Ы›·, ‚В‚·ИˆıВ›ЩВ fiЩИ
Л Ы˘ЫОВ˘‹ В›У·И ·О¤Ъ·ИЛ О·И ‰ВУ ¤¯ВИ ˘ФЫЩВ›
˙ЛМИ¤˜. ™В ВЪ›ЩˆЫЛ ·МКИ‚ФПИТУ, МЛУ ЩЛ
¯ЪЛЫИМФФИ‹ЫВЩВ О·И ·В˘ı˘УıВ›ЩВ ЫВ
ВИ‰ИОВ˘М¤УФ ЛПВОЩЪФПfiБФ.
- ∏ П·ЫЩИО‹ Ы·ОФ‡П· ЩЛ˜ Ы˘ЫОВ˘·Ы›·˜ ЩФ˘
ЪФ˚fiУЩФ˜ ı· Ъ¤ВИ У· К˘П¿ЫЫВЩ·И М·ОЪИ¿ ·fi
·И‰И¿ БИ·Щ› ·ФЩВПВ› Иı·У‹ ВЫЩ›· ОИУ‰‡УФ˘.
- ™В ВЪ›ЩˆЫЛ Ф˘ Л Ъ›˙· ‰ВУ Щ·ИЪИ¿˙ВИ МВ ЩФ КИ˜
ЩЛ˜ Ы˘ЫОВ˘‹˜, О·П¤ЫЩВ ¤У·У ЛПВОЩЪФПfiБФ БИ· У·
·УЩИО·Щ·ЫЩ‹ЫВИ ЩЛУ Ъ›˙· МВ МИ· ¿ППЛ ЩФ˘
О·Щ¿ППЛПФ˘ Щ‡Ф˘. ¢ВУ Ы˘УИЫЩ¿Щ·И Л ¯Ъ‹ЫЛ
·ÓÙ¿ÙÔÚ·, ÔχÚÈ˙Ô˘ ηÈ/‹ ÚÔ¤ÎÙ·Û˘
ηψ‰›Ô˘. ŸÙ·Ó Ë ¯Ú‹ÛË ÙˆÓ ·Ú·¿Óˆ ›ӷÈ
·ФП‡Щˆ˜ ··Ъ·›ЩЛЩЛ, ı· Ъ¤ВИ У·
¯ЪЛЫИМФФИ‹ЫВЩВ ·Пfi ‹ ФПП·Пfi ·УЩ¿ЩФЪ·
О·И ЪФВОЩ¿ЫВИ˜ Ф˘ Ы˘МКˆУФ‡У МВ ЩФ˘˜
ИЫ¯‡ФУЩВ˜ О·УФУИЫМФ‡˜ ·ЫК·ПВ›·˜, КЪФУЩ›˙ФУЩ·˜
У· МЛУ ˘ВЪ‚В›ЩВ ЩФ fiЪИФ ЩЛ˜ М¤БИЫЩЛ˜ ИЫ¯‡Ф˜ Ф˘
·Ó·ÁÚ¿ÊÂÙ·È Â¿Óˆ ÛÙÔÓ ·ÓÙ¿ÙÔÚ· ηÈ/‹ ÙËÓ
ÚÔ¤ÎÙ·ÛË.
- ∂¿У Л Ы˘ЫОВ˘‹ ЫЩ·М·Щ‹ЫВИ У· ПВИЩФ˘ЪБВ›,
·В˘ı˘УıВ›ЩВ ·ФОПВИЫЩИО¿ О·И МfiУФУ ЫВ О¿ФИФ
ВНФ˘ЫИФ‰ФЩЛМ¤УФ О¤УЩЪФ Ы¤Ъ‚И˜.
- ∏ Ы˘ЫОВ˘‹ ·˘Щ‹ ЪФФЪ›˙ВЩ·И ·ФОПВИЫЩИО¿ О·И
МfiУФ БИ· ЩЛ ¯Ъ‹ЫЛ БИ· ЩЛУ ФФ›· ¤¯ВИ Ы¯В‰И·ЫЩВ›.
∫¿ıВ ¿ППЛ ¯Ъ‹ЫЛ Ъ¤ВИ У· ıВˆЪВ›Щ·И
·О·Щ¿ППЛПЛ О·И Ы˘УВТ˜ ВИО›У‰˘УЛ. √
О·Щ·ЫОВ˘·ЫЩ‹˜ ‰ВУ МФЪВ› У· ıВˆЪЛıВ›
˘В‡ı˘УФ˜ БИ· Щ˘¯fiУ ˙ЛМИ¤˜ Ф˘ МФЪВ› У·
ЪФОПЛıФ‡У ·fi ·О·Щ¿ППЛПЛ, П·Уı·ЫМ¤УЛ О·И
·ПfiБИЫЩЛ ¯Ъ‹ЫЛ, О·И/‹ ·fi ВИЫОВ˘¤˜ Ф˘
ВОЩВП¤ЫЩЛО·У ·fi ·УВИ‰›ОВ˘ЩФ ЪФЫˆИОfi.
∂ȉÈÎfiÙÂÚ·, ÙËÚ‹ÛÙ ·˘ÛÙËÚ¿ ÙÔ˘˜ ·Ú·Î¿Ùˆ
‚·ÛÈÎÔ‡˜ ηÓfiÓ˜ ·ÛÊ·Ï›·˜:
- ªËÓ È¿ÓÂÙ ÙË Û˘Û΢‹ Ì ‚ÚÂÁ̤ӷ ‹ ˘ÁÚ¿
¯¤ÚÈ·.
- ªЛ ¯ЪЛЫИМФФИВ›ЩВ ЩЛ Ы˘ЫОВ˘‹ МВ Б˘МУ¿ ‹
‚ЪВБМ¤У· fi‰И·.
- ªЛУ ЩЪ·‚¿ЩВ ЩФ О·ПТ‰ИФ ЩЪФКФ‰ФЫ›·˜ ЩЛ˜
Ы˘ЫОВ˘‹˜ БИ· У· ‚Б¿ПВЩВ ЩФ КИ˜ ·fi ЩЛУ Ъ›˙·
ЩФ˘ ЪВ‡М·ЩФ˜.
- ªËÓ ·Ê‹ÓÂÙ ÙË Û˘Û΢‹ ÂÎÙÂıÂÈ̤ÓË ÛÂ
·ЩМФЫК·ИЪИОФ‡˜ ·Ъ¿БФУЩВ˜ (‚ЪФ¯‹, ‹ПИФ˜,
·БˆУИ¿, ОП).
- ªЛУ ·К‹УВЩВ У· ¯ЪЛЫИМФФИФ‡У ЩЛ Ы˘ЫОВ˘‹
·И‰И¿ ‹ ·У‹МФЪ· ¿ЩФМ·, ¯ˆЪ›˜ В›‚ПВ„Л.
- µБ¿ПЩВ ЩФ КИ˜ ·fi ЩЛУ Ъ›˙· ЩФ˘ ЪВ‡М·ЩФ˜ fiЩ·У
‰ВУ ¯ЪЛЫИМФФИВ›ЩВ ЩЛ Ы˘ЫОВ˘‹.
- ªËÓ ·Ê‹ÓÂÙ ¿ÛÎÔ· ·Ó·Ì̤ÓË ÙË Û˘Û΢‹ ÁÈ·Ù›
·ФЩВПВ› Иı·У‹ ВЫЩ›· ОИУ‰‡УФ˘.
- ªË ‚˘ı›˙ÂÙ ÙË Û˘Û΢‹ Û ÓÂÚfi.
- ™В ВЪ›ЩˆЫЛ Ф˘ ЩФ О·ПТ‰ИФ ˘ФЫЩВ› О¿ФИ·
˙ЛМИ¿, ·В˘ı˘УıВ›ЩВ ·М¤Ыˆ˜ ЫВ ЛПВОЩЪФПfiБФ БИ·
ЩЛУ ·УЩИО·Щ¿ЫЩ·Ы‹ ЩФ˘.
- ¶ЪИУ ВОЩВП¤ЫВЩВ ФФИ·‰‹ФЩВ ВЪБ·Ы›·
О·ı·ЪИЫМФ‡ ‹ Ы˘УЩ‹ЪЛЫЛ˜, ·ФЫ˘У‰¤ЫЩВ ЩЛ
Ы˘ЫОВ˘‹ ·fi ЩФ ЛПВОЩЪИОfi ‰›ОЩ˘Ф ‚Б¿˙ФУЩ·˜ ЩФ
КИ˜ ·fi ЩЛУ Ъ›˙·.
- ™В ВЪ›ЩˆЫЛ ‚П¿‚Л˜ О·И/‹ ВП·ЩЩˆМ·ЩИО‹˜
ПВИЩФ˘ЪБ›·˜, Ы‚‹ЫЩВ ЩЛ Ы˘ЫОВ˘‹ О·И МЛУ
ЪФЫ·ı‹ЫВЩВ У· ЩЛУ ·УФ›НВЩВ БИ· У· ЩЛУ
ВИЫОВ˘¿ЫВЩВ. °И· Иı·У¤˜ ВИЫОВ˘¤˜
·В˘ı˘УıВ›ЩВ ·ФОПВИЫЩИО¿ О·И МfiУФУ ЫВ О¿ФИФ
ВНФ˘ЫИФ‰ФЩЛМ¤УФ ∫¤УЩЪФ ™¤Ъ‚И˜ О·И ˙ЛЩ‹ЫЩВ ЩЛУ
·ÓÙÈηٿÛÙ·ÛË ÙˆÓ ÂÍ·ÚÙËÌ¿ÙˆÓ Ì ÁÓ‹ÛÈ·
·ÓÙ·ÏÏ·ÎÙÈο.
- ŸЩ·У ·ФК·Ы›ЫВЩВ У· МЛ ¯ЪЛЫИМФФИВ›ЩВ П¤ФУ
ЩЛ Ы˘ЫОВ˘‹, Ы·˜ Ы˘М‚Ф˘ПВ‡Ф˘МВ У· ЩЛУ
·¯ЪЛЫЩВ‡ЫВЩВ Оfi‚ФУЩ·˜ ЩФ ЛПВОЩЪИОfi ЩЛ˜
О·ПТ‰ИФ, ·КФ‡ ЪТЩ· ‚¤‚·И· ·К·ИЪ¤ЫВЩВ ЩФ КИ˜
·fi ÙËÓ Ú›˙· ÙÔ˘ Ú‡̷ÙÔ˜.
- º˘Ï¿ÍÙ Ì ÚÔÛÔ¯‹ ÙȘ Ô‰ËÁ›Â˜ ·˘Ù¤˜ ÁÈ· Ó· ÙȘ
Û˘Ì‚Ô˘Ï‡ÂÛÙ Û ÂÚ›ÙˆÛË Ô˘ ÙȘ
¯ÚÂÈ·ÛÙ›Ù ÛÙÔ Ì¤ÏÏÔÓ.
∆· ˘ПИО¿ О·И Щ· ·УЩИОВ›МВУ· Ф˘ ¤Ъ¯ФУЩ·И ЫВ В·К‹
МВ ЪФ˚fiУЩ· ‰И·ЩЪФК‹˜ В›У·И Ы‡МКˆУ· МВ ЩИ˜
‰И·Щ¿НВИ˜ ЩЛ˜ √‰ЛБ›·˜ EOK 89/109.
¶∂ƒπ°ƒ∞º∏
∞1. ÀÔ‰Ô¯‹ (ÁÈ· ¯Ù˘ËÙ‹ÚÈ "F1" Î·È ˙˘ÌˆÙ‹ÚÈ
"G1")
∞2. ÀÔ‰Ô¯‹ (ÁÈ· ¯Ù˘ËÙ‹ÚÈ "F2" Î·È ˙˘ÌˆÙ‹ÚÈ
"G2")
µ. ªÔÓ¿‰· ÌÔÙ¤Ú
C. ¢È·ÎfiÙ˘ ··ÛÊ¿ÏÈÛ˘ ÂÍ·ÚÙËÌ¿ÙˆÓ
D. ªÔ¯Ïfi˜ ON/OFF Î·È Ú‡ıÌÈÛ˘ Ù·¯‡ÙËÙ·˜
E. ¢È·ÎfiÙ˘ "TURBO" ÁÈ· ÚfiÛıÂÙË ÈÛ¯‡
F1. ÃÙ˘ËÙ‹ÚÈ (ÁÈ· ÙËÓ ˘Ô‰Ô¯‹ ∞1)
F2. ÃÙ˘ËÙ‹ÚÈ (ÁÈ· ÙËÓ ˘Ô‰Ô¯‹ ∞2)
G1. ∑˘ÌˆÙ‹ÚÈ (ÁÈ· ÙËÓ ˘Ô‰Ô¯‹ ∞1)
G2. ∑˘ÌˆÙ‹ÚÈ (ÁÈ· ÙËÓ ˘Ô‰Ô¯‹ ∞2)
ЫВ МВЪИО¿ МФУЩ¤П·
H. MÔÏ
I1. ÀÔ‰Ô¯‹ (ÁÈ· ¯Ù˘ËÙ‹ÚÈ "F1" Î·È ˙˘ÌˆÙ‹ÚÈ
"G1")
I2. ÀÔ‰Ô¯‹ (ÁÈ· ¯Ù˘ËÙ‹ÚÈ "F2" Î·È ˙˘ÌˆÙ‹ÚÈ
"G2")
L. µ¿ÛË ÛÙ‹ÚÈ͢ ÌÔÏ
M. ¢И·ОfiЩЛ˜ НВМФУЩ·Ъ›ЫМ·ЩФ˜ Ы˘ЫОВ˘‹˜
N. µЪ·¯›ФУ·˜ Щ·П·УЩТМВУФ˜
O. ¢È·ÎfiÙ˘ ··ÛÊ¿ÏÈÛ˘
FM265 30-05-2002 12:25 Pagina 19
Page 20

Ã∏™πª√∆∏∆∞ ∆ø¡ ∂•∞ƒ∆∏ª∞∆ø¡
Ã∆À¶∏∆∏ƒπ∞ (F1/F2): ∂›Ó·È ȉ·ÓÈο ÁÈ· Ó· ¯Ù˘‹ÛÂÙÂ
·ЫЪ¿‰И· ·˘БТУ О·И ОЪ¤М· Б¿П·ОЩФ˜, У· ВЩФИМ¿ЫВЩВ
ОЪ¤МВ˜ (fiˆ˜ ОЪ¤МВ˜ ˙·¯·ЪФП·ЫЩИО‹˜, Ы·УЩИБ‡,
ОП.), Ы¿ПЩЫВ˜ (fiˆ˜ М·БИФУ¤˙·), Ф˘Щ›БОВ˜, ВП·КЪИ¤˜
˙‡МВ˜ (fiˆ˜ БИ· ОЪ¤В˜, ФМВП¤ЩВ˜). ™ЩЛУ
ЪФВЩФИМ·Ы›· МИ·˜ М·П·О‹˜ ˙‡МЛ˜, ¯ЪЛЫИМВ‡Ф˘У ЫЩЛУ
·Ъ¯ИО‹ К¿ЫЛ ВВНВЪБ·Ы›·˜ БИ· ЩЛУ О·П‹ ·У¿МИНЛ ЩˆУ
˘ПИОТУ, Щ· ФФ›· ЫЩЛ Ы˘У¤¯ВИ· ı· ˙˘МˆıФ‡У ЫˆЫЩ¿
·fi Ù· ηٿÏÏËÏ· ˙˘ÌˆÙ‹ÚÈ·.
∑Àªø∆∏ƒπ∞ (G1/G2): ∂›У·И И‰·УИО¿ БИ· У· ВЩФИМ¿ЫВЩВ
ЫЩВБУ¤˜ ˙‡МВ˜ (fiˆ˜ ЫКФПИ¿Щ·, ˙‡МЛ БИ· Щ¿ЪЩВ˜, О¤ИО,
ЩЪИКЩ¤˜ ˙‡МВ˜) О·И М·П·О¤˜ ˙‡МВ˜ (fiˆ˜ ˙‡МВ˜ БИ·
МЪИfi˜, ЩФ‡ЪЩ· М·ЪБ·Ъ›Щ·, ·КЪ¿ЩВ˜ ЩФ‡ЪЩВ˜).
¶∂ƒπ™∆ƒ∂º√ª∂¡√ ª¶√§ ª∂ µ∞™∏ ™∆∏ƒπ•∏™ (H)
(
ЫВ МВЪИО¿ МФУЩ¤П·
): В›У·И И‰·УИОfi fiЩ·У Ъ¤ВИ У·
ВЩФИМ¿ЫВЩВ МВБ¿ПЛ ФЫfiЩЛЩ· ˙‡МЛ˜ Л ФФ›· ··ИЩВ›
·Ъ·ЩВЩ·М¤УФ ¯ЪfiУФ ·У¿МИНЛ˜ (fiˆ˜ ˙‡МЛ БИ· Щ¿ЪЩВ˜,
ОП).
¶ƒπ¡ ∆∏ Ã∏™∏
µВ‚·ИˆıВ›ЩВ fiЩИ Л Щ¿ЫЛ ЩФ˘ ‰ИОЩ‡Ф˘ ·УЩИЫЩФИ¯В› ЫЩЛУ
Щ¿ЫЛ Ф˘ ·У·БЪ¿КВЩ·И ЫЩЛУ Щ·М¤П· ЩЛ˜ Ы˘ЫОВ˘‹˜.
¶ЪИУ ¯ЪЛЫИМФФИ‹ЫВЩВ ЩЛ Ы˘ЫОВ˘‹ БИ· ЪТЩЛ КФЪ¿,
П‡УВЩВ О·И ЫЩВБУТЫЩВ О·П¿ fiП· Щ· ВН·ЪЩ‹М·Щ·.
ª√¡∆∞ƒπ™ª∞ ∆ø¡ ∂•∞ƒ∆∏ª∞∆ø¡
∆· ВН·ЪЩ‹М·Щ· Ъ¤ВИ У· МФУЩ¿ЪФУЩ·И ЫЩЛ ı¤ЫЛ
ЩФ˘˜ МfiУФУ fiЩ·У Л Ы˘ЫОВ˘‹ ‚Ъ›ЫОВЩ·И ВОЩfi˜
ПВИЩФ˘ЪБ›·˜ О·И В›У·И ·ФЫ˘У‰В‰ВМ¤УЛ ·fi ЩФ
ЛПВОЩЪИОfi ‰›ОЩ˘Ф.
ЫВ МВЪИО¿ МФУЩ¤П·
ÃÙ˘ËÙ‹ÚÈ· (F1/F2)
ñ ¶ÚÔÛ·ÚÙ‹ÛÙ ۈÛÙ¿ Î·È Ì¤¯ÚÈ Ù¤ÚÌ· Ù·
¯Щ˘ЛЩ‹ЪИ· F1 ЫЩЛУ ·УЩ›ЫЩФИ¯Л ˘Ф‰Ф¯‹ ∞1 (I1),
ЫЩЪ¤КФУЩ¿˜ ЩФ ВП·КЪ¿ БИ· У· ‰ИВ˘ОФП‡УВЩВ ЩФ
ОПВ›‰ˆМ· ЫЩЛ ЫˆЫЩ‹ ı¤ЫЛ (М¤¯ЪИ У· ·ОФ˘ЫЩВ› ЩФ
¯·Ъ·ОЩЛЪИЫЩИОfi "ОПИО"). ∫·ЩfiИУ ЪФЫ·ЪЩ‹ЫЩВ Щ·
¯Щ˘ЛЩ‹ЪИ· F2 ЫЩЛУ ¿ППЛ ˘Ф‰Ф¯‹.
∑˘ÌˆÙ‹ÚÈ· (G1/G2)
ñ ¶ÚÔÛ·ÚÙ‹ÛÙ ۈÛÙ¿ Î·È Ì¤¯ÚÈ Ù¤ÚÌ· ÙÔ ˙˘ÌˆÙ‹ÚÈ
G1 ЫЩЛУ ·УЩ›ЫЩФИ¯Л ˘Ф‰Ф¯‹ ∞1, ЫЩЪ¤КФУЩ¿˜ ЩФ
ВП·КЪ¿ БИ· У· ‰ИВ˘ОФП‡УВЩВ ЩФ ОПВ›‰ˆМ· ЫЩЛ
ЫˆЫЩ‹ ı¤ЫЛ (М¤¯ЪИ У· ·ОФ˘ЫЩВ› ЩФ ¯·Ъ·ОЩЛЪИЫЩИОfi
"ОПИО"). ∫·ЩfiИУ ЪФЫ·ЪЩ‹ЫЩВ ЩФ ˙˘МˆЩ‹ЪИ G2
ЫЩЛУ ¿ППЛ ˘Ф‰Ф¯‹.
∂¿У Щ· ˙˘МˆЩ‹ЪИ· ‰ВУ МФУЩ·ЪИЫЩФ‡У ЫˆЫЩ¿ ЫЩЛ
Ы˘ЫОВ˘‹, Щ· ˘ПИО¿ ‰ВУ ı· ·У·МИБУ‡ФУЩ·И ЫˆЫЩ¿.
∆ƒ√¶√™ Ã∏™∏™ ∆∏™ ™À™∫∂À∏™
с ªЛУ ·К‹УВЩВ ФЩ¤ ЩЛ Ы˘ЫОВ˘‹ У· ПВИЩФ˘ЪБВ›
¿‰ВИ·. ¡· ·У¿‚ВЩВ ЩЛ Ы˘ЫОВ˘‹ МfiУФУ ·КФ‡
¤¯ВЩВ МФУЩ¿ЪВИ Щ· ВН·ЪЩ‹М·Щ· ЫЩЛ ЫˆЫЩ‹ ı¤ЫЛ
О·И Щ· ¤¯ВЩВ О·ЩВ‚¿ЫВИ М¤Ы· ЫЩФ МФП fiФ˘
¤¯ВЩВ ЪФЫı¤ЫВИ Щ· ˘ПИО¿ Ф˘ ı¤ПВЩВ У·
ВВНВЪБ·ЫЩВ›ЩВ.
ñ µÂ‚·Èˆı›Ù fiÙÈ Ô ÌÔ¯Ïfi˜ ON/OFF (D) ‚Ú›ÛÎÂÙ·È
ЫЩЛ ı¤ЫЛ OFF (Ы‚ЛЫЩ‹ Ы˘ЫОВ˘‹) О·И fiЩИ Л Ы˘ЫОВ˘‹
В›У·И ·ФЫ˘У‰В‰ВМ¤УЛ ·fi ЩФ ЛПВОЩЪИОfi ‰›ОЩ˘Ф.
ñ ªÔÓÙ¿ÚÂÙ ٷ ÂÍ·ÚÙ‹Ì·Ù· Ô˘ ı¤ÏÂÙ ÛÙË
МФУ¿‰· ЩФ˘ МФЩ¤Ъ, ·ОФПФ˘ıТУЩ·˜ ЩИ˜ Ф‰ЛБ›В˜ Ф˘
‰›‰ФУЩ·И ЫЩЛУ ЪФЛБФ‡МВУЛ ·Ъ¿БЪ·КФ.
ñ ™˘Ó‰¤ÛÙ ÙÔ ÊȘ Ù˘ Û˘Û΢‹˜ ÛÙËÓ Ú›˙· ÙÔ˘
Ú‡̷ÙÔ˜.
ñ ∫·Ù‚¿ÛÙ ٷ ÌÔÓÙ·ÚÈṲ̂ӷ ÂÍ·ÚÙ‹Ì·Ù· ̤۷
ЫЩФ МФП fiФ˘ ¤¯ВЩВ ЪФЫı¤ЫВИ Щ· ЩЪfiКИМ· Ф˘
ı¤ПВЩВ У· ВВНВЪБ·ЫЩВ›ЩВ.
с •ВОИУ‹ЫЩВ ЩЛ ПВИЩФ˘ЪБ›· ЩЛ˜ Ы˘ЫОВ˘‹˜
ÌÂÙ·ÙÔ›˙ÔÓÙ·˜ ÙÔ ÌÔ¯Ïfi (D) ЪФ˜ Щ· ‰ВНИ¿ О·И
ЩФФıВЩ‹ЫЩВ ЩФУ ЫВ МИ· ·fi ЩИ˜ ‰И·ı¤ЫИМВ˜
Щ·¯‡ЩЛЩВ˜ ПВИЩФ˘ЪБ›·˜, ·У¿ПФБ· МВ ЩЛУ ФЫfiЩЛЩ·
О·И ЩЛ ˘ОУfiЩЛЩ· ЩˆУ ЩЪФК›МˆУ Ф˘ ı¤ПВЩВ У·
ВВНВЪБ·ЫЩВ›ЩВ.
√ФИ·‰‹ФЩВ ВВНВЪБ·Ы›· О·И ·У ı¤ПВЩВ У·
О¿УВЩВ, Ы·˜ Ы˘УИЫЩФ‡МВ У· ·Ъ¯›˙ВЩВ ·fi ЩЛ
¯·МЛПfiЩВЪЛ Щ·¯‡ЩЛЩ· О·И ЫИБ¿-ЫИБ¿ У· ВИП¤БВЩВ
ЩЛ МВБ·П‡ЩВЪЛ Щ·¯‡ЩЛЩ·:
1: ÷ÌËÏfiÙÂÚË Ù·¯‡ÙËÙ·
6: À„ËÏfiÙÂÚË Ù·¯‡ÙËÙ·
ªЛУ ·ЪВМ‚¿ПВЩВ ФЩ¤ Щ· ‰¿¯Щ˘П· ‹ Щ· ¯¤ЪИ· Ы·˜
О·ıТ˜ О·И О·У¤У· ¿ППФ ·УЩИОВ›МВУФ (fiˆ˜ М·¯·›ЪИ· ‹
ОФ˘Щ¿ПИ·) ·У¿МВЫ· ЫЩ· МФУЩ·ЪИЫМ¤У· ВН·ЪЩ‹М·Щ·
fiЩ·У Л Ы˘ЫОВ˘‹ ‚Ъ›ЫОВЩ·И ЫВ ПВИЩФ˘ЪБ›·.
∏ ФЫfiЩЛЩ· ЩˆУ ˘ПИОТУ Ф˘ ı¤ПВЩВ У·
ВВНВЪБ·ЫЩВ›ЩВ ‰ВУ Ъ¤ВИ ФЩ¤ У· ˘ВЪ‚·›УВИ ЩФ
В›В‰Ф ЩˆУ МВЩ·ППИОТУ ‰·ОЩ˘П›ˆУ Ф˘ ˘¿Ъ¯Ф˘У
В¿Уˆ ЫЩ· ВН·ЪЩ‹М·Щ·.
Ã∏™πª√∆∏∆∞ ∆∏™ §∂π∆√Àƒ°π∞™ "TURBO"
∏ ПВИЩФ˘ЪБ›· "TURBO" (="¶ЪfiЫıВЩЛ ИЫ¯‡˜")
Ы¯В‰И¿ЫЩЛОВ БИ· У· ЪФЫК¤ЪВИ ЩЛ М¤БИЫЩЛ ‰˘У·Щ‹
В˘ВПИН›· ЫЩЛ ¯Ъ‹ЫЛ ЩЛ˜ Ы˘ЫОВ˘‹˜. ªВ ЩФ ‰И·ОfiЩЛ
"TURBO" (∂) Л Ы˘ЫОВ˘‹ КЩ¿УВИ ЫЩФ М¤БИЫЩФ ЩЛ˜
ИЫ¯‡Ф˜ ЩЛ˜.
ŸЩ·У ·ВПВ˘ıВЪТУВЩВ ЩФ ‰И·ОfiЩЛ, Л Ы˘ЫОВ˘‹
В·У¤Ъ¯ВЩ·И ·˘ЩfiМ·Щ· ЫЩЛУ ЪФВИПВБМ¤УЛ Щ·¯‡ЩЛЩ·
ПВИЩФ˘ЪБ›·˜ ЩЛ˜.
∏ Ы˘БОВОЪИМ¤УЛ ПВИЩФ˘ЪБ›· ·ВУВЪБФФИВ›Щ·И fiЩ·У Ф
МФ¯Пfi˜ Ъ‡ıМИЫЛ˜ Щ·¯‡ЩЛЩ·˜ (D) ‚Ú›ÛÎÂÙ·È ÛÙË ı¤ÛË
"0".
•∂ª√¡∆∞ƒπ™ª∞ ∆ø¡ ∂•∞ƒ∆∏ª∞∆ø¡
∏ Û˘Û΢‹ Û·˜ Â›Ó·È ÂÍÔÏÈṲ̂ÓË Ì ¤Ó· Û‡ÛÙËÌ·
·ЫК¿ПИЫЛ˜ ЩˆУ ВН·ЪЩЛМ¿ЩˆУ ЫЩЛ ı¤ЫЛ ЩФ˘˜ ЩФ ФФ›Ф
‰ВУ Ы·˜ ВИЩЪ¤ВИ У· НВМФУЩ¿ЪВЩВ Щ· ВН·ЪЩ‹М·Щ· ЪИУ
Ы‚‹ЫВЩВ ЪФЛБФ˘М¤Уˆ˜ ЩЛ Ы˘ЫОВ˘‹.
¶ВЪИМ¤УВЩВ ЪТЩ· У· ·ОИУЛЩФФИЛıФ‡У Щ·
ВН·ЪЩ‹М·Щ· ЪИУ ЪФ¯ˆЪ‹ЫВЩВ ЫЩФ НВМФУЩ¿ЪИЫМ¿
ЩФ˘˜ ·fi ЩЛ Ы˘ЫОВ˘‹.
с ŸЩ·У ЩВПВИТЫВЩВ ЩЛ ¯Ъ‹ЫЛ ЩЛ˜ Ы˘ЫОВ˘‹˜, Ы‚‹ЫЩВ
ÙËÓ ·fi ÙÔ ÌÔ¯Ïfi Ú‡ıÌÈÛ˘ Ù·¯‡ÙËÙ·˜ (D) ηÈ
‚Á¿ÏÙ ÙÔ ÊȘ ·fi ÙËÓ Ú›˙· ÙÔ˘ Ú‡̷ÙÔ˜.
ñ ∫·ÙfiÈÓ, ȤÛÙ ÙÔÓ ‰È·ÎfiÙË ··ÛÊ¿ÏÈÛ˘
“EJECT” C ÁÈ· Ó· ·ÔÛ˘Ó‰ÂıÔ‡Ó Ù· ÂÍ·ÚÙ‹Ì·Ù·
·fi ÙË ÌÔÓ¿‰· ÙÔ˘ ÌÔÙ¤Ú Ù˘ Û˘Û΢‹˜.
20
FM265 30-05-2002 12:25 Pagina 20
Page 21

Ã∏™∏ ∆∏™ ™À™∫∂À∏™ ª∞∑π ª∂ ∆√ ª¶√§
ñ µÂ‚·Èˆı›Ù fiÙÈ Ô ÌÔ¯Ïfi˜ Ú‡ıÌÈÛ˘ Ù·¯‡ÙËÙ·˜ (D)
‚Ъ›ЫОВЩ·И ЫЩЛ ı¤ЫЛ "0" (Ы‚ЛЫЩ‹ Ы˘ЫОВ˘‹) О·И Л
Ы˘ЫОВ˘‹ В›У·И ·ФЫ˘У‰В‰ВМ¤УЛ ·fi ЩФ ЛПВОЩЪИОfi
‰›ОЩ˘Ф.
ñ ¶ÚÔÛ·ÚÙ‹ÛÙ ÙË ÌÔÓ¿‰· ÙÔ˘ ÌÔÙ¤Ú (µ) ÛÙÔÓ Ù·Ï·-
УЩТМВУФ ‚Ъ·¯›ФУ· (N), Ы˘У‰¤ФУЩ·˜ ЪТЩ· ЩФ
Ф›ЫıИФ ЩМ‹М· ЩФ˘ О·И МВЩ¿ ЩФ ВМЪfi-ЫıИФ, М¤¯ЪИ
У· ·ОФ˘ЫЩВ› ЩФ ¯·Ъ·-ОЩЛЪИЫЩИОfi "ОПИО".
ñ ¶È¤ÛÙ ÙÔ ‰È·Îfi-ÙË (O) Î·È Á˘Ú›ÛÙ ÙÔÓ
Щ·П·УЩТМВУФ ‚Ъ·¯›ФУ· ЫЩЛУ О·-Щ·ОfiЪ˘КЛ ı¤ЫЛ.
ñ ∆ÔÔıÂÙ‹ÛÙ ÙÔ ÌÔÏ (H) ÛÙË ‚¿ÛË ÛÙ‹ÚÈ͢.
ñ ªÔÓÙ¿ÚÂÙ ٷ ¯Ù˘-ËÙ‹ÚÈ· ‹ Ù· ˙˘-ً̈ÚÈ·
·ОФПФ˘-ıТУЩ·˜ ЩИ˜ Ф‰Л-Б›В˜ ЩЛ˜ ЪФЛБФ‡-МВУЛ˜
·Ъ·БЪ¿-КФ˘.
ñ ¶È¤ÛÙ ÙÔ ‰È·Îfi-ÙË (O) Î·È Ù·¯ÙÔ-ÔÈ‹ÛÙ ÙÔ
‚Ú·¯›Ô-Ó· ÛÙË ı¤ÛË ÂÚÁ·-Û›·˜.
ñ ™˘Ó‰¤ÛÙ ÙÔ ÊȘ Ù˘ Û˘Û΢‹˜ ÛÙËÓ Ú›˙· ÙÔ˘
Ú‡̷ÙÔ˜.
с •ВОИУ‹ЫЩВ ЩЛ ПВИЩФ˘ЪБ›· ЩЛ˜ Ы˘ЫОВ˘‹˜ fiˆ˜
ВЪИБЪ¿КВЩ·И ЫЩЛУ ·Ъ¿БЪ·КФ "ЩЪfiФ˜ ¯Ъ‹ЫЛ˜
ЩЛ˜ Ы˘ЫОВ˘‹˜".
ªЛУ ·К‹УВЩВ ФЩ¤ ЩЛ Ы˘ЫОВ˘‹ У· ПВИЩФ˘ЪБВ› ¿‰ВИ·.
¡· ·У¿‚ВЩВ ЩЛ Ы˘ЫОВ˘‹ МfiУФУ ·КФ‡ ¤¯ВЩВ МФУЩ¿ЪВИ
Щ· ВН·ЪЩ‹М·Щ· ЫЩЛ ЫˆЫЩ‹ ı¤ЫЛ О·И Щ· ¤¯ВЩВ
О·ЩВ‚¿ЫВИ М¤Ы· ЫЩФ МФП fiФ˘ ¤¯ВЩВ ЪФЫı¤ЫВИ Щ·
˘ПИО¿ Ф˘ ı¤ПВЩВ У· ВВНВЪБ·ЫЩВ›ЩВ.
™ЩИ˜ ВЪИЩТЫВИ˜ fiФ˘ В›У·И ··Ъ·›ЩЛЩФ У· Б›УВИ МИ·
·Ъ¯ИО‹ ·У¿МИНЛ ЩˆУ ˘ПИОТУ (fiˆ˜ ˙‡МЛ МВ ·˘Б¿), Ы·˜
Ы˘УИЫЩФ‡МВ У· ¯ЪЛЫИМФФИВ›ЩВ ЩФ МФП О·И ЩФ М›НВЪ
¯ˆЪ›˜ ЩЛ ‚¿ЫЛ ЫЩ‹ЪИНЛ˜. ∫·ЩfiИУ, МФЪВ›ЩВ У·
Ы˘УВ¯›ЫВЩВ ЩЛУ ВВНВЪБ·Ы›· ЩˆУ ˘ПИОТУ,
МФУЩ¿ЪФУЩ·˜ ЩФ МФП О·И ЩФ М›НВЪ ЫЩЛ ‚¿ЫЛ ЫЩ‹ЪИНЛ˜.
¶∂ƒπ™∆ƒ√º∏ ∆√À ª¶√§
∏ Ы˘ЫОВ˘‹ ‰И·ı¤ЩВИ ¤У· ВЪИЫЩЪВКfiМВУФ МФП ЩФ˘
ФФ›Ф˘ Л ВЪИЫЩЪФК‹ Б›УВЩ·И ·˘ЩfiМ·Щ· ·fi ЩЛ
ПВИЩФ˘ЪБ›· ЩФ˘ ›‰ИФ˘ ЩФ˘ М›НВЪ.
ŸЫФ МВБ·П‡ЩВЪЛ В›У·И Л Щ·¯‡ЩЛЩ· ПВИЩФ˘ЪБ›·˜ ЩЛ˜
Ы˘ЫОВ˘‹˜, ЩfiЫФ БЪЛБФЪfiЩВЪ· ЫЩЪ¤КВЩ·И ЩФ МФП. °И·
У· Ъ˘ıМ›ЫВЩВ, ВФМ¤Уˆ˜, ЩЛУ Щ·¯‡ЩЛЩ· ВЪИЫЩЪФК‹˜
ЩФ˘ МФП ¯ЪВИ¿˙ВЩ·И У· Ъ˘ıМ›ЫВЩВ ·У¿ПФБ· ЩЛУ
Щ·¯‡ЩЛЩ· ПВИЩФ˘ЪБ›·˜ ЩЛ˜ Ы˘ЫОВ˘‹˜.
°И· У· ‰И·ЫК·ПИЫЩВ› Л ЫˆЫЩ‹ ВЪИЫЩЪФК‹ ЩФ˘ МФП,
В›У·И ··Ъ·›ЩЛЩФ Щ· ВН·ЪЩ‹М·Щ· У· В›У·И ЫˆЫЩ¿
МФУЩ·ЪИЫМ¤У· ЫЩЛ ı¤ЫЛ ЩФ˘˜ (‚П¤В ·Ъ¿БЪ·КФ
"ªФУЩ¿ЪИЫМ· ЩˆУ ВН·ЪЩЛМ¿ЩˆУ").
∞¶√™¶∞™∏ ∆√À ªπ•∂ƒ ∞¶√ ∆∏ µ∞™∏ ™∆∏ƒπ•∏™
ñ µÂ‚·Èˆı›Ù fiÙÈ Ô ÌÔ¯Ïfi˜ Ú‡ıÌÈÛ˘ Ù·¯‡ÙËÙ·˜
(D) Â›Ó·È ÛÙË ı¤ÛË "0" (Û‚ËÛÙ‹) Î·È Ë Û˘Û΢‹
В›У·И ·ФЫ˘У‰В‰ВМ¤УЛ ·fi ЩФ ЛПВОЩЪИОfi ‰›ОЩ˘Ф.
с ¢И·ЩЛЪ‹ЫЩВ ЩФ ‚Ъ·¯›ФУ· ЫЩЛ ı¤ЫЛ ВЪБ·Ы›·˜.
с ¶И¤ЫЩВ ЩФ ‰И·ОfiЩЛ НВМФУЩ·Ъ›ЫМ·ЩФ˜ Ы˘ЫОВ˘‹˜
(M).
ñ ∫Ú·ÙÒÓÙ·˜ ÙÔÓ ·Ú·¿Óˆ ‰È·ÎfiÙË ·ÙË̤ÓÔ,
·У·ЫЛОТЫЩВ ЩФ ВМЪfiЫıИФ ЩМ‹М· ЩЛ˜ МФУ¿‰·˜
ÙÔ˘ ÌÔÙ¤Ú. ∆¤ÏÔ˜, ‚Á¿ÏÙÂ Î·È ·ÔÌ·ÎÚ‡ÓÙ ÙË
Û˘Û΢‹ ·fi ÙË ‚¿ÛË ÛÙ‹ÚÈ͢.
∫∞£∞ƒπ™ª√™ ∆∏™ ™À™∫∂À∏™ ∫∞π ∆ø¡
∂•∞ƒ∆∏ª∞∆ø¡
ñ ªË ‚˘ı›˙ÂÙ ÔÙ¤ ÙË ÌÔÓ¿‰· ÙÔ˘ ÌÔÙ¤Ú Û ÓÂÚfi,
·ÏÏ¿ ηı·Ú›ÛÙ ÙËÓ Ì ¤Ó· ˘ÁÚfi ·Ó¿ÎÈ.
ñ ªËÓ ÚÔ¯ˆÚ›Ù ÔÙ¤ Û ηı·ÚÈÛÌfi ÙˆÓ
ÂÍ·ÚÙËÌ¿ÙˆÓ fiÙ·Ó ·˘Ù¿ Â›Ó·È ·ÎfiÌË
ÌÔÓÙ·ÚÈṲ̂ӷ ¿ӈ ÛÙË ÌÔÓ¿‰· ÙÔ˘ ÌÔÙ¤Ú.
с ¡· ı˘М¿ЫЩВ ¿УЩФЩВ fiЩИ:
- МfiУФУ Щ· ВН·ЪЩ‹М·Щ· О·И ЩФ ВЪИЫЩЪВКfiМВУФ
МФП МФЪФ‡У У· ‚˘ıИЫЩФ‡У ЫВ ¯ПИ·Ъ‹
Ы·Ф˘У¿‰·. шЫЩfiЫФ ‰ВУ Ъ¤ВИ У·
·Ъ·МВ›УФ˘У ЫВ УВЪfi БИ· ФП‡ ТЪ·.
- °È· ÙÔÓ Î·ı·ÚÈÛÌfi Ù˘ ÌÔÓ¿‰·˜ ÙÔ˘ ÌÔÙ¤Ú,
·ЪОВ› У· ¯ЪЛЫИМФФИ‹ЫВЩВ ¤У· ˘БЪfi ·У¿ОИ.
- ¢ÂÓ Ú¤ÂÈ Ó· ϤÓÂÙ ÛÂ Ï˘ÓÙ‹ÚÈÔ È¿ÙˆÓ
ηӤӷ Ï·ÛÙÈÎfi ÂÍ¿ÚÙËÌ·. ªÔÚ›Ù fï˜ Ó·
ϤÓÂÙ ÛÙÔ Ï˘ÓÙ‹ÚÈÔ È¿ÙˆÓ fiÏ· Ù·
ÌÂÙ·ÏÏÈο ÂÍ·ÚÙ‹Ì·Ù· (¯Ù˘ËÙ‹ÚÈ·,
˙˘ÌˆÙ‹ÚÈ·, ÎÏ.).
21
FM265 30-05-2002 12:25 Pagina 21
Page 22

22
Г¿ЪЛ ЫЩЛУ ПЛıТЪ· ЩˆУ ВН·ЪЩЛМ¿ЩˆУ Ф˘ ЩЛ Ы˘УФ‰В‡Ф˘У, Л Ы˘ЫОВ˘‹ Ы¿˜ ВИЩЪ¤ВИ У· ВЩФИМ¿˙ВЩВ ЫВ ВП¿¯ИЫЩФ
¯ЪfiУФ О·И ¯ˆЪ›˜ ОФ‡Ъ·ЫЛ ¤У·У МВБ¿ПФ ·ЪИıМfi К·БЛЩТУ fiˆ˜: М·БИФУ¤˙·, Ы¿ПЩЫВ˜, М›БМ·Щ· БИ· ФМВП¤ЩВ˜, БИ·
ОЪ¤В˜, ПФ˘ОФ˘М¿‰В˜, ЩЛБ·У›ЩВ˜, ОЪ¤М· Б¿П·ОЩФ˜, М·Ъ¤БОВ˜, М›БМ·Щ· БИ· О¤ИО, Щ¿ЪЩВ˜, „ˆМ›, КЪ·УЩ˙ФП¿ОИ·,
ОЪ¤МВ˜, ЫФ‡В˜, Ф˘Ъ¤‰В˜ П·¯·УИОТУ, Ы¤ИО КЪФ‡ЩˆУ, ФЩ¿.
™ЩФ ‚И‚ПИ·Ъ¿ОИ Ы˘УЩ·БТУ М·˜, ¤¯Ф˘МВ Ы˘МВЪИП¿‚ВИ ‰И·КfiЪˆУ ВИ‰ТУ Ы˘УЩ·Б¤˜ Ф˘ ı· Ы·˜ ¯ЪЛЫИМВ‡ЫФ˘У Ы·У
‚¿ЫЛ БИ· У· НВОИУ‹ЫВЩВ. ™›БФ˘Ъ· Л ВМВИЪ›· О·И Л К·УЩ·Ы›· Ы·˜ ı· Ы·˜ ‰ТЫФ˘У ЩЛ ‰˘У·ЩfiЩЛЩ· У·
¯ЪЛЫИМФФИ‹ЫВЩВ ЩЛУ ПФ‡ЫИ· ВНФПИЫМ¤УЛ Ы˘ЫОВ˘‹ Ы·˜ БИ· У· ВЩФИМ¿ЫВЩВ О·И ФПП¿ ¿ПП· И¿Щ·, Ы¿ПЩЫВ˜ О·И
БП˘О¿.
°И· У· Б›УФ˘У fiП· ИФ В‡ОФП· БИ· Ы·˜, Л Ы˘ЫОВ˘‹ ¤¯ВИ ЪФБЪ·ММ·ЩИЫЩВ› БИ· ЛПВОЩЪФУИО‹ Ъ‡ıМИЫЛ ЩЛ˜ Щ·¯‡ЩЛЩ·˜
ВЪИЫЩЪФК‹˜ fiПˆУ ЩˆУ ВН·ЪЩЛМ¿ЩˆУ ЩЛ˜ (˘¿Ъ¯ВИ О·И Л ‰˘У·ЩfiЩЛЩ· У· ВИП¤БВЩВ О¿ıВ КФЪ¿ ЩЛУ О·Щ¿ППЛПЛ
Щ·¯‡ЩЛЩ· БИ· ЩФ В›‰Ф˜ ЩˆУ ЩЪФК›МˆУ Ф˘ ВВНВЪБ¿˙ВЫЩВ) О·ıТ˜ О·И ЩФ˘ ·˘ЩfiМ·Щ· ВЪИЫЩЪВКfiМВУФ˘ МФП (
ÛÂ
МВЪИО¿ МФУЩ¤П·
), Ф˘ МВЩ·ЩЪ¤ВИ ЩЛ Ы˘ЫОВ˘‹ ЫВ ·˘ЩfiМ·ЩФ ˙˘МˆЩ‹ЪИ МВБ¿ПЛ˜ ¯ˆЪЛЩИОfiЩЛЩ·˜.
™ À ¡ ∆ ∞ ° ∂ ™
ª∞°π√¡∂∑∞
с 1 ФПfiОПЛЪФ ·˘Бfi с у П›ЩЪФ П¿‰И
с ¤У· ОФ˘Щ·П¿ОИ БП. ¯˘Мfi ПВМФУИФ‡
с МИ· Ъ¤˙· ·П¿ЩИ
ƒ›НЩВ ЩФ ·˘Бfi ЫВ ¤У· В˘Ъ‡¯ˆЪФ ЫОВ‡Ф˜ О·И ЪФЫı¤ЫЩВ ·М¤Ыˆ˜
ЩФ ¯˘Мfi ПВМФУИФ‡ О·И ЩФ ·П¿ЩИ. µ¿ПЩВ ЫВ ПВИЩФ˘ЪБ›· ЩФ
¯Щ˘ЛЩ‹ЪИ О·И ВИП¤НЩВ ЩЛУ Щ·¯‡ЩЛЩ· 3. ¶ЪФЫı¤ЫЩВ ЩФ П¿‰И ЫИБ¿ЫИБ¿ О·И Ы˘УВ¯›ЫЩВ ЩФ ¯Щ‡ЛМ· М¤¯ЪИ У· ‰¤ЫВИ О·П¿ ЩФ М›БМ·.
ƒ√∑ ™∞§∆™∞
¶√Àƒ∂™
ñ 75 gr. ÓÈÊ¿‰Â˜ Ô˘Ú¤ ñ 150 ml ÓÂÚfi ·Ù¿Ù·˜
ñ 300 ml Á¿Ï· ñ ÌÈ· Ú¤˙· ·Ï¿ÙÈ
ƒ›НЩВ ЫВ М›· О·ЩЫ·ЪfiП· Щ· 300 ml Б¿П· М·˙› МВ Щ· 150 ml
УВЪfi О·И ‚¿ПЩВ У· ‚Ъ¿ЫФ˘У. ªfiПИ˜ ·Ъ¯›ЫВИ ЩФ ‚Ъ¿ЫИМФ,
О·ЩВ‚¿ЫЩВ ЩЛУ О·ЩЫ·ЪfiП· ·fi ЩЛ КˆЩИ¿, ЪФЫı¤ЫЩВ ЩИ˜
УИК¿‰В˜ ·Щ¿ЩВ˜ О·И, МВ ЩЛ ‚Ф‹ıВИ· ЩФ˘ МИОЪФ‡ ¯Щ˘ЛЩЛЪИФ‡
БИ· ЩЛУ ОЪ¤М· Б¿П·ОЩФ˜ (I), ·У·О·Щ¤„ЩВ М¤¯ЪИ У· ¿ЪВЩВ ¤У·
ФМФИФБВУ¤˜ М›БМ·. °И· У· ‰ТЫВЩВ ИФ ПФ‡ЫИ· БВ‡ЫЛ ЫЩФУ
Ф˘Ъ¤ Ы·˜, ЪФЫı¤ЫЩВ МИОЪ‹ ФЫfiЩЛЩ· ‚Ф‡Щ˘ЪФ˘ О·И П›БФ
ЩЪИММ¤УФ Щ˘Ъ›
.
∫ƒ∂ª∞ °∞§∞∫∆√™
Ã∆À¶∏ª∂¡∏/ª∞ƒ∂°∫∞ ∞À°ø¡
с 100 ml ОЪ¤М· Б¿П·ОЩФ˜
с 1 ‹ ВЪИЫЫfiЩВЪ· ·ЫЪ¿‰И· ·˘БТУ
ГЩ˘‹ЫЩВ Щ· ·ЫЪ¿‰И· ‹ ЩЛ ЪВ˘ЫЩ‹ ОЪ¤М· Б¿П·ОЩФ˜ М¤Ы· ЫВ ¤У·
ЫОВ‡Ф˜. µ¿ПЩВ ЫВ ПВИЩФ˘ЪБ›· ЩИ˜ Ы¿ЩФ˘ПВ˜ (P) ВИП¤БФУЩ·˜ ЩЛУ
Щ·¯‡ЩЛЩ· (5). ∞К‹ЫЩВ ЩФ М›БМ· У· ¯Щ˘ЛıВ› О·П¿ М¤¯ЪИ У·
·ФОЩ‹ЫВИ ЩЛУ О·Щ¿ППЛПЛ ФМФИФБ¤УВИ·.
ñ ª·ÁÈÔÓ¤˙· ñ 2 ÎÔ˘Ù·ÏȤ˜ ΤÙÛ·
ñ 1 ÎÔ˘Ù·Ï¿ÎÈ ÁÏ. ∫ÔÓÈ¿Î
ñ Worchester
ƒ›НЩВ ЫВ ¤У· ЫОВ‡Ф˜ ЩЛ М·БИФУ¤˙· О·И ЫЩЛ Ы˘У¤¯ВИ· ЪФЫı¤ЫЩВ
ЩФ ОФУИ¿О, ЩФ О¤ЩЫ·, ЩФ worchester (МВЪИО¤˜ ЫЩ·БfiУВ˜).
∞У·М›НЩВ О·П¿ fiП· Щ· ˘ПИО¿ ¯ЪЛЫИМФФИТУЩ·˜ Щ· ¯Щ˘ЛЩ‹ЪИ·.
FM265 30-05-2002 12:25 Pagina 22
Page 23

23
∫ƒ∂ª∞ ∑∞Ã∞ƒ√¶§∞™∆π∫∏™
ñ 6 ÎÚfiÎÔÈ ·˘ÁÒÓ ñ 170 gr. ˙¿¯·ÚË
ñ 40 gr. ·Ï‡ÚÈ ñ 1/2 Ï›ÙÚÔ Á¿Ï·
ñ ˙¿¯·ÚË ¿¯ÓË ñ ͇ÛÌ· ·fi 1/2 ÏÂÌfiÓÈ
ñ 1 Ê·ÎÂÏ¿ÎÈ ‚·Ó›ÏÈ·
™Â ¤Ó· ηÙÛ·ÚÔÏ¿ÎÈ ˙ÂÛÙ¿ÓÂÙ ÙÔ Á¿Ï· Î·È Ú›ÍÙ ¤Ó· Ê·ÎÂÏ¿ÎÈ
‚·Ó›ÏÈ·. ™ÙÔ ÌÂٷ͇, Ú›ÍÙ Û ÌÈ· ηÙÛ·ÚfiÏ· ÙË ˙¿¯·ÚË Ì ٷ
·˘Б¿ О·И ¯Щ˘‹ЫЩВ ¯ЪЛЫИМФФИТУЩ·˜ Щ· ¯Щ˘ЛЩ‹ЪИ· ЫЩЛУ
Щ·¯‡ЩЛЩ· 5. ŸЩ·У Щ· ˘ПИО¿ ·У·МИ¯ıФ‡У О·П¿, ·УЩИО·Щ·ЫЩ‹ЫЩВ Щ·
¯Щ˘ЛЩ‹ЪИ· МВ Щ· ˙˘МˆЩ‹ЪИ· О·И ЪФЫı¤ЫЩВ ЩФ ·ПВ‡ЪИ
ОФЫОИУИЫМ¤УФ. ™˘УВ¯›ЫЩВ У· ‰Ф˘ПВ‡ВЩВ ЩФ М›БМ· ¤ˆ˜ fiЩФ˘
ЪФО‡„ВИ ¤У· ФМФИФБВУ¤˜ М›БМ·. ∞‰ВИ¿ЫЩВ ЫЩФ М›БМ· ЩФ
‚Ъ·ЫМ¤УФ Б¿П· О·И Ы˘УВ¯›ЫЩВ ЩФ ·У·О¿ЩВМ·, ¯ЪЛЫИМФФИТУЩ·˜
ЩТЪ· Щ· ¯Щ˘ЛЩ‹ЪИ· О·И ЩЛУ Щ·¯‡ЩЛЩ· 2. µ¿ПЩВ ЩЛУ О·ЩЫ·ЪfiП·
МВ ЩФ М›БМ· ЫВ ¯·МЛП‹ КˆЩИ¿ О·И Ы˘УВ¯›ЫЩВ ЩФ ·У·О¿ЩВМ·
¯ЪЛЫИМФФИТУЩ·˜ ¿УЩ· Щ· ¯Щ˘ЛЩ‹ЪИ· О·И ЩЛ ¯·МЛПfiЩВЪЛ
Щ·¯‡ЩЛЩ·, ¤ˆ˜ fiЩФ˘ Л ОЪ¤М· ‹НВИ.
√ª∂§∂∆∞ ª∂ ª∞¡π∆∞ƒπ∞
ñ 6 ·˘Á¿ ñ 300 gr. Ì·ÓÈÙ¿ÚÈ·
ñ Ì·˚ÓÙ·Ófi˜ ñ Ï¿‰È
ñ ‚Ô‡Ù˘ÚÔ ñ ·Ï¿ÙÈ
™ФЩ¿ЪВЩВ Щ· М·УИЩ¿ЪИ· ЫВ П¿‰И О·И ‚Ф‡Щ˘ЪФ О·И ·К‹ЫЩВ У·
„ЛıФ‡У БИ· 20 ПВЩ¿. ªФЪВ›ЩВ У· ¯ЪЛЫИМФФИ‹ЫВЩВ fiФИФ В›‰Ф˜
М·УИЩ·ЪИТУ ı¤ПВЩВ (¿БЪИ·, О·ППИВЪБЛМ¤У·, ОП.). ŸЩ·У „ЛıФ‡У
Щ· М·УИЩ¿ЪИ·, Ъ›НЩВ Щ· fiˆ˜ В›У·И ЫВ ¤У· ЫОВ‡Ф˜ О·И ЪФЫı¤ЫЩВ
Щ· ·˘Б¿ О·И ЩФ ·П¿ЩИ. µ¿ПЩВ ЫВ ПВИЩФ˘ЪБ›· ЩФ М›НВЪ ЫЩЛ ı¤ЫЛ
ИЫ¯‡Ф˜ 2 БИ· ВЪ›Ф˘ 30 ‰В˘ЩВЪfiПВЩ·. ∞‰ВИ¿ЫЩВ ЩФ ·Ъ·¿Уˆ
М›БМ· ЫВ ¤У· ЩЛБ¿УИ, fiФ˘ ¤¯ВЩВ ЪФЛБФ˘М¤Уˆ˜ ПИТЫВИ П›БФ
‚Ф‡Щ˘ЪФ, О·И ·Ы·П›ЫЩВ МВ М·˚УЩ·Уfi. ж‹ЫЩВ ЩЛУ ФМВП¤Щ·,
ЪФЫ¤¯ФУЩ·˜ У· МЛУ ОfiППЛЫЛ.
∫∂´∫ ª∂ ™∆∞ºπ¢∂™∫ƒ∂¶∂™
ñ 50 gr. ·Ï‡ÚÈ ñ 30 gr. ‚Ô‡Ù˘ÚÔ
ñ 4 ·˘Á¿ ñ 100 ml Á¿Ï·
ñ ·Ï¿ÙÈ
ƒ›НЩВ ЫВ ¤У· ‚·ı‡ ЫОВ‡Ф˜ ЩФ ·ПВ‡ЪИ, Щ· ·˘Б¿, ЩФ ·П¿ЩИ О·И ЩФ
‚Ф‡Щ˘ЪФ ПИˆМ¤УФ О·И ‚¿ПЩВ ЫВ ПВИЩФ˘ЪБ›· Щ· ¯Щ˘ЛЩ‹ЪИ· ЫЩЛУ
Щ·¯‡ЩЛЩ· 3. ™ЩЛ Ы˘У¤¯ВИ· ·Ъ·ИТЫЩВ МВ ЩФ Б¿П·, ·˘Н¿УФУЩ·˜
ЪФФ‰В˘ЩИО¿ ЩЛУ Щ·¯‡ЩЛЩ· ВЪИЫЩЪФК‹˜ ЩˆУ ВН·ЪЩЛМ¿ЩˆУ М¤¯ЪИ
У· КЩ¿ЫВЩВ ЫЩЛУ ˘„ЛПfiЩВЪЛ Щ·¯‡ЩЛЩ·. §ИТЫЩВ ЫВ ¤У· ЩЛБ¿УИ
П›БФ ‚Ф‡Щ˘ЪФ, Ъ›НЩВ М¤Ы· МИ· МИОЪ‹ ФЫfiЩЛЩ· М›БМ·ЩФ˜
КЪФУЩ›˙ФУЩ·˜ У· ·ПˆıВ› ФМФИfiМФЪК· ЫВ fiПЛ ЩЛУ ВИК¿УВИ· ЩФ˘
ЩЛБ·УИФ‡. ∞К‹ЫЩВ У· „ЛıВ› БИ· П›Б· ‰В˘ЩВЪfiПВЩ·,
ЪФЫ¤¯ФУЩ·˜ У· МЛУ ОfiППЛЫЛ, О·И Щ¤ПФ˜ Б˘Ъ›ЫЩВ ЩЛУ ОЪ¤· МВ
ЩЛ ‚Ф‹ıВИ· МИ·˜ Ы¿ЩФ˘П·˜ БИ· У· „ЛıВ› О·И ·fi ЩЛУ ¿ППЛ
ПВ˘Ъ¿. ªfiПИ˜ „ЛıВ›, ‚Б¿ПЩВ ЩЛУ ·fi ЩФ ЩЛБ¿УИ, ЩФФıВЩ‹ЫЩВ
ЩЛУ ЫВ ¤У· И¿ЩФ О·И БВМ›ЫЩВ ЩЛУ МВ ˘ПИО¿ ЩЛ˜ ·ЪВЫОВ›·˜ Ы·˜.
∑Àª∏
ñ 250 gr. ·Ï‡ÚÈ ñ 110 gr. ˙¿¯·ÚË
ñ 125 gr. ‚Ô‡Ù˘ÚÔ с 1 ФПfiОПЛЪФ ·˘Бfi
с МИ· Ъ¤˙· ·П¿ЩИ + 1 ÎÚfiÎÔ˜
™Â ¤Ó· ‚·ı‡ Û·Ԙ Ú›ÍÙ ÙÔ ·Ï‡ÚÈ, ÙÔ ‚Ô‡Ù˘ÚÔ (Ô˘ ı· ÙÔ
·К‹ЫВЩВ ЪФЛБФ˘М¤Уˆ˜ У· М·П·ОТЫВИ) ЫВ ОФММ·Щ¿ОИ·, ЩЛ
˙¿¯·ЪЛ, ЩФ ·П¿ЩИ О·И Щ· ·˘Б¿. µ¿ПЩВ ЫВ ПВИЩФ˘ЪБ›· Щ· ˙˘МˆЩ‹ЪИ·
О·И ·К‹ЫЩВ Щ· ˘ПИО¿ У· ‰Ф˘ПВ˘ЩФ‡У БИ· ВЪ›Ф˘ 5/7 ПВЩ¿,
·Ъ¯ИО¿ ЫЩЛУ Щ·¯‡ЩЛЩ· 2 О·И ЫЩЛ Ы˘У¤¯ВИ· ЫЩЛУ Щ·¯‡ЩЛЩ· 4/5.
∞‰ВИ¿ЫЩВ ЩФ М›БМ· ЫВ МИ· КfiЪМ· (Ф˘ ı· ¤¯ВЩВ ЪФЛБФ˘М¤Уˆ˜
‚Ф˘Щ˘ЪТЫВИ О·И ·ПВ˘ЪТЫВИ) О·И „‹ЫЩВ БИ· 50 ПВЩ¿ ЫЩФ˘˜
180ЖC.
ñ 250 gr. ‚Ô‡Ù˘ÚÔ ñ 250 gr. ˙¿¯·ÚË
ñ 3 ·˘Á¿ + 2 ÎÚfiÎÔÈ ñ 250 gr. ·Ï‡ÚÈ
ñ 70 gr. ÛÙ·Ê›‰Â˜ ñ ·Ï¿ÙÈ
ЫФ˘ПЩ·У›УВ˜
с 50 gr. ОФЪИУıИ·О¤˜ ЫЩ·К›‰В˜
с 50 gr. КЪФ˘›-БП·Ы¤ О›ЩЪФ˘ О·И ФЪЩФО·ПИФ‡
с 1 ФЩЛЪ¿ОИ ЪФ‡МИ
ƒ›НЩВ ЩФ ‚Ф‡Щ˘ЪФ (У· В›У·И М·П·Оfi) ЫВ ¤У· ‚·ı‡ ЫОВ‡Ф˜ О·И
¯Щ˘‹ЫЩВ МВ ЩФ М›НВЪ О·И ЫЩЛУ Щ·¯‡ЩЛЩ· 5, М¤¯ЪИ У· Б›УВИ ОЪ¤М·.
¶ЪФЫı¤ЫЩВ, ЫВ МИОЪ¤˜ ФЫfiЩЛЩВ˜ ЩЛ КФЪ¿, ЩЛ ˙¿¯·ЪЛ О·И
Ы˘УВ¯›ЫЩВ ЩФ ¯Щ‡ЛМ· ¿УЩ· МВ ЩЛУ ›‰И· Щ·¯‡ЩЛЩ· ПВИЩФ˘ЪБ›·˜,
¤ˆ˜ fiЩФ˘ ЩФ М›БМ· Б›УВИ ¿ЫЪФ. ¶ЪФЫı¤ЫЩВ ¤У·-¤У· Щ· ·˘Б¿,
ЩФ˘˜ ОЪfiОФ˘˜, ЩФ ·ПВ‡ЪИ (ОФЫОИУИЫМ¤УФ) О·И МИ· Ъ¤˙· ·П¿ЩИ.
µ¿ПЩВ ЫВ ПВИЩФ˘ЪБ›· Щ· ˙˘МˆЩ‹ЪИ· О·И ВИП¤НЩВ ЩЛУ Щ·¯‡ЩЛЩ· 1.
¶ЪФЫı¤ЫЩВ ·ЪБ¿ ЩФ ЪФ‡МИ, ЩИ˜ ЫЩ·К›‰В˜ (ЩИ˜ ФФ›В˜ ı· ¤¯ВЩВ
ЪФЛБФ˘М¤Уˆ˜ МФ˘ЫО¤„ВИ ЫВ ¯ПИ·Ъfi УВЪfi) О·И Щ· КЪФ˘›-БП·Ы¤.
∞‰ВИ¿ЫЩВ ЩФ М›БМ· ЫВ МИ· КfiЪМ· ФЪıФБТУИФ˘ Ы¯‹М·ЩФ˜, ЩЛУ
ФФ›· ı· ¤¯ВЩВ ВВУ‰‡ЫВИ МВ ВП·КЪ¿ ‚Ф˘Щ˘ЪˆМ¤УЛ П·‰fiОФПП·.
ж‹ЫЩВ ЫЩФ КФ‡ЪУФ БИ· 90 ПВЩ¿ ЫЩФ˘˜ 180ЖC. µБ¿ПЩВ ЩФ О¤ИО
·fi ÙÔ ÊÔ‡ÚÓÔ fiÙ·Ó ı· ¤¯ÂÈ ÎÚ˘ÒÛÂÈ ÙÂÏ›ˆ˜.
FM265 30-05-2002 12:25 Pagina 23
Page 24

LESEN SIE VOR DEM GEBRAUCH DES GERÄTS DIESE ANLEITUNGEN AUFMERKSAM DURCH
ALLGEMEINE HINWEISE
- Kontrollieren Sie das Produkt bitte nach dem
Auspacken auf seine Unversehrtheit. Sollten Sie diesbezüglich irgendwelche Zweifel haben, wenden Sie
sich ausschließlich an qualifiziertes Fachpersonal.
- Der Plastiksack, in dem das Produkt eingepackt ist,
sollte außer der Reichweite von Kindern gelegt werden, da er für sie gefährlich sein könnte.
- Bei Inkompatibilität der Steckdose und des Steckers
des Geräts, lassen Sie bitte die Steckdose von einem
Fachmann mit einem angemessen Typ ersetzen. Es
wird von dem Gebrauch von Adaptern,
Mehrfachsteckdosen und/oder Verlängerungskabeln
abgeraten. Sollten diese jedoch unbedingt erforderlich sein, verwenden Sie bitte ausschließlich Einfach –
bzw. Mehrfachadapter und Verlängerungskabel, die
den geltenden Sicherheitsvorschriften entsprechen
und achten Sie bitte darauf, nicht die auf dem
Adapter und/oder dem Verlängerungskabel angegebene Leistung zu übersteigen.
- Falls das Gerät plötzlich nicht mehr funktionieren
sollte, wenden Sie sich ausschließlich an einen
autorisierten Kundendienst.
- Dieses Gerät darf ausschließlich für den Zweck eingesetzt werden, für den es ausgelegt und realisiert
worden ist. Jeder andere zweckentfremdete
Gebrauch ist unsachgemäß und kann daher gefährlich sein. Der Hersteller haftet nicht für eventuelle
Schäden, die durch unsachgemäßen, falschen oder
unvernünftigen Gebrauch und/oder von nicht von
Fachkräften vorgenommenen Reparaturarbeiten
verursacht werden. Beachten Sie insbesondere die
folgenden wesentlichen Sicherheitsregeln:
- Berühren Sie das Gerät niemals mit nassen oder
feuchten Händen.
-Verwenden Sie das Gerät nicht, wenn Sie barfuß
sind oder nasse Füße haben.
- Ziehen Sie nicht am Netzkabel, um den Stecker
aus der Steckdose zu ziehen.
- Lassen Sie das Gerät nicht im Freien stehen,
sodass es keinen Witterungseinflüssen (Regen,
Sonne, Frost, usw.) ausgesetzt wird.
-Sorgen Sie dafür, dass Kinder oder Personen, die
nicht mit dem Gerät umgehen können, dieses
unbeaufsichtigt benutzen.
- Ziehen Sie nach jedem Gebrauch den Stecker aus
der Steckdose.
- Lassen Sie das Gerät nicht unnötig eingeschaltet,
da es sich als mögliche Gefahrenquelle herausstellen könnte.
-Tauchen Sie das Gerät nicht in Wasser.
- Bei Beschädigungen des Kabels, lassen Sie es
bitte sofort von einem Fachmann auswechseln.
-Trennen Sie vor jedem Reinigungs- oder
Wartungseingriff das Gerät vom Stromnetz,
indem Sie den Stecker ziehen.
- Bei Defekt oder nicht korrektem Betrieb des Geräts,
schalten Sie es bitte unverzüglich ab, ohne
irgendwelche Eingriffe vorzunehmen. Für eventuelle Reparaturen wenden Sie sich bitte ausschließlich
an einen autorisierten Kundendienst und verlangen
Sie den Einsatz von Original-Ersatzteilen.
-Wenn das Gerät ausgedient hat und nicht mehr
benutzt werden soll, sorgen Sie bitte nach dem
Herausziehen des Steckers aus der Steckdose dafür,
es untauglich zu machen, indem Sie das
Versorgungskabel durchschneiden.
- Bewahren Sie diese Anleitung sorgfältig auf, um
jederzeit darin nachlesen zu können.
Die mit Lebensmittel in Berührung kommenden
Materialien und Gegenstände stimmen mit den
Vorschriften der EWG-Richtlinie 109/89 überein.
BESCHREIBUNG
A1. Öffnung (für Rührbesen „F1” und Knethaken
„G1”)
A2. Öffnung (für Rührbesen „F2” und Knethaken
„G2”)
B. Motorgehäuse
C. Auswerfertaste für das Zubehör
D. ON/OFF-Schalter und Geschwindigkeitsregler
E. Drucktaste „TURBO”
F1. Rührbesen (für Öffnung „A1”)
F2. Rührbesen (für Öffnung „A2”)
G1. Knethaken (für Öffnung A1)
G2. Knethaken (für Öffnung A2)
nicht bei allen Modellen
H. Schüssel
I1. Öffnung (für Rührbesen „F1” und für
Knethaken „G1”)
I2. Öffnung (für Rührbesen „F2” und für
Knethaken „G2”)
L. Schüsseluntersatz
M. Ausklinktaste Gerät
N. Schwingarm
O. Drucktaste Schwingung
24
D
FM265 30-05-2002 12:25 Pagina 24
Page 25

GEBRAUCH DER ZUBEHÖRTEILE
RÜHRBESEN (F1/F2): Ideal zum Schlagen von
Eiweiß und Sahne, zur Zubereitung von Krems (z.B.
englische Krem, Konditorkrem, Chantilly, usw.),
Saucen (z.B. Mayonnnaise), Pudding, Tropfteige
(Crêpes, Omeletts). Bei der Zubereitung von
Tropfteigen werden die Rührbesen zu Beginn der
Verarbeitung zum Vermengen der Zutaten eingesetzt. Danach werden sie dann von den Knethaken
ersetzt.
KNETHAKEN (G1/G2): Ideal zur Zubereitung von
trockenen Teigen (z.B. Blätterteig, Mürbeteig, Plum
Cake, Kleingebäck) und weichen Teigen (z.B.
Brioches, Butterkuchen Biskuitteige).
DREHSCHÜSSEL MIT HALTERUNG (H) (nur für
Modell KF352C): Ideal für die Zubereitung von
großen Mengen an Teig, die lange verrührt werden
müssen (z.B.: Mürbeteig, usw.).
VOR DEM GEBRAUCH
Vergewissern Sie sich, dass die Netzspannung mit
der auf dem Typenschild des Geräts übereinstimmt.Reinigen Sie die Zubehörteile vor dem ersten
Gebrauch, d.h. spülen Sie sie und trocknen Sie sie
anschließend gründlich ab.
MONTIEREN DER ZUBEHÖRTEILE
Montieren Sie die Zubehörteile nur bei ausgeschaltetem und von Stromnetz getrenntem Gerät.
Rührbesen (F1/F2)
• Führen Sie den Rührbesen F1 in die Öffnung A1
oder (I1) ein, indem Sie ihn leicht hinein drehen,
bis ein Klicken zu vernehmen ist. Gehen Sie mit
dem Rührbesen G2, der in die andere Öffnung
gesteckt wird, genauso vor.
Knethaken (G1/G2)
• Führen Sie den Knethaken G1 in die Öffnung A1
oder (I1) ein, indem Sie ihn leicht hinein drehen, bis
ein Klicken zu vernehmen ist. Gehen Sie mit dem
Knethaken G2, der in die andere Öffnung gesteckt
wird, genauso vor.
Falls die Knethaken nicht korrekt eingeführt sind,
werden die Zutaten nicht einwandfrei vermischt.
GEBRAUCH DES GERÄTS
• Setzen Sie das Gerät niemals in Betrieb, wenn
es leer ist, sondern schalten Sie es nur ein, wenn
alle Zubehörteile eingesetzt sind und in dem mit
den zu verarbeiteten Zutaten gefüllten Behälter
getaucht sind.
• Stellen Sie sicher, dass der ON/OFF-Schalter
(D) auf “0” steht und das Gerät vom Stromnetz
getrennt ist.
• Setzen Sie die gewünschten Zubehörteile entsprechend den im vorhergehenden Abschnitt beschriebenen Anleitungen am Motorgehäuse ein.
• Stecken Sie den Netzstecker ein.
•Tauchen Sie die Zubehörteile in das mit den zu
verarbeiteten Zutaten gefüllte Gefäß.
• Schalten Sie das Gerät ein, indem Sie den Schalter
(D) nach rechts schieben. Dann stellen Sie den
Schalter auf eine entsprechend der Menge und
Konsistenz der zu behandelnden Zutaten verfügbare Geschwindigkeit.
Es wird empfohlen sämtliche Verarbeitungsarten
mit der Mindestgeschwindigkeit zu starten und
diese dann allmählich zu steigern:
1: Mindestgeschwindigkeit
5: Höchstgeschwindigkeit
Stecken Sie niemals die Finger bzw. die Hand
sowie sonstige Gegenstände (z.B. Löffel oder
Messer) zwischen die Zubehörteile, während das
Gerät in Betrieb ist.
Die zu verarbeitende Zutatenmenge niemals über die
Metallringe auf den Zubehörteilen hinaus füllen.
GEBRAUCH DER FUNKTION „TURBO”
Die Funktion “TURBO” verleiht dem Gerät eine
maximale Gebrauchsflexiblität. Il pulsante “TURBO”
Die Drucktaste „TURBO“ (E) bringt das Gerät auf
die maximale Leistungsstufe.
Sobald Sie die Taste loslassen, kehrt der Rührbesen
wieder auf die eingestellte Geschwindigkeit zurück.
Die Funktion ist deaktiviert, wenn der
Geschwindigkeitsregler (D) auf „0“ steht.
ABMONTIEREN DER ZUBEHÖRTEILE
Ihr Gerät ist mit einem Auswurfsperrsystem ausgestattet,
das das Abmontieren der Zubehörteile unmöglich
macht, solange das Gerät noch eingeschaltet ist.
War ten Sie, bis die Zubehörteile vollkommen still
stehen, bevor Sie sie abmontieren.
•Wenn Sie das Gerät nicht mehr gebrauchen,
schalten Sie es aus, indem Sie den
Geschwindigkeitsregler (D) auf AUS stellen und
den Stecker aus der Steckdose ziehen.
• Drücken Sie dann die Drucktaste „EJECT“ (C),
um die Zubehörteile aus dem Motorgehäuse zu
lösen.
25
FM265 30-05-2002 12:25 Pagina 25
Page 26

GEBRAUCH DES GERÄTS MIT DER SCHÜSSEL
• Stellen Sie sicher, dass der Geschwindigkeitsregler
(D) auf AUS steht und das Gerät vom Stromnetz
getrennt ist.
• Das Motorgehäuse (B) am Schwingarm (N) ein-
rasten. Dazu zuerst das hintere und dann das
vordere Teil einführen, bis ein Klicken zu vernehmen ist (siehe Abb.1)
• Drücken Sie nun die Drucktaste (O) und drehen Sie
den Schwingarm auf vertikale Position (Abb.2)
• Stellen Sie die Schüssel (H) auf die Auflage.
•Montieren Sie die Rührbesen oder die
Knethaken entsprechend den im vorhergehenden Abschnitt beschriebenen Anleitungen.
•Drücken Sie die Drucktaste (O) und bringen Sie
den Schwingarm auf Arbeitsposition.
• Stecken Sie den Stecker in die Steckdose.
• Schalten Sie das Gerät wie in dem Abschnitt
„Gebrauch des Geräts“ beschrieben ein.
Setzen Sie niemals das Gerät in Betrieb, wenn es
leer ist. Schalten Sie das Gerät nur dann ein, wenn
die Zubehörteile in den mit den zu verarbeiteten
Zutaten gefüllten Behälter eingetaucht sind.
Für Rezepte, bei denen die Zutaten zuerst vermengt
werden müssen (z.B. Eierteig) wird empfohlen, die
Schüssel und die Rührmaschine anfangs ohne
Schwingarm und Untersatz zu benutzen. Dann können Sie die Maschine und die Schüssel an der
Halterung montieren und die Verarbeitung für die
erforderliche Zeit fortsetzen.
ROTATION DER SCHÜSSEL
Die Rührmaschine ist mit einer automatisch drehenden Schüssel ausgestattet, die von der Maschine
selbst angetrieben wird.
Um so mehr Sie die Geschwindigkeit des Geräts
steigern, desto schneller dreht sich die Schüssel. Die
Geschwindigkeit der Schüssel wird also über die
Geschwindigkeit des Geräts geregelt.
Die Schüssel dreht sich nur, wenn die Zubehörteile
korrekt montiert worden sind (siehe Abschnitt
„Montieren der Zubehörteile“).
HERAUSNEHMEN DER RÜHRMASCHINE AUS DER
HALTERUNG.
•Vergewissern Sie sich, dass der
Geschwindigkeitsregler (D) auf AUS steht und das
Gerät vom Stromnetz getrennt ist.
• Halten Sie die Schwingarmhalterung auf
Arbeitsstellung.
• Drücken Sie die Ausklink-Taste (M).
•Halten Sie die Taste gedrückt und heben Sie den
vorderen Teil des Motorgehäuses hoch.
Entnehmen Sie dann das Gerät.
REINIGUNG DES GERÄTS UND DER ZUBEHÖRTEILE
•Tauchen Sie das Motorgehäuse nicht ins
Wasser, sondern reinigen Sie es mit einem feuchten Tuch.
• Zum Säubern der Zubehörteile sind diese stets
vom Motorgehäuse zu lösen.
•Denken Sie stets daran, dass:
- nur die Zubehörteile und die Drehschüssel in
lauwarmes Seifenwasser eingetaucht werden
dürfen; allerdings sollten Sie sie nicht zu
lange im Wasser lassen;
- das Motorgehäuse mit einem feuchten Tuch zu
reinigen ist;
- kein Plastikteil in der Geschirrspülmaschine
gespült werden darf. Ausschließlich die
Zubehörteile aus Metall (Rührbesen,
Knethaken) dürfen in der Spülmaschine gereinigt werden.
26
FM265 30-05-2002 12:25 Pagina 26
Page 27

27
Dank der mitgelieferten Zubehörteile, können Sie mit diesem Gerät schnell und leicht eine große Anzahl von
Speisen zubereiten: Mayonnaise, Saucen, Tropfteig für Eierkuchen, Crêpes und Pfannkuchen, Schlagsahne,
Eischnee, Torten-, Brot- und Brotstangenteig, Babynahrung, Suppen, Gemüsekremsuppen, Obstmixgetränke,
Getränke und Cocktails.
In dieser Rezeptsammlung stellen wir Ihnen als Starthilfe verschiedene Rezepte zur Verfügung. Sicher werden
Sie mit ein bißchen Fantasie und Erfahrung dieses Gerät zur Zubereitung von zahlreichen anderen Speisen,
Saucen und Süßspeisen nutzen können.
Durch die elektronische Geschwindigkeitsregelung der Rotation der Werkzeuge (Sie können, je nachdem welche Speise Sie zubereiten möchten, die angemessene Geschwindigkeit einstellen) sowie durch die automatische Rotation der Drehschüssel und des Schwingarms (nur für Mod. KF352C) wird Ihre Arbeit erheblich erleichtert und das Gerät wird zudem in ein hochleistungsfähiges automatisches Rührgerät umgewandelt.
REZEPTSAMMLUNG
MAYONNAISE
• ein ganzes Ei • 1/2 Liter Öl
•1 Teelöffel Zitronensaft
•eine Prise Salz
Geben Sie das Ei in eine kleine Schüssel und fügen
Sie sofort das Salz und den Zitronensaft
hinzu.Setzen Sie die Rührbesen in Betrieb und stellen Sie die Geschwindigkeit auf 3.Geben Sie das
Öl nach und nach hinzu und verarbeiten Sie das
Ganze zu einer leichten und luftigen Masse.
ROSA SAUCE
• Maionese • 2 Esslöffel Ketchup
•1 Teelöffel Kognak
•Worchester Sauce
Geben Sie die Mayonnaise in eine Schüssel, fügen
Sie dann den Kognak, den Ketchup, die
Worchester Sauce (einige Tropfen) hinzu und vermengen das Ganze unter Zuhilfenahme der
Rührbesen.
KARTOFFELPÜREE
• 75gr.gefriergetrocknete • 150ccm Wasser
Püreeflocken
• 300ccm Milch • eine Prise Salz
Die 300 ccm Milch und 150 g Wasser aufkochen.
Sobald die Milch und das Wasser kochen, diese
vom Herd nehmen, die Kartoffelflocken zugeben
und mit den Rührbesen (F) zu einer gleichmäßigen
Masse vermengen. Für einen reichhaltigeren Püree
geben Sie ein Stück Butter und Parmesankäse
hinzu.
SCHLAGSAHNE/EISCHNEE
•1 dl Sahne
•1 oder mehrere Eiweiße
Schlagen Sie das Eiweiß oder die Sahne in einer
Schüssel mit den auf Höchstgeschwindigkeit (5)
gestellten Rührbesen (F) zu einer schaumigen
Masse.
FM265 30-05-2002 12:25 Pagina 27
Page 28

28
KONDITORKREM
•6 Eigelb • 170gr. Zucker
• 40gr. Mehl • 1/2l. Milch
•Vanillezucker • Zitronenschale
•1 Tüte Vanille
Erwärmen Sie die Milch mit einem Päckchen Vanillin in
einer kleinen Pfanne. In der Zwischenzeit schlagen Sie in
einer Schüssel den Zucker mit den Eiern. Nehmen Sie dazu
die Rührbesen und stellen Sie sie auf Geschwindigkeitsstufe
5. Sobald die Masse gut vermengt ist, ersetzen Sie die
Rührbesen mit den Knethaken, geben das durchgesiebte
Mehl hinzu und verarbeiten das Ganze zu einer gleichmäßigen Masse. Gießen Sie nun die Milch hinzu und vermengen Sie mit den auf Geschwindigkeitsstufe 2 gestellten
Rührbesen weiter. Stellen Sie die Schüssel auf den Herd bei
kleiner Flamme und rühren Sie mit den auf niedrigster
Geschwindigkeitsstufe eingestellten Rührbesen so lange weiter, bis die Krem dickflüssig ist.
PILZOMELETT
•6 Eigelb • 300gr. Pilze
• Petersilie • Öl
• Butter • Salz
Garen Sie die Pilze etwa 20 Minuten lang in Öl und Butter;
Sobald die Pilze gar sind, geben Sie diese zusammen mit
den Eiern und dem Salz in eine Schüssel und verarbeiten
das Ganze etwa 30 Sekunden lang mit dem auf
Geschwindigkeitsstufe 2 gestellten Rührgerät. Geben Sie
nun den Teig in eine Pfanne, in der Sie bereits ein Stückchen
Butter zerlassen und Petersilie gestreut haben; lassen Sie
das Omelett fest werden, wobei darauf zu achten ist, dass
es nicht an der Pfanne anbrennt.
PLUM CAKE
CRÊPES
• 50gr. Mehl • 30gr.zerlassene Butter
•4 Eier • 1dl Milch
• Salz
Das Mehl, die Eier, das Salz und die zerlassene Butter in
eine Schüssel geben und das Ganze mit den auf
Geschwindigkeitsstufe 3 gestellten Rührbesen verarbeiten;
dann die Masse mit der Milch verdünnen und nach und
nach die Drehzahl bis zur Höchstgeschwindigkeit steigern.
In einer Pfanne die Butter zerlassen, einen Schöpflöffel des
Teigs hineingeben und die Pfanne schwenken, damit der
Teig gleichmäßig ausläuft. Einige Sekunden lang garen lassen, wobei darauf zu achten ist, dass die Masse nicht
anbrennt und dann die Crêpe mit der Spachtel wenden
und auf der anderen Seiten garen. Sobald beide Seiten gar
sind, die Crêpe auf einen Teller geben und nach Belieben
füllen.
MÜRBETEIG
• 250gr. Mehl • 110gr. Zucker
• 125gr. Butter • - eine Prise Salz
•1 ganzes Ei + 1 Eigelb
Das Mehl, die in Stückchen geschnittene Butter (frühzei-
tig aus dem Kühlschrank nehmen, damit sie nicht zu hart
ist), den Zucker, das Salz und die Eier in eine Schüssel
geben. Die Zutaten für etwa 5/7 Minuten mit den
Knethaken anfangs auf Geschwindigkeitsstufe 2 und
später auf Stufe 4/5 verarbeiten. Den Teig in einer
(bereits mit Butter und Mehl bestrichenen) Kuchenform
auslegen und bei 180°C in etwa 50 Minuten backen.
• 250gr. Butter • 250gr. Zucker
•3 Eier + 2 Eigelb • 250gr. Mehl
• 70gr. Sultaninen • Salz
• 50gr. Korinthen
• 50gr. kandierte Orangen und Wacholder
•1 Gläschen Rum
Nach und nach den Zucker hinzugeben und den Teig
weiter auf der gleichen Geschwindigkeit solange
verarbeiten bis er weiß wird. Dann die Eier, eins nach
dem anderen, die Eigelbe, das durchgesiebte Mehl
und eine Prise Salz zufügen. Die Rührbesen auf
Geschwindigkeitsstufe 1 stellen und langsam den Rum,
die Sultaninen (die in lauwarmem Wasser etwas aufgequellt worden sind) und die kandierten Früchte
dazugeben. Den Teig in einer rechteckigen, mit
Backpapier ausgelegten und mit Butter eingefetteten
Form bei 180°C für 90 Minuten im Backofen backen.
Erst abkühlen lassen, bevor Sie den Kuchen aus dem
Ofen nehmen.
FM265 30-05-2002 12:25 Pagina 28
 Loading...