

Page 1

Proudly distributed by
De’Longhi Australia Pty Limited
P.O. BOX 4540
CASULA MALL NSW 2170
Customer Service Ph: 1800 126 659
Fax: 1800 706932
www.delonghi.com.au
e-mail: delonghi@delonghi.com.au
De’Longhi New Zealand Limited
25 Carbine Road
Mt Wellington
Auckland, New Zealand
P.O. Box 58-056 Botany
MANUKAU 2163
Customer Service Ph: 0508 200 300
Fax: 0508 200 301
www.delonghi.com.nz
e-mail:delonghi@delonghi.com.nz
De’Longhi Appliances via Seitz, 47 31100 Treviso Italia www.delonghi.com
5711310241/01.14_02
Page 2
HCX Series
CONVECTOR
Instructions for use
Page 3

B
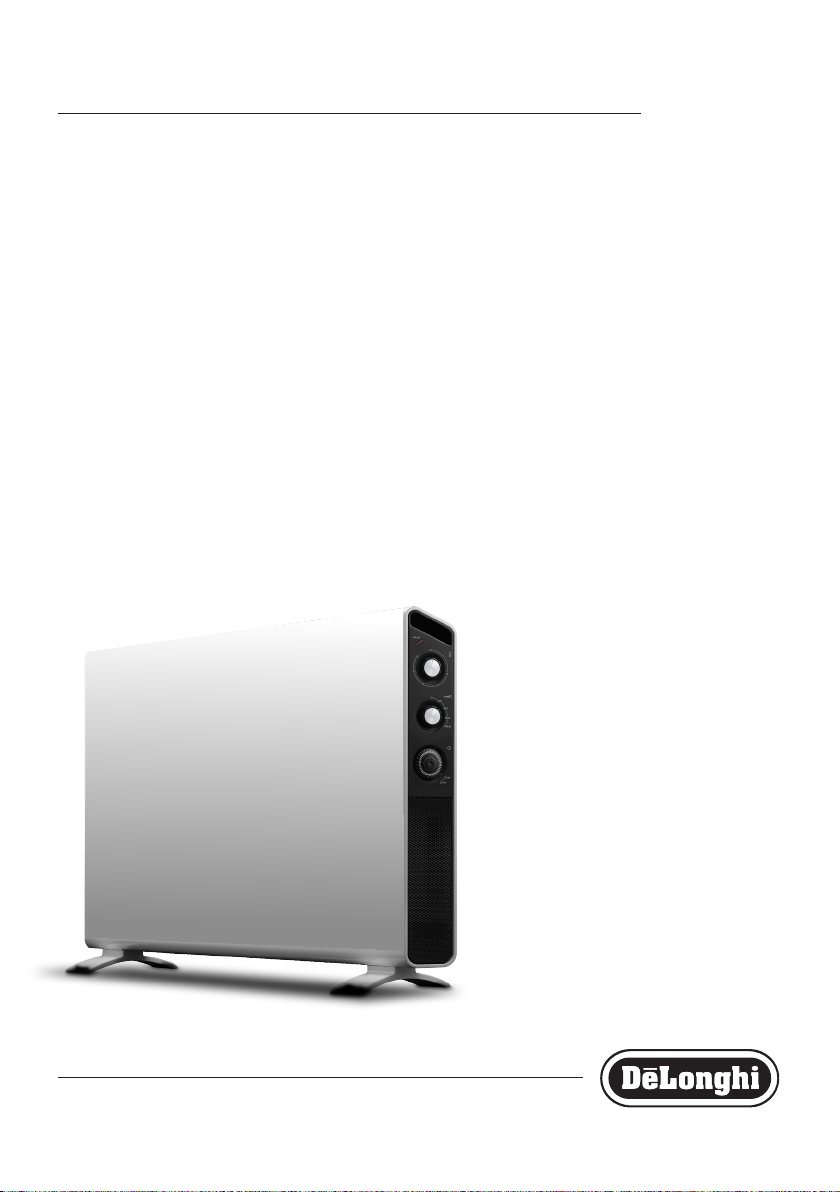
DESCRIPTION
Fig. 1
A
B
A
B
A
C
D
B
A
C
Fig. 2
Fig. 3
D
Max + Fan indicator light
Thermostat
Power selector
Timer
Slider
2
Page 4

IMPORTANT WARNINGS
Safety warnings
Important!
- This appliance can be used by children
aged from 8 years and above and persons
with reduced physical, sensory or mental
capabilities or lack of experience and
knowledge if they have been given
supervision or instruction concerning
use of the appliance in a safe way and
understand the hazards involved. Children
shall not play with the appliance. Cleaning
and user maintenance shall not be made
by children without supervision.
- Children of less than 3 years should be kept
away unless continuously supervised.
- Children aged from 3 years and less than 8
years shall only switch on/o the appliance
provided that it has been placed or installed
in its intended normal operating position
and they have been given supervision or
instruction concerning use of the appliance
in a safe way and understand the hazards
involved. Children aged from 3 years and
less than 8 years shall not plug in, regulate
and clean the appliance or perform user
maintenance.
CAUTION — Some parts of this product
can become very hot and cause burns.
Particular attention has to be given where
children and vulnerable people are present.
- WARNING: In order to avoid
overheating, never under any
circumstances cover the appliances
during operation, as this would lead to
dangerous overheating.
- The appliance must not be located
immediately below a xed socket-outlet.
- When the heater is used with feet do not
use in the vicinity of bathtubs, wash basins,
showers, sinks and swimming pools.
- If you intend to x your appliance to the
wall, make sure that the switch or other
control devices are not within reach of
persons in the bath or shower.
- If the power cable has been damaged, it
must be replaced by the manufacturer
or the technical service centre or by a
qualied person so as to avoid all risks.
- ATTENTION: in order to avoid any danger
caused by an accidental resetting of the
safety system, this appliance must not be
powered through an external timer.
- Do not use the appliance in small rooms
when they are occupied by persons that
are not capable of leaving the room, unless
constant supervision is provided.
Please note:
- Never use the heater to dry laundry.
- Never place the power cable on top of the heater while it is
hot.
- We recommend that you not place the heater in a draught,
because strong draughts of air may adversely aect the
equipment’s operational eciency.
- Only use the heater in an upright position.
- The heater must be positioned at least 80cm from furniture or
other objects.
- The rst time you use the appliance, operate it of at least 15
minutes with the thermostat at maximum to eliminate the
“new” smell. A little smoke due to the protective substances
applied to the heating element before transport may be given
o.
- Do not position the appliance on long hair carpets, in order to
avoid obstruction to the air intake grille located under it.
- Do not obstruct the hot air outlet grilles or the air intake grille
on the bottom of the appliance.
- Position the appliance so that the plug and the outlet can be
easily reached even after installation.
- Do not use the appliance in rooms less than 4m2 in
area.
- A tip over safety device turns the appliance o if it falls over
or is positioned inappropriately in such a way as to jeopardise
safety. The appliance emits a beep and turns o. The appliance
resumes operation after being placed in an upright position
again.
- The appliance is tted with a safety device which will switch
the appliance o in case of accidental overheating. To reset,
disconnect the plug from the power socket for a few minutes,
remove the cause of overheating then plug the appliance in
3
Page 5

again. If this abnormal situation happens several times, please
contact the customer service.
Danger of burns!!
- The use of an extension lead is not recommended, as
overheating of the extension lead may occur during the
operation of the heater.
The appliance complies with the following EC directives:
- Low Voltage Directive 2006/95/EC and subsequent
amendments;
- EEC Directive 2004/108 on electromagnetic compatibility
(EMC) and subsequent amendments;
Mounting the feet
Turn the appliance upside down on a rug or soft surface in order to
prevent damaging the paint nish.
Fix the feet to the appliance with the nr. 4 screws B supplied
(see g. 1), 2 screws for each foot.
Wall-Mounting Installation
The wall mounting kit contains:
4 metal brackets (A)
2 screws 4,8x13 PH (B)
4 screws 4,5x25 PH (C)
4 plastic anchors 6x30 (D)
INTRODUCTION
Thank you for choosing a De’Longhi product. Please take a few
moments to read the instructions to avoid risks or damage to the
appliance.
Symbols used in these instructions
Important warnings are identied by the symbols below.
It is important to respect the warnings.
Failure to respect the warnings could lead to electric shock, serious
injury, burns, re or damage to the appliance.
Important!
Failure to observe the warning could result in injury or damage to
the appliance.
Danger of burns!!
Failure to observe the warning could result in burns or scalds.
Please note:
This symbol indicates recommendations and important information
for the user.
General instructions
Remove the heater from the packaging. Check that neither the
heater nor the power cable has been damaged during transport.
Do not operate the heater if damaged. Remove all publicity
material present on the appliance. The appliance is suitable for
free-standing or wall-mounted usage. Do not assemble the feet if
wall-mounted.
Electrical connection
- Before connecting the appliance to the current outlet, check
that the voltage indicated on the appliance rating plate is the
same as your electric plant and that it can stand the power
consumption (Watt) indicated by the labelling.
- If more than one appliance is used at once, it is important to
ensure that the electric plant is able to support the power
required.
Required tools for assembly and estimated assembly time
Screwdriver PH 2 x 100 (Phillips type)
Estimated assembly time: 30 minutes
Before installing the unit , make sure of the following:
a. The appliance must not be located directly beneath a
current outlet.
b. The plug and outlet must be easy to reach after
installation.
c. No electric cables or other pipes could be damaged
during the installation.
d. Keep away from curtains or ammable materials.
To wall-mount, proceed as follows:
Turn the appliance upside down on a at stable surface . Using a
screwdriver, x the 2 brackets A with the 2 screws B as shown in Fig.
2. For brick walls use a 6 mm concrete drill bit.
For plaster board or false (hollow) walls, it is recommended to use
appropriate screws and anchors (not supplied).
1. Before drilling the wall, mark the exact points, respecting the
minimum distances as shown in g. 3.
2. Drill the wall where previously marked, and insert the plastic
anchors D.
3. Fix the 2 metal brackets A using the two screws C provided.
4. Hang the appliance on the bracket.
5. Mark out the 2 lower xing points. Remove the appliance, drill
the lower holes and insert the wall anchors D.
6. Now, you can hang back the heater on the bracket and x the
lower part of the appliance with the 2 remaining screws C.
USE
Operation and use
Plug into the mains, turn the thermostat dial to maximum (position
6) and turn the appliance on by means of the power selector (see
description) as described below:
• Turn the power selector knob to the Min position to select
minimum power.
• Turn the power selector knob to the Med position to select
medium power (only in some models).
4
Page 6

• Turn the power selector knob to the Max position to select
maximum power.
• Turn the power selector knob to the Max position to select
maximum power with the fan (the MAX + FAN indicator light
comes on).
• To turn the appliance o completely: turn the power selector
to the "0" position and the thermostat to the " " position,
then unplug from the mains.
Adjusting the thermostat
When the room has reached the required temperature, turn the
thermostat dial slowly anticlockwise until you hear a click and no
further. The thermostat will automatically regulate the temperature
set and keep it constant. In spring or autumn or on mild days, you
can save energy by using minimum power.
Frost prevention mode
With the thermostat dial in the position and one of the power
levels selected, the appliance maintains room temperature at about
5°C, preventing freezing with minimal energy consumption.
• Check the time on your clock or watch. If it is 10.00 for example,
turn the numbered programmer disk until the number 10
coincides with the pointer marked on the programmer.
• Set the periods of time
during which you want
the appliance to operate
by pushing the teeth
outwards (see gure).
Each tooth corresponds
to a period of 30 min. At
the end of this procedure,
sectors corresponding to
the operating periods can be seen.
• In this way, the appliance will function automatically each day
at the times set. (Important: the appliance must always be
plugged into the socket)
• To modify programming, return the teeth to the initial position
and set the new operating periods.
• To turn the appliance o, turn the power selector to the "0"
position.
Models with ventilation
The appliance has 2 fans for faster more even heating. To start this
function, turn the power selector to Max .
Models with 24 hour timer
When the appliance is plugged to the mains the timer is always
in turning movement, in order to stay synchronized with the local
time.
To operate the appliance without the timer, place the timer slider in
the position. To operate the appliance at set times, position
the slider in the position and proceed as follows:
MAINTENANCE
Before carrying out any maintenance, unplug the heater from the
mains and wait for it to cool o completely. This heater requires no
particular maintenance. It is sucient to remove the dust with a
soft, dry cloth. Never use abrasive powders or solvents. If necessary
remove concentrated areas of dirt with a vacuum cleaner.
TECHNICAL CHARACTERISTICS
Power supply See rating label
Absorbed power “
TROUBLESHOOTING
PROBLEM CAUSE SOLUTION
The appliance doesn’t work Be sure it is plugged in and that the electrical out-
let is working.
Check for any obstruction.
The power selector is in the ”0” position.
The thermostat may be set too low.
Plug into the outlet.
Remove the obstruction, unplug the heater
and let the appliance cool down. If the appliance doesn’t work please contact the nearest
service center.
Turn the
MED, MAX, MAX .
Turn the thermostat clockwise to a higher
setting until the heater restarts.
power
selector to the position MIN,
Setting the timer
Make sure the timer is correctly set to local
time and check the position of the teeth.
5
 Loading...