

De'Longhi GB-5725103500 Owner's Manual

Read this instructions booklet carefully before installing and using the appliance. It is the only way to
ensure the best results and maximum user safety.
DESCRIPTION OF THE APPLIANCE
(see diagram pag. 3)
A. Hole for filter control
B. Basket handle
C. Handle slide
D. Lid
E. Viewing window (not for all models)
F. Filter cover
G. Basket
H. Filter cover hook
I. Cable holder compartment
J. Handle for lifting up the appliance
K. Drainage pipe plug
L. Foot
M. Minute timer (not for all models)
N. Minute timer key (not for all models)
O. Oil drainage pipe
P. Signal lamp
Q. Thermostat and on/off knob
R. Opening button
S. Inspection door for pipe compartment
RECOMMENDATIONS
• Before use check that the voltage power supply corresponds to the one shown on the appliance data plate.
• Only connect the appliance to electrical sockets
which have a minimum load of 10A and which are
properly earthed. (If the socket and the plug on the
appliance should prove incompatible, get a professionally qualified technician to replace the socket
with a more suitable one).
• Do not place the appliance near heat sources.
•The supply cord for this appliance must not be
replaced by the user, as special tools are required
to replace it. In the event of damage, contact only a
service centre authorised by the maker.
• The appliance is hot when it is in use. DO NOT
LEAVE IT WITHIN THE REACH OF CHILDREN.
• Do not move the deep fryer when the oil is hot, as
there it could cause serious burns.
• The deep fryer must only be switched on after it has
been filled with oil or fat. If it is heated up while
empty, a thermal safety device comes into operation
which stops it from working. In this case it is necessary to contact our nearest authorised service centre.
• If the deep fryer leaks oil, contact the technical service centre or staff authorised by the Company.
• The basket clips automatically into the central pin in
the pan boiler. Therefore, to avoid breaking it, do not
turn it manually in order to seek the correct position.
• Before using the deep fryer for the first time, wash
the tank, the basket and the lid (removing the filters)
carefully with hot water and washing up liquid.
When this has been done, dry carefully; remove
any remaining water which has collected in the
drainage pipe (where fitted).
Always use the oil drainage pipe to empty out the
water as shown in fig. 17. After washing, dry thoroughly. Remove any water left in the bottom of the container and, in particular, inside the oil drainage pipe.
This avoids dangerous spurts of hot oil during use.
• During use and when the oil is hot, the pipe compartment inspection door must always be closed.
• Children or infirm persons should not be allowed to
use this product unsupervised.
• Children should not be allowed to play with this
appliance.
• Never move the appliance while the oil is still hot.
•To move the appliance, use the special lifting handles (J). (Never lift by the basket handle).
• The drainage pipe must always be closed and placed in its compartment while the appliance is in use.
• It is totally normal that, on first use, the refrigerator
emits a “new appliance” smell. If this happens,
aerate the room.
• The materials and objects likely to come into contact
with foodstuffs conform to EEC Directive 89/109.
INSTRUCTIONS FOR USE
Filling with oil or fat
• Raise the basket (G) to the highest position by pulling the special “B” handle upwards (fig.1).
The lid should ALWAYS be closed when the basket
is raised and lowered.
• Open lid “D” by pressing button “R” (fig.2).
• Remove the basket by pulling it upwards (fig.3).
• Pour into the container 1.2 litres of oil (or 1 kg. of fat).
WARNING
The level must always be between the maximum and
minimum levels indicated.
Never use the deep fryer when the oil is below the
“min” level as it could cause the thermal safety device to come into operation; to replace it you need to
contact one of our service centres.
Best results are obtained by using a good peanut oil.
Avoid mixing different types of oil. If you use lumps of
solid fat, cut them into small pieces so that the deep
fryer does not heat up in the first few minutes without a
covering of fat. The temperature must be set to 150°C
until the fat has melted completely. The required temperature can then be set.
6
GB
GB 18-01-2003 10:39 Pagina 6
STARTING TO FRY
1. Put the food which is to be fried into the basket, without
ever overfilling it (max. 1 kg. of fresh potatoes).
In order to obtain a more even frying, we recommend concentrating the food especially around the
perimeter of the basket., leaving the central part
more sparingly filled.
2. Put the basket into the boiler pan in a raised position (fig.3) and close the lid by pressing lightly
down upon it until the hooks click. Always close the
lid before lowering the basket in order to avoid hot
oil from splashing out.
3. Set thermostat knob “Q” to the required temperature (fig.4). When the temperature set has been reached, signal lamp “P” will go off.
4. As soon as the signal lamp goes off, immerse the
basket in the oil, lowering the handle slowly after
sliding the handle’s “C” slider back.
• It is completely normal for a considerable amount of
very hot steam to pour out of filter cover “F” immediately after this.
• At the start of cooking, immediately after the food
has been immersed in the oil, the internal wall of
viewing window “E” (where present) will steam up,
before progressively clearing.
• It is normal for drops of condensation to form around
the basket handle while the appliance is working.
In the models fitted with the electronic minute timer
Set the cooking time by pressing key “N”; display “M”
will show the minutes set.
The figures will begin flashing immediately afterwards,
signifying that the cooking time has started. The last
minute will be visualised in seconds.
In the event of error, the new cooking time can be set by
keeping the key pressed down for more than 2 seconds. The
display will reset itself, then repeat as for point 1 (above).
The minute timer will show the end of the cooking time
with two series of beeps at an interval of about 20
seconds. In order to switch off the audible alarm you
only need press minute timer key “N”.
WARNING: the minute timer does not switch the
appliance off.
Replacing the minute timer battery (fig.5)
• Remove the minute timer from its compartment by
prising it from the right side (see fig.5A).
•Turn the battery cover (fig.5B) placed on the back
in an anticlockwise direction until it is released.
• Replace the battery with another of the same type.
If the appliance is to be replaced or thrown away, the
battery must be removed and disposed of in accordance with the current laws as it represents an environmental hazard.
AFTER FRYING
When the cooking time runs out raise the basket and
check if the food has reached the required golden
colour. In the models fitted with a viewing window this
check can be carried out by looking through the window without opening the lid.
If you consider the cooking to be finished, switch off the
appliance by turning the thermostat knob to the
“ ● ” position until you hear the click of the internal
switch.
Allow the excess oil to drip off by leaving the basket in
the deep fryer in the high position.
P.S. If the cooking needs to be done in two phases
(e.g. potatoes) raise the basket at the end of the
first phase and wait for the signal lamp to go off
again. Then immerse the basket back in the oil for
a second time (see enclosed tables).
Models with drainage pipe
Bring the front part of the deep fryer to the edge of
the work surface, taking care that the feet (L) never
protrude over the edge (fig. 6).
1. Open the lid of the deep fryer and remove the
basket (fig. 3).
2. Open inspection door “S” as shown in fig. 7.
3. Remove drainage pipe “O”.
4. Remove plug “K” while at the same time squeezing
the pipe with two fingers to prevent the oil or fat
from leaking out before the pipe has been directed
into a container (fig. 8).
5. Allow the oil or fat to drip into a container (fig. 9).
6. Remove any deposits from the tank using a sponge
or absorbent paper.
7. At the end of the procedure fit the plug back onto the
drainage pipe and reposition it in its compartment.
8. Put the basket back in the high position and place
7
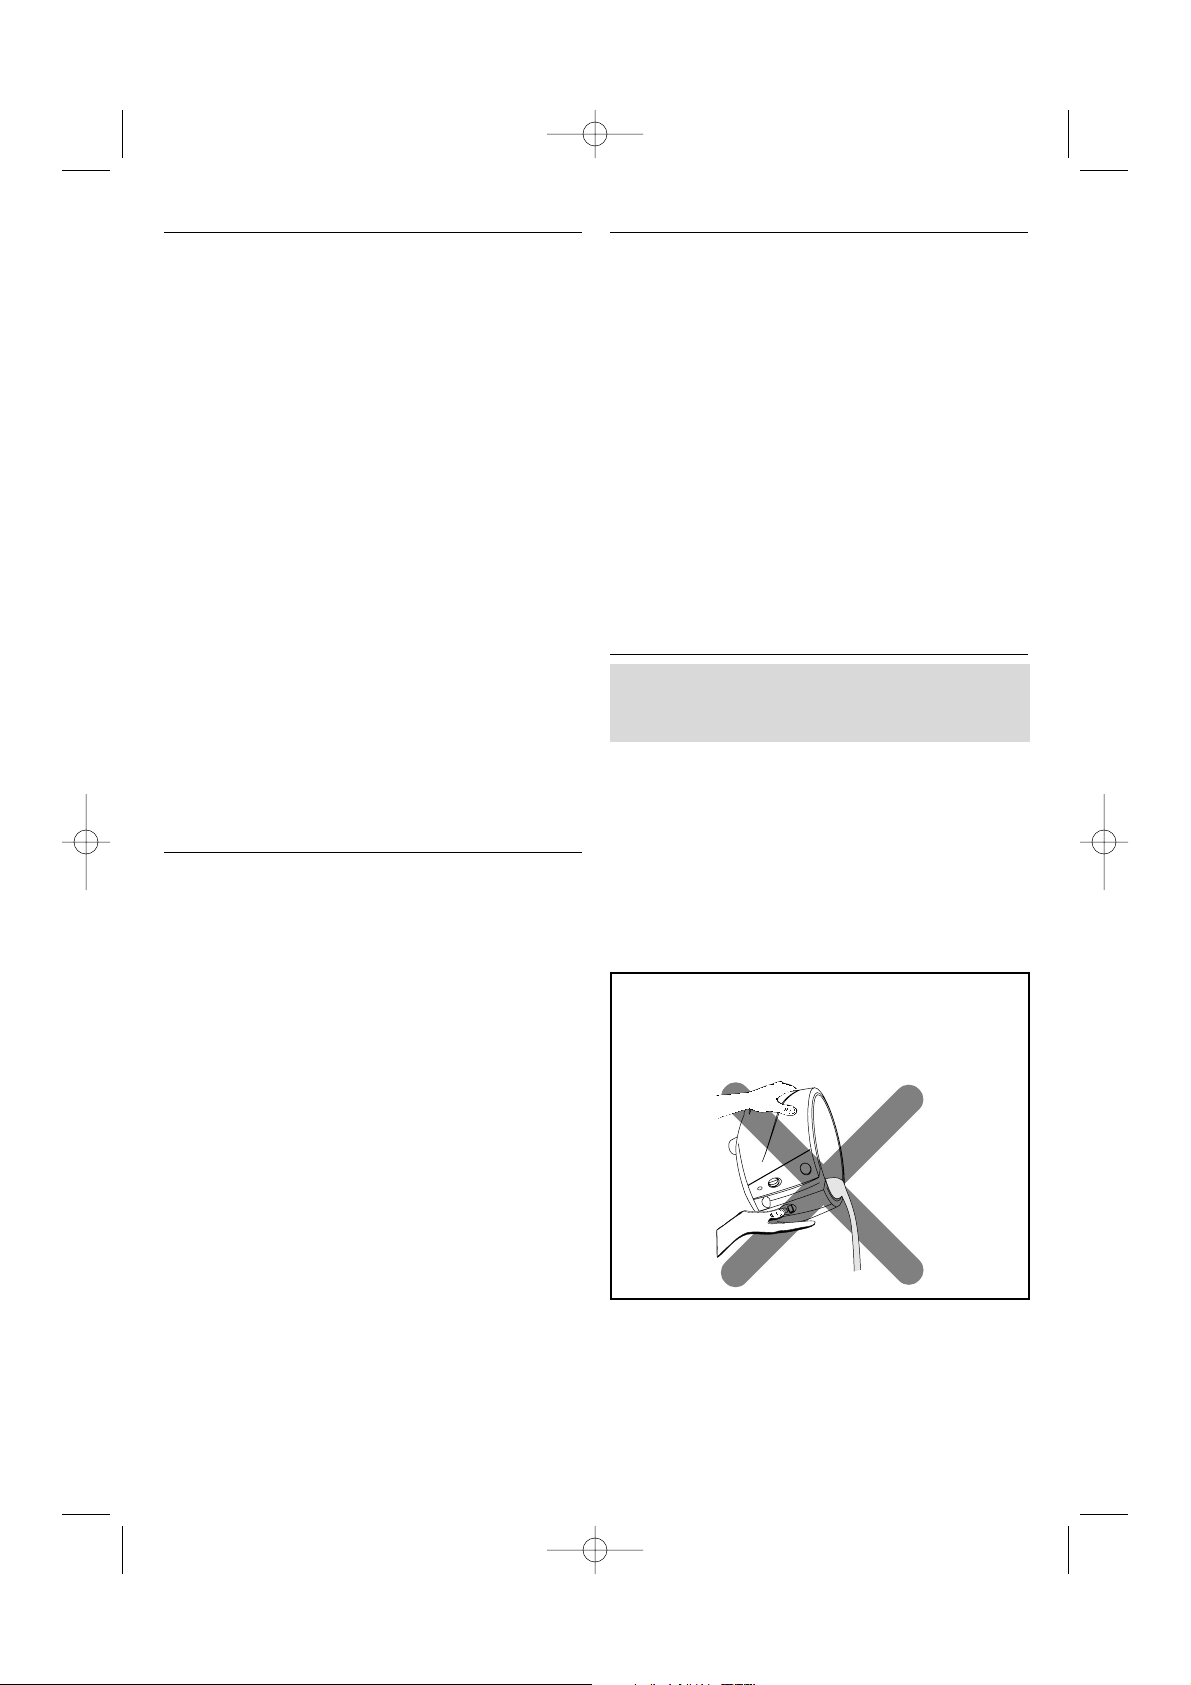
WARNING
Never empty the deep fryer by tilting it or turning
it upside down.
GB 18-01-2003 10:39 Pagina 7
 Loading...