

Page 1
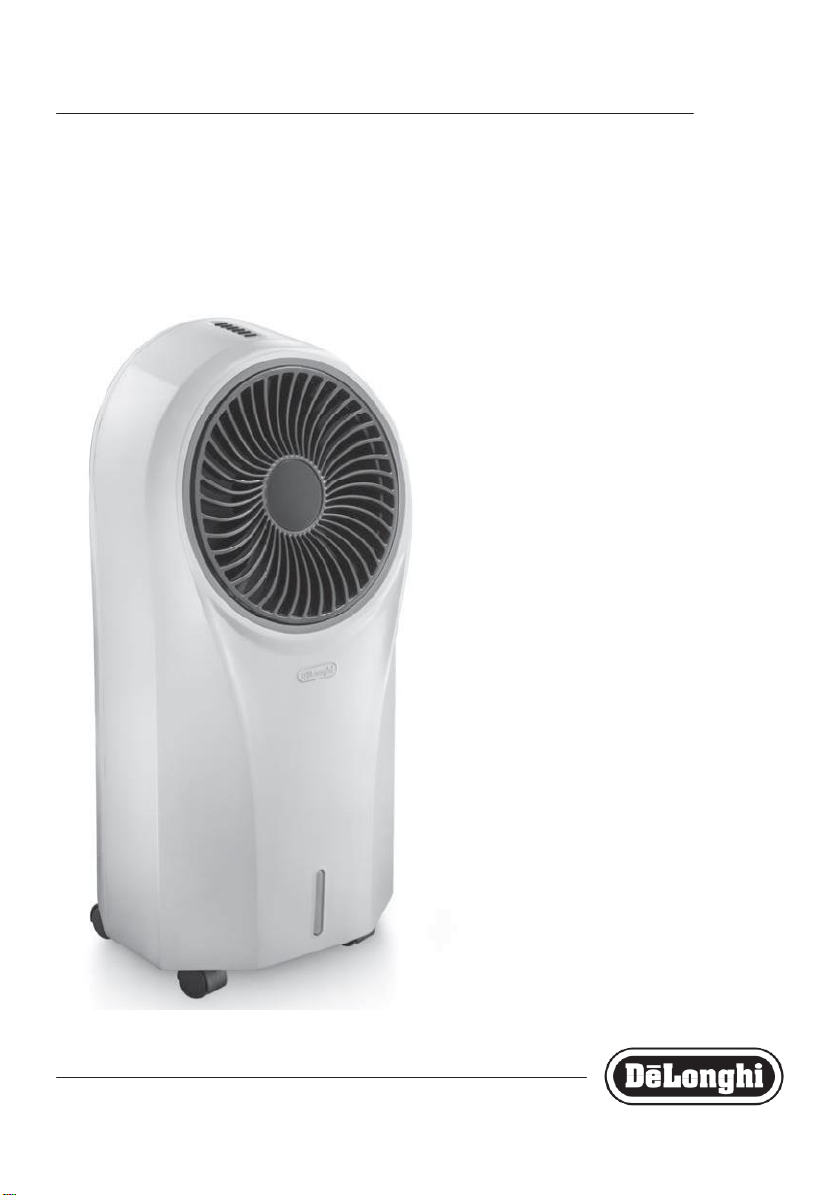
EV250
EVAPORATIVE COOLER
Instructions for use. Keep these instructions
Visit www.delonghi.com for a list of service centers
ELECTRIC CHARACTERISTICS
120 V~ 60 Hz
CLIMATISEUR À ÉVAPORATION
Mode d’emploi . Conservez cette notice
Visitez www.delonghi.com pour y voir une liste
descentresderéparationproches dechez vous.
CARACTÉRISTIQUES ÉLECTRIQUES
120 V~ 60 Hz
ENFRIADOR EVAPORATIVO
Repase y guarde estas instrucciones.
Lea cuidadosamente este instructivo
antes de usar su aparato.
Visite www.delonghi.com para ver la lista
decentrosdeservicioscercanosausted.
CARACTERISTICAS ELECTRICAS:
120 V~ 60 Hz
near you.
Page 2

2
EN
FR
ES
page 6
page11
pág.19
Page 3
3
C10
C2 C3 C4 C5
C8
C
C7 C6
B
A5
A1
C
A4
A4
A10
MAX
A2
MIN
A3
B
B2
B3
B4
B5
B6
C9
C8
C7
C6
C1
C5 C4
A11
A12
C10
D2
C2
D4
C3
D6
A8
A4
A6
A7
A9
D1
D3
D5
Page 4

4
Importantsafeguards
•
Use this appliance only as described in this
instruction manual.
As with any electrical appliance, the instructions
aim to cover as many situations as possible.
Cau tion and common sense should be used
when operating and installing this appliance.
•
Before operating the product, remove the
packaging and check that product is in good
condition.
•
This appliance has been manufactured to refresh
domestic environments and must not be used
for other purposes.
•
This appliance if for indoor use only!
•
It is dangerous to alter or modify the unit's
characteristics in any way.
•
The appliance must be installed in accordance
with the relevant national legislation.
•
Alway place the unit on a stable level floor.
•
Do not use in bathrooms or near water. Do not
keep the product where it may fall into a water
container.
•
Do not run power cord under carpeting, or cover
it with rugs or runners. Keep the cord away from
areas where it may be tripped over.
•
Should repairs be necessary, contact the nearest
authorized Repair Service Center. Unauthorized
servicingcanbe dangerous.
•
The appliance is not intended for use by persons
(including children) with reduced physical,
sensory or mental capabilities, or lack of
experience and knowledge, unless they have
been given supervision or instruction concerning
use of the appliance by a person responsible for
their safety.
Children should be supervised to ensure that
they do not play with the appliance.
•
If the power cord is damaged, it must be replaced
by the manufacturer or an authorized technical
service center in order to avoid all risk.
•
This appliance has a polarized plug (one blade
is wider than the other). To reduce the risk of
electric shock, this plug is intended to fit in a
polarized outlet only one way. If the plug does
not fit fully in the outlet, reverse the plug. If it
still does not fit, contact a qualified electrician.
Do not attempt to defeat this safety feature.
•
Donot useextensioncables.
•
Always unplug the appliance before refilling the
water tank, cleaning, servicing or relocating the unit.
•
Do not pull on or place strain on the power cord
when moving the appliance.
•
The appliance should not be installed where the
atmosphere may contain combustible gases, oil
orsulphur, or near heat sources.
•
Donot rest hot or heavy objects ontheappliance.
•
Do not insert or allow objects to enter any
ventilation or exhaust operning, as this may
damage the unit and may cause electrical shock
of fire.
•
Do not cover the appliance's air inlet or outlet, as
this may damage the motor.
•
This equipment should be inspected frequently
and collected dirt removed from it regularly to
prevent excessive accumulation that may result
in flashover or a risk of fire.
•
Avoid using heaters near the unit.
•
The unit should be transported with the tank
empty. Therefore, before transporting the
appliance, drain the tank.
•
Storetheunit withwater tankempty.
•
WARNING: Changes or modifications not
expressly approved by the party responsible for
compliance could void the user's authority to
operate the equipment.
•
WARNING: To reduce the risk of fire or electric
shock, do not use this appliance with any solid
statespeedcontrol device.
•
This product complies with the maximum
allowable concentration of ozone of 0.050 parts
per million by volume (ppmv) in a 24-hour
period.
Read and save these
instructions
This product is for household
useonly
Page 5

1.
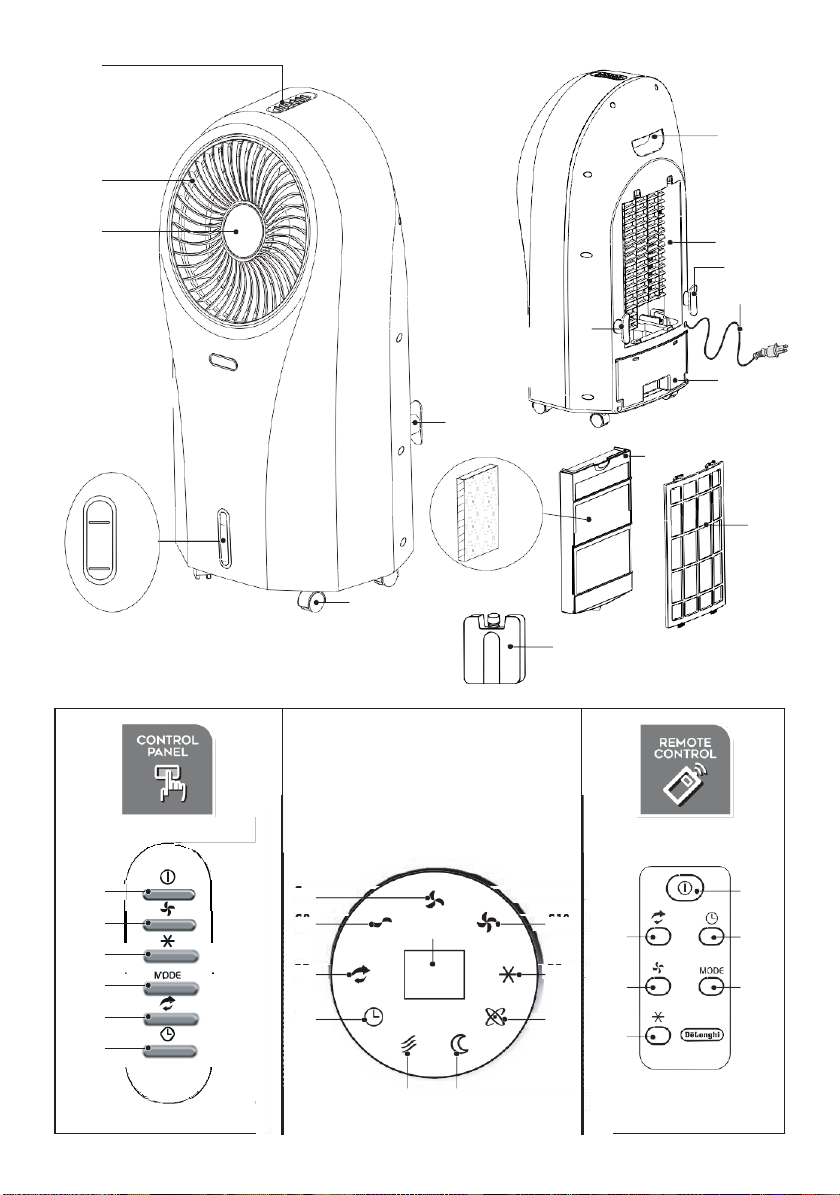
DESCRIPTION
1.1
Description of the appliance (A)
A1. Rotating vent
A2. Water level indicator
A3. Castors
A4. Power cord winder
A5. Handle
A6. Power cord
A7. Removable water tank
A8. Filter housing
A9. Dust filter
A10. Coolingpad
A11. Honeycomb cooling pad
A12. Ice box/pack
1.2
Descriptionofthecontrolpanel(B)
B1. ON/OFF button: to switch the appliance ONand OFF
B2. Speed fan. Press to selected the desired speed:
MAX, MIN
B3. Cooler/Humidifying. Press to select or deselect the fu nction
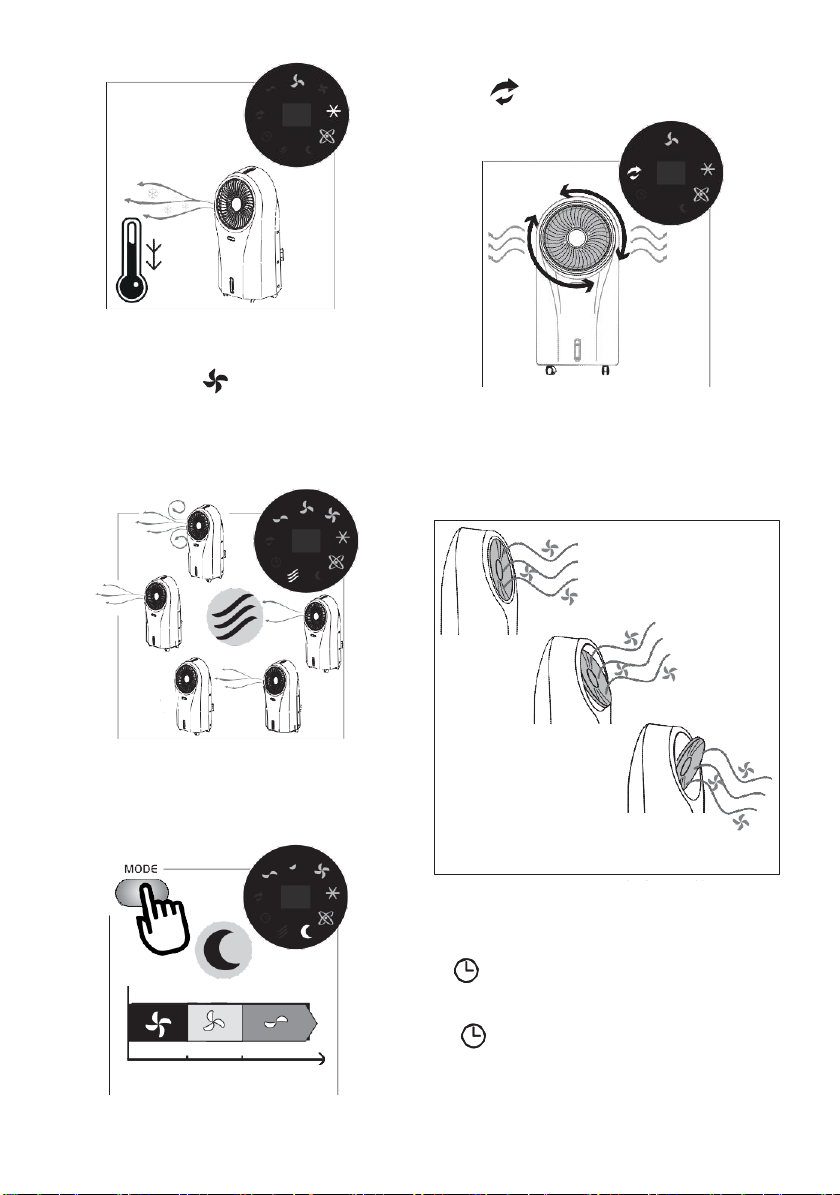
B4. Press to select the fan mode:
•
Natural : the appliance performs random ventilation
cycles at different speeds, interrupted by a few seconds of
stop
•
Sleep : the appliance runs 30 minutes at MAX speed,
then 30 minutes at MED speed: then runs at MIN speed
B5. “Swing”mode: when pressed, the grid rotates
B6. “AUTO OFF”: press to set the delayed auto off (from 1 to 24
hours):
•
When on, the symbol and the hours flash on the di-
splay for 5 seconds: when turn on steady, the auto off time
isset
•
To deactivate: press the relative button until “00” is se-
lected, then wait until the symbol and the number switch
off.
1.3
Description of the display (C)
C1. “Auto-off”display
C2. “Cooler/Humidifying”“ON”
C3. “Ionizer”“ON”(active in every mode)
C4. “Sleep” fan mode“ON”
C5. “Natural”fan mode“ON”
C6. “Auto-off”setting
C7. “Swing”“ON”
C8. “MIN”fan speed
C9. “MED”fan speed
C10. “MAX” fan speed
1.4
Descriptionofthe remotecontrol(D)
D1. ON/OFF:toswitchtheapplianceONandOFF
D2. “Swing”: when selected, the vent rotates
MED,
D3. “AUTO OFF” (see B6)
D4. Fan speed (see B2)
D5. Fan mode selection (see B4)
D6. Cooler/Humidifying. Press to select or deselect the function
2.
USING THE APPLIANCE
1.
Plug the appliance in: you will hear a beep and the applianceis ready to use;
2.
Remove the plastic tab from the battery (fig. 1);
3.
To turn the appliance on, press the button ( B1 or D1).
The appliance turns on at MED fan speed and the ionizer
is on (fig. 2).
MED
2.1
Settingfanspeed
1.
Press the button (B2 or D4);
2.
When you press the button, the fan speed changes (
MED, MAX, MIN) (fig. 3).
2
MAX
5
MED MIN
1
3
Page 6
6
2.2
Cooler/Humidifying
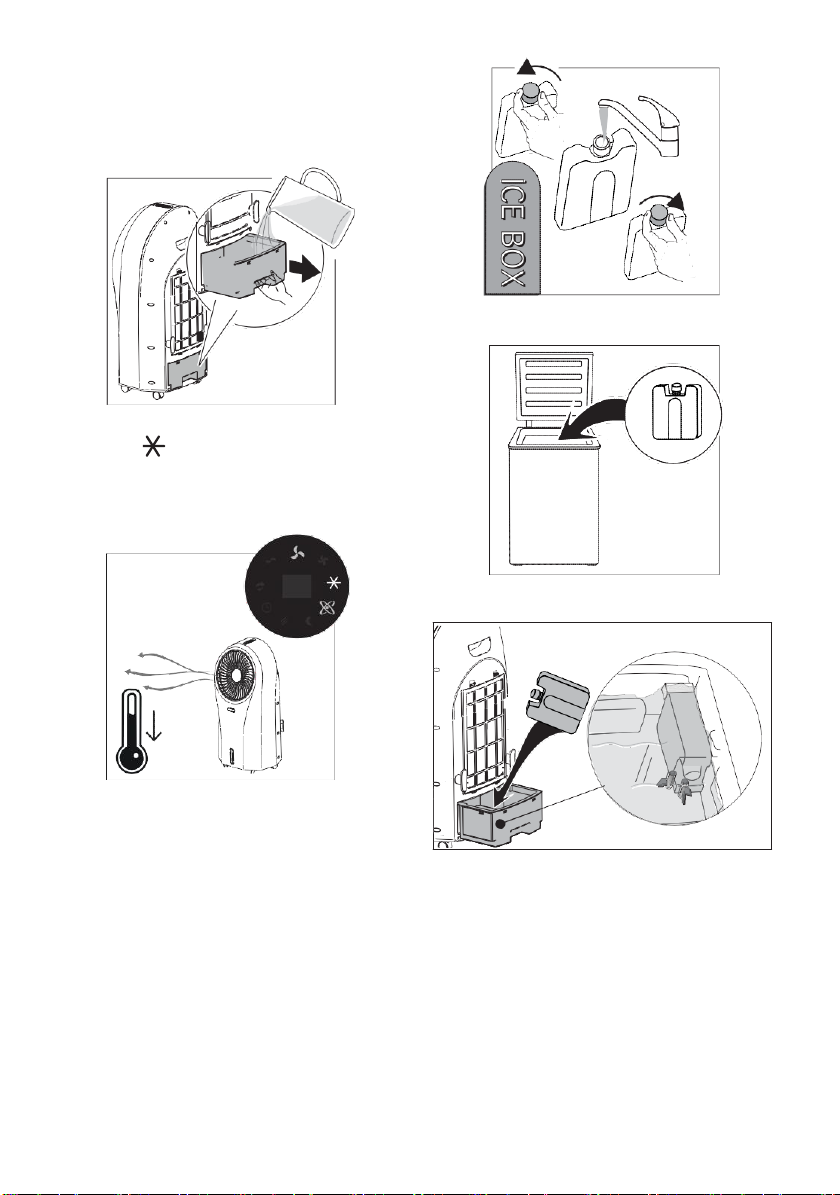
Fill the water tank before selecting this function.
1.
Extract the water tank (fig. 4) and fill with MAX 4.5L (152
oz) of fresh tap water (do not overload the water tank: see
water level indicator A2).
4
2.
Put the tank back in the appliance;
3.
Press the button (B3 or D6): the corresponding light
on the display turns on (fig. 5) and the air, flowing through
the cooling pad, comes out fresh and contributes to decrea-
se the room temperature;
5
Please note:
At first use, the appliance could emit a strange odor and the
water could be discolored: this is part of normal use.
Using the ice box/pack you can increase the efficiency of the
appliance.
4.
Fill the ice box/pack with tap water (fig. 6);
6
5. Put the ice box/pack in the freezer and leave it in until it is
frozen (fig. 7);
6. Put the ice box/pack vertically in the front left corner of the
tank as shown in figure 8;
7
7. Replace the water tank, turn on the appliance and select
Cooling/Humidifying: the air flow will be fresher than before (fig. 9).
Please note:
Always check the Ice box/pack is correctly inserted in its housing
(see fig. 8).
8
Page 7
7
2.4 Swing
Press the button (B5 or D2)once to activate the rotating
vent (fig. 12).
2.3
Selectingthe fanmode
The appliance can be set for 3 different fan modes:
1.
NORMAL- Press the button (B2 or D4) to select the fan
speed;
2.
NATURAL - Press the MODE button (B4 or D5) once. The
appliance performs random ventilation cycles at different
speeds, interrupted by a few seconds of stop (fig. 10);
9
PAUSE
10
3.
SLEEP - Press the MODE button (B4 or D5) twice. The
ap- pliance runs 30 minutes at MAX speed, then 30
minutes at MED speed: then runs continuosly at MIN
speed (fig. 11).
min
x2
MAX
MED MIN
30 30
11
12
Press again to exit swing mode.
Thecorresponding LED turns on and off accordingly.
You can also adjust vertically the vent by lightly pushing the vent
to orientate the air flow (fig. 13): always adjust the vent when
the vent is stationary.
13
2.5 Auto Off
You can set the delayed shut off from 1 to 24 hours by pressing
the button (B6 or D3).
1.
Select the number relative to the operating hours desired:
the number will be shown on the display (C1);
2.
symbol flashes to highlight that you are program- ming
the auto off: when the flashing stops, the auto off is set
(fig. 14);
Page 8

8
03
14
If you want to exit the “Auto off” function, repeatedly press the
button (B6 or D3) until “00” is displayed: symbol fla-
shes then disappears and“Auto Off”function is disabled.
3.
REFILLING THE WATER TANK
Before activating the Cooling/Humidification function, always
make sure there is water in the tank. If the water finishes during
use, the appliance makes an audible signal and the symbol
flashes on the display (fig. 15): the device will nonetheless continue to ventilate.
MAX
Recommendedtankfillingprocedure:
1.
Partially extract the water tank (fig. 4) and fill it with MAX
4.5l (152oz) of fresh tap water, using a jug. Always use tap
water and never overfill the tank: check the water level
indicator (A2);
2.
Put the tank back in the appliance.
Note:
If you decide to completely extract the tank:
•
extract the tank until the pump is raised (fig. 16) and wait
a few minutes for the residual water on the honeycomb
cooling pad to drip into the tank;
MIN
15
16
•
fully extract the tank and proceed to fill it.
Once the tank is filled:
•
if necessary, dry the tank housing;
•
check that the pump is raised;
•
carefully re-insert the water tank.
4.
CLEANING AND MAINTENANCE
•
Always unplug the appliance before cleaning.
•
Never immerse the appliance in water.
•
Pouring water on the unit is strictly forbidden.
•
Do not use benzine, alcohol or solvents for cleaning.
•
Do not spray insecticide liquid or similar since the plastic
could be deformed.
•
Clean the surface of the unit with a damp clot h, never use
an abrasive scourer directly on the outside surface as it
might scratch.
4.1
Cleaning the dust filter and the cooling pad
To avoid clogging of the dustproof filter, please clean the filter
regulary. The frequency of cleaning is to be related to the working time: if used daily, it is suggested to clean filter weekly.
•
Remove the dust filter and cooling pad (fig. 17);
17
•
Remove the dust from the filter and the cooling pad using a
vacuum cleaner (fig. 18);
Page 9

9
• Wash thoroughly the cooling pad with water; then leave it
to completely dry and reassemble the filtersin its
housing (fig. 19).
•
To maintain the efficiency of the appliance, it is suggested
to change the cooling pad every year.
4.2
Cleaning the water tank
Please note:
Turn off unit and let sit two minutes before removing drawer to
allow excess water to drain back into tank
•
Remove the water tank (fig. 4);
•
Clean thoroughly with a cleaning sanitizer, easily available
in stores (fig. 20).
18
19
20
4.3 Changing the battery of the remote control
•
Remove the battery holder on the back of the remote control (fig. 21);
21
•
Insert one 3V CR2025 type lithium battery on the support,
checking that the polarity is correct (+ and -) (fig. 22).
Please note:
•
•
•
•
If you change or dispose the remote control, the battery must be removed and disposed of according to local
recycling regulations.
Never throw the battery in fire as it may explode or leak
dangerous liquids.
This equipment has been tested and found to comply with
the limits for a Class B digital device, pursuant to part 15 of
the FCC Rules. These limits are designed to provide reasonable protection against harmfu l interference in a residential installation.
This equipment generates, uses and can radiate radio frequency energy and, if not installed and used in accordance
with the instructions, may cause harmful interference to
radio communications. However, there is no guarantee that
interference will not occur in a particular installation. If this
equipment does cause harmful interference to radio or television reception, which can be determined by turning the
equipment off and on, the user is encouraged to try to correct
the interference by one or more of the following measures:
-
Reorient or relocate the receiving antenna.
22
Page 10

10
-
PROBLEM
CAUSE
SOLUTION
No discharge of air
Cord is not plugged in
Make sure power cord is plugged in and the switchisON
Power isnot ON
Turn the unit ON by pressing the button
( B1 on the control panel or D1 on the remote
control)
The appliance switches off
The auto shutoff timer was set
Turn the appliance ON and check that the auto
shutoff symbol is off
Presence of water under the tank
When the tank is completely extracted
without waiting a couple of minutes, the
residual water on the honeycomb cooling
pad will drip into the tank housing
Dry the housing before re-inserting the tank. For
filling, follow the instructions in chap. 3.
Excessive humidity in the room
In Cooler/Humidifying function, the appliance produces moisture as a result of
evaporative cooling. This is normal
The appliance cools best in dry climates. If the
ambient humidty level is high (60% or above) refrain from using the cooler/humidifying function
Make sure the window/doors are open and there
is adequate cross ventilation in the room so
that the air can circulate better. Utilize the “fan”
function
Odors and colored water
When the appliance is new
At first use, the appliance will have an odor,
which will dissipate within a few hours of initial
use. The color in the water will also dissipate after
afewuses.
Algae or mold due to moisture. In very
damp conditions, algae may form due to
moisture
Check the Honeycomb Cooling Pad (A12), water
tank (A7) and other cooler parts. If you see mold
spots or algae issue, use a damp cloth to wipe
away the algae until all spots have disappeared. Make sure all parts are clean and dry before
storage. Contact Customer Service if problem
persists. If the Honeycomb Cooling Pad (A11) has
algae or mold, change it with a new one
Increase the separation between the equipment and
receiver.
-
Connect the equipment into an outlet on a circuit different from that to which the receiver is connected.
-
Consult the dealer or an experienced radio/TV techni-
cian for help.
Changes or modifications not expressly approved by the
party responsible for compliance could void the user’s authority to operate the equipment.
5.
TROUBLESHOOTING
Below is a list of some of the possible malfunctions.
If the problemcannot be resolved as described, contact Customer Service.
•
This device complies with Part 15 of the FCC Rules. Operation is subject to the following two conditions: (1) this
device may not cause harmful interference, and (2) this
device must accept any interference received, including
interference that may cause undesired operation.
•
This Class B digital apparatus complies with Canadian
ICES-003.
Page 11

11
PROBLEM
CAUSE
SOLUTION
Remote control does not work
Remote control battery is incorrectly inserted in the battery compartment
Check the battery is correctly inserted following the polarity guide inside the battery
compartment.
Remote control battery is exhausted
Replace with a new battery
Damaged remote control
If replacing new battery in the correct position
doesnot work, contact Customer Service
The unit does not respond
Damaged control panel on unit
Try to activate the unit with the remote control
If the unit responds, then the control panel on
the unit may be experiencing problems: contact
Customer Service
If neither the remote control or the control panel
isworking,contactCustoner Service
If “Cooler/Humidifier” indicator
flashes and unit beeps
Because of no water in the tank
Fill tank ab ove MIN mark with water
Page 12

12
PROBLEM
CAUSE
SOLUTION
No discharge of air
Cord is not plugged in
Make sure power cord is plugged in and the switchisON
Power isnot ON
Turn the unit ON by pressing the button
( B1 on the control panel or D1 on the remote
control)
The appliance switches off
The auto shutoff timer was set
Turn the appliance ON and check that the auto off
symbol is shutoff
Présence d’eau sous le réservoir
Lorsqu’on extrait complètement le rés-
ervoir san s attendre quelques minutes,
l’eau rés iduelle prés ente sur le panneau
évaporatif dégouline dans le logement
réservoir
Essuyer le logement avant de réinsérer le réservoir. Pour le remplissage, toujours suivre les indications du chap. 3.
PROBLEM
CAUSE
SOLUTION
Excessive humidity in the room
In Cooler/Humidifying function, the appliance produces moisture as a result of
evaporative cooling. This is normal
The appliance cools best in dry climates. If the
ambient humidty level is high (60% or above) refrain from using the cooler/humidifying function
Make sure the window/doors are open and there
is adequate cross-ventilation in the room so
that the air can circulate better. Prefer the “fan”
function
Odors and colored water
When the appliance is new
At first use, the appliance will have an odor,
which will dissipate within a few hours of initial
use. The color in the water will also dissipate after
afewuses.
Algae or mold due to moist parts. In very
damp conditions, algae may form due to
moisture
Check the Honeycomb Cooling Pad (A12), water
tank (A7) and other cooler parts. If you see mold
spots or algae issue, use a damp cloth to wipe
away the algae until all spots have disappeared. Make sure all parts are clean and dry before
storage. Contact Customer Service if problem
persists. If the Honeycomb Cooling Pad (A11) has
algae or mold, change it with a new one
Remote control does not work
Remote control battery is incorrectly inserted in the battery compartment
Check the battery is correctly inserted following the polarity guide inside the battery
compartment.
Remote control battery is exhausted
Replace with a new battery
Damaged remote control
If replacing new battery in the correct position
doesnot work, contact Customer Service
4.
TROUBLESHOOTING
Below is a list of some of the possible malfunctions.
If the problemcannot be resolved as described, contact Customer Service.
Page 13

13
The unit does not respond
Damaged control panel on unit
Try to activate the unit with the remote control
If the unit responds, then the control panel on
the unit may be experiencing problems: contact
Customer Service
If neither the remote control or the control panel
isworking,contactCustoner Service
If “Cooler/Humidifier” indicator
flashes and unit beeps
Because of no water in the tank
Fill tank ab ove MIN mark with water
Page 14

14
Advertencias
•
Use este electrodoméstico sólo como se indica
en este manual de instrucciones. Como con
cualquier electrodoméstico, las instrucciones
pretenden abarcar tantos imprevistos como
sea posible. Debe tener precaución y sentido
común al utilizar e instalar este equipo de aire
acondicionado.
•
Una vez quitado el embalaje, verifique la
integridad del aparato.
•
Este electrodoméstico se ha fabricado para
enfriar y deshumidificar el medio ambiente
domésticoy no debeusarseconotros fines.
•
No utilizar el aparato en el exterior.
•
Es peligroso alterar o modificar las características
de la unidad de cualquier modo.
•
El electrodoméstico debe instalarse de
conformidad con la legislación nacional
correspondiente.
•
Ponga el aparato en una superficie estable y
plana.
•
No utilizar en baños o cerca del agua. No guarde
el producto donde pueda caer en un contenedor
deagua.
•
No deje que el cable de alimentación cuelgue
de la mesa o superficie de trabajo para evitar
enredarse o tropezarse accidentalmente con éste.
•
Para eventuales reparaciones diríjase
exclusivamente a centros de asistencia técnica
autorizados exigiendo el uso de piezas de
repuestoy deaccesoriosoriginales.
•
El aparato no puede ser utilizado por personas
(incluidos niños) con las capacidades físicas,
sensoriales o mentales reducidas o con falta de
experiencia y de conocimiento, a menos que
estén vigilados o que hayan sido instruidos
sobre el uso seguro del aparato por una persona
responsable de su seguridad. Los niños deben
ser vigilados para asegurarse de que no juegan
con el aparato.
•
En caso de daños a la clavija o al cable de
alimentación, estos deben ser exclusivamente
cambiados por la Asistencia técnica, para
prevenircualquier riesgo.
•
Este producto está equipado con una clavij a de
corriente alterna polarizada (una clavija con un
polo con dimensiones mayores que las del otro).
Esta clavija se inserta sólo en un sentido en el
tomacorriente. Se trata de un dispositivo de seguridad. Si la clavija no entra completamente en
el tomacorriente, deberá girarla. Si tampoco así
lo consigue, solicite la intervención de un electricista para sustituir el tomacorriente obsoleto.
No intente modificar la clavija polarizada para
anular esta medida de seguridad.
•
Evite utilizar cables de extensión debido a
potenciales riesgos a la seguridad.
•
Antes de efectuar cualquier operación de limpieza
o de mantenimiento, desenchufe siempre la unidad
deltomacorriente.
•
No jale ni tense el cable de alimentación al mover el
electrodoméstico.
•
Elelectrodoméstico nodebeinstalarse enambientes
quepuedancontenergasescombustibles,petróleoo
azufre,nicercadefuentesdecalor.
•
No coloque objetos pesados o calientes sobre el
electrodoméstico.
•
Do not insert or allow objects to enter any ventilation
or exhaust operning, as this may damage the unit
andmay causeelectrical shockoffire.
•
No cubra la entrada o salida de aire del aparato,
ya que esto puede dañar el motor.
•
Este equipo debe inspeccionarse con frecuencia
y recogerse la suciedad que se extrae de él
con regularidad para evitar una acumulación
excesiva que pueda provocar una descarga
disruptiva o un riesgo de incendio.
•
Eviteutilizar calefactores cercade la unidad.
•
La unidad debe ser transportada con el depósito
de agua vacío. Antes de transportar la unidad,
drénela.
•
Almacene la unidad con el tanque de agua vacío.
•
ADVERTENCIA: Los cambios o modificaciones que
no hayan sido aprobados expresamente por la parte
responsable del cumplimiento de especificaciones
del electrodoméstico podrían anular la autoridad del
usuario para utilizar el aparato.
Page 15

15
•
ADVERTENCIA: No usar con cualquier aparato que
tieneun controlde velocidadde estado solido.
•
Este producto cumple con la concentración
máxima permisible de ozono de 0.050 partes
por millón por volumen (ppmv) en un período
de24horas.
Guardeestasinstrucciones
Este producto está diseñado para
uso doméstico exclusivamente
1.
DESCRIPCIÓN
1.1
Descripción del aparato (A)
A1. Rejilla rotatoria
A2. Indicador del nivel de agua en el tanque
A3. Ruedas
A4. Carrete de cable
A5. Manija
A6. Cable de alimentación
A7. Depósito de agu a extraíble
A8. Soporte filtros
A9. Filtr o antipolvo
A10. Soporte del panel evaporador
A11.Panelevaporador
A12. “Ice box”: Tabla de hielo
1.2
B1. ON/OFF:paraencender yapagarel aparato
B2. Velocidad ventilación Pulse para seleccionar una de las 3
B3. Enfriamiento/humidificación. Pulse para activar o desactiB4. Seleccione la modalidad de ventilación:
•
•
B5. Modo“Swing”(rotación):Cuandoseselecciona,larejillagira.
B6. “AUTOOFF”(autoapagado):pulseparaconfigurarel apaga-
•
•
Descripción del panel de control (B)
velocidades disponibles: MED, MÁX, MÍN
var la función
Natural
casual a distintas velocidades, interrumpidos por varios segundosdepausa.
Sleep
velocidad MÁX, seguidos de 30 minutos a velocidad MED;
luego procede siempre a velocidad mínima.
do retrasado (de 1 a 24 horas).
Cuando se pulsa, en el display el símbolo y el valor
numérico parpadean unos5 segundos cuandopermanecen
encendidos el apagadoestá programado.
Para desactivar el ’”auto OFF” (autoapagado): pulse la tecla
hasta seleccionar “00”, a continuación espere a que se apa-
guen el símbolo y el valor numérico.
: el aparato efectúa los ciclos de vent ilación
(nocturno): el aparato funciona 30 minutos a
1.3
Descripción del display (C)
C1. Visor programación“auto OFF”(autoapagado)
C2. “Enfriamiento/humidificación”activo
C3. “Ionizador” activo (siempre encendido, ya que la función
está presente en tod os los modos de funcionamiento)
C4. Modo de ventilación“Sleep” (nocturno) activo
C5. Modo de ventilación “Natural”activo
C6. “Auto-off”(autoapagado) programado
C7. Modo “Swing” (rotación) seleccionado
C8. Velocidad de ventilación“MÍN”
C9. Velocidad de ventilación“MED”
C10. Velocidad de ventilación“MÁX”
1.4
Descripción del mando a distancia (D)
D1. ON/OFF:paraencenderyapagarel aparato
D2. Modo “Swing” (rotación): Cuando se selecciona, la rejilla
gira.
D3. “AUTO OFF” (autoapagado) (véase B6)
D4. Velocidad de ventilación (véase B2)
D5. Seleccione la modalidad de ventilación (véase B4)
D6. Enfriamiento/humidificación. Pulse para activar o desacti-
var la función
2.
INSTRUCCIONESDEUSO
1.
Conecte el aparato a una toma de corriente: el aparato
emite una señal acústica. La máquina está preparada para
eluso;
2.
En el primer uso, quite la lengüeta de práctica (fig. 1);
3.
Pulse la tecla (B1 o D1). El aparato se enciende con
velocidad de ventilación “MED” y con la “ionización”
activa (fig. 2);
1
Page 16

16
MED
2.1
Seleccione la velocidad de ventilación
1.
Pulse la tecla (B2oD4);
2.
Cada vez que se pulsa la tecla, la velocidad de ventilación
cambia ( MED, MÁX, MÍN) (fig. 3).
2
MAX
MED
2.2
Enfriamiento/humidificación
Prepare el aparato llenando el depósito de agua.
1.
Saque el depósito de agua (fig. 4) y llénelo con agua fresca
del grifo (MAX 4.5L/152 oz); utilizando una jarra, preste
atención para no superar el nivel MÁX visible en el indicador de nivel (A2). El nivel MÁX asegura 6 horas de uso del
aparato;
MIN
4
2.
Vuelva a meter el depósito de agua;
3. Pulse la tecla (B3 o D6): el símbolo correspondiente
se enciende en el display (fig. 5). El aire atraviesa el dispo-
sitivo de enfriamiento y sale refrescada, contribuyendo de
esta forma a disminuir la temperatura del ambiente;
5
Nota:
La primera vez que se utiliza esta función, el agua puede teñirse
de color: esto forma parte del funcionamiento normal del
aparato.
Para aumentar la eficiencia del aparato use la ’”Ice box”.
4. Llene la ’”Ice box”con agua del grifo (fig. 6);
3
5.
Meta en el congelador la ”Ice box” (fig. 7) y déjela dentro
hastaquesecongele;
6.
Saque el depósito de agua y meta la ’”Ice box”poniéndola
en el ángulo posterior izquierdo (fig. 8);
6
7
Page 17

17
7.
Vuelva a meter el depósito de agua, encienda el aparato
y seleccione la función “Enfriamiento/Humidificación”: el
aire emitido por el aparato será más fresco (fig. 9).
Nota:
Asegúrese de que la ”Ice box” está bien colocada en su correspondiente sitio (fig. 8).
2.3 Seleccione el modo ventilación
El aparato se puede programar para funcionar en 3 modos distintos de ventilación:
1.
NORMAL- Pulse la tecla (B2 o D4) para seleccionar la
velocidad de ventilación;
2.
NATURAL-PulseunavezlateclaMODE(B4oD5) .Elaparato
efectúa los ciclos de ventilación casual a distintas velocidades, interrumpidos por varios segundos de pausa (fig.10);
9
PAUSE
10
3. SLEEP- Pulse una vez la tecla MODE (B4 o D5). El aparato
funciona automáticamente 30 minutos a velocidad MÁX,
luego 30 minutos a velocidad MED: continúa a velocidad
MÍN (fig. 11).
8
min
x2
MAX
MED MIN
30 30
2.4 Swing
Pulse la tecla (B5 o D2) para activar la rotación de la rejilla
(fig. 12): en el display se enciende el correspondiente símbolo;
Para detener la rotación, pulse de nuevo la misma tecla.
El LED correspondiente se enciende y apaga en consecuencia.
La rejilla se puede inclinar verticalmente moviéndola de forma
manual para orientar el flujo de aire (fig.13): efectúe este ajuste
con la rejilla parada, sin forzar.
11
12
Page 18

16
2.5
Auto Off
Esposibleconfigurarel apagadoretrasadode1a 24horas:pulse
la tecla (B6o D3).
1.
Pulse hasta seleccionar el número relativo a las horas de
funcionamiento deseadas: el número aparece en el display
(C1);
2.
El símbolo y el valor numérico parpadean para indicar la programación en curso del autoapagado. Cuando el
símbolo y el valor numérico permanecen encendidos fijos
significa que la programación se ha salvado (fig. 14).
03
13
MAX
MIN
Procedimientoaconsejadoparallenareldepósito:
1.
Saque parcialmente el depósito de agua (fig. 4) y llénelo
con un MÁX de 4,5 l de agua fresca del grifo usando una
jarra. Use siempre agua del grifo, no sobrecargue nunca el
depósito: verifique el indicador de nivel de agua (A2);
2.
Vuelva a meter el depósito de agua.
Nota:
Si decide sacar por completo el depósito:
•
Saque el depósito hasta elevar la bomba (fig. 16) y espere
unos minutos, hasta que el agua residual presente en el
panel evaporador gotee en el depósito;
•
saque por completo el depósito y llénelo.
15
14
Para salir del autoapagado, pulse la tecla (B6 o D3) hasta
configurar el valor numérico“00”: el símbolo y“00”parpadean.Cuandoseapagan,elautoapagadosecancela
3.
LLENEELDEPÓSITODEAGUA
Antes de iniciar la función Enfriamiento/Humidificación, asegúrese siempre de que hay agua en el depósito. Si el agua se
acaba durante el uso, el aparato emite una señal acústica y el
símbolo parpadea (fig. 15): en cualquier caso, el aparato
seguirá ventilando.
Después de haberllenado el depósito:
•
si es necesario, seque el compartimento del depósito;
•
verifique si la bomba está levantada;
•
vuelva a meter delicadamente del depósito de agua.
4.
LIMPIEZA Y MANTENIMIENTO
•
Desconecte siempre el aparato de la red eléctrica antes de
proceder a la limpieza.
•
No sumerja nunca el aparato en el agua.
•
No eche nunca eche agua directamente en el aparato.
•
No utilice nunca gasolina, alcohol o disolventes.
•
No pulverice nunca insecticidas ni sustancias similares: el
plástico podría deformarse.
•
Limpie la superficie del aparato con un paño suave, no uti-
lice nunca esponjas abrasivas, porque la superficie podría
rayarse.
24
16
Page 19

25
4.1 Limpie el filtro antipolvo y el panel
evaporador
Limpie con regularidad el filtro antipolvo. La frecuencia con la
que efectúa la limpieza debe establecerse de acuerdo con el
tiempo de uso: si se utiliza cotidianamente se aconseja limpiar
el filtro todas las semanas.
•
Saque el filtro antipolvo y el soporte del panel evaporador
(fig.17);
Quite el polvo de los filtros con un aspirador (fig. 18);
•
•
Lave cuidadosamente con agua el soporte del panel evaporador; a continuación déjelo secar por completo y vuelva a
poner los filtros en su sitio (fig.19).
Para mantener la eficiencia del aparato se aconseja cambiar el
panelevaporador cadaaño.
17
18
19
4.2
Limpieeldepósitode agua
Nota:
Apague el aparato y déjela reposar durante dos minutos antes de
retirar el cajón para permitir que el exceso de agua vuelva al tanque.
•
Saqueel depósitodeagua;
•
Limpie meticulosamente con un detergente higienizante,
disponible en el mercado (fig.20).
•
verifique si la bomba está levantada;
• vuelva a meter delicadamente del depósito de agua.
4.3
Cambiode la batería delmandoa distancia
•
Saque el soporte de la batería en la parte posterior del
mando a distancia (fig. 21);
20
21
22
• Introduzca una batería de tipo 3V CR2025 en el soporte
prestandoatenciónaquelapolaridadseacorrecta(+y)y vuelvaaintroducirlo(fig.22).
Page 20

26
Please note:
PROBLEMA
POSIBLE CAUSA
SOLUCIÓN
El aparato no se enciende
El cable de alimentación no está
conectado
Asegúrese de que el cable de alimentación está
conectado y de que hay corriente
El aparato no está encendido
Encienda el aparato pulsando la tecla
(B1 en el panel de control o D1 en el mando a
distancia)
El aparato se apaga
El autoapagado se ha activado
Encienda el aparato y asegúrese de que el símbolo de autoapagado está apagado en el display
Presencia de agua debajo del
depósito
Si se saca del todo el depósito sin esperar
unos minutos, el agua residual presente
en el panel evaporador gotea en el compartimento del depósito
Seque el compartimento antes de volver a meter
el depósito. Para llenarlo siga siempre las indicacionesdel cap. 4.
Humedad excesiva en la
habitación
Cuando se usa la función enfriamiento/
humidificación, el aparato produce humedad por efecto del refrescamiento
evaporador.Esnormal
El aparato refresca con más eficiencia en los climas secos. Si el nivel de humedad es alto (60%
y más), es mejor evitar el uso en la función
enfriamiento/humidificación
Asegúrese de que las ventanas/puertas están
abiertas y de que haya bastante aire corriente en
la habitación; a fin de que el aire pueda circular
mejor, es posible en todo caso utilizar el aparato
en la fun ción ventilación
•
•
•
•
If you change or dispose the remote control, the battery must be removed and disposed of according to local
recycling regulations.
Never throw the battery in fire as it may explode or leak
dangerous liquids.
This equipment has been tested and found to comply with
the limits for a Class B digital device, pursuant to part 15 of
the FCC Rules. These limits are designed to provide reasonable protection against harmful interference in a residential installation.
This equipment generates, uses and can radiate radio frequency energy and, if not installed and used in accordance
with the instructions, may cause harmful interference to
radio communications. However, there is no guarantee that
interference will not occur in a particular installation. If
this equipment does cause harmful interference to radio or
television reception, which can be determined by turning
the equipment off and on, the user is encouraged to try to
5.
SI ALGO NO FUNCIONA
Below is a list of some of the possible malfunctions.
If the problemcannot be resolved as described, contact Customer Service.
correct the interference by one or more of the following
measures:
-
Reorient or relocate the receiving antenna.
-
Increase the separation between the equipment and
receiver.
-
Connect the equipment into an outlet on a circuit differ-
ent from that to which the receiver is connected.
-
Consult the dealer or an experienced radio/TV technician
for help.
Changes or modifications not expressly approved by the
party responsible for compliance could void the user’s au-
thority to operate the equipment.
•
This device complies with Part 15 of the FCC Rules. Operation is subject to the following two conditions: (1) this
device may not cause harmful interference, and (2) this
device must accept any interference received, including
interference that may cause undesired operation.
•
This Class B digital apparatus complies with Canadian
ICES-003.
Page 21

27
PROBLEMA
POSIBLE CAUSA
SOLUCIÓN
Olores y agua coloreada
El aparato es nuevo
En el primer uso, el aparato tendrá un olor que se
disiparáunas pocas horas después del usoinicial.
El color en el agua también se disipará después
dealgunosusos.
Algas o moho debido a partes húmedas.
En condiciones muy húmedas, las algas
se pueden formar debido a la humedad
Compruebe el panel evaporador (A11), el depósito de agua extraíble (A7) y otras partes del sistema enfriador. Si ve manchas de moho o algas,
use un paño húmedo para limpiar las algas hasta
que todas las manchas hayan desaparecido. Asegúrese de que todas las piezas estén limpias y
secasantesdeguardarlas.ComuníqueseconServicio al Cliente si el problema persiste. Si el panel
evaporador (A11) tiene algas o moho, cámbielo
por uno nuevo
El mando a distancia no funciona
La batería del mando a distancia no está
correctamente introducida
Verifique si la batería está introducida en función de las indicaciones de la guía de polaridad
que aparece en la parte posterior del mando a
distancia.
La batería está descargada
Cámbielapor una batería nueva
El mando a distancia está dañado
Si el cambio de batería no resuelve el problema,
diríjase a un centro de asistencia autorizado
El aparato no responde
El panel de control
funciona
del aparato no
Use el mando a distancia para activar el aparato.
Si el aparato no responde, puede haber un problema de funcionamiento del panel de control:
diríjase a un centro de asistencia autorizado.
Si no funcionan ni el panel de control ni el mando
a distancia, diríjase a un centro de asistencia
autorizado.
Si el indicador “Enfriamiento/
humidificación” parpadea y la
unidad emite un sonido
No hay agua en el tanque
Leene el depósito de agua hasta la marca MIN
Page 22

5712410121_01_
0218
-
P
rin
t
ed
in
China
De’Longhi Appliances via Seitz, 47 31100 Treviso Italia www.delonghi.com
 Loading...