

1
1
2
2
3
3
4
4
5
5
6
6
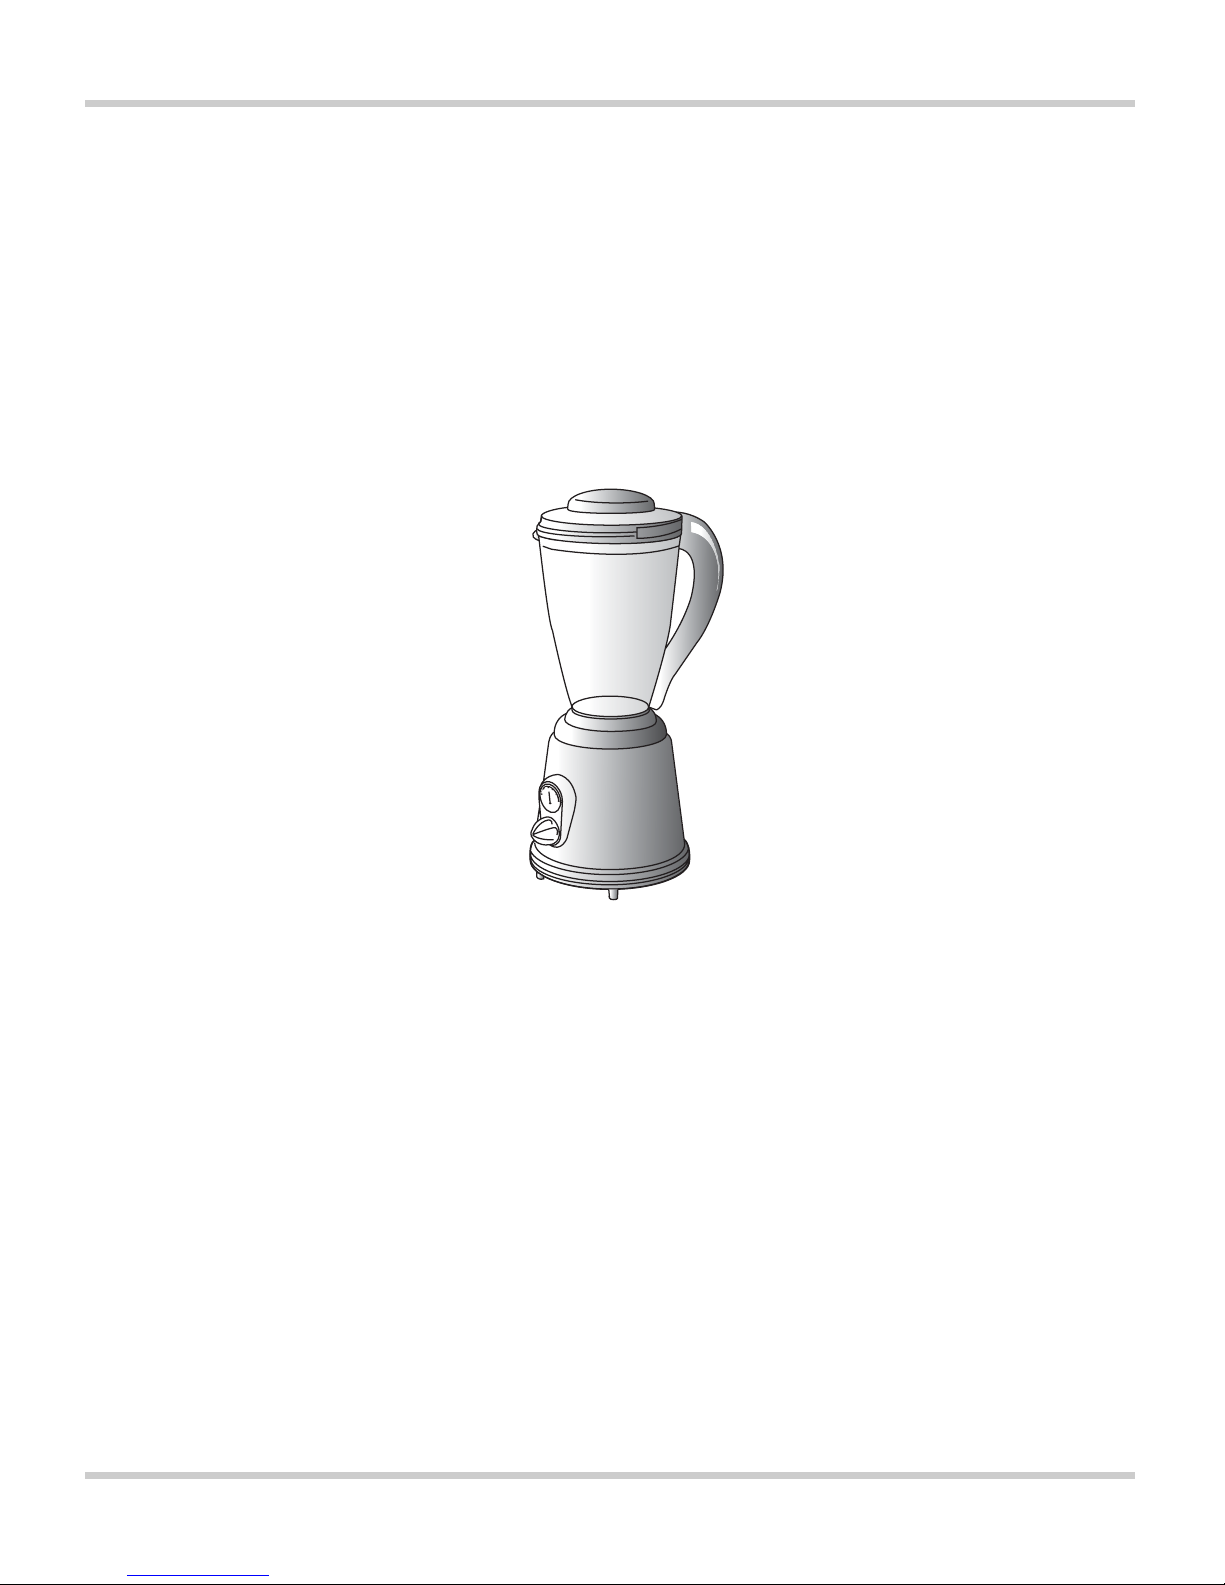
BLENDER
Instructions for use
MIXER
Mode d’emploi
ROBOT DE COCINA
Instrucciones para el uso
FRULLATORE
Istruzioni per l’uso
Register this product on-line and receive a free trial issue of “Cook’s Illustrated”. Visit www .prodregister.com/delonghi.
Visit www .delonghi.com for a list of service centers near you. (U.S. only).
Enregistrez ce produit en ligne et recevez un numéro gratuit de “Cook’s Illustrated”. Visitez www .prodregister.com/delonghi.
Visitez www .delonghi.com pour y voir une liste des centres de réparation proches de chez vous. (É.- U. uniquement).
Registre este producto en línea y reciba un ejemplar gratis de “Cook’ s Illustrated”. Visite www.prodregister.com/delonghi.
Visite www .delonghi.com para ver la lista de centros de servicios cercanos a usted. (Solamente en los Estados Unidos)
Registra questo prodotto “on-line” per ricevere una copia omaggio della rivista “Cook’s Illustrated”.
Visita www .prodregister.com/delonghi.
Visita www .delonghi.com per una lista dei centri di servizio a te più vicini. (Solo negli Stati Uniti).
Model/Modèle/Modelo/Modello
DBM8150
CARACTERISTICAS ELECTRICAS
120V 60Hz 550W

11
22
33
44
55
66
H
A
B
D
E
F
C
G
Open
Lock
Fig.1
Fig.4
Fig.5 Fig.6
Fig.2
Fig.3

4
IMPORTANT SAFEGUARDS
When using electrical appliances, basic safety precautions should always be followed, to reduce the risk of fire,
electrical shock and/or personal injur y.
READ ALL INSTRUCTIONS CAREFULLY.
•
To protect against electrical shock, do not place the cord or the blender’s base in water or other liquid.
•
Close supervision is necessary when any appliance is used by or near children.
•
Unplug from outlet when not in use and before cleaning. Turn the unit off before putting on or taking off parts, and before
cleaning the appliance. Never put hands into the glass jar, or handle the blade assembly with appliance plugged in.
•
Do not operate any appliance with a damaged cord or plug or after the appliance malfunctions, or has been damaged in any
manner. Return appliance to the nearest authorized service facility for examination, repair or adjustment.
• The use of accessory attachments not recommended by the appliance manufacturer.
•
Do not use outdoors.
•
Do not let cord hang over edge of table or counter, or touch hot surfaces.
•
Do not place on or near a hot gas or electric burner, or in a heated oven.
•
Always plug cord into the wall outlet before turning on any controls. To disconnect turn power OFF by pushing the
button on the speed control, then remove plug from wall outlet.
•
When blending hot liquids, remove the ingredient cap from the lid.
•
Do not use this appliance for other than intended use.
•
Avoid contact with moving parts.
•
Keep hands and utensils out of jar while blending, to reduce the risk of severe injury to persons or damage to blender itself.
A rubber or plastic spatula may be used but must be used only when the blender is turned OFF.
•
When blender is on, do not touch blade assembly, interfere with blade movement, or remove the lid from the jar.
Accidentally touching a speed button may activate the blender.
BLADES ARE SHARP. HANDLE CAREFULLY.
•
Never leave your blender unattended while running.
•
For safety reasons, the blending of ver y hot liquids is not reccomended.
•
Allow hot liquids to cool before blending.
•
When removing the glass jar from the power unit, wait until the blades have completely stopped.
•
NEVER run the blender when it is empty.
•
Only operate the blender with the lid in place.
•
The use of accessory attachments not recommended by the appliance manufacturer can cause electric shocks.
•
The manufacturer cannot be held responsible for damage caused by inappropriate, incorrect or irresponsible use.
•
Never touch the appliance with wet hands. Never immerse the base in water.
•
WARNING: TO REDUCE THE RISK OF ELECTRICAL SHOCK OR FIRE, DO NOT REMOVE THE BASE PANEL. NO USER
SERVICEABLE PARTS ARE INSIDE. REPAIR SHOULD BE DONE ONLY BY AUTHORIZED PERSONNEL.
SAVE THESE INSTRUCTIONS
SHORT CORD INSTRUCTIONS
•A short power cord is provided to reduce risks resulting from becoming entangled in or tripping over a
longer cord.
• Longer, detachable power supply cords or extension cords are available and may be used if care is exercised in their use.
• If an extension cord is used, the marked electrical rating should be at least as great as the electrical rating
of the appliance. If the appliance is provided with 3- wire, grounding type cord, the extension should be
a GROUNDING TYPE 3 - WIRE CORD. The longer cord should be arranged so that it will not drape over
the counter-top or table top where it can be pulled on by children or tripped over.
•Your product is equipped with a polarized alternating current line plug (a plug having one blade wider
than the other). This plug will fit into the power outlet only one way.
This is a safety feature. If you are unable to insert the plug fully into the outlet, tr y reversing the plug. If the
plug should still fail to fit, contact your electrician to replace your obsolete outlet. Do not defeat the safety purpose of the polarized plug.

5
BEFORE USE
Before using the appliance for the first time, wash
all accessories thoroughly. Take care when handling the blades as they are sharp.
Wipe the motor base with a damp cloth.
Never immerse the motor base in water!
Check that the outlet voltage corresponds to the voltage indicated on the rating plate.
HOW TO USE
• Place the appliance on a dry flat sur face.
DO NOT PLUG THE APPLIANCE INTO THE
OUTLET UNTIL ALL ACCESSORIES HAVE BEEN
CORRECTLY FITTED.
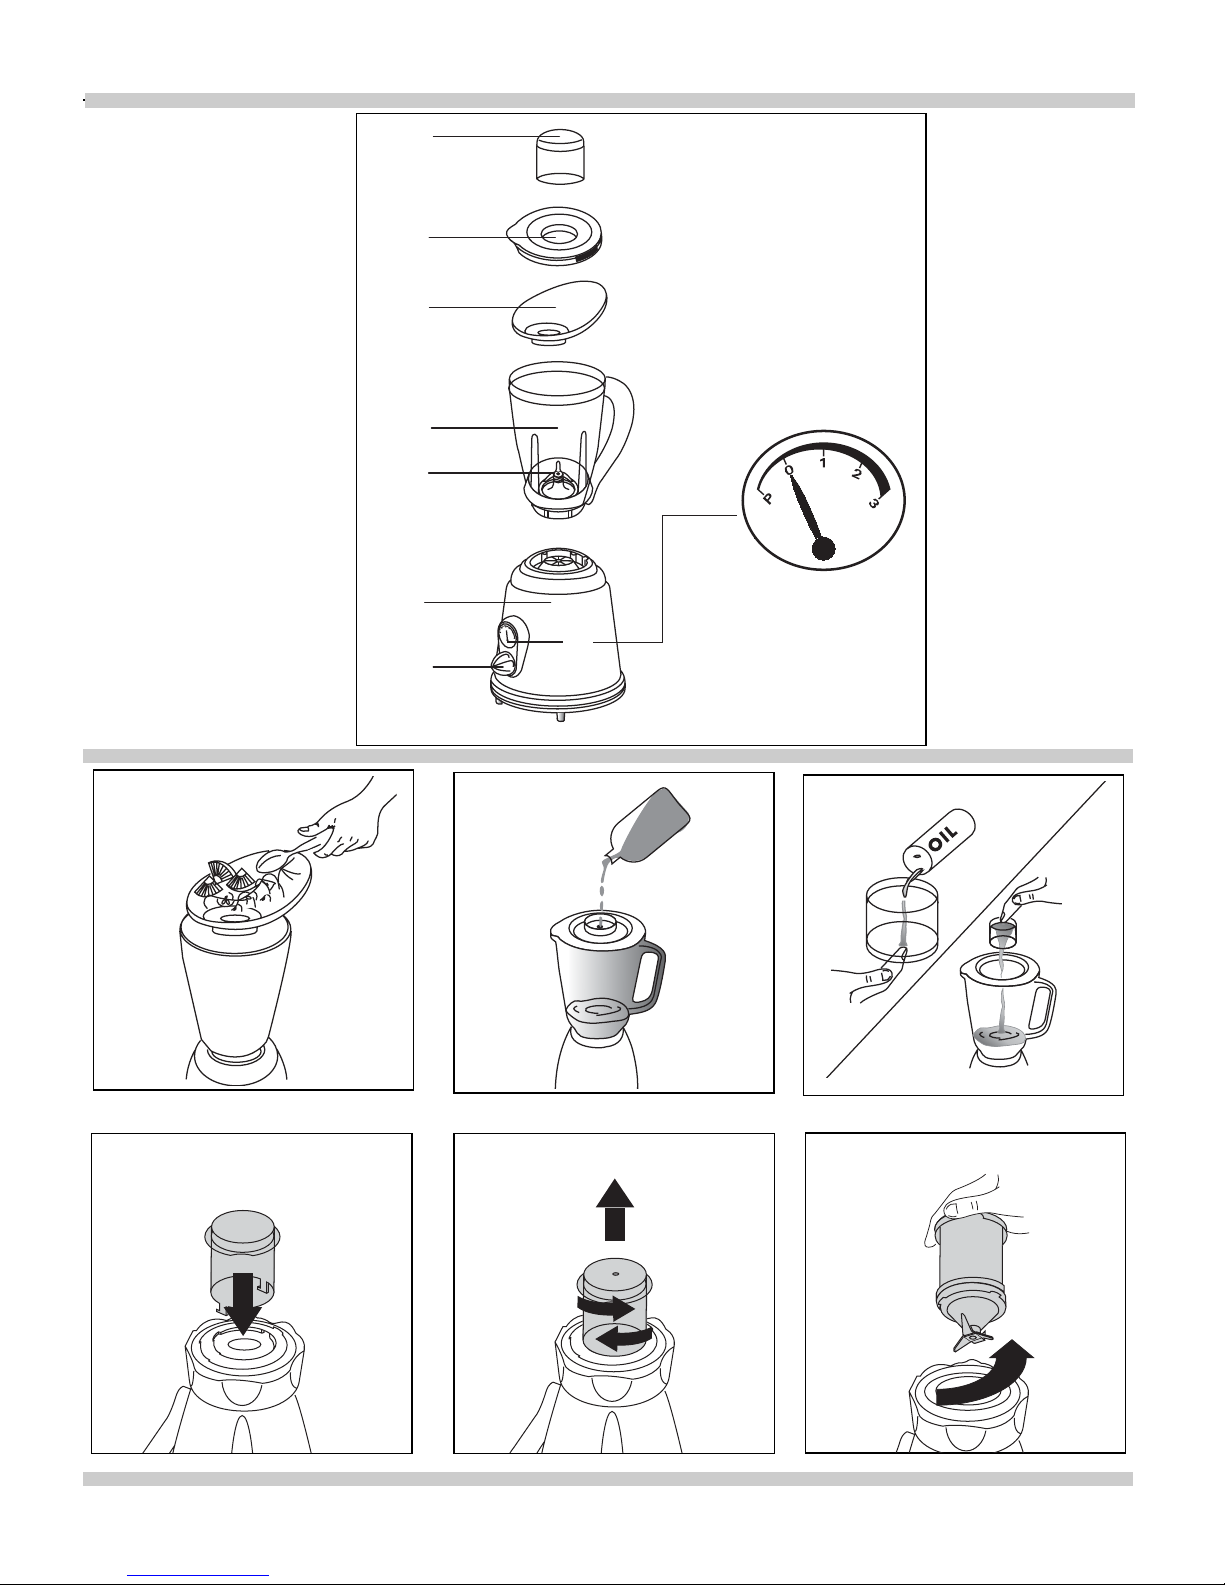
• Place the blender jar on the motor base.
• Pour the ingredients into the jar.
This may be done by:
1.Removing the entire lid (A+B) by rotating
counter-clockwise;
2.using the lid (B) without the measuring cup
(A);
3.using the fruit tray (C) inserted upside down
in the hole in the lid (B) (fig. 1).
• The appliance is supplied with a handy measuring
cup (A) with a useful hole for adding, for example,
drops of flavoring without opening the lid (fig. 2). If
you turn the measuring cup (A) upside down and
close the hole, it can also be used as a measure for
oil or similar. (see fig. 3).
Important:
Never use the appliance for more than 3 minutes consecutively. Pause for 3 minutes and continue to use for a maximum of five cycles. The
appliance must then be left to cool down.
• Cut solid food into cubes and add water.
• Place the lid (B) on the jar and rotate clockwi-
se until the safety device on the handle of the
jar clicks into place. The blender will not
function if the lid is not correctly positioned
on the jar.
• Plug into the outlet.
•To start processing the ingredients, just turn the
ON/OFF knob (G) to the desired speed
(1/2/3). When the ingredients have reached
the required consistency, turn the knob back to
the (O) position.
• On the "P" position, the blender operates at
maximum speed, improving control for short
periods of processing.
• Before cleaning, always unplug from the outlet.
USING THE "P" FUNCTION
The "P" (pulse) function improves control for short
periods of processing.
The appliance functions as long as the knob (G) is
kept in the "P" position.
CLEANING THE APPLIANCE
NEVER IMMERSE the motor base in water!
Make sure the appliance is unplugged from the
outlet socket.
• Remaining ingredients being processed must be
removed with a spatula.
• Pour lukewarm water into the blender jar, filling
to the halfway point.
A. Measuring cup (with hole)
B. Lid
C. Food tray
D. Glass jar
E. Blade unit
F. Motor base
G. ON/OFF/P knob
H. Speed indicator
DESCRIPTION
DESCRIPTION

6
Operate the appliance for a few seconds at the
maximum position (3) then empty the jar.
Repeat the operation if necessary.
• Remove the blender jar, lid and measuring cup
and wash in lukewarm water by hand. Rinse
and dry thoroughly.
•To facilitate cleaning, in certain models the
blade unit can be removed as follows:
1. Remove the jar from the base and turn it
upside down.
2. Insert the hooks on the end of the measuring cup
(A) into the notches on the bottom of the upturned jar (see fig. 4).
3. Turn the measuring cup clockwise (fig. 5) as far
as it will go then pull until the blade unit and the
the gasket are released (fig. 6).
4. Wash, dry, then reassemble, taking care to
replace the gasket correctly. Position the blade
unit on the bottom of the jar, pressing down until
it fits in place, then use the measuring cup (A) to
rotate the blade unit counter-clockwise as far as
it will go.
The blender jar, the lid and the food tray must
not be washed in the dishwasher or in boiling
water.
•Take care when handling the glass jar to avoid
damage.
• Clean the motor base with a damp cloth or
sponge.
Dry thoroughly with a soft cloth.
•Wrap the power cable carefully around the bottom of the motor base.
SUGGESTIONS FOR USE
1 General
• In order to get the best results, and so that the ingredients do not spill out of the blender jar, add the
ingredients to the jar at little at a time.
• Do not fill the jar more than full – the movement of
the blades will increase the volume of the ingredients
in the jar. The recipes that use large quantities of
ingredients should be processed in batches.
• Pour in the liquid ingredients before the solid ones,
as long as the recipe doesn’t say otherwise.
The liquid will facilitate the processing and will allow
for the use of a lower speed. Always add a cup of
water before processing ice.
• Blend for 5 – 30 seconds and then check the consistency. Continue to process the ingredients in this
way until the desired consistency is obtained. Be
sure to not process the ingredients too much; this
could cause a loss of consistency to the entire recipe.
• Always use the blender with the lid well inserted.
• DO NOT remove the blender jar from the motor
housing while the appliance is in use.
• In order to avoid the possibility of injury to the user
or damage to the appliance, do not insert hands or
utensils into the jar while the appliance is operating.
It is possible to utilize a spatula while the appliance
is turned off.
2 Solid ingredients
• It is necessary to pay par ticular attention during the
processing of fine ingredients. In this case, it is
necessary to interrupt the processing from time to
time, take off the lid and scrape the ingredients
down off the sides of the jar and the blades. Then
reinsert the lid and continue processing. If the processing becomes lengthy in this way, select a higher
speed.
•To add solid ingredients to the blender jar, remove
the measuring cup from the lid and add them a little
at a time through the hole in the lid. The vegetable
and cheese ingredients must always be cut into
cubes before being added to the jar.
3 Hot preparations
It is always necessar y to remove the measuring cup
from the lid before beginning the preparation of hot
recipes.
• Slowly add the hot ingredients, maximum 2 cups at
a time, through the hole in the lid.

7
Practical and convenient, your appliance will allow you to prepare quickly and with excellent results, creams,
mayonnaise, sauces, frittatas, pancakes, fillings for vegetables, frappès, drinks and cocktails of every kind. In
this recipe collection there are some ideas for using your appliance in diverse ways. These recipes should be
considered a point of departure and surely your own creativity will add to the uses and preparations.
RECIPE COLLECTION
WHIPPED CREAM
• 200 ml (6 ounces) of whipping cream
Pour the liquid cream into the blender jar and ope-
rate at a speed 3 for approximately 20 – 30
seconds.
MAYONNAISE
•1 whole egg • oil
•a tablespoon of mustard • a pinch of salt
•a few drops of lemon juice
Put the egg, the mustard, the lemon juice and the
salt in the blender jar and operate on speed 2 for a
few seconds. Fill the measuring cup with oil and at
speed 2 continue to mix (adding oil a little at a time)
until the mayonnaise becomes firm. Ideal with
poached fish.
PINK SAUCE
• 50 gr. (2 ounces) mayonnaise
• 10 gr. (0,35 ounces) ketchup
•4 drops of Worcestershire sauce
Put all the ingredients together in the blender jar and
operate at speed 1 for a few seconds. Ideal with
French fried potatoes and club sandwiches.
ITALIAN ICE
•Ice • flavored syrup
Pour the ice into the blender jar and operate the
PULSE knob until all the ice is chopped uniformly. Put
the ice into a glass and add the syrup.

8
This warranty applies to all products with De’Longhi or Kenwood brand names.
Limited Warranty
What does the warranty cover?
We warrant each appliance to be free from defects in material and workmanship. Our obligation
under this warranty is limited to repair at our factory or authorized service center of any defective parts
or part thereof, other than parts damaged in transit. In the event of a products replacement or return,
the unit must be returned transportation prepaid. The repaired or new model will be returned at the
company expense. This warranty shall apply only if the appliance is used in accordance with the factory directions, which accompany it, and on an Alternating current ( AC ) circuit.
How long does the coverage last?
This warranty runs for one year ( 1 ) from the purchase date found on your receipt and applies only
to the original purchaser for use.
What is not covered by the warranty?
The warranty does not cover defects or damage of the appliance, which result from repairs or alterations to the appliance outside our factory or authorized service centers, nor shall it apply to any
appliance, which has been subject to abuse, misuse, negligence or accidents. Also, consequential and
incidental damage resulting from the use of this product or arising out of any breach of contract or
breach of this warranty are not recoverable under this warranty. Some states do not allow the exclusion or limitation of incidental or consequential damage, so the above limitation may not apply to you.
How do you get ser vice?
If repairs become necessary, see contact information below:
U.S. Residents:
Please contact our toll free hotline at 1-800-322-3848 or log onto our website at www .delonghi.com.
For all accessories, spare parts or replacement parts, please contact our parts division at 1-800-865-6330.
Residents of Canada: Please contact our toll free hotline at 1-888-335-6644 or log onto our website
at www.delonghi.com.
Residents of Mexico: Please refer to the Limited Warranty statement for Mexico.
Please refer to the back page of the manual for De’Longhi addresses.
The above warranty is in lieu of all other express warranties and representations. All implied warranties are limited to the applicable warranty period set forth above. This limitation does not apply if you
enter into an extended warranty with De’Longhi. Some states do not allow limitations on how long an
implied warranty lasts, so the above exclusions may not apply to you. De’Longhi does not authorize
any other person or company to assume for it any liability in connection with the sale or use of its
appliance.
How does state law apply?
This warranty gives you specific legal rights, and you may also have other rights, which vary from state
to state.

15
ADVERTENCIAS DE SEGURIDAD
Cuando utilice aparatos eléctricos, debe respetar algunas normas de seguridad fundamentales para disminuir el
riesgo de incendio, descargas eléctricas y/o daños personales.
•
LEA ATENTAMENTE TODAS LAS INSTRUCCIONES
• Para evitar descargas eléctricas, no sumerja el cable de alimentación o la base del aparato en el agua o
en otros líquidos.
• No deje que el aparato sea usado por niños o cerca de ellos sin una vigilancia adecuada.
• Desenchufe el aparato de la corriente cuando no lo use y antes de efectuar cualquier operación de
limpieza. Apague el aparato antes de ponerle o quitarle accesorios y antes de la limpieza. No introduzca nunca las manos en la jarra o manipule las cuchillas con el aparato enchufado.
• En general, no utilice electrodomésticos que presenten cables o clavijas estropeados, o después de un funcinoamiento incorrecto o si han sufrido desperfectos de cualquier tipo. En estos casos, lleve su aparato al
centro de asistencia técnica autorizado más cercano para someterlo a una eventual reparación o ajuste.
• El fabricante desaconseja el uso de accesorios no originales.
• No utilice el aparato al aire libre.
• No deje que el cable cuelgue del borde de la superficie de apoyo del aparato, ni que entre en contacto
con superficies calientes.
• No ponga el aparato sobre o cerca de quemadores de gas o eléctricos o en el horno caliente.
• Enchufe el aparato a la corriente antes de accionar cualquiera de los mandos. Para apagar el aparato,
presione el botón de accionamiento velocidad y desenchufe el aparato.
• Cuando esté elaborando líquidos calientes, quite el dosificador de la tapadera.
• No use el aparato para usos diferentes a los indicados.
• No toque las partes en movimiento.
• Para evitar el riesgo de provocar graves lesiones o daños al aparato, no introduzca las manos o utensilios en la jarra mientras que el aparato está funcionando.
• Puede utilizar una espátula de plástico o de goma, pero únicamente cuando el aparato está apagado.
• Cuando el aparato está funcionando, no toque las cuchillas con las manos, no obstaculice su movimiento
o quite la tapadera de la jarra. El aparato puede encenderse incluso tocando accidentalmente uno de los
botones de control de la velocidad.
• LAS CUCHILLAS ESTÁN AFILADAS. TENGA CUIDADO AL MANIPULARLAS.
• No deje el aparato sin vigilancia cuando está funcionando.
• Por razones de seguridad, le desaconsejamos trabajar con líquidos muy calientes.
• Deje enfriar los alimentos antes de batirlos.
• Espere que las cuchillas estén completamente paradas antes de quitar la jarra del cuerpo motor.
• NO accione la batidora en vacío.
• Accione la batidora únicamente con la tapadera colocada correctamente.
• No utilice más de un accesorio a la vez.
• El fabricante declina cualquier responsabilidad por los eventuales daños derivados de un uso impropio,
incorrecto o irresponsable.
• No toque el aparato con las manos mojadas. No sumerja el cuerpo motor en el agua.
ATENCIÓN: PARA DISMINUIR EL RIESGO DE DESCARGAS ELÉCTRICAS, NO QUITE EL PANEL DE LA
BASE DEL APARATO, NO CONTIENE COMPONENTES SUSTITUIBLES POR EL USUARIO. EVENTUALES
REPARACIONES DEBERÁN SER REALIZADAS EXCLUSIVAMENTE POR PERSONAL AUTORIZADO.
GUARDE ESTAS INSTRUCCIONES

16
CÓMO SE USA
• Coloque el aparato sobre una superficie seca y
plana. NO ENCHUFE EL AP ARATO A LA CORRIENTE ANTES DE HABER MONTADO CORRECTAMENTE LOS ACCESORIOS.
• Ponga la jarra sobre el cuerpo motor.
•Vierta los ingredientes en la jarra.
Puede realizar esta operación:
1.Quitando del todo la tapadera (A+B), dándole vueltas en el sentido contrario de las
agujas del reloj.
2.Colocando la tapadera (B) sin el dosificador
(A).
3.Utilizando la bandeja de la fruta (C), colocada invertida en el agujero previsto en la tapadera (B) (Fig. 1).
• El aparato está equipado con un práctico dosificador (A) con agujero, útil para verter algunas
gotas de aroma/esencia sin tener que abrir la
tapadera (Fig.2).
Además, invirtiendo el dosificador (A) y tapando el
agujero puede utilizarlo como medidor, por ejemplo, para el aceite (consulte la figura 3).
Atención:
No utilice el aparato durante más de 3 minutos
consecutivos. Haga pausas de 3 minutos y reanude la utilización sin superar un máximo de 5
ciclos. Si supera este límite, deberá dejar el aparato enfriarse.
• Corte los alimentos sólidos en dados y añada
agua.
• Coloque la tapadera (B) sobre la jarra, dán-
dole vueltas en el sentido de las agujas del
reloj hasta que salte el dispositivo de seguridad, situado en el asa de la misma jarra.
El aparato no funciona con la tapadera colocada incorrectamente sobre la jarra.
A. Dosificador (con agujero)
B. Tapadera
C. Bandeja de la fruta
D. Jarra de cristal
E. Grupo de cuchillas
F. Cuerpo motor
G. Mando ON/OFF/”P”
H. Indicador de regulación de la velocidad
DESCRIPCIÓN DEL AP
DESCRIPCIÓN DEL AP
ARA
ARATOTO
INSTRUCCIONES PARA EL CABLE CORTO
(sólo para Estados Unidos)
• Se suministra un cable de alimentación corto para reducir los riesgos consecuentes de un enganche o
tropezadura con un cable largo.
• Se encuentran disponibles cables de alimentación separables más largos o cables de prolongación, los
cuales se podrán utilizar con tal de que se preste la máxima atención.
• Si se utiliza un cable de prolongación, los valores eléctricos contraseñados tienen que ser por lo menos
equivalentes a los del aparato. Si el aparato se suministra con cable de 3 hilos de tipo con puesta a tierra, el cable de prolongación tiene que ser un CABLE DE 3 HILOS DE TIPO CON PUESTA A TIERRA. El
cable más largo tiene que estar predispuesto de modo que no se apoye sobre la superficie del banco o
de la mesa, ya que podría ser halado por los niños y las personas podrían tropezarse.
• Su aparato está provisto de un enchufe polarizado para línea de corriente alterna (un enchufe que tiene
una espiga más larga que la otra). Este enchufe se adaptará en el tomacorriente de una sola manera, la
cual es una característica de seguridad. Si no logra introducir completamente el enchufe en el toma corriente, inviértalo. Si el enchufe no entra aún, llame al electricista de manera de que sustituya el toma de
corriente anómalo. No eludir el objetivo de seguridad del enchufe polarizado.

17
• Enchufe el aparato a la corriente.
• Para empezar a elaborar los ingredientes, gire
el mando ON/OFF (G) para seleccionar la velo-
cidad deseada (1/2/3). Cuando los ingredientes alcanzan la consistencia deseada, sitúe de
nuevo el mando en la posición (O).
• La posición “P” sirve para hacer funcionar el
aparato con la máxima velocidad permitiendo
controlar mejor las elaboraciones breves.
• Desenchufe el aparato de la corriente antes de
efectuar las operaciones de limpieza.
UTILIZACIÓN DE LA FUNCIÓN “P”
La función “P” (pulse) permite controlar mejor las
elaboraciones breves.
El aparato funciona mientras que el mando (G) permanece en la posición “P”.
LIMPIEZA DEL APARATO
NO SUMERJA NUNCA el cuerpo motor en el agua.
Asegúrese de que el aparato no sea enchufado a
la corriente.
• Elimine con una espátula todas los restos de los
ingredientes. En los modelos con jarra de plástico, utilice espátulas de goma para no rayar la
superficie.
• Llene la jarra hasta la mitad con agua templada. Encienda durante unos segundos el aparato y a continuación vacíe la jarra.
Si es posible, repita esta operación.
• Quite la jarra, la tapadera y el dosificador
antes de lavarlos con agua templada y enjabonada.
A continuación, enjuáguelos y séquelos correctamente.
• Para facilitar las operaciones de limpieza, en
algunos modelos puede desmontar el grupo de
cuchillas de la forma siguiente:
1.Quite la jarra de la base del aparato e inviértala.
2.Introduzca los ganchos, situados en las extremidades del dosificador (B), en las cavidades
correspondientes que están en la base de la
jarra invertida (consulte la figura 4).
3.Dé vueltas al dosificador en el sentido de las
agujas del reloj (fig. 5) hasta el tope y entonces tire hasta desenganchar el grupo de
cuchillas (fig. 6).
4. Lávelo todo, seque y, a continuación, monte de
nuevo los componentes teniendo cuidado de
colocar correctamente la junta; coloque después
el grupo de cuchillas en la base de la jarra, presione a fondo para encajarlo del todo, y por último, utilizando el dosificador (A), dé vueltas al
grupo de cuchillas en el sentido contrario de las
agujas del reloj hasta el tope.
La jarra y todas las partes de plástico no pueden lavarse en el lavavajillas o con agua hir-
viendo.
• Extreme todas las precauciones con la jarra de
cristal para evitar causarle impactos violentos.
• Limpie el cuerpo del motor y el cable de alimentación con un paño húmedo o con una esponja.
Seque completamente con un paño suave.
• Enrolle con cuidado el cable de alimentación en
la base del cuerpo motor.
CONSEJOS DE USO
1.Generalidades
• Para obtener buenos resultados e impedir que
los ingredientes se derramen, añada gradualmente los ingredientes en la jarra.
• No llene la jarra más de 3/4 - la acción de las
cuchillas aumenta los ingredientes en la jarra.
Las recetas que emplean grandes cantidades de
ingredientes deben realizarse en varias veces.
• Si no especificado de forma contraria en la
receta, vierta en primer lugar los ingredientes
líquidos y luego los sólidos. El líquido facilita la
elaboración y permite utilizar velocidades inferiores. Añada siempre una taza de agua antes
de triturar el hielo.
•Triture durante 5-30 segundos y compruebe la
consistencia.

• Siga triturando los ingredientes hasta obtener la
consistencia deseada.
•Tenga cuidado de no triturar demasiado los
ingredientes; pues esto causaría una pérdida de
consistencia de la receta.
• Utilice el aparato con la tapadera siempre puesta.
• NO quite la jarra del cuerpo motor mientras
que el aparato siga funcionando.
• Para no herirse o estropear el aparato, no introduzca las manos o utensilios en la jarra con el
aparato funcionando.
• Puede utilizar una espátula cuando el aparato
está apagado.
2 Ingredientes sólidos
• Debe prestar una atención especial durante la
preparación de ingredientes finos. En este caso
debe interrumpir de vez en cuando la preparación, quitar la tapadera y retirar los ingredientes depositados en los lados de la jarra y en las
cuchillas. A continuación, coloque de nuevo la
tapadera y siga con la preparación. Si de esta
forma tarda demasiado tiempo, seleccione una
velocidad más alta.
• Para añadir alimentos sólidos en la jarra,
extraiga el dosificador de la tapadera y añádalos gradualmente por el agujero de la tapadera. Corte siempre los alimentos del tipo de las
verduras y los quesos en dados antes de echarlos en la jarra.
3 Preparados calientes
Quite siempre el dosificador de la tapadera antes
de empezar a preparar recetas calientes.
• Añada lentamente los alimentos calientes,
máximo 2 tazas a la vez por el agujero de la
tapadera.
18

19
Práctico y manejable, su aparato le permitirá preparar en poco tiempo y con óptimos resultados, cremas,
mahonesa, salsas, tortillas, crepes, rellenos para verduras, batidos, bebidas con helado y cocktails en general.
Este recetario le facilita algunas ideas para utilizar el aparato de forma completa y variada. Estas recetas son la
base inicial pero seguramente su fantasía enriquecerá el uso y las preparaciones.
RECETARIO
NATA MONTADA
• 200 ml (6 ounces) de nata montada
Eche la nata en la jarra y haga funcionar el aparato
seleccionando la velocidad 3 durante 20 - 30
segundos aproximadamente.
MAHONESA
•1 huevo entero • El aceite necesario
• Una cucharada pequeña de mostaza
• Una pizca de sal • Unas gotas de limón
Eche el huevo, la sal, la mostaza y el limón en la
jarra y haga funcionar el aparato, seleccionando la
velocidad 2 durante unos segundos. Llene el dosificador con aceite, seleccione también la velocidad 2
y siga mezclando (no deje de añadir aceite) hasta
que la mahonesa se ponga dura. Salsa ideal para
pescado hervido.
SALSA ROSA
• 50 gr (2 ounces) de mahonesa
• 10gr. (0,35 ounces) de ketchup
•4 gotas de Worchester
Eche todos los ingredientes en la jarra y mezcle
seleccionando la velocidad 1 durante unos segundos. Ideal para patatas fritas y club sandwich.
GRANIZADOS
• Hielo
•Todo el almíbar que quiera
Vierta todo el hielo en la jarra, y pulse el botón PULSE
para seleccionar la velocidad 3 hasta conseguir triturar todo el hielo de forma homogénea. Ponga el
hielo en un vaso y añadir el almíbar.

20
Esta garantía cubre todos los productos con las marcas De'Longhi o Kenwood.
Garantía limitada
(para los Estados Unidos solamente)
Alcance de la garantía
Cada artefacto tiene garantía por defectos de materiales y de fabricación. Bajo los términos de esta garantía limitada, nuestra obligación se limita a la reparación de partes o componentes (a excepción de partes dañadas durante el transporte) en nuestra fábrica o en un centro autorizado de ser vicio. Al devolver un producto para cambio o
reparación, todos los costos de envío deben ser pagados por el propietario del mismo. El producto nuevo o reparado será devuelto con los gastos de envío pagados por la compañía.
Esta garantía es válida únicamente si el artefacto se utiliza de acuerdo con las instrucciones del fabricante (incluidas con el artefacto) y alimentada eléctricamente con corriente alterna (CA).
Duración de la garantía
Esta garantía es válida por un (1) año a partir de la fecha de compra que figura en el recibo o factura de
venta de la unidad, y sólo el comprador original tiene derecho a hacer uso de la garantía.
Exclusiones de la garantía
La garantía no cubre defectos ni daños que fueran consecuencia de reparaciones o modificaciones efectuadas al
artefacto por personal ajeno a nuestra fábrica o a centros autorizados de ser vicio, ni cubre fallas o daños causados por maltrato, uso indebido, negligencia o accidentes. Esta garantía tampoco reconocerá reclamos efectuados
por perjuicios directos ni indirectos emergentes del uso del producto, ni perjuicios o daños resultantes del uso del
producto en incumplimiento de los términos y condiciones que hacen válida la garantía. En algunos estados no se
permiten exclusiones ni limitaciones de los perjuicios reconocidos por una garantía, por lo cual las limitaciones mencionadas podrían ser no válidas en su caso particular.
Obtención de ser vicios de garantía
Si las reparaciones son necesarias, vea la información de contacto que aparece a continuación:
Residentes de los Estados Unidos: Por favor contactar a nuestra línea telefónica gratuita, al 1-800-3223848 o ingrese a nuestro sitio en el Internet www.delonghi.com. Para todos los accesorios, piezas de
repuesto o de reemplazo, por favor contactar a nuestra división de piezas, al 1-800-865-6330.
Residentes de Canadá: Por favor contactar a nuestra línea telefónica gratuita, al 1-888-335-6644 o ingrese a nuestro sitio en el Internet www.delonghi.com <http://www.delonghi.com/>.
Residentes de México: Refiera por favor a la garantía limitada para México.
Por favor vea la página trasera donde encontrará las direcciones de De’Longhi.
La garantía explicada anteriormente se ofrece en reemplazo de cualquier otra garantía, sea expresa u ofrecida de cualquier otra manera, y toda garantía implícita del producto estará limitada al período de duración mencionado anteriormente. Esta limitación queda anulada y es reemplazada por otros términos si el
usuario decide obtener una garantía prolongada de De’Longhi. En algunos estados no se permiten limitaciones del período de garantía implícita, por lo cual las limitaciones mencionadas anteriormente podrían
no ser válidas en su caso particular. De’Longhi no autoriza a ninguna otra persona ni compañía a ofrecer
ningún tipo de garantía ni responsabilidad con respecto al uso o a los términos de venta de sus artefactos.
Leyes estatales/provinciales
Esta garantía le confiere derechos establecidos por ley , pero usted también podría tener otros derechos que
varían de un estado a otro.

21
vaEsta garantía cubre todos los productos con las marcas De'Longhi o Kenwood.
GARANTIA
DESCRIPCIÓN Y MODELO
(ROBOT DE COCINA DBM8150)
Garantizamos todo producto DE´LONGHI por defectos de fabricación, material y mano de obra. Nuestra
obligación dentro de ésta garantía es proporcionar gratuitamente las refacciones y el servicio durante un
año a partir de la fecha de compra. Esta garantía se aplicará únicamente sí el producto se utiliza de acuerdo con las instrucciones anexas del fabricante y con un circuito de corriente alterna (ca). Esta garantía
reemplaza a cualquier otra garantía y acuerdo, expreso o implícito y a todas las demás obligaciones o
responsabilidades de nuestra parte. No autorizamos a ninguna otra persona o compañía a asumir nuestras responsabilidades relacionadas con la venta y el uso de nuestro producto. Esta garantía no implica
ninguna responsabilidad de parte nuestra en relación con la venta o el uso de nuestro producto.
Esta garantía no se hará válida en los siguientes casos:
a) Cuando el producto se hubiese utilizado en condiciones distintas a las normales
b) Cuando el producto no hubiese sido operado de acuerdo con el instructivo de uso que se le acompaña
c) Cuando el producto hubiese sido alterado o reparado por personas no autorizadas por el fabricante
nacional, importador o comercializador responsable respectivo.
Para hacer efectiva la garantía o si se necesitan reparaciones o refacciones, componentes, combustibles
y accesorios llame, con su garantía sellada por el establecimiento, al Centro Nacional de Servicio para
proporcionarle una cuenta de mensajería con la cual deberá remitir el producto y garantía. Los gastos que
se deriven del cumplimiento de la presente garantía deberán ser absorbidos por el Centro Nacional de
Servicio De´Longhi.
Obtención de ser vicios de garantía
Si las reparaciones son necesarias, vea la información de contacto que aparece a continuación:
Residentes de los Estados Unidos:
Por favor contactar a nuestra línea telefónica gratuita, al 1-800-322-3848 o ingrese a nuestro sitio en el
Internet www.delonghi.com.
Para todos los accesorios, piezas de repuesto o de reemplazo, por favor contactar a nuestra división de
piezas, al 1-800-865-6330.
Residentes de Canadá: Por favor contactar a nuestra línea telefónica gratuita, al 1-888-335-6644 o ingrese a nuestro sitio en el Internet www.delonghi.com <http://www.delonghi.com/>.
Residentes de México: Por favor contactar a nuestra línea telefónica gratuita, al 01-800-711-88-05 (lada
sin costo) o ingrese a nuestro sitio en el Internet www.delonghi.com <http://www.delonghi.com/>.
FIDUCIA ITALIANA S.A DE C.V
Pestalozzi #814
Col. Narvar te
Del. Benito Juarez
C.P. 03100
tels: 5543 1447

9
CONSIGNES DE SÉCURITÉ
L’utilisation d’un appareil électrique quel qu’il soit implique le respect de quelques règles fondamentales pour éviter
les risques d’incendie, de chocs électriques et de blessures corporelles.
•
LISEZ ATTENTIVEMENT TOUTES LES INSTRUCTIONS
• Pour éviter les chocs électriques, n’immergez pas le cordon d’alimentation ni la base du mixeur dans l’eau
ni dans d’autres liquides.
• Évitez d’utilisez l’appareil à proximité des enfants et ne les laissez pas l’utiliser sans surveillance.
• Si vous n’utilisez pas l’appareil, débranchez-le, ainsi qu’avant toute opération de nettoyage. Arrêtez l’appareil avant d’appliquer ou de retirer les accessoires et avant le nettoyage. Ne mettez pas les mains dans
le bol et évitez de manipuler les couteaux quand le mixeur est branché.
• N’utilisez pas l’appareil si le cordon, ou la fiche, est abîmé, ni s’il fonctionne manifestement mal ou s’il a été en
quelque sorte détérioré. Le cas échéant, pour un contrôle, un réglage ou une réparation, adressez-vous au centre
de Service le plus proche.
• Le fabricant préconise les accessoires d’origine.
• Évitez d’utiliser l’appareil à l’extérieur.
•Évitez de laisser le cordon pendre au bord du plan de travail et évitez le contact avec les surfaces chaudes.
•Ne posez pas l’appareil à proximité de brûleurs à gaz ou électriques ni dans un four chaud.
• Branchez toujours l’appareil avant d’actionner les commandes. Pour l’arrêter, appuyez sur le bouton de
commande vitesse et retirez la fiche de la prise.
• Lorsque vous travaillez des liquides chauds, retirez le doseur du couvercle.
• Utilisez l'appareil exclusivement pour les usages indiqués.
Ne touchez pas les pièces en mouvement.
• Afin d’éviter de vous blesser ou d’abîmer l’appareil, n’introduisez jamais les mains ni quoi que ce soit dans
le bol pendant que l’appareil est en marche.
Vous pouvez utiliser des spatules en plastique ou en caoutchouc mais seulement quand le mixeur est arrêté.
• Quand le mixeur est en marche, ne touchez pas les couteaux, n’empêchez pas leur mouvement et retirez
le couvercle du bol. L’appareil peut également démarrer si vous touchez accidentellement un des boutons
de contrôle de la vitesse.
LES LAMES SONT COUPANTES: MANIEZ-LES AVEC PRUDENCE.
• Ne laissez pas l’appareil marcher sans surveillance.
• Pour des raisons de sécurité, il est déconseillé de mixer des liquides très chauds.
• Laissez refroidir les aliments avant de les verser dans le mixeur.
• Attendez que les couteaux soient complètement arrêtés avant de retirer le bol du bloc moteur.
• N’actionnez PAS le mixeur à vide!
• Actionnez le mixeur exclusivement si le couvercle est correctement positionné.
•L’utilisation des accessories differents de ceux conseillez par le producteur peut causer des chocs électriques.
• Le fabricant décline toute responsabilité en cas de dégâts découlant d’un usage impropre, incorrect ou irresponsable.
• Ne touchez pas l’appareil les mains mouillées. N’immergez jamais le bloc moteur dans l'eau !
• ATTENTION: POUR RÉDUIRE LE RISQUE DE CHOCS ÉLECTRIQUES ET D’INCENDIE, NE RETIREZ PAS LE
PANNEAU DU SOCLE DE L’APPAREIL, VOUS NE POURRIEZ REMPLACER AUCUN DES COMPOSANTS
QU’IL CONTIENT. LES ÉVENTUELLES RÉPARATIONS DOIVENT ÊTRE EFFECTUÉES EXCLUSIVEMENT PAR
UN PERSONNEL AGRÉÉ.
CONSERVEZ CETTE NOTICE

10
AVANT LA MISE EN SERVICE
Avant la première mise en service de l’appareil,
lavez soigneusement tous les accessoires, en faisant
attention aux couteaux (qui sont très coupants) ;
passez un chiffon humide sur le bloc moteur.
N’immergez jamais le bloc moteur dans l'eau!
Vérifiez si la tension de secteur correspond à celle
indiquée sur la plaque signalétique de l’appareil.
MODE D’EMPLOI
• Posez l’appareil sur une surface sèche et plane.
NE BRANCHEZ L’APPAREIL SUR LA PRISE DE
COURANT QUE QUAND TOUS LES ACCESSOIRES SONT CORRECTEMENT MONTÉS.
• Positionnez le bol sur le bloc moteur.
•Versez les ingrédients dans le bol.
Pour exécuter cette opération, vous pouvez:
1. Retirer tout le couvercle (A+B) en le tournant en
sens inverse des aiguilles d’une montre.
2.Placer le couvercle (B) sans doseur (A).
3.Utiliser le plateau fruits (C) inséré à l’envers dans
le trou prévu dans le couvercle (B) (fig.1).
•L’appareil est doté d’un doseur pratique (A)
avec orifice, utile pour verser quelques gouttes
d’arôme/ essence sans ouvrir le couvercle
(fig.2), de plus, en renversant le doseur (A) et en
bouchant l’orifice, vous pouvez l’utiliser comme
doseur, pour l’huile par exemple. (voir figure 3).
Attention :
Évitez d ’utiliser l’appareil plus de 3 minutes consécutives. Faites une pause de 3 minutes entre
deux cycles et effectuez un maximum de 5
cycles. Après quoi, laissez refroidir l’appareil
• Coupez les aliments solides en dés et ajoutez de
l'eau.
• Insérez le couvercle (B) dans le bol en le fai-
sant tourner dans le sens des aiguilles d’une
montre jusqu’au dzéclic du dispositif de sécurité situé sur la poignée du bol. Le mixeur ne
fonctionne pas si le couvercle n’est pas correctement posé sur le bol.
• Branchez l’appareil.
A. Doseur (avec orifice)
B. Couvercle
C. Plateau fruits
D. Bol en verre
E. Couteaux
F. Bloc moteur
G. Bouton ON/OFF/ “P”
H. Indicateur réglage vitesse
DESCRIPTION DE L
DESCRIPTION DE L
’APP
’APP
AREIL
AREIL
CORDON SPECIAL
(seulement pour Etats Unis)
•L’appareil est muni d’un cordon d’alimentation court pour réduire les risques d’enchevêtrement et la possibilité
de trébucher sur un cordon plus long.
• Des cordons d’alimentation détachables plus longs ou des fils de rallonge sont également disponibles; il faut
cependant les utiliser avec précaution.
• Si l’on utilise un cordon long détachable ou une rallonge, les spécifications électriques du cordon ou de la rallonge doivent être au moins de la même valeur que celles de l’appareil. Si l’appareil est équipé d’une mise à
terre, la rallonge doit être de même un cordon a trois fils avec terre, et le cordon long doit être rangé de telle
façon qu’il ne soit pas étalé sur le comptoir ou sur la table, où il pourrait être tiré par les enfants, ou sur lequel
on pourrait trébucher.
•Votre produit est muni d’une fiche polarisée de courant alternatif (à savoir une fiche ayant une dent plus large
que l’autre). Cette fiche ne peut être enfoncée dans la prise que dans une seule position. Il s’agit d’une mesure de sécurité. Si vous ne pouvez pas enfoncer complètement la fiche dans la prise essayez de la tourner. Si
malgré tout vous ne pouvez pas encore la brancher, demandez à un électricien de remplacer la prise obsolète. Ne pas annuler la sécurité de la fiche polarisée.

11
• Pour commencer à travailler les ingrédients, il
suffit de tourner le bouton ON/OFF (G) jusqu’à
sélectionner la vitesse désirée (1/2/3). Dès que
les ingrédients ont la consistance désirée, ramenez le bouton sur (O).
• La position “P” sert à faire marcher l’appareil à
la vitesse maximale et de mieux contrôler les
préparations brèves.
• Débranchez l’appareil avant chaque opération
de nettoyage.
UTILISATION DE LA FONCTION “P”
La fonction “P” (pulse) permet de mieux contrôler
les préparations brèves. L’appareil fonctionne tant
que le bouton (G) est maintenu sur la fonction “P”.
NETTOYAGE DE L’APPAREIL
N’IMMERGEZ JAMAIS le bloc moteur dans l'eau.
Assurez-vous que l’appareil est débranché.
• Enlevez tous les résidus des ingrédients à l’aide
d’une spatule. Pour les modèles avec bol en plastique, utilisez une spatule en caoutchouc pour
ne pas rayer la surface.
• Remplissez la moitié du bol d’eau tiède. Faites
marcher l’appareil pendant quelques secondes
et videz le bol.
Si possible, répétez l’opération.
• Retirez le bol, le couvercle, le doseur avant de
les laver à l’eau tiède savonneuse. Puis rincez et
essuyez soigneusement.
• Pour un nettoyage facilité, vous pouvez, sur certains modèles, retirer les couteaux de la façon
suivante :
1. Retirez le bol du socle de l’appareil et renversez-le.
2. Insérez les crochets situés à l’extrémité du
doseur “B” dans les creux qui se trouvent dans
la base du bol renversé (voir figure 4)
3. T ournez le doseur à bloc dans le sens des aiguilles d’une montre (fig.5) puis tirez jusqu’à décrocher le couteau (fig. 6)
4. Lavez, essuyez et remontez tout sans oublier de
placer correctement le joint. Remontez le couteau sur le socle du bol et appuyez bien pour
l’insérer complètement.
Enfin, à l’aide du doseur (A) tournez à bloc le
couteau en sens inverse des aiguilles d’une
montre.
Évitez de passer le bol et toutes les pièces en plastique au lave-vaisselle ou à l’eau bouillante.
• Pour le bol en verre, il est conseillé de prendre
toutes les précautions nécessaires pour éviter les
chocs violents.
• Passez un chiffon humide ou une éponge sur le
bloc moteur et sur le cordon d’alimentation.
Essuyez soigneusement avec un chiffon doux.
• Enroulez soigneusement le cordon d’alimentation autour du socle du bloc moteur.
CONSEILS PRATIQUES
1 En général
• Pour obtenir de bons résultats et éviter que les
ingrédients débordent de la caraffe, ajouter
petit à petit les ingrédients dans la caraffe.
• Ne jamais remplir plus que les trois-quarts de la
caraffe – l’action des couteaux entraîne une
augmentation du volume des ingrédients dans
la caraffe. Les recettes qui exigent de grandes
quantités d’ingrédients doivent être préparées
en plusieurs fois.
• Sauf si la recette prévoit le contraire, verser d’abord les ingrédients liquides puis ceux solides.
Le liquide facilite la préparation et permet d’utiliser des vitesses inférieures. Ajouter toujours
une tasse d'eau avant de broyer de la glace.
• Mixer pendant 5-30 secondes et vérifier la consistance. Continuer ensuite à mixer les ingrédients jusqu'à ce que la consistance souhaitée
soit obtenue. Veiller à ne pas mixer trop les
ingrédients car cela entraînerait une perte de
consistance de la recette.
•Utiliser le mixer avec le couvercle toujours mis
en place.
• NE PAS enlever la caraffe du corps moteur lorsque l'appareil est en marche.
• Afin d’éviter tout risque de blessure ou d’endommagement de l'appareil, ne pas introduire
les mains ou des ustensiles dans la caraffe lorsque l'appareil est en marche. Une spatule peut
être utilisée lorsque l'appareil est éteint.

2 Ingrédients solides
• La préparation d’ingrédients minces requiert
une attention particulière. Il est nécessaire, en
effet, d’interrompre de temps à temps le fonctionnement de l'appareil, enlever le couvercle et
répartir le mélange qui se trouve autour des
couteaux et sur les côtés de la caraffe. Remettre
ensuite le couvercle en place et continuer l’opération. Si le mélange prend trop de temps,
sélectionner une vitesse plus élevée.
• Pour ajouter des ingrédients solides dans la
caraffe, enlever le doseur du couvercle et introduire graduellement les ingrédients à travers
l’orifice du couvercle. Les aliments tels que légumes et fromages doivent toujours être coupés en
dés avant d’être introduits dans la caraffe.
3 Préparations chaudes
Il est toujours nécessaire d’enlever le doseur du
couvercle avant de commencer la préparation des
recettes chaudes.
• Ajouter lentement les aliments chauds, maximum 2 tasses à la fois, à travers l’orifice du couvercle.
12

13
RECUEIL DE RECETTES
CREME FOUETÉE
• 200 ml (6 ounces) de crème fraîche
Verser la crème fraîche liquide dans la caraffe et
faire fonctionner le mixer sur la vitesse 3 pendant
environ 20 – 30 secondes.
MAYONNAISE
•1 œuf entier • une pincée de sel
• huile en quantité suffisante
• quelques gouttes de citron
•1 cuillerée à café de moutarde
Mettre l’œuf, le sel, la moutarde et le citron dans la
caraffe et faire fonctionner le mixer sur la vitesse 2
pendant quelques secondes. Remplir le doseur
d’huile et continuer à mélanger toujours sur la vitesse 2 en ajoutant toujours de l’huile jusqu'à ce que la
mayonnaise s’épaississe. Sauce idéale pour
accompagner les poissons froids.
SAUCE ROSE
• 50 g (2 ounces) de mayonnaise
• 10 g (0,35 ounces) de ketchup
•4 gouttes de worchester
Mettre tous les ingrédients ensemble dans la caraffe et faire marcher le mixer sur la vitesse 1 pendant
quelques secondes. Sauce idéale pour accompa-
gner les frites et les club-sandwiches.
Pratique et maniable, votre appareil vous permettra de préparer rapidement et avec d’excellents résultats des
crèmes, mayonnaises, sauces, omelettes, crêpes, farces pour légumes, milk-shake, boissons avec de la glace
et cocktails en général. Ce recueil de recettes vous propose des idées pour exploiter de manière complète et
variée votre appareil. Ces recettes constituent une base de départ que vous pourrez certainement enrichir avec
votre fantaisie pour créer d’autres préparations.
GRANITÉS
•Glace • Sirop au choix
Verser toute la glace dans la caraffe et actionner la
touche PULSE sur la vitesse 3 jusqu'à ce que toute la
glace soit pilée de manière homogène. Verser la
glace dans un verre et ajouter du sirop.

14
Cette garantie s’applique à tous les appareils ménagers de marques De’Longhi ou Kenwood.
Garantie limitée
Qu’est-ce qui est couvert par la garantie?
Nous garantissons que chaque appareil est exempt de vices de matériaux et de fabrication. Notre obligation,
dans le cadre de cette garantie, est limitée à la réparation, à notre usine ou dans un centre de réparation agréé,
de toutes les pièces défectueuses ou leurs composants. En cas de remplacement ou retour d’un produit, il doit
être retourné tout port payé. Le modèle neuf ou réparé sera retourné aux frais de la société. Cette garantie ne
s’applique que dans les cas où l’appareil est utilisé conformément aux instructions de l’usine qui l’accompagnent
et sur un circuit électrique à courant alternatif (c.a.).
Combien de temps dure la garantie?
Cette garantie dure une (1) année à partir de la date d’achat indiquée sur votre reçu et s’applique uniquement
à l’acheteur initial pour l’utilisation.
Qu’est ce qui n’est pas couvert par cette garantie?
Cette garantie ne couvre ni les défauts ou dégâts résultant de réparations ou altérations apportées à l’appareil
en dehors de notre usine ou des centres de réparation agréés ni les appareils qui ont été soumis à un mauvais
traitement, une mauvaise utilisation, une négligence ou des accidents. En outre, les dommages-intérêts directs ou
indirects résultant de l’utilisation de ce produit ou de la rupture d’un contrat ou du non-respect de cette garantie
ne sont pas recouvrables dans le cadre de cette garantie. Certains états ou provinces n’autorisent pas l’exclusion
ou la limitation des dommages-intérêts directs ou indirects. Par conséquent, la limitation ci-dessus peut ne pas
s’appliquer à vous.
Comment faire réparer l’appareil?
Si des réparations s’avèrent nécessaires, consultez les informations ci-dessous :
Résidents des États-Unis: Veuillez appeler notre ligne d’assistance sans frais au 1-800-322-3848 ou connectez-
vous à notre site Web à www.delonghi.com. Pour tous les accessoires, les pièces détachées et les pièces de
rechange, veuillez contacter notre service des pièces détachées au 1-800-865-6330.
Résidents du Canada: Veuillez appeler notre ligne d’assistance sans frais au 1-888-335-6644 ou connectezvous à notre site W eb à www.delonghi.com.
Résidents du Mexique: Veuillez consulter la déclaration de garantie limitée pour le Mexique.
Autres pays: Veuillez visitez www.delonghi.com.
Veuillez consulter le dos du manuel pour connaître les adresses de DèLonghi.
La garantie ci-dessus remplace toutes les autres garanties et représentations explicites. Toutes les garanties implicites sont limitées à la période de garantie applicable établie ci-dessus. Cette limitation ne s’applique pas si vous
concluez un contrat d’extension de garantie avec De’Longhi. Certains états ou provinces n’autorisent pas les limitations sur la durée des garanties implicites. Par conséquent, les exclusions ci-dessus peuvent ne pas s’appliquer
à vous. De’Longhi n’autorise aucune personne ni société à assumer des responsabilités en association avec la
vente ou l’utilisation de ses appareils.
Comment s’appliquent les lois de l’état ou de la province?
Cette garantie vous donne des droits juridiques précis et vous pouvez également avoir d’autres droits qui peuvent varier d’un état à un autre ou d’une province à une autre.

22
AVVERTENZE DI SICUREZZA
Quando si utilizzano apparecchi elettrici, è necessario seguire alcune fondamentali norme di sicurezza al fine di
ridurre il rischio di incendio, shock elettrico e/o danni personali.
•
LEGGERE ATTENTAMENTE TUTTE LE ISTRUZIONI.
• Per evitare shock elettrici, non immergere il cavo di alimentazione o la base del frullatore in acqua o altri
liquidi.
• Non permettere che l’apparecchio sia usato da o nelle vicinanze di bambini senza stretta sorveglianza.
• Scollegare l'apparecchio dalla presa elettrica quando non viene utilizzato e prima di qualsiasi operazione
di pulizia. Spegnere l'apparecchio prima di inserire o rimuovere gli accessori e prima della pulizia. Non
inserire le mani nella caraffa o maneggiare le lame con la spina del frullatore inserita.
• In generale, non utilizzare elettrodomestici che presentino cavi o spine danneggiati, che palesino un cattivo funzionamento o abbiano subito danneggiamenti di qualsiasi tipo. In questi casi, portare l'apparecchio al più vicino
centro di assistenza tecnica autorizzato per un controllo ed eventuale riparazione o regolazione.
• Il costruttore sconsiglia l'uso di accessori non originali.
• Non utilizzare l'apparecchio all'aperto.
• Non lasciare che il cavo penda dal bordo del piano su cui è appoggiato l'apparecchio, né entri a contatto con superfici calde.
• Non porre l'apparecchio sopra o in prossimità di bruciatori a gas o elettrici o nel forno caldo.
• Inserire sempre il cavo nella presa prima di azionare qualsiasi comando. Per spegnere l'apparecchio, premere il pulsante del comando velocità ed estrarre la spina dalla presa.
• Quando si lavorano liquidi caldi, rimuovere il dosatore dal coperchio.
• Non utilizzare l'apparecchio per usi diversi da quelli indicati.
Non toccare le parti in movimento.
• Per evitare il rischio di gravi lesioni o danni all'apparecchio, non inserire le mani o utensili nella caraffa
mentre l'apparecchio è in funzione.
È possibile utilizzare spatole di plastica o gomma, ma solo quando il frullatore è spento.
• Quando il frullatore è in funzione, non toccare le lame con le mani, non ostacolarne il movimento o rimuovere il coperchio della caraffa. Il frullatore può accendersi anche toccando accidentalmente uno dei pulsanti di controllo della velocità.
LE LAME SONO AFFILATE. MANEGGIARE CON CAUTELA.
• Non lasciare il frullatore incustodito quando è in funzione.
• Per ragioni di sicurezza, si sconsiglia di lavorare liquidi molto caldi.
• Lasciare raffreddare gli alimenti prima di inserirli nel frullatore.
• Attendere che le lame siano completamente ferme prima di rimuovere la caraffa dal corpo motore.
• NON azionare il frullatore quando è vuoto.
• Azionare il frullatore solo se il coperchio è correttamente posizionato.
•L’utilizzo di accessori diversi da quelli consigliati dal costruttore può essere causa di scosse elettriche.
• Il costruttore declina qualsiasi responsabilità per eventuali danni derivanti da uso improprio, non corretto
o irresponsabile.
• Non toccare l'apparecchio con le mani bagnate. Non immergere il corpo motore in acqua.
• ATTENZIONE: PER RIDURRE IL RISCHIO DI SHOCK ELETTRICO O INCENDIO, NON RIMUOVERE IL PAN-
NELLO DELLA BASE. L'APPARECCHIO NON CONTIENE COMPONENTI SOSTITUIBILI DALL'UTILIZZATORE. EVENTUALI RIP ARAZIONI VANNO ESEGUITE ESCLUSIVAMENTE DA PERSONALE AUTORIZZATO.
CONSERVARE LE PRESENTI ISTRUZIONI

23
CAVO DI ALIMENTAZIONE CORTO
(solo per Stati Uniti)
•L’apparecchio è dotato di un cavo di alimetazione corto per ridurre le possibilità di attorcigliamento del
cavo ed evitare di inciampare su cavi troppo lunghi.
•È possibile utilizzare cavi removibili o cavi di prolunga più lunghi prestando però molta attenzione durante
il loro utilizzo.
• Nel caso si utilizzi un cavo più lungo, le specifiche elettriche devono corrispondere a quelle indicate sulle
specifiche elettriche dell’apparecchio. Se l’apparecchio ha la messa a terra, il cavo dovrà essere a tre fili
con terra. La parte del cavo che eccede il fabbisogno, deve essere sistemata in modo da non uscire dal
tavolo o dal piano di lavoro dove potrebbe essere tirata da bambini o sulla quale si potrebbe inciampare.
• Il vostro apparecchio è provvisto di una spina polarizzata a corrente alternata (ovvero una spina avente
una lamina più larga delle altre). Questa spina si inserisce solo in un verso alla presa: si tratta di un dispositivo di sicurezza.
Se non riuscite ad infilare la spina nella presa, provate a girarla. Se ancora non riuscite ad infilarla, con-
tattate il vostro elettricista di fiducia per sostituire la presa.
A. Dosatore (con foro)
B. Coperchio
C. Vassoio frutta
D. Caraffa vetro
E. Gruppo lame
F. Corpo motore
G. Manopola ON/OFF/ “P”
H. Indicatore di regolazione velocità
DESCRIZIONE DELL
DESCRIZIONE DELL
’APP
’APP
ARECCHIO
ARECCHIO
PRIMA DELL’USO
Prima di utilizzare l’apparecchio per la prima volta,
lavare accuratamente tutti gli accessori, facendo
attenzione alle lame (sono taglienti); passare con un
panno umido il corpo motore.
Non immergere mai il corpo motore in acqua!
Verificare che la tensione di rete corrisponda a
quella indicata sulla targhetta dell’apparecchio.
COME SI USA
• Posizionare l’apparecchio su una superficie
asciutta e dritta. NON COLLEGATE L’APPARECCHIO AD UNA PRESA DI CORRENTE FINCHÉ
NON SONO STATI CORRETTAMENTE MONTATI GLI ACCESSORI.
• Inserire la caraffa sul corpo motore.
•Versare gli ingredienti nella caraffa.
Tale operazione può essere eseguita:
1.Togliendo tutto il coperchio (A+B) ruotandolo
in senso antiorario.
2.Inserendo il coperchio (B) senza il dosatore
(A).
•L’apparecchio è dotato di un pratico dosatore
(A) con foro, utile qualora si voglia versare
qualche goccia di aroma/essenza senza aprire
il coperchio (fig.2), inoltre capovolgendo il
dosatore (A) e tappando il foro è possibile utilizzarlo come misurino ad esempio per l’olio.
(vedi figura 3).
Attenzione:
Non utilizzare l’apparecchio per più di 3 minuti
consecutivamente. Fare pause di 3 minuti e
riprendere l’utilizzo per un massimo di 5 cicli.
Dopo ciò l’apparecchio deve essere lasciato raffreddare.
•Tagliare gli alimenti solidi in cubetti e aggiungere acqua.
• Inserire il coperchio (B) nella caraffa facendo-
lo ruotare in senso orario fino allo scatto del

24
dispositivo di sicurezza posizionato sul manico della caraffa stessa. Il blender non funziona se il coperchio non è posizionato correttamente sulla caraffa.
• Inserire la spina nella presa di corrente.
• Per iniziare la lavorazione degli ingredienti è
sufficiente girare la manopola ON/OFF (G) fino
a selezionare la velocità desiderata (1/2/3).
Quando gli ingredienti avranno raggiunto la
consistenza desiderata, riportate la manopola
in posizione (O).
• La posizione “P” serve per far funzionare l’apparecchio alla massima velocità permettendo
un miglior controllo sulle lavorazioni brevi.
• Disinserire la spina dalla presa di corrente
prima di ogni operazione di pulizia.
UTILIZZO DELLA FUNZIONE “P”
La funzione “P” (pulse) permette un miglior controllo sulle lavorazioni brevi.
L’apparecchio funziona finchè la manopola (G) è
mantenuta sulla funzione “P”.
PULIZIA DELL’APPARECCHIO
NON IMMRGERE MAI il corpo motore in acqua.
Accertarsi che la spina sia disinserita dalla presa
di corrente.
•Tutti i resti degli ingredienti sono da rimuovere
con una spatola. Nei modelli con caraffa in plastica, utilizzare spatole in gomma per non graffiare la superficie.
•Versare acqua tiepida fino a riempire a metà la
caraffa. Far funzionare per qualche secondo
l’apparecchio e poi svuotare la caraffa.
Se possibile, ripetere l’operazione.
•Togliere la caraffa, il coperchio, il dosatore
prima di lavarli in acqua tiepida e saponata.
Poi risciacquare e asciugare bene.
• Per facilitare le operazioni di pulizia, alcuni
modelli hanno la possibilità di smontare il gruppo lama come segue:
1.Rimuovere la carffa dalla base dell’apparecchio e capovolgerla.
2. Inserire i ganci situati all’estremità del dosatore “B” negli appositi incavi che si trovano
sulla base della caraffa capovolta (vedi figura 4)
3.Ruotare il dosatore in senso orario fino a fine
corsa quindi tirare fino a sganciare il gruppo
lame.
4.Lavare il tutto, asciugare quindi procedere al
rimontaggio avendo l’avvertenza di reinserire la guarnizione correttamente quindi posizionare il gruppo lame sulla base della caraffa, premere a fondo fino ad inserimento
completo dello stesso, infine servendovi del
dosatore (A) ruotare il gruppo lame in senso
antiorario fino a fine corsa.
La caraffa e tutti i particolari in plastica non
vanno lavati in lavastoviglie o con acqua bol-
lente.
• Per la caraffa in vetro si consiglia di prendere
tutte le precauzioni necessarie per evitare urti violenti.
• Passare il corpo motore e il cavo di alimentazione
con un panno umido o con una spugnetta.
Asciugare completamente con un panno morbido.
•Avvolgere con cura il cavo di alimentazione alla
base del corpo motore.
CONSIGLI D’USO
1. Generale
• Per avere risultati e non rischiare che gli ingredienti fuoriescano dalla caraffa, aggiungere
nella caraffa un po’ di ingredienti alla volta.
•Non riempire la caraffa più di 3/4 - l’azione
delle lame fanno aumentare gli ingredienti nella
caraffa. Le ricette che impiegano grosse quantità di ingredienti vanno fatte in più volte.
•A meno che la ricetta non dica il contrario, versare prima gli ingredienti liquidi di quelli solidi. Il
liquido facilita la lavorazione e permette di utilizzare velocità inferiori. Aggiungere sempre una
tazza di acqua prima di lavorare il ghiaccio.
•Frullare per 5-30 secondi e verificare la consistenza. Continuare poi a lavorare gli ingredienti fino ad ottenere la consistenza desiderata.

Fate attenzione a non lavorare troppo gli ingredienti; questo causerebbe una perdita di consistenza della ricetta.
• Utilizzate il frullatore con il coperchio sempre
inserito.
•NON rimuovere la caraffa dal corpo motore
mentre l’apparecchio è in funzione.
• Per evitare la possibilità di ferirsi o di danneggiare l’apparecchio, non inserite le mani o utensili nella caraffa mentre l’apparecchio è in funzione. É possibile utilizzare una spatola quando
l’apparecchio è spento.
2. Ingredienti solidi
•É necessario fare par ticolare attenzione durante la preparazione di ingredienti sottili. In questo caso è necessario interrompere di quando in
quando la lavorazione, togliere il coperchio e
raccogliere dai lati della caraffa e dai coltelli gli
ingredienti. Poi reinserire il coperchio e continuare la lavorazione. Se così facendo la lavorazione diventa lunga, selezionare una velocità
più alta.
• Per aggiungere alimenti solidi nella caraffa,
rimuovere il dosatore dal coperchio e aggiungerli un po’ alla volta attraverso il foro nel
coperchio. Gli alimenti tipo verdure e formaggi
vanno sempre tagliati a cubetti prima di essere
inseriti nella caraffa.
3. Preparazioni calde
É sempre necessario rimuovere il dosatore dal
coperchio prima di iniziare la preparazione di
ricette calde.
• Aggiungere lentamente gli alimenti caldi, massimo 2 tazze alla volta, attraverso il foro del
coperchio.
25

26
Pratico e maneggevole, il vostro apparecchio vi permetterà di preparare in poco tempo e con ottimi risultati,
creme, maionese, salse, frittate, crespelle, ripieni per verdure, frappé, sgroppini e cocktail in genere. In questo
ricettario sono contenute alcune idee per utilizzare in modo completo e vario l’apparecchio. Tali ricette sono la
base di partenza e sicuramente la Vostra fantasia arricchirà gli usi e le preparazioni.
RICETTARIO
PANNA MONTATA
• 200ml (6 ounces) di panna da montare
Mettere la panna liquida nella caraffa e far funzionare a velocità 3 per 20-30 secondi circa.
MAIONESE
•1 uovo intero • olio q.b.
• un cucchiaino di senape • un pizzico di sale
• qualche goccia di limone
Mettere l’uovo, il sale la senape e il limone nella
caraffa e far funzionare a velocità 2 per alcuni
secondi. Riempire il dosatore d’olio e sempre a velocità 2 continuare a mescolare (sempre aggiungendo olio) fino a che la maionese si rassoda. Salsa
ideale per pesce lesso.
SALSA ROSA
• 50gr. (2 ounces) di maionese
• 10gr. (0,35 ounces) di ketchup
•4 gocce di worchester
Mettere tutti gli ingredienti assieme nella caraffa e
utilizzare la velocità 1 per alcuni secondi. Ideale per
patate fritte e club sandwich.
GRANITE
• ghiaccio • sciroppo a piacere
Versare tutto il ghiaccio nella caraffa e PULSE fino a
che tutto il ghiaccio si trita in modo omogeneo. Porre
il ghiaccio in un bicchiere e aggiungere dello sciroppo.

27
Questa garanzia e’applicabile a tutti i piccoli elettrodomestici a marchio Kenwood o De’Longhi.
Garanzia limitata
Copertura della garanzia
De’Longhi garantisce che ciascun prodotto è esente da difetti di materiale e di fabbricazione. La presente garanzia è limitata alla riparazione delle parti difettose o delle loro componenti presso la nostra
fabbrica o presso un centro di assistenza autorizzato, ad eccezione delle parti danneggiate durante la
spedizione. Nel caso di sostituzione o restituzione di un prodotto, l'unità deve essere restituita con trasporto prepagato. Il modello riparato o nuovo verrà restituito a spese dell'azienda.
La presente garanzia ha validità solamente nel caso in cui il prodotto venga utilizzato in conformità
con le istruzioni di fabbrica con cui viene venduto, e su un circuito a corrente alternata ( c.a.).
Durata della garanzia
La presente garanzia ha validità di un anno ( 1 ) dalla data di acquisto riportata sulla prova d'acquisto ed è riconosciuta esclusivamente all'acquirente originale per l'uso.
Limitazioni della garanzia
La garanzia non copre difetti o danni del prodotto dovuti a riparazioni o alterazioni eseguite al di fuori
della fabbrica o dai centri di assistenza autorizzati, né si applica a prodotti danneggiati da abuso, uso
improprio, negligenza o incidente. Inoltre, i danni consequenziali ed incidentali derivanti dall'uso di
questo prodotto o da una qualsiasi violazione del contratto o di questa garanzia non sono coperti da
quest'ultima. Alcune giurisdizioni non consentono l'esclusione o la limitazione di danni incidentali o
consequenziali; in tal caso, le limitazioni o esclusioni di cui sopra non saranno applicabili
Come ottenere ser vizi di assistenza
Nel caso occorra fare delle riparazioni, rivolgersi al servizio informazioni:
Residenti negli USA: Contattare il servizio di assistenza telefonica gratuito al numero 1-800-322-3848
oppure collegarsi all’indirizzo internet www.delonghi.com. Per tutti gli accessori, i componenti o i pezzi
di ricambio, contattare il reparto componenti al numero 1-800-865-6330.
Residenti in Canada: Contattare il servizio di assistenza telefonica gratuito al numero1-888-335-6644
oppure collegarsi all’indirizzo internet www.delonghi.com.
Residenti in Messico: Riferirsi alle condizioni di garanzia limitata riportate nella sezione per il Messico.
Residenti in altri paesi: Vogliate visitare il nostro sito internet www.delonghi.com.
Per gli indirizzi di De'Longhi si prega di vedere la pagina posteriore del manuale.
La garanzia sopra riportata è esclusiva e sostituisce qualsiasi altra garanzia, espressa o implicita.
Eventuali garanzie implicite previste dalle leggi vigenti saranno soggette ai limiti di durata stabiliti dalla
garanzia. Il limite non si applica nel caso di un'estensione della garanzia con De’Longhi. Alcune giurisdizioni non consentono l'esclusione o la limitazione della durata delle garanzie implicite; in tal caso,
le limitazioni di cui sopra non saranno applicabili. De’Longhi non autorizza alcuna persona o società
ad assumersi qualsivoglia responsabilità relativamente alla vendita o all'uso dei propri prodotti.
Applicazione delle leggi dei singoli stati
La presente garanzia concede diritti legali specifici oltre a quelli eventualmente previsti dalla legislazione vigente nei vari stati.

De’Longhi America, Inc.
Park 80 West, Plaza One
Saddle Brook, NJ 07663
1-800-322-3848
De’Longhi Canada, Inc.
6150 McLaughlin Road
Mississauga, Ontario
L5R 4E1 Canada
1-888-335-6644
FIDUCIA ITALIANA S.A DE C.V
Pestalozzi #814
Col. Narvar te
Del. Benito Juarez
C.P. 03100
tels: 5543 1447
lada sin costo: 01 800 711 8805
www.delonghi.com
298IDL/05.06
Printed in China
 Loading...