

Page 1
Instruction Manual
Mode D’emploi
Blender
Mélangeur
Manual de instrucciones
Manuale di istruzioni
DBL750 Series / Serié
Read and Save These Instructions
Lisez et conservez ces instructions
Guardar estas instrucciones después de haberlas leído
Leggete e conservate queste istruzioni
Licuadora
Frullatore
P
U
E
L
S
Page 2

2
IMPORTANT SAFEGUARDS
When using electrical appliances, basic safety precautions should always be followed to
reduce the risk of fire, electrical shock and/or personal injury.
1. Read all instructions carefully.
2. To protect against electrical shock, do not place the cord or the
blender’s base in water or other liquid.
3. Close supervision is necessary when any appliance is used by or near
children.
4. Unplug from outlet when not in use and before cleaning. Turn the
unit off before putting on or taking off parts, and before cleaning the
appliance. Never put hands into the jar, or handle the blade assembly with
appliance plugged in.
5. Do not operate any appliance with a damaged cord or plug or after the
appliance malfunctions or has been damaged in any manner. Return
appliance to authorized service facility for examination, repair or adjustment.
6. The use of accessory attachments is not recommended by the
manufacturer. It may be dangerous and should be avoided.
7. Do not use outdoors.
8. Do not let cord hang over edge of table or counter, or touch hot surfaces.
9. Do not place on or near hot gas or electric burner, or in heated oven.
10. Always plug cord into the wall outlet before turning on any controls. To
disconnect turn power OFF by pushing the “0” button on the speed control,
then remove plug from wall outlet.
11. When blending hot liquids, remove the ingredient cap from the lid. It is
recommended to use the glass jar for hot liquids.
12. Do not use this appliance for other than intended use.
13. Avoid contact with moving parts.
14. Keep hands and utensils out of jar while blending, to reduce the risk of severe
injury to persons or damage to blender itself. A rubber or plastic spatula may
be used but must be used only when the blender is turned OFF.
15. When blender is “on”, do not touch blade assembly, interfere with blade
movement, or remove the lid from the jar. Accidentally touching a speed
button may activate the blender.
16. BLADES ARE SHARP. HANDLE CAREFULLY.
17. Never leave your blender unattended while running.
18. For safety reasons, the blending of hot liquids is not recommended.
19. Allow hot liquids to cool before blending.
20. When removing the jar from the power unit, wait until the blades have
completely stopped.
21. Never run the blender when it is empty.
22. Only operate the blender with the lid in place.
23. Do not use more than one attachment at a time.
24. The manufacturer cannot be held responsible for damage caused by
inappropriate, incorrect or irresponsible use.
Page 3

3
IMPORTANT SAFEGUARDS (continued)
25. Never touch the appliance with wet hands. Never immerse the base in
water.
26. WARNING: TO REDUCE THE RISK OF ELECTRICAL SHOCK OR
FIRE, DO NOT REMOVE THE BASE PANEL. NO USER SERVICEABLE
PARTS ARE INSIDE. REPAIR SHOULD BE DONE ONLY BY
AUTHORIZED PERSONNEL.
UL RATED FOR HOUSEHOLD AND
COMMERCIAL USE
SAVE THESE INSTRUCTIONS
SHORT CORD INSTRUCTIONS
A short power cord is provided to reduce the risk resulting from entanglement
or tripping over a longer cord. Longer detachable power supply cords are
available and may be used if care is exercised in their use. If a longer
detachable power cord or extension cord is used (1) the marked electrical
rating of the extension cord should be at least as great as the electrical
rating of the appliance, and (2) the longer cord should be arranged so that it
will not drape over the countertop or table top where it can be pulled on by
children or tripped over unintentionally. The electrical rating of the appliance
is listed on the bottom of the unit. If the appliance is of the grounded type,
the extension cord should be a grounded type 3 wire cord. This appliance
has a polarized plug. One blade is wider than the other. To reduce the risk of
electrical shock this plug will fit in a polarized plug only one way. If the plug
does not fit, contact a qualified electrician. Do not attempt to modify the
plug in any way.
BEFORE FIRST USE
Place the box on a large, sturdy flat surface. Carefully unpack your blender and
remove all packaging material and literature. Remove any labels or stickers from the
blender. To remove any dust that may have accumulated during packaging, you may
wipe the base with a clean, damp cloth. Dry thoroughly. Do not immerse the base in
water or other liquid. Carefully clean the accessories in warm water with mild detergent.
Rinse and dry thoroughly. The glass jar can be placed in the top rack of your
dishwasher. The stainless steel jar cannot be placed in the dishwasher, it should be
washed by hand. Do not use harsh or abrasive cleaners. (See “Cleaning Your Blender”
section of this manual for detailed instructions.) Keep all plastic bags away from
children.
Page 4
4
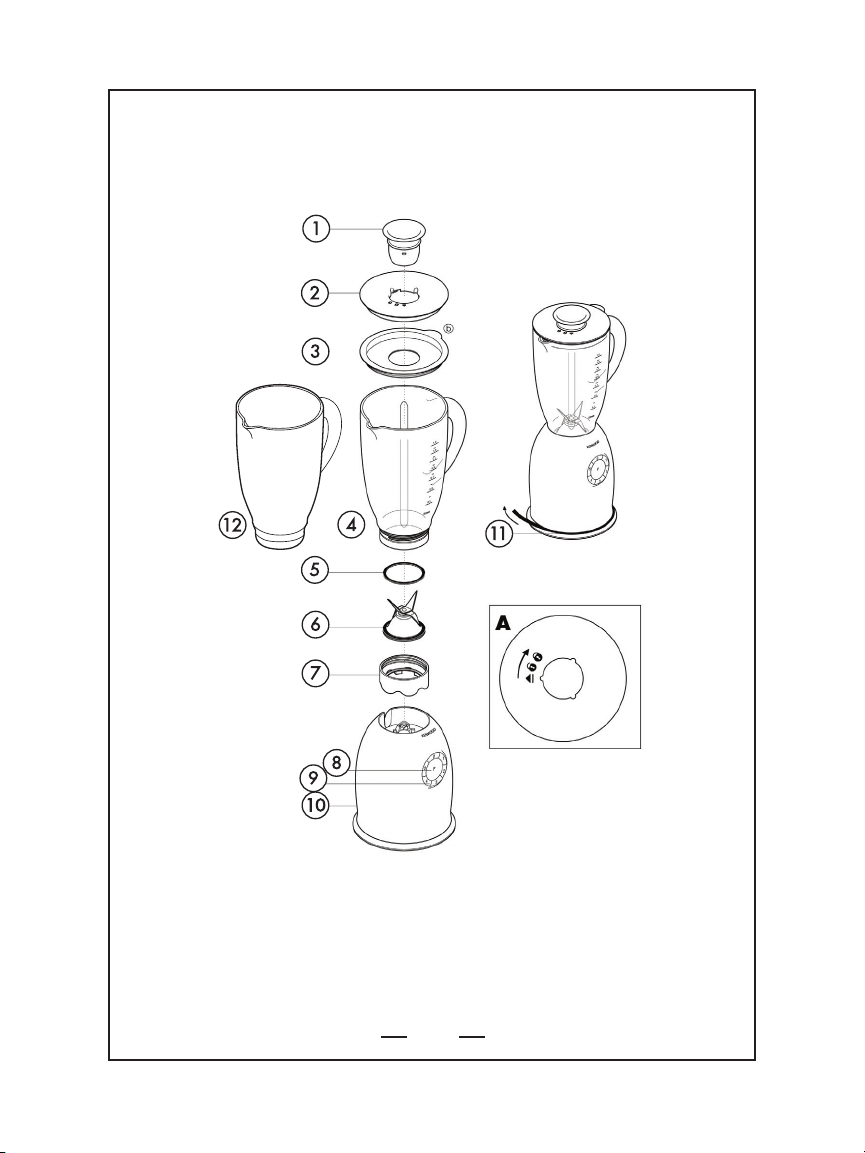
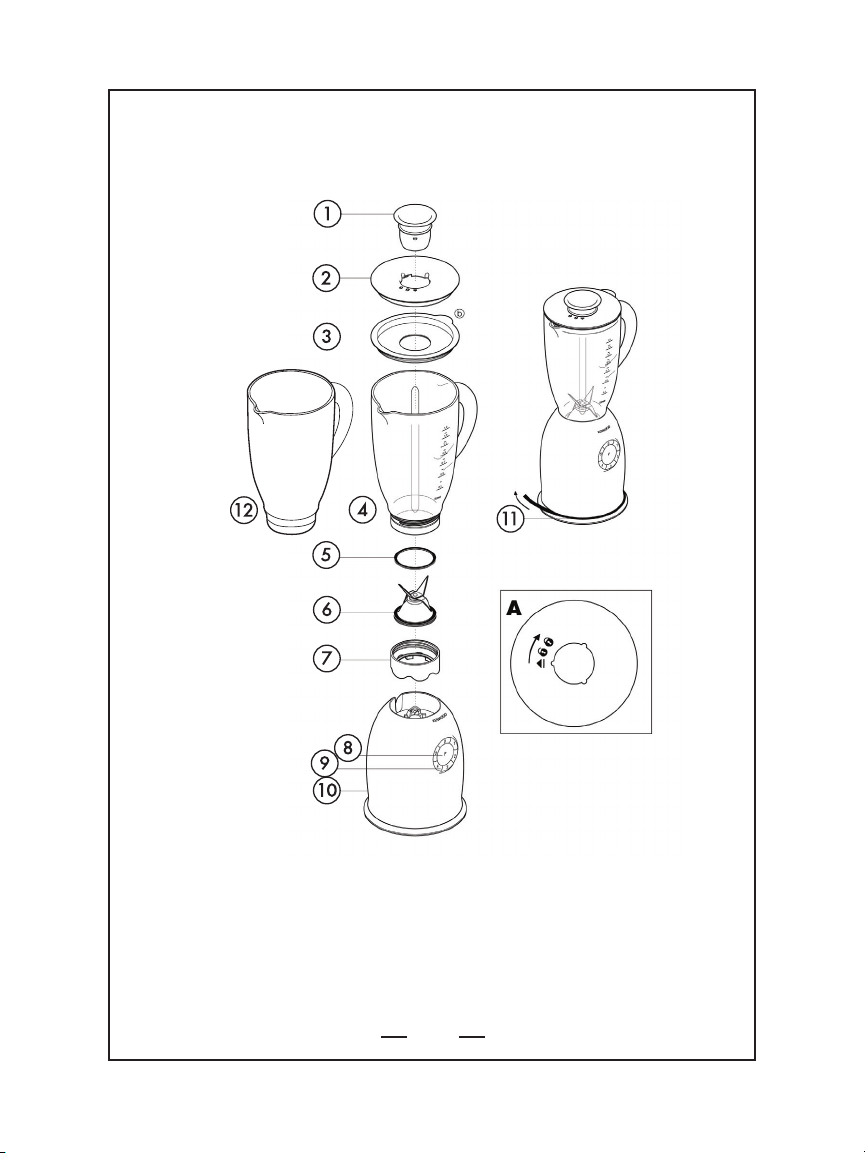
KNOW YOUR BLENDER
FIGURE 1
1. Ingredient Cap (2 included)
2. Dual Action Locking
Lid
(2 included)
3. Lid Seal (2 included)
4. Glass Jar
5. Sealing Ring (2 included)
6. Blade Assembly (2 included)
7. Blade Assembly Base
(2 included)
8. Pulse Control
9. Speed Control
10. Base
11. Cord Storage
12. Stainless Steel Jar
.5
1
.3
1
Page 5
5
KNOW YOUR BLENDER (continued)
FEATURES:
1. TWO REMOVABLE BLADE ASSEMBLIES: For easy cleaning.
2. CORD STORAGE
: For easy and convenient storage.
3. TWO LIDS WITH REMOVABLE INGREDIENT CAPS: The durable, sealed lids
have 3 positions: locked, unlocked for fitting and removing lids and you
can remove the central cap to easily add ingredients during blending.
4. ICE CRUSH FUNCTION
: Select the maximum speed (5), and this unique
function will easily crush ice by intermittently switching between “on”
and “off” for maximum efficiency.
5. 5-SPEED SOFT
-TOUCH CONTROLS WITH PULSE: Illuminated soft-touch
controls are easy-to-use and guarantee the perfect speed for all
blending tasks.
6. DROP-ON JARS
: No need to turn and twist the jar for perfect
positioning. Just drop the jar onto the base, and it will slide and lock
into place, just like professional blenders.
7. DUAL SAFE SYSTEM
: A De’Longhi exclusive, this system is equipped with
an automatic safety device that shuts down the motor if the jar is
removed from the base while in operation.
8. BRUSHED DIE-CAST ALUMINUM BASE
: Heavy-duty base ensures
maximum stability, and brushed aluminum finish beautifully
complements any kitchen decor.
9. SOFT START FEATURE: Automatically starts the blender at a lower speed
to prevent splattering, then quickly increases to the selected speed for
optimal performance.
10. HEA
VY-DUTY GLASS JAR: The durable 50-ounce capacity glass jar resists
scratching and discoloration.
HEAVY-DUTY STAINLESS STEEL JAR: The durable 50-ounce capacity
stainless steel jar is professional-quality and light weight.
Page 6

6
OPERATING YOUR BLENDER
1. Place the blender on a flat, level surface away from any edge.
2. Carefully fit the sealing ring, ensuring that the seal is placed
completely under the rim of the blade assembly. CAUTION: Blades
are sharp. NOTE: Leaking will occur if the seal is damaged or not
fitted correctly.
3. Carefully attach the blade assembly to the blade assembly base.
CAUTION: Blades are sharp.
4. Carefully screw the jar tightly onto the blade assembly.
5. Push the lid seal into the underside of the lid. Fit and lock the
ingredient cap by turning it one position.
6. Fit the lid to the jar and turn the ingredient cap to the locked
position. NOTE: The locked position is noted on top of the lid. The
ingredient cap can be placed in three different positions.
a) Unlocked: To remove the ingredient cap.
b) Unlocked: To remove and replace the lid.
c) Locked: Locks the lid to the jar.
7. Place the blender onto the base.
8. Plug the unit into a 120V / 60Hz only outlet. The “0” on the speed
control will illuminate red indicating the power is on.
9. Select a speed and the relevant number will illuminate green.
10. The pulse mode allows you to create a burst of power for quick,
efficient blending. To use the pulse function, push and release
“PULSE” in middle of speed control. Repeat if necessary. The
motor keeps running for as long as the button is pushed in. This
allows you to control the texture of various foods.
11. To crush ice select the maximum speed (5). It will intermittently
switch between “on” and “off” for maximum efficiency.
12. To dislodge food, use a rubber or plastic spatula to help remove
food lodged around the blade assembly. DO NOT USE SPATULA
UNTIL YOU HAVE TURNED THE BLENDER OFF. Replace the lid and
ingredient cap and continue blending, if necessary. Make sure
spatula is not inside jar before blending.
Page 7
7
OPERATING YOUR BLENDER (continued)
13. When finished blending, press the “0” button on the speed control
and unplug the blender from the outlet. Although this unit is
equipped with a “Dual Safe System” that will automatically shut off
the unit “off” if the jar is removed from the base, it is not
recommended to remove jar while unit is “on”.
Page 8

8
OPERATING YOUR BLENDER (continued)
DOs and DON’Ts WHEN USING YOUR BLENDER:
DO
1. Always add liquid ingredients to the jar first, then add remaining
ingredients. This will ensure that ingredients are uniformly mixed.
2. Cut foods into cubes approximately 1/2 inch (1.3 cm) to 1 inch
(2.5 cm) to achieve a more uniform result. Cut all cheeses into
pieces no larger than 1/2 inch (1.3 cm).
3. Use a rubber or plastic spatula as needed, only when the blender is
turned “off”. Never use metal utensils, as damage may occur to the
jar or blade assembly.
4. When scraping the jar with a spatula, remove the food from the sides
of the jar and place food in center of jar, over the blade assembly.
5. When chopping fresh herbs, garlic, onion, zest, bread crumbs, nuts,
spices, etc. make sure the jar and blade assembly are completely
dry.
6. If food tends to stick to the sides of the jar when blending, pulse in
short bursts. Pulses should be short bursts. Space the pulses so the
blades stop rotating between pulses.
7. Keep the jar lid on the blender while blending.
DON’T
1. Do not use the blender as a storage container. Keep it empty before
and after use.
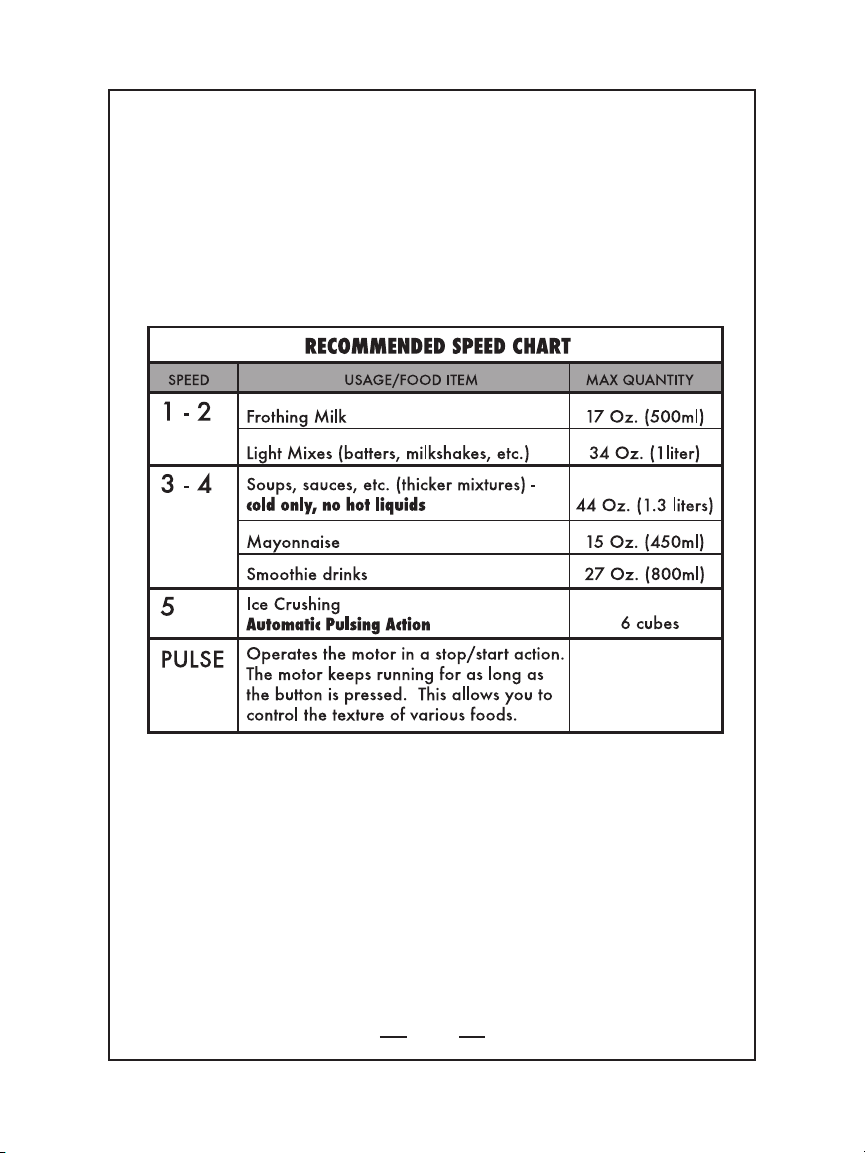
2. Never blend more than 44 ounces (1.3 liters) or more than 34 ounces
(1 liter) for frothy liquids like milk shakes. If the motor stalls, turn the
blender OFF, unplug the unit and remove a portion of the food, then
continue.
3. For smoothie recipes, never blend frozen ingredients that have
formed a solid mass during freezing. Break it up before adding to the
jar.
4. Do not put dry ingredients into the blender before switching “on”. If
necessary, cut them into pieces; remove the ingredient cap; then,
with the machine running, drop them through one by one. Keep
your hand over the opening. Empty regularly.
5. To ensure a long life for your blender, never run it longer than 60
seconds. Switch the blender “off” as soon as you have the right
consistency.
6. Do not place blade assembly and sealing ring onto base without jar
attached.
7. Do not attempt to mash potatoes, knead heavy dough or beat egg
whites.
8. Do not over-process foods. Blender will achieve most desired results
in seconds, not minutes.
Page 9

9
OPERATING YOUR BLENDER (continued)
TIPS
1. When making mayonnaise, put all ingredients, except the oil, into the
blender. Remove the ingredient cap. Then, with the machine
running, pour the oil down slowly through the hole in the lid.
2. The machine will not work if the jar is not fitted correctly.
3. The stylish, professional-quality stainless steel jar is durable and
lightweight. It's ideal for making smoothies and other cold drinks. It is
not recommended to blend hot liquids in the stainless steel jar as the
jar may become hot to the touch. It is recommended that the glass
jar be used when blending hot liquids.
CLEANING YOUR BLENDER
1. CAUTION: Make sure your blender is unplugged before attempting to
clean. To protect against electric shock, do not immerse cord, plug
or power unit of blender in water or other liquid.
2. The outside of the base can be cleaned by wiping the surface with
a damp, soft cloth. CAUTION: Never immerse the base in water or
other liquid.
3. Stainless steel jar, ingredient cap, lid, lid seal, sealing ring, blade
assembly and blade assembly base may be washed by hand with
warm, soapy water. CAUTION: Blades are sharp, be careful when
washing. Rinse and dry thoroughly. The glass jar can be placed in
the top rack of the dishwasher. Do not place any other parts of the
blender in the dishwasher.
Page 10

10
PRÉCAUTIONS IMPORTANTES
Lorsque vous utilisez des appareils électriques, vous devriez toujours respecter
des précautions élémentaires pour réduire les risques d’incendie,
d’électrocution ou de blessures.
1. Lire attentivement toutes les instructions.
2. Pour se protéger des risques de choc électrique, ne pas placer le cordon ou
le socle du mélangeur dans l’eau ni dans d’autres liquides.
3. Une supervision étroite est nécessaire si un appareil est utilisé par un
enfant ou près d’un enfant.
4. Débrancher l’appareil de la prise de courant lorsqu’il n’est pas utilisé, avant
d’installer ou de retirer des pièces et avant le nettoyage. Ne jamais mettre
la main dans le récipient ou toucher les lames lorsque l’appareil
est branché.
5. Ne pas utiliser le mélangeur ou tout autre appareil ménager si le cordon ou
la fiche sont endommagés, s’il présente un défaut de fonctionnement, ou s’il
est tombé ou a été endommagé de quelque manière que ce soit. Retourner
l’appareil au centre de réparation autorisé le plus proche pour le faire
examiner ou réparer, ou pour effectuer un réglage.
6. L’utilisation d’accessoires peut poser des dangers. Le fabricant
recommande donc de ne pas utiliser d’accessoires avec cet appareil.
7. Ne pas utiliser l’appareil à l’extérieur.
8. Ne pas laisser le cordon pendre du bord d’une table ou du comptoir, ou
toucher des surfaces chaudes.
9. Ne pas placer l’appareil à proximité de brûleurs à gaz ou électriques, ou
dans un four chauffé.
10. Brancher la fiche dans la prise murale avant de mettre l’appareil en marche.
Pour l’arrêter (OFF), appuyer sur le bouton « 0 » de la commande de
réglage de la vitesse, puis retirer la fiche de la prise murale.
11. Lorsqu'on mélange des liquides chauds, il faut enlever le chapeau doseur
d'ingrédients du couvercle. Il est recommandé d’utiliser le récipient en verre
pour les liquides chauds.
12. N’utiliser cet appareil qu’aux fins prévues.
13. Éviter de toucher aux pièces mobiles.
14. Afin de réduire les risques de blessures graves ou de dommages au
mélangeur, ne pas introduire les mains ni des ustensiles dans le récipient
pendant le mélange. On peut utiliser une spatule en caoutchouc ou en
plastique, mais seulement une fois que le mélangeur est arrêté.
15. Ne pas toucher aux lames ou interférer avec leur mouvement, ou encore
retirer le couvercle du récipient lorsque le mélangeur est en marche (ON).
Le mélangeur risque de se mettre en marche si l’on touche
accidentellement un bouton de réglage de la vitesse.
16. LES LAMES SONT TRANCHANTES. LES MANIPULER AVEC
PRUDENCE.
17. Ne jamais laisser fonctionner le mélangeur sans surveillance.
18. Pour des raisons de sécurité, on recommande de ne pas mélanger de
liquides chauds dans cet appareil.
19. Laisser refroidir les liquides chauds avant de les mélanger.
20. Attendre que les lames aient complètement arrêté de tourner avant de
retirer le récipient de verre du bloc moteur.
Page 11

PRÉCAUTIONS IMPORTANTES (suite)
21. Ne jamais faire fonctionner à vide.
22. N’utiliser le mélangeur qu’avec le couvercle en place.
23. Ne pas utiliser plus d’un accessoire à la fois.
24. Le fabricant ne peut être tenu responsable des dommages dus à une
utilisation inappropriée, incorrecte ou irresponsable.
25. Ne pas toucher l’appareil avec les mains mouillées. Ne jamais plonger
le socle dans l’eau.
26. AVERTISSEMENT : AFIN DE RÉDUIRE LES RISQUES D’INCENDIE
ET/OU DE CHOC ÉLECTRIQUE, NE PAS DÉVISSER LE PANNEAU
SOUS LE SOCLE. CET APPAREIL NE CONTIENT AUCUNE PIÈCE
RÉPARABLE PAR L’UTILISATEUR. LES RÉPARATIONS DOIVENT ÊTRE
FAITES PAR DU PERSONNEL AUTORISÉ.
ÉVALUÉ UL POUR USAGE DOMESTIQUE ET COMMERCIAL
CONSERVER CES INSTRUCTIONS
INSTRUCTIONS SPÉCIALES POUR LE CORDON
ÉLECTRIQUE
Le cordon électrique est court pour réduire les risques d’entortillement et de
trébuchement associés à un cordon électrique plus long. Un prolongateur peut être
utilisé s’il est utilisé avec soin. Cependant, en cas d’utilisation d’un prolongateur, son
régime électrique devrait être au moins aussi grand que celui de l’appareil. Le
prolongateur devrait être disposé afin qu’il ne pende pas du comptoir ou de la table
là où il pourrait être tiré par des enfants ou faire trébucher quelqu’un par accident.
Le régime électrique de la cafetière est inscrit sur le panneau inférieur de l’appareil.
Cet appareil possède une fiche polarisée (une branche est plus large que l’autre). À
titre de sécurité, cette fiche ne peut être insérée que d’une seule façon dans une
prise murale. Si elle ne s’insère complètement dans un sens ou dans l’autre,
contactez un électricien qualifié pour faire remplacer la prise obsolète. N’essayez en
aucun cas d’en modifier les branches.
AVANT LA PREMIÈRE UTILISATION
Déposez la boîte sur une surface plate et solide. Déballez soigneusement le mélangeur et
retirez tout le matériel d’emballage et la documentation. Enlevez toutes les étiquettes et
tous les autocollants qui se trouvent sur le mélangeur. Pour enlever la poussière accumulée
pendant l’emballage, essuyez le socle à l’aide d’un chiffon doux mouillé. Séchez-le
soigneusement. N’immergez pas le socle dans l’eau ni dans tout autre liquide. Nettoyez
soigneusement les accessoires à l’aide d’eau chaude et d’un détergent doux. Rincez-les
et séchez-les bien. Le récipient de verre peut être lavé dans le lave-vaisselle (panier
supérieur). Le récipient en acier inoxydable ne peut pas être mis au lave-vaisselle; il devrait
être lavé à la main. N’utilisez pas de produits abrasifs pour nettoyer le mélangeur. (Pour
des instructions détaillées, consulter la section de ce guide intitulée « Nettoyage du
mélangeur ».) Gardez tous les sacs en plastique hors de la portée des enfants.
11
Page 12
12
CARACTÉRISTIQUES DU MÉLANGEUR
FIGURE 1
1. Chapeau doseur
d’ingrédients (2 inclus)
2. Couvercle verrouillable
à double action (2 inclus)
3. Joint étanche (2 inclus)
4. Récipient de verre
5. Bague d’étanchéité
(2 inclus)
6. Ensemble de lames
(2 inclus)
7. Base de l’ensemble de
lames (2 inclus)
8. Commande d’impulsion
9. Commande de réglage de
la vitesse
10. Socle
11. Compartiment de
rangement du cordon
12. Récipient en acier
inoxydable
.5
1
3
.
1
Page 13

13
CARACTÉRISTIQUES DU MÉLANGEUR (suite)
CARACTÉRISTIQUES :
1. DEUX ENSEMBLES DE LAMES AMOVIBLES: Facilite le nettoyage.
2. COMP
ARTIMENT DE RANGEMENT DU CORDON: Facilite le rangement.
3. DEUX COUVERCLES AVEC BOUCHONS À INGRÉDIENTS AMOVIBLES:
Les couvercles
durables et étanches ont trois positions: verrouillé, déverrouillé (pour le mettre en
place et l’enlever) et avec le chapeau doseur d’ingrédients retiré pour ajouter
des ingrédients pendant le mélange.
4. BROYAGE DE LA GLACE: Pour broyer la glace, sélectionner la vitesse
maximale (5). Pour une efficacité optimale, le mélangeur broie la glace en
alternant entre la position de marche (ON) et la position d’arrêt (OFF).
5. CONTRÔLES À EFFLEUREMENT À 5 VITESSES A
VEC FONCTION
IMPULSION: Les contrôles à effleurement illuminés sont faciles à utiliser et
garantissent une vitesse de mélange optimale à chaque fois.
6. RÉCIPIENTS À POSE DIRECTE:
Il n’est pas nécessaire de tourner ou visser les
récipients pour les mettre parfaitement en position. Il suffit de poser le récipient
en verre ou en acier inoxydable sur le socle et il tournera et se verrouillera en
position de lui-même, comme les mélangeurs pour professionnels.
7. SYSTÈME À DOUBLE SÉCURITÉ:
Exclusivité de De’Longhi, ce système est
doté d’un dispositif de sécurité automatique qui éteint le moteur dès que l’on
retire le récipient du socle du mélangeur en marche.
8. SOCLE EN ALUMINIUM BROSSÉ, MOULÉ SOUS PRESSION:
Socle
robuste garantissant une stabilité maximale. Avec sa finition en aluminium
brossé, il saura compléter le décor de n’importe quelle cuisine.
9. FONCTION DE DÉMARRAGE PROGRESSIF: Afin de prévenir les
éclaboussures, le mélangeur démarre automatiquement à une vitesse plus
lente, puis passe rapidement à la vitesse désirée pour atteindre sa
performance optimale.
10. RÉCIPIENT DE VERRE ROBUSTE:
Le récipient de verre solide de 50 onces
résiste aux rayures et à la décoloration.
RÉCIPIENT ROBUSTE EN ACIER INOXYDABLE: Le récipient durable en acier
inoxydable d’une contenance de 50 onces est de qualité professionnelle et
léger.
Page 14

14
FONCTIONNEMENT DE VOTRE MÉLANGEUR
1. Déposez le mélangeur sur une surface plate et de niveau, et loin du
bord.
2. Placez soigneusement la bague d’étanchéité sous le rebord de
l’ensemble de lames. ATTENTION : Les lames sont tranchantes.
REMARQUE : Le récipient coulera si le joint est endommagé ou n’est
pas placé correctement.
3. Fixez prudemment les lames sur la base de l’ensemble de lames.
ATTENTION : Les lames sont tranchantes.
4. Vissez soigneusement le récipient sur l’ensemble de lames.
5. Insérez le joint du couvercle dans le rebord sous le couvercle. Mettez le
chapeau doseur d’ingrédients en place et verrouillez-le en le tournant.
6. Mettez le couvercle sur le récipient et verrouillez le chapeau
doseur d’ingrédients. REMARQUE : La position verrouillée est indiquée
sur le couvercle. Le chapeau doseur d’ingrédients peut être réglé à trois
positions différentes.
a) Déverrouillé : Pour le retirer.
b) Déverrouillé : Pour enlever et remettre le couvercle.
c) Verrouillé : Pour verrouiller le couvercle sur le récipient de verre.
7. Posez le mélangeur sur son socle.
8. Branchez l’appareil dans une prise murale de 120 volts / 60Hz. Le « 0 »
sur la commande de réglage de la vitesse s’illumine en rouge pour
indiquer que l’appareil est sous tension.
9. Sélectionnez la vitesse, et le chiffre correspondant s’illuminera en vert.
10. Le mode Impulsion vous permet de créer des « vagues » de
puissance pour assurer un mélange rapide et parfait. Pour utiliser la
fonction Impulsion, appuyez et relâchez le bouton « PULSE » au milieu
de la commande de réglage de la vitesse. Répétez au besoin. Le moteur
continue de tourner tant que ce bouton reste enfoncé. Cette fonction
permet de contrôler la texture des aliments mélangés.
11. Pour broyer de la glace, sélectionnez la vitesse maximale (5). Pour
une efficacité maximale, le mélangeur alternera entre la position de
marche (ON) et la position d’arrêt (OFF).
Page 15

15
FONCTIONNEMENT DE VOTRE MÉLANGEUR (suite)
12. Pour déloger les aliments autour des lames, utilisez une spatule en
caoutchouc ou en plastique. N’INTRODUISEZ PAS DE SPATULE
DANS LE RÉCIPIENT PENDANT QUE LE MÉLANGEUR
FONCTIONNE. Remettez le couvercle et le chapeau doseur
d’ingrédients en place et continuez le mélange, si nécessaire. Avant de
redémarrer le mélangeur, vérifiez que vous n’avez pas laissé la spatule
dans le récipient.
13. Une fois le mélange terminé, appuyez sur le bouton « 0 » de la commande
de réglage de la vitesse et débranchez le mélangeur de la prise murale.
Même si cet appareil est équipé d’un « système à double sécurité », grâce
auquel l’appareil s’éteint automatiquement dès que l’on retire le récipient de
son socle, il n’est pas recommandé de retirer le récipient de son socle lorsque
l’appareil est en marche.
Page 16

16
FONCTIONNEMENT DE VOTRE MÉLANGEUR (suite)
CHOSES À FAIRE ET À NE PAS F
AIRE AVEC LE MÉLANGEUR :
CHOSES À FAIRE
1. Pour assurer un mélange uniforme, ajoutez toujours les ingrédients liquides
dans le récipient en premier, avant tous les autres ingrédients.
2. Pour un mélange plus uniforme, coupez les aliments en cubes d’environ _
po (1,3 cm) à 1 po (2,5 cm). Coupez tous les fromages en morceaux de _
po (1,3 cm) ou moins.
3. Raclez l’intérieur du récipient à l’aide d’une spatule en caoutchouc
ou en plastique, mais seulement lorsque le mélangeur est en position
d’arrêt (OFF). Afin de ne pas abîmer l’intérieur du récipient ou
l’ensemble de lames, n’utilisez jamais d’ustensiles en métal.
4. Raclez les aliments collés sur les parois du récipient pour les
ramener vers le milieu, sur l’ensemble de lames.
5. Pour hacher des fines herbes, de l’ail, de l’oignon, du zeste, des noix, des
épices, etc., ou pour faire de la chapelure, assurez-vous que le récipient et les
lames sont tout à fait secs.
6. Si les aliments collent aux parois du récipient pendant le mélange,
appuyez quelques fois rapidement sur « PULSE ». Espacez les impulsions
de façon à ce que les lames aient le temps de s’arrêter entre deux.
7. Gardez le couvercle du récipient sur le mélangeur pendant le
mélange.
CHOSES À NE PAS FAIRE
1. N’utilisez pas le mélangeur comme récipient d’entreposage. Gardez-le vide
entre les utilisations.
2. Ne mélangez jamais plus de 44 oz (1,3 L) ou plus de 34 oz (1 L) de
liquides mousseux (tels que laits frappés). Si le moteur cale, mettez le
mélangeur en position d’arrêt (OFF), débranchez l’appareil et retirez une
partie des aliments avant de continuer.
3. Pour les boissons frappées, ne mélangez jamais les ingrédients congelés
qui auraient formé un bloc pendant la congélation. Cassez le bloc en petits
morceaux avant de verser dans le récipient.
4. Ne mettez pas d’ingrédients secs dans le mélangeur avant de l’avoir mis en
marche (ON). Si nécessaire, coupez-les en petits morceaux; retirez le
chapeau doseur d’ingrédients; puis, avec l’appareil en marche, faites-les
passer au travers de l’orifice du couvercle un à un. Gardez une main sur
l’ouverture. Videz régulièrement le récipient.
5. Afin d’assurer la durabilité du mélangeur, ne faites jamais fonctionner cet
appareil plus de 60 secondes à la fois. Mettez le mélangeur en position
d’arrêt (OFF) dès que vous avez obtenu la consistance désirée.
6. Ne mettez pas l’ensemble de lames et la bague d’étanchéité sur le bloc
moteur sans le récipient.
7. N’essayez pas de faire de la purée de pommes de terre avec le mélangeur,
de pétrir des pâtes lourdes ou de battre des blancs d’œufs en neige.
Page 17

17
FONCTIONNEMENT DE VOTRE MÉLANGEUR (suite)
8. Ne transformez pas excessivement les aliments. Il suffit la plupart du temps
de quelques secondes pour obtenir les résultats désirés.
CONSEILS
1. Pour faire de la mayonnaise, mettez tous les ingrédients, sauf l’huile, dans
le mélangeur. Retirez le chapeau doseur d’ingrédients, puis, avec le
mélangeur en marche, versez gentiment l’huile dans l’orifice du couvercle.
2. Le mélangeur ne fonctionne pas si le récipient n’est pas placé
correctement sur son socle.
3. Le récipient en acier inoxydable élégant et de qualité professionnelle est
durable et léger. Il est idéal pour la préparation de boissons fouettées et autres
boissons froides. Il n’est pas recommandé de mélanger des liquides chauds
dans le récipient en acier inoxydable car il pourrait devenir chaud au toucher.
Il est recommandé d’utiliser le récipient en verre lors du mélange de liquides
chauds.
NETTOYAGE DU MÉLANGEUR
1. ATTENTION : Débranchez toujours le mélangeur avant de le nettoyer.
Afin d’éviter les risques de choc électrique, n’immergez pas le cordon, la
fiche ou le bloc moteur du mélangeur dans l’eau ou dans tout autre liquide.
2. Nettoyez l’extérieur du socle à l’aide d’un chiffon doux mouillé.
ATTENTION : N’immergez jamais le socle dans l’eau ou dans tout autre
liquide.
3. Récipient en acier inoxydable, lavez les chapeau doseur d’ingrédients,
couvercle, joint du couvercle, bague d’étanchéité, ensemble de lames et
base de l’ensemble de lames à la main, dans de l’eau chaude savonneuse.
ATTENTION : Les lames sont tranchantes. Usez de prudence en les lavant.
Rincez et séchez bien le tout. Vous pouvez mettre le récipient de verre dans le
lave-vaisselle (panier supérieur). Ne mettez pas les autres pièces du mélangeur
dans le lave-vaisselle.
Page 18

18
ADVERTENCIAS DE SEGURIDAD
Para el manejo de artefactos eléctricos, se deben tomar ciertas precauciones
elementales para disminuir el riesgo de incendio, electrocución y/o lesiones
personales.
1. Leer atentamente todas las instrucciones.
2. Para evitar riesgo de electrocución, no sumergir el cable ni la base de la
licuadora en agua u otro líquido.
3. Vigilar atentamente los niños que estén usando o estén cerca de un
artefacto eléctrico.
4. Desenchufar el artefacto cuando no esté en uso y antes se limpiarlo o
lavarlo. Apagar el artefacto antes de agregar o quitar partes, y antes de
limpiarlo. No introduzca las manos en la jarra ni toque las cuchillas
mientras el artefacto esté enchufado.
5. No poner en funcionamiento artefactos que tengan el cordón o el enchufe
dañado, ni después que se haya producido una falla o el artefacto hubiera
sufrido daños de cualquier naturaleza. En tales casos, llevar o enviar el
artefacto a un taller autorizado de servicios para que sea revisado,
reparado o calibrado.
6. El fabricante no recomienda el uso de accesorios. Podría ser peligroso y
causar accidentes.
7. No usar el artefacto a la intemperie.
8. No dejar el cordón eléctrico colgando sobre el borde de una mesa o una
mesada, ni permitir que entre en contacto con superficies calientes.
9. No dejar el artefacto cerca de (ni sobre) un quemador de gas o eléctrico, ni
en un horno encendido.
10. Enchufar el artefacto antes de activar cualquiera de sus controles. Para
desconectar el artefacto, primero apagarlo pulsando el botón "0" en el
control de velocidad, y luego quite el enchufe del tomacorriente.
11. Cuando se mezclan líquidos calientes, quitar la copa de ingredientes de la
tapa. Le recomendamos utilizar el vaso de cristal para líquidos calientes.
12. No usar este artefacto para propósitos para los que no está específicamente
destinado.
13. Evitar tocar partes móviles.
14. Para evitar serios accidentes personales y/o daños a la máquina, mantener
las manos y utensilios fuera de la jarra mientras la licuadora esté en
marcha. Se puede introducir una espátula de plástico o de goma, pero
únicamente con la licuadora apagada.
15. No hacer contacto de ningún tipo con las cuchillas ni quitar la tapa de la
jarra mientras la licuadora esté en funcionamiento. El toque accidental de
un botón de velocidad podría poner en marcha la licuadora en forma
inesperada.
16. LAS CUCHILLAS SON MUY FILOSAS. MANEJARLAS CON
MUCHO CUIDADO.
17. No deje fuera de vista la licuadora mientras esté en funcionamiento.
18. Por seguridad, no es recomendable usar líquidos calientes en la licuadora.
19. Dejar que los líquidos se enfríen antes de ponerlos en la licuadora.
20. Esperar a que las cuchillas se detengan completamente antes de retirar la
jarra de la licuadora.
21. No usar la licuadora con la jarra vacía.
22. Poner en marcha la licuadora con la tapa bien colocada en la jarra.
Page 19

19
ADVERTENCIAS DE SEGURIDAD (continuación)
23. No utilice más de un accesorio a la vez.
24. El fabricante no asume ninguna responsabilidad por daños y perjuicios
emergentes del uso indebido, incorrecto o negligente del artefacto.
25. No tocar la máquina con las manos mojadas. Nunca se debe sumergir en
agua la base de la licuadora.
26. ADVERTENCIA: PARA REDUCIR EL RIESGO DE INCENDIO O
ELECTROCUCIÓN ACCIDENTAL, NO QUITAR LA TAPA INFERIOR DE
LA BASE. EL USUARIO NO DEBE EFECTUAR NINGUNA REPARACIÓN
DE LOS COMPONENTES INTERNOS DE ESTE ARTEFACTO. TODA
REPARACIÓN DEBE SER EFECTUADA ÚNICAMENTE POR PERSONAL
TÉCNICO CAPACITADO.
APROBADA POR NORMAS UL PARA
USO DOMÉSTICO Y COMERCIAL
CONSERVE ESTAS INSTRUCCIONES
INSTRUCCIONES CORTAS DE LA CUERDA
La cafetera tiene un cordón eléctrico corto para prevenir accidentes por enredos
y tropiezos. Tomando las precauciones necesarias, se puede usar un cordón
eléctrico prolongador (opcional). En tal caso: (1) la capacidad de corriente del
cordón prolongador debe ser igual o mayor que el consumo de corriente del
aparato que está alimentando; y (2) se deben tomar precauciones para que no
quede colgando del borde una mesa o mesada, adonde los niños puedan
arrastrarlo o tropezarse con él accidentalmente. El consumo nominal de corriente
eléctrica de la cafetera se encuentra especificado en el panel inferior de la
misma. Si el enchufe de la cafetera tiene pata de conexión a tierra, el cordón
prolongador también debe tener tres conductores, uno de los cuales debe servir
de conexión a tierra. Por razones de seguridad, este artefacto tiene un enchufe
con patas de polaridad diferenciada (una es más ancha que la otra), que se
puede introducir en una sola posición en un tomacorriente de polaridad
diferenciada. Si hubieran dificultades para introducirlo totalmente en el
tomacorriente, llamar a un electricista profesional para solucionar el problema.
No alterar el diseño original del enchufe por ningún motivo.
ANTES DE UTILIZARLA POR PRIMERA VEZ
Colocar la caja sobre una superficie amplia, firme y plana. Sacar la licuadora y los
documentos adjuntos, y quitar todos los materiales de embalaje. Quitar las etiquetas
y/o calcomanías de la licuadora. Si fuera necesario, se puede limpiar el polvo de la
base con un paño limpio y húmedo. Secar bien la máquina. No sumergir la base en
agua ni en ningún otro tipo de líquido. Limpiar con cuidado los accesorios con agua
tibia y detergente suave. Enjuagar y secar bien las piezas. La jarra de vidrio se puede
lavar en la rejilla superior del lavavajillas. El vaso de acero inoxidable no se puede lavar
en el lavavajillas, hay que lavarlo a mano. No usar productos limpiadores abrasivos ni
fuertes para limpiar la unidad (se pueden ver más detalles en la sección de "Limpieza
de la licuadora"). No dejar bolsas plásticas al alcance de los niños.
Page 20

20
COMPONENTES DE LA LICUADORA
FIGURA 1
1. Copa de ingredientes
(2 incluidos)
2. Tapa de doble cierre
(2 incluidos)
3. Junta de la tapa
(2 incluidos)
4. Jarra de vidrio
5. Junta anular (2 incluidos)
6. Mecanismo de cuchillas
(2 incluidos)
7. Base De la Asamblea De
Lámina (2 incluidos)
8. Control Del Pulso
9. Control De la Velocidad
10. Base
11. Almacenaje De la Cuerda
12. Vaso de acero inoxidable
.5
1
3
.
1
Page 21

COMPONENTES DE LA LICUADORA (continuación)
COMPONENTES Y FUNCIONES:
1. DOS GRUPOS DE CUCHILLAS EXTRAÍBLES: Máxima simplificación de la
limpieza.
2. COMP
ARTIMIENTO P
ARA CORDÓN ELÉCTRICO: Para guardarlo fácilmente
en forma prolija.
3. DOS TAPAS CON TAPONES EXTRAÍBLES PARA AÑADIR INGREDIENTES: Las tapas,
resistentes y herméticas, se puede colocar en 3 posiciones diferentes: Trabada,
destrabada para acomodarla o extraerla, y además se puede quitar la copa
central para agregar ingredientes mientras la licuadora está en funcionamiento.
4. FUNCIÓN DE TRITURACIÓN DE HIELO: Al seleccionar la velocidad máxima
(5), esta función pondrá en marcha la máquina en forma intermitente para
triturar hielo con máxima eficiencia.
5. BOTONES DE T
ACTO SUAVE PARA SELECCIÓN DE 5 VELOCIDADES,
CON BOTÓN PULSANTE: Controles iluminados para facilitar el uso de la
máquina y seleccionar la velocidad ideal.
6. V
ASOS FÁCILES DE MONTAR:
No hace falta girarlos ni enroscarlos para colocarlos
correctamente en su sitio. Basta situar el vaso de cristal o de acero en la base, y
éste se encajará perfectamente en su sitio, como las licuadoras profesionales.
7. DOBLE SISTEMA DE SEGURIDAD: Este es un sistema exclusivo de
De’Longhi. La máquina está equipada con un dispositivo de seguridad que
para automáticamente el motor de la licuadora si la jarra se quita de
la base cuando la máquina está en funcionamiento.
8. BASE DE FUNDICIÓN DE ALUMINIO PULIDA:
Base reforzada que posee
máxima estabilidad. La atractiva terminación de aluminio pulido
complementa todo estilo decorativo de la cocina.
9. ARRANQUE SUAVE Y GRADUAL: La licuadora arranca automáticamente a
una velocidad inferior para evitar salpicar el contenido. Luego aumenta su
velocidad hasta alcanzar el valor seleccionado.
10. JARRA DE VIDRIO REFORZADO:
Jarra de vidrio reforzado de 50 onzas (1,5
litros) de capacidad, que resiste rayones y descoloración.
VASO DE ACERO INOXIDABLE DE ALTA RESISTENCIA: El vaso de 1.5 l (50 onzas) de
acero inoxidable es de calidad profesional y muy ligero.
Page 22

22
USO DE LA LICUADORA
1. Colocar la licuadora sobre una superficie nivelada, alejada de los
bordes.
2. Colocar la junta anular bajo el aro de las cuchillas, asegurando que la
junta se coloque completamente debajo del borde del mecanismo de
cuchillas. PRECAUCIÓN: Las cuchillas son muy filosas. NOTA: La
jarra perderá su contenido si la junta anular está dañada o se la coloca
incorrectamente.
3. Colocar las cuchillas en su base con cuidado. PRECAUCIÓN: Las
cuchillas son muy filosas.
4. Enroscar la jarra en el mecanismo de las cuchillas con cuidado.
5. Colocar desde abajo la junta de la tapa. Insertar la copa de ingredientes
y hacerla girar para que quede fija en posición.
6. Colocar la tapa en la jarra y hacer girar la copa de ingredientes a la
posición trabada. NOTA: La posición trabada está marcada arriba de la
tapa. La copa de ingredientes se puede colocar en tres posiciones:
a) Destrabada: Para extraer la copa.
b) Destrabada: Para extraer y colocar la tapa de la jarra.
c) Trabada: Para dejar la tapa trabada en la jarra.
7. Colocar la jarra completa en la base de la licuadora.
8. Enchufar la licuadora en un tomacorriente de 120V / 60Hz. El botón de
velocidad “0” se iluminará con luz roja, indicando que el artefacto está
enchufado.
9. Seleccionar la velocidad deseada y el número correspondiente se
iluminará con luz verde.
10. En modo pulsante, se genera un movimiento súbito y enérgico de las
cuchillas. Para usar el modo pulsante, oprimir y soltar el botón "PULSE"
ubicado en centro de los controles de velocidad. Si fuera necesario,
repetir el procedimiento. Mientras se mantenga oprimido este botón, el
motor seguirá funcionando. Esta función es práctica para controlar mejor
la densidad de ciertos preparados.
11. Para triturar hielo, seleccionar la velocidad máxima (5). Las cuchillas
girarán intermitentemente para triturar con máxima eficiencia.
Page 23

23
USO DE LA LICUADORA (continuación)
12. Se puede usar una espátula de goma o de plástico para extraer lo que
pudiera haber quedado entre las cuchillas. NO USAR LA ESPÁTULA
ANTES DE APAGAR LA LICUADORA. Si fuera necesario, colocar la
tapa y la copa de ingredientes, y terminar de licuar el contenido.
Asegurarse de que la espátula no haya quedado adentro de la jarra.
13. Al terminar de licuar, oprimir el botón de velocidad “0” y desenchufar la
licuadora. Si bien esta licuadora tiene un doble sistema de seguridad que
para el motor automáticamente si se quita la jarra, no es recomendable
hacerlo mientras el motor está funcionando.
Page 24

24
USO DE LA LICUADORA (continuación)
SUGERENCIAS A TENER EN CUENTA:
LO QUE SE DEBE HACER
1. Cargar primero los líquidos en la jarra, y después los otros ingredientes.
Esto facilitará la mezcla uniforme de los ingredientes.
2. Para obtener mayor uniformidad, cortar los alimentos en cubos de
aproximadamente media pulgadas (1,3 cm) a una pulgada (2,5 cm). Cortar
los quesos en trozos que no sean más grandes de media pulgada (1,3 cm).
3. Para usar una espátula de plástico o de goma en la jarra, primero apagar
la licuadora. No usar utensilios de metal, ya que podrían dañar la jarra de
vidrio o las cuchillas.
4. Al raspar la jarra con una espátula para quitar lo adherido a los
costados, desplazar lo quitado hacia el centro de la jarra, sobre la cuchilla.
5. Si se utiliza la licuadora para picar verduras frescas, ajo, cebolla, cáscaras,
pan, especias, etc., la jarra y las cuchillas deben estar totalmente
secas.
6. Si la comida tiende a pegarse en el interior de la jarra, use el modo
pulsante en lugar de licuar continuamente. Pulse por períodos cortos.
Para espaciar correctamente los pulsos, esperar a que la cuchilla se
detenga antes de iniciar el
7. Mantener la tapa de la jarra siempre colocada mientras la
licuadora esté en funcionamiento.
LO QUE NO SE DEBE HACER
1. No usar la licuadora como recipiente de almacenamiento. Manténgala
siempre vacía cuando no está en uso.
2. No preparar una cantidad mayor de 44 onzas en la licuadora (1,3 litros), ni
más de 34 onzas (1 litro) en caso de que sean líquidos espumosos, tal
como licuados con leche. Si el motor tuviera dificultades para girar, apagar
la licuadora, desenchufarla, descargar parte del contenido y continuar.
3. Para preparar bebidas, no usar ingredientes que se hayan congelado hasta
convertirse en una masa sólida grande. En tal caso, rómpalos en pedazos
pequeños para ponerlos en la jarra.
4. No cargar ingredientes secos en la jarra antes de poner en marcha la
licuadora. Si fuera necesario, cortarlos en pedazos pequeños, quitar la
copa de ingredientes y, con la licuadora en marcha, volcarlos en la jarra
uno por uno. Cubrir la abertura con la mano. Vaciar la jarra regularmente.
5. Para prolongar la vida útil de la licuadora, no la use en marcha continua
por períodos de más de 60 segundos. Apague la licuadora
inmediatamente después que la preparación haya alcanzado la
consistencia justa.
6. No colocar el mecanismo de cuchillas y junta anular sobre el motor de la
licuadora sin que esté unido a la jarra.
7. No usar la licuadora para hacer puré de papas, para preparar masas
densas, ni para batir clara de huevo.
Page 25

25
USO DE LA LICUADORA (continuación)
8. No licuar alimentos por más tiempo que el estrictamente necesario. Por lo
general, la licuadora cumplirá su función en segundos, no en minutos.
CONSEJOS
1. Para hacer mayonesa, poner todos los ingredientes en la jarra, excepto el
aceite. Quitar la tapa de ingredientes y agregar aceite lentamente por la
abertura, con la licuadora en funcionamiento.
2. Si la jarra no está correctamente colocada, la licuadora no
arrancará.
3. El vaso, elegante y profesional, es muy resistente y ligero. Ideal para preparar
batidos y otras bebidas frescas. No es aconsejable batir líquidos calientes en el
vaso de acero porque el vaso podría alcanzar una temperatura demasiado
alta al tacto. Por lo tanto, en estos casos le recomendamos utilizar el vaso de
cristal.
LIMPIEZA DE LA LICUADORA
1. PRECAUCIÓN: Antes de limpiar la licuadora, asegurarse de que esté
desenchufada. Para evitar riesgo de electrocución, no sumergir el cable, ni
el enchufe, ni el motor de la licuadora en agua u otro líquido.
2. El exterior de la base se puede limpiar con un paño húmedo y suave.
PRECAUCIÓN: No sumergir la base en agua ni en ningún otro tipo de
líquido.
3. Vaso de acero inoxidable, la copa de ingredientes, la tapa, la junta de tapa,
la junta anular de cuchillas, las cuchillas y la base de cuchillas se pueden lavar
a mano con agua tibia y jabonosa. PRECAUCIÓN: Lave las cuchillas con
mucho precaución, ya que son muy filosas. Enjuagar y secar bien las piezas.
La jarra de vidrio se puede lavar en la rejilla superior del lavavajillas. No lavar
ninguna otra parte de la licuadora en un lavavajillas automático.
Page 26

26
IMPORTANTI MISURE DI SICUREZZA
Quando si maneggiano elettrodomestici si dovrebbero sempre osservare
alcune semplici norme precauzionali di sicurezza per ridurre i rischi di incendio,
di scosse elettriche e/o di danni alle persone.
1. Leggete attentamente tutte le istruzioni.
2. Per proteggervi dalle le scosse elettriche, non immergete il filo o la base del
frullatore in acqua o altri liquidi.
3. Esercitate un controllo particolare quando usate il frullatore in prossimità di
bambini.
4. Quando l’elettrodomestico non è in uso e prima di pulirlo, staccate la spina
dalla presa a muro. Spegnete l’unità prima di aggiungere o togliere delle
parti, o prima di procedere alla pulizia. Non mettete mai le mani dentro la
caraffa e non toccate mai il gruppo delle lame quanto la spina è
inserita nella presa.
5. Non mettete in funzione nessun elettrodomestico quando il filo elettrico o la
spina sono danneggiati o quando l’apparecchio manifesta un
funzionamento difettoso o ha subito un qualsiasi danno. Rimandare
l’apparecchio ad un centro d’assistenza autorizzato per ispezione ed
eventuale riparazione o regolazione.
6. La Ditta non raccomanda l’uso di accessori. Potrebbe essere pericoloso e
pertanto va evitato.
7. Non usate il frullatore all’aperto.
8. Non lasciate che il filo penzoli dal ripiano o dal tavolo su cui è posato o che
tocchi superfici calde.
9. Non sistemate l’elettrodomestico in prossimità di fornelli elettrici o a gas o
nel forno caldo.
10. Prima di azionare qualunque pulsante di controllo, inserite la spina nella
presa a muro. Prima di disinserire, SPEGNETE (OFF) premendo il pulsante
“0”sul regolatore di velocità, quindi staccate la spina dalla presa.
11. Quando frullate dei liquidi caldi, ricordatevi di togliere il dosatore/misurino dal
coperchio. Si raccomanda di utilizzare la caraffa di vetro per i liquidi caldi.
12. Non adibite questo elettrodomestico ad un uso diverso da quello consentito.
13. Evitate il contatto con parti in movimento.
14. Tenete le mani e gli utensili fuori dalla caraffa di vetro, per ridurre il rischio
di lesioni gravi alle persone o danni allo stesso elettrodomestico. Potete
usare una spatola di gomma o di plastica, ma solamente quando il frullatore
è SPENTO (OFF).
15. Quando il frullatore è acceso, non toccate il gruppo delle lame, non
interferite col movimento delle stesse e non togliete il coperchio della
caraffa. Toccando accidentalmente un pulsante di velocità potreste attivare
il frullatore.
16. LE LAME SONO AFFILATE. FATE ATTENZIONE.
17. Quando è in funzione, non perdete d’occhio l’elettrodomestico.
18. Per ragioni di sicurezza, si raccomanda di evitate di frullare liquidi caldi.
19. Prima di frullarli, attendete che i liquidi si raffreddino.
20. Quando staccate la caraffa di vetro dalla spina, attendete che le lame si
fermino completamente.
21. Non mettete in azione il frullatore quando è vuoto.
22. Quando usate il frullatore accertatevi che il coperchio sia al suo posto.
23. Non usate più di un accessorio per volta.
Page 27

IMPORTANTI MISURE DI SICUREZZA (cont.)
24. La Ditta non può essere responsabile per danni causati da un uso improprio,
incorretto o irresponsabile dell’elettrodomestico.
25. Non toccate mai l’elettrodomestico con le mani bagnate. Non immergete
mai la base in acqua.
26. ATTENZIONE: PER RIDURRE IL RISCHIO DI SCOSSE ELETTRICHE O DI
INCENDIO, NON RIMUOVETE IL PANNELLO DELLA BASE. ESSA NON
CONTIENE PARTI CHE L’UTENTE POSSA REGOLARE O RIPARARE. LE
RIPARAZIONI DEVONO ESSERE EFFETTUATE SOLAMENTE DAL
PERSONALE AUTORIZZATO.
L’APPARECCHIO È OMOLOGATO PER USO DOMESTICO E
COMMERCIALE.
CONSERVATE QUESTE ISTRUZIONI
ISTRUZIONI CORTE DEL CAVO
La macchina ha in dotazione un filo corto per ridurre il rischio che deriva da
eventuali grovigli o dal pericolo di inciampare. Sono disponibili fili più lunghi
staccabili da usarsi con tutte le attenzioni del caso. Se adoperate un filo
elettrico staccabile o una prolunga: (1) la potenza elettrica della prolunga
deve essere almeno la stessa di quella della macchina, e (2) il filo più lungo
dovrebbe essere disposto in modo tale che non sporga dal piano su cui è
sistemata la macchina: i bambini infatti potrebbero tirarlo o inciamparci. La
potenza elettrica della macchina è riportata alla base dell’unità. Se la
macchina prevede l’attacco a terra, anche la prolunga dovrebbe avere
l’attacco a terra di tipo 3. La macchina ha la spina polarizzata, con un polo
più grande dell’altro. Per ridurre il pericolo di scosse elettriche, questo tipo di
spina si adatta ad una presa polarizzata solamente in un modo per cui non è
possibile sbagliare. Se la spina non entra nella presa, contattare un elettricista
qualificato. Non tentate in nessun modo di modificare la spina.
PRIMA DELL’USO
Posate la scatola su una superficie piana e resistente. Liberate l’elettrodomestico
dall’imballaggio ed eliminate quest’ultimo assieme ai fogli pubblicitari. Per togliere la
polvere che potrebbe essersi accumulata durante le operazioni di imballaggio, potete
pulire la base con un panno soffice e umido, asciugando completamente. Non
immergete mai la base in acqua o altri liquidi. Pulite con cura gli accessori in acqua
tiepida e detergente leggero. Risciacquate e asciugate completamente. La caraffa di
vetro può lavata nel ripiano superiore della lavastoviglie. La caraffa in acciaio
inossidabile non può essere lavata in lavastoviglie, ma deve essere lavata a mano. Non
usate mai detergenti forti o abrasivi. (Per i dettagli, vedere le istruzioni, per la “Pulizia del
Frullatore”, in altra parte di questo manuale).
27
Page 28

28
PARTI DEL FRULLATORE
Illustrazione 1
1. Dosatore / Misurino (2 inclusi)
2. Coperchino di chiusura a
doppia azoine
(2 inclusi)
3. Sigillo del coperchino (2 inclusi)
4. Caraffa di veto
5. Anello di Guarizione (2 inclusi)
6. Gruppo Lame (2 inclusi)
7. Base Del Montaggio Della
Lama (2 inclusi)
8. Controllo Di Impulso
9. Controllo Di Velocità
10. Base
11. Immagazzinaggio Del Cavo
12. Caraffa in acciaio
inossidabile
.5
1
.3
1
Page 29

29
PARTI DEL FRULLATORE (cont.)
CARATTERISTICHE:
1. DUE GRUPPI LAME RIMOVIBILI: facilita la pulizia.
2. ALLOGGIAMENTO DEL FILO ELETTRICO
: per una opportuna conservazione
dell’elettrodomestico.
3. DUE COPERCHI CON T
APPI PER GLI INGREDIENTI RIMOVIBILI: I coperchi, resistenti
ed ermetici, hanno 3 posizioni: bloccata, libera per inserire o
rimuovere il coperchio, e per rimuovere la capsula centrale per favorire
l’aggiunta degli ingredienti.
4. FUNZIONE TRIT
A-GHIACCIO: si seleziona la velocità massima, (5) per tritare
facilmente il ghiaccio con azione intermittente, accendendo e spegnendo per
ottenere la massima efficienza.
5. CONTROLLI A 5 VELOCITÀ A TOCCO MORBIDO CON FUNZIONAMENTO
A SCATTI “PULSE”: i controlli sono illuminati, di facile uso e garantiscono una
velocità perfetta per ogni tipo di frullatura.
6. CARAFFE DI F
ACILE INSERIMENTO: Non è necessario girare o svitare le caraffe per
ottenere la giusta posizione. È sufficiente inserire la caraffa di vetro o di acciaio
inossidabile nella base, e la caraffa scivolerà e si bloccherà nella posizione
corretta, proprio come nei frullatori professionali.
7. DOPPIO SISTEMA DI SICUREZZA
: un sistema esclusivo della De’ Longhi.
Questa caratteristica spegne il motore automaticamente se la caraffa viene
rimossa dalla base mentre l’elettrodomestico è in funzione.
8. BASE DI ALLUMINIO SA
TINATO FUSO A PRESSIONE : assicura la massima
stabilità e resistenza. La rifinitura satinata è un complemento decorativo per la
cucina.
9. P
ARTENZA MORBIDA: questa caratteristica permette al frullatore di partire
alla velocità minima, evitando gli spruzzi, per poi raggiungere velocemente la
velocità desiderata per una resa ottimale.
10. CARAFF
A IN VETRO ULTRARESISTENTE: la caraffa in vetro dalla capacità
di 1500 ml (50 once) è antigraffio e antiscolorature.
CARAFFA IN ACCIAIO IN OSSIDABILE DI ELEVATA RESISTENZA: la caraffa in acciaio
inossidabile ha una capacità di 1,5 litri (50 once), è di qualità professionale ed è
estremamente leggera.
Page 30

30
FUNZIONAMENTO DEL FRULLATORE
1. Sistemare il frullatore su una superficie piana e uniforme, lontano
dai bordi.
2. Sistemare con cura l’anello di guarnizione, assicurandosi che sia
completamente piazzata sotto il bordo del gruppo delle lame.
ATTENZIONE: le lame sono affilate. NOTA: se la guarnizione non è a
posto o è danneggiata, sono possibili delle perdite.
3. Fissare con cura il gruppo lame alla base. ATTENZIONE: le lame
sono affilate.
4. Avvitare con cura la caraffa alla base su cui è stato fissato
il gruppo lame.
5. Spingere il sigillo del coperchio fissandolo alla parte inferiore del
coperchio. Fissare e bloccare il dosatore/misurino facendolo
ruotare leggermente.
6. Fissare il coperchio alla caraffa e bloccare il dosatore/misurino nella
posizione di chiusura. NOTA: la posizione di chiusura è indicata nella
parte superiore del coperchio. Il dosatore/misurino ha tre posizioni:
a) aperta in modo da permettere la rimozione del dosatore/misurino;
b) aperta in modo da poter rimuovere il coperchio;
c) chiusa in modo da fissare il coperchio alla caraffa, bloccandolo.
7. Sistemare il frullatore nella base.
8. Inserire la spina solamente in una presa di corrente a 120V/60Hz. Sul
pannello dei controlli di velocità, lo “0” si illuminerà di una luce rossa per
indicare che l’elettrodomestico è collegato alla corrente.
9. Selezionare la velocità desiderata e il numero selezionato si illuminerà di
una luce verde.
10. La funzione a scatti dà all’apparecchio un impulso di potenza per
ottenere una resa migliore e più veloce. Per attivare il movimento,
premete e rilasciate il pulsante “PULSE” che si trova al centro dei
controlli velocità. Se è necessario, ripetete l’operazione. Fin che il
pulsante è premuto, il movimento continua. Questa funzione vi permette
di controllare la densità dei diversi cibi.
11. Per attivare il tritaghiaccio, scegliete la velocità massima (5). Il
frullatore funziona a intermittenza automatica per una migliore
prestazione.
Page 31

31
FUNZIONAMENTO DEL FRULLATORE (cont.)
12. Per togliere il cibo accumulatosi nel gruppo lame, usate una spatola di
gomma o di plastica. NON USATE LA SPATOLA FINO A
QUANDO NON AVETE SPENTO IL FRULLATORE. Risistemate il
coperchio e continuate l’operazione, se necessario. Attenti a non lasciare
la spatola nella caraffa.
13. Quando avete finito la frullata, premete il pulsante “0” sul pannello dei
controlli velocità e togliete la spina dalla presa. Nonostante questa unità
sia munita di “duplice dispositivo di sicurezza” che spegne automaticamente
l’elettrodomestico quando la caraffa viene rimossa dalla base, non è
raccomandabile togliere la caraffa quando il frullatore è acceso.
Page 32

32
FUNZIONAMENTO DEL FRULLATORE (cont.)
SUGGERIMENTI PER UN USO CORRETTO DEL FRULLATORE:
COSE DA FARE
1. Versate nella caraffa prima gli ingredienti liquidi, poi gli altri per ottenere
una migliore uniformità dei frullati.
2. Tagliate in cubetti da 1 centimetro (_ pollice) a 2,5 centimetri (1 pollice)
circa i cibi per ottenere un risultato uniforme. Tutti i tipi di formaggio devono
essere ridotti in cubetti non più grandi di 1 cm.
3. Usate la spatola di gomma o di plastica a seconda delle necessità,
solamente quando il frullatore è spento. Non usate mai utensili di metallo
poiché possono causare danni alla caraffa o alle lame.
4. Quando staccate il cibo dalla caraffa, rimuovetelo dalle pareti e ponetelo
nel mezzo, sopra il gruppo lame.
5. Quando tritate erbe fresche, aglio, cipolle, bucce di limone o d’arancio,
pangrattato, noci, spezie, ecc., assicuratevi che la caraffa e le lame siano
completamente asciutte.
6. Il cibo tende ad attaccarsi alle pareti della caraffa. Per staccarlo, usate la
funzione a scatti che fa vibrare l’apparecchio. Il movimento deve provocare
scatti brevi. Distanziateli, in modo che le lame cessino di ruotare tra uno
scatto e l’altro.
7. Durante le operazioni, coprite sempre la caraffa con il suo coperchio.
COSE DA NON FARE
1. Non usate il frullatore per riporvi oggetti. Tenetelo vuoto prima e dopo l’uso.
2. Non frullate mai più di 1,3 litri (44 once) o 1 litri (34 once) di liquido
quando volete ottenere liquidi spumosi, come il frappé di latte. Se il motore
non parte, spegnete il frullatore, togliete la spina dalla presa, togliete parte
del liquido, quindi riprendete l’operazione.
3. Per frappé con frutta, non usate mai ingredienti surgelati che si sono
solidificati. Prima di metterli nella caraffa, spezzateli.
4. Non mettete mai ingredienti solidi nel frullatore prima di averlo acceso. Se è
necessario, tagliateli a pezzetti prima di farli passare nella caraffa;
rimuovete il dosatore/misurino; quindi, con la macchina in funzione, fatte
passare, ad uno ad uno, i pezzi. Tenete la mano sull’apertura. Svuotate
regolarmente.
5. Per assicurare una lunga durata al vostro frullatore, non lasciatelo mai
funzionare per più di 60 secondi. Non appena raggiungete un risultato
soddisfacente, spegnetelo.
6. Non mettete il gruppo lame e l’anello di guarnizione sulla base prima di
avervi avvitato la caraffa.
7. Non tentate di schiacciare patate o impastare impasti pesanti o montare
bianchi d’uovo.
8. Non lavorate eccessivamente il cibo. I risultati desiderati di solito si
ottengono in secondi, non in minuti.
Page 33

33
FUNZIONAMENTO DEL FRULLATORE (cont.)
CONSIGLI
1. Per fare la maionese, inserite nel frullatore tutti gli ingredienti, eccetto l’olio.
Rimuovete il dosatore/misurino e pian piano versate l’olio attraverso
l’apertura del coperchio.
2. Il frullatore non funziona se la caraffa non è correttamente fissata alla base.
3. L'elegante caraffa in acciaio inossidabile, di qualità professionale, è resistente
e leggera. È l'ideale per preparare frullati e altre bevande. Si consiglia di non
mescolare liquidi caldi nella caraffa in acciaio inossidabile in quanto potrebbe
diventare troppo calda al tatto. Si consiglia di utilizzare la caraffa di vetro per
mescolare liquidi caldi.
PULIZIA DEL FRULLATORE
1. ATTENZIONE: assicuratevi che il frullatore stia staccato dalla corrente
prima di procedere alla pulizia. Per evitare scosse elettriche, non
immergete il filo elettrico, la spina o la base in acqua o altri liquidi.
2. L’esterno della base può essere pulito con un panno soffice e umido.
ATTENZIONE: non immergete mai la base in acqua o altri liquidi.
3. Caraffa in acciaio inossidabileil dosatore/misurino, il coperchio, la guarnizione,
il gruppo lame e la base del gruppo lame, possono essere puliti a mano in
acqua tiepida e insaponata. ATTENZIONE: le lame sono affilate, quando si
lavano, fate attenzione. La caraffa di vetro può essere sistemata nella parte
superiore della lavastoviglie. Non lavate nessun’altra parte del frullatore nella
lavastoviglie.
Page 34

This warranty applies to all products with De’Longhi or Kenwood brand names.
Limited Warranty
What does the warranty cover?
We warrant each appliance to be free from defects in material and workmanship. Our
obligation under this warranty is limited to repair at our factory or authorized service
center of any defective parts or part thereof, other than parts damaged in transit. In the
event of a products replacement or return, the unit must be returned transportation
prepaid. The repaired or new model will be returned at the company expense.
This warranty shall apply only if the appliance is used in accordance with the factory
directions, which accompany it, and on an Alternating current ( AC ) circuit.
How long does the coverage last?
This warranty runs for one year ( 1 ) from the purchase date found on your receipt and
applies only to the original purchaser for use.
What is not covered by the warranty?
The warranty does not cover defects or damage of the appliance, which result from
repairs or alterations to the appliance outside our factory or authorized service centers,
nor shall it apply to any appliance, which has been subject to abuse, misuse, negligence
or accidents. Also, consequential and incidental damage resulting from the use of this
product or arising out of any breach of contract or breach of this warranty are not
recoverable under this warranty. Some states do not allow the exclusion or limitation of
incidental or consequential damage, so the above limitation may not apply to you.
How do you get service?
If repairs become necessary, see contact information below:
U.S. Residents:
Please contact our toll free hotline at 1-800-322-3848 or log onto our website at
www.delonghi.com.
For all accessories, spare parts or replacement parts, please contact our parts division at
1-800-865-6330.
Residents of Canada: Please contact our toll free hotline at 1-888-335-6644 or log onto
our website at www.delonghi.com.
Residents of Mexico: Please refer to the Limited Warranty statement for Mexico.
Please refer to the back page of the manual for De’Longhi addresses.
The above warranty is in lieu of all other express warranties and representations. All
implied warranties are limited to the applicable warranty period set forth above. This
limitation does not apply if you enter into an extended warranty with De’Longhi. Some
states do not allow limitations on how long an implied warranty lasts, so the above
exclusions may not apply to you. De’Longhi does not authorize any other person or
company to assume for it any liability in connection with the sale or use of its appliance.
How does state law apply?
This warranty gives you specific legal rights, and you may also have other rights, which
vary from state to state.
Page 35

Cette garantie s’applique à tous les appareils ménagers de marques De’Longhi ou Kenwood.
Garantie limitée
Qu’est-ce qui est couvert par la garantie?
Nous garantissons que chaque appareil est exempt de vices de matériaux et de fabrication.
Notre obligation, dans le cadre de cette garantie, est limitée à la réparation, à notre usine ou
dans un centre de réparation agréé, de toutes les pièces défectueuses ou leurs composants. En
cas de remplacement ou retour d’un produit, il doit être retourné tout port payé. Le modèle neuf
ou réparé sera retourné aux frais de la société. Cette garantie ne s’applique que dans les cas
où l’appareil est utilisé conformément aux instructions de l’usine qui l’accompagnent et sur un
circuit électrique à courant alternatif (c.a.).
Combien de temps dure la garantie?
Cette garantie dure une (1) année à partir de la date d’achat indiquée sur votre reçu et
s’applique uniquement à l’acheteur initial pour l’utilisation.
Qu’est ce qui n’est pas couvert par cette garantie?
Cette garantie ne couvre ni les défauts ou dégâts résultant de réparations ou altérations
apportées à l’appareil en dehors de notre usine ou des centres de réparation agréés ni les
appareils qui ont été soumis à un mauvais traitement, une mauvaise utilisation, une négligence
ou des accidents. En outre, les dommages-intérêts directs ou indirects résultant de l’utilisation de
ce produit ou de la rupture d’un contrat ou du non-respect de cette garantie ne sont pas
recouvrables dans le cadre de cette garantie. Certains états ou provinces n’autorisent pas
l’exclusion ou la limitation des dommages-intérêts directs ou indirects. Par conséquent, la
limitation ci-dessus peut ne pas s’appliquer à vous.
Comment faire réparer l’appareil?
Si des réparations s’avèrent nécessaires, consultez les informations ci-dessous :
Résidents des États-Unis : Veuillez appeler notre ligne d’assistance sans frais au 1-800-322-3848 ou
connectez-vous à notre site Web à www.delonghi.com. Pour tous les accessoires, les pièces
détachées et les pièces de rechange, veuillez contacter notre service des pièces détachées au
1-800-865-6330.
Résidents du Canada : Veuillez appeler notre ligne d’assistance sans frais au 1-888-335-6644 ou
connectez-vous à notre site Web à www.delonghi.com.
Résidents du Mexique : Veuillez consulter la déclaration de garantie limitée pour le Mexique.
Autres pays : Veuillez visitez www.delonghi.com.
Veuillez consulter le dos du manuel pour connaître les adresses de De’Longhi.
La garantie ci-dessus remplace toutes les autres garanties et représentations explicites. Toutes les
garanties implicites sont limitées à la période de garantie applicable établie ci-dessus. Cette
limitation ne s’applique pas si vous concluez un contrat d’extension de garantie avec De’Longhi.
Certains états ou provinces n’autorisent pas les limitations sur la durée des garanties implicites.
Par conséquent, les exclusions ci-dessus peuvent ne pas s’appliquer à vous. De’Longhi n’autorise
aucune personne ni société à assumer des responsabilités en association avec la vente ou
l’utilisation de ses appareils.
Comment s’appliquent les lois de l’état ou de la province?
Cette garantie vous donne des droits juridiques précis et vous pouvez également avoir d’autres
droits qui peuvent varier d’un état à un autre ou d’une province à une autre.
Page 36

Esta garantía cubre todos los productos con las marcas De'Longhi o Kenwood.
Garantía limitada
(para los Estados Unidos solamente)
Alcance de la garantía
Cada artefacto tiene garantía por defectos de materiales y de fabricación. Bajo los términos de
esta garantía limitada, nuestra obligación se limita a la reparación de partes o componentes (a
excepción de partes dañadas durante el transporte) en nuestra fábrica o en un centro
autorizado de servicio. Al devolver un producto para cambio o reparación, todos los costos de
envío deben ser pagados por el propietario del mismo. El producto nuevo o reparado será
devuelto con los gastos de envío pagados por la compañía.
Esta garantía es válida únicamente si el artefacto se utiliza de acuerdo con las instrucciones del
fabricante (incluidas con el artefacto) y alimentada eléctricamente con corriente alterna (CA).
Duración de la garantía
Esta garantía es válida por un (1) año a partir de la fecha de compra que figura en el recibo o
factura de venta de la unidad, y sólo el comprador original tiene derecho a hacer uso de la
garantía.
Exclusiones de la garantía
La garantía no cubre defectos ni daños que fueran consecuencia de reparaciones o
modificaciones efectuadas al artefacto por personal ajeno a nuestra fábrica o a centros
autorizados de servicio, ni cubre fallas o daños causados por maltrato, uso indebido,
negligencia o accidentes. Esta garantía tampoco reconocerá reclamos efectuados por
perjuicios directos ni indirectos emergentes del uso del producto, ni perjuicios o daños resultantes
del uso del producto en incumplimiento de los términos y condiciones que hacen válida la
garantía. En algunos estados no se permiten exclusiones ni limitaciones de los perjuicios
reconocidos por una garantía, por lo cual las limitaciones mencionadas podrían ser no válidas
en su caso particular.
Obtención de servicios de garantía
Si las reparaciones son necesarias, vea la información de contacto que aparece a
continuación:
Residentes de los Estados Unidos: Por favor contactar a nuestra línea telefónica gratuita, al 1800-322-3848 o ingrese a nuestro sitio en el Internet www.delonghi.com. Para todos los
accesorios, piezas de repuesto o de reemplazo, por favor contactar a nuestra división de piezas,
al 1-800-865-6330.
Residentes de Canadá: Por favor contactar a nuestra línea telefónica gratuita, al 1-888-335-6644
o ingrese a nuestro sitio en el Internet www.delonghi.com <http://www.delonghi.com/>.
Residentes de México: Refiera por favor a la garantía limitada para México.
Por favor vea la página trasera donde encontrará las direcciones de De’Longhi.
La garantía explicada anteriormente se ofrece en reemplazo de cualquier otra garantía, sea
expresa u ofrecida de cualquier otra manera, y toda garantía implícita del producto estará
limitada al período de duración mencionado anteriormente. Esta limitación queda anulada y es
reemplazada por otros términos si el usuario decide obtener una garantía prolongada de
De’Longhi. En algunos estados no se permiten limitaciones del período de garantía implícita, por
lo cual las limitaciones mencionadas anteriormente podrían no ser válidas en su caso particular.
De’Longhi no autoriza a ninguna otra persona ni compañía a ofrecer ningún tipo de garantía ni
responsabilidad con respecto al uso o a los términos de venta de sus artefactos.
Leyes estatales/provinciales
Esta garantía le confiere derechos establecidos por ley, pero usted también podría tener otros
derechos que varían de un estado a otro.
Page 37

Questa garanzia e’applicabile a tutti i piccoli elettrodomestici a marchio Kenwood o De’Longhi.
Garanzia limitata
Copertura della garanzia
De’Longhi garantisce che ciascun prodotto è esente da difetti di materiale e di fabbricazione. La
presente garanzia è limitata alla riparazione delle parti difettose o delle loro componenti presso la
nostra fabbrica o presso un centro di assistenza autorizzato, ad eccezione delle parti
danneggiate durante la spedizione. Nel caso di sostituzione o restituzione di un prodotto, l'unità
deve essere restituita con trasporto prepagato. Il modello riparato o nuovo verrà restituito a spese
dell'azienda.
La presente garanzia ha validità solamente nel caso in cui il prodotto venga utilizzato in
conformità con le istruzioni di fabbrica con cui viene venduto, e su un circuito a corrente
alternata ( c.a.).
Durata della garanzia
La presente garanzia ha validità di un anno ( 1 ) dalla data di acquisto riportata sulla prova
d'acquisto ed è riconosciuta esclusivamente all'acquirente originale per l'uso.
Limitazioni della garanzia
La garanzia non copre difetti o danni del prodotto dovuti a riparazioni o alterazioni eseguite al di
fuori della fabbrica o dai centri di assistenza autorizzati, né si applica a prodotti danneggiati da
abuso, uso improprio, negligenza o incidente. Inoltre, i danni consequenziali ed incidentali
derivanti dall'uso di questo prodotto o da una qualsiasi violazione del contratto o di questa
garanzia non sono coperti da quest'ultima. Alcune giurisdizioni non consentono l'esclusione o la
limitazione di danni incidentali o consequenziali; in tal caso, le limitazioni o esclusioni di cui sopra
non saranno applicabili
Come ottenere servizi di assistenza
Nel caso occorra fare delle riparazioni, rivolgersi al servizio informazioni:
Residenti negli USA: Contattare il servizio di assistenza telefonica gratuito al numero 1-800-3223848 oppure collegarsi all’indirizzo internet www.delonghi.com. Per tutti gli accessori, i
componenti o i pezzi di ricambio, contattare il reparto componenti al numero 1-800-865-6330.
Residenti in Canada: Contattare il servizio di assistenza telefonica gratuito al numero1-888-3356644 oppure collegarsi all’indirizzo internet www.delonghi.com.
Residenti in Messico: Riferirsi alle condizioni di garanzia limitata riportate nella sezione per il
Messico.
Residenti in altri paesi: Vogliate visitare il nostro sito internet www.delonghi.com.
Per gli indirizzi di De'Longhi si prega di vedere la pagina posteriore del manuale.
La garanzia sopra riportata è esclusiva e sostituisce qualsiasi altra garanzia, espressa o implicita.
Eventuali garanzie implicite previste dalle leggi vigenti saranno soggette ai limiti di durata stabiliti
dalla garanzia. Il limite non si applica nel caso di un'estensione della garanzia con De’Longhi.
Alcune giurisdizioni non consentono l'esclusione o la limitazione della durata delle garanzie
implicite; in tal caso, le limitazioni di cui sopra non saranno applicabili. De’Longhi non autorizza
alcuna persona o società ad assumersi qualsivoglia responsabilità relativamente alla vendita o
all'uso dei propri prodotti.
Applicazione delle leggi dei singoli stati
La presente garanzia concede diritti legali specifici oltre a quelli eventualmente previsti dalla
legislazione vigente nei vari stati.
Page 38

Page 39

PROTECT YOUR INVESTMENT WITH DE’LONGHI’S
EXTENDED SERVICE PLAN
For your convenience and protection an optional extended service plan is
available!
For a small price you can be sure that your appliance is protected. If your product
needs repair two years beyond the manufacturer’s limited warranty, we will fix it at
no cost to you. Note: The motors for the stand mixers and food processors are not
covered under this extended service plan.
If you choose to enroll, please detach and fill out this form and mail with payment
(check or money order only). Your Extended Service Plan certificate will be sent to
you by return mail.
PLEASE PRINT
Name:____________________________________________________________
Address:___________________________________________________________
City, State and Zip Code:___________________________________________
TWO-YEAR EXTENDED SER
VICE PLAN
Stand Mixers...........................................................................................$90.00
Food Processors.....................................................................................$70.00
Pasta Maker............................................................................................$50.00
Mini Food Processor and Chopper......................................................$20.00
Blender.....................................................................................................$30.00
Electric Citrus Juicer...............................................................................$15.00
Electric Food and Cheese Grater........................................................$15.00
MAIL TO:
De’Longhi America, Inc.
Park 80 West, Plaza One
Saddle Brook, NJ 07663
Attn: Consumer Service Dept.
Page 40

DBL750 Series / DBL750 Séries
Series DBL750 / Serie DBL750
Made in PRC / Fabriqué en RPC
Fabricado en la RPC / Fabbricato nella RPC
Power Requirement: 120 Volts / 60 Hz
Caractéristiques électriques: 120 Volts / 60 Hz
Ailmentación eléctrica: 120 Voltios / 60 Hz
Per uso con corrente: 120 Volt / 60 Hz
www.delonghi.com
©De’Longhi 2004
De’Longhi America, Inc.
Park 80 West, Plaza One
Saddle Brook, NJ 07663
1-800-322-3848
De’Longhi Canada, Inc.
6150 McLaughlin Rd.
Mississauga, Ontario
L5R 4E1 Canada
1-888-335-6644
 Loading...