

Page 1
Register this product on-line and receive a free trial issue of Cook's
Illustrated. Visit
www.delonghiregistration.com.
Visit
www.delonghi.com for a list of service centers near you. (U.S. and
Canada Only)
Enregistrez ce produit en ligne et recevez un numéro gratuit de Cook's
Illustrated. Visitez
www.delonghiregistration.com.
Visitez
www.delonghi.com pour y voir une liste des centres de réparation
proches de chez vous. (É.-U. et Canada uniquement)
Registre este producto en línea y reciba un ejemplar gratis de Cook's
Illustrated. Visite
www.delonghiregistration.com.
Visite
www.delonghi.com para ver la lista de centros de servicios cerca-
nos a usted. (Solamente en los Estados Unidos y Canada)
Registra questo prodotto "on-line" per ricevere una copia omaggio della
rivista Cook's Illustrated. Visita
www.delonghiregistration.com
Visita www.delonghi.com per una lista dei centri di servizio a te piu
vicini. (Solo negli Stati Uniti e Canada)
Instructions for use
Keep these instructions
Mode d'emploi
Conservez cette notice
Instrucciones para el uso
Repase y guarde estas instrucciones
Lea cuidadosamente este instructivo antes de usar su aparato.
Istruzioni per l’uso
Leggere e conservare queste istruzioni
DEEP FRYER
FRITEUSE
FREIDORA
FRIGGITRICE
D14522DZ
ELECTRONIC CHARACTERISTICS: CARACTÉRISTIQUES ÉLECTRIQUES:
CARACTERISTICAS ELECTRICAS: CARATTERISTICHE ELETTRICHE:
120V~60Hz 1500W
Page 2
2
A
Q
O
R
B
P
C
N
M
D
L
E
GF
S
K
I
T
J
H
Page 3
3
2
1
3
5
8
NO! OK!
7
4
3A
3B
X
6
NO!
MAX
level
Page 4

4
When using electrical appliances, basic safety
precautions should always be followed, including
the following:
1. Read all instructions.
2. Do not touch hot surfaces. Use handles and
knobs.
3. To protect against electric shock do not
immerse cord, plug and fryer in water or
other liquid.
4. Close supervision is necessary when any
appliance is used by or near children.
5. Unplug from outlet when not in use and
before cleaning. Allow to cool before
putting on or taking off parts, and before
cleaning the appliance.
6. Do not operate any appliance with a damaged cord or plug or after the appliance
malfunctions, or has been damaged in any
manner. Return appliance to the nearest
authorized service facility for examination,
repair or adjustment.
7. The use of accessory attachments not recommended by the appliance manufacturer
may cause injuries.
8. Do not use outdoors.
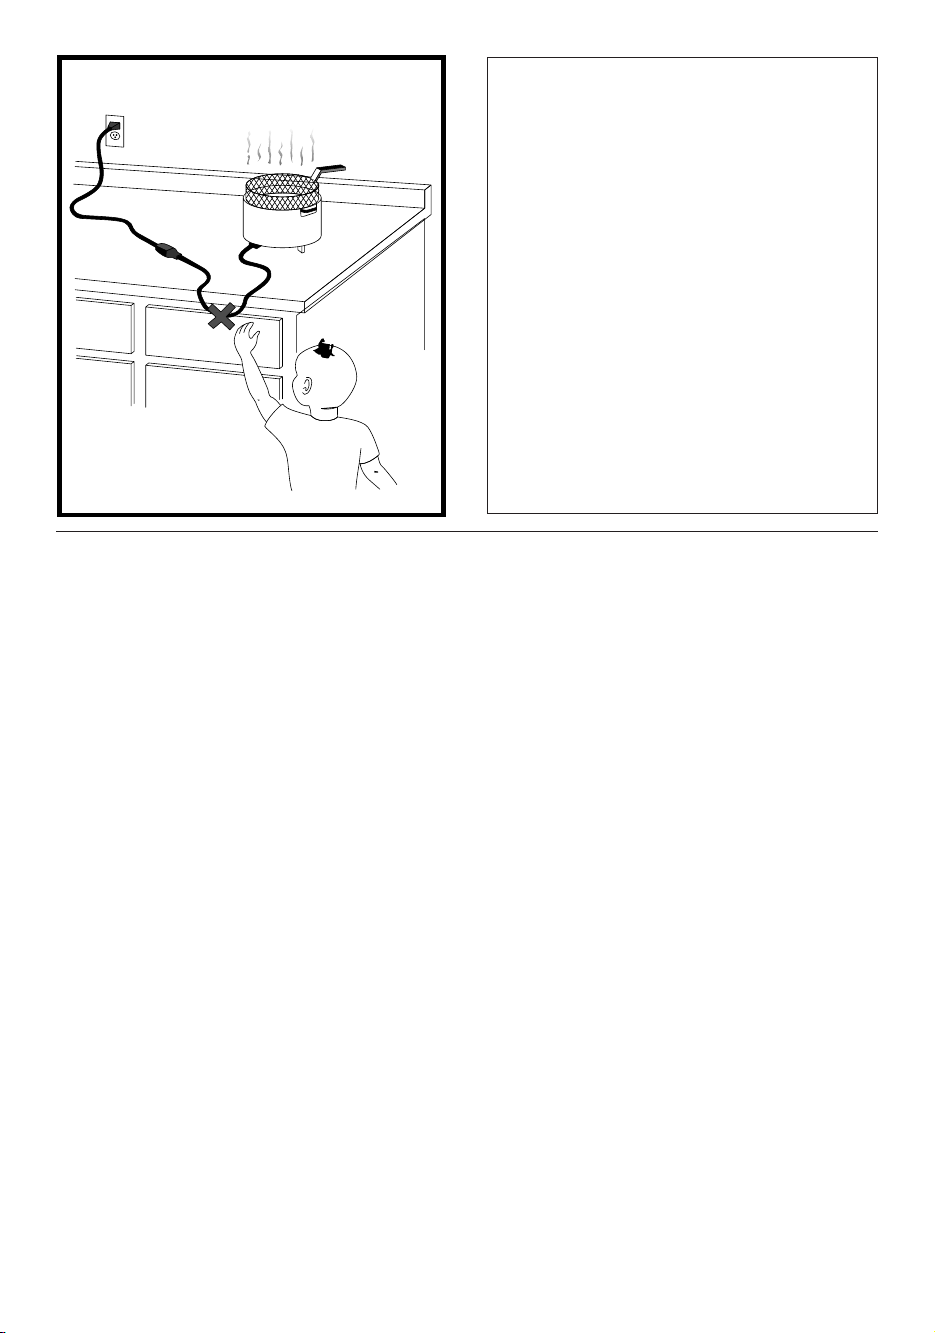
9. Do not let cord hang over edge of table or
counter, or touch hot surfaces.
10. Do not place on or near a hot gas or electric burner or in a heated oven.
11. Extreme caution must be used when moving an
appliance containing hot oil or other liquids.
12. Always attach plug to appliance first, then
plug cord into the wall outlet.
13. Do not use appliance for other than intended use.
14. Be sure handle is properly assembled to basket and locked in place.
IMPORTANT SAFEGUARDS
SAVE THESE INSTRUCTIONS
THIS PRODUCT IS FOR HOUSEHOLD USE ONLY
WARNING
• Do not use the fryer without oil. The fryer
will be severly damaged if heated dry.
• This fryer has a thermal cut-out, thus preventing
overheating.
•Plug cord into a 120 volt AC outlet.
• If your product is provided with a polarized
alternating current plug (a plug having one blade
wider than the other), this plug will fit into the
power outlet only one way. This is a safety feature. If you are unable to insert the plug fully into
the outlet, try reversing the plug. If the plug
should still fail to fit, contact your electrician to
replace your obsolete outlet. Do not defeat the
safety purpose of the polarized plug.
• Before using the fryer for the first time, wash the
aluminum pot, basket and lid thoroughly with hot
soapy water, carefully dry the pot to maintain its
attractive finish.
• Should the fryer leak, contact your nearest
Service Center or authorized Dealer for qualified
assistance.
•To assure safe operation, oversized foods or
utensils must not be inserted into the fryer.
•Children or infirm persons should not be allowed
to use this product unsupervised.
•Children should not be allowed to play with this
appliance.
• In order to avoid possible injuries or burns, do
not touch any metal parts on the deep fryer
because they may be very hot, use always
appropriate gloves.
• It is totally normal that, on first use, the appliance
emits a “new appliance” smell. If this happens,
aerate the room.
•
Before cleaning and when not in use, make sure that
the power plug is disconnected.
DO NOT USE AN EXTENSION CORD
A short power supply cord is provided to reduce the
risks resulting from being entangled in or tripping
over a longer cord.
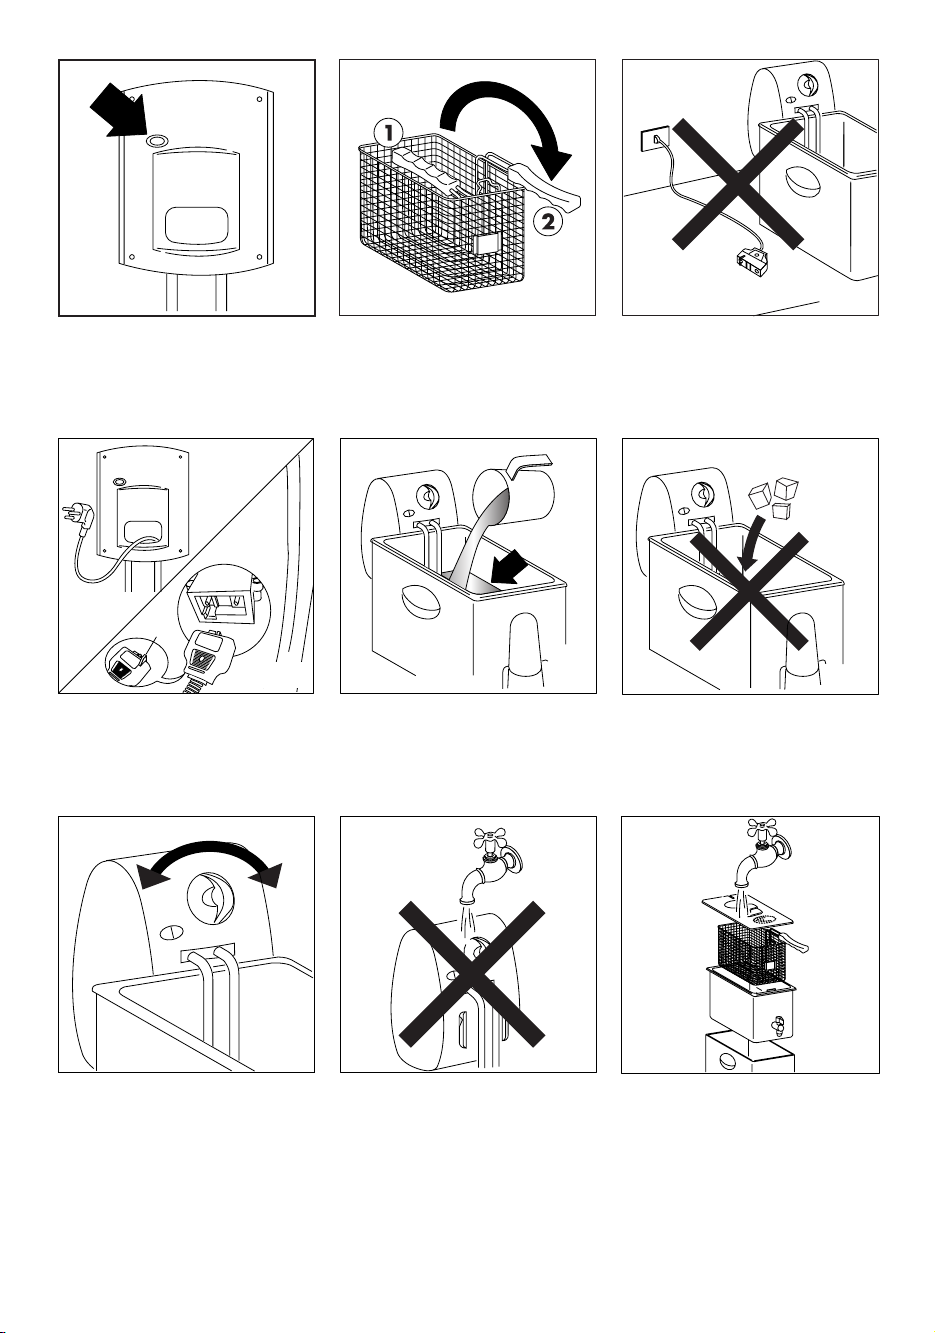
YOUR DEEP FRYER IS SUPPLIED WITH A CORD SET WITH MAGNETIC CONNECTOR:
First fit the magnetic connector to the appliance, as
seen in Figure 3B, making sure that the protruding
part of the connector (
X) is correctly inserted in the
corresponding slot on the appliance, and then plug
the cable into the power outlet.
Warning
Never leave the appliance plugged into the power
outlet if the magnetic connector is not fitted to the
deep fryer, Figure 3.
If the magnetic connector does not remain in place,
check that it has been inserted correctly, see Figure
3B. If the problem persists, contact an authorized
service center.
When the appliance is powered, always leave some
free space around the magnetic connector, so as to
prevent it from becoming detached.
Only use a type TA-35PA cord set supplied by
De’longhi authorized service centers.
Page 5
5
OPERATING INSTRUCTIONS
Before using the deep fryer for the first time, carefully
clean, using warm water and dishwashing detergent,
the basket, the bowl and the cover. The control unit,
power cable and heating element may be cleaned using
a damp cloth. Check that water does not enter into the
control unit and that there is no residual water in the bottom of the removable bowl. Carefully dry all the parts.
Check that the control unit is properly fastened to the
deep fryer body. The safety micro-switch “C” will not
allow the appliance to be operated if the control unit “R”
is not correctly positioned in the housing “H”.
The deep fryer is now ready for use.
FILLING WITH OIL OR FAT
• Remove the cover “K”, lifting it by the handle. Turn the
folding handle of the basket until it locks into place
(pos. 2, Fig. 2). Remove the basket “M” by lifting it
upwards.
• Remove the length of cable required to connect the
appliance to the mains, from the cable compartment
“O” (see Fig. 3A). The oil temperature light “B” becomes green.
If your fryer is supplied with magnetic connector:
First connect the magnetic connector (see fig. 3B)
keeping attention to place the connector with the jut
(X) on the bottom side, then connect the plug.
• If oil is used, pour it into the bowl “L” until reaching
the maximum level indicated (see Fig. 4). Never
DO NOT DRAPE CORD!
KEEP FROM
CHILDREN!
WARNING
SERIOUS HOT-OIL BURNS MAY
RESULT FROM A DEEP FAT FRYER
OR COOKER/FRYER BEING PULLED
OFF OF A COUNTERTOP. DO NOT
ALLOW THE CORD TO HANG
OVER THE EDGE OF THE COUNTER
WHERE IT MAY BE GRABBED BY
CHILDREN OR BECOME ENTANGLED WITH THE USER.
DO NOT USE WITH AN EXTENSION CORD.
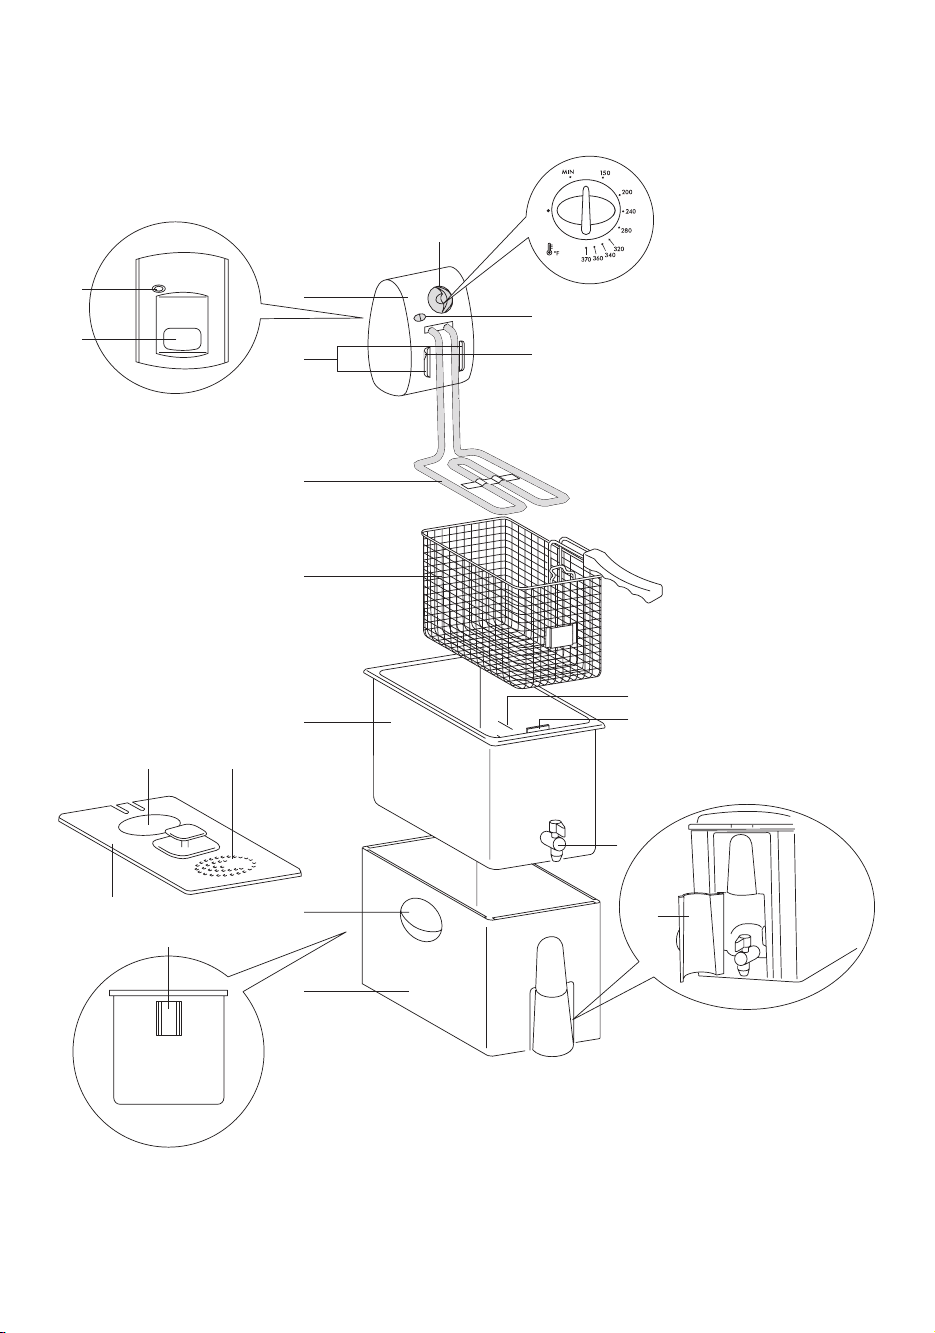
DESCRIPTION OF THE APPLIANCE:
A. Thermostat knob for setting the temperature
B. Oil temperature light (red, green)
C. Safety micro-switch
D. MIN– MAX level indicators
E. Basket support
F. Viewing window
G. Filter
H. Housing
I. Handles
J. Slots for fitting the control unit
K. Cover with handle slots
L. Removable bowl
M. Basket with folding handle
N. Electrical heating element
O. Cable compartment
P. Hooks for fastening the control box to the appliance
Q. Thermal safety device reset
R. Control unit
S Oil drain tap
T. Oil drain tap cover
THERMAL SAFETY DEVICE
The appliance is fitted with a thermal safety device that
stops the appliance from heating in the event of incorrect use or irregular operation. Once the appliance has
cooled, using a toothpick or similar, delicately press the
safety device reset button “Q” (see Fig. 1). If the
appliance does not start operating again, contact a service center authorized by the manufacturer.
Page 6

6
exceed this limit, as oil may overflow from the container. The level of oil must always be between the maximum and minimum limits, “D”. For best results, use
good quality peanut, canola or vegetable oil.
• If lumps of fat are used, cut the lumps into pieces and
melt them in another container, then pour the liquefied fat into the deep fryer bowl.
Never melt the fat
in the basket or on the deep fryer heating element
(see Fig. 5).
• If the oil contains food residues on the bottom, these
should be removed before heating the oil, to ensure
that the oil lasts longer.
• Close the cover “K”.
PREHEATING
• Place the food to be fried in the basket “M”, without
overfilling; max 3 lb of fresh potatoes. Check that the
handle of the basket is correctly positioned (pos. 2 in
Fig. 2).
•Move the thermostat knob “A” (see Fig. 6) to the
required temperature (see cooking table). The oil temperature light “B” becomes red.
• When the set temperature is reached, the oil temperature light “B” will become green.
STARTING FRYING
• As soon as the light becomes green, place the basket
“M” into the oil, lowering it very slowly to prevent the
hot oil from spraying or overflowing.
•A significant amount of steam will be released: this is
completely normal.
• It is normal during frying for steam to be released
from the cover and condensate to drip from the edge
of the cover.
•To avoid the risk of burns, never place your hands
above the filter on the cover or above the deep fryer
when frying. Before opening the cover completely,
open it slowly to release the steam from the side.
END OF FRYING TIME
• When the set cooking time has elapsed, lift the basket
“M” and check that the food has been cooked to the
required color.
• If the food is completely cooked, turn the appliance
off by moving the thermostat knob “A” to the “•”
position, until it clicks. The oil temperature light “B”
will become green.
• Unplug the appliance.
• Allow the excess oil to drain by hooking the basket
“M” onto the support “E” on the bowl; never leave the
basket too long in this position, as the steam may
make the fried food less crispy.
• Note: When cooking in two phases or if more food
needs to be cooked, at the end of the first phase hook
the basket ”M” onto the basket support “E” and wait
for the light to go off again. Then slowly lower the
basket “M” in the oil a second time.
COOKING HINTS
HOW LONG THE OIL OR FAT LASTS
The level of oil or fat must never fall below the minimum.
Every now and then it must be completely changed. The
life of the oil or fat depends on what foods are being
fried. Food coated in breadcrumbs, for example, dirties
the oil more than simple frying. As for any deep fryer,
the oil deteriorates after being heated a number of
times! Therefore, even if used correctly, it should be
completely changed after 8-10 uses.
CORRECT FRYING
Fresh potatoes must be washed in cold water and thoroughly dried, to prevent them from sticking together
and ensure they are crisp after frying. The recommended temperature should be followed for all recipes. If the
temperature is too low, the oil will be absorbed. If the temperature is too high, a crust will form immediately and the
inside of the food will not be cooked. The food being
fried must only be immersed in the oil when the oil has
reached the correct temperature, that is when the light
“B” becomes green. Never overfill the basket, as this
may cause a sudden drop in the temperature of the oil
and thus greasier and less uniform frying. Check that
the food is sliced into thin, even pieces. If the slices are
too thick, the food will not be well cooked inside, despite its appearance, while even slices will be perfectly
cooked at the same time. Carefully dry the food before
immersing it in the oil or fat, to avoid oil being sprayed;
furthermore, wet food will be less crisp after cooking
(especially potatoes). Foods with a high water content
(fish, meat, vegetables) should be coated with flour or
breadcrumbs before frying, making sure the excess
flour or breadcrumbs are removed before immersing
the food in the oil. Do not fry potatoes more than 3
times consecutively.
When cooking food in batter, you should first immerse
the basket empty. Then, when the set temperature has
been reached, immerse the food directly in the hot oil to
avoid the batter sticking to the basket.
Page 7

7
FRYING NON-FROZEN FOOD
When referring to the following table, please keep in mind that the cooking times and temperatures are approximate, and must be adjusted according to the quantity of food and personal tastes.
Food Max quantity Temperature Time (minutes)
gr lb °C °F
Fresh potato chips Half portion 800 1.8 170 340 8 - 10
Full portion 1300 3 170 340 12 – 14
Fish Calamari 600 1.3 140 280 9 - 11
Scallops 600 1.3 140 280 10-12
Sardines 600 1.3 140 280 10-12
Prawns 600 1.3 140 280 8 - 10
Meat Pork cutlets 500 1.1 160 320 8 - 9
Chicken cutlets 500 1.1 160 320 8 - 10
Meatballs 700 1.5 160 320 8 - 10
Vegetables Artichokes 400 0.9 150 300 15-17
Cauliflower 600 1.3 150 300 10-11
Mushrooms 500 1.1 150 300 8 - 10
Eggplant 200 0.4 150 300 9 - 11
Zucchini 500 1.1 150 300 13-15
FRYING FROZEN FOODS
Frozen foods are stored at very low temperatures. Consequently, they significantly lower the temperature of the liquid
used for cooking.
For best results, never exceed the maximum recommended quantity of food when frying.
Frozen foods are often covered with a layer of ice; this ice should be removed before cooking. Immerse the basket
in the oil very slowly to prevent the oil from boiling over.
The cooking times are approximate and must be adjusted according to the initial temperature of the food being fried
and the temperatures indicated on the packaging of the food.
Food Max quantity Temperature Time (minutes)
gr lb °C °F
Pre-cooked frozen potato chips 600 1.3 180 360 9 - 11
Potato croquettes 700 1.5 180 360 9 - 11
Fish Fish-fingers 500 1.1 180 360 7 - 8
Fish fillets 500 1.1 180 360 6 - 7
Meat Chicken cutlets 300 0.7 180 360 5 - 6
Page 8
8
OPERATING FAULTS
FAULT
Bad smell
The oil
overflows
Food does not
brown during
cooking
The oil does
not heat up
CAUSE
The oil has deteriorated.
The cooking liquid is unsuitable.
The oil has deteriorated and causes too
much foam.
You have immersed food which is not
sufficiently dry in the hot oil.
The basket has been immersed too
quickly.
The oil level in the deep fryer is over the
maximum limit.
Oil temperature is too low.
The basket is over loaded.
The deep fryer has previously been used
without oil in the fryer bowl, causing the
thermal safety device to break.
The magnetic connector is not correctly
inserted.
REMEDY
Replace the oil or fat.
Use a good quality peanut, canola or vegetable
oil.
Replace the oil or fat.
Dry the food well.
Immerse it slowly.
Reduce the amount of oil in the fryer bowl.
Select a higher temperature.
Reduce the food quantity.
Press the safety device reset button.
Insert the connector with the jut (X) on the bottom
side.
CLEANING
Before cleaning, make sure that the power plug is
disconnected.
Never immerse the deep fryer in water and never place
it under running tap water (see Fig. 7). The infiltration of
water into the control unit may cause electrocution.
Check that the oil has cooled down, and then remove
the control unit and drain the oil. Remove the deposits
from the bowl using a sponge or paper towel.
Except for the control unit, power cable and heating ele-
ment, all the other parts can be cleaned with warm
water and dishwashing detergent. Carefully wash the
filter “G” of the cover to maintain its efficiency. Never
use abrasive sponges, to avoid damaging the deep
fryer.
When this procedure has been completed, carefully
dry all parts, to prevent hot oil from spraying out
during operation.
The control unit can be cleaned with a damp cloth.
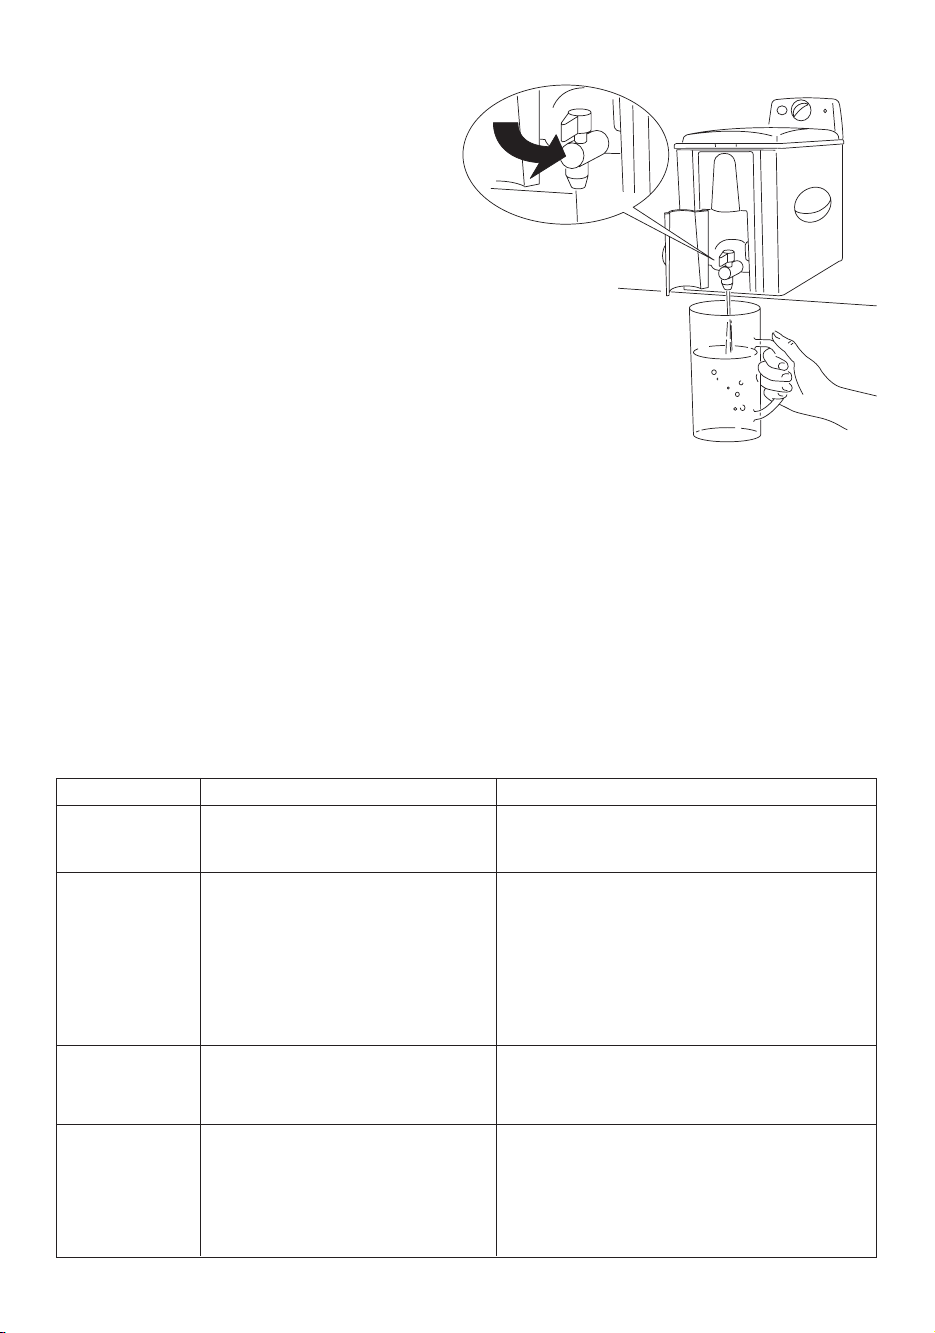
OIL DRAIN TAP
CAUTION! To avoid getting burnt do not drain oil
when oil is hot.
Proceed as follows:
1. Remove the basket.
2. Open the cover “T”.
3. Open the tap “S” by turning it counterclockwise.
4. Run the liquid into a container (see figure),
making sure it doesn’t overflow.
5. Remove any deposits from the bowl using a
sponge or paper towel.
6. Close the tap by turning it clockwise.
7. Close the cover “T”.
It is a good idea to keep the oil used to fry fish
separate from that used to fry other food.
If lard or fat is used, make sure it does not cool
down too much, otherwise it will solidify.
Page 9

9
This warranty applies to all products with De’Longhi or Kenwood brand names.
Limited Warranty
What does the warranty cover?
We warrant each appliance to be free from defects in material and workmanship. Our obligation under
this warranty is limited to repair at our factory or authorized service center of any defective parts or part
thereof, other than parts damaged in transit. In the event of a products replacement or return, the unit must
be returned transportation prepaid. The repaired or new model will be returned at the company expense.
This warranty shall apply only if the appliance is used in accordance with the factory directions, which
accompany it, and on an Alternating current ( AC ) circuit.
How long does the coverage last?
This warranty runs for one year ( 1 ) from the purchase date found on your receipt and applies only to the
original purchaser for use.
What is not covered by the warranty?
The warranty does not cover defects or damage of the appliance, which result from repairs or alterations
to the appliance outside our factory or authorized service centers, nor shall it apply to any appliance,
which has been subject to abuse, misuse, negligence or accidents. Also, consequential and incidental
damage resulting from the use of this product or arising out of any breach of contract or breach of this
warranty are not recoverable under this warranty. Some states do not allow the exclusion or limitation of
incidental or consequential damage, so the above limitation may not apply to you.
How do you get service?
If repairs become necessary, see contact information below:
U.S. Residents:
Please contact our toll free hotline at 1-800-322-3848 or log onto our website at www.delonghi.com.
For all accessories, spare parts or replacement parts, please contact our parts division at 1-800-865-
6330.
Residents of Canada: Please contact our toll free hotline at 1-888-335-6644 or log onto our website at
www.delonghi.com.
Residents of Mexico: Please refer to the Limited Warranty statement for Mexico.
Please refer to the back page of the manual for De’Longhi addresses.
The above warranty is in lieu of all other express warranties and representations. All implied warranties
are limited to the applicable warranty period set forth above. This limitation does not apply if you enter
into an extended warranty with De’Longhi. Some states do not allow limitations on how long an implied
warranty lasts, so the above exclusions may not apply to you. De’Longhi does not authorize any other per-
son or company to assume for it any liability in connection with the sale or use of its appliance.
How does state law apply?
This warranty gives you specific legal rights, and you may also have other rights, which vary from state to
state.
Page 10

10
ATTENTION
• Ne pas oubliez de remplir la friteuse d’huile
avant son fonctionnement.
Un fonctionnement à
sec de l’appareil entraîne sa destruction.
• Cette friteuse est équipée d’un dispositif de sécurité thermique. En cas de panne du thermostat, le
circuit électrique s’interrompt de façon automatique. Cela évite tout risque de surchauffage.
• Branchez le cordon dans une prise de courant
alternatif 120 volts.
• Si votre produit est muni d’une fiche polarisée de
courant alternatif (à savoir une fiche ayant une
dent plus large que l’autre), cette fiche ne peut
être enfoncée dans la prise que dans une seule
position. Il s’agit d’une mesure de sécurité. Si
vous ne pouvez pas enfoncer complètement la
fiche dans la prise, essayer de la tourner. Si malgré tout vous ne pouvez pas encore la brancher,
demandez à un électricien de remplacer la prise
obsolète. Ne pas annuler la sécurité de la fiche
polarisée.
•Avant d’utiliser la friteuse pour la première fois,
lavez soigneusement le bac, le panier et le couvercle à l’eau chaude en ajoutant un peu de produit à vaisselle, après sécher soigneusement
pour maintenir inaltérée l’esthétique du bac.
• Dans le cas de fuites d’huile de la friteuse,
s’adressez au centre après-vente ou à un distributeur agréé par le fabricant.
• Pour des raisons de sécurité, il ne faut pas introduire dans la friteuse des aliments ou des ustensiles trop grands.
• Il est préférable de ne pas laisser les enfants, ni
les personnes incapables, utiliser cet appareil
sans surveillance.
• Ne laissez pas les enfants jouer avec l’appareil.
•Pour éviter les brûlures, éviter de toucher les
pièces métalliques de la friteuse car elles peuvent
être très chaudes; utilisez toujours des gants.
•A la première utilisation l'appareil dégage une
odeur de neuf qui est tout à fait normale. Aérer
la pièce.
• Lorsque la friteuse n’est pas utilisée et avant de la nettoyer, s’assurer qu’elle est débranchée.
NE PAS UTILISEZ LA FRITEUYSE EN AJOUTANT UN
CORDON PROLONGATEUR
Nous livrons un cordon d’alimentation court pour
réduire les risques d’enchevêtrement et la possibilité de trébucher sur un cordon plus long
.
Il est toujours de mise de prendre certaines précautions lorsqu’on utilise un appareil électrique. La friteuse ne fait pas exception à la règle:
1. Lisez toutes les instructions.
2. Ne pas touchez les surfaces chaudes; utilisez
les poignées ou les boutons de réglage.
3. Afin d’éviter les risques d’éléctrocution, ne pas
immergez le cordon, la fiche ou l’appareil dans
l’eau ou dans tout autre liquide.
4. Si l’appareil est utilisé par des enfants, ou en
présence d’enfants, une surveillance étroite est
de rigueur.
5. Débranchez l’appareil avant de le nettoyer ou
lorsque vous ne l’utilisez pas. Le laissez refroidir avant d’installer ou d’enlever des pièces et
avant de le nettoyer.
6. Ne pas utilisez l’appareil si le cordon ou la
fiche est endommagé, s’il est défecteux, ou s’il
a subi quelque dommage que se soit. Dans un
tel cas, expédiez l’appareil à un centre de service après-vente autorisé pour examen, réparation ou réglage.
7. L’utilisation d’accessoires non recommandés
par le fabricant peut causer des blessures.
8. Ne pas utilisez l’appareil à l’extérieur.
9. Ne pas laissez le cordon pendre d’une table ou
d’un comptoir ou entrer en contact avec une
surface chaude.
10.Ne pas placez l’appareil sur ou près d’un brûleur, d’une cuisinière au gaz ou électrique ou
dans un four chaud.
11.Soyez extrêmement prudent si vous le transportez alors qu’il contient de l’huile chaude ou un
autre liquide chaud.
12.Toujours branchez le cordon à l’appareil pour premier, et ensuite dans la prise murale. Pour débrancher, mettre toutes les commandes sur la position
“OFF” et retirer la fiche de la prise murale.
13.N’utilisez cet appareil que pour l’emploi auquel
il est destiné.
14.Assurez vous que la poignée soit bien accrochée et bien fermée.
PRECAUTIONS IMPORTANTES
CONSERVEZ LES PRESENTES INSTRUCTIONS
PRODUIT À USAGE DOMESTIQUE UNIQUEMENT
VOTRE FRITEUSE EST MUNIE D'UN CORDON D'ALIMENTATION AVEC CONNECTEUR MAGNÉTIQUE:
Brancher d'abord le connecteur magnétique sur l'appareil, voir figure 1, en faisant attention à ce que la
partie saillante du connecteur (X) entre correctement
dans le logement prévu à cet effet sur l'appareil, puis
brancher la fiche sur la prise de courant.
Attention
Ne jamais laisser la fiche branchée sur la prise de
courant si le connecteur magnétique n'est pas branché sur la friteuse, figure 3.
Si le connecteur magnétique ne reste pas en place,
vérifier qu'il est bien enfoncé, voir figure 3B. Si le
connecteur ne tient toujours pas contacter un réparateur agréé.
Quand l'appareil est branché laisser toujours un
espace libre près du connecteur magnétique, pour
éviter qu'il puisse se détacher.
Utiliser seulement un cordon d'alimentation de type
TA-35PA fourni dans les SAV agréés.
Page 11

11
DESCRIPTION DE L'APPAREIL:
A. Poignée thermostat pour le réglage de la tempé-
rature
B. Témoin lumineux de température de l'huile
(rouge, vert)
C. Micro-interrupteur de sécurité
D. Indication de niveau MIN – MAX
E. Support panier
F. Hublot
G. Filtre
H. Carcasse
I. Poignées
J. Emplacement pour fixation du groupe des com-
mandes
K. Couvercle avec poignée
L. Cuve amovible
M. Panier avec manche amovible
N. Résistance électrique
O. Compartiment porte-câble
P. Crochets pour fixation du boîtier des comman-
des à l'appareil
Q. Rétablissement dispositif thermique de sécurité
R. Groupe des commandes
S. Robinet vidange huile
T. Volet robinet vidange huile
DISPOSITIF THERMIQUE DE SÉCURITÉ
L'appareil est équipé d'un dispositif thermique de sécuritè en interrompant le chauffage en cas d'utilisation ou
de fonctionnement incorrects. Après le refroidissement
de l'appareil, et avec l'aide d'un cure-dent ou similaire,
presser délicatement le bouton-poussoir de réarmement
du dispositif de sécurité “Q” (voir fig. 1). Si l'appareil
ne fonctionne pas, s'adresser exclusivement à un centre
d'assistance agréé autorisé par le constructeur.
INSTRUCTIONS D'UTILISATION
Avant la première utilisation, nettoyer soigneusement,
avec de l'eau chaude et du liquide vaisselle, le panier,
le bac et le couvercle. Le groupe commandes, le câble
d'alimentation et la résistance peuvent être nettoyés au
moyen d'un chiffon humide. S'assurer que l'eau ne
pénètre pas dans le groupe commande et de l'absence
de résidus au fond de la cuve mobile. Sécher soigneusement toutes les parties.
Contrôler que le groupe commandes est solidement fixé
au corps de la friteuse. Le micro-interrupteur de sûreté
“C” empêche tout fonctionnement de l'appareil si le
groupe commandes “R” n'est pas correctement positionné dans la carcasse “H”.
La friteuse est prête à l'utilisation.
REMPLISSAGE D'HUILE OU DE GRAISSE
• Retirer le couvercle "K" en le soulevant par sa poignée. Tourner la poignée du panier basculable
jusqu'à le bloquer (pos. 2 fig. 2). Retirer le panier
“M” en le tirant vers le haut.
• Extraire du compartiment porte-câble “O” la longueur de câble nécessaire à brancher l'appareil au
réseau d'alimentation (voir fig. 3A). Le témoin lumineux de température “B” de l'huile devient vert.
Si vostre friteuse est prévue de cable d’alimentation
avec connecteur magnetique:
Connecter le convecteur magnetique ollegare prima il
connettore magnetico (voir fig. 3B) avec la saillie (X)
en haut et brancher la fiche à la prise de courant.
• En cas d'utilisation d'huile, verser cette dernière dans
le bac “L” jusqu'au niveau maximal indiqué (voir fig.
4). Ne jamais dépasser cette limite pour éviter tout
débordement d'huile du récipient. Le niveau d'huile
doit toujours se trouver entre les repères max et min
NE PAS LAISSER
A LA PORTEE
DES ENFANTS
IMPORTANT
DE SERIEUSES BRULURES PEUVENT ETRE CAUSEES PAR L’HUILE
CHAUDE DE LA FRITEUSE. POUR
CETTE RAISON, ASSUREZ-VOUS
DE NE PAS LAISSER LE CORDON
TRAINER SUR LA SURFACE DU
TRAVAIL, OU DE LE LAISSER
PENDRE A UN ENDROIT OU
QUELQU’UN POURRAIT L’ACCROCHER OU TREBUCHER DESSUS PAR ACCIDENT.
Page 12

12
“D”. Pour obtenir de meilleurs résultats, utiliser une
huile d'arachide de bonne qualité.
• En cas d'utilisation d'un pain de graisse, couper
ce dernier en petits morceaux et les faire fondre
dans un autre récipient avant de verser la graisse
dans la friteuse.
Ne jamais faire fondre la graisse dans le panier ni sur la résistance de la friteuse (voir fig. 5).
• Il est conseillé d’éliminer les éventuels résidus d’aliments
déposés sur le fond de la friteuse avant de réchauffer
l’huile, pour que celle-ci dure plus longtemps.
• Refermer le couvercle “K”.
PRÉCHAUFFAGE
• Placer les aliments à frire dans le panier “M”, sans
jamais surcharger ce dernier: max 1,3 kg (3 livres)
de pommes de terre fraîches. Contrôler que le manche du panier est correctement positionné (pos. 2
fig. 2).
• Positionner le levier “A” du thermostat (voir fig. 6)
sur la température désirée (voir tableau de cuisson). Le témoin lumineux de température de l'huile “B” devient rouge.
• Une fois atteinte la température définie, le témoin
lumineux “B” devient vert.
DÉBUT FRITURE
•Dès que la lampe témoin devient rouge, immerger
le panier “M” dans l'huile, en procédant très lentement pour éviter toute projection ou débordement d'huile chaude.
• La production d'une grande quantité de vapeur
est normale.
• Il est normal, pendant la cuisson, que de la vapeur
s’échappe du couvercle et que de la condensation
coule du bord de celui-ci.
• Pour éviter les risques de brûlures, éviter pendant la
cuisson de poser les mains sur le filtre du couvercle et
sur la friteuse. Avant d’ouvrir grand le couvercle, le
soulever lentement pour faire s’échapper la vapeur
sur le côté.
FIN FRITURE
•A la fin du temps de cuisson, remonter le panier “M”
et contrôler si les aliments sont dorés à point.
• Si la cuisson est satisfaisante, éteindre l'appareil en
déplaçant le levier “A” du thermostat en position “•”
jusqu'au déclic. Le témoin lumineux “B” devient
vert
• Débranchez l’appareil.
• Égoutter l'excès d'huile en accrochant le panier “M”
sur le support “E” du bac. Ne pas laisser le panier
trop longtemps dans cette position car la vapeur
risque de rendre la friture moins croustillante.
• N.B. En cas de cuisson en 2 temps ou de cuissons
multiples, à la fin de la première phase accrocher le
panier ”M” sur le support panier “E” et attendre que
le témoin s'éteigne à nouveau. Immerger ensuite à
nouveau le panier “M” une seconde fois dans l'huile.
CONSEILS POUR LA CUISSON
DURÉE DE L'HUILE OU DE LA GRAISSE
L'huile ou la graisse ne doit jamais descendre en dessous du niveau minimal. De temps en temps, il est nécessaire de les changer complètement. La durée de l'huile
ou de la graisse dépend du type de friture effectuée. Les
aliments panés, par ex., salissent davantage l'huile que
les aliments simplement frits. Comme dans n'importe
quelle friteuse, l'huile chauffée plusieurs fois se détériore! Même si l’huile est utilisée correctement, elle doit être
remplacée au bout de 8 à 10 fritures.
POUR FRIRE CORRECTEMENT
Les pommes de terre fraîches doivent être lavées à l’eau
froide et parfaitement essuyées ; elles seront ainsi plus
croustillantes et resteront séparées les unes des autres.
Pour chaque recette, il est important de se conformer à
la température conseillée. A température trop basse, la
friture absorbe l'huile et, à une température trop élevée,
la croûte se forme immédiatement autour de l'aliment et
l'intérieur reste cru.
Les aliments à frire ne doivent être immergés que lorsque l'huile a atteint la température voulue, c'est-à-dire
quand le témoin lumineux a “B” s'éteint.
Ne pas surcharger le panier, pour éviter d'entraîner une
baisse soudaine de la température de l'huile et donc
une friture trop grasse et non uniforme.
Contrôler que les aliments sont en tranche mince et de
même épaisseur, les aliments trop épais cuisant mal à
l'intérieur malgré un aspect appétissant, tandis que ceux
d'une épaisseur uniforme atteigne simultanément un
degré de cuisson idéal.
Parfaitement sécher les aliments avant de les plonger
dans l'huile ou la graisse, afin d'éviter les projections
d'huiles; en outre, les aliments humides restent mous
après la cuisson, en particulier les pommes de terre.
Il est conseillé de paner ou de passer dans la farine les
aliments riches en eau (poissons, viandes, légumes), en
ayant soin d'éliminer le surplus de pain ou de farine
avant de les plonger dans l'huile.
Ne pas effectuer plus de 3 cuissons consécutives de
pommes de terre.
Quand vous cuisinez des aliments passés dans la pâte
à frire, immergez d’abord le panier vide puis, la température programmée étant atteinte immergez l’aliment
directement dans l’huile chaude, pour éviter que la pâte
ne colle au panier.
Page 13

FRITURE D'ALIMENTS NON SURGELÉS
Consulter le tableau suivant, sans oublier que les temps et températures de cuisson sont approximatifs et doivent être
adaptés en fonction de la quantité et des goûts de chacun.
Aliment Quantité max. Température Temps (minutes)
gr lb °C °F
Pommes frites
fraîches Demi-portion 700 1.8 170 340 8 – 10
Portion entière 1300 3 170 340 12 – 14
Poisson Calamars 600 1.3 140 280 9 - 11
Mollusques 600 1.3 140 280 10 - 12
Sardines 600 1.3 140 280 10 - 12
Crevettes 600 1.3 140 280 8 - 10
Viande Côtes de porc 500 1.1 160 320 8 - 9
Croquettes de poulet 500 1.1 160 320 8 - 10
Boulettes 700 1.5 160 320 8 - 10
Légumes Artichauts 400 0.9 150 300 15 - 17
Choux-fleurs 600 1.3 150 300 10 - 11
Champignons 500 1.1 150 300 8 - 10
Aubergines 200 0.4 150 300 9 - 11
Courgettes 500 1.1 150 300 13 - 15
FRITURE D'ALIMENTS SURGELÉS
Les surgelés ayant une température très basse, ils entraînent une baisse notable de la température du liquide de cuisson.
Pour obtenir de bons résultats, ne pas dépasser la quantité maximale d'aliments recommandée pour chaque friture.
Les aliments surgelés sont souvent recouverts de nombreux cristaux de glace qu'il vaut mieux éliminer avant la cuisson. Plonger ensuite le panier dans l'huile de friture très lentement pour éviter que l'huile ne bouillonne.
Les temps de cuisson sont approximatifs et doivent être adaptés en fonction de la température initiale des aliments à
frire et de la température conseillée par la marque de surgelés.
Aliment Quantité max. Température Temps (minutes)
gr. lb. °C °F
Pommes frites précuites surgelées 600 1.3 180 360 9 - 11
Croquettes de pommes de terre 700 1.5 180 360 9 - 11
Poisson Bâtonnets de poisson 500 1.1 180 360 7 - 8
Filets de sole 500 1.1 180 360 6 - 7
Viande Croquettes de poulet 300 0.7 180 360 5 - 6
13
Page 14

14
ANOMALIES DE FONCTIONNEMENT
ANOMALIE
Odeur
désagréable
L'huile déborde
Les aliments ne sont
pas dorés à point
L'huile ne chauffe
pas
CAUSE
L'huile s'est détériorée.
Liquide de cuisson inadéquat.
L'huile s'est détériorée et entraîne la
formation d'un excès de mousse.
Introduction dans l'huile chaude d'aliments humides.
Le panier a été immergé trop rapidement.
Le niveau de l'huile dépasse la limite
maximum.
La température de l'huile est trop basse.
Le panier est surchargé.
La friteuse a été mise en fonction sans
huile dans la cuve, et a provoqué la rupture du dispositif thermique de sécurité.
Le connecteur magnetique n’est pas correctement inserée.
SOLUTIONS
Remplacer l'huile ou la graisse.
Utiliser de l'huile
d’arachide
ou de l'huile végétale
de bonne qualité
Remplacer l'huile ou la graisse.
Bien sécher les aliments.
Immerger lentement les aliments.
Réduire la quantité d'huile dans la cuve.
Sélectionner une température plus élevée.
Réduire la quantité d'aliments.
Presser le bouton “reset”.
Connecter le connecteur avec la silie (X) sur la
partie haute.
NETTOYAGE
Débrancher l'appareil avant tout nettoyage.
Ne jamais immerger la friteuse dans l'eau ni sous le
robinet (voir fig. 7). Toute infiltration d'eau dans le corps
des commandes comporte des risques d'électrocution.
Contrôler que l'huile est suffisamment refroidie, puis retirer le groupe commandes et vider l'huile. Retirer le dépôt
de la cuve au moyen d'une éponge ou d'un papier
absorbant. A l'exception du groupe des commandes,
du câble d'alimentation et des résistances, toutes les
autres parties peuvent être lavées avec de l'eau chaude
et du liquide vaisselle. Laver attentivement le filtre “G”
du couvercle pour assurer sa efficace.
Ne jamais utiliser d'éponges abrasives risquant d'abîmer la friteuse. Une fois l'opération terminée, sécher
soigneusement le tout pour éviter toute projection
d'huile chaude durant le fonctionnement. Le groupe
de commandes peut se nettoyer avec un linge humide.
ROBINET DE VIDANGE D’HUILE
ATTENTION : ne pas vider l'huile encore chaude, risque de
brûlures.
Procéder de la façon suivante
1. Retirer le panier.
2. Ouvrir le volet “T”.
3. Ouvrir le robinet “S” en tournant en sens inverse des
aiguilles d’une montre.
4. Faire couler le liquide dans un récipient (voir figure) en
veillant à ce qu’il ne déborde pas.
5. Passer une éponge ou du papier essuie-tout dans la
cuve pour éliminer les éventuels dépôts.
6. Fermer le robinet en tournant dans le sens des aiguilles
d’une montre.
7. Refermer le volet “T”.
Il est de bonne règle de conserver séparément l’huile
utilisée pour frire le poisson et celle utilisée pour et les autres aliments.
Attention, le saindoux et le lard se solidifient ! Éviter de les laisser refroidir trop longtemps.
Page 15

15
Cette garantie s’applique à tous les appareils ménagers de marques De’Longhi ou Kenwood.
Garantie limitée
Qu’est-ce qui est couvert par la garantie?
Nous garantissons que chaque appareil est exempt de vices de matériaux et de fabrication. Notre obligation, dans le cadre de cette garantie, est limitée à la réparation, à notre usine ou dans un centre de répa-
ration agréé, de toutes les pièces défectueuses ou leurs composants. En cas de remplacement ou retour
d’un produit, il doit être retourné tout port payé. Le modèle neuf ou réparé sera retourné aux frais de la
société. Cette garantie ne s’applique que dans les cas où l’appareil est utilisé conformément aux instruc-
tions de l’usine qui l’accompagnent et sur un circuit électrique à courant alternatif (c.a.).
Combien de temps dure la garantie?
Cette garantie dure une (1) année à partir de la date d’achat indiquée sur votre reçu et s’applique unique-
ment à l’acheteur initial pour l’utilisation.
Qu’est ce qui n’est pas couvert par cette garantie?
Cette garantie ne couvre ni les défauts ou dégâts résultant de réparations ou altérations apportées à l’ap-
pareil en dehors de notre usine ou des centres de réparation agréés ni les appareils qui ont été soumis à
un mauvais traitement, une mauvaise utilisation, une négligence ou des accidents. En outre, les dommages-
intérêts directs ou indirects résultant de l’utilisation de ce produit ou de la rupture d’un contrat ou du non-
respect de cette garantie ne sont pas recouvrables dans le cadre de cette garantie. Certains états ou pro-
vinces n’autorisent pas l’exclusion ou la limitation des dommages-intérêts directs ou indirects. Par consé-
quent, la limitation ci-dessus peut ne pas s’appliquer à vous.
Comment faire réparer l’appareil?
Si des réparations s’avèrent nécessaires, consultez les informations ci-dessous :
Résidents des États-Unis : Veuillez appeler notre ligne d’assistance sans frais au 1-800-322-3848 ou con-
nectez-vous à notre site Web à www.delonghi.com. Pour tous les accessoires, les pièces détachées et les
pièces de rechange, veuillez contacter notre service des pièces détachées au 1-800-865-6330.
Résidents du Canada : Veuillez appeler notre ligne d’assistance sans frais au 1-888-335-6644 ou connec-
tez-vous à notre site Web à www.delonghi.com.
Résidents du Mexique : Veuillez consulter la déclaration de garantie limitée pour le Mexique.
Autres pays : Veuillez visitez www.delonghi.com.
Veuillez consulter le dos du manuel pour connaître les adresses de De’Longhi.
La garantie ci-dessus remplace toutes les autres garanties et représentations explicites. Toutes les garanties
implicites sont limitées à la période de garantie applicable établie ci-dessus. Cette limitation ne s’applique
pas si vous concluez un contrat d’extension de garantie avec De’Longhi. Certains états ou provinces n’au-
torisent pas les limitations sur la durée des garanties implicites. Par conséquent, les exclusions ci-dessus
peuvent ne pas s’appliquer à vous. De’Longhi n’autorise aucune personne ni société à assumer des respon-
sabilités en association avec la vente ou l’utilisation de ses appareils.
Comment s’appliquent les lois de l’état ou de la province?
Cette garantie vous donne des droits juridiques précis et vous pouvez également avoir d’autres droits qui
peuvent varier d’un état à un autre ou d’une province à une autre.
Page 16

16
LA FREIDORA ESTÁ EQUIPADA CON UNA CABLE DE ALIMENTACIÓN CON CONECTOR MAGNÉTICO:
Conecte en primer lugar el conector magnético al
aparato, como se representa en la figura n°3B,
teniendo cuidado de que la parte sobresaliente del
conector encaje perfectamente en la sede específica prevista en el aparato, a continuación enchufe la
clavija a la toma de corriente.
Atención
No deje nunca la clavija enchufada a la toma de
corriente cuando el conector magnético no esté
conectado a la freidora, figura 3.
Si el conector magnético no está conectado al aparato, compruebe la correcta colocación vea la figura 3B. Si el conector sigue sin estar colocado en su
posición, póngase en contacto con un centro de asistencia autorizado.
Cuando el aparato está alimentado deje siempre un
poco de espacio libre en las inmediaciones del conector
magnético, para prevenir una eventual desconexión.
Use solamente el cable de alimentación type TA-35PA,
suministrado por centros de asistencia autorizados.
Al utilizar dispositivos eléctricos se deben observar algunas
medidas básicas de seguridad. He aquí algunas de ellas:
1. Lea todas las instrucciones.
2. No toque las superficies calientes: sírvase de las
asas y los selectores.
3. No moje el aparato, ya que podría ocasionar
una descarga eléctrica. Siga las instrucciones
que se dan para la limpieza.
4. Extreme los controles cuando el aparato sea utilizado por o cerca de los niños.
5. Desenchufe el aparato para limpiarlo y cuando esté
fuera de uso. Antes de desenchufarlo, ponga el selector en APAGADO. Déjelo enfriar antes de colocarle o
extraerle algún componente y para limpiarlo.
6. No utilice el aparato si el cable o el enchufe
están deteriorados, o si ha sufrido algún daño.
Llévelo al servicio técnico más cercano para su
revisión, reparación o ajuste.
7. El uso de accesorios no recomendados puede
ser causa de accidentes.
8. No utilice el horno al aire libre.
9. No deje que el cable cuelgue de la encimera, ni
que toque ninguna superficie caliente
10.No coloque el aparato encima ni cerca de quemadores de gas o placas radiantes encendido
o también en un horno calentado.
11.No transportar la freidora cuando el aceite
està caliente, porque se corre el peligro de
graves quemaduras.
12.Primero, insertar siempre el enchufe en el aparato y luego conectar el cable en el tomacorriente.
Para desconectar el cable, colocar en “OFF”
cualquier mando y luego sacar el enchufe del
tomacorriente.
13.No utilice el aparato para usos diversos de los
previstos.
14.Averiguar que la asa estea abrochada correctamente al cesto.
ATENCIÓN
• La freidora tiene que ponerse en marcha sólo
tras haberla llenado con aceite o manteca;
en
efecto, si se calienta en vacío, interviene un
dispositivo de seguridad térmico que interrumpe
su funcionamiento.
• Conectar el aparato solo con enchufes de corriente alterna 120 volts.
• Si su aparato está provisto de un enchufe polarizado para línea de corriente alterna (un
enchufe que tiene una espiga más larga que la
otra). Este enchufe se adaptará en el tomacorriente de una sola manera, la cual es una característica de seguridad. Si no logra introducir
completamente el enchufe en el toma corriente,
inviértalo. Si el enchufe no entra aún, llame al
electricista de manera de que sustituya el tomacorriente anómalo. No eludir el objetivo de
seguridad del enchufe polarizado.
• Antes de usar la freidora por primera vez lavar
esmeradamente la cuba y el cesto con agua
caliente y poco detergente líquido para vajillas;
despues sacarlo atentamente.
• Si la freidora perdiera aceite, dirigirse al
centro de asistencia tecnica o al personal auto-
rizado de la empresa.
• No introducir en la freidora alimentos demasiado grandes o utensilios.
• Está prohibido el uso de este aparato por parte
de niños y de personas incapaces sin la oportuna vigilancia.
• No dejar que los niños jueguen con el aparato.
• Para evitar heridas o quemaduras, no tocar ninguna de las partes metálicas de la freidora, ya
que éstas pueden estar muy calientes; siempre
utilizar guantes idoneos.
• Es del todo normal que durante la primera utilización, el aparato emane un olor de nuevo.
Ventilar la habitación.
• Asegurarse de que la freidora está desconectada,
antes de proceder a limpiarla y cuando no la utilice.
NO UTILISA LA FREIDORA CON CABLES DE PROLONGACIÓN
Se suministra un cable de alimentación corto para
reducir los riesgos consecuentes de un enganche o
tropezadura con un cable largo.
PRECAUCIONES IMPORTANTES
CONSERVE ESTAS INSTRUCCIONES
ESTE PRODUCTO ESTÁ DISEÑADO PARA USO
DOMÉSTICO EXCLUSIVAMENTE
Page 17

17
DESCRIPCIÓN DEL APARATO
A. Botón termostato para la programación de la tem-
peratura.
B. Indicador luminoso temperatura aceite (rojo, verde)
C. Microinterruptor de seguridad
D. Indicación de los niveles MIN – MAX
E. Soporte cesta
F. Mirilla
G. Filtro
H. Cuerpo exterior
I. Asas
J. Sedes para la fijación del grupo mandos
K. Tapadera con asa
L. Cubeta amovible
M. Cesta con empuñadura abatible
N. Resistencia eléctrica
O. Alojamiento porta cable
P. Ganchos para la fijación de la caja de mandos del
aparato
Q. Restablecimiento del dispositivo térmico de seguri-
dad
R. Grupo mandos
S. Grifo para vaciar el aceite.
T.
Portezuela del grifo para vaciar el aceite.
DISPOSITIVO TÉRMICO DE SEGURIDAD
El aparato está dotado de un dispositivo térmico de
seguridad que interrumpe el calentamiento en caso de
utilización incorrecta o de funcionamiento anómalo.
Después de que el aparato se haya enfriado, con la
ayuda de palillos para dientes o de otros objetos similares, pulsar delicadamente el pulsador de restablecimiento del dispositivo de seguridad “Q”, (véase fig. 1).
Si el aparato no funcionase, es necesario consultar un
centro de asistencia autorizado por el fabricante.
INSTRUCCIONES PARA EL USO
Antes de utilizar la freidora por primera vez, limpiar
correctamente, con agua caliente y detergente para
vajillas, la cesta, la cubeta y la tapadera. El grupo de
mandos con cable de alimentación y resistencia pueden limpiarse con un paño húmedo. Asegurarse que no
haya penetrado agua en el grupo de mandos y que no
haya residuos en el fondo de la cubeta amovible. Secar
meticulosamente todas las partes.
Comprobar que el grupo mandos esté bien fijado al
cuerpo freidora. El microinterruptor de seguridad “C”
no permite el funcionamiento del aparato si el grupo de
mandos “R” no está correctamente colocado en el cuerpo exterior “H”.
La freidora estará lista para la utilización.
LLENADO DEL ACEITE O GRASA
• Quitar la tapadera “K” y levantarla cogiéndola por
el asa. Girar la empuñadura de la cesta abatible
hasta su bloqueo (pos. 2 de fig. 2). Sacar la cesta
“M” tirando hacia arriba de ella.
• Sacar del alojamiento porta cable “O” la longitud de
cable necesaria para enchufar el aparato a la red
(véase fig. 3A). El indicador luminoso temperatura
aceite “B” se volve verde.
Si la freidora está equipada con una cable de alimentación con conector magnético:
Connectar el connector magnético (véase fig. 3B)
prestando atención que el resalto (X) està rivolto en
alto y enchufar la toma de corrente.
• Si se utiliza el aceite, verter el aceite en la cubeta “L”
hasta alcanzar el nivel máximo indicado (véase fig.
4). No superar nunca este límite, el aceite podría
salirse del recipiente. El nivel de aceite debe estar
siempre entre las indicaciones máximo y mínimo
“D”. Los mejores resultados se obtienen utilizando un
IMPORTANTE
QUEMADURAS GRAVES PUEDEN PRODUCIRSE SI UNA FREIDORA CAE. NO
DEJAR QUE EL CABLE JUELGUE DEL
BORDE DE LA SUPERFICIE EN LA QUAL
ESTÁ LA FREIDORA, DESDE DONDE
PODERIA SER FACILMENTE AL ALCANCE DE UN NIÑO O CAUSAR MOLESTIA PARA EL UTILIZADOR.
NO DEJAR LA
FREIDORA CERCA
DE LOS NIÑOS
Page 18

18
aceite bueno de semillas de cacahuete.
• Pero si utilizan barras de grasa, cortarlas en trozos y
deshacerlos en otro recipiente y verter a continuación
la grasa derretida en la cubeta de la freidora.
No
fundir nunca la grasa en la cesta o sobre la resistencia de la freidora (véase fig. 5).
• Si el aceite contiene restos de comida en el fondo,
para asegurarse de que el aceite durará más tiempo,
le aconsejamos retirarlos.
• Cerrar de nuevo la tapadera “K”.
PRECALENTAMIENTO
• Poner los alimentos para freír en la cesta “M”, sin
sobrecargarla nunca: máx. 1,3 kg. (3 libras) de
patatas frescas Asegurarse que la empuñadura de
la cesta esté colocada correctamente (pos. 2 de fig.
2).
• Colocar el botón “A” del termostato (véase fig. 6)
sobre la temperatura deseada (véase la tabla cocción). El indicador luminoso temperatura aceite “B”
se volve rojo.
• Cuando se alcanza la temperatura programada, el
indicador luminoso “B” se volve verde.
INICIO FRITURA
• Cuando el indicador luminoso “B” se volve verde.,
colocar la cesta “M” en el aceite, sumergirla muy lentamente para evitar salpicaduras o salidas de aceite
caliente.
• Es perfectamente normal que salga una cantidad de
vapor
•Mientras se fríe, es normal que el vapor se escape
por la tapadera y que la condensación pueda caer
por los lados de ésta.
• Para evitar riesgos de quemaduras durante la cocción, no colocar las manos encima del filtro de la
tapadera ni de la freidora. Antes de abrir por completo la tapadera, abrirla lentamente para dejar salir
el vapor de los lados.
FINAL FRITURA
• Cuando se haya cumplido el tiempo de cocción,
levantar la cesta “M” y controlar que los alimentos
contenidos hayan alcanzado el grado de cocción
deseado.
• Cuando se considera finalizada la cocción, situar el
botón A del termostato en la posición “•”en el tope
para apagar aparato. El indicador luminoso “B” se
volve verde.
•Desenchufe el aparato de la corriente.
• Enganchar la cesta “M” en el soporte “E” de la cubeta para escurrir el aceite sobrante. Para que el vapor
no provoque que la fritura sea menos crujiente, no
dejar nunca la cesta de la freidora en esta posición.
•N.B. Si se debe efectuar la cocción en 2 fases o si se
deben efectuar varias cocciones, al final de la primera fase, enganchar la cesta “M” en el soporte cesta
“E” y esperar hasta que el indicador luminoso se
haya apagado de nuevo. A continuación, introducir
de nuevo lentamente la cesta “M” en el aceite por
segunda vez.
CONSEJOS PARA LA COCCIÓN
DURACIÓN DEL ACEITE O GRASA
El aceite o la grasa no debe estar nunca por debajo del
nivel mínimo. Esporádicamente, hay que renovarlo
completamente. La duración del aceite o grasa dependen de lo que se fríe. El rebozado por ejemplo ensucia
más el aceite que una simple operación de fritura. ¡Al
igual que con las demás freidoras, recalentar el aceite
varias veces lo deteriora! Por lo tanto, aunque se utilice correctamente, aconsejamos sustituir todo el aceite
después de usarlo 8-10 veces.
PROCEDIMIENTO PARA FREIR CORRECTAMENTE
Para evitar que las patatas fritas se peguen entre ellas y
sean más crujientes después de freírlas, lavar las patatas frescas con agua fría y secarlas cuidadosamente.
Es importante seguir para cada receta la temperatura
aconsejada. Con una temperatura demasiado baja, la
fritura absorbe aceite. Con una temperatura demasiado alta, se crea inmediatamente la costra y la parte
interna sigue estando cruda.
Poner en el aceite los alimentos que se desean freír,
solamente cuando el aceite alcance la temperatura correcta, es decir cuando el indicador luminoso “B” se
apaga.
No sobrecargar la cesta, ello provoca el descenso
repentino de la temperatura del aceite y por tanto una
fritura demasiado grasa y no uniforme.
Controlar que los alimentos no sean gruesos y que el
grosor sea el mismo para todos, ya que los alimentos
demasiados gruesos se cuecen mal en el interior, aunque presenten luego un aspecto bonito, sin embargo los
que tienen un grosor uniforme alcanzan al mismo tiempo una cocción ideal. Secar perfectamente los alimentos antes de introducirlos en el aceite o grasa para evitar salpicaduras de aceite; además los alimentos mojados resultan blandos después de la cocción (especialmente las patatas). Aconsejamos rebozar o enharinar
los alimentos con un alto contenido de agua (pescado,
carne, verduras) teniendo cuidado de eliminar el pan o
la harina sobrantes antes de ponerlos en el aceite.
No freír patatas más de 3 veces seguidas.
Cuando cocine alimentos rebozados, le aconsejamos
sumergir antes la cesta vacía, y cuando se alcance la
temperatura programada, eche el alimento directamente en el aceite caliente para evitar que el rebozado
se pegue a la cesta.
Page 19

19
FRITURA DE ALIMENTOS NO CONGELADOS
Consultar la siguiente tabla teniendo en consideración que los tiempos y las temperaturas de cocción son aproximados y deben ser regulados en función de las cantidades y del gusto personal.
Alimento Cantidad máxima Temperatura Tiempo (minutos)
gr lb °C °F
Patatas frescas Media ración 800 1.8 170 340 8 - 10
Ración entera 1300 3 170 340 12 – 14
Pescado Calamares 600 1.3 140 280 9 - 11
Vieiras 600 1.3 140 280 10 - 12
Sardinas 600 1.3 140 280 10 - 12
Quisquillas 600 1.3 140 280 8 - 10
Carne Chuletas de cerdo 500 1.1 160 320 8 - 9
Filetes de pollo 500 1.1 160 320 8 - 10
Albóndigas 700 1.5 160 320 8 - 10
Verduras Alcachofas 400 0.9 150 300 15 - 17
Coliflor 600 1.3 150 300 10 - 11
Setas 500 1.1 150 300 8 - 10
Berenjenas 200 0.4 150 300 9 - 11
Calabacines 500 1.1 150 300 13 - 15
FRITURA DE ALIMENTOS CONGELADOS
Los productos congelados tienen una temperatura muy baja. Por consiguiente, provocan un notable descenso de la
temperatura del líquido de cocción.
Para obtener un buen resultado, es aconsejable no superar las cantidades máximas de alimentos para cada fritura.
Los alimentos congelados con frecuencia están recubiertos por conchas de hielo que hay que intentar eliminar antes
de la cocción. Introducir a continuación la cesta en el aceite de fritura muy lentamente para evitar hervores del aceite.
Los tiempos de cocción son aproximados y deben modificarse en función de la temperatura inicial de los alimentos
que se freirán y en función de la temperatura aconsejada por el fabricante de los congelados.
Alimento Cantidad máxima Temperatura Tiempo (minutos)
gr lb °C °F
Patatas fritas Precocinadas congeladas 600 1.3 180 360 9 - 11
Croquetas de patatas 700 1.5 180 360 9 - 11
Pescado Palitos de merluza 500 1.1 180 360 7 - 8
Filetes de platija 500 1.1 180 360 6 - 7
Carne Filetes de pollo 300 0.7 180 360 5 - 6
Page 20

20
ANOMALÍAS DE FUNCIONAMIENTO
ANOMALÍA
Mal olor.
El aceite se salta.
Los alimentos no se
doran durante la
fase de cocción.
El aceite no se
calienta.
CAUSA
Aceite deteriorado.
Líquido de cocción inadecuado.
El aceite se ha deteriorado y por este
motivo se forma demasiada espuma
Los alimentos introducidos en el aceite
caliente no estaban suficientemente secos.
La cesta ha sido sumergida demasiado
rápidamente.
El nivel del aceite supera el límite máximo.
Temperatura del aceite demasiado
baja.
Cesta demasiado cargada.
Utilización de la freidora sin aceite en la
cuba, lo cual ha provocado la rotura del
dispositivo térmico de seguridad.
El conector magnético no està bien conectado.
SOLUCIÓN
Sustituir el aceite o la grasa.
Use aceite de cacahuete o aceite vegetal de
buena calidad.
Sustituir el aceite o la grasa.
Seque correctamente los alimentos.
Introduzca lentamente los alimentos.
Disminuya la cantidad de aceite en la cuba.
Seleccione una temperatura más alta.
Disminuya la cantidad de alimentos.
Pulsar a tecla “reset”
Connectar el connector magnético prestando atención que el resalto (X) està rivolto en alto.
LIMPIEZA
Asegurarse que el aparato esté desenchufado antes de
efectuar cualquier operación de limpieza. No introducir
nunca la freidora en el agua y no ponerla bajo el chorro del grifo (véase fig. 7). Si el agua se infiltra en el cuerpo de mandos, se podrían provocar riesgos de electrocución. Controlar que el aceite esté suficientemente frío,
a continuación, quitar el grupo de mandos y vaciar el
aceite. Quitar el depósito de la cubeta con la ayuda de
una esponja o con papel absorbente. Si se excluye el
grupo de mandos, cable alimentación y resistencia, se
pueden lavar todas las demás partes con agua caliente
y detergente para vajilla. Lavar con cuedad el filtro
“G” de la tapadera para garantizar la eficacia. No
utilizar nunca esponjas abrasivas para no estropear la
freidora. Al final de la operación, secar todo meticulosamente para evitar que durante el funcionamiento del aparato se produzcan salpicaduras de aceite
caliente. Puede limpiar el grupo de mandos con un
paño húmedo.
GRIFO PARA VACIAR EL ACEITE
ATENCIÓN: no vacíe el aceite si está aún caliente,
puede quemarse.
Efectuar las siguientes operaciones:
1. Extraer la cesta.
2. Abrir la portezuela “H”.
3. Abrir el grifo “I” dándole vueltas en el sentido
contrario de las agujas del reloj.
4. Verter el líquido en un recipiente (véase la figura),
asegurarse de que no se derrame.
5. Eliminar los eventuales depósitos presentes en la
cubeta con una esponja o papel absorbente.
6. Dar vueltas al grifo en el sentido de las agujas del
reloj para cerrarlo.
7. Cerrar de nuevo la portezuela “H”.
Es conveniente conservar por separado el aceite
usado para freír el pescado y el aceite usado para
freír otros alimentos.
Si se usa manteca o lardo, no dejar que se enfríe excesivamente para evitar que se solidifique.
Page 21

21
Esta garantía cubre todos los productos con las marcas De'Longhi o Kenwood.
Garantía limitada
(para los Estados Unidos solamente)
Alcance de la garantía
Cada artefacto tiene garantía por defectos de materiales y de fabricación. Bajo los términos de esta
garantía limitada, nuestra obligación se limita a la reparación de partes o componentes (a excepción de
partes dañadas durante el transporte) en nuestra fábrica o en un centro autorizado de servicio. Al devol-
ver un producto para cambio o reparación, todos los costos de envío deben ser pagados por el propieta-
rio del mismo. El producto nuevo o reparado será devuelto con los gastos de envío pagados por la com-
pañía.
Esta garantía es válida únicamente si el artefacto se utiliza de acuerdo con las instrucciones del fabricante
(incluidas con el artefacto) y alimentada eléctricamente con corriente alterna (CA).
Duración de la garantía
Esta garantía es válida por un (1) año a partir de la fecha de compra que figura en el recibo o factura de
venta de la unidad, y sólo el comprador original tiene derecho a hacer uso de la garantía.
Exclusiones de la garantía
La garantía no cubre defectos ni daños que fueran consecuencia de reparaciones o modificaciones efec-
tuadas al artefacto por personal ajeno a nuestra fábrica o a centros autorizados de servicio, ni cubre fal-
las o daños causados por maltrato, uso indebido, negligencia o accidentes. Esta garantía tampoco reco-
nocerá reclamos efectuados por perjuicios directos ni indirectos emergentes del uso del producto, ni perjui-
cios o daños resultantes del uso del producto en incumplimiento de los términos y condiciones que hacen
válida la garantía. En algunos estados no se permiten exclusiones ni limitaciones de los perjuicios recono-
cidos por una garantía, por lo cual las limitaciones mencionadas podrían ser no válidas en su caso parti-
cular.
Obtención de servicios de garantía
Si las reparaciones son necesarias, vea la información de contacto que aparece a continuación:
Residentes de los Estados Unidos: Por favor contactar a nuestra línea telefónica gratuita, al 1-800-322-
3848 o ingrese a nuestro sitio en el Internet www.delonghi.com. Para todos los accesorios, piezas de
repuesto o de reemplazo, por favor contactar a nuestra división de piezas, al 1-800-865-6330.
Residentes de Canadá: Por favor contactar a nuestra línea telefónica gratuita, al 1-888-335-6644 o
ingrese a nuestro sitio en el Internet www.delonghi.com <http://www.delonghi.com/>.
Residentes de México: Refiera por favor a la garantía limitada para México.
Por favor vea la página trasera donde encontrará las direcciones de De’Longhi.
La garantía explicada anteriormente se ofrece en reemplazo de cualquier otra garantía, sea expresa u
ofrecida de cualquier otra manera, y toda garantía implícita del producto estará limitada al período de
duración mencionado anteriormente. Esta limitación queda anulada y es reemplazada por otros términos
si el usuario decide obtener una garantía prolongada de De’Longhi. En algunos estados no se permiten
limitaciones del período de garantía implícita, por lo cual las limitaciones mencionadas anteriormente
podrían no ser válidas en su caso particular. De’Longhi no autoriza a ninguna otra persona ni compañía
a ofrecer ningún tipo de garantía ni responsabilidad con respecto al uso o a los términos de venta de sus
artefactos.
Leyes estatales/provinciales
Esta garantía le confiere derechos establecidos por ley, pero usted también podría tener otros derechos
que varían de un estado a otro.
Page 22

Esta garantía cubre todos los productos con las marcas De'Longhi o Kenwood.
GARANTIA
Garantizamos todo producto DE´LONGHI por defectos de fabricación, material y mano de obra. Nuestra
obligación dentro de ésta garantía es proporcionar gratuitamente las refacciones y el servicio durante un
año a partir de la fecha de compra. Esta garantía se aplicará únicamente sí el producto se utiliza de
acuerdo con las instrucciones anexas del fabricante y con un circuito de corriente alterna (ca). Esta
garantía reemplaza a cualquier otra garantía y acuerdo, expreso o implícito y a todas las demás obliga-
ciones o responsabilidades de nuestra parte. No autorizamos a ninguna otra persona o compañía a asu-
mir nuestras responsabilidades relacionadas con la venta y el uso de nuestro producto. Esta garantía no
implica ninguna responsabilidad de parte nuestra en relación con la venta o el uso de nuestro producto.
Esta garantía no se hará válida en los siguientes casos:
a) Cuando el producto se hubiese utilizado en condiciones distintas a las normales
b) Cuando el producto no hubiese sido operado de acuerdo con el instructivo de uso que se le acompaña
c) Cuando el producto hubiese sido alterado o reparado por personas no autorizadas por el fabricante
nacional, importador o comercializador responsable respectivo.
Para hacer efectiva la garantía o si se necesitan reparaciones o refacciones, componentes, combustibles y
accesorios llame, con su garantía sellada por el establecimiento, al Centro Nacional de Servicio para pro-
porcionarle una cuenta de mensajería con la cual deberá remitir el producto y garantía. Los gastos que
se deriven del cumplimiento de la presente garantía deberán ser absorbidos por el Centro Nacional de
Servicio De´Longhi.
Obtención de servicios de garantía
Si las reparaciones son necesarias, vea la información de contacto que aparece a continuación:
Residentes de los Estados Unidos:
Por favor contactar a nuestra línea telefónica gratuita, al 1-800-322-3848 o ingrese a nuestro sitio en el
Internet www.delonghi.com.
Para todos los accesorios, piezas de repuesto o de reemplazo, por favor contactar a nuestra división de
piezas, al 1-800-865-6330.
Residentes de Canadá: Por favor contactar a nuestra línea telefónica gratuita, al 1-888-335-6644 o
ingrese a nuestro sitio en el Internet www.delonghi.com <http://www.delonghi.com/>.
Residentes de México: Por favor contactar a nuestra línea telefónica gratuita, al 01 800 711 8805 (lada
sin costo) o ingrese a nuestro sitio en el Internet www.delonghi.com <http://www.delonghi.com/>.
Centro Nacional de Servicio:
Fiducia Italiana S.A. de C.V.
Pestalozzi #814
Col. Narvarte
Del. Benito Juarez
C.P. 03100
tels: 5543 1447
FECHA DE COMPRA
22
Page 23

23
LA FRIGGITRICE È DOTATA DI CAVO CON CONNETTORE MAGNETICO:
Collegare innanzitutto il connettore magnetico
all’apparecchio, come illustrato in Figura 3B, assicurandosi che la parte sporgente del connettore (
X)
sia correttamene inserita nell'apposita sede sull’apparecchio, quindi collegare il cavo alla presa di
corrente.
Avvertenza
Mai lasciare l’apparecchio collegato alla presa di
corrente se il connettore magnetico non è inserito
nella friggitrice, Figura 3. Se il connettore magnetico esce dalla sua sede, verificare che sia stato inserito correttamente, (vedi Figura 3B). Se il problema
persiste, rivolgersi a un centro di assistenza autorizzato. Quando l’apparecchio è in funzione,
lasciare sempre un po’ di spazio libero intorno al
connettore magnetico per impedire che si scolleghi.
Utilizzare soltanto cavi di tipo TA-35PA forniti da un
centro di assistenza autorizzato De Longhi.
Quando si usano apparecchi elettrici è bene
rispettare alcune regole fondamentali di sicurezza:
1. Leggere integralmente le istruzioni
2. Non toccare le superfici calde. Usare le apposite impugnature.
3. Per non prendere la scossa, non immergere il
cavo, la spina e la friggitrice in acqua o in altri
liquidi.
4. Quando l'apparecchio viene usato da o nella
vicinanza di bambini è necessario prestare la
massima attenzione.
5. Scollegare la spina dalla presa di corrente
quando l’apparecchio non è in funzione e
prima delle operazioni di pulizia. Lasciarlo
raffreddare prima di installare o rimuovere
componenti e prima di pulirlo.
6. Non mettere in funzione l'apparecchio se la
spina o il cavo appaiono danneggiati o dopo
che l’apparecchio ha dato segni di malfunzionamento o è stato in qualche modo danneggiato. Portare l’apparecchio al centro di assistenza autorizzato più vicino per consulenza o
riparazione.
7. L’uso di accessori non consigliati dal costruttore dell’apparecchio potrebbe causare danni.
8. Non utilizzare l'apparecchio all’aperto.
9. Non lasciare che il cavo penda dal bordo della
superficie su cui è appoggiato o venga a contatto con superfici calde.
10.Non posizionare l’apparecchio su o in prossimità di fornelli caldi, a gas o elettrici, né inserirlo nel forno quando è ancora caldo
11.Usare la massima attenzione quando si sposta
un apparecchio contenente olio o altri liquidi
caldi.
12.Inserire innanzitutto la spina nell’apparecchio
quindi collegare il cavo alla presa a muro. Per
spegnere, ruotare il termostato su “OFF”, quindi rimuovere la spina dalla presa di corrente.
13.Non usare l’apparecchio per scopi diversi da
quelli per cui è stato progettato.
14.Assicurarsi che la maniglia sia correttamente
assemblata e fissata al cestello.
CONSERVARE LE PRESENTI ISTRUZIONI
QUESTO PRODOTTO È DESTINATO ESCLUSIVAMENTE ALL'USO DOMESTICO
AVVERTENZE IMPORTANTI
AVVERTENZE
• Mettere in funzione la friggitrice soltanto dopo averla riempita di olio o grasso.
La friggitrice viene sev-
eramente danneggiata se messa in funzione a secco.
• Se viene riscaldata a vuoto, interviene un dispositivo
di sicurezza termico che ne blocca il funzionamento.
• Collegare il cavo a una presa da 120 volt c.a.
• Se l'apparecchio è dotato di una spina di sicurezza
polarizzata (una spina con un terminale più largo
dell’altro), tale spina entrerà nella presa soltanto in
un senso. Questa è una caratteristica di sicurezza. Se
la spina non entra completamente nella presa,
provare nell'altro senso. Se in ultima analisi la spina
risultasse non adatta alla presa, chiamare un elettricista per la sostituzione della presa di tipo obsoleto. Non vanificare il sistema di protezione della spina
polarizzata.
• Pulire bene l’apparecchio prima di usarlo per la
prima volta: la vasca, il cestello, il coperchio (senza
filtro) con acqua calda e detersivo per piatti. Quindi
asciugare con cura.
• Se si dovessero riscontrare perdite di olio, rivolgersi
al centro di assistenza tecnica o al personale autor-
izzato dal costruttore.
• Per garantire un funzionamento in sicurezza, non
introdurre cibi troppo grandi o utensili nella friggitrice .
• Senza opportuna sorveglianza, non consentire
l’uso di questo apparecchio a bambini.
• Non lasciare che i bambini giochino con l’apparec-
chio.
•Al fine di evitare possibili scottature, non toccare
nessuna parte metallica perché potrebbe essere
molto calda. usare guanti adeguati.
• Non aprire llo sportellino del rubinetto scarico olio
(se previsto) quando l’olio è ancora caldo.
•
È assolutamente normale che l’apparecchio emani un
odore “di nuovo” dopo essere stato usato per la
prima volta. Se succede, aerare l'ambiente.
• Quando l’apparecchio non è in funzione e prima di
procedere alla pulizia assicurarsi che la spina sia
scollegata dalla presa di corrente.
NON USARE CAVI DI PROLUNGA
L’apparecchio è dotato di un cavo di alimentazione corto
per ridurre i rischi derivanti da attorcigliamento del cavo.
Page 24

24
DESCRIZIONE DELL’APPARECCHIO:
A. Manopola termostato per la regolazione della
temperatura
B. Spia luminosa temperatura olio (rosso, verde)
C. Microinterruttore di sicurezza
D. Indicazione dei livelli MIN – MAX
E. Supporto cestello
F. Oblò
G. Filtro
H. Mantello
I. Maniglie
J. Sedi per il fissaggio del gruppo comandi
K. Coperchio con maniglia
L. Vasca amovibile
M. Cestello con manico ribaltabile
N. Resistenza elettrica
O. Vano porta-cavo
P. Guide per il fissaggio del gruppo comandi all’ap-
parecchio
Q. Reset del dispositivo termico di sicurezza
R. Gruppo comandi
S. Rubinetto scarico olio
T. Sportellino rubinetto scarico olio
DISPOSITIVO TERMICO DI SICUREZZA
L’apparecchio è dotato di un dispositivo termico di
sicurezza che interrompe il riscaldamento in caso di
errato utilizzo o di funzionamento anomalo. Dopo che
l’apparecchio si è raffreddato, con l’aiuto di uno stuzzicadenti o qualcosa di simile, premere delicatamente
il pulsante di riarmo del dispositivo di sicurezza “Q”
(vedi fig. 1). Se l’apparecchio non dovesse funziona-
re è necessario consultare un centro di assistenza
autorizzato dal costruttore.
ISTRUZIONI PER L’USO
Prima di utilizzare la friggitrice per la prima volta,
pulire bene, con acqua calda e detergente per stoviglie, il cestello, la vasca ed il coperchio. Il gruppo
comandi con cavo alimentazione e resistenza possono essere puliti con un panno umido. Assicurarsi che
non sia penetrata acqua nel gruppo comandi e che
non ci siano residui nel fondo della vasca amovibile
Asciugare accuratamente tutte le parti.
Verificare che il gruppo comandi sia ben fissato al
corpo friggitrice. Il microinterruttore di sicurezza “C”
non permette il funzionamento dell’apparecchio se il
gruppo comandi “R” non è correttamente posizionato
nel mantello “H”.
La friggitrice è ora pronta per l’utilizzo.
RIEMPIMENTO DELL’OLIO O GRASSO
•Togliere il coperchio “K” sollevandolo per la maniglia. Ruotare l’impugnatura del cesto ribaltabile fino
al suo bloccaggio (pos. 2 di fig. 2). Estrarre il cestello “M” tirandolo verso l’alto.
• Estrarre dal vano portacavo “O” la lunghezza di
cavo necessaria per collegare l’apparecchio alla
rete (vedi fig. 3A). La spia luminosa temperatura
olio “B” diventa verde.
Se la friggitrice è dotata di cavo con connettore
magnetico:
Dapprima inserire il connettore magnetico nell'apposita sede dell’apparecchio (fig. 3B), facendo
AVVERTENZA
UNA FRIGGITRICE CHE CADE
DALL'ALTO PUÒ PROVOCARE
GRAVI USTIONI. NON LASCIARE
CHE IL CAVO PENDA DAL
BORDO DELLA SUPERFICIE SU
CUI È APPOGGIATA LA FRIGGITRICE, DOVE POTREBBE FACILMENTE ESSERE AFFERRATO DA
UN BAMBINO O ESSERE D’IMPICCIO ALL’UTENTE. NON USARE
PROLUNGHE.
TENERE LONTANO
DALLA
PORTATA DEI BAMBINI
Page 25

25
attenzione che la parte sporgente del connettore
(X) sia rivolta verso il basso, quindi collegare il
cavo alla presa di corrente.
• Se utilizzate olio, versatelo nella vasca “L” fino a
raggiungere il livello massimo indicato (vedi fig. 4).
Non superare mai questo limite, si rischia la fuoriuscita di olio dal recipiente.
Il livello dell’olio deve sempre trovarsi tra i riferimenti massimo e minimo “D”. I migliori risultati si
ottengono utilizzando un buon olio di semi di arachide.
• Se invece utilizzate dei pani di grasso tagliateli a
pezzetti e fateli fondere in un altro recipiente e poi
versate il grasso liquefatto in quello della friggitrice.
Non fondere mai il grasso nel cestello o sulla resistenza della friggitrice (vedi fig. 5).
• Se l’olio contiene dei residui di cibo, questi devono
essere rimossi prima di scaldarlo, affinché l’olio duri
più a lungo.
• Richiudere il coperchio “K”.
PRERISCALDAMENTO
• Mettere il cibo da friggere nel cestello “M”, senza
mai sovraccaricarlo: max 1,3 Kg. (3 libre) di patate fresche. Assicurarsi che il manico del cestello sia
posizionato correttamente (pos. 2 di fig. 2).
• Posizionate la manopola “A” del termostato (vedi
fig. 6) sulla temperatura desiderata (vedi tabella
cottura). La spia luminosa “B” diventa rossa.
•Al raggiungimento della temperatura impostata, la
spia luminosa “B” diventa verde.
INIZIO FRITTURA
• Appena la lampada spia diventa verde, immergere
il cestello “M” nell’olio, abbassandolo molto lentamente per evitare schizzi o fuoriuscita d’olio caldo.
•E’ del tutto normale che fuoriesca una notevole
quantità di vapore.
• E' normale che durante la friggitura il vapore fuoriesca dal coperchio e che la condensa goccioli dal
bordo del coperchio.
•Per evitare scottature, non mettere mai le mani sopra
il filtro sul coperchio o sopra la friggitrice quando è
in uso. Prima di aprire completamente il coperchio,
aprirlo un poco per far uscire il vapore da un lato.
FINE FRITTURA
• Allo scadere del tempo di cottura alzare il cestello
“M” e controllare se il cibo ha raggiunto il grado di
doratura desiderato.
• Se ritenete che la cottura sia ultimata, spegnere
l’apparecchio portando la manopola “A” del termostato nella posizione “•” sino a sentire il click. La
spia luminosa “B” diventa verde.
• Scollegare la spina dalla presa di corrente.
• Fate sgocciolare l’olio in eccesso agganciando il
cestello “M” nel supporto “E” della vasca.
• N.B. Se la cottura è richiesta in 2 fasi o si vogliono
eseguire più cotture, al termine della prima fase
agganciare il cestello ”M” nel supporto cestello “E”
ed attendere che la spia si spenga nuovamente.
Quindi reimmergere lentamente il cestello “M” nell’olio per una seconda volta.
CONSIGLI PER LA COTTURA
DURATA DELL’OLIO O GRASSO
L’olio o il grasso non deve mai scendere sotto il livello
minimo. Di tanto in tanto, è necessario rinnovarlo
completamente. La durata dell’olio o grasso dipende
da cosa si frigge. L’impanatura, per esempio, sporca
l’olio più della frittura semplice. Come in una qualsiasi friggitrice, l’olio, se riscaldato più volte si deteriora!
Pertanto, anche se utilizzato correttamente, consigliamo di sostituirlo completamente con una certa frequenza.
PER FRIGGERE NEL MODO GIUSTO
E’ importante seguire per ogni ricetta la temperatura
consigliata. A temperatura troppo bassa, la frittura
assorbe olio. A temperatura troppo alta si forma subito la crosta e l’interno rimane crudo. Gli alimenti da
friggere devono essere immersi solo quando l’olio ha
raggiunto la giusta temperatura, cioè quando la spia
luminosa “B” si spegne. Non sovraccaricare il cestello, ciò provocherebbe un abbassamento repentino
della temperatura dell’olio e quindi una frittura troppo
grassa e non uniforme. Controllare che gli alimenti
siano sottili e di uguale spessore, in quanto gli alimenti
troppo spessi cuociono male all’interno, malgrado il
bell’aspetto, mentre quelli di spessore uniforme raggiungono contemporaneamente la cottura ideale.
Asciugare perfettamente gli alimenti prima di immergerli nell’olio o grasso per evitare spruzzi di olio; inoltre gli alimenti umidi risultano molli dopo la cottura
(specialmente le patate). E’ consigliato impanare o
infarinare gli alimenti ricchi di acqua (pesci, carne,
verdure), avendo cura di eliminare il pane o la farina
in eccesso prima di immergerli nell’olio.
Quando si cucinano cibi pastellati, consigliamo di
immergere prima il cestello vuoto, quindi, una volta
raggiunta la temperatura impostata, il cibo direttamente nell'olio caldo, per evitare che la pastella si
attacchi al cestello.
Page 26

26
FRITTURA DI ALIMENTI NON SURGELATI
Consultare la seguente tabella tenendo presente che i tempi e le temperature di cottura sono approssimativi e
devono essere regolati in funzione delle quantità e del gusto personale.
Alimento Quantità max. Temperatura Tempo (minuti)
gr lb °C °F
Patatine fresche Mezza porzione 800 1.8 170 340 8 - 10
Porzione intera 1300 3 170 340 12 – 14
Pesce Calamari 600 1.3 140 280 9 - 11
Canestrelli 600 1.3 140 280 10-12
Sardine 600 1.3 140 280 10-12
Gamberetti 600 1.3 140 280 8 - 10
Carne Cotolette di maiale 500 1.1 160 320 8 - 9
Cotolette di pollo 500 1.1 160 320 8 - 10
Polpette 700 1.5 160 320 8 - 10
Verdure Carciofi 400 0.9 150 300 15-17
Cavolfiore 600 1.3 150 300 10-11
Funghi 500 1.1 150 300 8 - 10
Melanzane 200 0.4 150 300 9 - 11
Zucchine 500 1.1 150 300 13-15
FRITTURA DI ALIMENTI SURGELATI
I surgelati hanno temperature molto basse. Di conseguenza provocano un notevole abbassamento della temperatura del liquido di cottura. Per ottenere un buon risultato, vi consigliamo di non superare le quantità massime
di alimenti per ogni frittura. Gli alimenti surgelati sono sovente ricoperti da numerosi cristalli di ghiaccio che bisogna cercare di eliminare prima della cottura. Immergere poi il cestello nell’olio di frittura molto lentamente per
evitare ribollimenti dell’olio.
I tempi di cottura sono approssimativi e devono essere variati in funzione della temperatura iniziale degli alimenti
da friggere ed in funzione della temperatura consigliata dal produttore dei surgelati.
Alimento Quantità max. Temperatura Tempo (minuti)
gr lb °C °F
Patatine precotte surgelate 600 1.3 180 360 9 - 11
Crocchette di patate 700 1.5 180 360 9 - 11
Pesce Bastoncini di merluzzo 500 1.1 180 360 7 - 8
Filetti di platessa 500 1.1 180 360 6 - 7
Carne Cotolette di pollo 300 0.7 180 360 5 - 6
Page 27

27
PULIZIA
Prima di qualsiasi pulizia accertarsi che la spina sia
disinserita.
Non immergere mai la friggitrice nell’acqua e non
metterla sotto il getto del rubinetto (vedi fig. 7).
Infiltrandosi nel corpo comandi, l’acqua potrebbe
provocare folgorazioni.
Controllare che l’olio sia sufficientemente freddo,
successivamente, togliere il gruppo comandi e svuotare l’olio.
Rimuovere il deposito dalla vasca con l’aiuto di una
spugna o con carta assorbente.
Escludendo il gruppo comandi, cavo alimentazione
e resistenza, tutte le altre parti possono essere lavate con acqua calda e detergente per stoviglie.
Per mantenere l’efficienza del filtro “G”, lavarlo
accuratamente.
Non utilizzate mai spugne abrasive in modo da non
rovinare la friggitrice.
A fine operazione asciugare tutto con molta cura,
questo per evitare che durante il funzionamento fuoriescano spruzzi d’olio caldo.
RIMEDIO
Sostituire l’olio o il grasso.
Usare olio di arachide o olio vegetale di buona qualità
Sostituire l’olio o il grasso
Asciugare bene gli alimenti.
Immergerli lentamente.
Diminuire la quantità di olio nella
vasca.
Selezionare una temperatura più
alta.
Ridurre la quantità di cibo.
Rivolgersi al Centro Assistenza (il
dispositivo va sostituito)
Inserire in connettore con la parte
sporgente (
X) rivolta verso il basso.
CAUSA
L’olio si è deteriorato.
Il liquido di cottura non è adatto.
L’olio si è deteriorato e si forma troppa
schiuma
Avete immerso nell’olio caldo degli alimenti non sufficientemente asciutti.
Il cestello è stato immerso troppo rapidamente.
Il livello dell’olio supera il limite massimo.
La temperatura dell’olio è troppo
bassa.
Il cestello è sovraccarico.
La friggitrice è stata usata senza olio nella
vasca, provocando il guasto del dispositivo termico di sicurezza.
Il connettore magnetico non è stato inserito correttamente.
ANOMALIE DI FUNZIONAMENTO
ANOMALIA
Cattivo odore
L’olio trabocca
Gli alimenti non raggiungono la
doratura in fase di cottura
L’olio non si
scalda
RUBINETTO SCARICO OLIO
ATTENZIONE: non scaricare l’olio quando è caldo, perché si rischiano scottature.
Procedere nel seguente modo:
1. Togliere il cestello.
2. Aprire lo sportellino “T”.
3. Aprire il rubinetto “S” ruotandolo in senso antiorario.
4. Fare defluire il liquido in un recipiente (vedi figura)
accertandosi che non trabocchi.
5. Rimuovere eventuali depositi dalla vasca con l’aiuto
di una spugna o con della carta assorbente.
6. Chiudere il rubinetto ruotandolo in senso orario.
7. Richiudere lo sportellino “T”.
E’ buona norma conservare separatamente l’olio
usato per friggere pesce da quello usato per friggere
altri cibi.
Se si usa strutto o lardo, non lasciarlo raffreddare troppo, per evitare che si solidifichi.
Page 28

28
Questa garanzia e’applicabile a tutti i piccoli elettrodomestici a marchio Kenwood o De’Longhi.
Garanzia limitata
Copertura della garanzia
De’Longhi garantisce che ciascun prodotto è esente da difetti di materiale e di fabbricazione. La presente
garanzia è limitata alla riparazione delle parti difettose o delle loro componenti presso la nostra fabbrica
o presso un centro di assistenza autorizzato, ad eccezione delle parti danneggiate durante la spedizione.
Nel caso di sostituzione o restituzione di un prodotto, l'unità deve essere restituita con trasporto prepaga-
to. Il modello riparato o nuovo verrà restituito a spese dell'azienda.
La presente garanzia ha validità solamente nel caso in cui il prodotto venga utilizzato in conformità con le
istruzioni di fabbrica con cui viene venduto, e su un circuito a corrente alternata ( c.a.).
Durata della garanzia
La presente garanzia ha validità di un anno ( 1 ) dalla data di acquisto riportata sulla prova d'acquisto ed
è riconosciuta esclusivamente all'acquirente originale per l'uso.
Limitazioni della garanzia
La garanzia non copre difetti o danni del prodotto dovuti a riparazioni o alterazioni eseguite al di fuori
della fabbrica o dai centri di assistenza autorizzati, né si applica a prodotti danneggiati da abuso, uso
improprio, negligenza o incidente. Inoltre, i danni consequenziali ed incidentali derivanti dall'uso di questo prodotto o da una qualsiasi violazione del contratto o di questa garanzia non sono coperti da quest'ultima. Alcune giurisdizioni non consentono l'esclusione o la limitazione di danni incidentali o consequenziali;
in tal caso, le limitazioni o esclusioni di cui sopra non saranno applicabili
Come ottenere servizi di assistenza
Nel caso occorra fare delle riparazioni, rivolgersi al servizio informazioni:
Residenti negli USA: Contattare il servizio di assistenza telefonica gratuito al numero 1-800-322-3848
oppure collegarsi all’indirizzo internet www.delonghi.com. Per tutti gli accessori, i componenti o i pezzi di
ricambio, contattare il reparto componenti al numero 1-800-865-6330.
Residenti in Canada: Contattare il servizio di assistenza telefonica gratuito al numero1-888-335-6644
oppure collegarsi all’indirizzo internet www.delonghi.com.
Residenti in Messico: Riferirsi alle condizioni di garanzia limitata riportate nella sezione per il Messico.
Residenti in altri paesi: Vogliate visitare il nostro sito internet www.delonghi.com.
Per gli indirizzi di De'Longhi si prega di vedere la pagina posteriore del manuale.
La garanzia sopra riportata è esclusiva e sostituisce qualsiasi altra garanzia, espressa o implicita.
Eventuali garanzie implicite previste dalle leggi vigenti saranno soggette ai limiti di durata stabiliti dalla
garanzia. Il limite non si applica nel caso di un'estensione della garanzia con De’Longhi. Alcune giurisdi-
zioni non consentono l'esclusione o la limitazione della durata delle garanzie implicite; in tal caso, le limi-
tazioni di cui sopra non saranno applicabili. De’Longhi non autorizza alcuna persona o società ad assu-
mersi qualsivoglia responsabilità relativamente alla vendita o all'uso dei propri prodotti.
Applicazione delle leggi dei singoli stati
La presente garanzia concede diritti legali specifici oltre a quelli eventualmente previsti dalla legislazione
vigente nei vari stati.
Page 29

451IDL/07.07 Printed in China
De’Longhi America, Inc.
Park 80 West, Plaza One
Saddle Brook, NJ 07663
1-800-322-3848
De’Longhi Canada, Inc.
6150 McLaughlin Road
Mississauga, Ontario
L5R 4E1 Canada
1-888-335-6644
Fiducia Italiana S.A. de C.V.
Pestalozzi #814
Col. Narvarte
Del. Benito Juarez
C.P. 03100
tels: 5543 1447
lada sin costo: 01 800 711 8805
www.delonghi.com
 Loading...