

De'Longhi A2-223IDL Owner's Manual

TOASTER
BROODROOSTER
TOSTADOR
TORRADEIRA
ºƒÀ°∞¡π∂ƒ∞
BRØDRISTER
BRÖDROST
LEIVÄNPAAHDIN
BRØDRISTER
TOSTER
KENYÉRPIRÍTÓ
TOUSTOVAĺ
ííééëëííÖÖêêÄÄ
Instructions for use
Mode d’emploi
Gebrauchsanweisung
Istruzioni per l’uso
Gebruiksaanwijzing
Instrucciones para el uso
Instruções de uso
œ‰Á„flÂÚ xÒ‹ÛÁÚ
Brugsanvisning
Bruksanvisning
Käyttöohjeet
Bruksanvisning
Instrukcja obs∏ugi
Használati utasítás
Návod k pouÏití
аМТЪЫНˆЛЛ ФУ ˝НТФОЫ‡Ъ‡ˆЛЛ
A1-223IDL 8-10-2003 11:23 Pagina 1
ELECTRICAL CONNECTION (U.K. ONLY)
A) If your appliance comes fitted with a plug, it will incorporate a 13 Amp fuse. If it does not fit your socket, the plug should be
cut off from the mains lead, and on appropriate plug fitted, as below. warning: Very carefully dispose of the cut off plug after
removing the fuse: do not insert in a 13 Amp socket elsewhere in the house as this could cause a shock hazard. With alternative plugs not incorporating a fuse, the circuit must be protected by a 15 Amp fuse. If the plug is a moulded-on type, the
fuse cover must be re-fitted when changing the fuse using a 13 Amp Asta approved fuse to BS 1362. In the event of losing
the fuse cover, the plug must NOT be used until a replacement fuse cover can be obtained from your nearest electrical dealer. The colour of the correct replacement fuse cover is that as marked on the base of the plug.
B) If your appliance is not fitted with a plug, please follow the instructions provided below:
WARNING - THIS APPLIANCE MUST BE EARTHED
IMPORTANT
The wires in the mains lead are coloured in accordance
with the following code:
Green and yellow Earth
Blue Neutral
Brown Live
As the colours of the wires in the mains lead may not correspond with the coloured markings identifying the terminals in your plug, proceed as follows:
The green and yellow wire must be connected to the terminal in the plug marked with the letter E or the earth symbol
or coloured green or green and yellow.
The blue wire must be connected to the terminal marked
with the letter N or coloured black.
The brown wire must be connected to the terminal marked
with the letter L or coloured red.
N
E
L
A1-223IDL 8-10-2003 11:23 Pagina 2

A1-223IDL 8-10-2003 11:23 Pagina 3
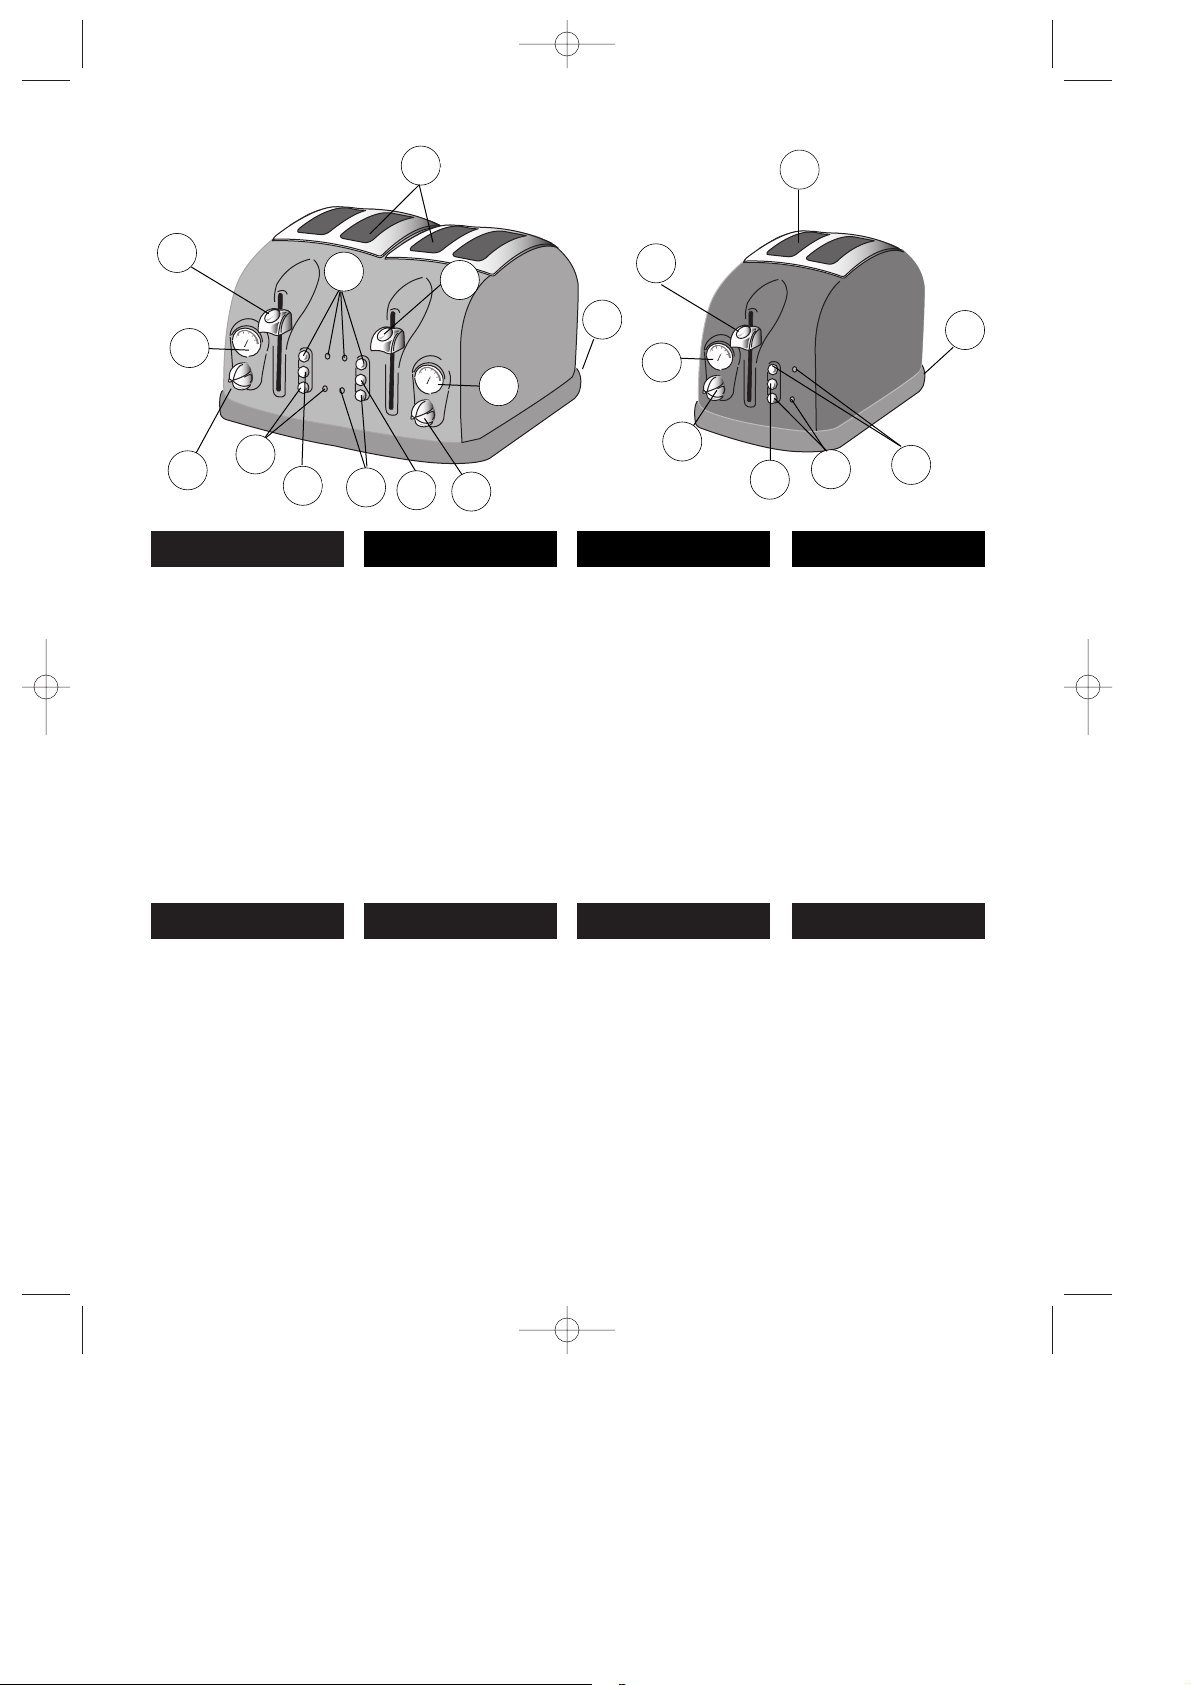
DESCRIPTION OF APPLIANCE
A) ON lever
B) Darkness viewer
C) Darkness setting dial
D) Warning light and
“Defrost” button
E) Stop/clear button
F) Warning light and
“Reheat” button
G) Crumb collection tray
H) Bread toasting slots
DESCRIZIONE
DELL’APPARECCHIO
A) Leva accensione
B) Indicatore grado di
tostatura
C) Manopola regolazione
grado di tostatura
D) Spia e pulsante “defrost”
E) Pulsante stop/clear
F) Spia e pulsante “reheat”
G) Vassoio raccoglibriciole
H) Bocche di caricamento
GERÄTEBESCHREIBUNG
A) Einschalthebel
B) Sichtanzeige
Bräunungsgrad
C) Einstell-Drehknopf
Bräunungsgrad
D) Kontrollampe und Schalter
Defrost (Auftauen)
E) Schalter Stop/Löschen
F)
Kontrollampe und
Schalter Reheat
(Aufwarmen)
G) Krümelblech
H) Toasteinführschlitze
DESCRIPTION DE L’APPAREIL
A) Levier de mise en marche
B) Indicateur degré de grillage
C) Bouton de réglage du degré
de grillage
D) Voyant lumineux et bouton
poussoir “Defrost”
E) Bouton poussoir Stop/Clear
F)
Voyant lumineux et bouton
poussoir “Reheat”
G) Tiroir ramasse-miettes
H) Ouvertures de chargement
ENGLISH ITALIANODEUTSCHFRANÇAIS
BESCHRIJVING VAN HET
APPARAAT
A) Hendel voor het aanzetten
B) Aanduiding bruiningsgraad
C) Draaiknop regulering
bruiningsgraad
D) Controlelampje en drukknop
“defrost”
E) Drukknop Stop/clear
F) Controlelampje en drukknop
“reheat”
G) Kruimelopvangblad
H) Broodsleuven
NEDERLANDS
DESCRIPCION DEL APARATO
A) Palanca encendido
B) Visor grado de tostado
C) Manopla regulación
grado de tostado
D) Señal luminosa y
pulsador “defrost””
E) Pulsador stop/clear
F) Señal luminosa y
pulsador “reheat”
G) Bandeja recoge migas
H) Bocas de carga
ESPAÑOL
DESCRIÇÃO DO APARELHO
A) Alavanca de ligar
B) Visor do grau de
torração
C) Botão de regulação do
grau de torração
D) Luz-piloto e botão
“defrost”
E) Botão stop/clear
F) Luz-piloto e botão
“reheat”
G) Tabuleiro para migalhas
H) Aberturas
PORTUGUÊS
¶∂ƒπ°ƒ∞º∏ ∆∏™ ™À™∫∂À∏™
∞) ªÔ¯Ïfi˜ ·Ó¿ÌÌ·ÙÔ˜
Û˘Û΢‹˜
µ) ¶·Ú·ı˘Ú¿ÎÈ ÔÙÈÎÔ‡
ÂϤÁ¯Ô˘ ÊÚ˘Á·Ó›ÛÌ·ÙÔ˜
C) ¢È·ÎfiÙ˘ Ú‡ıÌÈÛ˘
‚·ıÌÔ‡ ÊÚ˘Á·Ó›ÛÌ·ÙÔ˜
D) ∂У‰ВИОЩИОfi П·М¿ОИ О·И
ОФ˘М› "defrost"
E) ∫Ф˘М› stop/clear
F) ∂У‰ВИОЩИОfi П·М¿ОИ О·И
ÎÔ˘Ì› "reheat"
G) ¢›ÛÎÔ˜ Û˘ÏÏÔÁ‹˜
„›¯Ô˘ÏˆÓ
H) ™ÙfiÌÈ· ÂÈÛ·ÁˆÁ‹˜
∂§§∏¡π∫∞
H
A
B
C
D
F
D
A
B
G
A
B
G
C
E
F
H
F
E
C
E
CTM4023
CTM4023
CTM2023
CTM2023
A1-223IDL 8-10-2003 11:23 Pagina 4
3
2
4
1
5
3
2
4
1
5
3
2
4
1
5

BESKRIVELSE AV APPARATET
A) Hendel for igangsetting
B) Indikator for grad av
risting
C) Reguleringsknott for grad
av risting
D) Varsellampe og tast
“defrost”
E) Bryter stop/clear
F) Varsellampe og tast
“reheat”
G) Smuleskuff
H) Risteåpninger
NORSK
LAITTEEN KUVAUS
A) Käynnistysvipu
B) Leivän
paahtamisvoimakkuuden
osoitin
C) Leivän
paahtamisvoimakkuuden
säätönuppi
D) “Defrost” merkkivalo ja
painike
E) Stop/clear painike
F) “Reheat” merkkivalo ja
painike
G) Murujen keruualusta
H) Leivän paahdinurat
SUOMI
BESKRIVNING AV
APPARATEN
A)Startknapp
B) Indikator för rostningsgrad
C) Reglage för rostningsgrad
D) ”Defrost”-knapp med
kontrollampa
E) Stop/clear-knapp
F) ”Reheat”-knapp med
kontrollampa
G)Smulbricka
H) Rostöppningar
SVENSKA
BESKRIVELSE AF
APPARATET
A)Tændingsgrebet
B) Ristegradsindikatoren
C) Ristegradens
reguleringsknop
D) Advarselslampen og tasten
“defrost”
E) Trykknappen ”stop/clear”
F) Advarselslampen og tast
“reheat”
G)Krummebakke
H) Risteåbninger
DANSK
OPIS URZÑDZENIA
A)Dêwignia w∏àczajàca
B) Wskaênik stopnia
opieczenia
C) Pokr´t∏o regulacyjne
stopnia opieczenia
D) Lampka kontrolna
„rozmra˝anie”
E) Przycisk “stop/clear”
(zatrzymaj/czyÊç)
F) Lampka kontrolna
„podgrzewanie”
G)Taca na okruchy
H) Szczeliny opiekajàce
POLSKI
A KÉSZÜLÉK
LEÍRÁSA
A) Emelőkar
B) Pirítási fokozat-jelző
C)Pirításszabályzó gomb
D)”Defrost” (kiolvasztó)
gomb és jelzőlámpa
E) Stop/clear gomb
F) ”Reheat“ (újramelegítő)
gomb és jelzőlámpa
G)Morzsatálca
H)Pirítónyílások
MAGYR
POPIS P¤ÍSTROJE
A)Spou‰tûcí páãka
B) Ukazatel stupnû opékání
C) Otoãn˘ knoflík nastavení
stupnû opékání
D) Svûtelná kontrolka a
tlaãítko „defrost“
E) Tlaãítko stop/clear
F) Svûtelná kontrolka a
tlaãítko „reheat“
G)Zásuvka na drobky
H) ·tûrbiny
âESKY
ééèèààëëÄÄççààÖÖ èèêêààÅÅééêêÄÄ
A) к˚˜‡„ ‚НО˛˜ВМЛfl
З) мН‡Б‡ЪВО¸ ТЪВФВМЛ
ÔÓʇÍË
ë)ê͇ۘ „ÛÎËÓ‚ÍË
ТЪВФВМЛ ФУК‡НЛ
D)аМ‰ЛН‡ЪУ Л НМУФН‡
“defrost”
Ц) дМУФН‡ лнйи/йуалндД
(stop/clear)
D)аМ‰ЛН‡ЪУ Л НМУФН‡
“reheat”
G) èÓ‰‰ÓÌ ‰Îfl Ò·Ó‡
ÍÓ¯ÂÍ
ç) ᇄÛÁӘ̇fl ˘Âθ
RUSS
A1-223IDL 8-10-2003 11:23 Pagina 5
6
GB
IMPORTANT WARNINGS
- The appliance is exclusively for the use for
which it has been expressly manufactured. Any
other use is to be considered inappropriate and
therefore dangerous. The manufacturer cannot
be held responsible for eventual damage caused by inappropriate, improper or irresponsible
use and/or for repairs made to the product by
unauthorised personnel.
- After having removed the appliance from the
packaging, make sure that the product is complete and in perfect condition.
- The plastic bag in which the appliance was
packaged should be kept out of reach of children as it poses a suffocation hazard.
In order to remove the dust that may have accumulated on the appliance, simply dust it off with
a soft cloth.
- Children or infirm persons should not be
allowed to use this product unsupervised
- Children should not be allowed to play with this
appliance
- Before inserting the plug into the electrical
outlet, make certain:
- the voltage of the outlet corresponds to the
value indicated on the information label, attached to the appliance.
- the electrical outlet has adequate grounding
capacity:
the manufacturer declines any
responsibility for the lack of observation of
this norm.
- In the case of incompatibility between the outlet
and the plug of the appliance, have it replaced
by a qualified technician. The use of adapters,
multiple socket units and/or extension cords is
not recommended. Whenever it may be necessary to use such equipment, it is advisable to use
only simple or multiple adapters or extension
cords which comply with the current safety standards, and make sure not to exceed the voltage
limit of the adapter or extension cord.
- When the appliance is plugged into the electrical
outlet, and moreover, while it is turned on, never
place hands into the bread toasting slots (H).
- Never allow the appliance to be used by children or used without adult supervision.
- Do not touch the appliance with wet or damp
hands.
- The metal sides of the toaster and the areas surrounding the bread slots (H) become very hot
during use: control the appliance touching only
the plastic dials and handles.
-Bread is a foodstuff which may catch fire. Do
not use this appliance under or next to curtains
or other combustible material.
- Do not cover the appliance while it is in use.
- Do not use the appliance with bare or wet feet.
- Unplug the appliance from the electrical outlet
when it is not in use.
- Do not leave the appliance on when not being
used as this may be potentially dangerous.
- Do not unplug the appliance from the outlet by
pulling on the cord.
-Do not leave the appliance exposed to the elements, (rain, direct sunlight, frost, etc.).
- Before doing any cleaning or operation, unplug
the appliance from the electrical outlet. Do not
immerse the appliance, the plug, or the electrical cord in water.
-In case of break down or improper functioning
of the appliance, turn off the appliance without
tampering with it. For necessary repairs and for
the substitution of the electrical cord, consult the
technical service centre authorised by the manufacturer.
This appliance conforms to the Directive
89/336/CEE relative to electromagnetic compatibility.
The materials and the objects destined for contact
with food products are in compliance with the regulations of the EEC directive 89/109.
READ THE FOLLOWING INTSTRUCTIONS CAREFULLY BEFORE USING THIS APPLIANCE
A1-223IDL 8-10-2003 11:23 Pagina 6

7
USE OF THE COMMANDS
This appliance is used as if there were two distinct
units.
• Make sure that the lever (A) is raised and the
dial (
C) is set for a medium toasting level.
• Connect the appliance to the electrical outlet.
In
order to eliminate the “new” smell at the first
use, operate the appliance without any food
inside for at least 5 minutes. Aerate the room
during this operation.
• Insert the slices of bread into the bread toasting
slots (
H) and lower the lever (A) until it is all the
way down.
Note: If the appliance is not connected to the
electrical outlet, the lever will not go all the way
down.
•When the toasting is finished, the lever returns
to the up position, raising the toasted bread slices at the same time.
• If the bread is not sufficiently toasted, select a
darker degree of toasting by turning the dial
(
C). If it is too dark, select a lesser degree of
toasting.
• The toasting can be interrupted at any time by simply pressing the stop/clear button (
E).
Defrost function
You may toast slices of frozen bread by pressing the
defrost button (
D) immediately after having lowered
the lever (
A); the cooking cycle will be lengthened
in order to achieve the desired toasting level. The
red warning light will remain lighted while the
defrost function is in use.
Using the Reheat Button:
Press down control lever and press the reheat button (
F). The reheat light will remain on whilst the
reheat function is in use. Please note that this is a
fixed reheat time which cannot be adjusted by the
browning control.
SUGGESTIONS
• Never use the appliance when it is empty (when
there is no bread inserted).
• Do not use very thin or broken slices of bread.
• Do not insert other foods that may drip during
the cooking process. In addition to making the
cleaning procedure more difficult, these may
cause fires. It is also very important to clean the
crumb collection tray of any drippings before
each use.
• Do not insert (by force) foods that are too big for
the slots.
•
Do not insert forks or other utensils into the
toaster in order to remove bread,
in so far as it
may damage the resistance coils of the appliance. Remove the plug from the outlet and turn the
appliance over, gently shaking it to remove the
lodged item.
CLEANING AND MAINTENANCE
• Any cleaning and/or maintenance operation
must be done after having removed the plug
from the electrical outlet.
• Let the appliance cool down before proceeding
with its cleaning.
• The external part of the appliance must be cleaned with soft cloth. Do not use abrasive detergents which could ruin the surface.
• DO NOT IMMERSE IN WATER.
•After each use, remove the plug from the electrical outlet and empty the crumb collection tray
which is situated under the appliance.
• If a toast slice should become lodged in the toaster, unplug the appliance, turn it upside down,
and shake the toaster gently.
• NEVER TOUCH ANY PART OF THE TOASTER
WITH SHARP UTENSILS, ESPECIALLY INSIDE
THE BREAD TOASTING SLOTS.
A1-223IDL 8-10-2003 11:23 Pagina 7
 Loading...