

Page 1

PORTABLE AIR COOLER
Instruction Manual / Item No: 048-GM-48161
REMOTE CONTROLLED
Portable Air Cooler
Item NO.:048-GM-48161
User s Maunal
www.dellaproductsusa.com
909. 344. 2588
Page 2

2
Table of Content
Overview
Control Panel
Guide
Maintenance
Specication
03
04
05
07
07
Page 3
3
Specifications
Power Voltage 110V~/60Hz
Maximum Wind ≥25m /min
Maximum injecting water 5L
Net weight of unit 13.5 lbs
Outside size 13.8x13x29.5 inches
Indicator
Control Receiving Window
ind outlet
on each side)
level indicator
-filter net
cord
adding door
adding door button
controller depositary
panel
box
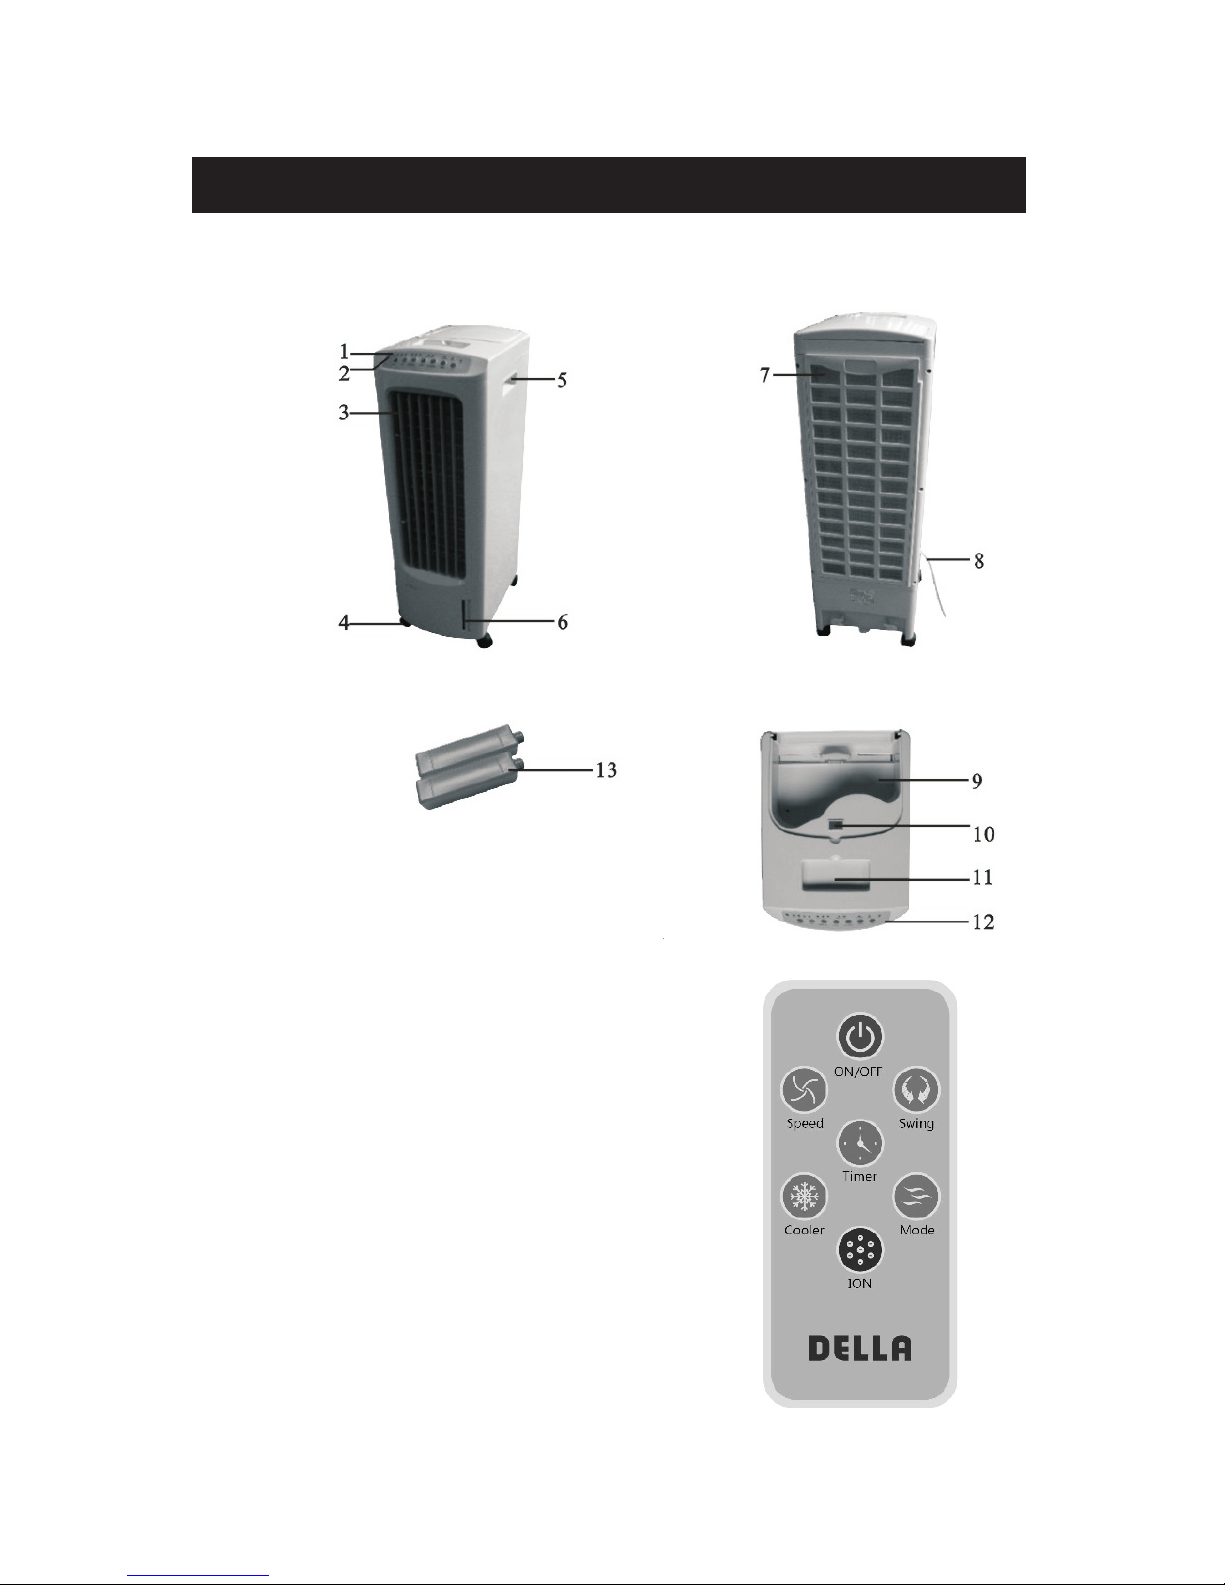
Overview
1. Mode Indicator
2. IR Remote Receiver
3. Air Outlet Vent
4. Rolling Caster Wheels
5. Handle (one on each side)
6. Water level indicator
7. Air Filter
8. Power Cord
9. Ice Reservoir Lid
10. Remote Control Holder
11. Control Panel
12. Ice Reservoir
Page 4

4
Control Panel
Fan Speed - The “SPEED” key is used to change the fan speed. The fan speed default is
“Medium” and changes back to low within a few seconds. This helps with the stress of
“Cold Start-Ups” which aids in longer motor life.
Cool/Humidier – When ice and water are loaded into the reservoirs, the cooling fea-
ture will lower the temperature and is indicated by a LED indicator.
Oscillation – The “Swing” key is used to enable the oscillating vents.
Timer – The timer can be adjusted from .5 – 12 hours. Each key press is 30 minutes and
is indicated by a LED indicator.
Ion – This function is uses high voltage to ionize (electrically charge) air molecules. This
method has been used to eliminate the occurrence of air-borne infections and air-borne
partials.
Mode – The mode key is used to activate the units Normal Wind, Natural Wind and
Sleeping wind modes.
On/O – This key is used to turn on or o the unit.
Control Panel
Time r
Cool
ION
ON/O FF
Spee d
Swin g
Mode
Page 5

5
Guide
1. Open the package and take the unit out. Dispose of any foam packaging.
2. Adding Water: Open the door on the side of the unit to gain access to the water reser-
voir. Add water until the water level is close to or has reached MAX.
Pay attention to the following:
1) When adding water, pay attention to the water level indicator on the front of the unit.
2) Do not ll water above red water level line.
3) Please close the cover when nish adding water, otherwise the unit will not work
4) If you want to reduce the temperature more, place ice in the top of the unit where the
ice reservoir is located.
3. The unit can be used after selecting ON/SPEED key, and you may select high, medium or
low wind by yourself.
4.Timing hours (0.5-7.5hours) can be decided by yourself. If timing indicator is not on,timing
function is not in operation.
5.When choosing wind oscillation function, you may press Oscillation key. If oscillation in-
dicator is on, air direction is from leftto right;if youmove horizontalair leafat airtransmitting
exit, air can blow up or down.
6.Anytime when you wantto stop machine, press“OFF Key”, Meanwhile,theunit stillunder“-
STAND-BY”situation.
7. Remote Control
1) The machine can be controlled by the included remote control. Open the battery cover
on the pack and install two AAA batteries.
2) There are 7 keys on the remote controller. The functions are some with the button func-
tion on the control panel. When using the remote, it should be aimed at the IR receiver on
the control panel and within 20 feet.
Page 6

6
Guide
8. Ice Box – The ice box is a great way of cooling the outgoing air. It has the ability of
keeping the ambient air a few degrees cooler.
Operation
1) Put the Ice Packs into the freezer and keep them inside until they are completely
frozen.
2) Place the Ice Packs into the water from the Water Filling Door.
3) The unit comes with two Ice Packs which can be used continuously.
IMPORTANT!
When adding water, do not excess the MAX level.
Do not place any objects on the unit.
Clean the outside of the unit with a wet microber and light detergent. Do not use
corrosive detergent or solvent to clean the body.
If the machine has fallen over with water still in it, immediately unplug and unit and wait
24 hours for the unit to dry. You may damage the machine if you do not follow these
instructions.
Do not move or shake the machine while it is operating or the automatic shut o will be
activated.
NOTES: The control panel should be free of water at all times
Page 7

7
Maintenance
Air Filter – Unplug the unit before removing the air lter. Simply plug on the lter handle to
remove the lter. Wash with a light soap and soft brush. Allow the lter to fully dry before
using for maximum performance.
Water Reservoir – When not in use, remove all water from the water reservoir to reduce the
chance of mold. Clean with a mild detergent to remove any foul smells. Built-In drain plug at
the bottom of the reservoir makes draining easy.
Outer Body – The body of the unit can be cleans with a mild detergent and a microber
cloth.
WARNING: Any part of unit other than the water/ice reservoir should not be in contact with
any water. Immediately unplug the unit in an event that water is exposed to the unit.
Specication
Voltage: 110 v / 60 hz
Power Consumption: 60 Watts
Air Flow: 25 m / Min.
Fan Speed: Low, Medium, High
Water Tank: 5 Liter Capacity
Auto-Timer 60 Min-12Hours
Overall Dimension 27.5” (H) x 11”(W) x 11.5 (D)
Page 8

8
www.dellaproductsusa.com
909. 344. 2588
 Loading...