


Vostro 14-5459
Owner's Manual
Regulatory Model: P68G
Regulatory Type: P68G001

Copyright © 2015 Dell Inc. Todos los derechos reservados. Este producto está protegido por las leyes internacionales
y de los Estados Unidos sobre los derechos de autor y la protección intelectual. Dell™ y el logotipo de Dell son marcas
comerciales de Dell Inc. en los Estados Unidos y en otras jurisdicciones. El resto de marcas y nombres que se
mencionan en este documento puede ser marcas comerciales de sus respectivas empresas.
2015 - 10
Rev. A00

Contents
1 Manipulación del equipo..................................................................................... 5
Safety instructions................................................................................................................................. 5
Before working inside your computer..................................................................................................6
Apagado del equipo.............................................................................................................................. 6
After working inside your computer.....................................................................................................7
2 Extracción e instalación de componentes.......................................................8
Recommended tools.............................................................................................................................8
Removing the back cover..................................................................................................................... 8
Installing the back cover....................................................................................................................... 8
Removing the battery............................................................................................................................9
Installing the battery..............................................................................................................................9
Removing the hard drive.......................................................................................................................9
Installing the hard drive.......................................................................................................................10
Removing the memory module..........................................................................................................10
Installing the memory module............................................................................................................ 11
Removing the WLAN card................................................................................................................... 11
Installing the WLAN card.....................................................................................................................12
Removing the keyboard...................................................................................................................... 12
Installing the keyboard........................................................................................................................ 13
Removing the speakers....................................................................................................................... 13
Installing the speakers......................................................................................................................... 14
Removing the heat sink.......................................................................................................................14
Installing the heat sink.........................................................................................................................14
Removing the fan................................................................................................................................ 15
Installing the fan.................................................................................................................................. 15
Removing the display assembly..........................................................................................................15
Installing the display assembly............................................................................................................16
Removing the display bezel.................................................................................................................17
Installing the display bezel...................................................................................................................17
Removing the display panel................................................................................................................ 17
Installing the display panel..................................................................................................................18
Removing the I/O panel......................................................................................................................18
Installing the I/O panel........................................................................................................................19
Removing the power connector........................................................................................................ 19
Installing the power connector..........................................................................................................20
Removing the camera.........................................................................................................................20
Installing the camera........................................................................................................................... 21
3

Removing the system board............................................................................................................... 21
Installing the system board.................................................................................................................22
3 Programa de configuración del sistema........................................................ 23
System Setup overview....................................................................................................................... 23
Boot Sequence....................................................................................................................................23
Teclas de navegación..........................................................................................................................23
Updating the BIOS ..............................................................................................................................24
System Setup options......................................................................................................................... 25
4 Solución de problemas......................................................................................27
Enhanced Pre-Boot System Assessment (ePSA) diagnostics............................................................ 27
LED error codes...................................................................................................................................27
Battery status lights.............................................................................................................................28
5 Specifications...................................................................................................... 29
6 Cómo ponerse en contacto con Dell..............................................................34
Cómo ponerse en contacto con Dell................................................................................................ 34
4
1
Manipulación del equipo
Safety instructions
Use the following safety guidelines to help protect your computer from potential damage and to help to
ensure your personal safety. Unless otherwise noted, each procedure included in this document assumes
that the following conditions exist:
• You have read the safety information that shipped with your computer.
• A component can be replaced or--if purchased separately--installed by performing the removal
procedure in reverse order.
AVISO: Desconecte todas las fuentes de energía antes de abrir la cubierta o los paneles del
equipo. Una vez que termine de trabajar en el interior del equipo, vuelva a colocar todas las
cubiertas, paneles y tornillos antes de conectarlo a la fuente de alimentación.
AVISO: Before working inside your computer, read the safety information that shipped with your
computer. For additional safety best practices information, see the Regulatory Compliance
Homepage at www.dell.com/regulatory_compliance
PRECAUCIÓN: Many repairs may only be done by a certified service technician. You should only
perform troubleshooting and simple repairs as authorized in your product documentation, or as
directed by the online or telephone service and support team. Damage due to servicing that is
not authorized by Dell is not covered by your warranty. Read and follow the safety instructions
that came with the product.
PRECAUCIÓN: To avoid electrostatic discharge, ground yourself by using a wrist grounding strap
or by periodically touching an unpainted metal surface, such as a connector on the back of the
computer.
PRECAUCIÓN: Handle components and cards with care. Do not touch the components or
contacts on a card. Hold a card by its edges or by its metal mounting bracket. Hold a component
such as a processor by its edges, not by its pins.
PRECAUCIÓN: When you disconnect a cable, pull on its connector or on its pull-tab, not on the
cable itself. Some cables have connectors with locking tabs; if you are disconnecting this type of
cable, press in on the locking tabs before you disconnect the cable. As you pull connectors apart,
keep them evenly aligned to avoid bending any connector pins. Also, before you connect a cable,
ensure that both connectors are correctly oriented and aligned.
NOTA: The color of your computer and certain components may appear differently than shown in
this document.
5
Before working inside your computer
To avoid damaging your computer, perform the following steps before you begin working inside the
computer.
1. Ensure that you follow the Safety instructions.
2. Ensure that your work surface is flat and clean to prevent the computer cover from being scratched.
3. Turn off your computer, see Apagado del equipo.
PRECAUCIÓN: To disconnect a network cable, first unplug the cable from your computer
and then unplug the cable from the network device.
4. Disconnect all the network cables from the computer.
5. Disconnect your computer and all attached devices from the electrical outlets.
6. Press and hold the power button while the computer is unplugged to ground the system board.
7. Remove the cover.
PRECAUCIÓN: Before touching anything inside your computer, ground yourself by touching
an unpainted metal surface, such as the metal at the back of the computer. While you work,
periodically touch an unpainted metal surface to dissipate static electricity, which could
harm internal components.
Apagado del equipo
PRECAUCIÓN: Para evitar la pérdida de datos, guarde todos los archivos que tenga abiertos y
ciérrelos, y salga de todos los programas antes de apagar el equipo.
1. Apagado del equipo
• En Windows 10 (utilizando un dispositivo táctil o un mouse):
1. Haga clic o toque el .
2. Haga clic o toque el y, a continuación, haga clic o toque Apagar.
• En Windows 8 (utilizando un dispositivo táctil o un mouse):
1. Deslice el dedo desde el borde derecho de la pantalla, abra el menú de accesos y seleccione
Configuración.
2. Toque el y, a continuación, toque Apagar
• En Windows 8 (usando un mouse):
1. Diríjalo hacia la esquina superior derecha y haga clic en Configuración.
2. Haga clic en el y, a continuación, haga clic en Apagar
• En Windows 7:
1. Haga clic en Inicio.
2. Haga clic en Apagar.
o
6

1. Haga clic en Inicio.
2. Haga clic en la flecha situada en la esquina inferior derecha del menú Inicio y, a
continuación, haga clic en Cerrar sesión.
2. Asegúrese de que el equipo y todos los dispositivos conectados estén apagados. Si el equipo y los
dispositivos conectados no se apagan automáticamente al cerrar el sistema operativo, mantenga
presionado el botón de encendido durante unos 6 segundos para apagarlos.
After working inside your computer
After you complete any replacement procedure, ensure you connect any external devices, cards, and
cables before turning on your computer.
PRECAUCIÓN: To avoid damage to the computer, use only the battery designed for this particular
Dell computer. Do not use batteries designed for other Dell computers.
1. Connect any external devices, such as a port replicator or media base, and replace any cards, such as
an ExpressCard.
2. Connect any telephone or network cables to your computer.
PRECAUCIÓN: To connect a network cable, first plug the cable into the network device and
then plug it into the computer.
3. Replace the battery.
4. Replace the base cover.
5. Connect your computer and all attached devices to their electrical outlets.
6. Turn on your computer.
7
2
Extracción e instalación de componentes
Esta sección ofrece información detallada sobre cómo extraer o instalar los componentes de su equipo.
Recommended tools
The procedures in this document require the following tools:
• Small flat blade screwdriver
• Phillips #0 screwdriver
• Phillips #1 screwdriver
• Small plastic scribe
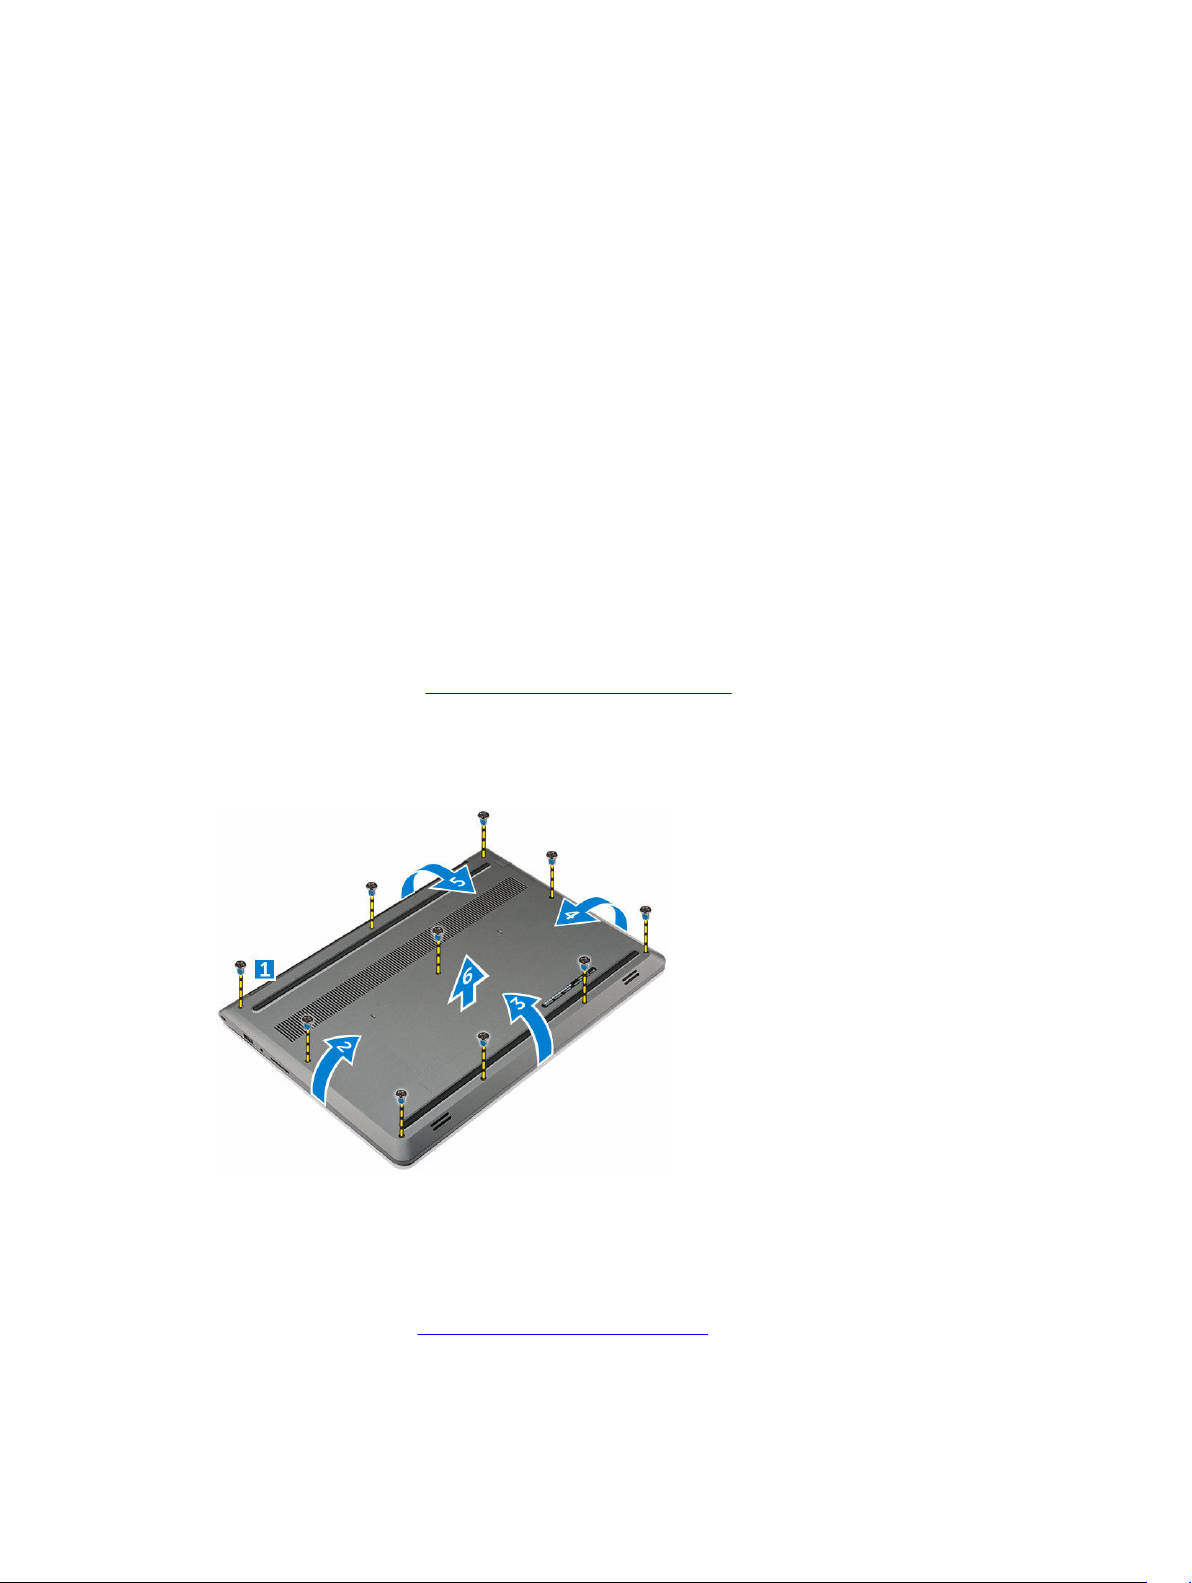
Removing the back cover
1. Follow the procedures in Before working inside your computer.
2. To remove the back cover:
a. Remove the screws that secure the back cover to the computer [1].
b. Pry the edges of the back cover from all sides, to release the back cover [2][3][4][5].
c. Lift the back cover from the computer [6].
Installing the back cover
1. Align the back cover with the screw holes on the computer.
2. Tighten the screws to secure the base cover to the computer.
3. Follow the procedure in After working inside your computer
8

Removing the battery
1. Follow the procedure in Before working inside your computer.
2. Remove the back cover.
3. To remove the battery:
a. Disconnect the battery cable from the connector on the system board [1].
b. Remove the screws that secure the battery to the computer [2].
c. Lift and remove the battery from the computer [3].
Installing the battery
1. Insert the battery into the slot on the computer.
2. Install the screws that secure the battery to the computer.
3. Connect the battery cable to the connector on the system board.
4. Install the back cover.
5. Follow the procedure in After working inside your computer
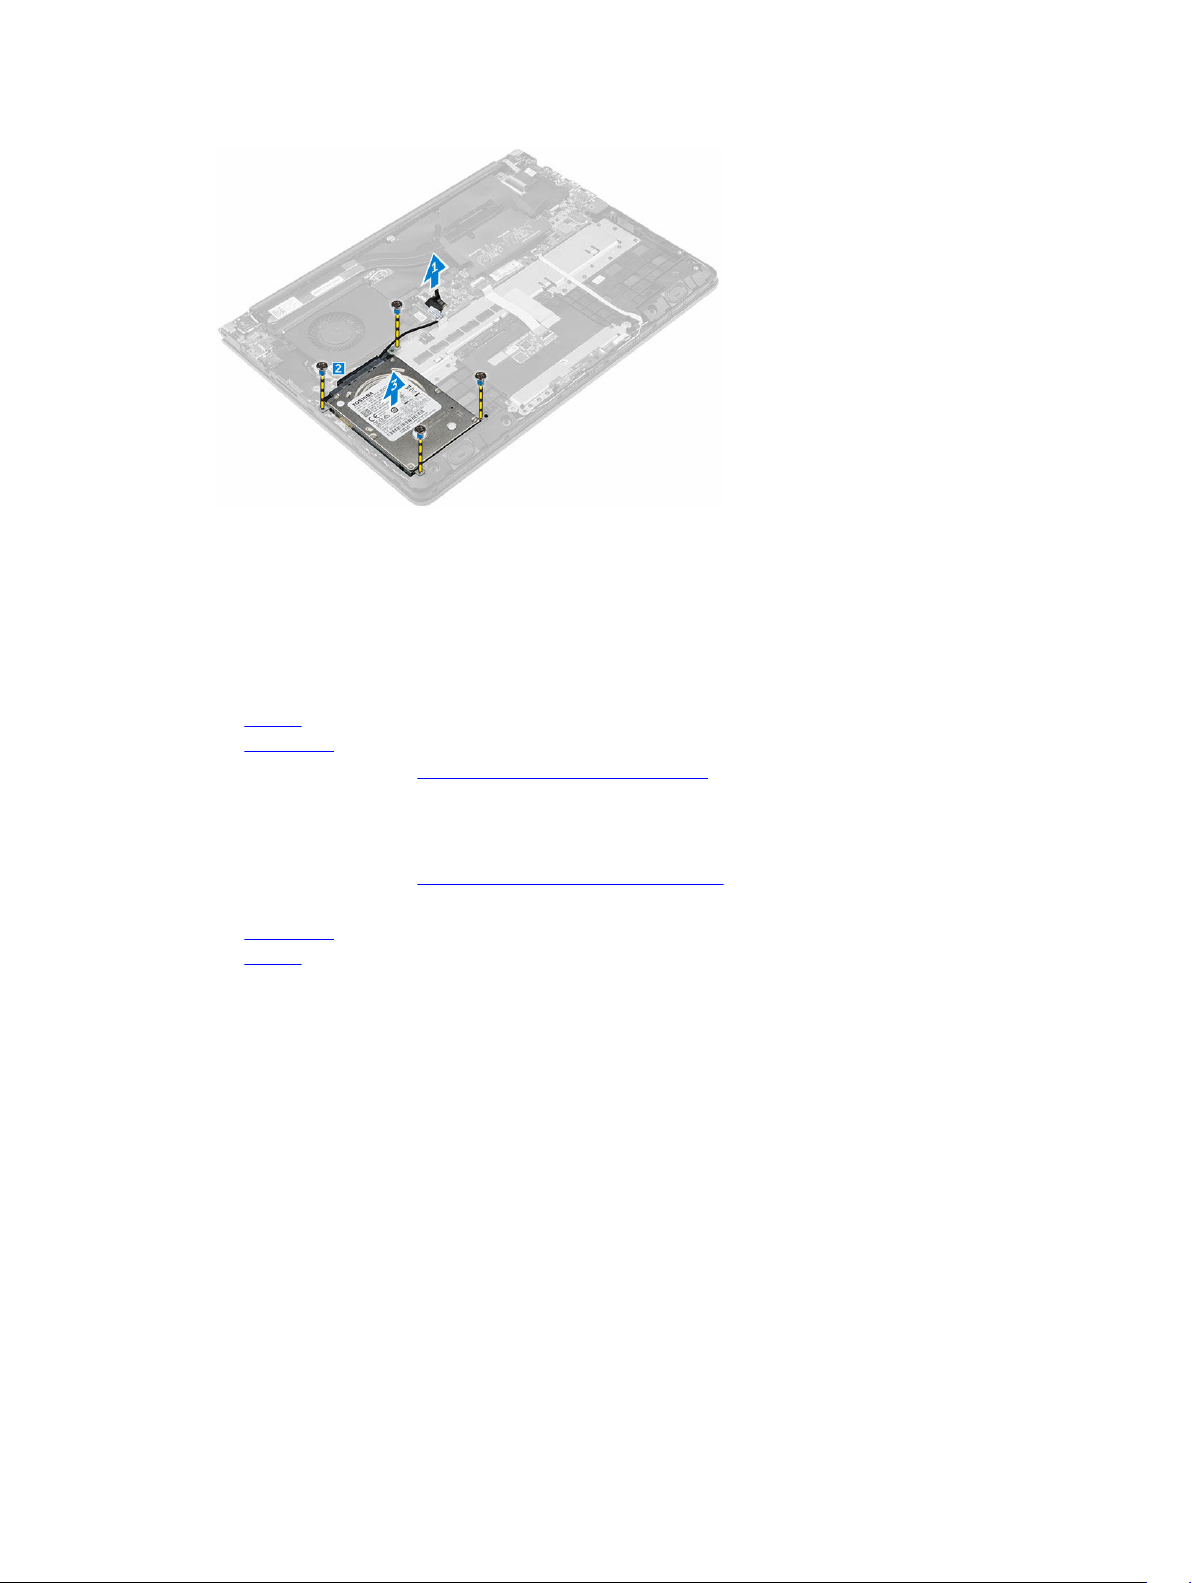
Removing the hard drive
1. Follow the procedure in Before working inside your computer.
2. Remove the:
a. back cover
b. battery
3. To remove the hard drive:
a. Disconnect the hard drive cable from the connector on the system board [1] .
b. Remove the screws that secure the hard drive to the computer [2].
c. Lift the hard drive from the computer [3].
9
Installing the hard drive
1. Insert the hard drive assembly into its slot on the computer.
2. Tighten the screws that secure the hard drive to the computer
3. Connect the hard drive cable to the connector on the system board.
4. Install the:
a. battery
b. back cover
5. Follow the procedure in After working inside your computer
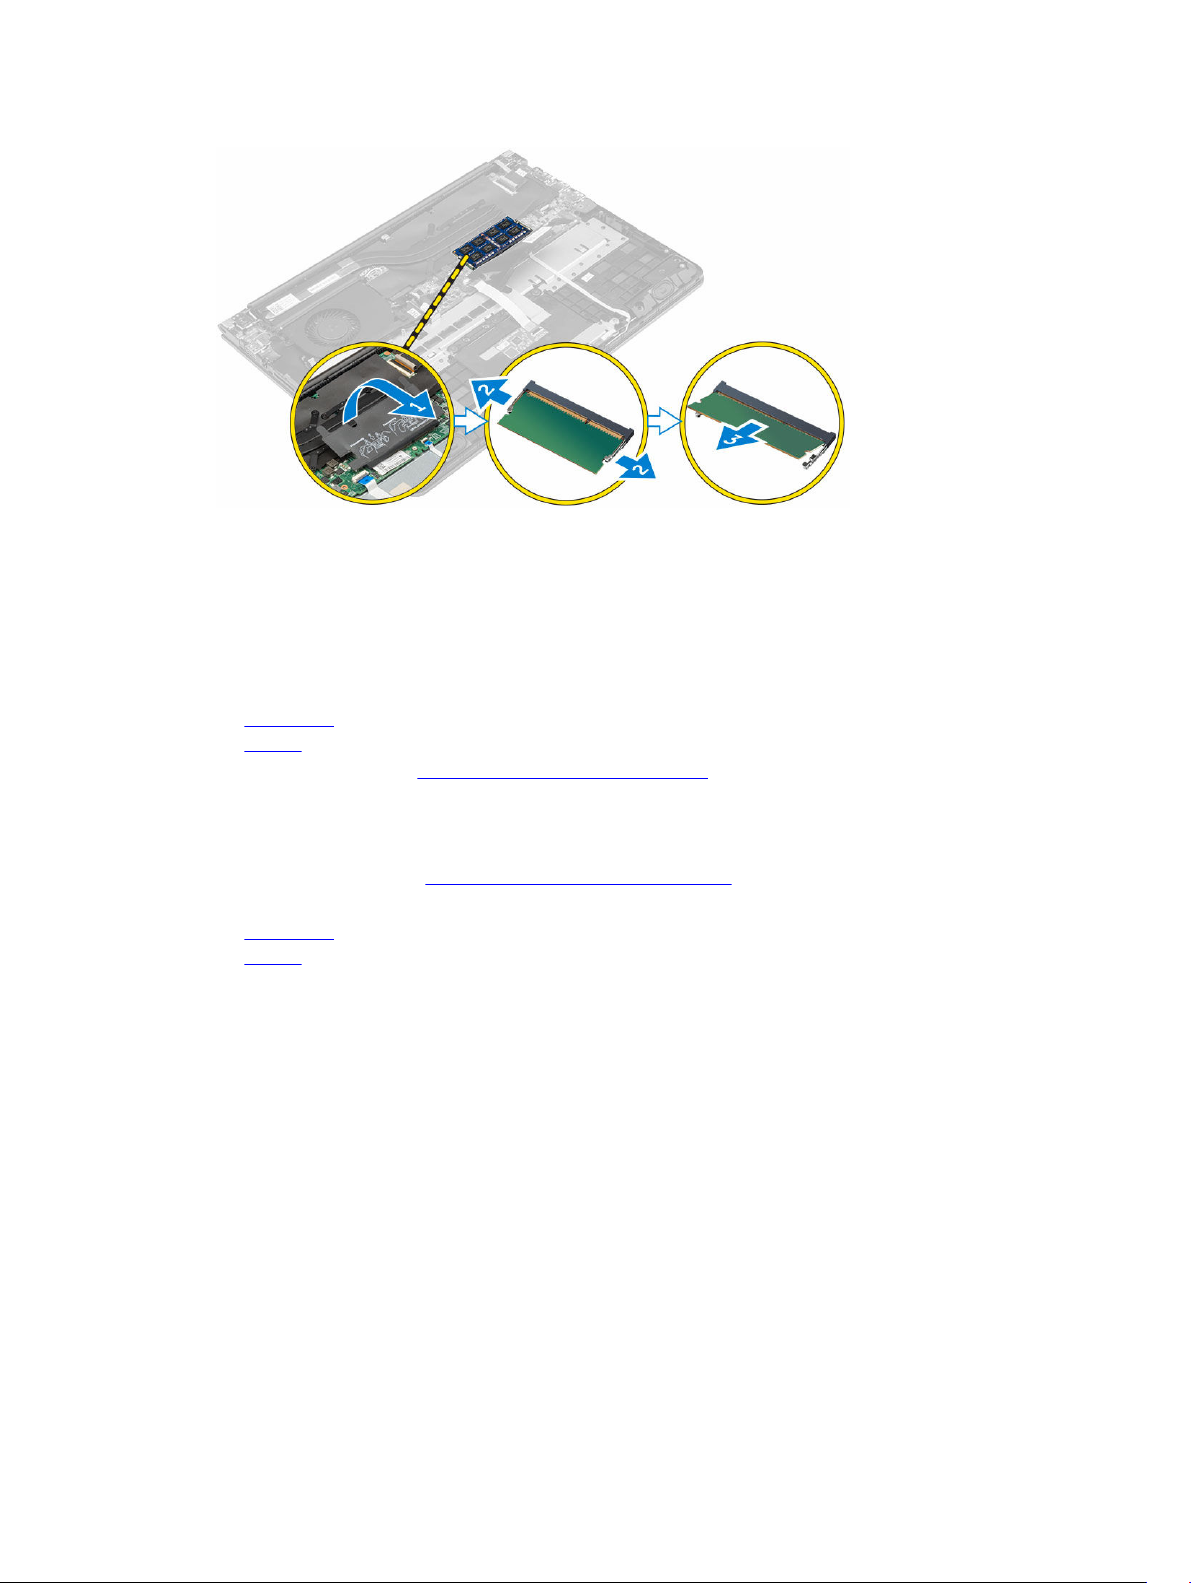
Removing the memory module
1. Follow the procedure in Before working inside your computer.
2. Remove the:
a. back cover
b. battery
3. To remove the memory module:
a. Lift the plastic enclosure covering the top of the memory module compartment [1].
b. Pull the retention clips from the memory module until it pops up [2].
c. Remove the memory module from the connector on the system board [3].
10
Installing the memory module
1. Insert the memory module into the memory module socket.
2. Press the memory module until it clicks into place.
3. Close the plastic enclosure which covers the memory module.
4. Install the:
a. back cover
b. battery
5. Follow the procedure in After working inside your computer
Removing the WLAN card
1. Follow the procedures in Before working inside your computer.
2. Remove the:
a. back cover
b. battery
3. To remove WLAN card:
a. Lift the plastic flap which covers the WLAN card [1].
b. Remove the screw that secures the WLAN card to the computer [2] [3].
c. Disconnect the antenna cable from the WLAN card [4].
d. Remove the WLAN card from the slot on the system board [5].
11
 Loading...