

Page 1

Dell Vostro 3670
Setup and specications guide
Regulatory Model: D19M
Regulatory Type: D19M005
Page 2

Notes, cautions, and warnings
NOTE: A NOTE indicates important information that helps you make better use of your product.
CAUTION: A CAUTION indicates either potential damage to hardware or loss of data and tells you how to avoid the problem.
WARNING: A WARNING indicates a potential for property damage, personal injury, or death.
© 2018 Dell Inc. or its subsidiaries. All rights reserved. Dell, EMC, and other trademarks are trademarks of Dell Inc. or its subsidiaries. Other trademarks
may be trademarks of their respective owners.
2018 - 04
Rev. A00
Page 3

Contents
1 Set up your computer.....................................................................................................................................5
2 Chassis.......................................................................................................................................................... 9
Chassis views..................................................................................................................................................................... 9
3 System specications................................................................................................................................... 11
Dimensions and weight.....................................................................................................................................................11
System information........................................................................................................................................................... 11
Operating system..............................................................................................................................................................12
Memory..............................................................................................................................................................................12
Ports and connectors....................................................................................................................................................... 13
Communications............................................................................................................................................................... 13
Video.................................................................................................................................................................................. 14
Audio.................................................................................................................................................................................. 15
Storage...............................................................................................................................................................................16
Processor...........................................................................................................................................................................16
Storage combinations...................................................................................................................................................... 16
System board connectors................................................................................................................................................16
Power supply.....................................................................................................................................................................17
Security hardware............................................................................................................................................................. 17
Regulatory and Environmental Compliance................................................................................................................... 17
4 System setup............................................................................................................................................... 18
BIOS overview.................................................................................................................................................................. 18
General screen options.................................................................................................................................................... 19
System Conguration screen options............................................................................................................................ 19
Video screen options........................................................................................................................................................21
Security screen options................................................................................................................................................... 21
Secure Boot screen options............................................................................................................................................22
Intel Software Guard Extensions screen options......................................................................................................... 23
Performance screen options...........................................................................................................................................23
Power Management screen options..............................................................................................................................24
POST Behavior screen options...................................................................................................................................... 25
Virtualization support screen options............................................................................................................................25
Wireless screen options...................................................................................................................................................25
Maintenance screen options...........................................................................................................................................26
System Log screen options.............................................................................................................................................26
Advanced conguration options.................................................................................................................................... 26
SupportAssist System Resolution screen options....................................................................................................... 26
5 Software......................................................................................................................................................27
Supported operating systems.........................................................................................................................................27
Downloading drivers.........................................................................................................................................................27
Contents
3
Page 4

Intel chipset drivers..........................................................................................................................................................27
Intel HID Event Filter........................................................................................................................................................28
Disk drivers....................................................................................................................................................................... 29
Display adapter driver......................................................................................................................................................29
Bluetooth drivers..............................................................................................................................................................29
Network drivers................................................................................................................................................................29
Audio drivers.....................................................................................................................................................................30
Storage drivers................................................................................................................................................................. 30
Security drivers................................................................................................................................................................ 30
6 Getting help................................................................................................................................................. 31
Contacting Dell..................................................................................................................................................................31
4 Contents
Page 5
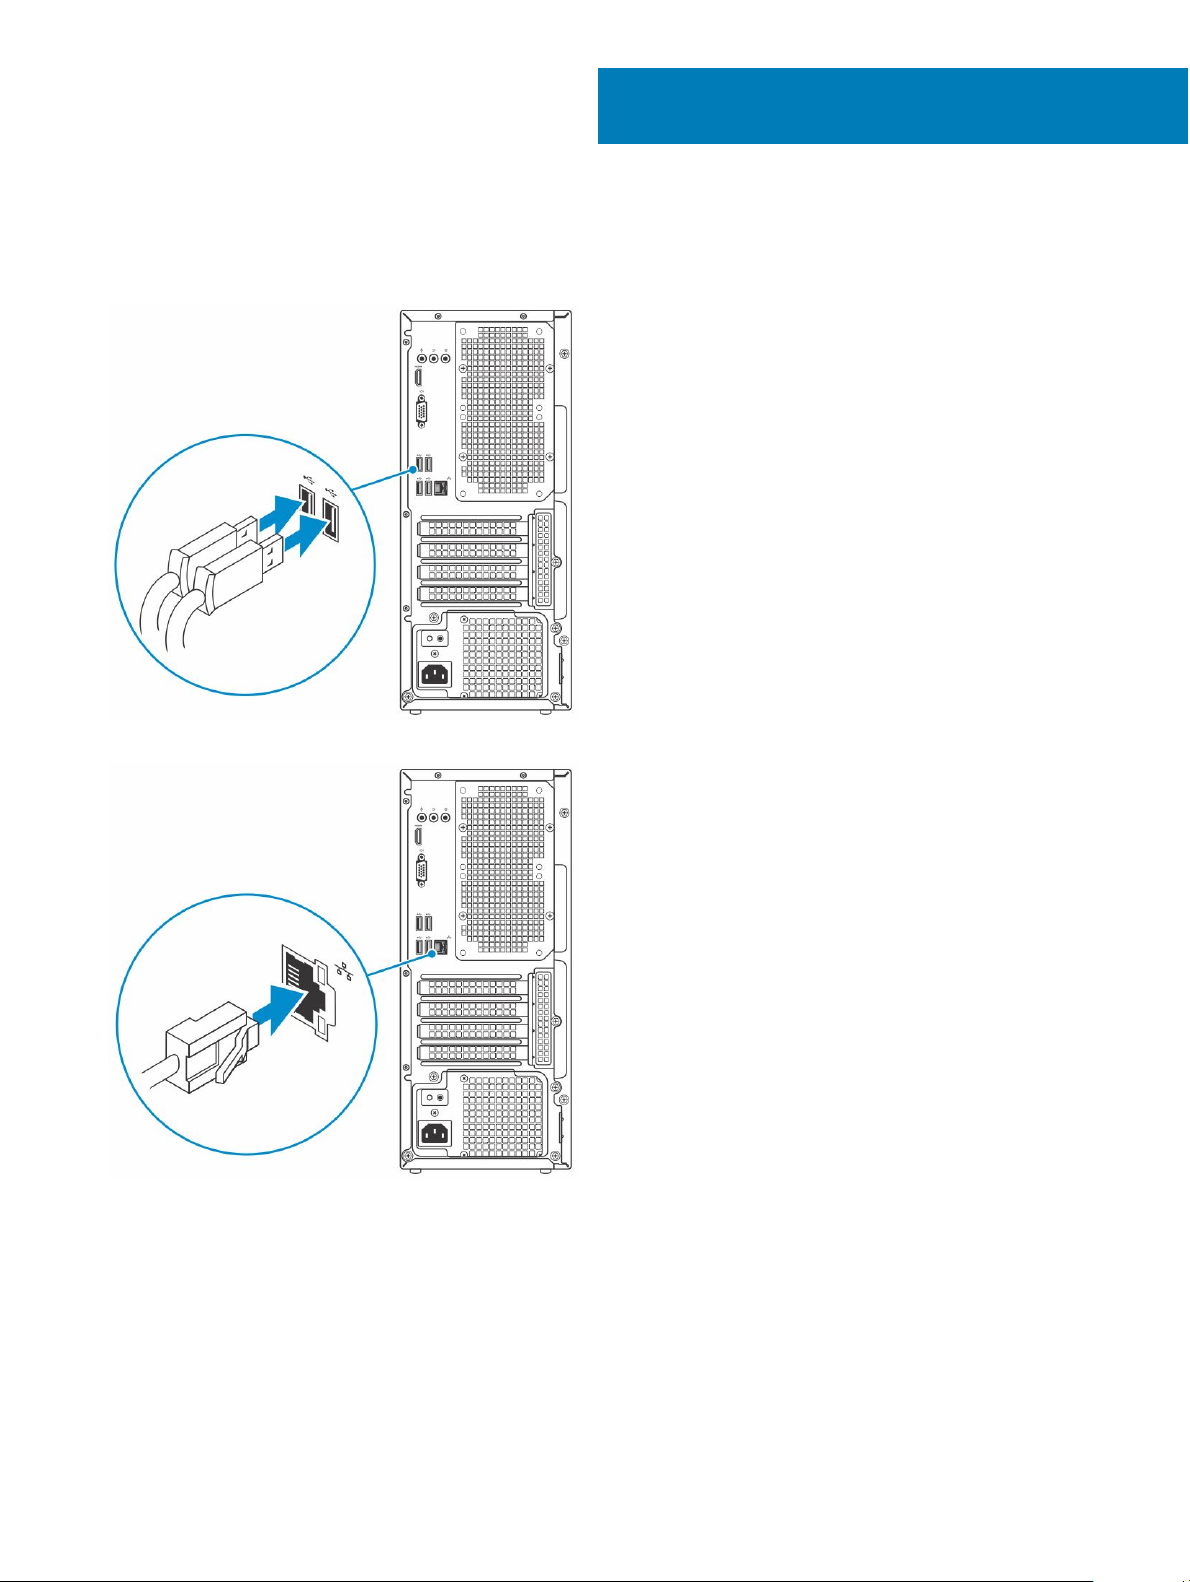
1 Connect the keyboard and mouse.
1
Set up your computer
2 Connect to your network using a cable, or connect to a wireless network.
3 Connect the display.
Set up your computer 5
Page 6
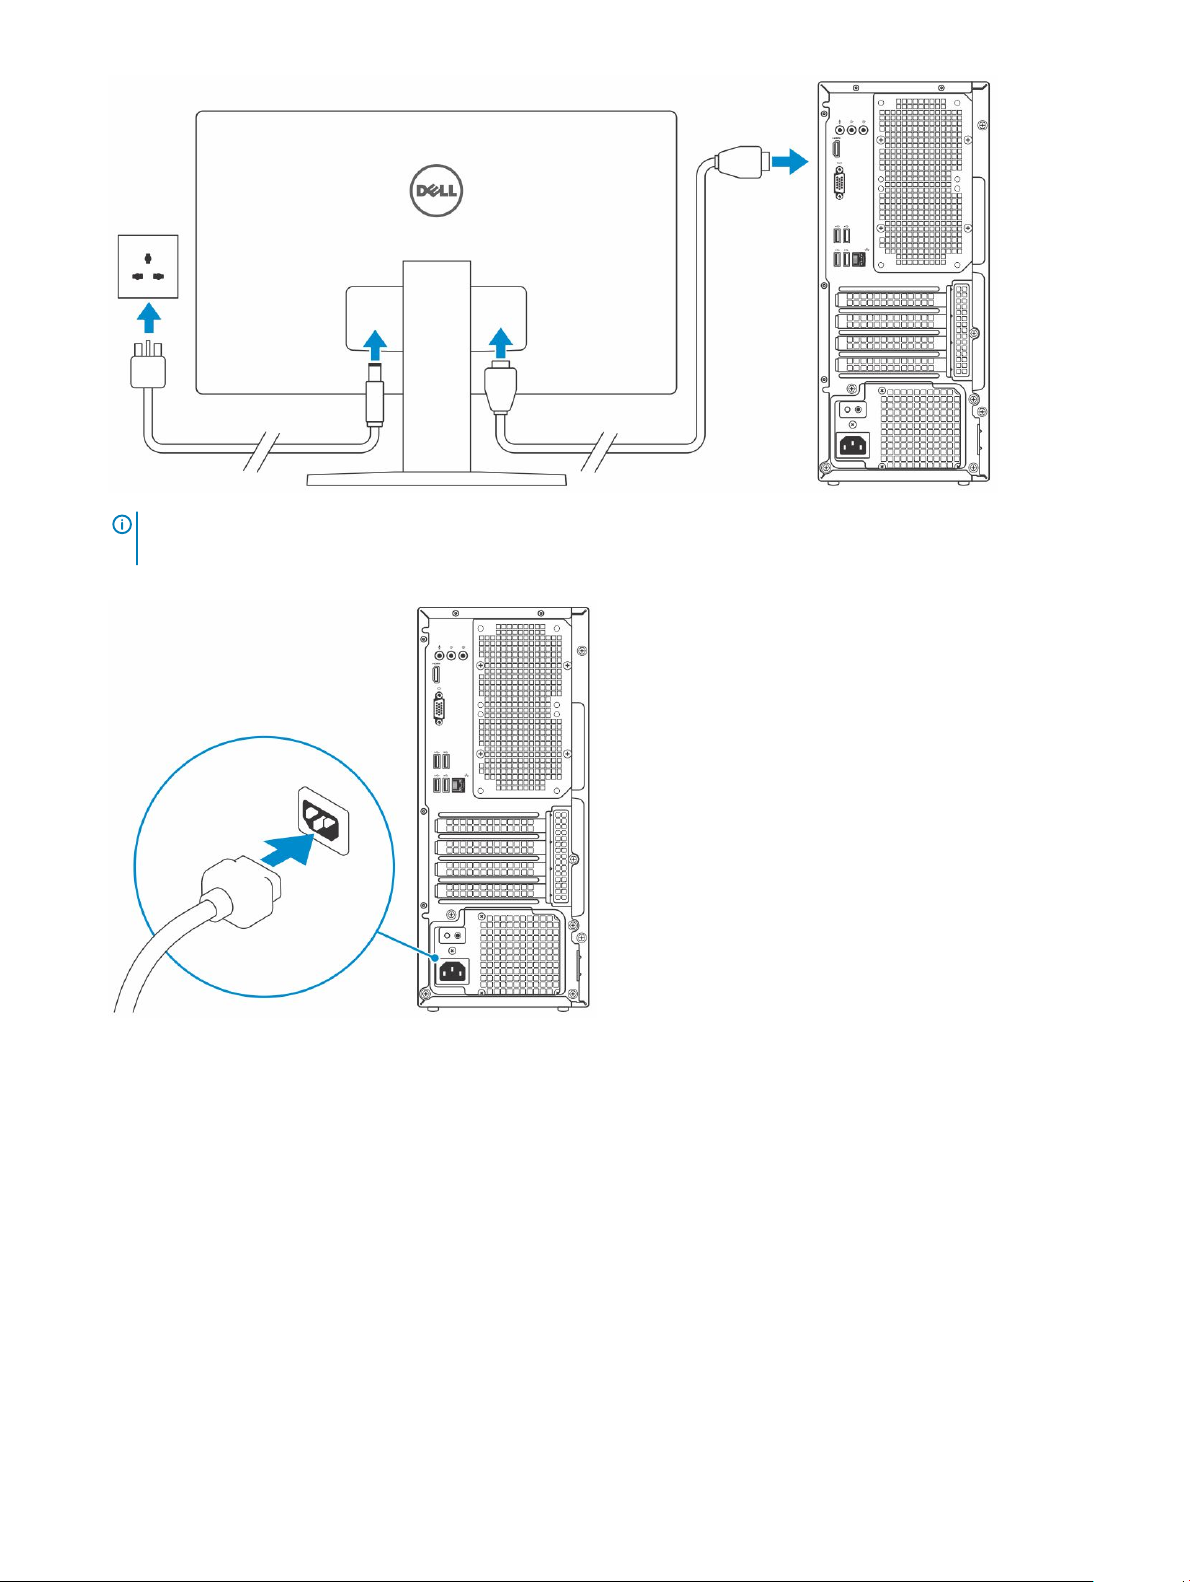
NOTE: If you ordered your computer with a discrete graphics card, the HDMI and the display ports on the back panel of
your computer are covered. Connect the display to the discrete graphics card.
4 Connect the power cable.
5 Press the power button.
6
Set up your computer
Page 7
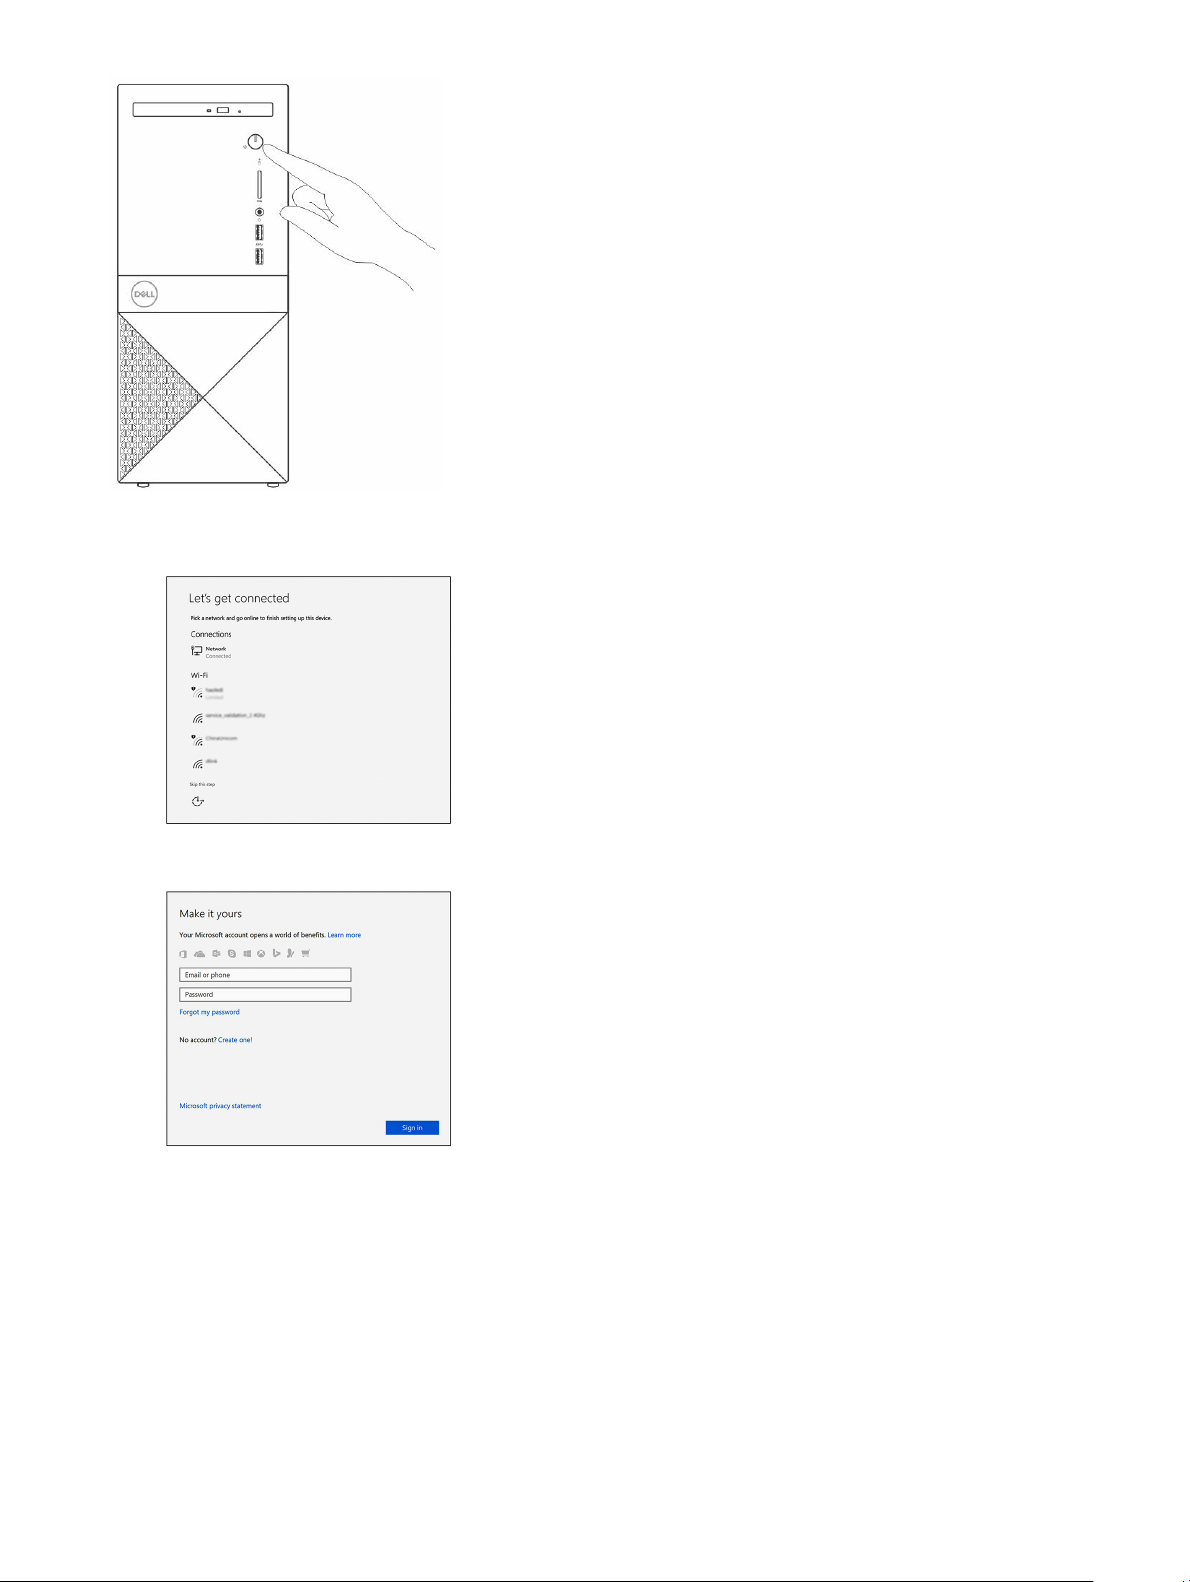
6 Follow the instructions on the screen to nish Windows setup:
a Connect to a network.
b Sign-in to your Microsoft account or create a new account.
7 Locate Dell apps.
Set up your computer
7
Page 8
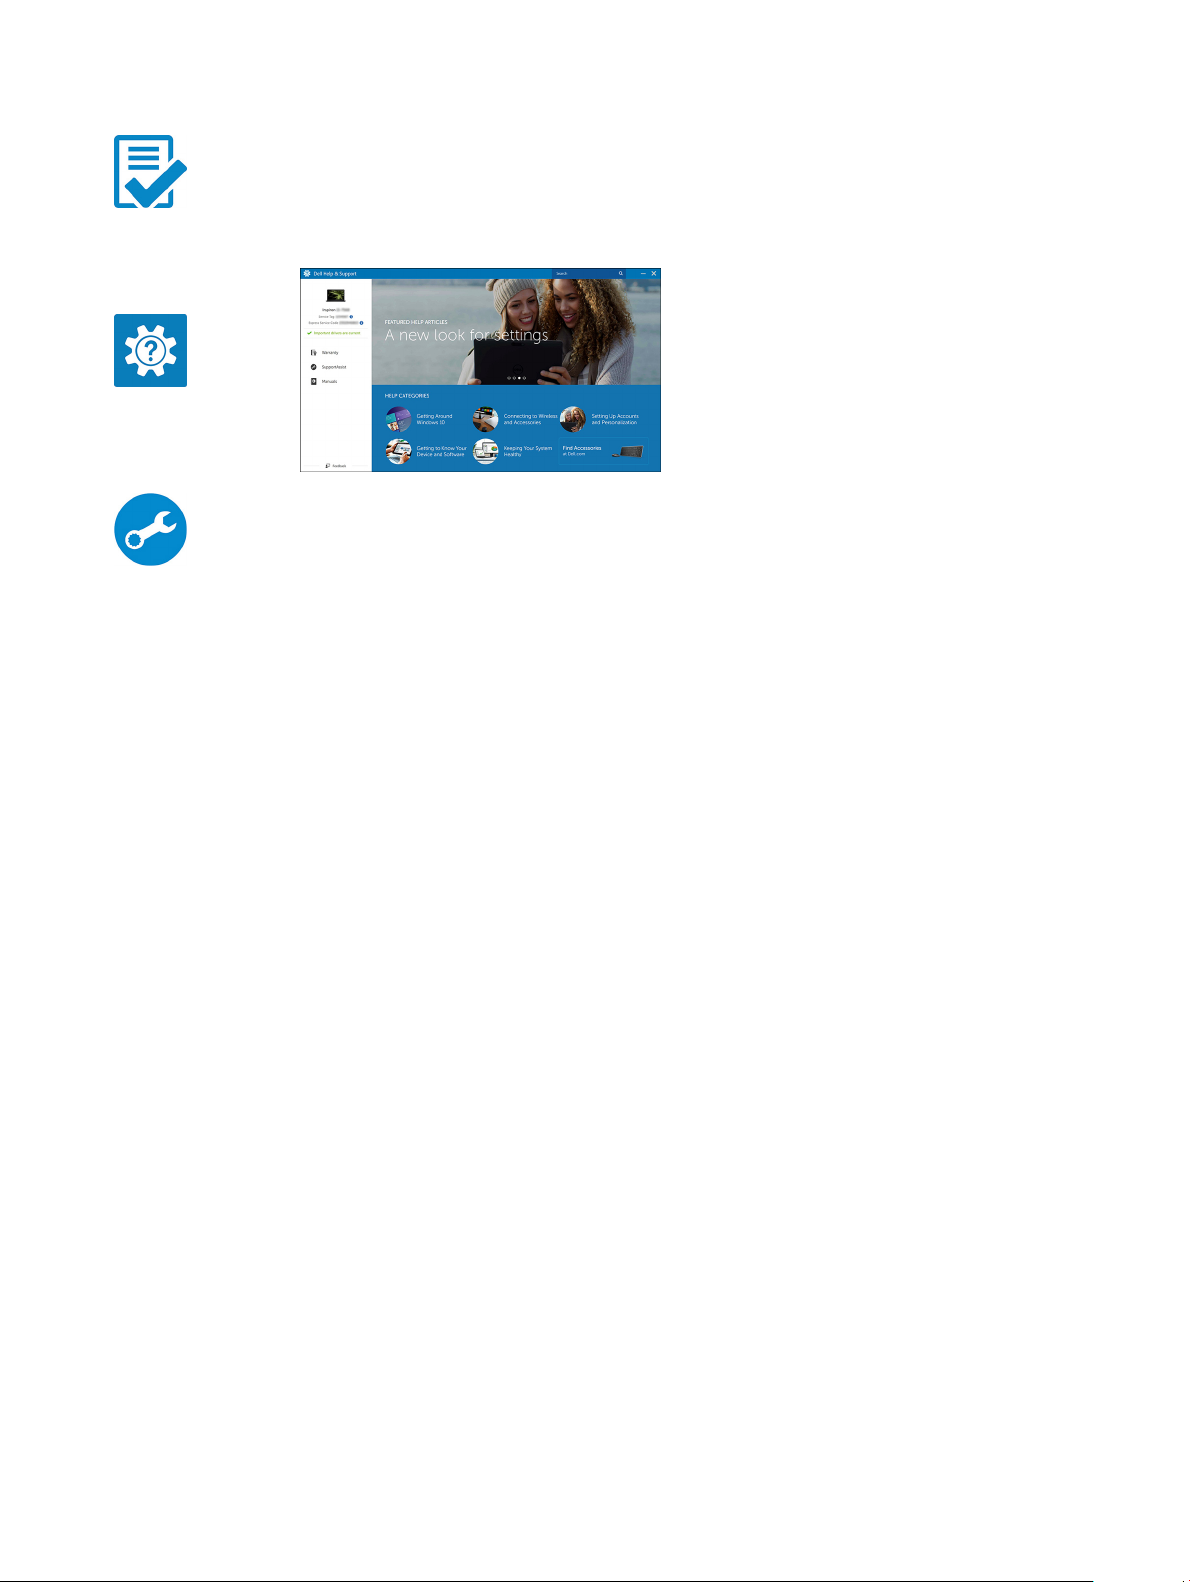
Table 1. Locate Dell apps
Register your computer
Dell Help & Support
SupportAssist — Check and update your computer
8
Set up your computer
Page 9
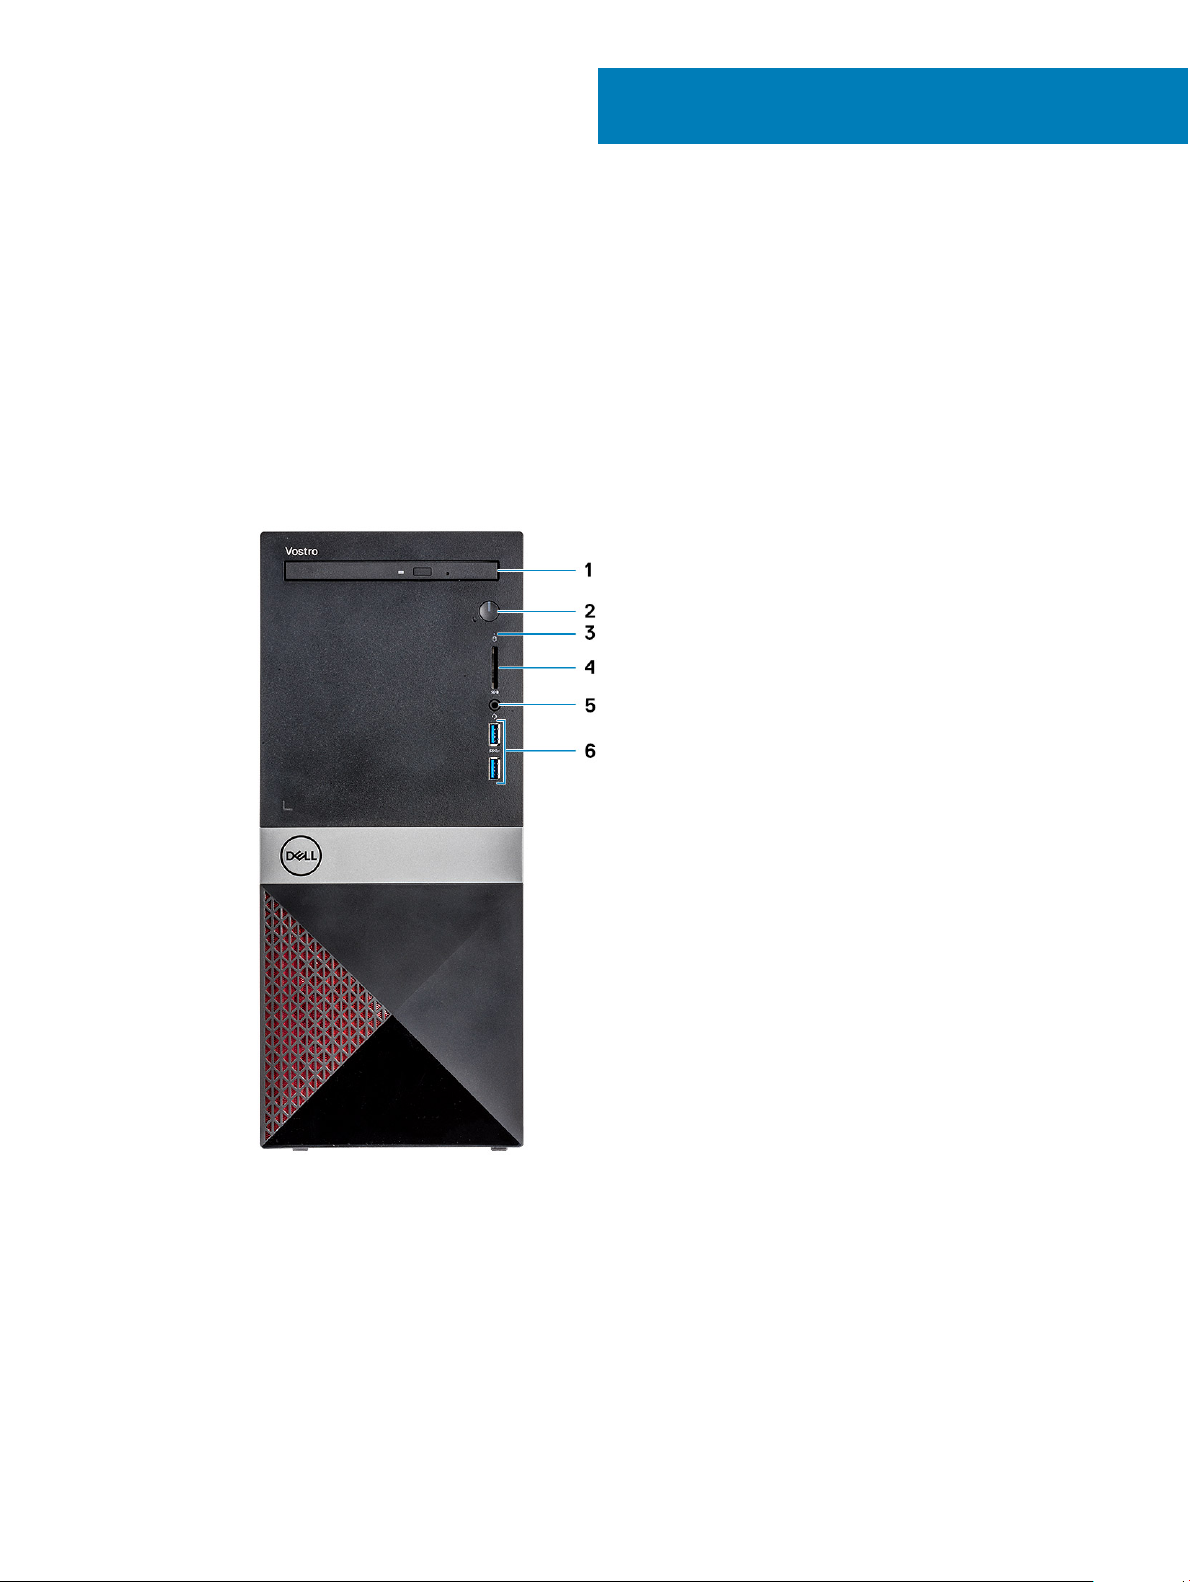
The chapter illustrates the multiple views of the chassis along with the ports and connectors.
Chassis views
The chassis view displays only the standard components and all the optional components may not be listed.
Front view
2
Chassis
1 Optical drive 2 Power button/Power-status light
3 Hard-drive activity light 4 SD card slot
5 Headset port 6 USB 3.1 Gen 1 ports (2)
Back view
Chassis 9
Page 10
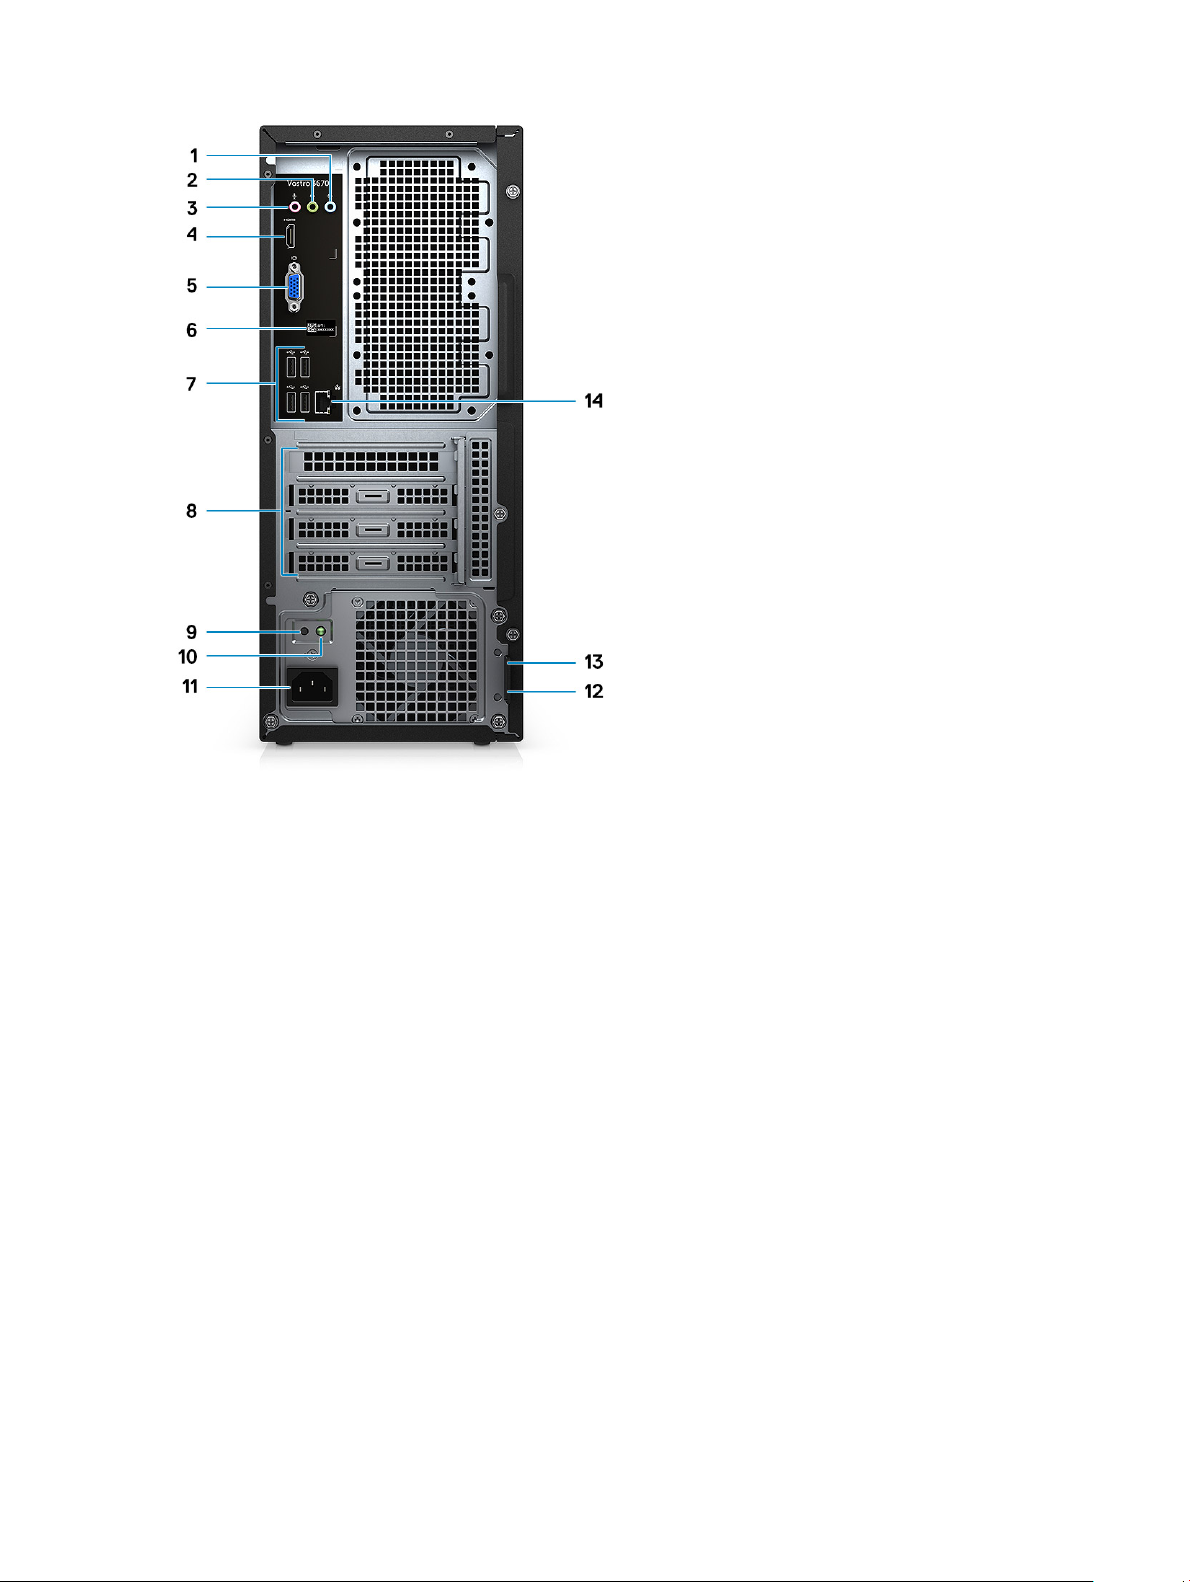
1 Line-in port 2 Line-out port
3 Microphone port 4 HDMI port
5 VGA port 6 Service tag label
7 USB 2.0 ports (4) 8 Expansion card slots
9 Power supply diagnostics button 10 Power supply diagnostics light
11 Power connector port 12 Padlock ring
13 Kensington security slot 14 Network port
10 Chassis
Page 11

System specications
NOTE: Oerings may vary by region. The following specications are only those required by law to ship with your computer. For
more information about the conguration of your computer, go to Help and Support in your Windows operating system and
select the option to view information about your computer.
Topics:
• Dimensions and weight
• System information
• Operating system
• Memory
• Ports and connectors
• Communications
• Video
• Audio
• Storage
• Processor
• Storage combinations
• System board connectors
• Power supply
• Security hardware
• Regulatory and Environmental Compliance
3
Dimensions and weight
Table 2. Dimensions and weight
Height 14.7 inch (373.7 mm)
Width 6.3 inch (160 mm)
Depth 11.4 inch (289.4 mm)
Weight 13.01 lb (5.9 kg)
System information
Table 3. System information
Chipset Intel B360
DRAM bus width 64-bit wide channels
System specications 11
Page 12

FLASH EPROM 256Mbit
PCIe bus 100 Mhz
External bus frequency DMI 3.0-8GT/s
Operating system
Table 4. Operating system
Operating systems supported
Memory
Table 5. Memory specications
Minimum memory conguration
Maximum memory conguration
Number of slots
Maximum memory supported per slot
Memory options
• Windows 10 64-bit
• Windows 10 64-bit Professional
• Windows 10 64-bit National Academic (STF)
• Ubuntu 16.04 LTS (64-bit)
4 GB
32 GB
2 UDIMM
16 GB
• 4 GB DDR4 2400 MHz (4Gx1)
• 8 GB DDR4 2400 MHz (8Gx1)
• 8 GB DDR4 2400 MHz (4Gx2)
• 12 GB DDR4 2400 MHz (8Gx1 + 4Gx1)
• 16 GB DDR4 2400 MHz (8Gx2)
• 16 GB DDR4 2400 MHz (16Gx1)
• 24 GB DDR4 2400 MHz (16Gx1 + 8Gx1)
• 32 GB DDR4 2400 MHz (16Gx2)
• 4 GB DDR4 2666 MHz (4Gx1)
• 8 GB DDR4 2666 MHz (8Gx1)
• 8 GB DDR4 2666 MHz (4Gx2)
• 12 GB DDR4 2666 MHz (8Gx1 + 4Gx1)
• 16 GB DDR4 2666 MHz (8Gx2)
• 16 GB DDR4 2666 MHz (16Gx1)
• 24 GB DDR4 2666 MHz (16Gx1 + 8Gx1)
• 32 GB DDR4 2666 MHz (16Gx2)
• 16 GB Optane (Optional)
• 32 GB Optane (Optional)
12 System specications
NOTE: The memory modules are customer replaceable
units (CRU), and it can be upgraded.
Page 13

NOTE:
• Memory conguration of 2400 MHz pair with PDC, CDC,
core i3 CPU
• Memory conguration of 2666 MHz pair with core i5, i7
CPU
Type DDR4 SDRAM Non-ECC memory
Speed
Ports and connectors
Table 6. Ports and connectors
USB
Security
Audio
Video
• 2666 MHz on Core i5, i7 processor
• 2400 MHz on Celeron, Pentium, and i3 processor
• Two USB 3.1 Gen 1 ports
• Four USB 2.0 ports
• Kensington lock slot
• Padlock ring
• Headset port
• Microphone port
• Line-in port
• Line-out port
• HDMI 1.4 (UMA)
• VGA port
Network adapter One RJ-45 connector
Secure Digital card
SD card slot
Communications
Table 7. Communication
Network adapter
Wireless
specications
Realtek RTL8111H Gigabit Ethernet controller 10/100/1000 Mb/s
Ethernet (RJ-45 )
• Intel 9462 1*1 ac + BT5 (802.11ac + Bluetooth 5.0,1X1)
• Intel 9560 2*2 ac + BT5 (802.11ac + Bluetooth 5.0,2x2)
• DW 1707 + BT4.0 (802.11bgn + Bluetooth 4.0, 1x1) via M.2
System specications 13
Page 14

Video
Table 8. Video
Controller Type CPU
Intel UHD
Graphics 630
Intel UHD
Graphics 610
nVIDIA GeForce
GT 710
UMA Intel Core i3
UMA Intel Pentium
Discrete
Dependency
-8100
Intel Core i5
-8400
Intel Core i7 8700
Gold G5400
Celeron
processor
G4900
N/A
Graphics
memory type
Integrated Shared system
Integrated Shared system
DDR3 2 GB DL-DVI
Capacity External display
support
VGA
memory
HDMI 1.4
VGA
memory
HDMI 1.4
HDMI
VGA (FH only)
Maximum
resolution
VGA:
2048x1536@60 Hz
HDMI : 1920x1080@
60Hz
VGA:
2048x1536@60 Hz
HDMI : 1920x1080@
60Hz
Dual Link DVI =
2560x1600
HDMI = 1920x1200
(PC Mode),
1920x1080 (TV
mode, 1080p)
VGA (optional) =
2048x1536
nVIDIA GeForce
GT 1030
nVIDIA GeForce
GTX 1050
Discrete
Discrete
N/A
N/A
GDDR5 2 GB SL-DVI
HDMI
GDDR5 2 GB DL-DVI
DP
HDMI
SL-DVI = 1920 x
1200x 24bpp @
60hz (reduced
blanking)
HDMI = 4096 x 2160
x 24bpp @ 60hz
DL-DVI = 2560 x
1600x 24bpp @
60hz (reduced
blanking)
DisplayPort =
• 7680 x 4320 @
60hz YUV420
8bit with single
DP1.3
• 5120 x 3200 x 24
bpp @ 60hz
(reduced
blanking)
• 5120 x 3200 x
30 bpp @ 60hz
(YUV422)
HDMI = 4096 x 2160
x 24bpp @ 60hz
14 System specications
Page 15

Controller Type CPU
nVIDIA GeForce
GTX 1050Ti
Discrete
Dependency
N/A
Graphics
memory type
GDDR5 4 GB DL-DVI
Capacity External display
support
DP
HDMI
Maximum
resolution
DL-DVI = 2560 x
1600x 24bpp @
60hz (reduced
blanking)
DisplayPort =
• 7680 x 4320 @
60hz YUV420
8bit with single
DP1.3
• 5120 x 3200 x 24
bpp @ 60hz
(reduced
blanking)
• 5120 x 3200 x
30 bpp @ 60hz
(YUV422)
HDMI = 4096 x 2160
x 24bpp @ 60hz
nVIDIA GeForce
GTX 1060
Discrete
N/A
GDDR5 3 GB DL-DVI
Audio
Table 9. Audio
Controller Waves MaxxAudio Pro
specications
DP
HDMI
DL-DVI = 2560 x
1600x 24bpp @
60hz (reduced
blanking)
DisplayPort =
• 7680 x 4320 @
60hz YUV420
8bit with single
DP1.3
• 5120 x 3200 x 24
bpp @ 60hz
(reduced
blanking)
• 5120 x 3200 x
30 bpp @ 60hz
(YUV422)
HDMI = 4096 x 2160
x 24bpp @ 60hz
Type Four-channel high-denition audio
Interface
• 3-stack audio jacks supporting 5.1 surround sound.
• High-quality speakers
• Stereo headset/mic combo
System specications 15
Page 16

Storage
Table 10. Storage specications
Type Form factor Interface Capacity
Solid-State Drive (SSD) M.2 2230 and 2280 PCIe PCIe 3 x4 NVME, Up to 32 Gbps Up to 512 GB
Hard drive (HDD) 2.5 and 3.5 inch SATA AHCI, Up to 6 Gbps Up to 2 TB at 5400 RPM and
7200 RPM
Processor
NOTE: Processor numbers are not a measure of performance. Processor availability is subject to change and may vary by region/
country.
Table 11. Processor specications
Type UMA Graphics
Intel 8th Generation Celeron processor G4900 (2M Cache, up to 3.1
GHz)
Intel UHD Graphics 610 with shared graphics memory
Intel 8th Generation Pentium Gold processor G5400 (4M Cache, up
to 3.7 GHz)
Intel 8th Generation Core i3-8100 (6 MB Cache, up to 3.6 GHz) Intel UHD Graphics 630 with shared graphics memory
Intel 8th Generation Core i5-8400 8th Generation Intel Core
i5-8400 processor (9 MB Cache, up to 4.0 GHz)
Intel 8th Generation Core i7-8700 8th Generation Intel Core i7-8700
processor (12 MB Cache, up to 4.6 GHz)
Intel UHD Graphics 610 with shared graphics memory
Intel UHD Graphics 630 with shared graphics memory
Intel UHD Graphics 630 with shared graphics memory
Storage combinations
Table 12. Storage combinations
Type Form factor
M.2 Drive + SATA M.2 128GB Solid State Drive+ 1TB 7200 rpm Hard Drive
System board connectors
Table 13. System board connectors
M.2 Connectors M.2 2230/2280 for M.2 PCIe SSD/Wireless (optional)
Serial ATA (SATA) connector 4 SATA 3.0 ports (Up to 6Gb/s)
PCIe X16 slot
PCIe X1 slot
16 System specications
PCIe X16 (1)
PCIe X1 (2)
Page 17

PCI
NOTE: PCI slot support on TPM sku
PCI (1)
Power supply
Table 14. Power supply
Input Voltage 100–240 VAC, 50–60 Hz
Input current (maximum)
• 290 W PSU (APFC Full range)
• 290 W PSU (EPA Bronze)
• 365 W PSU (EPA Gold), pair with nVIDIA GTX 1060 3GB
GDDR5, red mesh MT for China only.
Security hardware
Table 15. Security hardware
Security HW
• Data wipe via BIOS (Secure Erase)
• Support of Computrace BIOS agent – supports both
Computrace and Proactive Systems Management
• Discrete TPM 2.0 (optional)
• BIOS disable TPM (China Only)
• Control Vault 2.0 Advanced authentication w FIPS 140-2 Level 3
Certicate
Regulatory and Environmental Compliance
Table 16. Regulatory and Environmental Compliance
Regulatory and Environmental Compliance
• Energy Star 6.1 (available in selected congurations only)
• FCC, UL mark
• Silver EPEAT Registered (for selected congurations only). For
specic country participation and rating, please visit
www.epeat.net
• CCC/CECP (China only)
• ESPL/ 1 Million Hr MTBF (China only, Post-RTS)
System specications 17
Page 18

System setup
System setup enables you to manage your desktop hardware and specify BIOS level options. From the System setup, you can:
• Change the NVRAM settings after you add or remove hardware
• View the system hardware conguration
• Enable or disable integrated devices
• Set performance and power management thresholds
• Manage your computer security
Topics:
• BIOS overview
• General screen options
• System Conguration screen options
• Video screen options
• Security screen options
• Secure Boot screen options
• Intel Software Guard Extensions screen options
• Performance screen options
• Power Management screen options
• POST Behavior screen options
• Virtualization support screen options
• Wireless screen options
• Maintenance screen options
• System Log screen options
• Advanced conguration options
• SupportAssist System Resolution screen options
4
BIOS overview
CAUTION
make your computer work incorrectly.
NOTE: Before you change BIOS Setup program, it is recommended that you write down the BIOS Setup program screen
information for future reference.
Use the BIOS Setup program for the following purposes:
• Get information about the hardware installed in your computer, such as the amount of RAM and the size of the hard drive.
• Change the system conguration information.
• Set or change a user-selectable option, such as the user password, type of hard drive installed, and enabling or disabling base devices.
18 System setup
: Unless you are an expert computer user, do not change the settings in the BIOS Setup program. Certain changes can
Page 19

General screen options
This section lists the primary hardware features of your computer.
Option Description
System Information
Boot Sequence
• System Information: Displays BIOS Version, Service Tag, Asset Tag, Ownership Tag, Ownership Date,
Manufacture Date, and the Express Service Code.
• Memory Information: Displays Memory Installed, Memory Available, Memory Speed, Memory Channels Mode,
Memory Technology, DIMM 1 Size, DIMM 2Size.
• Processor Information: Displays Processor Type, Core Count, Processor ID, Current Clock Speed, Minimum
Clock Speed, Maximum Clock Speed, Processor L2 Cache, Processor L3 Cache, HT Capable, and 64-Bit
technology.
• Device Information: Displays Primary Hard Drive, SATA-0, SATA-1, SATA-2, SATA-3, LOM MAC Address, Video
Controller, Audio Controller, WiFi Device, Bluetooth Device.
Boot Sequence Allows you to change the order in which the computer attempts to nd an operating
system. The options are:
• Windows Boot Manager
• Onboard NIC(IPV4)
• Oboard NIC(IPV6)
By default, all the options are checked. You can also deselect any option or change the
boot order.
Boot List Options Allows you to change the boot list option:
• Legacy External Devices
• UEFI (default)
Advanced Boot
Options
UEFI Boot Path
Security
Date/Time Allows you to change the date and time.
This option allows you the legacy option ROMs to load.
• By default, the Enable Legacy Option ROMs is enabled
• This option allows you the legacy option ROMs to load. By default, the Enable Attemot Legacy Boot is
disabled.
.
This options control whether or not the system will prompt the user to enter the Admin password (if set) when
booting a UEFI boot path from the F12 Boot Menu
• Always Except Internal HDD (default)
• Always
• Never
System Conguration screen options
Option
Integrated NIC Allows you to congure the integrated network controller. The options are:
Description
• Disabled
System setup 19
Page 20

Option Description
• Enabled
• Enabled w/PXE: This option is enabled by default.
SATA Operation Allows you to congure the internal SATA hard-drive controller. The options are:
• Disabled
• AHCI
• RAID On(default)
Drives Allows you to congure the SATA drives on board. All drives are enabled by default. The options are:
• SATA-0
• SATA-1
• SATA-2
• SATA-3
• M.2 PCIe SSD-0
SMART Reporting This eld controls whether hard drive errors for integrated drives are reported during system startup. This
technology is part of the SMART (Self-Monitoring Analysis and Reporting Technology) specication. This option is
disabled by default.
• Enable SMART Reporting
USB Conguration This eld congures the integrated USB controller. If Boot Support is enabled, the system is allowed to boot any
type of USB Mass Storage Devices (HDD, memory key, oppy).
If USB port is enabled, device attached to this port is enabled and available for OS.
If USB port is disabled, the OS cannot see any device attached to this port.
• Enable USB Boot Support (default)
• Enable Front USB Ports(default)
• Enable Rear USB Ports (default)
NOTE: USB keyboard and mouse always work in the BIOS setup irrespective of these settings.
Front USB
Conguration
Rear USB
Conguration
This eld enables or disables the front USB conguration
• Front Port 1 (Bottom Right)* (default)
• Front Port 2 (Bottom Left)* (default)
* denotes a USB 3.0-capable port
This eld enables or disables the front USB conguration
• Rear Port 1
• Rear Port 2
• Rear Port 3 (w/RJ-45)
• Rear Port 4 (w/RJ-45)
* denotes a USB 3.0-capable port
Audio This eld enables or disables the integrated audio controller. By default, the Enable Audio option is selected.
20 System setup
Page 21

Option Description
Miscellaneous
Devices
Allows you to enable or disable the following devices:
• Enable PCI Slot
• Enabled Secure Digital (SD) Card (default)
Video screen options
Option Description
Multi-Display This option enables or disables Multi-Display. It should be enables for Windows 7 or later. This feature is not
applicable to other operating systems.
• Enable Multi-Display: This option is enabled by default.
Primary Display This option determines which video controller becomes the primary display when multiple controllers are available
in the system
• Auto: This option is enabled by default.
• Intel HD Graphics
• NVIDIA HD Graphics
Security screen options
Option
Admin Password Allows you to set, change, or delete the administrator (admin) password.
System Password Allows you to set, change, or delete the system password.
Internal HDD-0
Password
Internal HDD-3
Password
Description
NOTE: You must set the admin password before you set the system or hard drive password. Deleting the
admin password automatically deletes the system password and the hard drive password.
NOTE: Successful password changes take eect immediately.
Default setting: Not set
NOTE: Successful password changes take eect immediately.
Default setting: Not set
Allows you to set, change, or delete the password on the system's internal hard-disk drive.
NOTE: Successful password changes take eect immediately.
Default Setting: Not set
Allows you to set, change, or delete the password on the system's internal hard-disk drive.
NOTE: Successful password changes take eect immediately.
Default Setting: Not set
Password Change Allows you to enable the disable permission to the System and Hard Drive passwords when the admin password is
set.
System setup 21
Page 22

Option Description
Default setting: Allow Non-Admin Password Changes is selected.
UEFI Capsule
Firmware Update
TPM 2.0 Security Allows you to enable the Trusted Platform Module (TPM) during POST. The options are:
Computrace Allows you to activate or disable the optional Computrace software The options are:
This option controls whether the system allows the BIOS updates through UEFI capsule update packages. This
option is enabled by default.
• TPM On (enabled by default)
• Clear
• PPI Bypass for Enabled Commands
• PPI Bypass for Disabled Commands
• PPI Bypass for Clear Command
• Attestation Enable (enabled by default)
• Key Storage Enable (enabled by default)
• SHA-256 (enabled by default)
• Disabled
• Enabled (enabled by default)
NOTE: To upgrade or downgrade TPM1.2/2.0, download the TPM wrapper tool (software).
• Deactivate
• Disable
• Activate
NOTE: The Activate and Disable options will permanently activate or disable the feature and no further
changes are allowed
Default setting: Deactivate
Master Password
Lockout
SIMM Security
Mitigation
The option Enable Master Password Lockout is not selected by default.
Allows you to enable or disable the additional UEFI SIMM Security Mitigation protections.
Default Setting: SIMM Security Mitigation is not selected.
Secure Boot screen options
Option
Secure Boot Enable This option enables or disables the Secure Boot feature.
Secure Boot Mode
Expert Key
Management
Description
Default setting: Not selected
• Deployed Mode (default)
• Audit Mode
Allows you to manipulate the security key databases only if the system is in Custom Mode. The Enable Custom
Mode option is disabled by default. The options are:
22 System setup
• PK (default)
• KEK
Page 23

Option Description
• db
• dbx
If you enable the Custom Mode, the relevant options for PK, KEK, db, and dbx appear. The options are:
• Save to File—Saves the key to a user-selected le.
• Replace from File—Replaces the current key with a key from a user-selected le.
• Append from File—Adds a key to the current database from a user-selected le
• Delete—Deletes the selected key
• Reset All Keys—Resets to default setting
• Delete All Keys—Deletes all the keys
NOTE: If you disable the Custom Mode, all the changes made are erased and the keys restore to default
settings.
Intel Software Guard Extensions screen options
Option Description
Intel SGX Enable This eld species you to provide a secured environment for running code/storing sensitive information in the
context of the main OS. The options are:
• Disabled
• Enabled
• Software Controlled (default)
Enclave Memory
Size
This option sets SGX Enclave Reserve Memory Size. The options are:
• 32 MB
• 64 MB
• 128 MB
Performance screen options
Option
Multi Core Support This eld species whether the process has one or all cores enabled. The performance of some applications
Intel SpeedStep Allows you to enable or disable the Intel SpeedStep feature.
C-States Control Allows you to enable or disable the additional processor sleep states.
Description
improve with the additional cores. This option is enabled by default. Allows you to enable or disable multi-core
support for the processor. The installed processor supports two cores. If you enable Multi Core Support, two cores
are enabled. If you disable Multi Core Support, one core is enabled.
• Enabled Multi Core Support (enabled by default)
• Enable Intel SpeedStep
Default setting: The option is enabled.
• C states
System setup 23
Page 24

Option Description
Default setting: The option is enabled.
Power Management screen options
Option Description
AC Recovery Allows you to enable or disable the computer from turning on automatically when an AC adapter is connected.
• Power O (default)
• Power On
• Last Power State
Enable Intel Speed
Shift Technology
Auto On Time Allows you to set the time at which the computer must turn on automatically. The options are:
Deep Sleep Control Allows you to aggressive the system is at conserving power while Shut down (S5) or in Hybernate (S4) mode.
USB Wake Support Allows you to enable USB devices to wake the system from Standby.
This option is used to enable or disable the Intel speed shift technology support. The option is enabled by default.
• Disabled
• Every Day
• Weekdays
• Select Days
Default setting: Disabled
• Disabled (default)
• Enabled in S5 only
• Enabled in S4 and S5
NOTE: This feature is only functional when the AC power adapter is connected. If the AC power adapter
is removed during Standby, the system setup removes power from all the USB ports to conserve battery
power.
• Enable USB Wake Support
Default setting: The option is enabled..
Wake on LAN/
WLAN
Block Sleep This option lets you block entering to sleep (S3 state) in operating system environment.
24 System setup
Allows you to enable or disable the feature that powers on the computer from the O state when triggered by a
LAN signal.
• Disabled: This option is enabled by default.
• LAN Only
• WLAN Only
• LAN or WLAN
• LAN with PXE Boot
Block Sleep (S3 state)
Default setting: This option is disabled
Page 25

POST Behavior screen options
Option Description
Numlock LED This option species whether the NumLock LED should be on when the system boots.
• Enable Numlock LED: The option is enabled.
Keyboard Errors This option option species whether the keyboard related errors are reported when it boots.
• Enables Keyboard Error Detection: The option is enabled by default.
Fastboot Allows you to speed up the boot process by bypassing some of the compatibility steps. The options are:
• Minimal
• Thorough (default)
• Auto
Extend BIOS POST
Time
Full Screen Logo . This option displays full screen logo if your image match screen resolution. The option Enable Full Screen Logo is
Warnings and Errors
This option created an additional pre-boot delay.
• 0 seconds (default)
• 5 seconds
• 10 seconds
not selected by default.
• Prompt on Warnings and Errors (default)
• Continue on Warnings
• Continue on Warnings and Errors
Virtualization support screen options
Option
Virtualization Allows you to enable or disable the Intel Virtualization Technology.
VT for Direct I/O Enables or disables the Virtual Machine Monitor (VMM) from utilizing the additional hardware capabilities provided
Description
Enable Intel Virtualization Technology (default).
by Intel® Virtualization technology for direct I/O.
Enable VT for Direct I/O - enabled by default.
Wireless screen options
Option
Wireless Device
Enable
Description
Allows you to enable or disable internal wireless devices.
• WLAN/WiGig (default)
• Bluetooth (default)
System setup 25
Page 26

Maintenance screen options
Option Description
Service Tag Displays the Service Tag of your computer.
Asset Tag Allows you to create a system asset tag if an asset tag is not already set. This option is not set by default.
SERR Messages This eld controls the SERR message mechanism. Some graphic card required the SERR message.
• Enable SERR Messages (default)
BIOS Downgrade This eld controls ashing of the system rmware to pervious revisions.
Allows BIOS Downgrade (Enabled by default)
Data Wipe This eld enables user to erase data from all internal storage device.
BIOS Recovery Allows you to recover from certain corrupted BIOS conditions from a recover le on the user primary hard drive.
Enabled by default.
First Power On Date This option lets you set Ownership date. This option is disabled by default.
System Log screen options
Option
BIOS Events Allows you to view and clear the System Setup (BIOS) POST events.
Description
Advanced conguration options
Option
ASPM Allows you to set the ASPM level.
Description
• Auto (default)
• Disabled
• L1 Only
SupportAssist System Resolution screen options
Option
Auto OS Recovery
Threshold
Description
Allows you to control the automatic boot ow for SupportAssist System. Options are:
• O
• 1
• 2 (Enabled by default)
• 3
SupportAssist OS
Recovery
26 System setup
Allows you to recover the SupportAssist OS Recovery ( Enabledby default)
Page 27

This chapter details the supported operating systems along with instructions on how to install the drivers.
Topics:
• Supported operating systems
• Downloading drivers
• Intel chipset drivers
• Intel HID Event Filter
• Disk drivers
• Display adapter driver
• Bluetooth drivers
• Network drivers
• Audio drivers
• Storage drivers
• Security drivers
5
Software
Supported operating systems
Table 17. Supported operating systems
Supported operating systems Description
Windows 10
• Microsoft Windows 10 Pro 64-bit
• Microsoft Windows 10 Home 64-bit
Downloading drivers
1 Turn on the desktop.
2 Go to Dell.com/support.
3 Click Product Support, enter the Service Tag of your desktop, and then click Submit.
NOTE
: If you do not have the Service Tag, use the auto detect feature or manually browse for your desktop model.
4 Click Drivers and Downloads.
5 Select the operating system installed on your desktop.
6 Scroll down the page and select the driver to install.
7 Click Download File to download the driver for your desktop.
8 After the download is complete, navigate to the folder where you saved the driver le.
9 Double-click the driver le icon and follow the instructions on the screen.
Intel chipset drivers
Verify if the Intel chipset drivers are already installed in the system.
Software 27
Page 28
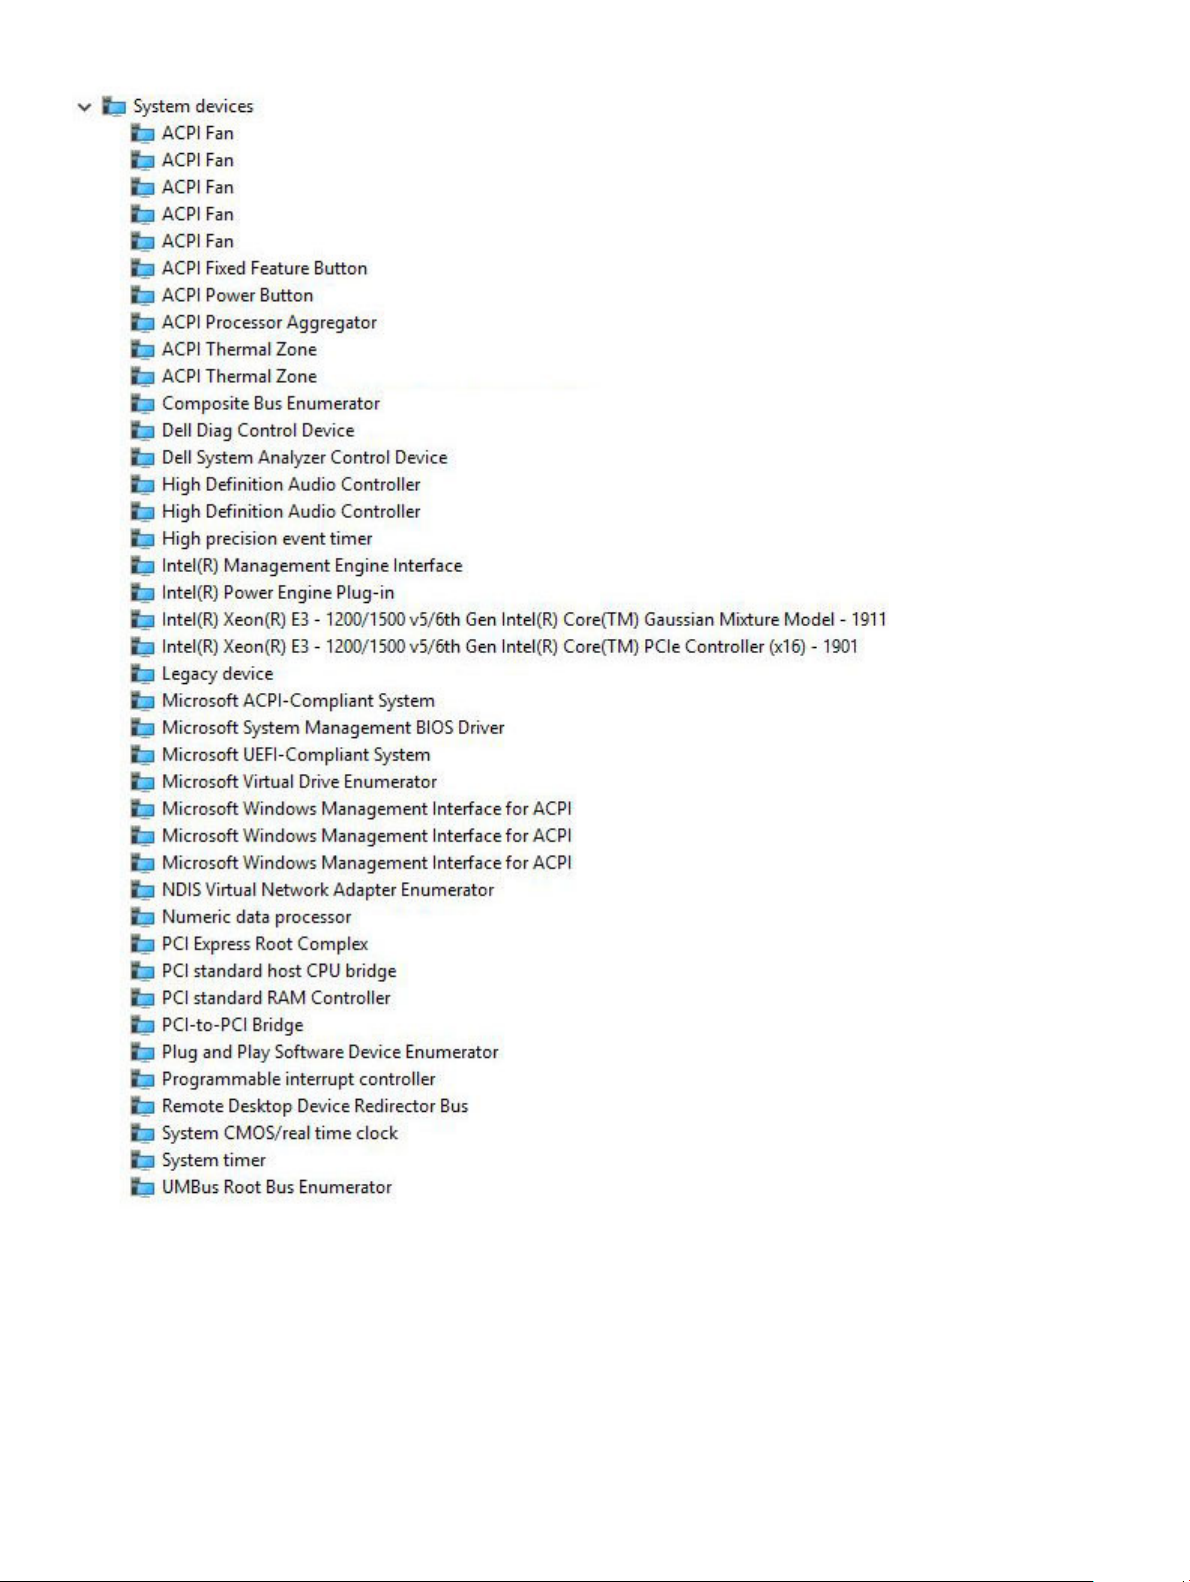
Intel HID Event Filter
Verify if the Intel HID event lter is already installed in the computer.
Software
28
Page 29
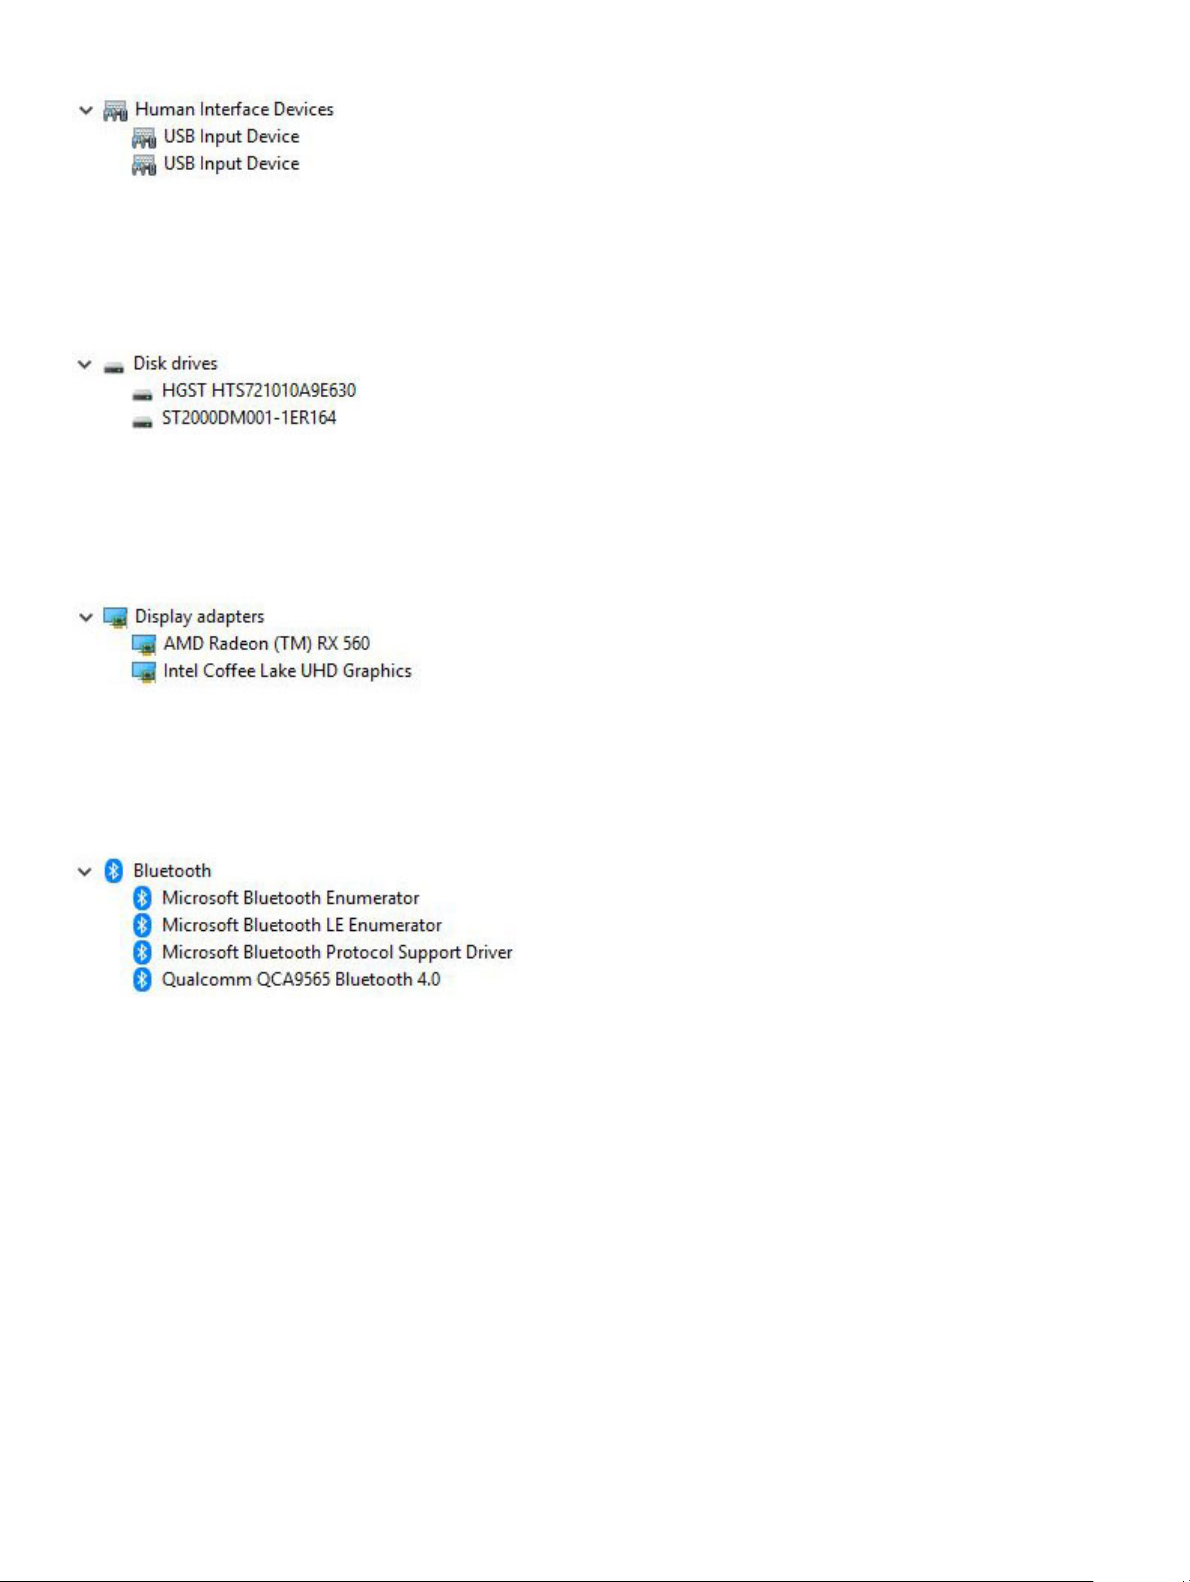
Disk drivers
Disk drivers installed in the system
Display adapter driver
Verify if the display adapter driver is already installed in the computer.
Bluetooth drivers
This platform supports a variety of Bluetooth drivers. The following is an example
Network drivers
Install the WLAN and Bluetooth drivers from the Dell support site.
Software
29
Page 30
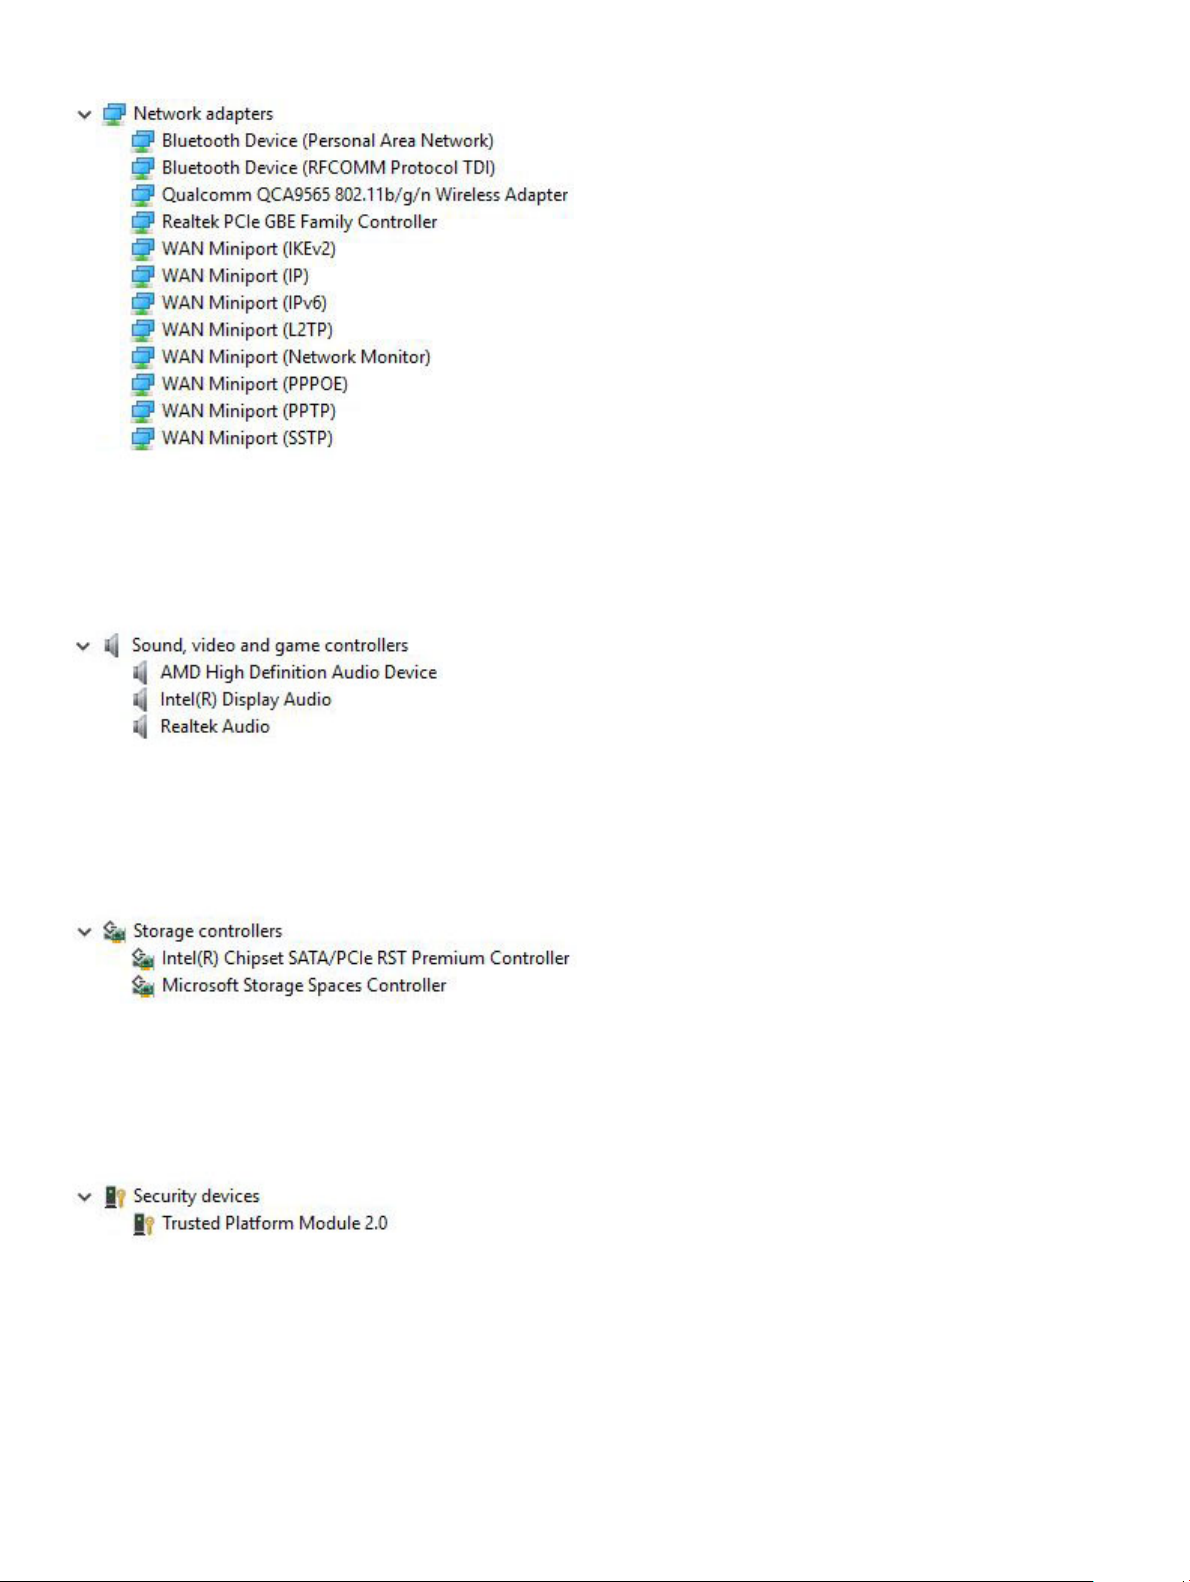
Audio drivers
Verify if audio drivers are already installed in the computer.
Storage drivers
Verify if the storage controller drivers are installed in the system.
Security drivers
Verify if the security device drivers are installed in the computer.
Software
30
Page 31

6
Getting help
Contacting Dell
NOTE: If you do not have an active Internet connection, you can nd contact information on your purchase invoice, packing slip,
bill, or Dell product catalog.
Dell provides several online and telephone-based support and service options. Availability varies by country and product, and some services
may not be available in your area. To contact Dell for sales, technical support, or customer service issues:
1 Go to Dell.com/support.
2 Select your support category.
3 Verify your country or region in the Choose a Country/Region drop-down list at the bottom of the page.
4 Select the appropriate service or support link based on your need.
Getting help 31
 Loading...