

Page 1

Dell UltraSharp 40 Curved WUHD
Monitor-U4021QW
Dell Display Manager
User’s Guide
Model: U4021QW
Regulatory model: U4021QWt
Page 2

NOTE: A NOTE indicates important information that helps you make
better use of your computer.
Copyright © 2020 Dell Inc. or its subsidiaries. All rights reserved. Dell, EMC, and other trademarks
are trademarks of Dell Inc. or its subsidiaries. Other trademarks may be trademarks of their respective
owners.
2020 – 12
Rev. A00
Page 3

Contents
Overview .........................................4
Using the Quick Settings Dialog........................5
Setting Basic Display Functions........................6
Assigning Preset Modes to Applications .................7
Organizing Windows with Easy Arrange..................8
Managing Multiple Video Inputs.......................10
Restoring Application Positions .......................13
Applying Energy Conservation Features ................14
Other Shortcut Keys ...............................15
Attach DDM To Active Window (Only Window 10) .........16
Troubleshooting ...................................17
Contents | 3
Page 4
Overview
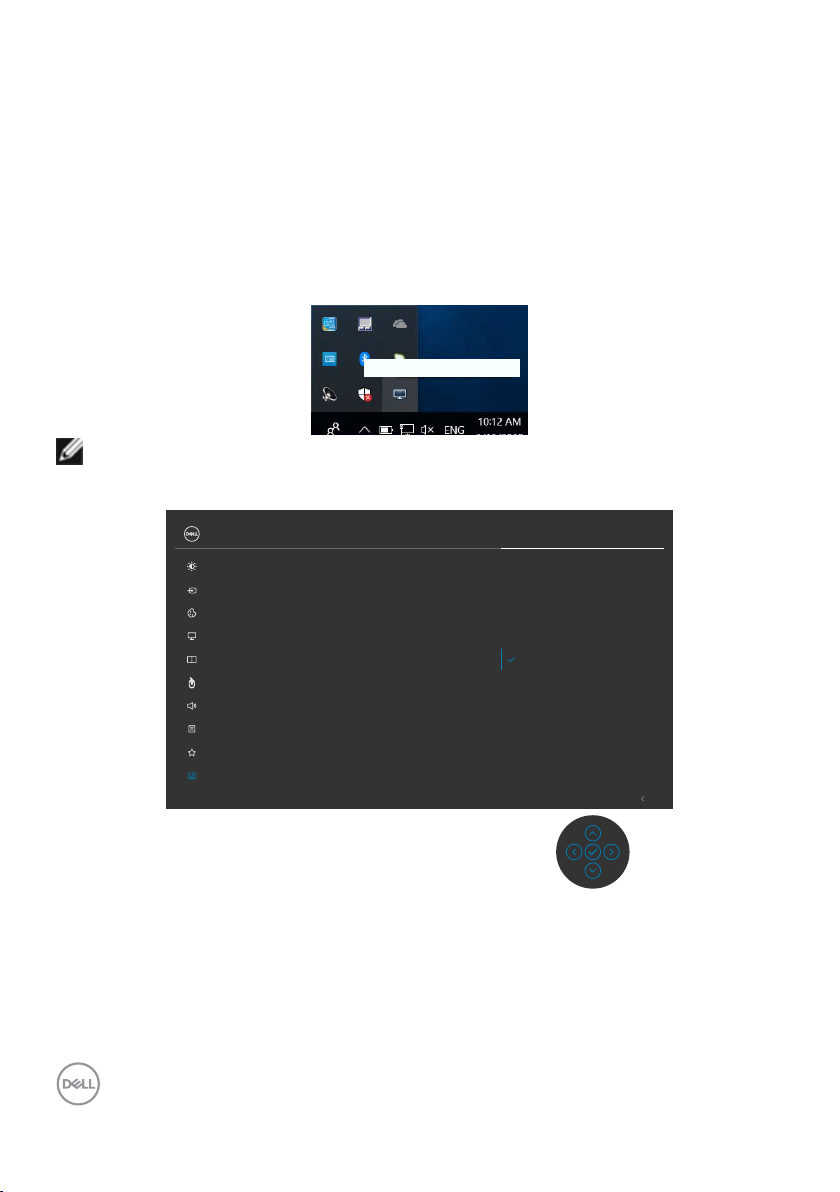
Dell Display Manager is a Microsoft Windows application used to manage a display or
a group of displays. It enables manual adjustment of the displayed image, assignment
of automatic settings, energy management, window organization, image rotation, and
other features on selected Dell displays. After installed, Dell Display Manager runs each
time the system starts and places its icon in the notification tray. Information about
displays connected to the system is available when hovering over the notification-tray
icon.
Dell U4021QW - Standard
NOTE: Dell Display Manager uses DDC/CI channel to communicate with
your display. Ensure that DDC/CI is enabled in the menu as below.
UltraSharp 40 Monitor
Brightness/Contrast
Input Source
Color
Display
PIP/PBP
USB
Audio
Menu
Personalize
Others
Display Info
DDC/CI
LCD Conditioning
Firmware
Service Tag
Reset Others
Factory Reset
On
O
Exit
4 | Overview
Page 5
Using the Quick Settings Dialog
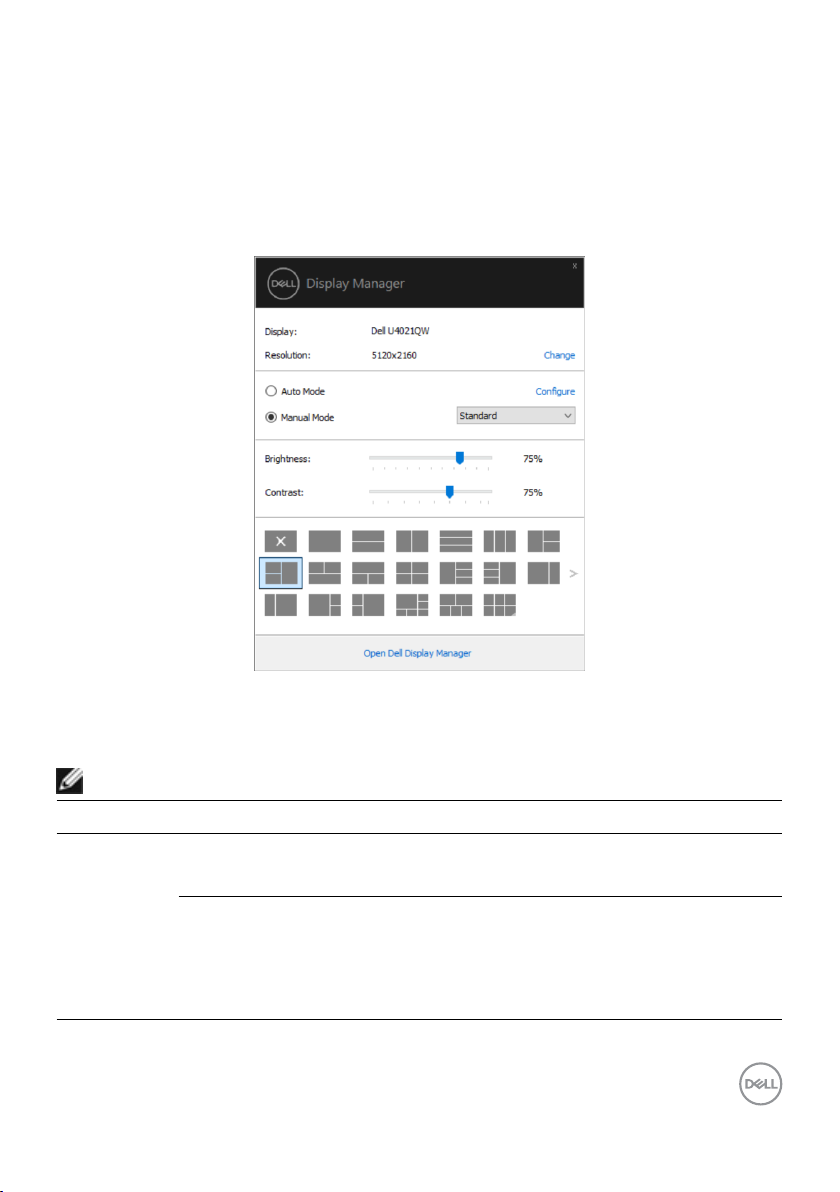
Clicking Dell Display Manager’s notification tray icon to open the Quick Settings
dialog box. When more than one supported Dell displays are connected to the
computer, a specific target display can be selected using the menu. The Quick
Settings dialog box enables convenient adjustment of the display’s brightness,
contrast, resolution, window layout, and so on. You can select Manual Mode or Auto
Mode, and the screen resolution can be changed.
The Quick Settings dialog box also provides access to Dell Display Manager’s
advanced user interface that is used to adjust basic functions, configure auto mode
and access other features.
NOTE:
Feature Function Description
Quick DDM
Access
Quick key to
call up DDM UI
Control
individual
display in
multiple
display setup
• Ctrl+Shift+D
• Use Page Up/Page Down key or click on “>” to
ip through all Easy Arrange layouts.
• From dropdown box to select display, selected
display has Dell logo shown.
• Perform display self-test feature check.
• Move DDM UI to the display to be controlled.
• Press Ctrl+Shift+D to bring up the miniUI under
the mouse pointer.
Using the Quick Settings Dialog | 5
Page 6
Setting Basic Display Functions
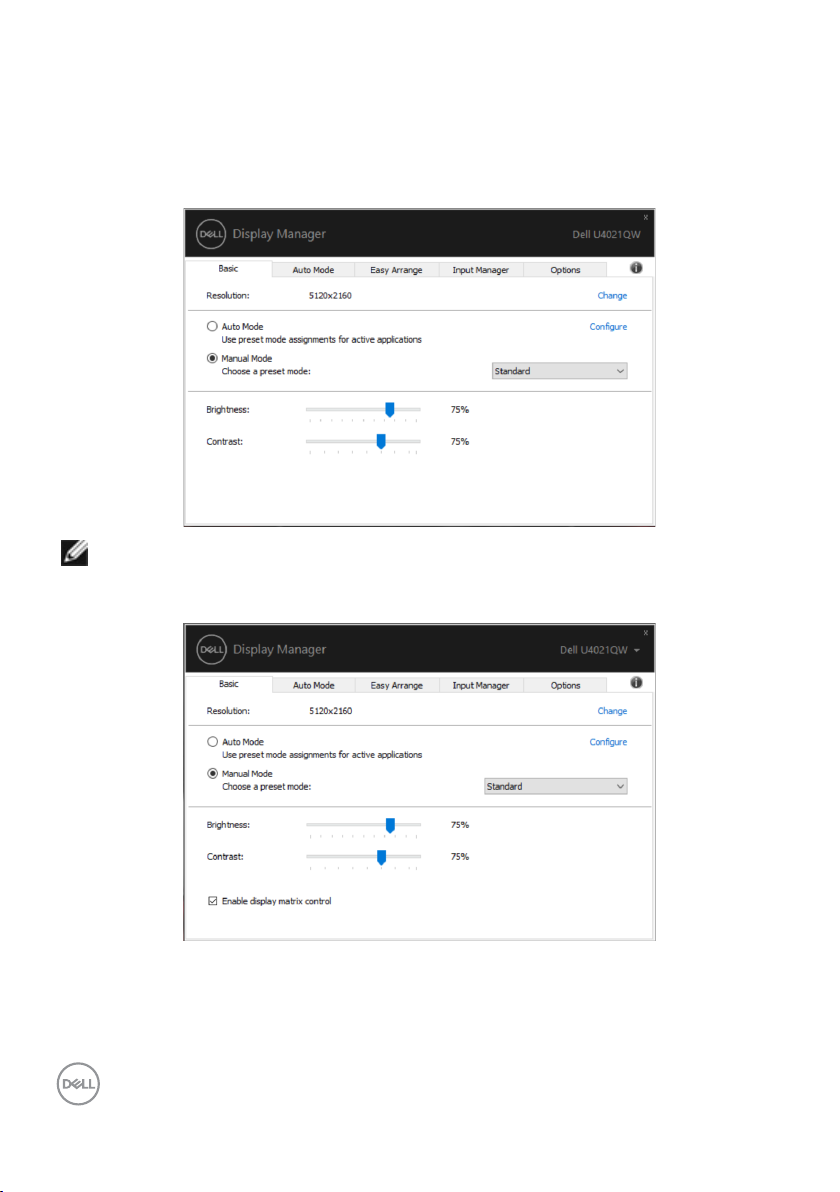
You can select Manual Mode that enables you to manually select a preset mode or
select Auto Mode that applies a preset mode based on the active application. An onscreen message displays the current preset mode whenever it changes. The selected
display’s Brightness and Contrast can also be directly adjusted from the Basic tab.
NOTE: When multiple Dell displays are connected, select “Enable display
matrix control” to apply brightness, contrast and color presets controls to
all displays.
6 | Setting Basic Display Functions
Page 7
Assigning Preset Modes to Applications
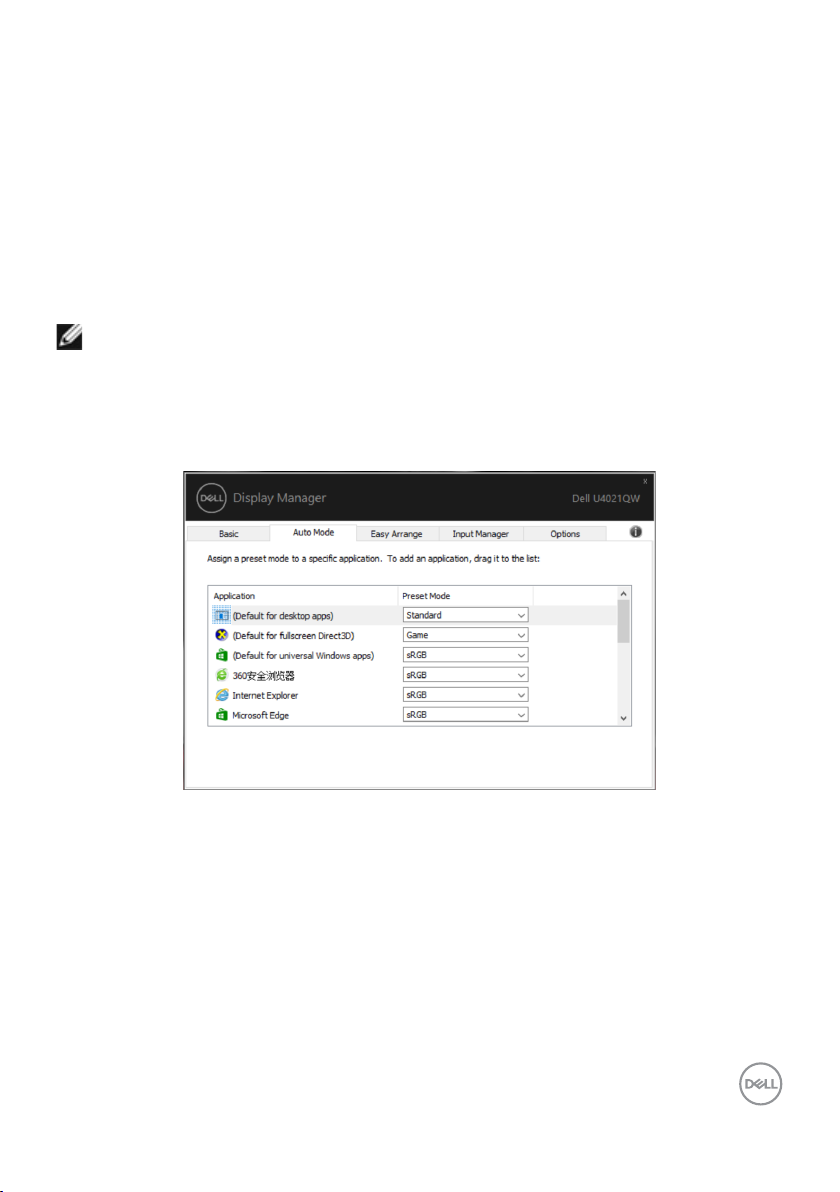
The Auto Mode tab allows you to associate a specific Preset Mode with a specific
application, and apply it automatically. When Auto Mode is enabled, Dell Display
Manager automatically switches to the corresponding Preset Mode whenever
the associated application is activated. The Preset Mode assigned to a particular
application may be the same on each connected display, or it can vary from one display
to another.
Dell Display Manager is pre-configured for many popular applications. To add a new
application to the assignment list, simply drag the application from the desktop,
Windows Start Menu, or elsewhere, and drop it onto the current list.
NOTE: Preset Mode assignments for batch les, scripts, loaders, and non-
executable les such as zip archives or packed les, are not supported.
You can also configure the Game preset mode to be used whenever a Direct3D
application runs in full-screen mode. To prevent an application from using mode, assign
a different preset mode to it.
Assigning Preset Modes to Applications | 7
Page 8
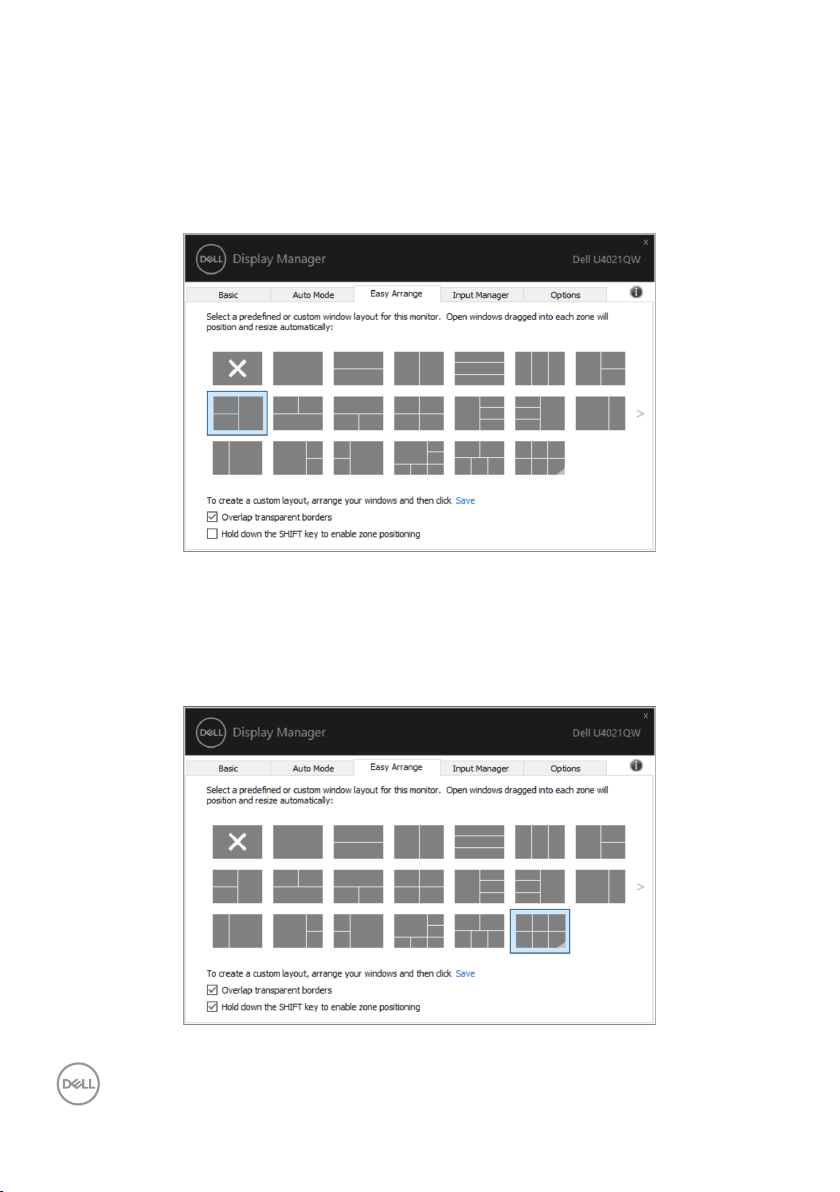
Organizing Windows with Easy Arrange
Easy Arrange helps you to effectively organize your application windows on the
desktop. You first choose a pre-defined layout pattern which suits your work, then
you just need to drag the application windows into the defined zones. Press “>” or use
Page Up/Page Down key to find more layouts. To create a custom layout, arrange the
open windows and then click Save.
For Windows 10, you can apply different window layouts for each of the virtual
desktops.
If you often use Windows snap feature, you can select “Hold down the SHIFT key to
enable zone positioning”. This gives Windows snap priority over Easy Arrange. You
will then need to press the Shift key to use Easy Arrange positioning.
8 | Organizing Windows with Easy Arrange
Page 9
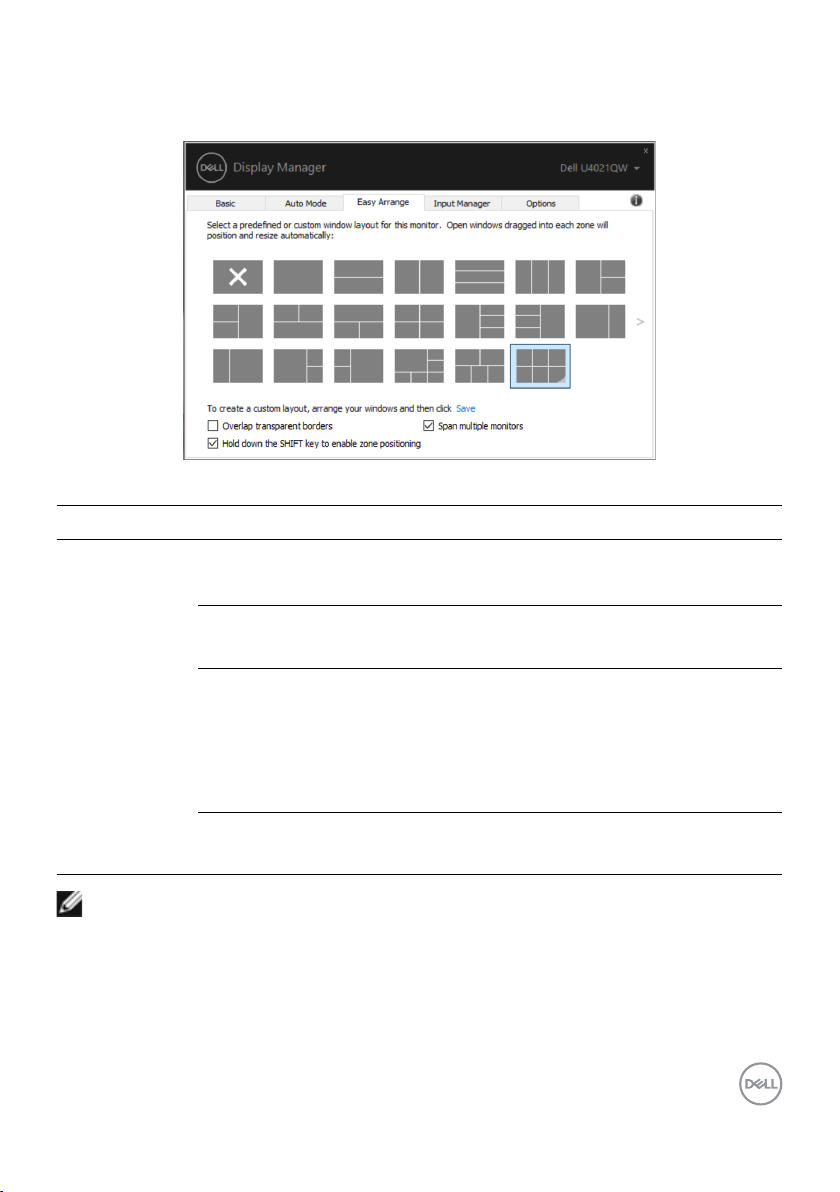
If you are using multiple displays in an array or matrix, Easy Arrange layout can be
applied across to all the displays as one desktop. Select “Span multiple displays” to
enable this feature. You need to align your displays properly to make it effective.
There are other advanced ways for the usage of Easy Arrange. Refer to table below.
Feature Function Description
Enhanced
Easy Arrange
Custom layouts • Save and name 5 customized Easy Arrange pat-
terns.
• Congure x*y patterns.
5 MRU (mostrecently-used)
layouts
On the y partition resizing
Easy Arrange
layouts for
portrait mode
• Press Ctrl+Shift+Home to cycle among the last 5
MRU layouts.
• Hold down Ctrl while resizing current Easy Ar-
range layout to adjust the size and numbers of
cells in a layout.
• Newly formed Easy Arrange pattern is saved into
the Easy Arrange icon position.
• Hold down Ctrl while clicking on a modied layout
icon to restore it to default layout.
• Portrait mode Easy Arrange icons are presented
when display is rotated.
NOTE: An application may require a minimum eective resolution for its
application window. Such application may not t in an Ease Arrange zone if
the zone is smaller than the required window size.
Organizing Windows with Easy Arrange | 9
Page 10
Managing Multiple Video Inputs
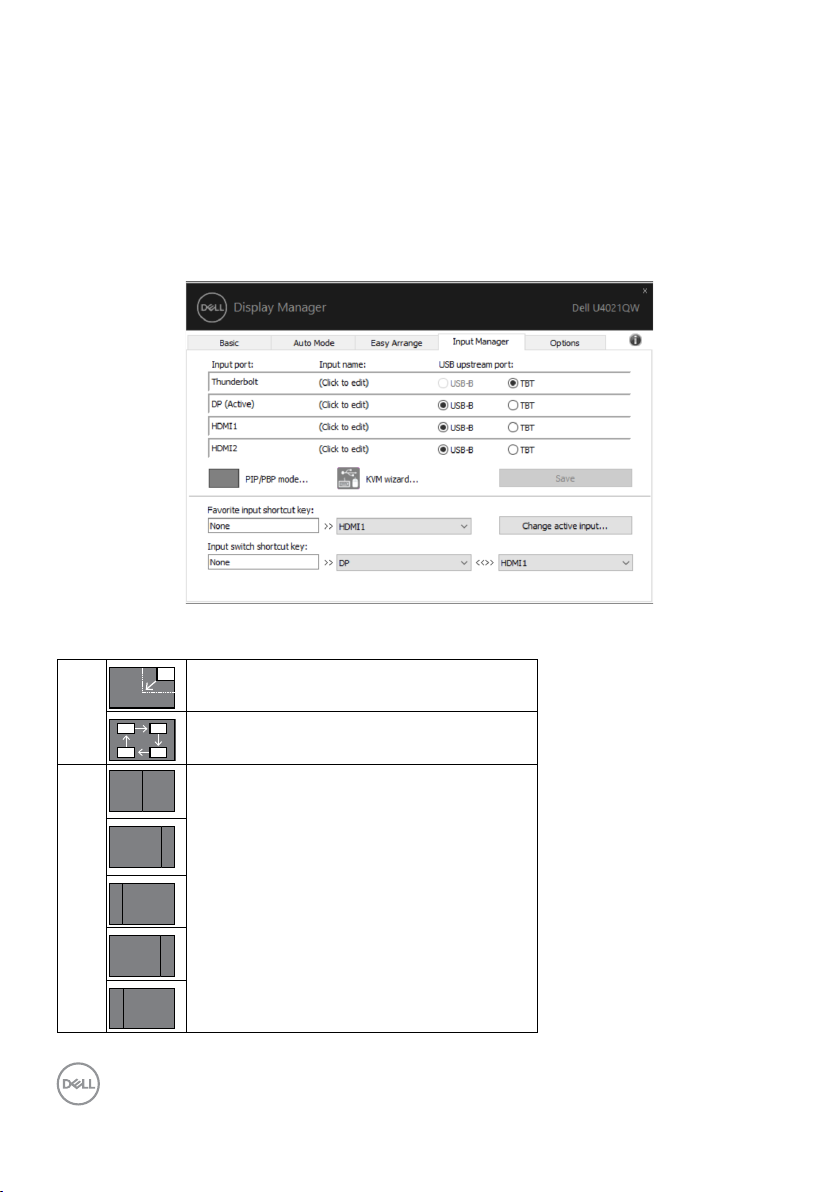
The Input Manager tab provides convenient ways for you to manage multiple video
inputs connected to your Dell display. It makes it very easy to switch between inputs
while you work with multiple computers.
All video input ports available to your display are listed. You can give each input a name
as you like. Please save your changes after editing.
You can define a shortcut key to quickly switch to your favorite input and another
shortcut key to quickly switch between two inputs if you often work between them.
You can use the PIP/PBP mode to adjust PIP Size of Small and Large, PIP sub-window position,
PBP 2 window.
PIP Size Small/Large
PIP
PIP sub-window position, Top-Left, Top-Right,
Bottom-Right, or Bottom-left.
80%
PBP
80%
PBP 2 window
75%
75%
10 | Managing Multiple Video Inputs
Page 11
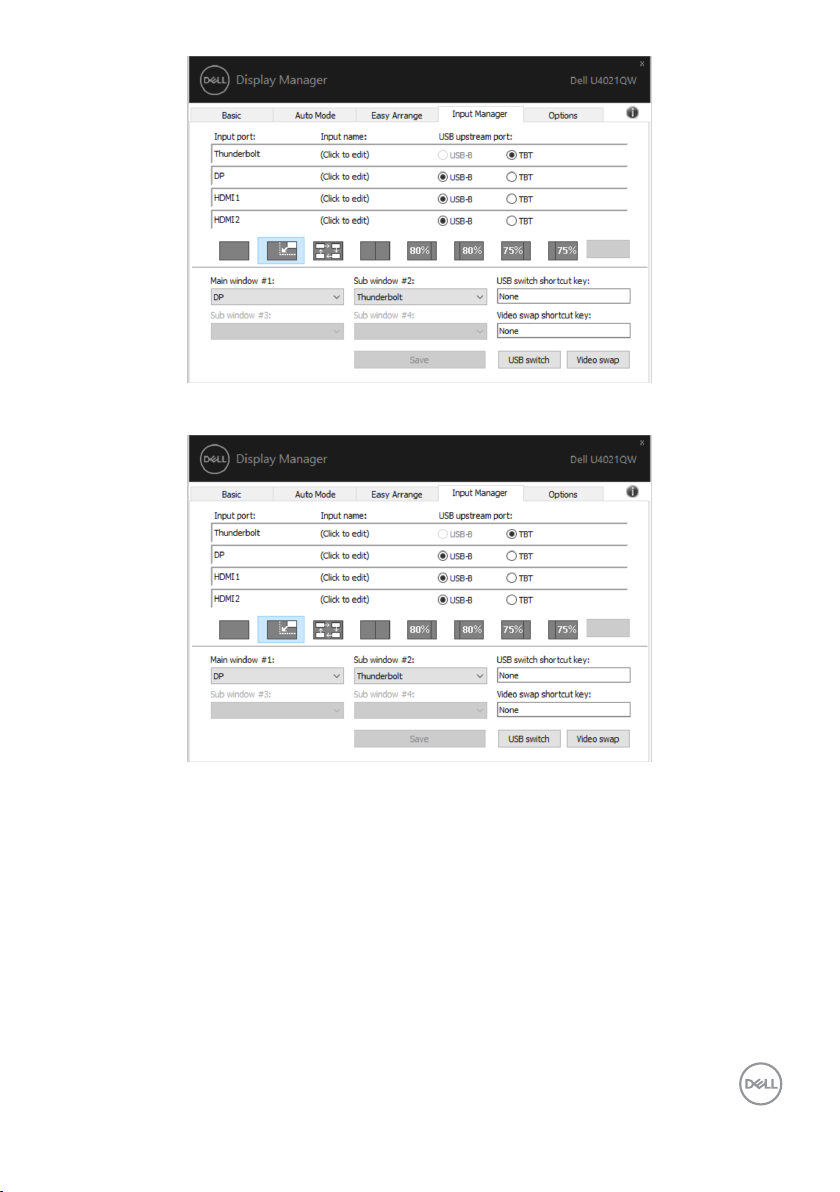
In case two inputs need to swap their window positions, ‘Video swap’ button provides a set of
dened pairs for quick selection.
Managing Multiple Video Inputs | 11
Page 12
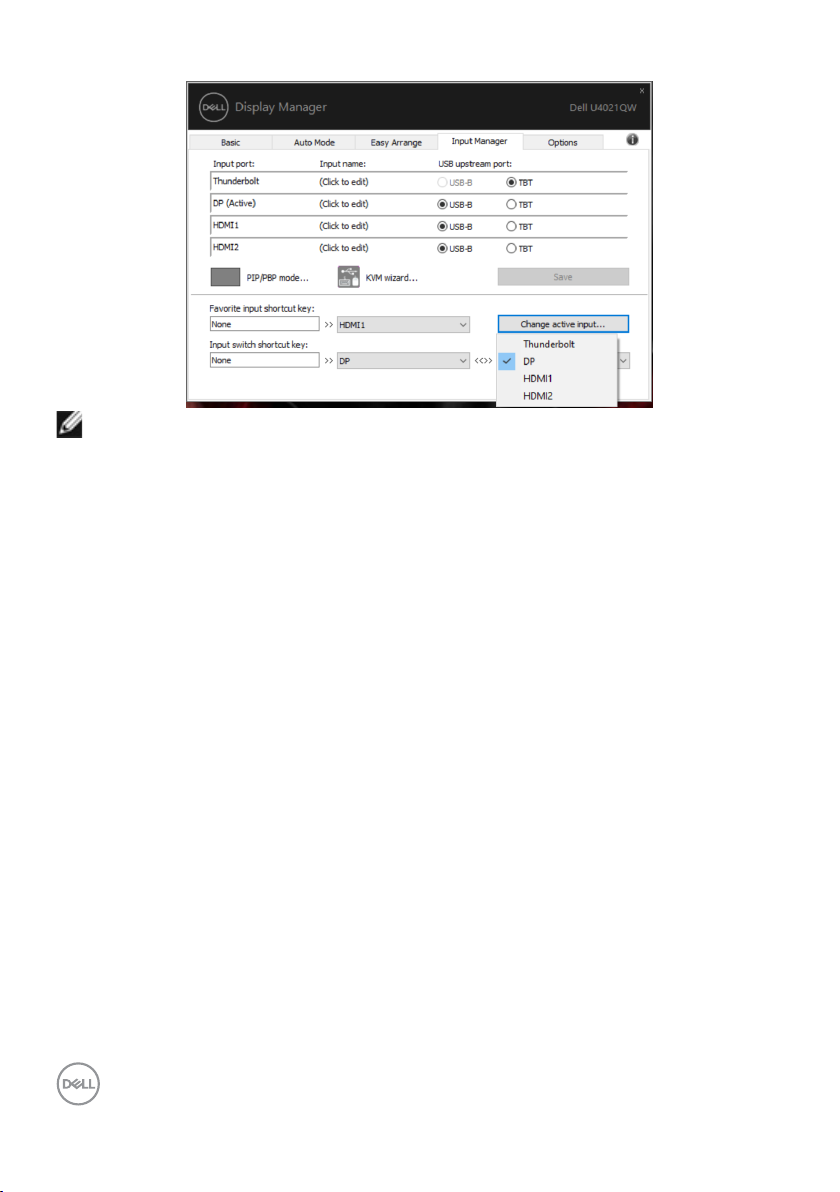
You can use the dropdown list to switch to any input source.
NOTE: DDM communicates with your display even when the display is
displaying video from another computer. You can install DDM on the
computer you frequently use and control input switching from it. You may
also install DDM on other computers connected to the display.
12 | Managing Multiple Video Inputs
Page 13
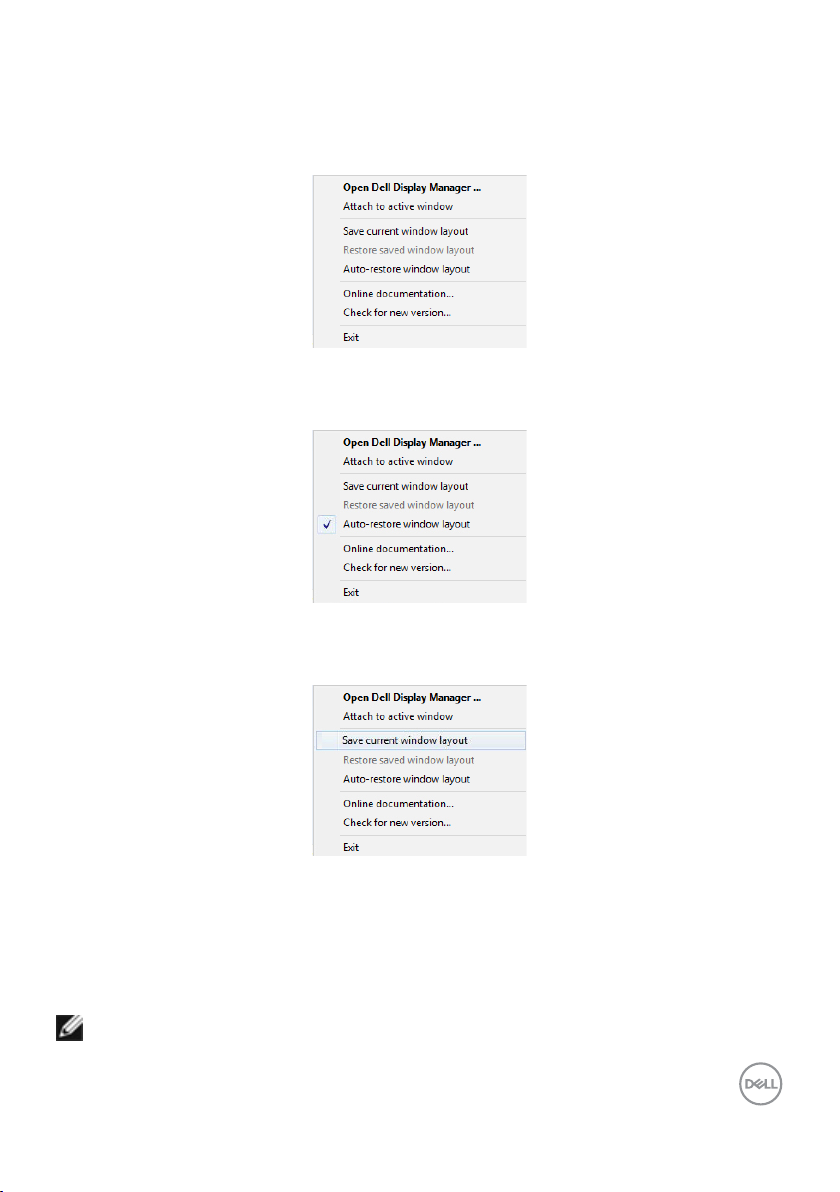
Restoring Application Positions
DDM can help you restore application windows into their positions when you reconnect
your computer to the display(s). You can quickly access to this feature by right-clicking
on DDM icon in the notification tray.
If you choose “Auto-restore window layout”, your application windows’ positions are
tracked and remembered by DDM. DDM automatically puts the application windows
into their original positions when you reconnect your computer to your display(s).
If you want to go back to a favorite layout after you have moved the application
windows around, you can first “Save current window layout” and later “Restore
saved window layout”.
You may use displays with different models or resolutions in your daily routine, and you
may apply different window layouts on them. DDM is able to know the display you have
reconnected and restore application positions accordingly.
In case you need to replace a display in a display matrix configuration, you can save
the window layout before replacement and restore the layout after a new display is
installed.
NOTE: You should keep your applications running in order to benet from
this feature. DDM doesn’t launch applications.
Restoring Application Positions | 13
Page 14
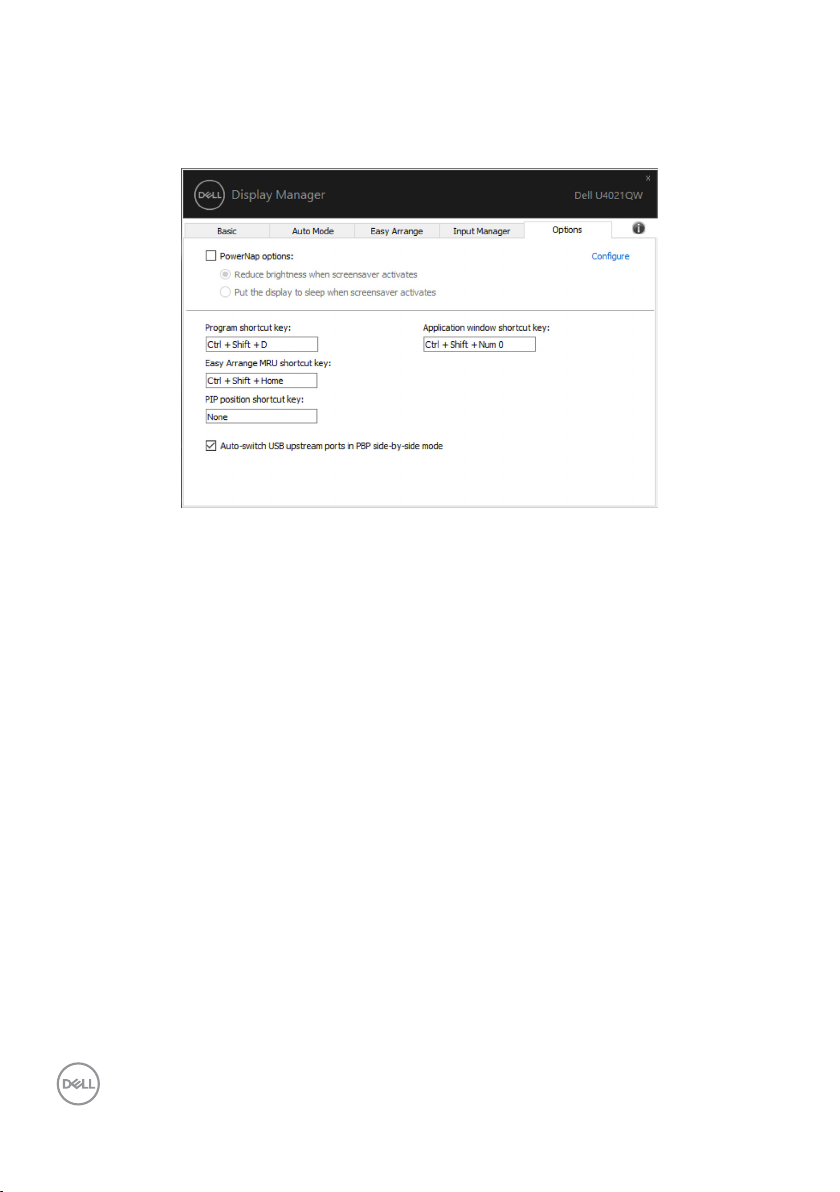
Applying Energy Conservation Features
On supported Dell models, an Options tab is available that provides PowerNap energy
conservation options. You can choose to set the display’s brightness to the minimum
level, or to put the display to sleep when the screensaver is activated.
14 | Applying Energy Conservation Features
Page 15
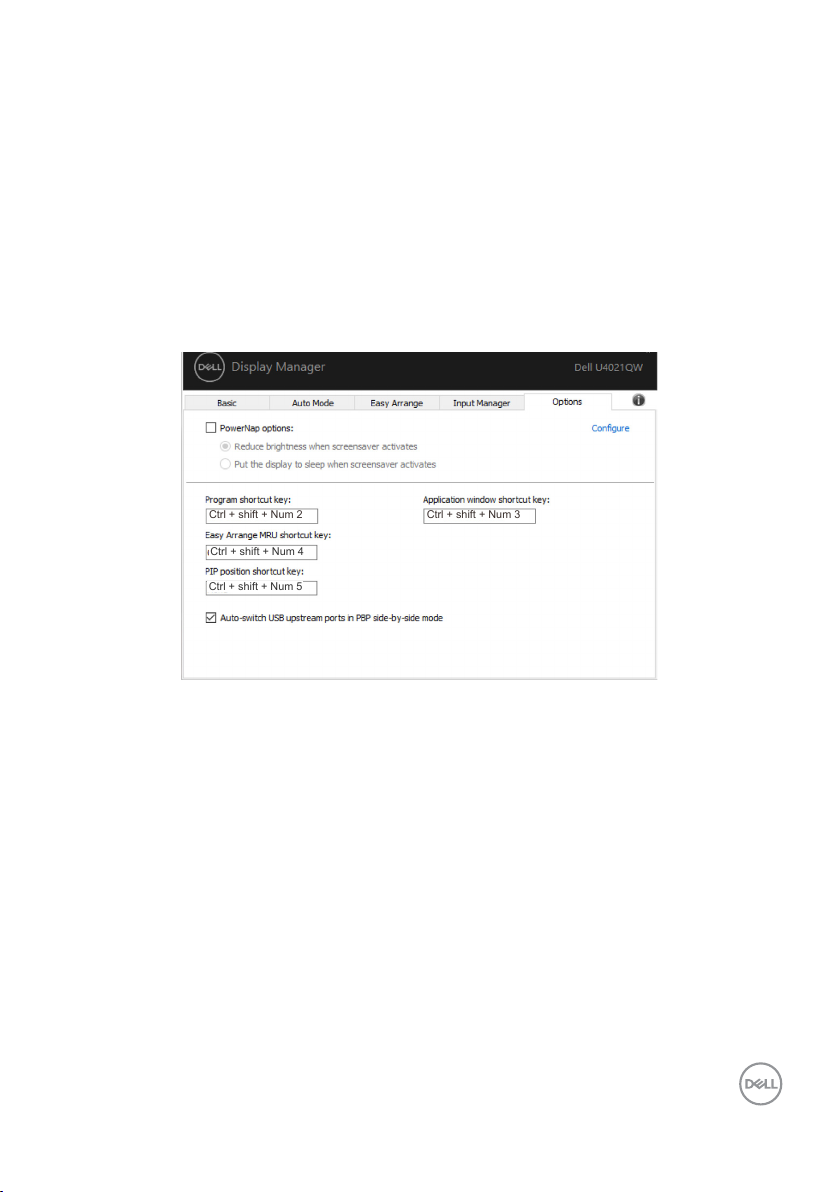
Other Shortcut Keys
Ctrl + shift + Num 2
Ctrl + shift + Num 3
Ctrl + shift + Num 4
Ctrl + shift + Num 5
Shortcut keys can be defined for below operations, you can define the shortcut keys
for quick access to perform these operations:
• Program shortcut key: to quickly open the Quick Settings dialog box.
• Easy Arrange MRU shortcut key: to quickly apply the 5 recently used window
layouts.
• Application window shortcut key: to launch a quick menu for options under
Auto Mode and Easy Arrange.
• PIP position shortcut key: to quickly apply the PIP sub position of window
position of Top-Left, Top-Right, Bottom-Right or Bottom-left.
Other Shortcut Keys | 15
Page 16
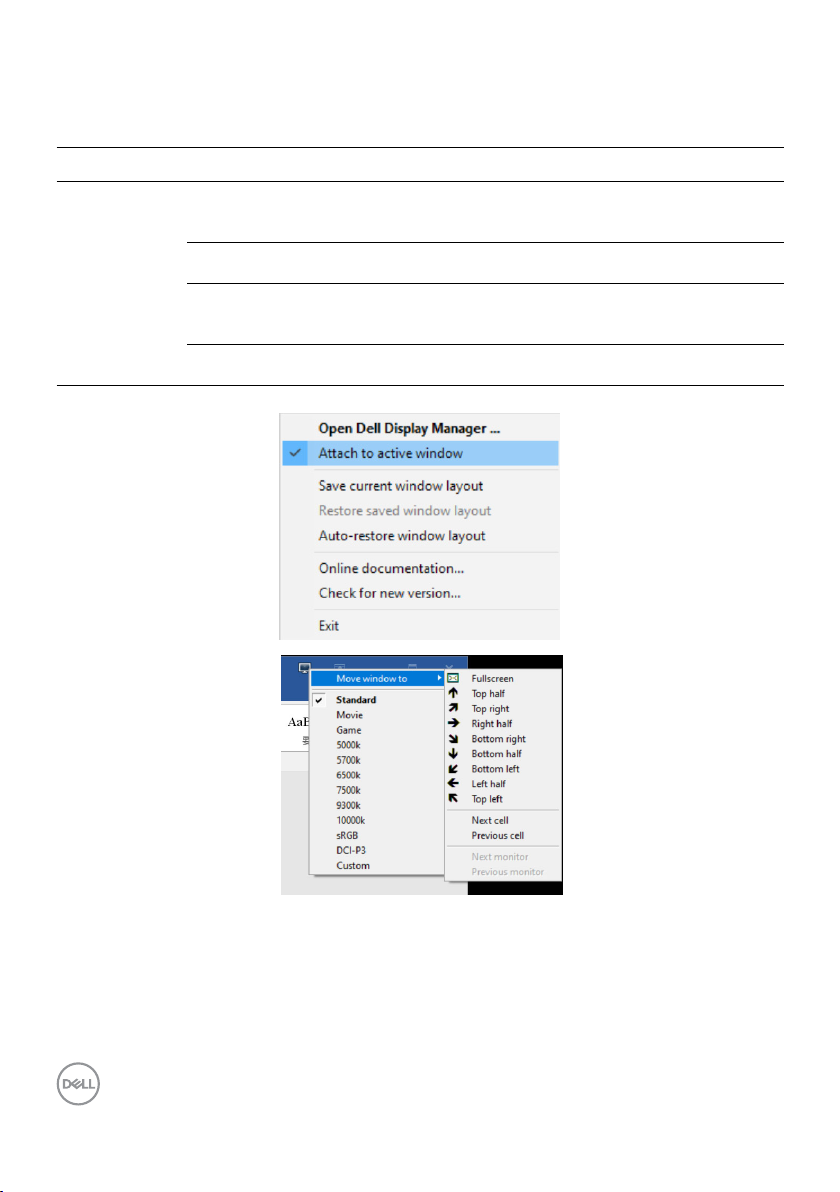
Attach DDM To Active Window (Only Window 10)
DDM icon can be attached to the active window you are working on. Click on the icon
for easy access to below features.
Feature Function Description
Attach DDM to
Active Window
(only Window
10)
Change preset or
snap to dierent
partitions
Shortcut key
trigger
Move app window
among Easy Ar-
range cells
Move app window
among displays
• DDM icon attached to active window and user can easily
switch windowposition, change color preset mode, and
associate auto preset mode.
• On a running app window, press Ctrl+Shift+Ins also triggers the attached DDM menu.
• Send the app window to previous/next Easy Arrange
cell.
• Send the app window to previous/next display.
16 | Attach DDM To Active Window (Only Window 10)
Page 17
Troubleshooting
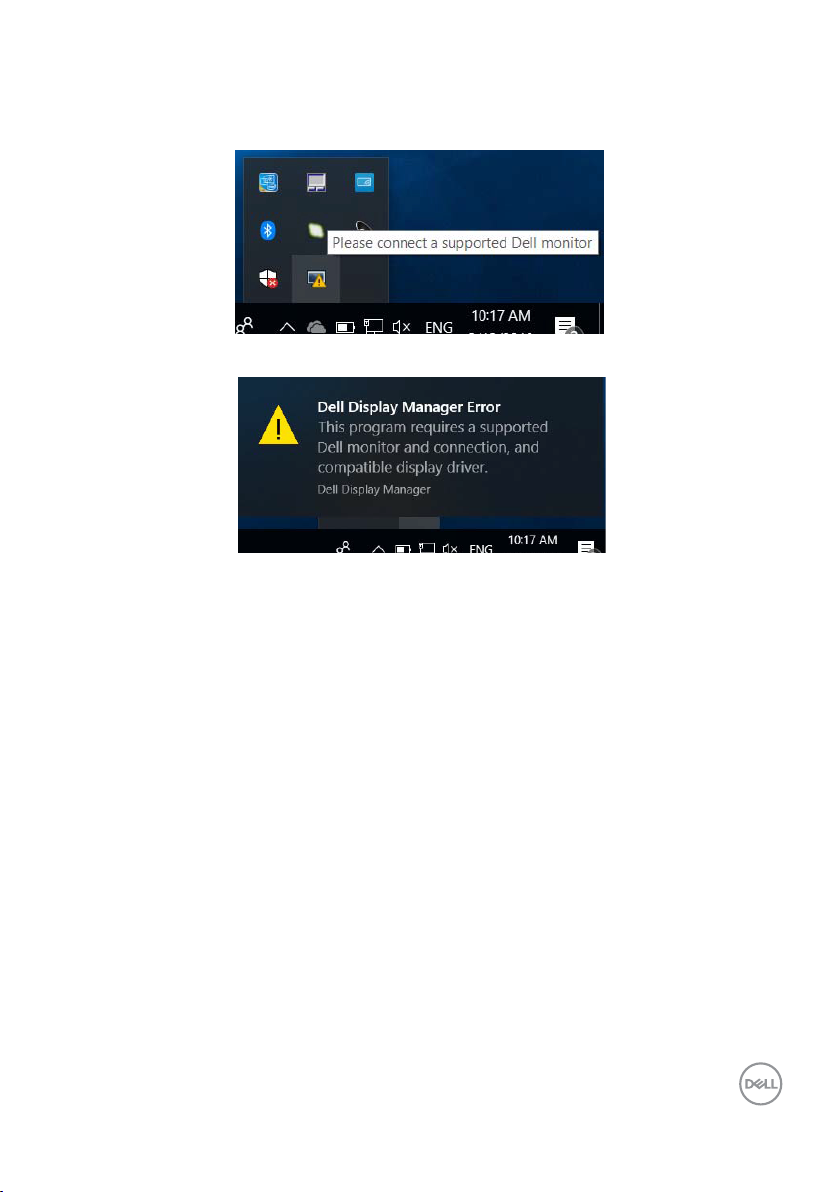
If DDM does not work with your display, DDM will show below icon in your notification
tray.
Click on the icon, DDM shows a more detailed error message.
Please note that DDM only works with Dell branded displays. If you are using displays
from other manufacturers, DDM doesn’t support them.
If DDM is unable to detect and/or communicate with a supported Dell display, please
take below actions to troubleshoot:
1. Make sure the video cable is properly connected to your display and your
computer. especially the connectors should be rmly inserted into position.
2. Check the display OSD to ensure DDC/CI is enabled.
3. Make sure you have the correct and latest display driver from the graphics
vendor (Intel, AMD, NVidia, etc.). Display driver is often the cause of DDM
failure.
4. Remove any docking stations or cable extenders or converters between the
display and the graphics port. Some low-cost extenders, hubs or converters
may not support DDC/CI properly and can fail DDM. Update the driver of such
device if the latest version is available.
5. Restart your computer.
Troubleshooting | 17
Page 18
DDM may not work with below displays:
• Dell display models earlier than year 2013 and D-series of Dell displays. For more
information see www.dell.com/support/monitors.
• Gaming displays using Nvidia-based G-sync technology
• Virtual and wireless displays do not support DDC/CI
• Some early models of DP 1.2 displays, it may be necessary to disable MST/DP
1.2 using the display OSD
If your PC is connected to the Internet, you will be prompted to upgrade to a newer
version of DDM when it is available. It is recommended to download and install the
latest DDM application.
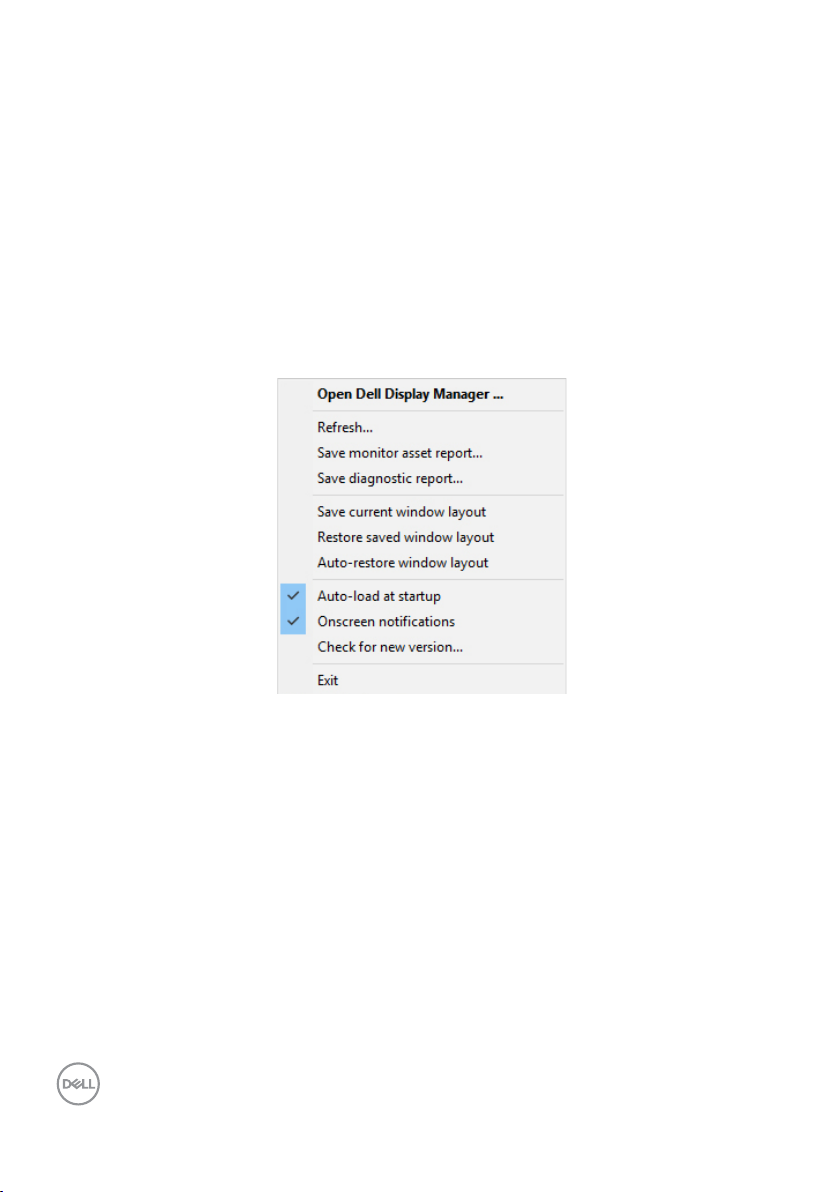
You may also check for new version by right clicking on DDM icon while pressing and
holding ‘shift’ key.
18 | Troubleshooting
 Loading...